OPERATION MANUAL WITH COOKING GUIDE Microwave Oven
INSTALLATION INSTRUCTIONS
- Remove all packing materials from the oven cavity, (do not remove the waveguide cover), and the feature sticker from the outside of the door, if there is one. Check the unit for any damage, such as a misaligned door, damaged door seals around the door or dents inside the oven cavity or on the door. If there is any damage, please do not operate the oven until it has been checked by a SERVICE CENTRE APPROVED BY SHARP and repaired, if necessary.
- Accessories provided: 1) Turntable 2) Roller stay 3) Operation manual and Cook book
- Place the roller stay in the coupling on the oven floor, then place the turntable on to the roller stay, ensuring it is located firmly. Refer to OVEN DIAGRAM below. NEVER operate the oven without the roller stay and turntable.
- This oven is designed to be used on a benchtop, on a shelf or built-in(not available in all countries). The appliance must not be placed in a cupboard. It should not be installed in any area where heat and steam are generated, for example, next to a conventional oven unit. The oven should be installed so as not to block ventilation openings. When the oven is mounted on a kitchen benchtop, allow a space of at least 15cm on the top, 10cm on both sides and 5cm at the rear of the oven for adequate air circulation. When installing on a shelf, the minimum dimension of the shelf should be 720mm(W) x 465mm(H) x 460mm(D). Do not build-in the appliance under the benchtop or any other appliances. If the oven is to be positioned near a conventional oven, ensure that adequate space is allowed, and a suitable heat shield is incorporated between the two to prevent damage to the oven. WARNING: The electrical outlet must be readily accessible so that the unit can be unplugged easily in an emergency.
- Neither the manufacturer nor the distributors can accept any liability for damage to the machine or personal injury for failure to observe the correct electrical connecting procedure. The A.C. voltage must be single phase 230 – 240V, 50Hz.
- This appliance must be earthed.
- Operate the oven from a general purpose domestic outlet. If a generator is used, do not operate the oven with non-sinusoidal outputs.
OVEN DIAGRAM
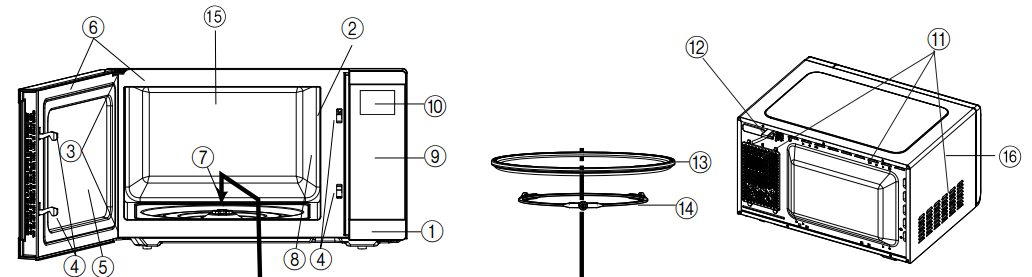
- Door open button
- Oven lamp
- Door hinges
- Door safety latches
- See through door
- Door seals and sealing surfaces
- Coupling
- Waveguide cover (Do not remove)
- Control panel
- LED Display
- Ventilation openings
- Power supply cord
- Turntable
- Roller stay
- Oven Cavity
- Outer cabinet
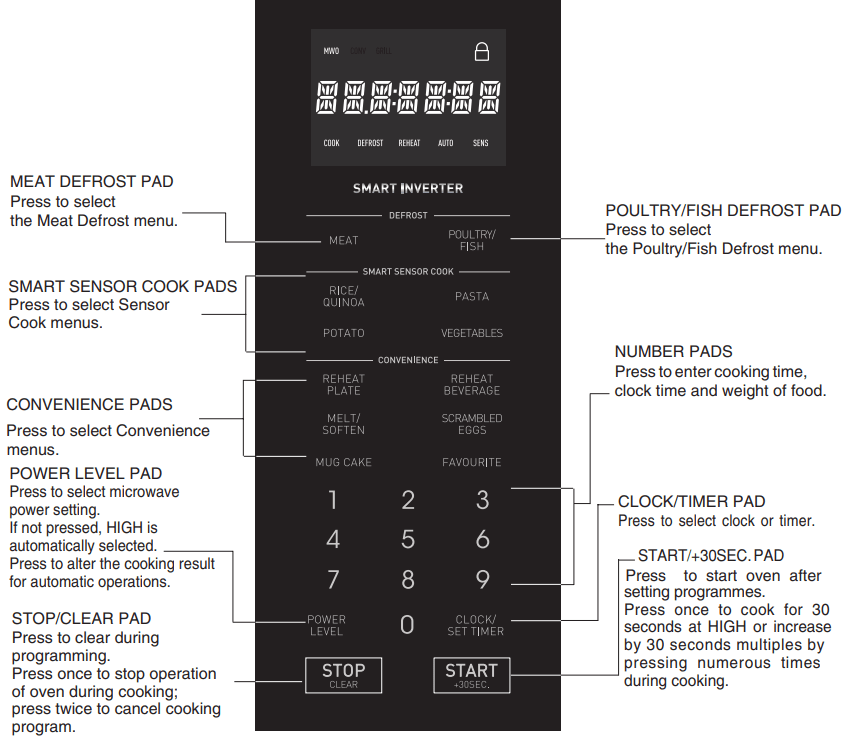
OPERATION OF TOUCH CONTROL PANEL
The operation of the oven is controlled by pressing the appropriate pads arranged on the surface of the control panel.
An entry signal tone should be heard each time you press the control panel to make a correct entry.
In addition an audible signal will sound for approximately 2 seconds at the end of the cooking cycle, or 4 times when cooking procedure is required.
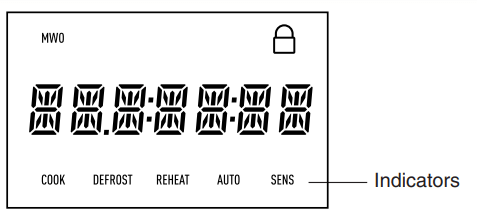
Control Panel Display
Touch Control Panel Layout
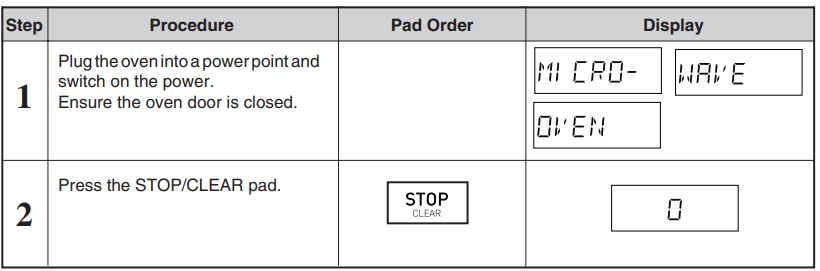
BEFORE OPERATING
Getting Started
Clock Setting
* To enter the present time of day 11:34 (AM or PM).
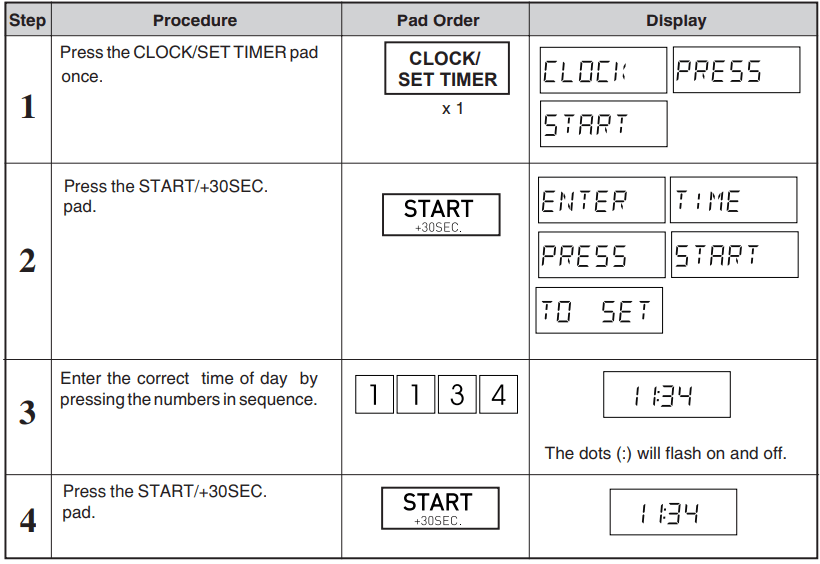
This is a 12 hour clock. If you attempt to enter an incorrect clock time (eg. 13:45), ENTER TIME PRESS START TO SET will appear in the display. Press the STOP/CLEAR pad and re-enter the time of day (eg. 1:45).
Stop/Clear
Press the STOP/CLEAR pad once to:
- Stop the oven temporarily during cooking.
- Clear if you make a mistake during programming.
MANUAL OPERATIONS
Microwave Time Cooking
This is a manual cooking feature, first enter the cooking time then the power level.
There are eleven different power levels. You can program up to 99 minutes, 99 seconds.
This variable cooking control allows you to select the rate of microwave cooking.
After cooking, the fan will continue to operate. COOLING may be displayed when the door is opened or STOP/ CLEAR pad is pressed while fan is operating.
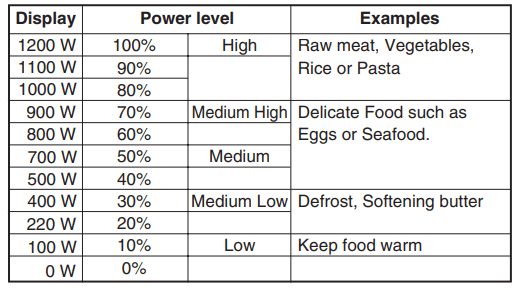
If a power level is not selected, then 1200W power is automatically used.
* Suppose you want to cook for 2 minutes 30 seconds on 1200W power.

To lower the power press the POWER LEVEL pad until desired power level is displayed. '
* Suppose you want to cook Fish Fillets for 10 minutes on 700W power.
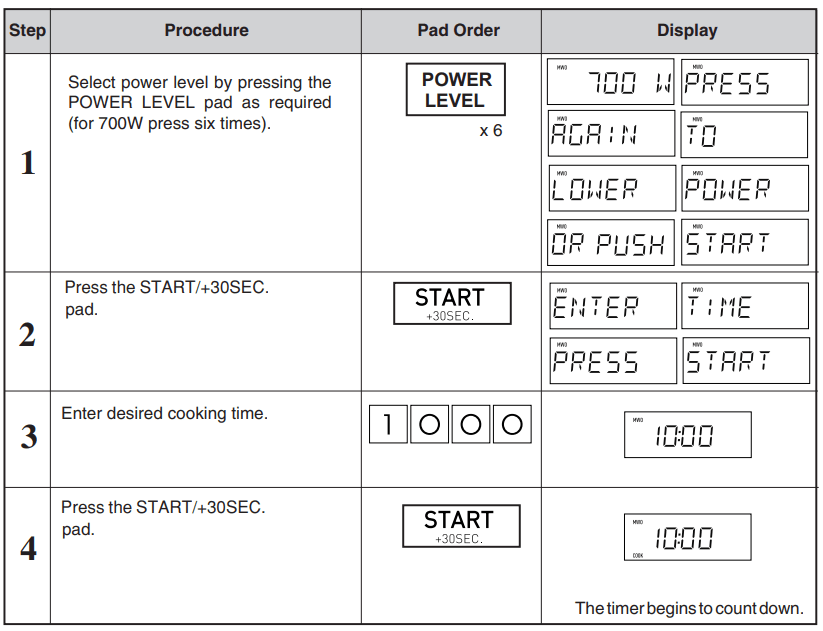
If the door is opened during a cooking process, the cooking time on the display automatically stops. The cooking time starts to count down again when the door is closed and the START/+30SEC. pad is pressed.
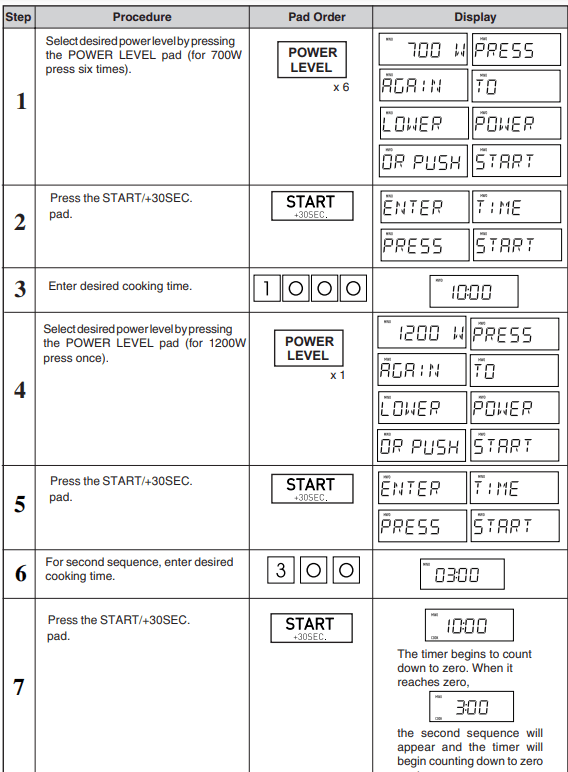
Sequence Cooking
Your oven can be programmed with up to 2 automatic cooking sequences, automatically switching from one variable power setting to the next.
* Suppose you want to cook for 10 minutes on 700W followed by 3 minutes on 1200W.
START/+30SEC.
For your convenience Sharp’s Instant Cook allows you to easily cook for 30 seconds on 1200W power.
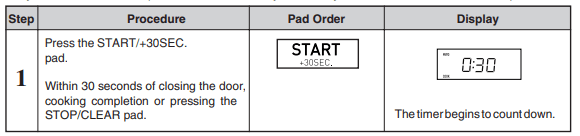
Press the START/+30SEC. pad until desired time is displayed. Each time the pad is pressed, the cook time is increased by 30 seconds
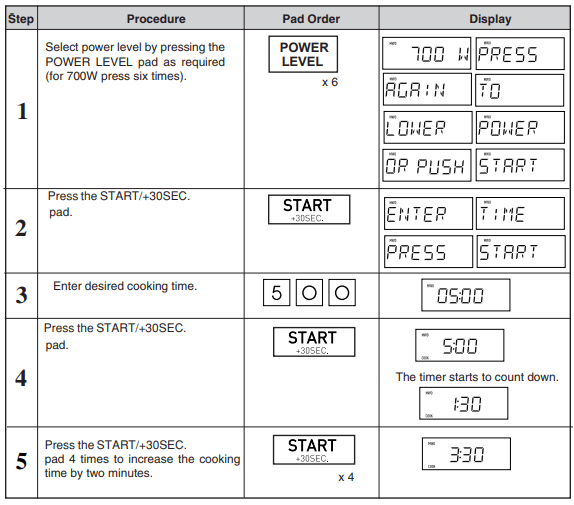
Increasing Time During a Cooking Program
Microwave time can be added during a manual cooking program using the START/+30SEC. pad.
* Suppose you want to increase the cooking time by 2 minutes during 5 minutes on 700W power cooking. (at the moment the remaining cooking time is 1 min. 30 sec.)
Notes for Automatic Operations
- Wipe off any moisture from the outside of cooking containers and the interior of the oven with a dry cloth or paper towel prior to cooking on any SMART SENSOR COOK menus.
- After oven is plugged in, wait 2 minutes before using SMART SENSOR COOK menus.
- When cooking small quantities of food on SMART SENSOR COOK menus, the food may be cooked without displaying any remaining cooking time or requiring any operations during the cooking.
- When using the automatic features, carefully follow the instructions provided in each MENU GUIDE to achieve the best result. If the instructions are not followed carefully, the food may be overcooked or undercooked. Please follow instructions carefully.
- Food weighing more or less than the quantity or weight listed in each MENU GUIDE should be cooked manually. Refer to manual cooking charts in the RECIPES section.
- The final cooking result will vary according to the foods condition (e.g.initial temperature, shape, quality). Check the food after cooking and if necessary continue cooking manually.
- After cooking, the fan will continue to operate. COOLING may be displayed when the door is opened or STOP/CLEAR pad is pressed while fan is operating.
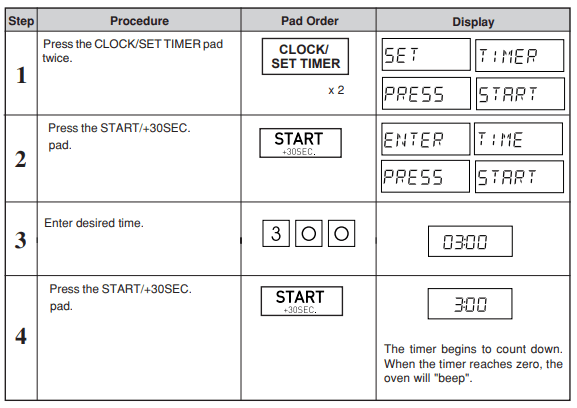
Set Timer
Use this feature as a general purpose timer. Examples include:
timing boiled eggs cooked on the stove top.
timing the recommended standing time of food.
You can enter any time up to 99 minutes, 99 seconds. If you want to cancel the timer during the count down phase simply press STOP/CLEAR.
* Suppose you want to set the timer for 3 minutes to boil an egg on the stove top.
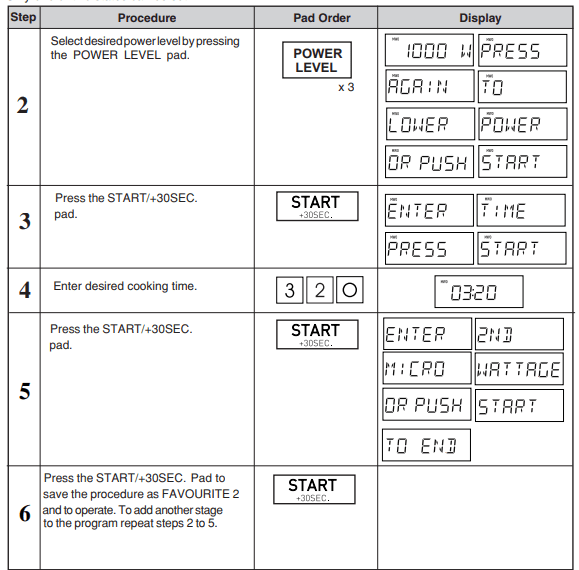
Favourite
The favourite function allows you to store 3 frequently used microwave power levels and cook times to make cooking/reheating more convenient.
Example: Set the following procedure as Favourite 2. Cook food for 3 minutes 20 seconds at 1000W microwave power.
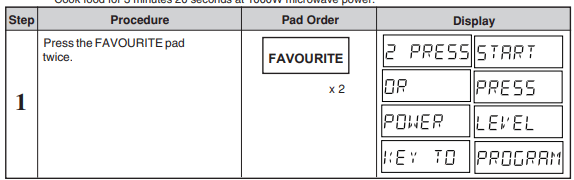
If the procedure has been set, press "START/+30SEC." to use it. If not, continue to set the procedure. Only one or two states can be set.
CARE AND CLEANING
CLEAN THE OVEN AT REGULAR INTERVALS - Keep the oven clean and remove any food deposits, or it could lead to deterioration of the surface. This could adversely affect the life of the appliance and possibly result in a hazardous situation.
Exterior: The outside may be cleaned with mild soap and warm water, wipe clean with a damp cloth. Avoid the use of harsh abrasive cleaners. Keep the ventilation openings free of dust.
Door: Wipe the door and window on both sides, the door seals and adjacent parts frequently with a damp cloth to remove any spills or spatters. Do not use abrasive cleaners.
Touch Control Panel: Wipe the panel with a slightly dampened cloth with water only. Do not scrub or use any sort of chemical cleaners. Avoid the use of excess water.
Interior walls: To clean the interior surfaces, wipe with a soft cloth and warm water. After use wipe the waveguide cover in the oven with a soft damp cloth to remove any food splashes. Built-up splashes may overheat and begin to smoke or catch fire. Do not remove the waveguide cover. DO NOT USE A COMMERCIAL OVEN CLEANER, ABRASIVE OR HARSH CLEANERS AND SCOURING PADS ON ANY PART OF YOUR MICROWAVE OVEN. NEVER SPRAY OVEN CLEANERS DIRECTLY ONTO ANY PART OF YOUR OVEN. Avoid using excess water. After cleaning the oven, ensure any water is removed with a soft cloth.
Turntable/Roller Stay: Wash with mild soapy water and dry thoroughly.
SERVICE CALL CHECK
Please check the following before calling for service:
- Does the display light up?
- When the door is opened, does the oven lamp come on?
- Place one cup of water (approx. 250 ml) in a glass measure in the oven and close the door securely. Oven lamp should go off if door is closed properly. Press the START/+30SEC. pad once.
A. Does the oven lamp come on?
B. Does the cooling fan work? (Put your hand over the rear ventilation openings.)
C. Does the turntable rotate? (The turntable can rotate clockwise or counterclockwise. This is quite normal.)
D. After one minute, did an audible signal sound and COOK indicator go off?
E. Is the water inside the oven hot?
If “NO” is the answer to any of the above questions, please check your wall socket and the fuse in your meter box. If both the wall socket and the fuse are functioning properly, CONTACT YOUR NEAREST SERVICE CENTRE APPROVED BY SHARP.
NOTE: In high / medium high power, output power will gradually be reduced to avoid overheating
SPECIFICATIONS
AC Line Voltage: Single phase 230–240V, 50Hz
Input (Steady): 1300 W
Input (Initial): 1900 W
Output Power: 1200 W* (IEC test procedure)
Microwave Frequency: 2450 MHz (Class B/Group 2)**
Outside Dimensions: 520mm(W) x 315mm(H) x 410mm(D)
Cooking Uniformity: Turntable (ø315mm tray) system
Weight: Approx. 12 kg
* When tested in accordance with AS/NZS 2895.1.2007
** This is the classification of ISM (Industrial, Scientific and Medical) equipment described in the International Standard CISPR11.
HINTS
- Always place the stems of vegetables – e.g. cauliflower, broccoli – toward the outside of the dish. The stems are tougher than the flower, so this will ensure even cooking.
- Ice-cream containers were made for freezing food and are not suitable for use in a microwave oven.
- Remember: When melting chocolate in the microwave oven, it holds its shape until stirred. Refer to MELT/ SOFTEN MENU GUIDE on page for instructions.
- Jams and chutneys are great when made in the microwave, as they retain their colour and flavour. As cooking time is so short, less evaporation occurs. Therefore pectin or a jam setting agent is required to make jam set.
- To obtain more juice from oranges, lemons or limes, prick skin, microwave 30 seconds on HIGH and stand 2 minutes before squeezing.
- Warm jam for a quick glaze. Heat 2-3 tablespoons for 30 seconds on HIGH; strain if necessary while hot.
- Soften cream cheese for dips or beating by removing foil wrapper and cooking for 1 minute on MEDIUM LOW.
- To melt marshmallows, place 100 g in a large bowl. Cook for 30 seconds on HIGH.
- To dissolve gelatine, mix 1 teaspoon gelatine with 2 tablespoons water and cook for 20-30 seconds on HIGH. Stir well.
- To blanch almonds place 100 g in a bowl with 1 cup of water. Cook for 5 minutes on HIGH.
- If brown sugar becomes hard, simply soften in the microwave oven. Place a cup at a time in a bowl with a slice of bread. Cover with plastic wrap and cook for 40 seconds on HIGH.
- Soften 6-8 honey-snap biscuits for 30 seconds on HIGH. Shape into base of patty dish for quick tartlet cases.
- Place a chocolate after-dinner mint on top of 6 patty cakes; arrange cakes evenly on turntable. Cook about 50-60 seconds on HIGH, or until chocolate is soft.
Gently spread chocolate mint evenly over patty cake for a quick icing.
- To soften honey, remove metal lid from jar and microwave on HIGH for 30 seconds.
- Stuffed mushrooms are a terrific idea. Provided the filling is cooked, twelve mushrooms placed on a layer of paper towel will take approximately 3 minutes to heat on HIGH.
- To remove odours, place 1-litre water with slice of lemon or 1 teaspoon vanilla essence in the microwave. Cook for 20 minutes on HIGH.
- As microwave cooking time is so quick, food should be seasoned to taste with herbs and spices after cooking.
- To peel a tomato, pierce the skin with a fork 3-4 times. Place on a rack and cook for 45-60 seconds on HIGH. Stand for 3 minutes before peeling.
- Lightly prick the skin of chicken before cooking. This prevents the loud popping noises.
- Peeling garlic is made easier by placing a clove in the microwave for 10 seconds on HIGH
- Pierce the skin of chicken livers with a fork before cooking to prevent popping of the internal fat. Cover with paper towel when cooking.
- The flavour of wine in food is highlighted with the short microwave cooking time, so adjust the quantity to your taste.
- Tomato sauce can be warmed for 30 seconds on HIGH to give it a pouring consistency. (ensure lid is removed.
- When cooking sauces in the microwave use less liquid: the absence of direct heat means sauces do not reduce as much as stovetop-prepared sauces.
- Rice and pasta cook well in small quantities. Use a large container to prevent boiling over.
- FOIL. Contrary to popular belief, foil can be used in the microwave – for shielding, not covering. It must not come in contact with the walls of the microwave.
Foil directs microwave energy away from delicate or thin areas of food, toward areas that need more cooking. It is essential for even defrosting. Place foil over the thawed sections, allowing the frozen portions to continue defrosting.
- To enhance the colour and flavour when roasting chicken, mix some brown sugar, honey and a little soy sauce together and brush both sides of poultry before and during cooking.
- To blanch vegetables for freezing, place 150 g of vegetables in a dish with 1 tablespoon of water. Cover and cook on HIGH for 1/3 of the usual cooking time. After cooking, immerse immediately in iced water, package, label, and freeze for up to 3 months.
- Do not add salt to vegetables before cooking, as salt draws out the moisture and causes vegetables to toughen.
COMMONLY ASKED QUESTIONS AND ANSWERS
MICROWAVES COOK FROM THE INSIDE OUT. They certainly do not. Microwaves penetrate foods from the outside to a depth of about 2.5 cm. Small foods, under 5 cm in diameter, are penetrated to the centre from all sides. With large foods, energy creates heat in the outer layer; then the heat moves to the centre by conduction, as it does conventionally. A few foods may appear to cook more on the inside. One example is an egg. Energy penetrates to the centre, where the fatty yolk becomes hotter than the white, and cooks quicker.
YOU CAN'T USE METAL IN A MICROWAVE OVEN. False. Metal reflects microwaves; the oven itself is made of metal so microwave energy can't escape. Inside the oven, metal slows cooking because it keeps energy from reaching parts of the food. You can use the reflective properties of metal to protect foods which might overcook in some areas.
DISHES DON'T GET HOT IN A MICROWAVE OVEN. Keep your oven mitts handy. A microwave-safe utensil will not be heated by microwave energy, but it will become hot from contact with hot food. Heat tends to equalise. A warm object heats the air around it, like a radiator in a cool room. When food becomes hot, some of this heat is transferred to the dish.
POINTS TO REMEMBER
As a general guide:
HIGH – is ideal for vegetables, fruit, soup, beverages, bacon and sauces.
MEDIUM HIGH – for roasting lamb, roasting chicken and fish fillets.
MEDIUM – is for roasting beef, pork and simmering; great for casseroles or stews and cooking seafood.
MEDIUM LOW – allows you to defrost.
LOW – is used to keep foods warm once they are cooked.
- The more food in the microwave oven, the longer it takes to cook.
- Reduce liquids in a microwave recipe because there is not as much evaporation, due to the shorter cooking time.
- Reduce seasonings slightly because flavours will be unbalanced by quantity of liquid. Do not add salt until the end of the cooking process.
- Microwaves cook from the outside to the centre, so when arranging foods always place the thicker or more dense portions of food at the outside, with the thinner, lessdense pieces on the inside.
- Foil can be used in the microwave oven successfully
Just remember two rules:
- There must be at least half of the food exposed to the microwaves.
- Do not let the foil touch the sides of the oven.
Use foil to shield thinner parts of food when defrosting, to prevent over-cooking and drying out.
- All food continues to cook after it leaves the microwave oven because the heat is stored in the food and not in the oven.
Standing time required will vary according to the volume and density of food.
e.g. Fish and vegetables – 1-5 minutes , Cakes – 3-10 minutes , Roasts – 10-15 minutes , Cover foods with a lid or foil when standing
- When reheating foods always cover with a lid, plastic wrap or paper towel to prevent foods from drying out. Reheat on MEDIUM for best results.
- Always pierce food that has a membrane – for example eggs, tomatoes, potatoes and kidneys.
- Remember to cover vegetables with a lid or plastic wrap when cooking.
DEFROSTING
Thawing food, especially meats, using the microwave oven is not only faster than any other method but it can also give better results.
Once frozen meat is thawed, it begins to lose its juices.
With a microwave oven you can thaw meat just before you plan to cook it, thus preserving the quality.
Microwave thawing doesn't mean a lot of fuss, but some attention is needed to make sure that parts of food do not start to cook before the centre is thawed. MEDIUM LOW is fast enough to be convenient but gentle enough to give good results.
POULTRY
Start thawing poultry breast-side down; shield warm areas and turn over halfway through defrosting. Let poultry stand 30 to 60 minutes after thawing, until giblets and neck can be removed and breast meat under wings is completely thawed.
CUTS OF MEAT
Break up or separate minced beef, cubed meat, chicken pieces or fish fillets after one-third of thawing time.
Remove any thawed pieces. Place remainder in baking dish to complete thawing. Turn over roasts, steaks, chops or chicken. Separate as soon as possible.
JOINTS
Turn over large roasts halfway through defrosting. As you turn, touch the meat to find warm areas and shield these with small pieces of foil. Let roasts stand 30 to 45 minutes after defrosting time. Thaw meats and poultry only until they can be pierced in the centre with a skewer. Surface or cavity should feel cool but not icy. Cook as soon as possible to prevent loss of juices.
REHEATING
Foods reheated in the microwave oven taste freshly cooked, not reheated. Suit the power level to the food. A bowl of leftover vegetables can be reheated at HIGH, while lasagne, which contains sensitive cheese and cannot be stirred, should be reheated at MEDIUM HIGH or MEDIUM.
CASSEROLES
Cover dish tightly with plastic wrap or a lid. Stir several times during reheating, especially if casserole has been refrigerated. If casserole cannot be stirred, reheat at MEDIUM.
MEATS
Medium to thin slices reheat best. Cover meat with sauce or gravy. Cover with microwave plastic wrap to hold in heat. Reheat on MEDIUM.
PLATES OF FOOD
Arrange food with thickest parts of meat and bulky vegetables to outside of the plate. Place quick-to-heat foods in the centre. Cover with microwave plastic wrap. Reheat on MEDIUM.
VEGETABLES
Wrap large, whole vegetables in microwave plastic wrap. Cover dishes of vegetables and stir during reheating, if possible.
TOASTING
ALMONDS
Place 100 g almonds in a glass dish; cook for 3-31/2 minutes on HIGH, or until golden brown. Stir almonds every minute during cooking.
SESAME SEEDS
Place 1 /4 cup sesame seeds in a glass bowl; cook for 2-3 minutes on HIGH, or until golden. Stir every minute.
RECONSTITUTING DRIED FOODS
DRIED FRUITS
Place 1 cup of fruit in a bowl, cover with cold water, and cook for 41 /2-5 minutes on HIGH. Stand covered for 5 minutes before using.
DRIED MUSHROOMS
Place in a bowl with 2 cups of water and heat, slowly, 8-10 minutes on LOW.