2021 CIVIC
Hatchback
Navigation Manual

The information and specifications included in this publication were in effect at the time of approval for printing. Honda Motor Co., Ltd., reserves the right,
however, to discontinue or change specifications or design at any time without notice and without incurring any obligation.
Accessories Precautions
The GPS antenna is located in the dashboard.
Metallic fr
ont or side window tinting can seriously degrade or obstruct GPS reception.
Signal noise from devices such as radar detectors, vehicle tracking d
evices, remote starters, and additional amplifiers can disrupt the navigation system. If you
install any such item, install it away from the navigation display and antenna.
Important Safety Information
Avoid focusing on the screen or manually operating the system controls while driving.
Certain on-screen controls are disabled when driving, however most of t
he voice co
mmands continue to function. Pull to the side of the road if you need to devote
more attention and time to look at the screen or access additional menus.
Route guidance may conflict with street closures, road construction,
detours, and out-of-date map data.
The system itself may also have limitations. Verify route information by carefully observing roads, signs, and signals. Always use your own judgment an
d obey
traffic laws.
2
System Limitations
P. 128
NOTICE
This vehicle’s navigation display, if so equipped, includes mercury-containing components. Upon removal, please reuse, recycle, or dispose of as hazardous waste.
Clean the screen with a soft, damp cloth. You may use a mild cleaner intended for use on navigation screens.
3 WARNING
Using the navigation system while driving can take your
attention away from the road, causing a crash in which you
could be seriously injured or killed.
Only operate system controls when the conditions permit you
to safely do so.
00X31-TGG-8400 2021 Civic Hatchback Navigation Manual NM-14140

Contents
2 System Setup P. 15
Start-up 16 Voice Control System 17 Personal Information 18 Display Mode Settings 26
Map & Vehicle 28 Navigation 36 Traffic 44 Other Settings 45
Data Reset 51
2 Navigation P. 53
Entering a Destination 54 Calculating the Route 74 Driving to Your Destination 77 Map Operation 81
Changing Your Route 91 Changing Your Destination 94
2 Other Features P. 107
About Apps Menu 108 ecoRoute
TM
109 Information Functions 117
2 Troubleshooting P. 121
Troubleshooting 122
2 Reference Information P. 127
System Limitations 128 Customer Assistance 130 Legal Information 132
2 Voice Commands P. 135
Voice Commands 136 List of Categories 138
Quick Reference Guide
P. 2
System Setup
P. 15
Navigation
P. 53
Other Features
P. 107
Troubleshooting
P. 121
Reference Information
P. 127
Voice Commands
P. 135
Index
P. 139

2
Quick Reference Guide
Quick Reference Guide
Overview—Functions at a Glance
Navigation
You can select any place/landmark as a destination by using the touchscreen. The navigation system gives you
turn-by-turn driving directions to your destination.
Store home address
(P18 )
Register
1
home address.
Track route
(P77 )
Follow your route in real-time with voice guidance.
Store contacts
(P19 )
Store locations to use as the destination.
Enter destination
(P54 )
Select your destination using several methods.
Select route
(P75 )
Set route preferences and select one of the available routes.
Avoid certain areas
(P39 )
Set streets and areas to detour around.
Add waypoints
(P93 )
Add “pit stops” along your route.
Traffic Information* (P86)
View and avoid congestion and traffic incidents.
*: Available only in certain areas.

3
Quick Reference Guide
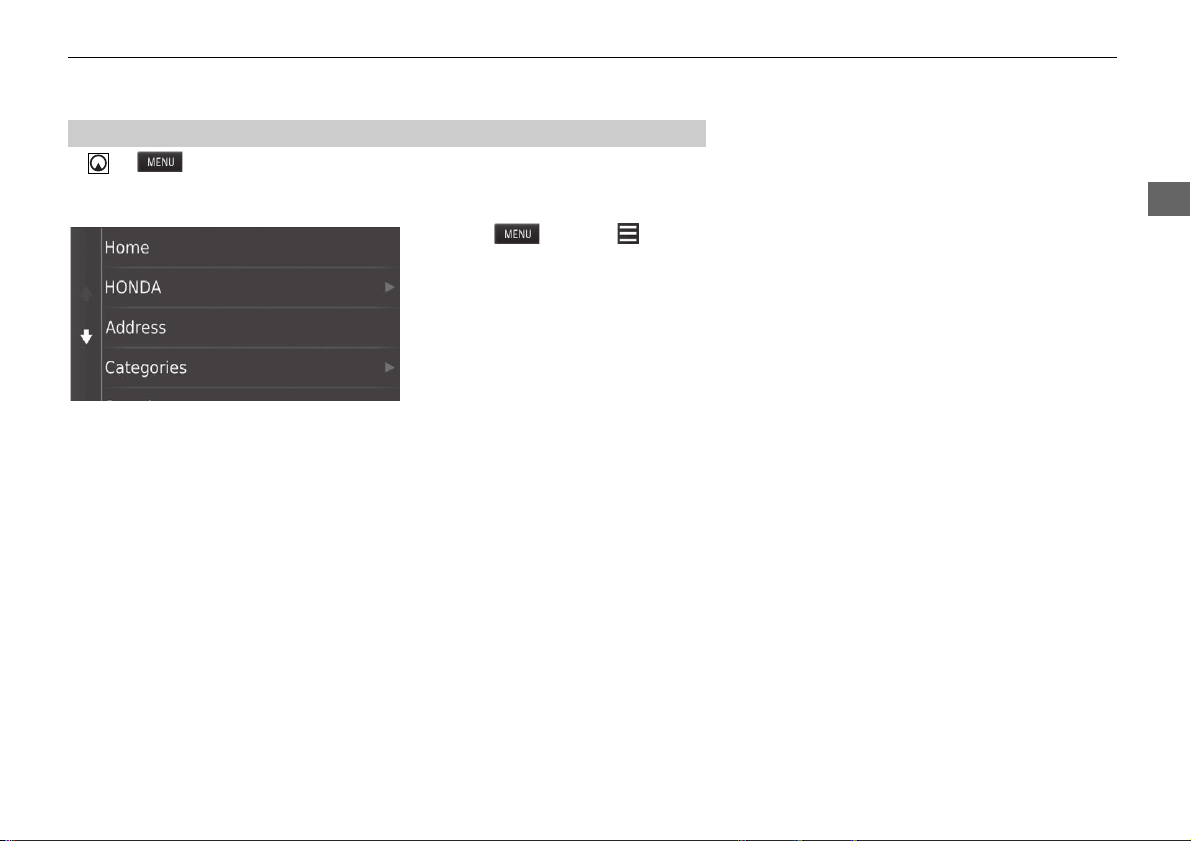
HOME Screen
The system displays various functions from the HOME screen. Press the button at any time to return to the main HOME screen.
Navigation Top Screen
Display the map screen and operate the navigation features. From the HOME screen, press the button and then press the button. The
navigation top screen is displayed.
(Home)
Display the HOME screen.
(Map)
Display the map screen.
(Back)
Go back to the previous screen.
VOL (Volume)
Increase or decrease the audio volume.
Display the map menu.
Navigation
Display the navigation feature that
was used the last time.
At start-up, the navigation top
screen is displayed.
(Display Mode)
Switch between Day and Night modes
manually.
GPS signal strength (P120)
Display the satellites’ status.
Where To? (P54)
Select search methods to enter a destination for
route guidance.
Apps (P108)
Display the useful functions incorporated into the
navigation system.
View Map (P6 )
Display the map screen.
Settings (P15 )
Change the settings for the navigation
functions.
4
Quick Reference Guide
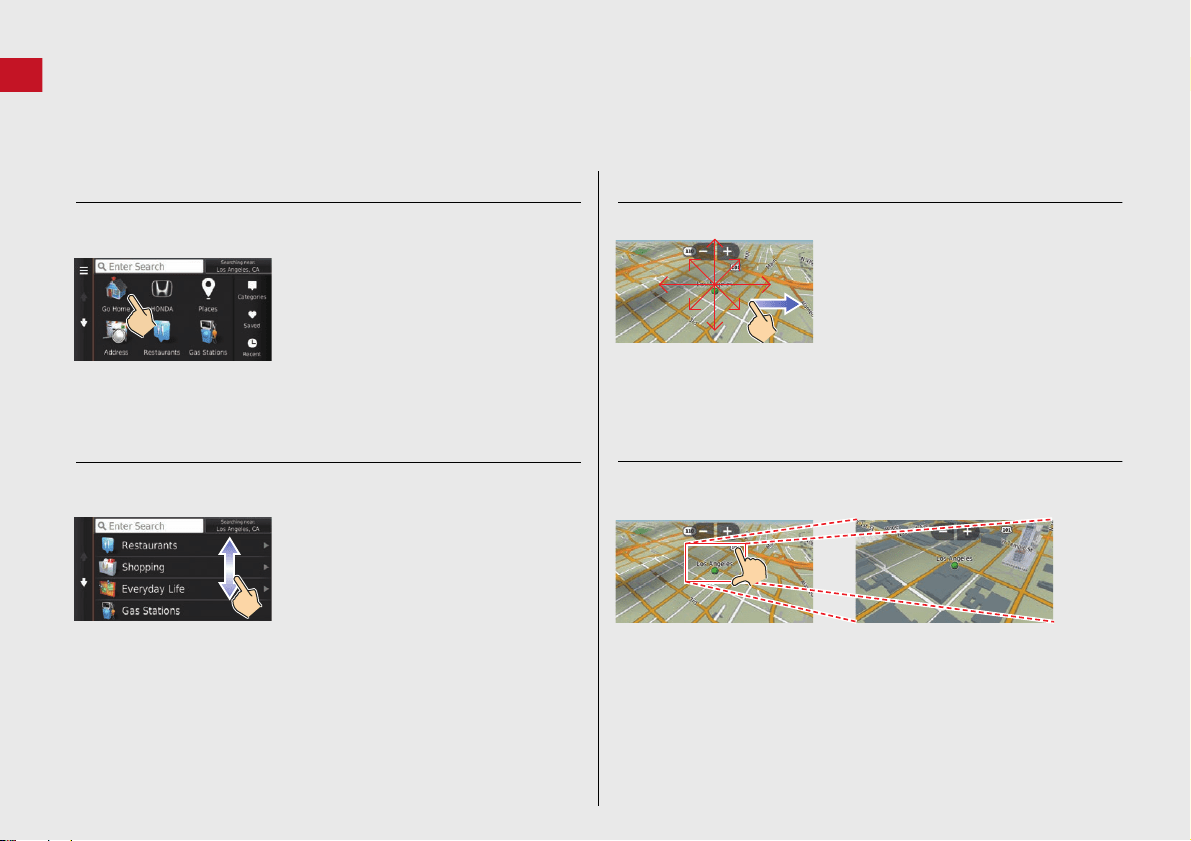
Touchscreen Operation
You can operate the system using your finger on the touchscreen.
The touchscreen can be operated if you are wearing thin gloves, but it may be more diff
icult for the system to respond.
Tap
Touch the screen lightly with your finger to select an option on the
screen.
Swipe
Lightly sweep your finger side to side or up and down to scroll a list
or map.
You can change the touchscreen sensitivity setting.
2 Refer to the O
wners Manual.
Slide
Move your finger slowly across the screen to scroll the map.
Pinch In/Out
Open or close your fingers on the screen in a pinching motion to
zoom in or out of the map.
5
Quick Reference Guide
How to Enter Information
You can enter information (e.g., city names, street names, numbers, and symbols) when prompted on the input screen.
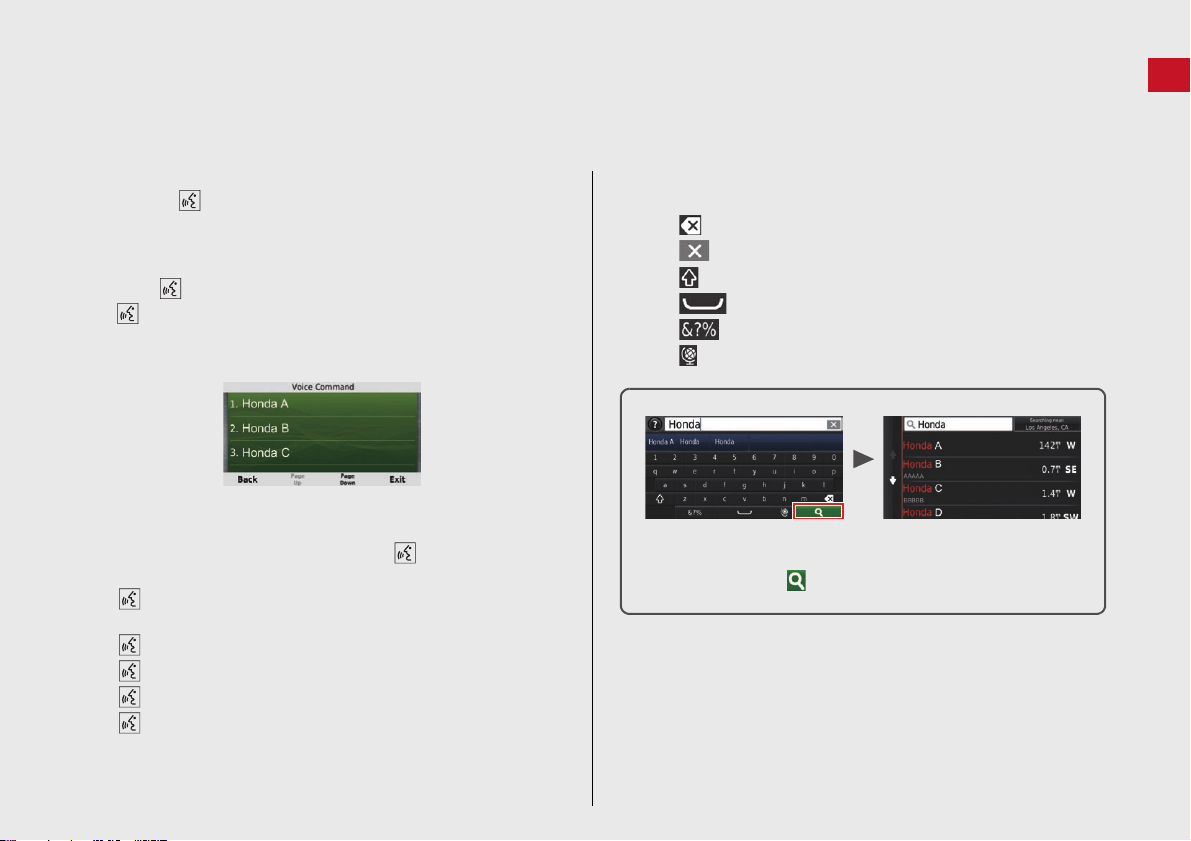
Using Voice Commands
When you see in this manual, voice commands are available for
that feature.
The system recognizes only certain commands.Available navigation
vo
ice commands (P136)
Press the button, and say the letter, nu
mber, or symbol (e.g.,
say “1”).
If a voice command is not recognized, a list is displayed with
possible options.
On list screens:
Say the number of the list item (e.g., say “Three” to select
item 3).
Say “Ma
in menu” to return to the voice command menu
screen.
Say “Back”
to return to the previous screen.
Say “Page U
p” to scroll up one page.
Say “Page D
own” to scroll down one page.
Say “Exit” to
end the voice command function.
Using the Touchscreen
Select a character or icon on the screen to select it.
Select to remove the last entered character.
Select to remove all entered characters.
Select to display upper/lower case characters.
Select to enter a space character.
Select to display other types of characters.
Select to change the keypad language.
On input search screens, the suggested search terms are
displayed. Select to display a list of possible entries.
6
Quick Reference Guide
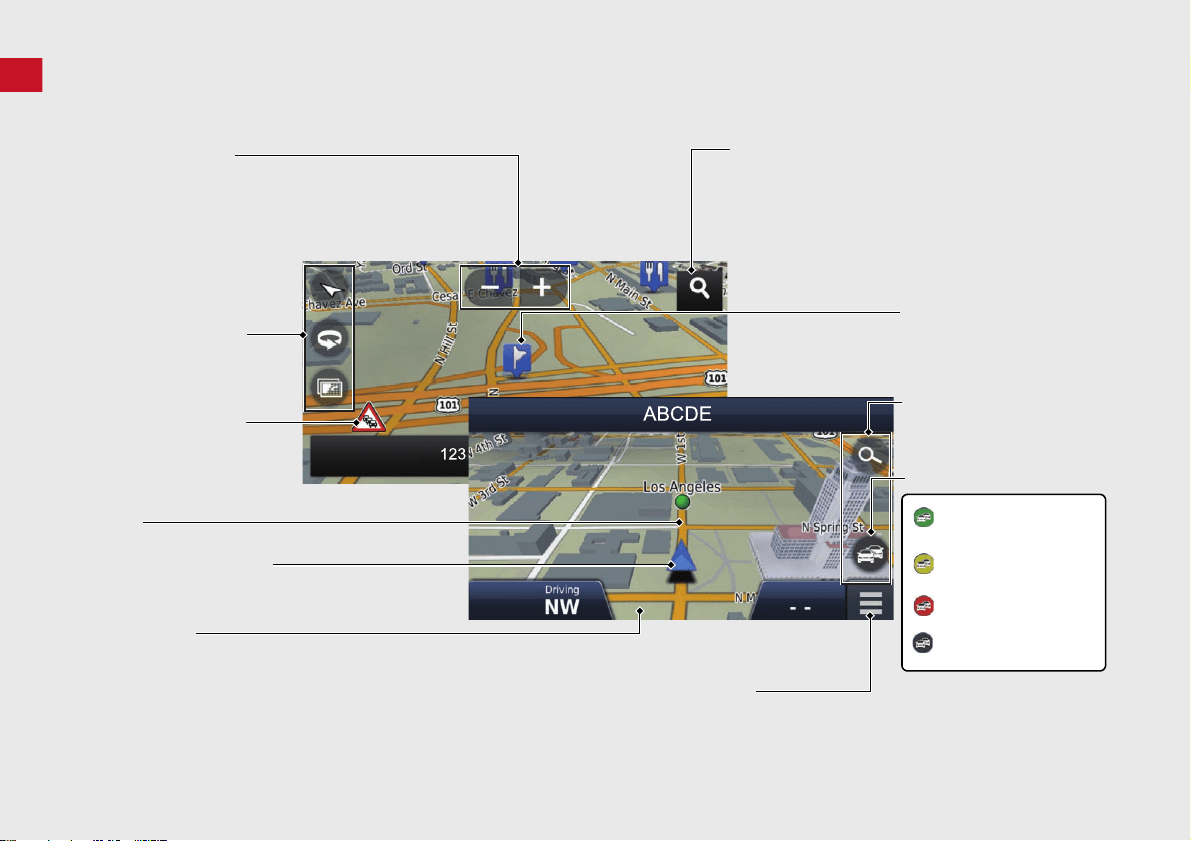
Map Screen Legend
The color of the map is different depending on the selected Map Theme.
Map operation icons
(P81 )
Map menu (P82)
Map scale (P81)
Current vehicle position
Streets
Landmark icons
Traffic incident icons
Traffic flow indicator
Traffic is flowing
normally.
Traffic is slightly
congested.
Traffic is heavily
congested or stopped.
Searching specific category (P73)
Traffic has not
updated.
Map buttons (P33 )
Feature areas
7
Quick Reference Guide
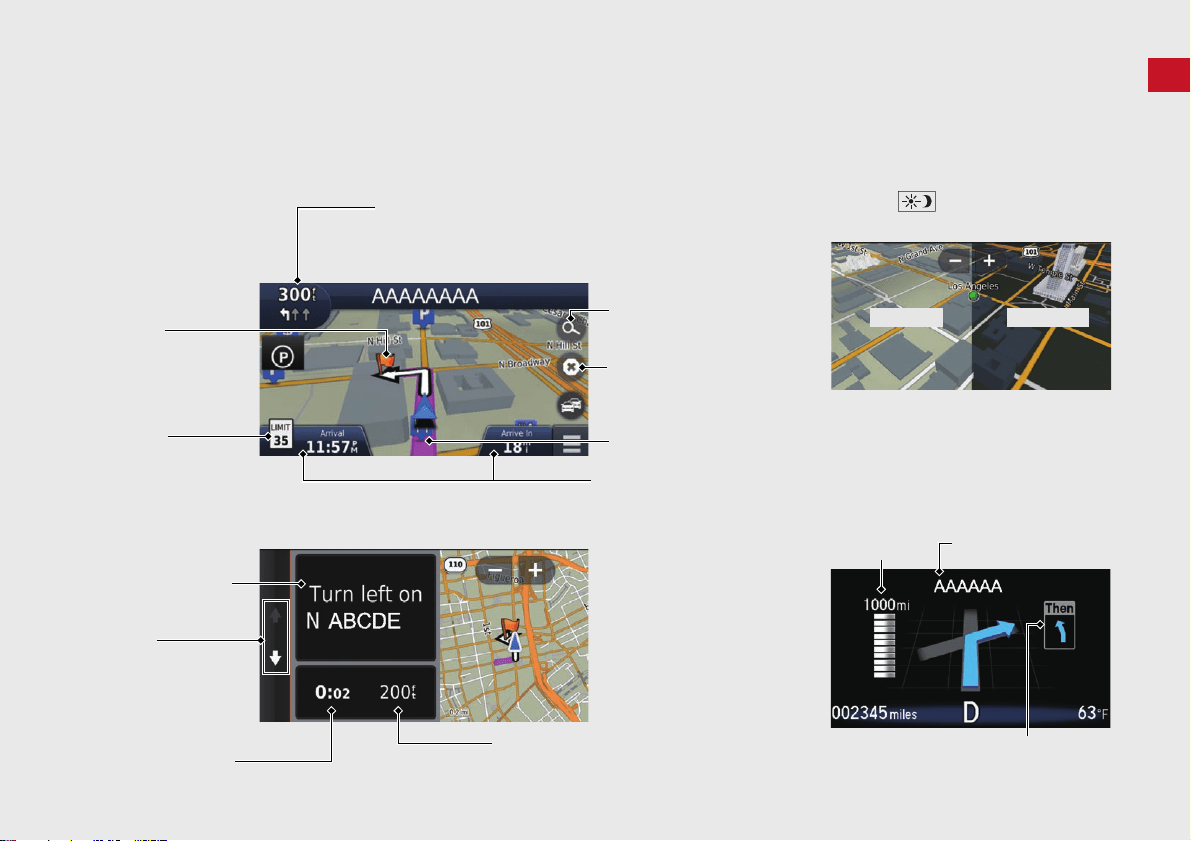
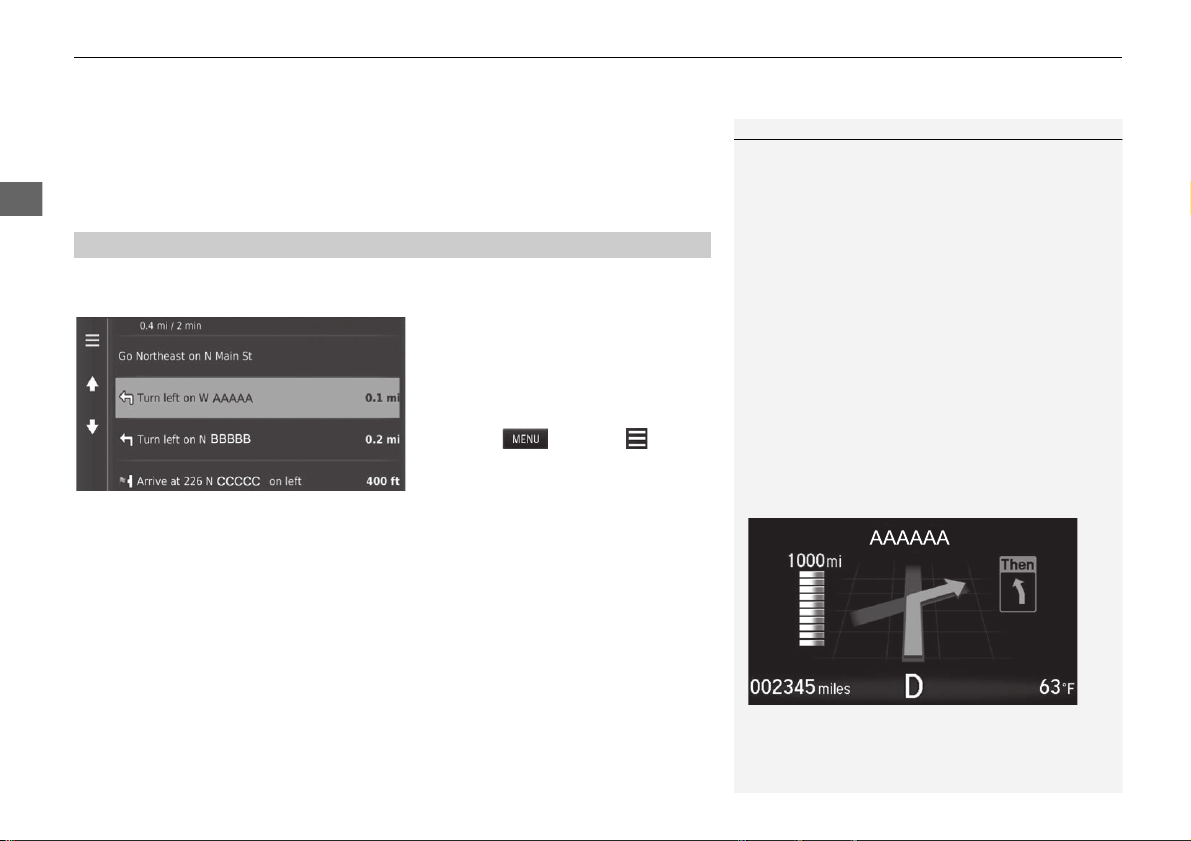
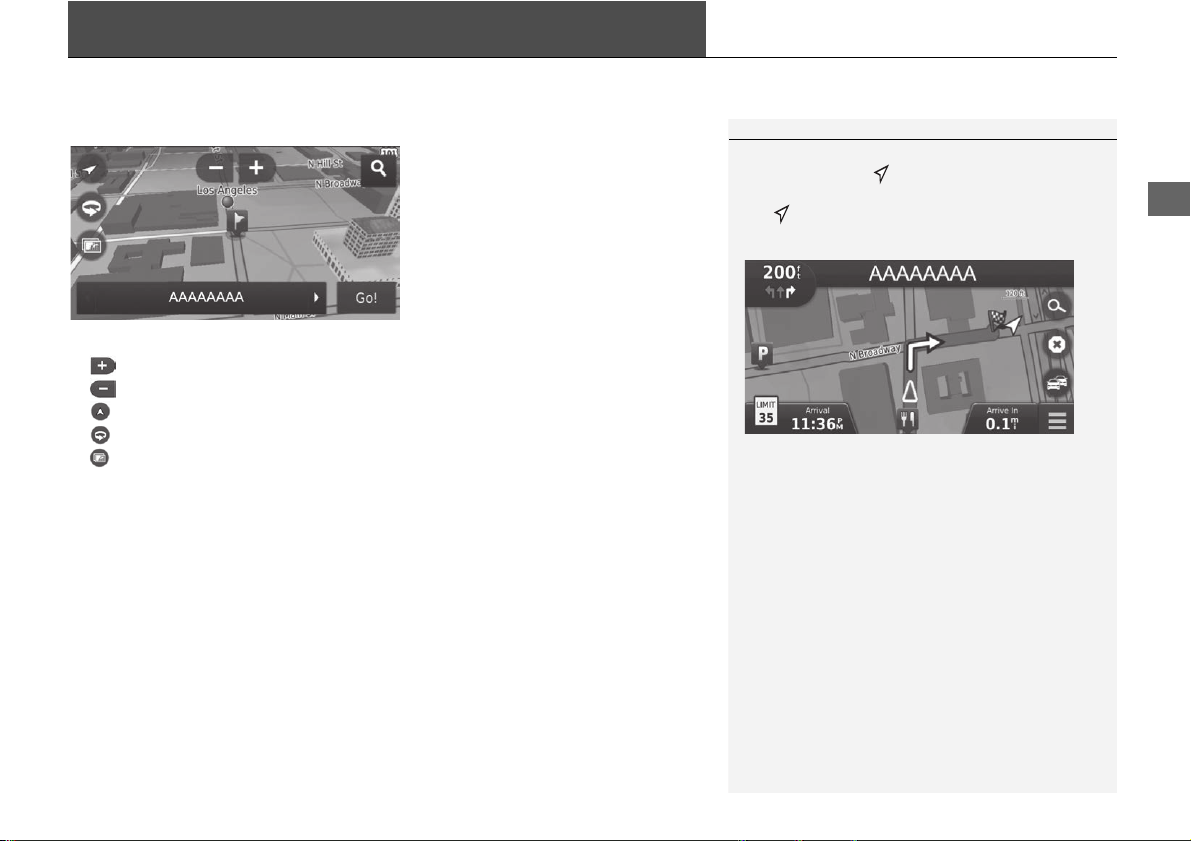
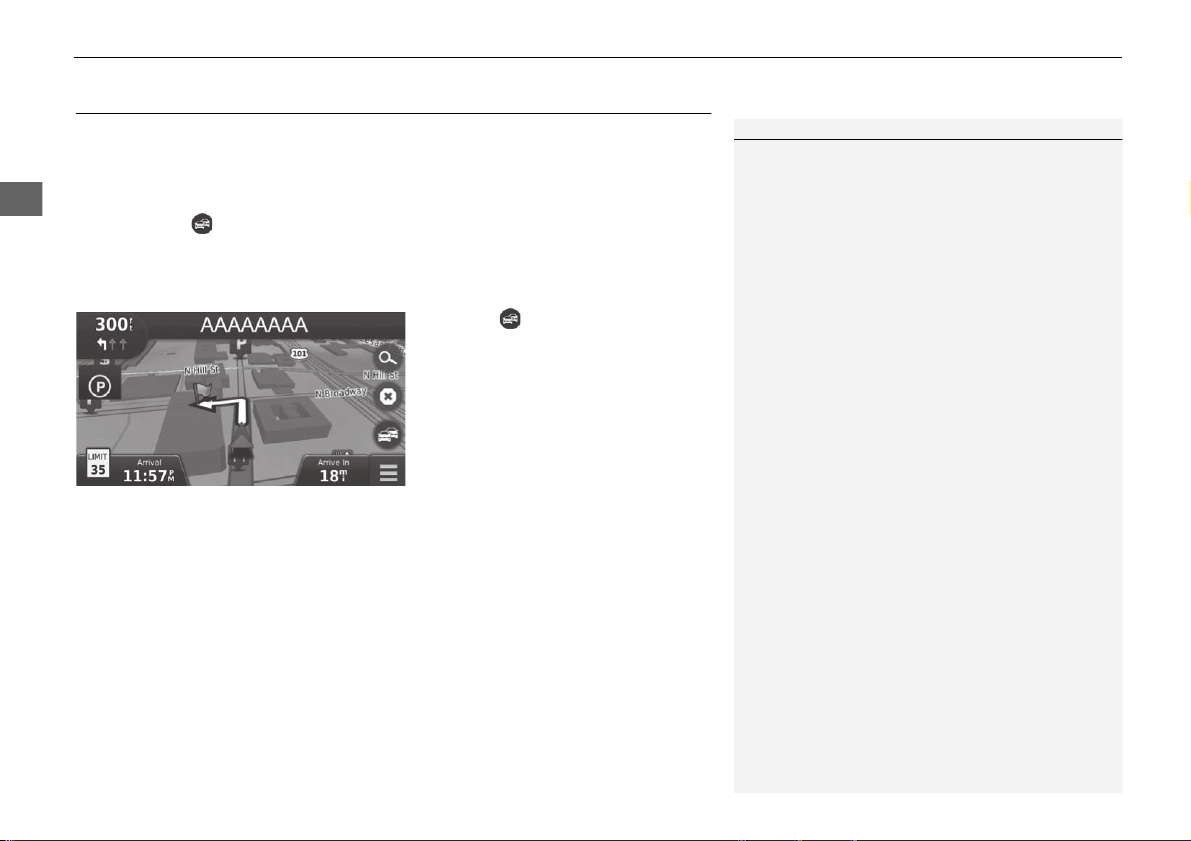
During Route Guidance
During route guidance, route information is displayed on the map screen.
You can see the detailed information on the turn information s
creen.
Map Screen
Guidance Screen
Dashboards (P77)
Next guidance indicator (P77 )
Distance to the next guidance point and street name of
next guidance point.
Where To? (P54)
Waypoint
Calculated route
Speed limit
Cancel route
Street name of next
guidance point
Distance to next guidance pointEstimated time to
next guidance point
Scrolls key
Select this key to scroll
the display.
Day or Night Mode
Press the button to manually
switch between Day and Night modes.
Turn-by-Turn Directions
The next guidance point appears on
the Driver Information Interface (DII).
Day Mode Night Mode
Remaining
distance
Street name of next
guidance point
Next driving maneuver is
approaching.

8
Quick Reference Guide
Navigation—Home Addresses and Going Home
The “Home” feature automatically routes you to your home address from any location simply by selecting Go Home.
You can store one home address. (P18 )
The order of the steps may change depending on the map data loaded on your system.
Storing Your Home Address
a Press the button.
b Select .
c Select and then select Set
Home Location.
d Select Enter My Address.
e Select Search All.
f Enter a house number and then select
Done.
g Enter a street and then select Done.
h Select a street from the list.
If the select city screen is displayed,
select a c
ity.
i Select an address from the list.
j Select Select.
Going Home
a Press the button.
b Select .
c Select Go Home.
Alternatively, you can say
“Na
vigation” and then “Go
Home” fro
m any screen.
9
Quick Reference Guide
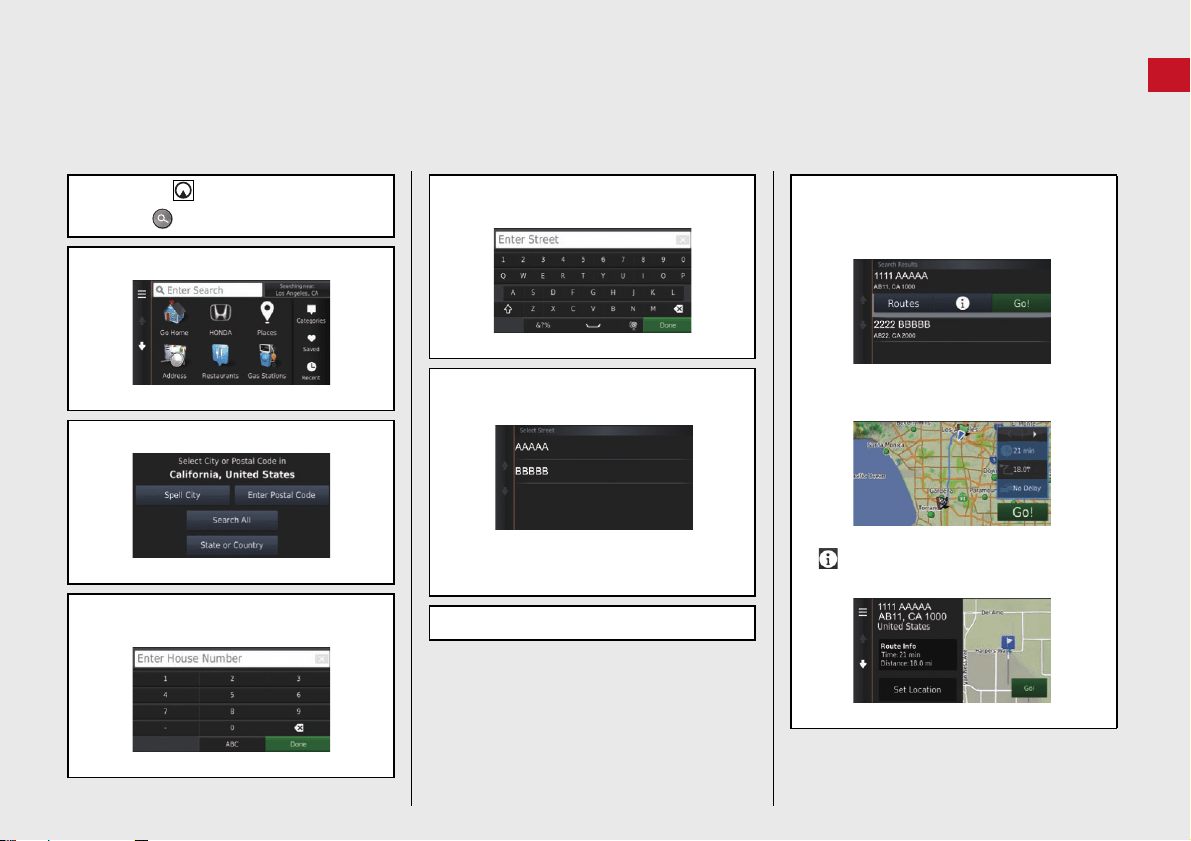
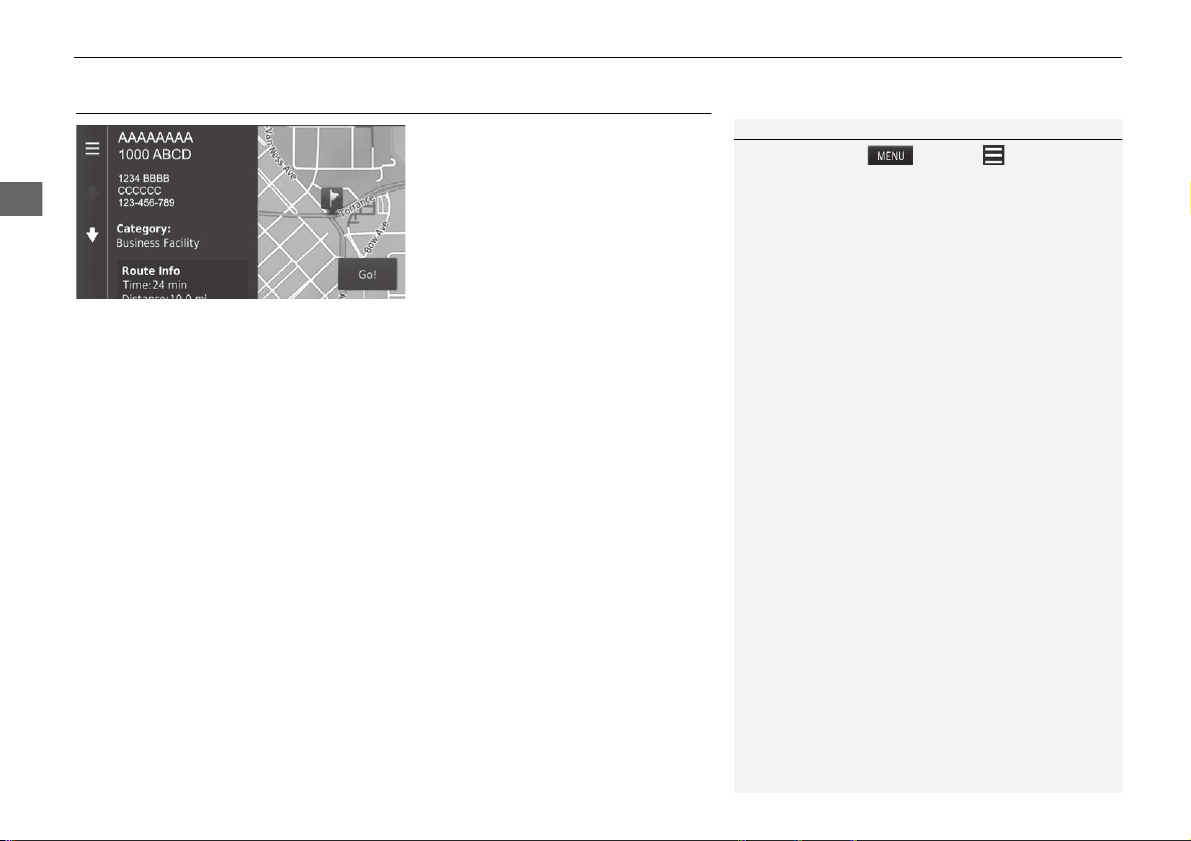
Navigation—Entering a Destination
Enter your destination using one of several methods, then follow route guidance on the map to your destination.
The order of the steps may change depending on the map data loaded on your system.
a Press the button.
b Select .
c Select Address.
d Select Search All.
e Enter the house number and select
Done if necessary.
f Enter the name of your destination
street and select Done.
g Select your destination street from
the list.
If the select city screen is displayed,
select a city.
h Select an address from the list.
i Select Go!.
Route guidance to the destination
beg
ins.
Routes: Choose one of multiple routes.
: Display your destination map and
save a plac
e.

10
Quick Reference Guide
Navigation—Changing Route or Destination
You can alter your route by adding waypoints to visit, or changing your destination during route guidance.
Adding a Waypoint (“Pit Stop”)
You can add waypoints along your route.
(P93 )
a Press the button.
b Select .
c Select a search method.
d Select the location to add to the
destination list and select Go!.
e Select Add to Active Route.
f If necessary, edit the order of the
destinations and select Done.
Changing Your Destination
There are several methods you can use to
specify a new destination during route
guidance.
Searching nearby hospitals, police
stations, or ga
s stations (P95 )
Select the vehicle icon and select an
op
tion.
Selecting an icon on the map (P94)
Select a place/landmark icon or a new
area o
n the map twice.
Entering a new destination (P97 )
Select Wh
ere To? and then enter a new
destination.
Canceling Your Route
a Select .
Alternatively, you can say
“Na
vigation” and then “Stop
route” from
any screen.
Help
This navigation system comes with help
information, which tells you how to use
this navigation. (P117)
a Press the button and then press
the
button.
b Press the button.
c Select Apps.
d Select Help.
e Select a help topic.
Select to search help topics by
keyword.
You can also display a help topic to
select on each menu screen.
11
Quick Reference Guide
Voice Control Operation
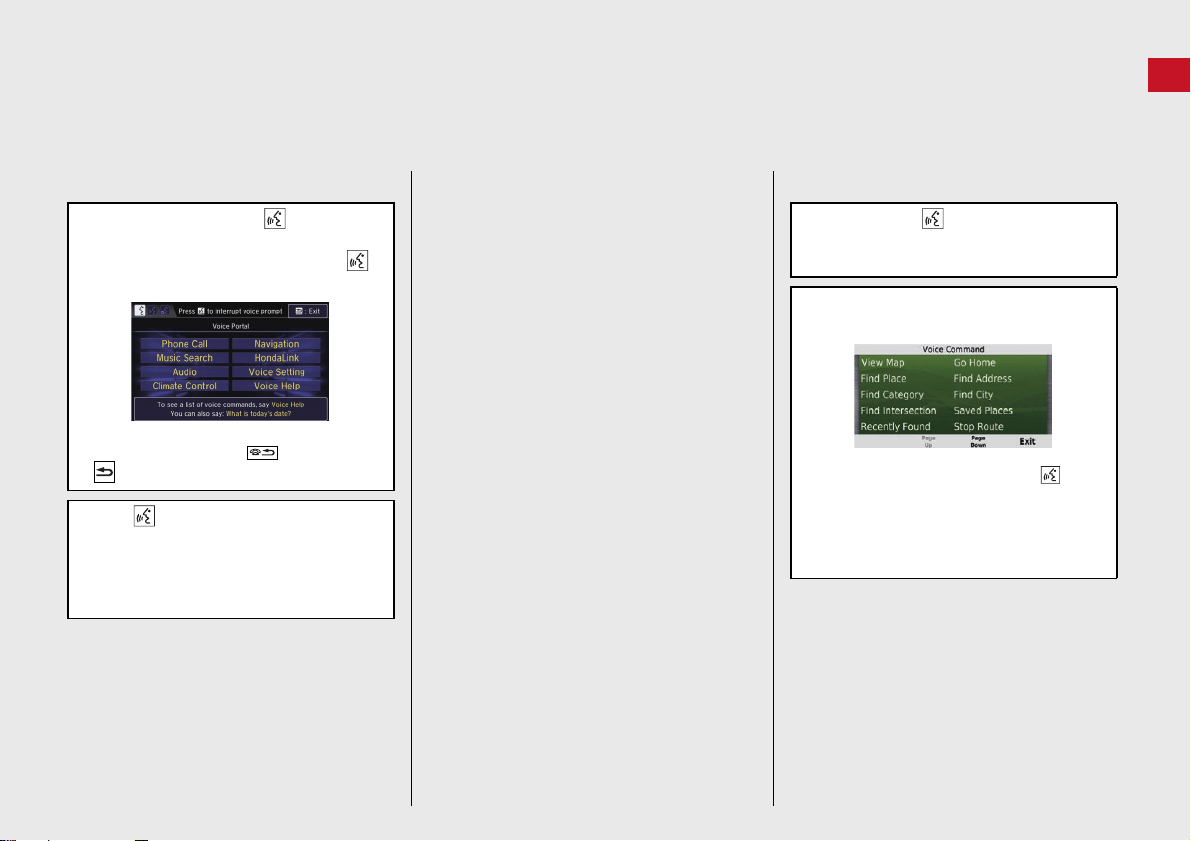
Voice Portal Screen
a Press and release the button.
The system prompts you to say a voice
co
mmand. Press and release the
button again to bypass this prompt.
The system beeps when ready for a
co
mmand. Press the button or the
button to cancel.
b Say “Navigation.”
The Voice Command screen is
disp
layed.
After that, follow the voice prompt
an
d say a voice command.
The audio system is muted during voice
control mode.
You can use other voice commands on
the Vo
ice Portal screen.
Disable Vo
ice Prompts to bypass the
voice prompt.
See the Owner's Manual.
Carefully read the usage note for the
voice c
ontrol.
Voice Control System (P17)
The system recognizes only certain
co
mmands.
Available navigation commands
(P13
6 )
Voice Command Screen
a After saying “Navigation” from
the Voice Portal screen, the below
screen ap
pears.
b Listen for the voice prompt, then say a
voice command.
You do not need to press the
button again in the Voice Command
screen.
Available voice commands are
hig
hlighted on the screen.
12
Quick Reference Guide
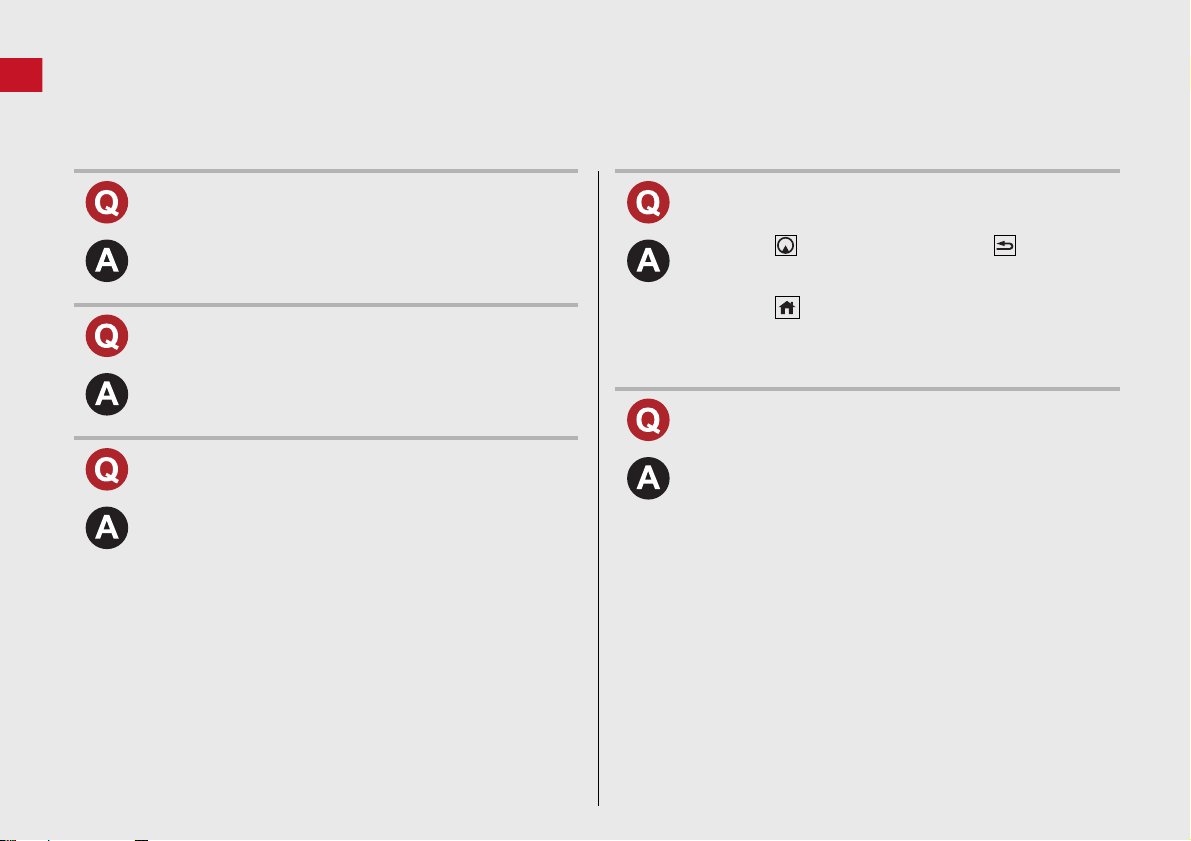
Troubleshooting
For more Information
(P121 )
Why does the vehicle position icon on the map appear
slightly off my actual position, especially at intersections?
This is normal. The navigation system is unaware of the
width of intersections. Large differences in vehicle position
can indicate a temporary loss of the GPS signal.
Why does the “Arrival time” display sometimes increase
even though I am getting closer to my destination?
The “Arrival time” is based on the speed limit on each
road. Depending on the traffic conditions, the “Arrival
time” may be calculated to be earlier or later.
Why does my clock frequently change the time forward
and backward by one hour?
The clock setting is automatically updated based on your
GPS location. If you are driving near a time zone border,
the automatic update likely is the reason.
How do I turn on the navigation system voice guidance?
1.Press the button and then press the button.
Select Settings > Na
vigation and enable Voice
Prompts.
2.Press the button.
Select Settings > System > S
ound/Beep tab.
Turn up Gu
idance Volume, if volume level is low.
For more details, see the Owner’s Manual.
How do I specify a destination when an entered city or
street could not be found?
Try selecting the destination directly from the map.

13
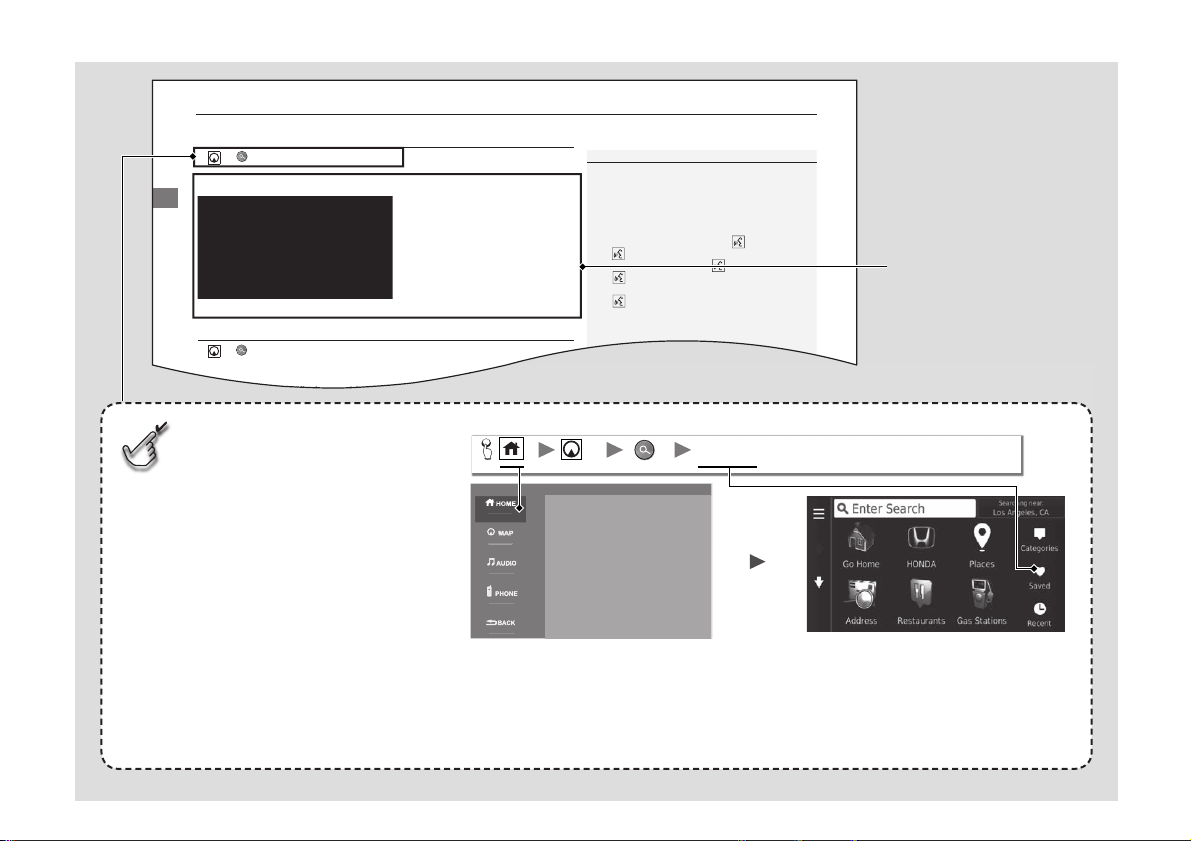
How to Use This Manual
This section explains different methods on how you can easily find information in this manual.
Searching the Table of Contents
(P1 )
First, find the general chapter related to
what you are looking for (e.g., entering
a destination from the Saved Places).
Then, go to that chapter to view a more
specific table of contents.
Searching the Index
(P139)
This more detailed table of contents
shows you exactly what information is
listed by section and title.
The Index consists of
main terms and sub-
entries. The sub-entries
help you get to the
desired page depending
on what you are looking
for.
Table of Contents
Chapter Contents
Navigation Screen
Index
Two types of Tables of Contents help
you find your desired information.
Menu items displayed on the
navigation screen (e.g., Saved) can be
found individually in the Index.
More Detailed
Contents
Go to the
Next Page
14
uuEntering a DestinationuSaved
Navigation
Saved
H uuSaved
Select a saved location to use as the destination.
1. Select your destination from the
list.
2. Select Go! to set the route to your
destination.
2 Calculating the Route P. 74
Recent
H uuRecent
Select an address from a list of your 50 most recent destinations to use as the
dti ti Th li t i di l d ith th t td ti ti tth t
1 Saved
You can add, edit, or delete the saved place.
2 Saved Locations P. 19
Using Voice Command
You can utilize a saved place by using voice
commands.
From the Voice Portal screen, say “Navigation.”
Say “Saved Place” on the voice command screen,
then say a saved place (e.g., “Honda”).
Say “View List” if you want to conrm all saved
places.
Say “Navigate” or “Yes” to set the route.
2 Using Voice Commands P. 5
2 Voice Con
trol Operation P. 11
1 Recent
If you want to delete all recent destinations, select
or select and then select Clear.
Select the item on the system
control panel.
Menu Tree
The menu tree helps guide you
through the system’s menu options.
To get to your desired function, follow
the menu tree in order of the steps
shown.
Select the menu option.
After following the menu
tree, step-by-step
instructions explain how to
achieve the desired result.
* Sample pages and images in this section may differ from the actual ones.
Select Saved.
Saved

15
System Setup
This section describes the start-up procedure and the navigation and setup functions.
Start-up ....................................................16
Voice Control System .......
.......................17
Voice Recognition ...................................17
Personal Information........
.......................18
Setting Home Location............................18
Saved Locations ......................................19
Display Mode Settings .....
.......................26
Switching Display Mode Manually ...........26
Map & Vehicle ...................
.......................28
Vehicle....................................................29
Driving Map View (Map Orientation) .......30
Map Detail..............................................31
Map Theme ............................................32
Map Buttons...........................................33
Map Layers ............................................ 34
Dashboards............................................ 34
myMaps................................................. 35
Navigation......
......................................... 36
Calculation Mode................................... 37
Avoidances ............................................ 38
Custom Avoidances ............................... 39
Traffic..............
......................................... 44
Other Settings.....................
.................... 45
Units ...................................................... 45
Language & Keyboard............................ 46
Device.................................................... 49
Data Reset ......
......................................... 51
Reset Factory Default Settings ................ 51
16
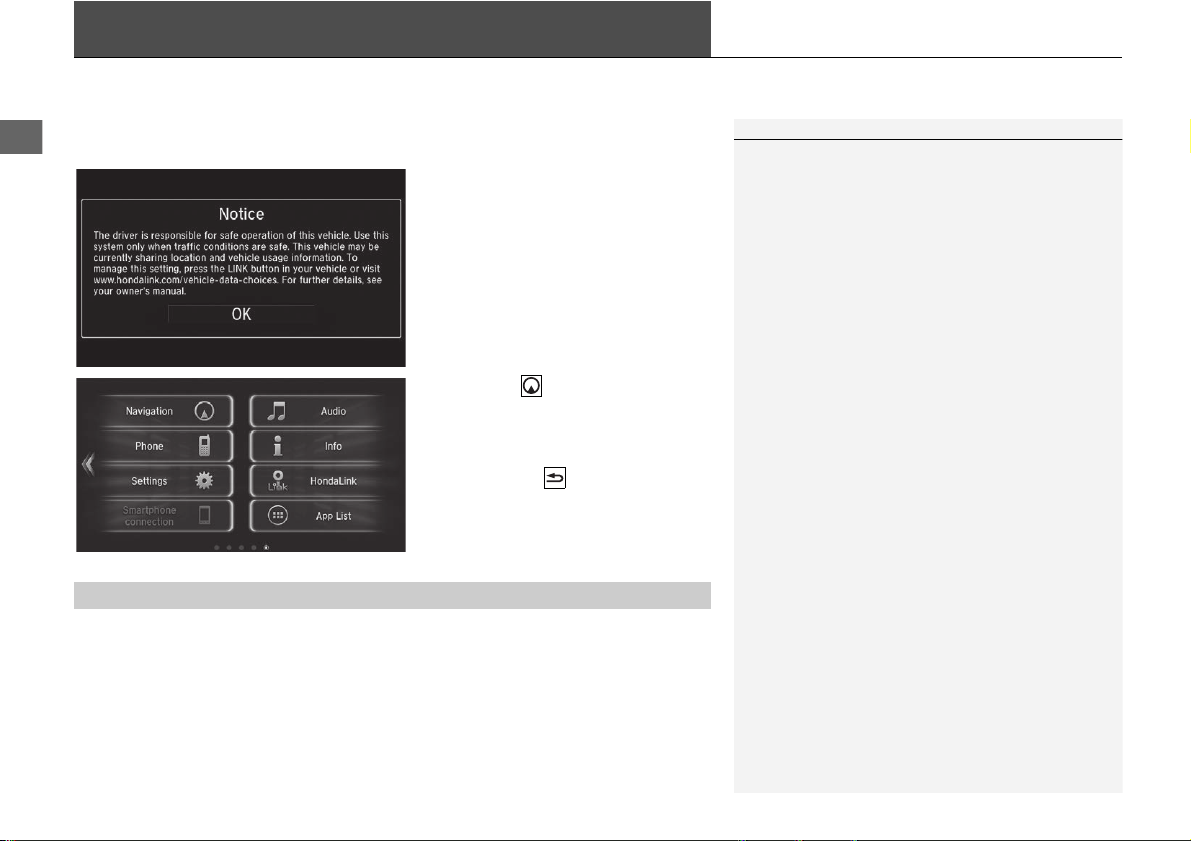
System Setup
Start-up
The navigation system starts automatically when you set the power mode to
ACCESSORY or ON. At start-up, the following confirmation screen is displayed.
1. Select OK.
u The HOME screen is displayed.
u If you do not select OK, the
system will automatically select
OK after a certain period of
time.
u The system
will automatically
start up the feature that was
used the last time.
2. Press the button.
u The map screen is displayed.
u When you want to display the
navigation top screen, you
press the button.
Certain manual functions are disabled or inope
rable while the vehicle is in motion.
You cannot select a grayed-out option until the vehicle is stopped.
Voice commands are still operable while the vehicle is in motion.
1 Start-up
Avoid focusing on the screen and drive safely.
When you use the navigation system, the system may
close other apps.
When you select Navigation, the system displays the
navigation feature that was used the last time. At
start-up, the navigation top screen is displayed.
■
Limitations for Manual Operation
17
System Setup
Voice Control System
Your vehicle has a voice control system that allows hands-free operation of the
navigation system functions.
The voice control sy
stem uses the and buttons on the steering wheel and a
microphone near the map lights on the ceiling.
For details of the button, button and microphone position, see the Owner's
Manual.
Voice Recognition
To achieve optimum voice recognition when using the navigation voice control
system:
• Make sure the correct screen is displayed for the voice command that you are
using. The system recognizes only certain commands.
Available navigation commands:
2 Navigation Commands P. 136
• Close the windows and moonroof
*
.
• Adjust the dashboard and side vents so air does not blow onto the microphone
on the ceiling.
• Speak in a clear, natural speaking voice without pausing between words.
• Reduce any background noise if possible. The
system may misinterpret your
command if more than one person is speaking at the same time.
1 Voice Control System
When you press the button, the system prompts
you to say a voice command. Press and release the
button again to bypass this prompt and give a
command.
1 Voice Recognition
The voice control system can only be used from the
driver’s seat because the microphone unit removes
noises from the passenger’s side.
* Not available on all models
18
System Setup
Personal Information
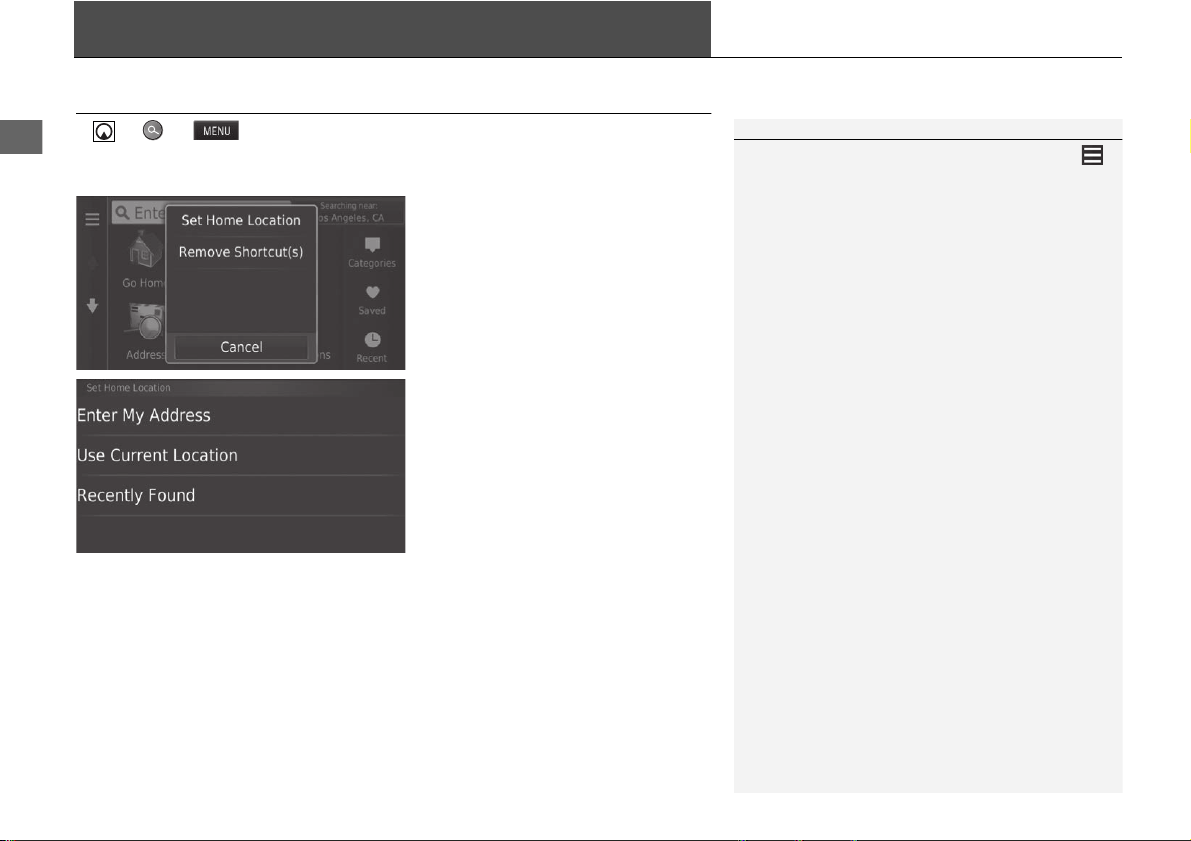
Setting Home Location
H u u
Use the personal information menu to set your home location.
1. Select Set Home Location.
2. Select an
option.
u Select Us
e Current Location
to set home location.
u If selecting Enter My Address
or Recently Found, proceed to
steps 3 and 4.
3. Select
the home location.
4. Select Select.
The following options are available:
• E
nter My Address: Sets the home location by entering the address.
2 Storing Your Home Address P. 8
• Use Current Location: Sets your current location as your home location.
• Recen
tly Found: Sets the home location from a recently found location.
1 Personal Information
You can also display the same screen by selecting
on the Where To? screen.
If you want to delete a shortcut(s), select Remove
Shortcut(s).
2 Deleting Shortcuts P. 59
The home location can be overwritten.

19
uu Personal Information u Saved Locations
Continued
System Setup
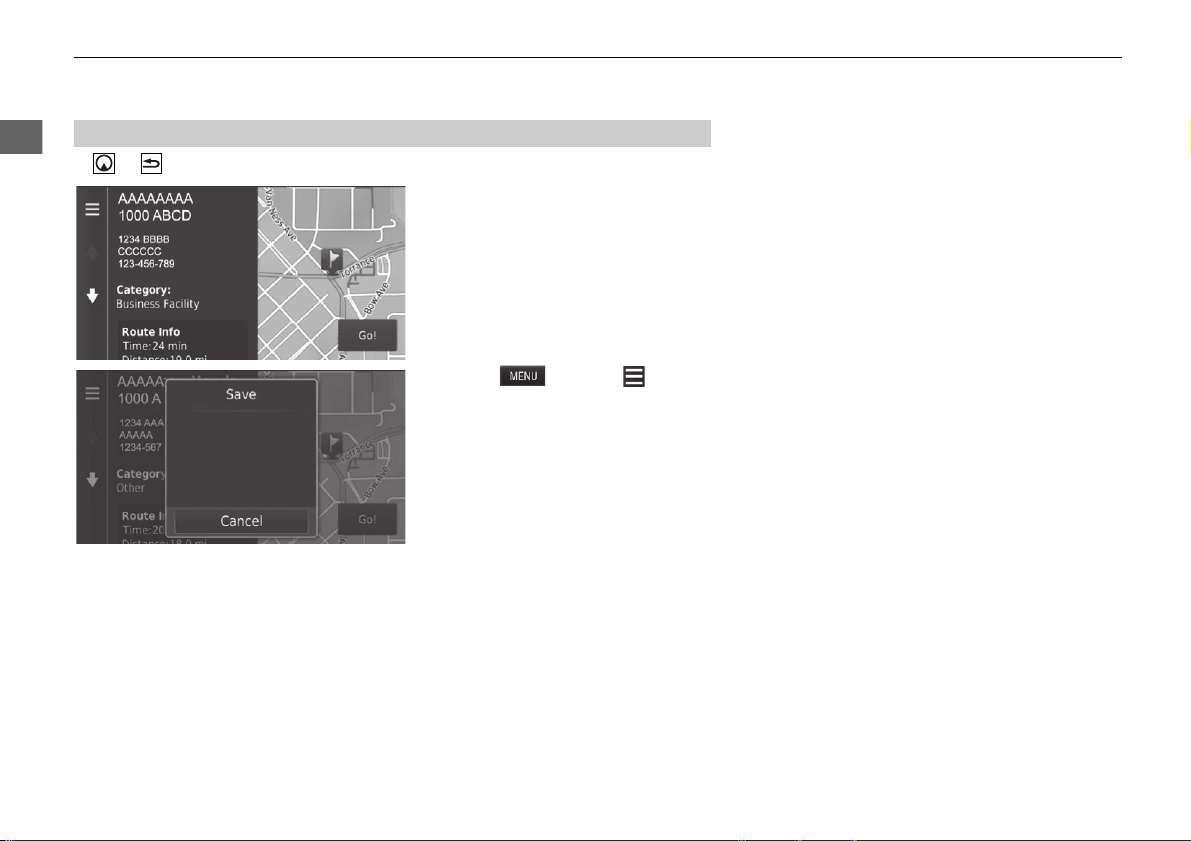
Saved Locations
You can save locations so you can quickly find them and create routes to them.
H u
1. Select a search method.
u Find a location that you want to
save.
2 Entering a Destination P. 54
2. Select .
3. Select or select .
4. Select Save.
u If necessary,
enter a name and
select Done.
5. Select OK.
■
Saving a Saved Location
20
uu Personal Information u Saved Locations
System Setup
H u u View Map
1. Select
a destination from the map.
2 Map Input P. 73
2. Select the destination name at the
bottom of the map.
3. Select or select .
4. Select Save.
u On some places
other than POI,
you can edit the place name.
5. Select OK.
■
Saving a Saved Location Manually
Continued
21
uu Personal Information u Saved Locations
System Setup
H u u View Map
1. Select the vehicle icon.
2. Select Save.
3. Enter a
name of the location.
4. Select Done.
5. Select OK.
■
Saving Your Current Location
1 Saving Your Current Location
Vehicle position may not be displayed when:
•
The vehicle is traveling off-road.
•
The vehicle position data cannot be updated.
22
uu Personal Information u Saved Locations
System Setup
H u u Saved
1. Select a
saved location you want
to edit.
2. Select .
3. Select or select .
4. Select Edit.
■
Editing a Saved Location

23
uu Personal Information u Saved Locations
Continued
System Setup
5. Select an option.
The following options are available:
• Name: Enters a new name for the location.
• Ph
one Number: Enters a phone number.
• Categories: Creates or changes the category in which this location is saved.
• Change Map Symbol: Select a new symbol.

24
uu Personal Information u Saved Locations
System Setup
H u u Saved
1. Select a
saved location you want
to delete.
2. Select .
3. Select or select .
4. Select De
lete.
5. Select Yes.
■
Deleting a Saved Location
25
uu Personal Information u Saved Locations
System Setup
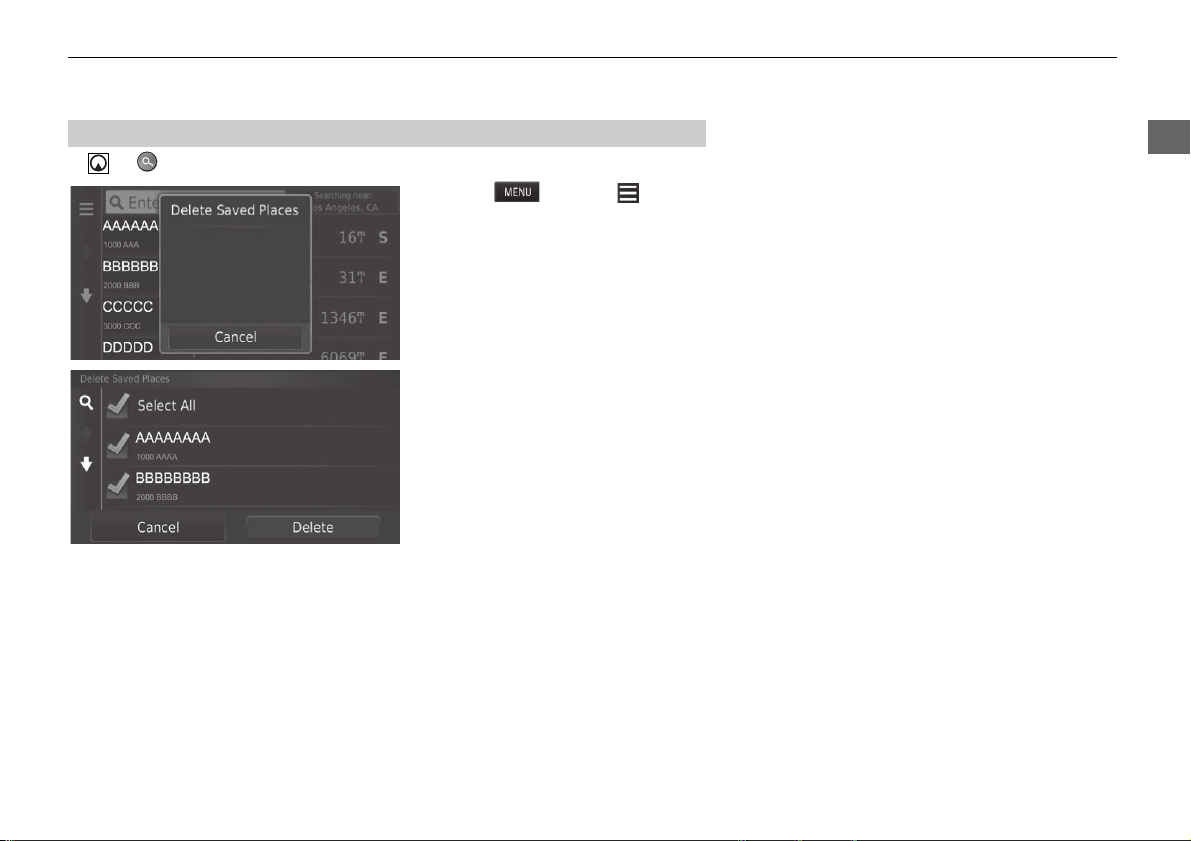
H u u Saved
1. Select or select .
2. Select Delet
e Saved Places.
3. Select a
saved location you want
to delete.
u Select Select All to delete all
saved locations.
4. Select Delet
e.
5. Select Yes.
■
Deleting Saved Locations
26
System Setup
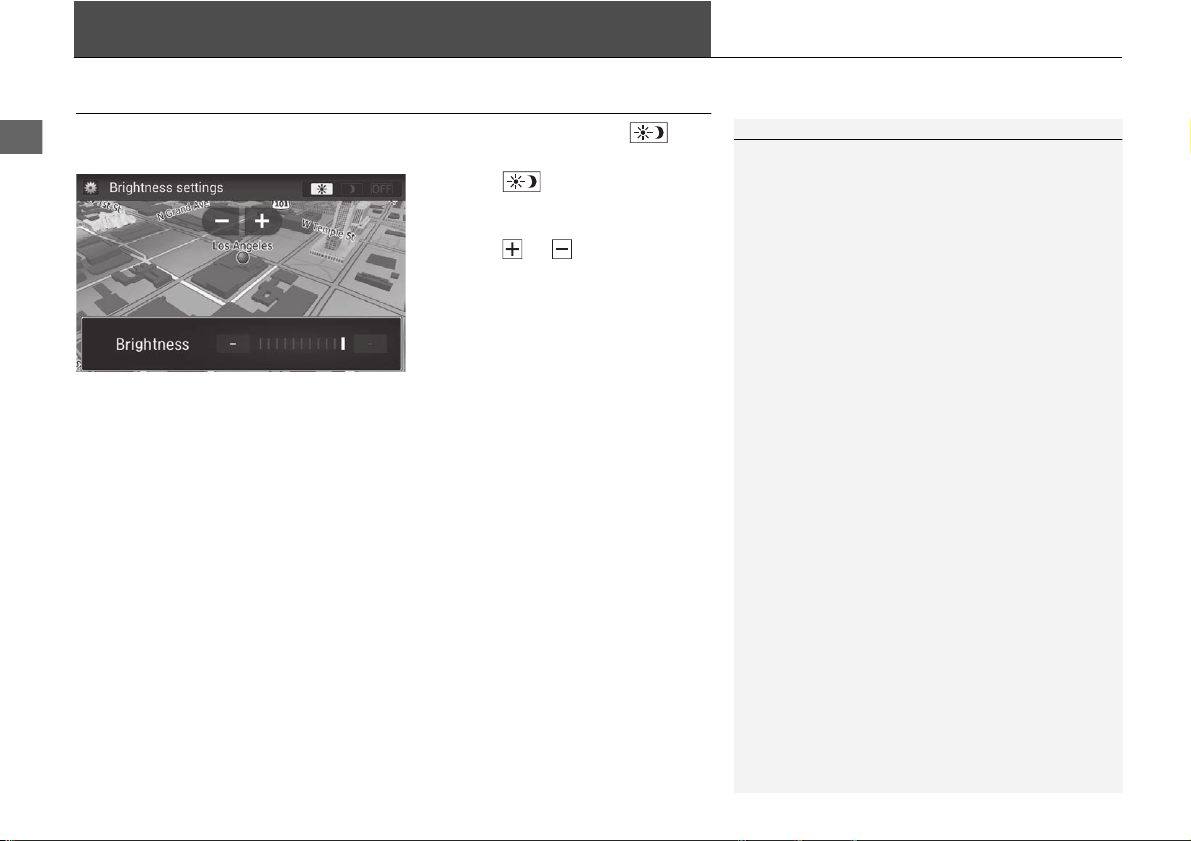
Display Mode Settings
Switching Display Mode Manually
Set the screen brightness separately for Day and Night modes. Press the
button to cycle through the display
modes (Day to Night to Off).
Press the button.
u The Brigh
tness bar is displayed for
a few seconds.
u Select or to adjust the
brightness.
1 Switching Display Mode Manually
You can also adjust the display brightness by sliding
or swiping on the Brightness bar.
You can change the touchscreen sensitivity setting.
2 Refer to the Owners Manual.

27
uu Display Mode Settings u Switching Display Mode Manually
System Setup
Illumination
control
Operation
button Selects Day or Night display mode when the user
wants to change the brightness of the display
temporarily.
Remember: This button overrides all other display
brigh
tness adjustments either set automatically by
the sunlight sensor or manually from the System
settings screen.
Sunlight sensor
*
(see your Owner’s
Manual for
location)
If the sunlight sensor detects daylight and the
headlights are turned on, the system automatically
overrides the Night display and displays the Day
display mode.
Remember: If desired, use the button to
override this automatic choice.
Dash illumination
adjustment knob
(see your Owner’s
Manual for
location)
When the headlights are turned on, and you wish to
have the Day display mode, adjust the illumination
to the full brightness (beeps).
Remember: Adjust the dash brightness back to
mi
drange to allow auto switching by sensing the
headlights are on or off.
Headlights
(Au
to
*
/On/Off)
When turned on, the display changes to Night
display mode.
The previous three controls listed above can
“cancel” this
function.
Remember: Use the button to adjust the
brightness of the display.
* Not available on all models

28
System Setup
Map & Vehicle
H u u Settings u Map & Vehicle
Change the map settings.
Select an option.
The following options are available:
• Vehicle: Changes the icon to represent your position on the map.
2 Vehicle P. 29
• Driving Map View: Sets the perspective on the map.
2 Driving Map View (Map Orientation) P. 30
• Map Detail: Sets the level of detail on the map. More detail may cause the map
to draw slower.
2 Map Detail P. 31
• Map Theme: Changes the color of the map data.
2 Map Theme P. 32
• Map Buttons: Sets which icons are included on the map. Up to three icons can
be included on the map.
2 Map Buttons P. 33
• Map Layers: Sets the data that appears on the map.
2 Map Layers P. 34
• Dashboards: Sets the map dashboard layout.
2 Dashboards P. 34
• myMaps: Sets which installed maps the system uses.
2 myMaps P. 35

30
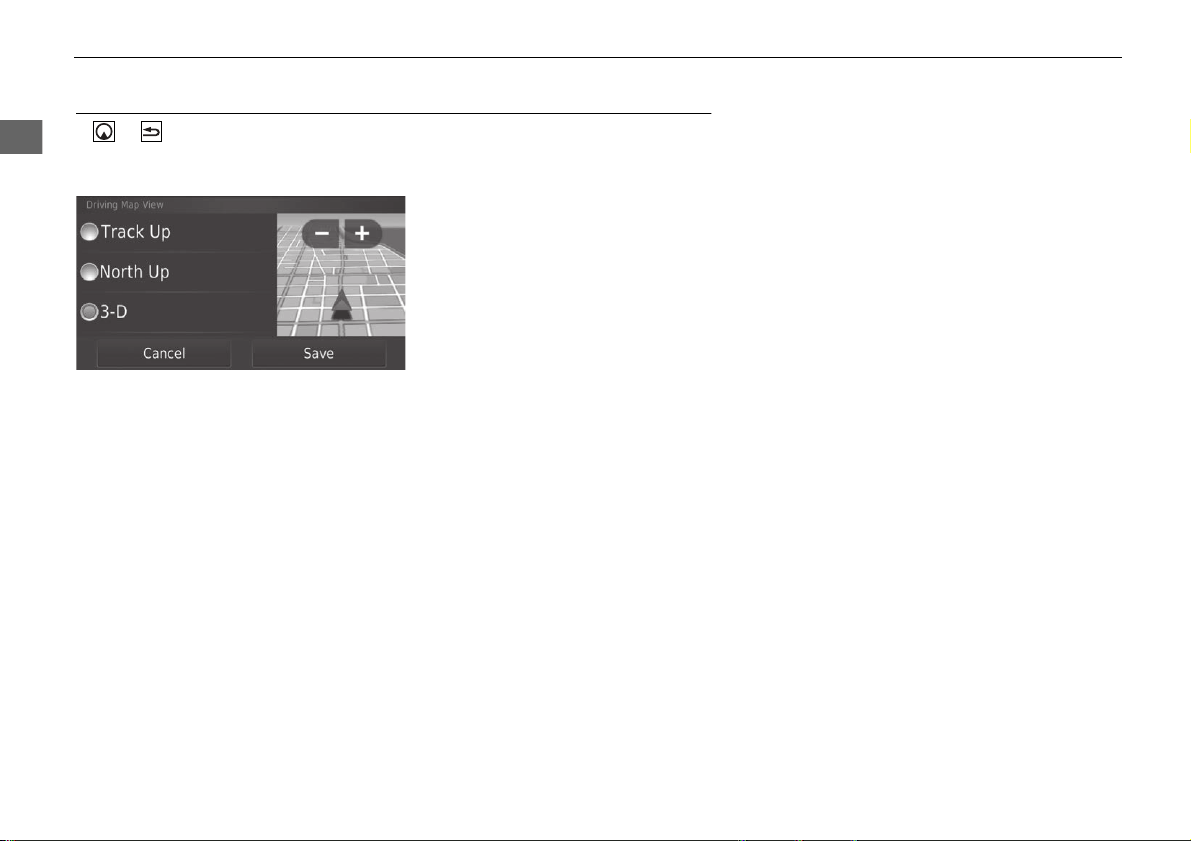
uu Map & Vehicle u Driving Map View (Map Orientation)
System Setup
Driving Map View (Map Orientation)
H u u Settings u Map & Vehicle u Driving Map View
Select the map orientation.
1. Select an option.
2. Select Save.
The following options are available:
• Track Up: Displays the map with your direction of travel facing upwards.
• North Up: Displays the map with north always pointing up.
• 3-
D (factory default): Displays the map in 3D with your direction of travel facing
upwards.
31
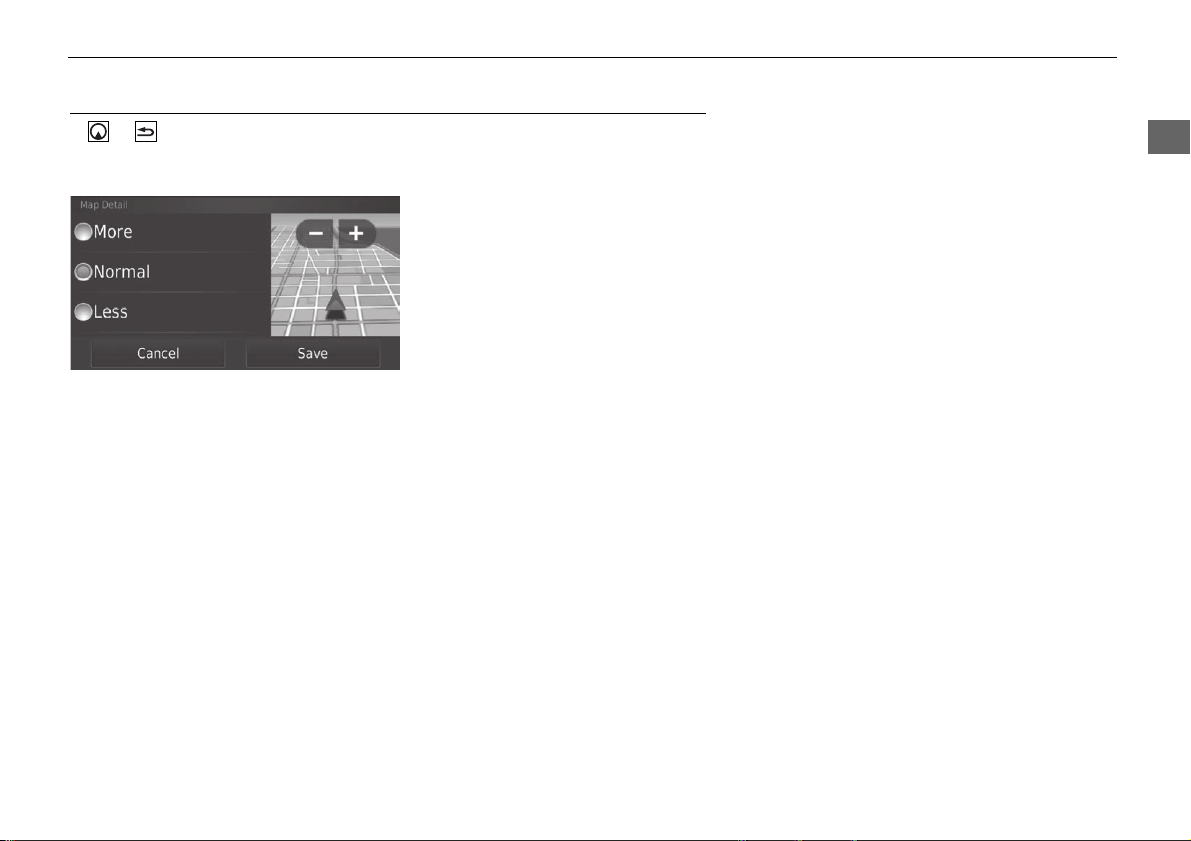
uu Map & Vehicle u Map Detail
System Setup
Map Detail
H u u Settings u Map & Vehicle u Map Detail
Sets the level of detail on the map.
1. Select an option.
2. Select Save.
The following options are available:
• More: Shows more detail on the map.
• Normal (factory default): Shows a standard amount of detail on the map.
• Less: Shows less detail on the map.
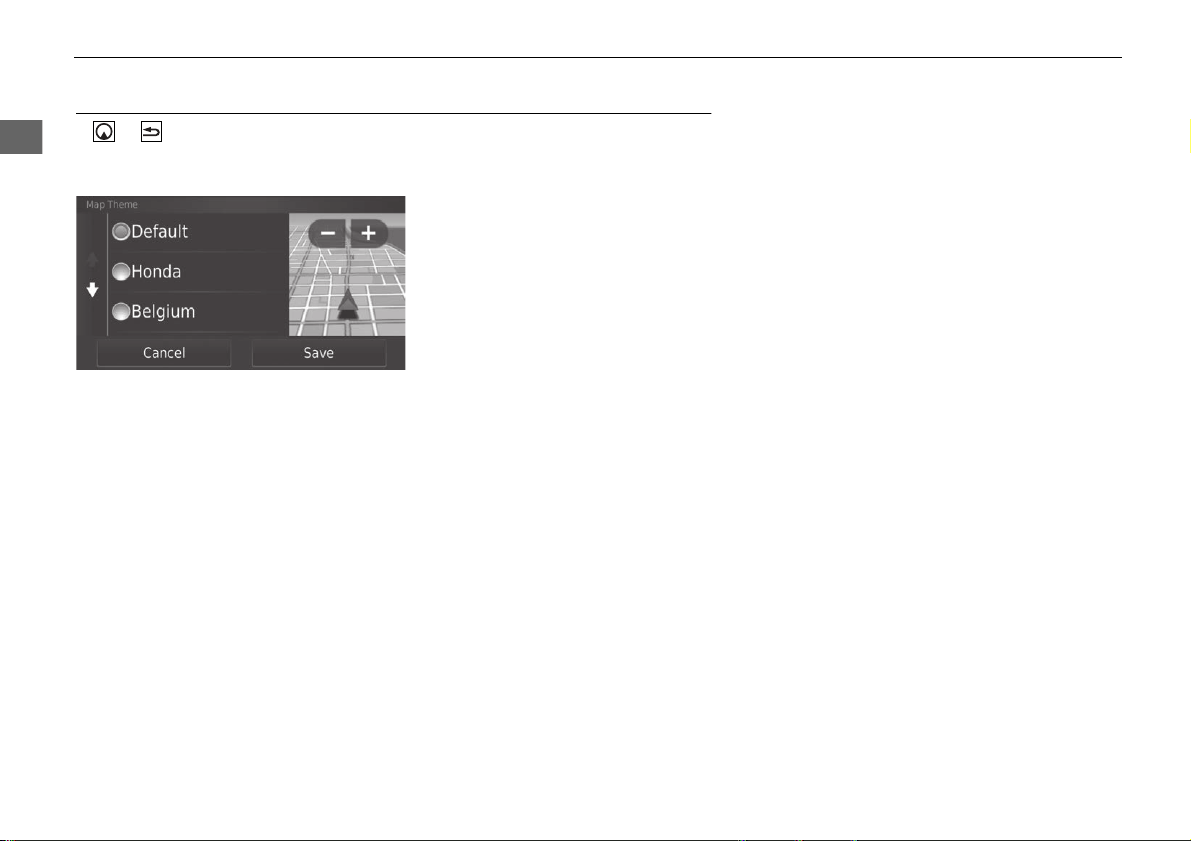
32
uu Map & Vehicle u Map Theme
System Setup
Map Theme
H u u Settings u Map & Vehicle u Map Theme
Changes the color of the map data.
1. Select an option.
2. Select Save.
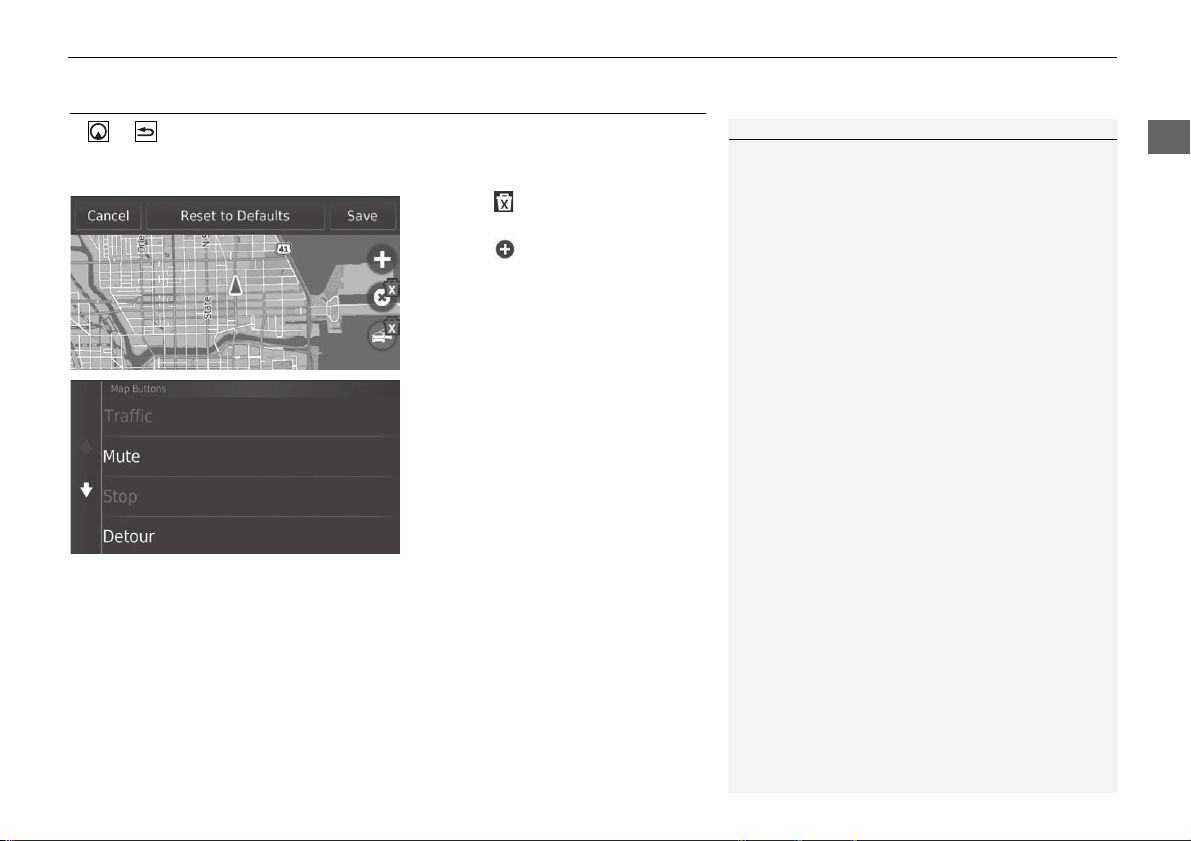
33
uu Map & Vehicle u Map Buttons
System Setup
Map Buttons
H u u Settings u Map & Vehicle u Map Buttons
Sets up to three shortcuts that appear in the map tools menu.
1. Select if you want to delete a
shortcut and then select OK.
2. Select to add a new shortcut.
3. Select an option.
4. Select Save.
1 Map Buttons
Reset to Defaults
Resets the settings to the factory defaults.
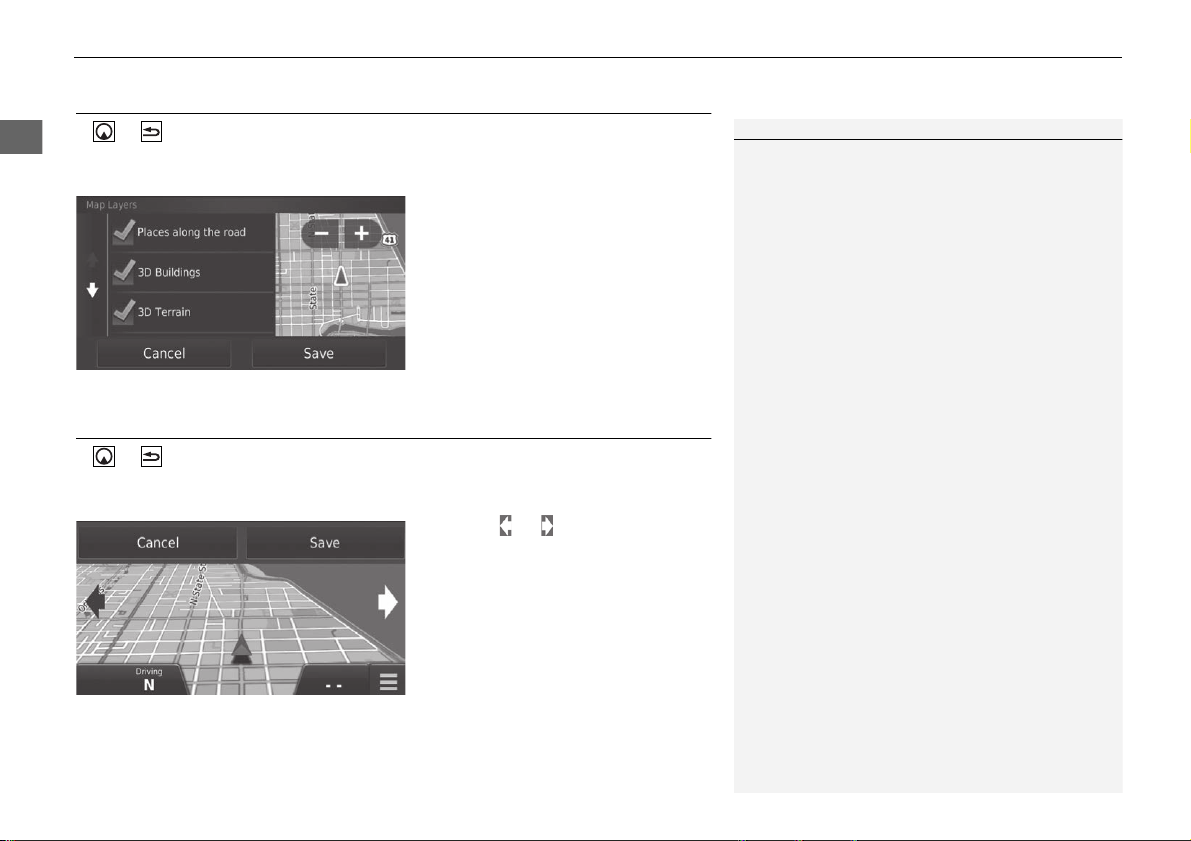
34
uu Map & Vehicle u Map Layers
System Setup
Map Layers
H u u Settings u Map & Vehicle u Map Layers
Sets the data that appears on the map screen.
1. Select an option(s).
2. Select Save.
Dashboards
H u u Settings u Map & Vehicle u Dashboards
Switches the dashboard layout at the bottom of the map.
1. Select or .
2. Select Save.
1 Map Layers
Trip Log is set to off as factory default.
35
uu Map & Vehicle u myMaps
System Setup
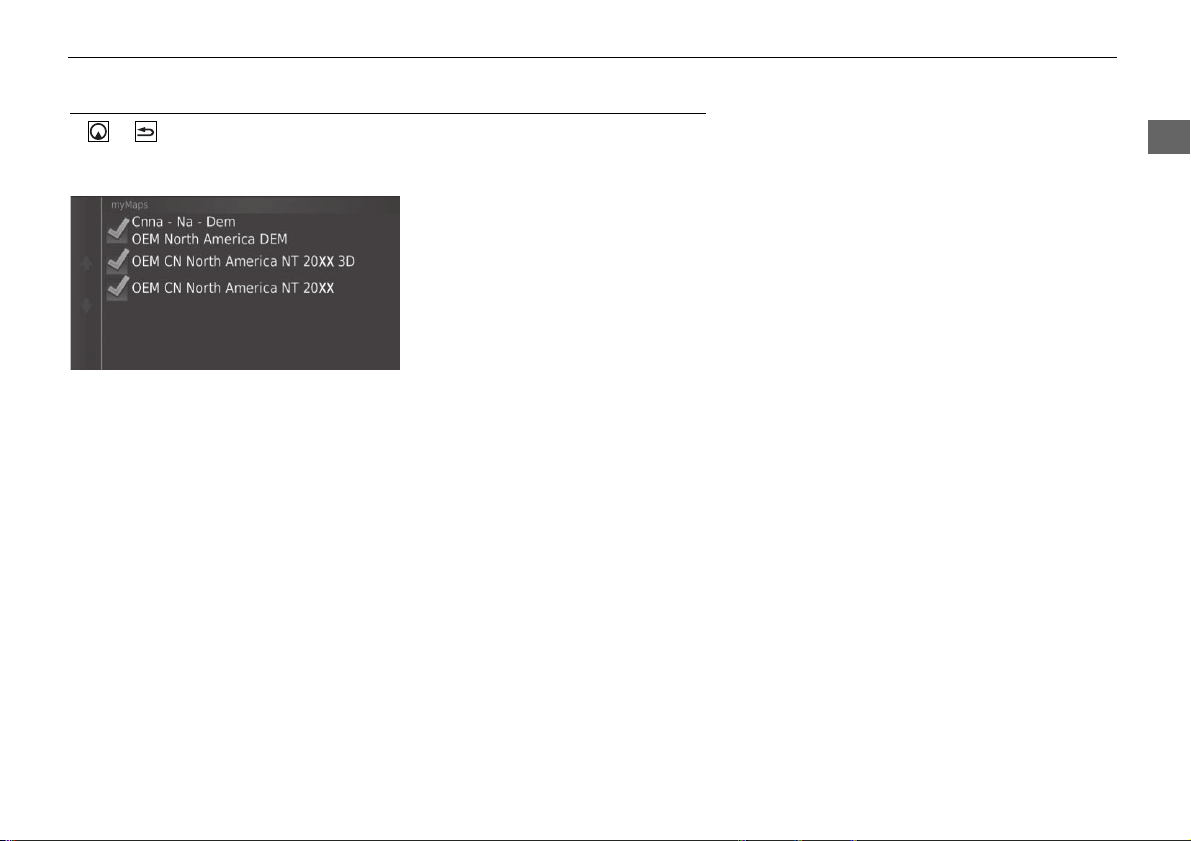
myMaps
H u u Settings u Map & Vehicle u myMaps
Sets which installed maps the system uses.
Select an option(s).
36
System Setup
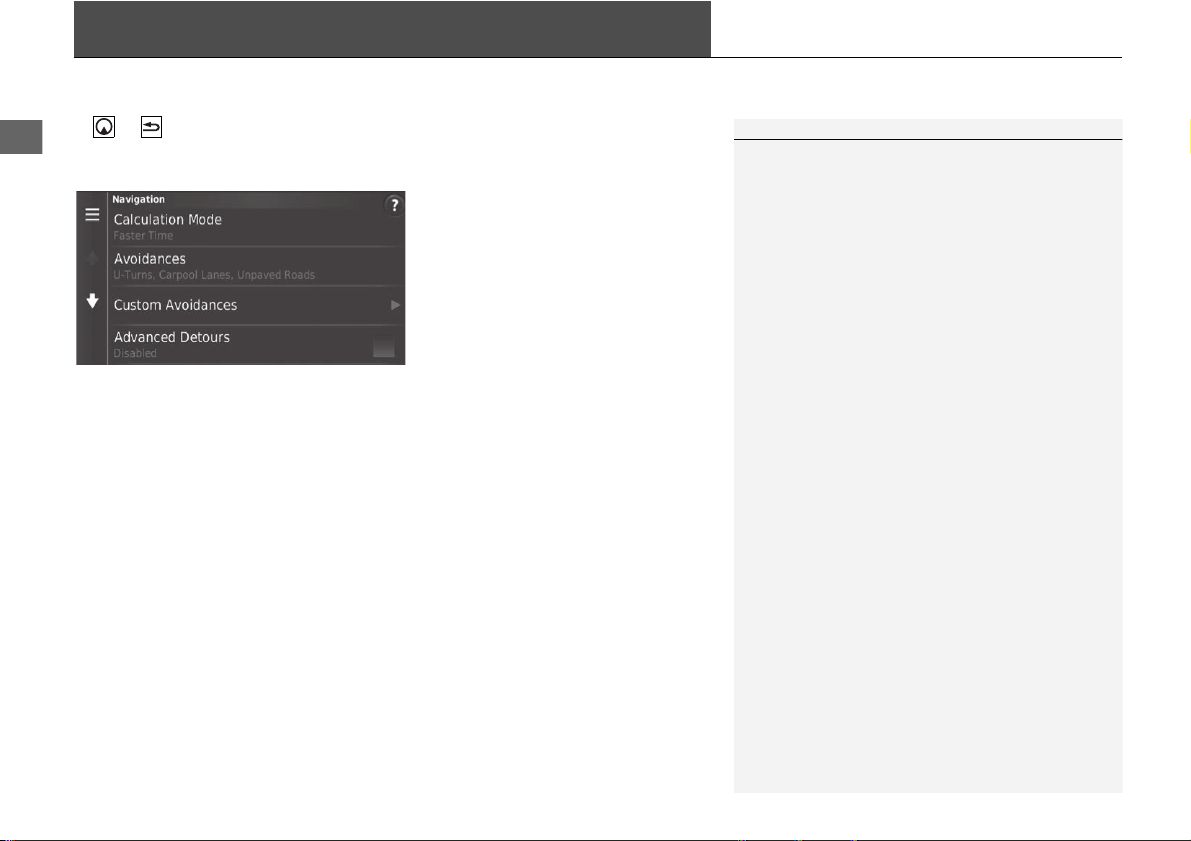
Navigation
H u u Settings u Navigation
Changes the navigation settings.
The following options are available:
• Calculation Mode: Sets route preference.
2 Calculation Mode P. 37
• Avoidances: Sets road features to avoid on a route.
2 Avoidances P. 38
• Custom Avoidances: Allows you to avoid specific roads or areas.
2 Custom Avoidances P. 39
• Advanced Detours: Sets the length of the detour.
• Voice Prompts: Turns the voice prompts on or off.
• GPS Simulator: Stops the system from receiving a GPS signal.
1 Navigation
Advanced Detours and GPS Simulator are set to
off as factory default.
37
uu Navigation u Calculation Mode
System Setup
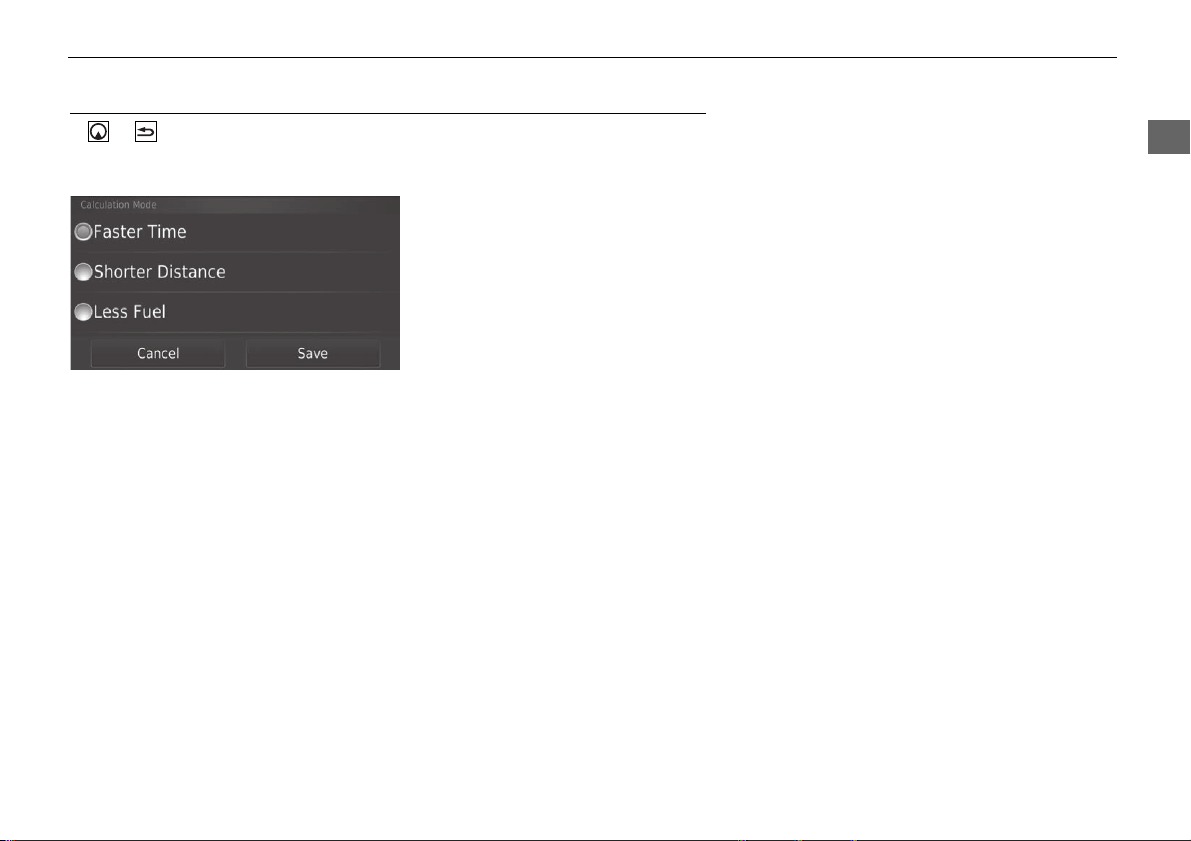
Calculation Mode
H u u Settings u Navigation u Calculation Mode
Sets the route preference.
1. Select an option.
2. Select Save.
The following options are available:
• Faster Time (factory default): Calculates routes that are faster to drive but can be
longer in distance.
• Short
er Distance: Calculates routes that are shorter in distance but can take
more time to drive.
• Less Fuel: Calculates routes that could use less fuel than other routes.
38
uu Navigation u Avoidances
System Setup
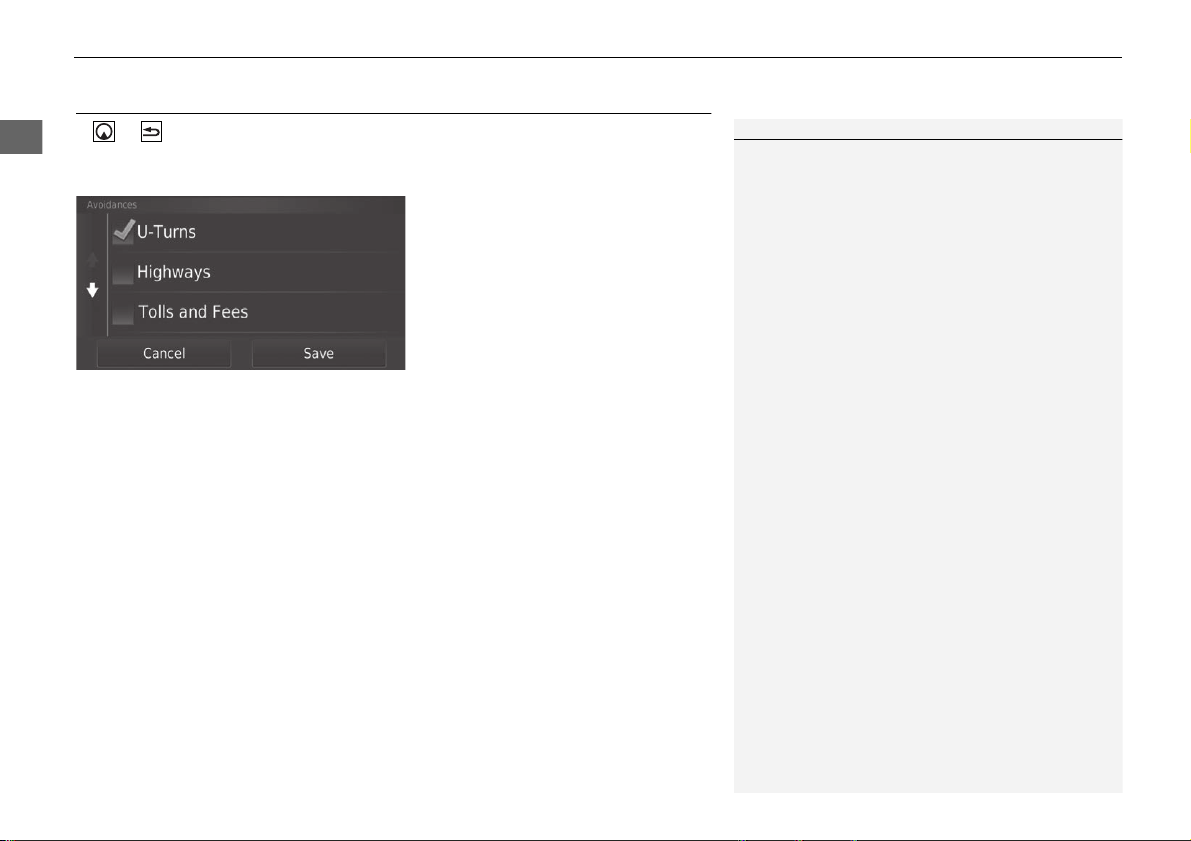
Avoidances
H u u Settings u Navigation u Avoidances
Set preferences for route options to avoid.
1. Select an option(s).
2. Select Save.
The following options are available:
• U-Turns: Avoids u-turns.
• Highways: Avoids highways.
• To
lls and Fees: Avoids toll roads.
• Ferries: Avoids ferries.
• Carpool Lanes: Avoids car share lanes.
• Unpaved Ro
ads: Avoids unpaved roads.
1 Avoidances
Highways, Tolls and Fees, and Ferries are set to off
as factory default.

39
uu Navigation u Custom Avoidances
Continued
System Setup
Custom Avoidances
H u u Settings u Navigation u Custom Avoidances
Allows you to avoid specific areas and sections of road. You can enable and disable
custom avoidances as needed.
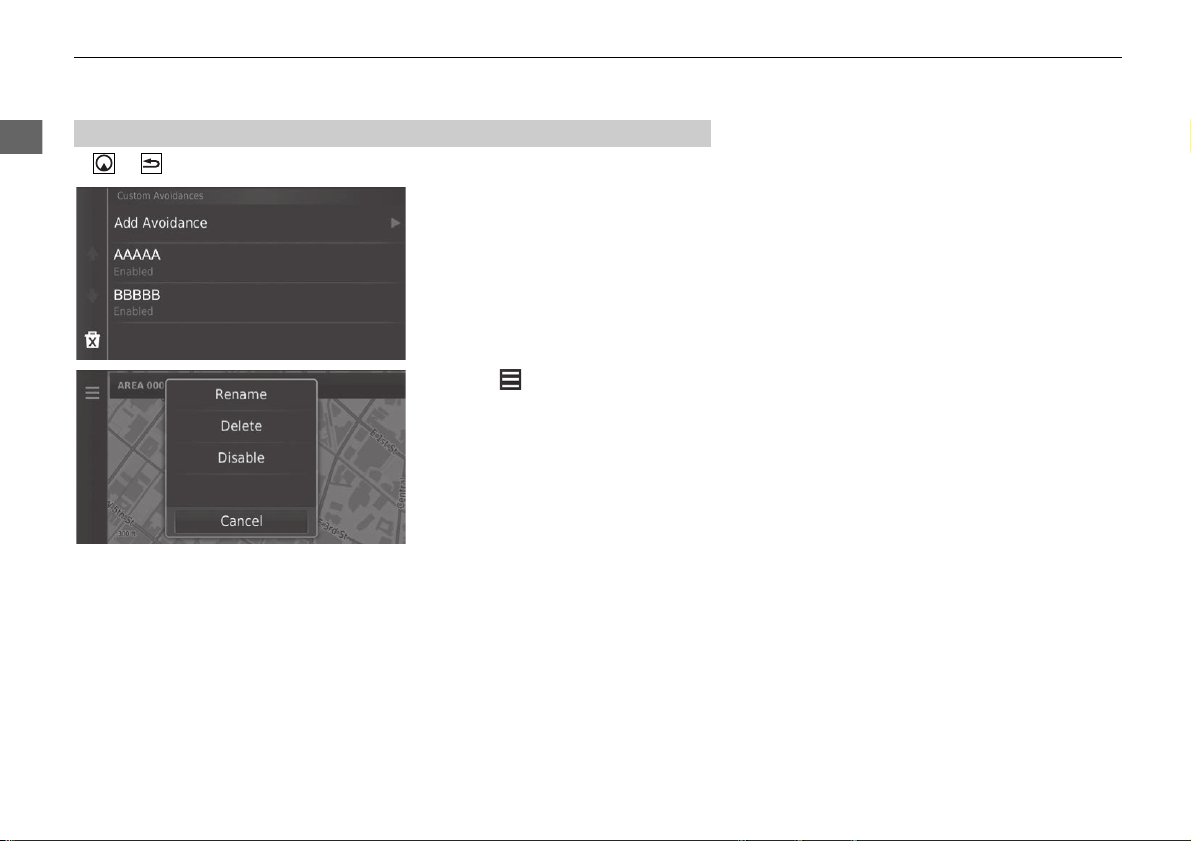
Select an option.
u Select Add Avoidance if custom
avoidances are already stored.
The following options are available:
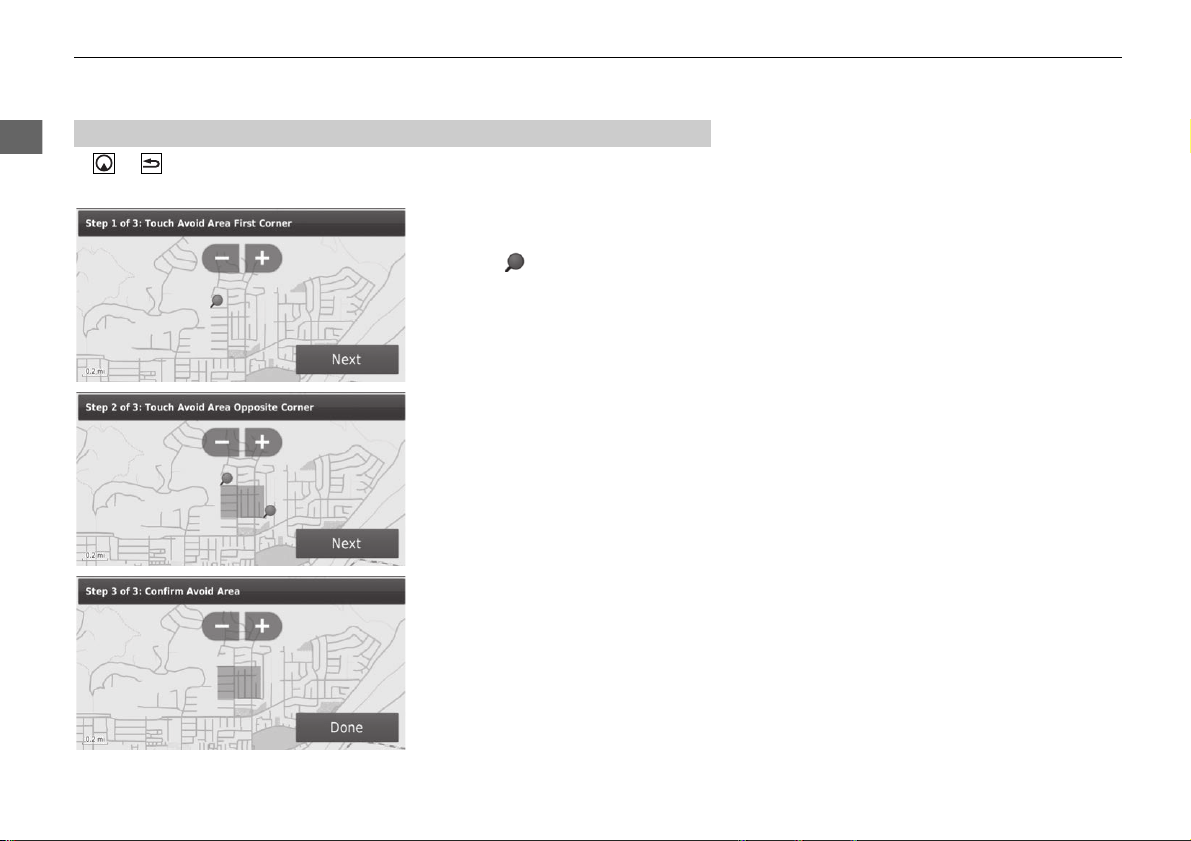
• Add Avoid Area: Sets an area to avoid.
2 Adding an Avoid Area P. 40
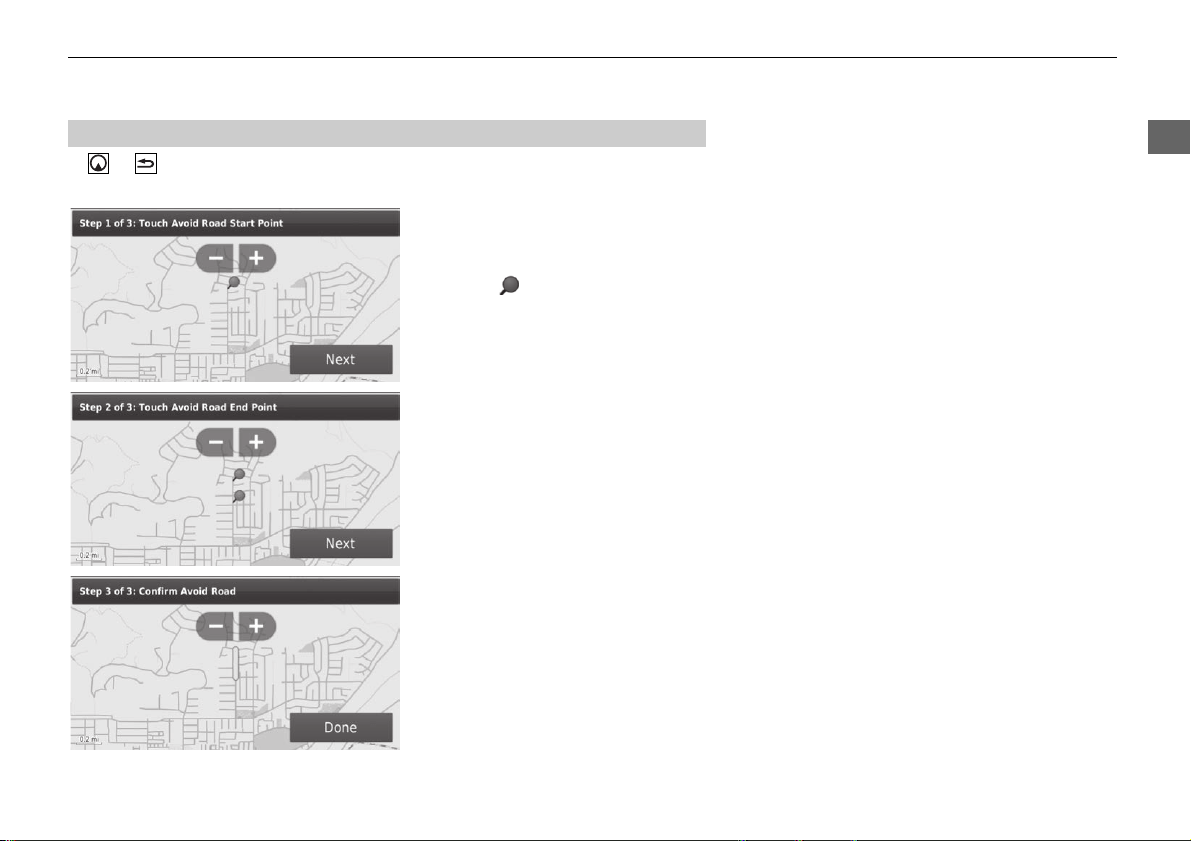
• Add Avoid Road: Sets a road to avoid.
2 Adding an Avoid Road P. 41
40
uu Navigation u Custom Avoidances
System Setup
H u u Settings u Navigation u Custom Avoidances u Add Avoid
Area
1. Select the upper-left (r
ight) corner
of the area to avoid. Select Next.
u The icon is displayed on the
map.
2. Select
the lower-right (left) corner
of the area to avoid. Select Next.
u The selected
area is shaded on
the map.
3. Select Done.
■
Adding an Avoid Area
41
uu Navigation u Custom Avoidances
Continued
System Setup
H u u Settings u Navigation u Custom Avoidances u Add Avoid
Road
1. Select the start
ing point of the
section of road to avoid. Select
Next.
u The icon is displayed on the
map.
2. Select the ending point
of the road
section. Select Next.
u The
selected road color
changes.
3. Select Done.
■
Adding an Avoid Road
42
uu Navigation u Custom Avoidances
System Setup
H u u Settings u Navigation u Custom Avoidances
1. Select
the area or road to edit
from the list.
2. Select .
u The menu scr
een is displayed.
3. Select an item.
The following items are available:
• Rename: Enters a new name.
• Delete: Deletes a selected area or road.
• Disa
ble: Disables the avoidance.
■
Editing a Custom Avoidance

43
uu Navigation u Custom Avoidances
System Setup
H u u Settings u Navigation u Custom Avoidances
1. Select .
2. Select opti
ons you want to delete.
u Select Select All for all options
in the list.
3. Select Delet
e.
■
Deleting Custom Avoidances
1 Deleting Custom Avoidances
Select if you want to search the saved custom
avoidance.

44
System Setup
Traffic
H u u Settings u Traffic
Sets the traffic feature.
Select an option.
The following options are available:
• Traffic: Enables the traffic feature.
2 Traffic Information P. 86
• Current Provider: Sets the traffic provider to use for traffic data.
• Subscriptions: Displays the lists of the current traffic subscriptions.
• Op
timize Route: Sets whether to use optimized alternate routes On Request
(factory default) or Automatic.
45
System Setup
Other Settings
Units
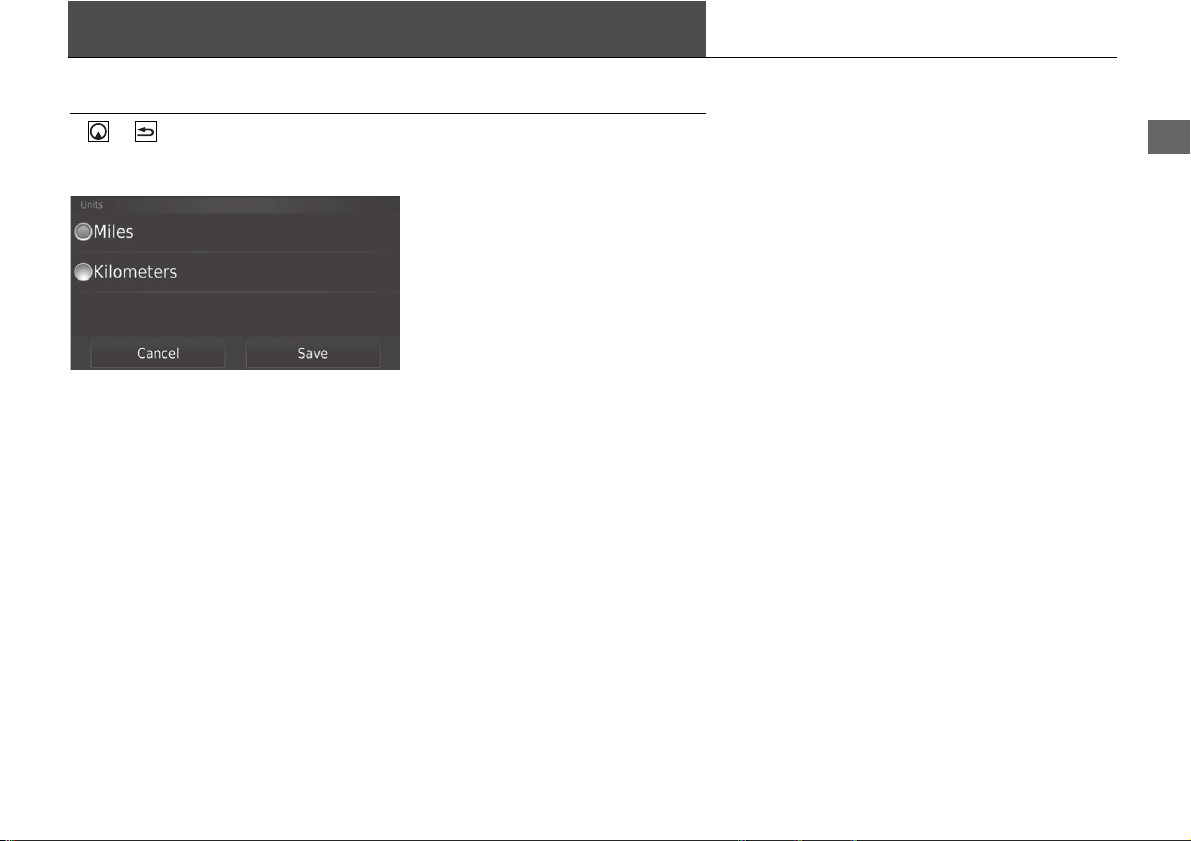
H u u Settings u Units u Units
Set the units and display on the map of the navigation system.
1. Select an option.
2. Select Save.
The following options are available:
• Miles (factory default): Sets the units to miles.
• Kilometers: Sets the units to kilometers.
46
uu Other Settings u Language & Keyboard
System Setup
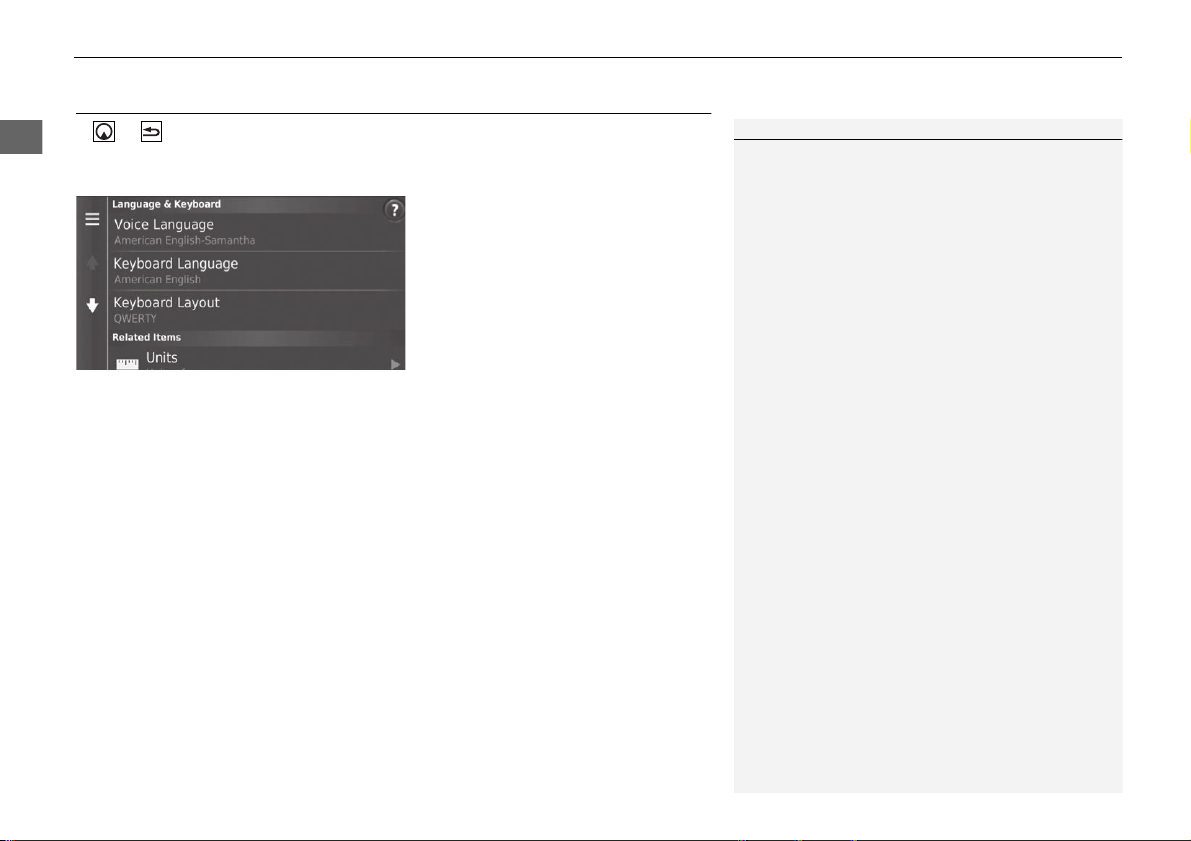
Language & Keyboard
H u u Settings u Language & Keyboard
Set the language for the unit and the keyboard layout.
Select an option.
The following options are available:
• Voice Language: Sets the language for voice prompts.
2 Voice Language P. 47
• Keyboard Language: Sets the language for your keyboard.
2 Keyboard Language P. 47
• Keyboard Layout: Sets the keyboard layout.
2 Keyboard Layout P. 48
1 Language & Keyboard
When you select a language for the audio system, the
language setting of the navigation system is
automatically switched.
See the Owner’s Manual for instructions.
47
uu Other Settings u Language & Keyboard
Continued
System Setup
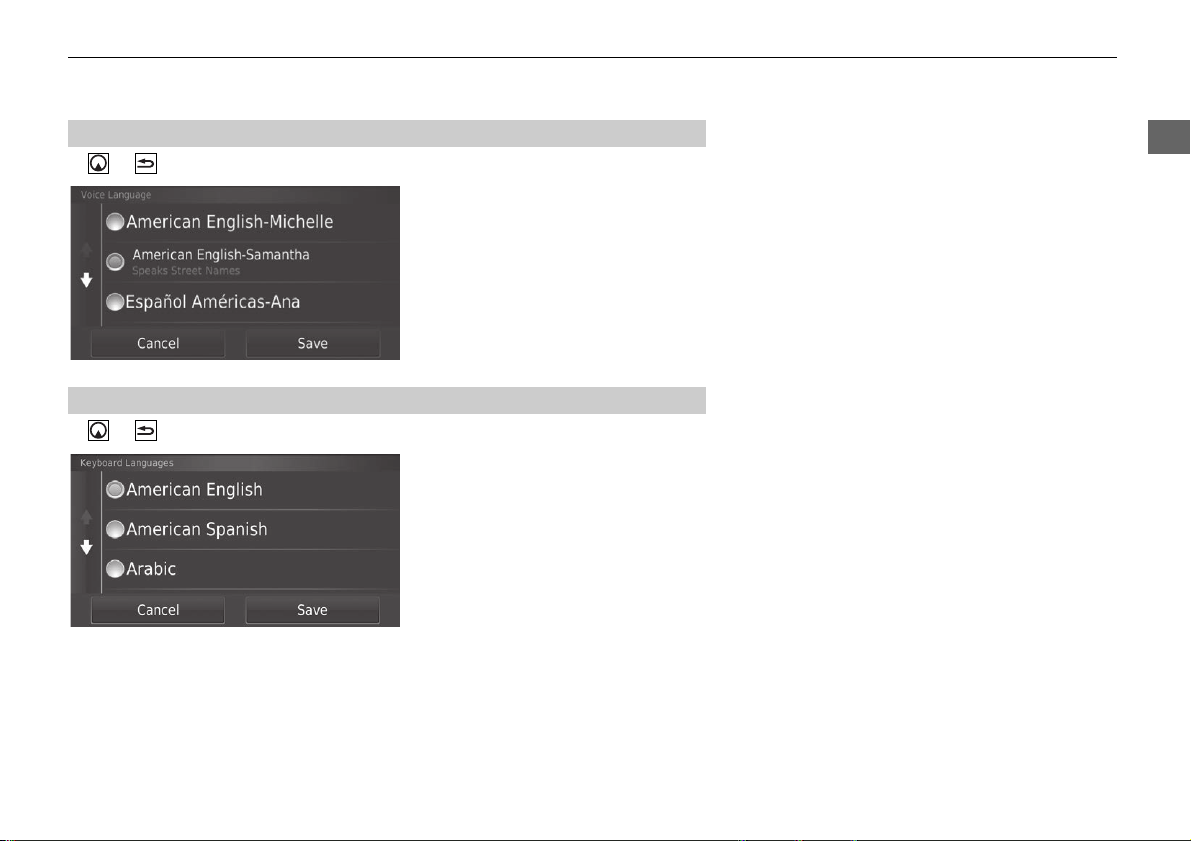
H u u Settings u Language & Keyboard u Voice Language
1. Select an option.
2. Select Save.
H u u Settings u Language & Keyboard u Keyboard Language
1. Select an option.
2. Select Save.
■
Voice Language
■
Keyboard Language
48
uu Other Settings u Language & Keyboard
System Setup
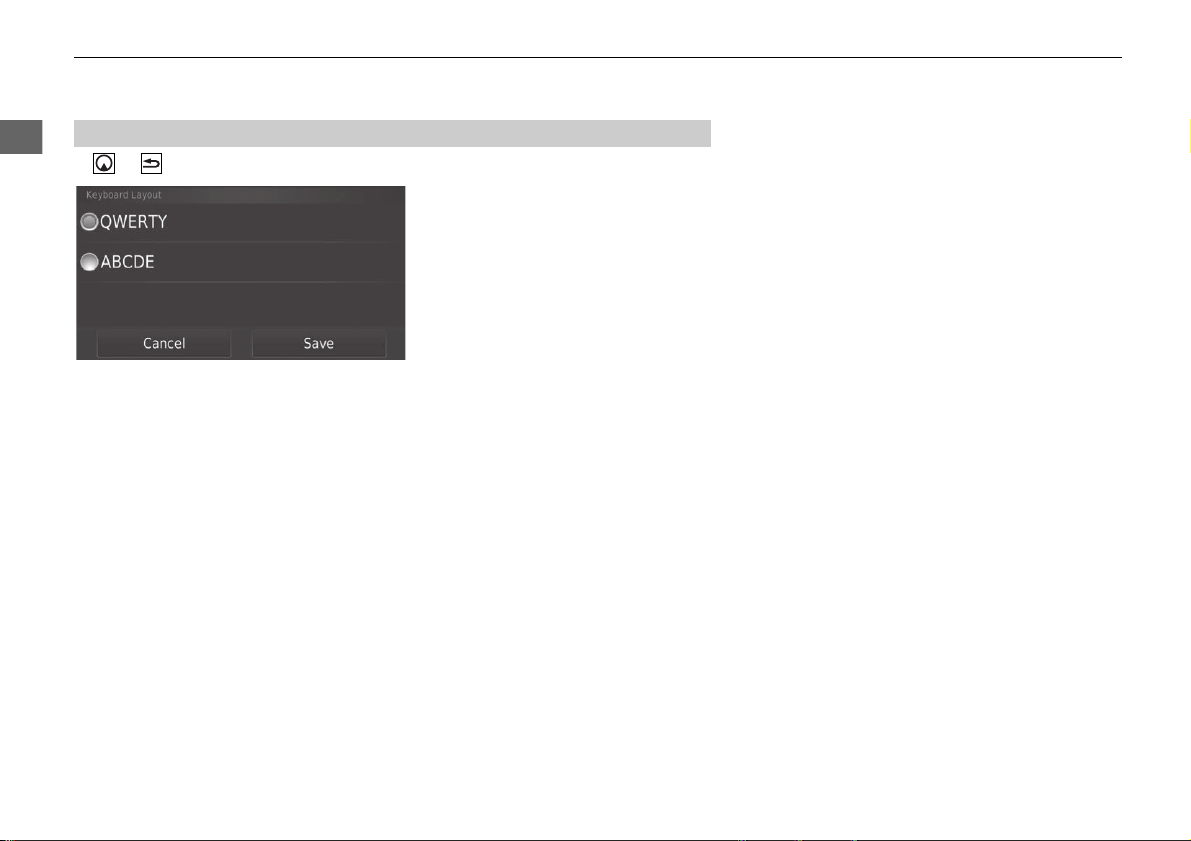
H u u Settings u Language & Keyboard u Keyboard Layout
1. Select an
option.
2. Select Save.
The following options are available:
• QWERTY (factory default): Sets the keyboard layout to QWERTY.
• ABCDE: Sets the keyboard layout to ABCDE.
■
Keyboard Layout
49
uu Other Settings u Device
Continued
System Setup
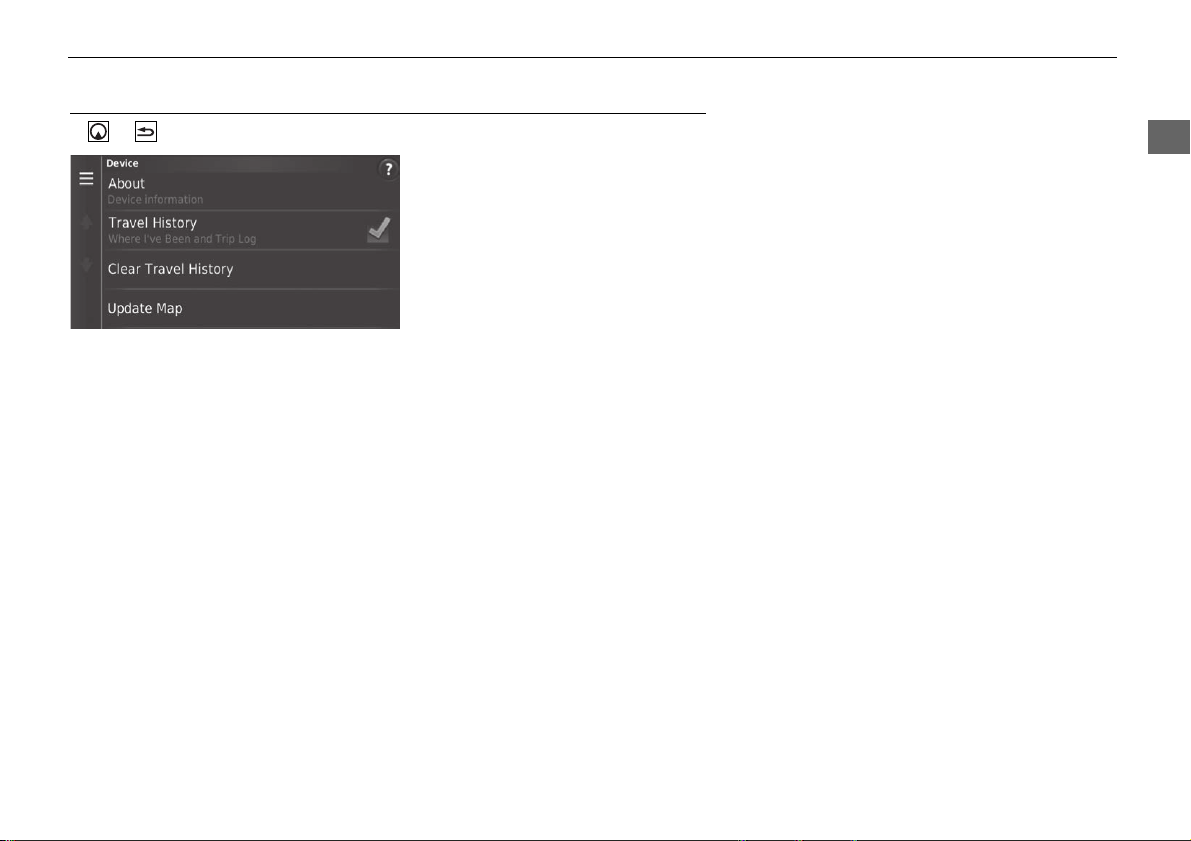
Device
H u u Settings u Device
Select an option.
The following options are available:
• About: Displays the device information.
2 About P. 50
• Travel History: Allows the system to record information for suggested routes,
previous routes and destinations, and Trip Log features.
• Cle
ar Travel History: Deletes the recorded information.
• Update Map: Displays the description screen of map update.
2 Obtaining a Navigation Update P. 130
50
uu Other Settings u Device
System Setup
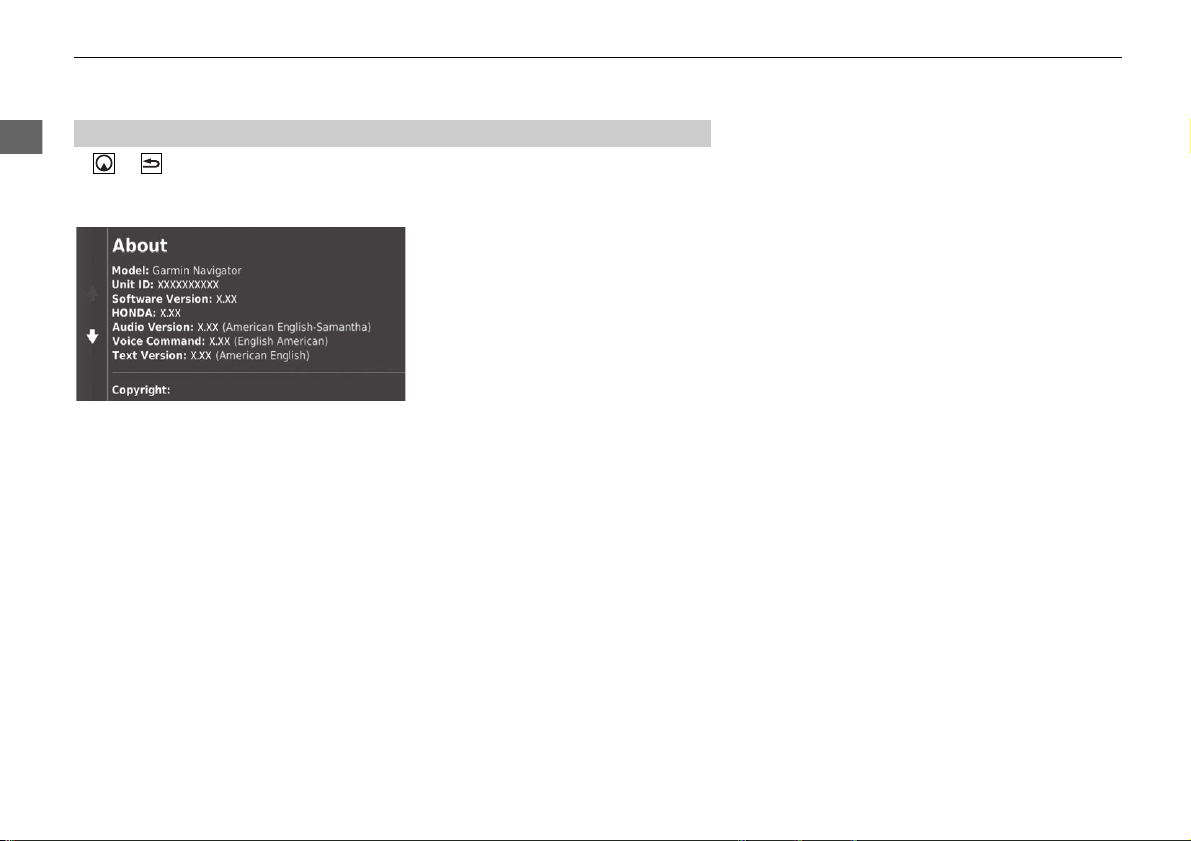
H u u Settings u Device u About
Displays the device information.
■
About
51
System Setup
Data Reset
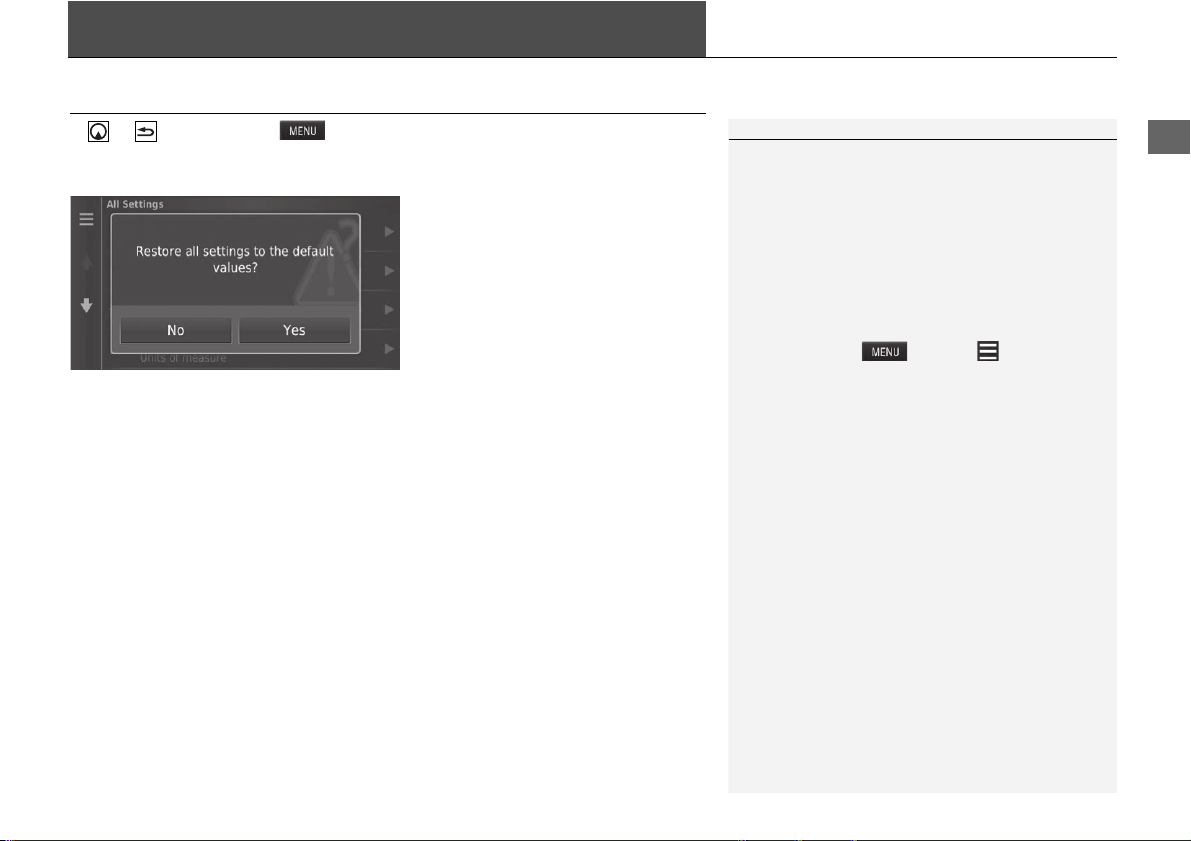
Reset Factory Default Settings
H u u Settings u
You can restore all settings to the factory default values.
1. Select Restore.
2. Select Yes.
1 Reset Factory Default Settings
When you want to reset the following options, see
the below references:
•
Home
2 Deleting Saved Locations P. 25
•
Recent
2 Recent P. 72
•
Saved
2 Saved Locations P. 19
When you select or select in each
settings category, you can restore the selected
category.
When you transfer the vehicle to a third party, reset
all settings to default and delete all personal data.

52

53
Navigation
This section describes how to enter a destination, select a route to take, and follow the
route to your destination. It also describes how to change your route or destination along
the way.
Entering a Destination ............................54
HONDA ..................................................60
Address ..................................................61
Categories ..............................................66
Saved......................................................72
Recent ....................................................72
Map Input...............................................73
Calculating the Route .......
.......................74
Viewing and Selecting the Routes ...........75
Viewing the Destination Map..................76
Driving to Your Destination .................
..77
Viewing the Route ..................................77
Map Operation .................
.......................81
Map Menu..............................................82
Traffic Information ..............................86
Changing Your Route ............................. 91
Stopping the Route ................................ 91
Taking a Detour ..................................... 92
Adding Waypoints ................................. 93
Changing Your Destination ...................
94
Selecting a Destination on the Map ........ 94
Searching Near Establishment ................ 95
Entering a New Destination.................... 97
Entering a New Destination from Trip
Planner................................................. 98
Editing the Destination List ................... 102
54
Navigation
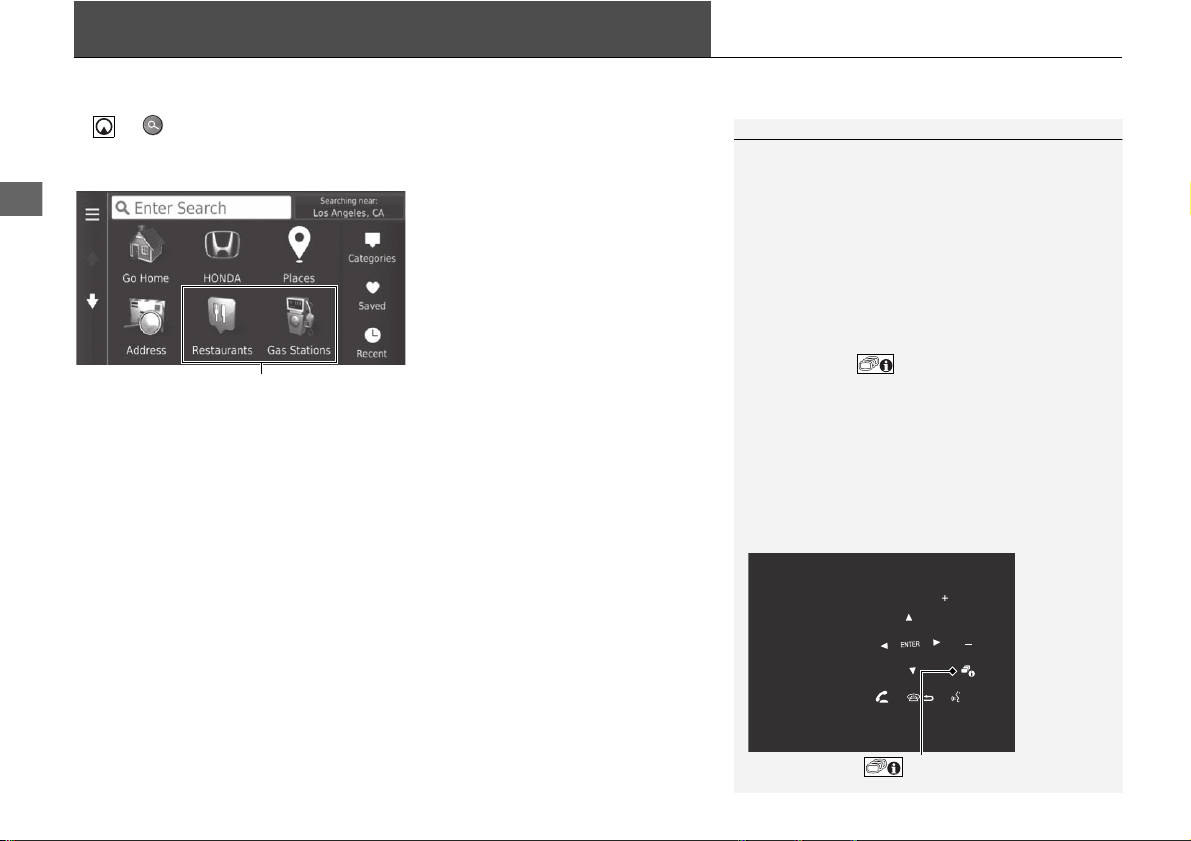
Entering a Destination
H u
This section describes how to enter a destination for route guidance.
Select an option.
The following options are available:
• E
nter Search: Sets a destination by entering a category, name, address, or city
name.
2 Using the Search Bar P. 56
• Searching near: Selects the city to search near.
2 Changing the Search Area P. 57
• Go Home: Sets your home address as the destination.
2 Going Home P. 8
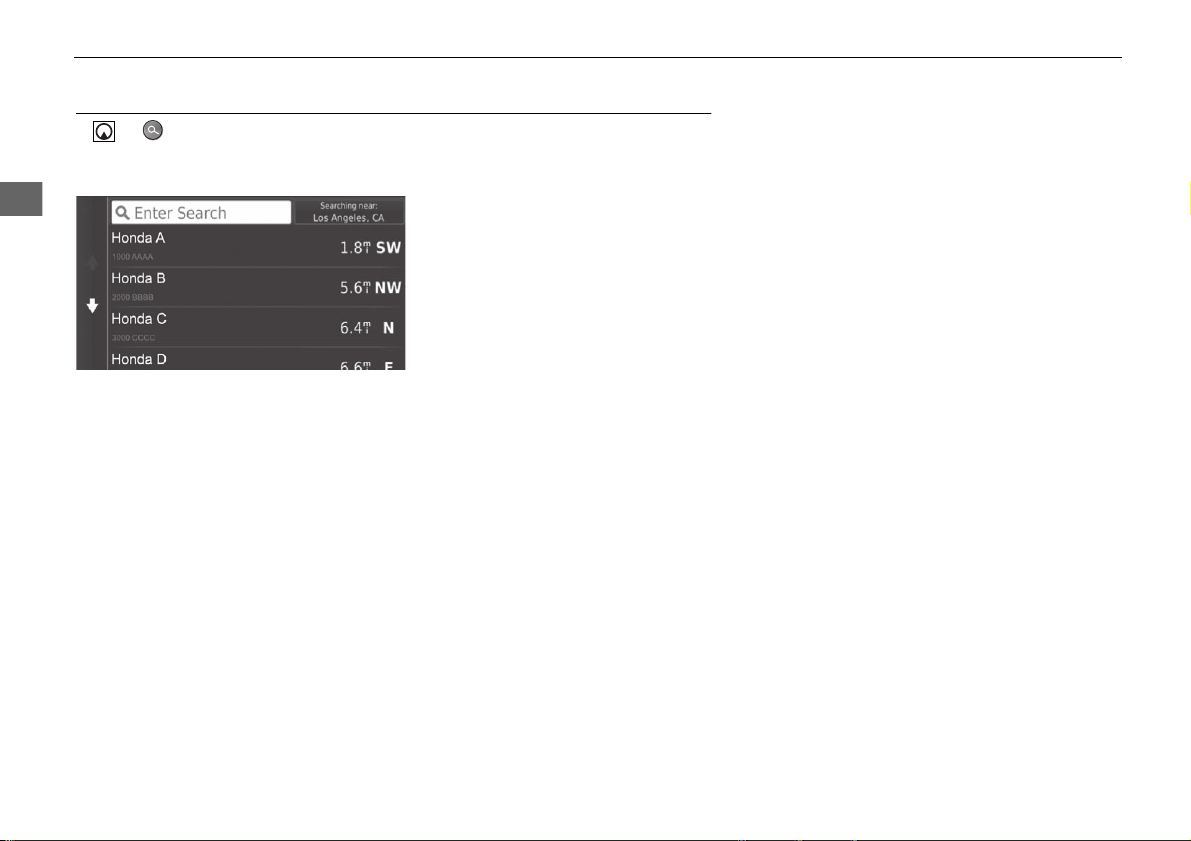
• HONDA: Sets a nearby Honda dealer as the destination.
2 HONDA P. 60
• Places: Launches HondaLink
TM
to search for places.
For more details, see the Owner's Manual.
• Address: Sets a destination by entering an address.
2 Address P. 61
• Categories: Sets a destination by selecting a category.
2 Categories P. 66
1 Entering a Destination
The Display Audio system can only provide route guidance
from one navigation system at a time. When setting a
destination on one system, any active route guidance with
the other system is canceled, and the system you are
currently using will direct you to your destination.
To use HondaLink
TM
, you must connect your
smartphone to the system.
For more details about smartphone connection and
how to use HondaLink
TM
, see the Owner's Manual.
If you press the button on the steering wheel
and select Navigation Menu while on the map
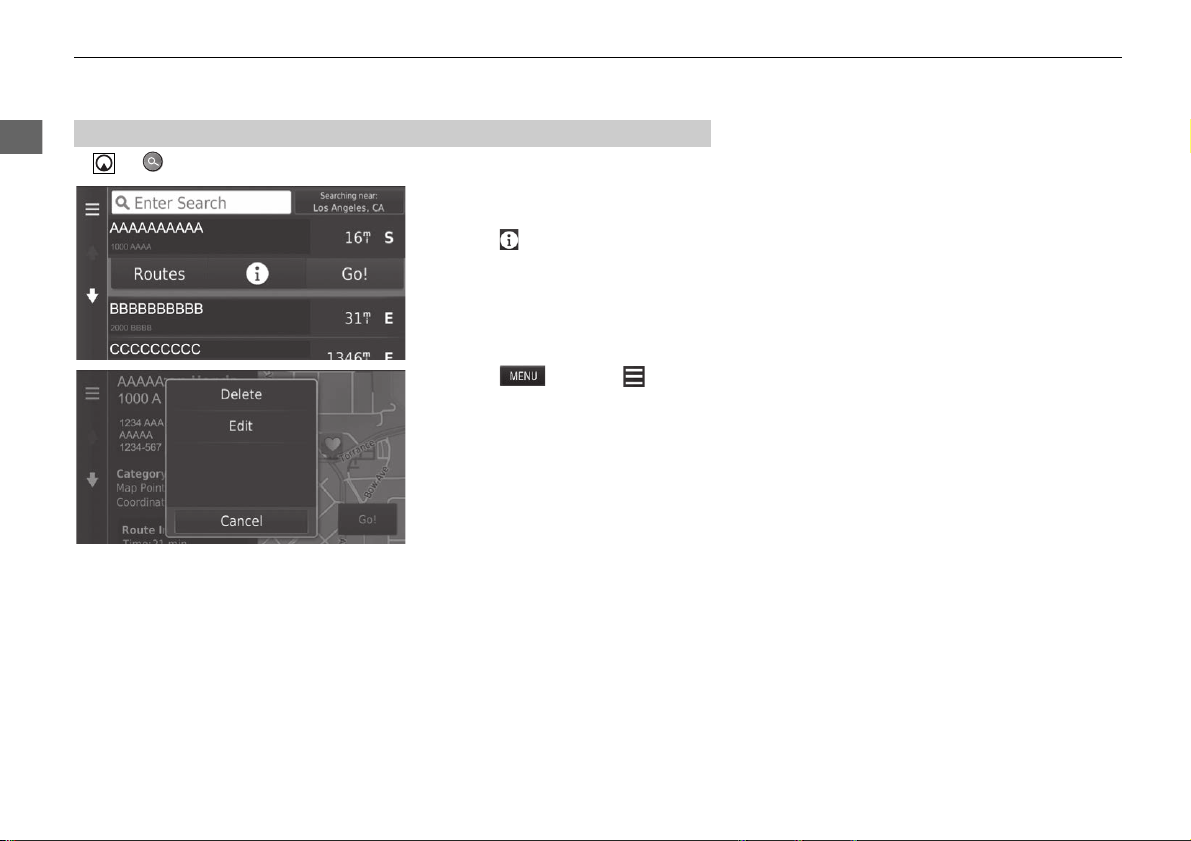
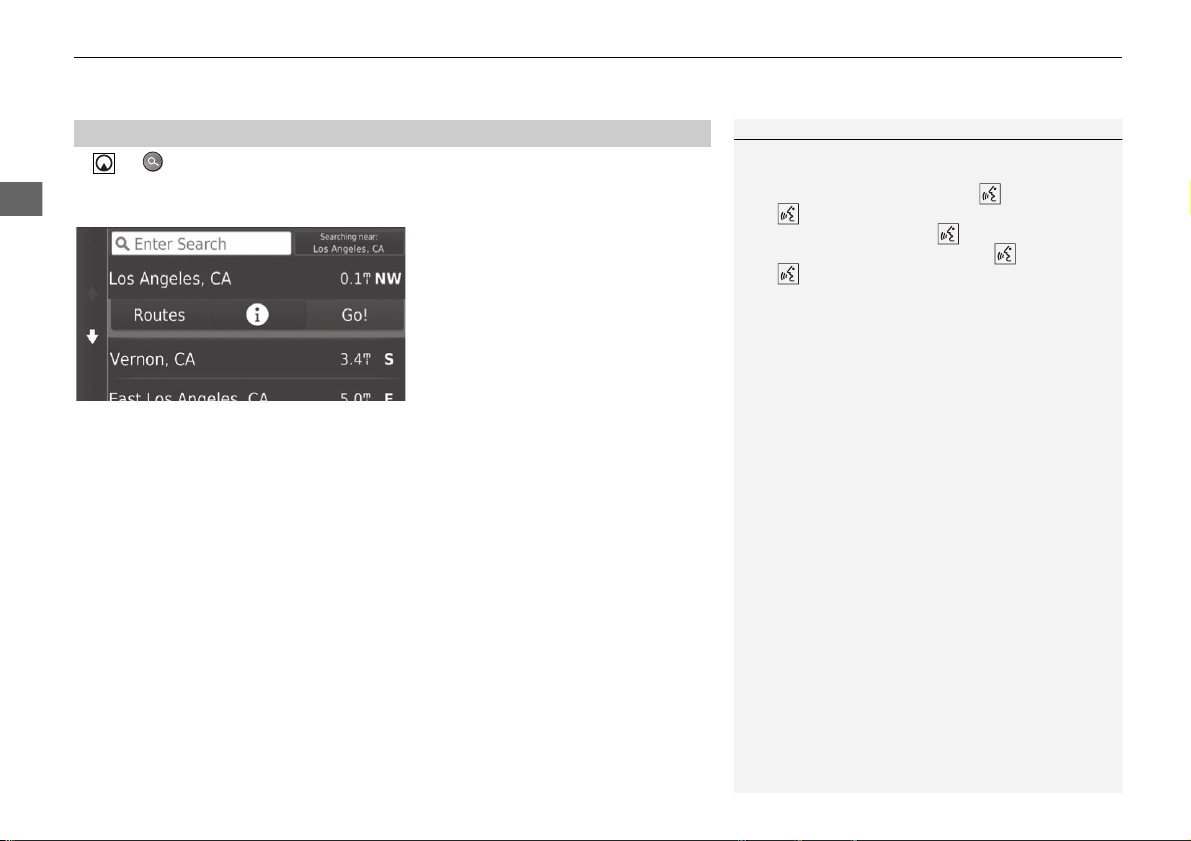
screen, the following items are available. Use the
steering wheel buttons to select the items.
•
Go Home
•
Recent Destination
•
Calculation Mode
•
Saved Places
•
Stop
•
Add New Address
Button
Shortcuts

uu Entering a Destination u
56
Navigation
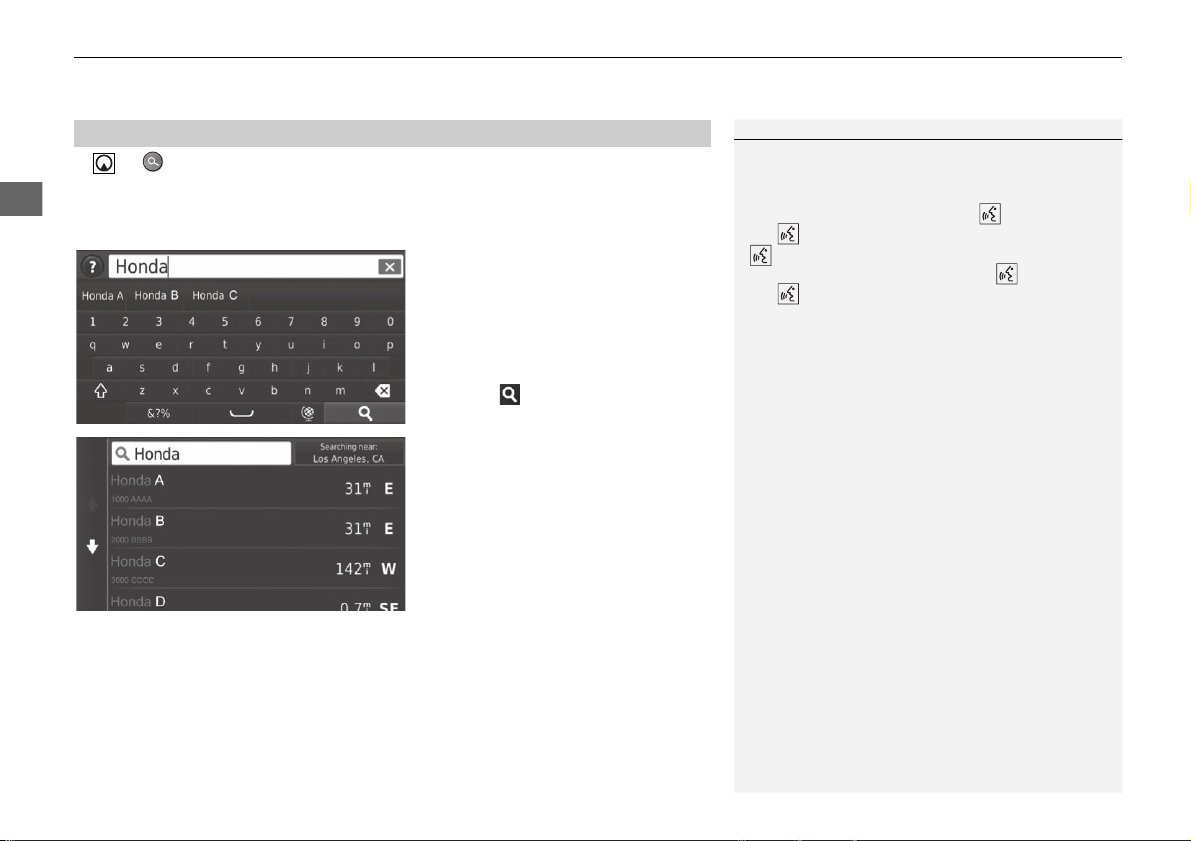
H u u Enter Search
You can use the search bar to search for locations by entering a category, name,
address, company phone number, or city name.
1. Enter a
search term.
u The
search history is displayed
below the search bar.
u Suggested search terms appear
below the search bar as you
type.
2. Select or a suggested search
term.
3. Selec
t your destination from the
list.
4. Select Go! to
set the route to your
destination.
2 Calculating the Route P. 74
■
Using the Search Bar
1 Using the Search Bar
Using Voice Command
You can say the names of popular, well-known
locations.
From the Voice Portal screen, say “Navigation.”
Say “Find Place,” then say a place name (e.g.,
“Honda”).
Say the line number of screen (e.g., “1”).
Say “Navigate” or “Yes” to set the route.
2 Using Voice Commands P. 5
2 Voice Control Operation P. 11
•
To search for a type of business, enter a category
name, such as “movie theaters.”
•
To search for a business by name, enter all or part
of the name.
•
To search for an address near you, enter the street
number and street name.
•
To search for an address in another city, enter the
street number, street name, city, and state.
•
To search for a city, enter the city and state.
If you want to delete the search history, select
Restore.
2 Reset Factory Default Settings P. 51
Continued
57
uu Entering a Destination u
Navigation
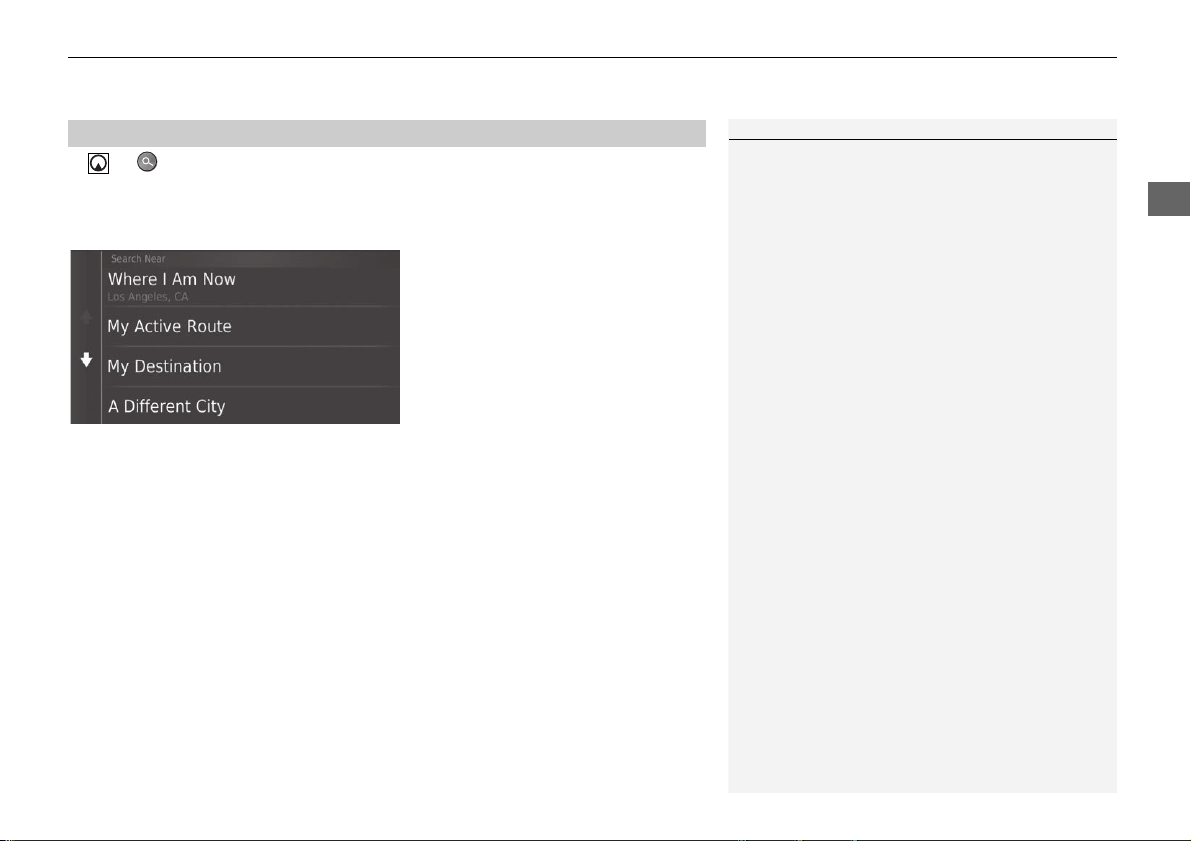
H u u Searching near
By default, your system finds locations closest to your current location. You can find
a location near another city or location.
Select an option.
The following options are available:
• Where I Am Now: Searches near your current location.
• My Active Route: Searches along your current route.
• M
y Destination: Searches near your current destination.
• A Different City: Searches near the city you enter.
• Recent Destination: Searches near a recent destination.
• Saved Place: Searches near a saved place.
■
Changing the Search Area
1 Changing the Search Area
My Active Route and My Destination can be set
when the route is active.
58
uu Entering a Destination u
Navigation
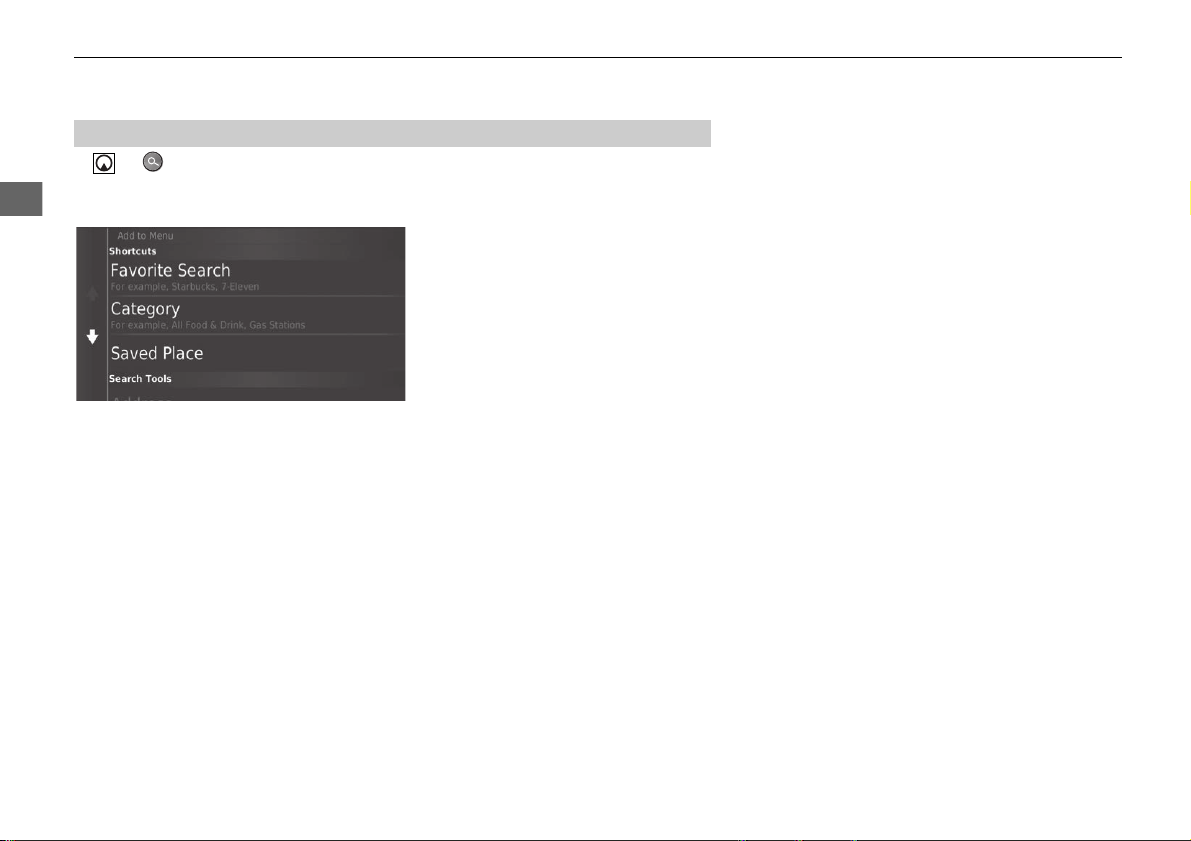
H u u Add Shortcut
Up to 36 shortcut icons can be stored.
Select an option you want to add as
a shortcut.
■
Adding Shortcuts
59
uu Entering a Destination u
Navigation
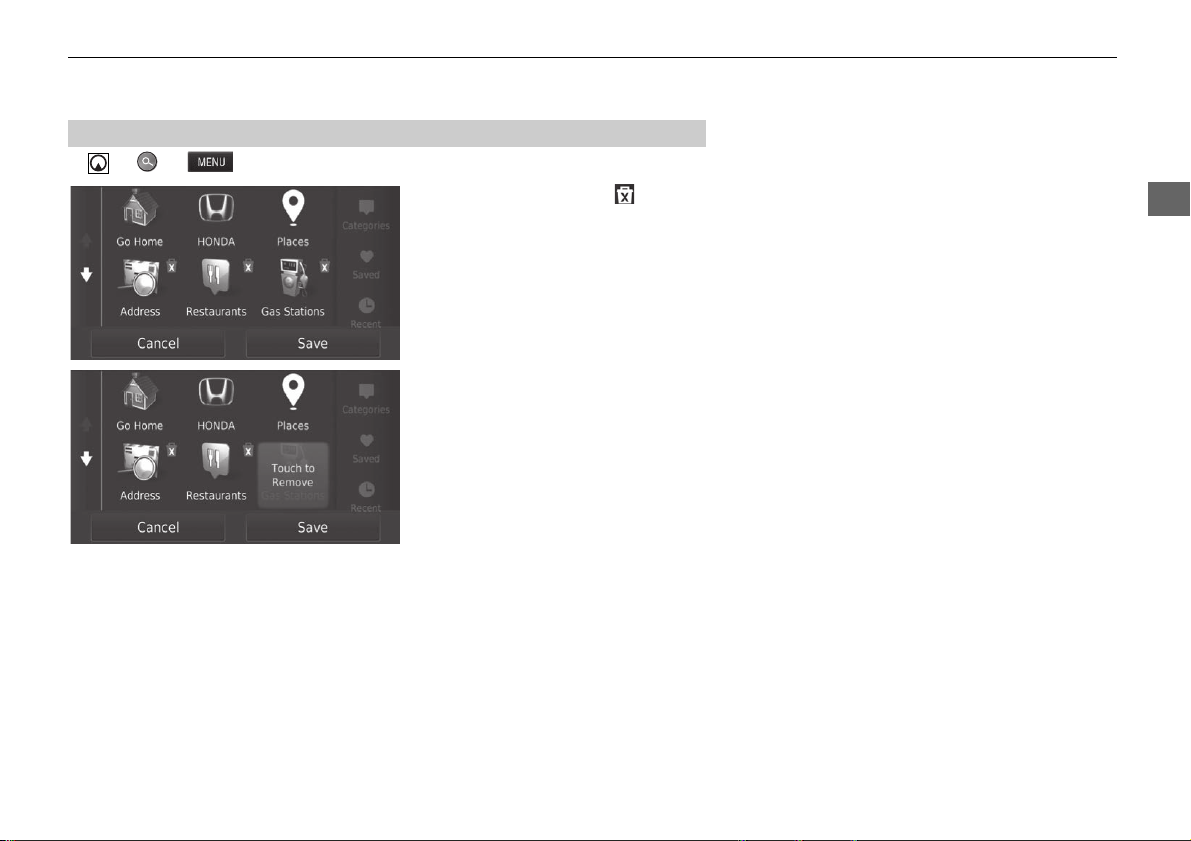
H u u u Remove Shortcut(s)
1. Select
a shortcut with if you
want to delete it.
2. Select To
uch to Remove.
3. Select Save.
■
Deleting Shortcuts
61
uu Entering a Destination u Address
Continued
Navigation
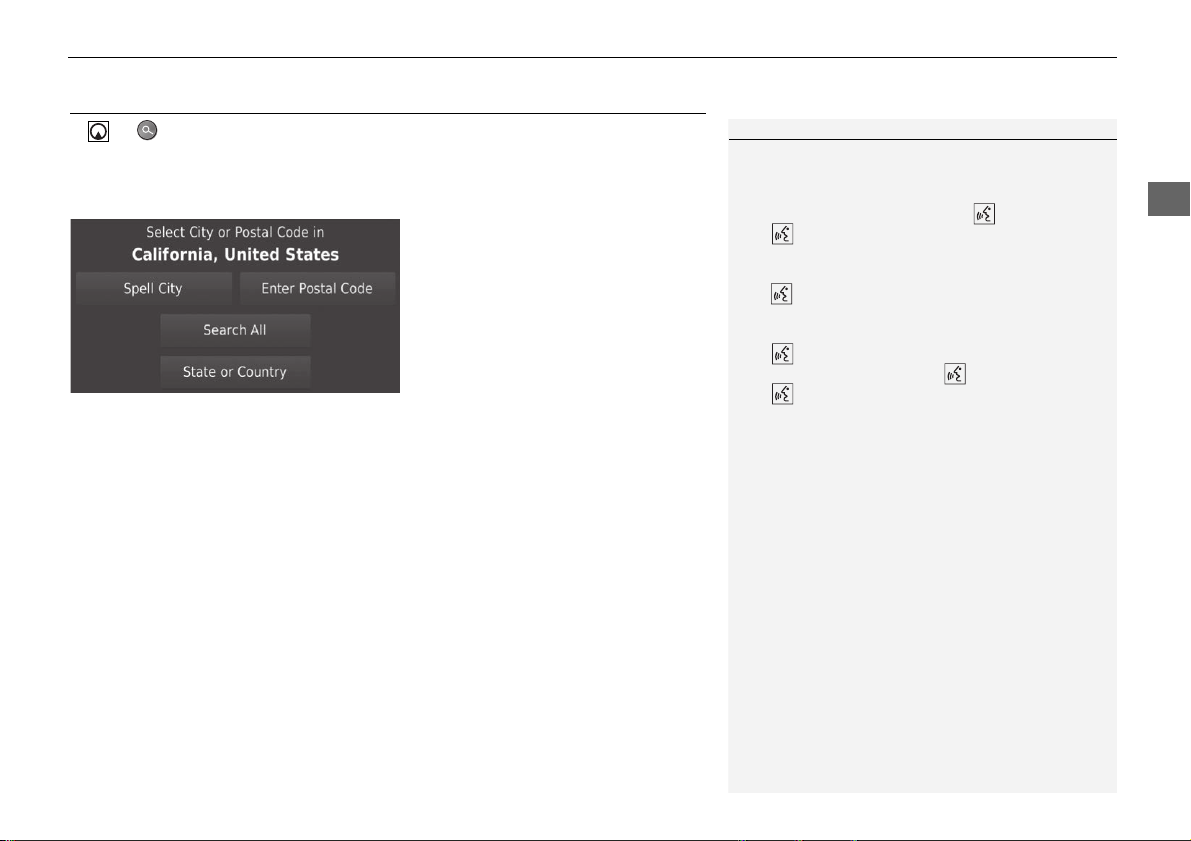
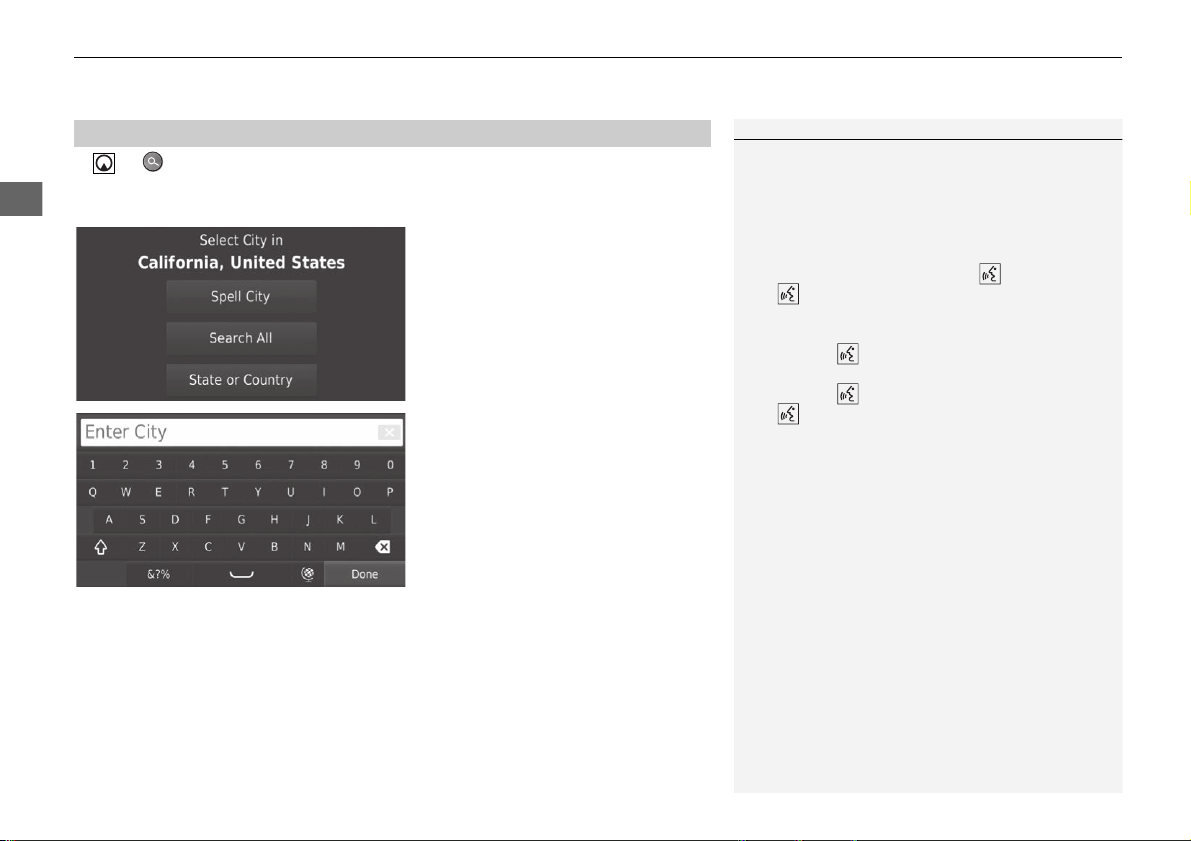
Address
H u u Address
Enter an address to use as the destination. The state or country you are currently in
is displayed.
Select an option.
The following options are available:
• Spell City: Selects your destination city.
2 Selecting the City P. 64
• Enter Postal Code: Selects your destination postal code.
2 Selecting the Postal Code P. 65
• Search All: Sets an address to use as the destination.
2 Search All P. 63
• State or Country: Selects the state or country.
2 Selecting the State/Country P. 62
1 Address
Using Voice Command
You can say the entire address at once using voice
commands.
From the Voice Portal screen, say “Navigation.”
Say “Find Address” on the voice command
screen, then say the entire address. (e.g., “1-2-3-4
Main Street, Los Angeles, California”).
Say “Change Country” if you want to change the
country.
The system interprets the address.
Say “Yes” or a line number of a screen if the
destination list appears (e.g., “1”).
Say “Navigate” or “Yes” to set the route.
2 Using Voice Commands P. 5
2 Voice Control Operation P. 11

62
uu Entering a Destination u Address
Navigation
H u u Address u State or Country
1. Enter a
state or country name.
2. Select a
state or country from the
list.
■
Selecting the State/Country
Continued
63
uu Entering a Destination u Address
Navigation
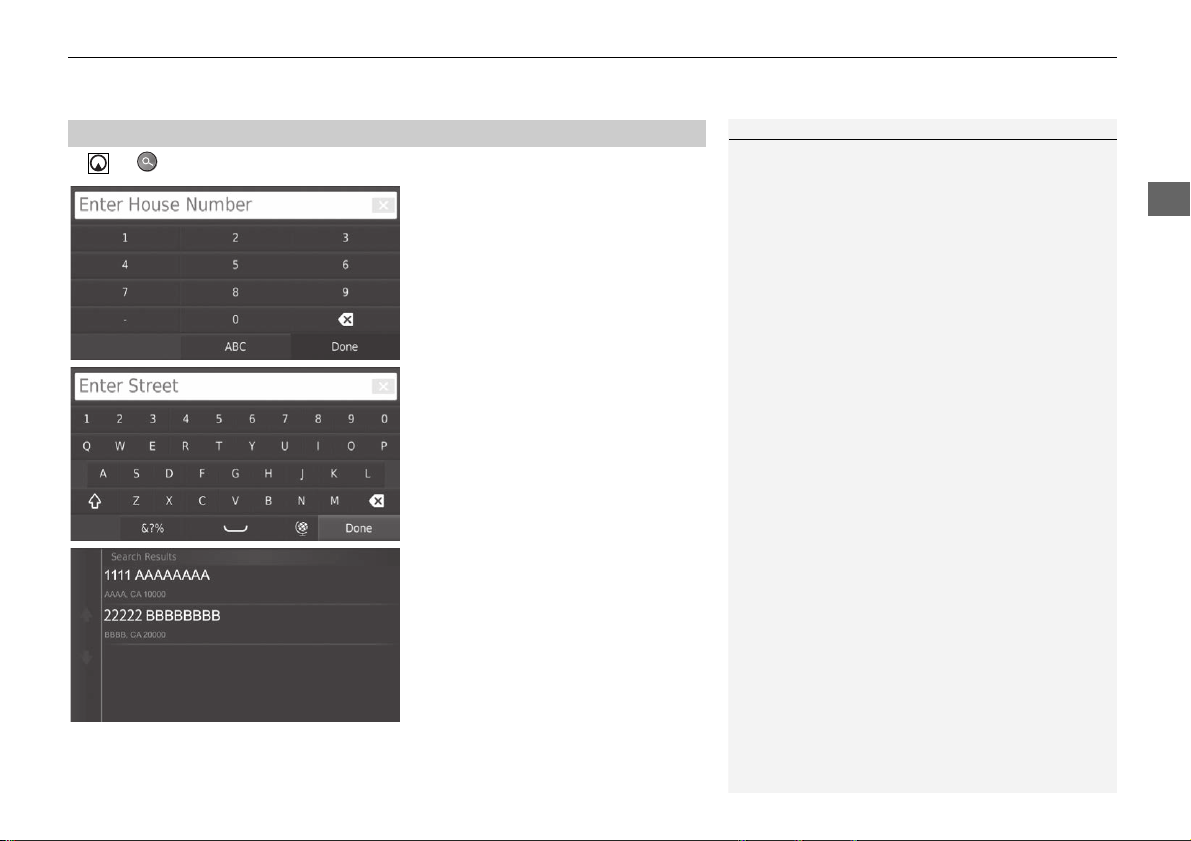
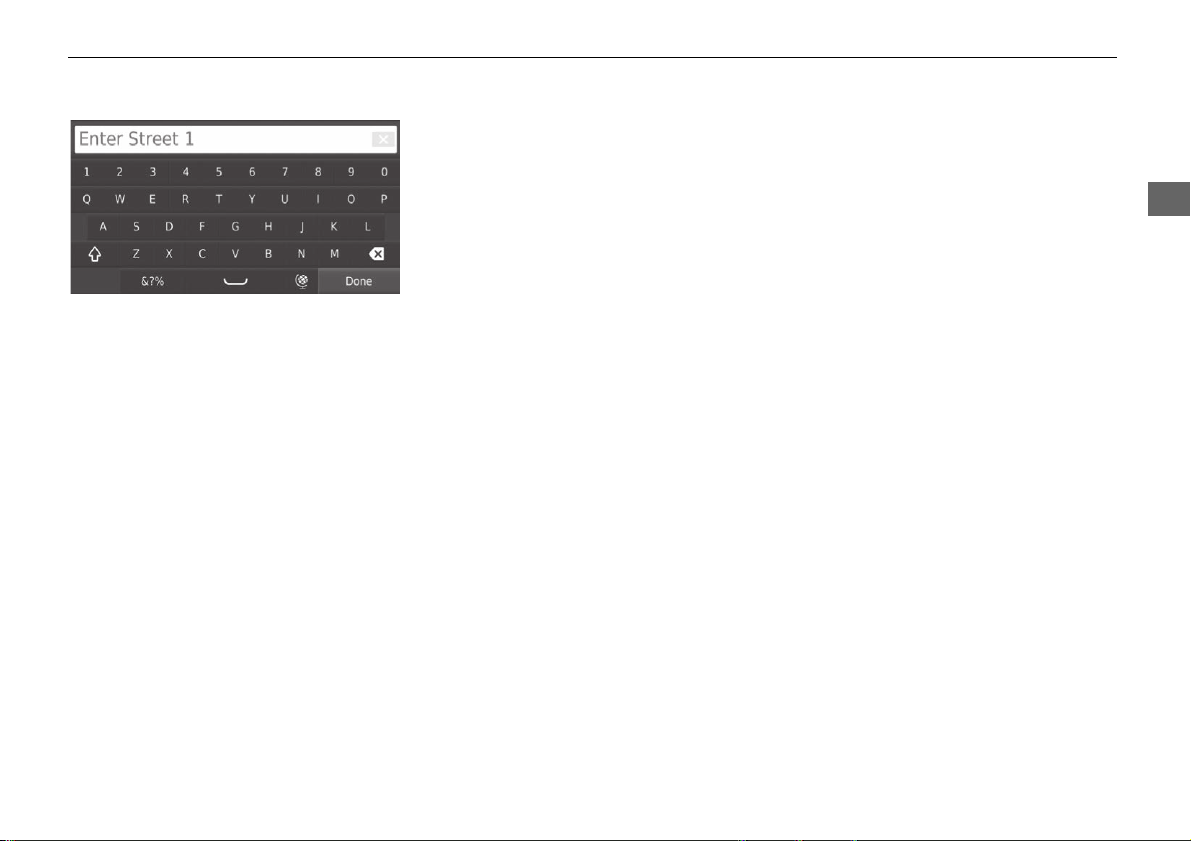
H u u Address u Search All
1. Enter
the house number. Select
Done.
2. Enter the street name. Select
Done.
u A
list of matching hits is
automatically displayed after
you enter several letters, with
the closest match at the top of
the list.
3. Select your destination from the
list.
u If the select city screen is
displayed, select a city.
4. Select Go! to set the route to your
destination.
2 Calculating the Route P. 74
■
Search All
1 Search All
The order of the steps may change depending on the
map data loaded on your system.
uu Entering a Destination u Address
64
Navigation
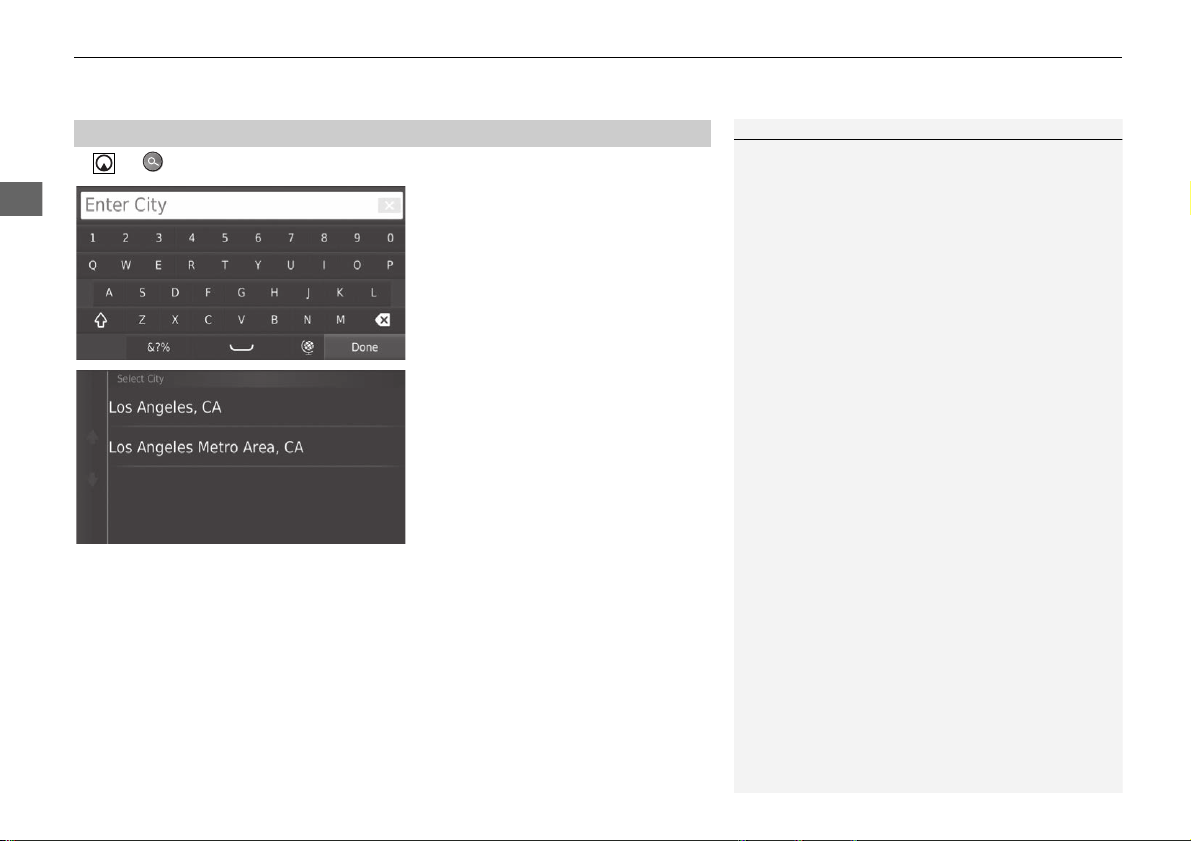
H u u Address u Spell City
1. Enter the name of
a different city.
Select Done.
u A list of matching hits is
automatically displayed after
you enter several letters, with
the closest match at the top of
the list.
2. Selec
t your destination city from
the list.
u Next, you are prompted to
enter a house number.
2 Search All P. 63
■
Selecting the City
1 Selecting the City
You do not need to enter spaces or symbols (e.g., &,
-, %).
The order of the steps may change depending on the
map data loaded on your system.
65
uu Entering a Destination u Address
Navigation
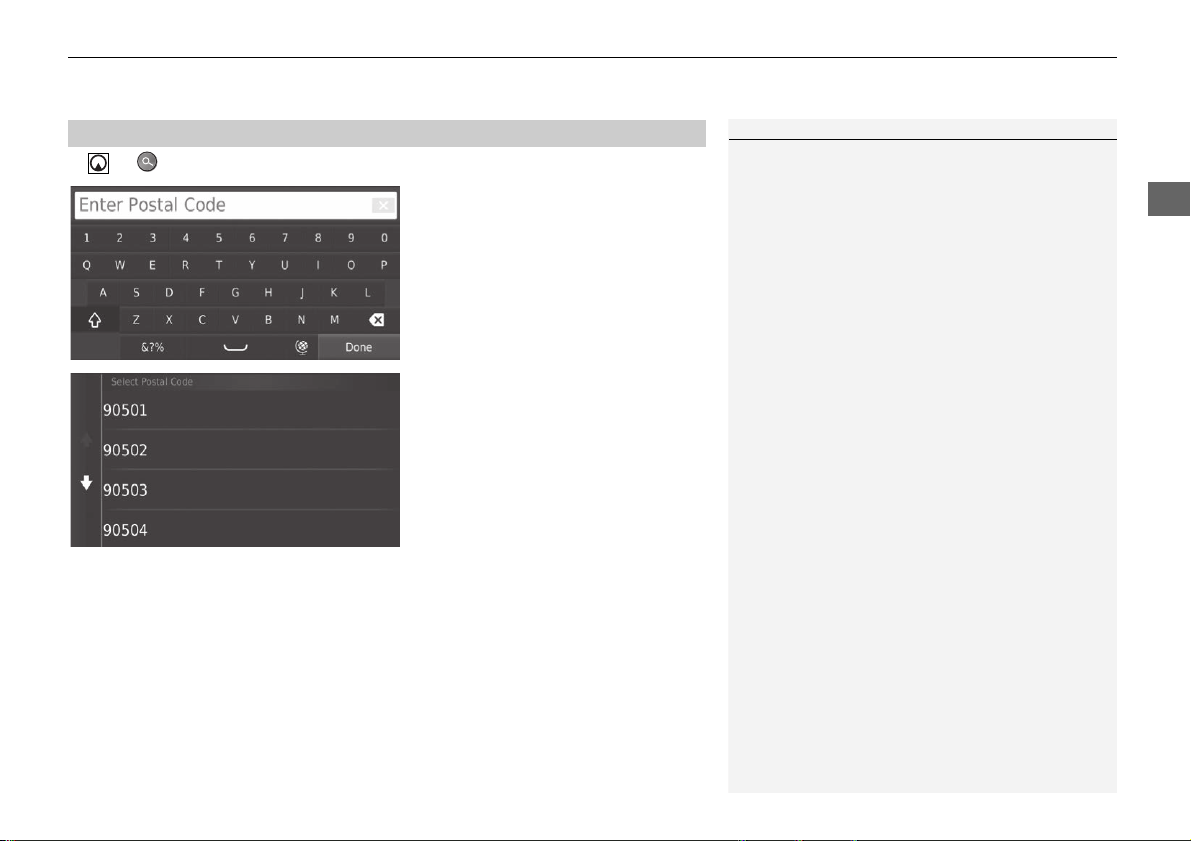
H u u Address u Enter Postal Code
1. Enter
the postal code. Select
Done.
2. Select your destination postal code
from the list.
3. Enter
the house number. Select
Done.
4. Enter the
street name. Select
Done.
5. Select your
destination street from
the list.
2 Calculating the Route P. 74
■
Selecting the Postal Code
1 Selecting the Postal Code
The order of the steps may change depending on the
map data loaded on your system.
66
uu Entering a Destination u Categories
Navigation
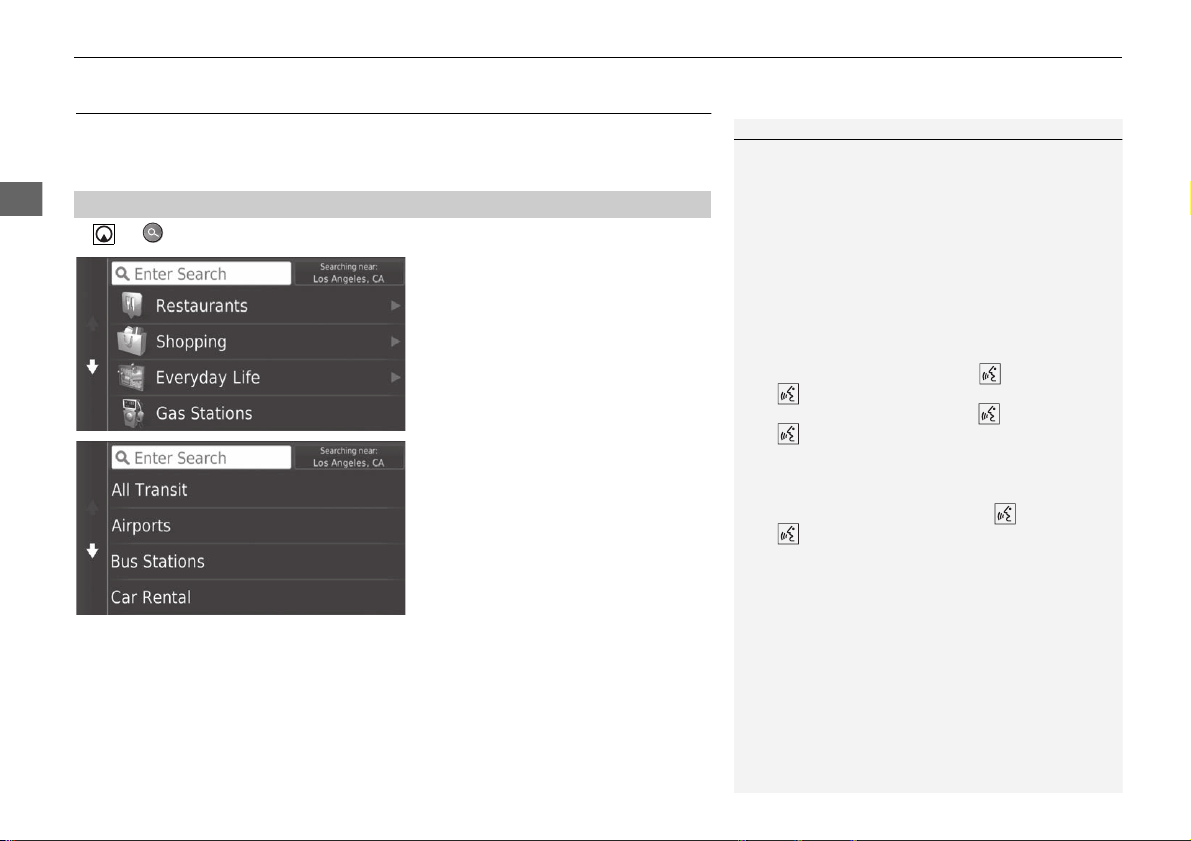
Categories
Select the category of a place (e.g., Restaurants, Gas Stations, Shopping) stored in
the map database to search for the destination.
H u u Categories
1. Select a category.
2. Select a
subcategory.
u If the subcategory screen is not
displayed, proceed to step 3.
■
Finding a Location by Category
1 Categories
This option is convenient if you do not know the
exact name of a place or if you want to narrow down
the number of matches returned for places with a
common name.
When you set the destination or waypoint, the same
categories of icons do not appear.
Using Voice Command
You can find a place by the name using voice
commands.
From the Voice Portal screen, say “Navigation.
Say “Find Category” on the voice command
screen, then say a category (e.g., “Fast Food”).
Say “View Categories” if you want to confirm
the category list.
Say a subcategory if the subcategory screen is
displayed.
Say a line number of a screen (e.g., “1”).
Say “Navigate” or “Yes” to set the route.
2 Using Voice Commands P. 5
2 Voice Control Operation P. 11
Continued
67
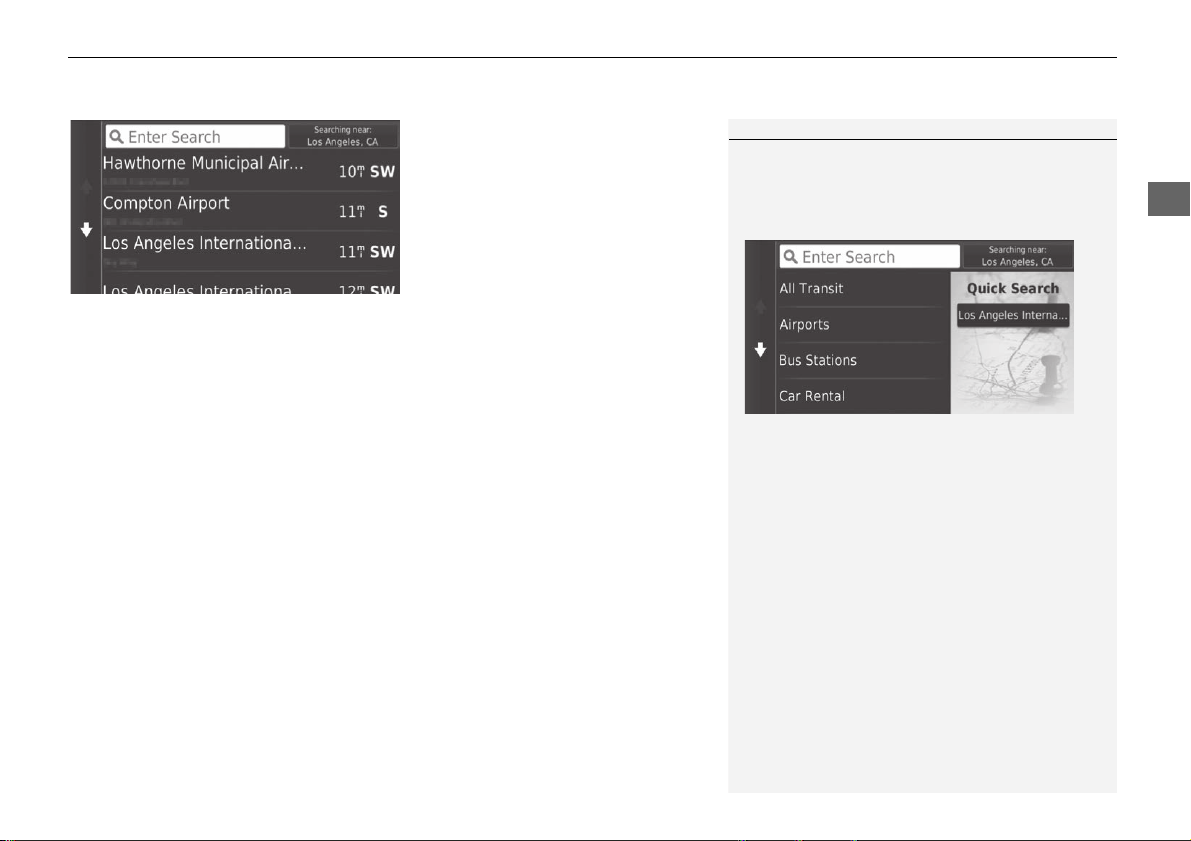
uu Entering a Destination u Categories
Navigation
3. Select a place name from the list.
4. Select Go! to set the route to your
destination.
2 Calculating the Route P. 74
1 Categories
Quick Search screen
After you have performed a search for a destination,
certain categories display a Quick Search list that
display several destinations you selected.
uu Entering a Destination u Categories
68
Navigation
H u u Categories u Intersections
Select the intersection of two streets as the destination.
1. Select Spell City.
u If s
electing Search All, proceed
to step 4.
u Select State or
Country, if
necessary.
2 Selecting the State/
Country P. 62
2. Enter a city name. Select Done.
u A lis
t of matching hits is
automatically displayed after
you enter several letters with
the closest match at the top of
the list.
3. Select a
city.
■
Finding a Location by Intersections
1 Finding a Location by Intersections
If there is more than one intersection, you are
prompted to select the intersection.
Using Voice Command
You can find intersections by the street name using
voice commands.
From the Voice Portal screen, say “Navigation.”
Say “Find Intersection” on the voice command
screen and then say a city name.
Say a street name 1, then say a line number of a
screen (e.g., “1”).
Say a street name 2, then say a line number of a
screen (e.g., “1”).
Say “Navigate” or “Yes” to set the route.
2 Using Voice Commands P. 5
2 Voice Control Operation P. 11
69
uu Entering a Destination u Categories
Continued
Navigation
4. Enter the street 1 name. Select
Done.
u A list of matching hits is
automatically displayed after
you enter several letters with
the closest match at the top of
the list.
5. Select the stree
t from the list.
u Repeat step 4 to
enter the
street 2 name.
6. Select the intersection.
7. Select Go! to
set the route to your
destination.
2 Calculating the Route P. 74
uu Entering a Destination u Categories
70
Navigation
H u u Categories u Cities
Selects your destination city.
1. Select a
city.
u Select Enter Search and enter
a city name if you want to
narrow down the number of
matches.
2. Select Go! to
set the route to your
destination.
2 Calculating the Route P. 74
■
Finding a City
1 Finding a City
Using Voice Command
You can find a city by using voice commands.
From the Voice Portal screen, say “Navigation.”
Say “Find City” on the voice command screen,
then say a city name. (e.g., “Los Angeles”).
Say a line number of a screen (e.g., “1”).
Say “Navigate” or “Yes” to set the route.
2 Using Voice Commands P. 5
2 Voice Control Operation P. 11
71
uu Entering a Destination u Categories
Navigation
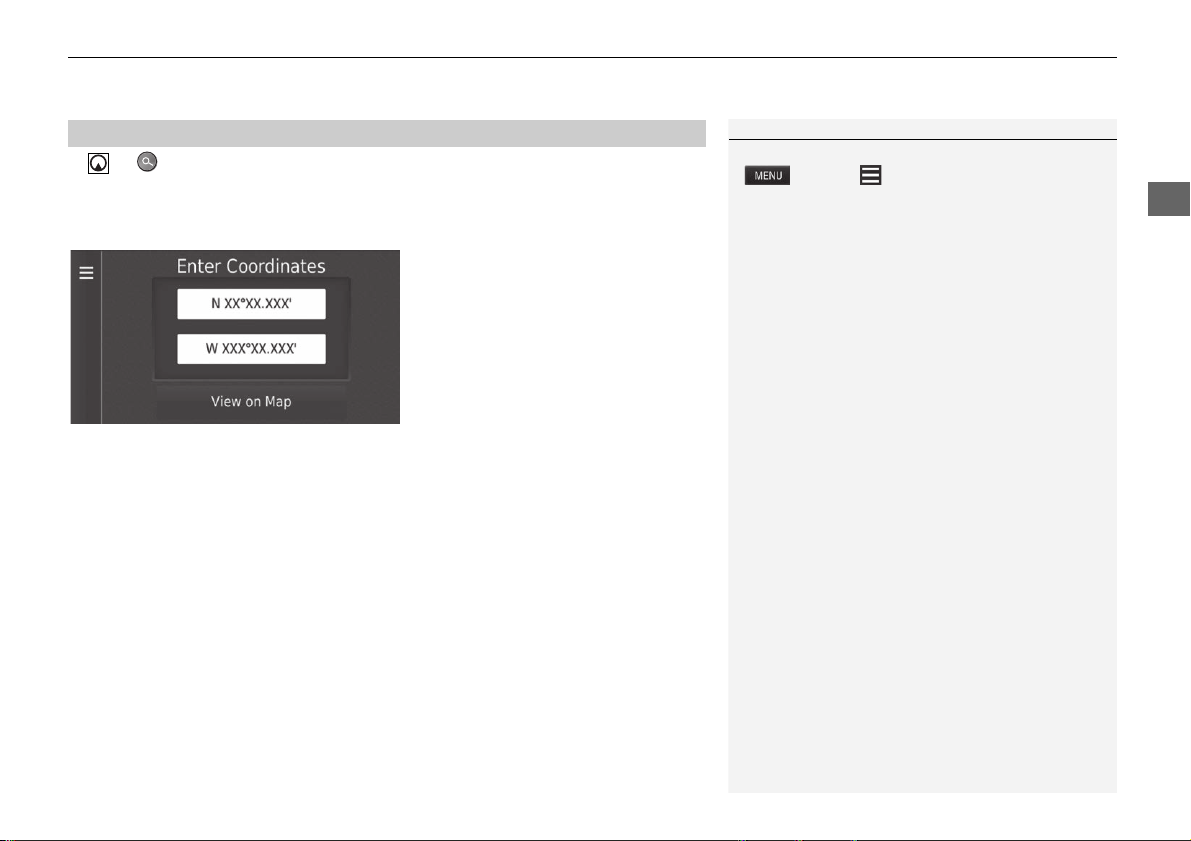
H u u Categories u Coordinates
You can find a location using latitude and longitude coordinates. This can be helpful
when geocaching.
1. Select the latitude coordinat
e.
2. Enter
the new coordinate. Select
Done.
3. Select the longitude coordinate.
4. Enter
the new coordinate. Select
Done.
5. Select View on Map.
6. Select Go! to
set the route to your
destination.
2 Viewing the Destination Map
P. 76
■
Finding a Location Using Coordinates
1 Finding a Location Using Coordinates
If you want to change the coordinate format, select
or select and then select Format.

72
uu Entering a Destination u Saved
Navigation
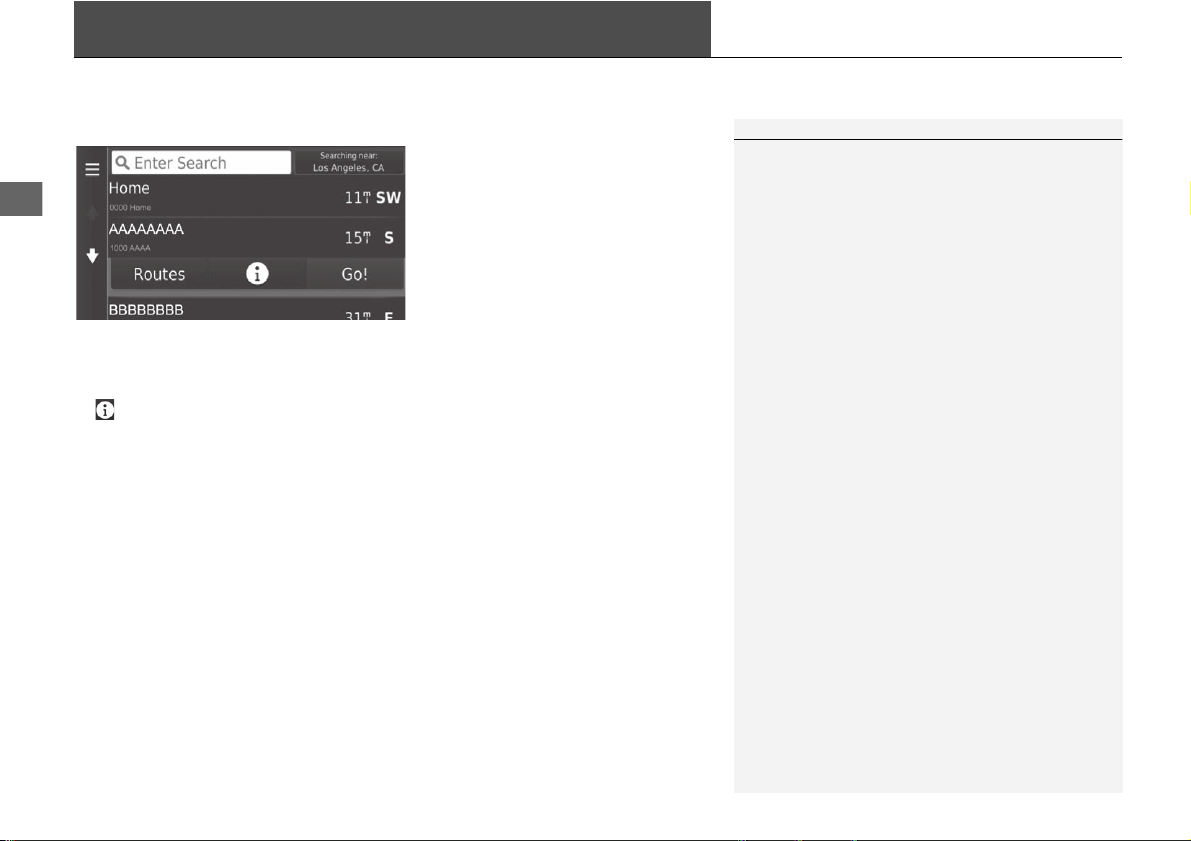
Saved
H u u Saved
Select a saved location to use as the destination.
1. Select your destination from the
list.
2. Select Go! to set the route to your
destination.
2 Calculating the Route P. 74
Recent
H u u Recent
Select an address from a list of your 50 most recent destinations to use as the
destination. The list is displayed with the most recent destination at the top.
1. Select your destination from the
list.
2. Select Go! to
set the route to your
destination.
2 Calculating the Route P. 74
1 Saved
You can add, edit, or delete the saved place.
2 Saved Locations P. 19
Using Voice Command
You can utilize a saved place by using voice
commands.
From the Voice Portal screen, say “Navigation.”
Say “Saved Place” on the voice command screen,
then say a saved place (e.g., “Honda”).
Say “View List” if you want to confirm all saved
places.
Say “Navigate” or “Yes” to set the route.
2 Using Voice Commands P. 5
2 Voice Control Operation P. 11
1 Recent
If you want to delete all recent destinations, select
or select and then select Clear.
Using Voice Command
You can utilize a recent destination by using voice
commands.
From the Voice Portal screen, say “Navigation.”
Say “Recently Found” on the voice command
screen, then say a line number of a screen (e.g.,
”1”).
Say “Navigate” or “Yes” to set the route.
2 Using Voice Commands P. 5
2 Voice Control Operation P. 11

73
uu Entering a Destination u Map Input
Navigation
Map Input
H u u View Map
Scroll the map to manually select an icon or a location as the destination.
1. Select any point on the map, a
street, intersection, or category
icon.
u Return to the current location
when you
press the button.
2. Select Go! to set the route to your
destination.
2 Calculating the Route P. 74
1 Map Input
“View Map”
2 Using Voice Commands P. 5
2 Voice Control Operation P. 11
You can customize the map as you like using ,
, , or .
2 Map Operation P. 81
If you want to display a specific category of places,
select and then select a category icon.
The place information is displayed when you select
on the map.
2 Viewing the Destination Map P. 76
74
Navigation
Calculating the Route
This section describes how to calculate your route.
Select Go!.
u The system calculates and displays
the route line on the map screen.
The following options are available:
• Routes: Displays different routes.
2 Viewing and Selecting the Routes P. 75
• : Displays the destination on the map.
2 Viewing the Destination Map P. 76
1 Calculating the Route
If the system has many guidance points on the route
to the destination, it may stop calculation.
In this case, the route guidance will start when you
select OK.
75
uu Calculating the Route u Viewing and Selecting the Routes
Navigation
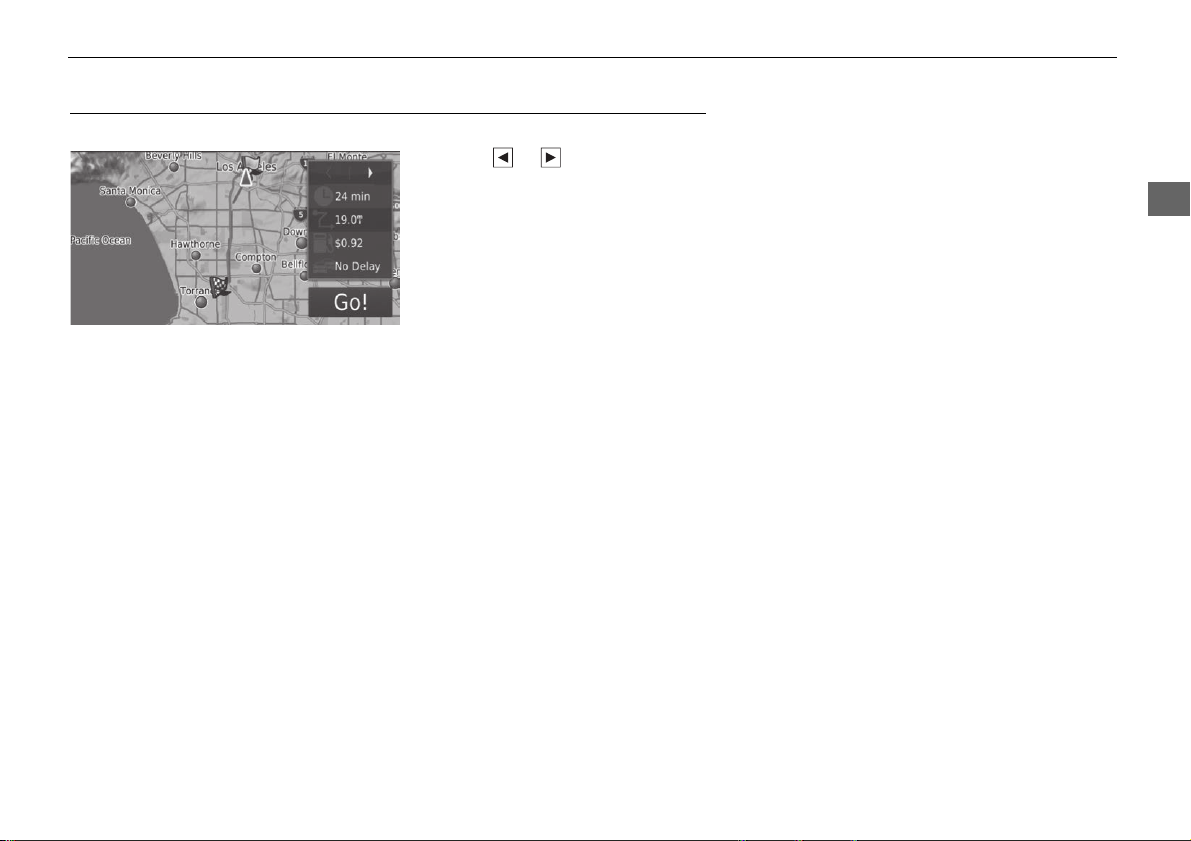
Viewing and Selecting the Routes
View and select different routes to your destination.
1. Select or to change a route.
u The travel distance, estimated
travel time, and traffic
information are displayed for
each route.
2. Select Go!.
u The syste
m calculates and
displays the route line on the
map screen.
76
uu Calculating the Route u Viewing the Destination Map
Navigation
Viewing the Destination Map
1. Select an option.
2. Select Go!.
u The
system calculates and
displays the route line on the
map screen.
The following options are available:
• Ro
ute Info: Displays different routes.
2 Viewing and Selecting the Routes P. 75
• Set Location: Sets the vehicle position when you are indoors or not receiving
satellite signals.
You can use this feature when GPS Sim
ulator is set to on.
2 Navigation P. 36
1 Viewing the Destination Map
When you select or select , you can add
to the saved location list.
2 Saved Locations P. 19

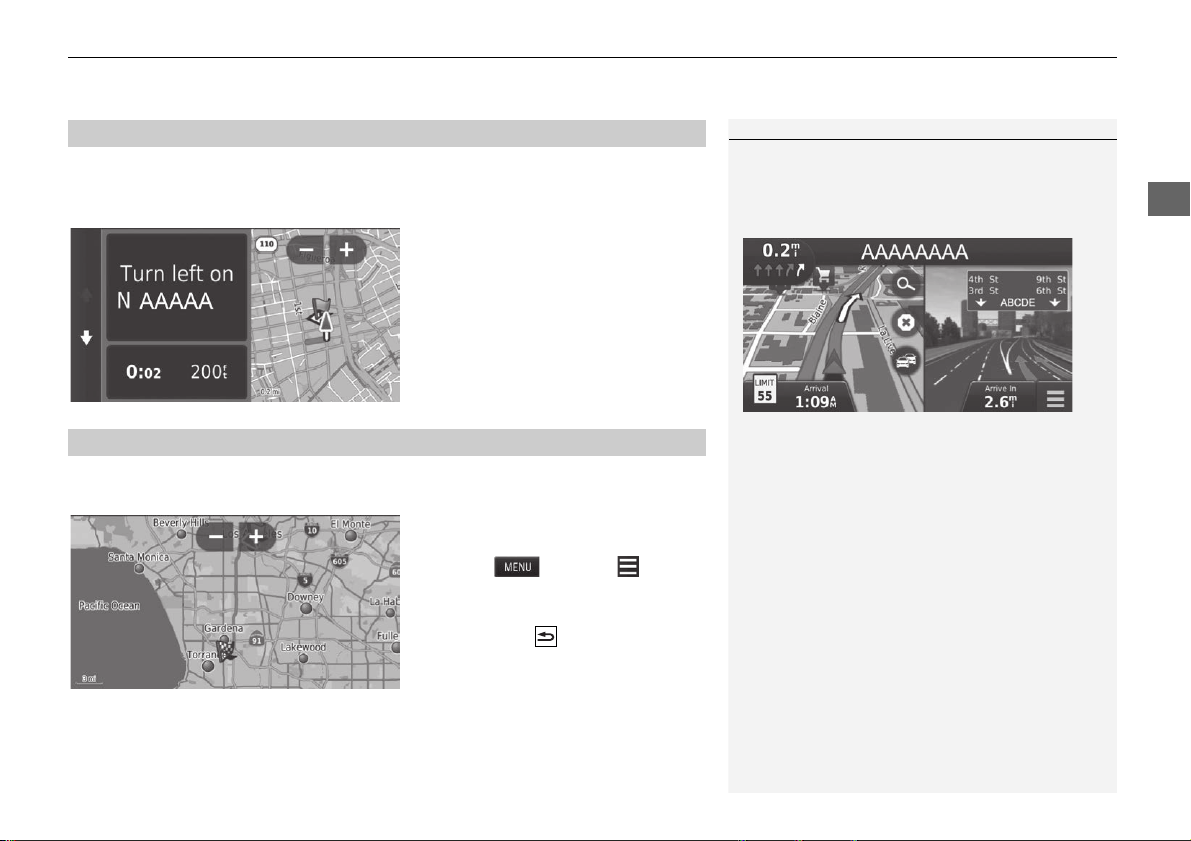
77
Continued
Navigation
Driving to Your Destination
Viewing the Route
This section describes how to follow the route guidance to your destination.
After calculating the route to your
destination,
the route is displayed on
the map screen.
2 During Route Guidance P. 7
As you drive, the system tracks your
position on the map in real time and
provides guidance as you approach
each guidance point on the route.
The following options are available:
• Select the text bar on the top of the map to display
the turn list screen.
2 Turn List P. 78
• Select the next guidance indicator to display the turn information screen or
intersection view screen.
2 Turn Information P. 79
• Select to cancel the route guidance and remove your current route.
2 Canceling Your Route P. 10
• Select to display the map menu.
2 Map Menu P. 82
• Select to display the parking information screen of nearby parking.
■
Map Screen
1 Viewing the Route
When your phone is connected to Bluetooth®
HandsFreeLink®, the navigation screen will switch to
the incoming call screen when receiving a call.
Speed limit icon
The speed limit shown on the map may be different
from the actual speed limit.
The speed limit icon is not displayed on all roads.
Select the vehicle icon to view the Where Am I?
screen.
2 Viewing the Current Location Information
P. 84
You can stop your vehicle en route (e.g., to rest, stop
for gas, etc.), and then continue on your route.
If you did not complete your route, the navigation
restarts when you restart your vehicle.
When LaneWatch
*
is activated, the navigation screen
will switch to the LaneWatch screen.
Next guidance indicator
Speed limit icon
Dashboards
* Not available on all models
uu Driving to Your Destination u Viewing the Route
78
Navigation
• Select the map dashboards when you want to change the information that is
displayed. Select the following options:
Arrival Time, Distance, Time to Destination, Via Arrival, Distance to Via,
Time to Via, Direction of Travel, Elevation.
The turn list screen displays turn-by-turn instructions and the distance between
turns.
Select the text bar on the top of the
map.
u Select a
turn to display the
detailed information.
2 Turn Information P. 79
u Select or select to
display the entire route on the
map.
2 Entire Route P. 79
■
Turn List
1 Viewing the Route
The next guidance indicator does not appear in the
following cases.
•
The vehicle speed is 3 mph (4.8 km/h) or less
•
The GPS signal is weak
•
The vehicle position on the map and current vehicle
position do not match
The system displays a roundabout to the next
guidance indicator in the following cases.
•
Its diameter is 82 ft (25 m) or more
•
There is no road inside it
•
There is no stop sign
Turn-by-Turn Directions
The next guidance point appears on the Driver
Information Interface (DII).
The Turn-by-Turn directions may not be displayed if
the information cannot be received correctly.
Continued
79
uu Driving to Your Destination u Viewing the Route
Navigation
The turn information screen displays the turn on the map and the distance and time
remaining before you reach the turn. The lane assist screen may display a view of the
upcoming intersection.
Select the next guidance indicator of
the map or select any turn on the
turn list screen.
The entire route screen displays the entire route, destination name, time to
destination, and distance to destination.
1. Select
the text bar on the top of
the map.
2. Select or select .
3. Select Ma
p to display the entire
route screen.
u Press the button to return to
the previous screen.
■
Turn Information
1 Viewing the Route
Intersection View Screen
The intersection view screen displays a view of the
upcoming intersection and which lane you should be
driving.
■
Entire Route
uu Driving to Your Destination u Viewing the Route
80
Navigation
If you leave the calculated route, the system automatically recalculates a route to the
set destination based on your current location and direction.
If you set the trip log to show, a series of lines (breadcrumbs) are displayed to track
the path you are taking.
2 Map Layers P. 34
■
Deviating From the Planned Route
■
Trip Log Display
1 Trip Log Display
You can delete the Trip Log.
2 Device P. 49
2 Reset Factory Default Settings P. 51
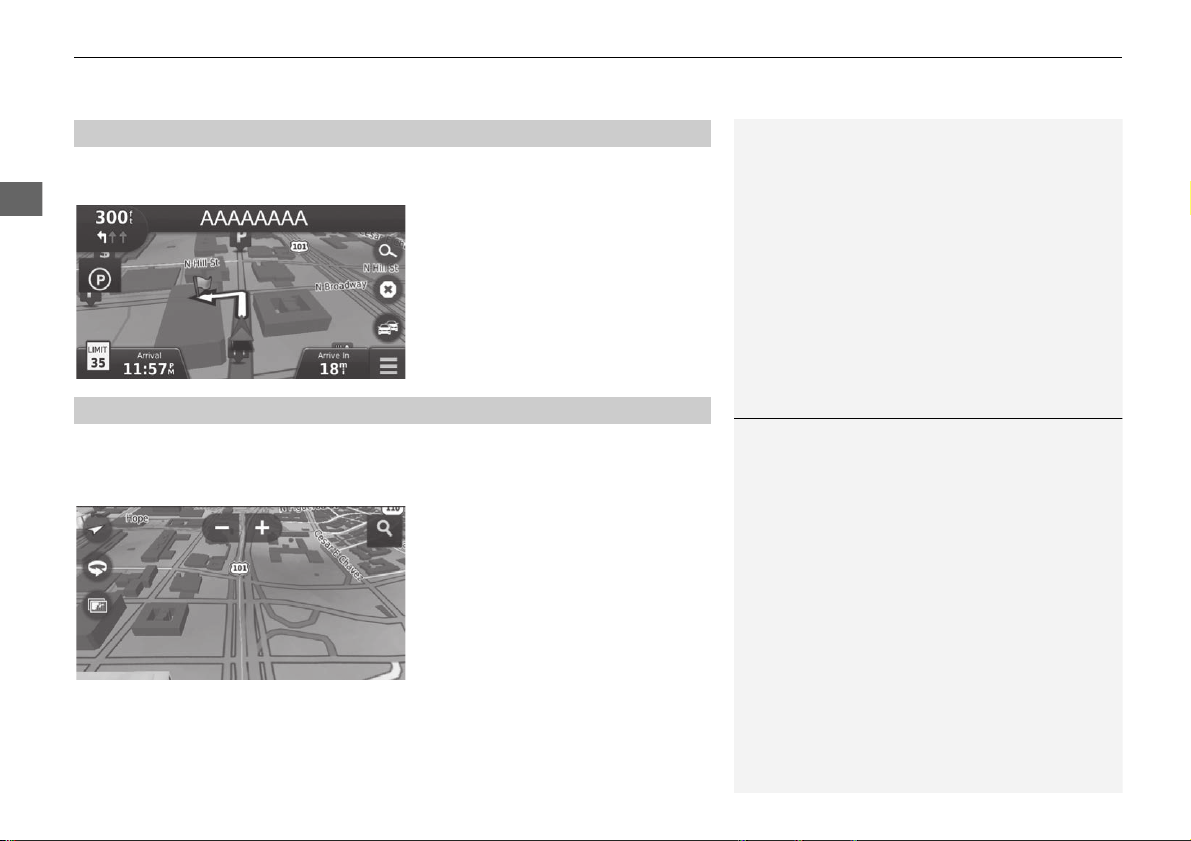
81
Navigation
Map Operation
Customize the map, set a destination, and save a place from the map.
1. Select any
point on the map.
2. Select an option.
u If
you want to set a destination
or save a location in the map,
scroll the map and select the
desired location.
2 Saved Locations P. 19
2 Map Input P. 73
The following options are available:
• : Zooms in to the map.
• : Zooms out of the map.
• : Switches the map to 2D or 3D.
• : Rotates the 3D map.
• : Sets the data that appears on the map.
2 Map Layers P. 34
1 Map Operation
When you select Track Up or North Up, the current
map scale and the (Track Up only) appear on the
map.
The always points to North.
2 Driving Map View (Map Orientation) P. 30
82
uu Map Operation u Map Menu
Navigation
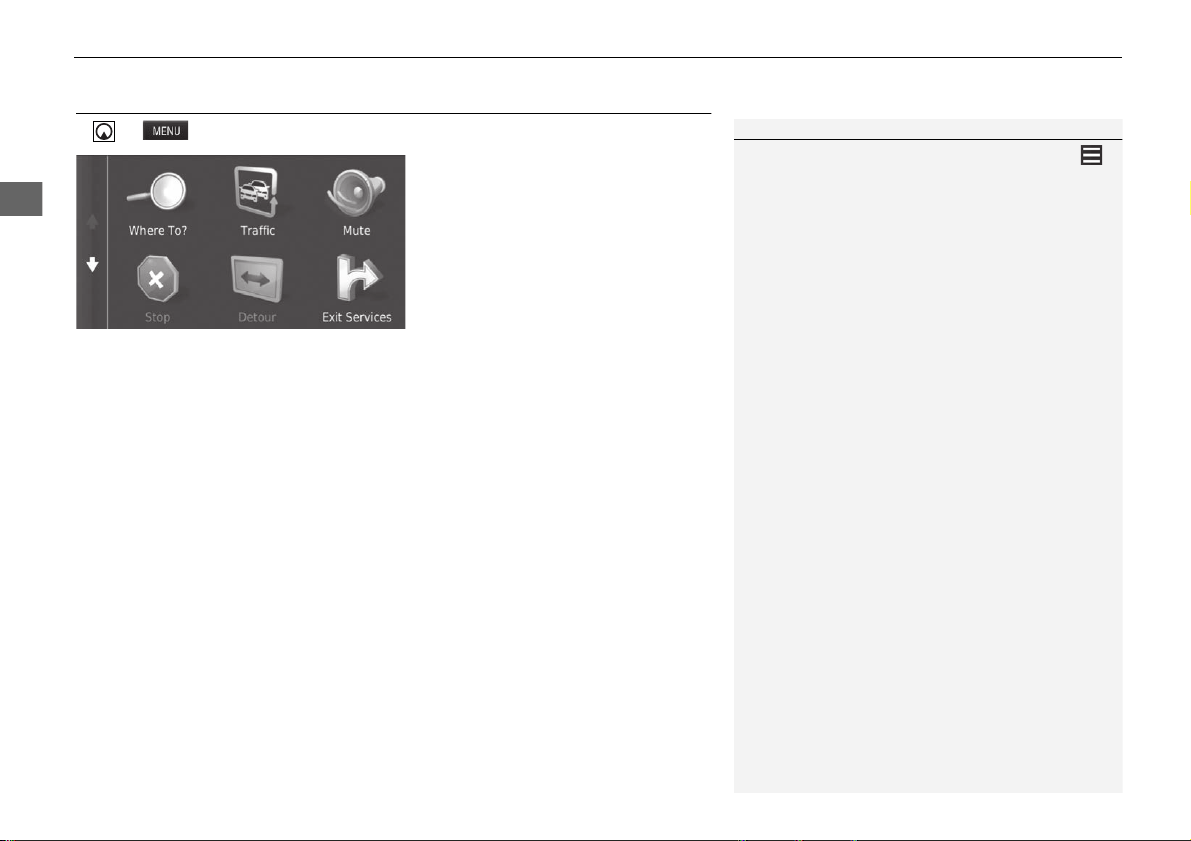
Map Menu
H u
Select an option.
The following options are available:
• Where To?: Enters a new destination.
2 Entering a Destination P. 54
• Traffic: Displays the traffic information screen.
2 Traffic Information P. 86
• Mute: Turns the voice prompts on or off.
• Stop: Cancels the route guidance and removes your current route.
• Detour: Calculates a detour route.
2 Taking a Detour P. 92
• Exit Services: Displays a list of the exit services for the route.
2 Viewing Exit Services P. 83
• Where Am I?: Displays the information about your current location.
2 Viewing the Current Location Information P. 84
• Map Layers: Sets the data that appears on the map.
2 Map Layers P. 34
• ecoRoute
TM
: Uses the ecoRoute
TM
features.
2 ecoRoute
TM
P. 109
• Settings: Changes settings for navigation functions.
2 System Setup P. 15
1 Map Menu
You can also display the map menu by selecting
on the map screen.
Continued
83
uu Map Operation u Map Menu
Navigation
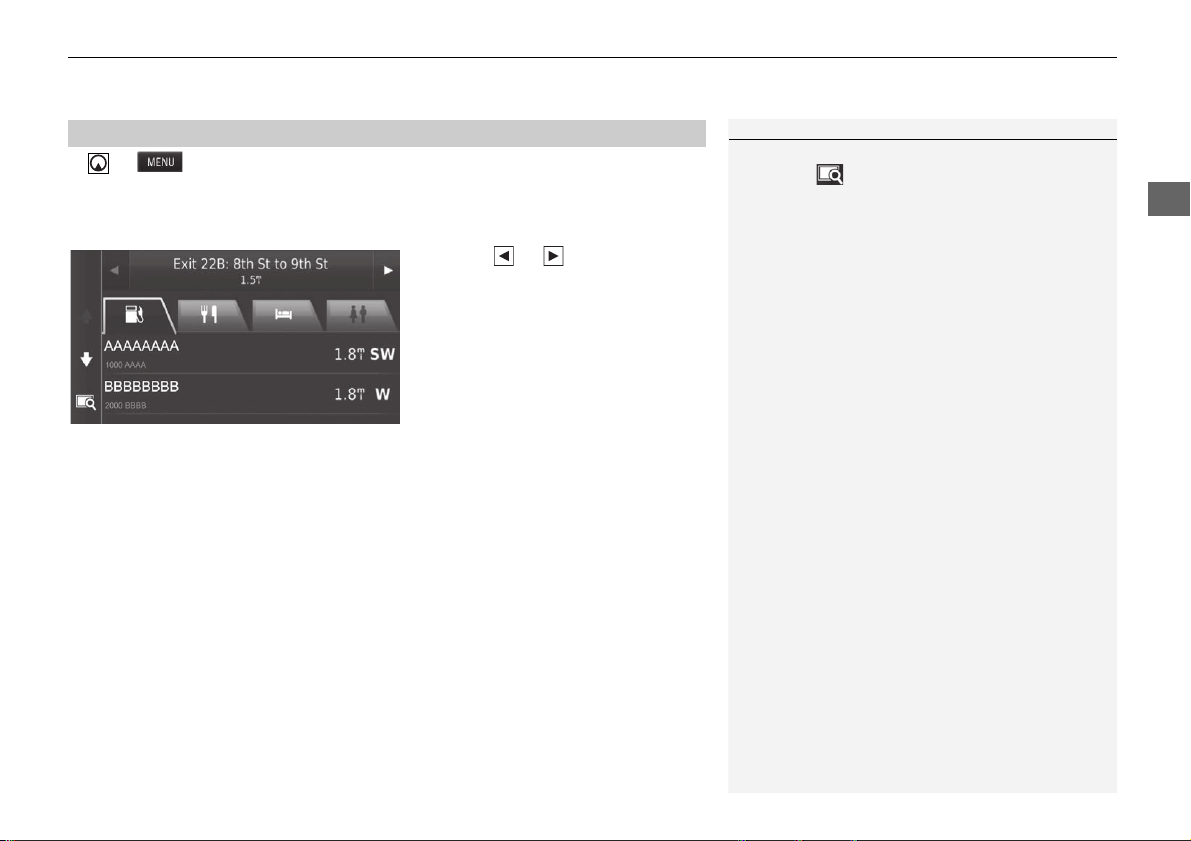
H u u Exit Services
You can view exit services (e.g., whether the exit is near gas stations, restaurants,
etc.) and add new destinations or waypoints to the calculated route.
1. Select or to display your
desired list of exit services.
2. Select a category tab.
3. Select an option.
u The lo
cation is displayed on the
Calculate Route screen.
2 Viewing the Destination Map
P. 76
■
Viewing Exit Services
1 Viewing Exit Services
The map screen of the selected exit is displayed when
you select .
uu Map Operation u Map Menu
84
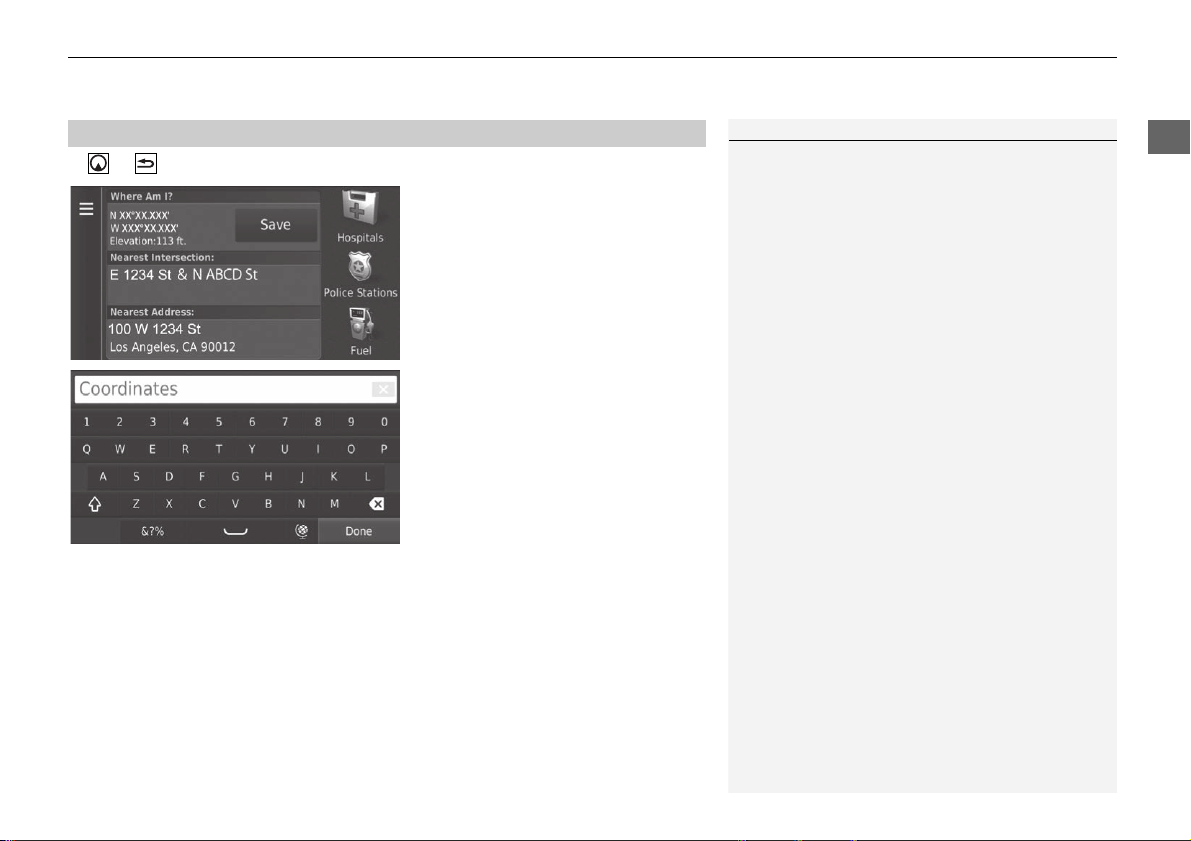
Navigation
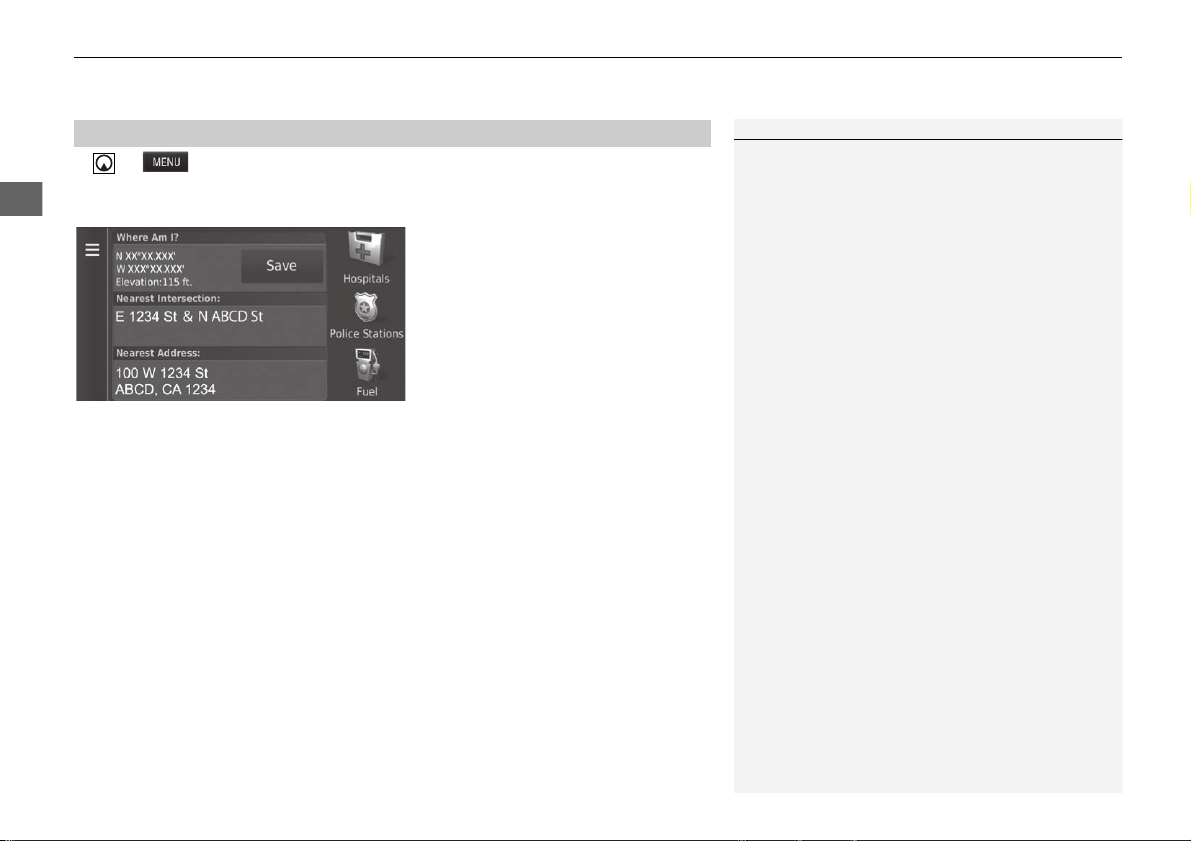
H u u Where Am I?
You can confirm your current location, address, and nearest intersection.
Select an option.
The following options are available:
• Save: Saves your current location.
2 Saving Your Current Location P. 21
• Hospitals/Police Stations/Fuel: Searches for a hospital, police station, or gas
station around your current location.
2 Searching Near Establishment P. 95
■
Viewing the Current Location Information
1 Viewing the Current Location Information
Vehicle position may not be displayed when:
•
The vehicle is traveling off-road.
•
The vehicle position data cannot be updated.
85
uu Map Operation u Map Menu
Navigation
H u u Where Am I?
Get a list of directions to your current location.
1. Select or select .
2. Select Directions to Me.
3. Select an option.
4. Select Select.
u The turn list screen displays
turn-by-turn instructions and
the distance between turns.
2 Turn List P. 78
■
Using Directions to Me
86
uu Map Operation u Traffic Information
Navigation
Traffic Information
When you set the traffic feature, the system examines traffic conditions and
optimizes the route for the shortest time. If a severe traffic delay occurs while you
are navigating, the system searches for a faster route. If it finds one, the system will
prompt you and you can choose to accept the new route.
The traffic icon changes color to indicate the severity of traffic conditions on your
route or on the road you are currently traveling. The system may route you through
a t
raffic delay if a better alternative route does not exist. The delay time is added into
your estimated time of arrival automatically.
1. Select on the map screen.
1 Traffic Information
Continuously updated traffic information is available
in major metropolitan areas across contiguous United
States and some cities in Canada.
You can change the traffic information settings.
2 Traffic P. 44
The traffic icon changes color to indicate the severity
of traffic conditions.
•
Green: Flowing freely.
•
Yellow: Moderate traffic condition.
•
Red: Very slow or stop-and-go traffic.
•
Gray: No traffic data.
87
uu Map Operation u Traffic Information
Continued
Navigation
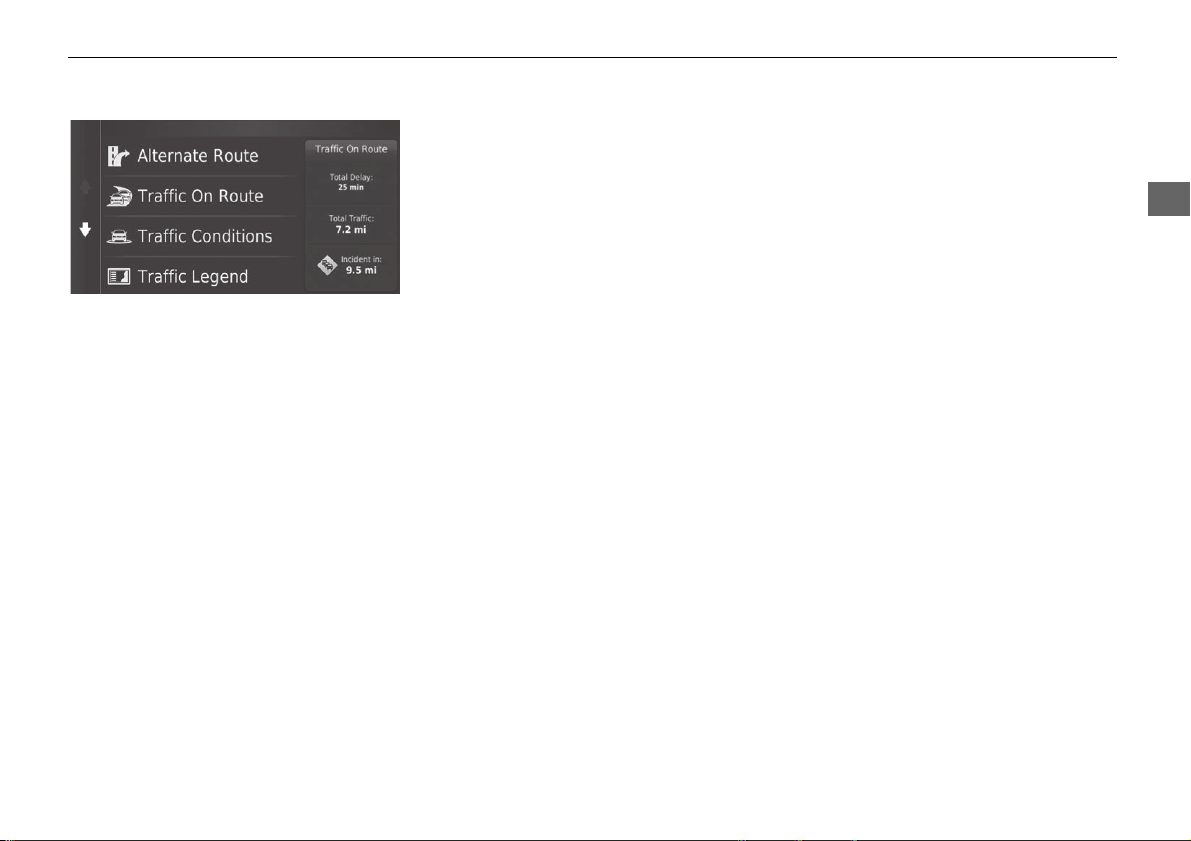
2. Select an option.
The following options are available:
• Alternate Route: Displays the alternate route screen.
2 Alternate Route P. 88
• Traffic On Route: Displays the traffic delays on your route. You can select the
traffic you want to avoid.
2 Traffic Rerouting Manually P. 89
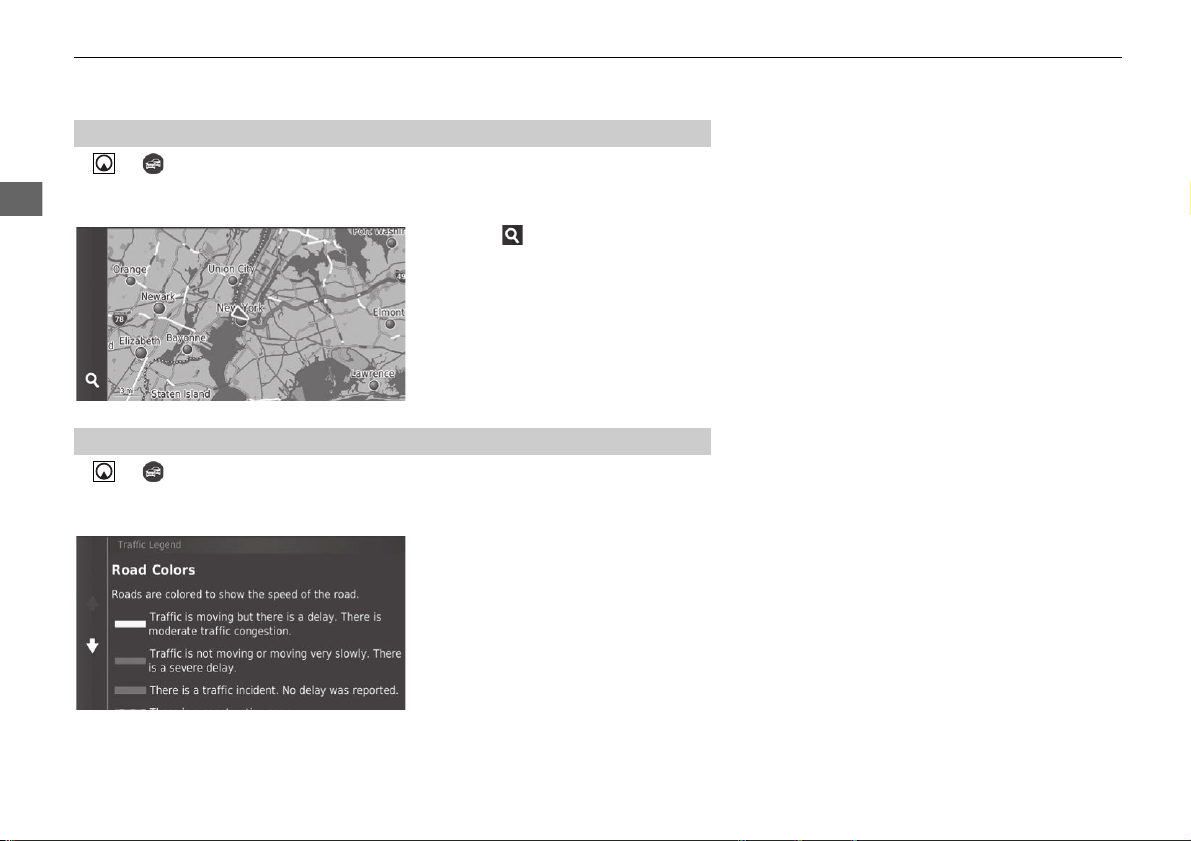
• Traffic Conditions: Displays the traffic flow and delays on nearby roads.
2 Viewing Traffic Delays P. 90
• Traffic Legend: Displays an overview of traffic legends.
2 Viewing Traffic Legends P. 90

88
uu Map Operation u Traffic Information
Navigation
H u u Alternate Route
Display the alternate route screen.
Select Go!.
■
Alternate Route
89
uu Map Operation u Traffic Information
Continued
Navigation
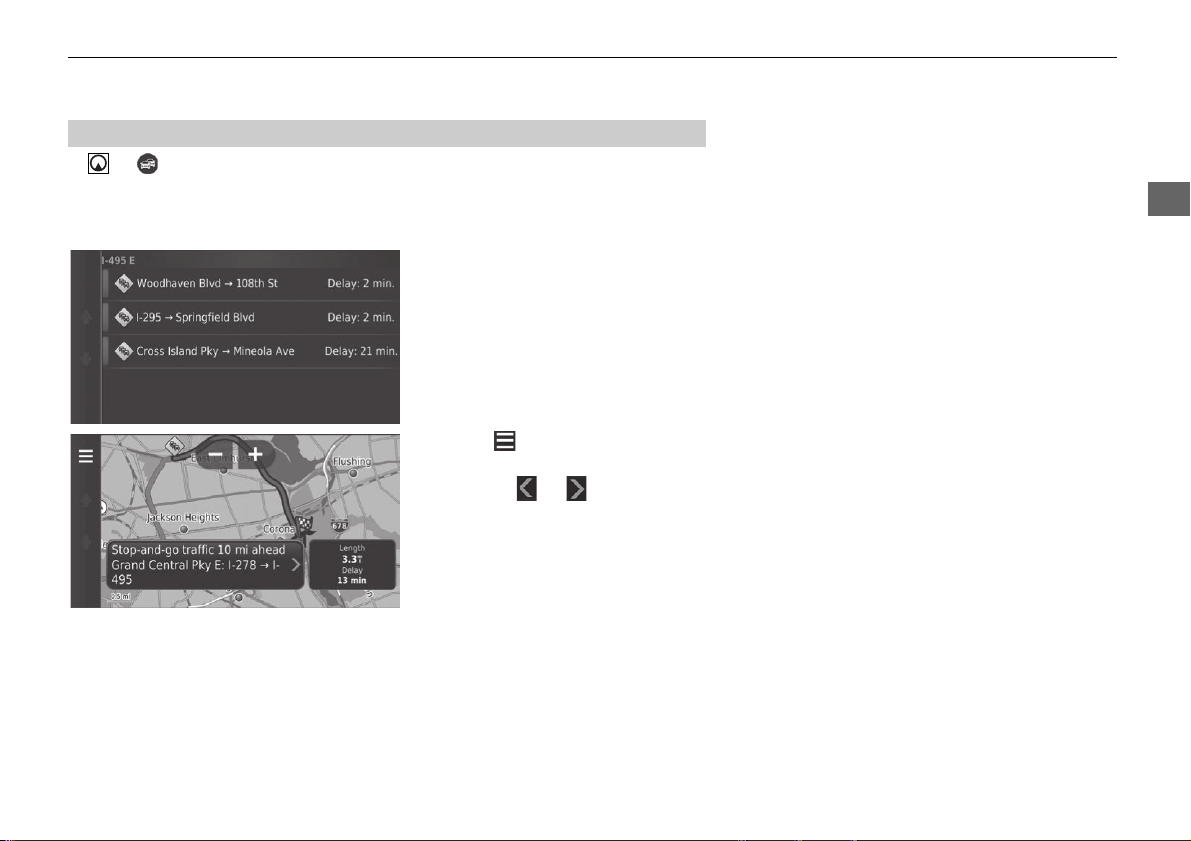
H u u Traffic On Route
View the traffic delays on your route, including the estimated time of each delay and
the distance to each delay. You can select the traffic you want to avoid manually.
1. Display a list of tr
affic events.
2. Select an option.
3. Select and then select Av
oid
to avoid the traffic delay.
u Select or to view other
traffic delays on your route.
■
Traffic Rerouting Manually
90
uu Map Operation u Traffic Information
Navigation
H u u Traffic Conditions
View the traffic flow and delays on nearby roads.
u Select if you want to display a
list of traffic delays.
H u u Traffic Legend
See an overview of the icons
and colors used on the traffic map.
The system displays the traffic
legend
.
■
Viewing Traffic Delays
■
Viewing Traffic Legends

92
uu Changing Your Route u Taking a Detour
Navigation
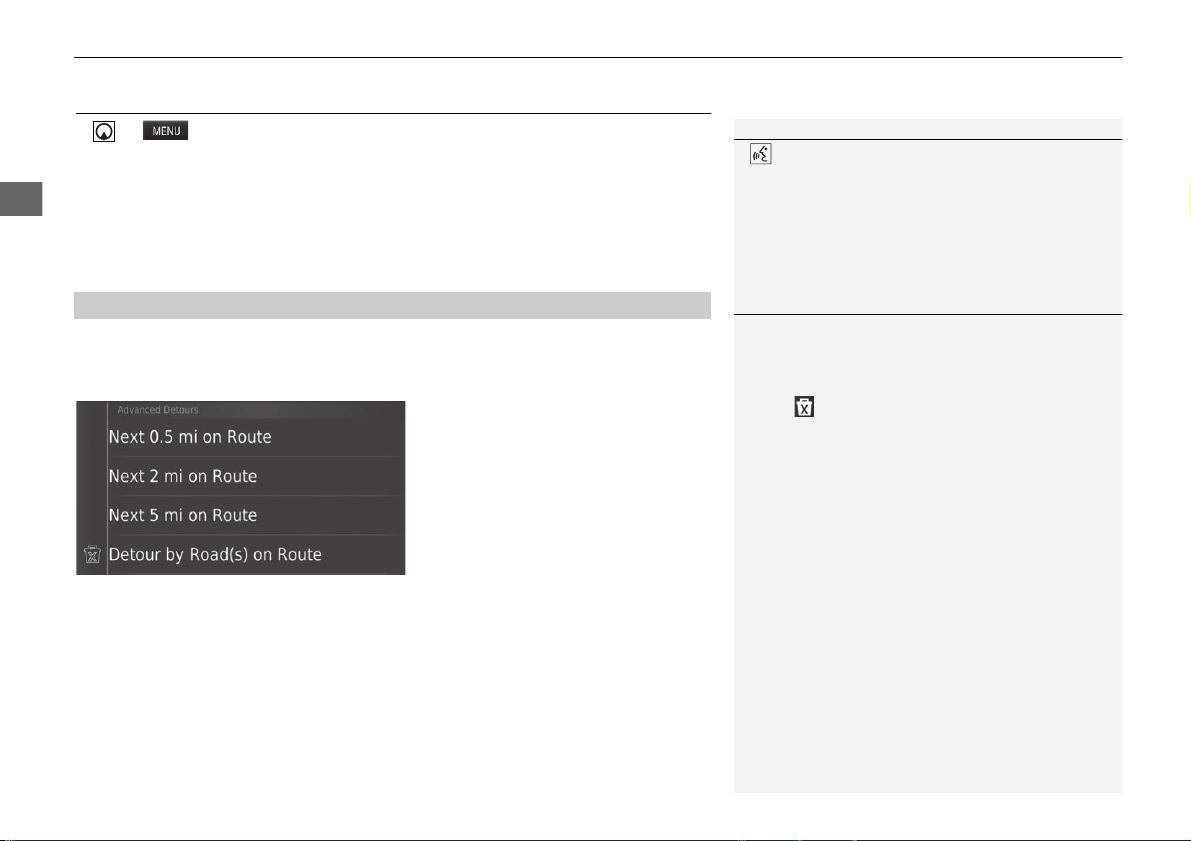
Taking a Detour
H u u Detour (when en route)
Calculate a new route to avoid something ahead of you. The system creates a new
route if possible and attempts to get you back on your original route as quickly as
possible.
You can take a detour for a specified distance along your route or detour around
specific roads. This is useful if you encounter construction zones, closed roads, or
poor road conditions.
Select an option.
The following options are available:
• Next 0.5 mi on Route: Calculates a new route by avoiding the next 0.5 mile on
your route.
• Ne
xt 2 mi on Route: Calculates a new route by avoiding the next 2 miles on
your route.
• Ne
xt 5 mi on Route: Calculates a new route by avoiding the next 5 miles on your
route.
• Detour by Road(s) on Route: Calculates a new route by avoiding the specific
roads on your route. Select roads from the turn list.
■
Taking a Detour Around Specified Areas
1 Taking a Detour
“Detour”
2 Using Voice Commands P. 5
2 Voice Control Operation P. 11
If your current route is the only reasonable option,
the system might not calculate a detour.
1 Taking a Detour Around Specified Areas
You can use this feature when Advanced Detours is
set to On.
2 Navigation P. 36
Select to delete all detours.
93
uu Changing Your Route u Adding Waypoints
Navigation
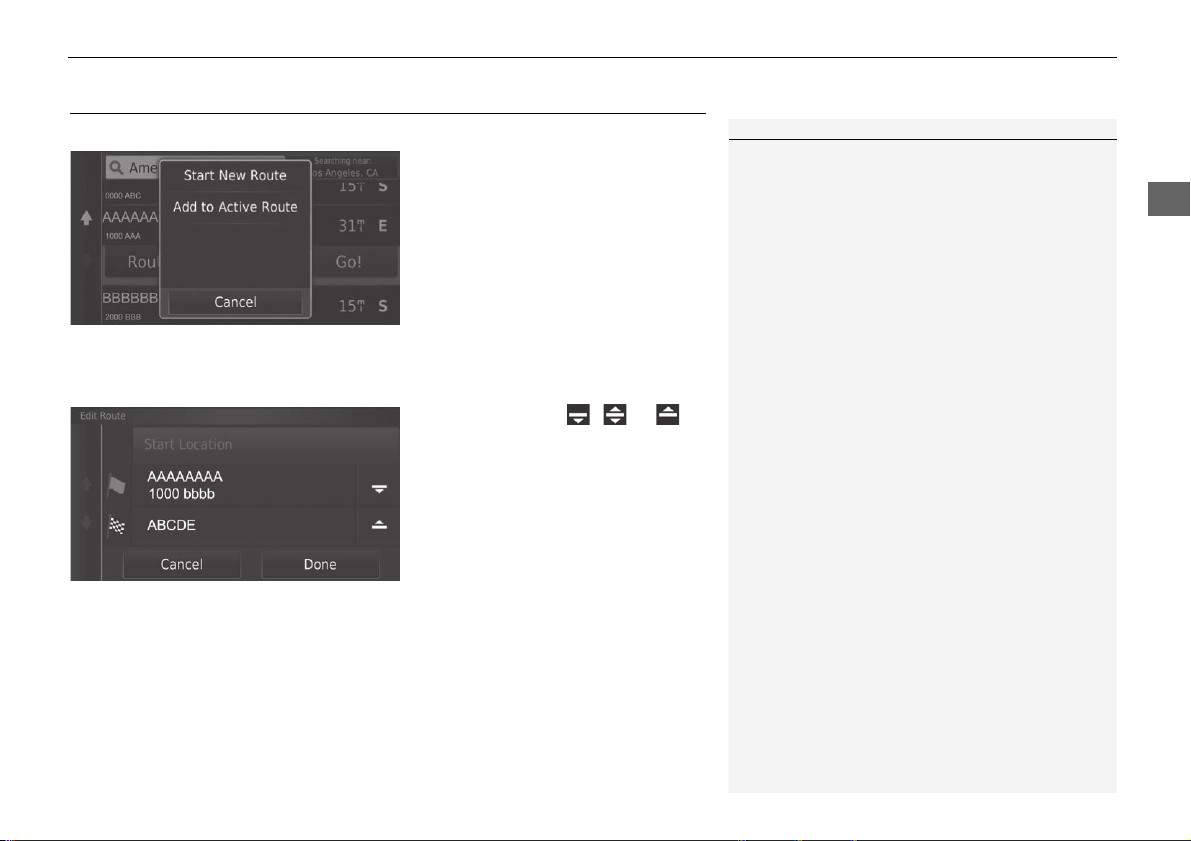
Adding Waypoints
Add waypoints (pit stops) along the route to your destination.
1. While en route, select a search
method to add a new destination
or waypoint.
2 Entering a Destination P. 54
2. Select a place. Select Go!.
3. Select Add to Active Route.
u Select Start New
Route to set
the location as your new
destination.
2 Entering a New Destination
P. 97
4. Select and hold , or
and then move the destination to
the desired position.
5. Select Done.
u The route is automatically
recalc
ulated and displayed on
the map screen.
1 Adding Waypoints
When you add a waypoint, the system may take
some time to update the arrival time.
94
Navigation
Changing Your Destination
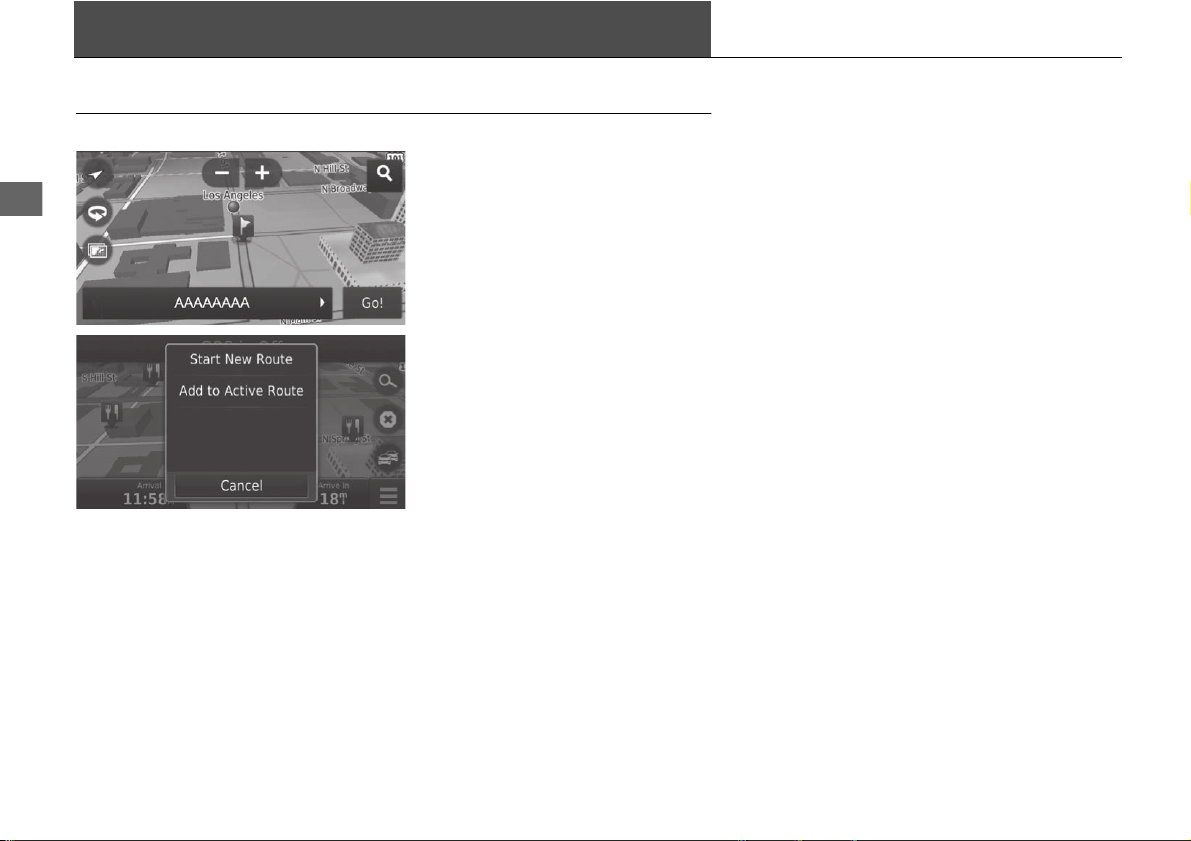
Selecting a Destination on the Map
Select a new destination when en route by selecting a location on the map.
1. Select any point on the map, or a
street, intersection, or category
icon.
2. Select Go!.
3. Select an
option.
The following options are available:
• Sta
rt New Route: Sets the location as your new destination.
• Add to Active Route: Sets the location as the first waypoint in the Edit Route
screen.
2 Adding Waypoints P. 93
95
uu Changing Your Destination u Searching Near Establishment
Continued
Navigation
Searching Near Establishment
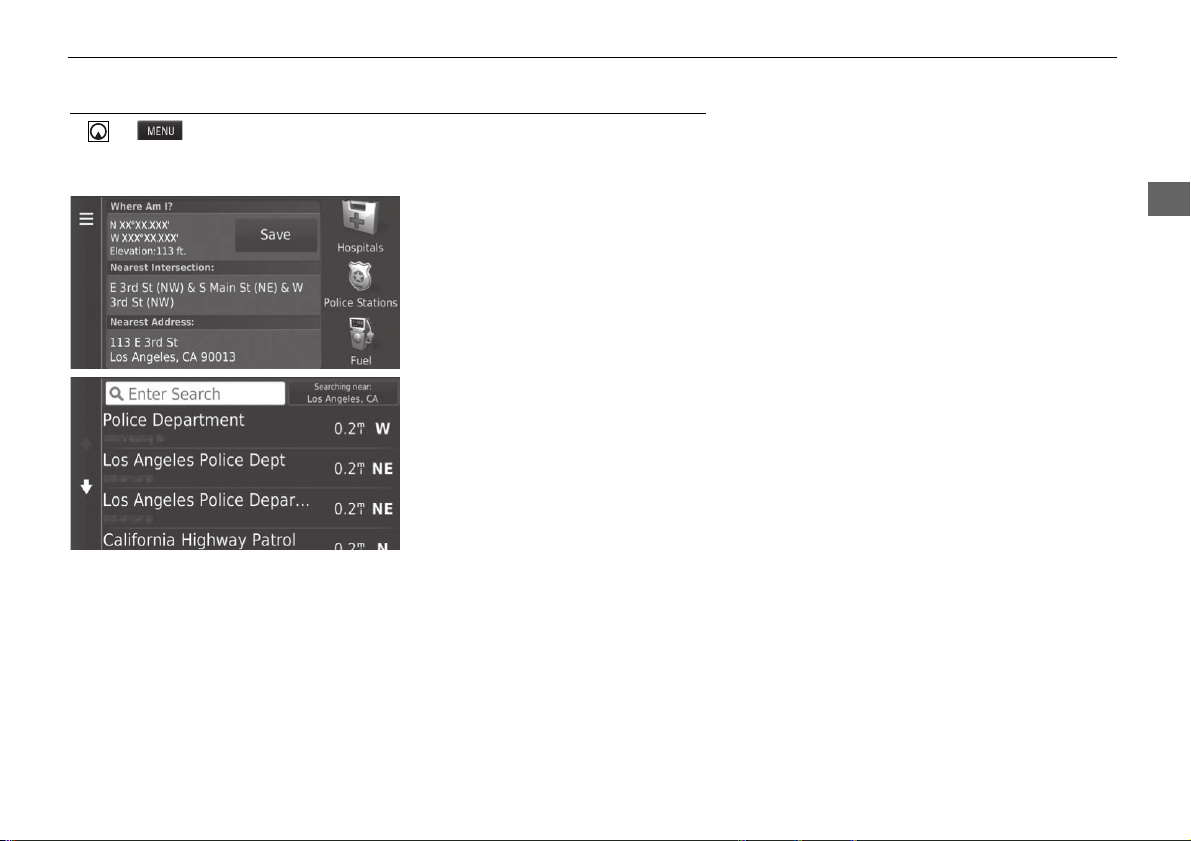
H u u Where Am I?
Search for a hospital, police station, or gas station around your current location.
1. Select a category type.
u You can also confirm your
current location, address, and
nearest intersection.
2. Select a
place.
3. Select Go!.
96
uu Changing Your Destination u Searching Near Establishment
Navigation
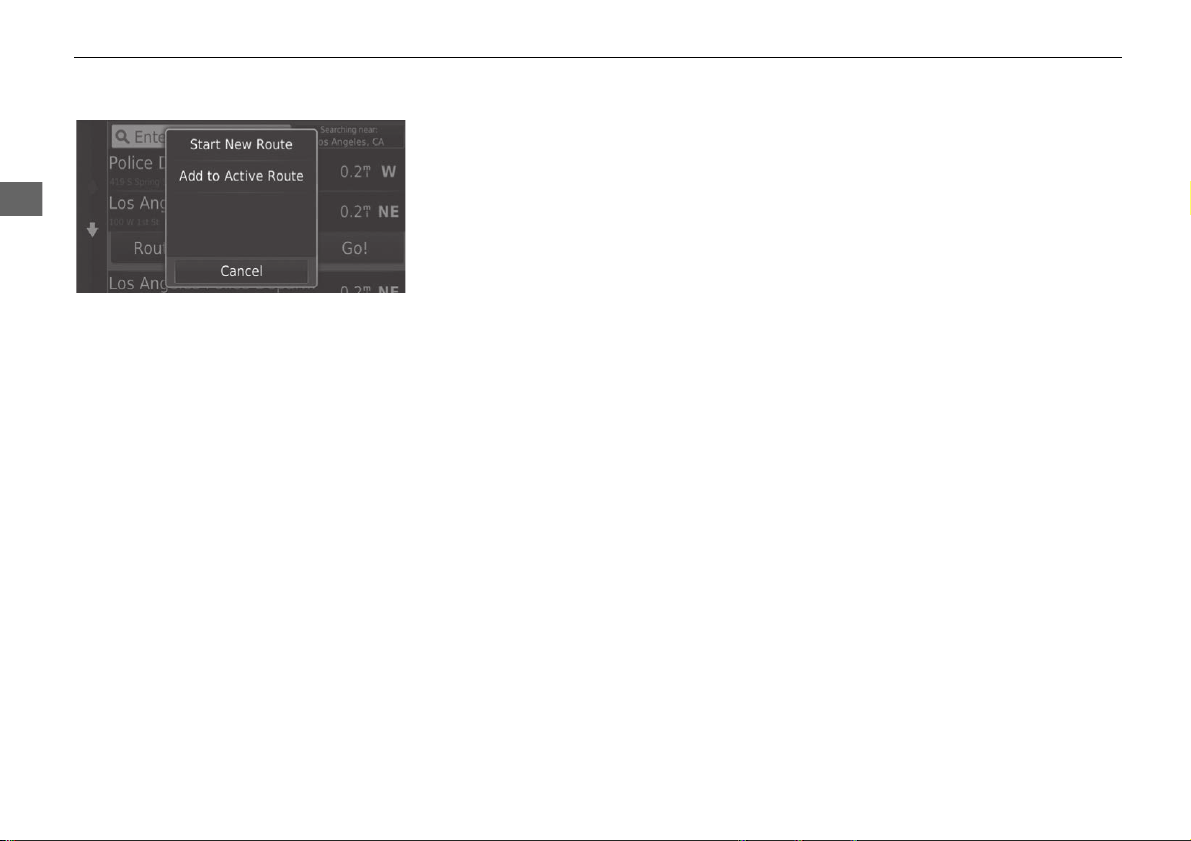
4. Select an option.
The following options are available:
• Start New Route: Sets the location as your new destination.
• Add to Active Route: Sets the location as the first waypoint in the Edit Route
screen.
2 Adding Waypoints P. 93

97
uu Changing Your Destination u Entering a New Destination
Navigation
Entering a New Destination
H u
Enter a new destination using the destination menu screen even when you are in
route.
1. Select a search method to enter a
new destination.
2 Entering a Destination P. 54
2. Select a place and then select Go!.
3. Select an option.
The following options are available:
• Sta
rt New Route: Sets the location as your new destination.
• Add to Active Route: Sets the location as the first waypoint in the Edit Route
screen.
2 Adding Waypoints P. 93
1 Entering a New Destination
You can also display the Where To? screen by
pressing button on the navigation top screen.
98
uu Changing Your Destination u Entering a New Destination from Trip Planner
Navigation
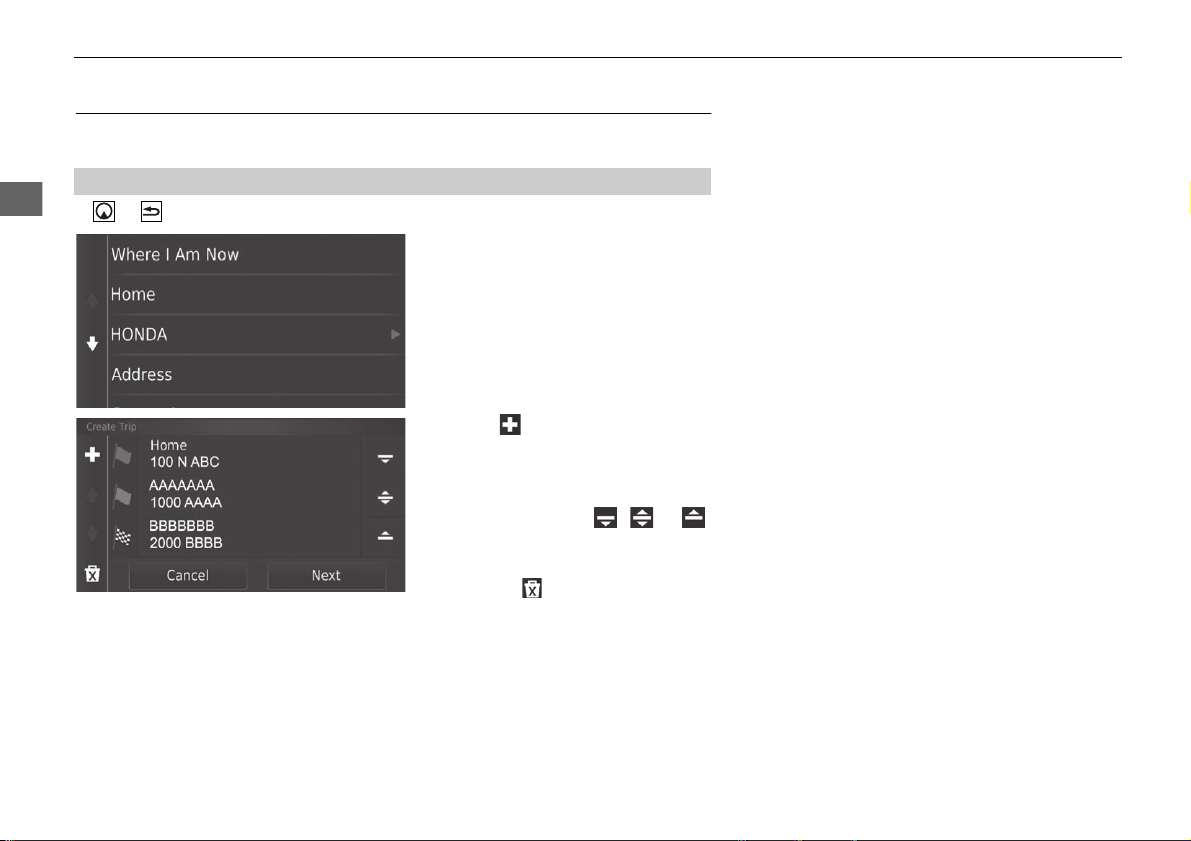
Entering a New Destination from Trip Planner
You can use the trip planner to create and save a route with multiple destinations.
H u u Apps u Trip Planner u New Trip u Select Start Location
1. Select a method to enter a new
destination.
2 Entering a Destination P. 54
2. Select Select.
3. Select to add additional
locations.
u R
epeat steps 1 and 2 to enter
the destination.
u Select and hold , or
and then move the destination
to the desired position.
u Select to delete unwanted
destinations.
4. Select Ne
xt.
■
Creating Your Route
99
uu Changing Your Destination u Entering a New Destination from Trip Planner
Continued
Navigation
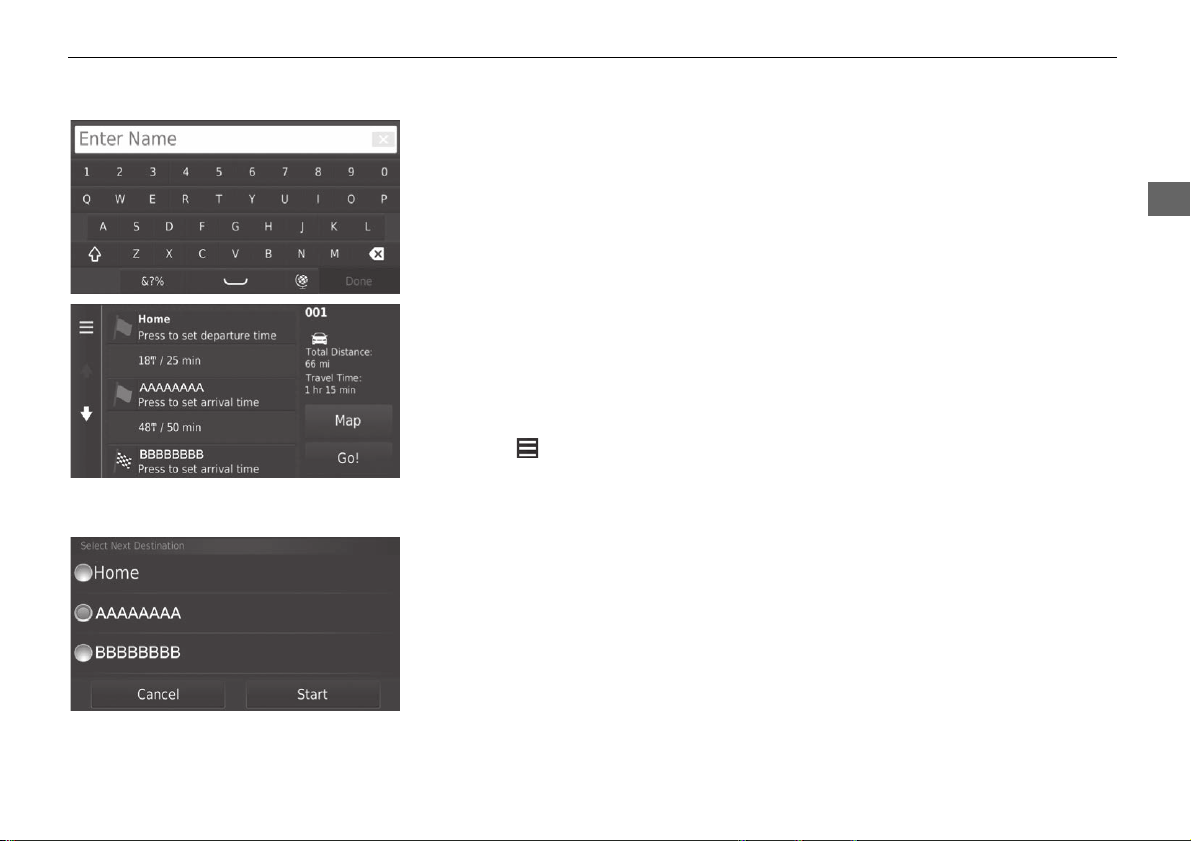
5. Enter a route name.
6. Select Done.
7. Select Go!.
u Select Ma
p to display the
destination and waypoints on
the map screen.
2 Reorder Your Destination
List Automatically P. 105
u Select to display the Edit
Trip screen.
2 Editing the Saved Route
P. 100
8. Select the next destination from
the list.
9. Select Start.
u The route is automatically
recalc
ulated and displayed on
the map screen.
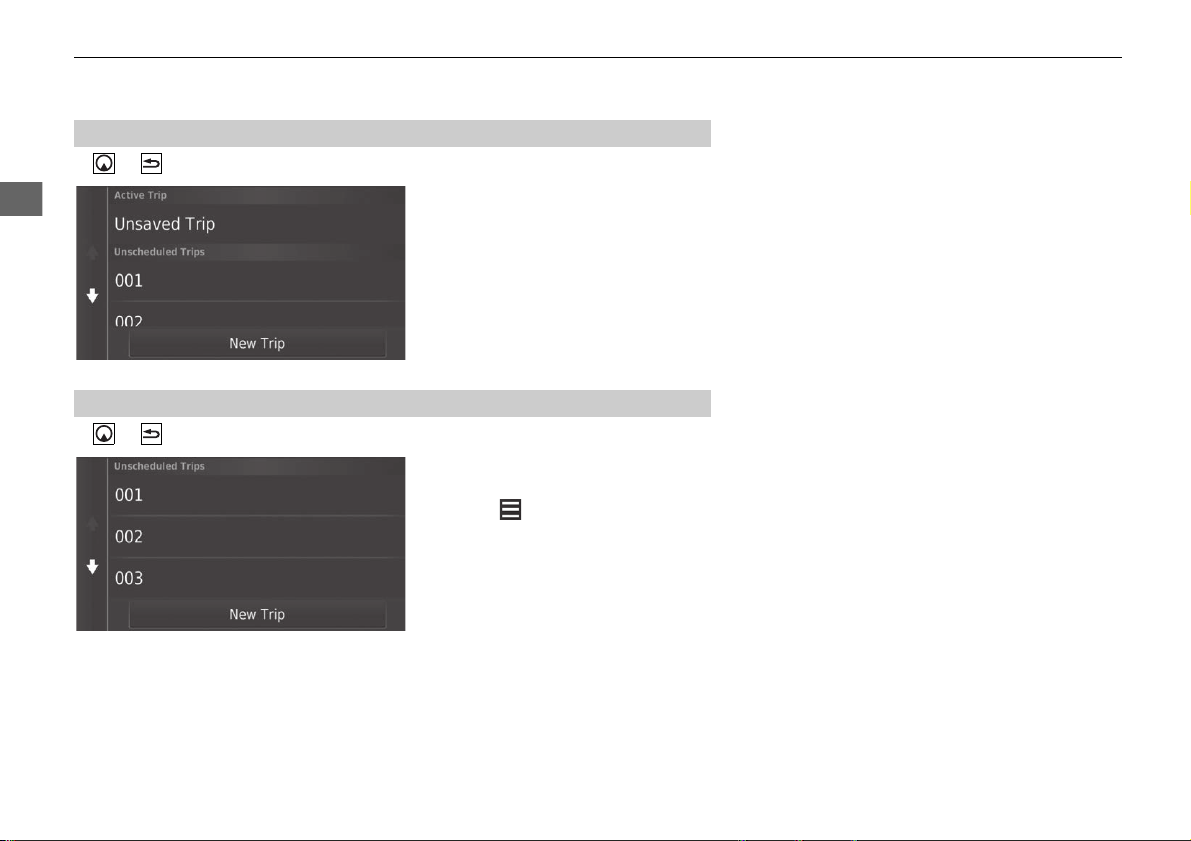
100
uu Changing Your Destination u Entering a New Destination from Trip Planner
Navigation
H u u Apps u Trip Planner
1. Select a
saved route.
2. Select Go!.
3. Select the next destination from
the list.
4. Select Start.
u The route is automatically
recalculat
ed and displayed on
the map screen.
H u u Apps u Trip Planner
1. Select
a saved route you want to
edit.
2. Select .
■
Using the Saved Route
■
Editing the Saved Route

101
uu Changing Your Destination u Entering a New Destination from Trip Planner
Navigation
3. Select an option.
The following options are available:
• Edit Destinations: Edits the destination list of the saved trip.
2 Editing Your Route P. 104
• Delete Trip: Deletes a saved trip.
• Rename Trip: Enters a new name for the saved trip.
• Optimize Order: Automatically orders the waypo
ints in the destination list.
2 Reorder Your Destination List Automatically P. 105
• Route Preference: Changes the route preferences (calculating method).
2 Recalculate Using Another Route Preference P. 106
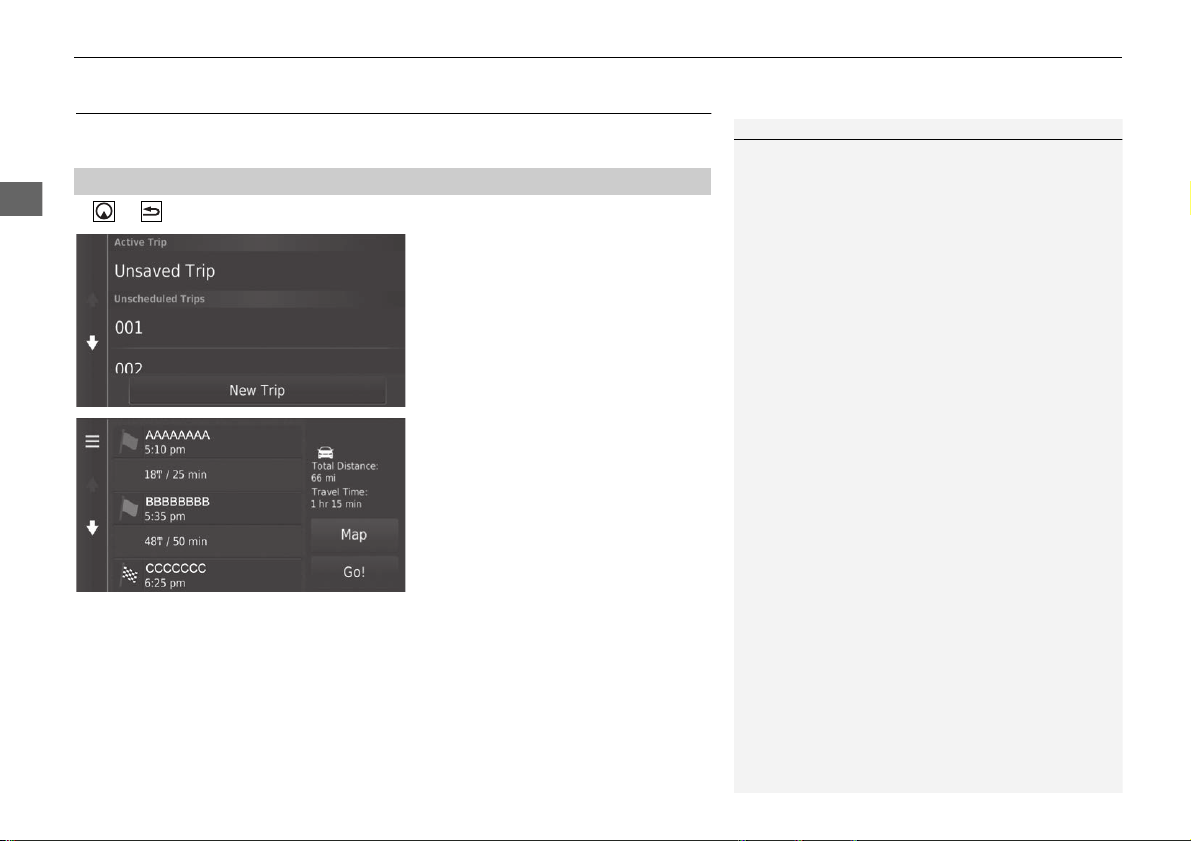
102
uu Changing Your Destination u Editing the Destination List
Navigation
Editing the Destination List
You can use the trip planner to edit and save a route with multiple destinations.
H u u Apps u Trip Planner
1. Select the trip you want to edit.
2. Select
a place from the destination
list.
■
Editing Places on Your Route
1 Editing the Destination List
Select Map to display the destination and waypoints
on the map screen.
2 Reorder Your Destination List
Automatically P. 105

103
uu Changing Your Destination u Editing the Destination List
Continued
Navigation
3. Select an option.
The following options are available:
• Departure Time (current location only): Sets the departure time.
• Cl
ear Departure Time (current location only): Clears the departure time.
• Arrival Time (destination and waypoints): Sets the arrival time.
• Clear Arrival Time (destination and waypoints): Clears the arrival time.
• Durat
ion (waypoints only): Sets the duration time.
• Change Location: Changes the destination or waypoint.
• Remove Location: Removes the destination or waypoint.
• Rena
me Location: Enters a new name for the location.

104
uu Changing Your Destination u Editing the Destination List
Navigation
H u u Apps u Trip Planner
1. Select
the trip you want to edit.
2. Select .
3. Select Edit Destinations.
4. Select and hold , or
and then move the destination to
th
e desired position.
u Select to add a new
location.
u Select to delete destinations
from the destination list.
5. Select Save.
u The route is automatically
recalculat
ed.
■
Editing Your Route
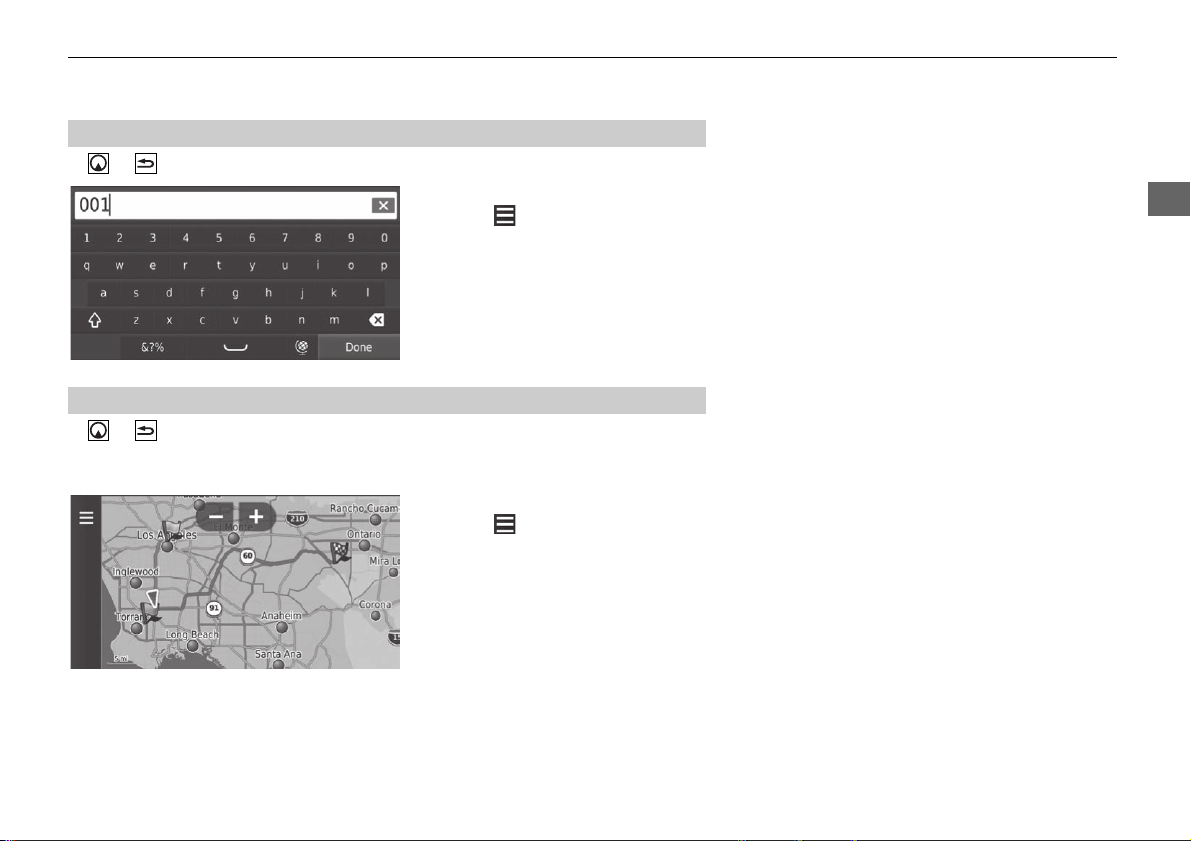
105
uu Changing Your Destination u Editing the Destination List
Continued
Navigation
H u u Apps u Trip Planner (when en route)
1. Select Unsaved Trip.
2. Select .
3. Select Save Trip.
4. Enter a route name.
5. Select Done.
H u u Apps u Trip Planner
Automatically order the waypoint
s in the destination list.
1. Select the tr
ip you want to edit.
2. Select .
3. Select Optimize Order.
4. Select Ma
p to display the
destination and waypoints on the
map screen.
■
Saving Your Route
■
Reorder Your Destination List Automatically
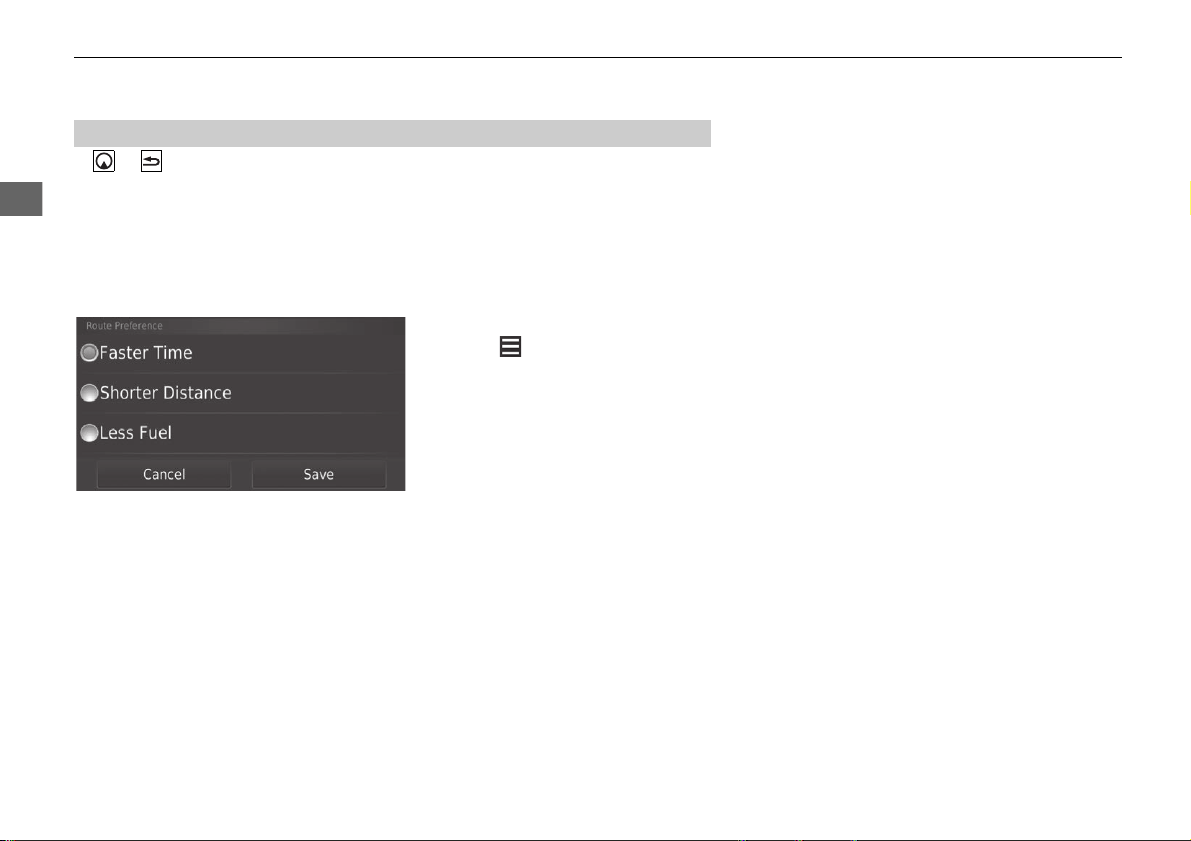
106
uu Changing Your Destination u Editing the Destination List
Navigation
H u u Apps u Trip Planner
The route preference is just for this time. If you want to change the route preference
for routing, change the navigation settings.
2 Calculation Mode P. 37
Recalculates the route using another route preference.
1. Select
the trip you want to edit.
2. Select .
3. Select R
oute Preference.
4. Select an option.
5. Select Save.
u The route is automatically
recalculat
ed.
■
Recalculate Using Another Route Preference

107
Other Features
This section describes the useful functions incorporated into the
navigation system.
About Apps Menu ................................ 108
ecoRoute
TM
............................................ 109
Setting Up the Vehicle Profile ............... 110
Viewing the Vehicle Profile................... 112
Calibrating the Fuel Economy ............... 113
Viewing the ecoChallenge Scores......... 114
Viewing Fuel Economy Information ...... 115
Viewing a Mileage Report .................... 116
Information Functions ........
.................. 117
Help..................................................... 117
Where I've Been................................... 118
Calculator ............................................ 118
Unit Converter ..................................... 119
GPS Information................................... 120
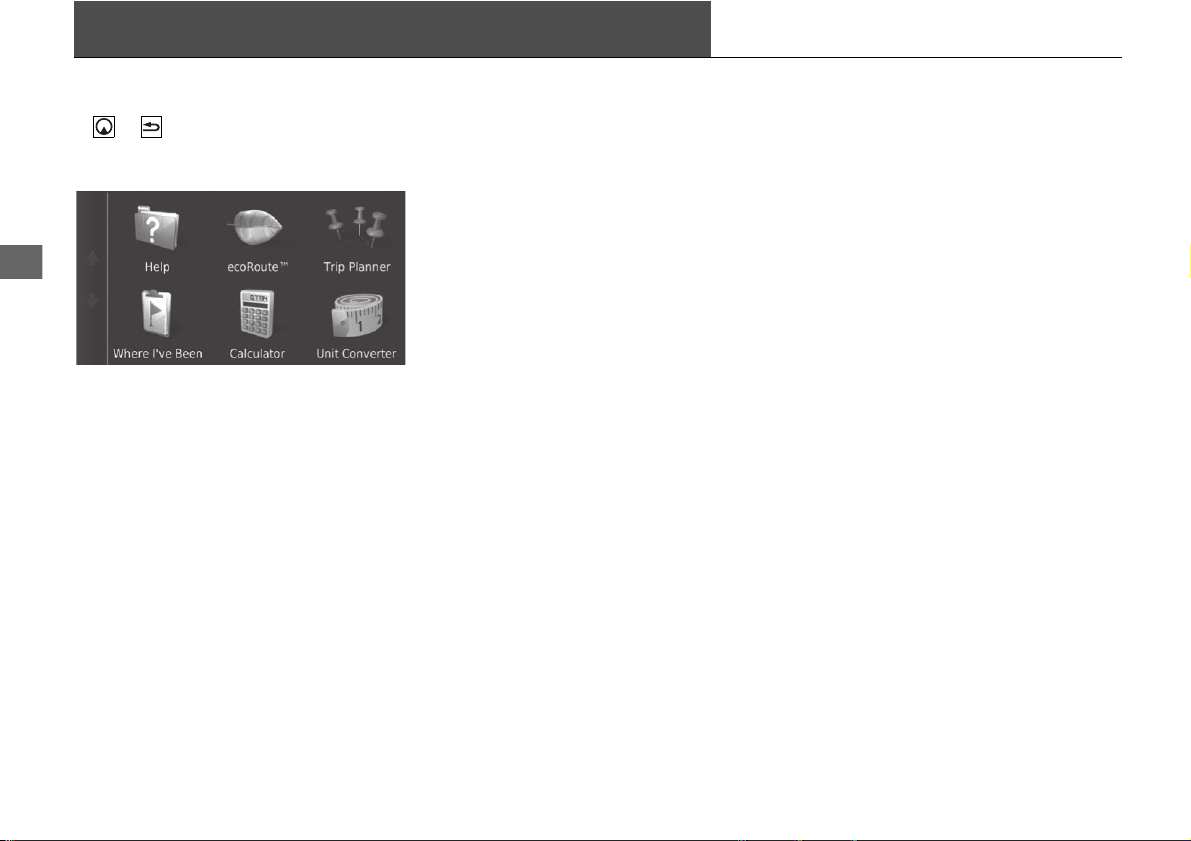
108
Other Features
About Apps Menu
H u u Apps
Display the useful functions incorporated into the navigation system.
Select an option.
The following options are available:
• Help: Displays the Help function.
2 Help P. 117
• ecoRoute
TM
: Allows for mileage and fuel cost entry and displays fuel economy
information, mileage reports, your driving habits, and vehicle information.
2 ecoRoute
TM
P. 109
• Trip Planner: Sets the trip planner to create and save a trip with multiple
destinations.
2 Editing the Destination List P. 102
2 Entering a New Destination from Trip Planner P. 98
• Where I've Been: Displays your previous routes and places you have stopped on
the map.
2 Where I've Been P. 118
• Calculator: Displays the calculator function.
2 Calculator P. 118
• Unit Converter: Displays the unit converter function.
2 Unit Converter P. 119
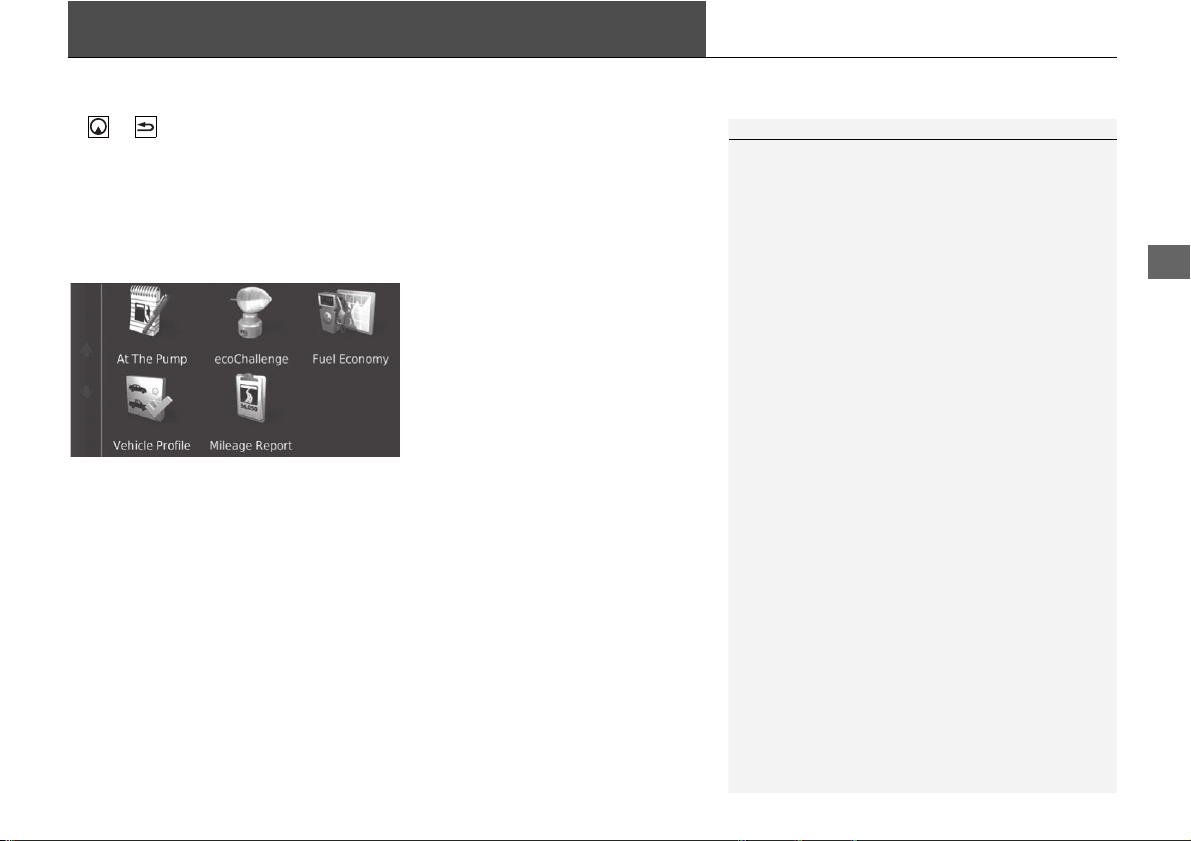
109
Other Features
ecoRoute
TM
H u u Apps u ecoRoute
TM
The ecoRoute
TM
feature calculates the fuel economy and the fuel price of navigating
to a destination and offers tools for improving fuel efficiency.
The data provided by the ecoRoute
TM
feature is an estimate only.
To receive more accurate fuel reports for your specific vehicle and driving habits,
calibrate the fuel economy.
Select an option.
The following options are available:
• At The Pump: Calibrates the fuel economy to receive more accurate fuel reports.
2 Calibrating the Fuel Economy P. 113
• ecoChallenge: Helps you maximize the vehicle fuel economy by scoring your
driving habits.
2 Viewing the ecoChallenge Scores P. 114
• Fuel Economy: Displays fuel economy information.
2 Viewing Fuel Economy Information P. 115
• Vehicle Profile: Checks or resets your vehicle information.
2 Viewing the Vehicle Profile P. 112
• Mileage Report: Displays mileage reports for your vehicle.
2 Viewing a Mileage Report P. 116
1 ecoRoute
TM
The first time you use the ecoRoute
TM
features, you
must enter vehicle information.
2 Setting Up the Vehicle Profile P. 110
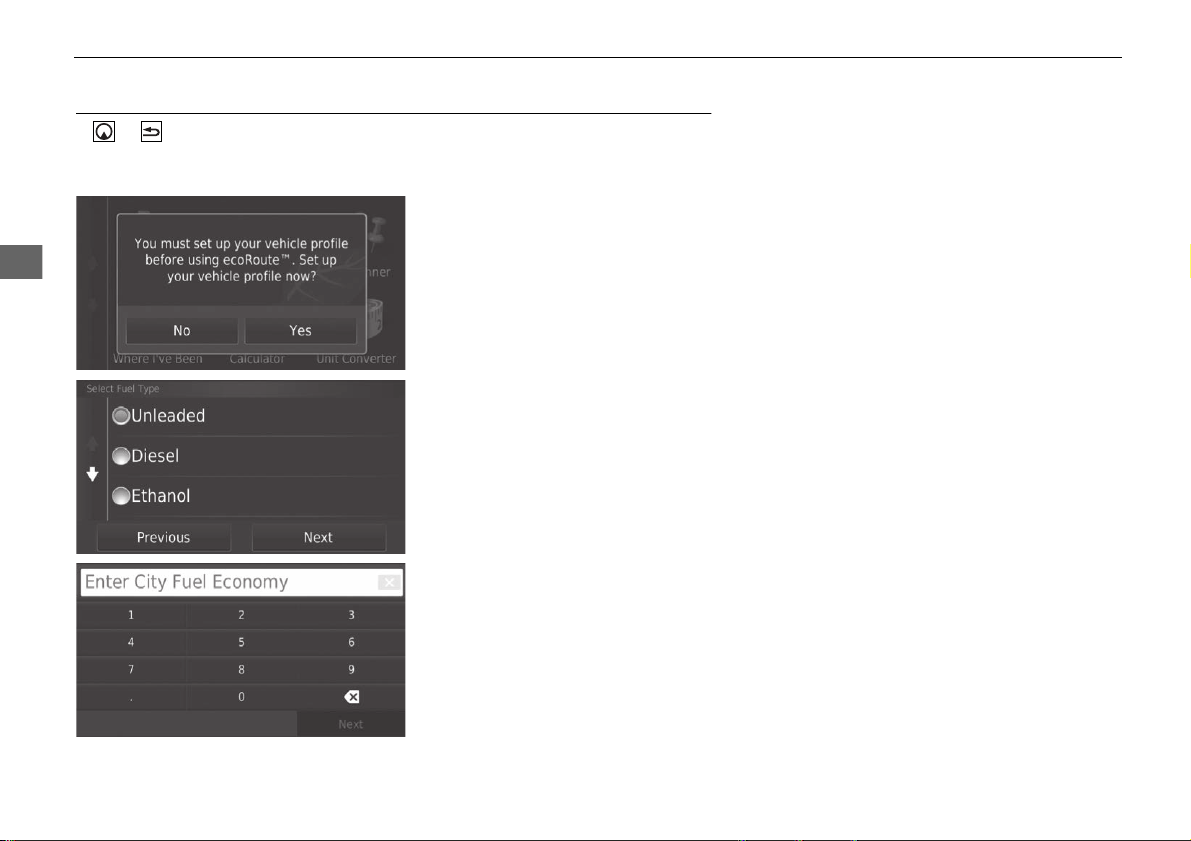
110
uu ecoRoute
TM
u Setting Up the Vehicle Profile
Other Features
Setting Up the Vehicle Profile
H u u Apps u ecoRoute
TM
The first time you use the ecoRoute
TM
features, you must enter vehicle information.
1. Select Yes.
2. Sele
ct a fuel type.
3. Sele
ct Next.
4. Ente
r your estimated city fuel
economy.
5. Sele
ct Next.
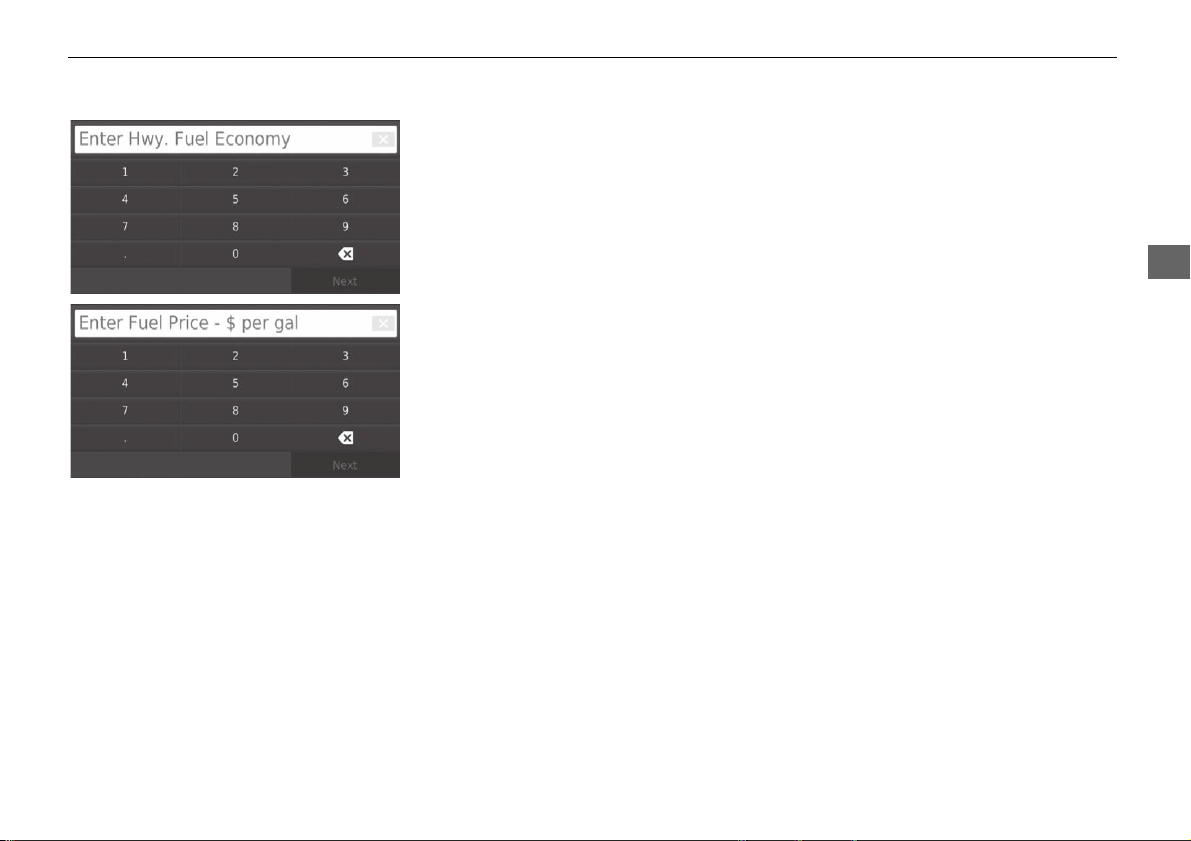
111
uu ecoRoute
TM
u Setting Up the Vehicle Profile
Other Features
6. Enter your estimated highway
fuel economy.
7. Select Next.
8. Enter
the fuel price.
9. Select Next.
u The confirmation message will
appear.
10. Select OK.
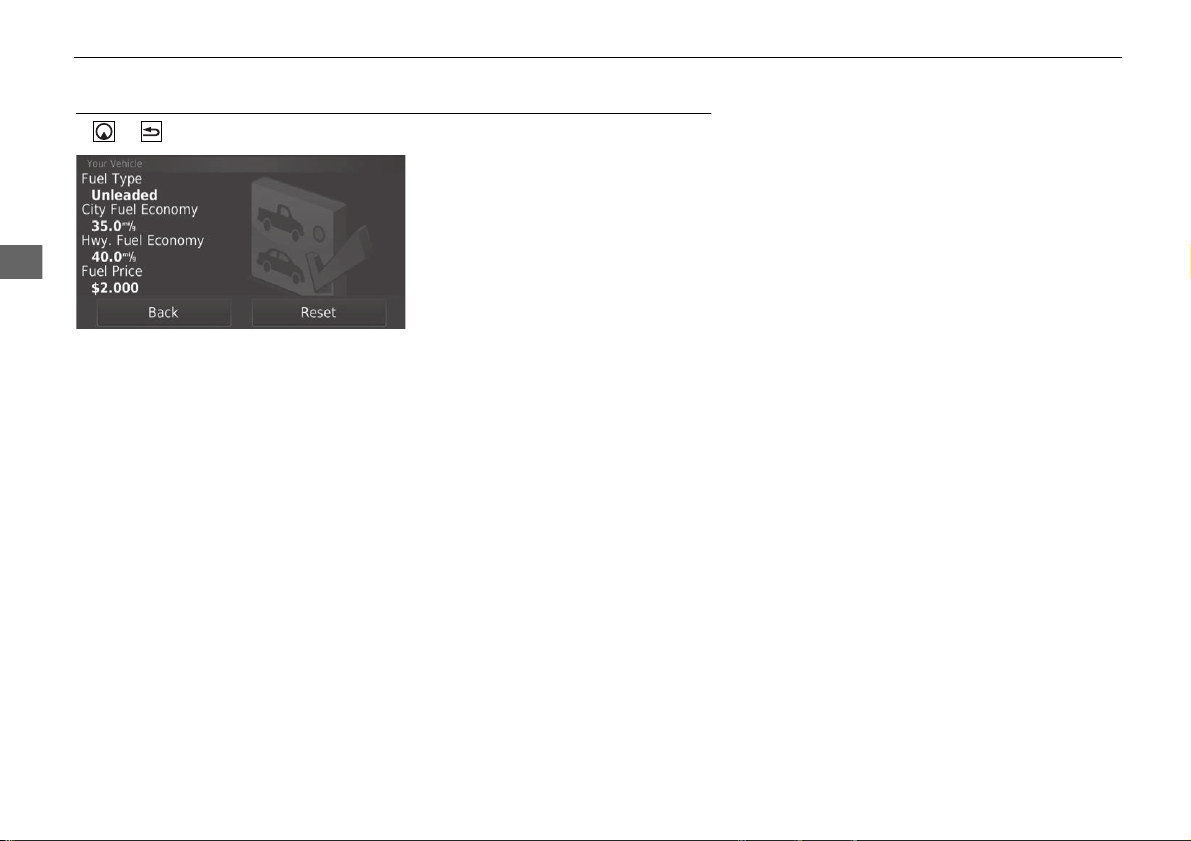
112
uu ecoRoute
TM
u Viewing the Vehicle Profile
Other Features
Viewing the Vehicle Profile
H u u Apps u ecoRoute
TM
Select Vehicle Profile.
u If you
want to reset the Vehicle
Profile, select Reset.
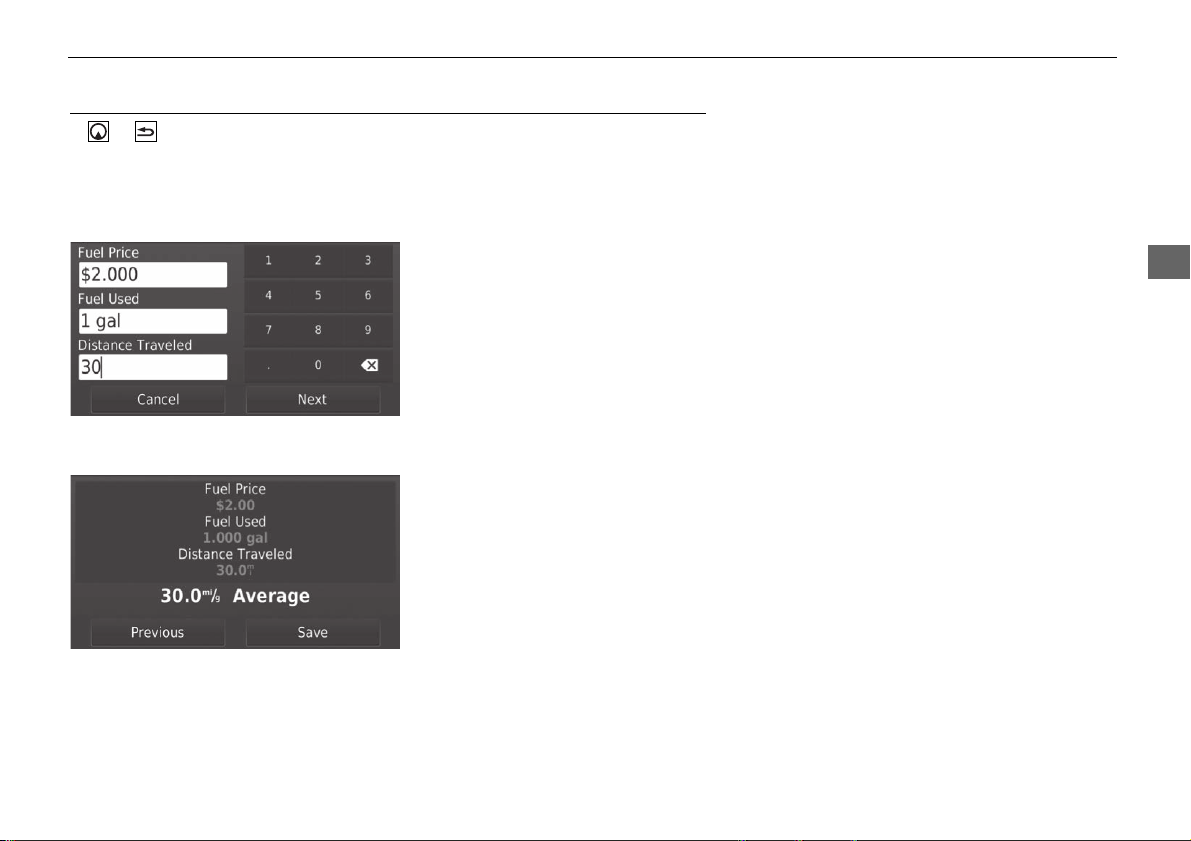
113
uu ecoRoute
TM
u Calibrating the Fuel Economy
Other Features
Calibrating the Fuel Economy
H u u Apps u ecoRoute
TM
u At The Pump
You can calibrate the fuel economy to receive more accurate fuel reports for your
specific vehicle and driving habits. You should calibrate when you fill up your fuel
tank.
1. Enter the current fuel price.
2. Enter
the amount of fuel the
vehicle has used since the last time
the fuel tank was filled.
3. Enter
the distance you have
traveled since the last time the fuel
tank was filled.
4. Select Next.
u The syste
m calculates the
average vehicle fuel economy.
5. Select Save.
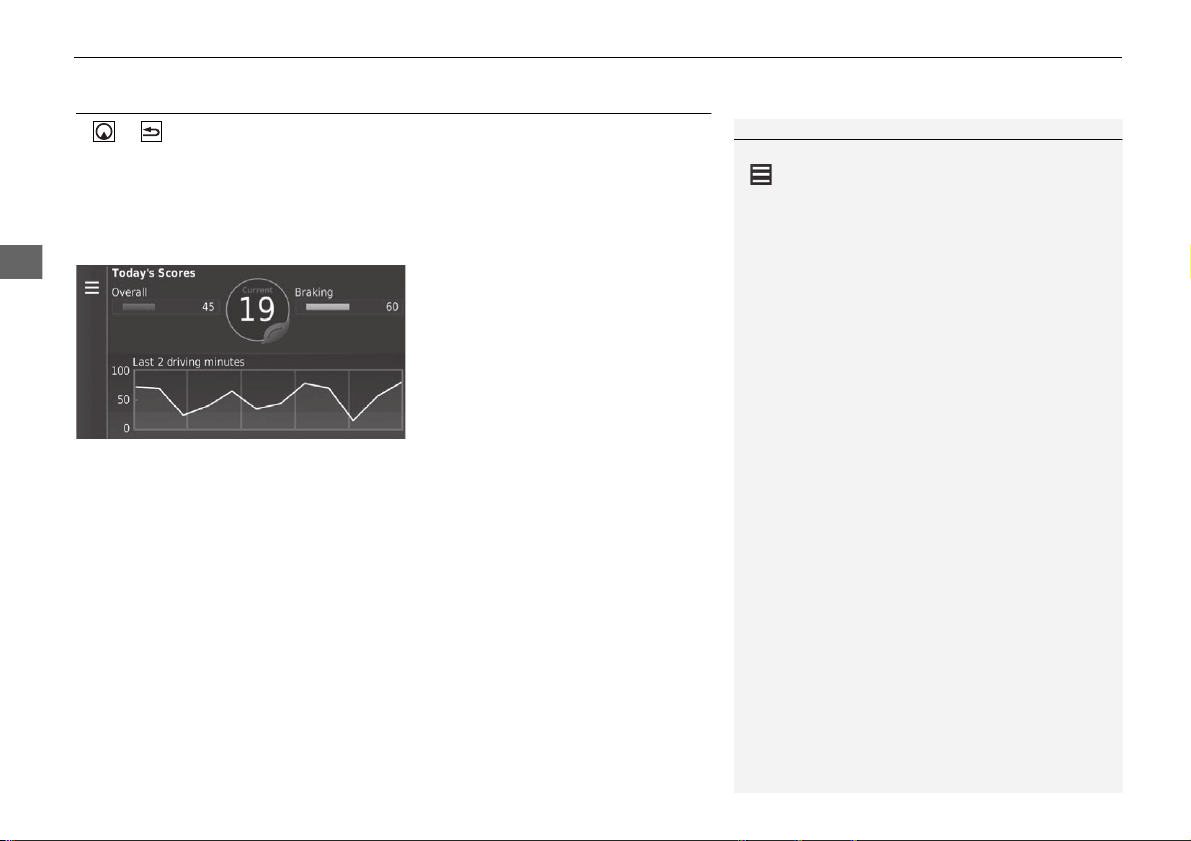
114
uu ecoRoute
TM
u Viewing the ecoChallenge Scores
Other Features
Viewing the ecoChallenge Scores
H u u Apps u ecoRoute
TM
u ecoChallenge
The ecoChallenge feature helps you maximize fuel economy by scoring your driving
habits. When your ecoChallenge scores are high, it means you have saved more fuel.
The ecoChallenge collects data and calculates a score whenever the vehicle is
moving.
The following information is displayed:
• Cu
rrent: Displays the score for your current driving activity.
• Overall: Displays an average of the speed, acceleration, and braking score.
• Speed: Displays your score for driving your
vehicle at the optimal speed for
conserving fuel (45–60 mph (72–96 km/h) for most vehicles).
• Acceleration: Displays your score for smooth and gradual acceleration. You lose
points for rapid acceleration.
• Braki
ng: Displays your score for smooth and gradual braking. You lose points for
hard braking.
1 Viewing the ecoChallenge Scores
If you want to reset the ecoChallenge scores, select
and then select Reset.
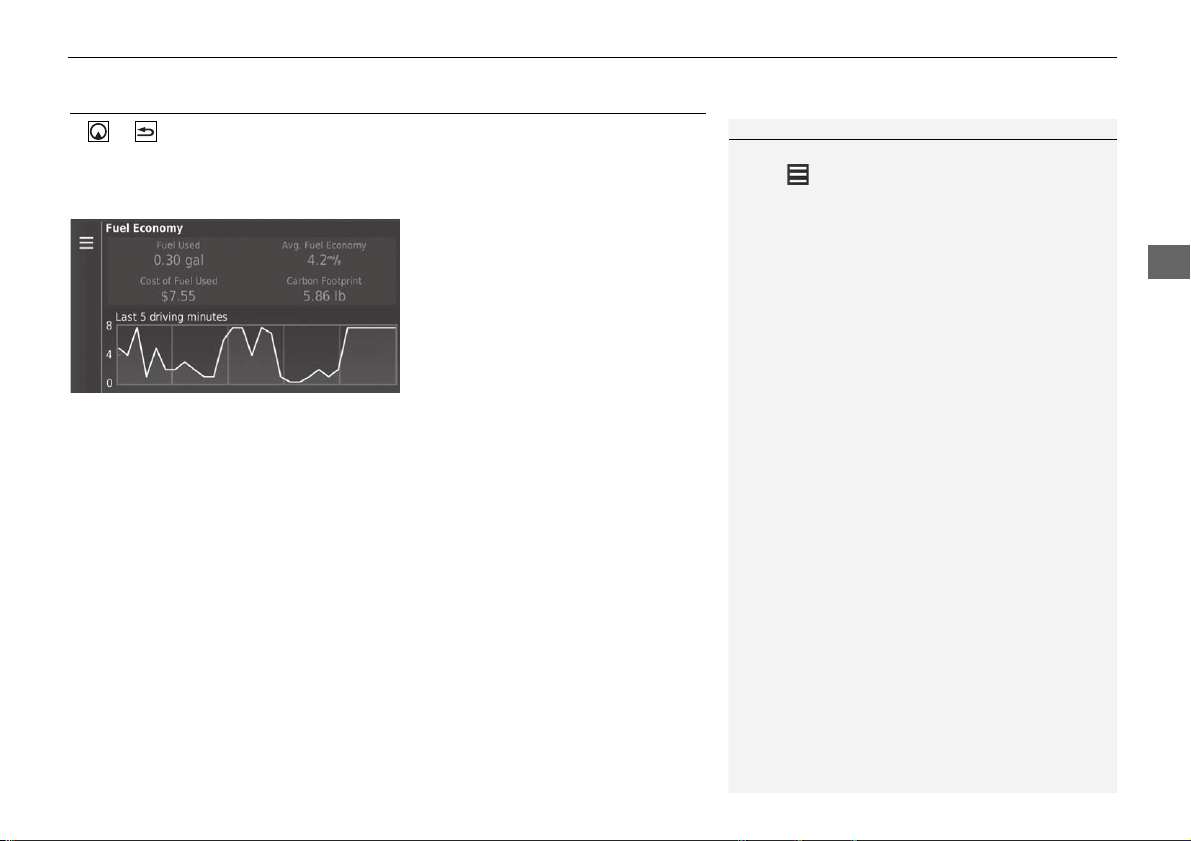
115
uu ecoRoute
TM
u Viewing Fuel Economy Information
Other Features
Viewing Fuel Economy Information
H u u Apps u ecoRoute
TM
u Fuel Economy
You can view your fuel consumption, your total fuel cost, and your average fuel
economy.
Select a section of the graph to zoom
in.
1 Viewing Fuel Economy Information
If you want to reset the Fuel Economy information,
select and then select Reset.
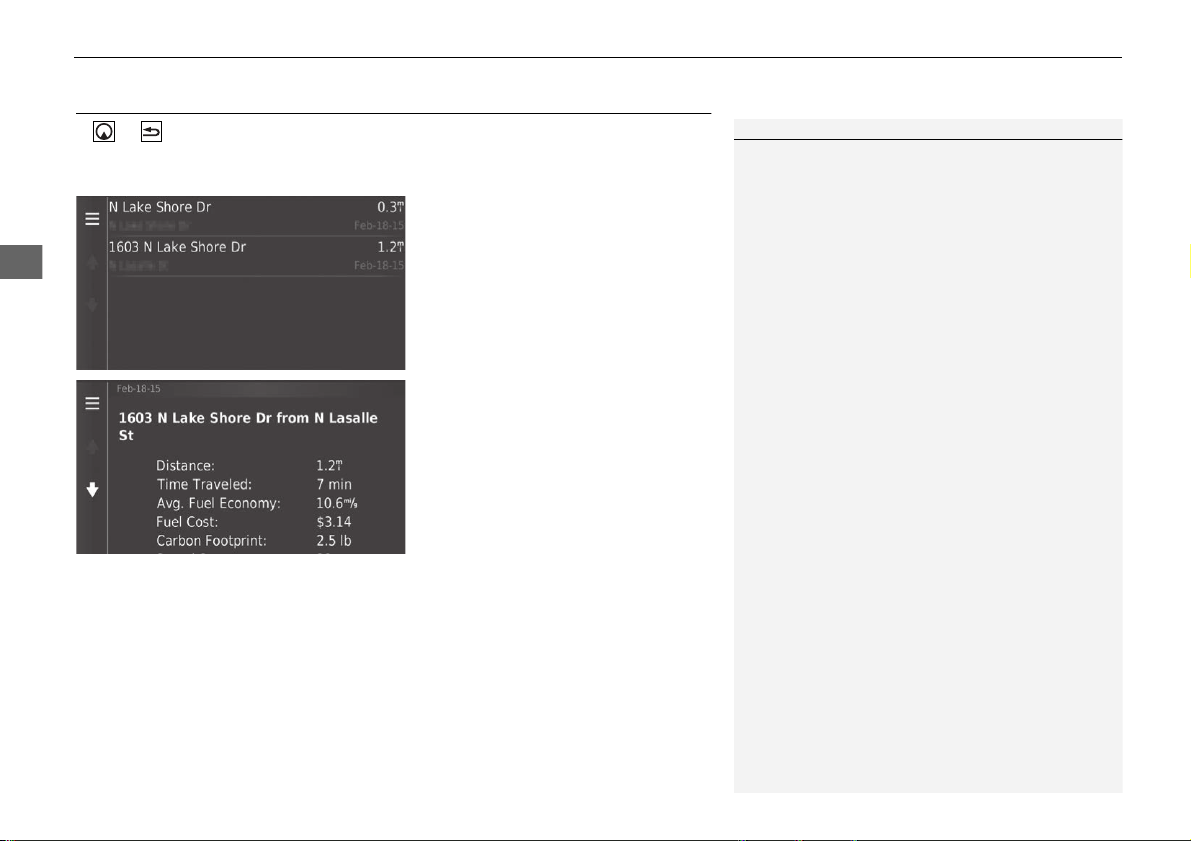
116
uu ecoRoute
TM
u Viewing a Mileage Report
Other Features
Viewing a Mileage Report
H u u Apps u ecoRoute
TM
u Mileage Report
You can view the mileage reports on the system.
Select a report.
u Display the Mileage Repor
t.
1 Viewing a Mileage Report
Mileage Reports
Mileage reports provide the distance, the time, the
average fuel economy, and the fuel cost of
navigating to a destination.
A mileage report is created for every route that you
drive. If you stop a route on the system, a mileage
report is created for the distance you traveled.

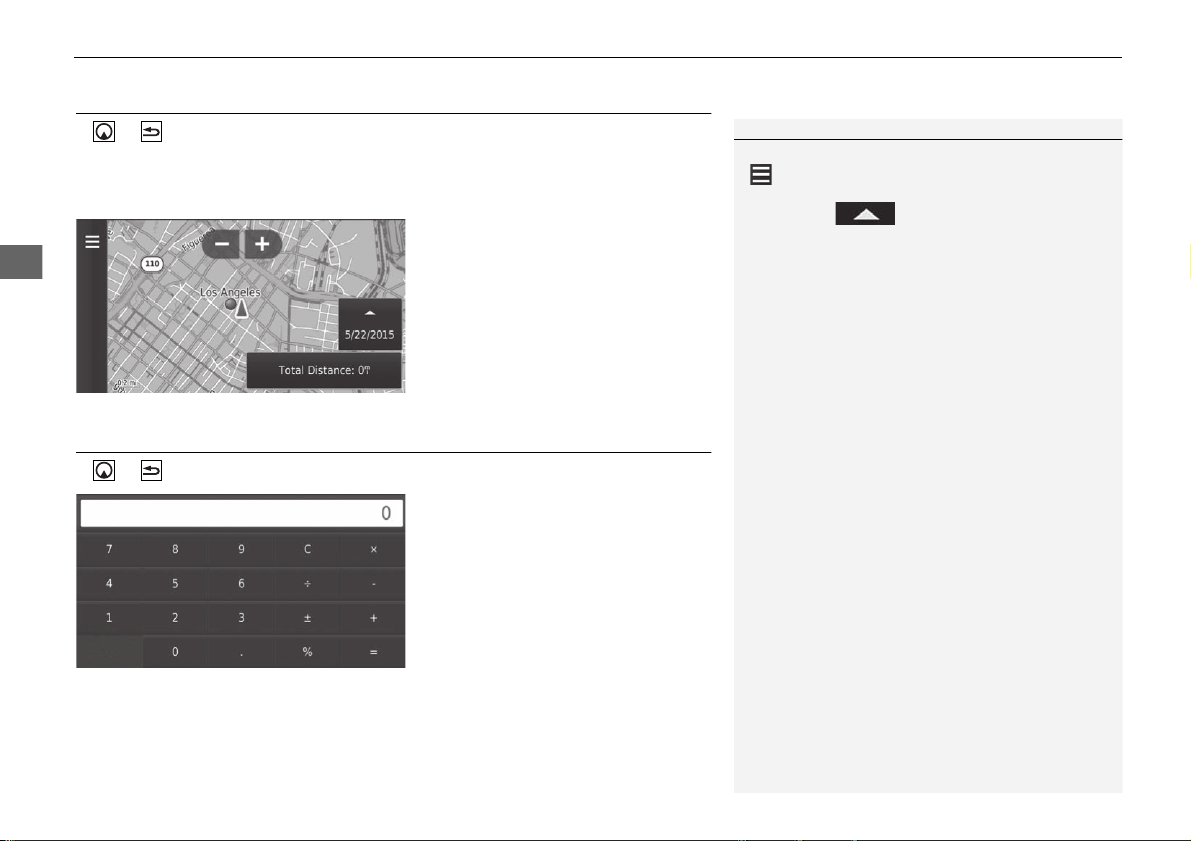
118
uu Information Functions u Where I've Been
Other Features
Where I've Been
H u u Apps u Where I've Been
Before you can use this feature, you must enable the travel history feature. You can
view your previous routes and places you have stopped on the map.
Calculator
H u u Apps u Calculator
Enter a numeric value to calculate.
1 Where I've Been
If you want to delete the recorded information, select
and then select Clear Travel History.
If you select , you can select the day to
display the travel history.
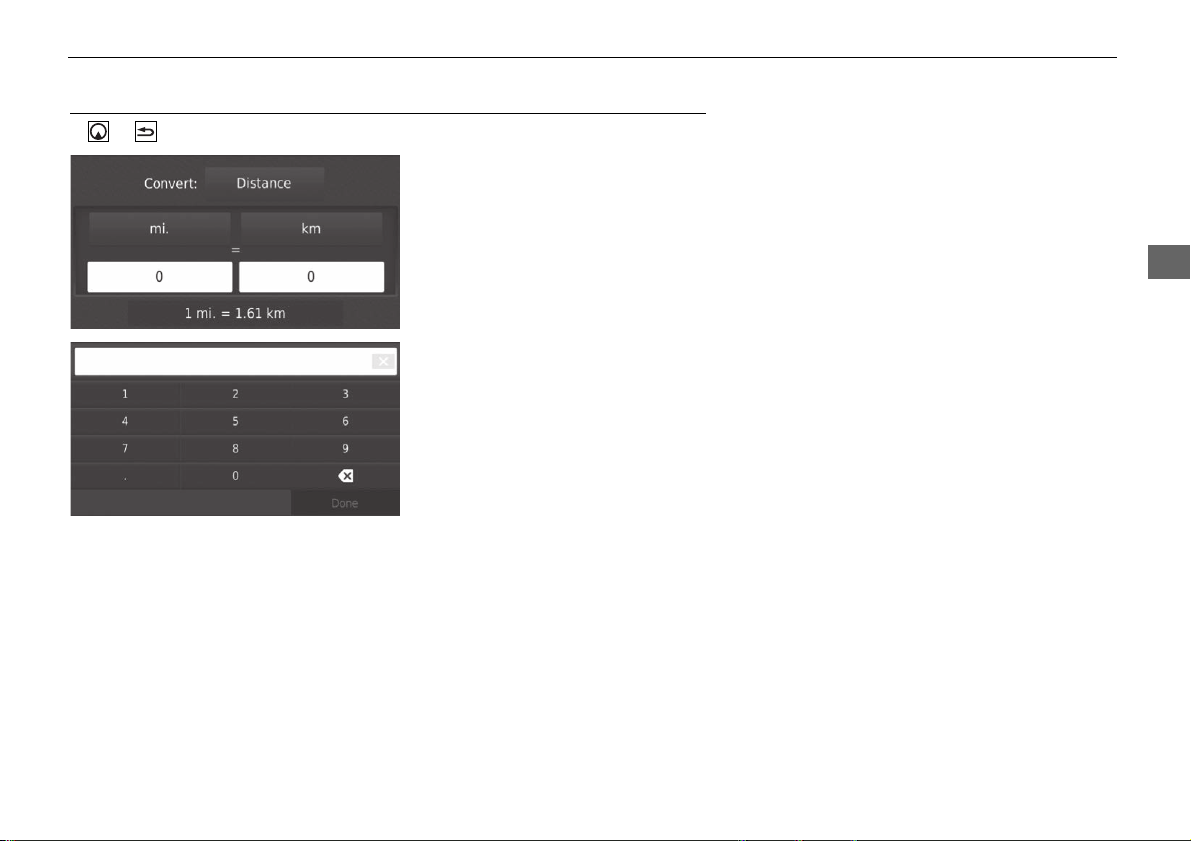
119
uu Information Functions u Unit Converter
Other Features
Unit Converter
H u u Apps u Unit Converter
1. If necessary,
select a measurement
category (e.g., Distance).
u Select a measurement categor
y
from the list. Select Save.
2. If neces
sary, select a unit of
measurement (e.g., km).
u Select a unit of measurement
from the list. Select Save.
3. Enter a numeric value to convert
(e.g., 1000). Select Done.
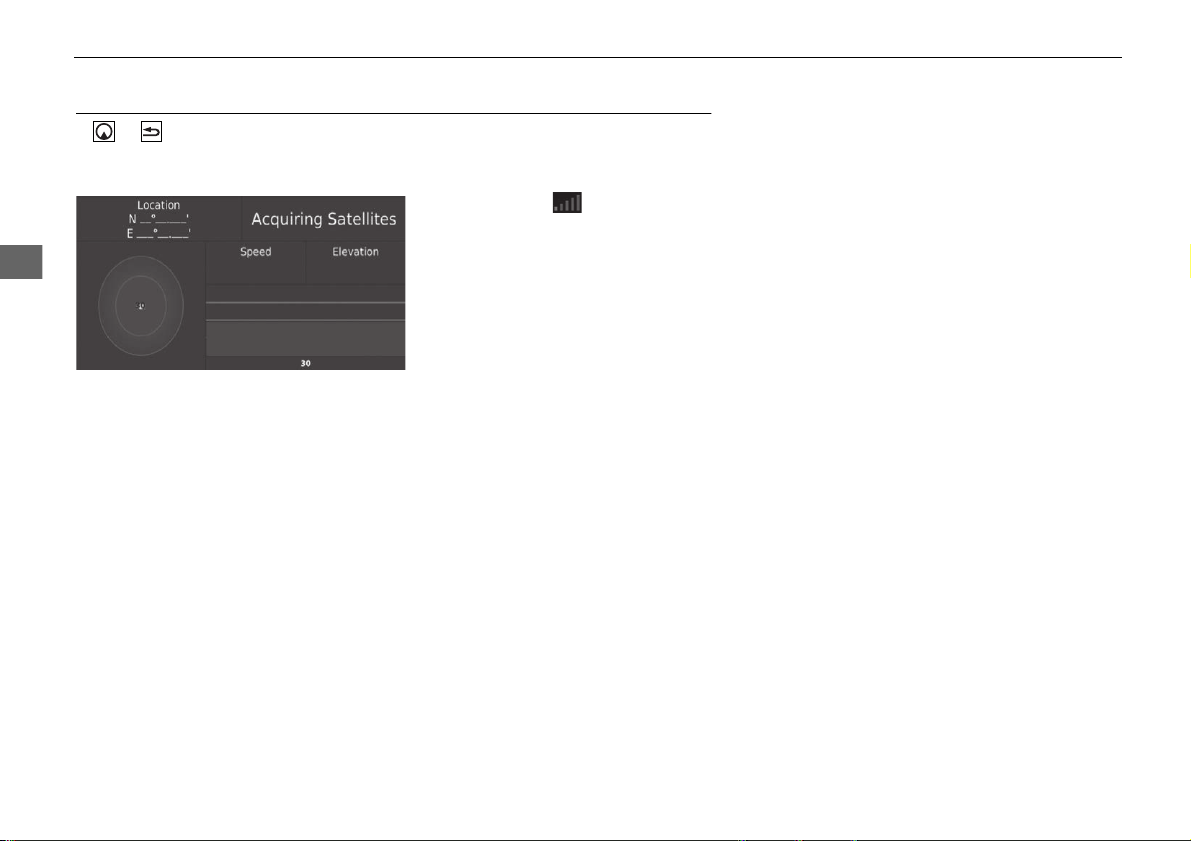
120
uu Information Functions u GPS Information
Other Features
GPS Information
H u
The GPS info screen displays the satellites’ status.
Select and hold .
u A solid bar indicates that the GPS
satellite is ready for use.

121
Troubleshooting
Troubleshooting ................................... 122
Map, Voice, Entering Destinations........ 122
Traffic .................................................. 123
Guidance, Routing ............................... 124
Update, Coverage, Map Errors ............. 125
Display, Accessories.............................. 125
Miscellaneous Questions ...................... 126
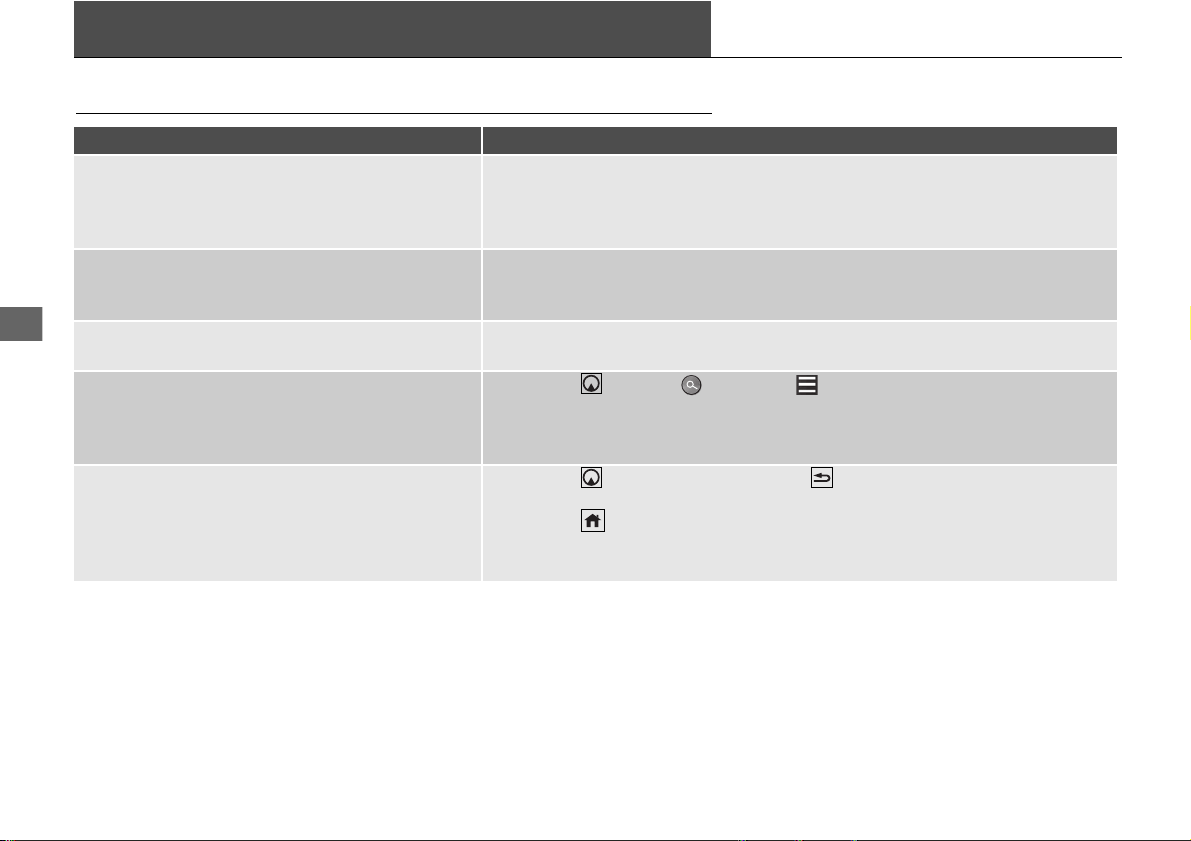
122
Troubleshooting
Troubleshooting
Map, Voice, Entering Destinations
Problem Solution
The Startup Confirmation screen is displayed every
time I start the car.
This is normal. The Startup Confirmation screen reminds you and your guest
drivers to always operate the navigation system in a safe manner. The Startup
Confirmation screen goes off after a certain period of time, even if you do not
select OK.
The navigation system reboots by itself (returns to
the opening screen).
A reboot can be caused by extreme temperatures or shock from bumpy roads, and
does not necessarily indicate a problem. If this happens frequently, please see your
dealer.
How do I specify a destination when an entered city
or street could not be found?
Try selecting the destination directly from the map.
2 Map Input P. 73
How do I delete saved places? 1. Press the button > > Saved > > Delete Saved Places.
2. Select
saved places you want to delete.
3. Select Delete.
4. Select Yes.
I cannot hear the navigation system voice. 1. Press the button and then press the button. Select Settings >
Navigation and enable Voice Prompts.
2. Press the button. Select Settings > System > Sound/Beep tab.
Turn up Gu
idance Volume, if volume level is low.
For more details, see the Owner’s Manual.

123
uu Troubleshooting u Traffic
Troubleshooting
Traffic
Problem Solution
Traffic information is missing or is not displaying
properly. What is wrong?
Verify the following:
●
Traffic information relies on a clear signal. If signal strength is low, traffic data
may not be available.
●
Check that the traffic icons are turned on.
2 Traffic Information P. 86
●
It is possible that there is a temporary technical problem with your metropolitan
area traffic provider. You can call Honda Automobile Customer Service to see if
there is an outage.
2 Honda Automobile Customer Service Contact Information P. 130
●
If the situation persists, see your Honda authorized dealer for assistance.
●
Traffic information is available only in certain areas.
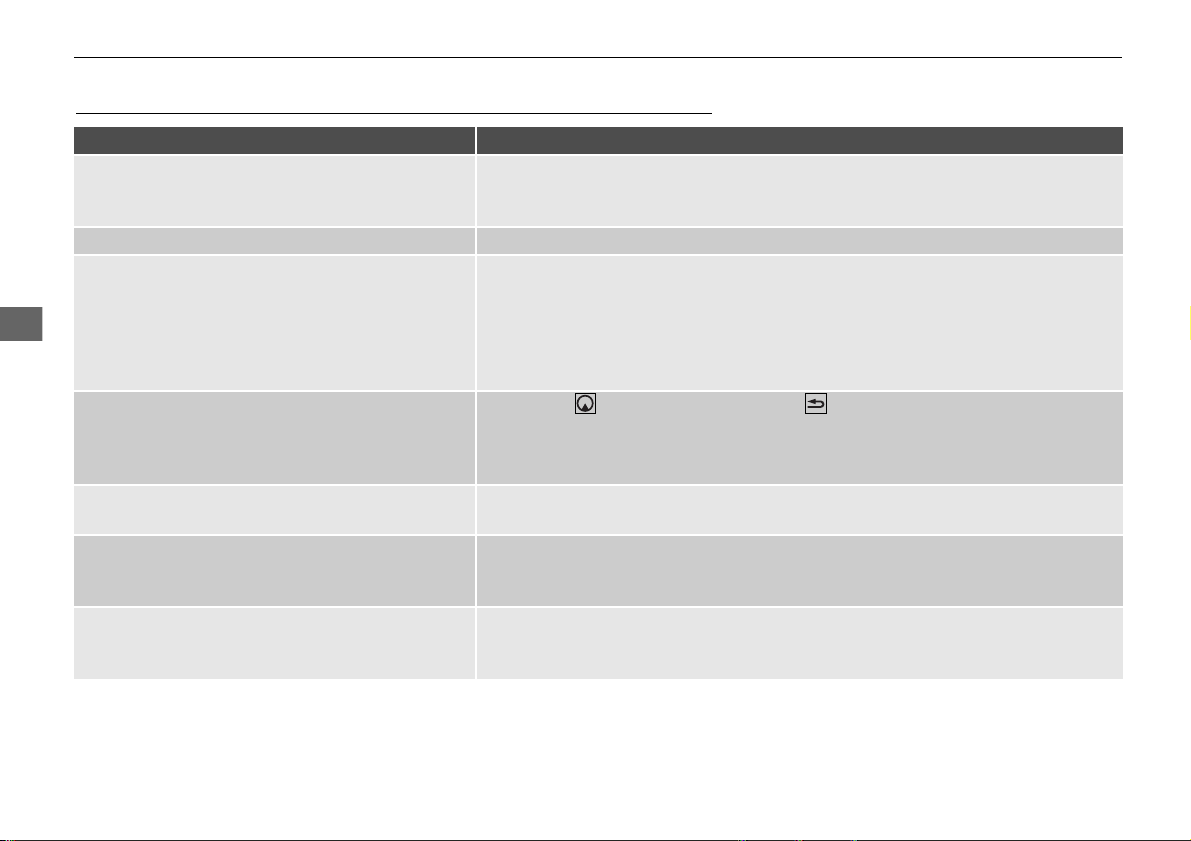
124
uu Troubleshooting u Guidance, Routing
Troubleshooting
Guidance, Routing
Problem Solution
The navigation system does not route me the same
way I would go or the same way as other mapping
systems.
The navigation system attempts to generate the optimal route. You can change the
route preferences used when calculating a route.
2 Recalculate Using Another Route Preference P. 106
The street I’m on is not shown on the map screen. The mapping database is constantly undergoing revision.
The vehicle position icon is not following the road.
●
Check that the GPS antenna (located in the dashboard) is not blocked. For best
reception, remove items from the dashboard, such as radar detectors, cellular
phones, or loose articles.
●
Metallic tinting or other aftermarket devices can interfere with GPS reception.
Please consult your dealer.
2 GPS P. 128
How do I stop the map from rotating as I drive
along?
1. Press the button and then press the button.
2. Select Settings > Map & Vehicle > Driving Map View.
3. Check that Dri
ving Map View is set to Track Up or 3-D.
4. Select North Up and then select Save.
The “Arrival time” display sometimes increases
even though I am getting closer to my destination.
The “Arrival time” is based on the speed limit on each road. Depending on the
traffic conditions, the “Arrival time” may be calculated to be earlier or later.
My elevation (shown when I display the current
position) seems to fluctuate even though my
elevation has not changed.
This is normal. The elevation can vary ±100 ft (30 m) due to GPS calculation errors.
2 GPS P. 128
My elevation is missing on the “current position”
screen.
The elevation is only displayed if the GPS antenna can receive signals from at least
four satellites. Try moving the vehicle into an open area. The elevation is also not
displayed if the calculated elevation is zero or below sea level.

125
uu Troubleshooting u Update, Coverage, Map Errors
Troubleshooting
Update, Coverage, Map Errors
Display, Accessories
Problem Solution
My city is not part of a fully verified detailed
coverage area.
The mapping database is constantly undergoing revision.
Does the navigation system work outside North
America?
The system contains maps for the United States of America, Canada, Mexico,
Puerto Rico, US Virgin Islands, Cayman Islands, Bahamas, French Guiana,
Guadeloupe, Martinique, Saint Barthelemy, and Jamaica. The navigation system
will not work in other countries.
2 Map Coverage P. 131
Problem Solution
The display appears dim when starting the car in
really cold weather.
This is normal. The display will become brighter after a few minutes.
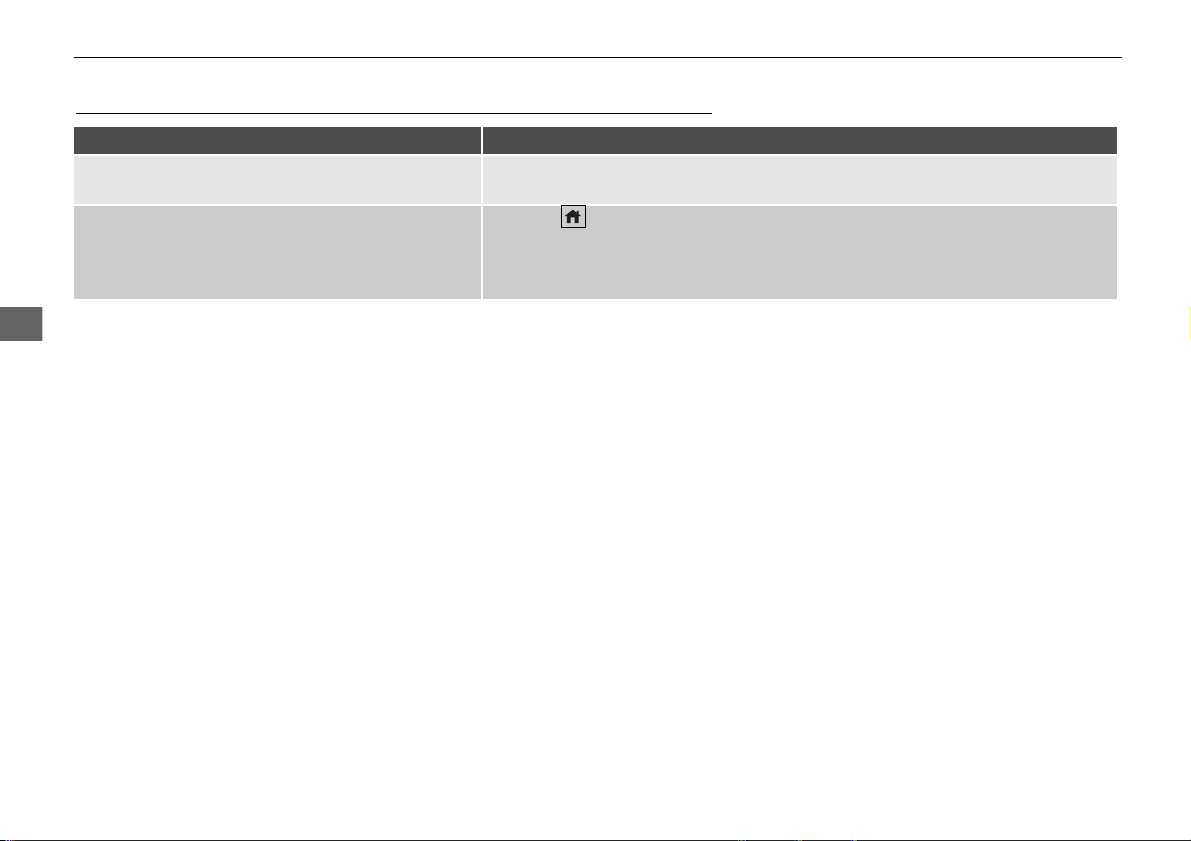
126
uu Troubleshooting u Miscellaneous Questions
Troubleshooting
Miscellaneous Questions
Problem Solution
My clock frequently changes forward and backward
by one hour.
The clock setting is automatically updated based on your GPS location. If you are
driving near a time zone border, the automatic update likely is the reason.
How do I change the interface language? Press the button and then select Settings > System > Others tab >
Language.
Select the desired language for system language.
For more information, see the Owner's Manual.

127
Reference Information
System Limitations ................................128
GPS ......................................................128
Address Calculation ..............................128
Database ..............................................128
Customer Assistance ........
.....................130
Resolving Problems ...............................130
Obtaining a Navigation Update .............130
Honda Automobile Customer Service
Contact Information............................130
Visiting Your Dealer ..............................131
Map Coverage ......................................131
Traffic Information ................................131
Legal Information ...............
.................. 132
User Agreement................................... 132

128
Reference Information
System Limitations
GPS
The signals received from GPS satellites are
extremely weak (less than a millionth of the
strength of a local FM station) and require
an unobstructed view of the sky. The GPS
antenna is located in the dashboard. The
signal reception can easily be interrupted or
interfered with by the following:
• Metallic window tint on the front or side
wind
ows
• Cellular phones, PDAs, or other electronic
d
evices docked in a cradle or lying loose
on the dashboard
• Remote starters or “hidden” vehicle
tracking system
s mounted near the
navigation unit
• Audio electronic devices mounted near
the nav
igation unit
• Trees, tall buildings, highway overpasses,
tunnels, or overhead electrical power
wires
GPS is operated by the U.S. Department of
Defense
. For security reasons, there are
certain inaccuracies built into GPS for which
the navigation system must constantly
compensate. This can cause occasional
positioning errors of up to several hundred
feet (meters).
Address Calculation
The destination icon shows only the
approximate location of a destination
address. This occurs if the number of
possible addresses is different from the
number of actual addresses on a block. For
example, the address 1425 on a 1400 block
with 100 possible addresses (because it is
followed by the 1500 block) will be shown a
quarter of the way down the block by the
system. If there are only 25 actual addresses
on the block, the actual location of address
1425 would be at the end of the block.
Database
The digitized map database reflects
conditions as they existed at various points
in time before production. Accordingly,
your database may contain inaccurate or
incomplete data or information due to the
passage of time, road construction,
changing conditions, or other causes.
For example, some places/landmarks may
be missing when
you search the database
because the name was misspelled, the place
was improperly categorized, or a place/
landmark is not yet in the database. This is
also true for police stations, hospitals, and
other public institutions. Do not rely on the
navigation system if you need law
enforcement or hospital services. Always
check with local information sources.

129
uu System Limitations u Database
Reference Information
The database does not include, analyze,
process, consider, or reflect any of the
following categories of information:
• Neighborhood quality or safety
• Population density
• Availability or proximity of law
enforcem
ent
• Emergency, rescue, medical, or other
assistance
• Construction work, zones, or hazards
• Road and lane closures
• Legal restrictions (such as vehicular type,
weight,
load, height, and speed
restrictions)
• Road slope or grade
• Bridge height, width, weight, or other
li
mits
• Traffic facilities safety
• Special events
• Pavement characteristics or conditions
Every effort has been made to verify that
th
e database is accurate. The number of
inaccuracies you experience increases the
longer you go without obtaining an
updated map database.
2 Obtaining a Navigation Update P. 130
We assume no liability for any incident that
may result from an error in the program, or
from changed conditions not noted above.

130
Reference Information
Customer Assistance
Resolving Problems
If you run into a specific issue that you
cannot resolve, consult the following help
resources:
• For navigation system issues:
2 Troubleshooting P. 122
Or, please contact your dealer.
• For traffic-related issues:
2 Traffic P. 123
• For reporting issues with the database or
places/landmarks:
• Visit
https://my.garmin.com/mapErrors/
re
port.faces
• Or call Garmin OEM support directly at
(8
55) 607-2536.
Obtaining a Navigation
Update
Honda is continuously updating the
navigation system and new software is
usually made available on an annual basis.
For information on navigation updates for
your vehicle, please visit:
• U.S.: ho
ndanavi.navigation.com
• Canada: www.hond
a.ca
You can also contact your Honda
authorized dealer for further information
regarding the update program available for
your vehicle.
Honda Automobile
Customer Service Contact
Information
Honda Navi
American Honda Motor Co., Inc.
Honda Automobile Customer Service
Mail Stop 100-5E-8A
1919 Torrance Blvd.
Torrance, CA 90501-2746
Tel: (800) 999-1009
Fax: (310) 783-3023
Honda Canada Inc.
Honda Customer Relations
180 Honda Blvd.
Markham, ON
L6C 0H9
Tel: (888)-9-HONDA-9
Hours: 8:00 am to 7:30 pm Mon to Fri (EST)

131
uu Customer Assistance u Visiting Your Dealer
Reference Information
Visiting Your Dealer
If you have a question that you cannot
resolve using the available help resources,
you can consult your dealer. Please identify
the specific issue (e.g., error occurs when
you enter a specific address, when driving
on a certain road, or just when it’s cold) so
that the service advisor can refer the issue to
the factory so that a solution can be found.
Be patient, the service advisor may be
unfamiliar with your specific issue.
Map Coverage
The system provides maps for the United
States of America, Canada, Mexico, Puerto
Rico, US Virgin Islands, Cayman Islands,
Bahamas, French Guiana, Guadeloupe,
Martinique, Saint Barthelemy, and Jamaica.
The navigation system will not work in other
countries.
Traffic Information
Continuously updated traffic information is
available in major metropolitan areas across
contiguous United States and some cities in
Canada.

132
Reference Information
Legal Information
User Agreement
The content provided (“Data”) is licensed,
not sold. By opening this package, or
installing, copying, or otherwise using the
Data, you agree to be bound by the terms
of this agreement. If you do not agree to
the terms of this agreement, you are not
permitted to install, copy, use, resell or
transfer the Data. If you wish to reject the
terms of this agreement, and have not
installed, copied, or used the Data, you
must contact your retailer or HERE North
America, LLC (as defined below) within
thirty (30) days of purchase for a refund of
your purchase price. To contact HERE,
please visit www.here.com.
The Data is provided for your personal,
internal
use only and may not be resold. It is
protected by copyright, and is subject to the
following terms (this “End User License
Agreement”) and conditions which are
agreed to by you, on the one hand, and
HERE and its licensors (including their
licensors and suppliers) on the other hand.
For purposes of these terms, “HERE” shall
■
END USER TERMS
mean (a) HERE North America, LLC with
respect to Data for the Americas and/or the
Asia Pacific region and (b) HERE Europe B.V.
for Data for Europe, the Middle East and/or
Africa.
The Data includes certain information and
related c
ontent provided under license to
HERE from third parties and is subject to the
applicable supplier terms and copyright
notices set forth at the following URL:
http://cor
porate.navteq.com/
supplier_terms.html.
License Limitations on Use: You agree
that your license to use this Data is limited
to and conditioned on use for solely
personal, noncommercial purposes, and not
for service bureau, timesharing or other
similar purposes. Except as otherwise set
forth herein, you agree not to otherwise
reproduce, copy, modify, decompile,
disassemble or reverse engineer any portion
of this Data, and may not transfer or
distribute it in any form, for any purpose,
except to the extent permitted by
mandatory laws.
■
TERMS AND CONDITIONS
License Limitations on Transfer: Your
limited license does not allow transfer or
resale of the Data, except on the condition
that you may transfer the Data and all
accompanying materials on a permanent
basis if: (a) you retain no copies of the Data;
(b) the recipient agrees to the terms of this
End User License Agreement; and (c) you
transfer the Data in the exact same form as
you purchased it by physically transferring
the original media (e.g., the CD-ROM or
DVD you purchased), all original packaging,
all Manuals and other documentation.
Specifically, Multidisc sets may only be
transferred or sold as a complete set as
provided to you and not as a subset thereof.
Additional License Limita
tions: Except
where you have been specifically licensed to
do so by HERE in a separate written
agreement, and without limiting the
preceding paragraph, your license is
conditioned on use of the Data as
prescribed in this agreement, and you may
not (a) use this Data with any products,
systems, or applications installed or
otherwise connected to or in
communication with vehicles capable of
vehicle navigation, positioning, dispatch,

133
uu Legal Information u User Agreement
Continued
Reference Information
real time route guidance, fleet management
or similar applications; or (b) with, or in
communication with, including without
limitation, cellular phones, palmtop and
handheld computers, pagers, and personal
digital assistants or PDAs.
Warning: This Data may contain inaccurate
or incomplete information due to the
passage of time, changing circumstances,
sources used and the nature of collecting
comprehensive geographic Data, any of
which may lead to incorrect results.
No Warranty: This Data is provided to you
“as is”, and you agree to
use it at your own
risk. HERE and its licensors (and their
licensors and suppliers) make no
guarantees, representations or warranties
of any kind, express or implied, arising by
law or otherwise, including but not limited
to, content, quality, accuracy,
completeness, effectiveness, reliability,
fitness for a particular purpose, usefulness,
use or results to be obtained from this Data,
or that the Data or server will be
uninterrupted or error free.
Disclaimer of Warranty: HERE AND ITS
LICENSORS (INCLUDING T
HEIR LICENSORS
AND SUPPLIERS) DISCLAIM ANY
WARRANTIES, EXPRESS OR IMPLIED, OF
QUALITY, PERFORMANCE,
MERCHANTABILITY, FITNESS FOR A
PARTICULAR PURPOSE OR NON-
INFRINGEMENT. Some States, Territories
and Countries do not allow certain warranty
exclusions, so to that extent the above
exclusion may not apply to you.
Disclaimer of Liability: HERE AND ITS
LICENSORS (INCLUDING T
HEIR LICENSORS
AND SUPPLIERS) SHALL NOT BE LIABLE TO
YOU IN RESPECT OF ANY CLAIM, DEMAND
OR ACTION, IRRESPECTIVE OF THE NATURE
OF THE CAUSE OF THE CLAIM, DEMAND
OR ACTION ALLEGING ANY LOSS, INJURY
OR DAMAGES, DIRECT OR INDIRECT,
WHICH MAY RESULT FROM THE USE OR
POSSESSION OF THIS DATA; OR FOR ANY
LOSS OF PROFIT, REVENUE, CONTRACTS
OR SAVINGS, OR ANY OTHER DIRECT,
INDIRECT, INCIDENTAL, SPECIAL OR
CONSEQUENTIAL DAMAGES ARISING OUT
OF YOUR USE OF OR INABILITY TO USE THIS
DATA, ANY DEFECT IN THIS DATA, OR THE
BREACH OF THESE TERMS OR
CONDITIONS, WHETHER IN AN ACTION IN
CONTRACT OR TORT OR BASED ON A
WARRANTY, EVEN IF HERE OR ITS
LICENSORS HAVE BEEN ADVISED OF THE
POSSIBILITY OF SUCH DAMAGES. Some
States, Territories and Countries do not
allow certain liability exclusions or damages
limitations, so to that extent the above may
not apply to you.
Export Control: You agree not to export
fr
om anywhere any part of the Data or any
direct product thereof except in compliance
with, and with all licenses and approvals
required under, applicable export laws,
rules and regulations, including but not
limited to the laws, rules and regulations
administered by the Office of Foreign Assets
Control of the U.S. Department of
Commerce and the Bureau of Industry and
Security of the U.S. Department of
Commerce. To the extent that any such
export laws, rules or regulations prohibit
HERE from complying with any of its
obligations hereunder to deliver or
distribute Data, such failure shall be excused
and shall not constitute a breach of this
Agreement.

134
uu Legal Information u User Agreement
Reference Information
Entire Agreement: These terms and
conditions constitute the entire agreement
between HERE (and its licensors, including
their licensors and suppliers) and you
pertaining to the subject matter hereof, and
supersedes in their entirety any and all
written or oral agreements previously
existing between us with respect to such
subject matter.
Severability: You and HERE agree that if
any
portion of this agreement is found
illegal or unenforceable, that portion shall
be severed and the remainder of the
Agreement shall be given full force and
effect.
Governing Law: The above terms and
co
nditions shall be governed by the laws of
the State of Illinois (for Data for the
Americas and/or the Asia Pacific region) or
The Netherlands (for Data for Europe, the
Middle East and Africa), without giving
effect to (i) its conflict of laws provisions, or
(ii) the United Nations Convention for
Contracts for the International Sale of
Goods, which is explicitly excluded. For any
and all disputes, claims and actions arising
from or in connection with the Data
(“Claims”), you agree to submit to the
personal jurisdiction of (a) the State of
Illinois for Claims related to Data for the
Americas and/or the Asia Pacific region
provided to you hereunder, and (b) The
Netherlands for Data for Europe, the Middle
East and/or Africa provided to you
hereunder.
Government End Users: If the Data is
b
eing acquired by or on behalf of the
United States government or any other
entity seeking or applying rights similar to
those customarily claimed by the United
States government, this Data is a
“commercial item” as that term is defined
at 48 C.F.R. (“FAR”) 2.101, is licensed in
accordance with this End User License
Agreement, and each copy of Data
delivered or otherwise furnished shall be
marked and embedded as appropriate with
the following “Notice of Use”, and be
treated in accordance with such Notice:
This Data is a commercial item as defined in
FAR
2.101 and is subject to the End User
License Agreement under which this Data
was provided.
© 1987-2013 HERE. All rights reserved.
If the Contracting Officer, federal
government a
gency, or any federal official
refuses to use the legend provided herein,
the Contracting Officer, federal
government agency, or any federal official
must notify HERE prior to seeking additional
or alternative rights in the Data.
© 1987-2013 HERE. All rights reserved.
NOTICE OF USE
CONTRACTOR (MANUFACTURER/
SUPPLIER) NAME:
HERE
CONTRACTOR (MANUFACTURER/
SUPPLIE
R) ADDRESS:
425 West Randolph Street, Chicago, IL
606
06.


136
Voice Commands
Voice Commands
Navigation Commands
The system only accepts these commands
on a map/guidance screen.
Navigation
View Map
Go Home
Find Place
Find Address
Find Category
Find City
Find Intersection
Saved Places
Recen
tly Found
Stop Route
Detour
Back
Page Up
Page Down
Exit
■
Voice Portal Commands
■
Navigation Commands
■
Other Commands
Yes
No
Navigate
Main Menu
Start New Route
Add to Activ
e Route
View List
Change Country
Along Route
Near Destination
Near Current Location
View Categories
1
2
3
4
5
Restaurants
Everyday Life
Banks & ATMs
Rest Areas
Attracti
ons
■
Line Number Commands
■
Category Commands
Medical Care
Shopping
Gas Stations
Parking
Art & Entertainment
Recrea
tion
Transit
Lodging
All Restaurants
Browse By Style
Barbecue
Coffee and Tea
Delis
Donuts and Baked Goods
Fast Food
Fish and Seafood
Grills
Pizza
Steakhouses
Wine, Beer, and Liquor
All Everyday Life
Auto Services
Car Washes
Colleges and Universities
Community Services
■
Sub Category Commands

137
uu Voice Commands u Navigation Commands
Voice Commands
Convenience Store
Fitness and Gyms
Laundry Services
Libraries
Places
of Worship
Post Offices
Sch
ools
Veterinary Clinics
All Attractions
Major Attractions
Amusement Parks
Event Centers
Historical Landmar
ks
Museums and Galleries
Offbeat Places
Parks and Gardens
Tourist Information
Wineries and Breweries
Zoos and Aquariums
All Medical Care
Hospitals
Doct
or Offices
Pharmacies
All Shopping
Books, Music, and
Movies
Clothing and Accessories
Computers and Electr
onics
Convenience S
tore
Department Stores
Florists and Gifts
Grocery Stores
Home and Garden
Housewares
Office S
upply and Shipping
Pharmacies
Shopping Centers
Sporting Goods
Wine, Beer, and Liquor
All Art & Entertainment
Bars and Pubs
Casinos
Movie Theaters
Museums and Galleries
Nightcl
ubs
Performing Arts
All Recreation
Amusement Parks
Bowling Center
Camps and Retreats
Golfing
Skiing and Winter Sports
Sport Centers
Stadiums and Tracks
All Transit
Airports
Bus Stations
Car Rental
Ferry Terminals
Transit Service
Truck Stops
Train Stations
Travel Agents
All Lodging
Bed and Breakfast or Inn
Campground or RV Park
Hotel or Motel

138
Voice Commands
List of Categories
Restaurants Everyday Life Recreation
Barbecue Fish and Seafood Auto Services Laundry Services Amusement Parks
Skiing and Winter Sports
Coffee and Tea Grills Car Washes Libraries Bowling Center Sports Centers
Delis Pizza
Colleges and Universities
Places of Worship Camps and Retreats Stadiums and Tracks
Donuts and Baked Goods
Steakhouses Community Services Post Offices Golfing
Fast Food Wine, Beer, and Liquor Convenience Store Schools Medical Care
Shopping Fitness and Gyms Veterinary Clinics Doctor Offices Pharmacies
Books, Music, and Movies
Home and Garden Art & Entertainment Hospitals
Clothing and Accessories
Housewares Bars and Pubs Museums and Galleries Transit
Computers and Electronics
Office Supply and Shipping
Casinos Nightclubs Airports Train Stations
Convenience Store Pharmacies Movie Theaters Performing Arts Bus Stations Transit Service
Department Stores Shopping Centers Attractions Car Rental Travel Agents
Florists and Gifts Sporting Goods Amusement Parks Parks and Gardens Ferry Terminals Truck Stops
Grocery Stores Wine, Beer, and Liquor Event Centers Tourist Information Gas Stations
Lodging Historical Landmarks Wineries and Breweries Banks & ATMs
Bed and Breakfast or Inn
Hotel or Motel Museums and Galleries Zoos and Aquariums Parking
Campground or RV Park
Offbeat Places Rest Areas

Index
139
Index
Index
Symbols
a Button ....................................... 3, 7, 26
d Bu
tton......................................... 5, 11, 17
Numbers
3D Map ....................................................... 30
A
Adding Waypoints..................................... 93
Apps Menu
............................................... 108
Avoidances
................................................. 38
C
Calculating the Route................................ 74
Calculation Mode
....................................... 37
Calculator
................................................. 118
Cancel Route
.............................................. 10
Categories
List of Categories .................................... 138
Changing Your Destination
...................... 94
Changing Your Route
................................ 91
Custom Avoidances
.................................... 39
Customer Assistance
................................ 130
D
Dashboards................................................. 34
Data Reset
.................................................. 51
Detour
......................................................... 92
Device
.......................................................... 49
Display Mode Settings
................................ 26
Driving to Your Destination
...................... 77
E
ecoChallenge ............................................ 114
ecoRoute
TM
................................................ 109
Editing the Destination List
..................... 102
Entering a Destination
............................... 54
Address ..................................................... 61
Categories................................................. 66
HONDA ..................................................... 60
Map Input ................................................. 73
Recent....................................................... 72
Saved ........................................................ 72
Entering a New Destination
...................... 97
F
Fuel Economy.................................... 113, 115
G
Go Home ....................................................... 8
GPS Information
....................................... 120
H
Help ..................................................... 10, 117
Home Location
........................................... 18
HOME Screen
................................................ 3
Honda Customer Service
.......................... 130
I
Information Functions ............................. 117
L
Language & Keyboard ............................... 46
Legal Information
.................................... 132
M
Map & Vehicle ............................................ 28
Map Buttons
............................................... 33
Map Coverage
.......................................... 131
Map Detail
.................................................. 31
Map Layers
.................................................. 34
Map Legend
.................................................. 6
Map Menu
.................................................. 82
Map Operation
........................................... 81
Map Screen
................................................. 77
Icon............................................................. 6
Map Theme
................................................. 32
Map Update
Obtaining Update Data ........................... 130
Map view
.................................................... 30
Mileage Report
......................................... 116
myMaps
....................................................... 35

140
Index
N
Navigation................................................... 36
Navigation Top Screen
................................. 3
North Up
..................................................... 30
O
Other Settings............................................. 45
P
Personal Information.................................. 18
S
Saved Locations .......................................... 19
Deleting............................................... 24, 25
Editing....................................................... 22
Saving ....................................................... 19
Setting
Data Reset................................................. 51
Device ....................................................... 49
Display Mode Settings ............................... 26
Language & Keyboard ............................... 46
Map & Vehicle ........................................... 28
Navigation................................................. 36
Other Settings ........................................... 45
Personal Information.................................. 18
Traffic........................................................ 44
Start-up
....................................................... 16
Stopping the Route
.................................... 91
System Limitations
.................................... 128
T
Track Up...................................................... 30
Traffic
Indicator...................................................... 6
Setting ...................................................... 44
Traffic Information .................................... 86
Troubleshooting
................................. 12, 122
U
Unit Converter.......................................... 119
Units
............................................................ 45
Update System Software
Obtaining Update Data ........................... 130
V
Vehicle ........................................................ 29
Vehicle Profile
.................................. 110, 112
Voice Commands
Basic Operation ........................................... 5
Voice Commands List .............................. 136
Voice Control System ................................ 17
Voice Control Operation
............................ 11
Voice Recognition
...................................... 17
W
Where I’ve Been ....................................... 118

© 2020 Honda Motor Co., Ltd. — All Rights Reserved
Printed in U.S.A.
owners.honda.com (U.S.)
honda.ca (Canada)
31TGG840
NM-14140
00X31-TGG-8400
2021 Honda Civic Hatchback Navigation Manual