User Manual
Installation, Location & How It Works
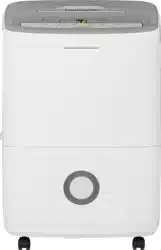
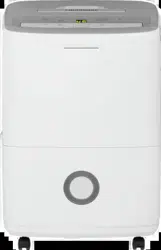
Location
Selecting a Location
IMPORTANT:
- Dehumidifier must be operated in an enclosed area to be most effective. Close all doors, windows, and other outside openings to the room. The effectiveness of the dehumidifier depends on the rate at which new moisture-laden air enters the room.
- Place dehumidifier in a location that does not restrict airflow through the rear of the unit.
- A dehumidifier operating in a basement will have little or no effect in drying an adjacent enclosed storage area, such as a closet, unless there is adequate circulation of air in and out of the area. lt may be necessary to install a second dehumidifier in the enclosed area for satisfactory drying.
- The dehumidifier must be installed on a level floor that will support it with a full bucket of water.
- There should be a minimum of 12 inches clearance around the dehumidifier
- Dehumidifier generates heat, do not operate in small spaces like closets, overheating may occur.
How It Works
When the unit is started, the fan begins to pull moisture-laden air across the dehumidifying coils.
The coils condense or draw moisture from the air, and air flows through the top louvers into the room as dry, warm air. Moisture removed from air is collected in a bucket on the rear of the dehumidifier.
The unit is designed to operate between 41 °F (5 °C), and 90 °F (32 °C). The unit will not work properly if the temperature is out of this temperature range, or the performance of the unit will fall greatly.
The "Compressor" circuit has an automatic 3 minute time delayed start if the unit is turned off and on quickly. This prevents overheating of the compressor and possible circuit breaker tripping.
Make sure the tank is fitted correctly otherwise unit will not turn on.
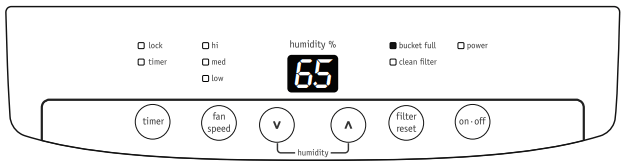
Operating Instructions
Allow the unit to reach room temperature before operating.
To begin operating the dehumidifier, follow these steps:
1. Plug the power cord into a properly grounded 115 volt AC outlet.
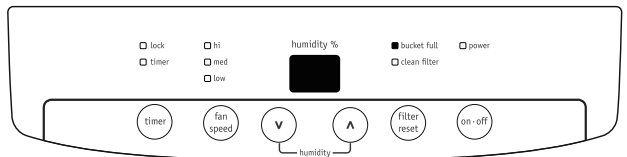
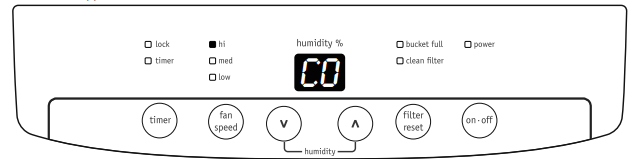
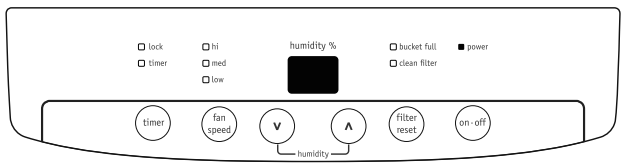
2. To turn the unit on, press the ON/OFF button. The unit will run in the factory setting of CONTINUOUS and high fan speed. In the CONTINUOUS mode, the unit will only display CO and not the room humidity. It is recommended you leave the unit running in the CONTINUOUS setting for the first three or four days until the sweating and dampness odors have stopped.
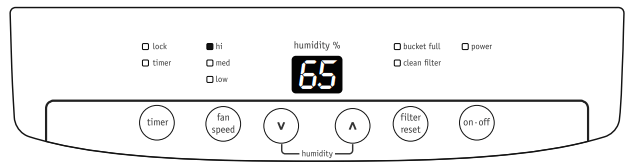
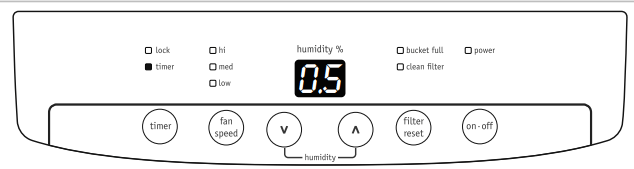
3. After a few days when the Relative Humidity has declined, press the HUMIDITY  or
or  buttons to choose a value between 35% to 85%, so the room is kept at a comfortable humidity. Pressing the or buttons will change the humidity selection in 5% increments. After you have set the desired humidity, the readout will display the actual room humidity. If at any time you want to return to the CONTINUOUS Mode, pressing the HUMIDITY button will lower the Relative Humidity through the 5% decrements until the display reads CO.
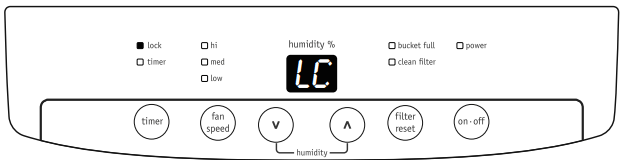
When unit is in operation, pressing and button will simultaneously for 3 seconds can lock buttons. If this function is enabled, LOCK indicator will illuminate and display shows LC, which will blink for 3 times. Then room humidity will be display again. To disable this function, press and button simultaneously for 3 seconds and the LOCK indicator will turn off.
4. You can also use the FAN SPEED button to change the fan speed to HIGH, Medium or LOW. The indicator light will show the setting you have selected. A higher fan speed will result in quicker moisture removal.
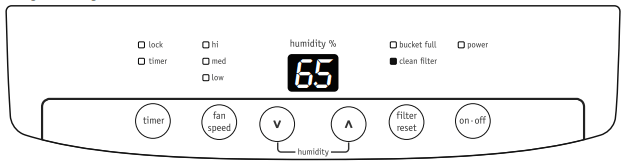
5. The CLEAN FILTER light will illuminate after 250 hours of operation. At this time refer to the care and cleaning section to remove and clean the filter. Once the filter has been cleaned and replaced, simply press the FILTER button to extinguish the light.
6. The TIMER function enables you to either Delay Start or Delay Stop the unit in the choice from 0.5 hour to 24 hours. If the unit is running, then selecting Timer will turn the unit off in the hours that will be set (Delay Stop). If the unit is off, then selecting Timer will turn the unit on in the hours that will be set (Delay Start). TIMER setting: First press TIMER button, then adjust timer setting, by tapping or holding the or button to change the delay timer at 0.5 hour increments, up to 10 hours, then by 1 hour increments up to 24 hours. The control will count down the time remaining (8,7.5,7, etc.) until the unit either starts or stops. For the Delay Start, the fan speed and humidity maintained will be the same as previous setting. After TIMER setting finishes, pressing TIMER button again at any time will stop the TIMER function. The Delay Start/Stop Feature will work until the unit either starts or stops. Once that happens the above steps have to be repeated.
7. To shut the unit down, press the ON/OFF button.
Fault Codes
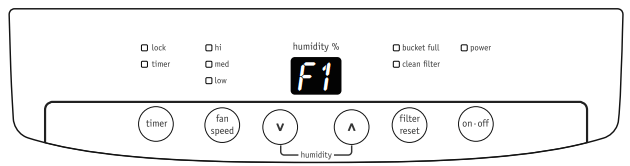
1. If the display reads "F1", "F2", "L1" or "H3" error codes, please turn off and unplug the unit, then plug it in again in 30 minutes. If the unit malfunctions again, please contact your Authorized Frigidaire Service Center.
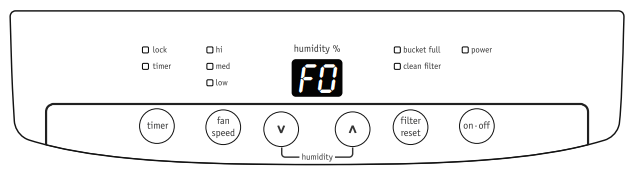
2. If the display reads "F0" , check the following operating conditions. Outlet voltage should be 115V±10% and the surrounding temperature should be with in the range of 41 °F (5 °C) to 90 °F (32 °C). Unplug the unit and plug it in again under normal operating conditions. If the "F0" code persists, contact your Authorized Frigidaire Service Center.
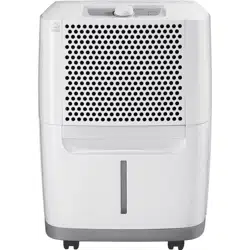
Removing Collected Water
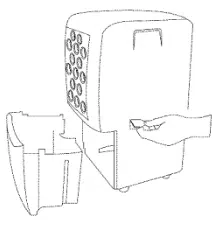
1. Emptying the Bucket:
a. When the bucket is full, the unit will shut down and the BUCKET FULL indicator will illuminate. The product have also added an additional bucket full indicator light to the front of the unit, this light will continually blink when the bucket is full, removed or not placed correctly.
b. Do not move the unit at this time otherwise water may spill on the floor.
c. Press sides of bucket gently to unclip the bucket from the unit.
d. Remove the bucket as shown in the photographs below and empty the bucket.
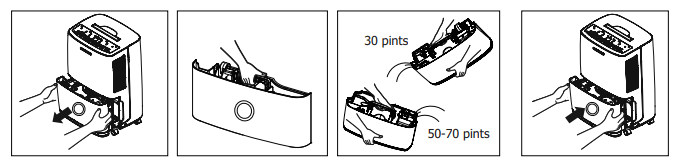
e. Replace the empty bucket back into the unit and once seated correctly, the unit will start up again.
f. You should hear a click when the bucket is in the correct position.
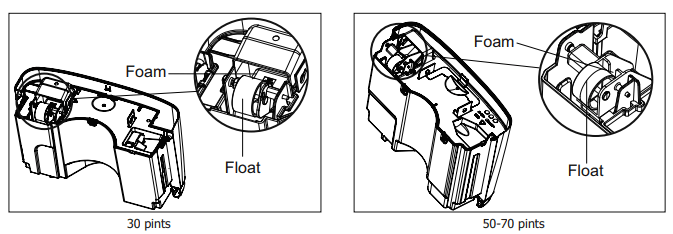
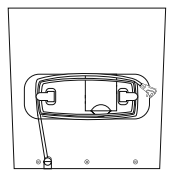
If the bucket full light does not extinguish, check that the float is correctly snapped in place as indicated by the diagram
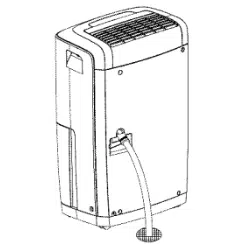
2. Continuous Drainage:
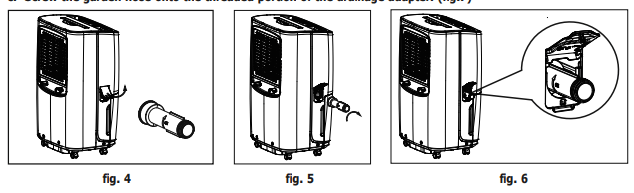
a. Open the drain cover at the side of the unit, so the drainage connector could be found inside. (fig.1) Take out drainage adapter from the top of the styrofoam packaging. (fig.4)
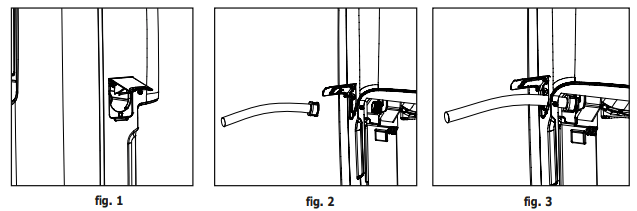
b. Screw the drainage adapter onto the threaded portion of the drainage connector of the unit securely. (fig.5&6)
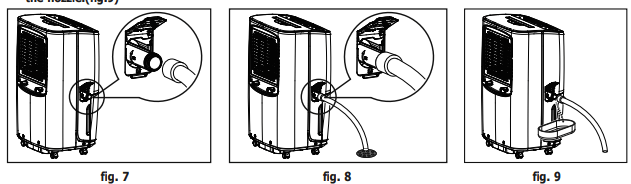
c. Screw the garden hose onto the threaded portion of the drainage adapter. (fig.7)
d. Make sure the hose is secure so there are no leaks.
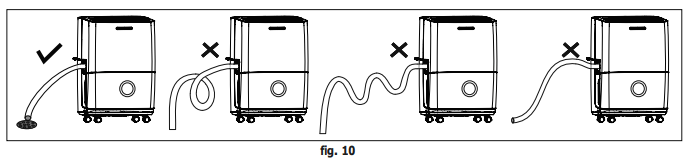
e. Direct the hose toward the drain, making sure that there are no kinks that will stop the water flowing. (fig.8)
f. When you want to remove the garden hose, prepare a drip tray (not supplied) to collect the water from the nozzle.(fig.9)
Care and Cleaning
1. Filter
a. Remove the filter every two weeks based on normal operating conditions.
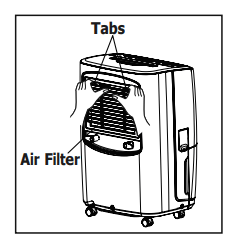
b.To remove the filter, pull the tabs and then take out the filter
c.Wash the filter with clean water then dry. Do not dry the air filter with electric hair dryer d.Once filter is dry, replace on rear of unit and snap in place
2. Cabinet
a. Dust cabinet with an oil-free cloth, or using a damp cloth.
b. Vacuum grill using brush attachment
3. Water Bucket
a. Clean bucket with warm water and detergent.
Storage
When unit is not in use, unplug and tidy up the cord as shown below.
Before You Call
Before calling for service, review this list. It may save you time and expense. This list includes common occurrences that are not the result of defective workmanship or materials in this appliance.
- DEHUMIDIFIER DOES NOT OPERATE.
- Wall plug disconnected. Push plug firmly into wall outlet.
- House fuse blown or circuit breaker tripped. Replace fuse with time delay type or reset circuit breaker.
- Water in the bucket has reached its preset level. Dehumidifier automatically turns off when this occurs. Empty bucket and return bucket to position.
- The dryness level you selected has been reached. Dehumidifier automatically shuts off when selected amount of moisture has been removed from the air. If you want to remove more moisture, Select
- CONTINUOUS' by using the humidity button. After the dehumidifier starts, reset the control to the desired setting.
- Bucket not installed properly. See “Removing Collected Water“.
- Dehumidifier is not turned on. Turn unit on.
- BUCKET FULL“ light is on. Remove bucket, empty water and re-install correctly.
- DEHUMIDIFIER RUNS TOO MUCH.
- Windows or doors near dehumidifier are open to outdoors. Close all windows or doors to outside.
- Area to be dehumidified is too large. Check with your dealer to see if capacity is adequate.
- Air movement through dehumidifier is blocked. Grill may be dirty. Use brush attachment of vacuum cleaner to clean grill. See “Care and Cleaning“. Dehumidifier must be placed in a space that does not restrict air flowing into the rear coil or out of the front grill.
- Dehumidifier has been installed or restarted recently. The higher the moistuire in the room, the longer the dehumidifier will operate.
- Dehumidifier is in the CONTINUOUS mode and will remain on in this mode, use the humidity button or knob to set a RH% higher level.
- DEHUMIDIFIER IS OPERATING BUT ROOM IS NOT DRY ENOUGH.
- Humidity setting is too high. Press the setting button to a lower setting or choose CONTINUOUS for maximum dryness.
- Dehumidifier has been installed or restarted recently. The higher the moisture in the room air, the longer it takes for the room air to become dry.
- Dehumidifier does not have sufficient clearance to operate. Air flow to front grill is blocked. See Selecting a Location“.
- Room temperature is too low. Unit will not operate satisfactorily if the room temperature is below 41°F(5 °C). See “Operating Conditions“.
- Refer to causes under DEHUMlDIFIER RUNS TOO MUCH.
- Frost Appears on Real Coil Behind Filter
- If unit operates in a room where temperature is from 41°F(5°C) to 59°F(15°C), it will start defrosting automatically. Compressor will stop for a brief period of time(fan will operate in high fan speed). When unit finishes defrosting, it will be back to normal operation.
- NOISE.
- Air is moving through the dehumidifier. The fan noise is normal sound. The unit is placed on uneven surface or wooden floor.
- WATER FLOWS INTO THE BUCKET, EVEN WHEN GARDEN HOSE IS EQUIPPED.
- Refer to “Continuous Drainage” for proper installation of garden hose and drainage joint.