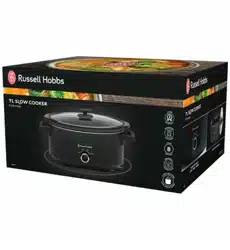
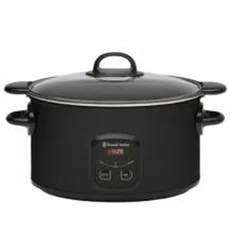
User manual Slow Cooker
IMPORTANT SAFEGUARDS
Follow basic safety precautions, including:
This appliance can be used by children aged from 8 years and above and persons with reduced physical, sensory or mental capabilities or lack of experience and knowledge if they have been supervised/instructed and understand the hazards involved. Children shall not play with the appliance. Cleaning and user maintenance shall not be done by children unless they are older than 8 and supervised. Keep the appliance and cable out of reach of children under 8 years.
If the cable is damaged, it must be replaced by the manufacturer, its service agent, or someone similarly qualified, to avoid hazard.
Don’t immerse the appliance in liquid.
The surfaces of the appliance will get hot.
Do not use this appliance near bathtubs, showers, basins or other vessels containing water.
- Leave a space of at least 50 mm all round the appliance.
- Use extreme caution when moving the appliance when it contains hot food or hot liquids.
- Use oven gloves or similar protection when removing the lid. Beware of escaping steam when removing the lid.
- Do not use this appliance outdoors.
- Don’t cover the appliance or put anything on top of it.
- Unplug the appliance when not in use, before moving and before cleaning.
- Don’t use accessories or attachments other than those we supply.
- Don’t use the appliance for any purpose other than those described in these instructions.
- Don’t operate the appliance if it’s damaged or malfunctions.
- Don’t place the cooking pot on any surface affected by heat. Always place the pot onto a trivet or heat-proof mat.
- The base of the cooking pot has a rough surface and can leave scratches or other marks on delicate or polished surfaces.
- Always place protective padding under the cooking pot to protect these types of surface.
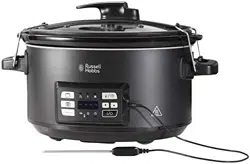
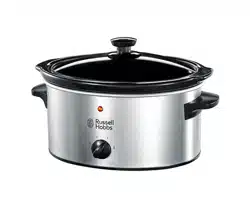
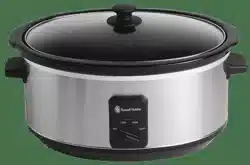
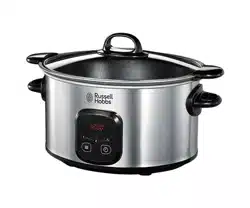
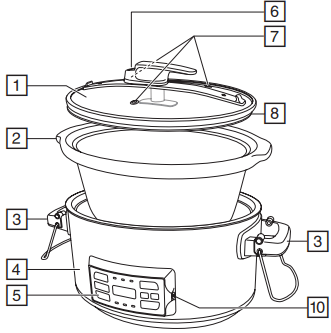
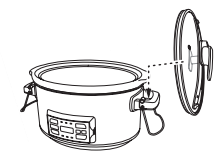
PARTS
1. Glass lid
2. Cooking pot
3. Locking handles
4. Base unit
5. Control panel
6. Temperature probe insertion point for Sous Vide
7. Temperature probe insertion holes (x 3)
8. Lid seal
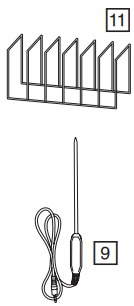
9. Temperature probe
10. Temperature probe connector socket
11. Support rack
BEFORE USING FOR THE FIRST TIME
Remove any packaging material and labels. Wash the removable parts in warm soapy water, rinse well, drain, and air dry.
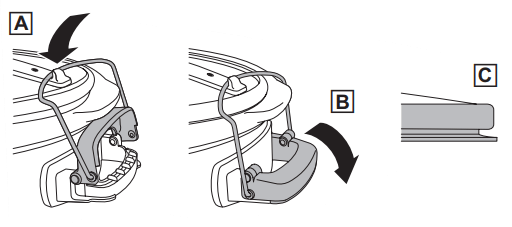
LOCKING AND UNLOCKING THE LID
- Place the cooking pot into the base unit.
- Place the lid, (with the lid seal installed), on top of the cooking pot.
- Swing the metals clips on both handles up and around, until they fit over the hooks on the lid (fig. A).
- Lock both of the handles by pushing down on them (fig. B). Do both handles at the same time rather than one side then the other. This will lock the lid in place.
- To unlock, push up the top part of the handles into the open, unlocked position. Next, lift the metals clips up and over the hooks on the lid then swing them downwards.
IMPORTANT
- Always carry the appliance using the two side handles. Make sure you securely grasp the bottom part of the handles to avoid the handles unlocking unexpectedly while carrying. Never lift the appliance by the lid handle. Detach the temperature probe before carrying the appliance.
- When unlocking, keep your fingers out from between the top part of the handles and the edge of the cooking pot.
The following table give a brief description of the buttons and lights on the control panel.
Buttons
Lights
 |
Slow cooker Keep Warm setting. |
 |
Slow cooker LOW setting. |
 |
Slow cooker HIGH setting. |
 |
Display is showing the actual probe temperature. |
 |
Display is showing the target temperature. |
 |
Display is showing programmed or remaining cooking time. See the individual cooking modes for more information. |
COOKING FUNCTIONS
Slow Cooking: Perfect for casseroles, soups, stews, and combinations of meats and vegetables.
Sous Vide: Sous-vide is a French term meaning “under vacuum”. It is a method of cooking food inside a sealed pouch in a water bath at an accurately regulated temperature. Sealing the food in pouches retains the juices and subtle flavours that would otherwise be lost during conventional cooking.
Temperature Probe: Ideal for cooking roasts and other larger cuts of meat. The temperature probe ensures that the joint does not overcook and dry out.
SLOW COOKING
THE BENEFITS OF SLOW COOKING
- Health: The gentle cooking action reduces damage to vitamins and retains more of the nutrients and flavours.
- Economy: Long, slow cooking can tenderise the cheaper, tougher cuts of meat, and uses about a quarter of the power of the small ring on the average hob.
- Convenience: Prepare the ingredients the night before, put them in the slow cooker before you leave, and have a delicious meal waiting for you when you get home.
USING THE SLOW COOKING MODE
- Add the ingredients to the cooking pot and cover with the glass lid. In slow cooking, you don’t need to lock the lid.
- Plug in the appliance. The main control display will flash “----”. This indicates that the heat is off and the appliance is ready to be programmed.
- You can select the LOW () or HIGH () setting. To do this, press the Slow Cook
 button a number of times until the or light is lit.
Note: Never use the Keep Warm () setting to cook. Only use the Keep Warm setting on food that is already cooked and hot.
4. The default cooking times are 4 hours on the HIGH setting, or 8 hours on the LOW setting. If you want to change them, use the  and
and  buttons to make any adjustments.
5. Press the I/O button to begin cooking. The display will stop flashing and the “:“ between the numbers will flash, indicating the unit is cooking
Making Adjustments During Cooking
You may adjust the time during the cooking cycle by pressing the and buttons. After 3 seconds of no buttons being pressed, the numbers will stop flashing and the new time for cooking will begin.
End of Cooking
- When the cooking time has ended, the unit will beep three times and automatically switch to the keep warm () setting. The light will come on and the display will start counting up from zero (00:00) to 4 hours (04:00).
- After the keep warm setting has been on for 4 hours, the unit will stop heating and return to the default display: “----”.
- Note: Do not keep foods on the keep warm setting for more than 4 hours.
- Unplug the appliance when not in use and always allow it to completely cool before cleaning and storing.
GENERAL TIPS
- Keep in mind that ingredients used straight from the fridge can increase the cooking time.
- Try not to open the lid unnecessarily during cooking. A lot of heat can escape when you do this and it can take your slow cooker a long time to recover.
- When testing a dish to see if it’s cooked, don’t forget that root vegetables usually take longer to cook.
- Thaw frozen food completely before adding it to the cooking pot.
- Pre-browning meat in a pan beforehand is not strictly necessary but can help seal in the moisture and add depth to the flavour.
- Store ingredients prepared beforehand (e.g. the night before) in containers in the fridge. Don’t put the slow cooker or the cooking pot into the fridge.
- When cooking with rice, use at least 150ml (¼ pt) of cooking liquid for each 100g (4 oz) of rice.
- Pasta isn’t suitable for slow cooking, it becomes too soft. If your recipe requires pasta, it should be pre-cooked and then stirred in 30-40 minutes before the end of the cooking time.
- After all the ingredients are put into the cooking pot, it shouldn’t be more than about three quarters full. If you overfill, it may spit hot liquid or overflow during use.
- If the finished dish is too liquid, it can be thickened using a little cornflour, arrowroot, etc. For each 250-300 ml of liquid, mix together 2 tbsp of cornflour with enough water to form a thin paste. Add the paste to the dish approx. 30-45 minutes before the end of cooking. Alternatively, stir in ready-made gravy granules following the manufacturer’s instructions.
COOKING GUIDELINES
Vegetables
Slow cooking is ideal for vegetables. There’s little evaporation, so all the juices and flavours are retained.
Root vegetables like potato, carrot, turnip, and swede, need more slow cooking than meat. Cut them into bite-size pieces and immerse in the cooking liquid. Place the vegetables as close to the bottom of the pot as possible.
Quickly cooked vegetables, like peas and sweetcorn, should be added half an hour before the end of cooking.
Pulses (Beans, Peas and Lentils)
Some dried pulses (lentils, peas, etc.) may need soaking before use. Always check any recommendations on the packaging before using.
WARNING dried beans (e.g. red kidney beans, cannellini, etc.) should be soaked for a minimum of 8 hours and boiled for at least 10 minutes before adding to the slow cooker. They’re poisonous if eaten raw or undercooked.
Meat and Poultry
- Slow cooking tenderises cheaper cuts, and reduces shrinkage and evaporation, retaining flavour and nutritional value.
- The leanest cuts of meat are best for slow cooking.
- Trim excess fat from the meat because this can add to the liquid during cooking in the form of fat.
- Where possible, use chicken without skin.
- Cut the meat into evenly sized cubes (approx. 2.5 cm) for casseroles and stews.
Suitable cuts include:
Beef - Brisket, shin, silverside, topside, stewing steak, braising steak, chuck
Pork - Leg, shoulder, belly, cheek, chump
Lamb - Shanks, leg, shoulder, neck
CONVERTING RECIPES FROM A TRADITIONAL OVEN
These times are approximate and can vary depending on the ingredients and quantities. Always check that the food is thoroughly cooked before serving.
| Oven cooking time |
Time on low (hours) |
Time on high (hours) |
| 15-30 minutes |
4-6 |
1-2 |
| 30-60 minutes |
6-8 |
2-4 |
| 1-3 hours |
8-12 |
4-7 |
IMPORTANT INFORMATION
- When slow cooking, if there is an interruption to the mains power supply during cooking of 2 hours or less, the appliance will resume cooking once the power is restored, and continue for the remaining amount of time that has been programmed. If the power is interrupted for longer than 2 hours the display will flash “----” to indicate that the food should be discarded. If you are not sure how long the appliance has been off, discard the food.
- Do not add cold food if the cooking pot is hot, and vice versa. The cooking pot material is not meant to handle sudden changes in temperature.
- Ensure that the lid seal is installed when using the slow cooker. The locking mechanism will not operate properly without the seal fitted.
- When installing the seal make sure that the lip of the seal is facing downwards (fig. C).
SOUS VIDE FUNCTION
For Sous Vide cooking you will need a bag or pouch to put the ingredients into from which you can remove as much of the air as possible, and then seal.
| Bag/pouch type |
Advantages |
Disadvantages |
| ‘Zipper lock’ plastic bag suitable for food |
Inexpensive |
‘Single use’ only |
| Silicon bag for sous vide cooking |
Can be reused
Can be cleaned in a dishwasher
|
Can be more difficult to remove air |
| Vacuum pack machine |
Creates an almost perfect vacuum and seals the bag at the same time. |
Higher initial cost
Each bag is ‘single use’ only
|
PREPARATION
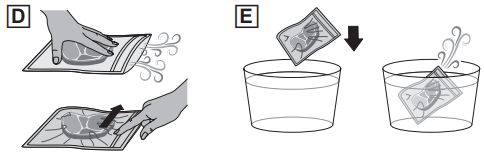
Place the ingredients into your chosen bag or pouch. Use one bag per portion. Try to keep portions similar in size. Before sealing the bag, you need to remove as much air out of it as possible.
For ‘Zipper lock’ style bags:
1. Hand Method (fig. D)
Place the bag onto a flat surface and, using your hand, carefully push out as much of the air from the bag as you can. Be careful not to squash or damage the ingredients when you do this. Then, close the seal on the bag.
2. Water Immersion Method (fig. E)
Fill a container big enough to hold the zip bag and ingredients with cold water. Put the ingredients into the bag and close the seal almost all of the way just leaving a small opening at one corner. Slowly push the bag into the water leaving the unsealed corner sticking up out of the water. When you do this, make sure than no water accidentally enters the bag. As you immerse the bag, the water will push almost all of the remaining air out. Finally, seal the corner and remove the bag from the container.
For Silicon bags:
Follow the instructions provided by the manufacturer of the bag.
For Vacuum pack machines:
A purpose made vacuum sealer suitable for food use is perfect for sous vide cooking. Use the correct bags as recommended by the manufacturer, and follow the instructions that come with the machine.
USING THE SOUS VIDE MODE
1. Add hot water and fill the cooking pot to approximately half way. Use water from the hot water tap (not boiling). Try and get the temperature of the water as close as you can to the temperature you are cooking at as this will cut down any unnecessary waiting time. Use a mixture of hot and cold water as required. If the water that you put in the cooker is at a temperature that is very different from the temperature you will be cooking at, the appliance will take a lot longer to either heat the water up or cool it down to the selected temperature.
2. Plug in the appliance. The main control display will flash “----”. This indicates that the heat is off and the appliance is ready to be programmed.
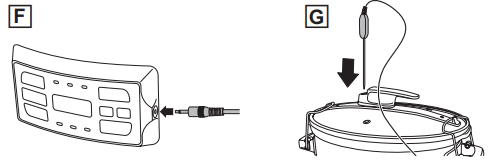
3. Connect the temperature probe to the socket on the side of the control panel (fig. F).
4. Put the bagged food into the cooking pot ensuring that it is fully submerged. Add additional water if needed. If you are putting in several items at once, use the provided rack to keep them separated.
5. Cover with the glass lid and lock it into place.
6. Plug in the appliance. The main control display will flash “----”. This indicates that the heat is off and the appliance is ready to be programmed.
7. Put the temperature probe into the sous vide insertion point in the lid. Make sure that the probe goes into the water and not the food.
8. Press the Sous Vide  button. The target temperature () light will come on, indicating that you are setting the cooking.
9. The default cooking temperature is set at 57°C. Use the and buttons to adjust the temperature (from 38ºC to 91ºC).
10. Press the temperature/time ( ) button. The time () light will come on.
11. The default cooking time is 60 minutes (01:00). Use the and buttons to set the time you wish to cook.
12. Press the I/O button to begin cooking. The actual temperature light (k) will come on, and the display will show the actual water temperature that the probe is sensing.
13. When the water temperature reaches the temperature that you have set, the appliance will beep twice and the countdown timer will begin. The timer will count down in minutes.
Making Adjustments During Cooking
You may adjust the time or probe temperature during the cooking cycle.
To adjust the probe temperature press the temperature/time () button until the target temperature () light is lit then use the and buttons to make the adjustment. After 3 seconds of no buttons being pressed, the numbers will stop flashing and the new temperature will be shown. Press the temperature/time () button again to return to the time display.
To adjust the cooking time press the temperature/time () button until the time () light is lit then use the u and d buttons to make the adjustment. After 3 seconds of no buttons being pressed, the numbers will stop flashing and the new time for cooking will begin.
End of Cooking
- When the cooking time has ended, the unit will beep three times and automatically switch the heat off.
- Remove the food.
- The display will count upwards in minutes from 00:00 to show how long the food has been cooling. After 4 hours the default display: “----” will appear.
- Unplug the appliance when not in use and always allow it to completely cool before cleaning and storing.
FINISHING STEPS
Some foods can be eaten straight after cooking. For steaks and other meats, searing after cooking in a hot pan is essential for the best flavour and texture.
- Heat up a good quality pan and add oil. Sear the edges and sides of the meat to your preference (up to 2 minutes per side).
- You can alternatively use a grill. Just keep in mind that the food is already cooked and you are only searing the outside.
NOTES ON COOKING TIMES AND FOOD SAFETY
To minimise the risks of illness due to improperly cooked food, please note the following :
- Cooking food at the right temperature and for the correct length of time will ensure that any harmful bacteria are killed. Always check the advice on food packaging and follow the cooking instructions provided.
- For food safety reasons, food cooked below 55ºC (e.g. steak) should not be cooked for longer than 2 hours and must be seared on the outside.
- Fish is often cooked at temperatures lower than 55ºC and if you intend to do this, it is important that you buy fish that is classed as Sushi grade (i.e. fish that can be eaten raw).
- Do not take meat out early. Let it cook at least for the minimum length of time on the chart at the correct temperature.
- It is OK to leave meat in longer than the minimum time range. Fish is the exception to this rule. Fish will get mushy if overcooked using the sous vide function.
- Always check that food is correctly cooked through (e.g. for pork, poultry, etc. till the juices run clear). Cook fish till the flesh is opaque throughout.
- Adding chilled ingredients straight from the refrigerator can rapidly decrease the temperature of the water and therefore add significantly to the overall cooking time. In a similar way, adding a lot of ingredients to the cooking pot can also lower the water temperature.
SOUS VIDE COOKING GUIDE TABLE
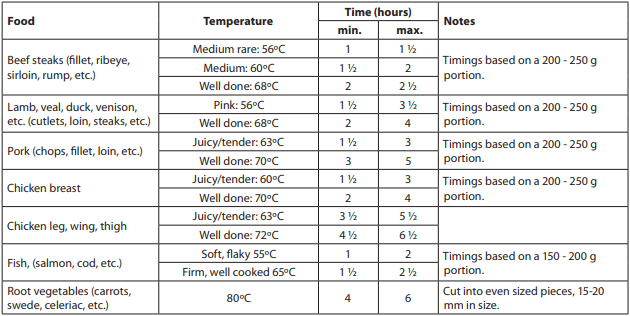
It is important that you cook ingredients at the specified temperature for at least the minimum specified time. Any heat up time that the water may require after adding the ingredients is not included. To guide you, the timer will only start when the water temperature has reached the temperature you have set. Always wait until the timer shows that you have cooked the ingredients for at least the minimum length of time shown above.
TEMPERATURE PROBE FUNCTION
The temperature probe function is ideal for cooking roasts and other larger cuts of meat. The temperature probe monitors the internal temperature of the meat and ensures that it does not overcook and dry out.
USING THE TEMPERATURE PROBE FUNCTION
- Add the joint to the cooking pot. Cover with the glass lid and lock it into place.
- Plug in the appliance. The main control display will flash “----”. This indicates that the heat is off and the appliance is ready to be programmed.
- Connect the temperature probe to the socket on the side of the control panel (fig. F).
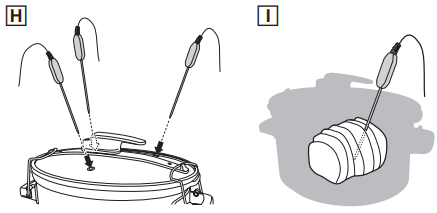
- Insert the temperature probe into the joint. There are three holes in the lid where you can do this (fig. H). Choose the one which allows you to insert the probe into the joint at the thickest part (fig. I). Don’t let the probe touch any bones in the joint. If needed, you can use the rack to elevate the joint nearer to the temperature probe. Note that it is only the tip of the probe that senses the temperature.
- Press the Temperature Probe (
 ) button. The target temperature () light will come on, indicating that you are setting the temperature that you want the food to be cooked to.
- The default cooking temperature is set at 82°C. Use the and buttons to adjust the temperature (from 38ºC to 91ºC).
- Press the I/O button to begin cooking. The actual temperature light () will come on, and the display will show the temperature that the probe is sensing from where it is located inside the food.
- When the internal temperature of the meat has reached the target temperature, the unit will beep twice and automatically switch to a cycle that holds the food at the target temperature. To help you keep track of the length of time the food has been held at that temperature, the display will start counting up from zero (00:00).
- Check the temperature probe occasionally during cooking to make sure it hasn’t changed position due to the meat shrinking.
End of Cooking
- Unplug the appliance when not in use and always allow it to completely cool before cleaning and storing.
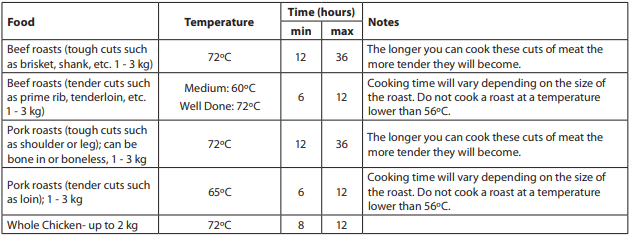
TEMPERATURE PROBE COOKING TABLE
TROUBLESHOOTING
Sous Vide and Temperature Probe
| Problem |
Possible Cause |
Solution |
The display shows “ ” ” |
The temperature probe is not connected properly |
Check the temperature probe connection |
| While using the temperature probe, the actual temperature doesn’t seem to be rising |
• The probe might not be inserted properly into the meat and is reading the temperature of the air.
• The lid may be fitted incorrectly.
|
• Re-insert the probe deep into the thickest part of the meat.
• Make sure the lid is correctly fitted and closed.
|
CARE AND MAINTENANCE
WARNING: Never immerse any part of the temperature probe or base unit in water or any other liquid.
- Unplug the appliance and let it cool down before cleaning or storing away.
- To clean the temperature probe, wipe only the metal probe end with a damp cloth. Dry thoroughly.
- Wash the cooking pot and glass lid in warm soapy water. Remove the lid seal from the lid and hand wash separately. If food sticks to the cooking pot, fill it with warm soapy water and allow it to soak before cleaning with a nonabrasive scouring pad.
- Wipe the inside and outside of the base unit with a soft, damp cloth.
- Allow to dry thoroughly before storing.
- Don’t use harsh or abrasive cleaners, solvents, scourers, wire wool, or soap pads.