User manual Refrigerator
REFRIGERATOR USE
Ensuring Proper Air Circulation
In order to ensure proper temperatures, you need to permit airflow between the refrigerator and freezer sections. As shown in the illustration, cool air enters through the bottom of the freezer section and moves up. Most of the air then flows through the freezer section vents and recirculates under the freezer floor. The rest of the air enters the refrigerator section through the top vent.
NOTE: Depending on your model, the refrigerator may have either a Normal flow or Multiflow air system.
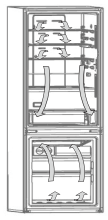
Do not block any of these vents with food packages. If the vents are blocked, airflow will be restricted and temperature and moisture problems may occur.
IMPORTANT: Because air circulates between both sections, any odors formed in one section will transfer to the other. You must thoroughly clean both sections to eliminate odors. To avoid odor transfer and drying out of food, wrap or cover foods tightly.
How to use the refrigerator with electronic control (some models)
Your refrigerator is equipped with a cutting-edge and user-friendly electronic temperature control located on the front panel of the refrigerator door.

Fridge Temp and Freezer Temp

Refrigerator: The Temperature Control will help you to adjust the temperature in your refrigerator within a range of 5 options. The temperature displayed is an average value in Degrees Celsius in the Refrigerator compartment.
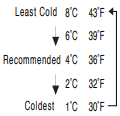
Fridge Default Temperature Settings: The Table on the left shows the temperature presets that you can select for your refrigerator. To select a setting, press the Temperature button until the value is displayed. The options will be displayed cyclically. (the values displayed are only an example).
Freezer: The Temperature Control will help you to adjust the temperature in your Freezer within a range of 5 options. The temperature displayed is an average value in Degrees Celsius in the Freezer compartment.
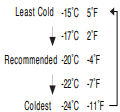
Freezer Default Temperature Settings: The Table on the left shows the temperature presets that you can select for your Freezer. To select a setting, press the Temperature button until the value is displayed. The options will be displayed cyclically. (the values displayed are only an example).

Switch between ºC / ºF: Your refrigerator displays temperature values in Degrees Centigrade (ºC) by default. You can switch to degrees Fahrenheit (ºF) by pressing both temperature buttons for 3 seconds.

The Open-Door Alarm will be displayed when the refrigerator door is left open. If the door is not closed within 5 minutes, the system will give off an audible warning (this can be deactivated by pressing the “Door Alarm button). The alarm is deactivated automatically once the door is closed.

Switch OFF/ON: You can switch off your appliance without disconnecting it by pressing the Special Modes button for 3 seconds and switch it back on in the same way.
Special Modes
 Full Load Quick Cooling activates a quick cooling system designed to effectively cool when you load items into the refrigerator. It is deactivated automatically after 6 hours.
 The Active Cleaning mode pauses cooling temporarily to allow you to clean the inside of the refrigerator. It is deactivated automatically after 15 minutes.
 The Vacation mode activates a low power consumption system when you do not expect to be using the appliance for several days. Press the Special Modes button again to deactivate this mode.
 To block the panel functions, press the Door Alarm button for 3 seconds to block all the functions and to prevent someone from changing your settings. To unblock it, press the same button again for 3 seconds.
Auto-Hibernate
 Your product can deliver optimal performance when you are not at home. For this purpose, use the Hibernating function to set the appliance to energy optimizing mode while you are not using it. Press the Cooling Modes button for 3 seconds to enter this mode and improve the appliance’s performance for as long as you wish. To exit this mode, press the same button again for 3 seconds.
COOLING MODE
 Use Quick Cooling in the freezer to make ice faster or freeze your food or drinks for longer. (Some Models)
 Full Load Quick Cooling activates a quick cooling system of all content and can be used for parties or meetings. This quick cooling system is available at all times.
 Quick Drink Cooling activates a quick cooling system to cool a drink for immediate use (bottle or can). To use this function, place the drink inside the freezer drawers. Once the cooling time ends, an alarm will go off to tell you that you can remove and enjoy your drink. It is deactivated automatically after 30 minutes.
Crisper Humidity Control (on some models)
You control the amount of humidity in the moisture-sealed crisper. Depending on the produce you are storing, select the desired Humidity Level.
Humidity Level - Min Setting
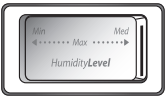
MIN (open) lets moist air out of the crisper for best storage of fruits and vegetables with skins.
- Fruit: Wash, let dry and store in refrigerator in plastic bag or crisper. Do not wash or cut berries until they are ready to use. Sort and keep berries in original container in crisper, or store in a loosely closed paper bag on a refrigerator shelf.
- Vegetables with skins: Place in plastic bag or plastic container and store in crisper.
Humidity Level - Max Setting
MAX (closed) keeps moist air in the crisper for best storage of fresh, leafy vegetables.
- Leafy vegetables: Wash in cold water, drain and trim or tear off bruised and discolored areas. Place in plastic bag or plastic container and store in crisper.
ICE AND WATER
Ice Maker (on some models - Accessory)
- Allow 24 hours to produce the first batch of ice. Discard the first three batches of ice produced.
- The quality of your ice will be only as good as the quality of the water supplied to your ice maker. Avoid connecting the ice maker to a softened water supply. Water softener chemicals such as salt) can damage parts of the ice maker and lead to poor quality ice. If a softened water supply cannot be avoided, make sure the water softener is operating properly and is well maintained.
- Do not use anything sharp to break up the ice in the storage bin. This can cause damage to the ice container and the dispenser mechanism.
- Do not store anything on top of or in the ice maker or storage bin.
Turning the Ice Maker On/Off
The On/Off switch is located on the bottom of the Ice Maker, can be accessed by lifting and opening the ice maker door.
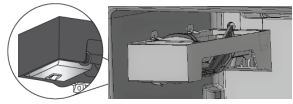
- To turn on the ice maker, lift open the ice maker door, flip the switch to the On (right) position.
- To manually turn off the ice maker, lift open the ice maker door, flip, the switch to the Off (left) position. Ice can still be dispensed, but no more can be made.
NOTE: Your ice maker has an automatic shutoff to keep the storage bin from overfilling during normal operation. As ice is made, the ice cubes will fill the ice storage bin, and the ice cubes will raise the shutoff arm to the Off (arm up) position. When the storage bin is at full capacity, the ice maker will automatically stop ice production, but the ice maker On/Off switch will remain in the On position.

REFRIGERATOR CARE
Cleaning
Both the refrigerator and freezer sections defrost automatically. However, clean both sections about once a month to avoid buildup of odors. Wipe up spills immediately.
IMPORTANT: Because air circulates between both sections, any odors formed in one section will transfer to the other. You must thoroughly clean both sections to eliminate odors. To avoid odor transfer and drying out of food, wrap or cover foods tightly.
To Clean Your Refrigerator:
NOTE: Do not use abrasive or harsh cleaners such as window sprays, scouring cleansers, flammable fluids, cleaning waxes, concentrated detergents, bleaches or cleansers containing petroleum products on plastic parts, interior and door liners or gaskets. Do not use paper towels, scouring pads, or other harsh cleaning tools.
- Unplug refrigerator or disconnect power.
- Hand wash, rinse, and dry removable parts and interior surfaces thoroughly. Use a clean sponge or soft cloth and a mild detergent in warm water.
- Wash painted metal exteriors with a clean sponge or soft cloth and a mild detergent in warm water. Dry thoroughly with a soft cloth.
- Plug in refrigerator or reconnect power.
Vacation
If you installed an ice maker and connected it to your household water line, turn off the water supply to the refrigerator if you will be away from home for longer than a few days.
TROUBLESHOOTING
| If you experience |
Possible Causes and/or Recommended Solutions |
| The refrigerator will not operate |
■ Not connected to an electrical supply - Plug the power cord into a grounded 3-prong outlet. Do not use an extension cord.
■ No power to the electrical outlet - Plug in a lamp to see if the outlet is working.
■ Household fuse blown or circuit breaker tripped - Replace the fuse or reset the circuit breaker. If the problem continues, contact an electrician.
■ Control is not turned on - Turn on the refrigerator control. See “Using the Controls.”
■ New Installation - Allow 24 hours following installation for the refrigerator to cool completely.
NOTE: Adjusting the temperature controls to coldest setting will not cool the refrigerator more quickly.
|
| The motor seems to run too much |
Your new refrigerator may run longer than your old one. Energy efficient refrigerators run longer at lower, more energy efficient speeds. Your refrigerator may run even longer if the room is warm, a large food load is added, the door is opened often, or if the door has been left open. |
| The refrigerator is noisy |
Refrigerator noise has been reduced over the years. Due to this reduction in operating noise, you may notice unfamiliar noises that are normal. Following are some normal sounds with an explanation: ■ Buzzing - heard when the water valve opens to fill the ice maker
■ Clicking/Snapping - valves opening or closing
■ Pulsating - fans/compressor adjusting to optimize performance
■ Rattling - flow of refrigerant, water line, or from items placed on top of the refrigerator
■ Sizzling/Gurgling - water dripping on the heater during defrost cycle
■ Popping - contraction/expansion of inside walls, especially during initial cool-down
■ Water running - may be heard when ice melts during the defrost cycle and water runs into the drain pan
■ Creaking/Cracking - occurs as ice is being ejected from the ice maker mold.
|
| The door will not close completely |
■ The door is blocked open - Move food packages away from door. Push bin or shelf back in the correct position. Make sure the crisper cover is fully pushed in, so that the back rests on the supports. |
| The door is difficult to open |
■ Gaskets are dirty or sticky - Clean gaskets and contact surfaces with mild soap and warm water. Rinse and dry with soft cloth. |
| Temperature is too warm |
■ New Installation - Allow 24 hours following installation for the refrigerator to cool completely.
■ Door(s) opened often or not closed completely - Allows warm air to enter refrigerator. Minimize door openings and keep doors fully closed.
■ A large amount of warm food has been recently added - Allow several hours for refrigerator to return to normal temperature.
■ Check that the Temperature Control(s) are set correctly for the surrounding conditions - Adjust the controls to one setting colder. Check temperature in 24 hours. See “Using the Controls.”
|
| There is interior moisture buildup NOTE: Some moisture buildup is normal. |
■ Humid room - Contributes to moisture buildup in the refrigerator.
■ Door(s) opened often or not closed completely - Allows humid air to enter the refrigerator. Minimize door openings and keep door fully closed.
|
| The ice maker is not producing ice or not enough ice |
■ The ice maker is not connected to a water supply - Connect refrigerator to water supply and turn water shutoff valve fully open.
■ A kink in the line can reduce water flow - Straighten the water source line.
■ Ice maker is not turned on - Make sure the ice maker wire shutoff arm or switch (depending on model) is in the ON position.
■ New installation - Wait 24 hours after ice maker installation for ice production to begin. Wait 3 days for full ice production.
■ Large amount of ice recently removed - Allow sufficient time or ice maker to produce more ice.
■ Ice cube jammed in the ice maker ejector arm - Remove ice from the ejector arm with a plastic utensil.
■ A reverse osmosis water filtration system connected to our cold water supply can decrease water pressure - See “Water Supply Requirements.”
|
| The ice cubes are hollow or small NOTE: This is an indication of low water pressure. |
■ The water valve is not completely open - Completely open the water shutoff valve.
■ A kink in the line can reduce water flow - Straighten the water source line.
■ A reverse osmosis water filtration system connected to our cold water supply can decrease water pressure - See “Water Supply Requirements.”
■ If questions regarding water pressure remain, call a licensed, qualified plumber.
|
| Off-taste, odor or gray color in the ice |
■ New plumbing connections can cause discolored or off-flavored ice - Discard the ice and wash the ice storage bin. Allow 24 hours for the ice maker to make new ice, and discard the first 3 batches of ice produced
■ Ice stored too long can develop an off-taste - Discard ice. Wash ice bin. Allow 24 hours for ice maker to make new ice.
■ Food odor transferring to ice - Use airtight, moisture proof packaging to store food.
■ There are minerals (such as sulfur) in the water - A water filter my need to be installed to remove the minerals.
|