Controls
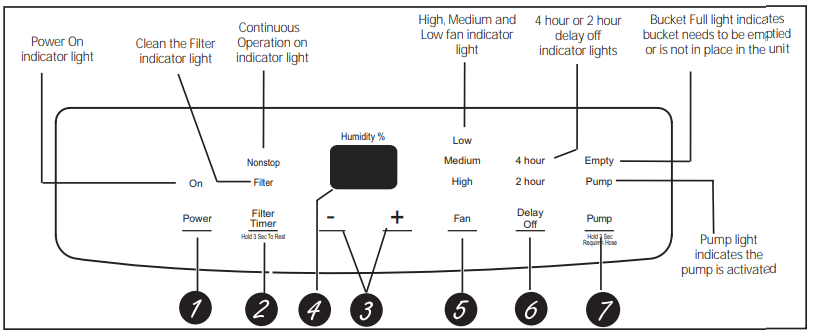
Controls
NOTE: When the bucket is full or removed, the controls cannot be set.
1. Power Pad
Press to turn the dehumidifier on and off.
2. Filter Timer
After 250 hours of operation, the Clean the Filter indicator light will glow to remind you to clean the filter. Remove the filter and clean it.
Press to turn off the Clean the Filter light. See the Care and Cleaning section.
3. Humidity Set Control Pads
The humidity lavel be set within a range of 35% RH (Relate Humidity) to 80% RH in 5% increments or at NS for continuous operation. To set the unit for continuous operation. press the pad until the screen reads NS.
NOTE: If NS (Nonstop) is selected, the dehumidifier will operate continuously at its maximum dehumidification settings if attached to a hose to drain or until the bucket is full.
For drier air, press the pad and set to a lower percent value (%).
For damper air, press the pad and set to a higher percent value (%)
When you first use the dehumidifier, set the humidity control to 45% or 50%. Allow at least 24 hours for the dehumidifier to achieve the humidity level. If you still have damper air than desired, set the humidity level to a lower setting or select Nonstop for maximum dehumidication. dehumidification
4. Display
Shows the set % humidity level while setting, then shows the actual (+/-5% accuracy) room % humidity level.
5. Fan Speed
Pad Controls the fan speed. Press to select either High, Medium or Low fan speed. Set the fan control to High for maximum moisture removal. When the humidity has been reduced and quiet operation is preferred, set the fan control to Medium or Low.
6. Delay Off
While the dehumidifier is in operation, press this pad to set it to automatically turn off in 2 hours or 4 hours.
7. Pump
Activates the internal pump function. Press for 3 seconds to activate the internal pump for automatic removal of condensate. The internal pump indicator light will remain illuminated after 3 seconds.
Press to deactivate the pump.
Other Features
Empty Light
Glows when the bucket is ready to be emptied, or when the bucket is removed or not replaced in the proper position.
Alarm
If the bucket is full or missing for more than 3 minutes, an alarm will sound for about 10 seconds to remind you to empty and replace the bucket.
Auto Shut Off
The Water Level Control Switch shuts offs the dehumidifier when the bucket is full, or when the bucket is removed or not replaced in the proper position. NOTE: Fan will continue to run approximately 3 minutes after bucket is removed.
Auto Defrost
When frost builds up on the evaporator coils, the compressor will cycle off and the fan will continue to run until the frost disappears.
Power Outage
In the case of a power outage or interruption, the unit will automatically restart, in the settings last used, after the power is restored.
Using the Dehumidifier
When first using the dehumidifier, operate the unit continuously for 24 hours.
How the Dehumidifier Operates
Moist, humid air is drawn over a cold refrigerated dehumidifying coil. Moisture in the air condenses on this coil and drains into a bucket (or through a hose and drain). Dry, clean air is drawn through the condenser where it is heated and discharged out the top grille into the room. It is normal for the surrounding air to become slightly warmer as the dehumidifier operates.
Automatic Defrost
When frost builds up on the evaporator coils, the compressor will cycle off and the fan will continue to run until the frost disappears. When the coil is defrosted, the compressor or fan will automatically restart and dehumidifying will resume.
Choosing a Location
A dehumidifier operating in a basement will have little or no effect in drying an adjacent enclosed storage area, such as a closet, unless there is adequate circulation of air in and out of the area.
- Do not use outdoors.
- This dehumidifier is intended for indoor residental applications only. This dehumidifier should not be used for commercial or industrial applications.
- Place the dehumidifier on a smooth, level floor strong enough to support the unit with a full bucket of water.
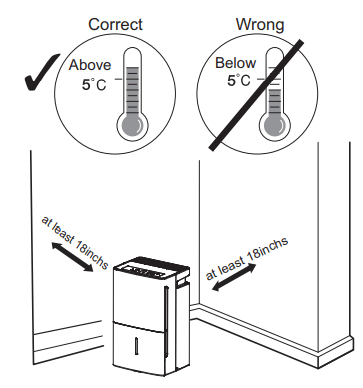
- Allow at least 12-18 inches of air space on all sides of the unit for good air circulation.
- Place the dehumidifier in an area where the temperature will not fall below 41F (5C). The coils can become covered woth frost at temperatures below 41F, which may reduce performance.
- Use the dehumidifier in cooking, laundry, bathing and dishwashing areas that have excessive moisture. NOTE: Place the dehumidifier away from the clothes dryer.
- Use the dehumidifier to prevent moisture damage anywhere books or valuables are stored.
- Use the dehumidifier in a basement to help prevent moisture damage.
- The dehumidifierto must be operated in an enclosed area to be most effective.
- Close all doors, windows and other outside opening to the room.
NOTE: The dehumidifier has rollers to aid placement but it should only be rolled on smooth, flat surfaces, Do not attempt to roll the dehumidifier on carpet or over objects.
Always make sure the water bucket is locked into place on the dehumidifier
Removing Collected Water
There are 3 ways to remove collected water.
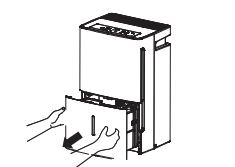
Use the bucket. When the bucket is removed, the unit will shut off. Empty and replace the bucket.
IMPORTANT: Do not use the hose if using the bucket to collect water. When the hose is connected, water will flow through it onto the floor instead of into the bucket.
NOTES :
- Do not remove the bucket while the dehumidifier is operating or if it has just stopped operating. This might cause some water to drip from the drain pan.
- The bucket must be in place and securely seated for the dehumidifier to operate.
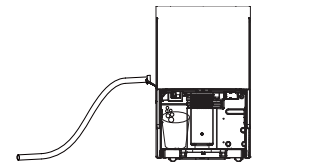
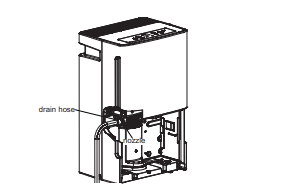
Use a hose. Water can be automatically emptied into a floor drain by attaching a garden water hose (not included).

- Remove the bucket from the front of the unit
- Open the drain cover on the back of the unit.
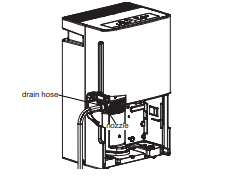
3. Thread a garden hose (not supplied) onto the nozzle, cut to length, and lead it to the floor drain.
4. Replace the bucket in the unit.
NOTE: The bucket must be in place and securely seated for the dehumidifier to operate.
Use the internal pump. Water can be automatically emptied into a remote location by attaching the included pump hose.
- Attach the pump hose to the hose connector by pushing the tube fitting into the connector until it fits into place (should not be able to remove the hose when pulled).
- Position the hose discharge to the desired location.
- Make sure the pump is activated. To activate the pump, press and hold the Pump button for 3 seconds, The Pump indicator light will flash then remain illuminated once the 3 seconds are complete.
IMPORTANT: Make sure the condensate hose is properly connected and is not kinked, bent or cracked as this may cause water to flow onto the floor, The bucket must also be fully seated for the pump to work properly. Do not operate the machine if the room temperature is 32F of below.
NOTE:
- Maximum lift height is 16ft.
- The bucket must be in place and securely seated for the dehumidifier and pump to operate. Make sure to install hose (included) before activating the pump.
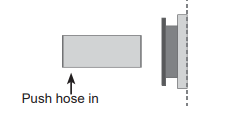
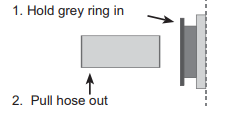
To Install Hose: Push in hose and gently pull to make sure it is secure.
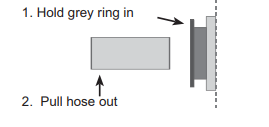
To Release Hose: Hold the grey ring while pulling to remove.
Water Level
The dehumidifier will turn off automatically when the bucket is full, or when the bucket is removed or not replaced in the proper position.
NOTE: DO NOT kink or crimp hose, as it can block water flow.
The bucket must be replaced in the proper position for the dehumidifier to work. The light will be on and the dehumidifier will not run if the bucket is not in the proper position.
Bucket Operation
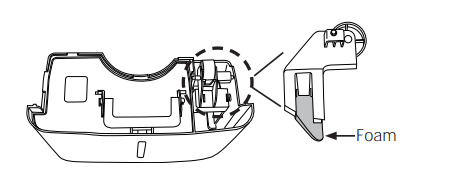
DO NOT remove the foam piece in the bucket assembly. If removed the Dehumidifier will not work properly. When the coil is defrosted, the compressor or fan will automatically restart and dehumidifying will resume.
Care and Cleaning
Turn off the dehumidifier and remove the plug from the wall outlet before cleaning.
Grille and Case
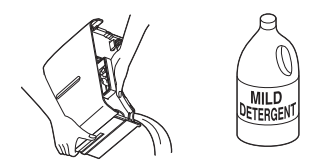
To clean the case:
Use water and a mild detergent. Do not use bleach or abrasives.
To clean the front grille:
Use a vacuum attachment or brush.
Water Bucket
To clean:
Every few weeks, clean the bucket to prevent growth of mold, mildew and bacteria. Partially fill the bucket with clean water and add a little mild detergent. Swish it around in the bucket, empty and rinse.
NOTE: Do not use a dishwasher to clean the water bucket.
To remove: Remove the bucket and pour out any water.
To replace: Slide the bucket into the dehumidifier.
NOTE: The bucket must be in place and securely seated for the dehumidifier to operate.
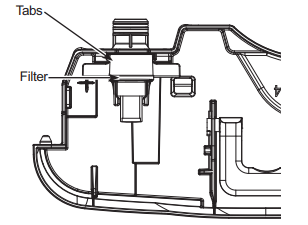
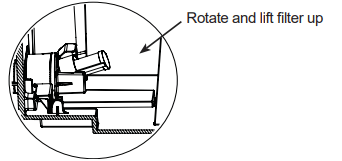
Air Filter
The air filter behind the front grille should be checked and cleaned at least every 250 hours of operation of more often if necessary.
After 250 hours of operation, the Clean the Filter indicator light will glow to remind you to clean the filter. Remove the filter and clean it. Replace the filter and press the Filter Timer pad to turn off the Clean the Filter light.
To remove:
Remove the bucket. Grasp the filter edge, and pull it straight down and out.
To clean:
Clean the filter with warm, soapy water. Rinse and let the filter dry before replacing it.
NOTE: DO NOT rinse or put the filter in an automatic dishwasher.
CAUTION DO NOT operate the dehumidifier without a filter because dirt and lint will clog it and reduce performance.

NOTE: Avoid using a dishwasher to clean the filter.
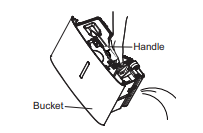
Bucket Filter
The bucket filter is located inside the bucket near the bottom. The filter should be checked when cleaning the bucket. If the filter has any debris on it, gently remove the filter as described below and rinse with warm water. Replace the filter in the bucket once it is clean.
IMPORTANT: Be careful not to tear or damage filter during removal, cleaning or replacement. Do not use the dishwasher to clean the filter.
TO REMOVE THE FILTER:
- Lift the handle to make the ends of the handle align with the holes in the clasps. Push the handle towards one of the clasps keeping the handle aligned with the clasp slots. Push the other clasp away from the handle allowing the handle to be separated from the clasp. Remove the handle from the other clasp.
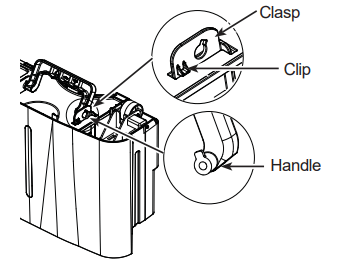
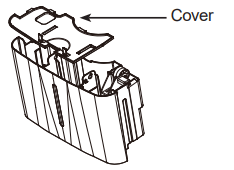
2. Squeeze both clasp inward to disengage clasp clips from water tank cover. Lift the cover upwards to remove.
3. Lift the end of the filter upwards to remove the filter.
TO REPLACE THE FILTER:
4. Place large end of filter above tabs, press filter down firmly to spread tabs. Once filter is between tabs press filter inward to engage tabs into filter.
5. Replace water tank cover and handle.
Storage
If the unit is to be stored for an extended period of time, take the following actions before putting away the machine.
- Empty the bucket of all water.
- Clean the water bucket and bucket filter per instructions.
- Allow water bucket to dry and reinstall.
- Remove pump hose and store with unit
To Release Hose: Hold the grey ring while pulling the hose to remove.
Troubleshooting Tips
Dehumidifier does not start
- The dehumidifier is unplugged.
- Makes sure the dehumidifier’s plug is pushed completely into the outlet.
- The fuse is blown/circuit breaker is tripped.
- Check the house fuse/circuit breaker box and replace the fuse or reset the breaker.
- Dehumidifier has reached its preset level or bucket is full.
- The dehumidifier automatically turns off when either condition occurs. Change to a lower setting or empty the bucket and replace properly.
- Bucket is not in the proper position.
- The bucket must be in place and securely seated for the dehumidifier to operate.
- Power Failure.
- There is a protective time delay (up to 3 minutes) to prevent tripping of the compressor overload. For this reason, the unit may not start normal heating or cooling for 3 minutes after it turned back on.
Dehumidifier does not dry the air as it should
- Did not allow enough time to remove the moisture.
- When first installed, allow at least 24 hours to maintain the desired dryness.
- Airflow is restricted.
- Make sure there are no curtains, blinds or furniture blocking the front of back of the dehumidifier. See the Choosing a Location section.
- Dirty Filter
- See the Care and Cleaning section.
- The Humidity Control may not be set low enough.
- For drier air, press the + pad and set to a lower percent value (%) or at at NS (Nonstop) for maximum dehumidification.
- Doors and windows may not be closed tightly.
- Check that all doors, windows and other openings are securely closed.
- Clothes dryer may be blowing moisure-laden air into the room.
- Check that all doors, windows and other openings are should be vented to the outside.
- Room temperature is too low.
- Moisture removal is best at higher room temperatures. Lower room temperatures will reduce the moisture removal rate. Models are designed to be operated at temperatures above 41F(5C).
Dehumidifier runs too much
- Area to be dehumidified is too large.
- The capicity of your dehumidifier may not be adequate.
- Doors and windows are open.
- Close all doors and windows to the outside.
Frost appears on the coils
- Dehumidifier has been turned on recently, or room temperature is below 41F(5C)
- This is normal. Frost will usually disppear within 60 minutes. See the Automatic Defrost section
Control cannot be set
- The compressor will turn off and the fan will automatically continue to run for approximately 3 minutes at a fixed setting.
- This is normal. Wait approximately 3 minutes and set the fan as desired.
Fan noise
- Air is moving through the dehumidifier.
- This is normal.
Water on floor
- Hose connection may be loose.
- Check the hose connection. See the Removing Collected Water section.
- Intended to use the bucket to collect water, but a hose was attached.
- Disconnect the hose if using a bucket to collect water. See the Removing Collected Water section.
Bucket Full LED light flashing and alarm sounds while drain hose is connected.
- Drain hose not tight on fitting.
- Check drain hose connection.
- Drain hose is kinked.
- Ensure the drain hose is pointed straight down to the floor and is not kinked in anyway.