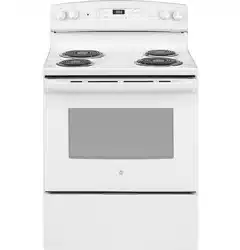
User manual Electric Range
Oven Controls
Throughout this manual, features and appearance may vary from your model.
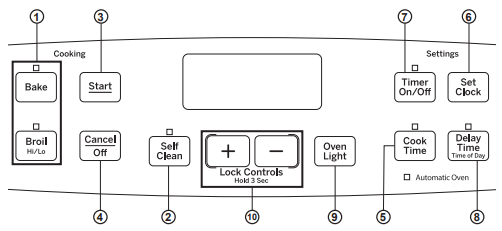
1. Traditional Cooking Modes: Your oven has the following traditional cooking modes: Bake and Broil Hi/lo. See the Cooking Modes section for more information.
2. Self Clean: See the Cleaning the Oven section for important information about using this mode.
3. Start: Must be pressed to start any cooking, cleaning, or timed function.
4. Cancel/Off: Cancels ALL oven operations except the clock and timer.
5. Cook Time: Counts down cooking time and turns off the oven when the cooking time is complete. Press the Cook Time pad, use the +/- pads to program a cooking time in hours and minutes, then press Start. This can only be used with Bake.
6. Clock: Sets the oven clock time. Press the Set Clock or Clock pad and the +/- pads to program the clock. Press Start to save the time.
7. Timer: Works as a countdown timer. Press the Timer pad and the +/- pads to program the time in hours and minutes. Press the Start pad. The timer countdown is complete. To turn the timer off press the Timer pad.
8. Delay Time: Delays when the oven will turn on. Use this to set a time when you want the oven to start. Press the Delay Time pad and use the +/- pads to program the time of day for the oven to turn on then press Start. Press the desired cooking mode and temperature then press Start. A cook time may also be programmed if desired. Follow the directions under Cook Time for setting this feature. This can only be used with Bake and Self-Clean. NOTE: When using the delay time feature, foods that spoil easily - such as milk, eggs, fish, stuffings, poultry and pork - should not be allowed to sit for more than 1 hour before or after cooking. Room temperature promotes the growth of harmful bacteria. Be sure that the oven light is off because heat from the bulb will speed harmful bacteria growth.
9. Oven Light: Turns the oven light on or off.
10. Lock Controls: Locks out the control so that pressing the pads does not activate the controls. Press and hold the +/- pads for three seconds to lock or unlock the control. Cancel/Off is always active, even when the control is locked.
Oven Temperature Knob (on some models)
Turn the OVEN TEMP knob to the setting you want
- Preheat the oven for 10 minutes for baking
- For models that do not have the self clean feature the oven heating ight comes on when the burner ison. It will cycle on and off during cooking
- For models that have the self clean feature the oven heating light comes on when you set your oven temperature knob. The light wil stay on unti you set your knob back to the off position.
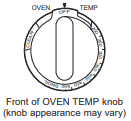
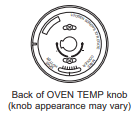
To Adjust the Thermostat (on models with an OVEN TEMP Knob)
1. Pull the Oven Temp knob off the range and look at the back side. To make an adjustment, loosen ( approximately one turn), but do not completely remove, the two screws on the back of the knob.
2. With the back of the knob facing you, hold the outer edge of the knob with one hand and turn the front of the knob with the other hand.
To increase the oven temperature, move the top screw toward the right. You’ll hear a click for each notch you move the knob.
To decrease the oven temperature, move the top screw toward the left.
Each click will change the oven temperature approximately 10°F. ( Range is plus or minus 60°F from the arrow. We suggest that you make the adjustment one click from the original setting and check oven performance before making any additional adjustments.
3. After the adjustment is made, retighten screws so they are snug, but be careful not to overtighten.
4. Replace the knob, matching the flat area of the knob to the shaft, and check performance.
Special Features
Adjust the Oven Temperature
This feature allows the oven baking temperature to be adjusted up to 35°F hotter or down to 35°F cooler. Use this feature if you believe your oven temperature is too hot or too cold and wish to change it. This adjustment affects Bake mode. No other cooking modes are affected
Press the Bake pad to enter the temperature adjustment mode. A number between 35 and - 35 will display. Use the +/- pads to set the desired temperature adjustment and use the Bake pad to change between negative and positive. Press the Start pad to save the temperature adjustment.
End of Timer Signals
This is the tone that signals the end of a timer. The tone can be continuous (Con bEEP) or one repeating beep (GEEP). A continuous setting will continue to sound a tone until a button on the control is pressed. Press the Timer pad to view the current setting and then to change the setting.
Fahrenheit or Celsius Temperature Display
The oven control is set to use Fahrenheit temperatures (F). but you can change it to use Celsius temperatures (C). Press the number Cook Time and Broil HilLo pads at the same time to view the current setting. Press again to change the setting.
Clock Display
This feature specifies how the time of day will be alae or fra tie of yw bo delayed Vou can select a standard 12-hour clock (12 H). 24-hour mi time display (24 H). or no clock displayed (OFF). Press the Clock pad to view the current setting. Press again to change the setting.
12-hour auto shut-off and Sabbath
Options for this feature are “12 SHdn”, “no SHdn” and “SAb”.
12-hour auto shut-off turns off the oven after 12 hours of continuous operations.
Sabbath mode disables the oven lights (the oven light will not turn on when the door is opened). all sounds (the control will not beep when a button is pressed), Broil, Cook Time. Timer. Clock. and Delay Time functions. Sabbath mode can only be used with Bake. This feature conforms to the Star-K Jewish Sabbath requirements.
Press the Set Clock pad to view the current setting and then to change the setting
To use Sabbath mode. select “SAb" and press Start. A] will appear in the display and the clock will not display.
Once in Sabbath mode. at any time you can press Bake to start the oven. Note that when programming a bake in Sabbath mode. the preset starting temperature will automatically be set to 350°F. Press the + or - pads to increase or decrease the temperature in 25°F increments. for temperatures between 170°F and 550°F and then press Start.
No sound will be given when the keys are pressed. At a random time between 30 seconds and 1 minute. If. will appear in the display indicating the oven is running
If you need to adjust the temperature while baking. press Bake again. Press the + or - pads to increase or decrease the temperature in 25°F from the previous temperature you set to the new baking temperature and then press Start.
To tum the oven off. Press Cancel/Off at any time. The oven will immediately turn off and ][ will change to ] indicating that the oven has turned off.
To exit Sabbath mode. make sure that the oven is turned off. Press and hold the Bake and Broil pads for 3 seconds to enter special features then press Delay Time until either “12 Shdn* or “no Shdn*is in the display and press Start.
NOTE: If power outage occurs during Sabbath mode the unit will remain in Sabbath mode but off when power is restored.
If you wish to use the Cook Time feature to bake in the oven and then have the oven automatically turn off, you will need to press the Cook Time pad, enter a cooking time duration, and press Start. Then enter special features to start Sabbath mode as detailed above.
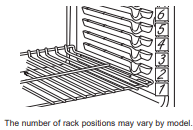
Oven Racks
Recommended rack positions for various types of foods are provided in the Cooking Guide. Adjusting rack position is one way to impact cooking results. For example, if you would prefer darker tops on cakes, muffins, or cookies, try moving food one rack position higher. If you find foods are too brown on top try moving them down next time.
When baking with multiple pans and on multiple racks, ensure there is at least 1½" between pans to allow sufficient space for air to flow.
Your Oven may have extension racks and/or traditional flat racks.
To avoid possible burns, place the racks in the desired position before you turn the oven on.
Cooking Modes
Your new oven has a variety of cooking modes to help you get the best results. These modes are described below. Refer to the Cooking Guide section for recommendations for specific foods. Remember, your new oven may perform differently than the oven it is replacing.
Baking Modes
When preparing baked goods such as cakes, cookies, and pastries always preheat the oven first. Follow recipe recommendations for food placement. If no guidelines are provided, center food in the oven.
Traditional Bake
The traditional bake mode is intended for single rack cooking. This mode uses heat primarily from the lower element but also from the upper element to cook food. To use this mode press the Bake pad, enter a temperature, and then press Start. Preheating is generally recommended when using this mode.
Broiling Modes
The oven must be closed during broiling. Monitor food closely while broiling. Use caution when broiling (on upper rack positions as placing food closer to the broil element increases smoking. spattering. and the possibility of fats igniting. For best performance center food below the broil heating element. Broiling on rack position 6 is not recommended.
Try broiling foods that you would normally grill. Adjust rack positions to adjust the intensity of the heat to the food. Place foods closer to the broil element when a seared surface and rare interior is desired. Thicker foods and foods that need to be cooked through should be broiled on a rack position farther from the broiler or by using Broil Lo.
Broil Hi
The Traditional Broil Hi mode uses intense heat from the upper element to sear foods. Use Broil Hi for thinner cuts. of meat and/or foods you prefer less done on the interior.
To use this mode press the Broil pad once and then press Start. It is not necessary to preheat when using this mode.
Broil Lo
The Traditional Broil Lo mode uses less intense heat from the upper element to cook food thoroughly while also producing surface browning. Use Broil Lo for thicker cuts of meat and/or foods that you would like cooked all the way through. To use this mode press the Broil pad twice and then press Start. It is not necessary to preheat when using this mode.
Cleaning the Range – Exterior
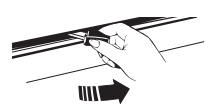
Control Knobs
The control knobs may be removed for easier cleaning. Make sure the knobs are in the OFF positions and pull them straight off the stems for cleaning.
The knobs can be cleaned in a dishwasher or they may also be washed with soap and water. Make sure the inside of the knobs are dry before replacing.
Replace the knobs, in the OFF position to ensure proper placement.
Oven Exterior
Do not use oven cleaners, abrasive cleaners, strong liquid cleansers, steel wool, plastic scouring pads, or cleaning powders on the interior or exterior of the oven. Clean with a mild soap and water or vinegar and water solution. Rinse with clean water and dry with a soft cloth. When cleaning surfaces, make sure that they are at room temperature and not in direct sunlight.
If stain on the door vent trim is persistent, use a mild abrasive cleaner and a sponge-scrubber for best results.
Spillage of marinades, fruit juices, tomato sauces and basting liquids containing acids may cause discoloration and should be wiped up immediately. Let hot surfaces cool, then clean and rinse.
Cleaning The Oven - Interior
The interior of your new oven can be cleaned manually or by using Self Clean.
Spillage of marinades, fruit juices, tomato sauces and basting liquids containing acids may cause discoloration and should be wiped up immediately. Let hot surfaces cool, then clean and rinse.
Manual Cleaning
Do not use oven cleaners, abrasive cleansers, strong liquid cleansers, steel wool, scouring pads, or cleaning powders on the interior of the oven. Clean with a mild soap and water or vinegar and water solution. Rinse with clean water and dry with a soft cloth. When cleaning surfaces, make sure that they are at room temperature.
Self Clean Mode (on some models)
Read Self-Cleaning Oven Safety Instructions at the beginning of this manual before using Self-Clean Mode. Self-clean uses very high temperatures to clean the oven interior. You will need to lock the oven door when using this feature. Before operating the self-clean cycle, wipe up grease and soils from the oven. Remove all items from the oven other than enameled ( dark color) racks. Shiny or silver racks and any cookware or other items should all be removed from the oven before initiating a self-clean cycle. Close the door. Latch the door.
NOTE: Never force the latch. If the oven is too hot, you will not be able to slide the latch. Allow the oven to cool. If your range has a knob turn knob to self-clean position or if your range has an oven control press the Self Clean pad and a default self-clean time is displayed. The clean time can be changed to any time between 3:00 and 5:00 hours by using the +/- pads to enter a different time and pressing Start. For heavily soiled ovens, the maximum 5 hour clean time is recommended. If you wish to use the default time, press the Start pad immediately after pressing the Self Clean pad. The oven will turn off automatically when the self-clean cycle is complete and the self-clean light will be off. Slide the latch handle to the left as far is it will go and open the door. Never force the latch handle. Forcing the handle will damage the door lock mechanism. After the oven has cooled down wipe any ash out of the oven.
We recommend venting your kitchen with an open window or using a ventilation fan or hood during the first self-clean cycle.
Soil on the front frame of the range and outside the gasket on the door will need to be cleaned by hand. Clean these areas with hot water, soap-filled steel-wool pads or cleansers such as Soft Scrub®. Rinse well with clean water and dry.
Do not clean the gasket. The fiberglass material of the oven door gasket cannot withstand abrasion. It is essential for the gasket to remain intact. If you notice it becoming worn or frayed, replace it.
Make sure the oven light bulb cover is in place and the oven light is off.
IMPORTANT: The health of some birds is extremely sensitive to the fumes given off during the self-cleaning cycle of any range. Move birds to another wellventilated room.
To Stop a Self-Clean Cycle
Press Cancel/Off and wait for self clean light to go off. Wait until the oven has cooled below the locking temperature to unlatch the door. You will not be able to open the door right away unless the oven has cooled below the locking temperature.
Racks
All racks can be washed with warm, soapy water.
Racks may be more difficult to slide, especially after a self-clean. Put some vegetable oil on a soft cloth or paper towel and rub onto the left and right edges.
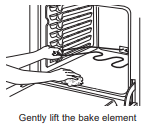
Oven Heating Elements
Do not clean the bake element or the broil element. Any soil will burn off when the elements are heated.
To clean the oven floor, gently lift the bake element. Clean the oven floor with warm, soapy water.
Cleaning the Glass Cooktop
Metal Marks and Scratches
1. Be careful not to slide pots and pans across your cooktop. It will leave metal markings on the cooktop surface.
These marks are removable using the CERAMA BRYTE® Ceramic Cooktop Cleaner with a CERAMA BRYTE® Cleaning Pad for Ceramic Cooktops.
2. If pots with a thin overlay of aluminum or copper are allowed to boil dry, the overlay may leave black discoloration on the cooktop.
This should be removed immediately before heating again or the discoloration may be permanent.
NOTE: Carefully check the bottom of pans for roughness that would scratch the cooktop.
Oven Light
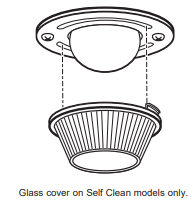
Oven Light Replacement (on some models)
To remove:
- Turn the glass cover counterclockwise 1/4 turn until the tabs of the glass cover clear the grooves of the socket. Wearing latex gloves may offer a better grip.
- Remove the bulb by turning it counterclockwise.
To replace:
1. Replace bulb with a new 40-watt appliance bulb. Insert the bulb and turn it clockwise until it is tight.
2. Place the tabs of the glass cover into the grooves of the socket. Turn the glass
For improved lighting inside the oven, clean the glass cover frequently using a wet cloth. This should be done when the oven is completely cool.
3. Reconnect electrical power to the oven.
Installation Instructions
1. REMOVE PACKAGING MATERIALS:
Failure to remove packaging materials could result in damage to the appliance. Remove all packing parts from oven, racks, heating elements and drawer. Also, remove protective film and labels on the outer door, cooktop and control panel.
Consider recycling options for your appliance packaging material.
2. PREPARE THE OPENING (FOR INDOOR USE ONLY)
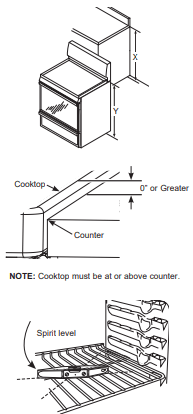
See illustrations for all rough-in and spacing dimensions. The range may be placed with 0” clearance (flush) at the back wall and side walls of the cabinet.
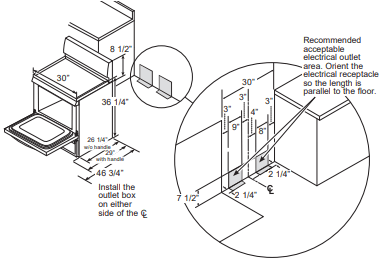
NOTE: Use a 4’ power cord to prevent interference with the storage drawer. Power cords 41⁄2’ to 6’ long may have to be dressed to allow for proper drawer closing.
MINIMUM DIMENSIONS BETWEEN COOKTOP, WALLS AND ABOVE THE COOKTOP:
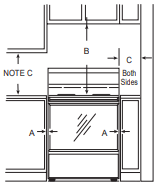
A. Make sure the wall covering, countertop, flooring and cabinets around the range can withstand the heat (up to 200°F) generated by the range. 0” to cabinets below cooktop and at the range back.
B. Allow 30” minimum clearance between surface units and bottom of unprotected wood or metal cabinet, or allow a 24” minimum when bottom of wood or metal cabinet is protected by no less than 1/4” thick flame retardant millboard covered with not less than No. 28 MSG sheet metal, (.015”), .015” thick stainless steel, .024” aluminum or .020” copper.
C. This appliance has been approved for 0” spacing to adjacent surfaces above the cooktop. However, a 6” minimum spacing to surfaces less than 15” above the cooktop and adjacent cabinet is recommended to reduce exposure to steam, grease splatter and heat.
To reduce the risk of burns or fire when reaching over hot surface elements, cabinet storage space above the cooktop should be avoided. If cabinet storage space is to be provided above the cooktop, the risk can be reduced by installing a range hood that projects at least 5” beyond the front of the cabinets. Cabinets installed above the cooktop must be no deeper than 16”.
3. ELECTRICAL REQUIREMENTS
WARNING This appliance must be properly grounded.
WARNING All new constructions, mobile homes, recreational vehicles and installations where local codes do not allow grounding through neutral, require a 4-conductor UL-listed range cord.
WARNING To prevent fire or shock, do not use an extension cord with this appliance.
WARNING To prevent shock, remove house fuse or open circuit breaker before beginning installation.
We recommend you have the electrical wiring and hookup of your range connected by a qualified electrician. After installation, have the electrician show you how to disconnect power from the range.
You must use a single-phase, 120/208 VAC or 120/240 VAC, 60 hertz electrical system. If you connect to aluminum wiring, properly installed connectors approved for use with aluminum wiring must be used.
Effective January 1, 1996, the National Electrical Code requires that new construction (not existing) utilize a 4-conductor connection to an electric range. When installing an electric range in new construction, mobile home, recreational vehicle, or an area where local codes prohibit grounding through the neutral conductor, refer to the section on four-conductor branch circuit connections.
Check with your local utilities for electrical codes which apply in your area. Failure to wire your oven according to governing codes could result in a hazardous condition. If there are no local codes, your oven must be wired and fused to meet the National Electrical Code, NFPA No. 70 – latest edition, available from the National Fire Protection Association.
This appliance must be supplied with the proper voltage and frequency, and connected to an individual, properly grounded, 40 amp (minimum) branch circuit protected by a circuit breaker or time-delay fuse.
Use only a 3-conductor or a 4-conductor UL-listed range cord. These cords may be provided with ring terminals on wire and a strain relief device.
A range cord rated at 40 amps with 125/250 minimum volt range is required. A 50 amp range cord is not recommended but if used, it should be marked for use with nominal 13⁄8” diameter connection openings. Care should be taken to center the cable and strain relief within the knockout hole to keep the edge from damaging the cable.
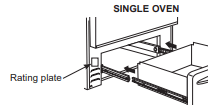
The rating plate is located on the oven frame or on the side of the drawer frame.
NOTE: Use of automatic, wireless or wired external switches that shut off power to the appliances, are not recommended for this product.
4. POWER CORD AND CONDUIT INSTALLATION
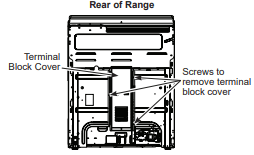
A. Remove wire cover (on the back of range) by removing screws using a 1/4” nut driver. You can access the terminal block by either removing a terminal block cover (on some models) or the wire cover. Do not discard these screws.
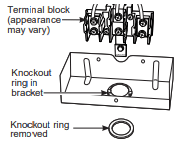
B. For power cord and 1” conduit only, remove the knockout ring (13⁄8”) located on bracket directly below the terminal block. To remove the knockout, use a pair of pliers to bend the knockout ring away from the bracket and twist until ring is removed.
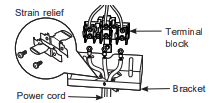
C. For power cord installations only (see the next step if using conduit), assemble the strain relief in the hole. Insert the power cord through the strain relief and tighten. Allow enough slack to easily attach the cord terminals to the terminal block. If tabs are present at the end of the winged strain relief, they can be removed for better fit.
NOTE: Do not install the power cord without a strain relief. The strain relief bracket MUST be installed before reinstalling the rear range wiring cover.
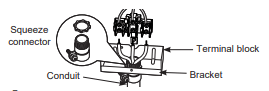
D. For 3/4” conduit installations only, purchase a squeeze connector matching the diameter of your conduit and assemble it in the hole. Insert the conduit through the squeeze connector and tighten. Allow enough slack to easily attach the wires to the terminal block. NOTE: Do not install the conduit without a squeeze connector. The squeeze connector MUST be installed before reinstalling the rear terminal block.
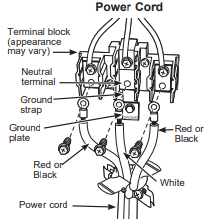
5. 3-WIRE INSTALLATION (GROUND IS THROUGH THE NEUTRAL WIRE)'
WARNING Shock Hazard The neutral wire and ground strap must be connected as shown below for the range to be properly grounded. Do not remove the ground strap. Failure follow this instruction may result in potential shock hazard.
WARNING Fire hazard Terminal block screws must be securely tightened. Failure to do so may result in potential fire hazard.
FOR POWER CORD INSTALLATION
A. Remove the 3 lower screws from the terminal block. Do not loosen the upper screws.
B. Do not cut or remove the ground strap.
C. Insert the 3 screws through each power cord terminal ring and back into the terminal block. Be certain the white wire is in the center. Securely tighten each screw (35 to 50 in-lbs.)
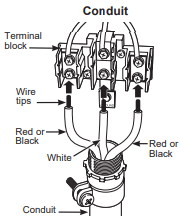
FOR CONDUIT INSTALLATION
A. Loosen the 3 lower screws on the terminal block. Do not loosen the upper screws.
B. Do not cut or remove the ground strap.
C. Insert the bare wire tip (insulation stripped 5/8”) into the bottom terminal block openings. Be certain the white wire is in the center. On certain models, the wire must be inserted through an opening in the ground strap. Securely tighten each screw onto each wire (35 to 50 in-lbs.).
D. Reinstall terminal block cover.
NOTE: Aluminum building wire may be used but it must be rated for the correct amperage and voltage.
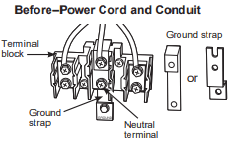
6. 4-WIRE INSTALLATION (SEPARATE GROUND WIRE)
WARNING The neutral wire of the supply circuit must be connected to the neutral terminal located in the lower center of the terminal block. The power leads must be connected to the lower left and the lower right terminals of the terminal block. The grounding lead must be connected to the frame of the range with the ground plate and the green ground screw.
FOR POWER CORD INSTALLATION
A. Remove the 3 lower screws from the terminal block. Do not loosen the upper screws.
B. Remove the ground screw and ground plate and retain them.
C. Cut the ground strap below the terminal block and discard the lower section.
D. Insert the ground screw through the ground plate (removed earlier) and back into the range frame. Tighten securely, but do not over-tighten (15 to 20 in-lbs.)
E. Insert the 3 terminal screws through each power cord terminal ring and back into the terminal block. Be certain the white wire is in the center. Securely tighten each screw (35 to 50 in-lbs.
F. Reinstall terminal block cover.

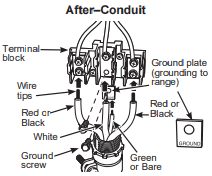
FOR CONDUIT INSTALLATION
A. Remove the 3 lower screws from the terminal block. Do not loosen the upper screws.
B. Remove the ground screw and ground plate and retain them.
C. Cut the ground strap below the terminal block and discard the lower section.
D. Insert the bare ground bare wire tip (insulation stripped 5/8”) between the range frame and the ground plate (removed earlier) and secure it in place with the ground screw. Tighten securely, but do not over-tighten (15 to 20 in-lbs).
E. Insert the wire tips (insulation stripped 5/8”) into the bottom terminal block openings. Be certain the white wire is in the center. On certain models, the wire must be inserted through an opening in the ground strap. Securely tighten each screw onto each wire (35 to 50 in-lbs.)
F. Reinstall terminal block cover.
NOTE: Aluminum building wire may be used but it must be rated for the correct amperage and voltage.
7. ANTI-TIP DEVICE INSTALLATION
To reduce the risk of tipping the range, the range must be secured by a properly installed anti-tip bracket. See installation instructions shipped with the bracket for complete details before attempting to install.
To check if the bracket is installed and engaged properly, look underneath the range to see that the rear leveling leg is engaged in the bracket. On some models, the storage drawer or kick panel can be removed for easier inspection. If visual inspection is not possible, slide the range forward, confirm the antitip bracket is securely attached to the floor or wall, and slide the range back so the leveling leg is under the anti-tip bracket. If the range is pulled from the wall for any reason, always repeat this procedure to verify the range is properly secured by the anti-tip bracket. Never completely remove the leveling legs or the range will not be secured to the anti-tip bracket.
8. LEVEL THE RANGE
WARNING Never completely remove the leveling leg as the range will not be secured to the anti-tip device properly.
A. Plug in the unit.
B. Measure the height of your countertop at the rear of the opening (X).
C. Adjust two rear leveling legs so that the rear of cooktop is at the same height or higher than the counter (Y).
D. Slide unit into place.
E. Install oven shelves in the oven and position the range where it will be installed.
F. Check for levelness by placing a spirit level on one of the oven shelves. Take two readings—with the level placed diagonally first in one direction and then the other.
G. Adjust front leveling legs until the range is level.
H. Look under the unit and verify that the rear leg is fully engaged with the anti-tip device. If not, remove the unit and adjust the height of the rear leg so that it is properly engaged.
9. FINAL INSTALLATION CHECKLIST
- Check to make sure the circuit breaker is closed (RESET) or the circuit fuses are replaced.
- Be sure power is in service to the building.
- Check that all packing materials and tape have been removed. This will include tape on metal panel under control knobs (if applicable), adhesive tape, wire ties, cardboard and protective plastic. Failure to remove these materials could result in damage to the appliance once the appliance has been turned on and surfaces have heated.
- Check that the door and drawer are parallel to each other and that both operate smoothly. If they do not, see the Owner’s Manual for proper replacement.
- Check to make sure that the rear leveling leg is fully inserted into the Anti-Tip bracket and that the bracket is securely installed.
OPERATION CHECKLIST
- Check that the oven control operates properly. If the oven control does not operate properly, recheck the wiring connections.
- Be sure all range controls are in the OFF position before leaving the range.
Troubleshooting Tips
Surface units will not maintain a rolling boil or cooking is not fast enough
- Improper cookware being used.
Use pans which are flat and match the diameter of the surface unit selected.
- In some areas, the power ( voltage) may be low.
Cover pan with a lid until desired heat is obtained.
Coil surface units do not work properly
- The surface units are not plugged in solidly.
With the controls off, check to make sure the surface unit is plugged completely into the receptacle.
- The surface unit controls improperly set.
Check to see the correct control is set for the surface unit you are using.
- The drip pans are not set securely in the cooktop.
With the controls off, check to make sure the drip pan is in the recess in the cooktop and that the opening in the pan lines up with the receptacle.
- A fuse in your home may be blown or the circuit breaker tripped.
Replace the fuse or reset the circuit breaker.
- Sensi-Temp Technology sensor cap is overly soiled.
Clean Sensi-temp Technology sensor cap per cleaning the range section.
- Sensi-temp sensor cap stuck or will not flex up and down.
Call a qualified technician for replacement. Replace coil surface units with only the exact replacement part.
Surface units do not work properly
- A fuse in your home may be blown or the circuit breaker tripped.
Replace the fuse or reset the circuit breaker.
- Cooktop controls improperly set.
Check to see the correct control is set for the surface unit you are using.
Surface unit stops glowing when turned to a lower setting
- The unit is still on and hot.
This is normal.
Scratches (may appear as cracks) on cooktop glass surface
- as cracks) on cooktop glass surface Incorrect cleaning methods being used.
Scratches are not removable. Tiny scratches will become less visible in time as a result of cleaning.
- Cookware with rough bottoms being used or coarse particles ( salt or sand) were between the cookware and the surface of the cooktop. Cookware has been slid across the cooktop surface.
To avoid scratches, use the recommended cleaning procedures. Make sure bottoms of cookware are clean before use, and use cookware with smooth bottoms.
Areas of discoloration on the cooktop
- Food spillovers not cleaned before next use.
See the Cleaning the glass cooktop section.
- Hot surface on a model with a light-colored cooktop.
This is normal. The surface may appear discolored when it is hot. This is temporary and will disappear as the glass cools.
Plastic melted to the surface
- Hot cooktop came into contact with plastic placed on the hot cooktop.
See the Glass surface - potential for permanent damage section in the Cleaning the glass cooktop section.
Pitting (or indentation) of the cooktop
- Hot sugar mixture spilled on the cooktop.
Call a qualified technician for replacement.
Frequent cycling off and on of surface units
- Improper cookware being used.
Use only flat cookware to minimize cycling.
My new oven doesn't cook like my old one. Is something wrong with the temperature settings?
- Your new oven has a different cooking system from your old oven and therefore may cook differently than your old oven.
For the first few uses, follow your recipe times and temperatures carefully. If you still think your new oven is too hot or too cold, you can adjust the temperature yourself to meet your specific cooking preference. NOTE: This adjustment affects Bake temperatures; it will not affect Broil or Clean.
Food does not bake properly
- Oven controls improperly set.
See the Cooking Modes section.
- Rack position is incorrect or rack is not level.
See the Cooking Modes section and Cooking Guide.
- Incorrect cookware or cookware of improper size being used.
See the Cookware section.
- Oven temperature needs adjustment.
See the Special Features section.
Substituting ingredients can change the recipe outcome.
Food does not broil properly
- Oven controls improperly set.
Make sure you select the appropriate broil mode.
- Improper rack position being used.
See Cooking Guide for rack location suggestions.
- Food being cooked in a hot pan.
Make sure cookware is cool.
- Cookware not suited for broiling.
Use a pan specifically designed for broiling.
- Aluminum foil used on the broiling pan and grid has not been fitted properly and slit as recommended.
If using aluminum foil conform to pan slits.
- In some areas the power (voltage) may be low.
Preheat the broil element for 10 minutes.
Oven temperature too hot or too cold
- Oven temperature needs adjustment.
See the Special Features section or adjust the thermostat ( on models with oven temperature knob).
Oven does not work or appears not to work
- A fuse in your home may be blown or the circuit breaker tripped.
Replace the fuse or reset the circuit breaker.
- Oven controls improperly set.
See the Using the Oven section.
Verify, that the oven is not in Sabbath Mode. See the Special Features section.
“Crackling” or “popping” sound
- This is the sound of the metal heating and cooling during both the cooking and cleaning functions.
This is normal.
Why is my range making a "clicking" noise when using my oven?
- Your range cycles the heating elements by turning relays on and off to maintain the oven temperature.
This is normal.
Clock and timer do not work
- A fuse in your home may be blown or the circuit breaker tripped.
Replace the fuse or reset the circuit breaker.
- Plug on range is not completely inserted in the electrical outlet.
Make sure electrical plug is plugged into a live, properly grounded outlet.
- Oven controls improperly set.
See the Using the kitchen timer section.
Storage drawer won’t close
- Power cord may be obstructing drawer in the lower back of the range.
Reposition the drawer and power cord. See the Storage Drawer Removal instructions in the Care and cleaning of the range section.
- Rear drawer support is on top of the guide rail.
Reposition the drawer. See the Storage Drawer Removal instructions in the Care and cleaning of the range section.
Oven door is crooked
- The door is out of position.
Because the oven door is removable, it sometimes gets out of position during installation. To straighten the door, push down on the high corner.
Oven light does not work
- Light bulb is loose or defective.
Tighten or replace bulb.
- Pad operating light is broken.
Call for service.
Oven will not self-clean
- The temperature is too high to set a self-clean operation.
Allow the oven to cool and reset the controls.
- Oven controls improperly set.
See the Cleaning the Oven section.
Excessive smoking during clean cycle
- Excessive soil or grease.
Press the Cancel/Off pad. Open the windows to rid the room of smoke. Wait until the LOCKED light goes off. Wipe up the excess soil and reset the clean cycle.
Excessive smoking during broiling
- Food too close to burner element.
Lower the rack position of the food.
Oven door will not open after a clean cycle
Allow the oven to cool below locking temperature.
Oven not clean after a clean cycle
- Oven controls improperly set.
See the Cleaning the Oven section.
Clean up heavy spillovers before starting the clean cycle. Heavily soiled ovens may need to self-clean again or for a longer period of time.
"LOCK DOOR" flashes in the display
- The self-clean cycle has been selected but the door is not closed.
Close the oven door.
DOOR LOCK light is on when you want to cook
- The oven door is locked because the temperature inside the oven has not dropped below the locking temperature.
Press the Cancel/Off pad. Allow the oven to cool.
“F— and a number or letter” flash in the display
- You have a function error code.
Press the Cancel/Off pad. Allow the oven to cool for one hour. Put the oven back into operation.
- If the function code repeats.
Disconnect all power to the oven for at least 30 seconds and then reconnect power. If the function error code repeats, call for service.
Display goes blank
- A fuse in your home may be blown or the circuit breaker tripped.
Replace the fuse or reset the circuit breaker.
See the Special features section.
Verify that the oven is not in Sabbath Mode. See the Special Features section.
Power outage, clock flashes
Reset the clock. If the oven was in use, you must reset it by pressing the Cancel/Off pad, setting the clock and resetting any cooking function.
“Burning” or “oily” odor emitting from the vent
- This is normal in a new oven and will disappear in time.
To speed the process, set a self-clean cycle for a minimum of 3 hours. See the Cleaning the Oven section.
Strong odor
- An odor from the insulation around the inside of the oven is normal for the first few times the oven is used.
This is temporary and will go away after several uses or a self-clean cycle.
My oven door glass appears to be "tinted" or have a "rainbow" color. Is this defective?
- No. The inner oven glass is coated with a heat barrier to reflect the heat back into the oven to prevent heat loss and keep the outer door cool while baking.
This is normal. Under certain light or anfgles, you may see this tint or rainbow color.
Sometimes the oven takes longer to preheat to the same temperature
- Cookware or food in oven.
The cookware or food in the oven will cause the oven to take longer to preheat. Remove items to reduce preheat time
Adding more racks to the oven will cause the oven to take longer to preheat. Remove some racks.
Display flashes
Reset the clock.
Unable to get the display to show “SF”
- Oven control pads were not touched properly.
The Broil Hi/Lo and Bake pads must be touched at the same time and held for 3 seconds.
Control signals after entering cooking time or start time
- You forgot to enter a bake temperature or cleaning time.
Touch the Bake pad and desired temperature or the Self Clean pad and desired clean time.
Oven racks are difficult to slide
- The shiny, silver-colored racks were cleaned in a self-clean cycle.
Apply a small amount of vegetable oil to a paper towel and wipe the edges of the oven racks with the paper towel. Do not spray with Pam® or other lubricant sprays.
Drawer does not slide smoothly or drags
- The drawer is out of alignment.
Fully extend the drawer and push it all the way in See the Care and cleaning of the range section.
- Drawer is over-loaded or load is unbalanced.
Reduce weight. Redistribute drawer contents.
Steam from the vent
- When using the ovens, it is normal to see steam coming out of the oven vents. As the number of racks or amount of food being cooked increases, the amount of visible steam will increase.
This is normal.
Excessive condensation in the drawer
Remove liquid.
Cover food with lid or aluminum foil.
- Temperature setting too high.
Reduce temperature setting.