Documents: Go to download!
User Manual
- User Manual - (English, French, Spanish)
- Energy Guide - (English)
- Product Specifications - (English)
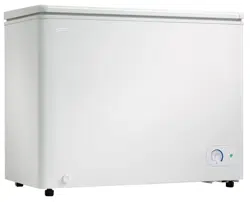
User manual Freezer
INSTALLATION INSTRUCTIONS
LOCATION
•Two people should be used when moving the appliance.
•Remove interior and exterior packaging prior to installation. Wipe the outside of the appliance with a soft, dry cloth and the inside with a lukewarm wet cloth.
•Place the appliance on a floor that is strong enough to support it when it is fully loaded.
•Do not place the appliance in direct sunlight or near sources of heat, such as a stove or heater, as this can increase electrical consumption. Extreme cold ambient temperatures may also cause the appliance to perform improperly.
•Do not use the appliance near water, for example, in a wet basement or near a sink.
•This appliance is intended for indoor household use only. It is not designed for outside installation, including anywhere that is not temperature controlled (garages, porches, vehicles, etc.).
•Before connecting the appliance to a power source, let it stand upright for approximately 6 hours. This will reduce the possibility of a malfunction in the cooling system from handling during transportation.
•This appliance is 101.4 cm (39.9 inches) wide by 84 cm (33.1 inches) high by 56.4 cm (22.2 inches) deep. Make sure that you leave the minimum amount of space between the appliance and all surrounding walls and vents.
•Allow 12.7 cm (5 inches) of space between the back and sides of the appliance and all adjacent walls.
•This appliance is intended for free-standing installation only and is not intended to be built into a cabinet or counter. Building in this appliance can cause it to malfunction.
OPERATING INSTRUCTIONS
FEATURES
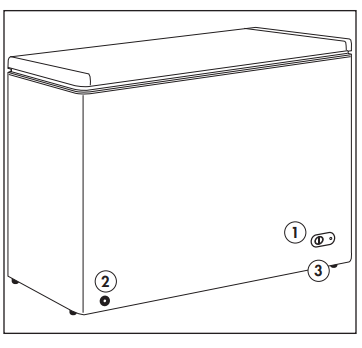
1.Thermostat Dial
2.Defrost Drain
3.Leveling Legs
4.Rust Resistant Interior (not pictured)
IMPORTANT NOTE
The freezer lid may be difficult to open immediately after closing it. This is normal and is due to the pressure difference between the cold interior of the freezer and the warm air that has just entered the freezer when the lid was opened. The pressure will equalize within a few minutes.
If the lid is especially difficult to open, wait 5 minutes to allow the pressure to equalize and then try again.
TEMPERATURE SELECTION

The temperature of the appliance can be adjusted by turning the thermostat dial on the front of the appliance.
•The thinner, lighter blue portion of the dial is the warmer setting.
•The thicker, darker portion of the blue dial is the colder setting.
•The temperature range of the appliance is approximately -12°C (10.4°F) to -24°C (-11.2°F).
•The temperature inside the appliance can vary based on ambient room temperature, the frequency that the lid is opened and the amount of fresh food that has recently been added to the unit.
•To stop the cooling function, turn the control knob to the “0” position.
•Do not overload the appliance as this can affect performance.
•Do not freeze large quantities of fresh food at the same time.
LEVELING INSTRUCTIONS
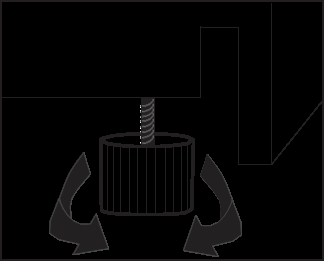
There are two adjustable legs on the bottom of the appliance that can be turned up or down to ensure that the appliance is level. It is important that the appliance is level to minimize noise and vibration. To level the appliance:
1.Move the appliance to its final location.
2.Turn the leveling leg counter-clockwise as far as it will go, until the top of the foot is touching the bottom of the chassis.
3.Slowly turn the leveling leg clockwise until the appliance is level.
DEFROSTING
This appliance should be defrosted approximately twice a year or when a 6 mm (1/4 inch) layer of frost has formed.
Turn the appliance control knob to the "OFF" position and unplug the power cord. Remove all contents and leave the lid open. Follow the instructions below:
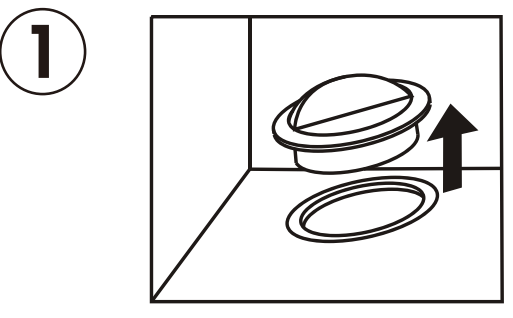
1.The interior defrost drain is located on the inside floor of the cabinet. Remove the rubber cover from the defrost drain. Defrosted water will flow into the hole and out through the exterior defrost drain cap. See Figure 1.
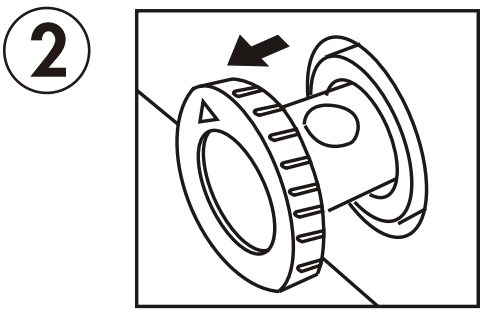
2.The exterior defrost drain cap is located on the front of the cabinet. Gently pull out the exterior drain cap approximately 20 - 25 mm until the water hole is visible. See Figure 2.
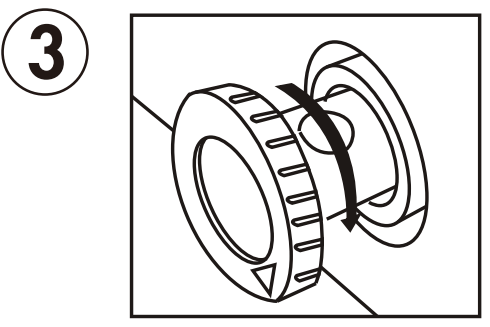
3.Twist the exterior drain cap so that the arrow points downward. See Figure 3.
4.Place a bucket or pan under the drain cap to catch defrosted water. Check the appliance regularly during defrosting to ensure that the water is not overflowing.
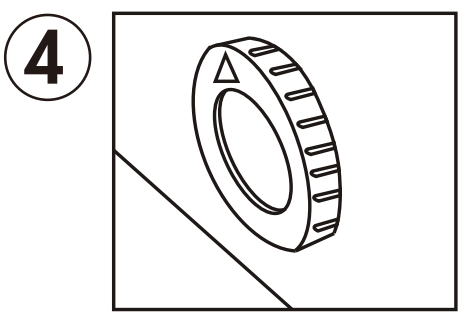
5.When all water has been drained, twist the drain cap until the arrow is pointing upwards and then push inward until it is flush with the cabinet. See Figure 4.
6.Replace the rubber cover in the interior defrost drain.
After defrosting is complete, set the temperature control to maximum for 2 to 3 hours before returning to the desired temperature setting.
IMPORTANT
Never use electrical appliances during defrosting. Do not use pointed or sharp objects to remove frost as this can damage the refrigerant lines. If these lines are accidentally pierced it will render the freezer inoperable and void the manufacturer’s warranty.
CARE & MAINTENANCE
CLEANING
Ensure the appliance is unplugged before cleaning.
•To clean the inside of the appliance, use a soft cloth and a solution of a tablespoon of baking soda to one quart of water or a mild soap solution or some mild detergent.
•Clean the outside with a soft, damp cloth and some mild detergent.
•It is important to keep the area where the lid seals against the cabinet clean to ensure a tight seal. Clean this area with a soapy cloth. Rinse with a damp cloth and let dry.
Note: Do not use cleaners containing ammonia or alcohol on the appliance. Ammonia or alcohol can damage the appearance of the appliance. Never use any commercial or abrasive cleaners or sharp objects on any part of the appliance.
POWER FAILURE
Most power failures are corrected within a few hours and should not affect the temperature of your appliance if you minimize the number of times the lid is opened. If the power is going to be off for a longer period of time, take the proper steps to protect your contents.
Note: Wait 3 to 5 minutes before attempting to restart the refrigerator if operation has been interrupted.
ENERGY SAVING TIP
The appliance should be located in the coolest area of the room, away from heat producing appliances, and out of direct sunlight. Do not overload the unit or block any ventilation openings.
VACATION
•Short vacations: Leave the appliance operating during vacations of less than three weeks.
•Long vacations: If the appliance will not be used for several months, remove all items and turn off the appliance. Defrost, clean and dry the interior thoroughly. To prevent odor and mold growth, leave the lid open slightly, blocking it open if necessary.
MOVING
•Remove all items.
•Tape the lid shut.
•Be sure the appliance stays secure in the upright position during transportation. Also protect the outside of the appliance with a blanket or similar item.
•If the appliance is placed on its back or side during transportation, upon reaching the destination, allow it to remain in its operating position for 6 hours to avoid damage to internal components.
DISPOSAL
This appliance may not be treated as regular household waste, it should be taken to the appropriate waste collection point for recycling of electrical components. For information on local waste collection points, contact your local waste removal agency or government office.
Disposal of this appliance should be in accordance with federal and local regulations.
TROUBLESHOOTING
PROBLEM | POSSIBLE CAUSE |
No power | •A fuse may be blown or the circuit breaker tripped •Plug not fully inserted into the wall outlet |
Internal temperature not cold enough | •Temperature setting is too warm •The lid is not shut properly or opened excessively •Recently added a large quantity of warm food to the cabinet •Close proximity to heat source or direct sunlight •Ambient temperature or humidity is very high |
Appliance runs continuously | •Temperature setting is too cold •The lid not shut properly or opened excessively •Recently added a large quantity of warm food to the cabinet •Close proximity to heat source or direct sunlight •Ambient temperature or humidity is very high |
See other models: DPA100EAUWDB DAR010A1BDB DCR041C1BSLDB-6 DCR044B1WM-6 DFG24A
