
Operating Instructions
Commercial Dishwasher
PG 8061
To prevent accidents and machine dam-
age, you must read these instructions
before installation or use.
en - US, CA
M.-Nr. 09 974 531

Contents
2
Guide to the manual ............................................................................................................5
Operating steps..................................................................................................................... 5
Proper use............................................................................................................................6
IMPORTANT SAFETY INSTRUCTIONS ..............................................................................7
Proper installation.................................................................................................................. 7
Technical safety..................................................................................................................... 7
Proper use ............................................................................................................................. 9
Children in the vicinity ......................................................................................................... 10
Accessories......................................................................................................................... 10
Symbols attached to the commercial dishwasher .............................................................. 11
Disposal of the commercial dishwasher ............................................................................ 11
Appliance description .......................................................................................................12
Appliance overview ............................................................................................................. 12
Control panel....................................................................................................................... 13
Caring for the environment ..............................................................................................14
Disposal of packaging material .......................................................................................... 14
Disposal of your old appliance............................................................................................ 14
User profiles.......................................................................................................................15
User groups......................................................................................................................... 15
Daily operators ............................................................................................................... 15
Experienced operators ................................................................................................... 15
Operation tips ....................................................................................................................16
Display functions................................................................................................................. 16
Menus.................................................................................................................................. 17
Symbols in the display ....................................................................................................... 19
Commissioning..................................................................................................................20
Opening and closing the door..........................................................................................24
Comfort Door Lock.............................................................................................................. 24
Opening the door .......................................................................................................... 24
Closing the door.................................................................................................................. 25
Opening the door using the emergency release ................................................................. 26
Filling the salt container ...................................................................................................27
Reactivation......................................................................................................................... 27
Setting the water hardness level ......................................................................................... 28
Salt refill reminder................................................................................................................ 30
Appliance lockdown due to low salt ................................................................................... 30
Filling the salt compartment................................................................................................ 31
Adding rinse aid.................................................................................................................33
Rinse aid.............................................................................................................................. 33
Rinse aid indicator.......................................................................................................... 33
Adding rinse aid ............................................................................................................. 34
Application technology .....................................................................................................35
Preparing the load ............................................................................................................... 35
Upper basket....................................................................................................................... 37
Adjusting the upper basket ................................................................................................. 38

Contents
3
Lower basket....................................................................................................................... 40
Use of plastic trays.............................................................................................................. 42
Operation............................................................................................................................44
Adding detergent................................................................................................................. 44
DOS module........................................................................................................................ 46
LEDs on the keypad ............................................................................................................ 49
Turning on the dishwasher .................................................................................................. 50
Selecting a program ............................................................................................................ 50
Starting a program .............................................................................................................. 52
Program end........................................................................................................................ 53
Turning off the dishwasher .................................................................................................. 53
Unloading the dishwasher................................................................................................... 53
Interrupting a program......................................................................................................... 54
Cancelling a program .......................................................................................................... 55
Program chart....................................................................................................................56
Additional functions ..........................................................................................................58
Delay Start........................................................................................................................... 58
Drying assistance ................................................................................................................ 59
Settings ...........................................................................................................................61
Menu structure .................................................................................................................... 62
Delay Start........................................................................................................................... 63
Drying .................................................................................................................................. 64
Setting the language ........................................................................................................ 65
Venting DOS modules ......................................................................................................... 66
Setting the date................................................................................................................... 67
Date format..................................................................................................................... 67
Setting the date.............................................................................................................. 67
Setting the time of day ........................................................................................................ 68
Setting ............................................................................................................................ 68
Display............................................................................................................................ 69
Clock format................................................................................................................... 69
Adjusting the volume........................................................................................................... 70
Keypad ........................................................................................................................... 70
Buzzer............................................................................................................................. 70
Setting the volume ......................................................................................................... 71
Additional settings ............................................................................................................72
Accessing the "Additional settings" menu.......................................................................... 72
Menu structure .................................................................................................................... 74
CODE .................................................................................................................................. 76
Access............................................................................................................................ 76
Changing the PIN code .................................................................................................. 76
Log book ............................................................................................................................. 78
Temperature unit.................................................................................................................. 79
Move program ..................................................................................................................... 80

Contents
4
Additional functions............................................................................................................. 81
Resetting ........................................................................................................................ 81
Increased amount of water............................................................................................. 82
Interim rinse.................................................................................................................... 82
DOS dispensing systems ............................................................................................... 83
Temperature / Time ........................................................................................................ 86
Program access................................................................................................................... 89
Water hardness ................................................................................................................... 90
Display view ........................................................................................................................ 90
Display................................................................................................................................. 91
Contrast.......................................................................................................................... 91
Brightness ...................................................................................................................... 91
Switch off after .................................................................................................................... 92
Factory default setting......................................................................................................... 93
Software version.................................................................................................................. 94
Cleaning and care .............................................................................................................95
Maintenance........................................................................................................................ 95
Cleaning the control panel .................................................................................................. 96
Cleaning the front of the dishwasher .................................................................................. 96
Cleaning the wash cabinet.................................................................................................. 96
Cleaning the door and the door seal................................................................................... 97
Cleaning the filters in the wash cabinet .............................................................................. 97
Cleaning the spray arms...................................................................................................... 99
Frequently asked questions ...........................................................................................101
Technical problems ........................................................................................................... 101
Door................................................................................................................................... 103
Unusual behavior of the dishwasher................................................................................. 104
Noises................................................................................................................................ 105
Poor cleaning results......................................................................................................... 106
Frequently asked questions ...........................................................................................108
Cleaning the filters in the water inlet ................................................................................. 108
Cleaning the drain pump and non-return valve................................................................. 109
After sales service...........................................................................................................111
Installation........................................................................................................................112
Installation ......................................................................................................................... 112
Undercounter installation ............................................................................................. 112
Leveling and securing the dishwasher......................................................................... 113
Floor anchors for free-standing units........................................................................... 114
Moving the dishwasher ..................................................................................................... 114
Electrical connection ......................................................................................................115
Plumbing ..........................................................................................................................116
Connecting the water supply ............................................................................................ 116
Connection to the drainage system .................................................................................. 118
Technical details..............................................................................................................119

Guide to the manual
5
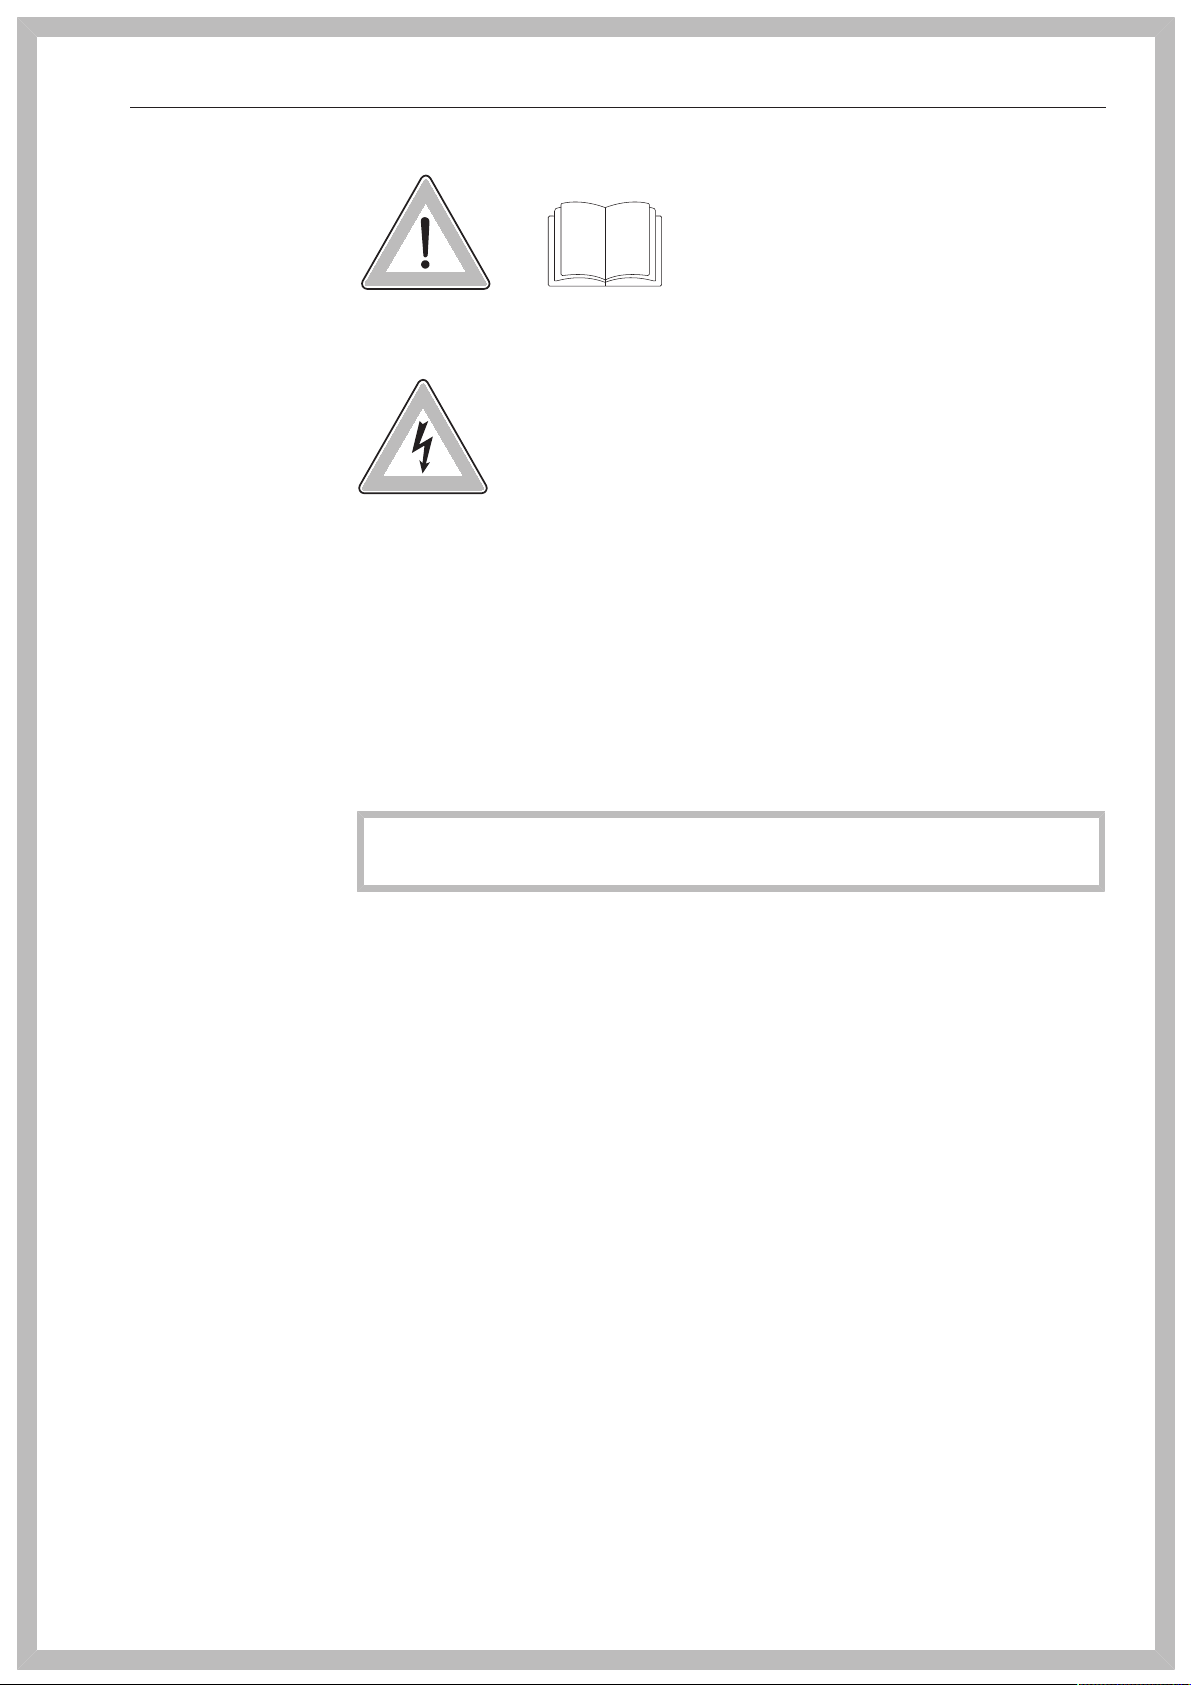
Warnings
Information which is important for safety is highlighted by a
thickly framed box with a warning symbol. This alerts you to a po-
tential risk of personal injury or property damage.
Read these warning notes carefully and follow any procedural in-
structions and operating prompts.
Notes
Notes contain information that requires particular attention.
They are highlighted by a thickly framed box.
Additional information and comments
Additional information and comments are marked by a box with thin
line.
They are not necessarily critical to the operation of the commercial
dishwasher.
Operating steps
Additional instructions on how to operate the dishwasher are de-
scribed step-by-step in a logical sequence.
Each new step is marked by a black square bullet point.
Example:
Open the dishwasher door.
Display
In this manual, information that is shown in the dishwasher display
appears in a special font similar to the display text.
Example:
Select Delay start and confirm your choice with theOKbutton.

Proper use
6
Proper use
This commercial dishwasher complies with current safety require-
ments. Inappropriate use can, however, lead to personal injury and
damage to property.
To avoid the risk of accidents and damage to the dishwasher,
please read these instructions carefully before using it for the first
time. They contain important information on its safety, installation,
use and maintenance. Keep these instructions in a safe place and
pass them on to any future owner.
With its short program running times and powerful cleaning perfor-
mance, this Miele commercial dishwasher is intended for commercial
use in the following:
– Guest houses
– School and day care centers, Restaurants and catering
– Nursing homes
– Other, similar commercial environments
This appliance is designed exclusively for use as a "dishwasher"
for cleaning cookware, glassware and cutlery only, as described in
these instructions. Alterations or conversions to the dishwasher, or
using it for purposes other than those for which it is designed, are not
permitted and could be dangerous.
Miele cannot be held liable for damage caused by improper or incor-
rect use or operation.
This commercial dishwasher is intended only for stationary indoor
use.
The special inserts are to be used for their specific purpose only.
This commercial dishwasher is not suitable for the cleaning of
medical products or devices.
Persons who lack physical, sensory or mental abilities, or experi-
ence with the appliance should not use it without supervision or in-
struction by a responsible person.

IMPORTANT SAFETY INSTRUCTIONS
7
Proper installation
Do not install the commercial dishwasher in areas at risk of explo-
sion or freezing.
To ensure the stability of undercounter commercial dishwashers,
they must only be installed beneath a continuous countertop that is
bolted to the adjacent cabinetry.
In order to reduce the risk of damage from condensation, the furni-
ture in the area around the commercial dishwasher should be de-
signed for commercial use.
Technical safety
The commercial dishwasher must only be installed, commissioned,
repaired and then maintained by the Miele Service Department or an
authorized Miele Service dealer. Installation, repair and other work by
unqualified persons could be dangerous and Miele will not be held li-
able.
This commercial dishwasher must only be operated by appropri-
ately trained personnel. They must be instructed and trained regularly.
Before using the commercial dishwasher, check it for any exter-
nally visible damage. Under no circumstances should you use it if it
has been damaged. It could be dangerous.
In the event of a damaged or leaking commercial dishwasher, turn
it off immediately and contact Miele or an authorized Miele Service
dealer.
Faulty components may only be replaced by genuine Miele original
parts. Only when these parts are fitted can Miele guarantee the safety
standards of the appliance.
The electrical safety of this commercial dishwasher can only be
guaranteed when it is connected to a correctly installed grounding
conductor system. If in any doubt, please have the electrical installa-
tion tested by a qualified electrician. Miele cannot be held liable for
the consequences for the lack or interruption of a grounding conduc-
tor (e.g. electric shock).
Be sure to follow the installation instructions in this manual and in
the installation diagram.
Ensure that the connection data on the data plate (voltage, fre-
quency, and fuse rating) match those of your electrical supply.
There must be no electrical sockets behind the commercial dish-
washer since the depth of the installation niche may be too small and
there is a danger of overheating if the dishwasher is pushed up
against a plug (see the "Electrical connection" chapter for more infor-
mation).

IMPORTANT SAFETY INSTRUCTIONS
8
Do not connect the dishwasher to the electrical supply by a multi-
ple outlet box or an extension cable since they do not guarantee the
required safety of the appliance (e.g. danger of overheating).
Do not open the commercial dishwasher casing under any circum-
stances. Tampering with electrical connections or components and
mechanical parts is highly dangerous to the user and can cause oper-
ational faults.
The commercial dishwasher must not be used if the connecting
cable is damaged. If the cable is damaged, it must be replaced with a
special connecting cable available from Miele. For safety reasons, this
may only be performed by the Miele Service Department or an autho-
rized Miele Service dealer.
Before maintenance, disconnect the commercial dishwasher from
the electrical supply.
The plastic housing of the water connection contains electrical
components. It must not be dipped in water.
There are live wires in the water inlet hose. Do not shorten the wa-
ter inlet hose, even if it is too long.
The built-in waterproof system offers reliable protection against
water damage if the following conditions are met:
– proper installation
– proper maintenance of the dishwasher or exchange of parts in
case of visible damage
– closing of the water valve during longer absences (for example va-
cation)
The waterproof system will work even if the dishwasher is turned off.
However, the commercial dishwasher must remain connected to the
electrical supply.

IMPORTANT SAFETY INSTRUCTIONS
9
Proper use
This commercial dishwasher is designed for operation with water
and detergents suitable for use in commercial dishwashers only. Or-
ganic solvents and flammable liquid agents must not be used.
This could cause an explosion, property damage due to the destruc-
tion of rubber or plastic, and the resulting leakage of liquids.
Use detergents formulated for use in commercial dishwashers.
Using unsuitable detergents could damage the dishes and the com-
mercial dishwasher itself.
Do not sit or lean on the opened door. This could cause the com-
mercial dishwasher to tip or become damaged.
After any plumbing work on the water supply, to the dishwasher
will need to be vented. If this is not done, components can be dam-
aged.
Please be aware that the dishwasher may be operating at high
temperatures. If the door is opened, there is a danger of burning or
scalding. Dishes, cutlery, baskets, and inserts must be allowed to
cool down before they are unloaded. Any water remaining in contain-
ers could still be very hot. Empty them into the wash cabinet before
taking them out.
The water in the wash cabinet is NOT safe to drink!
The pretreatment of items (for example with dishwashing liquid and
other detergents), but also some types of soiling and some deter-
gents, can cause a build-up of foam in the wash cabinet. Foam can
have an adverse effect on the cleaning result.
Foam escaping from the wash cabinet can cause damage to the
dishwasher. If foam escapes, the program must be cancelled immedi-
ately.
When using detergents and specialized products, it is essential
that the manufacturer's instructions are followed. Detergents must
only be used for the purpose they are designed for and in the situa-
tion specified, to avoid material damage and serious chemical reac-
tions (e.g. oxyhydrogen explosion).
Do not inhale or ingest powder detergent. Dishwasher detergents
contain irritant or corrosive ingredients which can cause burning in
the nose, mouth and throat if swallowed, or inhibit breathing. Seek
medical attention immediately if detergent has been swallowed or in-
haled.
Miele cannot be held liable for any effect chemical detergents may
have on the material of the items being cleaned. Observe the deter-
gent manufacturer's instructions with regard to storage conditions,
use, and dosage.

IMPORTANT SAFETY INSTRUCTIONS
10
To avoid material damage and corrosion, do not allow any acids or
solutions containing chloride to get into the wash cabinet. Similarly
avoid any materials with a corrosive effect.
Do not wash items soiled with ash, sand, wax, lubricants, or paint
in the dishwasher. These substances could damage the dishwasher.
Do not hose down the dishwasher or its direct vicinity to clean it,
e.g. with a water hose or high-pressure cleaner.
Ensure that the stainless steel outer casing of the appliance does
not come into contact with solutions or steam containing acid to
avoid any corrosion damage.
Be careful when sorting items with sharp pointed ends and posi-
tioning them in the dishwasher so that you do not hurt yourself or
create a danger for others. Cutlery should be placed in baskets in
such a way that no injuries can occur.
Remove any coarse food deposits from the items being cleaned
before loading them in the dishwasher.
Children in the vicinity
Supervise children when they are anywhere near this dishwasher.
Do not let them play with it. There is a danger that children may lock
themselves in the dishwasher.
Children must not be allowed to operate this dishwasher.
Keep children away from chemical agents. These contain irritant
and corrosive ingredients which can cause burning in the mouth,
nose and throat if swallowed, or inhibit breathing. Keep children away
from the dishwasher when the door is open. There could still be
residual chemical agent in the cabinet. Seek medical advice immedi-
ately if a child has swallowed or inhaled chemical agent.
Accessories
Only use genuine Miele original spare parts and accessories with
this dishwasher. Miele will provide you with the article designations of
the accessories.
Only use Miele baskets and inserts with this dishwasher. Using
baskets and inserts made by other manufacturers, or making modifi-
cations to Miele accessories can cause unsatisfactory cleaning re-
sults, for which Miele cannot be held liable. Any resultant damage
would not be covered by the guarantee.
IMPORTANT SAFETY INSTRUCTIONS
11
Symbols attached to the commercial dishwasher
Attention:
Observe the operating instructions
Attention:
Danger of electric shock!
Disposal of the commercial dishwasher
For safety and environmental reasons, dispose of all process
chemicals according to the manufacturer's instructions and to safety
regulations. Safety goggles and protective gloves should be worn.
Remove or disable the door lock prior to disposal of the dish-
washer, so that children cannot become trapped inside (see "Caring
for the environment").
Miele cannot be held liable for damage caused by failure to comply
with these safety instructions and warnings.
Appliance description
12
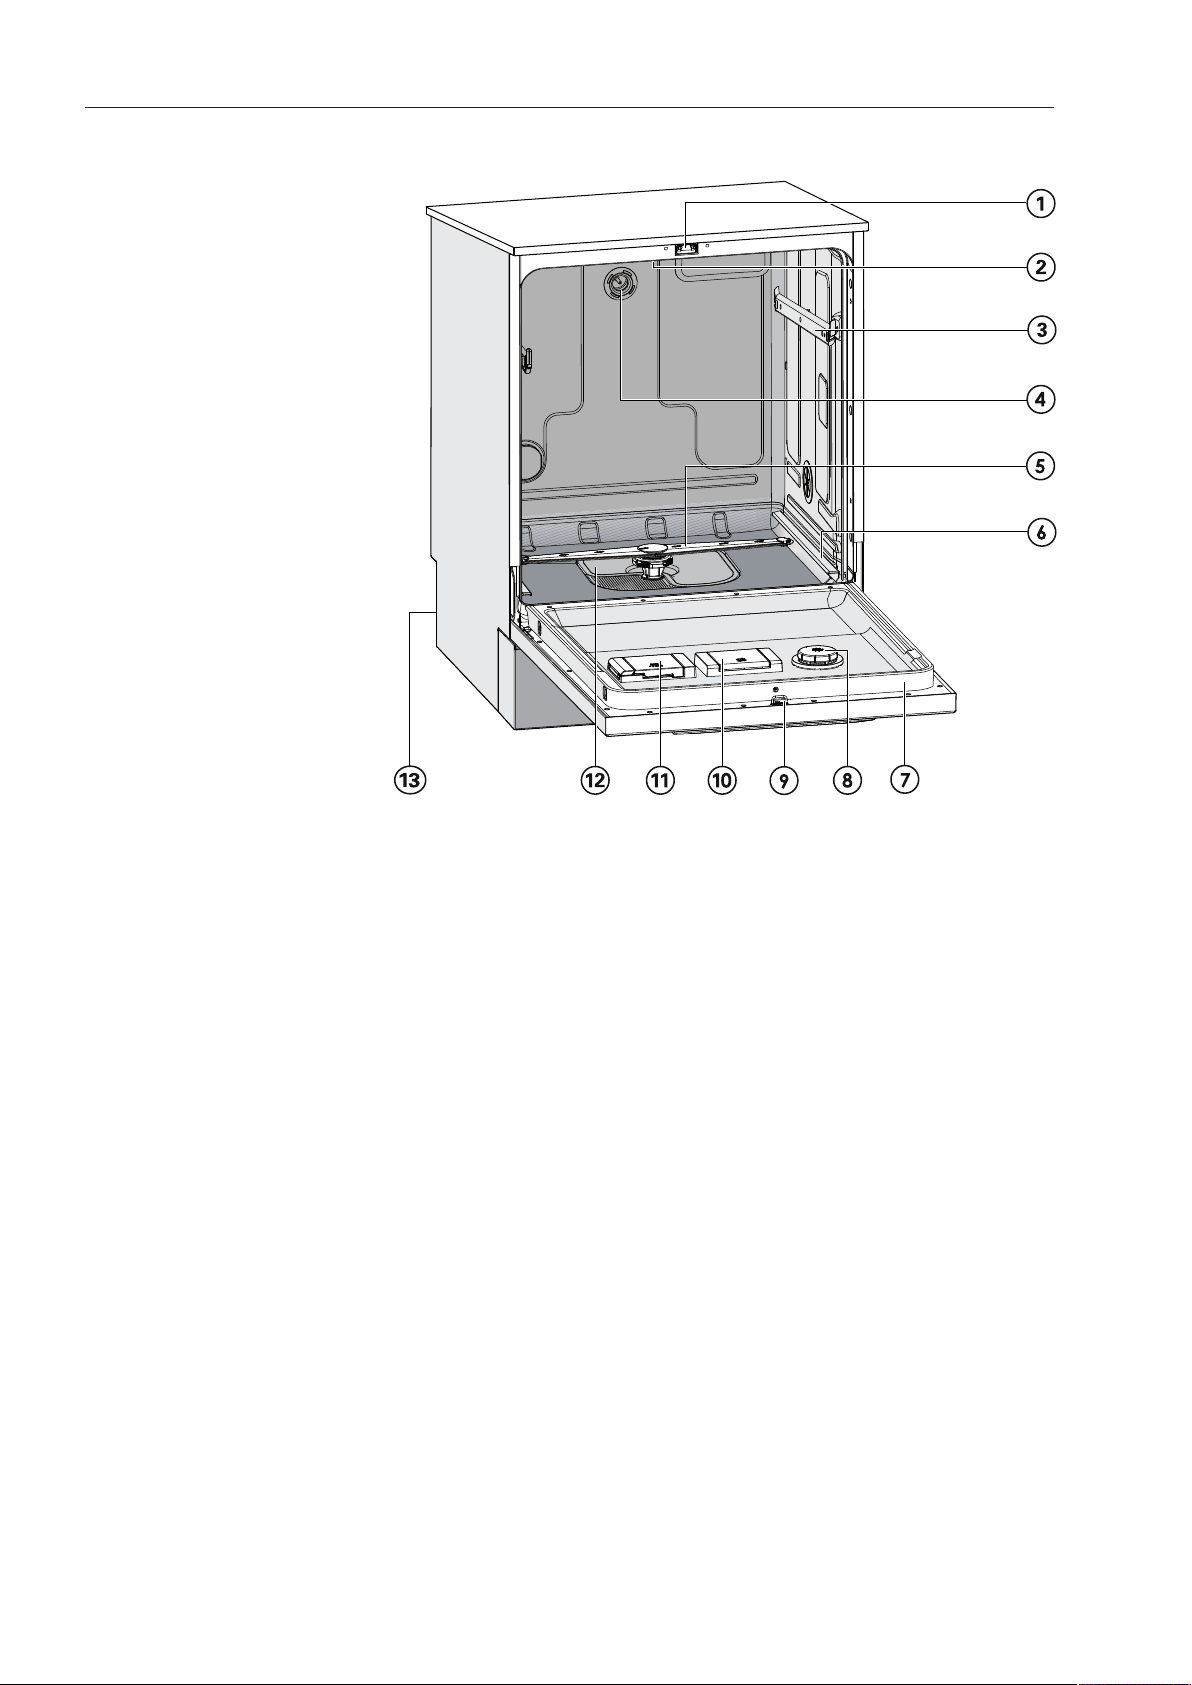
Appliance overview
a
Door lock
b
Upper spray arm (not visible)
c
Runner for upper basket
d
Connection for upper basket spray arm
e
Lower spray arm
f
Runner for lower basket
g
Data plate
h
Rinse aid reservoir
i
Door lock barrel
j
Reservoir for reactivation salt
k
Dispenser for powder detergent
l
Filter combination
m
Back:
Connection for DOS modules
External dispensing pump for liquid detergent (DOS1)
External dispensing pump for rinse aid (DOS4)
Appliance description
13
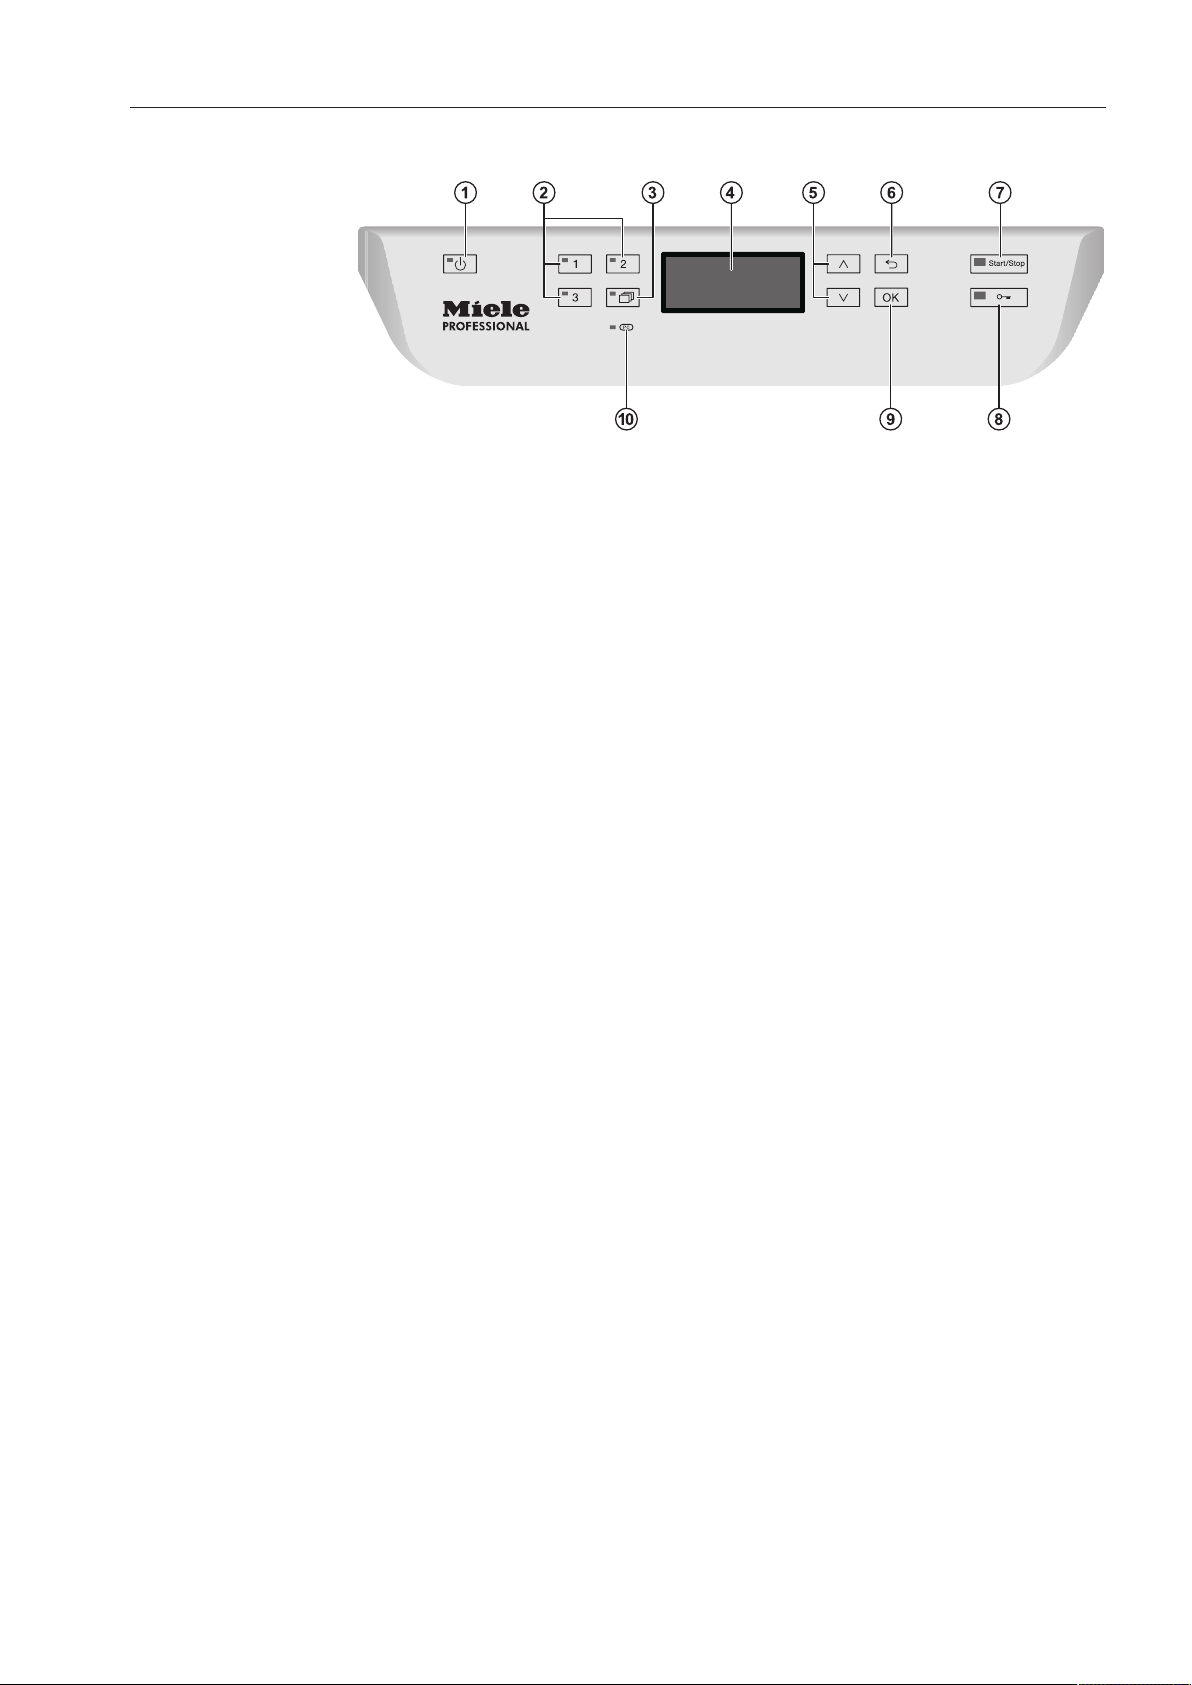
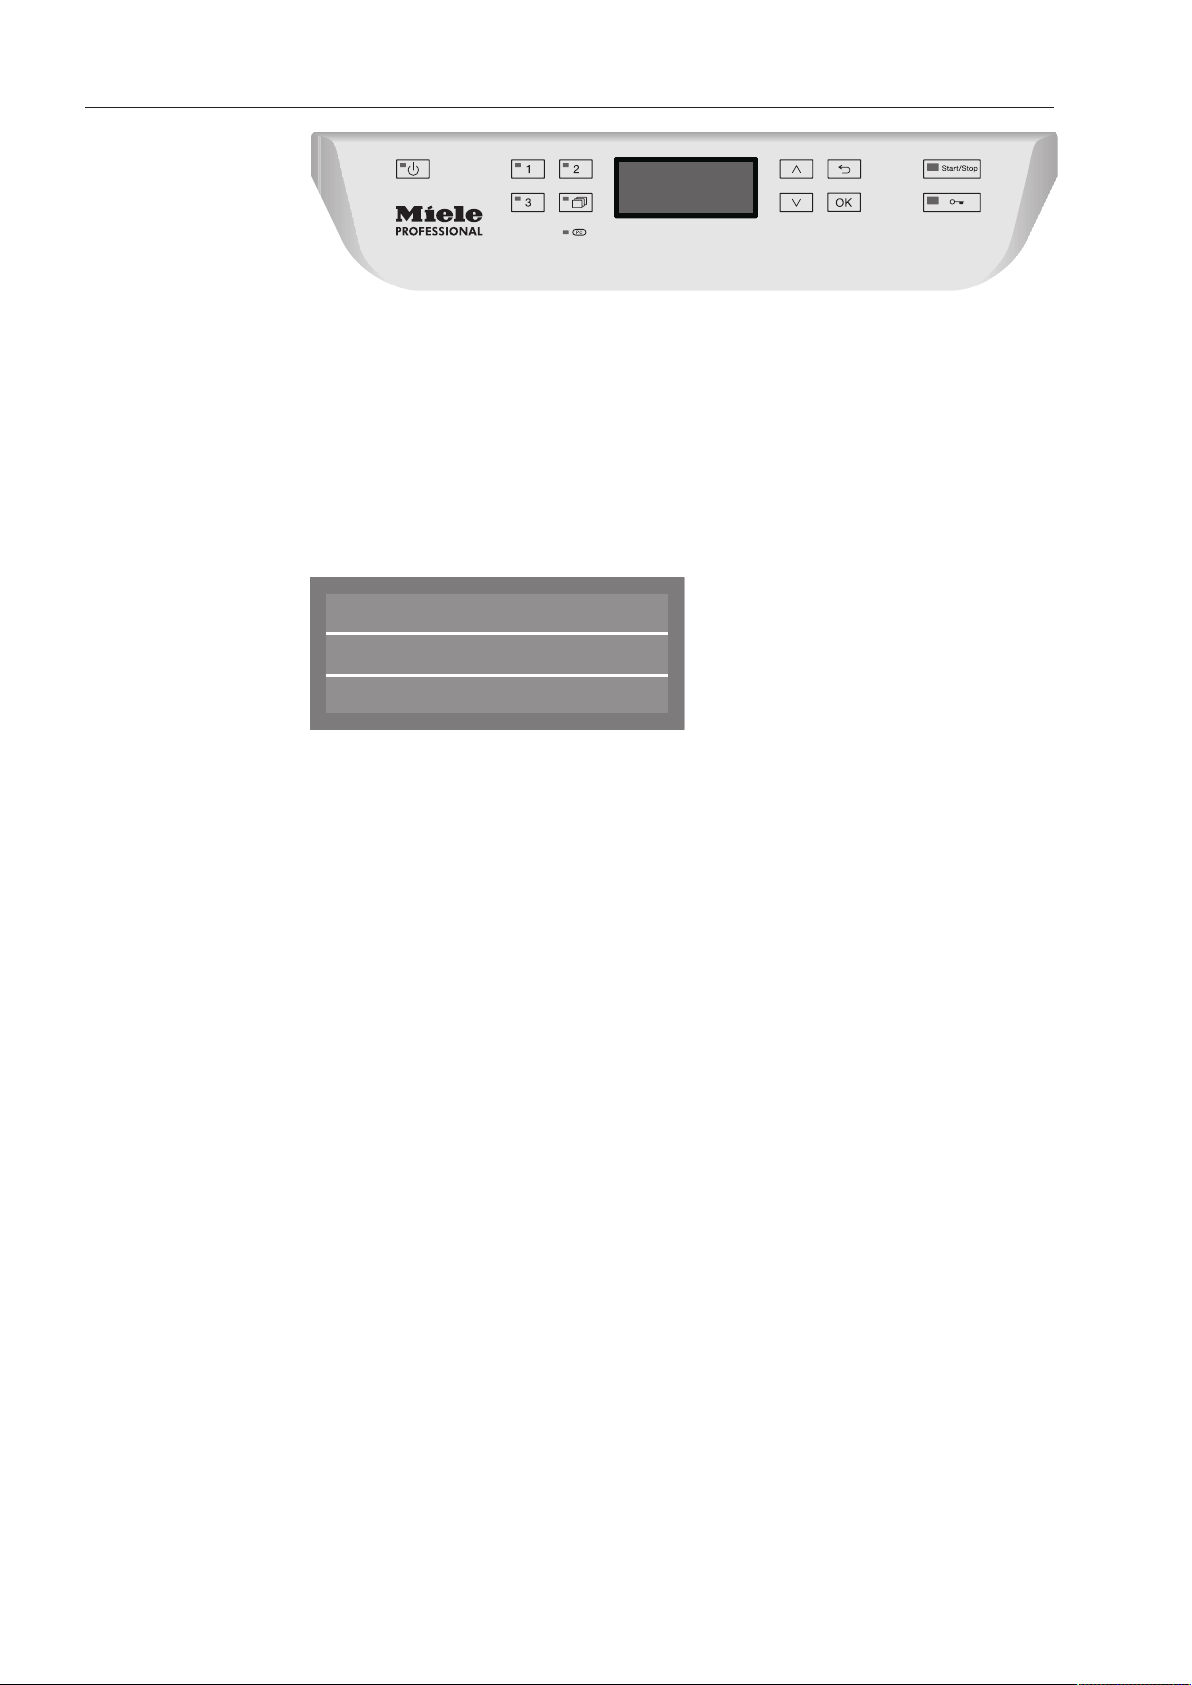
Control panel
a
button (On/Off)
For turning the dishwasher on and off
b
Buttons 1 - 3 (program selection buttons)
Shortcut buttons for storing favorite programs
c
button (additional programs)
For selecting additional programs
d
Display
User interface output
e
and button (arrow buttons)
Navigation in user interface
f
button (cancel or back)
For canceling a process in the user interface
(not for canceling programs)
g
Start/Stop button
For starting or cancelling a program
h
button (door release)
For opening the door or interrupting a program
i
OK button (confirmation)
For selecting or confirming entries in the user interface
j
Optical interface
Testing and transmission point for Miele customer service techni-
cians.

Caring for the environment
14
Disposal of packaging material
The packaging is designed to protect the dishwasher from damage
during transportation. The packaging materials used are selected
from materials which are environmentally friendly for disposal and
should be recycled.
Ensure that any plastic wrappings, bags, etc. are disposed of safely
and kept out of the reach of children. Danger of suffocation!
Disposal of your old appliance
Old electrical and electronic appliances often still contain valuable
materials. However, they also contain harmful substances that were
essential for the proper functioning and safe use of the equipment.
Handling these materials improperly or disposing of them in your
household waste can be harmful to your health and the environment.
Therefore, please do not dispose of your old appliance with regular
household waste.
Instead, use your local community waste collection and recycling
center to dispose of your old electric and electronic appliances. If
necessary, contact Miele for more information.
Ensure the appliance presents no danger to children while being
stored for disposal.

User profiles
15
User groups
Users can be divided into two groups:
– Daily operators
– Experienced operators
Access to "Additional settings" can be blocked to general, daily oper-
ators by using a code (see "Additional settings, Code").
Daily operators
Daily operators must be instructed in operating and loading the dish-
washer and trained regularly to guarantee safe daily use.
Experienced op-
erators
Experienced operators can additionally block access to programs,
modify temperature and holding times within program cycles, and al-
ter water levels.
Operation tips
16
Display functions
The display is not a touch screen.
The following functions can be selected or set with the display:
– The program
– The delay start time
– The settings
The following appears in the display while a program is running:
– The program name
– The program stage / target temperature / actual temperature
– The estimated time left for the program to run
– Any relevant fault messages and information
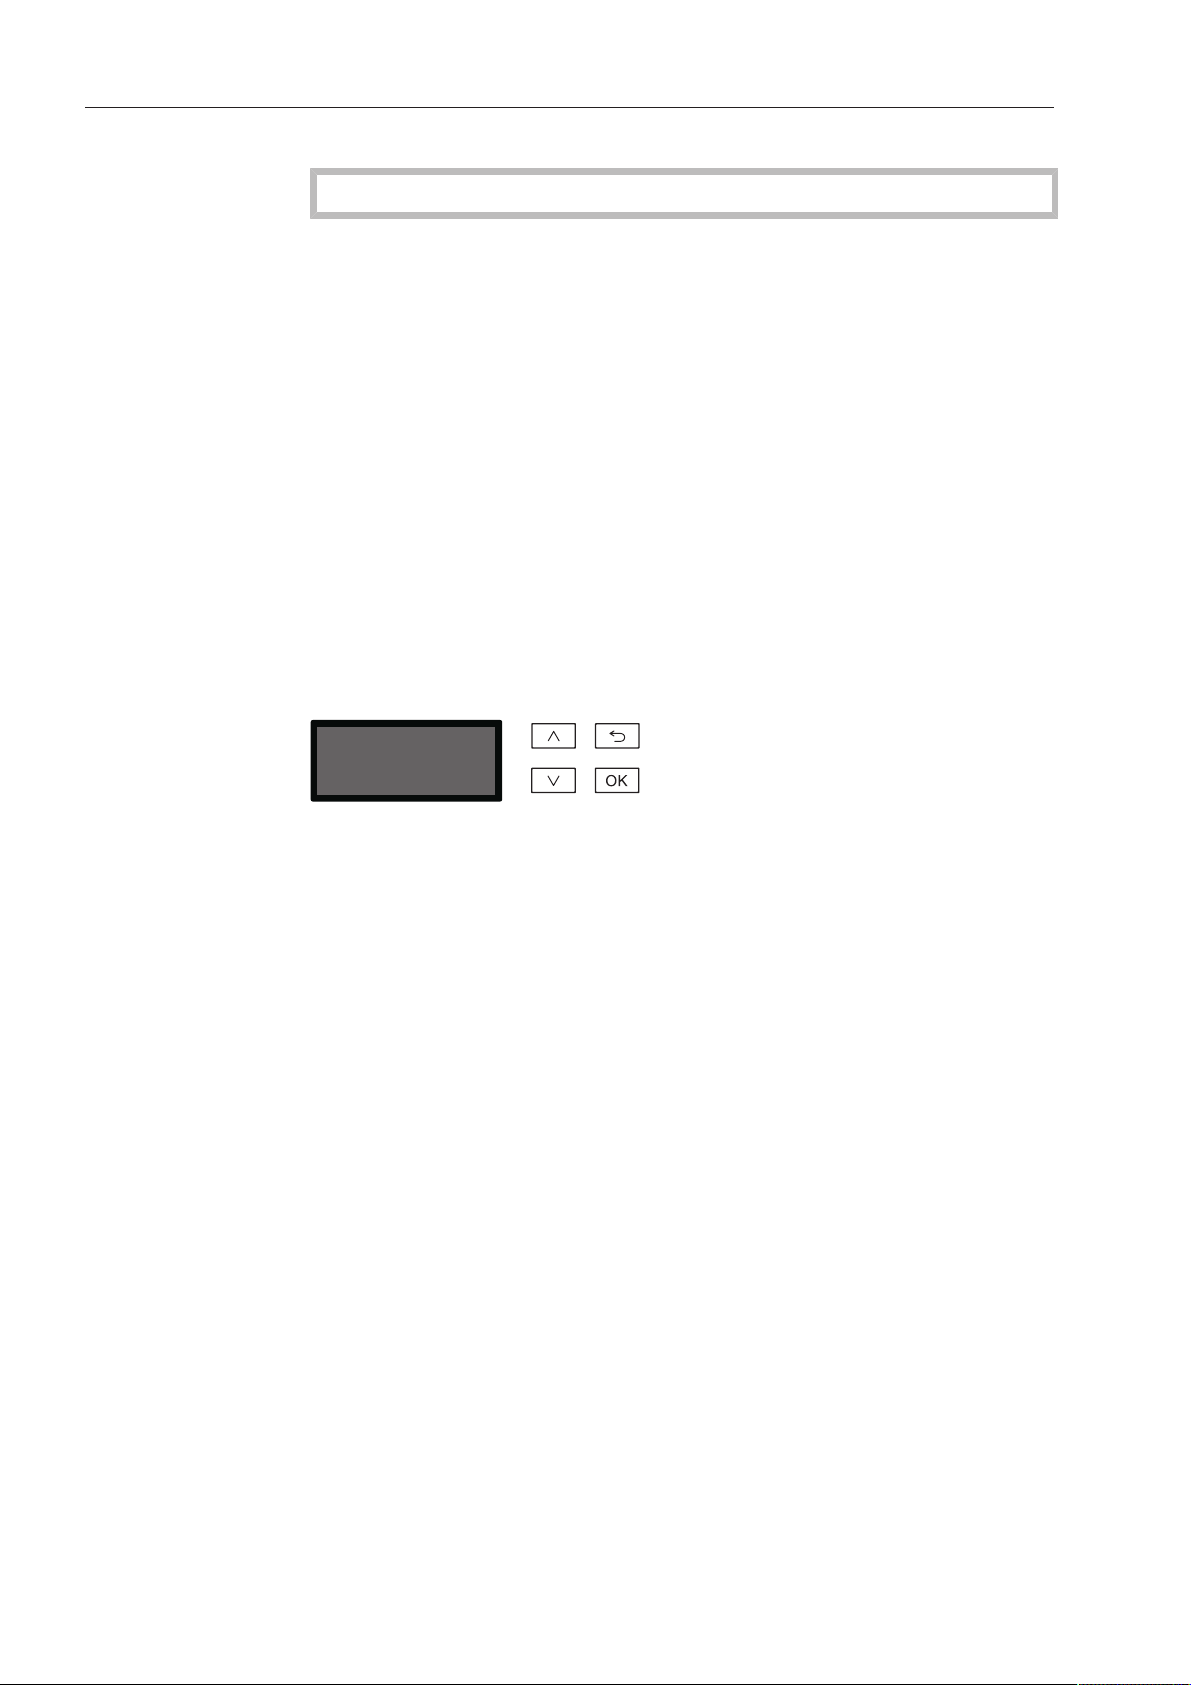
Menu operation
This dishwasher is operated exclusively via buttons on the control
panel. Arranged to the side of the display, the buttons (button fields)
are printed on the stainless steel control panel. They are operated by
pressing gently.
Menu operation is via the keypad to the right of the display.
– button
For navigating upwards by row within a menu, or increasing the
value highlighted.
– button (Cancel or back)
For ending a menu early. Any changes to settings are not saved
and the display reverts to the previous menu.
– button
For navigating downwards by row within a menu, or decreasing the
value highlighted.
– OK button
For confirming a selection or for saving input. The display moves to
the next menu or, when entering values, to the next input position.
The procedure for entering the values is described in the respective
chapter.

Operation tips
17
Menus
The dishwasher's user interface is divided into different menus. These
menus are displayed in a 3-line display on the control panel.
Example:
Language
,
;
(
english (GB)
deutsch
The name of the menu and a maximum of two menu options are
shown. The currently selected option is highlighted.
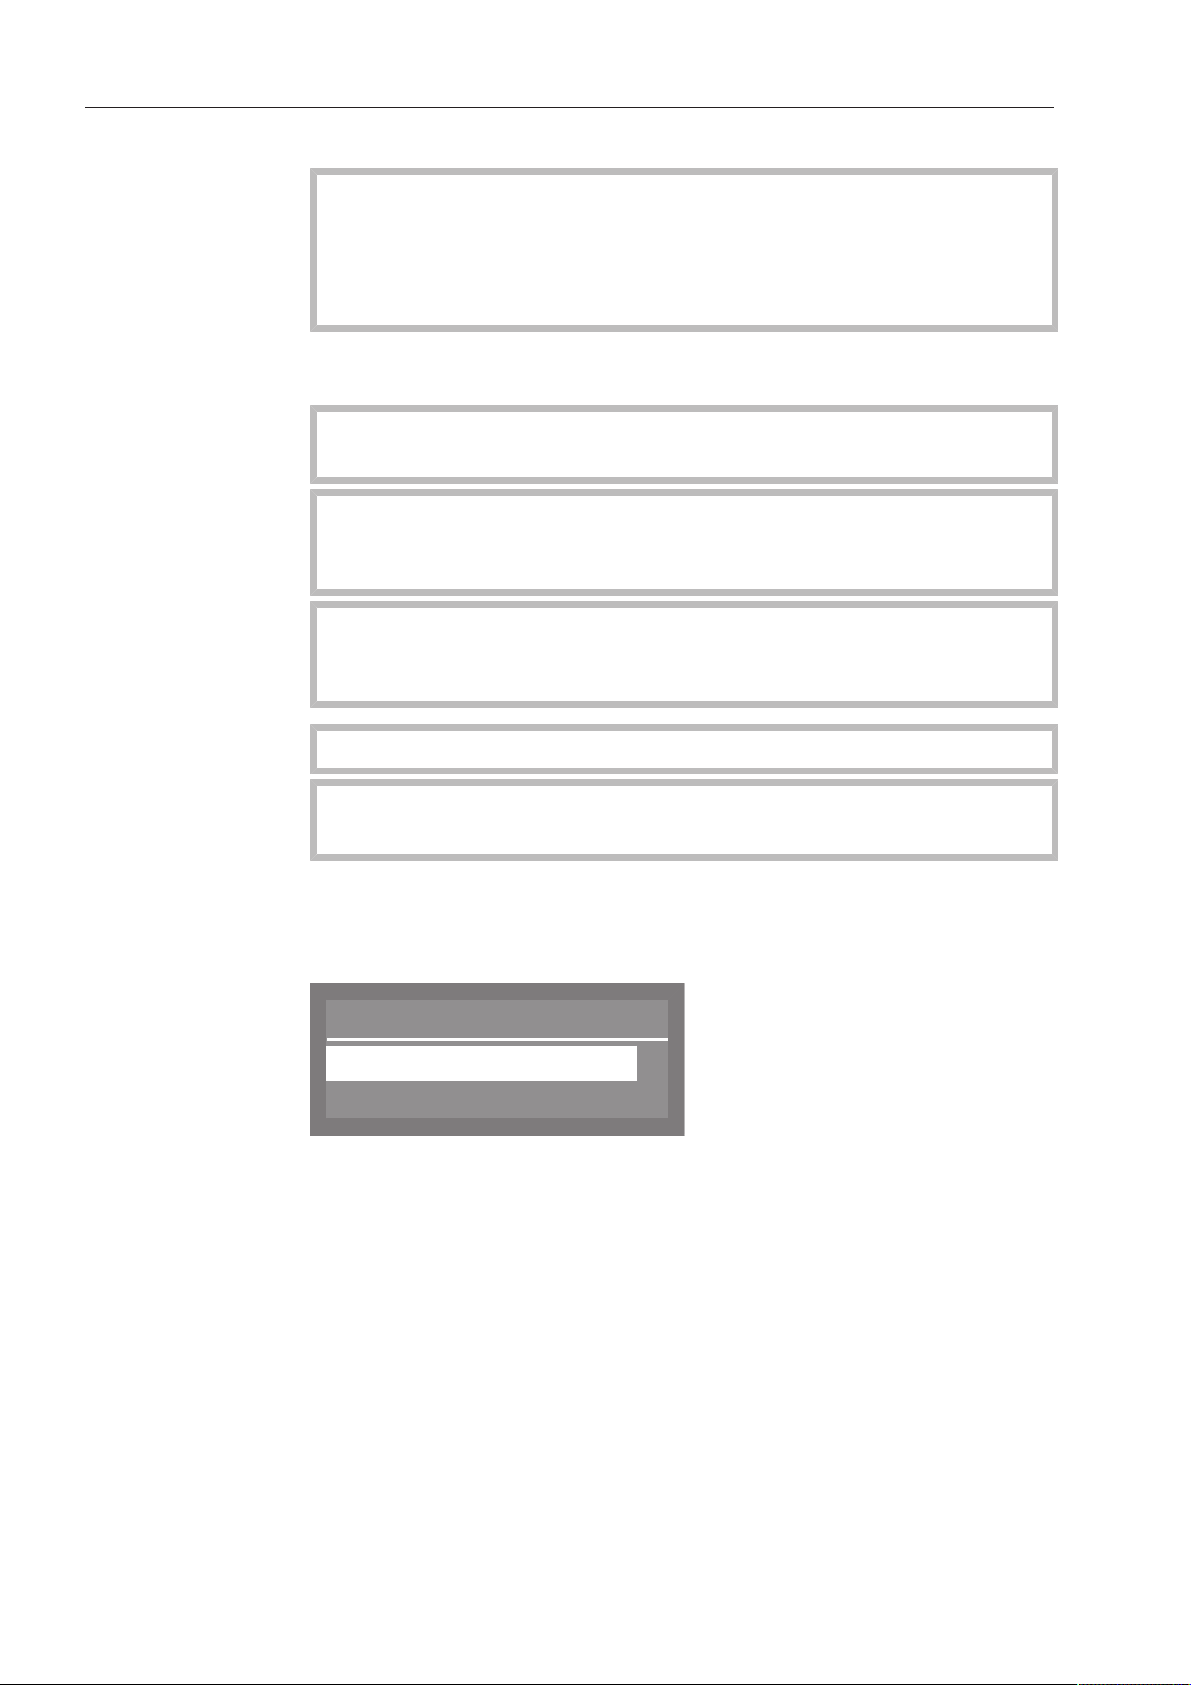
Single selection
Delay start
Yes
No
(
The and arrow buttons are used to navigate within the menu.
The highlighted option is selected by pressing the OK button. Once
selected, the option will have a checkmark beside it. Other options
are automatically deselected.
Press the OK button to move to the next higher menu, or to the next
entry position when confirming values. The procedure for entering
values is described in the corresponding chapter. Press the button
to return to the previous menu without saving the entry.
Multiple selection
Release program
Normal
Normal plus
,
;
9
9
The and arrow buttons are used to navigate within the menu.
Several options can be selected within the menu in succession using
the OK button. Once selected, an option will have a checkmark
beside it.
To save your chosen options, select Accept and confirm with the OK
button.

Operation tips
18
System messages
The symbol indicates a system message. These messages provide
information about current processes and the status of the dish-
washer. System messages are displayed individually at the end of the
program. If there are multiple system messages, the additional mes-
sages can be displayed by pressing the OKbutton. A system mes-
sage can be accessed again during a program cycle by pressing OK.
Example:
OK
Refill salt
Automatic switch-off
The dishwasher has an automatic switch-off function. The dish-
washer switches itself off automatically once the set time has expired.
The display and all other LEDs are switched off. To switch the dish-
washer on press the (On/Off) button.
The automatic switch-off function can be disabled (see "Additional
settings, Switch off after"). The display will then remain active in
standby mode.

Operation tips
19
Symbols in the display
Navigation arrows
If a menu contains more than two options, two navigation arrows are
shown beside the options. The arrow buttons and can be used
to scroll through the options.
Dotted line -------
If a menu contains more than two options, the end of the option list is
marked by a dotted line. The last entry appears above the line, the
first entry below it.
Tick
If there are several options available, the current setting is marked
with a tick .
Example:
Delay start
Yes
No
(
Drying
If drying assistance has been activated, the drying symbol will be dis-
played to the right of the program name.
Example:
Normal plus
Temperature
Duration
G
55 °C
Min
23
System messages
The symbol denotes system messages and is displayed alternately
with the symbol. If OK appears in the bottom right of the display,
the system message must be confirmed using the OK button. If OK
does not appear in the display, after a few seconds the display skips
to the next level up.
Fault messages
In the event of a fault, a warning triangle is shown in place of the
symbol. See "Frequently asked questions" for more information.
Commissioning
20
Commissioning
During commissioning, the following settings must be carried out.
You will be asked to program settings one after the other automati-
cally, and currently selected values have a tick beside them. The
commissioning process requires a set period of time which cannot
be interrupted.
The dishwasher will guide you automatically through the steps re-
quired.
Reactivation is carried out during the first program following com-
missioning.
If the first program after commissioning is not completed and the
dishwasher is then turned off, the commissioning process must be
carried out again.
The following options (with the exception of "Plumbing connec-
tions") can be altered retrospectively via the "Settings " menu and
"Additional Settings."
Switching on the
machine
The dishwasher must be connected to the electrical supply.
Close the door
(door must be completely closed for commissioning).
Press the button until the button's LED lights up.
Setting the
language
The commissioning process automatically begins at the language set-
ting screen, where you will be prompted to set the display language.
Language
,
;
(
english (GB)
deutsch
Use the and arrow buttons to select the desired language and
confirm your choice with the OKbutton.

Commissioning
21
Setting the tem-
perature unit
The display will then change to the screen for setting the temperature
unit.
Temperature unit
°C
°F
(
Use the and arrow buttons to select the desired temperature
unit and confirm your choice with the OKbutton.
Setting the
date format
The display then will change to the screen for setting the date format.
Date format
DD:MM:YY
MM:DD:YY
(
Use the and arrow buttons to select the desired date format
and confirm your choice with the OKbutton.
Setting the
date
The display will then change to the screen for setting the date.
Date
12 . 07 . 2013
Use the arrow buttons (higher) and (lower) to set the day,
month and year, and confirm each entry with the OKbutton.
Setting the
clock format
The display will then change to the screen for setting the clock for-
mat.
Time format
(
24 h
12 h
Use the and arrow buttons to select the desired format, and
confirm your choice with the OKbutton.

Commissioning
22
Setting the
time of day
The display will then change to the screen for setting the time of day.
Time of day
12 : 00
Use the arrow buttons (higher) and (lower) to set the hours and
minutes, and confirm each entry with the OKbutton.
If you have selected 12 h for the clock format, "am" or "pm" will ap-
pear beside the time.
Setting the water
hardness level
The display changes to the water hardness setting.
The dishwasher must be programmed to exactly match the hardness
of your water.
Your local water supplier can tell you the water hardness level in
your area.
Where the water hardness fluctuates (e.g. 16-28 gpg / 15-27°dH),
always program the dishwasher to the higher value (in this example,
28 gpg / 27°dH).
It is useful to know your water hardness so that you can provide the
service technician with this information in the event of any service
calls.
Enter the water hardness below:
____________________ gpg / °dH
The dishwasher is programmed at the factory for a water hardness
level of 20 gpg (19°dH)).
Water hardness
19
(0 - 70 °dH)
°dH
Use the arrow buttons (higher) and (lower) to set the water
hardness required and confirm your entry using the OK button.
See "Additional settings menu, Water hardness" for more informa-
tion.

Commissioning
23
Water
connections
The display will then change to the screen for setting the water con-
nection.
This setting can be disabled if it is not possible to connect the dish-
washer to all available water connections.
If individual water connections are disabled, they can only be en-
abled again by Miele Service.
Plumbing connections
Accept
Cold water
,
;
9
Use the and arrow buttons to select the water connections
which are not in use, and confirm your choice with the OKbutton.
The checkmark will be removed from the box and the water
connection is then disabled.
Select Accept to save your choice, and confirm your setting with
the OKbutton.
Commissioning
completed
Commissioning is successfully completed and the following message
will appear in the display.
OK
Set up successful
Press the OK button.
The dishwasher is now ready for use.
M
PROFESSIONAL
PG 8061
The start screen is displayed for 3 seconds.
Then the first shortcut button program will appear in the display.

Opening and closing the door
24
Comfort Door Lock
This dishwasher is equipped with a Comfort Door Lock.
This door locking mechanism assists the drying process by automati-
cally opening the door a few centimeters wide at the end of the pro-
gram (except for the Rapid, Reactivation, Rinse and Drain programs).
This function can also be disabled (see "Settings , Drying").
Opening the door
The door can only be opened if the dishwasher is connected to the
electrical supply and is turned on (the LED is lit on the keypad).
The control panel also serves as a door handle.
Press the button to open the door. The LED on the keypad turns
off as soon as the door is unlocked.
Grasp the handle underneath the control panel and lower the door
to open.
Pressing the button during operation can interrupt the program
(see "Operation, Interrupting a program").
A program which is already running should only be interrupted if
absolutely necessary, e.g. if the wash load is moving about signifi-
cantly.

Opening and closing the door
25
Closing the door
Insert the baskets.
Raise the door upwards and push it gently until the latch audibly
engages. The door will be drawn automatically into its final closed
position by the closing mechanism.
Do not put your hand inside the door as it is closing.
Risk of injury!
If the door cannot be closed properly by the mechanism because it
is obstructed by dishware or other similar objects, Door blocked or F
433 will appear in the display (see "Frequently asked questions")
and the mechanism will open.
Remove the obstruction from the door area.
If the door is closed with too much force, the Comfort Door Lock will
open it again.
The dishwasher can only remain leak-proof if the automatic closing
mechanism has drawn the door into the final closed position.
Opening and closing the door
26
Opening the door using the emergency release
The emergency release should only be operated when it is no
longer possible to open the door in the usual way.
If the emergency release is operated during a program cycle,
hot water can escape.
Danger of scalding and burning.
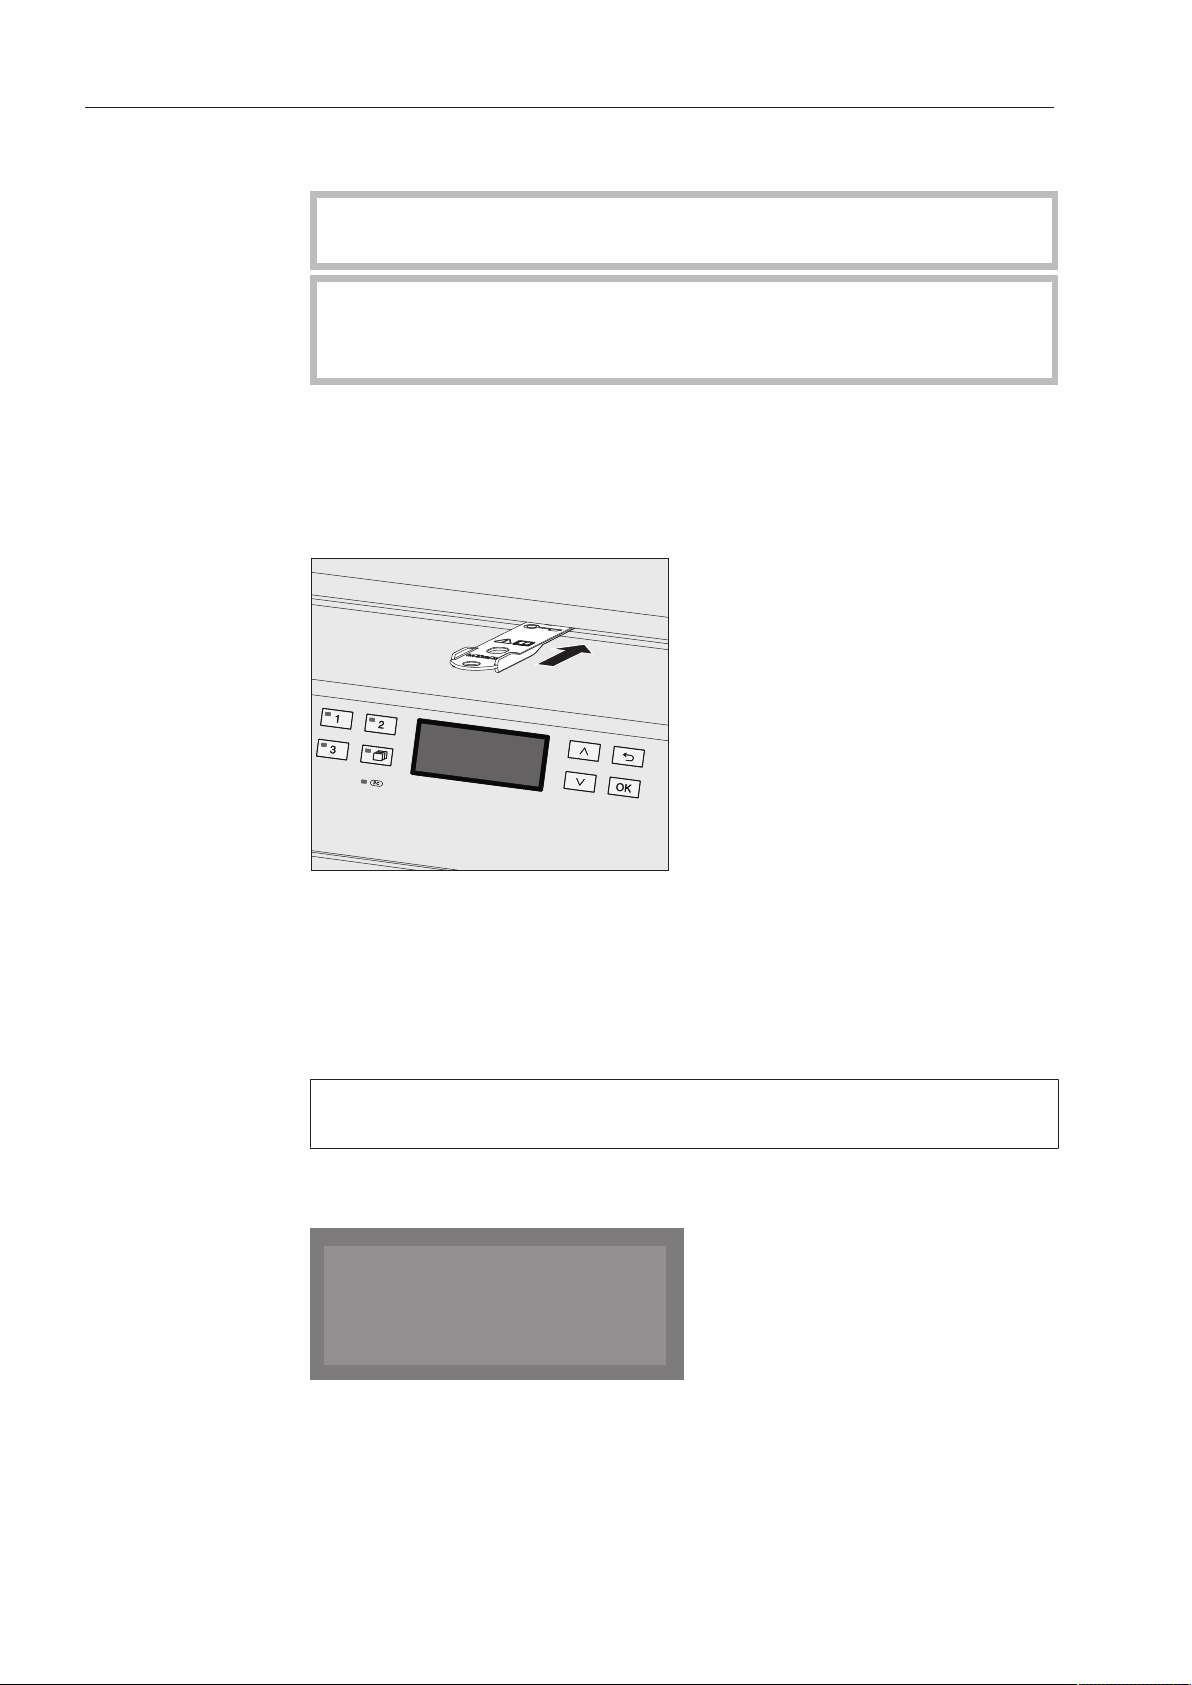
The emergency release mechanism is located on the right beside the
door lock between the door and the lid of the appliance (or the
counter, with built-under appliances).
The emergency release is operated using the tool supplied in the ac-
cessory pack with the operating instructions.
Insert the tool for the emergency release into the gap between the
lid and the door to the right of the lock. The right hand edge of the
tool should ideally be aligned with the right hand edge of the dis-
play.
Push the slider for the emergency release backwards with the tool
until the door opens slightly.
If you push against the door of the dishwasher at the same time,
less force will be needed to operate the emergency release.
When the door has been opened using the emergency release, the
following message will appear in the display:
Emergency release -
Door opened
Confirm the message after the door has been released from the clos-
ing mechanism. The last program used will then appear in the display.

Filling the salt container
27
Reactivation
In order to achieve excellent cleaning results, the dishwasher needs
to operate with soft water. Hard water results in the buildup of cal-
cium deposits on the load and the machine walls.
Water with a hardness of 4 gpg (= 4°dH German scale) or greater
must be softened. This occurs automatically in the built-in water soft-
ener.
In order for this process to function properly, the water softener must
be set to the exact hardness of the water supplied.
Your local water authority will be able to tell you the exact degree of
hardness of your water supply.
In the event of a service call at a later date, the technician's job will
be easier if the actual water hardness is known. Please note your
water hardness level here:
______________ gpg or °dH German scale
The water softener must be reactivated at regular intervals.
A special reactivation salt is required for this task.
If the hardness of your water is consistently less than 0.7mmol/l (=
4°dH German scale), it is not necessary to add any salt to the wa-
ter softener. However, the water hardness will still need to be set.
Do not fill the salt compartment with dishwasher detergent (in-
cluding liquid detergent).
Dishwasher detergent will damage the water softener.
Use only special, coarse-grained reactivation salt or other pure
evaporated salt.
Other types of salt may contain insoluble components which can
cause the water softener to malfunction.

Filling the salt container
28
Setting the water hardness level
The water softener can be set to between 0 and 73 gpg (0 - 70°dH
German scale).
Select the Additional settings menu.
Select Water hardness and confirm your choice with theOKbutton.
Water hardness
19
(0 - 70 °dH)
°dH
The factory default setting for the water softener is a hardness of 20
gpg (19°dH German scale).
Please observe the table below when setting the hardness level.
If the water hardness fluctuates, e.g. between 8 and 18 gpg (8 and 17
°dH German scale), always be sure to set the dishwasher to the
higher value, 18 gpg (17°dH German scale) in this example.
Use the arrow buttons (higher) and (lower) to set the required
water hardness level, and confirm your entry with the OKbutton.
Filling the salt container
29
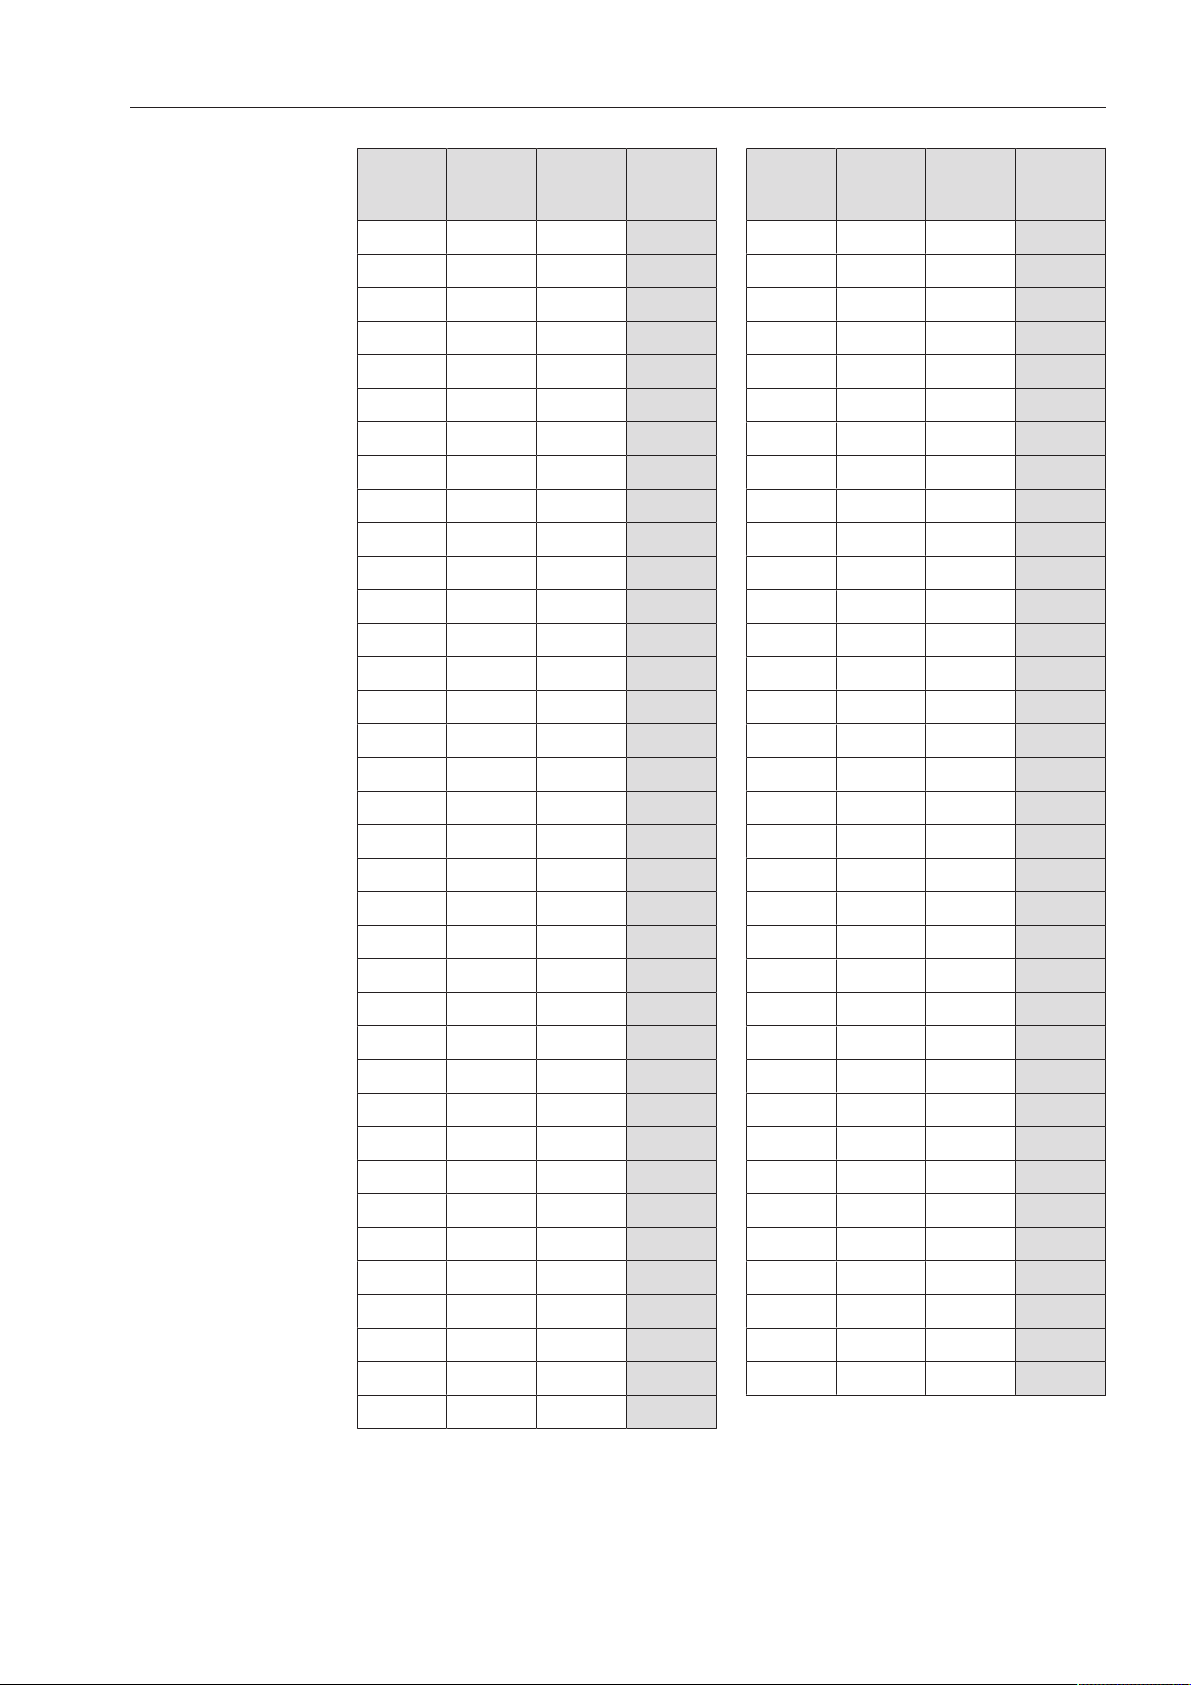
Settings table
gr/gal ppm
CaCO
3
mmol/l Display gr/gal ppm
CaCO
3
mmol/l Display
0 0 0 0 36 650 6.5 36
1 20 0.2 1 37 670 6.7 37
2 40 0.4 2 38 680 6.8 38
3 50 0.5 3 39 700 7.0 39
4 70 0.7 4 40 720 7.2 40
5 90 0.9 5 41 740 7.4 41
6 110 1.1 6 42 760 7.6 42
7 130 1.3 7 43 770 7.7 43
8 140 1.4 8 44 790 7.9 44
9 160 1.6 9 45 810 8.1 45
10 180 1.8 10 46 830 8.3 46
11 200 2.0 11 47 850 8.5 47
12 220 2.2 12 48 860 8.6 48
13 230 2.3 13 49 880 8.8 49
14 250 2.5 14 50 900 9.0 50
15 270 2.7 15 51 920 9.2 51
16 290 2.9 16 52 940 9.4 52
17 310 3.1 17 53 950 9.5 53
18 320 3.2 18 54 970 9.7 54
19 340 3.4 19 *) 55 990 9.9 55
20 360 3.6 20 56 1010 10.1 56
21 380 3.8 21 57 1030 10.3 57
22 400 4.0 22 58 1040 10.4 58
23 410 4.1 23 59 1060 10.6 59
24 430 4.3 24 60 1080 10.8 60
25 450 4.5 25 61 1100 11.0 61
26 470 4.7 26 62 1120 11.2 62
27 490 4.9 27 63 1130 11.3 63
28 500 5.0 28 64 1150 11.5 64
29 520 5.2 29 65 1170 11.7 65
30 540 5.4 30 66 1190 11.9 66
31 560 5.6 31 67 1210 12.1 67
32 580 5.8 32 68 1220 12.2 68
33 590 5.9 33 69 1240 12.4 69
34 610 6.1 34 70 1260 12.6 70
35 630 6.3 35
*) Factory default setting

Filling the salt container
30
Salt refill reminder
At the end of a program, fill the salt compartment with salt when-
ever the message appears in the display.
Acknowledge the message with the OK button.
If no salt is added, the symbol indicating low salt will appear beside
the program name on the right.
The low salt message will appear again at the end of each program.
Refill reminders can be displayed during the program cycle by press-
ing the OK button.
If there are no additional refill reminders, the symbol in the display
will go out after a few seconds once the salt has been refilled.
The salt refill reminder is deactivated if the dishwasher is set to a
water hardness of 0 - 0.7mmol/l (0 - 4°dH German scale).
Appliance lockdown due to low salt
If the low salt reminder is ignored for several program cycles and the
salt is not refilled, the appliance will be locked to prevent further use
until more salt is added.
The following message will appear in the display shortly before this
happens:
K
OK
Machine locking
Insufficient salt
Depending on the selected program and the water hardness setting,
only a few more program cycles will be possible.
If additional program cycles are run without the salt being refilled, the
dishwasher will be locked to prevent operation.
K
OK
Salt container empty,
Program locked
When reactivation salt is added, the appliance will automatically
unlock after a few seconds.
Filling the salt container
31
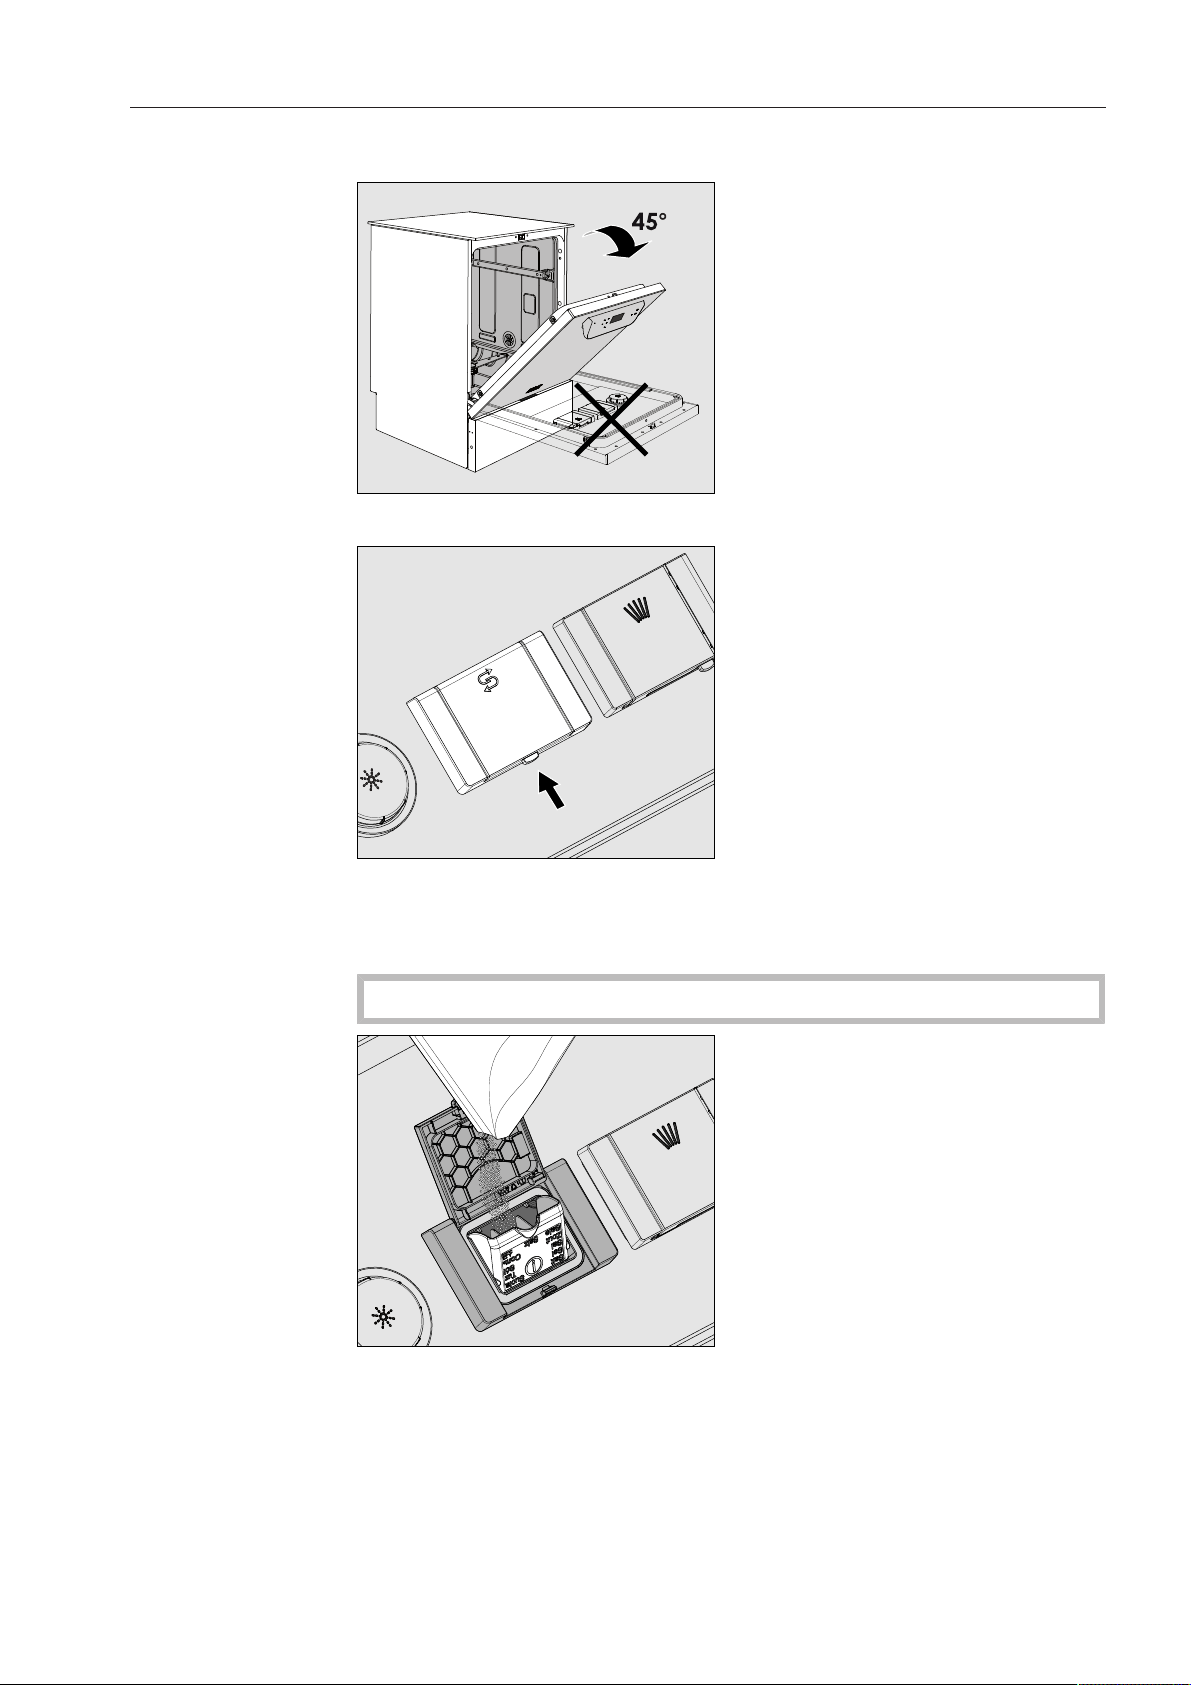
Filling the salt compartment
When adding salt, only open the door half way to avoid spills.
Press the button on the lid of the salt compartment in the direction
of the arrow until the flap springs open.
Open the funnel.
Do not pour any water into the salt compartment!
Only add salt until the funnel of the salt compartment is full so that
the funnel can continue to close properly. The salt compartment
holds approx. 4.4 lbs (2 kg) of salt on the first fill depending the
coarseness of the salt.
This number may be lower for subsequent refills, since there may
still be salt left in the compartment.

Filling the salt container
32
Do not add more than 4.4 lbs (2 kg) of salt.
If there is water present in the compartment, it may be forced out by
the added salt.
Clean any excess salt from around the compartment opening and
the seal surrounding it, and then close the flap.
After refilling the salt compartment, run the Rinse program immedi-
ately (with the dishwasher completely empty) to remove any traces
of salt from the interior. Salt residues can corrode the wash cabinet.

Adding rinse aid
33
Rinse aid
Rinse aid is necessary to ensure water does not cling and leave
marks on cookware before the drying phase and helps cookware dry
faster after it has been washed.
Rinse aid can be poured into the reservoir in the door or can be dis-
pensed via an external dispensing DOS module (Optional accessory -
see "DOS module").
Only fill the rinse aid reservoir with rinse aid. Do not fill it with
detergent (including liquid detergent). This will seriously damage
the reservoir.
Conversion to the external DOS module must be carried out only
by Miele Service or by an authorized dealer.
Rinse aid indica-
tor
Refill the rinse aid at the end of a program whenever the message
appears in the display.
K
OK
Refill rinsie aid
Acknowledge the message with the OK button.
Normal plus
Temperature
Duration
:
55 °C
Min
23
If rinse aid is not added, the symbol indicating low rinse aid will ap-
pear beside the program name on the right.
The refill reminder will be displayed again at the end of every subse-
quent program.
Refill reminders can be displayed during the program cycle by press-
ing the OK button.
If there are no additional refill reminders, the symbol in the display
will go out a few seconds after the rinse aid has been refilled.
Adding rinse aid
34
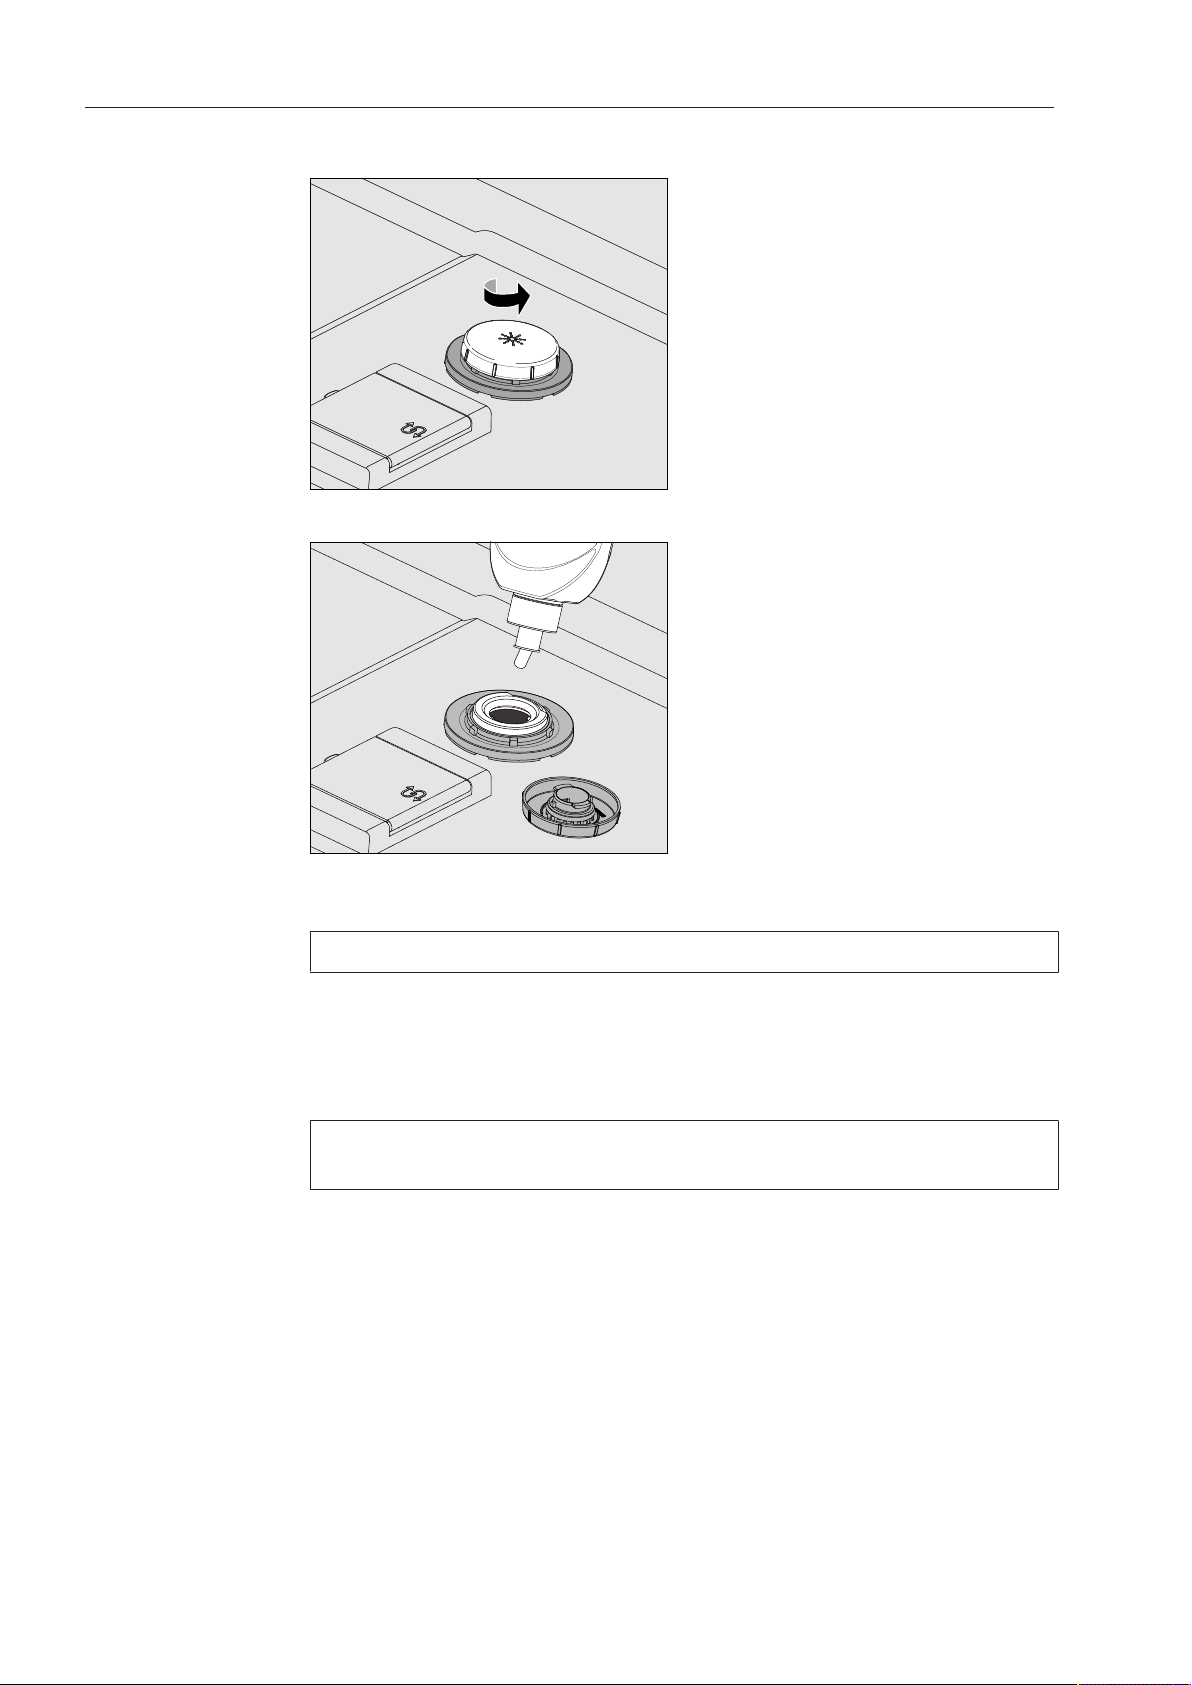
Adding rinse aid
Open the door all the way.
Unscrew the lid of the rinse aid compartment.
Only add rinse aid up to the maximum fill mark on the edge of the
compartment.
The rinse aid compartment holds approx. 10oz (300ml).
Screw the lid of the rinse aid compartment back on tightly so that
water cannot get into the compartment during the wash cycle.
Wipe up any spilled rinse aid to prevent over-foaming during the
next program.
You can adjust the dispensing quantity of the rinse aid for best re-
sults (see "Additional settings, Additional functions").

Application technology
35
Preparing the load
Remove coarse food residues from the dishware.
There is no need to rinse items under running water!
Tips
Ensure that no acid or solvent residues, especially hydrochloric
acid or chlorides, get inside the machine.
Do not wash items soiled with ash, sand, wax, grease or paint
in the dishwasher.
These substances will damage the dishwasher.
Load the dishware and utensils into their appropriate places in the
baskets, but be sure to observe the following instructions:
Load the dishware so that water can access all surfaces. This en-
sures that the items will be properly cleaned.
Load plates symmetrically in the upper and lower baskets with the
concave surfaces facing the center of the basket (as shown on the
following pages).
Do not place dishes or cutlery inside other pieces. They will cover
one another.
Make sure that all items are securely positioned.
Hollow items such as cups, glasses and pans, etc. should be
placed upside down in the baskets.
Tall and narrow hollow items should be placed in the center of the
basket if possible to ensure better water coverage.
Concave items such as mugs or bowls should be placed at an an-
gle so that the water can run off.
The spray arms must not be blocked by items which are too tall or
hang through the baskets. When in doubt, test for free movement
by manually rotating the spray arms.
Make sure that small items cannot fall through the holders in the
baskets. Small items should therefore be placed in the cutlery bas-
ket.

Application technology
36
Items not suitable
for dishwashers:
– Wooden cutlery and cookware or items with wooden parts: these
may discolor and fade. The glue used in these items is not dish-
washer-proof and wooden handles may come loose after being
washed in a dishwasher.
– Craft items, antiques, valuable vases and decorative glassware:
such items are not suitable for dishwashers.
– Plastic items which are not heat resistant: the high temperatures in
the dishwasher may cause them to melt or lose shape.
– Copper, brass, tin and aluminum items: these may discolor or be-
come matt.
– Colors painted over a glaze: these may fade after a number of
washes.
– Delicate glassware and glassware containing lead crystal: clouding
may occur over time.
We recommend
– When purchasing new cookware and cutlery, make sure they are
dishwasher-proof.
– Clouding may occur on glasses after frequent washing. If delicate
glassware is washed in the dishwasher ensure that only a special
glass-care program with very low temperatures (see program chart)
is selected and that suitable detergent is used. This will reduce the
risk of clouding.
Please note:
Silver and aluminum which has been in contact with foods contain-
ing sulfur can discolor.
Aluminum components (e.g. grease filters) must not be cleaned
with caustic alkaline commercial or industrial cleaning agents.
These may damage the material, or in extreme cases, there is a risk
of a severe explosive chemical reaction (such as an explosive oxy-
hydrogen gas reaction).
Application technology
37
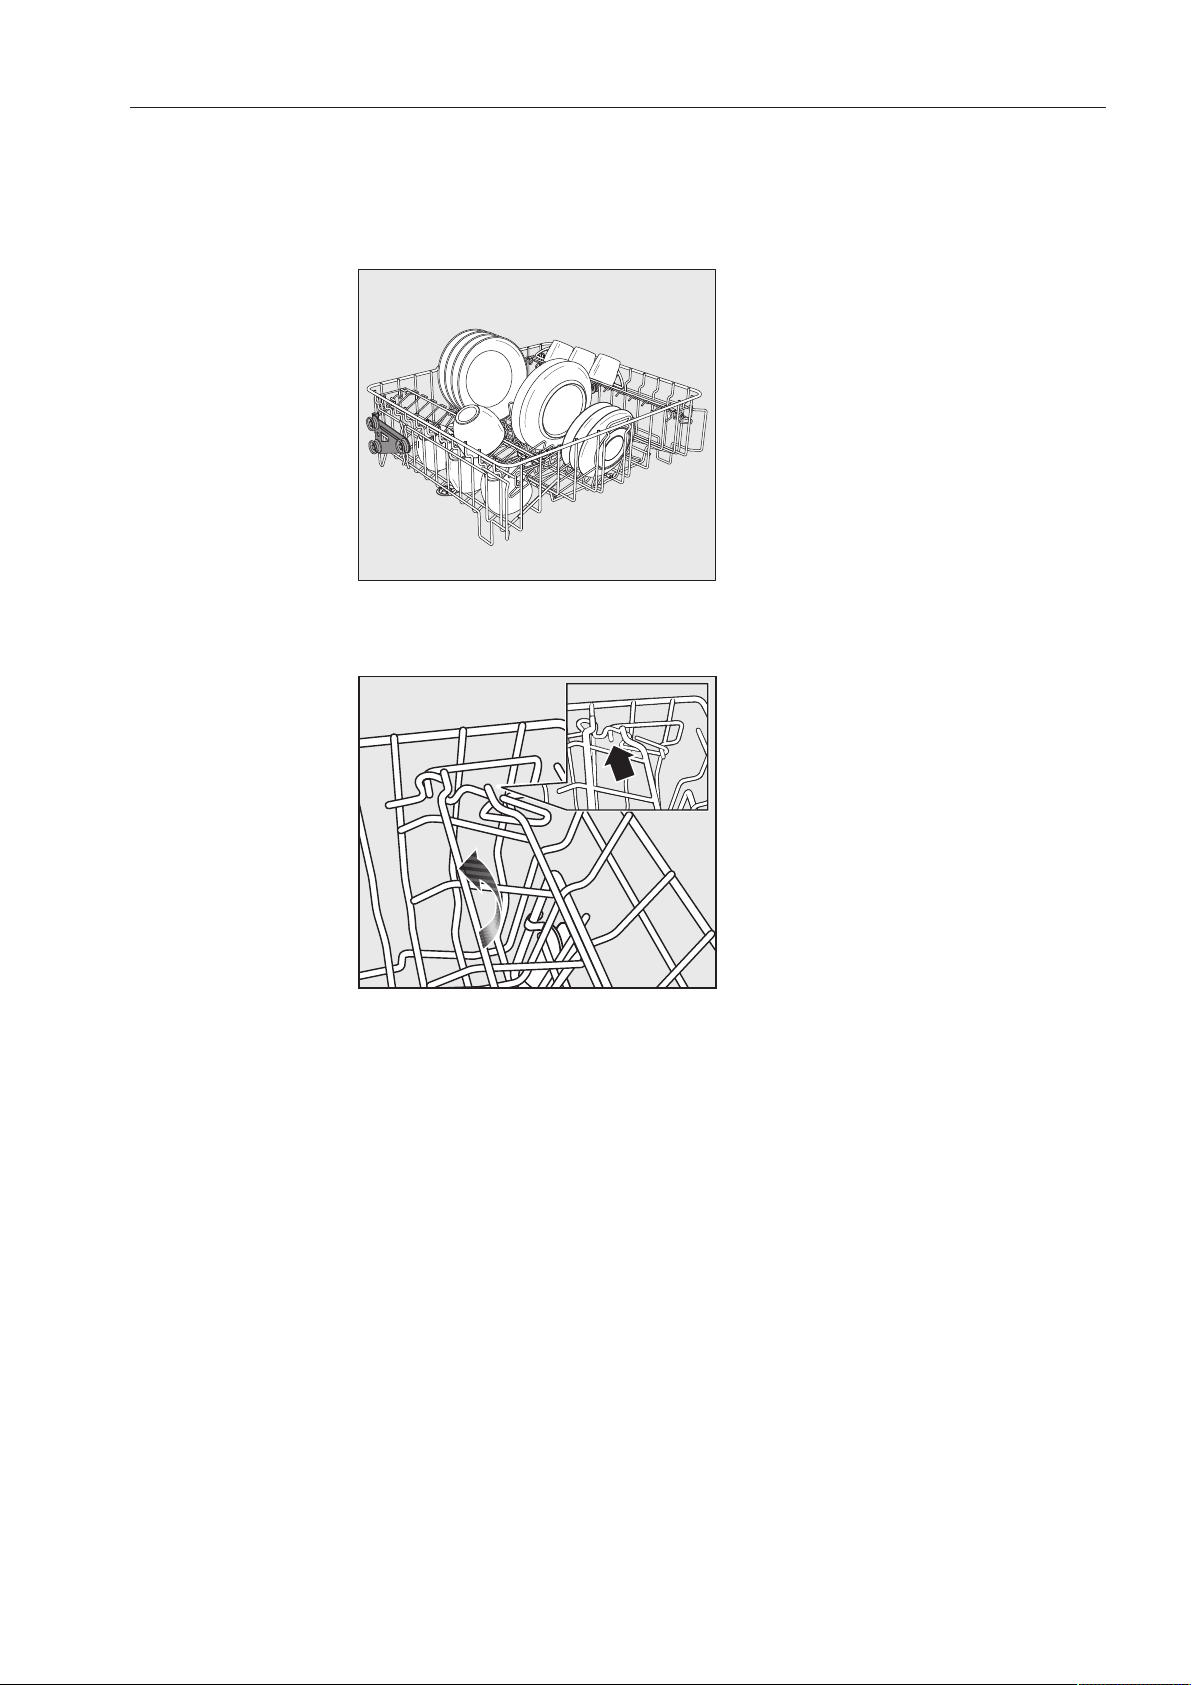
Upper basket
Use the upper basket for small, lightweight and delicate items such
as cups, saucers, glasses, dessert bowls etc. Light, heat resistant
plastic items can also be loaded in the upper basket.
O 891 upper basket
With insert E 810 for e.g. 20 cups, 33 saucers or 17 dessert plates.
Cup rack
The cup rack can be set at two different widths so that it can also ac-
commodate large cups.
Pull the cup rack upwards and click it back into position at the re-
quired width.
Application technology
38
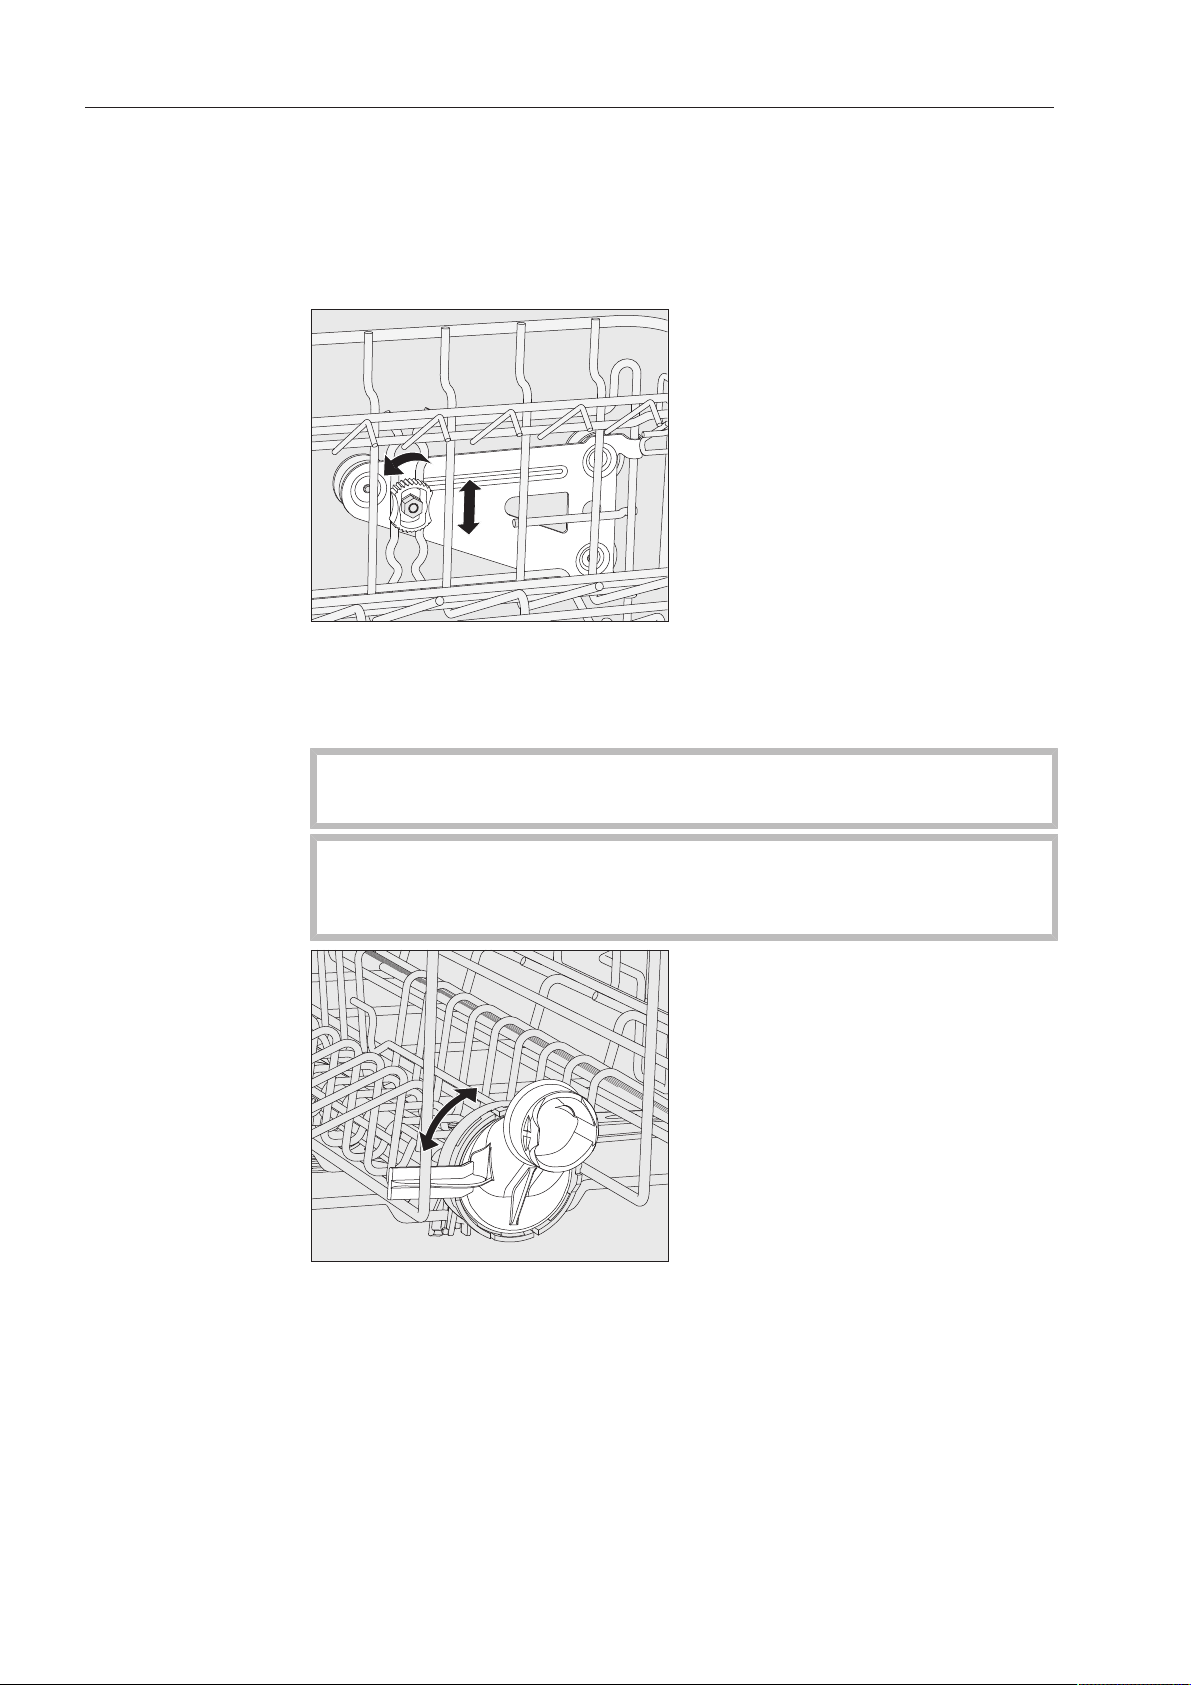
Adjusting the upper basket
In order to obtain more space for taller items in the lower or upper
basket, the upper basket can be adjusted between two vertical posi-
tions that are 5cm apart.
Pull the upper basket out.
Unscrew the lock nuts on both sides.
Lift or lower the basket into the desired position.
Tighten the lock nuts again.
The upper basket must be level in both positions.
If the basket is not level, the water connection will be blocked.
When changing the height of the upper basket, always adjust
the water connection accordingly before pushing the upper basket
back in.
Turn the upper basket water connection to the upper or lower posi-
tion.
The water connection must click audibly into place.

Application technology
39
Depending on the position of the upper basket, the following plate di-
mensions can be accommodated:
Example with upper basket O 891:
Upper basket posi-
tion
Upper basket plate Ø Lower basket plate Ø
Upper Max. 5 1/8" (15 cm) 13" (33 cm) *
Lower Max. 7 7/8" (20 cm) 9 3/4" (25 cm)
* Plate insert E812 required in the lower basket.
Application technology
40
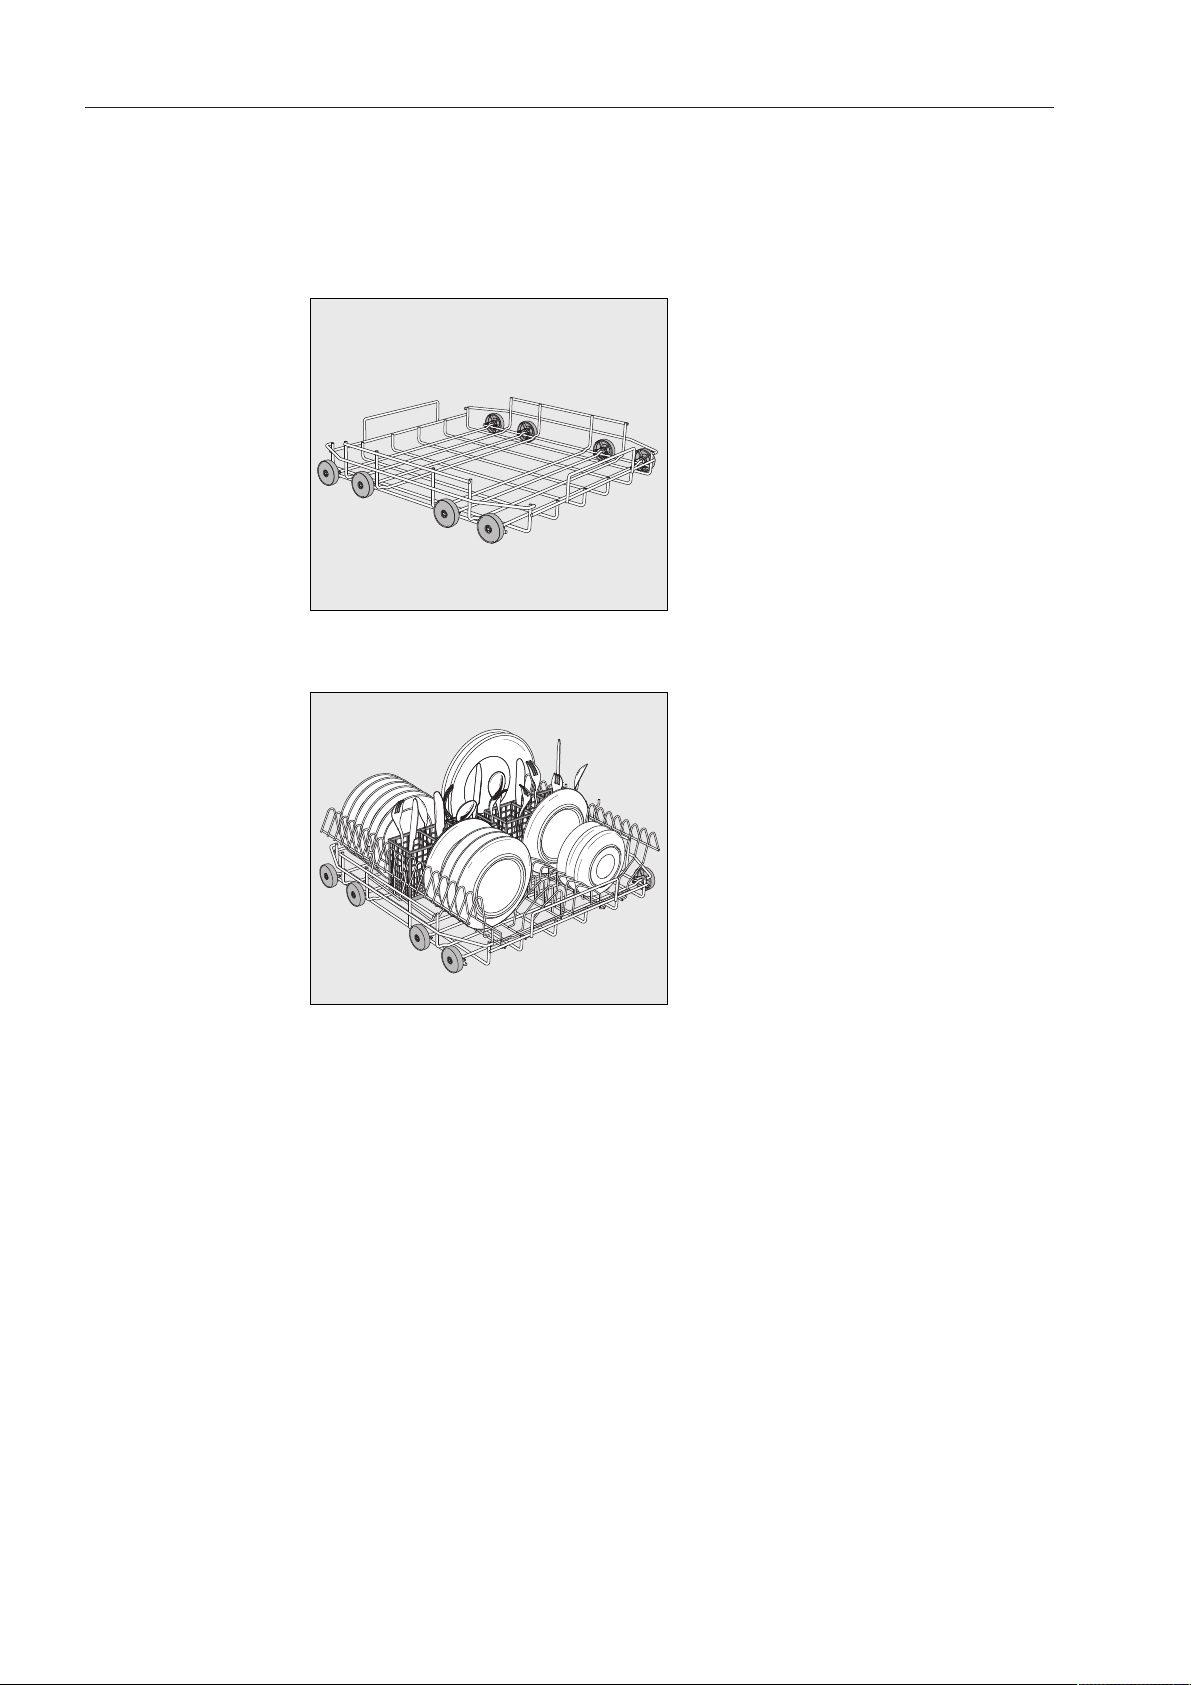
Lower basket
Use the lower basket for larger and heavier items such as plates,
serving platters, saucepans, bowls, etc.
Always place thin, delicate glassware in the lower basket using a suit-
able insert or basket.
U890 lower basket carrier
For plastic trays, various inserts and cutlery baskets.
U890 lower basket with 2 x E816 inserts and 2 x E165 cutlery baskets
16 plates with Ø 9 3/4" (25 cm) and various cutlery items can be
loaded. Without the cutlery baskets, 19 plates with Ø 9 3/4" (25 cm)
can be loaded into the E816 inserts.
Application technology
41
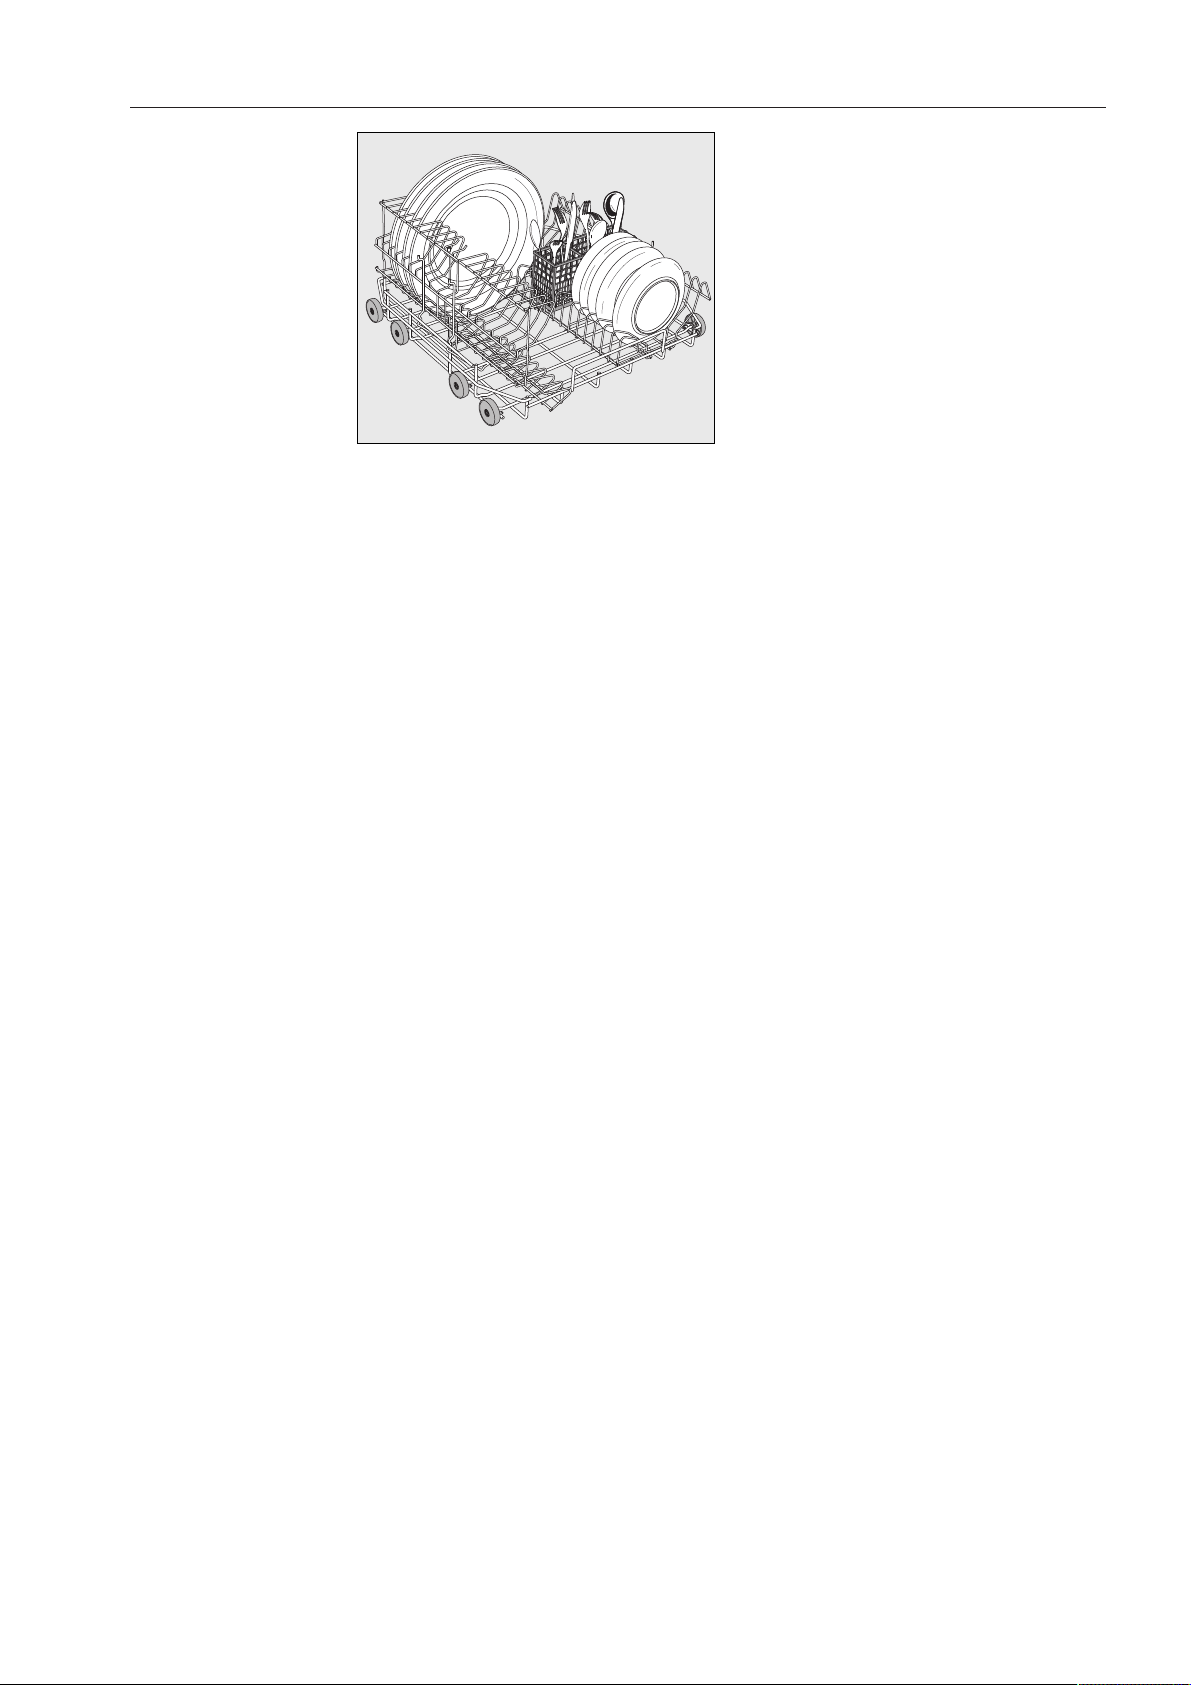
U 890 lower basket with an E 816 insert rotated 90°
With the E 165 cutlery baskets, 16 plates with Ø 13" (33 cm) and vari-
ous cutlery items can be loaded. Without the cutlery basket, 19 plates
with Ø 13" (33 cm) can be loaded into the rotated E 816 insert.
Application technology
42
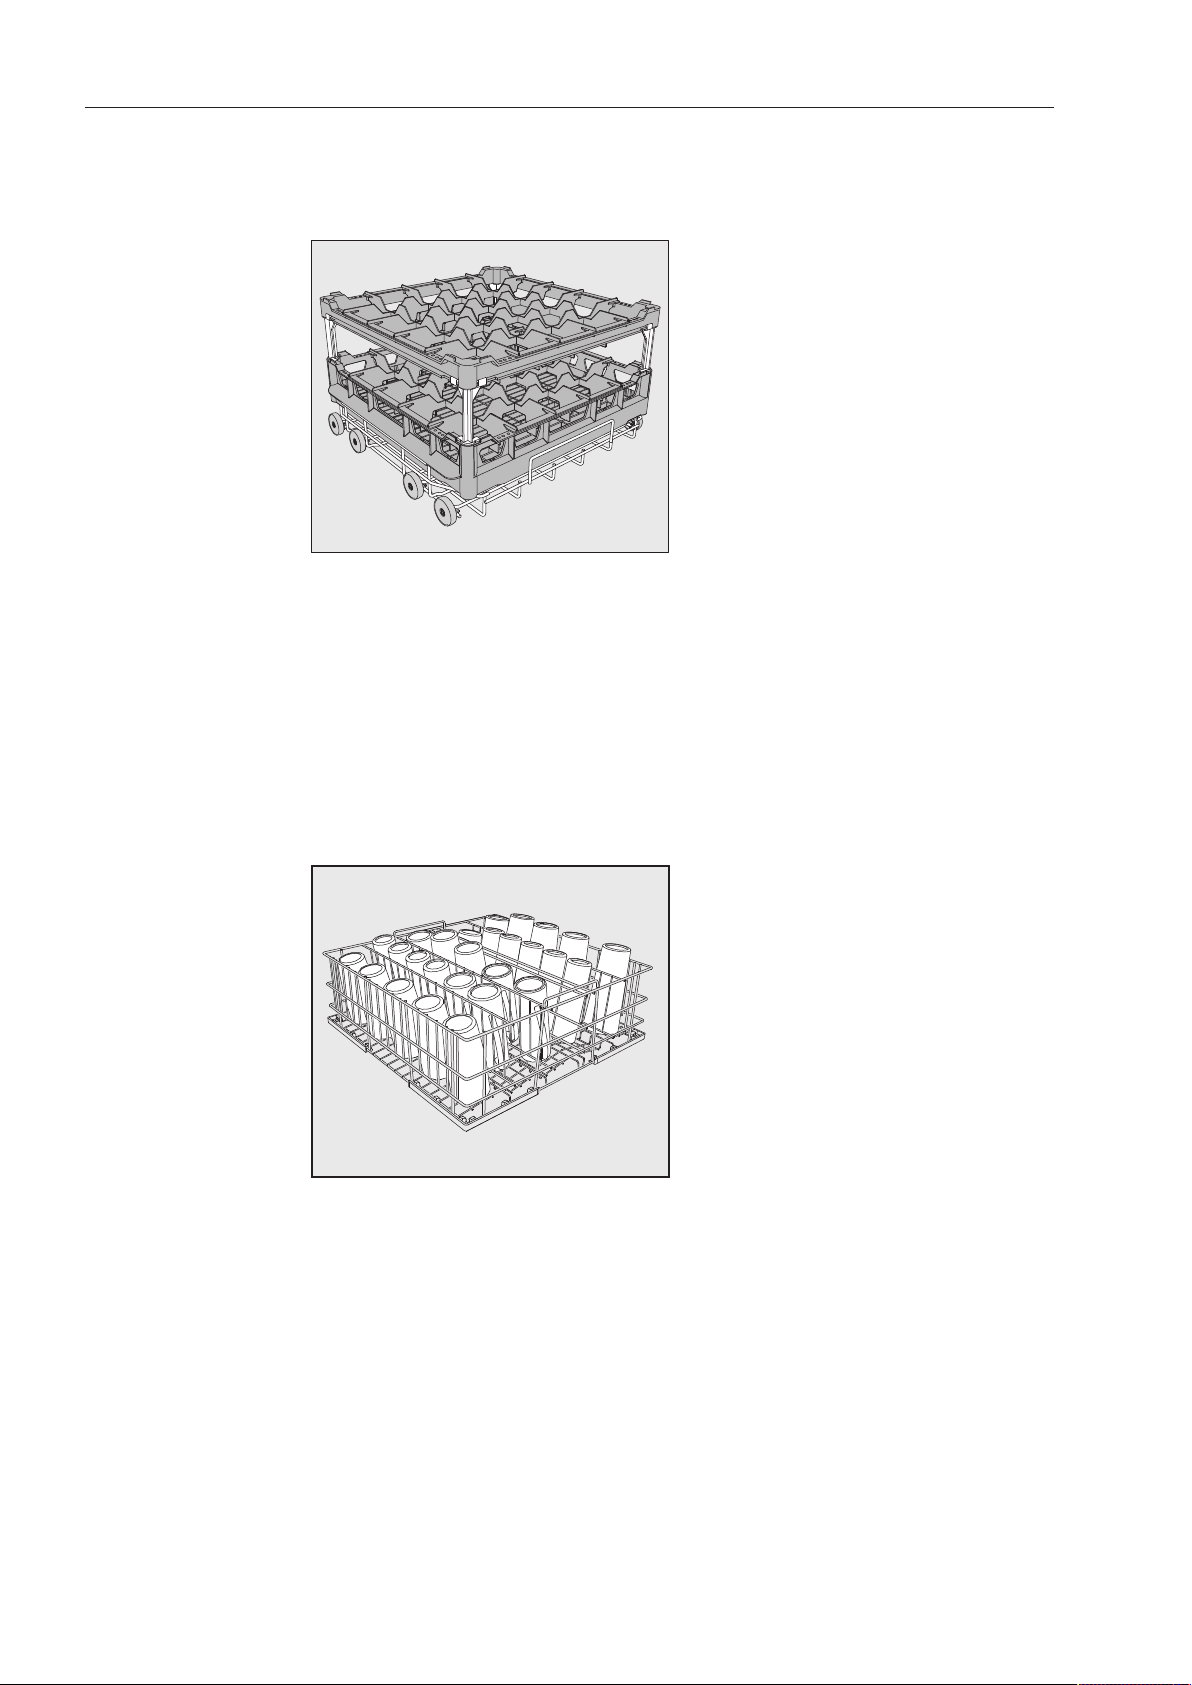
Use of plastic trays
The U 890 lower basket carrier can be loaded with plastic trays mea-
suring 19 3/4" x 19 3/4" (500 x 500 mm).
The special O 885 upper basket is required for loading plastic trays in
the upper basket (max. height for items is 5 1/8" (130 mm)).
The special U 876 lower basket carrier is required for loading taller
items in the lower basket.
The type, shape and size of the items to be washed will determine
which basket combination to use.
For additional information on the range of available baskets please
contact your Miele dealer or Miele Service.
Examples: (lower baskets)
U 525 5-row wire basket
The wire basket can be used for glasses with a maximum diameter of
3 1/8" (8 cm).
Application technology
43
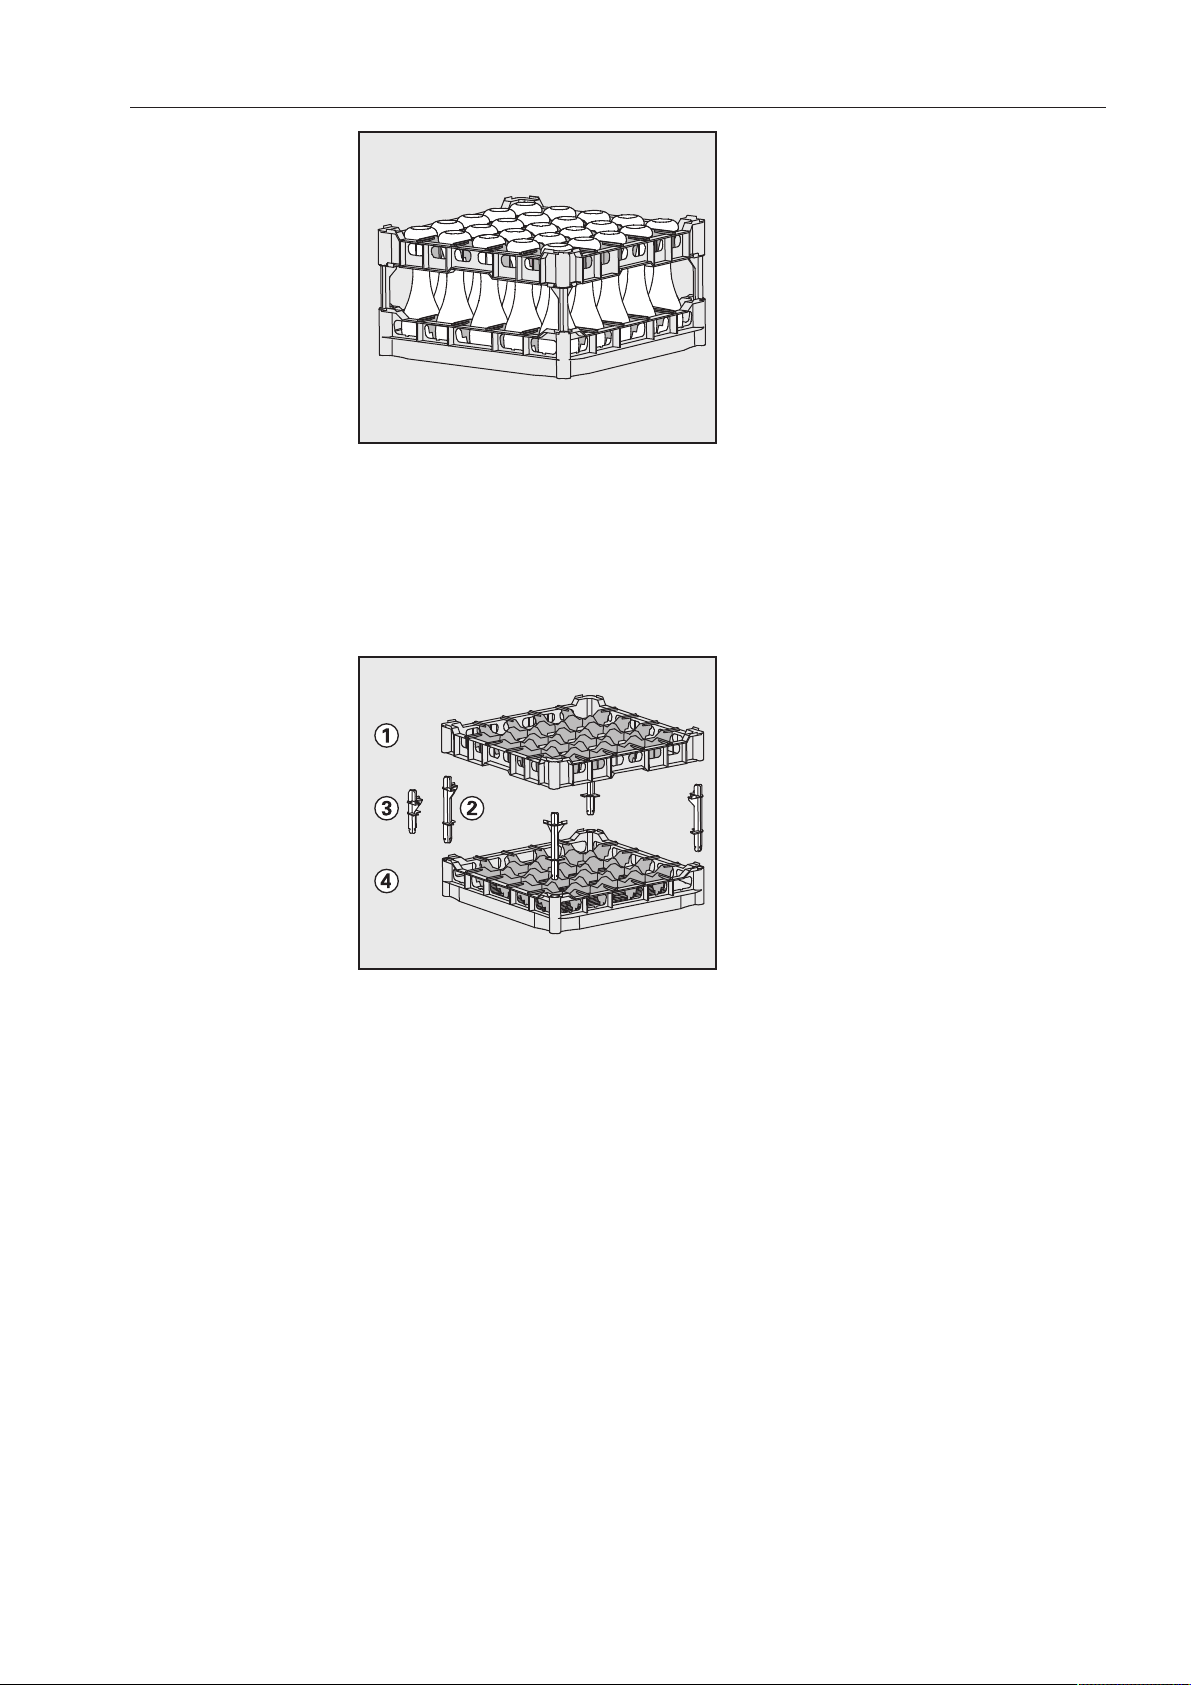
U 534 - U 537 plastic trays with compartments for different glass heights
In this example the plastic tray is connected to the top frame by long
extenders.
(for assembly in U 876 lower basket carrier only)
Assembling a
plastic tray
The height of the tray can be altered by fitting a top frame to the
base with long or short extenders.
Push all four extenders into the base basket .
Press the top frame securely onto the extenders.
Operation
44
Adding detergent
Only use detergent suitable for commercial dishwashers.
The detergent can be dispensed in powder form via the powder de-
tergent dispenser or in liquid form via an external DOS module (op-
tional accessory - see "DOS module").
Never use detergent tabs.
The tabs do not dissolve completely during the short program run-
times.
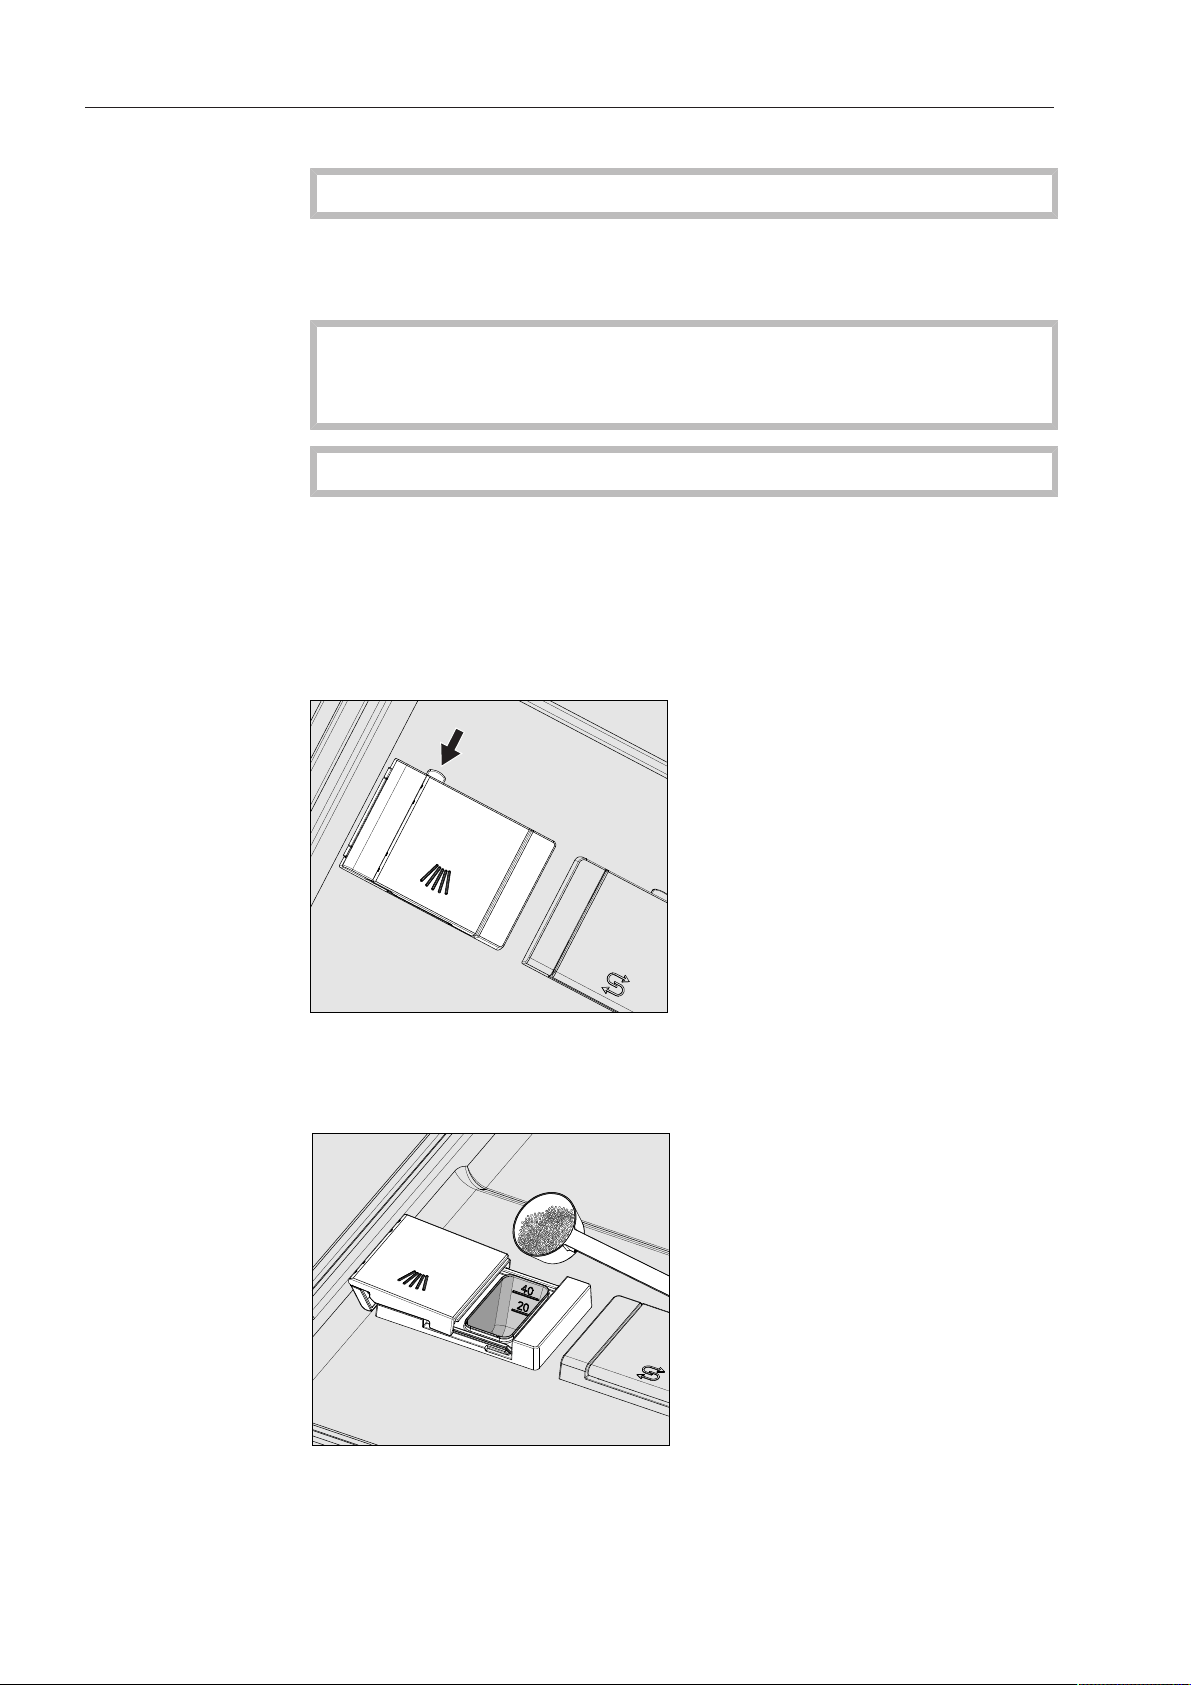
Powder detergent
Only use powder detergent in the door dispenser compartment.
Add powder detergent to the detergent dispenser in the door before
every wash program (except for Rapid, Rinse, Reactivation and Drain).
Follow the tips on the next page.
Add the appropriate amount of detergent to the dispenser based on
to how dirty the items to be washed are (be sure to note the quanti-
ties indicated in the "Program chart").
Press the opening catch on the dispenser in the direction of the ar-
row. The flap will spring open to the left.
The flap will always be open at the end of a program.
Add the required amount of powder detergent and close the flap.

Operation
45
Detergent quan-
tity
Always follow the recommendations of the detergent manufacturer.
There are markings to help you add the right amount of detergent: 20
and 40. The marks indicate a level of approx. 20 or 40 ml (0.7 oz or
1.3 oz) when the door is open in the horizontal position. They also in-
dicate the approx. amount in grams (depending on the manufacturer
and the coarseness of the powder).
The dispenser holds a maximum of 60 ml (2 oz) of detergent.
Operation
46
DOS module
In addition to the internal dispensing systems, up to two additional
external dispensing systems (DOS modules) can be connected for
dispensing liquid process chemicals.
For more information on Miele DOS modules, please contact your
Miele dealer or Miele Service.
Siphon markings
Liquid process chemicals from external containers are supplied by
siphons. The siphons are color-coded to help ensure proper dispens-
ing.
Miele uses and recommends the following colors:
Blue: for detergent
Red: for rinse aid
For cleaning specific types of soiling, and for information on the best
detergents and additives to use for liquid dispensing, please contact
Miele Service.
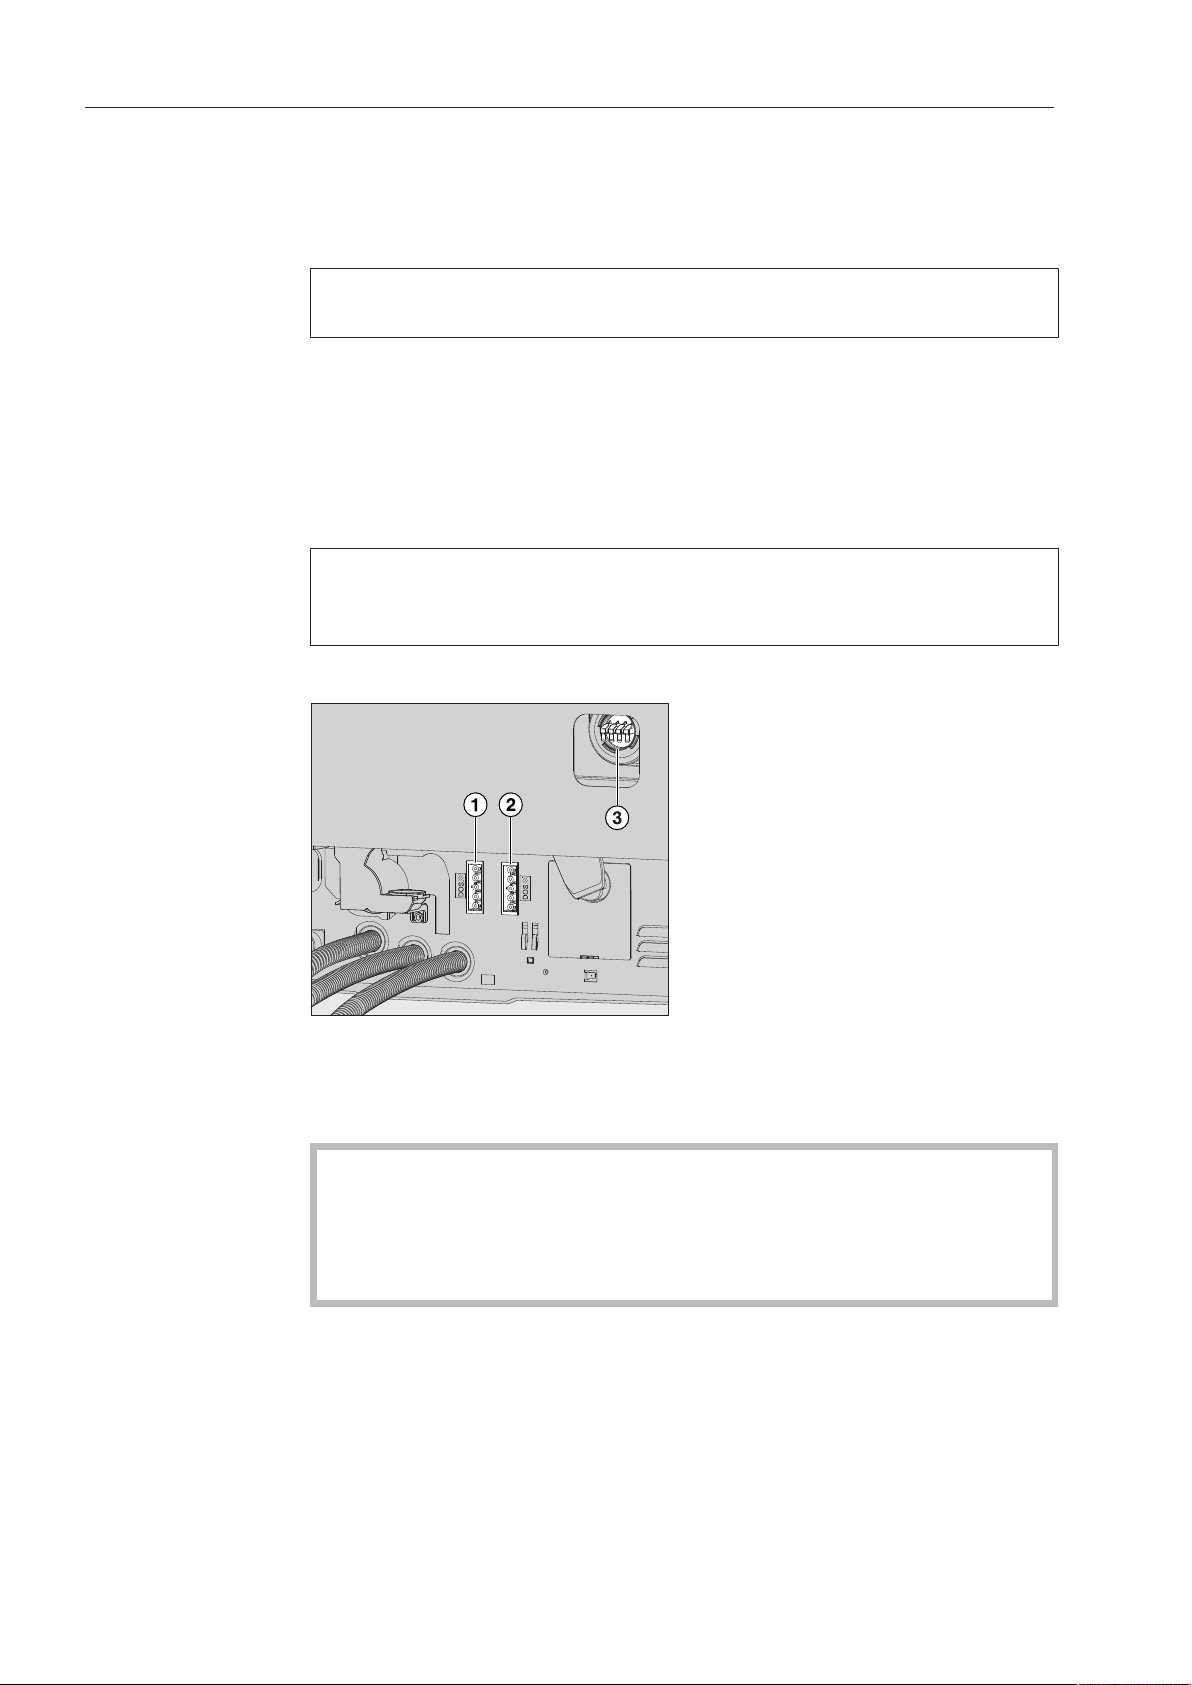
Connecting DOS
modules
The DOS module comes with a separate installation manual.
Power supply connection for DOS1, detergent.
Power supply connection for DOS4, rinse aid.
Connections for dispensing hoses.
Before installing the DOS module, compare the connection data
(voltage and frequency) on the module's data plate with the infor-
mation on the data plate of your dishwasher. If the information
does not match, the module may become damaged. When in
doubt, consult an electrician.
Connect the module to the electrical supply.
To connect a dispensing hose, release the hose clip on a free con-
nector and remove the safety cap.
Push the dispensing hose onto the connector and secure it with a
hose clip.
Operation
47
Unused connectors must be covered with safety caps to prevent
the leakage of wash water.
Setting the dis-
pensing concen-
tration
For information about setting the dispensing concentration, see "Ad-
ditional settings / Additional functions / Dispensing systems".
Refilling or
changing contain-
ers
The DOS module is equipped with a level monitor which shows a
message in the display when the amount drops below the minimum
level.
K
OK
Refill DOS
Refill the appropriate process chemical at the end of a program
whenever the message appears in the display.
Acknowledge the message with the OK button.
Refill the container ahead of time to prevent the dispensing system
from being fully emptied.
An empty dispensing system must be vented before the next pro-
gram is started.
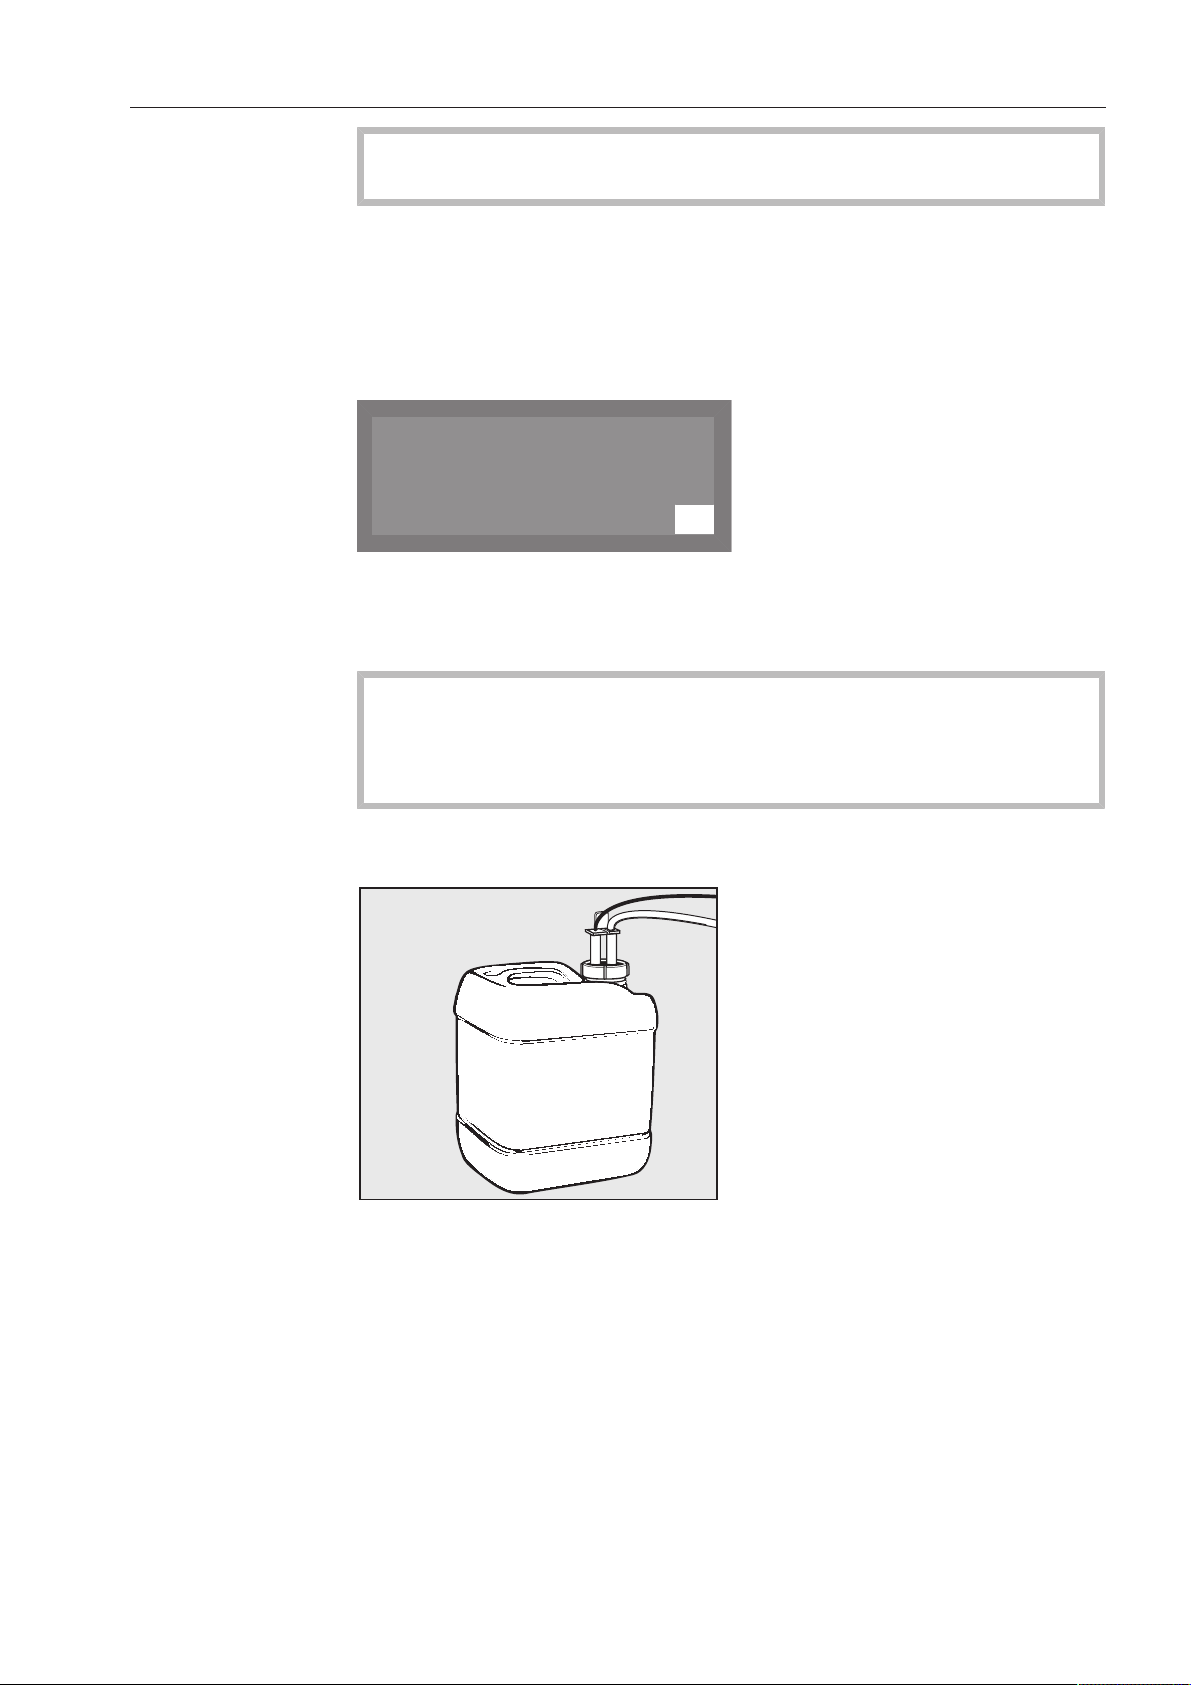
Place the container on the open cabinet door or on a surface which
is easy to clean.
Unscrew and remove the siphon. Place the siphon on the open
cabinet door.
Refill the container or replace it with a full one.
Push the siphon into the opening of the container and screw it on
tightly. Be sure to observe the color coding.
Wipe up any spilled process chemicals thoroughly.
Place the container on the floor beside the dishwasher or in an ad-
jacent cabinet.
Vent the dispensing system if necessary.

Operation
48
To vent the system and set the dispensing quantity, see
"Additional settings, Additional functions."
Checking
consumption
Monitor the amount of process chemicals used by regularly checking
the level in the container in order to detect any dispensing irregulari-
ties.
Operation
49
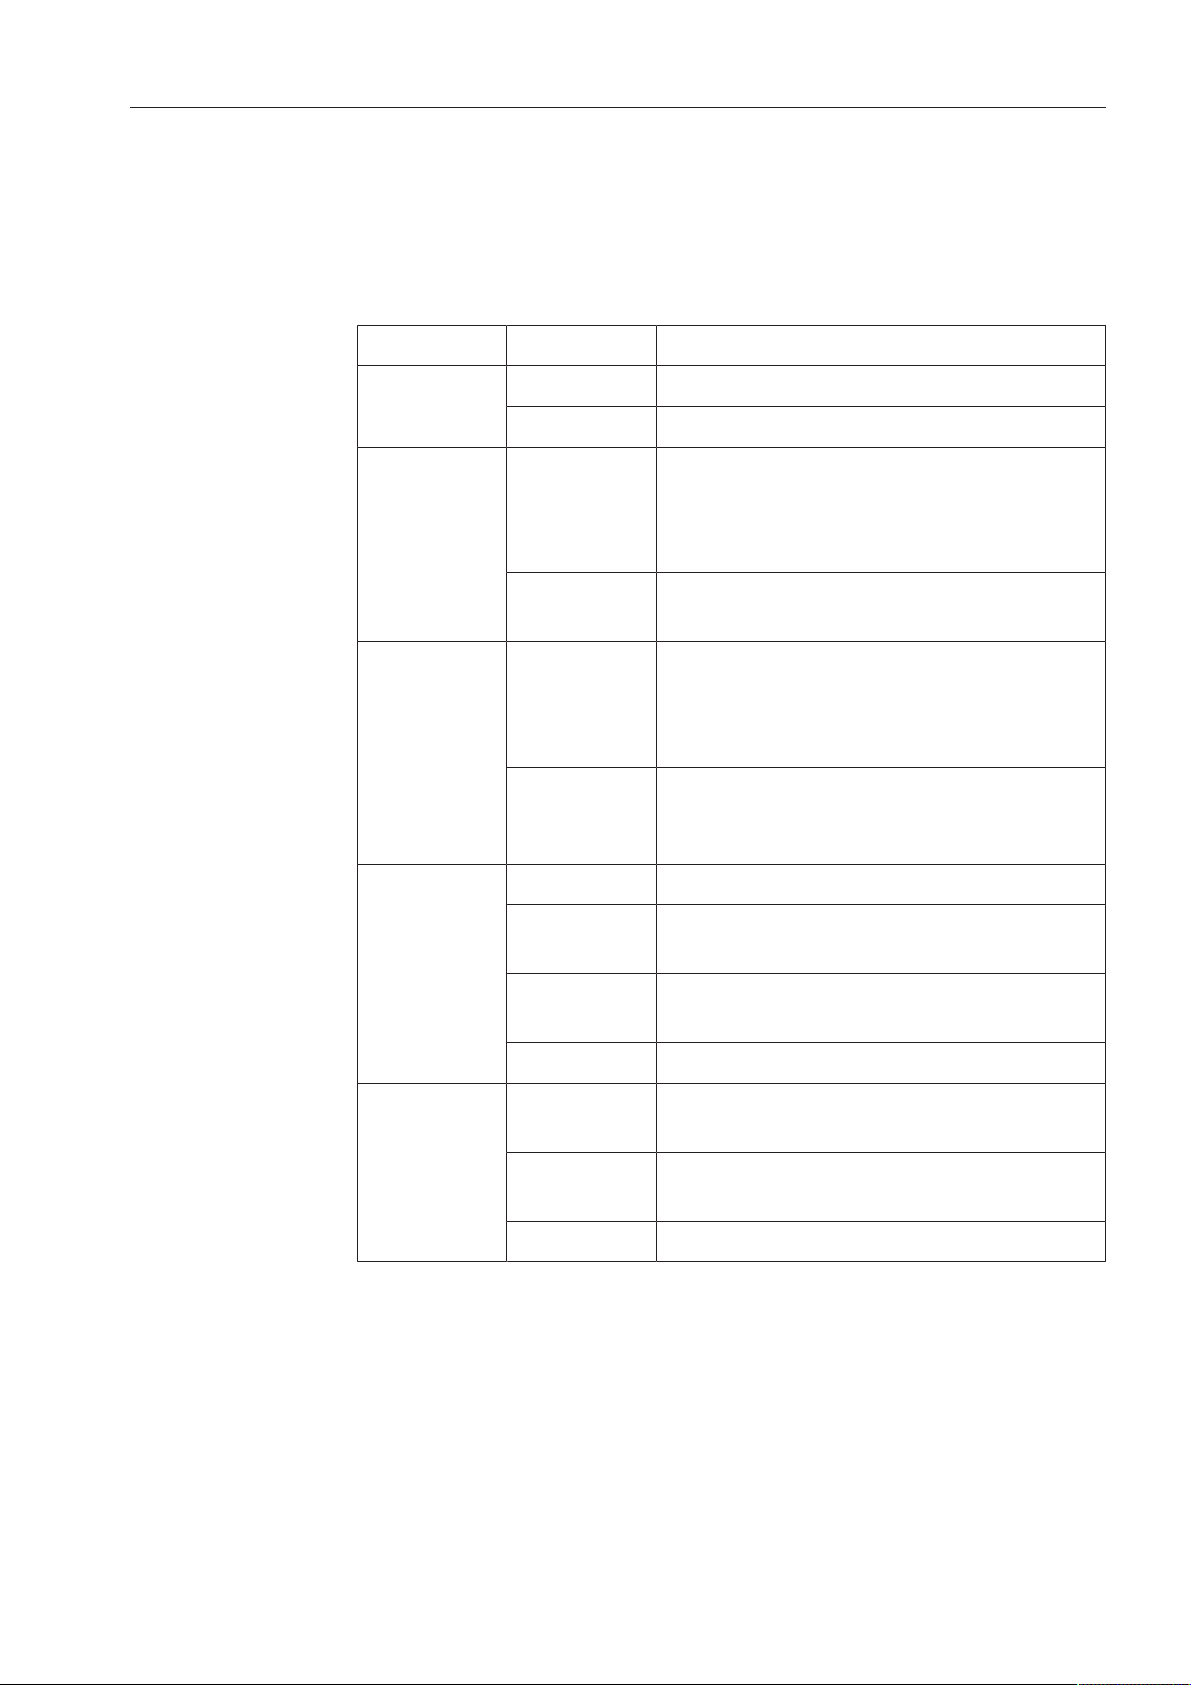
LEDs on the keypad
Light-emitting diodes that indicate the status of the dishwasher are
integrated in the keypad.
Except for the Start/Stop button, which has a green LED during nor-
mal operation, all other LEDs light up yellow.
In the event of a fault the Start/Stop button flashes red.
Button LED Status
(On/Off)
button
ON The dishwasher is on.
OFF The dishwasher is off.
,
and
buttons
(program
shortcut
buttons)
ON The lit program has been selected. At
the end of the program, the LED will re-
main lit until a different program is se-
lected.
OFF The program is not selected, or program
settings are being configured.
button
(additional
programs)
ON A program was selected from the pro-
gram list. At the end of the program, the
LED will remain lit until a different pro-
gram is selected.
OFF No program has been selected from the
list, or program settings are being con-
figured.
Start/Stop
button
ON A program is running.
FLASHES
GREEN
A program has been selected, but has
not yet started.
FLASHES
RED
A fault has occurred.
OFF A program has finished.
button
(door but-
ton)
ON A program has been selected, but has
not yet started.
FLASHES A program has finished and the door is
closed.
OFF A program is running.
Operation
50
Turning on the dishwasher
Open the water valve if it is closed.
Press the button until the button's LED lights up.
Close the door (the LED on the button will light up).
Once the dishwasher is ready for operation, the display changes to
show the previously selected program,
e.g.:
Normal plus
Temperature
Duration
G
55 °C
Min
23
Selecting a program
Choose your program according to the type of load and how dirty it
is.
Shortcut buttons
The most frequently used programs can be selected using the short-
cut buttons , and . Programs can be assigned to these
buttons as desired (see "Additional settings").
In the factory default setting, the first three programs from the pro-
gram chart (see "Program chart") are assigned to the shortcut but-
tons.
Select a program using the shortcut buttons.
The LED for the shortcut button will light up and the LED for the Start/
Stop button will flash.

Operation
51
Program list
Programs that cannot be selected using the shortcut buttons can be
selected from the program list.
Press the button.
The following selection menu appears in the display:
Rapid
Hygiene plus
,
;
Select program
Select the desired program using the and buttons, and confirm
your choice with the OK button.
The selected program will be shown in the display, e.g.:
Normal plus
Temperature
Duration
55 °C
Min
23
G
The LED for the button will light up and the LED for the Start/Stop
button will flash.
Additional functions can be selected by pressing the OK button (see
"Additional functions").

Operation
52
Starting a program
Press the Start/Stop button.
The LED for the Start/Stop button will light up and the LED for the
button will go out.
Once it has been started, a program can no longer be changed.
A running program can either be interrupted (see "Interrupting a
program") or cancelled (see "Canceling a program").
Program cycle
display
After the start of a program, the wash phase description and, for 10
seconds, Program running are shown in the display.
During the program cycle, the arrow buttons and can be used to
switch between the wash phase, the set temperature, and the actual
temperature in the second line of the display.
The time remaining is shown in the third line of the display.
Normal plus
Main wash
Duration
G
Min
23

Operation
53
Program end
When a program ends normally, the LED for the Start/Stopbutton
goes out and the LED for the will flash. The message Program fin-
ished will appear in the bottom line of the display.
Normal plus
Temperature
Program finished
55 °C
In addition, a buzzer will also sound for approx. 3 seconds (factory
default setting). To adjust the buzzer volume, see "Settings , Vol-
ume".
If drying assistance has been enabled (see "Settings , Drying"), the
door will automatically open a few centimeters.
If the Switch-off function is enabled, the dishwasher switches itself
off after a short period of time.
Press the button to switch the dishwasher on again.
Turning off the dishwasher
Press the button until the button's LED goes out.
When the dishwasher is turned off, the set time of day appears in the
display.
You can also change the time of day display for when the dishwasher
is off (see "Settings, Time of day, Display").
Unloading the dishwasher
Dishes tend to break and chip more easily when they are hot. Allow
the dishes to cool until they are cool enough to handle before unload-
ing them.
The dishes will cool much faster if you open the door when the pro-
gram has ended.
First unload the lower basket, then the upper basket. This will prevent
water drops from the upper basket falling onto the dishes in the lower
basket.

Operation
54
Interrupting a program
A program which is already running should only be interrupted if ab-
solutely necessary, e.g. if the wash load is moving about significantly.
Caution! The wash load and the interior of the dishwasher may
be hot.
Danger of scalding and burning.
Press the button.
If the temperature in the wash cabinet is more than 158°F (70
°C), the warning Wash cabinet too hot will appear in the display.
Acknowledge the message with the OK button.
The following will appear in the display:
Open door?
Yes
No
(
Select Yes and confirm your choice with theOKbutton.
The program is only cancelled when Yes is confirmed.
If confirmation does not occur within 20 seconds after the but-
ton has been pressed, the display will revert to the program cycle.
The door will open and the following message will appear in the dis-
play:
K
Program interrupted:
Door opened
Rearrange the items so that they are stable.
Close the door.
The program will continue from the point at which it was interrupted.
The display will automatically revert to the program cycle.

Operation
55
Cancelling a program
Only cancel a program that has already started if it is absolutely nec-
essary, e.g. if you want to change the program.
In the event of a fault, the program will be cancelled automatically.
Caution! The wash load and the interior of the dishwasher may
be hot.
Danger of scalding and burning.
Press the Start/Stop button.
The following will appear in the display:
Cancel program
Yes
No
(
Select Yes and confirm your choice with theOKbutton.
The program is only cancelled when Yes is confirmed.
If confirmation does not occur within 20 seconds after the Start/
Stopbutton has been pressed, the display will revert to the pro-
gram cycle.
The following message appears in the display:
K
Program cancelled
If you change the program and the detergent dispenser flap has al-
ready opened, add more detergent as needed.

Program chart
56
Program When to use Powder detergent
(if liquid detergent is
not used)
Follow the manufacturer's
recommendations
Short
"Speed program" for lightly soiled wash loads with fresh traces
of easily removable food.
0.7 - 1.0 oz (20 - 30 g)
in the detergent compart-
ment
Universal
For normally soiled items. 0.7 - 1.0 oz (20 - 30 g)
in the detergent compart-
ment
Intensive
For heavily soiled items. 0.7 - 1.0 oz (20 - 30 g)
in the detergent compart-
ment
Reactivation
Manual reactivation.
This can be run to avoid being forced to run a reactivation pro-
gram during busy periods.
Rinse
Use for rinsing heavily soiled items and to prevent soiling from
drying on the items.
Also used for flushing salt out of the cabinet after refilling the salt
container.
Drain
For pumping away the rinse water when, for example, the pro-
gram has been cancelled.

Program chart
57
Program cycle
1.
Pre-wash
2.
Pre-wash
3.
Main wash
(1) / (2)
4.
Interim
rinse
5.
Interim
rinse
6.
Final rinse
(1) / (2)
7.
Drying
X X
151°F
(66°C)
1 min
(X) X
185°F
(85°C)
1 min
(X)
X X
151°F
(66°C)
1 min
X (X) X
185°F
(85°C)
1 min
(X)
X X X
151°F
(66°C)
3 min
X (X) X
185°F
(85°C)
1 min
(X)
Reactivation cycle
(X)
X
X = Stages included in the program
(X) = Optional stages that can also be selected (see "Additional settings, Additional functions")
(1) Temperature range of 86 - 185°F (30 - 85 °C) (see "Additional settings, Additional functions").
(2) Holding time range of 0 - 10 minutes (see "Additional settings, Additional functions").

Additional functions
58
Delay Start
You can schedule the start time of a program in advance. The start
time can be delayed by 1minute to 24hours.
The Delay Start function must be enabled in the Settings menu (see
"Settings, Delay Start").
If Delay Start is disabled, the function will not appear in the "Addi-
tional functions" screen.
When using the Delay Start function together with powder deter-
gent, make sure that the detergent dispenser is dry before adding
the detergent. Wipe dry with a cloth if necessary.
If the compartment is wet, detergent can clump up and stick to the
dispenser, which may prevent the detergent from being fully dis-
pensed.
Setting the
start time
Turn the dishwasher on using the button.
Select the desired program (see "Operation, Selecting a program").
The LED for the Start/Stopbutton will flash.
Press the OK button.
Select Delay start and confirm your choice with theOKbutton.
Start time
-- : --
Use the arrow buttons (higher) and (lower) to set the hours and
minutes, and confirm each entry with the OKbutton.
After entering the start time, press the Start/Stopbutton.
Normal plus
Temperature
55 °C
12:30Turn on at
G
The selected program, along with the temperature and start time, will
then be displayed.
To cancel the entered Delay Start setting before the program starts,
turn the dishwasher off using the button.

Additional functions
59
Drying assistance
To achieve better drying results, the dishwasher door will automati-
cally open a few centimeters wide at the end of the program.
This function cannot be activated for all programs (see "Program
chart").
Drying assistance can still be activated or deactivated for the se-
lected program even if it the function is permanently enabled or dis-
abled in "Settings , Drying".
This single setting only applies to the selected program and will no
longer be used after the program has finished.
Turn the dishwasher on using the button.
Select the desired program (see "Operation, Selecting a program").
The LED for the Start/Stopbutton will flash.
Press the OK button.
If Delay Start is enabled in "Settings , Delay start", the following
selection menu will appear in the display:
Selection
Drying assistance
Delay start
Select Drying assistance and confirm your choice with theOKbut-
ton.
If Delay Start is disabled in "Settings , Delay start", the following
drying assistance options will be shown directly:
Drying
Yes
No
(
– No
Drying assistance is deactivated for the selected program.
– Yes
Drying assistance is activated for the selected program.
The setting opposite of the one configured in "Settings , Drying"
will be marked in the display.
You can apply this setting by pressing the OK button.

Additional functions
60
Normal plus
Temperature
Duration
G
55 °C
Min
23
If drying assistance is active, the drying symbol will appear next to
the program name.
If the temperature in the wash cabinet is greater than 153°F (67°C)
after the last wash phase (e.g. in the Hygiene Plus program) an active
cooling phase will also be run before the program finishes. Only after
the wash cabinet has dropped below 153°F (67°C) will the program
be finished.
An audible signal will then sound, Program finished will appear in the
display, and the door will automatically open a few centimeters wide.

Settings
61
Accessing the "Settings" menu
You can access the system settings menu as follows:
Turn the dishwasher off.
Press and hold the button and, at the same time, turn the dish-
washer on using the button.
The display will then show the following options, for example:
Menu
Settings
Additional settings
If the button is pressed at this menu, the dishwasher will exit
system settings and return to normal operation.
Select the Settings option and open the corresponding menu by
pressing the OKbutton.
Options in the
Settings
menu
– Delay start
Enable or disable Delay Start (see "Delay Start")
– Drying
Permanently enable or disable drying assistance and adjust the
drying time (see "Drying")
– Language
Select the system language (see "Setting the language")
– DOS priming (Option is only visible if a DOS module is activated)
Vent dispensing system (see "DOS venting")
– Date
Set date and date format (see "Setting the date")
– Time of day
Set the time and clock format (see "Time of day")
– Volume
Set the volume of keypad and buzzer (see "Buzzer tones")

Settings
62
Menu structure
The factory defaults for the menu structure are shown.
Menu 1st submenu 2nd submenu
1. Delay start No
Yes
2. Drying No
Yes
3. Language German
English (GB)
etc.....
4. Priming DOS DOS 1
DOS 4
5. Date Date format
Set
DD:MM:YY
MM:DD:YY
6. Time of day Set
Display
Time format
Set the time
Do not display
On
On for 60 seconds
12 h
24 h
7. Volume Keypad tone
Buzzer tones Program end
Warning

Settings
63
Delay Start
You can determine whether Delay Start appears in the "Additional
functions" menu or not.
Selecting No will remove Delay Start from the "Additional functions"
menu as an operation option.
To enable the delayed start of a program, Yes must be selected so
that Delay Start can be displayed and selected in the "Additional
functions" menu.
For information on setting the start time, please see "Additional func-
tions, Delay Start".
Select the Settings menu.
Select Delay start and confirm your selection with theOKbutton.
The following settings options are available:
Delay start
Yes
No
(
– No
Delay Start is disabled and therefore not visible as an additional
function.
– Yes
Delay Start is enabled.
Select the desired option and confirm your choice with the OKbut-
ton.

Settings
64
Drying
You can turn assisted drying on or off for all programs that support
this function.
Under "Additional functions", you can separately activate or deacti-
vate drying for individual programs (see "Additional functions, Drying
assistance").
Select the Settings menu.
Select Drying and confirm your choice with theOKbutton.
The following options are available:
Drying
Yes
No
(
– No
Drying is disabled.
– Yes
Drying is enabled for those programs which support drying assis-
tance.

Settings
65
Setting the language
The language set here will be used in the display.
The flag symbol next to the "Settings" menu and the word "Lan-
guage" will help guide you if a language that you do not understand
has been set.
In this case, keep selecting the menu option that is followed by a
flag until the "Language" submenu appears.
Select the Settings menu.
Select Language and confirm your choice with theOKbutton.
A list containing all available system languages will appear in the dis-
play.
Language
,
;
(
english (GB)
deutsch
Use the and arrow buttons to select the desired language, and
confirm your selection with the OKbutton.

Settings
66
Venting DOS modules
This option is only visible when a DOS module is connected.
The dispensing system for liquid media can only dispense reliably if
the system has been purged of air.
The DOS system must be vented:
– If it is being used for the first time
– If the liquid detergent or rinse aid container was not refilled in time
and the DOS system was emptied.
To avoid damage to the dispensing system, make sure before
venting that the detergent and rinse aid containers are adequately
filled and that the dispensing siphons are screwed securely to the
containers.
Select the Settings menu.
Select DOS priming and confirm your choice with theOKbutton.
DOS priming
DOS1
DOS4
Select the dispensing system to be vented using the and ar-
row buttons and confirm your choice with the OKbutton.
The dishwasher will then begin automatically venting the selected
dispensing system. Once this process is complete, Dispensing system
successfully primed will appear in the display.
Press the OKbutton to acknowledge the message.

Settings
67
Setting the date
Select the Settings menu.
Select Date and confirm your choice with the OKbutton.
In the following menu, you can choose between:
Date
Date format
Set
– Date format
This menu option offers two different formats for displaying the
date.
– Set
This option is used to set the date in the selected format.
Date format
Select Date format and confirm your choice with the OKbutton.
Date format
DD:MM:YY
MM:DD:YY
(
DD stands for day
MM stands for month
YY stands for year
Select the desired date format and confirm your choice with the
OKbutton.
Setting the date
Select Set and confirm your choice with the OKbutton.
Date
01 . 06 . 2015
Use the arrow buttons (higher) and (lower) to set the day,
month and year, and confirm each entry with the OKbutton.
After the day, month and year have been set, the display automati-
cally reverts to the Date menu.

Settings
68
Setting the time of day
Select the Settings menu.
Select Time of day and confirm your choice with the OKbutton.
In the following menu, you can choose between:
Time of day
Set
Display
,
;
– Set
Set the time of day.
– Display
Display the time of day when the dishwasher is turned off.
– Time format
Set the clock format.
The dishwasher does not automatically adjust between summer and
winter time. This must be performed manually by the user as needed.
Setting
Select Set and confirm your choice with the OKbutton.
Time of day
12 : 00
Use the arrow buttons (higher) and (lower) to set the hours and
minutes, and confirm each entry with the OKbutton.
After the hours and minutes have been set, the display automatically
reverts to the Time of day menu.

Settings
69
Display
If required, the time of day can be displayed when the dishwasher is
turned off.
Select Display and confirm your entry with theOK button.
The following options are available:
Display
Do not display
On
,
;
(
– Do not display
The time of day is not displayed.
– On
The time of day is always displayed.
– On for 60 seconds
The time of day appears for 60seconds after the dishwasher is
turned off.
Select the desired setting and confirm your choice with the OKbut-
ton.
Clock format
Select Time format and confirm your choice with the OKbutton.
The following options are available for the clock format shown in the
display:
Time format
(
24 h
12 h
– 12 h (am / pm)
– 24 h
Select the desired format and confirm your choice with the OKbut-
ton.

Settings
70
Adjusting the volume
The dishwasher has audible tones that sound when buttons on the
keypad are pressed, at the end of a program, and when there are sys-
tem messages.
Select the Settings menu.
Select Volume and confirm your choice with the OKbutton.
The following options are available:
Volume
Keypad tone
Buzzer tones
– Keypad tone
Set the volume for the keypad buttons.
– Buzzer tones
Set the volume for the program end and for messages.
Keypad
Select Keypad tone and confirm your choice with the OKbutton.
Set the desired volume (see "Setting the volume") and confirm your
selection with the OKbutton.
Buzzer
Select Buzzer tones and confirm your choice with the OKbutton.
The following options are available:
Buzzer tones
Program end
Warning
– Program end
Set the buzzer volume for the end of the program.
– Warning
Set the buzzer volume for messages.
Select the appropriate option and confirm your choice with the
OKbutton.
Set the desired volume (see "Setting the volume") and confirm your
selection with the OKbutton.

Settings
71
Setting the
volume
The procedure for setting the volume is always the same. The display
also looks similar, e.g.:
z
Keypad tone
Quieter Louder
Use the arrow buttons (louder) and (softer) to set the volume.
The volume level is shown as a bar. On the lowest setting, the buzzer
is turned off.
Confirm the volume setting with the OKbutton.
If confirmation does not occur within approx. 15seconds, the dis-
play will automatically switch to the next higher menu without saving
the setting.

Additional settings
72
Accessing the "Additional settings" menu
To access the "Additional settings" menu:
Turn the dishwasher off.
Press and hold the button and, at the same time, turn the dish-
washer on using the button.
The display will then show the following options, for example:
Menu
Settings
Additional settings
If the button is pressed at this menu, the dishwasher will exit the
additional settings and return to normal operation.
Select Additional settings and open the corresponding menu by
pressing the OKbutton.
Options in the
"Additional set-
tings" menu
This menu can be protected with a PIN code (see "Additional set-
tings, Code").
– Code
Assign a PIN code and configure settings (see "Code")
– Log book
Display consumption levels for supplies used and operating hours
(see "Log book")
– Temperature unit
Choose a temperature unit of either °C or °F (see "Temperature
unit")
– Move program
Assign programs to the shortcut buttons (see "Move program")
– Additional functions
Modify program parameters such as water intake, interim rinses,
temperatures, and holding times, as well as detergent concentra-
tion levels for the DOS module (see "Additional functions")
– Release program
Determine the availability of individual programs for operation (see
"Program access")
– Water hardness
Set the water hardness level (see "Water hardness" and "Water
softener")
– Display view
Switch the display between the set and actual temperatures (see
"Display view")

Additional settings
73
– Display
Adjust the contrast and brightness of the display (see "Display")
– Switch off after
Enable or disable the automatic switch-off function (see "Switch off
after")
– Factory default
Reset all parameters to the factory default settings (see "Restoring
factory default settings")
– Software version
Display the software version (see "Software version")

Additional settings
74
Menu structure
The factory defaults for the menu structure are shown.
Menu 1st submenu 2nd submenu 3rd submenu
1. Code Release
Change code
Additional settings
Enter code
Yes
Block
2. Log book Consumption: Water
Consumpt.:Cleaning
agent
Consumpt.: Rinsing
aid
Operating hours
Wash programs
Service interval
3. Temperature unit °C
°F
4. Move program 1. Normal
2. Normal plus
3. Intensive
etc.
5. Additional functions Reset
Increased water level
Interim rinse
Dispensing system
Temperature / Time
Yes
No
Yes
No
DOS 2 Rinsing aid
DOS 1
DOS 4
Normal
Normal plus
Intensive
etc.
Active
Inactive
DOS priming
Concentration
Change name
Reset
Main wash
Final rinse
6. Release program All
Selection Normal
Normal plus
etc.
Apply
7. Water hardness

Additional settings
75
Menu 1st submenu 2nd submenu 3rd submenu
8. Display view Actual temperature
Required temperature
9. Display Contrast
Brightness
Contrast Set
Brightness Set
10. Switch off after Yes
No
Set the time
11. Factory default Reset No
Program settings only
All settings
12. Software version EB Id: XXXX
EGL Id: XXXX
EZL Id: XXXX
EFU Id: XXXX

Additional settings
76
CODE
A PIN code can be used to prevent unauthorized access to various
functions and system settings on the dishwasher.
Select the Additional settings menu.
Select Code and open the corresponding menu by pressing the
OKbutton.
– Release
Restrict access to the Additional settings menu to users with admin-
istrator rights only, or allow access to all users.
– Change code
Set a new PIN code.
Access
Select the Release option and confirm your choice with the OKbut-
ton.
Select Additional settings and confirm your selection with the
OKbutton.
The following settings are available:
Additional settings
Yes
Block
(
– Yes
The menu is available to all users.
– Block
Access to the menu is only possible with a PIN code.
A checkmark indicates the current setting.
Select the appropriate option and confirm your selection with the
OKbutton.
Changing the PIN
code
Select the Change code option and confirm your choice with the
OKbutton.
First enter the current PIN code (see "Enter code").
Then enter your new PIN code.
Save the new PIN code by confirming the last digit.

Additional settings
77
Entering the
PIN code
If you have selected the Block option in the Release menu, or if ac-
cess to the Additional settings menu is already protected by a PIN
code, you must enter a PIN code.
Settings within the Additional settings menu can then only be changed
by users with system administrator rights.
The factory default setting for the PIN code is 8 0 0 0 if access to the
Additional settings is blocked.
The following PIN-entry screen will appear in the display, for example:
Enter code
0 0 0 0
Use the and arrow buttons to enter the numerical values, and
confirm each entry with the OKbutton.
If the OKbutton is pressed, the cursor automatically moves to the
next available input field.
Each entered digit is replaced by an asterisk (*).
The protected settings are unlocked once all digits have been cor-
rectly entered.
If an incorrect PIN code is entered, the following message will appear
in the display:
K
OK
Wrong code entered
Press the OKbutton to acknowledge the message.
The display will then revert to the input menu.

Additional settings
78
Log book
The dishwasher controls record the consumption levels for water, de-
tergent and rinse aid. They also calculate the number of hours the
dishwasher has been in operation, the number of programs that have
been run, and the required service intervals.
Select the Additional settings menu.
Select Log book and open the corresponding menu by pressing the
OKbutton.
The following options are available:
Log book
,
;
Consumption: Water
Consumpt.:Cleaning agent
– Consumption: Water
Display the total amount of water used in liters.
– Consumpt.:Cleaning agent
Display the total amount of detergent used in liters (only for dish-
washers using a DOS module).
– Consumpt.: Rinsing aid
Display the total amount of rinse aid used in liters
– Operating hours
Display the total number of operating hours.
– Wash programs
Display the total number of program cycles.
– Service interval
Display the next date for required service.
Select the desired option and confirm your choice with the OKbut-
ton.
A number will then be displayed.
You can switch the display to the next higher menu by pressing the
OKbutton.

Additional settings
79
Temperature unit
The temperature can be displayed in degrees Celsius or degrees
Fahrenheit.
Select the Additional settings menu.
Select Temperature unit and confirm your choice with theOKbutton.
Temperature unit
°C
°F
(
– °C
The temperature is displayed in degrees Celsius
– °F
The temperature is displayed in degrees Fahrenheit
Use the and arrow buttons to select the desired option, and
confirm your choice with the OKbutton.
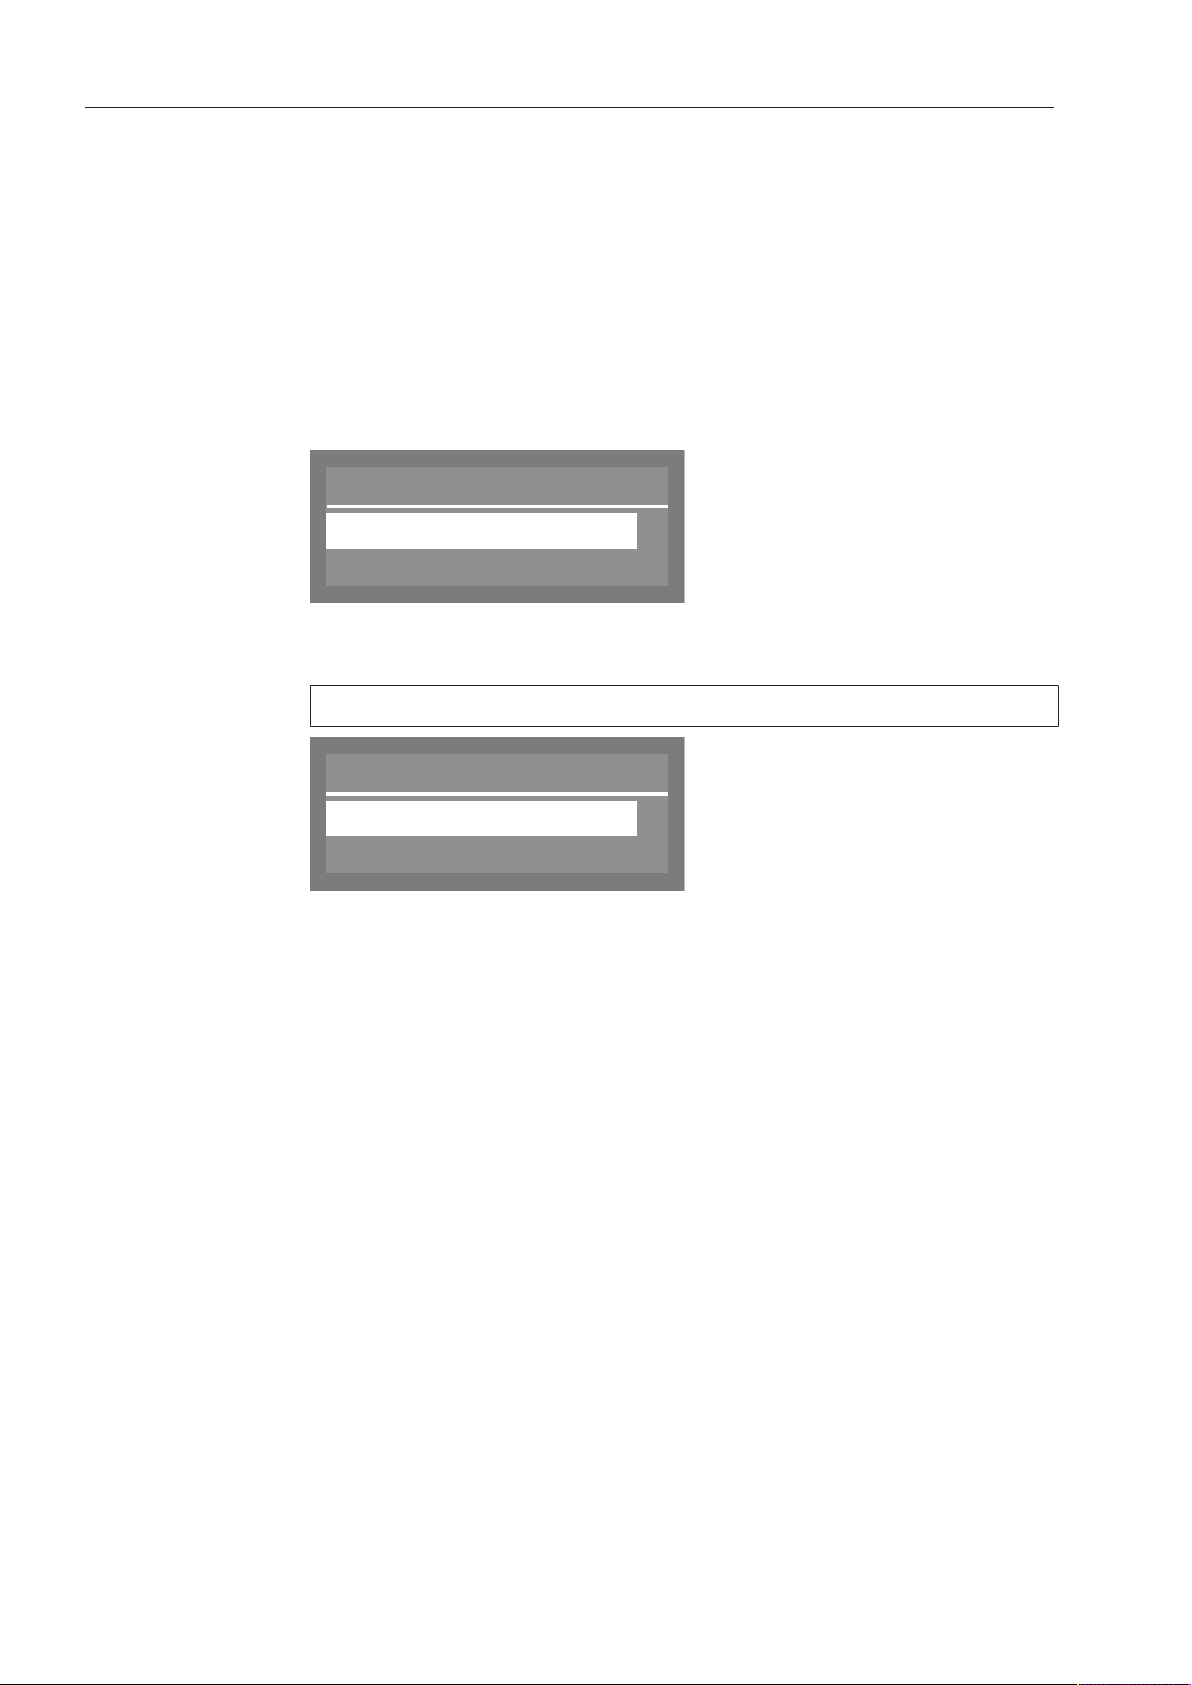
Additional settings
80
Move program
You can change the order of the programs and therefore also the allo-
cation of the shortcut buttons.
You can move the programs you use most frequently to program
places 1-3. These are then automatically allocated to the shortcut
buttons.
Select the Additional settings menu.
Select Move program and confirm the entry with the OK button.
Shortcut buttons
Programs are displayed in their current order.
Move program
1.
2.
,
;
Normal
Normal plus
Use the and buttons to select a program from the list that you
wish to move, and then confirm your choice with the OK button.
The program you select will be marked with a tick .
1.
1.
2.
,
;
(
Move program
Normal
Normal plus
Use the and buttons to select the position you want to move it
to and confirm your choice with the OK button.
Moving a program forwards moves the programs after it down a posi-
tion.
Moving a program to the end of the list moves the programs in front
of it up a position.

Additional settings
81
Additional functions
With these functions, it is possible to adjust individual parameters to
adapt program cycles to particular types of soiling and optimize
cleaning results.
Select the Additional settings menu.
Select Additional functions and open the corresponding menu by
pressing the OKbutton.
In the menu that then appears, you can choose from the following
options:
– Reset
Reset all of the parameters changed under the "Additional func-
tions" menu to their default settings.
– Increased water level
Increase the amount of water used in all wash programs.
– Interim rinse
Include an interim rinse in all programs that support this feature
(see "Program chart").
– Dispensing system
Vent the dispensing systems and change the name of the DOS
modules.
– Temperature / Time
Change the temperature and holding time for the main wash and fi-
nal rinse stages of a wash program.
Resetting
Select the Reset option and confirm your choice with the OKbut-
ton.
Reset
Yes
No
(
Select Yes and confirm your selection with the OKbutton.
All parameters that have been changed under "Additional func-
tions" will be reset to the factory default setting.

Additional settings
82
Increased amount
of water
Select the Increased water level option and confirm your choice with
the OKbutton.
The amount of water used is indicated in liters and can be increased
by up to 1.5l in 0.5-liter increments.
Increased water level
0,0 l
(0,0 - 1,5 l)
Use the arrow buttons (higher) and (lower) to select the de-
sired amount of water, and confirm your selection with the OKbut-
ton.
Interim rinse
Select the Interim rinse option and confirm your choice with the
OKbutton.
The following options are available:
Interim rinse
Yes
No
(
– Yes
The additional interim rinse is active.
– No
The additional interim rinse is inactive.
Select the desired option and confirm your selection with the OK
button.

Additional settings
83
DOS dispensing
systems
Select the Dispensing system option and confirm your choice with
the OKbutton.
Dispensing system
DOS1
;
,
DOS 2 Rinsing aid
Select the desired dispensing system and confirm your choice with
the OKbutton.
The following settings are available:
Active
Inactive
,
;
DOS1
– Active
The dispensing system is active.
– Inactive
The dispensing system is inactive.
– DOS priming
Venting of the dispensing system to ensure reliable dispensing.
– Concentration
The concentration of detergent and/or rinse aid can be modified as
needed.
– Change name
The name of the dispensing system can be changed.
With DOS 2 Rinsing aid, the only option displayed is Concentration.
The menu options DOS priming, Concentration and Change name
are only visible if Active is selected.
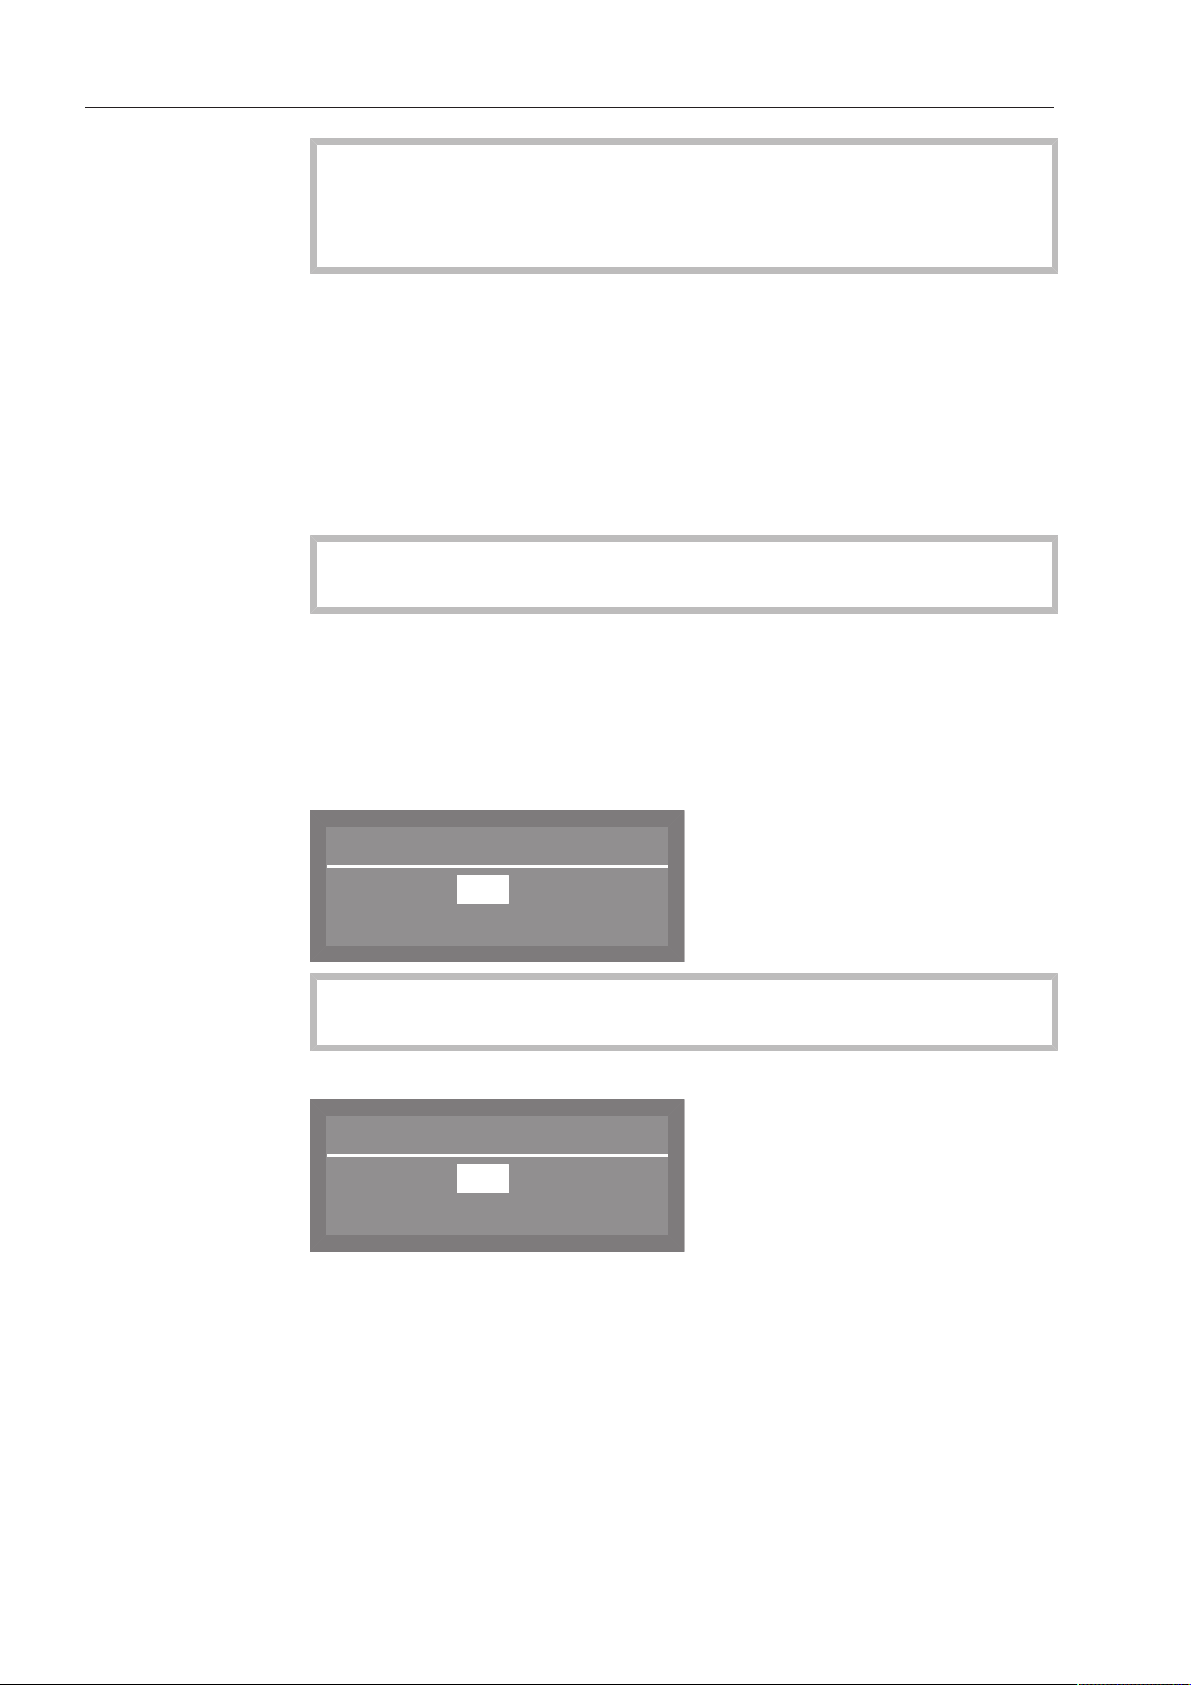
Additional settings
84
DOS venting
To avoid damage to the dispensing system, make sure before
venting that the detergent and rinse aid containers are adequately
filled and that the dispensing siphons are screwed securely to the
containers.
Select DOS priming and confirm your selection with the OKbutton.
The dishwasher will then begin automatically venting the dispensing
system.
Dispensing system DOS priming will appear in the display.
Once this process is complete, Dispensing system successfully primed
will appear in the display.
Press the OKbutton to acknowledge the message.
Setting the DOS
concentration level
Please observe dispensing recommendations made by the manu-
facturer of the agent.
Select Concentration and confirm your choice with theOKbutton.
Concentration levels are given as a percentage and can be set be-
tween 0.01 and 2.00%.
The concentration level set then applies to all programs.
Display for DOS1:
Concentration
0,30 %
(0,01 - 2,00 %)
If a DOS G 60 module is connected to the dishwasher, the factory
set concentration level set must be reduced by half.
Display for DOS2 rinse aid and DOS4:
Concentration
0,04 %
(0,01 - 2,00 %)
Use the arrow buttons (higher) (lower) to set the concentration
level you want and confirm your choice with the OK button.

Additional settings
85
Changing a DOS
name
Select Change name and confirm your choice with the OKbutton.
Change name
DOS1
<
_ _ _ _ _ _ _ _ _ _ _
P
OK
#
a
ä b c
.
The current name is shown in the second line of the display. This
name can be edited using the options shown in the bottom line.
The letters "DOS" are a fixed part of the name and cannot be
changed.
The top line shows which option has been selected.
Use the arrow buttons (move left) and (move right) to move the
cursor to the desired option.
Confirm each option individually with the OKbutton.
The following options are available:
– Letters from A - Z;
the first letter of each new word is automatically capitalized.
– Numbers from 0 - 9
– Space
– Use the symbol to delete the last character of the displayed
name.
– Select OK to save the name.
– If you do not wish to save the new name you have entered, press
the symbol.

Additional settings
86
Temperature /
Time
The temperature and holding time for the main wash and final rinse
phases can be changed in some programs (see "Program chart").
Select Temperature / Time and confirm your choice with the
OKbutton.
Select program
Normal
Normal plus
,
;
The following options are available:
Normal
Reset
Main wash
,
;
– Reset
This resets any values changed in the selected program to their fac-
tory default settings.
– Main wash
Used to adjust the temperature and holding time for the main wash
phase.
– Final rinse
Option to change the temperature and holding time for the final
rinse phase.

Additional settings
87
Main wash / Final
rinse
The procedure for altering settings in Main wash and Final rinse is the
same. The display also looks similar.
Select the Main wash or Final rinse option and confirm your choice
with the OKbutton.
Normal
Holding time
Final rinse temperature
Select the desired wash program and confirm your selection with
the OKbutton.
The following settings are available:
– Temperature / Final rinse temp.
The temperature for the main wash or final rinse phase can be
changed.
– Holding time
The temperature holding time can be changed.
Final rinse temper-
ature
Select Temperature or Final rinse temp. and confirm your choice with
the OKbutton.
The temperature for the main wash or final rinse phase can be
changed between 30 and 85°C (86 to 185°F) in 1°C increments.
The temperature for the Super Short program can only be increased
up to 70°C (158°F).
50
°C
(30 - 85 °C)
Final rinse temperature
Use the arrow buttons (higher) (lower) to set the desired tem-
perature, and confirm your selection with the OKbutton.

Additional settings
88
Holding time
Select Holding time and confirm your choice with theOKbutton.
The holding time is displayed in minutes and can be changed to be-
tween 0 and 10minutes in 1-minute increments.
In the Rapid program, the holding time is displayed in seconds and
can be changed to between 0 and 300 seconds in 5-second incre-
ments.
Holding time
1 Min
(0 - 10 Min)
Use the arrow buttons (higher) (lower) to set the holding time
you want and confirm your choice with the OKbutton.

Additional settings
89
Program access
Individual programs can be locked so that they cannot be used.
In the factory default setting, all programs are unlocked for use.
Select the Additional settings menu.
Release program
All
Selection
(
Select Release program and press OK to open the corresponding
menu.
The following settings are available:
– All
All programs are unlocked for use.
– Selection
Selection option for determining which individual programs are to
be locked.
Locking programs
to prevent use
Select Selection and confirm your choice with the OKbutton.
Release program
Normal
Normal plus
,
;
9
9
Select the programs that you wish to lock and press the OKbutton.
The checkmark will be removed from the box and the program
will then be locked and unavailable for use.
To save your selection, select Accept at the bottom of the program
list and confirm your choice with the OKbutton.
If programs are locked for use, Selection will be selected the next
time the "Program unlock" menu is accessed.

Additional settings
90
Water hardness
Using this menu, you can program the water softener to match the
hardness of the water supplied.
Detailed information is available under "Filling the salt compartment".
Display view
During a program, the actual or set temperature can be shown in the
second line of the display.
Select the Additional settings menu.
Display view
Actual temperature
Required temperature
(
Select Display view and open the corresponding menu by pressing
the OKbutton.
The following settings are available:
– Actual temperature
Displays the actual temperature during a program (this value will
vary over the course of the program).
– Required temperature
Display the set temperature for the main wash or the final rinse
phase.
(The maximum value is displayed as a static value. It will change
from one program stage to the next).
Select the desired option and confirm your choice with the OKbut-
ton.

Additional settings
91
Display
The Display menu can be used to alter the contrast and brightness of
the display.
Select the Additional settings menu.
Display
Contrast
Brightness
Select Display and open the corresponding menu by pressing the
OKbutton.
The following settings are available:
– Contrast
Set the contrast.
– Brightness
Set the brightness.
Contrast
Select the Contrast and confirm your choice with the OKbutton.
The contrast range is shown as a bar in the display.
{
Contrast
Lower Higher
Use the arrow buttons (higher) (lower) to set the desired con-
trast and confirm your choice with the OKbutton.
Brightness
Select the Brightness and confirm your choice with the OKbutton.
The brightness range is shown as a bar in the display.
Brightness
{
Darker Brighter
Use the arrow buttons (lighter) (darker) to set the desired
brightness and confirm your choice with the OKbutton.

Additional settings
92
Switch off after
When not in use, the dishwasher will turn itself off to save energy.
Select the Additional settings menu.
Select Switch off after and open the corresponding menu by press-
ing the OKbutton.
The following options are available:
Switch off after
Yes
No
(
– Yes
The Switch-off function is active and you can specify a period of
time after which the dishwasher will switch off.
– No
The Switch-off function is inactive.
Setting the
Switch-off time
Select the Yes and confirm your choice with the OKbutton.
In the factory default setting, the switch-off time is set to 60minutes.
It can be adjusted to between 5 and 60minutes in 5-minute incre-
ments.
Switch off after
60 Min
(5 - 60 Min)
Use the arrow buttons (higher) (lower) to set the Switch-off
time, and confirm your entry with the OKbutton.

Additional settings
93
Factory default setting
The "Factory default setting" option can be used to reset all changed
parameters on the dishwasher back to their default settings or only
those settings that have been changed for the programs.
Select the Additional settings menu.
Factory default
Reset
Select Factory default and open the corresponding menu by press-
ing the OKbutton.
The following options are available:
Reset
No
Program settings only
,
;
(
– No
Altered parameters will not be reset to their default settings.
– Program settings only
Only settings that have been altered in programs will be reset to
their factory defaults.
– All settings
All parameters that have been altered on the dishwasher will be re-
set to their default settings.
Select the desired option and confirm your choice with the OKbut-
ton.

Additional settings
94
Software version
Displays the versions of the individual software components.
Select the Additional settings menu.
Select Software version and open the corresponding menu by
pressing the OKbutton.
Software version
EB Id: XXXX
EGL Id: XXXX
,
;
The software for the individual components is displayed. XXXX de-
notes the version.
– EB Id: XXXX
Software version for the control and display unit.
– EGL Id: XXXX
Software version for the control board.
– EZL Id: XXXX
Software version for the relay board.
– EFU Id: XXXX
Software version for the frequency converter.
Modifications and updates to the software may only be carried out
by an authorized Miele service technician.

Cleaning and care
95
Maintenance
In order to increase the dishwasher's service life, the machine should
be served by an authorized Miele service technician after every 1000
hours of operation or at least once a year.
This service work covers the following points:
– Electrical safety check
– Door mechanism and door seal
– Screw connectors and connections in the wash cabinet
– Water intake and drainage
– Internal and external dispensing systems
– Spray arms
– Filter combination
– Collecting basin with drain pump and non-return valve
– All baskets and inserts
As part of the service package, the following functional checks are
performed:
– Test run of a program cycle
– Thermoelectric measurement
– Leak test
– Check of all safety-relevant measuring systems (indication of fault
status)
– Safety features check

Cleaning and care
96
Remove any soiling from the control panel and from the front of
the appliance straight away.
Otherwise the surfaces can become discolored or changed.
All surfaces are susceptible to scratches.
Contact with unsuitable detergents can alter or discolor the exter-
nal surfaces.
Cleaning the control panel
Clean the control panel with a clean sponge and a solution of dish-
washing liquid and hot water or with a clean damp microfiber cloth.
Dry the control panel with a soft cloth afterwards.
Do not use abrasive detergents!
These can damage the control panel.
Cleaning the front of the dishwasher
To clean the stainless steel front panel, use a damp cloth with either
a solution of liquid dish soap and hot water or a non-abrasive
cleaning agent suitable for use on stainless steel.
To keep the front panel from getting dirty again (fingerprints, etc.), a
stainless steel conditioner can be used after cleaning (e.g., Neoblank,
available from Miele Service).
Do not use cleaning agents containing ammonium chloride or
thinners!
These agents can damage the surface material.
When cleaning, do not hose down the dishwasher or its direct
vicinity, e.g. with a water hose or pressure washer.
Cleaning the wash cabinet
The wash cabinet is largely self-cleaning, provided that the correct
amount of detergent is always used.
If, despite this, lime scale or grease deposits accumulate in the cabi-
net, these can be removed with a proprietary dishwasher cleaner
(available from Miele).
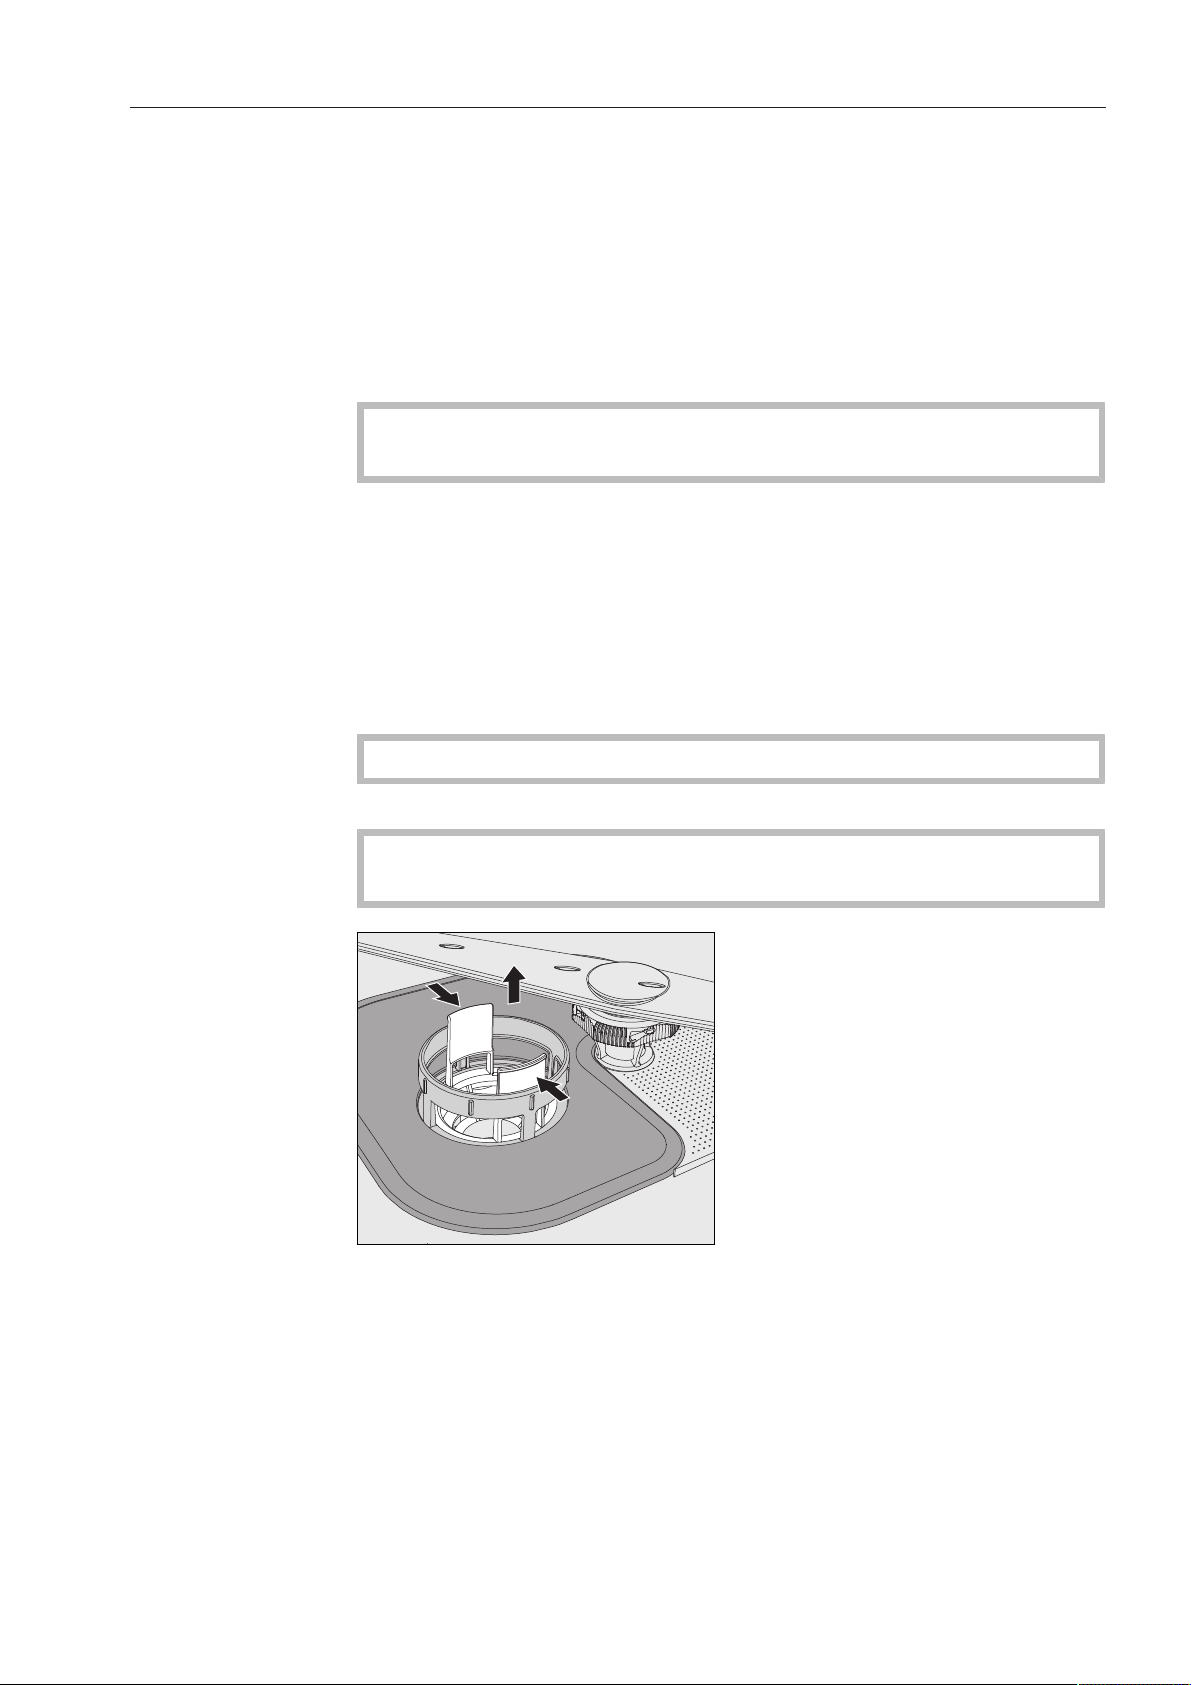
Cleaning and care
97
Cleaning the door and the door seal
Wipe the door seal and the area beneath the door regularly with a
damp cloth to remove food deposits.
Wipe away any spillages of food and beverages from the sides of
the dishwasher and from the hinges.
With freestanding dishwashers that have a base facing, please re-
move spillages of food and beverages from the channel that runs
below the door.
Be cautious of sharp edges when cleaning.
Danger of cutting yourself.
These surfaces are outside the wash cabinet and are not accessed
by water from the spray arms. If soiling is not removed, mold can de-
velop.
Cleaning the filters in the wash cabinet
The filter combination in the base of the wash cabinet retains coarse
soil from the suds solution, preventing it accessing the circulation
system and causing blockages in the spray arms.
This dishwasher must not be used without all the filters in place!
The filters must be checked regularly and cleaned when necessary.
Caution!
Danger of injury on glass splinters.
Cleaning the
coarse filter
Press the catches towards each other and remove the coarse filter.
Rinse the filter thoroughly under running water. If necessary use a
soft washing-up brush to remove soiling.
Replace the filter making sure it engages correctly.
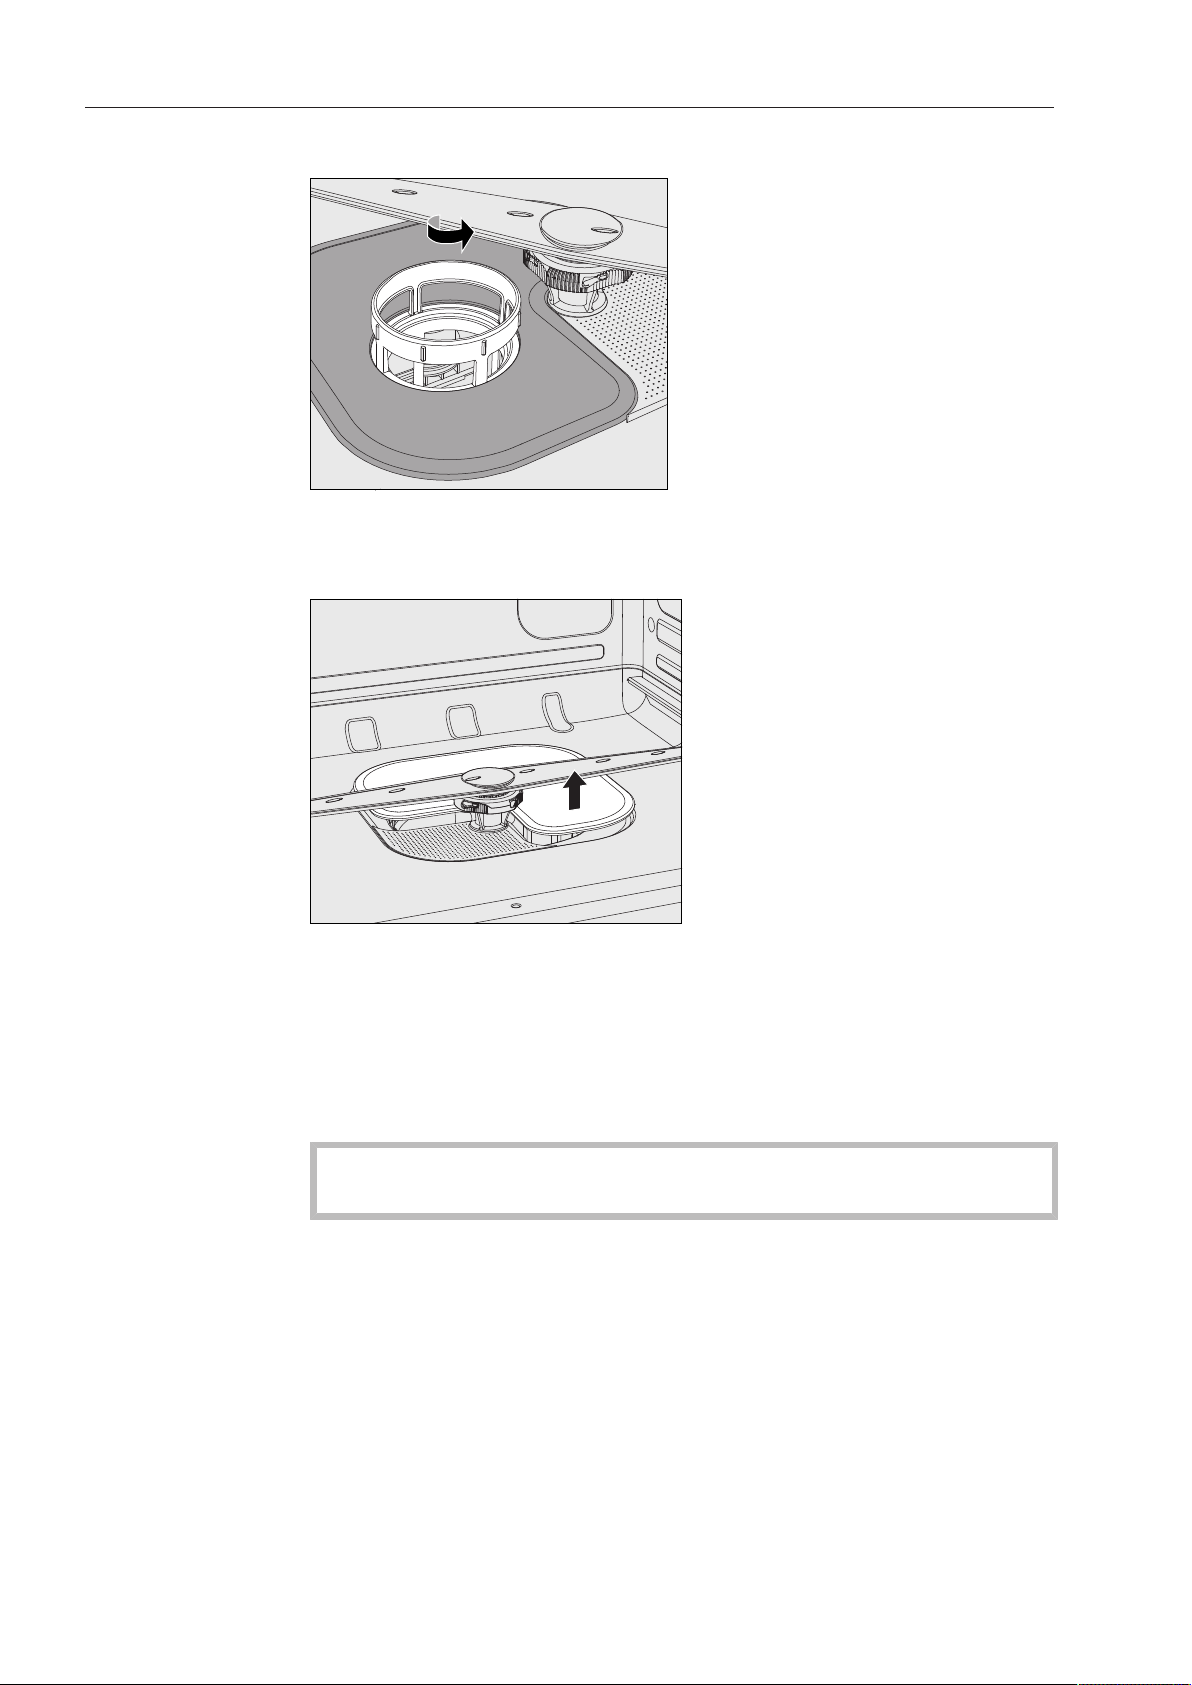
Cleaning and care
98
Cleaning the flat
and micro-fine fil-
ters
Remove the coarse filter.
Grasp the micro-fine filter by the upper rim and turn it in the direc-
tion of the arrow to release it.
Then lift it out.
Remove the flat filter.
Rinse the filters thoroughly under running water. If necessary use a
soft washing-up brush to remove soiling.
Replace the filter combination in the reverse order, turning the micro-
fine filter to the left to re-engage it.
The flat filter must lie flat in the bottom of the wash cabinet.
The spray arms will get blocked if the filters are not replaced cor-
rectly.
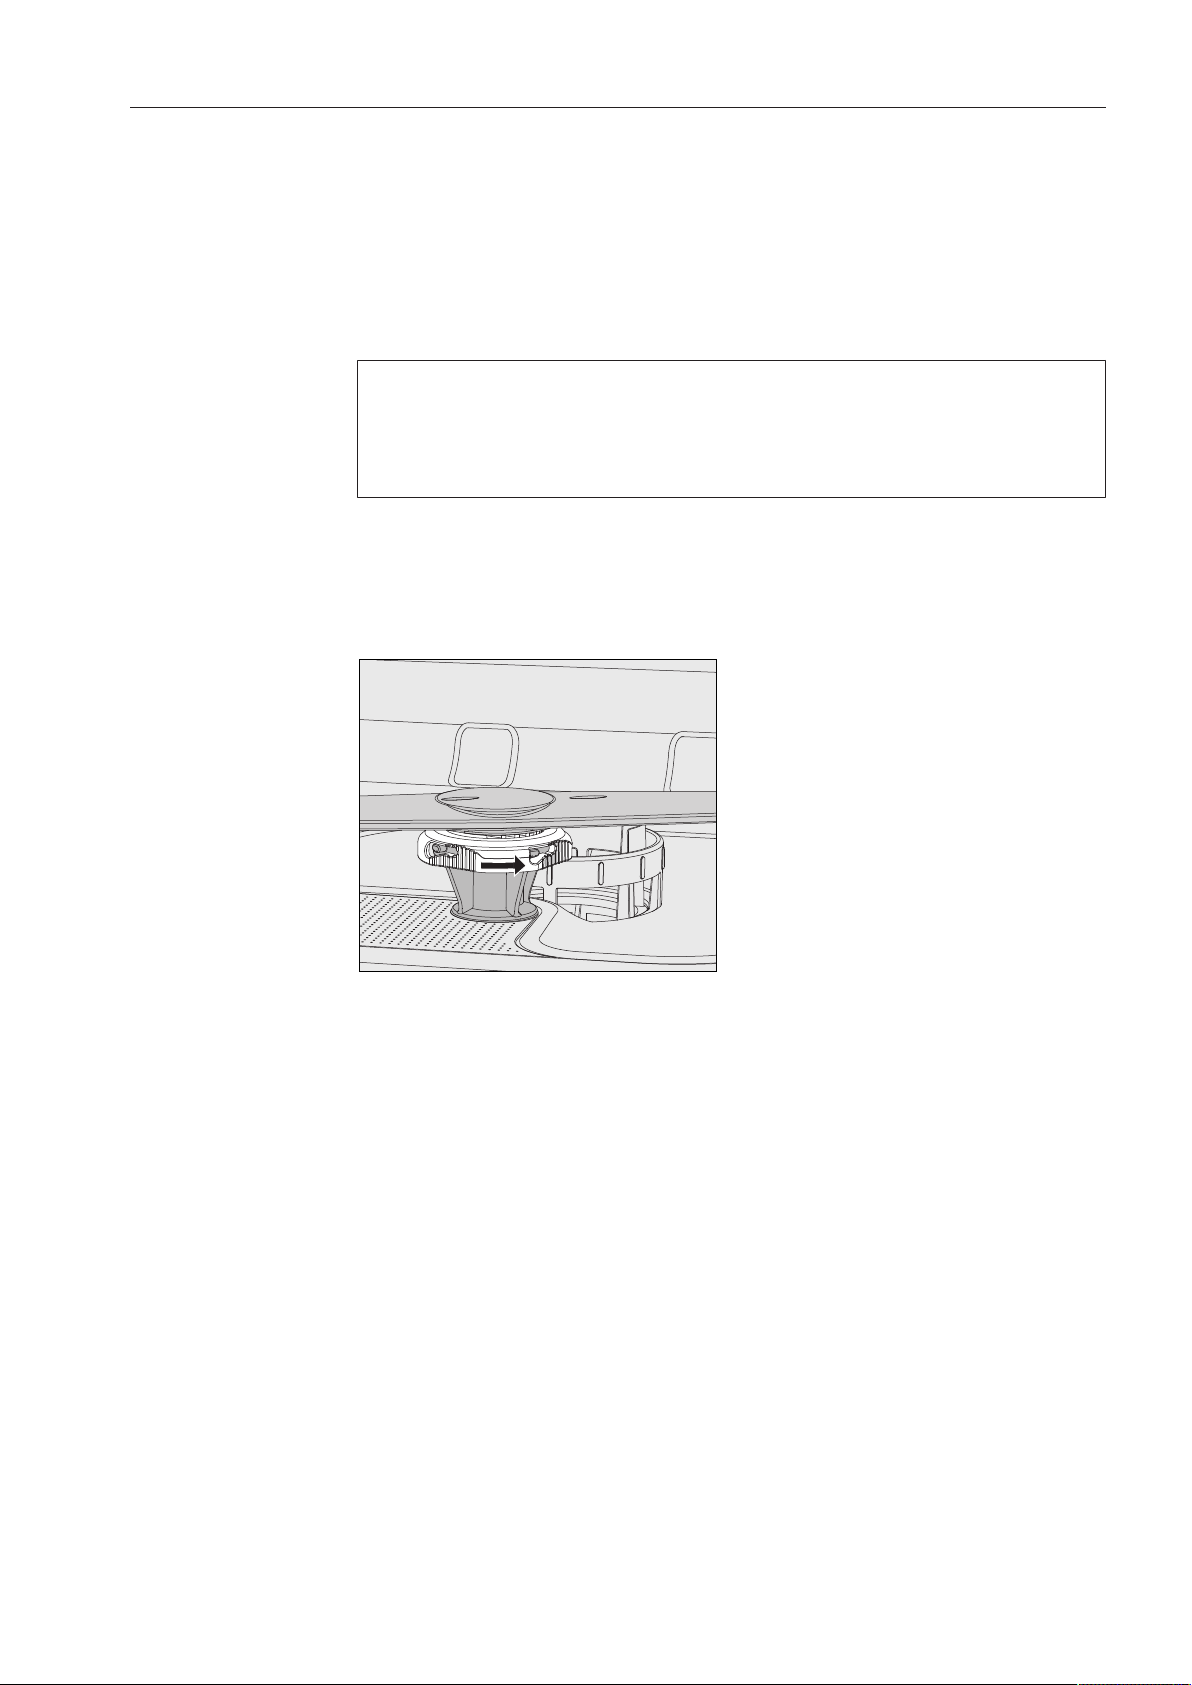
Cleaning and care
99
Cleaning the spray arms
This dishwasher has three different spray arms.
Particles of food can get stuck in the spray arm jets and bearings.
The spray arms should therefore be inspected and cleaned regularly.
Turn the dishwasher off.
Pull the upper spray arm downwards to remove it.
The middle and bottom spray arms are secured with a bayonet fit-
ting.
The bayonet fitting on the lower spray arm is colored yellow so that
it cannot be mistaken for the fitting on the middle spray arm.
To release the bayonet fitting proceed as follows:
Using the knurled nut turn the middle spray arm to the left as far
as it will go and then pull the spray arm downwards to remove it.
Remove the lower basket.
Using the knurled nut turn the lower spray arm to the right as far
as it will go and then pull the spray arm upwards to remove it.

Cleaning and care
100
Use a pointed object to push food particles that are stuck in the
spray arm jets into the spray arm.
Rinse the spray arms thoroughly under running water.
Replace the spray arms and check that they rotate freely.
Make sure that the spray arm with the yellow bayonet fitting is fitted
in the bottom of the wash cabinet.
Frequently asked questions
101
With the help of the following guide, minor faults in the performance of the appliance,
some of which may result from incorrect operation, can be corrected without contacting
the Service Department.
Please note that a call-out fee will be applied to unnecessary service visits where the prob-
lem could have been rectified as described in these operating instructions.
Repair work to electrical appliances must only be carried out by a suitably qualified
person in strict accordance with current local and national safety regulations. Repairs
and other work by unqualified persons could be dangerous. The manufacturer cannot be
held liable for unauthorized work.
Technical problems
Problem Possible cause and solution
The display remains dark
and the Start/Stop light
does not flash after the
dishwasher was turned on
using the button.
The dishwasher is not plugged in.
Plug the power cord into an electrical outlet.
The circuit breaker was tripped.
Activate the fuse
(see data plate for minimum fuse rating).
The dishwasher stops dur-
ing a program.
The circuit breaker has tripped.
Reset the circuit breaker (see data plate for the correct
fuse rating).
If the circuit breaker trips again, contact Miele Customer
Service.
One of the following fault
messages is displayed:
Before remedying the fault:
Turn the dishwasher off using the button.
Check water intake There is a problem with the water intake.
Open the faucet all the way.
Clean the filter in the water inlet (see "Cleaning and
care").
Fault 403-405 If Check water intake has appeared in the display, the con-
trols will check the water intake every 30seconds. If no wa-
ter has entered the dishwasher after three attempts, one of
these fault numbers appears in the display and the program
will be canceled.
Open the water supply valve all the way.
Turn the dishwasher back on.
Select the desired program.
Press the Start/Stop button.
Fault 406-408 Water inlet fault.
One of these numbers will appear in the display if the flow
pressure is too low and the program will be cancelled.
The flow pressure at the water intake point is too low
(see "Technical data"). Contact Miele Service for advice.

Frequently asked questions
102
Problem Possible cause and solution
Fault 412-414 Water inlet fault.
One of these numbers will appear in the display if the flow
pressure is too high and the program will be cancelled.
The flow pressure at the water intake point is too high
(see "Technical data"). Contact Miele Service for advice.
Check drainage The water outlet is restricted. There might be water in the
wash cabinet.
Clean the filter combination (see "Cleaning and care").
Clean the drain pump (see "Frequently asked ques-
tions").
Clean the non-return valve (see "Frequently asked ques-
tions").
Remove any kink or loop in the drain hose.
Fault 433 The door was obstructed when closing and cannot be
drawn into the final closed position.
Remove the obstruction from the vicinity of the door.
Fault 438 Heavy objects positioned in front of the dishwasher prevent
the Comfort Door Lock from automatically opening the
door.
Do not place any (heavy) objects in front of the dish-
washer door.
Fault 492, 504, 541 Fault during program start. There may still be water in the
wash cabinet.
Clean the filter combination (see "Cleaning and care").
Clean the non-return valve (see "Frequently asked ques-
tions").
Fault 550 The Waterproof system was activated.
Close the water supply valve.
Contact Miele Service.
Fault XXX
(XXX stands for a number)
A malfunction may have occurred.
After waiting 10seconds:
Turn the dishwasher back on.
Select the desired program.
Press the Start/Stop button.
If the fault message is displayed again, there has been a
malfunction.
Contact Miele Service.
Frequently asked questions
103
Door
Problem Possible cause and solution
The door opens again after
being closed
If the door is closed with too much force, the Comfort Door
Lock will open it again.
Guide the door into the door lock with less force.
Door blocked Protruding items are blocking the door.
Arrange the wash load so that no items project into the
door area.
Close the door.
The Comfort Door Lock is jammed.
Carefully attempt (without force) to pull the door open by
the door handle.
If the door is still jammed:
Open the door using the emergency release.
Close the door and attempt to open it again using the
button.
If the door remains jammed:
Contact Miele Service.
Warning! Cabinet hot. Open
anyway?
When the button is pressed, the temperature in the
wash cabinet is over 158°F (70°C).
When the door is opened, hot steam and process
chemicals can escape!
Open the door only when necessary.
The door is open a fraction
and cannot be closed us-
ing the button.
This is not a fault.
The Comfort door lock has opened the door slightly at the
end of the program.
Open the door. The door can now be closed completely
again using the button.
Obstruction sensor This is not a fault!
The door is engaged in the catch while the locking mecha-
nism moves back into its closed position.
Open the door and wait until the locking mechanism
reaches its final closed position.
Frequently asked questions
104
Unusual behavior of the dishwasher
Problem Possible cause and solution
The dishwasher fails to re-
act when buttons are
pressed. The display and
indicator lights remain
dark.
The dishwasher has turned itself off after the set Switch-off
time to save energy.
Press the button to turn the dishwasher on again.
The following fault mes-
sage is appears in the dis-
play:
Salt container lid not closed
correctly
The salt reservoir cover is not properly closed.
Close the salt reservoir cover.
The dispenser cover can-
not be closed.
Detergent residue is blocking the latch.
Remove the detergent residue.
The inside of the door and/
or the interior walls are
wet after a program has
finished.
This is not a fault.
It is caused by the drying system.
The moisture will dissipate after a short while.
There is still water in the
wash cabinet at the end of
the program.
(This does not apply to the
"Super Short" program.)
Before remedying the fault:
Turn the dishwasher off using the button.
The filter combination in the wash cabinet is clogged.
Clean the filter combination (see "Cleaning and care").
The drain pump or non-return valve is blocked.
Clean the drain pump or the non-return valve (see "Fre-
quently asked questions").
The drain hose is kinked.
Remove the kink.
The on-site drain trap is clogged.
Check and clean the drain trap.

Frequently asked questions
105
Noises
Problem Possible cause and solution
There is a knocking noise
in the wash cabinet.
A spray arm is hitting the dishware.
Interrupt the program, and rearrange the items which are
obstructing the spray arm.
There is a rattling noise in
the wash cabinet.
Dishware is moving around in the wash cabinet.
Interrupt the program and rearrange loose pieces.
A foreign object (e.g. a cherry pit) has become lodged in
the drain pump.
Remove the foreign object from the drain pump (see
"Cleaning the drain pump and non-return valve").
There is a knocking noise
from the water pipe
This may be caused by the installation or the diameter of
the water pipe.
This has no effect on the functioning of the dishwasher.
If in doubt, contact a plumber.

Frequently asked questions
106
Poor cleaning results
Problem Possible cause and solution
The dishes are not clean. The dishes were not loaded correctly.
Please observe the instructions in "Loading the dish-
washer."
The program was not suitable for the requirements.
Select a more suitable program (see "Program guide)".
Not enough detergent was dispensed.
Use more detergent, or change the brand you are using.
Items are blocking the path of the spray arms.
Rearrange the items so that the spray arms can rotate
freely.
The filter combination in the base of the wash cabinet is not
clean or is not correctly fitted.
This may cause the spray arm jets to get blocked.
Clean and/or fit the filter combination correctly.
Clean the spray arm jets, if necessary (see "Cleaning and
care").
The non-return valve is open and blocked. Dirty water has
flowed back into the wash cabinet.
Clean the drain pump and the non-return valve (see "Fre-
quently asked questions").
If necessary alter the temperature and / or the holding time
for the program being used.
Change the relevant parameters for the program (see
"Additional settings, Additional functions").
Smearing appears on
glassware and cutlery.
There is a bluish sheen on
the surface of glassware;
film can be wiped off.
The rinse aid dosage is set too high.
Reduce the dosage (see "Additional settings, Additional
functions, Dispensing systems").
Dishware is not dry or cut-
lery and glasses are
spotty.
The rinse aid dosage is set too low or the rinse aid reservoir
is empty.
Replenish the rinse aid, increase the dosage or change
the brand of rinse aid used (see "Adding rinse aid").
White residue is visible on
cookware and cutlery,
clouding occurs on glass-
ware; film can be wiped
off.
The rinse aid dosage is too low.
Increase the dosage (see "Additional settings, Additional
functions, Dispensing systems").
The salt reservoir is empty.
Fill the salt reservoir (see "Filling the salt reservoir").
The water softener is programmed to too low for the water
hardness level.
Program the water softener to the correct value (see "Ad-
ditional settings, Water hardness").

Frequently asked questions
107
Problem Possible cause and solution
Glasses have a brownish-
blue discoloration; the de-
posit cannot be wiped off.
Detergent deposits.
Switch to another detergent right away.
Glasses are dull and dis-
colored; the deposit can-
not be wiped off.
The glassware is not dishwasher-proof. The surfaces are
affected.
In the future make sure you purchase dishwasher-proof
glassware.
Tea or lipstick stains have
not been completely re-
moved.
The wash temperature of the selected program was too
low.
Select a program with a higher wash temperature.
The bleaching effect of the detergent is too low.
Switch to another detergent.
Plastic parts are discol-
ored.
Natural dyes e.g. from carrots, tomatoes or ketchup may be
the cause. The amount of detergent used or its bleaching
effect was not sufficient to deal with natural dyes.
Use more detergent (see "Operation, Adding detergent").
Discolored plastic items will not regain their original color.
There are rust stains on
the cutlery.
The "Cold" program was not run after dishwasher salt was
added. Traces of salt have gotten into the wash cycle.
Always run the "Cold" program without a load after refill-
ing salt.
The affected items are not corrosion resistant.
Purchase cutlery which is dishwasher-proof.
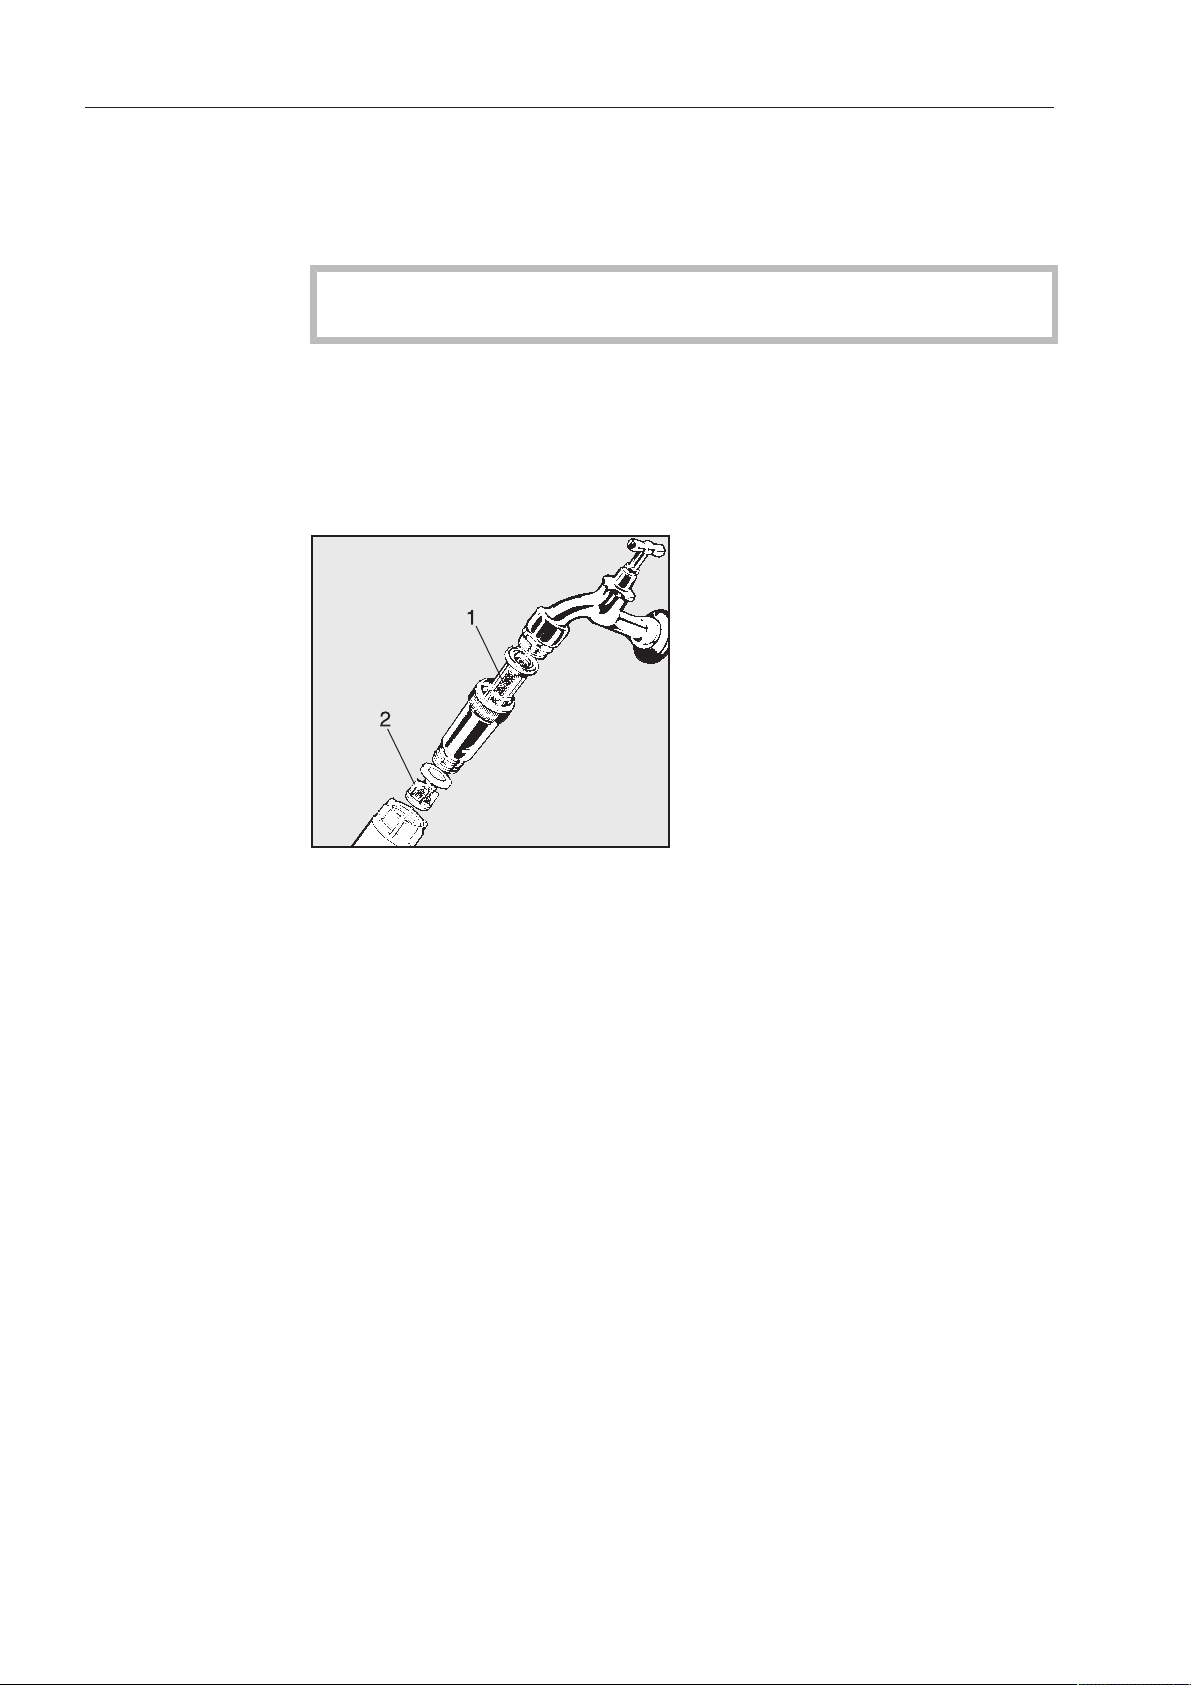
Frequently asked questions
108
Cleaning the filters in the water inlet
Filters are incorporated into the water inlet connection on the hose to
protect the water inlet valve. If these filters get dirty they must be
cleaned as otherwise too little water will flow into the wash cabinet.
The plastic housing on the water inlet valve contains an electri-
cal component. It must not be dipped in water.
To clean the filter
Disconnect the dishwasher from the water supply and the electrical
supply (turn the dishwasher off, unplug it or disconnect or disable
the fuse).
Close the faucet.
Unscrew the water inlet valve.
Carefully pull out the large surface area filter 1.
Take the seal ring out of the screw connection.
Withdraw fine filter 2 using pointed pliers.
Clean the filters or replace them with new ones if necessary.
Replace the filters and seals, making sure they are sitting correctly.
Reconnect the hose to the water faucet, making sure the thread
goes on straight and not cross-threaded.
Turn on the water faucet gradually to test for leaks.
If there is a leak, the inlet hose might not be secured properly, or it
may have been screwed on at an angle. Unscrew and reconnect the
water inlet hose correctly before tightening it.
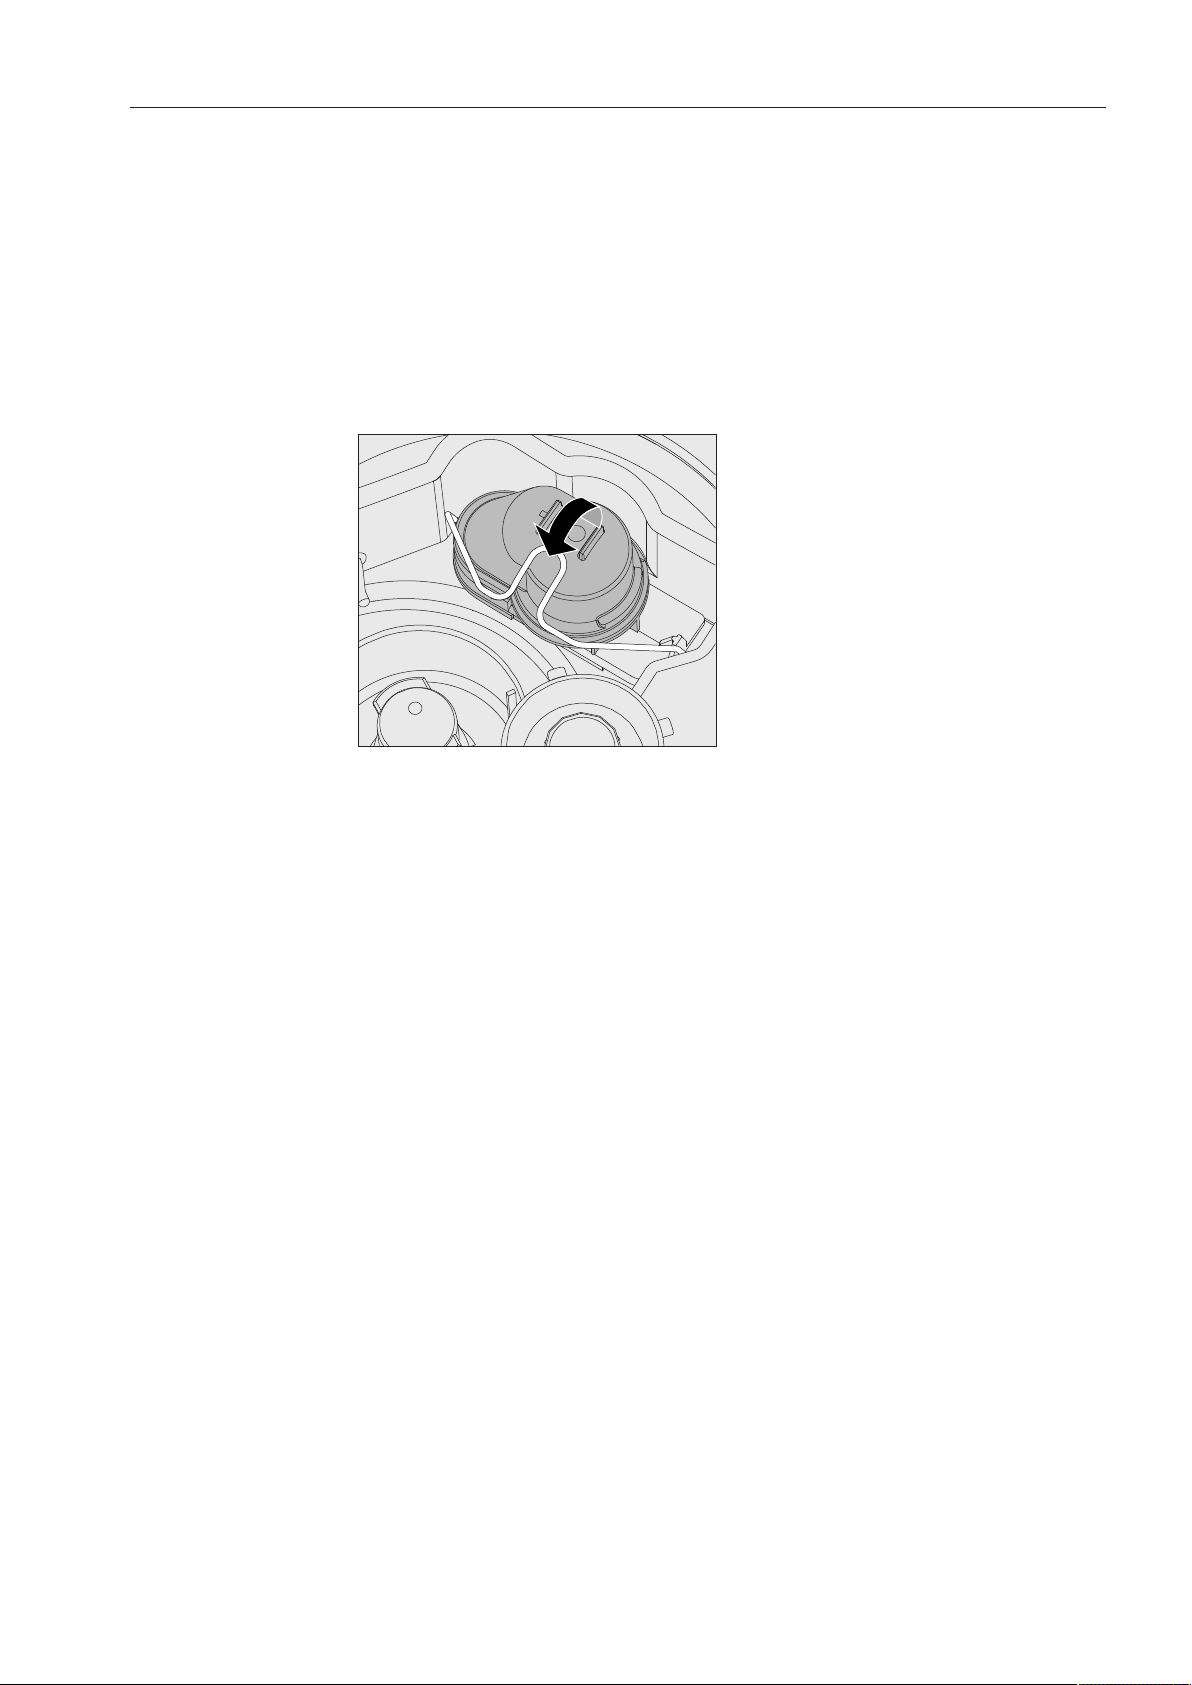
Frequently asked questions
109
Cleaning the drain pump and non-return valve
If water has not pumped out at the end of a program, there may be a
foreign object in the drain pump or blocking the non-return valve.
These are easy to remove.
Disconnect the dishwasher from the water supply and the electrical
supply (turn the dishwasher off, unplug it or disconnect or disable
the fuse).
Take the filter combination out of the wash cabinet (see "Cleaning
and care").
Lift the locking clamp.
Lift out the non-return valve and rinse well under running water.
Make sure that the vent on the external part of the non-return valve
is not blocked. (This vent is only visible when the non-return valve
has been taken out of the dishwasher). If it is blocked, use a
pointed object to release the blockage.

Frequently asked questions
110
The drain pump is situated under the non-return valve (see arrow).
Check the area around the drain pump for foreign objects (watch
out for glass splinters which could cause injury) and remove them
before replacing the non-return valve.
Carefully replace the non-return valve and secure it with the clamp.

After sales service
111
After sales service
If, despite following the instructions in this manual, you are unable to
rectify a problem please contact one of the following, quoting the
fault code shown in the display:
– your Miele dealer or
– the Miele Technical Service Department.
Contact details for the Miele Technical Service Department can be
found at the back of this manual.
When contacting Miele, please quote the model number of your
dishwasher together with the 8 digit machine number.
The model number and the machine number are both shown on the
data plate, located at the top of the door.
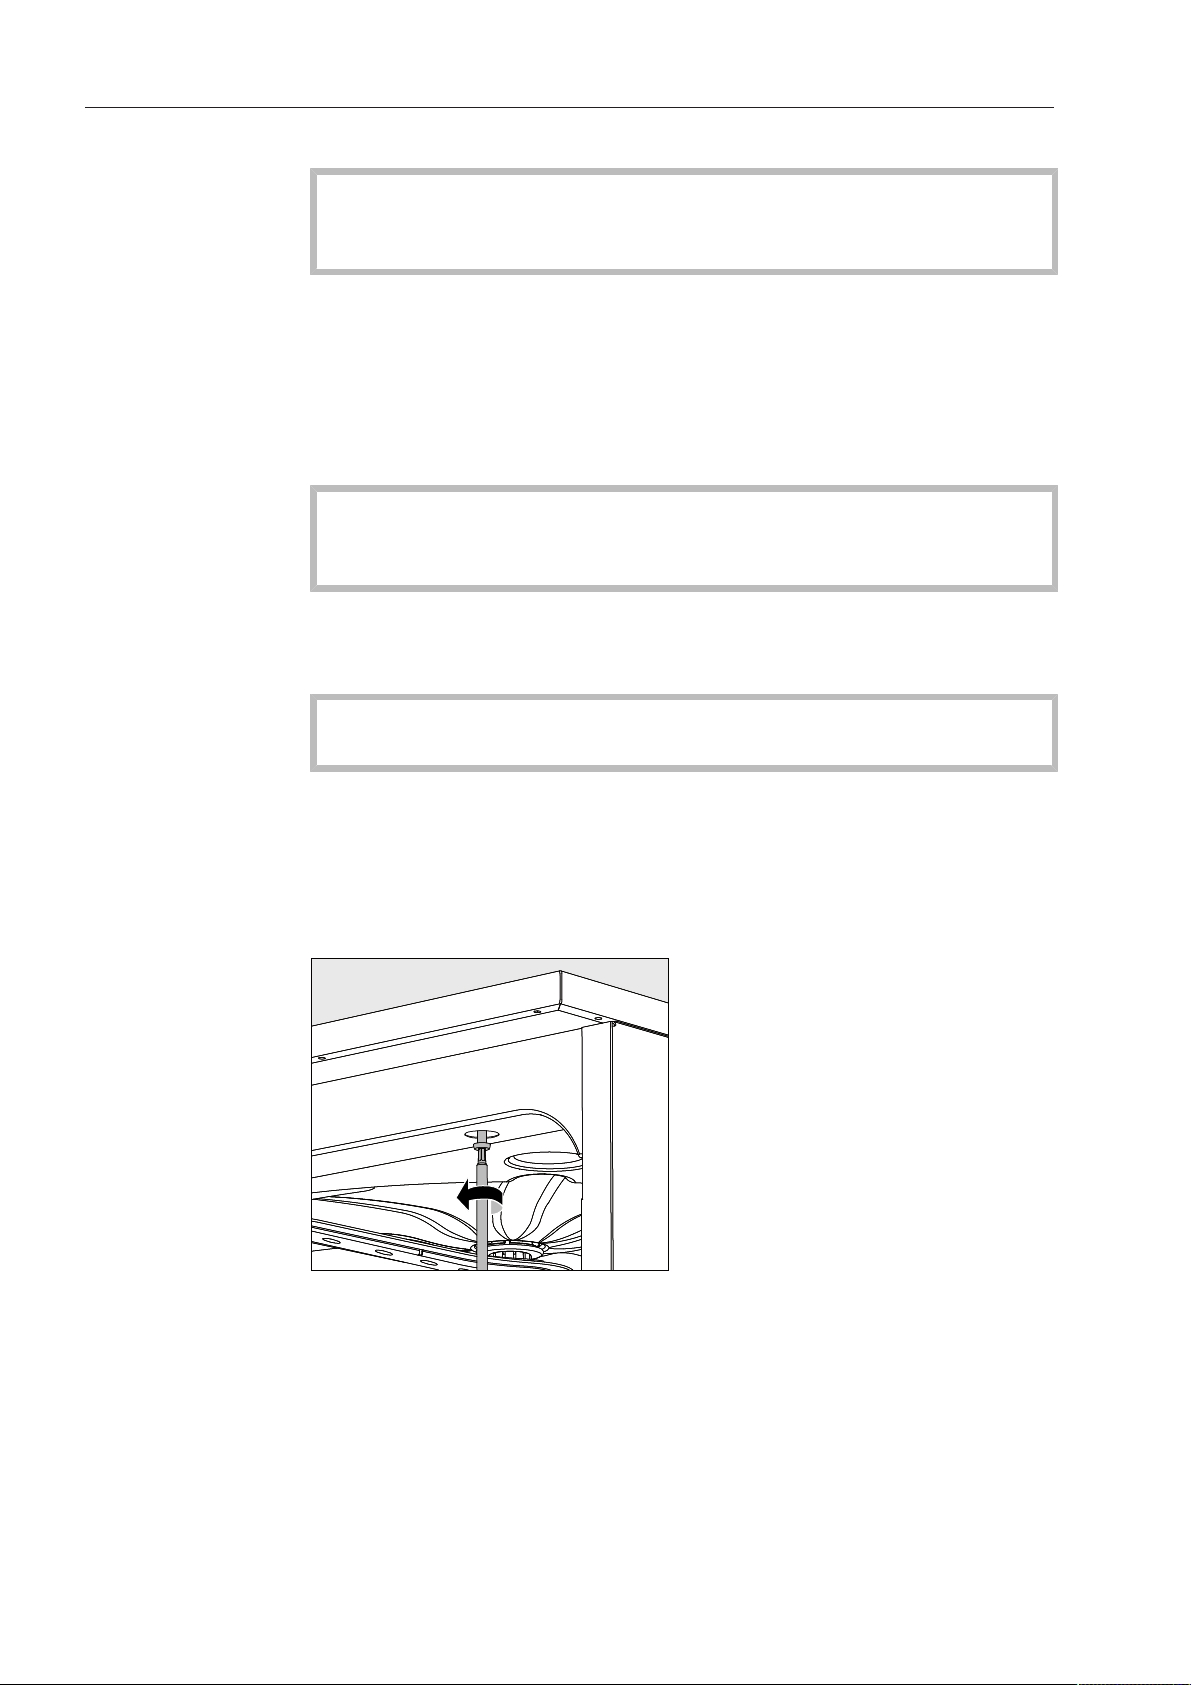
Installation
112
Installation
In order to reduce the risk of possible damage from condensa-
tion, the furniture in the area around the commercial dishwasher
should be designed for commercial use.
The dishwasher must be installed in a secure and level position. Use
the four feet to compensate for any unevenness in the floor and ad-
just the height of the machine.
If the dishwasher is to be installed next to other appliances and furni-
ture or in a recess, an installation space measuring at least 23 5/8"
wide and 23 5/8" deep (60cm by 60cm) is required.
Undercounter in-
stallation
To ensure the stability of undercounter commercial dishwash-
ers, these units may only be installed beneath a continuous coun-
tertop that is bolted to adjacent cabinetry.
If the dishwasher is to be installed beneath a continuous countertop,
an installation space measuring at least 23 5/8" wide, 23 5/8" deep
and 32 1/4" high (60cm wide, 60cm deep, 82cm high) is required.
When adjusting the dishwasher height, the feet may only be
screwed out up to 2 1/4" (6cm).
If the dishwasher is equipped with a cover, it can be removed as fol-
lows:
Remove both securing screws on the back of the dishwasher with a
screwdriver.
Open the door.
Unscrew the left and right fastening screws with a screwdriver.
Lift the appliance cover upwards to remove.
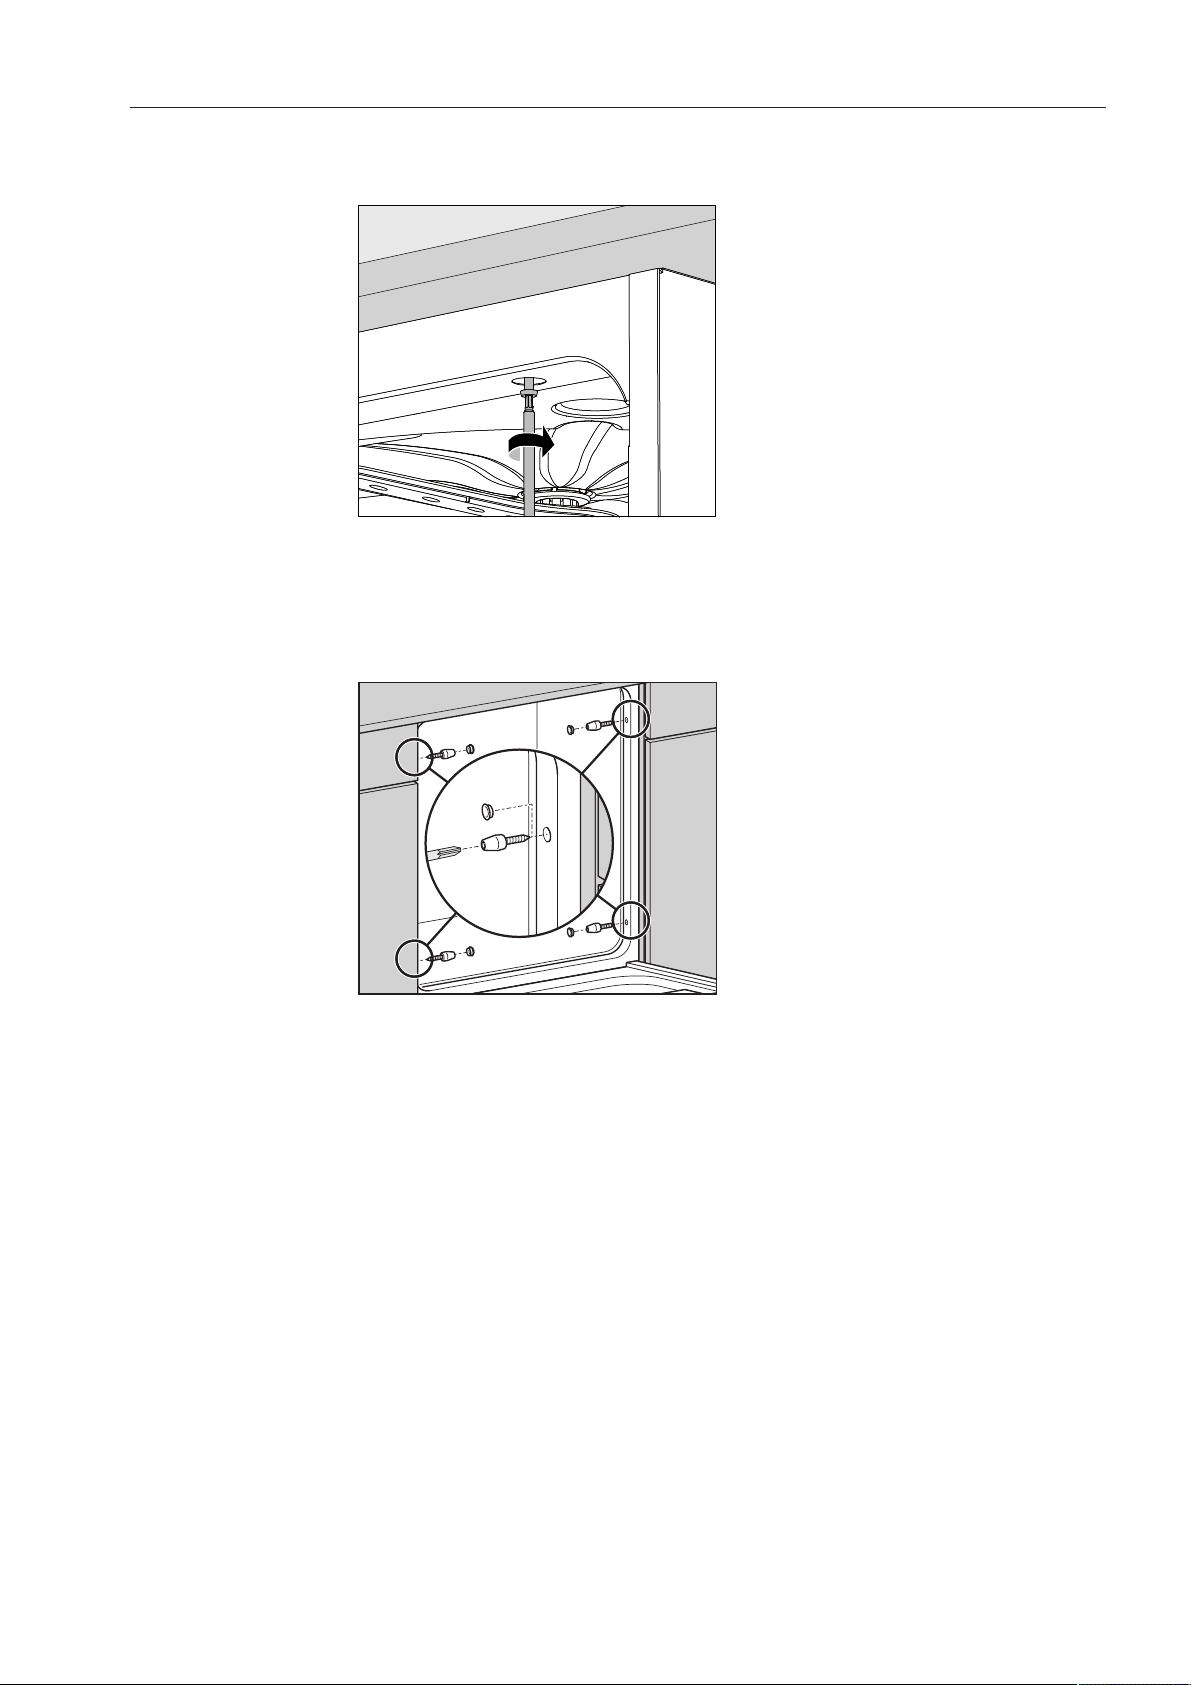
Installation
113
Leveling and se-
curing the dish-
washer
To ensure stability, the dishwasher must be secured to the counter
once it has been leveled.
After leveling, securely screw the dishwasher to the continuous
countertop.
With the door open, turn the screws into the countertop through the
holes in the front trim on the left and right hand sides of the dish-
washer.
For countertops made of stainless steel or natural stone, the dish-
washer must be secured to the adjacent cabinetry on the left and
right hand sides using two screws per side.
Special screws (4x27 / TorxT20) are included in the accessories
provided.
For this type of installation, holes must be drilled in the side wall in
front of the door seal.
The gaps between undercounter dishwashers and adjacent cabinetry
or appliances may not be filled with silicone sealant, since this could
impair the ventilation of the circulation pump.
Depending on the specific undercounter installation situation, the
stainless steel cover plate supplied with the dishwasher can be used
to protect the underside of the countertop against damage caused by
steam.
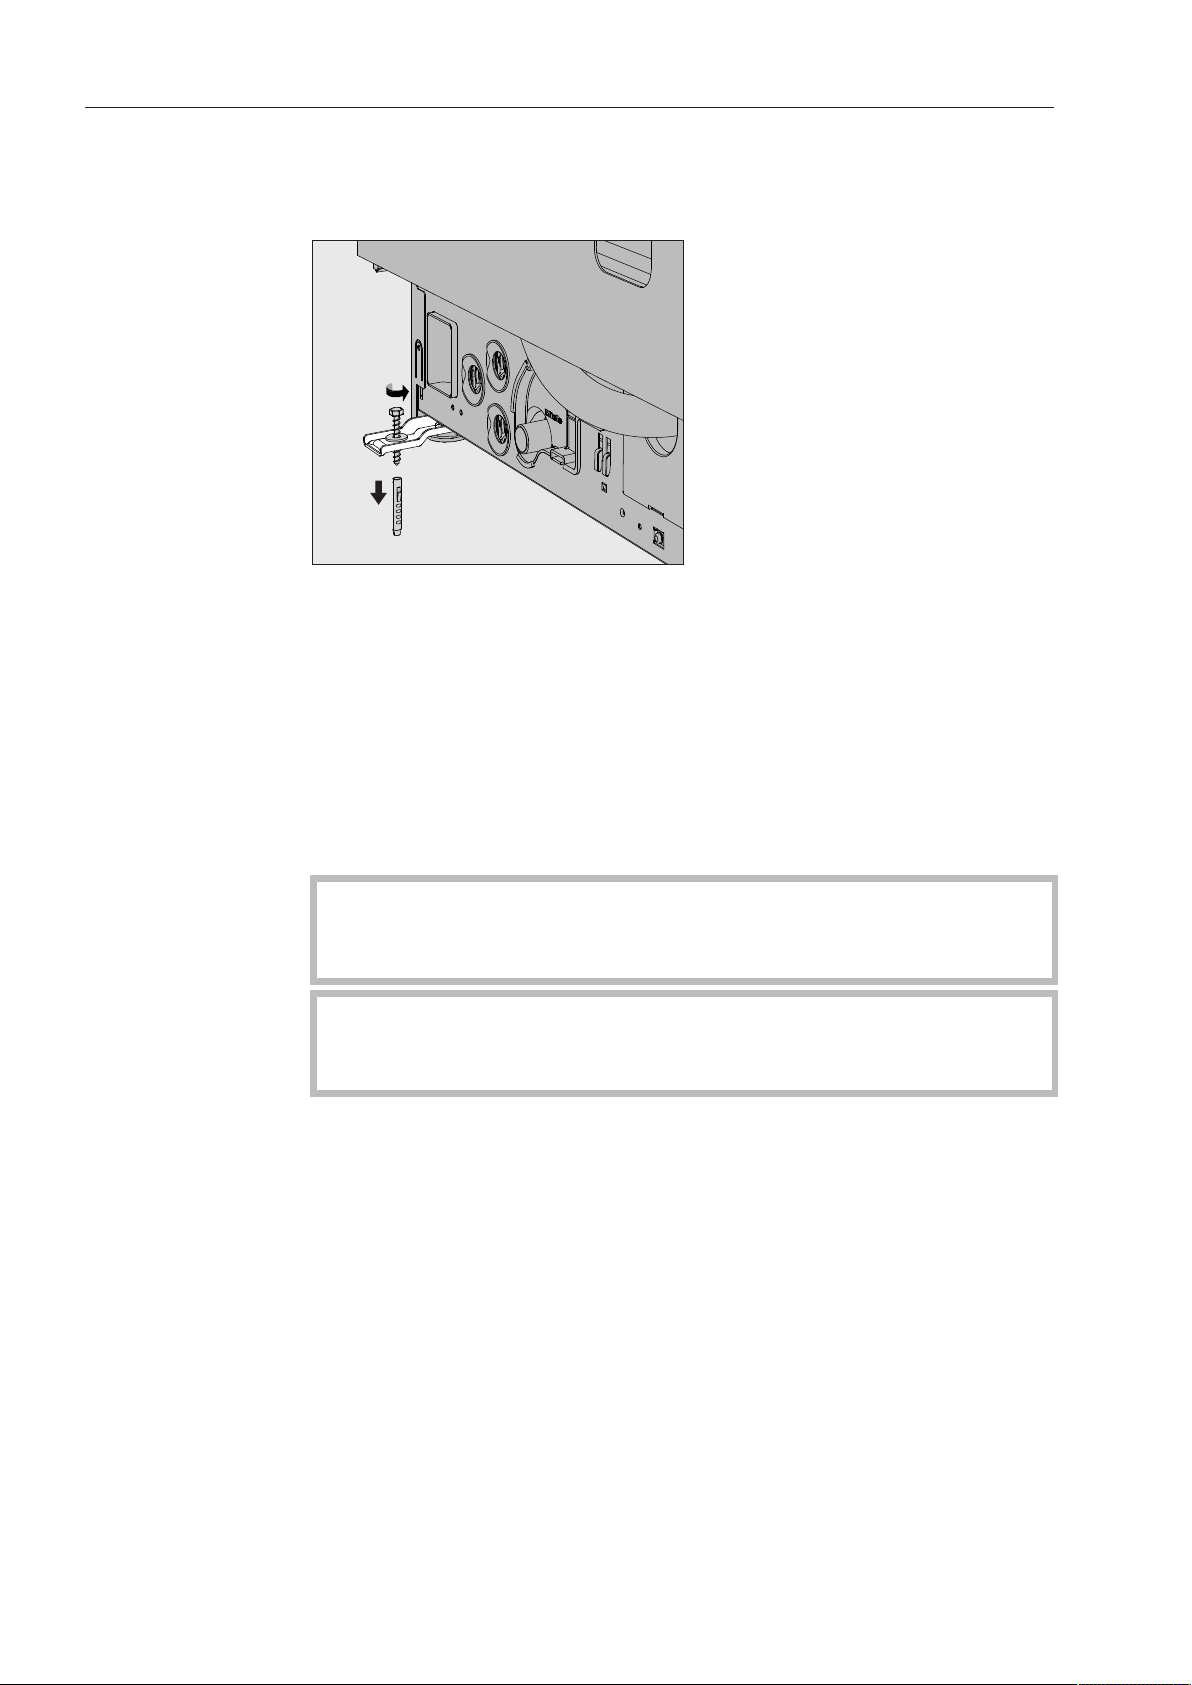
Installation
114
Floor anchors for
free-standing
units
During conversion to a free-standing unit, both rear appliance feet of
the dishwasher must be secured against tipping using the floor an-
chors.
Attach the floor anchors to the floor using the included fastening
materials at the distance of both rear appliance feet.
The fastening screws can be used in both wood floors and, with the
help of dowels, concrete floors.
Push the dishwasher into the provided floor anchor seats.
Moving the dishwasher
Before moving the dishwasher, screw in the adjustable feet fully so
that they do not become damaged.
Do not use protruding parts, e.g. the control panel, to lift the
dishwasher.
These parts could break off.
Only transport the dishwasher in its original packaging using a
hand truck. For subsequent moves, the dishwasher must be placed
on a continuous support base to avoid damage.

Electrical connection
115
Electrical connection
All electrical work must be performed by a suitably qualified
electrician in accordance with local and national safety codes.
– The electrical system must conform to local and national safety
standards.
– The dishwasher can be plugged into an electrical outlet (the outlet
must be accessible after installation). This will then make it easier to
perform an electrical safety check, e.g. during repair or service
work.
– If the dishwasher is permanently wired to the power supply, a main
switch capable of disconnecting the dishwasher at all poles must
be installed. This switch must have a contact gap of at least 3mm
and also be lockable in the neutral position.
– To increase safety, it is recommended that the machine be con-
nected to a ground fault circuit breaker with a tip current of 30 mA.
– If necessary, equipotential bonding can be carried out.
– The power cord may only be replaced by an original Miele spare
part.
– For technical data, see the data plate or the accompanying wiring
diagram.
The dishwasher may only be operated with the voltage, frequency
and fuse protection indicated on the data plate.
This appliance can be converted to a different type of power sup-
ply in accordance with the accompanying conversion and wiring dia-
grams.
The conversion diagram and the data plate are supplied with and
affixed to the appliance, respectively.
Grounding con-
nection
The ground lead must be connected to the screw connection point
(marked with the ground symbol ) at the back of the machine.
WARNING
THIS APPLIANCE MUST BE GROUNDED

Plumbing
116
Connecting the water supply
The water in the dishwasher is NOT safe to drink!
Do not reuse removable hose attachments. Use the hose sets sup-
plied with this dishwasher.
– The dishwasher's connection to the water supply system must be
in compliance with local code.
– The water quality should satisfy local drinking water requirements.
A high iron content can lead to external rust deposits on the wash
load and the dishwasher itself. A chloride concentration greater
than 100 mg/l in the process water significantly increases the risk of
corrosion for the wash load.
– In certain regions (e.g. mountainous areas), the typical water com-
position can cause precipitates to form, which in turn requires the
use of softened water for the dishwasher.
– A device for preventing the return flow of water is not necessary, as
this dishwasher conforms to the applicable standards for the pro-
tection of drinking water.
– The water pressure (flow pressure) must be equal to an overpres-
sure of at least 29psi / 200kPa (100 kPa = 1 bar). If the water pres-
sure (flow pressure) is less than 29psi / 200kPa, the water intake
time will automatically be extended. The maximum allowable static
pressure is 145psi / 1000kPa (overpressure). If the water pressure
lies outside the range of 29psi - 145psi (200kPa - 1000kPa),
please contact Miele Service for instructions on how to proceed.
– The standard version of this dishwasher is intended for connection
to the cold (blue marking) and hot (red marking) water supply with a
temperature of up to 149°F (65 °C). Connect the intake hoses to
the shutoff valves for the cold and hot water supply.
– If no hot water supply is available, the intake hose with the red
marking must also be connected to the cold water supply.
– Connect the intake hose for the steam condenser (without a water
protection device) to a cold water shutoff valve.
– An on-site shutoff valve with a 3/4" screw connection is required to
connect the dishwasher to the water supply. The valve should be
easily accessible, since the water supply should be shut off when-
ever the dishwasher is not in use.
– The intake hose is an approx. 67" (1.7-m) long DN 10 pressure hose
with a 3/4" screw connection. A 59" (1.5m) flexible metal hose (test
pressure: 140 bar) is available as an extension. Do not remove the
filter from the screw connection.
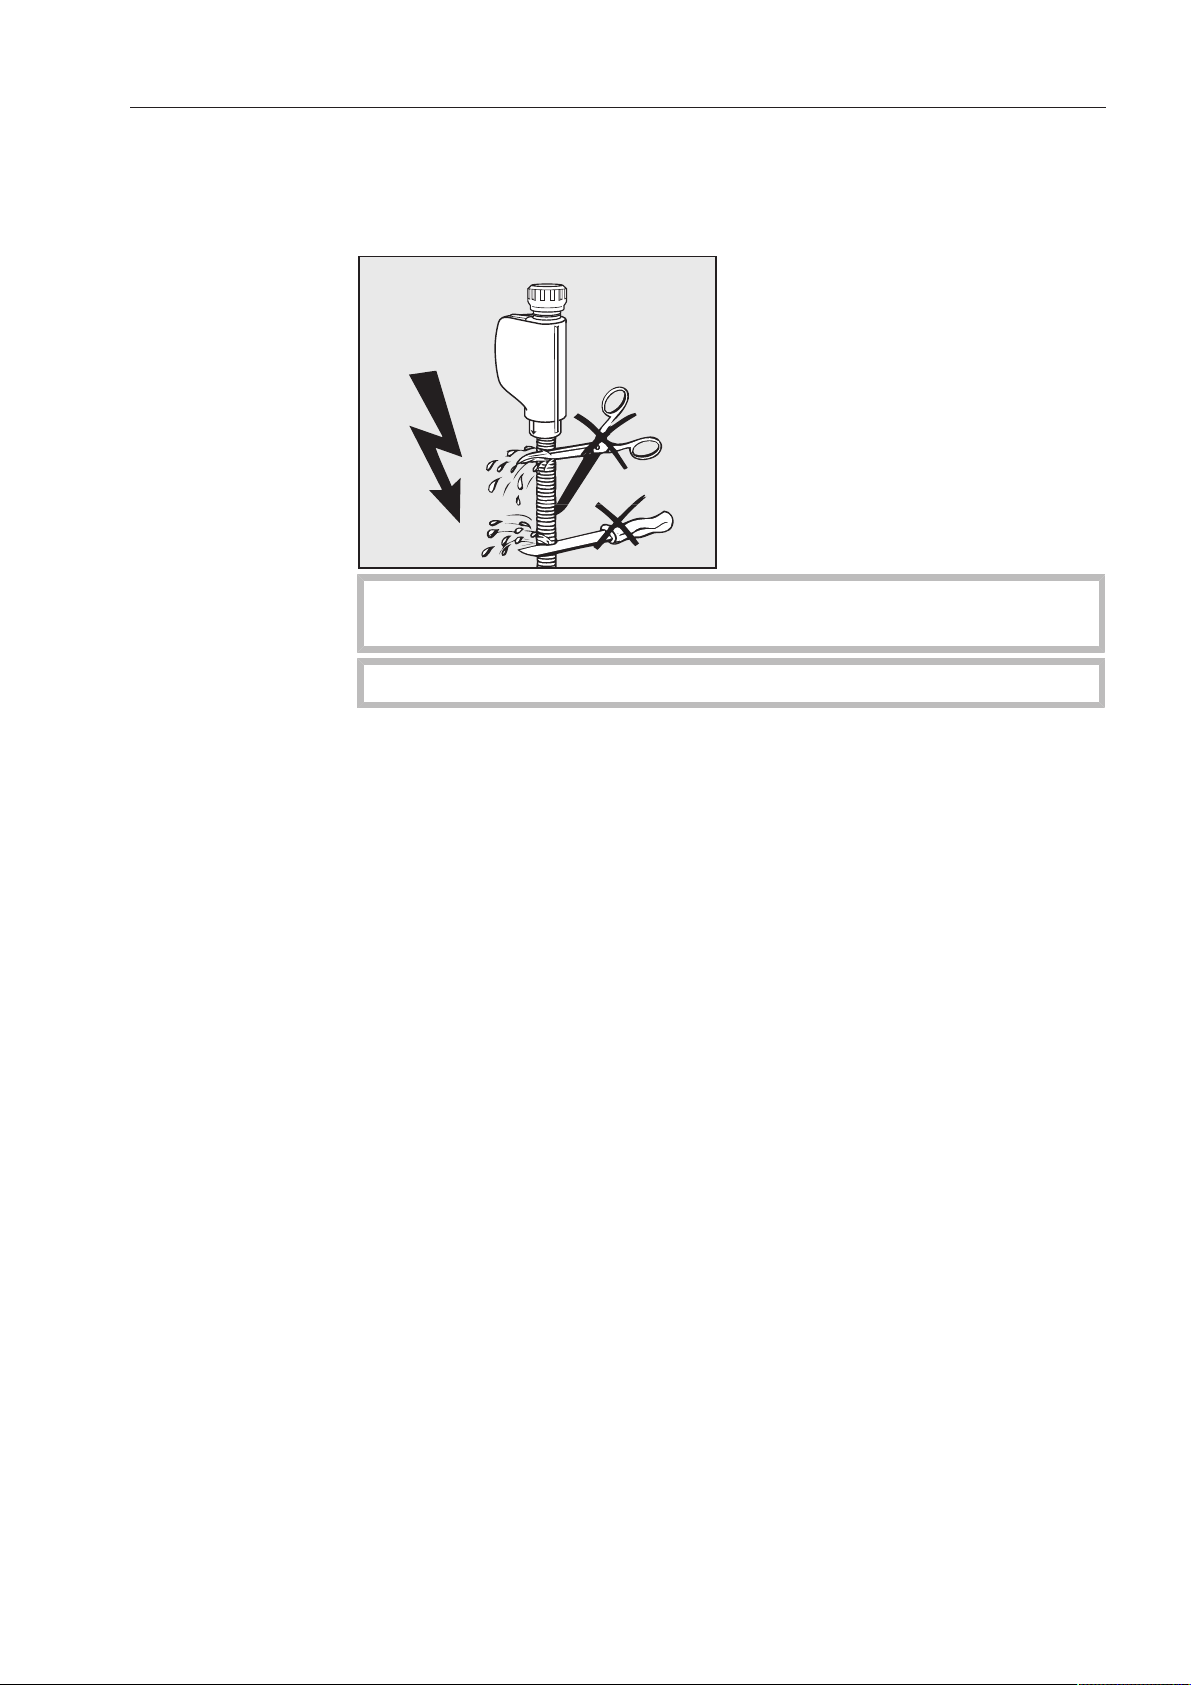
Plumbing
117
– Install the large-surface filter (included with the accessories) be-
tween the shutoff valve and intake hose.
(See "Frequently asked questions, Cleaning filters in water intake"
for illustration).
Do NOT shorten or otherwise damage the inlet hoses (see dia-
gram).
Also refer to the supplied installation diagram!

Plumbing
118
Connection to the drainage system
– The dishwasher drain contains a built-in non-return valve which
prevents dirty water from flowing back into the dishwasher via the
drain hose.
– Ideally, the dishwasher should be connected to a separate on-site
drainage system. If a separate connection is not available, we rec-
ommend connecting the dishwasher to a dual-chamber trap. The
on-site connection must be positioned between 12" and 40" (0.3m
and 1m) above the bottom edge of the dishwasher. If the connec-
tion is lower than the minimum height, the drain hose must be bent
to maintain a height of 12" (0.3m).
– The dishwasher is equipped with a 59" (1.5-m) long flexible drain
hose (clear width of 7/8" (22mm)). Clamps for connecting the hose
are included with the dishwasher.
– Do not shorten the drain hose! The hose can be extended by a con-
necting piece and an additional hose. The length of the drainage
line may not exceed 13' (4m).
– The drainage system must be able to handle a discharge rate of at
least 4.2g/min (16l/min).
Make sure that there are no kinks in the hose, and that it is not
crushed or stretched.
Please also refer to the accompanying installation diagram!
Technical details
119
Height 32 5/16" (820mm) adjustable
+ 2 1/4" (60mm)
Height with cover 32 7/8" (835mm) adjustable
+ 2 1/4" (60mm)
Width 23 1/2" (598mm)
Depth
with door open
23 1/2" (600mm)
47 1/4" (1,200mm)
Weight (net) 154 lbs (70kg)
Voltage, rated load, fuse rating See data plate
Power cord Approx. 5' 6" (1.7m)
Water temperature:
Cold water connection
Hot water connection
Max. 68°F (20°C)
Max. 149°F (65°C)
Static water pressure Max. 145 psi (1000kPa) overpressure
Recommended flow pressure:
Cold and hot water connection
Water connection for steam condenser
29 psi (200kPa) overpressure
14.5 psi (100kPa) overpressure
Minimum flow pressure:
Cold water connection
Hot water connection
14.5 psi (100kPa) overpressure
5.8 psi (40kPa) overpressure
Drain hose height Min. 1' (0.3m), max. 3' 3" (1.0m)
Drain hose length Max. 13' 1" (4.0m)
Ambient temperature 40 - 104°F (5 - 40°C)
Relative humidity
Maximum
Linearly decreasing to
80% for temperatures up to 88°F (31°C)
50% temperatures up to 104°F (40°C)
Altitude above sea level Up to 6,561 ft (2,000m)*
Inlet hoses Approx. 5' 7" (1.7m)
Drain hose Approx. 4' 9" (1.5m)
Noise emission values
Sound power in LwA
Sound pressure in LpA
Undercounter installation with wooden trim
in front of base, Short program
57dB (A)
45dB (A)
Certification marks CSA approval, NSF
CE mark Machinery directive 2006/42/EC
Manufacturer's address Miele & Cie. KG, Carl-Miele-Straße 29,
33332 Gütersloh, Germany
* For installation at altitudes above 6,561 ft (2,000m), the boiling point of the wash water will be lower. In this case, the
dishwasher must be modified by Miele Service.

Please have the model and serial number
of your appliance available before
contacting Technical Service.
U.S.A.
Miele, Inc.
National Headquarters
9 Independence Way
Princeton, NJ 08540
Phone:
Fax:
www.miele-pro.com
Technical Service & Support
Nationwide
Phone:
Fax:
800-991-9380
800-220-1348
800-991-9380
609-419-4241
Importer
Miele Limited
Professional Division
1-888-325-3957
1-800-803-3366
Miele Professional
Technical Service
1-888-325-3957
1-800-803-3366
Phone:
Fax:
Canada
Miele & Cie. KG
Carl-Miele-Straße 29
33332 Gütersloh
Germany
Manufacturer
161 Four Valley Drive
Vaughan, ON L4K 4V8
Phone:
Fax:
www.mieleprofessional.ca
Alteration rights reserved / Publication date: 2016-02-15 M.-Nr. 09 974 531 / 00