User Manual
PARTS AND FEATURES
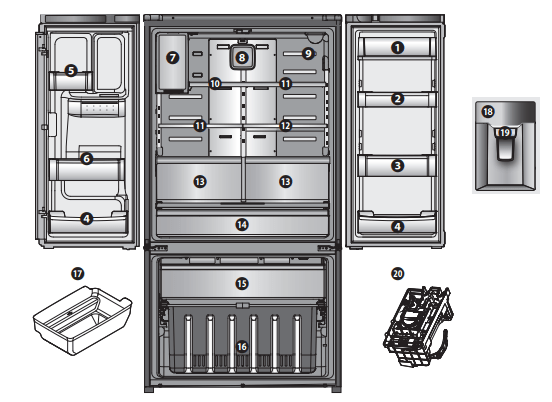
1. Covered Dairy Bin or Covered Storage Bin
for storing butter and cheese.
2. Low profile door storage bin
for items of medium to large size.
3. Gallon door storage bin
for items of medium to large size.
4. Low profile door storage bin
for items of medium size.
5. Small door storage bin
for small items.
6. Narrow door storage bin
for small items.
7. Icemaker/Ice cube bin
for making and holding ice for through-the-door dispenser.
8. Air filter
9. Water filter
10. Narrow Top Shelf
11. Adjustable glass shelf
12. Slide Shelf (*)
13. Humidity controlled crisper bin
for storage of fruits and vegetables
14. Temperature Control full width pantry drawer (*)
for storage of meat and fresh vegetables
15. Pull out freezer drawer
16. Lower freezer basket
for general freezer storage
17. Freezer Ice Storage Bin
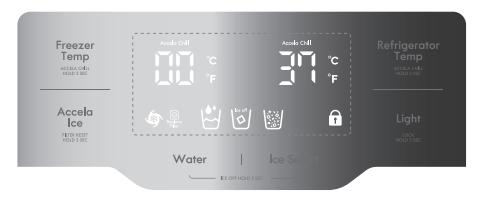
18. Control and display panel
19. Ice/Water Dispenser
20. Freezer icemaker (*)
USING YOUR REFRIGERATOR
SETTING THE CONTROLS
Temperature Control
NOTE: When changing control settings, wait 24 hours before making additional adjustments. The controls are set correctly when milk or juice is as cold as you would like and when ice cream is firm. If the temperature in either compartment is too cold or too warm, change the setting one increment at a time. Wait 24 hours for the change to stabilize before adjusting again.
- The refrigerator temperature control is preset to 37 deg F (3 deg C) and the freezer control is preset to 0 deg F (-18 deg C). These are recommended temperature settings for normal use conditions.

Freezer Compartment
Push the Freezer Temp. button and the temperature setting changes in the sequence as shown below:

Quick Chill Freezer function:
To activate freezer Quick Chill, press and hold the Freezer Temp. button for 3 seconds. Quick Chill LED will turn on. Push the button again to cancel.
The Quick Chill function is useful to help quickly chill the freezer compartment when needed. For example: If a large quantity of warm food is placed inside the freezer, or if loading the freezer with new groceries which may not be as cold as normal freezer temperatures.
Quick Chill will automatically cancel (Quick Chill LED will turn off) after 50 hours.
Refrigerator Compartment
Push the Fridge Temp. button and the temperature setting changes in the sequence as shown below:

Accela Chill Refrigerator function:
To activate refrigerator Accela Chill, press and hold the
Refrigerator button for 3 seconds. Accela Chill LED will turn on. Push the button again to cancel.
The Accela Chill function is useful to help quickly cool the refrigerator compartment when needed. For example: If a large quantity of warm food is placed inside the refrigerator, or if loading the refrigerator with new groceries which may not be as cold as normal refrigerator temperatures.
Accela Chill refrigerator function will automatically cancel (Accela Chill LED will turn off) after 6 hours
Demo Mode (For Store Use Only)
The Demo Mode disables all cooling in the refrigerator and freezer sections to conserve energy while on display in a retail store.
When Demo Mode is active, the icons for the various refrigerator functions will light up in sequence across the face of the panel.
To activate:
- Push and hold Light button for 3 seconds to lock control panel. The Locked icon will appear.
- While pressing and holding the Accela Ice and Refrigerator Temp buttons, press the Light button 5 times. You will hear a soft beep with each press. After the fifth press the Demo Mode is activate
To deactivate:
1. While pressing and holding the Accela Ice and Refrigerator Temp buttons, press the Light button 5 times. You will hear a soft beep with each press. After the fifth press the Demo Mode is deactivated
. 2. Push and hold Light button for 3 seconds to unlock control panel. The Locked icon will disappear.
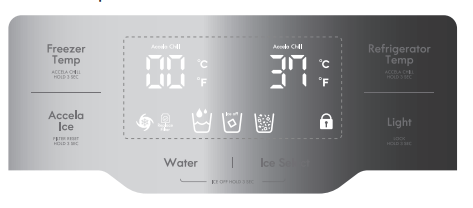
Control Panel
1. Freezer Temp. button 
Selection button for freezer compartment temperature.
2. Accela Ice button 
1) Press the Accela ice button once to turn on Quick Ice Mode.
Press the "Accela" button one time to cancel Quick Ice feature (LED Off). This function increases ice-making capabilities for 24 hours.
2) Filter Reset
When the Filter Change icon turns on, you need to change the water filter. After changing the water filter, press and hold the Quick Ice button for 3 seconds to turn the indicator light off. You need to change the water filter approximately every 6 months.
3. Water / Ice Select 
Press either Water or Ice Type button according to your needs. Press Ice Type button again according to your ice preference. (Cube/Crushed)
4. Refrigerator button 
Selection button for refrigerator compartment temperature.
5. Light button 
1) Press to turn dispenser light on or off.
2) To lock the control panel: Press and hold light button for 3 seconds. Locked icon will appear. To unlock, press and hold Light button for 3 seconds. Locked icon will disappear.
6. Symbols on the display panel
Accela Ice 
Illuminates when Accela Ice function is ON.
Replace Filter 
When the Filter Change icon turns on, you need to change the water filter. After changing the water filter, press and hold the Quick Ice button for three seconds to turn the indicator light off. You need to change the water filter approximately every six months.
Panel lock 
Illuminates when the panel lock is on.
Ice Maker 
Illuminates when the Ice maker is off
Cubed/Crushed Ice 
Changes according to your ice preference (Ice Type button)
7. Temperature Mode Switch Function (°F ↔°C)
If you want to convert °F to °C or vice Versa:
1) Press and hold the Lock button for 3 seconds. The lock icon will illuminate.
2) Press and hold Freezer Temp. and Fridge Temp. buttons at same time for 5 seconds until temperature mode changes.
NOTE: If the lock icon is illuminated after performing this function, press and hold Light button for 3 seconds to turn control lock OFF
ICEMAKER
Turning on the icemaker
Both the The 7303* and 7330* models have a dispenser connected icemaker located on the left side of the refrigerator compartment. The 7330* model also features an icemaker located on the left side of the bottom freezer compartment. Whenever the refrigerator is plugged in after being unplugged, icemaking is automatically set to On. To turn icemaking Off or On, see the instructions in Shutting icemaking off. For the 7330* model the control panel On and Off icemaking settings apply to both icemakers at the same time.
NOTE: As long as icemaking is turned On in the control panel, if an icemaker stops production because the ice bin becomes full, production will resume operation once the ice bin is cleared of ice
Dispenser Icemaker Alternate On/Off
The dispenser icemaker is equipped with an On/Off button in the upper left corner. You may turn the icemaker On or Off by pressing the button for 3 seconds. When turned On, the indicator light next to the button will illuminate. See detailed instructions on the label found on the side of the dispenser icemaker.
NOTE: In model 7330*, turning off icemaking with the button on the dispenser icemaker will also turn off the freezer icemaker. Turning dispenser icemaker back on with the button will also turn on the freezer icemaker.
In case the icemaker doesn’t work
- Did you wait for 12 hours after installation of the water supply line before making ice?
- Is the water line connected and the shut-off valve opened?
- Is the freezer temperature too warm? Try setting the freezer temperature lower.
In case of power failure
In the event of a lengthy power failure, remove ice cubes in the storage bin as the ice may melt and flow down to the ice dispenser and leak out.
Place bin back in the icemaker assembly
Shutting icemaking off 
Important! If you do not intend to use any ice cubes for longer than one week (e.g. because you are going on holiday), shut off icemaking for that period to prevent ice cubes from freezing together.
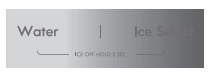
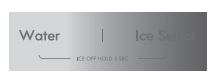
1. To turn OFF : Press and hold Water and Ice Type buttons at same time for 3 seconds until Ice Off illuminates in the control panel display.
To turn ON : Press and hold Water and Ice Type buttons at same time for 3 seconds until Ice Off ceases to illuminate in the control panel display.
2. Empty and clean the ice cube bin. To remove ice bin from dispenser icemaker, grasp front of ice bin and pull forward. To remove freezer ice bin, pull freezer drawer all the way forward and lift ice bin up and out of pullout drawer.
NOTE: There is a fingerhold indentation on the bottom front of the dispenser ice bin for ease of bin removal.
3. Return the ice cube bin into position.
NOTE: The ice bin should be emptied any time the icemaker is turned off.
WHEN TO SET ICEMAKER TO OFF
- When the water supply will be shut off for several hours.
- When the ice bin is removed for more than one or two minutes.
- When the refrigerator will not be used for several days.
NOTE: The ice bin should be emptied any time the icemaker is turned off.
PREPARING FOR VACATION
Shut off the water supply to the refrigerator.
To turn OFF :
Press and hold Water and Ice Select buttons at same time for 3 seconds until Ice Off illuminates in the control panel display.
To turn ON :
Press and hold Water and Ice Select buttons at same time for 3 seconds until Ice Off ceases to illuminate in the control panel display.
NOTE: The ice bin should be emptied any time the icemaker is turned off.
If the ambient temperature will drop below freezing, have a qualified technician drain the water supply system to prevent serious property damage due to flooding caused by ruptured water lines or connections.
How to use the Automatic Icemaker
The dispenser icemaker will produce 12 cubes per cycle. The freezer icemaker will produce 7 cubes per cycle.
- The dispenser icemaker will produce approximately 216 - 288 cubes (20 - 24 cycles a day) in a 24 hour period, depending on freezer compartment temperature, room temperature, number of door opening and other user conditions.
- The freezer icemaker will produce 50 to 70 ice cubes in a 24 hour period depending on the same conditions listed above.
- It is normal for the icemaker to make banging sounds when the ice cubes are falling into the ice storage bin
- To prevent bad odor smell, regularly clean the ice cube storage bin.
- If the amount of ice in the storage bin is not sufficient, the ice may not be dispensed. Wait a day or so to make more ice.
- If the ice does not dispense easily, ensure the dispenser outlet is not blocked.
- Throw away the first few batches of ice to allow the water line to clear. Be sure nothing interferes with the level of the optical sensor space at the dispenser icemaker base or the shutoff arm of the freezer icemaker.

Icemaking will stop when the dispenser ice bin fills to the level of the optical sensor, or when the freezer ice bin fills and pushes the shutoff arm all the way up. Clear the bin of of excessive ice. If you remove bin for clearing, return bin correctly into place. Icemaking will resume after the ice bin is cleared to below the optical sensor in the dispenser icemaker, or cleared to allow the shutoff arm to lower in the freezer icemaker.
It is normal for several ice cubes to be joined together. If ice is not used frequently, old ice cubes will become shrunken, cloudy and taste stale. If you won't use ice frequently, shut icemaking off.
REFRIGERATOR SECTION
WATER OR ICE DISPENSER
To dispense water or ice, press the Water or Ice Type button on control panel and push on the dispenser lever with the side of your glass.
NOTE: The dispenser is equipped with a light that turns on when the dispenser lever is pressed.

When Ice Select button is pressed once, cubed ice will dispense. Press Ice Select button a second time to dispense crushed ice.
NOTE: Some ice may drop outside of cup during Ice dispensing.
Slowly remove glass from dispenser Lever before full to help prevent ice spillage.
A few uncrushed ice cubes may mix in with Crushed Ice when you dispense Crushed Ice.
Foldaway door bar (mullion bar)
- When closing the left refrigerator door, the mullion bar folds behind the right refrigerator door, forming a seal between the refrigerator doors.
- When opening the left refrigerator door, the mullion bar folds back to the left door automatically.

- The mullion bar may become damaged upon closing if it has been extended to the right while the door left door is open.
REFRIGERATOR SHELVES
The shelves in your refrigerator are adjustable to meet your individual storage needs. Your model may have glass or wire shelves.
Adjusting the shelves to fit different heights of items will make finding the exact item you want easier. Doing so will also reduce the amount of time the refrigerator door is open which will save energy.
IMPORTANT: Do not clean glass shelves with warm water while they are cold. Shelves may break if exposed to sudden temperature changes or impact.
CAUTION: Glass shelves are heavy. Use special care when removing them.
Adjusting Shelves (Cantilever)
Remove shelves from the shipping position and replace shelves in the position you want.
To remove a shelf: Lift up on front of shelf with one hand and with other hand push up on back of shelf to release attachment hooks from attachment slots. Pull the shelf out.
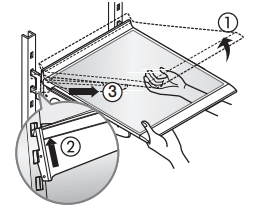
To reinstall a shelf: With front of shelf angled slightly up, engage hooks on back of shelf into attachment slots, and then lower front of shelf into place.
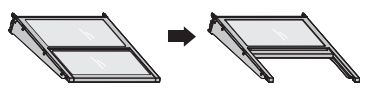
Slide Glass Shelf (model 7330* only)
To create space for tall item storage, grasp edge of front half of shelf and slide down and under the back half of shelf.
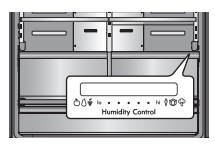
HUMIDITY CONTROLLED CRISPER
The crispers provide fresher tasting fruit and vegetables by letting you easily control humidity inside the drawer.
You can control the amount of humidity in the moisture sealed crispers crispers by adjusting the control to any setting between VEGETABLES and FRUIT.
- Slide the Humidity Control toward “hi” to keep moist air in crisper for best storage of fresh, leafy vegetables.
- Slide the Humidity Control toward “lo” to release moist air from crisper for best storage of fruit.
REMOVING THE HUMIDITY CONTROLLED CRISPER
- To remove, pull the drawer out to full extension.
- Lift the front of the crisper up, then pull it straight out.
- To install, slightly tilt up the front, insert the drawer into the frame and push it back into place.

FREEZER SECTION
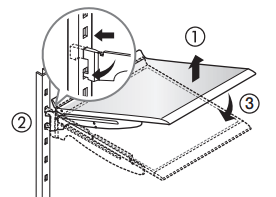
PULLOUT FREEZER DRAWER
1. To remove, pull the freezer drawer out to full extension. Lift out the ice bin if present. Tilt the front of the pullout freezer drawer up and then lift drawer out.

CAUTION: Pinch hazard! Keep hands and feet clear of the bottom of the freezer drawer when opening and closing.
2. To replace, hold pullout freezer drawer with back angled down. Insert the back rollers over the front edge of the runers built into the sides of the freezer cabinet. Slide the drawer back and into place. Fit ice bin back into pullout freezer drawer.
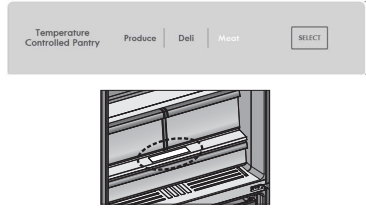
Temperature Controlled Pantry Drawer (model 7330* only)
The Temperature Controlled Pantry Drawer provides storage space with a variable temperature control that can keep the compartment colder than the refrigerator section. This drawer can be used for large party trays, deli items, and beverages. (This drawer should not be used for vegetables that require high humidity). Press Select button to choose between Produce, Deli or Meat.
DOOR BIN
The door bins are removable for easy cleaning and adjustment.
1. To remove the bin, simply lift the bin up and pull straight out.
2. To replace the bin, slide it in above the desired support and push down until it snaps into place.
NOTE: Some bins may vary in appearance and will only fit in one location.

CONNECTING THE WATER LINE
WATER PRESSURE
The water pressure must be from 30 to 125 psi or 207-862 kPa or 2.1-8.8 kgf/cm2 . If the refrigerator is installed in an area with low water pressure “below 30 psi”, you can install a booster pump to compensate for the low pressure.
WATER SUPPLY KIT
* Connecting the water line to the refrigerator.

1. Connect water line to the compression fitting.
- If you are using copper tubing (not supplied), slip the compression nut (not supplied) and ferrule (not supplied) on copper tubing.
- If you are using plastic tubing (not supplied), insert the molded ending of the plastic tubing into the compression fitting.
2. Tighten the compression nut onto the compression fitting.
3. Turn the water on and check for any leakage.
CARE AND CLEANING

1. Water Dispenser
- Clean the water collecting tray with a sponge or absorbent cloth.
2. Ice Storage Bin
- Removing: Pull out and remove the ice cube bin
- Cleaning: Empty the ice cube bin and clean with lukewarm water. Thoroughly dry the bin and screw conveyor to prevent new ice cubes from sticking.
- Replacing: Push the ice cube bin all the way back onto the supports until it locks into position. If the bin cannot be pushed all the way back, rotate the ice auger a quarter turn and insert again.

3. Freezer & Refrigerator Bins
- Hold both ends and pull up.
4. Refrigerator Shelves
To remove a shelf: Lift up on front of shelf with one hand and with other hand push up on back of shelf to release attachment hooks from attachment slots. Pull the shelf out.

To reinstall a shelf: With front of shelf angled slightly up, engage hooks on back of shelf into attachment slots, and then lower front of shelf into place.

TROUBLESHOOTING GUIDE
COOLING
Refrigerator and Freezer section are not cooling.
- Power cord unplugged.
- Plug into a known properly grounded 3-prong outlet.
- Refrigerator is set to demo mode.
- Demo Mode allows the lights and control display to work normally while disabling cooling to save energy while on the showroom floor. Refer to the Setting the Controls section for instructions on how to disable Demo Mode.
- Refrigerator is in the defrost cycle.
- During the defrost cycle, the temperature of each compartment may raise slightly. Wait 30 minutes and confirm the proper temperature has been restored once the defrost cycle has completed.
- Refrigerator was recently installed.
- It may take up to 24 hours for each compartment to reach the desired temperature.
- Refrigerator was recently relocated.
- If the refrigerator was stored for a long period of time or moved on its side, it is necessary for the refrigerator to stand upright for 24 hours before connecting it to power.
Cooling System runs too much.
- Refrigerator is replacing an older model.
- Modern refrigerators require more operating time but use less energy due to more efficient technology.
- Refrigerator was recently plugged in or power restored.
- The refrigerator will take up to 24 hours to cool completely.
- Door opened often or a large amount of food / hot food was added.
- Adding food and opening the door warms the refrigerator, requiring the compressor to run longer in order to cool the refrigerator back down. In order to conserve energy, try to get everything you need out of the refrigerator at once, keep food organized so it is easy to find, and close the door as soon as the food is removed. (Refer to the Food Storage Guide.)
- Doors are not closed completely.
- Firmly push the doors shut. If they will not shut all the way, see the Doors will not close completely or pop open section in Parts & Features Troubleshooting.
- Refrigerator is installed in a hot location.
- The compressor will run longer under warm conditions.At normal room temperatures (70°F) expect your compressor to run about 40% to 80% of the time. Under warmer conditions, expect it to run even more often. The refrigerator should not be operated above 110°F.
- Condenser / back cover is clogged.
- Use a vacuum cleaner with an attachment to clean the condenser cover and vents. Do not remove the panel covering the condenser coil area.
Refrigerator or Freezer section is too warm.
- Refrigerator was recently installed.
- It may take up to 24 hours for each compartment to reach the desired temperature.
- Doors are opened often or for long periods of time.
- When the doors are opened often or for long periods of time, warm, humid air enters the compartment. This raises the temperature and moisture level within the compartment. To lessen the effect, reduce the frequency and duration of door openings.
- Unit is installed in a hot location.
- The refrigerator should not be operated in temperatures above 110F.
- A large amount of food or hot food was added to either compartment.
- Adding food warms the compartment requiring the cooling system to run. Allowing hot food to cool to room temperature before putting it in the refrigerator will reduce this effect.
- Doors not closed correctly
- See the Doors will not close correctly or pop open section in Parts & Features Troubleshooting
- Temperature control is not set correctly.
- If the temperature is too warm, adjust the control one increment at a time and wait for the temperature to stabilize. Refer to the Setting the Controls section for more information.
- Defrost cycle has recently completed.
- During the defrost cycle, the temperature of each compartment may raise slightly and condensation may form on the back wall. Wait 30 minutes and confirm the proper temperature has been restored once the defrost cycle has completed.
Interior moisture buildup.
- Doors are opened often or for long periods of time.
- When the doors are opened often or for long periods of time, warm, humid air enters the compartment. This raises the temperature and moisture level within the compartment. To lessen the effect, reduce the frequency and duration of door openings.
- Doors not closed correctly.
- See the Doors will not close correctly section in the Troubleshooting section.
- Weather is humid.
- Humid weather allows additional moisture to enter the compartments when the doors are opened leading to condensation or frost. Maintaining a reasonable level of humidity in the home will help to control the amount of moisture that can enter the compartments.
- Defrost cycle recently completed.
- During the defrost cycle, the temperature of each compartment may raise slightly and condensation may form on the back wall. Wait 30 minutes and confirm that the proper temperature has been restored once the defrost cycle has completed.
- Food is not packaged correctly.
- Food stored uncovered or unwrapped, and damp containers can lead to moisture accumulation within each compartment. Wipe all containers dry and store food in sealed packaging to prevent condensation and frost
COOLING/ICE & WATER
Food is freezing in the refrigerator compartment.
- Food with high water content was placed near an air vent.
- Rearrange items with high water content away from air vents.
- Refrigerator temperature control is set incorrectly.
- If the temperature is too cold, adjust the control one increment at a time and wait for the temperature to stabilize. Refer to the Setting the Controls section for more information.
- Refrigerator is installed in a cold location.
- When the refrigerator is operated in temperature below 41°F (5°C), food can freeze in the refrigerator compartment. The refrigerator should not be operated in temperature below 55°F (13°C).
Frost or ice crystals form on frozen food(outside of package).
- Door is opened frequently or for long periods of time.
- When the doors are opened often or for long periods of time, warm, humid air enters the compartment. This raises the temperature and moisture level within the compartment. Increased moisture will lead to frost and condensation. To lessen the effect, reduce the frequency and duration of door openings.
- Door is not closing properly.
- Refer to the Doors will not close correctly or pop open section in the Troubleshooting section.
Refrigerator or Freezer section is too cold.
- Incorrect temperature control settings.
- If the temperature is too cold, adjust the control one increment at a time and wait for the temperature to stabilize. Refer to the Setting the Controls sect;ion for more information.
Frost or ice crystals on frozen food (inside of sealed package).
- Condensation from food with a high water content has frozen inside of the food package.
- This is normal for food items with a high water content.
- Food has been left in the freezer for a long period of time.
- Do not store food items with high water content in the freezer for a long period of time.
Icemaker is not making enough ice.
- Demand exceeds ice storage capacity.
- The dispenser icemaker will produce approximately216-288 cubes in a 24 hour period. The freezer icemaker will produce approximately 50 to 70 cubes in a 24 hour period.
- House water supply is not connected, valve is not turned on fully, or valve is clogged.
- Connect the refrigerator to a cold water supply with adequate pressure and turn the water shutoff valve fully open.
- If the problem persists, it may be necessary to contact a plumber.
- Water filter has been exhausted.
- It is recommended that you replace the water filter:
- Approximately every six months.
- When the water filter indicator turns on.
- When the water dispenser output decreases.
- When the ice cubes are smaller than normal.
- Low house water supply pressure.
- NOTE: The water pressure must be from 30 to 125 psi or 207-862 kPa or 2.1-8.8 kgf/cm². If the refrigerator is installed in an area with low water pressure below 30 psi, you can install a booster pump to compensate for the low pressure.
- If the problem persists, it may be necessary to contact a plumber or install a booster pump to compensate for the low pressure.
- Reverse Osmosis filtration system is used.
- Reverse osmosis filtration systems can reduce the water pressure below the minimum amount and result in icemaker issues. (Refer to Water Pressure section.)
- Tu erature for the freezer compartment for normal ice production is 0°F. If the freezer temperature is warmer, ice production will be affected.
Dispensing water slowly.
- Water filter has been exhausted.
- It is recommended that you replace the water filter:
- Approximately every six months.
- When the water filter indicator turns on.
- When the water dispenser output decreases.
- When the ice cubes are smaller than normal.
- Low house water supply pressure
- NOTE: The water pressure must be from 30 to 125 psi or 207-862 kPa or 2.1-8.8 kgf/cm². If the refrigerator is installed in an area with low water pressure below 30 psi, you can install a booster pump to compensate for the low pressure.
- If the problem persists, it may be necessary to contact a plumber or install a booster pump to compensate for the low pressure.
Not dispensing ice.
- Doors are not closed completely
- Ice will not dispense if any of the refrigerator doors are left open.
- Infrequent use of the dispenser.
- Infrequent use of the ice dispenser will cause the cubes to stick together over time, which will prevent them from properly dispensing. Check the ice bin for ice cubes clumping/sticking together. If they are, break up the ice cubes to allow for proper operation.
- The delivery chute is clogged with frost or ice fragments.
- Eliminate the frost or ice fragments by removing the ice bin and clearing the chute with a plastic utensil.Dispensing cubed ice can also help prevent frost or ice fragment buildup.
- The dispenser display is locked.
- Press and hold the Lock button for three seconds to unlock the control panel and dispenser.
- Ice bin is empty.
- It may take up to 24 hours for each compartment to reach the desired temperature and for the icemaker to begin making ice. Make sure that the shutoff (arm/ sensor) is not obstructed. Once the ice supply in the bin has been completely exhausted, it my take up to 90 minutes before additional ice is available, and approximately 24 hours to completely refill the bin.
Icemaker is not making ice.
- Refrigerator was recently installed or icemaker recently connected.
- It may take up to 24 hours for each compartment to reach the desired temperature and for the icemaker to begin making ice.
- Icemaker not turned on.
- Locate the icemaker on/of button and confirm that it is turned ON.
- The refrigerator is not connected to a water supply or the supply shutoff valve is not turned on.
- Connect refrigerator to the water supply and turn the water shutoff valve fully open.
- Dispenser icemaker optical sensor is blocked by ice.
- Remove enough ice from bin so that the optical sensing space is not blocked
- Freezer icemaker shutoff arm is pushed all the way up by ice.
- Remove enough ice from bin to allow shutoff arm to lower from shutoff position.
Not dispensing water.
- New installation or water line recently connected.
- Dispense 2.5 gallons of water (flush for approximately5 minutes) to remove trapped air and contaminates from the system. Do not dispense the entire 2.5 gallon amount continuously. Depress and release the dispenser pad for cycles of 30 seconds ON and 60 seconds OFF.
- The dispenser panel is locked.
- Press and hold the Lock button for three seconds to unlock the control panel and dispenser.
- The dispenser is not set for water dispensing.
- On the control panel press the Water button.
- Refrigerator or freezer doors are not closed properly.
- Water will not dispense if any of the refrigerator doors are left open.
- Water filter has been recently removed or replaced.
- After the water filter is replaced, dispense 2.5 gallons of water (flush for approximately 5 minutes) to remove trapped air and contaminates from the system. Do not dispense the entire 2.5 gallon amount continuously.Depress and release the dispenser pad for cycles of30 seconds ON and 60 seconds OFF.
- Tubing connecting refrigerator to house supply valve is kinked.
- The tubing can kink when the refrigerator is moved during installation or cleaning resulting in reduced water flow. Straighten or repair the water supply line and arrange it to prevent future kinks.
- The house water supply is not connected, the valve is not turned on fully, or the valve is clogged.
- Connect refrigerator to the water supply and turn the water shutoff valve fully open.If the problem persists, it may be necessary to contact a plumber.
Ice has bad taste or odor.
- Water supply contains minerals such as sulfur.
- A water filter may need to be installed to eliminate taste and odor problems.
- NOTE: In some cases, a filter may not help. It may not be possible to remove all minerals / odor / taste in all water supplies.
- Icemaker was recently installed.
- Discard the first few batches of ice to avoid discolored or bad tasting ice.
- Ice has been stored for too long.
- Ice that has been stored for too long will shrink, become cloudy, and may develop a stale taste. Throw away old ice and make a new supply.
- The food has not been stored properly in either compartment.
- Rewrap the food. Odors may migrate to the ice if food is not wrapped properly.
- The interior of the refrigerator needs to be cleaned.
- See the Care and Cleaning section for more information.
- The ice storage bin needs to be cleaned.
- Empty and wash the bin (discard old cubes). Make sure that the bin is completely dry before reinstalling it.
Dispensing warm water.
- Refrigerator was recently installed.
- Allow 24 hours after installation for the water storage tank to cool completely.
- The water dispenser has been used recently and the storage tank was exhausted.
- Depending on your specific model, the water storage capacity will range from approximately 20 to 30 oz.
- Dispenser has not been used for several hours.
- If the dispenser has not been used for several hours, the first glass dispensed may be warm. Discard the first 10 oz.
- Refrigerator is connected to the hot water supply.
- Make sure that the refrigerator is connected to a cold water pipe.
Water has bad taste or odor.
- Water supply contains minerals such as sulfur.
- A water filter may need to be installed to eliminate taste and odor problems.
- Water filter has been exhausted.
- It is recommended that you replace the water filter:
- Approximately every 6 months.
- When the water filter indicator turns on.
- When the water dispenser output decreases.
- When the ice cubes are smaller than normal.
- Refrigerator was recently installed.
- Dispense 2.5 gallons of water (flush for approximately5 minutes) to remove trapped air and contaminates from the system. Do not dispense the entire 2.5 gallon amount continuously. Depress and release the dispenser pad for cycles of 30 seconds ON and 60 seconds OFF.
NOISE
Clicking
- The defrost control will click when the automatic defrost cycle begins and ends. The thermostat control (or refrigerator control on some models) will also click when cycling on and off.
Rattling
- Rattling noises may come from the flow of refrigerant, the water line on the back of the unit, or items stored on top of or around the refrigerator.
- Refrigerator is not resting solidly on the floor.
- Floor is weak or uneven or leveling legs need to be adjusted. See the Door Alignment section.
- Refrigerator with linear compressor was jarred while running.
Whooshing
- Evaporator fan motor is circulating air through the refrigerator and freezer compartments.
- Air is being forced over the condenser by the condenser fan.
Gurgling
- Refrigerant flowing through the cooling system.
Popping
- Contraction and expansion of the inside walls due to changes in temperature.
Sizzling
- Water dripping on the defrost heater during a defrost cycle.
Vibrating
- If the side or back of the refrigerator is touching a cabinet or wall, some of the normal vibrations may make an audible sound.
- To eliminate the noise, make sure that the sides and back cannot vibrate against any wall or cabinet.
Dripping
- Water running into the drain pan during the defrost cycle.
Pulsating or High Pitched Sound
- Your refrigerator is designed to run more efficiently to keep your food items at the desired temperature. The high efficiency compressor may cause your new refrigerator to run longer than your old one, but it is still more energy efficient than previous models.While the refrigerator is running, it is normal to hear a pulsating or highpitched sound.
PARTS & FEATURES
Doors will not close correctly or pop open.
- Food packages are blocking the door open.
- Rearrange food containers to clear the door and door shelves.
- Ice bin, crisper cover, pans, shelves, door bins, or baskets are out of position.
- Push bins all the way in and put crisper cover, pans, shelves and baskets into their correct positions. See the Using Your Refrigerator section for more information.
- The doors were removed during product installation and not properly replaced.
- Remove and replace the doors according to the Removing and Replacing Refrigerator Handles and Doors section.
- Refrigerator is not leveled properly.
- See Door Alignment in the Refrigeration Installation section to level refrigerator.
Doors are difficult to open.
- The gaskets are dirty or sticky.
- Clean the gaskets and the surfaces that they touch.Rub a thin coat of appliance polish or kitchen wax on the gaskets after cleaning.
- Door was recently closed.
- When you open the door, warmer air enters the refrigerator. As the warm air cools, it can create a vacuum. If the door is hard to open, wait one minute to allow the air pressure to equalize, then see if it opens more easily.
Refrigerator wobbles or seems unstable.
- Leveling legs are not adjusted properly.
- Refer to the Leveling and Door Alignment section.
- Floor is not level.
- It may be necessary to add shims under the leveling legs or rollers to complete installation.
Lights do not work.
- LED interior lighting failure.
- The refrigerator compartment lamp is LED interior lighting, and service should be performed by a qualified technician. Refer to the Light BulbReplacement section.
The interior of the refrigerator is covered with dust or soot.
- The refrigerator is located near a fire source, such as a fireplace, chimney or candle.
- Make sure that the refrigerator is not located near a fire source, such as a fireplace, chimney or candle.
The refrigerator compartment has an unpleasant odor.
- Food may be producing unpleasant odor.
- Remove odor producing food. Place box of baking soda in refrigerator compartment to absorb odors
- The Air Filter may need to be replaced.
- To replace, see Cleanflow Air Filter information in WATER FILTER section of this Use & Care Guide