
10031409 10031410 10034392
Lerina
Ballettstange
Ballet Barre
Barra de ballet
Barre de ballet
Sbarra da danza classica


3
DE
English 9
Français 15
Español 21
Italiano 27
Sehr geehrter Kunde,
wir gratulieren Ihnen zum Erwerb Ihres Gerätes.
Lesen Sie die folgenden Hinweise sorgfältig durch und
befolgen Sie diese, um möglichen Schäden vorzubeugen.
Für Schäden, die durch Missachtung der Hinweise und
unsachgemäßen Gebrauch entstehen, übernehmen wir
keine Haftung. Scannen Sie den folgenden QR-Code,
um Zugriff auf die aktuellste Bedienungsanleitung
und weitere Informationen rund um das Produkt zu
erhalten.
HERSTELLER & IMPORTEUR (UK)
Hersteller:
Chal-Tec GmbH, Wallstraße 16, 10179 Berlin, Deutschland.
Importeur für Großbritannien:
Berlin Brands Group UK Limited
PO Box 42
272 Kensington High Street
London, W8 6ND
United Kingdom
SICHERHEITSHINWEISE
• Lesen Sie sich die Montageanweisungen für dieses Produkt vollständig
durch.
• Überprüfen Sie die Verpackung gründlich und stellen Sie sicher, dass keine
Teile fehlen. Verwenden Sie dieses Produkt nicht, wenn Teile fehlen.
• Teilen.
• Vergewissern Sie sich vor der Benutzung des Geräts, dass alle Schrauben
fest angezogen sind und der Standort eben ist.
• Bevor Sie mit einem Trainingsprogramm beginnen, sollten Sie sich mit
Ihrem Arzt beraten. Dies ist besonders wichtig, wenn Sie über 35 Jahre
alt sind, noch nie trainiert haben, schwanger sind oder an einer Krankheit
oder Rückenverletzung leiden. Bei unsachgemäßer Verwendung des
Geräts und bei Nichtbeachtung aller Anweisungen kann es zu körperlichen
Verletzungen kommen.
• Halten Sie Kinder und Haustiere von dem Gerät fern.

4
DE
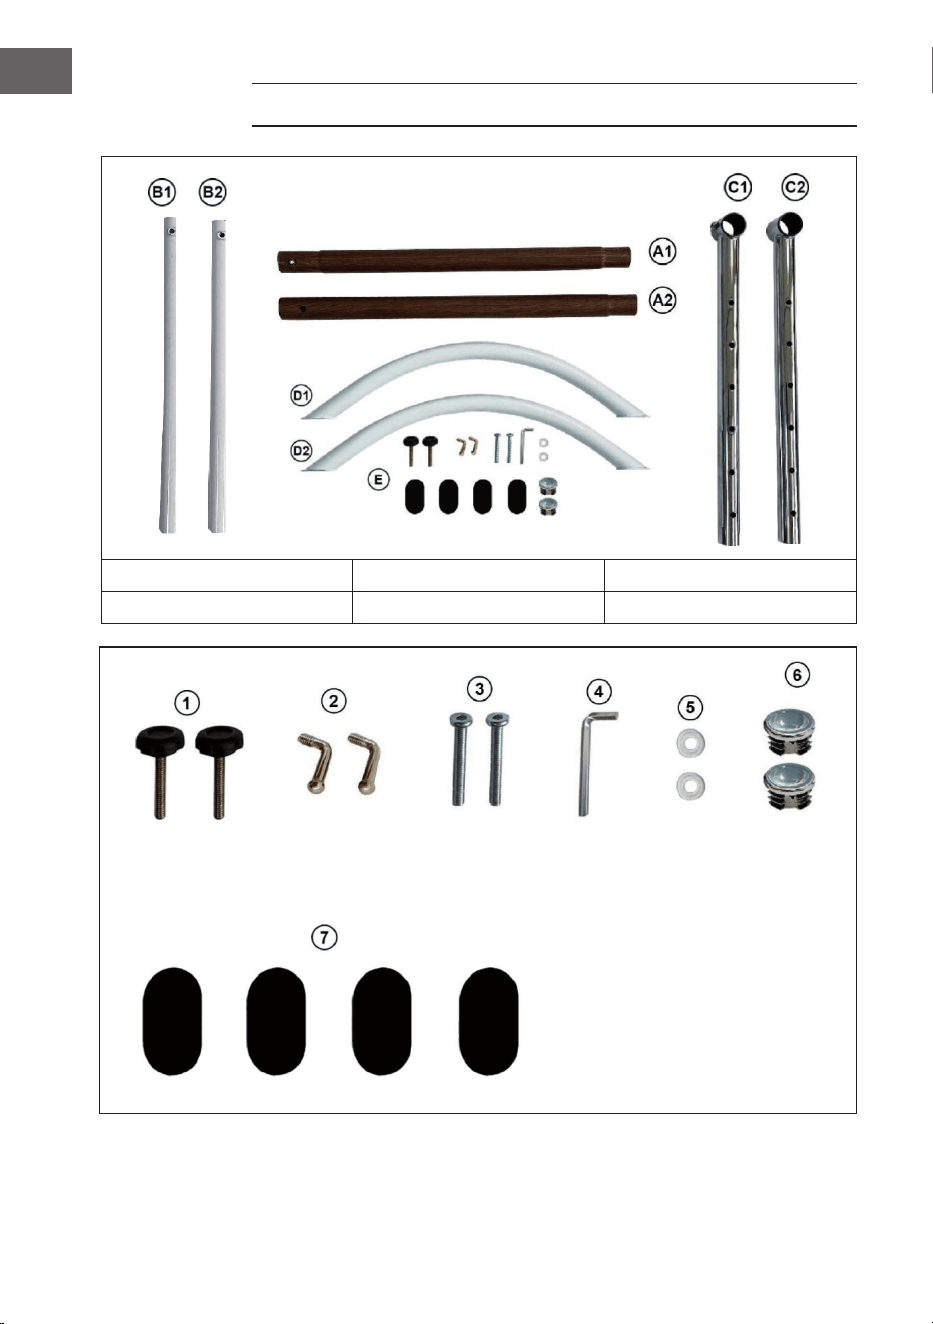
LIEFERUMFANG
A1 Eisenrohr (58.3 cm) B1/B2 Eisenrohr (50 cm) D1/D2 Bogenrohr
A2 Eisenrohr (59.3 cm) C1/C2 T-Rohr mit Löchern E Zubehörteile
E Zubehörteile:
1 Kunststoffkopfschraube (x2)
2 L-Schraube (x2)
3 Lange Schraube (x2)
4 L-Schlüssel (x1)
5 Kunststoff-Unterlegscheibe (x2)
6 Endkappe (x2)
7 Anti-Rutsch-Pad (x4)

5
DE
ZUSAMMENBAU
Schritt 1
Stecken Sie die Endkappen (6) in die Enden der beiden Eisenrohre (A1 & A2).
Schritt 2
Kleben Sie die Anti-Rutsch-Pads auf die Enden der Bogenrohre (D1 & D2).

6
DE
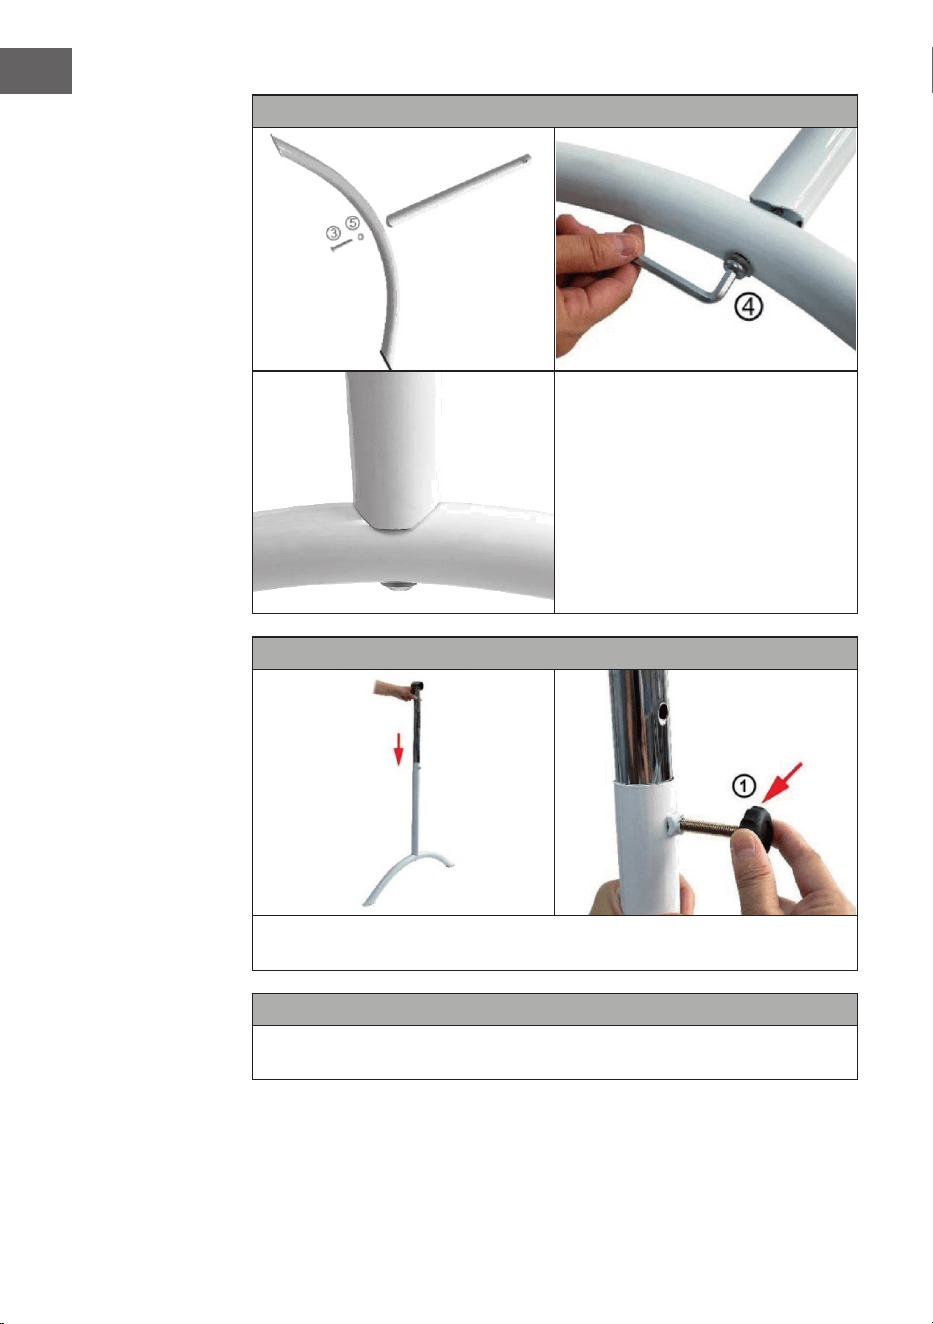
Schritt 3
Befestigen Sie die Eisenrohre
(B & D) mit den langen
Schrauben(3) und den
Unterlegscheiben (5) und
ziehen Sie sie dann mit dem
L-Schlüssel (4) fest.
Schritt 4
Setzen Sie das T-Rohr mit Löchern (C) in das Bogenrohr (D) ein.
Stellen Sie die gewünschte Höhe ein und ziehen Sie dann die
Kunststoffkopfschraube(1) fest.
Schritt 5
Wiederholen Sie die eben genannten Schritte, um den zweiten Ständer zu
installieren.
7
DE
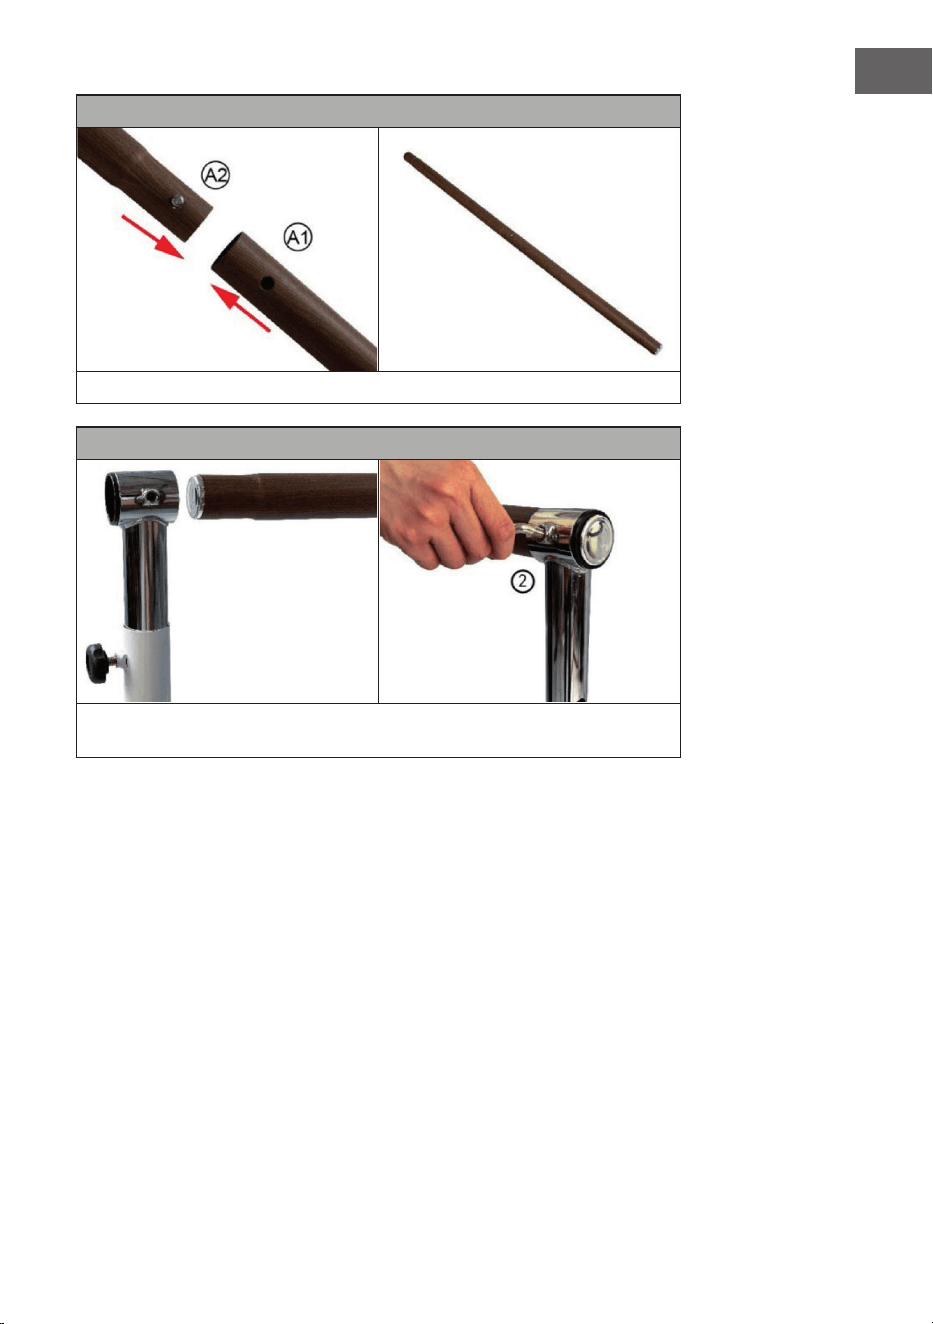
Schritt 6
Drücken Sie den Federknopf und verbinden Sie die Eisenrohre (A1 & A2).
Schritt 7
Stecken Sie die verbundenen Eisenrohre (A1 & A2) in die T-Rohre (C1 & C2)
und ziehen Sie die Eisenrohre mit den L-Schrauben (2) fest.


9
EN
Dear Customer,
Congratulations on purchasing this device. Please read
the following instructions carefully and follow them to
prevent possible damages. We assume no liability for
damage caused by disregard of the instructions and
improper use. Scan the QR code to get access to the
latest user manual and more product information.
MANUFACTURER & IMPORTER (UK)
Manufacturer:
Chal-Tec GmbH, Wallstrasse 16, 10179 Berlin, Germany.
Importer for Great Britain:
Berlin Brands Group UK Limited
PO Box 42
272 Kensington High Street
London, W8 6ND
United Kingdom
SAFETY INSTRUCTIONS
• Read the assembly instructions for this product completely.
• Check the packaging thoroughly and make sure that no parts are missing.
Do not use this product if any parts are missing.
• Parts.
• Before using the product, make sure all screws are tight and the location
is level.
• Before beginning any exercise program, consult with your physician. This is
especially important if you are over 35 years of age, have never exercised
before, are pregnant, or have a medical condition or back injury. Improper
use of the equipment and failure to follow all instructions may result in
physical injury.
• Keep children and pets away from the equipment.

10
EN
SCOPE OF DELIVERY
A1 Iron tube (58.3 cm) B1/B2 iron tube (50 cm) D1/D2 bend tube
A2 Iron tube (59.3 cm) C1/C2 T-tube with holes E Accessories
E Accessories:
1 Plastic head screw (x2)
2 L-bolt (x2)
3 Long screw (x2)
4 L-wrench (x1)
5 Plastic washer (x2)
6 End cap (x2)
7 Anti-slip pad (x4)

11
EN
ASSEMBLY
Step 1
Insert the end caps (6) into the ends of the two iron tubes (A1 & A2).
Step 2
Glue the anti-slip pads to the ends of the bend tubes (D1 & D2).

12
EN
Step 3
Attach the iron tubes (B & D)
with the long screws (3) and
washers (5), then tighten them
with the L-wrench (4).
Step 4
Insert the T-tube with holes (C) into the bend tube (D). Set the desired height
and then tighten the plastic head screw (1).
Step 5
Repeat the steps just mentioned to install the second stand.

13
EN
Step 6
Press the spring button and connect the iron tubes (A1 & A2).
Step 7
Insert the connected iron tubes (A1 & A2) into the T-tubes (C1 & C2) and
tighten the iron tubes with the L-bolts (2).


15
FR
Cher client, chère cliente,
Toutes nos félicitations pour l’acquisition de ce nouvel
appareil. Lisez attentivement les indications suivantes
et suivez-les pour éviter d'éventuels dommages.
Nous ne saurions être tenus pour responsables des
dommages dus au non-respect des consignes et à la
mauvaise utilisation de l’appareil. Scannez le QR-Code
pour obtenir la dernière version du mode d'emploi ainsi
que d'autres informations concernant le produit.
FABRICANT ET IMPORTATEUR (UK)
Fabricant :
Chal-Tec GmbH, Wallstraße 16, 10179 Berlin, Allemagne.
Importateur pour la Grande Bretagne :
Berlin Brands Group UK Limited
PO Box 42
272 Kensington High Street
London, W8 6ND
United Kingdom
CONSIGNES DE SÉCURITÉ
• Lisez entièrement les instructions de montage de ce produit.
• Examinez attentivement l'emballage et assurez-vous qu'il ne manque
aucune pièce. N'utilisez pas ce produit s'il manque des pièces.
• Partager.
• Avant d'utiliser l'appareil, assurez-vous que toutes les vis sont bien serrées
et que l'emplacement est plat.
• Avant de commencer un programme d'entraînement, consultez votre
médecin. Ceci est particulièrement important si vous avez plus de 35
ans, si vous n'avez jamais fait d'exercice, si vous êtes enceinte ou si vous
souffrez d'une maladie ou d'une blessure au dos. Une utilisation incorrecte
de l'appareil et le non-respect de toutes les instructions peuvent entraîner
des blessures physiques.
• Tenez les enfants et les animaux domestiques à distance de l'appareil.

16
FR
CONTENU DE L'EMBALLAGE
A1 Tube de fer (58,3 cm) B1/B2 Tube de fer (50 cm) D1/D2 Tube coudé
A2 Tube de fer (59,3 cm) C1/C2 Tube en T avec trous E Accessoires
E Accessoires :
1 Vis à tête en plastique (x2)
2 Vis en L (x2)
3 Vis longues (x2)
4 Clé en L (x1)
5 Rondelle en plastique (x2)
6 Embout (x2)
7 Patin antidérapant (x4)

17
FR
ASSEMBLAGE
Étape 1
Insérez les embouts (6) dans les extrémités des deux tubes en fer (A1 & A2).
Étape 2
Collez les patins antidérapants sur les extrémités des tubes courbes (D1 &
D2).

18
FR
Étape 3
Fixe les tubes en fer (B & D)
avec les vis longues (3) et les
rondelles (5), puis serre-les avec
la clé en L (4).
Étape 4
Insérez le tube en T avec les trous (C) dans le tube coudé (D). Réglez la
hauteur souhaitée, puis serrez la vis à tête plastique (1).
Étape 5
Répétez les étapes ci-dessus pour installer les deux pieds.

19
FR
Étape 6
Appuyez sur le bouton à ressort et reliez les tubes en fer (A1 & A2).
Étape 7
Insérez les tubes en fer reliés (A1 & A2) dans les tubes en T (C1 & C2) et
serrez les tubes en fer avec les vis en L (2).


21
ES
Estimado cliente:
Le felicitamos por la adquisición de este producto. Lea
atentamente el siguiente manual y siga cuidadosamente
las instrucciones de uso con el n de evitar posibles
daños. La empresa no se responsabiliza de los daños
ocasionados por un uso indebido del producto o por
haber desatendido las indicaciones de seguridad.
Escanee el siguiente código QR para obtener acceso
al manual de usuario más reciente y otra información
sobre el producto.
FABRICANTE E IMPORTADOR (REINO UNIDO)
Fabricante:
Chal-Tec GmbH, Wallstraße 16, 10179 Berlín, Alemania.
Importador para el Reino Unido:
Berlin Brands Group UK Limited
PO Box 42
272 Kensington High Street
London, W8 6ND
United Kingdom
INDICACIONES DE SEGURIDAD
• Lea completamente las instrucciones de montaje de este producto.
• Compruebe bien el embalaje y asegúrese de que no falta ninguna pieza. No
utilice este producto si falta alguna pieza.
• Piezas
• Antes de utilizar la unidad, asegúrese de que todos los tornillos estén
apretados y que el lugar esté nivelado.
• Antes de iniciar un programa de ejercicios, debe consultar a su médico.
Esto es especialmente importante si tiene más de 35 años, nunca ha hecho
ejercicio, está embarazada o tiene una enfermedad o lesión de espalda. El
uso inadecuado del aparato y el incumplimiento de todas las instrucciones
pueden provocar lesiones físicas.
• Mantenga a los niños y las mascotas lejos del aparato.
22
ES
CONTENIDO DEL ENVÍO
A1 Tubo de hierro (58,3 cm) B1/B2 Tubo de hierro (50 cm) D1/D2 Tubo curvo
A1 Tubo de hierro (59,3 cm) C1/C2 Tubo en T con agujeros E Accesorios
E Accesorios
1 Tornillo de cabeza de plástico (x 2)
2 Tornillos L (x 2)
3 Tornillos largos (x 2)
4 Llave en L (x 1)
5 Arandela de plástico (x 2)
6 Tapa de extremo (x 2)
7 Almohadilla antideslizante (x 4)

23
ES
MONTAJE
Paso 1
Introduzca las tapas (6) en los extremos de los dos tubos de hierro (A1 y A2).
Paso 2
Pegue las almohadillas antideslizantes en los extremos de los tubos curvos
(D1 y D2).

24
ES
Paso 3
Fije los tubos de hierro (B y D)
con los tornillos largos (3) y las
arandelas (5) y luego apriételos
con la llave en L (4).
Paso 4
Introduzca el tubo en T con agujeros (C) en el tubo curvo (D). Ajuste la altura
deseada y luego apriete el tornillo de cabeza de plástico (1).
Paso 5
Repita los pasos anteriores para instalar la segunda barra.

25
ES
Paso 6
Pulse el botón del muelle y conecte los tubos de hierro (A1 y A2).
Paso 7
Introduzca los tubos de hierro conectados (A1 y A2) en los tubos en T (C1 y
C2) y apriete los tubos de hierro con los pernos en L (2).


27
IT
Gentile cliente,
La ringraziamo per l'acquisto del dispositivo. La
preghiamo di leggere attentamente le seguenti
indicazioni e di seguirle per evitare eventuali danni.
Non ci assumiamo alcuna responsabilità per danni
scaturiti da una mancata osservanza delle avvertenze
di sicurezza e da un uso improprio del dispositivo. Per
accedere al manuale d'uso più recente e per ricevere
informazioni sul prodotto, scansionare il codice QR
seguente.
PRODUTTORE E IMPORTATORE (UK)
Produttore:
Chal-Tec GmbH, Wallstraße 16, 10179 Berlino, Germania.
Importatore per la Gran Bretagna:
Berlin Brands Group UK Limited
PO Box 42
272 Kensington High Street
London, W8 6ND
United Kingdom
AVVERTENZE DI SICUREZZA
• Leggere attentamente le istruzioni di montaggio relative a questo
prodotto.
• Controllare accuratamente la confezione e assicurarsi che non vi siano
pezzi mancanti. Non utilizzare il prodotto se mancano alcuni pezzi.
• Pezzi.
• Prima di utilizzare il dispositivo, accertarsi che tutte le viti siano ben
strette e che la posizione sia in piano.
• Prima di iniziare un programma di esercizi, è necessario consultare il
proprio medico. Questo è particolarmente importante se si hanno più di
35 anni, se non si ha mai fatto ginnastica, si è incinta, si è ammalati o si
ha una lesione alla schiena. L'uso improprio del dispositivo e la mancata
osservanza di tutte le istruzioni possono causare lesioni siche.
• Tenere bambini e animali domestici lontano dal dispositivo.

28
IT
VOLUME DI CONSEGNA
A1 tubo di ferro (58,3 cm) B1/B2 tubo di ferro (50 cm) D1/D2 tubo curvo
A2 tubo di ferro (59,3 cm) C1/C2 tubo a T con fori E accessori
E accessori:
1 Vite con testa di plastica (x2)
2 Vite L (x2)
3 Vite lunga (x2)
4 Chiave a L (x1)
5 Rondella di plastica (x2)
6 Tappo di chiusura (x2)
7 Cuscinetto antiscivolo (x4)

29
IT
MONTAGGIO
1° passaggio
Inserire i tappi (6) nelle estremità dei due tubi di ferro (A1 e A2).
2° passaggio
Incollare i cuscinetti antiscivolo alle estremità dei tubi curvi (D1 e D2).
30
IT
3° passaggio
Fissare i tubi di ferro (B e D) con
le viti lunghe (3) e le rondelle
(5) e poi serrarle con la chiave
a L (4).
4° passaggio
Inserire il tubo a T con fori (C) nel tubo curvo (D). Impostare l'altezza
desiderata e serrare la vite con testa di plastica (1).
5° passaggio
Ripetere i passaggi descritti in precedenza per installare il secondo
cavalletto.

31
IT
6° passaggio
Premere il pulsante a molla e collegare i tubi di ferro (A1 e A2).
7° passaggio
Inserire i tubi di ferro collegati (A1 e A2) nei tubi a T (C1 e C2) e serrare i tubi
di ferro con le viti a L (2).