User Guide
Indoor/Outdoor Wi-Fi Home Security Camera
©2026 TP-Link 1900001746 REV1.0.0

Contents
About This Guide ···········································································1
Introduction ······················································································2
Appearance ······················································································3
Set Up Your Camera ·····································································5
Set Up Using Amazon Frustration-Free Setup ··············6
Install a microSD Card ······························································ 10
Mount Your Camera··································································· 11
How to Reset Your Camera ··················································· 13
Authentication ··············································································14
1
About This Guide
This guide provides a brief introduction to the Indoor/Outdoor Home Security Wi-Fi Camera and regulatory information.
Please note that features available in Tapo may vary by model and software version. Tapo availability may also vary by region. All images, steps, and
descriptions in this guide are only examples and may not reect your actual Tapo experience.
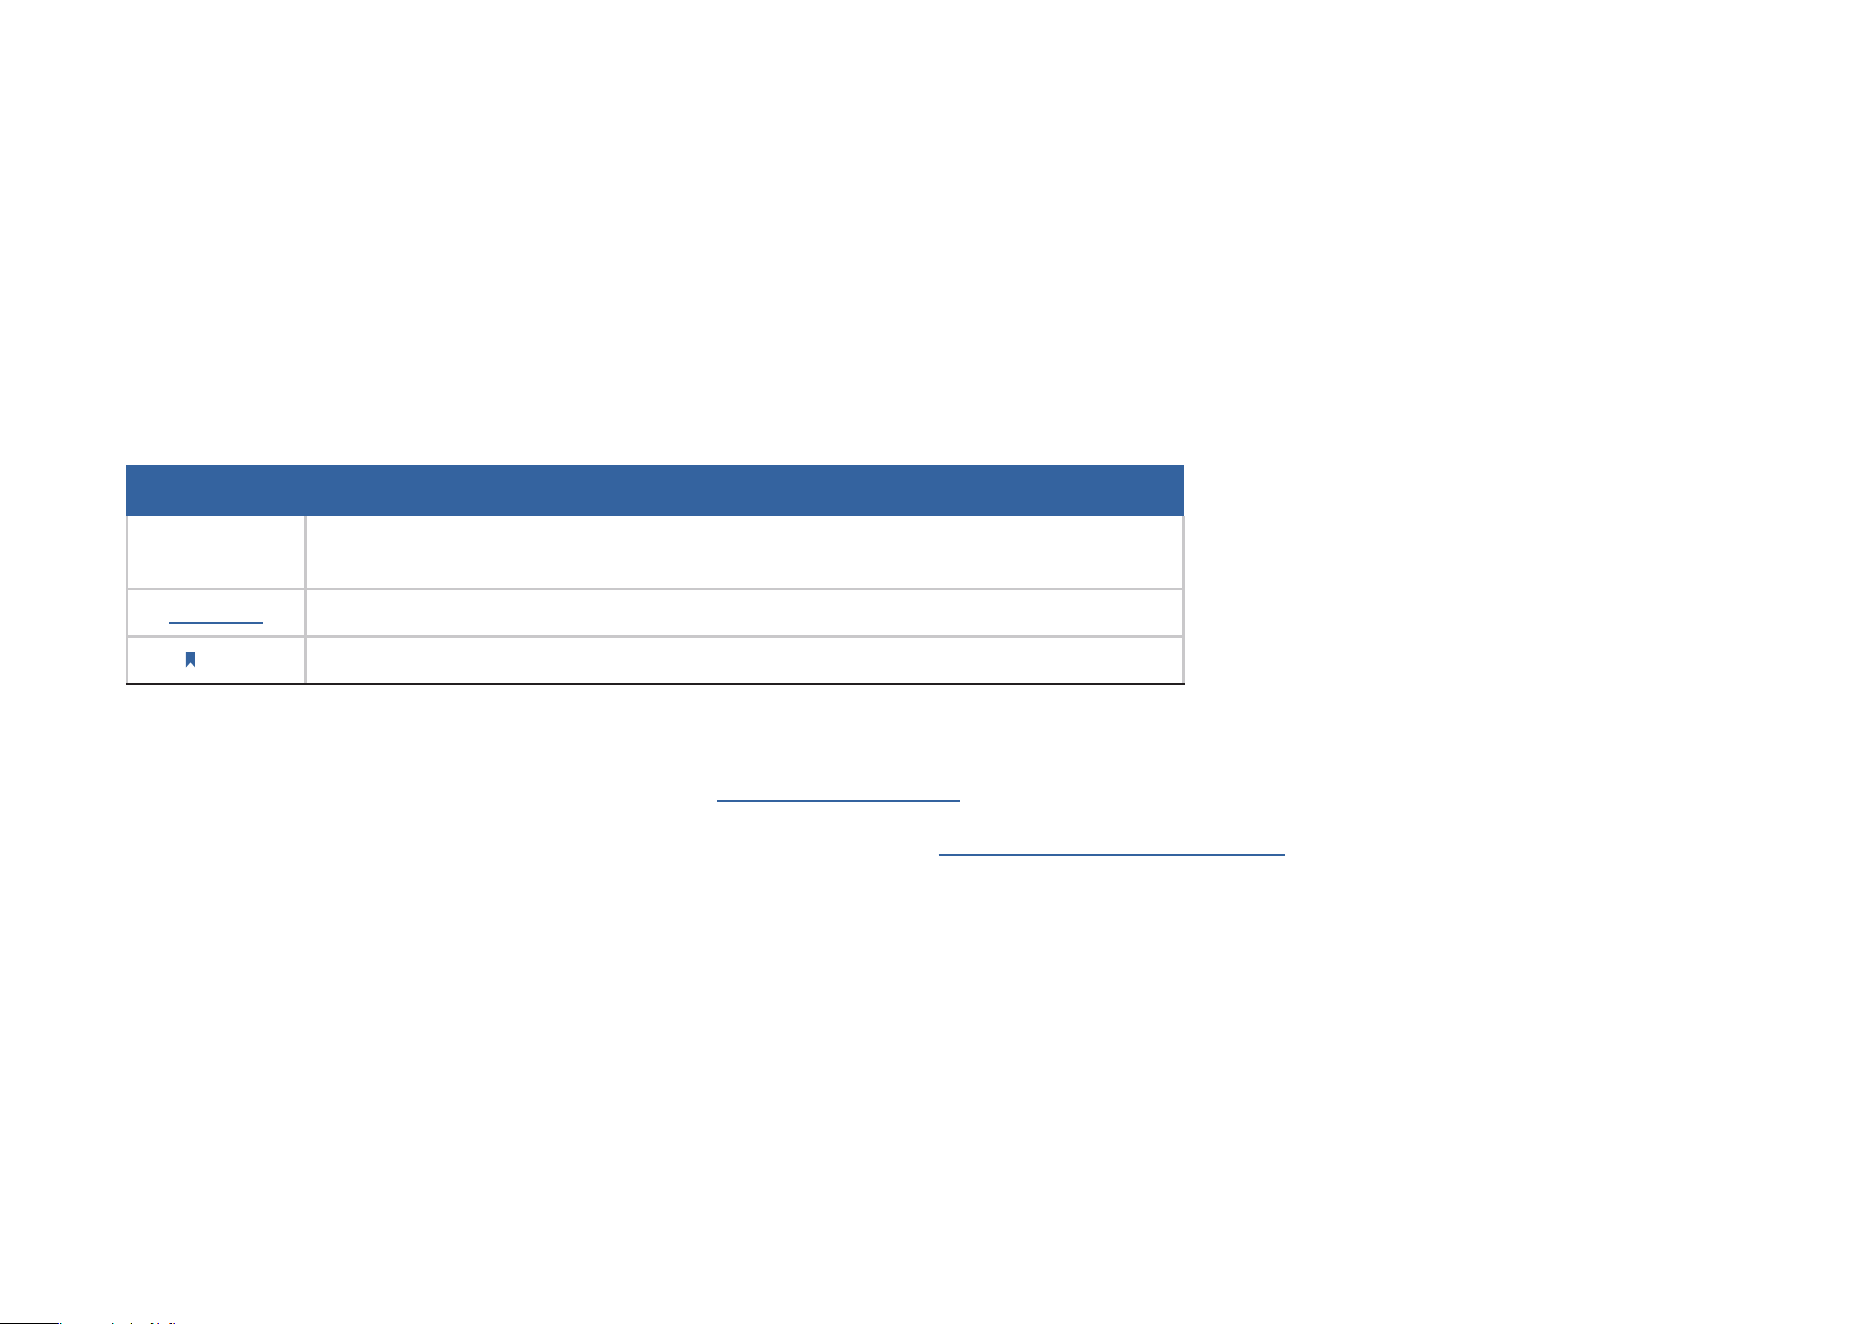
Conventions
In this guide, the following convention is used:
Convention Description
Blue
Key information appears in blue, including management page text such as menus,
items, buttons and so on.
Underline Hyperlinks are in blue and underlined. You can click to redirect to a website.
Note:
Ignoring this type of note might result in a malfunction or damage to the device.
More Info
• Specications can be found on the product page at https://www.tapo.com.
• Our Technical Support and troubleshooting information can be found at https://www.tapo.com/support/.

2
Introduction
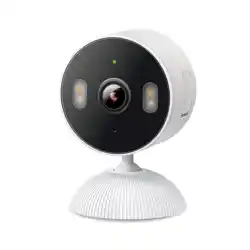
Your Flexible Home Security Guard, Always on the Watch. Enjoy exible indoor/outdoor use, versatile placement, and reliable performance
in any weather, thanks to its robust IP65 weatherproong.
• Indoor & Outdoor 24/7 Monitoring - Perfect for your yard, garage, bedroom, or kitchen. The IP65 weatherproof design withstands rain,
snow, and dust for 24/7 protection in any environment.
• Clear Vision, Day & Night - Integrated spotlights and color night vision deliver sharp 1080p video, ensuring rich details even in the dark.
• Free Smart AI Detection & Alerts - Advanced AI detects motion, people, and even a baby’s cry, keeping you instantly informed of what
matters most.
• Secured Local & Cloud Storage - Save recorded videos to a microSD card* (up to 512 GB) or by using Tapo Care** cloud services.
*microSD card needs to be purchased separately.
**Subscribe for cloud storage at https://www.tapo.com/tapocare/
• Light and Custom Sound Triggers - The camera can be set to have the spotlights turn on when motion is detected. You can also
customize sound to play in the event of a motion trigger.
• Full Duplex Two-Way Audio - Listen and speak to guests, delivery drivers, and pets on the other side of the camera with enhanced
clarity thanks to Tapo camera's premium microphone and speakers.
• Customizable Block Zones - Set customizable block zones to keep certain spaces from being recorded so you never need to worry
about personal moments being leaked.
• Compatibility with Amazon Alexa, Google Home & Samsung SmartThings - Take command with voice control capabilities through
popular third-party devices like Amazon Alexa and Google Home, allowing you to eortlessly manage your Tapo camera and enjoy true
hands-free operation.
3
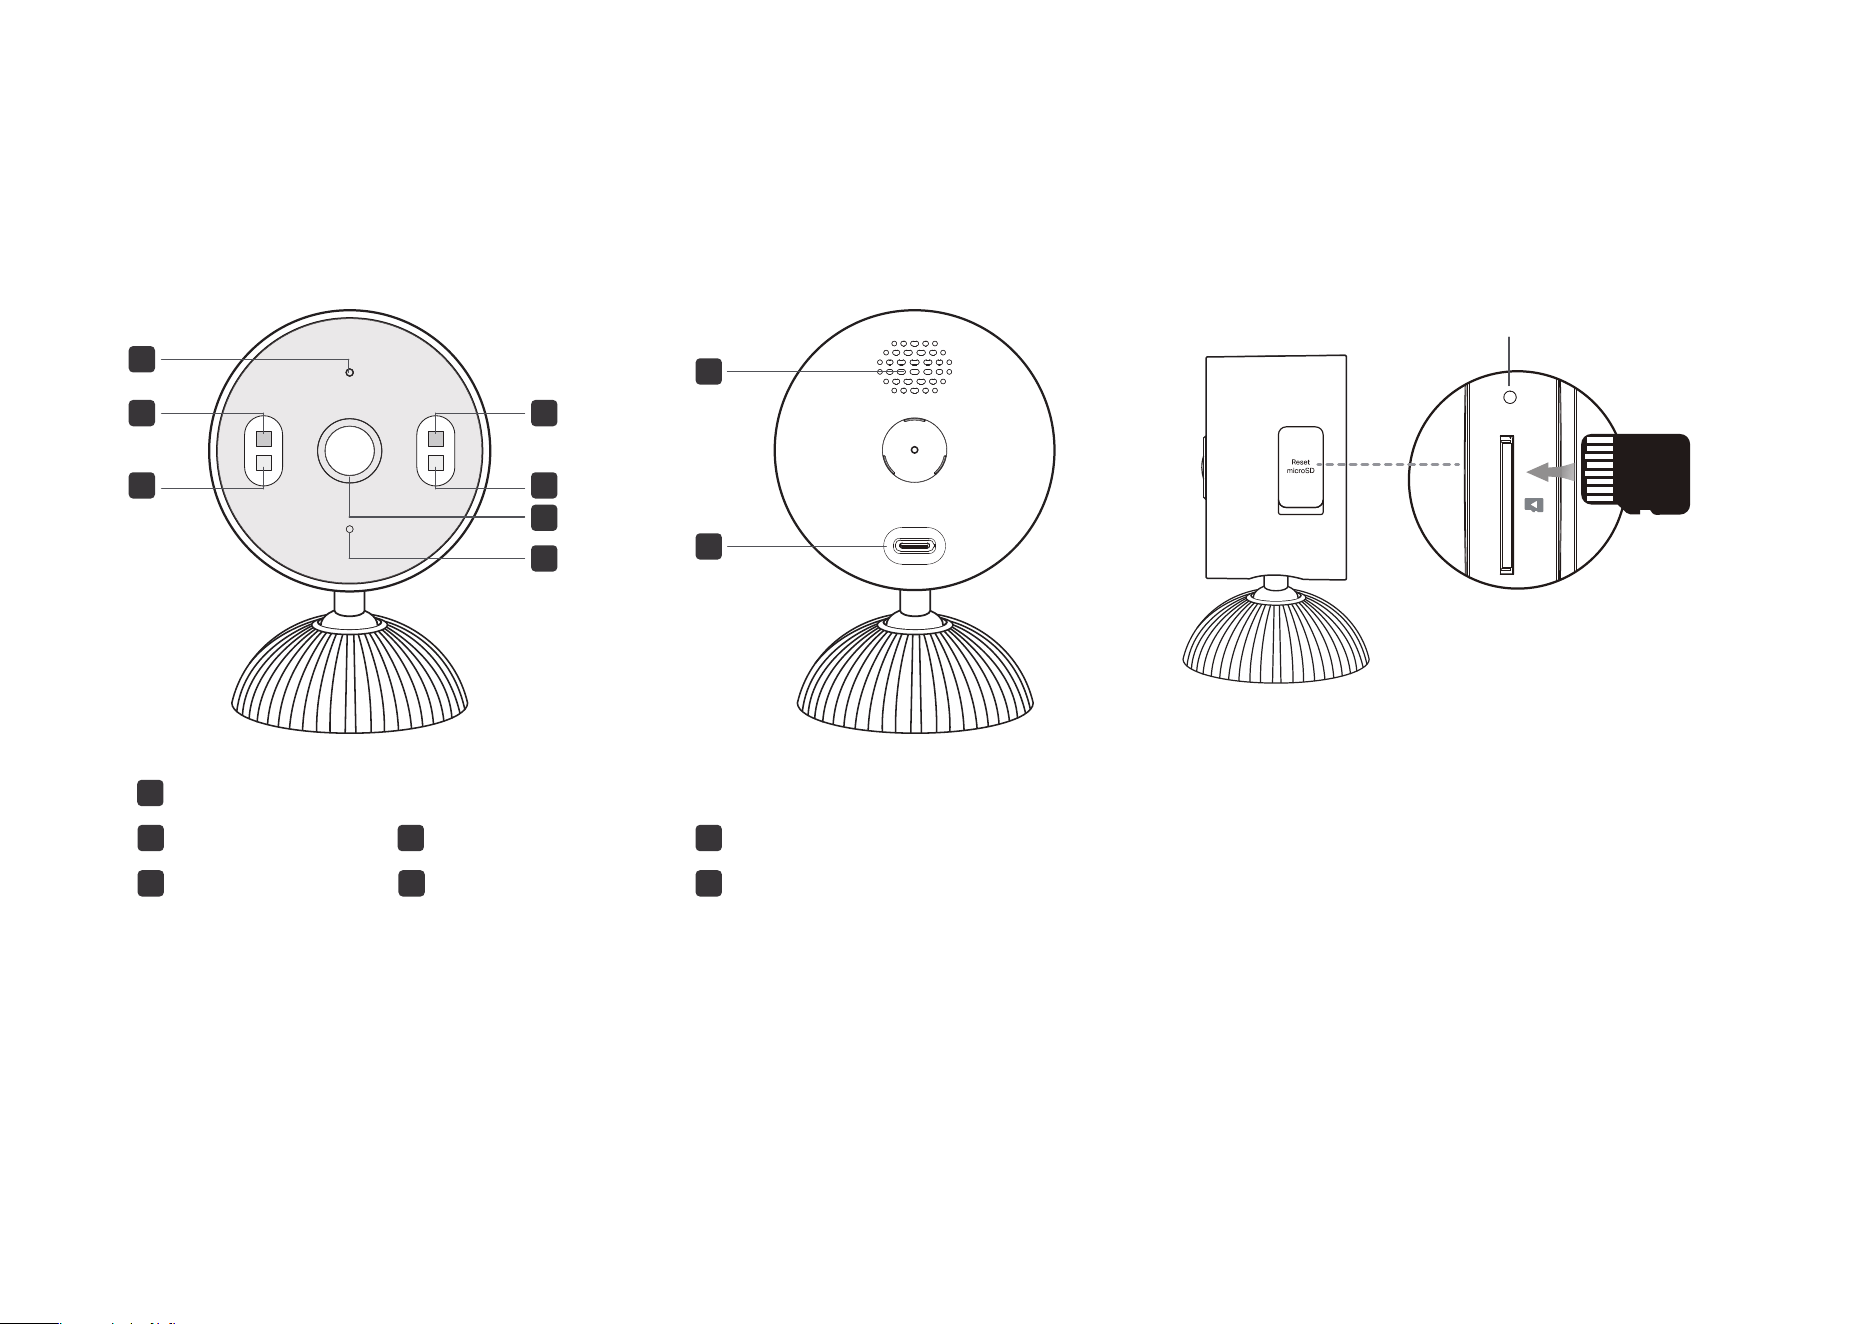
Appearance
6
Speaker
Reset
7 USB Type-C Power Port
1
2 White Lights
3 IR Lights
Status LED
5
Microphone
4 Lens
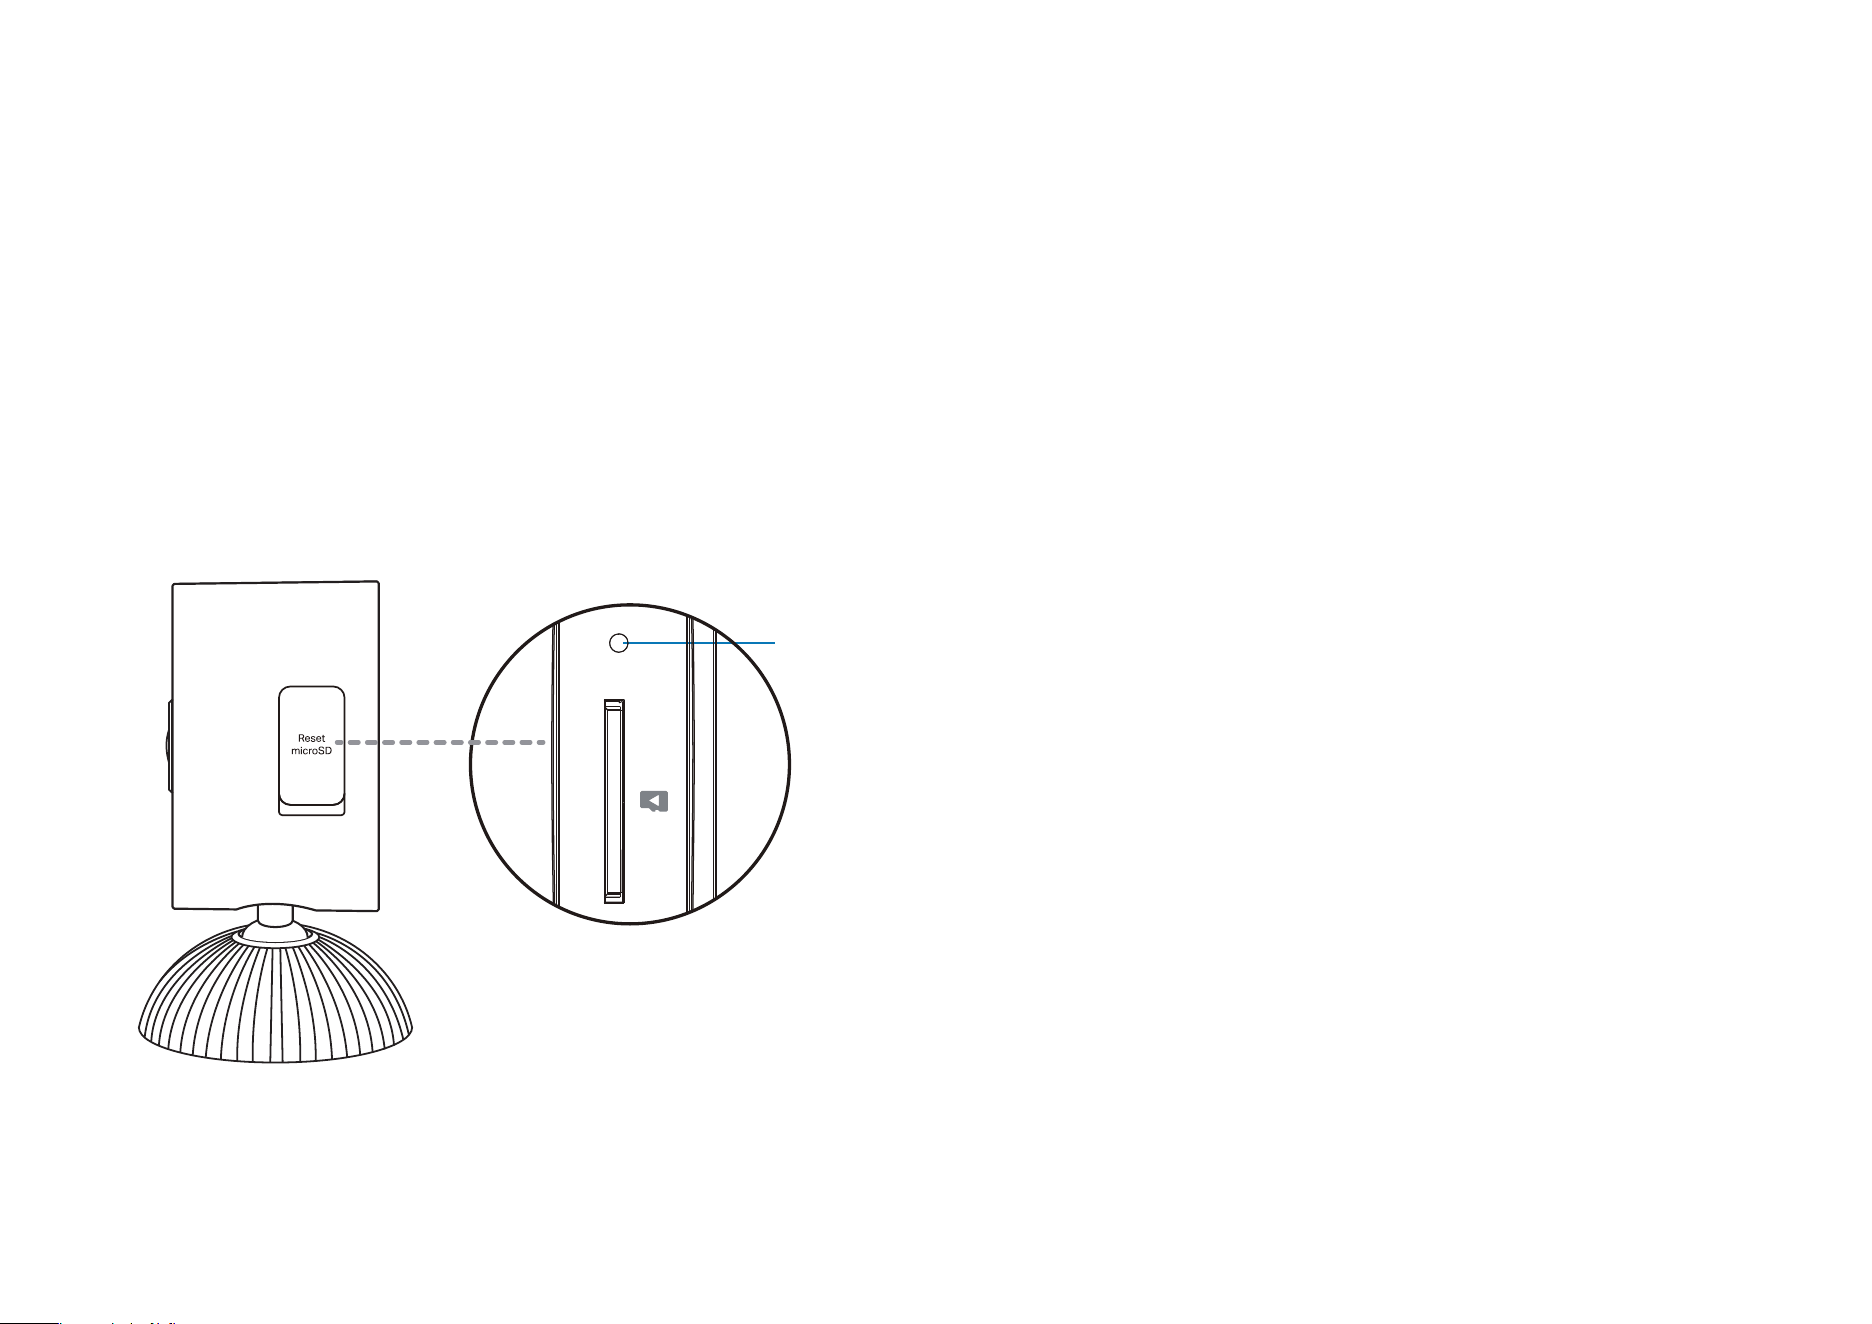
microSD Card Slot
Open the cover. Insert a microSD card (not included) and
initialize it on the Tapo app for local recording.
Reset
• Use a pin to press and hold for 5s: Reset Wi-Fi settings
• Use a pin to press and hold for 10s: Reset to factory settings
microSD
3
5
4
1
2
3
2
6
7
4
LED
Blinking red and green
Blinking red slowly
Solid amber
Blinking red quickly
Solid red
Solid green
Blinking green quickly
Starting up
Connected to the cloud
Ready for setup
Connecting to Wi-Fi
Connected to Wi-Fi
Camera resetting
Camera updating
5
Set Up Your Camera
Follow the steps below to set up your camera.
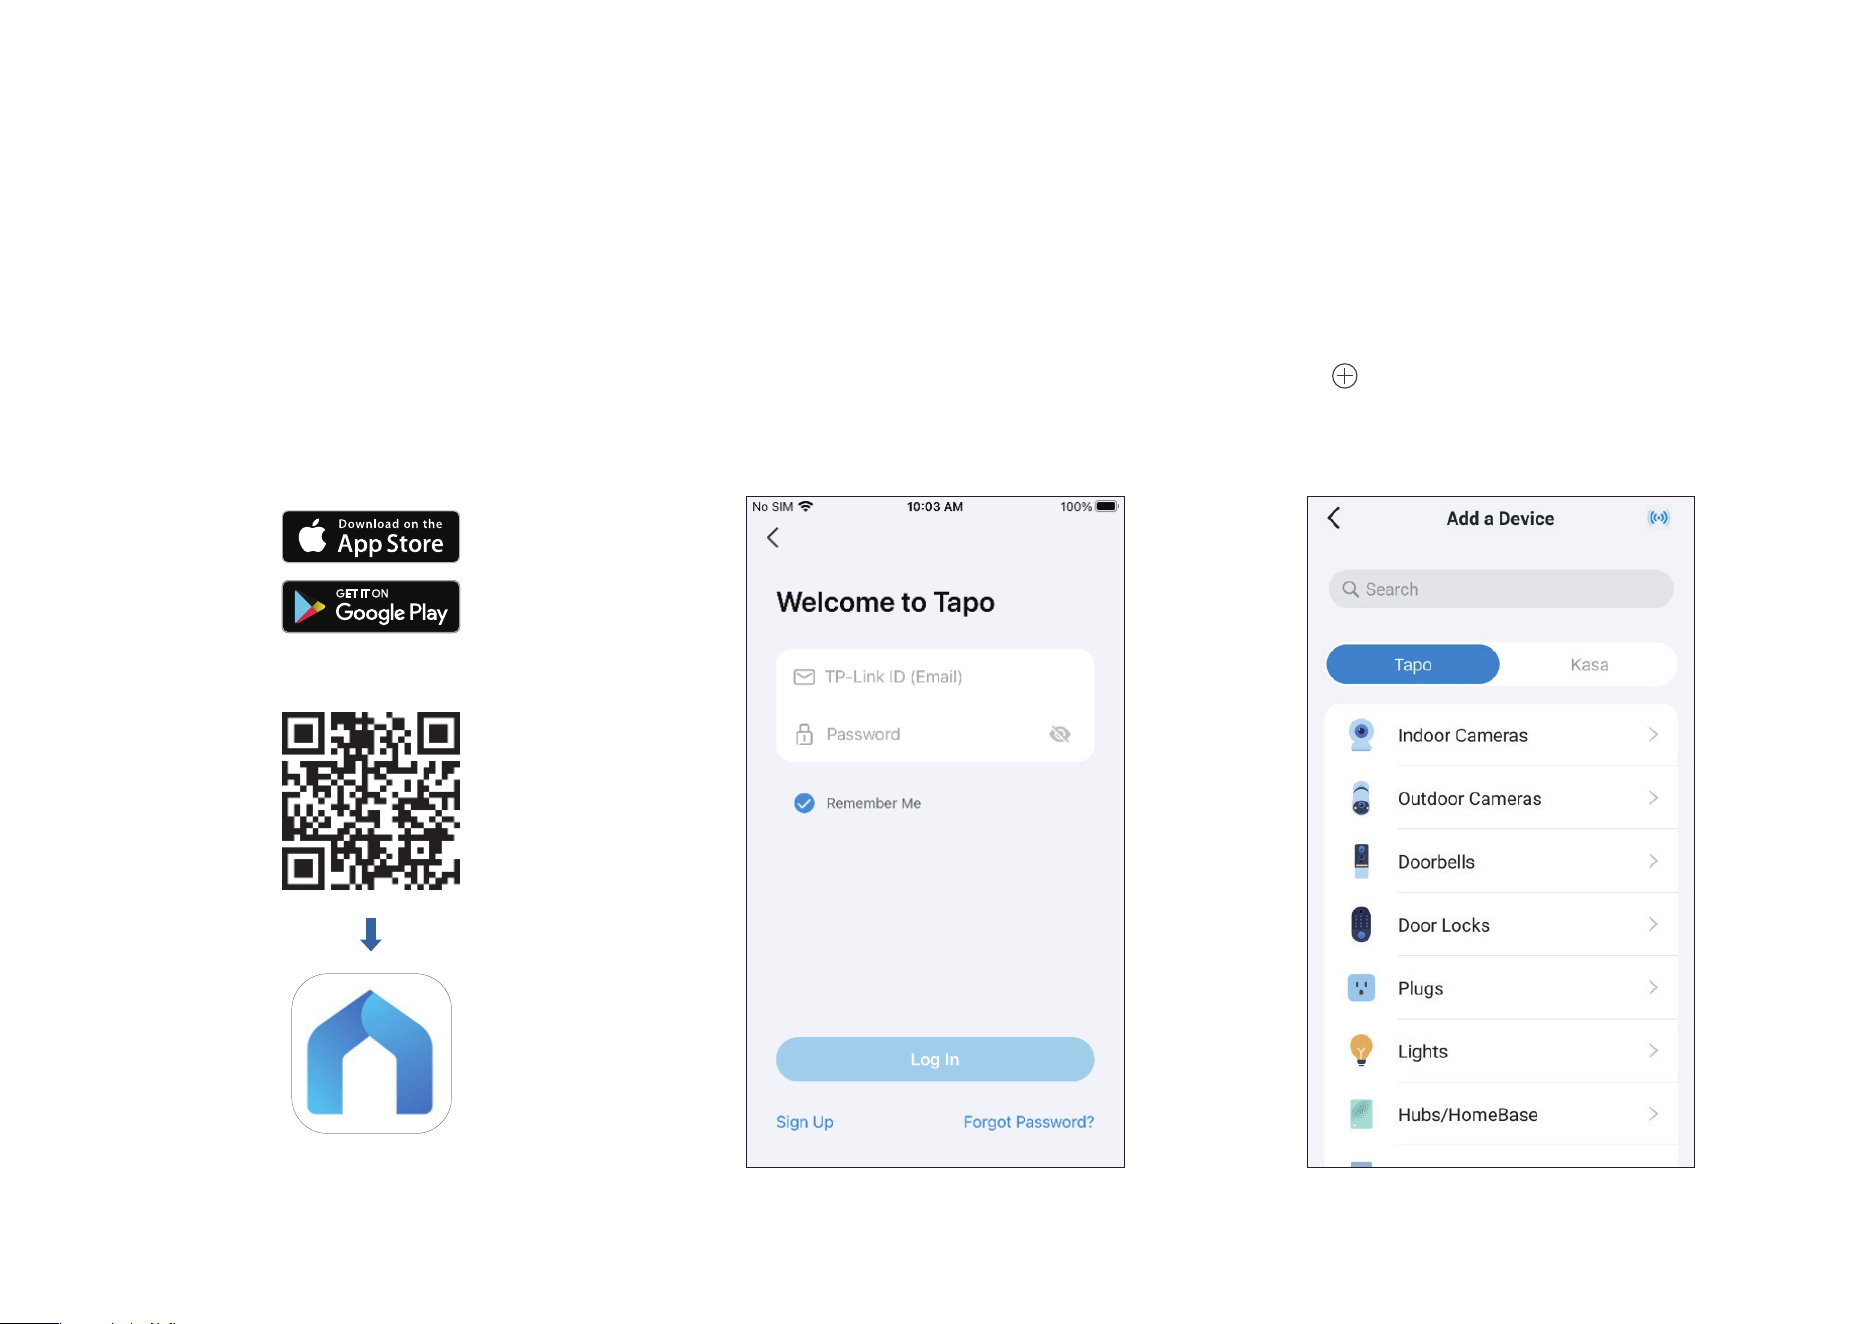
Step 1. Download Tapo App
Get the Tapo app from the App Store or
Google Play, or by scanning the QR code
below.
OR
Step 2. Log In
Open the app, and log in with your TP-Link ID.
If you don't have an account, create one rst.
Step 3. Add Your Camera
Tap the button in the app and select your
model. Then follow app instructions to set up
your camera.
6
Set Up Using Amazon Frustration-Free Setup
Note: TCW61 doesn't support Amazon Frustration-Free setup.
What is Amazon Frustration-Free Setup?
Amazon Frustration-Free Setup can help connect and set up Tapo smart devices in fewer steps, without having to remember and re-enter your Wi-Fi
password on each device.
To use this feature, conrm the following:
● The new Tapo device supports Amazon FFS.
● The new Tapo device is purchased from Amazon.
● You have an Amazon FFS enabled Alexa device or router.
● You have saved your Wi-Fi information to Amazon by using Alexa echo.
● Your Tapo device and router are on the same network as your Alexa echo.
LED Indications during Amazon Frustration-Free Setup
LED Status
Blinking red and green Ready for setup
Blinking amber FFS setup in progress
Solid green Working properly
If the LED does not turn solid green after a long time, you can try to add the Tapo device manually. (Press the Reset button on your Tapo device once.
Then open the Tapo app, tap the + button on the page, select your device model, and follow the app instructions. )
7
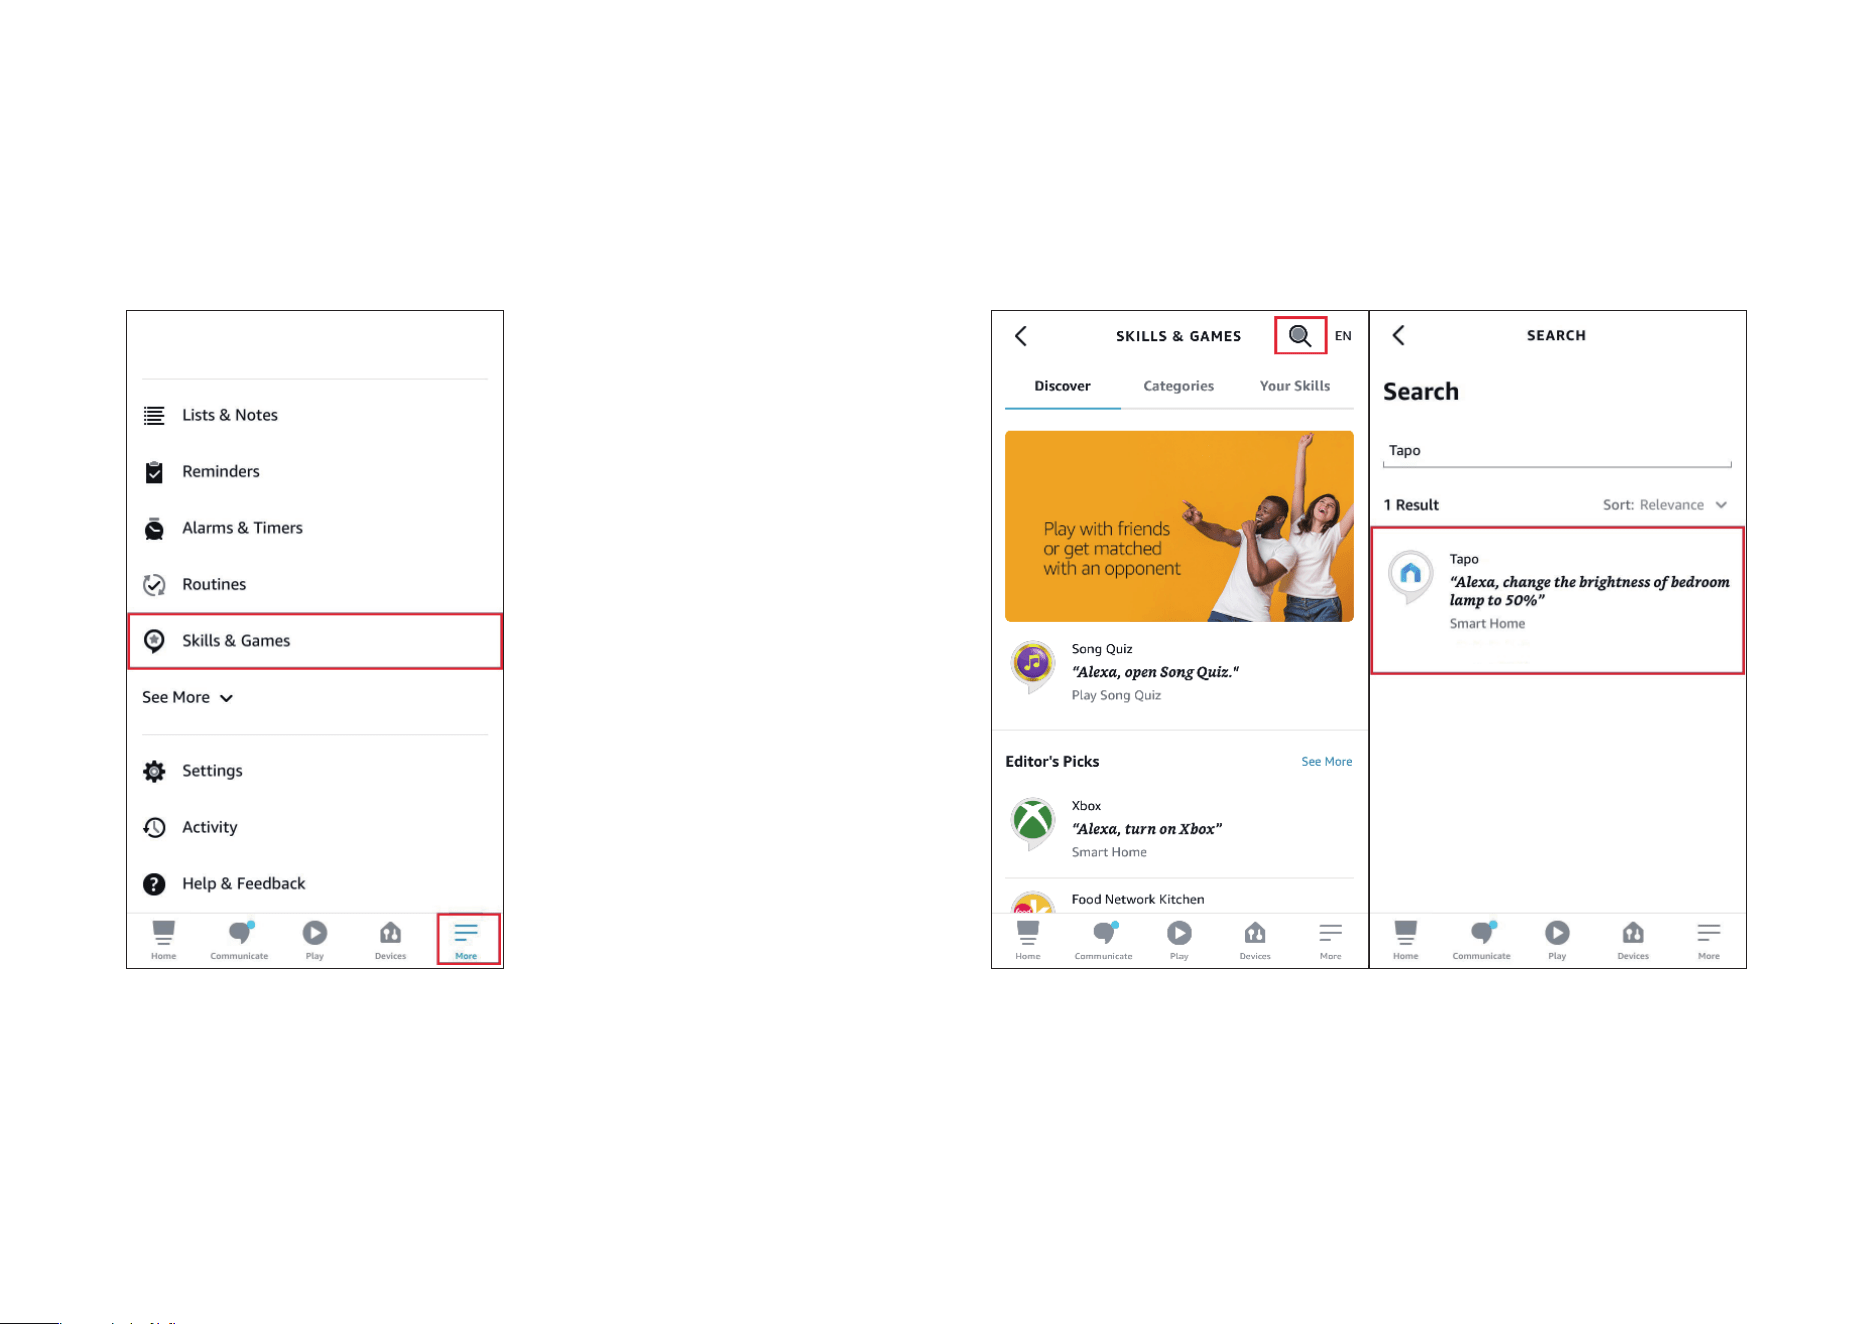
1. Open the Amazon Alexa app. Then tap More and select Skills &
Games.
How to use Amazon Frustration-Free Setup with Tapo devices
2. Enter Tapo in the search bar and choose Tapo.
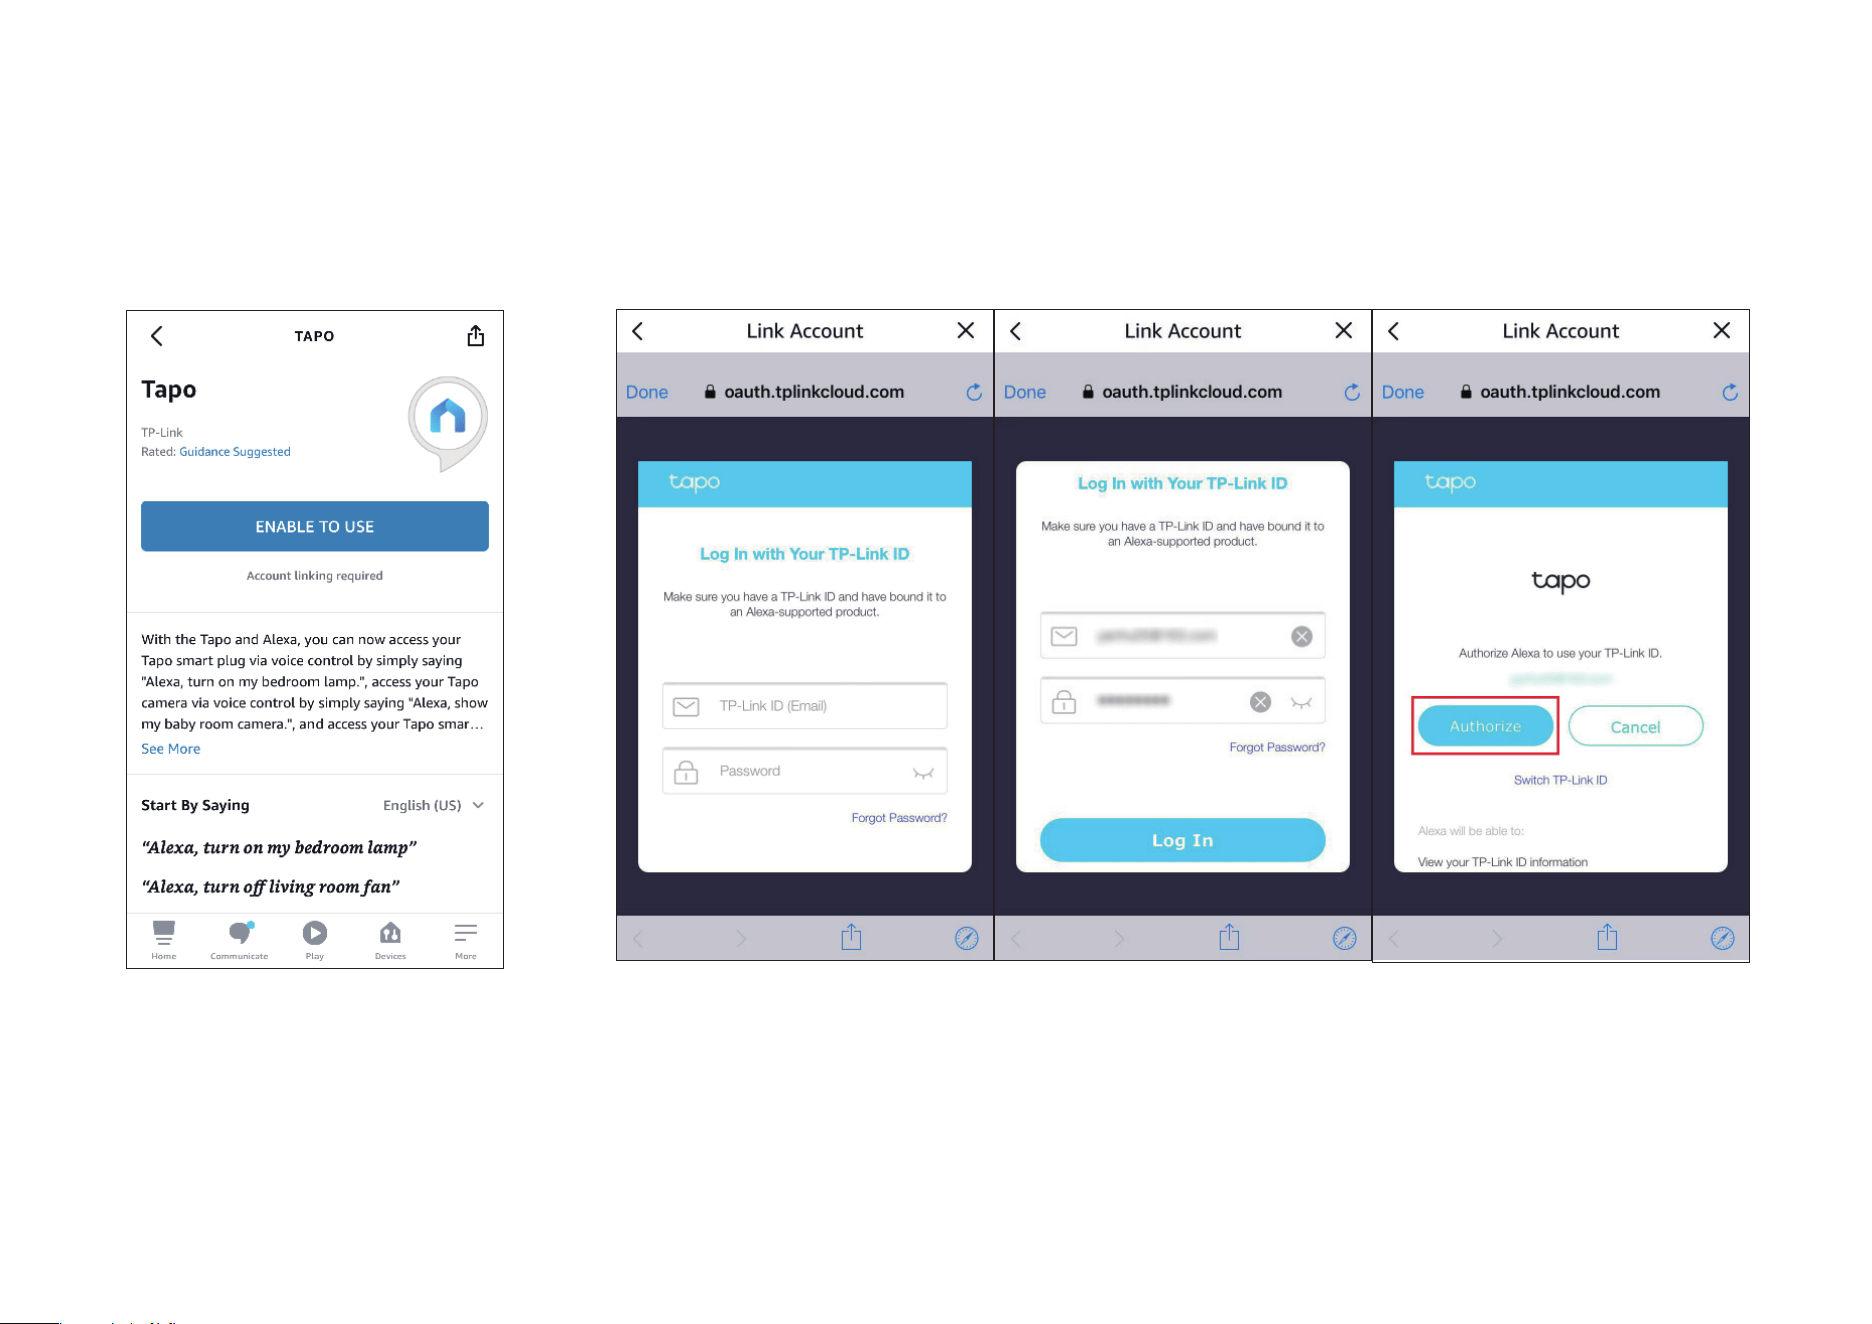
8
3. Tap the ENABLE TO USE button.
4. Log in with your TP-Link ID that has bound to your Tapo device, and tap Authorize. After authorized
successfully, the message Tapo has been successfully linked will come up.

9
5. Plug in your Tapo device and the setup will complete automatically in two minutes.
For setting up more Tapo devices, just plug in and enjoy!
Done!
If this device displays on the Home page in the Tapo app, it indicates this device has been successfully associated with your Amazon account and
joined your Wi-Fi network automatically.
If this device does not display on the Home page in the Tapo app, try setting it up manually. (Tap the + button on the page, select your device model,
and then follow the app instructions.)
10
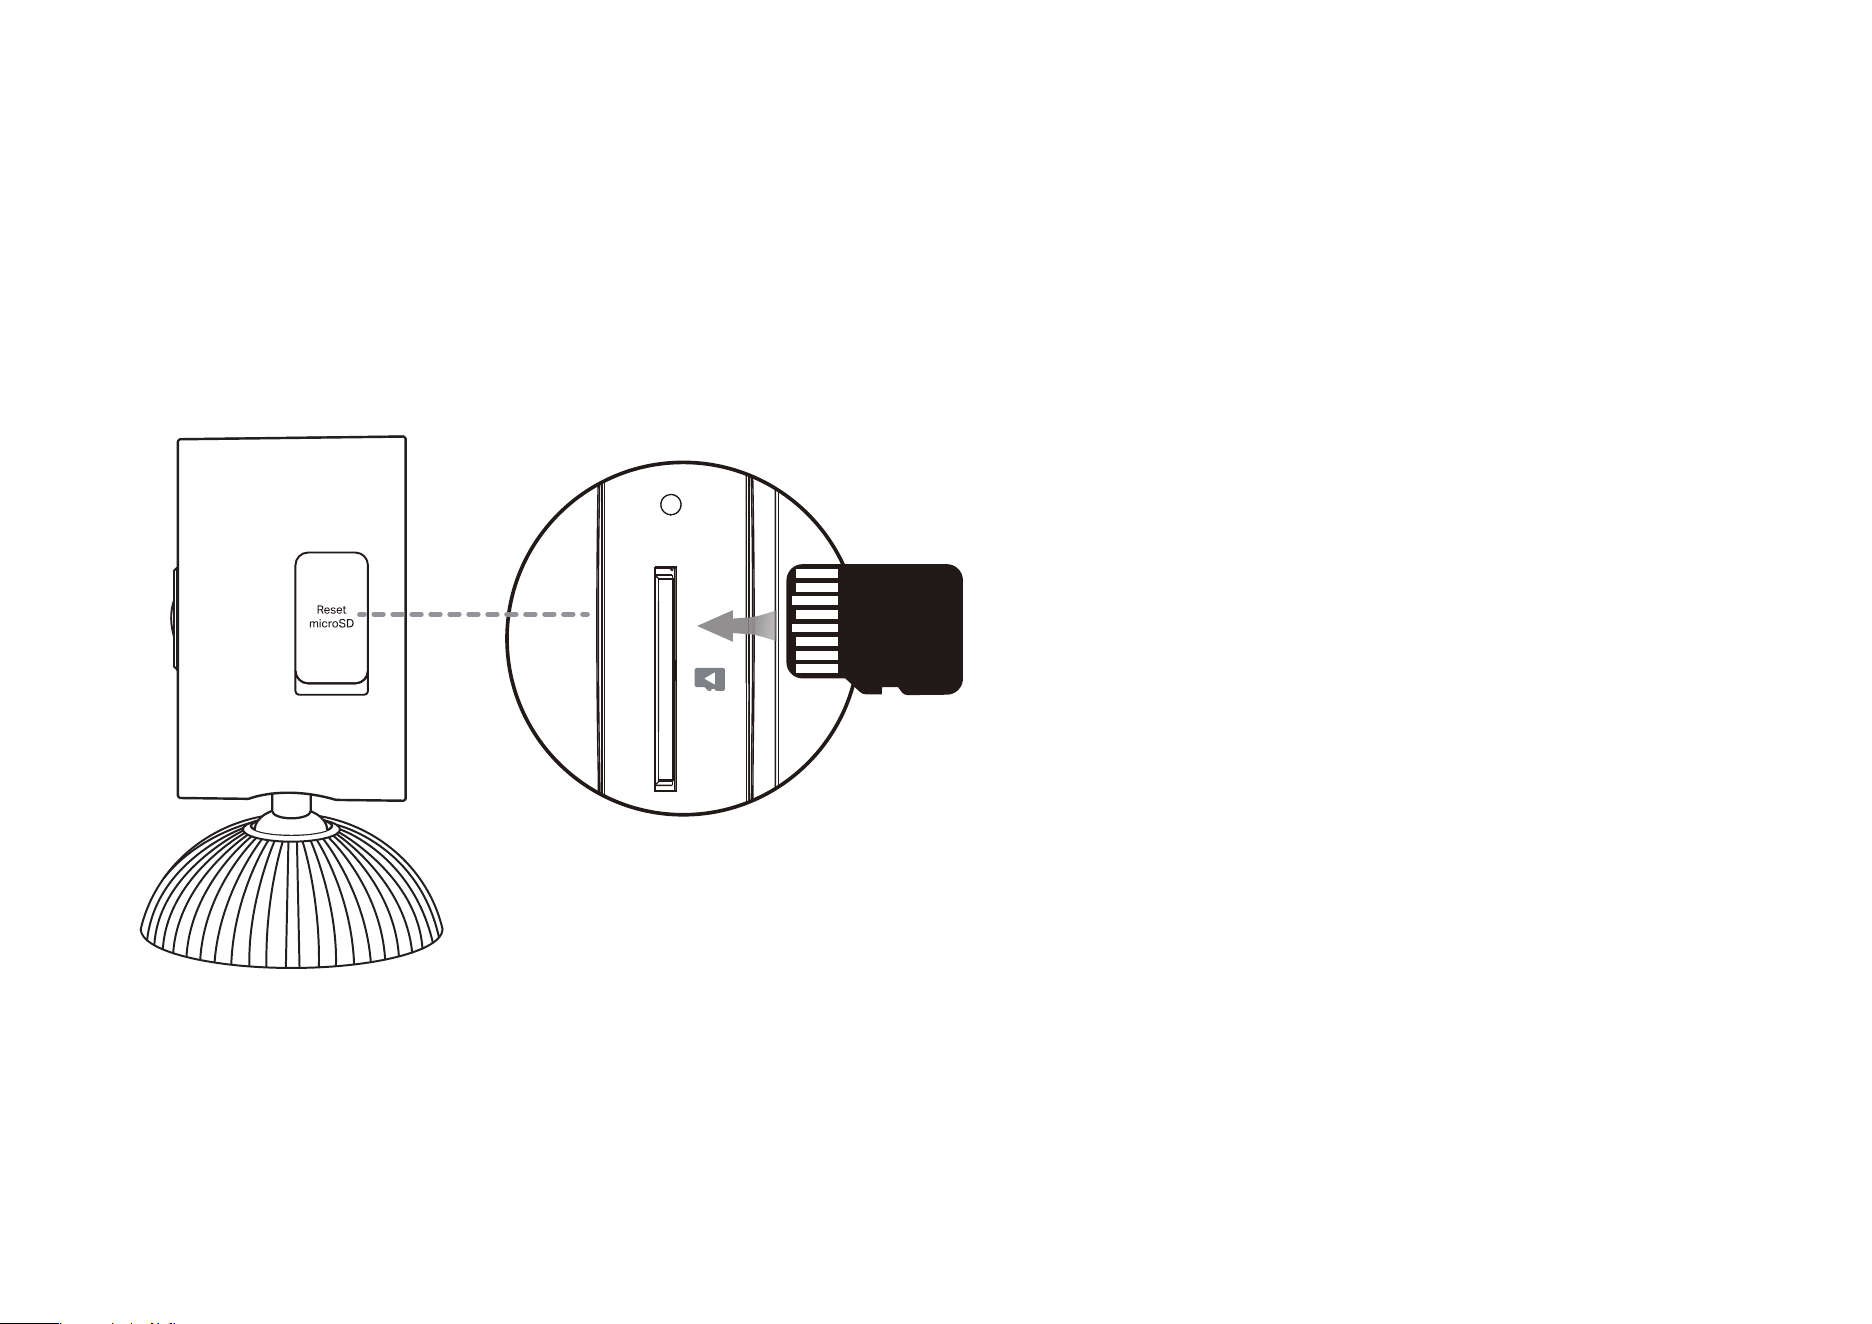
Install a microSD Card
Follow the steps below to install the microSD card for local recording.
You can go to Camera Settings > microSD Card in the Tapo app to check the card status or format your card.
Open the cover. Identify the direction of the microSD card and carefully insert the card into the slot. Push in the card until you hear a clicking sound.
microSD
11
Mount Your Camera
When you nish adding your camera in the Tapo app, you can set it on a table or shelf. You can also mount it on a wall or ceiling
with the provided mounting template and screws. Follow the steps below to mount your new camera or follow the setup video at
https://www.tp-link.com/support/setup-video/#cloud-cameras.
Φ=6 mm (15/64 in.)
Bracket
Base
6
0
-0.5
3.5
+0.1
-0.1
30
+0.5
-0.5
1.8
+0.1
-0.1
*1.15-1.73
3.8(REF)
1(REF)
35P
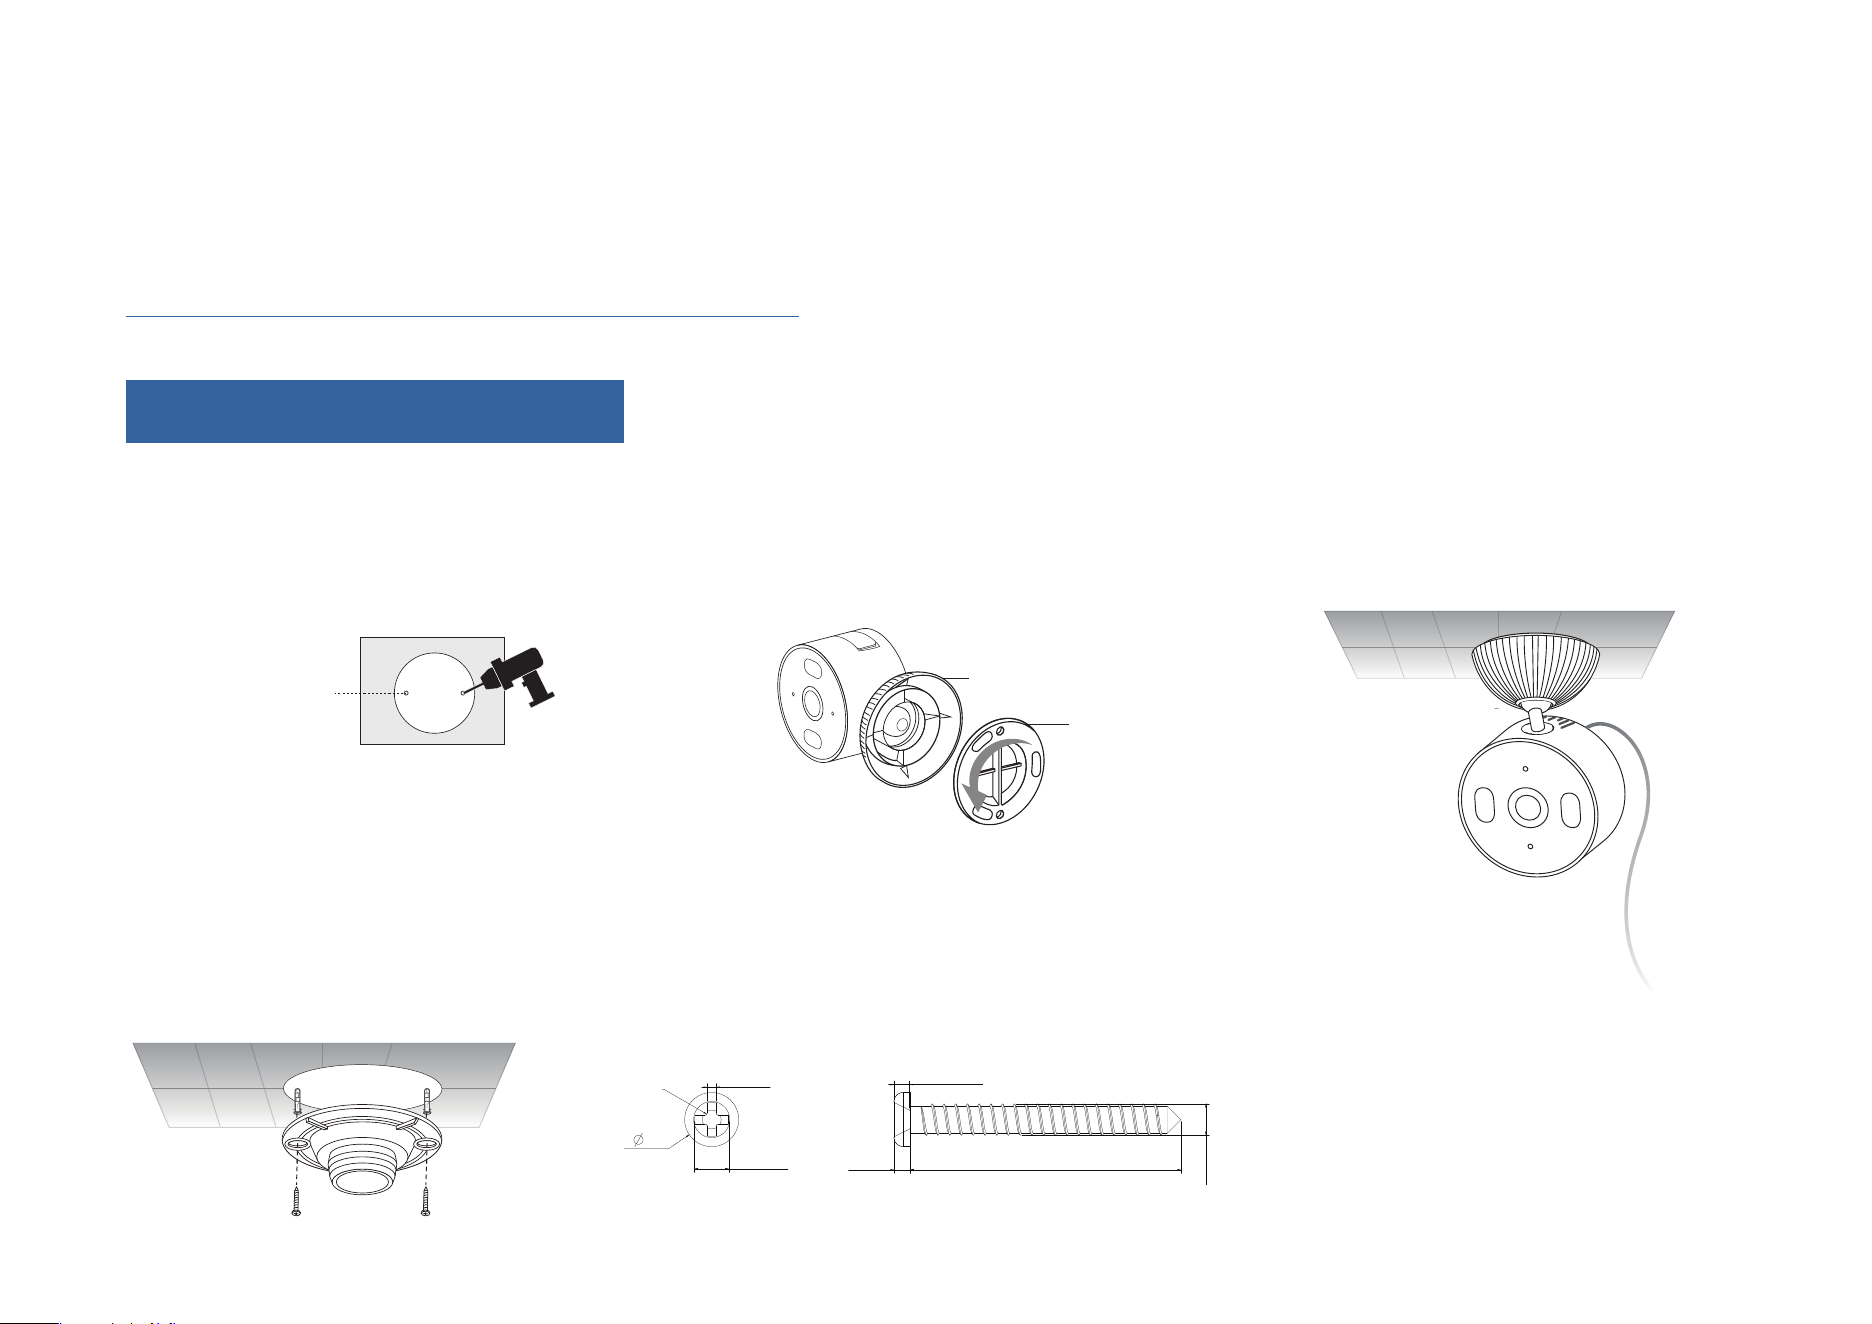
Option 1. Mount to the Ceiling
1. Drill Holes
Stick the mounting template sticker to the
desired mounting place. Drill two holes
according to the template.
2. Unscrew the Bracket
Unscrew the bracket from the base.
3. Secure the Bracket
Insert two anchors into the holes and use
the screws to ax the bracket over the
anchors.
4. Install the Camera
Screw the camera with the base onto the bracket. Loosen the base to adjust the angle,
then tighten to secure.
12
6
0
-0.5
3.5
+0.1
-0.1
30
+0.5
-0.5
1.8
+0.1
-0.1
*1.15-1.73
3.8(REF)
1(REF)
35P
Φ=6 mm (15/64 in.)
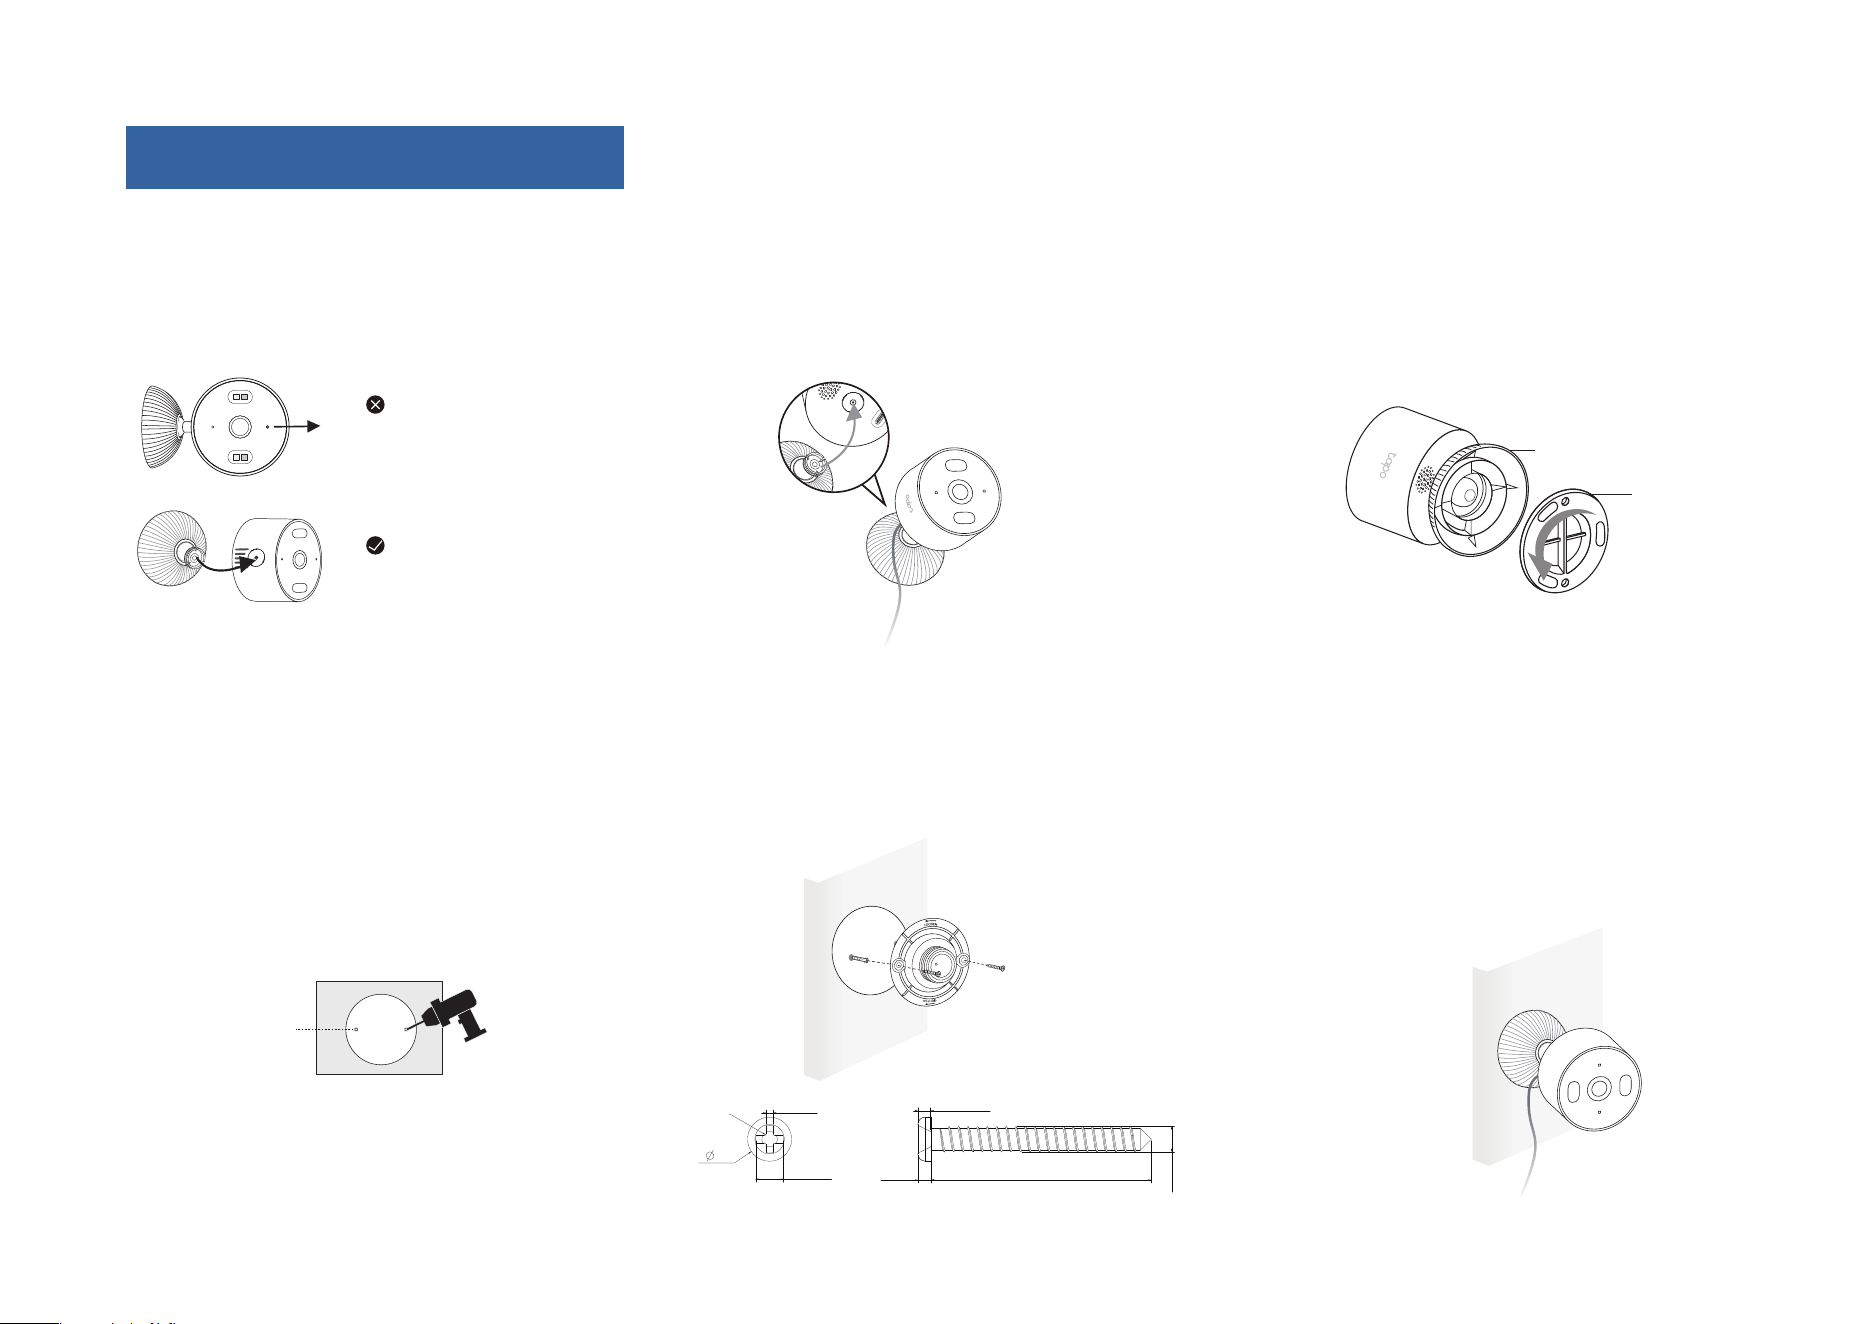
Force at an angle
Force along shaft
Bracket
Base
1. Remove the Camera
Avoid pulling the camera straight along
the shaft. Instead, tilt and lift it at an angle
for easier removal.
2. Install Over the Back Mounting Hole
Make sure the bracket is secured to
the base. Push the shaft into the back
mounting hole until it clicks into place.
5. Secure the Bracket
Insert two anchors into the holes and use
the screws to ax the bracket over the
anchors.
3. Unscrew the Bracket
Unscrew the bracket from the base.
6. Install the Camera
Screw the camera with the base onto the
bracket. Loosen the base to adjust the
angle, then tighten to secure.
4. Drill Holes
Stick the mounting template sticker to the
desired mounting place. Drill two holes
according to the template.
Option 2. Mount to the Wall
13
How to Reset Your Camera
Follow the steps below to reset your camera via the Reset button.
You can also go to Camera Settings in the Tapo app and tap Remove Device at the bottom to factory reset your camera.
Open the cover.
Press and hold the RESET button to reset the camera.
• Press and hold for 5s until the LED blinks red slowly: Reset Wi-Fi settings only
• Press and hold for 10s until the LED blinks red quickly: Reset to factory settings
Reset Button
Authentication
FCC compliance information statement
Product Name: Indoor/Outdoor Home Security Wi-Fi Camera
Model Number: Tapo C103 / Tapo C104 / TCW61
Component Name Model
I.T.E. Power Supply AD-D0930500100US01 / A8-501000
Responsible party:
TP-Link Systems Inc.
Address: 10 Mauchly, Irvine, CA 92618
Website: http://www.tp-link.com/us/
Tel: +1 626 333 0234
Fax: +1 909 527 6804
E-mail: sales.usa@tp-link.com
This equipment has been tested and found to comply with the limits for a Class B digital device, pursuant to part 15 of the FCC Rules. These limits are
designed to provide reasonable protection against harmful interference in a residential installation. This equipment generates, uses and can radiate
radio frequency energy and, if not installed and used in accordance with the instructions, may cause harmful interference to radio communications.
However, there is no guarantee that interference will not occur in a particular installation. If this equipment does cause harmful interference to radio or
television reception, which can be determined by turning the equipment o and on, the user is encouraged to try to correct the interference by one or
more of the following measures:
• Reorient or relocate the receiving antenna.
• Increase the separation between the equipment and receiver.
• Connect the equipment into an outlet on a circuit dierent from that to which the receiver is connected.
• Consult the dealer or an experienced radio/ TV technician for help.

This device complies with part 15 of the FCC Rules. Operation is subject to the following two conditions:
1. This device may not cause harmful interference.
2. This device must accept any interference received, including interference that may cause undesired operation.
Any changes or modifications not expressly approved by the party responsible for compliance could void the user’s authority to operate the
equipment.
Note: The manufacturer is not responsible for any radio or TV interference caused by unauthorized modications to this equipment. Such modications
could void the user’s authority to operate the equipment.
FCC RF Radiation Exposure Statement
This equipment complies with FCC RF radiation exposure limits set forth for an uncontrolled environment. This device and its antenna must not be co-
located or operating in conjunction with any other antenna or transmitter.
“To comply with FCC RF exposure compliance requirements, this grant is applicable to only Mobile Configurations. The antennas used for this
transmitter must be installed to provide a separation distance of at least 20 cm from all persons and must not be co-located or operating in conjunction
with any other antenna or transmitter.”
We, TP-Link Systems Inc., has determined that the equipment shown as above has been shown to comply with the applicable technical standards,
FCC part 15. There is no unauthorized change is made in the equipment and the equipment is properly maintained and operated.
Issue Date: 2025.12.08
FCC compliance information statement
Product Name: I.T.E. Power Supply
Model Number: AD-D0930500100US01 / A8-501000
Responsible party:
TP-Link Systems Inc.
Address: 10 Mauchly, Irvine, CA 92618
Website: http://www.tp-link.com/us/
Tel: +1 626 333 0234
Fax: +1 909 527 6804
E-mail: sales.usa@tp-link.com

This equipment has been tested and found to comply with the limits for a Class B digital device, pursuant to part 15 of the FCC Rules. These
limits are designed to provide reasonable protection against harmful interference in a residential installation. This equipment generates, uses
and can radiate radio frequency energy and, if not installed and used in accordance with the instructions, may cause harmful interference to radio
communications. However, there is no guarantee that interference will not occur in a particular installation. If this equipment does cause harmful
interference to radio or television reception, which can be determined by turning the equipment off and on, the user is encouraged to try to correct
the interference by one or more of the following measures:
• Reorient or relocate the receiving antenna.
• Increase the separation between the equipment and receiver.
• Connect the equipment into an outlet on a circuit different from that to which the receiver is connected.
• Consult the dealer or an experienced radio/ TV technician for help.
This device complies with part 15 of the FCC Rules. Operation is subject to the following two conditions:
1. This device may not cause harmful interference.
2. This device must accept any interference received, including interference that may cause undesired operation.
Any changes or modifications not expressly approved by the party responsible for compliance could void the user’s authority to operate the
equipment.
We, TP-Link Systems Inc., has determined that the equipment shown as above has been shown to comply with the applicable technical standards,
FCC part 15. There is no unauthorized change is made in the equipment and the equipment is properly maintained and operated.
Issue Date: 2025.12.08

Canadian Compliance Statement
This device contains licence-exempt transmitter(s)/receiver(s) that comply with Innovation, Science and Economic Development Canada’s licence-
exempt RSS(s). Operation is subject to the following two conditions:
(1) This device may not cause interference.
(2) This device must accept any interference, including interference that may cause undesired operation of the device.
L’émetteur/récepteur exempt de licence contenu dans le présent appareil est conforme aux CNR d’Innovation, Sciences et Développement
économique Canada applicables aux appareils radio exempts de licence. L’exploitation est autorisée aux deux conditions suivantes :
1) L’appareil ne doit pas produire de brouillage;
2) L’appareil doit accepter tout brouillage radioélectrique subi, même si le brouillage est susceptible d’en compromettre le fonctionnement.
Radiation Exposure Statement:
This equipment complies with IC radiation exposure limits set forth for an uncontrolled environment. This equipment should be installed and operated
with minimum distance 20cm between the radiator & your body.
Déclaration d’exposition aux radiations:
Cet équipement est conforme aux limites d’exposition aux rayonnements IC établies pour un environnement non contrôlé. Cet équipement doit être
installé et utilisé avec un minimum de 20 cm de distance entre la source de rayonnement et votre corps
Industry Canada Statement
CAN ICES-3 (B)/NMB-3(B)
Safety Information
• Do not use damaged charger or USB cable to charge the device.
• Do not use any other chargers than those recommended.
• Do not use the device where wireless devices are not allowed.
• Adapter shall be easily accessible.
• Use only power supplies which are provided by manufacturer and in the original packing of this product. If you have any questions, please don't
hesitate to contact us.
• Keep the device away from re or hot environments. DO NOT immerse in water or any other liquid.
• Do not disassemble, repair or modify the product.
• Do not use the product if the casing has been broken. Danger of electric shock.

• Never touch the product with wet hands.
• Do not place near automatically controlled devices such as fire alarms. Radio waves emitted from this product may cause such devices to
malfunction resulting in an accident.
• Observe restrictions on using wireless products in fuel depots, chemical plants or when blasting operations are in progress.
• Do not use liquid to clean the product. Only use a dry cloth.
• Never put metal objects inside the product. If a metal object enters the product, turn o the circuit breaker and contact an authorised electrician.
• This product is not intended to be used when providing medical care. Consult the manufacturer of any personal medical devices, such as pacemakers
or hearing aids to determine if they are adequality shielded from external RF (radio frequency) energy.
• Do not use this product in health care facilities. Hospitals or health care facilities may be using equipment that could be sensitive to external RF
energy.
• Do not place heavy objects on top of the product.
• When you leave the product unused for a long time unplug the product from the power outlet.
• This product may interfere with other electronic products such as TV, radios, personal computers, phones or other wireless devices.
• Adapter should be used indoors where the ambient temperature is lower than or equal to 40 ºC.
• Operating Temperature: -20 ºC ~ 45 ºC (-4 °F ~ 113 °F)
• The camera shall be installed no higher than 2 meters.
Please read and follow the above safety information when operating the device. We cannot guarantee that no accidents or damage will occur due to
improper use of the device. Please use this product with care and operate at your own risk.
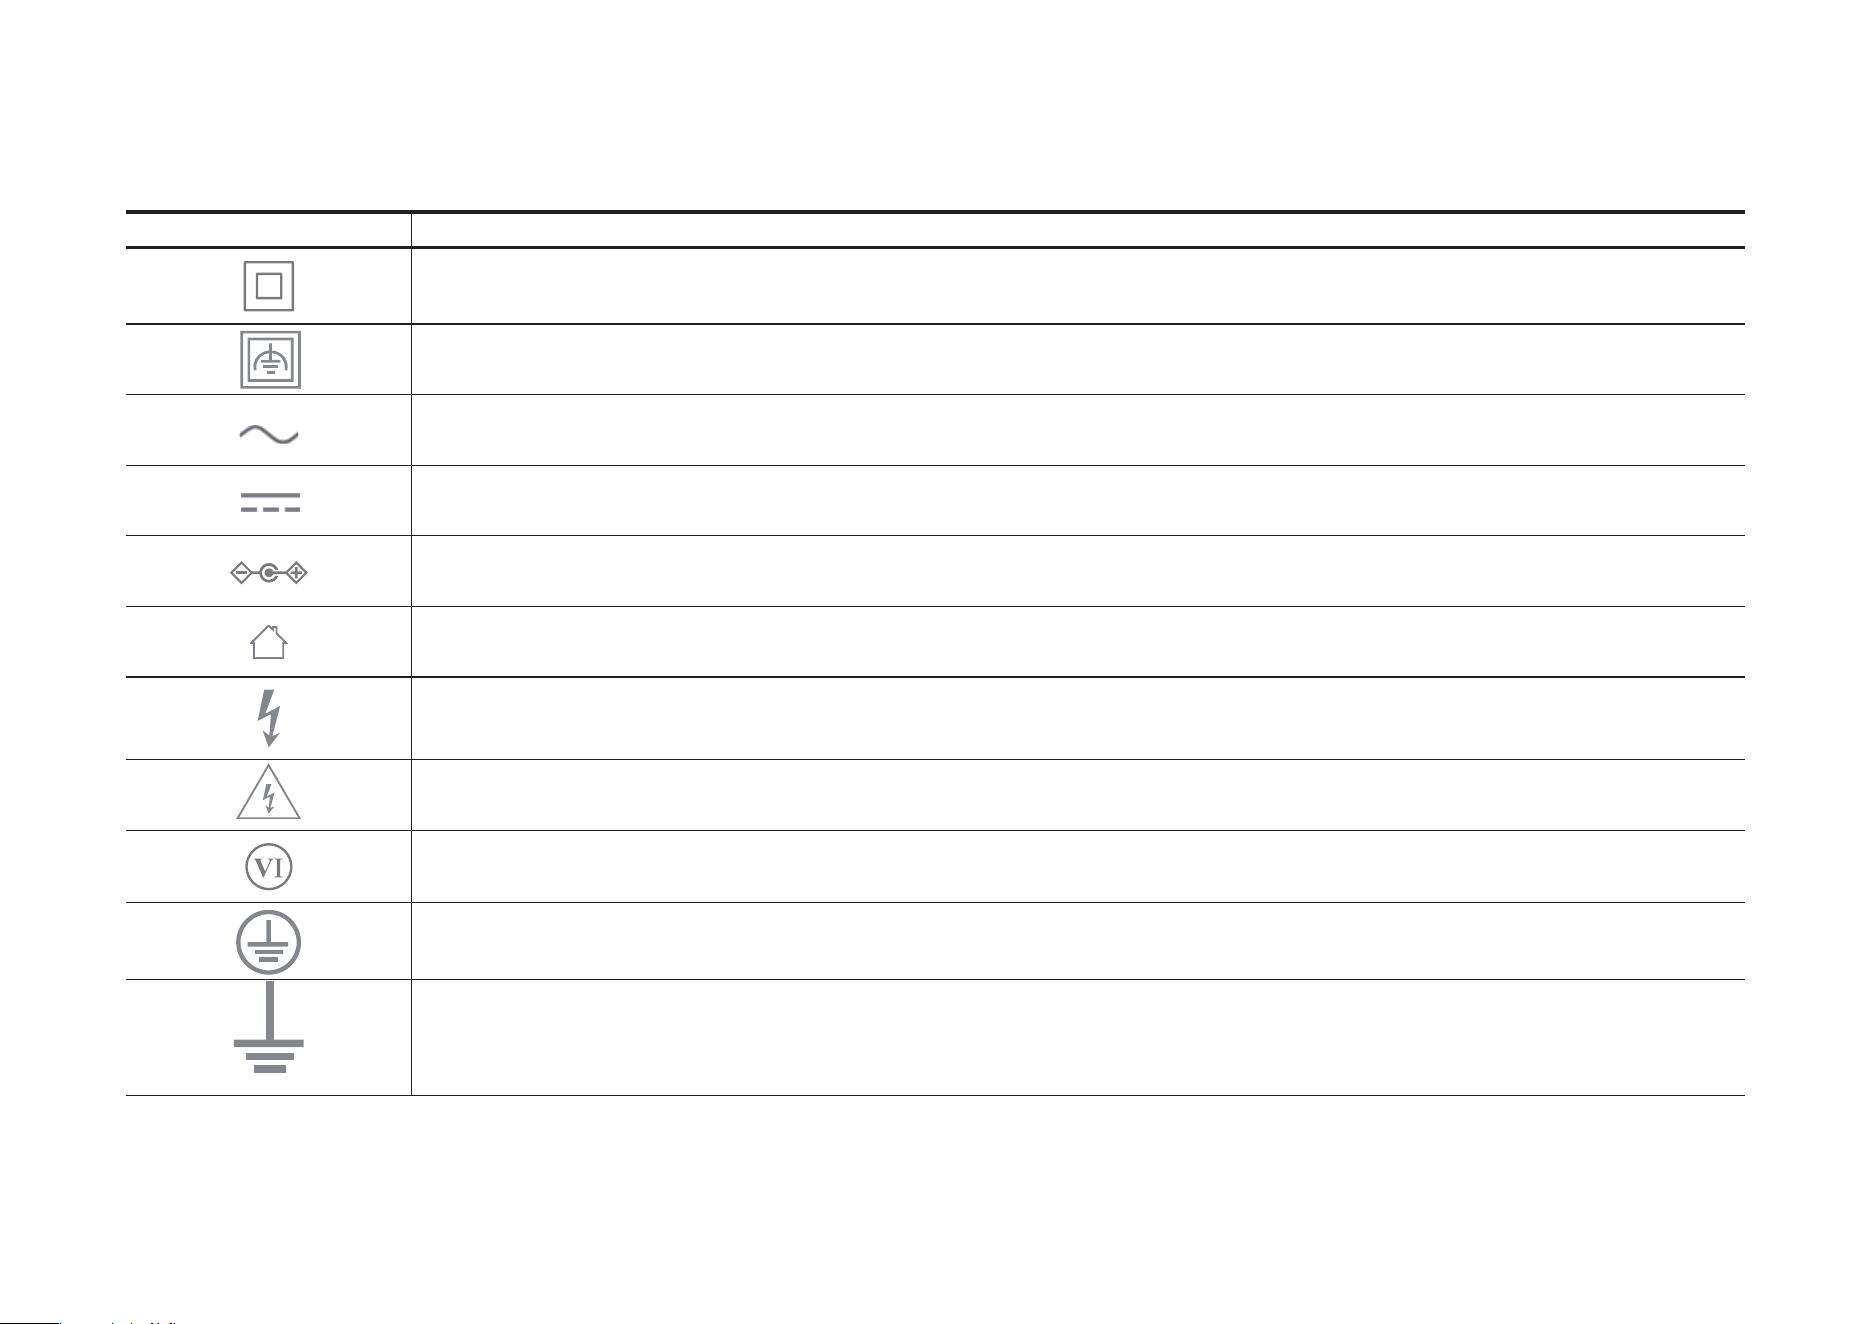
Explanation of the symbols on the product label
Note: The product label is on the bottom of the product and its power supply. Symbols may vary from products.
Symbol Explanation
Class II equipment
Class II equipment with functional earthing
Alternating current
DC voltage
Polarity of output terminals
Indoor use only
Dangerous voltage
Caution, risk of electric shock
Energy efficiency Marking
Protective earth
Earth
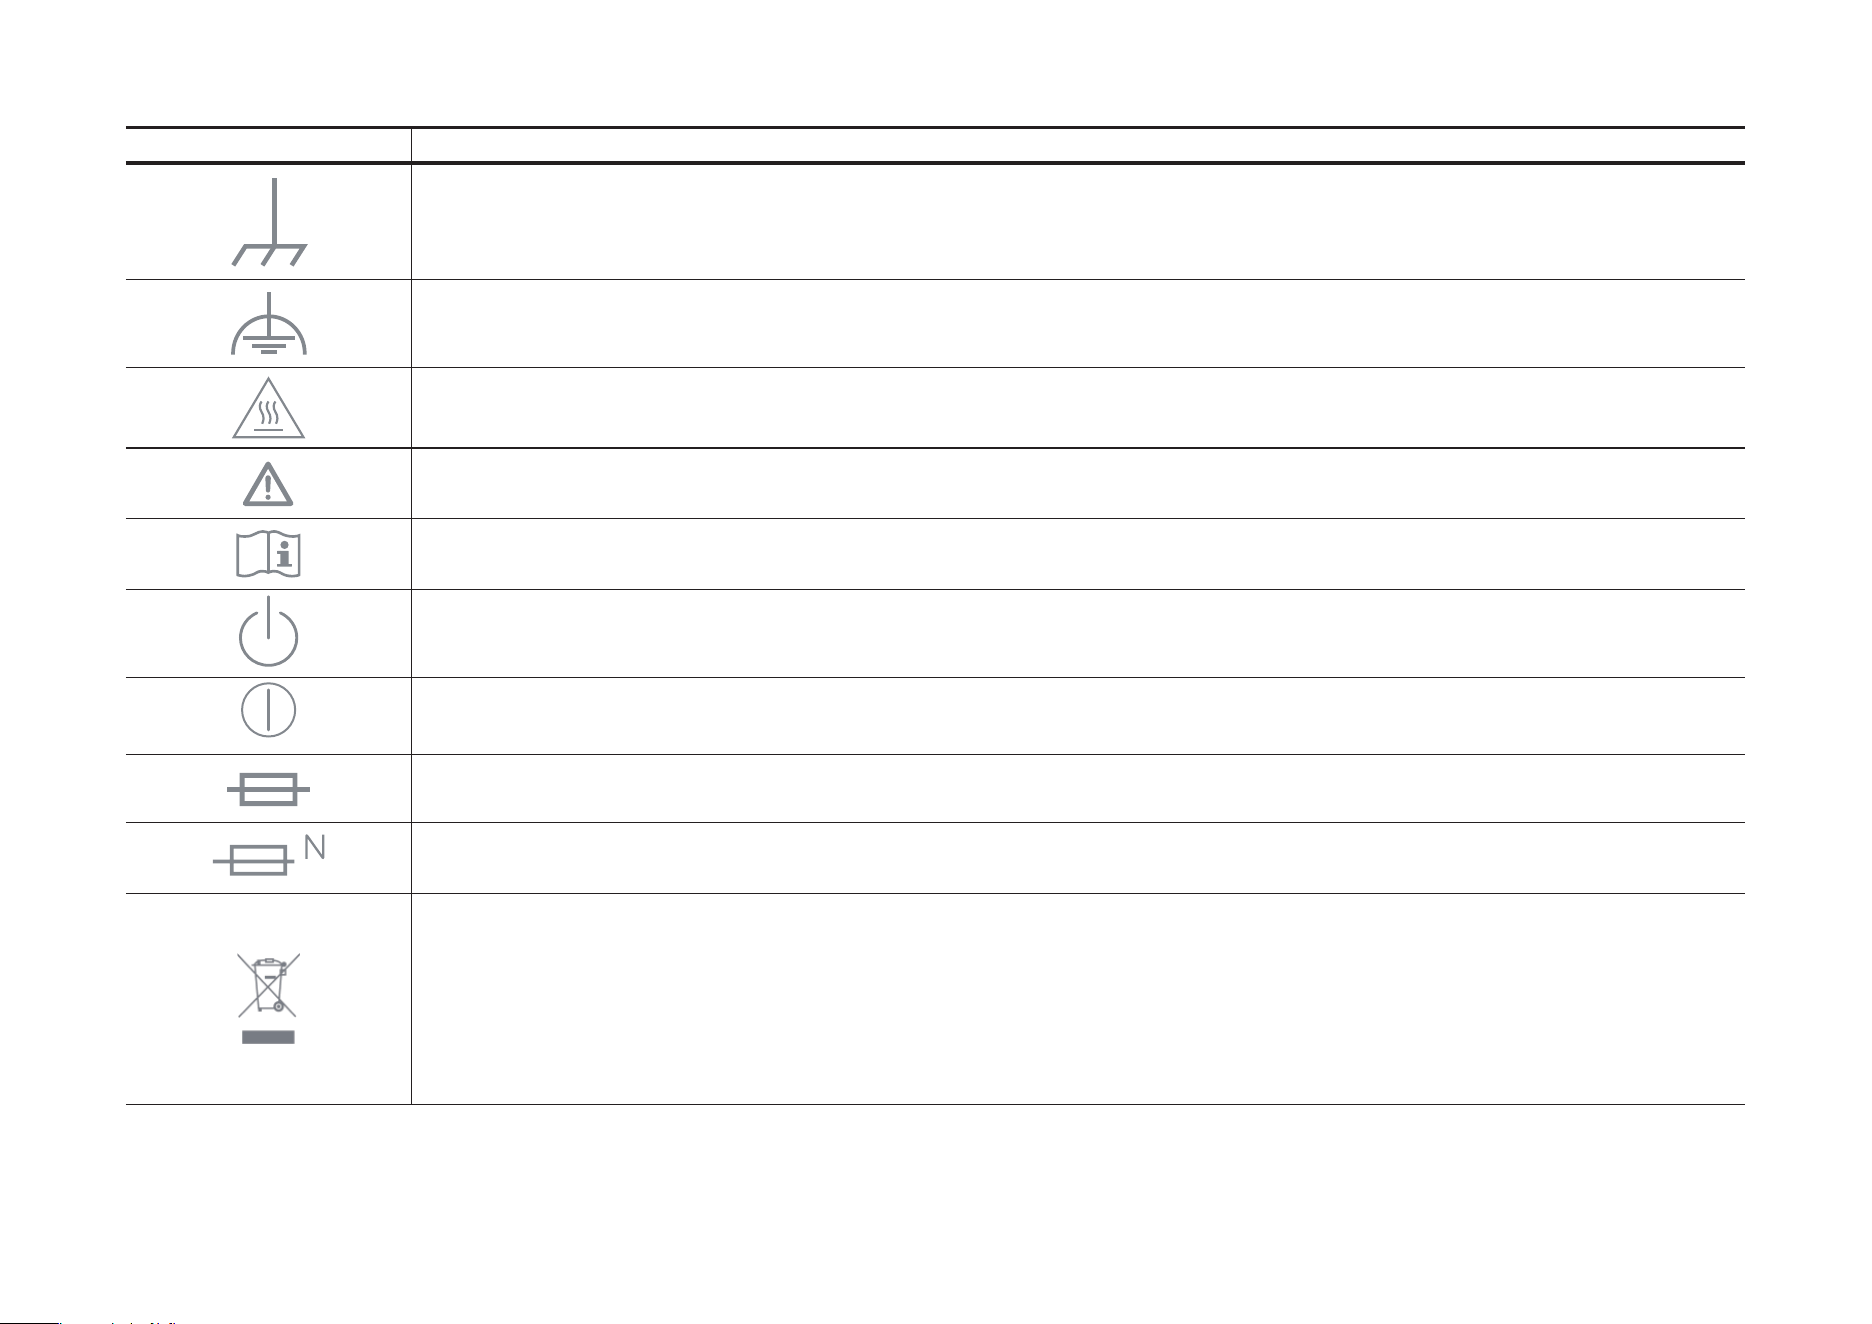
Symbol Explanation
Frame or chassis
Functional earthing
Caution, hot surface
Caution
Operator’s manual
Stand-by
“ON”/”OFF” (push-push)
Fuse
Fuse is used in neutral N
RECYCLING
This product bears the selective sorting symbol for Waste electrical and electronic equipment (WEEE). This means
that this product must be handled pursuant to European directive 2012/19/EU in order to be recycled or dismantled to
minimize its impact on the environment.
User has the choice to give his product to a competent recycling organization or to the retailer when he buys a new
electrical or electronic equipment.
Symbol Explanation
Caution, avoid listening at high volume levels for long periods
Disconnection, all power plugs
m Switch of mini-gap construction
µ
Switch of micro-gap construction (for US version)
Switch of micro-gap / micro-disconnection construction (for other versions except US)
ε Switch without contact gap (Semiconductor switching device)