USE & CARE
MANUAL
24 IN. TOP CONTROL BUILT-IN DISHWASHER
DW24X8BA99 | DW24X8BA00

USE & CARE MANUAL
tho
rkitchen.com
24 IN. TOP CONTROL BUILT-IN
DISHWASHER WITH AUTO OPEN
DOOR DRYING, 8 PROGRAMS,
THIRD RACK, 49DBA IN
STAINLESS STEEL / BLACK
DW24X8BA99
DW24X8BA00

Thank you for choosing THOR KITCHEN. This product has been manufactured by Thor International, 4651
E Airport Drive, Ontario, CA 91761. This manual contains all the information you will need to install / use
the product correctly and safely. Please read all the instructions prior using the product, and keep this
manual in a secure place for future reference. Do not remove the attached adhesive identification label
containing code, model number, manufacturer and other information from the product. This label will
be used by the THOR KITCHEN authorized service representative in the event that your product needs
servicing.
Nous vous remercions d’avoir choisi THOR KITCHEN. Cet appareil a été fabriqué par Thor International,
4651 E Airport Drive, Ontario, CA 91761. Le présent manuel contient l’intégralité des consignes dont vous
aurez besoin pour installer l’appareil correctement et en toute sécurité. Veuillez lire l’intégralité des
consignes avant installation de l’appareil, puis conservez le présent manuel en lieu sûr afin de pouvoir
vous y référer ultérieurement. Ne pas retirer de l’appareil l’étiquette d’identification adhésive qui contient
le code, le numéro de modèle, le nom du fabricant et toutes autres informations. Ladite étiquette sera
utilisée par le représentant du service après-vente agréé de THOR KITCHEN au cas où votre appareil
nécessiterait réparation ou entretien.
Gracias por elegir a THOR KITCHEN. Este electrodoméstico fue fabricado por Thor International, 4651 E
Airport Drive, Ontario, CA 91761. Este manual contiene toda la información que necesitará para instalar
y usar el electrodoméstico de manera adecuada y segura. Lea todas las instrucciones antes de instalar
el electrodoméstico, y mantenga este manual en un lugar seguro para usarlo como referencia a futuro.
No quite la etiqueta de identificación adhesiva que contiene el código, número de modelo, fabricante y
otros datos del electrodoméstico. El representante de servicio autorizado por THOR KITCHEN usará esta
etiqueta en caso de que su electrodoméstico requiera reparaciones.

1
TABLE OF CONTENTS
IMPORTANT SAFETY INSTRUCTIONS � � � � � � � � � � � � � � � � � � � � � � � � � � � � � � � � � � � � � � � � � � � � � � � � � � � � � � � � � � � � � � 2
1�1 Information for safety � � � � � � � � � � � � � � � � � � � � � � � � � � � � � � � � � � � � � � � � � � � � � � � � � � � � � � � � � � � � � � � � � � � � � � � � 2
1�2 Signal words explanation � � � � � � � � � � � � � � � � � � � � � � � � � � � � � � � � � � � � � � � � � � � � � � � � � � � � � � � � � � � � � � � � � � � � � 3
1�3 Intended use � � � � � � � � � � � � � � � � � � � � � � � � � � � � � � � � � � � � � � � � � � � � � � � � � � � � � � � � � � � � � � � � � � � � � � � � � � � � � � � � 3
APPLIANCE SPECIFICATIONS � � � � � � � � � � � � � � � � � � � � � � � � � � � � � � � � � � � � � � � � � � � � � � � � � � � � � � � � � � � � � � � � � � � � � 4
APPLIANCE DESCRIPTION � � � � � � � � � � � � � � � � � � � � � � � � � � � � � � � � � � � � � � � � � � � � � � � � � � � � � � � � � � � � � � � � � � � � � � � � 4
2�1 Main appliance � � � � � � � � � � � � � � � � � � � � � � � � � � � � � � � � � � � � � � � � � � � � � � � � � � � � � � � � � � � � � � � � � � � � � � � � � � � � � � 4
2�2 Third rack � � � � � � � � � � � � � � � � � � � � � � � � � � � � � � � � � � � � � � � � � � � � � � � � � � � � � � � � � � � � � � � � � � � � � � � � � � � � � � � � � � � 5
2�3 Upper rack � � � � � � � � � � � � � � � � � � � � � � � � � � � � � � � � � � � � � � � � � � � � � � � � � � � � � � � � � � � � � � � � � � � � � � � � � � � � � � � � � � 5
2�4 Lower rack � � � � � � � � � � � � � � � � � � � � � � � � � � � � � � � � � � � � � � � � � � � � � � � � � � � � � � � � � � � � � � � � � � � � � � � � � � � � � � � � � � 5
QUICK START GUIDE � � � � � � � � � � � � � � � � � � � � � � � � � � � � � � � � � � � � � � � � � � � � � � � � � � � � � � � � � � � � � � � � � � � � � � � � � � � � � � 6
PREPARING AND LOADING THE APPLIANCE � � � � � � � � � � � � � � � � � � � � � � � � � � � � � � � � � � � � � � � � � � � � � � � � � � � � � � � 6
3�1 Cookware materials guide� � � � � � � � � � � � � � � � � � � � � � � � � � � � � � � � � � � � � � � � � � � � � � � � � � � � � � � � � � � � � � � � � � � � 6
3�2 Rack and basket accessories � � � � � � � � � � � � � � � � � � � � � � � � � � � � � � � � � � � � � � � � � � � � � � � � � � � � � � � � � � � � � � � � � 7
3�3 Loading the appliance� � � � � � � � � � � � � � � � � � � � � � � � � � � � � � � � � � � � � � � � � � � � � � � � � � � � � � � � � � � � � � � � � � � � � � � � 9
3�4 Suggested loading patterns� � � � � � � � � � � � � � � � � � � � � � � � � � � � � � � � � � � � � � � � � � � � � � � � � � � � � � � � � � � � � � � � � � 10
3�5 Adding detergent � � � � � � � � � � � � � � � � � � � � � � � � � � � � � � � � � � � � � � � � � � � � � � � � � � � � � � � � � � � � � � � � � � � � � � � � � � � 12
3�6 Adding rinse aid � � � � � � � � � � � � � � � � � � � � � � � � � � � � � � � � � � � � � � � � � � � � � � � � � � � � � � � � � � � � � � � � � � � � � � � � � � � � 13
3�7 Unloading the appliance� � � � � � � � � � � � � � � � � � � � � � � � � � � � � � � � � � � � � � � � � � � � � � � � � � � � � � � � � � � � � � � � � � � � � 13
OPERATION � � � � � � � � � � � � � � � � � � � � � � � � � � � � � � � � � � � � � � � � � � � � � � � � � � � � � � � � � � � � � � � � � � � � � � � � � � � � � � � � � � � � � 14
4�1 Control panel description� � � � � � � � � � � � � � � � � � � � � � � � � � � � � � � � � � � � � � � � � � � � � � � � � � � � � � � � � � � � � � � � � � � � 14
4�2 Program overview � � � � � � � � � � � � � � � � � � � � � � � � � � � � � � � � � � � � � � � � � � � � � � � � � � � � � � � � � � � � � � � � � � � � � � � � � � 15
4�3 Starting or resuming a cleaning cycle � � � � � � � � � � � � � � � � � � � � � � � � � � � � � � � � � � � � � � � � � � � � � � � � � � � � � � � � 18
4�4 Interrupting a cleaning cycle� � � � � � � � � � � � � � � � � � � � � � � � � � � � � � � � � � � � � � � � � � � � � � � � � � � � � � � � � � � � � � � � � 18
4�5 Changing a program � � � � � � � � � � � � � � � � � � � � � � � � � � � � � � � � � � � � � � � � � � � � � � � � � � � � � � � � � � � � � � � � � � � � � � � � 19
4�6
Canceling a cleaning cycle
/ Draining� � � � � � � � � � � � � � � � � � � � � � � � � � � � � � � � � � � � � � � � � � � � � � � � � � � � � � � � � � 19
CLEANING� � � � � � � � � � � � � � � � � � � � � � � � � � � � � � � � � � � � � � � � � � � � � � � � � � � � � � � � � � � � � � � � � � � � � � � � � � � � � � � � � � � � � � � 19
5�1 General cleaning � � � � � � � � � � � � � � � � � � � � � � � � � � � � � � � � � � � � � � � � � � � � � � � � � � � � � � � � � � � � � � � � � � � � � � � � � � � 19
5�2 Cleaning the interior � � � � � � � � � � � � � � � � � � � � � � � � � � � � � � � � � � � � � � � � � � � � � � � � � � � � � � � � � � � � � � � � � � � � � � � � 20
5�3 Cleaning the filter assembly � � � � � � � � � � � � � � � � � � � � � � � � � � � � � � � � � � � � � � � � � � � � � � � � � � � � � � � � � � � � � � � � � 20
5�4 Cleaning the spray arms � � � � � � � � � � � � � � � � � � � � � � � � � � � � � � � � � � � � � � � � � � � � � � � � � � � � � � � � � � � � � � � � � � � � 21
MAINTENANCE � � � � � � � � � � � � � � � � � � � � � � � � � � � � � � � � � � � � � � � � � � � � � � � � � � � � � � � � � � � � � � � � � � � � � � � � � � � � � � � � � � 22
6�1 Maintenance guidelines � � � � � � � � � � � � � � � � � � � � � � � � � � � � � � � � � � � � � � � � � � � � � � � � � � � � � � � � � � � � � � � � � � � � � 22
6�2 Preparing for extended absence � � � � � � � � � � � � � � � � � � � � � � � � � � � � � � � � � � � � � � � � � � � � � � � � � � � � � � � � � � � � � 22
6�3 Preparing for winter � � � � � � � � � � � � � � � � � � � � � � � � � � � � � � � � � � � � � � � � � � � � � � � � � � � � � � � � � � � � � � � � � � � � � � � � 22
6�4 Purchase replacement parts� � � � � � � � � � � � � � � � � � � � � � � � � � � � � � � � � � � � � � � � � � � � � � � � � � � � � � � � � � � � � � � � � 22
TROUBLESHOOTING � � � � � � � � � � � � � � � � � � � � � � � � � � � � � � � � � � � � � � � � � � � � � � � � � � � � � � � � � � � � � � � � � � � � � � � � � � � � � 23
ERROR CODES � � � � � � � � � � � � � � � � � � � � � � � � � � � � � � � � � � � � � � � � � � � � � � � � � � � � � � � � � � � � � � � � � � � � � � � � � � � � � � � � � � � 26
WARRANTY � � � � � � � � � � � � � � � � � � � � � � � � � � � � � � � � � � � � � � � � � � � � � � � � � � � � � � � � � � � � � � � � � � � � � � � � � � � � � � � � � � � � � 26

2
IMPORTANT SAFETY INSTRUCTIONS
1.1 Information for safety
WARNING: When using your dishwasher, follow basic
precautions, including the following:
WARNING
Risk of injury!
•
Do not use the appliance until it has been completely and properly installed�
•
Do not push down on the appliance door when it is open�
WARNING
This appliance contains chemicals known to the State of California to cause cancer and/or
reproductive harm, and birth defects or other reproductive harm� For more information go to
www�P65Warnings�ca�gov�
•
Read all instructions before using the dishwasher�
•
Use the dishwasher only for its intended function�
•
Use only detergents or wetting agents recommended for use in a dishwasher and keep them out of
the reach of children�
•
When loading items to be washed:
- Locate sharp items so that they are not likely to damage the door seal; and
- Load sharp knives with the handles up to reduce the risk of cut-type injuries�
•
Do not wash plastic items unless they are marked “dishwasher safe” or the equivalent� For plastic
items not so marked, check the manufacturer’s recommendations�
•
Do not touch the heating element during or immediately after use�
•
Do not operate your dishwasher unless all enclosure panels are properly in place�
•
Do not tamper with controls�
•
Do not abuse, sit on, or stand on the door or dish rack of the dishwasher�
•
To reduce the risk of injury, do not allow children to play in or on a dishwasher�
•
Under certain conditions, hydrogen gas might be produced in a hot-water system that has not been
used for two weeks or more� HYDROGEN GAS IS EXPLOSIVE� If the hot-water system has not been
used for such a period, before using the dishwasher turn on all hot-water faucets and let the water
flow from each for several minutes� This will release any accumulated hydrogen gas� As the gas is
flammable, do not smoke or use an open flame during this time�
•
Remove the door to the washing compartment when removing an old dishwasher from service or
discarding it�
•
A child or adult can tip the appliance and be killed�
•
Install the mounting bracket to the countertop (see Installation manual)� Verify the mounting bracket
has been properly installed and engaged with the appliance�
•
Engage the appliance to the mounting bracket by pushing that appliance all the way into the
installation location� Ensure the mounting bracket is re-engaged when the appliance is moved�
•
Re-engage the mounting bracket if the appliance is moved� Do not operate the appliance without the
mounting bracket in place and engaged�
•
See installation instructions for details�
•
Failure to do so can result in death to children or adults�

3
IMPORTANT SAFETY INSTRUCTIONS
To check the installation of the mounting bracket:
1� Remove any items from the appliance�
2� Grasp the top rear edge of the appliance and carefully attempt to tilt it forward�
3� Verify that the mounting bracket is engaged�
Grounding instructions
This appliance must be connected to a grounded metal, permanent wiring system, or an equipment-
grounding conductor must be run with the circuit conductors and connected to the equipment-grounding
terminal or lead on the appliance�
SAVE THESE INSTRUCTIONS
1.2 Signal words explanation
The following signal words are used in this manual
DANGER
This signal word indicates a hazardous situation which, if not avoided, will result
in death or serious injury�
WARNING
This signal word indicates a hazardous situation which, if not avoided, could
result in death or serious injury�
CAUTION
This signal word indicates a hazardous situation which, if not avoided, could
result in minor or moderate injury�
CAUTION
This signal word indicates a hazardous situation which, if not avoided, could
result in property damage�
NOTICE
This signal word is a preferred signal word to address tips and practices not
related to personal injury�
1.3 Intended use
•
This appliance is intended for cleaning dishware, silverware and cookware�
•
This appliance is intended for household use only�
•
This appliance is intended to be used in dry indoor areas only�
•
Only use the appliance as mentioned in this manual� Any other use is considered improper and may
result in damage to property or injury to persons�
•
Potential injury from improper use�
•
The manufacturer or vendor cannot be held liable for damages or injury incurred through improper or
incorrect use�
4
APPLIANCE SPECIFICATIONS
Rated voltage 120 V AC, 60 Hz
Rated power 1200 W, 15 A
IP rating IPX1
Net weight
82�7 lbs (37�5 kg)
Dimensions (W x D x H) 23 7/8 x 25 1/8 x 33 7/8" (60�4 x 63�8 x 85� cm)
APPLIANCE DESCRIPTION
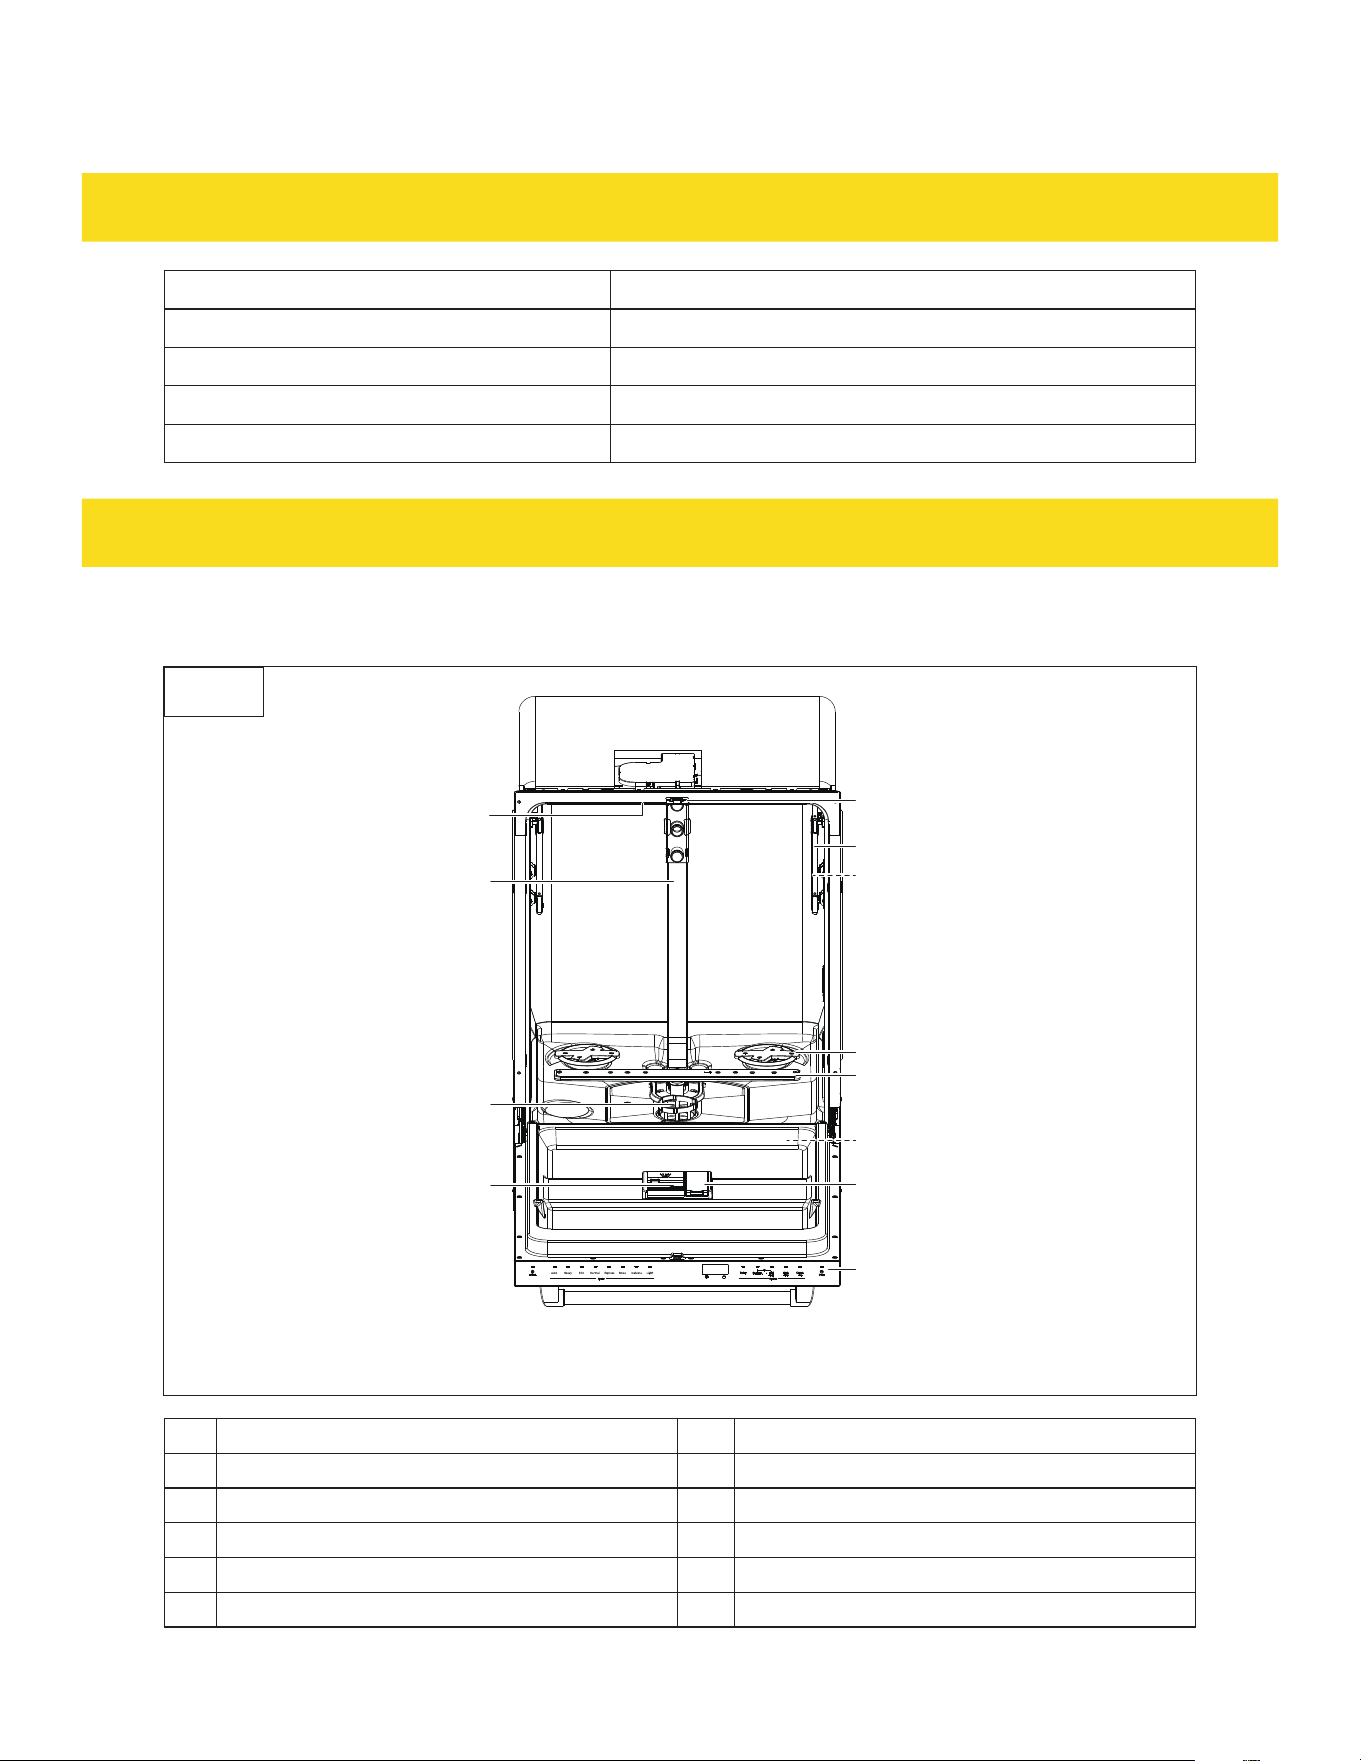
2.1 Main appliance
M
L
K
J
A
C
B
E
F
G
H
I
Fig. 1
A Auto open door switch H Control panel
B Third rack sliding bracket x2 I Spotlight indicator
C Upper rack sliding bracket x2 J Detergent dispenser
E Area wash K Filter assembly
F Lower spray arm L Inner pipe
G Rinse aid dispenser M Upper level wash
5
APPLIANCE DESCRIPTION
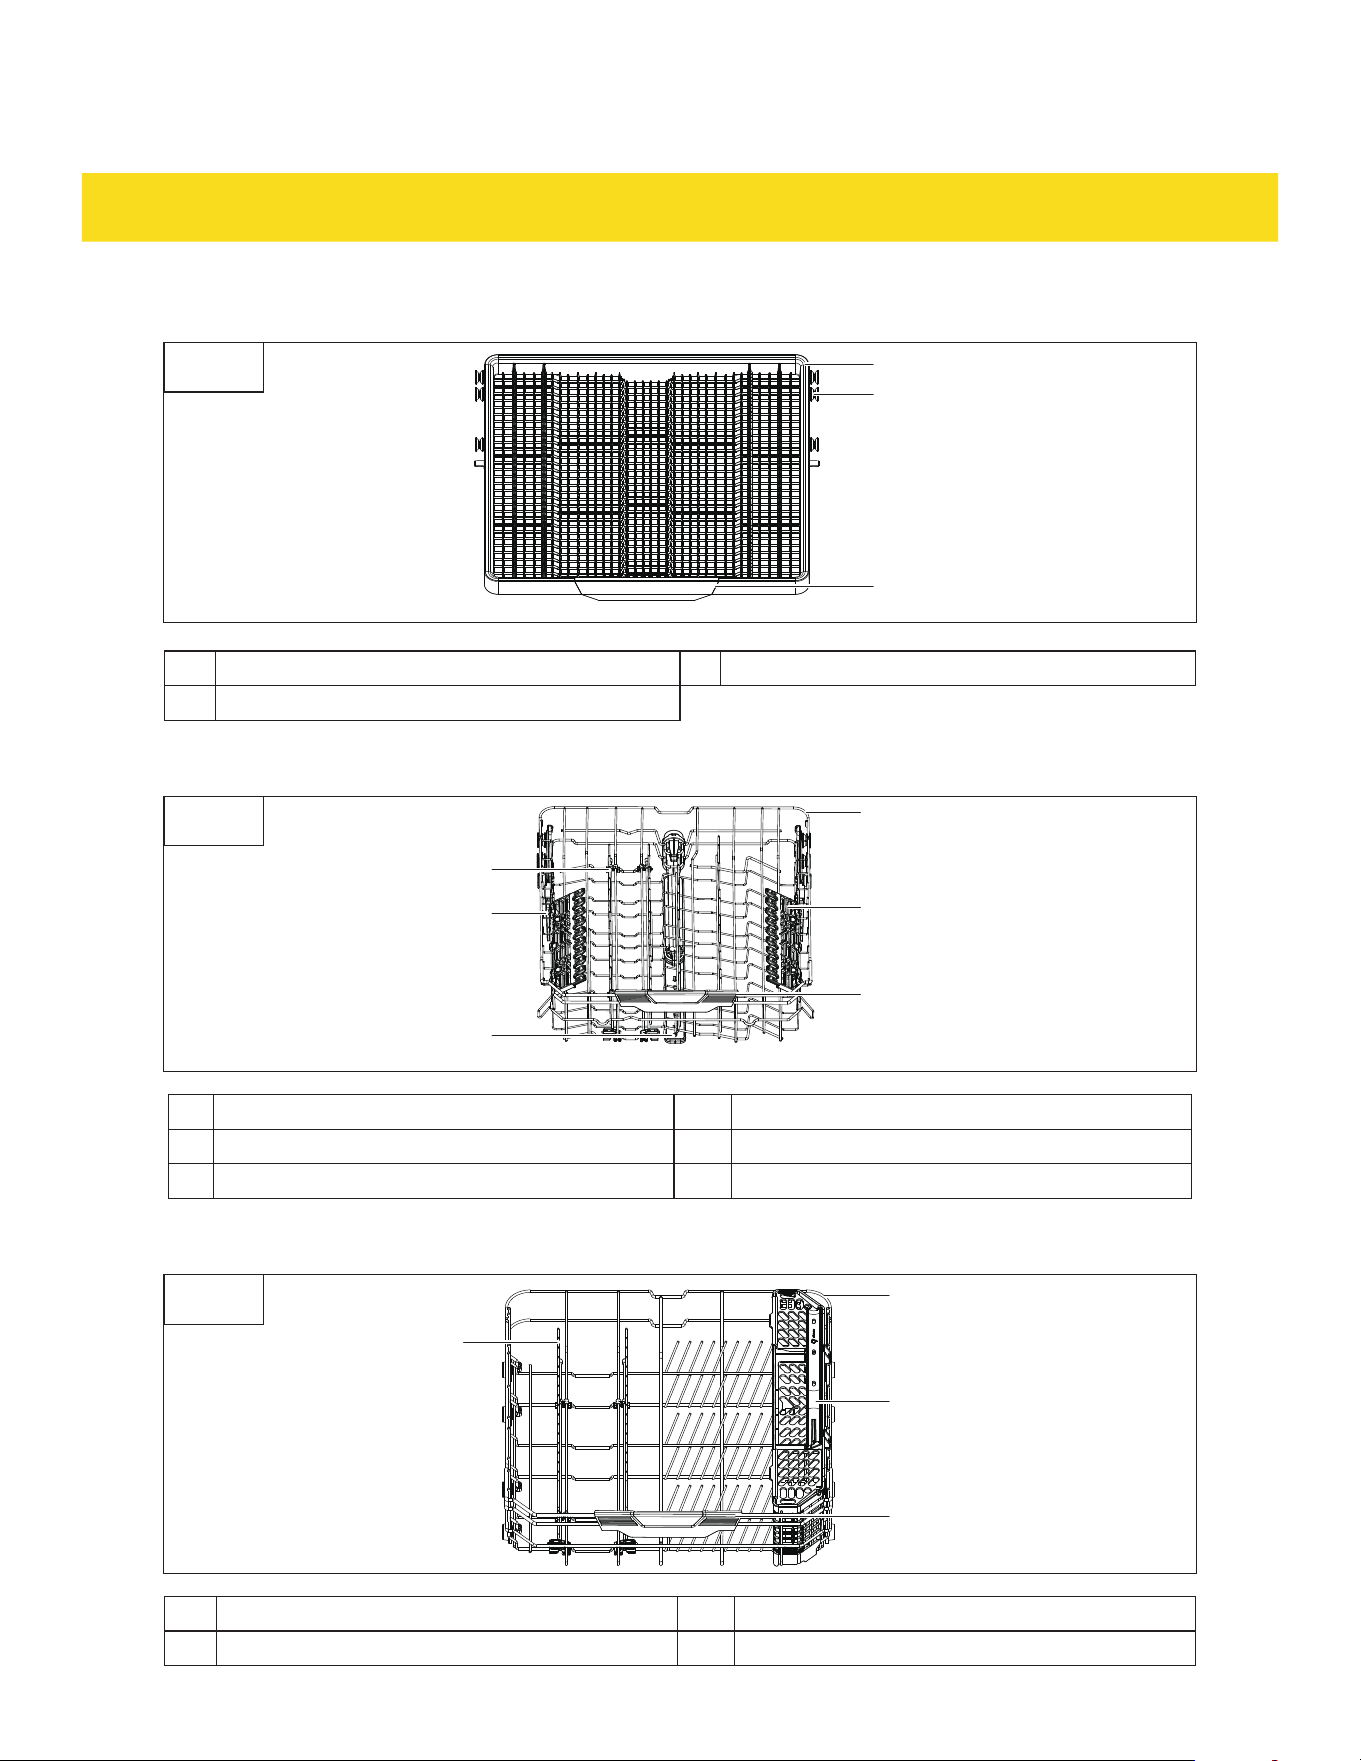
2.2 Third rack
P
N
O
Fig. 2
N Third rack P Third rack handle
O Roller x6
2.3 Upper rack
V
U
T
R
Q
S
Fig. 3
Q Upper rack T Upper spray arm
R Cup shelf with stemware holder x2 U Rack height adjuster x2
S Upper rack handle V Folding tines
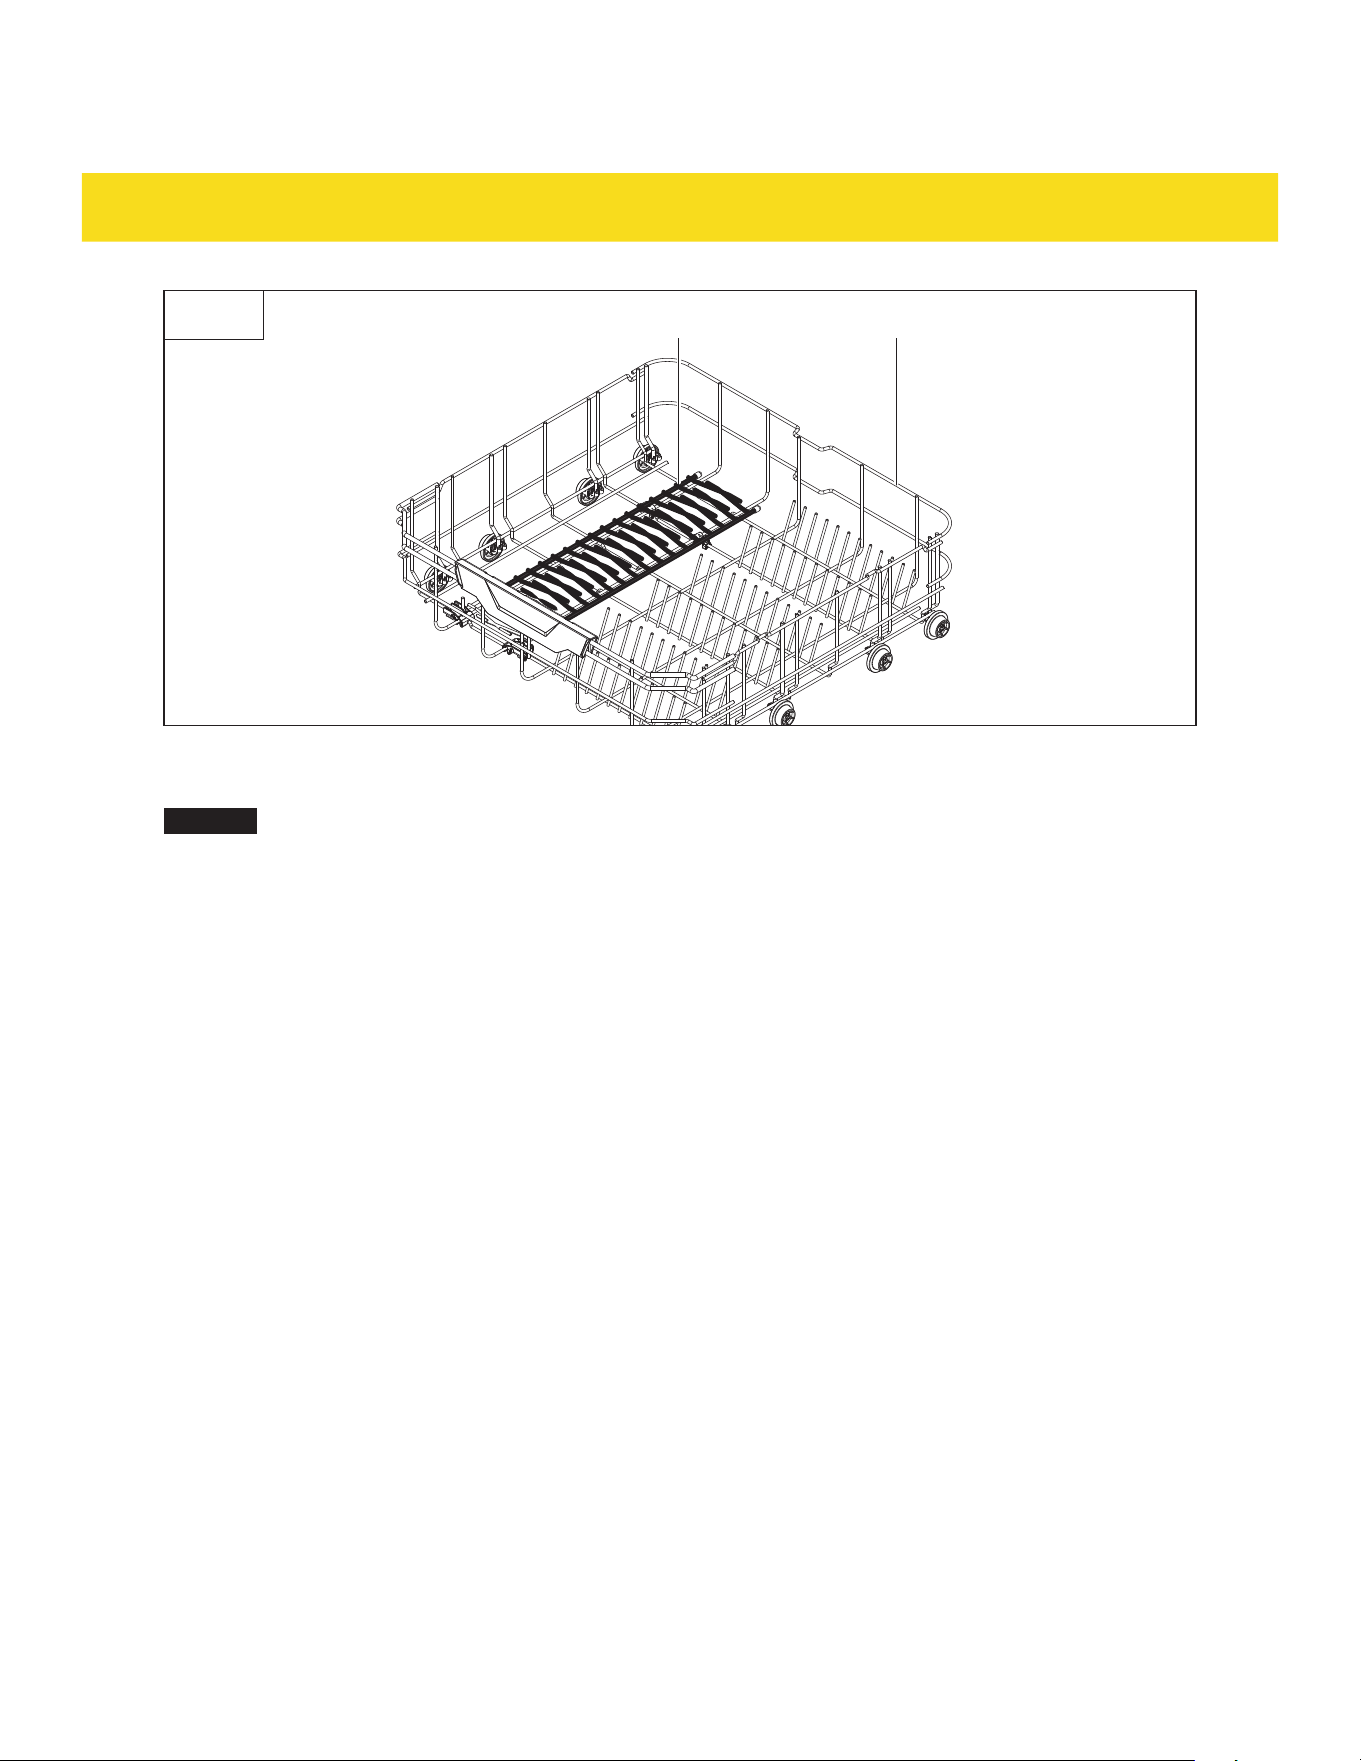
2.4 Lower rack
Z
X
W
Y
Fig. 4
W Lower rack Y Lower rack handle
X Silverware basket Z Sliding tines

6
QUICK START GUIDE
1� Prepare and load the appliance (Fig� 5)�
- Scrape off excess food into the trash or other means of food waste collection�
- Place dishware and cookware so that the water spray reaches all surfaces�
Fig. 5
21
2� Add detergent to the detergent dispenser (J) (Fig� 6)�
3� Add rinse aid to the rinse aid dispenser (G) (Fig� 6)�
J
G
Fig. 6
21
4� Close the door of the appliance securely�
5� Press the On/Off button (1) to switch the appliance on�
6� Select a program and desired functions�
7� Press the Start/Resume button (18) to start the cleaning cycle�
PREPARING AND LOADING THE APPLIANCE
3.1 Cookware materials guide
NOTICE
Do not wash small items that could easily fall out of the racks (N, Q, W) and silverware
basket (X) in the appliance�
Unsuitable for the dishwasher
•
Wooden, horn china or mother-of-pearl items�
•
Plastic items that are not heat-resistant�

7
PREPARING AND LOADING THE APPLIANCE
•
Older items that may have been glued and are not heat-resistant�
•
Bonded cutlery items or dishware�
•
Pewter or copper items�
•
Crystal glassware�
•
Hard Anodized cookware�
•
Wooden platters�
•
Items made from synthetic fibers�
Limited suitability for the dishwasher
•
Some types of glassware can become cloudy after several cleaning cycles�
•
Silver and aluminum parts may discolor�
•
Glazed surfaces may fade�
3.2 Rack and basket accessories
Silverware basket
•
Keep silverware separate using the slots in the cover of the silverware basket (X)�
•
If the silverware does not fit into the designated slots, rotate the covers upward to remove them and
mix silverware types to allow more space in between items�
•
Load knives down, forks up, and alternate spoons for an optimal clean�
Cup shelves
The upper rack (Q) has cup shelves (R) on each side� Raise the cup shelves (R) to place small cups on top
or lean tall glasses against it� Fold it up when it is not needed�
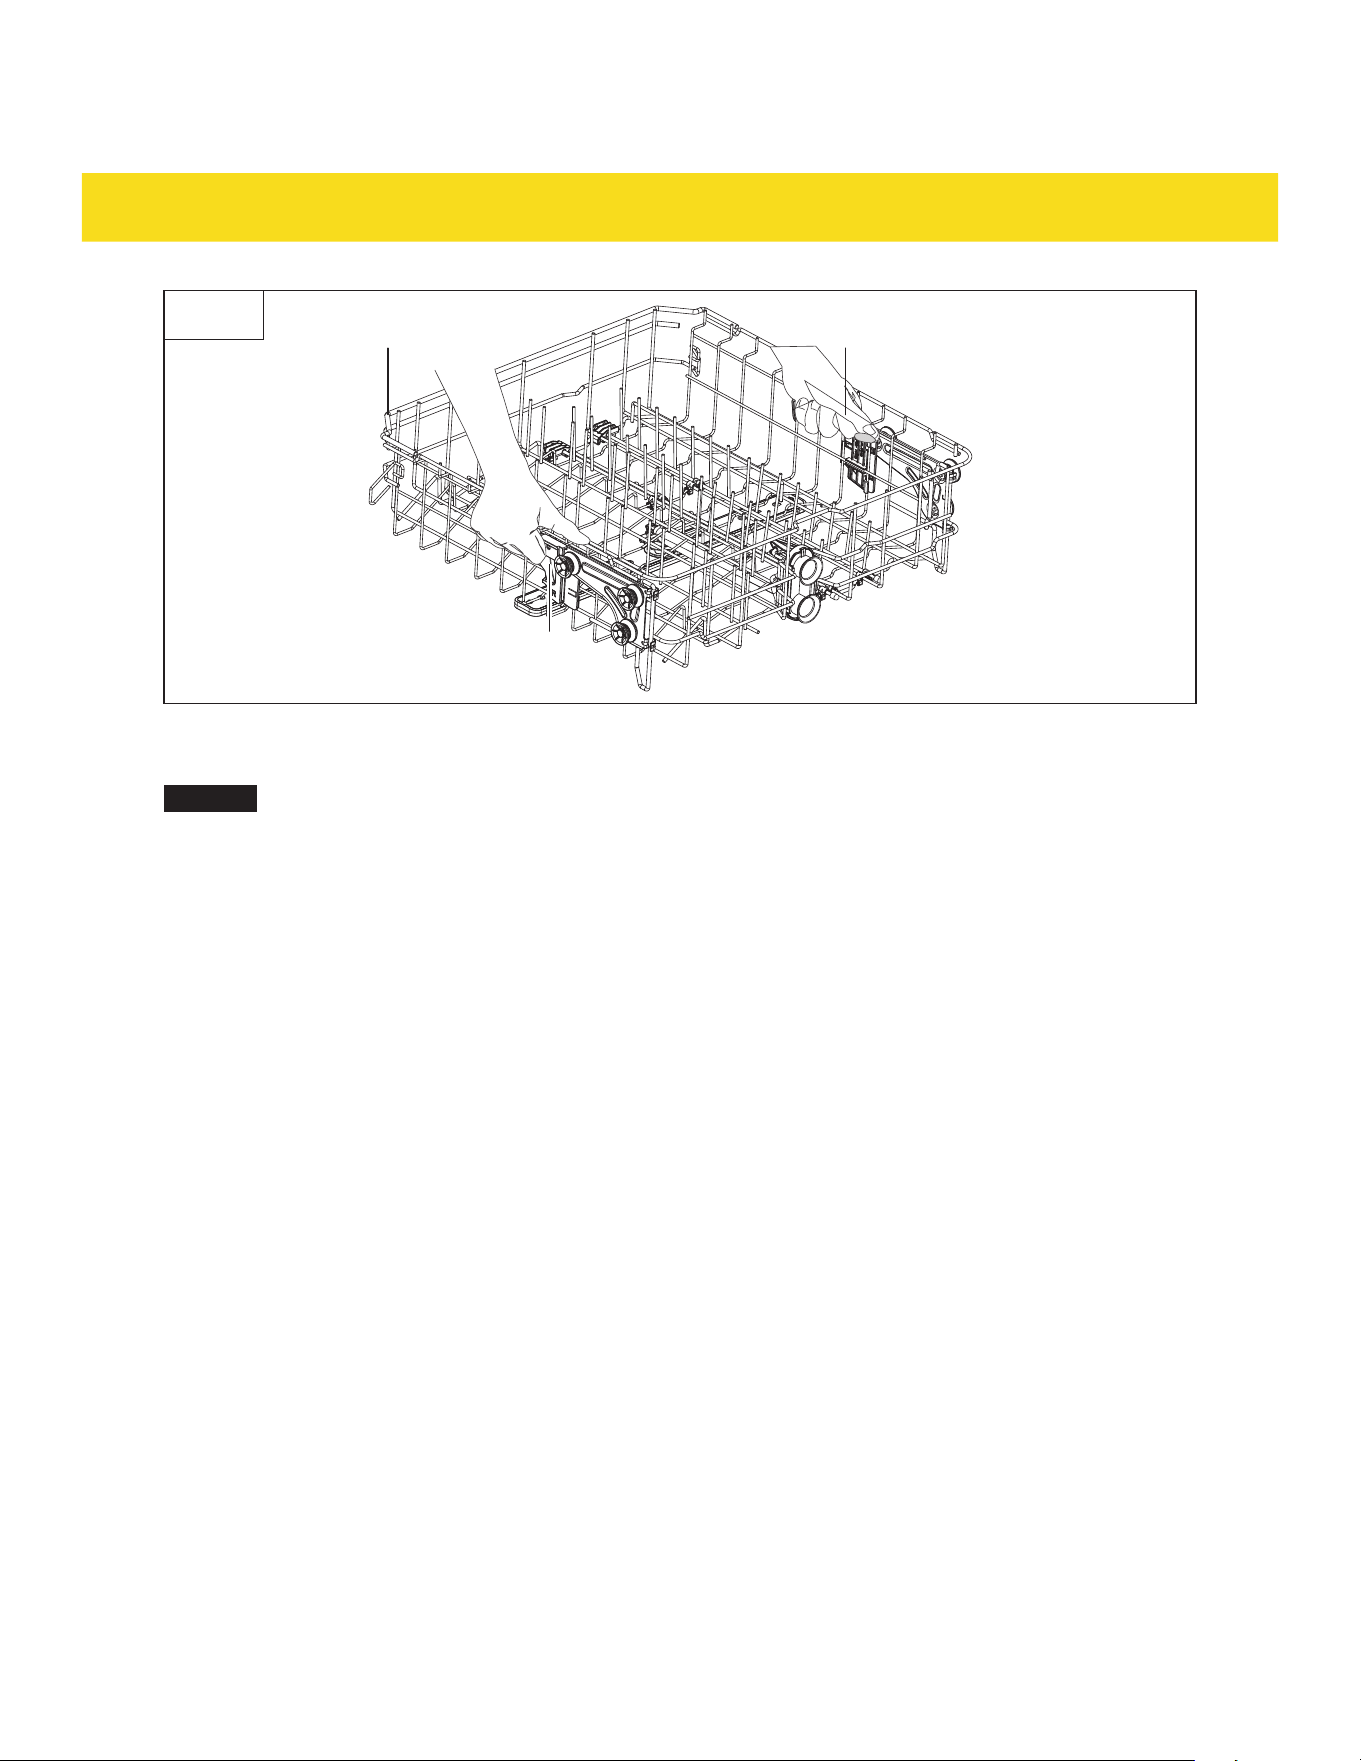
Folding and sliding tines
•
The folding tines (V) in the upper rack (Q) are adjustable� Raise them up to make more space for small
plates and bowls or lower them to fit more cups and other small items�
•
The sliding tines (Z) in the lower rack (W) are adjustable� Slide the tines to the desired position to
make more space for bowls, pots or pans (Fig� 7)�
8
PREPARING AND LOADING THE APPLIANCE
Z W
Fig. 7
Adjustable upper rack
NOTICE
Unload any items from the upper rack (Q) before making adjustments�
The position of the upper rack (Q) can be adjusted to accommodate taller dishware in either the upper
rack (Q) or lower rack (W)�
To raise the upper rack (Q):
1� Pull the upper rack (Q) out using the upper rack handle (S)
1� Squeeze and hold the rack height adjusters (U) on both sides of the upper rack (Q) (Fig� 8)�
2� Pull the upper rack (Q) up until it locks into place at the top position�
3� Release the rack height adjusters (U)�
To lower the upper rack (Q):
1� Squeeze and hold the rack height adjusters (U) on both sides of the upper rack (Q) (Fig� 8)�
2� Push the upper rack (Q) down until it locks into place at the bottom position�
3� Release the rack height adjusters (U)�
9
PREPARING AND LOADING THE APPLIANCE
U
UQ
Fig. 8
Removable third rack
NOTICE
Unload any items from the third rack (N) before removal�
The third rack (N) can be removed to accommodate taller dishware in the upper rack (Q)�
To remove the third rack (N):
1� Pull the third rack (N) out using the third rack handle (P)�
2� Lift the third rack (N) up and remove it from the third rack sliding brackets (B)�
3� Push the rails back into the appliance�
To reinstall the third rack (N):
1� Pull the third rack sliding brackets (B) out on both sides of the appliance�
2� Align and place the wheels of the third rack (N) onto the third rack sliding brackets (B) on both sides
of the appliance�
3� Push the third rack (N) into the appliance�
3.3 Loading the appliance
•
Scrape off any large amounts of leftover food� It is not necessary to rinse the dishware�
•
Soften remnants of burnt food in pans using hot water�
•
Load the racks (N, Q, W) and silverware basket (X) from the back to the front and from the bottom to
the top� Place large items first, then dishware and cups and finally, silverware�
•
Place small items and dishwasher-safe plastic items in the upper rack (Q)�
•
Place cups, glasses, pots/pans facing downwards�
•
Load curved items, or ones with recesses, at an angle so that water can easily slide off�
•
Load dishware, utensils and silverware securely to prevent them from tipping over�
•
All dishware, utensils and silverware should not block the spray arms (F, T) to allow them to rotate
freely during washing�
•
Dishware and silverware must not touch or overlap each other�
10
PREPARING AND LOADING THE APPLIANCE
•
Place long and/or sharp cutlery, such as carving knives, in the third rack (N)�
•
Do not overload the appliance�
•
Use the suggested loading patterns for an optimal clean� See chapter 3.4 Suggested loading
patterns�
3.4 Suggested loading patterns
NOTICE
Make sure all items are placed firmly inside the racks (N, Q, W) and silverware basket (X)�
Items should not extend beyond the bottom of the racks (N, Q, W) and silverware basket (X) to
avoid blocking the spray arms (F, T)�
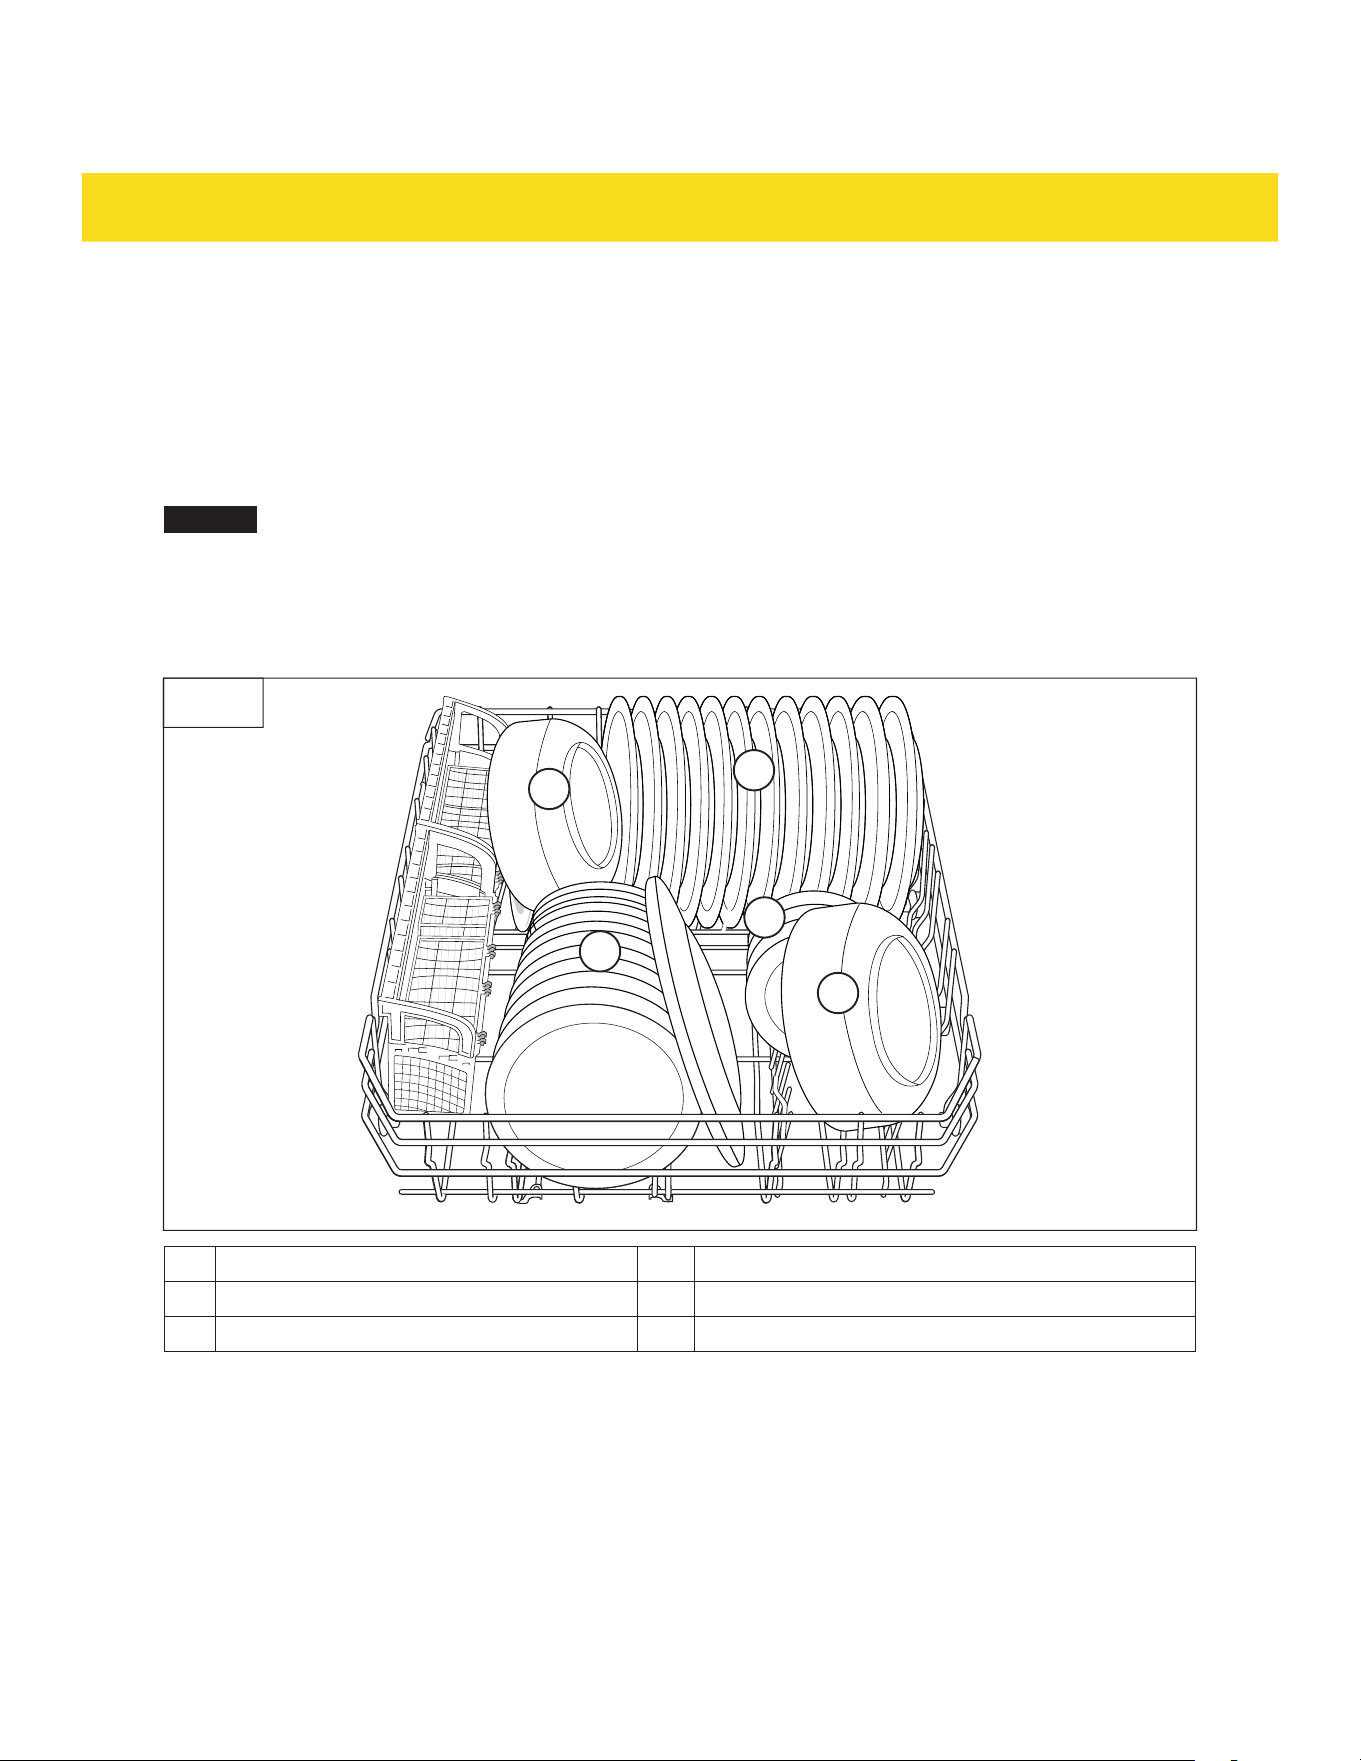
Lower rack
1
2
3
4
5
Fig. 9
1 Dinner plates 4 Salad plates
2 Serving bowls 5 Soup plates
3 Dessert dishes
11
PREPARING AND LOADING THE APPLIANCE
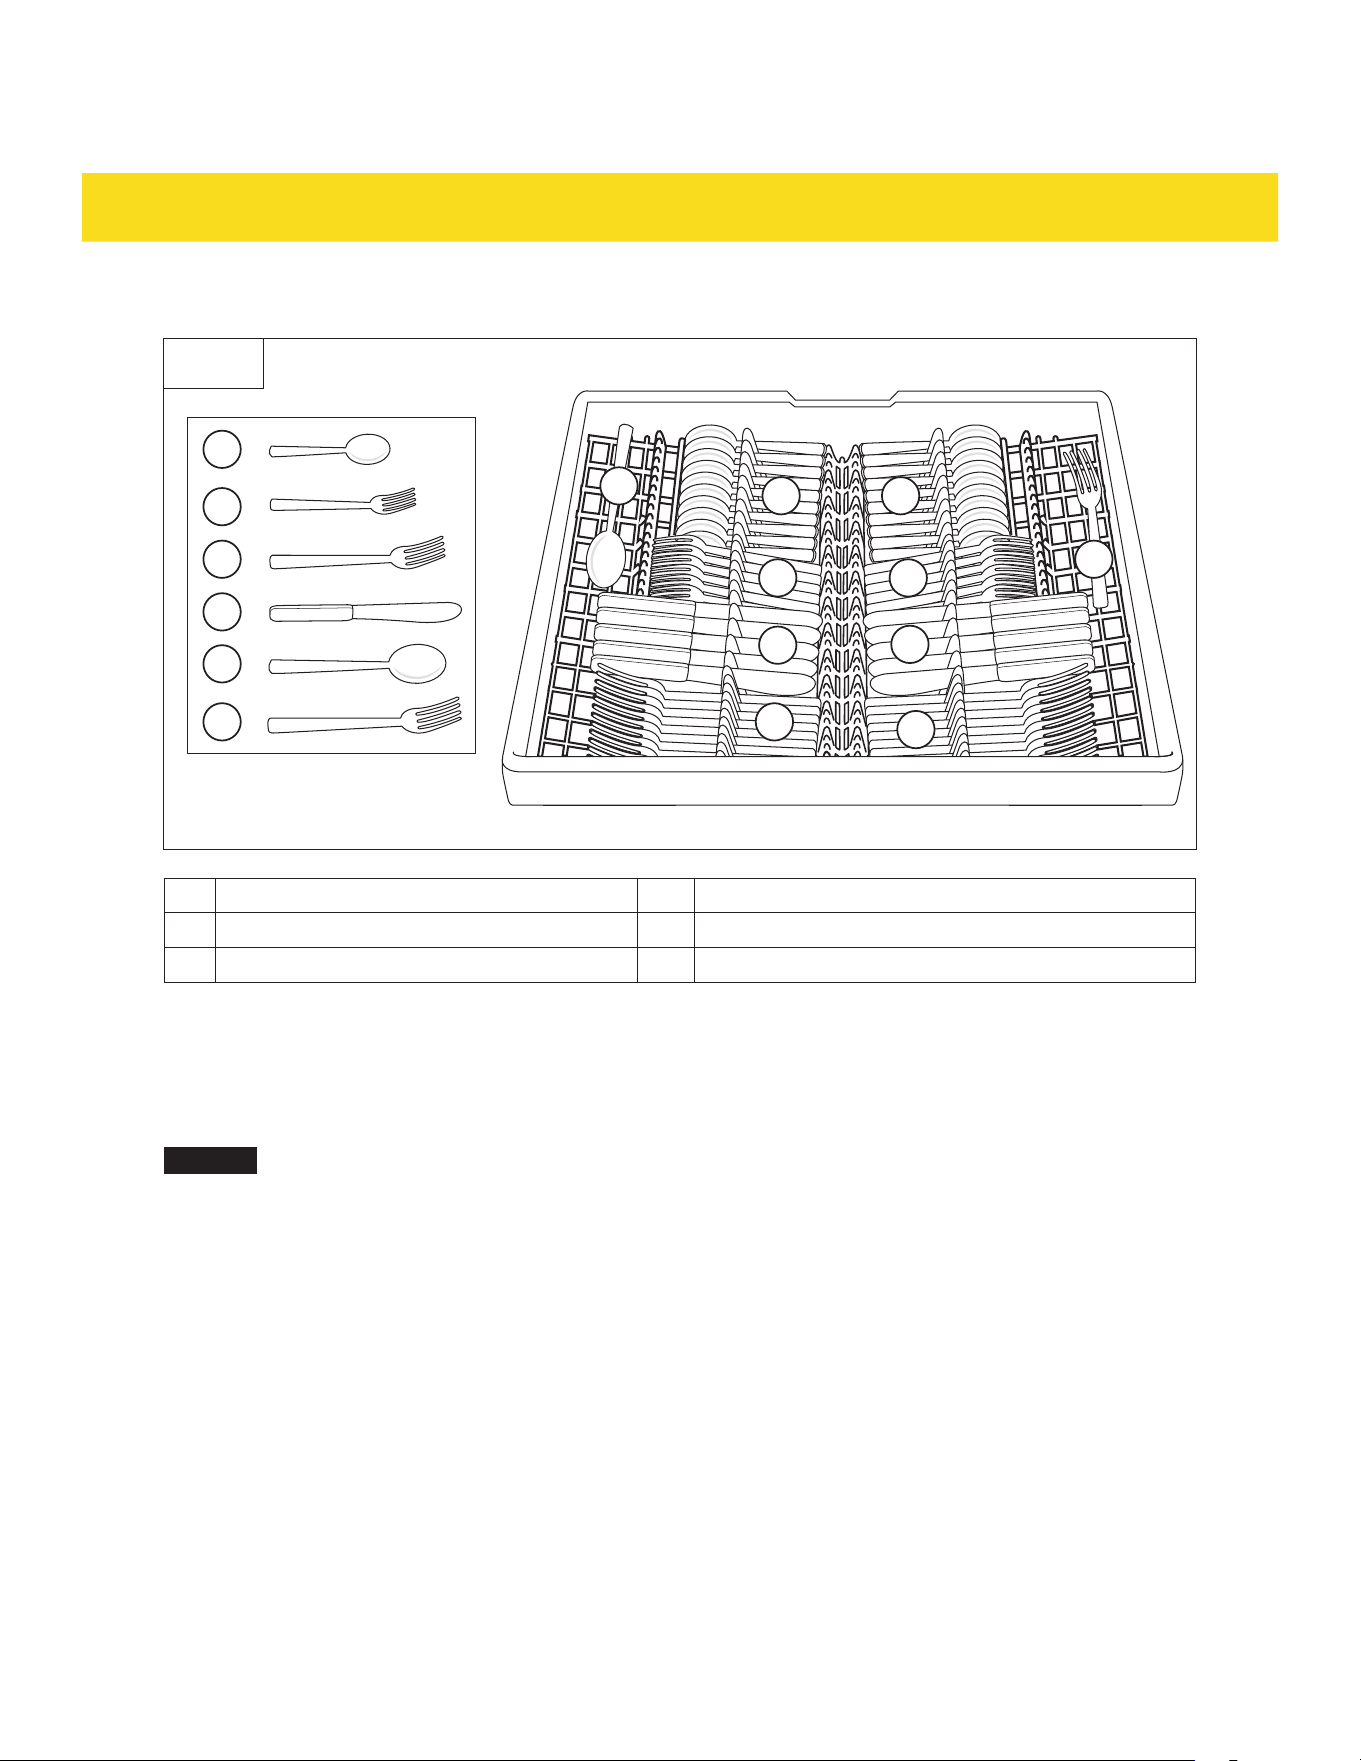
Silverware basket
Fig. 10
1 Dessert spoons or teaspoons 4 Knives
2 Dessert forks 5 Dinner spoons or serving spoons
3 Salad forks 6 Dinner forks or serving forks
*Utensils listed can be placed in any open slot of the silverware basket
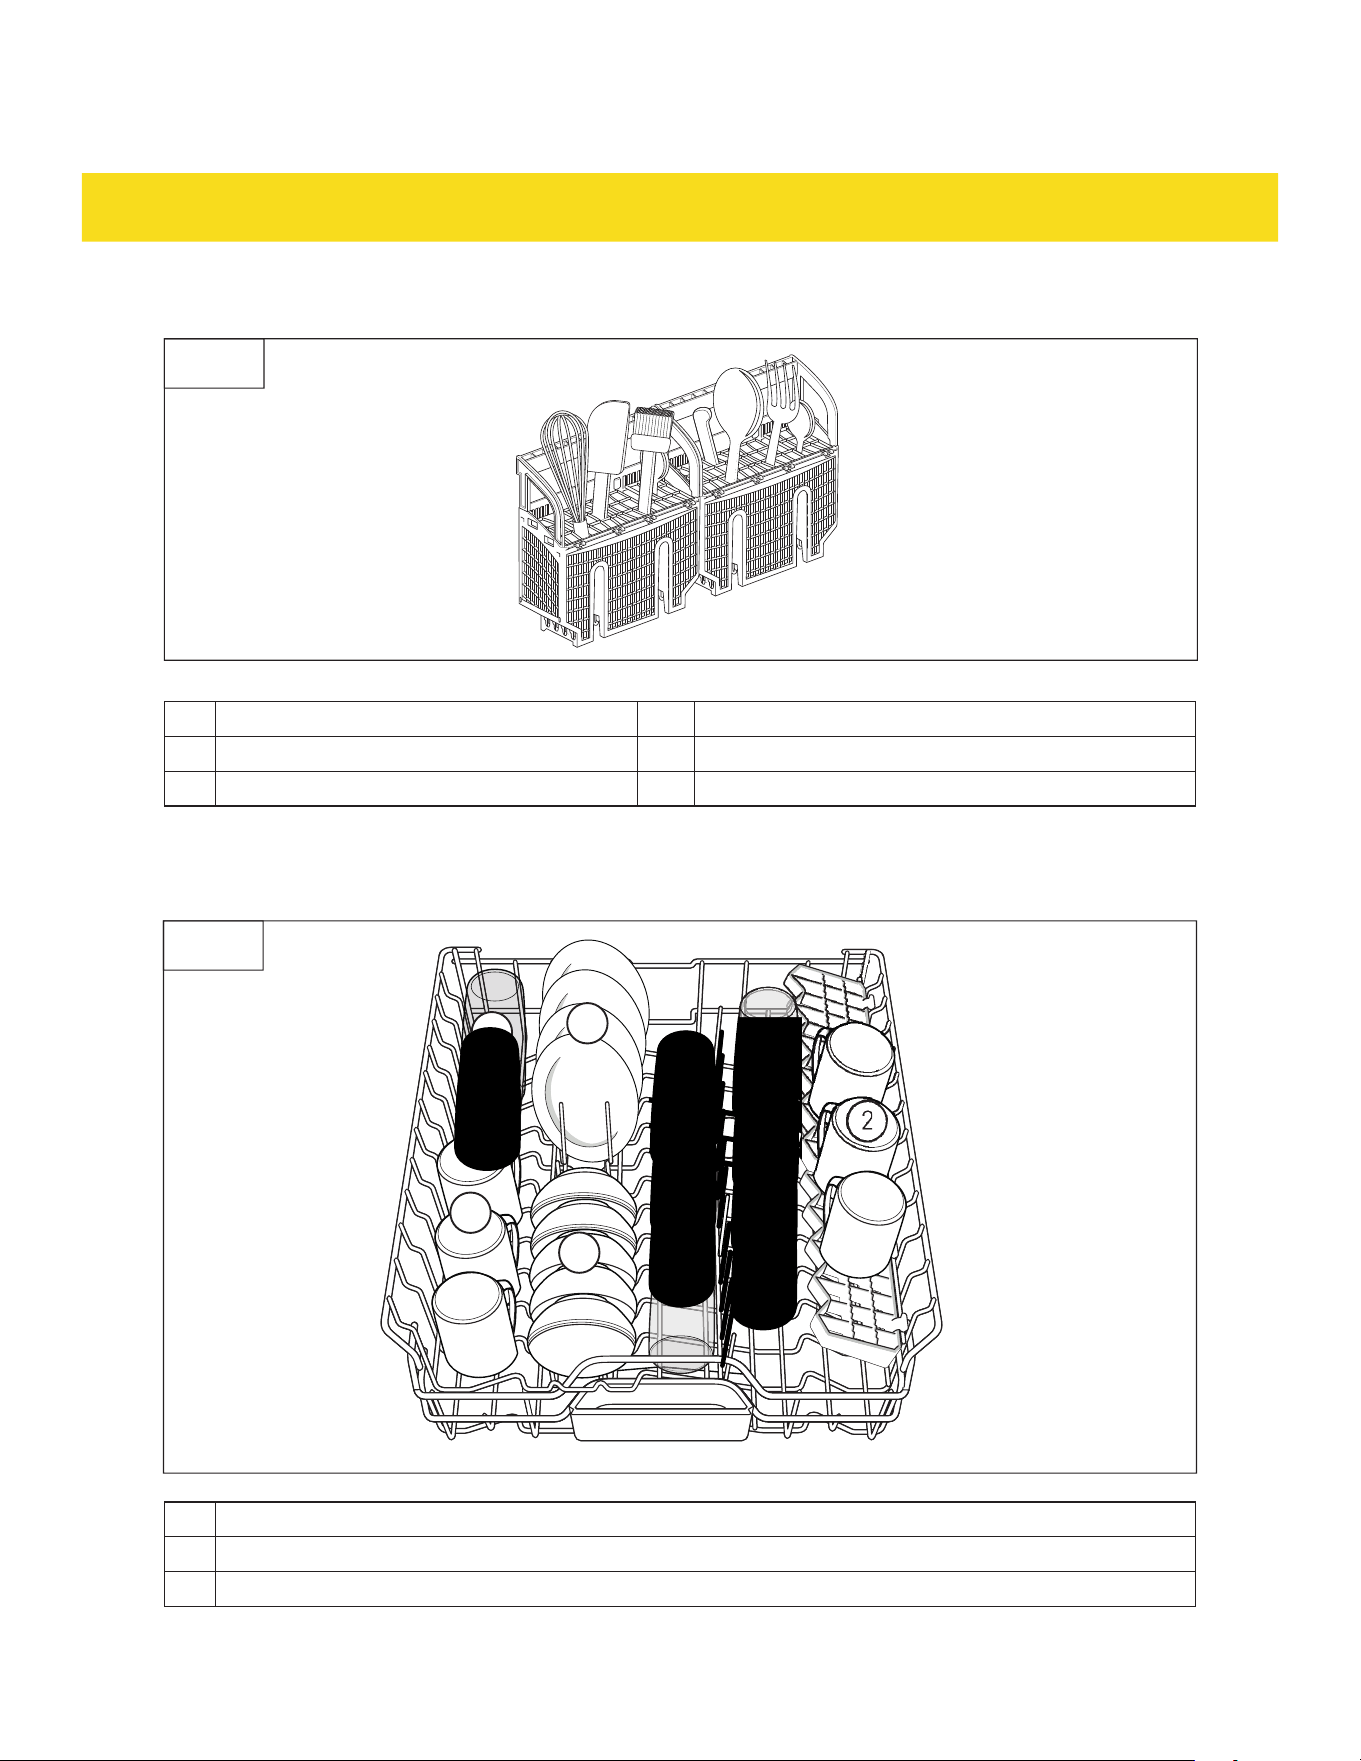
Upper rack
1
2
2
1
3
3
Fig. 11
1 Glasses
2 Cups
3 Saucers or small serving bowls
12
PREPARING AND LOADING THE APPLIANCE
Third rack
1
2
3
4
5
6
1 1
2 2
4
4
3
3
5
6
Fig. 12
1 Dessert spoons or teaspoons 4 Knives
2 Dessert forks 5 Dinner spoons or serving spoons
3 Salad forks 6 Dinner forks or serving forks
3.5 Adding detergent
Dishwasher detergent contains enzymes that break down the oils and dirt on the dishware and
silverware� It should be added every time before starting a cleaning cycle�
NOTICE
•
Only use detergent intended for dishwasher use� Gel detergent, powder detergent or
single dose tabs can be used�
•
It is recommended to use a water softener if the area has hard water deposits greater
than 15 grains/gal�
•
If the water in the area is soft, add less detergent to prevent glassware and delicate items
from etching�
•
The strength and cleaning capabilities of dishwasher detergent vary by brand� Refer to the
packaging of the detergent for the recommended amount�
•
The capacity of the detergent dispenser (J) is max� 2 tbsp (30 ml)� max� 2 tbsp (30 ml)�
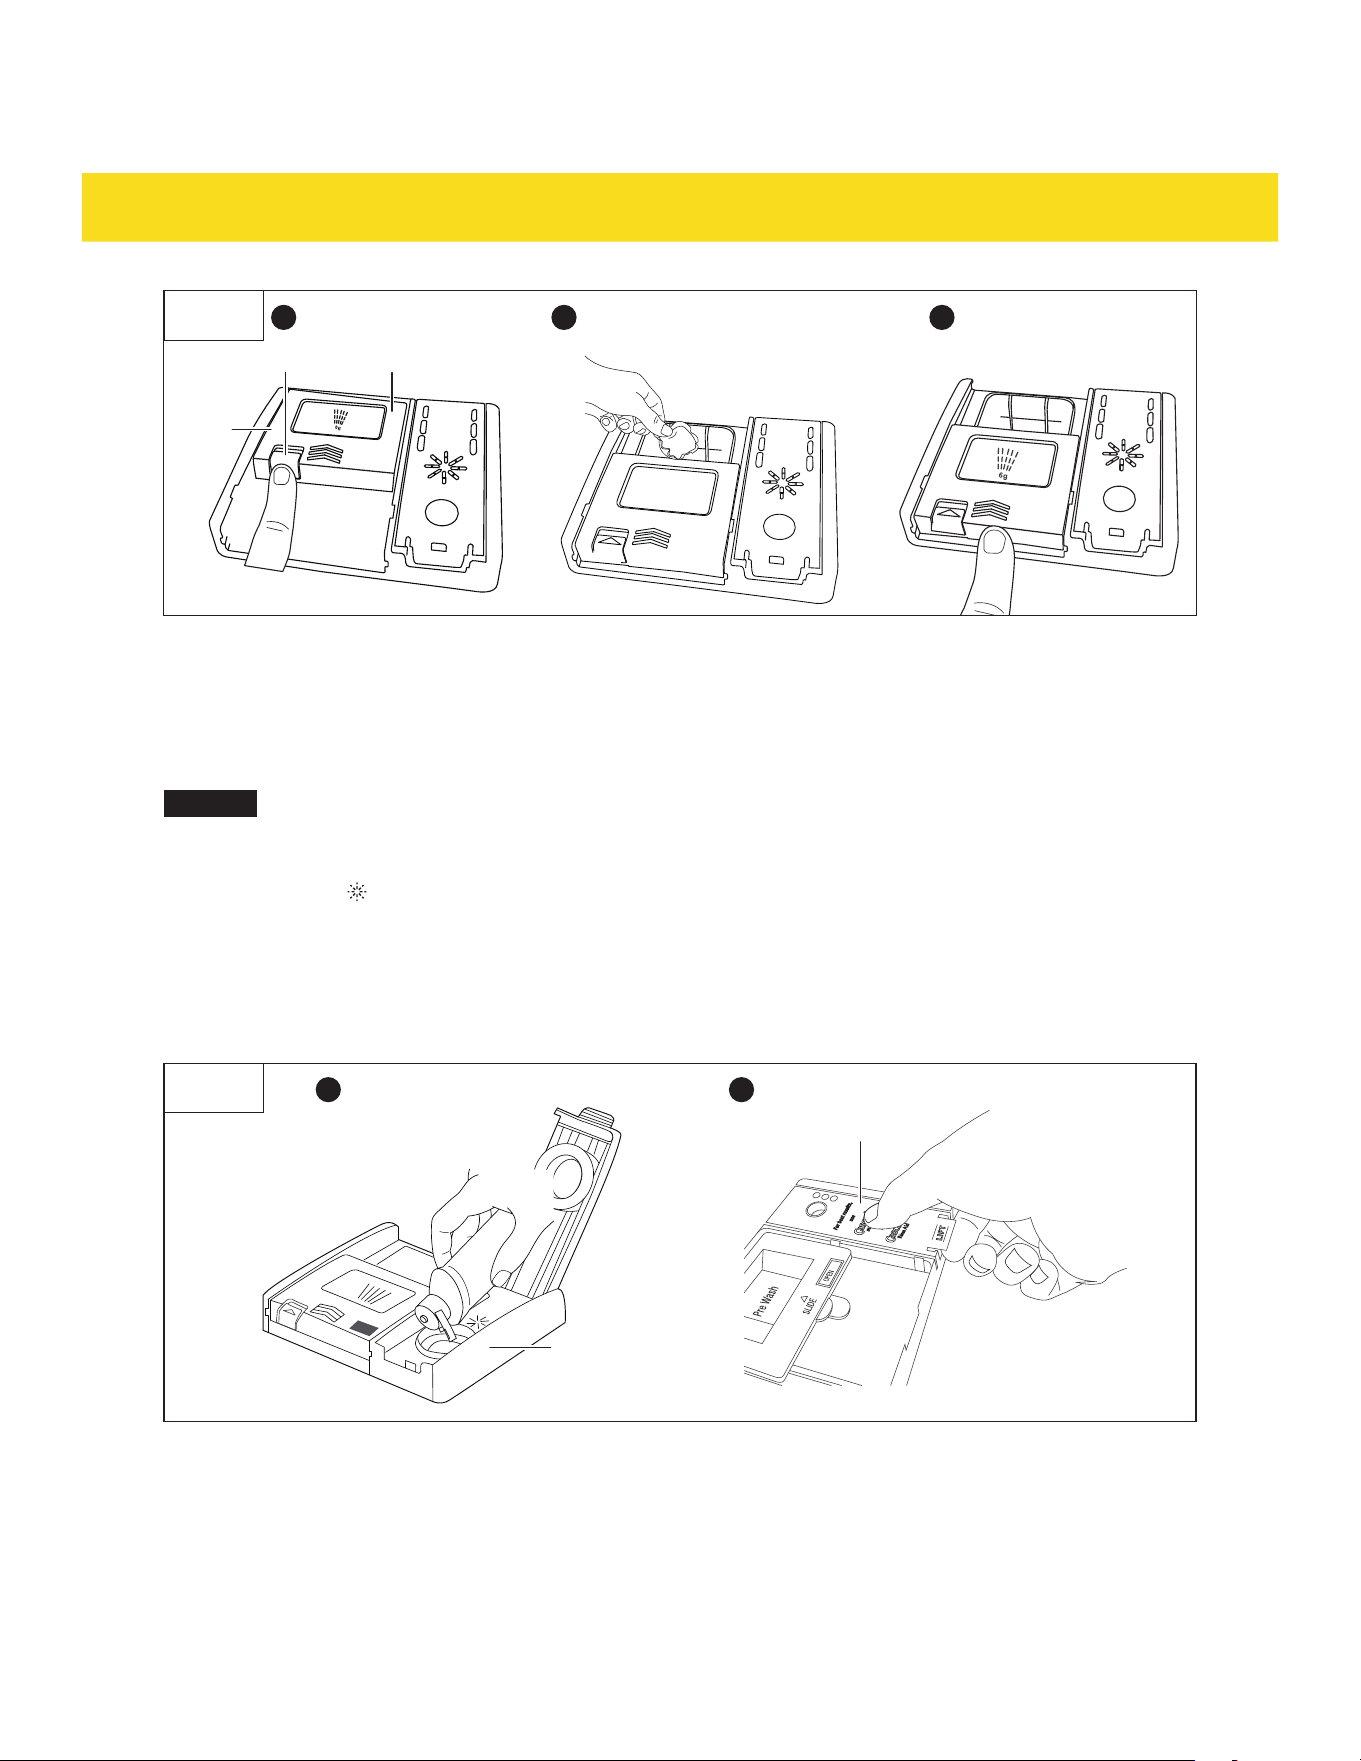
1� Push the tab of the detergent dispenser (J) lid to open it (Fig� 13)�
2� Add an appropriate amount of detergent to the dispenser (Fig� 13)�
3� Slide the detergent dispenser (J) lid forward until it clicks into place (Fig� 13)�
13
PREPARING AND LOADING THE APPLIANCE
Tab Lid
J
Fig. 13
1 2 3
3.6 Adding rinse aid
Rinse aid prevents water from forming spots, streaks or droplets on the dishware and silverware� It is
released during the final rinsing phase of the program�
NOTICE
•
Only use rinse aid intended for dishwasher use�
•
The capacity of the rinse aid dispenser (J) is max� 1�7 oz (50 ml)� Under normal use, this
amount lasts around 1-3 months�
•
The indicator (12) appears on the display (10) as a reminder to add rinse aid to the rinse
aid dispenser (G)�
1� Lift the tab of the rinse aid dispenser (G) lid to open it�
2� Add rinse aid to the dispenser until it reaches the MAX marking (Fig� 14)�
3� Press the rinse aid dispenser (G) lid down firmly until it clicks into place (Fig� 14)�
G
Lid
Fig. 14
21
3.7 Unloading the appliance
Unload the racks (N, Q, W) and silverware basket (X) from the bottom to the top to prevent water dripping
from dishware in the higher racks� Unload the lower rack (N), followed by the upper rack (Q), then the
third rack (W)�
14
OPERATION
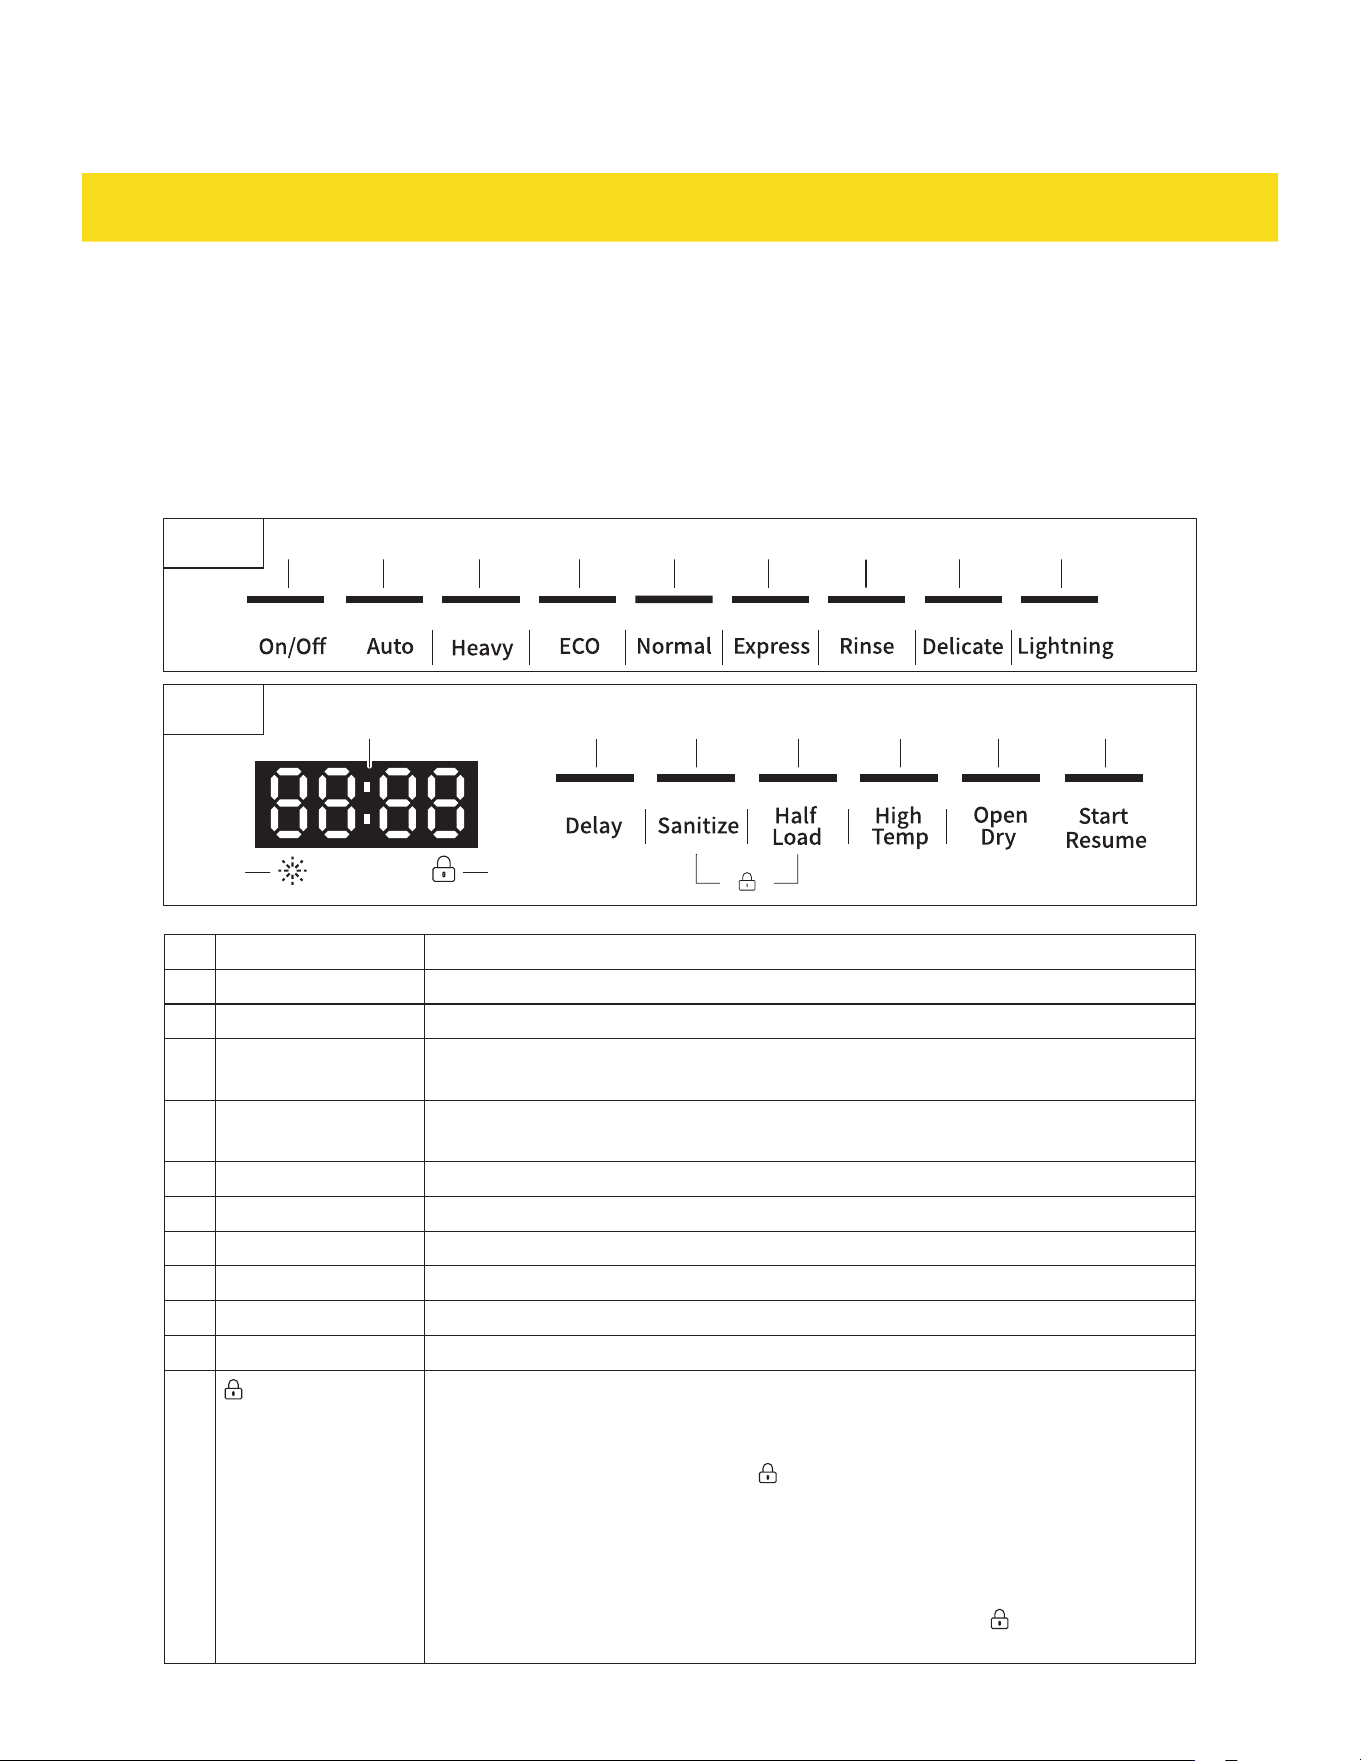
4.1 Control panel description
•
Use the control panel (H) to set the desired program, delay time and other settings (Fig� 15, Fig� 16)�
•
The appliance emits a beep tone when a button is pressed�
•
Each button has an indicator that lights up when the button is pressed�
•
If a program or setting is not able to be selected, the appliance emits 3 beep tones when the
corresponding button is pressed�
1 2 3 4 5 6 7 8 9
Fig. 15
1310 14 15 16 17 18
12
11
Fig. 16
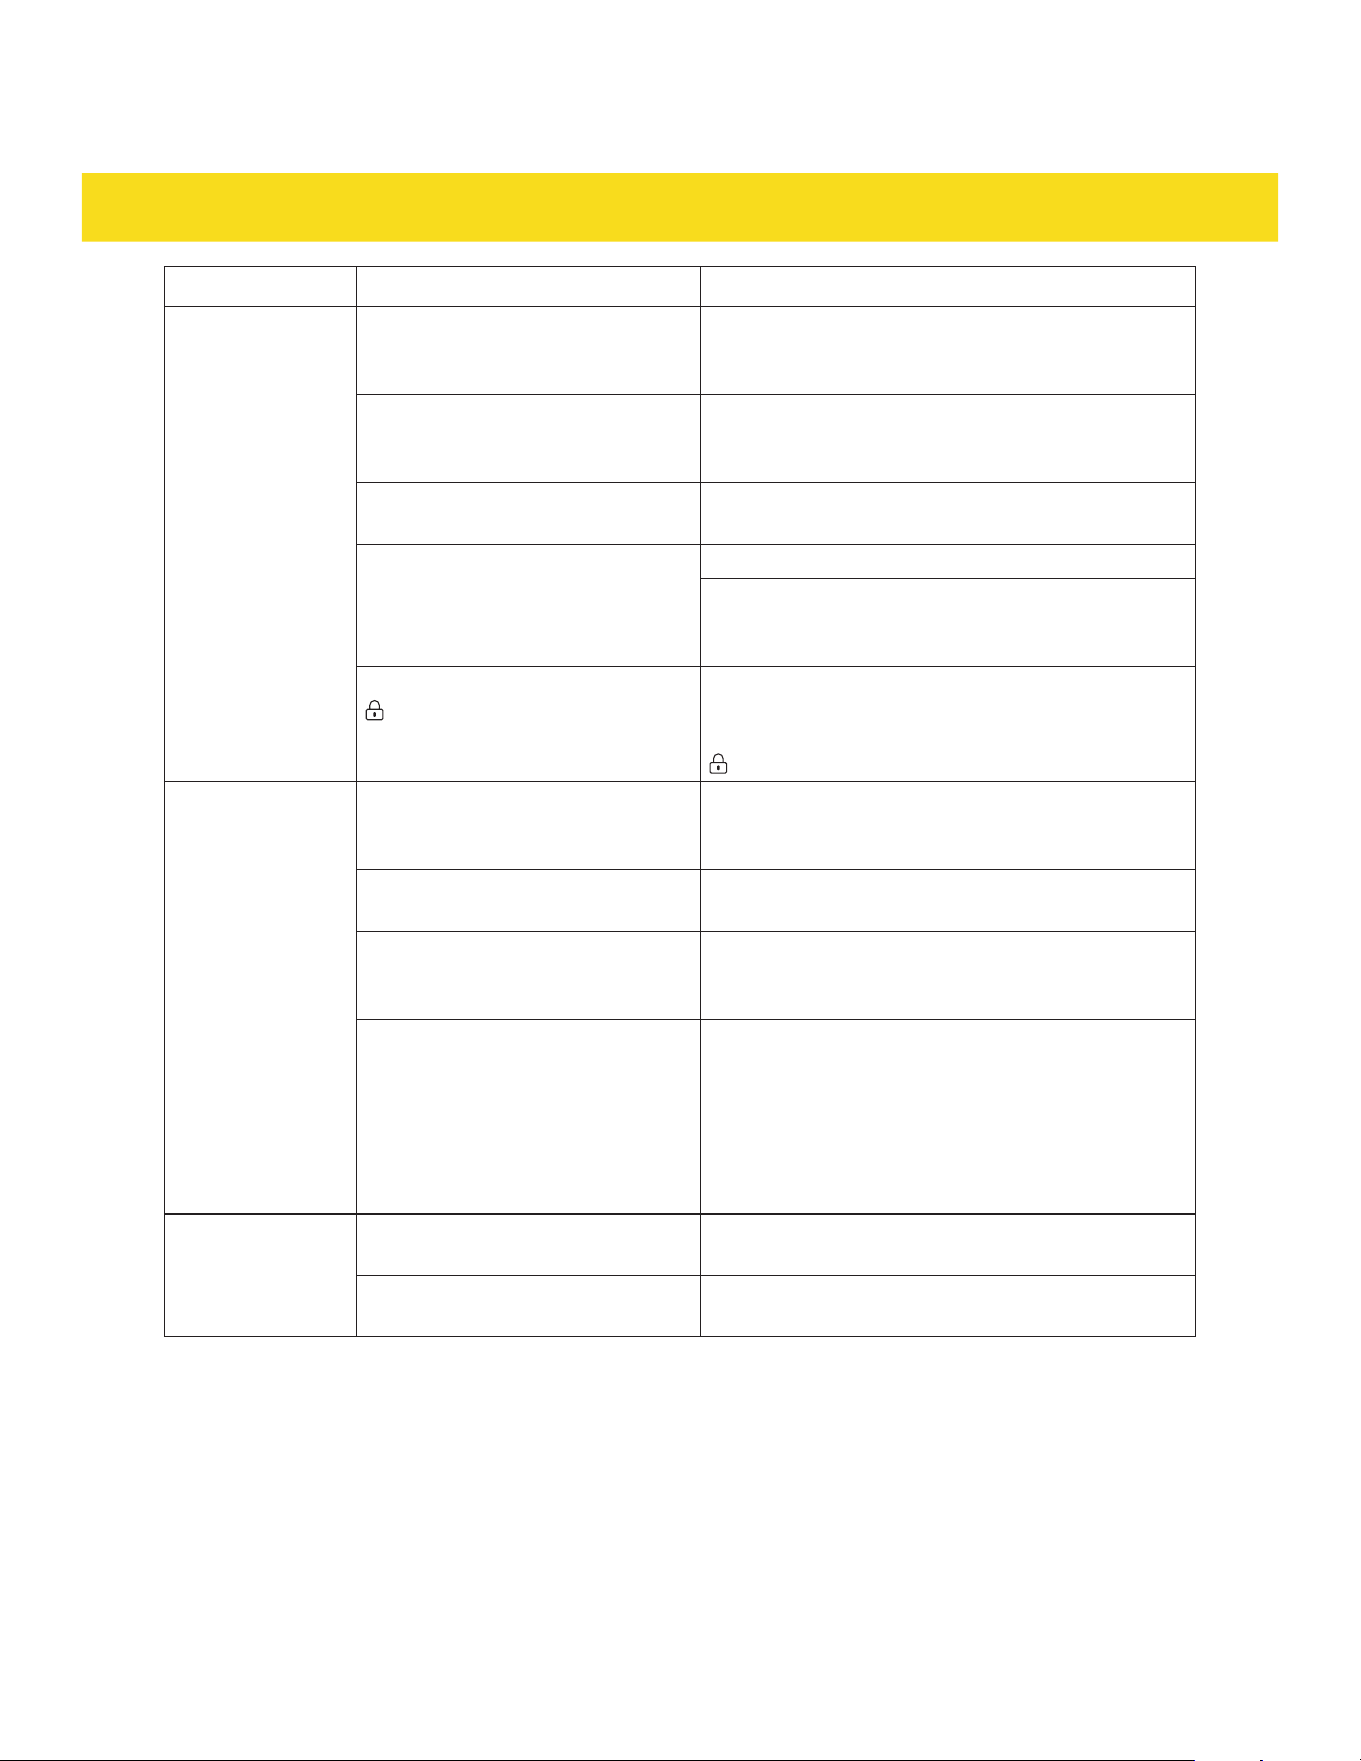
Button/Indicator Description
1 On/Off button
Switches the appliance on/off�
2 Auto button Suitable for loads with stubborn grease and stuck-on food residue�
3 Heavy button Automatically senses and adjusts the wash for mixed dishware and
cookware with varying levels of food soil�
4 ECO button Energy and water-saving mode for normally soiled items, including lightly
soiled pots, pans, plates, and glasses�
5 Normal button Regular daily cleaning of normally soiled loads�
6 Express button Quick cleaning for lightly soiled loads without drying�
7 Rinse button Rinses dishware, glasses and silverware for cleaning at a later time�
8 Delicate button For lightly soiled fragile dishware and glassware�
9 Lightning button For rinsing dishware and glassware�
10 Display Shows delay time and error codes�
11
indicator
•
Activates child lock mode� Prevents buttons from being pressed during a
cleaning cycle�
•
Press and hold the Sanitize button (14) and Half Load button (15) at the
same time for 3 seconds� The indicator (11) appears on the display (10)�
If any button is pressed while the child lock mode is activated, the
appliance emits 3 beep tones�
•
The door can be opened and closed while the child lock mode is activated�
•
To deactivate, press and hold the Sanitize button (14) and Half Load
button (15) at the same time again for 3 seconds� The indicator (11)
disappears from the display (10)�
15
OPERATION
Button/Indicator Description
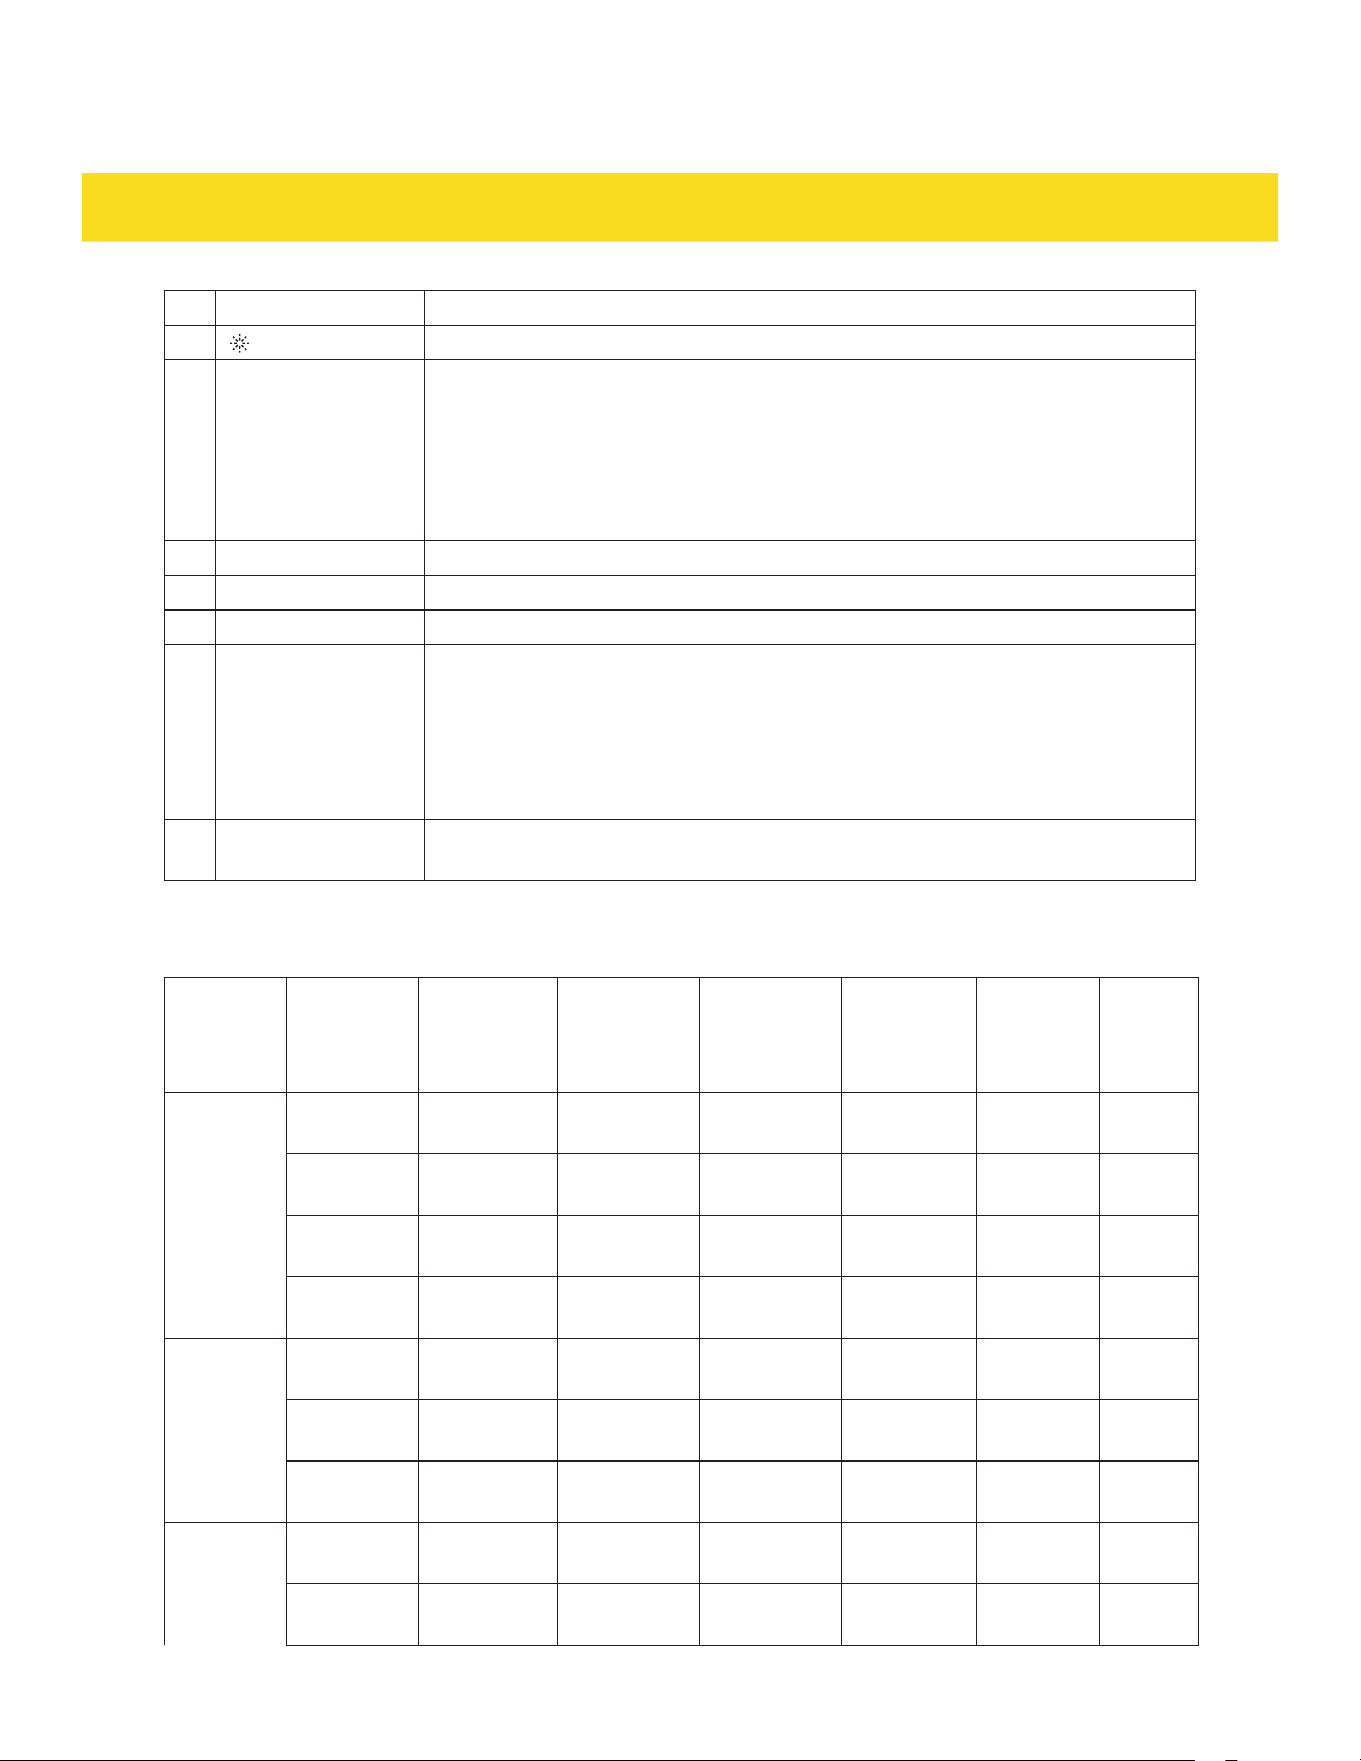
12
indicator
Indicates to add rinse aid to the rinse aid dispenser (G)�
13 Delay button
•
Delays the start of the cleaning cycle�
•
Press the Delay button (13) repeatedly to increase the delay time in
increments of 30 minutes� Press and hold the Delay button (13) for
1 second to automatically increase the delay time in increments of
30 minutes�
•
The maximum delay time is 24 hours�
14 Sanitize button Increases the water temperature during washing to disinfect items�
15 Half Load button Washes smaller loads with less energy and water�
16 High Temp button Increases the water temperature during rinsing to help items dry faster�
17 Open Dry button
•
In the final stage of rinsing, the appliance automatically opens the door
to release hot air, allowing for faster drying� Once the cleaning cycle is
complete, the door opens to a set angle, while the door lock remains
engaged� Open the door normally to unload the appliance�
•
Avoid hitting or pushing the door after it opens automatically� This could
damage the door mechanism�
18 Start/Resume
button (18)
Starts a cleaning cycle�
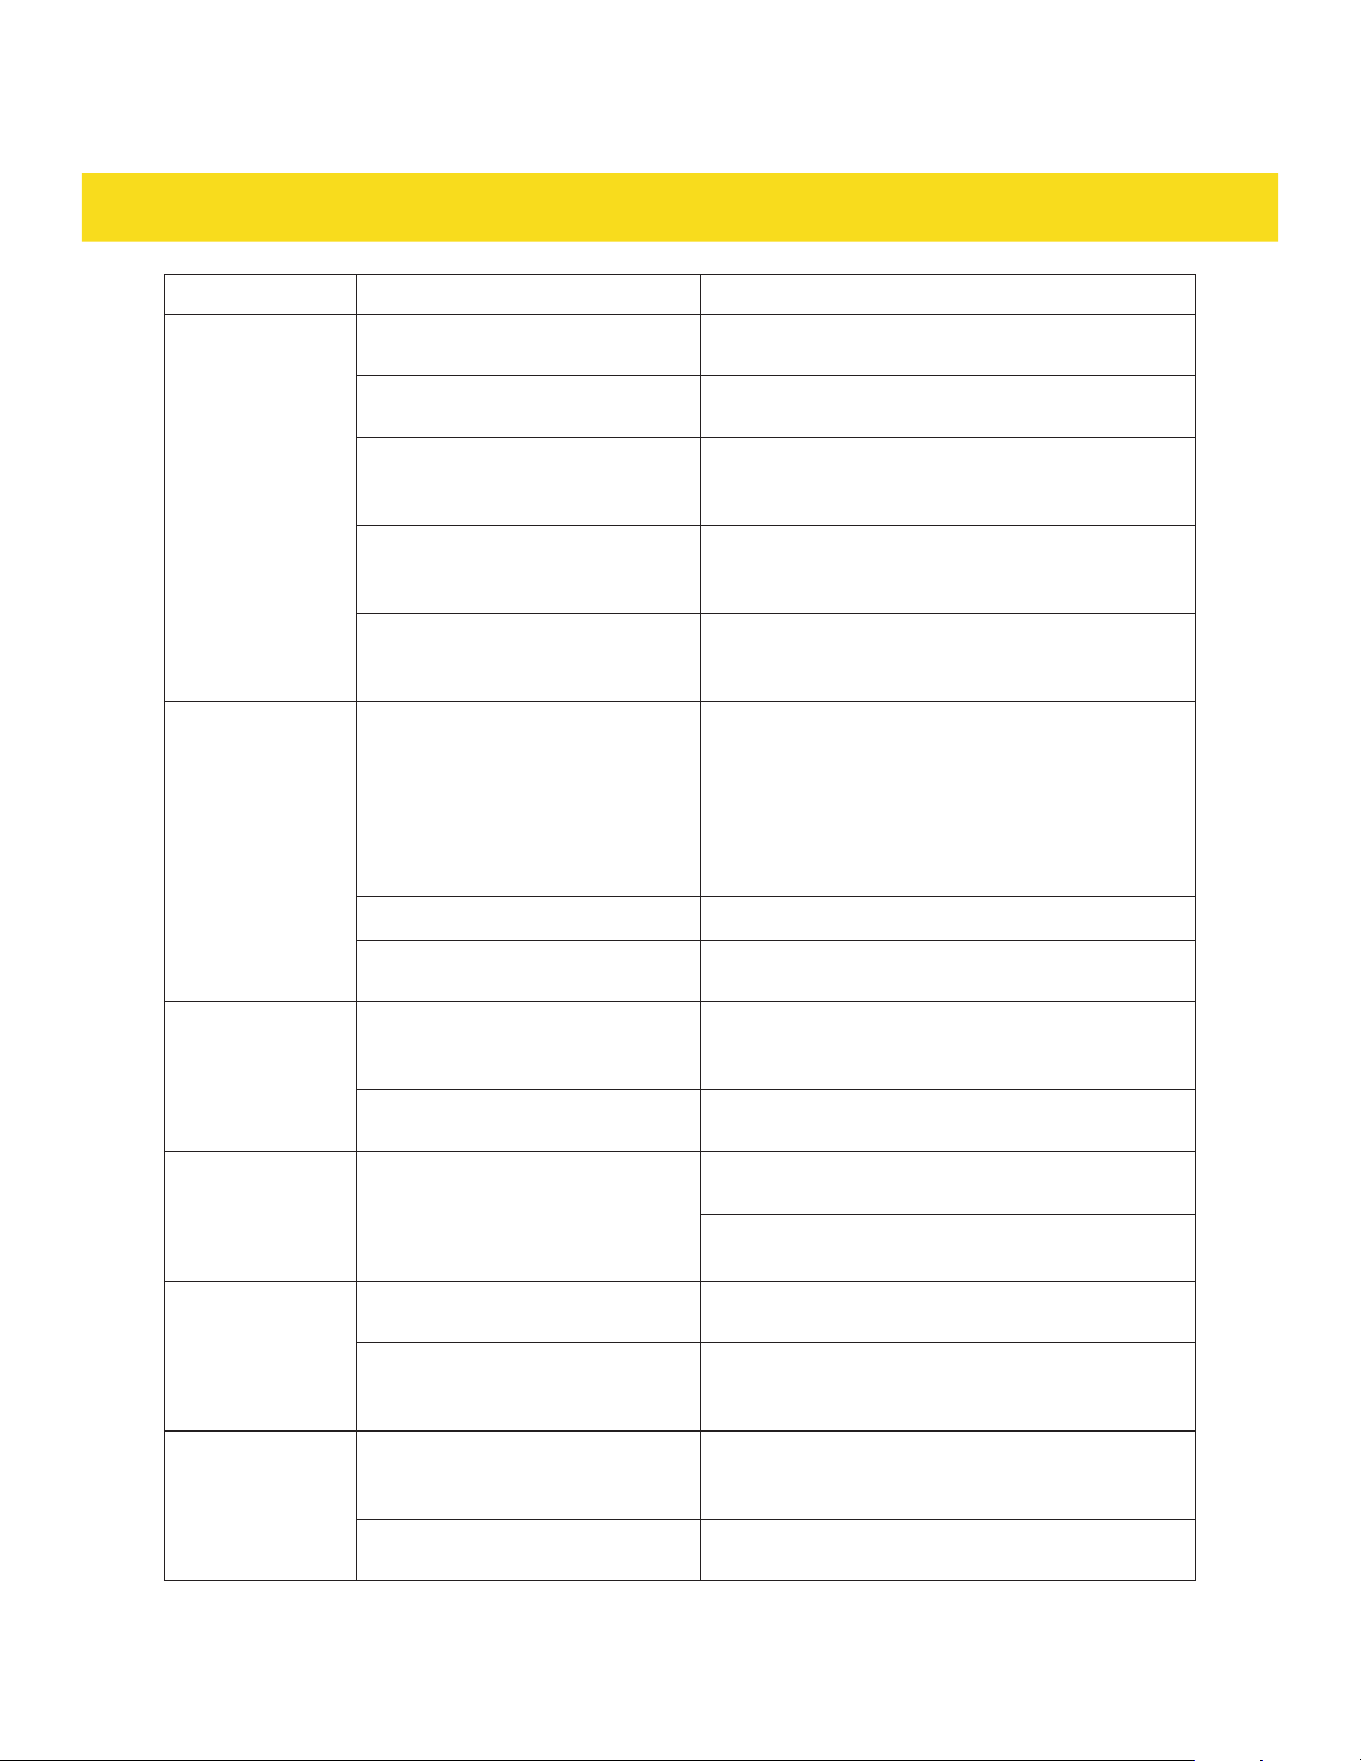
4.2 Program overview
Program Cycle Type Cycle Time
(Open Dry)
Cycle Time
(No Open
Dry)
Water Used
(gal/L)
Pre-Wash
Temp
(°F/°C)
Main
Wash
Temp
(°F/°C)
Rinse
Temp
(°F/°C)
Heavy Standard 165 min 182 min 5�7 gal
(21�6 L)
+122 °F
(+50°C)
+131 °F
(+55 °C)
+158 °F
(+70 °C)
Sanitize 174 min 191 min
5�7 gal
(21�6 L)
+122 °F
(+50 °C)
+131°F
(+55 °C)
+158 °F
(+70 °C)
Half Load 164 min 181 min
4�75 gal
(18 L)
+122 °F
(+50 °C)
+131 °F
(+55 °C)
+158 °F
(+70 °C)
High Temp 170 min 187 min
5�7 gal
(21�6 L)
+122 °F
(+50 °C)
+131 °F
(+55 °C)
+158 °F
(+70 °C)
ECO Standard 148 min 165 min
3�01 gal
(11�4 L)
Water inlet
temp
+113 °F
(+45 °C)
+140 °F
(+60 °C)
Sanitize 160 min 177 min 3�01 gal
(11�4 L)
Water inlet
temp
+113 °F
(+45 °C)
+158 °F
(+70 °C)
High Temp 161 min 178 min
3�01 gal
(11�4 L)
Water inlet
temp
+140 °F
(+60 °C)
+140 °F
(+60 °C)
Delicate Standard 117 min 134 min
3�70 gal
(14 L)
Water inlet
temp
+113 °F
(+45 °C)
+140 °F
(+60 °C)
Sanitize 129 min 146 min
3�70 gal
(14 L)
Water inlet
temp
+113 °F
(+45 °C)
+158 °F
(+70 °C)
16
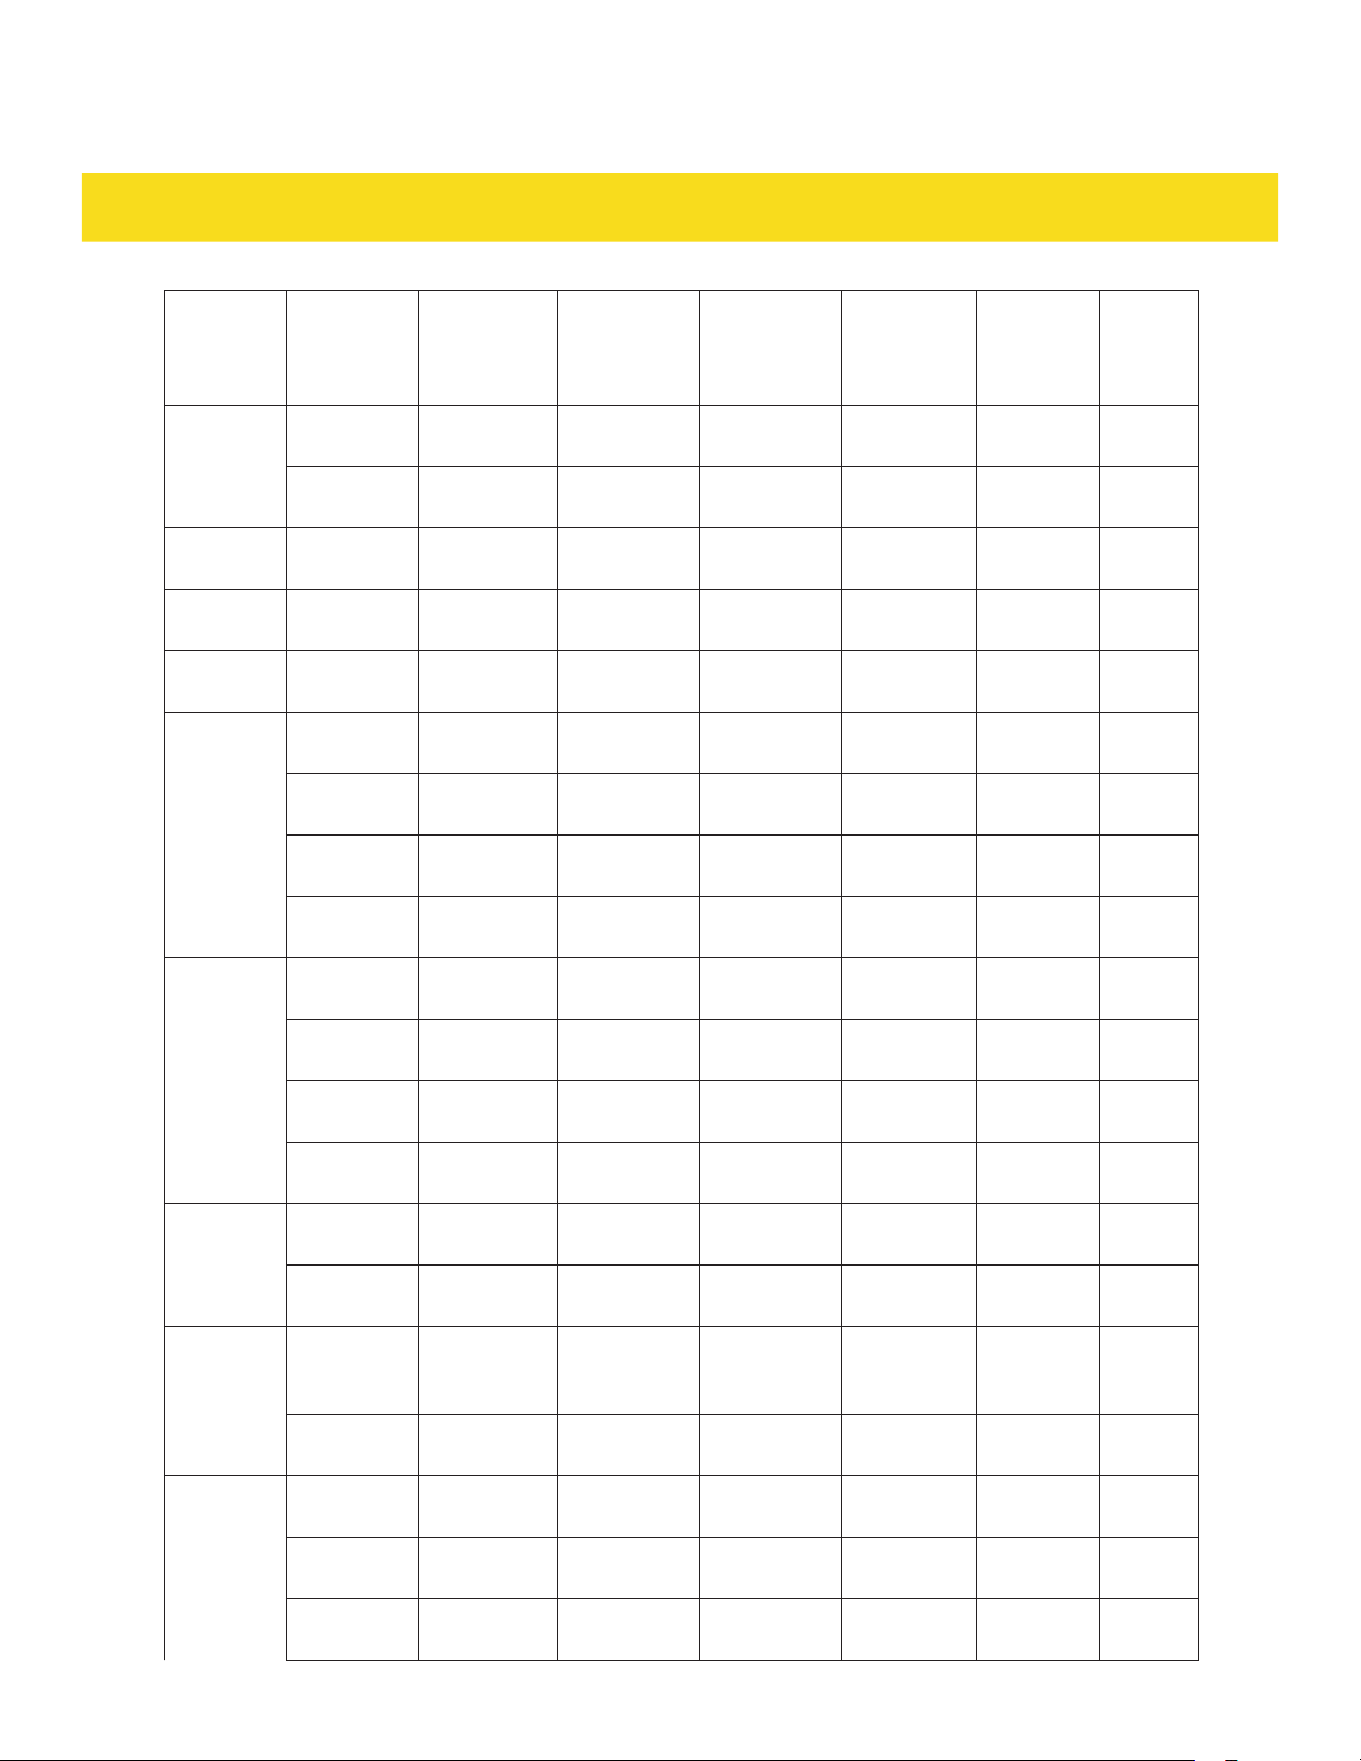
OPERATION
Program Cycle Type Cycle Time
(Open Dry)
Cycle Time
(No Open
Dry)
Water Used
(gal/L)
Pre-Wash
Temp
(°F/°C)
Main
Wash
Temp
(°F/°C)
Rinse
Temp
(°F/°C)
Half Load 116 min 133 min
3�17 gal
(12 L)
Water inlet
temp
+113 °F
(+45 °C)
+140 °F
(+60 °C)
High Temp 130 min 147 min 3�70 gal
(14 L)
Water inlet
temp
+140 °F
(+60 °C)
+140 °F
(+60 °C)
Express Standard n/a 23 min
1�85 gal
(7 L)
n/a +113 °F
(+45 °C)
n/a
Rinse Standard n/a 40 min
1�85 gal
(7 L)
n/a +113 °F
(+45 °C)
+140 °F
(+60 °C)
Lightning Standard n/a 14 min
0�92 gal
(3�5 L)
n/a +113 °F
(+45 °C)
n/a
Normal
(super H)
*
Standard 144 min 161 min 5�34 gal
(20�2 L)
Water inlet
temp
+131 °F
(+55 °C)
+140 °F
(+60 °C)
Sanitize 156 min 173 min
5�34 gal
(20 L)
Water inlet
temp
+131 °F
(+55 °C)
+158 °F
(+70 °C)
Half Load 143 min 160 min
4�75 gal
(20�2 L)
Water inlet
temp
+131 °F
(+55 °C)
+140 °F
(+60 °C)
High Temp 149 min 166 min
5�34 gal
(20�2 L)
Water inlet
temp
+140 °F
(+60 °C)
+140 °F
(+60 °C)
Normal
(H)
**
Standard 125 min 142 min 3�54 gal
(13�4 L)
Water inlet
temp
+131 °F
(+55 °C)
+140 °F
(+60 °C)
Sanitize 137 min 154 min
3�54 gal
(13�4 L)
Water inlet
temp
+131 °F
(+55 °C)
+158 °F
(+70 °C)
Half Load 124 min 141 min
3�17 gal
(12 L)
Water inlet
temp
+131 °F
(+55 °C)
+140 °F
(+60 °C)
High Temp 130 min 147 min
3�54 gal
(13�4 L)
Water inlet
temp
+140 °F
(+60 °C)
+140 °F
(+60 °C)
Normal
(M)
***
Standard 112 min 129 min 3�54 gal
(13�4 L)
Water inlet
temp
+122 °F
(+50 °C)
+140 °F
(+60 °C)
Sanitize 123 min 140 min 3�54 gal
(13�4 L)
Water inlet
temp
+122 °F
(+50 °C)
+158 °F
(+70 °C)
Normal
(M)
***
(con't)
Half Load 111 min 128 min 3�17 gal
(12 L)
Water inlet
temp
+122 °F
(+50 °C)
+140 °F
(+60 °C)
High Temp 120 min 137 min
3�54 gal
(13�4 L)
Water inlet
temp
+140 °F
(+60 °C)
+140 °F
(+60 °C)
Normal
(L)
****
Standard 95 min 112 min 2�67 gal
(10�1 L)
Water inlet
temp
+113 °F
(+45 °C)
+140 °F
(+60 °C)
Sanitize 106 min 113 min 2�67 gal
(10�1 L)
Water inlet
temp
+113 °F
(+45 °C)
+158 °F
(+70 °C)
Half Load 94 min 111 min
2�38 gal
(9 L)
Water inlet
temp
+113 °F
(+45 °C)
+140 °F
(+60 °C)
17
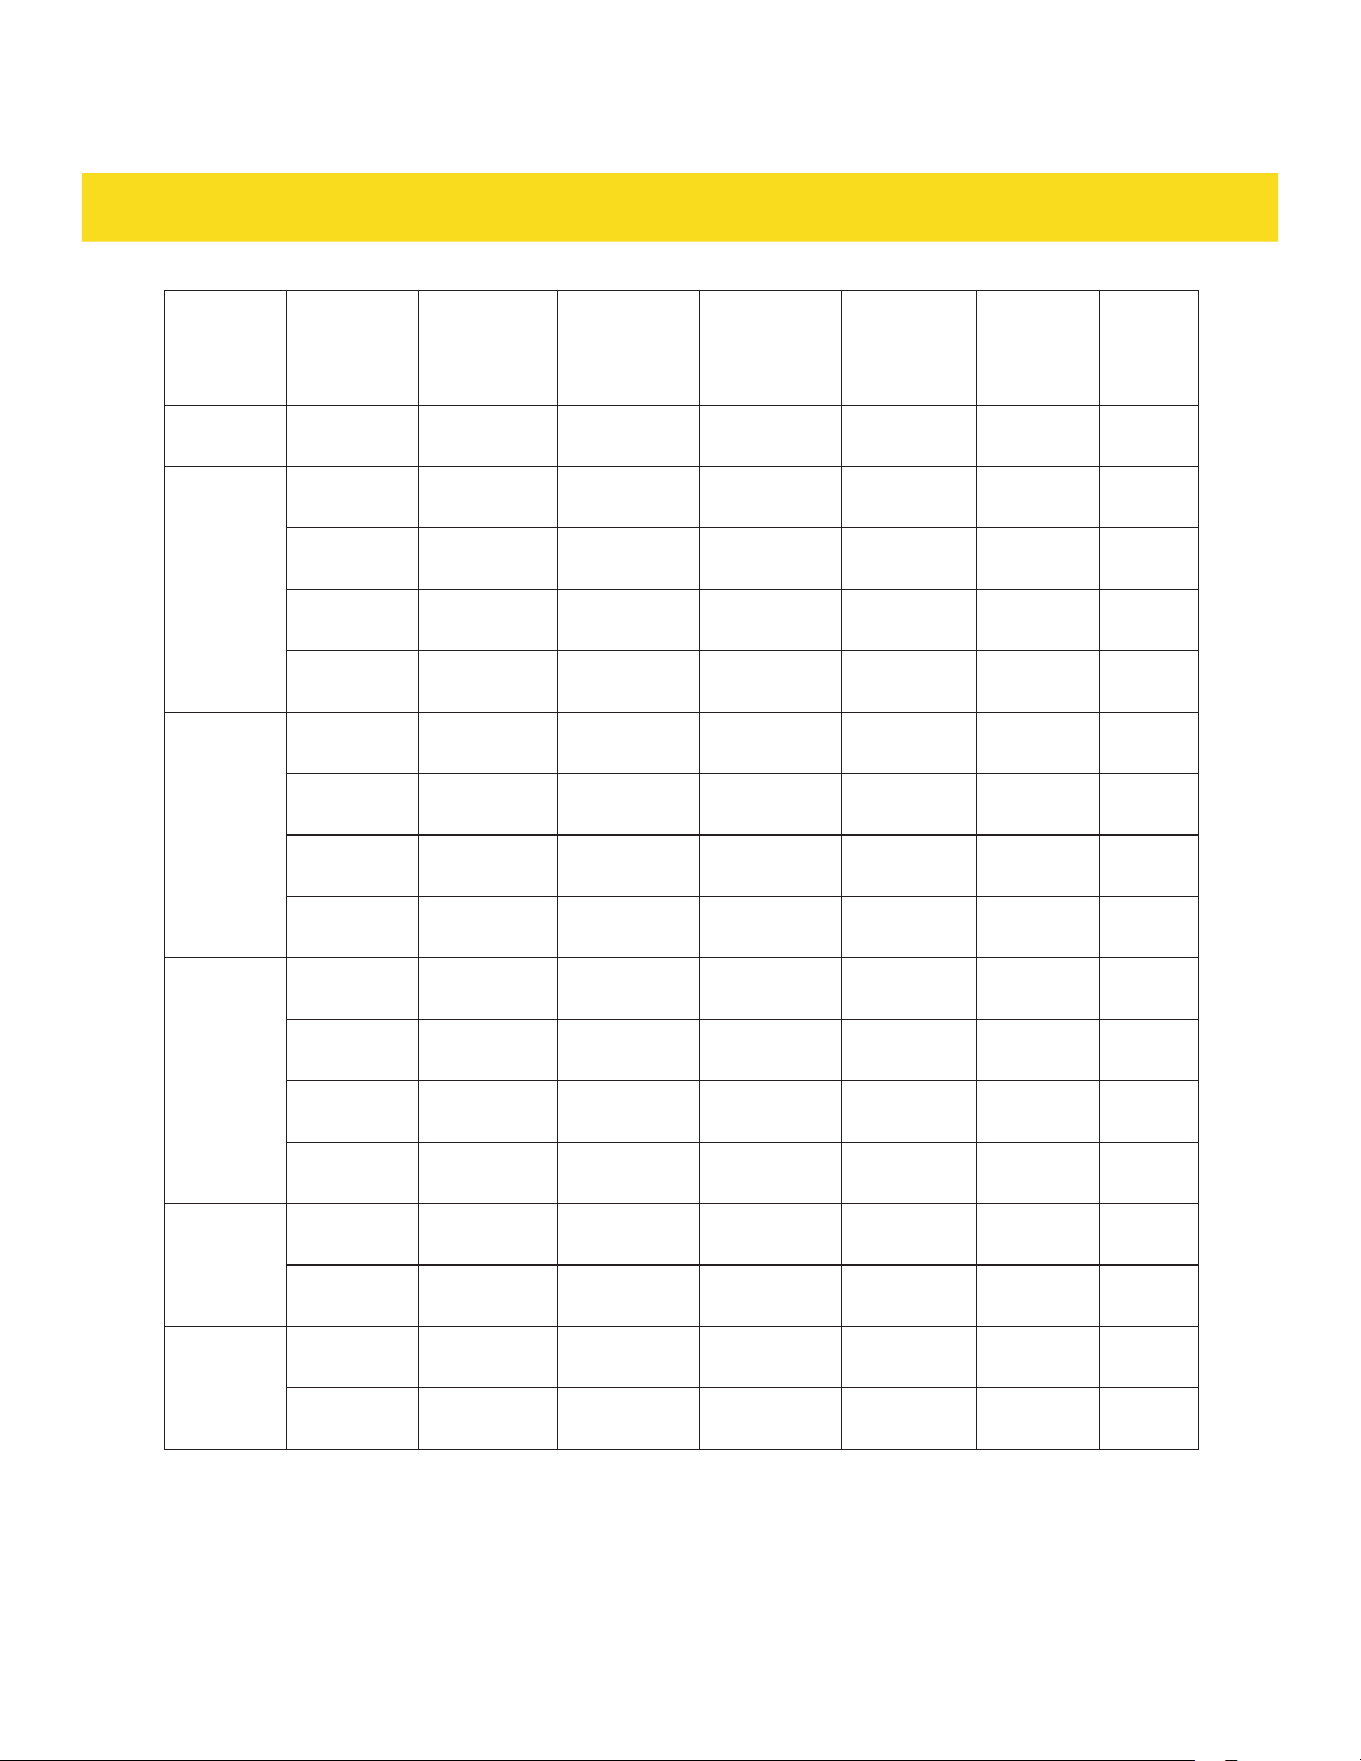
OPERATION
Program Cycle Type Cycle Time
(Open Dry)
Cycle Time
(No Open
Dry)
Water Used
(gal/L)
Pre-Wash
Temp
(°F/°C)
Main
Wash
Temp
(°F/°C)
Rinse
Temp
(°F/°C)
High Temp 108 min 125 min
2�67 gal
(10�1 L)
Water inlet
temp
+140 °F
(+60 °C)
+140 °F
(+60 °C)
Auto
(Super H)
*
Standard 153 min 170 min 4�76 gal
(18 L)
Water inlet
temp
+131 °F
(+55 °C)
+140 °F
(+60 °C)
Sanitize 164 min 181 min
4�76 gal
(18 L)
Water inlet
temp
+131 °F
(+55 °C)
+158 °F
(+70 °C)
Half Load 152 min 169 min
4�23 gal
(16 L)
Water inlet
temp
+131 °F
(+55 °C)
+140 °F
(+60 °C)
High Temp 158 min 175 min
4�76 gal
(18 L)
Water inlet
temp
+140 °F
(+60 °C)
+140 °F
(+60 °C)
Auto (H)
**
Standard 134 min 151 min 3�75 gal
(14�2 L)
Water inlet
temp
+131 °F
(+55 °C)
+140 °F
(+60 °C)
Sanitize 146 min 163 min
3�75 gal
(14�2 L)
Water inlet
temp
+131 °F
(+55 °C)
+158 °F
(+70 °C)
Half Load 133 min 1+50 min
3�17 gal
(12 L)
Water inlet
temp
+131 °F
(+55 °C)
+140 °F
(+60 °C)
High Temp 139 min 156 min
3�75 gal
(14�2 L)
Water inlet
temp
+140 °F
(+60 °C)
+140 °F
(+60 °C)
Auto (M)
***
Standard 127 min 144 min 3�75 gal
(14�2 L)
Water inlet
temp
+122 °F
(+50 °C)
+140 °F
(+60 °C)
Sanitize 138 min 155 min
3�75 gal
(14�2 L)
Water inlet
temp
+122 °F
(+50 °C)
+158 °F
(+70 °C)
Half Load 125 min 142 min
3�17 gal
(12 L)
Water inlet
temp
+122 °F
(+50 °C)
+140 °F
(+60 °C)
High Temp 135 min 152 min
3�75 gal
(14�2 L)
Water inlet
temp
+140 °F
(+60 °C)
+140 °F
(+60 °C)
Auto (L)
****
Standard 104 min 121 min 2�88 gal
(10�9 L)
Water inlet
temp
+131 °F
(+55 °C)
+140 °F
(+60 °C)
Sanitize 115 min 132 min 2�88 gal
(10�9 L)
Water inlet
temp
+113 °F
(+45 °C)
+158 °F
(+70 °C)
Auto (L)
****
(con't)
Half Load 111 min 128 min 2�62 gal
(9�9 L)
Water inlet
temp
+113 °F
(+45 °C)
+140 °F
(+60 °C)
High Temp 117 min 134 min
2�88 gal
(10�9 L)
Water inlet
temp
+140 °F
(+60 °C)
+140 °F
(+60 °C)
*
Super H corresponds to super heavy soil level�
**
H corresponds to heavy soil level�
***
M corresponds to medium soil level�
****
L corresponds to light soil level�

18
OPERATION
4.3 Starting or resuming a cleaning cycle
NOTICE
•
To ensure an optimal temperature for washing, run hot water at the sink closest to the
dishwasher until the water is hot, then turn the water off�
•
If the door is open longer than 4 seconds after starting a cleaning cycle (including if the
Delay function is selected), it is necessary to press the Start/Resume button (18) again�
•
If the indicator (12) appears on the display (10), add rinse aid to the rinse aid
dispenser (G)�
1� Remove large pieces of food residue (e�g� bones, shells) from the dishware and silverware�
2� Load the racks (N, Q, W) and silverware basket (X) from the back to the front and from the bottom to
the top�
3� Fill the detergent dispenser (J) and rinse aid dispenser (G) as needed�
4� Press the On/Off button (1) to switch the appliance on� The On/Off button (1) indicator, Auto button (2)
indicator and display (10) light up� The Auto program duration appears on the display (10)�
5� Press the corresponding button on the control panel (H) to select the desired program and settings�
6� Lock the control panel (H) if necessary� To do so, press and hold the Sanitize button (14) and Half Load
button (15) at the same time for 3 seconds� The indicator (11) appears on the display (10)�
7� Press the Start/Resume button (18) to start the cleaning cycle�
8� Firmly close the door within 4 seconds of pressing the Start/Resume button (18)� If the door is not
closed within 4 seconds, the Start/Resume button (18) flashes and the cleaning cycle does not start�
9� As the cleaning cycle starts and progresses, the spotlight indicator (I) flashes then stays lit�
10� When the cleaning cycle ends, the appliance emits a signal tone and the spotlight indicator (I) goes off�
If no operation is made within 3 minutes, the appliance automatically switches off�
11� After every cleaning cycle, leave the door slightly open for at least 30 minutes to release any moisture
and odor�
4.4 Interrupting a cleaning cycle
CAUTION
Risk of injury! The appliance may emit hot steam if it is opened mid-cycle� Keep the body
away from the appliance and wear protective gloves if necessary�
NOTICE
Pausing the cleaning cycle to add extra dishware is only possible before the detergent
dispenser (J) opens�
1� Press the Start/Resume button (18) to pause the cleaning cycle� The button indicator and spotlight
indicator (I) flash�
2� Open the door slightly to stop the cleaning cycle� Wait for the water to stop spraying, then open the
door completely�
3� Check if the detergent dispenser (J) lid is open or closed� If it is open, the cleaning cycle has started
and it is not recommended to add dishware or silverware�
4� If the detergent dispenser (J) cover is closed, add any extra dishware or silverware to the racks (N, Q,
W) and silverware basket (X)�
5� Close the door�
6� Press the Start/Resume button (18) again to resume the cleaning cycle� The button indicator and
spotlight indicator (I) remain steady on�

19
OPERATION
4.5 Changing a program
NOTICE
The program can only be changed at the early stages of a cleaning cycle� If the detergent has
been released or if the wash water is drained, a new program has to be set and the detergent
dispenser (J) must be refilled�
1� Press and hold the On/Off button (1) for 3 seconds to switch the appliance off� The button indicator
goes off�
2� Press and hold the On/Off button (1) briefly to switch the appliance back on� The button indicator
lights up�
3� Press the corresponding button on the control panel (H) to select the desired program and settings�
4� Press the Start/Resume button (18) to start the cleaning cycle� The button indicator and spotlight
indicator (I) light up�
4.6 Canceling a cleaning cycle / Draining
1� Press and hold the On/Off button (1) for 3 seconds to switch the appliance off� The button indicator
goes off�
2� Press and hold the Start/Resume button (18) for 5 seconds� The button indicator flashes and the
appliance starts draining water�
3� The appliance switches off again 25 seconds after draining� The button indicator goes off�
CLEANING
5.1 General cleaning
•
Unload any items from the racks (N, Q, W) and silverware basket (X) before cleaning�
•
Do not let cooking grease or other flammable materials accumulate on the surfaces or near the
appliance�
•
Never use corrosive detergents, wire brushes, abrasive scourers, metal or sharp utensils to clean the
appliance
•
Check that the appliance is switched off and all surfaces are cool before cleaning any part of the
appliance�
•
If the appliance is moved for servicing, check that the anti-tip restraints are re-engaged properly
when the appliance is reinstalled�
Control panel
•
Wipe the control panel (H) with a soft, damp microfiber cloth� Wipe dry with a dry cloth�
•
Do not use spray cleaner on the control panel (H) to avoid penetration of water into the appliance�
•
Do not use abrasive cleaners to prevent scratching�

20
CLEANING
Stainless steel surfaces
CAUTION
Risk of damage! Do not use a steel-wool pad or abrasive cleaners to clean the surfaces� It
may scratch the surfaces�
•
It is recommended to use a stainless steel cleaner to remove fingerprints, dust and other residue�
•
Clean the stainless steel surfaces when they are visibly dirty or dull�
•
Follow the manufacturer's instructions indicated on the product packaging�
5.2 Cleaning the interior
CAUTION
Health hazard!
Using detergents containing chlorine may result in harm to health�
•
It is recommended to use dishwahser cleaning tablets once a month or as needed for effective
removal of residue and stains on the interior surfaces� Build up of residue and stains may affect
dishwasher performance over time�
1� Clean the filter assembly� Wash away any food residue and lock it back in place�
2� Place one dishwasher cleaning tablet in the detergent tray without dishes and one tablet in the bottom
of the dishwasher with dishes�
3� Run a normal cycle�
5.3 Cleaning the filter assembly
CAUTION
Risk of damage!
Never operate the appliance without the filter assembly (K)� Using the appliance without the
filter assembly (K) may damage the internal components�
NOTICE
•
Check the condition of the filter assembly (K) and clean it at least once a month�
•
Do not overtighten the filter assembly (K)� Make sure the filter assembly (K) is installed
securely to prevent debris from entering the appliance�
1� Pull the lower rack (W) out from the appliance using the lower rack handle (Y)�
2� Hold the top of the filter assembly (K) and rotate it counterclockwise to loosen it� Take the filter
assembly (K) out of the appliance (Fig� 17)�
3� Take off the inner filter from the top of the filter assembly (K) (Fig� 17)�
4� Rinse the filters under running water� Use a soft cleaning brush to remove any remaining food residue
or debris�
5� Reassemble the filters in the reverse order of disassembly� Place the filter assembly (K) into the
appliance and rotate it clockwise to tighten it�

21
CLEANING
Fig. 17
2
1
5.4 Cleaning the spray arms
NOTICE
Check the condition of the spray arms (F, T) and clean them at least once a month�
1� To remove the upper spray arm (T), hold the nut in the center and rotate the upper spray arm
counterclockwise (Fig� 18)�
2� To remove the lower spray arm (F), pull it upwards (Fig� 18)�
3� Wash the spray arms (F, T) in warm, soapy water� Use a soft cleaning brush to remove any residue
from the jets�
4� Rinse the spray arms (F, T) thoroughly under running water�
5� Reinstall the spray arms (F, T)�
1
2
Fig. 18
Upper spray arm
Lower spray arm

22
MAINTENANCE
6.1 Maintenance guidelines
•
Unload any items from the racks (N, Q, W) and silverware basket (X) before performing maintenance
or servicing�
•
Switch off the power to the appliance at the main fuse or circuit breaker� If in doubt, contact an
electrician�
•
If the appliance is moved for servicing, check that the anti-tip restraints are re-engaged properly
when the appliance is reinstalled�
•
Always disconnect the appliance from the electrical supply before servicing�
•
Any other servicing than mentioned in this manual should be performed by a professional repair
center�
6.2 Preparing for extended absence
If the appliance is not going to be used for a long time, run the Auto program without a load� Once
complete, switch off the power to the appliance, close the water supply and leave the door slightly open�
This helps the door seals to last longer and prevent odors from forming inside the appliance�
6.3 Preparing for winter
Perform these steps after a cleaning cycle in winter to prevent frost from forming inside the appliance:
These steps should only be applied in colder areas to prevent frost from forming inside the appliance
after a cleaning cycle during winter� In warmer regions, these precautions may not be needed�
1� Disconnect the appliance from the power source�
2� Switch off the water supply and disconnect the water inlet pipe from the water valve�
3� Run the Half Load program to drain any remaining water from the water inlet pipe and water valve�
4� Reconnect the water inlet pipe to the water valve�
5� Remove the filter assembly (K) at the bottom of the inner cavity� Soak up any water with a sponge or
absorbent cloth�
6.4 Purchase replacement parts
For purchasing replacement parts, ensure compatibility by referencing the appliance model number and
serial number, then contact Thor by:
Contact Phone number Email
Thor's parts department
877-288-8099 (option 5)
parts@thorinternational�com
Customer service
877-288-8099 (option 3)
service@thorinternational�com
23
TROUBLESHOOTING
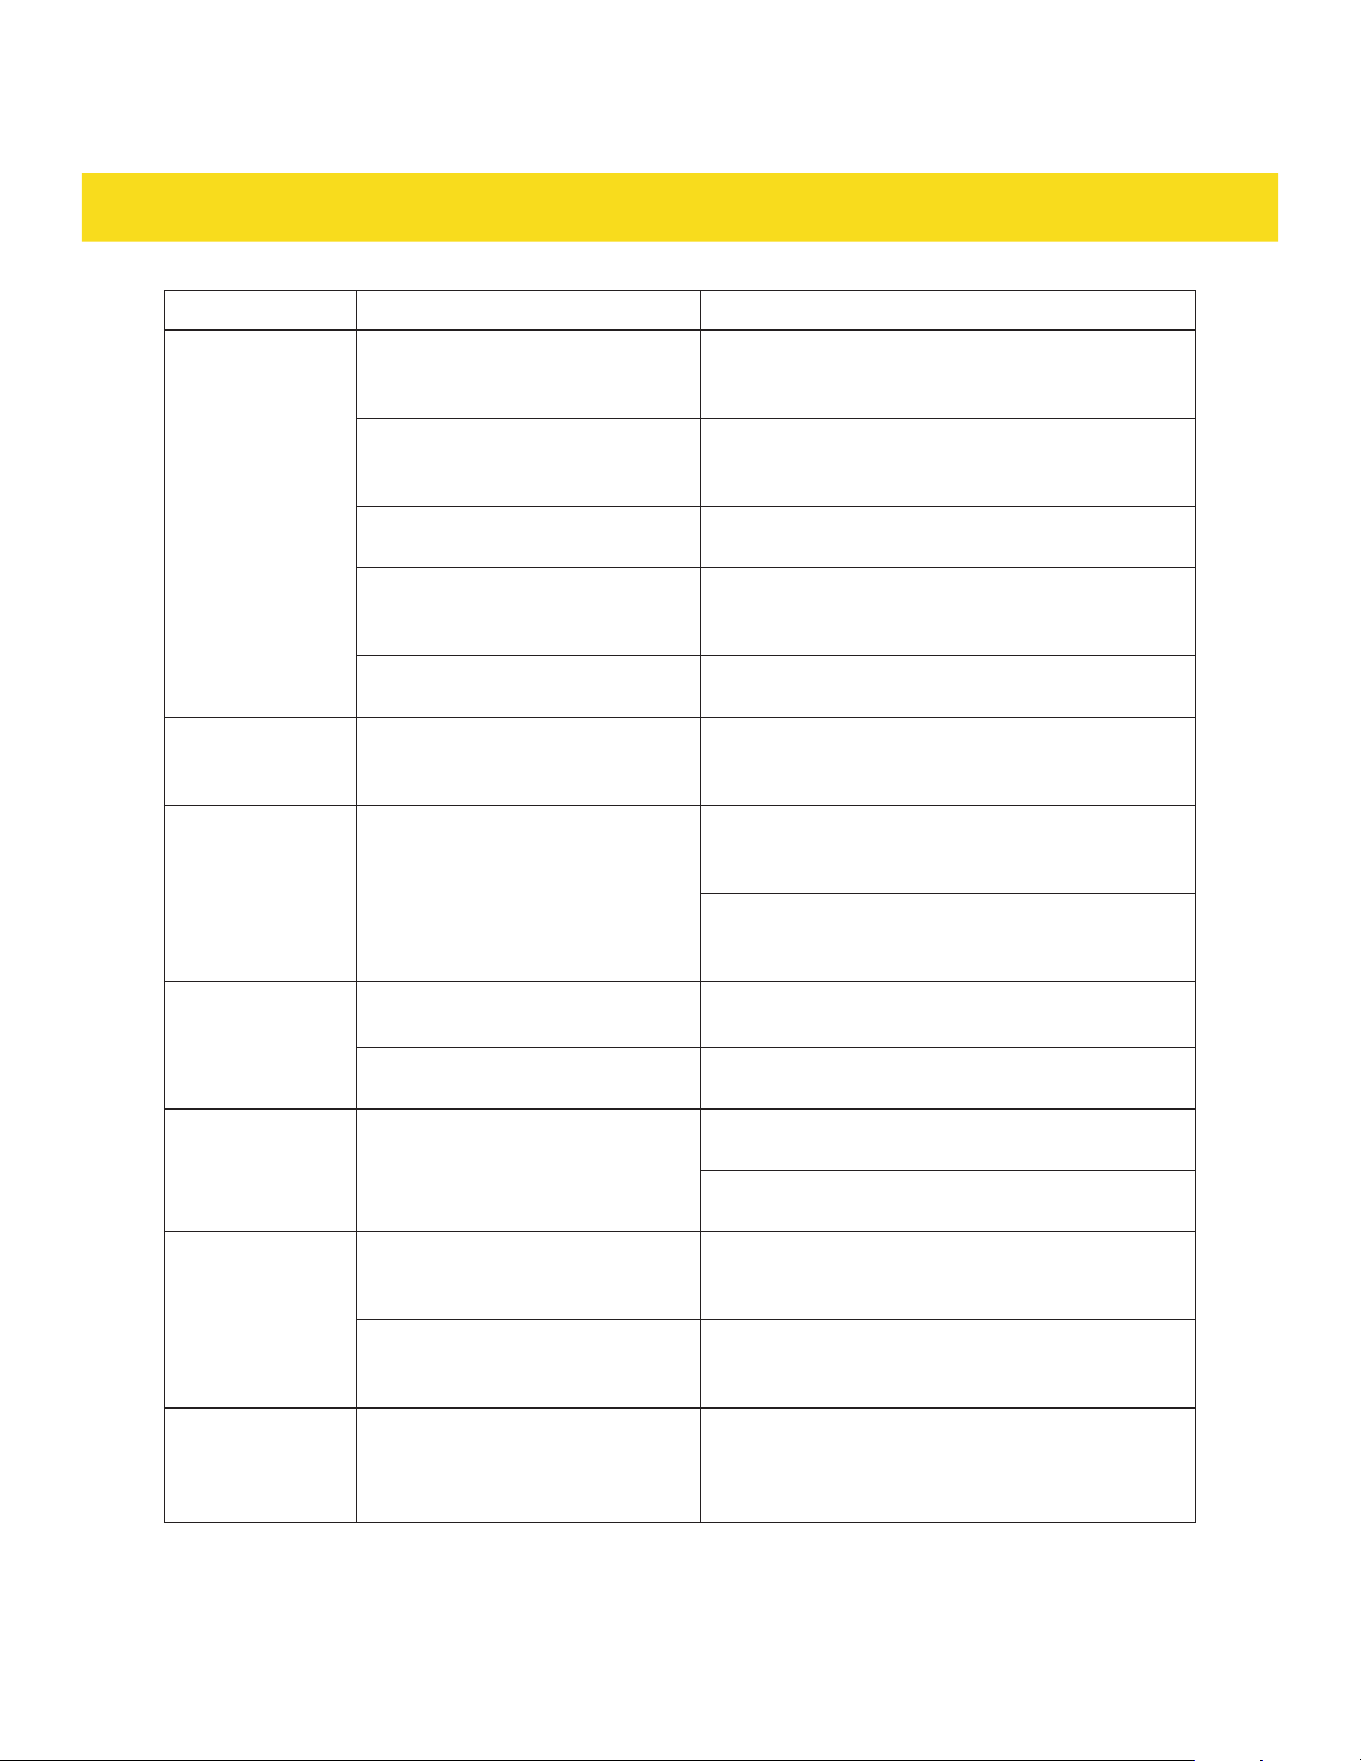
Problem Possible cause Solution
The appliance
does not switch
on�
The electrical wiring is not
connected to the power supply�
Check if the wire connections inside the junction
box are secure� Use a voltage tester at the
junction box to verify if the wires are powered�
The fuse is blown, or the circuit
breaker has tripped�
Replace fuse or reset circuit breaker� Remove
any other appliances sharing the same circuit
with the appliance�
Water pressure is low� Check that the water supply is connected
properly and the water is switched on�
The door is not closed� Open the door then firmly close it�
Make sure that dishware is not preventing the
door from closing� Adjust the position of the
items as necessary�
Child lock mode is activated� The
indicator (11) appears on the
display (10)�
Deactivate child lock mode� Press and
hold the Sanitize button (14) and Half Load
button (15) at the same time for 3 seconds� The
indicator (11) disappears from the display (10)�
Water remains in
the interior of the
appliance or does
not drain�
The drain hose is twisted or
kinked�
Reposition the drain hose so water can flow
freely through it�
The filter assembly (K) is
clogged�
Clean the filter assembly (K)� See chapter
5.3 Cleaning the filter assembly.
The kitchen sink is clogged� Check that the kitchen sink can drain properly�
If the kitchen sink is not draining, consult a
plumber�
The appliance detected suds� Unload all items from the appliance� To remove
the suds, pour 1�06 gal (4 L) of water into the
interior base of the appliance� Close the door,
then select any program to flush away the
suds� Open the door after the cleaning cycle is
complete to check if the suds are gone� Repeat
the steps if any suds remain�
The appliance is
leaking�
The appliance is not level� Level the appliance� Refer to the Installation
manual�
The appliance was not installed
properly�
Contact customer service�
24
TROUBLESHOOTING
Problem Possible cause Solution
The appliance
is not drying the
dishware�
The rinse aid dispenser (G) is
empty�
Add rinse aid to the rinse aid dispenser (G)
before starting a cleaning cycle�
The open dry setting was not
selected�
Select the open dry setting before starting a
cleaning cycle�
The dishware is not correctly
loaded�
Load dishware using the recommended loading
pattern� See chapter 3.4 Suggested loading
patterns�
The dishware was unloaded too
early�
Wait at least 15 minutes after a cleaning cycle
has completed to let the dishware dry off and
cool down�
The wrong program was
selected�
Select a program that allows the open dry
setting to be used� See chapter 4.2 Program
overview�
There are suds in
the appliance�
Wrong type of detergent is used� Only use detergent intended for dishwashers�
To remove the suds, pour 1�06 gal (4 L) of water
into the interior base of the appliance� Close the
door, then select any program to flush away the
suds� Open the door after the cleaning cycle is
complete to check if the suds are gone� Repeat
the steps if any suds remain�
Too much detergent was used� Use less detergent�
The rinse aid dispenser (G) lid
was not closed properly�
Press the rinse aid dispenser (G) lid down firmly
until it clicks into place�
Water does not
drain properly�
The cleaning cycle was
interrupted�
Firmly close the door then press the Start/
Resume button (18) to resume the cleaning
cycle�
The filter assembly (K) is
clogged�
Clean the filter assembly (K)� See chapter
5.3 Cleaning the filter assembly.
There is white
residue on the
interior of the
appliance�
Mineral buildup from water� Clean the interior of the appliance� See chapter
5.2 Cleaning the interior.
Install a water softener if the area has hard
water� Contact a plumber if necessary�
The appliance
emits bad odors�
The filter assembly (K) is
clogged�
Clean the filter assembly (K)� See chapter
5.3 Cleaning the filter assembly.
The appliance is not used
frequently and the door is kept
closed�
Clean the interior of the appliance� See chapter
5.2 Cleaning the interior.
Abnormal noises
are coming from
the appliance�
A spray arm (F, T) is hitting an
item in the racks (N, Q, W) or
silverware basket (X)�
Pause the program and rearrange the dishware
to make sure no items are blocking the spray
arms (F, T)�
Dishes are moving inside the
appliance�
Pause the program and rearrange the dishware
to secure all items in place�
25
TROUBLESHOOTING
Problem Possible cause Solution
Dishware is not
clean�
The dishware is not correctly
loaded�
Load dishware using the recommended loading
pattern� See chapter 3.4 Suggested loading
patterns�
The program is not powerful
enough for the amount of food
soil�
Wash the dishware again on a more intensive
program� See chapter 4.2 Program overview�
There is not enough detergent� Add more detergent or use a different detergent
with stronger cleaning capabilities�
The spray arms (F, T) are
blocked or not rotating freely�
Pause the program and rearrange any dishware
blocking the spray arms (F, T) so that they can
rotate freely�
The filter assembly (K) is
clogged�
Clean the filter assembly (K)� See chapter
5.3 Cleaning the filter assembly.
Dishware is
damaged�
The dishware is not correctly
loaded�
Load dishware using the recommended loading
pattern� See chapter 3.4 Suggested loading
patterns�
Button indicators
are flashing�
Button indicators flash when
a cleaning cycle is paused or
when a cleaning cycle has been
interrupted by opening the door�
If the Start/Resume button (18) indicator is
flashing, press the Start/Resume button (18)
and close the door within 4 seconds�
If the spotlight indicator (I) or other button
indicators are flashing and the appliance is not
working as expected, contact customer service�
Glassware is
cloudy�
Not enough rinse aid was added
to the rinse aid dispenser (G)�
Add rinse aid to the rinse aid dispenser (G) until
it reaches the MAX marking�
Too much or not enough
detergent was used�
Add an appropriate amount of detergent to the
detergent dispenser (J)�
There is white
residue on the
dishware�
Mineral buildup from water� Install a water softener if the area has hard
water� Contact a plumber if necessary�
Make sure to add rinse aid to the rinse aid
dispenser (G)� See chapter 3.6 Adding rinse aid�
The interior of
the appliance is
stained�
Water contains high iron content� Clean the interior of the appliance� See chapter
5.2 Cleaning the interior.
Dishware is covered with large
amounts of tomato-based or
acidic residue�
Remove as much food residue from the
dishware as possible before loading the
appliance�
Detergent does
not release
during a cleaning
cycle�
Dishes are blocking the
detergent dispenser (J) from
opening�
Rearrange the dishes so that they are not
blocking the detergent dispenser (J)�

26
ERROR CODES
WARNING
•
If overflow occurs, switch the main water supply off before consulting a professional
repair service�
•
If water has leaked into the base due to an overfill or small leak, remove the water
before restarting the appliance�
Error code Possible cause
E1
Not enough water flowing through the inlet�
E2 The inlet valve is faulty�
E4 Appliance overfills and leaks�
E5 The communication between internal parts during a cleaning cycle is faulty�
E6 NTC (Negative Temperature Coefficient) is faulty�
E11 Auto-open door function is faulty�
E14 The communication between the display board and the main control board is faulty�
WARRANTY
Warranty&Service
This appliance has been manufactured by Thor International, 4651 E Airport Drive, California 91761
For Customer Service, please call (877) 288 - 8099
For the most up to date warranty and service policy, please refer to our website
WWW�THORKITCHEN�COM/WARRANTY-REGISTRATION
For in-warranty service requests, please visit our website at
WWW�THORKITCHEN�COM/SERVICE
Please Note: For any inquiries regarding service or products, please provide the serial number of the
item in order to process requests efficiently�

#ChefInspired
WELCOME TO THE
GORDON RAMSAY COLLECTION
THOR Kitchen x Gordon Ramsay Collection is backed by a solid two-year warranty
on both parts and labor. It’s our commitment to quality and your peace of mind.
Registering your appliance ensures top-notch service and personalized support.
Your registration helps us stay informed about your appliance, enabling us
to provide timely maintenance reminders, updates, and exclusive offers. This
ensures your appliance maintains peak performance for years to come.
01
02
03
Scan the QR Code or visit thorkitchen.
com/register-your-product.
Input your purchase and product
information and select register.
That’s it. You’re all set.
Start cookin’!
ThorKitchen.com/Gordon-Ramsay-Collection