7081 293-01 413
Operating instructions
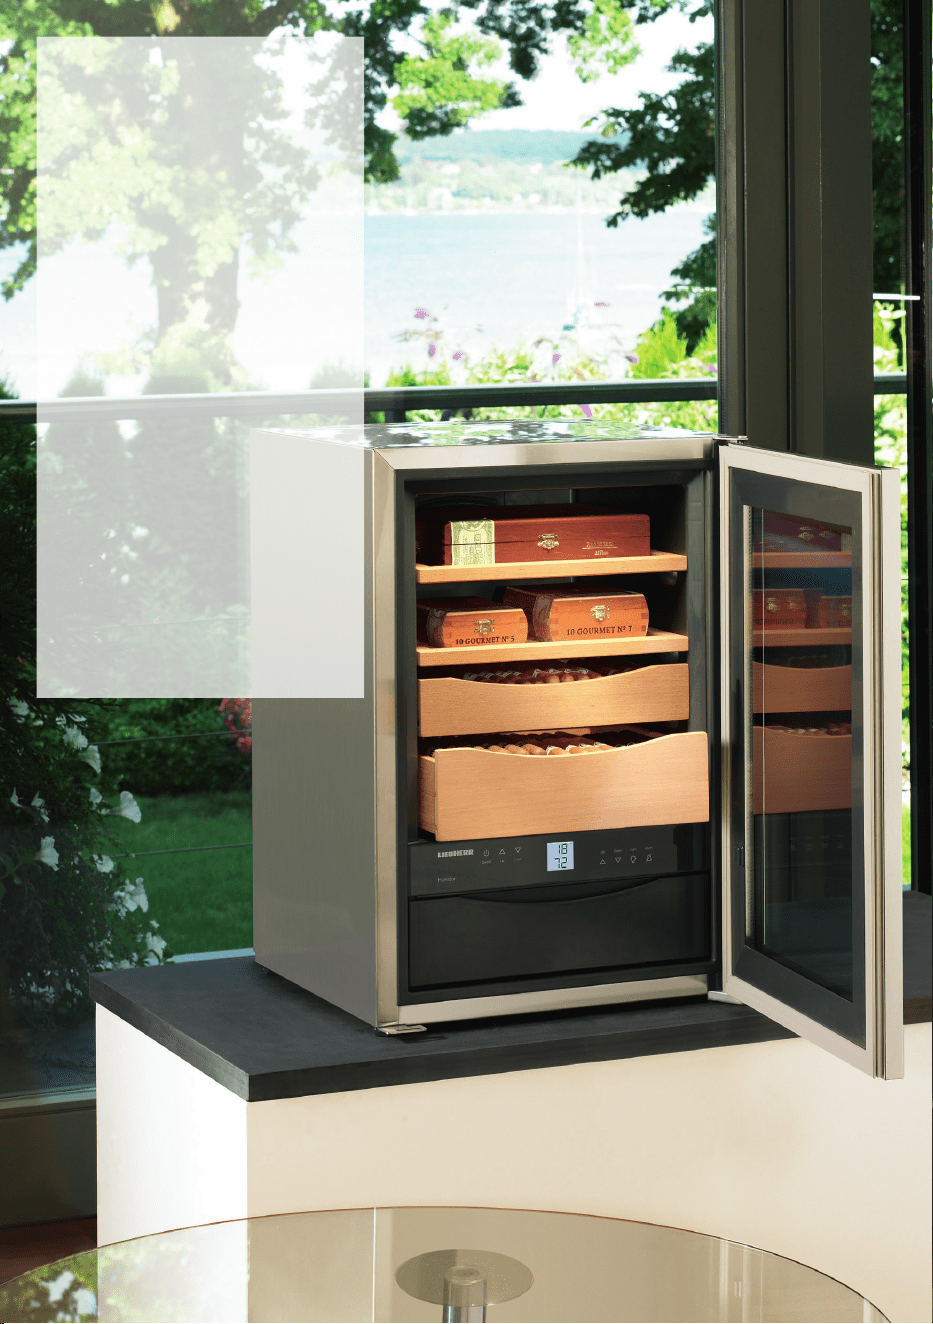
Cigar storage unit
Page 18

18
Many thanks for your trust.
Congratulations on your purchase of this cigar storage unit. In buying this product,
which is distinguished by its perfect user-friendliness, impeccable reliability and high
quality, you have chosen a top class appliance.
Optimum humidity and temperature are key.
The very best humidors keep cigars at an even and constant relative humidity. Experts
put the ideal level at 68-75% at an interior temperature of between 16 and 20°C. These
climatic conditions allow the characteristic avours of the cigar to unfold, the cigar will
burn evenly and your enjoyment of the cigar and its taste will be enhanced. With the
Liebherr cigar storage unit you can ensure constant humidity and a constant tempera-
ture - and control each one individually.
Naturally Spanish cedarwood.
The interior ttings of the Liebherr cigar storage unit are made of Spanish cedarwood.
This top quality wood is used for the shelves and presentation boxes. Spanish cedar-
wood is used because it ensures an even climate inside the appliance, it helps the
cigars to mature and its aroma enhances the unique avour of exclusive cigars.
EPREL database
As from 1 March 2021, information about energy labelling and ecodesign require-
ments will be available in the European product database (EPREL). You can access
the product database using the following link: https://eprel.ec.europa.eu/. You will be
asked to enter the model identier. You will nd the model identier on the type plate.

19
EN
GB
Content page
Setting up ...........................................................................................20
Range of appliance use ......................................................................20
Dimensions ......................................................................................... 20
Electrical requirement .........................................................................21
Operating and control elements ..........................................................21
Switching on for the rst time ..............................................................22
Setting the temperature ......................................................................22
Adjusting the humidity ......................................................................... 23
Lighting ...............................................................................................23
Audible warning signal .......................................................................24
Control elements .................................................................................24
Setup mode ........................................................................................25
Equipment ..........................................................................................27
Alternative interior layouts ...................................................................28
Cleaning .............................................................................................30
Malfunctions .......................................................................................31
Safety instructions and warnings ........................................................32
Disposal notes ....................................................................................33
Wall mounting .....................................................................................33
Shutting your appliance down .............................................................33
Description of appliance and equipment
Adjustable-height feet
Operating and control elements
Water tank behind front ap
Pull-out shelves for storing
cigars in containers
Presentation boxes for individu-
al cigar storage
Note
The type plate is located on the
rear of the appliance.

20
Setting up
• Avoid positioning the appliance in direct sunlight or near cookers, radiators and
similar sources of heat.
• The oor on which the appliance stands should be horizontal and level. Compen-
sate for uneven oors with the adjustable feet.
• Do not cover ventilation openings or grille.
• Standard EN 378 species that the room in which
you install your appliance must have a volume of
1 m
3
per 8 g of R 600a refrigerant used in the ap-
pliance, so as to avoid the formation of inammable gas/air mixtures in the room
where the appliance is located in the event of a leak in the refrigerant circuit. The
quantity of refrigerant used in your appliance is indicated on the type plate of the
appliance.
• The appliance is set to operate within specic ambient temperature limits accord-
ing to its climate rating. These temperature limits should not be exceeded.
The appliance has the following climate rating: N = +16°C to +32°C.
• When installing two appliances next to each other, always leave a gap of 50 mm to
prevent condensation forming in the gap.
Humidity at the place of installation
To ensure fault-free operation of the appliance, 80% humidity at the place of installa-
tion must not be exceeded. Higher levels of humidity will cause error messages from
the electronic control system.
DimensionsRange of appliance use
This appliance is designed for storing cigars only.
The appliance is not suited for storing and cool-
ing pharmaceuticals, blood plasma, laboratory
preparations or similar substances and prod-
ucts subject to the Medical Devices Directive
2007/47/EC.
Any misuse of the appliance may result in dam-
age to or spoilage of the stored goods.
Furthermore, the appliance is unsuited for use in
areas exposed to an explosion hazard.
21
EN
GB
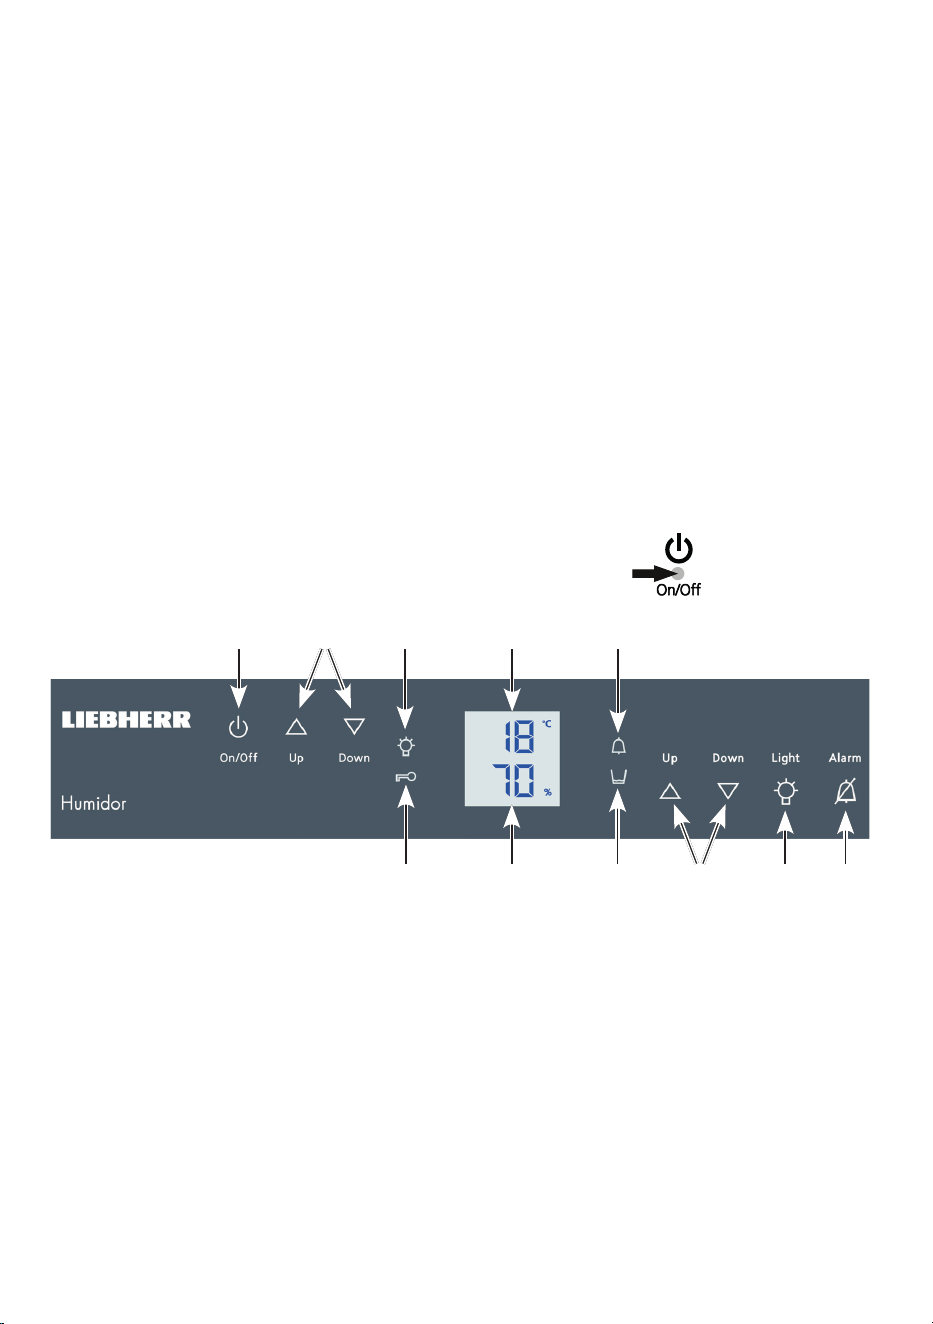
Operating and control elements
The electronic control panel has the new "touch capacitance technology". Any func-
tion can be activated by touching the corresponding icon.
The exact contact point is between the symbol and its label.
Appliance ON/OFF
Temperature setting buttons (for set-
ting the interior temperature)
Humidity setting buttons (for setting
the interior humidity)
Interior light ON/OFF
Mute alarm
Interior light On LED
(1) (2) (6) (7) (8)
(4) (5)bmbl (3)(9)
Temperature display
Alarm LED (ashes to indicate a
malfunction)
Child lock LED
Humidity display
bm
Top up water tank
Electrical connection
Only operate the appliance with alternating current (AC). The permissible voltage
and frequency are indicated on the type plate.
The socket must be properly earthed and protected by a fuse. The tripping current of
the fuse must be between 10 A and 16 A.
The socket must not be situated behind the appliance and must be easily accessi-
ble.
Do not connect the appliance using an extension cable or extension socket.
Do not use stand-alone inverters (conversion of direct current to alternating/three-
phase current) or energy-saving plugs. Risk of damage to the electronic control
system!
22
Switching on for the rst time
Before switching on the appliance, ll the water tank
with 1 litre of distilled water.
Use distilled water only!
Fold down the front ap completely and if necessary
slide it into the appliance as far as it will go. Lift the
water tank slightly, remove and ll with water.
Replace the water tank, sliding it in as far as it will go.
Pull out the front ap completely and fold upwards at
a 90° angle.
To switch on
Press the On/O button. The display will ash.
The appliance will take 24 hours to reach the correct
level for storing cigars (temperature, humidity).
The factory setting is +18°C and 70% humidity.
To switch o
Press the On/O button for 3 seconds until the display goes dark.
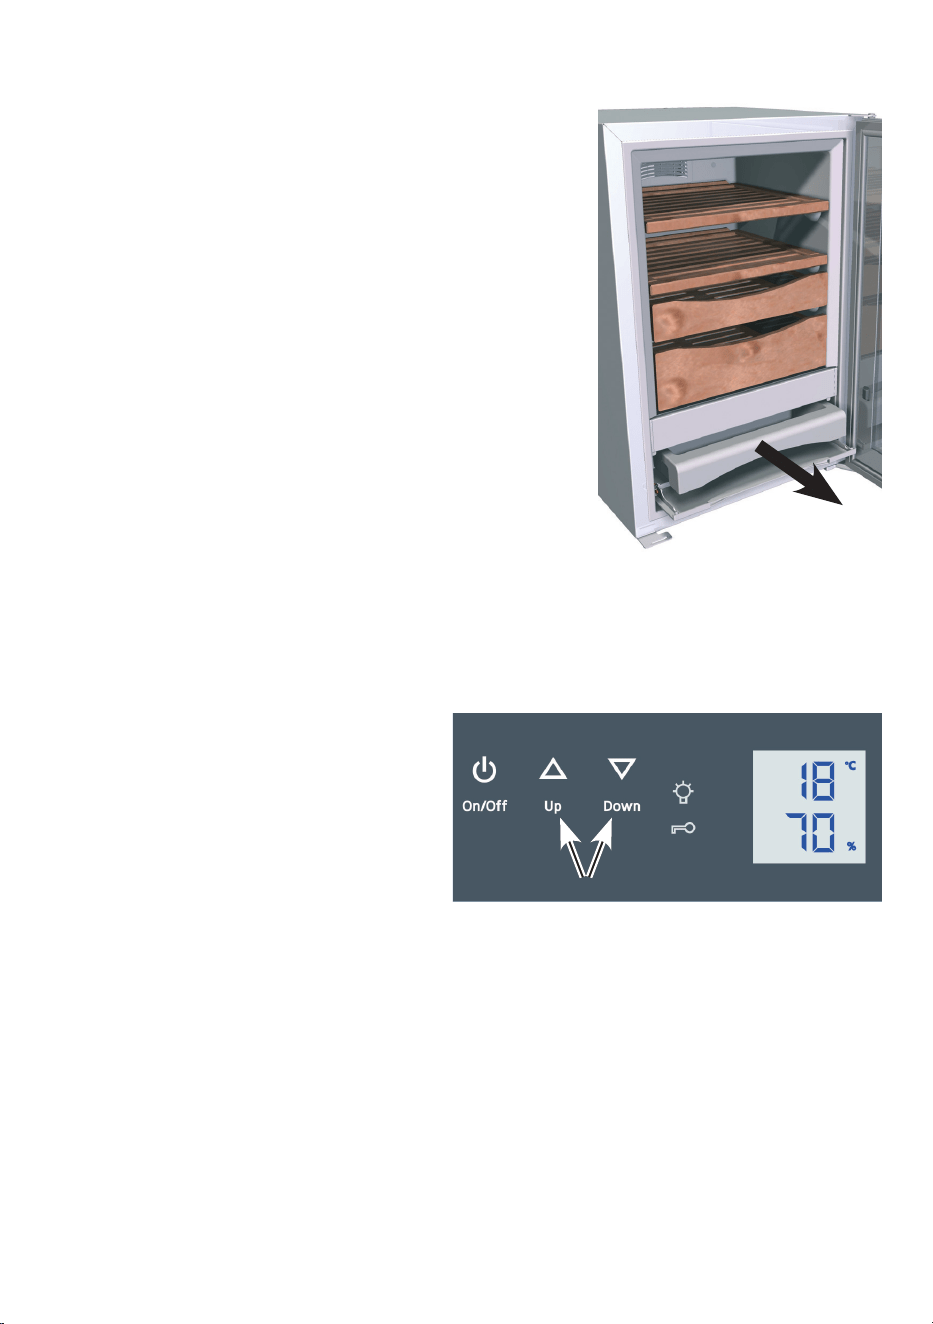
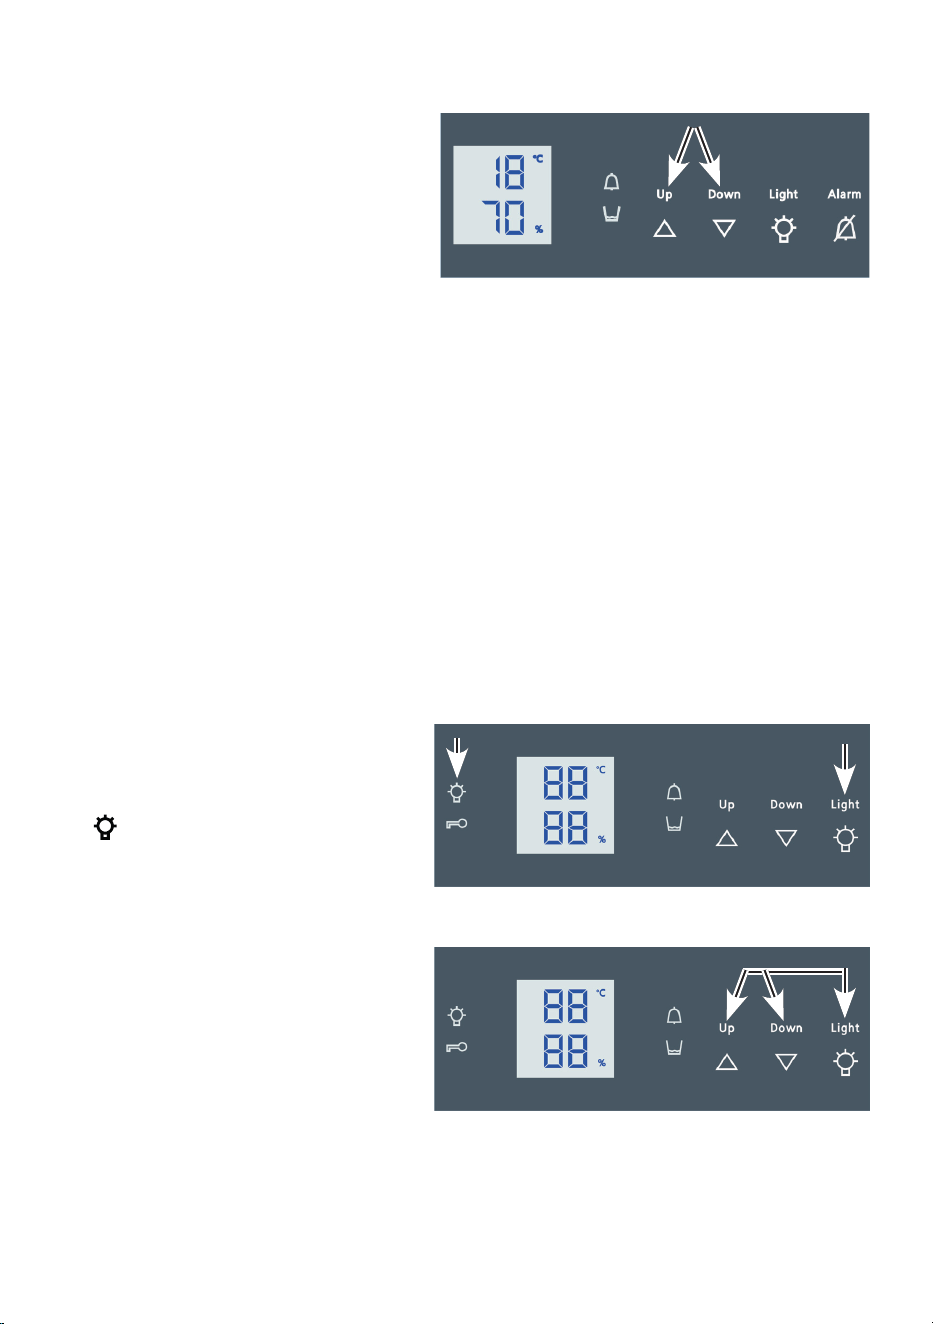
Setting the temperature
To reduce the temperature
Press the Down button.
To increase the temperature
Press the Up button.
- While you are entering the tempera-
ture, the set temperature will ash on
the display.
- The electronic controls will switch over automatically about 5 seconds after the last
time you pressed the button, and the interior temperature will be displayed. The
temperature can be set between +16°C and +20°C.
23
EN
GB
Adjusting the humidity
To reduce the humidity
Press the Down button.
To increase the humidity
Press the Up button.
- While you are setting the humidity,
the display will ash.
- About 5 seconds after the button was last pressed, the actual interior humidity will
be displayed.
The humidity can be adjusted between 68% and 75%.
Extremely accurate measurement of humidity requires a complex sensor system
such as the one integrated in your appliance. Separate measurements with hygro-
meters can produce humidity values that deviate from those on the humidor display.
This can be the result of inaccurate measurement technology or the positioning of
the sensor in the appliance.
Opening the door or placing fresh cigars in the appliance can aect the humidity
level inside. This can also lead to deviations of the humidity displayed from the refe-
rence setting, without the appliance being defective.
Lighting
The light is integrated into the door
frame and can be switched on and o
by pressing the Light button.
The LED lights up when the light is
operational.
The brightness of the light can also be adjusted.
• Press and hold the Light button and
at the same time press the humid-
ity setting buttons to increase or
decrease the brightness.
24
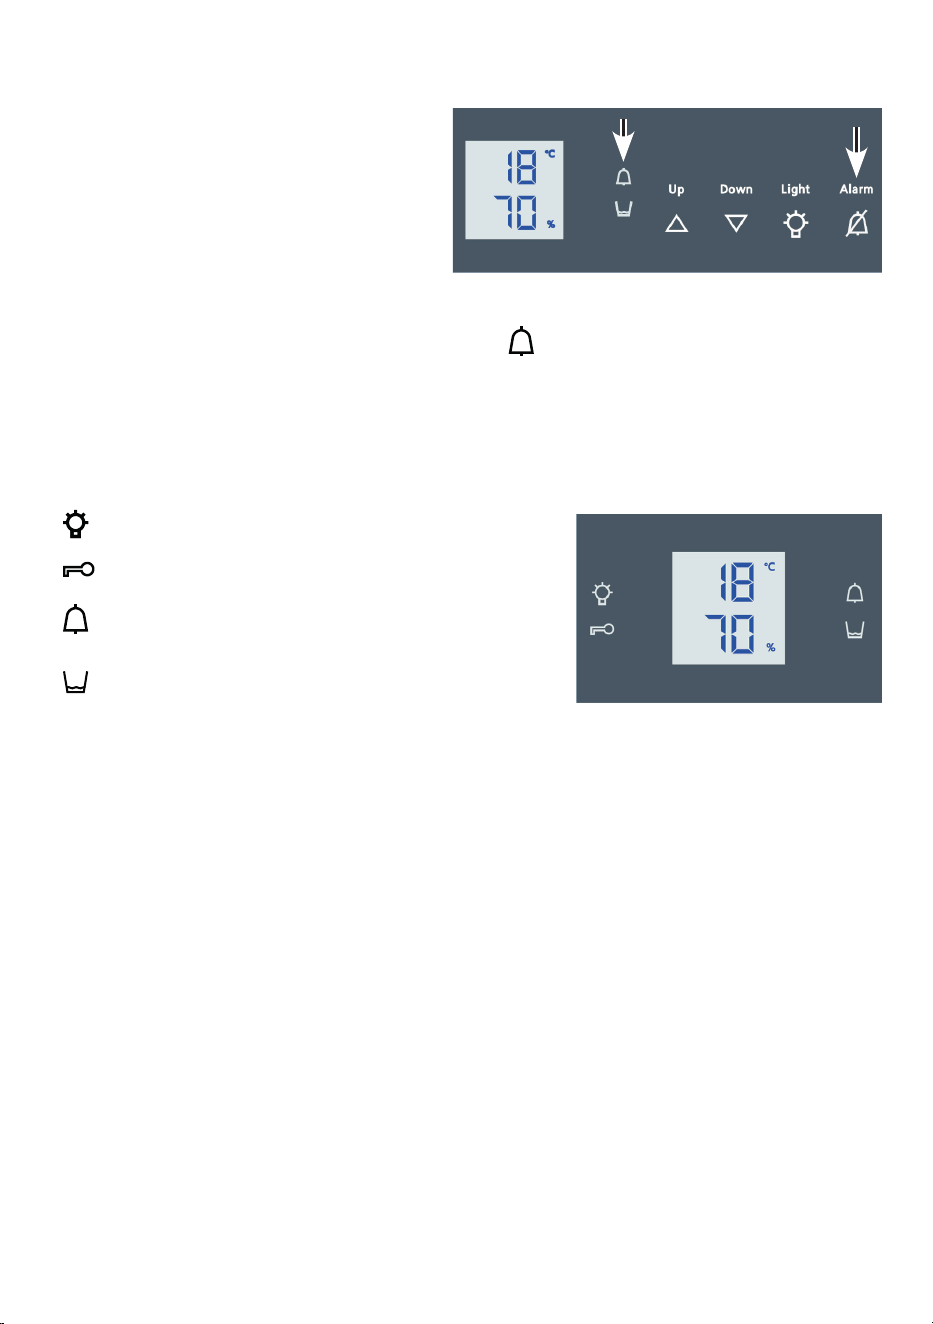
Audible warning signal
The audible warning signal sounds in
the event of a malfunction.
It will always sound when the door
has been left open for longer than 60
seconds.
It will also sound if the interior be-
comes too cold or too warm or if the humidity is too high or too low.
The corresponding display will also ash. The
LED will light up.
Stop the signal by pressing the Alarm button.
Control elements
LED lights up when the lighting is operational.
LED lights up when the child lock is active.
LED ashes when the temperature or humidity
inside the appliance is too high or too low.
LED lights up when the water tank needs top-
ping up.
Important!
This alarm will activate when the water level drops to 400 ml (sucient to allow
the appliance to run properly for another 6 weeks). When topping up the water,
always remove any impurities such as cigar leaves.
If the water tank is very dirty, clean it and rell with fresh water.
25
EN
GB
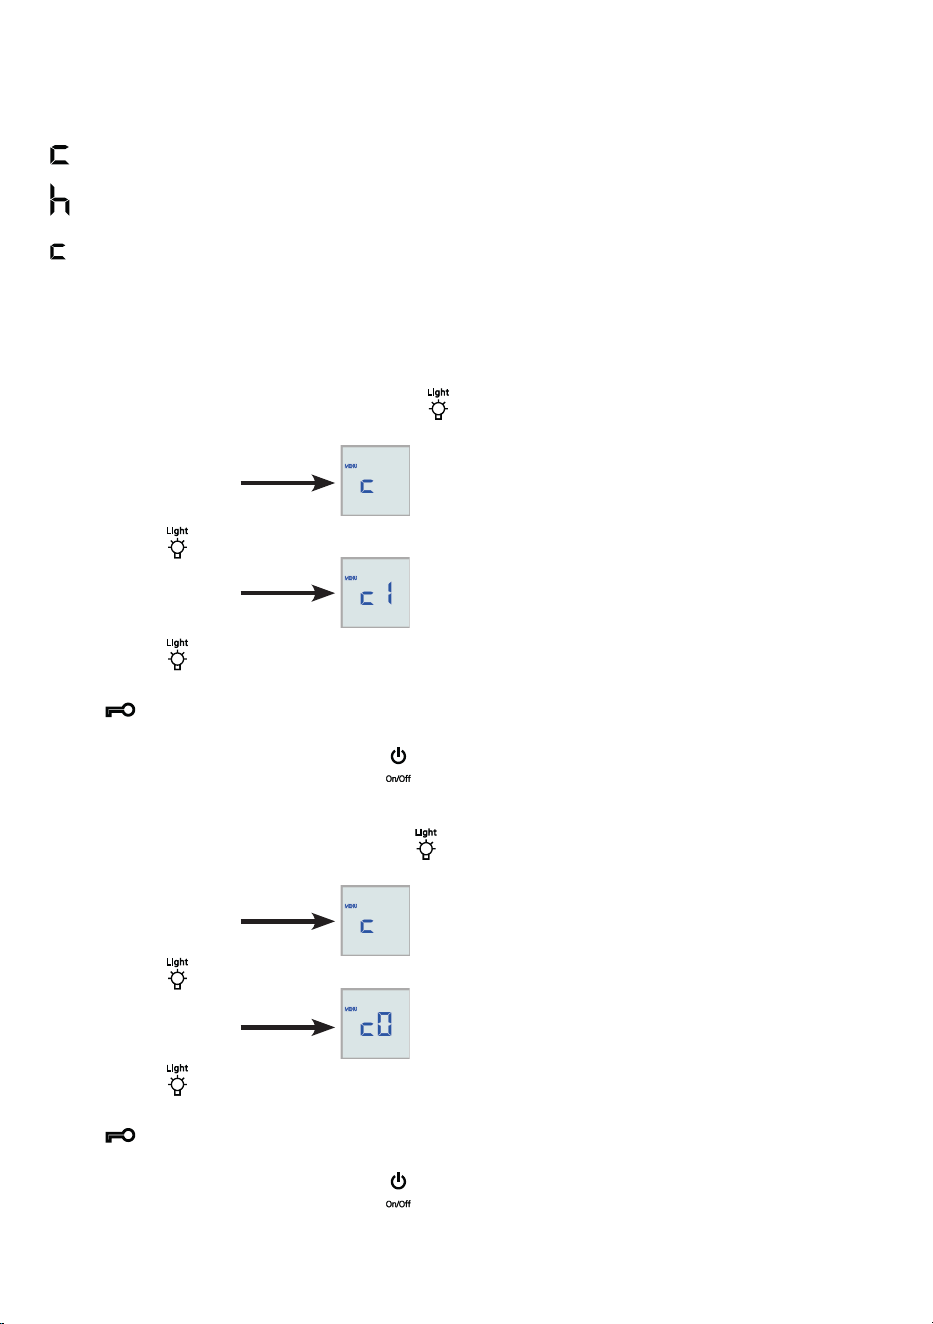
Setup mode
The following functions can be activated in setup mode:
= Child lock
= Display brightness
= Child lock
The child lock is designed to protect the appliance from being switched o acciden-
tally.
Activating the child lock
• Activate setup mode by pressing the
button for 5 seconds.
- The display reads
• Press the button.
- The display reads
• Press the button again.
- The symbol will light up to indicate that the child lock is activated.
• Exit setup mode by pressing the button.
Deactivating the child lock
• Activate setup mode by pressing th
button for 5 seconds.
- The display reads
• Press the button.
- The display reads
• Press the button again.
- The symbol will go out, indicating that the child lock is deactivated.
• Exit setup mode by pressing the button.
26
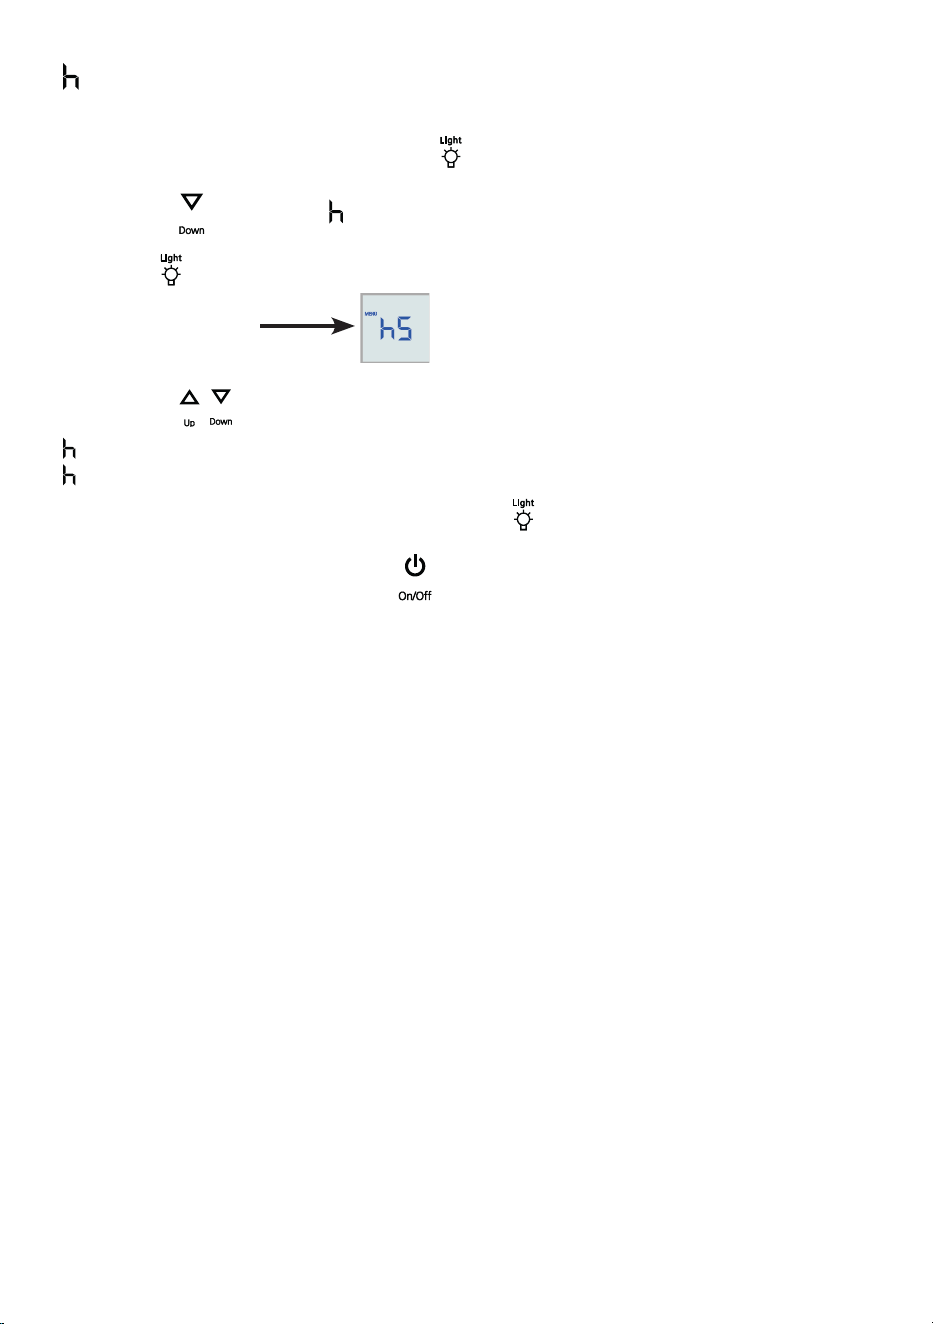
= Display brightness
Adjusting the display brightness
• Activate setup mode by pressing the
button for 5 seconds.
• Press the
button until appears in the display.
Press the
button.
- The display reads
• Press the buttons and set the brightness between
0 = minimum and
5 = maximum.
• When you reach the desired level, press the
button.
• Exit setup mode by pressing the button.
• Close the door. The new setting will activate after about 1 minute.
27
EN
GB
Equipment
Air exchange with activated charcoal lter
To guarantee optimum air throughput, the appli-
ance is tted with an activated charcoal lter at
the top of the rear wall.
We recommend that you replace the illustrated
lter once a year. Filters can be obtained from
your dealer.
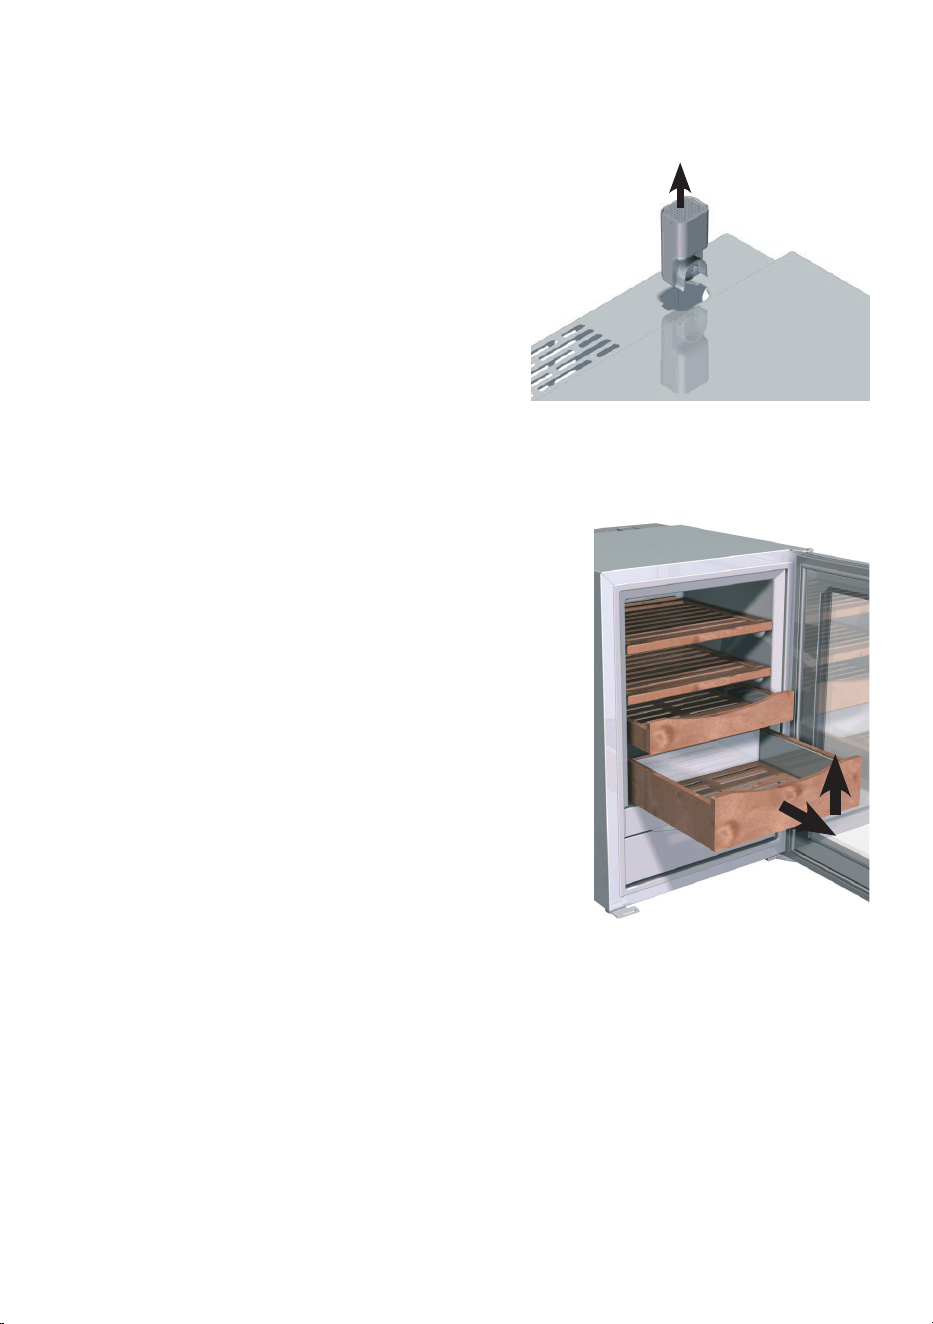
Changing the lter:
The lter can be removed by depressing the re-
cesses on the left and right with a small screw-
driver.
Spanish cedarwood shelves
The presentation boxes are designed for storing cigars
individually.
The other shelves are for storing cigars in various
containers or boxes.
All shelves are tted with a pull-out stop and can be
pulled out by 100 mm.
To remove completely, pull the shelf out as far as it will
go, lift slightly at the front and remove. The door must
be open at an angle of at least 90°.
Note: To ensure optimum operation, there must always
be at least two cedarwood shelves or boxes inside the
appliance, one of which must always be inserted im-
mediately above the control panel.
28
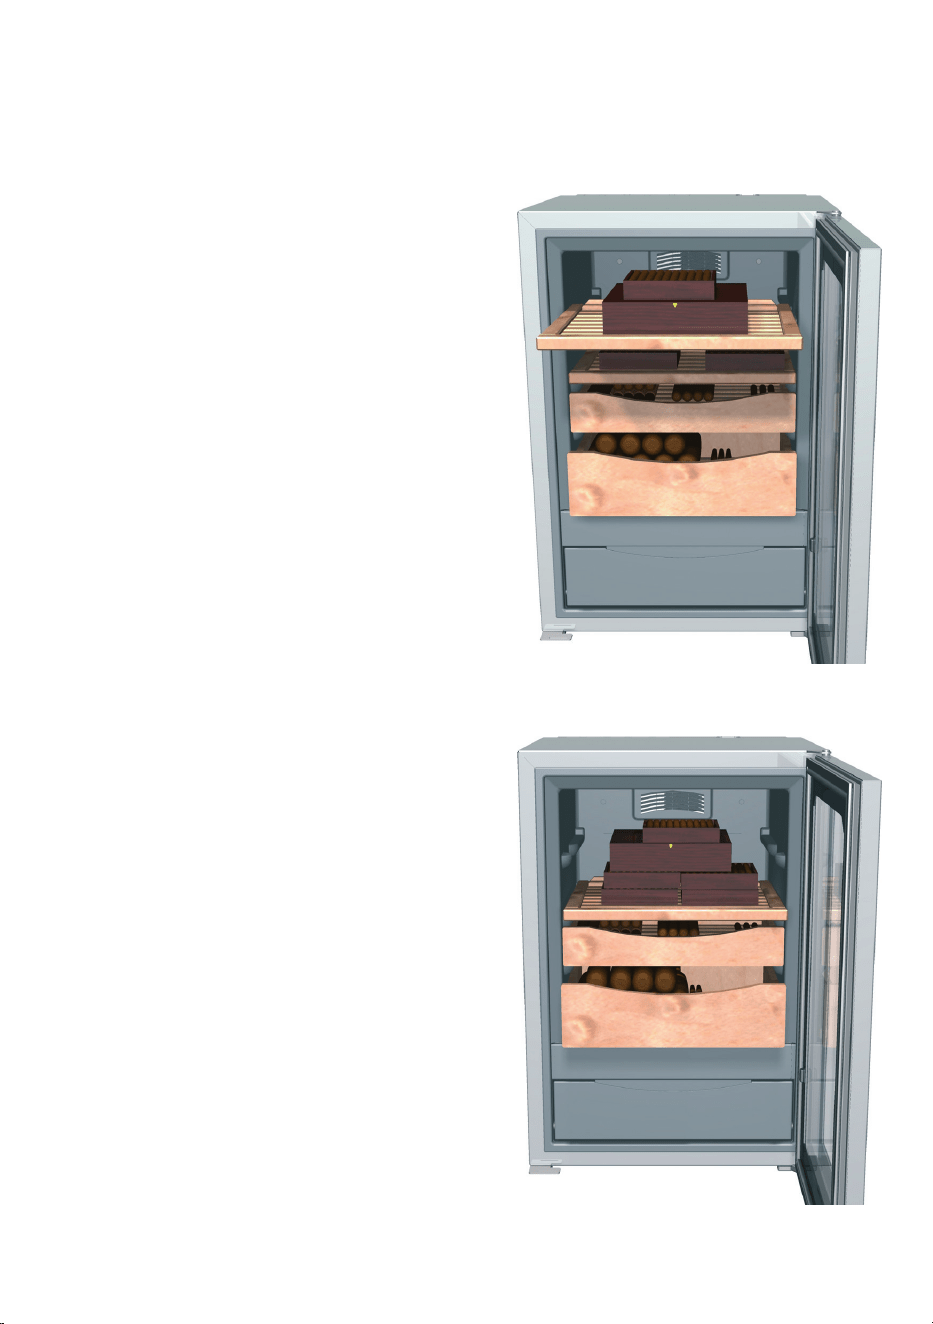
Alternative interior layouts
The dierent tting layouts for optimum cigar storage are illustrated and described
below.
Alternative 1
(as supplied)
Use this layout to store large numbers
of cigars individually in the presenta-
tion boxes and small cigar boxes on the
shelves.
Alternative 2
(with top shelf removed)
Use this layout to store large cigar boxes.
29
EN
GB
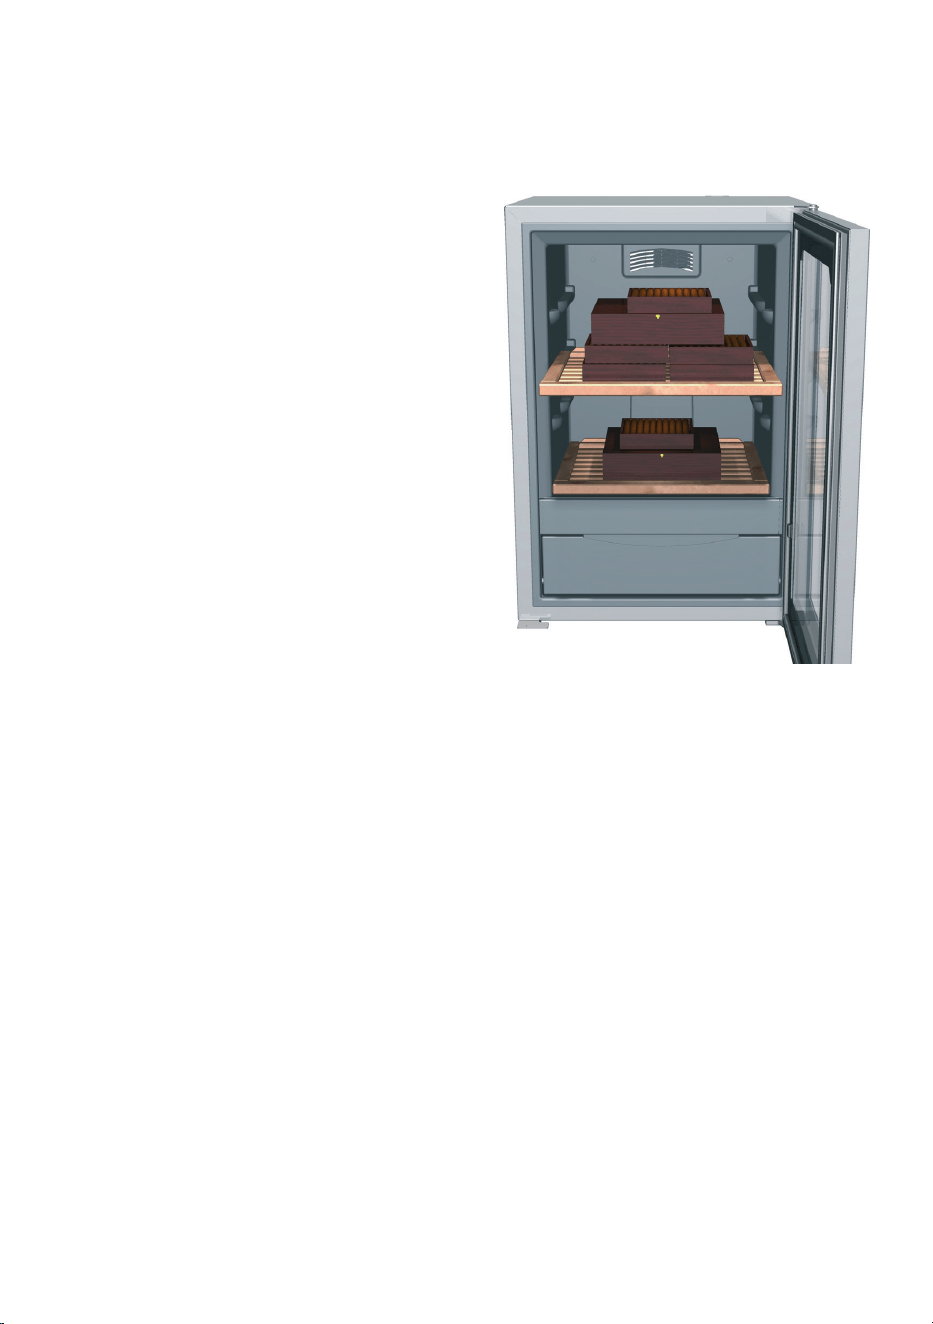
Alternative 3
(with both presentation boxes removed)
This layout is only suitable for storing
large cigar boxes (see gure).
Important!
1. To ensure constant humidity, there must be at least two pull-out shelves or presen-
tation boxes in the appliance at all times.
2. To ensure adequate air circulation there must always be a shelf or presentation
box immediately above the control panel.
3. The pull-out shelves should only be used for storing cigar boxes. Do not use them
for storing individual cigars!
30
Cleaning
Before cleaning, always switch o the appliance. Disconnect from the mains or
switch o or unscrew the fuse.
• Remove all cigars from the appliance and store them in a suitable place.
• Remove all shelves and presentation boxes.
• Clean the inside, the door seal and the inside of the glass with a clean, damp
cloth.
Important: Never use detergents or other substances that emit odours.
• Always keep the door closed when cleaning the outside of the appliance. Make
sure no detergent odours penetrate into the appliance.
• Clean the side panels and door surfaces with a clean and soft cloth. If necessary,
use a moist cloth (water + detergent). Alternatively, use a microbre cloth.
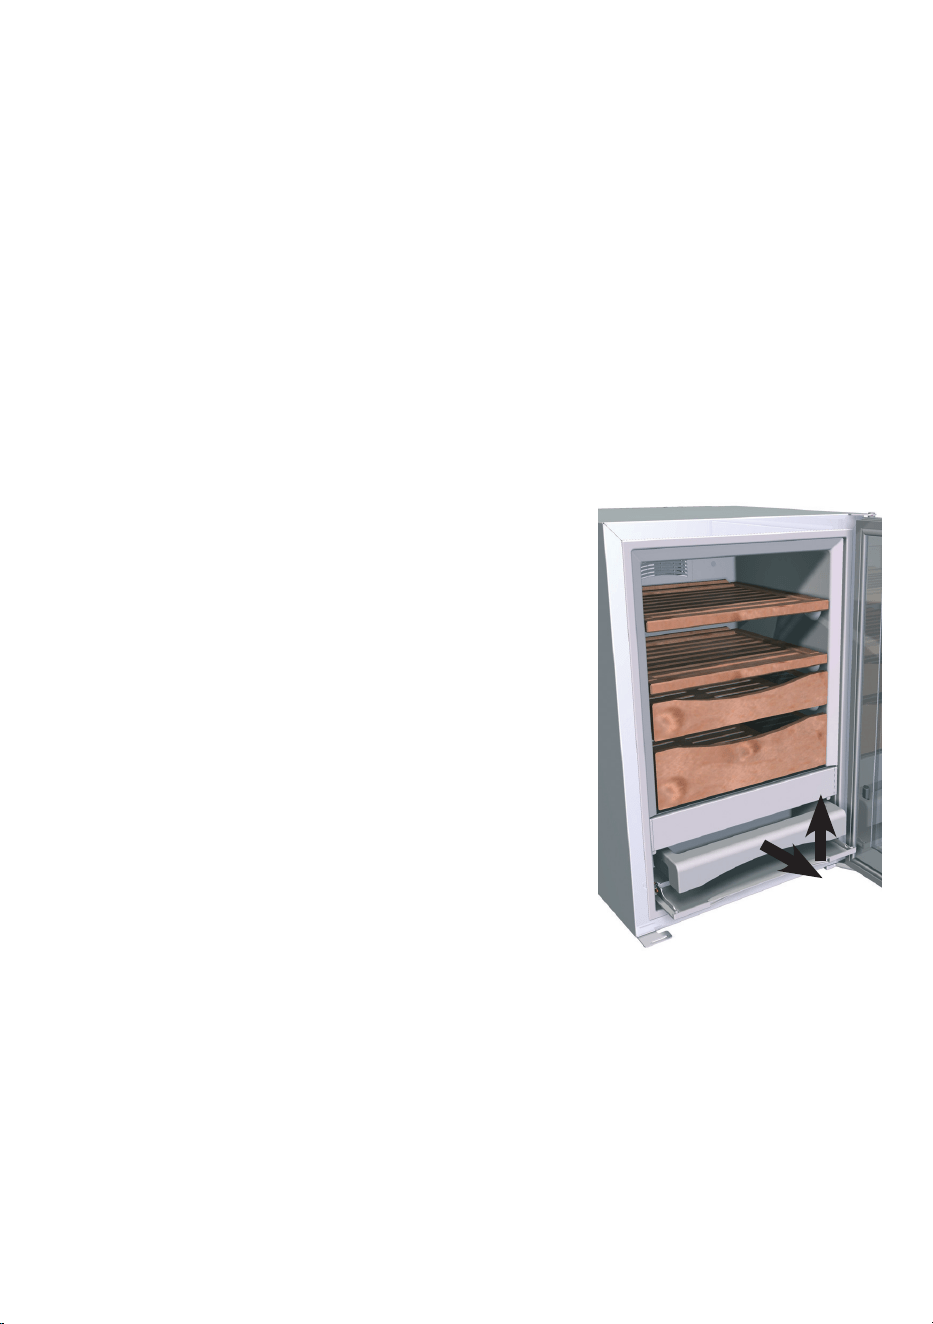
• Fold down the front ap, lift the water tank slightly
and remove, as illustrated.
This tray can be washed with water and detergent
either manually or in a dishwasher. After cleaning,
always make sure the tray is thoroughly rinsed with
clean water before replacing.
• Dry the interior and the water tank thoroughly with a
clean cloth and replace the water tank.
• Switch the appliance back on and replace the
cigars.
• Do not damage the type plate on the back of the ap-
pliance. It is very important for servicing purposes.

31
EN
GB
Malfunctions
If a malfunction occurs during operation, check whether it is due to an operating er-
ror. Please note that even during the warranty period the resultant servicing costs in
this case will have to be borne by the owner.
You can rectify the following faults yourself:
• Appliance does not function:
- Is the mains plug properly inserted in the socket?
- Is the fuse intact?
• Loud running noise:
- Is the appliance standing rmly on the oor?
Please note that noises caused by the refrigerant circuit and fan noise cannot be
avoided. The interior fan runs constantly.
• The temperature inside the appliance is too high:
- Is the temperature setting correct (see "Setting the temperatures")?
- Is the ventilation system working properly?
- Is the appliance set up too close to a heat source?
• The humidity inside the appliance is too low:
- Is there sucient water in the water tank?
• The humidity inside the appliance is too high:
- Is the water tank inserted as far as it will go?
- Is the seal seated properly against the water tray? You can check this visually from
the front of the appliance. If the seal is not seated properly, remove the water tank
and slide it back into the appliance.
- If the humidity is too high, this could indicate a technical fault. Contact the custo-
mer service department and, as an interim measure, leave the door of the appli-
ance open until the display returns to a normal value.
• Water level alarm lights up despite full water tank:
- Is the oat gauge in the water tank stuck? Move it
with a pointed object.
If none of the above causes apply and you cannot rectify
the fault yourself, please contact your nearest customer
service department stating the type designation , service
and appliance number as indicated on the type plate.

32
Safety instructions and warnings
• To prevent injury or damage to the unit, the appliance should be unpacked and set
up by two people.
• In the event that the appliance is damaged on delivery, contact the supplier imme-
diately before connecting to the mains.
• To guarantee safe operation, ensure that the appliance is set up and connected as
described in these operating instructions.
• Disconnect the appliance from the mains if any fault occurs. Pull out the plug,
switch o or remove the fuse.
• When disconnecting the appliance, pull on the plug, not on the cable.
• Any repairs and work on the appliance should only be carried out by the customer
service department, as unauthor ised work could prove highly dangerous for the
user. The same applies to changing the mains power cable.
• Do not stand on the plinth, drawers or doors or use them to support anything else.
• This appliance can be used by children of 8 years old and over, and also by per-
sons with restricted physical, sensory or mental capacity or lack of experience and
knowledge, if they are supervised or have been instructed on safe use of the appli-
ance and understand the resulting risks. Children must not be allowed to play with
the appliance. Cleaning and user maintenance must not be carried out by children
without supervision.
• If you have a lockable appliance, do not keep the key near the appliance or within
reach of children.
• Do not use electrical appliances inside the appliance.
• Do not damage the refrigerant circuit pipes.
• Do not allow naked ames or ignition sources to enter the appliance. When trans-
porting and cleaning the appliance ensure that the refrigerant circuit is not dam-
aged. In the event of damage, make sure that there are no ignition sources nearby
and keep the room well ventilated.
The appliance complies with the relevant safety regulations and EU Directives
2014/30/EU and 2014/35/EU.
33
EN
GB
Disposal notes
The appliance contains reusable materials and should be disposed of pro-
perly - not simply with unsorted household refuse. Appliances which are no
longer needed must be disposed of in a professional and appropriate way,
in accordance with the current local regulations and laws.
When disposing of the appliance, ensure that the refrigerant circuit is not
damaged to prevent uncontrolled escape of the refrigerant it contains (data
on type plate) and oil.
• Disable the appliance.
• Pull out the mains plug.
• Cut through the connection cable.
WARNING
Danger of suocation due to packing material and plastic lm!
Do not allow children to play with packaging material.
Take the packaging material to an ocial collection point.
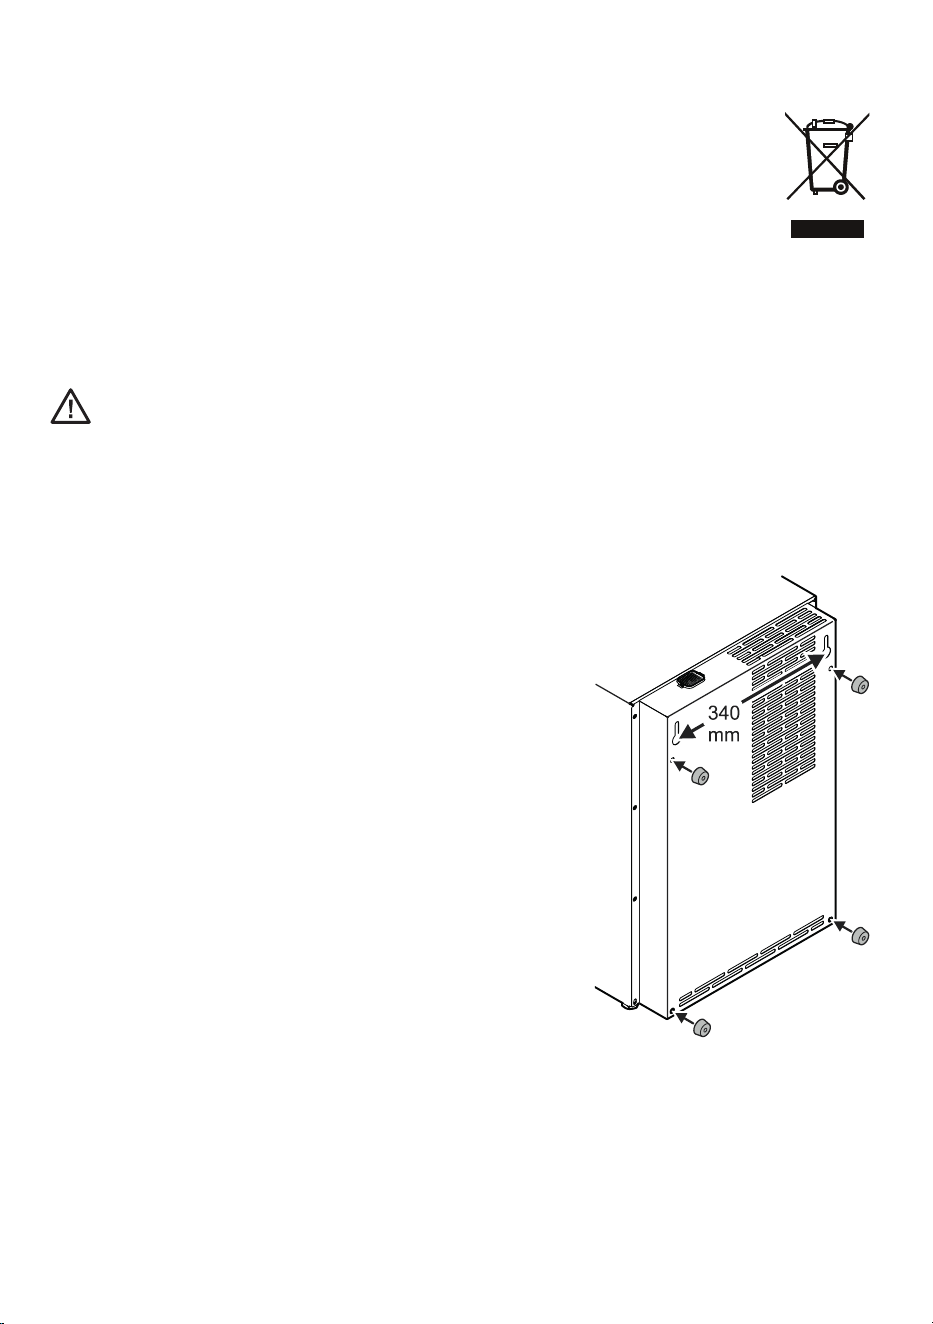
Wall mounting
The appliance can be wall-mounted. There are two
mounting holes at the back of the appliance
Make sure the wall and fastenings can withstand the
weight of the appliance when fully loaded. The empty
appliance weighs 31 kg.
Important!
To ensure sucient ventilation through the ventilation
slots, the four wall spacers must always be inserted,
regardless of whether the appliance is wall-mounted or
standing on the oor against a wall.
Simply insert the spacers in the openings provided.
Shutting your appliance down
If your appliance is to be shut down for any length of time, switch it o and discon-
nect the plug or remove the fuse. Clean the appliance and leave the door open in
order to prevent unpleasant smells.


Liebherr Hausgeräte Lienz GmbH * Dr.-Hans-Liebherr-Strasse 1 * A-9900 Lienz ** www.liebherr.com
