EN
1
DAILY REFERENCE
GUIDE
PRODUCT DESCRIPTION
THANK YOU FOR BUYING A HOTPOINT ARISTON PRODUCT.
In order to receive a more complete assistance, please
register your appliance on: www.hotpoint.eu/register
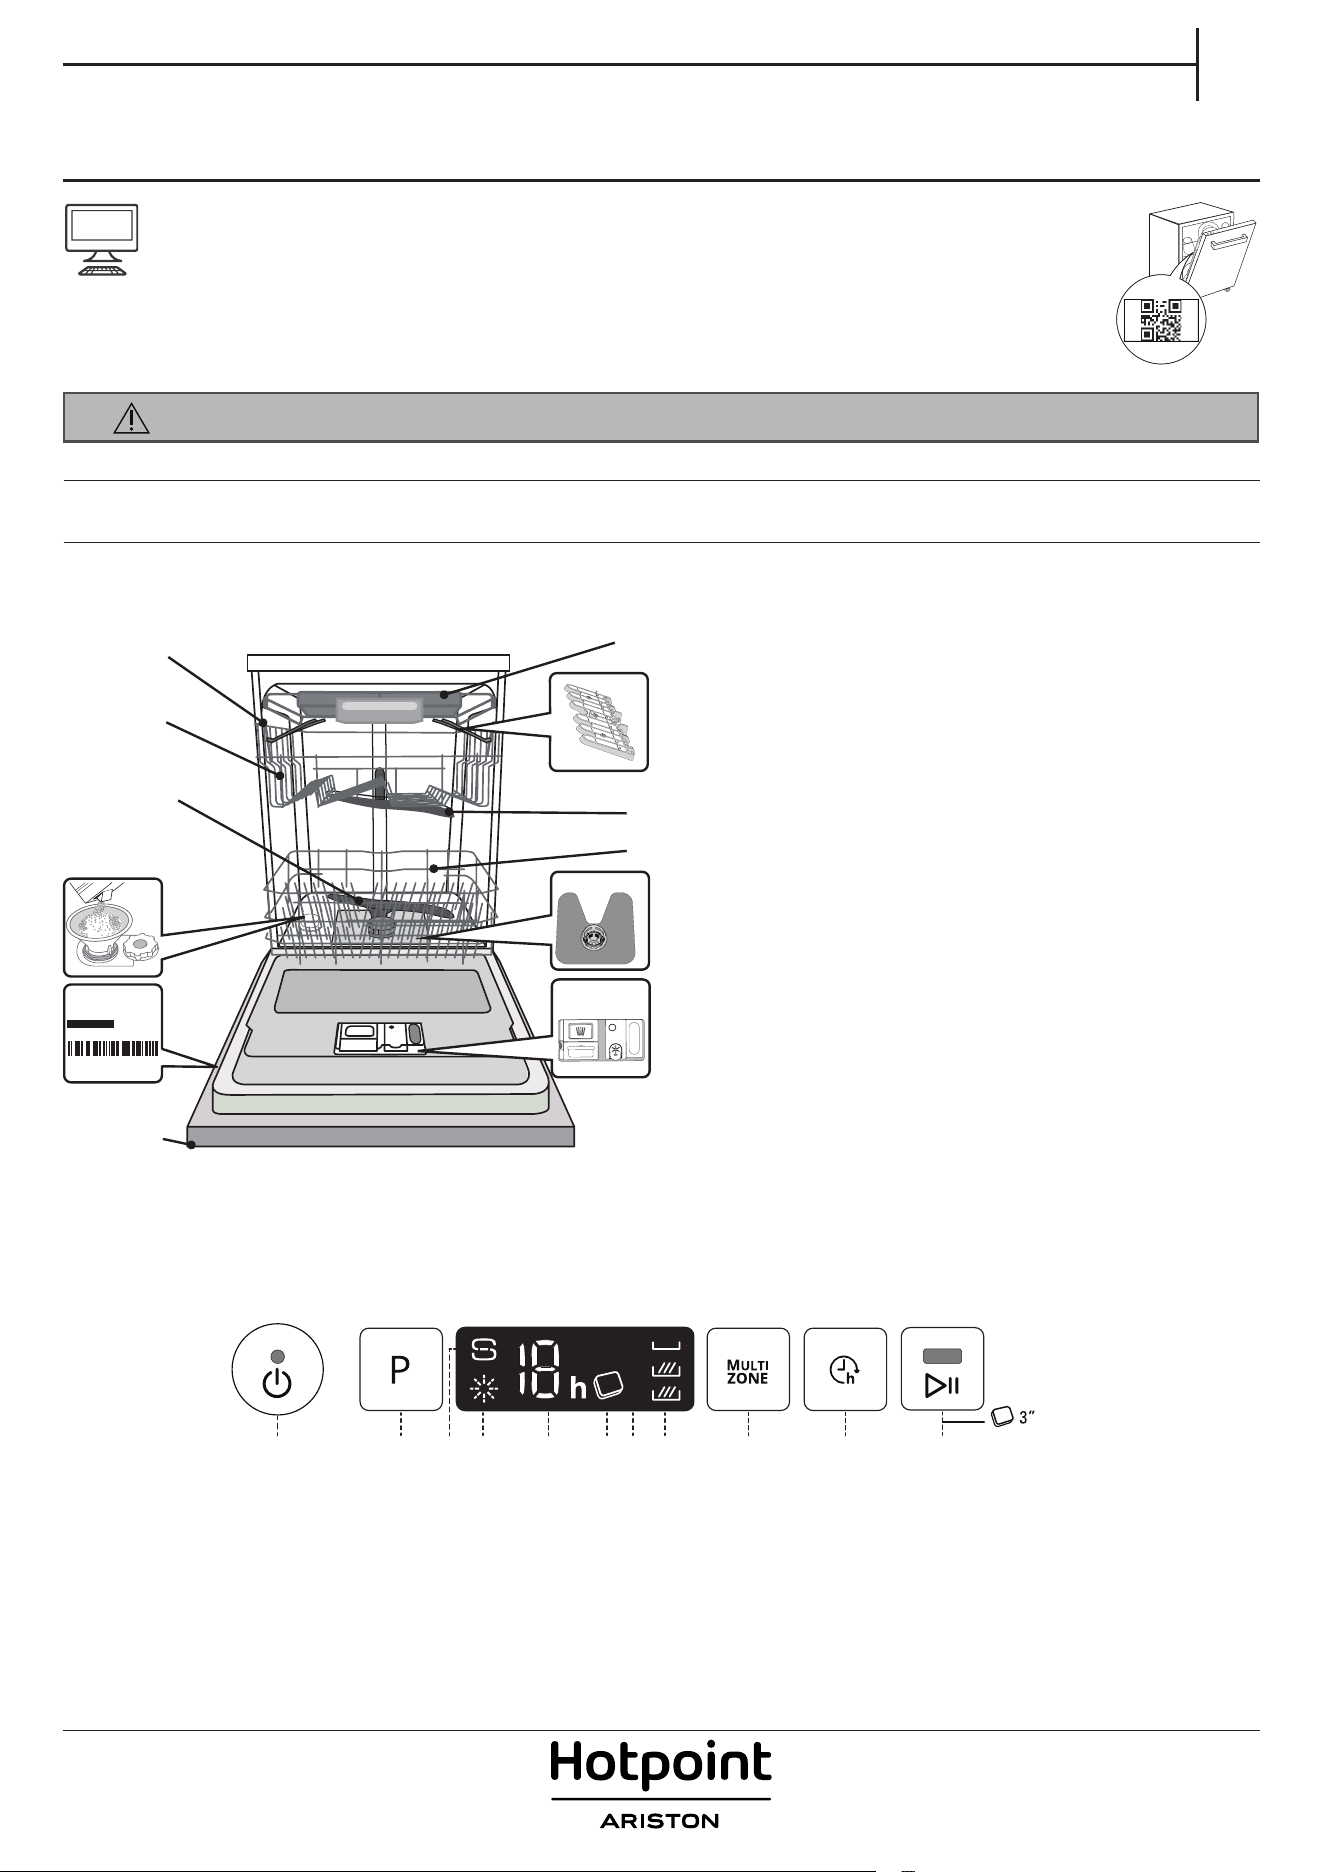
APPLIANCE
CONTROL PANEL
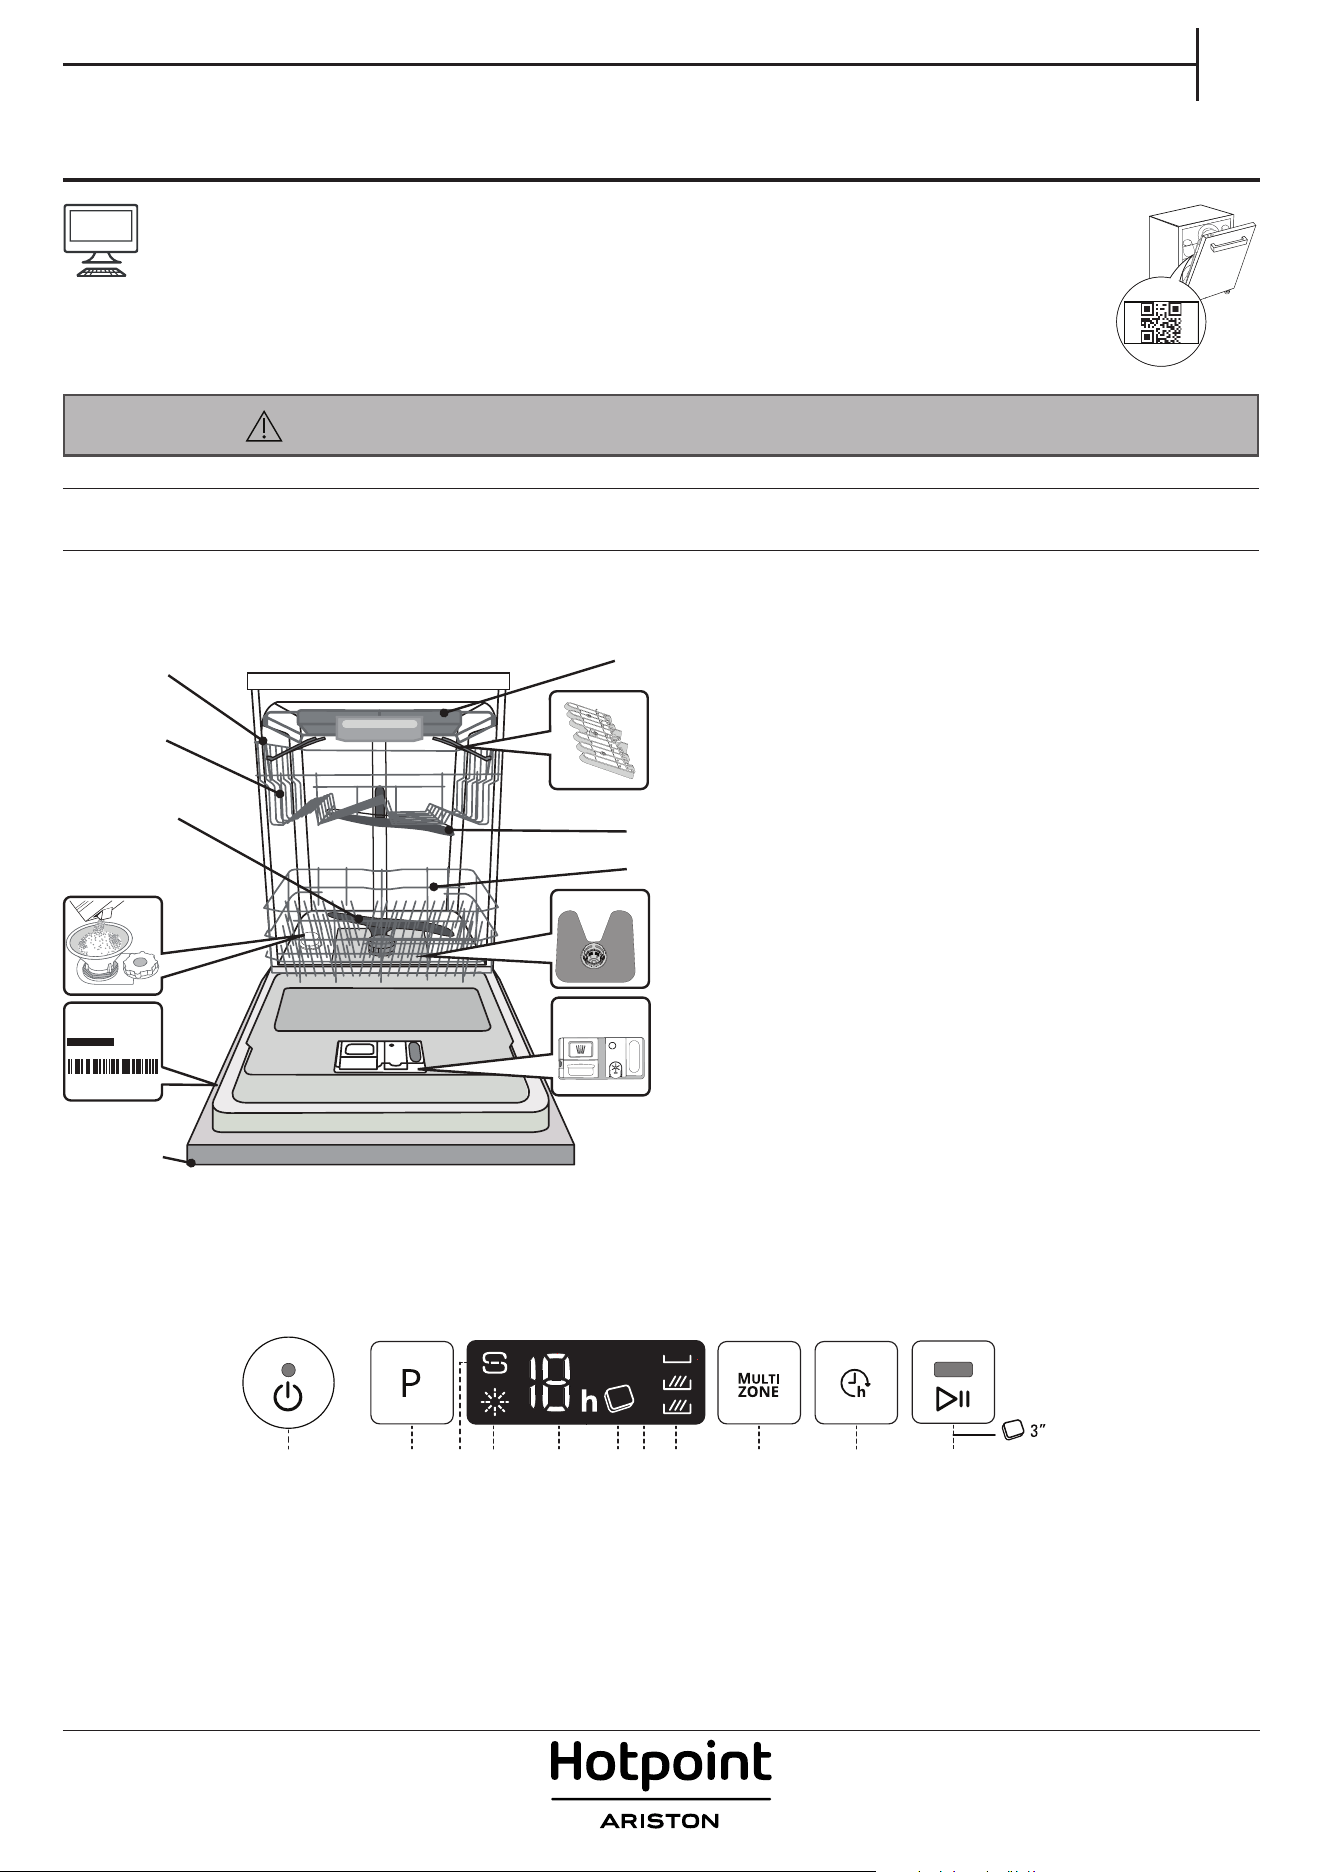
1. On-O/Reset button with indicator light
2. Program selection button
3. Salt rell indicator light
4. Rinse Aid rell indicator light
5. Program number and delay time indicator
6. Tablet (Tab) indicator light
7. Display
8. Multizone indicator lights
9. Multizone button
10. Delay button
11. START/Pause button with indicator light / Tablet (Tab)
1 2 3 4 5 6 7 8 9 10
11
1. Upper rack
2. Cutlery rack
3. Foldable aps
4. Upper rack height adjuster
5. Upper spray arm
6. Lower rack
7. Lower spray arm
8. Filter Assembly
9. Salt reservoir
10. Detergent and Rinse Aid dispensers
11. Rating plate
12. Control panel
1
4
5
6
7
12
10
8
2
3
9
0000 000 00000
Service:
11
PLEASE SCAN THE
QR CODE ON YOUR
APPLIANCE IN ORDER TO
HAVE MORE DETAILED
INFORMATION
Before using the appliance carefully read Safety Instructions.
2
FIRST TIME USE
SALT, RINSE AID AND DETERGENT
ADVICE REGARDING THE FIRST TIME USE
After installation, remove the stoppers from the racks and the retaining
elastic elements from the upper rack.
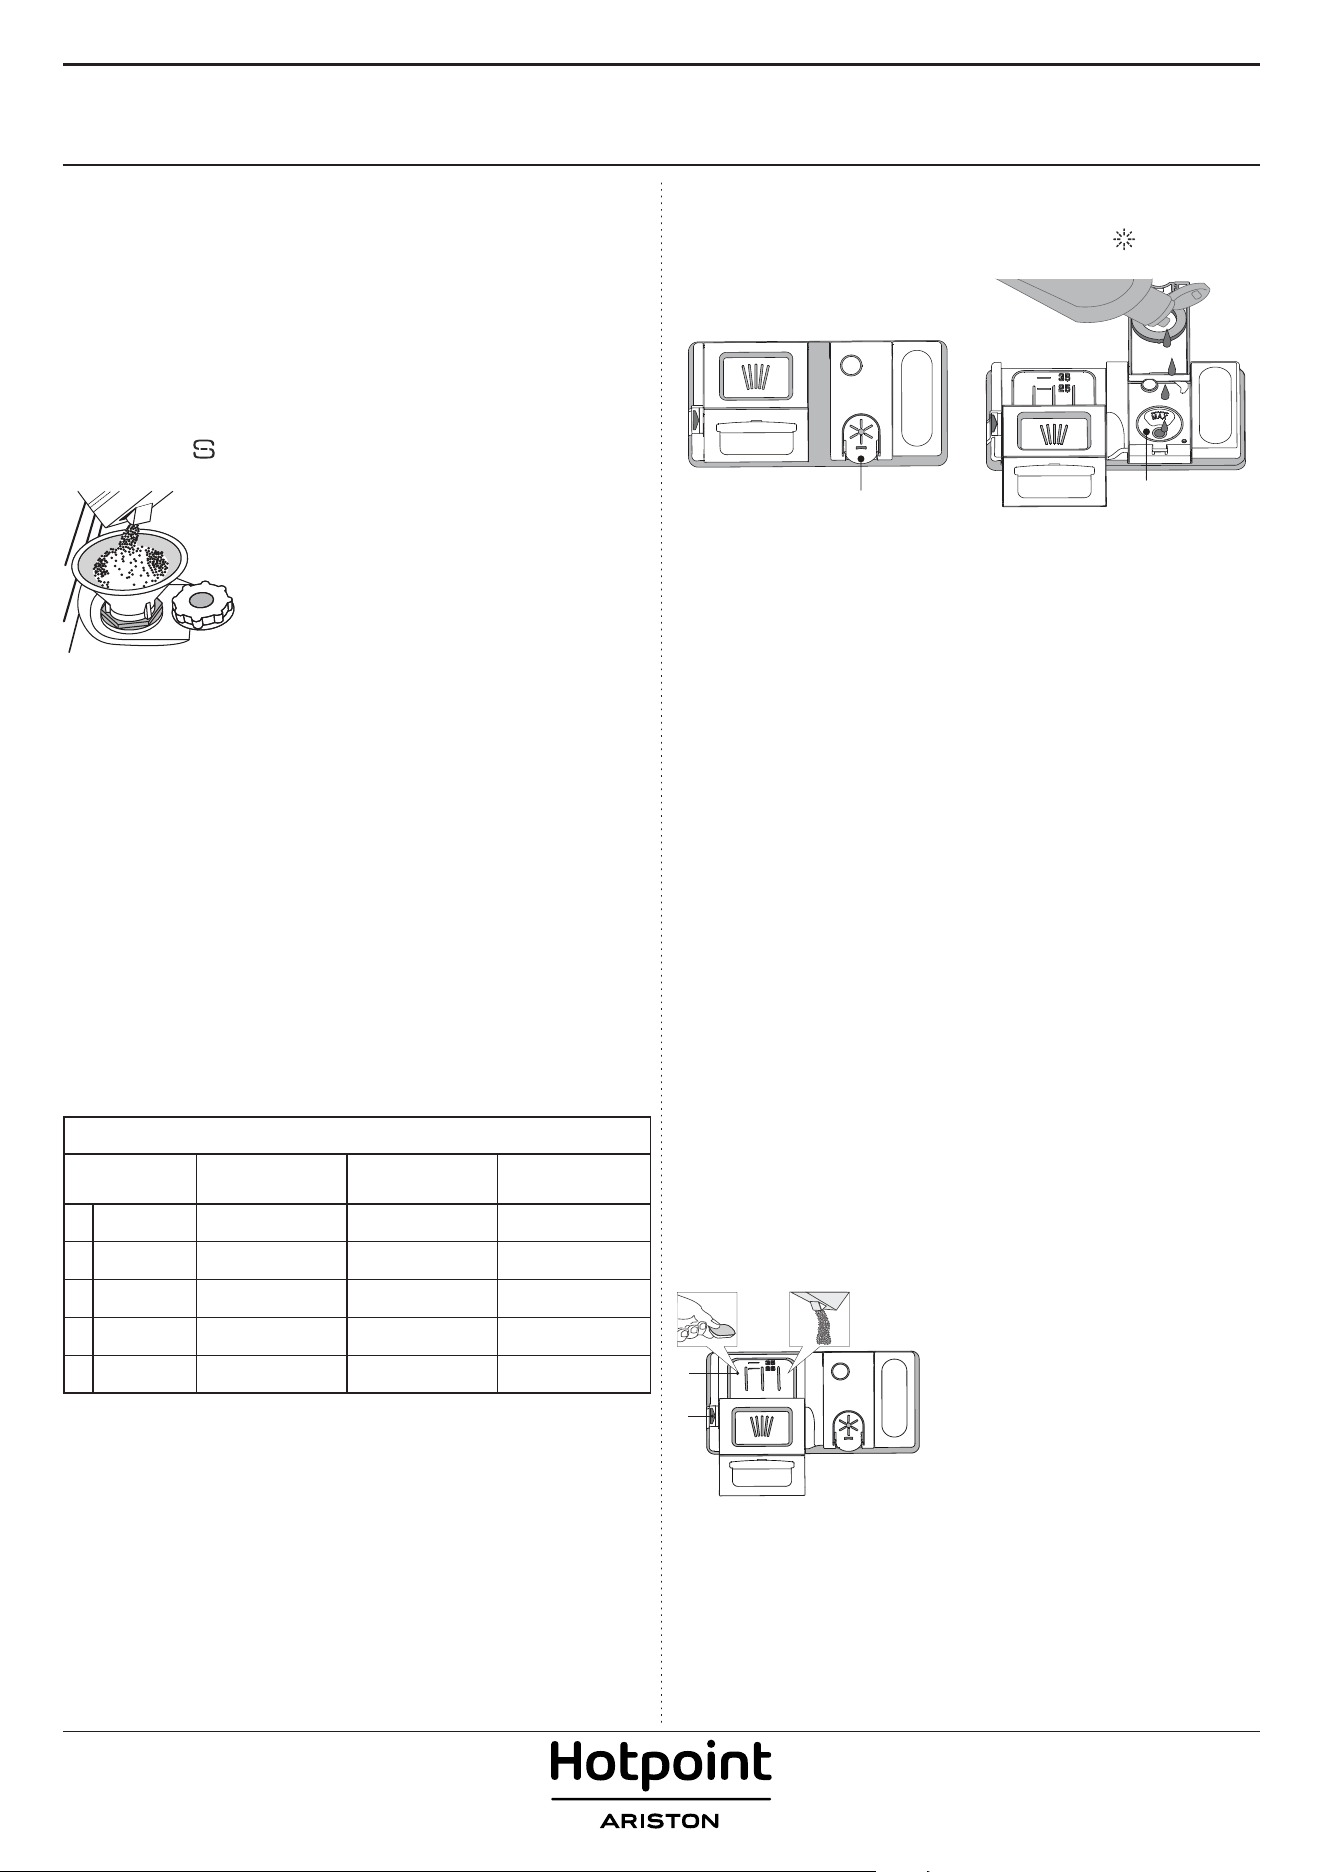
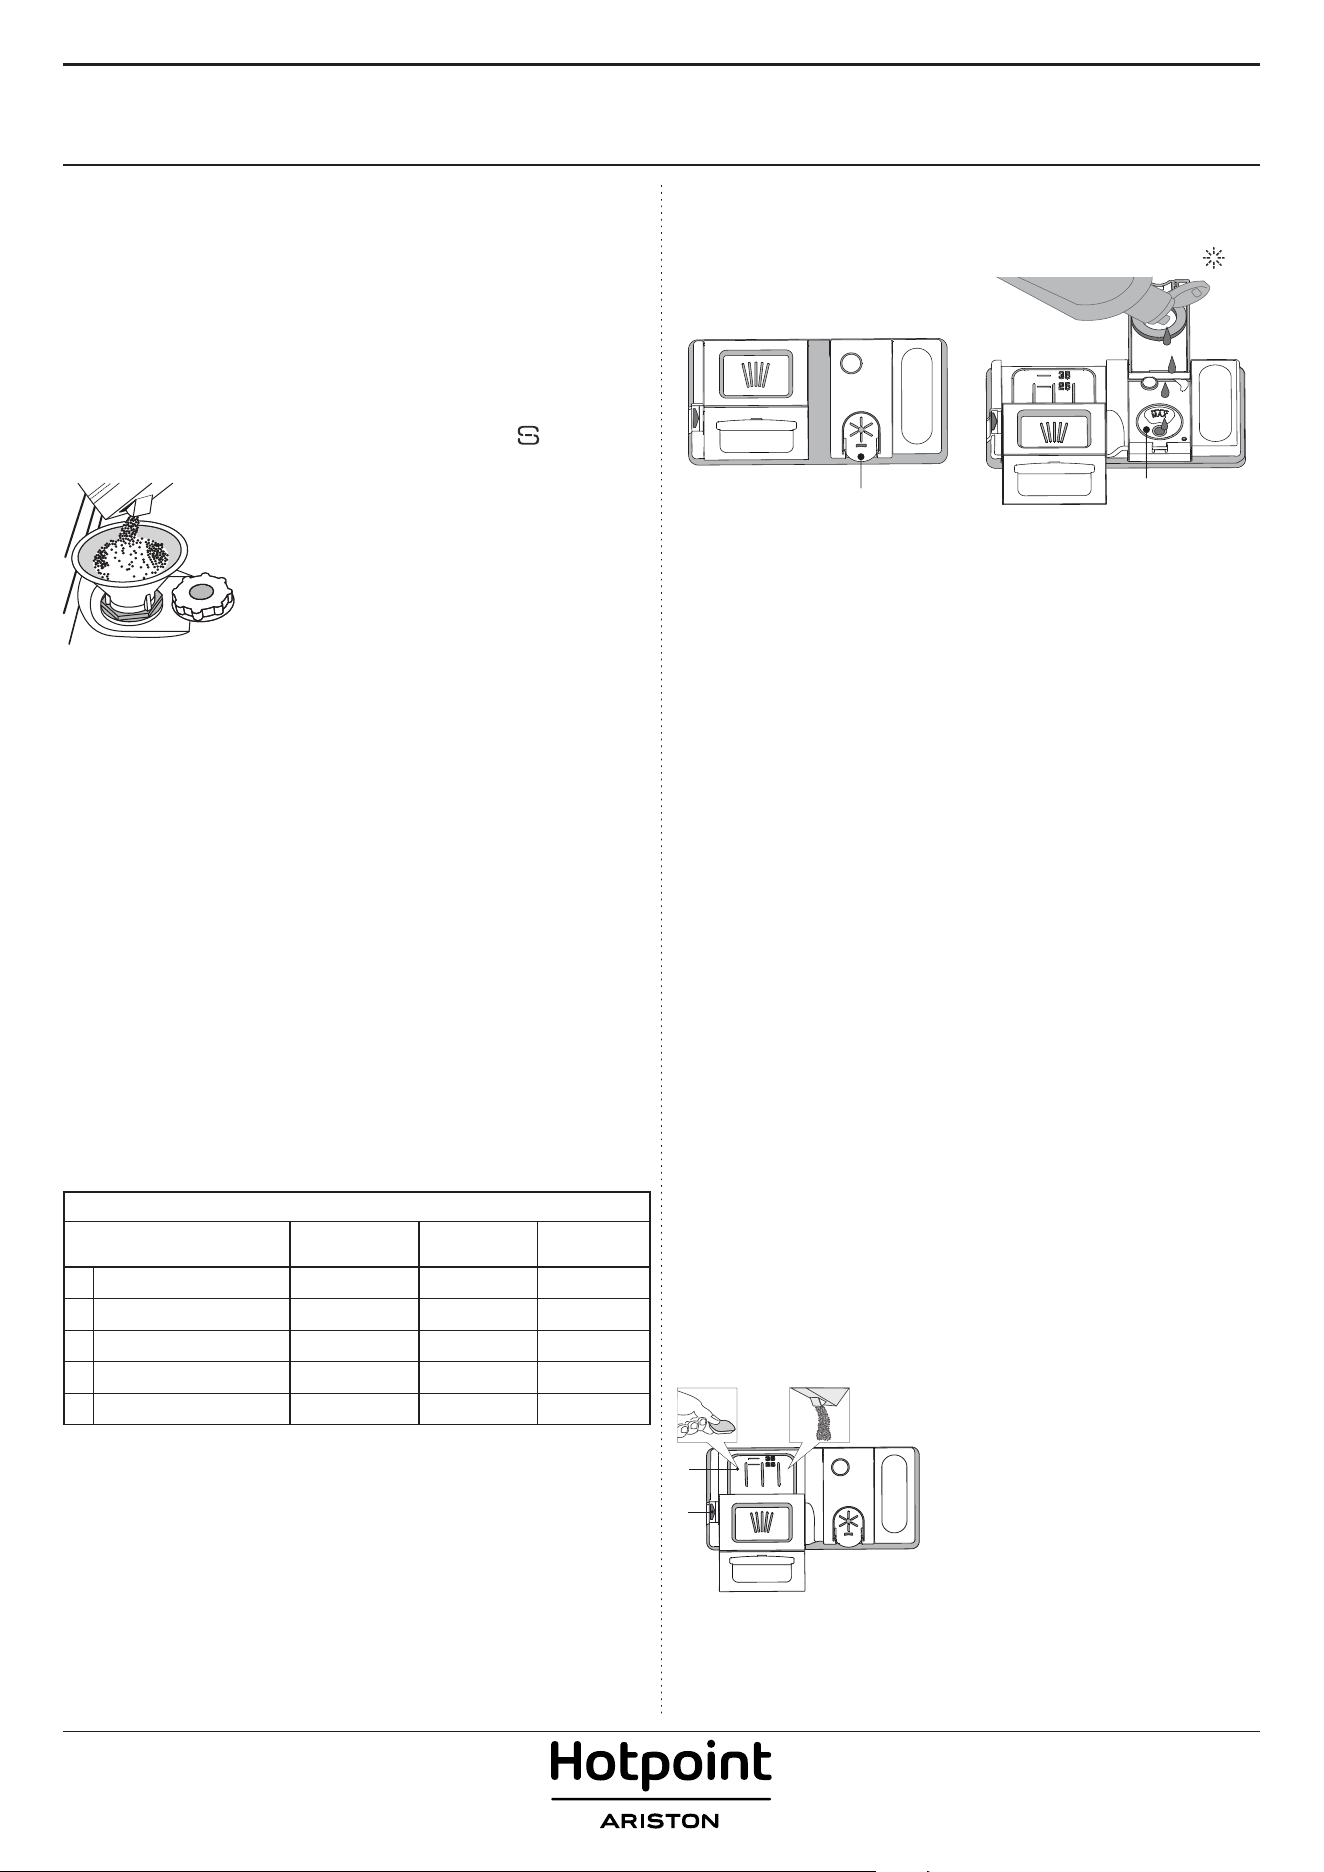
FILLING THE SALT RESERVOIR
The use of salt prevents the formation of LIMESCALE on the dishes and
on the machine’s functional components.
• It is mandatory that THE SALT RESERVOIR NEVER BE EMPTY.
• It is important to set the water hardness.
The salt reservoir is located in the lower part of the dishwasher
(see PRODUCT DESCRIPTION) and must be lled when the SALT REFILL
indicator light in the control panel is lit.
1. Remove the lower rack and unscrew the
reservoir cap (anticlockwise).
2. Only the rst time you do this: ll the salt
reservoir with water.
3. Position the funnel (see gure) and ll the salt
reservoir right up to its edge (approximately
1kg); it is not unusual for a little water to leak out.
4. Remove the funnel and wipe any salt residue
away from the opening.
Make sure the cap is screwed on tightly, so that no detergent can get
into the container during the wash program (this could damage the
water softener beyond repair).
Whenever you need to add salt, it is mandatory to complete the pro-
cedure before the beginning of the washing cycle to avoid corrosion.
SETTING THE WATER HARDNESS
To allow the water softener to work in a perfect way, it is essential that
the water hardness setting is based on the actual water hardness in
your house. This information can be obtained from your local water
supplier.
The factory sets the default value for the water hardness:
• Switch on the appliance by pressing the ON/OFF button.
• Switch o the appliance by pressing the ON/OFF button.
• Hold down button P for 5 seconds, until you hear a beep.
• Switch on the appliance by pressing the ON/OFF button.
• The current selection level number and the salt indicator light both ash.
• Press button P to select the desired hardness level (see WATER
HARDNESS TABLE).
• Switch o the appliance by pressing the ON/OFF button.
Setting is complete!
As soon as this procedure is complete, run a program without loading.
Only use salt that has been specically designed for dishwashers.
After the salt has been poured into the machine, the SALT REFILL indi-
cator light switches o.
If the salt container is not lled, the water softener and the heating
element may be damaged as a result of limescale accumulation.
Using of Salt is recommended with any type of dishwasher detergent.
Water Hardness Table
Level
°dH
German degrees
°fH
French degrees
°Clark
English degrees
1 Soft 0 - 6 0 - 10 0 - 7
2 Medium 7 - 11 11 - 20 8 - 14
3 Average 12 - 16 21 - 29 15 - 20
4 Hard 17 - 34 30 - 60 21 - 42
5 Very hard 35 - 50 61 - 90 43 - 62
FILLING THE RINSE AID DISPENSER
Rinse aid makes dish DRYING easier. The rinse aid dispenser A should be
lled when the RINSE AID REFILL indicator light in the control
panel is lit.
1. Open the dispenser B by pressing and pulling up the tab on the lid.
2. Pour in the rinse aid (max.110 ml), making sure it does not overow
from the dispenser. If this happens, clean the spill immediately with
a dry cloth.
3. Press the lid down until you hear a click to close it.
NEVER pour the rinse aid directly into the appliance tub.
ADJUSTING THE DOSAGE OF RINSE AID
If you are not completely satised with the drying results, you can ad-
just the quantity of rinse aid used.
• Switch the dishwasher on using the ON/OFF button.
• Switch it o using the ON/OFF button.
• Press button P three times - a beep will be heard.
• Switch it on using the ON/OFF button.
• The current selection level number and rinse aid indicator light ash.
• Press button P to select the level of rinse aid quantity to be supplied.
• Switch it o using the ON/OFF button
Setting is complete!
If the rinse aid level is set to ZERO (ECO), no rinse aid will be supplied.
The LOW RINSE AID indicator light will not be lit if you run out of rinse aid.
A maximum of 5 levels can be set according to the dishwasher model.
The factory setting is specic to the model, please follow instruction
above to check this for your machine.
• If you see bluish streaks on the dishes, set a low number (1-2).
• If there are drops of water or limescale marks on the dishes, set a mid-
range number (3-4).
FILLING THE DETERGENT DISPENSER
To open the detergent dispenser use the opening device C.
Introduce the detergent into the dry dispenser D only. Place the
amount of detergent for pre-washing directly inside the tub.
1. When measuring out the detergent
refer to the mentioned earlier infor-
mation to add the proper quantity.
Inside the dispenser D there are indi-
cations to help the detergent dosing.
2. Remove detergent residues from
the edges of the dispenser and
close the cover until it clicks.
3. Close the lid of the detergent dis-
penser by pulling it up until the
closing device is secured in place.
The detergent dispenser automatically opens up at the right time
according to the program.
If all-in-one detergents are used, we recommend using the TABLET
button, because it adjusts the program so that the best washing and
drying results are always achieved.
Usage of detergent not designed for dishwashers may cause mal-
function or damage to the appliance.
A
B
D
C
3
EN
ECO program data is measured under laboratory conditions according to European Standard EN 60436:2020 .
Note for Test Laboratories:
For information on comparative EN testing conditions, please send an email to the following address: [email protected]
Pre-treatment of the dishes is not needed before any of the programs.
*) Not all options can be used simultaneously.
**) Values given for programs other than the program Eco are indicative only. The actual time may vary depending on many factors such as temperature
and pressure of the incoming water, room temperature, amount of detergent, quantity and type of load, load balancing, additional selected options and
sensor calibration. The sensor calibration can increase program duration up to 20 min.
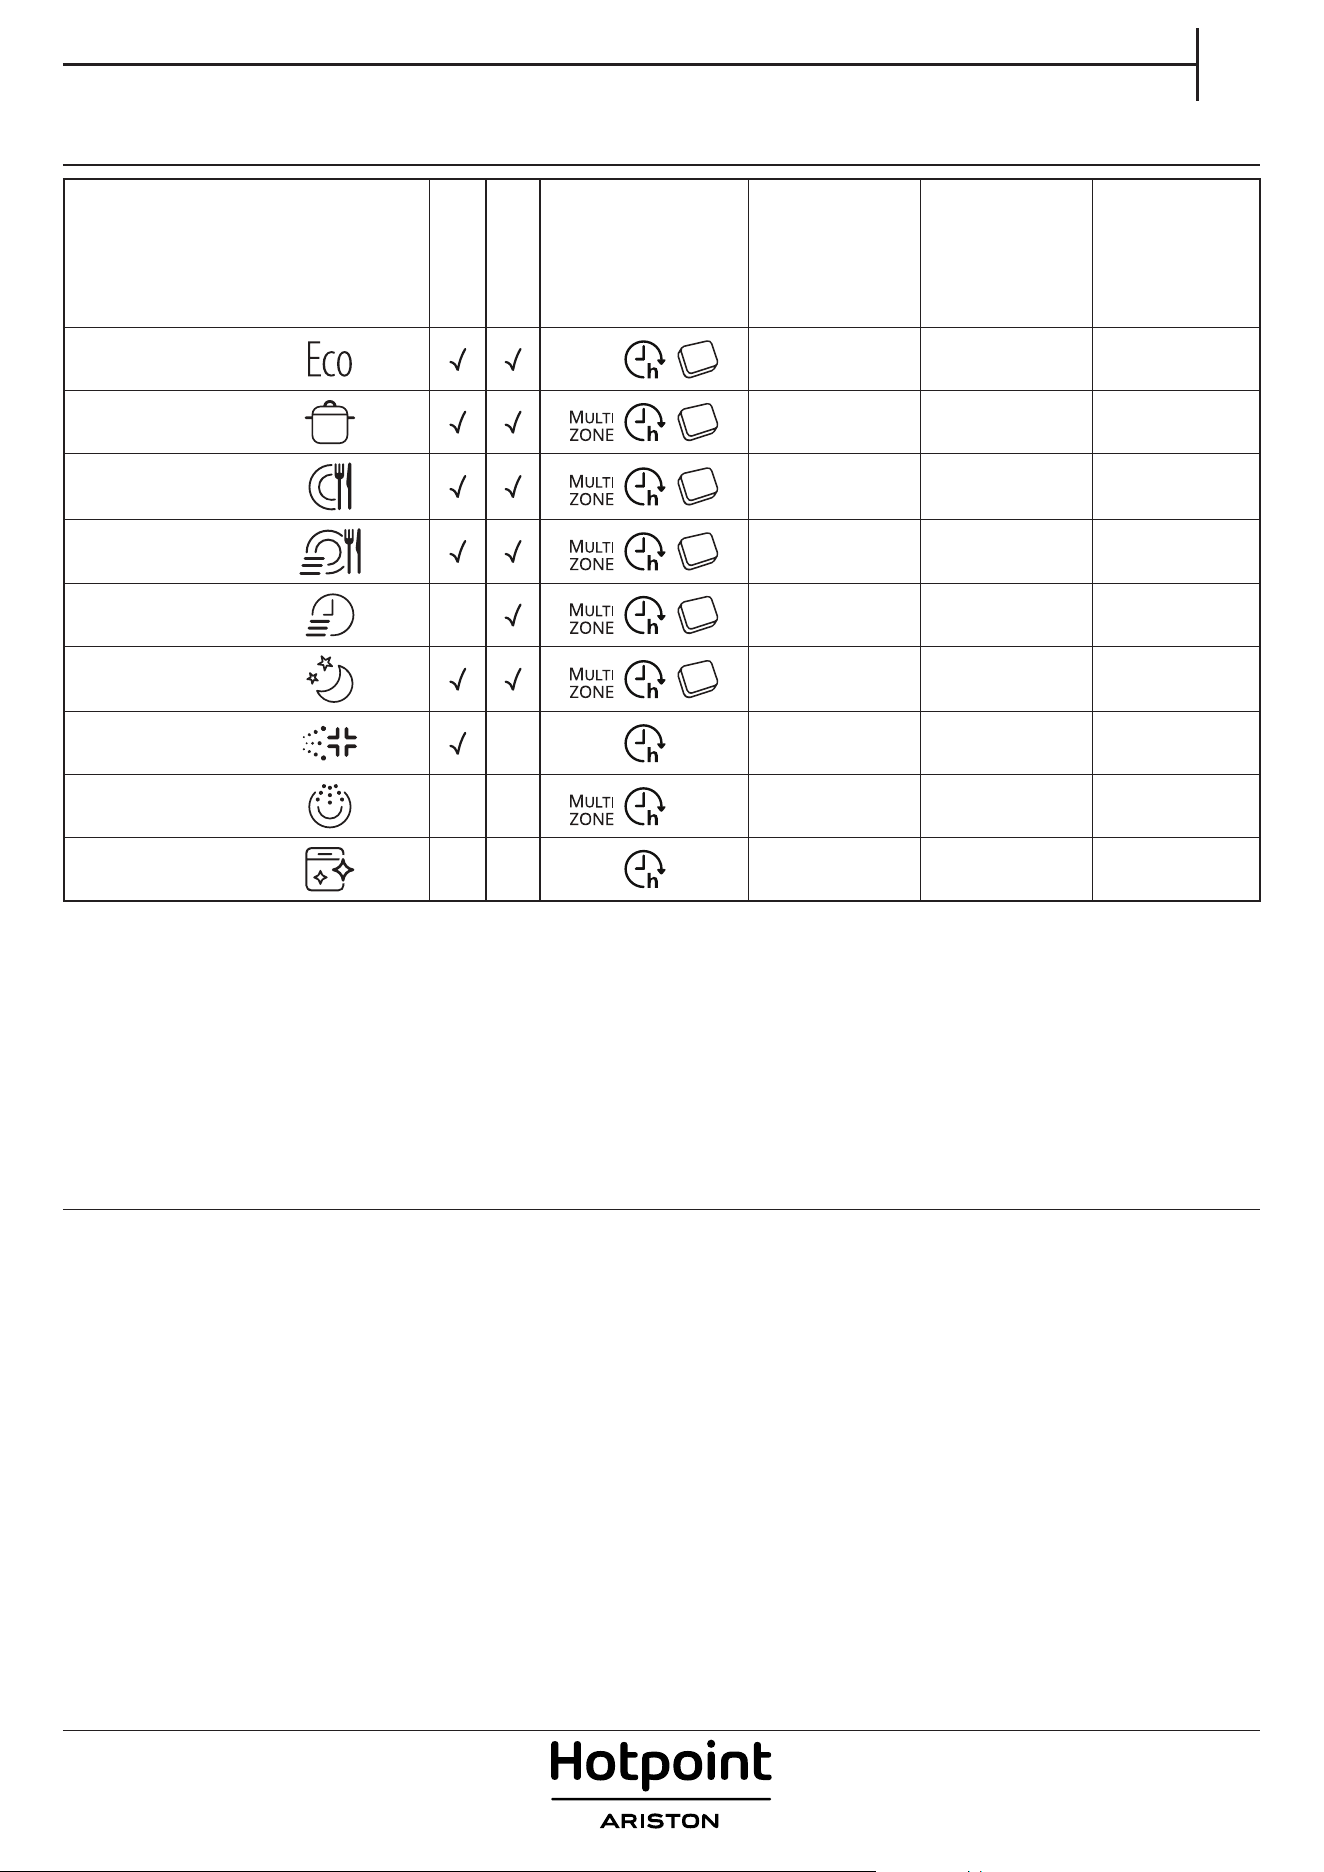
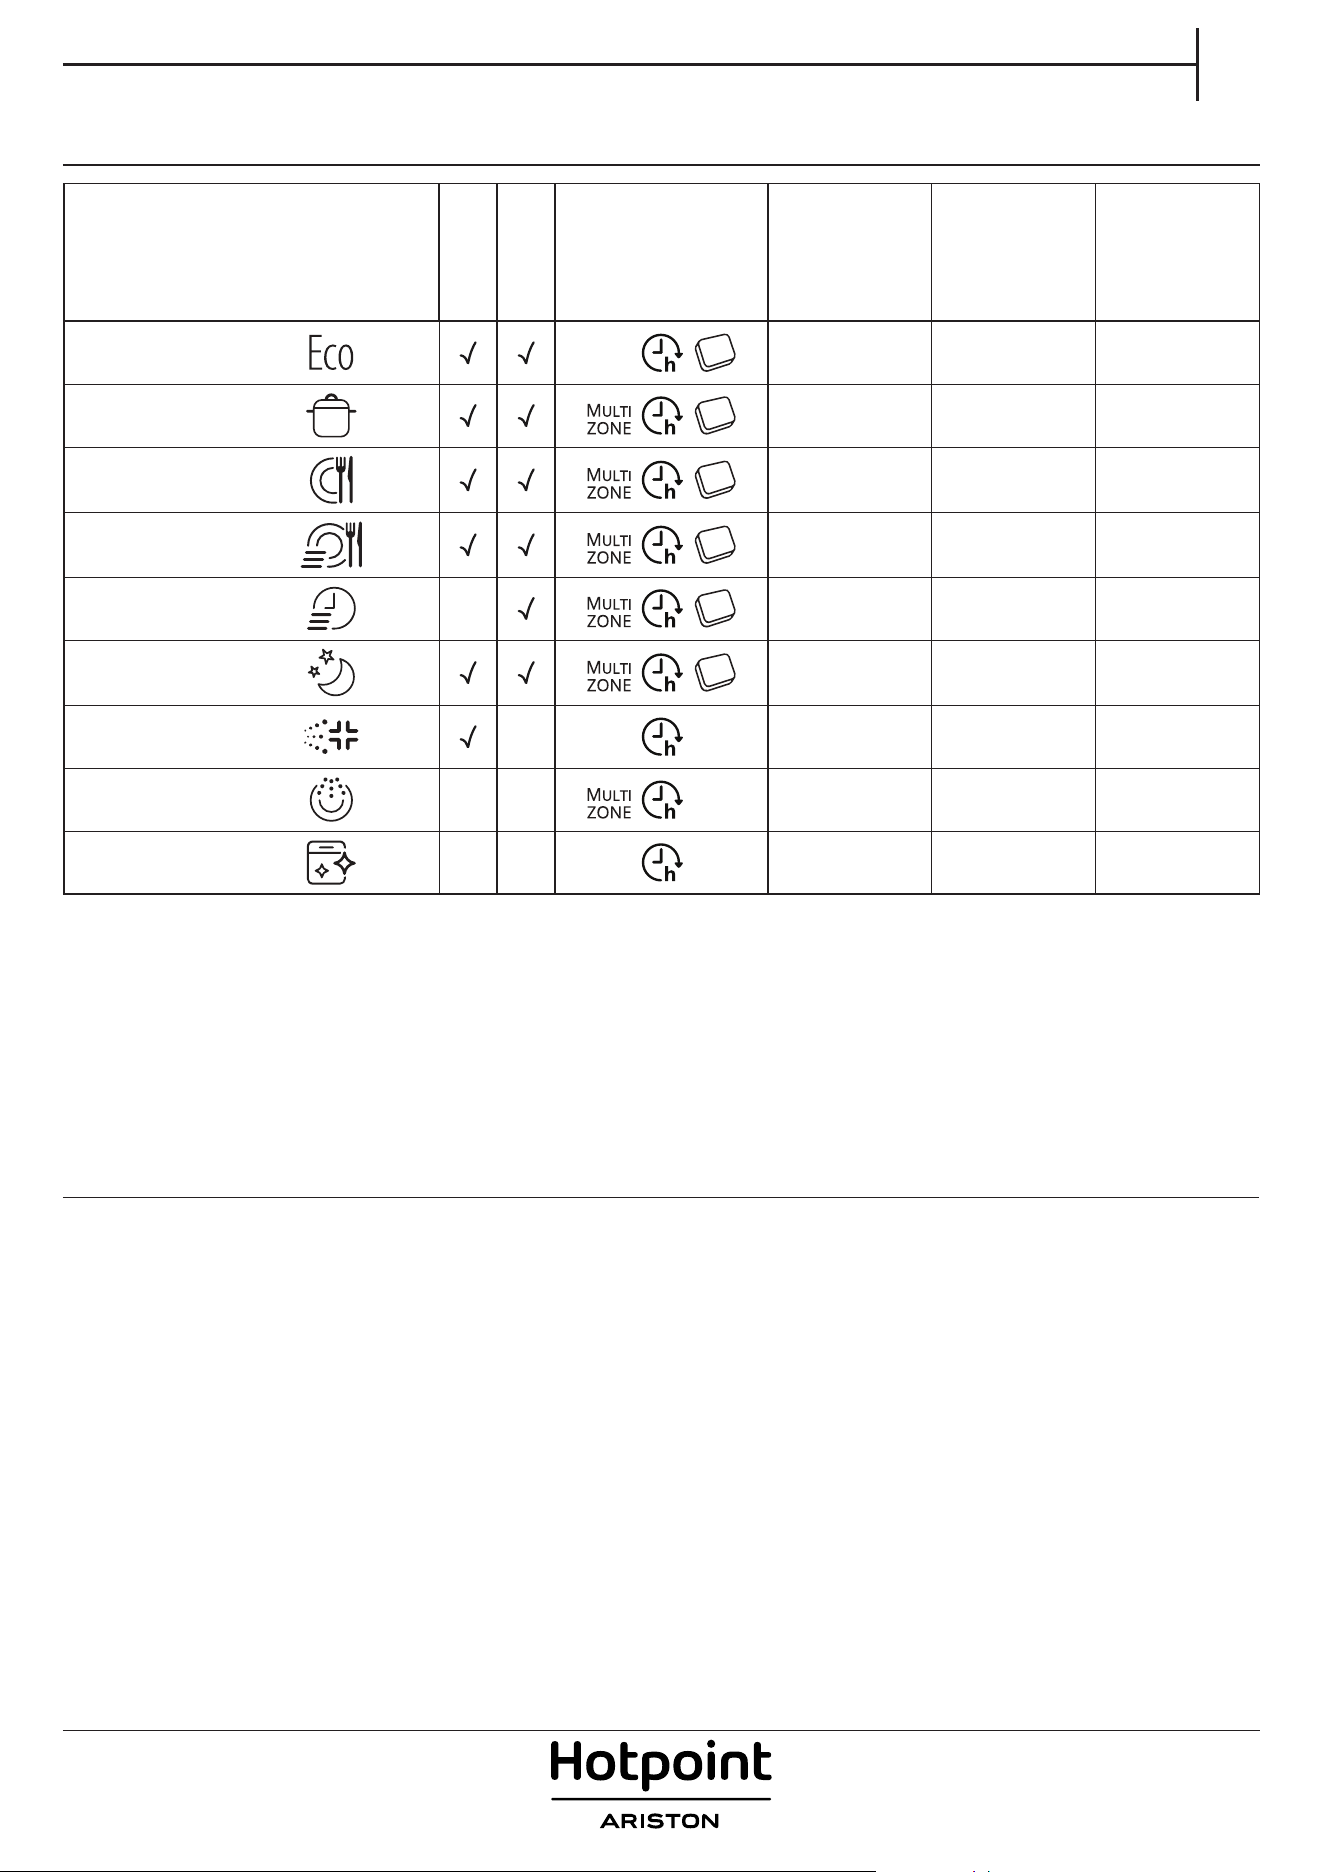
Program
Drying phase
ActiveDry
Available
options
*)
Duration of
wash program
(h:min)
**)
Water
consumption
(litres/cycle)
Energy
consumption
(kWh/cycle)
1. Eco 50°
3:10 8.9 0.75
2. Intensive 65°
2:50 17.0 1.60
3. Mixed 55°
2:30 15.0 1.40
4. Fast Wash&Dry 50°
1:25 11.5 1.10
5. Rapid 30’ 45°
-
0:30 9.0 0.50
6. Good Night 50°
3:30 16.0 1.15
7. Sanitizing 65°
-
1:40 12.0 1.30
8. Soak
- -
-
0:12 4.5 0.01
9. Self-Clean 65°
-
-
0:50 8.0 0.85
PROGRAMS TABLE
PROGRAMS DESCRIPTION
Instructions on wash cycle selection.
1 ECO
Eco programme is suitable to clean normally soiled tableware, that for
this use, it is the most ecient programme in terms of its combined
energy and water consumption, and that it is used to assess complian-
ce with the EU Ecodesign legislation.
2 INTENSIVE
Program recommended for heavily soiled crockery, especially suitable
for pans and saucepans (not to be used for delicate items).
3 MIXED
Mixed soil. For normally soiled dishes with dried food residues.
4 FAST WASH&DRY
Normally soiled crockery. Everyday cycle, that ensures optimal cleaning
and drying performance in shorter time.
5 RAPID 30’
Program to be used for half load of lightly-soiled dishes with no dried
food residues. Does not include drying phase.
6 GOOD NIGHT
Suitable for night-time operation of the appliance. Ensures optimal cle-
aning and drying performance with the lowest noise emission.
7 SANITIZING
Normally or heavily soiled crockery, with additional antibacterial wash.
Can be used to perform maintenance of the dishwasher.
8 SOAK
Use to refresh crockery planned to be washed later. No detergent to be
used with this program.
9 SELF-CLEAN
Program to be used to perform maintenance of the dishwasher, to be
carried out only when the dishwasher is EMPTY using specic deter-
gents designed for dishwasher maintenance.
Notes:
Please note that cycle Rapid 30’ is dedicated for lightly soiled dishes.
4
OPTIONS AND FUNCTIONS
OPTIONS can be selected directly by pressing the corresponding button (see CONTROL PANEL).
If an option is not compatible with the selected program see PROGRAMS TABLE, the corresponding LED ashes rapidly 3 times
and beeps will sound. The option will not be enabled.
TABLET (Tab)
This setting allows you to optimize the performance of the
program according to the type of detergent used.
Press the START/Pause button for 3 seconds (the corresponding
symbol will light up) if you use combined detergents in tablet
form (rinse aid, salt and detergent in 1 dose).
If you use powder or liquid detergent, this option should
be o.
ActiveDry
ActiveDry is a convection drying system which automatically opens the
door during/after drying phase to ensure exceptional drying perfor-
mance every day. Door opens at the temperature that is safe to your
kitchen furniture.
As additional steam protection, special designed protection foil is add-
ed
together with the dishwasher. To see how to mount protection foil
please refer to (INSTALLATION GUIDE).
ActiveDry functionality could be disabled by the user as follows:
1. Go to the Dishwasher software menu pressing and holding P
button (6 sec).
2. You are currently in Light Control Menu (please refer to OPERATION
INDICATOR description), if you don’t want to change anything
please
press and hold P button (
until one of the two letters appears on the
display).
3. You switched to ActiveDry Control Menu, you could change status
of ActiveDry functionality by pressing P button:
E – enabled d – disabled
To conrm the change and exit from the Control Menu please press and
hold P button (3 sec).
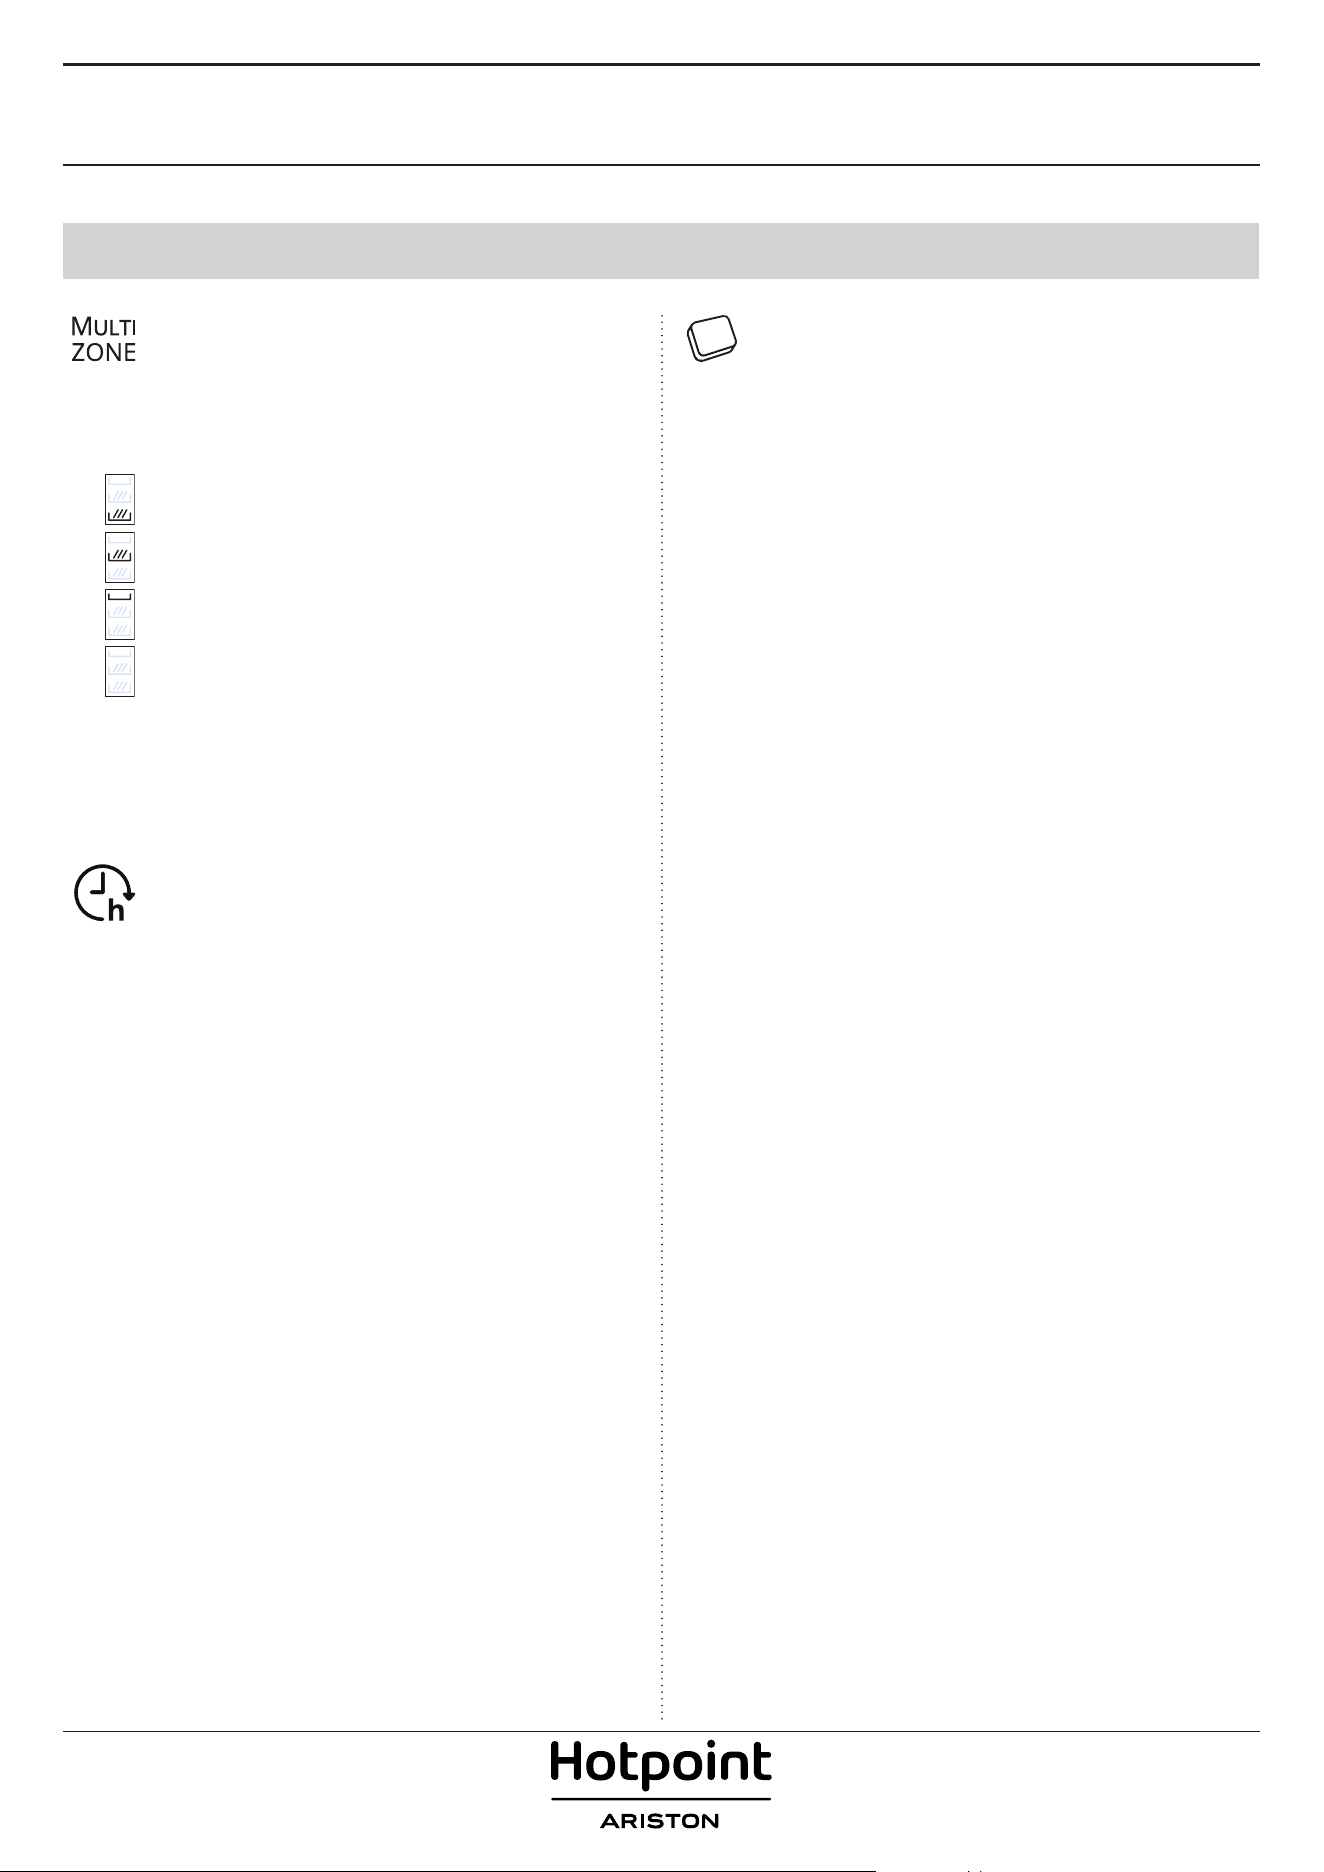
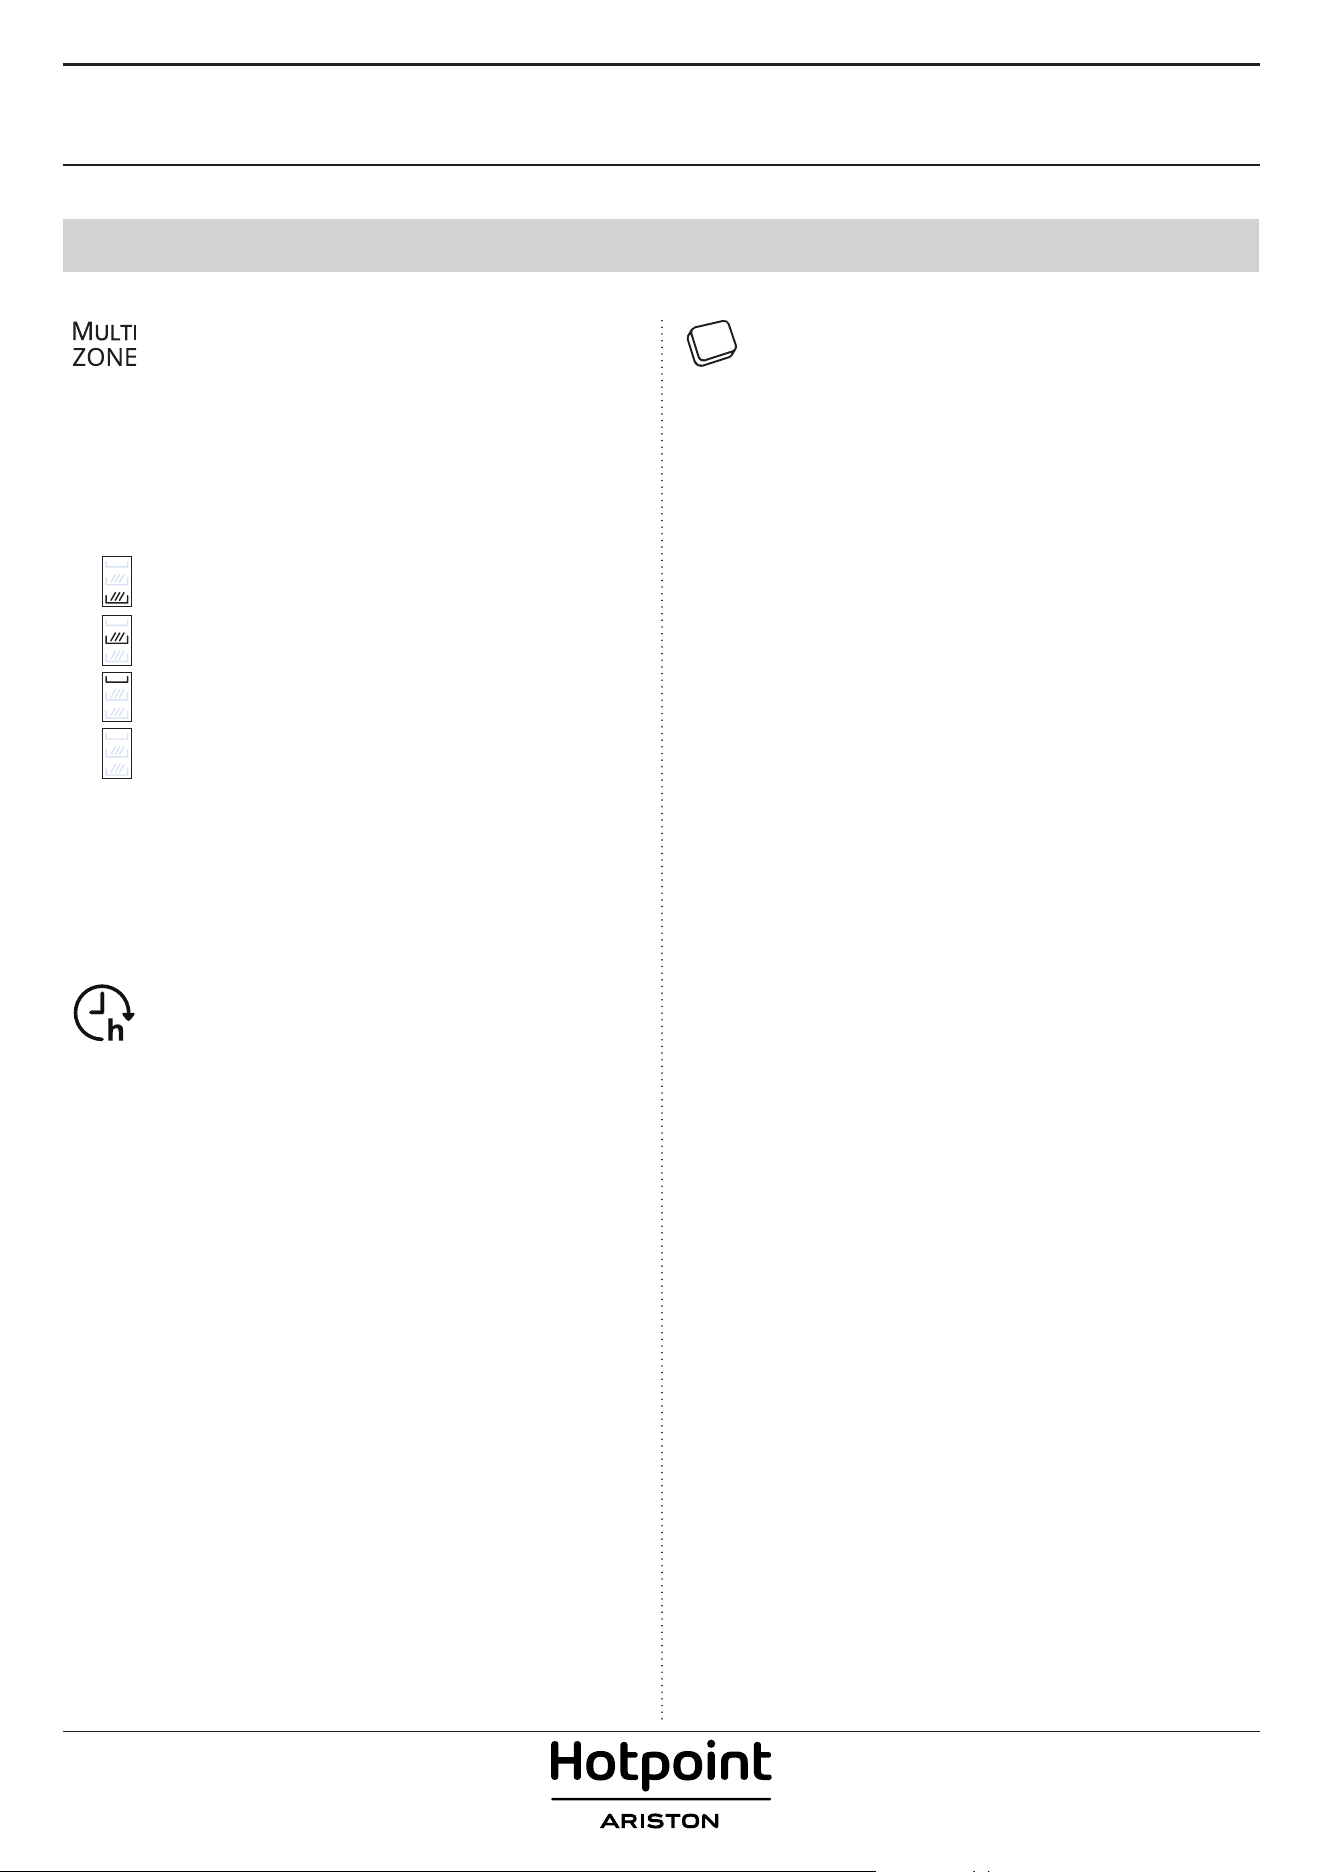
MULTIZONE
If there are not many dishes to be washed, a half loading may
be used in order to save water, electricity and detergent.
Select the program and then press the MULTIZONE button:
the symbol of the chosen rack will appear on the display.
By default the appliance washes dishes in all racks.
To wash only the specic rack, press this button repeatedly:
shown on the display (only lower rack)
shown on the display (only upper rack)
shown on the display (only cutlery rack)
shown on the display (option is OFF and the appliance will
wash dishes in all racks).
Remember to load the upper or lower rack only, and to
reduce the amount of detergent accordingly.
If upper rack is removed, please apply detergent directly
to tub instead of detergent dispenser.
DELAY
The start time of the program may be delayed for a period of
time between 1 and 12 hours.
1. Press the DELAY button: the corresponding «h» symbol
appears on the display; each time you press the button,
the time (1h, 2h, etc. up to max. 12h) from the start of the
selected wash cycle will be increased.
2. Select the wash program, press the START/PAUSE button
and within 4 seconds close the door: the timer will begin
counting down.
3. Once this time has elapsed, the indicator light «h» switches
o and the wash cycle begins.
To adjust the delay time and select a shorter period of
time, press the DELAY button. To cancel it, press the button
repeatedly until the selected delayed start indicator light «h»
switches o.
The DELAY function cannot be set once a wash cycle has
been started.
5
EN
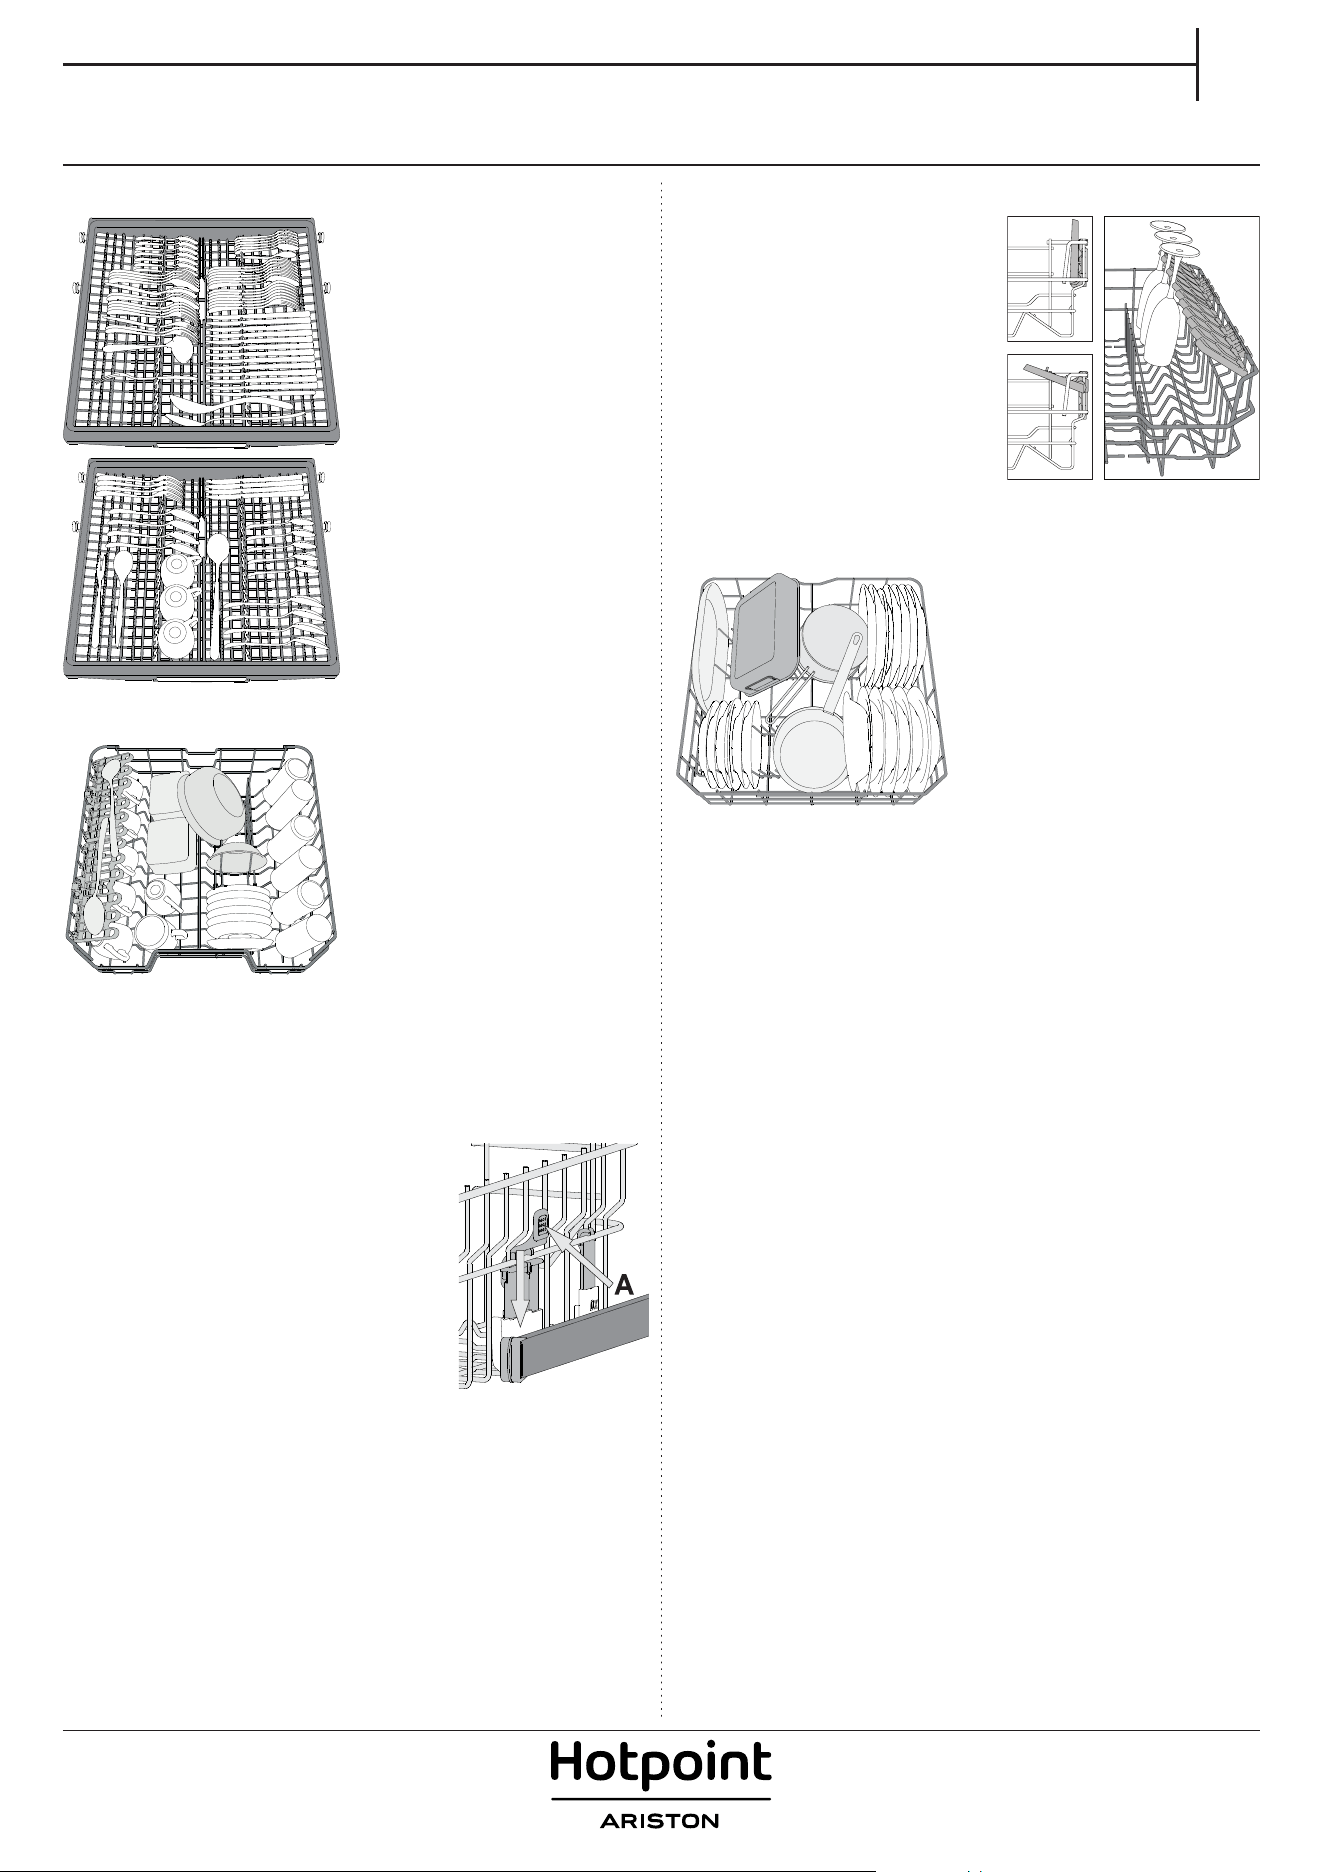
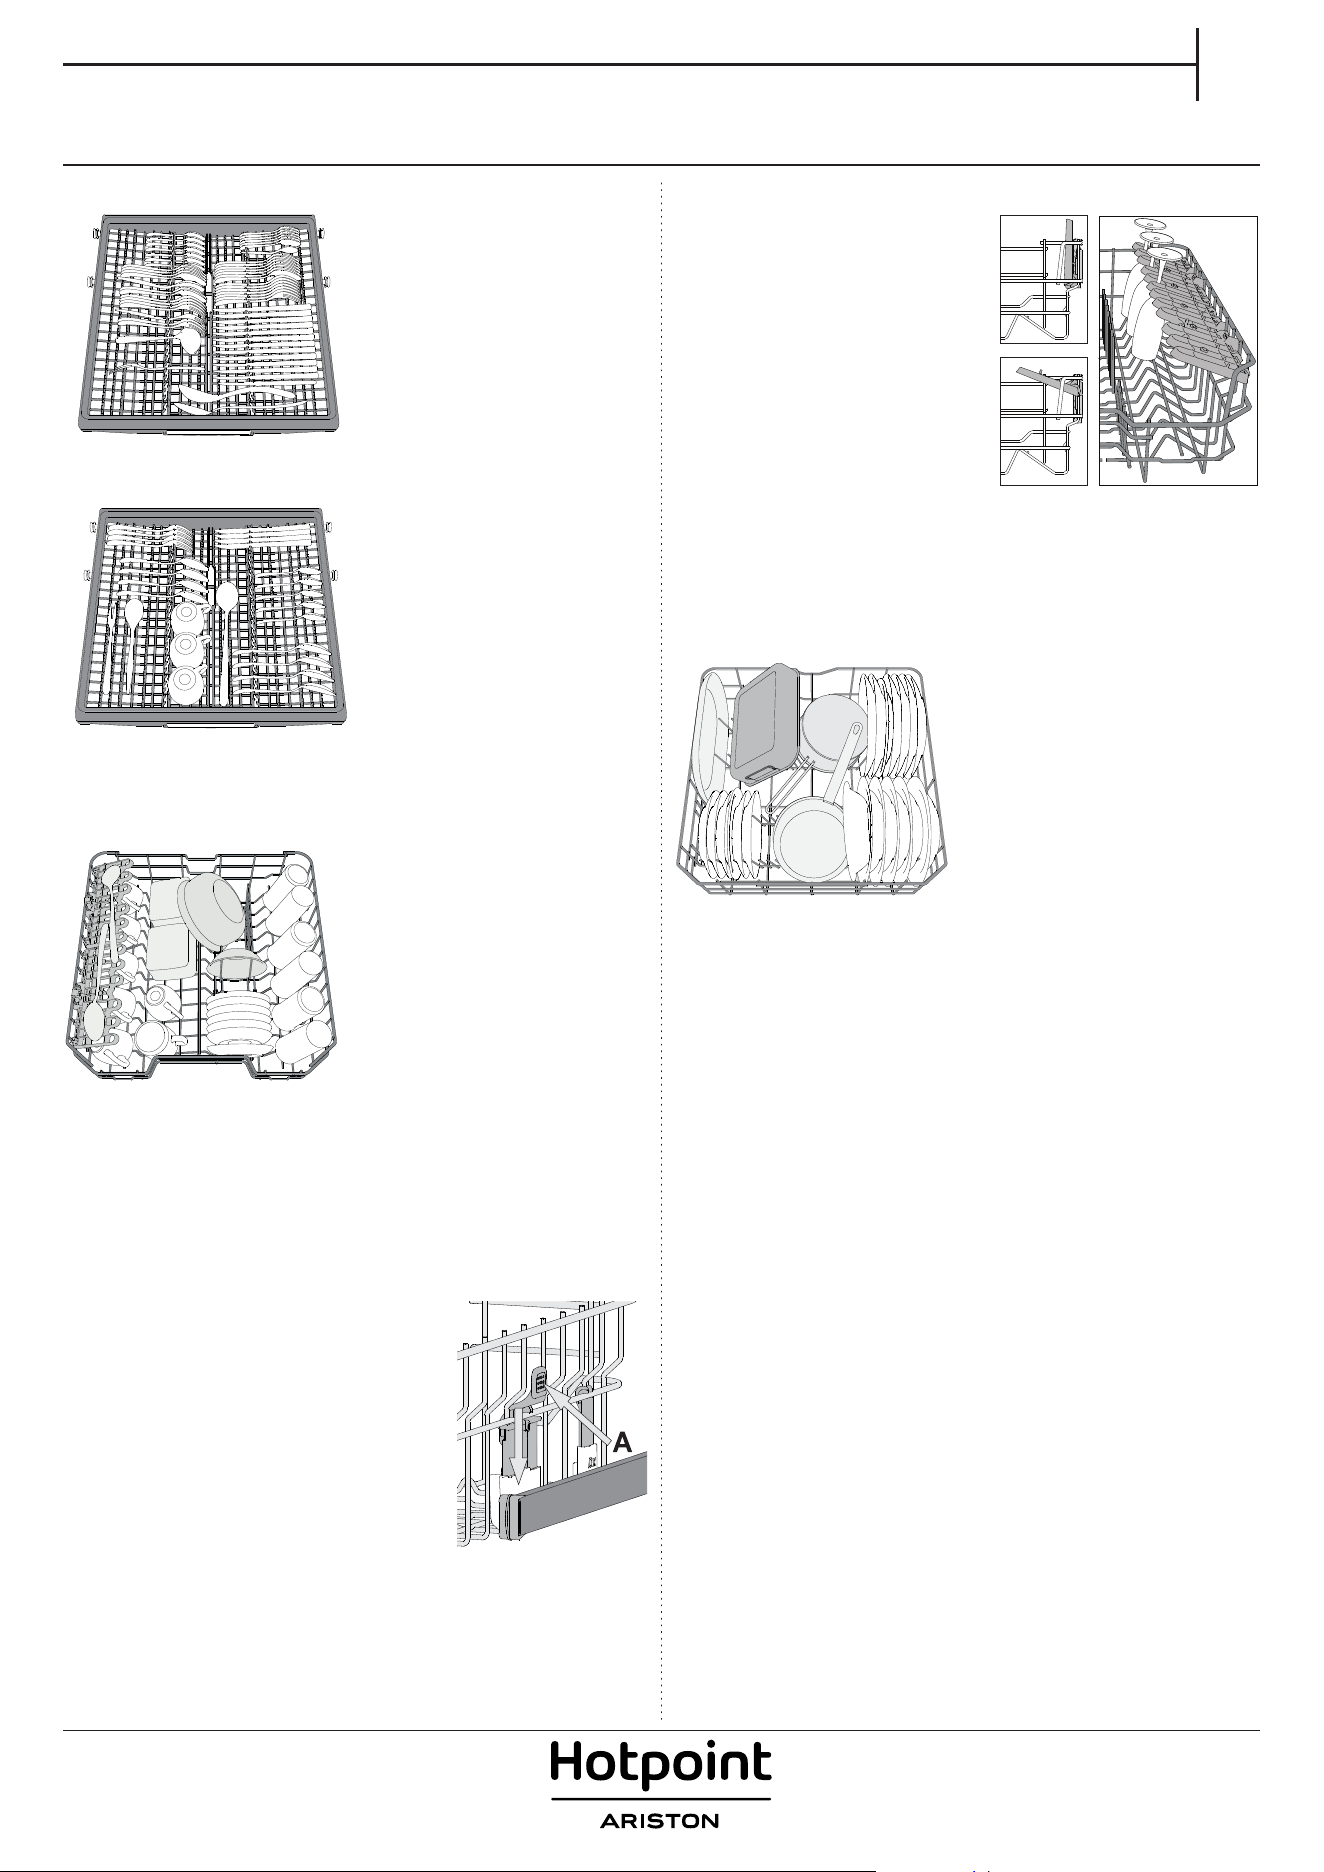
LOADING THE RACKS
FOLDABLE FLAPS WITH ADJUSTABLE POSITION
The side foldable aps can be fold or
unfold to optimize the arrangement of
crockery inside the rack. Wine glasses
can be placed safely in the foldable
aps by inserting the stem of each
glass into the corresponding slots.
Depending on the model:
– to unfold the aps there is needed
to slide it up and rotate or release it
from the snaps and pull it down.
– to fold the aps there is needed to
rotate it and slide aps down or pull
it up and attach aps to the snaps.
LOWER RACK
For pots, lids, plates, salad bowls, cut-
lery etc. Large plates and lids should
ideally be placed at the sides to avoid
interferences with the spray arm.
(loading example for the lower rack)
CUTLERY RACK
The third rack was designed to house
the cutlery.
Arrange the cutlery as shown in the
gure.
Aseparate arrangement of the cut-
lery makes collection easier after
washing and improves washing and
drying performance.
Knives and other utensils with
sharp edges must be positioned
with the blades facing downwards.
The geometry of the rack makes it
possible to place such small items
as coee cups in the area in the
middle.
UPPER RACK
Load delicate and light dishes:
glasses, cups, saucers, low salad
bowls.
(loading example for the upper rack)
ADJUSTING THE HEIGHT OF THE UPPER RACK
The height of the upper rack can be adjusted: high position to place bulky
crockery in the lower basket and low position to make the most of the tip-
up supports by creating more space upwards and avoid collision with the
items loaded into lower rack.
The upper rack is equipped with aUpper Rack
height adjuster (see gure), without pressing
the levers, lift it up by simply holding the rack
sides, as soon as the rack is stable in its upper
position. To restore to the lower position, press
the levers Aat the sides of the rack and move the
basket downwards.
We strongly recommend that you do not ad-
just the height of the rack when it is loaded.
NEVER raise or lower the basket on one side
only.

6
DAILY USE
1. CHECK WATER CONNECTION
Check that the dishwasher is connected to the water supply and that
the tap is open.
2. SWITCH ON THE DISHWASHER
Press the ON/OFF button.
3. LOAD THE RACKS
(see LOADING THE RACKS).
4. FILLING THE DETERGENT DISPENSER
5. CHOOSE THE PROGRAM AND CUSTOMISE THE CYCLE
Select the most appropriate program in accordance with the type of
crockery and its soiling level (see PROGRAMS DESCRIPTION) by press-
ing the P button.
Select the desired options (see OPTIONS AND FUNCTIONS).
6. START
Start the wash cycle by pressing the START/Pause button. When the
program starts you hear abeep.
7. END OF WASH CYCLE
The end of the wash cycle is indicated by beeps and the display
shows End. Open the door and switch o the appliance by pressing
the ON/OFF button.
Wait for a few minutes before removing the crockery - to avoid
burns. Unload the racks, beginning with the lower one.
The machine will switch o automatically during certain extended
periods of inactivity, in order to minimise electricity consumption.
If the crockery is only lightly soiled or if it has been rinsed with wa-
ter before being placed in the dishwasher, reduce the amount of
detergent used accordingly.
ADVICE AND TIPS
TIPS
Before loading the baskets, remove all food residues from the crockery
and empty the glasses. You do not need to rinse beforehand under run-
ning water.
Arrange the crockery so that it is held in place rmly and does not tip
over; and arrange the containers with the openings facing downwards
and the concave/convex parts placed obliquely, thus allowing the wa-
ter to reach every surface and ow freely.
Warning: lids, handles, trays and frying pans do not prevent the spray-
er arms from rotating.
Place any small items in the cutlery basket.
Very soiled dishes and pans should be placed in the lower basket be-
cause in this sector the water sprays are stronger and allow ahigher
washing performance.
After loading the appliance, make sure that the sprayer arms can
rotate freely.
UNSUITABLE CROCKERY
• Wooden crockery and cutlery.
• Delicate decorated glasses, artistic handicraft and antique crockery.
Their decorations are not resistant.
• Parts in synthetic material which do not withstand high temperatures.
• Copper and tin crockery.
• Crockery soiled with ash, wax, lubricating grease or ink.
The colours of glass decorations and aluminium/silver pieces can
change and fade during the washing process. Some types of glass (e.g.
crystal objects) can become opaque after anumber of wash cycles too.
DAMAGE TO GLASS AND CROCKERY
• Only use glasses and porcelain guaranteed by the manufacturer as
dishwasher safe.
• Use adelicate detergent suitable for crockery
• Collect glasses and cutlery from the dishwasher as soon as the wash
cycle is over.
TIPS ON ENERGY SAVING
• When the household dishwasher is used according to the manufac-
turer’s instructions, washing tableware in a dishwasher usually
consumes less energy and water than hand dishwashing.
• In order to maximize dishwasher eciency it is recommended to in-
itiate the wash cycle once dishwasher is fully loaded. Loading the
household dishwasher up to the capacity indicated by the manufac-
turer will contribute to energy and water savings. Information on cor-
rect loading of tableware can be found in LOADING THE RACKS chapter.
• In case of partial loading it is recommended to use dedicated wash
options if available (Half load/ Zone Wash, Multizone), illing up only
selected racks. Incorrect loading or overloading the dishwasher may
increase resources usage (such as water, energy and time, as well as
increase noise level), reducing cleaning and drying performance.
• Manual pre-rinsing of tableware items leads to increased water and
energy consumption and is not recommended.
HYGIENE
To avoid odour and sediment which can be accumulated in the
dishwasher please run a high temperature program at least one
amonth. Use atea spoon of detergent and run it without the loading
to clean your appliance.
MODIFYING ARUNNING PROGRAM
If awrong program was selected, it is possible to change it, provided
that it has only just begun: press and hold the ON/OFF button, the ma-
chine will switch o. Switch the machine back on using the ON/OFF
button and select the new wash cycle and any desired options; start the
cycle by pressing the START/PAUSE button.
ADDING EXTRA CROCKERY
Without switching o the machine, open the door (be ware of HOT
steam!) and place the crockery inside the dishwasher. Close the door
and press the START/Pause button the cycle will begin from the point
at which it was interrupted.
ACCIDENTAL INTERRUPTIONS
If the door is opened during the wash cycle, or if there is apower cut,
the cycle stops. Once the door has been closed or the electricity supply
is restored, to start again the cycle from where it was interrupted, press
the START/Pause button.
To disable the DEMO MODE the following actions must be carried out
in sequence, without breaks. Switch the machine ON and then switch
it OFF again. Press the DELAY button until the buzzer is heard. Switch
the machine on again. The “dOF” indicator ashes and then turns OFF.
7
EN
CARE AND MAINTENANCE
CLEANING THE FILTER ASSEMBLY
Regularly clean the lter assembly so that the lters do not clog and
that the waste water ows away correctly.
Using dishwasher with clogged lters or foreign objects inside ltration
system or sprayarms may cause unit malfunction resulting in lose of
performance, noisy work or higher resources usage.
The lter assembly consists of three lters which remove food residues
from the washing water and then recirculate the water.
The dishwasher must not be used without lters or if the lter is
loose.
At least once per month or after each 30 cycles, check the lter assem-
bly and if necessary clean it thoroughly under running water, using
anon-metallic brush and following the instructions below:
1. Turn the cylindrical lter Ain an anti-clockwise direction and pull it
out (Fig 1).
2. Remove the cup lter B by exerting a slight pressure on the side
aps (Fig 2).
3. Slide out the stainless-steel plate lter C (Fig 3).
4. In case you nd foreign objects (such as broken glass, porcelain,
bones, fruit seeds etc.) please remove them carefully.
5. Inspect the trap and remove any food residues. NEVER REMOVE the
wash-cycle pump protection (black detail) (Fig 4).
After cleaning the lters, re-place the lter assembly and x it in posi-
tion correctly; this is essential for maintaining the ecient operation of
the dishwasher.
CLEANING THE WATER INLET HOSE
If the water hoses are new or have not been used for an extended period
of time, let the water run to make sure it is clear and free of impurities be-
fore performing the necessary connections. If this precaution is not tak-
en, the water inlet could become blocked and damage thedishwasher.
21
43
A
C
A
B
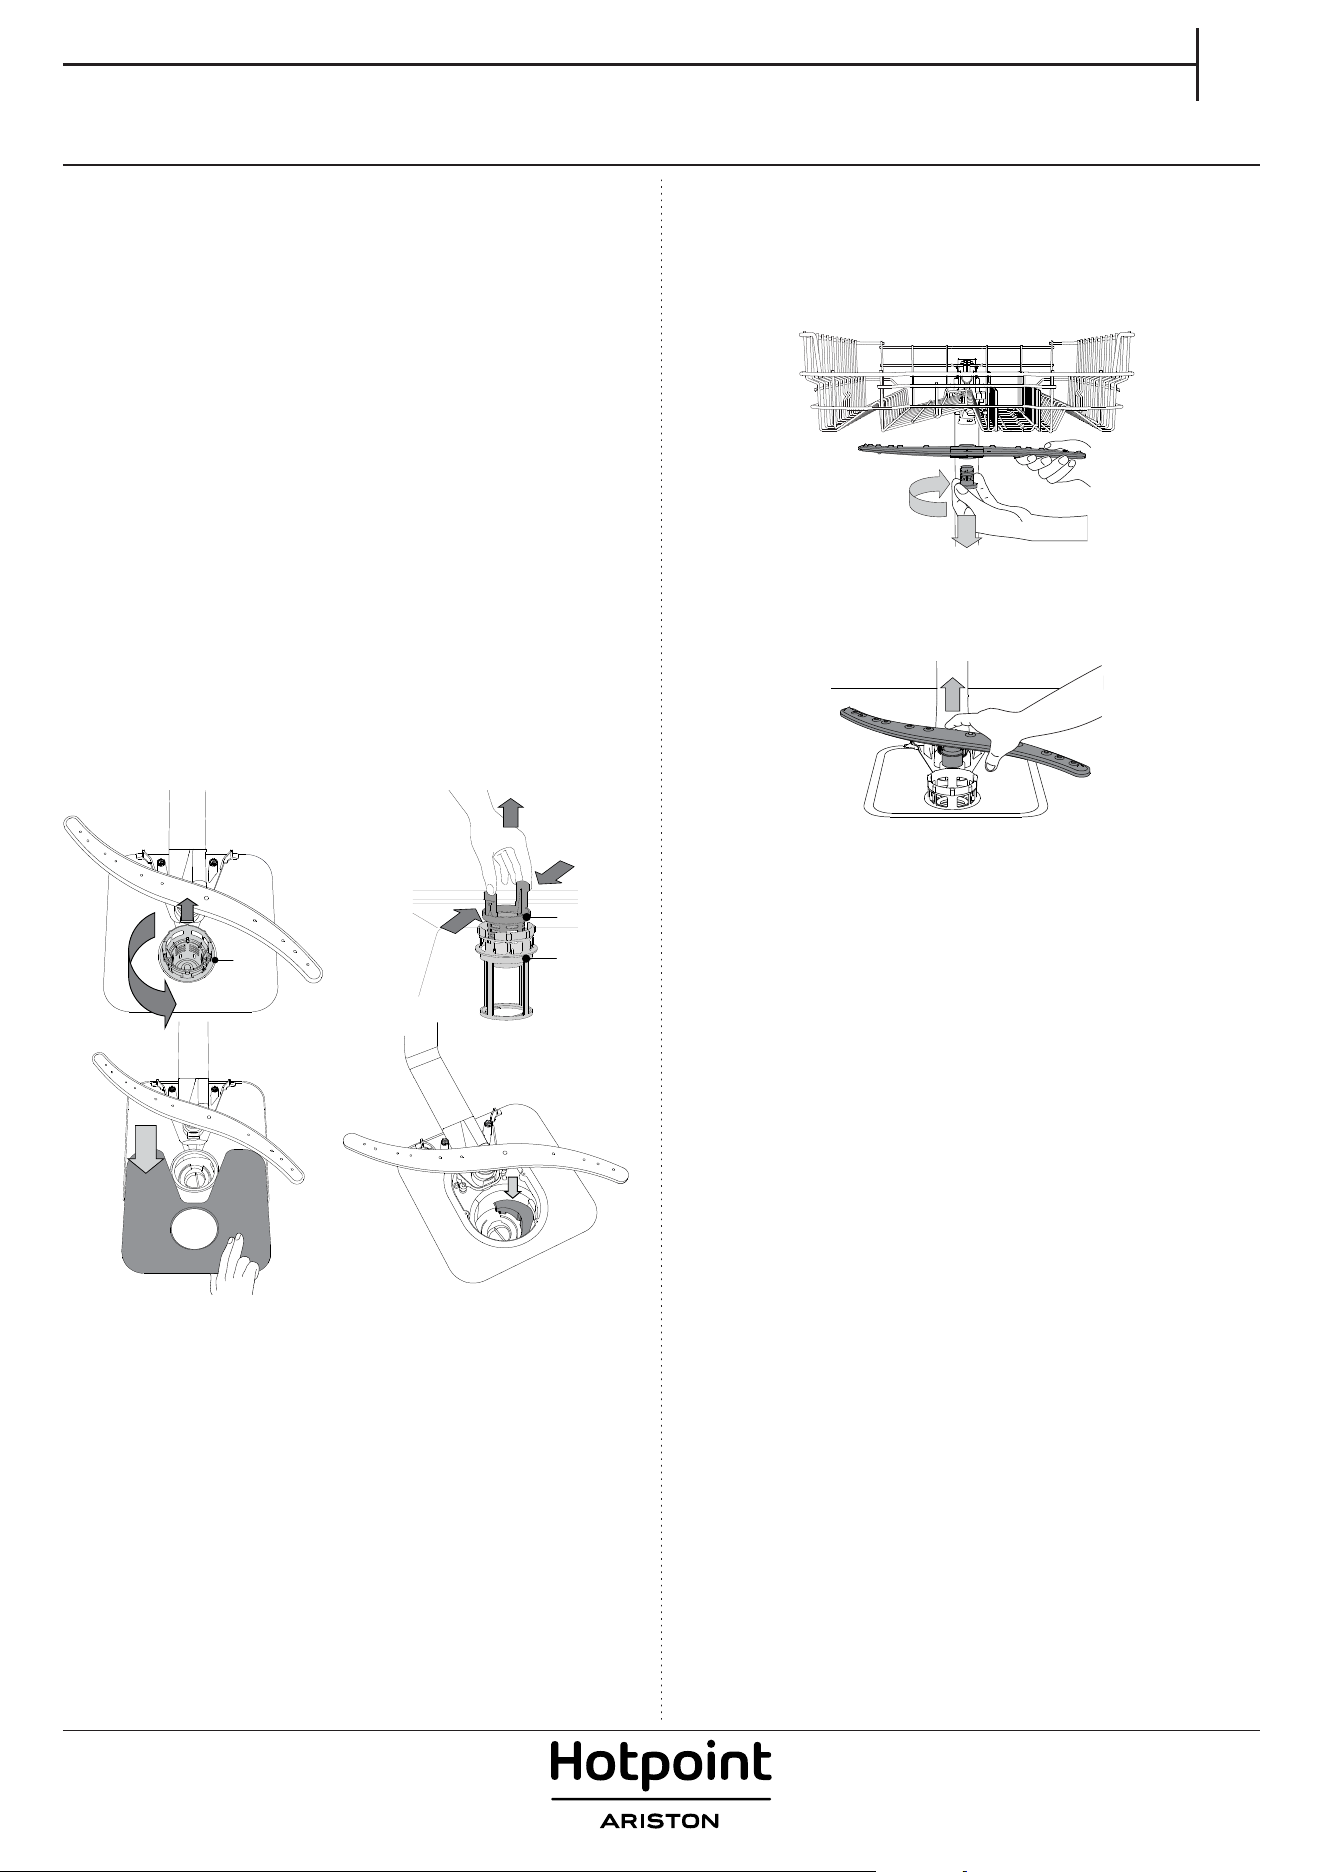
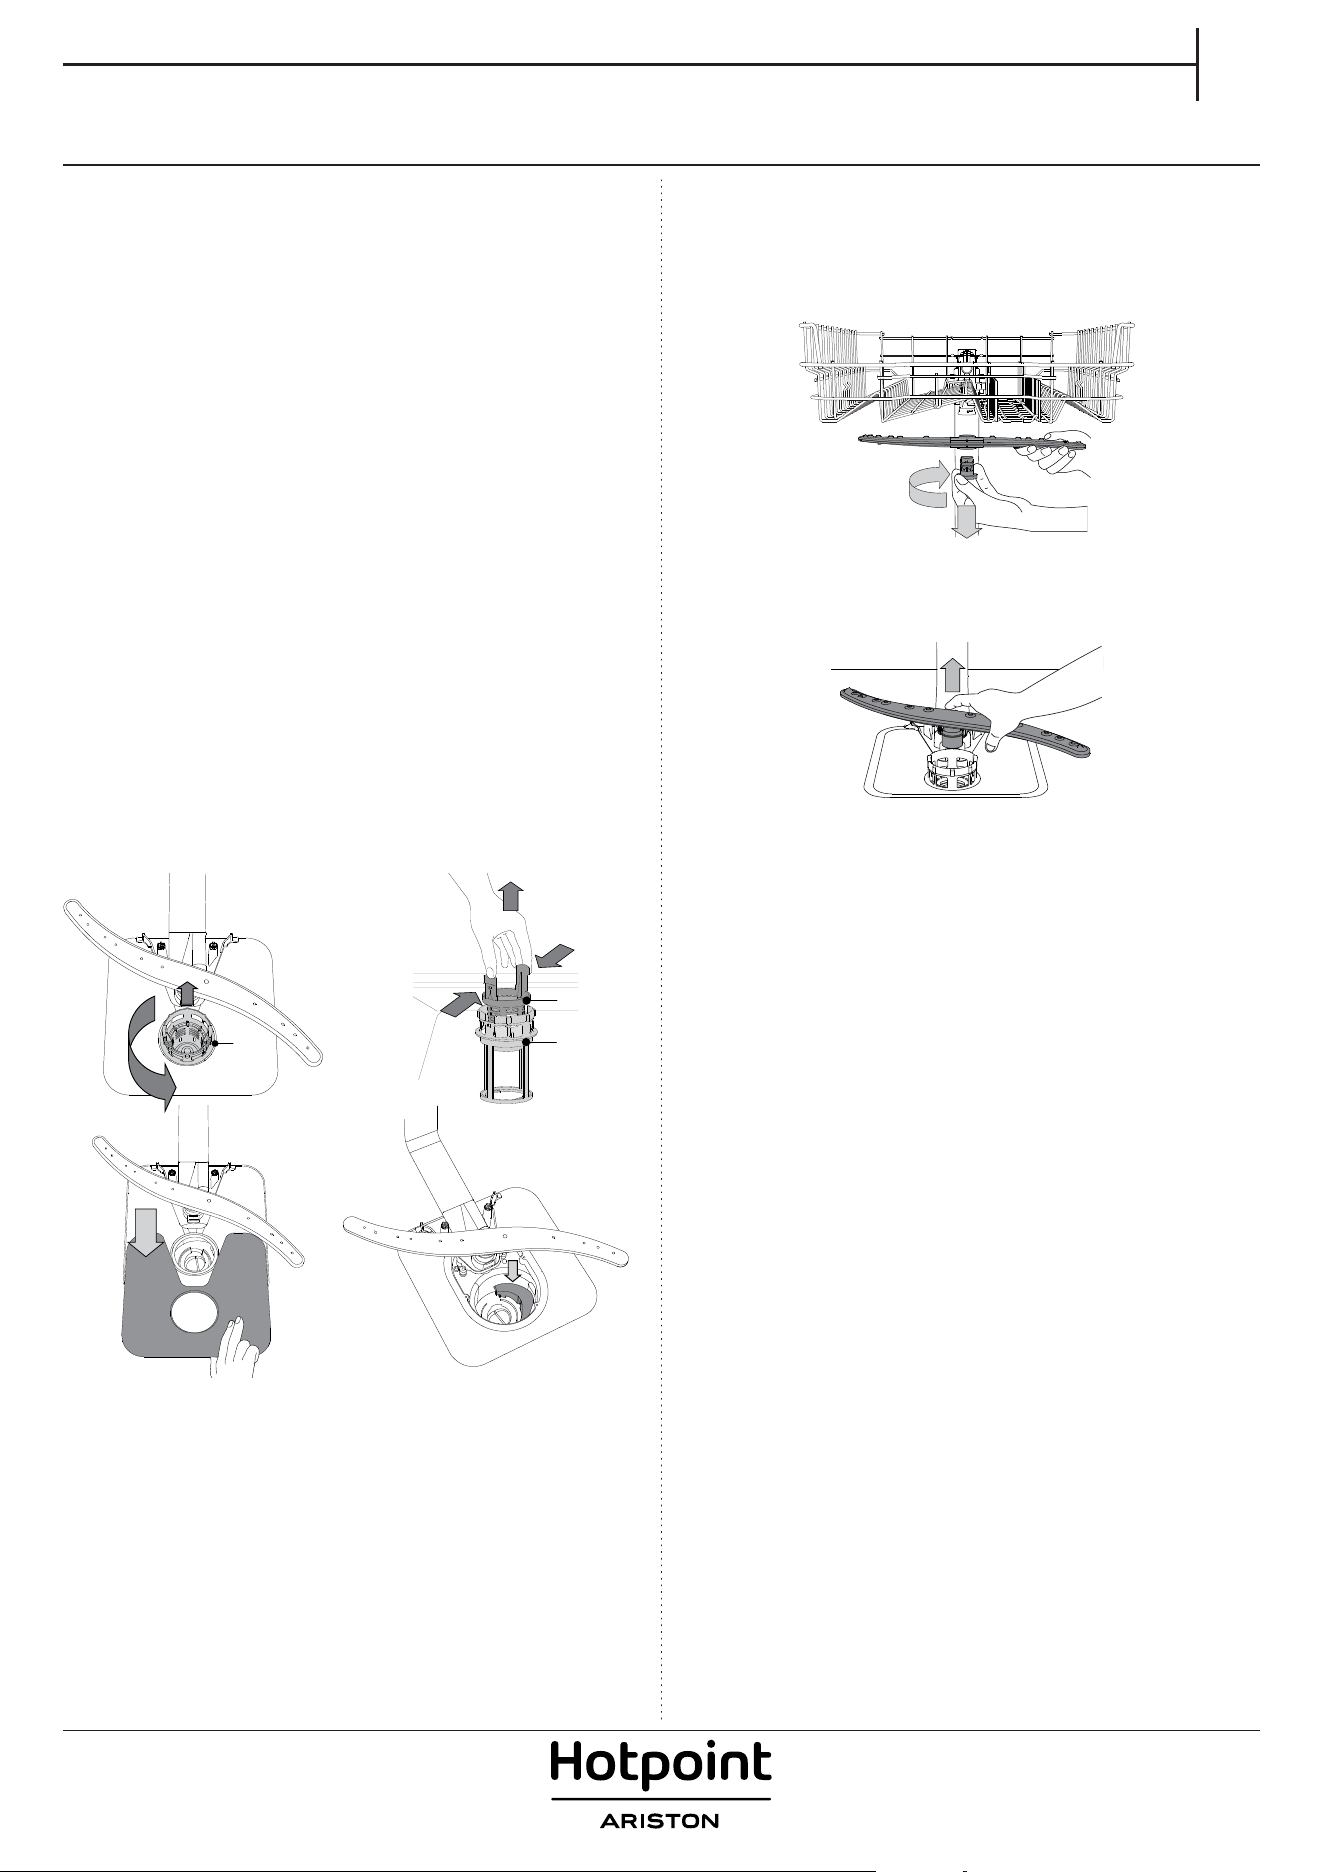
CLEANING THE SPRAY ARMS
On occasions, food residue may become encrusted onto the spray arms
and block the holes used to spray the water. It is therefore recommend-
ed that you check the arms from time to time and clean them with
asmall non-metallic brush.
To remove the upper spray arm, turn the plastic locking ring in aclockwise
direction. The upper spray arm should be replaced so that the side with
the greater number of holes is facing upwards.
The lower spray arm may be removed by pulling it upwards.
WATER SOFTENING SYSTEM
Water softener automatically reduces water hardness, consequently
preventing scale buildup on heater, contributing also to better cleaning
eciency.
This system regenerates itself with salt, therefore it is required to
rell salt container when empty.
Frequency of regeneration depends on water hardness level setting
- regeneration takes place once per 6 Eco cycles with water hardness
level set to 3.
Regeneration process starts in nal rinse and nishes in drying phase,
before cycle ends.
• Single regeneration consumes: ~3.5L of water;
• Takes up to 5 additional minutes for the cycle;
• Consumes below 0.005kWh of energy.
8
TROUBLESHOOTING
PROBLEMS POSSIBLE CAUSES SOLUTIONS
Salt indicator
is lit
Salt reservoir is empty. (After rell the salt indi-
cator may remain lit for several wash cycles).
Rell reservoir with salt (for more information - see page 2).
Adjust water hardness - see table, page 2.
Rinse aid
indicator is lit
Rinse aid dispenser is empty. (After rell the rinse
aid indicator may remain lit for several wash cycles).
Rell dispenser with rinse aid (for more information - see page 2).
The dishwasher
won’t start or
does not respond
to commands.
The appliance has not been plugged in properly.
Insert the plug into the socket.
Power outage.
For safety reasons, dishwasher will not re-start automatically when pow-
er returns. Open dishwasher door, press Start/Pause button and close the
door within 4 seconds.
The dishwasher door is not closed.
ActiveDry pin is not pulled in.
Vigorously push the door until you hear the “click”.
Cycle is interupted by door opening for more
than 4 seconds.
Press START/Pause and close the door within 4 seconds.
It does not respond to commands.
Display shows: 9 or 12 and On/O LED is
blinking rapidly
Switch o the appliance by pressing the ON/OFF button, switch it back
on after approximately one minute and restart the program. If problem
persists, unplug the appliance for 1 minute, then plug it back in.
The dishwasher
won’t drain.
Display shows:
3 and On/O LED
is blinking rapidly
The wash cycle has not nished yet. Wait until the wash cycle nishes.
The drain hose is bent. Check that the drain hose is not bent (see INSTALATION INSTRUCTION).
The sink drain pipe is blocked. Clean the sink drain pipe.
The lter is clogged up with food residues. Clean the lter (see CLEANING THE FILTER ASSEMBLY).
The dishwasher
makes excessive
noise.
The dishes are rattling against each Position the crockery correctly (see LOADING THE RACKS).
An excessive amount of foam has been pro-
duced.
The detergent has not been measured out correctly or it is not suitable
for use in dishwashers (see FILLING THE DETERGENT DISPENSER). Restart
the current cycle by switching OFF the dishwasher, then switch it on
again, select a new program, press START/Pause and close the door with-
in 4 seconds. Please do not add any detergent.
The dishes are
not clean.
The crockery has not been arranged properly. Arrange the crockery correctly (see LOADING THE RACKS).
The spray arms cannot rotate freely, being hin-
dered by the dishes.
Arrange the crockery correctly (see LOADING THE RACKS).
The wash cycle is too gentle. Select an appropriate wash cycle (see PROGRAMS TABLE).
An excessive amount of foam has been produced.
The detergent has not been measured out correctly or it is not suitable for
use in dishwashers (see FILLING THE DETERGENT DISPENSER).
The cap on the rinse aid compartment has not
been shut correctly.
Make sure the cap of the rinse aid dispenser is closed.
The lter is soiled or clogged. Clean the lter assembly (see CARE AND MAINTENANCE).
There is no salt. Fill the salt reservoir (see FILLING THE SALT RESERVOIR).
The dishwasher
does not ll the
water.
Display shows: H,
6 and On/O LED
is blinking rapidly
No water in the water supply or the tap is
closed.
Make sure there is water in the water supply or the tap running.
The inlet hose is bent.
Make sure the inlet hose is not bent (see INSTALLATION) reprogram the
dishwasher and reboot.
The sieve in the water inlet hose is clogged; it is
necessary to clean it
After having carried out the verication and cleaning, turn o and turn
on the dishwasher and restart a new program.
Dishwasher
nishes the cycle
prematurely.
Display shows: 15
and On/O LED is
blinking
rapidly
Drain hose positioned too low or siphoning into
home sewage system.
Check if end of drain hose is placed at correct height (see INSTALLATION).
Check for siphoning into home sewage system, install air admittance
valve if necessary.
Air in water supply. Check water supply for leaks or other issues letting air inside.
Detergent leaks.
Depends on the liquid detergent used and can be
emphasized in case of delay option is activated.
Small leaks will not cause machine malfunction and can be avoided by
changing liquid detergent type or using tablets.
In case your dishwasher doesn’t work properly, check if the problem can be solved by going through the following list.
For other errors or issues please contact authorized After-sales Service which contact details can be found in the warranty booklet.
Spare parts will be available for a period of either up to 7 or up to 10 years, according to the specic Regulation requirements.
Policies, standard documentation, ordering of spare parts and additional product information can be found by:
• Using QR code on your product.
• Visiting our website docs.hotpoint.eu and parts-selfservice.europeanappliances.com
• Alternatively, contact our After-sales Service (See phone number in the warranty booklet).
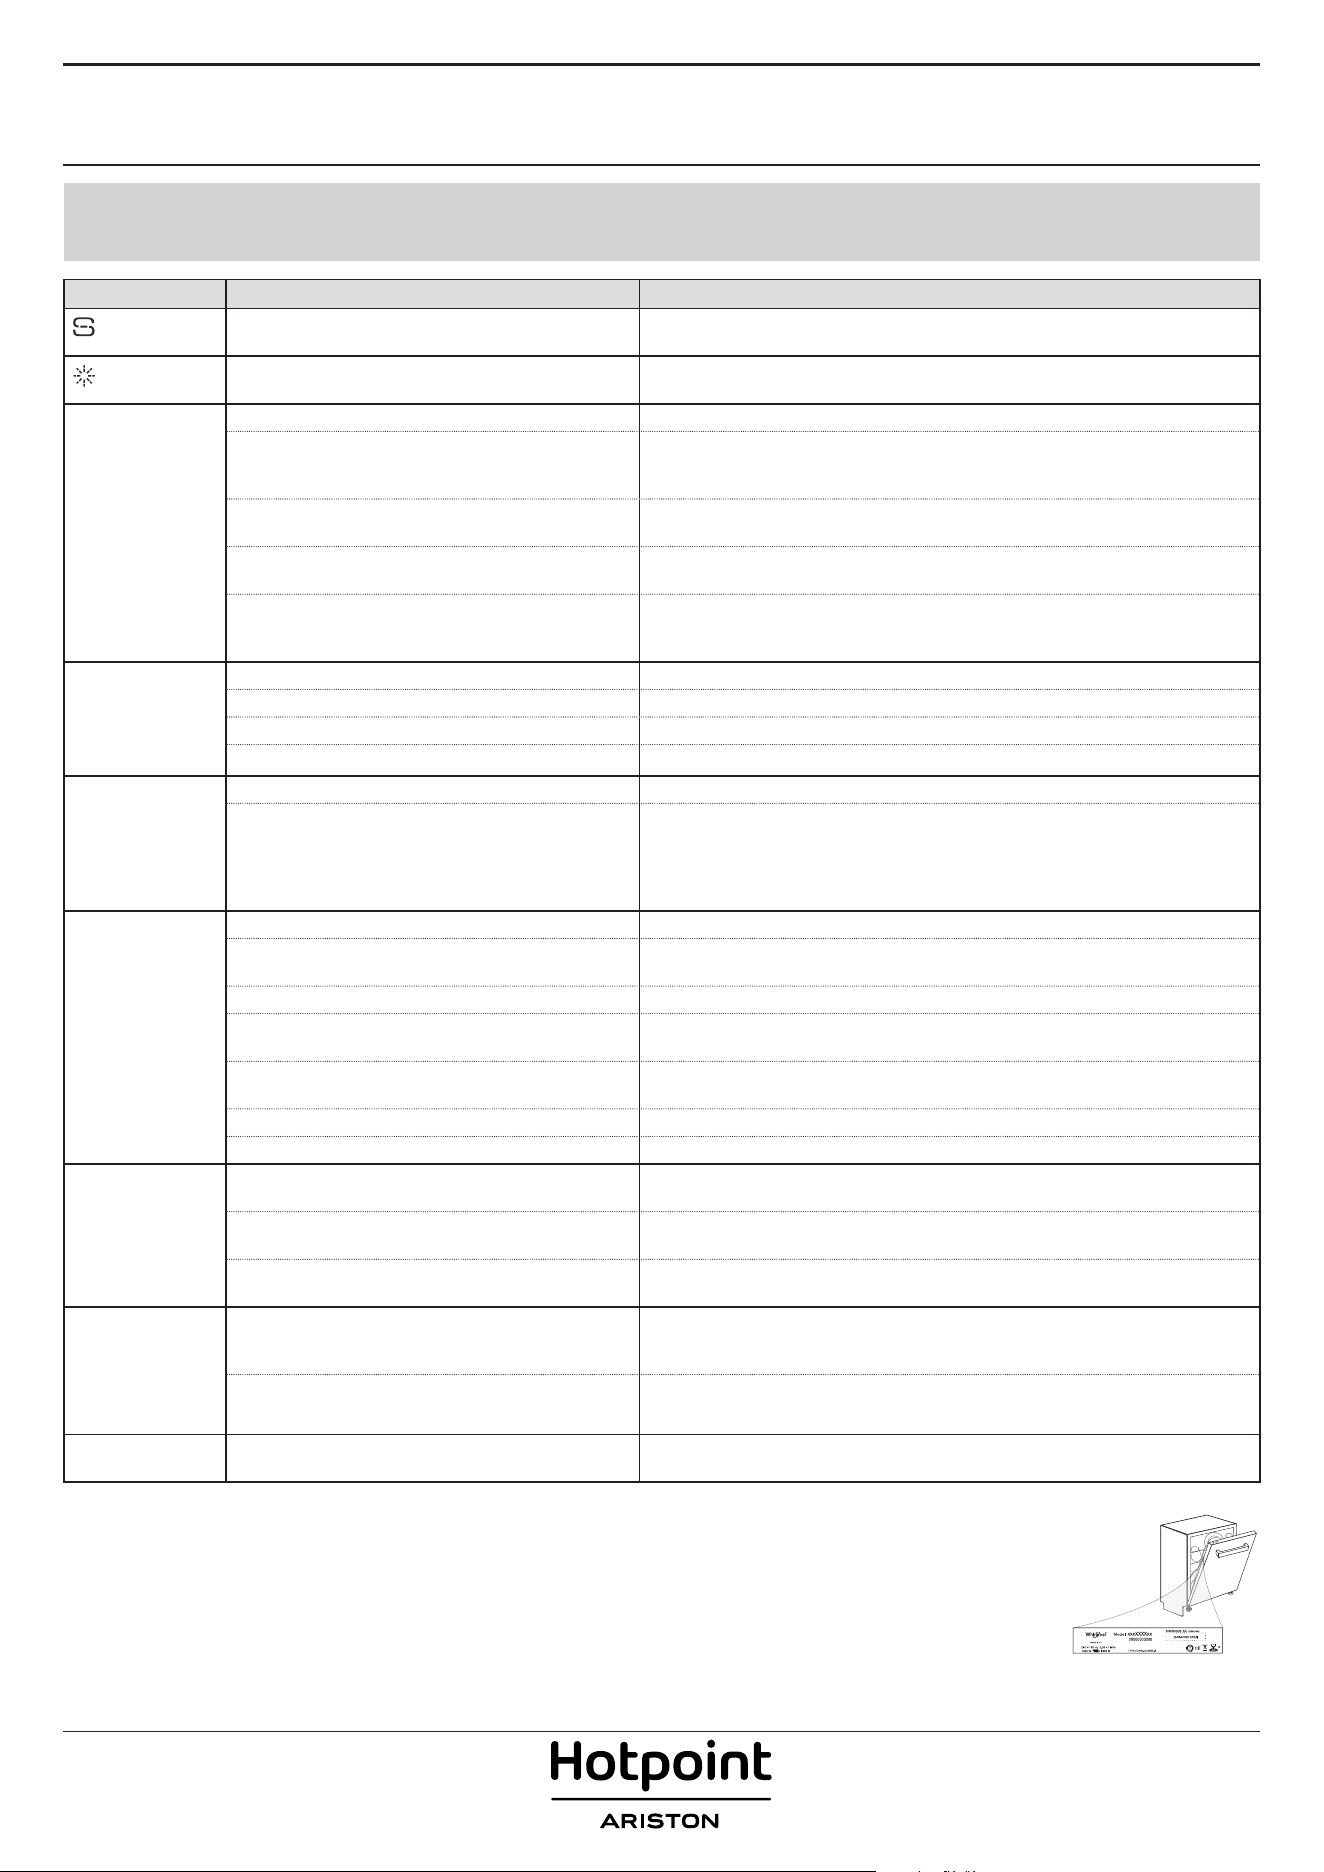
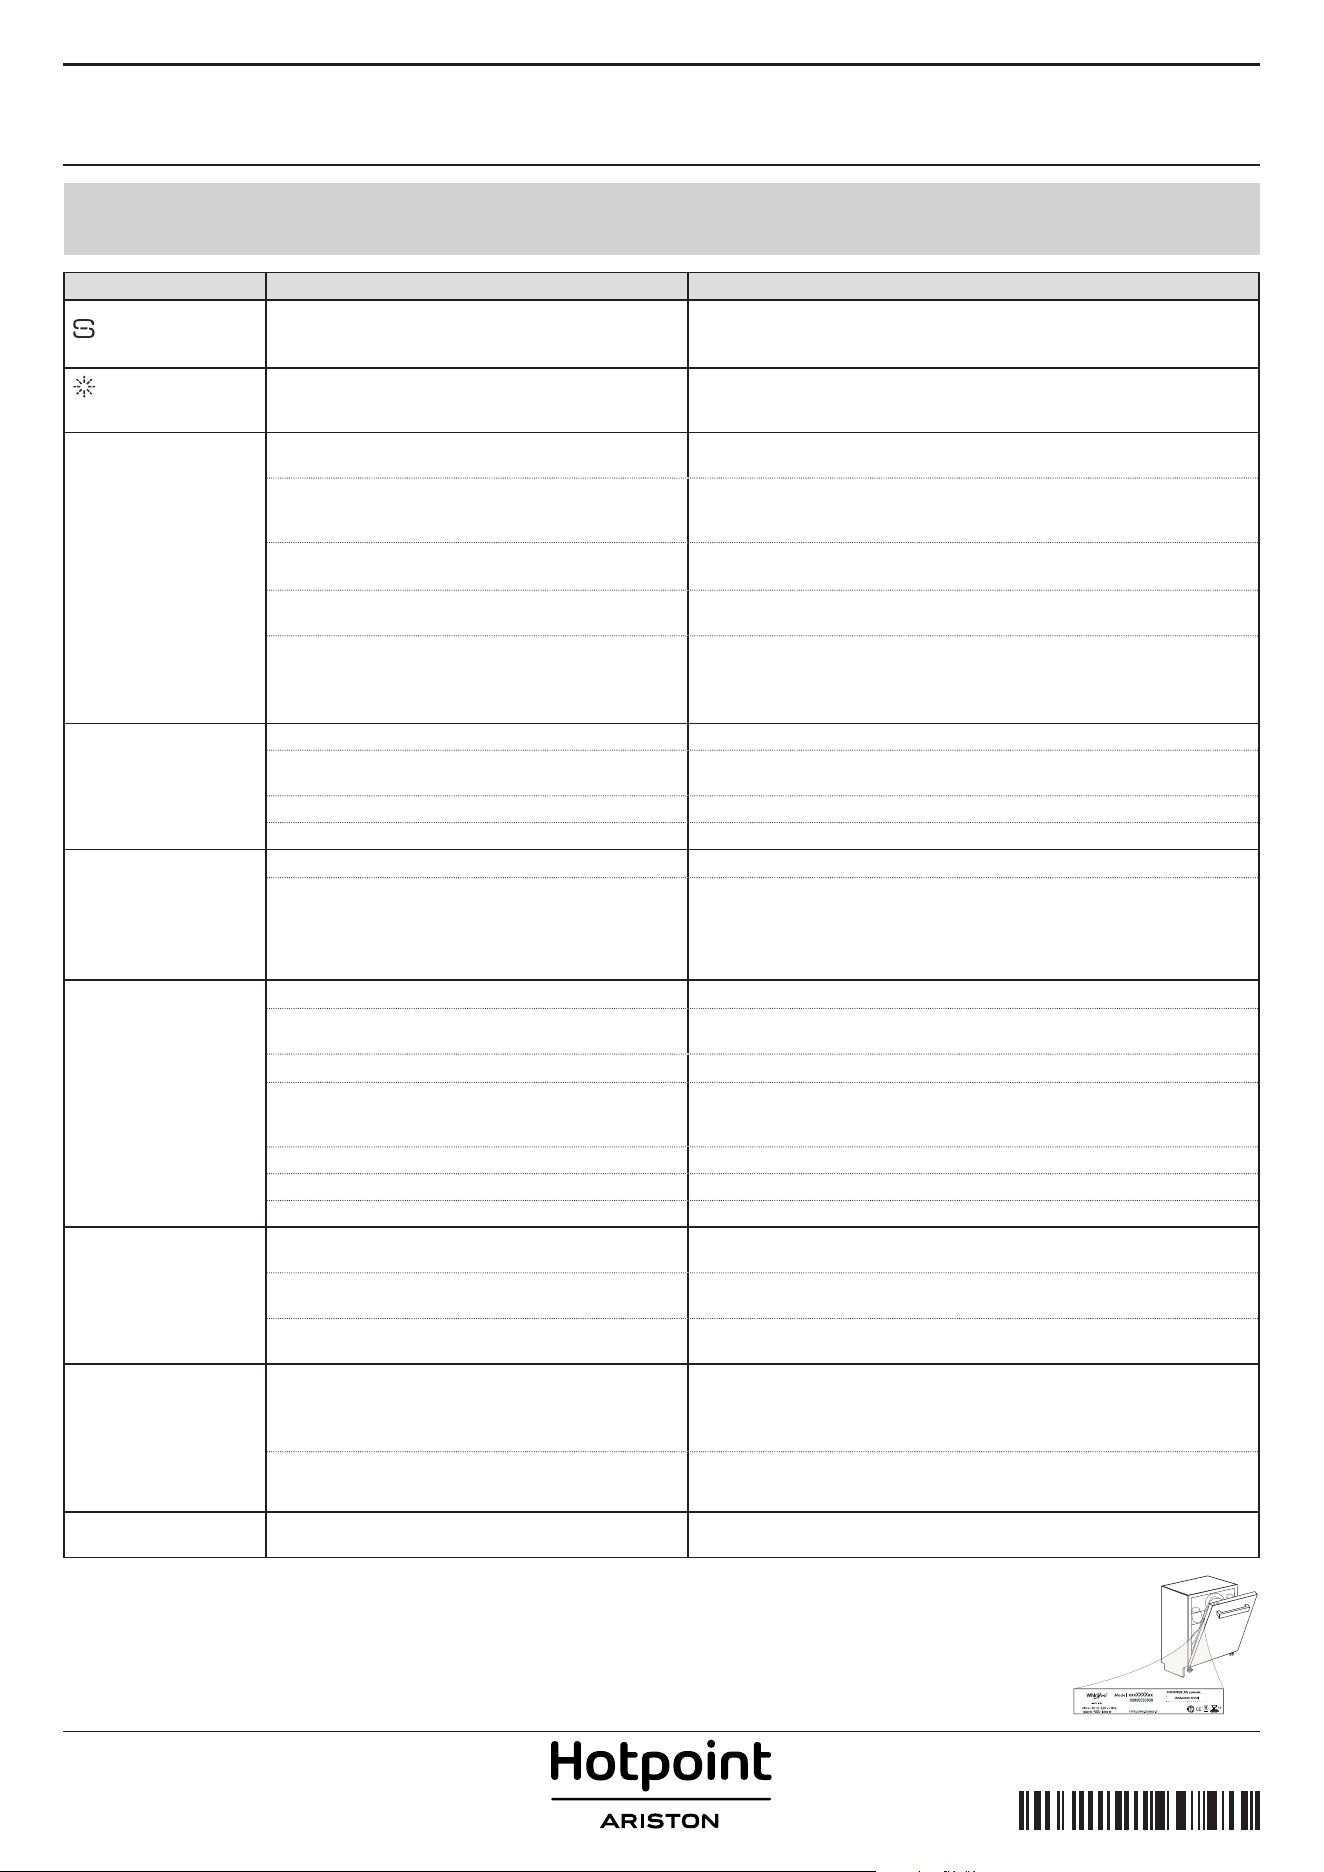
When contacting our After-sales Service, please state the codes provided on your product‘s identication plate.
The model information can be retrieved using the QR-Code reported in the energy label.
The label also includes the model identier that can be used to consult the portal of the registry
at https://eprel.ec.europa.eu.
IEC 436
:
IT
1
APPARECCHIO
GUIDA RAPIDA
GUASTI
PANNELLO COMANDI
GRAZIE PER AVER ACQUISTATO UN PRODOTTO
HOTPOINT ARISTON
.
Per ricevere assistenza in modo più completo, registrare il
proprio apparecchio sul sito: www.hotpoint.eu/register
1. Tasto Accensione-Spegnimento/Ripristino e relativa spia
2. Tasto di selezione programmi
3. Indicatore di riempimento del sale
4. Indicatore di riempimento del brillantante
5. Numero programma e indicatore di durata del ritardo
6. Spia Pastiglia
7. Display
8. Spia funzione Multizone
9. Tasto Multizone
10. Tasto di avvio ritardato
11. Tasto AVVIO/Pausa e relativa spia/ Pastiglia
1. Cestello superiore
2. Cestello portaposate
3. Sponde ribaltabili
4. Regolatore altezza cestello superiore
5. Braccio aspersore superiore
6. Cestello inferiore
7. Braccio aspersore inferiore
8. Gruppo ltro
9. Distributore del sale
10. Distributori per detersivo e brillantante
11. Targhetta matricola
12. Pannello comandi
1
4
5
6
7
12
10
8
2
3
9
0000 000 00000
Service:
11
DESCRIZIONE PRODOTTO
SCANSIONARE IL CODICE
QR SULL’APPARECCHIO
PER VISUALIZZARE
INFORMAZIONI PIÙ
DETTAGLIATE
Prima di utilizzare l’apparecchio, leggere attentamente le Istruzioni per la sicurezza.
1 2 3 4 5 6 7 8 9 10
11
2
PRIMO UTILIZZO
SALE, BRILLANTANTE E DETERSIVO
SUGGERIMENTO PER IL PRIMO UTILIZZO
Dopo aver completato l’installazione, togliere i fermi dai cestelli e gli
elementi elastici di ritegno dal cestello superiore.
RIFORNIMENTO DEL SERBATOIO DEL SALE
L’uso di sale previene la formazione di CALCARE sulla supercie dei
piatti e sui componenti della macchina.
• È indispensabile che IL SERBATOIO DEL SALE NON SIA MAI VUOTO.
• È essenziale quindi che il livello di durezza dell’acqua sia stato im-
postato.
Il serbatoio del sale è situato nella parte inferiore della lavastoviglie (ve-
dere DESCRIZIONE PRODOTTO) e deve essere obbligatoriamente riforni-
to ogni volta che l’indicatore di RIEMPIMENTO SALE sul pannello
comandi si accende.
1. Togliere il cestello inferiore e svitare il tappo
del serbatoio (ruotare in senso antiorario).
2. Solo la prima volta: riempire d’acqua il
serbatoio del sale.
3. Sistemare opportunamente l’imbuto (vede-
re gura) e rifornire il serbatoio del sale no
all’orlo (circa 1 kg); Non è inconsueto che l’ac-
qua trabocchi leggermente.
4. Togliere l’imbuto ed eliminare qualsiasi resi-
duo di sale dall’areacircostante l’apertura.
Accertarsi che il tappo sia adeguatamente serrato per evitare l’ingresso
di detersivo all’interno della vaschetta durante il programma di lavag-
gio (ciò potrebbe causare il danneggiamento del dispositivo addolcen-
te senza possibilità di riparazione).
Ogni volta che occorre aggiungere sale, la procedura deve essere
necessariamente eseguita prima dell’inizio del ciclo di lavaggio per
evitare rischi di corrosione.
IMPOSTAZIONE DELLA DUREZZA DELL’ACQUA
Per consentire che il dispositivo addolcente dell’acqua agisca al meglio,
è essenziale che l’impostazione del livello di durezza dell’acqua tenga
conto della sua durezza eettiva nell’utenza domestica. È possibile ot-
tenere il valore di durezza dell’acqua nell’utenza domestica rivolgendo-
si al proprio fornitore.
Il valore predenito per la durezza dell’acqua viene impostato in fabbrica.
• Azionare l’apparecchio agendo sul tasto ACCENSIONE/SPEGNIMENTO.
• Disattivare l’apparecchio agendo sullo stesso tasto
ACCENSIONE/SPEGNIMENTO.
• Tenere premuto il tasto P per 5 secondi, no a udire il segnale corri-
spondente.
• Azionare l’apparecchio agendo sul tasto ACCENSIONE/SPEGNIMENTO.
• Il numero corrispondente al livello di selezione corrente e l’indicatore
di livello del sale lampeggiano entrambi.
• Premere il tasto P per selezionare il livello di durezza dell’acqua ri-
chiesto (vedere TABELLA DEI LIVELLI DI DUREZZA DELL’ACQUA).
Tabella di durezza dell’acqua
Livello
°dH
Gradi tedeschi
°fH
Gradi francesi
°Clark
Gradi inglesi
1 Dolce 0 - 6 0 - 10 0 - 7
2
Moderatamente dolce
7 - 11 11 - 20 8 - 14
3 Medio 12 - 16 21 - 29 15 - 20
4 Dura 17 - 34 30 - 60 21 - 42
5 Molto dura 35 - 50 61 - 90 43 - 62
• Disattivare l’apparecchio agendo sullo stesso tasto ACCENSIONE/
SPEGNIMENTO.
La procedura di impostazione è stata completata!
Non appena completata tale procedura, avviare uno dei programmi
senza carico.
Utilizzare soltanto sale di tipo specico per lavastoviglie.
Dopo aver versato il sale all’interno della macchina, la spia riempimento
SALE si spegne.
La mancanza di sale nel serbatoio potrebbe danneggiare l’addol-
citore d’acqua e la resistenza per eetto dell’accumulo di calcare.
L’uso del sale è consigliato con qualsiasi tipo di detersivo per lava-
stoviglie.
RIEMPIMENTO DEL DISTRIBUTORE BRILLANTANTE
L’utilizzo di brillantante facilita il processo di ASCIUGATURA delle sto-
viglie. Il distributore di brillantante A deve essere riempito ogni volta
che a spia dell’ indicatore di RIEMPIMENTO BRILLANTANTE sul
pannello comandi è illuminata.
A
B
1. Aprire il distributore B esercitando opportuna pressione e quindi
sollevando la linguetta posta sul coperchio.
2. Versare delicatamente il brillantante no al segno che indica il livello
di riferimento massimo (110 ml), ma evitandone la fuoriuscita. Nel
caso in cui ciò si verichi, asciugare immediatamente il liquido fuori-
uscito mediante un panno asciutto.
3. Abbassare il coperchio no ad avvertire lo scatto che ne segnala la
chiusura.
Non versare MAI il brillantante direttamente all’interno della
vaschetta.
REGOLAZIONE DEL DOSAGGIO DI BRILLANTANTE
Se non si è completamente soddisfatti del processo di asciugatura, è
possibile regolare la quantità di brillantante da utilizzare.
• Azionare la lavastoviglie agendo sul tasto ACCENSIONE/SPEGNIMENTO.
• Disattivare la lavastoviglie utilizzando lo stesso tasto ACCENSIONE/
SPEGNIMENTO.
• Premere tre volte il tasto P: si avverte il segnale corrispondente.
• Azionare la lavastoviglie mediante il tasto ACCENSIONE/SPEGNIMENTO.
• Il numero corrispondente alla selezione corrente e la spia del brillan-
tante lampeggiano entrambi.
• Premere sul tasto P per impostare il livello di brillantante corrispon-
dente alla quantità richiesta.
• Disattivare utilizzando il tasto ACCENSIONE/SPEGNIMENTO
La procedura di impostazione è stata completata!
Nel caso in cui il livello di brillantante sia impostato su ZERO (ECO), il
brillantante non viene erogato. In caso di esaurimento del brillantante
la spia BRILLANTANTE INSUFFICIENTE non è illuminata.
A seconda del modello di lavastoviglie è possibile impostare al mas-
simo 5 livelli di dosaggio. Le impostazioni di fabbrica dipendono dal
modello; seguire le istruzioni precedenti in base alle caratteristiche del
proprio apparecchio.
• In presenza di strisce con sfumature blu sulla supercie dei piatti,
impostare un livello di dosaggio basso (1-2).
• In presenza di gocce d’acqua o di calcare sulla supercie dei piatti
impostare invece dosaggi alti (3-4).
RIEMPIMENTO DEL DISTRIBUTORE DETERSIVO
Per aprire il distributore detersivo utilizzare il dispositivo di apertura
C. Versare il detersivo esclusivamente nel distributore D asciutta.
Mettere la dose di detersivo per il prelavaggio direttamente all’interno
del distributore.
1. Per il dosaggio corretto del detersivo
fare riferimento ai dati sopra riportati. La
vaschetta D contiene indicatori di livello
per facilitare il dosaggio del detersivo.
2. Eliminare eventuali residui di deter-
sivo dai bordi del distributore e chiu-
dere il coperchio no ad avvertire lo
scatto caratteristico.
3. Chiudere il coperchio del distributore
sollevandolo no a portare il disposi-
tivo di chiusura in sede.
Il distributore del detersivo si apre automaticamente quando previsto dal
programma in uso. Se si utilizzano detersivi del tipo „All in one”, si consi-
glia di servirsi del tasto PASTIGLIA per impostare il programma in modo da
ottenere sempre i migliori risultati nel lavaggio e nell’asciugatura.
L’uso di un detersivo non specico per lavastoviglie potrebbe causare
malfunzionamenti o danni all’apparecchio.
D
C
3
IT
TABELLA DEI PROGRAMMI
La misurazione dei dati per la creazione del programma ECO avviene in condizioni di laboratorio secondo quanto prescritto dalle norme europee
EN 60436:2020
.
Nota per i laboratori di Prove: per informazioni sulle condizioni della prova comparativa EN. farne richiesta all’indirizzo: dw_test_support@europeanappliances.com
Questi programmi non richiedono un pre-trattamento delle stoviglie.
*) Non è possibile selezionare tutte le opzioni contemporaneamente.
**)Ad eccezione del programma Eco, i valori riportati per gli altri programmi sono puramente indicativi.
La durata eettiva può dipendere da molti fattori. quali la temperatura e la pressione dell’acqua di alimentazione. la temperatura ambiente. la dose di
detersivo utilizzata. la quantità e il tipo di carico e il suo bilanciamento. la selezione di determinate opzioni e la taratura dei sensori. La taratura dei sensori
può prolungare la durata dei programmi anche di 20 minuti.
DESCRIZIONE DEI PROGRAMMI
Programma
Fase di
asciugatura
ActiveDry
Opzioni
disponibili
*)
Durata
programma
di lavaggio
(h:min)
**)
Consumo
d'acqua
(litri/ciclo)
Consumo
energetico
(kWh/ciclo)
1. Eco 50°
3:10 8.9 0.75
2. Intensivo 65°
2:50 17.0 1.60
3. Misto 55°
2:30 15.0 1.40
4. Lavaggio rapido
e asciugatura
50°
1:25 11.5 1.10
5. Rapido 30’ 45°
-
0:30 9.0 0.50
6. Buona notte 50°
3:30 16.0 1.15
7. Antibatterico 65°
-
1:40 12.0 1.30
8. Ammollo
- -
-
0:12 4.5 0.01
9. Autopulente 65°
-
-
0:50 8.0 0.85
Istruzioni per selezionare il ciclo di lavaggio.
1 ECO
Il programma Eco è indicato per le stoviglie mediamente sporche; è il
programma più eciente in termini di consumo combinato di acqua ed
energia per questo tipo di stoviglie e viene usato per valutare la confor-
mità dell’apparecchio alla legislazione UE in materia di progettazione
ecocompatibile.
2 INTENSIVO
Programma consigliato per stoviglie molto sporche, particolarmente in-
dicato per padelle e tegami (non adatto per oggetti delicati).
3 MISTO
Carichi misti. Per piatti con sporco normale e residui secchi di cibo.
4 LAVAGGIO RAPIDO E ASCIUGATURA
Stoviglie normalmente sporche. Ciclo quotidiano; permette di ottenere
risultati di lavaggio e asciugatura ottimali in un tempo inferiore.
5 RAPIDO 30’
Programma indicato per un mezzo carico di stoviglie poco sporche
e prive di residui secchi. Non è prevista una fase di asciugatura.
6 BUONA NOTTE
Adatto al funzionamento nelle ore notturne. Permette di ottenere
risultati di lavaggio e asciugatura ottimali con una minima emissione
sonora.
7 ANTIBATTERICO
Sporco normale e molto sporco, con azione antibatterica supplementa-
re. Ciclo utilizzabile per la manutenzione della lavastoviglie.
8 AMMOLLO
Da utilizzare per sciacquare le stoviglie da lavare successivamente.
Questo programma non richiede detersivo.
9 AUTOPULENTE
Programma da utilizzare per la manutenzione della lavastoviglie; deve
essere eseguito solo con l’apparecchio VUOTO e usando un detersivo
specico per la manutenzione della lavastoviglie.
Note:
SIl ciclo Rapido 30’ è indicato per stoviglie poco sporche.
4
OPZIONI E FUNZIONI
PASTIGLIA
Questa impostazione permette di ottimizzare le prestazioni
del programma in base al tipo di detersivo usato.
Se si utilizzano più detersivi in forma di unica pastiglia (bril-
lantante, sale e detersivo in 1 dose) premere per 3 secondi il
tasto AVVIO/Pausa (il simbolo corrispondente si illumina).
Quando si utilizza un detergente in polvere o liquido questa
opzione deve rimanere disattivata.
ActiveDry
ActiveDry è una funzione di asciugatura a convezione che apre
automaticamente la porta durante/dopo la fase di asciugatura per
garantire stoviglie perfettamente asciutte dopo ogni lavaggio. La
porta viene aperta quando la temperatura interna è tale da non poter
danneggiare i mobili della cucina.
Come ulteriore protezione dal vapore, la lavastoviglie viene fornita con
una speciale lamina di protezione aggiuntiva. Per istruzioni sul montaggio
della lamina protettiva, vedere le (ISTRUZIONI PER L’INSTALLAZIONE).
La funzionalità ActiveDry può essere disabilitata come segue:
1. Accedere al menu del software della lavastoviglie premendo a lungo
il tasto P (6 secondi).
2. Viene aperto il menu Controllo luce (vedere la descrizione della SPIA
FUNZIONAMENTO); se non si desidera modicare le impostazioni
correnti, premere a lungo il tasto P (nché una delle due lettere
compare sul display).
3. Quando si passa al menu Controllo ActiveDry, è possibile cambiare lo
stato della funzionalità ActiveDry premendo il tasto P:
E – funzione abilitata d – funzione disabilitata
Per confermare la modica e uscire dal menu ActiveDry Control, premere
a lungo il tasto P (3 secondi).
È possibile selezionare le varie OPZIONI premendo direttamente il tasto corrispondente (vedere la TABELLA DEI PROGRAMMI).
In caso di opzione non compatibile con il programma selezionato vedere la TABELLA DEI PROGRAMMI, il LED corrispondente
lampeggia 3 volte in rapida successione ed emette i previsti segnali acustici. L’opzione non è in tal caso abilitata.
MULTIZONE
Nel caso in cui i piatti da lavare siano pochi, per limitare il
consumo di acqua, elettricità e detersivo si può utilizzare il
programma Mezzo carico.
Selezionare il programma richiesto e quindi premere il tasto
MULTIZONE: sul display compare il simbolo del cestello
prescelto. Come sua impostazione predenita, l’apparecchio
esegue il lavaggio in tutti i cestelli.
Per il lavaggio esclusivamente di un cestello in particolare,
premere ripetutamente il tasto in questione:
indicato nel display (cestello inferiore soltanto)
indicato nel display (cestello superiore soltanto)
indicato nel display (cestello portaposate soltanto)
indicato nel display (l’opzione è impostata su Spegnimento
e l’apparecchio esegue il lavaggio per tutti i cestelli).
Ricordarsi di riempire soltanto i cestelli superiore
e inferiore e di ridurre conseguentemente la dose di
detersivo.
Se il cestello superiore viene rimosso, introdurre il detersivo
direttamente nell’apparecchio anziché nell’apposita
vaschetta.
AVVIO RITARDATO
È possibile ritardare l’avvio del programma per un tempo
compreso tra 1 e 12 ore.
1. Premere il tasto AVVIO RITARDATO: sul display appare il sim-
bolo «h» corrispondente; aogni pressione del tasto aumenta
l’intervallo di tempo (1 h, 2 h, ecc. no aun massimo di 12 h)
tra il momento in cui iseleziona il programma el’avvio del
ciclo di lavaggio selezionato.
2. Selezionare il programma di lavaggio, premere il tasto
AVVIO/PAUSA echiudere la porta entro 4 secondi: Il timer ini-
zia il conto alla rovescia.
3. Una volta trascorso il tempo impostato, l’indicatore «h» si spe-
gne einizia il ciclo di lavaggio.
Per regolare il tempo di avvio ritardato eselezionare un interval-
lo di tempo inferiore aquello impostato, premere il tasto AVVIO
RITARDATO. Per annullare l’impostazione premere ripetuta-
mente il tasto no allo spegnimento dell’indicatore «h».
Una volta avviato il ciclo di lavaggio, non è più possibile
impostare la funzione di avvio ritardato.
5
IT
CARICAMENTO DEI CESTELLI
CESTELLO PORTAPOSATE
Il terzo cestello è stato progettato
per alloggiare le posate durante il
lavaggio. La possibilità di sistemare
le posate a parte ne rende più sem-
plice la raccolta dopo il lavaggio
e migliora le prestazioni sia nella
fase di lavaggio che in quella di
asciugatura.
Coltelli e altri utensili con bordi alati devono essere sistemati
con le lame rivolte verso il basso.
La geometria del cestello prevede
anche la possibilità di alloggiare
oggetti di piccole dimensioni,
come nel caso delle tazzine da
caè per le quali è adibita la zona
centrale.
CESTELLO SUPERIORE
Riporvi i piatti poco resistenti e le
stoviglie delicate: vetri, tazze, piatti-
ni, insalatiere dai bordi bassi.
(esempio di carico del cestello superiore)
REGOLAZIONE IN ALTEZZA DEL CESTELLO SUPERIORE
È possibile regolare del cestello superiore nel senso dell’altezza: la posi-
zione rialzata consente di sfruttare al massimo il cestello inferiore per
riporvi le stoviglie di dimensioni ingombranti, mentre la posizione ri-
bassata consente di utilizzare le sponde ribaltabili creando lo spazio
che esse richiedono e di evitare urti con gli oggetti caricati nel cestello
inferiore.
Il cestello superiore è munito di regolatore in
altezza (vedere gura) che non richiede pres-
sione sulle leve; sollevarlo tenendolo per i lati,
non appena si trovi in posizione rialzata.
Per ripristinare la posizione ribassata, agire sul-
le leve A poste ai lati del cestello e abbassare il
cestello.
Si raccomanda vivamente di non procedere
alla regolazione in altezza di cestelli già
caricati.
Non rialzare o ribassare MAI il cestello agendo su un lato soltanto.
SPONDE RIBALTABILI CON POSIZIONE REGOLABILE
Le sponde ribaltabili laterali possono es-
sere estese o ripiegate per ottimizzare la
disposizione delle stoviglie nel cestello.
Si possono disporre i bicchieri da vino
nelle sponde ribaltabili in modo asso-
lutamente sicuro, inserendone lo stelo
negli appositi spazi.
In base al modello:
• per estendere le sponde occorre farle
scorrere verso l’alto e ruotarle oppure
sganciarle dai fermi e abbassarle.
• per ripiegare le sponde occorre
ruotarle e farle scorrere verso il basso oppure sollevarle e agganciarle ai
fermi.
CESTELLO INFERIORE
Per pentole, coperchi, piatti,
insalatiere, stoviglie, ecc. In teoria
conviene disporre piatti e coperchi
di grandi dimensioni ai lati, per
evitare interferenze con l’elemento
aspersore.
(esempio di carico nel cestello inferiore)

6
USO QUOTIDIANOUSO QUOTIDIANO
1. VERIFICA DEL COLLEGAMENTO ALLA RETE IDRICA
Vericare che la lavastoviglie sia collegata alla rete idrica eche il
rubinetto dell’acqua sia aperto.
2. AZIONAMENTO DELLA LAVASTOVIGLIE
Premere il tasto ACCENSIONE/SPEGNIMENTO.
3. CARICAMENTO DEI CESTELLI
(vedere CARICAMENTO DEI CESTELLI).
4. RIEMPIMENTO DEL DISTRIBUTORE DETERSIVO
5. SELEZIONARE IL PROGRAMMA EADATTARE IL CICLO
SECONDO NECESSITÀ
Selezionare il programma più adatto in base al tipo di stoviglie
ealla quantità di sporco in essi presente (vedere la DESCRIZIONE
DEI PROGRAMMI) premendo sul tasto P.
Selezionare le opzioni richieste (vedere OPZIONI EFUNZIONI).
6. AVVIO
Avviare il ciclo di lavaggio mediante pressione sul tasto
AVVIO/PAUSA. All’avvio del programma selezionato si avvia il
segnale corrispondente.
7. FINE DEL CICLO DI LAVAGGIO
La conclusione del ciclo di lavaggio è indicata dalla relativa segna-
lazione acustica, mentre il display visualizza End
. Aprire la porta
edisattivare l‘apparecchio premendo sul tasto ACCENSIONE/SPE-
GNIMENTO.
Per evitare bruciature, prima di togliere le stoviglie attendere pochi
minuti. Scaricare icestelli, iniziando da quello inferiore.
La macchina si disattiva automaticamente nel corso di determinati
periodi di inattività prolungata, al ne di ridurre al minimo il consu-
mo di elettricità. Se le stoviglie sono soltanto leggermente sporche
oppure sono state risciacquate prima di essere poste nella lavastovi-
glie, ridurre in proporzione la dose di detersivo da utilizzare.
MODIFICA DI UN PROGRAMMA IN CORSO
Nel caso in cui sia stato selezionato il programma sbagliato, è possibi-
le apportarvi le modiche necessarie acondizione che esso sia appena
iniziato: tenere premuto il tasto ACCENSIONE/SPEGNIMENTO: la mac-
china si disattiva.
Azionare nuovamente la macchina agendo sul tasto ACCENSIONE/
SPEGNIMENTO e selezionare il nuovo ciclo di lavaggio con qualsiasi
opzione richiesta; avviare il ciclo premendo sul tasto AVVIO/PAUSA.
AGGIUNTA DI ALTRE STOVIGLIE
Senza spegnere la macchina, aprire la porta (fare attenzione al vapore
CALDO!) esistemare le posate all’interno della lavastoviglie. Chiudere
la porta epremere il tasto AVVIO/PAUSA: il ciclo riprende dal punto in
cui si era interrotto.
INTERRUZIONI ACCIDENTALI
In caso di apertura della porta durante il ciclo di lavaggio, oin caso di
mancanza dell’alimentazione elettrica, il ciclo si interrompe. Una volta
chiusa la porta oripristinata l’alimentazione elettrica, per riprendere il
funzionamento del ciclo dal punto in cui era stato interrotto, premere il
tasto AVVIO/PAUSA.
Per disabilitare la MODALITÀ DEMO, eseguire la procedura descritta
in sequenza, senza interruzioni. Accendere espegnere l’apparecchio.
Premere il tasto RITARDO nché non viene emesso un segnale acustico.
Accendere nuovamente l’apparecchio. L’indicazione “dOF” lampeggia
equindi si spegne.
CONSIGLI
Prima di caricare icestelli, eliminare tutti iresidui di cibo dalle stoviglie
evuotare ibicchieri. Non occorre il risciacquo sotto acqua corrente
prima del caricamento.
Sistemare le stoviglie in modo che rimangano in sede enon si possano
ribaltare; esistemare le vaschette con le aperture rivolte verso il basso ele
parti concave/complesse disposte obliquamente, per consentire all’ac-
qua di lavaggio di raggiungere ogni supercie escorrervi liberamente.
Avvertenza: coperchi, maniglie, vassoi epadelle non devono ostacola-
re la rotazione degli aspersori.
Riporre tutti gli oggetti di piccole dimensioni nel cestello portaposate.
Quando molto sporche, riporre piatti e pentole nel cestello inferiore
poiché nel relativo settore gli aspersori svolgono un’azione più intensa
econsentono migliori prestazioni nel lavaggio.
Una volta completata la procedura di carico, accertarsi che gli aspersori
possano ruotare liberamente.
STOVIGLIE DI TIPO NON ADATTO
• Stoviglie eposate in legno.
• Bicchieri decorati, pezzi di artigianato epiatti antichi. le decorazioni
non sono sucientemente resistenti.
• Componenti in materiali sintetici che non resistono alle temperature
elevate.
• Stoviglie in rame estagno.
• Stoviglie sporche di cenere, cera, grasso lubricante oinchiostro.
Durante la fase di lavaggio icolori delle decorazioni di bicchieri epezzi
in alluminio/argento possono sbiadire. Alcuni tipi di bicchieri (es. ibic-
chieri in cristallo) possono divenire opachi anche soltanto dopo un cer-
to numero di lavaggi.
DANNEGGIAMENTO DI BICCHIERI ESTOVIGLIE
• Utilizzare soltanto bicchieri eporcellane garantite dal produttore per
il lavaggio in lavastoviglie.
• Utilizzare un detersivo delicato eadatto al tipo di stoviglie in questione
• Togliere ibicchieri egli altri elementi dalla lavastoviglie non appena
sia terminato il ciclo di lavaggio.
CONSIGLI PER IL RISPARMIO ENERGETICO
• Se la lavastoviglie viene usata secondo le istruzioni del produttore,
il
lavaggio delle stoviglie amacchina comporta normalmente un MINO-
RE CONSUMO DI ENERGIA eacqua rispetto al lavaggio amano.
• Per ottimizzare l’ecienza della lavastoviglie si raccomanda di av-
viare il ciclo di lavaggio con l’apparecchio apieno carico. Cari-
cando la lavastoviglie no alla capacità indicata dal produttore si
contribuirà aridurre iconsumi d’acqua edi energia. Per informazio-
ni sul caricamento corretto delle stoviglie, leggere la sezione CARI-
CAMENTO DEI CESTELLI. In caso di carico parziale, si raccomanda di
usare le apposite opzioni di lavaggio, se disponibili (Mezzo carico/
Zone Wash/ Multizona), caricando solo icestelli selezionati. Un cari-
camento non corretto oeccessivo della lavastoviglie può aumentare
il consumo di risorse (acqua, energia etempo, oltre auna maggiore
rumorosità) eridurre le prestazioni di lavaggio easciugatura.
• Il pre-risciacquo delle stoviglie comporta un maggiore consumo di
acqua ed energia enon è consigliato.
IGIENIZZANTE
Per evitare la formazione di cattivi odori esedimenti vari all’interno della
lavastoviglie avviare un programma che preveda temperature elevate
almeno una volta al mese. Per eseguire la pulizia dell’apparecchio utiliz-
zare un cucchiaino di detersivo eavviare il ciclo in assenza di carico.
AVVISI ECONSIGLI
7
IT
MANUTENZIONE E PULIZIA
PULIZIA DEL GRUPPO FILTRO
Pulire regolarmente il gruppo ltro in modo che nei relativi elementi
non si formino ostruzioni eche l’acqua vi scorra regolarmente.
L’uso della lavastoviglie con iltri ostruiti, ocon oggetti estranei nel
sistema ltrante onei bracci irroratori, può causare malfunzionamenti
edeterminare una perdita di prestazioni, un aumento della rumorosità
oun maggiore consumo di risorse.
Il gruppo ltro è composto da tre elementi ltranti che eliminano la
presenza di residui di cibo dall’acqua di lavaggio, rimettendola in circo-
lo ai ni del programma:per ottenere le migliori prestazioni durante il
lavaggio è necessario che tali elementi siano sempre puliti.
Non utilizzare mai la lavastoviglie priva dei ltri ocon iltri allentati.
Almeno una volta al mese oogni 30 cicli di lavaggio,, vericare lo stato
del gruppo ltro ese necessario pulirlo completamente sotto getto di
acqua corrente, servendosi di spazzola metallica eseguendo le istruzio-
ni sotto riportate:
1. Ruotare il ltro cilindrico Ain senso antiorario, quindi estrarlo (Fig. 1).
2. Smontare il ltro atazza B esercitando una leggera pressione sulle
sponde laterali (Fig. 2).
3. Far scorrere il ltro apiastra in acciaio inossidabile C, no ad estrarlo
(Fig. 3).
4. Se si trovano oggetti estranei (frammenti di vetro, porcellana, ossa,
semi di frutta, ecc.), rimuoverli con attenzione.
5. Esaminare il sifone ed eliminare la presenza di qualsiasi residuo di
cibo. NON TOGLIERE MAI l’elemento di protezione della pompa di
lavaggio (dettaglio di colore nero) (Fig 4).
Dopo aver pulito iltri, rimontare il gruppo essarlo correttamente in
sede ciò è fondamentale per garantire l’ecienza della lavastoviglie.
PULIZIA DEL TUBO DI CARICO ACQUA
Se itubi dell’acqua sono nuovi osono rimasti inutilizzati per un periodo
prolungato, prima di eseguire iraccordi necessari far scorrere l’acqua
per controllare che sia pulita epriva di impurità. In assenza di tale pre-
cauzione, il tubo di carico acqua può risultare ostruito con conseguente
danneggiamento della lavastoviglie.
21
43
A
C
A
B
PULIZIA DEI BRACCI ASPERSORI
I residui di cibo possono occasionalmente formare incrostazioni sui
bracci aspersori ebloccare ifori utilizzati per l’irrorazione dell’acqua.
Siraccomanda pertanto di ispezionare di volta in volta ibracci edi pu-
lirli mediante piccola spazzola metallica.
Per smontare il braccio aspersore superiore, ruotare l’anello di bloccag-
gio in plastica in senso orario. Il rimontaggio del braccio aspersore deve
avvenire in modo che il lato con il maggior numero di fori sia rivolto
verso l’alto.
È possibile smontare l’elemento aspersore del cestello inferiore solle-
vandolo verso l’alto.
SISTEMA DI ADDOLCIMENTO DELL’ACQUA
L’addolcitore riduce automaticamente la durezza dell’acqua, impeden-
do la formazione di calcare sulla serpentina econtribuendo amigliora-
re l’ecienza di lavaggio.
Questo sistema si rigenera con il sale, che deve essere perciò rab-
boccato quando il serbatoio del sale è vuoto.
La frequenza di rigenerazione dipende dal livello di durezza imposta-
to - con la durezza dell’acqua impostata al livello 3, la rigenerazione
avviene ogni 6 cicli Eco.
Il processo di rigenerazione inizia durante il risciacquo nale etermina
nella fase di asciugatura, prima del termine del ciclo.
• Ogni rigenerazione comporta: un consumo di ~3,5 litri d’acqua;
• Un prolungamento di 5 minuti della normale durata del ciclo;
• Un consumo di energia minore di 0,005 kWh.
8
RISOLUZIONE DEI PROBLEMI
Se la lavastoviglie non funziona correttamente, provare a risolvere il problema consultando l’elenco sotto riportato. Per errori o problemi di altro
tipo, contattare un Servizio Assistenza Tecnica autorizzato; i dati di contatto sono riportati nel libretto di garanzia. I ricambi saranno disponibili per
un periodo no a 7 o no a 10 anni, secondo i requisiti specici del regolamento.
PROBLEMI POSSIBILI CAUSE SOLUZIONE
L’indicatore del sale
è acceso
Il serbatoio del sale è vuoto. (È possibile che, dopo
aver riempito il serbatoio, la spia del sale resti accesa
per diversi cicli di lavaggio).
Riempire il serbatoio con sale (per ulteriori informazioni, vedere pagina 2).
Regolare la durezza dell’acqua - vedere la tabella a pagina 2.
L’indicatore del
brillantante è
acceso
La vaschetta del brillantante è vuota. (È possibile che,
dopo aver riempito la vaschetta, la spia del brillantante
resti accesa per diversi cicli di lavaggio).
Riempire la vaschetta con brillantante (per ulteriori informazioni,
vedere pagina 2)
La lavastoviglie non si
avvia o i comandi non
rispondono.
L'apparecchio non è stato collegato correttamente
all'alimentazione elettrica.
Inserire la spina nella presa di corrente.
Mancanza di corrente.
Per ragioni di sicurezza, la lavastoviglie non si riavvia automaticamente
al ripristino della corrente elettrica. Aprire la porta, premere il tasto
AVVIO/Pausa e richiudere la porta entro 4 secondi.
Mancata chiusura della porta lavastoviglie.
La spina ActiveDry non è inserita.
Spingere con decisione la porta no ad avvertire il caratteristico “clic.
Il ciclo è stato interrotto con l'apertura dello sportel-
lo per più di 4 secondi.
Premere AVVIO/Pausa e chiudere lo sportello entro 4 secondi
Mancato funzionamento dei vari comandi.
Sul display viene visualizzato 9 o 12 e il LED
Accen-
sione/Spegnimento
lampeggia rapidamente
Spegnere l’apparecchio premendo il tasto ACCENSIONE/SPEGNIMEN-
TO, riaccenderlo dopo circa un minuto e riavviare il programma. Se il
problema persiste, staccare l’apparecchio dalla rete elettrica per un
minuto, quindi ricollegarlo.
Lo scarico della lavasto-
viglie non avviene.
Sul display viene visua-
lizzato 3 e il LED Accen-
sione/Spegnimento
lampeggia rapidamente
Ciclo di lavaggio non ancora concluso. Attendere la conclusione del ciclo di lavaggio.
Tubo di scarico piegato.
Vericare che il tubo di scarico non sia piegato (vedere le ISTRUZIONI DI
INSTALLAZIONE).
Tubo di scarico del lavandino ostruito. Pulire il tubo di scarico del lavandino.
Ostruzione ltro a causa di residui di cibo Pulire il ltro (vedere PULIZIA DEL GRUPPO FILTRO).
La rumorosità della la-
vastoviglie è eccessiva.
Urto dei piatti tra loro durante il lavaggio.
Sistemare le stoviglie nel modo corretto (vedere CARICAMENTO DEI CESTELLI).
Produzione eccessiva di schiuma.
Il dosaggio del detersivo non è stato stabilito in modo corretto oppure il
detersivo non è del tipo adatto alle lavastoviglie (vedere RIEMPIMENTO DELLA
VASCHETTA DEL DETERSIVO). Per riavviare il ciclo in corso, spegnere e riaccen-
dere la lavastoviglie, scegliere un nuovo programma, premere AVVIO/Pausa
e chiudere lo sportello entro 4 secondi. Non aggiungere altro detersivo
I piatti non risultano
puliti.
Errata disposizione delle stoviglie.
Sistemare le stoviglie nel modo corretto (vedere CARICAMENTO DEI CESTELLI).
Impedimento nella rotazione dei bracci aspersori a
causa dell'interferenza dei piatti.
Sistemare le stoviglie nel modo corretto (vedere CARICAMENTO DEI
CESTELLI).
Il ciclo di lavaggio è eccessivamente delicato. Selezionare il programma adatto (vedere la TABELLA DEI PROGRAMMI).
Produzione eccessiva di schiuma.
Il dosaggio del detersivo non è stato stabilito in modo corretto oppure il
detersivo non è del tipo adatto alle lavastoviglie (vedere RIEMPIMENTO DEL
DISTRIBUTORE DETERSIVO).
Tappo sul vano brillantante non correttamente chiuso.
Accertarsi che il tappo sul distributore brillantante sia chiuso.
Filtro sporco oppure ostruito. Pulire il gruppo ltro (vedere CURA E MANUTENZIONE).
Mancanza di sale.
Riempire il serbatoio del sale (vedere RIEMPIMENTO DEL SERBATOIO SALE).
La lavastoviglie non ese-
gue il carico dell'acqua.
Sul display viene visua-
lizzato H, 6 e il LED Ac-
censione/Spegnimento
lampeggia rapidamente
Assenza di alimentazione idrica o rubinetto chiuso.
Accertarsi che il tubo di alimentazione idrica contenga l’acqua necessa-
ria o che il rubinetto sia aperto.
Il tubo di carico è piegato
Accertarsi che il tubo di carico non sia piegato (vedere INSTALLAZIONE)
riprogrammare la lavastoviglie e riavviarla.
L’elemento ltrante nel tubo di carico è ostruito; è
necessario pulirlo.
Dopo aver eseguito le operazioni di ispezione e pulizia, spegnere e
accendere la lavastoviglie e avviare un programma nuovo.
La lavastoviglie termina
il ciclo di lavaggio trop-
po presto. Sul display
viene visualizzato 15 e
il LED Accensione/Spe-
gnimento lampeggia
rapidamente
Il tubo di scarico è posizionato troppo in basso
o crea un eetto sifone nell’impianto di scarico
domestico.
Controllare che l’estremità del tubo di scarico si trovi all’altezza
corretta (vedere INSTALLAZIONE). Vericare eventuali eetti sifone
nell’impianto di scarico domestico; se necessario, installare una
valvola di ingresso aria.
Aria nel tubo di mandata dell'acqua.
Controllare che non vi siano perdite nell’impianto idraulico o altri
problemi che causino l’ingresso di aria.
La perdita di deter-
gente.
Dipende dal detergente liquido utilizzato e può es-
sere accentuata in caso di opzione di ritardo attivata.
Piccole perdite non causano malfunzionamenti della macchina e possono es-
sere evitate cambiando il tipo di detergente liquido o utilizzando le pastiglie.
Documentazione normativa, documentazione standard, ordinazione di pezzi di ricambio e altre informazioni sul
prodotto possono essere reperite:
• Utilizzo del codice QR sul prodotto.
• Visitando il nostro sito web docs.hotpoint.eu e parts-selfservice.europeanappliances.com
• Oppure, contattare il Servizio Assistenza Tecnica(al numero di telefono riportato sul libretto di garanzia).
Quando si contatta il Servizio Assistenza Tecnica, fornire i codici presenti sulla targhetta matricola del prodotto.
I dati del modello possono essere richiamati usando il codice QR riportato sull’etichetta energetica. L’etichetta riporta anche il
codice identicativo del modello che può essere utilizzato per consultare il portale di registrazione su https://eprel.ec.europa.eu.
IEC 436
:
400020029588
08/2025 jk - Xerox Fabriano