
INSTRUCTION MANUAL
MANUAL DE INSTRUCCIONES
Cordless Driver Drill
Atornillador Taladro Inalámbrico
XFD16
IMPORTANT: Read Before Using.
IMPORTANTE: Lea antes de usar.

2 ENGLISH
ENGLISH (Original instructions)
SPECIFICATIONS
Model: XFD16
Drilling capacities Steel 13 mm (1/2")
Wood Auger bit: 38 mm (1-1/2")
Self-feed bit: 51 mm (2”)
Hole saw: 51 mm (2”)
Fastening capacities Wood screw 10 mm x 90 mm (3/8" x 3-1/2")
Machine screw M6 (1/4")
No load speed (RPM) High (2) 0 - 1,800 /min
Low (1) 0 - 550 /min
Overall length 174 mm (6-7/8")
Rated voltage D.C. 18 V
Net weight 1.8 - 2.5 kg (4.0 - 5.5 lbs)
• Duetoourcontinuingprogramofresearchanddevelopment,thespecicationshereinaresubjecttochange
without notice.
• Specicationsmaydierfromcountrytocountry.
• Theweightmaydierdependingontheattachment(s),includingthebatterycartridge.Thelightestandheavi-
est combinations, according to EPTA-Procedure 01/2014, are shown in the table.
Applicable battery cartridge and charger
Batterycartridge BL1815N / BL1820B / BL1830B / BL1840B / BL1850B / BL1860B
Charger DC18RC / DC18RD / DC18RE / DC18SD / DC18SE / DC18SF /
DC18SH / DC18WC
• Someofthebatterycartridgesandchargerslistedabovemaynotbeavailabledependingonyourregionof
residence.
WARNING: Only use the battery cartridges and chargers listed above.Useofanyotherbatterycartridges
andchargersmaycauseinjuryand/orre.
SAFETY WARNINGS
General power tool safety warnings
WARNING Read all safety warnings, instruc-
tions, illustrations and specications provided with
this power tool. Failure to follow all instructions listed
belowmayresultinelectricshock,reand/orserious
injury.
Save all warnings and instruc-
tions for future reference.
Theterm"powertool"inthewarningsreferstoyour
mains-operated(corded)powertoolorbattery-operated
(cordless) power tool.
Work area safety
1. Keep work area clean and well lit. Cluttered or
dark areas invite accidents.
2. Do not operate power tools in explosive atmo-
spheres, such as in the presence of ammable
liquids, gases or dust. Power tools create sparks
whichmayignitethedustorfumes.
3.
Keep children and bystanders away while operating
a power tool.Distractionscancauseyoutolosecontrol.
Electrical safety
1. Power tool plugs must match the outlet. Never
modify the plug in any way. Do not use any
adapter plugs with earthed (grounded) power
tools. Unmodiedplugsandmatchingoutletswill
reduce risk of electric shock.
2. Avoid body contact with earthed or grounded
surfaces, such as pipes, radiators, ranges and
refrigerators. There is an increased risk of elec-
tricshockifyourbodyisearthedorgrounded.
3. Do not expose power tools to rain or wet con-
ditions. Water entering a power tool will increase
the risk of electric shock.
4. Do not abuse the cord. Never use the cord for
carrying, pulling or unplugging the power tool.
Keep cord away from heat, oil, sharp edges
or moving parts. Damaged or entangled cords
increase the risk of electric shock.
5. When operating a power tool outdoors, use an
extension cord suitable for outdoor use. Use of
a cord suitable for outdoor use reduces the risk of
electric shock.

3 ENGLISH
6. If operating a power tool in a damp location is
unavoidable, use a ground fault circuit inter-
rupter (GFCI) protected supply. Use of a GFCI
reduces the risk of electric shock.
7. Power tools can produce electromagnetic
elds (EMF) that are not harmful to the user.
However, users of pacemakers and other similar
medical devices should contact the maker of their
device and/or doctor for advice before operating
this power tool.
Personal safety
1. Stay alert, watch what you are doing and use
common sense when operating a power tool.
Do not use a power tool while you are tired or
under the inuence of drugs, alcohol or med-
ication. A moment of inattention while operating
powertoolsmayresultinseriouspersonalinjury.
2. Use personal protective equipment. Always
wear eye protection. Protective equipment such
asadustmask,non-skidsafetyshoes,hardhator
hearing protection used for appropriate conditions
willreducepersonalinjuries.
3. Prevent unintentional starting. Ensure the
switch is in the o-position before connecting
to power source and/or battery pack, picking
up or carrying the tool.Carryingpowertoolswith
yourngerontheswitchorenergisingpowertools
that have the switch on invites accidents.
4. Remove any adjusting key or wrench before
turning the power tool on.Awrenchorakeyleft
attachedtoarotatingpartofthepowertoolmay
resultinpersonalinjury.
5. Do not overreach. Keep proper footing and
balance at all times. This enables better control
of the power tool in unexpected situations.
6. Dress properly. Do not wear loose clothing or
jewellery. Keep your hair and clothing away
from moving parts.Looseclothes,jewelleryor
long hair can be caught in moving parts.
7. If devices are provided for the connection of
dust extraction and collection facilities, ensure
these are connected and properly used. Use of
dust collection can reduce dust-related hazards.
8.
Do not let familiarity gained from frequent use
of tools allow you to become complacent and
ignore tool safety principles. A careless action can
causesevereinjurywithinafractionofasecond.
9. Always wear protective goggles to protect
your eyes from injury when using power tools.
The goggles must comply with ANSI Z87.1 in
the USA.
It is an employer's responsibility to enforce the
use of appropriate safety protective equipment
by the tool operators and by other persons in
the immediate working area.
Power tool use and care
1. Do not force the power tool. Use the correct
power tool for your application. The correct
powertoolwilldothejobbetterandsaferatthe
rate for which it was designed.
2. Do not use the power tool if the switch does
not turn it on and o.Anypowertoolthatcannot
be controlled with the switch is dangerous and
must be repaired.
3. Disconnect the plug from the power source
and/or remove the battery pack, if detachable,
from the power tool before making any adjust-
ments, changing accessories, or storing power
tools.Suchpreventivesafetymeasuresreduce
theriskofstartingthepowertoolaccidentally.
4.
Store idle power tools out of the reach of children and
do not allow persons unfamiliar with the power tool
or these instructions to operate the power tool. Power
tools are dangerous in the hands of untrained users.
5.
Maintain power tools and accessories. Check for
misalignment or binding of moving parts, break-
age of parts and any other condition that may
aect the power tool’s operation. If damaged, have
the power tool repaired before use.Manyaccidents
arecausedbypoorlymaintainedpowertools.
6. Keep cutting tools sharp and clean.Properly
maintained cutting tools with sharp cutting edges
arelesslikelytobindandareeasiertocontrol.
7. Use the power tool, accessories and tool bits
etc. in accordance with these instructions, tak-
ing into account the working conditions and
the work to be performed. Use of the power tool
foroperationsdierentfromthoseintendedcould
result in a hazardous situation.
8.
Keep handles and grasping surfaces dry, clean
and free from oil and grease.Slipperyhandlesand
grasping surfaces do not allow for safe handling and
control of the tool in unexpected situations.
9. When using the tool, do not wear cloth work
gloves which may be entangled. The entangle-
mentofclothworkglovesinthemovingpartsmay
resultinpersonalinjury.
Battery tool use and care
1. Recharge only with the charger specied by
the manufacturer. A charger that is suitable for
onetypeofbatterypackmaycreateariskofre
whenusedwithanotherbatterypack.
2. Use power tools only with specically desig-
nated battery packs.Useofanyotherbattery
packsmaycreateariskofinjuryandre.
3. When battery pack is not in use, keep it away
from other metal objects, like paper clips,
coins, keys, nails, screws or other small metal
objects, that can make a connection from one
terminal to another.Shortingthebatterytermi-
nalstogethermaycauseburnsorare.
4.
Under abusive conditions, liquid may be ejected
from the battery; avoid contact. If contact acci-
dentally occurs, ush with water. If liquid con-
tacts eyes, additionally seek medical help. Liquid
ejectedfromthebatterymaycauseirritationorburns.
5. Do not use a battery pack or tool that is dam-
aged or modied.Damagedormodiedbatteries
mayexhibitunpredictablebehaviourresultingin
re,explosionorriskofinjury.
6. Do not expose a battery pack or tool to re or
excessive temperature.Exposuretoreortem-
peratureabove130°Cmaycauseexplosion.
7. Follow all charging instructions and do not
charge the battery pack or tool outside the
temperature range specied in the instruc-
tions.Chargingimproperlyorattemperatures
outsidethespeciedrangemaydamagethe
batteryandincreasetheriskofre.

4 ENGLISH
Service
1.
Have your power tool serviced by a qualied repair
person using only identical replacement parts. This
willensurethatthesafetyofthepowertoolismaintained.
2. Never service damaged battery packs. Service
ofbatterypacksshouldonlybeperformedbythe
manufacturer or authorized service providers.
3. Follow instruction for lubricating and chang-
ing accessories.
4. Do not modify or attempt to repair the appli-
ance or the battery pack except as indicated in
the instructions for use and care.
Cordless driver drill safety warnings
Safety instructions for all operations
1.
Hold the power tool by insulated gripping surfaces,
when performing an operation where the cutting
accessory or fasteners may contact hidden wiring.
Cuttingaccessoryorfastenerscontactinga"live"wire
maymakeexposedmetalpartsofthepowertool"live"
and could give the operator an electric shock.
2.
Always be sure you have a rm footing. Be sure no
one is below when using the tool in high locations.
3. Hold the tool rmly.
4. Keep hands away from rotating parts.
5. Do not leave the tool running. Operate the tool
only when hand-held.
6. Do not touch the drill bit, the workpiece or
chips immediately after operation; they may be
extremely hot and could burn your skin.
7.
Some material contains chemicals which may be
toxic. Take caution to prevent dust inhalation and
skin contact. Follow material supplier safety data.
8. If the drill bit cannot be loosened even you
open the jaws, use pliers to pull it out. In such a
case,pullingoutthedrillbitbyhandmayresultin
injurybyitssharpedge.
9. Make sure there are no electrical cables, water
pipes, gas pipes etc. that could cause a hazard
if damaged by use of the tool.
Safety instructions when using long drill bits
1.
Never operate at higher speed than the maximum
speed rating of the drill bit. At higher speeds, the
bitislikelytobendifallowedtorotatefreelywithout
contactingtheworkpiece,resultinginpersonalinjury.
2. Always start drilling at low speed and with the
bit tip in contact with the workpiece. At higher
speeds,thebitislikelytobendifallowedtorotate
freelywithoutcontactingtheworkpiece,resulting
inpersonalinjury.
3. Apply pressure only in direct line with the bit
and do not apply excessive pressure. Bits can
bend causing breakage or loss of control, resulting
inpersonalinjury.
SAVE THESE INSTRUCTIONS.
WARNING: DO NOT let comfort or familiarity
with product (gained from repeated use) replace
strict adherence to safety rules for the subject
product. MISUSE or failure to follow the safety
rules stated in this instruction manual may cause
serious personal injury.
Symbols
Thefollowingsshowthesymbolswhichmaybeused
fortheequipment.Besurethatyouunderstandtheir
meaning before use.
volts
direct current
no load speed
revolutions or reciprocation per minute
diameter
Important safety instructions for
battery cartridge
1.
Before using battery cartridge, read all instruc-
tions and cautionary markings on (1) battery char-
ger, (2) battery, and (3) product using battery.
2. Do not disassemble or tamper with the battery
cartridge.Itmayresultinare,excessiveheat,
or explosion.
3. If operating time has become excessively
shorter, stop operating immediately. It may
result in a risk of overheating, possible burns
and even an explosion.
4.
If electrolyte gets into your eyes, rinse them out
with clear water and seek medical attention right
away. It may result in loss of your eyesight.
5. Do not short the battery cartridge:
(1) Do not touch the terminals with any con-
ductive material.
(2) Avoid storing battery cartridge in a con-
tainer with other metal objects such as
nails, coins, etc.
(3) Do not expose battery cartridge to water
or rain.
A battery short can cause a large current
ow, overheating, possible burns and even a
breakdown.
6. Do not store and use the tool and battery car-
tridge in locations where the temperature may
reach or exceed 50 °C (122 °F).
7. Do not incinerate the battery cartridge even if
it is severely damaged or is completely worn
out. The battery cartridge can explode in a re.
8. Do not nail, cut, crush, throw, drop the battery
cartridge, or hit against a hard object to the
battery cartridge.Suchconductmayresultina
re,excessiveheat,orexplosion.
9. Do not use a damaged battery.
10. The contained lithium-ion batteries are subject
to the Dangerous Goods Legislation require-
ments.
Forcommercialtransportse.g.bythirdparties,
forwarding agents, special requirement on pack-
aging and labeling must be observed.
5 ENGLISH
For preparation of the item being shipped, consult-
ing an expert for hazardous material is required.
Pleasealsoobservepossiblymoredetailed
national regulations.
Tapeormaskoopencontactsandpackupthe
batteryinsuchamannerthatitcannotmove
around in the packaging.
11. When disposing the battery cartridge, remove
it from the tool and dispose of it in a safe
place. Follow your local regulations relating to
disposal of battery.
12. Use the batteries only with the products
specied by Makita. Installing the batteries to
non-compliantproductsmayresultinare,exces-
siveheat,explosion,orleakofelectrolyte.
13. If the tool is not used for a long period of time,
the battery must be removed from the tool.
14. During and after use, the battery cartridge may
take on heat which can cause burns or low
temperature burns. Pay attention to the han-
dling of hot battery cartridges.
15. Do not touch the terminal of the tool imme-
diately after use as it may get hot enough to
cause burns.
16. Do not allow chips, dust, or soil stuck into the
terminals, holes, and grooves of the battery
cartridge.Itmaycauseheating,catchingre,
burstandmalfunctionofthetoolorbatterycar-
tridge,resultinginburnsorpersonalinjury.
17. Unless the tool supports the use near
high-voltage electrical power lines, do not use
the battery cartridge near high-voltage electri-
cal power lines.Itmayresultinamalfunctionor
breakdownofthetoolorbatterycartridge.
18. Keep the battery away from children.
SAVE THESE INSTRUCTIONS.
CAUTION: Only use genuine Makita batteries.
Use of non-genuine Makita batteries, or batteries that
havebeenaltered,mayresultinthebatterybursting
causingres,personalinjuryanddamage.Itwill
alsovoidtheMakitawarrantyfortheMakitatooland
charger.
Tips for maintaining maximum
battery life
1. Charge the battery cartridge before completely
discharged. Always stop tool operation and
charge the battery cartridge when you notice
less tool power.
2. Never recharge a fully charged battery car-
tridge. Overcharging shortens the battery
service life.
3. Charge the battery cartridge with room tem-
perature at 10 °C - 40 °C (50 °F - 104 °F). Let
a hot battery cartridge cool down before
charging it.
4. When not using the battery cartridge, remove
it from the tool or the charger.
5. Charge the battery cartridge if you do not use
it for a long period (more than six months).
FUNCTIONAL
DESCRIPTION
CAUTION: Always be sure that the tool is
switched o and the battery cartridge is removed
before adjusting or checking function on the tool.
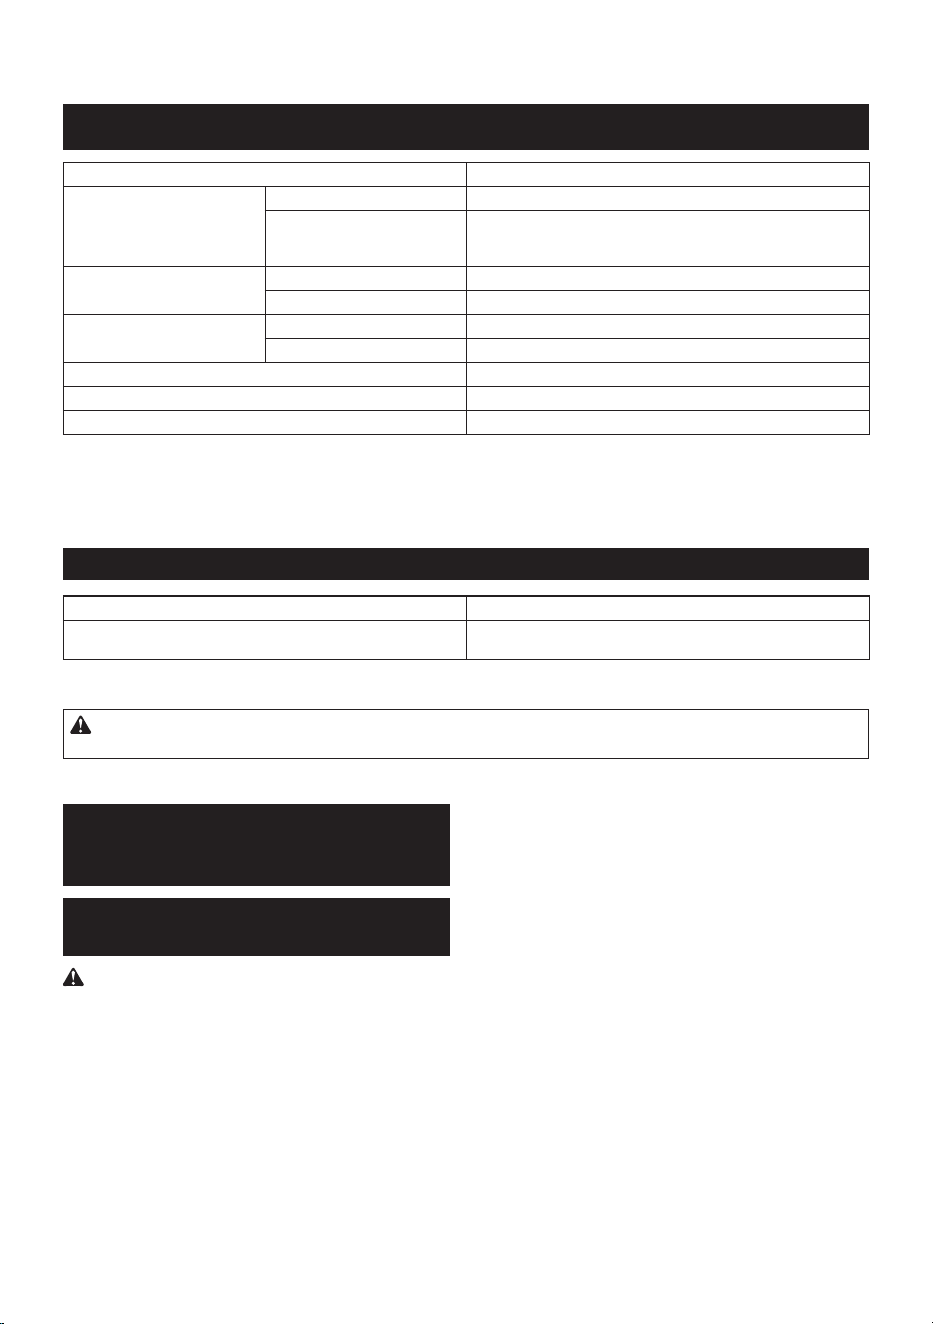
Installing or removing battery
cartridge
CAUTION: Always switch o the tool before
installing or removing of the battery cartridge.
CAUTION: Hold the tool and the battery car-
tridge rmly when installing or removing battery
cartridge.Failuretoholdthetoolandthebattery
cartridgermlymaycausethemtoslipoyourhands
andresultindamagetothetoolandbatterycartridge
andapersonalinjury.
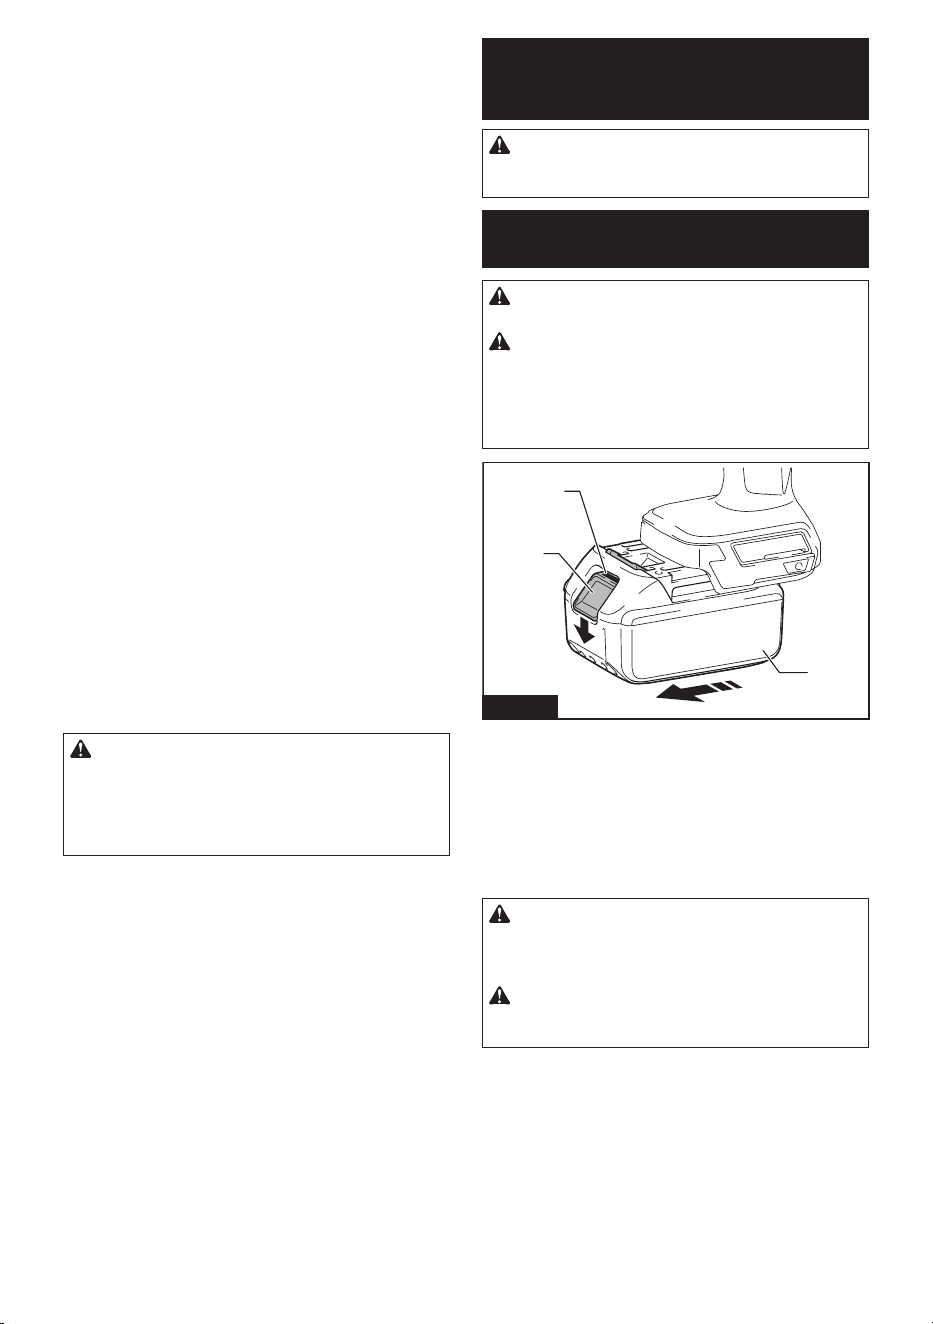
1
2
3
Fig.1
►1. Red indicator 2. Button 3.Batterycartridge
Toremovethebatterycartridge,slideitfromthetool
while sliding the button on the front of the cartridge.
Toinstallthebatterycartridge,alignthetongueonthe
batterycartridgewiththegrooveinthehousingandslip
itintoplace.Insertitallthewayuntilitlocksinplace
withalittleclick.Ifyoucanseetheredindicatoras
showninthegure,itisnotlockedcompletely.
CAUTION: Always install the battery cartridge
fully until the red indicator cannot be seen. If not,
itmayaccidentallyfalloutofthetool,causinginjuryto
youorsomeonearoundyou.
CAUTION: Do not install the battery cartridge
forcibly.Ifthecartridgedoesnotslideineasily,itis
notbeinginsertedcorrectly.
6 ENGLISH
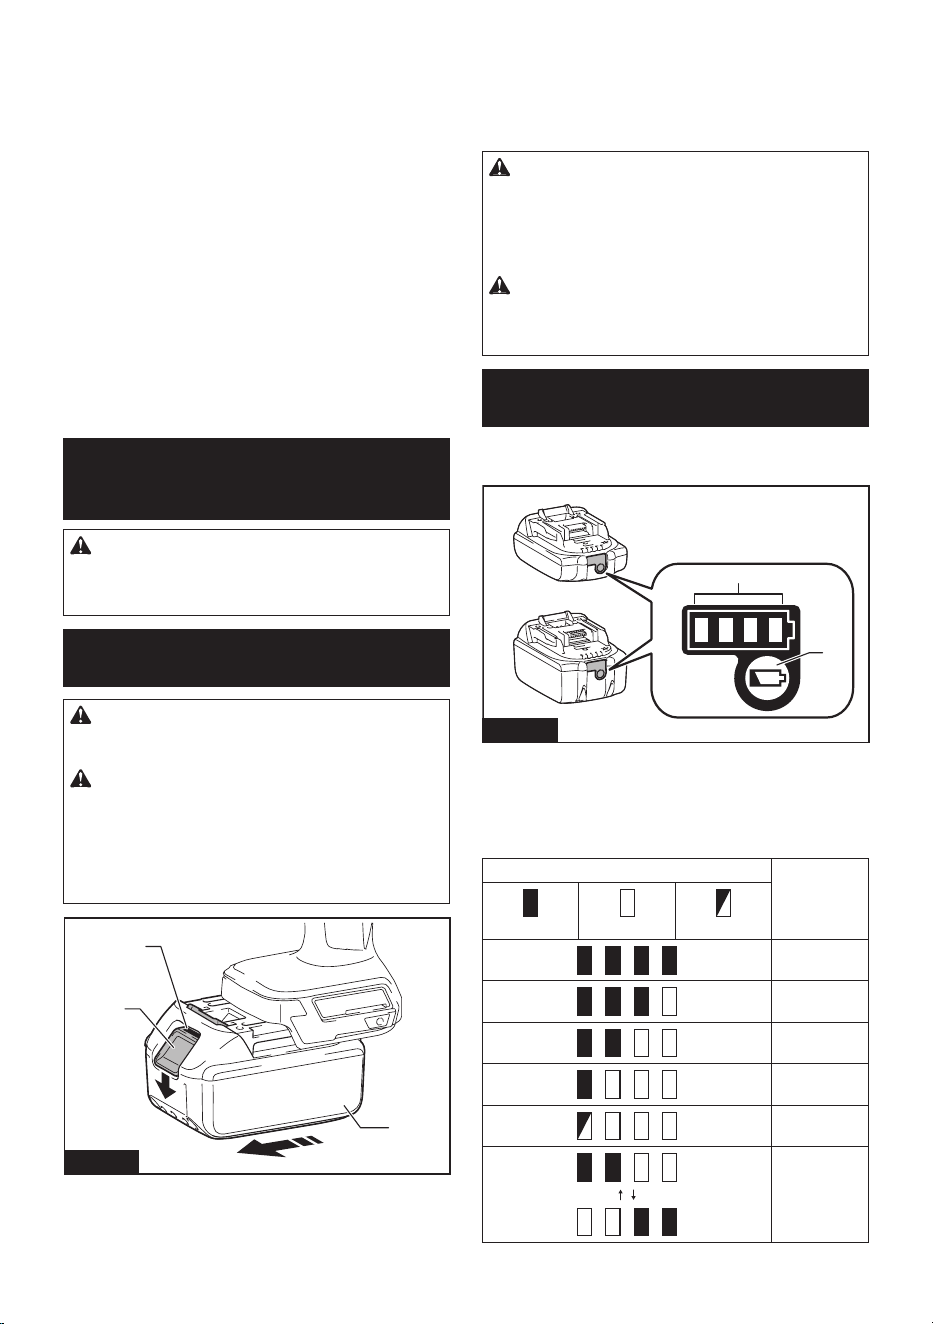
Indicating the remaining battery capacity
Only for battery cartridges with the indicator
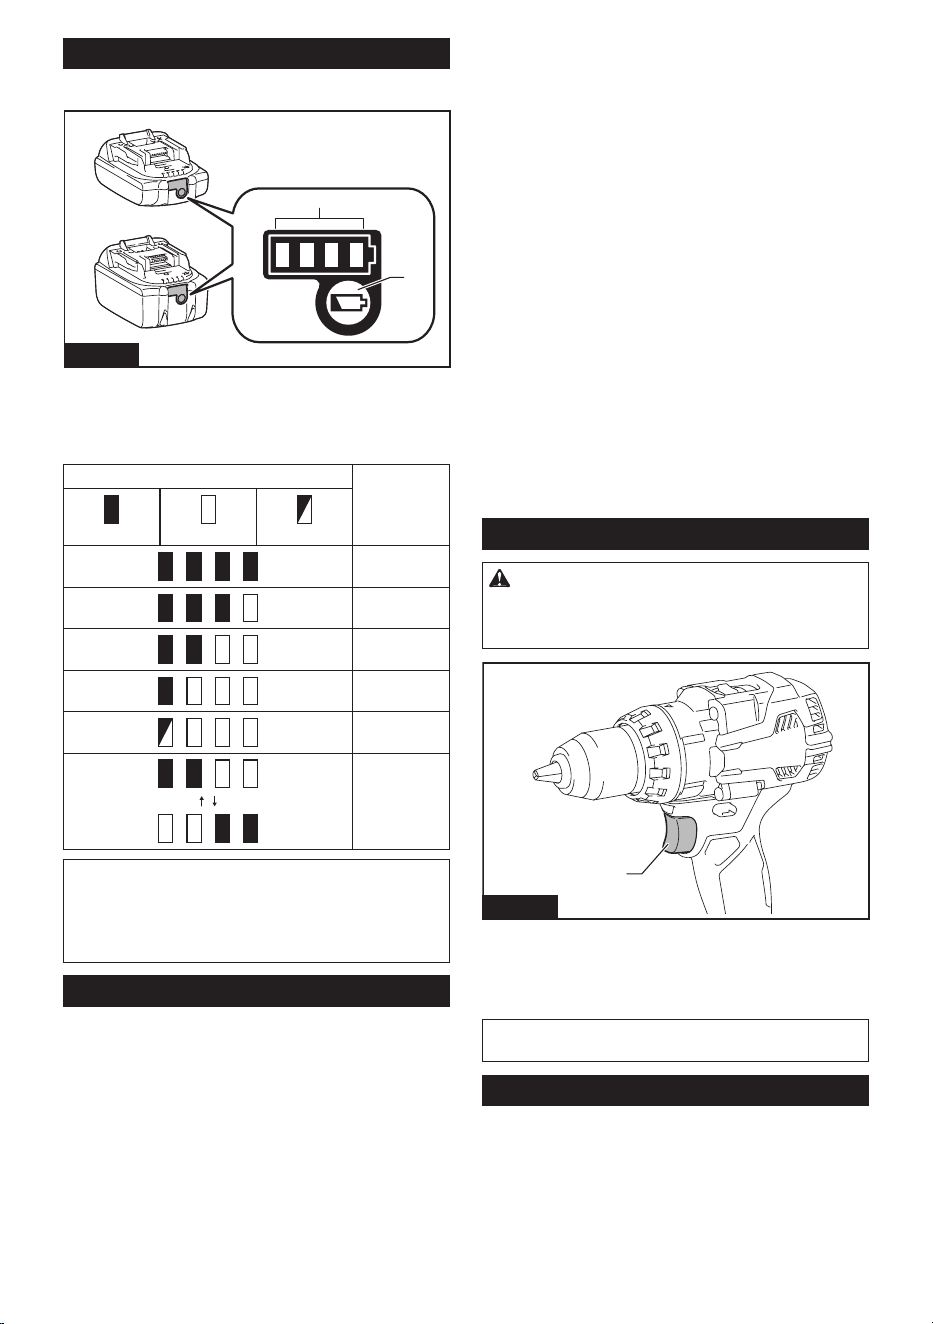
1
2
Fig.2
►1. Indicator lamps 2. Check button
Pressthecheckbuttononthebatterycartridgetoindi-
catetheremainingbatterycapacity.Theindicatorlamps
light up for a few seconds.
Indicator lamps Remaining
capacity
Lighted O Blinking
75% to 100%
50% to 75%
25% to 50%
0% to 25%
Charge the
battery.
Thebattery
mayhave
malfunctioned.
NOTE: Depending on the conditions of use and the
ambienttemperature,theindicationmaydierslightly
fromtheactualcapacity.
NOTE:Therst(farleft)indicatorlampwillblinkwhen
thebatteryprotectionsystemworks.
Tool / battery protection system
Thetoolisequippedwithatool/batteryprotectionsys-
tem.Thissystemautomaticallycutsothepowerto
extendtoolandbatterylife.Thetoolwillautomatically
stopduringoperationifthetoolorbatteryisplaced
under one of the following conditions:
Overload protection
Thisprotectionworkswhenthetool/batteryisoperated
inamannerthatcausesittodrawanabnormallyhigh
current.Inthissituation,turnthetooloandstopthe
application that caused the tool to become overloaded.
Then turn the tool on to restart.
Overheat protection
Thisprotectionworkswhenthetoolorbatteryisover-
heated.Inthissituation,letthetoolandbatterycool
before turning the tool on again.
Overdischarge protection
Thisprotectionworkswhentheremainingbattery
capacitygetslow.Inthissituation,removethebattery
fromthetoolandchargethebattery.
Protections against other causes
Protectionsystemisalsodesignedforothercauses
that could damage the tool and allows the tool to stop
automatically.Takeallthefollowingstepstoclearthe
causes,whenthetoolhasbeenbroughttoatemporary
halt or stop in operation.
1. Turnthetoolo,andthenturnitonagainto
restart.
2. Chargethebattery(ies)orreplaceit/themwith
rechargedbattery(ies).
3. Letthetoolandbattery(ies)cooldown.
Ifnoimprovementcanbefoundbyrestoringprotection
system,thencontactyourlocalMakitaServiceCenter.
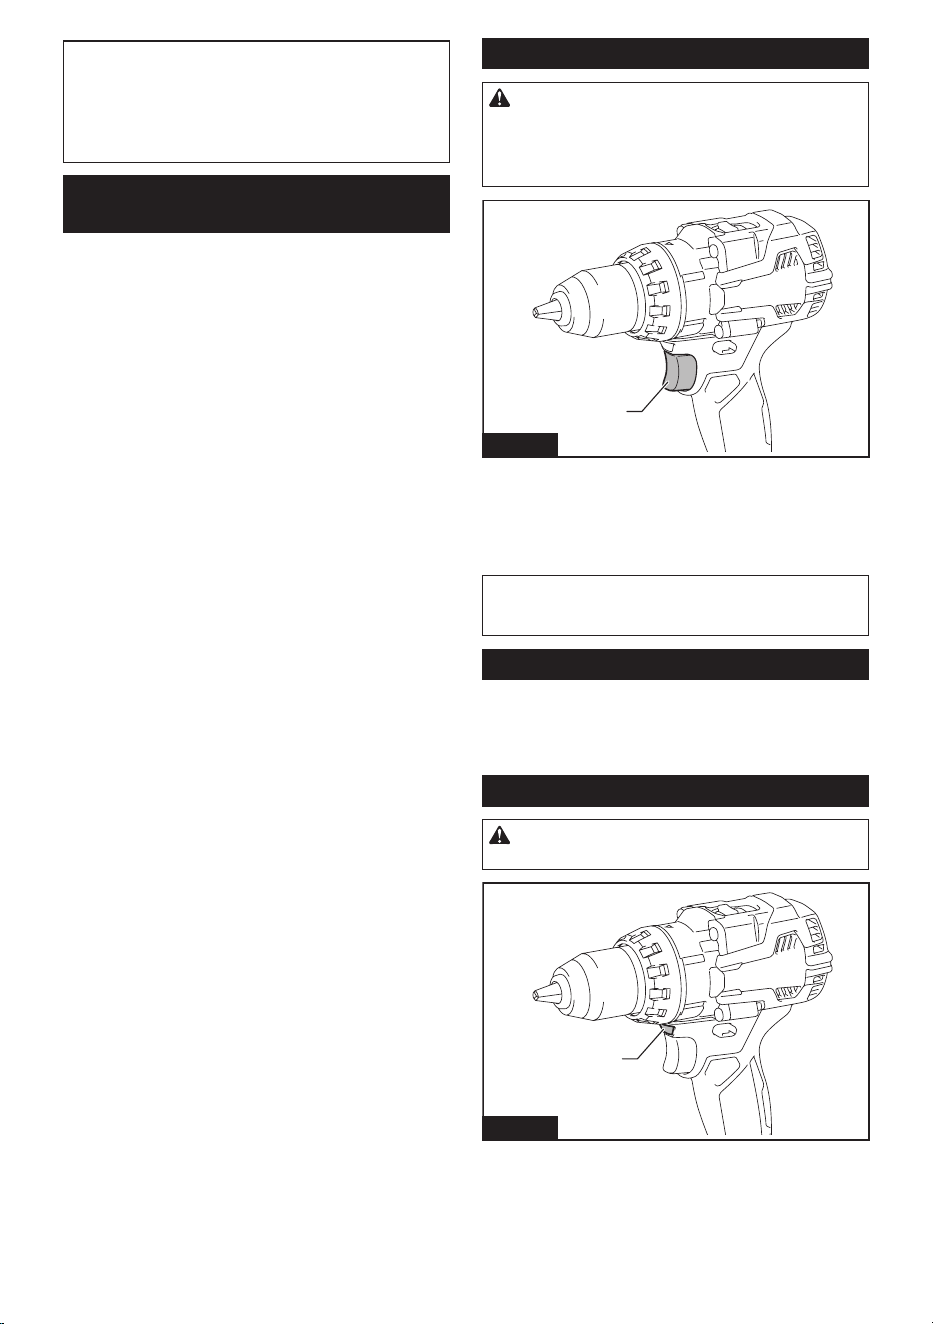
Switch action
CAUTION: Before installing the battery car-
tridge into the tool, always check to see that the
switch trigger actuates properly and returns to
the "OFF" position when released.
1
Fig.3
►1. Switch trigger
Tostartthetool,simplypulltheswitchtrigger.Tool
speedisincreasedbyincreasingpressureontheswitch
trigger. Release the switch trigger to stop.
NOTE:Thetoolautomaticallystopsifyoukeeppull-
ing the switch trigger for about 6 minutes.
Electric brake
This tool is equipped with an electric brake. If the tool
consistentlyfailstoquicklystopaftertheswitchtrigger
is released, have the tool serviced at a Makita service
center.
7 ENGLISH
Lighting up the front lamp
CAUTION: Do not look in the light or see the
source of light directly.
1
Fig.4
►1. Lamp
Pull the switch trigger to light up the lamp. The lamp keeps on
lighting while the switch trigger is being pulled. The lamp goes
outapproximately10secondsafterreleasingtheswitchtrigger.
NOTE:
When the tool is overheated, the tool stops auto-
maticallyandthelampstartsashing.Inthiscase,release
theswitchtrigger.Thelampturnsoinoneminute.
NOTE:Useadryclothtowipethedirtothelensof
the lamp. Be careful not to scratch the lens of lamp, or
itmaylowertheillumination.
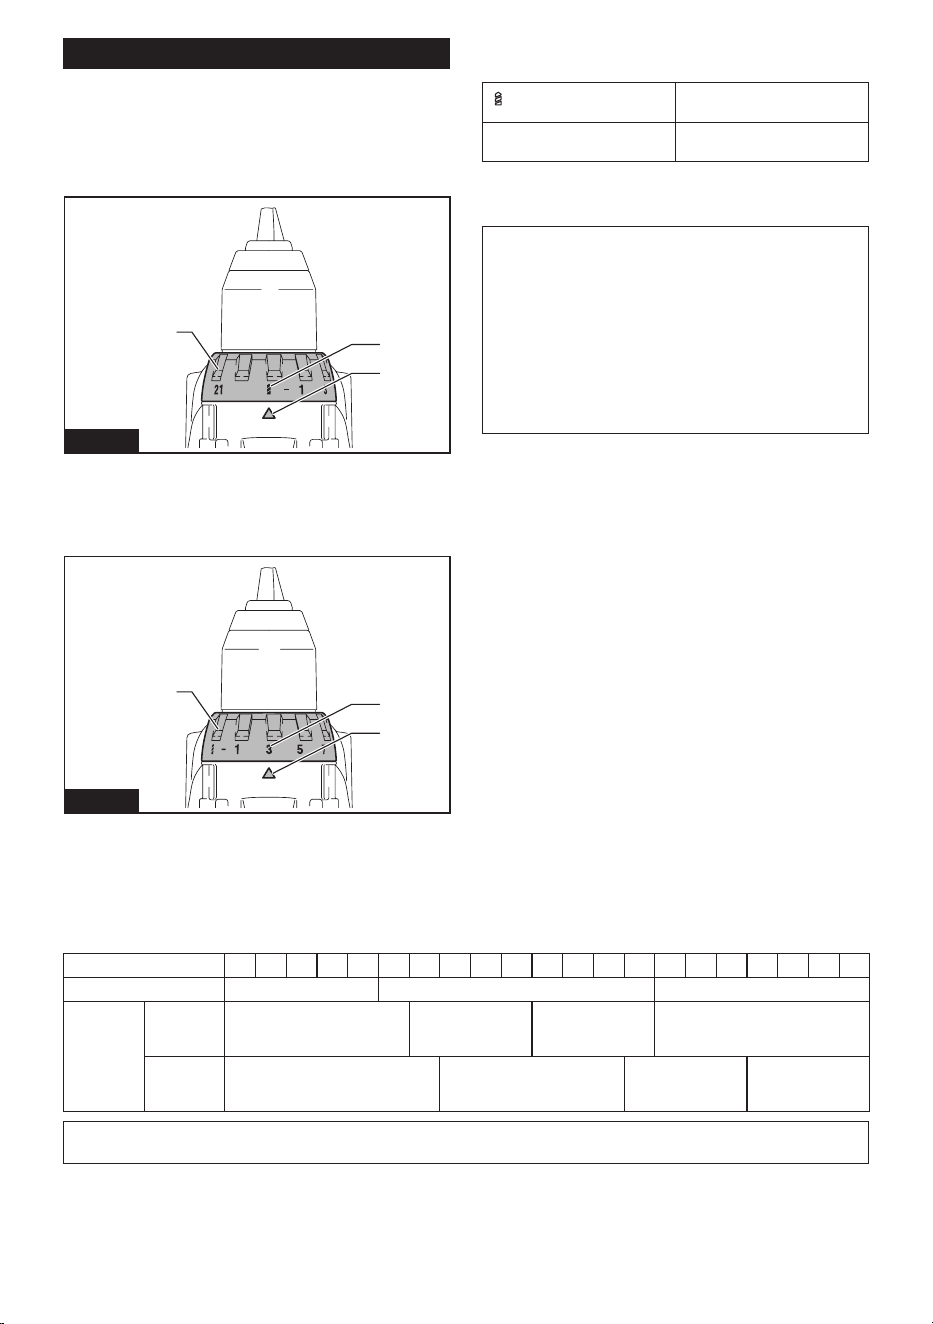
Reversing switch lever action
CAUTION: Always check the direction of
rotation before operation.
CAUTION:
Use the reversing switch lever only after
the tool comes to a complete stop. Changing the direction
ofrotationbeforethetoolstopsmaydamagethetool.
CAUTION:
When not operating the tool, always
set the reversing switch lever to the neutral position.
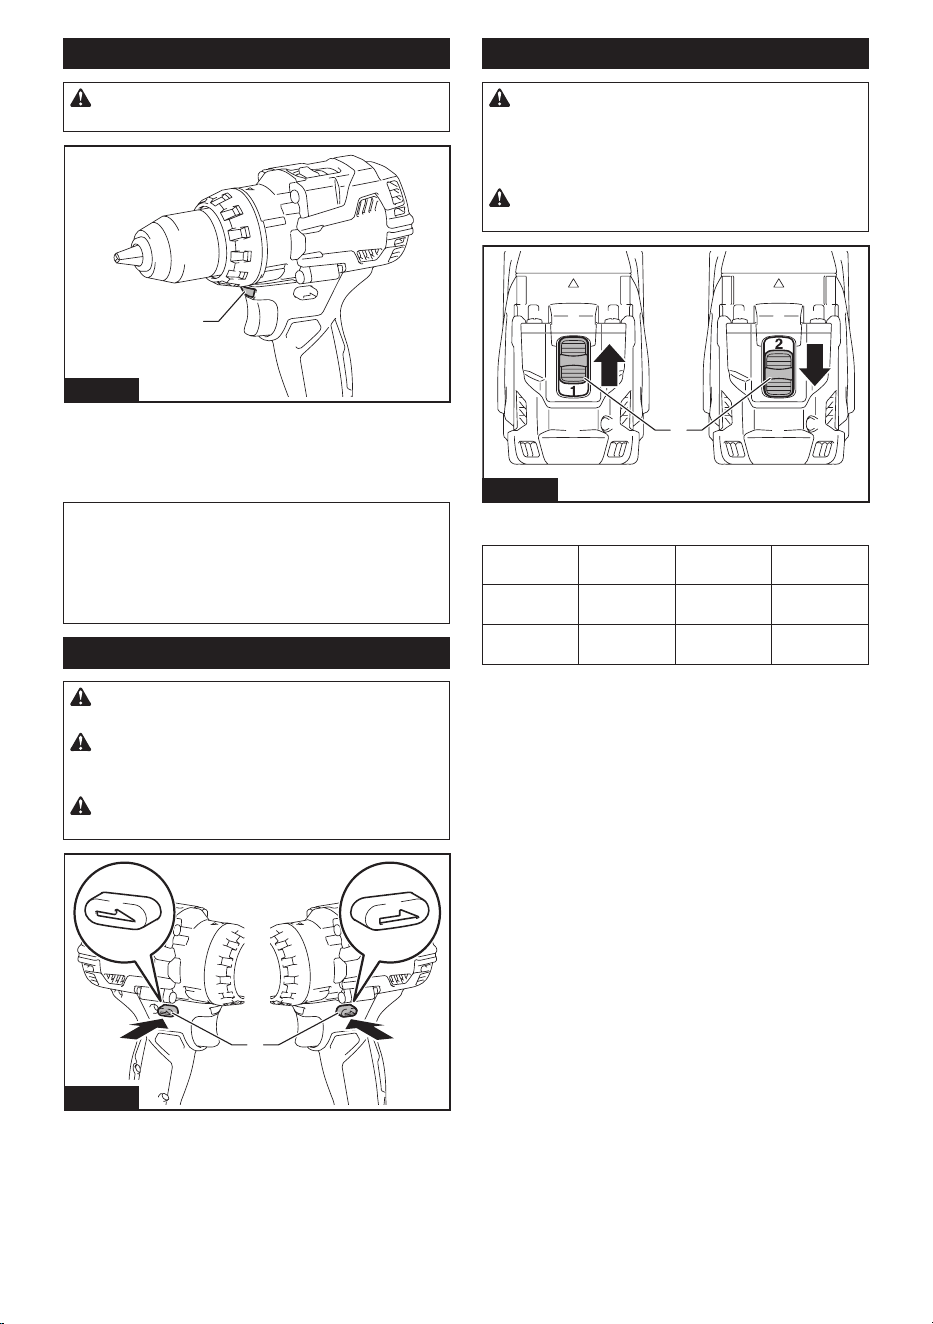
1
AB
Fig.5
►1. Reversing switch lever
This tool has a reversing switch lever to change the
direction of rotation. Depress the reversing switch lever
from the A side for clockwise rotation or from the B side
for counterclockwise rotation.
When the reversing switch lever is in the neutral posi-
tion, the switch trigger cannot be pulled.
Speed change
CAUTION: Always set the speed change lever
fully to the correct position.Ifyouoperatethe
toolwiththespeedchangeleverpositionedhalfway
betweenthe"1"sideand"2"side,thetoolmaybe
damaged.
CAUTION: Do not use the speed change lever
while the tool is running.Thetoolmaybedamaged.
1
Fig.6
►1. Speed change lever
Displayed
Number
Speed Torque Applicable
operation
1 Low High Heavyload-
ing operation
2 High Low Light loading
operation
Tochangethespeed,switchothetoolrst.Pushthe
speedchangelevertodisplay"2"forhighspeedor"1"
for low speed. Be sure that the speed change lever is
set to the correct position before operation.
Ifthetoolspeediscomingdownextremelyduringthe
operationwithdisplay"2",pushthelevertodisplay"1"
and restart the operation.
8 ENGLISH
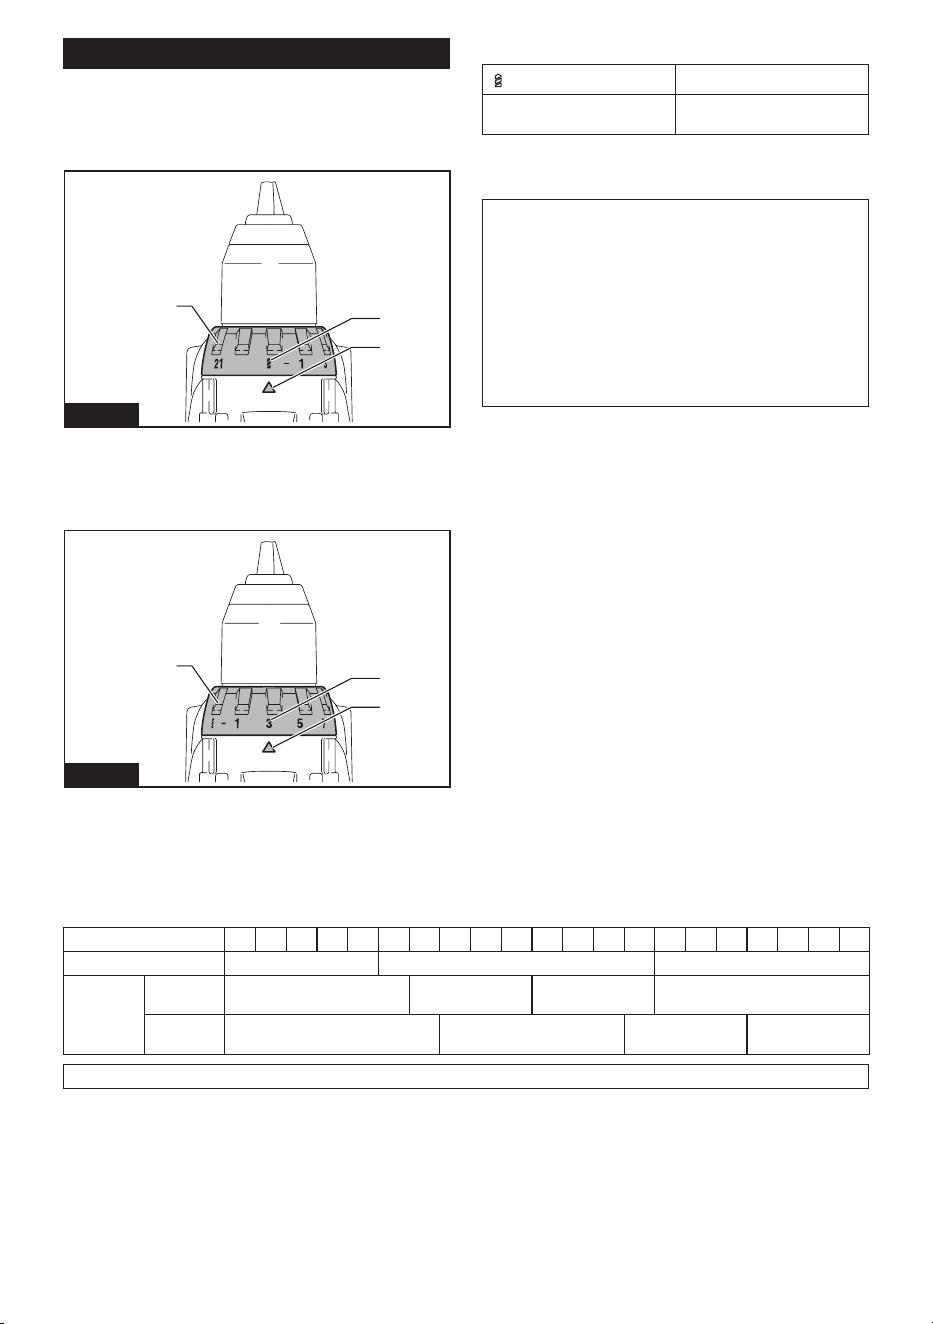
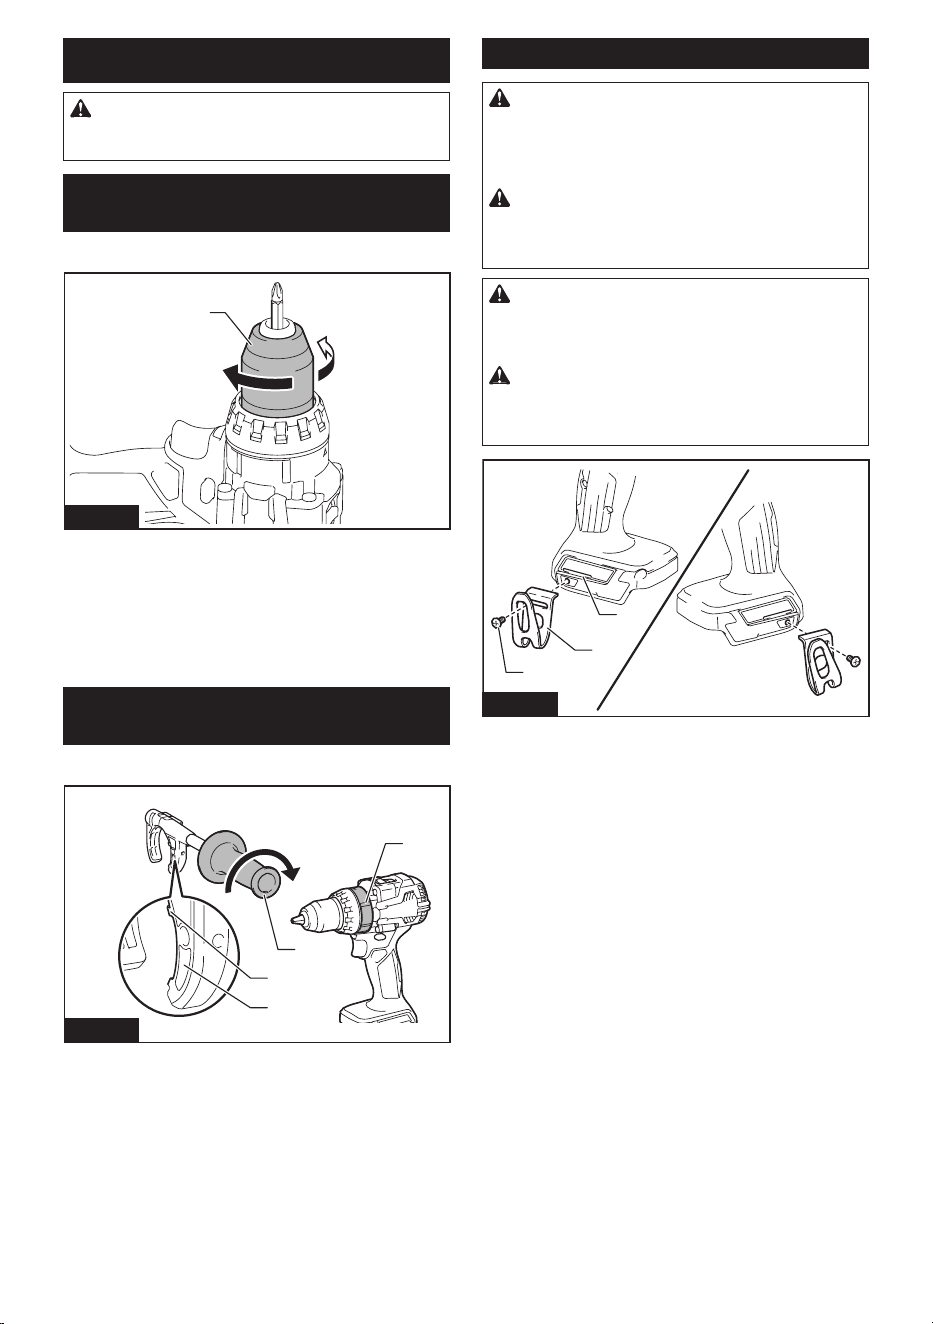
Adjusting ring
Youcanselecttheactionmodeandadjustthefastening
torquewiththeadjustingring.
Selecting the action mode
1
2
3
Fig.7
►1.Adjustingring2. Mark 3. Arrow
This tool has two action modes.
Drillingmode(rotationonly)
1 - 21 Screwdriving mode (rotation
with clutch)
Selectthemodesuitableforyourwork.Turntheadjust-
ingringandalignthemarkthatyouselectwiththe
arrowonthetoolbody.
NOTICE:Alwayssettheringcorrectlytoyour
desiredmodemark.Ifyouoperatethetoolwiththe
ringpositionedhalfwaybetweenthemodemarks,the
toolmaybedamaged.
NOTICE: Do not change the action mode while tool
is rotating.
NOTICE:Ifitisdiculttoslidetheadjustingring,
switch on and run the tool for a second, then stop
thetoolandslidetheadjustingringtoyourdesired
position again.
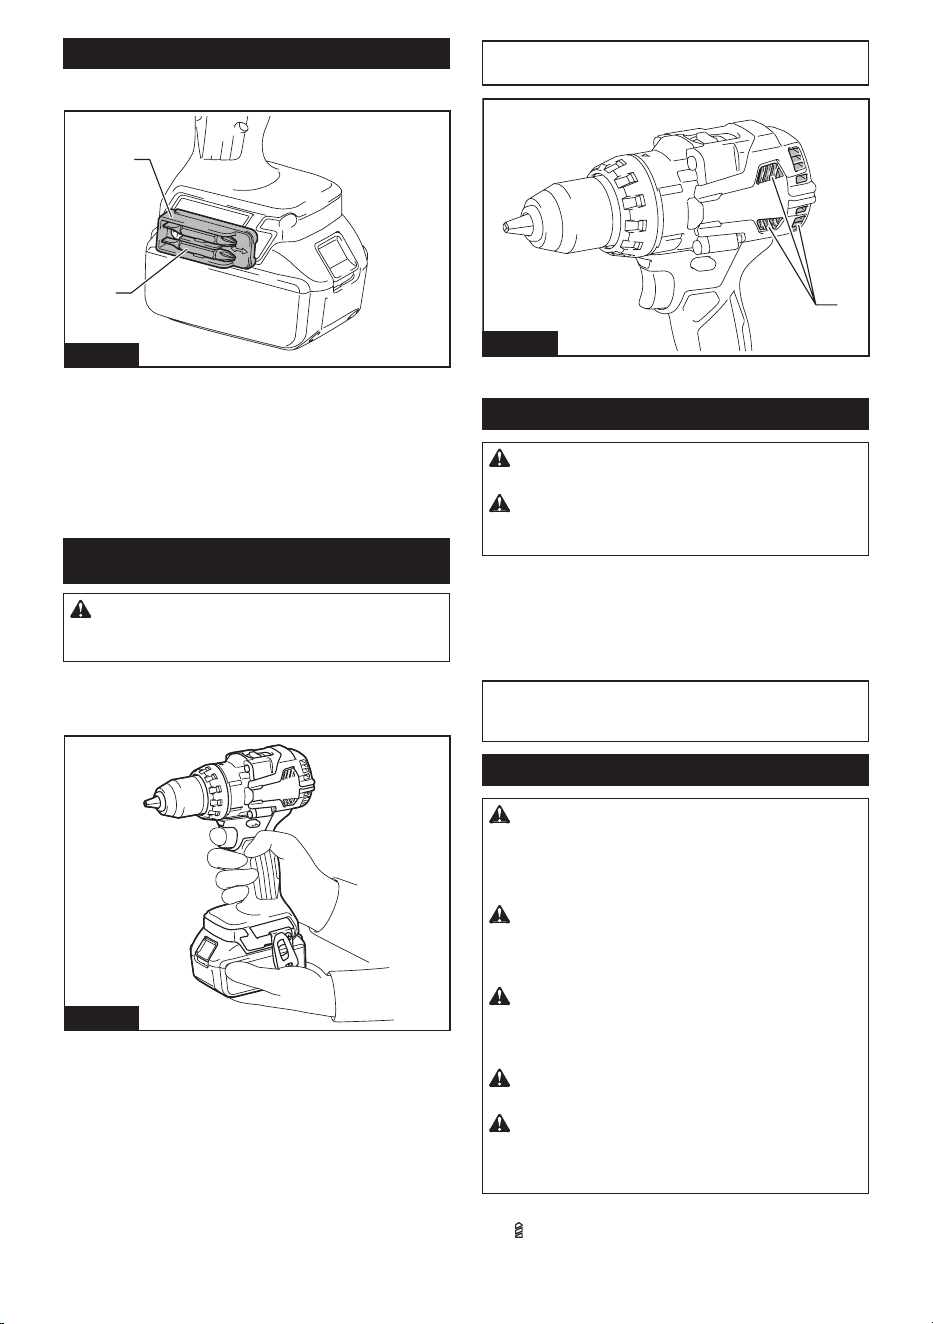
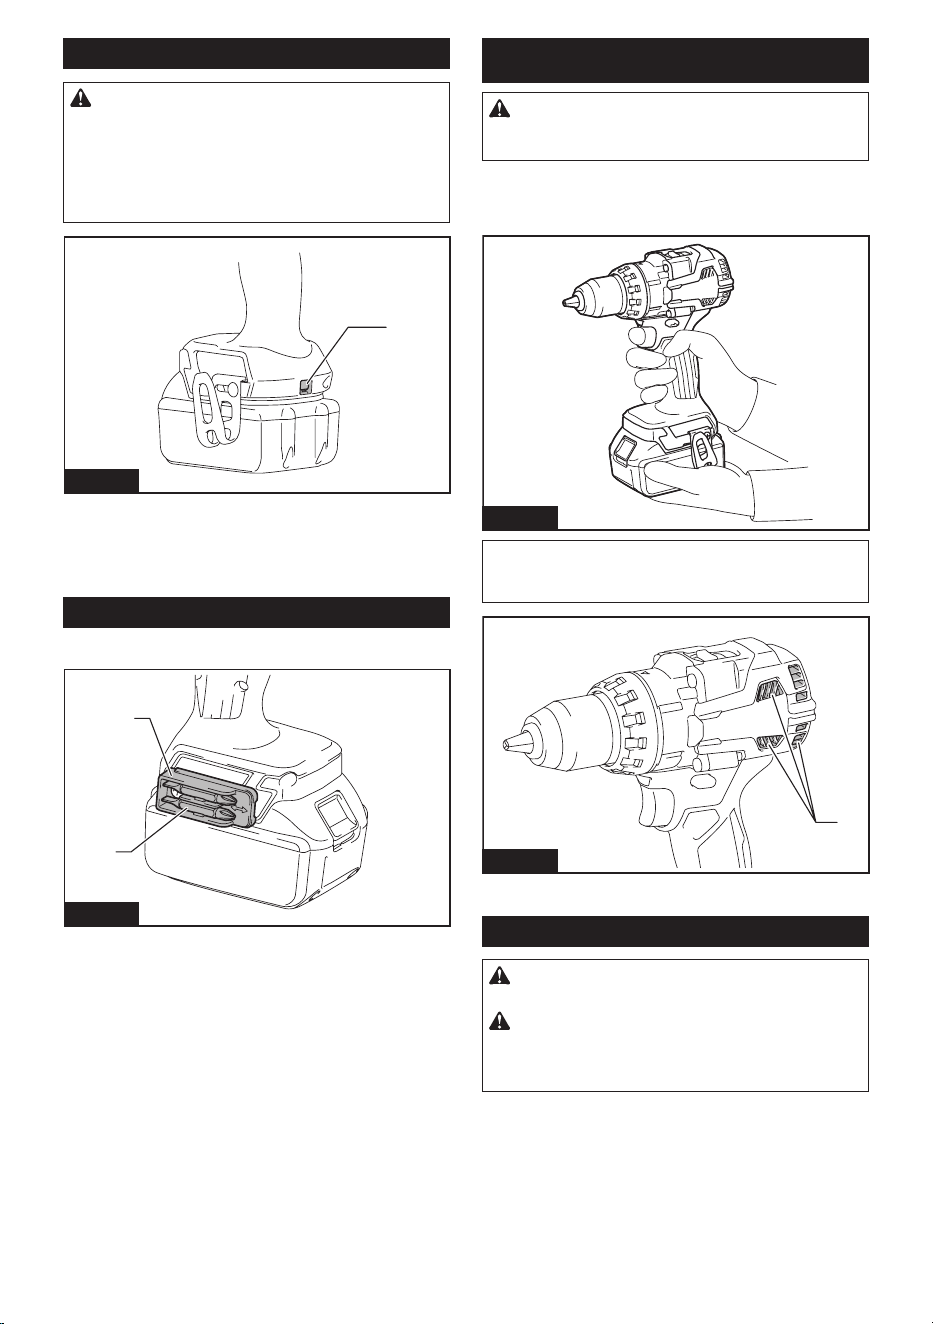
Adjusting the fastening torque
1
2
3
Fig.8
►1.Adjustingring2. Mark (1 - 21 graduation)
3. Arrow
Thefasteningtorquecanbeadjustedin21levelsbyturningtheadjustingring.Alignthegraduationswiththearrow
onthetoolbody.Youcangettheminimumfasteningtorqueat1andmaximumtorqueat21.
Beforeactualoperation,driveatrialscrewintoyourmaterialorapieceofduplicatematerialtodeterminewhich
torque level is required for a particular application.
Graduation 1 2 3 4 5 6 7 8 9 10 11 12 13 14 15 16 17 18 19 20 21
Machine screw M4 M5 M6
Wood
screw
Soft wood
(e.g. pine)
– ø3.5 x 22 ø4.1x 38 –
Hard wood
(e.g. lauan)
– ø3.5 x 22 ø4.1x 38 –
NOTE:Theadjustingringdoesnotlockwhenthearrowispositionedonlyhalfwaybetweenthegraduations.

9 ENGLISH
ASSEMBLY
CAUTION: Always be sure that the tool is
switched o and the battery cartridge is removed
before carrying out any work on the tool.
Installing or removing driver bit/
drill bit
Optional accessory
1
3
2
Fig.9
►1. Sleeve 2. Close 3. Open
Turn the sleeve counterclockwise to open the chuck
jaws.Placethedriverbit/drillbitinthechuckasfar
as it will go. Turn the sleeve clockwise to close the
chuck. To remove the driver bit/drill bit, turn the sleeve
counterclockwise.
Installing side grip (auxiliary handle)
Optional accessory
4
2
1
3
Fig.10
►1. Side grip 2. Protrusion 3. Groove 4. Arm
When operating in the heavier load, using the side grip
enablestoholdthetoolmorestably.
Installthesidegripsothattheprotrusionsonthearmt
in the grooves on the tool barrel. Turn the grip clockwise
to secure it.
Dependingtheoperations,youcaninstallthesidegrip
either right or left side of the tool.
Installing hook
WARNING: Use the hanging/mounting parts
for their intended purposes only, e.g., hanging the
tool on a tool belt between jobs or work intervals.
WARNING:
Be careful not to overload the hook
as too much force or irregular overburden may cause
damages to the tool resulting in personal injury.
CAUTION:
When installing the hook, always
secure it with the screw rmly.Ifnot,thehookmay
comeofromthetoolandresultinthepersonalinjury.
CAUTION:
Make sure to hang the tool securely
before releasing your hold.Insucientorunbalanced
hookingmaycausefallingoandyoumaybeinjured.
3
2
1
Fig.11
►1. Groove 2. Hook 3. Screw
Thehookisconvenientfortemporarilyhangingthetool.Thiscan
be installed on either side of the tool. To install the hook, insert it
into a groove in the tool housing on either side and then secure it
with a screw. To remove, loosen the screw and then take it out.
Using hole
WARNING: Never use the hanging hole for
unintended purpose, for instance, tethering the
tool at high location.Bearingstressinaheavily
loadedholemaycausedamagestothehole,result-
ingininjuriestoyouorpeoplearoundorbelowyou.
1
Fig.12
►1. Hanging hole
Use the hanging hole at the bottom rear of the tool to
hang the tool on a wall using a hanging cord or similar
strings.
10 ENGLISH
Installing driver bit holder
Optional accessory
1
2
Fig.13
►1. Driver bit holder 2. Driver bit
Fit the driver bit holder into the protrusion at the tool foot
on either right or left side and secure it with a screw.
When not using the driver bit, keep it in the driver bit
holders. Driver bits 45 mm-long (1-3/4") can be kept
there.
OPERATION
CAUTION: When the speed comes down
extremely, reduce the load or stop the tool to
avoid the tool damage.
Holdthetoolrmlywithonehandonthegripandthe
otherhandonthebottomofthebatterycartridgeto
control the twisting action.
Fig.14
NOTICE:Donotcovervents,oritmaycauseover-
heating and damage to the tool.
1
Fig.15
►1. Vent
Screwdriving operation
CAUTION: Adjust the adjusting ring to the
proper torque level for your work.
CAUTION: Make sure that the driver bit is
inserted straight in the screw head, or the screw
and/or driver bit may be damaged.
First,turntheadjustingringsothatthearrowonthetool
bodypointstotheproperfasteningtorquelevel(1-21).
Place the point of the driver bit in the screw head and
applypressuretothetool.Startthetoolslowlyandthen
increasethespeedgradually.Releasetheswitchtrigger
as soon as the clutch cuts in.
NOTE: When driving wood screw, pre-drill a pilot hole
2/3 the diameter of the screw. It makes driving easier
and prevents splitting of the workpiece.
Drilling operation
CAUTION: Pressing excessively on the tool
will not speed up the drilling. In fact, this excessive
pressurewillonlyservetodamagethetipofyourdrill
bit, decrease the tool performance and shorten the
service life of the tool.
CAUTION: Hold the tool rmly and exert care
when the drill bit begins to break through the
workpiece. There is a tremendous force exerted on
the tool/drill bit at the time of hole break through.
CAUTION: A stuck drill bit can be removed
simply by setting the reversing switch to reverse
rotation in order to back out. However, the tool
may back out abruptly if you do not hold it rmly.
CAUTION: Always secure workpieces in a
vise or similar hold-down device.
CAUTION: If the tool is operated continuously
until the battery cartridge has discharged, allow
the tool to rest for 15 minutes before proceeding
with a fresh battery.
First,turntheadjustingringsothatthearrowpointsto
the marking. Then proceed as follows.

11 ENGLISH
Drilling in wood
When drilling in wood, the best results are obtained
with wood drills equipped with a guide screw. The guide
screwmakesdrillingeasierbypullingthedrillbitinto
the workpiece.
Drilling in metal
To prevent the drill bit from slipping when starting a
hole, make an indentation with a center-punch and
hammer at the point to be drilled. Place the point of the
drill bit in the indentation and start drilling.
Use a cutting lubricant when drilling metals. The excep-
tionsareironandbrasswhichshouldbedrilleddry.
MAINTENANCE
CAUTION: Always be sure that the tool is
switched o and the battery cartridge is removed
before attempting to perform inspection or
maintenance.
NOTICE: Never use gasoline, benzine, thinner,
alcohol or the like. Discoloration, deformation or
cracks may result.
To maintain product SAFETY and RELIABILITY,
repairs,anyothermaintenanceoradjustmentshould
beperformedbyMakitaAuthorizedorFactoryService
Centers,alwaysusingMakitareplacementparts.
OPTIONAL
ACCESSORIES
CAUTION: These accessories or attachments
are recommended for use with your Makita tool
specied in this manual.Theuseofanyother
accessories or attachments might present a risk of
injurytopersons.Onlyuseaccessoryorattachment
for its stated purpose.
Ifyouneedanyassistanceformoredetailsregard-
ingtheseaccessories,askyourlocalMakitaService
Center.
• Drill bits
• Driver bits
• Driver bit holder
• Hook
• Side grip
• Rubberpadassembly
• Wool bonnet
• Foam polishing pad
• Makitagenuinebatteryandcharger
NOTE:Someitemsinthelistmaybeincludedinthe
toolpackageasstandardaccessories.Theymay
dierfromcountrytocountry.
MAKITA LIMITED WARRANTY
Pleaserefertotheannexedwarrantysheetforthe
mostcurrentwarrantytermsapplicabletothisproduct.
Ifannexedwarrantysheetisnotavailable,refertothe
warrantydetailssetforthatbelowwebsiteforyour
respectivecountry.
United States of America: www.makitatools.com
Canada: www.makita.ca
Other countries: www.makita.com
12 ESPAÑOL
ESPAÑOL (Instrucciones originales)
ESPECIFICACIONES
Modelo: XFD16
Capacidades de taladrado Acero 13 mm (1/2")
Madera Brocadebarrena:38mm(1-1/2″)
Brocadeautoalimentación:51mm(2″)
Sierraperforadora:51mm(2″)
Capacidades de apriete Tornillo para madera 10 mm x 90 mm (3/8" x 3-1/2")
Tornillo de máquina 6 mm (1/4")
Velocidad sin carga (rpm) Alta (2) 0 - 1 800 r/min
Baja(1) 0 - 550 r/min
Longitud total 174 mm (6-7/8")
Tensión nominal 18 V c.c.
Peso neto 1,8 - 2,5 kg (4,0 - 5,5 lbs)
• Debidoanuestrocontinuoprogramadeinvestigaciónydesarrollo,lasespecicacionesaquíincluidasestán
sujetasacambiosinprevioaviso.
• Lasespecicacionespuedenvariardepaísapaís.
• Elpesopuedevariarenfuncióndelosaccesorios,incluidoelcartuchodebatería.Enlatablasemuestrala
combinacióndepesomásligeroymáspesadoconformealprocedimiento01/2014deEPTA.
Cartucho de batería y cargador aplicables
Cartuchodebatería BL1815N / BL1820B / BL1830B / BL1840B / BL1850B / BL1860B
Cargador DC18RC / DC18RD / DC18RE / DC18SD / DC18SE / DC18SF /
DC18SH / DC18WC
• Algunosdeloscartuchosdebateríaycargadoresenumeradosarribapodríannoestardisponiblesdepen-
diendo de su área de residencia.
ADVERTENCIA: Use únicamente los cartuchos de batería y los cargadores indicados arriba. El uso de
cualquierotrocartuchodebateríaycargadorpodríaocasionarunalesióny/ounincendio.
ADVERTENCIAS DE
SEGURIDAD
Advertencias generales de seguridad
para herramientas eléctricas
ADVERTENCIA Lea todas las advertencias de
seguridad, instrucciones, ilustraciones y espe-
cicaciones suministradas con esta herramienta
eléctrica. El no seguir todas las instrucciones indicadas
a continuación podrá ocasionar una descarga eléctrica,
incendio o lesiones graves.
Conserve todas las advertencias
e instrucciones como referencia
en el futuro.
En las advertencias, el término “herramienta eléctrica”
sereereasuherramientaeléctricadefuncionamiento
con conexión a la red eléctrica (con cableado eléctrico)
oherramientaeléctricadefuncionamientoabatería
(inalámbrica).
Seguridad en el área de trabajo
1. Mantenga el área de trabajo limpia y bien ilu-
minada. Las áreas oscuras o desordenadas son
propensas a accidentes.
2. No utilice las herramientas eléctricas en
atmósferas explosivas, tal como en la presen-
cia de líquidos, gases o polvo inamables. Las
herramientas eléctricas crean chispas que pueden
prender fuego al polvo o los humos.
3. Mantenga a los niños y curiosos alejados
mientras utiliza una herramienta eléctrica. Las
distracciones le pueden hacer perder el control.
Seguridad eléctrica
1. Las clavijas de conexión de las herramientas
eléctricas deberán encajar perfectamente en la
toma de corriente. No modique nunca la cla-
vija de conexión de ninguna forma. No utilice
ninguna clavija adaptadora con herramientas
eléctricas que tengan conexión a tierra (puesta
a tierra). Lautilizacióndeclavijasnomodica-
dasyqueencajenperfectamenteenlatomade
corriente reducirá el riesgo de que se produzca
una descarga eléctrica.

13 ESPAÑOL
2.
Evite tocar con el cuerpo supercies conectadas
a tierra o puestas a tierra tales como tubos, radia-
dores, cocinas y refrigeradores. Si su cuerpo es
puestoatierraoconectadoatierraexistiráunmayor
riesgo de que sufra una descarga eléctrica.
3. No exponga las herramientas eléctricas a la
lluvia ni a condiciones húmedas. La entrada de
agua en una herramienta eléctrica aumentará el
riesgo de que se produzca una descarga eléctrica.
4. No maltrate el cable. Nunca utilice el cable
para transportar, jalar o desconectar la herra-
mienta eléctrica. Mantenga el cable alejado del
calor, aceite, objetos cortantes o piezas móvi-
les. Los cables dañados o enredados aumentan
el riesgo de sufrir una descarga eléctrica.
5.
Cuando utilice una herramienta eléctrica en
exteriores, utilice un cable de extensión apro
-
piado para uso en exteriores. La utilización de un
cable apropiado para uso en exteriores reducirá el
riesgo de que se produzca una descarga eléctrica.
6. Si no es posible evitar usar una herramienta
eléctrica en condiciones húmedas, utilice un
alimentador protegido con interruptor de cir-
cuito de falla a tierra (ICFT). El uso de un ICFT
reduce el riesgo de descarga eléctrica.
7. Las herramientas eléctricas pueden producir
campos electromagnéticos (CEM) que no son
dañinos para el usuario. Sin embargo, si los
usuariostienenmarcapasosyotrosdispositivos
médicos similares, deberán consultar al fabricante
desudispositivoy/oasumédicoantesdeoperar
esta herramienta eléctrica.
Seguridad personal
1. Manténgase alerta, preste atención a lo que
está haciendo y utilice su sentido común
cuando opere una herramienta eléctrica. No
utilice una herramienta eléctrica cuando esté
cansado o bajo la inuencia de drogas, alco-
hol o medicamentos. Un momento de distracción
mientras opera las herramientas eléctricas puede
terminar en una lesión grave.
2. Use equipo de protección personal. Póngase
siempre protección para los ojos. El equipo
protector tal como máscara contra el polvo, zapa-
tosdeseguridadantiderrapantes,cascorígidoy
protecciónparaoídosutilizadoenlascondiciones
apropiadas reducirá el riesgo de lesiones.
3.
Impida el encendido accidental. Asegúrese
de que el interruptor esté en la posición de
apagado antes de conectar a la alimentación
eléctrica y/o de colocar el cartucho de batería,
así como al levantar o cargar la herramienta.
Cargar las herramientas eléctricas con su dedo
en el interruptor o enchufarlas con el interruptor
encendido hace que los accidentes sean comunes.
4. Retire cualquier llave de ajuste o llave de
apriete antes de encender la herramienta. Una
llavedeajusteollavedeaprietequehayasido
dejadapuestaenunapartegiratoriadelaherra-
mienta eléctrica puede ocasionar alguna lesión.
5. No utilice la herramienta donde no alcance.
Mantenga los pies sobre suelo rme y el equi-
librio en todo momento.Estopermiteunmejor
control de la herramienta eléctrica en situaciones
inesperadas.
6.
Use una vestimenta apropiada. No use ropa
suelta ni alhajas. Mantenga el cabello y la ropa
alejados de las piezas móviles. Las prendas de
vestirholgadas,lasalhajasyelcabellolargosuelto
podríanengancharseenestaspiezasmóviles.
7.
Si dispone de dispositivos para la conexión de
equipos de extracción y recolección de polvo,
asegúrese de conectarlos y utilizarlos debida-
mente. Hacer uso de la recolección de polvo puede
reducir los riesgos relacionados con el polvo.
8.
No permita que la familiaridad adquirida debido
al uso frecuente de las herramientas haga que se
sienta conado e ignore los principios de seguridad
de las herramientas.Undescuidopodríaocasionar
una lesión grave en una fracción de segundo.
9. Utilice siempre gafas protectoras para prote-
ger sus ojos de lesiones al usar herramientas
eléctricas. Las gafas deben cumplir con la
Norma ANSI Z87.1 en EUA.
Es responsabilidad del empleador imponer
el uso de equipos protectores de seguridad
apropiados a los operadores de la herramienta
y demás personas cerca del área de trabajo.
Mantenimiento y uso de la herramienta eléctrica
1. No fuerce la herramienta eléctrica. Utilice la
herramienta eléctrica correcta para su aplica-
ción. La herramienta eléctrica adecuada hará un
mejortrabajoydeformamásseguraalaveloci-
dad para la que ha sido fabricada.
2.
No utilice la herramienta eléctrica si el interrup-
tor no la enciende y apaga. Cualquier herramienta
eléctrica que no pueda ser controlada con el inte-
rruptorespeligrosaydebeserreemplazada.
3.
Desconecte la clavija de la fuente de alimenta-
ción y/o retire la batería de la herramienta eléc-
trica, en caso de ser removible, antes de realizar
ajustes, cambiar accesorios o almacenar las
herramientas eléctricas. Tales medidas de segu-
ridad preventivas reducirán el riesgo de poner en
marcha la herramienta eléctrica de forma accidental.
4. Guarde la herramienta eléctrica que no use
fuera del alcance de los niños y no permita
que las personas que no están familiarizadas
con ella o con las instrucciones la operen. Las
herramientas eléctricas son peligrosas en manos
de personas que no saben operarlas.
5.
Dé mantenimiento a las herramientas eléctricas
y los accesorios. Compruebe que no haya piezas
móviles desalineadas o estancadas, piezas rotas
y cualquier otra condición que pueda afectar al
funcionamiento de la herramienta eléctrica. Si la
herramienta eléctrica está dañada, haga que la
reparen antes de utilizarla. Muchos de los acciden-
tes son ocasionados por no dar un mantenimiento
adecuado a las herramientas eléctricas.
6.
Mantenga las herramientas de corte limpias y
losas.Sirecibeunmantenimientoadecuadoytiene
losbordesalados,esprobablequelaherramienta
seatasquemenosyseamásfácilcontrolarla.
7.
Utilice la herramienta eléctrica, los accesorios y
las brocas de acuerdo con estas instrucciones,
considerando las condiciones laborales y el
trabajo a realizar. Si utiliza la herramienta eléctrica
para realizar operaciones distintas de las indicadas,
podrá presentarse una situación peligrosa.

14 ESPAÑOL
8. Mantenga los mangos y supercies de asi-
miento secos, limpios y libres de aceite o
grasa.Losmangosysuperciesdeasimiento
resbalosos no permiten una manipulación segura
ni el control de la herramienta en situaciones
inesperadas.
9. Cuando vaya a utilizar esta herramienta, evite
usar guantes de trabajo de tela ya que éstos
podrían atorarse.Silosguantesdetrabajode
tela llegaran a atorarse en las piezas móviles,
estopodríaocasionarlesionespersonales.
Uso y cuidado de la herramienta a batería
1. Recargue sólo con el cargador especicado
por el fabricante. Un cargador que es adecuado
paraunsolotipodebateríapuedegenerarriesgo
deincendioalserutilizadoconotrabatería.
2. Utilice las herramientas eléctricas solamente
con las baterías designadas especícamente
para ellas.Lautilizacióndecualquierotrabatería
puede crear un riesgo de lesiones o incendio.
3. Cuando no se esté usando la batería, mantén-
gala alejada de otros objetos metálicos, como
sujetapapeles (clips), monedas, llaves, clavos,
tornillos u otros objetos pequeños de metal
los cuales pueden actuar creando una cone-
xión entre las terminales de la batería. Originar
un cortocircuito en las terminales puede causar
quemaduras o incendios.
4. En condiciones abusivas, podrá escapar
líquido de la batería; evite tocarlo. Si lo toca
accidentalmente, enjuague con agua. Si hay
contacto del líquido con los ojos, busque asis-
tencia médica.Puedequeellíquidoexpulsado
delabateríacauseirritaciónoquemaduras.
5. No utilice una herramienta ni una batería que
estén dañadas o hayan sido modicadas. Las
bateríasdañadasomodicadaspodríanoca-
sionar una situación inesperada provocando un
incendio, explosión o riesgo de lesiones.
6. No exponga la herramienta ni la batería al
fuego ni a una temperatura excesiva. La expo-
sición al fuego o a una temperatura superior a los
130°Cpodríacausarunaexplosión.
7. Siga todas las instrucciones para la carga y
evite cargar la herramienta o la batería fuera
del rango de temperatura especicado en
las instrucciones. Una carga inadecuada o a
unatemperaturafueradelrangoespecicado
podríadañarlabateríaeincrementarelriesgode
incendio.
Servicio
1. Haga que una persona calicada repare la
herramienta eléctrica utilizando sólo piezas de
repuesto idénticas. Esto asegura que se man-
tenga la seguridad de la herramienta eléctrica.
2. Nunca dé servicio a baterías que estén daña-
das.Elservicioalasbateríassolamentedeberá
ser efectuado por el fabricante o un agente de
servicio autorizado.
3. Siga las instrucciones para la lubricación y
cambio de accesorios.
4. No modique ni intente reparar el aparato ni el
paquete de baterías salvo como se indique en
las instrucciones para el uso y cuidado.
Advertencias de seguridad para el
taladro atornillador inalámbrico
Instrucciones de seguridad para todas las operaciones
1.
Sujete la herramienta eléctrica por las supercies
de agarre aisladas al realizar una operación en la
que el accesorio de corte o sujetadores puedan
estar en contacto con cables ocultos. El accesorio
decorteosujetadoresquehagancontactoconun
cableelectricadopuedenelectricarlaspiezasmetá-
licas expuestas de la herramienta eléctrica, lo cual
podríaocasionarunadescargaeléctricaaloperador.
2. Asegúrese siempre de que pisa sobre suelo
rme. Asegúrese de que no haya nadie debajo
cuando utilice la herramienta en lugares altos.
3. Sujete la herramienta con rmeza.
4.
Mantenga las manos alejadas de las piezas giratorias.
5.
No deje la herramienta funcionando. Ponga la herra-
mienta en marcha únicamente cuando la tenga con usted.
6. No toque la broca, la pieza de trabajo o las
astillas inmediatamente después de la opera-
ción; podrían estar extremadamente calientes
y ocasionar quemaduras en la piel.
7.
Algunos materiales contienen sustancias quími-
cas que pueden ser tóxicas. Evite inhalar polvo y
que éste entre en contacto con la piel. Consulte la
hoja de seguridad de materiales del proveedor.
8. Si la broca no puede ser aojada aun abriendo
las mordazas, utilice tenazas para sacarla.
Enestecaso,sacarlabrocaconlamanopodría
ocasionarunalesiónacausadesubordeloso.
9. Asegúrese de que no haya cables eléctricos,
tubos de agua, tubos de gas, etc. que pudieran
representar un peligro en caso de ser dañados
por el uso de la herramienta.
Instrucciones de seguridad cuando se utilicen brocas largas
1.
Nunca opere a una velocidad mayor que la velo-
cidad máxima nominal de la broca. A velocidades
más altas, es probable que la broca se doble si se
permite que gire libremente sin tocar la pieza de
trabajo,loqueocasionaríalesionespersonales.
2. Siempre comience a perforar a baja velocidad
y con la punta de la broca en contacto con la
pieza de trabajo. A velocidades más altas, es
probable que la broca se doble si se permite que
girelibrementesintocarlapiezadetrabajo,loque
ocasionaríalesionespersonales.
3. Aplique presión solo en línea directa con la
broca y no aplique presión excesiva. Las bro-
caspodríandoblarseyromperseuocasionarla
pérdidadelcontrol,loqueresultaríaenlesiones
personales.
GUARDE ESTAS
INSTRUCCIONES.
ADVERTENCIA: NO DEJE que la comodidad
o familiaridad con el producto (a base de utilizarlo
repetidamente) sustituya la estricta observancia
de las normas de seguridad para dicho producto.
El MAL USO o el no seguir las normas de seguri-
dad establecidas en este manual de instrucciones
puede ocasionar lesiones personales graves.

15 ESPAÑOL
Símbolos
Acontinuaciónsemuestranlossímbolosquepue-
den ser utilizados para el equipo. Asegúrese de que
entiendesusignicadoantesdeutilizar.
volts o voltios
corriente directa o continua
velocidad sin carga
revoluciones o alternaciones por minuto,
frecuencia de rotación
diámetro
Instrucciones importantes de
seguridad para el cartucho de
batería
1. Antes de utilizar el cartucho de batería, lea
todas las instrucciones e indicaciones de
precaución en el (1) el cargador de batería, (2)
la batería, y (3) el producto con el que se utiliza
la batería.
2. No desarme ni modique el cartucho de bate-
ría.Podríaocurrirunincendio,calorexcesivoo
una explosión.
3. Si el tiempo de operación se ha acortado en
exceso, deje de operar de inmediato. Podría
correrse el riesgo de sobrecalentamiento,
posibles quemaduras e incluso explosión.
4. En caso de que ingresen electrolitos en sus
ojos, enjuáguelos bien con agua limpia y con-
sulte de inmediato a un médico. Esto podría
ocasionar pérdida de visión.
5. Evite cortocircuitar el cartucho de batería:
(1) No toque las terminales con ningún mate-
rial conductor.
(2) Evite guardar el cartucho de batería en un
cajón junto con otros objetos metálicos,
tales como clavos, monedas, etc.
(3) No exponga el cartucho de batería al
agua o la lluvia.
Un cortocircuito en la batería puede causar
un ujo grande de corriente, sobrecalenta-
miento, posibles quemaduras e incluso una
descompostura.
6.
No guarde ni utilice la herramienta y el cartu-
cho de batería en lugares donde la temperatura
pueda alcanzar o exceder los 50 °C (122 °F).
7. Nunca incinere el cartucho de batería incluso
en el caso de que esté dañado seriamente o
ya no sirva en absoluto. El cartucho de batería
puede explotar si se tira al fuego.
8. No clave, corte, aplaste, lance o deje caer el
cartucho de batería, ni golpee un objeto sólido
contra el cartucho de batería. Dicha acción
podríaresultarenunincendio,calorexcesivooen
una explosión.
9. No use una batería dañada.
10. Las baterías de ión de litio están sujetas a los
requisitos reglamentarios en materia de bie-
nes peligrosos.
Paraeltrasportecomercial,porej.,mediante
terceros o agentes de transporte, se deben tomar
en cuenta los requisitos especiales relativos al
empaqueyeletiquetado.
Paraefectuarlospreparativosdelartículoquese
va a enviar, se requiere consultar a un experto
en materiales peligrosos. Si es posible, consulte
además otras regulaciones nacionales más deta-
lladas.
Pegue o cubra con cinta adhesiva los contactos
abiertosyempaquelabateríademaneraqueésta
no pueda moverse dentro del paquete.
11. Para deshacerse del cartucho de batería,
sáquelo de la herramienta y deséchelo en un
lugar seguro. Siga las regulaciones locales
relacionadas al desecho de las baterías.
12. Utilice las baterías únicamente con los pro-
ductos especicados por Makita. Instalar las
bateríasenproductosquenocumplanconlos
requisitospodríaocasionarunincendio,uncalen-
tamiento excesivo, una explosión o una fuga de
electrolito.
13. Si no se utiliza la herramienta por un
período largo, debe extraerse la batería de la
herramienta.
14. El cartucho de batería podría absorber calor
durante y después de su uso, lo que ocasiona-
ría quemaduras o quemaduras a baja tempe-
ratura. Tenga cuidado con la manipulación de
los cartuchos de batería que estén calientes.
15. No toque el terminal de la herramienta inme-
diatamente después de su uso, ya que el
mismo podría estar lo sucientemente caliente
como para provocarle quemaduras.
16. No permita que las rebabas, el polvo o la tierra
queden atrapados en los terminales, oricios
y ranuras del cartucho de batería.Podríapro-
vocarcalentamiento,incendio,explosiónymal
funcionamiento de la herramienta o del cartucho
debatería,loqueresultaríaenquemaduraso
lesiones personales.
17. No utilice el cartucho de batería cerca de
cables eléctricos de alto voltaje, a menos que
la herramienta sea compatible con el uso cer-
cano a estos cables eléctricos de alto voltaje.
Estopodríaocasionarunaaveríaodescompos-
turadelaherramientaodelcartuchodebatería.
18. Mantenga la batería alejada de los niños.
GUARDE ESTAS
INSTRUCCIONES.
PRECAUCIÓN: Utilice únicamente baterías
originales de Makita.Elusodebateríasnoorigina-
lesdeMakita,odebateríasalteradas,puedeocasio-
narquelasbateríasexplotencausandounincendio,
lesionespersonalesydaños.Asimismo,estoinva-
lidarálagarantíadeMakitaparalaherramientayel
cargador Makita.
16 ESPAÑOL
Consejos para alargar al máximo
la vida útil de la batería
1.
Cargue el cartucho de batería antes de que se
descargue completamente. Pare siempre la ope-
ración y cargue el cartucho de batería cuando
note menos potencia en la herramienta.
2. No cargue nunca un cartucho de batería que
esté completamente cargado. La sobrecarga
acortará la vida de servicio de la batería.
3. Cargue el cartucho de batería a una tempera-
tura ambiente de 10 °C - 40 °C (50 °F - 104 °F).
Si un cartucho de batería está caliente, déjelo
enfriar antes de cargarlo.
4. Cuando no utilice el cartucho de batería,
sáquelo de la herramienta o del cargador.
5. Cargue el cartucho de batería si no va a utili-
zarlo durante un período prolongado (más de
seis meses).
DESCRIPCIÓN DEL
FUNCIONAMIENTO
PRECAUCIÓN: Asegúrese siempre de que la
herramienta esté apagada y el cartucho de batería
haya sido extraído antes de realizar cualquier
ajuste o comprobación en la herramienta.
Instalación o extracción del
cartucho de batería
PRECAUCIÓN: Apague siempre la herra-
mienta antes de colocar o quitar el cartucho de
batería.
PRECAUCIÓN: Sujete la herramienta y el car-
tucho de la batería con rmeza al colocar o quitar
el cartucho de batería.Sinosesujetaconrmezala
herramientayelcartuchodebatería,puedeocasio-
nar que se resbalen de sus manos causando daños
alaherramientayalcartuchodebatería,asícomo
lesiones a la persona.
1
2
3
Fig.1
►1.Indicadorrojo2. Botón 3.Cartuchodebatería
Paraquitarelcartuchodebatería,deslícelodelaherra-
mienta mientras desliza el botón sobre la parte delan-
tera del cartucho.
Parainstalarelcartuchodebatería,alineelalengüeta
sobreelcartuchodebateríaconlaranuraenlacarcasa
ydeslícelahastasulugar.Insérteloporcompletohasta
quesejeensulugarconunpequeñoclic.Sipuede
verelindicadorrojocomosemuestraenlailustración,
este no ha quedado asegurado por completo.
PRECAUCIÓN: Introduzca siempre com-
pletamente el cartucho de batería hasta que
el indicador rojo no pueda verse.Sino,podría
accidentalmentesalirsedelaherramientaycaeral
suelo causando una lesión a usted o alguien a su
alrededor.
PRECAUCIÓN: No instale el cartucho de
batería a la fuerza. Si el cartucho no se desliza al
interior fácilmente, se debe a que no está siendo
insertado correctamente.
Indicación de la capacidad restante
de la batería
Únicamente para cartuchos de batería con el
indicador
1
2
Fig.2
►1. Luces indicadoras 2.Botóndevericación
Oprimaelbotóndevericaciónenelcartuchodela
bateríaparaqueindiquelacapacidadrestantedela
batería.Laslucesindicadorasseiluminaránporalgu-
nos segundos.
Luces indicadoras Capacidad
restante
Iluminadas Apagadas Parpadeando
75% a 100%
50% a 75%
25% a 50%
0% a 25%
Cargar la
batería.
Labatería
pudo haber
funcionado
mal.
17 ESPAÑOL
NOTA:Dependiendodelascondicionesdeusoy
la temperatura ambiente, la indicación podrá diferir
ligeramente de la capacidad real.
NOTA: La primera luz indicadora (extrema izquierda)
parpadeará cuando el sistema de protección de
bateríaestéenfuncionamiento.
Sistema de protección para la
herramienta/batería
La herramienta está equipada con un sistema de pro-
tecciónparalaherramienta/batería.Estesistemacorta
automáticamente la alimentación para prolongar la vida
delaherramientaylabatería.Laherramientasedeten-
drá automáticamente durante la operación si la herra-
mientaolabateríasesometenaunadelassiguientes
condiciones:
Protección contra sobrecarga
Esta protección funciona cuando la herramienta/bate-
ríaseestánutilizandodeunamaneraquecausaque
consuma una cantidad de corriente inusualmente alta.
Enestasituación,apaguelaherramientaydetenga
laaplicaciónquehayacausadoquelaherramienta
se sobrecargara. Luego encienda la herramienta para
reiniciarla.
Protección contra
sobrecalentamiento
Esta protección funciona solo cuando la herramienta
olabateríasesobrecalientan.Enestecaso,espere
aquelaherramientaylabateríaseenfríenantesde
volver a encender la herramienta.
Protección en caso de
sobredescarga
Esta protección funciona cuando la capacidad restante
delabateríadisminuye.Enestasituación,extraigala
bateríadelaherramientaycárguela.
Protección contra otras causas
El sistema de protección también está diseñado para
otrascausasquepodríandañarlaherramienta,yper-
mite que la herramienta se detenga automáticamente.
Siga todos los pasos a continuación para eliminar las
causascuandolaherramientasehayadetenidotempo-
ralmenteosehayadetenidoduranteelfuncionamiento.
1. Apaguelaherramienta,yluegoenciéndalanueva-
mente para reiniciarla.
2. Carguela(s)batería(s)oreemplácela(s)con
batería(s)recargada(s).
3. Dejequelaherramientayla(s)batería(s)se
enfríen.
Sinohayningunamejoraalrestaurarelsistemade
protección,comuníqueseconsucentrolocaldeservi-
cio Makita.
Accionamiento del interruptor
PRECAUCIÓN: Antes de insertar el cartucho
de batería en la herramienta, compruebe siem-
pre y cerciórese de que el gatillo interruptor se
acciona debidamente y que vuelve a la posición
“OFF” (apagado) cuando lo suelta.
1
Fig.3
►1. Gatillo interruptor
Para poner en marcha la herramienta, simplemente
apriete el gatillo interruptor. La velocidad de la herra-
mienta aumenta incrementando la presión en el gatillo.
Para detenerla, suelte el gatillo.
NOTA: La herramienta se detiene automáticamente
sicontinúajalandoelgatillointerruptoralrededorde
6 minutos.
Freno eléctrico
La herramienta está equipada con un freno eléctrico. Si
la herramienta falla constantemente en detenerse tras
soltar el gatillo interruptor, lleve la herramienta a mante-
nimiento a un centro de servicio Makita.
Iluminación de la luz delantera
PRECAUCIÓN: No mire a la luz ni vea a la
fuente de luz directamente.
1
Fig.4
►1. Luz
Jale el gatillo interruptor para encender la luz. La luz
continúailuminándosemientrasseestájalandoel
gatillo interruptor. La luz se apaga aproximadamente 10
segundos tras haber liberado el gatillo interruptor.

18 ESPAÑOL
NOTA: Cuando la herramienta se sobrecaliente, ésta
sedetendráautomáticamenteylalámparacomen-
zará a destellar. En este caso, suelte el gatillo inte-
rruptor. La lámpara se apagará en un minuto.
NOTA: Utilice un paño seco para quitar la suciedad
delalentedelalámpara.Tengacuidadodenorayar
lalentedelalámparayaquelailuminaciónpodría
disminuir.
Acción de la palanca del interruptor
de inversión
PRECAUCIÓN: Verique siempre la dirección
de la rotación antes de la operación.
PRECAUCIÓN: Utilice la palanca del inte-
rruptor de inversión solamente después de que
la herramienta haya parado completamente. El
cambiar la dirección de rotación antes de que la
herramientasedetengapodríacausardañosala
herramienta.
PRECAUCIÓN: Cuando no esté utilizando la
herramienta, ponga siempre la palanca del inte-
rruptor de inversión en la posición neutral.
1
AB
Fig.5
►1. Palanca del interruptor de inversión
Esta herramienta cuenta con una palanca del interrup-
tor de inversión para cambiar la dirección de la rotación.
Presione la palanca del interruptor de inversión desde
el lado A para una rotación en el sentido de las mane-
cillasdelrelojodesdeelladoB,paraunarotaciónen
sentidoinversoaldelasmanecillasdelreloj.
Cuando la palanca del conmutador de inversión esté
enlaposiciónneutral,nosepodrájalarelgatillo
conmutador.
Cambio de velocidad
PRECAUCIÓN: Coloque siempre la palanca
de cambio de velocidad exactamente en la posi-
ción correcta. Si usted utiliza la herramienta con la
palanca de cambio de velocidad puesta a medias
entrelaposición“1”y“2”,laherramientapodría
dañarse.
PRECAUCIÓN: No utilice la palanca de cam-
bio de velocidad mientras la herramienta está en
marcha.Laherramientapodríadañarse.
1
Fig.6
►1. Palanca de cambio de velocidad
Número
desplegado
Velocidad Torsión Operación
aplicable
1 Baja Alta Operación de
carga pesada
2 Alta Baja Operación de
carga ligera
Para cambiar la velocidad, primero apague la herra-
mienta. Presione la palanca de cambio de velocidad
para desplegar “2” para velocidad alta o “1” para velo-
cidadbaja.Asegúresedequelapalancadecambiode
velocidadseaajustadaenlaposicióncorrectaantesde
iniciar la operación.
Si la velocidad de la herramienta desciende extrema-
damente durante la operación con el “2” desplegado,
presionelapalancaparadesplegar“1”yreiniciela
operación.
19 ESPAÑOL
Anillo de ajuste
Ustedpuedeseleccionarelmododeaccionamientoy
ajustarlatorsióndeaprietemedianteelanillodeajuste.
Selección del modo de
accionamiento
1
2
3
Fig.7
►1.Anillodeajuste2. Marca 3. Flecha
Esta herramienta cuenta con dos modos de
accionamiento.
Modo de taladrado (rotación
solamente)
1 - 21 Modo de atornillado (rotación
con embrague)
Seleccioneelmodoapropiadoparasutrabajo.Gireel
anillodeajusteyalineelamarcaqueustedseleccione
conlaechaenelcuerpodelaherramienta.
AVISO: Ponga siempre el anillo correctamente en la
marca del modo que desee. Si utiliza la herramienta
con el anillo puesto a medias entre las marcas de
modo, la herramienta podrá dañarse.
AVISO: No cambie el modo de accionamiento mien-
tras la herramienta está en rotación.
AVISO:Siesdifícildeslizarelanillodeajuste,
enciendayhagafuncionarlaherramientaporun
segundo,luegodetengalaherramientaydesliceel
anillodeajustealaposicióndeseadanuevamente.
Ajuste de la torsión de apriete
1
2
3
Fig.8
►1.Anillodeajuste2. Marca (graduación 1 - 21)
3. Flecha
Latorsióndeaprietepuedeajustarseen21nivelesgirandoelanillodeajuste.Alineelasgraduacionesconlaecha
enelcuerpodelaherramienta.Puedeconseguirunajacióndetorsiónmínimaen1yunatorsiónmáximaen21.
Antes de la operación real, coloque un tornillo de prueba en el material o algún duplicado del material para determi-
nar qué nivel de torsión se requiere para la aplicación particular.
Graduación 1 2 3 4 5 6 7 8 9 10 11 12 13 14 15 16 17 18 19 20 21
Tornillo de máquina 4 mm 5 mm 6 mm
Tornillo
para
madera
Madera
blanda
(Ej.pino)
– ɸ3,5 mm x 22 mm ɸ4,1 mmx 38 mm –
Madera
dura
(Ej.lauan)
– ɸ3,5 mm x 22 mm ɸ4,1 mmx 38 mm –
NOTA:Elanillodeajustenosebloqueacuandolaechaestéposicionadasoloamediocaminoentrelas
graduaciones.
20 ESPAÑOL
MONTAJE
PRECAUCIÓN:
Asegúrese siempre de que la herra-
mienta esté apagada y el cartucho de batería haya sido
extraído antes de realizar cualquier trabajo en la misma.
Instalación o extracción de la punta
de destornillador/broca de taladro
Accesorio opcional
1
3
2
Fig.9
►1. Mandril 2. Cerrar 3. Abrir
Gireelmandrilensentidoinversoaldelasmanecillasdelrelojpara
abrirlasgarrasdelaprensadesujeción.Coloquelapuntapara
atornillar/brocaenlaprensadesujeciónhastaquelleguealtope.
Gireelmandrilenelsentidodelasmanecillasdelrelojparacerrar
laprensadesujeción.Paraextraerlapuntaparaatornillar/broca,
gireelmandrilensentidoinversoaldelasmanecillasdelreloj.
Instalación de la empuñadura lateral
(mango auxiliar)
Accesorio opcional
4
2
1
3
Fig.10
►1. Empuñadura lateral de mango 2. Protuberancia
3. Ranura 4. Brazo
Cuando opere con la carga más pesada, utilizar la empuñadura
lateral permite sostener la herramienta de manera más estable.
Instale la empuñadura lateral de modo que las protuberancias en
el brazo queden entre las ranuras del cilindro de la herramienta.
Girelaempuñaduraenelsentidodelasmanecillasdelrelojpara
asegurarla.Laempuñadurapuedejarseenelángulodeseado.
Dependiendo de las operaciones, usted puede instalar
la empuñadura lateral en el lado derecho o izquierdo de
la herramienta.
Instalación del gancho
ADVERTENCIA: Utilice las piezas para col-
gado/montado solo para los nes previstos; por
ejemplo, colgar la herramienta en un cinturón
de herramientas entre trabajos o intervalos de
trabajo.
ADVERTENCIA: Tenga cuidado de no sobre-
cargar el gancho, ya que demasiada fuerza o una
sobrecarga irregular podrían dañar la herramienta
y provocar lesiones personales.
PRECAUCIÓN: Cuando instale el gancho,
siempre asegúrelo rmemente con el tornillo. De
locontrario,elganchopodríadesprendersedela
herramientayocasionarlesionespersonales.
PRECAUCIÓN: Asegúrese de colgar la
herramienta de forma segura antes de soltarla. Un
engancheinsucienteodesequilibradopodríaprovo-
carquesecaigayustedpodríalesionarse.
3
2
1
Fig.11
►1. Ranura 2. Gancho 3. Tornillo
El gancho resulta útil para colgar temporalmente la
herramienta. Se puede instalar en cualquiera de los
lados de la herramienta. Para instalar el gancho, insér-
telo en una ranura de la carcasa de la herramienta de
cualquieradelosladosydespuéssujételoconuntorni-
llo.Paraquitarlo,aojeeltornilloydespuéssáquelo.
21 ESPAÑOL
Uso del oricio
ADVERTENCIA: Nunca use el oricio para
colgado para un propósito no previsto, por ejem-
plo, atar la herramienta en un lugar alto. La carga
deesfuerzoenunoriciomuycargadopodríacausar
dañosaloricio,loquepodríaresultarenlesiones
para usted o para las personas que se encuentran a
sualrededorodebajodeusted.
1
Fig.12
►1.Oricioparacolgado
Utiliceeloricioparacolgadoenlaparteinferiortrasera
de la herramienta para colgar la herramienta en una
pared, con un cordón para colgar o cuerdas similares.
Instalación del portabrocas
Accesorio opcional
1
2
Fig.13
►1. Portabrocas 2. Punta de destornillador
Coloque el portabrocas en la protuberancia en la base
delaherramientaoyaseadelladoderechooizquierdo
yasegúreloconuntornillo.
Cuando no utilice la punta de destornillador, mantén-
gala dentro del portabrocas. Las puntas de destornilla-
dorde45mmdelargo(1-3/4")sepuedenguardarahí.
OPERACIÓN
PRECAUCIÓN: Cuando la velocidad baje
demasiado, reduzca la carga o detenga la herra-
mienta para evitar daños en ésta.
Sujetermementelaherramientaconunamanoenla
agarraderayotraenlaparteinferiordelcartuchode
bateríaparacontrolarlaaccióndetorsión.
Fig.14
AVISO: No tape las aberturas de ventilación o
puedeprovocarunsobrecalentamientoydañarla
herramienta.
1
Fig.15
►1. Aberturas de ventilación
Operación de atornillado
PRECAUCIÓN: Coloque el anillo de ajuste en
el nivel de torsión apropiado para su trabajo.
PRECAUCIÓN: Asegúrese de que la punta
de destornillador se inserte exactamente en la
cabeza del tornillo, de lo contrario el tornillo y/o la
punta de destornillador pueden dañarse.
Enprimerlugar,gireelanillodeajustedemodoquela
echaenlaherramientaapuntealniveldetorsiónde
apriete adecuado (1 - 21).
Coloque la punta de la punta de destornillador sobre la
cabezadeltornilloyapliquepresiónenlaherramienta.
Hagafuncionarlaherramientalentamenteydespués
aumente la velocidad gradualmente. Suelte el gatillo
interruptor en cuanto el embrague patine.
22 ESPAÑOL
NOTA: Cuando atornille en madera, taladre primero
unoriciode2/3deldiámetrodeltornillo.Estofacilita
laoperaciónyevitaquelapiezadetrabajoserompa
en dos.
Operación de taladrado
PRECAUCIÓN: Ejercer una presión excesiva
sobre la herramienta no hará que consiga taladrar
más rápido. De hecho, una presión excesiva sólo
logrará dañar la punta de la broca de taladro, reducir
eldesempeñoyacortarlavidaútildelaherramienta.
PRECAUCIÓN: Sujete rmemente la herra-
mienta y tenga cuidado cuando la broca de tala-
dro comience a penetrar en la pieza de trabajo. La
fuerzaejercidaenlaherramienta/brocadetaladroal
momento de la penetración es enorme.
PRECAUCIÓN: Para extraer una broca de
taladro atorada, basta simplemente con ajustar el
interruptor de inversión en rotación inversa para
hacerla retroceder. Sin embargo, la herramienta
puede retroceder bruscamente si no la sujeta con
rmeza.
PRECAUCIÓN: Asegure siempre las piezas
de trabajo con un tornillo de banco o dispositivo
de sujeción similar.
PRECAUCIÓN: Si utiliza la herramienta de
forma continua hasta que el cartucho de batería
se descargue, deje descansar la herramienta
durante 15 minutos antes de proceder con una
batería llena.
Primero,gireelanillodeajustedetalformaquela
echaapuntehacialamarca . Después proceda
como sigue.
Taladrado en madera
Cuandotaladreenmadera,podráobtenermejores
resultados si utiliza brocas para madera equipadas
conuntornilloguía.Eltornilloguíafacilitaeltaladrado
jalandolabrocadetaladrohaciaelinteriordelapieza
detrabajo.
Taladrado en metal
Para evitar que la broca de taladro resbale una vez que
comienceahacereloricio,hagaunsurcoconpunzón
yunmartilloenelpuntoataladrar.Coloquelapunta
delabrocadetaladroenelsurcoycomienceataladrar.
Utilice un lubricante para corte cuando taladre metales.
Salvoenelcasodehierroybronce,loscualesdeberán
ser taladrados en seco.
MANTENIMIENTO
PRECAUCIÓN: Asegúrese siempre de que la
herramienta esté apagada y el cartucho de batería
extraído antes de intentar realizar una inspección
o mantenimiento.
AVISO: Nunca use gasolina, bencina, diluyente
(tíner), alcohol o sustancias similares. Puede que
esto ocasione grietas o descoloramiento.
ParamantenerlaSEGURIDADyFIABILIDADdelpro-
ducto,lasreparaciones,ycualquierotratareademan-
tenimientooajustedeberánserrealizadasencentros
de servicio autorizados o de fábrica Makita, empleando
siempre repuestos Makita.
ACCESORIOS
OPCIONALES
PRECAUCIÓN: Estos accesorios o aditamen-
tos están recomendados para utilizarse con su
herramienta Makita especicada en este manual.
El empleo de cualquier otro accesorio o aditamento
puede conllevar el riesgo de lesiones personales.
Utilice los accesorios o aditamentos solamente para
sunestablecido.
Sinecesitacualquierayudaparamásdetallesen
relación con estos accesorios, pregunte a su centro de
servicio local Makita.
• Brocas de taladro
• Puntas de destornillador
• Portabrocas
• Gancho
• Empuñadura lateral de mango
• Montajedelplatodegoma
• Capucha de lana
• Almohadilla de pulido de espuma
• BateríaycargadororiginalesdeMakita
NOTA:Algunosdelosartículosenlalistapueden
incluirse en el paquete de la herramienta como acce-
soriosestándar.Éstospuedenvariardepaísapaís.
GARANTÍA LIMITADA DE MAKITA
Ésta Garantía no aplica para México
Consultelahojadelagarantíaanexaparaverlos
términosmásvigentesdelagarantíaaplicableaeste
producto.Encasodenodisponerdeestahojade
garantíaanexa,consultelosdetallessobrelagarantía
descritosenelsitiowebdesupaísrespectivoindicado
a continuación.
Estados Unidos de América: www.makitatools.com
Canadá: www.makita.ca
Otrospaíses:www.makita.com

23

Some dust created by power sanding, sawing, grinding, drilling, and other
construction activities contains chemicals known to the State of California
to cause cancer, birth defects or other reproductive harm. Some examples
of these chemicals are:
• lead from lead-based paints,
• crystalline silica from bricks and cement and other masonry products, and
• arsenic and chromium from chemically-treated lumber.
Your risk from these exposures varies, depending on how often you do this
type of work. To reduce your exposure to these chemicals: work in a well
ventilated area, and work with approved safety equipment, such as those
dust masks that are specially designed to filter out microscopic particles.
WARNING
< USA only >
ADVERTENCIA
Algunos polvos creados por el lijado, aserrado, esmerilado, taladrado y
otras actividades de la construcción contienen sustancias químicas
reconocidas por el Estado de California como causantes de cáncer, defectos
de nacimiento y otros peligros de reproducción. Algunos ejemplos de estos
productos químicos son:
• plomo de pinturas a base de plomo,
• sílice cristalino de ladrillos y cemento y otros productos de albañilería, y
• arsénico y cromo de maderas tratadas químicamente.
El riesgo al que se expone varía, dependiendo de la frecuencia con la que
realice este tipo de trabajo. Para reducir la exposición a estos productos
químicos: trabaje en un área bien ventilada y póngase el equipo de seguridad
indicado, tal como las máscaras contra polvo que están especialmente
diseñadas para filtrar partículas microscópicas.
< Sólo en los Estados Unidos >
Makita Corporation
3-11-8, Sumiyoshi-cho,
Anjo, Aichi 446-8502 Japan
www.makita.com
885A01-940
XFD16-1
EN, ESMX
20221130
