

SHB 9130WH
EN
CORDLESS HAND BLENDER
Translation of the original manual

SHB 9130WH
A
1
2
3
4
5
6
7
8
9
11
12
13
14
15
16
17
10
B
1
2
3
4


- 1 -
12/2024
2024, .
EN
Cordless Hand Blender
User Manual
Important Safety Instructions
READ CAREFULLY AND STORE FOR FUTURE
USE.
General Warnings
• This appliance may be used by persons with physical,
sensory or mental impairments or by inexperienced
persons, if they are properly supervised or have been
informed about how to use of the product in asafe manner
and understand the potential dangers.
• This appliance is not to be used by children. Keep the
appliance and its accessories out of the reach of children.
• Children must not play with the appliance.
• This appliance is intended for domestic use only.
The appliance is not intended for use in premises such as:
– kitchenettes in shops, offices and other work
environments;
– agricultural farms;
– hotels, motels and other residential environments;
– bed and breakfast establishments.
• This appliance is not intended for commercial use in order
to conduct business.
• To avoid injury from the chopping blades, take extra
care when handling the blending attachment of the
hand blender and the chopper blade unit, especially
when assembling the appliance, removing the blending
attachment from the motor unit or the blade unit from the
CORDLESS IMMERSION BLENDER
- 2 -
12/2024
2024, .
chopper container, emptying the container and during
cleaning. Do not touch the chopping blades.
• General warning for food preparation andprocessing
machines andblenders: Take special care if you pour hot
liquid into the appliance container, as it may splash out of
the appliance due to sudden evaporation.
Warning:
Improper or unintended use can lead to injury.
• Recommended speed settings and ingredient processing
times are given in the chapter QUICK GUIDE TO
PROCESSING INGREDIENTS.
• The maximum continuous operating times for each type of
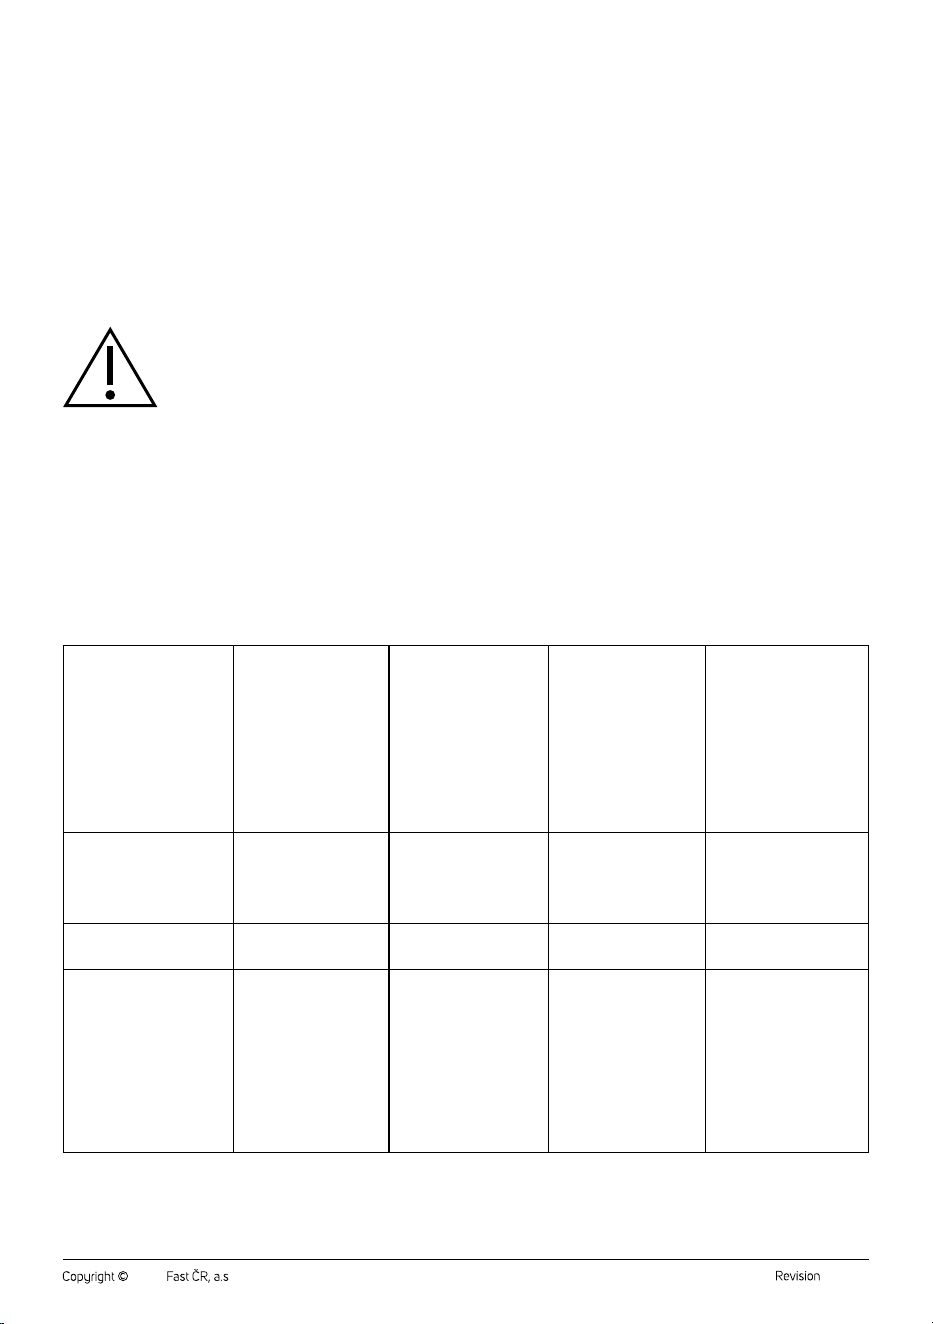
accessory are given below.
Type of
accessory
Maximum
operating
cycle time
Maximum
number of
operating
cycles
Cooling
time
between
operating
cycles
Cooling
time after
maximum
number of
cycles
Hand
Blender
1 minute 5 1 minute 30 minutes
Chopper
15 seconds 3 1 minute 30 minutes
Beating
whisk or
milk frothing
attachment
2 minutes 3 1 minute 30 minutes
• Do not exceed the maximum operating time andobserve
the cooling time of the appliance.

- 3 -
12/2024
2024, .
Warning:
Avoid contact with rotating parts of the appliance.
• Always disconnect the battery from the power source
when left unattended, after charging and before using or
moving it.
• It is forbidden to use adamaged charging cable.
Adamaged charging cable must be replaced with anew
cable of the same type.
• Before replacing the accessories or accessible movable
parts, please turn the appliance off and remove the
battery.
• Always turn the appliance off and remove the battery
when left unattended and before assembly, disassembly
or cleaning.
• Clean the food contact surfaces of the appliance and its
accessories according to the instructions in the chapter
CLEANING AND MAINTENANCE.
. . . . . . . . . . . . . . . . . . . . . . . . . . . . . . . . . . . . . . . . . . . . . . . . . . . . . . . . . . . . . . . . . . . . . . . . . . . . . . . . . . . . . . . . . . . . . . . . . . . . . . . . . . . . . . . . . . . . . . . . . . . . . . . . . . . . . . . . . . . .
Additional Important Safety Instructions forUse of
the Appliance
• Use the appliance and its accessories in accordance with the instructions in this manual.
• The appliance is designed for blending, whipping and chopping of ingredients. Do not use the appliance for purposes other than those for which it
was designed.
• This appliance is designed to process normal quantities of food in ahousehold.
• The chopper is designed to process food of solid consistency. Do not use it to process liquids.
• The appliance and the battery are designed for indoor use. Do not use them in an industrial environment or outdoors.
• It is forbidden to modify the surface of the appliance in any way, e.g. using self-adhesive foil, etc.
• Do not expose the appliance or its accessories to the outdoor environment, extreme temperatures, rapid temperature changes, direct sunlight or
excessive dust.
• Always place the appliance on aclean, flat, dry and stable surface. Do not place it on the edge of the table to prevent it from falling.
• Do not place the appliance or its accessories on or near an electric or gas hob. Keep it at asufficient distance from open fire, heating elements
andother sources of heat.
• Do not place the appliance or any part of it into the freezer.
• Before use, always make sure that no part of the appliance is damaged. Do not use the appliance if it is damaged in any way.
• Only use the appliance with original accessories from the manufacturer.
- 4 -
12/2024
2024, .
Warning:
The use of non-original accessories can lead to adangerous situation.
• Before putting the appliance into operation, make sure that the appliance is properly assembled according to the instructions in this user'smanual.
• Do not overfill the appliance container. The maximum capacity of the containers is indicated by the marks located on the containers.
• To avoid adangerous situation and damage of the appliance, do not use it to process hard ingredients such as coffee beans, bones, ice cubes,
nutshells, hard pits of apricots, peaches, mangoes, etc.
• Do not use the chopper accessories to process ingredients such as baking soda, baking powder, yeast, etc., or to prepare dough, mashed potatoes
or whip egg whites, etc.
• To avoid damage to the beating whisk, do not use it to whip thick and dense dough.
• Use the Milk Frothing Attachment only for frothing milk.
• Some liquids, such as milk and whipping cream, expand in volume when mixing or whipping. Do not overfill the container.
• Take extra care when handling hot liquids and food. Hot steam or splashes of hot liquids or food can cause scalding.
• Do not place foods or pour liquids with atemperature higher than 50 °C in the hand blender container or chopper container. For added safety, we
recommend letting hot liquids andfood cool sufficiently, ideally to room temperature, before placing in the blending container.
• Placing hot food or pouring hot liquids, but no higher than 50 °C, into the container causes its surface to heat up. Pay extra attention when handling
heated surface.
• Do not seal the hot contents in the chopper container or any other container. Allow the container to cool to room temperature before closing. Sealing
hot liquids or foods in the mixing container can cause more hot steam to build up inside the container and pressurise it. When opening the container,
there is arisk of splashing the hot contents of the container.
• To avoid the risk of scalding from splashing hot contents out of the container, do not blend or whip foods or liquids that are too hot. Allow hot foods
and liquids to cool completely before blending. To prevent ingredients from splattering, do not overfill the container and keep the blending or
whisking attachment immersed in the ingredients until the rotating parts stop. Do not use the appliance to process ingredients incontainers that are
placed on the heat source.
• Do not process hot food in the chopper. Allow them to cool down to room temperature before processing.
• Keep foreign objects such as parts of clothing, hair, bracelets, etc. at asufficient distance from the rotating parts of the appliance during operation.
• Do not turn the appliance on when empty. Incorrect use may negatively affect the appliance’slifetime.
• If food is sticking to the sides of the chopper container and the blade unit is running empty, stop the appliance. Wait until the rotating parts come to
astop. Remove the removable battery. Remove the motor unit from the lid. Remove the lid from the container. Use aspatula to loosen the food from
the sides of the container. Do not release food with your hands to avoid injury from thechopping blade.
• None of the components of this appliance are intended for use inamicrowave or electric oven, etc.
• Do not use the containers supplied with the appliance forheating food or liquids or forprolonged storage of food or liquids.
• Remove the battery from the appliance after each use.
• If you will not be using the appliance for an extended period of time, make sure that the battery is not attached toit.
• Topower the appliance, use only the SHBX 002 SENCOR Li-Ion battery. To avoid adangerous situation, do not use other types of battery.
• Use the SHBX 002 SENCOR battery only topower the appliances for which it is designed by the manufacturer.
• The battery must be supervised during charging.
• Do not charge the battery near flammable materials or objects or at high ambient temperatures. Do not cover the battery during charging.
• Do not short-circuit the battery power connectors.
• Keep the battery dry. Do not expose it to moisture or immerse it in water or any other liquid.
• Charge anduse the battery inadry environment at an ambient temperature of 15 to 30°C.
• Store the battery inadry environment at atemperature of -10 to 35°C. Do not expose it to freezing temperatures for too long. Before charging or
using, allow the battery to stabilize at room temperature. This may take several hours.
Warning:
Do not attempt to disassemble, break or short-circuit the removable battery. Do not expose it to high temperatures or throw it into
afire. There is arisk of leakage of toxic substances, fire or explosion if improperly handled. Keep the accumulator out of reach of
children.
• To charge the battery, use only aSHBX 001 SENCOR Li-Ion fast charging station or acertified type of USB power supply withan output voltage
and acurrent of 5 V / 2 A, which allows to power terminal devices using aUSB charging cable. Only use aUSB power supply that meets all
the safety and technical requirements set by the regulations in your country that apply to it. To avoid adangerous situation, do not use other types
of power supply.
• Only use the supplied USB charging cable or acharging cable with the corresponding technical specifications 5 V / 2 Athat meets all the safety
and technical requirements set by the regulations in your country that apply to it.
• Before connecting the adapter that comes with the fast charging station or USB charging adapter to amains socket, make sure that the rated input
voltage stated on the rating label corresponds to the voltage in your socket.
• Make sure that the charging cable does not hang over the edge of the table or touch hot surfaces or sharp objects.
• Disconnect the USB charging cable from the battery by pulling the connector. Do not pull the charging cable.
• Disconnect the charging adapter from the mains socket by pulling the plug. Do not pull the charging cable. Only handle the charging adapter with
dry andclean hands.
• Do not immerse the motor unit, charging cable or adapter in water or any other liquid, or wash these parts under running water.
• Do not use adamaged charging cable or adapter.
- 5 -
12/2024
2024, .
• Do not use the appliance if it is not working properly, if the motor unit has been immersed in water or if it shows any signs of damage. Take it to an
authorised service centre for inspection or repair.
• Do not make any adjustments to the appliance. Do not disassemble the motor unit.
• To avoid adangerous situation, never repair the appliance yourself. All repairs should be carried out by an authorised service centre. Tampering with
the appliance during the validity of the warranty may result in the loss of your legal rights regarding faulty performance or warranty for quality.
• Store the appliance in adry and clean environment out of the reach of children and animals.
. . . . . . . . . . . . . . . . . . . . . . . . . . . . . . . . . . . . . . . . . . . . . . . . . . . . . . . . . . . . . . . . . . . . . . . . . . . . . . . . . . . . . . . . . . . . . . . . . . . . . . . . . . . . . . . . . . . . . . . . . . . . . . . . . . . . . . . . . . . .
EXPLANATION OF SYMBOLS PLACED ON THE PRODUCT OR INTHE ACCOMPANYING DOCUMENTATION
The product meets all the basic requirements of the applicable EU directives.
Used accumulators and batteries do not belong in normal municipal waste.
Used electrical andelectronic products must not be added to ordinary municipal waste.
. . . . . . . . . . . . . . . . . . . . . . . . . . . . . . . . . . . . . . . . . . . . . . . . . . . . . . . . . . . . . . . . . . . . . . . . . . . . . . . . . . . . . . . . . . . . . . . . . . . . . . . . . . . . . . . . . . . . . . . . . . . . . . . . . . . . . . . . . . . .
- 6 -
12/2024
2024, .
• Thank you for purchasing our SENCOR product; we hope it will serve
to your satisfaction.
• Prior to using this appliance, please read the user manual thoroughly,
even in cases when you are already familiar with the use of similar
types of appliances. Use the appliance only as described in this
user manual. Keep the manual for future reference. If you pass the
appliance on to another person, ensure that this user manual is
included.
• Carefully unpack the appliance and make sure not to discard any part
of the packaging material until you have found all its components. It
is recommended to keep the original packaging, packing material,
receipt and confirmation of the extent of the seller'sliability or warranty
certificate at least for the duration of the legal right of defective
performance or quality guarantee. When transporting the appliance,
we recommend packaging it again in the original box provided by the
manufacturer.
. . . . . . . . . . . . . . . . . . . . . . . . . . . . . . . . . . . . . . . . . . . . . . . . . . . . . . . . . . . . . . . . . . . .
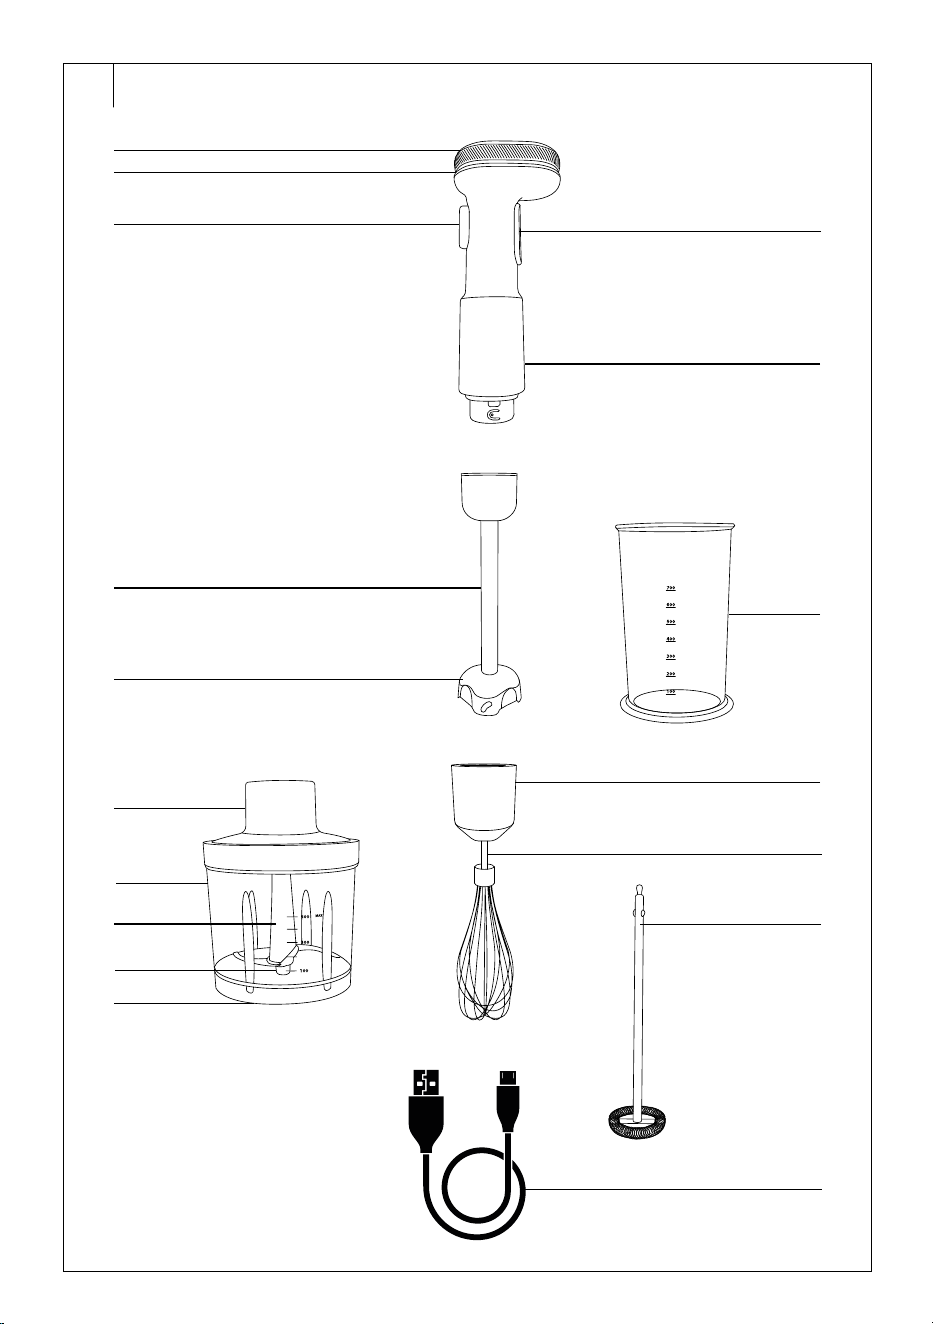
DESCRIPTION OF THE HAND BLENDER AND ITS ACCESSORIES
(PIC. A)
A1 Removable battery
A2 Removable battery
compartment
A3 Speed control button
A4 Safety button
A5 Motor unit
A6 Removable blending
attachment withgearbox
A7 Blade unit of the blending
attachment
A8 Blending container
withacapacity of 700 ml
A9 Chopper container lid
withgearbox
A10 Chopper container
withacapacity of 500 ml
A11 Blade unit of the chopper
A12 Centre pin
A13 Anti-slip feet
A14 Adapter withgearbox for
attaching abeating whisk or
milk frothing attachment
A15 Beating whisk
A16 Milk frothing attachment
A17 USB-C charging cable
. . . . . . . . . . . . . . . . . . . . . . . . . . . . . . . . . . . . . . . . . . . . . . . . . . . . . . . . . . . . . . . . . . . .
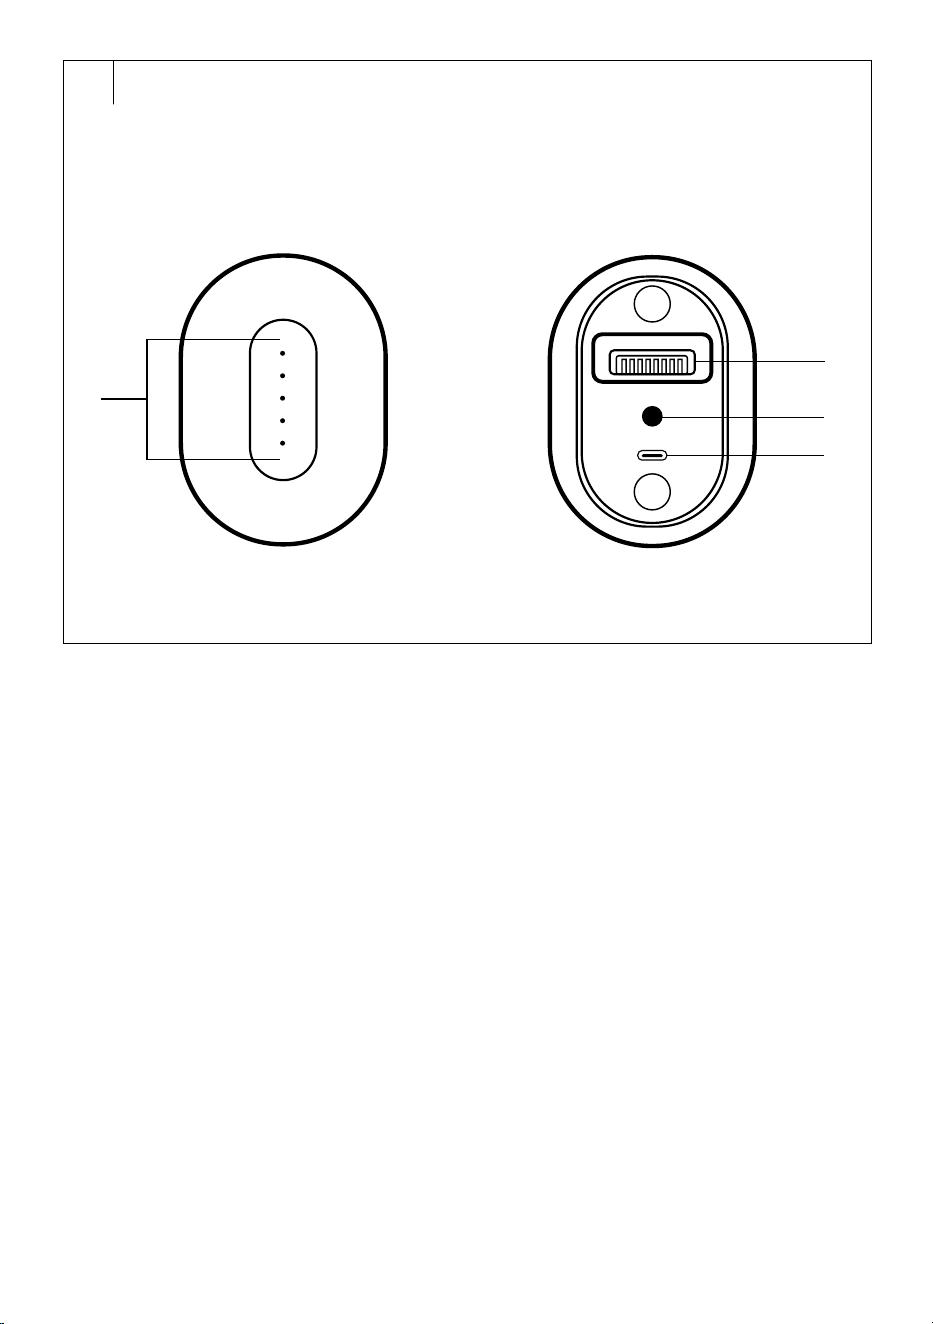
DESCRIPTION OF REMOVABLE BATTERY (PIC. B)
B1 LED indicators indicate
charging and charge level
of the battery, high engine
temperature or activation of
battery protection
B2 Power connectors
B3 Button for displaying the
battery charge level
B4 USB-C charging port
. . . . . . . . . . . . . . . . . . . . . . . . . . . . . . . . . . . . . . . . . . . . . . . . . . . . . . . . . . . . . . . . . . . .
PURPOSE OF USE OF THE HAND BLENDER AND ITS ACCESSORIES
• The hand blender has accessories that allow you to blend, chop
and whisk ingredients. The wireless operation of the hand blender is
ensured by the removable Li-Ion battery.
• Blending attachment is suitable for blending of soft ingredients
andliquids. It is used toblend smoothies, milkshakes, soups, sauces
or baby food.
• The food chopper is designed for chopping foods such as fruit,
vegetables, semi-hard or hard cheeses, nuts, herbs or lean meat, and
for preparing fruit or vegetable purees or spreads.
• The beating whisk is suitable for whipping cream, egg whites, dessert
creams andforpreparing light doughs.
• Whisk the milk froth with the milk frothing attachment.
. . . . . . . . . . . . . . . . . . . . . . . . . . . . . . . . . . . . . . . . . . . . . . . . . . . . . . . . . . . . . . . . . . . .
CHARGING AREMOVABLE BATTERY
• The wireless operation of the hand blender is ensured by
the SHBX 002 SENCOR removable Li-Ion battery (11.1 V ,
2000 mAh, 22.2Wh).
• To charge the battery, use aSHBX 001 SENCOR Li-Ion fast charging
station or auniversal USB power supply withan output voltage and
acurrent of 5 V / 2 Aand aA17 USB-C charging cable.
Note:
Universal USB power supply is not supplied with the
appliance.
The SHBX 001 SENCOR Li-Ion fast charging station can be
purchased as an optional accessory tothis appliance.
• When using the Li-Ion fast-charging station, insert the A1 battery into
the fast charging station. Make sure that it fits properly into it. Connect
the fast-charging station to the mains adapter that was supplied with it.
Connect the mains adapter to amains socket.
• When using auniversal USB power supply, connect the A1 battery to
the USB power supply using the A17 USB-C charging cable. Connect
the USB power supply to amains socket. When using the USB power
supply, follow the manufacturer'sinstructions in the user manual.
• During charging, the corresponding number of B1 LED indicators
light up white indicating the A1 battery charge level, see the chapter
BATTERY CHARGE LEVEL INDICATION. The B1 LED indicators
are gradually turning on and off, indicating the level to which the A1
battery is currently charging. Fully charge the A1 battery before first
use.
• Afull charge of the A1 battery is indicated by the flashing of all B1 LED
indicators. After charging, disconnect the mains adapter / USB power
supply from the mains socket. Remove the A1 battery from thefast-
charging station or disconnect it from the A17 USB-C charging cable.
• Full charge of adischarged battery using auniversal USB power
supply 5 V , 2 Atakes approximately 3 hours.
• Do not leave the A1 battery connected to the USB power supply
longer than necessary tofully charge it.
• To keep the life of the battery as long as possible, charge, use
andstore the Li-Ion battery at room temperature. Do not fully
discharge the battery. It is better to recharge the battery before they
are fully discharged. If you do not use the battery for along time, keep
it charged to about half its capacity.
. . . . . . . . . . . . . . . . . . . . . . . . . . . . . . . . . . . . . . . . . . . . . . . . . . . . . . . . . . . . . . . . . . . .
BATTERY CHARGE LEVEL INDICATION
A1 battery charge level
Number of B1 LED indicators
illuminated in white
81−100 % 5
61−80 % 4
41−60 % 3
21−40 % 2
≤20 % 1
• The state of battery charge level can be verified by pressing the
B3 button once. Dependingon the A1 battery charge level, the
corresponding number of B1 LED indicators will light in white.
. . . . . . . . . . . . . . . . . . . . . . . . . . . . . . . . . . . . . . . . . . . . . . . . . . . . . . . . . . . . . . . . . . . .
BEFORE FIRST USE
• Wash the A6 removable blending attachment (except the top), the
A8 andA10 containers, the A11 chopper blade unit, the A15 beating
whisk and the A16 milk frothing attachment thoroughly with warm
water using afew drops of dish soap. Do not rinse the top part that
attaches the A6 blender attachment to the A5 motor unit under water
or immerse it in water to prevent water from entering the gearbox.
Rinse the washed parts under running water to remove any dish soap
residue. Wipe dry with akitchen cloth.
EN
Cordless Hand Blender
User Manual
- 7 -
12/2024
2024, .
Warning:
When handling and cleaning the A6 blending
attachment and the A11 chopper blade unit, take extra
care not to cut yourself on the chopping blades.
Do not touch the blades.
• Wipe the A5 motor unit, the A9 chopper container lid, the A14 adapter
with the gearbox andthe upper part (gearbox) of the A6 blending
attachment thoroughly with aslightly damp cloth anddry with
akitchen cloth. Only wipe the space for attaching the A1 removable
battery with adry cloth. Do not immerse the components containing
the gearbox in water or wash them under running water to prevent
water from entering the gearbox.
Warning:
Do not immerse the A5 motor unit in water or any
other liquid, or wash it under running water.
. . . . . . . . . . . . . . . . . . . . . . . . . . . . . . . . . . . . . . . . . . . . . . . . . . . . . . . . . . . . . . . . . . . .
ASSEMBLY AND DISASSEMBLY
Warning:
To avoid the risk of injury, before assembly or
disassembly, the appliance must be switched off
and the removable A1 battery removed from the A5
motor unit.
Warning:
When handling the A6 blending attachment and
the A11 chopper blade unit, take extra care not to cut
yourself on the chopping blades. Do not touch the
blades.
Hand Blender
• Attach the A6 removable blending attachment from below to the A5
motor unit. Turn the A6 blending attachment counterclockwise until it
stops to firmly connect the two parts.
• To disassemble, turn the A6 removable blending attachment
clockwise until it stops. Take off the A6 blending attachment from the
A5 motor unit by pulling downwards.
Chopper
• Place the A11 blade unit on the A12 centre pin on the bottom of the
A10 container. Place the A9 lid on the A10 container so that the locks
around the perimeter of the A9 lid, fit into the grooves around the
perimeter of the A10 container. Hold the A10 container. Turn the A9
lid clockwise until it stops. This secures the A9 lid against movement.
Place the A5 motor unit on the A9 lid. Hold the A9 lid firmly. Turn the
A5 motor unit clockwise until it is fixed tothe A9 lid.
• To disassemble, hold the A9 lid firmly. Turn the A5 motor unit
anticlockwise until it stops. Remove the A5 motor unit by pulling it
upwards. Hold the A10 container firmly. Turn the A9 lid anticlockwise
until it stops. Remove the A9 lid. Grab the A11 blade unit by the central
plastic part. Remove the A11 blade unit from the A10 container.
Hand blender with beating whisk or milk frothing attachment
• Insert the A15 beating whisk or the A16 milk frothing attachment into
the hole under the A14 adapter. The attachment is signalled by an
audible click. Pull lightly on the A15 beating whisk or A16 attachment
to verify the strength of the connection. Attach the A14 adapter from
below to the A5 motor unit. Turn the A14 adapter counterclockwise
until it stops to securely connect the two parts.
• To disassemble, hold the A5 motor unit firmly. Turn the A14 adapter
clockwise until it stops. Take off the A14 adapter from the A5 motor
unit by pulling downwards. Hold the A14 adapter firmly. Pull down the
A15 beating whisk or the A16 attachment to remove from the hole at
the bottom of the A14 adapter.
. . . . . . . . . . . . . . . . . . . . . . . . . . . . . . . . . . . . . . . . . . . . . . . . . . . . . . . . . . . . . . . . . . . .
PREPARING FOR USE
Hand Blender
• Place the ingredients you wish to process in the A8 container or other
suitable container. Pre-cut larger foods into smaller pieces up to 2 cm
in size. Some liquids expand in volume during blending. Do not overfill
the container.
Chopper
• Cut larger foods into smaller pieces up to 2 cm in size or prepare foods
for processing according to the instructions in thechapter QUICK
GUIDE TO PROCESSING INGREDIENTS.
• Fill the A10 container with food only after placing the A11 blade unit
on the A12 centre pin. Follow this procedure. Do not overfill the A10
container above the MAX mark.
Hand blender with beating whisk or milk frothing attachment
• Place the ingredients that you wish to process into A8 container
or another suitable container. The milk to be whipped with the A16
attachment must be heated to atemperature of approximately 50°C.
• Some liquids, such as whipping cream or milk, expand in volume
when whipped. Do not overfill the container.
. . . . . . . . . . . . . . . . . . . . . . . . . . . . . . . . . . . . . . . . . . . . . . . . . . . . . . . . . . . . . . . . . . . .
USE OF THE HAND BLENDER AND ITS ACCESSORIES
• Verify that the appliance is properly assembled.
• Attach the removable A1 battery to the A5 motor unit with dry, clean
hands. The A1 battery andthe A5 motor unit are equipped with
magnets for easier attachment of the A1 battery. Always attach the A1
battery only before using the hand blender.
• The recommended speeds andtimes of food processing according
to the type of accessories are given in thechapter QUICK GUIDE TO
PROCESSING INGREDIENTS.
• Observe the operating times listed in the MAXIMUM OPERATING
TIME table. Do not exceed the maximum operating time andobserve
the cooling time of the appliance.
Operating the hand blender
• Immerse the A6 blending attachment in the container with
theingredients. Hold the container. Press the A3 speed button and
the A4 safety button at the same time to start the hand blender. The
harder you press the A3 button, the higher the speed will be.
• Slowly move the blender in different directions so that all ingredients
are processed. Keep the blender in avertical position. The A7 blade
unit must be sufficiently submerged in the blended mixture throughout
operation to prevent the ingredients from splashing out of the
container. Hold the container.
• Release the A3 speed button to stop the hand blender. After stopping
the rotating parts, lift the hand blender upwards.
Operating the Chopper
• Hold the container. Press the A3 speed button and the A4 safety
button at the same time to start the chopper. The harder you press
the A3 button, the higher the speed will be. Hold the A10 container
with one hand during operation, especially when processing harder
foods. Release the A3 speed button to stop the operation of the A5
motor unit.
• Forsome foods, it is advisable to use pulse switching, i.e. alternately
press andrelease the A3 speed button and repeat this procedure until
the ingredients are processed.
Operation the hand blender with abeating whisk or milk frothing
attachment
• Immerse the A15 beating whisk or the A16 milk frothing attachment
in the container with the ingredients. Hold the container. Press the A3
speed button and the A4 safety button at the same time to start the
blender. The harder you press the A3 button, the higher the speed
will be.
• Slowly move the blender in different directions so that all ingredients
are processed. Keep the blender in avertical position. The A15
beating whisk or the A16 milk frothing attachment must be sufficiently
submerged throughout operation to prevent the ingredients from
splashing out of the container. Hold the container.
• Release the A3 speed button to stop the blender.
After stopping the rotating parts, lift the blender upwards.

- 8 -
12/2024
2024, .
. . . . . . . . . . . . . . . . . . . . . . . . . . . . . . . . . . . . . . . . . . . . . . . . . . . . . . . . . . . . . . . . . . . . . . . . . . . . . . . . . . . . . . . . . . . . . . . . . . . . . . . . . . . . . . . . . . . . . . . . . . . . . . . . . . . . . . . . . . . .
TERMINATION OF USE
• Wait until the rotating parts come to astop. Remove the A1 battery from the A5 motor unit.
• After each use, properly clean the parts that have come in contact with food according to the instructions in the chapter CLEANING AND MAINTENANCE.
. . . . . . . . . . . . . . . . . . . . . . . . . . . . . . . . . . . . . . . . . . . . . . . . . . . . . . . . . . . . . . . . . . . . . . . . . . . . . . . . . . . . . . . . . . . . . . . . . . . . . . . . . . . . . . . . . . . . . . . . . . . . . . . . . . . . . . . . . . . .
MAXIMUM OPERATING TIME
Type of accessory
Maximum operating cycle
time
Maximum number of
operating cycles
Cooling time between
operating cycles
Cooling time after maximum
number of cycles
Hand Blender 1 minute 5 1 minute 30 minutes
Chopper 15 seconds 3 1 minute 30 minutes
The A15 beater whisk
or A16 milk frothing
attachment
2 minutes 3 1 minute 30 minutes
. . . . . . . . . . . . . . . . . . . . . . . . . . . . . . . . . . . . . . . . . . . . . . . . . . . . . . . . . . . . . . . . . . . . . . . . . . . . . . . . . . . . . . . . . . . . . . . . . . . . . . . . . . . . . . . . . . . . . . . . . . . . . . . . . . . . . . . . . . . .
QUICK GUIDE TO PROCESSING INGREDIENTS
Hand Blender
Beverages / dishes Maximum amount per dose Speed setting Recommended processing time
Smoothie beverages 600 ml Low to medium speed 30−60 s
Milkshakes 600 ml Low to medium speed 30−60 s
Children'smixed fruit or vegetable
snacks
600 ml High speed 60 s
Soups and sauces 600 ml Medium to high speed 30−60 s
Chopper
Ingredients | Dishes
Preparing the ingredients
before processing
Maximum amount per dose Speed setting
Recommended processing
time
Apple puree
Peel the apples, remove the
cores, cut them into 2 cm
cubes andlet them stew
until soft.
250 g Low to medium speed 15 s
Onion
Peel the onion andcut it into
quarters.
For larger onions, cut the
quarters in half crosswise.
200 g Medium speed 10−15 spulse switching
Walnuts
Remove the nuts from the
shells.
150 g Medium to high speed 10−15 s
Semi-hard cheeses
Cut the cheese into 2 cm
cubes.
200 g Medium to high speed 10−15 s
Hard cheeses
Cut the cheese into 2 cm
cubes.
200 g High speed 15 s
Hard pastry for
breadcrumbs
Cut the bread into 2 cm cubes. 50 g (approx. 1 roll) High speed 10 spulse switching
Baby biscuits or cookies
Break the biscuits or cookies
into smaller pieces.
70 g High speed 15 spulse switching
Lean meat
Remove the bones from the
meat andcut 2 cm cubes.
200 g Medium to high speed 15 s
Fresh herbs
Cut the stems to alength
of 5 cm.
20 g Low to medium speed 10 spulse switching
Whisk
Ingredients | Dishes Maximum amount per dose Speed setting Recommended processing time
Whipping cream 200 ml High speed 2 min
Egg whites 6 pcs High speed 2 min
Lightweight doughs 300 ml Low to medium speed 1 min

- 9 -
12/2024
2024, .
Milk Frothing Attachment
Beverages Maximum amount per dose Speed setting Recommended processing time
Milk heated to 50°C 200 ml Medium to high speed 1.5 min
. . . . . . . . . . . . . . . . . . . . . . . . . . . . . . . . . . . . . . . . . . . . . . . . . . . . . . . . . . . . . . . . . . . . . . . . . . . . . . . . . . . . . . . . . . . . . . . . . . . . . . . . . . . . . . . . . . . . . . . . . . . . . . . . . . . . . . . . . . . .
TROUBLESHOOTING
Problem Cause Solution
LED indicator of the battery charge status to
≤20 % flashes twice white and then red.
The A1 battery is discharged. Charge the A1 battery.
LED indicator of battery charge status to ≤20%
glows blue.
Motor temperature is too high.
Let the A5 motor unit to cool completely.
LED indicator of battery charge status to ≤20%
glows red.
Protection of the A1 battery has been activated.
The surface of the A1 battery is overheated.
Let the surface of the A1 battery to cool
completely. After cooling down, connect the A1
battery to the power source to reactivate it.
. . . . . . . . . . . . . . . . . . . . . . . . . . . . . . . . . . . . . . . . . . . . . . . . . . . . . . . . . . . . . . . . . . . . . . . . . . . . . . . . . . . . . . . . . . . . . . . . . . . . . . . . . . . . . . . . . . . . . . . . . . . . . . . . . . . . . . . . . . . .
CLEANING AND MAINTENANCE
• Before any cleaning, maintenance or disassembly, the appliance must
be switched off and the A1 battery removed from the A5 motor unit.
• Clean the appliance immediately after use. Do not let food residues
dry incontainers or on accessories.
• Clean each part of the appliance separately. Do not clean the
assembled appliance.
• Never use thinners, metal or other dish scourers or abrasive detergents
for cleaning. The finish of the appliance and its accessories could be
damaged.
Warning:
Do not immerse the A5 motor unit andthe A1 battery
in water or any other liquids, and do not wash these
parts under running water.
• Wash the A6 removable blending attachment (excluding the top), the
A8 andA10 containers, the A11 chopper blade unit, the A15 beating
whisk and the A16 milk frothing attachment with warm water using
afew drops of dish soap. Do not rinse the upper part that attaches the
A6 blending attachment to the A5 motor unit under water or immerse
it in water to prevent water from entering the gearbox. Rinse the
washed parts under running water to remove any dish soap residue.
Wipe dry with akitchen cloth.
Warning:
When handling and cleaning the A6 blending
attachment and the A12 chopper blade unit, take
extra care not to cut yourself on the chopping blades.
Do not touch the blades.
• Wipe the A5 motor unit, the lid of the A9 chopper container, the A14
adapter andthe upper part (gearbox) of the A6 blending attachment
with aslightly damp cloth anddry with akitchen cloth. Only wipe the
space for attaching the A1 removable battery with adry cloth. Do not
immerse the components containing the gearbox in water or wash
them under running water to prevent water from entering the gearbox.
Warning:
Do not immerse the A5 motor unit in water or any
other liquid, or wash it under running water.
• The A8 and A10 containers are dishwasher safe. The other parts of the
attachment are not dishwasher safe.
• Clean the A1 battery using adry cloth. If necessary, you can use
aslightly dampened cloth to clean the back of the A1 battery, on
which the B1 LED indicators are located. Then wipe the cleaned
surface dry.
. . . . . . . . . . . . . . . . . . . . . . . . . . . . . . . . . . . . . . . . . . . . . . . . . . . . . . . . . . . . . . . . . . . .
STORAGE
• Clean the hand blender and its accessories according to the
instructions in the chapter CLEANING AND MAINTENANCE. Before
storing, the hand blender andits accessories must be clean anddry.
• Store the blender and its accessories in aclean, dry place out of the
reach of children and pets.
. . . . . . . . . . . . . . . . . . . . . . . . . . . . . . . . . . . . . . . . . . . . . . . . . . . . . . . . . . . . . . . . . . . .
TECHNICAL SPECIFICATIONS
Li-lon battery
Voltage andcapacity ........................................11.1 V , 2000 mAh, 22.2 Wh
Charging cable
Connectors ........................................................................................... USB-A/USB-C
Voltage andmax. current ............................................................ up to 5 V , 2 A
Hand Blender
Input voltage and current .......................................................................5 V , 2 A
Engine power........................................................................................................180 W
Noise level ........................................................................................................ 85 dB(A)
The declared noise emission level of the appliance is 85 dB(A), which
represents alevel Aof acoustic power with respect to areference acoustic
power of 1 pW.
. . . . . . . . . . . . . . . . . . . . . . . . . . . . . . . . . . . . . . . . . . . . . . . . . . . . . . . . . . . . . . . . . . . .
INSTRUCTIONS AND INFORMATION ON DISPOSAL OF USED
PACKAGING MATERIAL
Dispose of used packaging material at the location designated by the
municipality for waste disposal.
DISPOSAL OF USED ELECTRICAL AND ELECTRONIC EQUIPMENT
Used electrical andelectronic products must not be added to ordinary
municipal waste. For proper disposal and recycling of these products,
deliver them to designated collection points. Alternatively, in some
European Union states or other European countries the products can be
returned to the local retailer when buying an equivalent new product.
By properly disposing of this product, you help preserve valuable natural
resources and contribute to preventing potential negative impacts on the
environment and human health resulting from improper waste disposal.
For further details, contact your local authorities or the nearest collection
point. Fines may be imposed for improper disposal of this type of waste in
accordance with national regulations.
For Business Entities in European Union States
To dispose of electric or electronic equipment, request necessary
information from your retailer or supplier.
Disposal in Other Countries Outside the European Union
If you wish to dispose of this product, request the necessary information
about the correct disposal method from the local council or from your
retailer.
. . . . . . . . . . . . . . . . . . . . . . . . . . . . . . . . . . . . . . . . . . . . . . . . . . . . . . . . . . . . . . . . . . . .
Changes to text and technical parameters are reserved.

- 10 -
12/2024
2024, .

FAST ČR, a.s.
U Sanitasu 1621
CZ-251 01 Říčany
www.sencor.com
info@sencor.cz