Version 2.01

30/11/00 Martin Matrix Controller V2.01
1
© R&D International NV for Martin Professional A/S
Index
1. Introduction _____________________________________________________________3
2. Features_________________________________________________________________3
2.1 Hardware ____________________________________________________________3
2.2 Software _____________________________________________________________3
3. Connecting ______________________________________________________________4
3.1 Cable connections _____________________________________________________4
3.2 How the DMX is used __________________________________________________5
3.2.1 On startup ________________________________________________________5
3.2.2 Stand-alone mode __________________________________________________6
3.2.3 With a light desk connected__________________________________________6
4 Starting up _______________________________________________________________6
5 Programming the Matrix____________________________________________________7
6. Defining the Matrix and Patch fixtures________________________________________8
6.1 Patch ________________________________________________________________9
6.2 Patch example step by step _____________________________________________10
7 The main program________________________________________________________14
7.1 How the main program is used__________________________________________14
7.2 The main screen______________________________________________________15
7.2.1 The menu button__________________________________________________15
7.2.1.1 Show ________________________________________________________15
7.2.1.2 Parameters ___________________________________________________15
7.2.1.3 View_________________________________________________________16
7.2.1.4 Options ______________________________________________________16
7.2.1.5 Exit _________________________________________________________16
7.2.2 Stand-alone button and ‘Controlled from DMX-IN’ button ______________16
7.2.3 Page and program (cue) selection buttons and Direct Access buttons ______17
7.2.4 Master fader _____________________________________________________17
7.2.5 Mode fader ______________________________________________________18
7.2.6 Effect engines ____________________________________________________18
7.2.6.1 Snake effects__________________________________________________19
7.2.6.2 Lines ________________________________________________________20
7.2.6.3 Circles _______________________________________________________21
7.2.6.4 Rectangles____________________________________________________21
7.2.7 Text engine ______________________________________________________21
7.2.8 Program (cue) storage options_______________________________________21
7.3 An example__________________________________________________________22
7.3.1 Select a cue ______________________________________________________22
7.3.2 Edit one or more effect engines ______________________________________22
7.3.3 Apply the effect on a channel________________________________________23
7.3.4 Make a text effect _________________________________________________24
7.3.5 Notes on the channel limit values ____________________________________25
7.4 Controlling the Matrix Controller from a light desk________________________26

30/11/00 Martin Matrix Controller V2.01
2
© R&D International NV for Martin Professional A/S
8. PRESETS and Overrides __________________________________________________27
8.1 Presets______________________________________________________________28
8.1.1 Preset screen _____________________________________________________29
8.1.2 An example ______________________________________________________30
8.2 Override groups______________________________________________________32
8.2.1 Override fixture DMX values _______________________________________32
8.2.2 Crossfade fixture DMX values ______________________________________32
8.2.3 Example_________________________________________________________33
8.2.4 Assigning the groups ______________________________________________34
8.2.5 Controlling the override groups _____________________________________34

30/11/00 Martin Matrix Controller V2.01
3
© R&D International NV for Martin Professional A/S
1. Introduction
Thank you for selecting the Matrix Controller. The Martin Matrix Controller is designed to
reduce programming time of fixtures, arranged in a matrix, to a maximum. At the same time,
it relieves your conventional controller of precious DMX-channels, but you will still be able
to control your Matrix from the conventional desk.
2. Features
2.1 Hardware
- Pentium based industrial 19”controller
- 2048 DMX output channels standard expandable to 4096 DMX output channels (*)
- 2048 DMX input channels standard expandable to 4096 DMX input channels (*)
(*) All channels are opto isolated. The controller is expandable per 1024 DMX in/out
channels.
2.2 Software
- Windows based control software
- Can be used as an independent stand alone matrix controller
- Or client controlled from any DMX controller. Requires:
o 10 DMX channels for main control (master,
o 32 DMX channels (if used) for:
Preset calling (1-32 channels, depends on number of fixture channels)
Preset crossfade timing (1-32 channels, depends on number of fixture
channels)
- Up to 500 fixtures, each with a maximum of 32 channels per fixture.
- Uses the same fixtures libraries as the Martin Case controllers
- Storage for 400 programs ordered in 20 pages of 20 programs.
- 4 independent effect engines can run simultaneous. There is a choice between:
o Snake effects
o Line effects
o Circle effects
o Rectangle effects
- Text engine to use the matrix as a text display
- 50 presets for each fixture channel to make for example logos
- Possibility to run a matrix effect on every fixture channel
- Automatic recalculation of effects when resizing the matrix
30/11/00 Martin Matrix Controller V2.01
4
© R&D International NV for Martin Professional A/S
3. Connecting
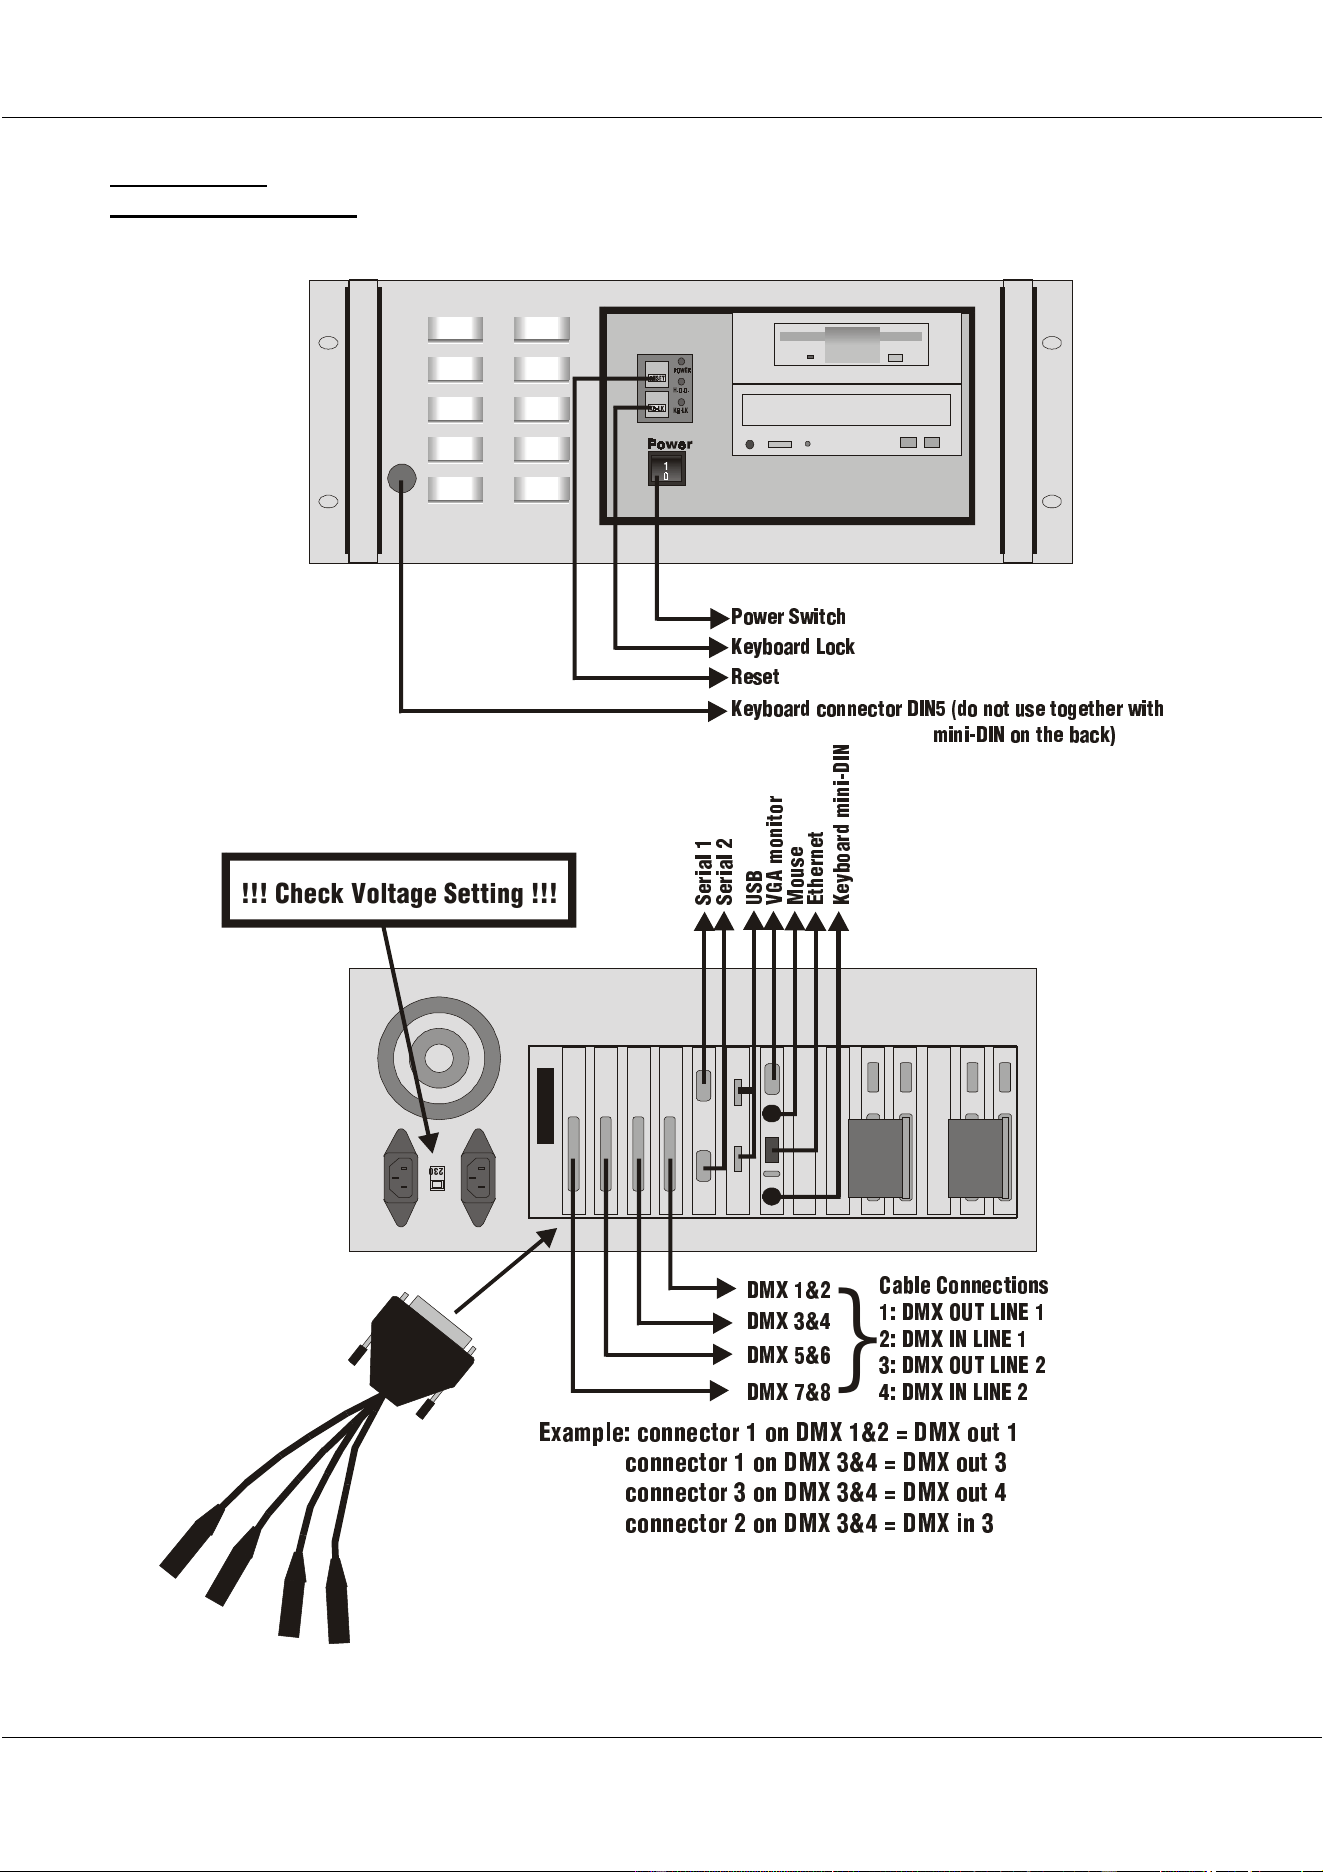
3.1 Cable connections
#$!
5>I " #
4RS]V 4`__VTeZ`_d
"+ 5>I @FE =:?6 "
#+ 5>I :? =:?6 "
$+ 5>I @FE =:?6 #
%+ 5>I :? =:?6 #
5>I $ %
5>I & '
5>I ( )
`
DVcZR] "
FD3
G82 ^`_Ze`c
>`fdV
6eYVc_Ve
<VjS`RcU ^Z_Z5:?
DVcZR] #
A`hVc DhZeTY
4YVT\G`]eRXVDVeeZ_X
<VjS`RcU =`T\
CVdVe
<VjS`RcU T`__VTe`c 5:?& U` _`e fdV e`XVeYVc hZeY
^Z_Z5:? `_ eYV SRT\
6iR^a ]V+ T`__VTe`c " `_ 5>I "# . 5>I `fe "
T`__VTe`c " `_ 5 > I $% . 5>I ` fe $
T`__VTe`c $ `_ 5 > I $% . 5>I ` fe %
T`__VTe`c # `_ 5 > I $% . 5>I Z _ $
30/11/00 Martin Matrix Controller V2.01
5
© R&D International NV for Martin Professional A/S
The system is delivered with:
- Microsoft Intellipoint mouse
- Power cable
- 2 DMX XLR converters (2048 channel version)
WARNING: Adjust the voltage setting of the Matrix Controller to your local AC
power supply before applying power.
Connect:
- A keyboard at the back of the Matrix Controller (MINI DIN) or at the front (DIN 5).
Do not use both connections at the same time.
- A mouse
- An SVGA monitor
- Both XLR converters
- Fixtures or an MSD (Martin Show Designer)
- (A Light desk if you want to control the Matrix from a Light controller)
The XLR connectors are numbered from 1 to 4:
- 1 = DMX OUT line 1
- 2 = DMX IN line 1
- 3 = DMX OUT line 2
- 4 = DMX IN line 2
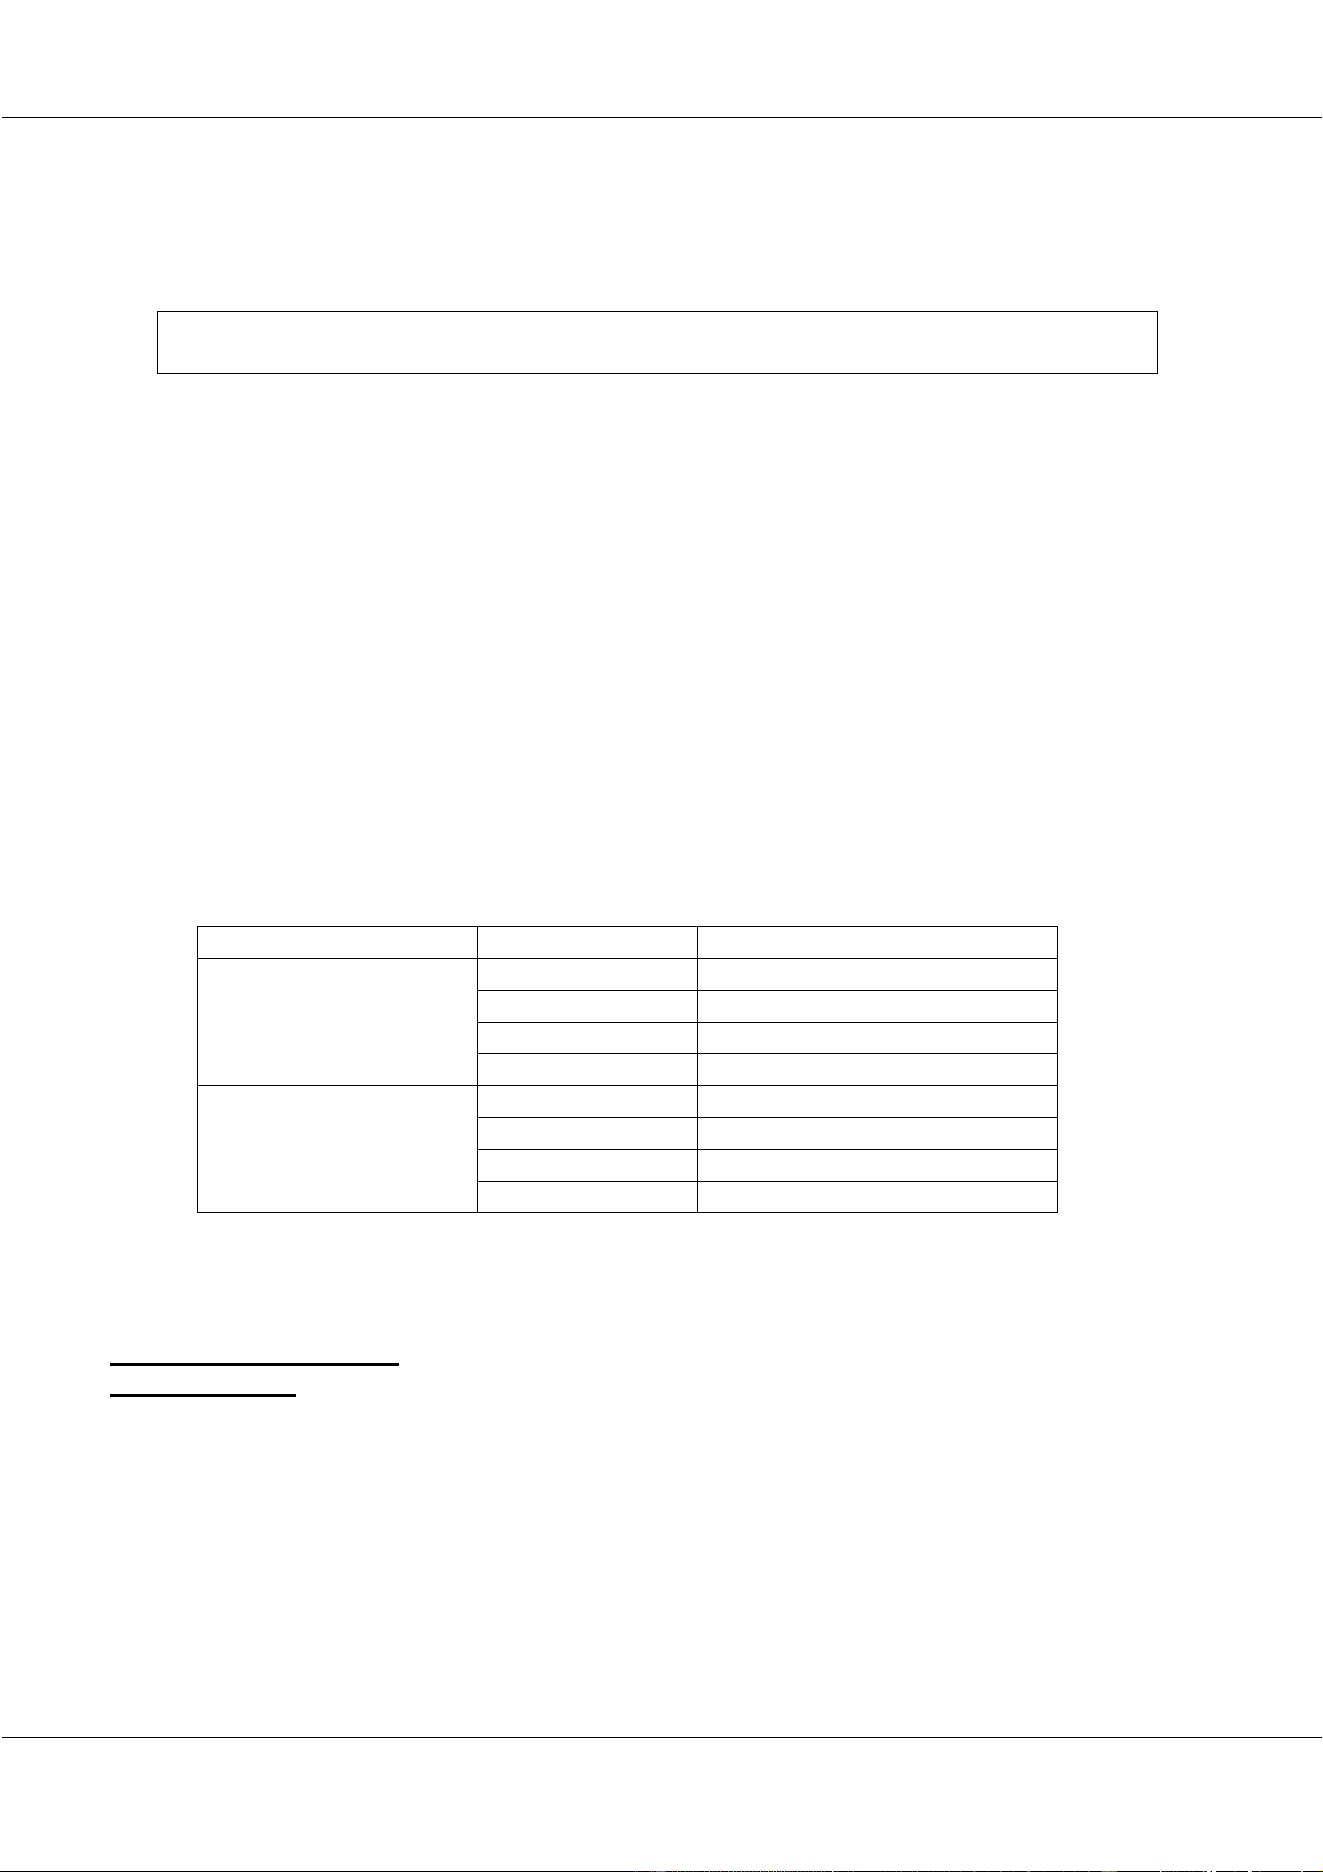
Depending on the output where they are used, they become
DMX CONNECTOR XLR Number Channel Number
1 DMX out 1 - 512
2 DMX in 1 - 512
3 DMX out 513 - 1024
DMX 1&2
4 DMX in 513 - 1024
1 DMX out 1025 - 1536
2 DMX in 1025 - 1536
3 DMX out 1537 - 2048
DMX 3&4
4 DMX in 1537 - 2048
Apply power to the Matrix Controller and switch it on.
3.2 How the DMX is used
3.2.1 On startup
When the Matrix controller is used in ‘stand alone’ mode (no Light desk connected), all DMX
channels will have zero value when starting up.
When the Matrix controller is used together with a light desk connected to it, the DMX is
linked through from the input to the output, on startup. As soon as the program ‘Logimatrix’
is started, the link through will be cut off, and the DMX outputs will follow the actions of the
Martix controller.
30/11/00 Martin Matrix Controller V2.01
6
© R&D International NV for Martin Professional A/S
3.2.2 Stand-alone mode
In ‘Stand alone’ mode, the Matrix controller is the only controller to generate the light effects.
Programs, made on the Matrix controller, are selected by the mouse.
3.2.3 With a light desk connected
When a light desk is connected to the Matrix controller on its DMX inputs, there are 3
possibilities. The light desk:
- Selects the programs made on the Matrix controller
- Generates its own effects on the light matrix
- Selects the programs made on the Matrix controller and at the same time, generates its
own effects for some fixture channels on the light matrix.
For every channel of the fixtures in the light matrix, you can decide whether the Matrix
controller is in control or the light desk.
4 Starting up
Note: When the system starts up, there will be a message:
Verifying DMI Pool Data .....................
Boot from ATAPI CD-ROM : Failure .........
Please ignore the ‘failure’ message. The system will startup normally.
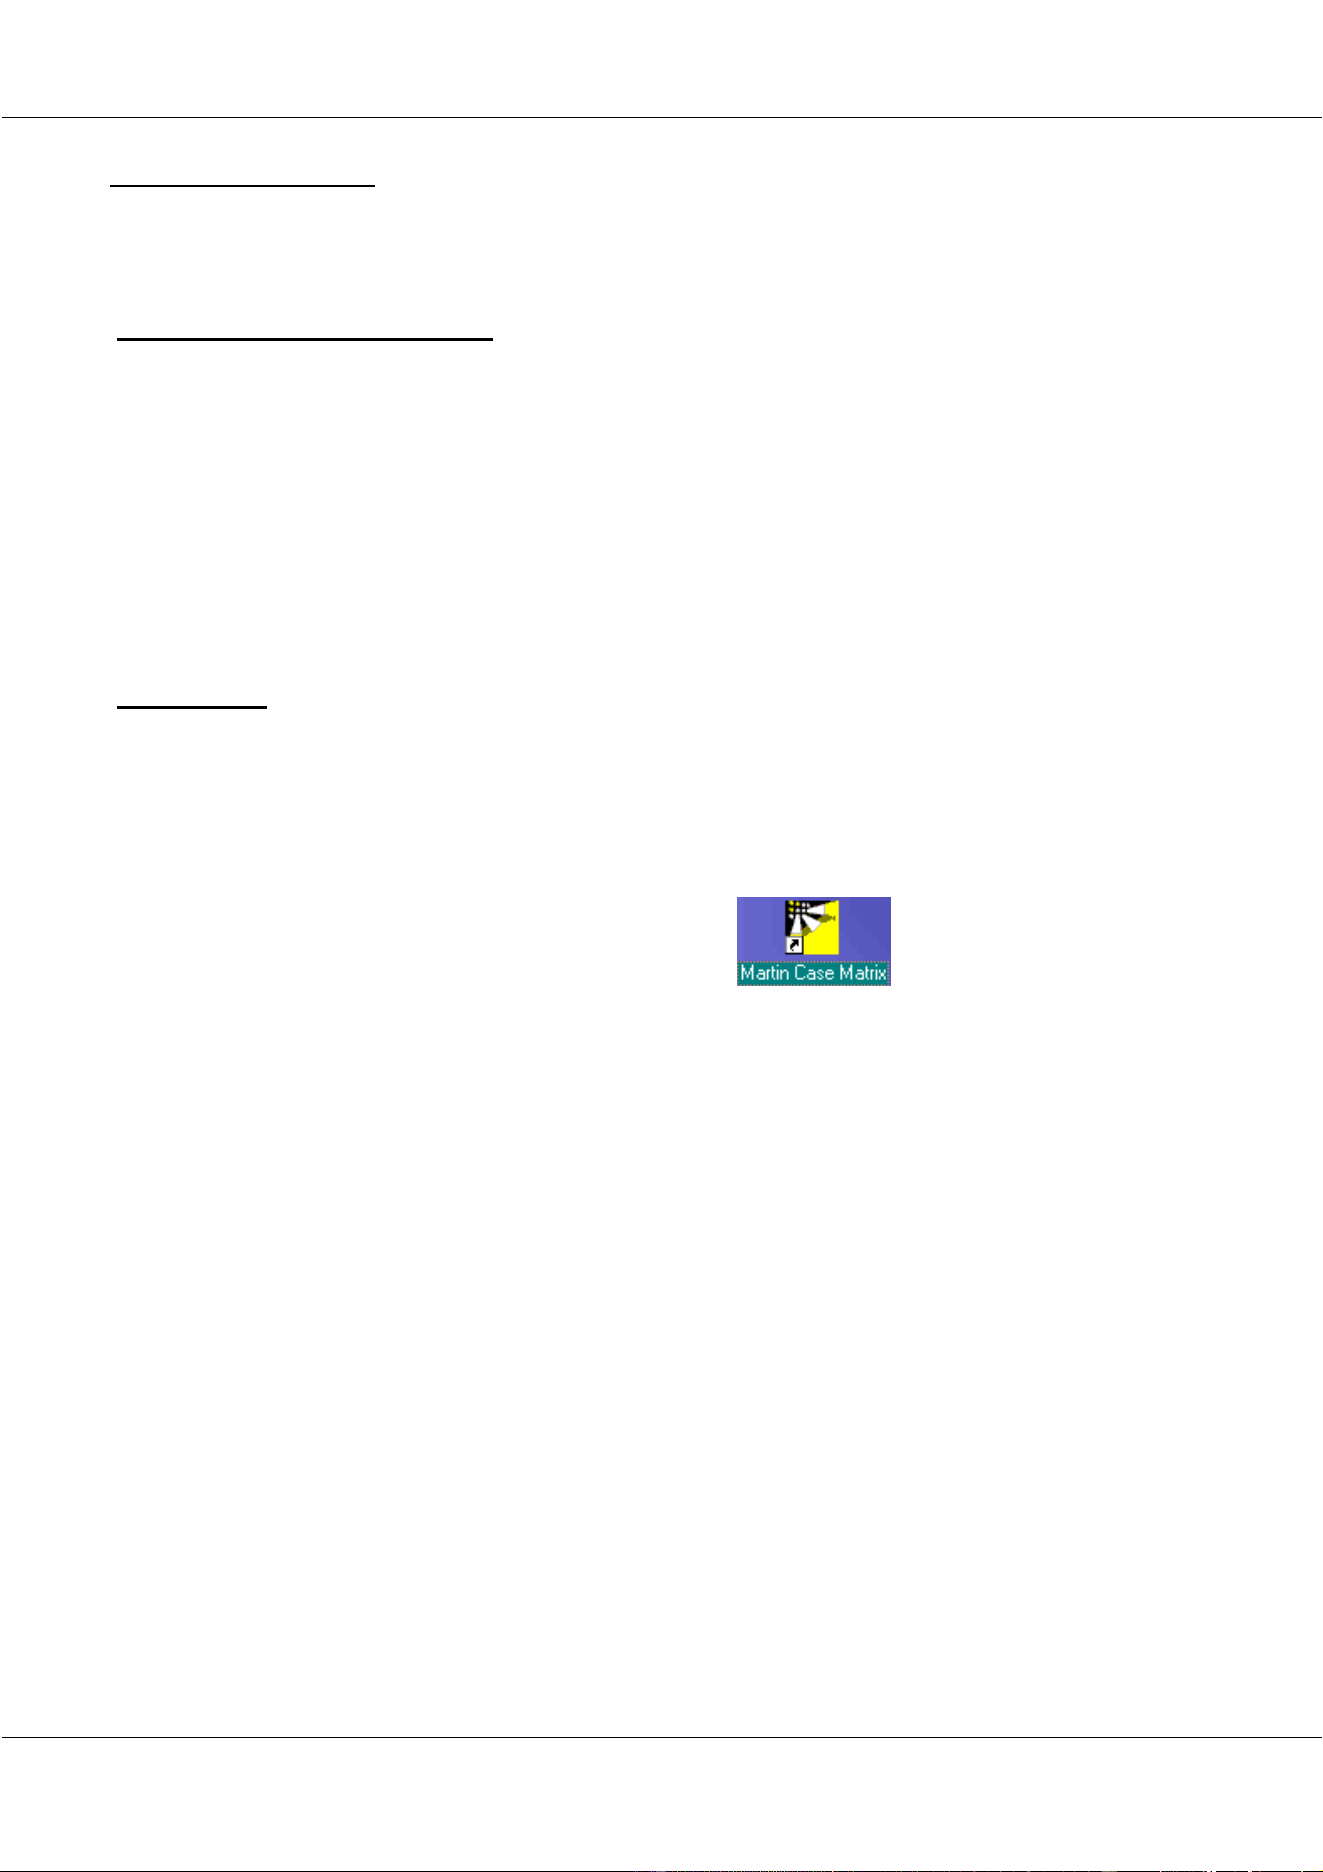
As soon as the system is started, double click the icon, and you will enter
the Matrix program.
30/11/00 Martin Matrix Controller V2.01
7
© R&D International NV for Martin Professional A/S
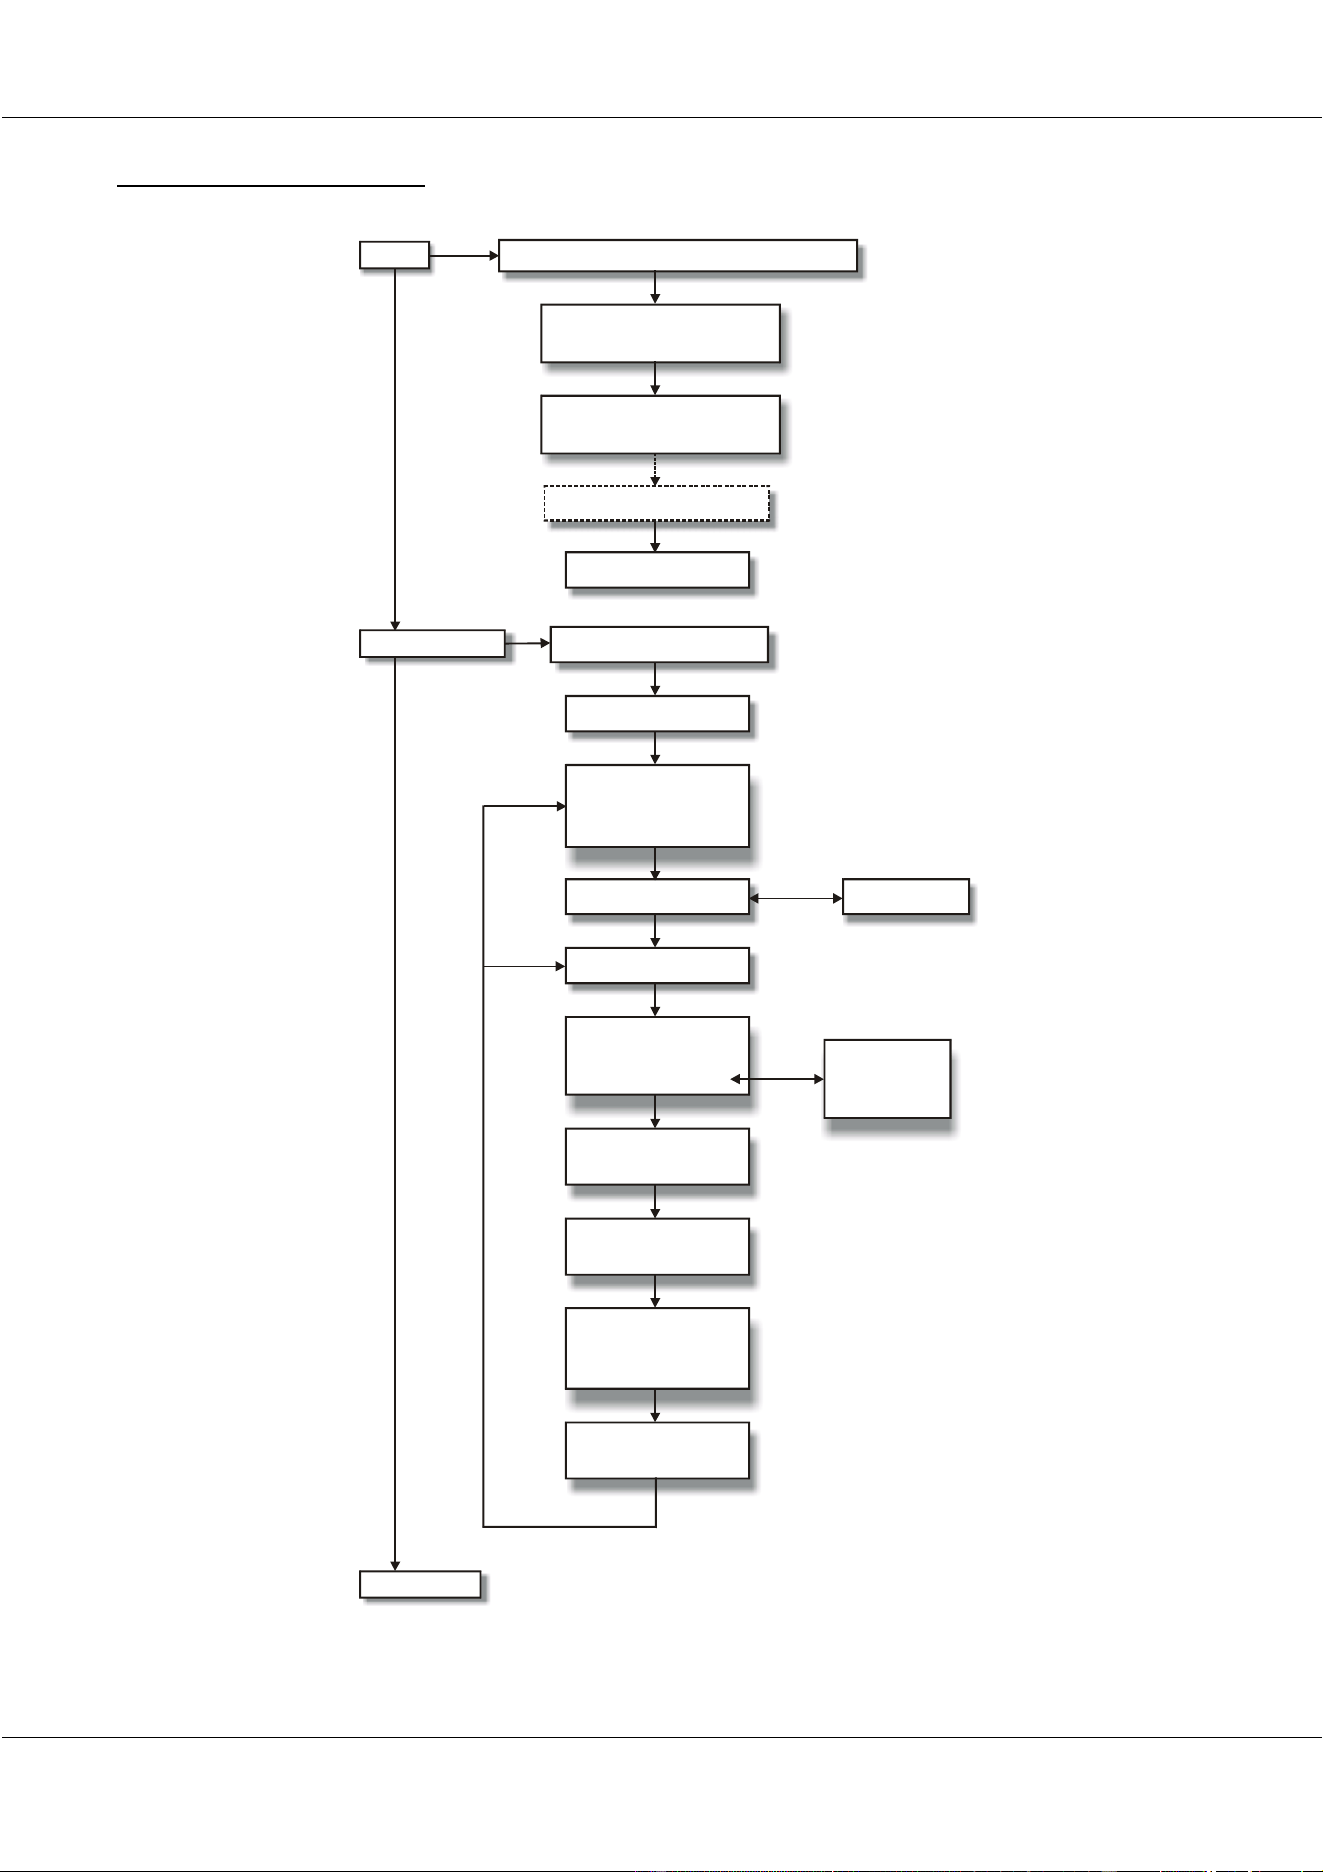
5 Programming the Matrix
Patch
Main Program
Save Show
Define M atrix : number of colums and rows
Select Fixture manufacturer
and Fixture type
Address Fixtures or use
Auto-Patch
Save and Exit Patch
Edit effect engin(e)(s)
Select Program
=
Select Page and Cue
Select Fixture channel
Open M aster fader
Select ‘Stand alone’ mode
Select Lim its
(upper and lower)
Save or update
Cue
A djust effect engine
or text engine
Speed
Select one of
the four effect engines
Select Fade mode
or
Select Text mode
Select effect
Select text
or
Enter text
Define DMX IN addresses
30/11/00 Martin Matrix Controller V2.01
8
© R&D International NV for Martin Professional A/S
Programming hundreds of fixtures, arranged in a matrix, was never so easy. All that has to be
done is:
- Define the number of fixtures in x and y direction
- Select the fixture type
- Address the fixtures
- Select an effect
- Apply the effect on a fixture channel
- Adjust the speed of the effect
To explain the steps that have to be taken to program the Martix controller, we will
make an example with 60 miniMACs profile.
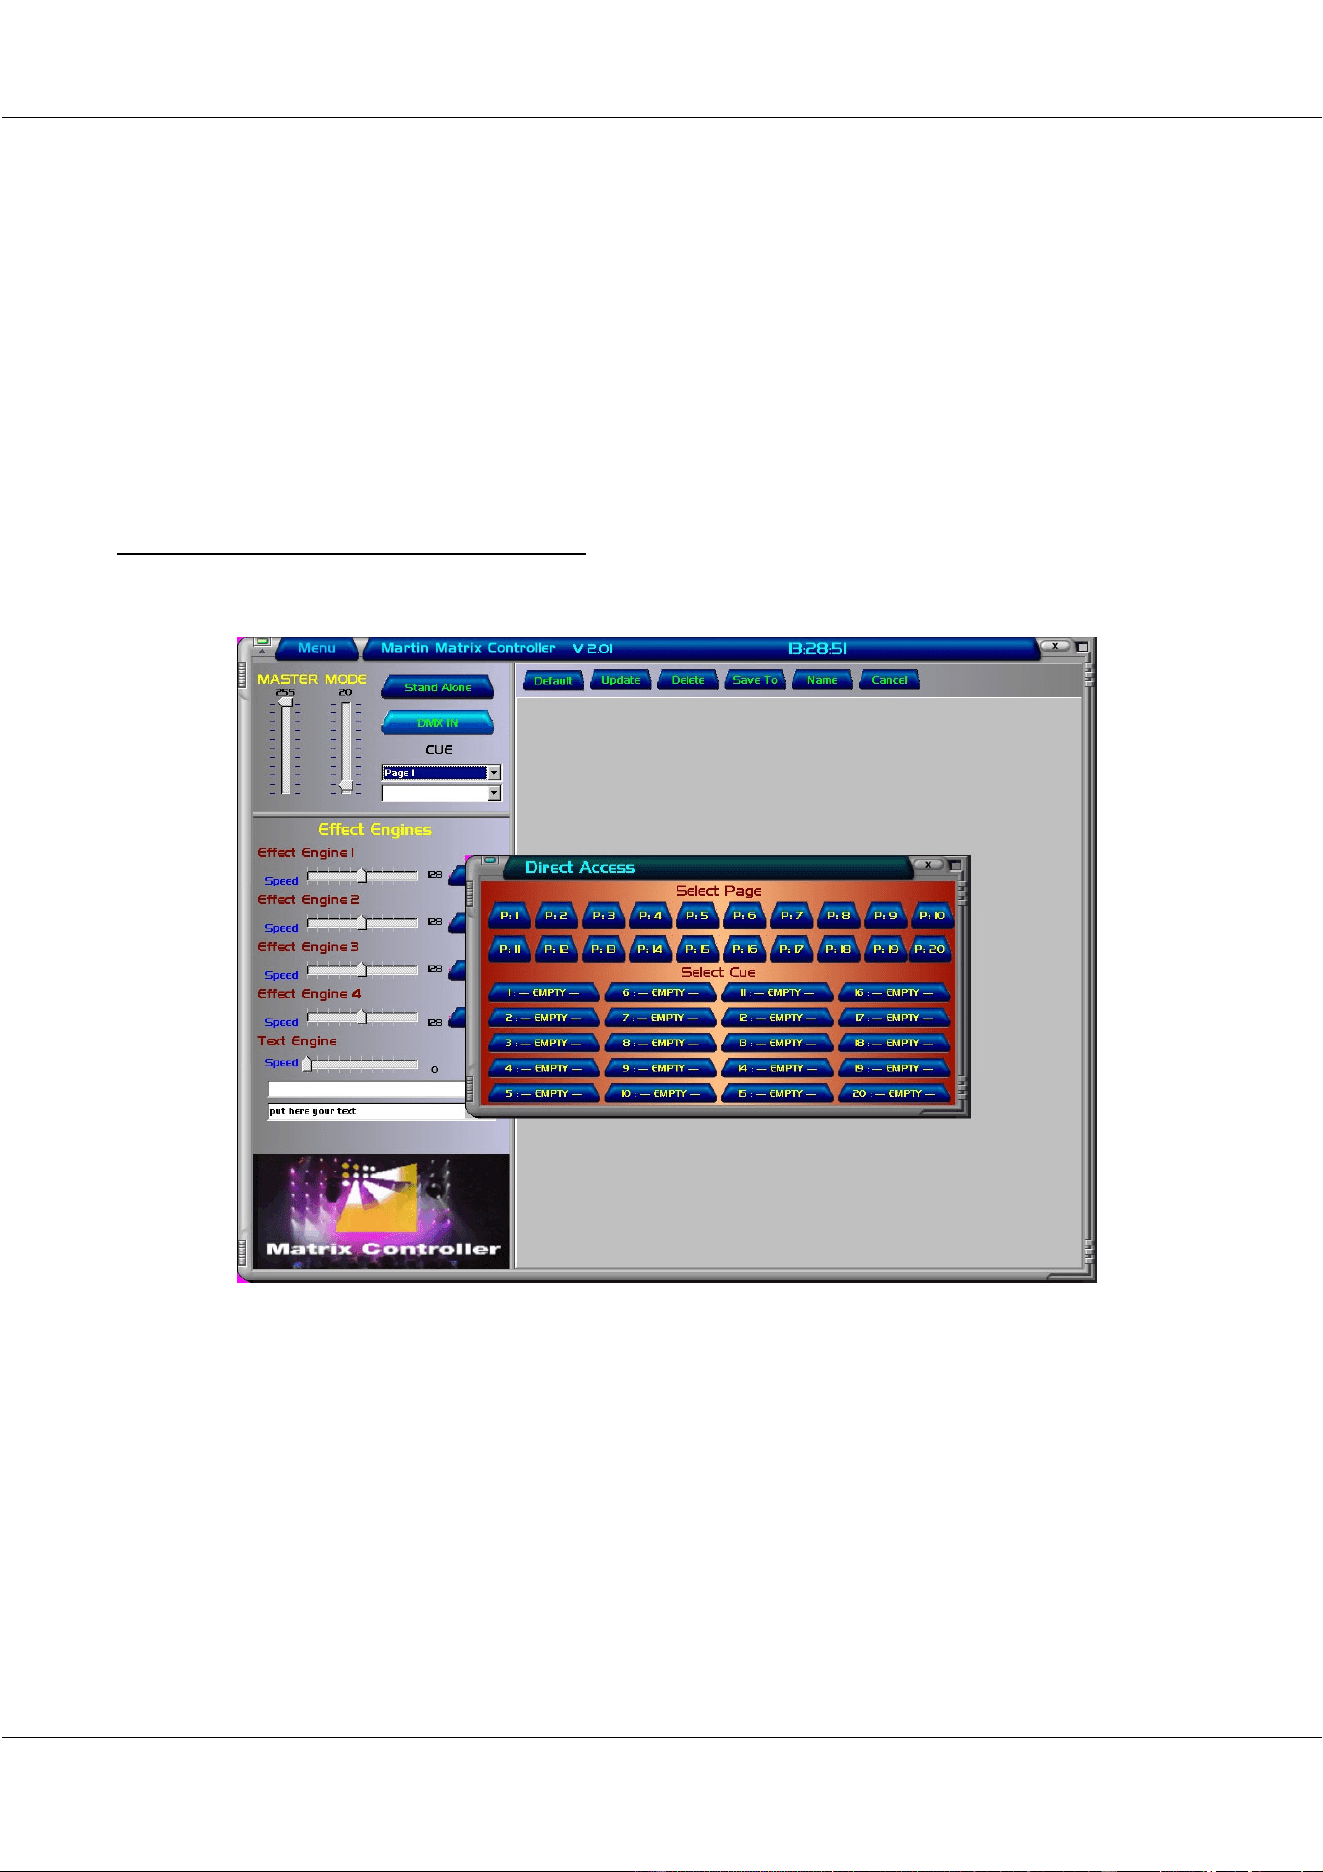
6. Defining the Matrix and Patch fixtures
When the program is active, we will see an empty screen:
The first thing that has to be done is defining the width and height of the matrix, selecting a
fixture type and address the fixtures. This is done with the Patch program.
30/11/00 Martin Matrix Controller V2.01
9
© R&D International NV for Martin Professional A/S
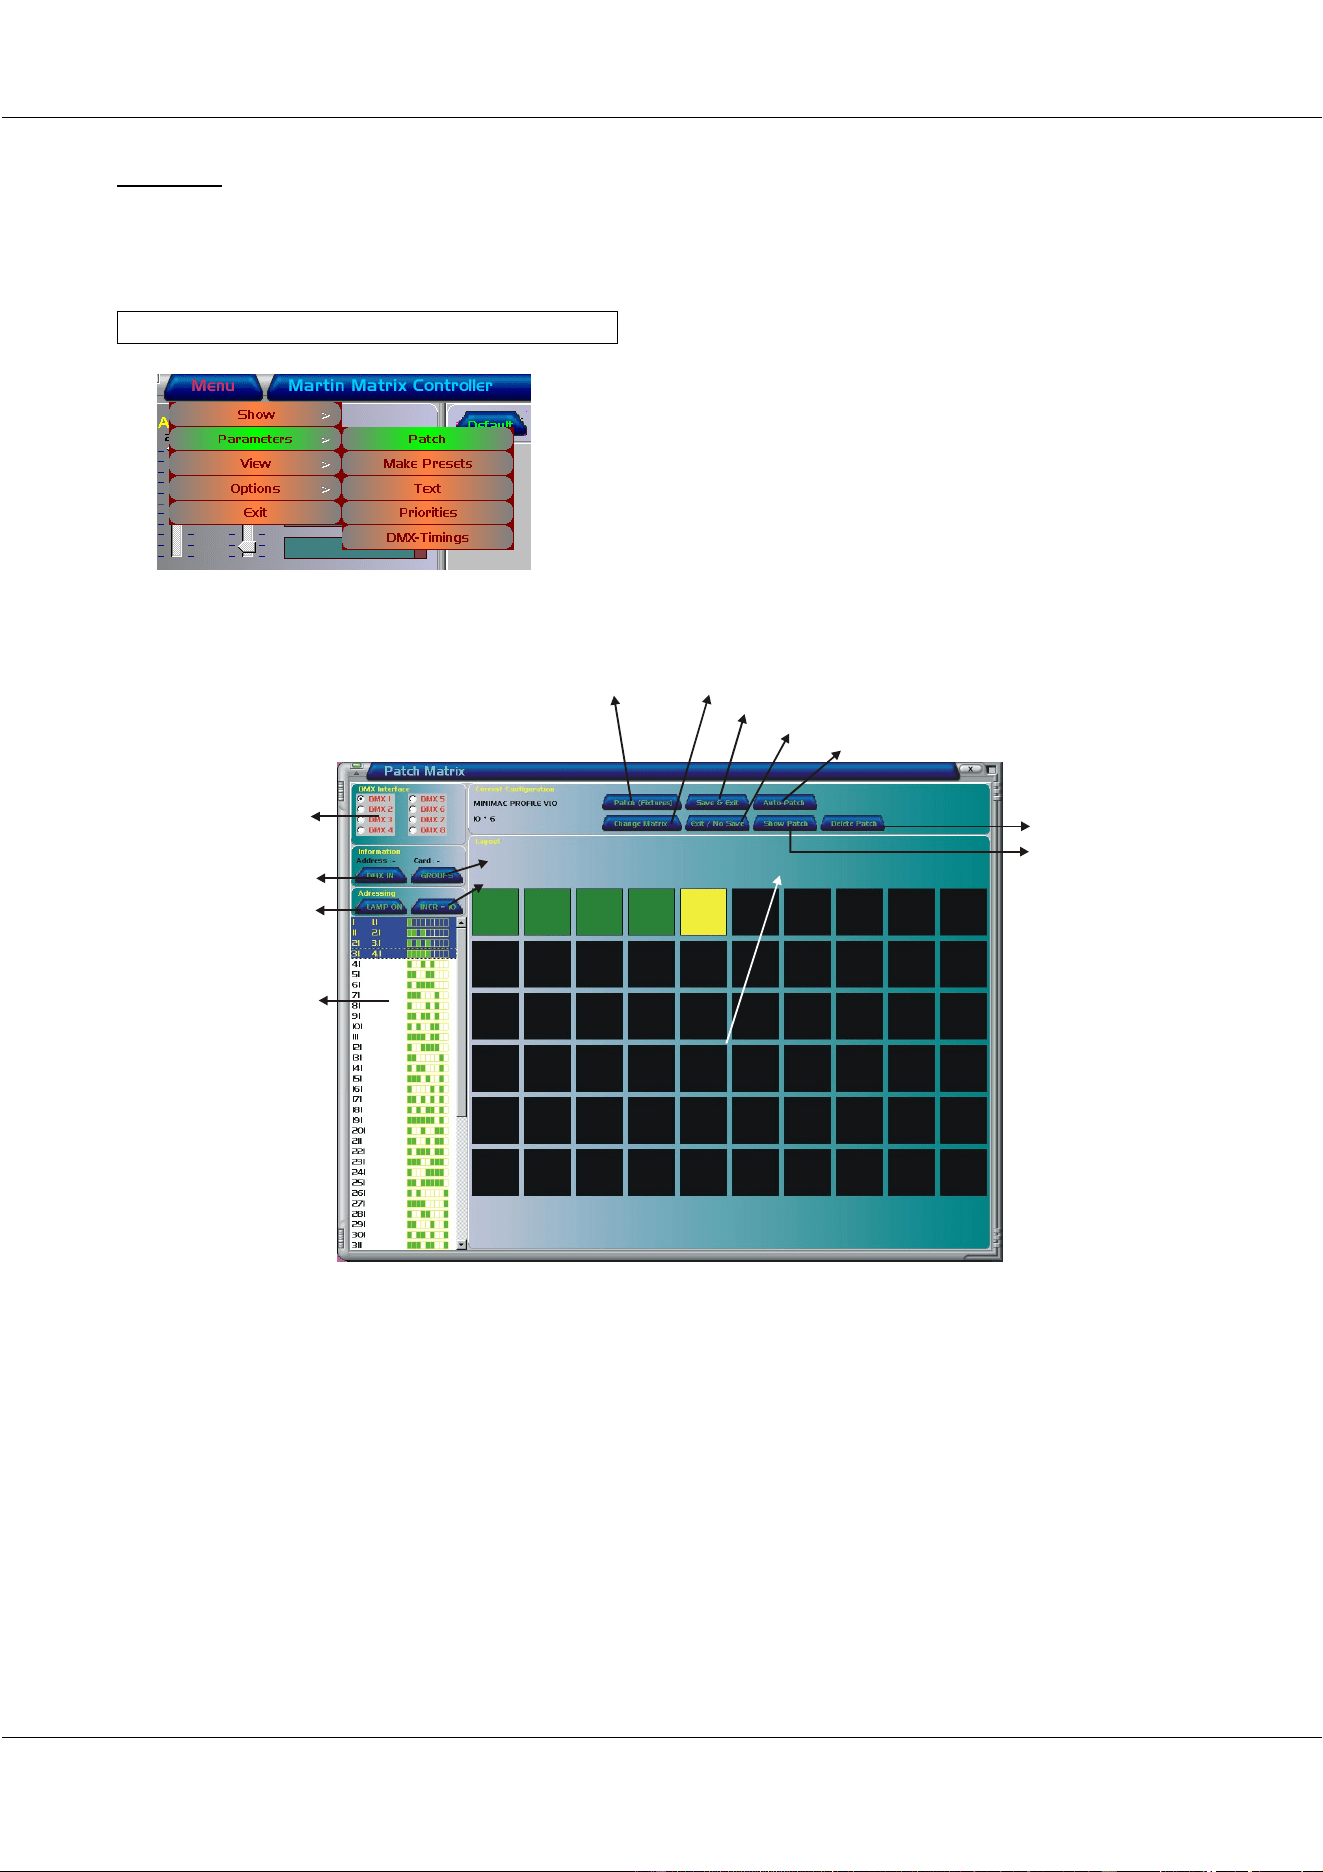
6.1 Patch
In the PATCH program, we will define the matrix (10 wide by 6 high), we will select the
miniMAC fixture and address those 60 fixtures.
[Select the MENU button] [Select Patch]
The PATCH program will start:
DMX OUT line selection: Here the output channel will be selected. If the line is RED,
then the output is not available. Black outputs are available.
o DMX 1: channels 1 – 512
o DMX 2: channels 513 – 1024
o DMX 3: channels 1025 – 1536
o DMX 4: channels 1537 – 2048
o DMX 5: channels 2049 – 2560
o DMX 6: channels 2561 – 3072
o DMX 7: channels 3073 – 3584
o DMX 8: channels 3585 – 4096
D M X o ut line selection
Show present Patch
A utom atic P atch
Exit (no save will be done)
Exit and save Patch
Change x-y matrix
Fixture library
D elete present Patch
DMX in addressing
LAMP ON function
DMX out
address selection
Fixture M atrix
DM X in override group selection
Address Increm ent selection

30/11/00 Martin Matrix Controller V2.01
10
© R&D International NV for Martin Professional A/S
DMX IN addressing: To address DMX inputs when a conventional light desk will
control the Martix Controller.
Lamp On function: While addressing the fixtures, the fixture lamps can be struck.
DMX OUT address selection: If fixtures must be addressed manually, run with your
mouse pointer over the addresses.
DMX IN override groups selection: Used to address the DMX IN range for override
groups (presets) and their fade timings. (only
used when controlling from a conventional light
desk)
Address increment selection: If fixtures are addressed manually, the addresses can be
shown by:
Increment 1
Increment per number of fixture channels
Fixture matrix: The field shows the layout of the light matrix. It is important
that the layout order corresponds with the fixtures in the actual
light matrix.
o Green = addressed
o Yellow is currently active
o Black = not addressed yet
Fixture library: A library of fixture manufacturers and fixture types. The system
uses the same fixture libraries as the Martin Case controllers.
Change X-Y matrix: To define the number of fixtures in X and Y direction.
Exit and save patch: When leaving the Patch program, the patch should be saved.
Exit (no save will be done): To cancel all changes and return to the main program.
Automatic Patch: When fixtures in the light matrix are arranged in successive
order, starting from the top left to the bottom right, the
automatic patch will address all fixtures automatically.
Delete present Patch: To delete all addresses from the patch.
Show present Patch: This gives an overview of the fixtures in (x,y) direction, their
addresses and the used DMX output.
6.2 Patch example step by step
Suppose we have a matrix of miniMACs profile, arranged in successive order from the top left
to the bottom right. We have also a conventional light desk that will be used to control the
Martix controller. In the example, we will show you how to work with the light desk, but the
desk is not really necessary to follow the example.
30/11/00 Martin Matrix Controller V2.01
11
© R&D International NV for Martin Professional A/S
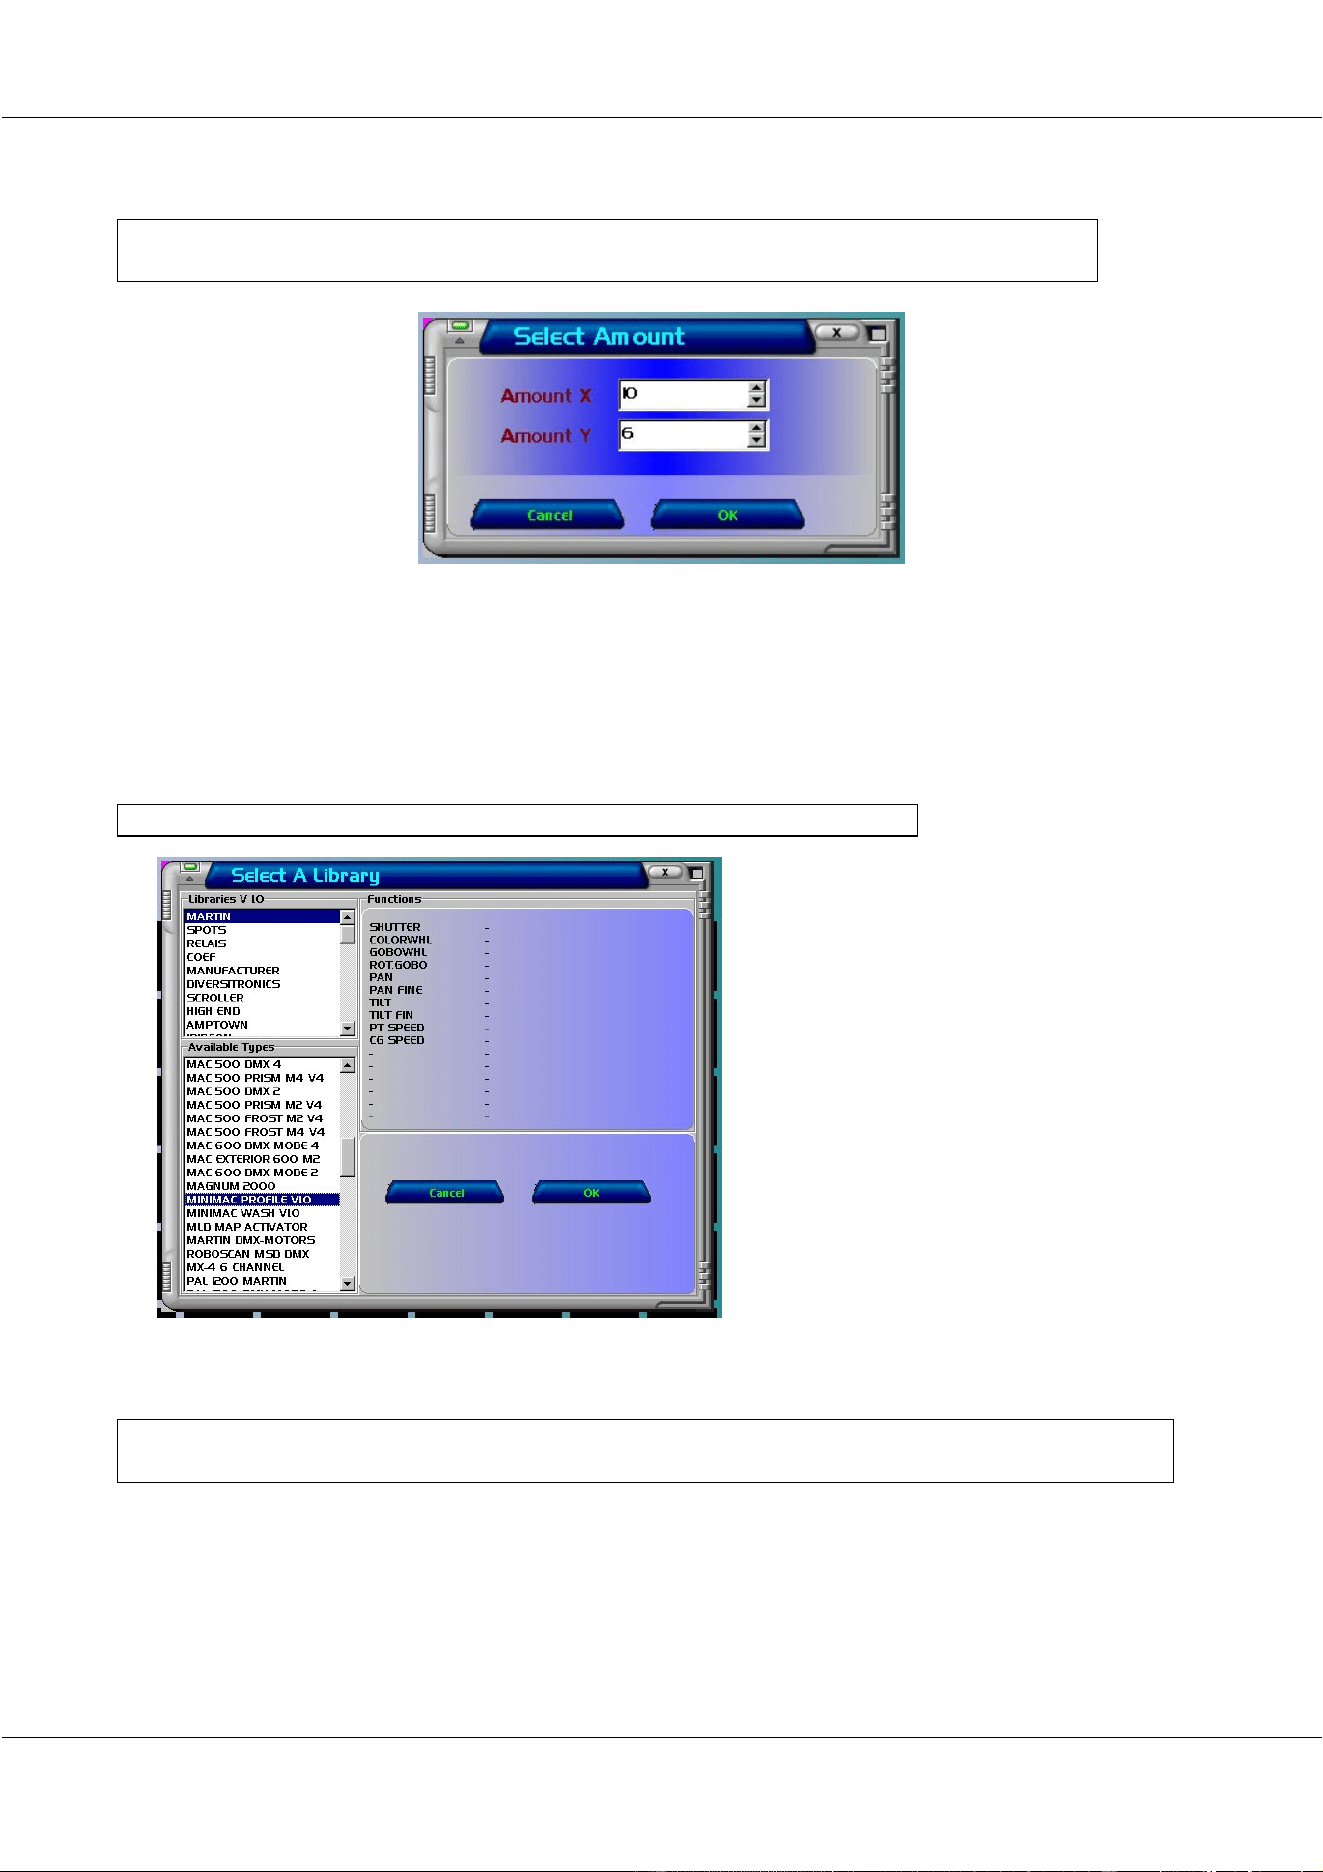
The first thing that has to be done is: define the number of fixtures in the matrix.
[Select the CHANGE MARTIX button] [Enter the amount of fixtures in X and Y
direction] [Click OK]
All fixtures will appear now on your screen as black boxes.
Now we have to select a fixture type.
Note: The Matrix controller accepts only one fixture type. It is impossible to make a
matrix mix with different fixture types.
[Select PATCH (fixtures)] [Select the manufacturer and fixture type]
Since we will make a matrix of Martin
miniMAC profile, we select this fixture.
Each fixture in the Matrix has to have an address. We can address them manually by:
[Select a FIXTURE box] [Select the DMX output (1-8)] [Select the address from the
dipswitch window]
Since no fixtures have an address yet, all fixture boxes will be black. When one of them is
selected, the box will become yellow. If the address is set, the box will be green, meaning that
the fixture is patched.
We can address all fixtures manually, but since we have a light matrix in successive order
from the top left to the bottom right, it will be easier to address all fixtures automatically:
30/11/00 Martin Matrix Controller V2.01
12
© R&D International NV for Martin Professional A/S
[Select AUTOPATCH and confirm]
If some of the fixtures have other addresses than given by the auto patch, it is always possible
to change it manually.
If you work in ‘Stand Alone’ mode (no extra light desk connected), then the patch is ready at
this point. The only thing that has to be done is save.
[Select SAVE & EXIT]
However, when a controlling light desk is connected, we have to address its control channels.
On the light desk, a 10-channel fixture has to be made and addressed. If the controlling light
desk is a Martin Case controller, you can select the ‘MATRIX BLACKBOX’ from the
‘CASEFIXTURES’ library. The DMX address given to this fixture MUST have a unique
address, which not overlaps with the fixture addresses on the Matrix controller.
The controlling desk can be used in 3 ways. It can control:
- The Matrix controller and its presets (override groups or groups). In this case, the light
desk sees the Matrix controller as a normal 10-channel fixture (if presets are used also,
you need to setup also 2 fixtures of 4 channels at a unique address).
- The light matrix itself when the DMX through option of the Martix Controller is used.
In this case, the light desk should have the same fixture setup as the Martix controller.
- Both, the Matrix controller with presets and the light matrix.
The DMX input of the Matrix Controller must be set at the same address of the MATRIX
BLACKBOX on the light desk.
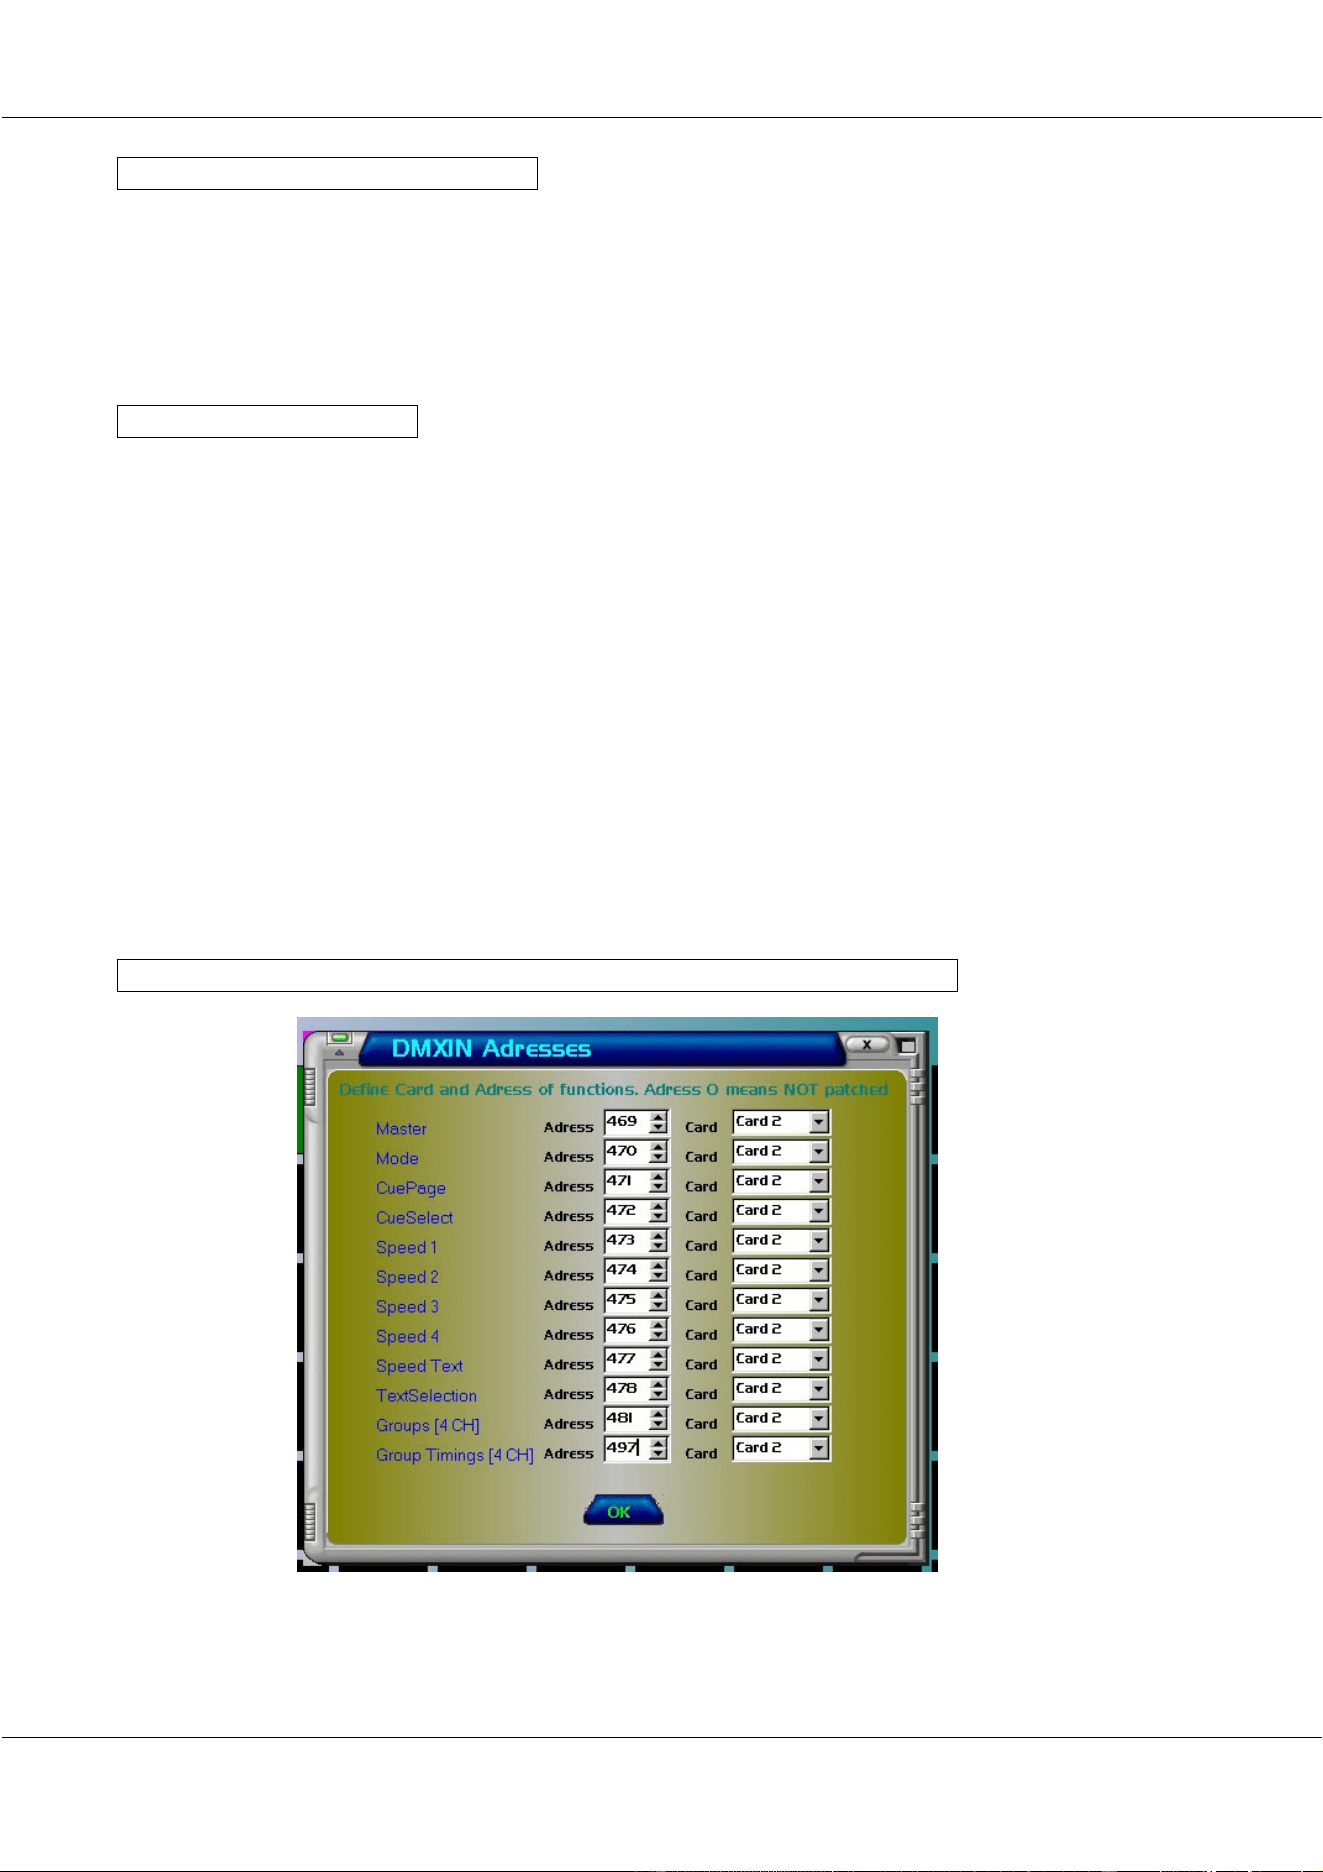
[Select DMX IN] [Enter DMX addresses that are not in the fixture range]
Note: Card 2 means the same as Line 2.

30/11/00 Martin Matrix Controller V2.01
13
© R&D International NV for Martin Professional A/S
Explanation: In this example, we have chosen address 469 on line 2 as a DMX input. This
means that; if the conventional light desk has a fixture at address 469 on the
incoming 2
nd
DMX line of the Matrix Controller, we will be able to control
the Master fader of the Matrix Controller from the fixture at address 469 of
the light desk. We will explain the other channels in the main program.
The use of presets will be explained later.
To save the Patch, click the SAVE & EXIT button.
30/11/00 Martin Matrix Controller V2.01
14
© R&D International NV for Martin Professional A/S
7 The main program
7.1 How the main program is used
There are 20 pages of 20 cues.
- Each cue holds:
o All fixture channels
o 4 effect engines
o 1 text engine
Page x - Cue y
Fixture
Channel 1 (ex. Dimmer)
Channel 2 (ex. Color)
Channel 3 (ex. Gobo)
Channel 4 (ex. Rot Gobo)
Channel 5 (ex. Pan)
Channel 6 (ex. Tilt)
Channel x
Snake effect
Line effect
Circle effect
Rectange effect
Effect engine (1-4)
Text engine
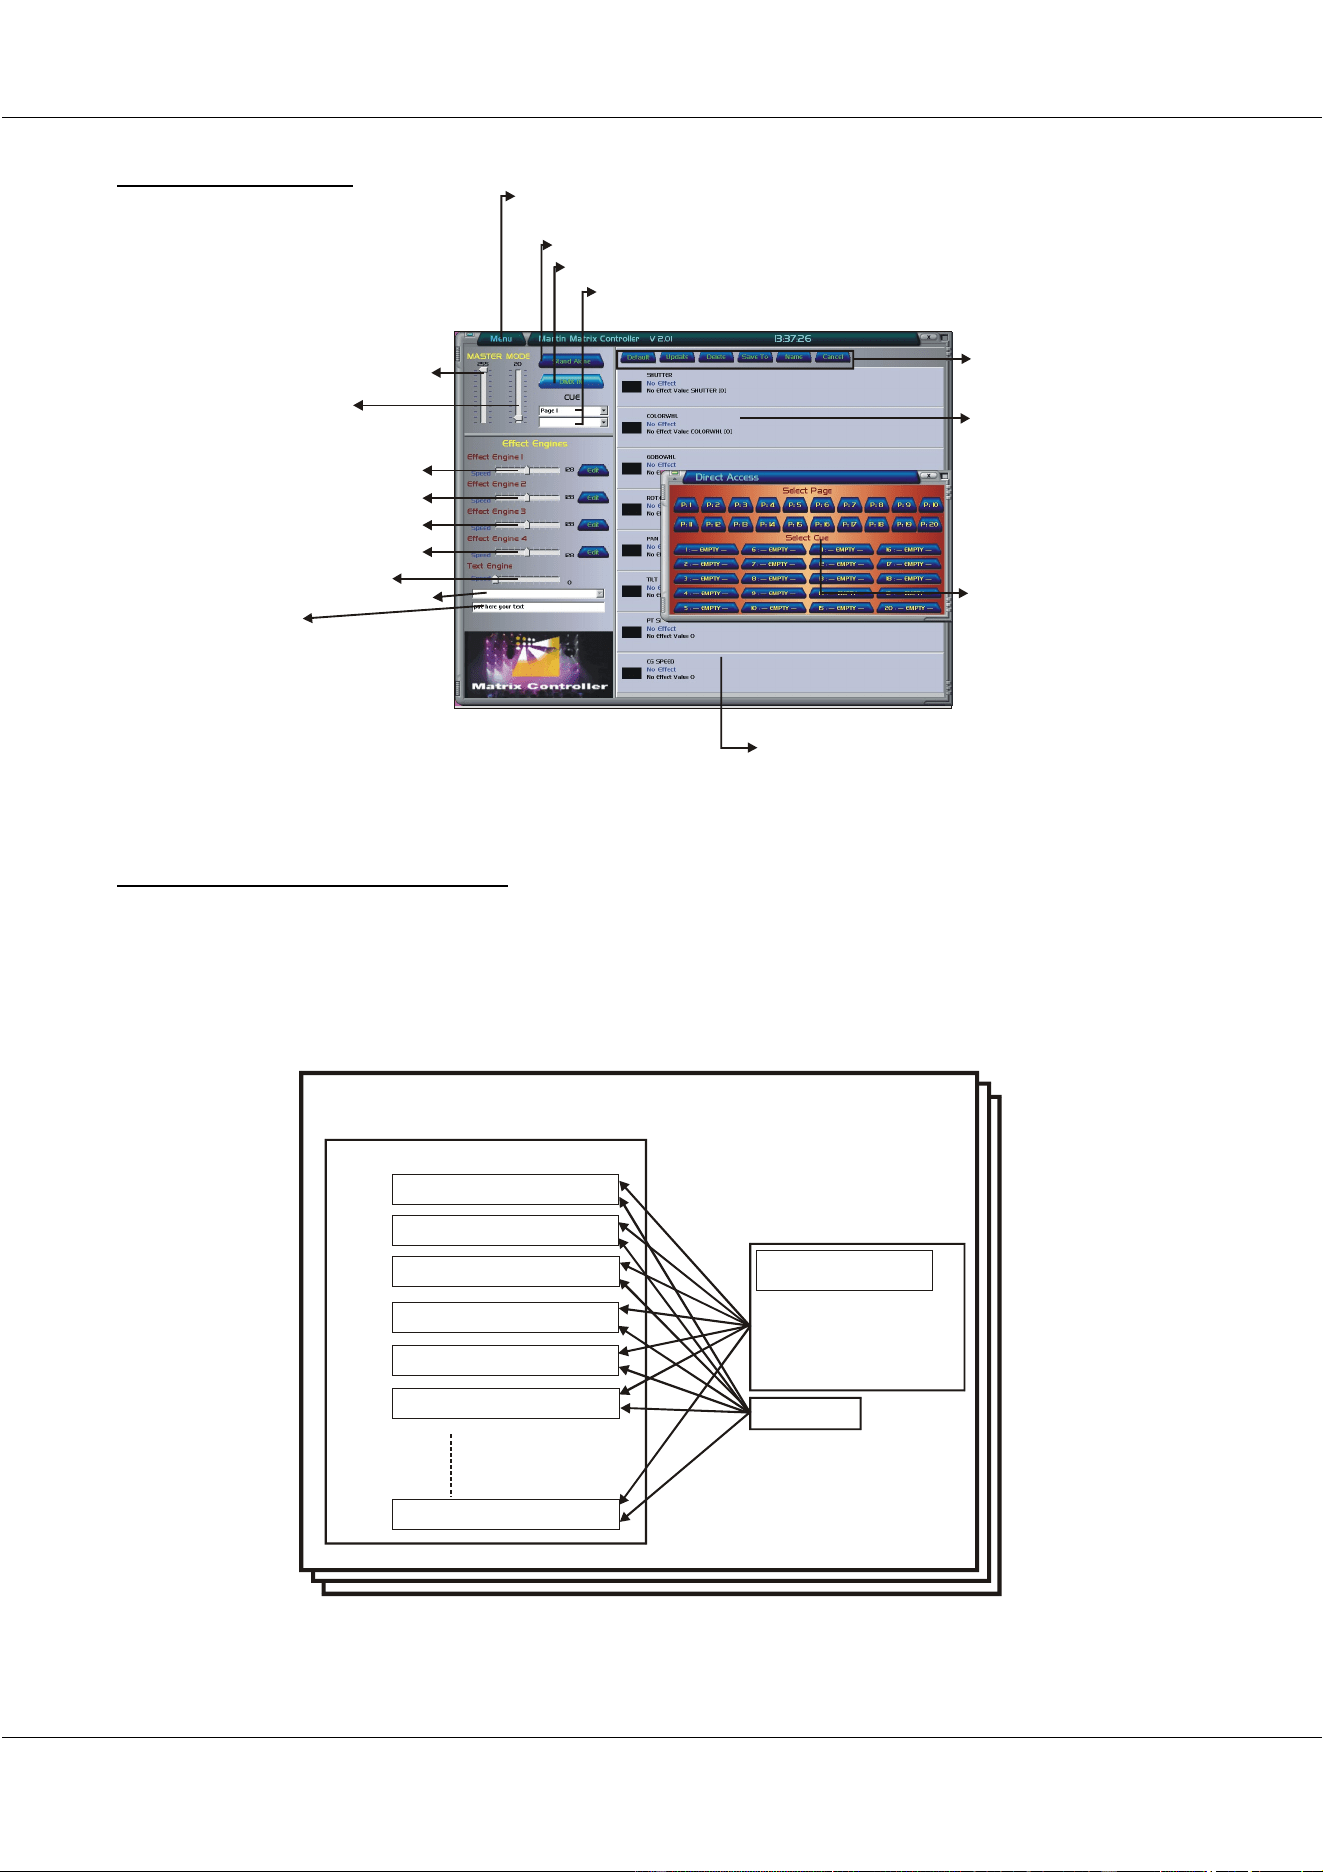
To open the m enu
M aster fader (dim m er)
M ode fader
{
Speed faders effect engins
and effect engins edit buttons
Speed fader text engine
Selection of predefined texts
Online text
Stand Alone button
Controlled from DMX-IN button
Page and program (cue) selection buttons
Program (cue)
storage options
Fixture Channels
Fixture Channel
Effect Parameters
Direct access buttons of
Programs (cues)

30/11/00 Martin Matrix Controller V2.01
15
© R&D International NV for Martin Professional A/S
On every fixture channel, one of the 4 effect engines or the text engine can generate an effect.
The effect will be active between the fixture channels limits.
The fixture channel limits are entered:
- By a number
- By the direct access field (ex. Between color white and yellow)
- By a preset
Note: The fixture channel limits may be negative and may exceed value 255. This will be
explained in the example.
7.2 The main screen
7.2.1 The menu button
Initial settings, like defining the matrix, selecting the fixture type, addressing the fixtures...,
show loading and saving options, DMX timing settings etc. can be accomplished in the menu.
7.2.1.1 Show
To store/load the entire programmed Matrix show on/from the hard disk or the floppy drive.
7.2.1.2 Parameters
The parameters button includes:
- Patch:
o Definition of the matrix
o Selecting the fixture type
o Addressing fixtures
o Addressing the DMX-IN inputs
- Make Presets:
o To define your own logos to be displayed on the Matrix. There is storage for
50 presets on each fixture channel.
Fixture Channel
Effect
or
text engine
Upper limit
Valu e
or
Direct access (ex. Yellow)
or
Preset
Valu e
or
Direct access (ex. W hite)
or
Preset
Lower limit

30/11/00 Martin Matrix Controller V2.01
16
© R&D International NV for Martin Professional A/S
o Cross fading times can be applied for fading between 2 logos.
- Text:
o There is storage for 20 pre-defined texts, to use the Matrix as a text display. On
top of this, texts can also be entered ‘on the fly’.
- Priorities:
o To define the priorities of the running Matrix.
o Attention, playing with the priorities can slow down the Matrix program
enormously.
- DMX timings:
o Some older fixtures may react wrong on the standard DMX timings.
Attention, changing the DMX timings can result in strange behavior of the
fixtures.
7.2.1.3 View
To activate/deactivate the preset override screen (with X-fade timings) and the Direct Access
cue window.
7.2.1.4 Options
Some special fixture functions like reset, lamp on, lamp off, can be applied directly on the
entire matrix. The lamp on function will strike all lamps one by one, to avoid power surges.
7.2.1.5 Exit
To close the program.
Attention: The program runs in a Windows environment, please shut down the system
properly by using the Windows START button.
7.2.2 Stand-alone button and ‘Controlled from DMX-IN’ button
When no light desk is connected to the Matrix controllers DMX inputs, or when programming
effects, the Matrix controller should be set in ‘Stand Alone’ mode.
In ‘Stand Alone’ mode, all faders (Master, Mode and speed) are accessible through the
mouse.
The Matrix controller can be controlled from an external light desk via its DMX-IN inputs
(see ‘Controlling the matrix from a light desk’). Enable the ‘DMX-IN’ button if you want to
do so.

30/11/00 Martin Matrix Controller V2.01
17
© R&D International NV for Martin Professional A/S
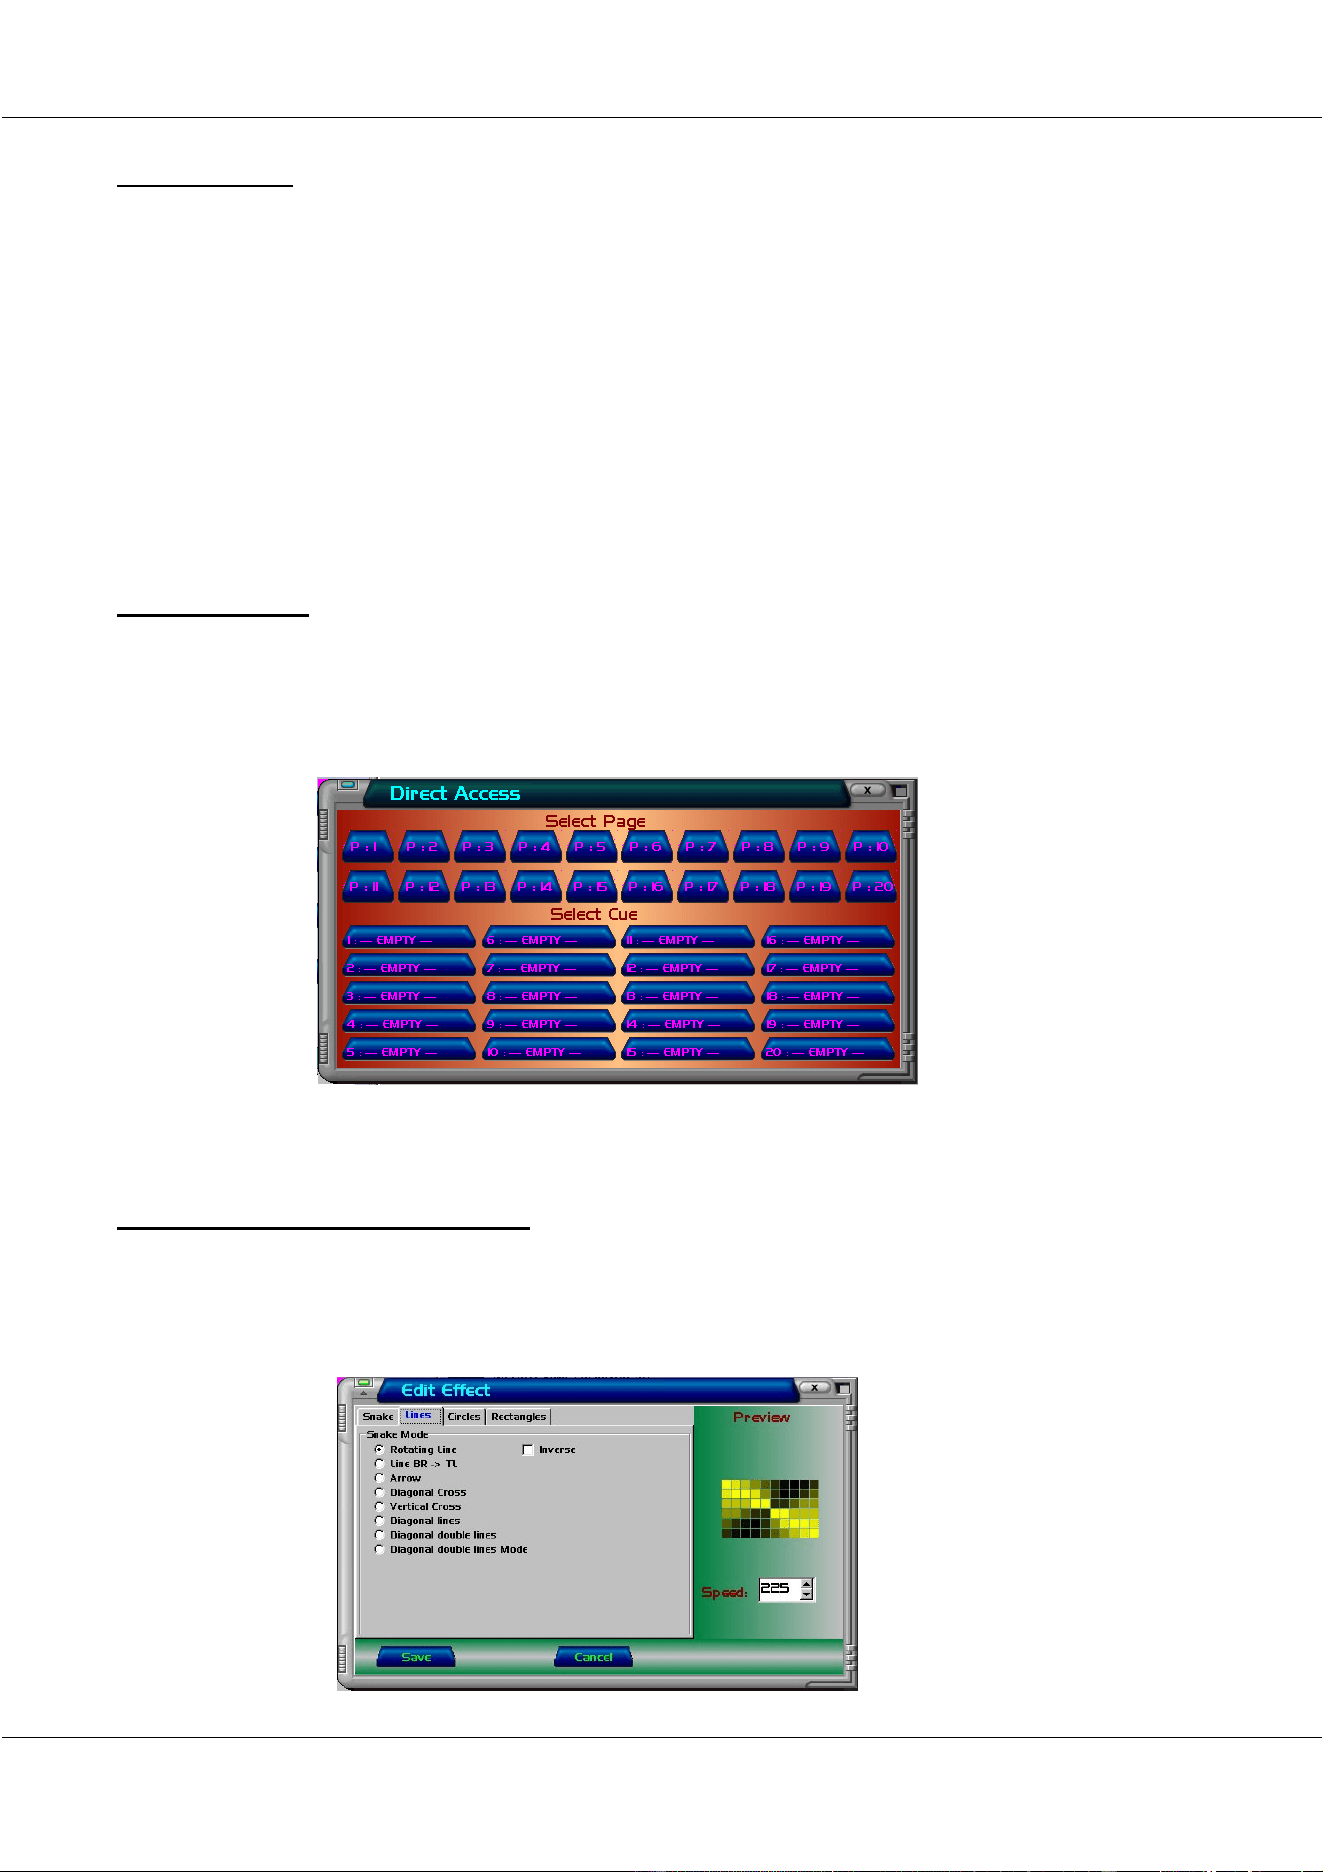
7.2.3 Page and program (cue) selection buttons and Direct Access buttons
A cue is a program. Programs are divided into 20 pages of 20 cues.
One cue can hold:
- 4 effect engines
- 1 text engine
- Effects for all channels of the selected Matrix fixture.
Every cue holds all channels of the fixtures. On those channels, an effect can be applied with
1 of the 4 effect engines (every cue, there are 4 new effect engines), or the text engine. When
the effect is running on a fixture channel, it is running between 2 limits. Those limits can be
set using:
- Digital values
- Direct access values (ex. Color white and green, or between dimmer closed and open)
- Pre-defined presets
To select a cue:
[Select a page] [Select a cue]
7.2.4 Master fader
To open or close the dimmers of all fixtures instantly. In ‘Stand alone’ mode, the fader is set
with the mouse. When controlling from a light desk, the fader is set on the light desk.
&8(
Page x
Cue y
4 effect engines
1 text engine
Presets
Fixture channels

30/11/00 Martin Matrix Controller V2.01
18
© R&D International NV for Martin Professional A/S
7.2.5 Mode fader
There are 2 modes for this fader:
- DMX through
- Chase
In DMX through mode, the fixture matrix is controlled from a connected light desk. This
means that the light desk has to hold the same fixture setup as the Matrix controller. The
incoming DMX on the Matrix controller will be sent instantly to the DMX outputs. The
Matrix controller doesn’t change DMX values in this mode.
In Chase mode, the Matrix controller controls the fixture matrix. Matrix controller cues can be
selected from a connected light desk (for DMX channels, see Paragraph: Controlling the
Matrix controller from a light desk), or with the mouse in ‘Stand Alone’ mode.
Note: When the Matrix controller is used in ‘Stand Alone’ mode, the mode fader must
be set in Chase mode to be able to select Cues.
7.2.6 Effect engines
For every cue that is selected, there are 4 new effect engines. Every effect engine has its own
effect speed.
There are 4 main effects for an effect engine:
- Snakes
- Lines
- Circles
- Rectangles
To select an effect for an effect engine:
[Select a cue (page + cue)] [Edit an effect engine with its EDIT button]
To see the effect, the effect must be applied on a fixture channel, and the speed must be
set.
30/11/00 Martin Matrix Controller V2.01
19
© R&D International NV for Martin Professional A/S
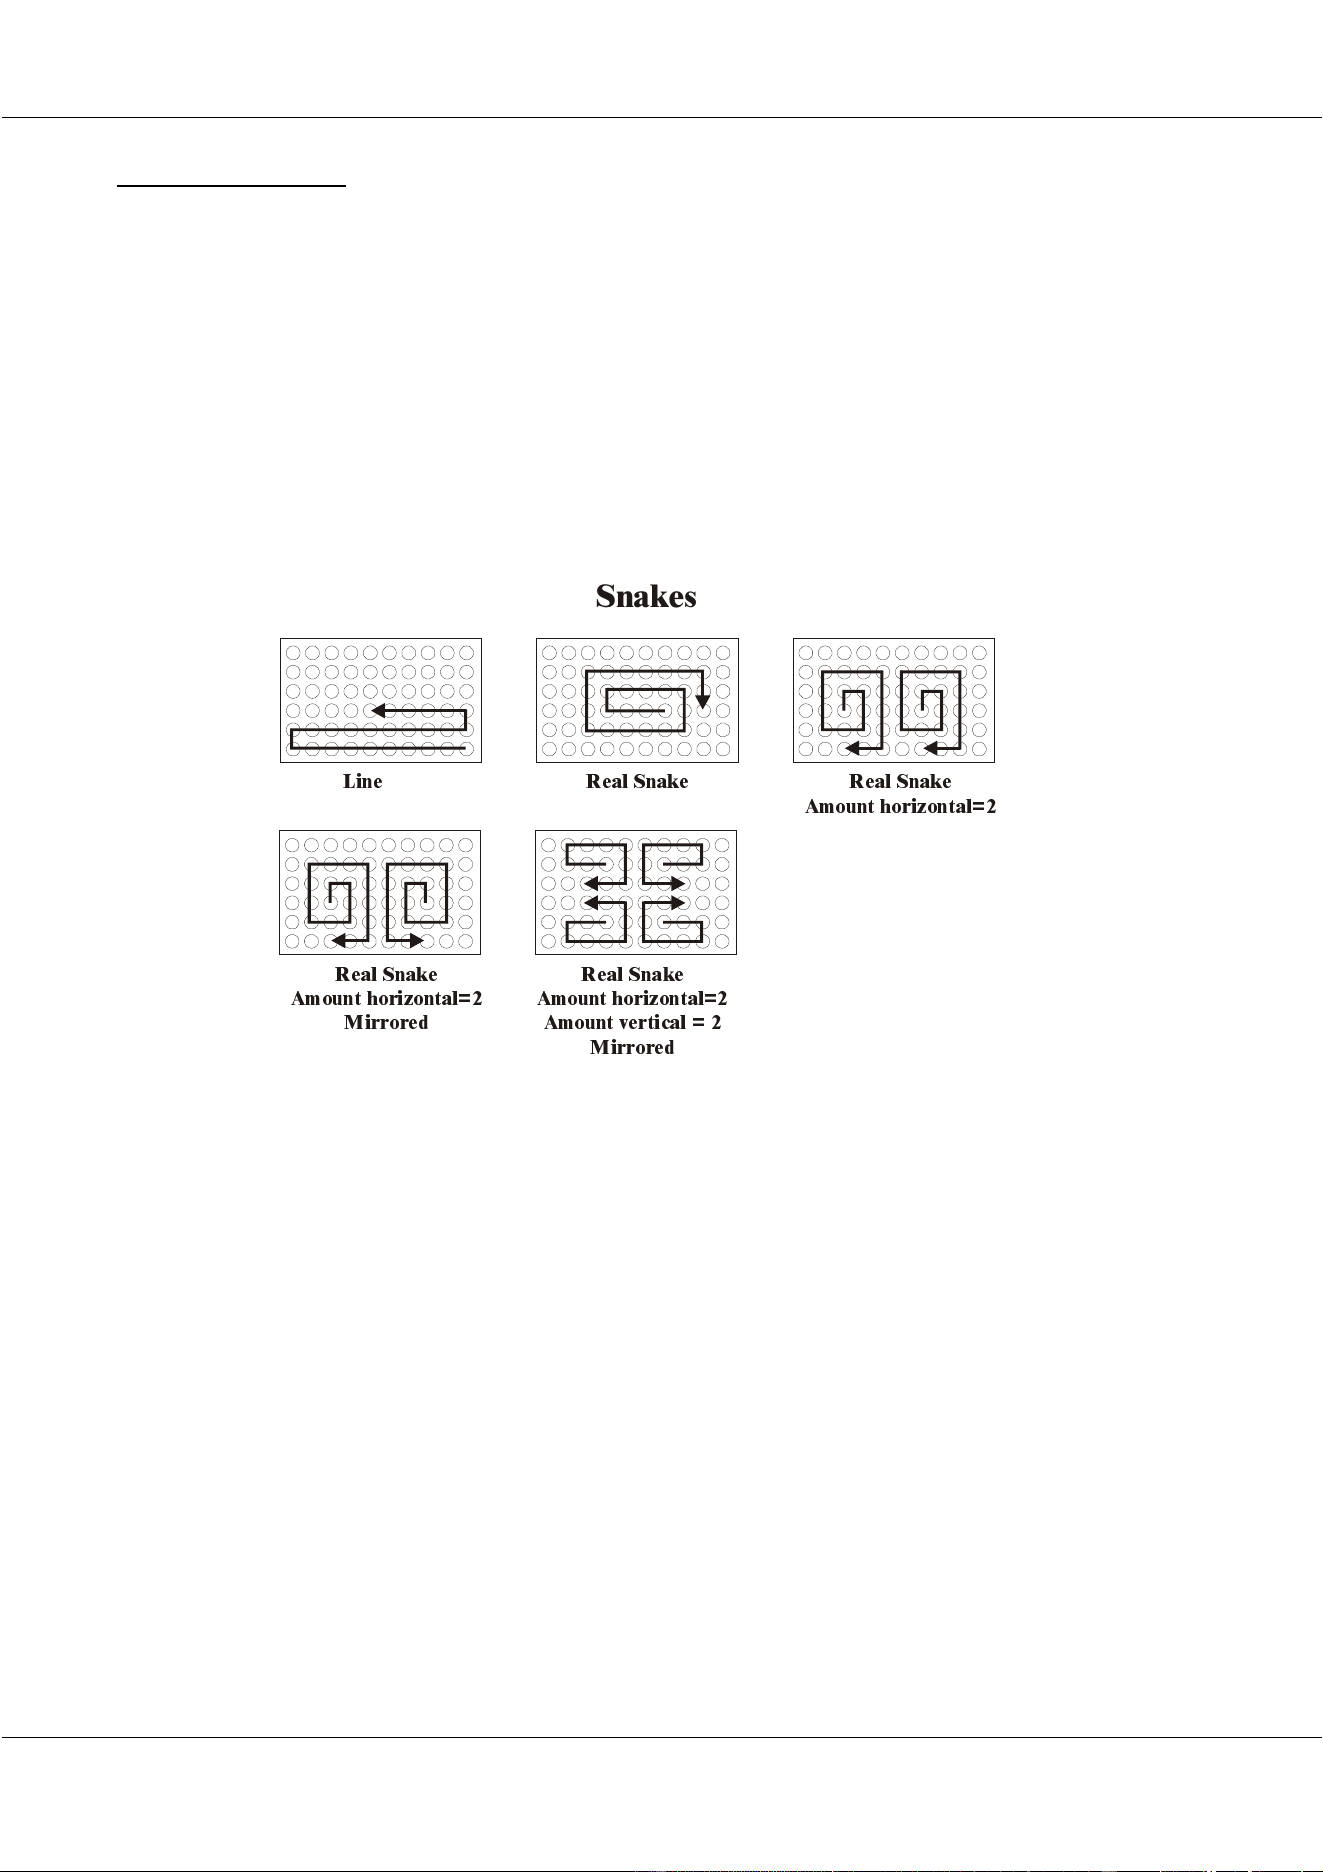
7.2.6.1 Snake effects
3 snake effects are available:
- Random: The fixture channel on which the random effect is applied will be selected at
random.
- Lines: The effect will select the fixture channel in a line order (see figure), starting
from the bottom to the top.
- Real Snake: The effect will select the fixture channel in a snake order, starting in the
middle (see figure).
The direction of the ‘lines’ and ‘real snake’ effect can be inversed.
The amount of snakes in ‘real snake’ mode, is selectable and the effect can be mirrored.
/LQH 5HDO 6QDNH
6QDNHV
5HDO 6QDNH
$PRXQW KRUL]RQWDO
5HDO 6QDNH
$PRXQW KRUL]RQWDO
0LUURUHG
5HDO 6QDNH
$PRXQW KRUL]RQWDO
$PRXQW YHUWLFDO
0LUURUHG
30/11/00 Martin Matrix Controller V2.01
20
© R&D International NV for Martin Professional A/S
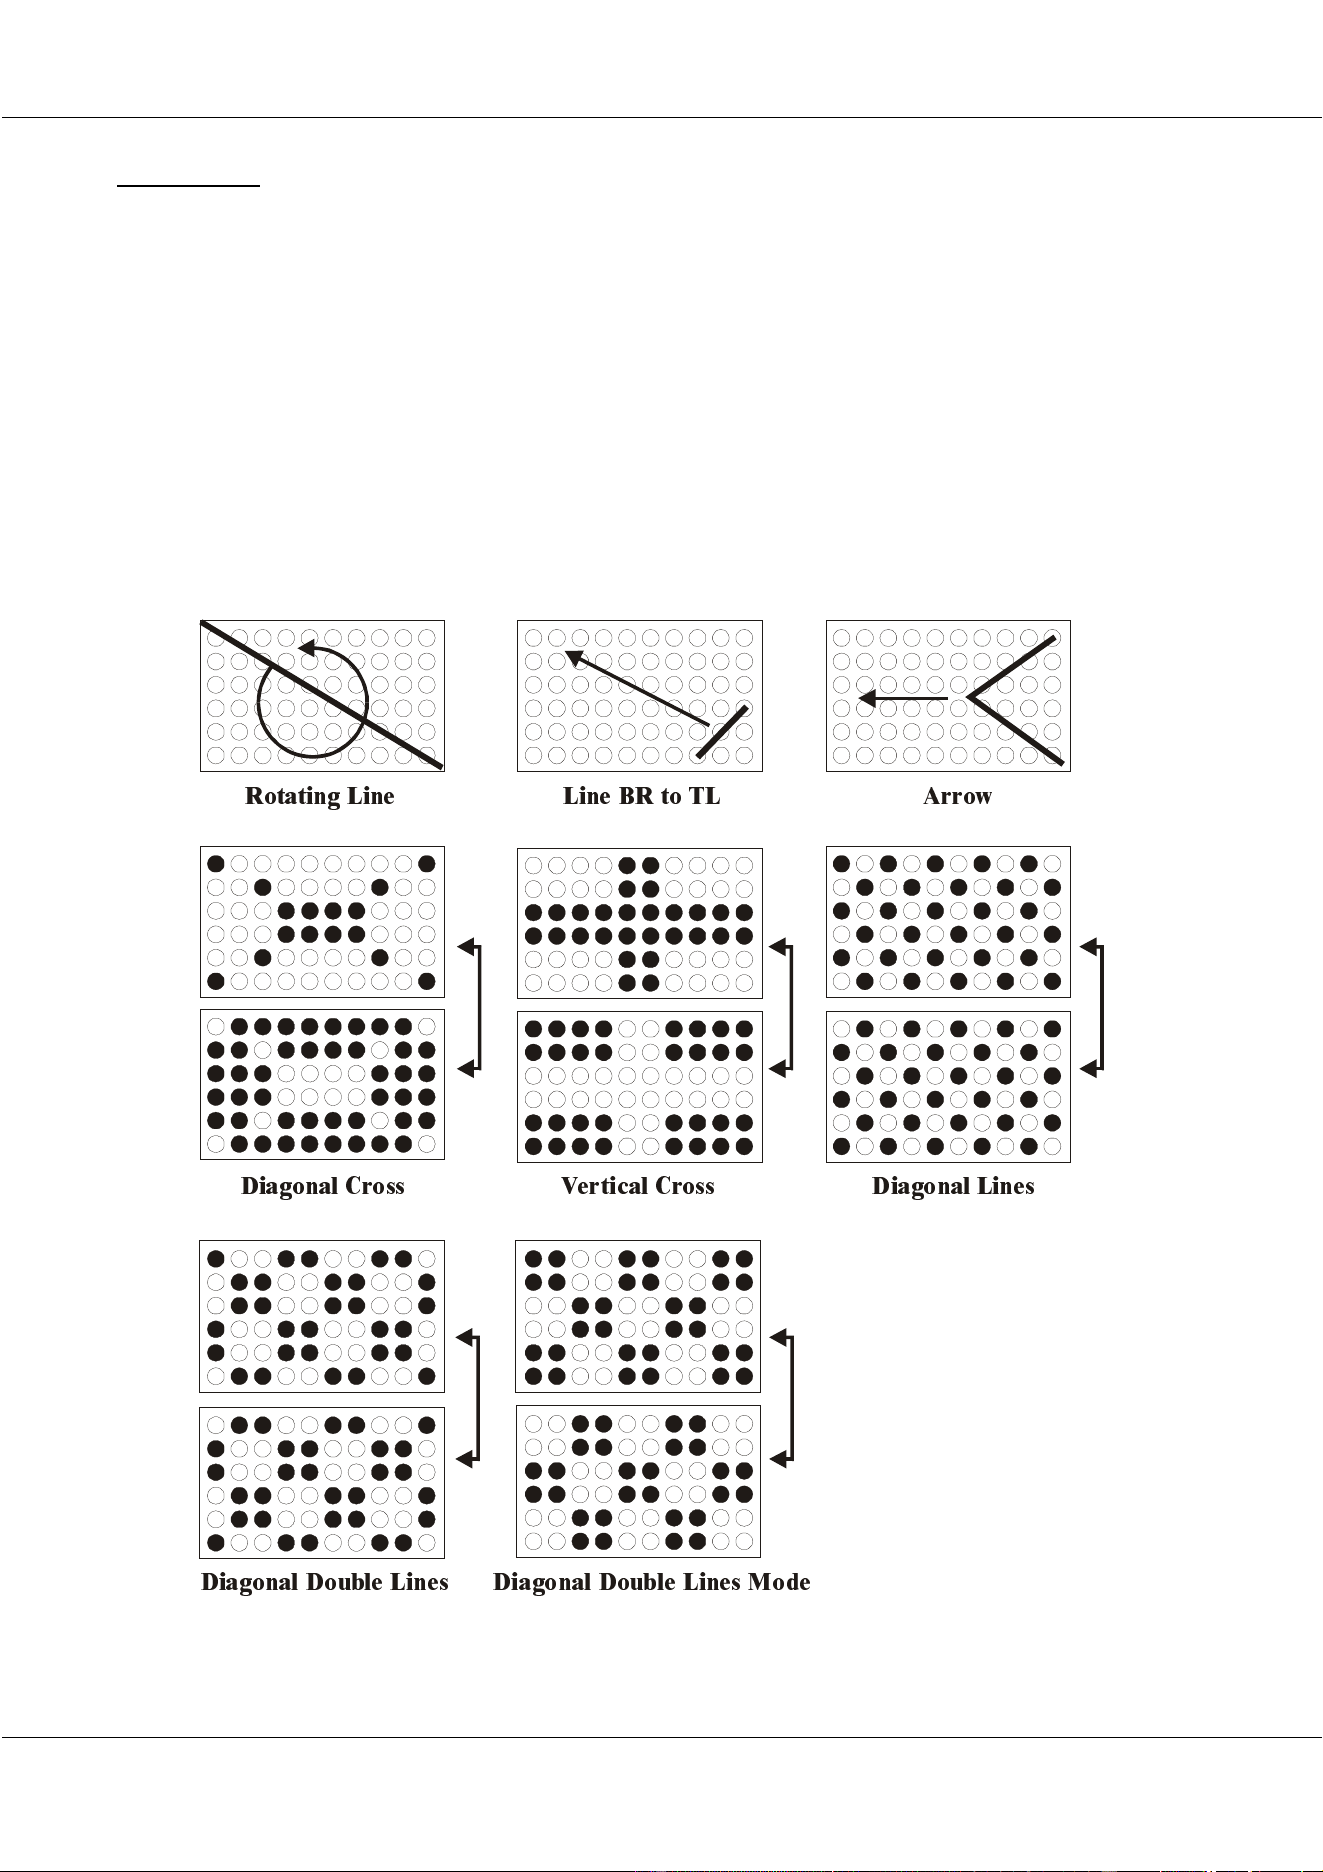
7.2.6.2 Lines
There are 8 line effects:
- Rotating line
- Line BR (bottom right) to TL (top left)
- Arrow
- Diagonal Cross
- Vertical Cross
- Diagonal lines
- Diagonal Double Lines
- Diagonal Double Lines Mode
Every effect can be inversed (direction).
5RWDWLQJ /LQH
'LDJRQDO &URVV
'LDJRQDO 'RXEOH /LQHV 'LDJRQDO 'RXEOH /LQHV 0 R GH
9HUWLFDO &URVV 'L DJRQDO /LQHV
/LQH %5 WR 7/ $U URZ
30/11/00 Martin Matrix Controller V2.01
21
© R&D International NV for Martin Professional A/S
7.2.6.3 Circles
There are 2 circle effects:
- Outside – Inside
- Inside – Outside
They can both be set for a random center point.
7.2.6.4 Rectangles
Like the circles, there are 2 effects:
- Outside – inside
- Inside – Outside
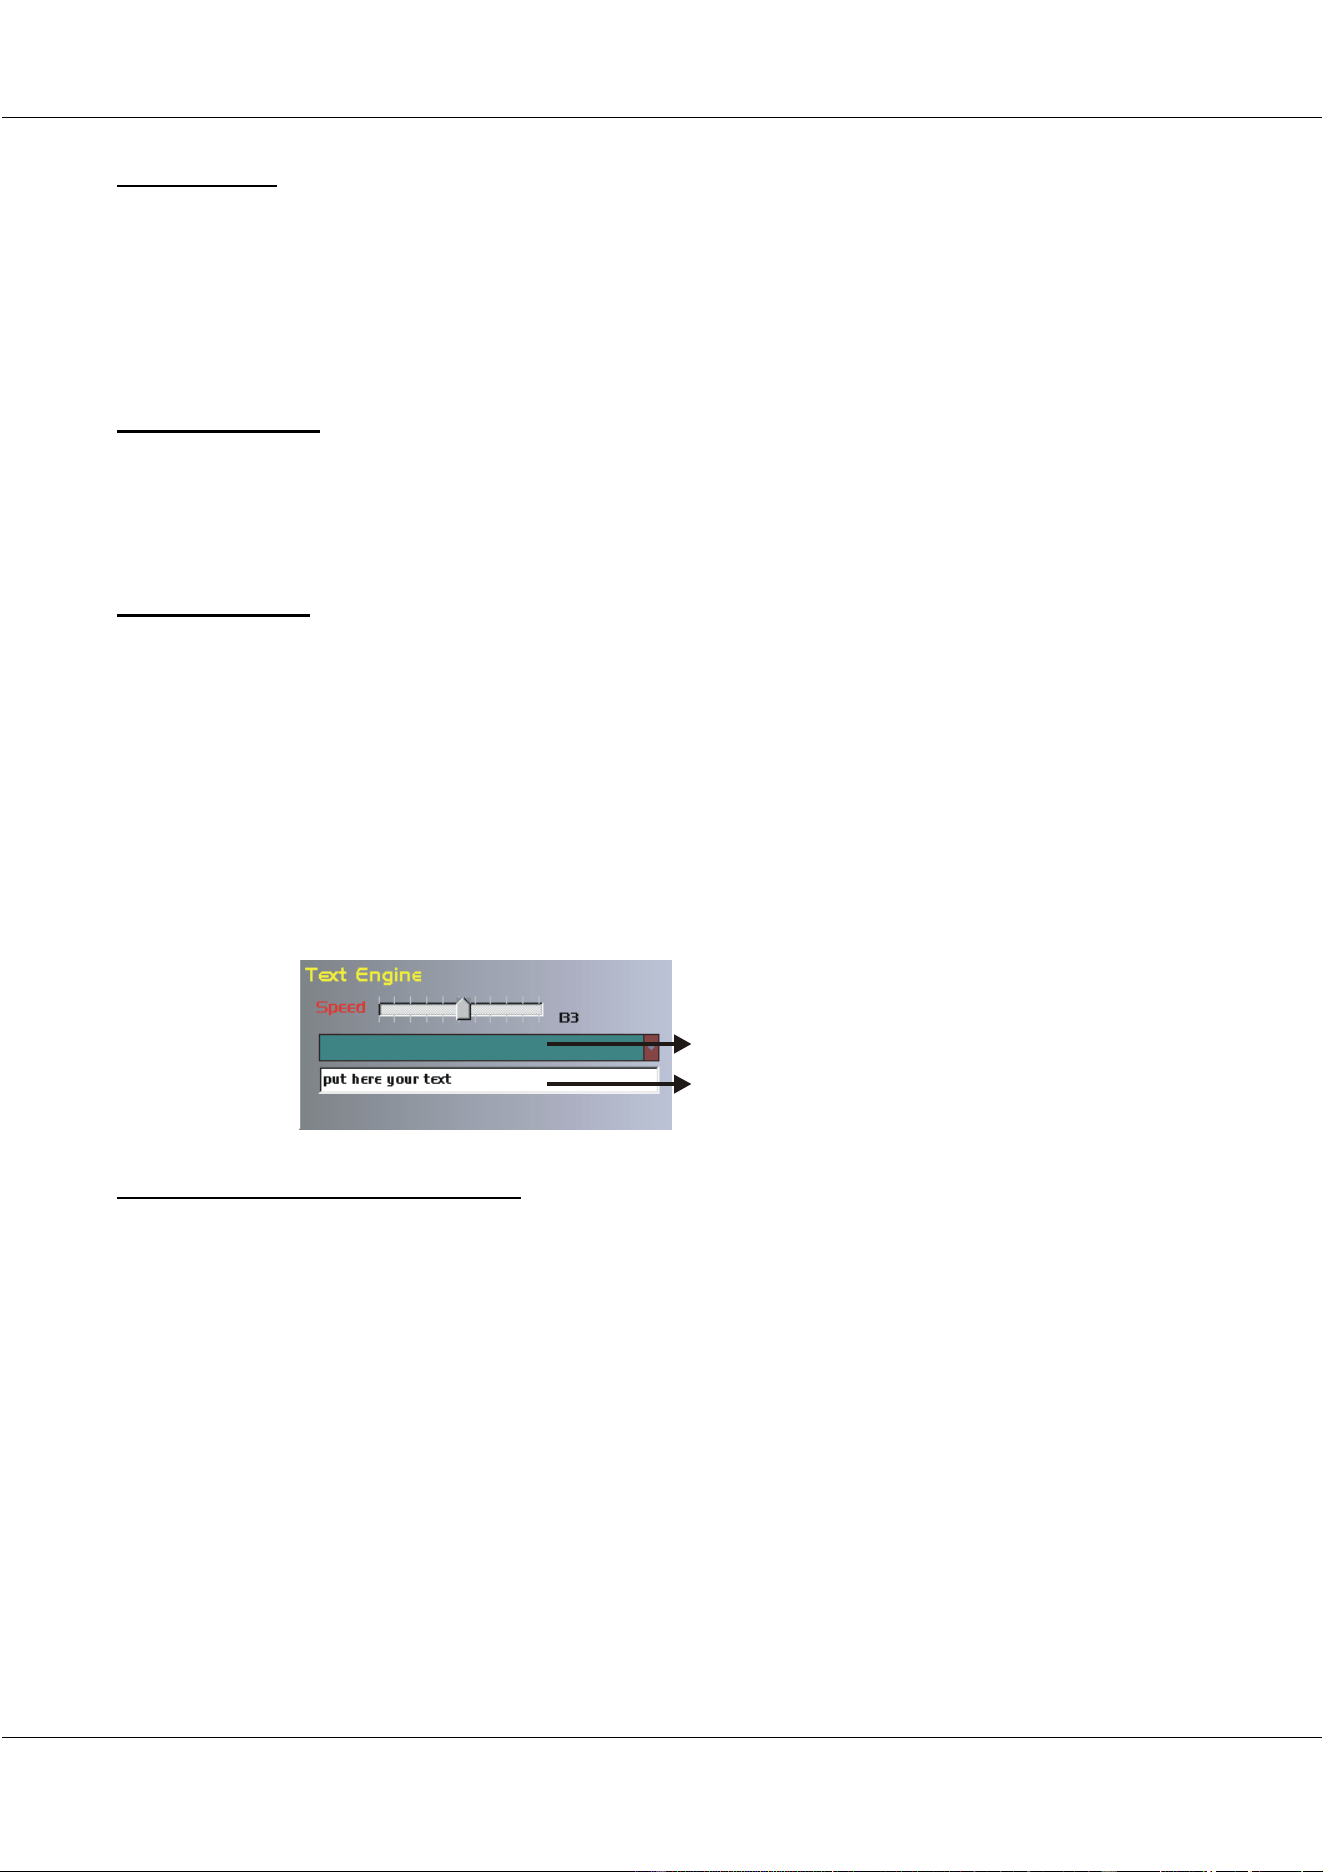
7.2.7 Text engine
The text engine is an effect engine, but it displays only texts when it is applied on a fixture
channel (ex. The dimmer channel).
Texts can be displayed on a matrix with minimum dimensions of 5 fixtures by 5.
It is possible to display pre-stored texts or to display texts ‘on the fly’.
To run the text engine, the engine must be applied on a fixture channel and its speed
must be set.
7.2.8 Program (cue) storage options
The selected cue can be stored using those options. When effect engines have been prepared,
and when the effect engin(e)(s) have been applied on the fixture channel(s), the cue must be
stored.
There are 5 options:
- Default: To put the fixtures back to their defaults i.e.: Dimmer open, no color, no gobo
and Pan/Tilt at halve their values. All effect engines will be removed from the
channels (not deleted).
- Update: To store changes to a previous stored cue.
- Delete: To delete the cue.
- Save to: To store the settings of the effect engines and the effects applied on the
fixture channels.
- Name: To rename the cue.
Selection for pre-stored texts
Text input ‘on the fly’
30/11/00 Martin Matrix Controller V2.01
22
© R&D International NV for Martin Professional A/S
7.3 An example
We will use in the example, the 10 by 6 matrix of miniMACs that we’ve prepared in the
Patch.
As we have explained, we have to select first a cue, edit its effect engine(s) and then apply the
effect engines on one or more control channels (with upper and lower limits of the channel).
The last step that has to be done is: save the cue.
Before we begin:
- Select the ‘Stand Alone’ box, to be able to control the Matrix controller with the
mouse.
- Open the Master Fader.
7.3.1 Select a cue
First we have to select a cue.
Select a Page and a Cue in the Direct Access box.
In case of a new show, all cues will be empty.
Note: When the cue is selected, the mode fader will automatically go into chase mode when
he was on DMX-in.
7.3.2 Edit one or more effect engines
In every cue, we have 4 new effect engines.
Open an effect engine with its EDIT button:
30/11/00 Martin Matrix Controller V2.01
23
© R&D International NV for Martin Professional A/S
In the effect engine, we can select the snakes, lines, circles or rectangle effects.
When effect is chosen, select the SAVE button. Suppose we want a snake effect (real snake,
amount horizontal=2, amount vertical=2, mirrored):
- Select ‘SNAKE’
- Select ‘REAL SNAKE’
- Enter the amounts
- Select ‘MIRROR’
- SAVE
Now, one effect engine is prepared. You can edit the 2
nd
, 3
rd
or 4
th
effect engine if you want
more effect engines available in this cue.
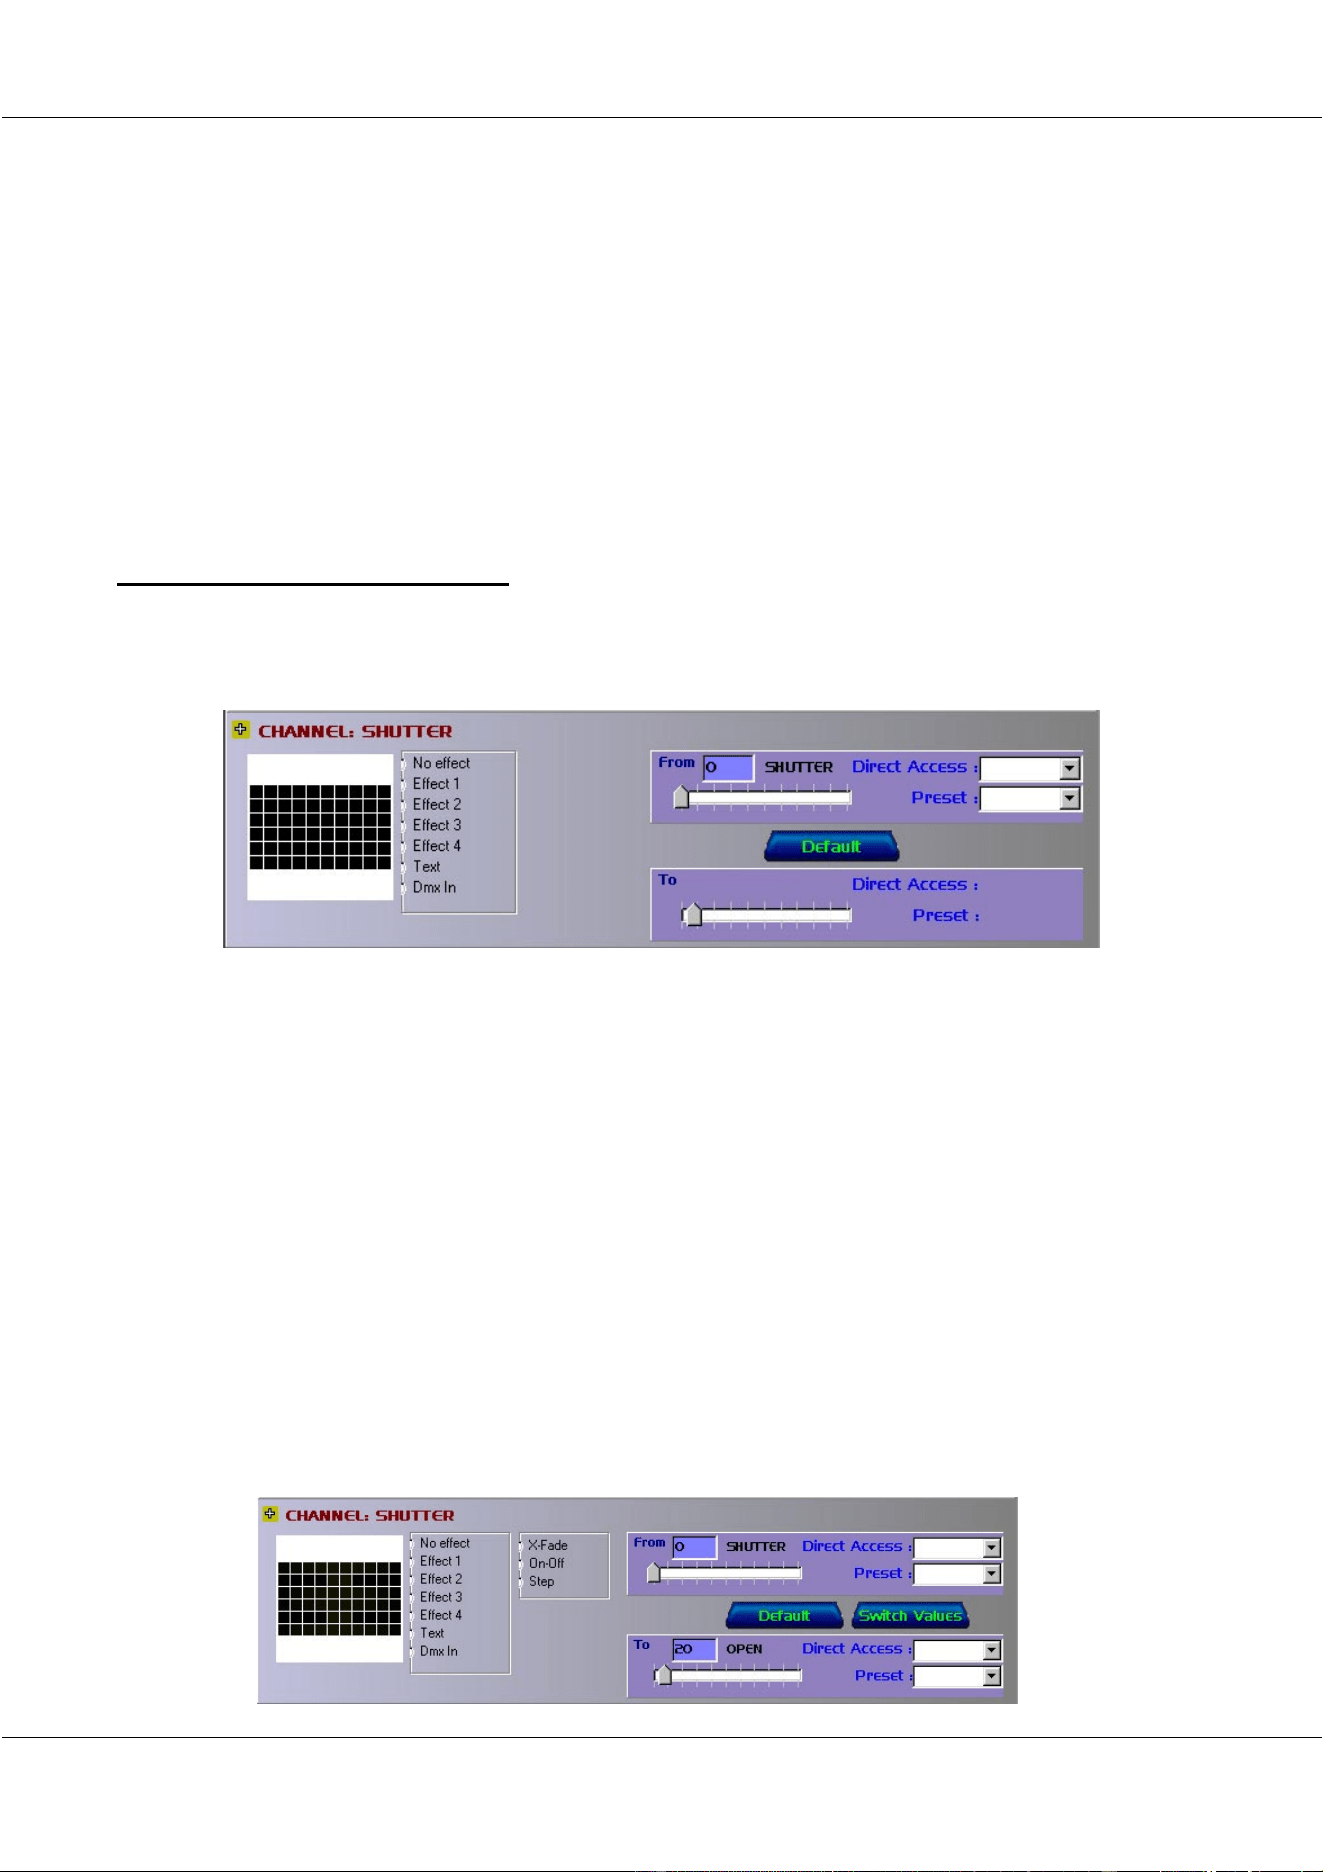
7.3.3 Apply the effect on a channel
The effect engine(s) can now be applied on one or more channels.
Click a channel (ex. The shutter channel)
A window will open at the bottom. In this channel window, we can:
- Select the effect:
o No effect
o An effect engine:
Select the fade mode:
• Cross-fade (x-fade)
• ON-OFF wave: no fading
• Step (future use)
o Text effect
o Set this channel on DMX-in
- Select the limits of the effect (from – to)
We will apply the snake effect of the previous paragraph on the shutter channel:
- Select ‘Effect 1’ and ‘X-FADE’ (the TO, and an effect engine select window will
open)
- Select in the TO window, the direct access field, and select ‘OPEN’

30/11/00 Martin Matrix Controller V2.01
24
© R&D International NV for Martin Professional A/S
We have now an effect running with Effect engine 1 (if you want another effect engine
running on this shutter channel, you can select it in the effect engine box). The effect is
running between value 0 and 20 (open).
If you don’t see the effect, the effect engine speed of effect engine 1 may be 0. You can adjust
the effect speed with the effect engine fader.
Suppose: in this cue, we want also a color effect, another gobo, and Pan/Tilt values have to be
adjusted:
- Edit effect engine 2
o Select rotating line
o Save
- Open the color channel
o Select direct access from ‘Pink’
o Select direct access to ‘Red’
o Select ‘ON-OFF fade’
o Select ‘effect engine 2’
- Open the gobo channel
o Select ‘no effect’
o Select direct access from ‘Stardust’
- Open the Pan channel
o Select ‘Default’ (the default value is 127 with no effect)
- Open the Tilt channel
o Select ‘Default’
Our effect is now ready and running. The only thing that has to be done is: Save the Cue:
- Select ‘Save to’
- Select ‘Page 1 – Cue 1’
- Enter a name (ex. Colored snake’)
The name will appear in the ‘Cue Direct Access’ window.
Note: To save the effect, it is also possible to select ‘Update’ (because we’ve selected Page 1,
cue 1 when we started) and then select ‘Name’.
7.3.4 Make a text effect
In cue 2 of page 1, we will create a text effect. The text should appear on the shutter channel,
with gobo ‘dot sh’ (for those who want to see it clearly on an MSD (Martin Show Designer))
and with Pan/Tilt on default.
- Select Page 1 cue 2
- Select the ‘Shutter’ channel
o Select ‘Text’
o Select to ‘Open’
- Adjust Text engine speed
- Select the ‘Gobo’ channel
o Select ‘No Effect’
o Select from ‘Dot sh’
- Select the ‘Pan’ channel
30/11/00 Martin Matrix Controller V2.01
25
© R&D International NV for Martin Professional A/S
o Select ‘Default’
- Select the ‘Tilt’ channel
o Select ‘Default’
- Select ‘Save to’
o Page 1 cue 2
o Name ‘Dimmer text’
The text that will be displayed will be: ‘put here your text’
You can replace the text in the field, but this text will not be stored into the cue. If you wish
to store a text into this cue, you must first edit some texts and select them before you save the
cue:
- Select in the ‘Menu’: ‘Parameters – Text’
- Enter some texts
- Select the text
- Save or update the cue
Note: The text will run continuously: “Hello WorldHello WorldHe....”. Add some spaces after
the word ‘World’ if you want a separation.
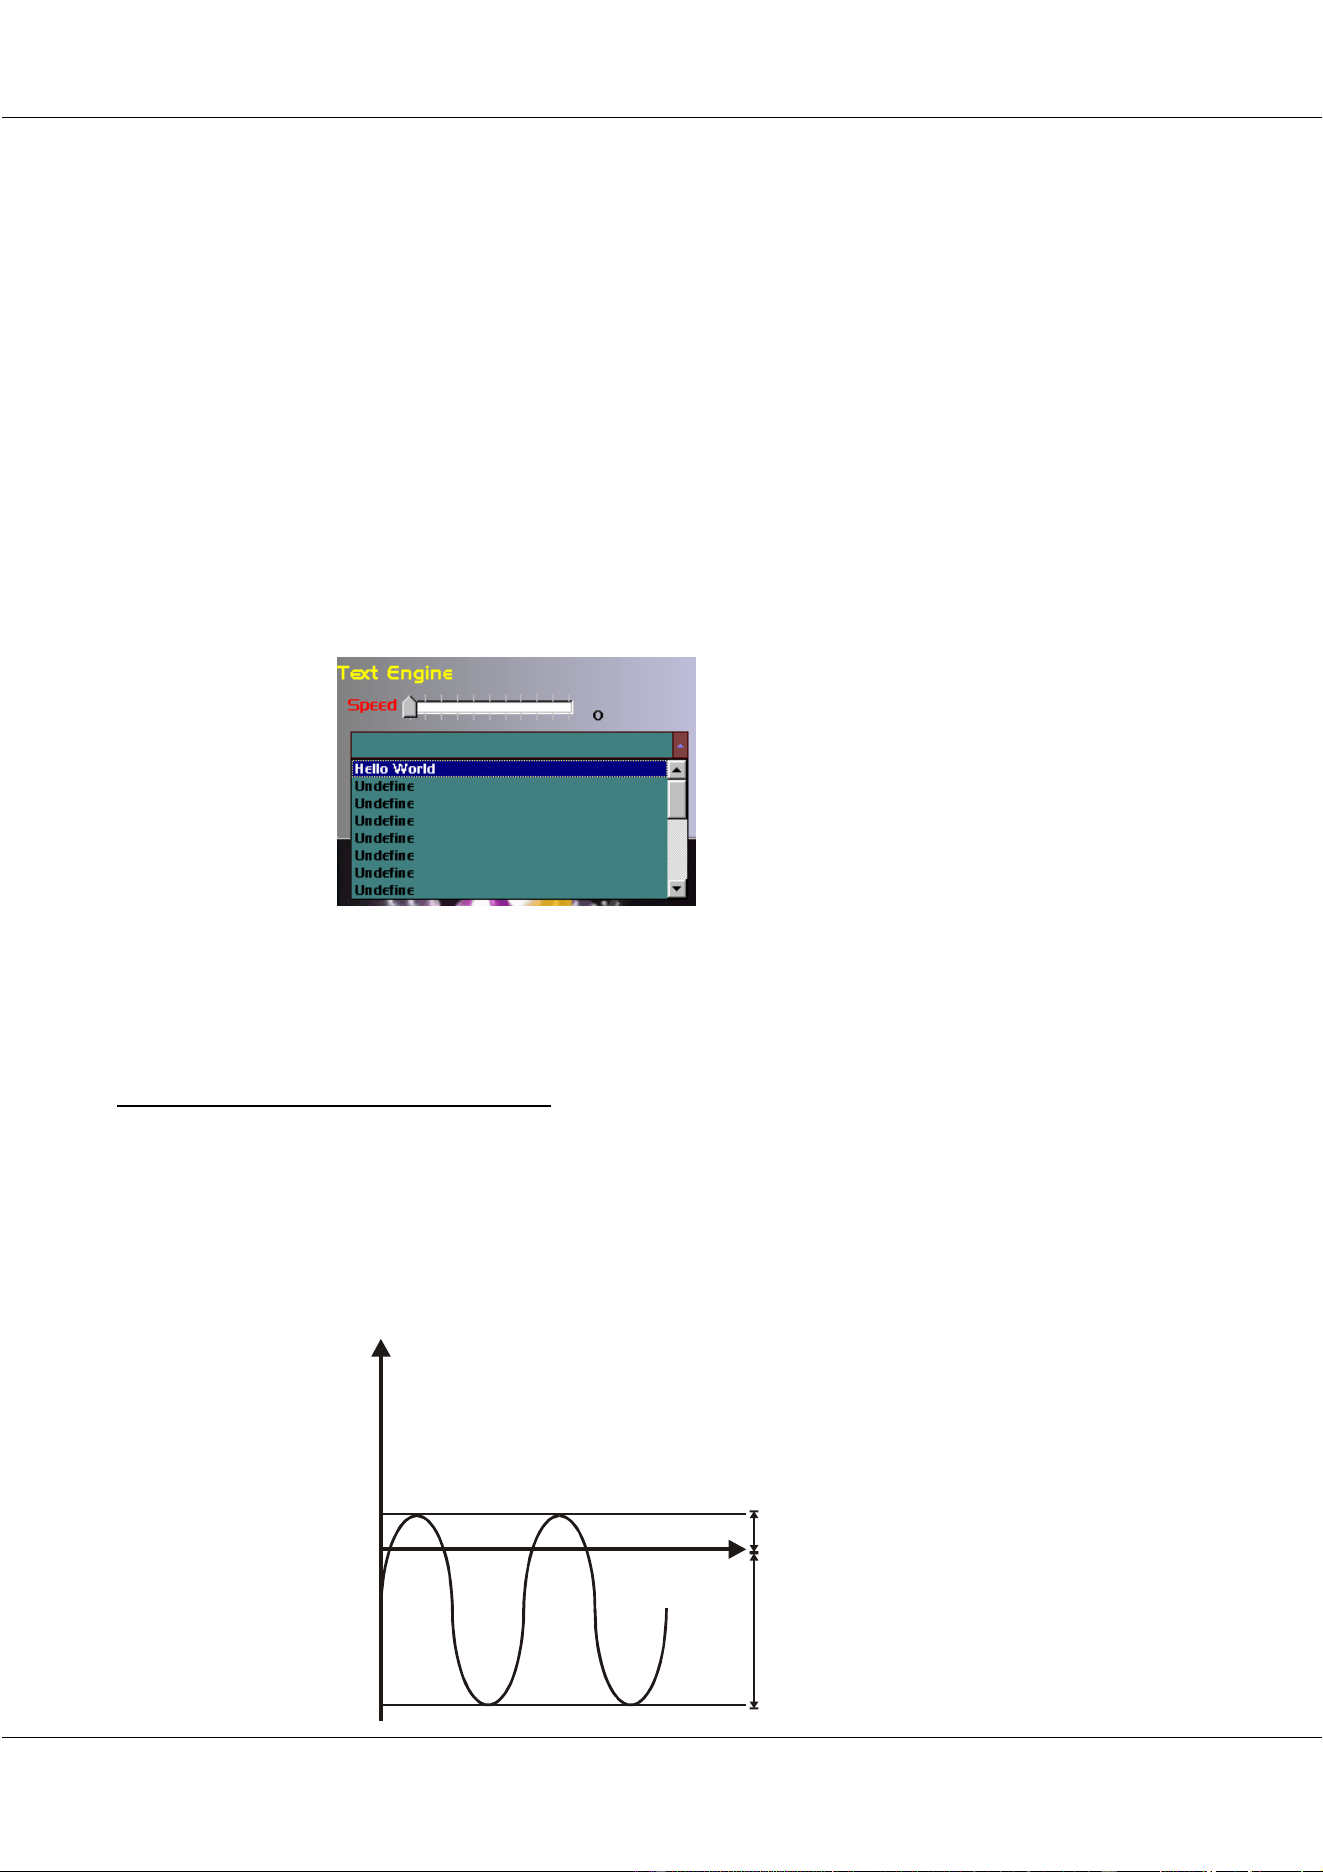
7.3.5 Notes on the channel limit values
As mentioned, channel limits may exceed the maximum (255) and minimum (0) channel
values. Values may be 2,000 or –2,000.
Explanation:
Suppose, we have an effect engine running as a sine wave and we want the dimmer channel to
Flash (short bursts of light, longer dark periods).
Shutter Channel value
Time
0=Closed
20=Open
Open during short time
Closed during long time
255
- y = closed
30/11/00 Martin Matrix Controller V2.01
26
© R&D International NV for Martin Professional A/S
Warning: Some channels like the shutter channel on the miniMAC, contain values for
reset, lamp off and lamp on. Those functions will be activated when the upper limit is
bigger than one of those function values.
7.4 Controlling the Matrix Controller from a light desk
When a light desk is connected to one of the Matrix Controllers DMX-inputs, and it has a
unique address, as explained in the Patch program, it can control the Matrix Controller.
The Matrix controller requires 10 DMX channels from the light desk for main control, and 2 x
4 channels for preset control:
- Main control:
o Master fader
o Mode fader
o Page selection
o Cue selection
o Speed fader effect engine 1
o Speed fader effect engine 2
o Speed fader effect engine 3
o Speed fader effect engine 4
o Speed fader text engine
o Text selection
- Preset Selection (4 channel)
- Preset X-fade time (4 channel)
Example: The DMX-in was patched on the Matrix controller at address 469 on line 2. When
DMX-in line 2 of the Matrix controller is connected with a light desk that has a 10 channel
fixture at address 469, we can control the Matrix Controller:
Light desk Matrix Controller DMX Value
Channel 1 Master Fader 0 – 255
Channel 2 Mode Fader 0 - 19 : DMX through
20 – 39 : Chase
40 – 255 : not used
Channel 3 Page Selection (mode fader in
chase mode)
0 – 12 : Page 1
13 – 24 : Page 2
25 – 36 : Page 3
37 – 48 : Page 4
....
244 – 255 : Page 20
Channel 4 Cue Selection (mode fader in
chase mode)
0 – 12 : Cue 1
13 – 24 : Cue 2
25 – 36 : Cue 3
37 – 48 : Cue 4
....
244 – 255 : Cue 20
Channel 5 Speed Fader Effect engine 1 0 - 255
Channel 6 Speed Fader Effect engine 2 0 - 255
Channel 7 Speed Fader Effect engine 3 0 - 255
Channel 8 Speed Fader Effect engine 4 0 - 255

30/11/00 Martin Matrix Controller V2.01
27
© R&D International NV for Martin Professional A/S
Channel 9 Speed Fader Text engine 0 - 255
Channel 10 Text selection 0 – 12 : Text 1
13 – 24 : Text 2
25 – 36 : Text 3
37 – 48 : Text 4
....
244 – 255 : Text 20
Note 1: To be able to control the Matrix Controller from an external desk, deselect
‘Stand Alone’ mode on the Matrix Controller.
Note 2: When the mode fader is set at DMX-IN, the DMX-inputs are patched to the
DMX-outputs. When the light desk contains the same fixture setup as the Matrix Controller,
the light matrix listens to the light desk instead of to the Matrix Controller.
8. PRESETS and Overrides
Why overrides?
- The main purpose of overrides is; to be able to control for each channel if the channel
should follow the Matrix Controller, or if it should follow DMX coming in on the
DMX inputs or if the channel should go to a Matrix defined preset. To make the
transition between the modes smooth, override crossfade timings can be used, even
between presets.
Why presets?
- To design custom logos applied on fixture channels like, for example the color
channel
- To create some variation in the effects; instead of using the same channel limits for all
fixtures, use a variation (preset) to define the channel limits. For example on the color
channel: instead of going from green (for all fixtures in the matrix) to red (for all
fixtures), go from a combination of colors to another combination of colors.
What is an override group?
An override group combines one or more fixture channels. We can combine for
example the Pan and Tilt channel to one override group so that if we call a Matrix
Controller preset for the Pan channel, the Tilt channel preset will be loaded too.
30/11/00 Martin Matrix Controller V2.01
28
© R&D International NV for Martin Professional A/S
Up to 4 override groups can be defined.
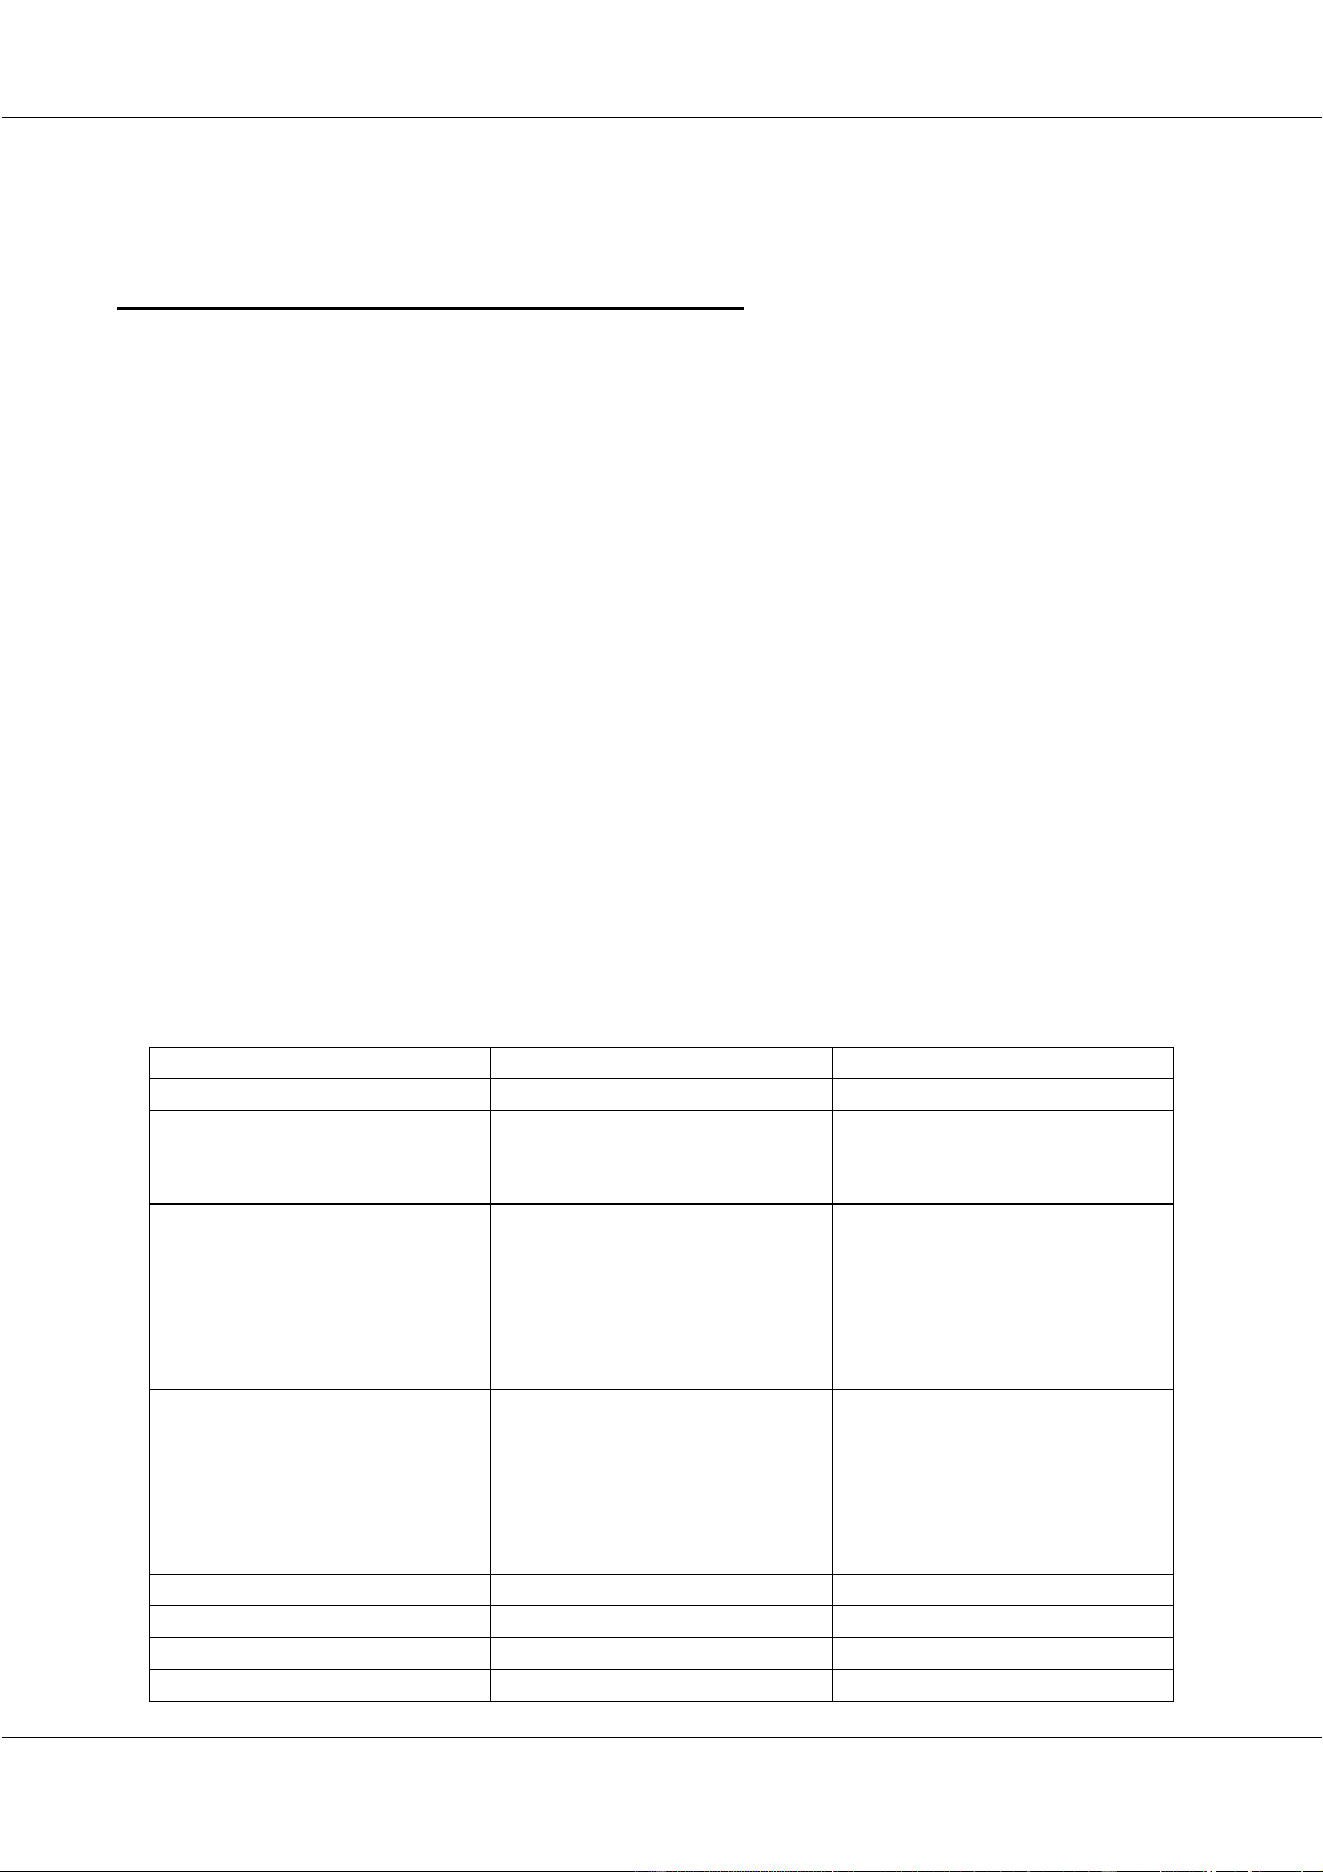
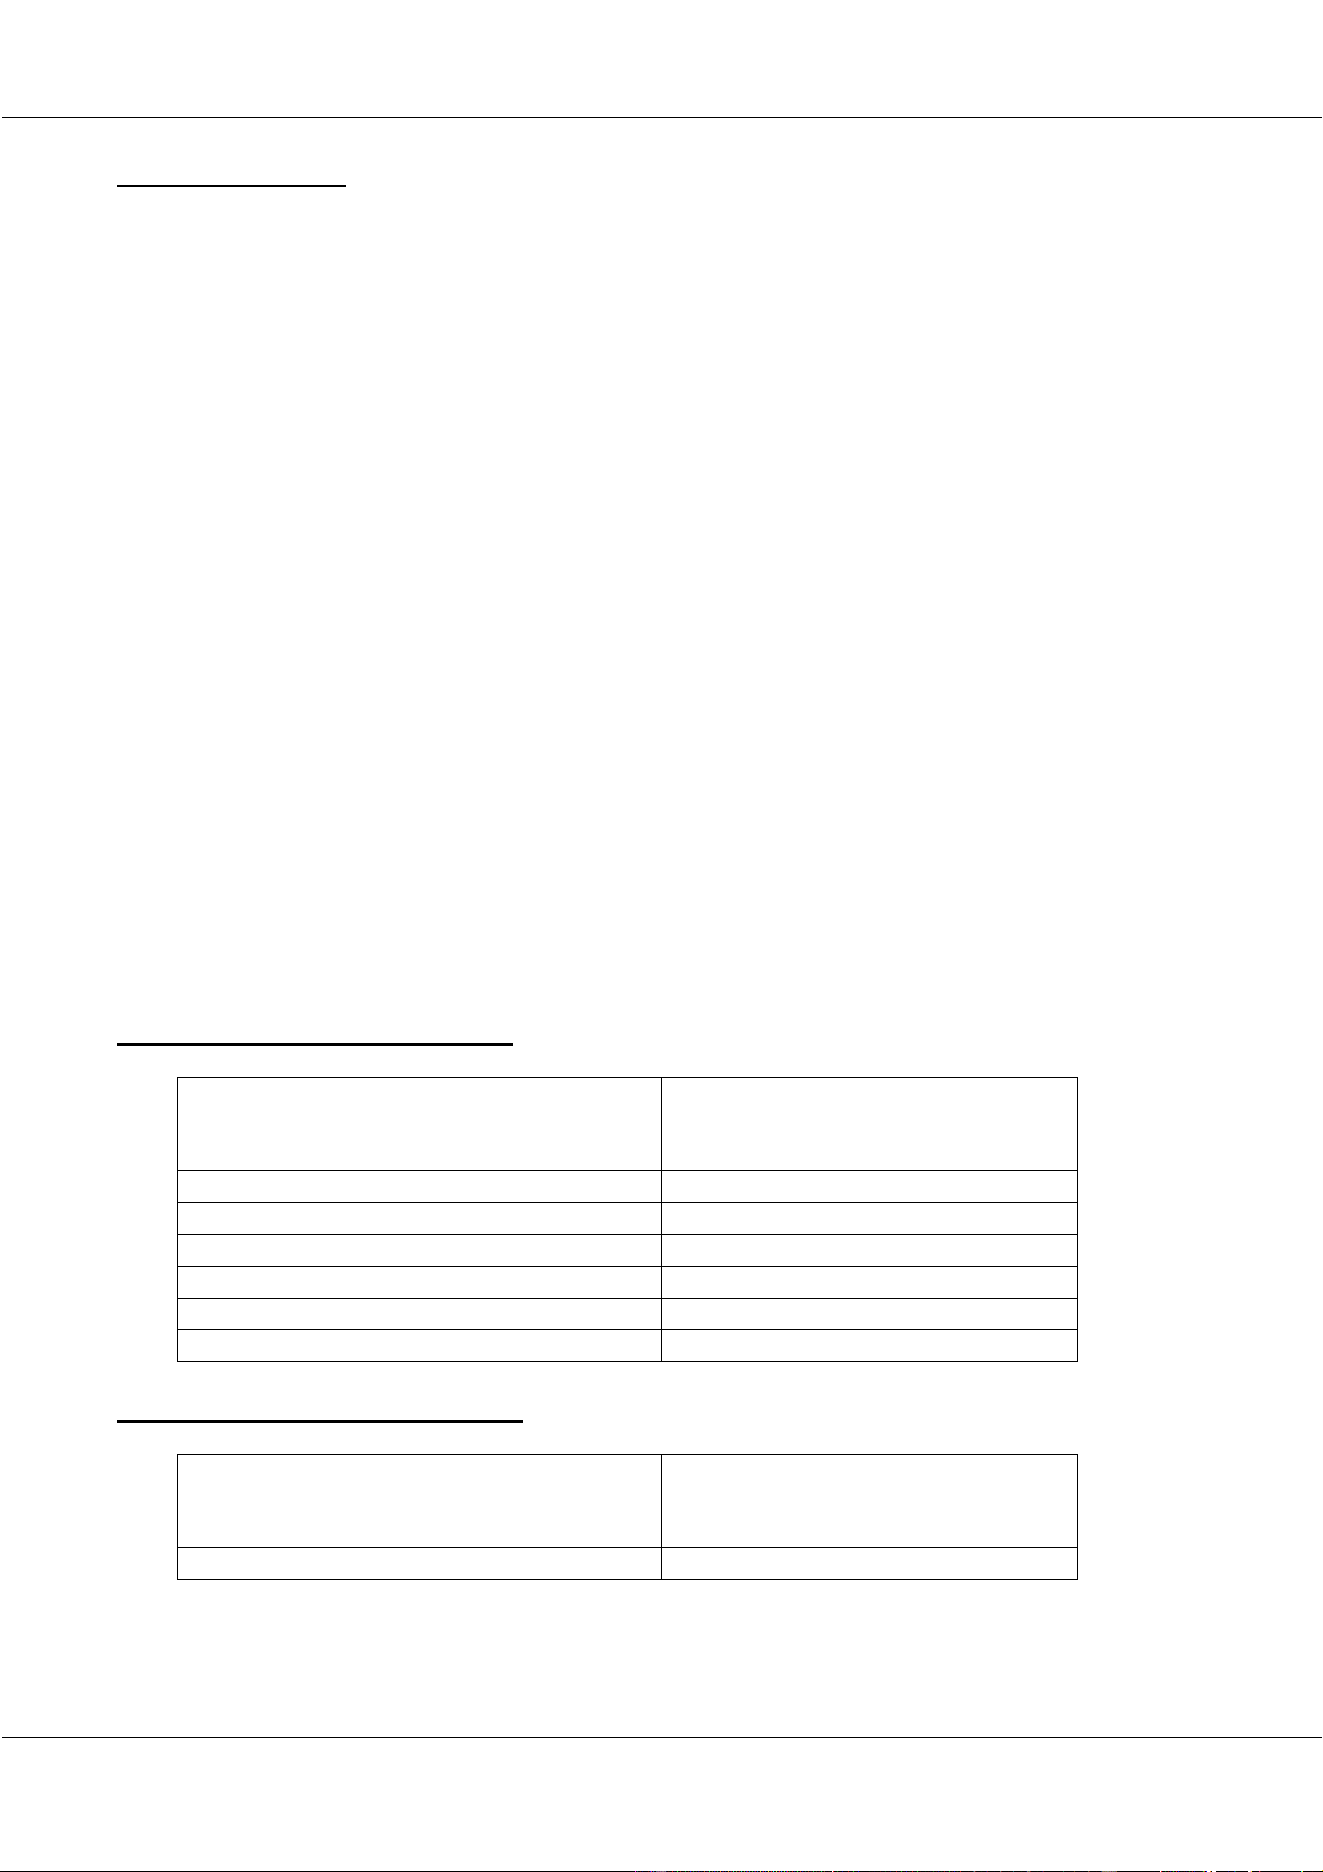
In the example for the miniMAC matrix, we can define 4 override groups:
- Group 1 for the dimmer presets
- Group 2 for the color presets
- Group 3 for the Gobo presets
- Group 4 for the Pan/Tilt presets
Each of those 4 override groups has its own crossfade timings. This is the time to fade from
one preset to another.
8.1 Presets
There are 50 presets available for every fixture channel. Every preset contains a combination
of values for 1 fixture channel.
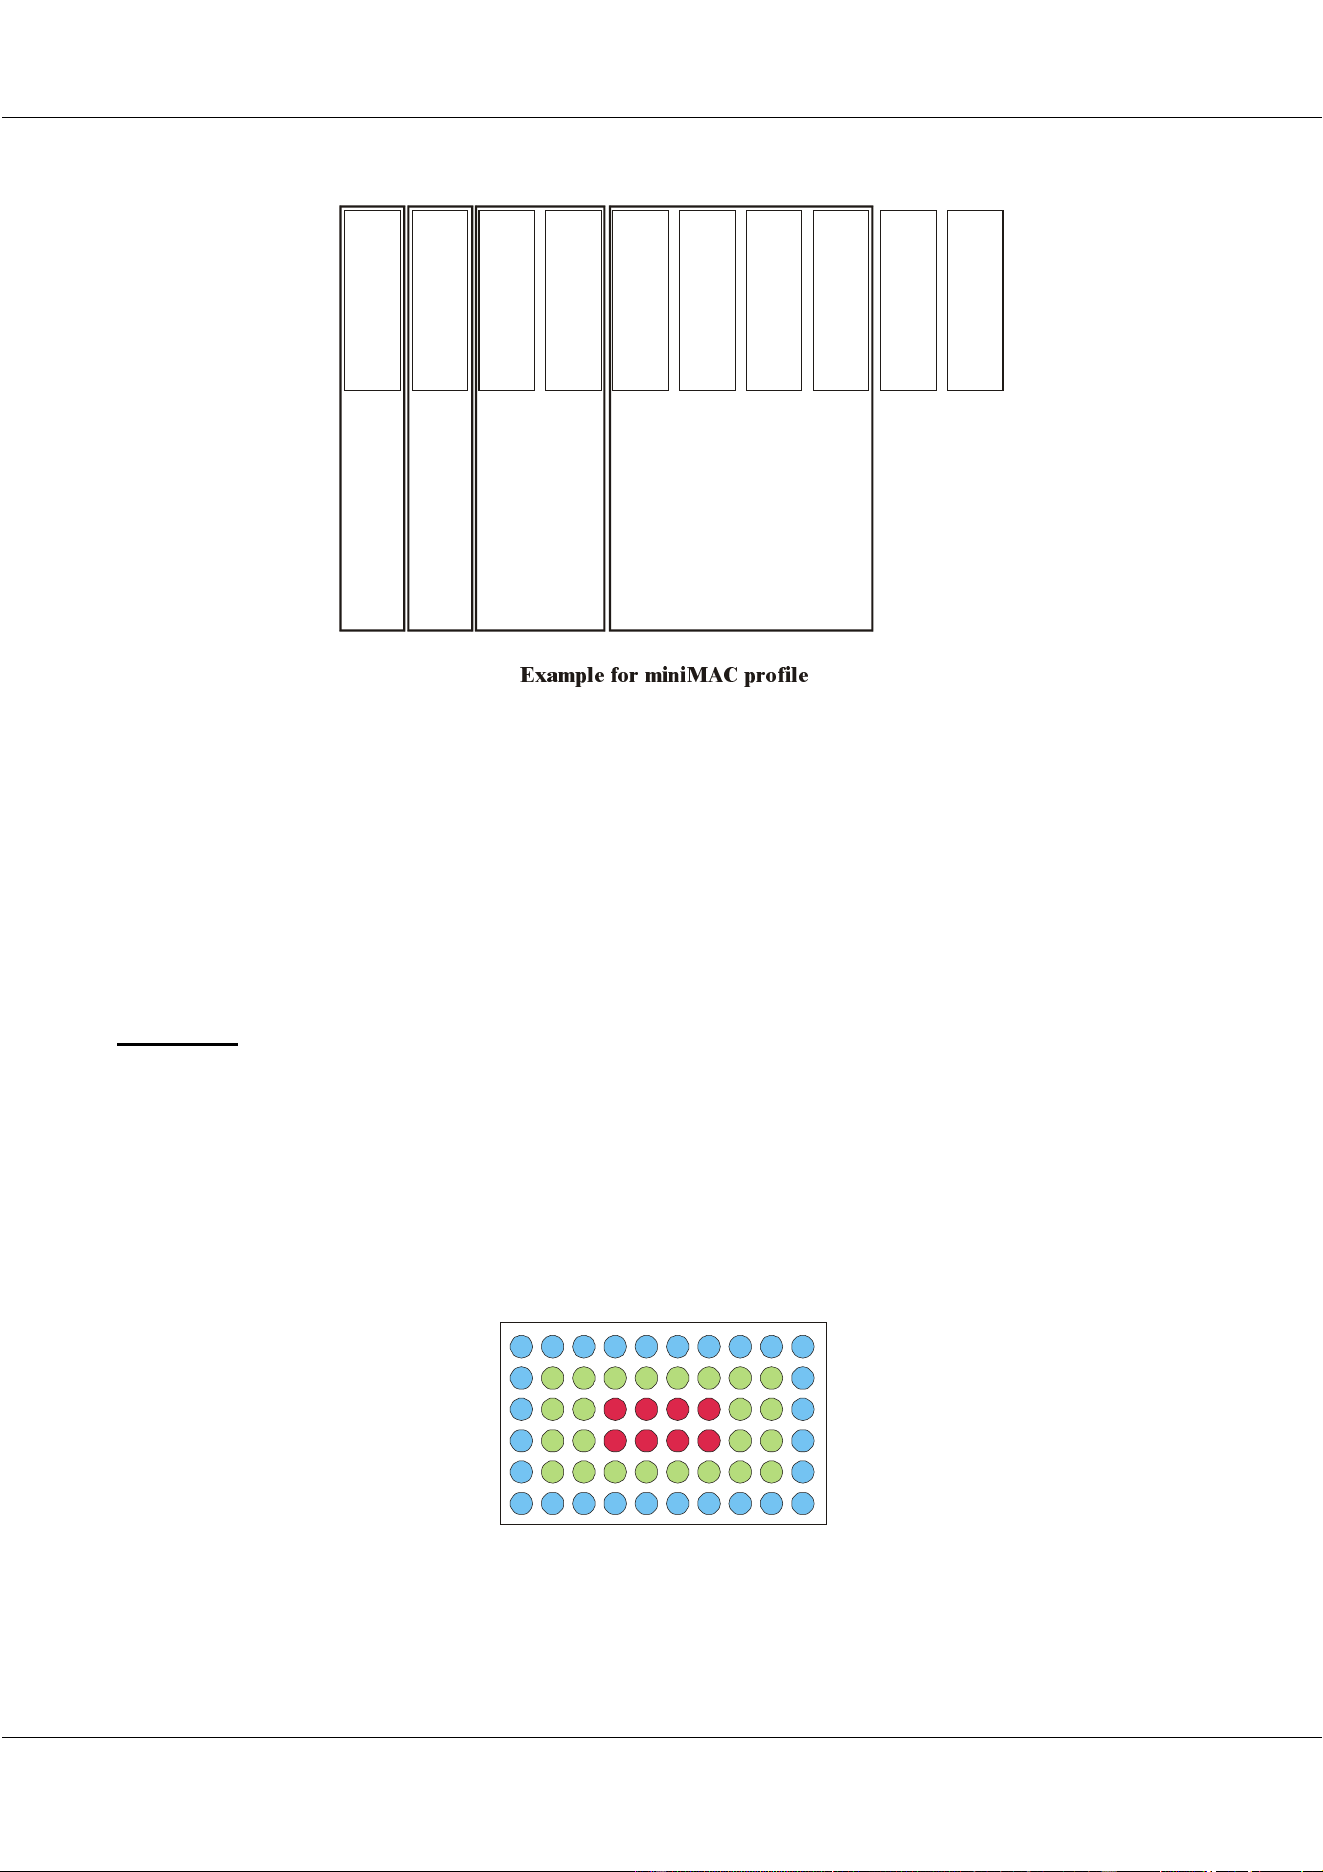
For example, we want to create a color preset:
- The 8 inner fixtures have to be in red
- The outer fixtures have to be in blue
- In between the fixtures have to be in green
Up to 50
dimmer presets
Override Group 1
Override Group 2
Override Group 3
Override Group 4
Up to 50
color presets
Up to 50
Gobo presets
Up to 50
Rot Gobo presets
Up to 50
Pan presets
Up to 50
Pan Fine presets
Up to 50
Tilt presets
Up to 50
Tilt Fine presets
Up to 50
PT speed presets
Up to 50
Col/Gob speed presets
([DPSOH IRU PLQL0$& SURILOH
30/11/00 Martin Matrix Controller V2.01
29
© R&D International NV for Martin Professional A/S
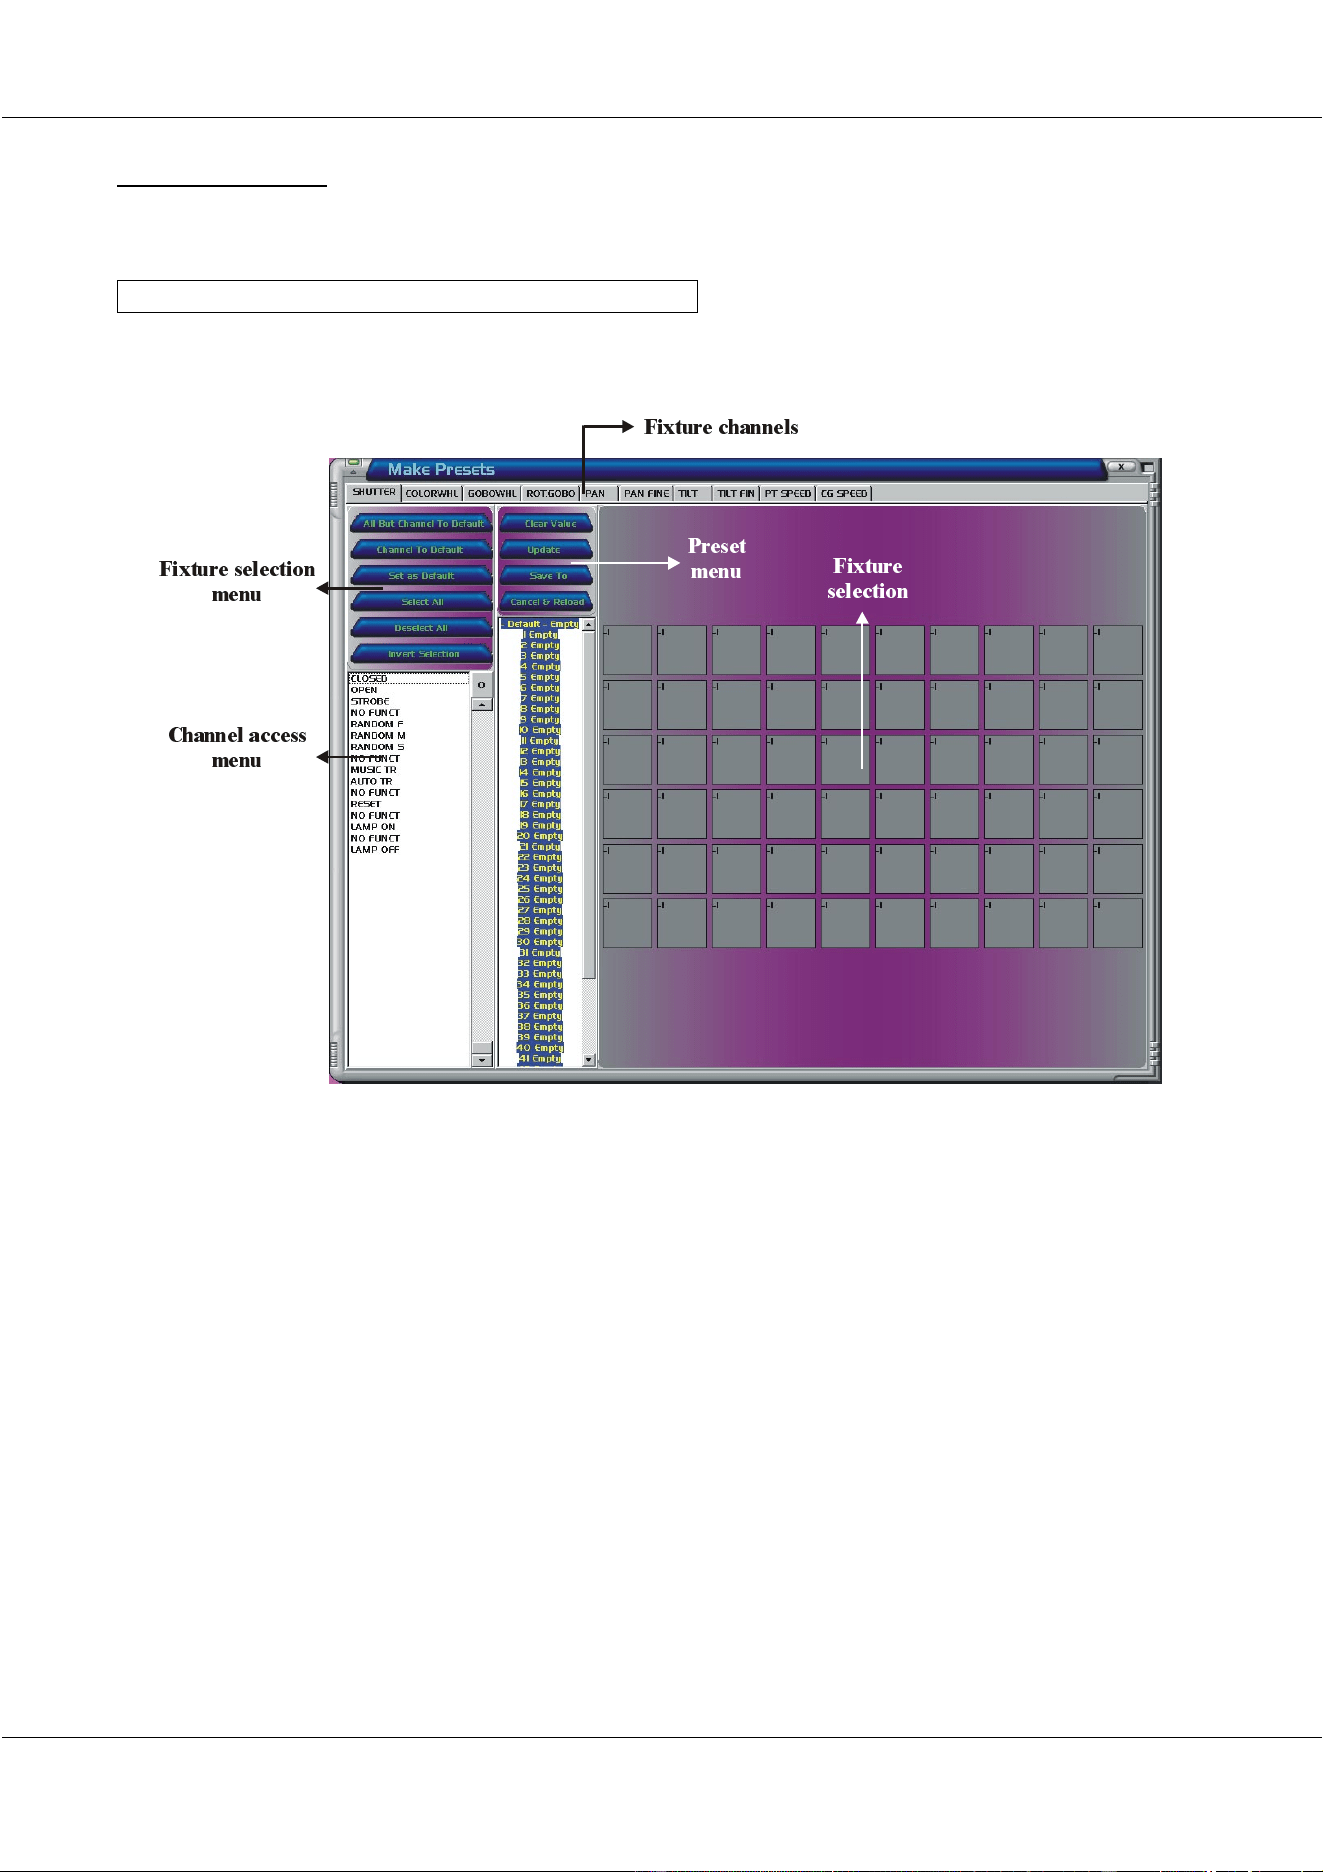
8.1.1 Preset screen
To create presets, select:
[MENU] [PARAMETERS] [MAKE PRESETS]
You will enter Preset mode:
Fixture channels: To select the channel on which the preset has to be applied
Fixture selection: To select or deselect a fixture in the Fixture matrix.
• Mouse left button: to select a fixture
• Mouse right button: to deselect a fixture
Note: you can hold down the mouse button while moving over the
fixtures to make a selection.
Fixture selection menu: To make global selections, or to set channel(s) to their default.
Channel access menu: To select a direct access channel for the selected fixtures
Preset menu: To save or load presets
)L[WXUH FKD QQHOV
)L[WXUH VHOHFWLRQ
PHQX
)L[WXUH
VHOHFWLRQ
&KDQQHO DFFHVV
PHQX
3UHVHW
PHQX
30/11/00 Martin Matrix Controller V2.01
30
© R&D International NV for Martin Professional A/S
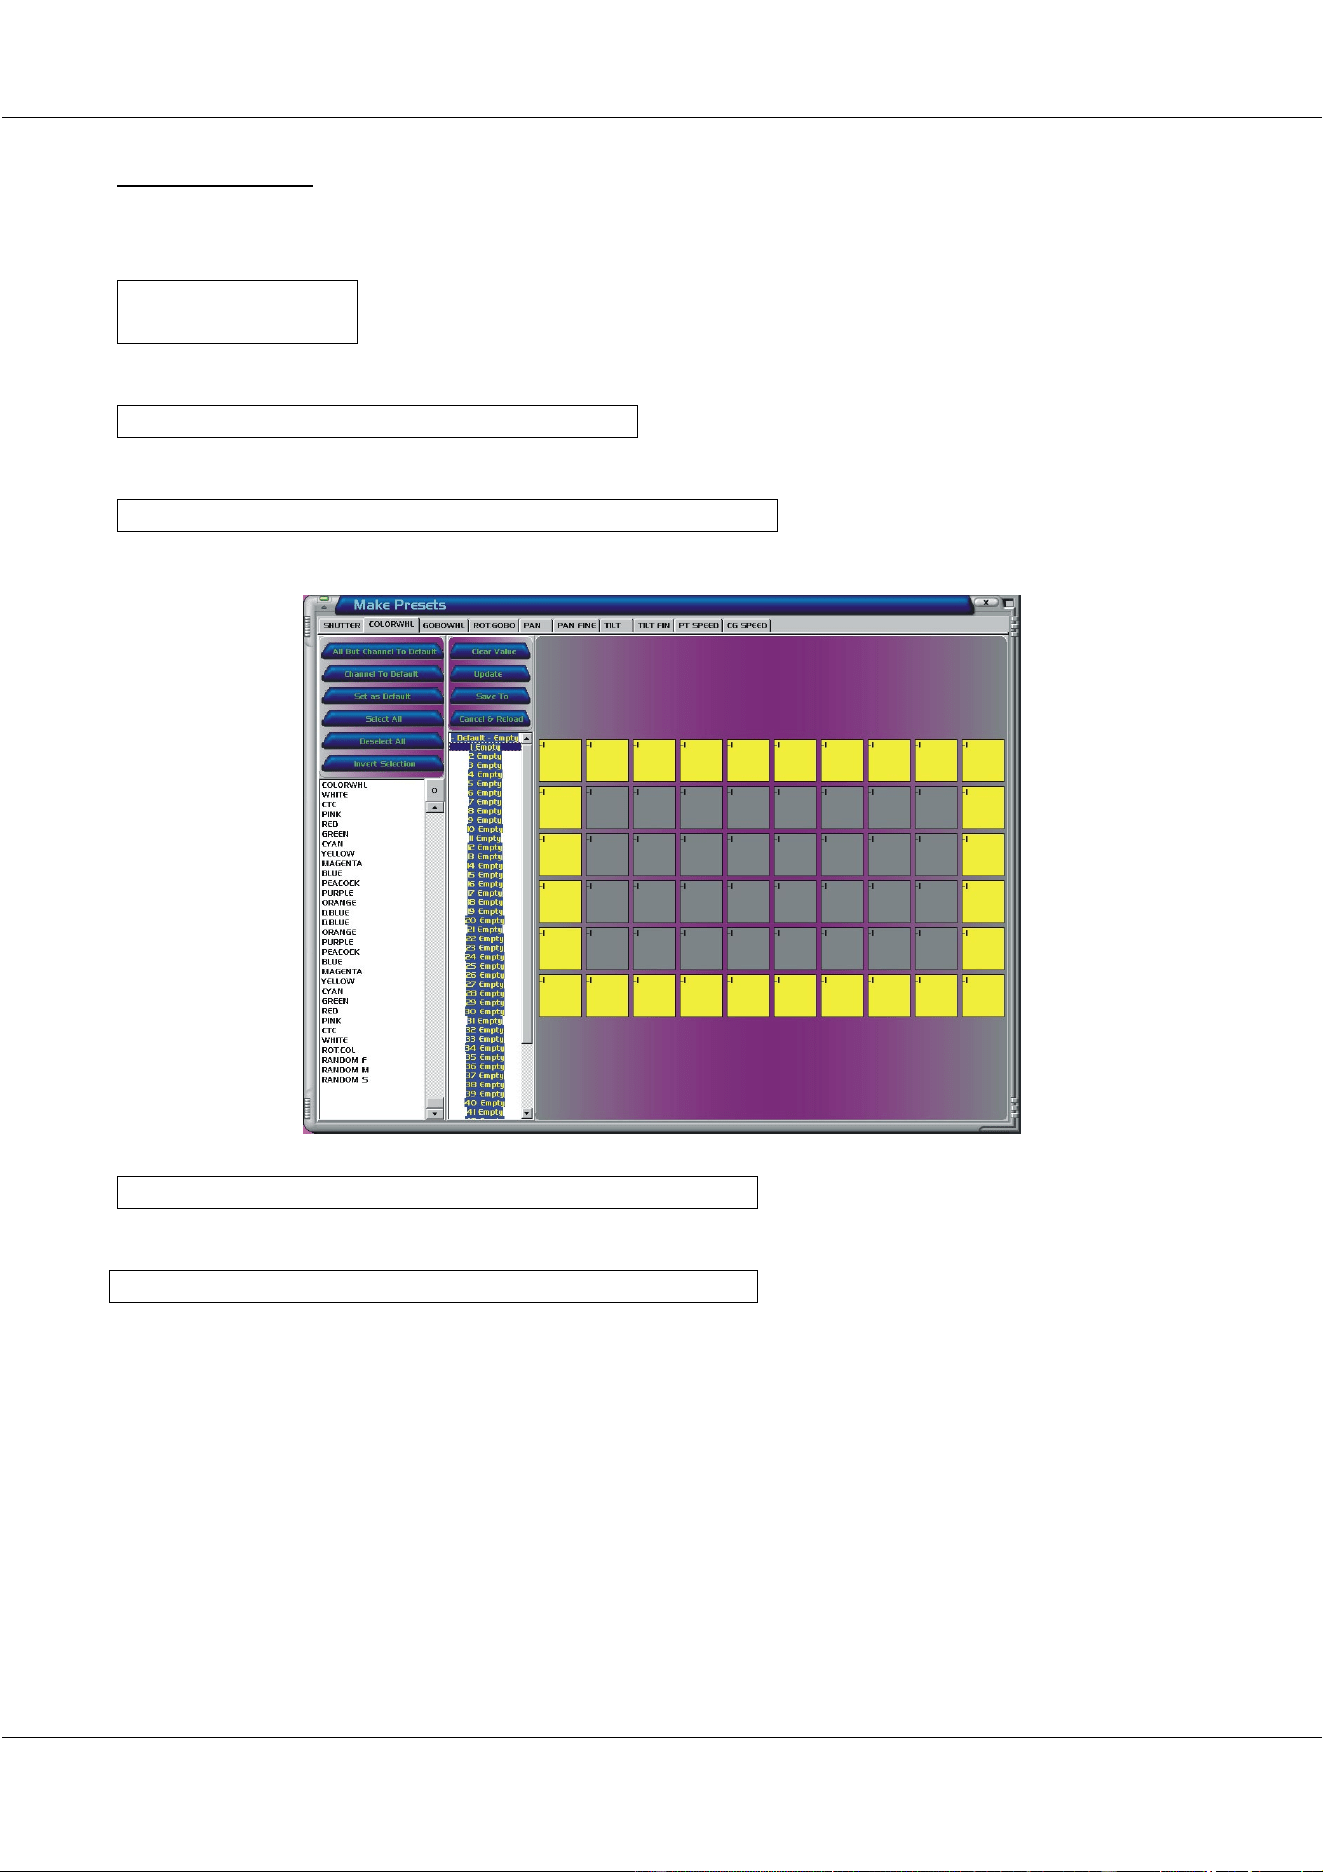
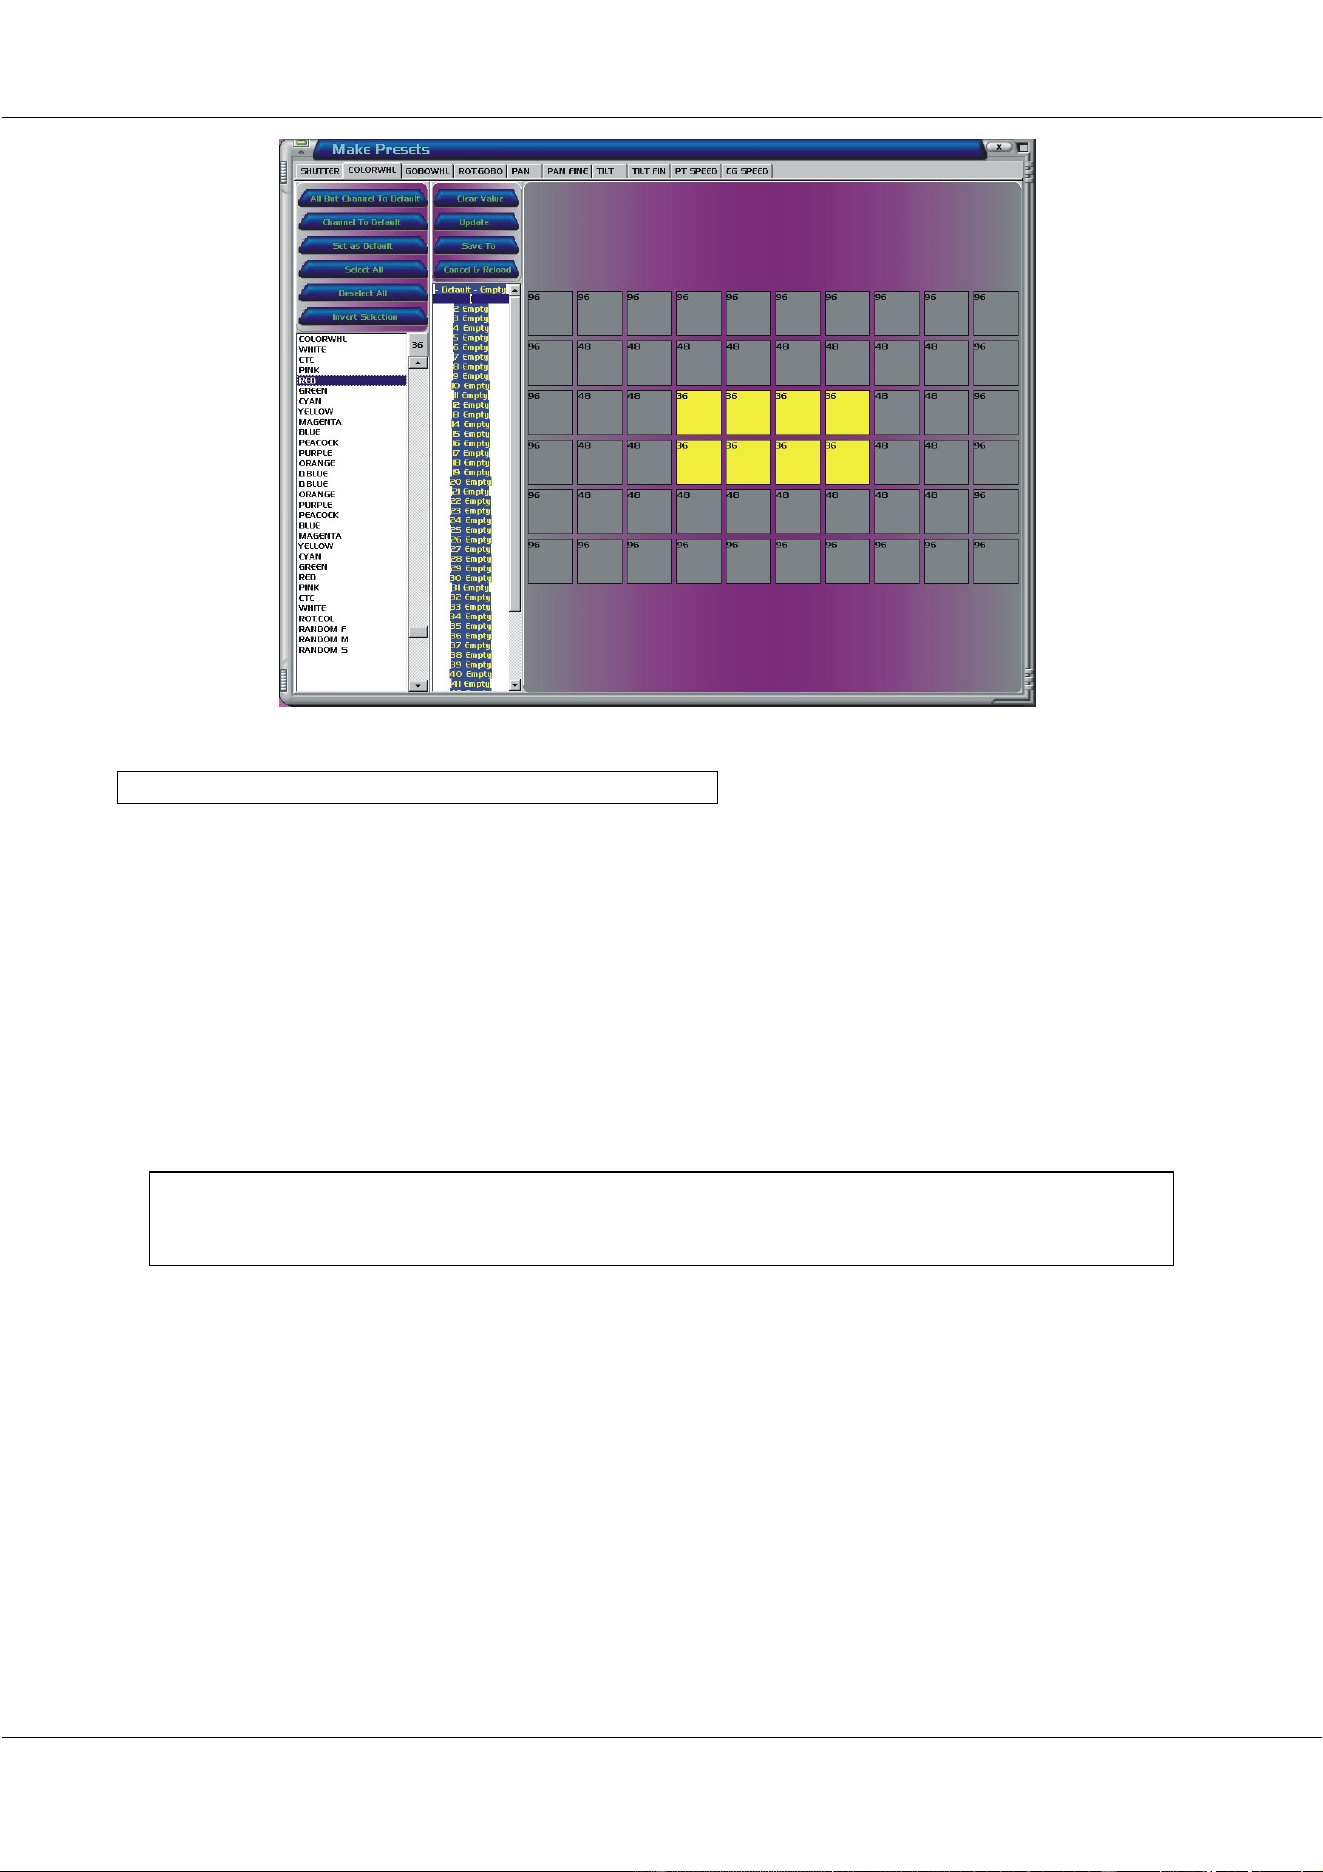
8.1.2 An example
Let’s create the color example:
[Click
COLORWHL]
To move to the color presets on the color wheel.
[Select a preset number in the ‘preset menu’]
[Left click the outer fixtures in the ‘Fixture selection’ area]
To select the fixtures
[Select the color ‘blue’ from the ‘channel access menu’]
The value from the selected fixtures will be ‘96’.
[Select ‘Deselect ALL’ from the ‘fixture selection menu’]
Now we can select other fixtures and give them another color. Repeat these steps until we
have the colors from the example. It should look like this:
30/11/00 Martin Matrix Controller V2.01
31
© R&D International NV for Martin Professional A/S
[Select ‘Update’ or ‘Save to’ from the ‘preset menu’]
- Update to save to the selected preset
- Save to, to save to another preset.
We can create presets for the color wheel, the gobo wheel, for Pan/Tilt....
Note: When 2 or more channels are grouped into override groups, use the same preset
number for the grouped channels. Since override groups are combinations of channels, and
since calling a preset in an override group will call the same preset number for those channels,
it is important that the presets match with each other. For example, if Pan and Tilt are
combined in an override group, then calling Pan preset number 5 (called from the overrides)
will load automatically Tilt preset number 5.
The presets can now be used when an effect is created on a channel. Instead of using the
values or the direct access (see paragraph ‘7.3.3 Apply the effect on a channel) we can also
use the presets in the ‘from – to’ fields.
30/11/00 Martin Matrix Controller V2.01
32
© R&D International NV for Martin Professional A/S
8.2 Override groups
Override groups are only used when the Matrix Controller itself is controlled from an external
light desk. With the override groups, we can call presets on the Matrix Controller and also
their crossfade times.
Note: As shown in the Patch Example (see 6.2 Patch Example Step by Step) we have to
address 2 4-channel fixtures on the external light desk and on the Matrix Controller.
- 1 4-channel fixture to call the 4 groups of presets (let’s call it override group fixture)
- 1 4-channel fixture to set the crossfade timings (let’s call it crossfade fixture)
With the ‘override group fixture’, we can select:
- MX mode or Martix mode. This mode is the normal mode as if we don’t use the
overrides.
- DMX-IN mode. In this mode, the DMX-IN is patched to DMX-OUT for the grouped
fixture channels, as if the Matrix Controller doesn’t exist for those channels. Those
Fixture matrix channels are now controlled on the external light desk (if the same
fixture setup exists on this controller). The Matrix controller is not totally disabled in
this mode, because we can use crossfade timings (on the ‘crossfade fixture’) to go to
the DMX-IN values and the other channels that are not involved in the group will still
follow Matrix Controller actions.
- Preset mode. We can select one of the 50 presets with crossfade timings, set with the
‘crossfade fixture’.
With the ‘crossfade fixture’, the crossfade timings are set for the same ‘override group
fixture’ channel.
8.2.1 Override fixture DMX values
DMX value from external light desk for
‘override fixture’ (4 channel fixture: all
channels have the same values)
Matrix Controller Mode
0 - 48 Matrix Mode
49 - 55 DMX IN Mode
56 – 59 Preset 1
60 - 63 Preset 2
...... Preset X
252 – 255 Preset 50
8.2.2 Crossfade fixture DMX values
DMX value from external light desk for
‘crossfade fixture’ (4 channel fixture: all
channels have the same values)
Matrix Crossfade Time
0 - 255 0 sec - 25.5 sec.
30/11/00 Martin Matrix Controller V2.01
33
© R&D International NV for Martin Professional A/S
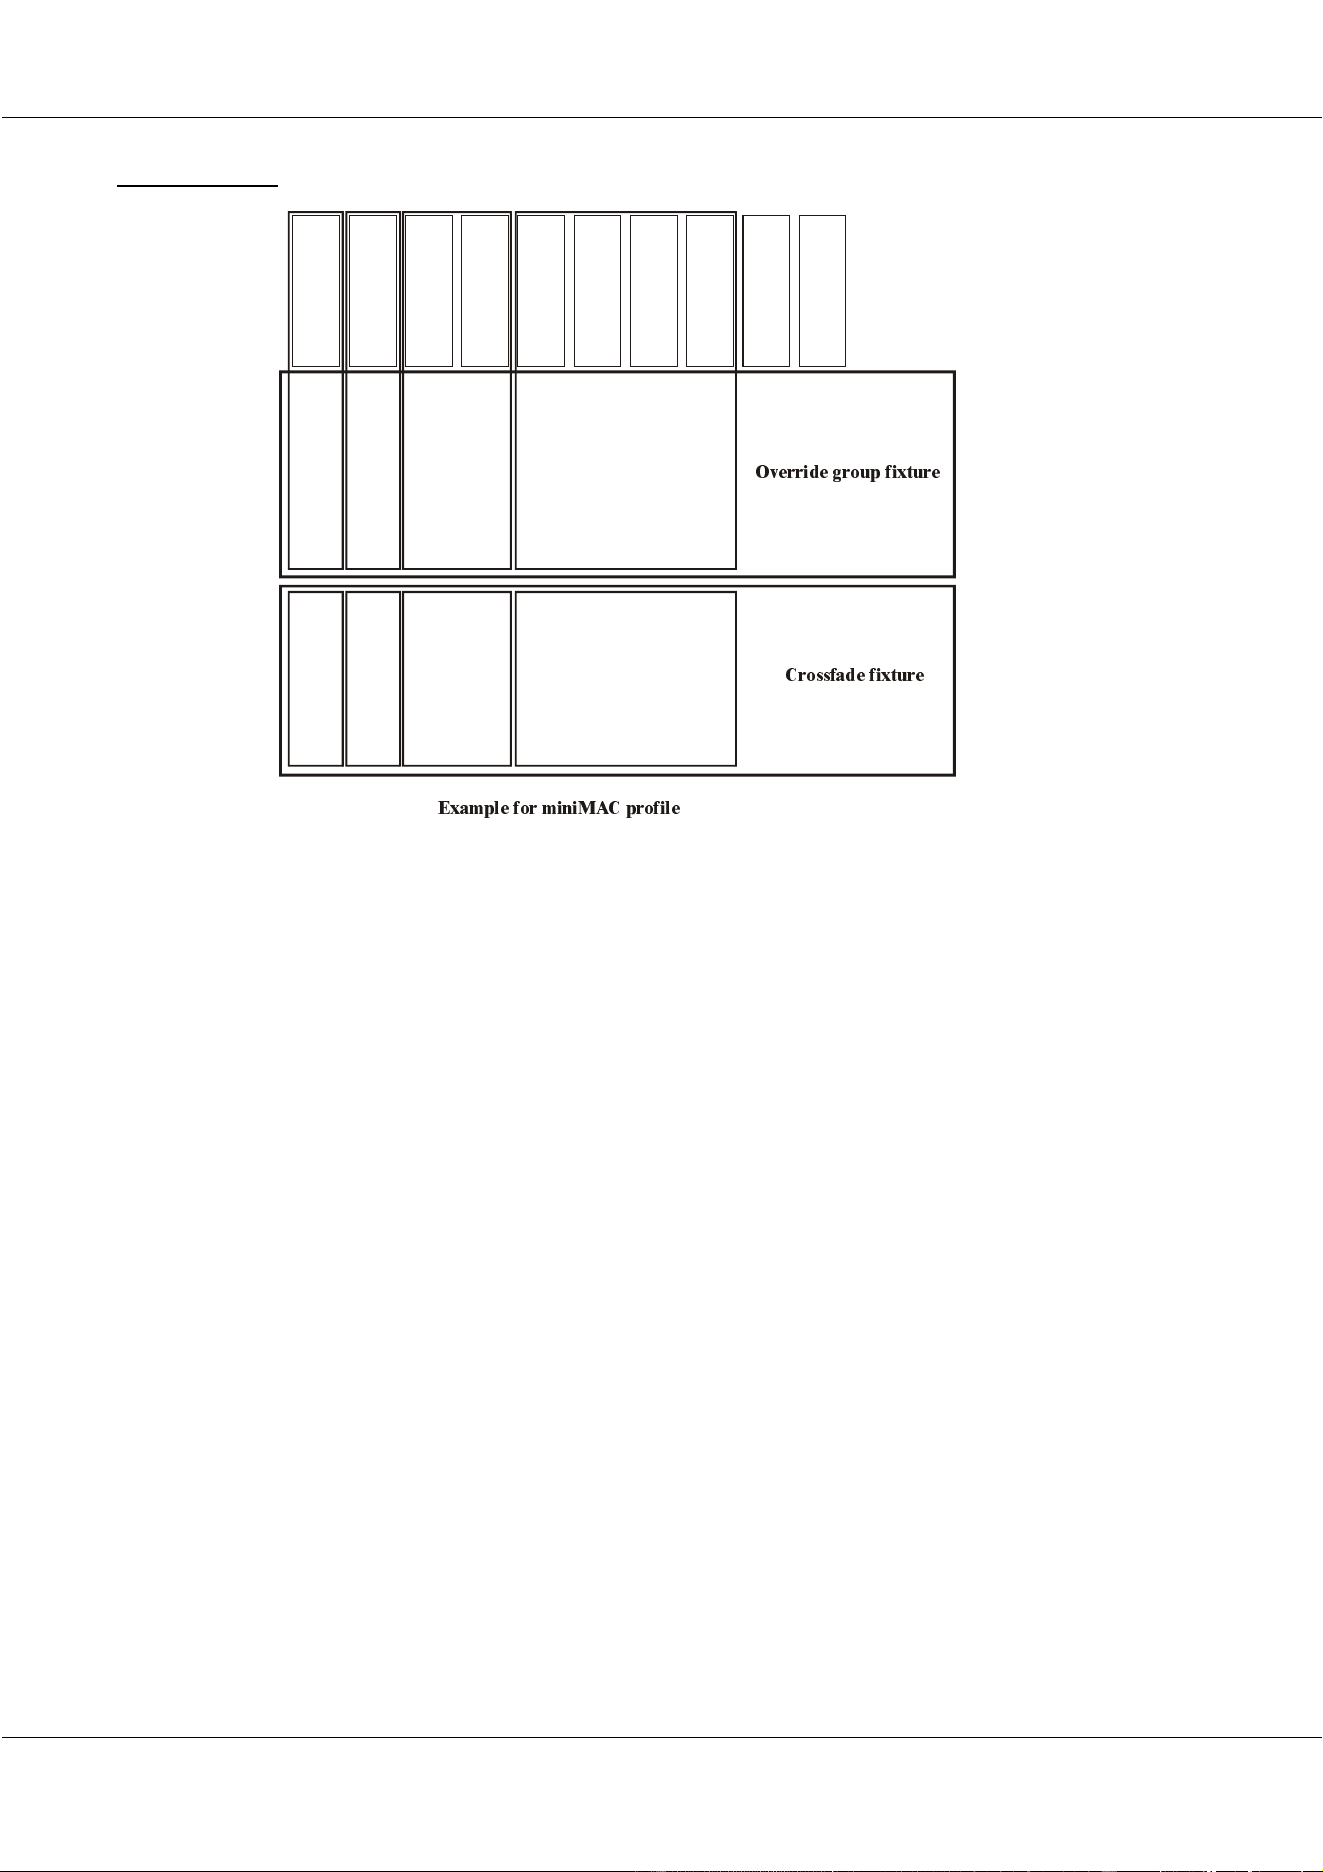
8.2.3 Example
In this example:
- Override group 1 groups the dimmer (shutter) channel in the ‘override group fixture’
channel 1. The crossfade for this channel is set on the ‘crossfade fixture’ channel 1.
- Override group 2 groups the color channel in the ‘override group fixture’ channel 2.
The crossfade for this channel is set on the ‘crossfade fixture’ channel 2.
- Override group 3 groups the gobo and Rot Gobo channels in the ‘override group
fixture’ channel 3. The crossfade for this channel is set on the ‘crossfade fixture’
channel 3.
- Override group 4 groups the Pan-Pan Fine-Tilt-Tilt Fine channels in the ‘override
group fixture’ channel 4. The crossfade for this channel is set on the ‘crossfade
fixture’ channel 4.
If we set on the external light desk, ‘override fixture’ channel 4 in:
- MX mode, then the Pan/Tilt (+ fine channels) will follow the actions programmed on
the Matrix controller
- DMX-IN mode, the Pan/Tilt (+ fine channels) will follow the actions programmed on
the external light desk.
- Preset mode, then presets (the same preset number on Pan, Tilt (+ fine channels) will
be selected) are called on the Matrix Controller.
Up to 50
dimm er presets
Override Group 1
Crossfade time
channel 1
Crossfade time
channel 2
Crossfade time
channel 3
Crossfade time
channel 4
Override Group 2
Override Group 3
Override Group 4
Up to 50
color presets
Up to 50
Gobo presets
Up to 50
Rot Gobo presets
Up to 50
Pan presets
Up to 50
Pan Fine presets
Up to 50
Tilt presets
Up to 50
Tilt Fine presets
Up to 50
PT speed presets
Up to 50
Col/Gob speed presets
([DPSOH IRU PLQL0$& SURILOH
2YHUULGH JURXS IL[WXUH
&URVVIDGH IL[WXUH

30/11/00 Martin Matrix Controller V2.01
34
© R&D International NV for Martin Professional A/S
8.2.4 Assigning the groups
First the fixture channels must be assigned to an override group:
We enter the patch program with:
[MENU] [PARAMETERS] [PATCH]
Select the groups button:
[GROUPS]
Assign the fixture channels to one of the four groups:
Note 1: Since we must assign a group to a channel, we’ve selected in group 4 also the Pan/Tilt
speed and in group 3 also the color/Gobo speed.
Note 2: Do not forget to assign also a DMX-IN channel to both, the override fixture and
the crossfade fixture (see 6.2 Patch Example Step by Step).
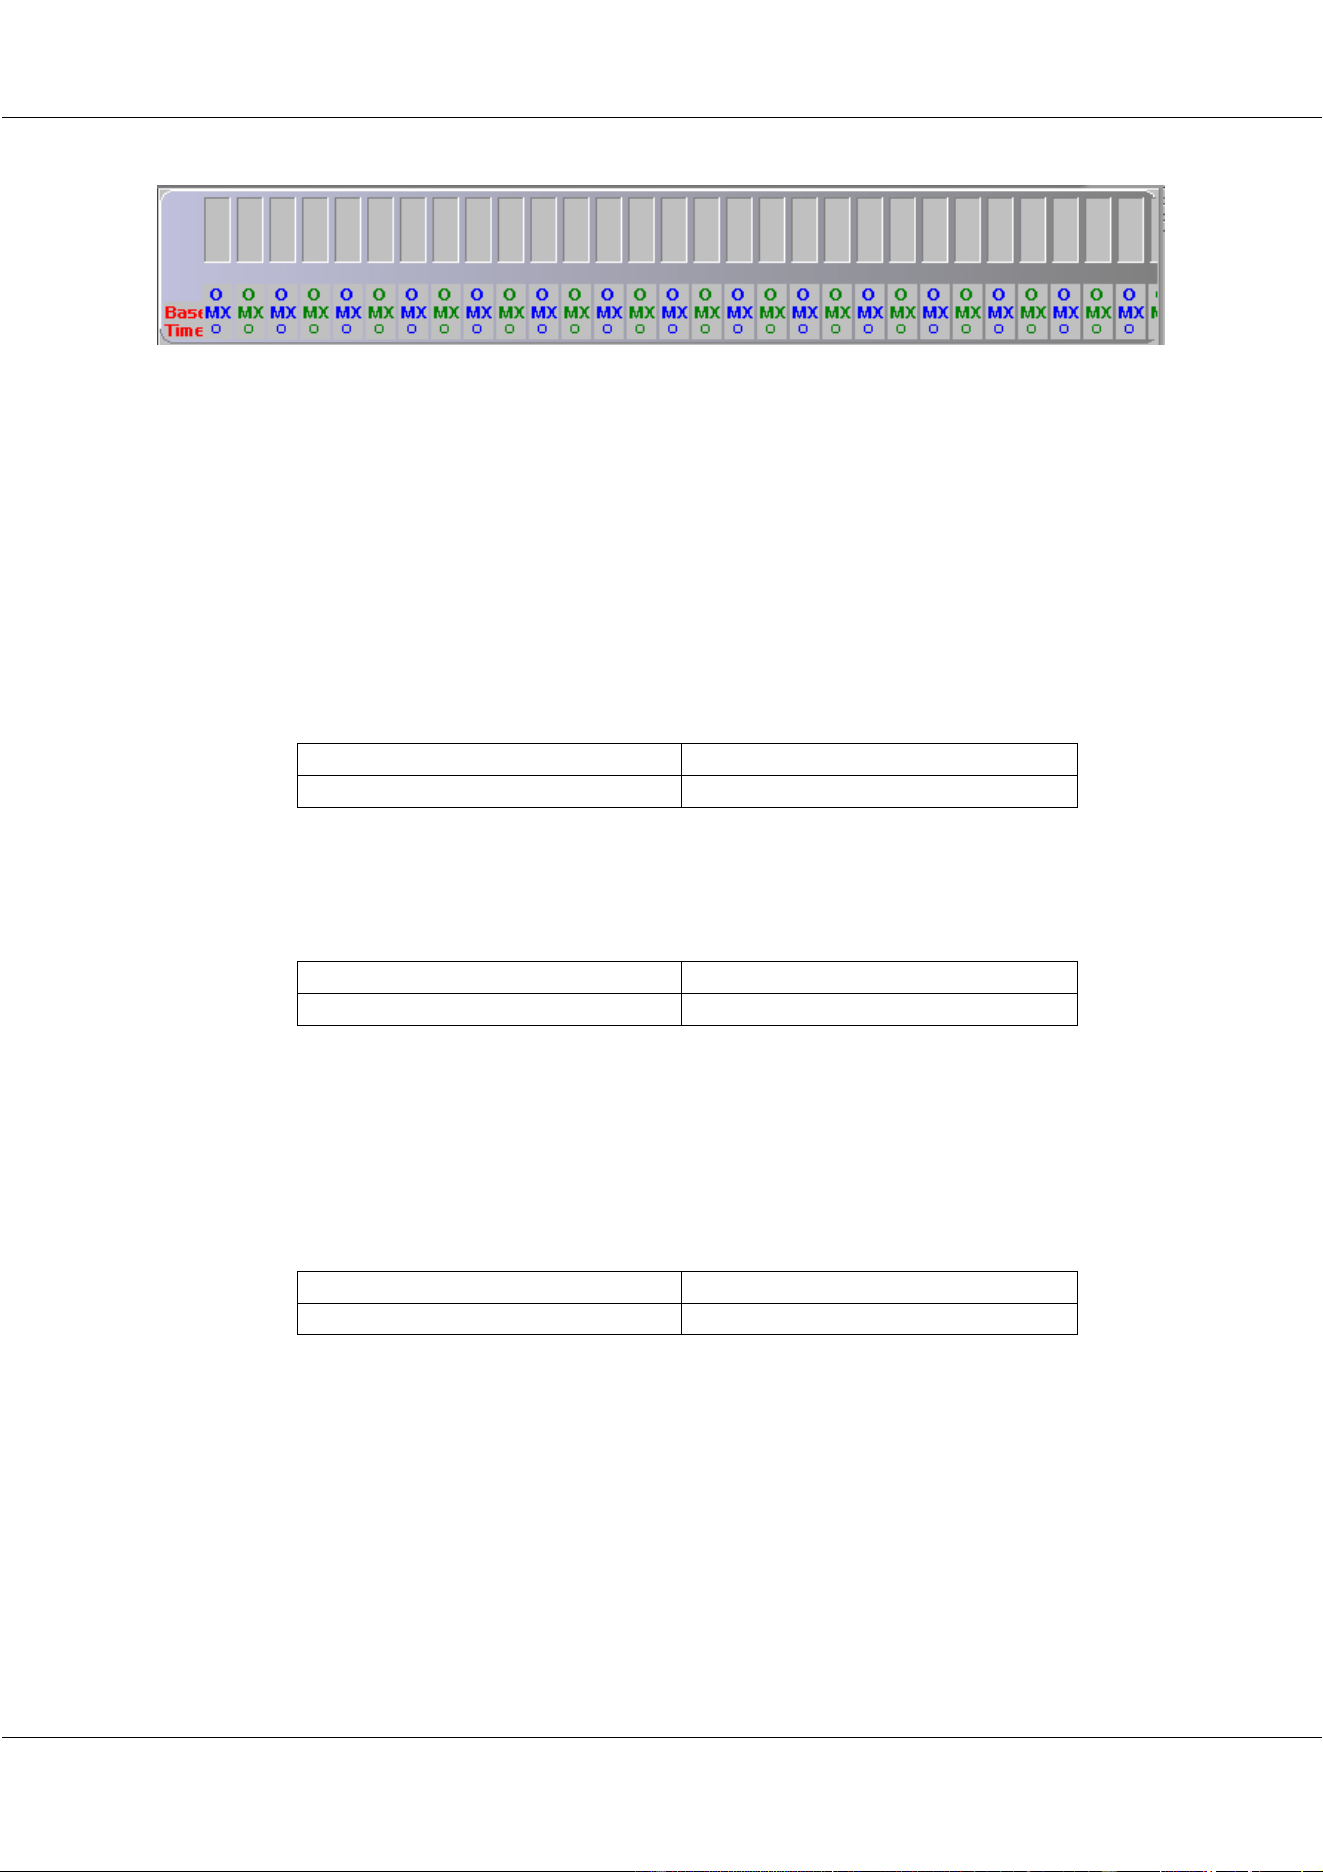
8.2.5 Controlling the override groups
The override groups can now be controlled from the external light desk. We can see the
overrides and their crossfade timings in the Main screen:
[MENU] [VIEW] [OVERRIDES]
This will open the override screen.
30/11/00 Martin Matrix Controller V2.01
35
© R&D International NV for Martin Professional A/S
In this view, only the first 10 fader fields will be used, since in our example, the fixture is a
miniMAC profile with 10 channels.
If we now give a value for ‘override fixture’channel 1 on the external light desk, we will see
the first fader going to this value. If we give a value to ‘override fixture’ channel 4, we will
see 5 faders going to the value (Pan- Tilt (+ fine channels + speed channel).
If a value is given for ‘crossfade fixture’ channel 4, we will see a crossfade time coming up
for the Pan Tilt (+ fine channels + speed channel).
For example:
On the external desk, we program a fist step:
Override channel 4 Crossfade channel 4
Value 0 (MATRIX) Value 0
This means that the Pan Tilt (+ fine + speed) follow the actions programmed on
the Matrix Controller (ex.: a Pan/Tilt cue). The crossfade time is 0 sec.
The second step on the external desk:
Override channel 4 Crossfade channel 4
Value 49 (DMX-IN) Value 155
This means that the Pan Tilt (+ fine + speed) will follow some programs coming
in on the DMX-IN of the Matrix Controller, thus programmed with the external
light desk, since DMX is patched through for those channels in the Matrix
Controller. The crossfade timing is 155, which means that the Pan/Tilt cue (from
step 1) is fading to the DMX-IN values (from step 2) in 15.5 sec.
The third step on the external desk:
Override channel 4 Crossfade channel 4
Value 60 (PRESET 2) Value 255
This means that Preset 2 is called on the Matrix Controller only for Pan/Tilt (+
fine channels + speed channel (the same preset number for Pan, Tilt, their fine
channels and the speed). The Preset is faded in from the DMX-IN values (from
step 2) in 25.5 sec.
