
INSTRUCTION MANUAL
EN
MILK FROTHER
AR
Important information for the user
Recommendations /
Description /
Use /
Cleaning and care /
Safety instructions /
Information /
Suggerimento /

Dear Customer, Thank you for purchasing one of our appliances. Our products are unique because
they combine iconic style with innovative technical solutions. They match perfectly with other products
in our range and work equally well as a standalone design objects in your kitchen. We hope you
enjoy using your new appliance! Best regards.
SMEG S.p.A.

Model: MFF02
A
B
3
1
7
4
5
6
2
Model: MFF02
< 3s
8
9
10
C
D

1
EN
Instructions
1 Instructions
This user manual is an integral part
of the appliance and must therefore
be kept in its entirety and within the
user’s reach for the whole working
life of the appliance.
1.1 Intended use
Failure to respect the safety
warnings and read the instruction
booklet may result in improper use
of the appliance and personal
injury.
• Only use the appliance indoors
and at a maximum altitude of
2000 metres.
• This appliance is intended
for household use and similar
applications such as:
- staff kitchen areas in shops,
offices and other working
environments
- bed and breakfast facilities/
farm accommodation
- by guests in hotels, motels
and other residential
accommodations;
• The appliance is not designed to
operate with external timers or
with remote-control systems.
• Use the appliance indoors and
protected from atmospheric
agents.
• This appliance is not intended
for use by persons with reduced
physical, sensory or mental
abilities (including children
under the age of 8) unless they
are supervised or have been
properly instructed on how to use
the appliance safely.
1.2 General safety
instructions
Follow all safety instructions in order
to use the appliance safely:
• Read this user manual carefully
before using the appliance.
• Do not place the appliance on
or near gas burners or electric
hot plates that are switched on,
inside an oven, or near any heat
sources.
• Do not leave the appliance
unattended when it is switched
on.
• Avoid contact with moving parts
during operation.
• Keep hands, hair, clothing
and tools away from moving
parts during operation to avoid
personal injury and/or damage
to the appliance.
• Switch off the appliance
immediately after use.

2
Instructions
• Do not immerse the appliance,
power cable or plug in water or
any other liquid.
• This appliance has an earth
connection for functional
purposes only.
• Never attempt to extinguish a
fire/flames with water: switch
off the appliance, remove the
plug from the socket, smother the
flames with a fire blanket or other
suitable cover.
• Always disconnect the appliance
from the power supply before
assembling or disassembling
components.
• Always unplug the appliance
and allow it to cool before
cleaning.
• Use only genuine spare parts.
The use of spare parts not
approved by the manufacturer
may result in fire, electric shock
or personal injury.
• Do not attempt to modify or repair
the appliance: in the event of a
malfunction, it must be repaired
by a qualified technician or by
the technical support.
• The cable is intentionally short to
prevent accidents. Do not use an
extension cord.
• Do not allow the power cable
to come into contact with sharp
edges.
• Do not pull the cable to remove
the plug from the wall socket.
• Do not use the appliance
when the power cord or the
plug is damaged or when the
appliance has been dropped or
is damaged in any manner.
• If the power cable is damaged,
contact technical support for
replacement.
• Children must never play with the
appliance. Keep the appliance
and its power cable out of the
reach of children.
• The appliance must only be used
with the power base provided.
• To avoid damage, do not allow
liquids to enter the socket.
• The surface of the heating
element may remain hot after use.
• Do not allow children to clean or
maintain the appliance without
supervision
3
EN
Instructions
1.3 Caution
• Do not use the milk frother without
the lid.
• Check that the lid is properly
closed before switching on the
milk frother.
• Do not overfill the milk frother.
• Do not use the milk frother with
parts or accessories from other
manufacturers.
• Only place the milk frother on
flat, dry surfaces.
• Do not use the milk frother when
empty to avoid permanent
damage to the whisk.
• Do not use the milk frother as a
storage container. Keep the milk
frother empty before and after
use.
• Do not place metal objects such
as knives, forks and spoons on
the appliance during use.
• For instructions on how to clean
the appliance properly, please
refer to section “4 Cleaning and
maintenance”.
1.4 Connecting the appliance
Make sure that the mains voltage
and frequency match those
specified on the data plate on the
underside of the appliance.
In case of incompatibility between
the socket and the plug of the
appliance, contact the technical
support service for replacement.
1.5 Manufacturer liability
The manufacturer declines any
liability for damage to persons or
property caused by:
• Use of the appliance other than
the one envisaged.
• Not having read the user manual.
• Tampering with any part of the
appliance.
• Use of non-original spare parts
• Failure to comply with the safety
instructions
Please keep this
instruction booklet in
a safe place. If the
appliance is passed
on to another person,
please also give them
this instruction booklet.
These instructions can be
downloaded from the Smeg
website “www.smeg.com”.
4
Instructions / Description
2 Appliance description
(Fig. A)
1) Lid
2) Seal
3) Milk frother
4) Whisk
5) Function selection and start
button
6) Connector
7) Base
The accessories intended
to come into contact with
foodstuffs are made of
materials that comply
with the provisions of
current legislation.
2.1 Identification plate
The identification plate bears the
technical data, serial number and
brand name of the appliance.
Do not remove the identification
plate for any reason.
1.6 Disposal
Appliances marked with
this symbol are subject
to the requirements of
European Directive
2012/19/EU.
• All waste electrical and electronic
appliances must be disposed of
separately from household waste
and taken to an authorised waste
disposal facility. Correct disposal
of this appliance will help protect
the environment and human
health. For further information
on how to dispose of the used
appliance, please contact your
local authority waste disposal
department or the shop where
you purchased it.
5
EN
Description
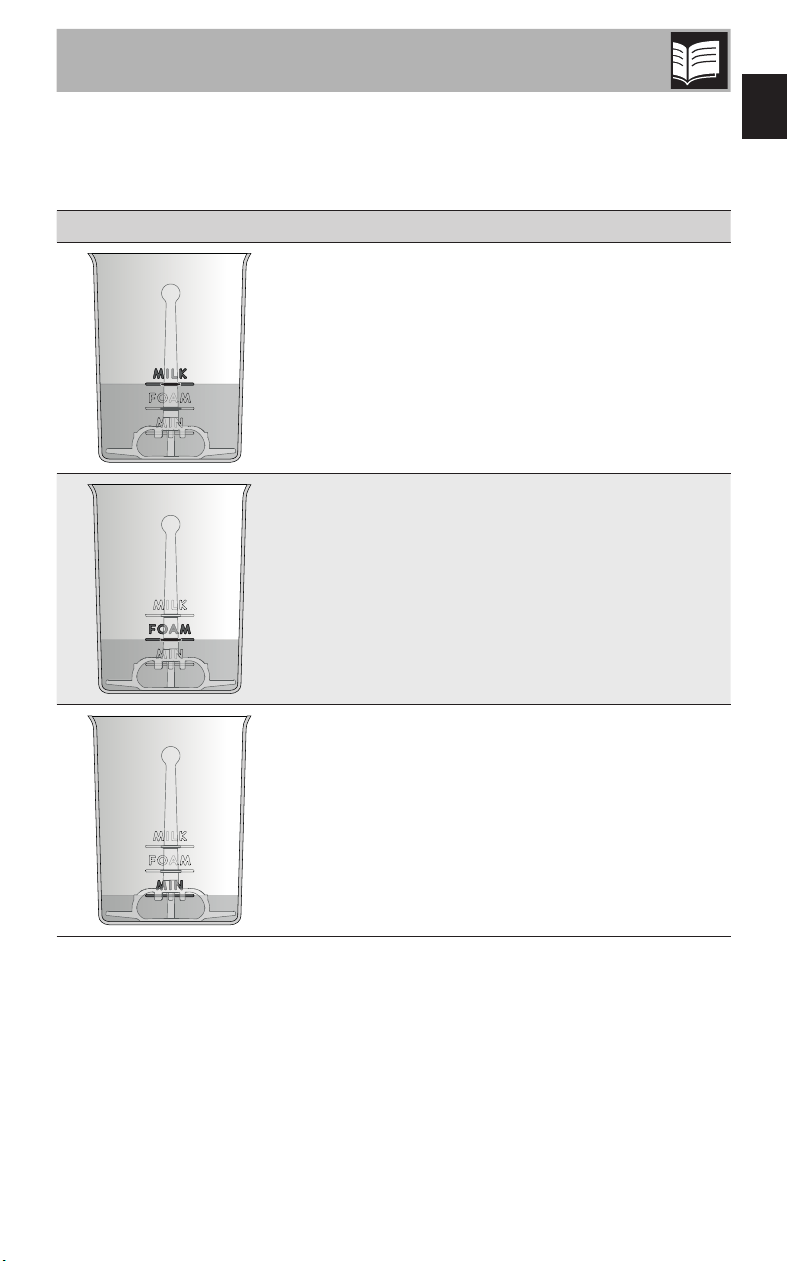
2.2 Level indicators (Fig. B)
The level indicators are located inside the container and in the notches on
the whisk.
Symbol Description
Maximum milk level for “hot milk function”.
Maximum milk level for “hot/cold frothing
function”.
Minimum milk level.
6
Use
3 Use
3.1 Before first use
Danger of electrocution
Plug the appliance into a
suitable earthed socket.
• Do not remove the
earth prong.
• Do not use an adapter.
• Do not use an extension
cord.
• Failure to follow these
instructions could result
in death, fire, or electric
shock.
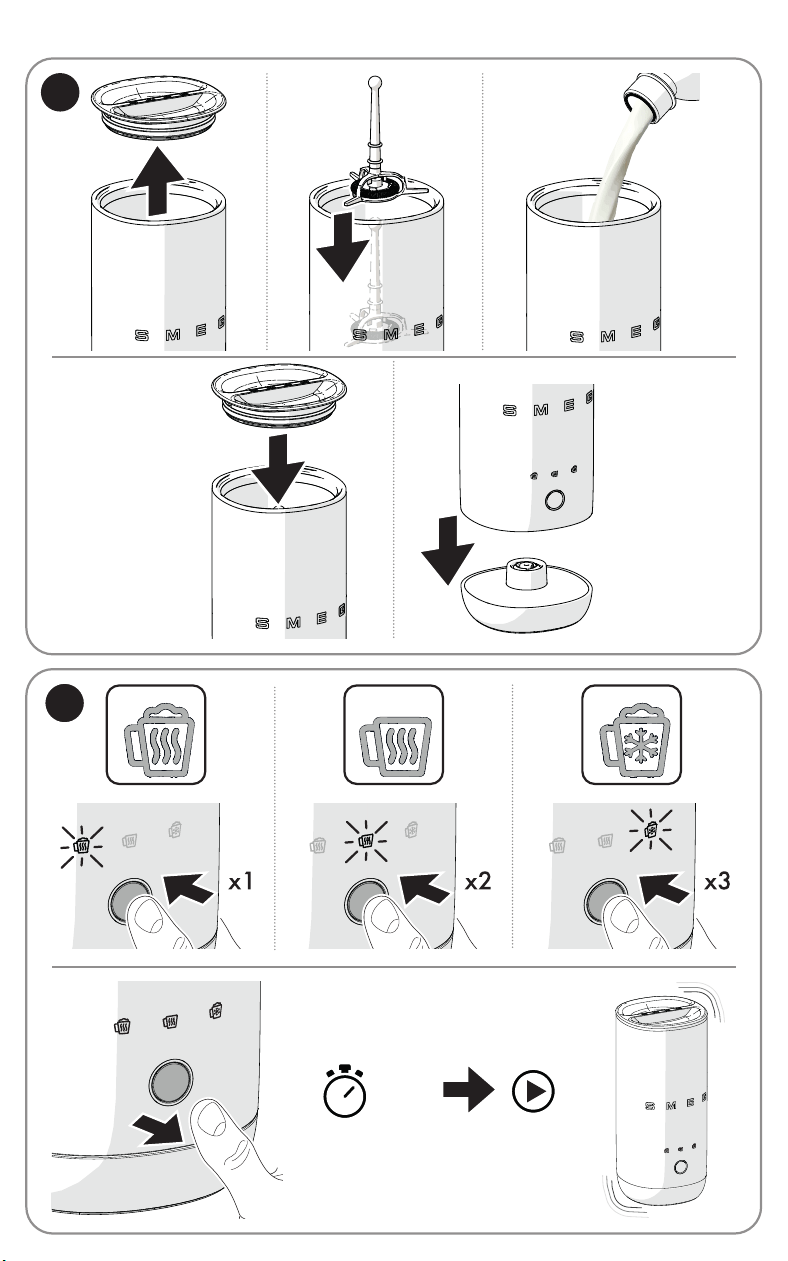
Carry out a pre-cleaning cycle
before using the appliance:
1) Remove the lid (1) from the milk
frother (3).
2) Insert the whisk (4) into the milk
frother (3).
3) Fill the milk frother (3) with fresh,
still drinking water up to the
level mark (FOAM=120ml).
4) Place the lid (1) on the milk
frother (3).
5) Place the milk frother (3)
correctly on its base (7).
6) Press the button (5) and wait
3 seconds for the cleaning
cycle to start.
7) The appliance will beep three
times to signal the end of the
cleaning cycle.
8) Remove the milk frother (3)
from the base (7) and empty it.
9) Wash and dry thoroughly
(see “4.1 Cleaning the
components”).
Risk of accidental start
Make sure the milk
frother is unplugged
before fitting or
removing the whisk.
7
EN
Use
3.2 Heat or froth the milk
(Fig. C and D)
Do not use the appliance
without liquid. Starting
the appliance without
liquid can damage the
jug.
Always fill to the MIN
level and never higher
than the MILK level, both
of which are indicated
inside the milk frother.
For an ideal hot milk
froth, use cold (4-8°C)
whole milk (pasteurised
or UHT) from the fridge.
Avoid using milk at
ambient temperature.
1) Remove the lid (1) from the milk
frother (3).
2) Insert the whisk (4) into the milk
frother (3).
Do not use the milk
frother without the whisk
attached.
3) Pour cold milk into the milk
frother (3). Observe the level
indicators inside the milk frother.
4) Place the lid (1) on the milk
frother (3).
5) Place the milk frother (3)
correctly on its base (7).
The appliance is now
switched on and ready
for use.
6) Press the button (5) to select
one of the three functions
available:
8
Use
• Hot foam function (8)
Press the button (5) once; the “hot
foam function” LED lights up.
• Hot milk function (9)
Press the button (5) twice; the “hot
milk function” LED lights up.
• Cold foam function (10)
Press the button (5) three times; the
“cold foam function” LED lights up.
Press the button (5)
again to switch off all
LEDs.
7) To activate the required function,
select the mode and wait
3 seconds. The function will
start automatically.
You can stop the cycle
before the set time by
pressing the button (5).
8) The end of the cycle is indicated
by three beeps and the LED of
the selected function goes out.
9) Remove the milk frother (3)
from the base (7).
10) Remove the lid (1) and pour the
hot or frothed milk into the cup.
After use, the appliance
automatically switches
to standby mode after
1 minute of inactivity.
Standby power
consumption: 0.1 W
(in accordance with the
ERP directive).
9
EN
Cleaning and maintenance
4 Cleaning and
maintenance
Improper use. Danger of
electrocution
• Unplug the milk frother
before cleaning it.
• Never immerse the
base in water or other
liquids.
Improper use. Risk of
damage to surfaces.
• Do not use steam jets to
clean the appliance.
• Do not use detergents
containing chlorine,
ammonia or bleach on
parts with metal surfaces
(e.g. anodised, nickel-
plated, chrome-plated).
• Do not use abrasive or
corrosive detergents
(e.g. powder products,
stain removers and
metallic scourers).
• Do not use rough or
abrasive materials or
sharp metal scrapers.
4.1 Cleaning the components
To make cleaning easier, it is
recommended that the components
are cleaned regularly after each
use after they have cooled down.
Lid
Milk frother
x
Whisk
Base
x
Make sure that the
components are
completely dry before
putting them back into
the milk frother.

10
What to do if...
Problem Cause Solution
The milk frother does
not start
Appliance not
connected to the
mains.
Make sure that
the power cable is
properly plugged into
the wall socket.
The appliance is
connected to multiple
sockets or a power
strip.
Plug the appliance
directly into a power
socket.
No power.
Make sure that the
main circuit breaker is
switched on.
Milk frother not
inserted properly.
Check that the milk
frother is correctly
placed on the base
and that there are
no foreign objects
between the base and
the milk frother that
could prevent it from
working correctly.
Milk frother does not
froth milk
There is no whisk in the
milk frother or it is not
correctly assembled/
installed.
Check that the whisk
is present, assembled
and correctly fitted in
the milk frother.

11
EN
What to do if...
Problem Cause Solution
Poor quality milk
froth
Dirty milk frother or
whisk.
Make sure the milk
frother and whisk are
clean.
Incorrect amount of
milk.
Check that the correct
amount of milk has
been inserted and that
it is at the correct level.
Unsuitable milk.
It is recommended
to use cold milk from
the fridge (4-8°C) to
obtain an optimal hot
froth.
Too long a period
between the end
of preparation and
consumption.
Pour the preparation
into the cup as soon as
it is ready and consume
it immediately.
Milk leaks from the
frother during use
There may be too
much milk.
Respect the level
indicator.
Milk too hot or burnt
Incorrect amount of
milk.
Make sure you have
not used less than the
minimum amount of
milk (60 ml).
12
What to do if...
Problem Cause Solution
The milk frother is
noisy
Components are not
installed correctly.
Make sure you have
inserted the whisk
correctly.
Make sure the lid is
correctly fitted.
Make sure the
appliance is on a
stable surface.
Foreign objects
present.
Check that there are
no foreign objects
inside the milk frother
and between the base
and the milk frother
that could prevent it
from working properly.
Milk frother stops
during operation
The milk frother is too
hot.
Rinse the milk frother
with cold water and
refill with cold milk.
Milk is too hot.
Do not reuse
pre-heated milk. Use
cold milk.
If the problem persists, or for other faults, contact your local
service centre.
Notes
Scan the QR code for quick access to the My Smeg Assistant portal
My Smeg Assistant ةباوب ىلإ ا
ً
يرس لوصولا لجأ نم ةيرسلا ةباجتسا زمر حسما

The manufacturer reserves the right to make any changes deemed necessary for the improvement of its
products without prior notice. The illustrations and descriptions contained in this manual are therefore
not binding and are merely indicative.