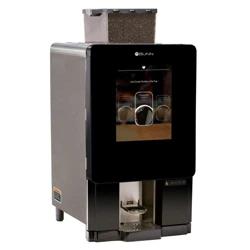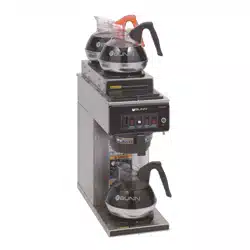
Infusion Series
®
Platinum Edition
®
Pro
Multi-Temp Batch Brewing Coffee & Tea System
59212.0000 B 8/25 © 2025 Bunn-O-Matic Corporation
www.bunn.com
For Technical Service, contact Bunn-O-Matic Corporation at 1-800-286-6070.
INSTALLATION & OPERATING GUIDE
Bunn-O-Matic Corporation
Post Office Box 3227, Springfield, Illinois 62708-3227
Phone (217) 529-6601 | Fax (217) 529-6644

2
Bunn-O-Matic Corp. (“BUNN”) warrants equipment manufactured by it as follows:
1) All coffee and tea dispensers/servers, MCR/MCP/MCA single cup brewers, and BUNNlink
®
electronic circuit and/or
control boards – 1 year parts and 1 year labor.
2) Product-specific warranties for Premia
™
,Crescendo
®
, Fast Cup
®
, Sure Immersion
®
, Sure Tamp
®
and others – 1 year
parts and 1 year labor. Please visit commercial.bunn.com/support/warranty-lookup for further details.
3) All other equipment – 2 years parts and 1 year labor plus added warranties as specified below:
a) Electronic circuit and/or control boards – parts and labor for 3 years.
b) Compressors on refrigeration equipment – 5 years parts and 1 year labor.
c) Grinding burrs on coffee grinding equipment for 4 years or 40,000 pounds of coffee, whichever comes first.
4) For customers subscribed to BUNNlink
®
, BUNN reserves the right to periodically auto-push critical software
updates that will enhance functionality or performance of the BUNN equipment, unless the customer requests
advance notice of such software updates from BUNN in writing.
These warranty periods run from the date of installation. BUNN warrants that the equipment manufactured by it will
be commercially free of defects in material and workmanship existing at the time of manufacture and appearing
within the applicable warranty period. This warranty does not apply to any equipment, component or part that was
not manufactured by BUNN or that, in BUNN’s judgment, has been affected by misuse, neglect, alteration, improper
installation or operation, improper maintenance or repair, non periodic cleaning and descaling, equipment failures
related to poor water quality, damage or casualty. In addition, the warranty does not apply to replacement of items
subject to normal wear with use including but not limited to user replaceable parts such as seals and gaskets. This
warranty is conditioned on the Buyer 1) giving BUNN prompt notice of any claim to be made under this warranty by
telephone at (217) 529-6601 or by writing to Post Office Box 3227, Springfield, Illinois 62708-3227; 2) if requested
by BUNN, shipping the defective equipment prepaid to an authorized BUNN service location; and 3) receiving prior
authorization from BUNN that the defective equipment is under warranty.
THE FOREGOING WARRANTY IS EXCLUSIVE AND IS IN LIEU OF ANY OTHER WARRANTY, WRITTEN OR
ORAL, EXPRESS OR IMPLIED, INCLUDING, BUT NOT LIMITED TO, ANY IMPLIED WARRANTY OF EITHER
MERCHANTABILITY OR FITNESS FOR A PARTICULAR PURPOSE. The agents, dealers or employees of BUNN
are not authorized to make modifications to this warranty or to make additional warranties that are binding on BUNN.
Accordingly, statements by such individuals, whether oral or written, do not constitute warranties and should not be
relied upon.
If BUNN determines in its sole discretion that the equipment does not conform to the warranty, BUNN, at its
exclusive option while the equipment is under warranty, shall either 1) provide at no charge replacement parts
and/or labor (during the applicable parts and labor warranty periods specified above) to repair the defective
components, provided that this repair is done by a BUNN Authorized Service Representative; or 2) shall replace
the equipment or refund the purchase price for the equipment.
THE BUYER’S REMEDY AGAINST BUNN FOR THE BREACH OF ANY OBLIGATION ARISING OUT OF THE
SALE OF THIS EQUIPMENT, WHETHER DERIVED FROM WARRANTY OR OTHERWISE, SHALL BE LIMITED, AT
BUNN’S SOLE OPTION AS SPECIFIED HEREIN, TO REPAIR, REPLACEMENT OR REFUND.
In no event shall BUNN be liable for any other damage or loss, including, but not limited to, lost profits, lost sales, loss
of use of equipment, claims of Buyer’s customers, cost of capital, cost of down time, cost of substitute equipment,
facilities or services, or any other special, incidental or consequential damages.
BUNN-O-MATIC COMMERCIAL PRODUCT WARRANTY

3
CONTENTS
NORTH AMERICAN REQUIREMENTS .................................................................................................................... 5
CE REQUIREMENTS ................................................................................................................................................5
OPERATOR NOTICES .............................................................................................................................................. 6
PLUMBING REQUIREMENTS .................................................................................................................................. 6
Plumbing Hook-Up .................................................................................................................................................6
Tank Drain ..............................................................................................................................................................7
ELECTRICAL REQUIREMENTS ITCB-DV ...............................................................................................................7
ELECTRICAL HOOK-UP ........................................................................................................................................... 8
FOR INDOOR USE ONLY .........................................................................................................................................8
Counter ...............................................................................................................................................................8
INITIAL SETUP .........................................................................................................................................................8
COFFEE BREWING .................................................................................................................................................. 9
Brewing without a Smart Funnel and MHG Grinder ...............................................................................................9
Brewing with a Smart Funnel and MHG Grinder ....................................................................................................9
TEA BREWING ....................................................................................................................................................... 10
CLEANING .............................................................................................................................................................. 11
Daily .....................................................................................................................................................................11
Tea Server ........................................................................................................................................................12
Weekly..................................................................................................................................................................13
Tea Server ........................................................................................................................................................14
Monthly .................................................................................................................................................................15
Tea Server ........................................................................................................................................................15
Dispenser .............................................................................................................................................................15
PROGRAMMING .................................................................................................................................................... 16
Operating Controls ...............................................................................................................................................16
How To Access Programming ..............................................................................................................................17
How To Exit Programming ...................................................................................................................................17
Programming Lockout ..........................................................................................................................................17
Service Access .....................................................................................................................................................17
Service Access Options .......................................................................................................................................17
Service Menu .......................................................................................................................................................18
Service Menu Options .......................................................................................................................................... 18
Viewing Asset, Serial and Service Number ..........................................................................................................18
Calibrate Bypass Flow Rate ................................................................................................................................. 19
Calibrate Dilution Flow Rate .................................................................................................................................19
Edit Recipe Settings ............................................................................................................................................. 20
Choosing Beverage Type .................................................................................................................................21
Renaming a Recipe ..........................................................................................................................................21
Enabling/Disabling Batch Sizes ........................................................................................................................22
Recipe Edit Information ........................................................................................................................................ 22
Editing Temperature Zones ..................................................................................................................................25
Machine Settings ..................................................................................................................................................26
How To Access Machine Settings ....................................................................................................................26
Brew Settings .......................................................................................................................................................27
Canceling an initiated Brew Cycle ....................................................................................................................28
Canceling a Brew Cycle in Process ..................................................................................................................28
Smart Funnel ....................................................................................................................................................28
Enabling FRESHlink Server Settings ...................................................................................................................30
Screen Lock Settings ...........................................................................................................................................32
continued >

4
How To Access Screen Lock Settings ..............................................................................................................32
Import / Export ......................................................................................................................................................33
Import/Export Menu ..........................................................................................................................................33
Screen Saver........................................................................................................................................................34
How To Access Screen Saver Settings ............................................................................................................34
Custom Screen Saver .........................................................................................................................................35
Custom Image Requirements ...........................................................................................................................35
USB Folder Structure ........................................................................................................................................ 35
Importing Custom ScreenSaver ........................................................................................................................ 35
Language .............................................................................................................................................................36
Time and Date ......................................................................................................................................................37
Units .....................................................................................................................................................................38
Change Password ................................................................................................................................................ 39
Energy Saver........................................................................................................................................................40
How To Access .................................................................................................................................................40
continued from previous page
CONTENTS

5
NORTH AMERICAN REQUIREMENTS
• This appliance must be installed in locations where it can be overseen by trained personnel.
• For proper operation, this appliance must be installed where the temperature is between 41°F to 95°F (5°C to 35°C).
• Appliance shall not be tilted more than 10° for safe operation.
• An electrician must provide electrical service as specified in conformance with all local and national codes.
• This appliance must not be cleaned by pressure washer.
• This appliance can be used by persons if they have been given supervision or instruction concerning use of the
appliance in a safe way and if they understand the hazards involved.
• Keep the appliance and its cord out of reach of children.
• Appliances can be used by persons with reduced physical, sensory or mental capabilities or lack of experience and
knowledge if they have been given supervision or instruction concerning use of the appliance in a safe way and
understand the hazards involved.
• If the power cord is ever damaged, it must be replaced by the manufacturer or authorized service
personnel with a special cord available from the manufacturer or its authorized service personnel in
order to avoid a hazard.
• Machine must not be immersed for cleaning.
• This appliance is intended for commercial use in applications such as:
– staff kitchen areas in shops, offices and other working environments
– by clients in hotel and motel lobbies and other similar types of environments
• Access to the service areas permitted by Authorized Service personnel only.
CE REQUIREMENTS
• This appliance must be installed in locations where it can be overseen by trained personnel.
• For proper operation, this appliance must be installed where the temperature is between 5°C to 35°C.
• Appliance shall not be tilted more than 10° for safe operation.
• An electrician must provide electrical service as specified in conformance with all local and national codes.
• This appliance must not be cleaned by water jet.
• This appliance can be used by persons aged from 18 years and above if they have been given supervision or instruc-
tion concerning use of the appliance in a safe way and if they understand the hazards involved.
• Keep the appliance and its cord out of reach of children aged less than 18 years.
• Appliances can be used by persons 18 years and above with reduced physical, sensory or mental capabilities or lack
of experience and knowledge if they have been given supervision or instruction concerning use of the appliance in a
safe way and understand the hazards involved.
• Children under the age of 18 years should be supervised to ensure they do not play with the appliance.
• If the power cord is ever damaged, it must be replaced by the manufacturer or authorized service personnel with a
special cord available from the manufacturer or its authorized service personnel in order to avoid a hazard.
• Machine must not be immersed for cleaning.
• Cleaning and user maintenance shall not be made by children unless they are older than 18 years and supervised.
• This appliance is intended to be used in household and similar applications such as:
– staff kitchen areas in shops, offices and other working environments;
– by clients in hotels, motels and other residential type environments;
– bed and breakfast type environments.
• This appliance not intended to be used in applications such as:
– farm houses;
• Access to the service areas permitted by Authorized Service personnel only.
• The A-Weighted sound pressure level is below 70 dBA.
6
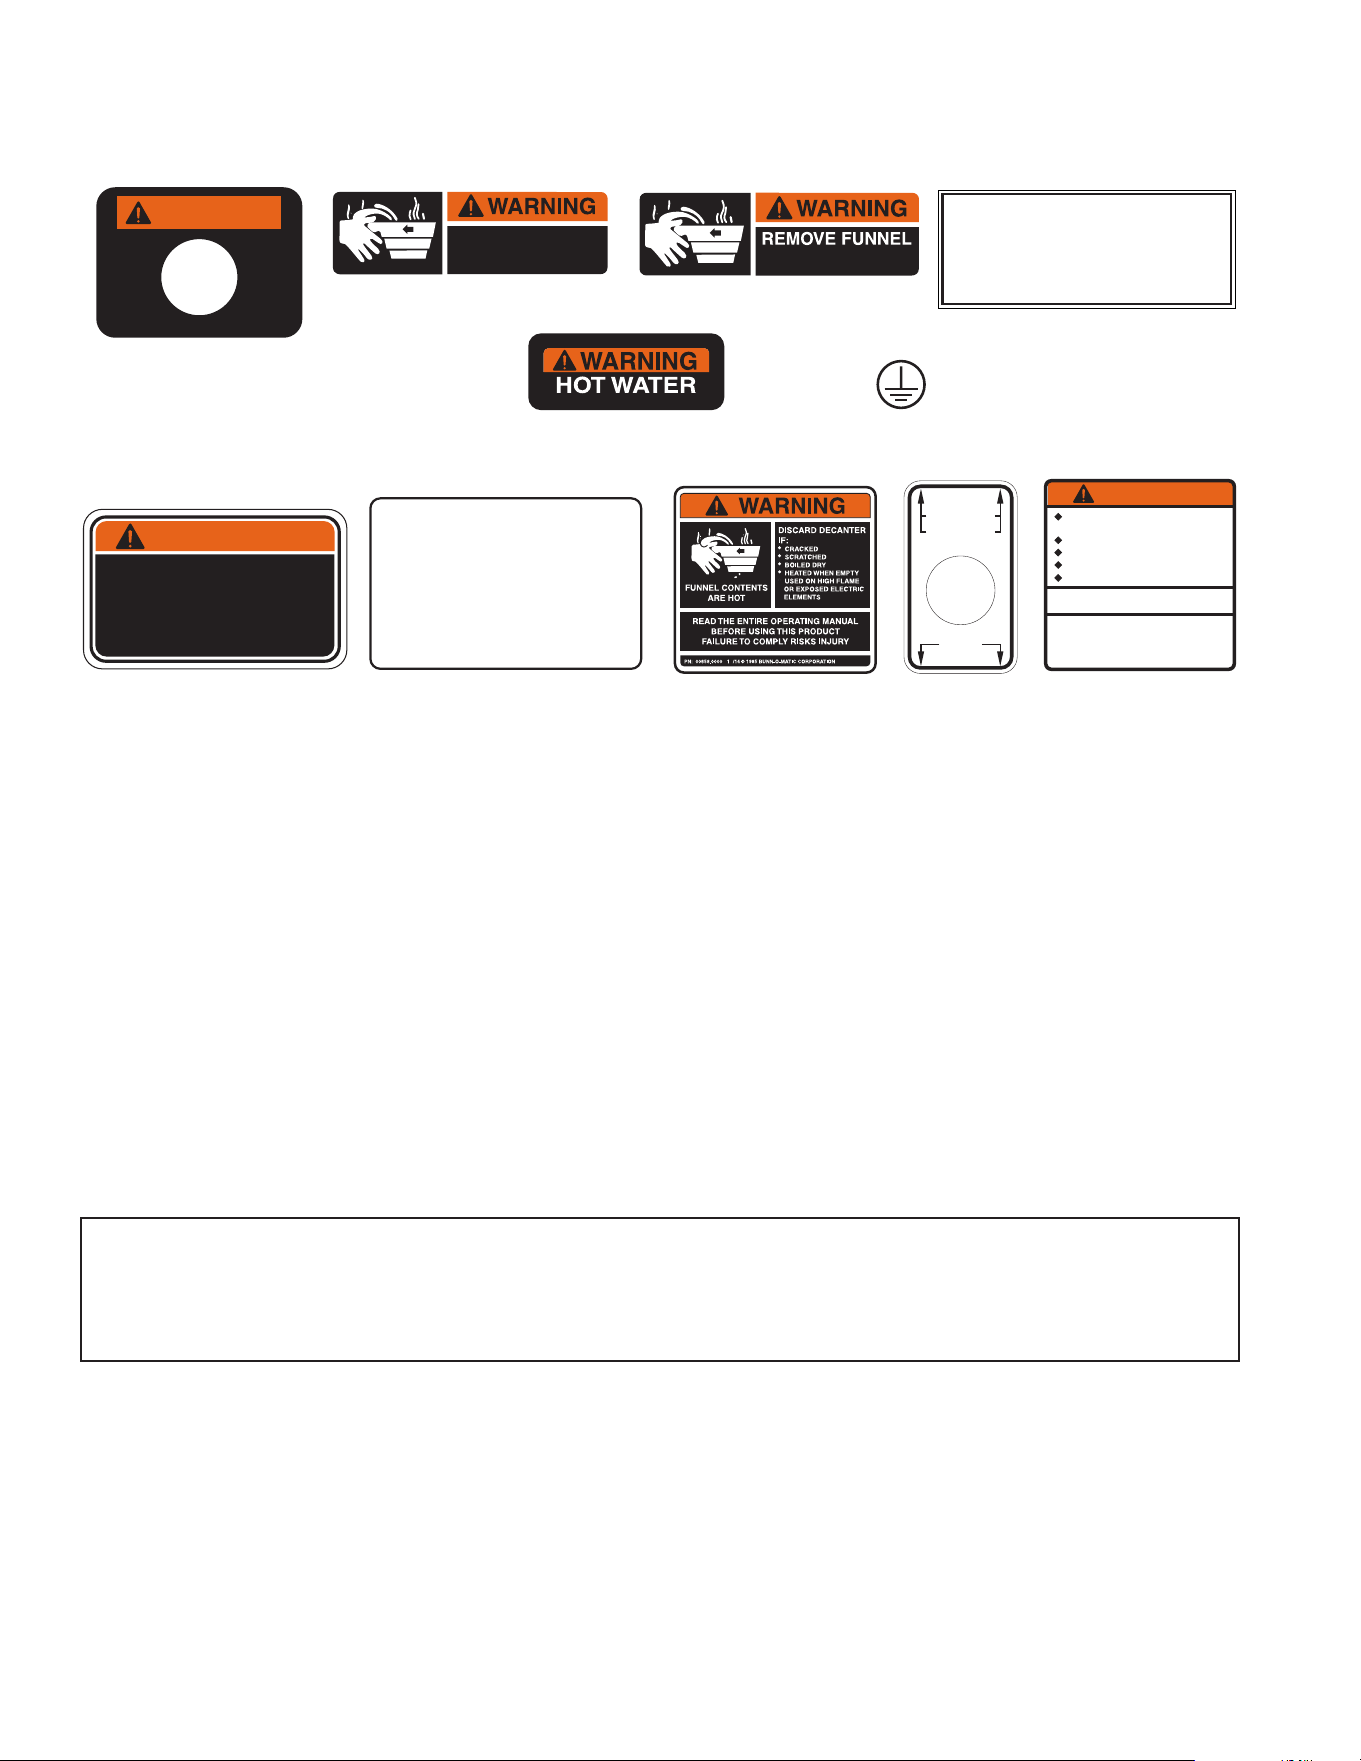
OPERATOR NOTICES
Carefully read and follow all notices in this manual and on the equipment. All labels on the equipment should
be kept in good condition. Replace any unreadable or damaged labels.
00656.0001
As directed in the International Plumbing Code of the
International Code Council and the Food Code
Manual of the Food and Drug Administration (FDA),
this equipment must be installed with adequate
backflow prevention to comply with federal, state
and local codes. For models installed outside the
U.S.A., you must comply with the applicable Plumb-
ing /Sanitation Code for your area.
00986.0000
WARNING
FAILURE TO COMPLY RISKS EQUIPMENT
DAMAGE, FIRE OR SHOCK HAZARD.
READ THE ENTIRE
OPERATING MANUAL BEFORE
USING THIS PRODUCT
00986.0000M 10/14 ©1994 Bunn-O-Matic Corporation
Use only on a properly protected
circuit capable of the rated load.
Electrically ground the chassis.
Follow national/local electrical codes.
Do not use near combustibles.
Do not deform plug or cord.
2
M
00658.000037881.0000
To reduce the risk of electric shock,
do not remove or open cover.
No user-serviceable parts inside.
Authorized service personnel only.
Disconnect power before servicing.
WARNING
34056.0001
120/208V
120/240V
120V
29710.0016
Optional Field Wiring
120 V, 14 A, 1700 W
1PH, 2-Wire + GND, 60HZ
00824.0002
SLOWLY
03408.0008
HOT
LIQUID
03409.0006
36302.0000
Plumbing Hook-Up
1. If applicable, remove the shipping cap from the fitting on the rear of the brewer.
2. Securely attach adaptor elbow assembly to the .75-11.5 NH (HOSE THREAD) fitting at the rear of
the brewer. Ensure the flare gasket is seated inside the elbow fitting before connecting.
3. Flush the water line and Securely attach it to the adaptor elbow.
4. Turn on the water supply. Inspect all water connections for leaks. If water leaks are detected, shut off
the water supply and fix connections until no leaks are detected.
These brewers must be connected to a cold water system with operating pressure between 20 and 90 psi
(0.138 and 0.620 mPa) from a 1/2˝ or larger supply line. A shut-off valve should be installed in the line
before the brewer. Install a regulator in the line when pressure is greater than 90 psi (0.620 mPa) to reduce
it to 50 psi (0.345 mPa). The water inlet fitting is .75-11.5 NH (HOSE THREAD). For convenience an
elbow adaptor is provided to convert to a 3/8˝ flare fitting. Bunn-O-Matic does not recommend the use of a
reverse-osmosis or deionized water supply to this equipment. REQUIRED: 1.25 gpm (4.73 lpm) flow rate
from water supply line.
As directed in the International Plumbing Code of the International Code Council and the Food Code
Manual of the Food and Drug Administration (FDA), this equipment must be installed with adequate
back flow prevention to comply with federal, state and local codes. For models installed outside the
U.S.A., you must comply with the applicable Plumbing /Sanitation Code for your area.
PLUMBING REQUIREMENTS
NOTE: Bunn-O-Matic recommends 3⁄8" copper tubing for all installations from the 1⁄2" water supply line.
A tight coil of tubing in the water line will facilitate moving the brewer to clean the countertop. Bunn-O-Matic
does not recommend the use of a saddle valve to install the brewer. The size and shape of the hole made
in the supply line by this type of device may restrict water flow.
continued >
HOT
WATER
WARNING
HOT
WATER
29007.0005
7
N
L1
G
L2 RED L2 RED
POWER CORD
WHITE NEUTRAL WHITE
GREEN
NEUTRAL
L1 BLACK L1 BLACK
L2
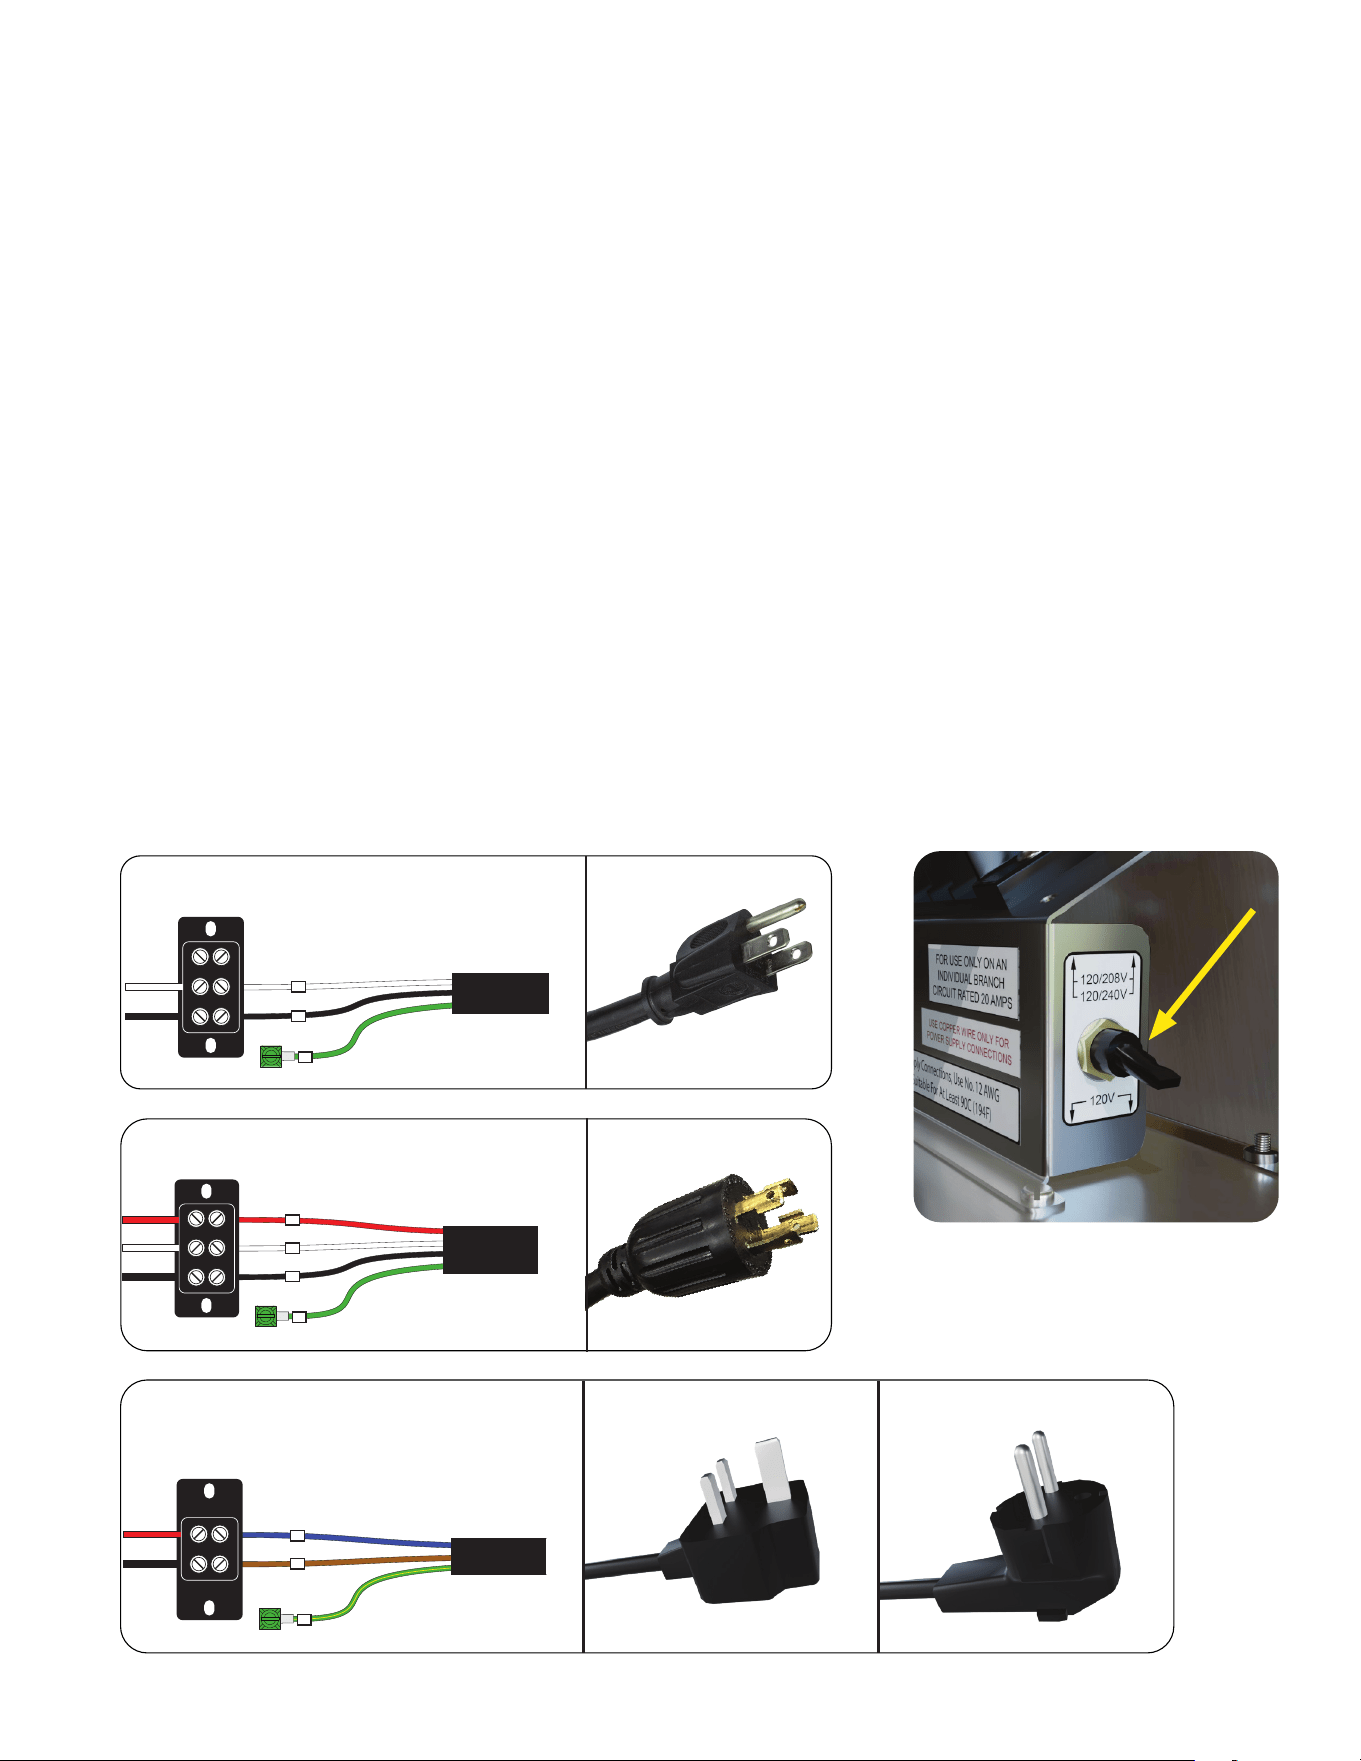
ELECTRICAL REQUIREMENTS ITCB-DV
WARNING - The brewer must be disconnected from the power source until specified.
WARNING - The power cord must be UL Listed, Flexible Cord Type SO, SJO, SJTO, HSJO or SJOW,
Rated 90° C, and the attachment plug cap must be UL Listed, in order to avoid a hazard. The Power
Supply Cord must be at least 3 feet long and maximum 6 feet long (measured from Strain Relief to end
of the Attachment Plug Cap).
Refer to Data Plate on the Brewer, and local/national electrical codes to determine circuit
requirements. Optional Field Wiring ratings are located on the machine near the Data Plate.
N
L1
G
POWER CORD
WHITE NEUTRAL WHITE
GREEN
NEUTRAL
L1 BLACK L1 BLACK
120V 3 WIRE + GROUND
120/208 - 240V 3 WIRE + GROUND
DUAL VOLT
TOGGLE SWITCH
(DV models only)
Located behind front panel.
Tank Drain
1. Remove the flip tray on the brewer.
2. Loosen screws that secure the front access panel. Remove the panel.
3. Tighten the white shutoff clamp on the long hose between the tank and inlet solenoid.
4. Disconnect the hose clamp and hose from the inlet solenoid.
5. Place the end of the drain hose in a container that has a minimum capacity of
[3.5 gallons / 13.25 L Singles]. The receiving container must be rated for minimum 207˚F / 97˚C.
6. Release the white clamp to drain water from the tank.
7. When tank is empty, replace the hose onto the inlet solenoid, and tighten the clamp to secure tubing.
8. Plug the drain hose and place back into machine. Ensure the hose clamp is in the open position.
9. Replace the front panel and tighten the screws.
PLUMBING REQUIREMENTS
L2 RED NEUTRAL BLUE
N
L1 BLACK
L1
G
POWER CORD
GREEN/YELLOW
L1 BROWN
220-240V 2 WIRE + GROUND
(models without Dual Volt)
UK Plug
Euro Plug
8
continued >
CAUTION – Improper electrical installation will damage electronic components. Damage
caused by incorrect electrical connections is not covered by warranty.
1. An electrician must provide electrical service.
2. Determine the available on-site electrical service.
3. Select the desired unit voltage based on the available on-site electrical service (DV models only).
4. Using a voltmeter, check the voltage and color coding of each conductor at the electrical source.
5. Remove the front access panel to gain access to the terminal block.
6. Feed the power cord through the strain relief and connect it to the terminal block(s) if applicable.
7. Connect the power cord to the terminal block as shown.
8. Before proceeding, verify the voltage at the field wiring terminal block.
9. Set voltage switch to the appropriate position and replace the access panel.
10. If plumbing is to be hooked up later, be sure the brewer is disconnected from the power source.
If plumbing has been hooked up, the brewer is ready for Initial Setup.
ELECTRICAL HOOK-UP
FOR INDOOR USE ONLY
INITIAL SETUP
1. Insert an empty funnel into the funnel rails of the brew station.
2. Place empty server under the funnel.
3. Connect the brewer to the power source.
4. Turn on the main power switch.
5. Water will flow into the tank and stop when the tank is filled to its capacity.
NOTE: Pressing the recipe name button on the home
screen will allow the user to select a different recipe.
6. Wait approximately 25 minutes for the water in the tank to heat to the proper temperature.
NOTE: Some water may drip from the funnels during this time; this is due to expansion and should not
occur thereafter.
7. Water Flow-rate settings have been preset at the factory. Refer to Calibration section to perform a
Dilution and Bypass calibration.
8. The brewer is now ready for use in accordance with the instructions for Coffee Brewing and Recipe
Setup.
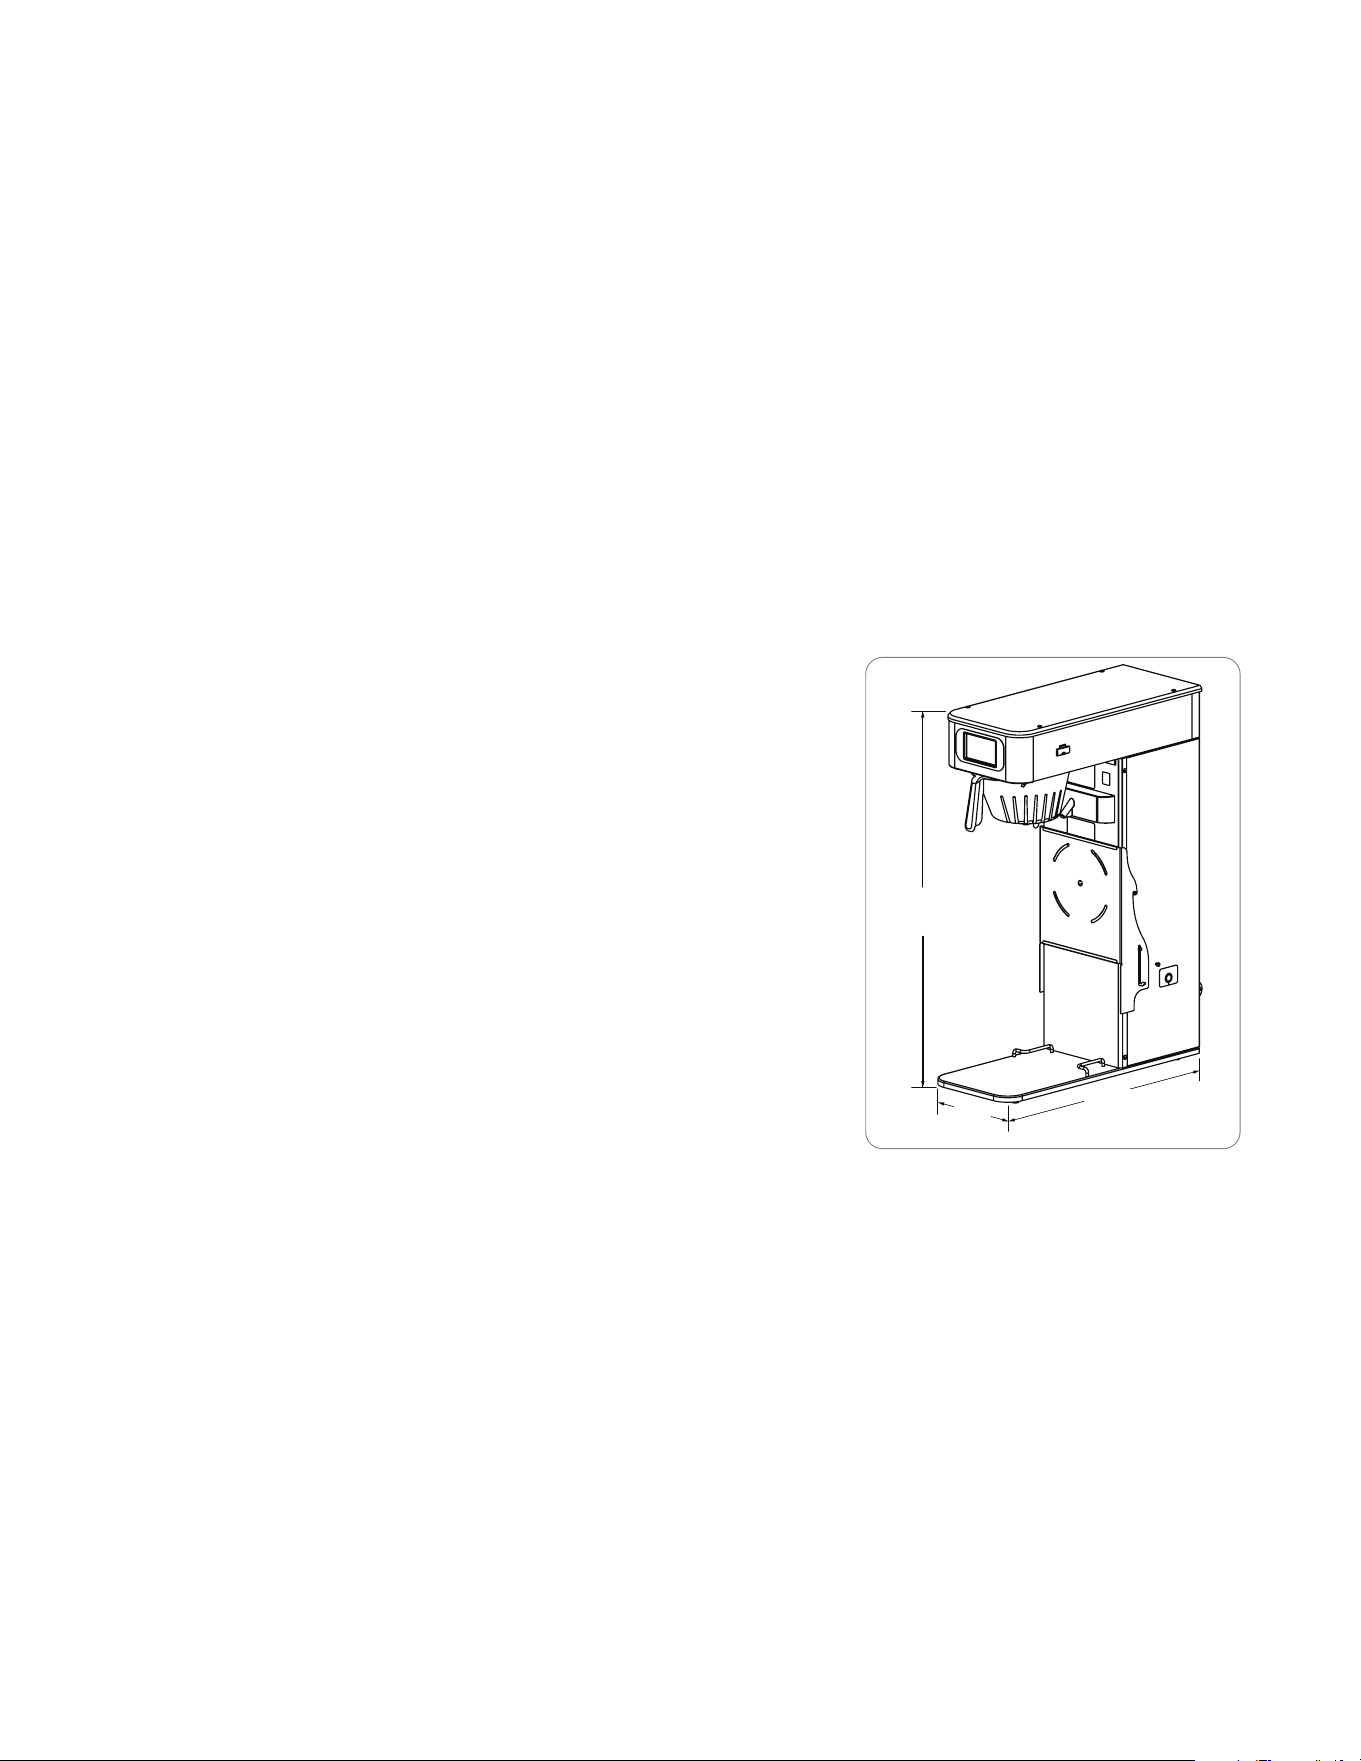
35.0in
[ 888mm ]
21.8in
[ 554mm ]
7.4in
[ 188mm ]
COUNTER
• Machine must be level within 2˚ for proper operation.
• Counter must be a sturdy, level surface able to
support 48 lbs.
• Suggested area around machine is 2 inches in all directions.
9
There may be certain situations in which the brew cycle will not begin when BREW is selected:
• BREW TEMPERATURE TOO LOW - wait until heated, or cancel BREW LOCKOUT option.
• CHECK FUNNEL - remove funnel, empty previously brewed grounds and replace with fresh.
COFFEE BREWING
continued >
Brewing without a Smart Funnel and MHG Grinder
1. Begin each brew cycle with a clean empty brew funnel.
2. Insert a BUNN filter into the funnel.
3. Pour the fresh coffee into the filter and level the bed of grounds by gently shaking.
4. Slide the funnel into the funnel rails of the selected side until it stops.
5. Place an empty server under the funnel.
6. Select the desired recipe by selecting the button above the batch selections. If there are more than 6
recipes stored in the brewer, use the scroll arrow to navigate to the desired recipe.
7. Select the desired batch size for the recipe.
8. Select the START BREW button. For twin models, ensure to select the brew button for the side of the
brewer that is loaded with freshly ground coffee.
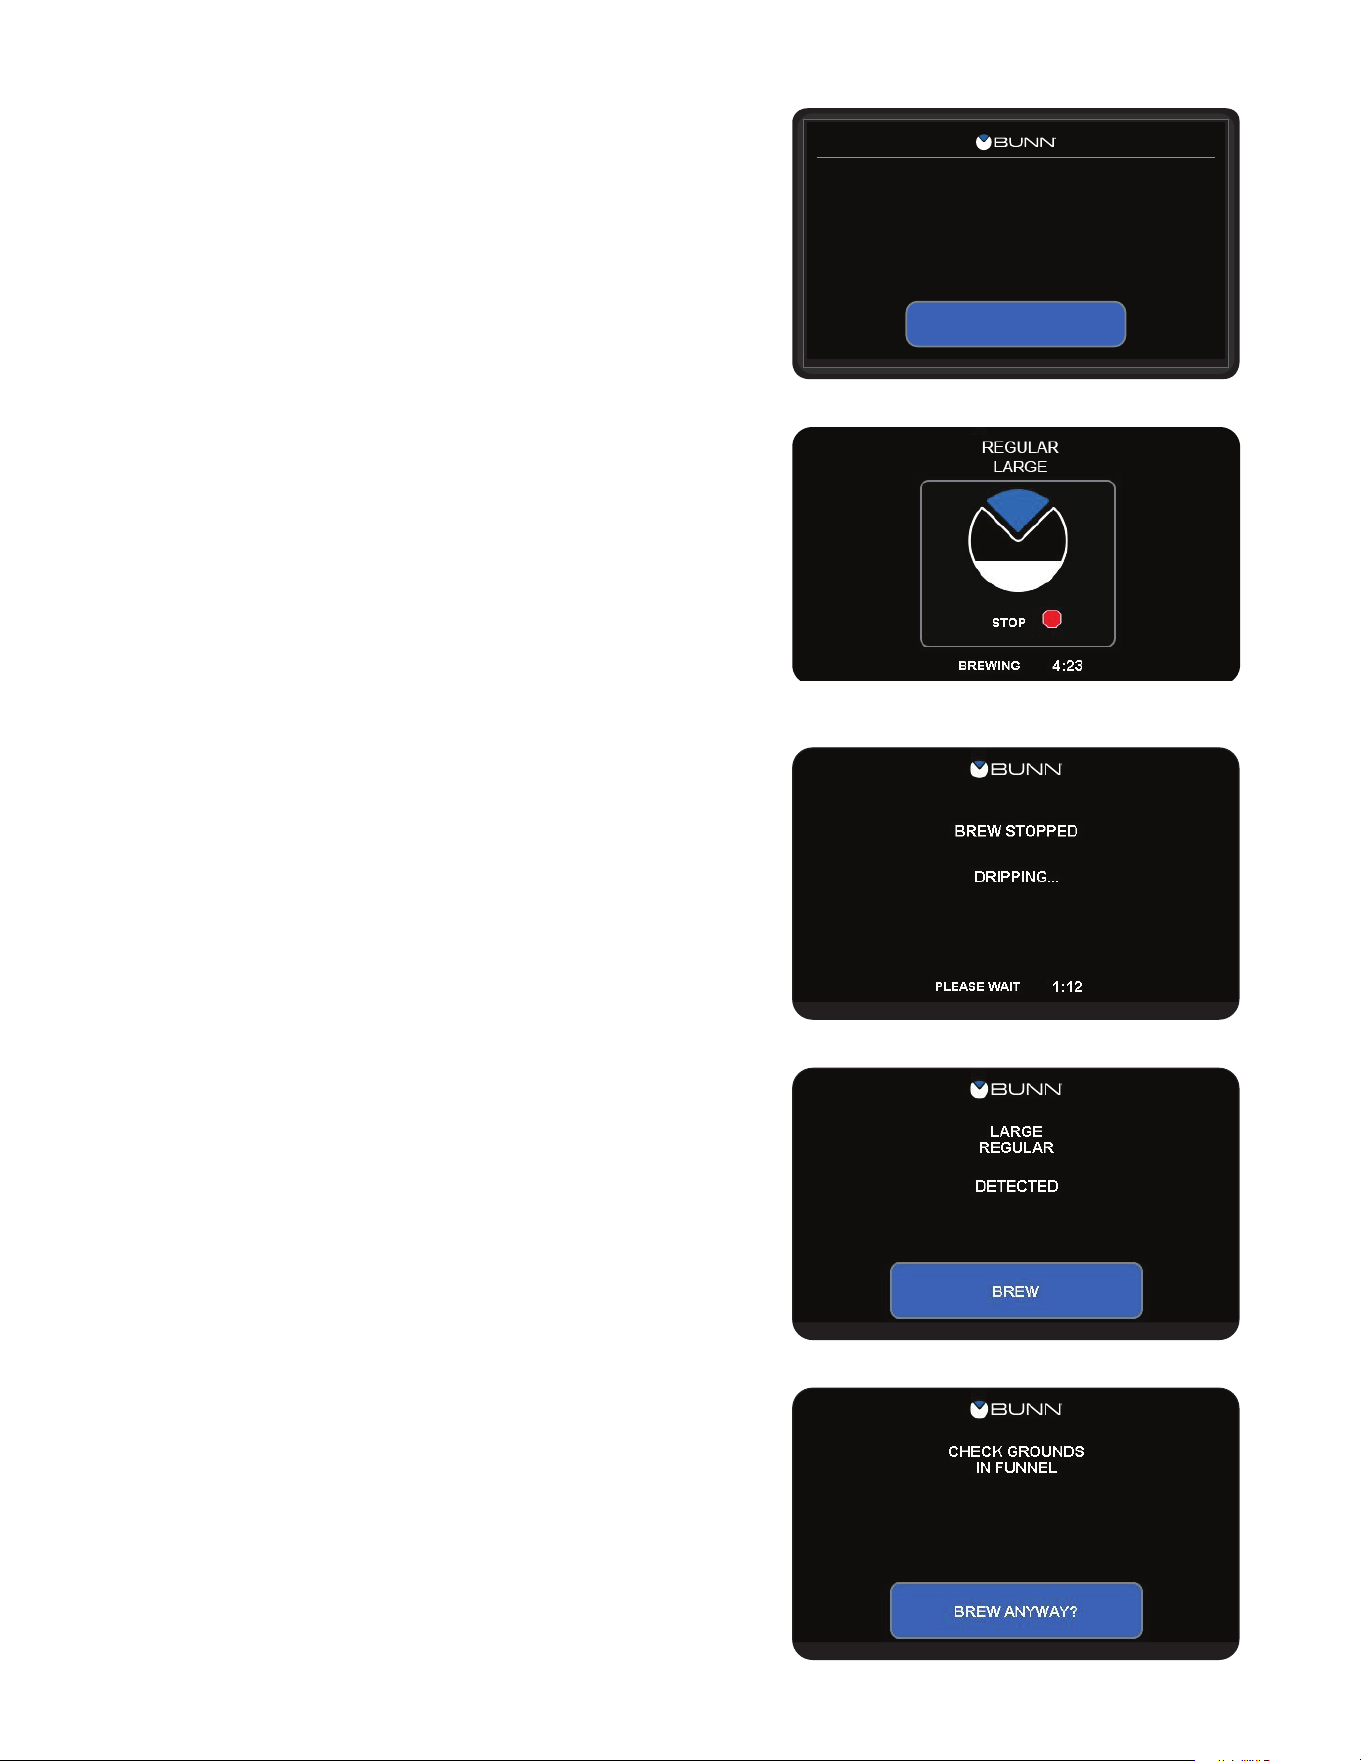
9. The display will read BREWING and show the time remaining in the brew cycle. Select the STOP button
to discontinue the brewing if necessary.
10. Carefully remove the brew funnel and discard the grounds and filter only after visible dripping stops.
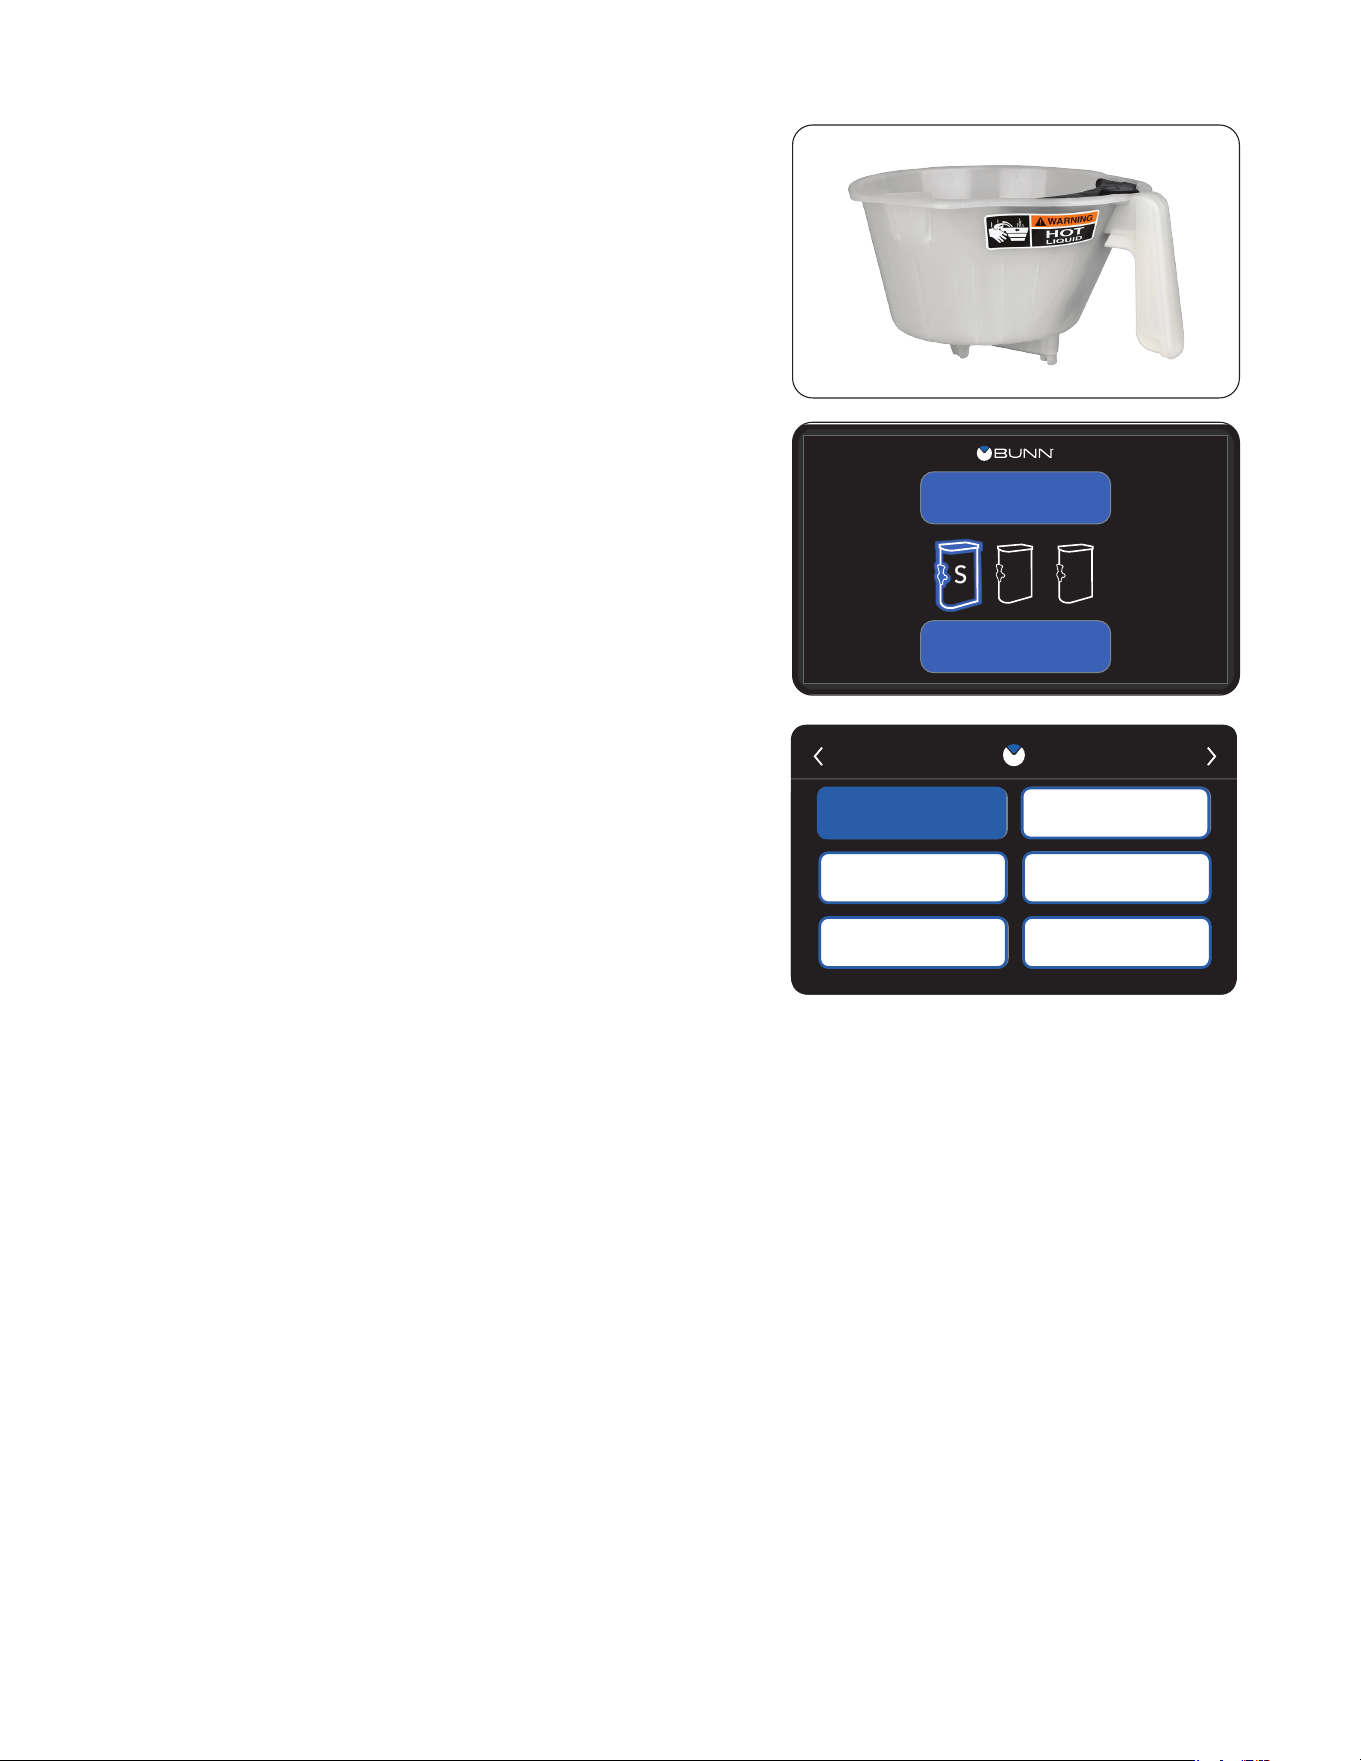
Brewing with a Smart Funnel and MHG Grinder
1. Select the desired batch size on the grinder.
2. Insert a BUNN filter into the Smart Funnel.
3. Grind the selected amount of fresh coffee into the Smart Funnel using the MHG, and level the grounds
by gently shaking. The brewer will automatically match the brew batch size to the grinder batch size:
4. Slide the funnel into the funnel rails of the selected side. The
brewer will read the coffee name and size ground through
the chip in the funnel handle.
5. Place an empty server under the funnel.
6. Select the START BREW button.
7. The display will read BREWING and show the time remaining in the brew cycle. Select the STOP button
to discontinue the brewing if necessary.
8. Carefully remove the brew funnel and discard the grounds and filter only after visible dripping stops.
GRINDER BREWER
Small Small Batch
Medium Medium Batch
Large Large Batch
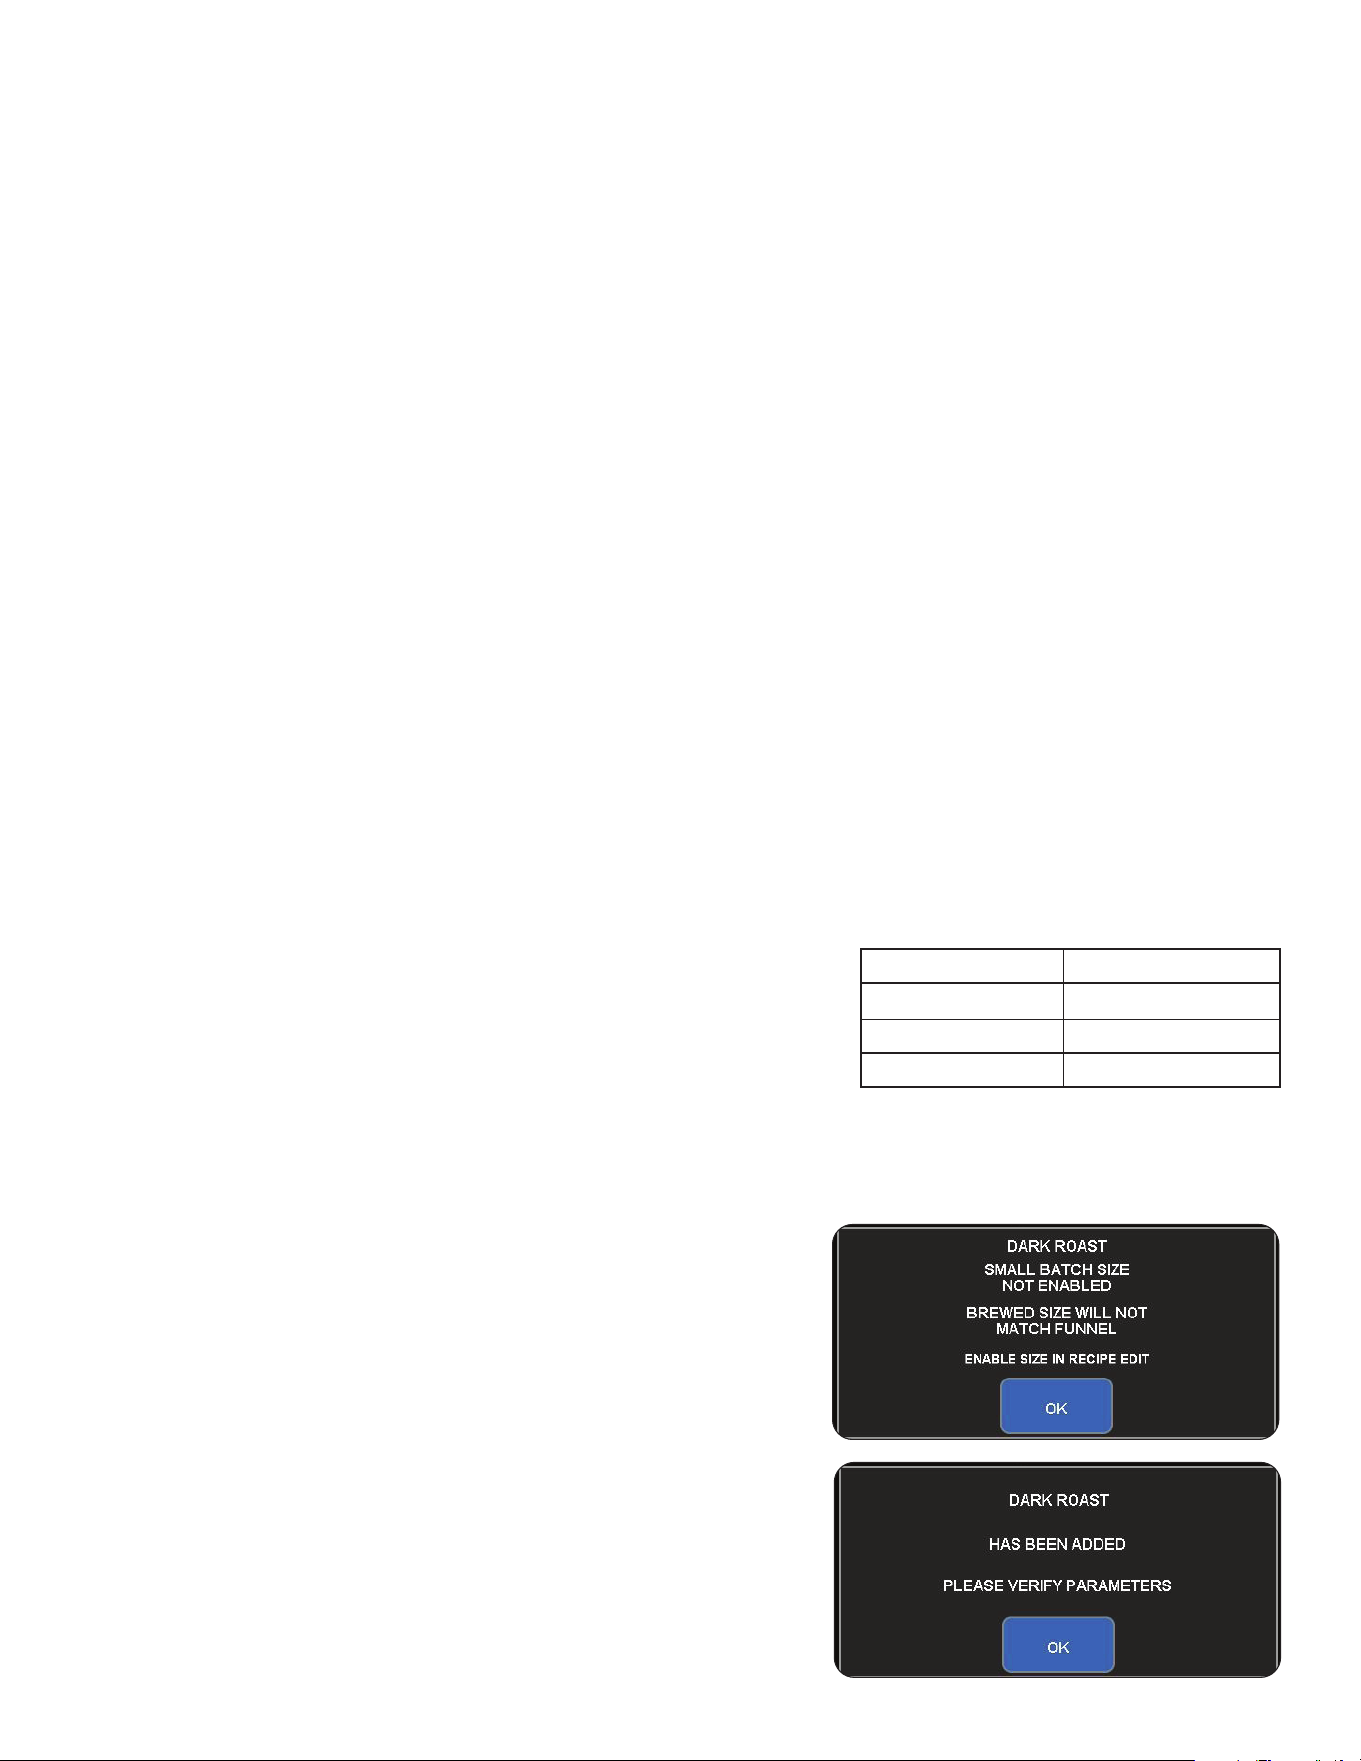
• Batch Size Not Enabled
If the batch size recorded in the Smart Funnel is not enabled
for the recipe stored in the brewer, you will need to enter into
the RECIPES option in programming and verify the correct
batch size is enabled for the coffee name. Refer to the
"MODIFYING RECIPES" section for information on how to
enable or disable batch sizes.
• Please Verify Parameters
When inserting a Smart Funnel onto the funnel rails, the
brewer will automatically add the coffee name if it doesn't
exist in programming. In this event, the display will prompt the
operator to verify that the recipe parameters are correct before
starting a brew. Refer to the MODIFYING RECIPES section for
information on how to review and set recipes.
10
BREW
ICED TEA
LM
S
1. Begin each brew cycle with a clean empty brew funnel and
server. (Ensure the server lid doesn’t interfere with the flow
of dilution water coming from the dilution nozzle.)
2. If not using pre-packed tea pouches, Insert a BUNN filter
into the funnel.
3. Pour the packet of loose fresh tea leaves into the filter.
Approximately three to five ounces is recommended for
three gallons of beverage.
4. Level the bed of tea leaves by gently shaking brew funnel.
5. Slide the brew funnel into the funnel rails until it stops.
6. Select the desired recipe by selecting the button above the
batch selections.
NOTE: If there are more than 6 recipes stored in
the brewer, use the scroll arrow to navigate to the
desired recipe.
7. Select the desired batch size for the recipe.
8. Select the START BREW button.
a. BREW TEMPERATURE TOO LOW - wait until
heated, or disable BREW LOCKOUT option.
b. CHECK FUNNEL - remove funnel, empty
previously brewed grounds and replace with fresh.
9. The display will read BREWING and show the time
remaining in the brew cycle.
NOTE: Select the STOP button to discontinue the brewing
if necessary.
10. Carefully remove the brew funnel and discard the grounds
and filter only after visible dripping stops.
TEA BREWING
RECIPE SELECTION
REGULAR
HOT TEA
TEA 2
DECAF
TEA 1
ICED COFFEE
HOT TEA
TEA 2
TEA 1
ICED COFFEE
REGULAR
DECAF
11
M
L
S
BREW
REGULAR
CARE
DAILY WEEKLY
CLEAN SCREENDISPENSER
CLEANING
7
S SFM T TW
<
CARE
DAILY WEEKLY
CLEAN SCREENDISPENSER
CLEANING
7
S SFM T TW
<
CLEANING
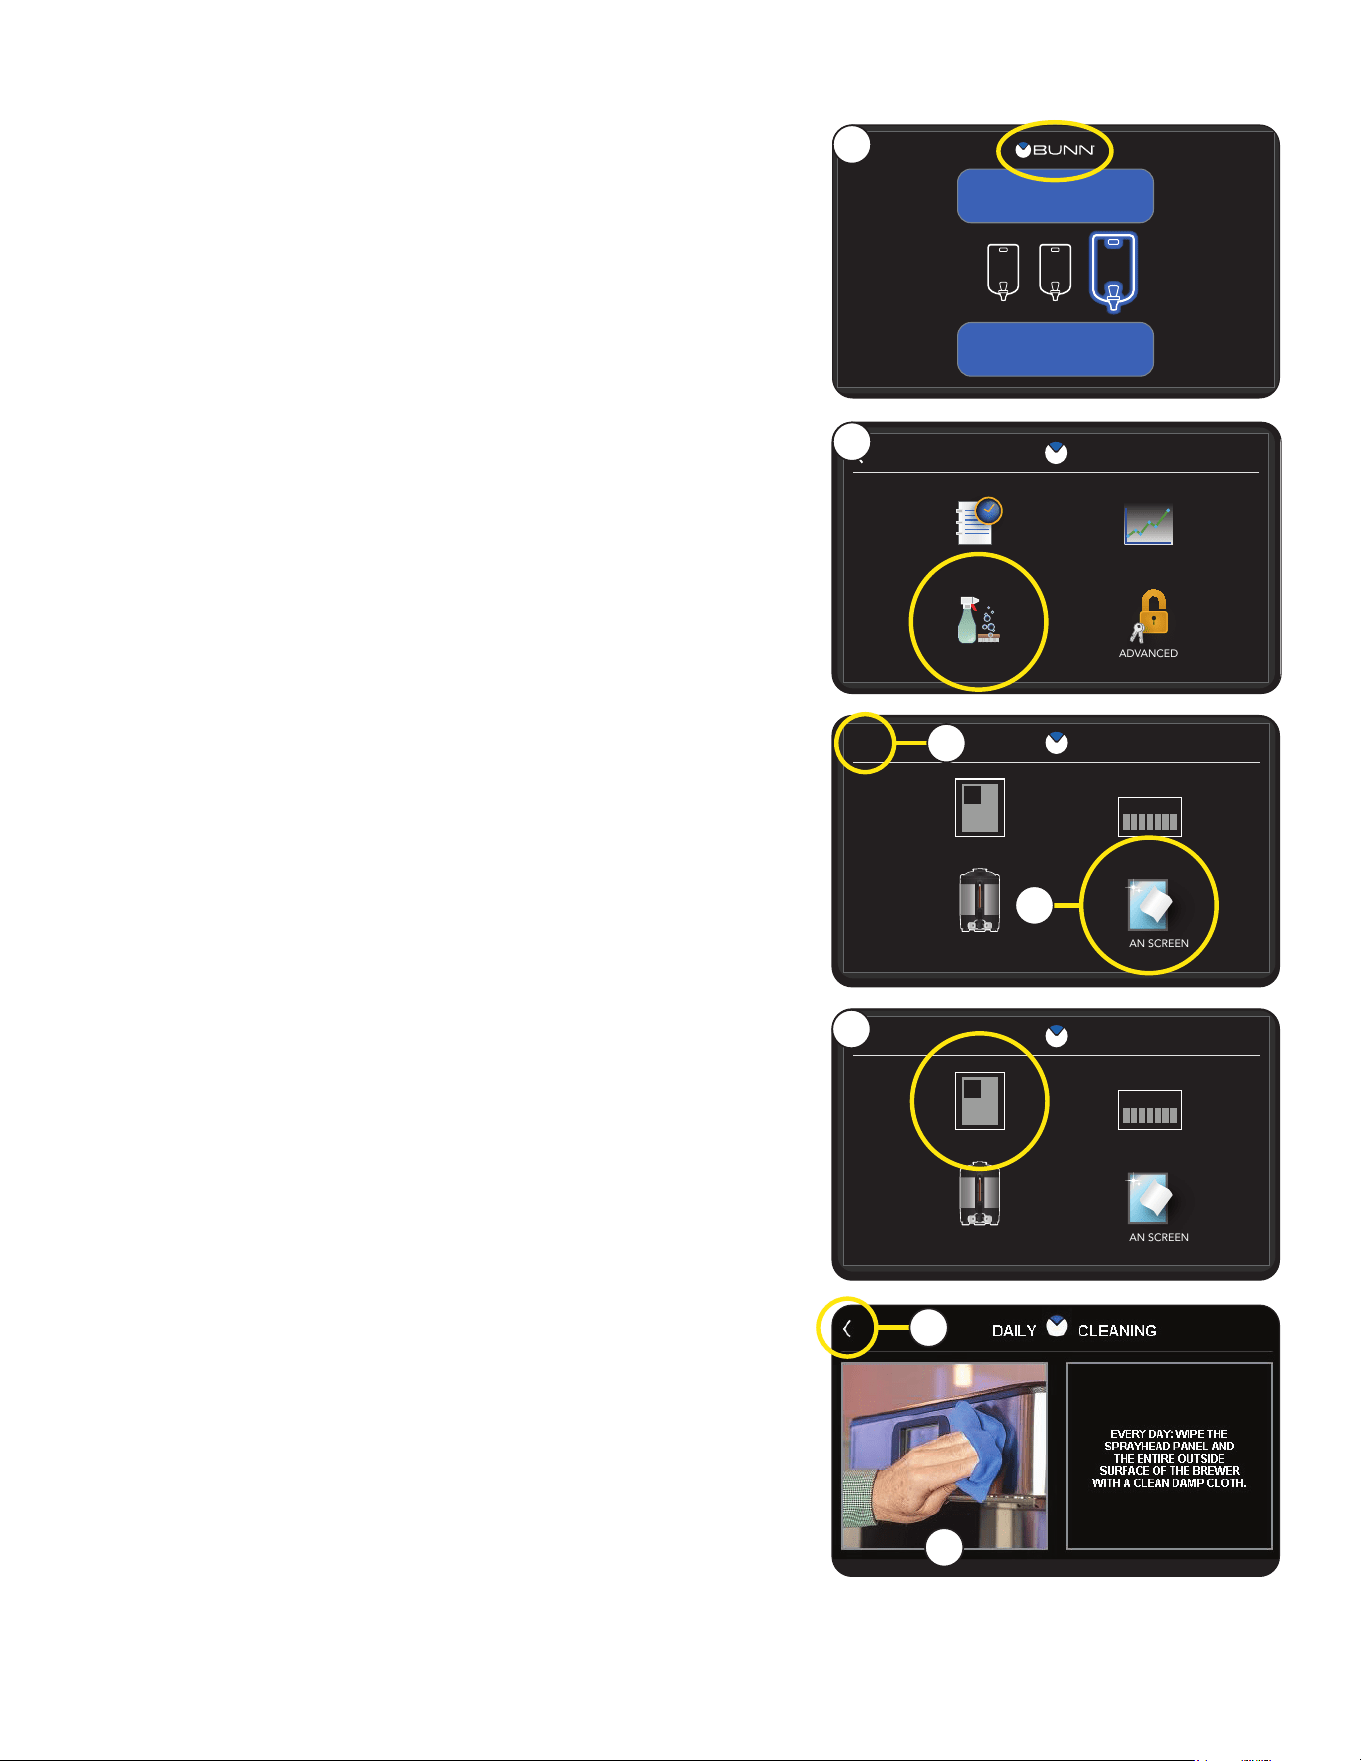
Daily
The intuitive Care and Cleaning instructions are accessible in
the Programming section.
SERVICE
RECIPES STATISTICS
ADVANCEDCARE & CLEANING
ACCESS
2
3
4
5
7
6
7. If you're not using a Tea server with your machine, then
Daily Cleaning is complete.
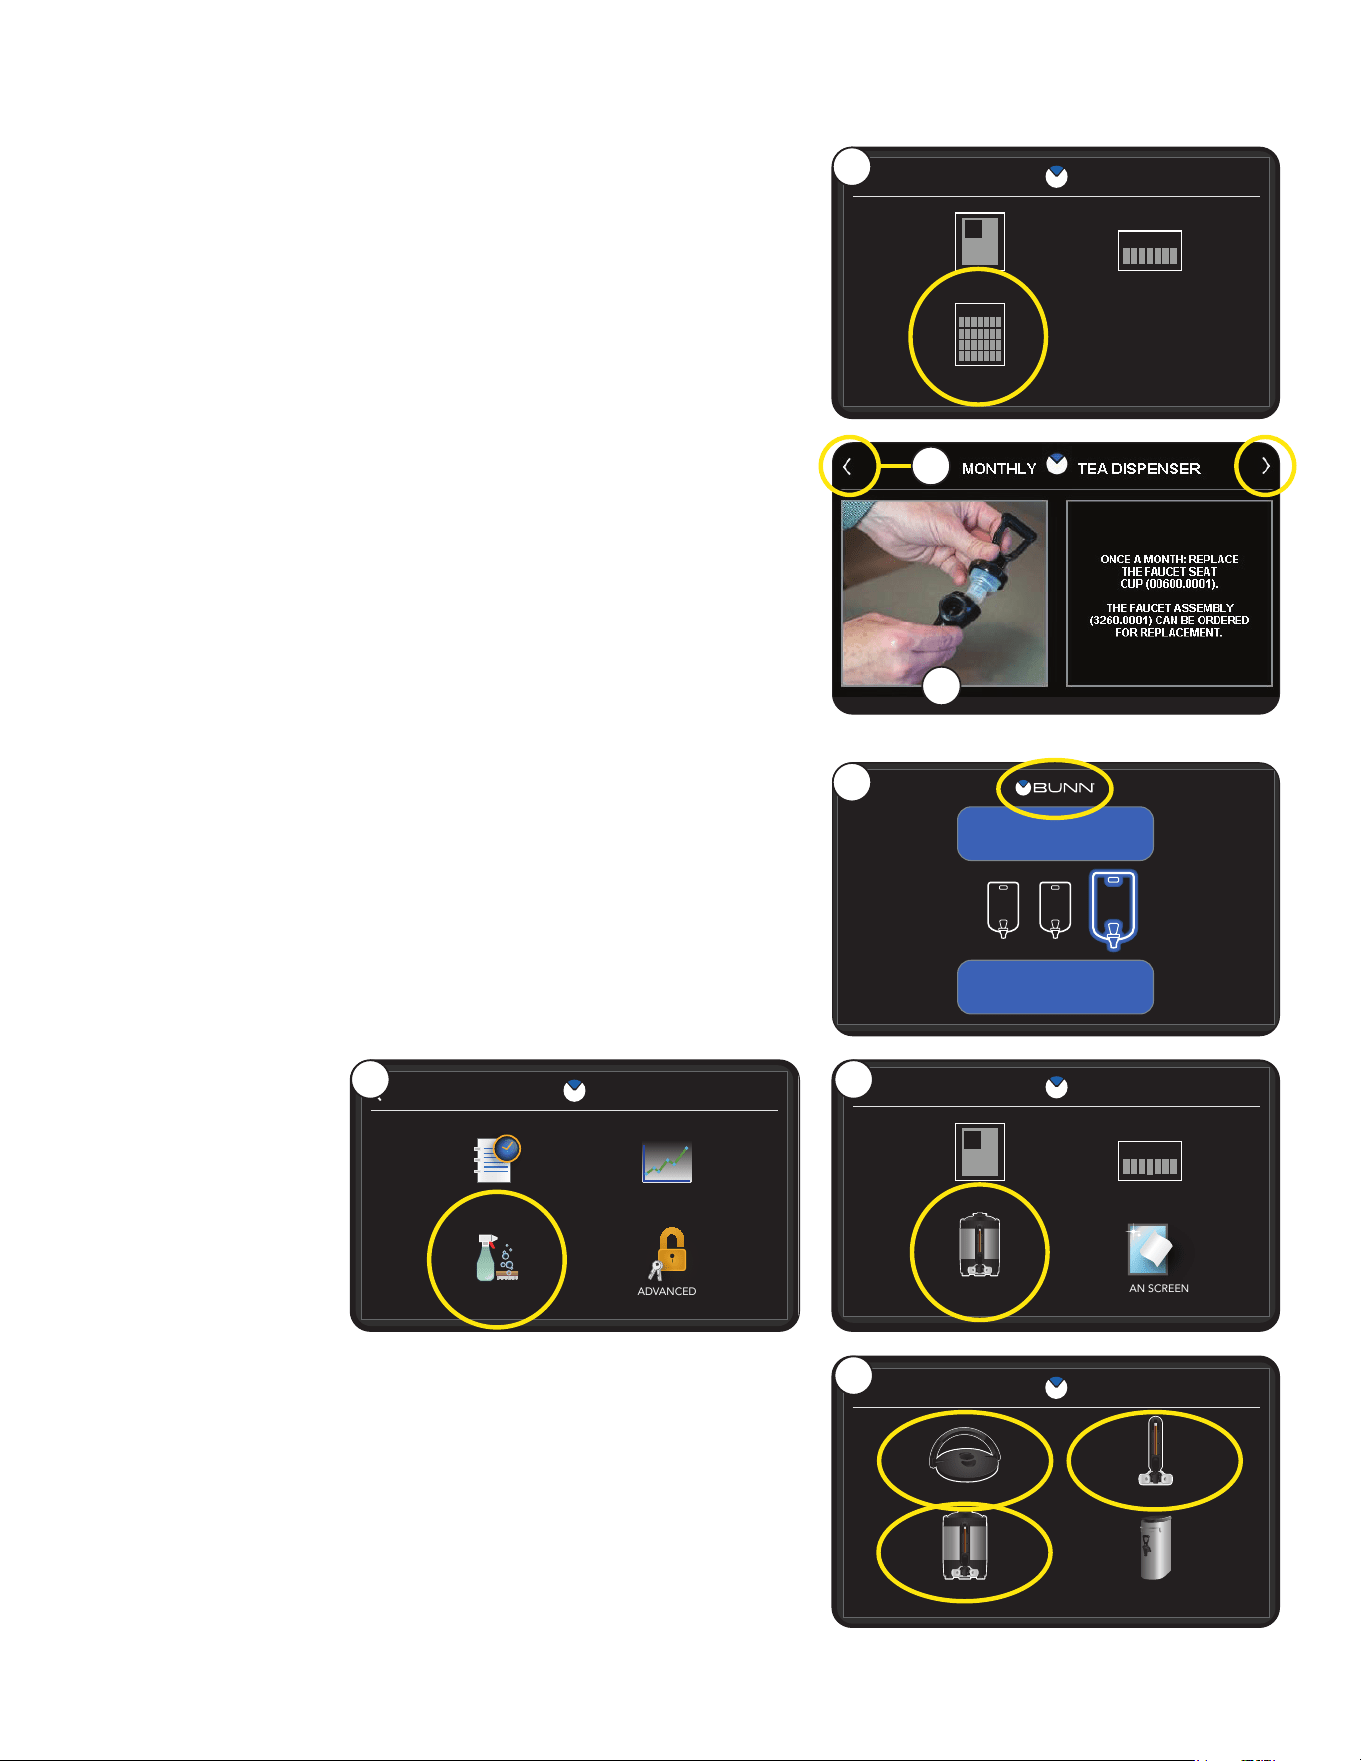
5. Select the Daily Cleaning icon.
6. Prepare a warm soapy solution with nonabrasive, liquid
detergent (140˚ F). Then use a clean, damp cloth wetted
in the solution to wipe down all surfaces on the BUNN
equipment. Do NOT clean this equipment with a water
jet device.
3. Select the "Clean Screen" button to deactivate the screen
for :15 seconds to permit cleaning.
2. Select the Care and Cleaning icon to prompt the Care and
Cleaning buttons.
1. Start from Home screen, then touch the BUNN logo for
1 second to enter the Service Access screen.
1
4. Use a soft, clean, cloth to wipe the screen free of any
contaminants during the :15 second timer countdown.
When finished, either choose the (<) to go back to the
Care and Cleaning screen or touch the BUNN logo to
exit back to the Home Screen.
continued >
12
TEA
DAILY WEEKLY
MONTHLY
CLEANING
7
S SFM T TW
<
MONTH
DISPENSER
LID ASSEMBLY FAUCET & SIGHT TUBE
TEA DISPENSERSERVER
CLEANING
CARE
DAILY WEEKLY
CLEAN SCREENDISPENSER
CLEANING
7
S SFM T TW
<
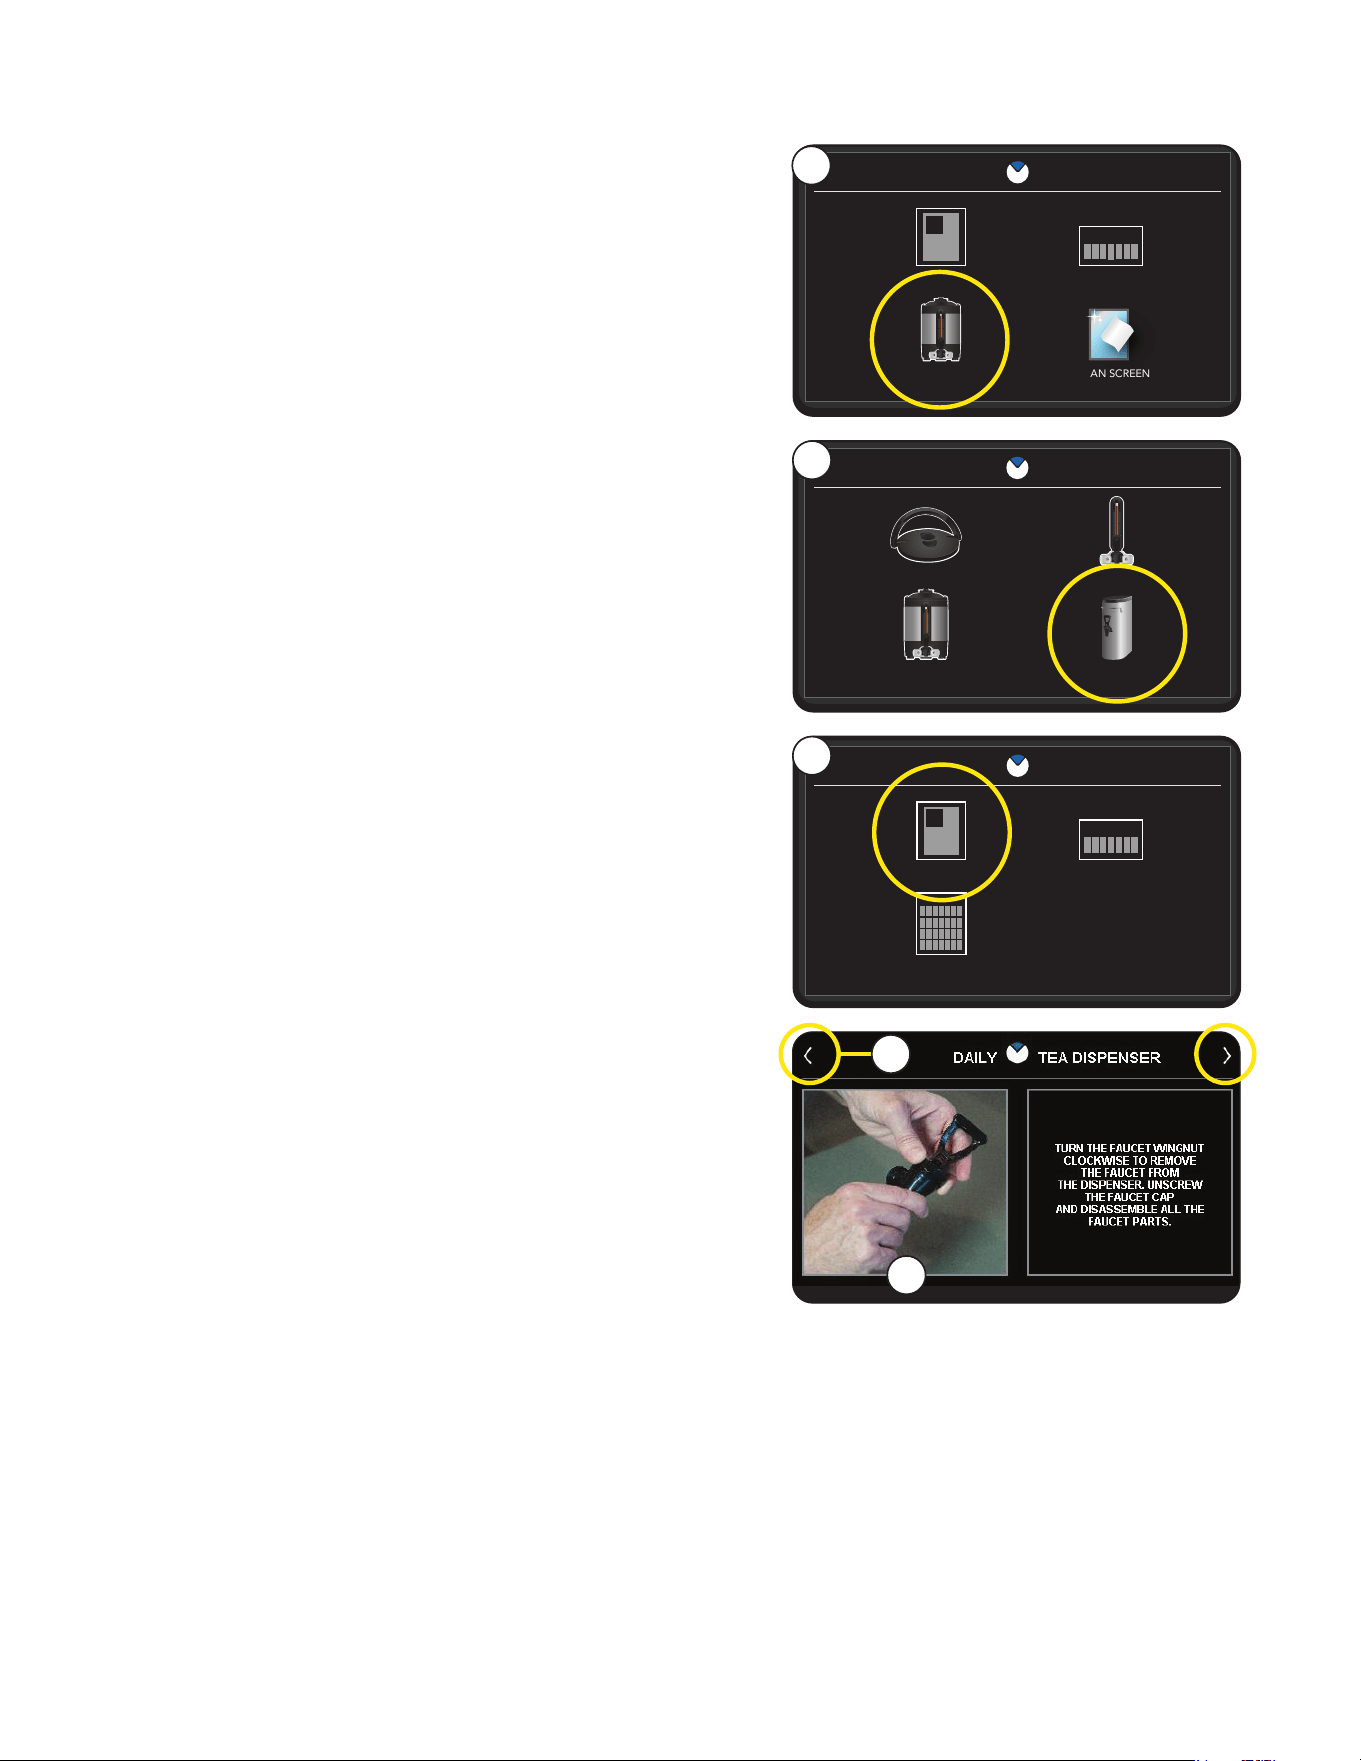
8. If you are using a Tea server, additional steps are needed.
Return to the Care and Cleaning screen and select the
Dispenser icon.
8
continued from previous page
CLEANING
10. Select Daily.
9. Select Tea Dispenser.
11. Follow the on-screen directions to complete the
cleaning process.
9
10
11
12. Navigate between instructional screens by using the
arrows at the top corners of the screen.
12
TEA SERVER
continued >
13
CARE
DAILY WEEKLY
CLEAN SCREENDISPENSER
CLEANING
7
S SFM T TW
<
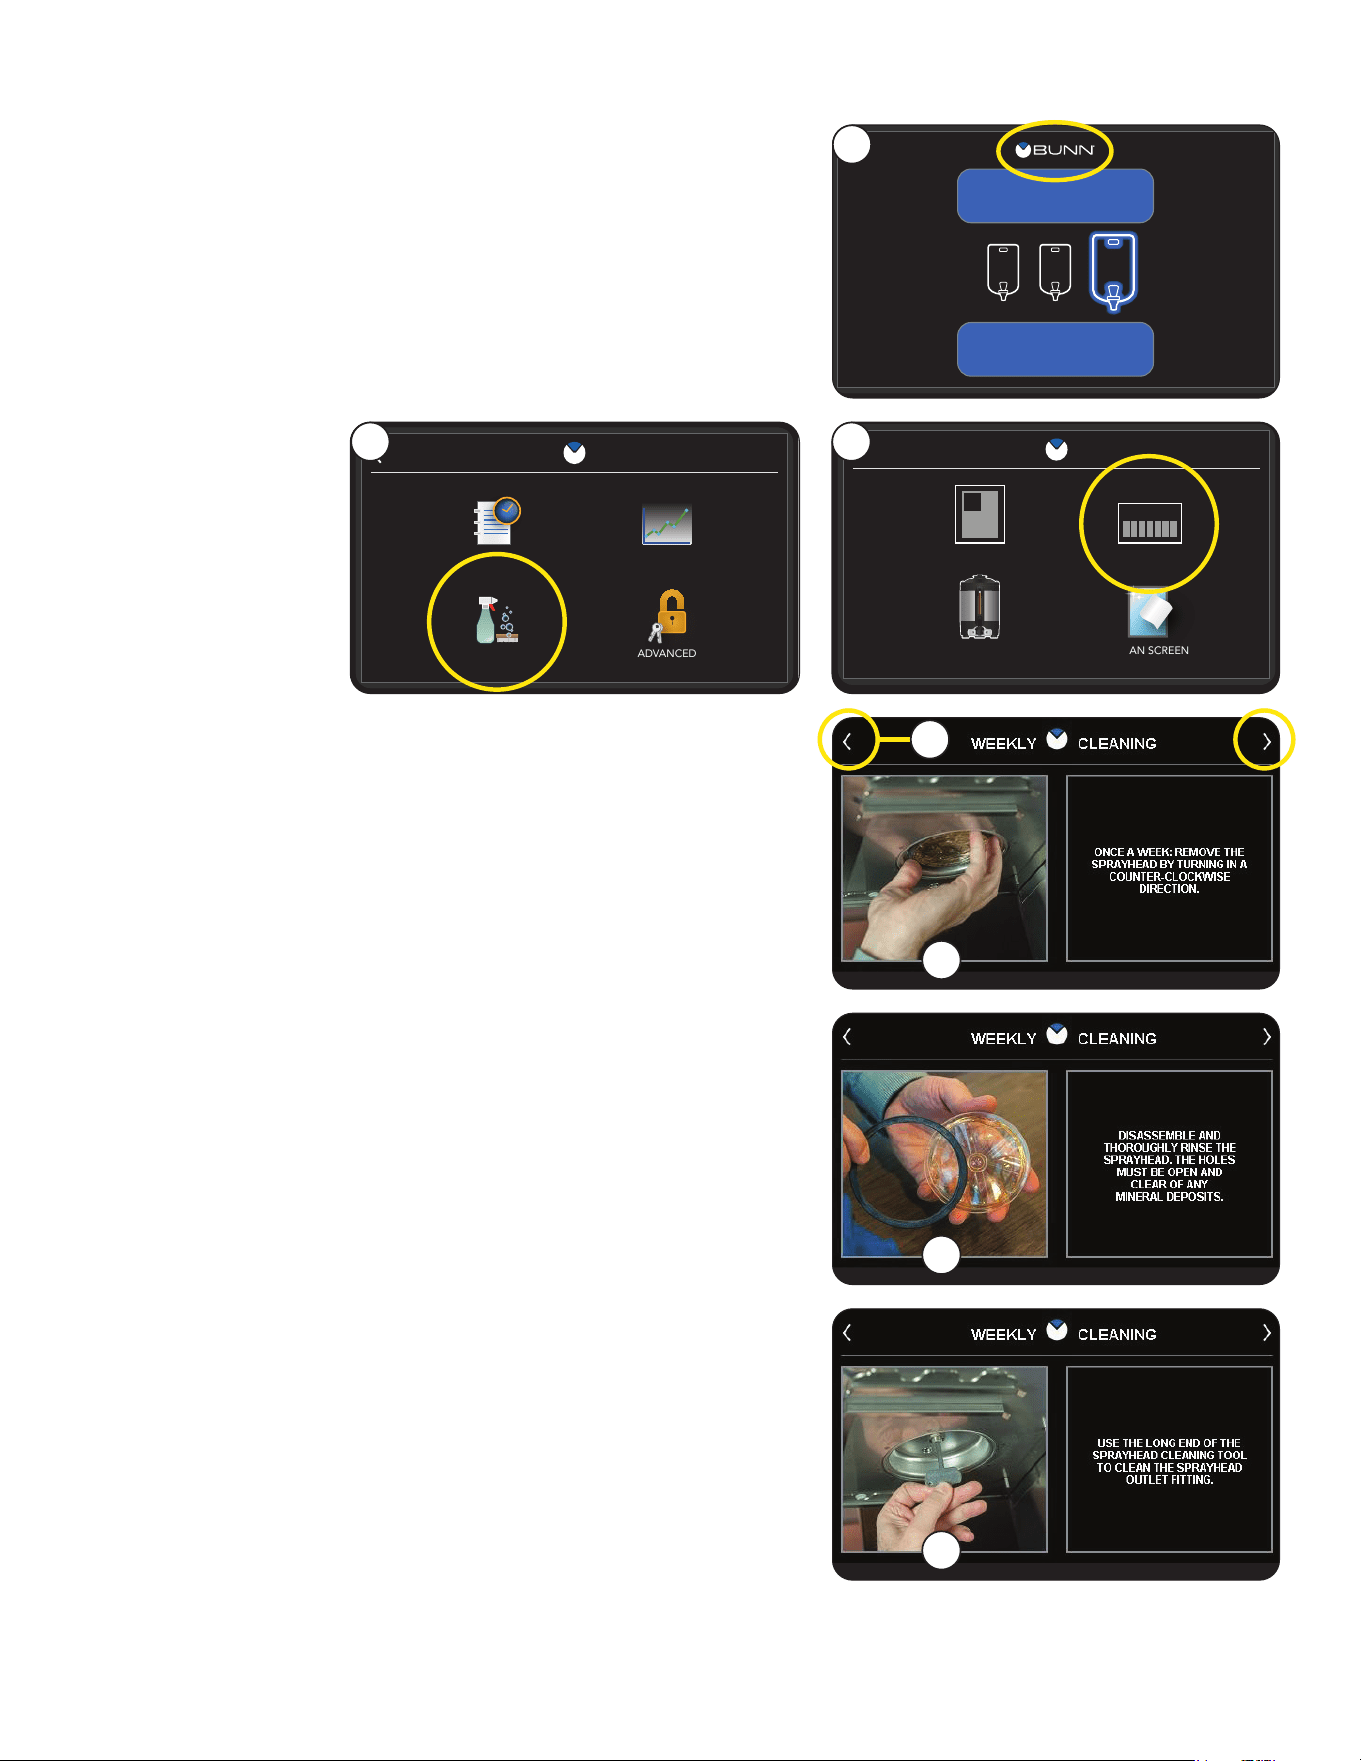
3
2. Select the Care and Cleaning icon.
3. Navigate to Care and Cleaning screen and select Weekly.
1. Start from Home screen, then touch the BUNN logo for
1 second to enter the Service Access screen.
Weekly
The intuitive Care and Cleaning instructions are accessible in
the Programming section.
4. Follow the on-screen directions to complete the weekly
cleaning process. Navigate between instructional screens
by using the arrows at the top corners of the screen.
CLEANING
SERVICE
RECIPES STATISTICS
ADVANCEDCARE & CLEANING
ACCESS
2
M
L
S
BREW
REGULAR
1
4
NOTE: Any buildup on the spray head may restrict water
flow, and impact your coffee brewing. For consistently great
coffee, clean spray heads weekly. Upon visual inspection it
may appear that light passes through all holes in the spray
head plate, but a thin film of residue can pass light and still
impede water flow.
5. First, remove the Smart Funnel
®
and set it aside.
8. Now disassemble the Peak Extraction spray head by
removing the black seal.
Submerge and wash all the individual spray head parts in
the solution. Ensure all spray head holes are fully open and
clear of any product residue or mineral deposit build-up.
6
8
6. Now, unscrew the Peak Extraction
®
spray head
counter-clockwise from the brewer, and set it aside.
9. Insert the spray head cleaning tool into the spray head and
by-pass outlet fitting. Rotate several times to remove any
mineral deposits from the fitting.
9
7. Prepare a warm soapy solution with nonabrasive, liquid
detergent (140˚ F). Then use a clean, damp cloth wetted in
the solution to wipe down the spray head panel.
10. After washing the spray head parts, thoroughly rinse the
parts with clean water.
14
TEA
DAILY WEEKLY
MONTHLY
CLEANING
7
S SFM T TW
<
MONTH
CARE
DAILY WEEKLY
CLEAN SCREENDISPENSER
CLEANING
7
S SFM T TW
<
CLEANING
1
DISPENSER
LID ASSEMBLY FAUCET & SIGHT TUBE
TEA DISPENSERSERVER
CLEANING
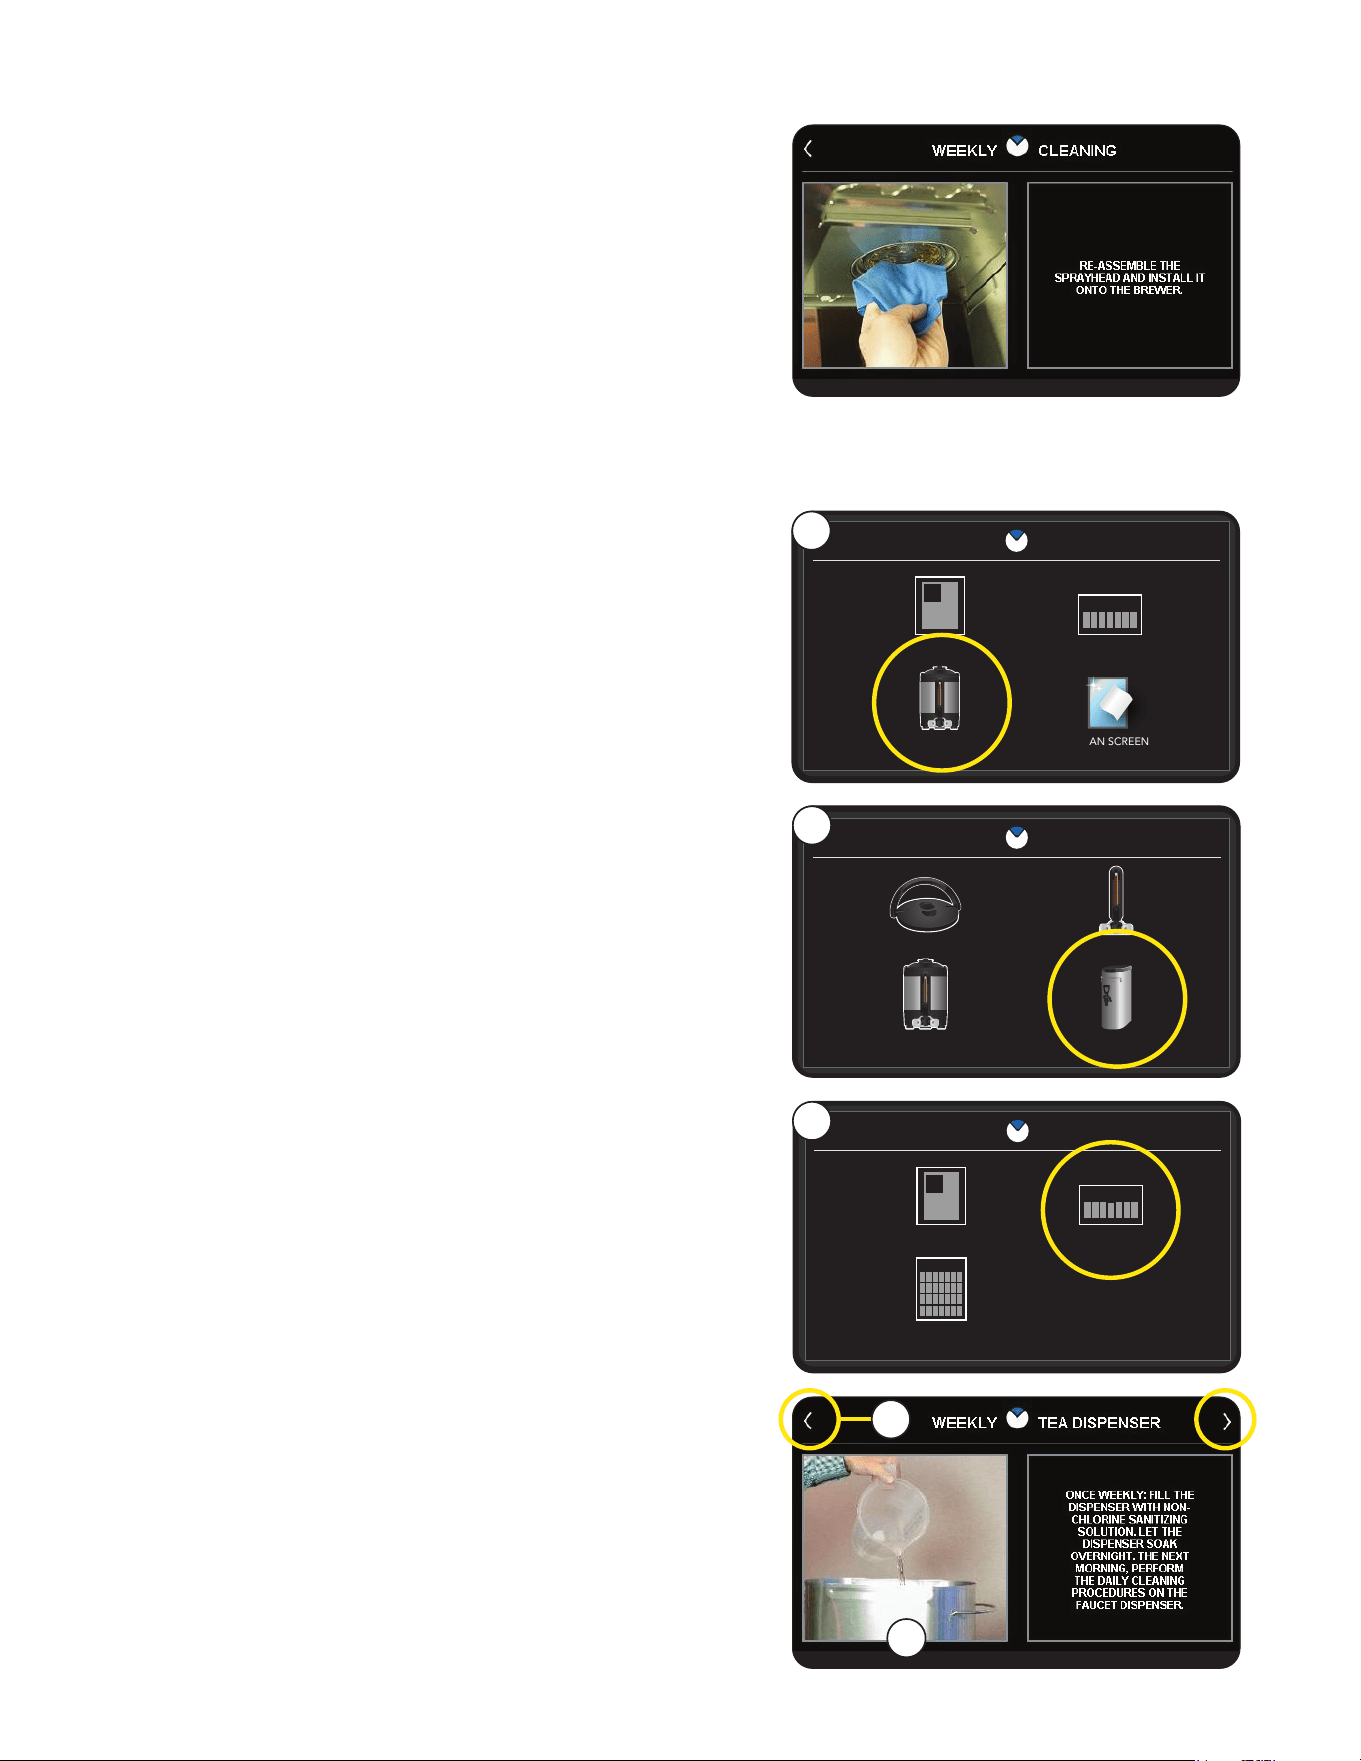
3. Select Weekly.
2. Select Tea Dispenser.
4. Follow the on-screen directions to complete the
cleaning process.
2
3
4
5. Navigate between instructional screens by using the
arrows at the top corners of the screen.
5
continued from previous page
12. If you're not using a Tea server with your machine, then Weekly Cleaning is complete.
11. Reassemble the spray head and screw it back onto the
threaded outlet fitting. The spray head only needs to be
hand tightened.
Machine may need to be re-calibrated due to lime build-up.
If machine is cleaned and build-up removed, machine must
be re-calibrated to achieve desired volumes.
Refer to programming manual for calibration routine to
verify spray head flow and by-pass rate matches pro-
grammed flow rate.
1. If you are using a Tea server, additional steps are needed.
Return to the Care and Cleaning screen and select the
Dispenser icon.
TEA SERVER
15
DISPENSER
LID ASSEMBLY FAUCET & SIGHT TUBE
TEA DISPENSERSERVER
CLEANING
CARE
DAILY WEEKLY
CLEAN SCREENDISPENSER
CLEANING
7
S SFM T TW
<
TEA
DAILY WEEKLY
MONTHLY
CLEANING
7
S SFM T TW
<
MONTH
continued from previous page
CLEANING
1. If Monthly Tea Server cleaning is needed, navigate to the
Tea Cleaning screen and select the Monthly icon.
3. Navigate between instructional screens by using the
arrows at the top corners of the screen.
2
1
Monthly
TEA SERVER
3
2. Follow the on-screen directions to complete the
cleaning process.
3
4
2. Select the Care and Cleaning icon.
3. Navigate to Care and Cleaning screen and select Weekly.
4. Select a dispenser part to be cleaned:
Lid Assembly, Faucet & Sight Tube, Server.
1. Start from Home screen, then touch the BUNN logo for
1 second to enter the Service Access screen.
Dispenser
The intuitive Care and Cleaning instructions are accessible in
the Programming section.
SERVICE
RECIPES STATISTICS
ADVANCEDCARE & CLEANING
ACCESS
2
M
L
S
BREW
REGULAR
1
5. Follow the on-screen directions to complete the
cleaning process.
Navigate between instructional screens by using
the arrows at the top corners of the screen.
16
Operating Controls
To access the programming mode, and to scroll through the different function screens, on screen
programming buttons are used.
A. PROGRAMMING
Touch the BUNN logo for 1 second to enter the programming.
B. BREW
When the main screen is visible, select the BREW button to begin a brew cycle on the selected side.
C. BATCH SELECTOR SWITCHES (Coffee Batch Icons)
Selecting the icon corresponding to Small, Medium, and Large batch selects the amount of product to
be brewed. The highlighting of the icon indicates the selected batch to brew. Coffee Batch Icons will only
appear if a coffee recipe is selected from the Recipe Library.
D. BATCH SELECTOR SWITCHES (Tea Batch Icons)
Selecting the icon corresponding to Small, Medium, and Large batch selects the amount of product to
be brewed. The highlighting of the icon indicates the selected batch to brew. Tea Batch Icons will only
appear if a tea recipe is selected from the Recipe Library.
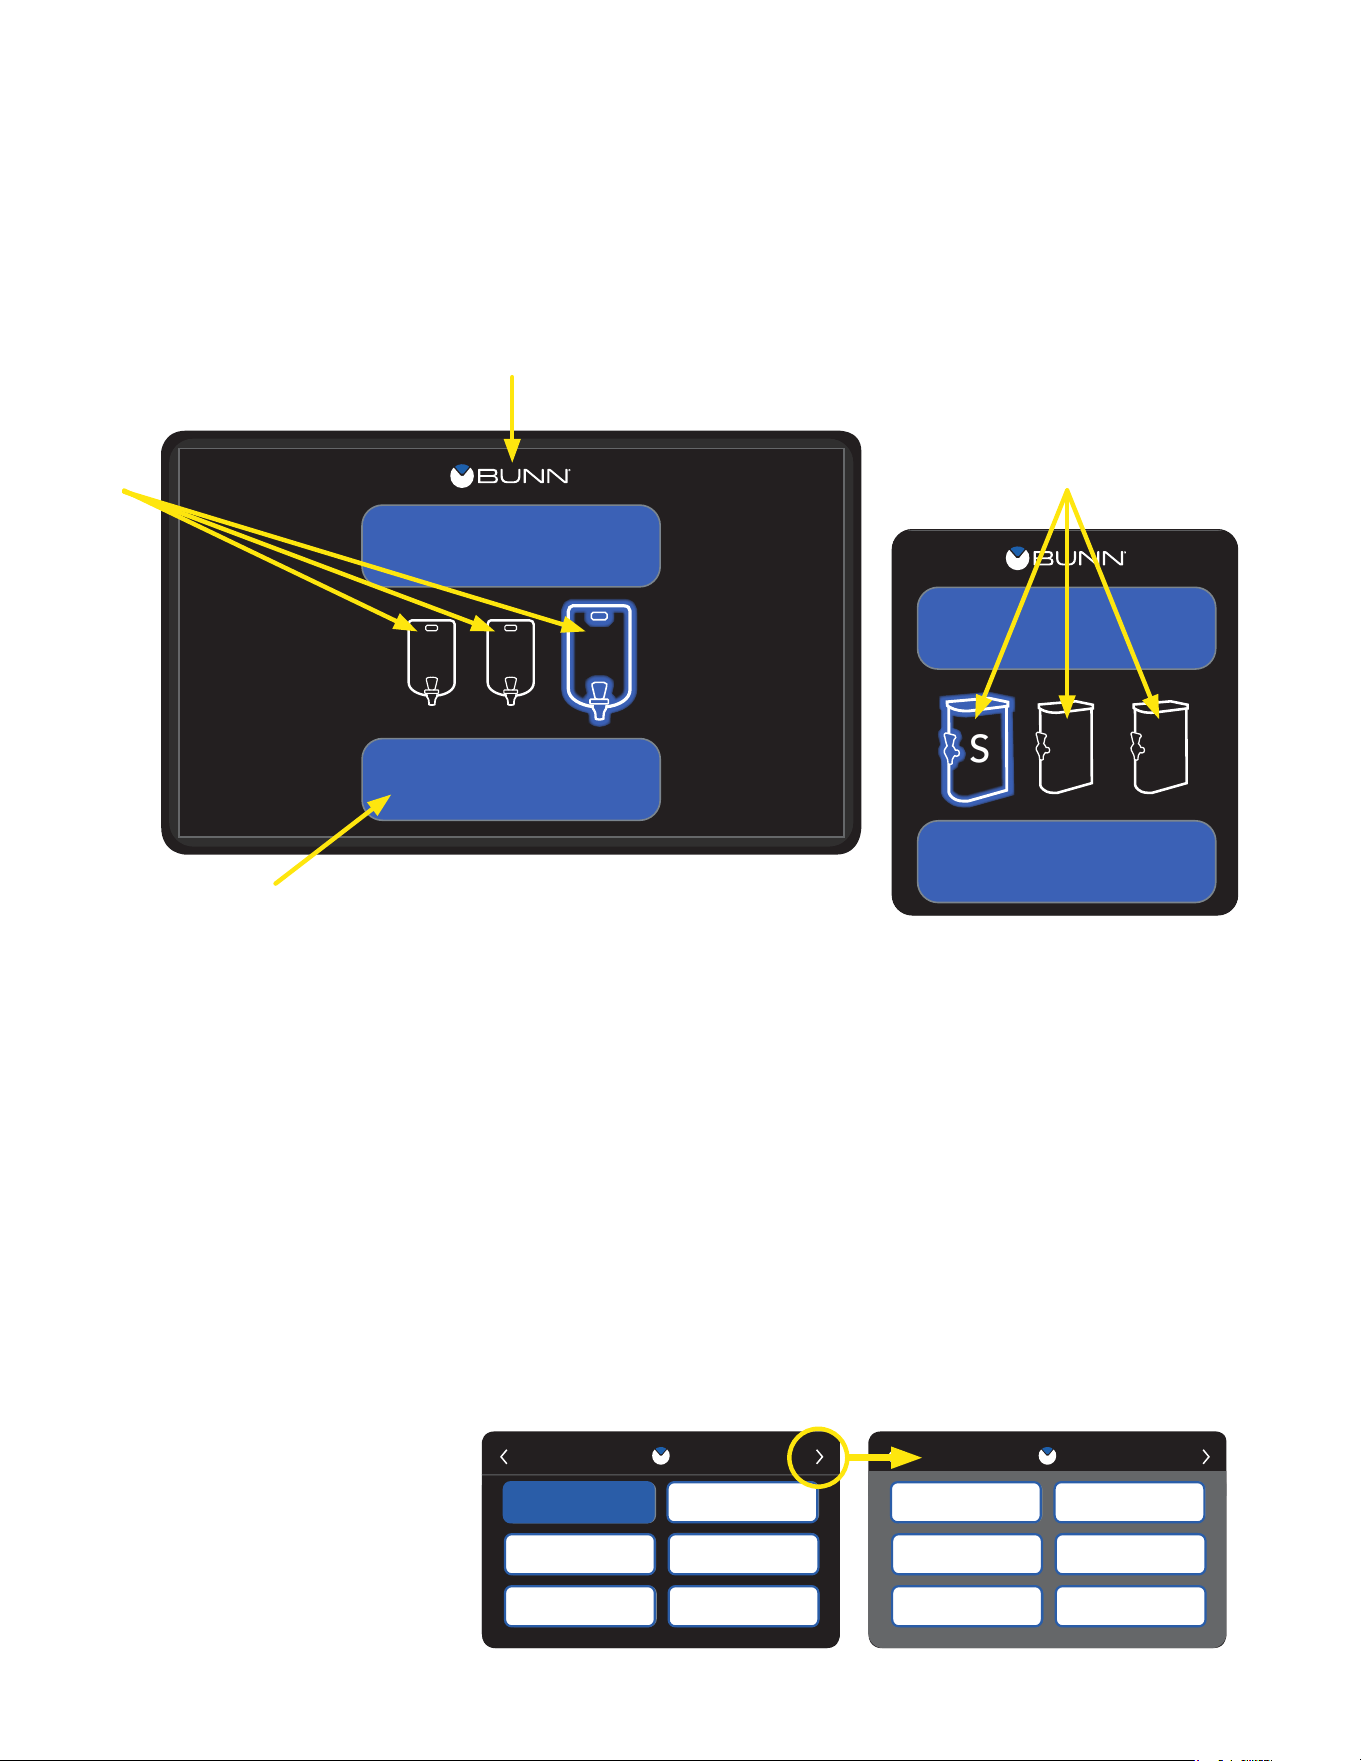
E. RECIPE LIBRARY
Select the button to choose
between any of the saved
recipes stored in programming.
NOTE: Use the arrows at the top
of the screen to scroll through
the list of recipes available.
Using the menu-driven display on the front of the brewer, the operator has the ability to alter or modify
various brewing parameters such as brew temperatures, brew volumes, bypass, pulse brew, pre-infusion,
SmartWAVE
®
, drip time and fresh time. The operator can customize the brewing process to their specifica-
tions, allowing for the precise brewing of various flavors of coffee.
PROGRAMMING
M
L
S
BREW
REGULAR
Home Screen
Example with
Tea Server Icons
C
D
A
B
continued >
BREW
ICED TEA
LM
S
NEW
NEW
NEW
NEW
RECIPE SELECTION
GRN BUBBLE TEA BLK BUBBLE TEA
RECIPE 9
RECIPE 11
RECIPE 10
RECIPE 12
RECIPE SELECTION
REGULAR
HOT TEA
TEA 2
DECAF
TEA 1
ICED COFFEE
COLD CONCENTRATE
LEMONADE
COLD BREW RTD
REGULAR MT
GRN BUBBLE TEA
BLK BUBBLE TEA
HOT TEA
TEA 2
TEA 1
ICED COFFEE
REGULAR
DECAF
17
M
L
S
BREW
REGULAR
Always remember to place a container and funnel under the spray head when operating the brewer
during the set-up of CALIBRATE FLOW, and testing the brew and bypass valves in SERVICE TOOLS /
TEST OUTPUTS.
Touch for 1 second
PROGRAMMING
IMPORTANT NOTES - READ CAREFULLY -
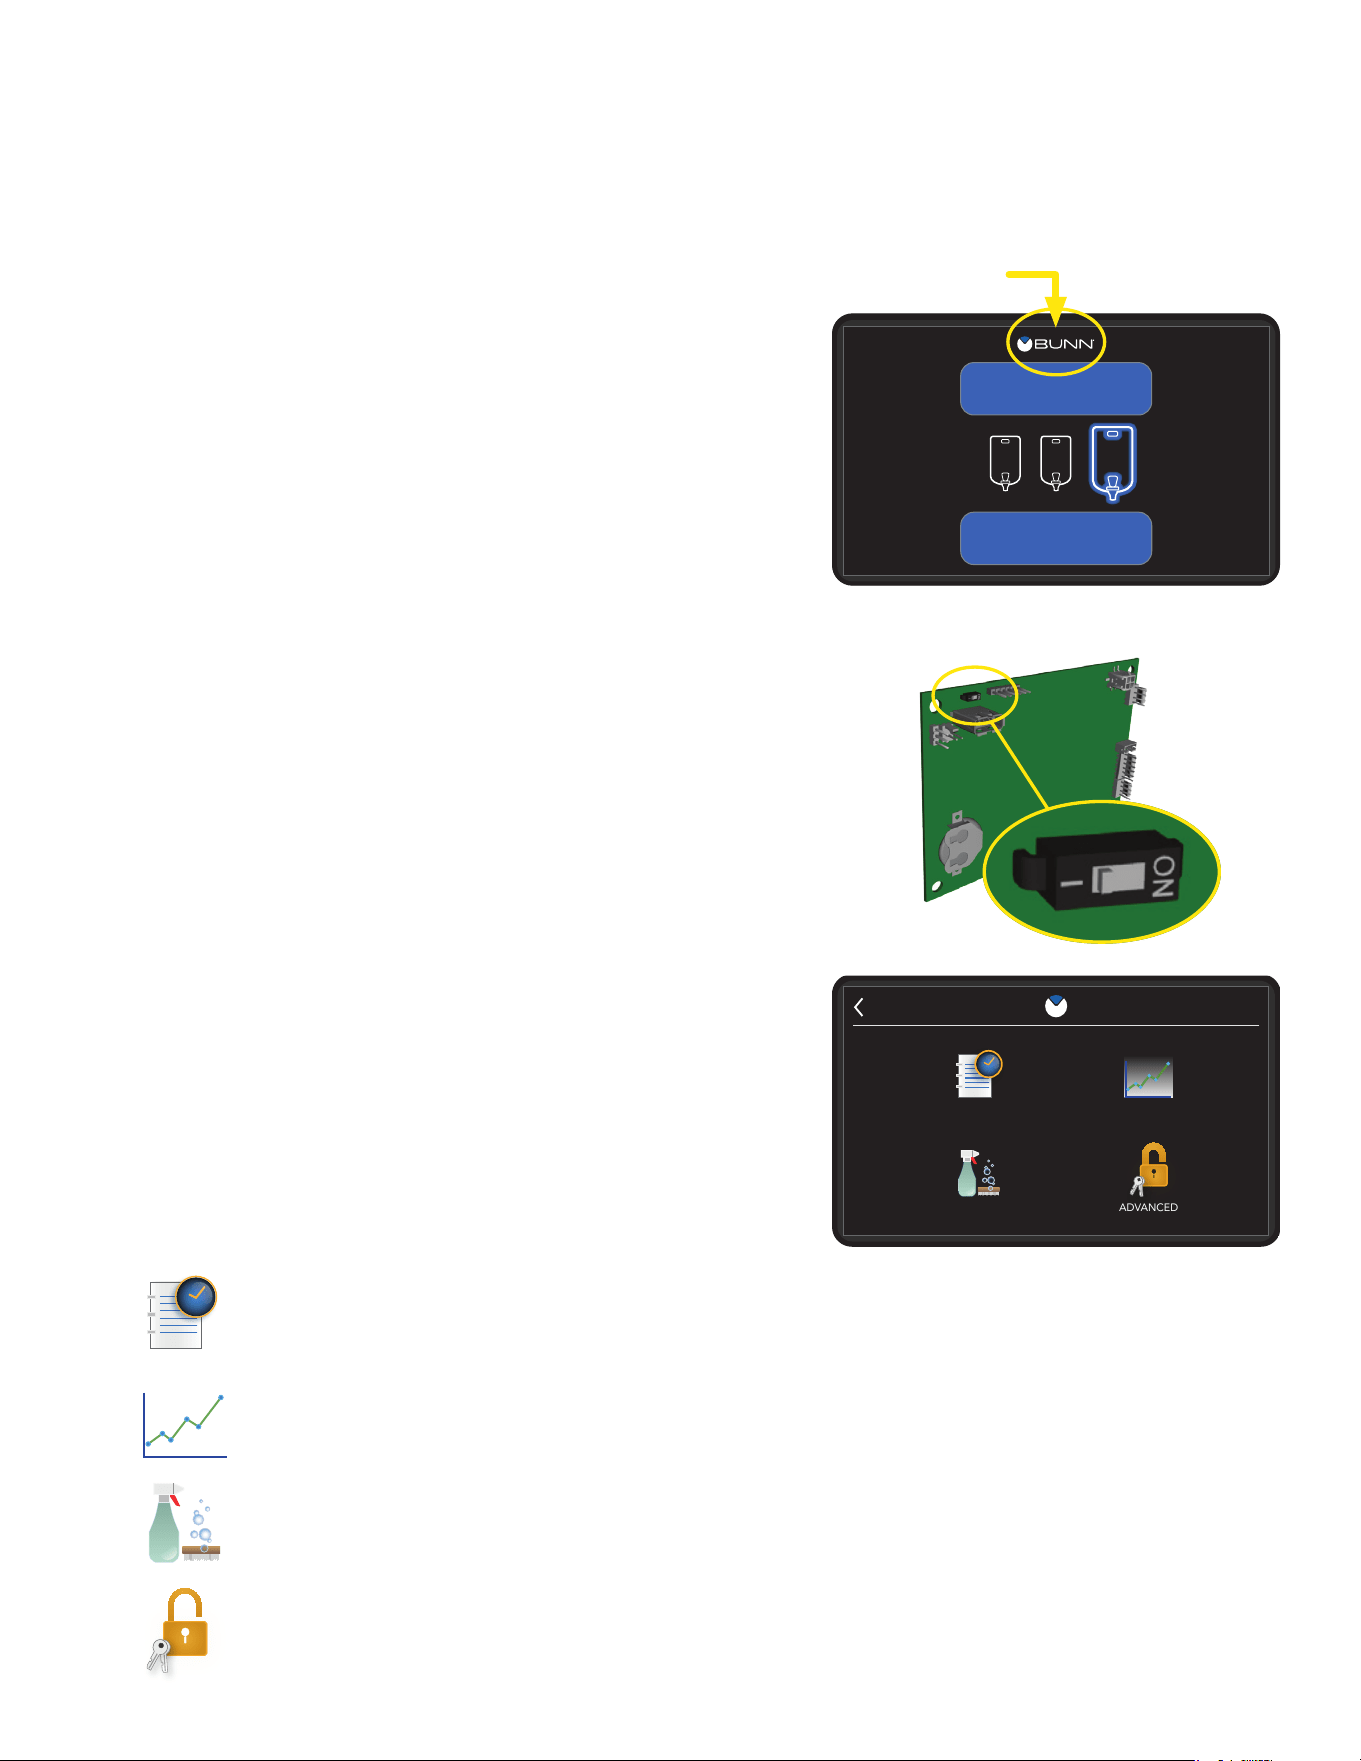
Programming Lockout
This switch is located on the graphics board located under
the top panel of the brewer. The switch can be set to prevent
access to the advanced programming settings of the brewer.
Once all the correct brew settings are programmed, the
operator can set the switch to the "ON" position to prohibit
anyone from viewing and changing settings. The brewer
must be powered down when setting the switch.
Service Access
To access this menu, touch the BUNN logo for 1 second with
the home screen present. This is the first screen that will
appear on the display when accessing programming mode.
If Programming Lockout is enabled, the advanced icon will not
appear until the feature is disabled. Select any icon to access
the sub-menus.
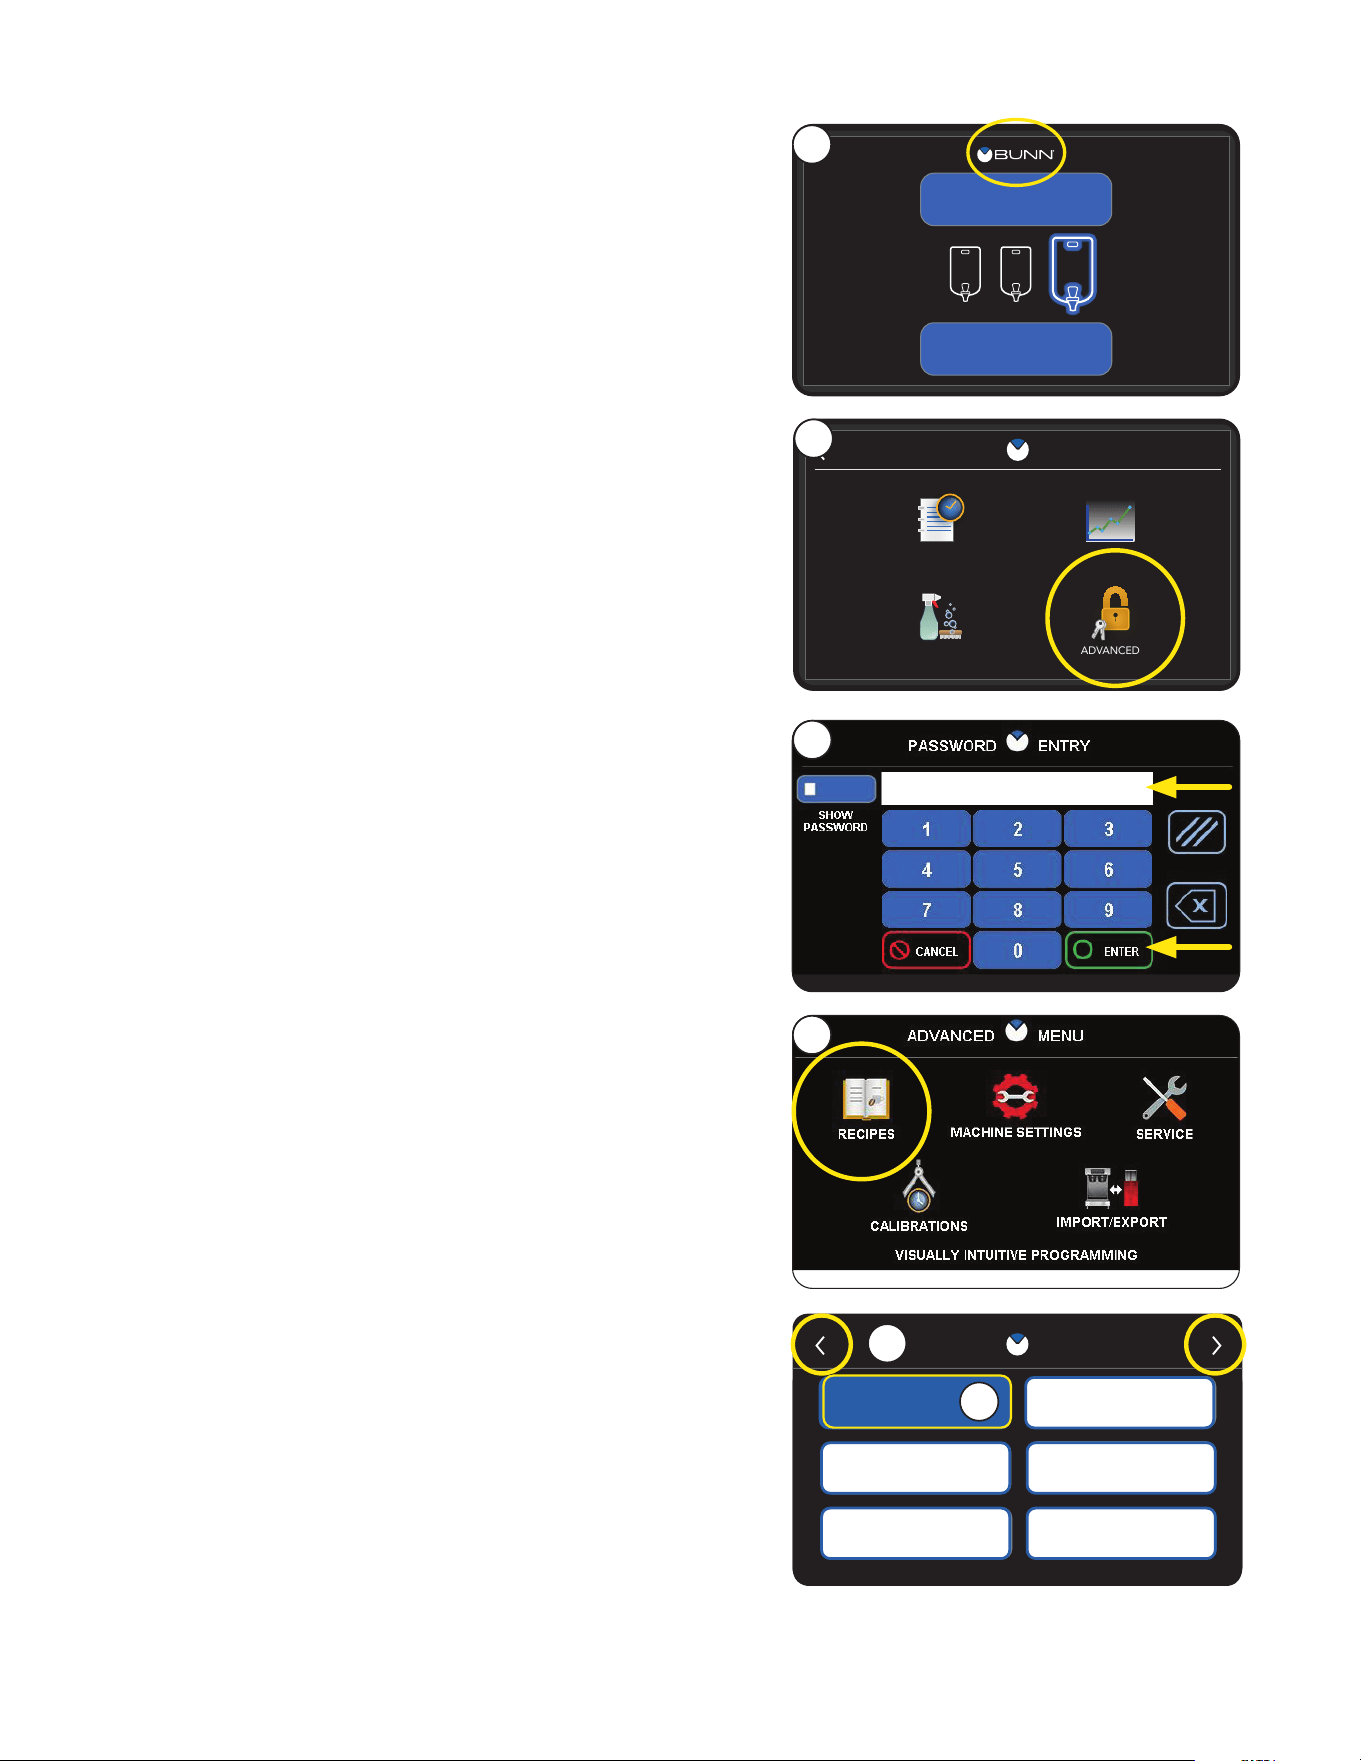
How To Access Programming
To enter programming mode, the home screen must be
present on the display. Touch the BUNN logo at the top of
the display for 1 second. The SERVICE ACCESS screen
will appear on the display.
Service Access Options
EVENT HISTORY - Select this icon to view current cycles, lifetime cycles, and the length/number
of times certain components are activated.
STATISTICS - Select this icon to view the amount of brew cycles per batch size. Twin models will
show separate numbers for left and right brew cycles. The second sub-screen within Statistics
will show model, display version and I/O version number.
CARE & CLEANING - Select this icon to view cleaning instructions. The instructional content
featured will have a picture with a short description of the action that should take place.
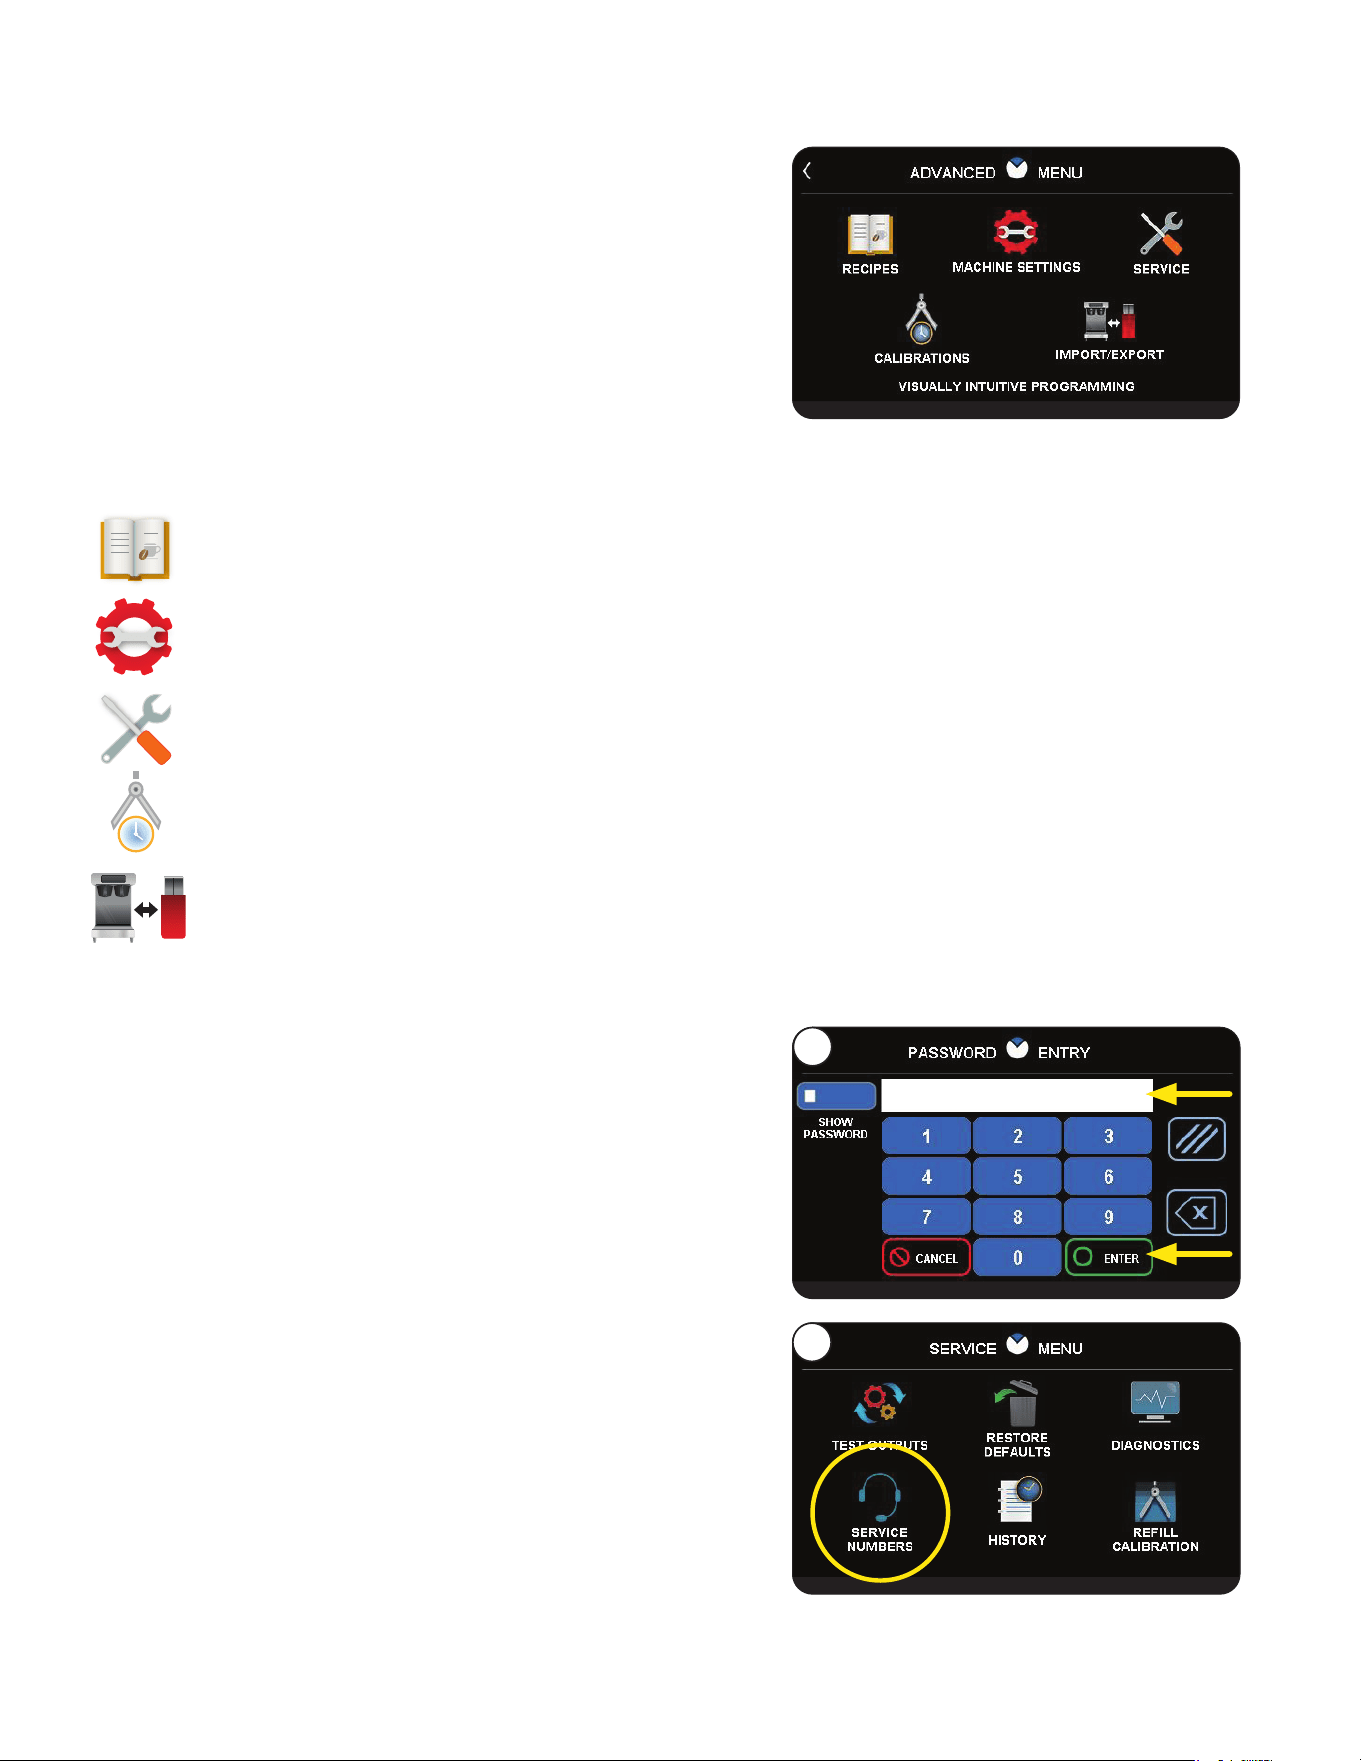
ADVANCED - Selecting this icon will display a password entry screen. By default, the password
can be bypassed by selecting ENTER. By default, entering 7738 on this screen will allow
permission for setting a password. Setting a password will prevent entry into the Service Menu.
How To Exit Programming
To exit the programming mode at any time, select the BUNN
logo at the top of the display. The display will return to the
home screen.
If there is no interaction with the touchscreen within a 5-minute
period while in programming mode, the display will automati-
cally return to the home screen.
SERVICE
RECIPES STATISTICS
ADVANCEDCARE & CLEANING
ACCESS
continued >
18
Service Menu Options
RECIPES - Select this icon to disable, enable, add or modifying recipes.
MACHINE SETTINGS - Select this icon to adjust global settings on the brewer.
SERVICE - Select this icon to access high level diagnostic functions and service information.
CALIBRATIONS - Select this icon to perform necessary adjustments to ensure accurate brewing.
IMPORT/EXPORT - Select this icon to import/export screen graphics or recipes.
Service Menu
To access this menu, select the ADVANCED icon while
viewing the SERVICE ACCESS screen on the display.
If Programming Lockout is enabled, this menu cannot be
accessed until the feature is disabled. Select any icon to
access the sub-menus.
PROGRAMMING
continued from previous page
Viewing Asset, Serial and Service Number
1. Touch the BUNN logo for 1 second to enter the SERVICE
ACCESS screen.
2. Select the ADVANCED icon.
3. At the PASSWORD ENTRY screen, select ENTER.
4. At the SERVICE MENU screen, select the SERVICE icon.
5. Select SERVICE NUMBERS to view the asset, serial and
service numbers.
NOTE: The asset number will display if it has been setup in
programming, otherwise it will not appear.
3
4
continued >
19
PROGRAMMING
Calibrate Dilution Flow Rate
This function allows the operator to test and enter the actual
flow rate of water coming out of the dilution. The procedure
includes a 1-minute dispense of water to determine the actual
flow rate.
1. Place a container, accurately graduated with a minimum
capacity of 60 ounces, under the funnel.
2. Touch the BUNN logo for 1 second to enter SERVICE ACCESS.
3. Select the ADVANCED icon.
4. At the PASSWORD ENTRY screen, select ENTER. If a password is required, enter the code at this screen.
5. At the SERVICE MENU screen, select the CALIBRATION icon. Then select Dilution Calibration.
6. Ensure the container is under the dilution nozzle.
7. Select the START button to begin a 1-minute dispense of hot water from the dilution nozzle.
8. The display will show the time remaining for dispense along with the option to stop the dispense if
necessary. The 60-second timer on the display will count down to zero.
9. When the counter reaches zero, the display will change to allow the measured amount of water in the
container to be entered and saved in programming. Measure the amount of water in the container and
select the white box area on the screen to enter the value to match the amount in the container.
10. Select SAVE.
11. The display should now show the actual flow rate for dilution water.
SELECT CALIBRATIONS
BYPASS
SPRAYHEAD
AMBIENT
DILUTION
Calibrate Bypass Flow Rate
This function allows the operator to test and enter the actual
flow rate of water coming out of the bypass. The procedure
includes a 1-minute dispense of water to determine the actual
flow rate. Ensure that the brewer is heated to brewing tempera-
ture before performing a bypass calibration.
1. Place a container, accurately graduated with a minimum
capacity of 60 ounces, under the funnel.
2. Touch the BUNN logo for 1 second to enter SERVICE ACCESS.
3. Select the ADVANCED icon.
4. At the PASSWORD ENTRY screen, select ENTER. If a password is required, enter the code at this screen.
5. At SERVICE MENU screen, select the CALIBRATIONS icon.
6. Ensure the container is under the brew station.
7. Select the START button to begin a 1-minute dispense of hot water from the bypass.
8. The display will show the time remaining for dispense along with the option to stop the dispense if
necessary. The 60-second timer on the display will count down to zero.
9. When the counter reaches zero, the display will change to allow the measured amount of water in the
container to be entered and saved in programming. Measure the amount of water in the container and
select the white box area on the screen to enter the value to match the amount in the container.
10. Select SAVE.
11. The display should now show the actual flow rate of the bypass.
SELECT CALIBRATIONS
BYPASS
SPRAYHEAD
AMBIENT
DILUTION
20
RECIPE SELECTION
REGULAR
HOT TEA
TEA 2
DECAF
TEA 1
ICED COFFEE
HOT TEA
TEA 2
TEA 1
ICED COFFEE
REGULAR
DECAF
PROGRAMMING
Edit Recipe Settings
By default, recipe settings are preset from the factory. The
operator has the choice of enabling, disabling and modifying
any recipe setting.
NOTE: By default, recipe settings are preset from the factory.
The operator has the choice of enabling, disabling and modifying
any recipe setting.
1. Touch the BUNN logo for 1 second to enter SERVICE
ACCESS.
M
L
S
BREW
REGULAR
5
6
4
SERVICE
RECIPES STATISTICS
ADVANCEDCARE & CLEANING
ACCESS
2
1
3
6. Select a Recipe you want to edit.
NOTE: If necessary, use the scroll arrows at the top of the
screen to navigate to a desired recipe name if not shown.
5. The Select Recipes screen will appear with default recipes.
4. In the SERVICE MENU screen, select the RECIPES icon.
3. At the PASSWORD ENTRY screen, select ENTER
(If a password is required, enter the code at this screen).
2. Select the ADVANCED icon.
continued >
21
RECIPE SELECTION
REGULAR
HOT TEA
TEA 2
DECAF
TEA 1
ICED COFFEE
HOT TEA
TEA 2
TEA 1
ICED COFFEE
REGULAR
DECAF
1. With the SELECT RECIPE screen displayed, use the scroll
arrow at the top of the screen to navigate to the desired
recipe name to edit. Select the recipe name.
NOTE: Blue-filled buttons represent recipes with enabled
batch sizes; these recipes will appear in the recipe selection
list from the home screen. Grey-filled buttons represent
recipes with all batch sizes disabled; these recipe names
will not appear in the recipe selection list from the home
screen until a batch size is enabled.
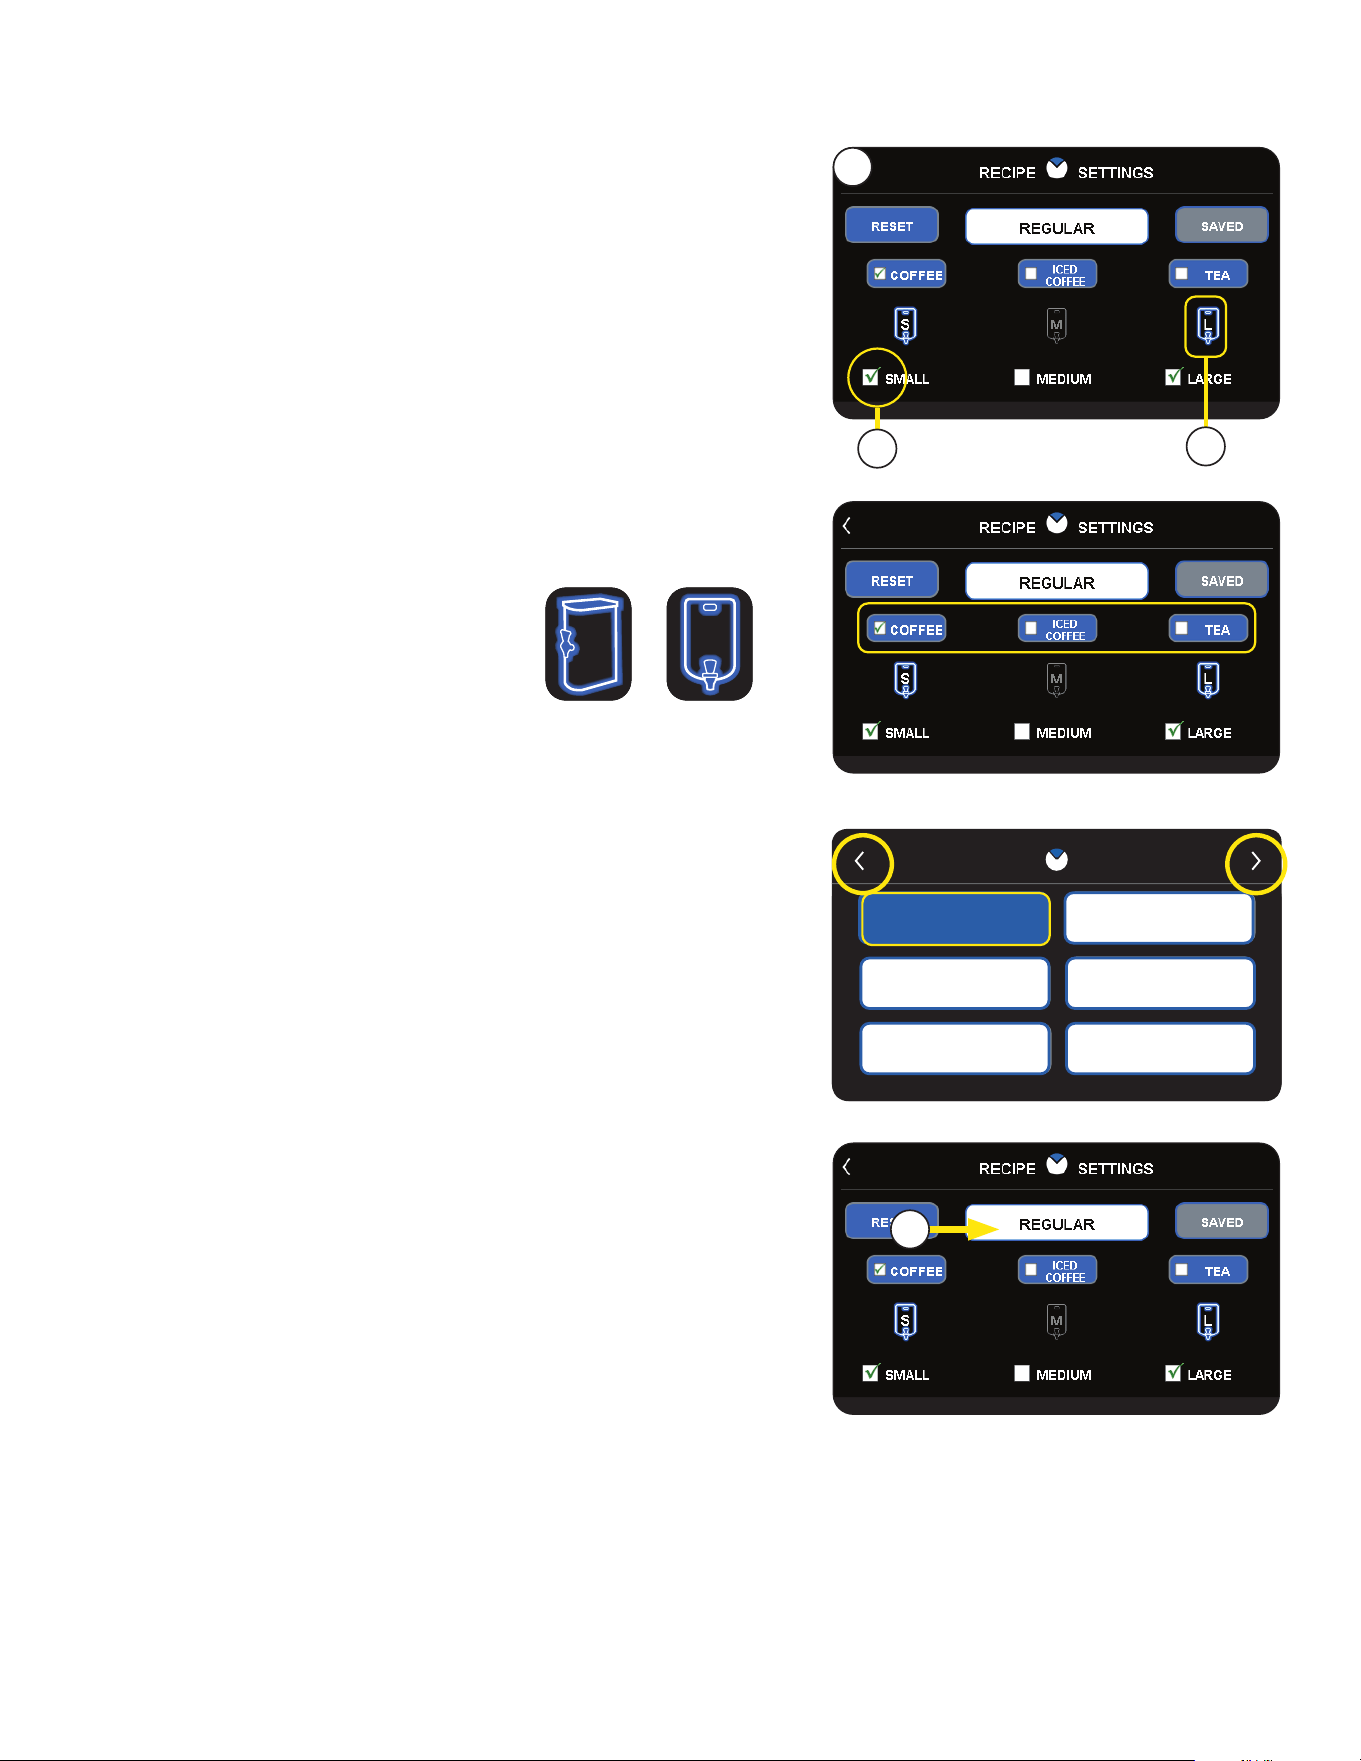
2. Select the white rectangle that contains the current name
for the recipe.
3. Use the touchscreen to enter a new recipe name.
Select ENTER when finished.
4. Select SAVE to store the new recipe name in programming.
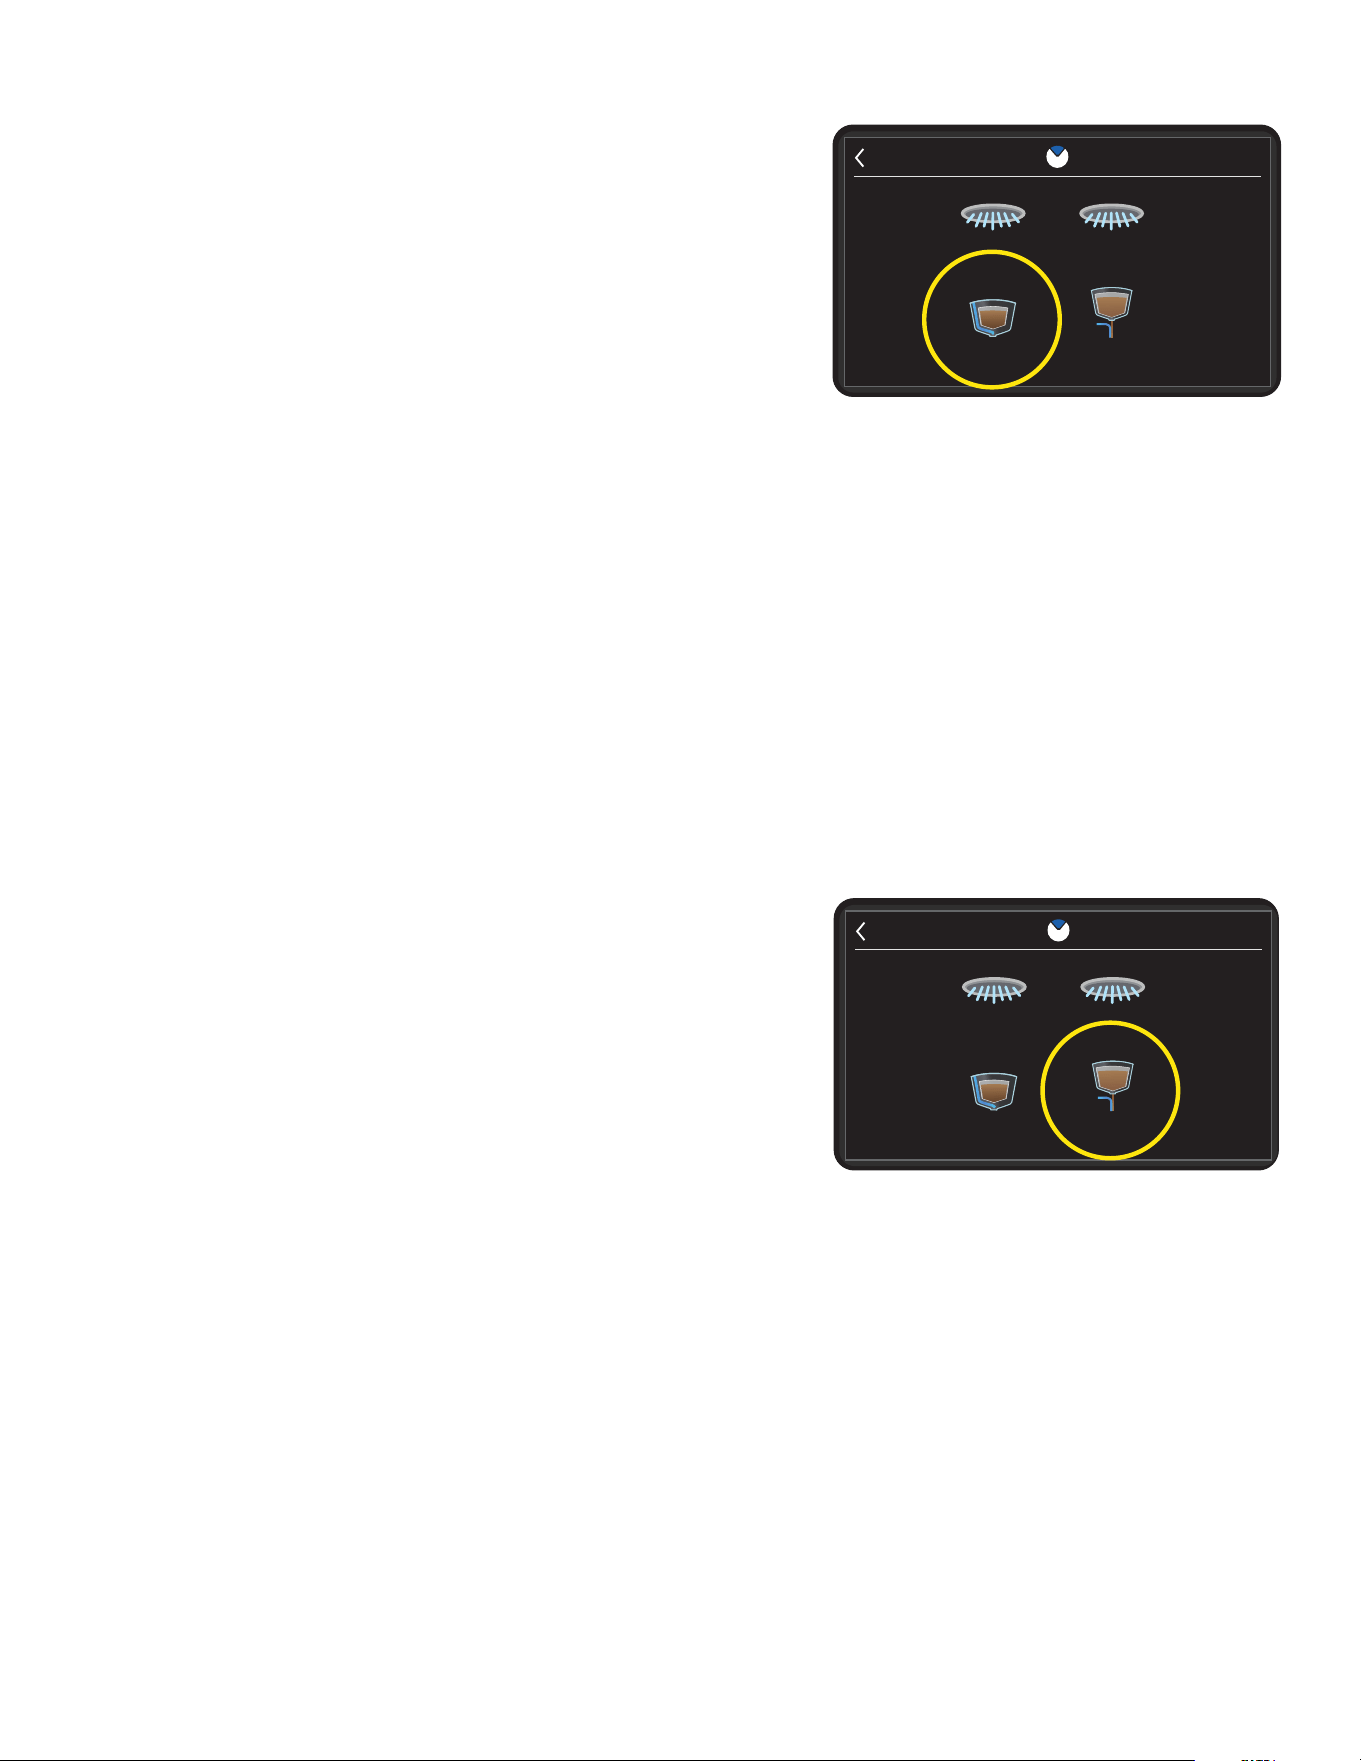
1. With the RECIPE EDIT screen on the display, choose a
beverage type from the options available (Coffee, Iced
Coffee or Tea).
continued from previous page
PROGRAMMING
NOTE: When choosing Tea
as a beverage type, the batch
selector icons will change to
represent tea servers.
Tea
Server
Icon
Coffee
Server
Icon
S
M
L
BREW
TEA
BREW
REGULAR
S
M
L
S
M
L
BREW
TEA
BREW
REGULAR
S
M
L
7
8
7. The RECIPE EDIT screen will appear for the chosen recipe.
8. Enable the batch size you wish to modify by selecting the
white check box. If the batch size is already enabled as
indicated by the green check mark, proceed to the next step.
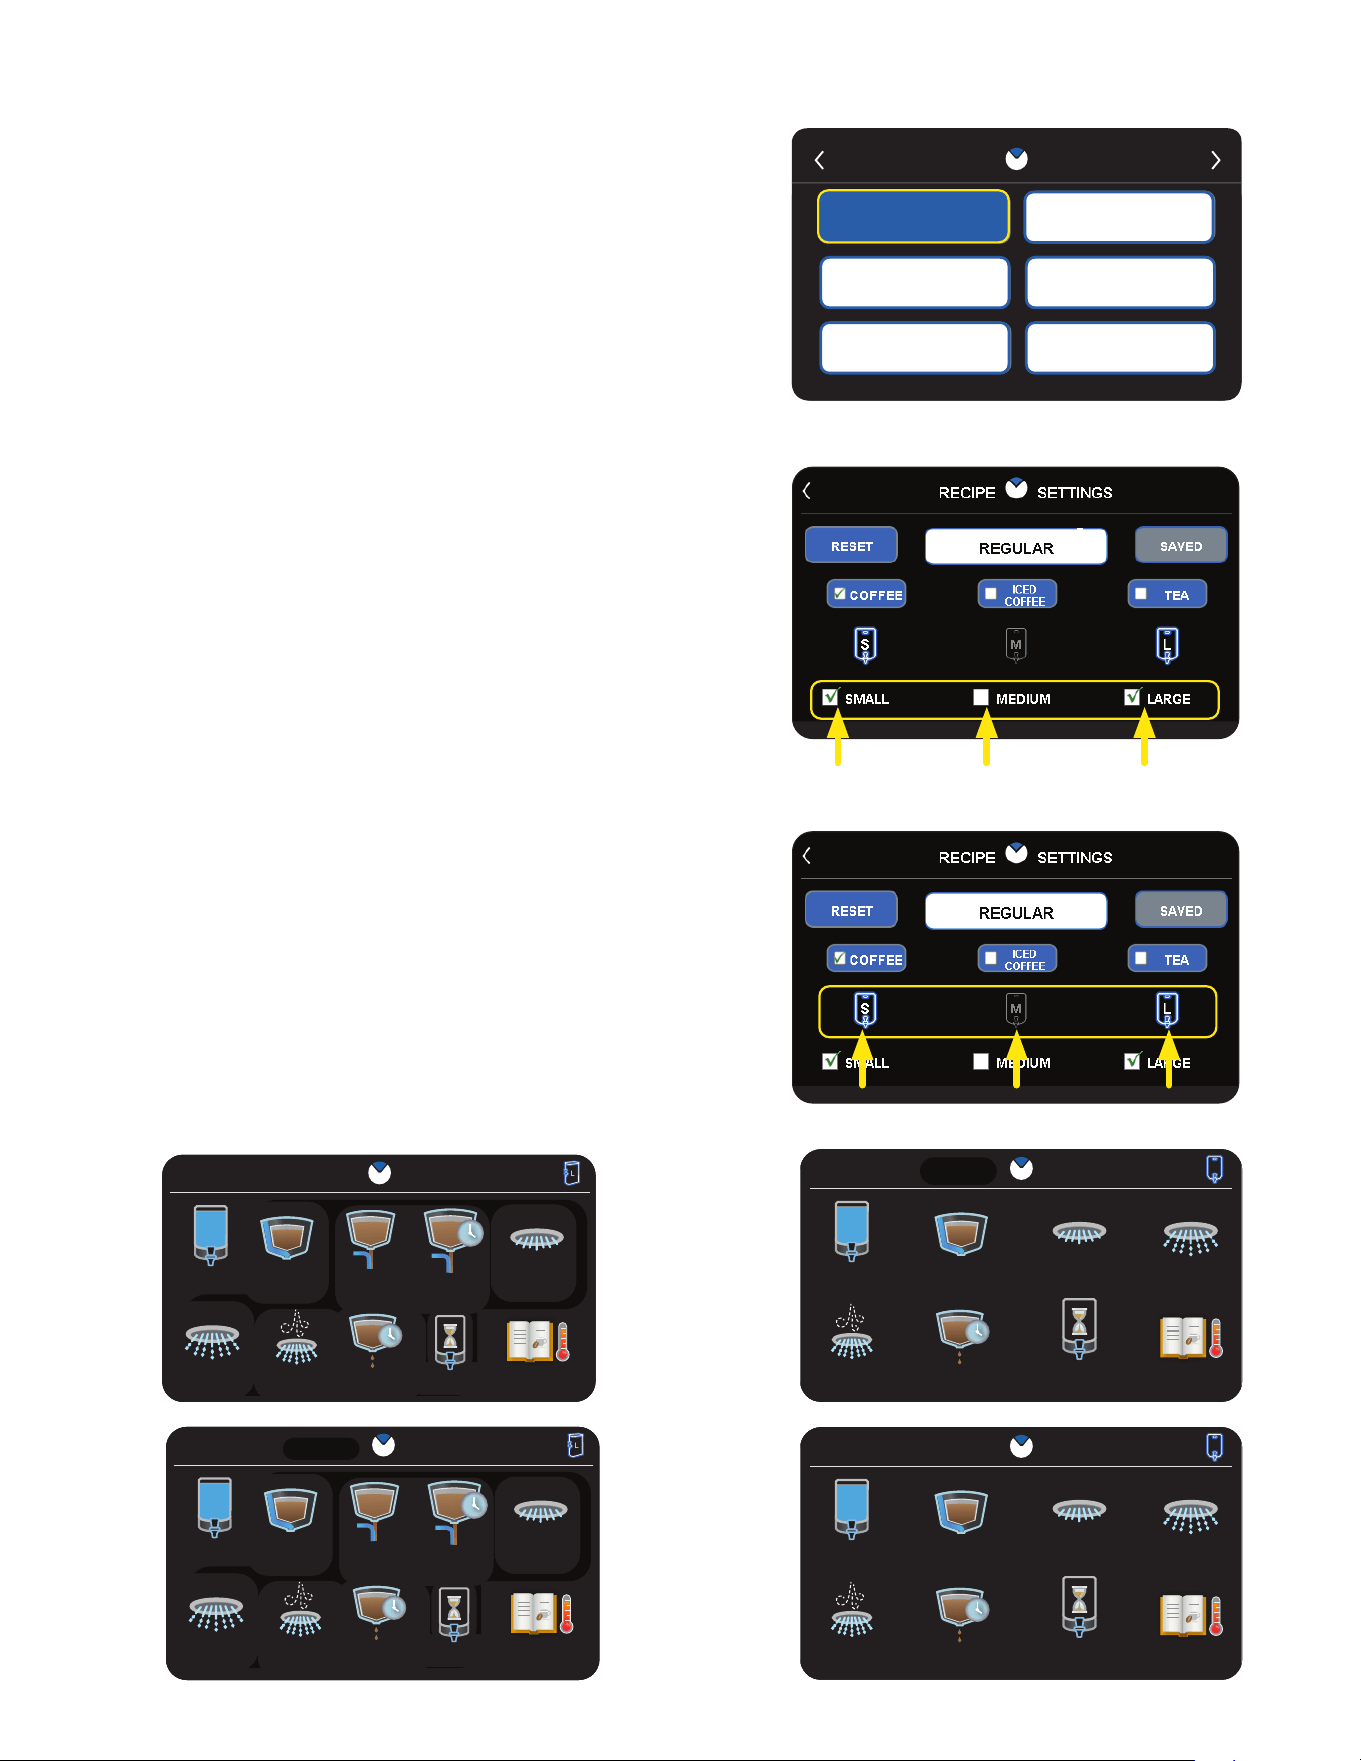
9. Select the batch icon above the size you wish to modify
(small, medium and large) by pressing the icon.
12. The screen that will appear has a menu of icons that
represent settings you can enable, disable or modify.
2
continued >
CHOOSING BEVERAGE TYPE
RENAMING A RECIPE
9
There are 5 pages containing 6 recipe names (30 total).
By default, recipe names are preset from the factory. The
operator has the choice of renaming any recipe.
22
RECIPE SELECTION
REGULAR
HOT TEA
TEA 2
DECAF
TEA 1
ICED COFFEE
HOT TEA
TEA 2
TEA 1
ICED COFFEE
REGULAR
DECAF
continued from previous page
ENABLING/DISABLING BATCH SIZES
The operator has the option to setup a recipe to include up to
3 batch sizes. Disabling all batch sizes for any given recipe will
remove it from the recipe selection list at the home screen.
1. Touch the BUNN logo for 1 second to enter SERVICE ACCESS.
2. Select the ADVANCED icon.
3. At the PASSWORD ENTRY screen, select ENTER
(If a password is required, enter the code at this screen).
4. In the SERVICE MENU screen, select the RECIPE icon.
5. The RECIPE EDIT screen will appear on the display. If
necessary, use the scroll arrow at the top of the screen
to navigate to the desired recipe name to edit. Select the
recipe name.
6. Select the desired batch sizes to be offered with the recipe
by selecting the white check box next to each batch size
icon. Enabling the batch size without editing the batch
recipe settings will automatically set recipe parameters to
default settings (Volume, Bypass, Pre-infusion, etc).
7. Select SAVE to keep the changes made to the recipe.
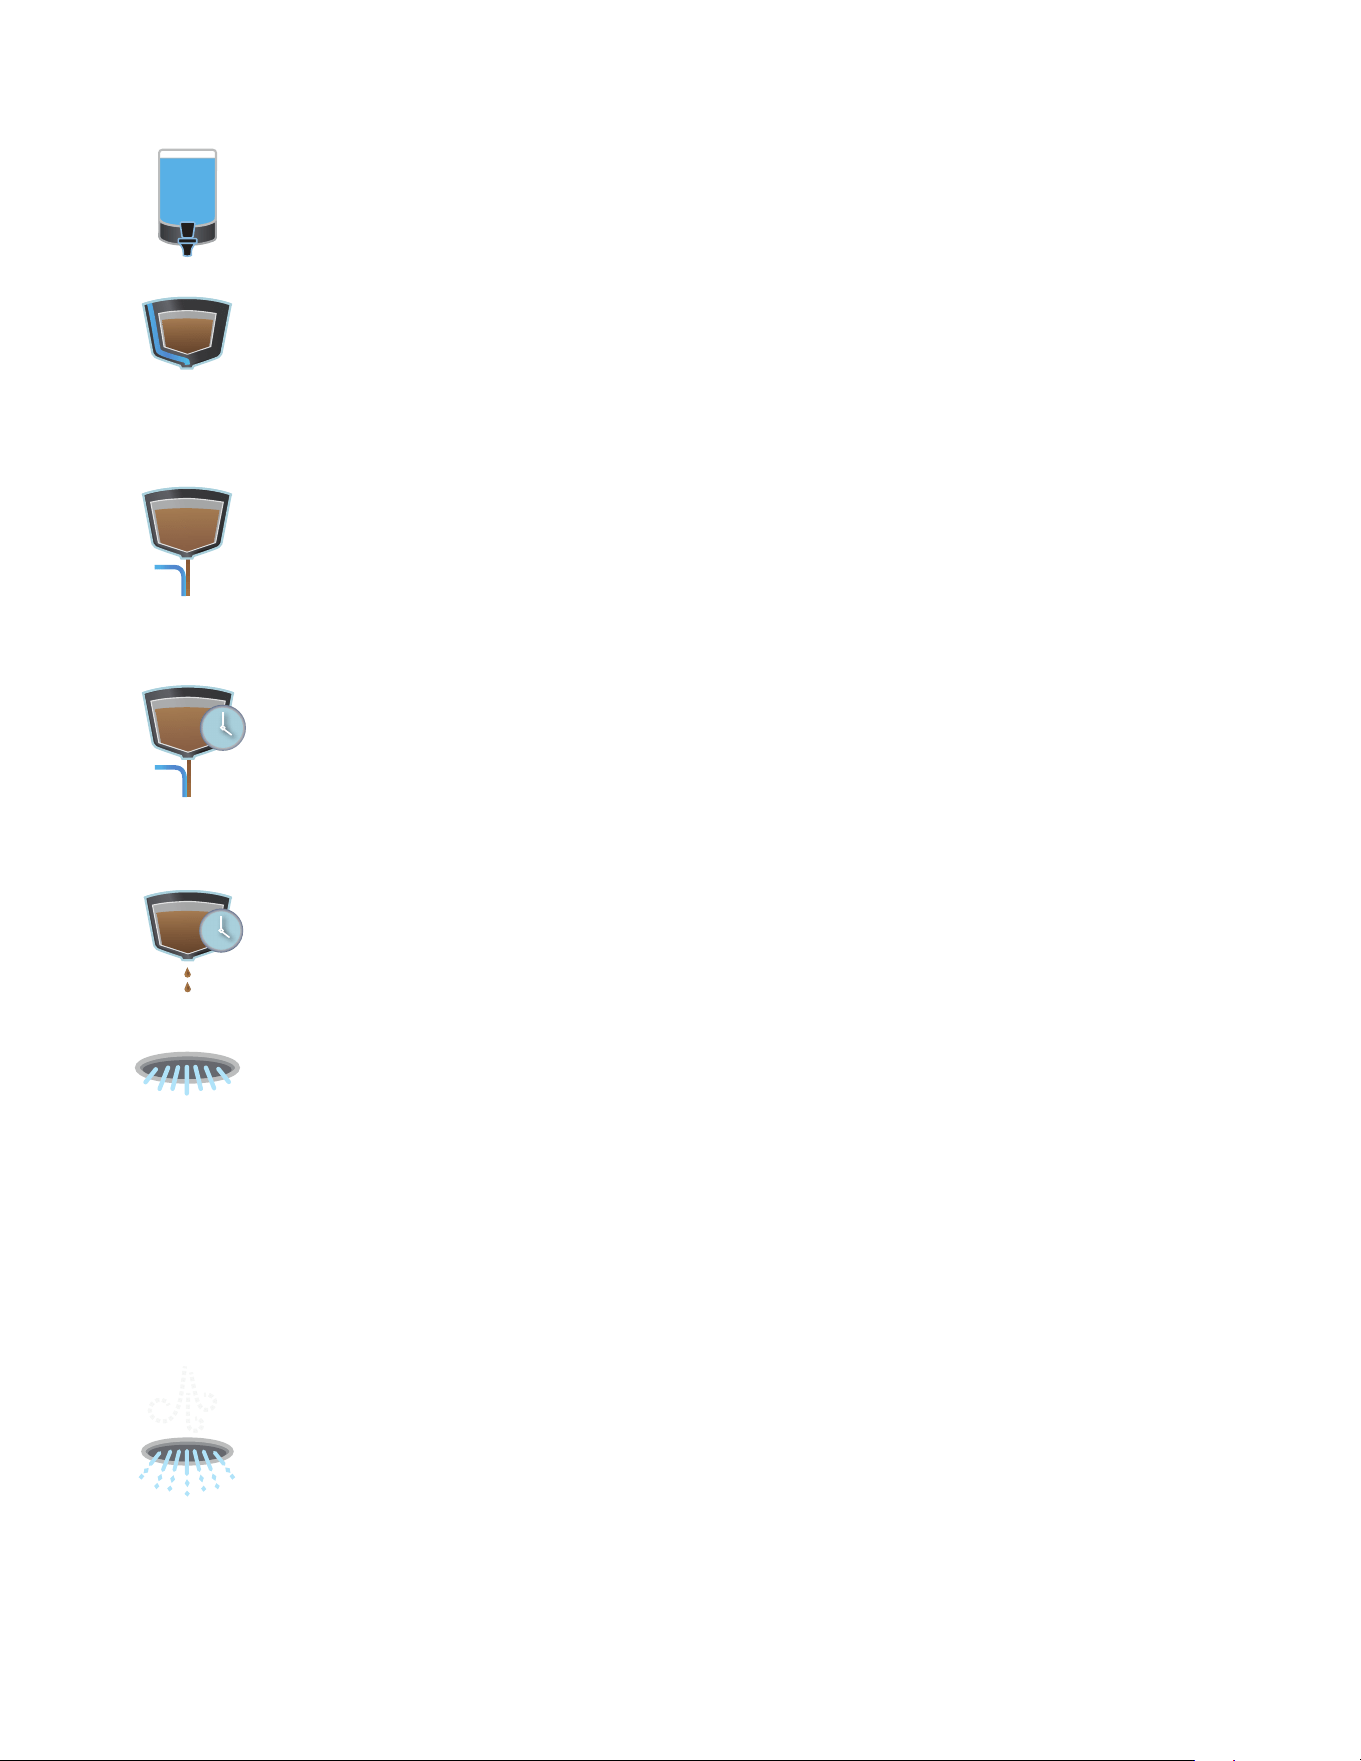
Recipe Edit Information
The operator can edit the recipe default settings for the
beverage chosen by selecting the beverage buttons in the
RECIPE SETTINGS screen.
continued >
PROGRAMMING
Tea
Recipe
Cold Brew
Coffee Recipe
REGULAR EDIT
VOLUME
SMARTWAVE
PULSE BREWPRE-INFUSE
FRESHNESS
DRIP TIME
BYPASS
S
TEMPERATURE
Regular
Coffee Recipe
Iced
Coffee
Recipe
HOT TEA EDIT
VOLUME
SMARTWAVE
PULSE BREWPRE-INFUSE
FRESHNESS
DRIP TIME
DILUTION
DILUTION
DELAY
L
TEMPERATURE
REGULAR EDIT
VOLUME
SMARTWAVE
PULSE BREWPRE-INFUSE
FRESHNESS
DRIP TIME
BYPASS
S
TEMPERATURE
HOT TEA EDIT
VOLUME
SMARTWAVE
PULSE BREWPRE-INFUSE
FRESHNESS
DRIP TIME
DILUTION
DILUTION
DELAY
L
TEMPERATURE
HOT TEA EDIT
VOLUME
SMARTWAVE
PULSE BREWPRE-INFUSE
FRESHNESS
DRIP TIME
DILUTION
DILUTION
DELAY
L
TEMPERATURE
HOT TEA EDIT
VOLUME
SMARTWAVE
PULSE BREWPRE-INFUSE
FRESHNESS
DRIP TIME
DILUTION
DILUTION
DELAY
L
TEMPERATURE
HOT TEA EDIT
VOLUME
SMARTWAVE
PULSE BREWPRE-INFUSE
FRESHNESS
DRIP TIME
DILUTION
DILUTION
DELAY
L
TEMPERATURE
HOT TEA EDIT
VOLUME
SMARTWAVE
PULSE BREWPRE-INFUSE
FRESHNESS
DRIP TIME
DILUTION
DILUTION
DELAY
L
TEMPERATURE
HOT TEA EDIT
VOLUME
SMARTWAVE
PULSE BREWPRE-INFUSE
FRESHNESS
DRIP TIME
DILUTION
DILUTION
DELAY
L
TEMPERATURE
HOT TEA EDIT
VOLUME
SMARTWAVE
PULSE BREWPRE-INFUSE
FRESHNESS
DRIP TIME
DILUTION
DILUTION
DELAY
L
TEMPERATURE
HOT TEA EDIT
VOLUME
SMARTWAVE
PULSE BREWPRE-INFUSE
FRESHNESS
DRIP TIME
DILUTION
DILUTION
DELAY
L
TEMPERATURE
REGULAR EDIT
VOLUME
SMARTWAVE
PULSE BREWPRE-INFUSE
FRESHNESS
DRIP TIME
BYPASS
S
TEMPERATURE
HOT TEA EDIT
VOLUME
SMARTWAVE
PULSE BREWPRE-INFUSE
FRESHNESS
DRIP TIME
DILUTION
DILUTION
DELAY
L
TEMPERATURE
HOT TEA EDIT
VOLUME
SMARTWAVE
PULSE BREWPRE-INFUSE
FRESHNESS
DRIP TIME
DILUTION
DILUTION
DELAY
L
TEMPERATURE
HOT TEA EDIT
VOLUME
SMARTWAVE
PULSE BREWPRE-INFUSE
FRESHNESS
DRIP TIME
DILUTION
DILUTION
DELAY
L
TEMPERATURE
HOT TEA EDIT
VOLUME
SMARTWAVE
PULSE BREWPRE-INFUSE
FRESHNESS
DRIP TIME
DILUTION
DILUTION
DELAY
L
TEMPERATURE
HOT TEA EDIT
VOLUME
SMARTWAVE
PULSE BREWPRE-INFUSE
FRESHNESS
DRIP TIME
DILUTION
DILUTION
DELAY
L
TEMPERATURE
HOT TEA EDIT
VOLUME
SMARTWAVE
PULSE BREWPRE-INFUSE
FRESHNESS
DRIP TIME
DILUTION
DILUTION
DELAY
L
TEMPERATURE
HOT TEA EDIT
VOLUME
SMARTWAVE
PULSE BREWPRE-INFUSE
FRESHNESS
DRIP TIME
DILUTION
DILUTION
DELAY
L
TEMPERATURE
ICED COFFEE
REGULAR EDIT
VOLUME
SMARTWAVE
PULSE BREWPRE-INFUSE
FRESHNESS
DRIP TIME
BYPASS
S
TEMPERATURE
COLD BREW
23
PROGRAMMING
continued from previous page
DRIP TIME - Drip time is the time allotted to allow for any excess coffee to drip from the funnel
after a brew has been completed. The operator will be able to add up to 5 minutes worth of time.
If no time is added the brew will complete and funnel locks will raise.
SMARTWAVE
®
- This is a brewing feature that alters the trajectory of water coming out of the
spray head in order to enhance uniformity of extraction. This is accomplished by activating the
air pump during the spray head on times only. When the spray head valve is on, the air pump will
activate and blow a pulse of air which will widen the pattern of water that hits the bed of coffee. The
operator will be able to set the SmartWAVE from 1-14. The plus/minus buttons will increment and
decrement by 1. Each number represents the air pump turning on twice during that brew cycle.
1 (2) - 14 (28). There will always be a blowout period of 5 seconds at the end of the brew. This
will evacuate water in the spray head to help avoid lime build up.
PRE-INFUSE - Pre-Infusion is defined as two parts; the first initial wetting of the coffee grounds
and the first initial "OFF" period before the rest of the brew cycle begins. The operator will have
the ability to brew with just pre-infusion only, if they prefer to do so. The operator must enable
the feature by selecting the check box. To set an "ON" time, the operator can select the text
field. This will prompt the numeric keypad to enter the desired time. To confirm a change, the
operator must press the SAVE button. The batch size icon in the upper right hand corner of the
screen will allow the operator to cycle between batch sizes. If the operator switches to a different
batch size, those parameters must be updated in the fields. Disabling the feature will gray out the
white text fields. The operator will not be able to adjust this setting unless the feature is enabled.
VOLUME - This icon allows for volume adjustments. Each batch size, small, medium, and large
will have adjustable brew volume ranges to choose from. Pressing SAVE after the number has
been entered will confirm the change and exit back out to the recipe parameter screen.
BYPASS - This icon adjusts the bypass as a percentage of the total brew volume. This means
the set percentage will bypass the coffee grounds through the funnel to the server. If bypass is
used in a recipe, it will only turn on after 30 seconds of spray head time. The operator will press
SAVE to confirm their entry, which will exit them back to the recipe parameter screen.
DILUTION - Dilution is used in tea brewing to dilute the concentrate of tea brewed in the funnel.
The user will set the amount desired in ounces or ml. The user can adjust the volume by
touching the text field and prompting the numeric keypad or use the plus or minus buttons to
increment or decrement the volume. Save confirms the change and exits the user back to the
recipe parameters screen. The arrow will just take user back to the recipe parameter screen.
DILUTION DELAY - This feature allows the user to set a time when the dilution water should
turn on after a brew cycle has been initiated. The user can adjust the time by touching the
text field and prompting the numeric keypad or use the plus or minus buttons to increment or
decrement the time. Save confirms the change and exits the user back to the recipe parameters
screen. The arrow will just take user back to the recipe parameter screen.
continued >

24
PROGRAMMING
continued from previous page
TEMPERATURE - This button allows the user to review the temperature percentage and settings
for all the zones, including pre-infusion. It is displayed in a table layout that shows the parameters
and the values that are set. Selecting the white area will take the user directly to the edit page for
that setting. Here the user can change the value, save, and exit back to the temperature screen.
The batch size icon in the upper right-hand corner of the screen cycles through other enabled
sizes in the recipe. This allows the user to quickly setup all the enabled batch sizes without returning
to the recipe settings screen. A° is used to display an ambient temperature for pre-infusion or
the zone.
FRESHNESS - This time is used to help control beverage quality. An alert will pop-up full
screen and state that the recipe has expired. Once acknowledged, the operator can brew
as normal.
PULSE BREW - Pre-infusion and bypass settings will be taken into account if set already. The
operator will use the text fields to enter times. When entering the spray head on time, the ounces
or milliliters (depends on units set on the machine) being dispersed for that amount of time will
display. The quantity of water dispersed will be larger the longer the time is on. If the time is
decreased, the volume should lower as well. The volume displayed will be gathered from an
average of both the left and right spray head calibration settings. When setting the pause time,
the operator is choosing how long to turn the spray head off; this is not an accumulated time.
This time is the length that the spray head will turn off during the pulse routine then turn back on.
Both on and off times will have limits the operator is able to set depending on the parameters of
the recipe. When configuring the routine, the total brew time will change to be shorter or longer
depending on the routine settings. Longer pause times extend total brew time in most cases.
The Auto calculate button will automatically set a routine based on the parameters for the recipe.
Save will confirm and save the settings for that recipes batch size. The batch size icon will cycle
through the other enabled sizes to allow the operator to set the pulse brew for a different size
batch from this screen.
Easy Pulse Brew - An auto pulse brew is a set routine of 7 pulses that has been calculated
by parameters the operator has set. The operator must specify the batch volume,
percentage of bypass, pre-infusion time, and drip time. The pulse off time is calculated off
a 60 second additional Brew time for the 6 off pulses between the 7 on pulses.
Off time = 10 sec / pulse = 60 sec / 6 pulses
Manual Pulse Brew - If a operator would like to adjust the brewing time which they have
been given in Auto pulse, they can change or make adjustments to the remaining on/off
times Doing this can extend or shorten the brew time originally calculated for the Auto Pulse
brew thus the operator is now going to control what on and off times the brewer will use to
make a pulse routine.
25
PROGRAMMING
Editing Temperature Zones
This feature allows the user to review the temperature percentage
and settings for all the zones.
1. Touch the BUNN logo for 1 second to enter SERVICE ACCESS.
2. Select the ADVANCED icon.
3. At the PASSWORD ENTRY screen, select ENTER
(If a password is required, enter the code at this screen).
4. In the SERVICE MENU screen, select the RECIPE icon.
5. The RECIPE EDIT screen will appear on the display. If
necessary, use the scroll arrow at the top of the screen to
navigate to the desired recipe to edit.
6. Select the recipe name.
7. Select the desired batch size icon to edit.
NOTE: The Large size is selected for this example.
8. Choose the Recipe Edit icon from the RECIPE MENU
screen.
9. Choose the Temperature icon from Regular Edit screen.
10. Select any of the zone number fields to edit the variables.
NOTE: Zone 1 is the only field selected for this example.
11. Press the minus or plus buttons to change the Zone % or
Temperature values.
NOTE: Zone %: Min value = 0.0 to Max value = 100
Temperature: Min value = 100° F to Max value = 207° F
12. Select SAVE to keep any changes made.
7
REGULAR RECIPE MENU
RECIPE EDIT
RECIPE HISTORYRECIPE REVIEW
L
REGULAR EDIT
VOLUME
SMARTWAVE
PULSE BREWPRE-INFUSE
FRESHNESS
DRIP TIME
BYPASS
L
TEMPERATURE
8
9
REGULAR TEMPERATURE
L
PRE-INFUSION
ZONE 1 SETTINGS
ZONE 2 SETTINGS
ZONE 3 SETTINGS
TOTAL
DISABLED
200˚F / 40.0% / 0:39
190˚F / 35.0% / 0:34
180˚F / 25.0% / 0:25
64.0 OZ / 2:38
REGULAR ZONE 1 SETTINGS
L
ZONE %
TEMP ˚F
VOLUME
ZONE TIME
SAVED
40.0
200˚
22.4 OZ.
0:34
AMBIENT
10
11
26
PROGRAMMING
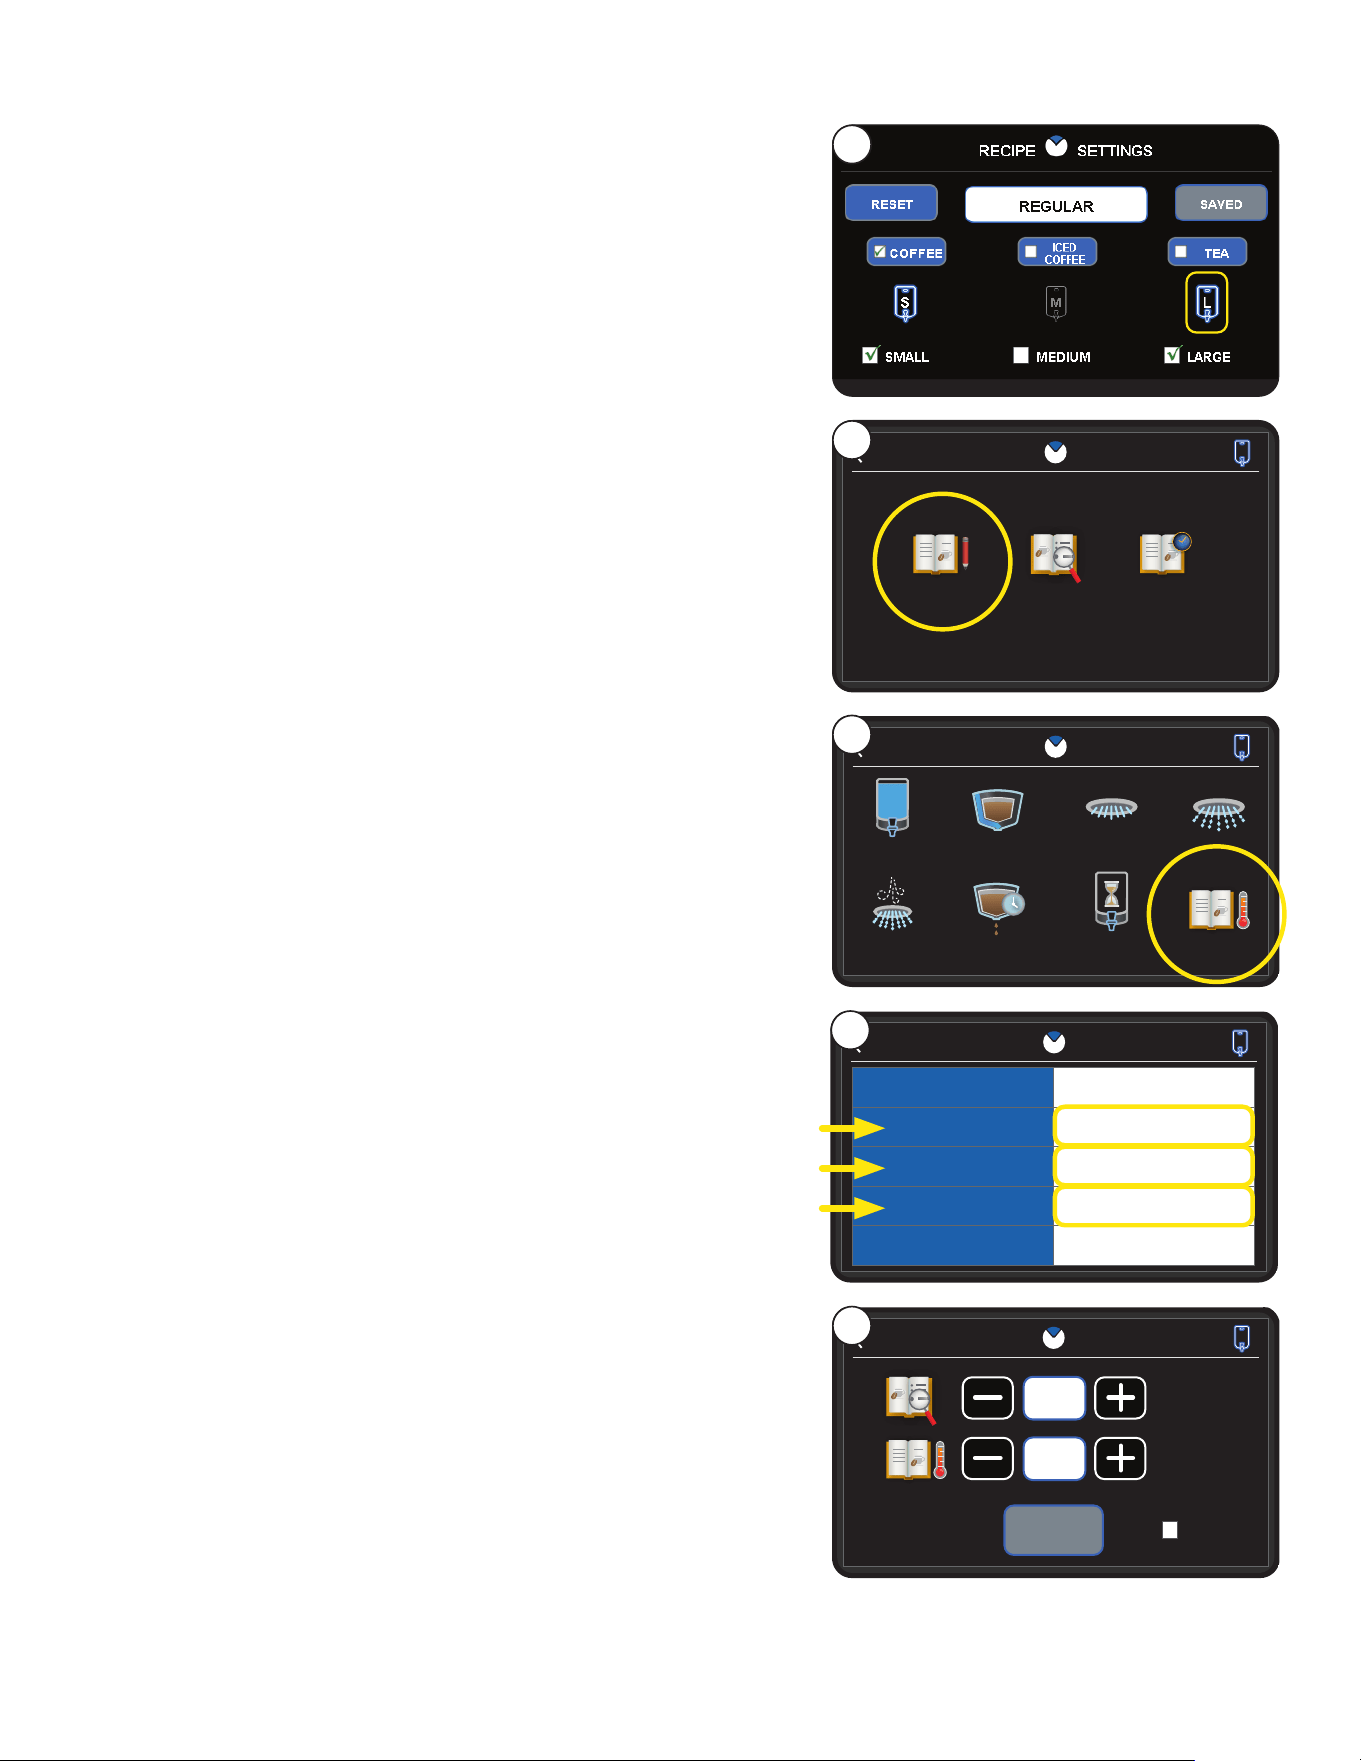
Machine Settings
HOW TO ACCESS MACHINE SETTINGS
1. Touch the BUNN logo for 1 second to enter
SERVICE ACCESS.
2. Select the ADVANCED icon.
3. At the PASSWORD ENTRY screen, select ENTER
(If a password is required, enter the code at this screen).
4. In the SERVICE MENU screen, select the MACHINE
SETTINGS icon.
5. The MACHINE SETTINGS screen will appear on the
display. There will be a menu of icons that represent
settings you can enable, disable or modify.
REGIONAL SETTINGS - Regional settings will allow the user to change the language, time &
date, units, and password for the brewer. Selecting each button will navigate the user to that
respective category. The BUNN programming button will navigate the user to the main home screen.
MACHINE SETTINGS
REGIONAL SETTINGS BREWER SETTINGS
BREW SETTINGS SERVER SETTINGS
SERVER SETTINGS - This menu will have settings related to the servers. Server preheat, auto
off, server detect, and smart server will all be available to enable or disable from this screen. When
the buttons have a green check mark next to the text that feature is enabled. If there is just a white
box with no check the feature is disabled. Select the buttons toggles the features on or off.
BREW SETTINGS - Users can press the temp set temperature number to go to a keypad entry
screen to change the value. The ready temperature will work similarly, but can only be accessed
if brew lockout is enabled. If brew lockout is disabled, then the ready temperature is greyed out
and the button will become inactive. Selecting the brew lockout check box will alternate states
between enabled and disabled. If the ready temperature is active, it allows a value to be entered
in a range of 140 to 207 degrees below the tank set temperature.
BREWER SETTINGS - Machine settings lets the operator make changes to the energy saver,
funnel detect, and screen saver. The green check mark means the feature is enabled. Pressing
the button again will disable that feature and the check mark will go away to leave just an empty
white box. Once enabled if the feature has settings that must be set, the user will be taken directly
to the set up screens.
continued >
27
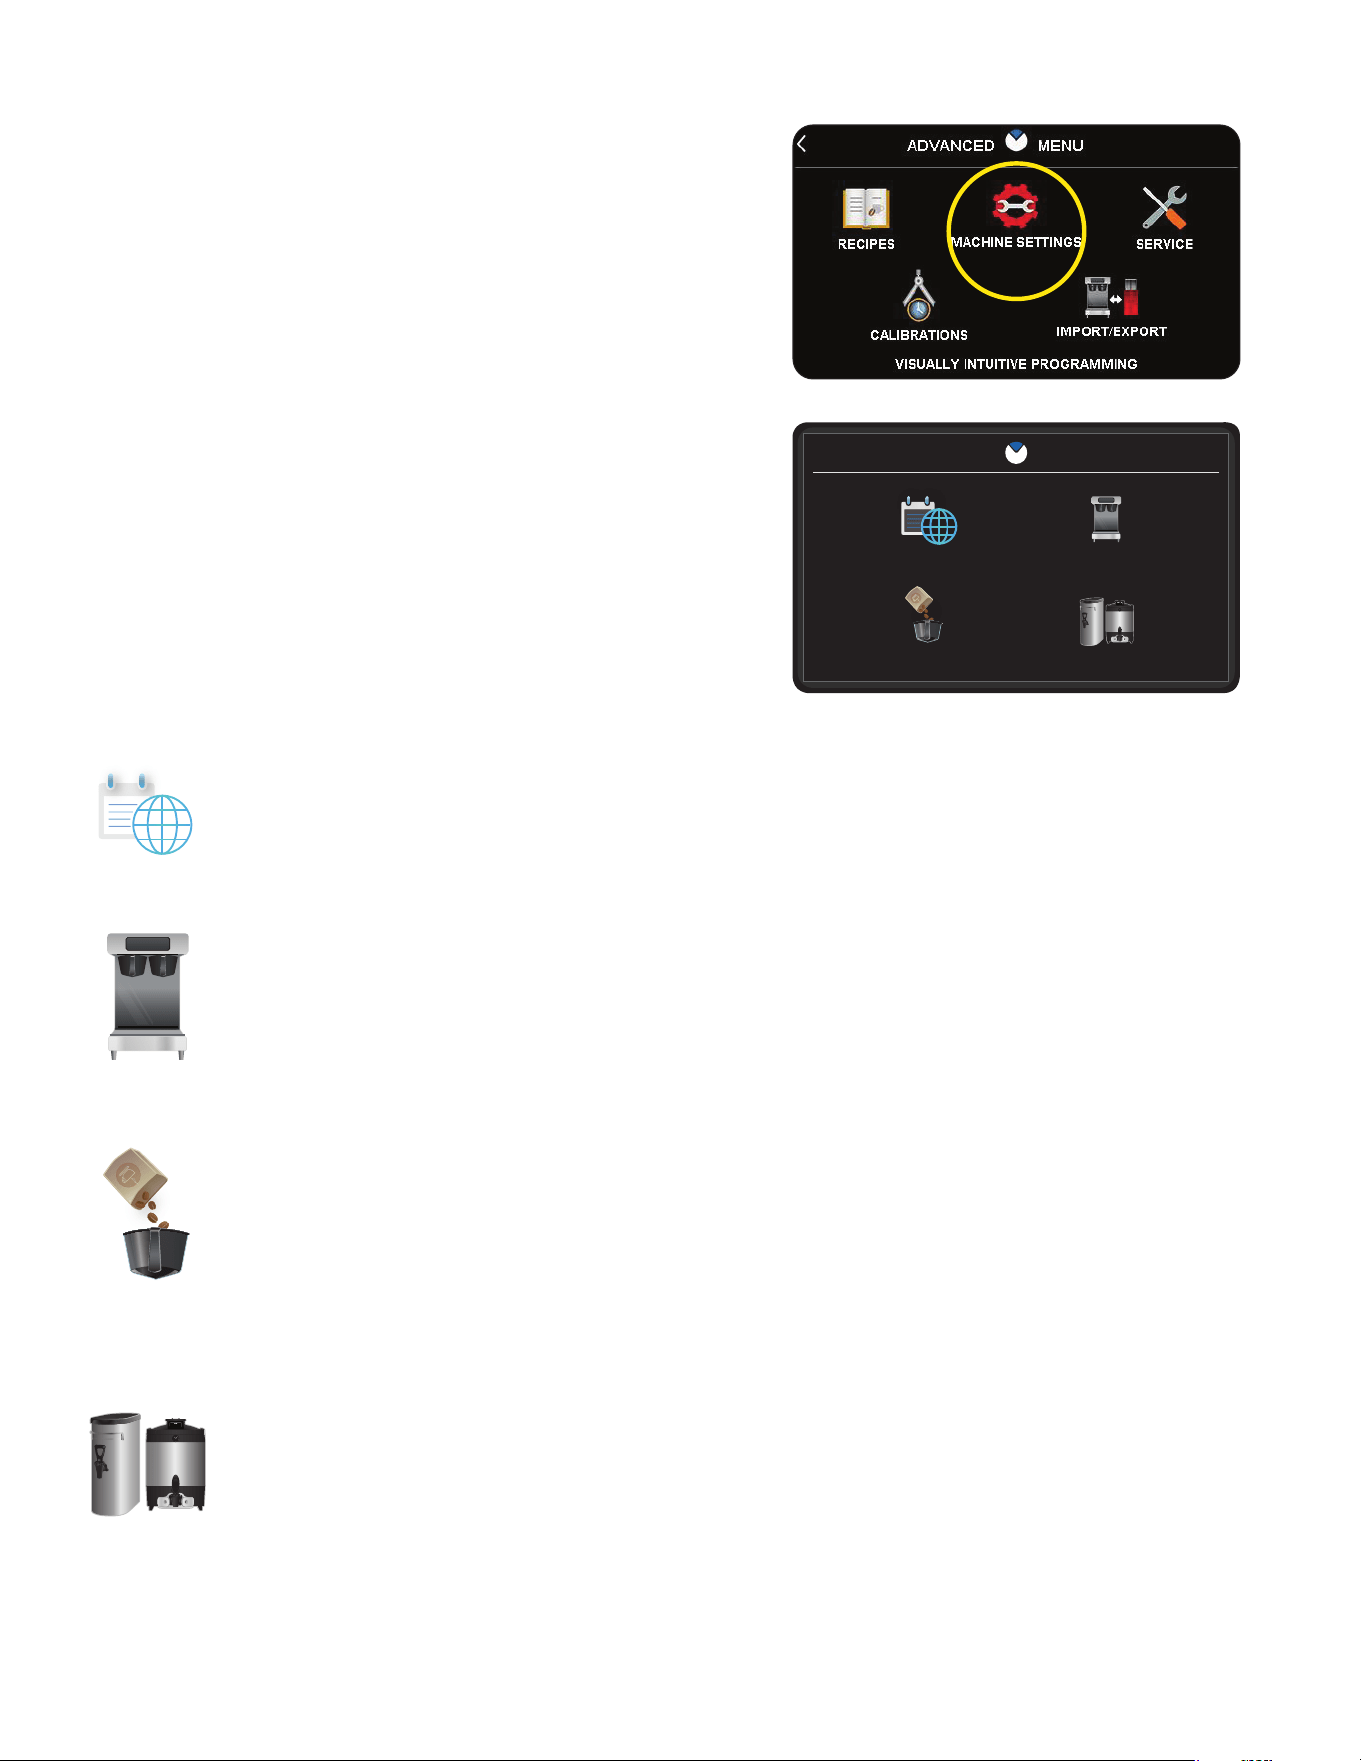
Brew Settings
Accessed from
MACHINE SETTINGS,
there are several
adjustable settings
shown within the
Brew Settings options.
BREW SETTINGS
TANK SET
READY TEMP
SAVED
205˚ F
200˚ F
BREW LOCKOUT
Default Screen for Brew Settings Brew Settings with Brew Lockout enabled
BREW SETTINGS
TANK SET
READY TEMP
SAVED
205˚ F
200˚ F
BREW LOCKOUT
PROGRAMMING
Tank Set - The TANK SET is a temperature setting for water inside the tank. The value entered and saved
will be used as the default temperature for brewing coffee. Minimum and maximum temperature ranges are
dependent on Brew Mode that is selected.
Ready Temp: The READY TEMP is the lowest temperature required for the water inside the tank before
the machine can brew coffee. This option is only available when BREW LOCKOUT is enabled.
Brew Lockout - If BREW LOCKOUT is enabled, the machine will not allow coffee to be brewed until the
water inside the tank reaches a minimum temperature specified within the READY TEMP. If BREW
LOCKOUT is disabled, the READY TEMPERATURE is greyed out and the button will become inactive.
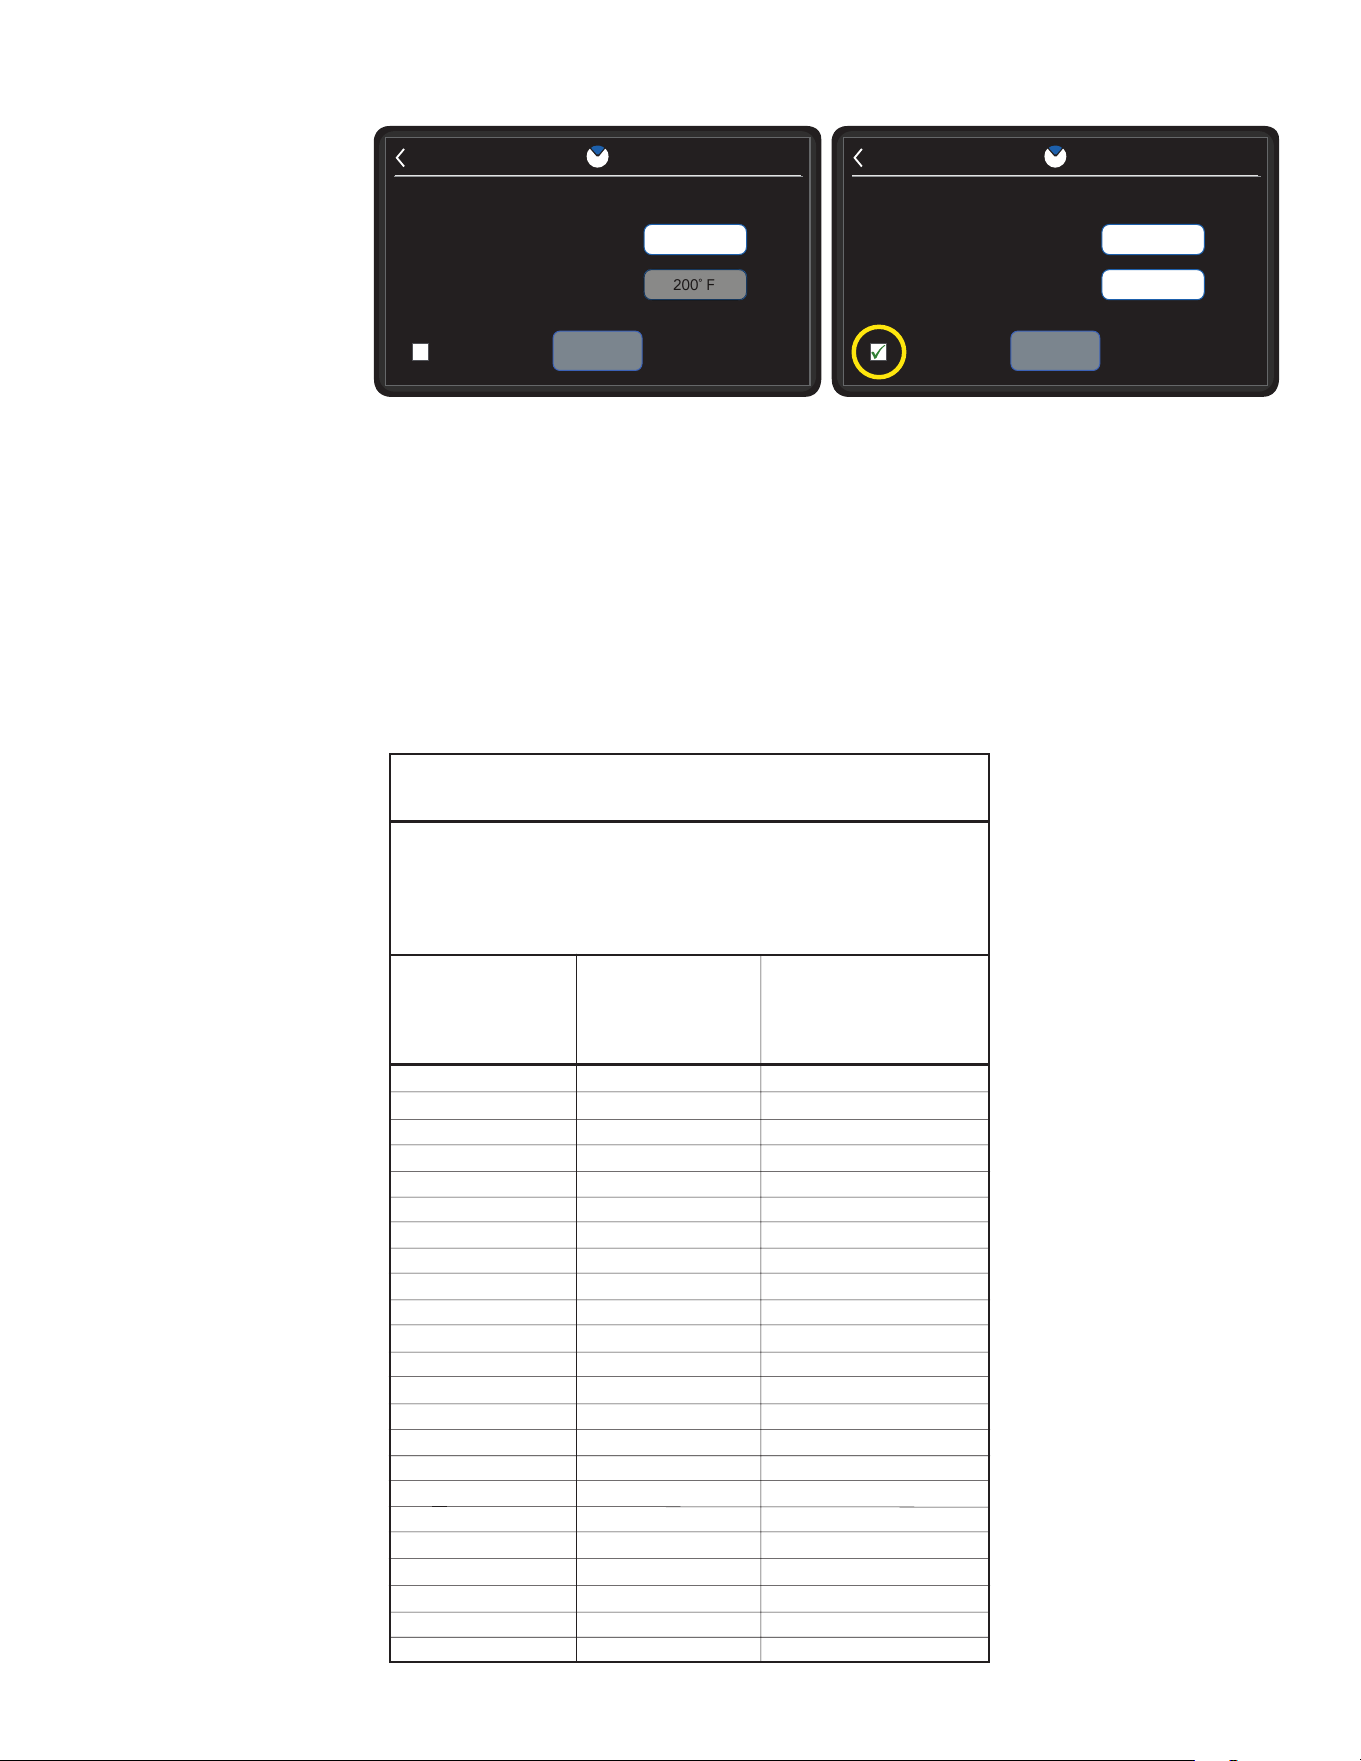
Brew water temperature is factory set at 200° F (93.3°C)
Areas of high altitude will require lowering this temperature
to prevent boiling. This chart should be used as a guide
when readjusting the brew water temperature.
Altitude
(Feet)
101.0
100.5
100.0
99.5
99.0
98.5
98.0
97.4
96.9
96.4
95.9
95.4
94.9
94.4
93.9
93.4
92.9
92.4
91.9
91.4
90.8
90.3
89.8
200
200
200
200
200
200
200
200
199
198
197
196
195
195
194
193
192
191
190
189
188
187
186
93.3
93.3
93.3
93.3
93.3
93.3
93.3
93.3
92.8
92.2
91.7
91.1
90.6
90.6
90.0
89.4
88.9
88.3
87.8
87.2
86.7
86.1
85.6
213.8
212.9
212.0
211.1
210.2
209.3
208.4
207.4
206.5
205.6
204.7
203.8
202.9
201.9
201.0
200.1
199.2
198.3
197.4
196.5
195.5
194.6
193.7
-1000
-500
0
500
1000
1500
2000
2500
3000
3500
4000
4500
5000
5500
6000
6500
7000
7500
8000
8500
9000
9500
10000
Boiling point
of water
°F °C
Recommended
water temperature
°F °C
NOTICE
28
PROGRAMMING
SMART FUNNEL
Funnel Detected - If a Smart Funnel is used to brew then the
machine will recognize this and immediately jump to the start
brew screen. The RFID will only be read for the side in which
the funnel has been inserted. The name and batch size should
be read from the RFID chip in the funnel and be reflected on
the screen. The user can confirm the brew by pressing the
brew button.
CANCEL
STARTING
REGULAR
LARGE
IN
:03
CANCELING AN INITIATED BREW CYCLE
Once Brew is selected, a countdown timer will display along
with a Cancel button that can be pressed at any time to cancel
the brewing. While in the delay prior to a brew starting, the funnel
lock will engage to prevent the funnel from being removed
before the brew begins.
If the Cancel button is pressed, the Brew Timer is aborted and
the user is returned to the Home Screen. Funnel locks will be
disengaged when brew start has been cancelled.
NOTE: After pressing the stop button, there is a delay before
the brew funnel can be removed. You must wait for the drip
out time to complete before the funnel locks will disengage.
CANCELING A BREW CYCLE IN PROCESS
Once a brew begins the brew animation will display and show the
Bunn logo filling from the bottom. Once brewing is complete
the home screen will display. The user will have the ability to
stop a brewing at anytime in the brew cycle. The stop button is
highlighted by the white border around the STOP text and the
brewing animation.
continued >
Check Grounds in Funnel - If the funnel detect is enabled
and the funnel has not been removed since the last brew the
user will be prompted to check grounds in the funnel. This
message will display if there is a funnel that has been brewed
into (RFID has been cleared) but not had a new recipe wrote
from a grinder. The brew anyway button will allow the user to
begin the brew sequence.
29
continued from previous page
PROGRAMMING
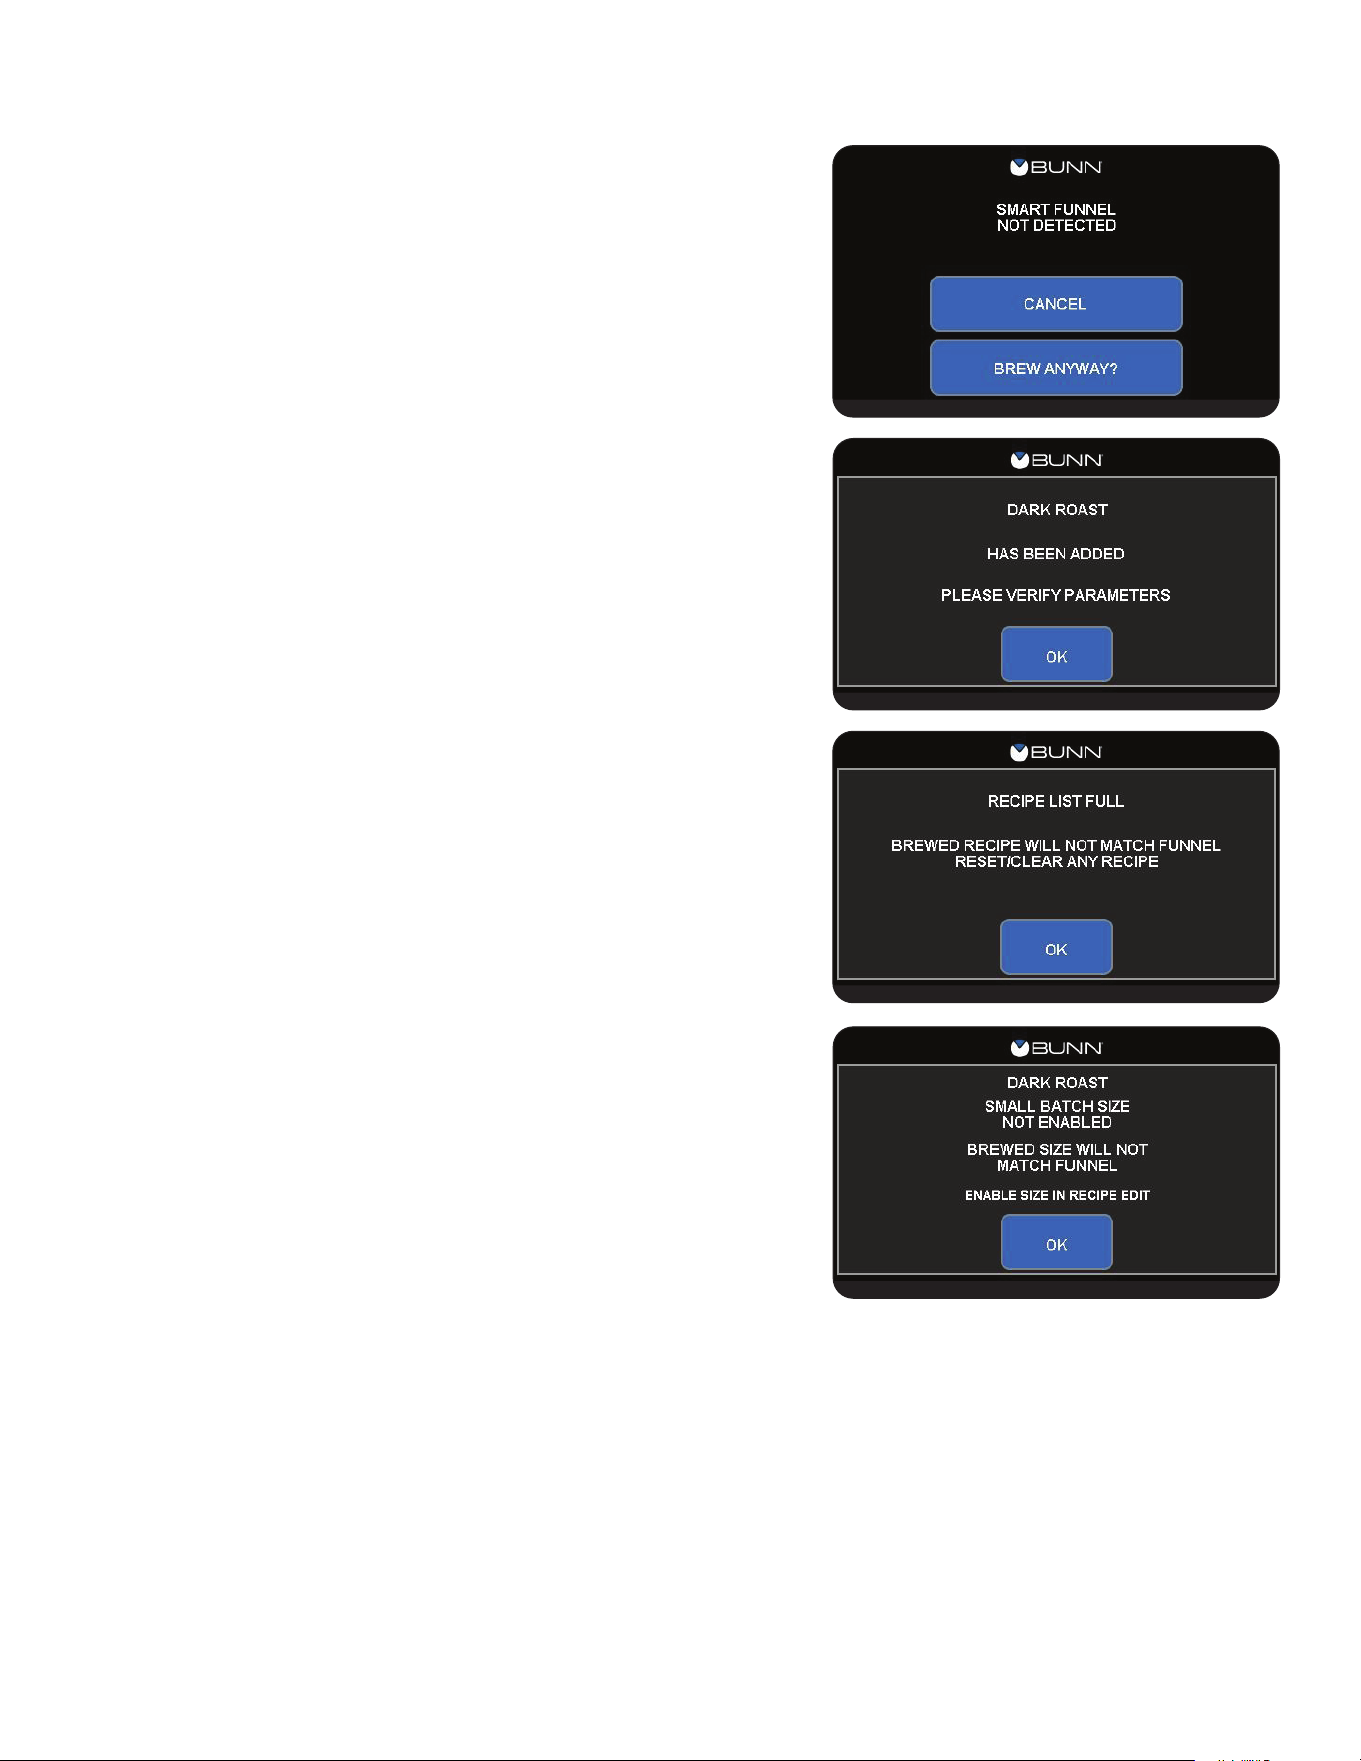
Smart Funnel Not Detected - If funnel detect is enabled and
the user selects the brew button, this screen will display. The
machine has the ability to brew without a smart funnel, but the
user needs to confirm or deny this action. This screen will also
display if the brew button has been pressed and no funnel is
present at all. From here the user may select cancel and exit
to the home screen.
Recipe Not in Library - When a smart funnel is inserted and
the recipe is not in the Recipe library, the system will attempt
to add the funnel recipe to the recipe library. If there is an
empty recipe it will be added in the first available empty slot in the
library.
When this occurs a pop up event/alarm will be shown to
indicate that a new recipe has been added to the library.
Recipe List is Full - If there is not an empty slot in the library
the funnel will be treated as an empty funnel and when this
occurs a pop up event/alarm will be shown to indicate that the
library is full and the funnel recipe will be ignored.
This should prompt them to reset recipes in the library to make
room for this funnel recipe or just ignore the funnel.
RFID Recipe Size Not Shown - If a RFID recipe is in the library,
but the size is not available, the recipe will be selected, but the
size selection will not be auto selected.
The main screen will show this as an empty funnel, but has
size icons selectable. When this occurs a pop up event/alarm
will be shown to indicate that the recipe does not support this
size and will be ignored or the recipe library is full and the
funnel recipe will be ignored. It should also prompt you to
correct the recipe size selection in the recipe library.
There will be three different screens, one for each possible size.
NOTE: If the funnel is inserted during a brew, instead of a full-screen
pop-up a partial screen pop-up is shown with an OK button.
continued >
30
9. Once a server is selected, the Server Edit screen appears.
This allows the user to name the server.
SERVER EDIT
SERVER 1
RESET
CLEAR TIME SAVED
OFF
ENABLED
RECIPE NAME
FRESHNESS TIME
COLD
CONCENTRATE
PROGRAMMING
9
10
10. To enable the server, select the Enabled box.
When the green check mark appears, this server will be
available to choose when brewing on the machine.
12. Select SAVE when complete.
11. The user can clear the time left on a server at anytime by
pressing the Clear Time button. This will stop the
freshness time and keep it from showing alarm on the
displayed screen saver.
SERVER EDIT
RESET
CLEAR TIME SAVE
0:00
ENABLED
REGULAR
11
12
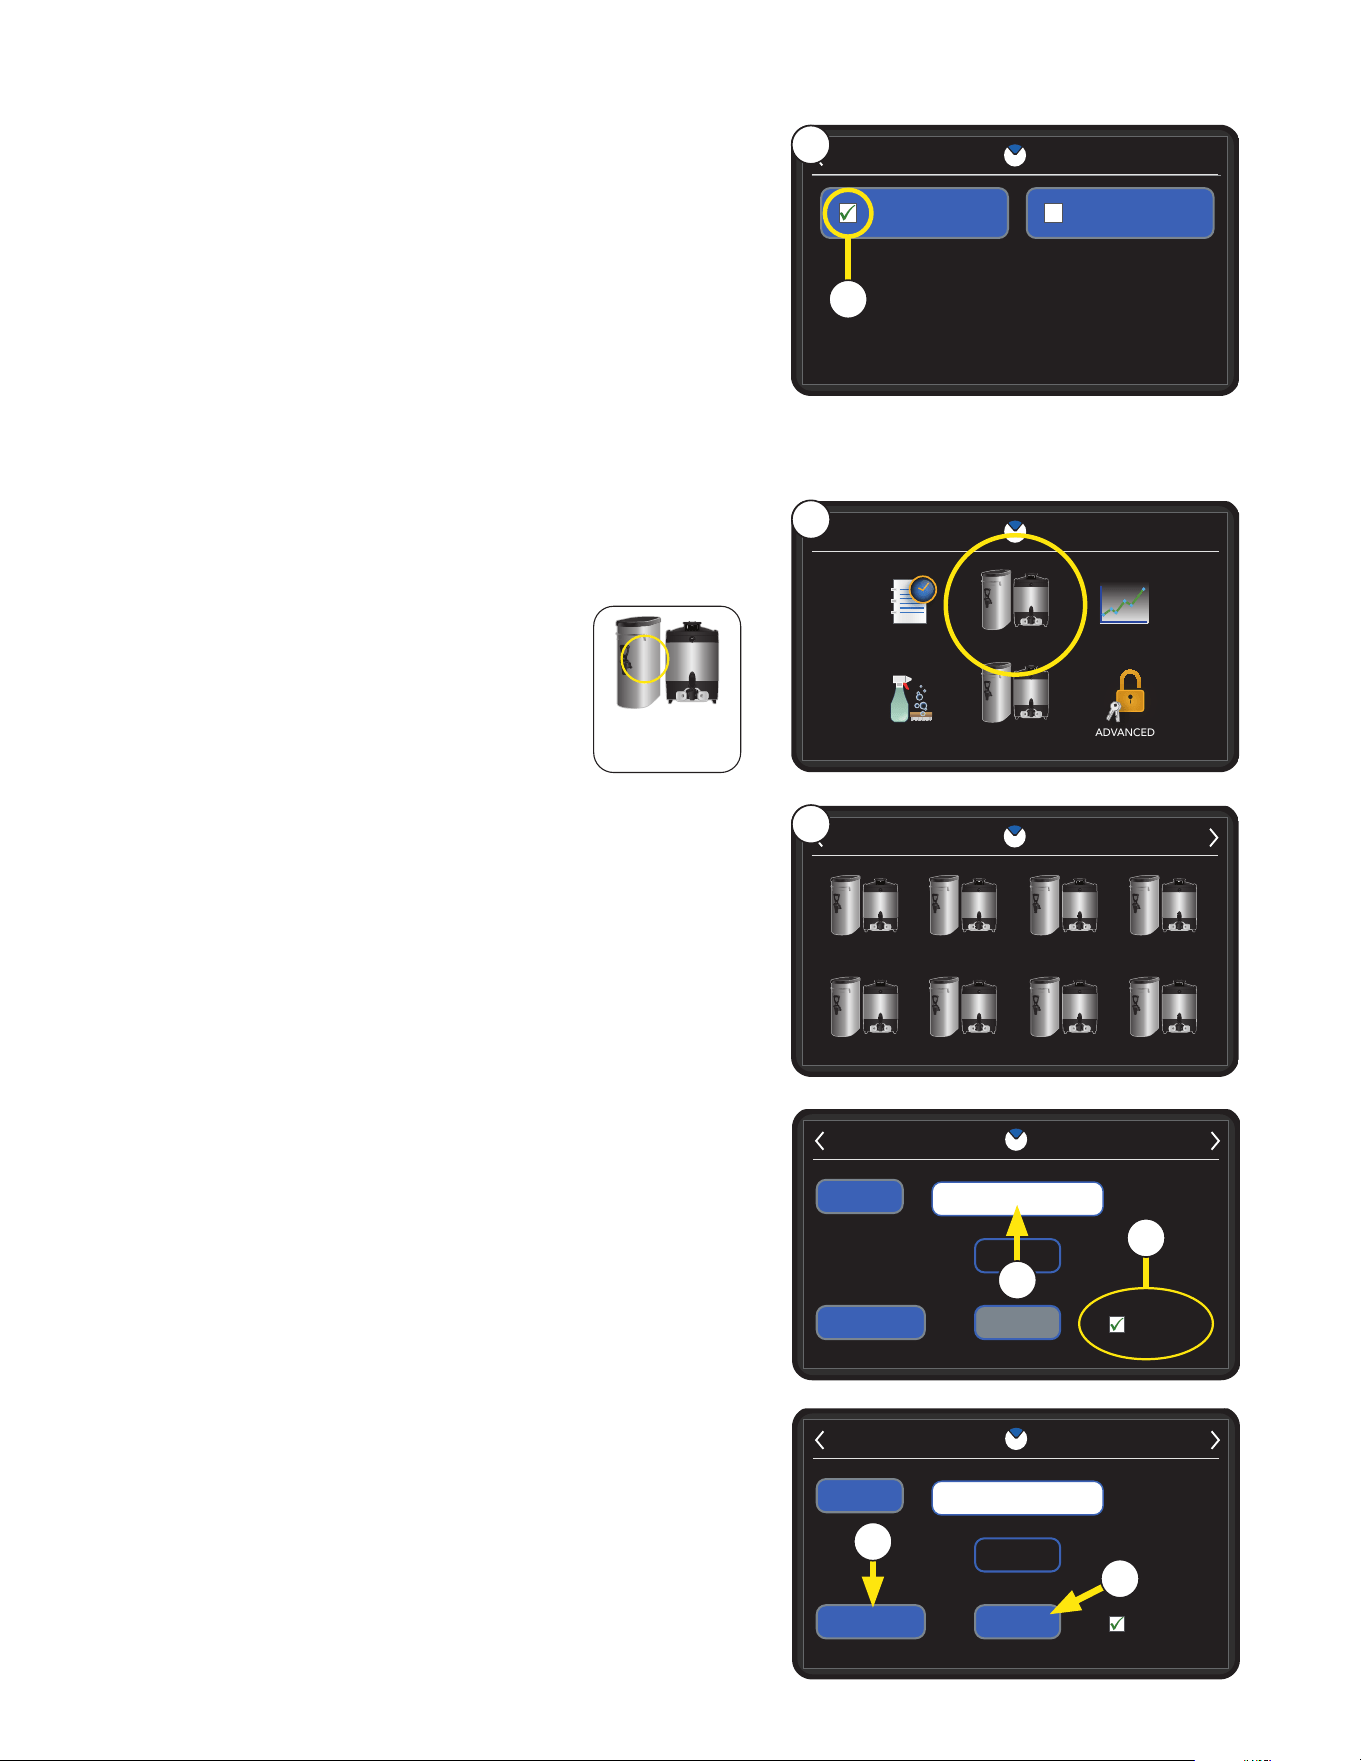
7. When complete, a new SERVERS icon will appear on the
SERVICE ACCESS screen.
NOTE: The feature is enabled but will not function correctly
(as indicated by the 0 on the server(s)
since no servers are enabled.
Numbers on the servers communicate
how many server(s) are enabled. There
are 16 servers possible.
Enabling FRESHlink Server Settings
1. Touch the BUNN logo for 1 second to enter
SERVICE ACCESS.
2. Select the ADVANCED icon.
3. At the PASSWORD ENTRY screen, select ENTER
(If a password is required, enter the code at this screen).
4. In the ADVANCED MENU screen, select MACHINE
SETTINGS and then the SERVER SETTINGS icon.
5. The SERVER SETTINGS screen will appear on the display.
6. Select the white check box to enable FRESHlink. A green
check mark will appear in the box when enabled.
SERVER SETTINGS
FRESHlink
®
EARLY NOTIFICATIONS
5
6
SERVICE
SERVERS
SETTINGS ADVANCEDCARE & CLEANING
ACCESS
STATISTICSEVENT LOG
9:10 AM 10/09/2024
00
7
Enabled
Servers
16
8. Select one of the server icons on the SERVER
SELECTION screen.
SERVER 1 SERVER 2 SERVER 3 SERVER 4
SERVER 5 SERVER 6 SERVER 7 SERVER 8
SERVER SELECTION
8
continued >
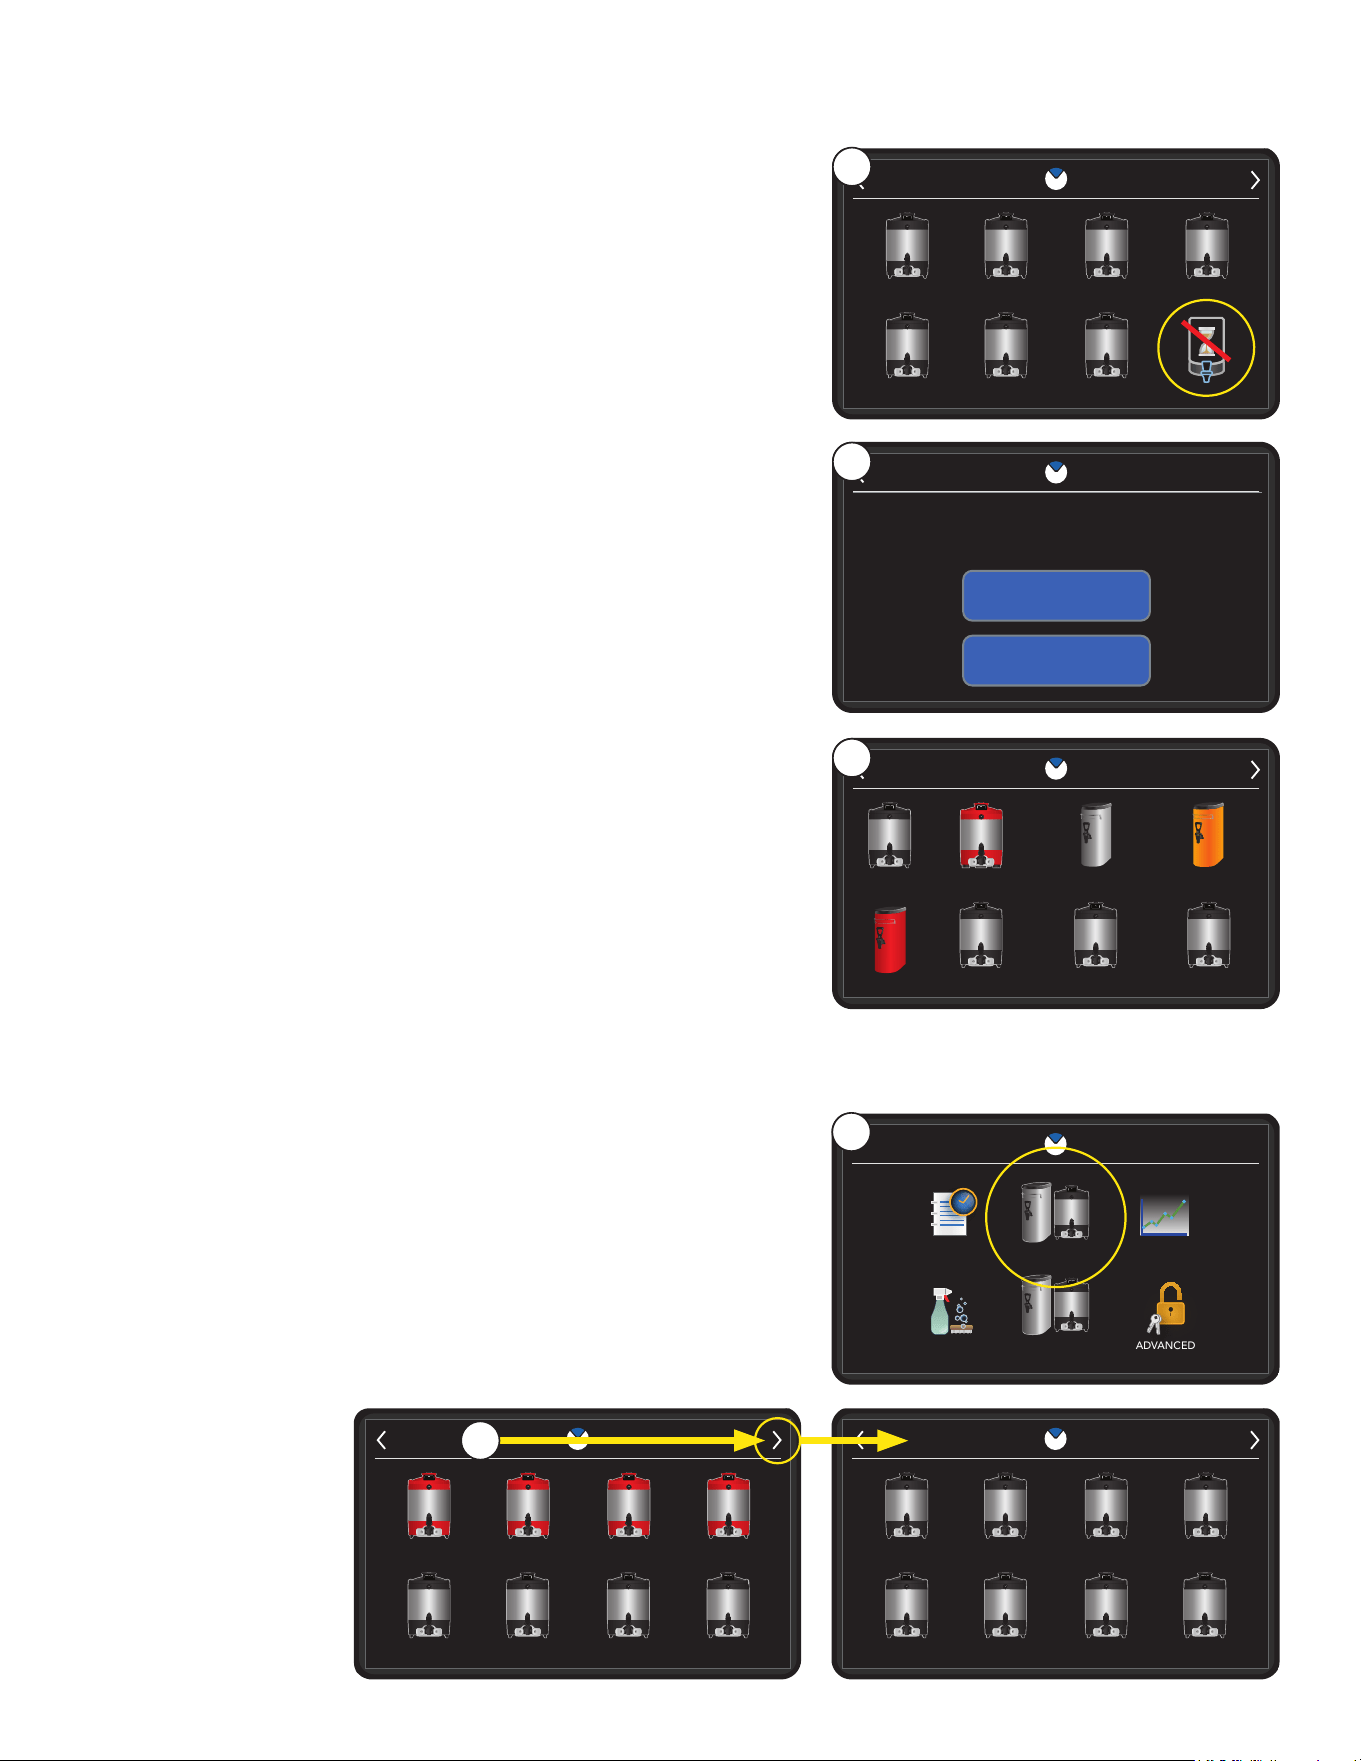
31
13. When the operator presses the brew button the server
selection screen will display. The user can choose what
server they would like to brew their recipe in.
SERVER SELECTION
0 0 0
0 0 0
0
REGULAR DECAF ETHIOPIA KENYA
LIGHT ROAST DARK ROAST GUATEMALA
REG
0:05
LIG
0:25
DAR
0:30
GUA
0:30
DEC
0:10
ETH
0:15
KEN
0:20
14
continued from previous page
14. The NO TRACKING icon allows a recipe to be brewed
without the freshness time being tracked.
PROGRAMMING
SERVER SELECTION
CANCEL
FRESHNESS TIME REMAINING IN
REGULAR
BREW ANYWAY?
15
15. After selecting the server, the brewer goes to the countdown
screen. The machine will now brew the batch as intended.
NOTE: If a server is selected with time remaining, the
following screen will also be shown to confirm the brew.
SERVER SELECTION
REGULAR
REG
1:00
0
ICED COFFEE
ICE
0:30
HOT TEA
0
GRN BUBBLE TEA
GRN
0:45
HOT
1:00
DECAF
DEC
0:00
TEA 2
HOT
0:00
TEA 1
0
GRN BUBBLE TEA
GRN
OFF
HOT
0:15
17
18. When a server expires, it will flash red.
When a server early notification is set, it will flash yellow at
the designated time.
If no Freshness Time is set, then OFF will be displayed in
the server.
17. After thirty seconds of idle time a screen saver displaying
the servers and freshness times will display.
The servers with the least amount of freshness time will
display first.
NOTE: If the screen is touched it will return to the
home screen.
Example of servers showing different
stages of freshness countdown.
SERVER SELECTION
0 0 0
0 0 0
0
SERVER 9 SERVER 10 SERVER 11 SERVER 12
SERVER 13 SERVER 14 SERVER 15
REG
0:05
COS
0:25
ETH
0:30
GUA
0:35
SERVER 16
KEN
0:40
DEC
0:10
BRA
0:15
COL
0:20
SERVICE
SERVERS
SETTINGS ADVANCEDCARE & CLEANING
ACCESS
STATISTICSEVENT LOG
9:10 AM 10/09/2024
00
SERVER SELECTION
0 0 0 0
REGULAR DECAF BRAZIL COLOMBIA
COSTA RICA ETHIOPIA GUATEMALA KENYA
REG
0:00
REG
0:00
COS
0:25
ETH
0:30
GUA
0:30
KEN
0:20
DEC
0:00
BRZ
0:00
COL
0:00
20
19
20. If more than 8 servers are being monitored an arrow will
appear in the upper right hand corner of the screen. This
will allow the user to advance to a second page to view
another maximum of eight servers.
19. Selecting the Servers icon from the SERVICE ACCESS
screen will allow the user to view all active servers being
monitored.
continued >
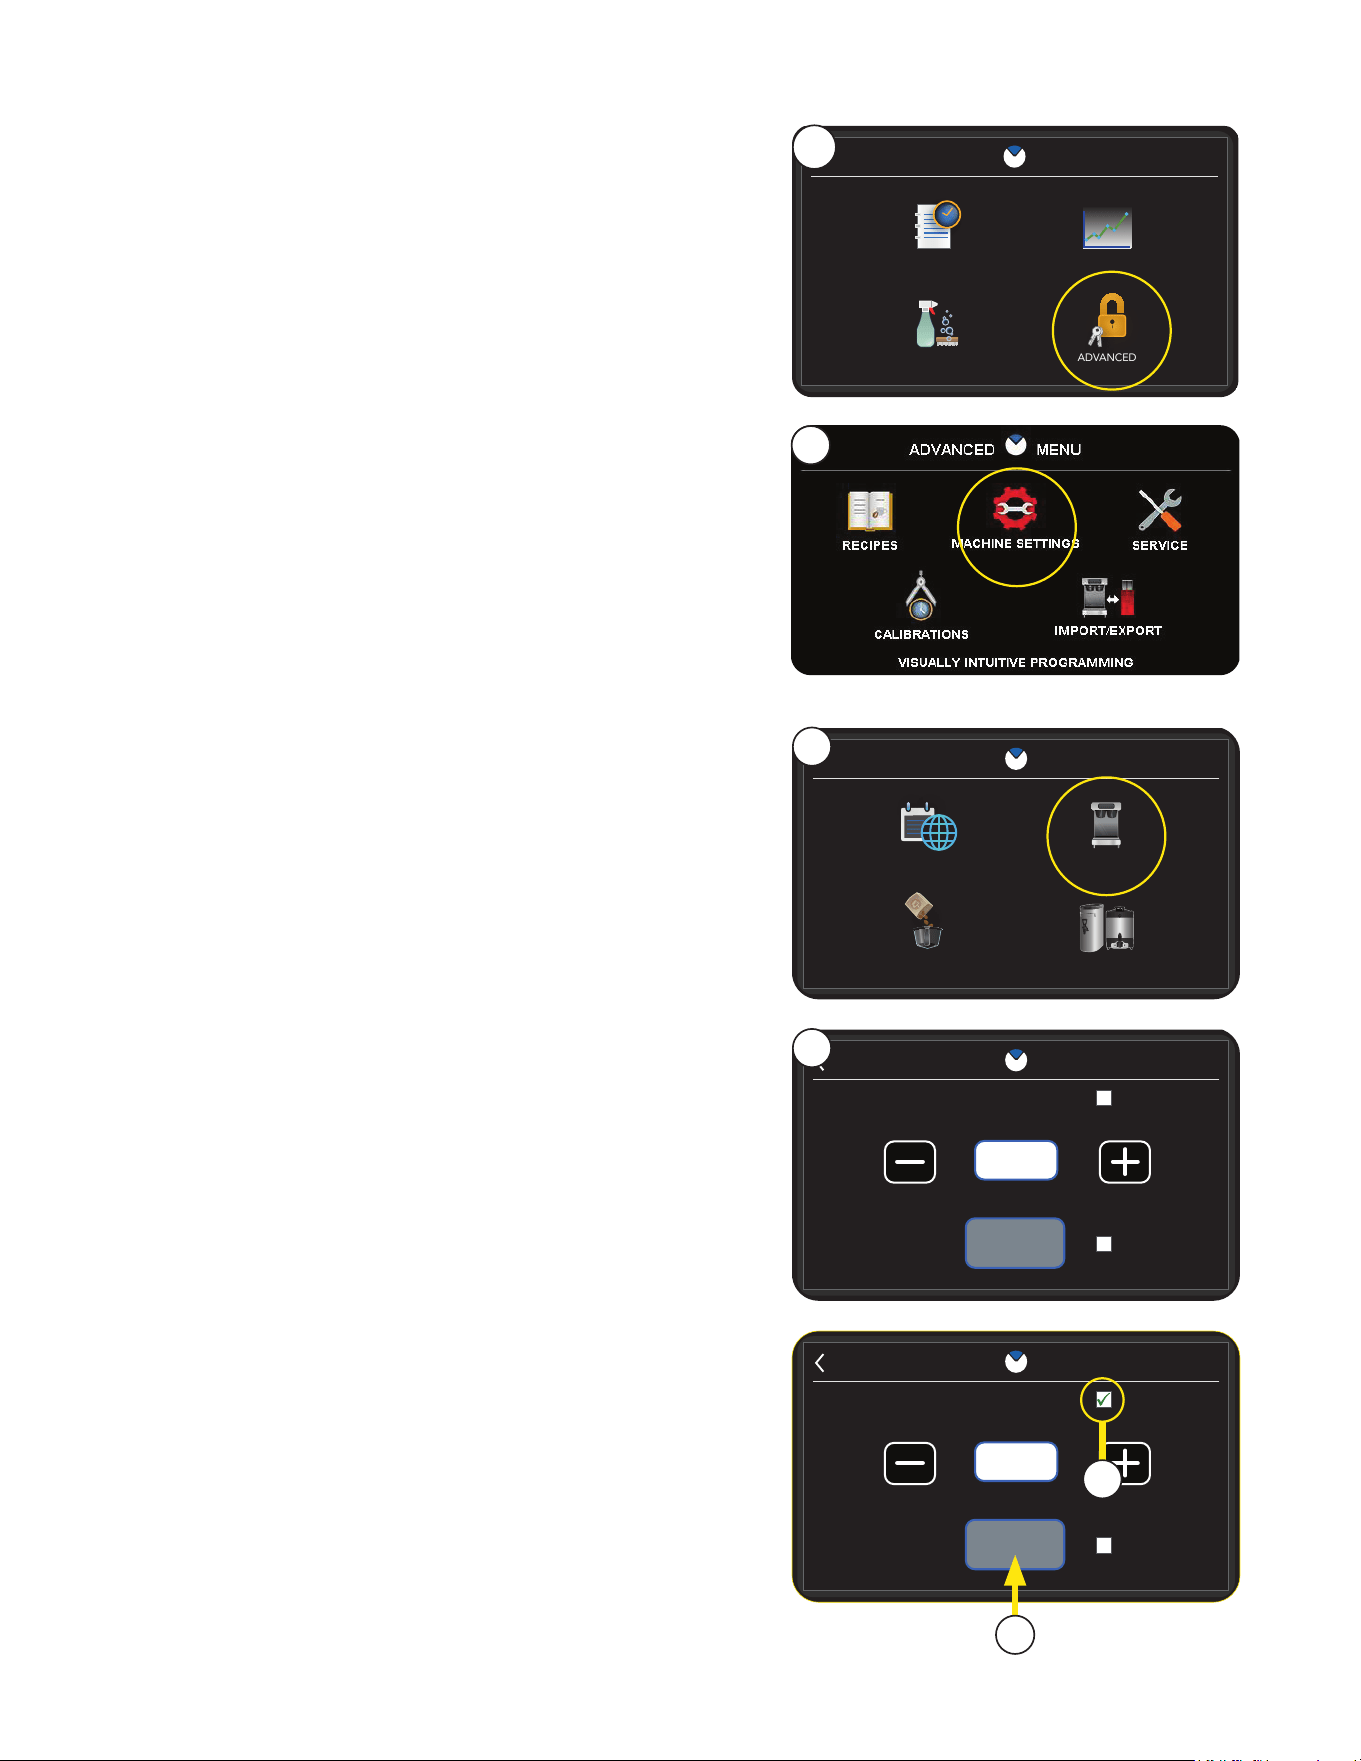
32
CUSTOM ENABLED
SAVED
0:15
BUNN ENABLED
SCREEN LOCK
SCREEN
SCREEN SAVER
ON AFTER
MIN:SEC
SAVER
7
Screen Lock Settings
This feature allows the user to lock the display after a
certain amount of idle time. This action keeps the machine
from accidentally brewing while also protecting it from
unauthorized access.
NOTE: A password will need to be entered if the display is
touched while the machine is locked.
After successful entry the user will be allowed to brew and
access programming parameters.
SERVICE
RECIPES STATISTICS
ADVANCEDCARE & CLEANING
ACCESS
2
PROGRAMMING
7. Select SAVED to complete.
6. Screen Lock is active when the user presses the white
box next to the Screen lock text and the green
check mark appears.
NOTE: The Screen lock feature can be used along with
other Screen Saver options.
NOTE: Screen Lock will have a minimum time of five
seconds and a maximum time of five minutes.
6
CUSTOM ENABLED
SAVED
0:15
BUNN ENABLED
SCREEN LOCK
SCREEN
SCREEN SAVER
ON AFTER
MIN:SEC
SAVER
5
MACHINE SETTINGS
REGIONAL SETTINGS BREWER SETTINGS
BREW SETTINGS SERVER SETTINGS
4
3
5. The screen SAVER screen will appear.
4. Select Brewer Settings.
HOW TO ACCESS SCREEN LOCK SETTINGS
1. Touch the BUNN logo for 1 second to enter
SERVICE ACCESS.
2. Select ADVANCED.
3. Select Machine Settings.
continued >
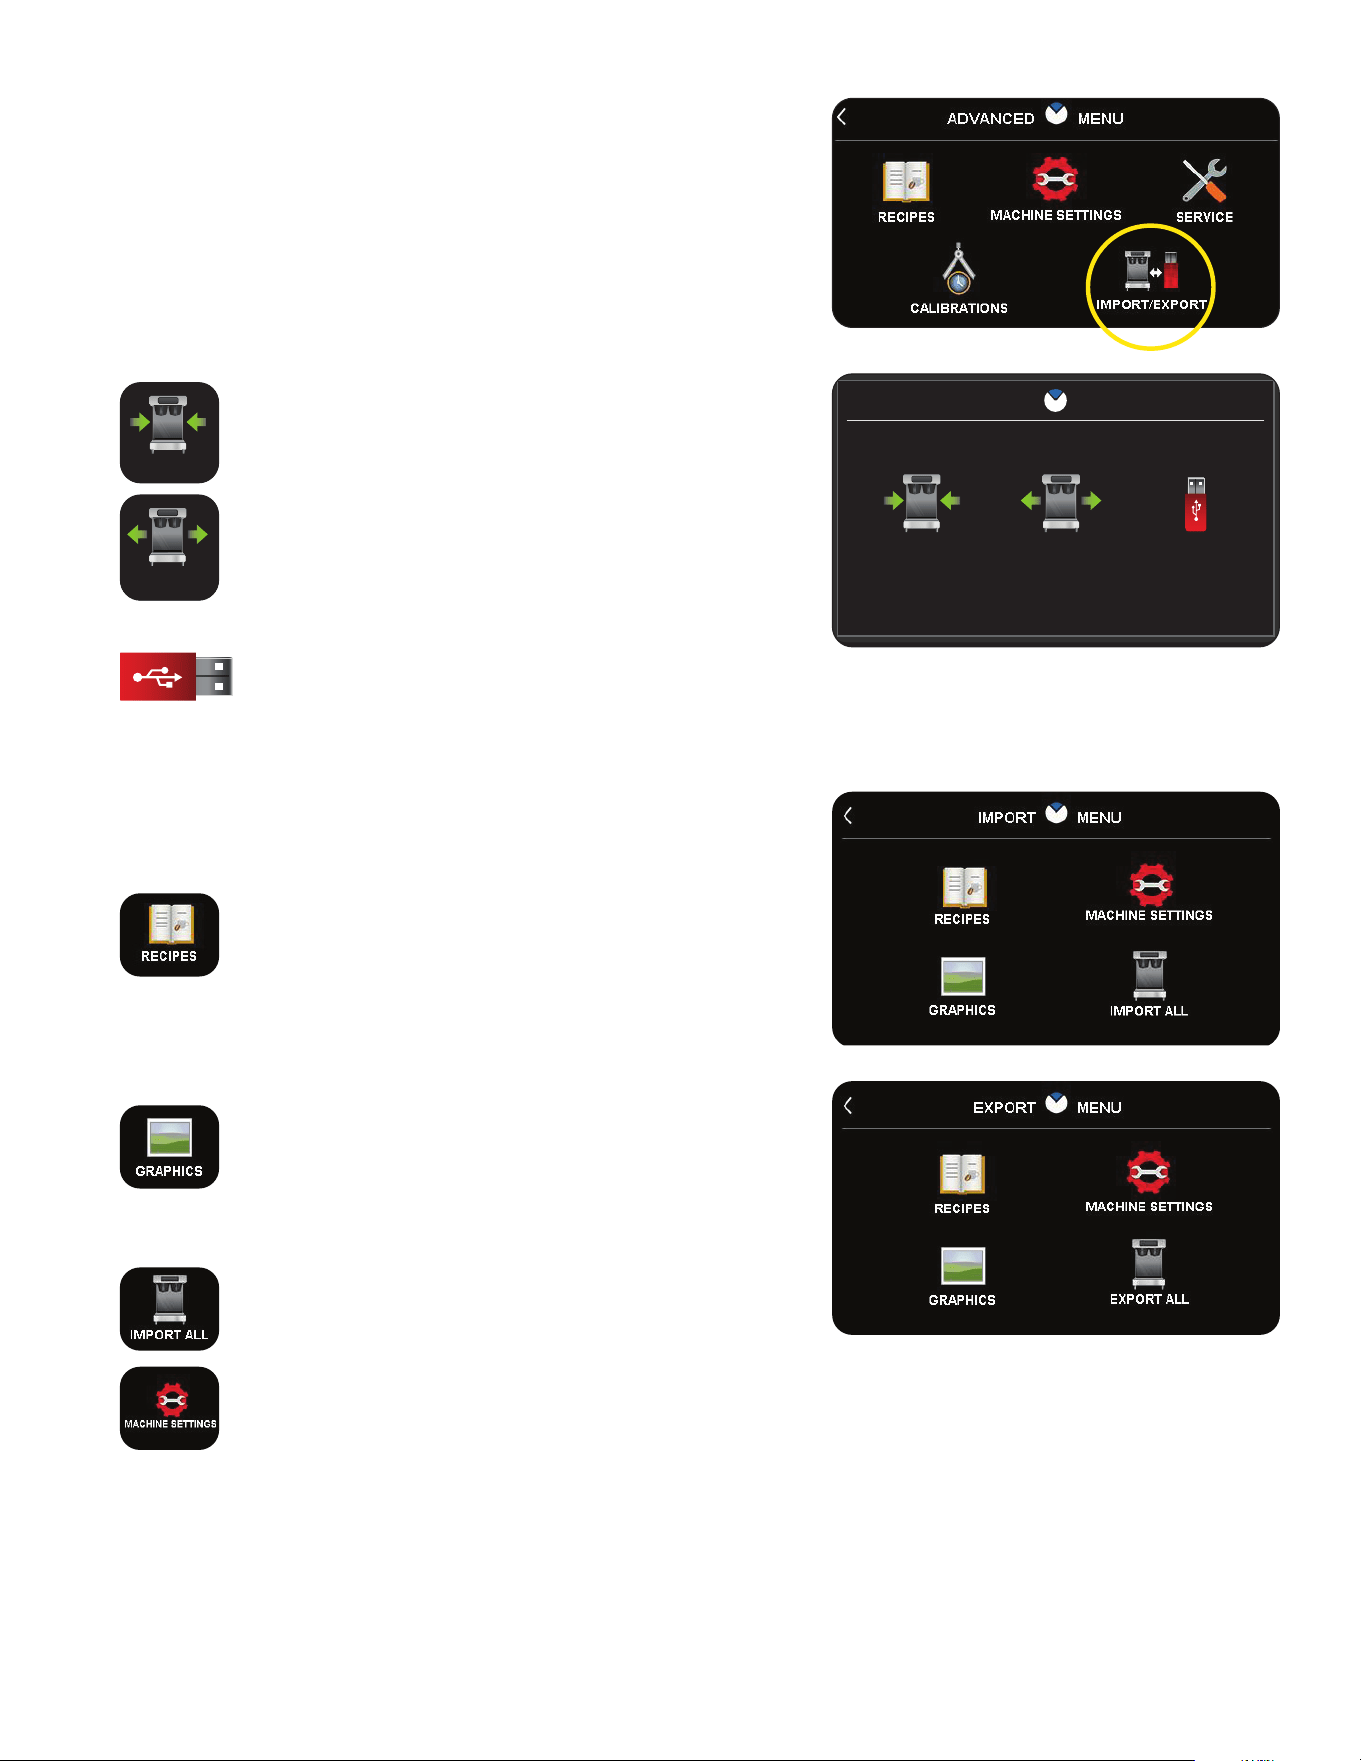
33
IMPORT/EXPORT MENU
The icons that have no files available will be grayed out and
not available for selection.
Recipes: Users will have the ability to import or
export the full recipe banks. Once the USB has
been detected, and the user selects the Recipes
icon, then the user must confirm the import or
export of the recipes. Any recipes present on
the stick will then be imported/exported into the
system.
Graphics: Custom images for a Screen Saver can
be imported into a machine and used in place of
the default screen savers. Once loaded, the user
can export the customer graphic to an external
USB. See section for Custom Screen Saver.
Import/Export All: This icon can be used to
import or export all files detected on an external
USB.
Machine Settings: Selecting machine settings will
allow the user to import or export all the settings
from another brewer. This includes all regional,
brewer, brew, and server settings. Calibrations
and serial number will be exported into the file, but
are read only, and as such will be ignored during
importing. Selecting yes will confirm the import.
Import / Export
The user will be allowed to import and export machine set-
tings, recipes, and screen savers.
When import export is selected, the user will be given three
selection choices of Import, Export, and Update. The user can
enter through the service screen and select the Import Export
icon. Inserting a USB on the home screen will prompt the
Import/Export passcode and when entered, will navigate the
user to the import export screen.
Use the Import feature to load recipes, graphics
and machine settings into a machine.
Use the Export feature to load recipes, graphics
and machines settings from a machine to an
external USB device.
The Update feature is used when newer software
files are loaded onto an external USB device.
IMPORT EXPORT
IMPORT EXPORT UPDATE
IMPORT EXPORT
IMPORT EXPORT UPDATE
IMPORT EXPORT
IMPORT EXPORT UPDATE
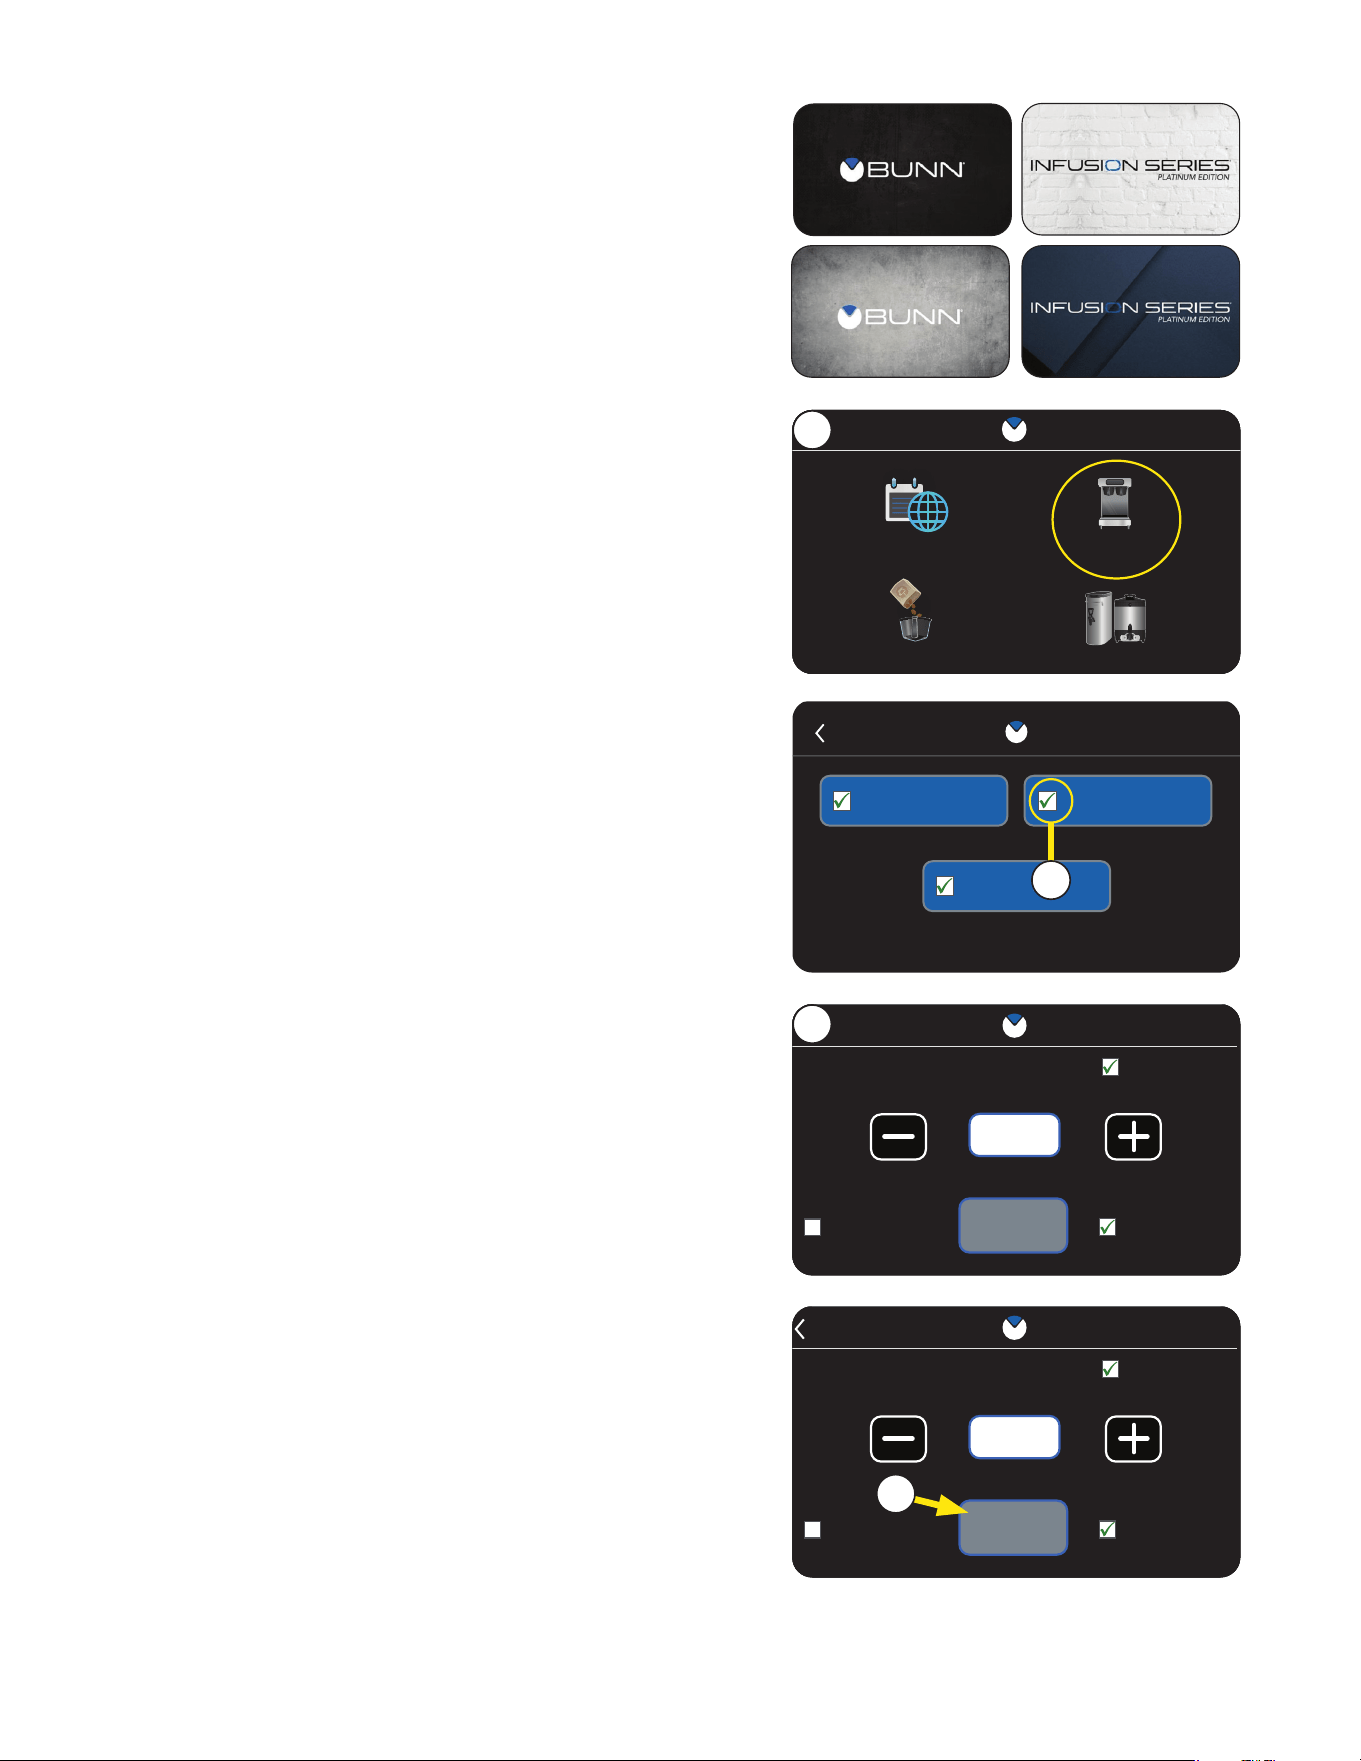
34
PROGRAMMING
continued >
CUSTOM ENABLED
SAVED
0:15
BUNN ENABLED
SCREEN LOCK
SCREEN
SCREEN SAVER
ON AFTER
MIN:SEC
SAVER
CUSTOM ENABLED
SAVED
0:15
BUNN ENABLED
SCREEN LOCK
SCREEN
SCREEN SAVER
ON AFTER
MIN:SEC
SAVER
CUSTOM ENABLED
SAVED
0:15
BUNN ENABLED
SCREEN LOCK
SCREEN
SCREEN SAVER
ON AFTER
MIN:SEC
SAVER
8
8. Select SAVED to complete.
NOTE: See next page for instructions on setting up a
custom screen saver.
7. To activate Screen Saver, press the white box next to either
Custom Enabled or BUNN Enabled (default images).
When enabled, a green check mark appears.
CUSTOM ENABLED
SAVED
0:15
BUNN ENABLED
SCREEN LOCK
SCREEN
SCREEN SAVER
ON AFTER
MIN:SEC
SAVER
CUSTOM ENABLED
SAVED
0:15
BUNN ENABLED
SCREEN LOCK
SCREEN
SCREEN SAVER
ON AFTER
MIN:SEC
SAVER
CUSTOM ENABLED
SAVED
0:15
BUNN ENABLED
SCREEN LOCK
SCREEN
SCREEN SAVER
ON AFTER
MIN:SEC
SAVER
6
MACHINE SETTINGS
REGIONAL SETTINGS BREWER SETTINGS
BREW SETTINGS SERVER SETTINGS
4
6. The screen SAVER screen will appear.
4. Select Brewer Settings.
HOW TO ACCESS SCREEN SAVER SETTINGS
1. Touch the BUNN logo for 1 second to enter
SERVICE ACCESS.
2. Select ADVANCED.
3. Select Machine Settings.
Screen Saver
The brewer ships with four default Screen Saver images. This
feature will be shipped default disabled. After the idle time has
been met, the Screen Savers will show in a rotating order.
NOTE: The four images are always in the brewer and rotate
every 15 seconds.
5. Select Screen Saver
BREWER SETTINGS
ENERGY SAVER
FUNNEL DETECT
SCREEN SAVER
5
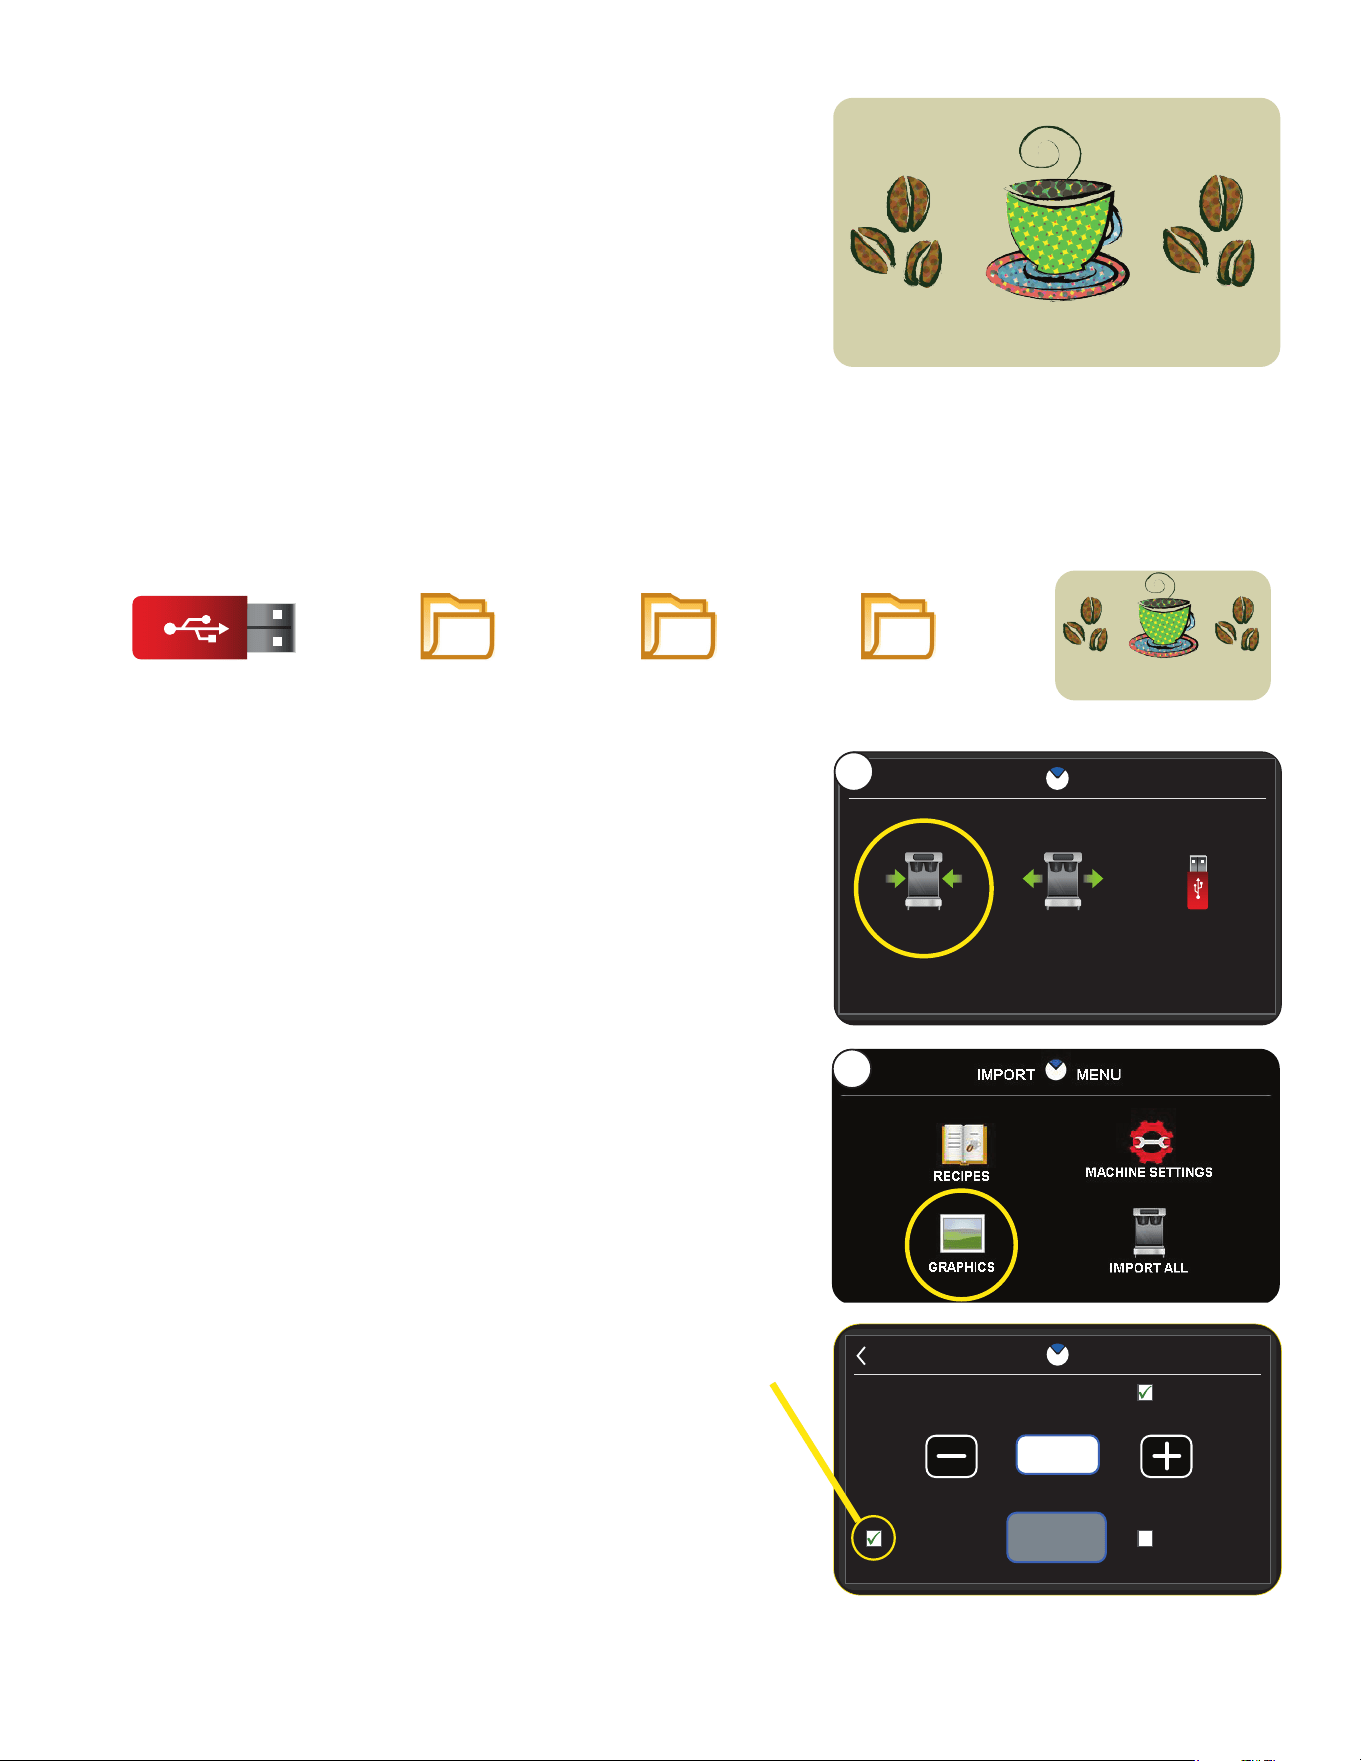
35
IMPORTING CUSTOM SCREEN SAVER
1. Insert a USB drive with the custom images to be imported.
2. At the PASSWORD ENTRY screen, select ENTER
(If a password is required, enter the code at this screen).
3. Choose Import from the 3 choices shown.
4. Select Graphics.
5. Select Yes to Import Graphics. Allow some time for the
image files to import.
6. You will be prompted when importing is complete. You can
exit the screen.
NOTE: If Screen Saver is not appearing on the display,
please refer to previous page for Enabling Screen Saver.
Custom Screen Saver
Custom Screen Saver images can be imported using the
Import/Export feature in the Service Menu.
CUSTOM IMAGE REQUIREMENTS
• Custom screen images must be 480 x 272 pixels in size.
• 10 images are the maximum allowed
- Images should be labeled "Screen1.jpg" sequentially
up to "Screen10.jpg".
CUSTOM ENABLED
SAVED
0:15
BUNN ENABLED
SCREEN LOCK
SCREEN
SCREEN SAVER
ON AFTER
MIN:SEC
SAVER
IMPORT EXPORT
IMPORT EXPORT UPDATE
3
USB Drive (D:)
>
BUNN_USB
>
SW
>
ScreenSaver
>
Image File
USB FOLDER STRUCTURE
The image file(s) must reside in a specific folder structure
as shown below. Ensure images are labeled correctly
before placing inside the ScreenSaver folder:
4
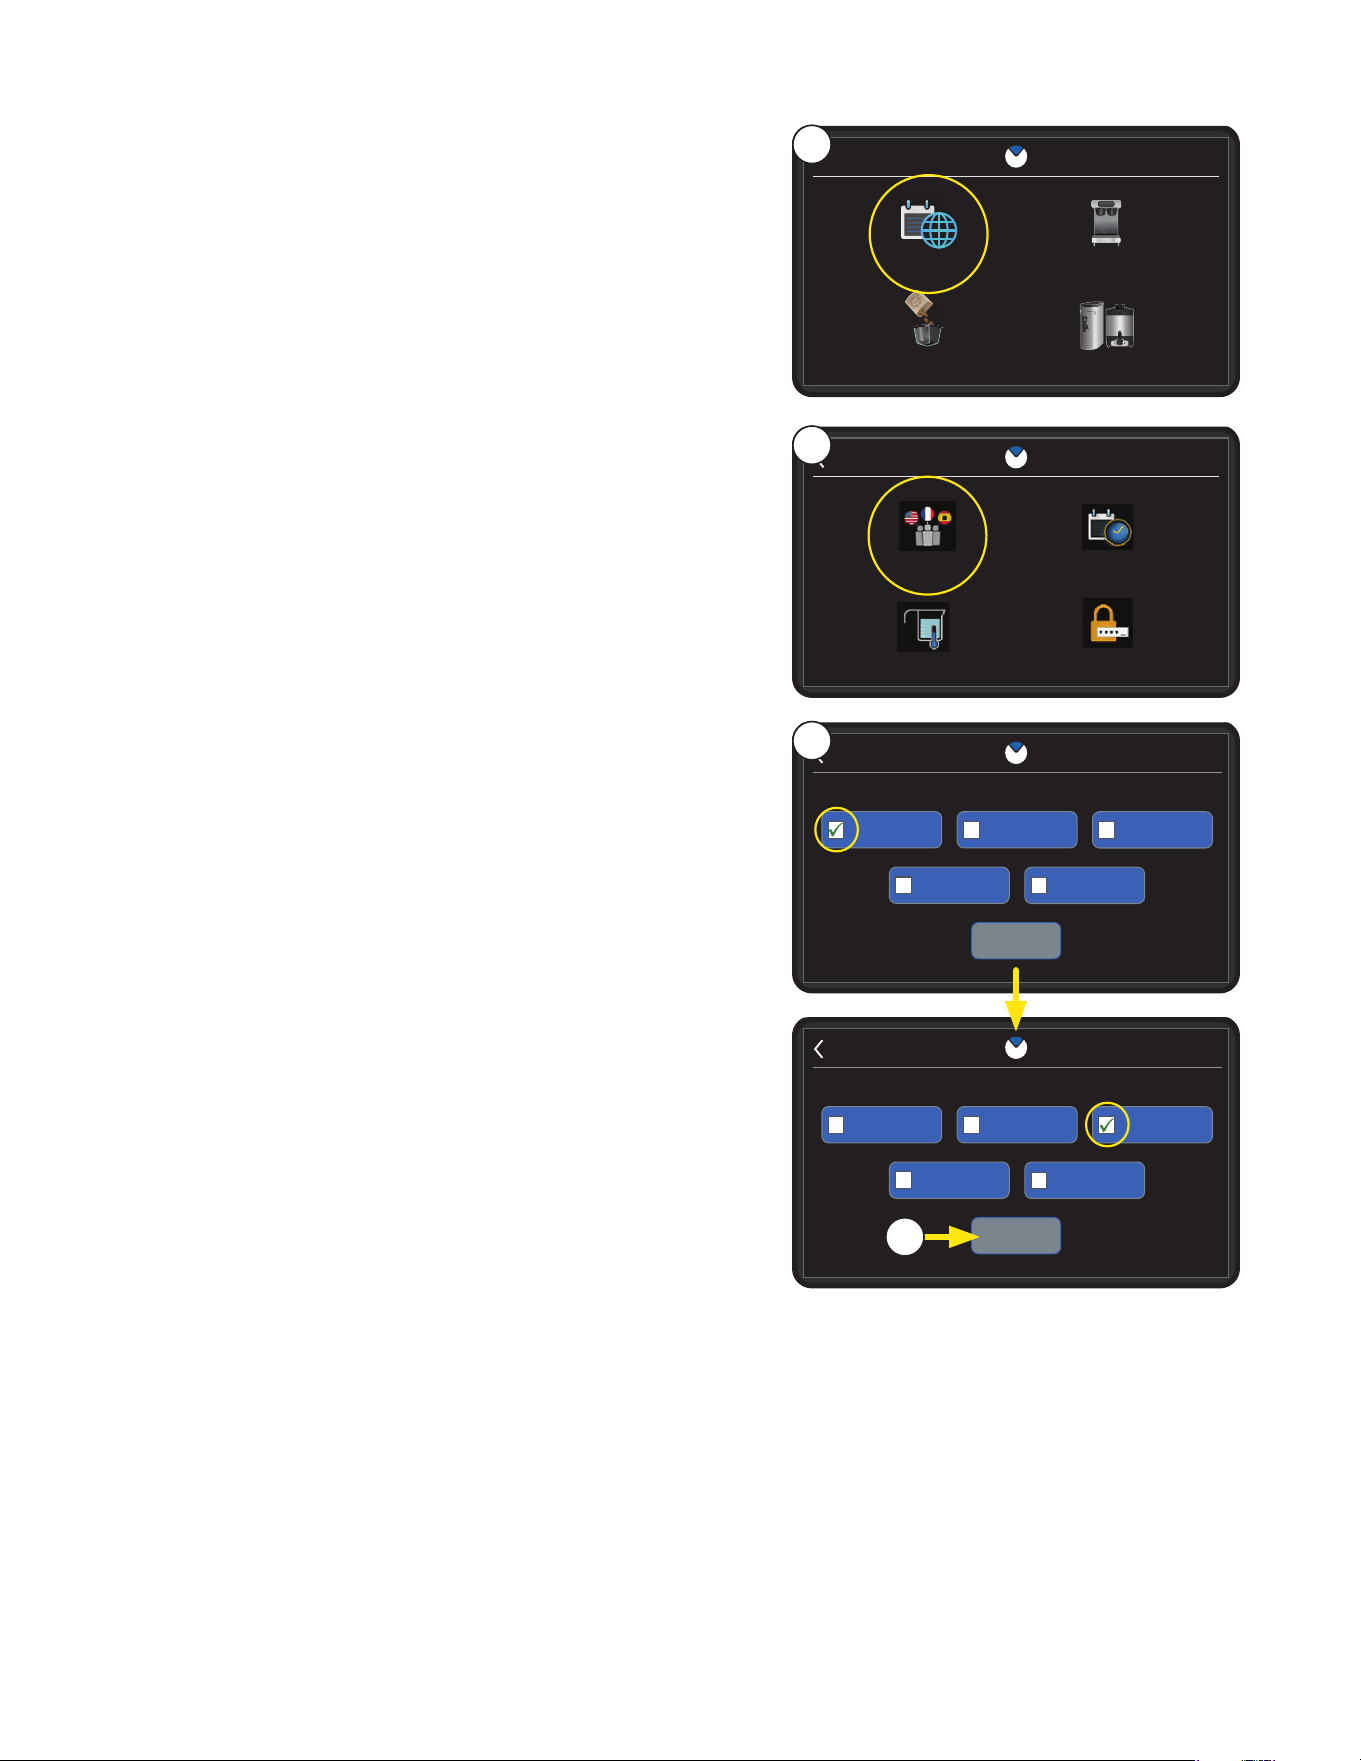
36
Language
When the Language button is selected, the user will be able
to choose French, English, Spanish, Japanese, or Chinese to
display on the machine.
1. Touch the BUNN logo for 1 second to enter
SERVICE ACCESS.
2. Select ADVANCED.
3. Select Machine Settings.
4. Select REGIONAL SETTINGS.
MACHINE SETTINGS
REGIONAL SETTINGS BREWER SETTINGS
BREW SETTINGS SERVER SETTINGS
REGIONAL SETTINGS
LANGUAGE TIME & DATE
UNITS PASSWORD
5
5. Select Language icon.
6. English is the default language the brewer is shipped with.
To select a new language the user must press the
preferred language box.
4
PROGRAMMING
SELECT LANGUAGELANGUAGE
CHOOSE YOUR LANGUAGE
SAVE
FRENCHENGLISH
SPANISH
JAPANESE
CHINESE
7. Pressing the Save button will confirm and switch the
language of the machine.
7
SELECT LANGUAGELANGUAGE
CHOOSE YOUR LANGUAGE
SAVED
FRENCHENGLISH
SPANISH
JAPANESE
CHINESE
6
NOTE: The check mark will move to the new language.
continued >

37
SAVED
9 10 AM
TIME
:
11 26 2024
DATE
Time and Date
To set the time and date, the user must select Time & Date
from the Regional Settings menu.
MACHINE SETTINGS
REGIONAL SETTINGS BREWER SETTINGS
BREW SETTINGS SERVER SETTINGS
REGIONAL SETTINGS
LANGUAGE TIME & DATE
UNITS PASSWORD
6. To set the time, select a text field to change by clicking
in the preferred box, then use the plus or minus button to
change the number for that field.
TIME FORMAT
MM-DD-YYYY MM-YYYY-DD
DD-MM-YYYY YYYY-DD-MM
DD-YYYY-MM YYYY-MM-DD
12 HOURS 24 HOURS
6
5
NOTE: The 12-hour format is the default for the clock.
NOTE: The selected formats will show a green arrow in the
white boxes.
5. Select Time & Date.
4
PROGRAMMING
12 Hour / MM-DD-YYYY Format
SAVE
13 08
TIME
:
04 15 2024
DATE
10. Select SAVE to confirm and exit back to the Regional
Settings screen.
9. Select the arrow in the upper left corner to return to the
Time & Date screen.
10
24 Hour / MM-DD-YYYY Format
7. To choose another format, select the arrow in the upper
right corner to view the Time Format screen.
8. To change the format, select the preferred Month, Day,
Year button or Hour button to change the date and
time display.
7
8
9
continued >
1. Touch the BUNN logo for 1 second to enter
SERVICE ACCESS.
2. Select ADVANCED.
3. Select Machine Settings.
4. Select REGIONAL SETTINGS.

38
Units
This feature can change the display to English or Metric units.
NOTE: Default units are set to English
MACHINE SETTINGS
REGIONAL SETTINGS BREWER SETTINGS
BREW SETTINGS SERVER SETTINGS
REGIONAL SETTINGS
LANGUAGE TIME & DATE
UNITS PASSWORD
5
5. Select Units icon.
6. To change the Unit type, select the button of the
preferred type.
4
7. Select SAVE to confirm and exit back to the Regional
Settings screen.
SELECT UNITS
CHANGE UNITS
METRIC
SAVED
ENGLISH
6
NOTE: The check mark will move to the new selection.
PROGRAMMING
7
1. Touch the BUNN logo for 1 second to enter
SERVICE ACCESS.
2. Select ADVANCED.
3. Select Machine Settings.
4. Select REGIONAL SETTINGS.
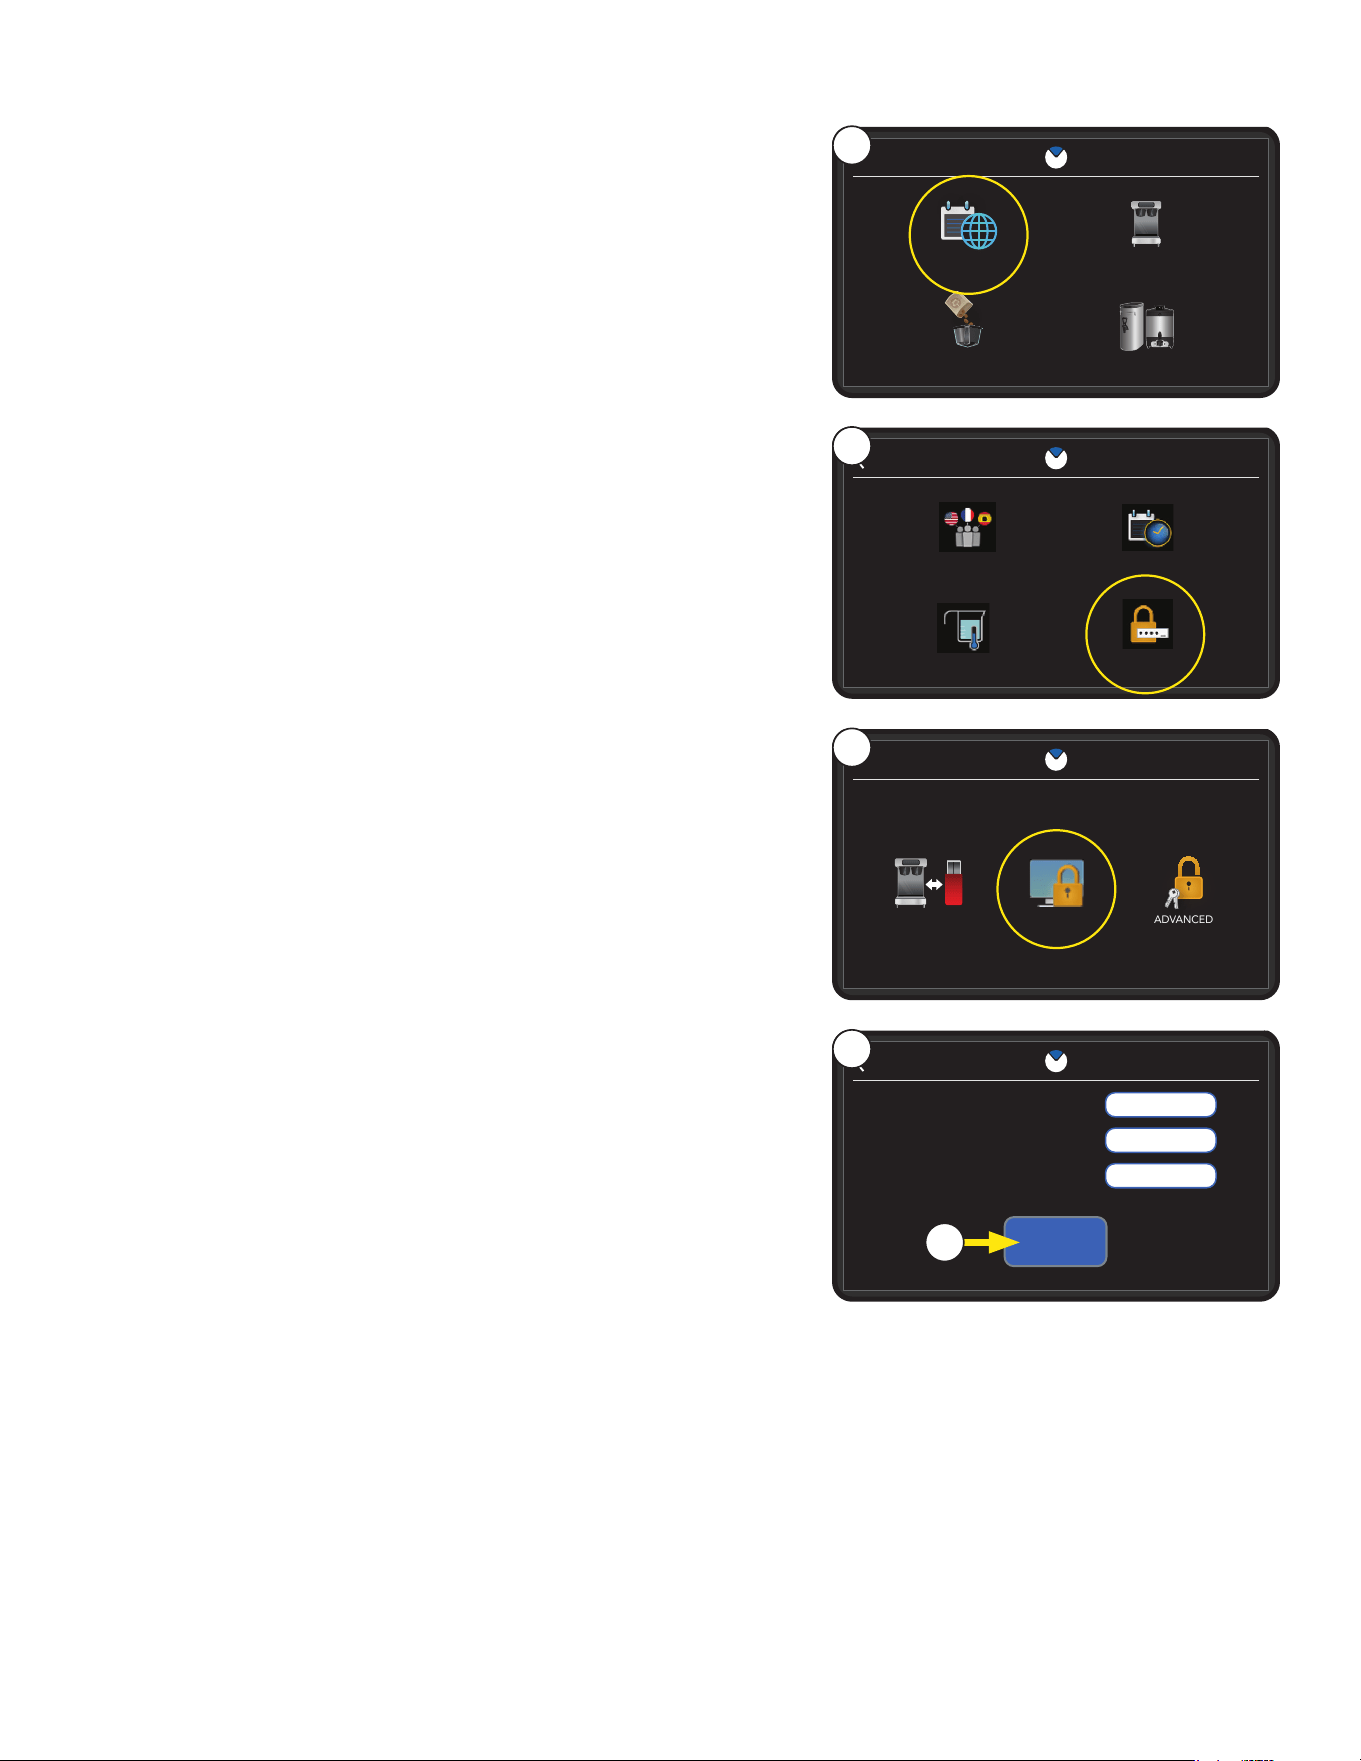
39
PROGRAMMING
Change Password
This feature allows the user to set passwords for different
regions of the machine.
MACHINE SETTINGS
REGIONAL SETTINGS BREWER SETTINGS
BREW SETTINGS SERVER SETTINGS
REGIONAL SETTINGS
LANGUAGE TIME & DATE
UNITS PASSWORD
XXXX
XXXX
XXXX
CHANGE PASSWORD
SAVE
PASSWORD
NEW PASSWORD
CONFIRM NEW PASSWORD
8. Select SAVE if changed.
8
7
7. Passwords can be created or reset from this screen.
CHANGE
SCREEN LOCK
PASSWORD
IMPORT / EXPORT ADVANCED
6
5
6. For this example select screen LOCK.
5. Select PASSWORD.
4
1. Touch the BUNN logo for 1 second to enter
SERVICE ACCESS.
2. Select ADVANCED.
3. Select Machine Settings.
4. Select REGIONAL SETTINGS.
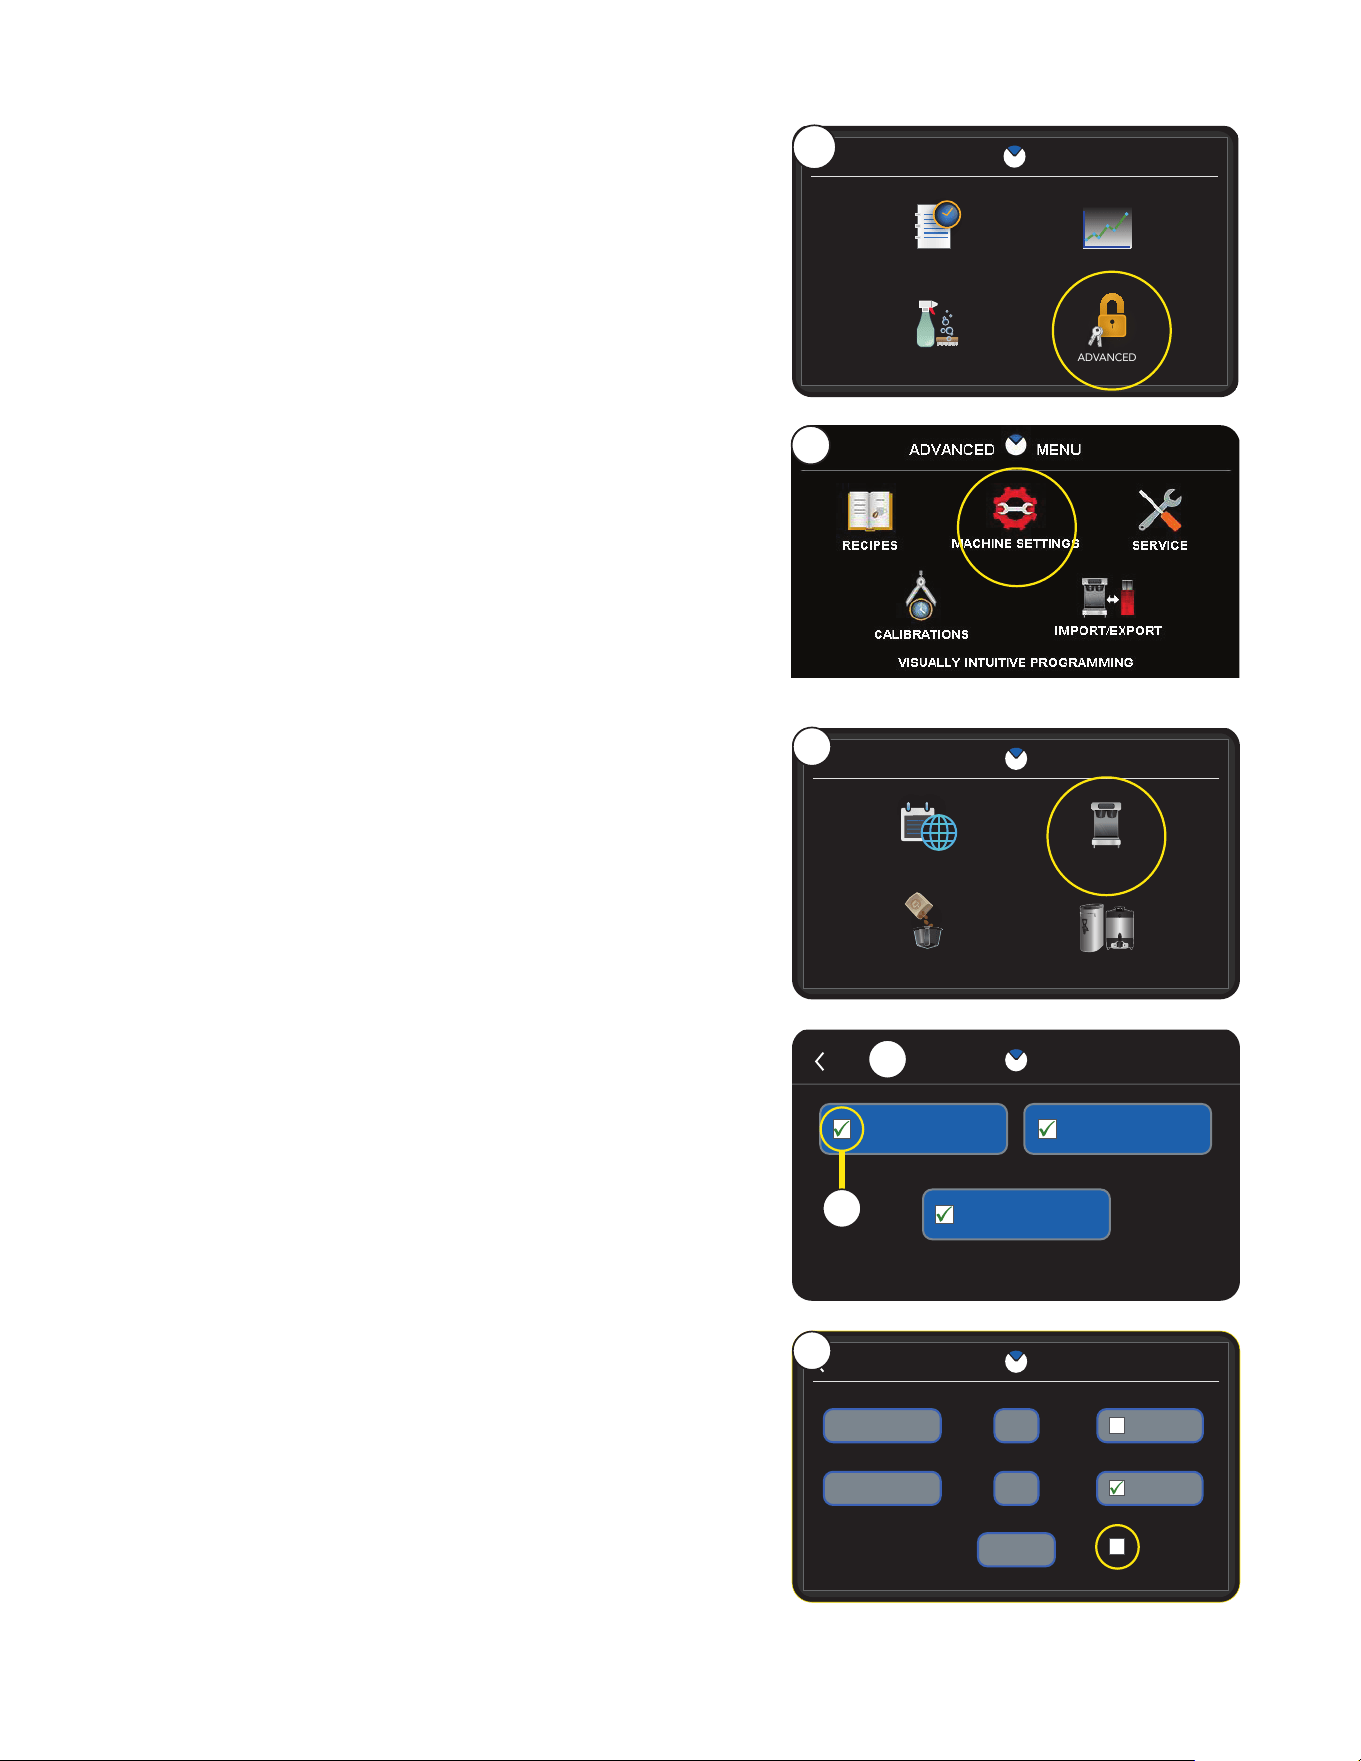
40
ENERGY SAVER
11:59
12:00
SAVED
PM
AM
ENABLED
ENERGY SAVER ON TANK ACTION
ENERGY SAVER OFF
140˚
OFF
Energy Saver
Accessed through Brewer Settings, the Energy Saver feature
can be enabled to either turn the tank heater off or drop the
temperature to 140° to save energy.
NOTE: A password will need to be entered if the display is
touched while the machine is locked.
After successful entry the user will be allowed to brew and
access programming parameters.
SERVICE
RECIPES STATISTICS
ADVANCEDCARE & CLEANING
ACCESS
2
7. By default Energy Saver is disabled.
Select the check box to enable.
BREWER SETTINGS
ENERGY SAVER
FUNNEL DETECT
SCREEN SAVER
5
MACHINE SETTINGS
REGIONAL SETTINGS BREWER SETTINGS
BREW SETTINGS SERVER SETTINGS
4
3
5. The BREWER SETTINGS screen will appear.
4. Select Brewer Settings icon.
HOW TO ACCESS
1. Touch the BUNN logo for 1 second to enter
SERVICE ACCESS.
2. Select ADVANCED.
3. Select Machine Settings.
PROGRAMMING
Disabled in 12 Hour format
6. Select the Energy Saver button.
The green check mark will appear in the box.
6
7
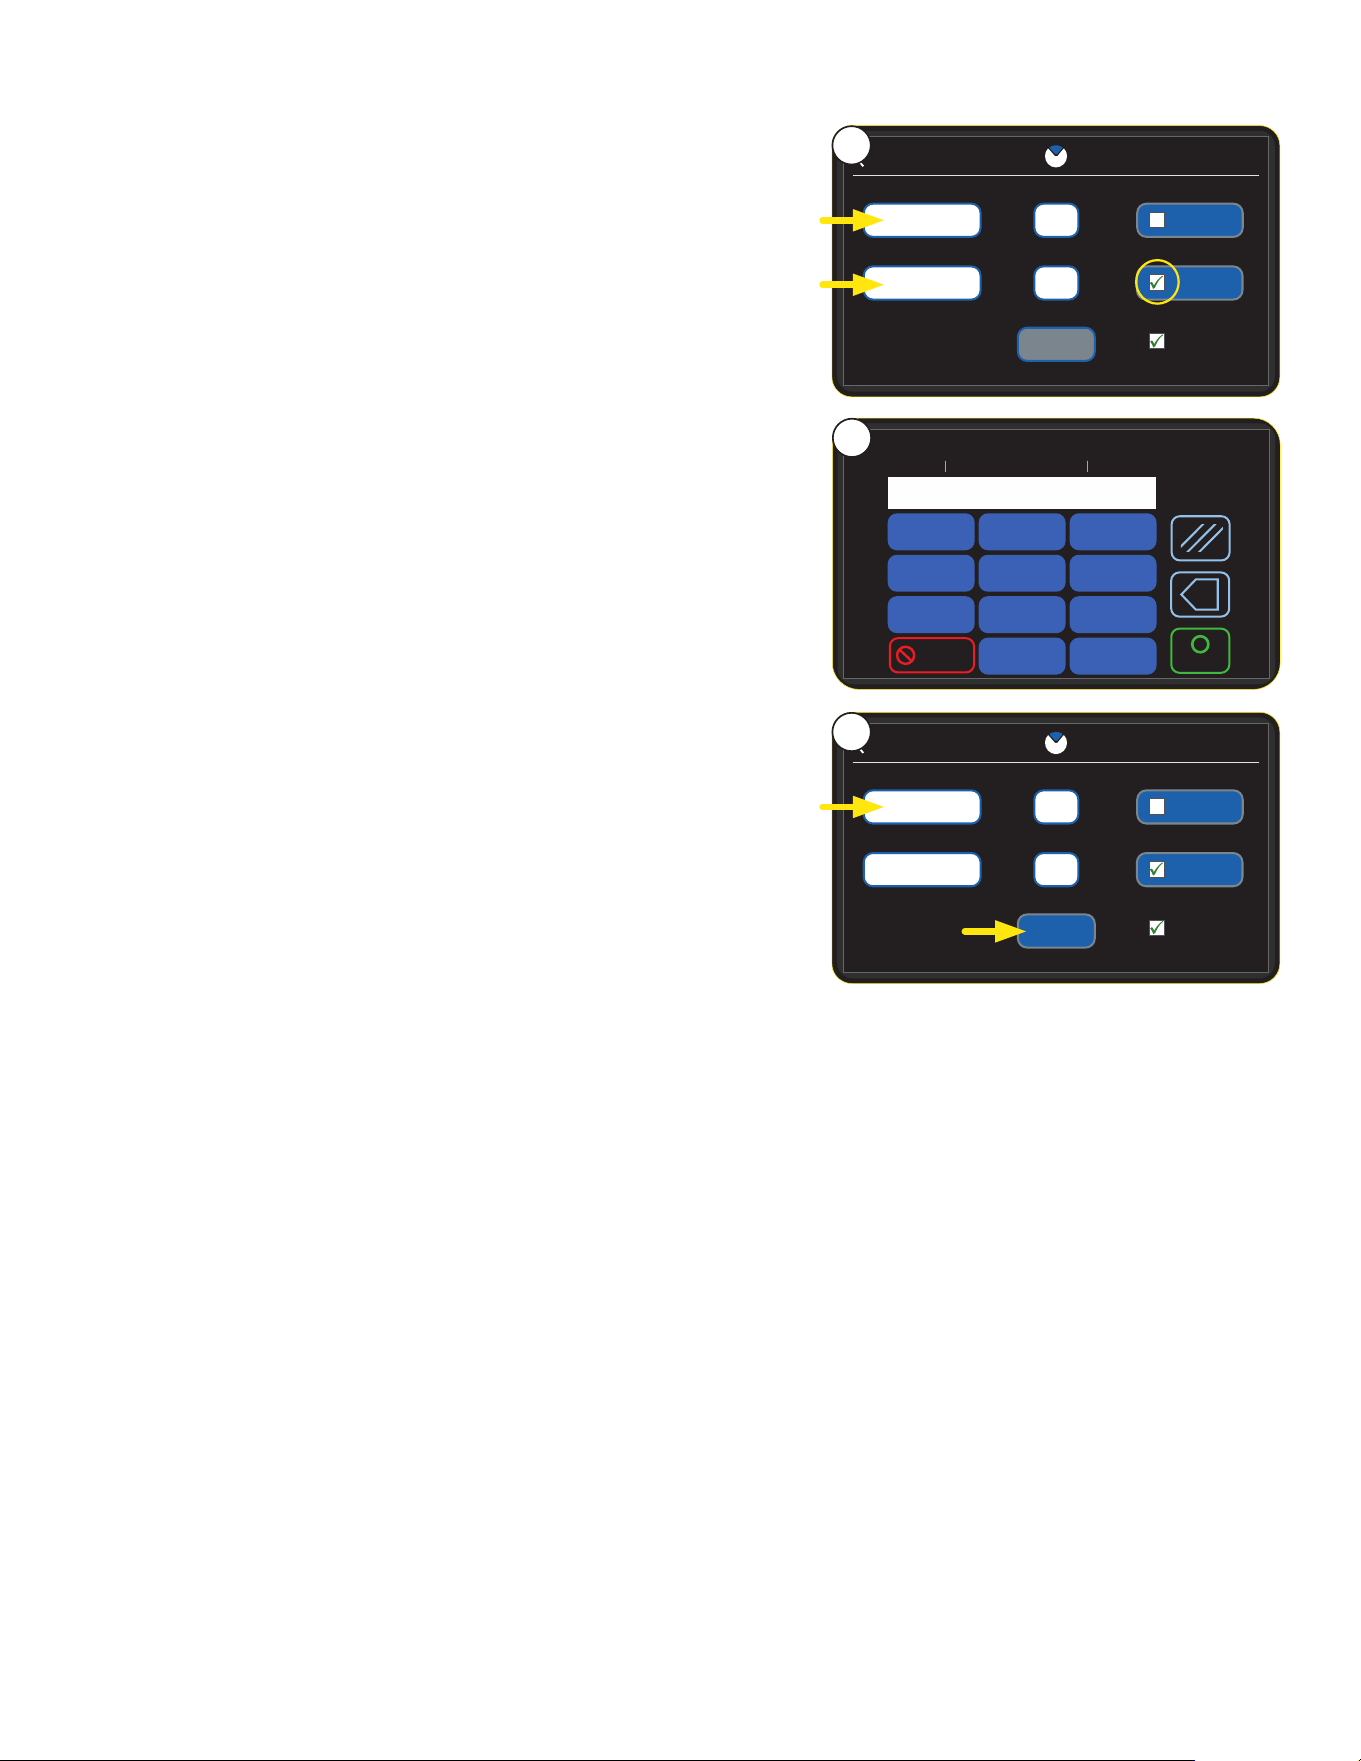
41
ENERGY SAVER
11:59
12:00
SAVED
PM
AM
ENABLED
ENERGY SAVER ON TANK ACTION
ENERGY SAVER OFF
140˚
OFF
ENERGY SAVER ON
CURRENT 11:59MIN 1:00 MAX 12:59
1
4
7
2
5
8
3
6
9
0
1
4
7
2
5
8
3
6
9
0
Cancel
1
4
7
2
5
8
3
6
9
0
.
ENTER
x
10:30
8. Set times by pressing in the white fields.
NOTE: The AM and PM fields will allow the user to set
the time when the tank heater will shut off or drop in
temperature to 140˚ as noted by the check mark.
9. When pressed, a numeric keypad will prompt the user to
enter the time desired.
Enter the time, then press Enter to confirm.
10. If time is changed, press Save to complete.
PROGRAMMING
8
9
ENERGY SAVER
10:30
12:00
SAVE
PM
AM
ENABLED
ENERGY SAVER ON TANK ACTION
ENERGY SAVER OFF
140˚
OFF
10