Setup Instructions
Product No. 2515200.1
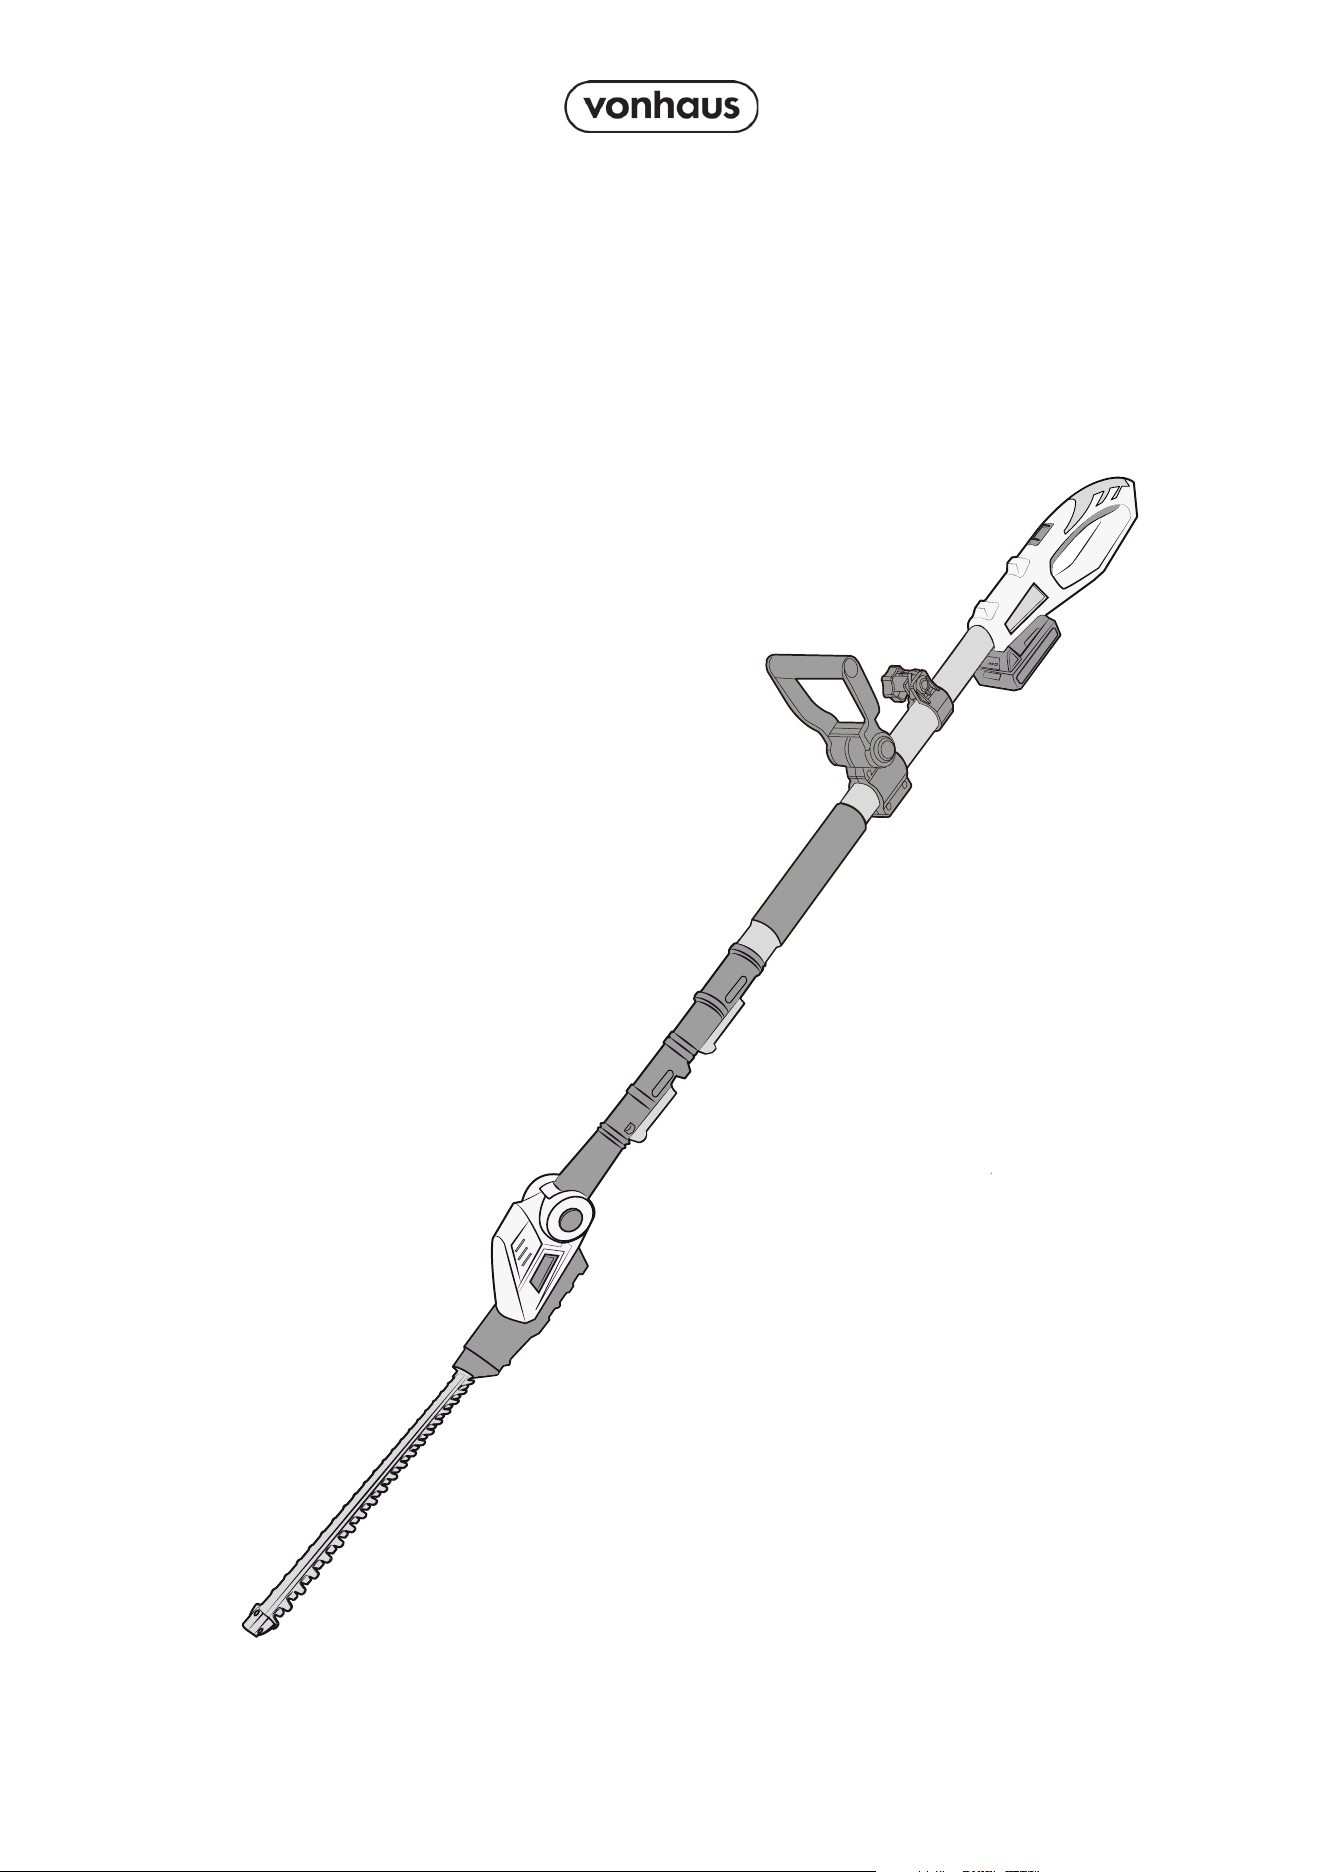
20V MAX CORDLESS
POLE TRIMMER

2
Let’s get started!
Visit our product hub for
useful tips and tricks on
getting the most out of
your new product.
SCAN ME
Need further help?
suppor[email protected]
See our full range at
www.vonhaus.com
3
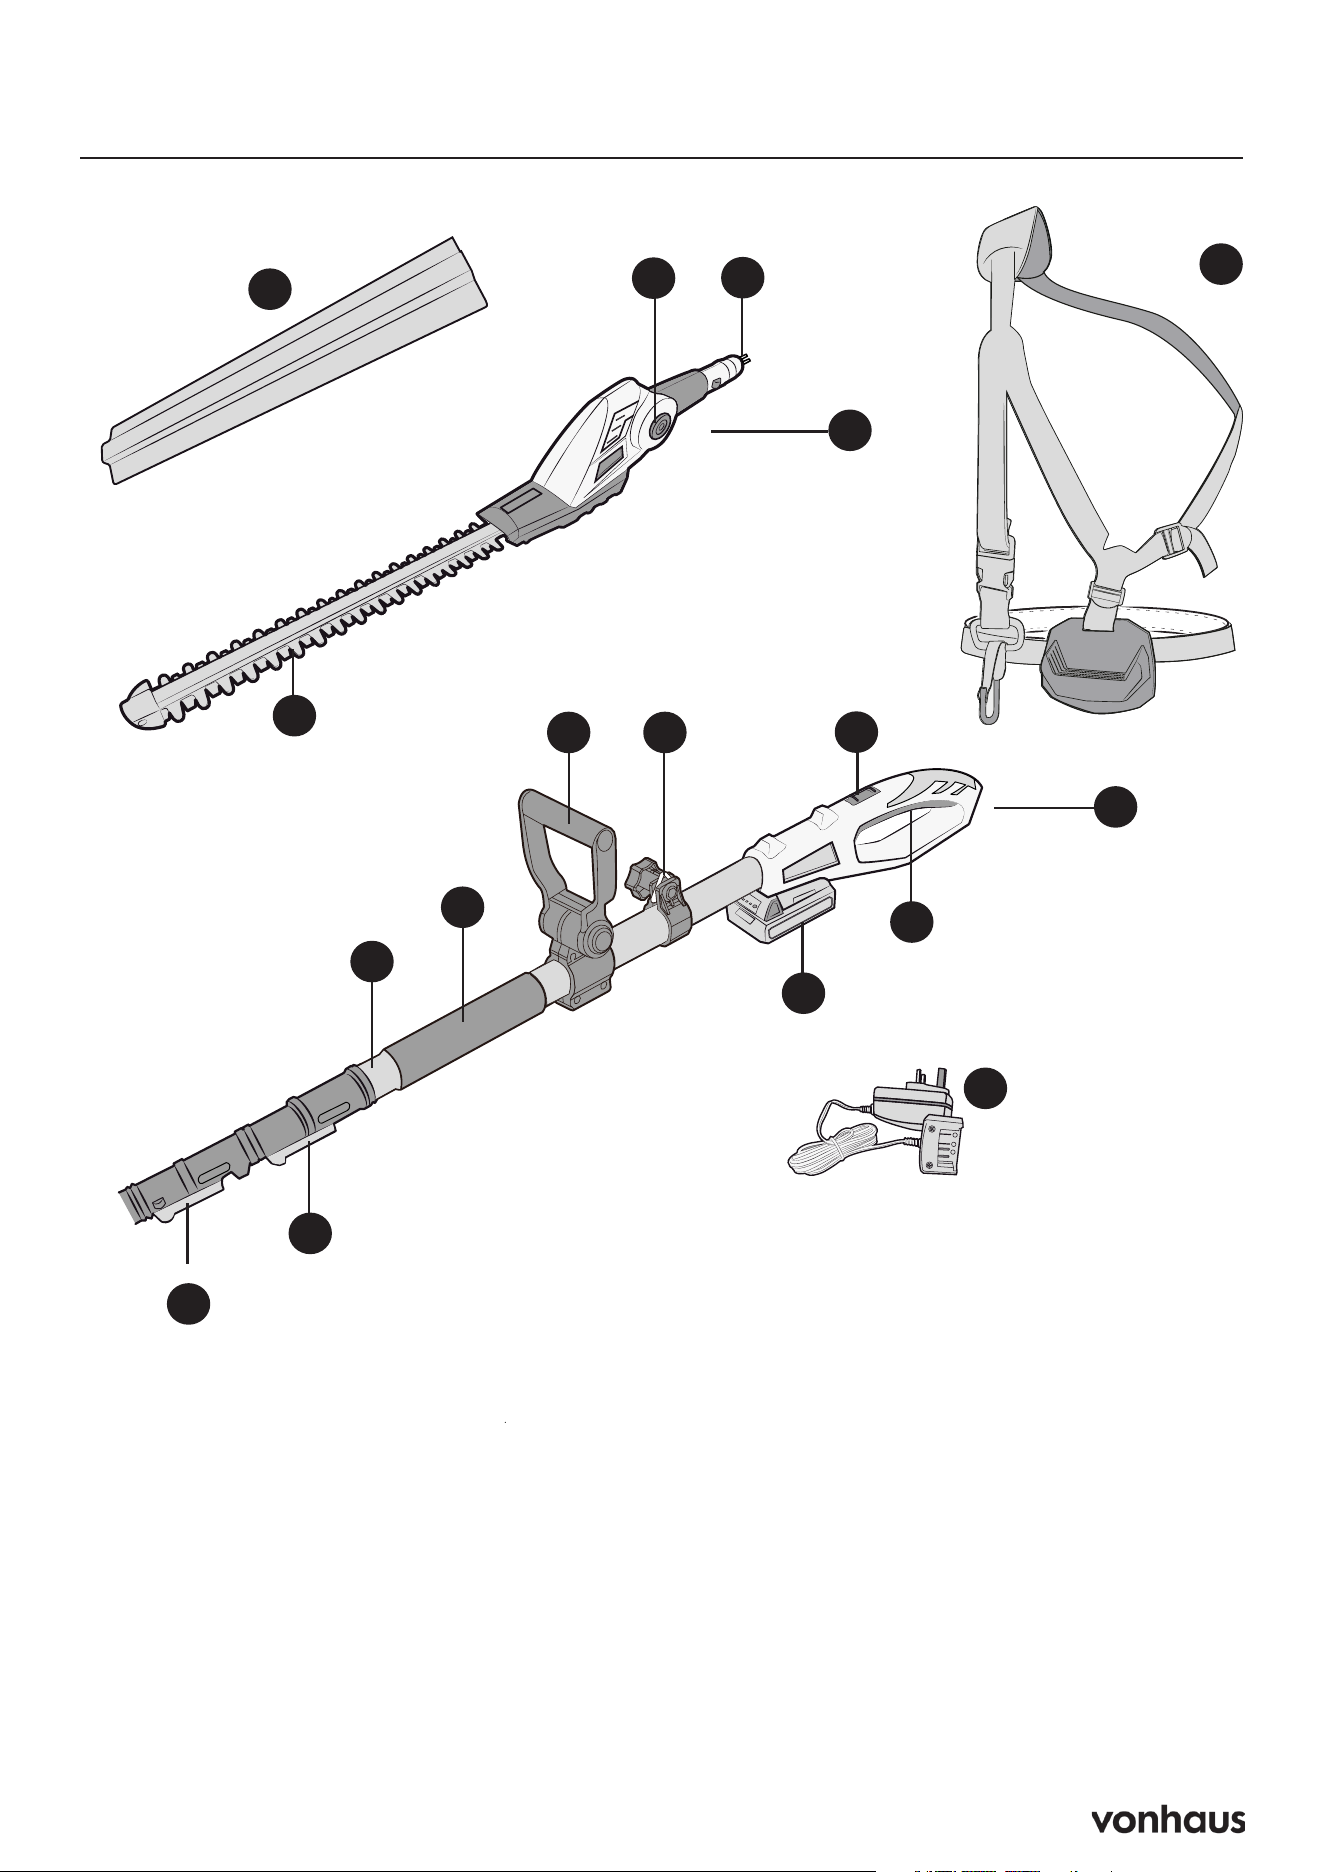
Parts & Components
N
M
J
L
K
C
B
Q
F
D
I
H
A
G
O
P
A. Blade Cover
B. Trimmer Head
C. Connecting Head for Telescopic Pole
D. Angle Adjustment Button
E. Blade
F. Back Handle
G. Power Trigger
H. Lock-off Button
I. Shoulder Strap Mount
J. Auxiliary Handle
K. Handle Grip
L. Telescopic Pole
M. Trimmer Release Lever
N. Extending Release Lever
O. Battery Charger
P. Battery
Q. Shoulder Strap
E
4
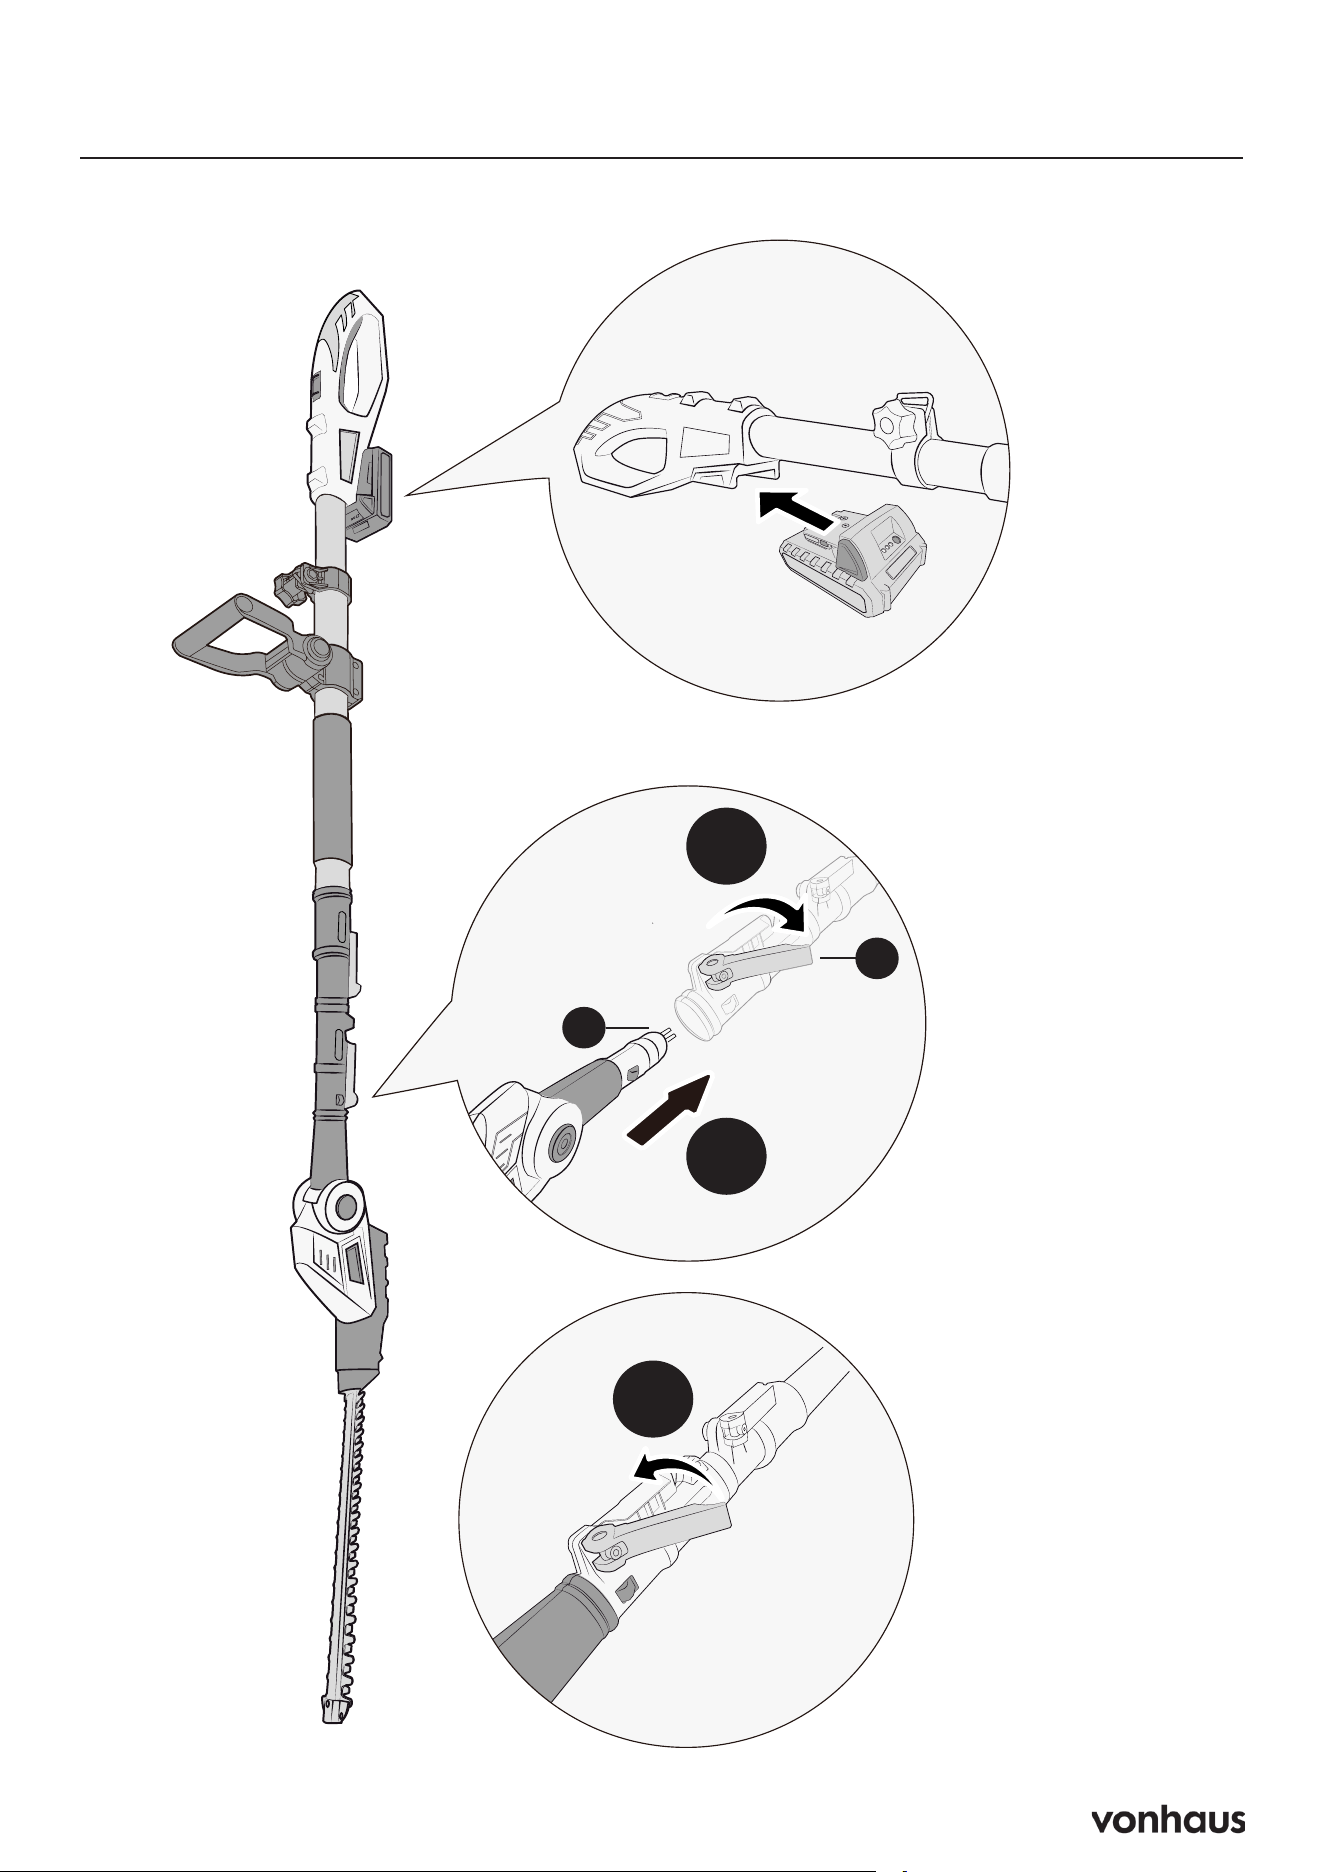
Assembly
1
2
3
C
M
5
Operation
Insert the battery into the trimmer.
1
2
To turn ON:
• Push and hold the lock-off button (H) forward on the back
handle with your thumb.
• While holding (H), squeeze the trigger switch (G).
• Once the trimmer starts, you can release the lock-off button.
To turn OFF:
• Release the trigger switch (G).
3
H
G
WARNING:
• DO NOT press any switches when inserting the battery.
• When starting the pole trimmer, you may experience kickback. To
maintain control:
- Stand firmly with your feet shoulder-width apart.
- Grip both handles tightly before and during operation.
6
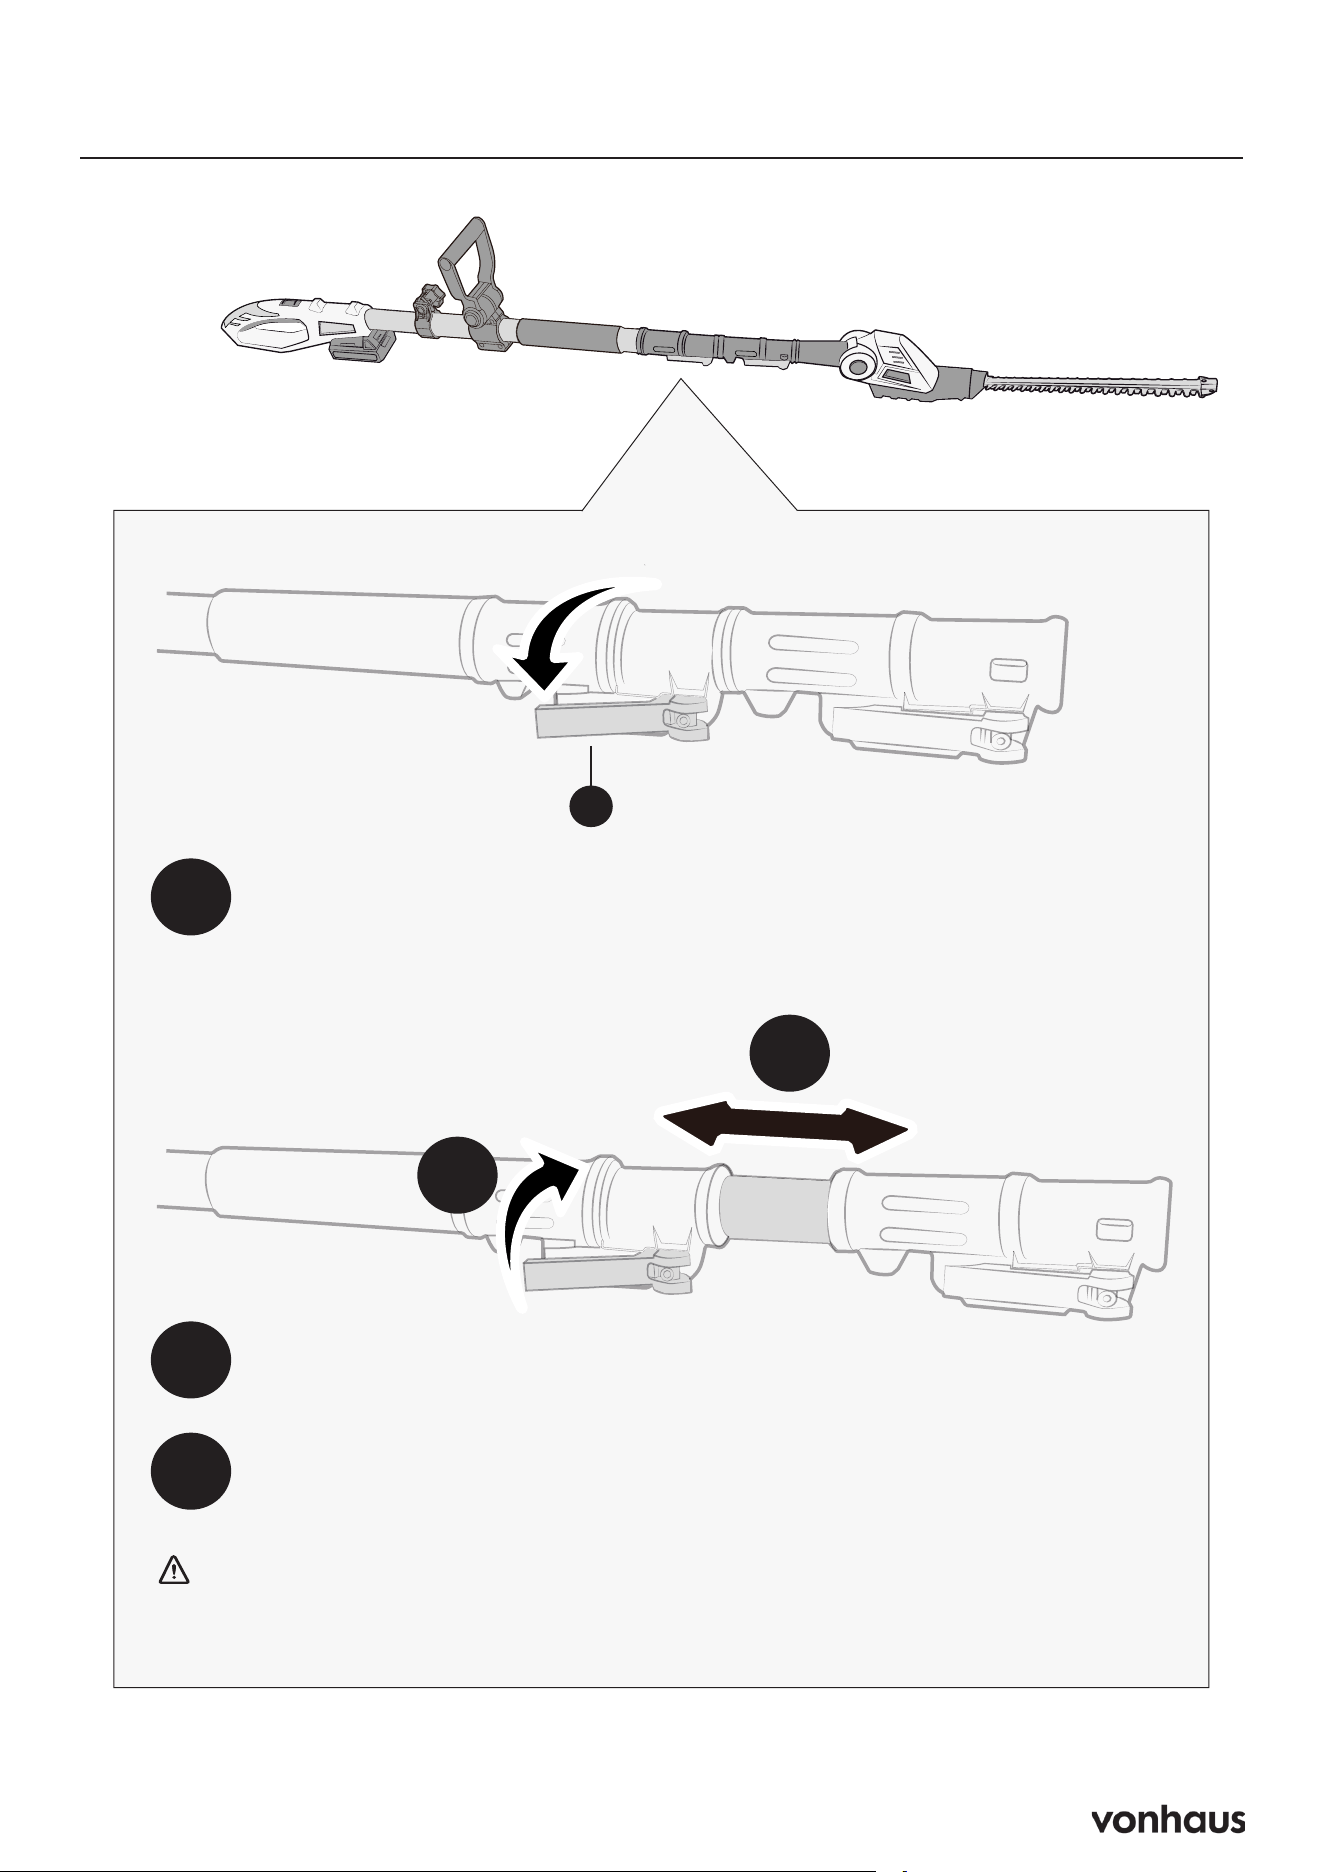
Adjusting the Telescoping Pole
1
2
3
3
2
Release the extending release lever (N).
Extend the pole to reach the hedge.
Secure the length by returning the extending release lever (N) to its
original position.
WARNING: Failure to lock the telescoping pole properly after adjusting
could result in personal injury.
N
7
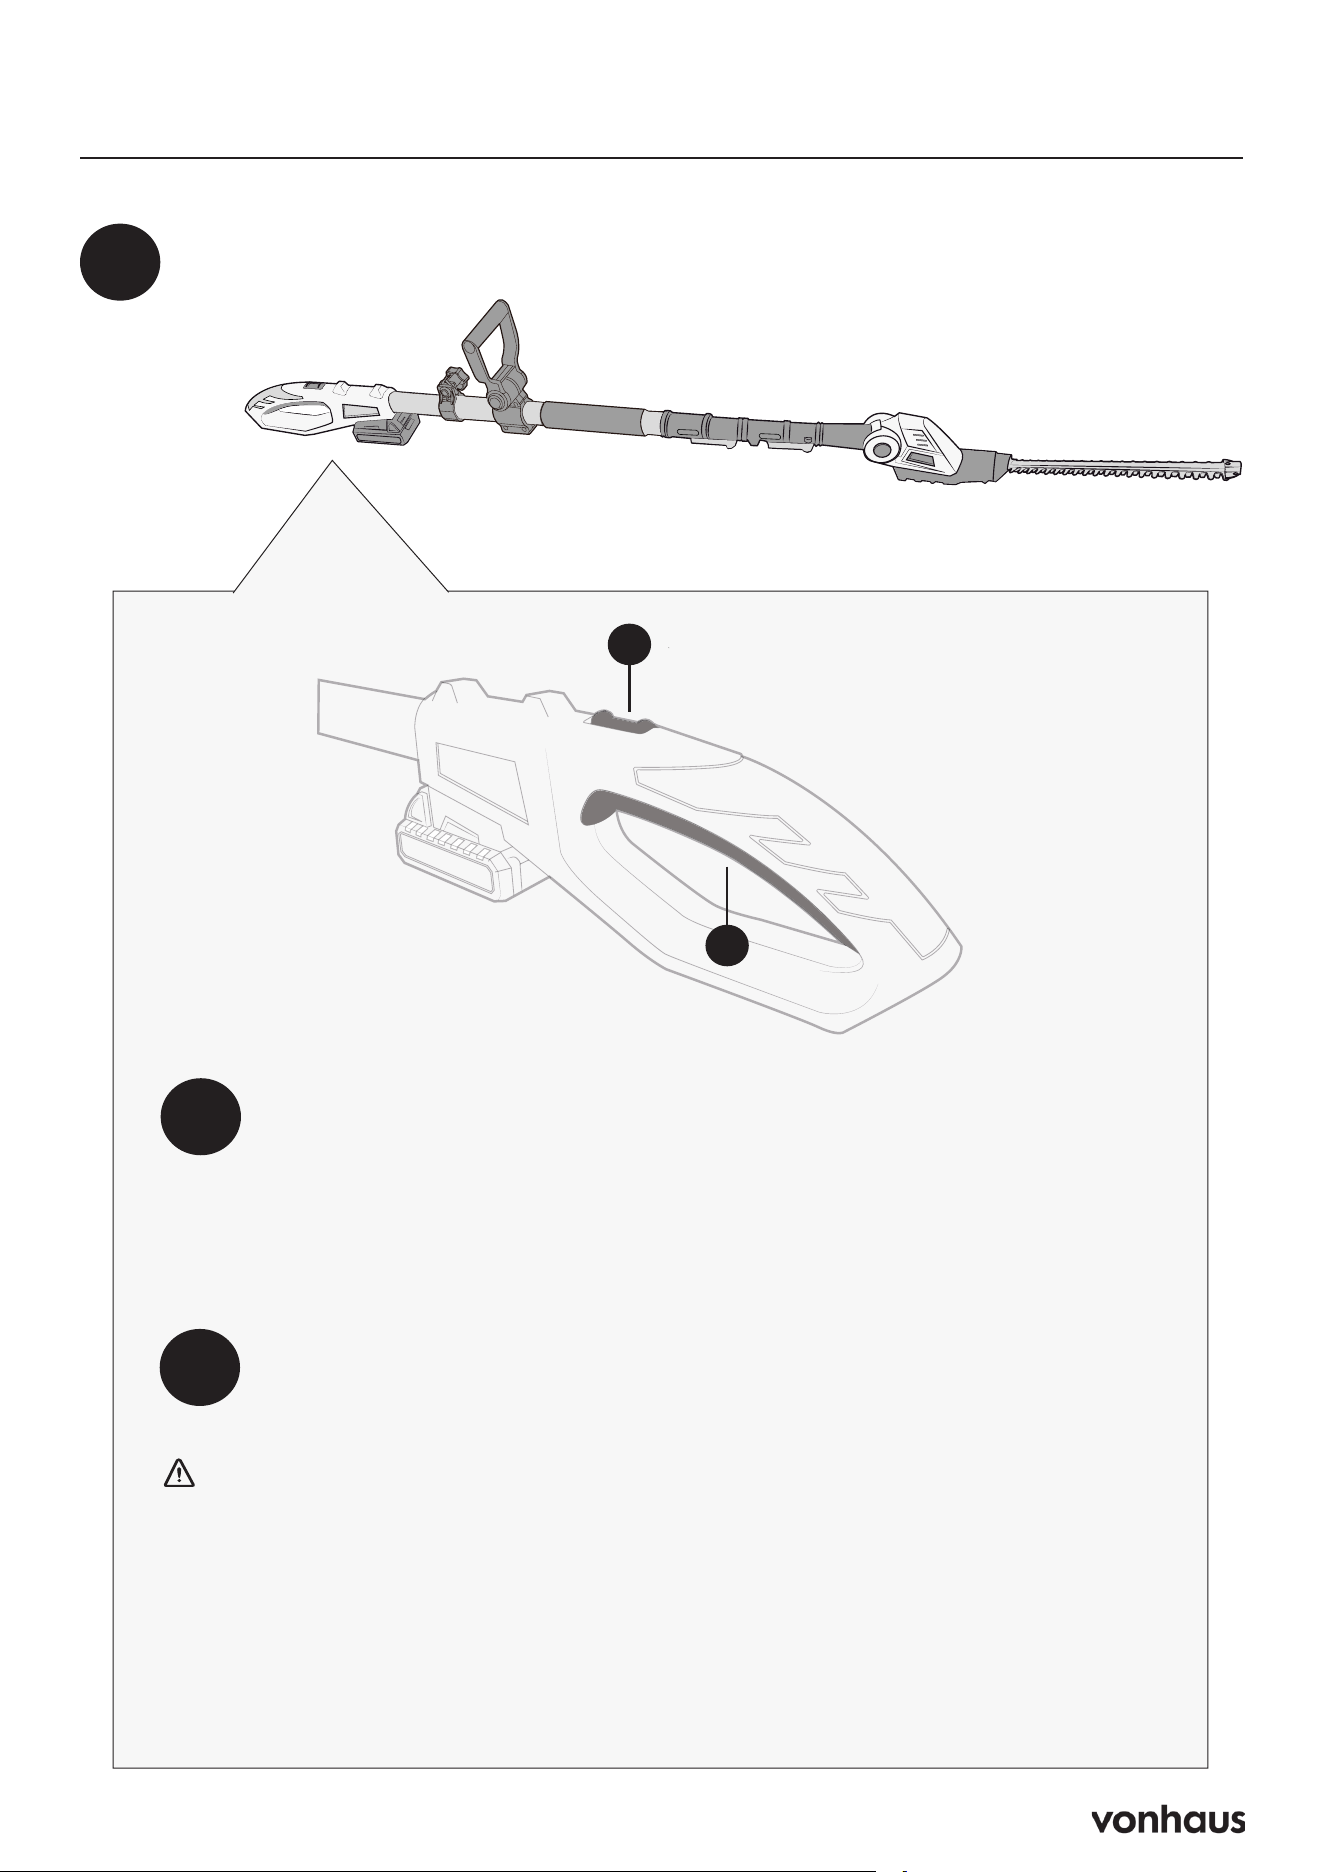
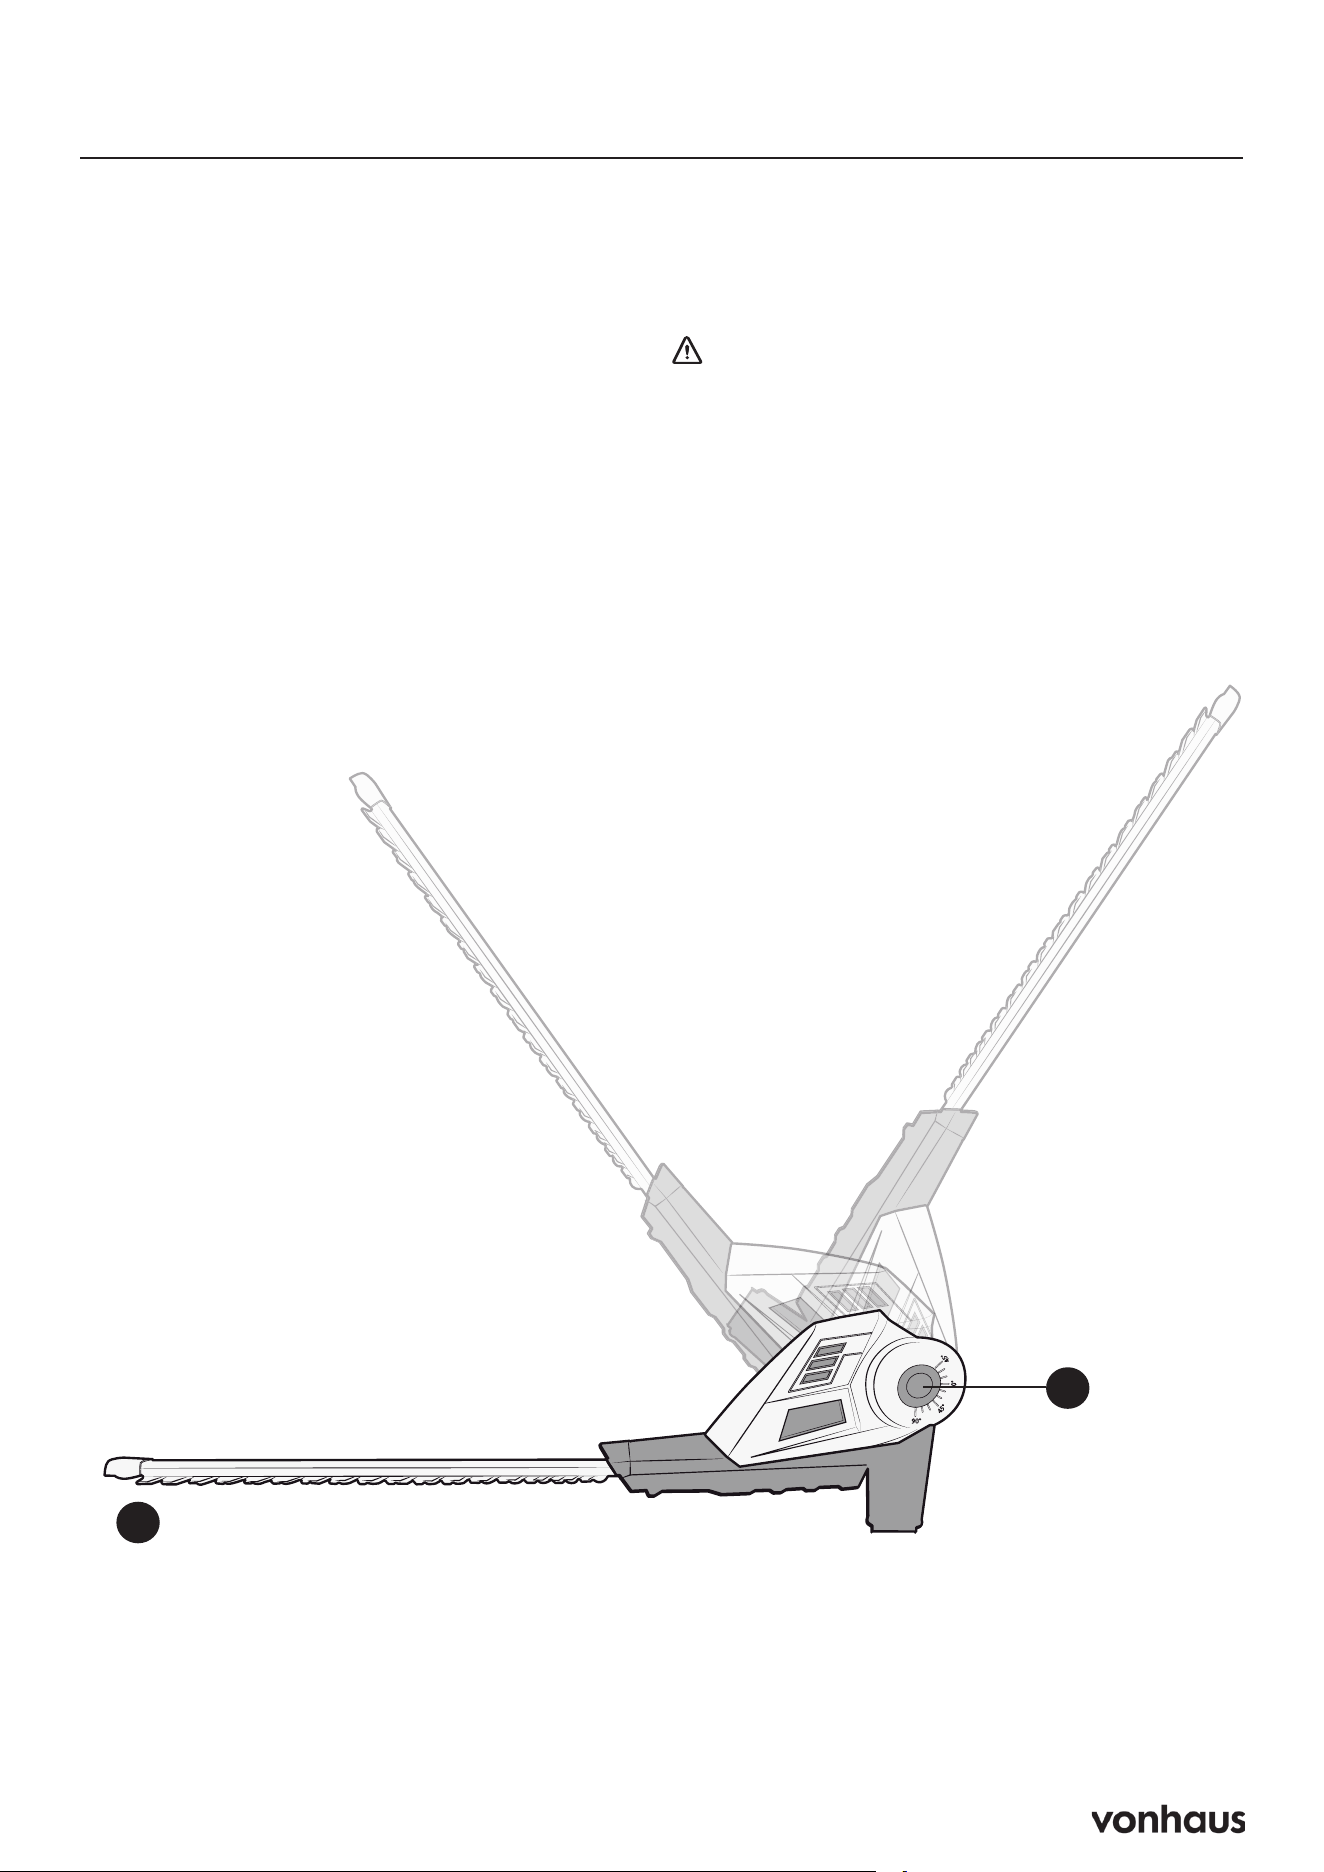
Adjusting the Multi-Angle Head
1. Disconnect Power: Unplug the tool.
2. Position the Tool: Place the trimmer on
a flat surface.
3. Adjust Head: Press both sides of
the angle adjustment button (D)
simultaneously. Position the blade (E)
to your desired angle.
4. Release the button until you hear it click
into place.
WARNING: Keep hands away from
the trimmer head and base to avoid pinch
injuries.
D
E

8
Charging the Battery
Charging the Battery
1. Connect the battery charger (O) to a
standard power outlet.
2. Insert the charger plug into the battery
(P)’s charging port.
3. The green indicator lights will display
charging status.
Checking Charge Level
Press the charge indicator button (P1) to
view battery status:
1 flashing light: Low charge (needs
charging)
2 solid green lights: Partially charged
3 solid green lights: Fully charged
Battery Protection Features
Automatic Shutoff
When the battery is depleted:
• The protective circuit will automatically
power off the trimmer.
• Immediately release all triggers/
switches
• DO NOT attempt to restart until fully
recharged.
IMPORTANT NOTES:
• Allow up to 30 minutes cooling time
before recharging (time varies by
ambient temperature and usage).
• Unlike other battery types, operation
stops abruptly when fully discharged
(normal low-voltage protection).
• Charging won’t begin until battery
temperature normalizes.
P
O
P1
9
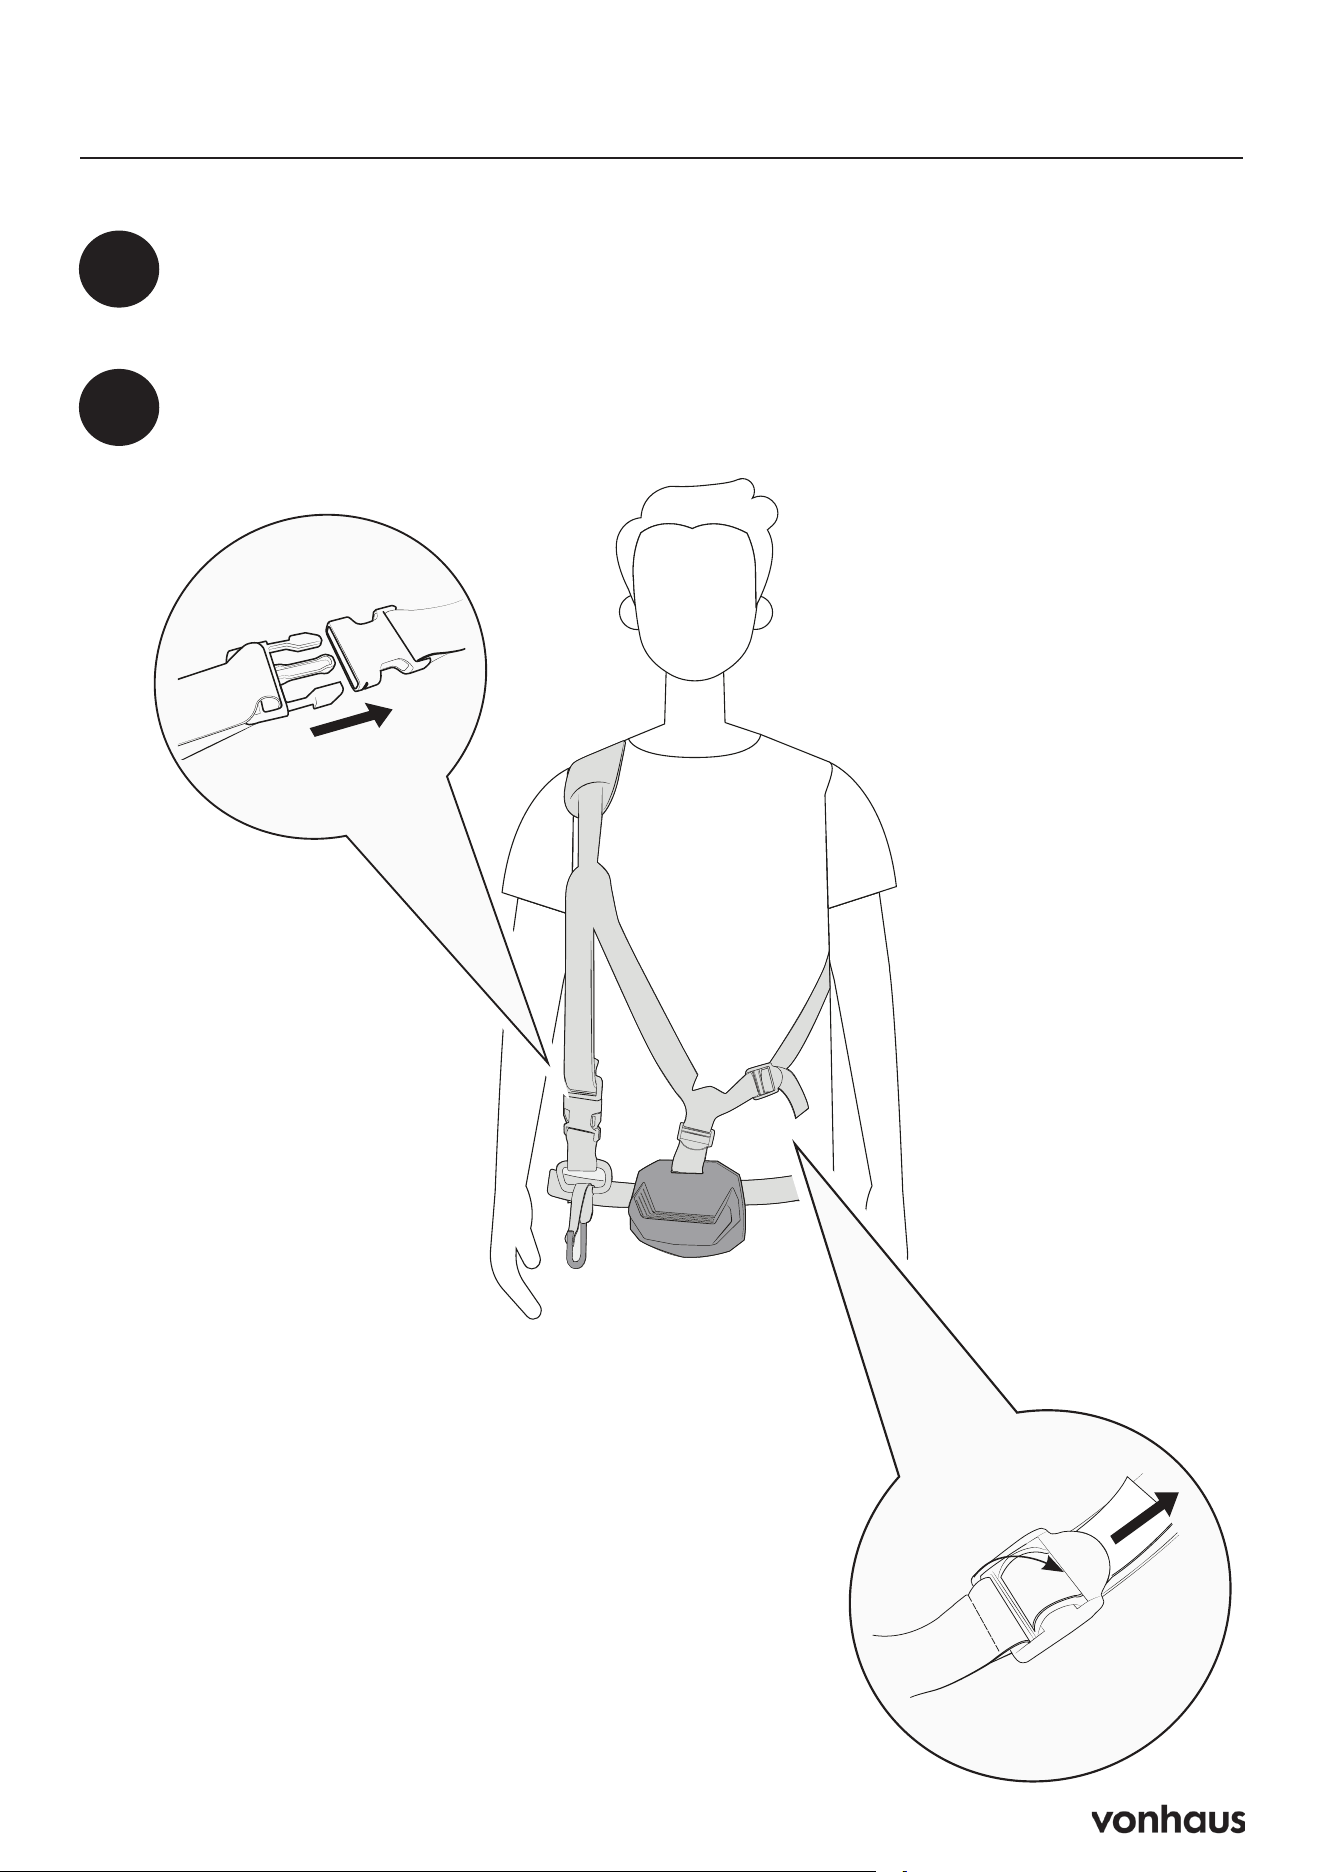
How to Use the Harness
1
Place the large loop of the shoulder strap over your head and let it rest on
your shoulder.
2
Take the strap portion and wrap them around your waist, then secure the
buckles until they click.
10
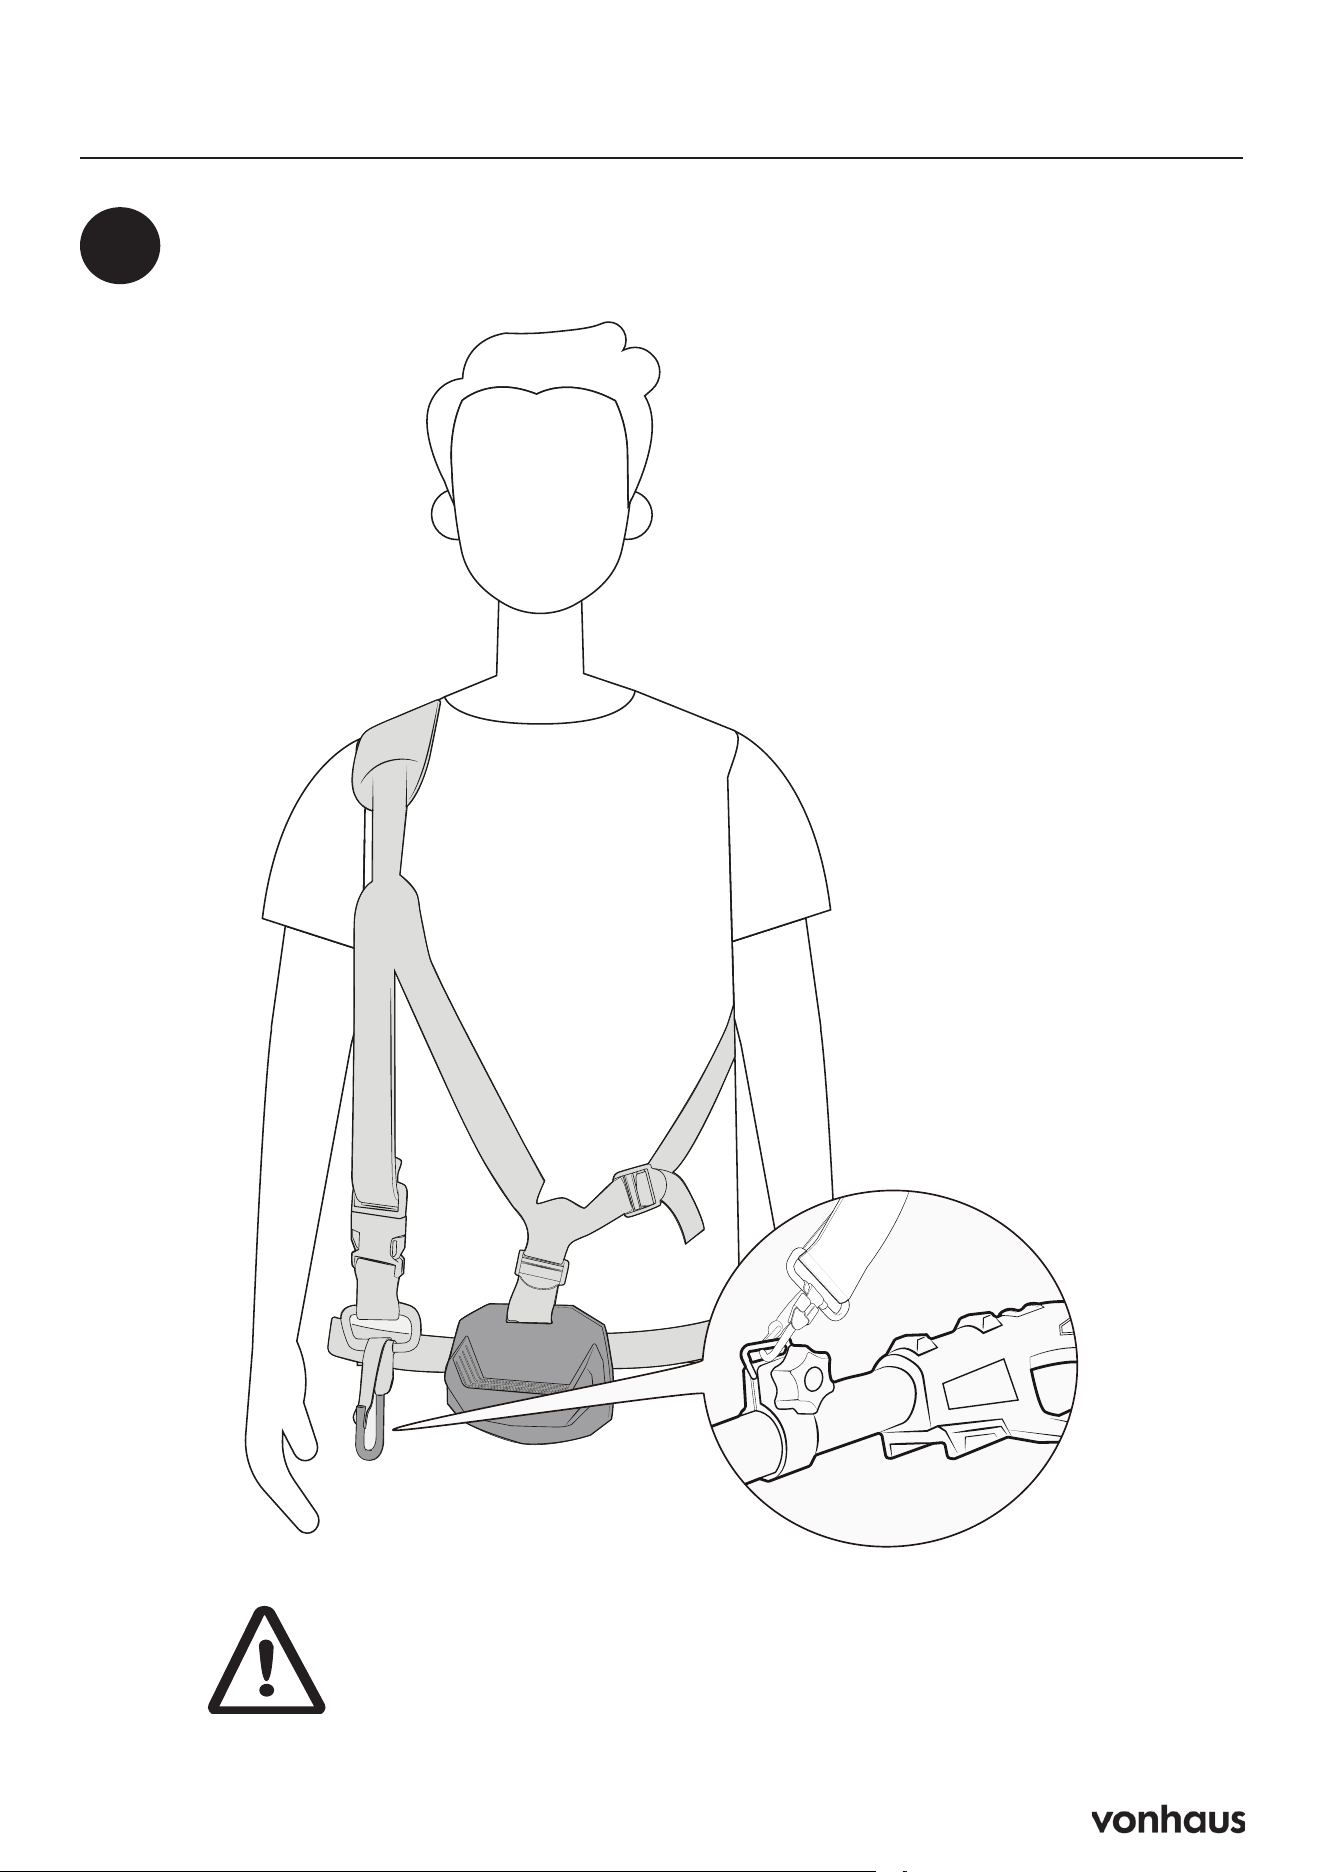
How to Use Harness
3
Locate the attachment clip hanging from the harness and connect it to the
designated mounting point on your trimmer.
WARNING: Ensure all buckles are securely
fastened and the harness fits snugly before
operating the equipment.
11
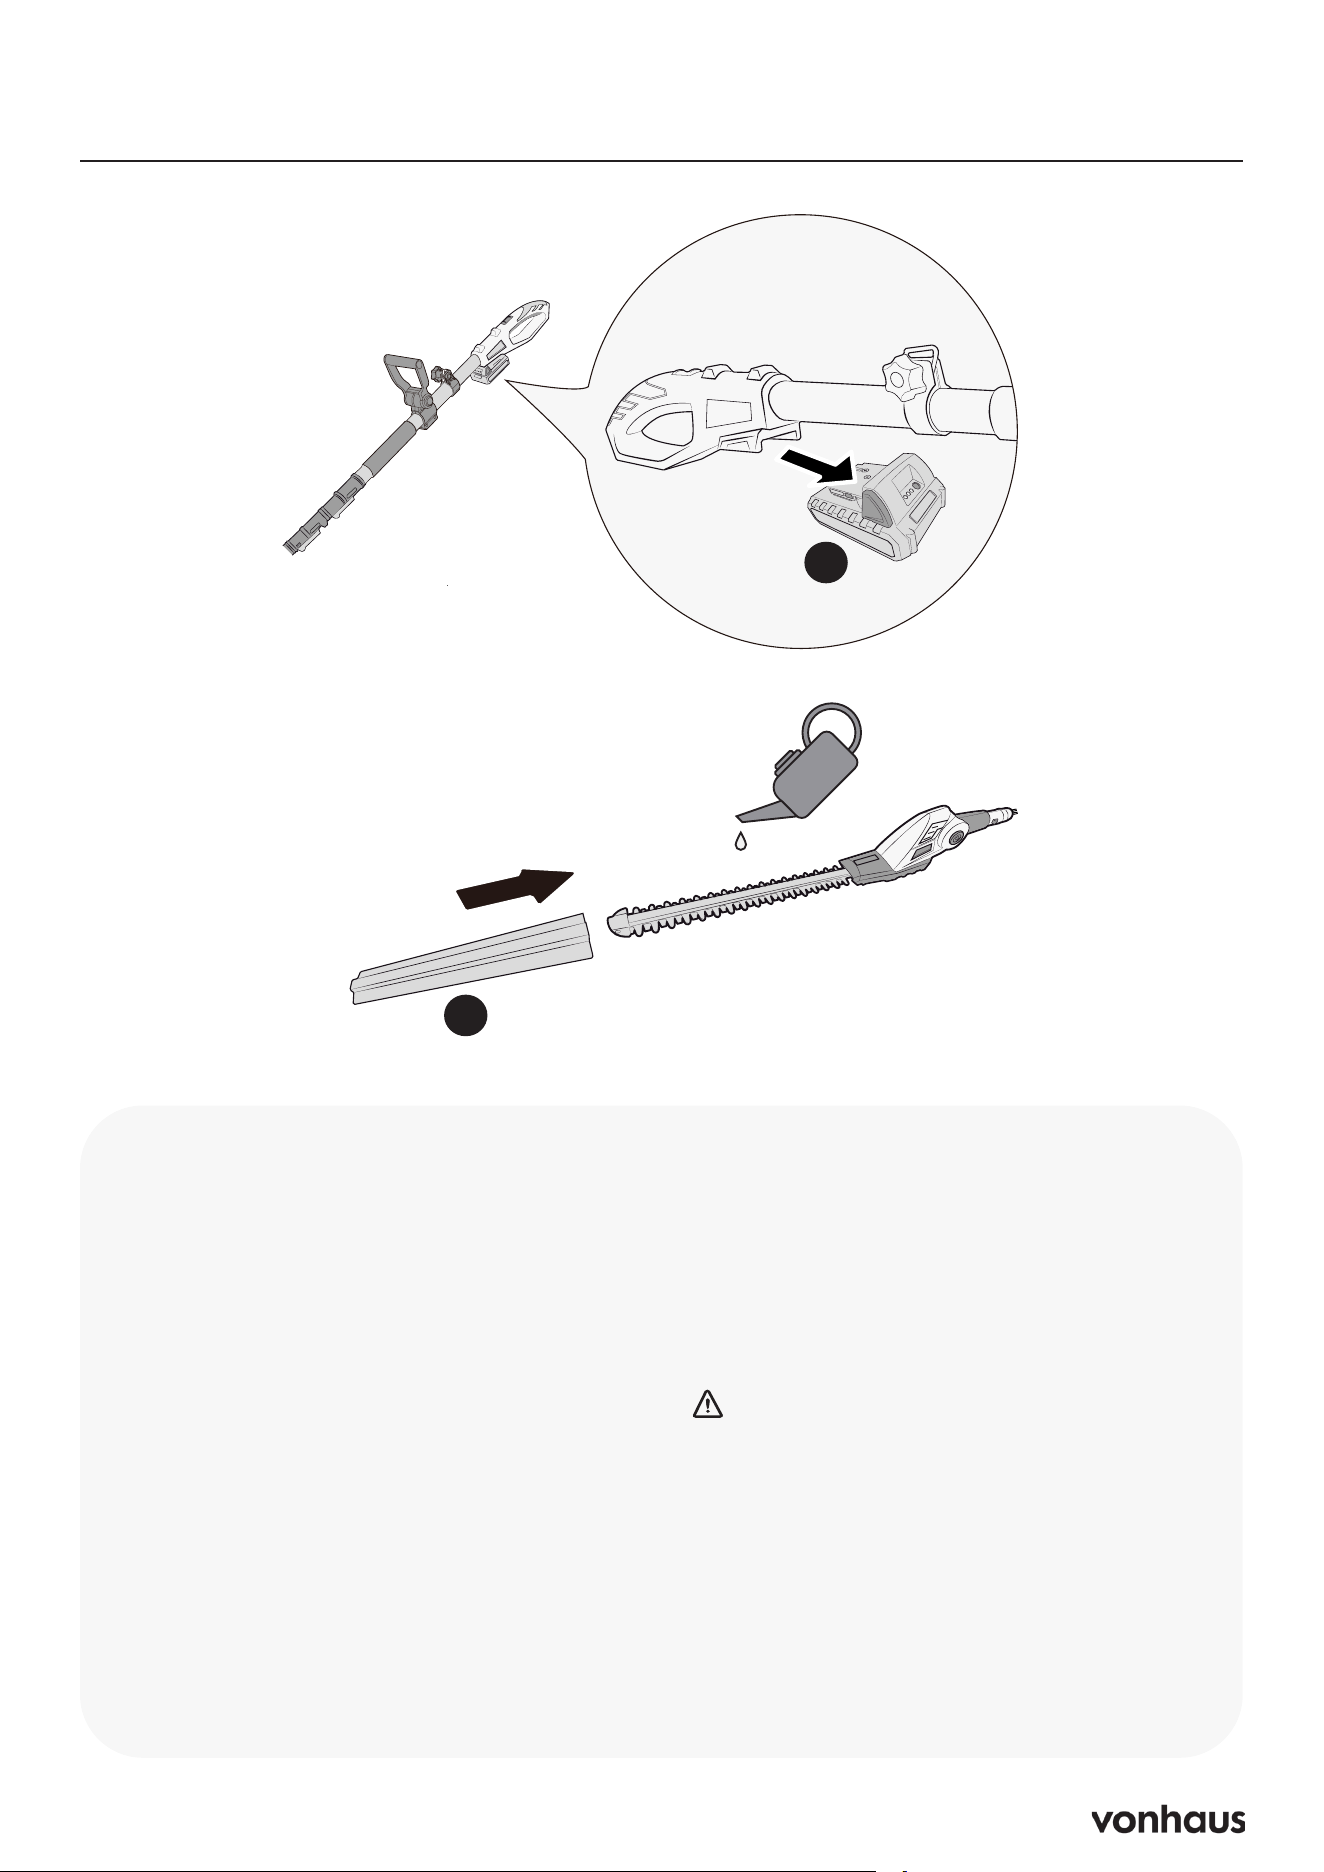
Maintenance
Instructions
IMPORTANT: Always remove the
Battery (P) from the tool before cleaning
to avoid electric shock.
1. Clean the blade after operation.
2. Dry the blade thoroughly by using a
soft brush and cloth.
3. During longer cutting periods of 15
mins or longer, coat the blade with
lubricating oil or spray.
4. Store the tool in a secure, dry place,
out of reach of children and animals.
5. When transporting or storing the
Trimmer, always fit the Blade Cover
(A).
Why This Matters
• Improve cutting performance
• Prevent corrosion
• Ensure battery run times
CAUTION:
• DO NOT use abrasive materials to
clean the product.
• DO NOT immerse any part of the tool
in water or any other liquid.
• Remove all debris, especially from the
ventilation slots on the motor housing.
P
A

12
Troubleshooting
Why the tool does not power on?
• Check that the Battery is connected
correctly and fully charged before use.
• Ensure that the Charger is charging
correctly.
Why the blades do not move?
• The Blades may be blocked. Power off and
remove the blockage.
• The Blades may have seized - Contact
suppor[email protected]
Why poor cutting performance?
• The Blades may be damaged - Contact
suppor[email protected]
• The Battery may be low, remove the Battery
and recharge.
Why the blades become hot?
The Blades have not been lubricated.
1. Power off the tool.
2. Remove the battery.
3. Lubricate the Blades as necessary.
Why the blades juddering or
vibrating abnormally?
There is a blockage.
1. Power off the tool.
2. Remove the blockage.
If you require support, please contact
suppor[email protected]
13
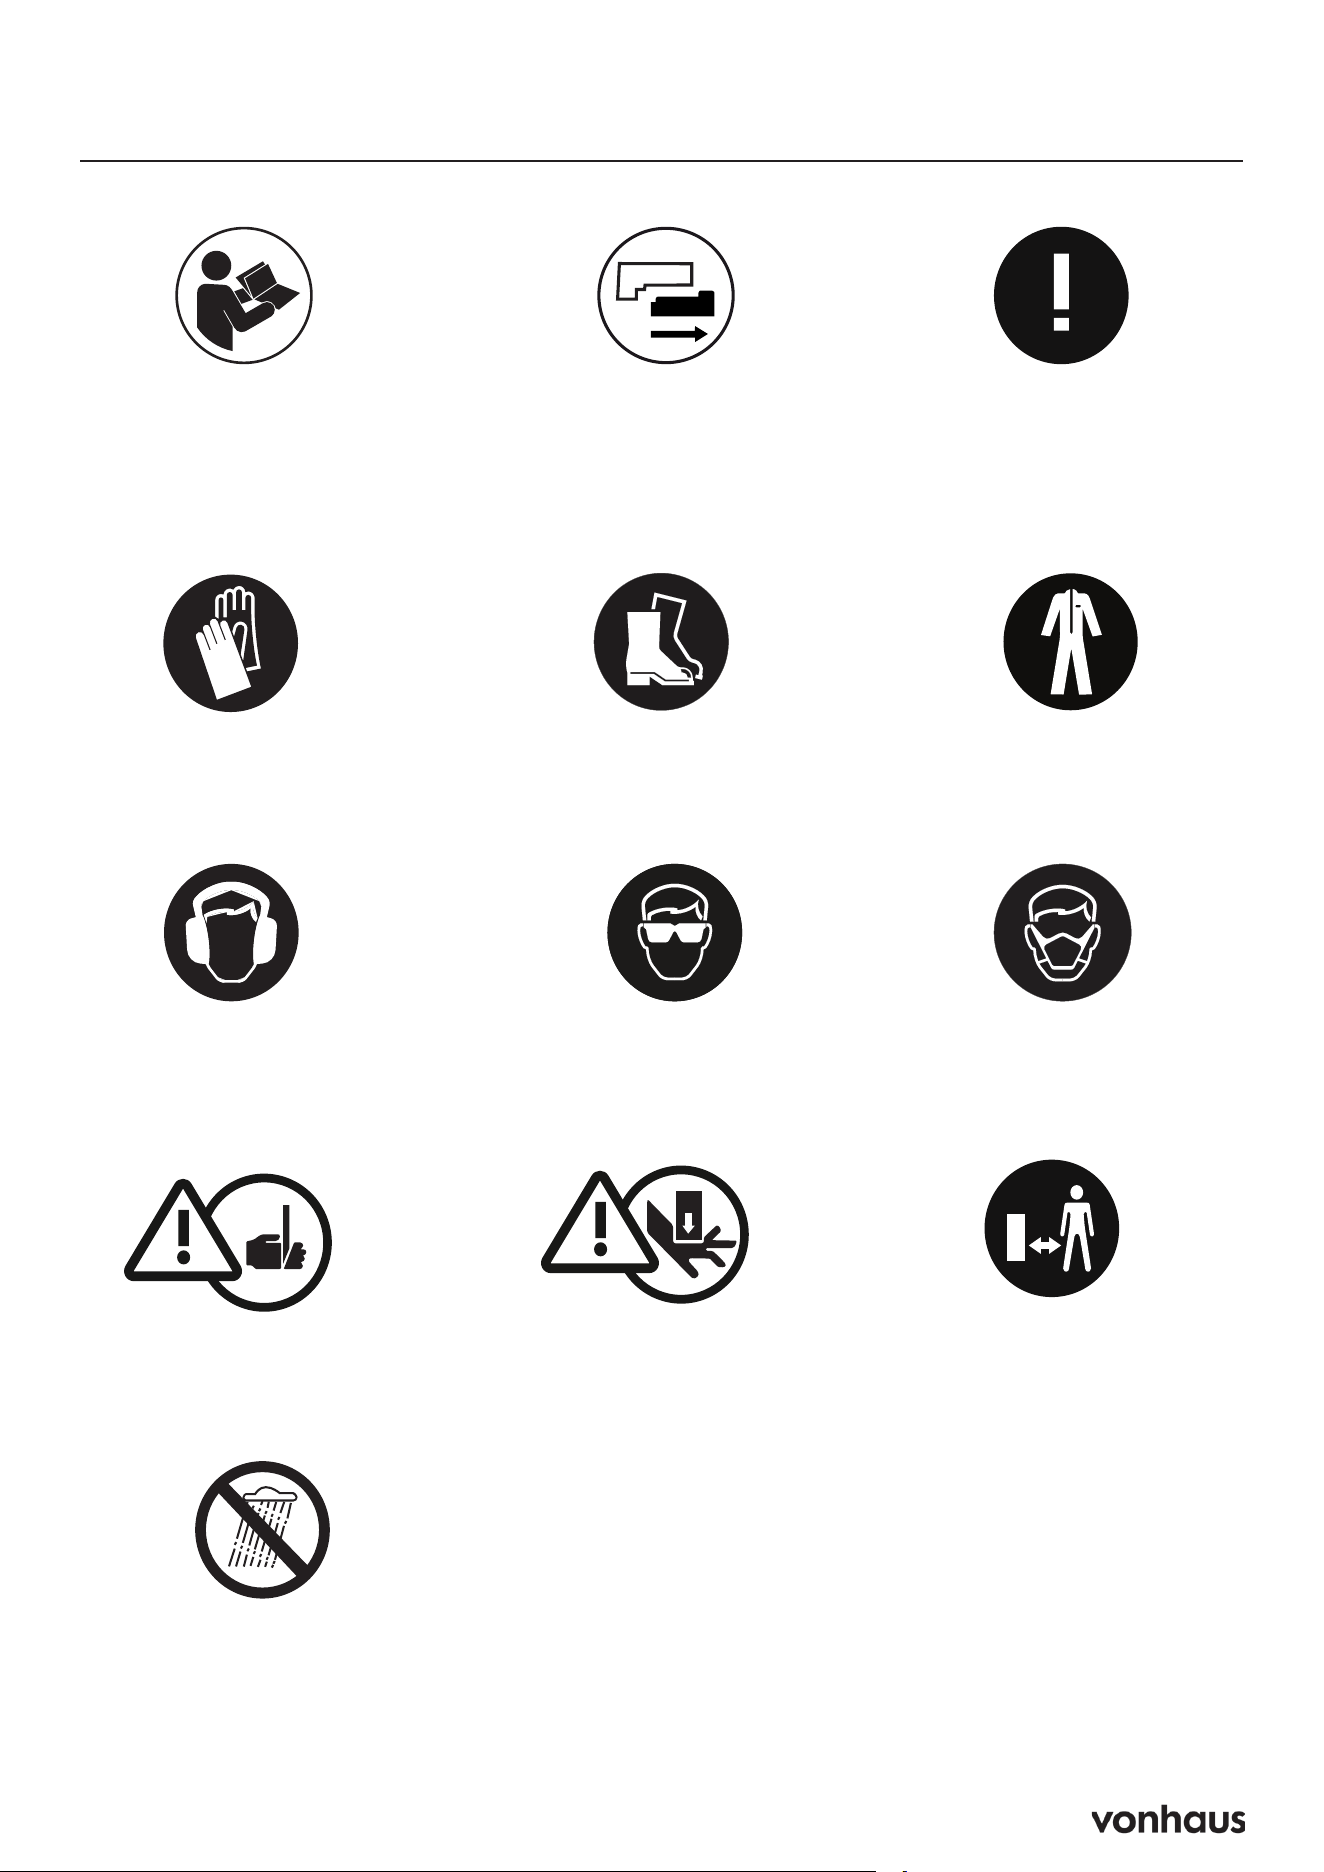
Usage & Safety
Please read all instructions
carefully before use and
retain for future reference.
Do not use in
wet conditions
Sharp edges
Protect your hands
Remove battery from the
appliance before cleaning
Beware of kickback
Potential finger
trap points
Maintain a safe distance
from bystanders
Wear suitable footwear
Protective clothing
must be worn
Protect your ears
Protect your eyes
Dust musk must
be worn

14
Intended Use
• Household use only - not for commercial
applications.
• Never use by children under 16 or
unsupervised persons.
• Operators 16-18 require adult supervision.
• Never use in rain, near power lines, or damp
conditions.
• NOT intended for use by persons (including
children) with reduced physical, sensory or
mental capabilities, or lack of experience
and knowledge, unless they have been
given supervision and instruction concerning
the use of the tool by a person responsible
for their safety.
Electrical Safety
• Use only matching, unmodified plugs.
• Keep tool and cords dry - no wet conditions.
• Never yank cord; use outdoor-rated
extensions outdoors.
• RCD (residual current device) protection
advised for damp areas.
Usage Warnings
• Always use two-handed grip.
• Maintain balanced stance - no overreaching.
• Avoid flammable materials (creates sparks).
DO NOT use if:
• the switch does not turn it on and off.
• continuously for periods longer than those
specified in the instructions.
Personal Protection Requirements
• Must wear: Safety goggles, gloves, non-
slip shoes.
• Recommended: Hearing protection, dust
mask.
• No loose clothing/jewelry - tie back long
hair.
• Never operate when tired or under influence.
Pre-Operation Checklist
• Inspect tool for damage before each use.
• Clear work area of debris and bystanders.
• Verify switch is OFF before connecting
power.
• Secure footing in clean, well-lit area.
Cutting Techniques
Hedges:
• Trim narrower at top
• Use guide string for level cuts
Branches:
• Cut at ≤135° angle
• Remove lower branches first
• Never stand under cutting area
Emergency Procedures
If blade jams:
1. Turn OFF immediately
2. Unplug and wait for stop
3. Clear obstruction carefully
After any impact:
• Inspect thoroughly before reuse
Technical Specifications
• BATTERY MAX.: 20V
• CHARGE TIME: 1hour
• BATTERY: Li-Ion, 1500mAh
• NO LOAD SPEED: 1400min
-1
• MAX CUTTING CAPACITY: 14mm
Usage & Safety

15
Battery & Charger Safety
General Warnings
• Keep batteries away from children.
• Never disassemble, crush, puncture, or
expose batteries to fire/heat.
• Avoid short-circuiting battery terminals
(keep away from metal objects like keys/
coins).
• Do not mix different battery types, brands,
or ages in the same device.
• The battery must be removed from the
appliance before being scrapped.
• The battery is to be disposed of safely.
Usage & Storage
• Remove batteries from devices when not in
use for extended periods.
• Store in a cool, dry place - avoid heat
sources and direct sunlight.
• Check polarity before insertion.
• DO NOT place charger on soft surfaces
that may block ventilation
Charging Safety
• Use only the manufacturer-approved
charger - incompatible chargers may
cause fire.
• Household voltage only - never modify or
connect multiple chargers.
• No extension cords unless absolutely
necessary (use proper-rated cord if
required).
• NEVER Disassemble charger - service by
qualified technicians only.
NEVER CHARGE:
• With non-approved chargers.
• Near water or flammable materials.
Charger Specifics
• Indoor use only in well-ventilated areas.
• Unplug when not in use.
• Inspect regularly for damage - do not use if
dropped or cracked.
• Pull from plug (not cord) when disconnecting.
First Aid & Emergencies
• If swallowed: Seek medical help
immediately.
• If leaked:
1. Avoid skin / eye contact.
2. Rinse affected area with water for 15
minutes.
3. Get medical attention.
Battery Disposal
NEVER:
• Mutilate batteries – risk of corrosive leaks
& fire.
• Incinerate – may explode or release toxic
fumes.
• Discard while charged – discharge fully
first.
Proper Recycling
• Return to authorized collection points (e.g.,
local warranty agents/recycling centers).
• Separate battery types (lithium-ion/nickel-
based/etc.) for processing.
• Follow local regulations for lithium-ion
battery disposal.
Li-ion

16
Legal
Disposal Information
Please recycle where facilities exist. Check
with your local authority for recycling advice.
Customer Service
If you are having difficulty using this product
and require support, please contact
suppor[email protected]
Warranty
To register your product and find out if you
qualify for a free extended warranty please
go to www.vonhaus.com/warranty
Please retain a proof of purchase receipt or
statement as proof of the purchase date.
The warranty only applies if the product is used
solely in the manner indicated in the warnings
page of this manual, and all other instructions
have been followed accurately.
Any abuse of the product or the manner in
which it is used will invalidate the warranty.
Returns
Returned goods will not be accepted unless
re-packaged in its original packaging and
accompanied by a relevant and completed
returns form. This does not affect your statutory
rights.
No rights are given under this warranty to a
person acquiring the appliance second-hand
or for commercial or communal use.
Copyright
All material in this instruction manual are
copyrighted by DOMU Brands.
Any unauthorised use may violate worldwide
copyright, trademark, and other laws.
Thank You
Thank you for purchasing your product/
appliance.
Should you require assistance with your
purchase, please contact us at
suppor[email protected]
VonHaus is a registered trademark of DOMU
Brands Ltd.
Made in China for DOMU Brands Ltd.
Unit 30, Stakehill Industrial Estate
Middleton, Manchester, M24 2RW
EU Authorised Representative
Authorised Representative Service
77 Camden Street Lower
Dublin, D02 XE80
Ireland
Product No. 2515200.1
Let’s get started!
Visit our product hub for
useful tips and tricks on
getting the most out of
your new product.
SCAN ME