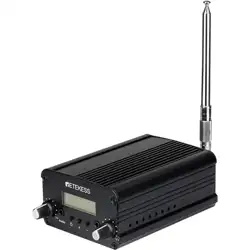
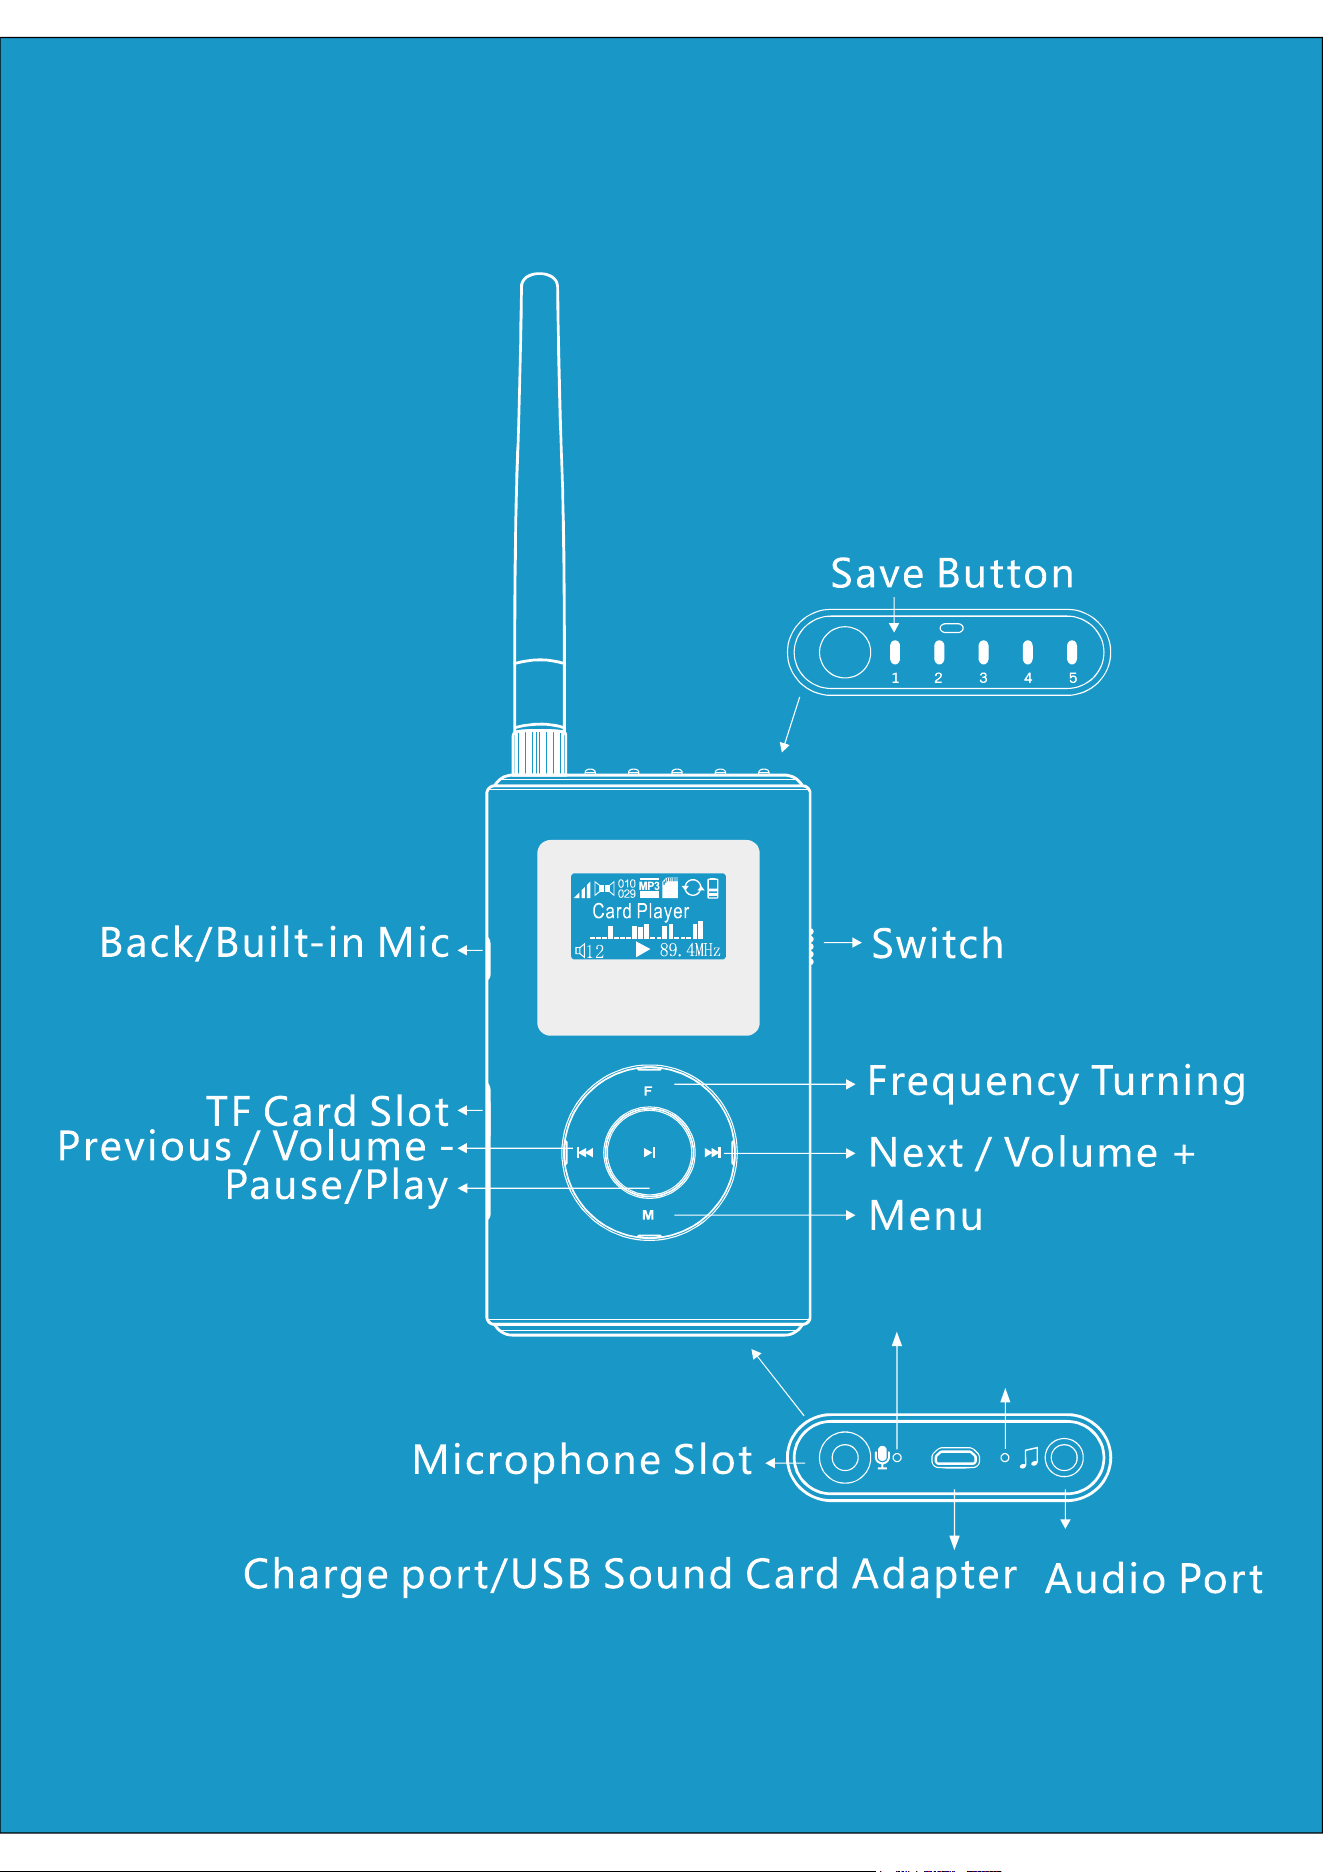
Built-in microphone hole
Charging indicator
一、 /Power ON OFF
【 】Power ON Shitf power switch downwards to make the green part of the switch
visible Thus the transmitter gets into work mode. , .
【 】Power OFF Shitf power switch upwards to make the red part of the switch
visible Thus the transmitter stops working. , .
二、 Main Interface Operation
【 / 】Play Pause In TF mode or computer sound adapter mode short press button , 【 】
can play or pause audio .
【 】Previous In TF mode or compute sound adapter mode short press button to play , 【 】
previous video .
【 】Next In TF mode or compute sound adapter mode short press button to play next , 【 】
video.
【 】Volume Long press button to decrease volume Long press to increase , 【 】 【 】
volume.
【 - 】Start up buit in microphone Hold and press on button to turn on built in - 【 】
microphone When you stop pressing button the microphone will shut off. , .【 】
【 / 】Turn on screen Return Short press butoon can light up the screen and back to 【 】
the main interface .
三、 FM Frepuency Setting
【 】Frequency
Short press button continuously,until appears.Short press or 【 】 【 】 【 】F 1 Frequency
【 】button,the frequency will go forwards 100K each time;
Long press or button,the frequency will go forwards 1MHz each time.【 】 【 】
【 】RF Power
Short press button continuously,until appears.Short press【 】 【 】 【 】F 2 RF Power
button to increase power rate and short press button to decrease power rate.【 】
Attention:In small area usage,for example,in car,low power rate mode is
recommended.
【 】Built in MIC
Short press button continuously,until appears Short press【 】 【 】 【 】F 3 Built in MIC .
or button to go to built in microphone setting mode.【 】
◆ .【 】External MIC means turning off the built in microphone
◆ .【 】MIC ON By Key means turning on built in microphone
◆ .【 】MIC Always ON means the built in microphone is ready all the time
【 】Sound Channel
Short press button continuously,until appears Short press【 】 【 】F 4 Sound Channel .
【 】 【 】or button to set FM sound tracks.
【 - 】Pre emphasis
Short press button continuously,until appears Short press【 】 【 - 】 【 】F 5 Pre emphasis .
or button to set FM pre emphasis time【 】 - .
四、 MP3 Setting
【 】MIC VOL
Short press button continuously,until appears Short press【 】 【 】M 1 MIC VOL .
【 】 【 】button to increase mic volume.Short press to decrease mic volume.
【 】MIC ECHO
Short press button continuously,until appears Short press【 】 【 】M 2 MIC ECHO .
【 】 【 】button to increase echo volume.Short press to decrease echo volume.
【 】MIC Delay
Short press button continuously,until appears Short press【 】 【 】M 3 MIC delay .
【 】 【 】button to increase mic delay.Short press to decrease mic delay.
【 】EQ
Short press button continuously,until appears Short press【 】 【 】M 4 EQ .
【 】 【 】or button can set sound effect for the whole kit.
【 】Repeat
Short press button continuously,until appears Short press【 】 【 】M 5 Repeat .
【 】 【 】or button can set Mp3 cycle mode.
【 】BASS
Short press button continuously,until appears Short press【 】 【 】M 6 BASS .
【 】 【 】or button can set BASS for the whole kit.
【 】TREB
Short press button continuously,until appears Short press【 】 【 】M 7 TREB .
【 】 【 】or button can set tone for the whole kit.
【 】Language
Short press button continuously,until appears Short press【 】 【 】M 8 Language .
【 】 【 】 or button can set Language for the whole kit .
五、 Frequency Saving and Use Saved Frequencies
Turn out your wanted frequency then long press save button until frequency button ,
flashes Thus this frequency is saved When you want to switch to this frequency next. , .
time you just need short press the save button to find it, .
六、 , , ,TF Card Audio Input USB Sound Card Microphone
【 】TF Card Installation Put TF card in card slot follow up the , 【 Main Interface
Operation】
【 】Audio Input play Connect this item to an audio source device with a 3 5mm audio .
cable Main interface will display the connector icon Thus the connection is finished. . , .
【 】USB Sound Card Display Connect this item to a computer with an USB cable Main .
interface will display a computer icon Thus the connection is finished . , .
【 : 】Tip Audio source priority
> > Audio Input USB Sound Card TF Card
【 】External Microphone
Put the external microphone connector to the transmitter s microphone port.The '
main interface displays the microphone icon.It means the connection is successful.
【 】Tips:Microphone Priority
> External microphones Built in microphone
The external microphone must be a 3 step condenser microphone - .
七、Charge
The transmitter can be charged when it is connected to an USB power supply device
by USB cable .
Tips The item can be charged both in on and off mode : .
八、CAUTIONS
◆ .Do not turn on the transmitter when its antenna is not installed
◆
Don not use the transmitter in explosive environment such as gas station and
.oil warehouse
◆ .Please follow local laws and regulation when using this transmitter
◆Repair of this transmitter can only operated by professional technicians.
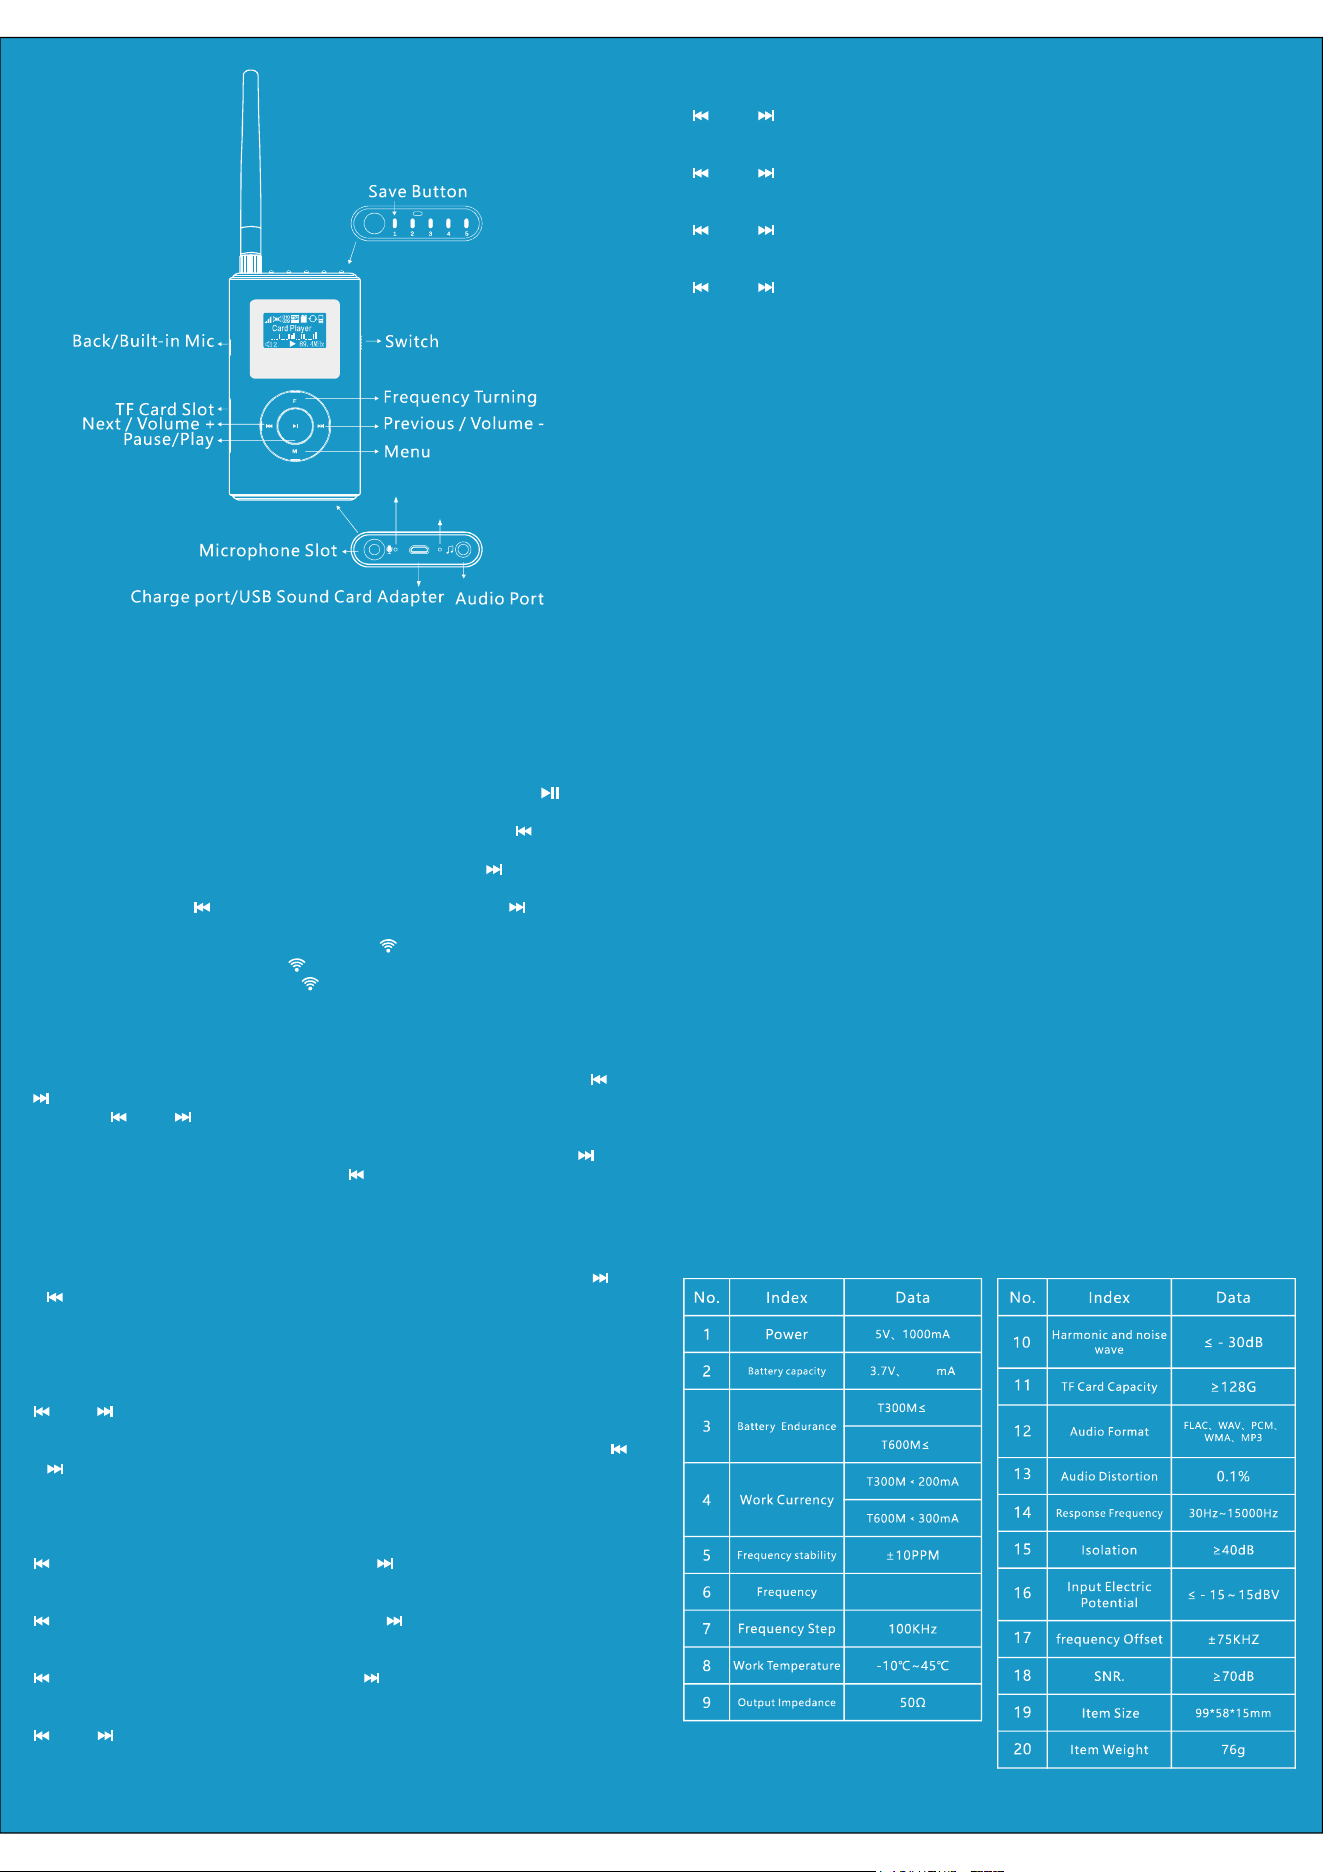
九、 Technology Parameters
1500
5h
3h
Built-in microphone hole
Charging indicator

FCC Statement
This equipment has been tested and found to comply with the limits for a Class B digital
device, pursuant to part 15 of the FCC Rules. These limits are designed to provide reasonable
protection against harmful interference in a residential installation. This equipment generates,
uses and can radiate radio frequency energy and, if not installed and used in accordance with
the instructions, may cause harmful interference to radio communications. However, there is
no guarantee that interference will not occur in a particular installation. If this equipment
does cause harmful interference to radio or television reception, which can be determined by
turning the equipment off and on, the user is encouraged to try to correct the interference by
one or more of the following measures:
• Reorient or relocate the receiving antenna.
• Increase the separation between the equipment and receiver.
• Connect the equipment into an outlet on a circuit different from that to which the receiver
is connected.
• Consult the dealer or an experienced radio/TV technician for help.
Caution: Any changes or modifications to this device not explicitly approved by manufacturer
could void your authority to operate this equipment.
This device complies with part 15 of the FCC Rules. Operation is subject to the following two
conditions: (1) This device may not cause harmful interference, and (2) this device must
accept any interference received, including interference that may cause undesired operation.
RF Exposure Information
The device has been evaluated to meet general RF exposure requirement. The device can be
used in portable exposure condition without restriction.