OWNER'S MANUAL
WASHING MACHINE
Before beginning installation, read these instructions
carefully. This will simplify installation and ensure that the
product is installed correctly and safely. Leave these
instructions near the product after installation for future
reference.
ENGLISH
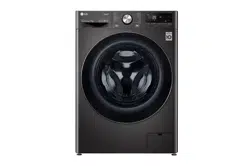
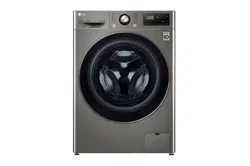
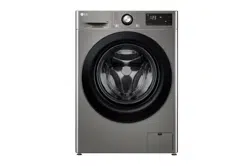
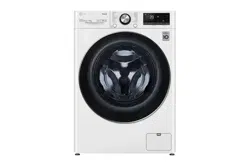
WX9-1410MB / WX9-1409MB / WX9-1409W
MFL72134444
Rev.03_090525
www.lg.com
Copyright © 2025 LG Electronics. All Rights Reserved
Scan the QR code to see the manual.

TABLE OF CONTENTS
This manual may contain images or
content that may be different from the
model you purchased.
This manual is subject to revision by the
manufacturer.
SAFETY INSTRUCTIONS
READ ALL INSTRUCTIONS BEFORE USE .................................................... 5
Safety Messages...................................................................................................5
WARNING .................................................................................................... 5
Technical Safety....................................................................................................5
Maximum Capacity ..............................................................................................6
Installation ............................................................................................................6
Operation ..............................................................................................................7
Maintenance .........................................................................................................9
Disposal.................................................................................................................9
INSTALLATION
Parts and Specifications .......................................................................... 10
Front View ...........................................................................................................10
Rear View.............................................................................................................10
Specifications......................................................................................................11
Accessories..........................................................................................................12
Installation Place Requirements............................................................ 13
Installation Location ..........................................................................................13
Wooden Floors (Suspended Floors) .................................................................13
Ventilation...........................................................................................................14
Ambient Temperature .......................................................................................14
Electrical Connection .........................................................................................14
Unpacking the Appliance ........................................................................ 14
Lifting the Appliance Off the Foam Base.........................................................14
Removing the Transit Bolt Assemblies............................................................14
Levelling the Appliance ........................................................................... 15
Checking the Level .............................................................................................15
Adjusting and Levelling the Feet......................................................................15
Using Anti-Slip Sheets........................................................................................16
Connecting the Water Supply Hose ....................................................... 17
Note for Connection ..........................................................................................17
Checking the Rubber Seal .................................................................................17

Connecting the Hose to the Water Tap...........................................................17
Connecting the Hose to the Appliance............................................................18
Installing the Drain Hose ........................................................................ 18
Installing the Drain Hose with the Elbow Bracket .........................................18
OPERATION
Operation Overview................................................................................. 20
Using the Appliance...........................................................................................20
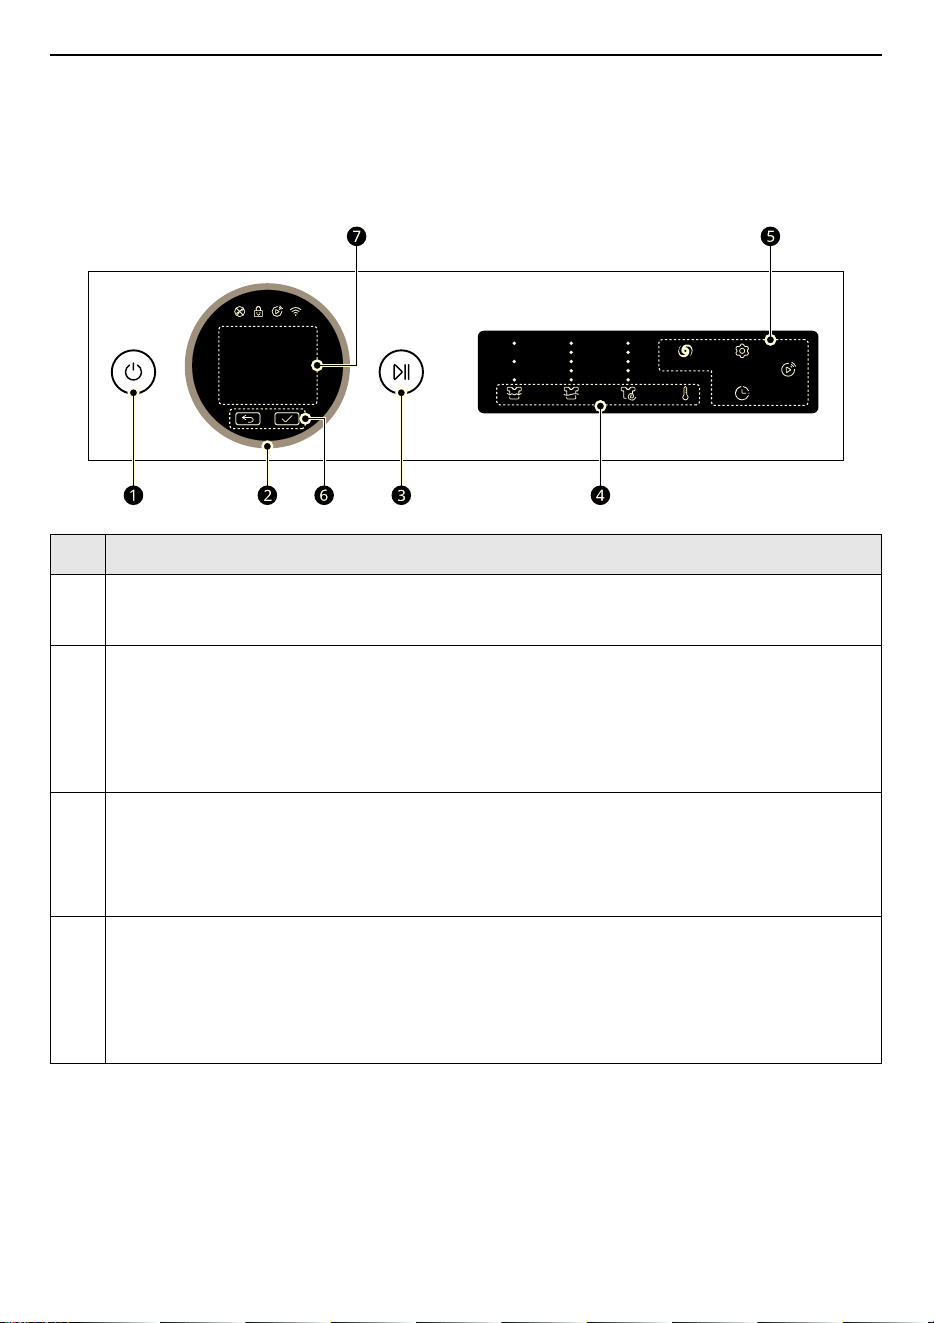
Control Panel ............................................................................................ 22
Control Panel Features......................................................................................22
Preparing the Wash Load ........................................................................ 24
Sorting the Clothes ............................................................................................24
Checking the Clothes Care Label......................................................................24
Checking the Clothes before Loading .............................................................24
Adding Detergents and Softeners.......................................................... 25
Detergent Dosage..............................................................................................25
Using the Dispenser...........................................................................................25
Adding Detergent Tablets.................................................................................26
Adding Water Softener......................................................................................26
Programme Table..................................................................................... 27
Washing Programme.........................................................................................27
Extra Options ......................................................................................................30
Selectable Spin Speed........................................................................................31
Test in Conformity with AS/NZS 2040.1...........................................................32
Extra Options and Functions .................................................................. 33
Customizing a Washing Programme...............................................................33
Using Special Option..........................................................................................33
Using Basic Option.............................................................................................34
Using Various Settings.......................................................................................34
SMART FUNCTIONS
LG ThinQ Application ............................................................................... 36
LG ThinQ Application Features.........................................................................36
Installing LG ThinQ Application and Connecting an LG Appliance..............36
Activating Network Connection........................................................................37
Using the Appliance Remotely .........................................................................37
Deactivating Network Connection...................................................................38
RF Radiation Exposure Statement....................................................................38
Open Source Software Notice Information ....................................................38

Smart Diagnosis ....................................................................................... 38
Using LG ThinQ to Diagnose Issues.................................................................38
Using Audible Diagnosis to Diagnose Issues .................................................39
MAINTENANCE
Cleaning After Every Wash...................................................................... 40
What to Clean .....................................................................................................40
Cleaning the Exterior.........................................................................................40
Cleaning the Appliance Periodically ...................................................... 40
Cleaning the Drum.............................................................................................40
Cleaning the Water Inlet Filter .........................................................................41
Cleaning the Drain Pump Filter and Performing an Emergency Water
Evacuation...........................................................................................................41
Cleaning the Dispenser Drawer .......................................................................43
TROUBLESHOOTING
Before Calling for Service ........................................................................ 44
Error Messages...................................................................................................44
Noises You Might Hear......................................................................................45
Operation ............................................................................................................46
Performance .......................................................................................................48
Odour...................................................................................................................49
Wi-Fi .....................................................................................................................50
5
SAFETY INSTRUCTIONS
ENGLISH
SAFETY INSTRUCTIONS
READ ALL INSTRUCTIONS BEFORE USE
The following safety guidelines are intended to prevent unforeseen
risks or damage from unsafe or incorrect operation of the appliance.
The guidelines are separated into ‘WARNING’ and ‘CAUTION’ as
described below.
Safety Messages
WARNING
WARNING
To reduce the risk of explosion, fire, death, electric shock, injury or
scalding to persons when using this product, follow basic precautions,
including the following:
Technical Safety
• This appliance is not intended for use by persons (including children)
with reduced physical, sensory or mental capabilities, or lack of
experience and knowledge, unless they have been given supervision
or instruction concerning use of the appliance by a person
responsible for their safety.
This symbol is displayed to indicate matters and operations
that can cause risk. Read the part with this symbol carefully
and follow the instructions in order to avoid risk.
WARNING
This indicates that the failure to follow the instructions can
cause serious injury or death.
CAUTION
This indicates that the failure to follow the instructions can
cause the minor injury or damage to the product.

6
SAFETY INSTRUCTIONS
• Children should be supervised to ensure that they do not play with
the appliance.
• If the power cord is damaged, it must be replaced by the
manufacturer, its service agent or similarly qualified persons in order
to avoid a hazard.
• Use a new hose or hose-set supplied with the appliance. Reusing old
hoses can cause a water leak and subsequent property damage.
• Ventilation openings must not be obstructed by a carpet.
• This appliance is intended to be used in household only.
• The inlet water pressure must be between 100 kPa and 800 kPa.
• Potentially there could be hydrogen built-up in hot water system that
has not been used for two weeks or more. In this instance, hot water
faucets should be allowed to run for several minutes prior to use of
the washing machine.
Maximum Capacity
The maximum capacity in some cycles for dry clothes to be washed is:
Installation
• This appliance should only be transported by two or more people
holding the appliance securely.
• Do not install the appliance in a damp and dusty place. Do not install
or store the appliance in any outdoor area, or any area that is subject
to weathering conditions such as direct sunlight, wind, rain, or
temperatures below freezing.
• Make sure the power plug is completely pushed into the power
outlet.
• Do not plug the appliance into multiple outlet sockets, power boards,
or an extension power cable.
WX9-1410MB WX9-1409MB / WX9-1409W
10 kg 9 kg

7
SAFETY INSTRUCTIONS
ENGLISH
• Do not modify the power plug provided with the appliance. If it does
not fit the power outlet, have a proper outlet installed by a qualified
electrician.
• This appliance is equipped with a power cord having an equipment-
earthing / grounding conductor (earthing pin) and a grounding
power plug. The power plug must be plugged into an appropriate
outlet socket that is installed and earthed / grounded in accordance
with all local codes and ordinances.
• Improper connection of the equipment-grounding conductor can
result in risk of electric shock. Check with a qualified electrician or
service personnel if you are in doubt as to whether the appliance is
properly grounded.
Operation
• Never attempt to operate the appliance if it is damaged,
malfunctioning, partially disassembled, or has missing or broken
parts, including a damaged cord or plug.
• Do not apply any sharp objects to the control panel in order to
operate the appliance.
• Do not attempt to separate any panels or disassemble the appliance.
• Do not repair or replace any part of the appliance. All repairs and
servicing must be performed by qualified service personnel unless
specifically recommended in this Owner's Manual. Use only
authorized factory parts.
• Do not push down the door excessively, when the appliance door is
open.
• Do not put animals, such as pets into the appliance.
• Do not wash any items that are specified by the manufacturer as not
washable on the care label.
• Keep the area underneath and around the appliance free of
combustible materials such as lint, paper, rags, chemicals, etc.
• Do not leave the appliance door open. Children may hang on the door
or crawl inside the appliance, causing damage or injury.

8
SAFETY INSTRUCTIONS
• Do not put in, wash or dry articles that have been cleaned in, washed
in, soaked in, or spotted with combustible or explosive substances
(such as waxes, wax removers, oil, paint, gasoline, degreasers,
drycleaning solvents, kerosene, petrol, spot removers, turpentine,
vegetable oil, cooking oil, acetone, alcohol, etc.). Improper use can
cause fire or explosion.
• Do not use or store flammable or combustible substances (ether,
benzene, alcohol, chemical, LPG, combustible spray, gasoline,
thinner, petroleum, insecticide, air freshener, cosmetics, etc.) near
the appliance.
• Never reach into the appliance while it is operating. Wait until the
drum has completely stopped.
• Do not touch the door during a high temperature programme.
• In case of a water leak from the appliance or flood, disconnect the
power plug and contact the LG Electronics customer information
centre.
• Turn off water taps to relieve pressure on hoses and valves and to
minimize leakage if a break or rupture should occur. Check the
condition of the fill hoses; they should be replaced after 5 years.
• If there is a gas leakage (isobutane, propane, natural gas, etc.) within
the home, do not touch the appliance or power plug and ventilate the
area immediately.
• If the drain hose or inlet hose is frozen during winter, use it only after
thawing.
• Keep all washing detergents, softener and bleach away from
children.
• Do not touch the power plug or the appliance controls with wet
hands.
• Do not bend the power cable excessively or place a heavy object on it.
• Avoid touching any water that is drained from the appliance during
the wash.
• Make sure that drainage is working properly. If water is not drained
properly, your floor may get flooded.

9
SAFETY INSTRUCTIONS
ENGLISH
• When the air temperature is high and the water temperature is low,
condensation may occur and thus wet the floor.
• Wipe off dirt or dust on the contacts of the power plug.
Maintenance
• Disconnect the appliance from the power supply before cleaning the
appliance. Setting the controls to the OFF or stand by position does
not disconnect this appliance from the power supply.
• Securely plug the power plug in the outlet socket after completely
removing any moisture and dust.
• Do not spray water inside or outside the appliance to clean it.
• Never unplug the appliance by pulling on the power cable. Always
grip the power plug firmly and pull straight out from the outlet
socket.
• Only qualified service personnel from LG Electronics service centre
should disassemble, repair, or modify the appliance. Contact an LG
Electronics customer information centre if you move and install the
appliance in a different location.
Disposal
• Before discarding an old appliance, unplug it. Cut off the cable
directly behind the appliance to prevent misuse.
• Dispose of all packaging materials (such as plastic bags and
styrofoam) away from children. The packaging materials can cause
suffocation.
• Cut off the power cord and remove the door before disposing of this
appliance to avoid the danger of children or small animals getting
trapped inside.
10
INSTALLATION
INSTALLATION
Parts and Specifications
NOTE
• Appearance and specifications may change without notice to improve the quality of the appliance.
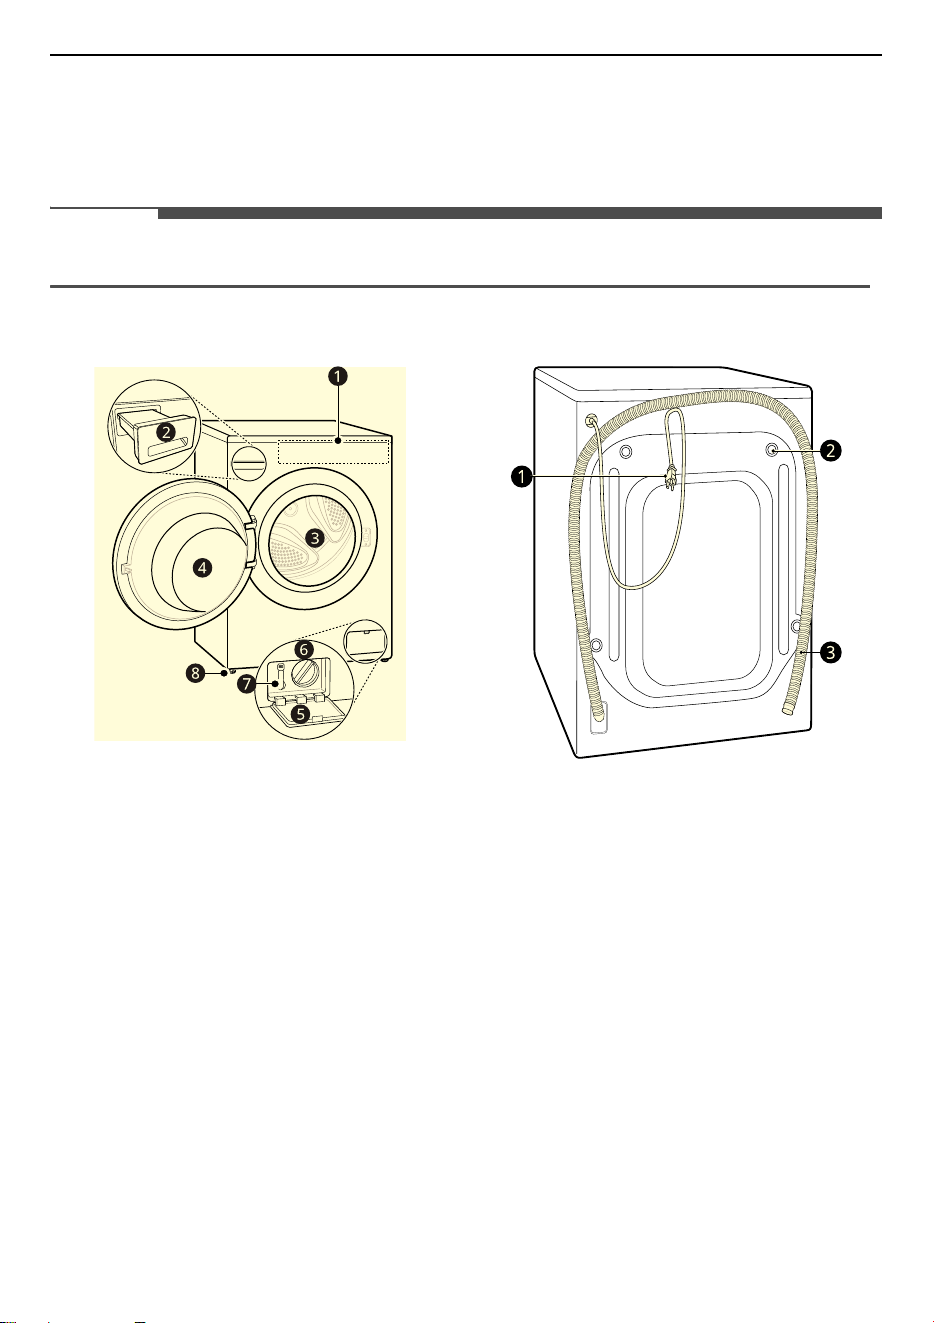
Front View
a
Control Panel
b
Detergent Dispenser Drawer
c
Drum
d
Door
e
Cover Cap
f
Drain Pump Filter
g
Drain Plug
h
Levelling Feet
Rear View
a
Power Plug
b
Transit Bolts
c
Drain Hose
11
INSTALLATION
ENGLISH
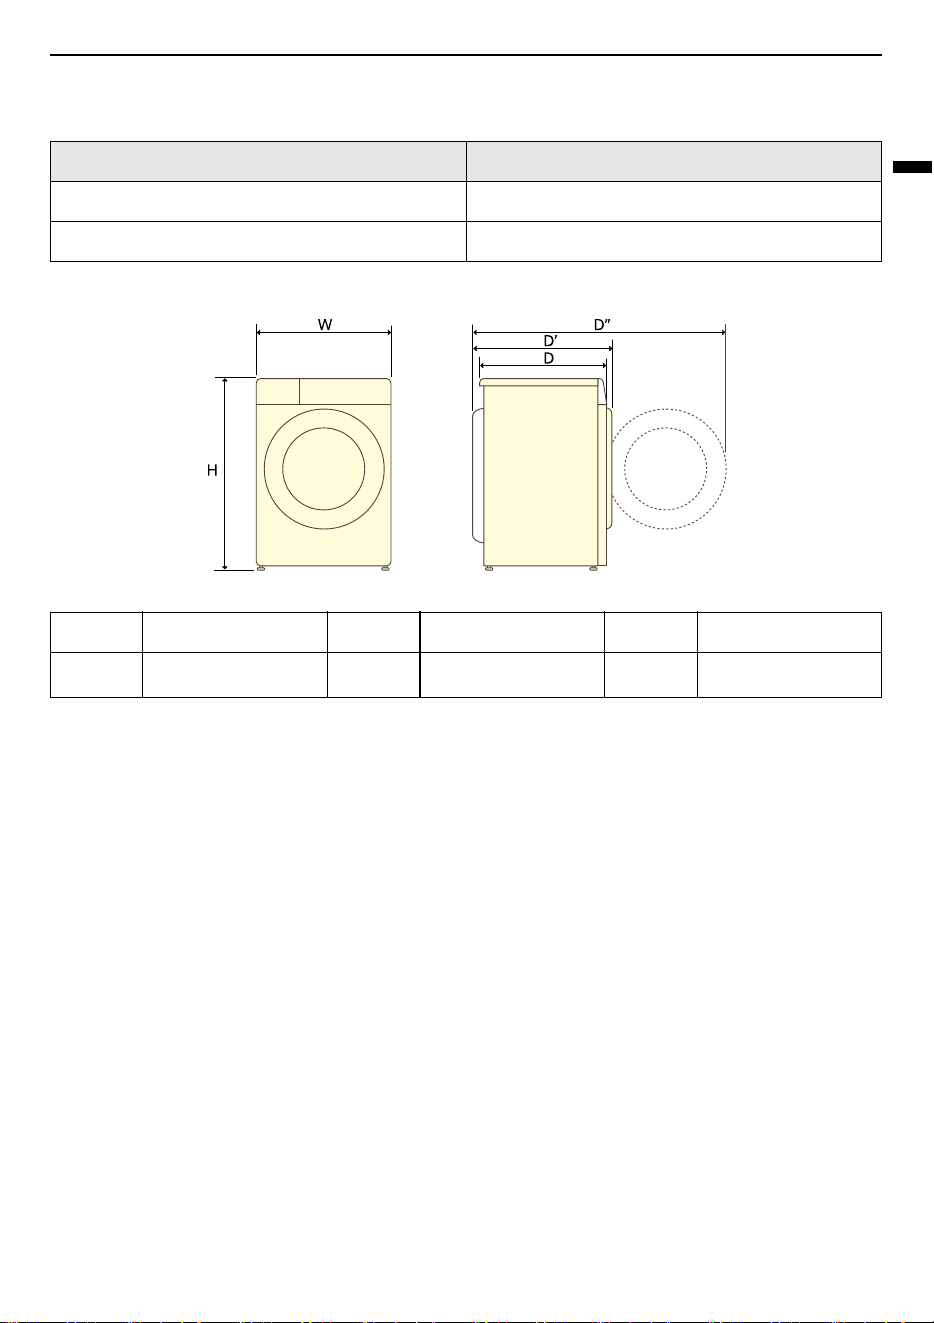
Specifications
Dimension(mm)
Model WX9-1410MB / WX9-1409MB / WX9-1409W
Power Supply 220‒240 V~, 50 Hz
Product Weight 68 kg
W 600 D 565 D'' 1100
H850D'620
12
INSTALLATION
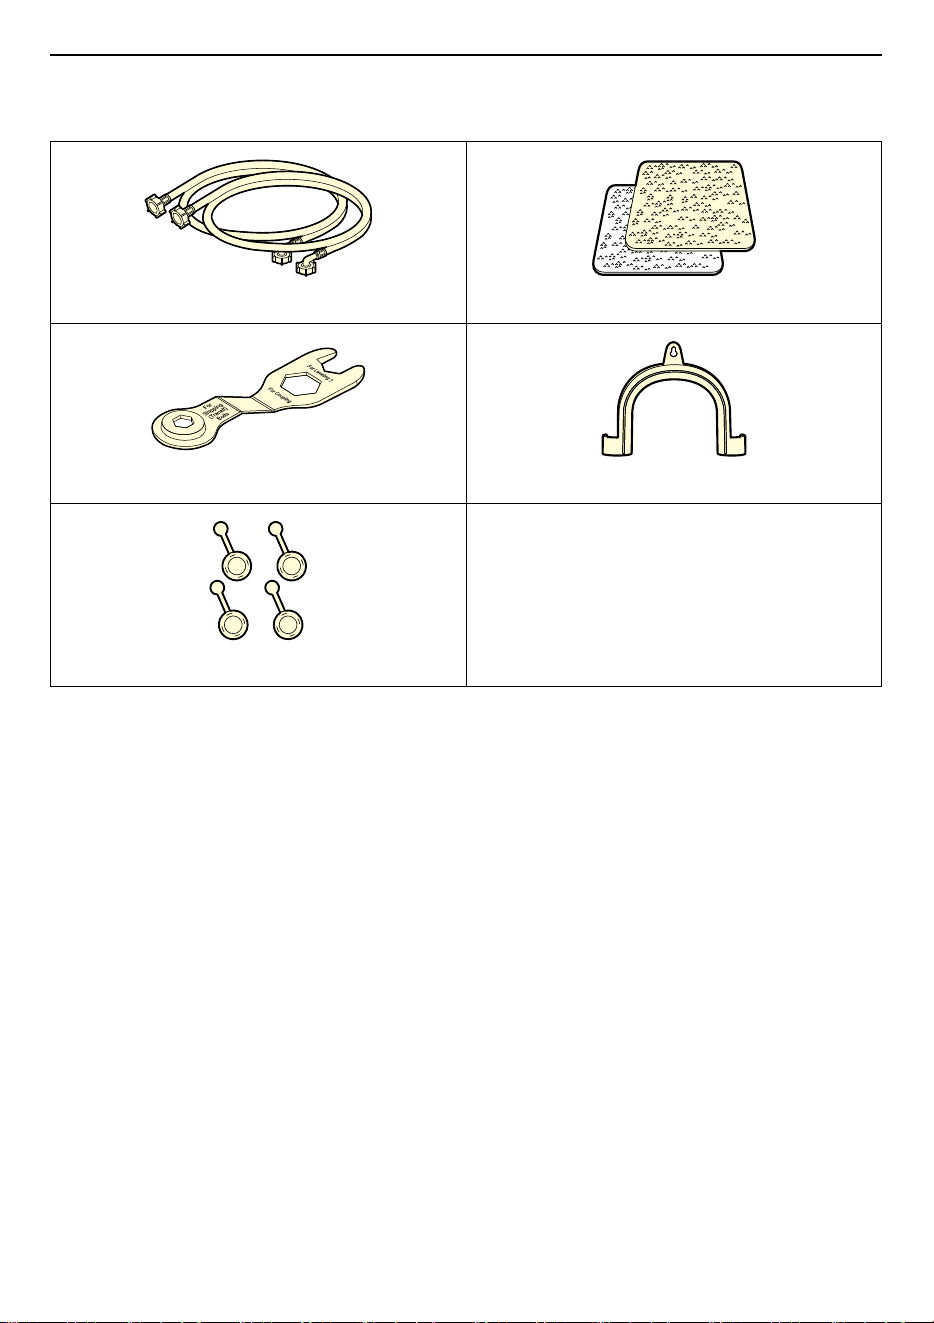
Accessories
Cold and Hot Water Inlet Hoses
Anti–slip Sheets
Spanner
Elbow Bracket for Securing Drain Hose
Caps for Covering Transit Bolt Holes
13
INSTALLATION
ENGLISH
Installation Place
Requirements
Before installing the appliance, check the following
information to make sure that the appliance is
installed in a correct place.
Installation Location
• This appliance must be installed on firm flooring
to minimize vibration during the spin cycle.
Concrete flooring is best, being far less prone to
vibration during the spin cycle than wooden
floorboards or a carpeted surface.
• If it is impossible to avoid positioning the
appliance next to a gas cooker or coal burning
stove, an insulation (850 X 600 mm) covered with
aluminum foil on the side facing the cooker or
stove must be inserted between the two
appliances.
• Ensure that when the appliance is installed, it is
easily accessible for an engineer in the event of a
breakdown.
• When installing the appliance, adjust all four feet
using the transit bolt spanner provided to
ensure the appliance is stable.
• Ensure that there is enough room for full
opening of the appliance door.
• To ensure sufficient clearance for water inlet
hoses, drain hose and airflow, allow minimum
clearances of at least 20 mm at the sides and 100
mm behind the appliance. Be sure to allow for
wall, door, or floor moldings that may increase
the required clearances.
WARNING
• This appliance must only be used for domestic
household purposes and should not be used in
mobile applications.
Wooden Floors (Suspended
Floors)
When installing the appliance on wooden floors,
use rubber cups to reduce excessive vibration and
unbalance. Timber or suspended type flooring may
contribute to excessive vibration and unbalance,
errors and malfunction.
• To reduce vibration, we recommend placing at
least 15 mm thickness of rubber cups
a
under
each adjusting foot of the appliance, secured to
at least two floor beams with screws.
• If possible, install the appliance in one of the
corners of the room, where the floor is more
stable.
• Fit the rubber cups to reduce vibration.
CAUTION
• If the appliance is installed on the unstable floor
(e.g. wooden floor), the warranty does not cover
any damages and cost occurred due to the
installation on the unstable floor.
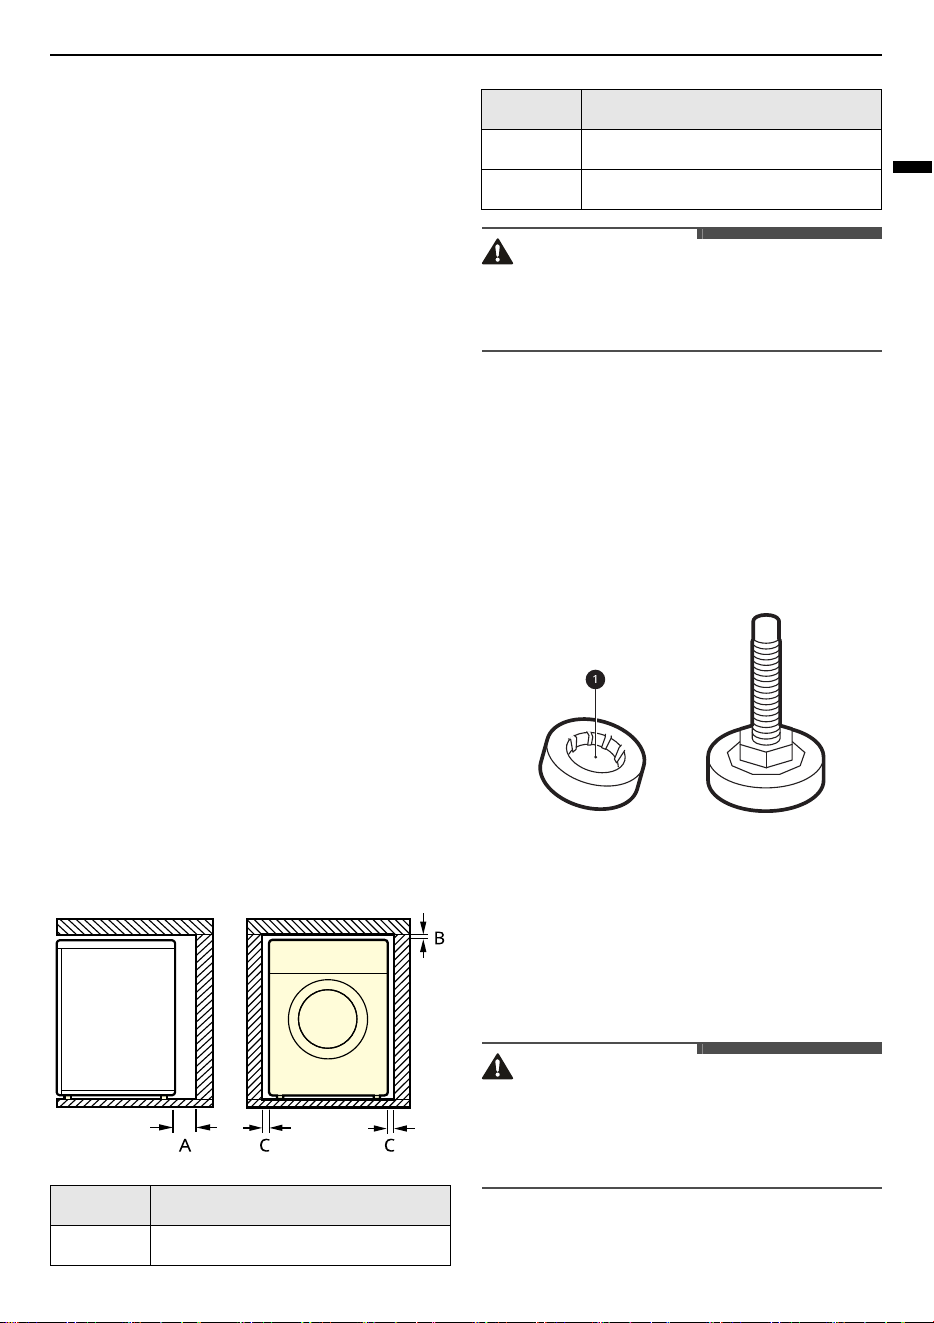
Index Clearance (mm)
A
100
B
5
C
20
Index Clearance (mm)
14
INSTALLATION
NOTE
• You can purchase rubber cups (part No.
4620ER4002B
) from the LG service centre.
Ventilation
• Make sure that air circulation around the
appliance is not be impeded by carpets, rugs,
etc.
Ambient Temperature
• Do not install the appliance in rooms where
freezing temperatures may occur. Frozen hoses
may burst under pressure. The reliability of the
electronic control unit may be impaired at
temperatures below freezing point.
• If the appliance is delivered in winter and
temperatures are below freezing, place the
appliance at room temperature for a few hours
before putting it into operation.
Electrical Connection
• Do not use an extension cord or double adapter.
• Always unplug the appliance and turn off the
water supply after use.
• Connect the appliance to an earthed socket in
accordance with current wiring regulations.
• The appliance must be positioned so that the
plug is easily accessible.
• Power outlet must be within 1 meter of either
side of the appliance.
WARNING
• Repairs to the appliance must only be carried out
by qualified personnel. Repairs carried out by
inexperienced persons may cause injury or
serious malfunctioning. Contact your local
authorised LG repairer.
• The power plug must be plugged into an
appropriate outlet socket that is installed and
grounded/earthed in accordance with all local
codes and ordinances.
Unpacking the Appliance
Lifting the Appliance Off the
Foam Base
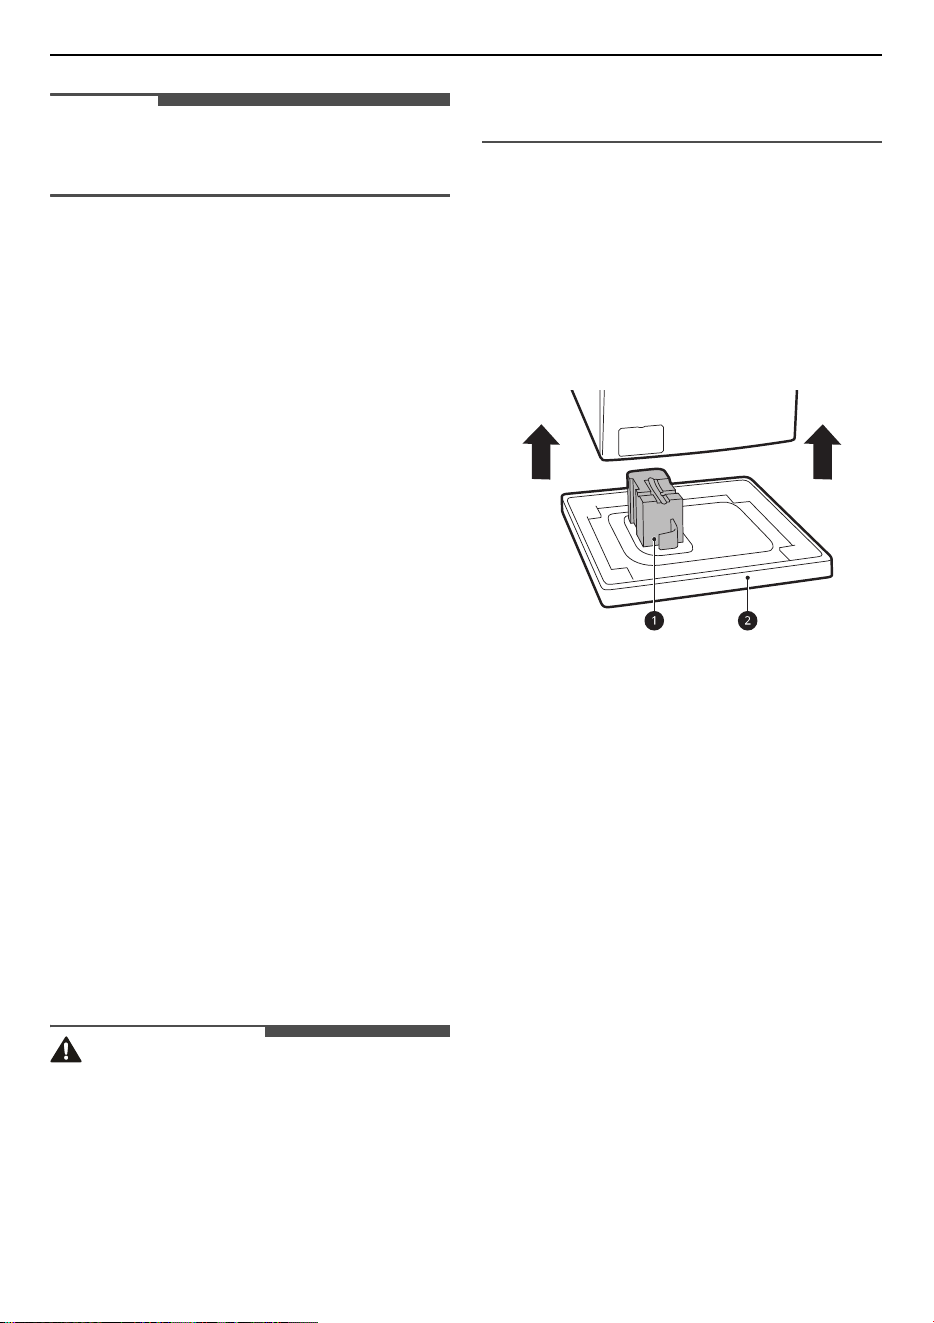
After removing the carton and shipping material,
lift the appliance off the foam base.
• Make sure the tub support
a
* comes off with
the base and is not stuck to the bottom of the
appliance.
• If you must lay the appliance down to remove
the carton base
b
, always protect the side of the
appliance and lay it carefully on its side. Do not
lay the appliance on its front or back.
* This feature may vary depending on the model
purchased.
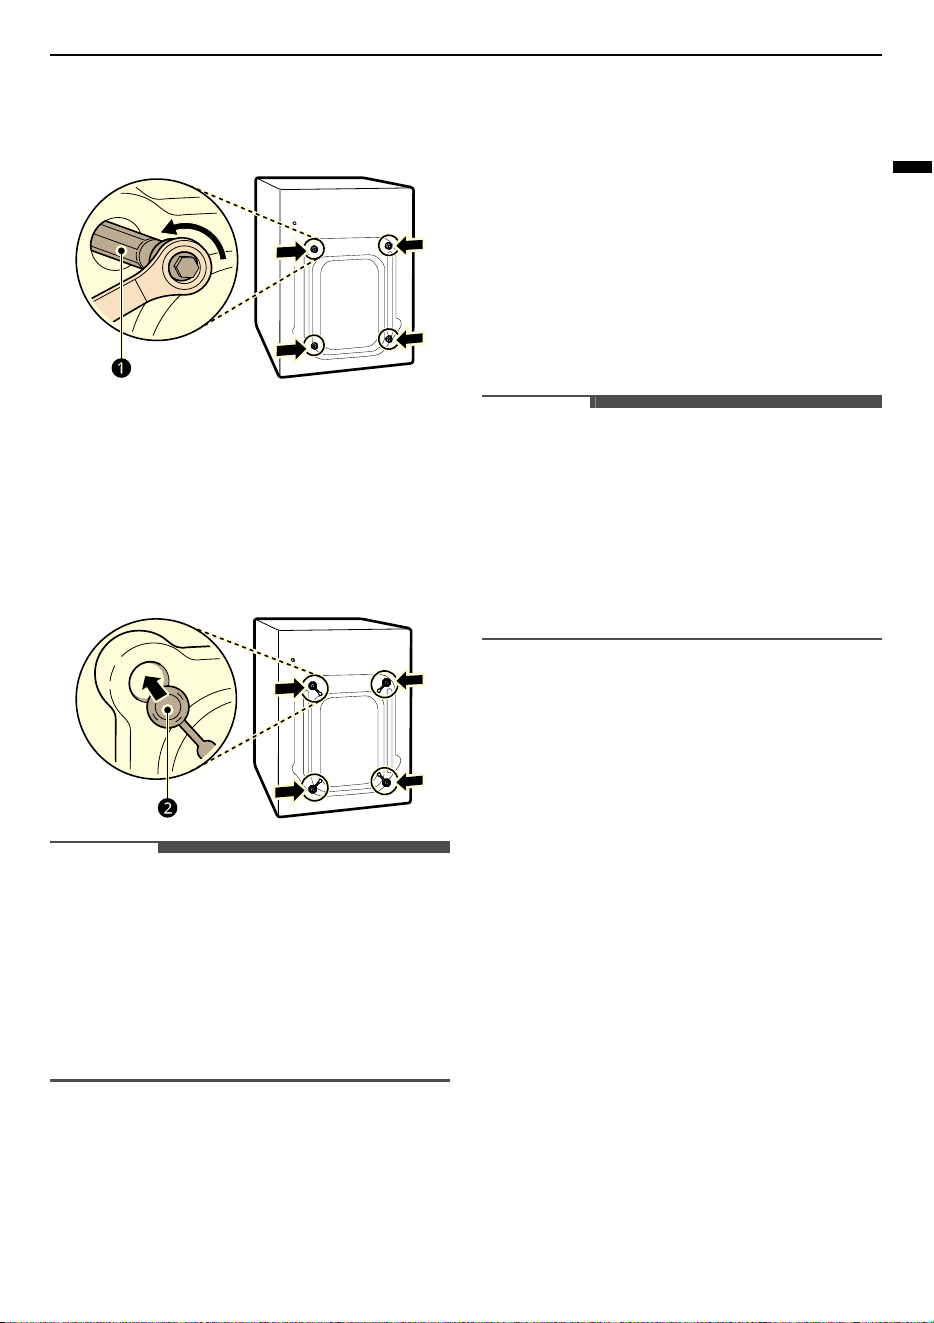
Removing the Transit Bolt
Assemblies
To prevent the appliance from severe vibration and
breakage, remove transit bolts and retainers.
*
15
INSTALLATION
ENGLISH
1
Starting with the bottom two transit bolts
a
,
use the spanner (included) to fully loosen all
transit bolts by turning them counterclockwise.
2
Remove the bolt assemblies by wiggling them
slightly while pulling them out.
3
Install the hole caps.
• Locate the hole caps
b
included in the
accessory pack or attached on the back.
NOTE
• Save the transit bolts and retainers for future
use.
• Transport this appliance for the prevention of
breakage as below:
- The transit bolts are reinstalled.
- The power cord is secured to the back of the
appliance.
Levelling the Appliance
Checking the Level
When pushing down the edges of the top plate
diagonally, the appliance should not move up and
down at all (check both directions).
• If the appliance rocks when pushing the top
plate of the appliance diagonally, adjust the feet
again.
• Check whether the appliance is perfectly level
after installation.
NOTE
• Timber or suspended type flooring may
contribute to excessive vibration and unbalance.
Reinforcement or bracing of the timber floor
may need to be considered to stop or reduce
excessive noise and vibration.
• Never try to level any uneven floor by putting
pieces of wood, cardboard or similar materials
under the appliance.
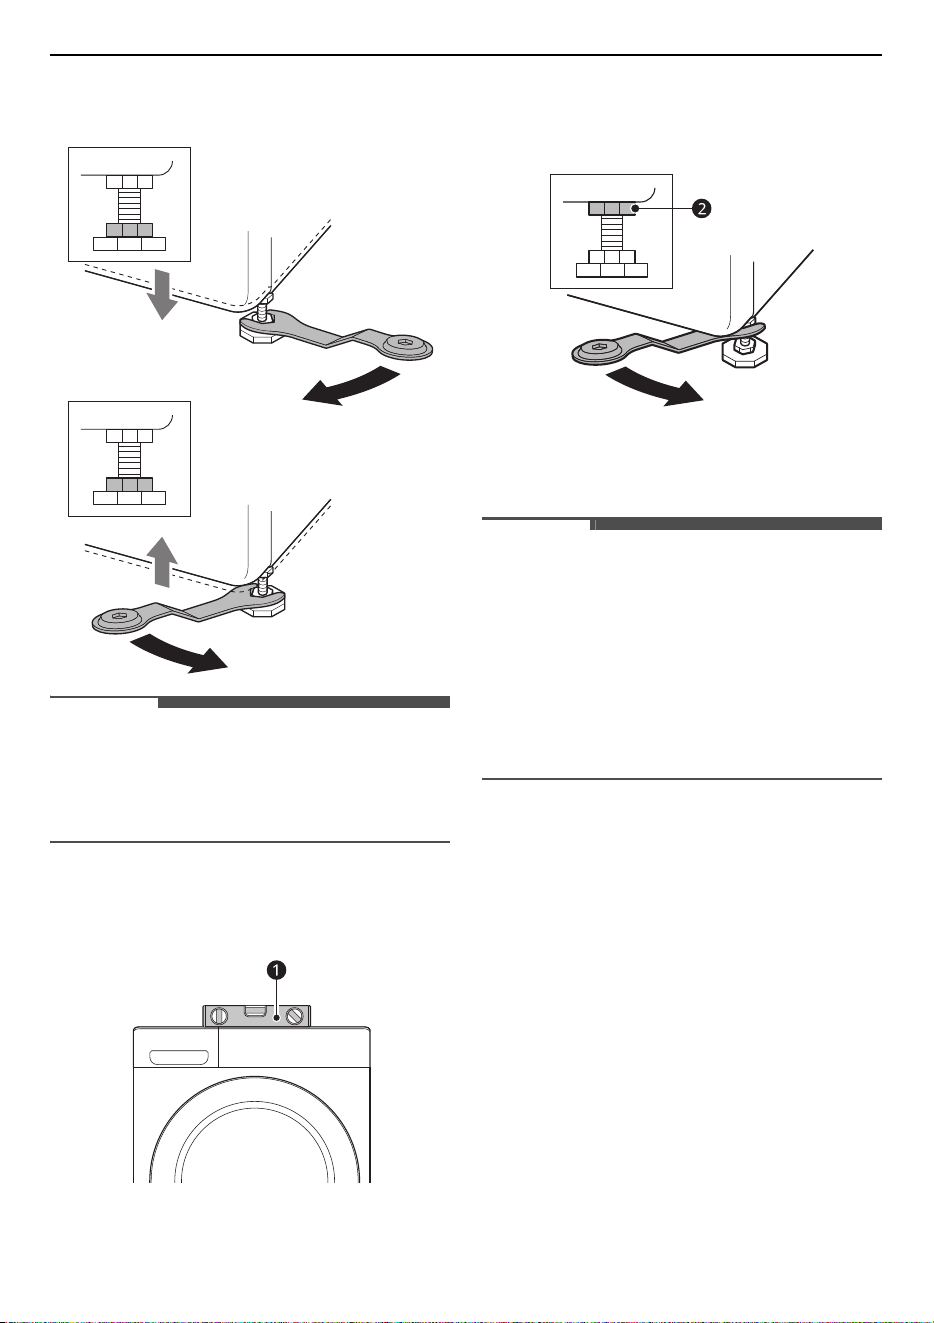
Adjusting and Levelling the
Feet
When installing the appliance, the appliance
should be aligned and perfectly level. If the
appliance is not aligned and level properly, the
appliance may be damaged or may not operate
properly.
1
Turn the levelling feet as required if the floor is
uneven.
• Do not insert pieces of wood etc. under the
feet.
16
INSTALLATION
• Make sure that all four feet are stable and
resting on the floor.
NOTE
• Do not install the washing machine on a plinth,
stand or elevated surface unless it is
manufactured by LG Electronics for use with this
model.
2
Check if the appliance is perfectly level using a
spirit level
a
.
3
Secure the levelling feet with the lock nuts
b
by turning anti-clockwise against the bottom of
the appliance.
4
Check if all lock nuts at the bottom of the
appliance are secured properly.
NOTE
• Proper placement and levelling of the appliance
will ensure long, regular, and reliable operation.
• The appliance must be 100% horizontal and
stand firmly in position on a hard flat floor.
• It must not ‘Seesaw’ across corners under the
load.
• Do not let the feet of the appliance get wet.
Failure to do so may cause vibration or noise.
Using Anti-Slip Sheets
This feature may vary depending on the model
purchased.
If you install the appliance on a slippery surface, it
may move because of excessive vibration.
Incorrect levelling may cause malfunction through
noise and vibration. If this occurs, install the anti-
slip sheets under the levelling feet and adjust the
level.
1
Clean the floor to attach the anti-slip sheets.
• Use a dry rag to remove and clean foreign
objects and moisture. If moisture remains,
the anti-slip sheets may slip.

17
INSTALLATION
ENGLISH
2
Adjust the level after placing the appliance in
the installation area.
3
Place the adhesive side
a
of the anti-slip
sheets on the floor.
• The most effective way is to install the anti-
slip sheets under the front feet. If it is
difficult to place the sheets under the front
feet of the appliance, attach them under the
rear feet.
4
Put the appliance on the anti-slip sheets.
• Do not attach the adhesive side
a
of anti-
slip sheets to the feet of the appliance.
NOTE
• Additional anti-slip sheets are available at LG
Electronics service centre.
Connecting the Water
Supply Hose
Note for Connection
• Water pressure must be between
100 kPa
and
800 kPa
(1.0 – 8.0 kgf/cm²). If the water pressure
is more than
800 kPa
, a decompression device
should be installed.
• Periodically check the condition of the water
supply hose and replace the water supply hose if
necessary.
NOTE
• If the water pressure is near or over 800 kPa, a
water pressure reduction device should be
installed to both taps.
• Exceeding 65 °C can damage some clothes.
• Temperatures below 4 °C can cause hoses to
freeze and burst and unfavourable wash results
due to undissolved detergent.
• Cold inlet Water Temperatures over 25 °C can
cause damage to clothes such as delicate
Woollens
• Do not overtighten the water supply hose or use
mechanical devices to tighten onto the inlet
valves.
• No further backflow protection required for
connection to the water inlet.
• Ensure the inlet hoses are not bent, kinked or
tangled as this could cause insufficient water
flow and result in a malfunction.
Checking the Rubber Seal
Two rubber seals
a
are supplied with the water
supply hose. They are used to prevent water leaks.
Connection to taps is sufficiently tight.
• Do not use mechanical devices such as multi
grips to tighten the water supply hose. Ensure
that the curved end of the water supply hose is
connected to the appliance.
Connecting the Hose to the
Water Tap
Connecting Screw-Type Hose to Tap with Thread
Screw the supply hose connector onto the water
supply tap. Hand tighten only with the aid of a soft
18
INSTALLATION
cloth. Do not overtighten the supply hose with any
mechanical device.
NOTE
• After connecting the water inlet hose to the
water tap, turn on the water tap to flush out
foreign substances (dirt, sand, sawdust, and etc.)
in the water lines. Let the water drain into a
bucket, and check the water temperature.
Connecting the Hose to the
Appliance
Screw the supply hose to the water inlet valve on
the back of the appliance.
• Do not connect the hose to the hot water supply
for models with one water inlet. Connect to the
cold water supply only.
NOTE
• After completing connection, if water leaks from
the hose, repeat the same steps. Use the most
conventional type of tap for the water supply. In
case that the tap is square or too big, remove the
guide plate before inserting the tap into the
adaptor.
• Make sure that the hose should not be kinked or
trapped.
Installing the Drain Hose
Installing the Drain Hose with
the Elbow Bracket
The drain hose should not be placed higher than
100 cm
above the floor. Water in the appliance may
not drain or may drain slowly.
• Securing the drain hose correctly will protect the
floor from damage due to water leakage.
• If the drain hose is too long, do not force it back
into the appliance. This will cause abnormal
noise.
19
INSTALLATION
ENGLISH
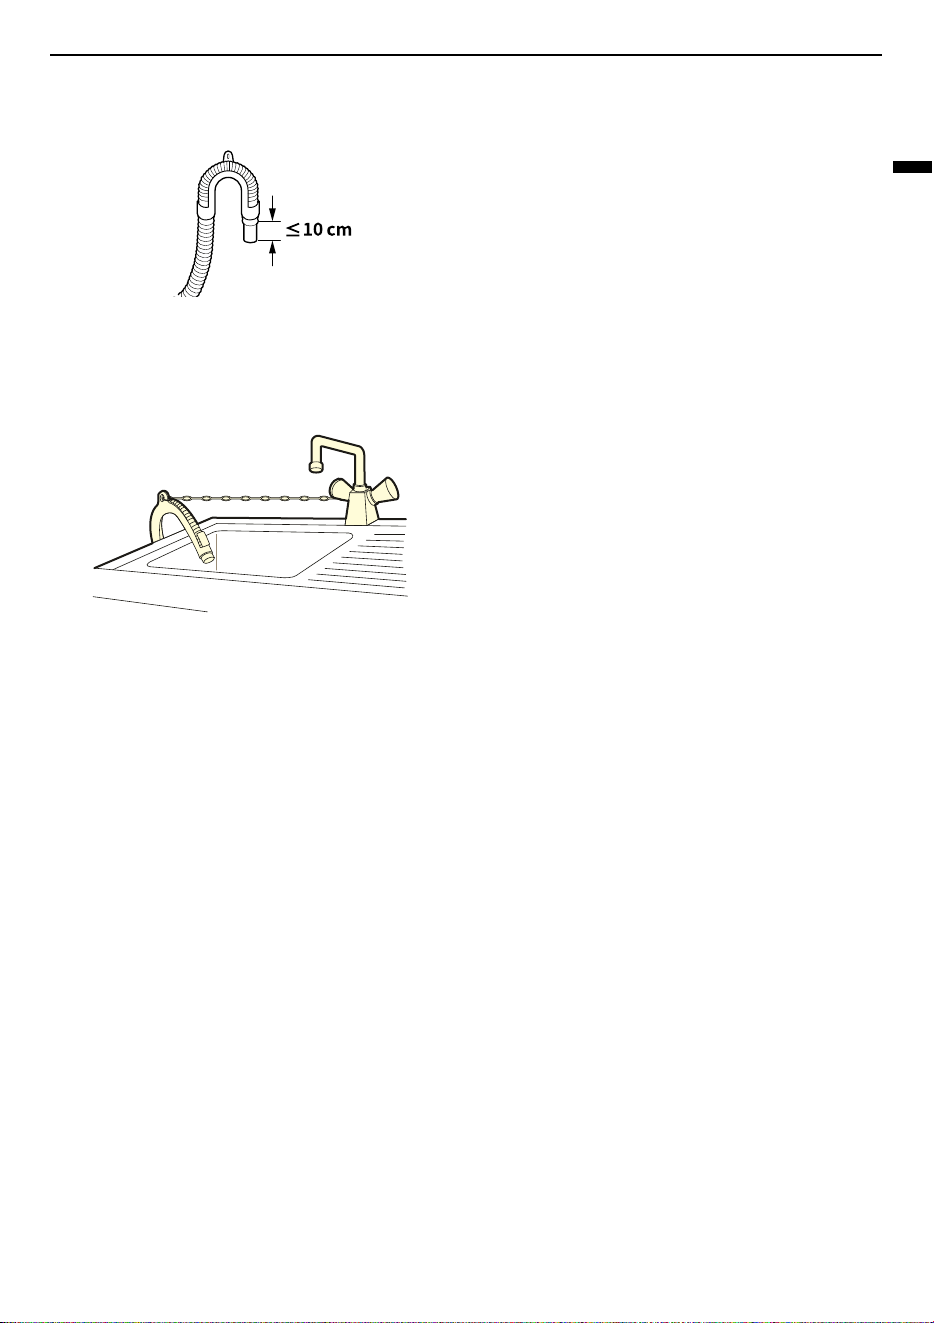
• Connect the elbow bracket within
10 cm
of the
end of the drain hose.
• Ensure that the drain hose is inserted no more
than
15 cm
into the drain.
• When installing the drain hose to a sink, secure it
tightly with string.
20
OPERATION
OPERATION
Operation Overview
Using the Appliance
Before the first wash, select the
Cotton
wash
programme and add a half amount of the
detergent. Start the appliance without clothes. This
will remove possible residues and water from the
drum that may have been left during
manufacturing.
1
Sort clothes and load items.
• Sort clothes by fabric type, soil level, colour
and load size as needed. Open the door and
load items into the appliance.
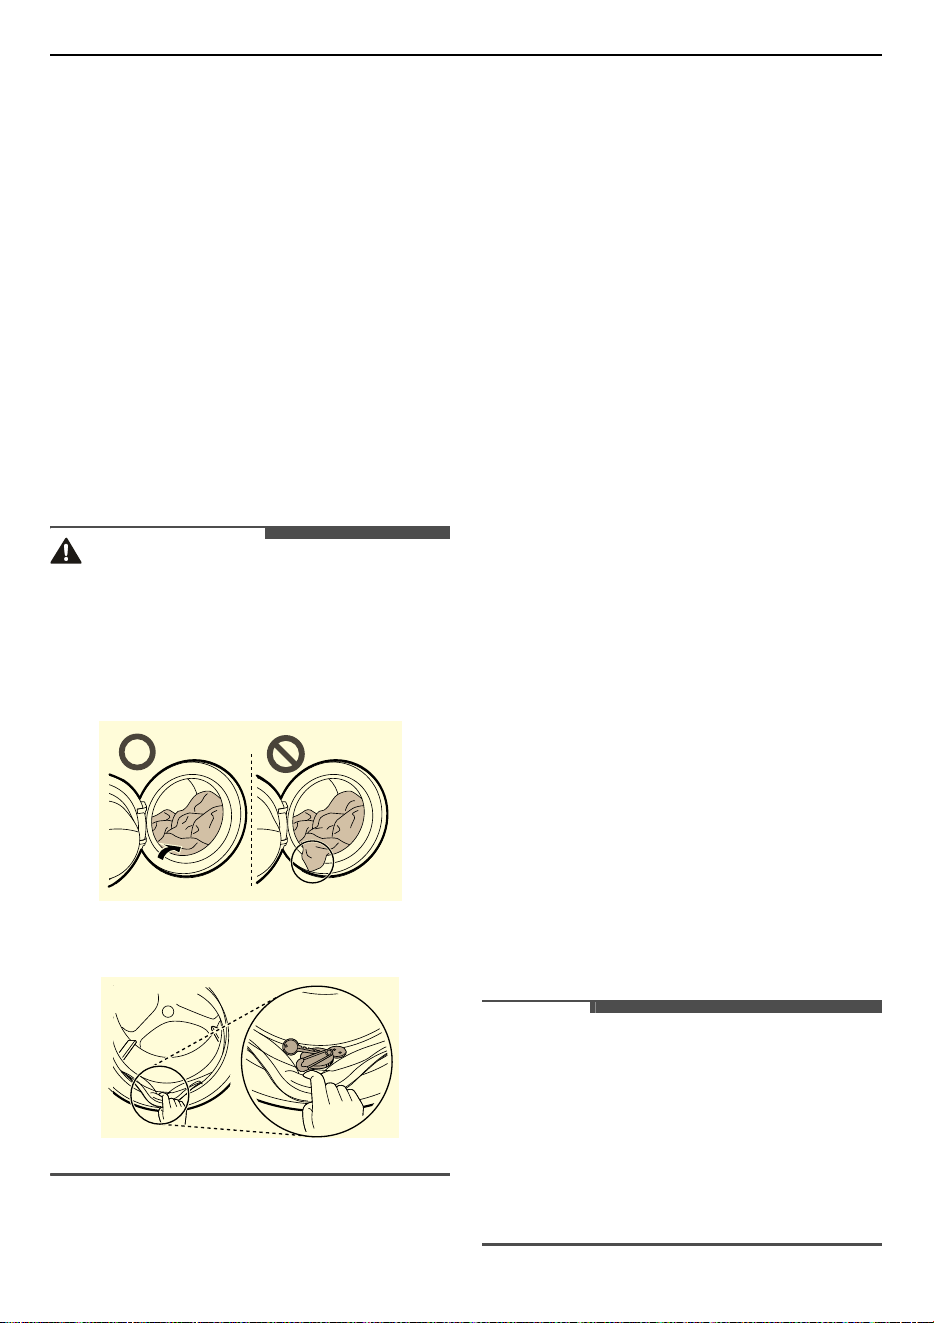
CAUTION
• Before closing the door, ensure that all clothes
and items are inside the tub and not
overhanging on the rubber door seal where they
will become caught when the door is closed.
Failing to do so will cause damage to the door
seal and the clothes.
• Remove items from the flexible door seal gasket
to prevent clothing and door seal damage.
2
Add cleaning products or detergent and
softener.
• Add the proper amount of detergent to the
detergent dispenser. If desired, add fabric
softener to the appropriate areas of the
dispenser.
3
Turn on the appliance.
• Press the
Power
button to turn on the
appliance.
4
Choose the desired cycle.
• Turn the cycle selector knob until the desired
cycle is selected.
• Now select a soil level, number of rinses,
spin speed and temperature. Pay attention
to the fabric care label of your clothes.
5
Begin cycle.
• Press the
Start/Pause
button, and then
press the
8
button within 60 seconds to
begin the cycle. The appliance will agitate
briefly without water to measure the weight
of the load.
• The appliance is equipped with a 2-button
start safety feature; if the
8
button is not
pressed within 60 seconds, the feature will
reset. In this case, repeat the steps and make
sure to press both buttons within 60 seconds
of each other.
• If the
Start/Pause
button is not pressed for
a prolonged period, the appliance will shut
off, and all settings will be lost.
NOTE
• In the following case, the door will not open even
if you pause the washing programme or turn the
washing machine off.
- When the washing machine starts a washing
programme and has water inside the drum,
the door will not open in order to prevent a
flood until the washing machine drains the
water completely.

21
OPERATION
ENGLISH
6
End of cycle.
• When the cycle is finished, a melody will
sound. Immediately remove your clothing
from the appliance to reduce wrinkling.
Check around the door seal when removing
the load for small items that may be caught
in the seal.
22
OPERATION
Control Panel
The actual control panel may differ from model to model.
Control Panel Features
Description
a
Power
On/Off Button
• Press this button to turn the washing machine on or off.
b
Programme Knob
• Programmes are available according to the clothes type.
• Once the desired cycle has been selected, the standard presets will appear in the display.
These settings can be adjusted using the
Customizing Washing Programme buttons
at any
time before starting the cycle.
c
Start/Pause
Button
• This button is used to initiate the 2-button start safety feature to start the wash program or
pause the wash program.
• If a temporary stop of the wash programme is needed, press this button.
d
Customizing Washing Programme Buttons
Use these buttons to adjust the soil level, number of rinses, spin speed or temperature settings
for the selected programme.
• The current settings are shown in the display.
• Press the button for that option to select other settings.

23
OPERATION
ENGLISH
Time and Status Display
e
Extra Options and Functions
• To use the extra functions, press the corresponding button. The corresponding symbol lights
up in the display.
• This allows you to select an additional programmes and will light when selected.
Â
Remote Start
With the
LG ThinQ
app, you can use a smartphone to control your appliance remotely.
• In order to use this function, refer to
SMART FUNCTIONS
.
f
N
&
8
Buttons
• Press the
N
button to go to the previous screen.
• Press the
8
button to select a menu item, save the information, or start the wash programme.
g
Display
• The display shows the settings, estimated remaining time, options, and status messages.
Description
a
Programme Status Indicators
• The display shows the settings, estimated remaining time, options, and status messages.
b
Ã
lights up when the programme starts and the door is locked.
c
Á
lights up when the control panel is locked except for the
Power
button.
d
Â
lights up when the remote control feature is activated.
e
f
lights up when the appliance is connected to Wi-Fi network at home.
Description
24
OPERATION
Preparing the Wash Load
Sort the wash load for best washing results, and
then prepare the clothes according to the symbols
on their care labels.
Sorting the Clothes
• Soil level (Heavy, Normal, Light): Separate
clothes according to soil level. If possible, do not
wash heavily soiled items with lightly soiled
ones.
• Colour (White, Lights, Darks): Wash dark or dyed
clothes separately from whites or light colours.
Mixing dyed clothes with light clothes can result
in dye transfer or discolouration of lighter
clothes.
• Lint (Lint producers, Collectors): Wash separately
lint producing fabrics from lint collecting fabrics.
Lint producers can result in pilling and linting on
the lint collectors.
Checking the Clothes Care Label
The symbols tell you about the fabric content of
your garment and how it should be washed.
Symbols on the Care Labels
NOTE
• The dashes under the symbol give you
information about the type of fabric and the
maximum allowance of mechanical stress.
Checking the Clothes before
Loading
• To help distribute the load evenly during
spinning, combine large and small items in a
load.
• Do not wash single small items. Add 1-2 similar
items to the load to prevent an out-of-balance
load.
• Check all pockets to make sure that they are
empty. Items such as nails, hair clips, matches,
pens, coins and keys can damage both your
appliance and clothes.
• When washing clothes with long attached
straps, tie them or use a laundry net.
• Use a laundry net for small items like sleeves,
stockings, tights, underwear, and socks to
prevent them from getting stuck between the
drum and the door seal.
• Fill the laundry net with less than half its capacity
and wash it with other clothes. Avoid overfilling
or washing it separately, as it may cause an
imbalance in the drum, leading to an inadequate
spin cycle.
• Close zippers, hooks and strings to make sure
that these items do not snag on other clothes.
• Pre-treat dirt and stains by brushing a small
amount of detergent dissolved water onto stains
to help lift dirt.
Symbol Wash / Fabric type
• Normal Wash
• Cotton, Mixed Fabrics
• Easy Care
• Synthetic, Mixed Fabrics
• Special Delicate Wash
• Delicates
• Hand Wash Only
• Wool, Silk
• Do not wash
25
OPERATION
ENGLISH
Adding Detergents and
Softeners
Detergent Dosage
• Detergent should be used according to the
instruction of the detergent manufacturer and
selected according to type, colour, soiling of the
fabric and the washing temperature. Use only
detergents that are suitable for Drum (front
load) type washers.
• If too many suds occur, reduce the detergent
amount.
• If too much detergent is used, too many suds
can occur and this will result in poor washing
results or cause heavy load to the motor.
• If you wish to use liquid detergent, follow the
guidelines provided by the detergent
manufacturer.
• You can pour liquid detergent directly into the
main detergent drawer if you are starting the
wash cycle immediately.
• Do not use liquid detergent if you are using the
Delay End
function, or if you have selected
Pre
Wash
option, as the liquid will dispense
immediately and may harden in the drawer or
the tub.
• Detergent usage may need to be adjusted for
water temperature, water hardness, size and soil
level of the load. For best results, avoid
overdosing the detergent. Failing to do so will
cause oversudsing.
• Refer to the label of the clothes, before adding
the detergent and choosing the water
temperature.
• Use only suitable detergents for the respective
type of clothing:
- Liquid detergent is often designed for special
applications, e.g. for coloured fabric, wool,
delicate or dark clothes.
- Powdered detergent is suitable for all types of
fabric.
- For better washing results of white and pale
garments, use powdered detergent with
bleach.
- Detergent is flushed from the dispenser at the
beginning of the wash cycle.
NOTE
• Do not let the detergent harden. Doing so may
lead to blockages, poor rinse performance or
odour.
• Full load: According to manufacturer’s
recommendation.
• Part load: 1/2 of the normal amount.
• Minimum load: 1/3 of full load.
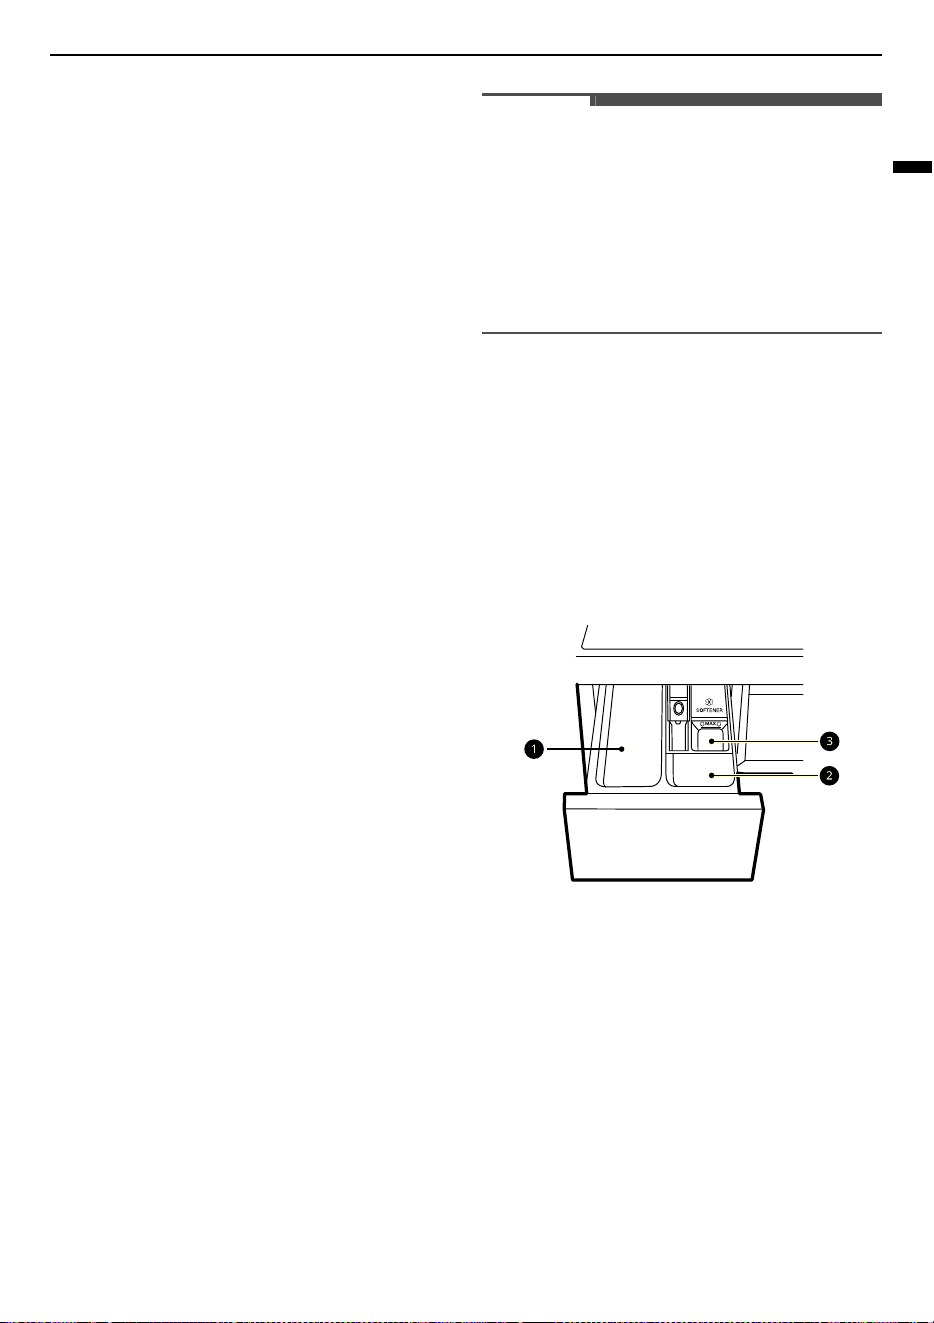
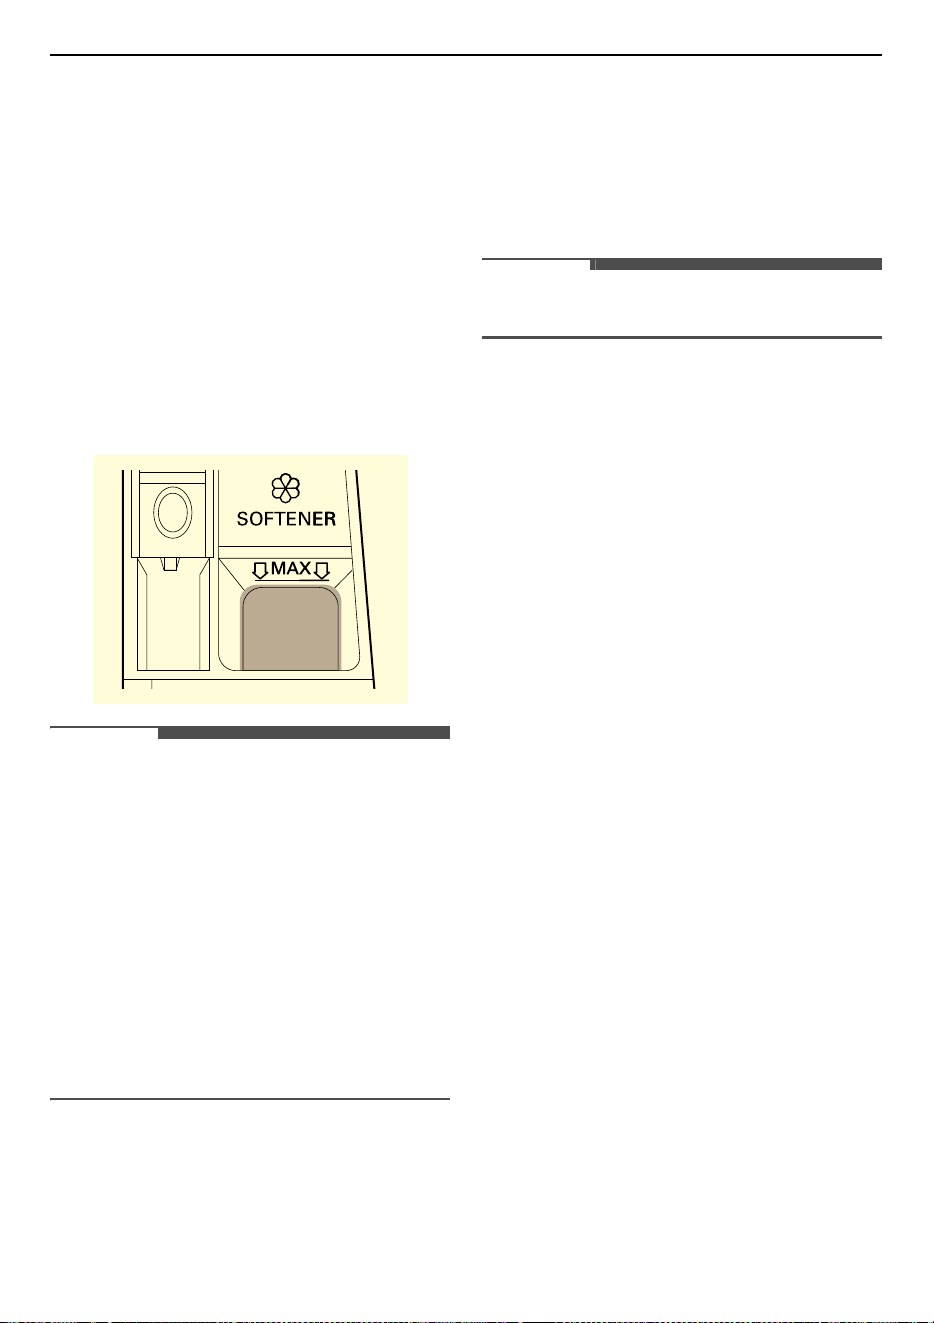
Using the Dispenser
To add detergent dosage to the dispenser:
1
Open the dispenser drawer.
2
Add the detergent and softener into the
appropriate compartments.
a
Main wash detergent compartment
• Detergents for the main wash, water
softener, bleach and stain remover
b
Pre-wash detergent compartment
c
Liquid fabric softener compartment
3
Gently close the detergent dispenser drawer
before starting the cycle.
• Slamming the drawer closed may result in
the detergent overflowing into another
compartment or dispensing into the drum
earlier than programmed.
26
OPERATION
• Be careful not to get a hand caught in the
drawer while closing.
• It is normal for a small amount of water to
remain in the dispenser compartments at
the end of the cycle.
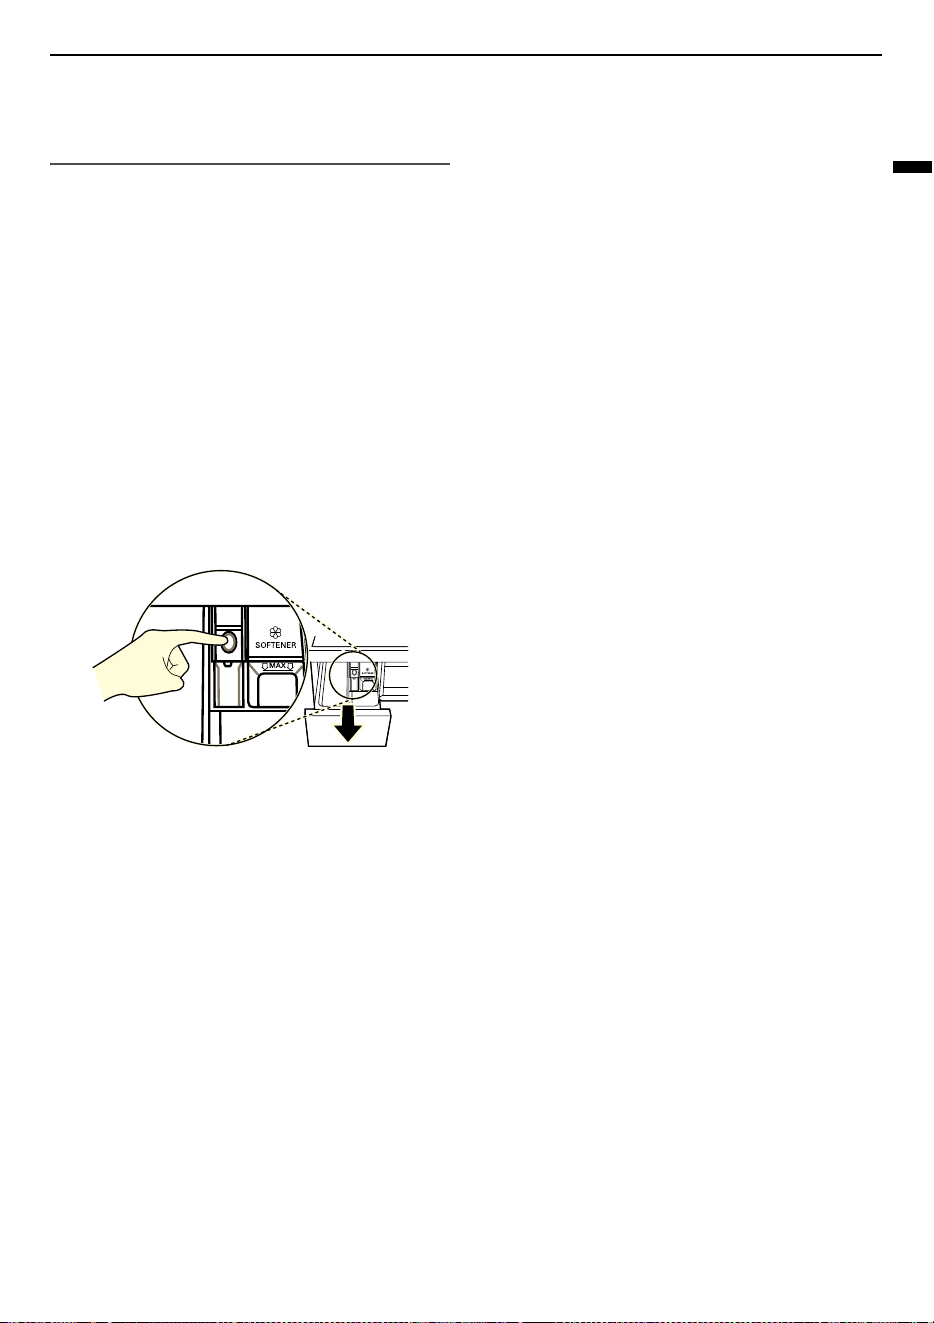
Fabric Softener Compartment
This compartment holds liquid fabric softener,
which is automatically dispensed during the final
rinse cycle. Either powdered or liquid fabric
softener may be used.
• Pour fabric softener to the maximum fill line.
Pouring excessive fabric softener over the
maximum fill line can cause it to dispense too
early, which may stain the clothes.
NOTE
• Do not pour fabric softener directly onto the
clothes in the wash drum, doing so will cause
dark staining on the clothes that will be difficult
to remove.
• Do not leave the fabric softener in the detergent
drawer for more than 1 day. Fabric softener may
harden. Softener may remain in the dispenser if
it is too thick. The softener should be diluted if
the consistency is too thick so that it can flow
easily.
• Do not open the drawer when water is being
supplied during the wash.
• Solvents (benzene, etc.) must never be used.
Adding Detergent Tablets
Detergent tablets can also be used when washing.
1
Open the door and put detergent tablets into
the drum before loading the clothes.
2
Load the clothes into the drum and close the
door.
NOTE
• Do not put tablets into the dispenser.
Adding Water Softener
A water softener, such as anti-limescale can be
used to cut down on the use of detergent in areas
with high water hardness level.
• First add detergent, and then the water softener.
Dispense according to the amount specified on
the packaging.
27
OPERATION
ENGLISH
Programme Table
Washing Programme
Default washing programmes
Cotton 40 ℃ (Cold to 95 ℃) Max. Load: Rating
Description Washes normally soiled clothes by combining various drum motions.
AI Wash 40 ℃ (Cold to 60 ℃) Max. Load: 3 kg
Description
AI Wash
provides the appropriate drum rotation actions after load sensing is
completed.
• It washes softly for waterproof fabrics, and strongly for water permeable fabrics.
NOTE
• For best wash results, load the dry clothes for this programme.
• AI sensing is not activated when the
Steam
option is selected.
Cotton Eco 60 ℃ (Cold to 60 ℃) Max. Load: Rating
Description Washes normally soiled clothes by combining various drum motions with less energy
consumption than
Cotton
programme with comparable settings.
TurboClean 39 40 ℃ (Cold to 60 ℃) Max. Load: 5 kg
Description With 4 water jets operating during the wash and rinse, this washing machine can wash
a half load of lightly soiled clothes in approximately 39 minutes.
Mixed Fabric 40 ℃ (Cold to 60 ℃) Max. Load: 4 kg
Description Washes mixed fabrics simultaneously.
• Use for various kind of fabrics except special garments (silk/delicate, sports wear,
dark clothes, wool, duvet/curtains).
Quick 14 20 ℃ (20 ℃ to 40 ℃) Max. Load: 2 kg
Description Washes small loads of lightly soiled clothes for approximately 14 minutes.
Delicates 20 ℃ (Cold to 40 ℃) Max. Load: 3 kg
Description Washes machine-washable lingerie, sheer and lacy clothes.
28
OPERATION
Non-default washing programmes
Edit the list of washing programmes using the
Cycle List Edit
option to use these programmes.
Easy Care 40 ℃ (Cold to 60 ℃) Max. Load: 4 kg
Description Washes clothes that do not need ironing after washing.
• Use for Polyamide, acrylic, polyester.
Hand/Wool 30 ℃ (Cold to 40 ℃) Max. Load: 2 kg
Description Washes hand-washable and machine-washable delicate clothes such as washable
wool, lingerie, dresses etc.
• Use detergent for machine washable woolens.
Microplastic Care 40 ℃ (Cold to 40 ℃) Max. Load: 3 kg
Description Reduces the release of microplastics generated when washing synthetic clothes.
Activewear 40 ℃ (Cold to 40 ℃) Max. Load: 3 kg
Description Washes special garments like sports and outdoor wear.
• Use for water-repellent fabric laminate used on clothing.
Allergy Care 60 ℃ Max. Load: 4 kg
Description Helps minimise substances that cause an allergic reaction, using the steam function.
• Use for cotton, underwear, pillow covers, bed sheets, baby wear.
Tub Clean - -
Description This function helps clean the inside of your appliance's tub.
Cold Wash Cold Max. Load: Rating
Description Lightly soiled clothes with cold water.
Rinse+Spin - Max. Load: Rating
Description Rinses and spins clothes. Use fabric softener if needed.
Spin Only - Max. Load: Rating
Description This programme drains and spins the clothes without washing or rinsing it.
29
OPERATION
ENGLISH
NOTE
• Select the appropriate water temperature for chosen wash programme. Always follow garment
manufacturer’s care label or instructions when washing to avoid damage to clothes.
• Select the proper wash temperature and spin speed for the desired programmes.
• Actual water temperature may differ from the declared cycle temperature.
• Neutral detergent is recommended.
Rainy Days 40 ℃ (Cold to 95 ℃) Max. Load: Rating
Description Washes clothes made slightly wet by rain, but not suitable for raincoats.
Towels 40 ℃ (Cold to 95 ℃) Max. Load: Rating
Description Washes hard wearing fabrics such as towels, shirts and tableclothes.
Duvet Cold (Cold to 40 ℃)
Max. Load: 2.5 kg (1 down
duvet)
Description Washes large items such as bed covers, pillows, sofa covers, etc.
Silent Wash 40 ℃ (Cold to 60 ℃) Max. Load: 5 kg
Description Washes clothes with less noise and vibration than other washing programmes.
• Use for lightly soiled white cotton (underwear).
Baby Steam Care 60 ℃ Max. Load: 4 kg
Description Helps to remove soild and protein stains and provide better rinse performance. Use
for lightly soiled baby wear.
Sleeve Hems and Collars 60 ℃ Max. Load: Rating
Description Remove stains with high temp (60 ℃).
Bed Sheets Cold (Cold to 40 ℃) Max. Load: 2.5 kg
Description Washes bedding items like sheets or throws.
Down Jacket 20 ℃ (Cold to 40 ℃) Max. Load: 3 kg
Description Washes down-filled clothes without losing the down filling.
30
OPERATION
Extra Options
*1 This option is automatically inserted in the programme and can not be deselected.
NOTE
•
Delay End
option can be selected for every washing programme in this table.
Programme Steam TurboClean Pre Wash Wrinkle Care
Cotton
####
AI Wash
#
Cotton Eco
####
TurboClean 39
#
#
*1
##
Mixed Fabric
####
Quick 14
#
*1
Delicates
#
Easy Care
####
Hand/Wool
Microplastic
Care
Activewear
#
Allergy Care
#
*1
Cold Wash
#
Rinse+Spin
Spin Only
Rainy Days
####
Towels
####
Duvet
#
Silent Wash
## #
Baby Steam Care
#
*1
31
OPERATION
ENGLISH
Selectable Spin Speed
Sleeve Hems and
Collars
####
Bed Sheets
#
Down Jacket
Programme
Spin Speed
Default Available
Cotton
1400 rpm All
AI Wash
1400 rpm All
Cotton Eco
1400 rpm All
TurboClean 39
1200 rpm 400 to 1400 rpm
Mixed Fabric
1000 rpm All
Quick 14
400 rpm 400 to 1400 rpm
Delicates
800 rpm Up to 800 rpm
Easy Care
1400 rpm All
Hand/Wool
800 rpm Up to 800 rpm
Microplastic Care
1000 rpm All
Activewear
800 rpm Up to 800 rpm
Allergy Care
1400 rpm All
Cold Wash
1400 rpm All
Rinse+Spin
1400 rpm 400 to 1400 rpm
Spin Only
1400 rpm 400 to 1400 rpm
Rainy Days
1400 rpm All
Towels
1400 rpm All
Duvet
1000 rpm Up to 1000 rpm
Silent Wash
800 rpm Up to 1000 rpm
Baby Steam Care
1000 rpm Up to 1000 rpm
Programme Steam TurboClean Pre Wash Wrinkle Care

32
OPERATION
NOTE
• Actual maximum spin speed may vary depending on the load conditions. The values above are rounded
to the nearest hundred.
Test in Conformity with AS/NZS 2040.1
•
WX9-1410MB
: Programme setting with
Cotton Eco
,
40 ℃
,
Rinse
4
,
Spin
1400 rpm
option for test in
accordance or in conformity with
AS/NZS 2040.1
for 10 kg normally soiled cotton load.
•
WX9-1409MB, WX9-1409W
: Programme setting with
Cotton Eco
,
40 ℃
,
Rinse
4
,
Spin
1400 rpm
option
for test in accordance or in conformity with
AS/NZS 2040.1
for 9 kg normally soiled cotton load.
• The test results depend on water pressure, water hardness, water inlet temperature, room temperature,
type and amount of load, degree of soiling utilized detergent, fluctuations in the main electricty supply
and chosen additional options.
NOTE
• For AS/ NZS standard testing, detergent should be dissolved in 1 L of water as per clause B7.3 of
standard AS/NZS2040.1 and put it in the dispenser before starting.
Sleeve Hems and Collars
1400 rpm All
Bed Sheets
1000 rpm Up to 1000 rpm
Down Jacket
800 rpm Up to 1000 rpm
Programme
Spin Speed
Default Available

33
OPERATION
ENGLISH
Extra Options and
Functions
You can use the extra options and functions to
customize the programmes.
Customizing a Washing
Programme
Each programme has default settings that are
selected automatically. You may also customize
these settings using these buttons.
Â
Wash
Press the
Wash
button repeatedly until the desired
soil level is selected.
•
Heavy
: for normal and heavily soiled clothes
•
Medium
: for normal soiled clothes
•
Light
: for lightly soiled clothes
Ã
Rinse
The number of rinses can be selected by pressing
the
Rinse
button. This function is recommended
for people with detergent allergies.
È
Spin
The spin intensity level can be selected by pressing
this button repeatedly.
• Press the
Spin
button to select spin speed.
NOTE
• If
No
of the spin level is selected, the drum of the
washing machine will rotate before the
drainage.
Ù
Temp.
This button selects the wash temperature for the
selected programme.
• Press the
Temp.
button until the desired setting
is lit.
• Select the water temperature suitable for the
type of load you are washing. Follow the
garment fabric care labels for best results.
Follow the next steps to customize a
washing programme:
1
Prepare the clothes and load the drum.
2
Press the
Power
button.
3
Add detergent.
4
Select a washing programme.
5
Customize the washing programme (
Wash
,
Rinse
,
Spin
and
Temp.
) as necessary.
6
Press the
Start/Pause
button.
Using Special Option
You can customize the programmes by using the
following special option:
E
TurboClean
Adding this option reduces the programme time
but the similar washing results will be provided.
Follow the next steps to use a special
option.
1
Press the
Power
button.
2
Select a washing programme.
3
Change the washing programme (
Wash
,
Rinse
,
Spin
and
Temp.
) as necessary.
4
Press the
TurboClean
button.
5
Press the
Start/Pause
button.

34
OPERATION
Using Basic Option
You can customize the programmes by using the
following basic option:
z
Delay End
You can set this function so that the appliance
starts automatically and finishes after a specified
time interval.
1
Press the
Power
button.
2
Select a washing programme.
3
Press the
Delay End
button as necessary.
4
Press the
Start/Pause
button.
NOTE
• Except for LED of the
Delay End
button, all LEDs
on the control panel will be turned off within 20
minutes. This feature may vary depending on
the model purchased.
• The delay time is the time to the end of the
programme, not the start. The actual running
time may vary due to water temperature, clothes
and other factors.
• To cancel the function, the
Power
button should
be pressed.
• Avoid using liquid detergent for this function.
Using Various Settings
Settings
1
Press the
ε
Settings
button.
2
Turn the knob to select the desired setting and
press the
8
button.
3
Turn the knob to select or change the setting
and press the
8
button to save the setting.
4
To return to the previous screen, press the
Settings
button again or press the
N
button.
NOTE
• If no action is taken for several minutes after
pressing the
Settings
button, the display reverts
to the previous screen.
Drum Light
The drum is equipped with a white LED light that
illuminates when the appliance is turned on. This
light automatically turns off when the door is
closed and the cycle starts.
• The drum light will turn off automatically after 4
minutes.
Child Lock
Use this option to disable the controls. This
function can prevent children from changing cycles
or operating the appliance.
• Press and hold the
8
button for 3 seconds to
deactivate this function.
NOTE
• Once this function is set, all buttons are locked
except the
Power
button.
• When the controls are locked, the
Child Lock
indicator lights up and the washing programme
is shown on the display.
• Turning off the power will not reset this function.
You must deactivate this function before you can
access any other options and functions.
Pre Wash
This option is recommended when washing a
heavily soiled load.

35
OPERATION
ENGLISH
Steam
Adding this option helps provide better cleaning
results.
Wrinkle Care
Adding this option reduces wrinkles by steaming
after spin.
Cycle List Edit
Edit the list of washing programmes as desired.
1) Turn the knob to select the desired washing
programme and press the
8
button to
include or exclude washing programmes.
• If a washing programme is added, a check
mark is displayed by that programme.
• If a washing programme is deleted, the
check mark is not displayed by that
programme.
2) Press the
N
button to save the washing
programme list.
NOTE
• Some default programmes that cannot be
deleted have their checkboxes disabled.
• The order of washing programme in the list can
be changed. Change the order of the washing
programme in the list using
More Settings
>
Cycle Optimisation
on the product or
Cycle
Optimisation
in the
LG ThinQ
application.
More Settings
1
Press the
ε
Settings
button.
2
Turn the knob to select the
More Settings
and
press the
8
button.
3
Turn the knob to select the desired setting and
press the
8
button.
4
Turn the knob to select or change the setting
and press the
8
button to save the setting.
5
To return to the previous screen, press the
N
button.
Wi-Fi Connection
Use to set up the
Wi-Fi Connection
. When Wi-Fi is
turned on, the Wi-Fi icon appears in the display.
Cycle Optimisation
When activated, this feature organizes the washing
programme list and options automatically based
on your usage patterns.
•
On
is the default setting.
• Selecting
Off
retains the current list order.
Sound
Use this option to adjust the volume of the sound
and turn the sound off.
Smart Diagnosis
Use this to help troubleshoot errors or
malfunctions.
• See the
Smart Diagnosis
section for more
details.
Factory Reset
Select this to delete all the stored data and initialize
settings.
36
SMART FUNCTIONS
SMART FUNCTIONS
LG ThinQ Application
The
LG ThinQ
application allows you to
communicate with the appliance using a
smartphone.
LG ThinQ Application Features
Communicate with the appliance from a
smartphone using the convenient smart features.
Remote Start
It allows you to control the appliance remotely
from the
LG ThinQ
application.
Tub Clean Coach
This function shows how many cycles remain
before it is time to run the
Tub Clean
function.
Energy Monitoring
This function checks the energy consumption of
the recently used cycles and monthly average.
Smart Diagnosis
This function provides useful information for
diagnosing and solving issues with the appliance
based on the pattern of use.
Settings
Allows you to set various options on the appliance
and in the application.
Push Alert
When the cycle is complete or the appliance has
problems, you have the option of receiving push
notifications on a smartphone. The notifications
are triggered even if the
LG ThinQ
application is
off.
NOTE
• In the following cases, you must update the
network information for each appliance in the
LG ThinQ
application under
Device Cards
~
Setting
~
Change Network
.
- wireless router is changed
- wireless router password is changed
- Internet service provider is changed
• The application is subject to change for
appliance improvement purposes without notice
to users.
• Functions may vary by model.
Installing LG ThinQ Application
and Connecting an LG
Appliance
Models with QR Code
Scan the QR code attached to the product using the
camera or a QR code reader application on your
smartphone.
Models without QR Code
1
Search for and install the
LG ThinQ
application
from the Google Play Store or Apple App Store
on a smartphone.
2
Run the
LG ThinQ
application and sign in with
your existing account or create an LG account
to sign in.
3
Touch the add (
~
) button on the
LG ThinQ
application to connect your LG appliance.

37
SMART FUNCTIONS
ENGLISH
Follow the instructions in the application to
complete the process.
NOTE
• To verify the Wi-Fi connection, check that the Wi-
Fi indicator on the control panel is lit.
• The appliance supports 2.4 GHz Wi-Fi networks
only. To check your network frequency, contact
your Internet service provider or refer to your
wireless router manual.
•
LG ThinQ
is not responsible for any network
connection problems or any faults,
malfunctions, or errors caused by network
connection.
• The surrounding wireless environment can
make the wireless network service run slowly.
• If the distance between the appliance and the
wireless router is too far, the signal strength
becomes weak. It may take a long time to
connect or installation may fail.
• If the appliance is having trouble connecting to
the Wi-Fi network, it may be too far from the
router. Purchase a Wi-Fi repeater (range
extender) to improve the Wi-Fi signal strength.
• The network connection may not work properly
depending on the Internet service provider.
• The Wi-Fi connection may not connect or may be
interrupted because of the home network
environment.
• The appliance cannot be connected due to
problems with the wireless signal transmission.
Unplug the appliance and wait about a minute
before trying again.
• If the firewall on your wireless router is enabled,
disable the firewall or add an exception to it.
• The wireless network name (SSID) should be a
combination of English letters and numbers. (Do
not use special characters.)
• Smartphone user interface (UI) may vary
depending on the mobile operating system (OS)
and the manufacturer.
• If the security protocol of the router is set to
WEP
, you may fail to set up the network. Please
change it to other security protocols (
WPA2
is
recommended) and connect the product again.
Activating Network Connection
1
Run the
LG ThinQ
application.
2
Select and touch the
Front Load Washer
in the
application.
3
Press the
Power
button on the control panel.
4
Press the
ε
Settings
button.
5
Turn the knob to select the
More Settings
and
press the
8
button.
6
Turn the knob to select the
Wi-Fi Connection
and press the
8
button.
7
Select the
On
and press the
8
button.
• When
Wi-Fi
is turned on, the
Wi-Fi
icon
appears in the display.
Using the Appliance Remotely
Â
Remote Start
Use a smartphone to control your appliance
remotely. You can also monitor your cycle
operation so you know how much time is left in the
cycle.
Using this function
1
Put the clothes into the drum.
• If desired, add bleach or fabric softener to
the appropriate areas of the dispenser.
2
Press the
Power
button.

38
SMART FUNCTIONS
3
Press the
Remote Start
button and select
On
to enable the remote control function.
4
Start a cycle from the
LG ThinQ
application on
your smartphone.
NOTE
• If the door has been opened, you can not start a
cycle remotely.
Disable this function manually
When this function is activated, press the
Remote
Start
button and select
Off
to deactivate it.
Deactivating Network
Connection
1
Press the
Power
button on the control panel.
2
Press the
ε
Settings
button.
3
Turn the knob to select the
More Settings
and
press the
8
button.
4
Turn the knob to select the
Wi-Fi Connection
and press the
8
button.
5
Select the
Off
and press the
8
button.
• When
Wi-Fi
is turned off, the
Wi-Fi
icon
disappears in the display.
RF Radiation Exposure
Statement
This equipment shall be installed and used at a
minimum distance of 20 cm from the human body.
Open Source Software Notice
Information
To obtain the source code that is contained in this
product, under GPL, LGPL, MPL, and other open
source licenses that have the obligation to disclose
source code, and to access all referred license
terms, copyright notices and other relevant
documents, please visit https://
opensource.lge.com.
LG Electronics will also provide open source code to
you on CD-ROM for a charge covering the cost of
performing such distribution (such as the cost of
media, shipping, and handling) upon email request
to opensou[email protected]m
.
This offer is valid to anyone in receipt of this
information for a period of three years after our
last shipment of this product.
Smart Diagnosis
Use this feature to help you diagnose and solve
problems with your appliance.
NOTE
• For reasons not attributable to LGE’s negligence,
the service may not operate due to external
factors such as, but not limited to, Wi-Fi
unavailability, Wi-Fi disconnection, local app
store policy, or app unavailability.
• The feature may be subject to change without
prior notice and may have a different form
depending on where you are located.
Using LG ThinQ to Diagnose
Issues
If you experience a problem with your Wi-Fi
equipped appliance, it can transmit
troubleshooting data to a smartphone using the
LG ThinQ
application.
• Launch the
LG ThinQ
application and select the
Smart Diagnosis
feature in the menu. Follow
the instructions provided in the
LG ThinQ
application.
39
SMART FUNCTIONS
ENGLISH
Using Audible Diagnosis to
Diagnose Issues
Follow the instructions below to use the audible
diagnosis method.
• Launch the
LG ThinQ
application and select the
Smart Diagnosis
feature in the menu. Follow
the instructions for audible diagnosis provided
in the
LG ThinQ
application.
1
Press the
Power
button to turn on the
appliance.
2
Press the
ε
Settings
button.
3
Turn the knob to select the
More Settings
and
press the
8
button.
4
Turn the knob to select the
Smart Diagnosis
and press the
8
button.
5
Place the mouthpiece of your smartphone
close to the
Power
button and press
8
button.
• Hold the smartphone mouthpiece to the
Power
button until the data transfer is
complete.
6
After the data transfer is complete, the
appliance will turn off.
NOTE
• For best results, do not move the smartphone
while the tones are being transmitted.
40
MAINTENANCE
MAINTENANCE
WARNING
• Unplug the appliance before cleaning to avoid the risk of electric shock. Failure to follow this warning
may result in serious injury, fire, electric shock, or death.
• Never use harsh chemicals, abrasive cleaners, or solvents to clean the appliance. They may damage the
finish.
Cleaning After Every Wash
What to Clean
Always remove items from the washing machine as
soon as the cycle is complete. Leaving damp items
in the washing machine can cause wrinkling, colour
transfer, and odour.
• After the wash cycle is finished, wipe the door
and door seal to remove any moisture.
• Leave the door slightly open to dry the drum.
• Wipe the appliance with a dry cloth to remove
any moisture.
WARNING
• Leave the door open to dry inside of the
appliance only if the children are supervised at
home.
Cleaning the Exterior
Proper care of your appliance can extend the
service life.
Exterior
• Immediately wipe off any spills.
• Wipe with a damp cloth and then again with a
dry cloth ensuring there is no moisture in
cabinet joints or crevices.
• Do not press on the surface or the display with
sharp objects.
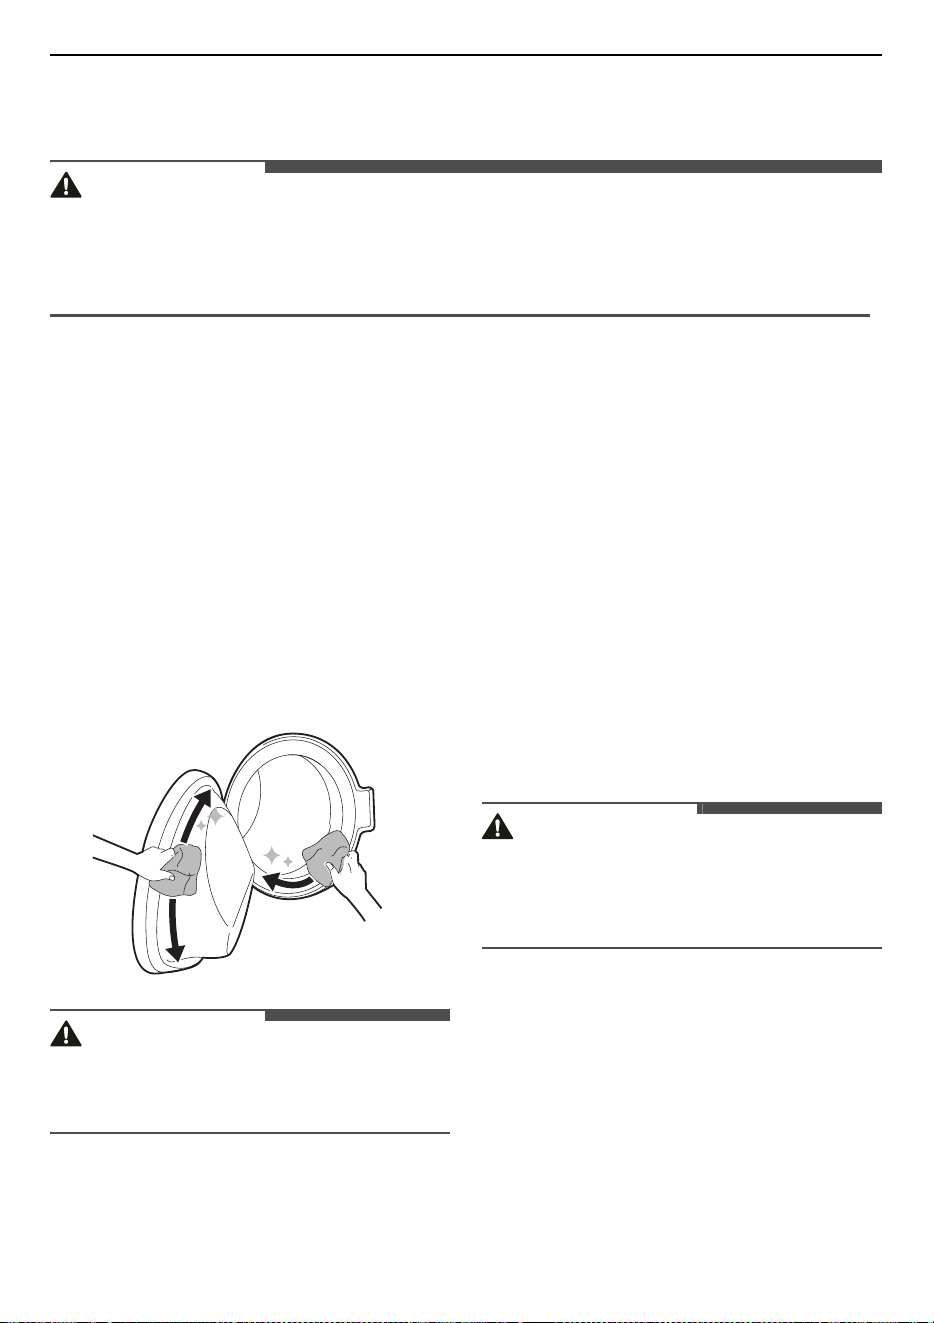
Door
• Wash with a damp cloth on the outside and
inside and then dry with a soft cloth.
WARNING
• Do not attempt to separate any panels or
disassemble the appliance. Do not apply any
sharp objects to the control panel in order to
operate the appliance.
Cleaning the Appliance
Periodically
Cleaning the Drum
Tub Clean
This is a programme to help clean the inside of the
appliance by soaking, washing, rinsing and
spinning.
41
MAINTENANCE
ENGLISH
Run this function
once a month
(or more often if
needed) to reduce build-up of detergent and
softener and other residue.
• If there is a bad smell or mildew inside the
appliance, run this function
once a week for 3
weeks
in addition to the regularly prompted
intervals.
NOTE
• The
Tub Clean
message will be displayed to alert
to the recommendation of operating this
function.
1
Remove any clothing or items from the
appliance and close the door.
2
Open the dispenser drawer and add anti
limescale powder to the main wash
compartment.
• Tablets can be placed directly into the drum
as an alternative to powder.
3
Close the dispenser drawer slowly.
4
Turn on the power, and then select the
Tub
Clean
.
5
Press the
Start/Pause
button to start.
6
Leave the door open to dry the inside of the
appliance completely.
• When the inside of the appliance is not dried
completely, it may cause a bad smell or
mildew.
WARNING
• Leave the door open to dry inside of the
appliance only if the children are supervised at
home.
Cleaning the Water Inlet Filter
The water inlet filter collects lime or any sediment
that may be in water that is supplied to the
appliance. Clean the inlet filter every six months or
more often if the water is very hard or contains
traces of limescale.
• Turn off the water supply taps to the appliance if
the appliance is to be left for a certain period of
time (e.g. holiday), especially if there is no floor
drain (gully) in the immediate vicinity.
•
Water supply
error message will be displayed
on the control panel when the water is not
entering the detergent drawer.
1
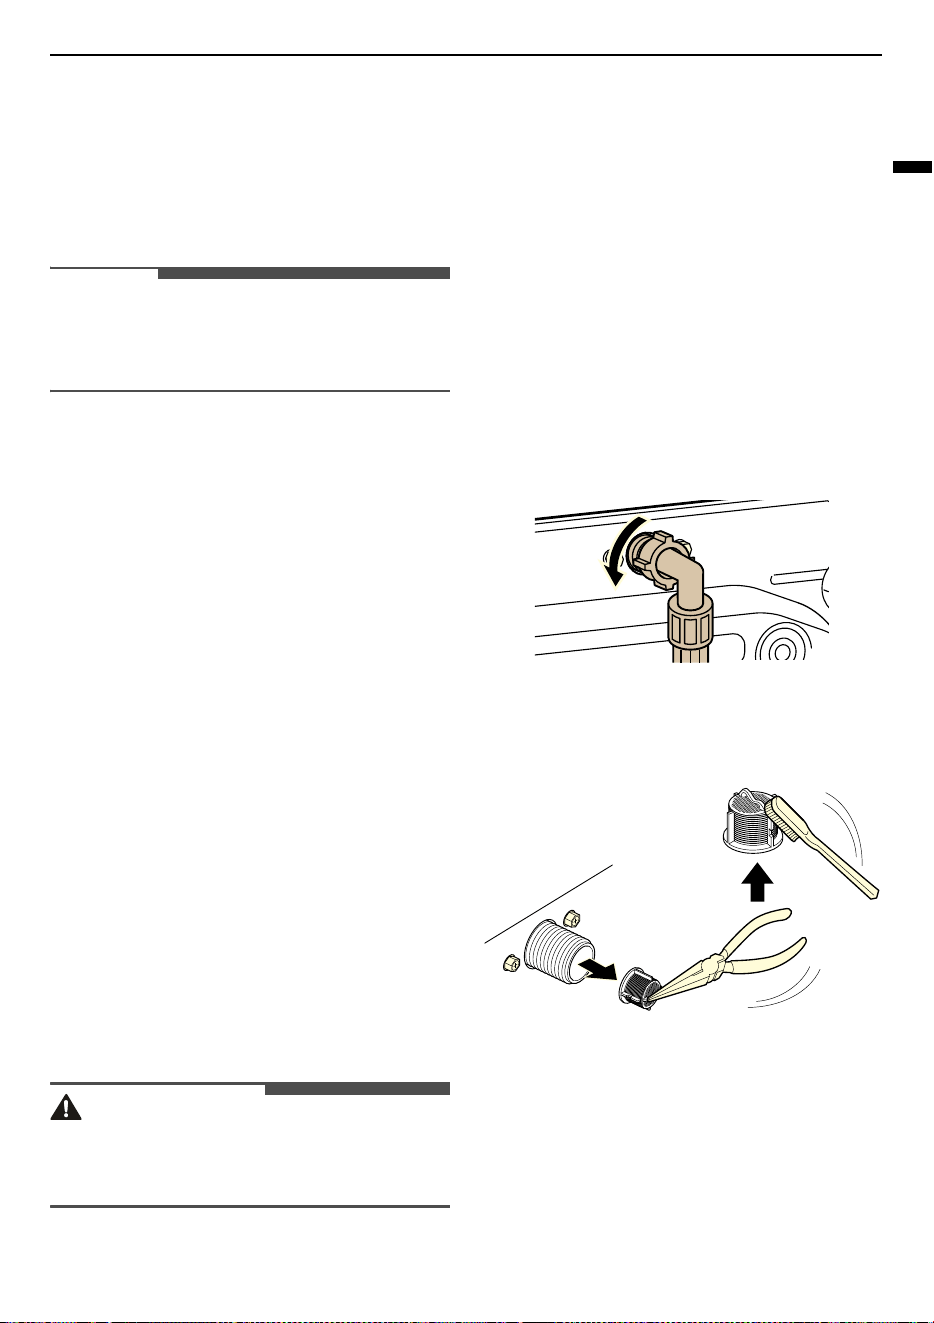
Turn off the power and the water tap and then
unscrew the water inlet hose.
2
Remove the water inlet filter with small pliers
and then clean the filter using a medium bristle
tooth brush.
Cleaning the Drain Pump Filter
and Performing an Emergency
Water Evacuation
The drain filter collects threads and small objects
that may have been accidentally left in the clothes.
Make sure that the filter is clean every six months
to ensure smooth running of your appliance.
42
MAINTENANCE
Allow the water to cool before cleaning the drain
pump filter. Open the door in an emergency or
perform an emergency water evacuation.
1
Unplug the appliance.
2
Open the cover cap and pull out the drain tube.
3
Remove the drain plug from the drain tube
first, and then drain the water.
4
Unscrew the drain pump filter slowly to drain
the remaining water and then proceed to
remove any debris or objects from the filter.
5
Clean the pump filter and opening with a
brush.
6
After cleaning the drain pump filter, carefully
reinsert the filter and screw the drain cap back
in clockwise carefully to avoid cross threading
and leakage.
7
Reinsert the plug back into the drain tube and
place the tube into its holder. The vertical and
horizontal tube holders are provided for the
proper storage or the drain tube.
8
Close the cover cap.
CAUTION
• Be careful when draining, as the water may be
hot.
• Do not push the drain tube back into the cabinet.
This will cause damage to the tube.
43
MAINTENANCE
ENGLISH
• Run the drum cleaning programme once a
month (or more often, as needed) to remove
excess detergent and other debris.
Cleaning the Dispenser Drawer
Detergent and fabric softener can build up in the
dispenser drawer. Liquid detergents can remain
under the dispenser drawer and not dispense
completely. Remove the drawer and inserts and
check for build-up of cleaning products
once or
twice a month
.
1
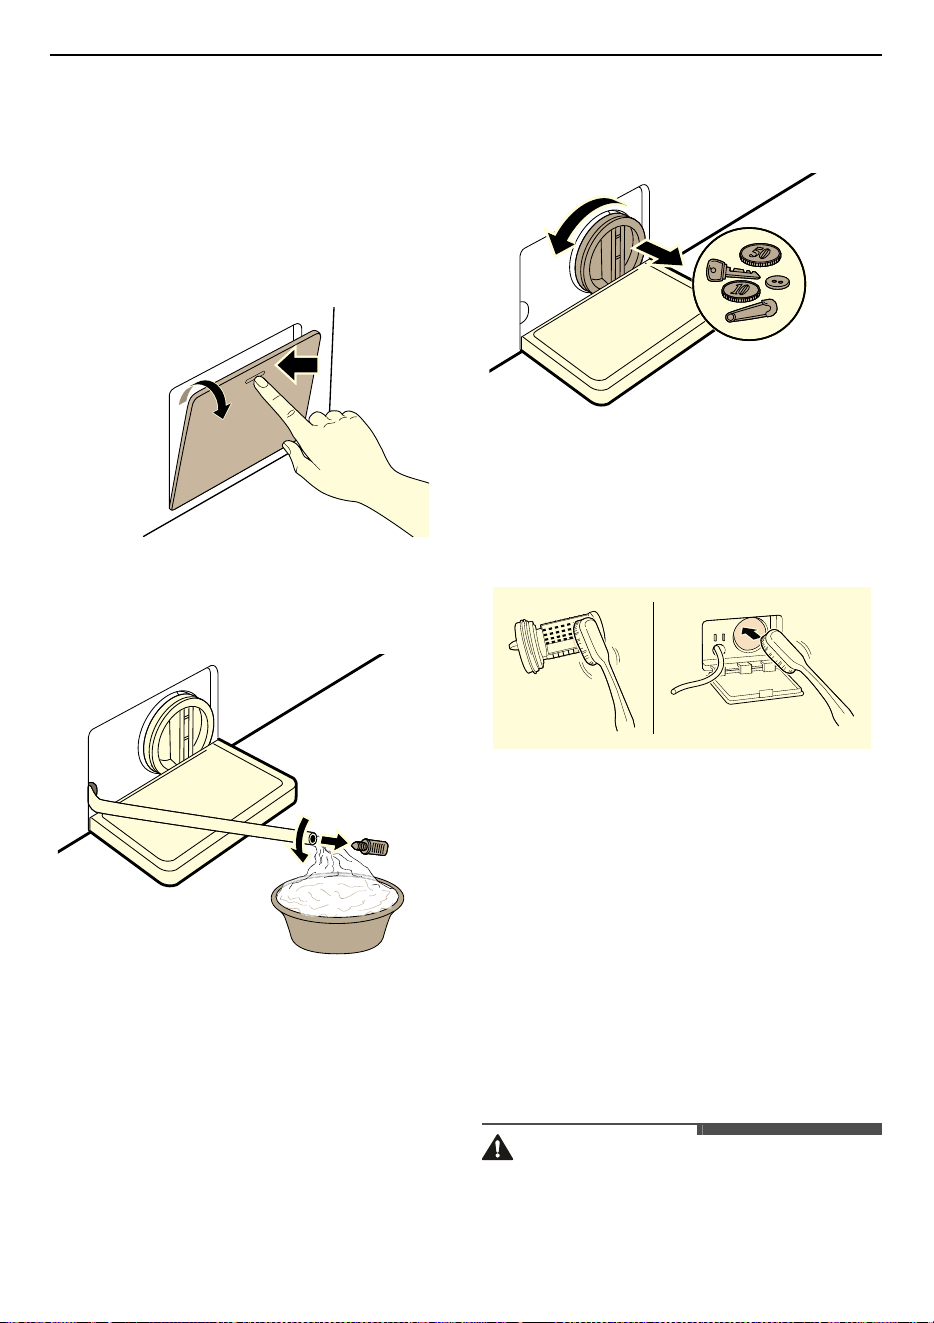
Remove the detergent dispenser drawer by
pulling the drawer straight out until the drawer
stops.
• Then gently pull the drawer outward while
pressing hard the disengage button.
2
Remove the build-up of detergent and
softener.
• Rinse the drawer and the components of the
drawer with warm water to remove the
build-up from detergent and softener. Use
only water to clean the dispenser drawer.
3
To clean the drawer opening, use a cloth or
small, non-metal brush to clean the recess.
• Remove all residue from the upper and
lower parts of the recess.
4
Wipe any moisture with a dry towel or cloth
after cleaning.
5
Reassemble the components of the drawer to
the proper compartments and insert the
detergent dispenser drawer.
44
TROUBLESHOOTING
TROUBLESHOOTING
Operation of your appliance can lead to errors and malfunctions. The following tables contain possible
causes and notes for resolving an error message or malfunction. It is recommended to read the tables
carefully below in order to save your time and money that may cost for calling to LG Electronics service
centre.
Before Calling for Service
Your appliance is equipped with an automatic error-monitoring system to detect and diagnose problems
at an early stage. If the appliance does not function properly or does not function at all, check the following
tables before calling to LG Electronics service centre.
Error Messages
Symptoms Possible Cause & Solution
Door open The door is opened.
• Open and close the door again. If the message keeps appearing, unplug
the power cord and call for service.
Door unlocked The door is not secured.
• Close and secure the door. If the message keeps appearing, unplug the
power cord and call for service.
Water supply Water supply is not adequate in that location. Water does not enter
appliance or it enters slowly.
• Check another tap in the house.
Water supply tap is not completely open. Water does not enter the
appliance or it enters slowly.
• Open fully tap.
Water supply hose(s) are kinked.
• Straighten hose or reinstall the water inlet hose.
The filter of the supply hose(s) are clogged.
• Check and clean the inlet valve filter after turning off the taps and
removing the hose connections to the washing machine.
Drainage Drain hose is kinked or clogged. Water in the appliance does not drain
or drains slowly.
• Clean and straighten the drain hose.
The drain filter is clogged.
• Check and clean the drain filter.
45
TROUBLESHOOTING
ENGLISH
Noises You Might Hear
Unbalance The appliance has a system which detects and corrects the unbalance of
the appliance.
• The clothes may be too wet at the end of the cycle, rearrange the load to
allow proper spinning. Close the door and press
Start/Pause
button. It
may take a few moments before the appliance begins to spin. The door
must be locked before spin can be achieved.
Load is too small. This system may stop spinning or even interrupt the
spin cycle altogether if individual heavy articles (e.g. bath mat, bath
robe, etc.) are loaded.
• Add 1 or 2 similar items or smaller articles of clothes to help balance the
load. Close the door and press
Start/Pause
button. It may take a few
moments before the appliance begins to spin. The door must be locked
before spin can be achieved.
No water detected Water level sensor malfunctions.
• Close the water tap. Unplug the power plug. Call for service.
Motor error Over load in motor.
• Let the appliance wait for 30 minutes until the motor is cooled down and
then, restart the cycle.
Water too high Water overfills due to a possible faulty water valve.
• Close the water tap. Unplug the power plug. Call for service.
Freeze error Is supply/drain hose or drain pump frozen?
• Supply warm water into the drum in order to unfreeze the drain hose and
the drain pump. Cover the supply hose with wet and warm towel.
No temp detected This is a control error.
• Unplug the power plug and call for service.
Vibration sensor Vibration sensor malfunctions.
• Call for service.
Communication Error The appliance does not work properly.
• Call for service.
Symptoms Possible Cause & Solution
Rattling and clanking
noise
Foreign objects, such as keys, coins, or safety pins may be in the drum.
• Stop the appliance, check the drum for foreign objects. If the noise
continues after the appliance is restarted, call for service.
Symptoms Possible Cause & Solution
46
TROUBLESHOOTING
Operation
Thumping sound Heavy clothes may produce a thumping sound. This is usually normal.
• If the sound continues, the appliance is probably out of balance. Stop and
redistribute the clothes.
The clothes may be out of balance.
• Pause the programme and redistribute the clothes after the door unlocks.
Vibrating noise Package materials are not removed.
• Remove package materials.
The clothes may be unevenly distributed in the drum.
• Pause the programme and redistribute the clothes after the door unlocks.
Not all levelling feet are resting firmly and evenly on the floor.
• See the
Levelling the Appliance
instruction to adjust the levelling of the
appliance.
Floor not rigid enough.
• Check if the floor is sold and does not flex. See the
Installation Place
Requirements
to select the proper location.
Symptoms Possible Cause & Solution
Water is leaking. House drain pipes are clogged.
• Unclog waste pipes. Contact plumber if necessary.
Leakage is caused by improper installation of drain hose or clogged
drain hose.
• Clean and straighten the drain hose. Check and clean the drain filter
regularly.
Drain pump filter cap is not fitted correctly.
• Refit the drain pump filter.
Appliance does not
operate.
Control panel has powered off due to inactivity.
• This is normal. Press the
Power
button to turn the appliance on.
Appliance is unplugged.
• Make sure that the cord is plugged securely into a working outlet.
Water supply is turned off.
• Turn the water supply tap completely.
Controls are not set properly.
• Make sure that the programme is correctly set. Close the door and press
the
Start/Pause
button.
Symptoms Possible Cause & Solution
47
TROUBLESHOOTING
ENGLISH
Appliance does not
operate.
Door is open.
• Close the door and make sure that nothing is caught under the door
preventing it from closing completely.
Circuit breaker/fuse is tripped/blown.
• Check house circuit breakers/fuses. Replace fuses or reset breaker. The
appliance should be on a dedicated branch circuit. The appliance will
resume the programme where it stopped once power is restored.
Control needs to be reset.
• Press the
Power
button, then reselect the desired programme and press
the
Start/Pause
button.
Start/Pause was not pressed after a programme was set.
• Press the
Power
button, then reselect the desired programme and press
the
Start/Pause
button. The appliance is turned off if the
Start/Pause
button is not pressed within a certain time.
Start/Pause button and
8
were not pressed within 60 seconds.
• The appliance is equipped with a 2-button start safety feature; after the
Start/Pause
button is pressed, if
8
button is not pressed within 60
seconds, the feature will reset. In this case, repeat the steps and make sure
to press both buttons within 60 seconds of each other.
Extremely low water pressure.
• Check another tap in the house to make sure that household water
pressure is adequate.
Appliance is heating the water or making steam.
• The drum may stop operating temporarily during certain cycles, while
water is safely heated to a set temperature.
Appliance stops for a
few minutes and then
restarts.
A motor protection device has been activated to prevent overheating of
the motor.
• This is normal. If the motor protection device is activated, the appliance
will stop for a few minutes and then start again.
Buttons may not
function properly.
The Child Lock option is activated.
• Deactivate the
Child Lock
option if necessary.
Door does not open. The door cannot be opened for safety reasons once the appliance starts.
• This is normal. You can safely open the door after
H
/
Ã
turns off.
Appliance is not filling
properly.
Inlet filter clogged.
• Make sure the inlet filters on the fill valves are not clogged.
Inlet hoses may be kinked.
• Check that inlet hoses are not kinked or clogged.
Symptoms Possible Cause & Solution
48
TROUBLESHOOTING
Performance
Appliance is not filling
properly.
Insufficient water supply.
• Make sure that both hot and cold water taps are turned on all the way.
Hot and cold supply hoses are reversed.
• Check supply hose connections.
Appliance does not
drain water.
Kinked drain hose.
• Ensure that the drain hose is not kinked.
Drain located higher than 1 m above the floor.
• Make sure that the drain hose is no higher than 1 m above the bottom of
the appliance.
Detergent is not
dispensed completely
or not dispensed at all.
Too much detergent is used.
• Follow the guidelines provided by the detergent manufacturer.
Drain Pump Filter may be blocked.
• Clean the Drain filter.
Cycle time is longer
than usual.
The load is too small.
• Add more items to allow the appliance to balance the loads.
Heavy articles are mixed with lighter items.
• Always try to wash articles with similar weight in order to allow the
appliance to evenly distribute the weight of the load for spinning.
The load is out of balance.
• Manually redistribute the load if articles have become tangled.
Cycle end is delayed Unbalance is detected or suds removing programme is on.
• This is normal. The time remaining shown on the display is only an
estimated duration. Actual time may vary.
Symptoms Possible Cause & Solution
Poor stain removal Previously set stains.
• Articles that have been previously washed may have stains which have
been set. These stains may be difficult to remove and may require hand
washing or pre-treating to aid in stain removal.
Staining Bleach or softener is dispensed too soon.
• Dispenser compartment is overfilled. It makes bleach or softer dispensed
rapidly. Always measure bleach or softener to prevent overfilling.
• Close the detergent dispenser slowly.
Symptoms Possible Cause & Solution
49
TROUBLESHOOTING
ENGLISH
Odour
Staining Bleach or softener was added directly to the clothes in the drum.
• Always use the detergent dispenser to ensure that bleach or softener is
properly dispensed at the right time in the programme.
Clothes were not properly sorted.
• Always wash dark colours separately from light colours and whites to
prevent discoloration.
• Never wash heavily soiled items with lightly soiled items.
Wrinkling Appliance is not unloaded promptly.
• Always remove items from the appliance as soon as the programme is
complete.
Appliance is overloaded.
• The appliance can be fully loaded, but the drum should not be tightly
packed with items. The door of the appliance should be closed easily.
Hot and cold water supply hoses are reversed.
• Hot water rinse can set wrinkles in garments. Check the supply hose
connections.
Spin speed may be too high.
• Set the spin speed to suit the garment type.
Symptoms Possible Cause & Solution
Musty or mildewy
odour in appliance
Inside of drum is not cleaned properly.
• Run the
Tub Clean
function regularly.
Odours can occur if the drain hose is not properly installed, causing
siphoning (water flowing back inside of the appliance).
• When installing the drain hose, make sure that it does not get kinked or
blocked.
If the detergent dispenser is not cleaned regularly, odours can occur
from mold or foreign substances.
• Remove and clean the detergent dispenser, especially the top and bottom
of the dispenser’s opening.
Symptoms Possible Cause & Solution

50
TROUBLESHOOTING
Wi-Fi
Symptoms Possible Cause & Solution
Your home appliance
and smartphone are
not connected to the
Wi-Fi network.
The password for the Wi-Fi that you are trying to connect to is incorrect.
• Find the Wi-Fi network connected to your smartphone and remove it, then
register your appliance on
LG ThinQ
.
Mobile data for your smartphone is turned on.
• Turn off the
Mobile data
of your smartphone and register the appliance
using the Wi-Fi network.
The wireless network name (SSID) is set incorrectly.
• The wireless network name (SSID) should be a combination of English
letters and numbers. (Do not use special characters).
The router frequency is not 2.4 GHz.
• Only a 2.4 GHz router frequency is supported. Set the wireless router to 2.4
GHz and connect the appliance to the wireless router. To check the router
frequency, check with your internet service provider or the router
manufacturer.
The distance between the appliance and the router is too far.
• If the distance between the appliance and the router is too far, the signal
may be weak and the connection may not be configured correctly. Move
the location of the router so that it is closer to the appliance.

Memo