
SSJ 8050SS
EN
VERTICAL SLOW JUICER
Translation of the original manual
SSJ 8050SS
A
6
8
13
1
2
3
4
5
7
10
14
15
16
11
9
12
B
1
2
3
4
5
67
800 ml
700
600
500
400
300
200
100

C
1
3
2
5
4
5s
6
30s
max.
20 min
C
8
7
9
D
1
6
5
4
8
7
23
800 ml
700
600
500
400
300
200
100
E


– 1 –
08/2024
2024, .
EN
Vertical Slow Juicer
User Manual
Important Safety Instructions
READ CAREFULLY AND STORE FOR FUTURE USE.
• Persons with reduced physical, sensory, or mental
capabilities or with alack of experience and knowledge
may use this appliance only if they are supervised or have
been instructed on how to use the appliance safely and
understand the potential hazards.
• This appliance is not to be used by children. Keep the
appliance and its power cord out of the reach of children.
• Children must not play with the appliance.
• This appliance is designed for domestic use and similar
premises, such as:
– kitchenettes in shops, offices and other work
environments;
– agricultural farms;
– inhotels, motels andother residential environments
(inthese facilities the appliance is intended for use by
guests);
– bed and breakfast establishments.
• This appliance is not intended for commercial use in order
to conduct business.
– 2 –
08/2024
2024, .
Caution:
To avoid the risk of asudden resetting of the thermal
fuse, this appliance must not be supplied via an
external switching device such as atimer or be
connected to acircuit with regular on/off switching.
• If the power cord is damaged, have it replaced in
aprofessional service centre in order to prevent
adangerous situation. It is forbidden to use the appliance
with the power cable damaged.
• Do not use the appliance if the press screw, sieve or
protective cover is damaged or has visible cracks.
• Do not use the appliance if the safety lock is damaged in
any way. The safety lock is located in the elevated part of
the motor unit andallows the appliance to operate only
with the cover attached.
Warning:
Improper or unintended use can lead to injury.
• The maximum continuous operation time of the
appliance is 20 minutes. Allow the appliance to cool for
10–15minutes before using it again. Do not exceed the
maximum continuous operation time and observe the time
required for the appliance to cool down.
• Clean the surfaces of the appliance and its accessories
that are intended to come into contact with food according
to the instructions in the chapter CLEANING AND
MAINTENANCE.
– 3 –
08/2024
2024, .
• Always disconnect the appliance from the power socket
if you are leaving it unattended and before assembly,
disassembly or cleaning.
• Before replacing the accessories or accessible movable
parts, please turn the appliance off and disconnect it from
the power supply.
. . . . . . . . . . . . . . . . . . . . . . . . . . . . . . . . . . . . . . . . . . . . . . . . . . . . . . . . . . . . . . . . . . . . . . . . . . . . . . . . . . . . . . . . . . . . . . . . . . . . . . . . . . . . . . . . . . . . . . . . . . . . . . . . . . . . . . . . . . . .
Additional Important Safety Instructions forUse of the Appliance
• Use the appliance and its accessories in accordance with the instructions in this manual.
• The appliance is intended for juicing fruits and vegetables. Do not use it for any other purposes than those for which it was designed.
• It is forbidden to modify the surface of the appliance in any way, e.g. using self-adhesive foil, etc.
• The appliance is designed for indoor use. Do not use the appliance in an industrial environment or outdoors.
• Do not expose the appliance or its accessories to the outdoor environment, extreme temperatures, rapid temperature changes, direct sunlight or
excessive dust.
• Place the appliance only on aclean, flat, dry and stable surface. Do not place it on windowsills, sink drain tray, unstable surfaces or places where it
could fall into water. Do not place it on the edge of the table to prevent it from falling.
• Do not place the appliance or its accessories on or near an electric or gas hob. Keep it at asufficient distance from open fire, heating elements
andother sources of heat.
• Do not place the appliance or any of its components in the freezer.
• Before connecting this appliance to apower socket, make sure the rated voltage stated on the product'srating label corresponds to the voltage in
your power socket.
• Do not place any objects on the power cord. Make sure that the power cord does not hang over the edge of the table or touch hot surfaces or sharp
objects. The use of an extension cable is not recommended.
• Make sure the appliance is correctly assembled before connecting it to the mains socket.
• Only use the appliance with original accessories from the manufacturer.
Warning:
The use of non-original accessories may lead toserious injury or damage to the appliance.
• Before use, always make sure that no part of the appliance is damaged. Do not use the appliance if there are any signs of damage.
• Do not handle the appliance or touch the switch when your hands are wet.
• Never put in the juicer:
– hard ingredients such as sugar cane;
– dried ingredients such as dried pepper, coffee beans, etc;
– hard stones or parts of hard stones ofapricots, peaches, cherries, mangoes, etc.;
– frozen, cooked or canned fruits or vegetables;
– ice cubes.
• The appliance could be damaged if ahard chip gets into the pressing mechanism. Always stone fruit with hard stones thoroughly. Damage to the
appliance can be caused by even asmall remnant of the stone.
• To avoid the risk of serious injury or damage to the appliance, avoid contact withmoving parts of the appliance.
• Do not insert any items into the pulp outlet or juice outlet during operation. Keep fingers, hands, hair, clothing andother foreign objects out of the
inner space of the filling tube. Use only the pusher provided for squeezing the ingredients in the filling tube. Insert the pusher only into the hole in the
middle of the hopper. To squeeze the ingredients, never use your fingers or tools such as afork, spoon, knife, spoon, etc.
Warning:
Incorrect use may lead to injuries.
• Do not cover the pulp outlet during operation.
• Do not attempt to disassemble the filling tube, cover andsieve assembly during operation.
• Regularly check the filling status of the juicing chamber. Take care not to overfill it. Juice from theoverfilled juicing chamber could overflow onto the
motor unit.
• Do not leave the appliance in empty operation or overload it by loading excessive doses of ingredients at once. Incorrect use may damage the
appliance or negatively affect its lifetime.
– 4 –
08/2024
2024, .
• The appliance is equipped with athermal fuse that automatically stops the motor if it overheats. If this occurs, set the switch to position 0, unplug the
appliance from the mains socket and allow it to cool down for 10–15 minutes. If the automatic stoppage of the engine was caused by overfilling with
ingredients, disassemble the appliance according to the instructions in the chapter DISASSEMBLY OF THE JUICER andclean it according to the
chapter CLEANING AND MAINTENANCE.
• Always turn off the appliance and disconnect it from the power socket if you will not be using it and if you are leaving it without supervision, before
assembly, disassembly, relocation or cleaning.
• Disconnect the power cord from the power socket by pulling the plug. Do not pull the power cord. Otherwise, damage to the power cable or the
power socket may occur.
• Do not connect or disconnect the power cord plug to or from the power socket with wet hands.
• Before disassembling, make sure that the appliance is turned off, disconnected from the power socket andthat the motor unit has come to
acomplete stop.
• None of the components of this appliance are intended for use inamicrowave or electric oven, etc.
• To avoid the risk of electric shock, do not immerse the motor unit, power cord or power cord plug in water or any other liquid, or wash these parts
under running water. Keep the motor unit, power cord andits plug dry.
• Do not make any adjustments to the appliance. Do not attempt to disassemble the motor unit.
• Do not use the appliance if it is not working properly, if the motor unit has been immersed in water or if it shows any signs of damage. Take it to an
authorised service centre for inspection or repair.
• To avoid adangerous situation, never repair the appliance yourself. All repairs should be carried out by an authorised service centre.
• Tampering with the appliance may result in the loss of your legal rights regarding faulty performance or warranty for quality.
• Store the appliance in adry and clean environment out of the reach of children and animals.
. . . . . . . . . . . . . . . . . . . . . . . . . . . . . . . . . . . . . . . . . . . . . . . . . . . . . . . . . . . . . . . . . . . . . . . . . . . . . . . . . . . . . . . . . . . . . . . . . . . . . . . . . . . . . . . . . . . . . . . . . . . . . . . . . . . . . . . . . . . .
EXPLANATION OF SYMBOLS PLACED ON THE PRODUCT OR INTHE ACCOMPANYING DOCUMENTATION
Read the user'smanual.
Product with protection class II
This symbol on products or original documents means that used electric or electronic products must not be added to ordinary municipal
waste.
The product meets all the basic requirements of the applicable EU directives.
. . . . . . . . . . . . . . . . . . . . . . . . . . . . . . . . . . . . . . . . . . . . . . . . . . . . . . . . . . . . . . . . . . . . . . . . . . . . . . . . . . . . . . . . . . . . . . . . . . . . . . . . . . . . . . . . . . . . . . . . . . . . . . . . . . . . . . . . . . . .
– 5 –
08/2024
2024, .
• Thank you for purchasing our SENCOR product; we hope it will serve
to your satisfaction.
• Prior to using this appliance, please read the user manual thoroughly,
even in cases when you are already familiar with the use of similar
types of appliances. Use the appliance only as described in this
user manual. Keep the manual for future reference. If you pass the
appliance on to another person, ensure that this user manual is
included.
• Carefully unpack the appliance and make sure not to discard any part
of the packaging material until you have found all its components. It
is recommended to keep the original packaging, packing material,
receipt and confirmation of the extent of the seller'sliability or warranty
certificate at least for the duration of the legal right of defective
performance or quality guarantee. When transporting the appliance,
we recommend packaging it again in the original box provided by the
manufacturer.
. . . . . . . . . . . . . . . . . . . . . . . . . . . . . . . . . . . . . . . . . . . . . . . . . . . . . . . . . . . . . . . . . . . .
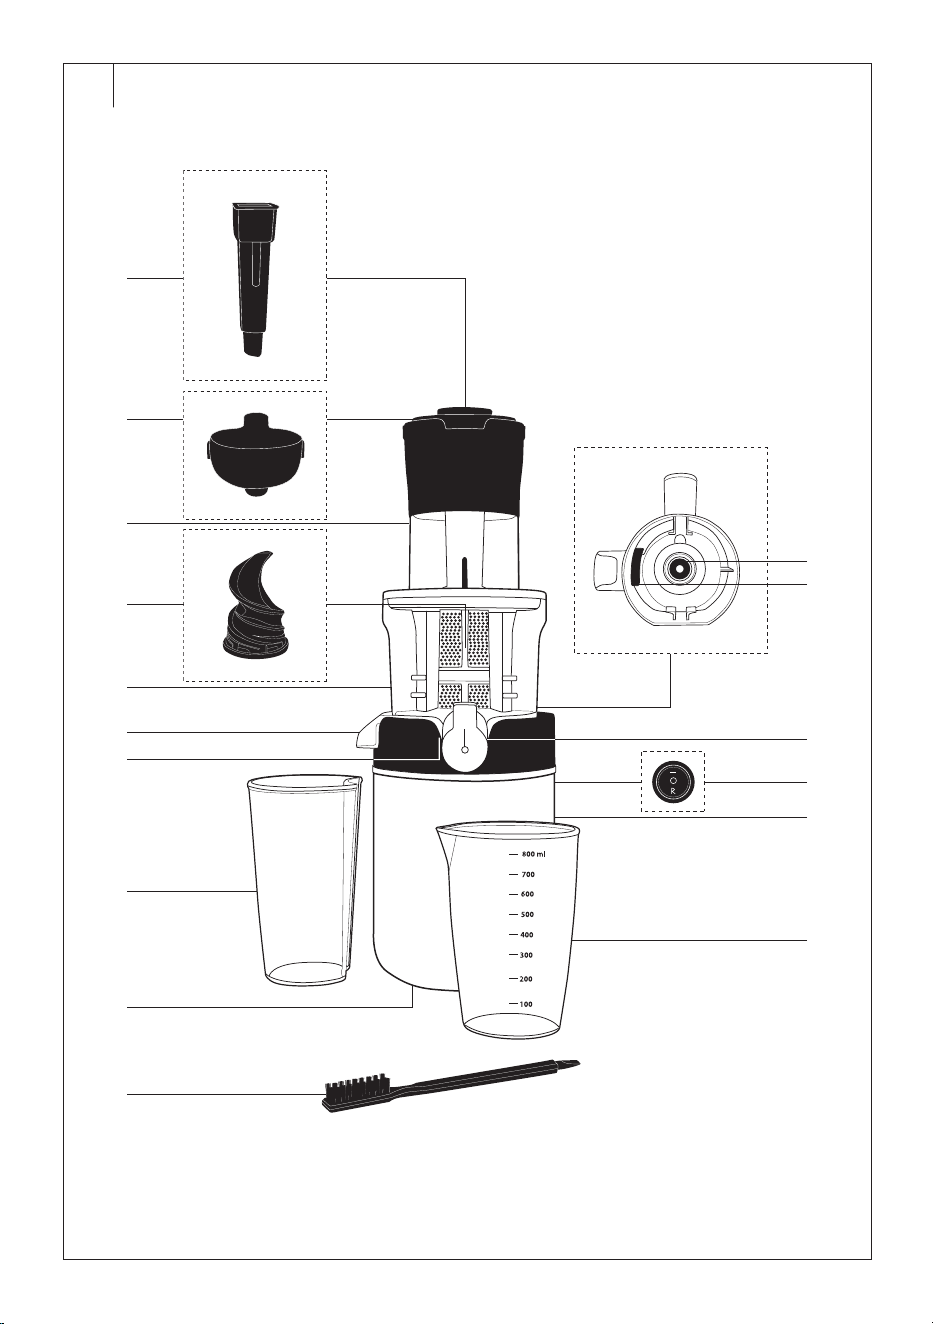
DESCRIPTION OF THE JUICER AND ITS ACCESSORIES (Fig. A)
A1 Pusher
A2 Swinging hopper of the filling
tube
A3 Filling tube, cover andsieve
assembly
A4 Pressing screw
A5 Juicing chamber
A6 Gasket ring
A7 Pulp outlet
A8 Silicone plug
A9 Juice outlet with plug
andgasket
A10 Motor shaft (not illustrated)
A11 Switch
0 – off
I– on
R – engine reverse
A12 Motor unit
A13 Juice container with avolume
of 800ml
A14 Pulp container with avolume
of 600ml
A15 Anti-slip feet
A16 Cleaning brush
. . . . . . . . . . . . . . . . . . . . . . . . . . . . . . . . . . . . . . . . . . . . . . . . . . . . . . . . . . . . . . . . . . . .
PURPOSE OF USE AND PRINCIPLE OF OPERATION OF THE JUICER
• The vertical slow juicer can juice most fruits andvegetables. The
chapter SELECTION OF INGREDIENTS will help you to select suitable
ingredients .
• The juice is pressed at low speed. The juice thus obtained contains
asmaller proportion of foam, oxidises more slowly andretains
valuable vitamins andenzymes for longer. You can store it in the fridge
for up to 24hours.
• The ingredients are first drawn through the press screw into the
juicing mechanism and coarsely ground. In thenext stage, the juice
is pressed and the pulp is separated. During this process, the pulp
is continuously drained into acontainer prepared under the pulp
outlet and the juice flows out into acontainer located under the juice
outlet. The closable juice outlet allows you to mix juices gradually
squeezed fromvarious types of ingredients inside the juicing chamber
andprevents the juice from dripping after juicing.
. . . . . . . . . . . . . . . . . . . . . . . . . . . . . . . . . . . . . . . . . . . . . . . . . . . . . . . . . . . . . . . . . . . .
BEFORE FIRST USE
• Remove all wrapping material, including promotional labels and tags,
from the appliance and its accessories.
• Wash the A1–A9 and A13–A14 removable parts that are intended to
come into contact withfood with warm water using afew drops of
hand dish washing detergent. Then thoroughly rinse everything under
running water to remove any detergent residue andwipe dry with
akitchen towel.
• Wipe the A12 motor unit with aclean, slightly damp cloth and then
wipe it thoroughly dry.
Caution:
When washing, do not use too hot water.
None of the components of this appliance are
dishwasher safe.
Warning:
To avoid the risk of electric shock, do not immerse
the A12 motor unit, power cord or power cord plug in
water or any other liquid, or wash these parts under
running water.
. . . . . . . . . . . . . . . . . . . . . . . . . . . . . . . . . . . . . . . . . . . . . . . . . . . . . . . . . . . . . . . . . . . .
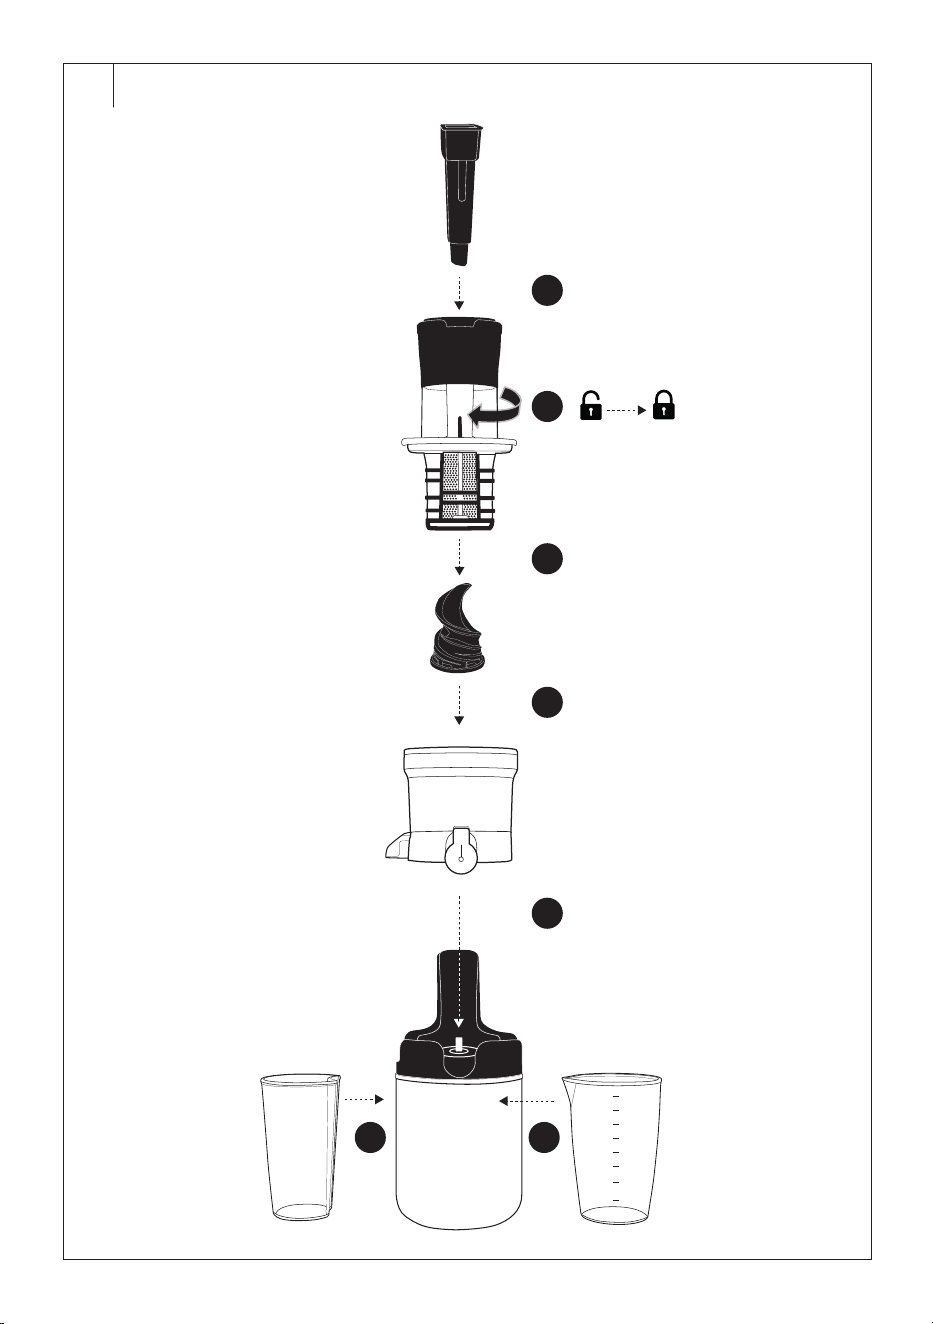
ASSEMBLY OF THE JUICER (Fig. B)
Warning:
Assemble the juicer only when the A12 motor unit is
switched off and unplugged from the power outlet.
• Before assembling the juicer, the removable parts must be clean
anddry.
• Place the A12 motor unit on adry, clean, even andstable surface.
• Place the A5 juicing chamber on the A12 motor unit andmake sure
that it fits properly into it.
Caution:
Before attaching the A5 juicing chamber to the A12
motor unit, properly close the A8 silicone plug at
the bottom of the A7 pulp outlet andcheck that the
A6 sealing ring is attached to the central hole at the
bottom of the A5 juicing chamber.
• Insert the A4 press screw into the middle of the A5 juicing chamber
andpress it down until it is fully seated on the A10 motor shaft.
• Place the filling tube, cover andsieve assembly A3 on the A5 juicing
chamber so that
the symbol on the cover aligns with the
symbol on the A12 motor unit. Turn the assembly A3 clockwise, i.e.
in the direction of the symbol
on the A12 motor unit, until it stops.
The symbols
are located on the raised part of the A12 motor
unit. The safety lock will not allow the juicer to start if the cover is not
secured in the correct position.
• Insert the A1 pusher into the opening in thehopper of the A2 filling
tube.
• Place the A13 juice container and the A14 pulp container under the A9
andA7 outlets.
. . . . . . . . . . . . . . . . . . . . . . . . . . . . . . . . . . . . . . . . . . . . . . . . . . . . . . . . . . . . . . . . . . . .
SELECTION OF INGREDIENTS
• The quality, taste andquantity of the juice pressed depend on the
ingredients used.Choose quality, fresh andripe ingredients for juicing.
Some ingredients contain alarger amount of juice andasmaller
proportion of pulp. For other ingredients it is the opposite. Overripe or
longer stored ingredients are not very suitable forjuicing. Not only will
you get asmaller amount of juice with alower nutritional value, but
you will also need to clean the sieve more often.
• The table below will help you with the selection of ingredients that can
be juiced in avertical screw juicer.
EN
Vertical Slow Juicer
User Manual
– 6 –
08/2024
2024, .
Ingredients Instructions for Selection
Citrus fruits Most citrus fruits such as oranges, grapefruits, mandarins, limes, lemons, etc. can be juiced.
Exotic fruit Pineapple is the most suitable tropical fruit. Toalesser extent, kiwi, mango andpapaya can be juiced. Banana,
avocado, figs, etc. are inappropriate.
Pome Apples andpears are suitable for juicing.
Drupe The cherries can be juiced separately. Peaches, plums, nectarines or apricots should be juiced together withother
harder fruits or vegetables. Separately, they will be harder to juice because they are too soft andmay clog the
sieve frequently.Juice pressed separately fromthese fruits will have athick, mushy consistency.
Berries Currants, gooseberries, raspberries, bilberries, blackberries, sea buckthorn, strawberries andgrapes should be
juiced together withotherharder fruits or vegetables. If you juice them separately or in larger quantities, they may
clog the sieve more often.
Fruit vegetables Peppers, cucumber, tomato and watermelon are suitable as fruit vegetables.
Root vegetables You can juice carrots, parsley roots, celery andbeetroot. In larger quantities, we recommend juicing them together
withother softer ingredients such as apples, oranges, etc. The vertical slow juicer is not very suitable forjuicing
large amounts of root vegetables alone.
Cruciferous vegetables Cabbage andbroccoli can be juiced fromcruciferous vegetables. Put them in the juicer together withother
vegetables or fruits. Broccoli is characterized by low juice yield.
Leafy and stem vegetables,
herbs andyoung green wheat
You can juice spinach, celery, rocket, parsley, wheat, etc. Juice them insmaller quantities together withother
ingredients to make juicing smooth.
Rhubarb is not juiced due to the oxalic acid content. Rhubarb is only used for consumption by petioles, and only
properly peeled andheat-treated.
Onion vegetables You can use onions andgarlic. The taste of onions andgarlic is very distinctive. If you do not have much
experience with the taste of onions andgarlic in juices, we recommend starting with avery small amount. In
general, these ingredients are juiced only additionally withother vegetables or fruits. Alarger amount of these
ingredients could clog the sieve.
Note:
Certain fruits andvegetables can cause digestive problems, such as bloating, or cause allergic reactions.
Please consult an expert if you have any questions regarding the health aspect of the selection of ingredients.
. . . . . . . . . . . . . . . . . . . . . . . . . . . . . . . . . . . . . . . . . . . . . . . . . . . . . . . . . . . . . . . . . . . . . . . . . . . . . . . . . . . . . . . . . . . . . . . . . . . . . . . . . . . . . . . . . . . . . . . . . . . . . . . . . . . . . . . . . . . .
• Larger fruits andvegetables need to be cut to pass through the filling
hole andensure their smooth juicing. Cut the root vegetables into
thinner chips of 2 × 5 cm. Cut leafy and stem vegetables, such as
spinach, celery, etc., wheat grass or herbs into approximately 3 cm
pieces. Larger parts could be tangled on the pressing screw. There is
no need to cut small fruit that passes freely through the filling hole.
The strawberries can be cut lengthwise in half. Cut other types of
fruit andvegetables into pieces that will easily fit into A2 hopper.
Approximately 3 cm cubes are ideal.
. . . . . . . . . . . . . . . . . . . . . . . . . . . . . . . . . . . . . . . . . . . . . . . . . . . . . . . . . . . . . . . . . . . .
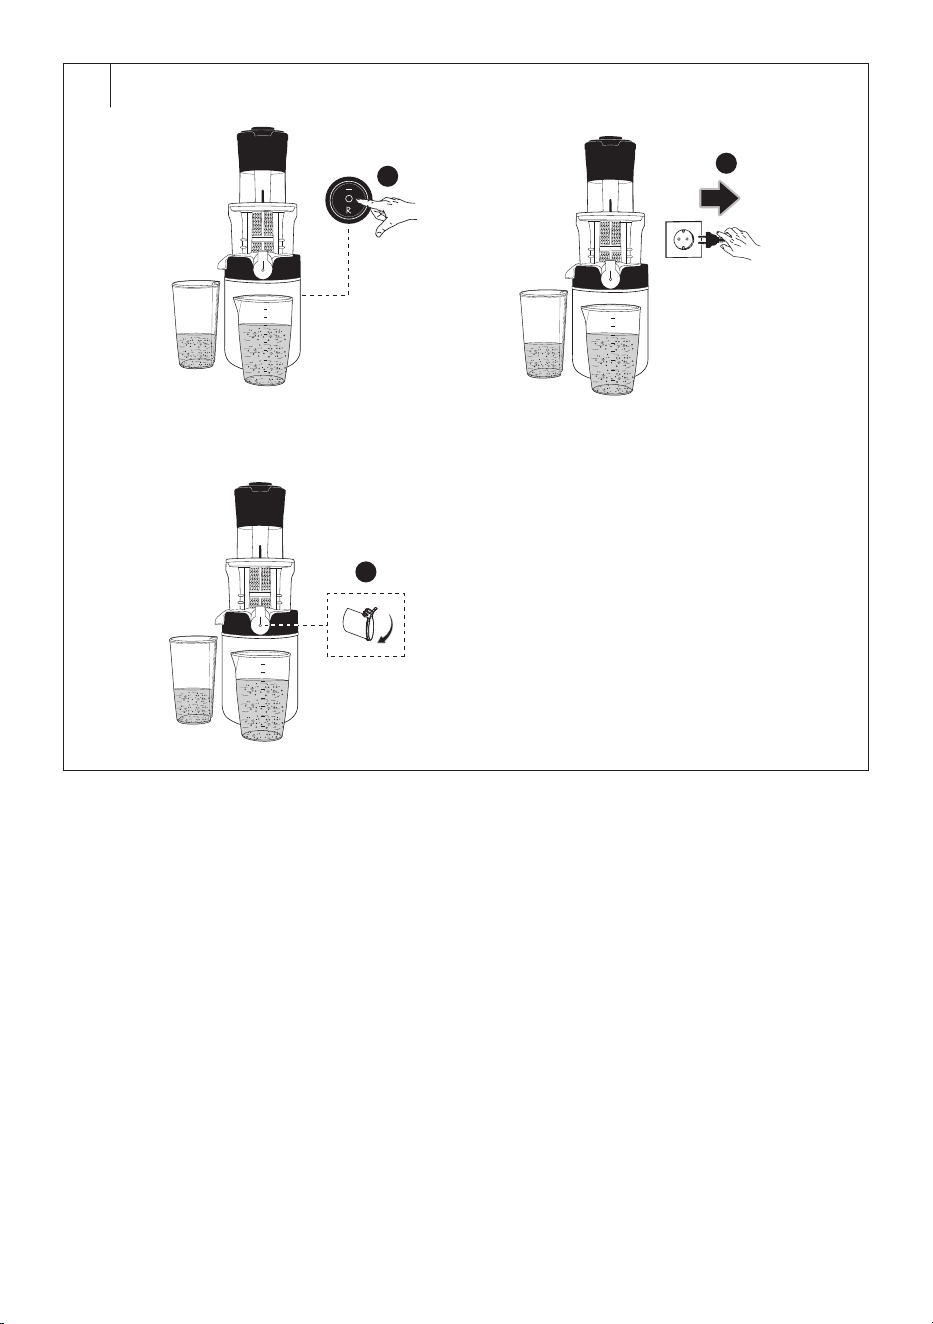
USING THE JUICER (Fig. C)
• Verify that the juicer is properly assembled and the A11 switch is set
to position 0 (off).
Note:
The safety lock will not allow the juicer to start if the cover is
not secured in the correct position.
• Connect the juicer to an electrical socket.
• Make sure that the A13 andA14 containers are in their correct location.
Open the A9 drain plug so that the juice can flow freely into the A13
container. If you are gradually juicing various types of ingredients
and you want to mix the juice pressed fromthem directly in the
A5 juicing chamber, close the A9 drain plug. During operation, it is
then necessary to regularly check the filling status of the A5 juicing
chamber to prevent it from overfilling. Open the A9 drain plug to drain
the juice from the A5juicing chamber.
• Set the A11 switch to position I(on) and gradually insert pre-prepared
ingredients into the hopper of the A2 filling tube. The A2 swinging
hopper will tip the ingredients into the filling tube. If the A2 swinging
hopper does not tip over, grab the tongue of the A2 hopper and flip
the A2 hopper over to transfer the ingredients into the filling tube.
Fromthe filling tube, the ingredients get into the pressing mechanism,
where juice is squeezed fromthem.
INGREDIENTS THAT DO NOT BELONG TO THE JUICER
• Never put in the juicer:
– hard ingredients, such as sugar cane, etc.;
– dried ingredients such as dried pepper, coffee beans, cereal grains,
etc.;
– hard stones ofapricots, peaches, cherries, mangoes, etc.;
– frozen, cooked, preserved or otherwise prepared fruit or
vegetables;
– ice cubes.
. . . . . . . . . . . . . . . . . . . . . . . . . . . . . . . . . . . . . . . . . . . . . . . . . . . . . . . . . . . . . . . . . . . .
PREPARATION OF INGREDIENTS FOR JUICING
• Forhygiene reasons, clean andthoroughly wash all fruits
andvegetables under drinking running water. Make sure that any
residues of soil, sand or other impurities are removed during washing.
Remains of soil, sand or other debris could, among other things,
damage the appliance.
• Remove the peel from citrus fruits and fruits with inedible or too hard
skin, such as pineapple, mango, etc. Remove the central part of the
pineapple as well. The centre of the pineapple is too stiff andnot
suitable forjuicing.
• Fruit withhard stones, such as apricots, peaches, nectarines, cherries,
etc., should be thoroughly stoned. Remove any remaining stones to
avoid damaging the juicer.
• Remove the cores and stems from fruits such as apples, pears, etc.
• Remove all stems and leaves from the berries.
• Remove the thick skin from fruiting vegetables such as watermelon.
You do not need to peel the cucumber. It is necessary understand
that the juice ofunpeeled cucumber will taste different than the juice
ofpeeled cucumber.
• Peel the root vegetables with thicker skin, such as celery or beetroot.
Carrots andparsley roots do not need to be peeled.
• Remove the skin from the onion vegetables.
– 7 –
08/2024
2024, .
• Add the ingredients into A2 hopper continuously inappropriate doses
to prevent overloading of the pressing mechanism.
• If it is necessary to press down the ingredients in the filling tube,
use the provided A1 pressure. Insert the A1 pressure into the hole in
the middle of the A2 hopper and press the ingredients with aslow
andreasonably large force.
• The pulp is continuously drained into A14 container located under the
A7 pulp outlet. Do not cover the A7 pulp outlet with any items during
operation.
• The juice is continuously drained into the A13 container located under
the A9 juice outlet. If the A9 juice outlet is closed, periodically check
the filling status of the A5 juicing chamber to prevent it from overfilling.
After filling the A5 juicing chamber, stop the operation of the juicer by
setting the A11 switch to position 0 (off) and discharge the juice into the
A13 container. Then you can continue juicing.
• Hold the A11 switch in the R position (motor reverse) for 3−5seconds
to release the ingredients stuck inside the pressing mechanism. When
you release the A11 switch, it returns to 0 (off). To process the released
ingredients, start the normal operation of the appliance. Ifnecessary,
you can repeat the above procedure. If you still cannot fix the problem,
the juicer will need to be cleaned according to the instructions in the
chapter CLEANING AND MAINTENANCE.
• The processing time of ingredients varies in units of minutes. The
maximum continuous operating time is 20 minutes. Then let the
appliance cool down for 10–15 minutes. Do not exceed the maximum
continuous operation time and observe the time required for the
appliance to cool down.
• Some ingredients may cause faster clogging of the sieve. Insuch
acase, it is necessary to divide the ingredients into several batches
and clean the removable parts between individual batches according
to the instructions in the chapter CLEANING AND MAINTENANCE.
Before disassembly and reassembly, the appliance must be turned
off anddisconnected from the power socket. Before reassembling the
appliance, thoroughly dry the removable parts.
• After juicing the last ingredients, set the A11 switch to the R position
(engine reverse) for 5seconds andthen start the normal operation
of the appliance for 30seconds. This will process the ingredients
remaining in thepressing mechanism.
• When you have finished using it, turn off the juicer by setting the
A11 switch to position 0 (off) anddisconnect the power cord from the
power socket. When the juice stops flowing from the A9 outlet, close
it with the stopper.
• After each use, disassemble the juicer according to the instructions
inchapter DISASSEMBLY OF THE JUICER andclean it according to
the instructions inchapter CLEANING AND MAINTENANCE. Always
clean the juicer immediately after use. Do not let food residues dry in
the juicer. Dried residues can make it difficult not only to disassemble
the removable parts, but also to clean them afterwards. Dry residues
that cannot be removed may adversely affect the juicing efficiency
when continuing to use the juicer.
. . . . . . . . . . . . . . . . . . . . . . . . . . . . . . . . . . . . . . . . . . . . . . . . . . . . . . . . . . . . . . . . . . . .
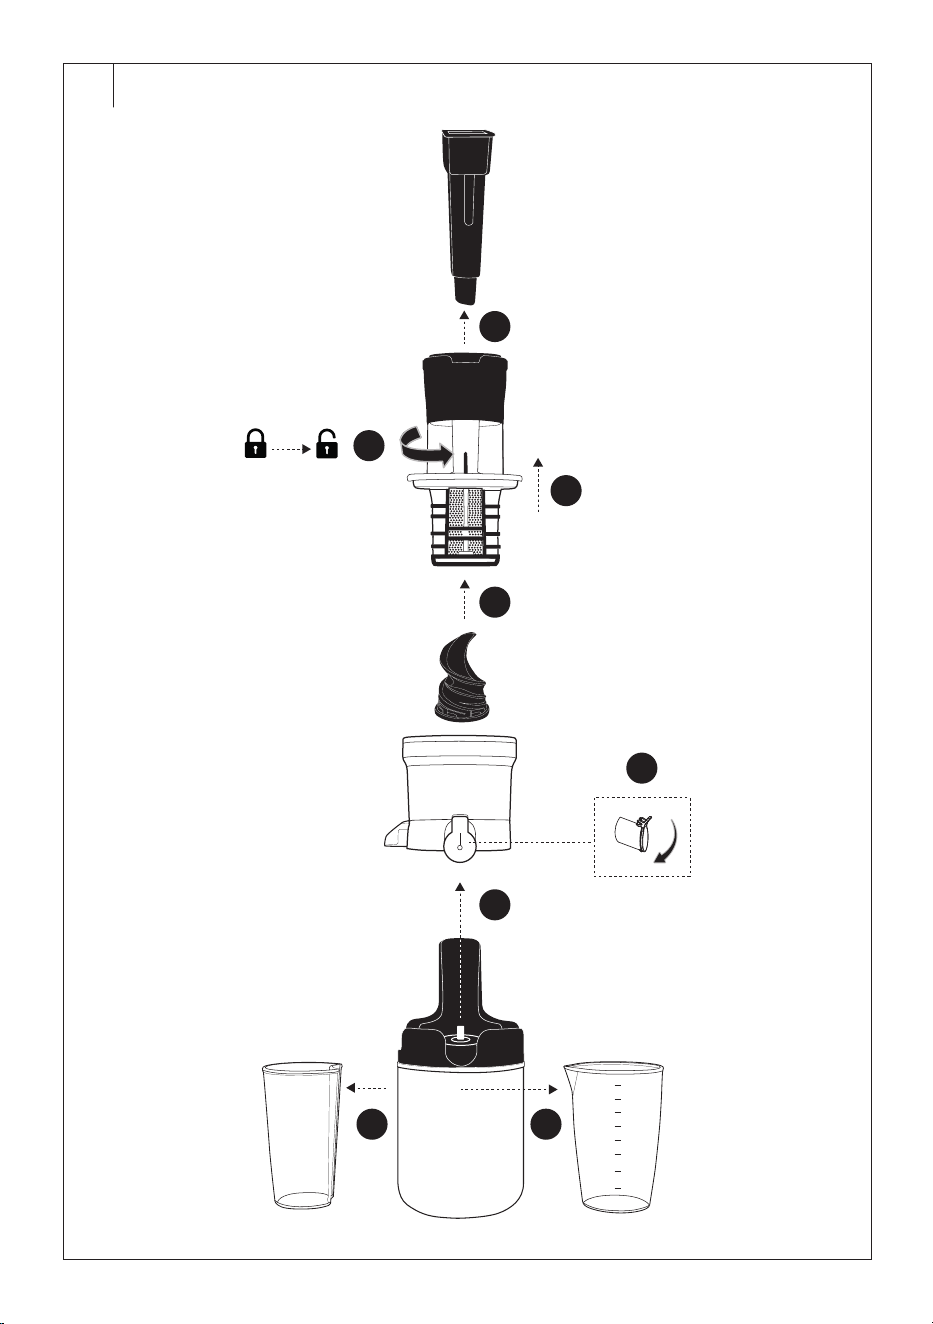
DISASSEMBLY OF THE JUICER (Fig. D)
• Before disassembly, turn off the juicer by setting the A11 switch to
position 0 (off) and disconnect the power cord from the power socket.
Wait until the motor comes to acomplete stop.
Warning:
Do not disassemble the appliance when the A12
motor unit is connected to the power socket.
• Close the A9 juice outlet. Put A13 andA14 containers aside.
• If the A1 pusher is inserted inthehopper opening of the A2 filling tube,
remove it.
• Turn the A3 filling tube, cover andsieve assembly counter-clockwise
in the direction of the symbol
until it reaches the top. The symbol
is located on the raised part of the A12 motor unit. Lift andremove
the A3 assembly from theA5 juicing chamber.
• Carefully remove the A5 juicing chamber from the A12 motor unit by
pulling it upwards. Leave the A4 press screw inside. If you are unable
to remove the A5 juicing chamber, gently swing it from side to side,
then pull it upwards andremove it.
• The A2 hopper is afixed part of the filling tube. Do not attempt to
remove it.
. . . . . . . . . . . . . . . . . . . . . . . . . . . . . . . . . . . . . . . . . . . . . . . . . . . . . . . . . . . . . . . . . . . .
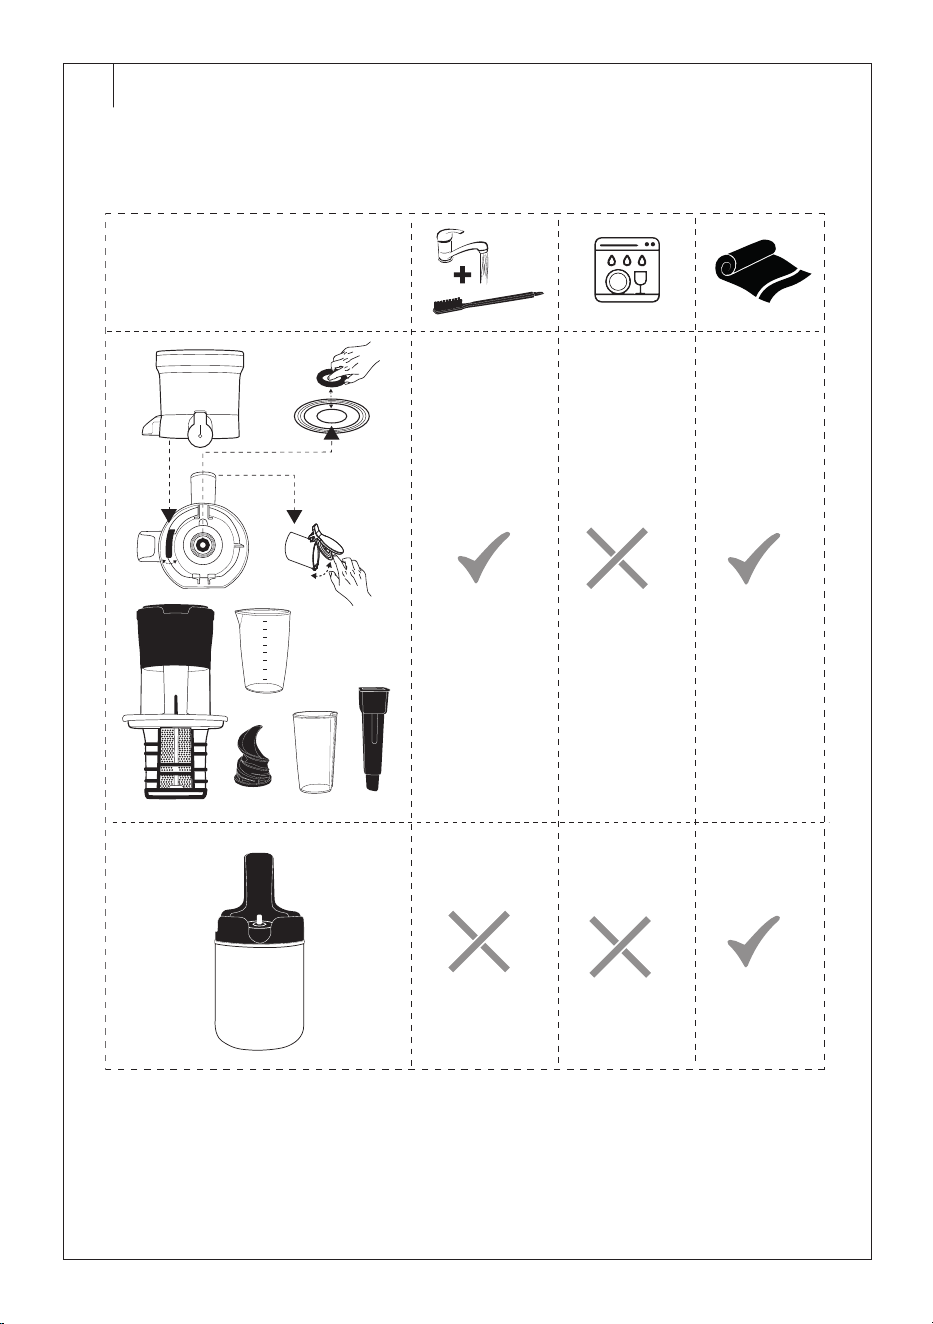
CLEANING AND MAINTENANCE (Fig. E)
• Before any cleaning, the juicer must be turned off anddisconnected
from the power socket. First, remove the removable parts from the A12
motor unit. Follow the instructions in the chapter DISASSEMBLY OF
THE JUICER.
• Clean the appliance immediately after use. Do not let food residues
dry in the juicer. Dried food residues are more difficult to remove. Dry
residues that cannot be removed may adversely affect the juicing
efficiency when continuing to use the juicer.
Warning:
To avoid the risk of electric shock, do not immerse
the A12 motor unit, power cord or power cord plug in
water or any other liquid, or wash these parts under
running water.
• Never use thinners, metal or other dish scourers or abrasive cleaners
for cleaning. Otherwise, the surface finish of the appliance or its
accessories could be damaged.
• Move the A5 juicing chamber with the A4 pressing screw over the sink.
Remove the A4 pressing screw from the A5 juicing chamber. Open the
A9 juice outlet plug. Remove any remaining pulp andjuice. Turn the A5
juicing chamber upside down and open the A8 silicone plug, which is
located at the bottom of the A7 pulp outlet. When the A8 plug is opened,
the A7 pulp outlet will be easier to clean.
• Wash all removable parts, i.e. the A1 pressure, the A3 filling tube, cover
and sieve assembly, the A4 pressing screw, the A5 juicing chamber
and the A13 andA14 containers thoroughly with warm water using
afew drops of hand dish washing detergent. Pay extra attention to
cleaning hard-to-reach parts such as the A7 pulp outlet, the A9 juice
outlet and the interior of the A5 juicing chamber. Use the included
A16 brush to clean the sieve. Make sure that all dirt is removed. Then
thoroughly wash everything under clean running water to remove any
detergent residue and wipe dry with akitchen towel. After cleaning,
close the A8 silicone plug at the bottom of the A7 pulp outlet properly.
• After several uses, remove the seal from the plug of the A9 juice outlet
andremove the A6 sealing ring from the central hole at the bottom of
the A5 juicing chamber. To remove the A6 sealing ring, turn the A5
juicing chamber upside down and press the A6 ring with your thumb
from the central opening towards the A5 juicing chamber. Clean both
the A9 juice outlet plug seal and the A6 sealing ring under clean
flowing water.
Caution:
When washing, do not use too hot water.
None of the components of this appliance are
dishwasher safe.
• After cleaning, return the seal of the A9 juice outlet plug and the A6
sealing ring back to their place. To attach the A6 sealing ring to theA5
juicing chamber, proceed as follows. Place the A5 juicing chamber on
an even, dry surface at the bottom. Apply the A6 sealing ring to the
central hole at the bottom of the A5 juicing chamber so that the wider
smooth side points upwards. Then push it into the central hole until it
fits properly along the entire perimeter.
• Surface deposits may form on removable components due to
use. Therefore, it is advisable to immerse the sieve (part of the A3
assembly) and the A5 juicing chamber for half an hour in asolution
of water and citric acid. The recommended dosage of citric acid is
2tablespoons per 1 litre of water. This will remove most of the surface
deposits. After removal from thesolution, thoroughly rinse the sieve
and the A5 juicing chamber under clean flowing water. Then dry
everything thoroughly.
• Use alightly dampened cloth to remove dirt from A12 motor unit
.
Wipe
the cleaned surface dry with asoft cloth.
. . . . . . . . . . . . . . . . . . . . . . . . . . . . . . . . . . . . . . . . . . . . . . . . . . . . . . . . . . . . . . . . . . . .

– 8 –
08/2024
2024, .
STORAGE
• Before storing, thoroughly clean and dry the juicer and its accessories. Follow the instructions in the chapter CLEANING AND MAINTENANCE.
• Store the juicer and its accessories in aclean, dry place out of the reach of children and pets.
. . . . . . . . . . . . . . . . . . . . . . . . . . . . . . . . . . . . . . . . . . . . . . . . . . . . . . . . . . . . . . . . . . . . . . . . . . . . . . . . . . . . . . . . . . . . . . . . . . . . . . . . . . . . . . . . . . . . . . . . . . . . . . . . . . . . . . . . . . . .
TROUBLESHOOTING
Problem Possible Cause Solution
The juicer is connected to the power
socket but cannot be started.
The A3 filling tube, cover andsieve
assembly is not properly attached
to theA5 juicing chamber.
Set the A11 switch to position 0 (off) and disconnect the power cord
from the mains socket. Attach the A3 filling tube, cover andsieve
assembly to the A5 juicing chamber according to the instructions in
thechapter ASSEMBLY OF THE JUICER.
The overheating protection could be
activated if the juicer was previously
operated for more than 20minutes.
Set the A11 switch to position 0 (off). Disconnect the juicer from the
power socket andallow it to cool for 10−15minutes.
During operation, you can notice
alouder noise and more vibration
than usual.
This is caused by the pressing of
hard ingredients.
This is anormal occurrence.
The juicer suddenly stopped. There is too much ingredient in the
pressing mechanism or too large
pieces of hard ingredient.
Set the A11 switch to position R (reverse) andhold it inthis position for
3−5seconds to release the ingredients. Then you can continue juicing.
If the problem persists, the juicer needs to be cleaned. Before cleaning,
switch off the juicer and disconnect it from the power socket. Follow
the instructions in the CLEANING AND MAINTENANCE chapter for
cleaning.
Hard ingredients, such as root vegetables, should be cut according to
the instructions in the chapter PREPARATION OF INGREDIENTS FOR
JUICING before inserting them into the juicer.
Juice is leaking from the bottom of
the A5 juicing chamber.
The A8 silicone plug at the bottom
of the A7 pulp outlet is not properly
closed or the A6 sealing ring is not
properly or not at all attached to the
central hole at the bottom of the A5
juicing chamber.
Set the A11 switch to position 0 (off). Disconnect the power cord
from the power socket. Drain thejuice from the A5 juicing chamber.
Carefully disassemble the juicer according to the instructions inchapter
DISASSEMBLY OF THE JUICER. Wash the A3−A5 removable parts
under running water anddry them. Close the A8 silicone plug at the
bottom of the A7 pulp outlet or properly attach the A6 sealing ring
to the central hole at the bottom of the A5 juicing chamber, or both.
If the surface of the A12 motor unit is dirty,clean it according to the
instructions in thechapter CLEANING AND MAINTENANCE.
The A8 silicone plug or the A6
sealing ring does not fit tightly
because it is not clean.
Set the A11 switch to position 0 (off). Disconnect the power cord
from the power socket. Drain thejuice from the A5 juicing chamber.
Carefully disassemble the juicer according to the instructions inchapter
DISASSEMBLY OF THE JUICER. Wash the A3−A5 removable parts
under running water and clean the A8 silicone plug or the
A6 sealing
ring properly. Follow the instructions in the chapter CLEANING AND
MAINTENANCE. After cleaning, dry everything, close the A8 silicone
plug properly and return the A6 sealing ring back to its place. If the
surface of the A12 motor unit is dirty, also clean it according to the
instructions in thechapter CLEANING AND MAINTENANCE.
Juice is leaking at the joint between
the cover and the A5 juicing
chamber.
The A9 juice outlet is closed. The
A5 juicing chamber was overfilled.
Stop the juicer. Open the plug of the A9 outlet so that the juice can
flow freely into the A13 container. If the surface of the juicer is dirty,
disconnect it from the power socket andclean it according to the
instructions in thechapter CLEANING AND MAINTENANCE.
The A3 filling tube, cover andsieve
assembly cannot be removed from
theA5 juicing chamber.
Too much pulp has accumulated
in the A5 juicing chamber or harder
ingredients are stuck init.
Set the A11 switch to the R (reverse) position andhold it inthis
position for 3−5seconds torelease the accumulated pulp or jammed
ingredients. Disconnect the juicer from the power socket. Wait for the
engine to come to acomplete standstill and try to remove the A3 filling
tube, cover andsieve assembly again. If you are not able to do this,
repeat the above mentioned procedure once or twice.
After use, the accessories that
comes into contact withfood are
coloured.
Colouring is caused by pigments
naturally occurring infruits
andvegetables.
This is anormal occurrence.
. . . . . . . . . . . . . . . . . . . . . . . . . . . . . . . . . . . . . . . . . . . . . . . . . . . . . . . . . . . . . . . . . . . . . . . . . . . . . . . . . . . . . . . . . . . . . . . . . . . . . . . . . . . . . . . . . . . . . . . . . . . . . . . . . . . . . . . . . . . .

– 9 –
08/2024
2024, .
TECHNICAL SPECIFICATIONS
Rated voltage range ................................................................................220−240 V
Rated frequency ............................................................................................50/60Hz
Rated input power ..............................................................................................200 W
Safety class (for electric shock protection) ............................................................ II
Noise level .........................................................................................................72 dB(A)
Speed of revolutions.................................................................................45–65 rpm
Juice container capacity ................................................................................800 ml
Pulp container capacity ..................................................................................600 ml
Operating cycle ..................................................................................................20 min
Cooling time ...................................................................................................10–15 min
The declared noise emission level of the appliance is 72 dB(A), which
represents alevel Aof acoustic power with respect to areference acoustic
power of 1 pW.
Glossary of technical terms
Safety Class for Electric Shock Protection:
Class II – Electric shock protection is provided by double or heavy-duty
insulation.
. . . . . . . . . . . . . . . . . . . . . . . . . . . . . . . . . . . . . . . . . . . . . . . . . . . . . . . . . . . . . . . . . . . .
INSTRUCTIONS AND INFORMATION ON DISPOSAL OF USED
PACKAGING MATERIAL
Dispose of used packaging material at the location designated by the
municipality for waste disposal.
DISPOSAL OF USED ELECTRICAL AND ELECTRONIC EQUIPMENT
Used electrical andelectronic products must not be added to ordinary
municipal waste. For proper disposal and recycling of these products,
deliver them to designated collection points. Alternatively, in some
European Union states or other European countries the products can be
returned to the local retailer when buying an equivalent new product. By
properly disposing of this product, you help preserve valuable natural
resources and contribute to preventing potential negative impacts on the
environment and human health resulting from improper waste disposal.
For further details, contact your local authorities or the nearest collection
point. Fines may be imposed for improper disposal of this type of waste in
accordance with national regulations.
For Business Entities in European Union States
To dispose of electric or electronic equipment, request necessary
information from your retailer or supplier.
Disposal in Other Countries Outside the European Union
If you wish to dispose of this product, request the necessary information
about the correct disposal method from the local council or from your
retailer.
. . . . . . . . . . . . . . . . . . . . . . . . . . . . . . . . . . . . . . . . . . . . . . . . . . . . . . . . . . . . . . . . . . . .
Changes to text and technical parameters are reserved.

– 10 –
08/2024
2024, .