Read all instructions before
assembling and using product.
IMPORTANT - Keep
Instructions for future use.
0922R1-653X
Owner’s Manual
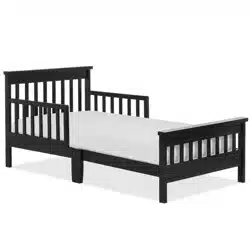
SAN-FRAN
Convertible Toddler Bed
Scan the QR code to register your product
Scannez le code QR pour enregistrer votre produit
Escanee el código QR para registrar su producto
https://dreamonme.com/customercare/registration/
Manuel du propriétaire Manual del usuario
Lisez toutes les instructions avant avant
d'assembler et d'utiliser le produit.
IMPORTANT - Conservez les instructions
pour pour une utilisation ultérieure.
Lea todas las instrucciones antes de
montar y utilizar el producto.
IMPORTANTE - Guarde las instrucciones
para uso futuro.

2
www.dreamonme.com/help
SAFE SLEEP TIPS
Adult Assembly
Required.
DO NOT use the
product if it is
damaged, broken,
and/or components are
missing or broken.
To protect your parts
during assembly,
please place them on a
soft surface.
Contact Dream On
Me in case of any
assistance needed.
Small parts may
present choking
hazard prior to
assembly.
Please read the
instructions
thoroughly. Identify all
parts & hardware.
Do Not Use Power
Drills or Drivers.
To clean surface, use
only water on a damp
cloth. Do not use
window cleaner or
cleaning abrasive as it
will scratch the surface
and could damage the
protective coating.
For a Safe and
comfortable Sleep
experience, we
suggest using Dream
On Me Greenguard
Gold Certified
Full-Size Mattress.
0-6

3
www.dreamonme.com/help
CONSEILS POUR UN SOMMEIL SÛR
Un assemblage par
un adulte est requis.
NE PAS utiliser le
produit s'il est
endommagé, cassé,
et/ou si des
composants sont
manquants ou cassés.
Pour protéger vos
pièces pendant
l'assemblage, veuillez
les placer sur une
surface souple.
Contactez Dream On
Me Inc en cas de besoin
d'assistance.
Les petites pièces
peuvent présenter un
risque d'étouffement
avant l'assemblage.
Veuillez lire
attentivement les
instructions. Identifiez
toutes les pièces et le
matériel.
N'utilisez pas de
perceuse ou de
visseuse électrique.
Pour nettoyer la surface,
utilisez uniquement de
l'eau sur un chiffon
humide. N'utilisez pas
de nettoyant pour vitres
ou d'abrasif de
nettoyage, car cela
rayerait la surface et
pourrait endommager le
revêtement protecteur.
Pour une expérience
de sommeil sûre et
confortable, nous vous
suggérons d'utiliser un
matelas pleine
grandeur certifié
Greenguard Gold de
Dream On Me/Evolur.
0-6

4
www.dreamonme.com/help
CONSEJOS PARA DORMIR CON SEGURIDAD
Se requiere el
montaje por parte
de un adulto.
NO utilice el producto si
está dañado, roto y/o
faltan componentes o
están rotos.
Para proteger las piezas
durante el montaje,
colóquelas sobre una
superficie blanda.
Contacte con Dream On
Me Inc en caso de
necesitar ayuda.
Las piezas pequeñas
pueden presentar
peligro de asfixia
antes del montaje.
Lea detenidamente las
instrucciones.
Identifique todas las
piezas y herrajes.
No utilice taladros o
atornilladores
eléctricos.
Para limpiar la
superficie, utilice sólo
agua en un paño
húmedo. No utilice
limpiacristales o
productos de limpieza
abrasivos, ya que
rayarán la superficie y
podrían dañar el
revestimiento protector.
Para una experiencia
de sueño segura y
confortable,
sugerimos usar el
colchón de tamaño
completo Dream On
Me/Evolur Greenguard
Gold Certified.
0-6

5
www.dreamonme.com/help
…. for choosing Dream On Me and congratulations on joining our family;
a family that has been transforming lives for over 30+ years!
We appreciate your feedback and wish you the very best in the
coming years with your new addition. If you have any questions
or concerns please don’t hesitate to reach out to us. One of our
trusted Customer Care representatives will be happy to assist you.
Thank you again for entrusting us to provide you with safe
and affordable baby products and accessories.
THANK YOU...
LIMITED WARRANTY:
• Dream On Me warrants its product to be free from defects in material and
workmanship and agrees to remedy any such defect.
• This warranty covers 1 year from the date of original purchase.
• This warranty is valid only upon presentation of proof of purchase.
• This is solely limited to the repair or replacement of defective furniture
components and no assembly labor is included.
• This warranty does not apply to any product which has been improperly
assembled, subjected to misuse or abuse or which has been altered or
repaired in any way.
• This warranty gives you specific legal rights and you may also have other
rights which vary from State to State.

6
www.dreamonme.com/help
.... pour avoir choisi Dream On Me et félicitations pour avoir rejoint notre
famille ; une famille qui transforme des vies depuis plus de 30 ans ! Nous
apprécions vos commentaires et vous souhaitons le meilleur pour les années
à venir avec votre nouveau bébé. Si vous avez des questions ou des
préoccupations, n'hésitez pas à nous contacter. L'un de nos représentants
du service clientèle se fera un plaisir de vous aider. Merci encore de nous
avoir fait confiance pour vous fournir des produits et accessoires pour bébés
sûrs et abordables.
MERCI...
GARANTIE LIMITÉE :
• Dream On Me garantit que son produit est exempt de tout défaut de
matériel et de fabrication et s'engage à remédier à tout défaut de ce type.
• Cette garantie couvre 1 an à partir de la date d'achat originale.
• Cette garantie n'est valable que sur présentation d'une preuve d'achat.
• Elle est uniquement limitée à la réparation ou au remplacement des
composants défectueux du meuble et aucune main d'œuvre de montage
n'est incluse.
• Cette garantie ne s'applique pas à un produit qui a été mal assemblé,
soumis à une mauvaise utilisation ou à un abus ou qui a été modifié ou
réparé de quelque façon que ce soit.
• Cette garantie vous donne des droits légaux spécifiques et vous pouvez
également avoir d'autres droits qui varient d'un État à l'autre. droits qui
varient d'un État à l'autre.

7
www.dreamonme.com/help
.... por elegir a Dream On Me y enhorabuena por unirse a nuestra familia;
¡una familia que lleva más de 30 años transformando vidas! Apreciamos sus
comentarios y le deseamos lo mejor en los próximos años con su nueva
incorporación. Si tiene alguna pregunta o duda, no dude en ponerse en
contacto con nosotros. Uno de nuestros representantes de atención al
cliente de confianza estará encantado de ayudarle. Gracias de nuevo por
confiar en nosotros para proporcionarle productos y accesorios para bebés
seguros y asequibles.
GRACIAS...
GARANTIE LIMITÉE :
• Dream On Me garantiza que su producto está libre de defectos de
material y mano de obra y se compromete a remediar cualquier defecto.
• Esta garantía cubre 1 año a partir de la fecha de compra original.
• Esta garantía sólo es válida si se presenta el comprobante de compra.
• Se limita únicamente a la reparación o sustitución de los componentes
defectuosos del mueble y no se incluye la mano de obra de montaje.
• Esta garantía no se aplica a ningún producto que haya sido montado
incorrectamente, sometido a un mal uso o abuso o que haya sido
alterado o reparado de alguna manera.
• Esta garantía le otorga derechos legales específicos y también puede
tener otros derechos que varían de un estado a otro.

8
www.dreamonme.com/help
WARNINGS
• FAILURE TO FOLLOW THESE WARNINGS AND ASSEMBLY INSTRUCTIONS COULD RESULT IN
SERIOUS INJURY OR DEATH.
• CHECK THIS PRODUCT FOR DAMAGED HARDWARE, LOOSE JOINTS, MISSING PARTS, OR
SHARP EDGES BEFORE AND AFTER ASSEMBLY AND FREQUENTLY DURING USE.
• DO NOT USE THIS TODDLER BED IF ANY PARTS ARE MISSING, DAMAGED, OR BROKEN.
CONTACT DREAM ON ME INC - 1532 S. WASHINGTON AVE, PISCATAWAY, NJ 08854 FOR
REPLACEMENT PARTS.
• DO NOT USE A WATER MATTRESS WITH THIS TODDLER BED.
• IF REFINISHING, USE A NON-TOXIC FINISH SPECIFIED FOR CHILDREN’S PRODUCTS.
• NEVER USE BED FOR INFANTS. THIS TODDLER BED IS NOT A SUBSTITUTE FOR A CRIB. THE
TODDLER BED IS USED FOR A CHILD BETWEEN THE AGE OF 15 MONTHS TO 5 YEARS WITH A
MAXIMUM WEIGHT OF 50 POUNDS (22.7KG).
STRANGULATION HAZARD:
• TO HELP PREVENT STRANGULATION, TIGHTEN ALL FASTENERS. A CHILD CAN TRAP PARTS
OF THE BODY OR CLOTHING ON LOOSE FASTENERS.
• DO NOT PLACE A TODDLER BED NEAR A WINDOW WHERE CORDS FROM BLINDS OR DRAPES
MAY STRANGLE A CHILD.
• NEVER ADD A PILLOW, COMFORTER, OR PADDING.
• NEVER USE PLASTIC SHIPPING BAGS OR ANY PLASTIC FILM AS MATTRESS COVERS
BECAUSE THEY CAN CAUSE SUFFOCATION.
• TODDLERS CAN SUFFOCATE IN GAPS BETWEEN THE SIDES OF THE TODDLER BED AND A
MATTRESS THAT IS TOO SMALL. TO AVOID DANGEROUS GAPS, ANY MATTRESS USED IN THIS
BED SHALL BE FULL SIZE CRIB MATTRESS AT LEAST 51-5/8IN (1310MM) IN LENGTH, 27-1/4IN
(690MM) IN WIDTH AND 4IN (100MM) IN THICKNESS, OR GREATER, BUT SHOULD NOT EXCEED
5IN. THE DIMENSIONS OF THE MATTRESS SHALL BE TAKEN FROM SEAM TO SEAM OR EDGE
TO EDGE WHERE APPROPRIATE.
FALL HAZARD:
• WHEN STORING A TODDLER BED, USE CAUTION AS EXTREME CHANGES IN
• TEMPERATURE OR HUMIDITY CAN COMPROMISE THE TODDLER BED, MAKING IT EXTREMELY
DANGEROUS TO YOUR CHILD.
• USE CAUTION WHEN A VAPORIZER OR HUMIDIFIER IS IN USE. ALWAYS AIM VAPOR AWAY
FROM THE TODDLER BED AS WELL AS ANY OTHER WOODEN FURNITURE. PROLONGED
PERIODS OF HUMIDITY IN STORAGE AS WELL AS IN THE HOME CAN COMPROMISE THE
TODDLER BED.
• AVOID USING VAPORIZERS AND HUMIDIFIERS FOR PROLONGED PERIODS.

9
www.dreamonme.com/help
WARNINGS (cont.)
WARNING
• DO NOT USE THIS TODDLER BED IF YOU CANNOT FOLLOW THE ACCOMPANYING
INSTRUCTIONS.
• DO NOT PLACE IN OR NEAR THIS TODDLER BED ANY CORD, STRAP, OR SIMILAR
ITEM THAT COULD GET WRAPPED AROUND A TODDLER’S NECK.
• DO NOT PLACE THIS TODDLER BED NEAR A WINDOW OR A PATIO DOOR WHERE
THE TODDLER COULD REACH THE CORD OF A BLIND OR CURTAIN AND GET
STRANGLED.
• CHECK THIS TODDLER BED REGULARLY BEFORE USING IT. DO NOT USE IT IF
ANY PARTS ARE LOOSE OR MISSING OR THERE ARE ANY SIGNS OF DAMAGE.
• DO NOT SUBSTITUTE PARTS. CONTACT THE MANUFACTURER IF REPLACEMENT
PARTS OR ADDITIONAL INSTRUCTIONS ARE NEEDED.
• USE A CRIB MATTRESS THAT IS NO THICKER THAN 15 CM AND IS OF SUCH A
SIZE THAT, WHEN IT IS PUSHED FIRMLY AGAINST ANY SIDE OF THE TODDLER
BED, IT DOES NOT LEAVE A GAP OF MORE THAN 3 CM BETWEEN THE MATTRESS
AND ANY PART OF THE SIDES OF THE TODDLER BED.
• TODDLERS CAN SUFFOCATE ON SOFT BEDDING. DO NOT PLACE PILLOWS,
COMFORTERS, OR SOFT MATTRESSES IN THIS TODDLER BED.

10
www.dreamonme.com/help
AVERTISSEMENTS
• LE NON-RESPECT DE CES AVERTISSEMENTS ET DES INSTRUCTIONS DE MONTAGE PEUT
ENTRAÎNER DES BLESSURES GRAVES OU LA MORT.
• AVANT ET APRÈS L'ASSEMBLAGE ET FRÉQUEMMENT PENDANT L'UTILISATION, VÉRIFIEZ QUE
CE PRODUIT NE COMPORTE PAS DE PIÈCES ENDOMMAGÉES, DE JOINTS L CHES, DE PIÈCES
MANQUANTES OU DE BORDS TRANCHANTS.
• N'UTILISEZ PAS CE LIT D'ENFANT SI DES PIÈCES SONT MANQUANTES, ENDOMMAGÉES OU
CASSÉES. CONTACTEZ DREAM ON ME INC - 1532 S. WASHINGTON AVE, PISCATAWAY, NJ
08854 POUR OBTENIR DES PIÈCES DE RECHANGE.
• N'UTILISEZ PAS DE MATELAS D'EAU AVEC CE LIT D'ENFANT.
• EN CAS DE RÉNOVATION, UTILISER UNE FINITION NON TOXIQUE SPÉCIFIÉE POUR LES
PRODUITS POUR ENFANTS.
RISQUE DE STRANGULATION:
• POUR ÉVITER TOUT RISQUE DE STRANGULATION, SERREZ TOUTES LES FIXATIONS. UN
ENFANT PEUT SE COINCER DES PARTIES DU CORPS OU DES VÊTEMENTS SUR DES
ATTACHES L CHES.
• NE PLACEZ PAS UN LIT D'ENFANT PRÈS D'UNE FENÊTRE OÙ LES CORDONS DES STORES OU
DES RIDEAUX PEUVENT ÉTRANGLER UN ENFANT.
• N'AJOUTEZ JAMAIS D'OREILLER, D'ÉDREDON OU DE REMBOURRAGE.
• N'UTILISEZ JAMAIS DE SACS D'EXPÉDITION EN PLASTIQUE OU TOUT AUTRE FILM PLASTIQUE
COMME COUVRE-MATELAS, CAR ILS PEUVENT PROVOQUER UNE SUFFOCATION.
• LES ENFANTS EN BAS GE PEUVENT SUFFOQUER DANS LES ESPACES ENTRE LES CÔTÉS DU
LIT ET UN MATELAS TROP PETIT. TOUT MATELAS UTILISÉ DANS CE LIT D'ENFANT DOIT
MESURER AU MOINS 69 CM (27-1/4 PO) SUR 131 CM (51-5/8 PO), AVEC UNE ÉPAISSEUR NE
DÉPASSANT PAS 15 CM (6 PO) ET UNE ÉPAISSEUR MINIMALE DE 10 CM (4 PO). LES
DIMENSIONS DU MATELAS DOIVENT ÊTRE PRISES D'UNE COUTURE À L'AUTRE OU D'UN
BORD À L'AUTRE, LE CAS ÉCHÉANT.
RISQUE DE CHUTE:
• LORSQUE VOUS RANGEZ UN LIT POUR ENFANT, FAITES ATTENTION CAR DES CHANGEMENTS
EXTRÊMES DE TEMPÉRATURE OU D'HUMIDITÉ PEUVENT COMPROMETTRE LE LIT POUR
ENFANT ET LE RENDRE EXTRÊMEMENT DANGEREUX POUR VOTRE ENFANT.
• SOYEZ PRUDENT LORSQU'UN VAPORISATEUR OU UN HUMIDIFICATEUR EST UTILISÉ. VEILLEZ
À TOUJOURS ÉLOIGNER LA VAPEUR DU LIT D'ENFANT ET DE TOUT AUTRE MEUBLE EN BOIS.
DES PÉRIODES PROLONGÉES D'HUMIDITÉ DANS L'ENTREPÔT OU DANS LA MAISON PEUVENT
COMPROMETTRE LE LIT D'ENFANT.
• ÉVITEZ D'UTILISER DES VAPORISATEURS ET DES HUMIDIFICATEURS PENDANT DES PÉRIODES
PROLONGÉES.

11
www.dreamonme.com/help
AVERTISSEMENTS (suite)
• N'UTILISEZ PAS CE LIT POUR ENFANT SI VOUS NE POUVEZ PAS SUIVRE LES
INSTRUCTIONS QUI L'ACCOMPAGNENT.
• NE PLACEZ PAS DANS OU PRÈS DE CE LIT D'ENFANT UN CORDON, UNE
COURROIE OU UN ARTICLE SIMILAIRE QUI POURRAIT S'ENROULER AUTOUR DU
COU D'UN ENFANT.
• NE PLACEZ PAS CE LIT D'ENFANT PRÈS D'UNE FENÊTRE OU D'UNE PORTE PATIO
OÙ L'ENFANT POURRAIT ATTEINDRE LE CORDON D'UN STORE OU D'UN RIDEAU
ET S'ÉTRANGLER.
• VÉRIFIEZ RÉGULIÈREMENT CE LIT D'ENFANT AVANT DE L'UTILISER. NE
L'UTILISEZ PAS SI DES PIÈCES SONT DESSERRÉES OU MANQUANTES OU S'IL Y A
DES SIGNES DE DOMMAGES. NE REMPLACEZ PAS LES PIÈCES. CONTACTEZ LE
FABRICANT SI DES PIÈCES DE RECHANGE OU DES INSTRUCTIONS
SUPPLÉMENTAIRES SONT NÉCESSAIRES.
• UTILISEZ UN MATELAS DE LIT D'ENFANT DONT L'ÉPAISSEUR NE DÉPASSE PAS 15
CM ET DONT LA TAILLE EST TELLE QUE, LORSQU'IL EST POUSSÉ FERMEMENT
CONTRE L'UN DES CÔTÉS DU LIT D'ENFANT, IL NE LAISSE PAS UN ESPACE DE
PLUS DE 3 CM ENTRE LE MATELAS ET L'UN DES CÔTÉS DU LIT D'ENFANT.
• LES ENFANTS EN BAS ÂGE PEUVENT SUFFOQUER SUR UNE LITERIE MOLLE. NE
PLACEZ PAS D'OREILLERS, D'ÉDREDONS OU DE MATELAS MOUS DANS CE LIT
D'ENFANT.

12
www.dreamonme.com/help
ADVERTENCIAS
• EL INCUMPLIMIENTO DE ESTAS ADVERTENCIAS E INSTRUCCIONES DE MONTAJE PUEDE
PROVOCAR LESIONES GRAVES O LA MUERTE.
• ANTES Y DESPUÉS DEL MONTAJE, Y CON FRECUENCIA DURANTE EL USO, COMPRUEBE QUE
ESTE PRODUCTO NO TENGA PIEZAS DAÑADAS, JUNTAS SUELTAS, PIEZAS QUE FALTEN O
BORDES AFILADOS.
• NO UTILICE ESTA CUNA SI FALTA ALGUNA PIEZA, ESTÁ DAÑADA O ROTA. PÓNGASE EN
CONTACTO CON DREAM ON ME INC - 1532 S. WASHINGTON AVE, PISCATAWAY, NJ 08854
PARA LAS PIEZAS DE RECAMBIO.
• NO UTILICE UNA CAMA DE AGUA CON ESTA CUNA.
• SI SE RENUEVA, UTILICE UN ACABADO NO TÓXICO ESPECIFICADO PARA PRODUCTOS
INFANTILES.
PELIGRO DE ESTRANGULAMIENTO:
• PARA EVITAR EL ESTRANGULAMIENTO, APRIETE TODAS LAS FIJACIONES. UN NIÑO PUEDE
ENGANCHARSE PARTES DEL CUERPO O LA ROPA CON LOS CIERRES SUELTOS.
• NO COLOQUES UNA CUNA CERCA DE UNA VENTANA EN LA QUE LAS CUERDAS DE LAS
PERSIANAS O CORTINAS PUEDAN ESTRANGULAR AL NIÑO.
• NUNCA AÑADA ALMOHADAS, EDREDONES O RELLENO.
• NO UTILICES NUNCA BOLSAS DE PLÁSTICO PARA ENVÍOS O CUALQUIER OTRA LÁMINA DE
PLÁSTICO COMO FUNDA DE COLCHÓN, YA QUE PUEDEN PROVOCAR ASFIXIA.
• LOS NIÑOS PEQUEÑOS PUEDEN ASFIXIARSE EN LOS HUECOS ENTRE LOS LADOS DE LA
CAMA Y UN COLCHÓN PEQUEÑO. CUALQUIER COLCHÓN QUE SE UTILICE EN ESTA CUNA
DEBE SER DE AL MENOS 69 CM (27-1/4 PULGADAS) POR 131 CM (51-5/8 PULGADAS), CON UN
GROSOR NO SUPERIOR A 15 CM (6 PULGADAS) Y UN GROSOR MÍNIMO DE 10 CM (4
PULGADAS). LAS DIMENSIONES DEL COLCHÓN DEBEN TOMARSE DE COSTURA A COSTURA O
DE BORDE A BORDE, SEGÚN EL CASO.
RIESGO DE CAÍDA:
• CUANDO ALMACENE UNA CUNA, TENGA CUIDADO YA QUE LOS CAMBIOS EXTREMOS DE
TEMPERATURA O HUMEDAD PUEDEN COMPROMETER LA CUNA Y HACERLA
EXTREMADAMENTE PELIGROSA PARA SU HIJO.
• TENGA CUIDADO AL UTILIZAR UN VAPORIZADOR O HUMIDIFICADOR. MANTENGA SIEMPRE EL
VAPOR ALEJADO DE LA CUNA Y DE OTROS MUEBLES DE MADERA. LOS PERIODOS
PROLONGADOS DE HUMEDAD EN EL ALMACENAMIENTO O EN EL HOGAR PUEDEN
COMPROMETER LA CUNA.
• EVITAR EL USO DE VAPORIZADORES Y HUMIDIFICADORES DURANTE PERÍODOS
PROLONGADOS.

13
www.dreamonme.com/help
ADVERTENCIAS (continuación)
• NO UTILICE ESTA CUNA SI NO PUEDE SEGUIR LAS INSTRUCCIONES QUE LA
ACOMPAÑAN.
• NO COLOQUE EN ESTA CUNA, O CERCA DE ELLA, NINGÚN CORDÓN, CORREA O
ELEMENTO SIMILAR QUE PUEDA ENROLLARSE EN EL CUELLO DEL NIÑO.
• NO COLOQUE ESTA CUNA CERCA DE UNA VENTANA O PUERTA DE PATIO DONDE
UN NIÑO PODRÍA ALCANZAR EL CORDÓN DE UNA PERSIANA O CORTINA Y
ESTRANGULARSE.
• REVISE ESTA CUNA REGULARMENTE ANTES DE USARLA. NO LO UTILICES SI
ALGUNA PIEZA ESTÁ SUELTA O FALTA, O SI HAY SIGNOS DE DAÑOS. NO
SUSTITUYA LAS PIEZAS. PÓNGASE EN CONTACTO CON EL FABRICANTE SI
NECESITA PIEZAS DE REPUESTO O INSTRUCCIONES ADICIONALES.
• UTILIZA UN COLCHÓN DE CUNA QUE NO TENGA MÁS DE 15 CM DE GROSOR Y
DE UN TAMAÑO TAL QUE, AL EMPUJARLO FIRMEMENTE CONTRA UN LADO DE
LA CUNA, DEJE UN HUECO DE NO MÁS DE 3 CM ENTRE EL COLCHÓN Y UN
LADO DE LA CUNA.
• LOS NIÑOS PEQUEÑOS PUEDEN ASFIXIARSE CON LA ROPA DE CAMA BLANDA.
NO COLOQUE ALMOHADAS, EDREDONES O COLCHONES BLANDOS EN ESTA
CUNA.
14
www.dreamonme.com/help
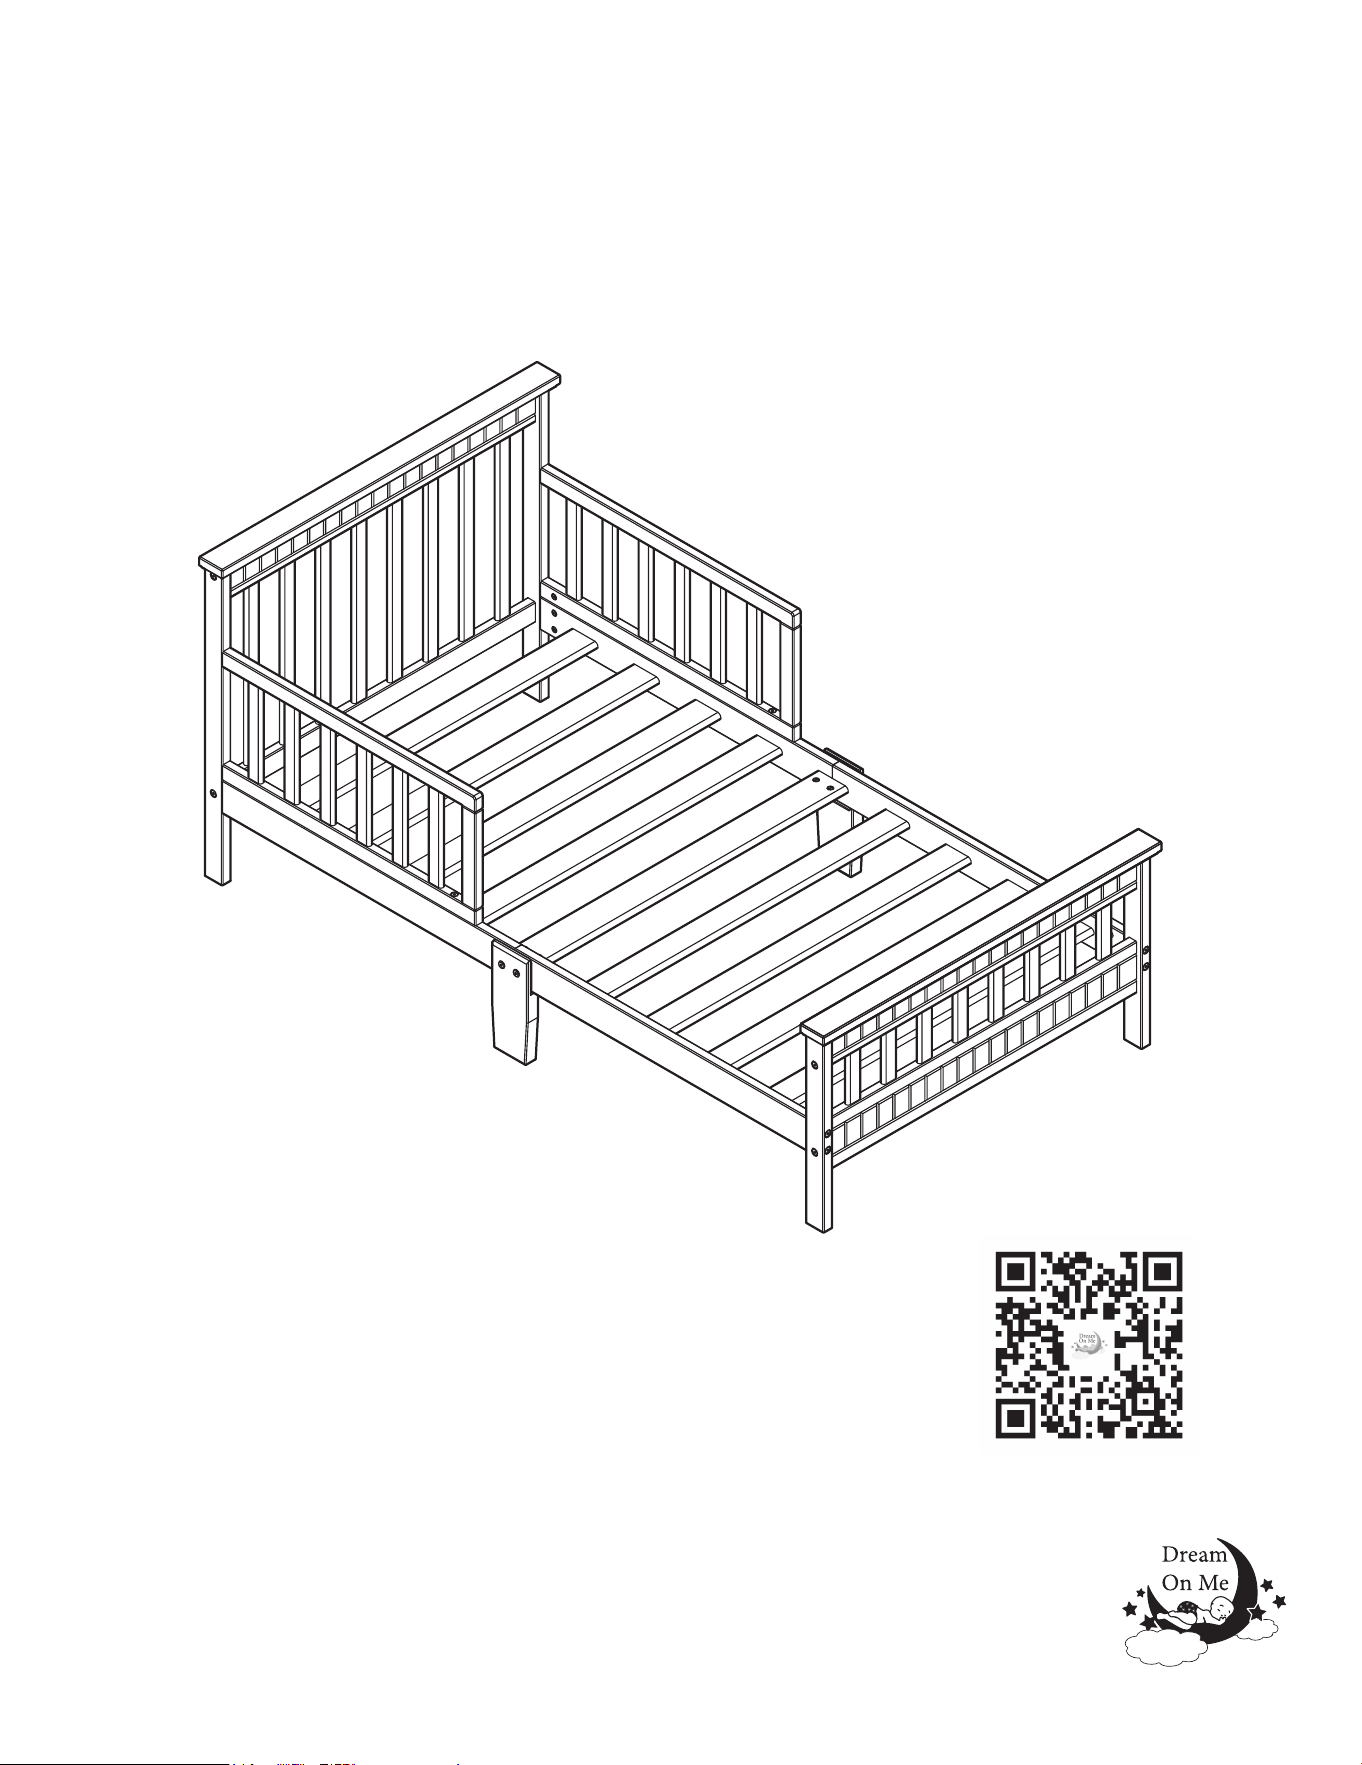
PARTS
PIÈCES
PARTES
If there are any missing parts, please contact Dream On Me before using the product.
S'il y a des pièces manquantes, veuillez contacter Dream On Me avant d'utiliser le produit.
Si falta alguna pieza, póngase en contacto con Dream On Me antes de utilizar el producto.
Headboard panel (x1)
Panneau de tête de lit (x1)
Panel de cabecera
(x1)
1
Left Headboard Post (x1)
Poteau de tête de lit gauche
(x1)
Poste de cabecera izquierdo
(x1)
2
Right Headboard Post (x1)
Montant droit de la tête de
lit (x1)
Poste de cabecera derecho
(x1)
3
Footboard panel (x1)
Panneau de pied de lit (x1)
Panel del piecero (x1)
4
Left Footboard Post (x1)
Poteau de pied de lit
gauche (x1)
Poste del estribo
izquierdo (x1)
5
Right Footboard Post (x1)
Montant droit du panneau
de pied de lit (x1)
Poste del estribo
derecho (x1)
6
Split leg (x2)
Jambe fendue (x2)
Pierna dividida (x2)
7
Cross Bar (x8)
Barre transversale (x8)
Travesaño (x8)
8
Cross Center Bar (x1)
Barre transversale centrale (x1)
Travesaño central (x1)
9
15
www.dreamonme.com/help
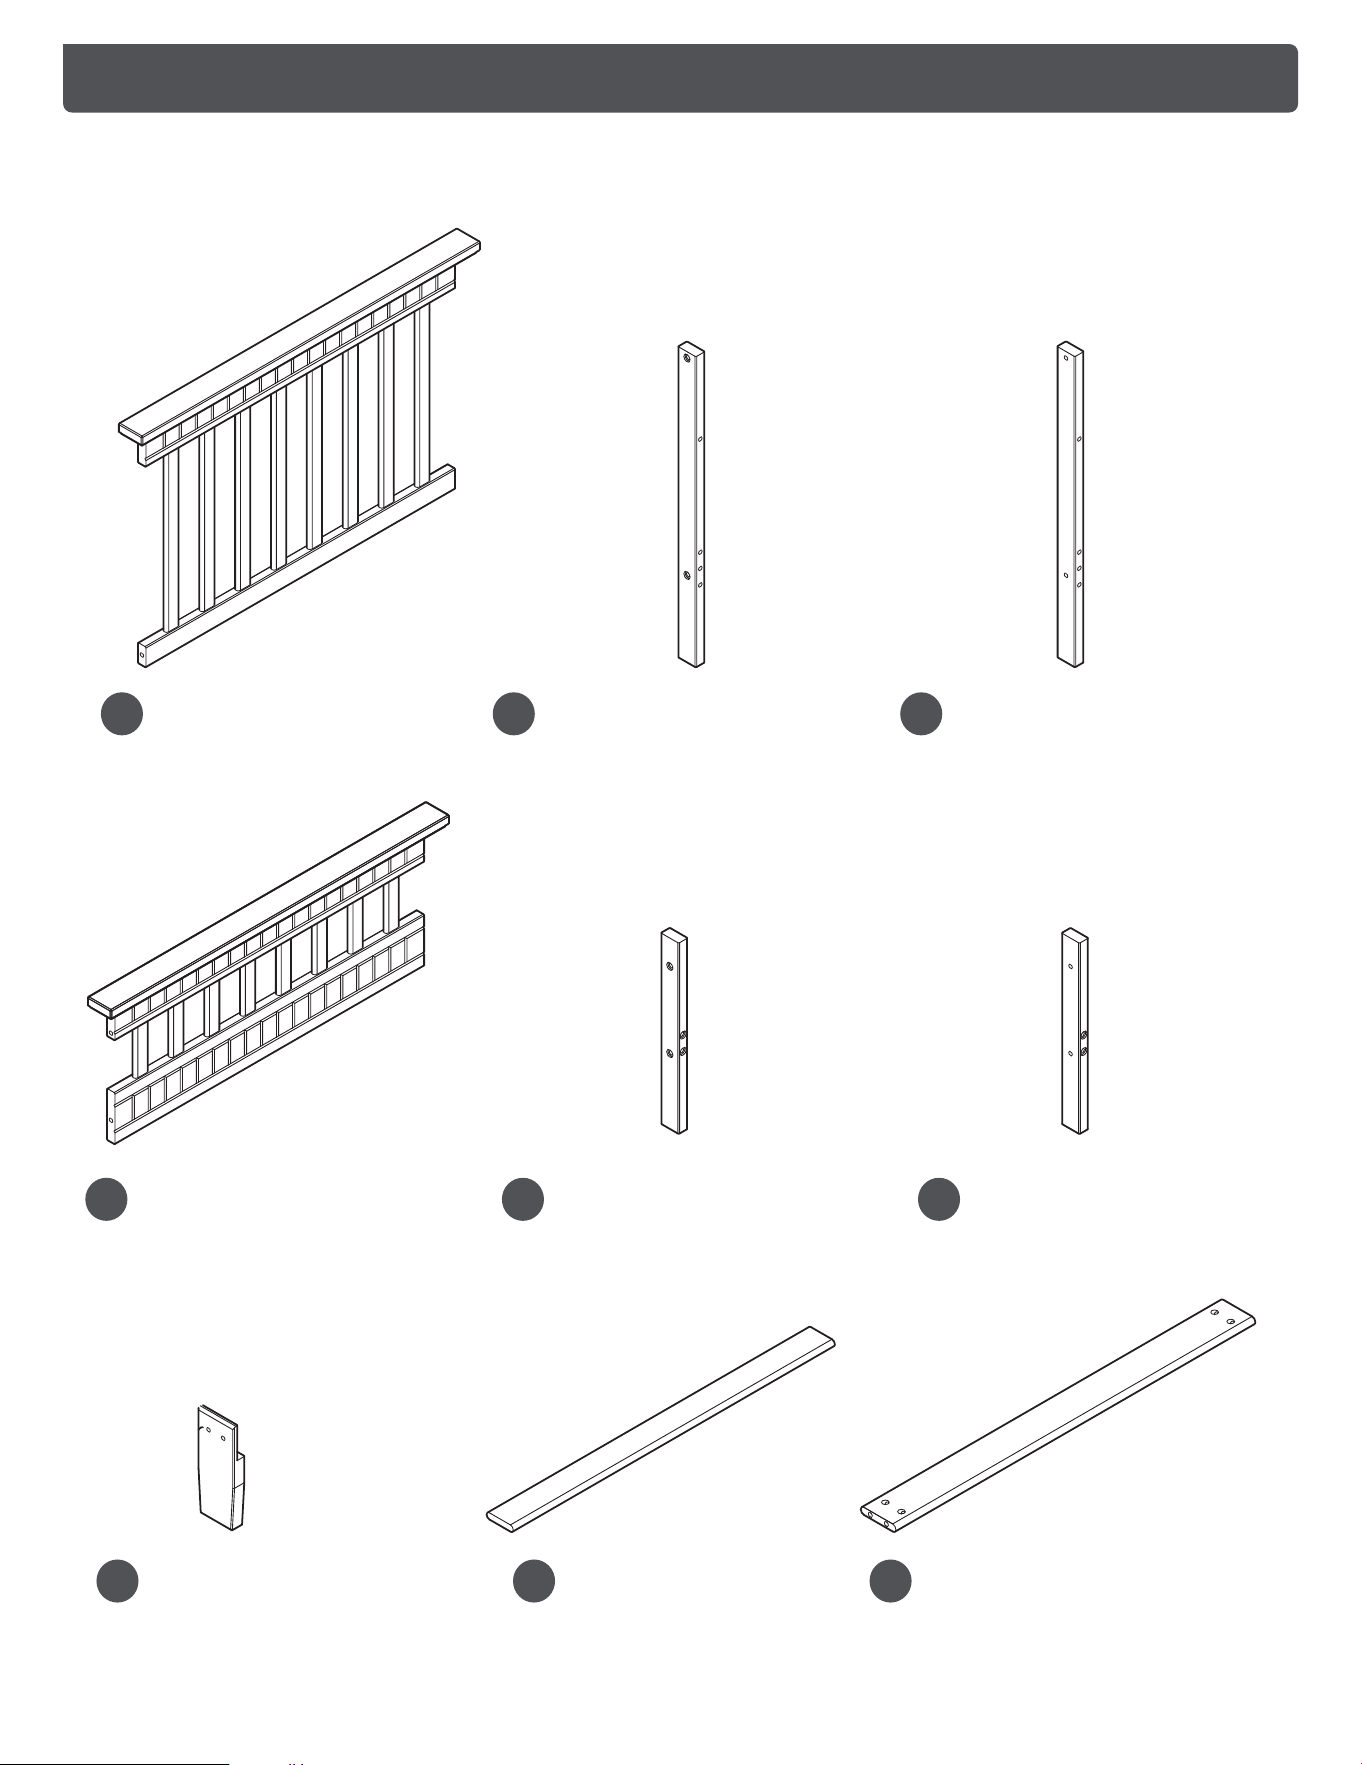
PIÈCES
PARTES
If there are any missing parts, please contact Dream On Me before using the product.
S'il y a des pièces manquantes, veuillez contacter Dream On Me avant d'utiliser le produit.
Si falta alguna pieza, póngase en contacto con Dream On Me antes de utilizar el producto.
PARTS (cont.)
Back Left Side Rail (x1)
Rail arrière gauche (x1)
Riel lateral izquierdo
trasero (x1)
10
Left Bed Rail (x1)
Barre de lit gauche (x1)
Barra izquierda de la cama (x1)
13
Right Bed Rail (x1)
Rail de lit droit (x1)
Barra derecha de la cama (x1)
14
Back Right Side Rail (x1)
Rail arrière droit (x1)
Barra lateral derecha
trasera (x1)
11
Front Side Rail (x2)
Rail latéral avant (x2)
Barra lateral delantera
(x2)
12
16
www.dreamonme.com/help
If there are any missing parts, please contact Dream On Me before using the product.
S'il y a des pièces manquantes, veuillez contacter Dream On Me avant d'utiliser le produit.
Si falta alguna pieza, póngase en contacto con Dream On Me antes de utilizar el producto.
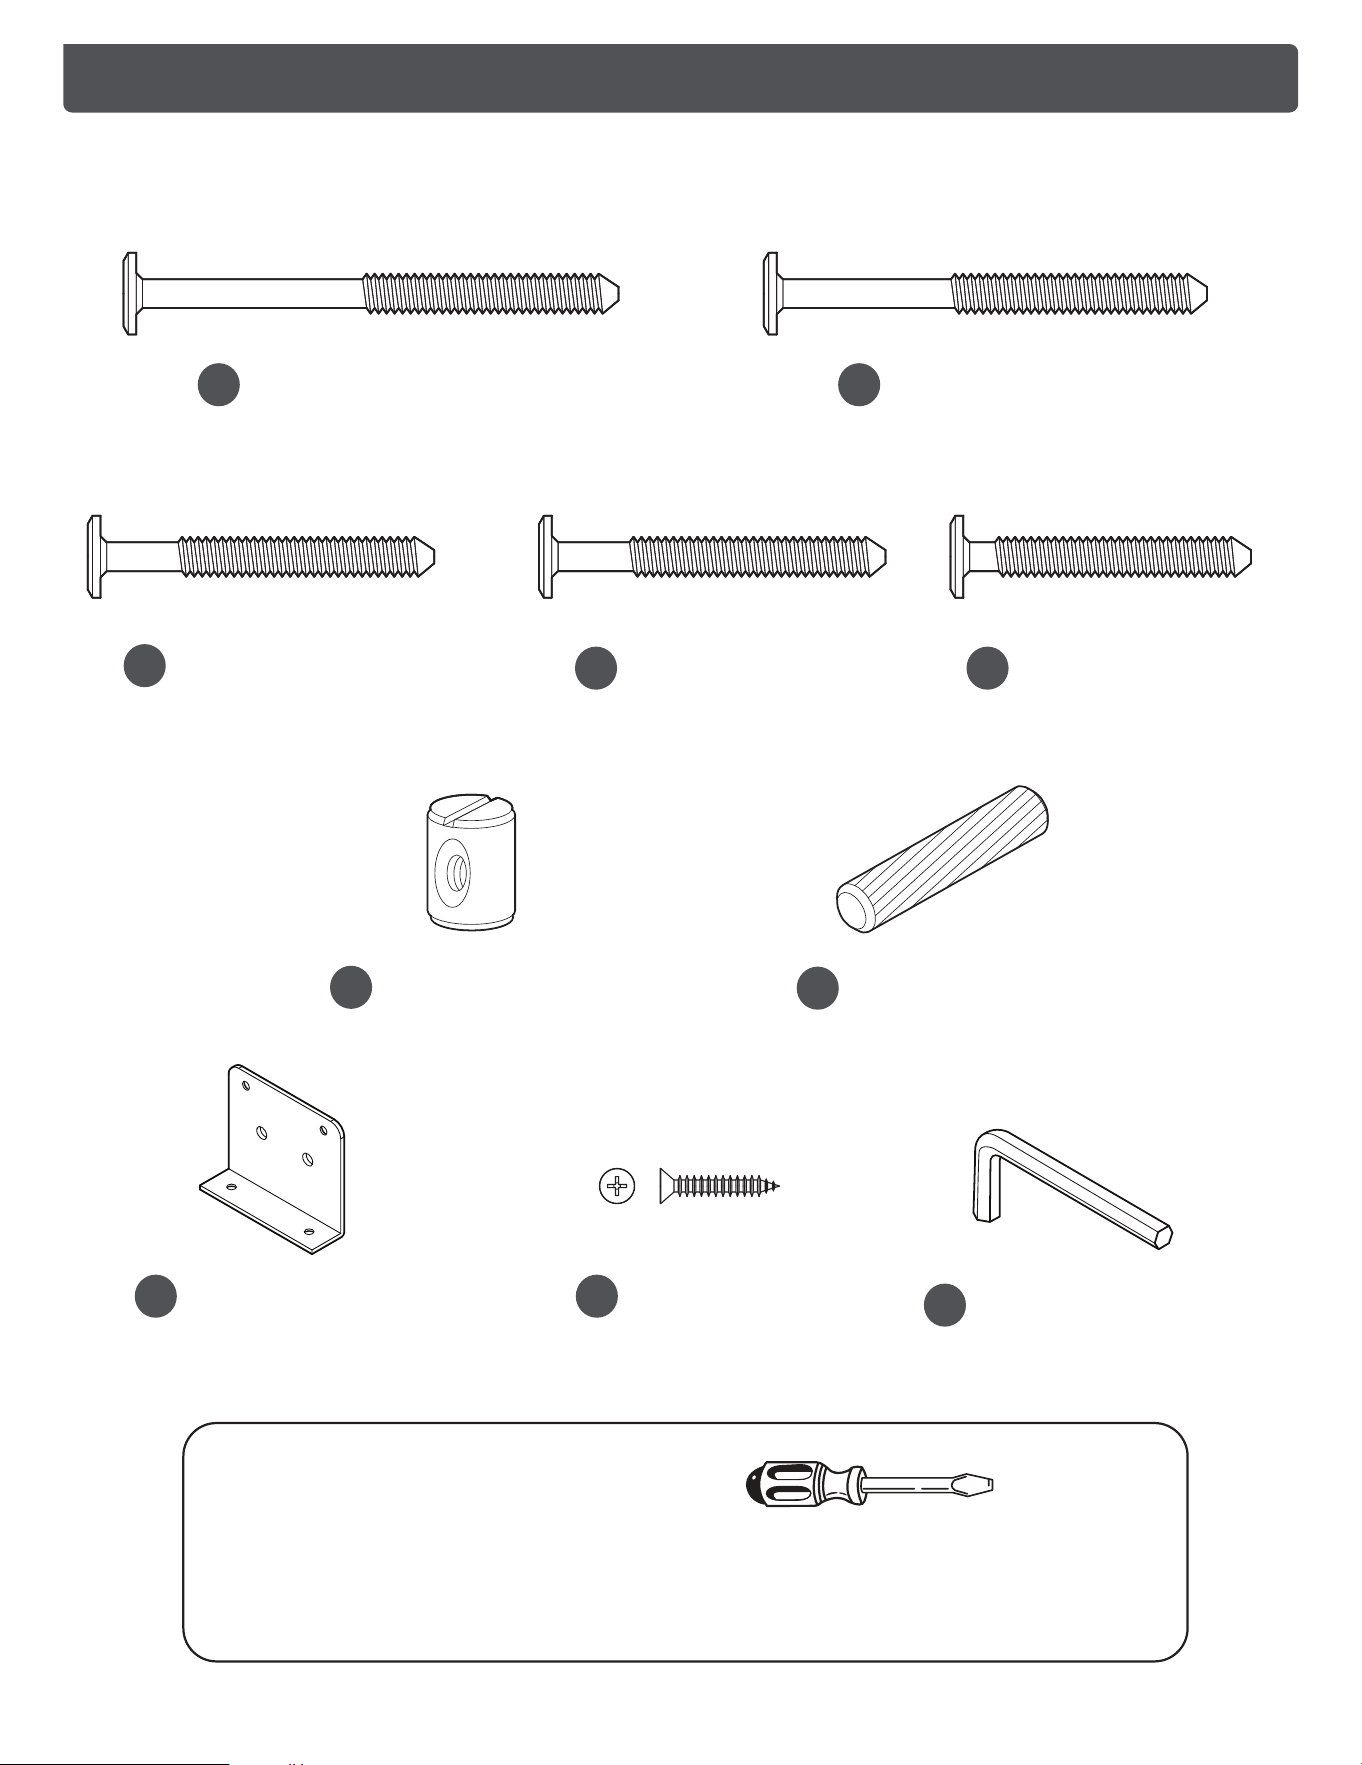
HARDWARE
Philips Screw Driver (NOT INCLUDED)
Tournevis Philips (NON INCLUS)
Destornillador Philips (NO INCLUIDO)
Tools Needed:
Outils nécessaires:
Herramientas necesarias:
Bolt 2” (×2)
Boulon 2” (×2)
Perno 2” (×2)
D
Bolt 3” (×10)
Boulon 3” (×10)
Perno 3” (×10)
A
Bolt 2-5/8” (×4)
Boulon 2-5/8” (×4)
Perno 2-5/8” (×4)
B
Bolt 1-3/4” (×2)
Boulon 1-3/4” (×2)
Perno 1-3/4” (×2)
E
G
Wooden Dowel (×4)
Cheville en bois (×4)
Clavija de madera (×4)
H I
Allen Key (x1)
Clé Allen (x1)
Llave Allen (x1)
J
F
Barrel Nut (x22)
Écrou de baril (x22)
Tuerca de barril (x22)
L Metal Plate (×2)
L Plaque métallique (×2)
Placa metálica L (×2)
Screw (×8)
Vis (x8)
Tornillo (x8)
Bolt 2-1/8” (×8)
Boulon 2-1/8” (×8)
Perno 2-1/8” (×8)
C
17
www.dreamonme.com/help
1
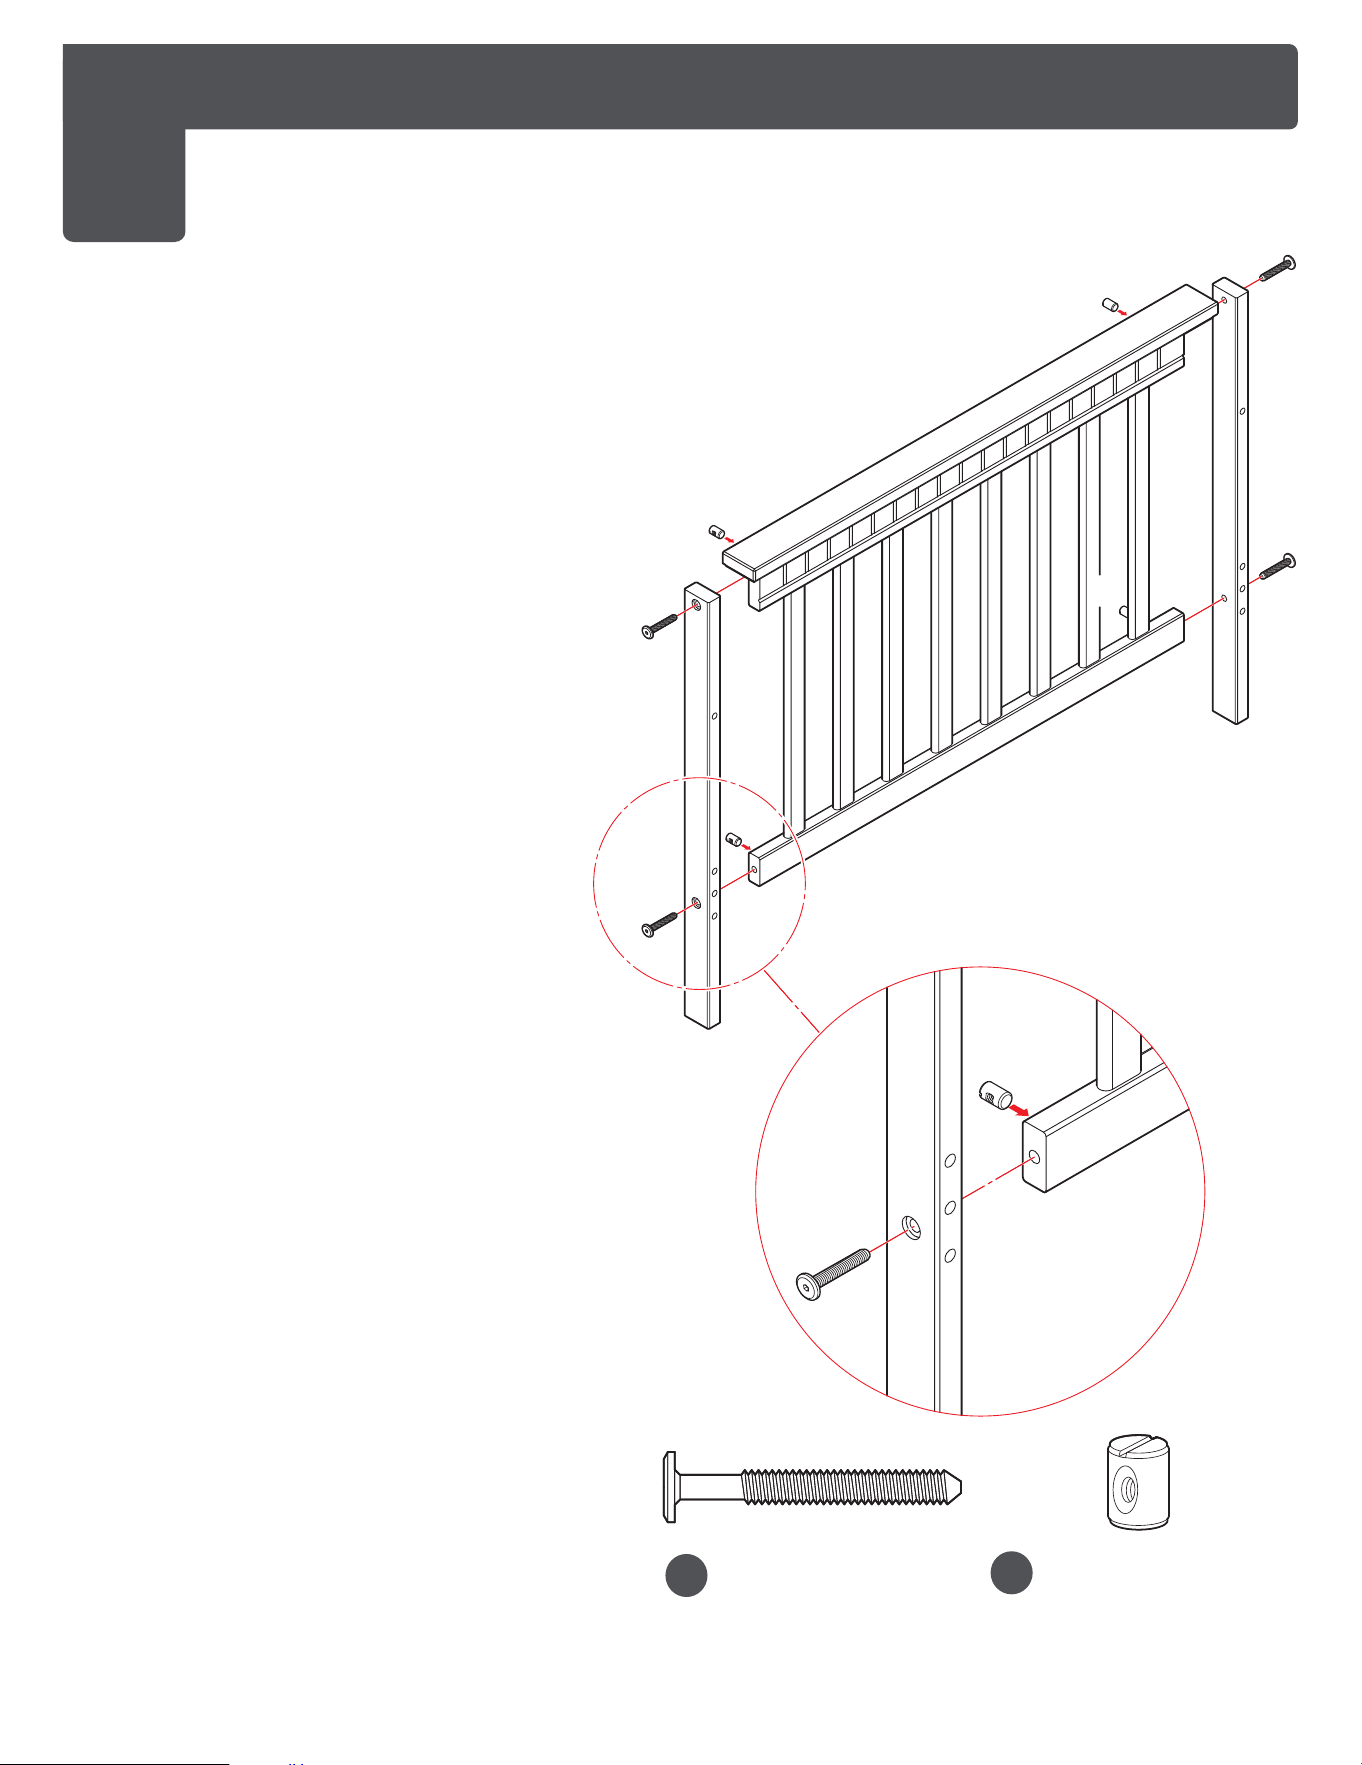
TODDLER BED ASSEMBLY - HEADBOARD ASSEMBLY
ASSEMBLAGE DU LIT D'ENFANT - ASSEMBLAGE DE LA TÊTE DE LIT
MONTAJE DE LA CAMA PARA NIÑOS PEQUEÑOS - MONTAJE DEL CABECERO
F
Barrel Nut (x4)
Écrou de baril (x4)
Tuerca de barril (x4)
Bolt 2-1/8” (×4)
Boulon 2-1/8” (×4)
Perno 2-1/8” (×4)
C
(2)
(3)
(1)
(C)
(C)
(C)
(C)
(F)
(F)
(F)
(F)
(C)
(F)
(2)
(1)
1a. Place the parts to be assembled on a soft
surface.
1b. Align Left Headboard Post (2) and the Right
Headboard Post (3) to the Headboard Panel (1)
as shown in the illustration.
1c. Attach the Barrel Nuts (F) in the insertions
provided on the top and bottom of the
headboard. Use the Flat Head Screwdriver (not
included) to hold the barrel nut in the proper
alignment.
1d. Similarly, attach the Bolt Nuts (C) in the
insertions given on the posts. Tighten the bolts
into the barrel Nuts using the Allen key (J)
provided to assemble the headboard.
1a. Placez les pièces à assembler sur une surface
souple.
1b. Aligner le montant gauche de la tête de lit (2) et
le montant droit de la tête de lit (3) sur le
panneau de la tête de lit (1) comme indiqué sur
l'illustration.
1c. Fixez les écrous (F) dans les encoches prévues
en haut et en bas de la tête de lit. Utilisez le
tournevis à tête plate (non inclus) pour maintenir
l'écrou baril dans le bon alignement.
1d. De la même façon, fixez les boulons-écrous (C)
dans les insertions prévues sur les montants.
Serrez les boulons dans les écrous cylindriques
à l'aide de la clé Allen (J) fournie pour assembler
la tête de lit.
1a. Coloque las piezas a ensamblar sobre una
superficie blanda.
1b. Alinee el poste izquierdo del cabecero (2) y el
poste derecho del cabecero (3) con el panel del
cabecero (1) como se muestra en la ilustración.
1c. Coloque las tuercas de barril (F) en las
inserciones previstas en la parte superior e
inferior del cabecero. Utilice el destornillador de
cabeza plana (no incluido) para mantener la
tuerca de barril en la alineación adecuada.
1d. Del mismo modo, coloque las tuercas de perno
(C) en las inserciones previstas en los postes.
Apriete los pernos en las tuercas de barril
utilizando la llave Allen (J) suministrada para
montar el cabecero.
18
www.dreamonme.com/help
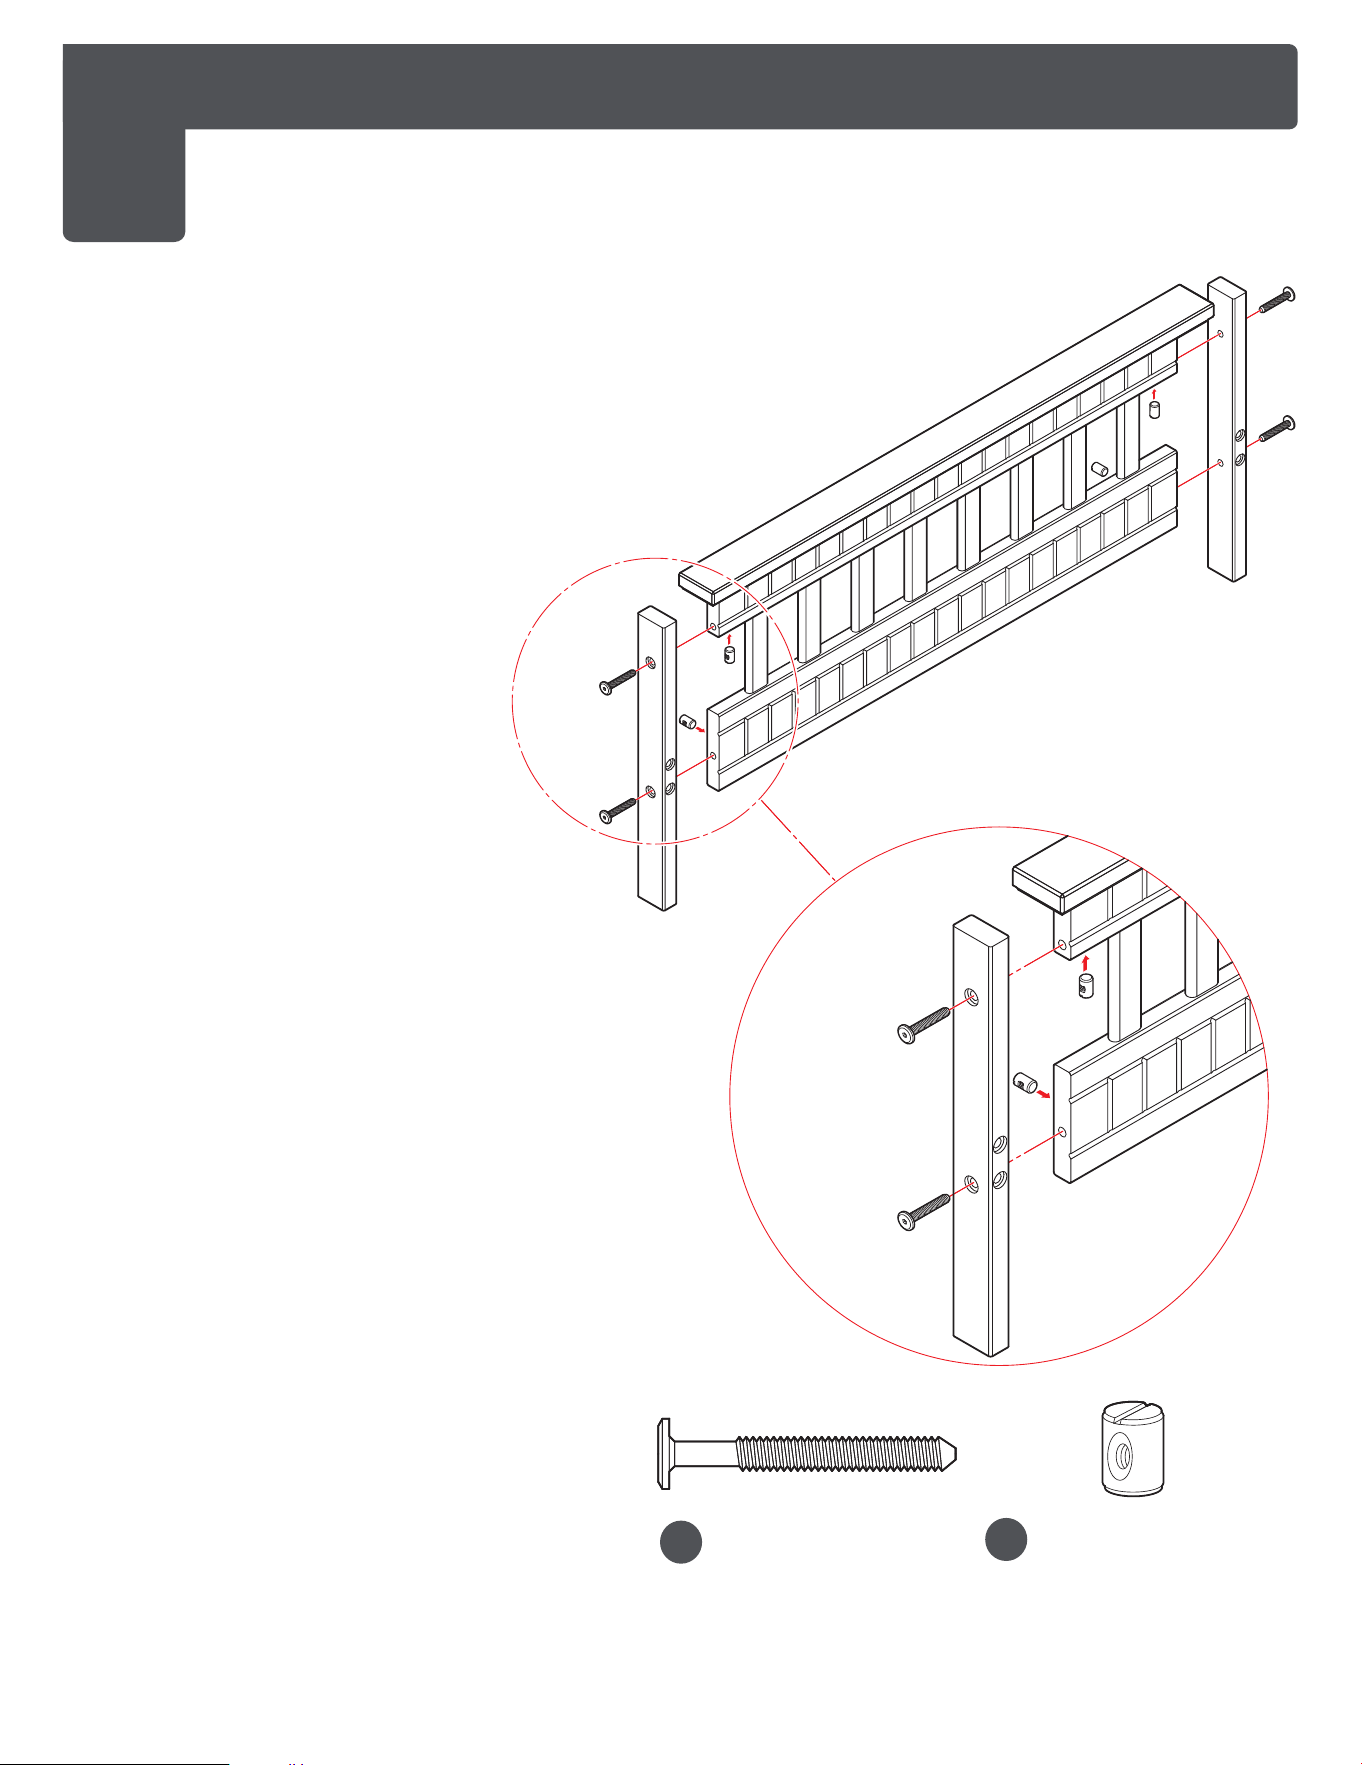
ASSEMBLAGE DU LIT D'ENFANT - ASSEMBLAGE DU PIED DE LIT
MONTAJE DE LA CAMA PARA NIÑOS PEQUEÑOS - MONTAJE DEL PIECERO
F
Barrel Nut (x4)
Écrou de baril (x4)
Tuerca de barril (x4)
Bolt 2-1/8” (×4)
Boulon 2-1/8” (×4)
Perno 2-1/8” (×4)
C
(F)
(F)
(F)
(C)
(C)
(C)
(C)
(4)
(5)
(6)
(F)
(C)
(C)
(5)
(4)
2
TODDLER BED ASSEMBLY - FOOTBOARD ASSEMBLY
2a. Align Left Footboard Post (5) and
the Right Footboard Post (6) to the
Footboard Panel (4) as shown in the
illustration.
2b. Attach the Barrel Nuts (F) in the
insertions provided on the
footboard. Use the Flat Head
Screwdriver (not included) to hold
the barrel nuts in the proper
alignment.
2c. Similarly, attach the Bolt Nuts (C) in
the insertions given on the posts.
Tighten the bolts into the barrel nuts
using the Allen key (J) provided to
assemble the footboard.
2a. Alignez le montant gauche du pied de lit
(5) et le montant droit du pied de lit (6) sur
le panneau du pied de lit (4) comme
indiqué sur l'illustration.
2b. Fixez les écrous de baril (F) dans les
encoches prévues sur le panneau du pied
de lit. Utilisez le tournevis à tête plate
(non fourni) pour maintenir les écrous
cylindriques dans le bon alignement.
2c. De même, fixez les écrous-boulons (C)
dans les insertions données sur les
poteaux. Serrez les boulons dans les
écrous cylindriques à l'aide de la clé Allen
(J) fournie pour assembler le pied de lit.
2a. Alinee el poste izquierdo del estribo (5) y el poste
derecho del estribo (6) con el panel del estribo
(4) como se muestra en la ilustración.
2b. Coloque las tuercas de barril (F) en las
inserciones previstas en el estribo. Utilice el
destornillador de cabeza plana (no incluido) para
mantener las tuercas de barril en la alineación
adecuada.
2c. Del mismo modo, coloque las tuercas de los
pernos (C) en las inserciones dadas en los
postes. Apriete los pernos en las tuercas de
barril utilizando la llave Allen (J) suministrada
para montar el estribo.
19
www.dreamonme.com/help
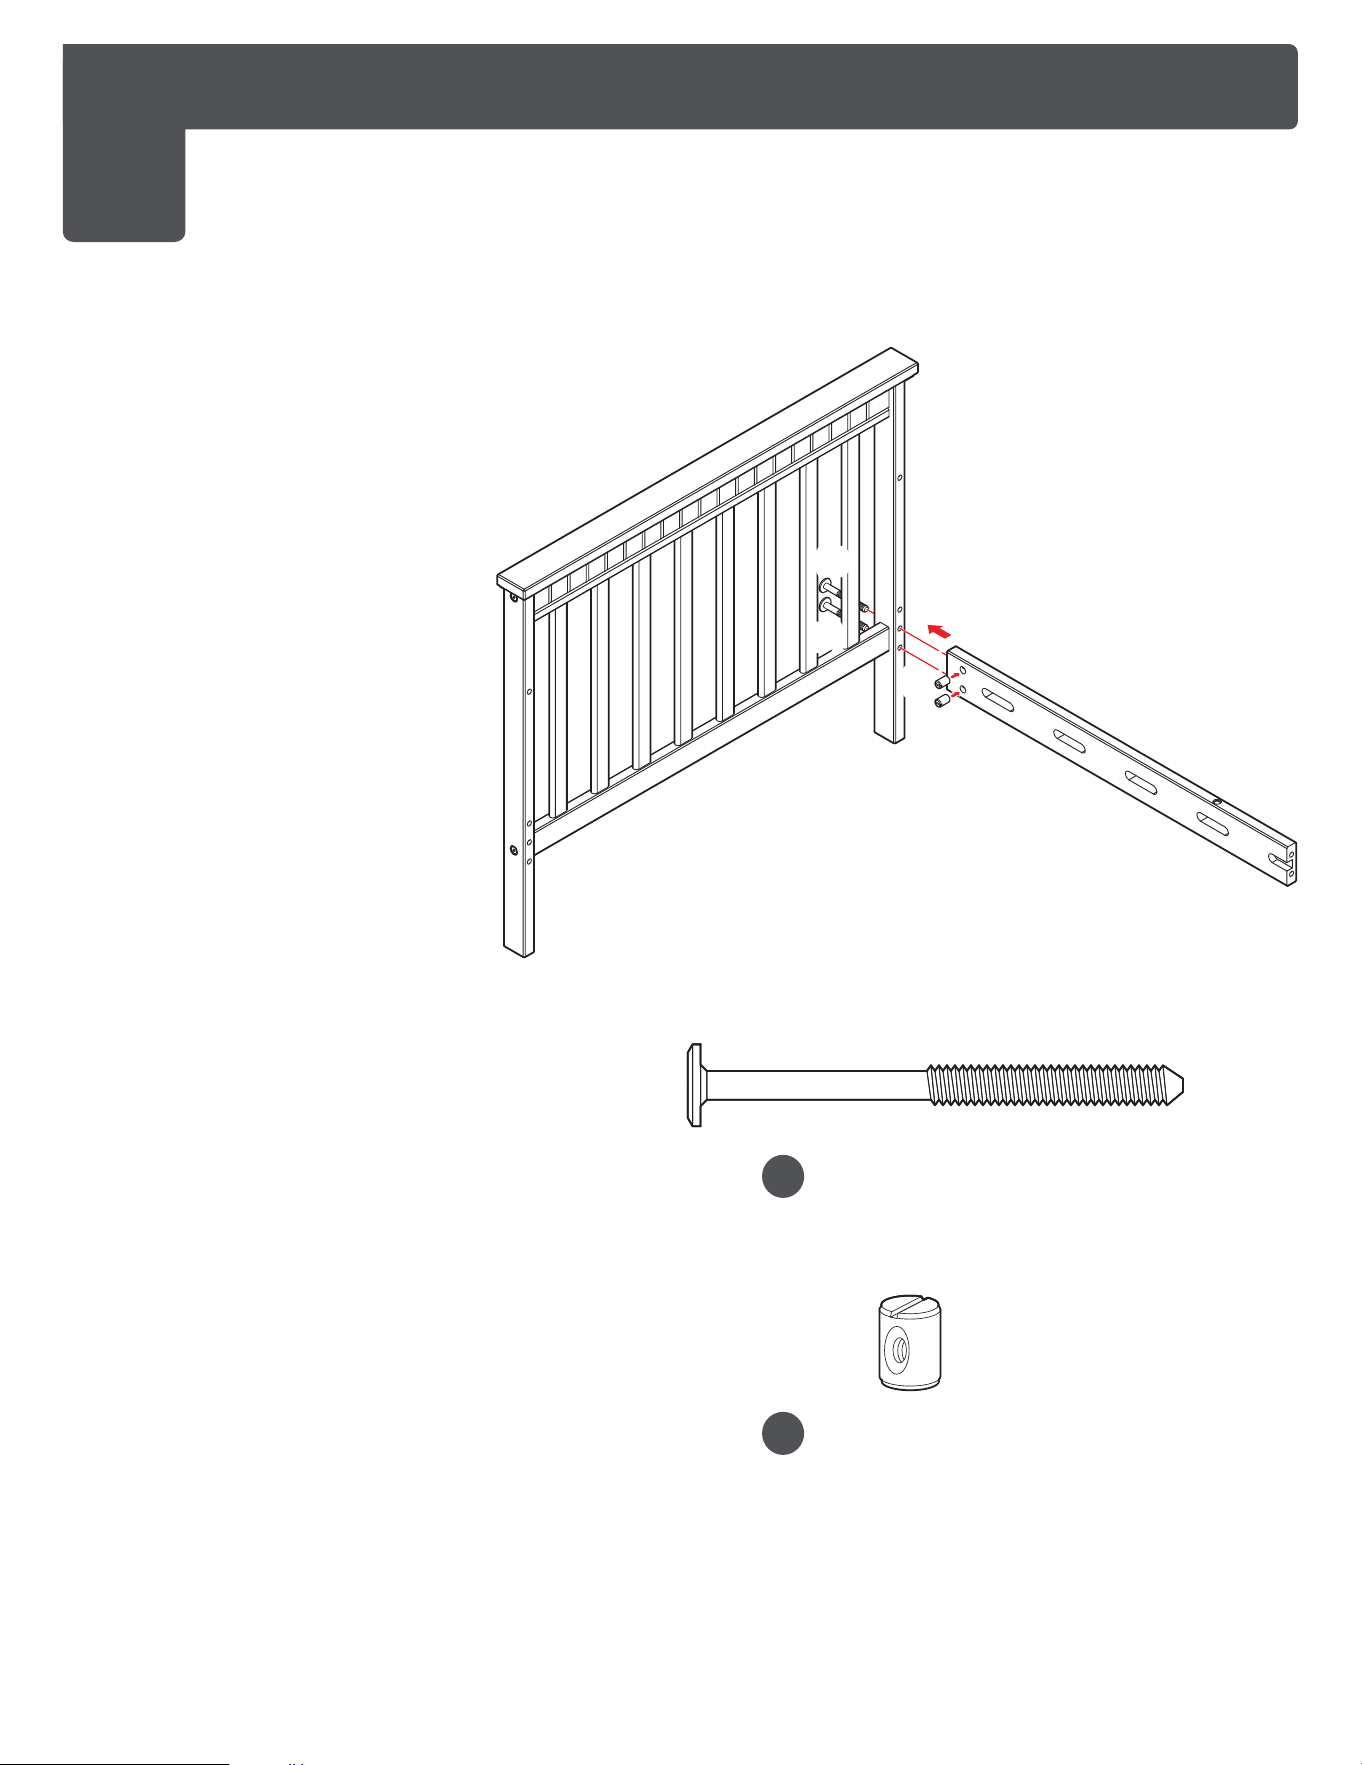
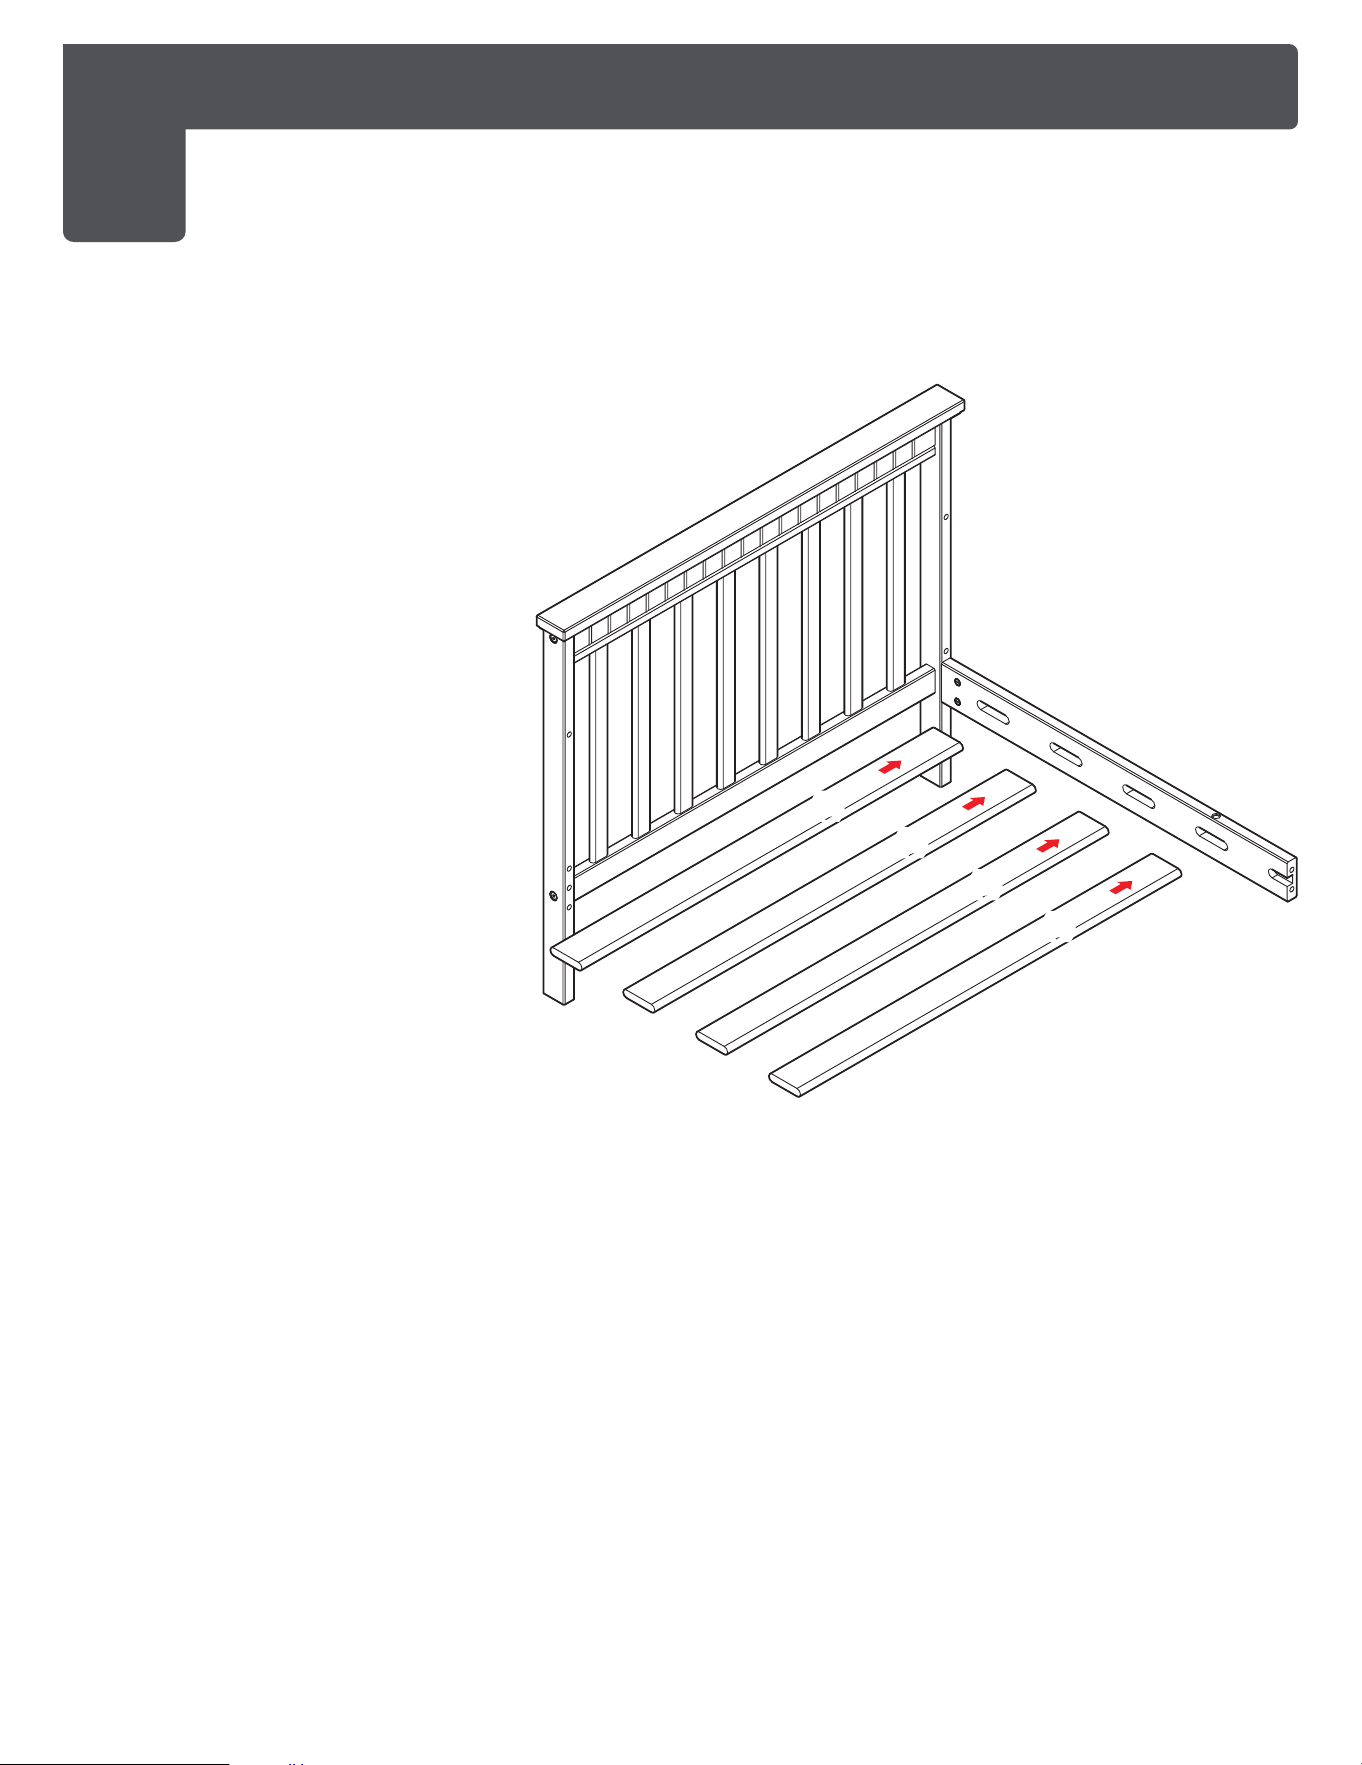
ASSEMBLAGE DU LIT POUR ENFANT - ASSEMBLAGE DU CADRE SUPÉRIEUR
DU LIT
MONTAJE DE LA CAMA PARA NIÑOS PEQUEÑOS - MONTAJE DEL MARCO DE
LA CAMA SUPERIOR
F
Barrel Nut (x2)
Écrou de baril (x2)
Tuerca de barril (x2)
(F)
(F)
(3)
(11)
(A)
(A)
3
TODDLER BED ASSEMBLY - TOP BED FRAME ASSEMBLY
3a. Align the Back Right Side Rail (11)
to the pre-assembled headboard
as shown in the illustration.
3b. Attach the Barrel Nuts (F) in the
insertions provided on the back
right side rail. Use the Flat Head
Screwdriver (not included) to hold
the barrel nuts in the proper
alignment.
3c. Similarly, attach the Bolt Nuts (A) in
the insertions given on the right
post. Tighten the bolts into the
barrel nuts using the Allen key (J)
provided.
3a. Alignez la traverse latérale arrière
droite (11) sur la tête de lit
préassemblée, comme indiqué sur
l'illustration.
3b. Fixez les écrous (F) dans les
encoches prévues à cet effet sur la
traverse arrière droite. Utilisez le
tournevis à tête plate (non fourni)
pour maintenir les écrous
cylindriques dans le bon alignement.
3c. De même, fixez les boulons-écrous
(A) dans les insertions prévues sur le
montant droit. Serrez les boulons
dans les écrous de barillet à l'aide
de la clé Allen (J) fournie.
3a. Alinee el riel lateral trasero derecho (11) con
el cabecero preensamblado como se
muestra en la ilustración.
3b. Coloque las tuercas de barril (F) en las
inserciones provistas en el riel lateral
derecho trasero. Utilice el destornillador de
cabeza plana (no incluido) para mantener
las tuercas de barril en la alineación
adecuada.
3c. Del mismo modo, coloque las tuercas de
los pernos (A) en las inserciones dadas en
el poste derecho. Apriete los pernos en las
tuercas del cañón utilizando la llave Allen (J)
suministrada.
Bolt 3” (×2)
Boulon 3” (×2)
Perno 3” (×2)
A
20
www.dreamonme.com/help
ASSEMBLAGE DU LIT POUR JUNIOR - ASSEMBLAGE DU CADRE DU LIT
SUPÉRIEUR (suite)
MONTAJE DE LA CAMA DEL NIÑO - MONTAJE DEL MARCO DE LA CAMA
SUPERIOR (Cont.)
(8)
(8)
(8)
(8)
(11)
3
TODDLER BED ASSEMBLY - TOP BED FRAME ASSEMBLY (Contd.)
3d. Attach the Cross Bars (8)
in the insertions provided
on the back right side rail.
3d. Fixez les barres
transversales (8) dans les
encoches prévues à cet
effet sur la traverse arrière
droite.
3d. Attach the Cross Bars (8)
in the insertions provided
on the back right side rail.
www.dreamonme.com/help
21
F
Barrel Nut (x2)
Écrou de baril (x2)
Tuerca de barril (x2)
Bolt 3” (×2)
Boulon 3” (×2)
Perno 3” (×2)
A
(10)
(2)
(A)
(A)
(F)
(F)
(10)
(8)
(8)
(8)
(8)
(2)
3e. Align the Back Left Side Rail (10) to
the cross bars and the headboard as
shown in the illustration.
3f. Attach the Barrel Nuts (F) in the
insertions provided on the back left
side rail. Use the Flat Head
Screwdriver (not included) to hold the
barrel nuts in the proper alignment.
3g. Similarly, attach the Bolt Nuts (A) in
the insertions given on the left post.
Tighten the bolts into the barrel nuts
using the Allen key (J) provided.
3e. Aligner la traverse latérale arrière
gauche (10) sur les barres
transversales et la tête de lit comme
indiqué sur l'illustration.
3f. Fixer les écrous (F) dans les encoches
prévues à cet effet sur la traverse
arrière gauche. Utilisez le tournevis à
tête plate (non fourni) pour maintenir
les écrous cylindriques dans
l'alignement approprié.
3g. De même, fixez les boulons-écrous (A)
dans les insertions prévues sur le
montant gauche. Serrez les boulons
dans les écrous de barillet à l'aide de
la clé Allen (J) fournie.
3e. Alinee el riel lateral izquierdo trasero
(10) con las barras transversales y la
cabecera como se muestra en la
ilustración.
3f. Coloque las tuercas de barril (F) en las
inserciones previstas en el riel lateral
izquierdo trasero. Utilice el
destornillador de cabeza plana (no
incluido) para mantener las tuercas de
barril en la alineación adecuada.
3g. Del mismo modo, coloque las tuercas
de los pernos (A) en las inserciones
dadas en el poste izquierdo. Apriete
los pernos en las tuercas del cañón
utilizando la llave Allen (J)
suministrada.
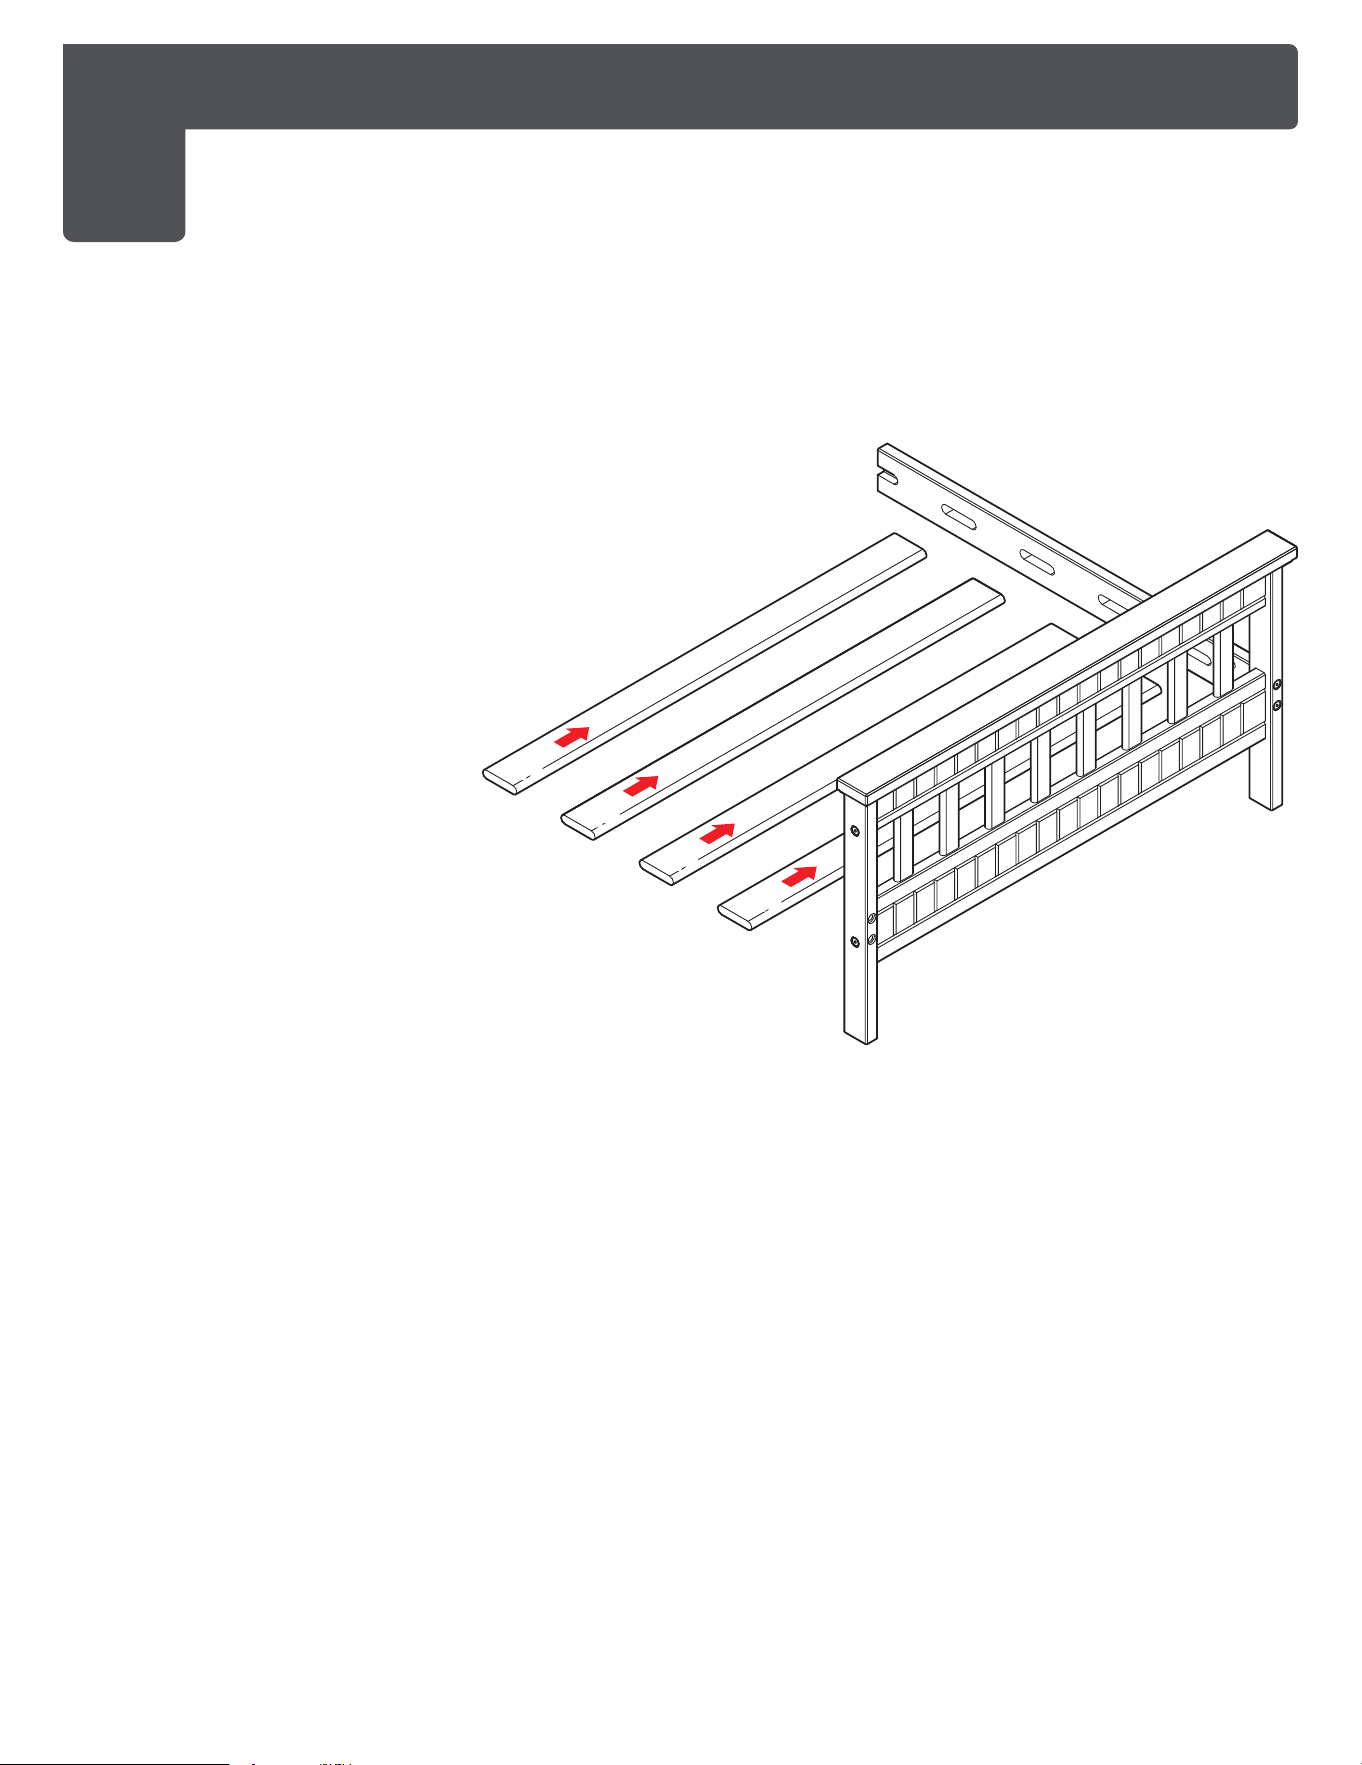
ASSEMBLAGE DU LIT POUR JUNIOR - ASSEMBLAGE DU CADRE DU LIT
SUPÉRIEUR (suite)
MONTAJE DE LA CAMA DEL NIÑO - MONTAJE DEL MARCO DE LA CAMA
SUPERIOR (Cont.)
3
TODDLER BED ASSEMBLY - TOP BED FRAME ASSEMBLY (Contd.)
22
www.dreamonme.com/help
F
Barrel Nut (x2)
Écrou de baril (x2)
Tuerca de barril (x2)
Bolt 3” (×2)
Boulon 3” (×2)
Perno 3” (×2)
A
ASSEMBLAGE DU LIT POUR TOUT-PETITS - ASSEMBLAGE DU CADRE DU
LIT INFÉRIEUR
MONTAJE DE LA CAMA PARA NIÑOS PEQUEÑOS - MONTAJE DEL MARCO
DE LA CAMA INFERIOR
(A)
(A)(A)
(12)
(F)
(F)
4
TODDLER BED ASSEMBLY - BOTTOM BED FRAME ASSEMBLY
4a. Align the Front Side Rail (12) to the
pre-assembled footboard as shown in the
illustration.
4b. Attach the Barrel Nuts (F) in the insertions
provided on the front side rail. Use the Flat
Head Screwdriver (not included) to hold the
barrel nuts in the proper alignment.
4c. Similarly, attach the Bolt Nuts (A) in the
insertions given on the post. Tighten the
bolts into the barrel nuts using the Allen key
(J) provided.
4a. Alignez la traverse latérale avant (12) sur le
pied de lit préassemblé, comme indiqué sur
l'illustration.
4b. Fixez les écrous (F) dans les encoches prévues
à cet effet sur la traverse latérale avant. Utilisez
le tournevis à tête plate (non fourni) pour
maintenir les écrous cylindriques dans
l'alignement approprié.
4c. De la même manière, fixez les écrous à boulon
(A) dans les insertions prévues sur le poteau.
Serrez les boulons dans les écrous
cylindriques à l'aide de la clé Allen (J) fournie.
4a. Alinee el riel lateral delantero (12) con el estribo
preensamblado como se muestra en la
ilustración.
4b. Coloque las tuercas de barril (F) en las
inserciones previstas en el riel lateral
delantero. Utilice el destornillador de cabeza
plana (no incluido) para mantener las tuercas
de barril en la alineación adecuada.
4c. Del mismo modo, coloque las tuercas de los
pernos (A) en las inserciones dadas en el
poste. Apriete los pernos en las tuercas de
barril utilizando la llave Allen (J) suministrada.
23
www.dreamonme.com/help
ASSEMBLAGE DU LIT POUR ENFANTS - ASSEMBLAGE DU CADRE DU LIT
INFÉRIEUR (suite)
MONTAJE DE LA CAMA DEL NIÑO - MONTAJE DEL MARCO DE LA CAMA
INFERIOR (Cont.)
(12)
(8)
(8)
(8)
(8)
4
TODDLER BED ASSEMBLY - BOTTOM BED FRAME ASSEMBLY (Contd.)
4d. Attach the Cross Bars (8) in
the insertions provided on
the front side rail.
4d. Fixez les barres
transversales (8) dans les
insertions prévues sur le
rail latéral avant.
4d. Fije las barras transversales
(8) en las inserciones
previstas en el riel lateral
delantero.
24
www.dreamonme.com/help
F
Barrel Nut (x2)
Écrou de baril (x2)
Tuerca de barril (x2)
Bolt 3” (×2)
Boulon 3” (×2)
Perno 3” (×2)
A
ASSEMBLAGE DU LIT POUR ENFANTS - ASSEMBLAGE DU CADRE DU LIT
INFÉRIEUR (suite)
MONTAJE DE LA CAMA DEL NIÑO - MONTAJE DEL MARCO DE LA CAMA
INFERIOR (Cont.)
4
TODDLER BED ASSEMBLY - BOTTOM BED FRAME ASSEMBLY (Contd.)
(12)
(8)
(8)
(8)
(8)
(12)
(A)
(A)
(F)
(F)
4e. Align the Front Side Rail (12) to the
cross bars and the footboard as
shown in the illustration.
4f. Attach the Barrel Nuts (F) in the
insertions provided on the front side
rail. Use the Flat Head Screwdriver
(not included) to hold the barrel
nuts in the proper alignment.
4g. Similarly, attach the Bolt Nuts (A) in
the insertions given on the post.
Tighten the bolts into the barrel
nuts using the Allen key (J)
provided.
4e. Aligner la traverse latérale avant (12) sur les
barres transversales et le pied de lit, comme
indiqué sur l'illustration.
4f. Fixez les écrous (F) dans les encoches
prévues à cet effet sur la traverse latérale
avant. Utilisez le tournevis à tête plate (non
fourni) pour maintenir les écrous
cylindriques dans l'alignement approprié.
4g. De même, fixez les écrous à boulon (A) dans
les insertions prévues sur le poteau. Serrez
les boulons dans les écrous cylindriques à
l'aide de la clé Allen (J) fournie.
4e. Alinee el riel lateral delantero (12) con las
barras transversales y el estribo como se
muestra en la ilustración.
4f. Coloque las tuercas de barril (F) en las
inserciones previstas en el riel lateral
delantero. Utilice el destornillador de cabeza
plana (no incluido) para mantener las
tuercas de barril en la alineación adecuada.
4g. Del mismo modo, coloque las tuercas de
perno (A) en las inserciones dadas en el
poste. Apriete los pernos en las tuercas del
cañón utilizando la llave Allen (J)
suministrada.
25
www.dreamonme.com/help
ASSEMBLAGE DU LIT POUR TOUT-PETITS - ASSEMBLAGE DU CADRE DU LIT
MONTAJE DE LA CAMA PARA NIÑOS PEQUEÑOS - MONTAJE DEL MARCO
DE LA CAMA
(9)
(G)
(G)
(G)
(G)
(9)
(G)
(G)
5
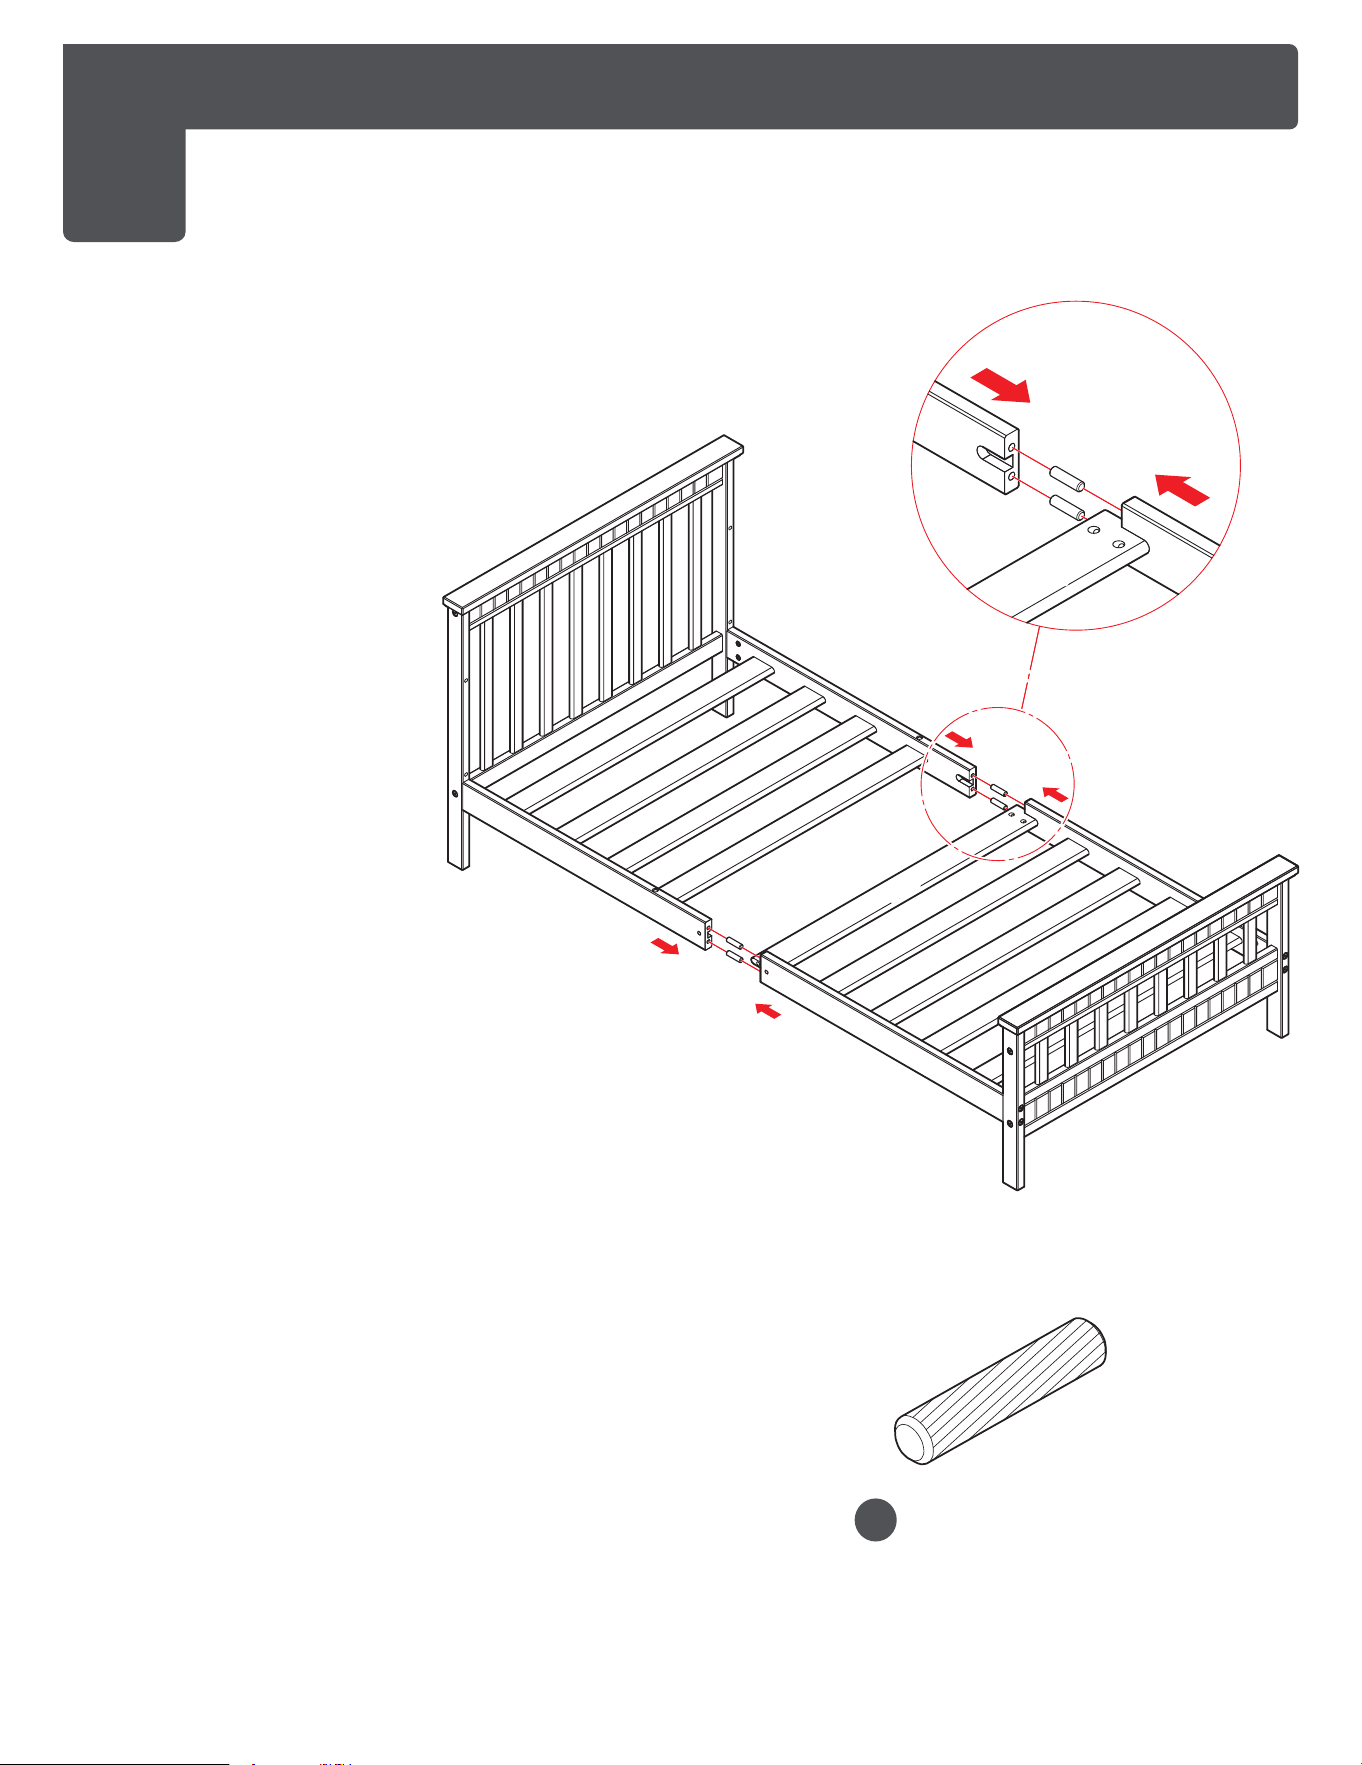
TODDLER BED ASSEMBLY - BED FRAME ASSEMBLY
5a. Align the Center Cross Bar
(9) between the assembled
Top and Bottom Bed
Frames.
5b. Position the Wooden Dowels
(G) between the insertions of
the Top Bed Frame and
Bottom Bed Frame as shown
in the illustration.
5a. Alignez la barre transversale
centrale (9) entre les cadres
de lit supérieur et inférieur
assemblés.
5b. Placez les chevilles en bois
(G) entre les insertions du
cadre de lit supérieur et du
cadre de lit inférieur, comme
indiqué sur l'illustration.
5a. Alinee la barra transversal
central (9) entre los marcos
de la cama superior e inferior
ensamblados.
5b. Coloque las clavijas de
madera (G) entre las
inserciones del marco de la
cama superior y el marco de
la cama inferior como se
muestra en la ilustración.
G Wooden Dowel (×4)
Cheville en bois (×4)
Clavija de madera (×4)

26
www.dreamonme.com/help
H I
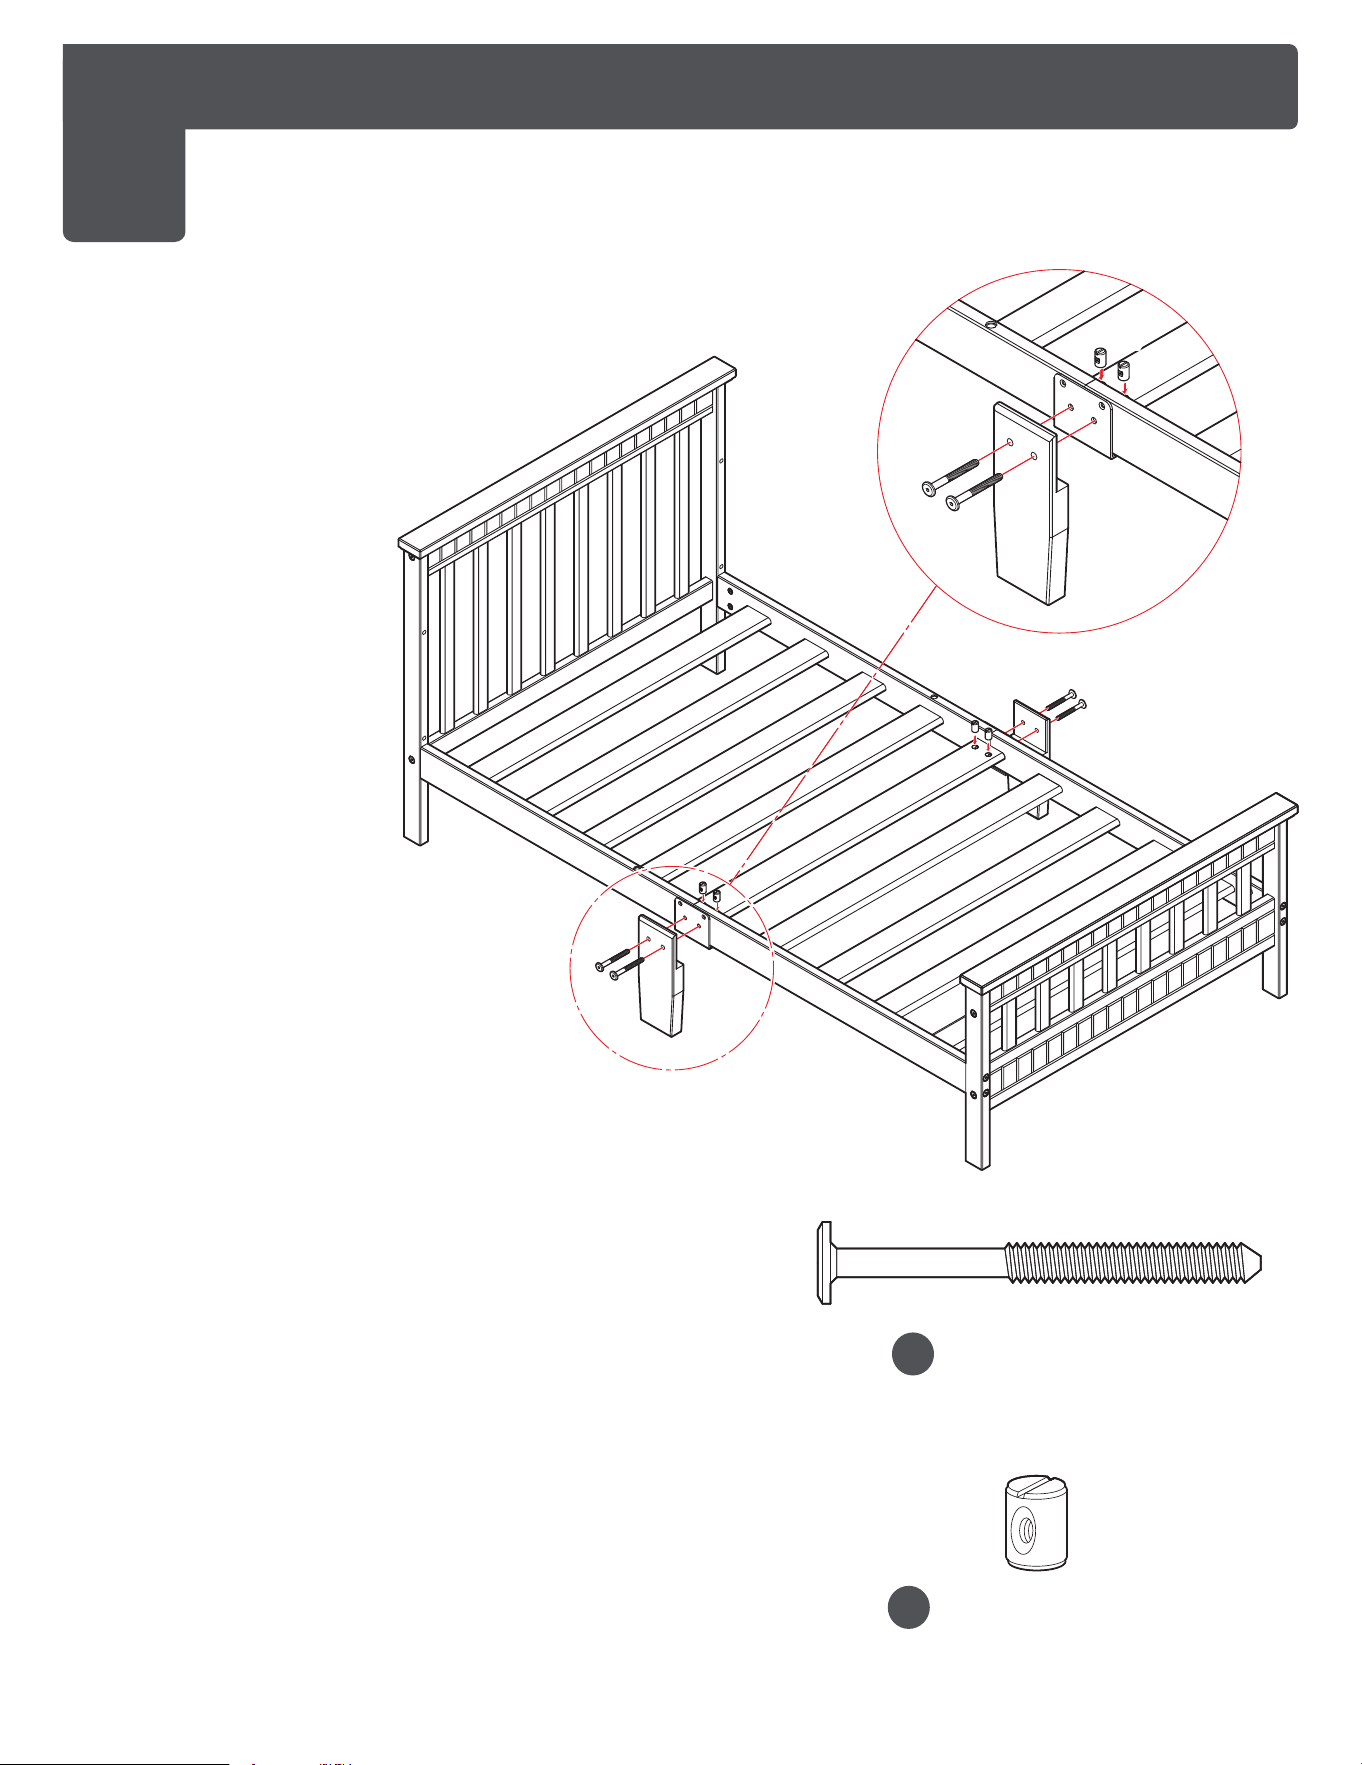
L Metal Plate (×2)
L Plaque métallique (×2)
Placa metálica L (×2)
Screw (×8)
Vis (x8)
Tornillo (x8)
ASSEMBLAGE DU LIT POUR ENFANTS - ASSEMBLAGE DU CADRE DE LIT (suite)
MONTAJE DE LA CAMA PARA NIÑOS - MONTAJE DEL MARCO DE LA CAMA (Cont.)
(G)
(J)
(J)
(J)
(J)
(H)
(H)
5
TODDLER BED ASSEMBLY - BED FRAME ASSEMBLY (Contd.)
5c. Align the L Metal Plates (H) with
the center of the bed frame's
sides as shown in the illustration.
5d. Connect the top and bottom bed
frames with the Screws (I) by
inserting the screws into the
insertions in the L metal plate.
5e. Tighten the screws using a Philips
Screw Driver (not included).
NOTE:
• When attaching the L metal plates,
make sure the holes on the L
metal plates match the holes on
the side rail (12, 10). Then tighten
the self-drilling screws.
5c. Alignez les plaques métalliques en L (H) avec
le centre des côtés du cadre de lit, comme
indiqué sur l'illustration.
5d. Reliez les cadres de lit supérieur et inférieur
avec les vis (I) en insérant les vis dans les
insertions de la plaque métallique en L.
5e. Serrez les vis à l'aide d'un tournevis Philips
(non fourni).
REMARQUE :
• Lorsque vous fixez les plaques métalliques
en L, assurez-vous que les trous des plaques
métalliques en L correspondent aux trous du
rail latéral (12, 10). Ensuite, serrez les vis
autoperceuses.
5c. Alinee las placas metálicas L (H) con el centro de
los lados del marco de la cama como se muestra
en la ilustración.
5d. Conecte los marcos de la cama superior e
inferior con los tornillos (I) insertando los tornillos
en las inserciones de la placa metálica L.
5e. Apriete los tornillos con un destornillador Philips
(no incluido).
NOTA:
• Cuando fije las placas metálicas en L, asegúrese
de que los agujeros de las placas metálicas en L
coincidan con los agujeros de la barandilla lateral
(12, 10). A continuación, apriete los tornillos
autoperforantes.
27
www.dreamonme.com/help
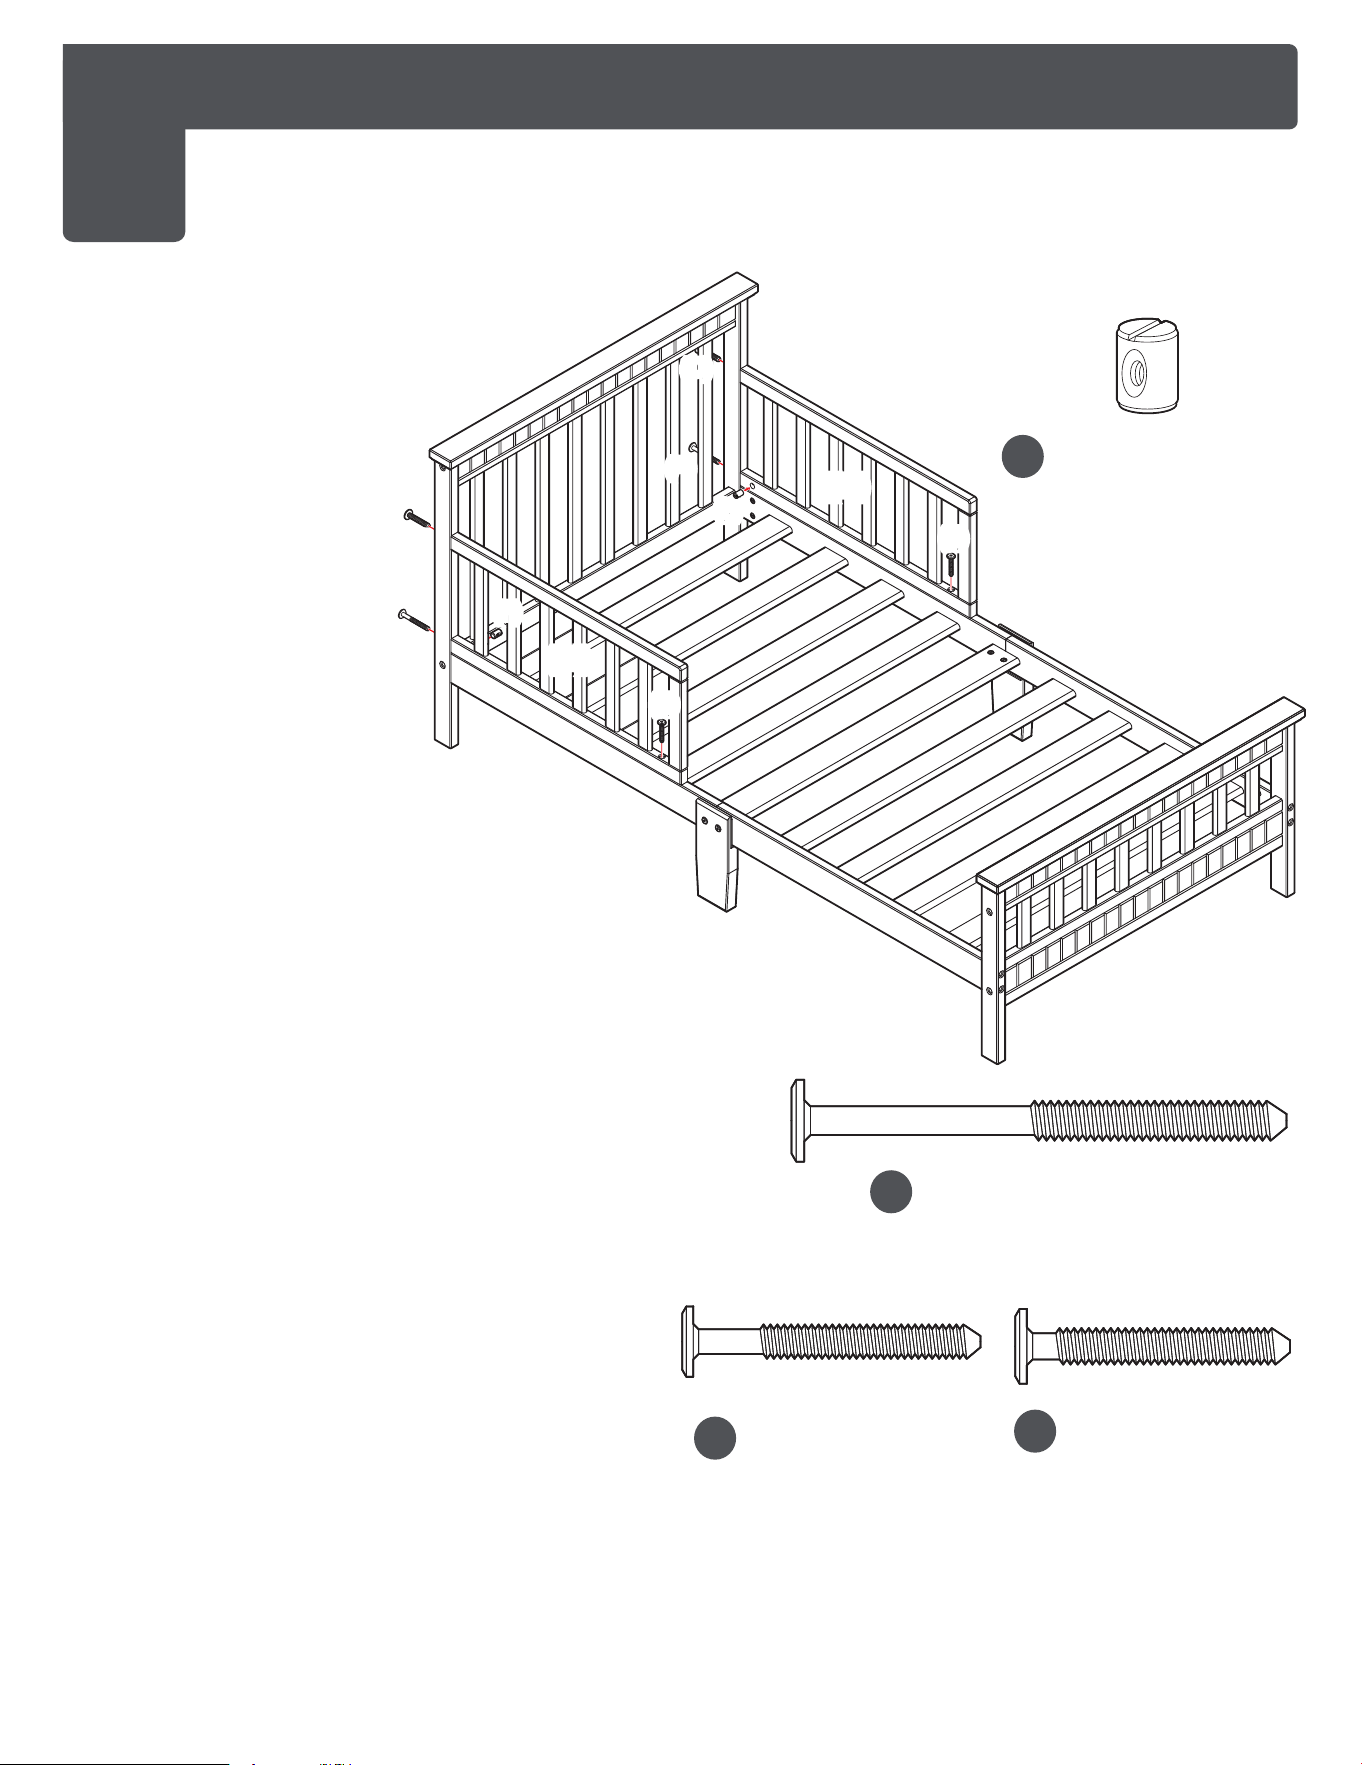
F
Barrel Nut (x4)
Écrou de baril (x4)
Tuerca de barril (x4)
ASSEMBLAGE DU LIT D'ENFANT - ASSEMBLAGE DES PIEDS
MONTAJE DE LA CAMA PARA NIÑOS PEQUEÑOS - MONTAJE DE LAS PATAS
(7)
(7)
(7)
(B)
(F)
6
TODDLER BED ASSEMBLY - LEGS ASSEMBLY
6a. Align the Split Legs (7) to
the metal plates on the bed
frame as shown in the
illustration.
6b. Attach the Barrel Nuts (F) in
the insertions provided on
the frame. Use the Flat
Head Screwdriver (not
included) to hold the barrel
nuts in the proper
alignment.
6c. Similarly, attach the Bolt
Nuts (B) in the insertions
given on the split legs as
shown in the illustration.
Tighten the Bolts (B) into
the Barrel Nuts (F) using the
Allen key (J) provided.
6a. Alignez les pattes fendues (7) sur les
plaques métalliques du cadre du lit,
comme indiqué sur l'illustration.
6b. Fixez les écrous (F) dans les encoches
prévues à cet effet sur le cadre. Utilisez
le tournevis à tête plate (non fourni) pour
maintenir les écrous cylindriques dans
l'alignement approprié.
6c. De la même manière, fixez les écrous (B)
dans les insertions prévues sur les pieds
fendus, comme indiqué sur l'illustration.
Serrez les boulons (B) dans les écrous
de baril (F) à l'aide de la clé Allen (J)
fournie.
6a. Alinee las patas divididas (7) con las placas metálicas del
armazón de la cama como se muestra en la ilustración.
6b. Coloque las tuercas de barril (F) en las inserciones previstas en
el marco. Utilice el destornillador de cabeza plana (no incluido)
para mantener las tuercas de barril en la alineación adecuada.
6c. Del mismo modo, coloque las tuercas de los pernos (B) en las
inserciones dadas en las patas divididas como se muestra en
la ilustración. Apriete los pernos (B) en las tuercas de barril (F)
utilizando la llave Allen (J) suministrada.
Bolt 2-5/8” (×4)
Boulon 2-5/8” (×4)
Perno 2-5/8” (×4)
B
28
www.dreamonme.com/help
F
Barrel Nut (x2)
Écrou de baril (x2)
Tuerca de barril (x2)
Bolt 3” (×4)
Boulon 3” (×4)
Perno 3” (×4)
A
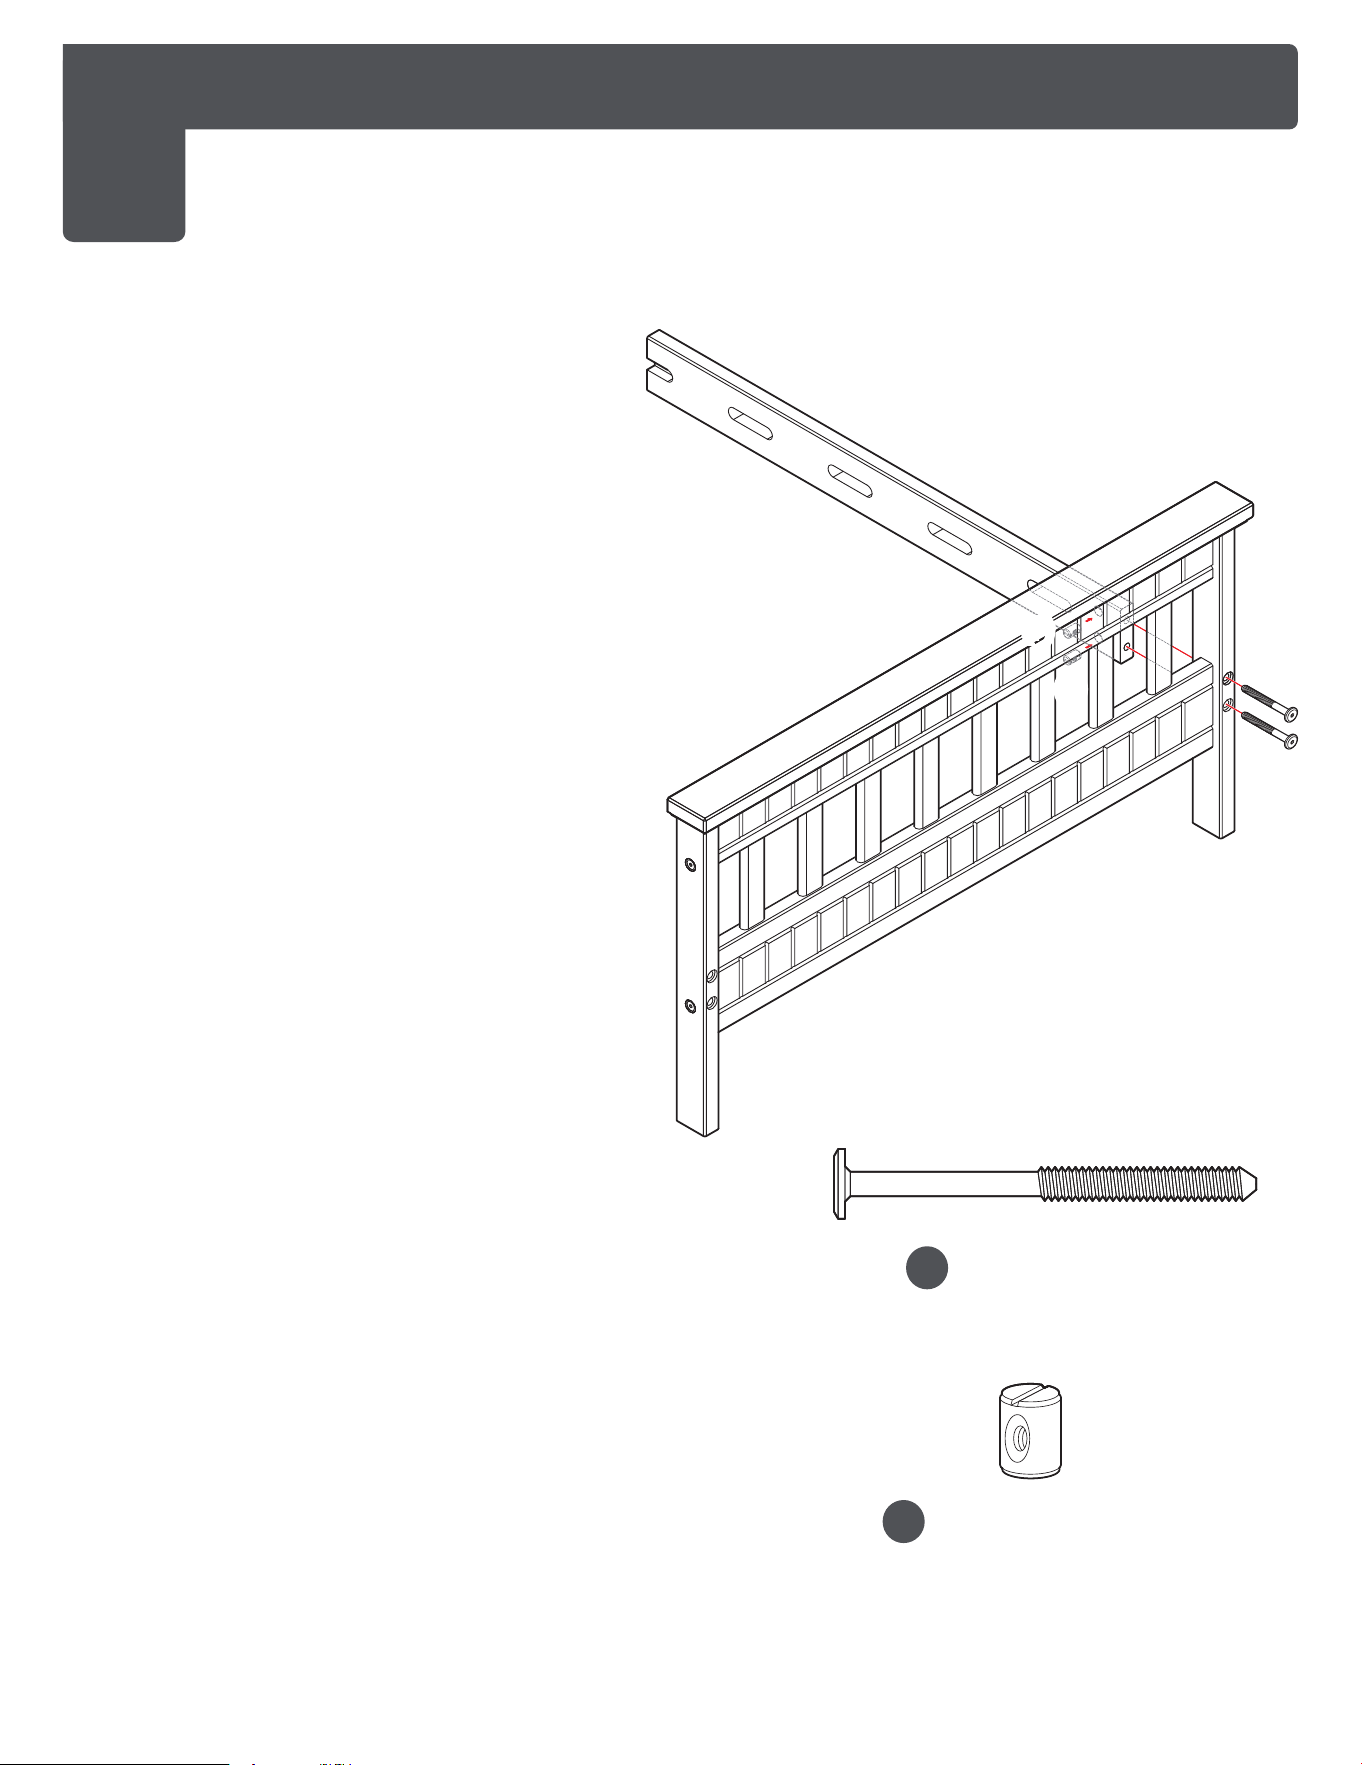
ASSEMBLAGE DU LIT D'ENFANT - ASSEMBLAGE DES RAILS
MONTAJE DE LA CAMA PARA NIÑOS PEQUEÑOS - MONTAJE DE LOS RIELES
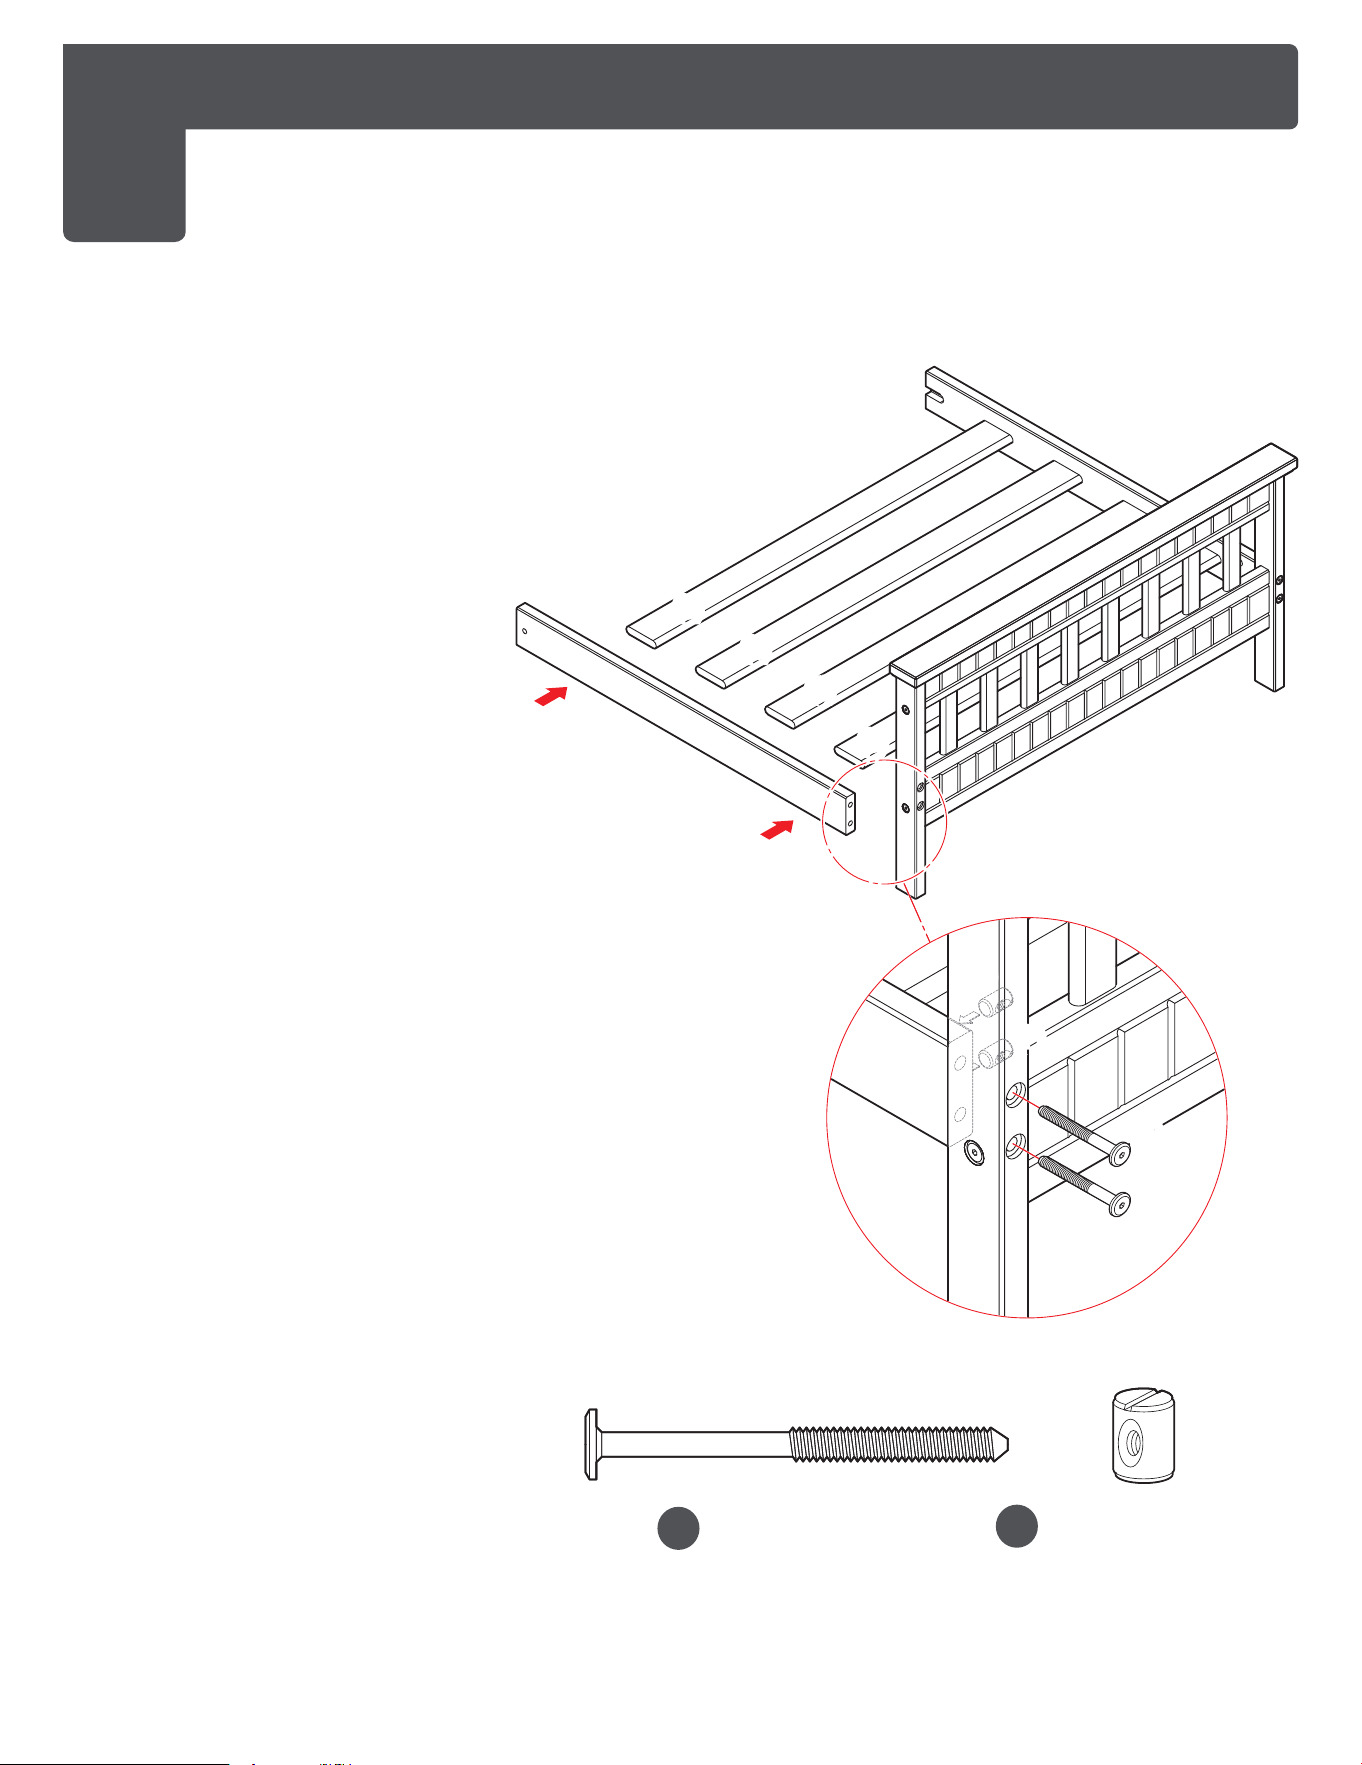
7a. Alignez la barre de lit droite (14) et la barre de lit gauche
(13) sur la tête de lit, comme indiqué sur l'illustration.
7b. Fixez les écrous (F) dans les encoches prévues à cet effet à
l'intérieur des barrières. Utilisez le tournevis à tête plate
(non fourni) pour maintenir les écrous cylindriques dans le
bon alignement.
7c. De la même manière, fixez les écrous (A) et les écrous (D)
dans les encoches prévues sur les pieds de la tête de lit,
comme indiqué sur l'illustration.
7d. Fixez les boulons-écrous (E) dans les encoches prévues à
l'extrémité des rails.
7e. Serrez les boulons (A), (D) et (E) dans les écrous (F) à l'aide
de la clé Allen (J) fournie.
7a. Alinee la barandilla de la cama derecha (14) y la
barandilla de la cama izquierda (13) en el cabecero
como se muestra en la ilustración.
7b. Coloque las tuercas (F) en las muescas previstas en
el interior de los carriles. Utilice el destornillador de
cabeza plana (no suministrado) para mantener las
tuercas del cilindro en la alineación correcta.
7c. De la misma manera, fije las tuercas (A) y las
tuercas (D) en las muescas previstas en las patas
del cabecero, como se muestra en la ilustración.
7d. Fije los pernos (E) en las muescas del extremo de
los carriles.
7e. Apriete los pernos (A), (D) y (E) en las tuercas (F) con
la llave Allen (J) suministrada.
(13)
(14)
(E)
(E)
(A)
(A)
(D)
(D)
(F)
(F)
7
TODDLER BED ASSEMBLY - RAILS ASSEMBLY
7a. Align the Right Bed Rail (14) and the Left Bed
Rail (13) to the headboard as shown in the
illustration.
7b. Attach the Barrel Nuts (F) in the
insertions provided on the insides
of the rails. Use the Flat Head
Screwdriver (not included) to
hold the barrel nuts in the
proper alignment.
7c. Similarly, attach the Bolt
Nuts (A) and Bolt Nuts (D) in
the insertions given on the
legs of the headboard as
shown in the illustration.
7d. Attach the Bolt Nuts (E) in
the insertions given on the
end of the rails.
7e. Tighten the Bolts (A), (D),
and (E) into the Barrel Nuts
(F) using the Allen key (J)
provided.
Bolt 2” (×2)
Boulon 2” (×2)
Perno 2” (×2)
D
Bolt 1-3/4” (×2)
Boulon 1-3/4” (×2)
Perno 1-3/4” (×2)
E

CRADLE CARE INSTRUCTIONS
ROOM CLIMATE CONTROL:
• Wood, when first cut contains more than 50 percent water. When it is prepared for
furniture construction it is placed in a Kiln and the moisture content is brought down
to 8 to 10 percent. Wood is porous and responds to its environment. If the room has
high humidity it will absorb it and expand and if the humidity is low it will lose
moisture and shrink.
• It is important that the humidity levels in the room be controlled from extremes of
too much humidity or too little. Furniture should not be placed close to the
air-conditioning outlets, fire places, radiators, space heaters, humidifiers or
dehumidifiers. Exposure to extreme variations of temperature and humidity can
damage any fine wood product.
THE IDEAL ENVIRONMENT FOR FINE FURNITURE:
• Fine wood furniture will have fewer problems when its environment is controlled at a
temperature between 65 and 75 degrees and a relative humidity between 35 and 40
percent. Wood placed in an environment outside of those limits can and will shrink
or expand and may develop some small cracks which are not material or structural
defects.
STICKING DOORS AND DRAWERS:
• With the minor changes in temperature and humidity, doors and drawers may swell
and be difficult to open or close. Tolerances have been built into the units but
extreme conditions may still cause sticking. This will adjust back to normal over
time but until it does consider using a dehumidifier or rub candle wax or paraffin on
sides that stick.
AVOID DIRECT SUNLIGHT:
• Keep the furniture out of direct sunlight. Ultraviolet rays will fade colors and in some
cases darken them. It can also cause crazing or hair line cracks in the finish. White
finishes will yellow naturally over time and exposure to direct sunlight will hasten
this natural process along with some woods darkening naturally over time; this is
not considered to be a quality defect.
PROPER STORAGE:
• If you need to put your furniture in storage for any period of time do not store them
in a damp basement or hot dry attic. Allow air movement around the furniture and
do not stack anything on it.
FURNITURE CARE INSTRUCTIONS
29
www.dreamonme.com/help

CRADLE CARE INSTRUCTIONS (cont.)
YOU DID IT!
FURNITURE CARE INSTRUCTIONS (cont.)
IN GENERAL:
• Protect furniture surface from hot or extremely cold items.
• Use coasters under hot or cold beverages.
• Do not use synthetic fabric under accessories or lamps.
• Protect tops from pens, markers and crayons.
• Oils from potpourri and other scented items can damage the finish of the furniture.
• Do not drag items across the surface of the furniture.
• Allow the surface to breathe by rotating your accessories and lamps.
• Do not over polish the furniture, do it only two or three times a year. Over polishing
can distort the natural finish of the product.
• Do not wax the furniture, as wax build up can destroy natural finish of the product.
• When moving furniture always lift the unit. Do not push or drag it to avoid damage
to legs.
• Keep the furniture level so doors and drawers open and close freely.
• Clean with a damp, not wet, cloth. Use only a mild soap. Do not use the abrasive
cleaners.
• Do not scratch or chip the finish.
• Inspect the product periodically, contact Dream On Me Inc for replacement parts
or questions.
• Do not store the product or any parts in extreme temperatures and conditions such
as a hot attic or a damp, cold basement. These extremes can cause a loss of
structural integrity.
• To preserve the luster of the high-quality finish on your product, it is recommended
to place a doily or felt pad under any items you place on the finish.
• Clean with a damp cloth, then a dry cloth to preserve the original luster and beauty
of this fine finish.
• Do not use abrasive chemicals.
• Do not spray cleaners directly onto furniture.
• Lift slightly when moving on carpeting to prevent leg breakage.
• Use of a vaporizer near furniture will cause wood to swell and to peel.
YOU DID IT!
Congratulations Mom & Dad!
It's time to create your dream nursery. A safe, elegant
handcrafted toddler bed that grows with your little one.
30
www.dreamonme.com/help

31
www.dreamonme.com/help
CRADLE CARE INSTRUCTIONS
CONTRÔLE DU CLIMAT DE LA PIÈCE:
• Le bois, lorsqu'il est coupé pour la première fois, contient plus de 50 % d'eau.
Lorsqu'il est préparé pour la construction de meubles, il est placé dans un four et
son taux d'humidité est ramené à 8 ou 10 %. Le bois est poreux et réagit à son
environnement. Si l'humidité de la pièce est élevée, il l'absorbera et se dilatera et si
l'humidité est faible, il perdra de l'humidité et se contractera.
• Il est important de contrôler le taux d'humidité de la pièce pour éviter qu'il ne soit
trop élevé ou trop bas. Les meubles ne doivent pas être placés près des sorties
d'air conditionné, des cheminées, des radiateurs, des appareils de chauffage, des
humidificateurs ou des déshumidificateurs. L'exposition à des variations extrêmes
de température et d'humidité peut endommager tout produit en bois fin.
L'ENVIRONNEMENT IDÉAL POUR LES MEUBLES EN BOIS PRÉCIEUX:
• Les meubles en bois fin auront moins de problèmes si leur environnement est
contrôlé à une température comprise entre 65 et 75 degrés et une humidité relative
comprise entre 35 et 40 pour cent. Le bois placé dans un environnement en dehors
de ces limites peut et va se rétracter ou se dilater et peut développer quelques
petites fissures qui ne sont pas des défauts matériels ou structurels.
COLLER LES PORTES ET LES TIROIRS:
• Avec les changements mineurs de température et d'humidité, les portes et les tiroirs
peuvent gonfler et être difficiles à ouvrir ou à fermer. Des tolérances ont été
intégrées dans les unités, mais des conditions extrêmes peuvent tout de même
provoquer des coincements. Ce phénomène reviendra à la normale avec le temps,
mais en attendant, pensez à utiliser un déshumidificateur ou à frotter de la cire de
bougie ou de la paraffine sur les côtés qui collent.
ÉVITEZ LA LUMIÈRE DIRECTE DU SOLEIL:
• Gardez les meubles à l'abri de la lumière directe du soleil. Les rayons ultraviolets
décolorent les couleurs et, dans certains cas, les assombrissent. Ils peuvent
également provoquer des craquelures ou des fissures dans le fini. Les finitions
blanches jaunissent naturellement avec le temps et l'exposition à la lumière directe
du soleil accélère ce processus naturel, de même que certains bois s'assombrissent
naturellement avec le temps ; ceci n'est pas considéré comme un défaut de qualité.
STOCKAGE APPROPRIÉ:
• Si vous devez entreposer vos meubles pour une période quelconque, ne les
entreposez pas dans un sous-sol humide ou dans un endroit chaud et humide. dans
une cave humide ou un grenier chaud et sec. Laissez l'air circuler autour des
meubles et n'empilez rien dessus.
INSTRUCTIONS D'ENTRETIEN DU MOBILIER

32
www.dreamonme.com/help
CRADLE CARE INSTRUCTIONS (cont.)
VOUS AVEZ RÉUSSI !
INSTRUCTIONS D'ENTRETIEN DES MEUBLES (suite)
EN GÉNÉRAL :
• Protégez les surfaces des meubles contre les objets chauds ou extrêmement froids.
• Utilisez des sous-verres sous les boissons chaudes ou froides.
• N'utilisez pas de tissu synthétique sous les accessoires ou les lampes.
• Protégez les dessus des stylos, marqueurs et crayons de couleur.
• Les huiles des pots-pourris et autres articles parfumés peuvent endommager la finition des
meubles.
• Ne faites pas glisser d'objets sur la surface du meuble.
• Laissez la surface respirer en faisant tourner vos accessoires et lampes.
• Ne polissez pas trop les meubles, ne le faites que deux ou trois fois par an. Un polissage
excessif peut altérer la finition naturelle du produit.
• Ne cirez pas les meubles, car l'accumulation de cire peut détruire la finition naturelle du
produit.
• Lorsque vous déplacez des meubles, soulevez toujours le meuble. Ne le poussez pas et ne le
traînez pas pour éviter d'endommager les pieds.
• Maintenez le meuble de niveau afin que les portes et les tiroirs s'ouvrent et se ferment
librement.
• Nettoyez avec un chiffon humide, non mouillé. Utilisez uniquement un savon doux. N'utilisez
pas de nettoyants abrasifs.
• Ne rayez pas et n'écrasez pas la finition.
• Inspectez le produit périodiquement, contactez Dream On Me Inc pour des pièces de
rechange ou des questions.
• Ne stockez pas le produit ou des pièces dans des températures et des conditions extrêmes
telles qu'un grenier chaud ou un sous-sol humide et froid. Ces conditions extrêmes peuvent
entraîner une perte d'intégrité structurelle.
• Pour préserver le lustre de la finition de haute qualité de votre produit, il est recommandé de
placer un napperon ou un tampon de feutre sous tous les articles que vous posez sur la
finition.
• Nettoyez à l'aide d'un chiffon humide, puis d'un chiffon sec pour préserver le lustre et la
beauté d'origine de ce fini de qualité. N'utilisez pas de produits chimiques abrasifs.
• Ne vaporisez pas de nettoyants directement sur les meubles.
• Soulevez légèrement les meubles lorsque vous les déplacez sur un tapis afin d'éviter qu'ils
ne se cassent les pieds.
• L'utilisation d'un vaporisateur près d'un meuble fera gonfler le bois et le fera peler.
Félicitations à maman et papa !
Il est temps de créer la chambre de bébé de vos rêves. Un
lit pour enfant sûr, élégant élégant et sûr, fabriqué à la main,
qui grandit avec votre enfant.

33
www.dreamonme.com/help
CRADLE CARE INSTRUCTIONS
CLIMATIZACIÓN DE HABITACIONES:
• La madera, cuando se corta por primera vez, contiene más del 50% de agua.
Cuando se prepara para la construcción de muebles, se introduce en un horno y su
contenido de humedad se reduce al 8-10%. La madera es porosa y reacciona a su
entorno. Si la humedad de la habitación es alta, absorberá y se expandirá, y si la
humedad es baja, perderá humedad y se encogerá.
• Es importante controlar el nivel de humedad de la habitación para evitar que sea
demasiado alto o demasiado bajo. Los muebles no deben colocarse cerca de
tomas de aire acondicionado, chimeneas, radiadores, calefactores, humidificadores
o deshumidificadores. La exposición a variaciones extremas de temperatura y
humedad puede dañar cualquier producto de madera noble.
EL ENTORNO IDEAL PARA LOS MUEBLES DE MADERA FINA:
• Los muebles de madera fina tendrán menos problemas si su entorno está
controlado a una temperatura de entre 65 y 75 grados y una humedad relativa de
entre el 35 y el 40 por ciento. La madera colocada en un ambiente fuera de estos
límites puede y se encogerá o expandirá y puede desarrollar algunas pequeñas
grietas que no son defectos materiales o estructurales.
ENCOLADO DE PUERTAS Y CAJONES:
• Con pequeños cambios de temperatura y humedad, las puertas y cajones pueden
hincharse y ser difíciles de abrir o cerrar. Se han incorporado tolerancias en las
unidades, pero las condiciones extremas aún pueden causar atascos. Esto volverá
a la normalidad con el tiempo, pero mientras tanto considera usar un
deshumidificador o frotar cera de vela o parafina en los lados pegados.
EVITAR LA LUZ SOLAR DIRECTA:
• Mantenga los muebles fuera de la luz solar directa. Los rayos ultravioleta destiñen
los colores y, en algunos casos, los oscurecen. También puede provocar el
agrietamiento o la división del acabado. Los acabados blancos amarillean de forma
natural con el tiempo y la exposición a la luz solar directa acelera este proceso
natural, al igual que algunas maderas se oscurecen de forma natural con el tiempo;
esto no se considera un defecto de calidad.
ALMACENAMIENTO ADECUADO:
• Si necesita almacenar sus muebles durante algún tiempo, no los guarde en un
sótano húmedo o en un lugar cálido y húmedo. en un sótano húmedo o en un ático
cálido y seco. Deje que el aire circule alrededor de los muebles y no apile nada
encima.
INSTRUCCIONES PARA EL CUIDADO DE LOS MUEBLES

34
www.dreamonme.com/help
CRADLE CARE INSTRUCTIONS (cont.)
¡LO HICIERON!
INSTRUCCIONES PARA EL MANTENIMIENTO DEL MUEBLE (cont.)
EN GENERAL :
• Proteja las superficies de los muebles de los objetos calientes o extremadamente fríos.
• Utilice posavasos debajo de las bebidas calientes o frías.
• No utilice tejidos sintéticos bajo los accesorios o las lámparas.
• Protege la parte superior de los bolígrafos, rotuladores y lápices de colores.
• Los aceites del popurrí y otros artículos perfumados pueden dañar el acabado de los muebles.
• No arrastre objetos por la superficie del mueble.
• Deje que la superficie respire, rotando sus accesorios y lámparas.
• No pules en exceso los muebles, hazlo sólo dos o tres veces al año. Un pulido excesivo puede
alterar el acabado natural del producto.
• No encere los muebles, ya que la acumulación de cera puede destruir el acabado natural del
producto.
• producto.
• Al trasladar los muebles, levántelos siempre. No lo empujes ni lo arrastres para evitar que se
dañen las patas.
• Mantenga los muebles nivelados para que las puertas y cajones se abran y cierren libremente.
• Limpiar con un paño húmedo, no mojado. Utilice sólo un jabón suave. No utilice limpiadores
abrasivos.
• No raye ni aplaste el acabado.
• Inspeccione el producto periódicamente, póngase en contacto con Dream On Me Inc para
obtener piezas de repuesto o hacer preguntas.
• No almacene el producto o las piezas en temperaturas y condiciones extremas, como un ático
caliente o un sótano húmedo y frío. Estas condiciones extremas pueden provocar la pérdida
de la integridad estructural.
• Para preservar el brillo del acabado de alta calidad de su producto, se recomienda colocar un
tapete o una almohadilla de fieltro debajo de todos los artículos que coloque sobre el
acabado.
• Limpie con un paño húmedo y luego con un paño seco para conservar el brillo y la belleza
originales de este acabado de calidad. No utilice productos químicos abrasivos.
• No rocíe limpiadores directamente sobre los muebles.
• Levante ligeramente los muebles al moverlos sobre una alfombra para evitar que se rompan
los pies.
• El uso de una botella de spray cerca de los muebles hará que la madera se hinche y se
despegue.
¡Enhorabuena a papá y mamá!
Ha llegado el momento de crear el vivero de tus sueños. Una
cuna segura, elegante y hecha a mano que crece con su hijo.

1532 S. WASHINGTON AVE STE1
PISCATAWAY, NJ 08854-9908
www.dreamonme.com
Follow Us @dreamonmeinc
to get your nursery featured on our social media.
Enter our monthly giveaway!
Scan the QR code to register.
Chat with us!
Scan the QR code to Live Chat.
E-mail: [email protected]

1532 S. WASHINGTON AVENUE
PISCATAWAY, NJ 08854
www.dreamonme.com
Courriel : [email protected]
Suivez-nous @dreamonmeinc
pour que votre crèche soit présentée sur nos médias sociaux.
Participez à notre concours mensuel !
Scannez le code QR pour vous inscrire.
Chattez avec nous !
Scannez le code QR pour accéder au
Live Chat.

1532 S. WASHINGTON AVENUE
PISCATAWAY, NJ 08854
www.dreamonme.com
Siga con nosotros @dreamonmeinc
para que su guardería aparezca en nuestras redes sociales.
Participa en nuestro sorteo mensual.
Escanee el código QR para registrarse.
Chatea con nosotros.
Escanee el código QR para el chat en vivo.
Correo electrónico: [email protected]