Instruction Manual
Model PB-D-37W-W-UK
25L Smart Compressor Dehumidier
IMPORTANT INSTRUCTIONS
- RETAIN FOR FUTURE USE

2 of 16 | English English | 3 of 16
CONTENTS
Safety Instructions...........................................................................Page 3
Specic Information Regarding R290 Refrigerant Gas .....Page 6
Symbols Explained ..........................................................................Page 7
Specications ....................................................................................Page 8
Dehumidier Benets .....................................................................Page 8
Features ...............................................................................................Page 8
Controls ...............................................................................................Page 9
Smart App Instructions ................................................................ Page 10
Connecting the Water Hose ...................................................... Page 12
Removing and Emptying the Water Tank ............................ Page 12
Cleaning and Storage .................................................................. Page 12
Defrosting..........................................................................................Page 14
Recycling and Disposal ............................................................... Page 14
EN
25L SMART DEHUMIDIFIER
MODEL PB-D-37W-W-UK
Thank you for choosing to purchase a product from Pro Breeze. Please read the entire manual
carefully prior to rst use and keep in a safe place for future reference.
SAFETY INSTRUCTIONS
―
―
PLEASE READ AND SAVE THESE IMPORTANT SAFETY
INSTRUCTIONS.
When using electrical appliances, basic safety precautions
should always be followed to reduce risk of re, electric
shock, and injury to persons, including the following:
WARNING: TO AVOID THE RISK OF ELECTRICAL SHOCK,
FIRE OR INJURY TO PEOPLE, ALWAYS TURN THE APPLIANCE
OFF, UNPLUG THE POWER CORD FROM THE ELECTRICAL
OUTLET AND EMPTY THE WATER TANK BEFORE HANDLING,
CLEANING OR SERVICING THE APPLIANCE.
• Do not cover the appliance whilst in use.
• The appliance shall be installed in accordance with
national wiring regulations.
• The unit’s circuit board (PCB) is designed with a fuse to
provide overcurrent protection. The specications of the
fuse are printed on the circuit board.
• Do not operate the appliance without the lter.
• Never leave water in the water tank when the appliance
is not in use.
• Use this appliance only as described in this manual. Any
other use not recommended by the manufacturer may
cause re, electric shock, or injury to person.
• Always unplug the appliance when not in use.
• Do not expose the appliance to direct sunlight, heat
sources or extreme cold.
• Keep the appliance out of reach of children and pets.
• Do not leave children alone or unattended in the area

4 of 16 | English English | 5 of 16
where the appliance is in use.
• Children shall not play with the appliance.
• Cleaning and user maintenance shall not be made by
children unless continuously supervised.
• Dispose of water held by the appliance. This water is not
drinkable.
• This appliance can be used by children aged from
8 years and above and person with reduced physical,
sensory or mental capabilities or lack of supervision or
instruction concerning use of the appliance in a safe way
and understand the hazards involved.
• When moving the appliance, ensure it is kept in an
upright position.
• The appliance must have a minimum 50cm clearance
around all sides.
• Never leave the appliance unattended while in use.
Always turn the appliance off and disconnected from the
power supply when not in use.
• Avoid placing the power cord in areas where it can
become a tripping hazard. Do not place the power cord
under carpeting or cover it with rugs, runners or similar.
• Place the appliance on a at, stable and dry surface
and always keep the appliance in an upright position.
Operating the appliance in any other position could
cause a hazard.
• Never place anything on top of the appliance.
• Ensure that the mains supply (including voltage,
frequency and power) complies with the rating label of
the appliance.
• There may be trace of odour during the rst few minutes
of initial use. This is normal and will quickly disappear.
• Do not place the appliance against a wall or other
appliances.
• Do not cover the appliance or restrict the air ow of the
inlet or exhaust grills whilst in use.
• Do not cover, obstruct or push objects into the vents and
opening of the appliance as this may cause an electric
shock, re or damage the appliance.
• Do not operate the appliance with wet hands.
• Do not use this appliance near water or in the immediate
surroundings of a bath, shower or a swimming pool.
Never place the appliance where it may fall into a
bathtub or other water container.
• Do not allow water or other liquids to run into the interior
of the appliance, as this could create a re and/or
electrical hazard.
• Do not use mechanical devices to accelerate the
appliances defrosting process.
• Do not place the continuous drainage hose outside when
the temperature falls below 1
o
C.
• This appliance is intended for indoor household use and
similar applications. Do not use outdoors.
• Do not use the appliance near petrol, paints, ammable
gases, ovens, or other heating sources.
• The mains cable should not hang down from the surface
on which the appliance is placed in order to prevent the
appliance from being pulled down.
• To avoid a circuit overload when using this appliance,
do not operate another high-wattage appliance on the
same electrical circuit.
• Always plug the appliance directly into a wall socket.
Avoid using extension leads where possible as they may
overheat and cause a risk of re.
• Do not use this appliance with an external programmer,
timer switch or any other device which would switch the
appliance on automatically unless this has already been
pre-built into the appliance by the manufacturer.
• Do not pull on the power cord. Never move, carry, or hang
the appliance by the power cord.
• Do not kink or wrap the power cord and plug around the
appliance, as this may cause the insulation to weaken or
split, particularly where it enters the appliance.
6 of 16 | English English | 7 of 16
• Do not operate the appliance with the water tank removed.
• Ensure the mains cable is fully extended before use and
arrange it so that it is not in contact with any part of the
appliance.
• Do not operate the appliance with any safety guards
removed.
• Do not operate the appliance if there are signs of
damage to the appliance, power cord, or any of the
accessories supplied. If the supply cord is damaged, it
must be replaced by the manufacturer, its service agent
or a similarly qualied person in order to avoid a hazard.
• Do not operate the appliance if there are any signs of
damage to the appliance or accessories supplied.
• Do not attempt to repair or adjust any electrical or
mechanical elements in the appliance. Doing so may be
unsafe and will void your warranty.
• Never insert ngers or metal objects into the vents and
openings of the appliance
• The appliance shall be installed in accordance with
national wiring regulations.
• Do not operate the appliance without the lter.
SPECIFIC INFORMATION REGARDING R290 REFRIGERANT GAS
―
―
WARNING: THE APPLIANCE MUST BE INSTALLED, OPERATED
AND STORED IN A ROOM WITH A FLOOR AREA LARGER
THAN 4M
2
.
• This appliance contains 0.065kg (65g) of R290 refrigerant
gas.
• R290 is a refrigerant gas that complies with the European
directive on the environment.
• Do not puncture any part of refrigerant circuit.
• Be aware R290 refrigerant is odourless and does not
have the odour normally associated with natural gas and
propane tanks.
• Do not use means to accelerate the defrosting process
or to clean, other than those recommended by the
manufacturer.
• The appliance must be placed in an area without any
continuous sources of ignition such as open ames, gas,
or electrical appliances in operation.
• Do not puncture and do not burn.
• If the appliance is installed, operated or stored in a non-
ventilated area, the room must be designed to prevent
the accumulation of refrigerant leaks resulting in a risk of
re or explosion due to ignition of the refrigerant caused
by electric heaters, stoves, or other sources of ignition.
• The appliance must be stored in such a way as to
prevent mechanical failure.
• Individuals who operate or work on the refrigerant circuit
must have the appropriate certication issued by an
accredited organisation that ensures competence in
handling refrigerants according to a specic evaluation
recognised by associations in the industry.
• Maintenance and repairs that require the assistance
of other qualied personnel must be performed under
the supervision of an individual specied in the use of
ammable refrigerants.
SYMBOLS EXPLAINED
―
―
For indoor use only. Please read instruction manual
and retain for future use.
Equipment complies with the
applicable UK safety requirements
and regulations.
Equipment complies with the
applicable EU safety requirements
and regulations.
CAUTION
RISK OF FIRE
8 of 16 | English English | 9 of 16
SPECIFICATIONS
―
―
Model Number: PB-D-37W-W-UK Fuse: AC 250V, 3.15A
Product Dimensions: 580 x 320 x 200mm Max. Tank Capacity: 5.5L
Net Weight: 12.2kg Operating Range: 5–32 °C
Power Supply: 220-240V~, 50Hz Collection Capacity: Approx. 25L per day at 30°C,
80% humidity
Input Power: 420W
DEHUMIDIFIER BENEFITS
―
―
For advice on the benets of dehumidiers and how to get the best out of your unit, visit our
Advice Blog at www.probreeze.com.
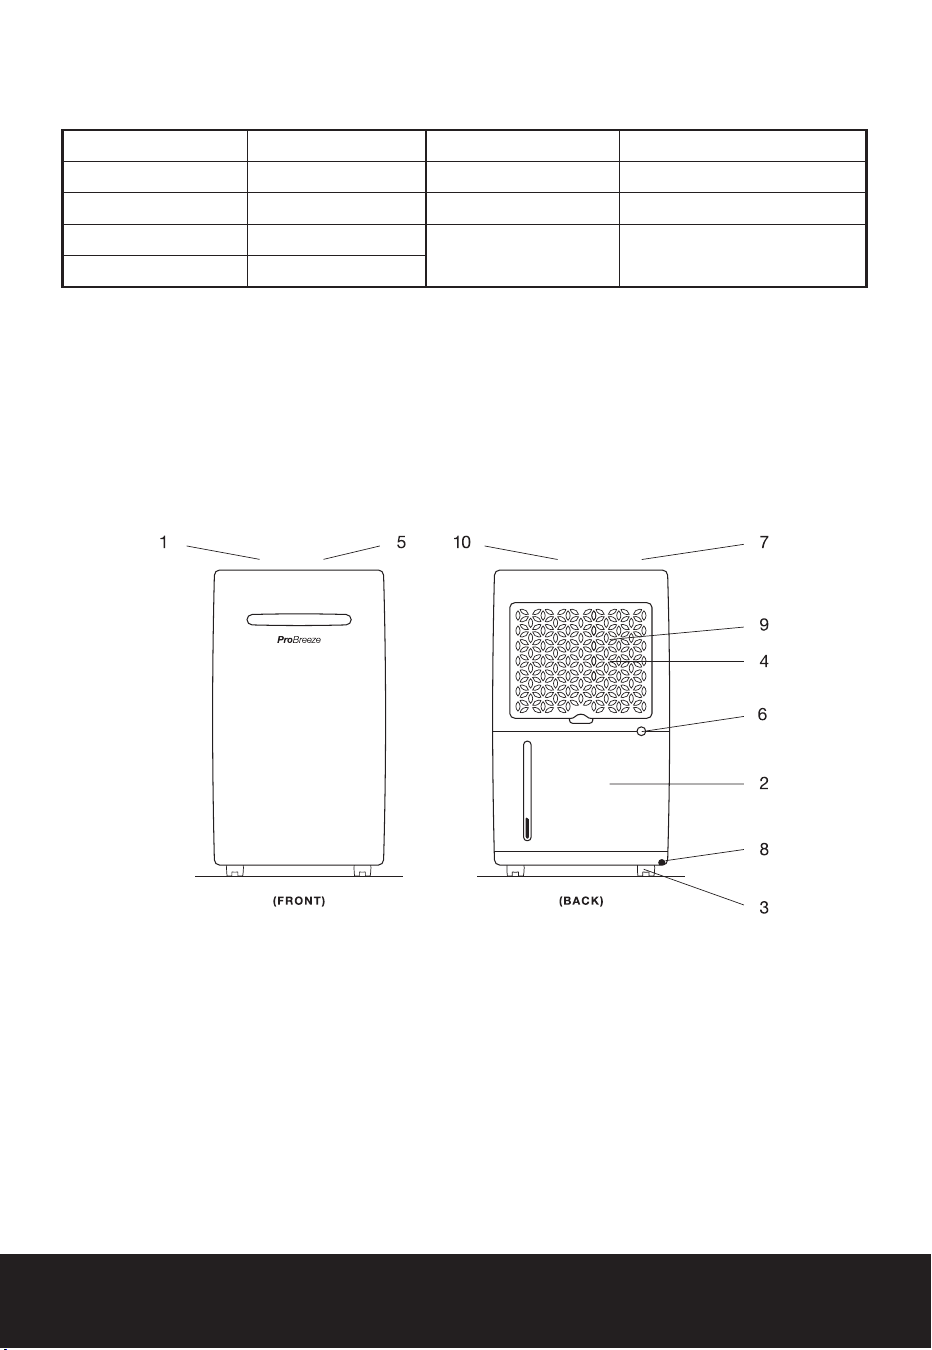
FEATURES
―
―
1. Control Panel
2. Water Tank
3. Wheels
4. Air Inlet
5. Handle
6. Water Hose Connector
7. Air Outlet
8. Power Connector
9. Filter
10. Humidity Indicator Light
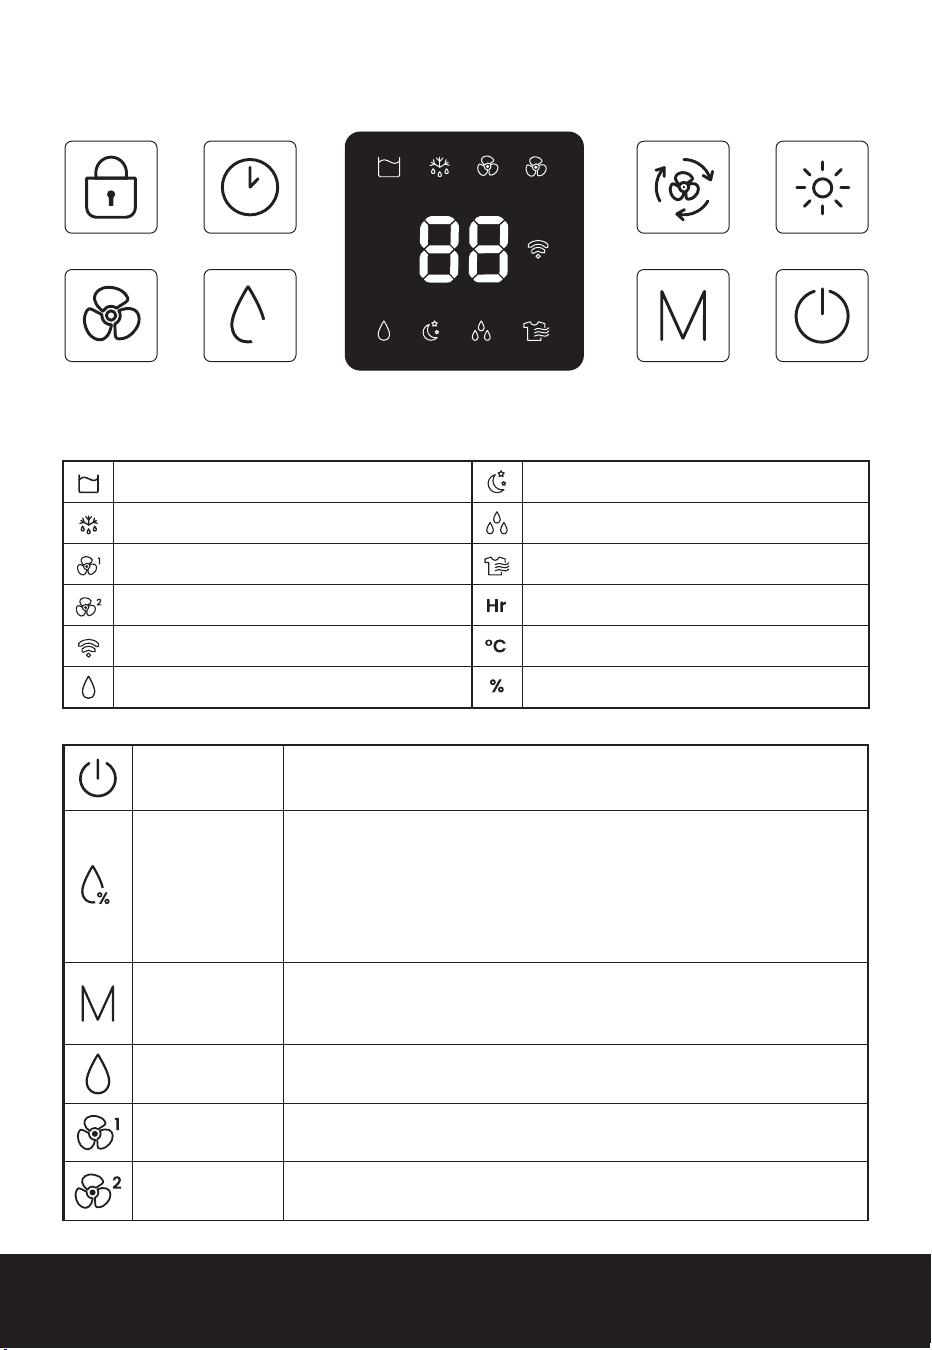
CONTROLS
―
―
On/Off Turns the dehumidier on and off.
Set % Sets the desired relative humidity (RH) between 30%-80% during
normal dehumidication mode. The ‘%’ indicator light will ash when
changes are being made. The dehumidier will turn off when the
room reaches this target RH%.
To see the current room temperature press and hold the SET %
button for 5 seconds until the temperature indicator light is on (°C).
Modes Select between Normal, Low-power, High-power and Laundry
Modes.
Normal Mode Allows manual setting of both fan speed and target humidity %.
Fan Speed Low Automatically sets the fan speed to low. Target humidity % is
disabled and the dehumidier will run continuously.
Fan Speed High Automatically sets the fan speed to high. Target humidity % is
disabled and the dehumidier will run continuously.
CH
ILD LOCK
FAN SET %
TIMER SPEED
MODE
DISPLAY
POWER
%
Hr °C %
1
2
Indicator Lights
Water Tank Full Low Power Mode Indicator
Defrosting Light High Power Mode Indicator
Fan Speed Low Laundry Mode
Fan Speed High Hour Indicator
WiFi Temperature Indicator
Normal Mode Humidity Indicator
These images are for reference only, please refer to your product. If you nd you’re missing
any parts from your order, please contact our customer care team by emailing
[email protected] for fast and friendly help.
8 of 16 | English English | 9 of 16
SPECIFICATIONS
―
―
Model Number: PB-D-37W-W-UK Fuse: AC 250V, 3.15A
Product Dimensions: 580 x 320 x 200mm Max. Tank Capacity: 5.5L
Net Weight: 12.2kg Operating Range: 5–32 °C
Power Supply: 220-240V~, 50Hz Collection Capacity: Approx. 25L per day at 30°C,
80% humidity
Input Power: 420W
DEHUMIDIFIER BENEFITS
―
―
For advice on the benets of dehumidiers and how to get the best out of your unit, visit our
Advice Blog at www.probreeze.com.
FEATURES
―
―
1. Control Panel
2. Water Tank
3. Wheels
4. Air Inlet
5. Handle
6. Water Hose Connector
7. Air Outlet
8. Power Connector
9. Filter
10. Humidity Indicator Light
CONTROLS
―
―
On/Off Turns the dehumidier on and off.
Set % Sets the desired relative humidity (RH) between 30%-80% during
normal dehumidication mode. The ‘%’ indicator light will ash when
changes are being made. The dehumidier will turn off when the
room reaches this target RH%.
To see the current room temperature press and hold the SET %
button for 5 seconds until the temperature indicator light is on (°C).
Modes Select between Normal, Low-power, High-power and Laundry
Modes.
Normal Mode Allows manual setting of both fan speed and target humidity %.
Fan Speed Low Automatically sets the fan speed to low. Target humidity % is
disabled and the dehumidier will run continuously.
Fan Speed High Automatically sets the fan speed to high. Target humidity % is
disabled and the dehumidier will run continuously.
CH
ILD LOCK
FAN SET %
TIMER SPEED
MODE
DISPLAY
POWER
%
Hr °C %
1
2
Indicator Lights
Water Tank Full Low Power Mode Indicator
Defrosting Light High Power Mode Indicator
Fan Speed Low Laundry Mode
Fan Speed High Hour Indicator
WiFi Temperature Indicator
Normal Mode Humidity Indicator
These images are for reference only, please refer to your product. If you nd you’re missing
any parts from your order, please contact our customer care team by emailing
[email protected] for fast and friendly help.
10 of 16 | English English | 11 of 16
Laundry For use in a laundry room when drying clothes. Target humidity % is
disabled and the dehumidier will run continuously.
Speed Sets the dehumidier power to high or low speed when in Normal
Mode.
Timer Set a turn-on or shut-off timer, between 1-24 hrs.
• Setting a Turn-On timer: When the dehumidier is off, tap
the timer button until you reach the desired number of hours
before you want it to turn on. The ‘Hr’ light will light up when a
timer is set.
• Setting a Turn-Off timer: When the unit is on, tap the timer
button until you reach the desired number of hours required
before it turns off. The ‘Hr’ light will light up when a timer is set.
Child Lock This button will lock the controls for child safety. Press and hold the
button for 3 seconds to lock and unlock.
Fan Turns off the dehumidifying function so that only the fan runs.
Display Press this button to send the display to sleep. The unit will continue
working but the lights will turn off.
Defrosting Light Indicates when the unit is defrosting.
Humidity
Indicator Light
This is an indicator of the current air humidity:
• Red: Humidity more than 70%
• Green: Humidity between 50% -70%
• Blue: Humidity below 50%
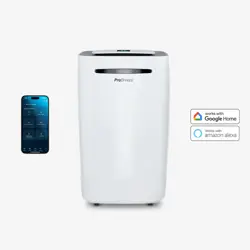
SMART APP INSTRUCTIONS
―
―
Our Pro Breeze app is a centralised app for smart device management. Control your
dehumidier and set up schedules to turn your unit on and off from your phone.
Note: Ensure your Wi-Fi network is set to 2.4GHz for successful pairing.
Pair Your Device in 4 Simple Steps:
1. Register: Download the Pro Breeze app on the Google Play or
Apple app store. Sign in/register for an account.
2. Prepare your unit: Once you're all signed in, hold down the mode
button on the control panel for 5 seconds then the WiFi indicator
will appear on the display.
3. Prepare the app: Open the Pro Breeze app press “+” in the top
right corner and press “add device”.
4. Pair your heater: Then the app will scan for devices and then
your unit will show up. Press "add". Then type in the password for
the Wi-Fi your phone is on.
Now your unit is connected to the Pro Breeze app.
Amazon Echo Set-Up
Before connecting, ensure:
• The Pro Breeze app is downloaded, and the appliance is paired.
• The Amazon Alexa app is downloaded, and an Echo device is paired with it.
Link Pro Breeze App to Alexa
1. Open Amazon Alexa > Skills.
2. Search Pro Breeze and tap Enable.
3. Follow on-screen instructions to link accounts.
Pair Alexa with the Appliance
1. Open Amazon Alexa > Devices.
2. Tap + > Add Device.
3. Select the appliance and follow on-screen instructions.
4. Control via voice: “Turn <device name> on/off” (Default name: 20 Litre Compressor
Dehumidier).
Google Home Set-Up
Before connecting, ensure:
• The Pro Breeze app is downloaded, and the appliance is paired.
• The Google Home app is downloaded, and a Google Home device is paired with it.
Connect Pro Breeze App to Google Home
1. Open Google Home > + > Set up device.
2. Tap Have something already set up?
3. Search Pro Breeze and follow on-screen instructions to link accounts.
Pair Google Home with the Appliance
1. Return to Google Home > select the assigned room > tap appliance name.
2. Control via voice: “Turn <device name> on/off”.
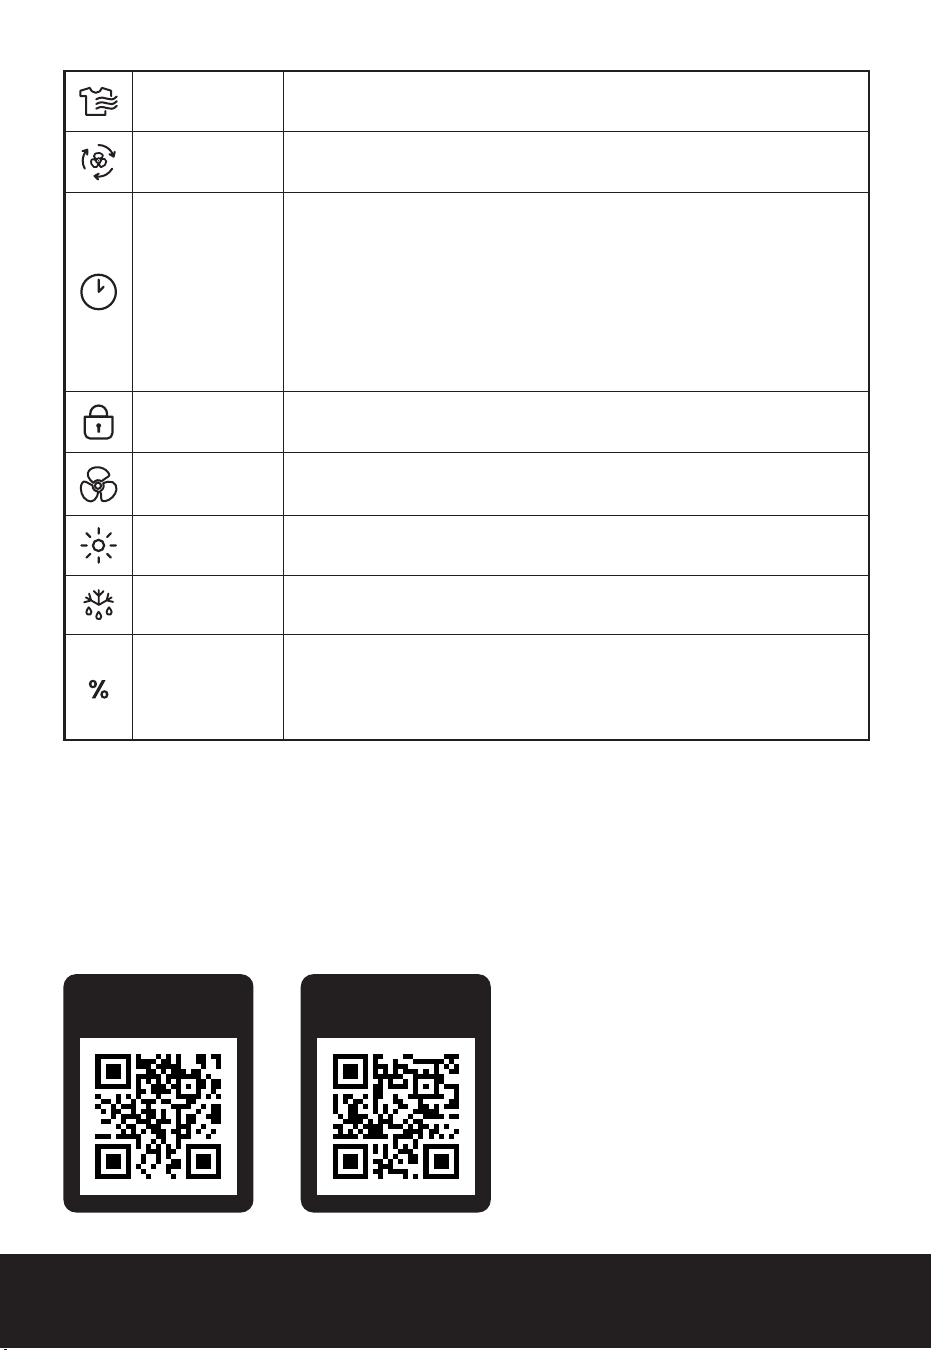
Scan the QR Code
to Download the App
For a voice control
tutorial scan here

10 of 16 | English English | 11 of 16
Laundry For use in a laundry room when drying clothes. Target humidity % is
disabled and the dehumidier will run continuously.
Speed Sets the dehumidier power to high or low speed when in Normal
Mode.
Timer Set a turn-on or shut-off timer, between 1-24 hrs.
• Setting a Turn-On timer: When the dehumidier is off, tap
the timer button until you reach the desired number of hours
before you want it to turn on. The ‘Hr’ light will light up when a
timer is set.
• Setting a Turn-Off timer: When the unit is on, tap the timer
button until you reach the desired number of hours required
before it turns off. The ‘Hr’ light will light up when a timer is set.
Child Lock This button will lock the controls for child safety. Press and hold the
button for 3 seconds to lock and unlock.
Fan Turns off the dehumidifying function so that only the fan runs.
Display Press this button to send the display to sleep. The unit will continue
working but the lights will turn off.
Defrosting Light Indicates when the unit is defrosting.
Humidity
Indicator Light
This is an indicator of the current air humidity:
• Red: Humidity more than 70%
• Green: Humidity between 50% -70%
• Blue: Humidity below 50%
SMART APP INSTRUCTIONS
―
―
Our Pro Breeze app is a centralised app for smart device management. Control your
dehumidier and set up schedules to turn your unit on and off from your phone.
Note: Ensure your Wi-Fi network is set to 2.4GHz for successful pairing.
Pair Your Device in 4 Simple Steps:
1. Register: Download the Pro Breeze app on the Google Play or
Apple app store. Sign in/register for an account.
2. Prepare your unit: Once you're all signed in, hold down the mode
button on the control panel for 5 seconds then the WiFi indicator
will appear on the display.
3. Prepare the app: Open the Pro Breeze app press “+” in the top
right corner and press “add device”.
4. Pair your heater: Then the app will scan for devices and then
your unit will show up. Press "add". Then type in the password for
the Wi-Fi your phone is on.
Now your unit is connected to the Pro Breeze app.
Amazon Echo Set-Up
Before connecting, ensure:
• The Pro Breeze app is downloaded, and the appliance is paired.
• The Amazon Alexa app is downloaded, and an Echo device is paired with it.
Link Pro Breeze App to Alexa
1. Open Amazon Alexa > Skills.
2. Search Pro Breeze and tap Enable.
3. Follow on-screen instructions to link accounts.
Pair Alexa with the Appliance
1. Open Amazon Alexa > Devices.
2. Tap + > Add Device.
3. Select the appliance and follow on-screen instructions.
4. Control via voice: “Turn <device name> on/off” (Default name: 20 Litre Compressor
Dehumidier).
Google Home Set-Up
Before connecting, ensure:
• The Pro Breeze app is downloaded, and the appliance is paired.
• The Google Home app is downloaded, and a Google Home device is paired with it.
Connect Pro Breeze App to Google Home
1. Open Google Home > + > Set up device.
2. Tap Have something already set up?
3. Search Pro Breeze and follow on-screen instructions to link accounts.
Pair Google Home with the Appliance
1. Return to Google Home > select the assigned room > tap appliance name.
2. Control via voice: “Turn <device name> on/off”.
Scan the QR Code
to Download the App
For a voice control
tutorial scan here
12 of 16 | English English | 13 of 16
CAUTION: DO NOT USE ANY ABRASIVE CLEANERS OR
SOLVENTS, AS THIS CAN DAMAGE THE APPLIANCE.
• Do not attempt to clean the appliance in any other way
than that detailed by the manufacturer.
• Clean the exterior surface of the appliance by wiping
it with a soft, damp cloth. Dry the appliance with a soft,
clean cloth.
• The lter should be cleaned every two weeks using a
damp cloth
• Always empty the water tank, clean and dry the
appliance when not in use to prevent mould.
• The unit may need defrosting in temperatures less than
23°C - this will happen automatically and last up to 5
minutes. During this time, the dehumidifying function will
stop and the defrost indicator will light up. Do not switch
off while the unit is defrosting.
Cleaning the water tank:
• Remove and empty the water tank as per the instructions
above.
• Clean the water tank with warm tap water and mild
detergent (e.g. washing up liquid). Note: Do not use
boiling water to clean the water tank.
• Ensure to remove any scale or deposits that have formed
inside the water tank.
• Wipe all surfaces dry before placing the water tank back
into the appliance.
Storage:
• To store your product, we recommend using the original
or a similar-sized box.
• Store the appliance in a safe, clean and dry place, away
from direct sunlight and out of reach of children when
not in use.
CONNECTING THE WATER HOSE FOR CONTINUOUS DRAINING
―
―
For long term use it is recommended to connect a hose for continuous drainage.
1. Remove water tank.
2. Insert the hose into the water hose connector, ensuring it is connected properly.
3. Ensure the hose end has a suitable drainage outlet (e.g. a drain or bucket).
4. Slot the tank back in carefully.
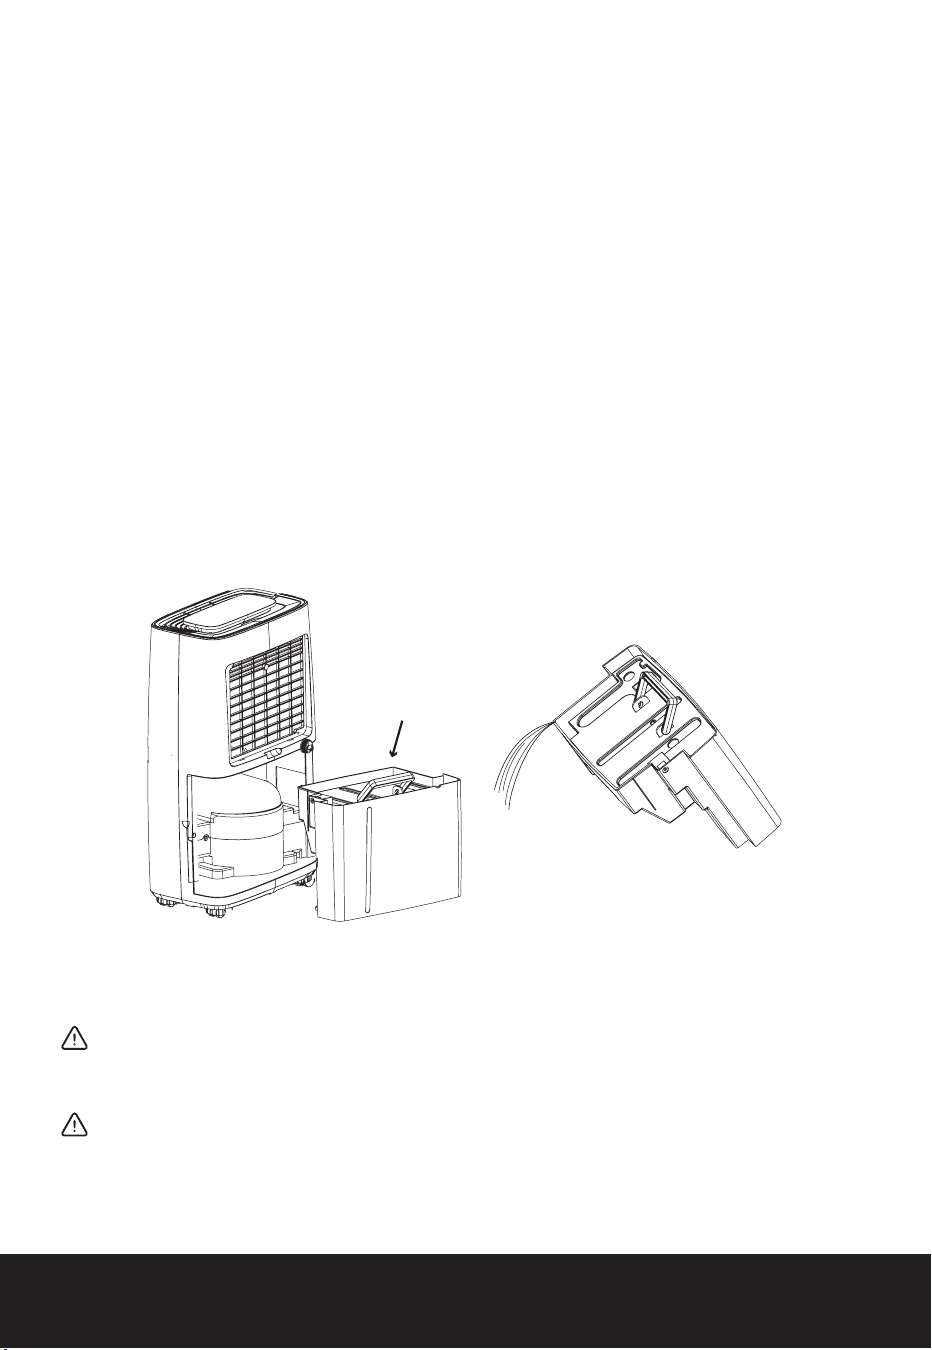
REMOVING AND EMPTYING THE WATER TANK
―
―
When the water tank is full the red indicator light will ash and the product will make a beeping
sound. The dehumidifying function will automatically stop. Press the ON/OFF button to turn off
the dehumidier before removing the water tank.
1. Gently pull the water tank out from the back of the dehumidier.
2. Use handle to empty the water tank.
3. Once empty, slot the tank back in carefully.
CLEANING AND STORAGE
―
―
WARNING: ALWAYS TURN THE APPLIANCE OFF AND UNPLUG
THE POWER CORD FROM THE ELECTRICAL OUTLET BEFORE
HANDLING OR CLEANING IT.
CAUTION: DO NOT ALLOW WATER OR OTHER LIQUIDS TO
RUN INTO THE INTERIOR OF THE APPLIANCE, AS THIS COULD
CREATE A FIRE AND/OR ELECTRICAL HAZARD.
HANDLE

12 of 16 | English English | 13 of 16
CAUTION: DO NOT USE ANY ABRASIVE CLEANERS OR
SOLVENTS, AS THIS CAN DAMAGE THE APPLIANCE.
• Do not attempt to clean the appliance in any other way
than that detailed by the manufacturer.
• Clean the exterior surface of the appliance by wiping
it with a soft, damp cloth. Dry the appliance with a soft,
clean cloth.
• The lter should be cleaned every two weeks using a
damp cloth
• Always empty the water tank, clean and dry the
appliance when not in use to prevent mould.
• The unit may need defrosting in temperatures less than
23°C - this will happen automatically and last up to 5
minutes. During this time, the dehumidifying function will
stop and the defrost indicator will light up. Do not switch
off while the unit is defrosting.
Cleaning the water tank:
• Remove and empty the water tank as per the instructions
above.
• Clean the water tank with warm tap water and mild
detergent (e.g. washing up liquid). Note: Do not use
boiling water to clean the water tank.
• Ensure to remove any scale or deposits that have formed
inside the water tank.
• Wipe all surfaces dry before placing the water tank back
into the appliance.
Storage:
• To store your product, we recommend using the original
or a similar-sized box.
• Store the appliance in a safe, clean and dry place, away
from direct sunlight and out of reach of children when
not in use.
CONNECTING THE WATER HOSE FOR CONTINUOUS DRAINING
―
―
For long term use it is recommended to connect a hose for continuous drainage.
1. Remove water tank.
2. Insert the hose into the water hose connector, ensuring it is connected properly.
3. Ensure the hose end has a suitable drainage outlet (e.g. a drain or bucket).
4. Slot the tank back in carefully.
REMOVING AND EMPTYING THE WATER TANK
―
―
When the water tank is full the red indicator light will ash and the product will make a beeping
sound. The dehumidifying function will automatically stop. Press the ON/OFF button to turn off
the dehumidier before removing the water tank.
1. Gently pull the water tank out from the back of the dehumidier.
2. Use handle to empty the water tank.
3. Once empty, slot the tank back in carefully.
CLEANING AND STORAGE
―
―
WARNING: ALWAYS TURN THE APPLIANCE OFF AND UNPLUG
THE POWER CORD FROM THE ELECTRICAL OUTLET BEFORE
HANDLING OR CLEANING IT.
CAUTION: DO NOT ALLOW WATER OR OTHER LIQUIDS TO
RUN INTO THE INTERIOR OF THE APPLIANCE, AS THIS COULD
CREATE A FIRE AND/OR ELECTRICAL HAZARD.
HANDLE
14 of 16 | English English | 15 of 16
DEFROSTING
―
―
The unit may need defrosting in temperatures less than 16°C. This will happen automatically and
last up to ten minutes. During this time, P1 will show on the display panel and the compressor will
stop collecting water but the fan will continue to run at its prior setting.
Do not switch off while the unit is defrosting.
RECYCLING AND DISPOSAL
―
―
Waste electrical and electronic products (WEEE), batteries, accumulators, and packaging
should not be disposed of with general household waste. This is to prevent possible harm to the
environment and human well-being, and to help conserve our natural resources. Most electrical
products with a plug, battery, or cable can be recycled. Contact your local council, household
waste disposal service, or the store where you purchased the product for information regarding
the collection schemes in your area.
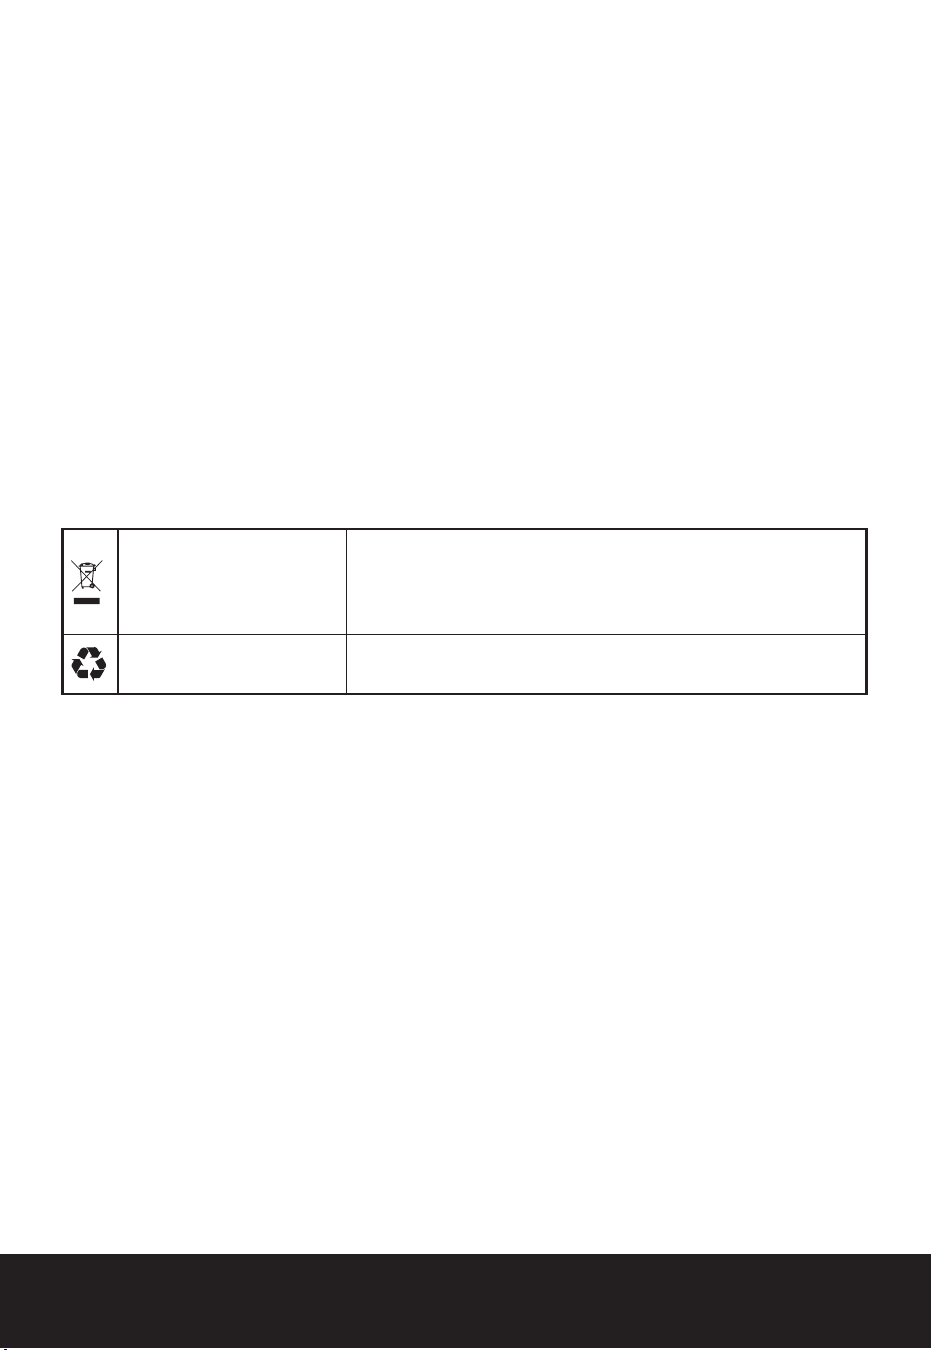
Waste Electrical and
Electronic Equipment
(WEEE)
This symbol on the product and/or packaging indicates that
Waste Electrical products (WEEE) under Directive 2012/19/
EU which governs used electrical and electronic appliances,
should not be disposed of with general household waste.
The Mobius Loop
This symbol indicates that the product or packaging is
capable of being recycled.
Take-Back Scheme
Waste electrical products (WEEE) can be sent to One Retail Group for recycling and disposal
when you purchase a new product from One Retail Group, on a like-for-like basis. For more
information on how to recycle this product please visit www.probreeze.com
The end-user of electrical and electronic products (WEEE) is responsible for separating old
batteries and lamp bulbs before they are handed over to a designated disposal and recycling
service. Waste batteries can also be disposed of in collection bins, which can be found in most
local supermarkets and household waste recycling centres.

14 of 16 | English English | 15 of 16
DEFROSTING
―
―
The unit may need defrosting in temperatures less than 16°C. This will happen automatically and
last up to ten minutes. During this time, P1 will show on the display panel and the compressor will
stop collecting water but the fan will continue to run at its prior setting.
Do not switch off while the unit is defrosting.
RECYCLING AND DISPOSAL
―
―
Waste electrical and electronic products (WEEE), batteries, accumulators, and packaging
should not be disposed of with general household waste. This is to prevent possible harm to the
environment and human well-being, and to help conserve our natural resources. Most electrical
products with a plug, battery, or cable can be recycled. Contact your local council, household
waste disposal service, or the store where you purchased the product for information regarding
the collection schemes in your area.
Waste Electrical and
Electronic Equipment
(WEEE)
This symbol on the product and/or packaging indicates that
Waste Electrical products (WEEE) under Directive 2012/19/
EU which governs used electrical and electronic appliances,
should not be disposed of with general household waste.
The Mobius Loop
This symbol indicates that the product or packaging is
capable of being recycled.
Take-Back Scheme
Waste electrical products (WEEE) can be sent to One Retail Group for recycling and disposal
when you purchase a new product from One Retail Group, on a like-for-like basis. For more
information on how to recycle this product please visit www.probreeze.com
The end-user of electrical and electronic products (WEEE) is responsible for separating old
batteries and lamp bulbs before they are handed over to a designated disposal and recycling
service. Waste batteries can also be disposed of in collection bins, which can be found in most
local supermarkets and household waste recycling centres.

One Retail Group, Ryland House,
24a Ryland Road, London, NW5 3EH, United Kingdom
EU Authorised Representative: One Retail Group EU Ltd.,
No. 1, Ent. A, St. Racho Dimchev 1, Soa, 1000, Bulgaria
Compliance Contact: [email protected]
© Copyright 2025
www.probreeze.com
