User Guide
Quality, Design and Innovation
home.liebherr.com/fridge-manuals
Contents
1 The appliance at a glance..................................... 3
1.1 Delivered contents....................................................... 3
1.2 Appliance and equipment overview.......................... 3
1.3 SmartDevice*................................................................ 3
1.4 Range of appliance use............................................... 4
1.5 Conformity..................................................................... 4
1.6 SVHC substances according to REACH regulation. 4
1.7 EPREL Database........................................................... 4
2 General safety instructions.................................. 4
3 Start-up................................................................. 6
3.1 Turning on the appliance............................................ 6
3.2 Insert the equipment................................................... 6
3.3 Starting the EasyTwist-Ice for the first time*......... 6
4 Storage.................................................................. 6
4.1 Information regarding storage................................... 6
4.2 Fridge compartment.................................................... 6
4.3 BioFresh......................................................................... 7
4.4 Freezer compartment.................................................. 7
4.5 Storage times............................................................... 7
5 Energy saving........................................................ 8
6 Use......................................................................... 8
6.1 Controls and displays.................................................. 8
6.1.1 Status display..............................................................9
6.1.2 Navigation....................................................................9
6.1.3 Operating structure.................................................... 9
6.1.4 Display symbols.......................................................... 9
6.2 Operating logic............................................................. 9
6.2.1 Activating/deactivating settings.............................9
6.2.2 Selecting function value..........................................10
6.2.3 Activating/deactivating settings...........................10
6.2.4 Selecting the setting value..................................... 10
6.2.5 Calling up the customer menu............................... 10
6.3 Appliance functions..................................................... 11
Turn off appliance..................................................... 11
6.3.2 Switching temperature zones off and on..............11
WiFi............................................................................. 11
Temperature...............................................................12
Temperature unit.......................................................13
D-Value....................................................................... 13
SuperCool................................................................... 13
SuperFrost.................................................................13
PartyMode.................................................................. 13
HolidayMode.............................................................. 13
SabbathMode............................................................13
E-Saver........................................................................14
CleaningMode............................................................14
Display brightness.................................................... 14
Door alarm..................................................................15
Entry lock....................................................................15
Info...............................................................................15
Reminder.................................................................... 15
Demo mode............................................................... 15
Reset........................................................................... 16
6.4 Error messages............................................................. 16
6.4.1 Warnings.................................................................... 16
7 Equipment............................................................. 16
7.1 Door racks..................................................................... 16
7.2 Shelves.......................................................................... 17
7.3 Split shelf...................................................................... 17
7.4 Variable bottle shelf.................................................... 17
7.5 Drawers.......................................................................... 18
7.6 Fruit & Vegetable-Safe cover..................................... 18
7.7 Humidity control........................................................... 19
7.8 Glass shelves................................................................ 19
7.9 EasyTwist-Ice*.............................................................. 19
7.10 VarioSpace.................................................................... 20
7.11 Bottle rack..................................................................... 20
7.12 Freezer packs*.............................................................. 21
8 Maintenance.......................................................... 21
8.1 FreshAir carbon filter................................................... 21
8.2 Disassembling / assembling pull-out systems...... 21
8.3 Defrosting the appliance............................................ 21
8.4 Cleaning the appliance............................................... 22
9 Customer support................................................. 23
9.1 Technical specifications............................................. 23
9.2 Operating noises.......................................................... 24
9.3 Technical faults............................................................ 24
9.4 Customer Service......................................................... 25
9.5 Rating plate................................................................... 25
10 Decommissioning.................................................. 26
11 Disposal................................................................. 26
11.1 Preparing appliance for disposal.............................. 26
11.2 Disposing of the appliance in an environmentally
friendly manner............................................................ 26
The manufacturer is constantly working to improve all types
and models. Therefore, please be aware that we reserve the
right to make changes to the shape, equipment and tech‐
nology.
Symbol
Explanation
Read instructions
Please read the information in these instruc‐
tions carefully to understand all of the benefits
of your new appliance.
2 * Depending on model and options
Symbol Explanation
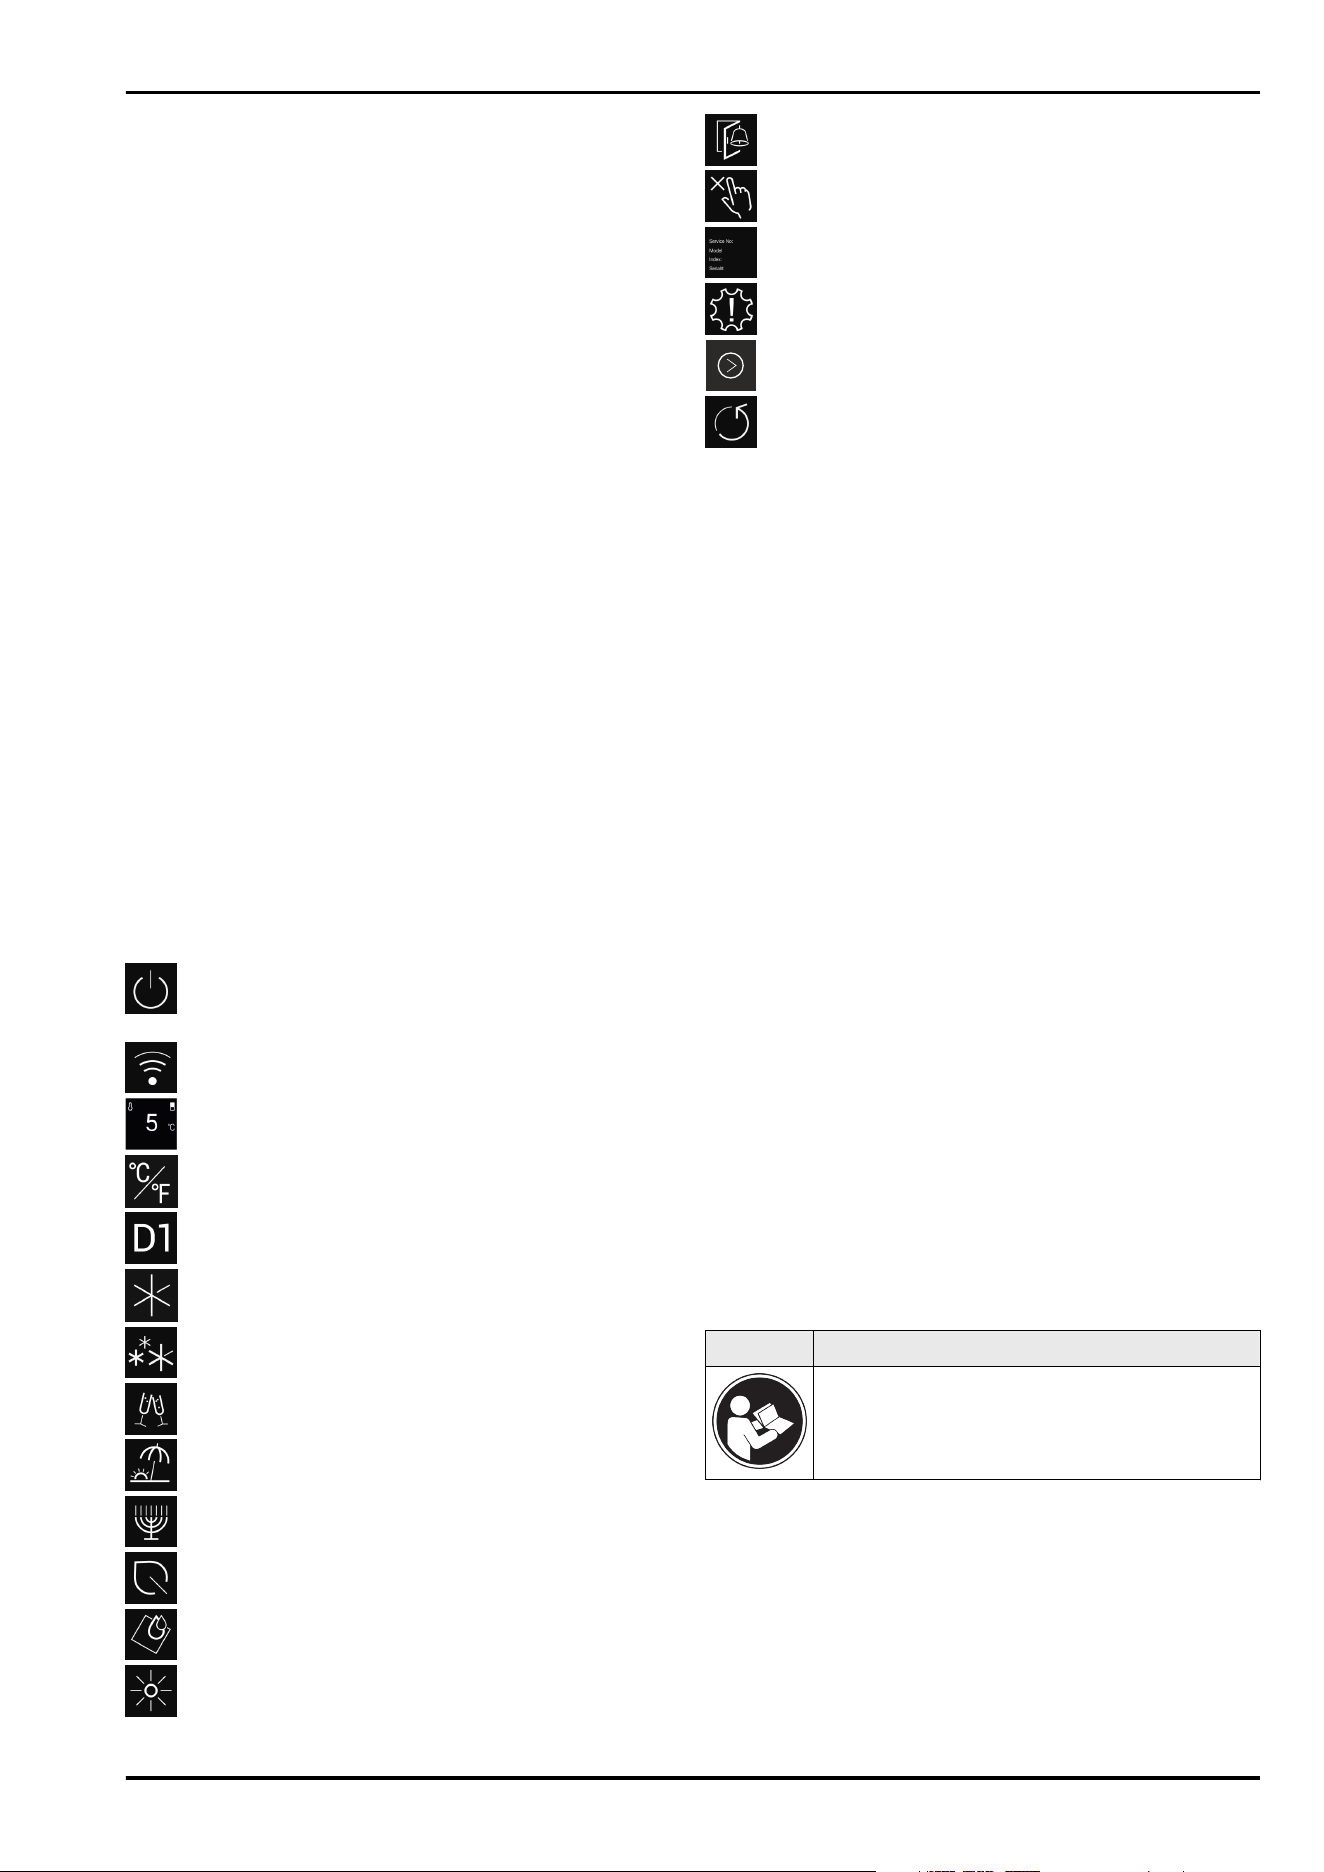
Full instructions on the internet
You can find detailed instructions on the
internet using the QR code on the front of
these instruction or by entering the service
number at home.liebherr.com/fridge-
manuals.
The service number can be found on the serial
tag:
Fig. Example illustration
Check appliance
Check all parts for transport damage. If you
have any complaints, please contact your
agent or customer service.
Differences
These instructions apply to a range of models,
so there may be differences. Sections that
apply to certain models only are indicated by
an asterisk (*).
Instructions and results
Instructions are marked with a .
Results are marked with a .
Videos
Videos about the appliances are available on
the YouTube channel of Liebherr-Hausgeräte.
These operating instructions apply to:
CBN (sf)(pc)(bb) (e)(d)(c)
52..57..(i)
CBNdmy 5723 II3
Note
If your appliance has an N in its appliance designation, it is
a NoFrost appliance.
1 The appliance at a glance
1.1 Delivered contents
Check all parts for transport damage. If you have any
complaints, please contact the retailer or customer service.
(see 9.4 Customer Service)
Delivery contains the following parts:
-
Standalone appliance
-
Equipment (depending on your model)
-
Installation parts (depending on your model)
-
“Quick Start Guide”
-
“Installation Guide”
-
Service brochure
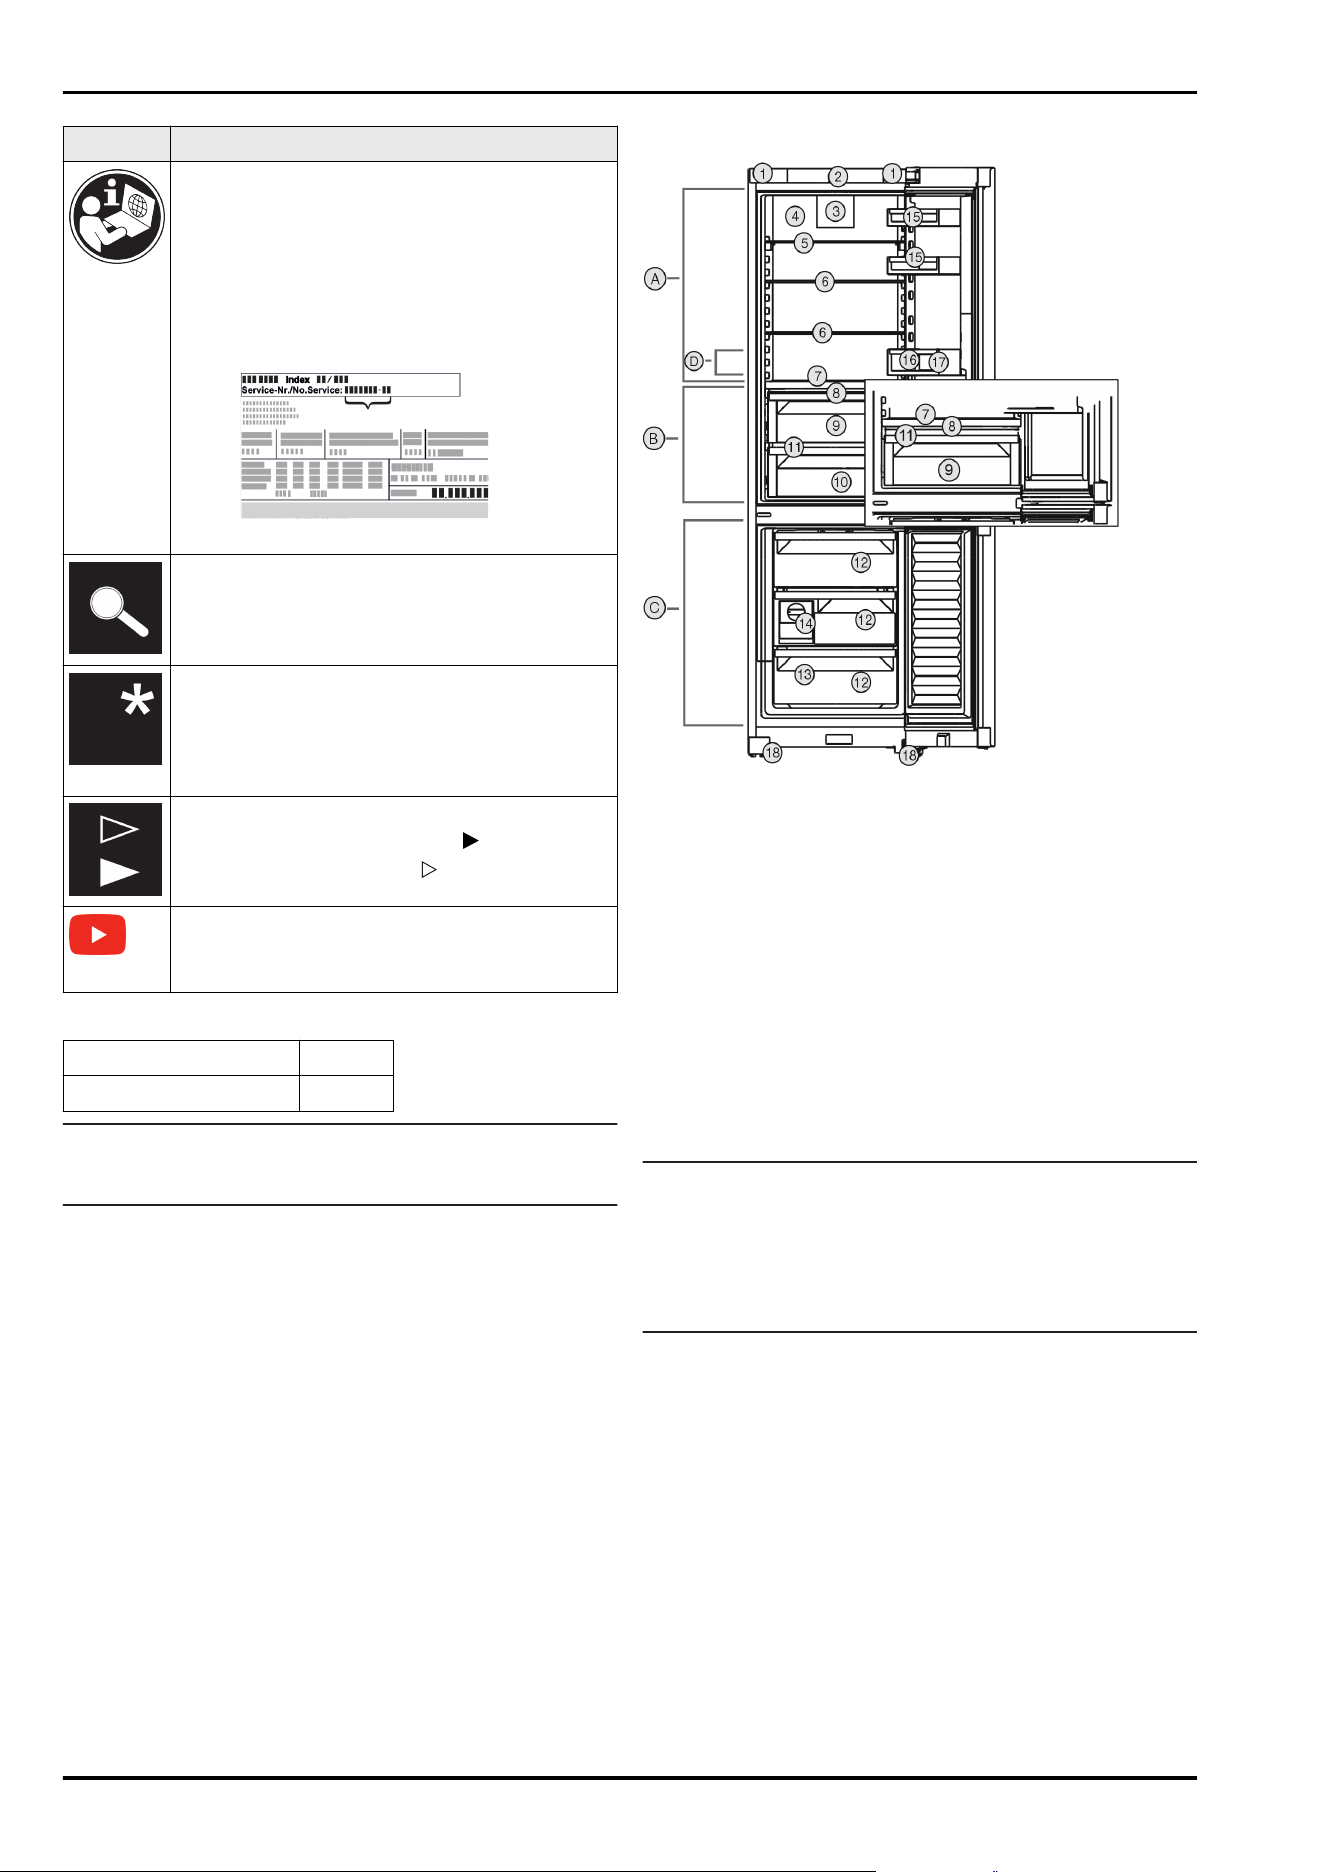
1.2 Appliance and equipment overview
Fig. 1 Illustration example
Temperature range
(A)
Fridge compartment (C) Freezing compartment
(B) BioFresh (D) Coldest zone
Features
(1)
Transport handles (10) Meat & Dairy-Safe*
(2) Control elements (11) Drain hole
(3) Fan with FreshAir acti‐
vated charcoal filter
(12) Freezer drawer
(4) Dry rear panel (13) Serial tag
(5) Split shelf (14) EasyTwist-Ice*
(6) Shelf (15) Can rack
(7) Variable bottle shelf (16) Bottle shelf
(8) Lid for Fruit & Vege‐
table-Safe
(17) Bottle rack
(9) Fruit & Vegetable-Safe (18) Adjustable feet (front)
Note
u
The shelves, drawers, and baskets are arranged for
optimal energy efficiency in the factory configuration.
However, changes to the arrangement within the given
insertion options – for example the arrangement of
shelves in the fridge compartment – have no effect on
energy consumption.
1.3 SmartDevice*
SmartDevice is the networking solution for your fridge-
freezer.
If your appliance is SmartDevice-enabled or compatible, you
can quickly and easily connect your appliance to your WiFi.
With the SmartDevice app, you can operate your appliance
from a mobile device. Additional functions and setting
options are available in the SmartDevice app.
SmartDevice-
enabled appli‐
ance:*
Your appliance is capable of being a
SmartDevice. To be able to connect
your device to WiFi, you need to
download the SmartDevice app.*
The appliance at a glance
* Depending on model and options 3
More information
about SmartDe‐
vice:
smartdevice.liebherr.com
Downloading the
SmartDevice app:
After installing and configuring the
SmartDevice app, you can connect
your appliance to the WiFi using the
SmartDevice app and the WiFi appli‐
ance function (see WiFi) .
Note
The SmartDevice function is not available in the following
countries: Russia, Belarus, Kazakhstan.
1.4 Range of appliance use
Normal use
The appliance is only suitable for cooling food
for residential or other similar environments.
This includes the following types of uses
-
in staff kitchens, bed and breakfasts,
-
by guests in country homes, hotels, motels
and other types of accommodations,
-
for catering and similar wholesale services.
The appliance is not suitable as a built-in
unit;
All other types of uses are not permitted.
Foreseeable misuse
The following uses are specifically prohibited:
-
Storage and cooling of medication, blood
plasma, laboratory preparations or similar
substances and products in accordance
with the Medical Device Directive
2007/47/EC
-
Use in areas at risk of explosion
Incorrect appliance use can cause damage to
the stored products or cause them to spoil.
Climate ratings
The appliance is set to operate within
specific ambient temperature limits
according to its climate rating The climate
rating for your appliance is printed on the
rating plate
Note
u
To guarantee trouble-free operation,
comply with the indicated ambient temper‐
atures.
Climate rating for ambient temperatures from
SN 10 °C to 32 °C
N 16 °C to 32 °C
ST 16 °C to 38 °C
T 16 °C to 43 °C
SN-ST 10 °C to 38 °C
SN-T 10 °C to 43 °C
1.5 Conformity
The refrigerant circuit has been tested for leaks. The appli‐
ance complies with the applicable safety regulations and
with the corresponding directives.
For the EU
market:*
The appliance complies with directive
2014/53/EU.*
For the GB
market:*
The appliance complies with the Radio
Equipment Regulations 2017 SI 2017
No. 1206.*
The full text of the EU Declaration of Conformity is available
on the following website: www.Liebherr.com
The BioFresh compartment meets the requirements of a
cold storage compartment as set out in DIN EN 62552:2020.
1.6 SVHC substances according to
REACH regulation
You can check whether your appliance contains SVHC
substances according to REACH regulation at the following
link: home.liebherr.com/de/deu/de/liebherr-erleben/nach‐
haltigkeit/umwelt/scip/scip.html
1.7 EPREL Database
Details about energy labeling and ecodesign requirements
will be available on the European product database (EPREL)
from March 1, 2021. You can access the product database at
the following link: https://eprel.ec.europa.eu/ You will be
asked to enter the model ID. You can find the model ID on
the type plate.
2 General safety instructions
Please keep these operating instructions in a
safe place so you can refer back to them at
any time.
If you pass the appliance on, please hand
these operating instructions to the new
owner.
Read these operating instructions before use
in order to use the appliance safely and
correctly. Follow the instructions, safety
instructions and warning messages included
at all times. They are important for ensuring
you can operate and install the appliance
safely and without any problems.
Dangers for the user:
-
This appliance can be operated by children
as well as by persons with reduced phys‐
General safety instructions
4 * Depending on model and options
ical, sensory or mental capabilities or lack
of experience and knowledge if they are
supervised or have been instructed in the
safe use of the appliance and understand
the associated risks. Children must not play
with the appliance. Cleaning and user
maintenance must not be performed by
children unless they are supervised. Chil‐
dren between the ages of 3 and 8 may load
and unload the appliance. Children under
the age of 3 must be kept away from the
appliance if they are not constantly super‐
vised.
-
The socket must be easily accessible so
that the appliance can be disconnected
quickly from the electricity in an emer‐
gency. It must not be located in the area
behind the appliance.
-
When disconnecting the appliance from the
outlet, always take hold of the plug. Do not
pull on the cable.
-
Disconnect the power plug or switch off
the power if a fault occurs.
-
Do not damage the mains power line. Do
not operate the appliance from a defective
mains power line.
-
Repairs and work on the appliance may
only be carried out by after sales service or
other specifically trained qualified
personnel.
-
The appliance should only be assembled,
connected and disposed of in accordance
with the instructions.
Risk of fire:
-
The refrigerant contained within the appli‐
ance (specifications on the rating plate) is
environmentally friendly, but flammable.
Leaking refrigerant can ignite.
•
Do not damage the pipes of the refrig‐
erant circuit.
•
Do not handle ignition sources inside the
appliance.
•
Do not use electrical devices inside the
appliance (e.g. steam cleaners, heaters,
ice cream makers, etc.).
•
If refrigerant leaks: Remove naked flames
or ignition sources located near the area
of the leak. Air the room well. Contact the
customer service department.
-
Do not store explosive materials or spray
cans with flammable propellants, such as
e.g. butane, propane, pentane, etc. in the
appliance. You can recognize such spray
cans by the printed contents or a flame
symbol. Any leaking gasses can be ignited
by electrical components.
-
Keep lit candles, lamps and other objects
with naked flames away from the appliance
so they do not cause a fire.
-
Alcoholic beverages or other containers
holding alcohol must always be tightly
sealed for storage purposes. Any leaking
alcohol can be ignited by electrical compo‐
nents
Tipover hazard:
-
Do not stand or climb on the base, drawers,
doors, etc. This applies in particular to chil‐
dren.
Risk of food poisoning:
-
Do not consume food that has passed its
best before date.
Danger of frostbite, feelings of numbness
and pain:
-
Avoid prolonged skin contact with cold
surfaces or chilled/frozen food or take
protective measures, e.g. wear gloves.
Risk of injury and damage:
-
Hot steam may lead to injuries. Do not use
any electrical heating or steam cleaning
equipment, naked flames or defrosting
sprays for defrosting
-
Do not remove ice with sharp objects
Risk of crushing:
-
Do not reach into the hinge when opening
and closing the door. Fingers may get
trapped.
Symbols on the device:
The symbol can be on the compressor. It
refers to the oil in the compressor and
refers to the following danger: Can be
lethal if swallowed or inhaled. This notice
only applies for recycling. There is no
danger during normal operation.
The symbol is located on the compressor
and indicates the danger of inflammable
materials. Do not remove the label.
This label or a similar one may be located
on the rear of the appliance. This label indi‐
cates that there are vacuum insulation
panels (VIP) or perlite panels in the door
and/or housing. This notice only applies for
recycling. Do not remove the label.
Observe the warning messages and other
detailed information in the other sections:
DANGER
indicates a hazardous situation,
which if not avoided, will result in
death or serious injury.
General safety instructions
* Depending on model and options 5
WARNING indicates a hazardous situation,
which if not avoided, could result
in death or serious injury.
CAUTION indicates a hazardous situation,
which if not avoided, will result in
minor or moderate injury.
NOTICE indicates a hazardous situation,
which if not avoided, could result
in damage to property.
Note indicates useful advice and tips.
3 Start-up
3.1 Turning on the appliance
Make sure that the following requirements are met:
q
Appliance is set up and connected according to installa‐
tion instructions.
q
All adhesive strips, adhesive and protective films, as well
as transport safety devices in and on the appliance are
removed.
q
All advertising material has been removed from the
drawers.
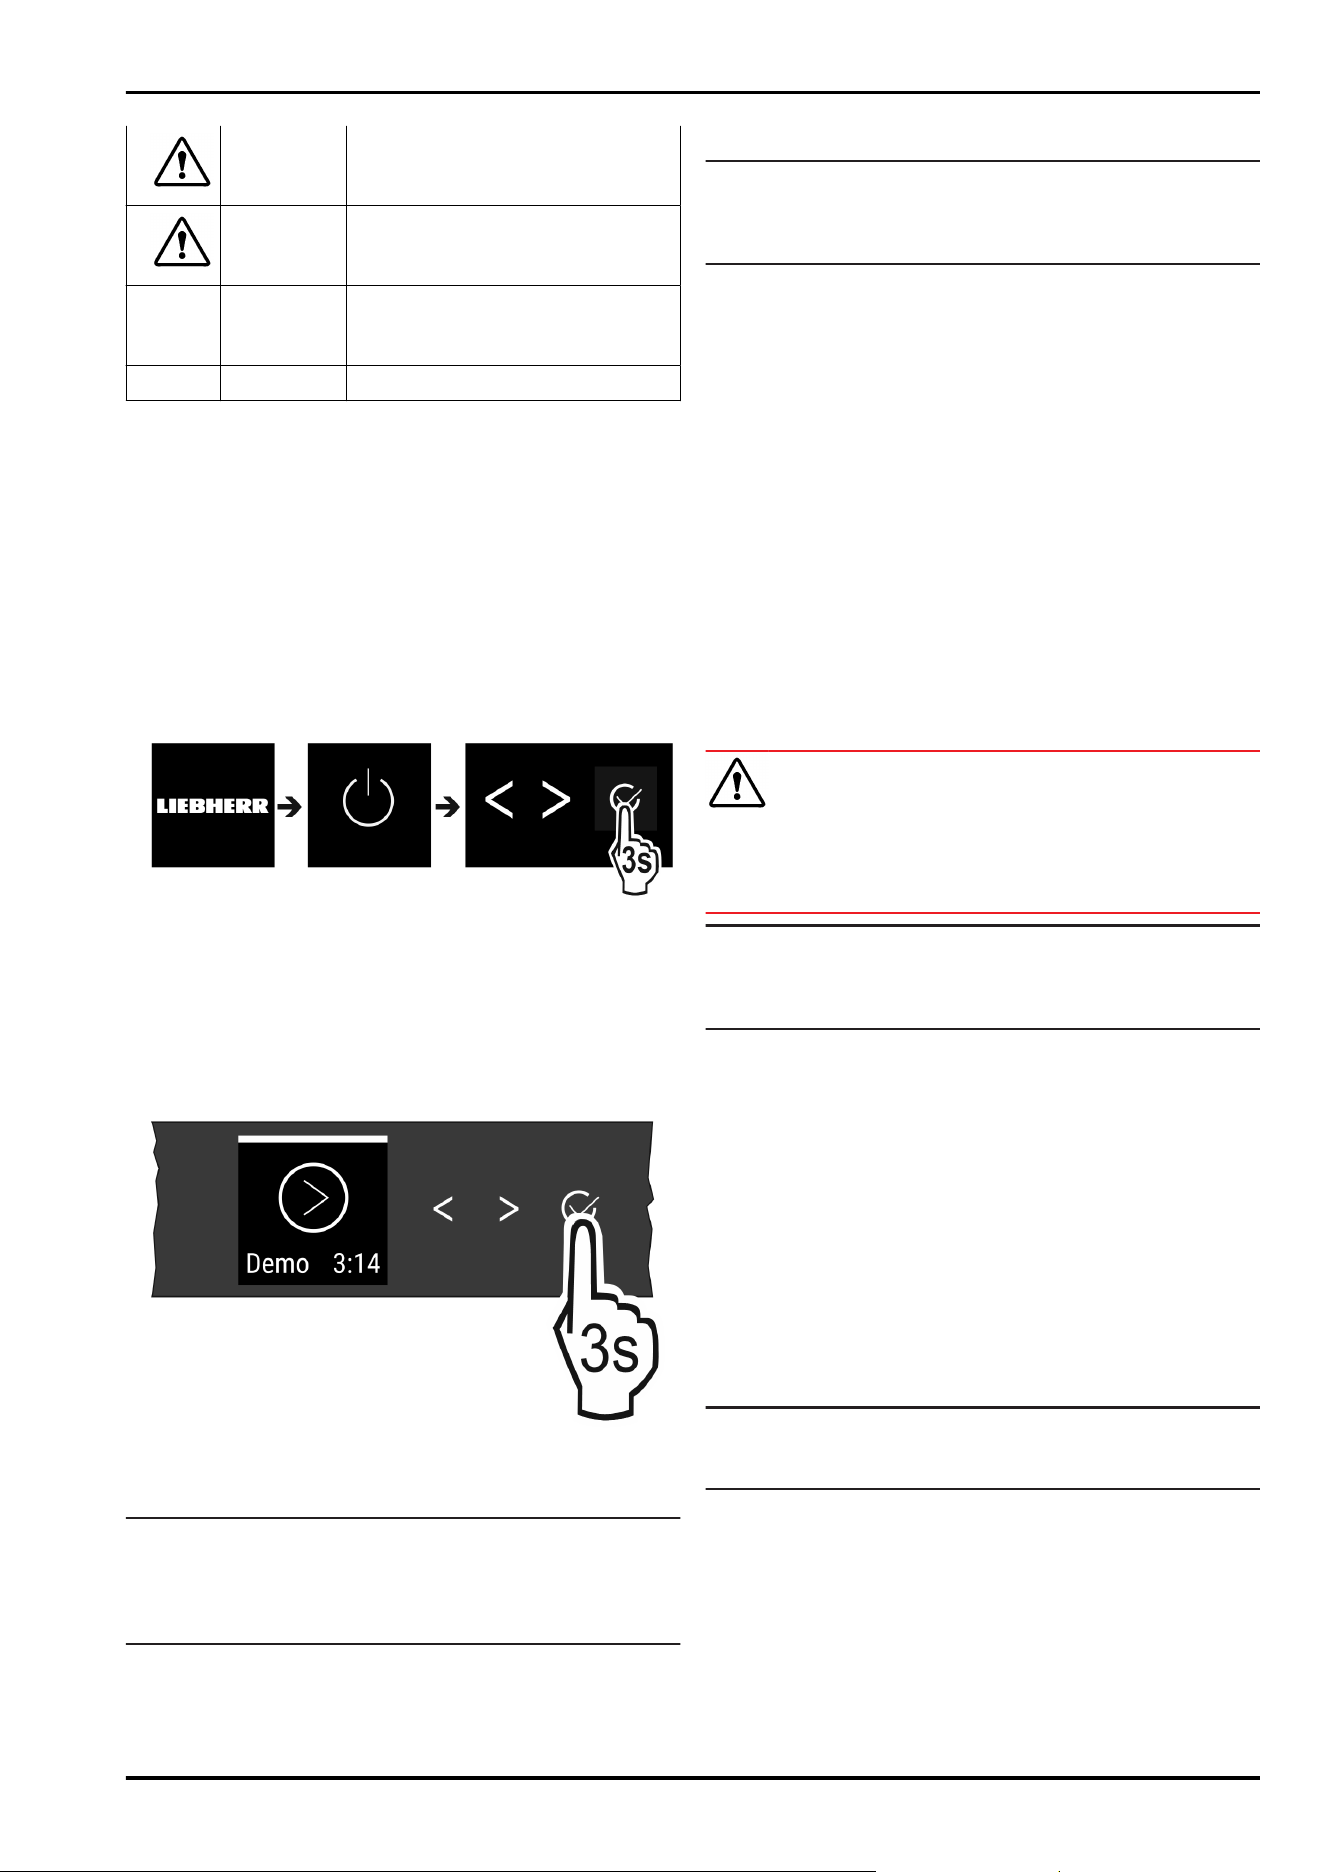
Fig. 2
u
Switch on the appliance using the control panel next to
the display.
w
The status display appears.
The appliance starts in DemoMode:
If the appliance starts in DemoMode, you can deactivate
DemoMode within the next 5 minutes.
Fig. 3
u
Press Confirm next to the display for 3 seconds.
w
DemoMode is deactivated.
Note
The manufacturer recommends:
u
Place the food inside: Wait for around 6 hours until the
set temperature is reached.
u
Store frozen foods at -18 °C or colder.
3.2 Insert the equipment
Note
Accessories can be purchased from the Liebherr-Hausg‐
eräte store at home.liebherr.com/shop/de/deu/
zubehor.html.
u
Insert the supplied equipment to help you make the most
of the appliance.
3.3 Starting the EasyTwist-Ice for the
first time*
If your appliance is equipped with EasyTwist-Ice, you must
clean the EasyTwist-Ice before using it for the first time.
Make sure that the following requirements are fulfilled:
q
The appliance is properly connected.
u
Clean the EasyTwist-Ice. (see 8.4.5 Cleaning the Easy‐
Twist-Ice*)
u
Fill the water tank.
4 Storage
4.1 Information regarding storage
WARNING
Danger of fire
u
Do not use electrical appliances inside the food storage
compartments of the appliance, unless they are of the
type recommended by the manufacturer.
Note
Insufficient ventilation results in an increase in energy
consumption and reduction of the refrigerating performance
u
Always keep the air slots unobstructed.
Observe the following specifications for storage:
-
Keep the air vents on the inside of the rear wall free.
-
In the freezer compartment: Package food properly.
-
Package or cover foods that readily take on or give off
odors or taste in closed containers.
-
Package raw meat or fish in clean, closed containers.
This will prevent meat or fish from touching or dripping
onto other food.
-
Keep liquids in closed containers.
-
Leave space between goods to ensure good air circula‐
tion.
-
Store food according to the instructions on the pack‐
aging.
-
Always observe the best-before date indicated on the
packaging.
Note
Failure to follow these guidelines can lead to foodstuffs
spoiling.
4.2 Fridge compartment
The air circulation in the appliance creates different temper‐
ature zones. You will find the different temperature zones in
the appliance and equipment overview. (see 1.2 Appliance
and equipment overview)
4.2.1 Arranging your food properly
u
Upper area and door: Store butter, cheese, canned food
and tubes.
Start-up
6 * Depending on model and options
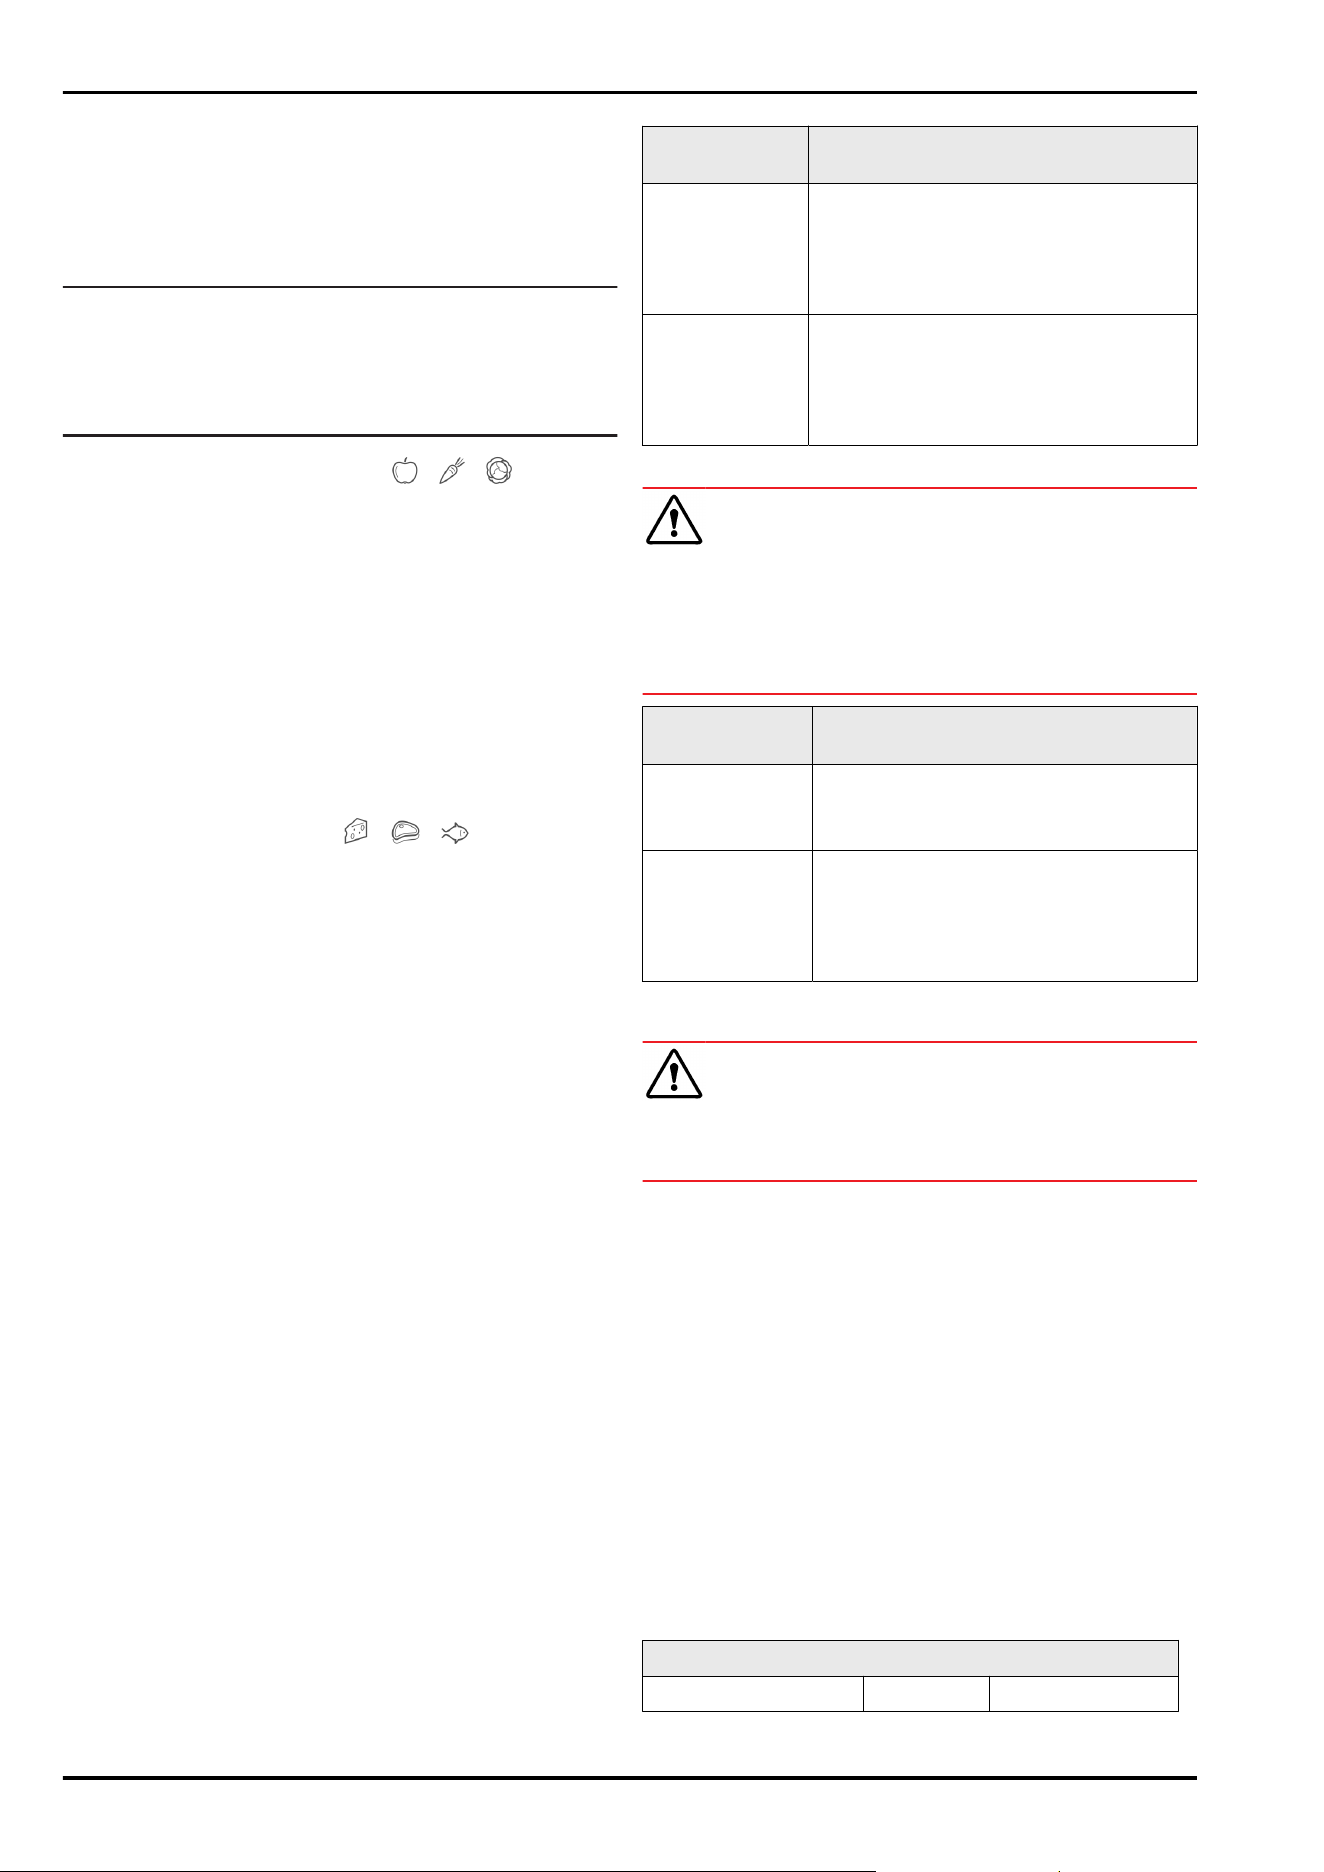
u
Coldest temperature zone: Store perishable foods such
as pre-cooked meals.
4.3 BioFresh
BioFresh will extend the storage time for some fresh foods
compared to traditional refrigeration.
Note
If the temperatures drop below 0 °C foods may freeze to
each other.
u
Store cold-sensitive produce such as cucumbers,
eggplants, zucchinis and tropical fruit in the fridge
compartment.
4.3.1 Fruit & Vegetable safe
This safe creates a storage climate of close to 0 °C. The
tight lid ensures constant levels of humidity. This storage
climate is suitable for storing unpackaged food with high
intrinsic moisture (for example, lettuce, vegetables, fruit).
The humidity in the compartment depends on the moisture
content of the chilled goods placed in it, and also depends
on how often the compartment is opened. You can regulate
the humidity level. (see 7.7 Humidity control)
Arranging your food properly
u
Store unpackaged fruit and vegetables.
If the humidity is too high:
u
Regulate the humidity. (see 7.7 Humidity control)
4.3.2 Meat & Dairy safe
This safe creates a storage climate of close to 0 °C. This
storage climate is suitable for more sensitive foods (e.g.
dairy products, meat, fish, sausage).
Arranging your food properly
u
Store dry or packaged food.
4.4 Freezer compartment
Here, a dry, frosty storage climate is created at -18 °C. The
frosty storage climate is suitable for storing frozen food for
several months, for making ice cubes or freezing fresh food.
4.4.1 Freezing food
Freezing quantity
The maximum amount of fresh food that you can freeze
within 24 hours is specified on the type plate (see 9.5 Rating
plate) under “Freezing capacity ... kg/24h.”
To ensure that food quickly freezes through, adhere to the
following quantities per package:
-
Fruit and vegetables up to 1 kg
-
Meat up to 2.5 kg
Freezing food using SuperFrost
Depending on how much food you have to freeze, you can
activate SuperFrost (see SuperFrost) before freezing to
achieve lower freezing temperatures.
u
Activate SuperFrost if the amount of food you have to
freeze is more than approx. 2 kg.
The time at which you activate SuperFrost depends on the
amount of food you have to freeze:
Freezing quan‐
tity
Time at which you should activate
SuperFrost
Small amount of
food to freeze
Activate SuperFrost about 6 hours
before freezing.
You can place the food in the freezer as
soon as the appliance automatically
deactivates SuperFrost.
Maximum
amount of food
to freeze
Activate SuperFrost about 24 hours
before freezing.
You can place the food in the freezer as
soon as the appliance automatically
deactivates SuperFrost.
Arranging your food properly
CAUTION
Risk of injury from broken glass!*
Bottles and cans with beverages can burst during freezing.
This applies in particular to carbonated beverages.
u
Only freeze bottles and cans with beverages if you have
activated the BottleTimer function in the SmartDevice
app.
Freezing quan‐
tity
Arranging your food properly
Small amount of
food to freeze
Place packaged food in the top drawer.
If possible, place groceries at the back
of the drawer near the rear wall.
Maximum
amount of food
to freeze
Distribute packaged groceries
throughout all drawers, but do not place
any groceries in the bottom drawer.
If possible, place groceries at the back
of the drawer near the rear wall.
4.4.2 Defrosting food
WARNING
Danger of food poisoning!
u
Do not re-freeze defrosted food.
u
Use defrosted foodstuff as quickly as possible.
You can defrost food in several ways:
-
In the fridge compartment
-
In the microwave
-
In the oven/fan-assisted oven
-
At room temperature
u
Take out only as much food as necessary.
4.5 Storage times
The storage times given are guidelines
Food with a “use by” date must still be consumed by the
date indicated on the package
4.5.1 Fridge
The best-before date stated on the packaging applies.
4.5.2 BioFresh
Guideline storage times for the Meat & Dairy-Safe
Butter at 1 °C up to 90 days
Storage
* Depending on model and options 7

Guideline storage times for the Meat & Dairy-Safe
Hard cheese at 1 °C up to 110 days
Milk at 1 °C up to 12 days
Sausage, cold cuts at 1 °C up to 8 days
Poultry at 1 °C up to 6 days
Pork at 1 °C up to 6 days
Beef at 1 °C up to 6 days
Game at 1 °C up to 6 days
Note
u
Note that higher-protein foods spoil more quickly So,
shellfish and crustaceans perish faster than fish, and fish
perishes faster than meat.
Guideline storage times for the Fruit & Vegetable-Safe
Vegetables, lettuce
Artichokes at 1 °C up to 14 days
Celery at 1 °C up to 28 days
Cauliflower at 1 °C up to 21 days
Broccoli at 1 °C up to 13 days
Endives at 1 °C up to 27 days
Mâche at 1 °C up to 19 days
Peas at 1 °C up to 14 days
Kale at 1 °C up to 14 days
Carrots at 1 °C up to 80 days
Garlic at 1 °C up to 160 days
Cabbage turnip at 1 °C up to 14 days
Iceberg lettuce at 1 °C up to 13 days
Herbs at 1 °C up to 13 days
Leeks at 1 °C up to 29 days
Mushrooms at 1 °C up to 7 days
Radishes at 1 °C up to 10 days
Brussels sprouts at 1 °C up to 20 days
Asparagus at 1 °C up to 18 days
Spinach at 1 °C up to 13 days
Savoy cabbage at 1 °C up to 20 days
Fruit
Apricots at 1 °C up to 13 days
Apples at 1 °C up to 80 days
Pears at 1 °C up to 55 days
Blackberries at 1 °C up to 3 days
Dates at 1 °C up to 180 days
Strawberries at 1 °C up to 7 days
Figs at 1 °C up to 7 days
Blueberries at 1 °C up to 9 days
Raspberries at 1 °C up to 3 days
Red currants at 1 °C up to 7 days
Cherries, sweet at 1 °C up to 14 days
Guideline storage times for the Fruit & Vegetable-Safe
Kiwi at 1 °C up to 80 days
Peaches at 1 °C up to 13 days
Plums at 1 °C up to 20 days
Cranberries at 1 °C up to 60 days
Rhubarb at 1 °C up to 13 days
Gooseberries at 1 °C up to 13 days
Grapes at 1 °C up to 29 days
4.5.3 Freezer
Guidelines for storage periods for various foods
Ice cream at -18 °C 2 to 6 months
Sausage, ham at -18 °C 2 to 3 months
Bread, bakery prod‐
ucts
at -18 °C 2 to 6 months
Game, pork at -18 °C 6 to 9 months
Fish, fatty at -18 °C 2 to 6 months
Fish, lean at -18 °C 6 to 8 months
Cheese at -18 °C 2 to 6 months
Poultry, beef at -18 °C 6 to 12 months
Vegetables, fruit at -18 °C 6 to 12 months
5 Energy saving
-
Always ensure good ventilation. Do not obstruct ventila‐
tion openings or grilles.
-
Never block air slits in the fan.
-
Do not install the appliance in direct sunlight or next to a
stove, heater or similar heat source.
-
Energy consumption depends on installation conditions
such as the ambient temperature (see 1.4 Range of appli‐
ance use) . A warmer ambient temperature can increase
the energy consumption.
-
Avoid opening the appliance door for any longer then
necessary
-
The lower the temperature is set the higher the energy
consumption.
-
Sort your food items: home.liebherr.com/food.
-
All food stored in the appliance should be well wrapped
and covered. This prevents frost buildup.
-
Only take food out for as long as necessary so that it
does not get too warm.
-
Insertion of warm foods: first let the food cool down to
room temperature.
-
Defrost frozen food in the fridge
-
For longer periods of absence, use HolidayMode (see
HolidayMode) .
6 Use
6.1 Controls and displays
The display provides a quick overview of the temperature
setting and the status of functions and settings. You can
control the functions and settings either by deactivating/
activating them or by selecting a value.
Energy saving
8 * Depending on model and options
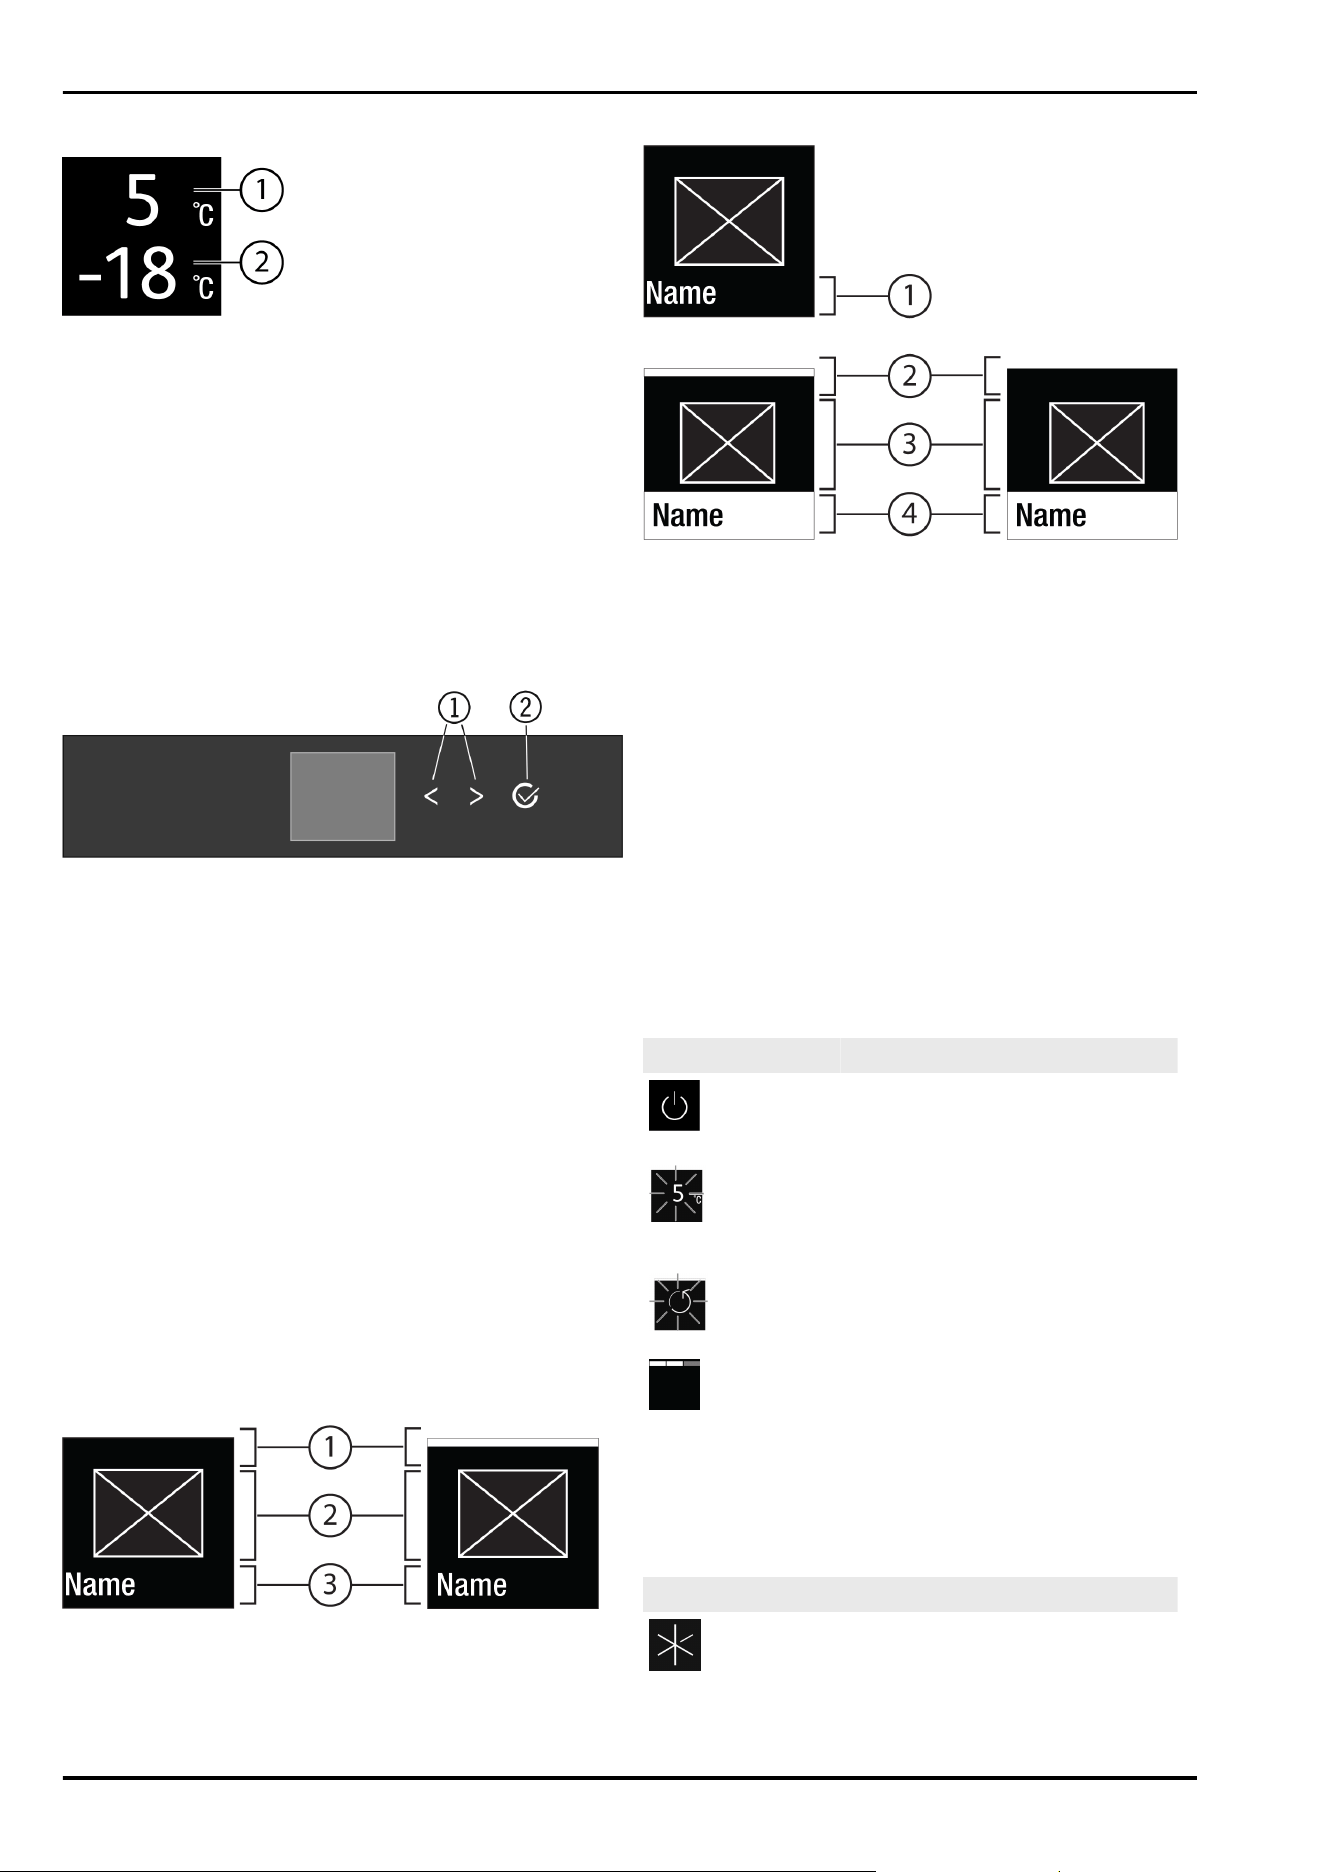
6.1.1 Status display
Fig. 4
(1) Fridge compartment
temperature display
(2) Freezer compartment
temperature display
The Status display shows the set temperatures and is the
home display. From there, you can navigate to the options
and settings.
6.1.2 Navigation
Navigate in the menu to access the individual functions. An
audible signal sounds after confirming a function or setting.
If no selection is made after 10 seconds the display
switches to the Status display.
The appliance is operated with the buttons next to the
display.
Fig. 5
(1)
Left/right navigation
arrow
(2) Confirm
Left/right navigation arrow Fig. 5 (1):
-
Navigating in the menu. After the last menu page, it goes
back to the first one.
Confirm Fig. 5 (2):
-
Activating/deactivating a function.
-
Opening a submenu.
-
Confirming a selection. After confirmation the display
switches back to the menu.
Back to the Status display: in the fastest possible manner:
-
Close and open the door.
-
or wait 10 seconds. The display changes to the Status
display.
6.1.3 Operating structure
The controls are explained by a template. The display
changes depending on the function or settings.
Menu without submenu
Fig. 6
(1)
Status deactivated /
status activated white
bar in the top area
(3) Menu: Function name or
menu: Setting name
(2) Symbol or selected
value
Menu with submenu
Fig. 7
(1)
Menu: Function name
or menu: Setting name
(3) Symbol or selected value
(2) Status (4) Submenu: Function name
or submenu: Setting
name
(2) Off / On
You can navigate as follows:
-
Navigate with the left/right navigation arrow Fig. 5 (1).
-
Press Confirm Fig. 5 (2) to go to the submenu Fig. 7 (4).
•
Navigate with the left/right navigation arrow Fig. 5 (1).
•
Set new level: Press Confirm Fig. 5 (2) to select a dese‐
lected value Fig. 6 (1).
•
Back to menu: Press Confirm Fig. 5 (2) to select the
selected value Fig. 6 (2).
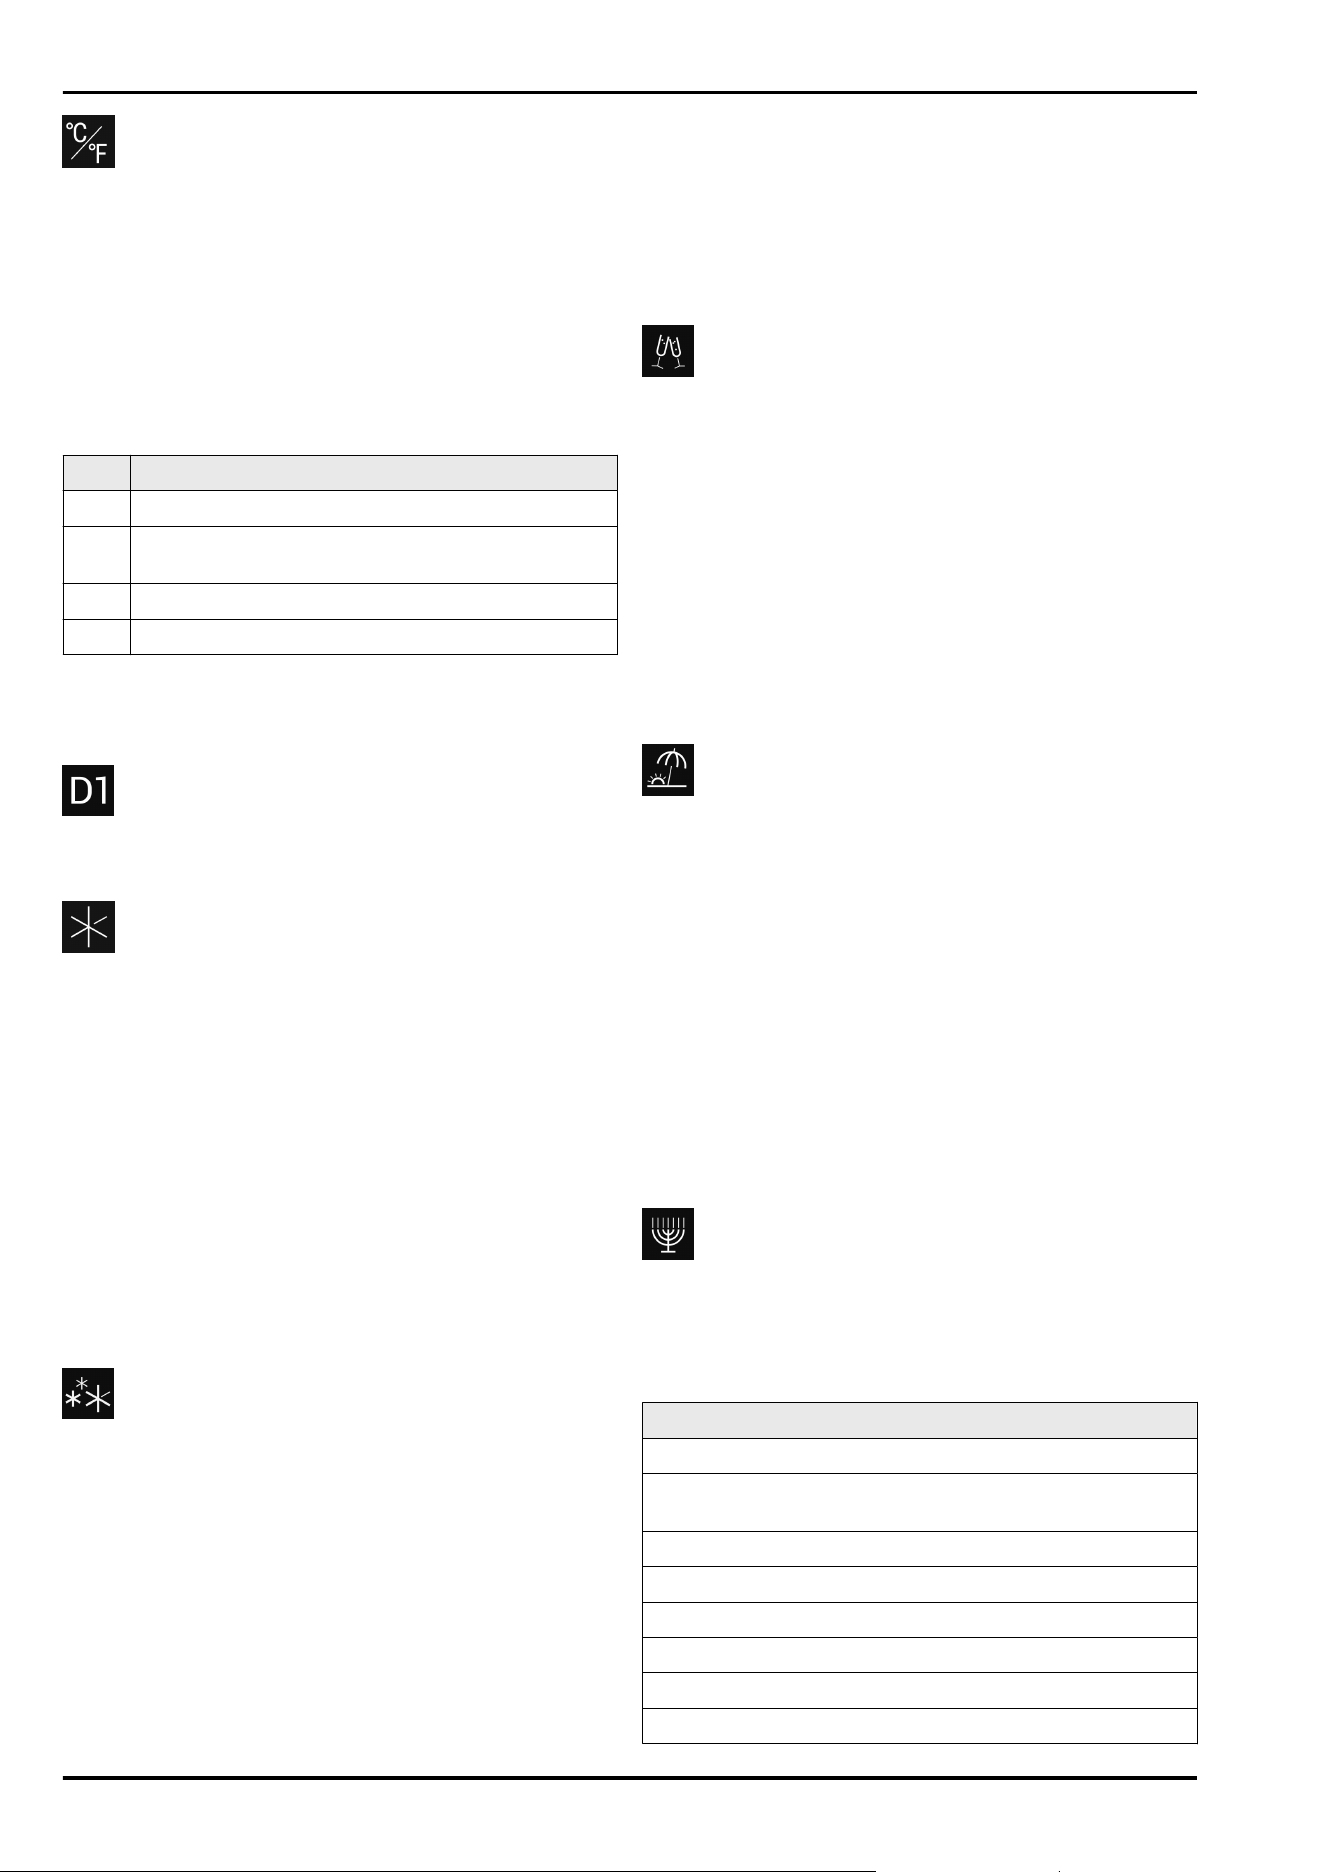
6.1.4 Display symbols
The display symbols provide information about the current
appliance status.
Symbol
Appliance status
Standby
The appliance or temperature zone
is turned off.
Flashing number
Appliance is working. Temperature
flashes, until the set value is
reached.
Flashing symbol
Appliance is working. Setting is
made.
Bar grows steadily
Function is activated.
6.2 Operating logic
6.2.1 Activating/deactivating settings
You can activate/deactivate the following functions:
Symbol
Function
SuperCool
x
Use
* Depending on model and options 9
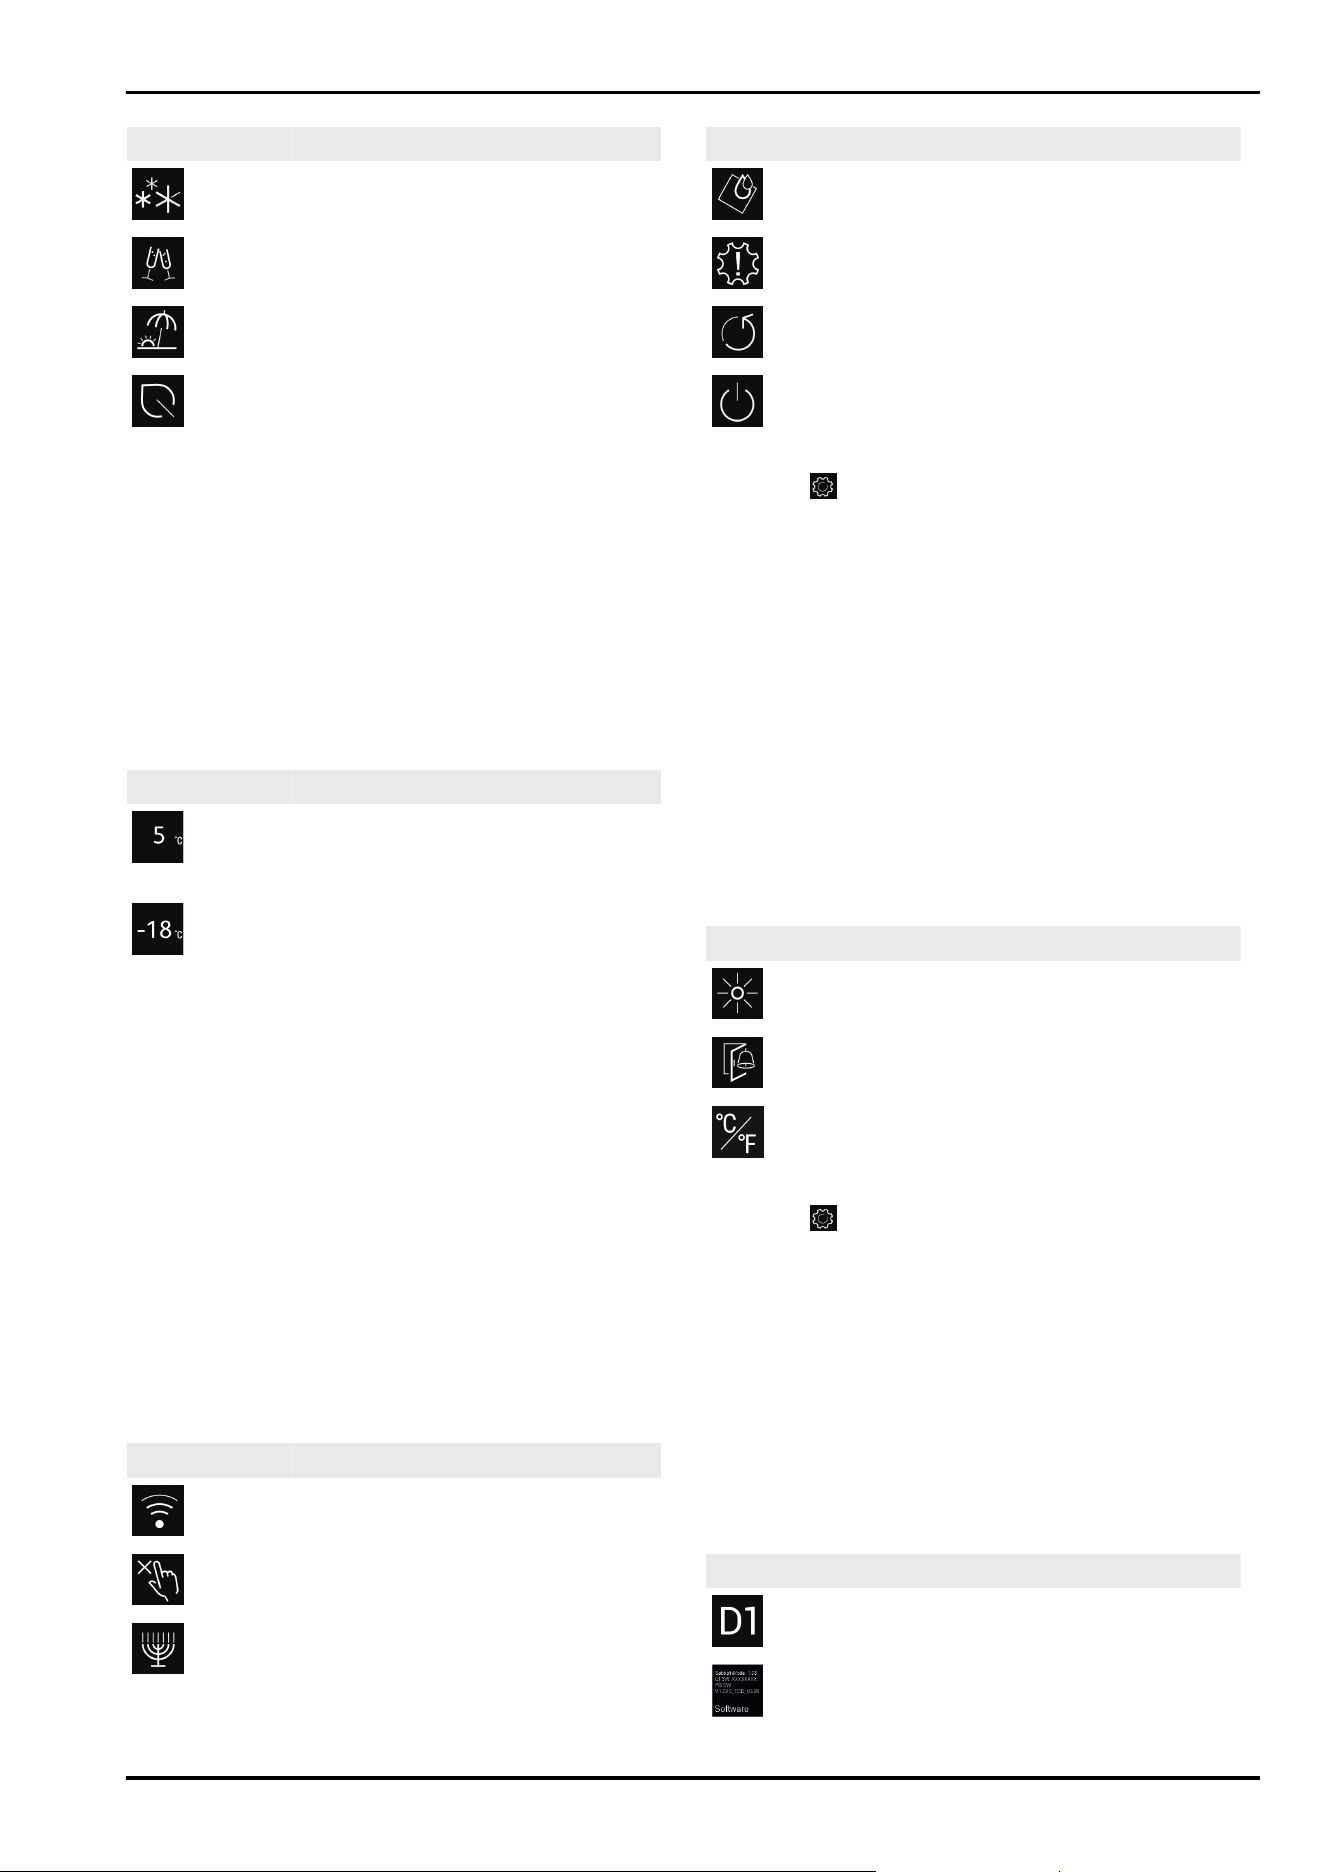
Symbol Function
SuperFrost
x
PartyMode
x
HolidayMode
E-Saver
x
When function is on, the appliance works harder. This
means appliance noise when operating may be louder for a
short while, and more energy will be consumed.
u
Press the navigation arrows Fig. 5 (1) repeatedly until the
function is displayed.
u
Press Confirm Fig. 5 (2).
w
You hear the confirmation tone.
w
Status appears in the menu.
w
Function is on/off.
6.2.2 Selecting function value
With the following functions you can set a value in the
submenu:
Symbol
Function
Cool:
Setting the temperature
Turn on/off the temperature zone
Freeze:
Setting the temperature
Switch the appliance on/off
u
Press the navigation arrows Fig. 5 (1) repeatedly until the
function is displayed.
u
Press Confirm Fig. 5 (2).
u
Select the setting value with the navigation arrows
Fig. 5 (1).
Setting the temperature
u
Press Fig. 5 (2) confirm.
w
You hear the confirmation tone.
w
Status: on Fig. 6 (1) appears briefly in the submenu
Fig. 7 (4).
w
Display switches back to the menu.
Switching the temperature zone on/off
u
Press Confirm for 3 seconds.
w
You hear the confirmation tone.
w
Display returns to the status screen.
6.2.3 Activating/deactivating settings
You can activate/deactivate the following settings:
Symbol
Setting
WiFi
1
Entry lock
2
SabbathMode
2
Symbol Setting
Cleaning Mode
2
Reminders
1
Reset
2
Switch off
2
u
Press the navigation arrows Fig. 5 (1) repeatedly until the
settings
are displayed.
u
Press Confirm Fig. 5 (2).
u
Press the navigation arrows Fig. 5 (1) repeatedly until the
desired setting is displayed.
1
Activate setting (short press)
u
Press Confirm Fig. 5 (2).
w
You hear the confirmation tone.
w
Status appears in the menu.
w
Setting is activated / deactivated.
2
Activate setting (long press)
u
Press Confirm Fig. 5 (2) for 3 seconds.
w
You hear the confirmation tone.
w
Status appears in the menu.
w
Display changes.
6.2.4 Selecting the setting value
With the following settings you can set a value in the
submenu:
Symbol
Settings
Brightness
Door alarm
Temp. unit
u
Press the navigation arrows Fig. 5 (1) repeatedly until the
settings are displayed.
u
Press Confirm Fig. 5 (2).
u
Press the navigation arrows Fig. 5 (1) repeatedly until the
desired setting is displayed.
u
Press Confirm Fig. 5 (2).
u
Select the setting value with the navigation arrows
Fig. 5 (1).
u
Press Confirm Fig. 5 (2).
w
You hear the confirmation tone.
w
Status appears briefly in the submenu.
w
Display switches back to the menu.
6.2.5 Calling up the customer menu
The customer menu provides the following settings:
Symbol
Function
D-Value
1
Software
Use
10 * Depending on model and options
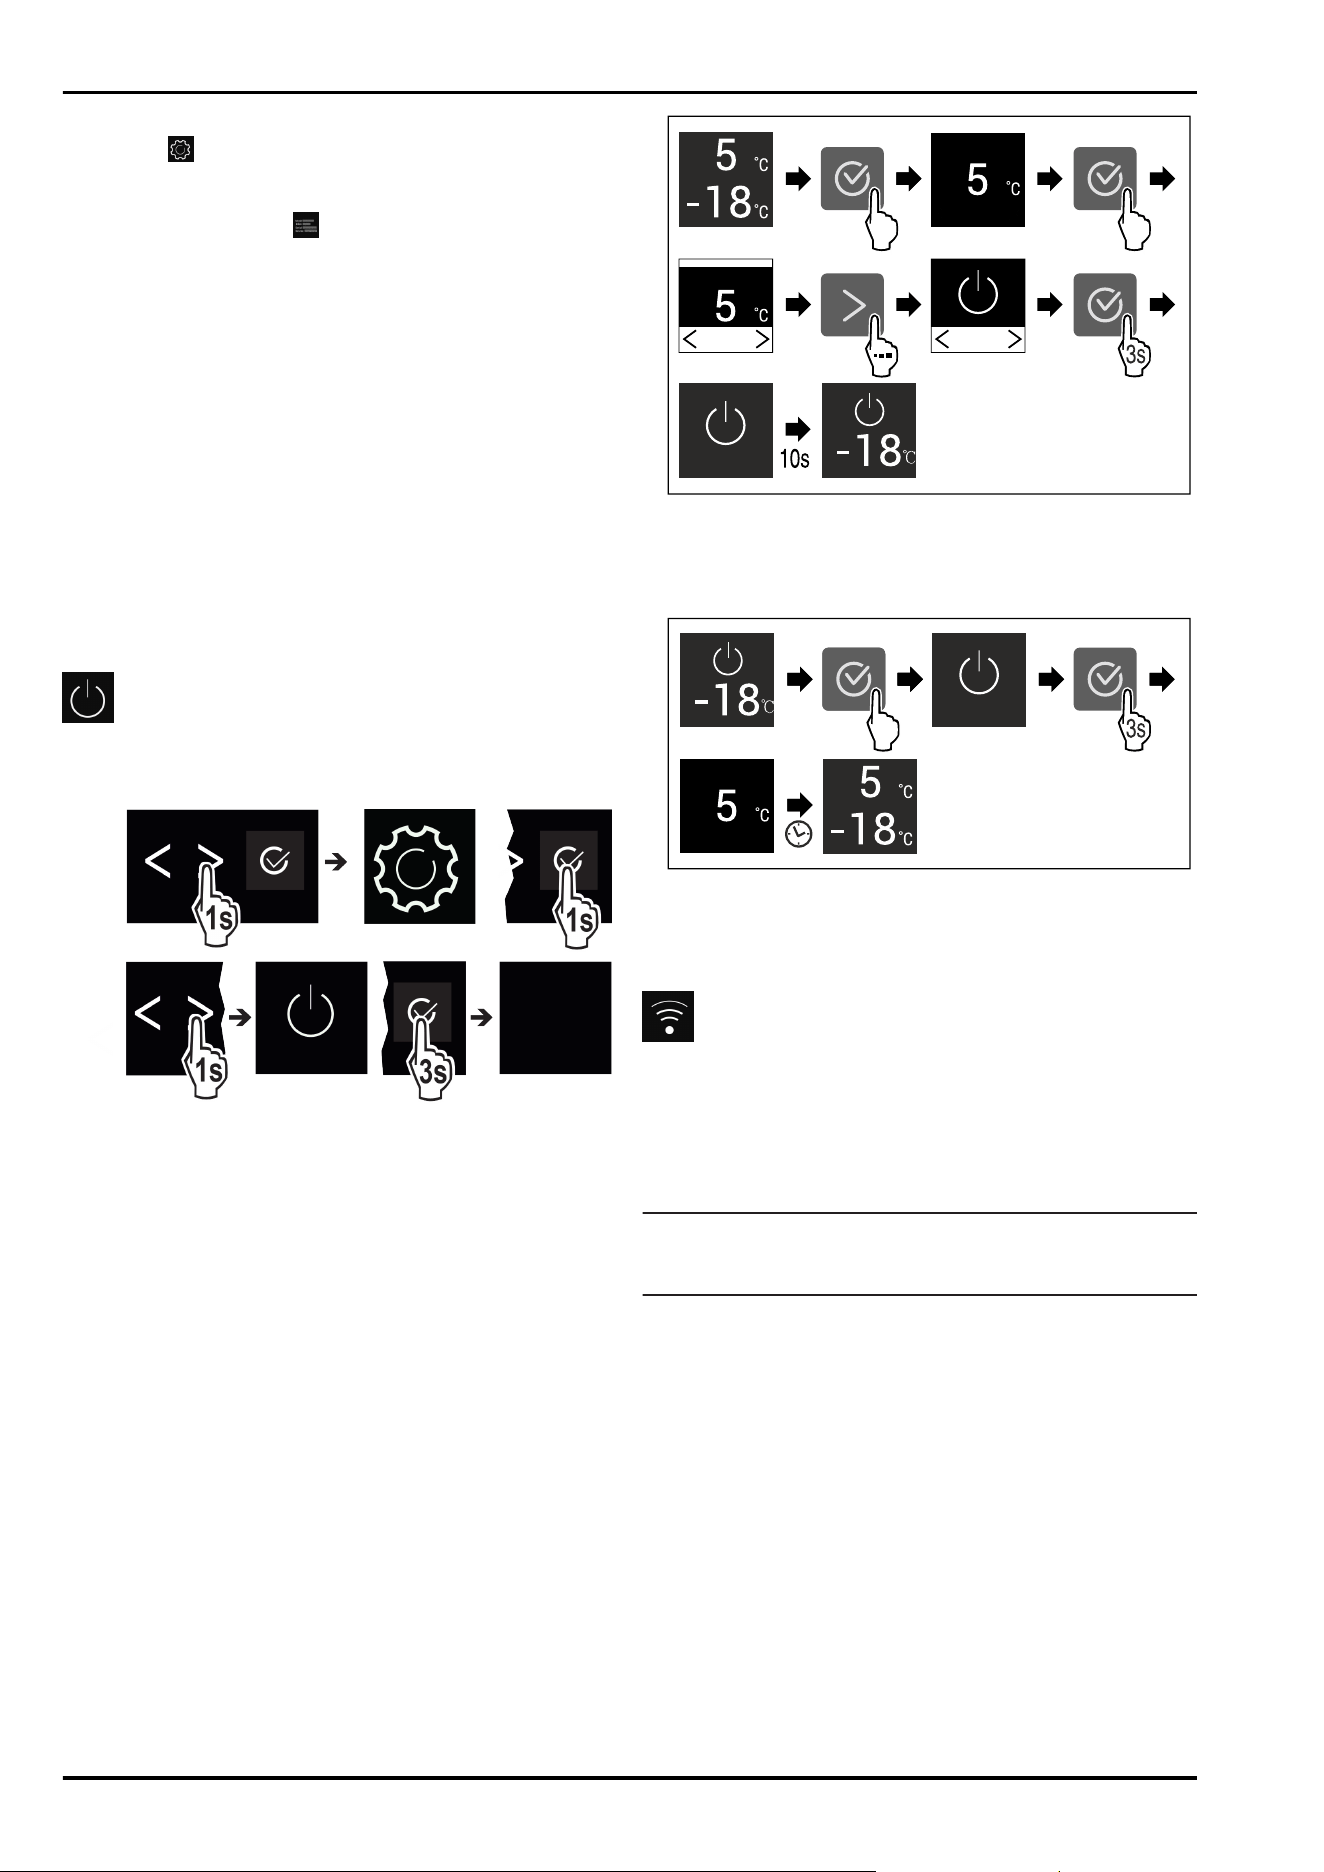
u
Press the navigation arrows Fig. 5 (1) repeatedly until the
settings appear.
u
Press Confirm Fig. 5 (2).
u
Press the navigation arrows Fig. 5 (1) repeatedly until
appliance information appears in the display.
u
Press Confirm Fig. 5 (2).
u
Enter the numerical code 151.
w
The customer menu appears.
u
Press the navigation arrows Fig. 5 (1) repeatedly until the
desired setting appears.
1
Select the setting value
u
Press Confirm Fig. 5 (2).
w
You hear the confirmation tone.
w
Status appears briefly in the display.
w
The display switches back to the menu.
2
Activate setting
u
Press Confirm Fig. 5 (2) for 3 seconds.
w
You hear the confirmation tone.
w
Status appears in the display.
w
The symbol flashes as long as the appliance is working.
6.3 Appliance functions
Turn off appliance
This setting turns off the whole appliance.
Switch off whole appliance
Fig. 8
u
Activating/deactivating (see 6.2 Operating logic) .
w
Off: Display turns black.
6.3.2 Switching temperature zones off and on
You can switch temperature zones of the appliance off inde‐
pendently.
Application:
-
Cleaning
-
Defrosting
Switching the fridge compartment off
Make sure that the following requirements are fulfilled:
q
Refrigerator compartment has been emptied.
Fig. 9 Example illustration
u
Carry out action steps according to the illustration.
w
Refrigerator compartment is switched off.
Switching the fridge compartment on
Fig. 10 Example illustration
u
Carry out action steps according to the illustration.
w
Refrigerator compartment is switched on.
w
The appliance cools to the last set temperature.
WiFi
Use this function to connect your appliance to WiFi. You can
then operate it via the SmartDevice app on a mobile device.
You can also use this function to disconnect or reset the
WiFi connection.
More information on the SmartDevice: (see 1.3 SmartDe‐
vice*)
Note
The SmartDevice function is not available in the following
countries: Russia, Belarus, Kazakhstan.
Establishing the WiFi connection for the first time*
Make sure that the following requirements are fulfilled:
q
You have installed the SmartDevice app (see
apps.home.liebherr.com).
q
Registration in the SmartDevice app is completed.
u
Call up the settings menu. (see 6.2 Operating logic)
u
Tap the navigation arrow repeatedly until the corre‐
sponding function is displayed.
Use
* Depending on model and options 11
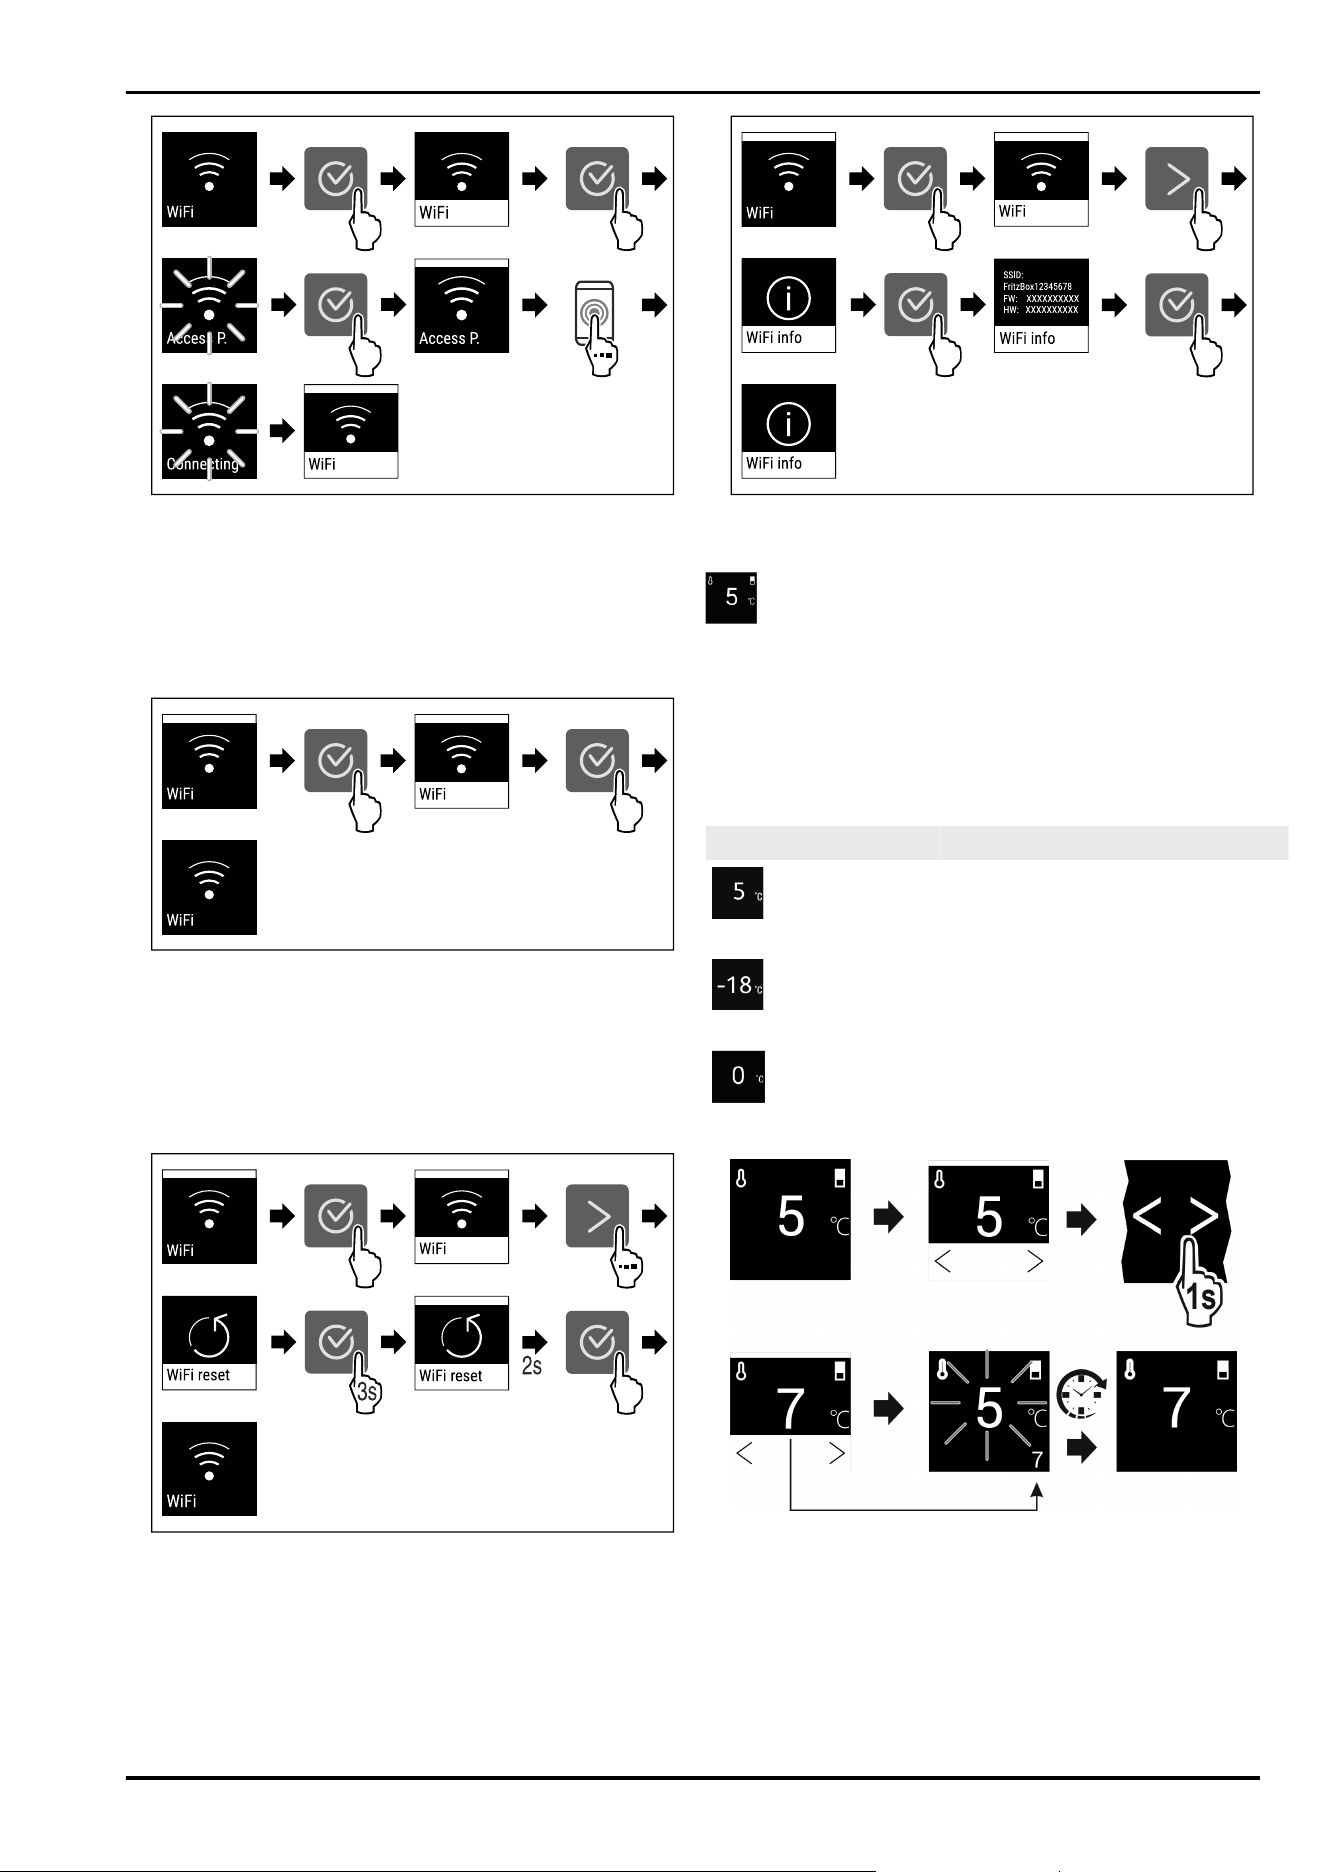
Fig. 11
u
Carry out action steps according to the illustration.
w
Connection is established.
Disconnecting from the WiFi
u
Call up the settings menu. (see 6.2 Operating logic)
u
Tap the navigation arrow repeatedly until the corre‐
sponding function is displayed.
Fig. 12
u
Carry out action steps according to the illustration.
w
There is no connection.
Resetting the WiFi connection
u
Call up the settings menu. (see 6.2 Operating logic)
u
Tap the navigation arrow repeatedly until the corre‐
sponding function is displayed.
Fig. 13
u
Carry out action steps according to the illustration.
w
WiFi connection and other WiFi settings are reset to
factory settings.
Showing information about the WiFi connection
u
Call up the settings menu. (see 6.2 Operating logic)
u
Tap navigation arrow repeatedly until corresponding
function is displayed.
Fig. 14
u
Carry out action steps according to the illustration.
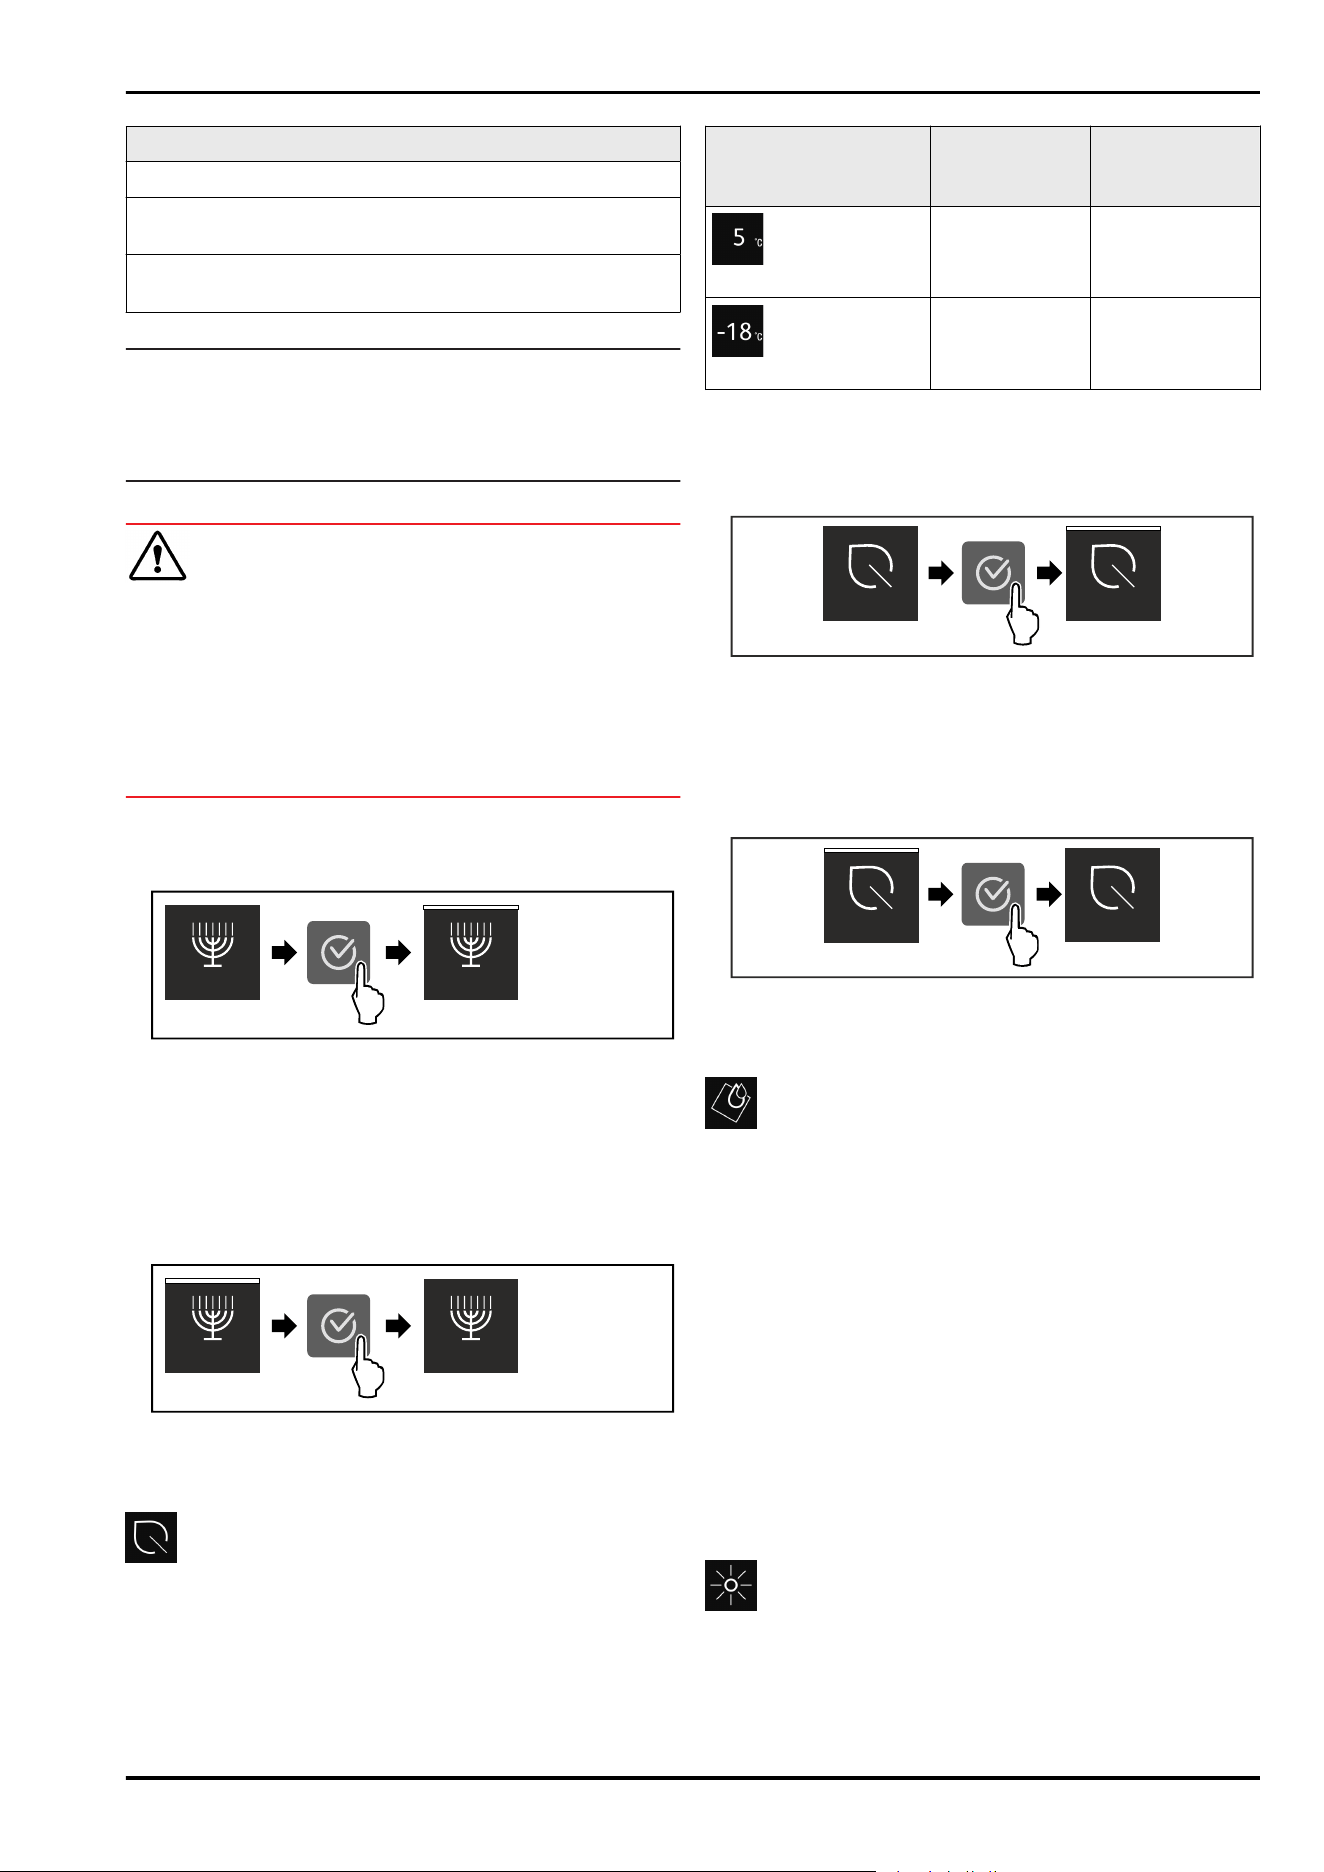
Temperature
Use this function to set the temperature.
The temperature depends on the following factors:
-
How often the door is opened
-
How long the door is open for
-
The room temperature of the installation site
-
The type, temperature and amount of food
Temperature zone
Recommended setting
Fridge compart‐
ment
5 °C
Freezer compart‐
ment
-18 °C
BioFresh
(see Setting the temperature in the
BioFresh)
Setting the temperature in the refrigerator compartment
Fig. 15
u
Carry out action steps according to the illustration.
w
Temperature is set.
Setting the temperature in the BioFresh
You can set the temperature using the BioFresh B-Value in
the customer menu.
Use
12 * Depending on model and options
Temperature unit
This setting allows you to change between Celsius and
Fahrenheit as the temperature unit.
Selecting the setting value
u
Set the value (see 6.2 Operating logic) .
When delivered, the temperature in the BioFresh compart‐
ment is set to B5. The status indicator on the display shows
the target temperature in the BioFresh.
You can change this value slightly if a higher or lower
ambient temperature makes it necessary. When setting the
value, note:
Value
Description
B1 Lowest temperature
B1-B4 The temperature can drop below 0 °C which means
foods can easily freeze.
B5 Pre-set temperature
B9 Highest temperature
BioFresh B-Value
Selecting the setting
u
Set value in customer menu (see 6.2 Operating logic) .
D-Value
The D-Value is preset for your appliance and may not be
changed.
SuperCool
Select this function for the maximum cooling setting, to
reach lower cooling temperatures.
This function is relevant to the fridge section Fig. 1 (A)
Use:
-
Cool large amounts of food quickly.
Activating/deactivating settings
u
Using the fridge section: activate the function when you
add the goods.
u
Activating/deactivating (see 6.2 Operating logic) .
-or-
u
Activate/deactivate using the SmartDevice app.*
The function automatically turns off. The appliance goes
back to normal mode. The temperature adjusts itself to the
set level.
SuperFrost
Select this function for the maximum freezing setting, to
reach lower freezing temperatures.
This function is relevant to the freezer section Fig. 1 (C).
Use:
-
To freeze more than 2 kg fresh food a day.
-
Freezing fresh food quickly to the core.
-
Increasing the cold reserves in the stored goods before
defrosting the appliance.
Activating/deactivating settings
With a small volume of frozen goods:
u
Activate 6 hours before use.
With the maximum volume of frozen goods:
u
Activate 24 hours before use.
u
Activating/deactivating (see 6.2 Operating logic) .
-or-
u
Activate/deactivate using the SmartDevice app.*
The function automatically turns off. The appliance goes
back to normal mode. The temperature adjusts itself to the
set level.
PartyMode
This option offers an assortment of special functions and
settings that are useful if you are having a party.
The following functions are activated:
-
SuperCool
-
SuperFrost
You can set any functions you like. Your changes are lost
when the option is switched off.
Activating/deactivating settings
u
Activating/deactivating (see 6.2 Operating logic) .
w
On: All functions are activated at the same time.
w
Deactivated: Previously set temperatures are restored.
The function is automatically switched off after 24 hours.
HolidayMode
This function minimizes the energy consumption during an
extended absence. The temperature of the refrigerator
compartment is set to 15 °C and this is displayed on the
status screen when the temperature has been reached.
The set freezer temperature remains unchanged.
This function is relevant to the fridge section Fig. 1 (A).
Use:
-
Save energy if you plan to be away for a while.
-
Avoid coming home to bad smells and mold.
Activating/deactivating settings
u
Empty everything from the fridge section.
u
Activating/deactivating (see 6.2 Operating logic) .
w
On: Fridge temperature is raised.
w
Off: The previously set temperature is restored.
SabbathMode
With this function you can activate or deactivate the
SabbathMode. If you activate this function, some electronic
functions will be switched off. This allows your device to
meet religious requirements on Jewish holidays such as the
Sabbath and comply with STAR-K Kosher certification.
Appliance status with active SabbathMode
The status display continuously shows SabbathMode.
All functions in the display except the Deactivate
SabbathMode function are locked.
Active functions remain active.
The display stays lit when you close the door.
The interior lighting is switched off.
Reminders are disabled. The set time intervals are paused.
Reminders and warnings are not displayed.
There is no door alarm.
Use
* Depending on model and options 13
Appliance status with active SabbathMode
There is no temperature alarm.
The defrost cycle only works for the specified time without
taking account of appliance use.
After a power failure, the appliance returns to
SabbathMode.
Appliance status
Note
This appliance has certification from the “Institute for
Science and Halacha”. (www.machonhalacha.co.il)
You can find a list of STAR-K-certified appliances at
www.star-k.org/appliances.
Activating SabbathMode
WARNING
Danger of poisoning from spoiled food!
If you have SabbathMode activated and a power failure
occurs, no message appears in the status display about the
power failure. Once the power is restored, the appliance
continues to operate in SabbathMode. The power failure
may mean that food spoils and the consumption of this food
could lead to food poisoning.
After a power failure:
u
Do not consume food that has been frozen and thawed.
u
Call up the settings menu. (see 6.2 Operating logic)
u
Tap the navigation arrow repeatedly until the corre‐
sponding function is displayed.
3s
Fig. 16
u
Carry out action steps according to the illustration.
w
SabbathMode is activated.
w
Status display continuously shows SabbathMode.
Deactivating SabbathMode
u
Call up the settings menu. (see 6.2 Operating logic)
u
Tap the navigation arrow repeatedly until the corre‐
sponding function is displayed.
3s
Fig. 17
u
Carry out action steps according to the illustration.
w
SabbathMode is deactivated.
E-Saver
This function activates or deactivates the energy-saving
mode. When you activate this function, the energy
consumption decreases and the temperature increases by
2 °C in the appliance. The food remains fresh, but the shelf
life is shortened.
Temperature zone
Recommended
setting (see
Temperature)
Temperature
when E-Saver
activated
Fridge compart‐
ment
5 °C 7 °C
Freezer
compartment
-18 °C -16 °C
Temperatures
Activating E-Saver
u
Tap navigation arrow repeatedly until corresponding
function is displayed.
E-Saver
E-Saver
Fig. 18
u
Carry out action steps according to the illustration.
w
Energy-saving mode is activated.
Deactivating E-Saver
u
Tap navigation arrow repeatedly until corresponding
function is displayed.
E-Saver
E-Saver
Fig. 19
u
Carry out action steps according to the illustration.
w
Energy-saving mode is deactivated.
CleaningMode
This setting makes it easy to clean the appliance.
This setting is relevant to the fridge section Fig. 1 (A).
Use:
-
Clean the fridge section manually.
What happens with the appliance when this setting is on:
-
The refrigerator compartment is switched off.
-
Reminders and warnings are not shown. There is no
acoustic signal.
Activating/deactivating settings
u
Activate/deactivate setting (see 6.2 Operating logic) .
w
On: Fridge compartment is switched off. Light stays on.
w
Off: preset temperature is restored.
The setting is automatically deactivated after 60 minutes.
Then the appliance continues operation in normal mode.
Display brightness
With this setting, you can choose a brightness level for the
display.
You can set the following brightness levels:
-
40%
Use
14 * Depending on model and options
-
60%
-
80%
-
100%
Choosing the setting
u
Set the level (see 6.2 Operating logic) .
Door alarm
Set the time before the door alarm (see Close the door)
sounds.
Options are as follows:
-
1 min
-
2 min
-
3 min
-
Off
Choosing the setting
u
Set the level (see 6.4 Error messages) .
Entry lock
This setting avoids accidental operation of the appliance,
e.g. by children.
Use:
-
Avoid unintentional changing of settings and functions.
-
Avoid unintentional switching off of the appliance.
-
Avoid unintentional temperature adjustments.
Activating/deactivating settings
u
Activating/deactivating (see 6.2 Operating
logic) .
Info
This setting allows the appliance information to be read out
as well as access to the customer menu.
It provides the following information:
-
Model name
-
Index
-
Serial number
-
Service number
View appliance data
u
Press the navigation arrows Fig. 5 (1) repeatedly until the
settings
are displayed.
u
Press Confirm Fig. 5 (2).
u
Press the navigation arrows Fig. 5 (1) repeatedly until the
information display appears.
u
Read the appliance data.
Reminder
Reminders are displayed acoustically by a beep and visually
by a symbol in the display. The signal gets louder until the
alert stops.
Replace the FreshAir active carbon filter
This message appears when the air filter needs replacing.
u
Replace the air filter every six months.
u
Confirm the message with OK.
w
The service interval resets.
w
The air filter guarantees the air quality in the fridge.
Activate setting
u
Activating/deactivating (see 6.2 Operating logic) .
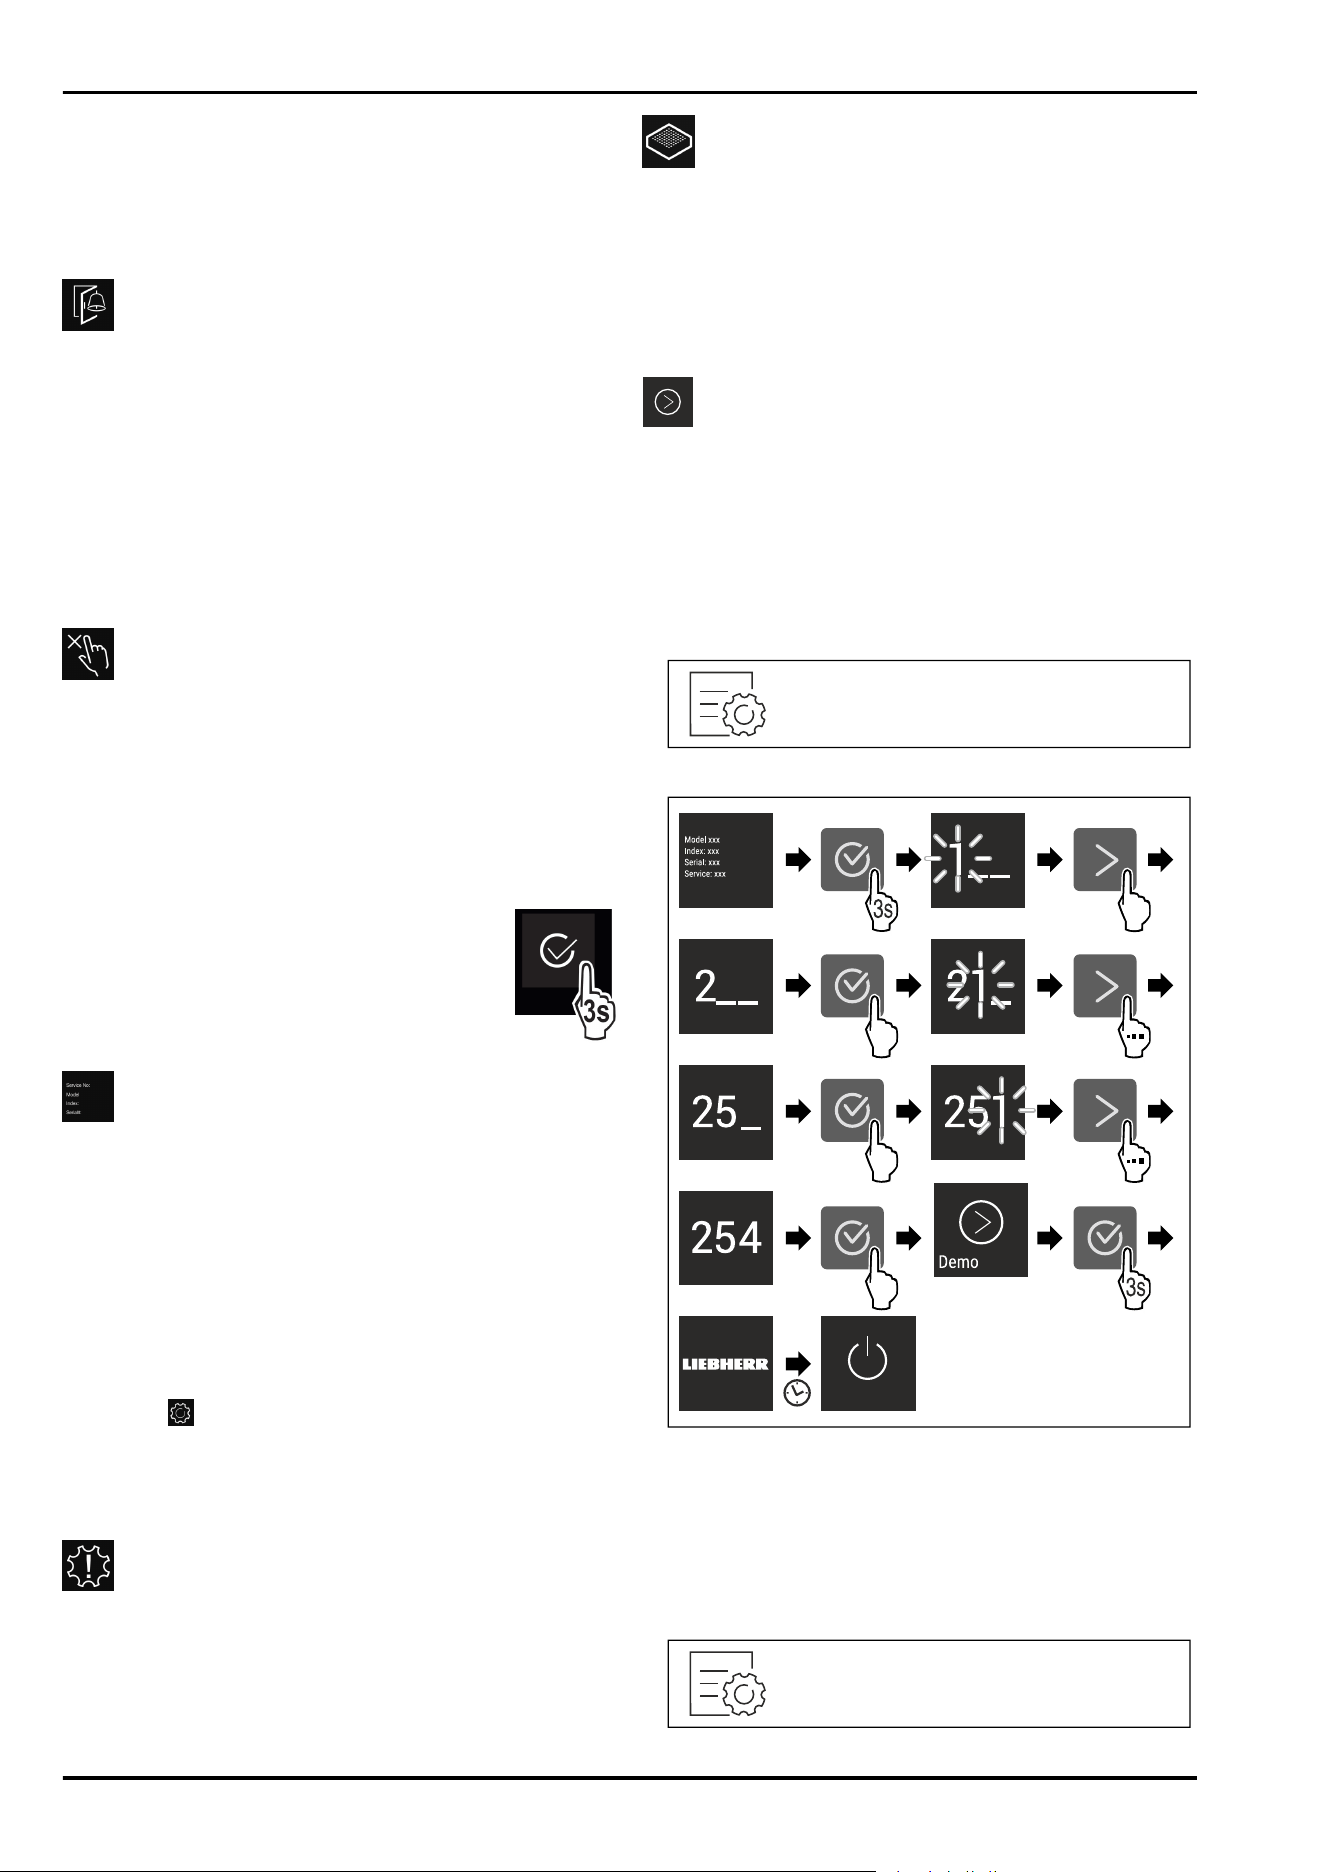
Demo mode
Demo mode is a special feature for dealers who want to
demonstrate appliance features. If you activate demo mode,
all refrigeration functions are deactivated.
If you switch on your appliance and “Demo” appears in the
status display, then demo mode is already activated.
If you activate and then deactivate demo mode, the appli‐
ance will be reset to factory defaults. (see Reset)
Activating demo mode
Fig. 20
Fig. 21
u
Carry out action steps according to the illustration.
w
Demo mode is activated.
w
Appliance is switched off.
u
Switch on the appliance. (see 3.1 Turning on the appli‐
ance)
w
“DEMO” appears in the status display.
Deactivating demo mode
Use
* Depending on model and options 15

Fig. 22
Fig. 23
u
Carry out action steps according to the illustration.
w
Demo mode is deactivated.
w
Appliance is switched off.
u
Switch on the appliance. (see 3.1 Turning on the appli‐
ance)
w
Appliance is reset to factory settings.
Reset
This function resets all settings to the factory settings. All
settings that you have made thus far will be reset to their
original values.
Activate the setting
u
Activating (see 6.2 Operating logic) .
6.4 Error messages
Error messages appear in the display. There are two catego‐
ries of error message:
Category
Meaning
Message Reminder of general procedures. You can carry
out these procedures to eliminate the message.
Warning Appears when there are malfunctions. A signal
sounds in addition to the display. The signal
becomes louder until you acknowledge by
tapping the display. You can eliminate simple
defects yourself. For more serious defects, you
must contact customer service.
6.4.1 Warnings
Close the door
This message appears if the door is open too long.
You can set the time before this message appears .
u
Stop alarm: Confirm the message.
-or-
u
Close the door.
Power failure.
This message appears if the freezer temperature rises after
a power outage. When the power outage is over, the appli‐
ance will continue to operate at the last temperature
setting.
u
Stop alarm: Confirm the message.
w
Temperature alarm appears (see Temperature alarm) .
Temperature alarm
This message appears if the freezer temperature does not
match the set temperature.
Temperature differences may be caused by:
-
Hot fresh food was placed in the appliance.
-
When sorting and removing food from the appliance, too
much warm ambient air got in.
-
There has been a prolonged power outage.
-
The appliance is faulty.
When the cause is eliminated, the appliance will continue to
operate at the last temperature setting.
u
Confirm the display.
w
Warmest temperature is displayed.
u
Confirm the display again.
w
The status display is displayed.
w
Current temperature is displayed.
Error
This message appears when there is a fault with the appli‐
ance. An appliance component has an error.
u
Open the door.
u
Take note of the error code.
u
Confirm the message.
w
The signal tone stops.
w
The status display appears.
u
Close the door.
u
Contact customer service. (see 9.4 Customer Service)
7 Equipment
7.1 Door racks
7.1.1 Moving/removing door racks
Fig. 24
u
Slide racks up.
u
Pull to the front.
u
Re-insert in reverse order.
7.1.2 To dismantle door racks
The door racks can be disassembled for cleaning.
Equipment
16 * Depending on model and options
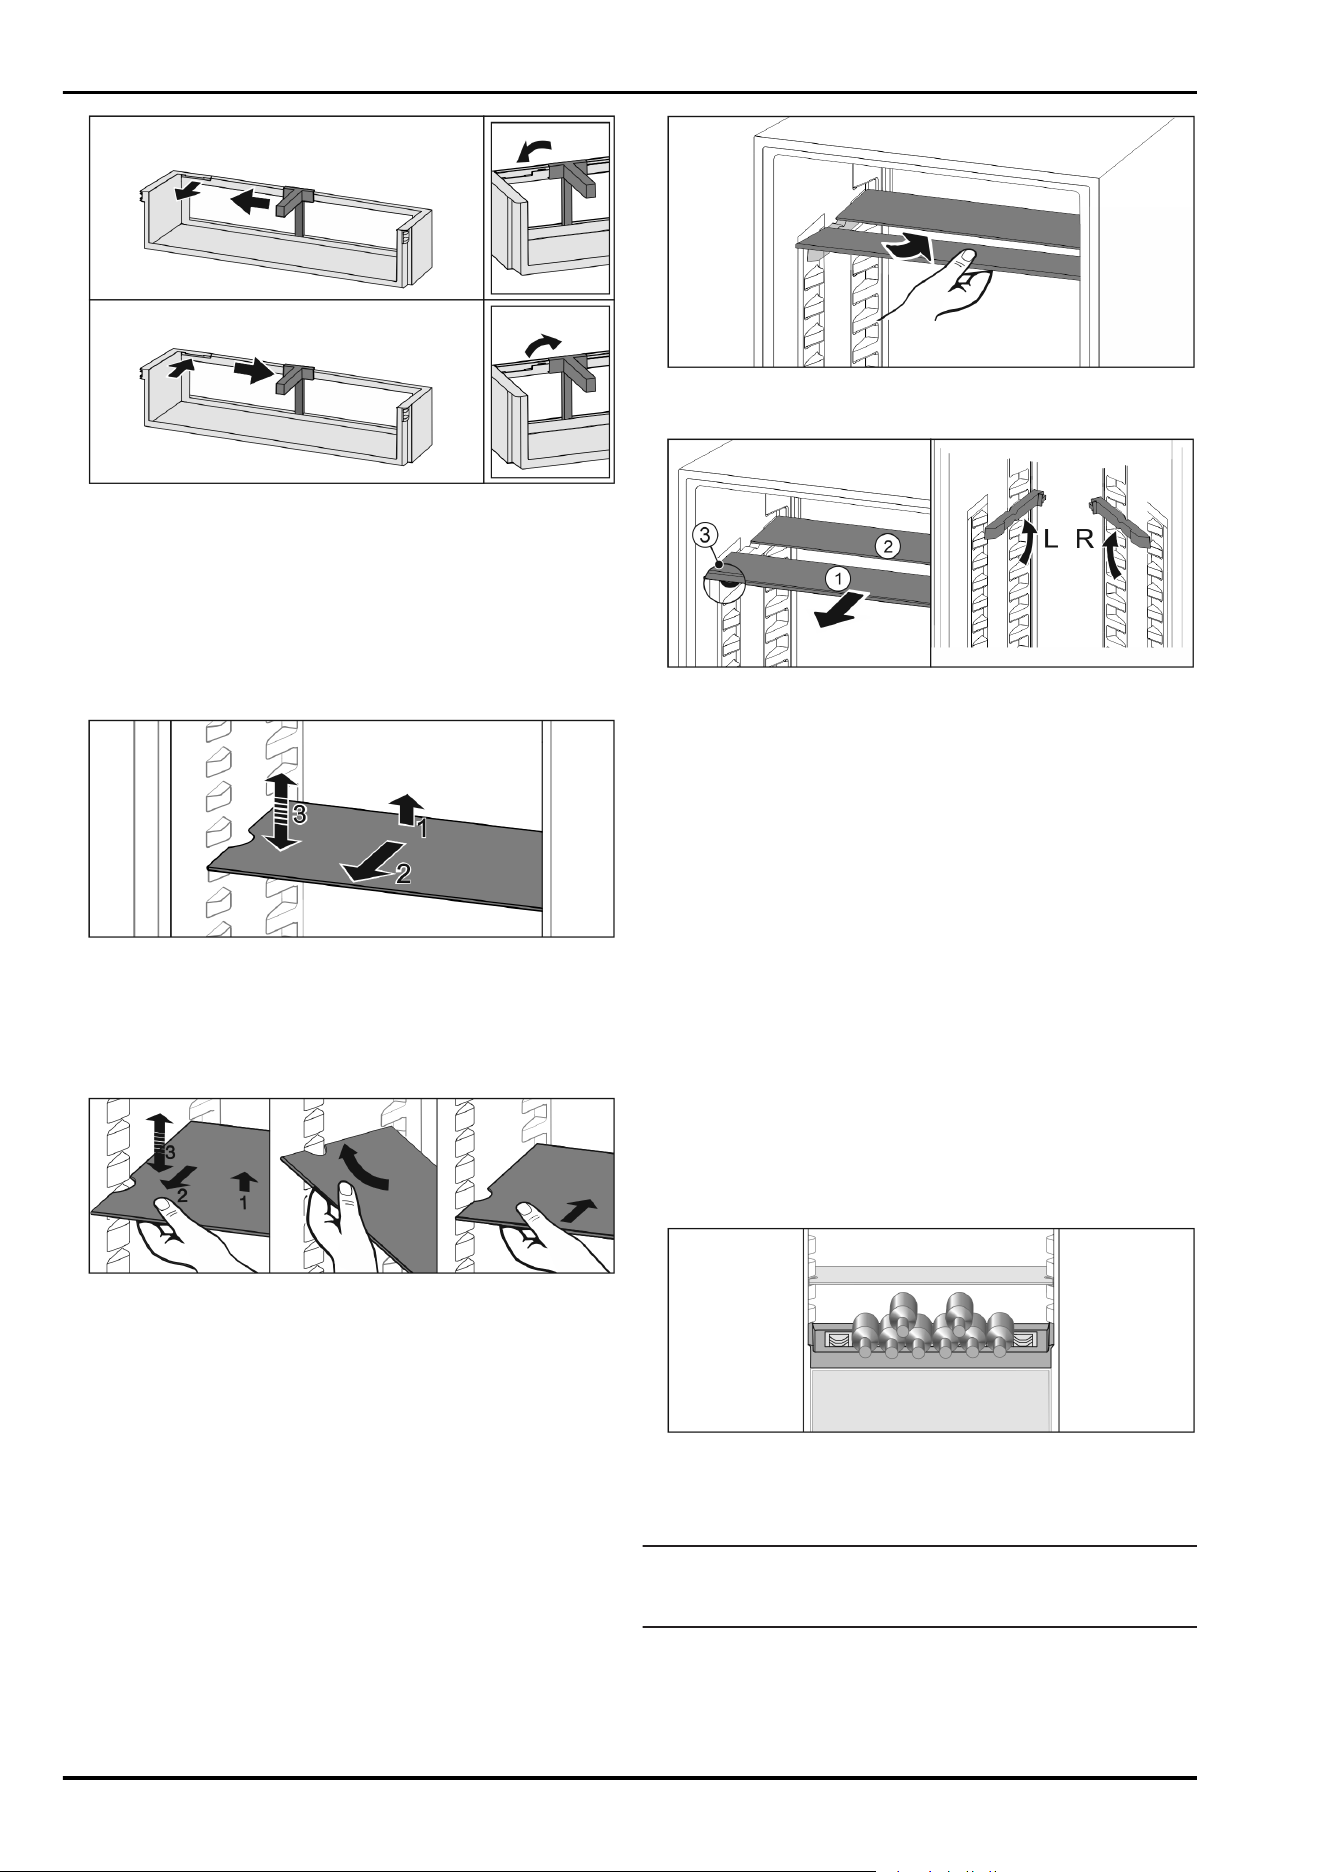
Fig. 25
u
Disassemble the door racks.
7.2 Shelves
7.2.1 Moving/removing shelves
Extension stops secure the shelves against being acciden‐
tally pulled out
Fig. 26
u
Lift the shelf and pull to the front.
w
Side recess to shelf position.
u
Reposition the shelf: Lift up or lower to the desired height
and insert.
-or-
Fig. 27
u
Take out the shelf completely: Pull out to the front.
u
Easier removal: Set the shelf at an angle.
u
Reinsert the shelf: Push it in to its stop limit.
w
Pull-out stoppers are pointing down.
w
Pull-out stoppers are behind the front shelf.
7.3 Split shelf
7.3.1 Using the split shelf
Extension stops secure the shelves against being acciden‐
tally pulled out
Fig. 28
u
Push the split shelf underneath as in the illustration
Fig. 29
Adjusting heights:
u
Pull the glass panels out Fig. 29 (1) from the front, one at
a time.
u
Pull the support rails out of their retainers and snap into
place at the height you want them.
u
Slide in the glass panels one at a time.
w
Flat pull-out stoppers at the front, right behind the
support rail.
w
Taller pull-out stoppers at the back.
Using both shelves:
u
Hold the bottom glass panel with one hand and pull it to
the front.
w
The glass panel Fig. 29 (1) with the trim strip is at the
front.
w
The stops Fig. 29 (3) point downward.
7.4 Variable bottle shelf
7.4.1 Using the bottle shelf
Use the variable bottle shelf or the glass panel placed on
the fridge floor.
Fig. 30
u
Remove the glass shelf and store separately.
u
Place the bottles with the base pointing backwards
facing the rear wall
Note
If the bottles protrude over the front of the bottle shelf:
u
Move the bottom door rack higher up.
7.4.2 Removing the bottle shelf
You can remove the bottle shelf for cleaning.
u
Remove the glass panel above the bottle shelf.
Equipment
* Depending on model and options 17
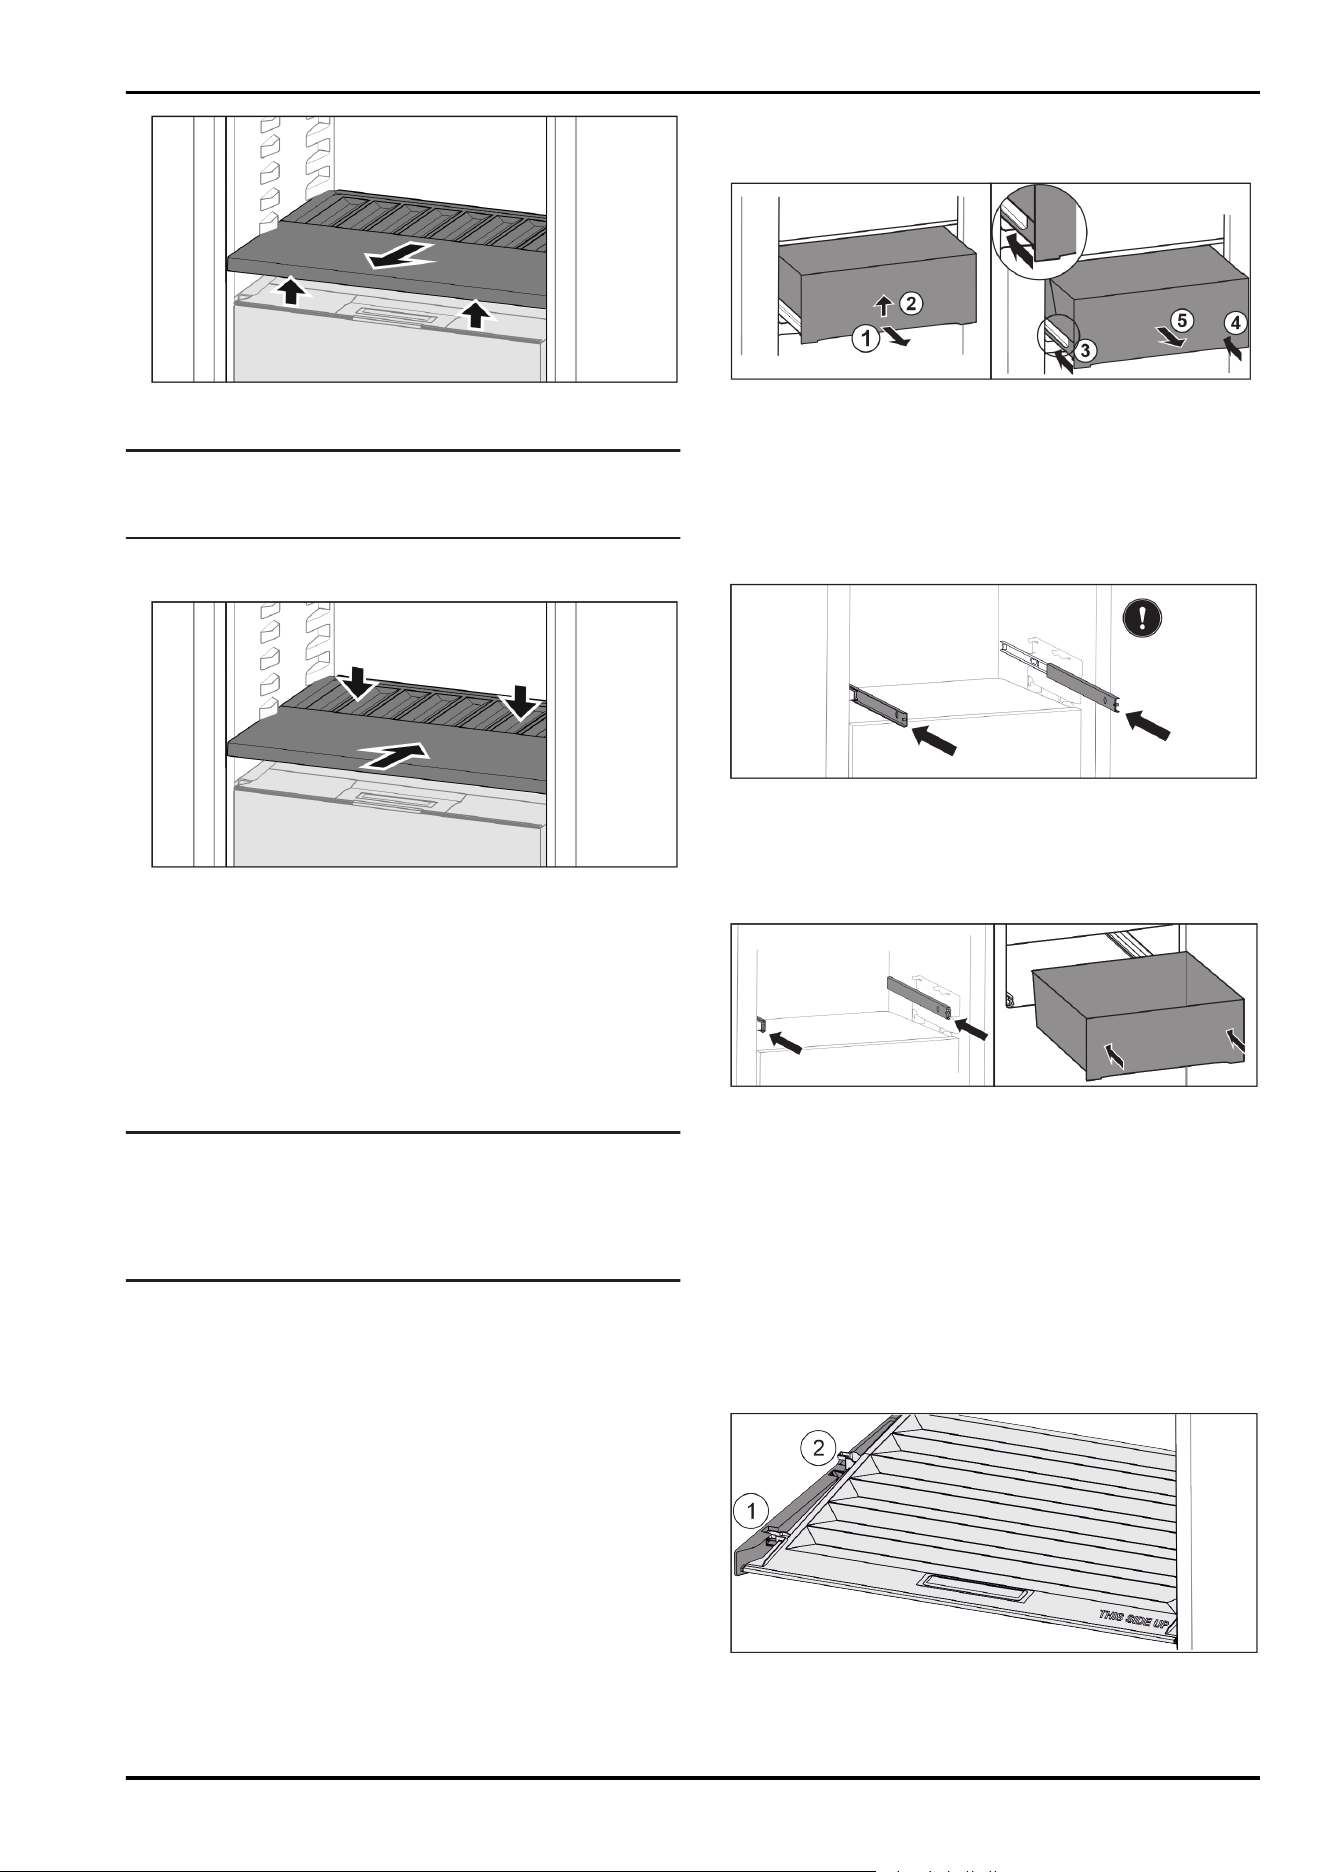
Fig. 31
u
Lift the bottle shelf at the front and pull out.
Note
Liebherr recommends the following:
Do not place any goods on the drawer cover below.
7.4.3 Inserting the bottle shelf
Fig. 32
u
Slide in the bottle shelf until it engages and push down.
7.5 Drawers
You can remove the drawers for cleaning.
You can remove the drawers to use VarioSpace.
The way to remove/insert the drawers varies depending on
the pull-out system. Your appliance can contain a variety of
pull-out systems.
Note
Insufficient ventilation results in an increase in energy
consumption and reduction of the refrigerating perform‐
ance.
u
Leave the bottom drawer in appliance!
u
Never obstruct the vents on the interior rear wall!
7.5.1 Drawer on telescopic rails
The drawer runs on full-extension rails (telescopic rails).
There are full-extension telescopic rails and telescopic rails
with partial pull-out. Drawers which are full extension can
be pulled out fully from the appliance. Drawers with partial
pull-out cannot be pulled out fully from the appliance. The
system in your appliance depends on the type of appliance.
Partial pull-out fridge compartment
Removing drawer
Fig. 33
u
Pull out the drawer halfway. Fig. 33 (1)
u
Lift the drawer from the bottom. Fig. 33 (2)
u
Lift and hold the drawer and at the same time pull it
forwards.
u
Slide in left rail. Fig. 33 (3)
u
Slide in right rail. Fig. 33 (4)
u
Remove drawer to the front. Fig. 33 (5)
Fig. 34
If the rails are not yet fully pushed in after removing the
drawer:
u
Push the rails in completely.
Inserting drawer
Fig. 35
u
Slide rails in.
u
Place drawer on rails.
u
Slide in drawer to the back.
7.6 Fruit & Vegetable-Safe cover
The compartment lid can be removed for cleaning.
7.6.1 Removing the compartment lid
Make sure that the following requirements are fulfilled
q
Bottle shelf is removed (see 7.4 Variable bottle shelf) .
Fig. 36
If the drawers are removed:
u
Pull the lid up at the front in the retaining parts to the
opening Fig. 36 (1).
Equipment
18 * Depending on model and options
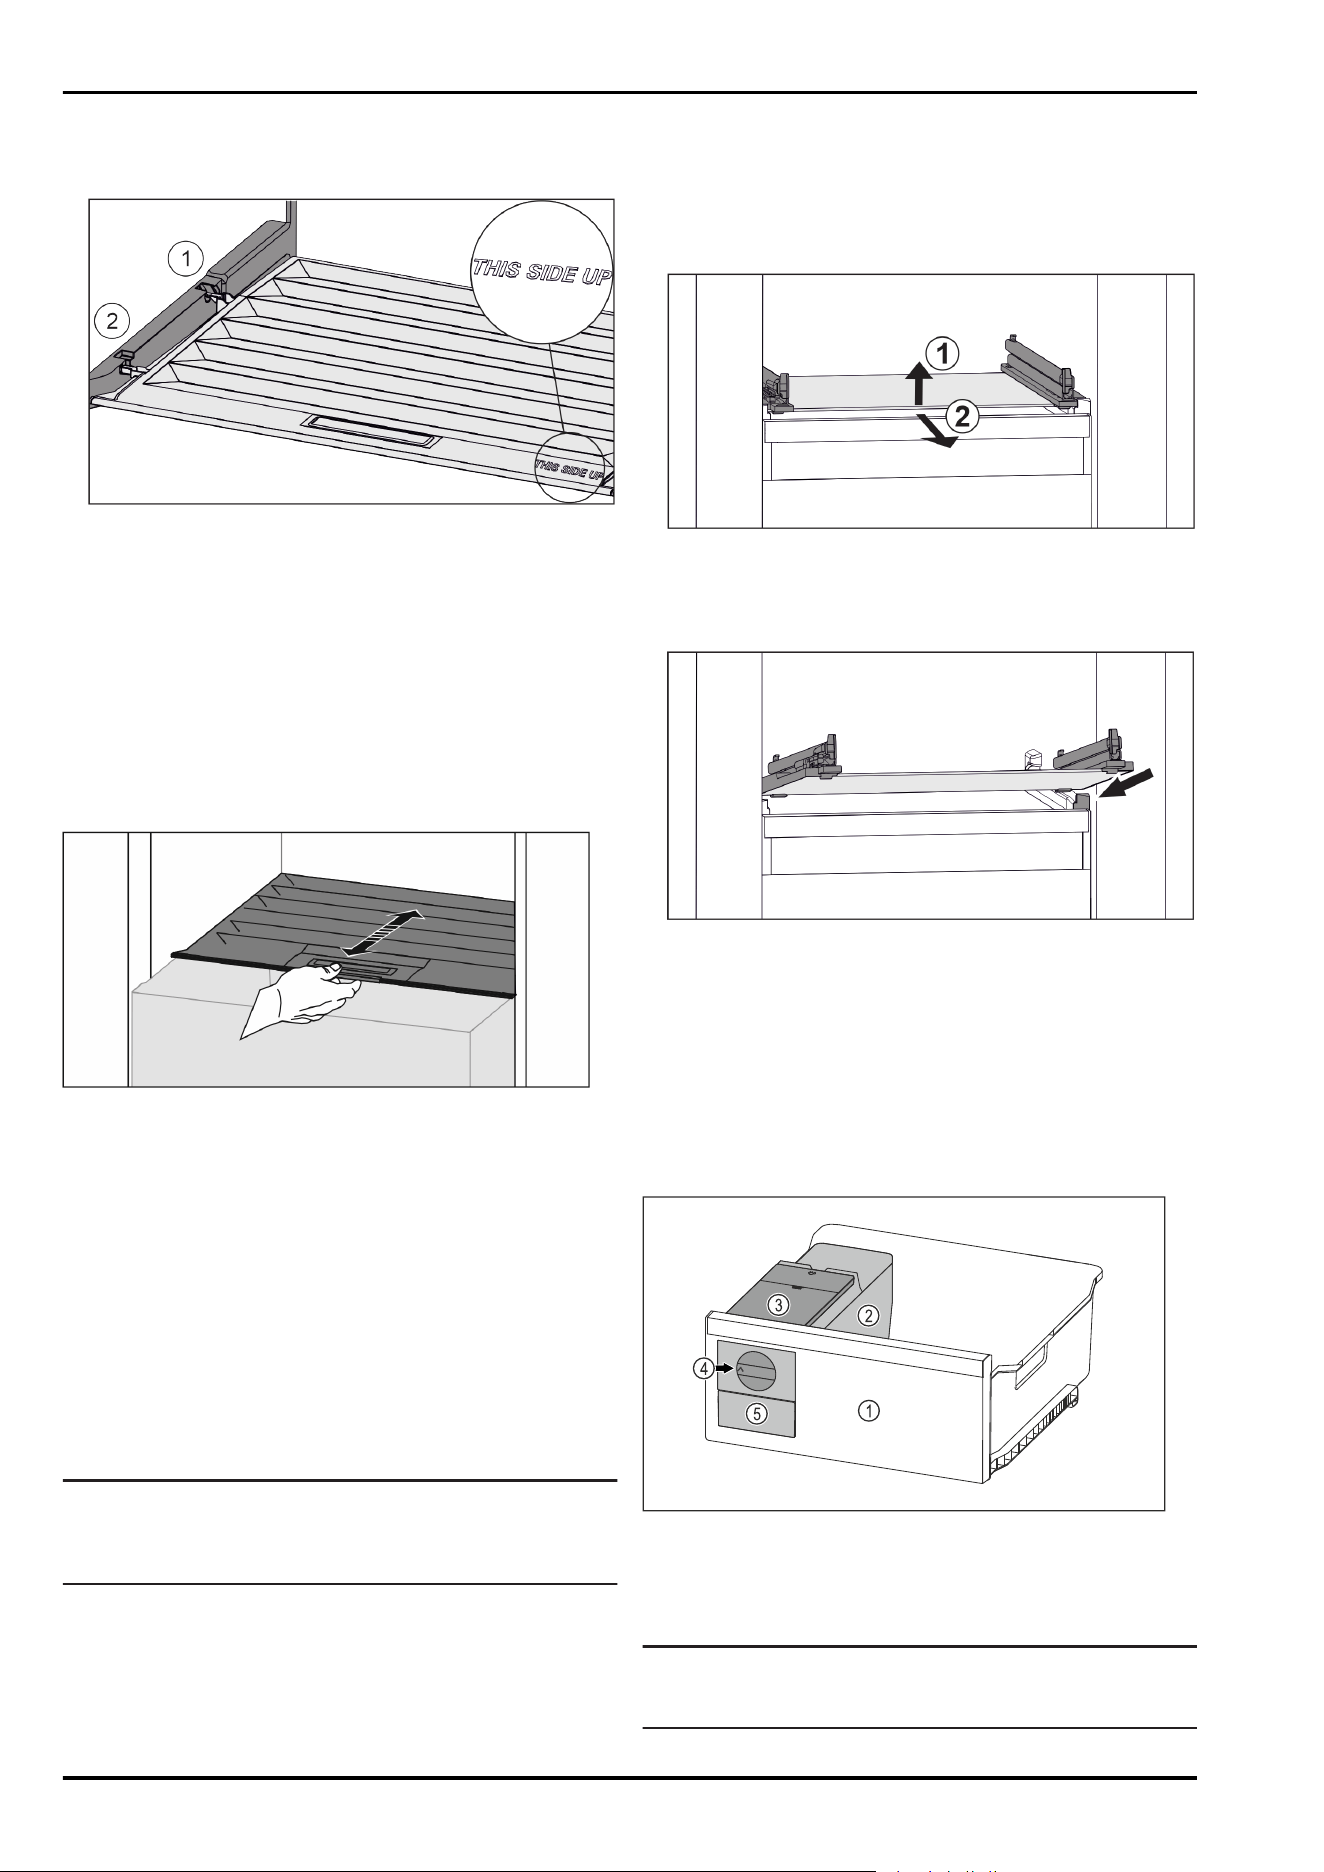
u
Lift from the back and pull it up and out Fig. 36 (2).
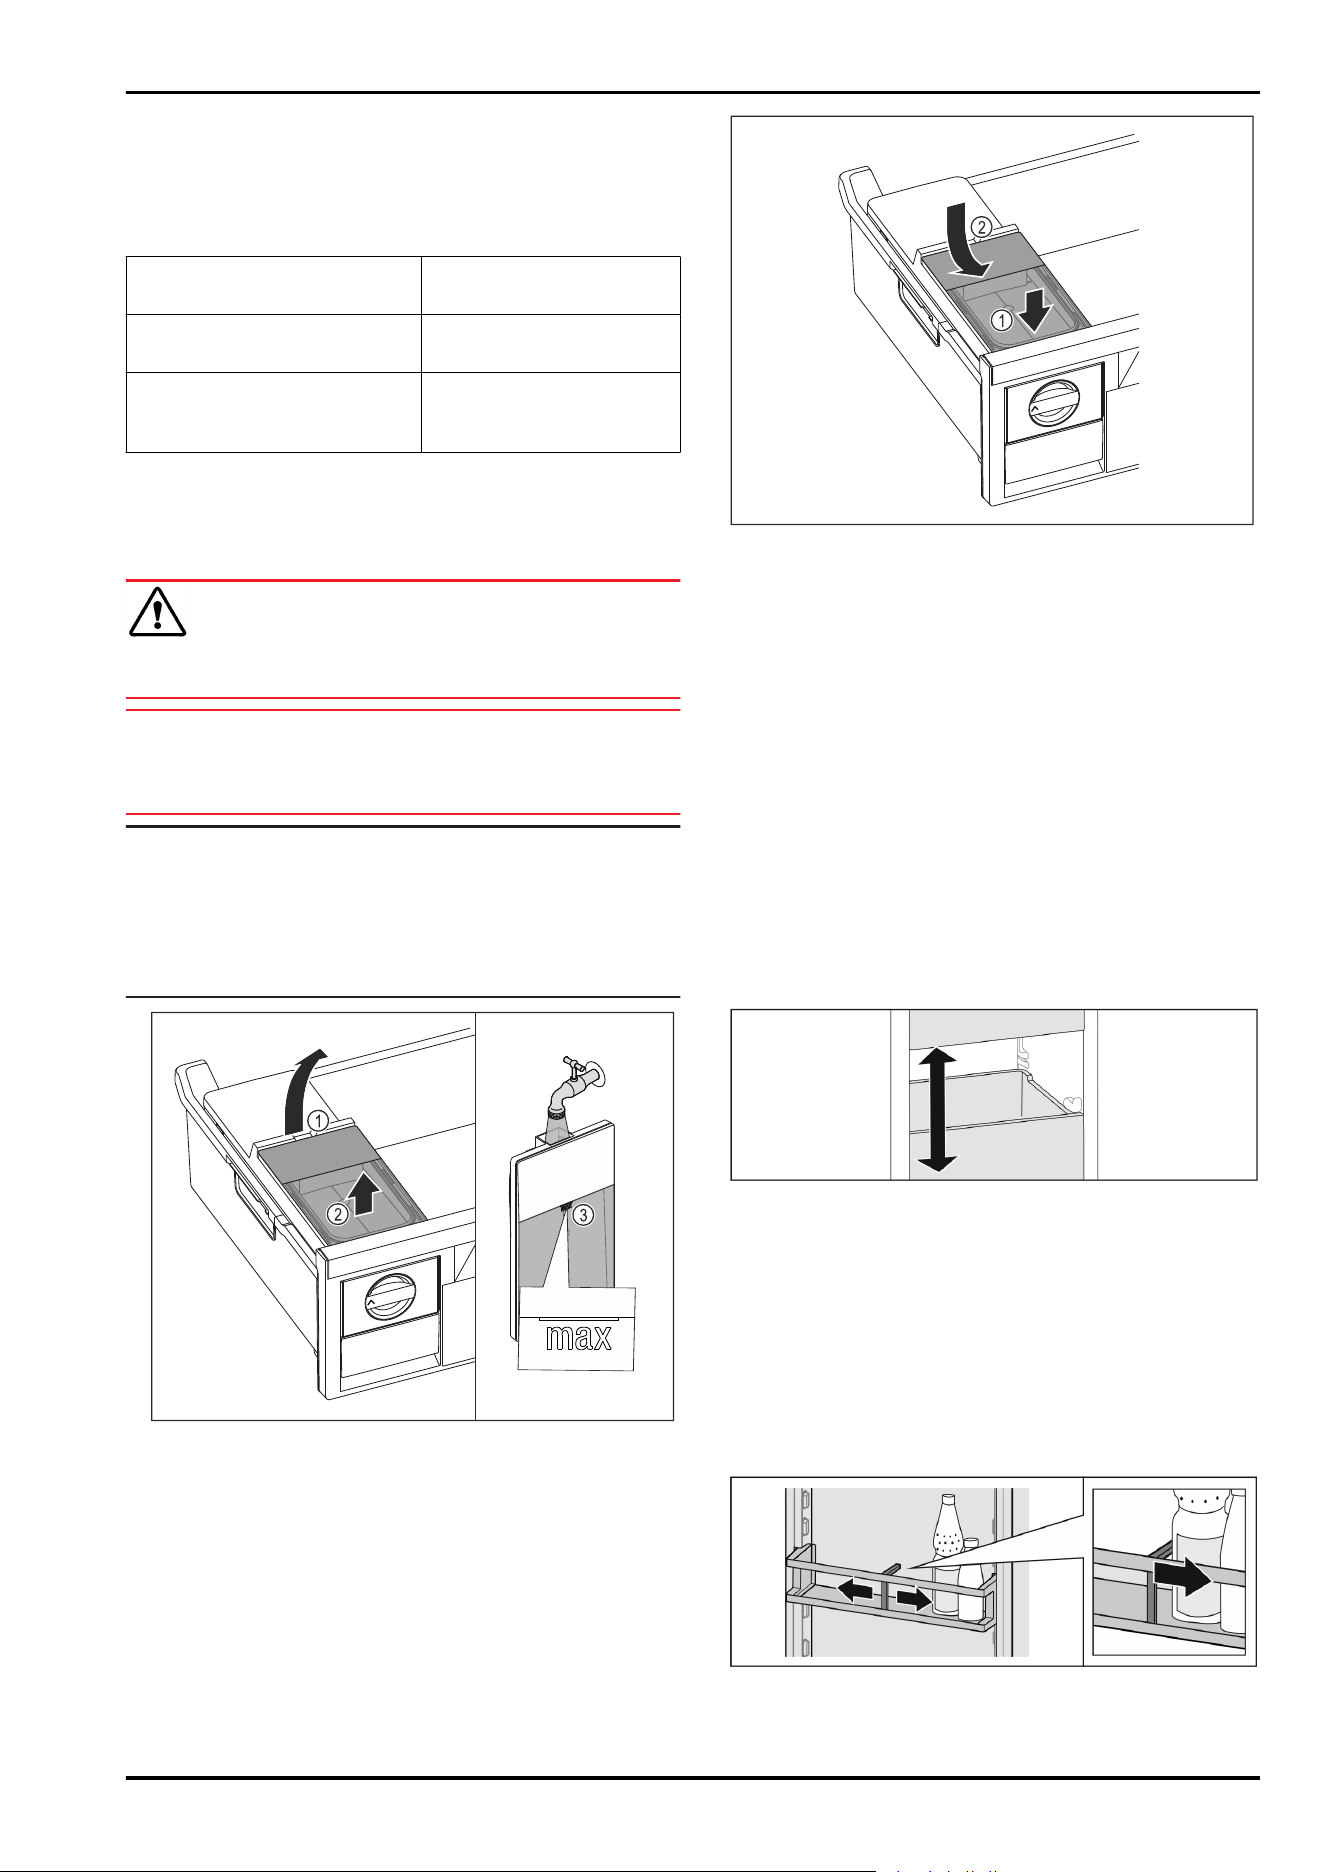
7.6.2 Inserting the compartment lid
Fig. 37
If the text THIS SIDE UP is on top:
u
Insert the lip of the cover over the opening of the rear
bracket Fig. 37 (1) and click into place Fig. 37 (2).
u
Position the cover where you want it (see 7.7 Humidity
control) .
7.7 Humidity control
You can regulate the moisture in the drawer yourself by
adjusting the compartment cover.
The compartment cover is on the drawer itself and can be
covered with shelves or additional drawers.
Fig. 38
Low air humidity
u
Open the drawer.
u
Pull the drawer cover to the front.
w
If the drawer is closed: Gap between lid and compart‐
ment.
w
Moisture levels lower in the Safe.
High air moisture:
u
Open the drawer.
u
Slide the compartment cover to the back.
w
If the drawer is closed: The cover seals the compartment.
w
Moisture levels rise in the Safe.
If there is too much moisture in the compartment:
u
Choose a “low moisture setting”.
-or-
u
Remove the moisture with a cloth.
Note
With the “low humidity” setting, the Fruit & Vegetable-Safe
can also be used as a Meat & Dairy-Safe.
u
Choose a “low moisture” setting.
7.8 Glass shelves
You can remove the glass shelf under the drawers for
cleaning.
You can remove the glass shelf under the drawers to use
VarioSpace.
7.8.1 Removing / inserting the glass shelf
Make sure that the following requirements are fulfilled:
q
Glass shelf under the drawer: Drawer has been removed.
(see 7.5 Drawers)
Removing glass shelf
Fig. 39 Example illustration of glass shelf
u
Lift glass shelf at the front. Fig. 39 (1)
u
Remove glass shelf to the front. Fig. 39 (2)
Inserting the glass shelf
Fig. 40 Example illustration of glass shelf
u
Position glass shelf at an angle behind the stoppers. (see
Fig. 40)
u
Lower glass shelf.
u
Slide in glass shelf to the back.
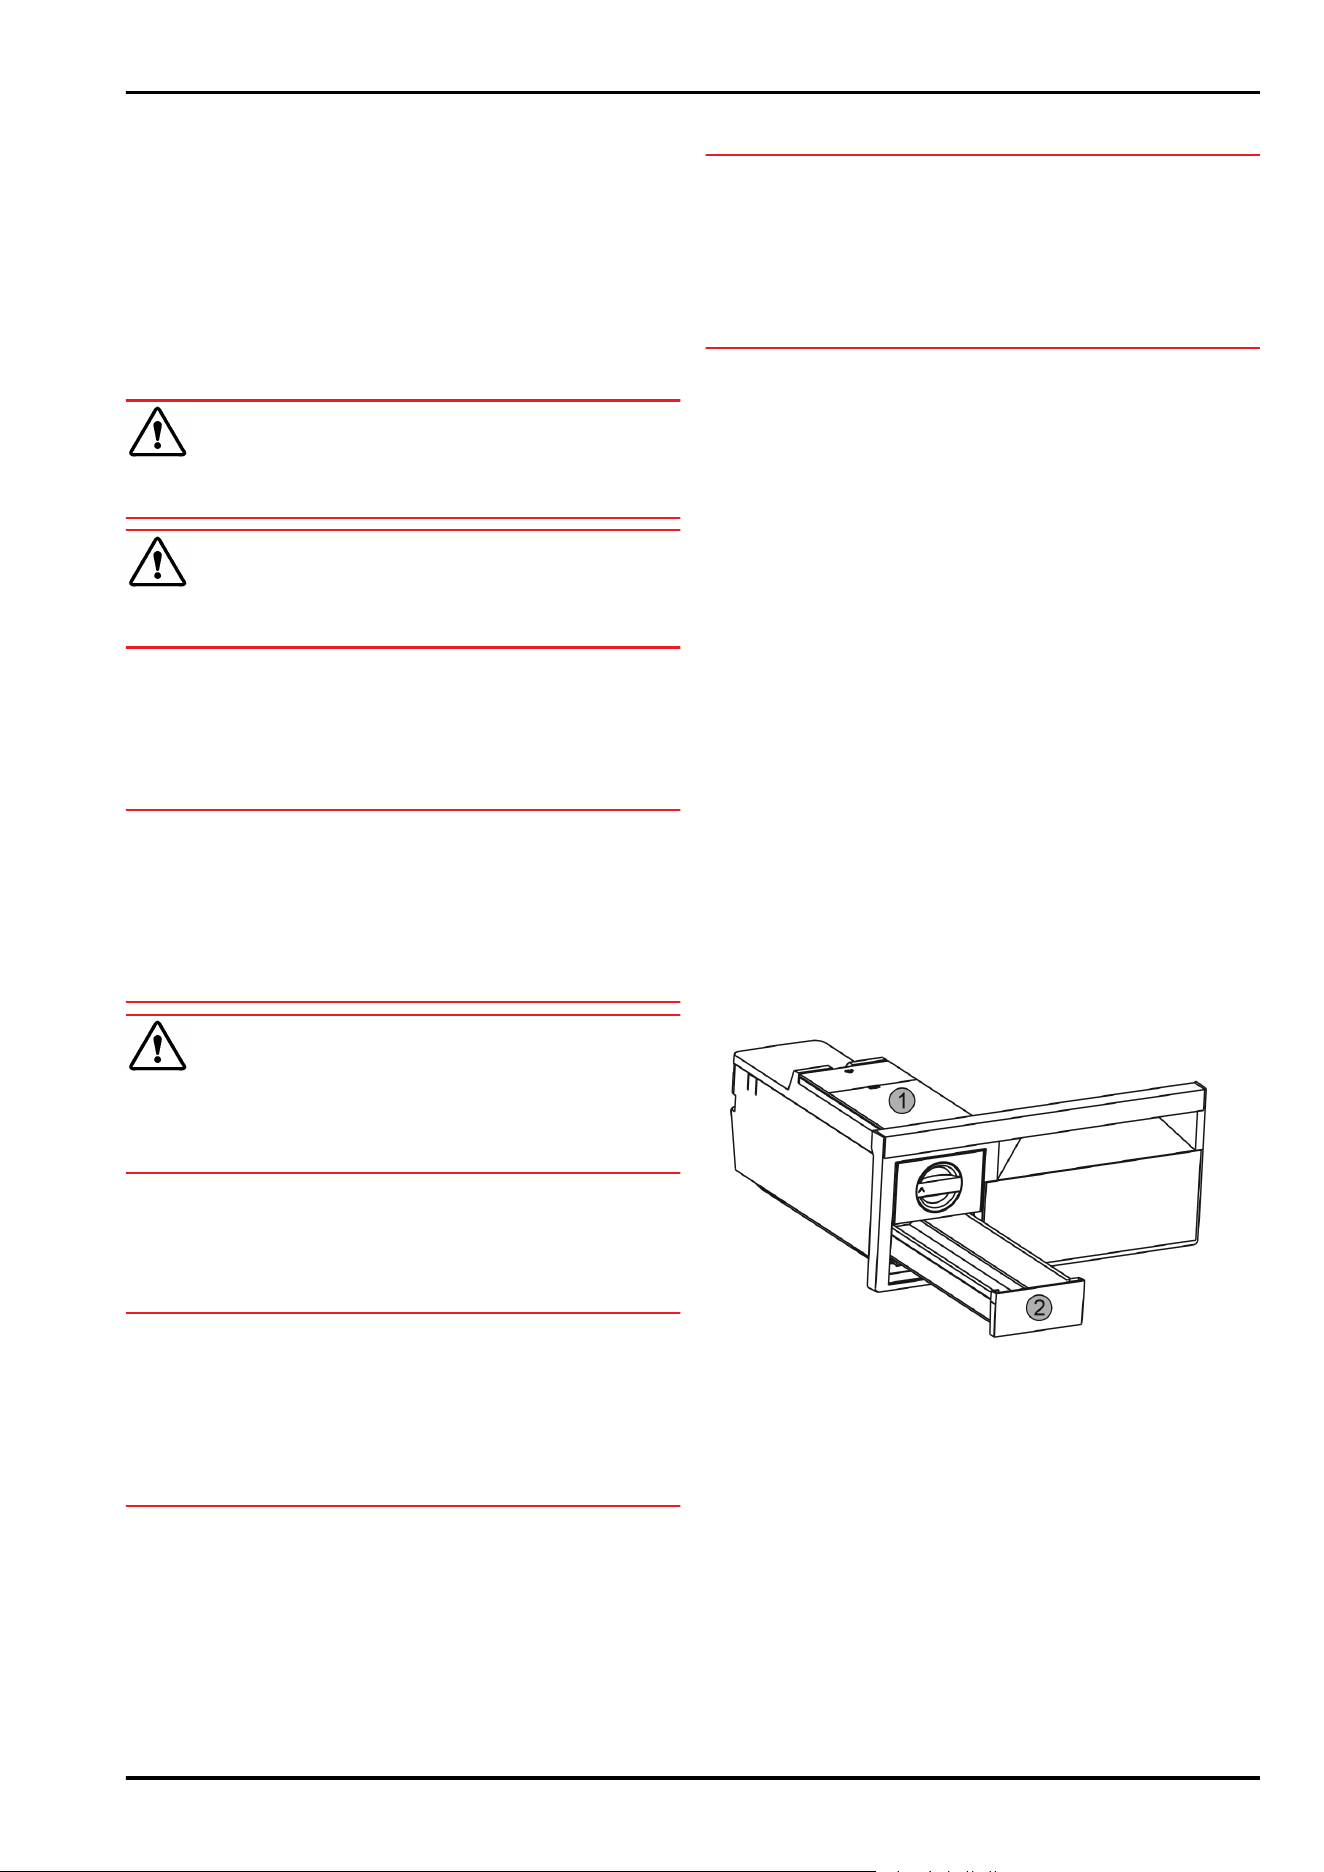
7.9 EasyTwist-Ice*
With the EasyTwist-Ice you can make enough ice cubes for
the whole household. The EasyTwist-Ice is supplied with
water via a water tank.
Fig. 41 Example illustration
(1)
Freezer drawer with
EasyTwist-Ice
(4) Rotary knob
(2) Body with ice cube tray (5) Ice cube drawer
(3) Water tank
Note
Do not change the position of the freezer drawer with the
EasyTwist-Ice in the appliance.
Equipment
* Depending on model and options 19
7.9.1 Making ice cubes
The amount of ice cubes you can make in a given period of
time with the EasyTwist-Ice depends on the freezer temper‐
ature of the appliance. The lower the temperature in the
appliance, the more ice cubes you can make.
Maximum number of ice cubes
in the ice cube tray:
20 ice cubes
Maximum capacity of the ice
cube drawer:
40 ice cubes (equivalent
to two ice cube batches)
More information about the
time needed for ice cube
production:
(see 9.1 Technical specifi‐
cations)
Make sure that the following requirements are fulfilled:
q
Components of the EasyTwist-Ice have been cleaned.
(see 8.4.5 Cleaning the EasyTwist-Ice*)
Filling the water tank
WARNING
Risk of poisoning due to contaminated water!
u
Fill the water tank with potable water only.
NOTICE
Sugary liquids!
Damage to the EasyTwist-Ice.
u
Fill with cold drinking water only.
Note
Using filtered, decarbonized water ensures the best-tasting
drinking water for your ice cubes.
This water quality can be achieved using a table water filter
of the kind available in trade retail outlets.
u
Always fill the water tank only with filtered, decarbonized
drinking water.
Fig. 42
u
Pull out freezer drawer as far as it will go.
u
Lift the water tank at the recess Fig. 42 (1).
u
Remove the water tank by lifting it upward. Fig. 42 (2)
u
Fill the water tank with drinking water up to the mark
Fig. 42 (3).
Fig. 43
u
Position the water tank at the front. Fig. 43 (1)
u
Lower the water tank at the rear. Fig. 43 (2)
u
Slide in the freezer drawer.
Releasing the ice cubes
Make sure that the following requirements are fulfilled:
q
The required time for the production of ice cubes has
been observed. (see 9.1 Technical specifications)
q
Freezer drawer is fully inserted.
q
Ice cube drawer is fully inserted.
u
Turn the rotary knob Fig. 41 (4) clockwise as far as it will
go.
w
Ice cubes fall from the ice cube tray into the ice cube
drawer Fig. 41 (5).
If all the ice cubes do not come out of the ice cube tray:
u
Turn the rotary knob clockwise several times to the stop.
7.10 VarioSpace
Fig. 44
You can remove drawers and glass panels from your appli‐
ance. This provides more room for large food items such as
poultry, joints of meat, large game and bulky baked goods.
You can then freeze these items whole for later preparation.
u
Note the load limits on the drawers and glass panels
(see 9.1 Technical specifications) .
7.11 Bottle rack
7.11.1 Using the bottle rack
Fig. 45
u
Slide the bottle rack at the edges.
w
Stops bottles from tipping over.
Equipment
20 * Depending on model and options
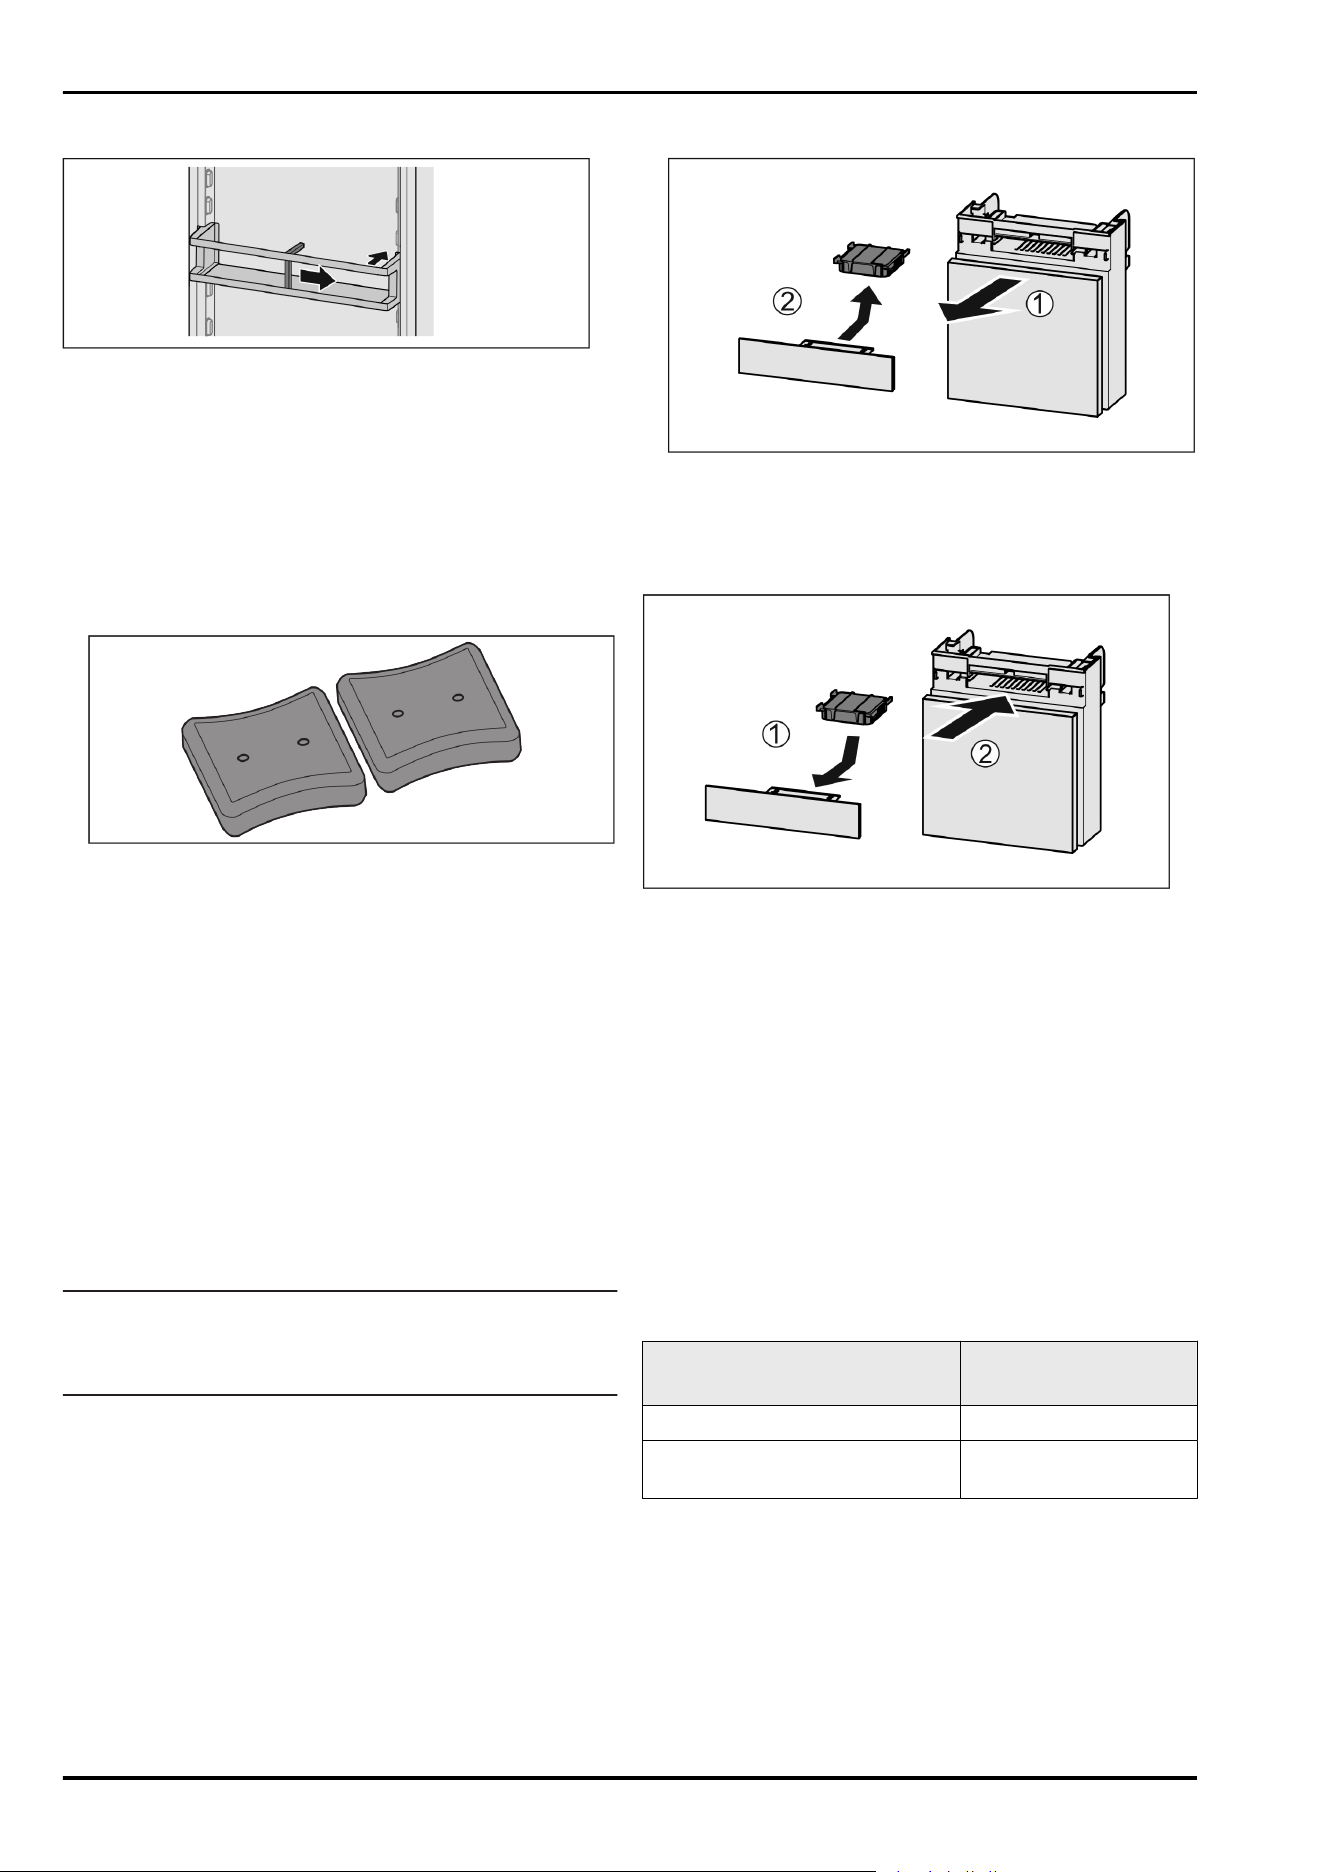
7.11.2 Removing the bottle rack
Fig. 46
u
Slide the bottle rack all the way to the right edge.
u
Remove to the back.
7.12 Freezer packs*
The freezer packs prevent the temperature from rising too
fast in the event of a power failure.
The freezer packs are in the drawer.
7.12.1 Using the freezer packs
Fig. 47
When the freezer packs are fully frozen:
u
Place on the frozen goods in the top, front part of the
freezer.
8 Maintenance
8.1 FreshAir carbon filter
The FreshAir carbon filter is located in the compartment
above the fan.
It guarantees the best air quality.
q
Change the carbon filter every 6 months.
When the reminder is set, a message on the display
prompts you to change it.
q
You can dispose of the carbon filter with the regular
household waste.
Note
FreshAir activated charcoal filters can be purchased from
the Liebherr-Hausgeräte store at home.liebherr.com/
shop/de/deu/zubehor.html.
8.1.1 Removing the FreshAir carbon filter
Fig. 48
u
Pull out the compartment Fig. 48 (1).
u
Remove the carbon filter Fig. 48 (2).
8.1.2 Inserting the FreshAir carbon filter
Fig. 49
u
Insert the carbon filter as shown in the diagram
Fig. 49 (1).
w
The carbon filter clicks into place.
If the carbon filter is pointing downwards:
u
Push the compartment in Fig. 49 (2).
w
The carbon filter is now ready for use.
8.2 Disassembling / assembling pull-
out systems
8.2.1 Notes on disassembly
You can disassemble some of the pull-out systems for
cleaning. Your appliance can contain a variety of pull-out
systems.
The following pull-out systems can be disassembled or
cannot be disassembled:
Pull-out system
can be disassembled /
cannot be disassembled
Drawer on glide rails cannot be disassembled
Partial pull-out fridge compart‐
ment
cannot be disassembled
8.3 Defrosting the appliance
8.3.1 Defrosting the refrigerator compartment
Defrosting is performed automatically. The water from the
thawing process runs out via the drain opening and is
evaporated.
u
Clean the drain opening regularly (see 8.4 Cleaning the
appliance) .
Maintenance
* Depending on model and options 21
8.3.2 Defrosting the freezer compartment with
NoFrost
Defrosting is performed automatically by the NoFrost
system. The moisture condenses on the evaporator and is
periodically defrosted and evaporated.
The appliance does not have to be defrosted.
8.4 Cleaning the appliance
8.4.1 Preparation
WARNING
Danger of electric shock.
u
Unplug refrigerator or disconnect power.
WARNING
Danger of fire
u
Do not damage the refrigerant circuit.
u
Empty appliance.
u
Pull out the power plug.
-or-
u
Activate CleaningMode. (see CleaningMode)
8.4.2 Cleaning the housing
NOTICE
Improper cleaning!
Damage to the appliance.
u
Only use soft cleaning cloths and ph-neutral all-purpose
cleaners.
u
Do not use steel wool or sponges that scour or scratch.
u
Do not use caustic or abrasive cleaning materials or
those containing sand, chloride, or acids.
WARNING
Risk of injury or damage due to hot steam.
Hot steam can cause scalding/burns and damage to
surfaces.
u
Do not use steam cleaners.
u
Wipe the housing down with soft, clean cloth. If very
dirty, use lukewarm water with a neutral cleaner. Glass
surfaces can also be cleaned with glass cleaner.
8.4.3 Cleaning the interior
NOTICE
Improper cleaning!
Damage to the appliance.
u
Only use soft cleaning cloths and ph-neutral all-purpose
cleaners.
u
Do not use steel wool or sponges that scour or scratch.
u
Do not use caustic or abrasive cleaning materials or
those containing sand, chloride, or acids.
u
Plastic surfaces: clean by hand with a soft clean cloth,
lukewarm water and a little detergent.
u
Metal surfaces: clean by hand with a soft clean cloth,
lukewarm water and a little detergent.
u
Drain hole: remove any deposits with a thin item such as
a cotton bud.
8.4.4 Cleaning the equipment
NOTICE
Improper cleaning!
Damage to the appliance.
u
Only use soft cleaning cloths and ph-neutral all-purpose
cleaners.
u
Do not use steel wool or sponges that scour or scratch.
u
Do not use caustic or abrasive cleaning materials or
those containing sand, chloride, or acids.
Clean with a soft, clean cloth, lukewarm water and a little
washing up liquid:
- Door racks
- Shelf
- Split shelf
- Fruit & Vegetable-Safe cover
- Drawer
- Variable bottle shelf
- Components of the EasyTwist-Ice*
Clean with a damp cloth:
- Retracting rails
Please note: the grease in the tracks is there for lubrica‐
tion purposes and must not be removed!
Clean in the dishwasher up to 60 °C:
- Bottle rack
- Holder for the split shelf
u
Disassemble the equipment: see the relevant section.
u
Clean the equipment.
8.4.5 Cleaning the EasyTwist-Ice*
Cleaning must be conducted in the following situations:
q
Operating for the first time
q
Non-use for longer than 48 hours
q
When the appliance requires cleaning
When operating for the first time, longer periods of disuse
and when the appliance requires cleaning
Fig. 50
u
Take out the water tank Fig. 50 (1) and ice cube drawer
Fig. 50 (2).
u
Take out the freezer drawer with EasyTwist-Ice.
Maintenance
22 * Depending on model and options
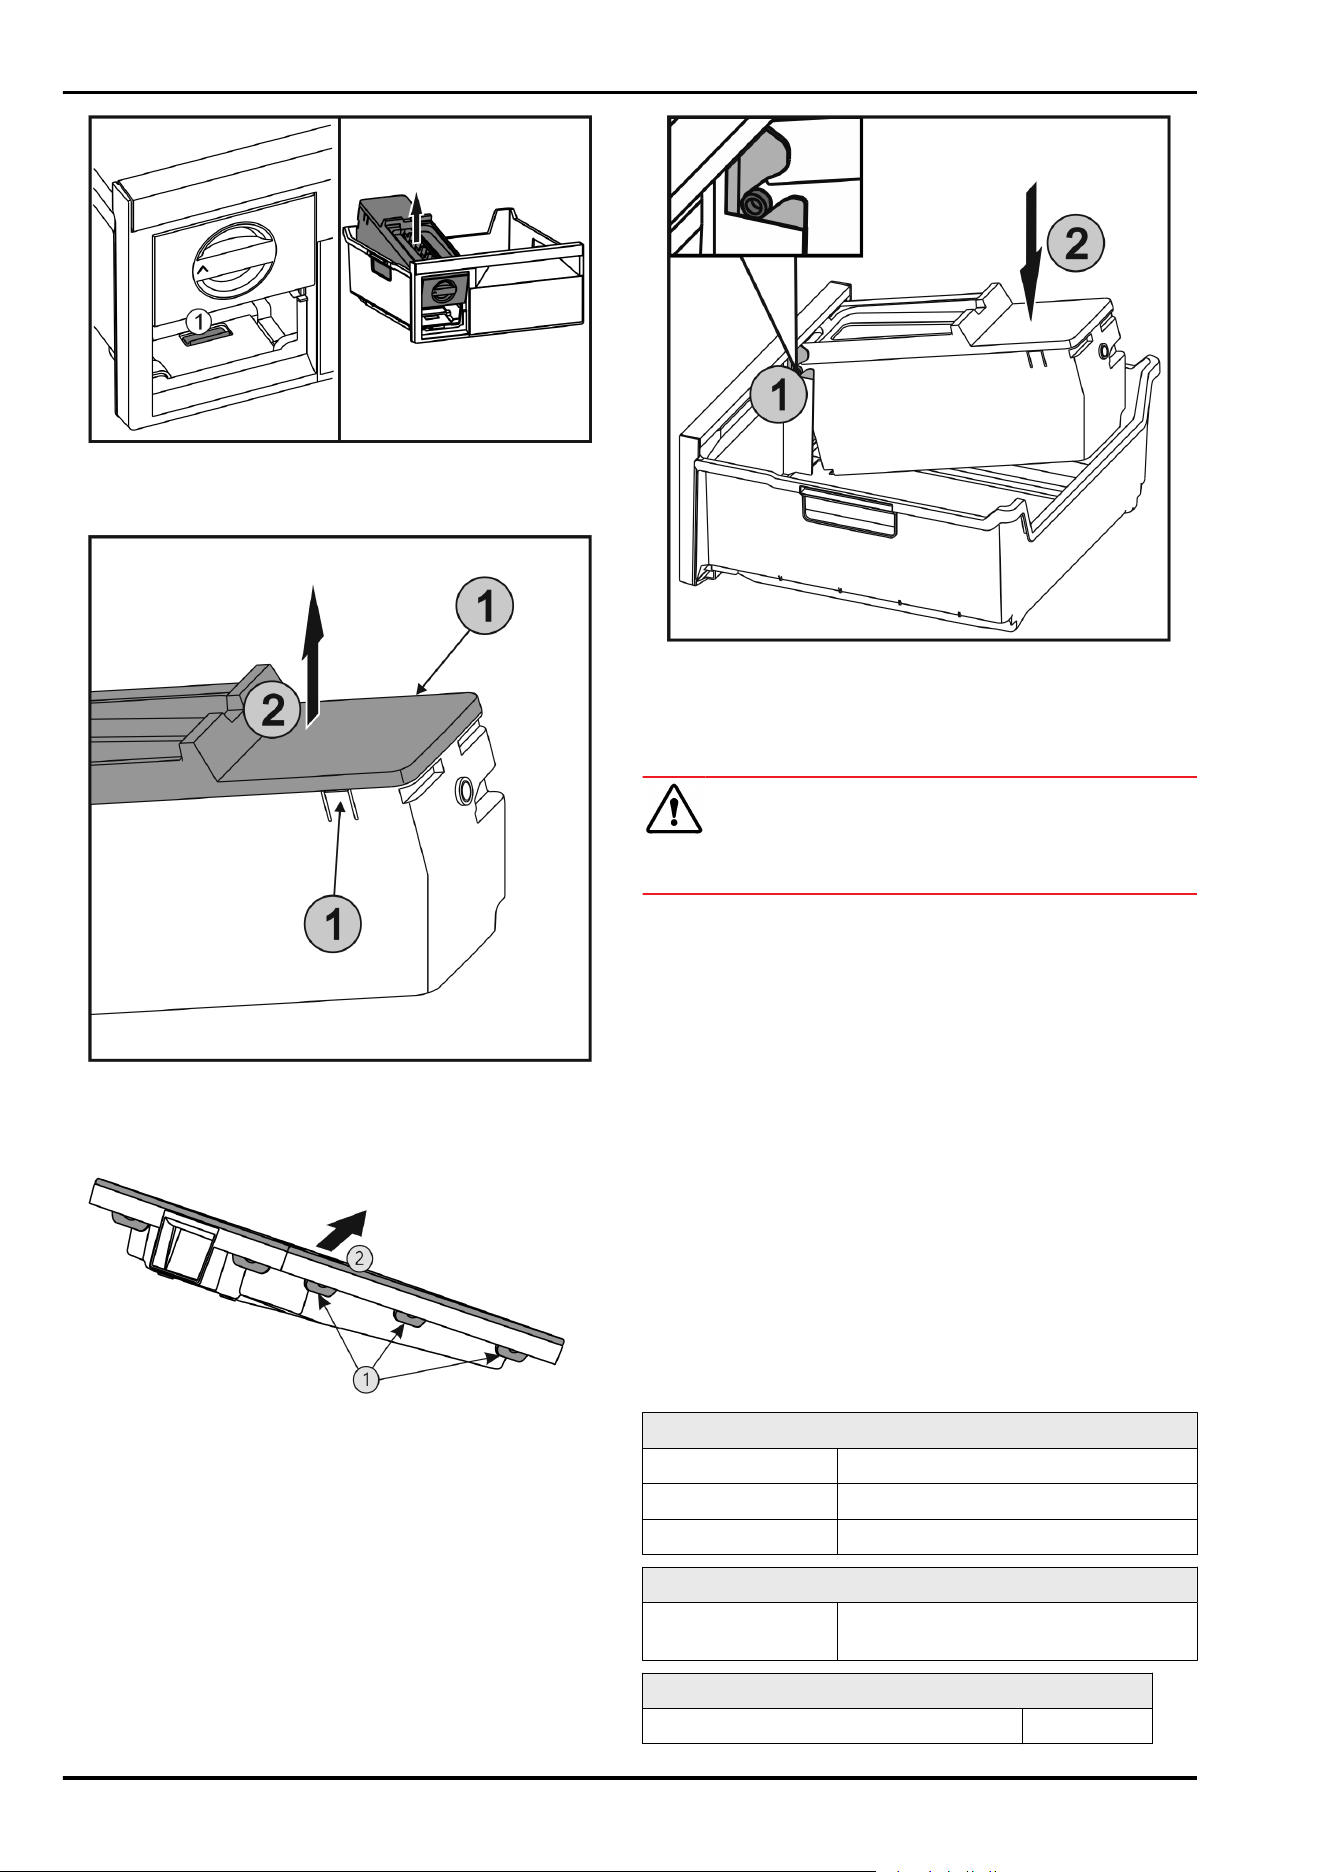
Fig. 51
u
Press the lug Fig. 51 (1), lift up the EasyTwist-Ice at the
back and take it out of the freezer drawer.
Fig. 52
u
Press the lugs Fig. 52 (1) on both sides of the EasyTwist-
Ice simultaneously and take off the cover Fig. 52 (2)
upwards.
Fig. 53
u
Press all lugs Fig. 53 (1) one after another and remove the
cover Fig. 53 (2).
u
Clean the Ice cube drawer, water tank and EasyTwist-Ice
with water and a little detergent.
u
Assemble the EasyTwist-Ice.
Fig. 54
u
Insert the axles Fig. 54 (1) on the EasyTwist-Ice in the
guides and push the rear side Fig. 54 (2) until the lug
engages.
u
Push in the EasyTwist-Ice drawer.
WARNING
Risk of poisoning due to contaminated water!
u
Fill the water tank with potable water only.
u
Fill the water tank and insert it.
With unfiltered water:
u
Dispose of ice cubes that were produced within 24 hours
of the first ice cube production.
With filtered water:
u
Dispose of ice cubes that were produced within 48 hours
of the first ice cube production.
8.4.6 After cleaning
u
Wipe dry the appliance and items of equipment
u
Connect and switch on the appliance.
u
Activate SuperFrost (see 6.3 Appliance functions) .
When the temperature is sufficiently cold
u
Place the food inside.
u
Repeat cleaning regularly.
9 Customer support
9.1 Technical specifications
Temperature zone
Cool: 3 °C to 9 °C
BioFresh 0 °C to 3 °C
Freezing -26 °C to -15 °C
Maximum freezing quantity/24 h
Freezer See “Freezing capacity …/24 h” on
the type plate
Ice cube production with EasyTwist-Ice*
Time required at -18 °C approx. 5.5 h
Customer support
* Depending on model and options 23
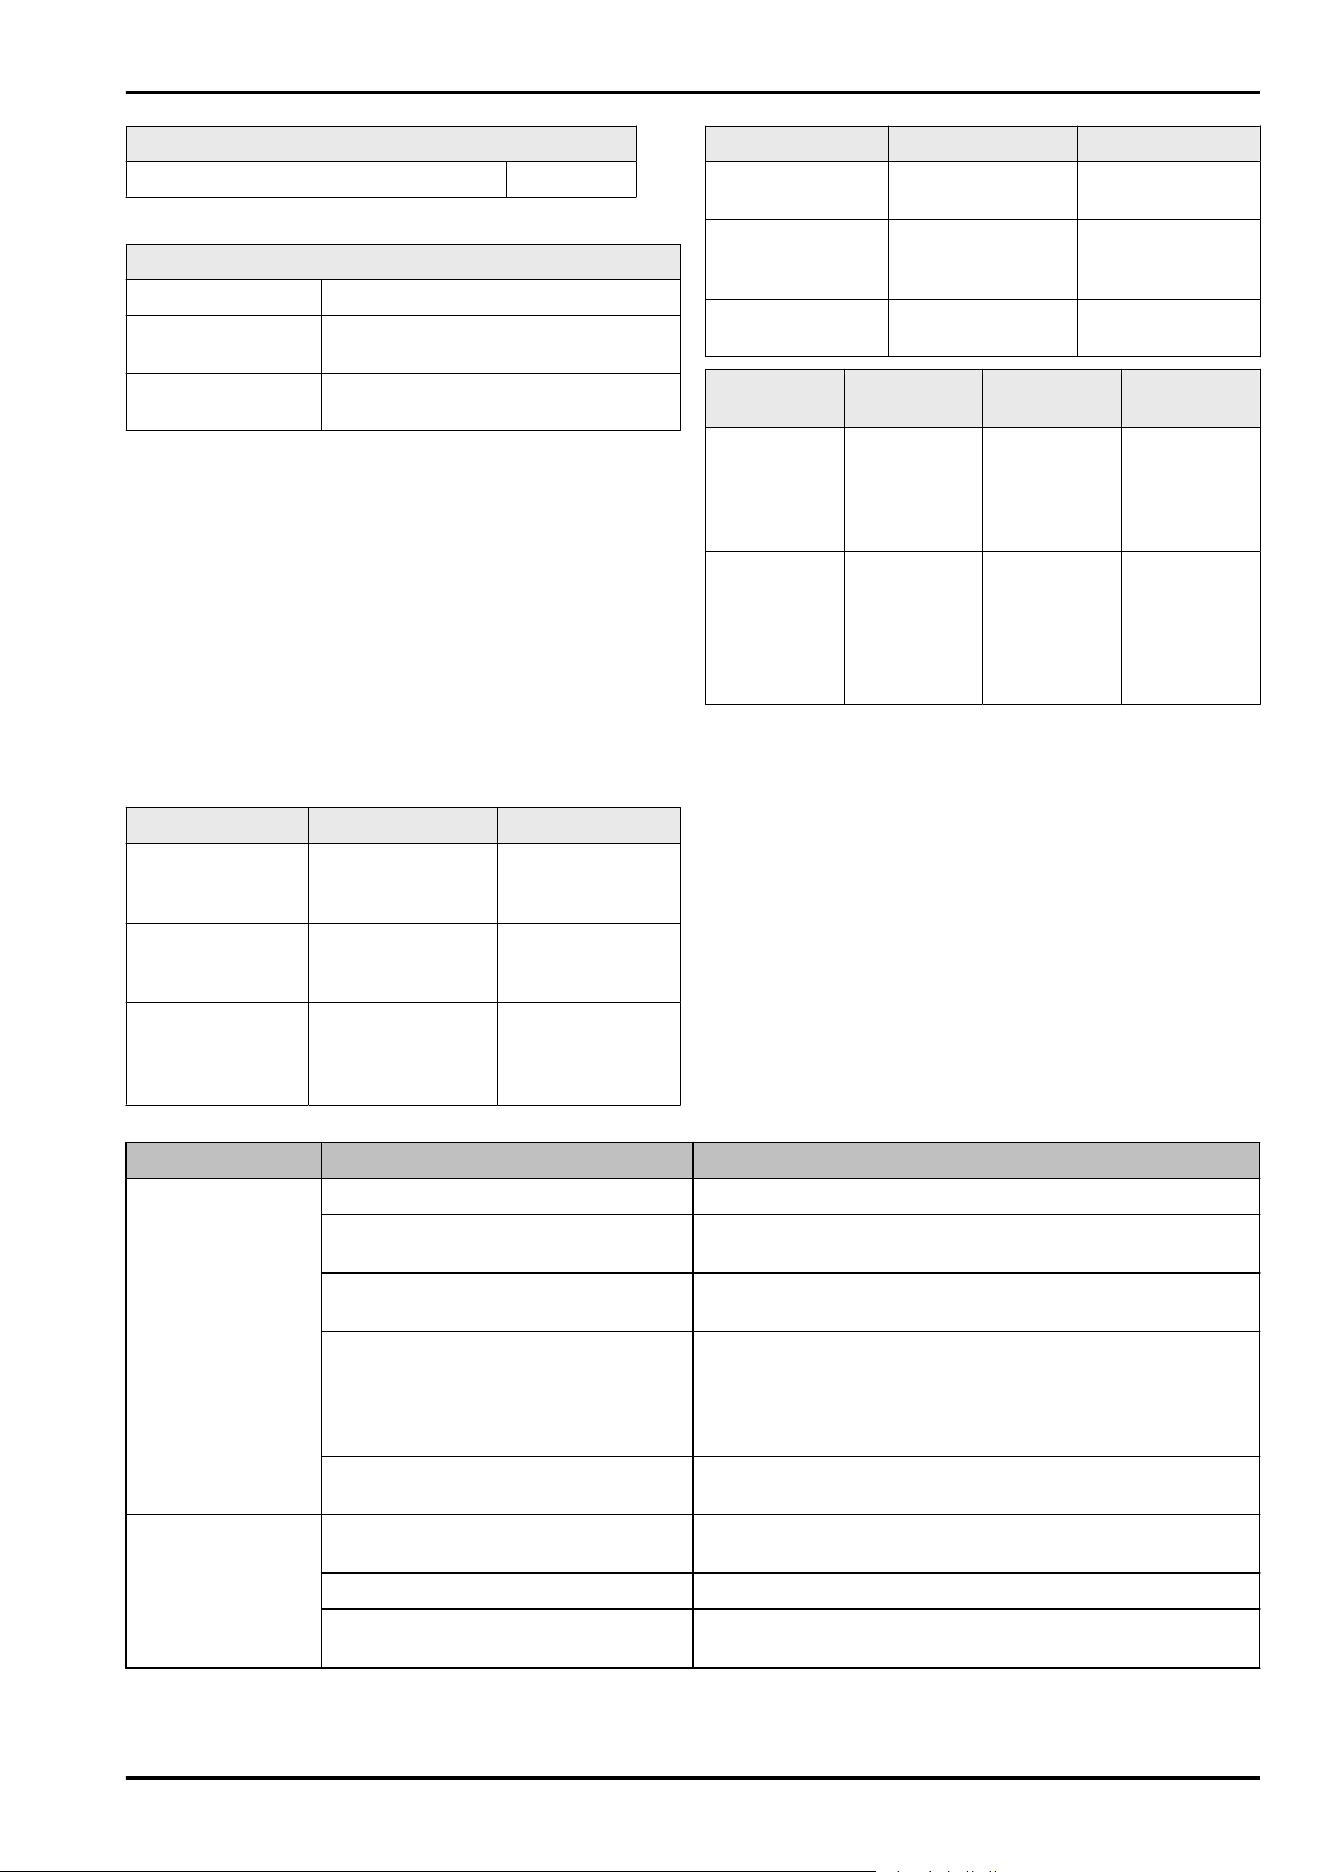
Ice cube production with EasyTwist-Ice*
Time required with SuperFrost activated approx. 3 h
For appliances with a WiFi connection:*
Frequency specification*
Frequency band 2.4 GHz
Maximum radiated
power
< 100 mW
Purpose of the
wireless equipment
Integration in the local WiFi network
for data communication
9.2 Operating noises
The appliance makes noises while in operation.
-
At less cooling output the appliance saves energy but
takes longer to cool items. The volume is lower.
-
At a higher cooling output the food cools more quickly.
The volume is higher.
Examples:
•
Activated functions (see 6.3 Appliance functions)
•
Running fan
•
Freshly sorted food
•
High ambient temperature
•
Door opened for long periods
Noise
Possible cause Type of noise
Bubbling and
splashing
Coolant is flowing
into the cooling
circuit.
Normal noise
Spitting and
hissing
Coolant is spraying
into the cooling
circuit.
Normal noise
Humming The appliance
cools. The volume
depends on the
cooling output.
Normal noise
Noise Possible cause Type of noise
Whirring and
murmuring
The fan is running. Normal operating
noise
Clicking Components are
being switched on
and off.
Normal switching
noise
Rattling or
humming
Valves are active. Normal switching
noise
Noise Possible
cause
Type of noise How to
resolve
Vibration Unsuitable
setup
Error noise Adjust the
feet to make
sure the
appliance is
horizontal.
Clattering Equipment,
Objects
inside the
appliance
Error noise Secure
equipment
parts.
Leave a gap
between
items.
9.3 Technical faults
Your appliance is designed and manufactured for reliable
operation and a long service life. If a malfunction nonethe‐
less occurs during operation, please check whether the
malfunction is due to an operating error. In this case, you
will have to be charged for the costs incurred, even during
the warranty period.
You may be able to rectify the following faults yourself.
9.3.1 Appliance function
Defect
Cause Remedy
The appliance does
not work.
→ The appliance is not switched on.
u
Switch on the appliance.
→ The power plug is not properly
inserted in the wall socket.
u
Check the power plug.
→ The powerfuse in the wall socket is
not OK.
u
Check the fuse.
→ Power failure.
u
Keep the appliance closed.
u
Protect your food: Lay freezer packs on top of the food or
use another freezer if the power is off for a prolonged
period.
u
Do not re-freeze defrosted food.
→ The appliance connector is not
correctly inserted in the appliance.
u
Check the appliance connector.
The temperature is
not cold enough
→ This means that the door of the
appliance is not closed properly
u
Close the appliance door
→ Insufficient ventilation
u
Clear and clean the ventilation grille.
→ The ambient temperature is too
high
u
Solution: (see 1.4 Range of appliance use) .
Customer support
24 * Depending on model and options
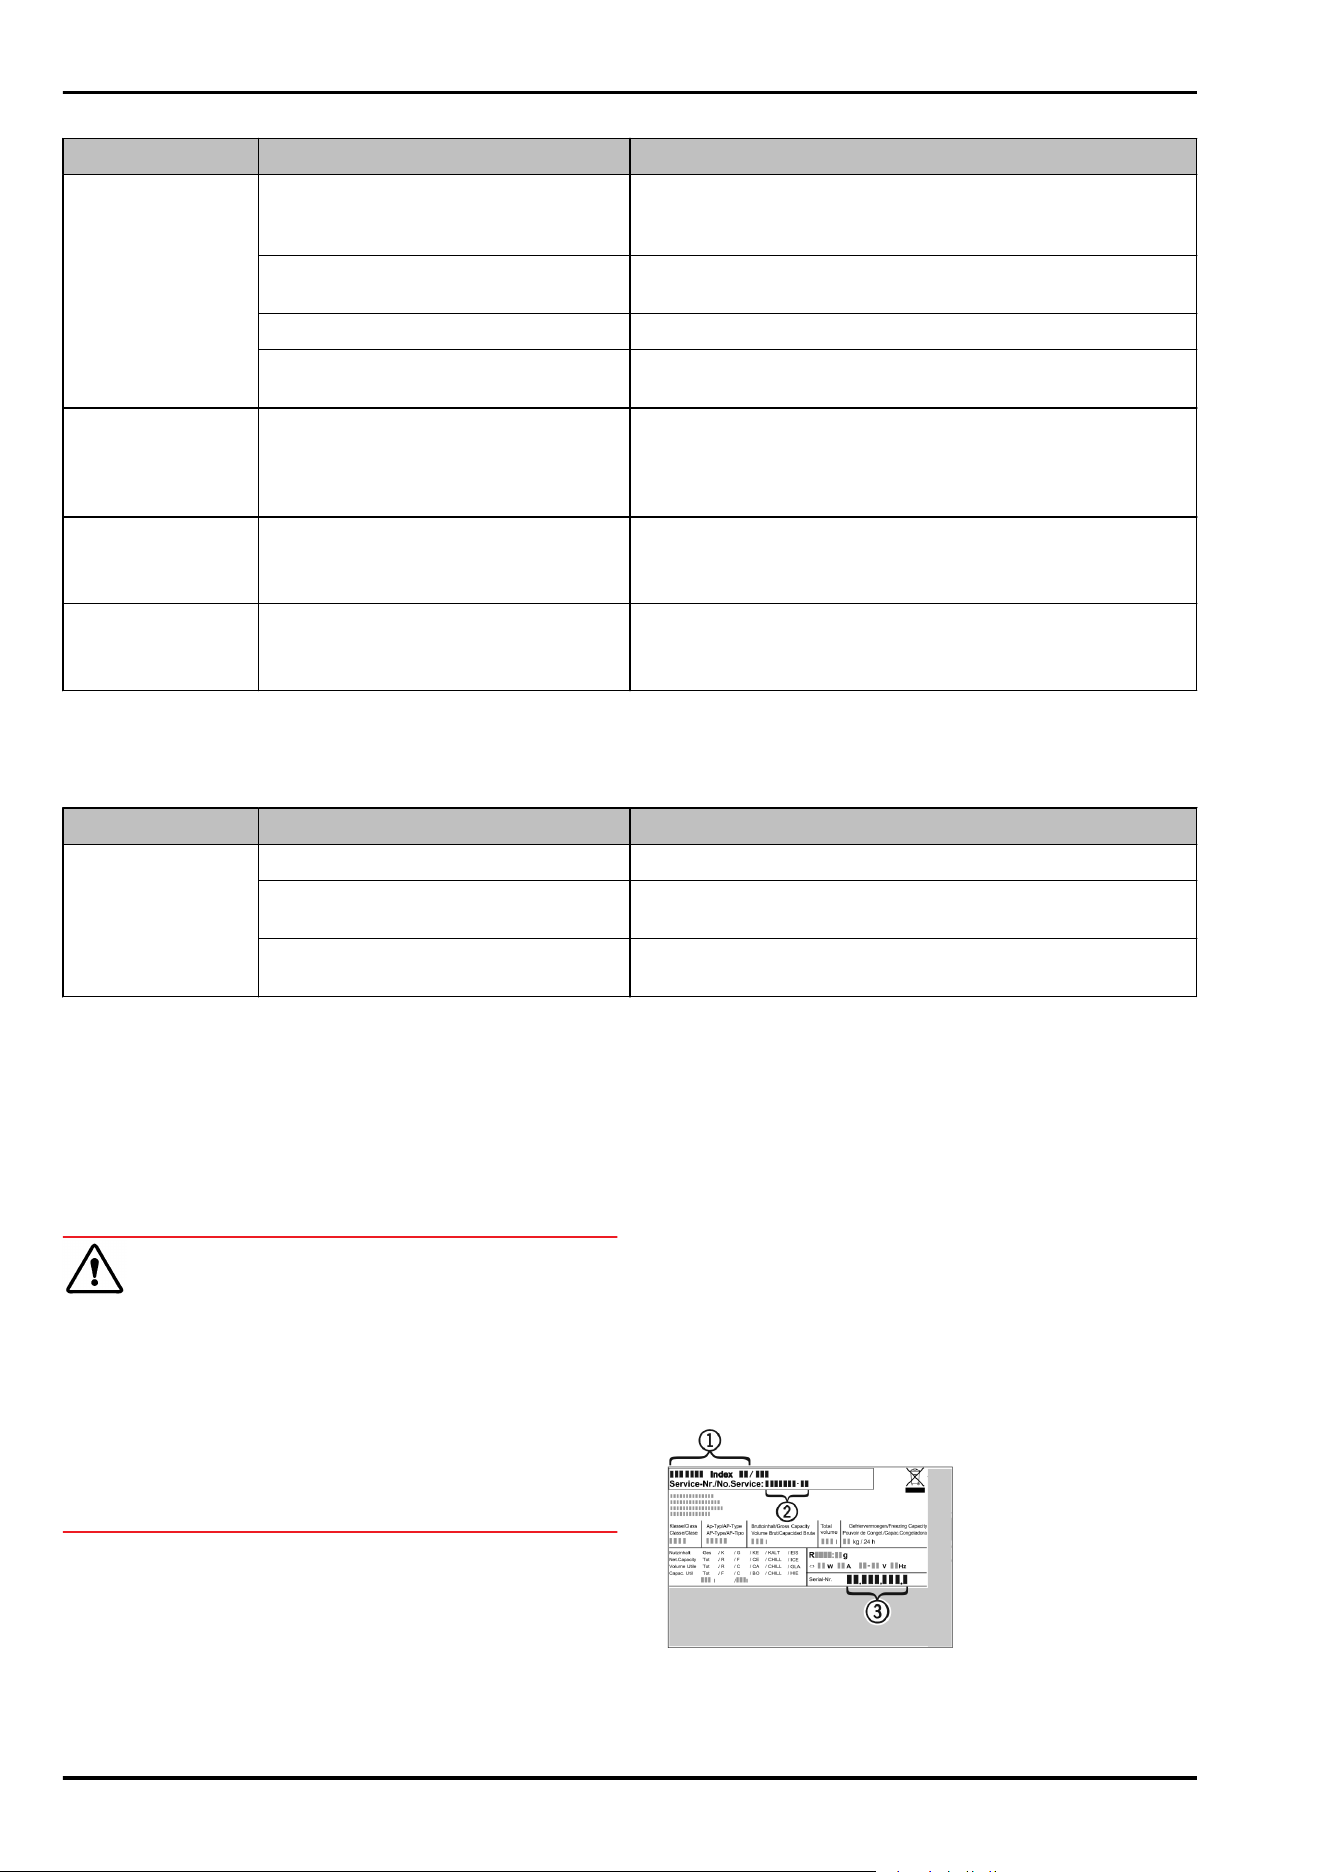
Defect Cause Remedy
→ The appliance was opened too
frequently or for too long
u
Wait to see if the required temperature corrects itself. If
not, contact Customer Service. (see 9.4 Customer
Service)
→ Too much fresh food was placed
inside without SuperFrost.
u
Solution: (see SuperFrost)
→ The temperature is incorrectly set
u
Set to a colder temperature and check after 24 hours.
→ The appliance is too near to a heat
source (stove, heater etc).
u
Change location of appliance or the heat source.
The door seal is
defective or should
be replaced for
other reasons.
→ The door seal is interchangeable.
You can replace it without the use
of any special tools.
u
Contact Customer Service. (see 9.4 Customer Service)
The appliance is
iced up or conden‐
sation is building.
→ The door seal may have slipped out
of its groove.
u
Check the door seal is well placed in the groove.
The outside
surfaces of the
appliance are hot*.
→ The heat of the refrigerant circuit is
used to prevent condensate from
forming
u
This is normal.
9.3.2 Equipment
Defect Cause Remedy
The interior light
does not turn on.
→ The appliance is not switched on.
u
Switch on the appliance.
→ The door was open for longer than
15 min.
u
The interior light automatically switches itself off if the
door stays open for approx. 15 min.
→ The LED interior light is faulty or
the lid is damaged.
u
Contact Customer Service. (see 9.4 Customer Service)
9.4 Customer Service
First check whether you can rectify the fault yourself
(see 9 Customer support) . If you cannot rectify the problem,
contact Customer Service.
You can find the address in the enclosed brochure “Liebherr-
Service” or at home.liebherr.com/service.
WARNING
Unprofessional repair!
Injuries.
u
Repairs and work on the appliance and the power supply
cable not described in the Manual (see 8 Maintenance)
should only be carried out by a qualified service provider.
u
A damaged power cable may only be replaced by the
manufacturer, the manufacturer’s Customer Service or a
similarly qualified person.
u
For appliances with an IEC connector, the change can be
made by the customer.
9.4.1 Contacting Customer Service
Make sure that the following appliance information is avail‐
able:
q
Appliance name (model and index)
q
Service no. (service)
q
Serial no. (S no.)
u
Call up the appliance information via the display. (see
Info)
-or-
u
Refer to the type plate for appliance information.
(see 9.5 Rating plate)
u
Take note of the appliance information.
u
Notify customer service: Report errors and the appliance
information.
w
This will help us give you fast and accurate support.
u
Follow further instructions from Customer Service.
9.5 Rating plate
The nameplate is located behind the drawers on the inside
of the appliance.
Fig. 55
(1)
Appliance name (3) Serial no.
(2) Service no.
u
Information from the nameplate.
Customer support
* Depending on model and options 25
10 Decommissioning
u
Empty appliance.
u
Switch off appliance. (see Turn off appliance)
u
Pull out the power plug.
u
Remove the appliance connector if necessary: Pull it out
and, at the same time, move it from the left to the right.
u
Clean appliance. (see 8.4 Cleaning the appliance)
u
Leave the door open to prevent bad smells
11 Disposal
11.1 Preparing appliance for disposal
Liebherr uses batteries in some of its appli‐
ances. In the EU, for environmental reasons,
legislation obliges the end user to remove
these batteries before disposing of the old
appliances. If your appliance contains
batteries, a corresponding notice is attached to
the appliance.
Lamps If you can remove the lamps yourself without
destroying them, also remove these before
disposal.
u
Take the appliance out of operation.
u
Appliance with batteries: Remove the batteries. For
description, see Maintenance chapter.
u
If possible: Remove lamps without destroying them.
11.2 Disposing of the appliance in an
environmentally friendly manner
The appliance still contains
valuable materials and must be
collected separately from
unsorted municipal waste so it
can be recycled.
Dispose of batteries separately
from the old appliance. You can
do this by returning the
batteries free of charge to
retailers or taking them to recy‐
cling centers and collection
centers for recyclable materials.
Lamps Dispose of removed lamps via
the respective collection
systems.
For Germany: You can dispose of the appli‐
ance free of charge via the class
1 collection containers at the
local recycling and recyclable
material collection centers.
When purchasing a new fridge/
freezer, if the sales area > 400
m
2
, retailers will also take back
the old appliance free of charge.
WARNING
Leaking refrigerant and oil!
Fire. The refrigerant contained within the appliance is envi‐
ronmentally friendly, but flammable. The oil contained
within the appliance is flammable. Escaping refrigerant and
oil can ignite if they are of high enough concentration and
are exposed to an external heat source.
u
Do not damage the pipelines of the coolant circuit and
the compressor.
u
Transport the appliance away without damaging it.
u
Dispose of batteries, lamps, and the appliance according
to the above specifications.
Decommissioning
26 * Depending on model and options

Disposal
* Depending on model and options 27

home.liebherr.com/fridge-manuals
Combined fridge-freezer with BioFresh
Issue date: 20230921
Part number index: 7080438-01
Liebherr-Hausgeräte Marica EOOD
Bezirk Plovdiv
4202 Radinovo
Bulgarien