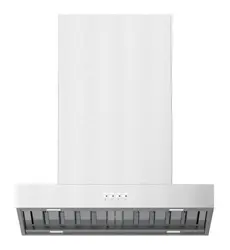

T BAR CANOPY RANGEHOOD
MODEL CK90CTF
USER MANUAL
PLEASE READ THE USER MANUAL CAREFULLY BEFORE USING THE RANGEHOOD.
Don’t install the rangehood if it is damaged. Call 1300 307 917 for assistance

D
ear Customer,
Thank you for choosing our product. This manual is
designed to guide you through the proper operation
of your appliance, helping you achieve optimal
performance and take full advantage of its features. For
your safety and the safety of others, please carefully
review the included safety instructions and warnings. We
recommend keeping this manual in a secure location for
future reference.
This appliance is intended solely for the preparation of
food in a domestic (household) setting. Any other use is
considered unsafe and inappropriate. The manufacturer
cannot be held responsible for any issues resulting from
improper use, misuse, or incorrect installation.
Glem Gas Australasia Pty Ltd
Please ensure you read this manual fully before you
call for service or a full call out fee could be applied.
Record your model and serial number here:
Model number.............................................................
Serial number .............................................................
Date and place of purchase .........................................
......................................................................................
Product Specification & Technical Parameters
Model CK90CTF
Rated Voltage 230V
Rated Power Frequency 50Hz
Light Power 1×10W MAX
Motor Power 230W
Total Power 240W
Motor Single
Maximum Extraction Rate 800 cubic metres/hour
Diameter of Outlet Adapter 150mm
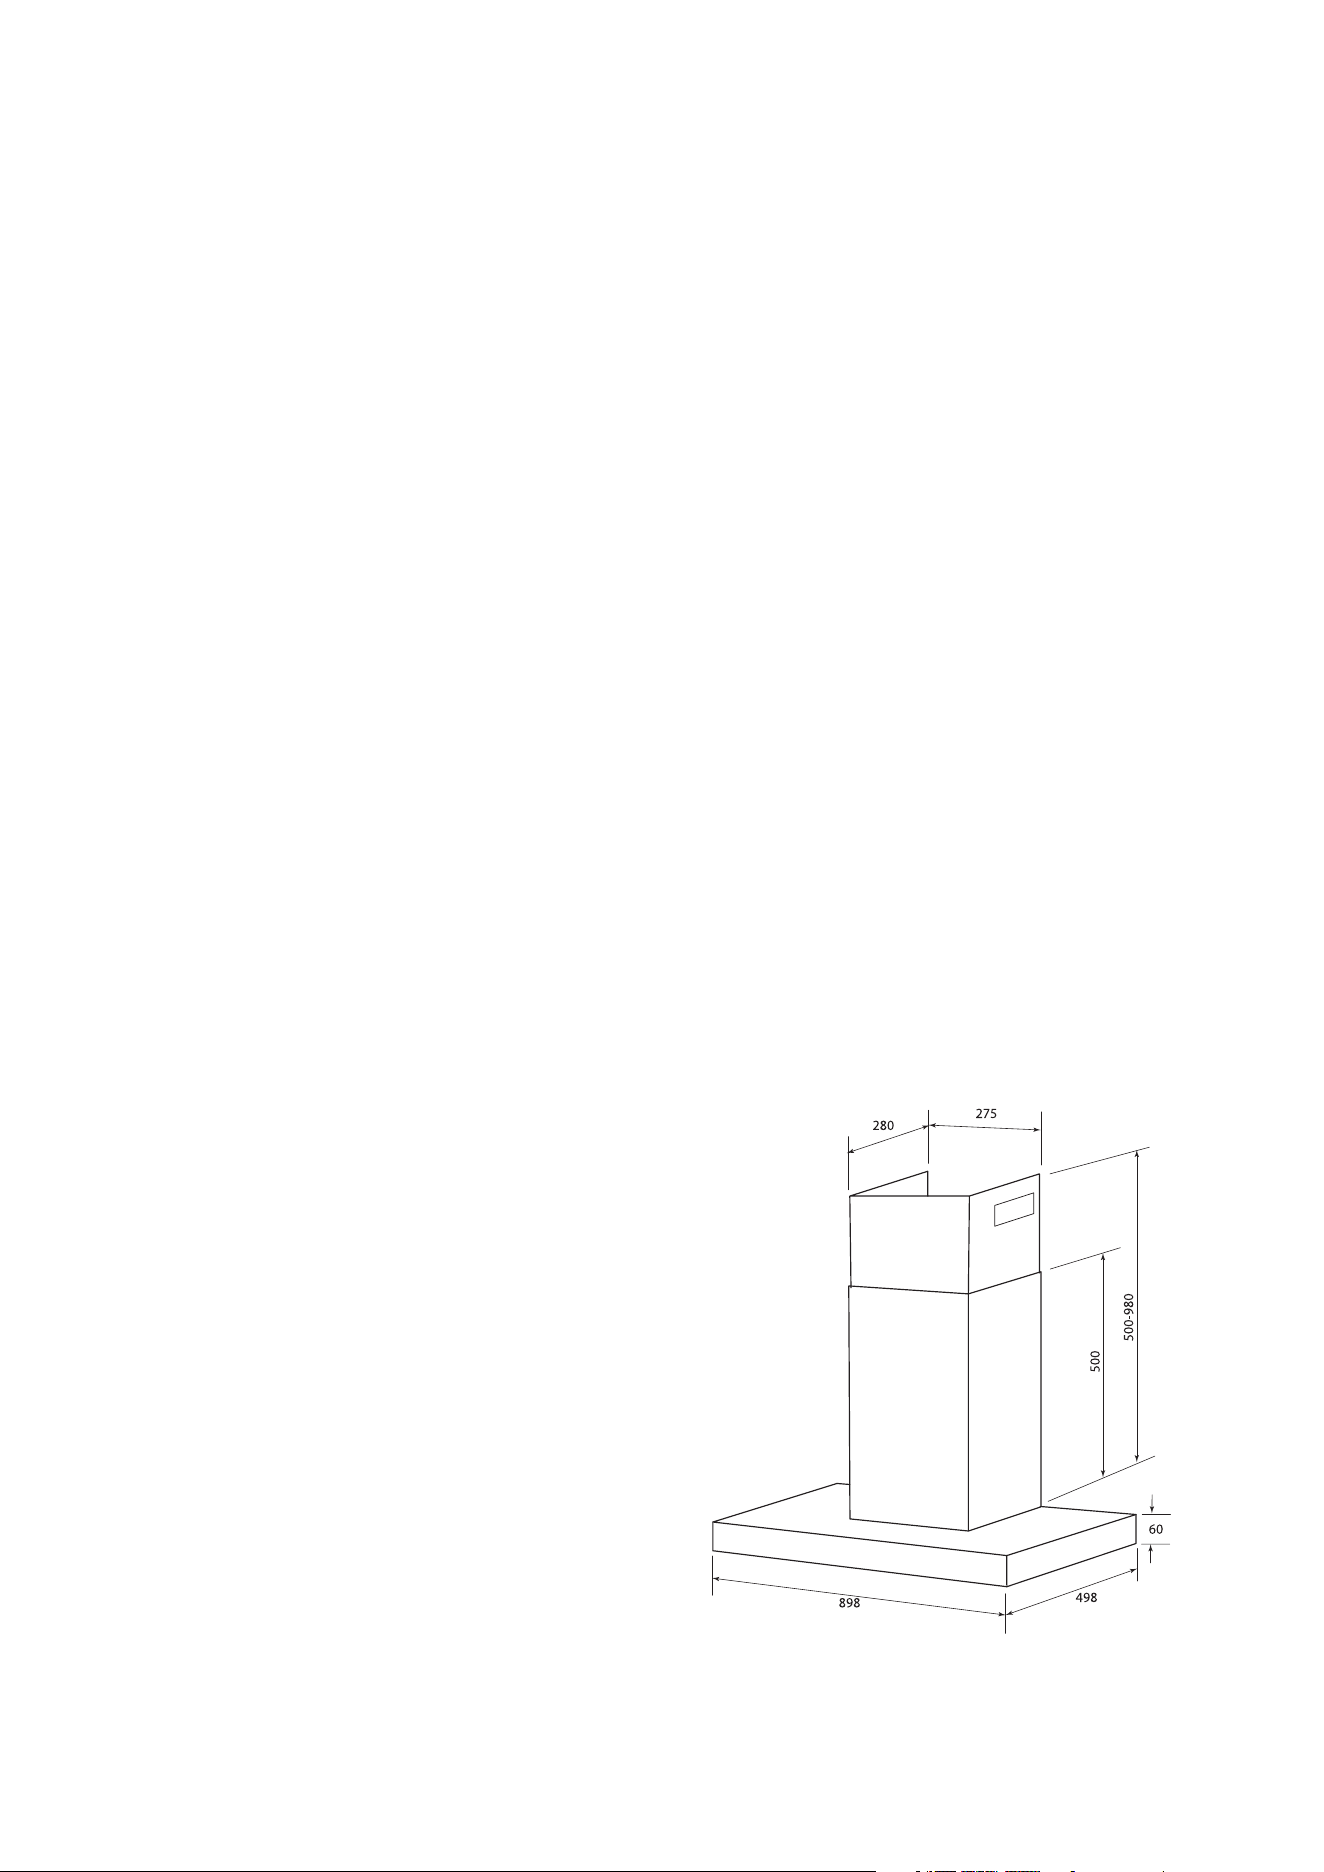
Dimension(mm) W898 X D498 X H560min/1040max
Safety Warnings –
Applicable Safety Standard AS/NZS 60335.2.31:2020
The appliance is not intended for use by persons
(including children) with reduced physical, sensory
or mental capabilities, or lack of experience and
knowledge, unless they have been given supervised
or instruction concerning use of the appliance by a
responsible person for their safety.
Young children should be supervised to ensure that they
do not play with the appliance.
If the supply cord is damaged, it must be replaced by the
manufacturer or its service agent or a similarly qualified
person in order to avoid a hazard.
Range Hoods and other cooking fume extractors may
adversely affect the safe operation of appliances burning
gas or other fuels (including those in other rooms) due
to lack of back flow of combustible gases. These gases
can potentially result in carbon monoxide poisoning.
After installation of a range hood or other cooking fume
extractor, the operation of flued gas appliances should
be tested by a competent person to ensure that back
flow of combustion gases do not occur
There is a risk of fire if cleaning is not carried out in
accordance with the instructions.
Caution: Accessible parts may become hot when used
with a cooking appliance.
Do not flambé under the range hood.
The exhaust air must not be discharged into a flue which
is used for exhausting fumes from other appliances
burning gas or other fuels. (Not applicable for appliances
which only discharge air back into the room)
The minimum distance between the supporting surface
for the cooking vessels of the hob and the lowest
part of the range hood shall be at least 60cm for
electric cooktops and 650mm for gas cooktops. If the
instructions for installation specify a greater distance, this
has to be taken into account.
Regulations concerning the discharge of air have to be
fulfilled.
Warning: Failure to install the screws or fixing devices
in accordance with the instructions may result in an
electrical hazard.
For LED lamp replacement please contact manufacturer
or associated service agent
IMPORTANT INSTALLATION INFORMATION
The manufacturer is not responsible for any damage
resulting from incorrect or improper installation.
Please read this manual thoroughly before installing and
using your range hood. Retain it in a safe place for future
reference.
Installation and servicing must be carried out only by a
qualified and trained service technician.
Ensure that the main voltage matches the value
indicated on the rating plate located inside the hood.
If the hood is used alongside non-electrical appliances
(e.g., gas stoves), adequate ventilation must be provided
to prevent the backflow of exhaust gases. The kitchen
must have a direct opening to the outdoors to ensure a
fresh air supply.
According to Australian safety standards, the
minimum clearance is 650mm above gas cooktops
and 600mm above electric cooktops. For optimal
performance, we recommend installing the range
hood 750mm above a gas cooktop and 650mm above
an electric cooktop.
For queries regarding installation height, please
contact 1 300 307 917.
MAINTENANCE
Proper maintenance is essential for the efficient
operation of your range hood.
Always disconnect the appliance from the power supply
before performing any maintenance.
Clean or replace aluminum grease filters and activated
charcoal filters at the intervals recommended in this
manual.
Clean the hood using a damp cloth and a mild, neutral
detergent.
DISPOSAL: Do not dispose of this product with regular
household waste. It must be collected separately for
proper environmental treatment.
WARNING
Electrical appliances can pose hazards under certain
conditions. Please observe the following safety
precautions:
- Do not inspect or remove filters while hood operation.
- Never disconnect the appliance with wet hands.
- Avoid open flames beneath the hood, as this may
damage the filters.
- Monitor frying carefully to prevent overheating oil,
which may cause a fire.
- Always unplug the appliance before conducting any
maintenance or servicing.
TO REDUCE THE RISK OF FIRE,ELECTRIC SHOCK,OR
INJURY TO PERSONS,OBSERVE THE FOLLOWING:
All installation work and electrical wiring must be carried
out by qualified personnel, in full compliance with
relevant codes, standards, and fire-rated construction
requirements.
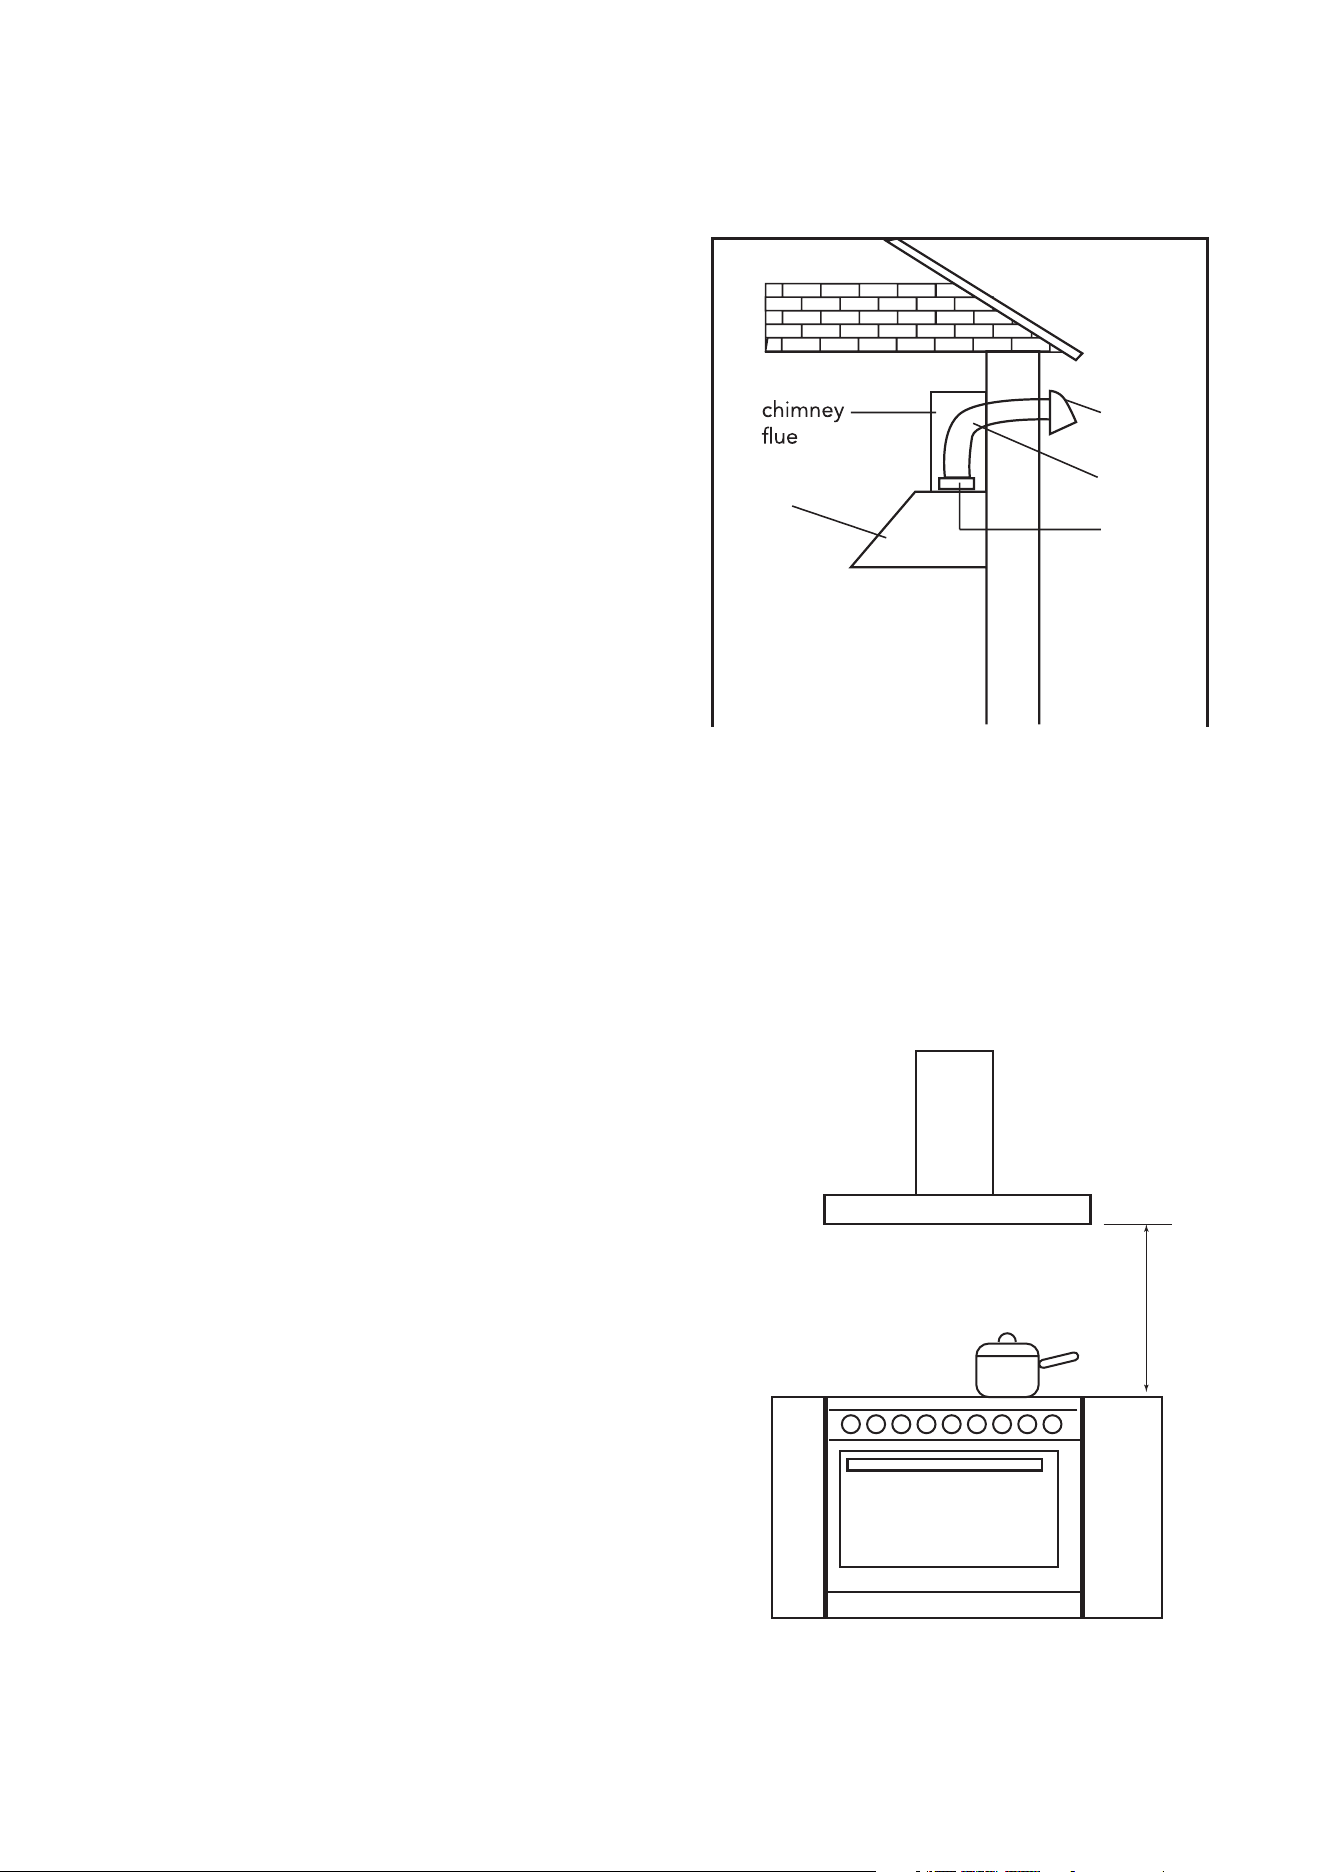
Proper ventilation is essential to ensure safe combustion
and the effective discharge of gases through the flue
(chimney), preventing the risk of backdrafts.
Take care when cutting or drilling into walls or ceilings
to avoid damaging concealed electrical wiring or other
hidden utilities.
Ducted ventilation systems must always be vented
directly to the outdoors.
This product is intended for indoor use only; do not use
it outdoors.
Adequate ventilation must be ensured when the range
hood is operated simultaneously with gas or fuel-burning
appliances to avoid the accumulation of hazardous
fumes.
Failure to clean the appliance in accordance with the
provided instructions may pose a fire hazard.
DIMENSIONS
INSTALLATION & USE
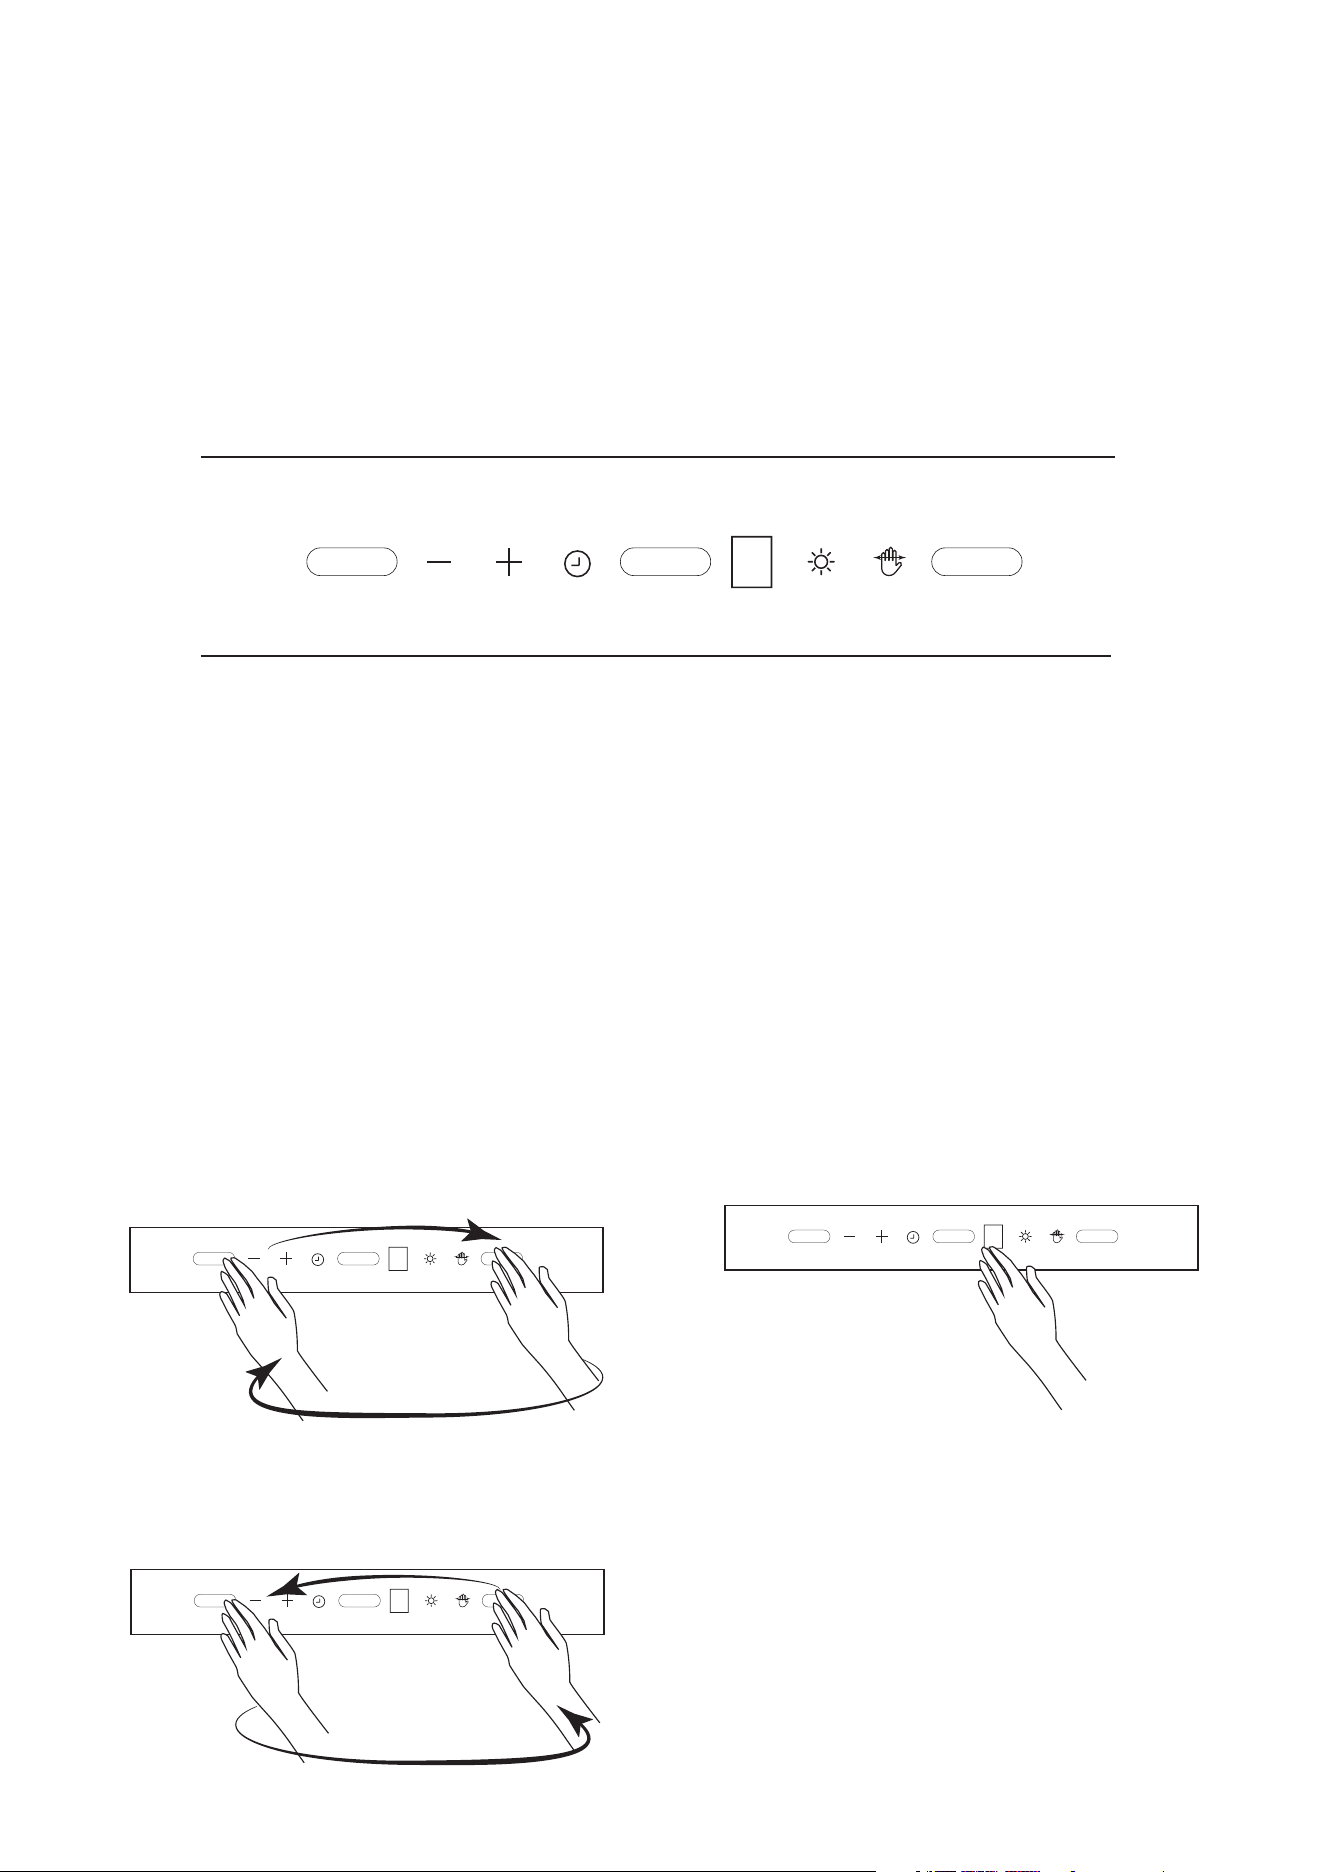
OPERATION OF CONTROLS
This innovative rangehood features hand gesture
controls for adjusting fan speeds and lighting. This
touch-free functionality helps keep the surface clean,
even when your hands are messy during cooking.
CONTROL PANEL
A Gesture sensors for fan speed
B Gesture sensors for turning light on/off
1 Reduce fan speed sensor
2 Increase fan speed sensor
3 Delay function
4 Screen
5 Light function sensor
6 Gesture control on/off sensor
USING GESTURE CONTROLS
FAN SPEED
To increase the fan speed, wave your hand in front of
the control panel from left to right. The motor speed
will cycle through 0 - 1 - 2 - 3, with the display updating
accordingly.
To decrease the fan speed, wave your hand from right
to left, reducing the speed from 3 - 2 - 1 - 0. The current
speed setting will be shown on the screen.
The range hood is operated via a touch control panel.
The “+” and “–” buttons adjust the fan speed across
three levels: Low, Medium, and High. The display screen
shows the current speed setting as 0, 1, 2, or 3.
The timer icon activates a 15-minute auto shut-off func-
tion.
The light icon toggles the range hood’s light on and off.
The gesture icon enables the gesture control feature.
LIGHT
To turn on the light, hold your hand in front of the
center sensor (labelled B) for approximately 2 seconds.
The corresponding icon will appear, and the rangehood
light will switch one.
A 1
2
3
B 4
5 6
A
GREASE FILTERS
Grease filters should be cleaned regularly to maintain
optimal performance. Use a warm water and mild
detergent solution for manual cleaning.
The filters are also dishwasher-safe and may be cleaned
using a light wash cycle. Note: Discoloration may occur
over time but does not affect filter performance.
For removal and installation instructions, refer to the
“INSTALL FILTERS” section of this manual.
INSTALLING THE DUCTWORK
Ducting Guidelines and Safety Precautions
Caution: To minimize the risk of fire, always use metal or
fire-resistant ducting materials.
The duct outlet has a diameter of 150mm. Reducing this
diameter may significantly increase noise levels during
operation.
Plan the ductwork path from the range hood to the
exterior of the building. For optimal performance, use a
short and straight duct run wherever possible.
Avoid long duct runs, multiple elbows, or transitions, as
these will decrease the efficiency of the range hood. For
longer runs, larger diameter ducting is recommended to
maintain airflow and reduce noise.
Do not discharge air into a flue that is used for venting
combustion fumes from gas or fuel-burning appliances.
All air discharge must comply with applicable
regulations.
Install a wall cap on the exterior wall. Connect round
metal ducting to the cap and work back toward the
hood. Use duct tape to securely seal all joints between
duct sections to ensure airtight connections.
INSTALLING THE RANGE HOOD
Before final installation, carefully remove all protective
plastic film from the exterior surfaces of the hood and
chimney.
Note: Installation requires at least two people for safe
and proper mounting.
Mounting Height Above Cooktop H
According to Australian Standard AS/NZS 5601.1:2013,
the minimum clearance between the cooktop and range
hood must be:
650mm above gas cooktops
600mm above electric or induction cooktops
We recommend installing the hood at a height of
750mm above the cooktop for optimal performance.
Heights above 750mm are at the installer’s and user’s
discretion, though this may reduce extraction efficiency.
ELECTRICAL INSTALLATION
Electrical wiring must be done by a qualified person(s)in accordance with all applicable codes and standards.This
range hood must be properly earthed.Turn off electrical power at power board before wiring.
If the supply cord is damaged,it must be replaced by the manufacturer, its service agent or similarly qualified persons
in order to avoid a hazard.
rangehood
wall cap
ducting
air outlet
adaptor
H
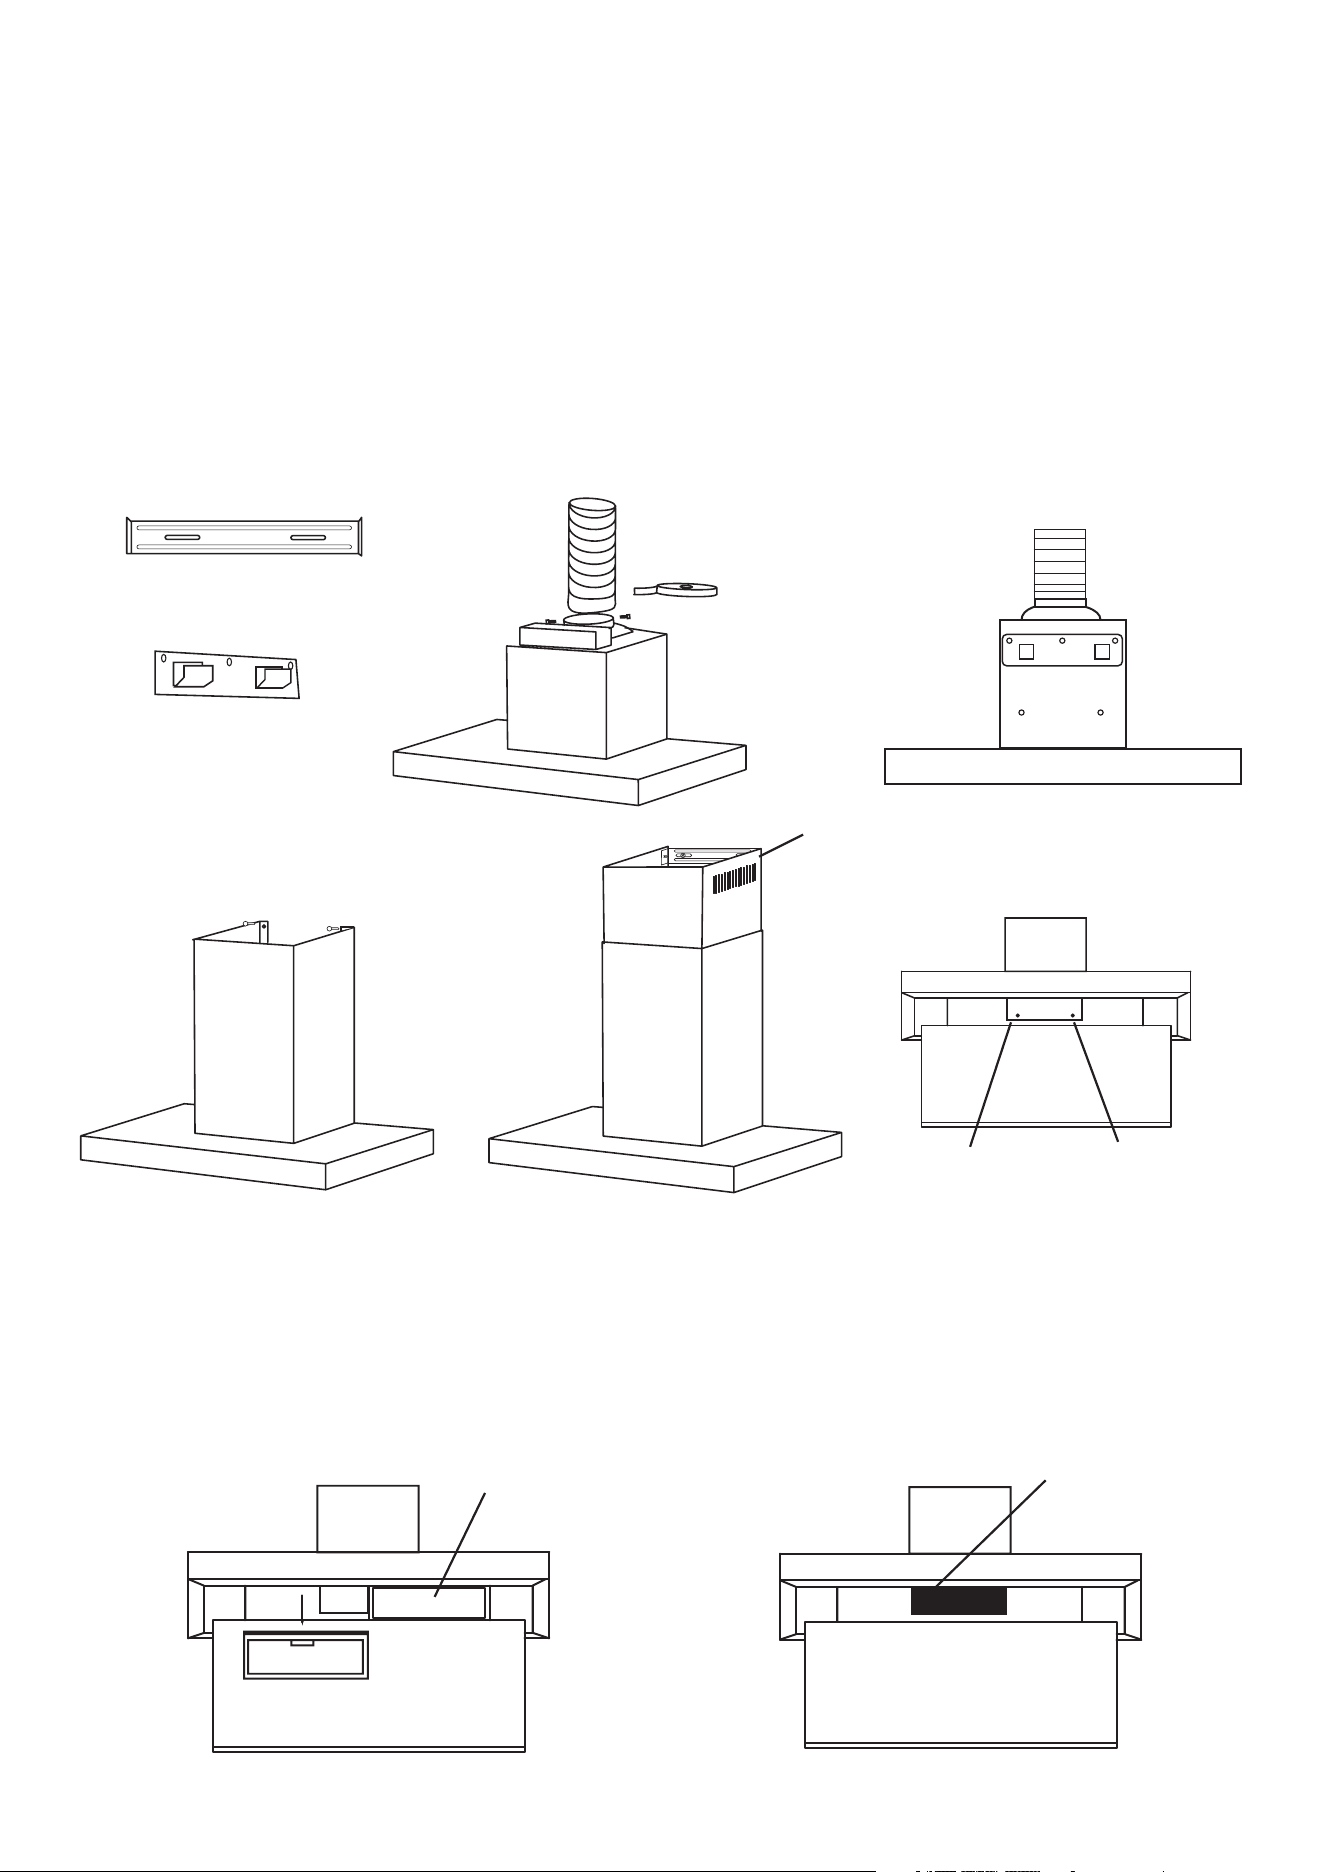
RANGEHOOD INSTALLATION ONTO THE WALL
Secure the hood mounting bracket to the wall using three (3) ST 5×45mm screws and appropriate wall anchors suited
to the wall type.
Attach the Hood Body:
Align the hood body with the bracket and gently lower it until it is securely seated on the bracket.
Install the Discharge Collar: Attach the discharge collar firmly to the air outlet adapter.
Connect the Ducting: Attach a suitable length of 150mm round ducting to the outlet adapter.
Note: Reducing the duct diameter may increase operational noise.
Assemble the Chimney: Slide the top flue piece down inside the decorative bottom flue piece.
Carefully fit the bottom flue section into the recessed area on top of the hood body.
Mount the top flue bracket: Secure the top flue mounting bracket to the wall using two (2) ST 2.9×14mm screws and
appropriate wall anchors.
Secure the Top Flue: Raise the top flue until its mounting holes align with those on the top flue moutning bracket.
Ensure the hood is level, then fasten the top flue to the bracket using two screws.
Secure the Bottom Flue: From inside the hood body, fasten the bottom flue section using three (3) screws.
INSTALL FILTERS
To remove the grease filter,push in on the metal latch tab.This will disengage the filter from the hood.
Tilt the filter downward and remove.
To install the grease filter,align rear filter tabs with slots in the hood.Push in the metal latch tab,push filter into
position and release.Make sure the filter is securely engaged after assembly.
Optional charcoal filter (if available)
lock it until the stop click is heard.
Top flue mounting bracket.
Screw into wall
2 x 30mm screws
Hood mounting bracket
Screw securely into wall
3 x 45mm screws
Fit and tape ducting
Secure with
2 x 8mm screws
Fit the bottom of the flue
2 x 14mm screws
Secure the rangehood with
2 x 30mm screws
Flue top
Flue bottom
2 x 6mm screws
Filter
PRODUCT WARRANTY
Thank you for choosing Glem Gas and Emilia Appliances. The purchase of this appliance is an important investment in your home
and so to protect your investment we urge you to complete the registration card attached and then please return it immediately.
A WARRANTY REQUIREMENT IS THAT PROOF OF PURCHASE BE PROVIDED PRIOR TO REQUESTING A SERVICE CALL.
THIS WARRANTY SHALL NOT APPLY IF THE APPLIANCE WAS NOT INSTALLED BY A LICENSED TECHNICIAN AND PROOF OF
AUTHORISED INSTALLATION IS NOT SUPPLIED.
The benefits conferred by this warranty are in addition to all other conditions and warranties in respect of this product which the
consumer may have under the Trade Practices Act 1874 of the Commonwealth of Australia and/or similar State or Territory Laws.
Our goods come with guarantees that cannot be excluded under the Australian Consumer Law. You are entitled to a replacement
or refund for a major failure and for compensation for any other reasonably foreseeable loss or damage. You are also entitled
to have the goods repaired or replaced if the goods fail to be of acceptable quality and the failure does not amount to a major
failure.
Glem Gas Australasia Pty Ltd warrants, this appliance to be free from defects in workmanship and materials for a period of:
a) Where the appliance is intended to be used and is used for
DOMESTIC USE – 24 MONTHS FROM DATE OF DELIVERY TO THE ORIGINAL PURCHASER.
b) Where the appliance is intended to be used and is used for
COMMERCIAL USE – 90 DAYS FROM DATE OF DELIVERY TO THE ORIGINAL PURCHASER.
NOTE: We do not recommend this appliance as being suitable for commercial application.
Glem Gas Australasia Pty Ltd, during the period of warranty, will at its option, and subject to the terms and conditions stated be-
low, repair or replace free of charge this appliance or any component part, which upon examination by Glem Gas Australasia Pty
Ltd is found to be defective.
THIS WARRANTY SHALL NOT APPLY:
If the rating plate has been removed or the serial number or other details on it have been removed or rendered illegible.
If the appliance is connected to any voltage other than shown on rating plate.
If the appliance has been subjected to misuse, abuse accident or want of care.
If the appliance has been installed, used, or maintained contrary to the instructions supplied by Glem Gas Australasia Pty Ltd.
If any defect or failure is due to connection to an inadequate power supply.
If damage is caused by foreign objects on the appliance or due to its use for purposes other than that for which it was delivered.
If a repair has been made or attempted by the purchaser.
Where the appliance is installed outside an 80km radius from the GPO of any Australian Capital City. Freight and travel costs be-
yond that radius will not be covered.
THIS WARRANTY DOES NOT COVER ANY GLASS DAMAGE.
This Warranty is given by Glem Gas Australasia Pty Ltd, and no other person or organisation is authorised to vary its provisions and
conditions.
Please complete the section below and return to:
Glem Gas Australasia Pty. Ltd, PO Box 63 Blaxcell PO South Granville or email to [email protected] (image off phone is easy)
APPLIANCE AND CUSTOMER DETAILS
Model Number – found on the data plate
Serial number – found on the data plate
Place of purchase – retailer name and address
Date of purchase
Customer name
Customer address
Customer email address
Customer telephone number
INSTALLATION DETAILS
Installers name
Date of installation
Installers telephone number
Installers signature

Glem Gas Australasia Pty Ltd
48 Percy Street Auburn NSW 2144
PO Box 63 Blaxcell PO South Granville NSW 2142
Website: www.glemgas.com.au
Email: [email protected]
Telephone: 1300 307 917