GREASE GUN
06827
EN
Original Instructions
Version 1 – June 2025
PISTOL AND LEVER ACTION
1.1 Product Reference
User Manual for: Pistol and Lever Action Grease Gun
Stock No: 06827
Part No: DGGP/LH
1.2 Revisions
Version 1: June 2025
First release
As our manuals are continually updated, always ensure
that the latest version is used.
Download the latest version from:
drapertools.com/manuals
1.3 Understanding the Safety Content of
This Manual
WARNING!
– Situations or actions that may result
in personal injury or death.
CAUTION! – Situations or actions that may result
in damage to the product or surroundings.
ATTENTION – Situations or actions that may result in
damage to the product or surroundings.
Important: – Information or instructions of particular
importance.
1.4 Copyright © Notice
Copyright © Draper Tools Limited.
Permission is granted to reproduce this manual for
personal and educational use ONLY. Commercial
copying, redistribution, hiring or lending is strictly
prohibited.
No part of this manual may be stored in a retrieval system
or transmitted in any other form or means without written
permission from Draper Tools Limited.
In all cases, this copyright notice must remain intact.
1. Preface
These are the original product instructions. This
document is part of the product; retain it for the life
of the product, passing it on to subsequent holders.
Read this manual in full before attempting to
assemble, operate, or maintain this product.
This Draper Tools manual describes the purpose
of the product and contains all the necessary
information to ensure its correct and safe use.
Following all the instructions and guidance in
this manual will ensure the safety of both the
product and the operator and increase the
lifespan of the product.
All photographs and drawings within this manual are
supplied by Draper Tools to help illustrate correct
operation of the product.
Every eort has been made to ensure the
information contained in this manual is accurate.
However, Draper Tools reserves the right to amend
this document without prior warning. Always use the
latest version of the product manual.
– 2 –

2. Contents
– 3 –
EN
1. Preface 2
1.1 Product Reference 2
1.2 Revisions 2
1.3 Understanding the Safety Content of This
Manual 2
1.4 Copyright © Notice 2
2. Contents 3
3. Product Introduction 4
3.1 Intended Use 4
3.2 Specication 4
4. Health and Safety Information 4
5. Identication 5
5.1 Intended Use 5
5.2 Product Overview 5
5.3 Packaging 5
6. Setting up the Grease Gun 6
6.1 Setting Up The Grease Gun Head 6
6.2 Loading the Grease Gun 6
6.3 Priming/Removing Trapped Air from
the Grease Gun 7
7. Operating the Grease Gun 7
7.1 Converting the Gun between Modes 7
7.2 Greasing a Grease Fitting/Grease Nipple 8
8. Maintenance, Storage and Disposal 9
8.1 Troubleshooting 9
9. Warranty 9
10. Explanation of Symbols 9
– 4 –
3. Product Introduction
4. Health and Safety Information
3.1 Intended Use
This dual action grease gun is designed to convert
between pistol and lever mode and operate in both
high-pressure and high volume modes.
Any other application beyond the conditions established
for use will be considered misuse. Draper Tools accepts
no responsibility for improper use of this product.
This product is intended for domestic and infrequent
light-duty trade use.
3.2 Specication
Stock No.: 06827
Part No.: DGGP/LH
Steel extension: 150mm
Flexible hose: 450mm
Jaw coupler: 1⁄ 8" BSPT
Lever Mode
High pressure mode: 7000psi/28g per 44 strokes
High volume mode: 5500psi/28g per 26 strokes
Pistol Mode
Pressure: 4500psi
Number of strokes: 28g per 44 strokes
Grease cartridge required: 400g (not supplied)
Net weight (No cartridge tted): 1.7kg
Important: Read all the Health and Safety instructions
before attempting to operate, maintain or repair this
product. Failure to follow these instructions may result in
injury or damage to the user or the product.
• Follow workshop Health & Safety rules and
regulations when using the grease gun.
• ALWAYS check the gun and accessories for damage,
wear, cracks and other damage before use. Replace
any damaged or worn parts.
• Only use genuine approved parts and accessories.
• Wear suitable safety eye and hand protection.
• Keep the gun clean and in good working condition for
the best and safest performance.
• Keep the hose away from heat, oil and sharp edges.
Check for wear and ensure that all connections are
secure.
• Excess pressure at the greasing point can damage the
grease nipple, bearings and the gun.
WARNING! Slip hazard - excess grease left on
oors, tools or equipment can create slippery
surface. Keep work are clean and remove excess
grease after use.
• DO NOT exceed the maximum working pressure
specied.
• DO NOT use the gun for a task it is not designed to
perform.
• DO NOT drop, throw or abuse the gun.
• DO NOT carry by the extension component.
• Grease is delivered at high pressure. DO NOT point
the grease gun outlet at yourself or others.
• DO NOT use the gun if damaged or could be faulty.
Contact your local service agent.
CAUTION! The grease or empty cartridge in the
barrel are under pressure from the internal
spring. Take care when removing the head from
the grease gun barrel.
5.1 Intended Use
Carefully remove the product from the packaging and examine it for any signs of damage that may have occurred
during shipment. If any part is damaged or missing, DO NOT attempt to use the product. Please contact the Draper
Helpline; contact details can be found at the back of this manual.
5.2 Product Overview
– 5 –
5. Identication
EN
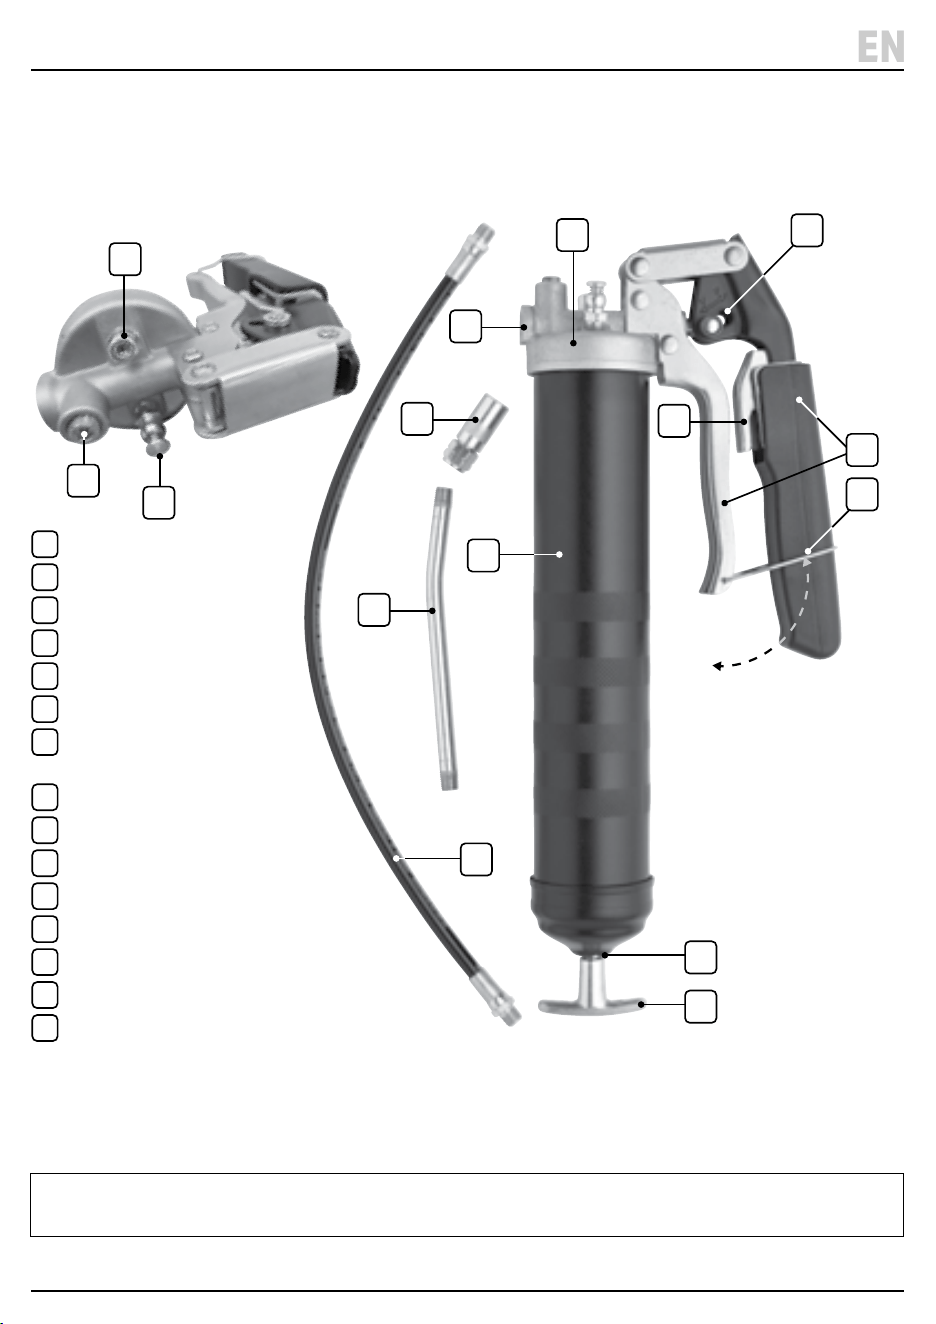
1
Grease gun barrel
2
Grease gun head
3
Front outlet
4
Top outlet
5
Bulk loader valve
6
Air release valve
7
Conversion button
(high pressure to high volume)
8
Handle lock
9
Handle/trigger
10
Handle clip
11
Plunger handle
12
Plunger release tab
13
Grease coupler
14
Extension rod
15
Flexible hose
5.3 Packaging
Keep the product packaging for the duration of the
warranty period for reference should the product need to
be returned for repair.
WARNING! Keep packaging materials out of reach of
children. Dispose of packaging correctly and
responsibly and in accordance with local regulations.
Please visit drapertools.com for our full range of accessories and consumables.
1
4
5
6
15
14
8
13
3
2
9
10
7
11
12
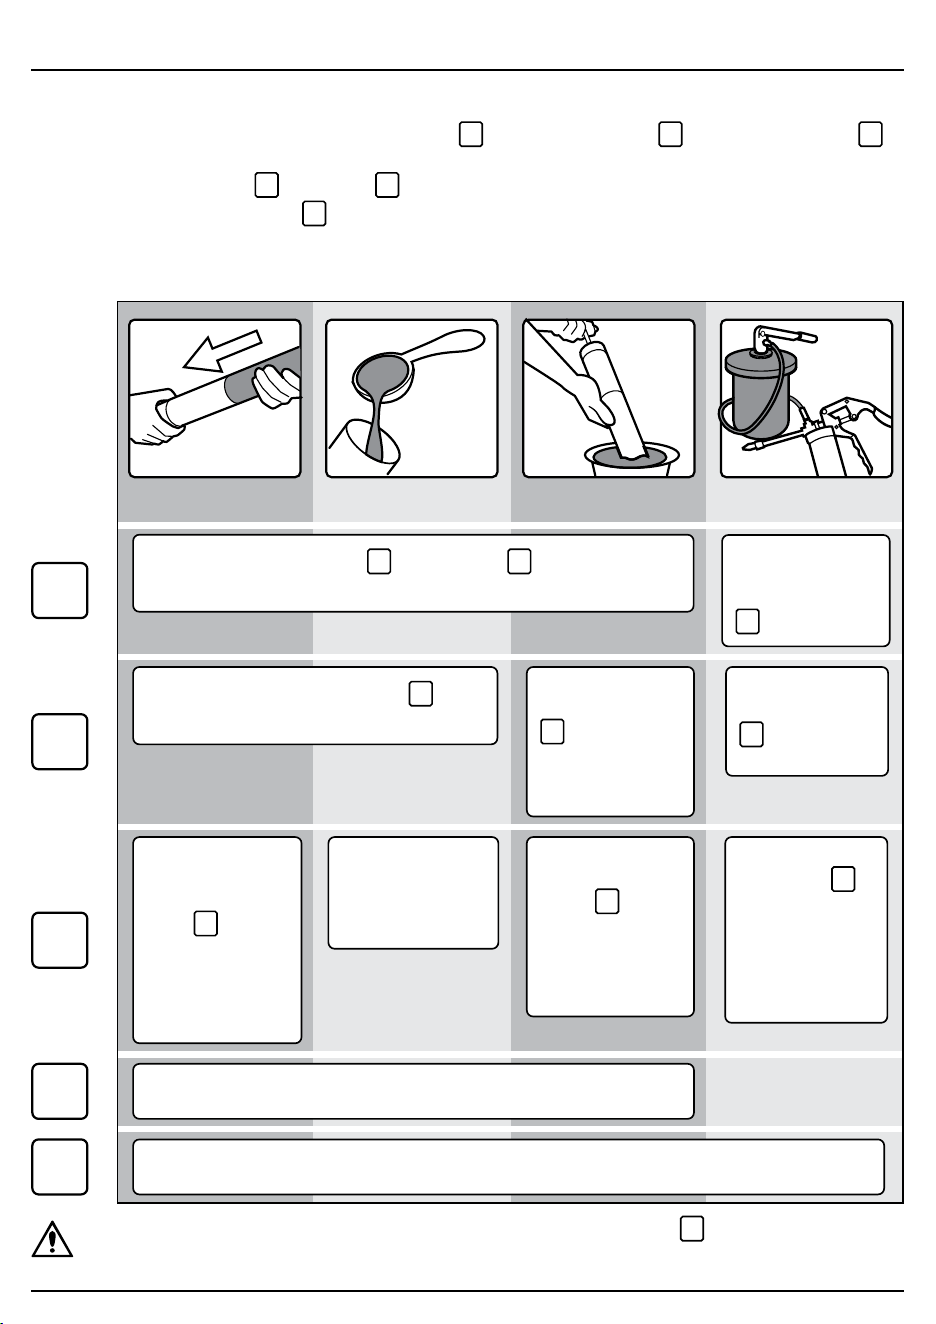
Cartridge Loading Bulk Loading Suction Loading Filler Pump Loading
– 6 –
6. Setting up the Grease Gun
6.1 Setting Up The Grease Gun Head
Note: Use P.T.F.E tape while connecting the extension rod
14
to the grease gun head
2
and the grease coupler
13
to
the extension rod.
1. Connect the extension rod
14
to the outlet
3
on the grease gun head – turn until secure.
2. Then connect the grease coupler
13
to the end of the extension rod – tighten the thread.
• Check connections are tight before operating.
6.2 Loading the Grease Gun
Unscrew the grease gun head
2
from the barrel
1
by turning
anticlockwise.
Leave the head
tted and use the
bulk loader valve
5
.
Fully draw back the plunger handle
11
and
lock it with the end cap.
Ret the grease gun head to the barrel by turning clockwise.
Remove any trapped air after lling – refer to Section 6.3
Insert the open end
of the cartridge into
the grease gun
barrel
1
. Push all
the way in.
Remove the seal or
pull the tab end
from the cartridge.
Submerge the open
end of the barrel
1
into a grease
bucket by
approximately
50mm.
Then slowly draw
back the plunger
handle
11
to draw
grease into the
empty barrel
Lock with the end
cap.
Connect the bulk
loader valve
5
to
the bulk ller
pump.
Operate the ller
pump to ll the
grease gun barrel.
Scoop out clean
grease from the
bulk container and
ll the barrel.
Fully draw back
the plunger handle
11
and lock with
the end cap.
2
3
4
5
1
Steps
CAUTION! DO NOT apply excessive torque or overtighten the grease gun head
2
as this
may damage the outlet.
– 7 –– 7 –
6. Setting up the Grease Gun
7. Operating the Grease Gun
EN
6.3 Priming/Removing Trapped Air from
the Grease Gun
1. After lling the barrel
1
with grease, reassemble the
gun.
• General Procedure
− Leave the barrel open by 2-3 turns when
reassembling the gun.
• Using Air Release Valve
− Press the release valve
6
to release any trapped
air.
2. Operate the grease gun continuously.
3. Then release the plunger rod handle
11
by pressing
the release tab
12
.
• Pull the plunger all the way back.
• Then push plunger back and forth to remove the air.
4. Move the plunger rod forward and backwards to
remove any trapped air.
5. Kep operating the grease gun until grease comes out
of the coupler
13
.
6. General Procedure – Tighten the grease gun head
2
to the barrel
1
.
Using Air Release valve – Tap again to release any
trapped air.
7. The grease gun is now ready to use.
Important: Before operating this product, read and
understand all the safety instructions listed in this
manual. Ensure that the product is fully assembled and
correctly prepared for use.
• Two handle modes are available:
− Pistol Mode for tight space and with low pressure
requirements.
− Lever Mode for open spaces and in high pressure
applications.
7.1 Converting the Gun between Modes
To convert the gun to Pistol Mode
• Press the trigger
9
and slide the handle up to pistol
mode.
• Then press the handle lock
8
to secure in place.
• Use the front outlet
3
.
To convert the gun to Lever Mode
• Press the trigger
9
and pull the handle down for
Lever Mode.
• Then press the handle lock
8
to secure in place.
• Use the top outlet
4
.
To Convert from High Pressure to High Volume Mode
High Pressure Mode (Achieve maximum working
pressure in a few strokes)
• Use to open jammed/clogged ttings even in very
cold weather conditions.
• To select pull the button
7
and move to the
P
position.
1 Fig.
V
P
7
High Volume Mode (Achieve maximum output with less
greasing time).
• To select pull the button
7
and move to the
V
position.
– 8 –
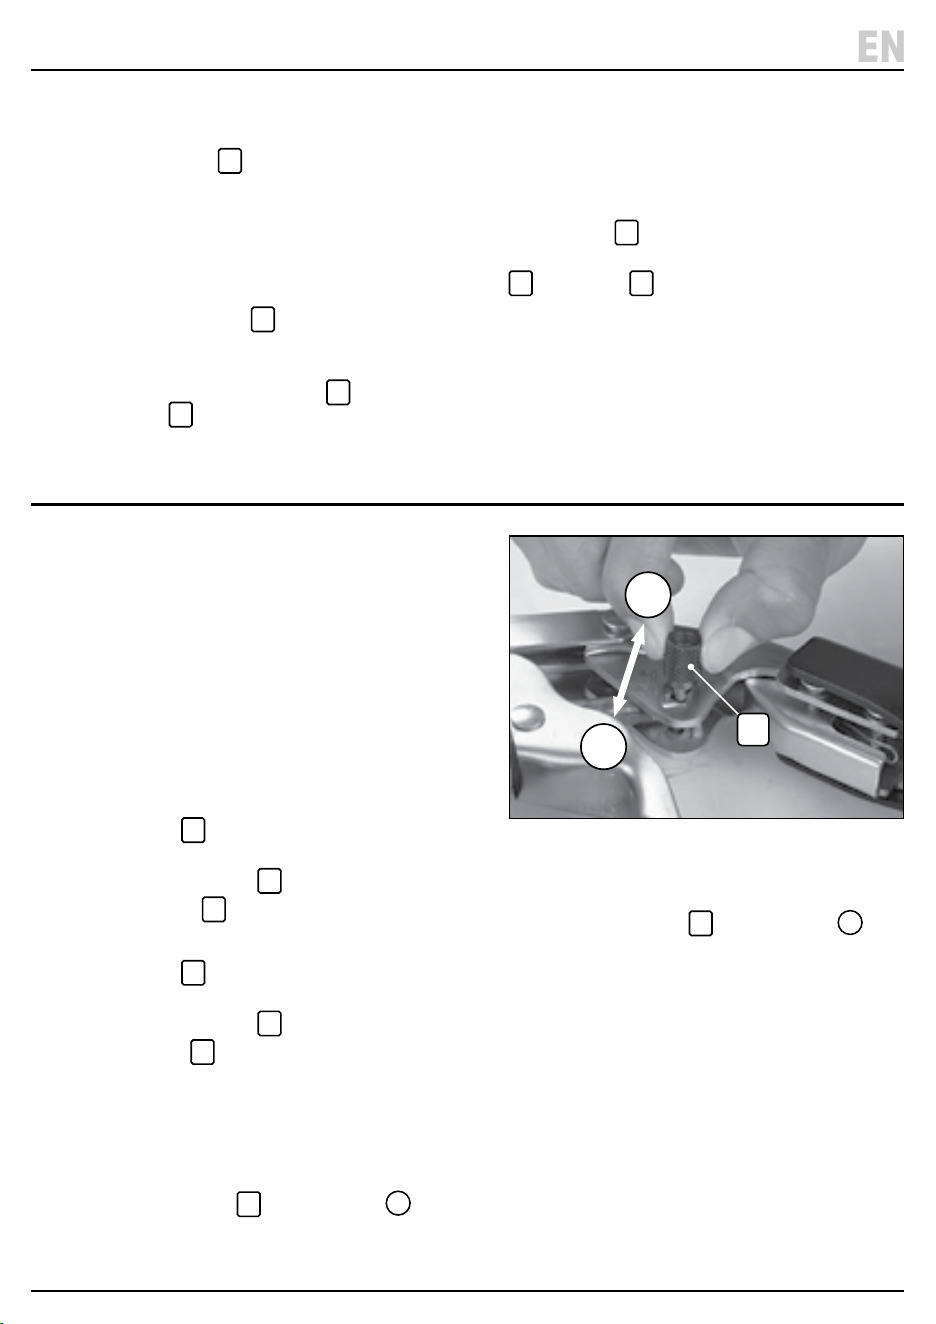
7.2 Greasing a Grease Fitting/Grease Nipple
1. Fit the coupler to the extension rod
14
.
2. Connect the end of the grease coupler
13
to the grease tting – press straight on to form a snug t.
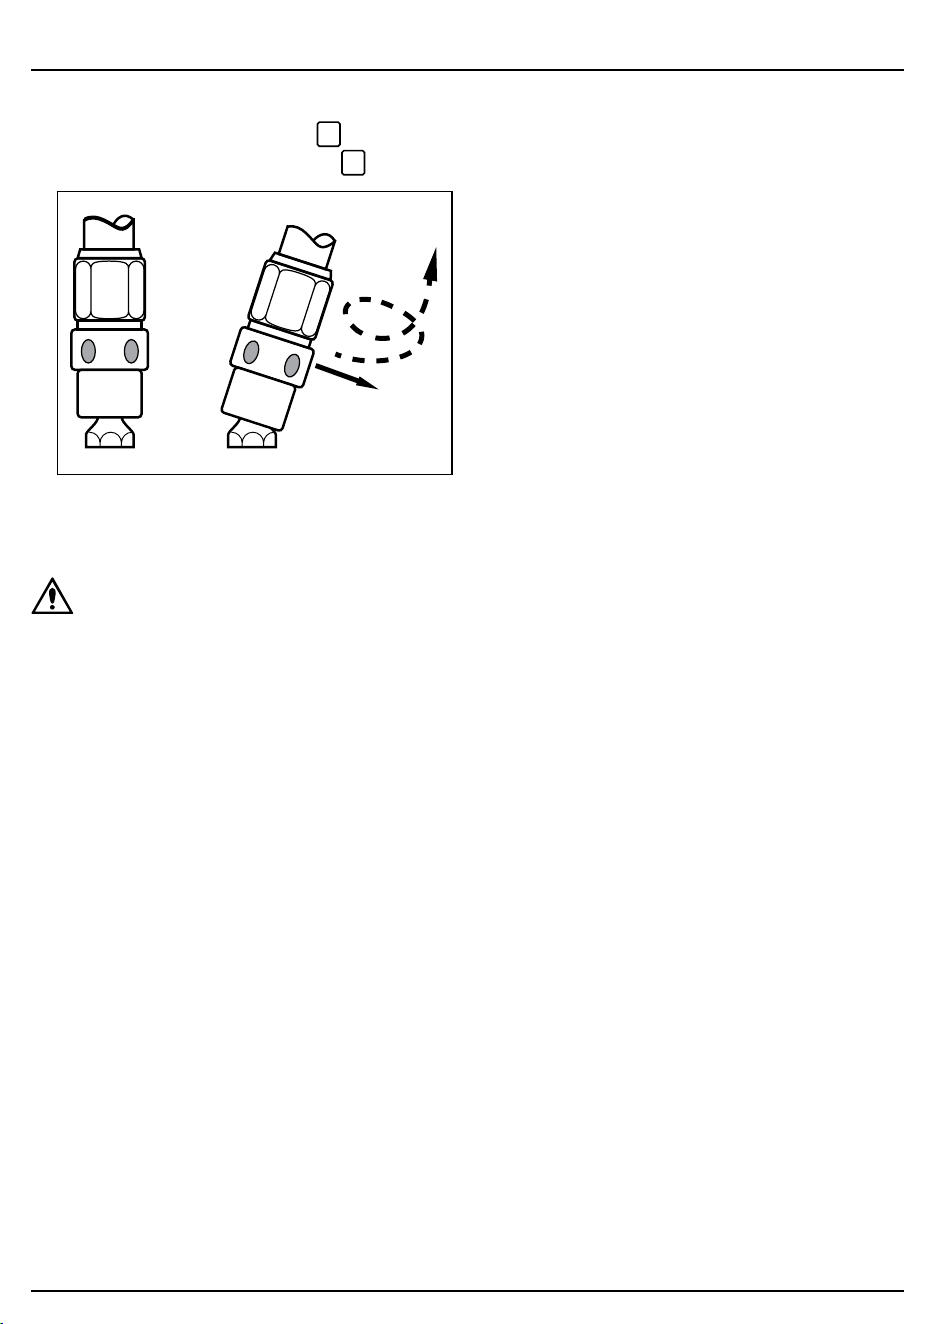
2 Fig.
To remove, tilt,
twist and pull
3. Operate the grease gun with the coupler aligned with the tting.
4. Once greasing is complete, slightly tilt the coupler, twist and pull back. Then remove the coupler.
WARNING! Never disengage the
coupler by pulling it out straight.
7. Operating the Grease Gun
– 9 –
8. Maintenance, Storage and Disposal
• Keep the grease gun and extension clean check for damage before each use.
• At the end of its working life, dispose of the product responsibly and in line with local regulations. Recycle where
possible.
• Dispose of grease separately and in accordance with local regulations; DO NOT abandon it in the environment
8.1 Troubleshooting
Problem Possible Cause Remedy
Grease gun pumps little or no grease. Barrel not completely tightened. Tighten the barrel.
Extension blocked. Remove the extension rod and
operate the grease gun to check if
grease dispensed.
Clean or replace the extension rod.
Grease gun head blocked. Unscrew the grease gun head and
check for contaminants blocking the
passage of grease. Clean and ret
the head.
Grease too thick or cold. Use a thinner grease.
Do not store grease gun and grease
at low temperatures.
Excessive grease leaking from plunger
rod.
Plunger is damaged. Replace the grease gun or contact
Draper Tools for advice.
Grease leaking from the coupler joint
or in between the coupler jaw and
grease nipple.
Grease coupler damaged. Replace the coupler.
9. Warranty
12 months from date of purchase – Visit drapertools.com/warranty for full details.
10. Explanation of Symbols
Read the instruction manual.
Warning!
EN

– 10 –
© Published by Draper Tools Limite ..© Published by Draper Tools Limited
Delta International
Delta International BV
Oude Graaf 8
6002 NL
Weert
Netherlands
Contact Details
Draper Tools
Draper Tools Limited
Hursley Road
Chandler’s Ford
Eastleigh
Hampshire
SO53 1YF
UK
Website: drapertools.com
Email: [email protected]
Product Helpline: +44 (0) 23 8049 4344
Telephone Sales Desk: +44 (0) 23 8049 4333
General Enquiries: +44 (0) 23 8026 6355
Please contact the Draper Tools Product Helpline for repair and servicing enquiries.
