8000 series
Café Aromis
EN USER MANUAL
DA BRUGERVEJLEDNING
DE BEDIENUNGSANLEITUNG
ES MANUAL DEL USUARIO
FR MODE D’EMPLOI
IT MANUALE UTENTE
NL GEBRUIKSAANWIJZING
NO BRUKERHÅNDBOK
PT MANUAL DO UTILIZADOR
FI KÄYTTÖOPAS
SV ANVÄNDARHANDBOK
EL ΕΓΧΕΙΡΙΔΙΟΧΡΉΣΉΣ
TR KULLANIM KILAVUZU
BG РЪКОВОДСТВОЗА
ПОТРЕБИТЕЛЯ
CS UŽIVATELSKÁPŘÍRUČKA
ET KASUTUSJUHEND
HE שמתשמלךירדמ
HR KORISNIČKIPRIRUČNIK
HU FELHASZNÁLÓIKÉZIKÖNYV
LV LIETOT JA ROKASGR MATA
LT NAUDOTOJO VADOVAS
MKКОРИСНИЧКОУПАТСТВО
PL INSTRUKCJAOBSŁUGI
RO MANUAL DE UTILIZARE
SL UPORABNIŠKIPRIROČNIK
SK NÁVODNAPOUŽITIE
SR УПУТСТВОЗАКОРИШЋЕЊЕ
SQ MANUALI I PËRDORIMIT
UK ПОСІБНИККОРИСТУВАЧА
www.home.id
HomeID
A2A1 A3 A4
A14
A8A7A6
A9
A12
A13
A10
A11
A5
A17
A15
A
A18
A16
A20A19 A21 A22 A23 A24
A17A18 A16 A14 A23 A24 A21 A15 A9 A4 A12
B
C
C1 C2 C3 C4 C5
English
4
English
English
Contents
Machine overview (Fig. A) ________________________________________________________________ 4
Control panel (Fig. C) ____________________________________________________________________ 4
Introduction ____________________________________________________________________________ 5
Before first use __________________________________________________________________________ 5
AquaClean water filter ___________________________________________________________________ 7
Brewing drinks __________________________________________________________________________ 7
Personalizing drinks______________________________________________________________________ 10
Creating a profile ________________________________________________________________________ 10
Adjusting machine settings _______________________________________________________________ 10
Removing and inserting the brew group___________________________________________________ 11
Cleaning and maintenance _______________________________________________________________ 12
Descaling procedure _____________________________________________________________________ 13
Ordering accessories _____________________________________________________________________ 14
Troubleshooting _________________________________________________________________________ 14
Technical specifications___________________________________________________________________ 21
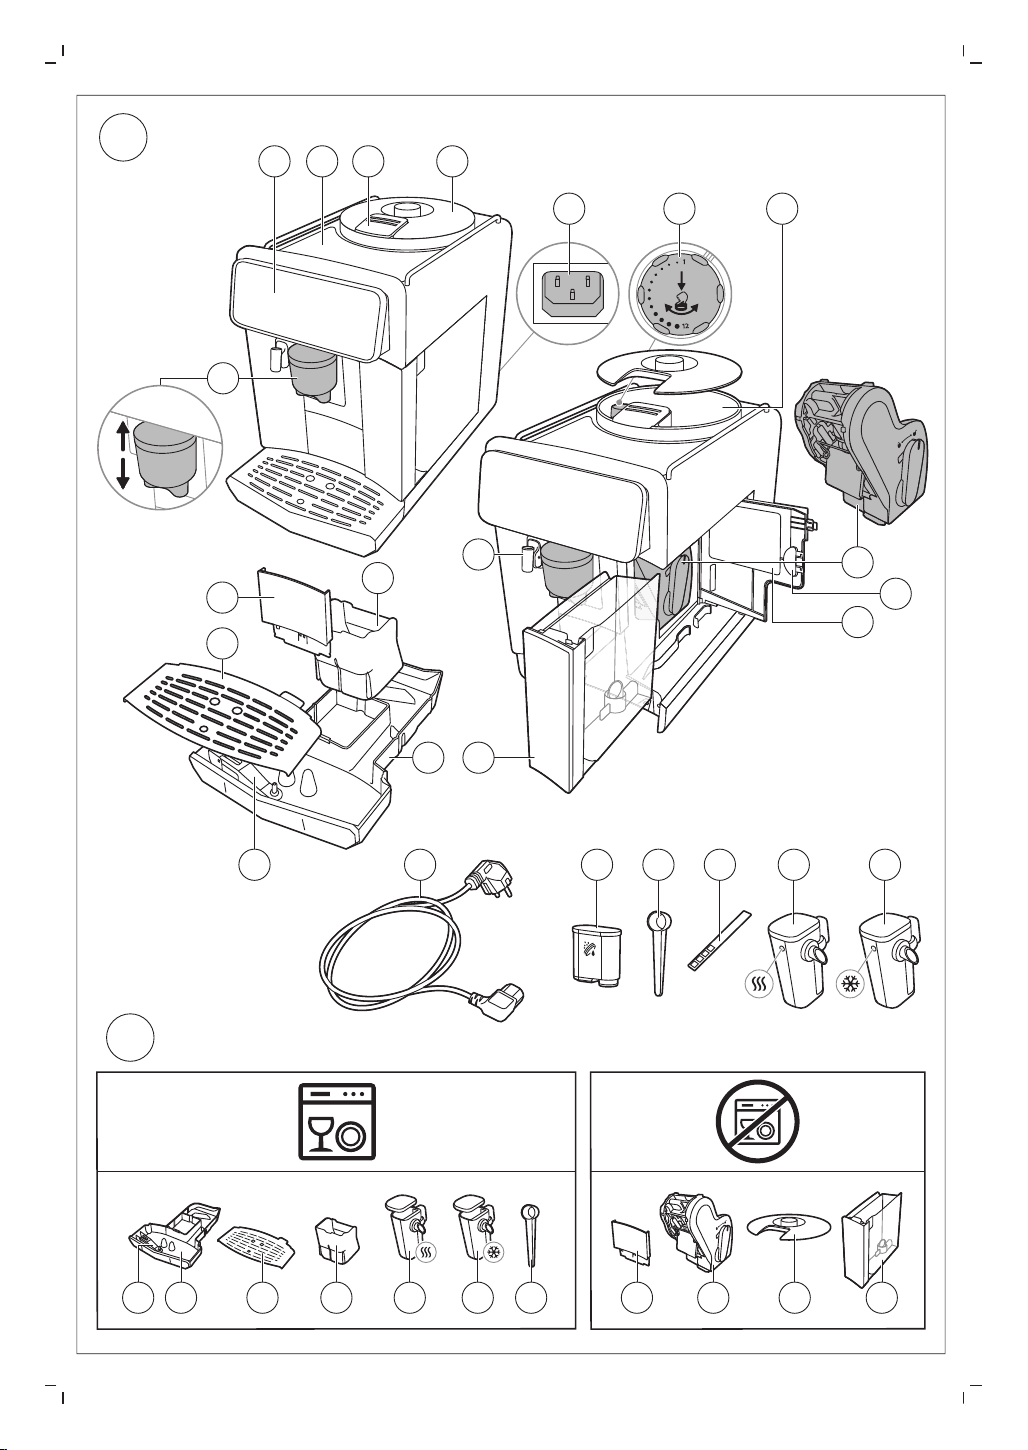
Machine overview (Fig. A)
A1 Control panel A10 Service door
A2 Cup holder A11 Data label with type number
A3 Pre-ground coffee compartment A12 Water tank
A4 Lid of bean hopper A13 Hot water spout
A5 Adjustable coffee spout A14 Coffee grounds container
A6 Socket for power cord A15 Front panel of coffee grounds container
A7 Grind setting knob A16 Drip tray cover
A8 Coffee bean hopper A17 Drip tray
A9 Brew group A18 'Drip tray full' indicator
Accessories
A19 Power cord A22 Water hardness test strip
A20 AquaClean water filter A23 LatteGo Pro hot milk system
A21 Measuring scoop A24 LatteGo Pro cold milk system
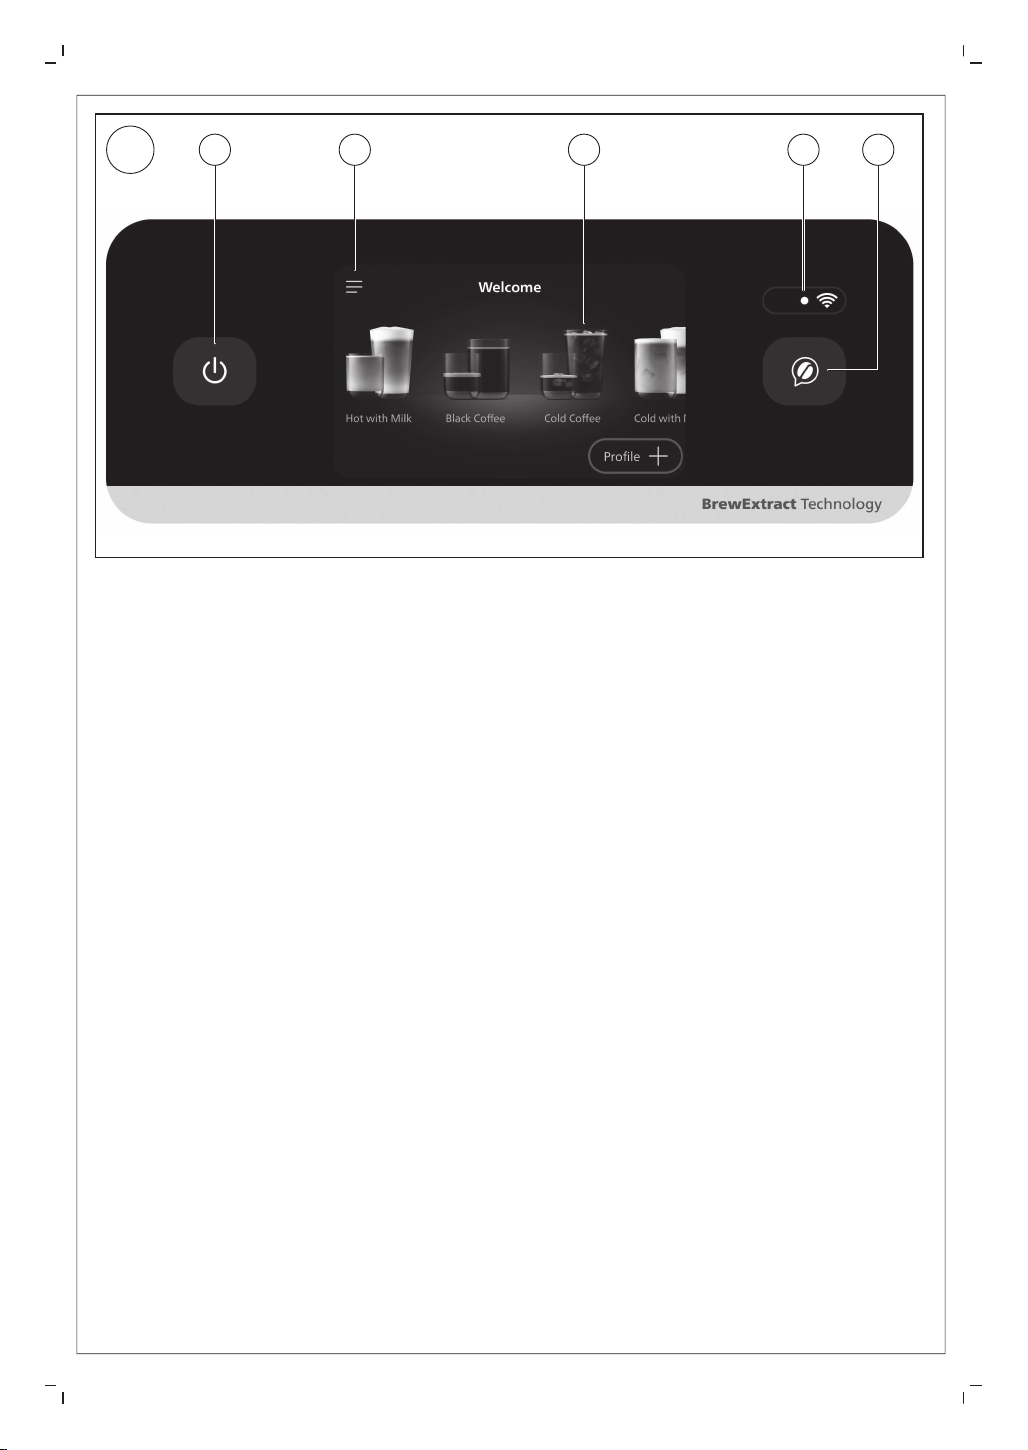
Control panel (Fig. C)
Refer to figure C for an overview of all buttons and icons. Below you find the description.
5
English
English
C1 On-off C2 Menu C3 Drink categories
C4 Wi-Fi icon C5 Barista assistant
Introduction
Congratulations on your purchase of a Philips fully automatic coffee machine! To fully benefit from the
support that we offer, please register your product at www.home.id.
Read the separate safety booklet carefully before you use the machine for the first time and save it for
future reference.
Before first use, rinse with hot water all removable accessories destined to come into contact with water or
milk. Switch on the machine and follow the instructions displayed to set up the machine. To help you get
started and to get the best out of your machine, Philips offers support in multiple ways.
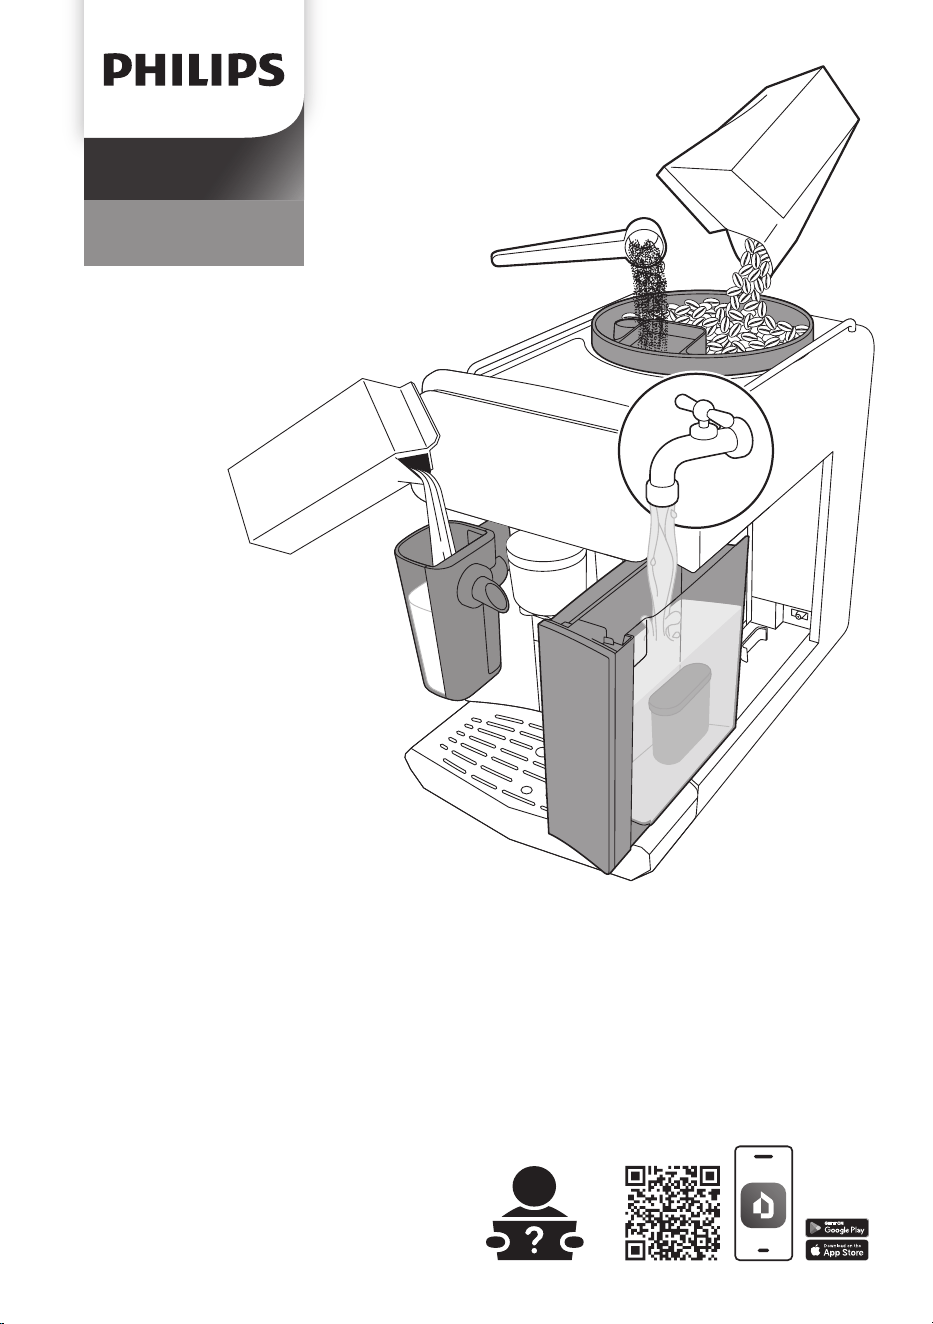
1 The Quick Start Guide with picture-based usage instructions and information on cleaning and
maintenance.
2 The separate safety booklet with instructions on how to use the machine in a safe way.
3 For online support (this extended user manual, frequently asked questions, videos, etc.), scan the QR
code on the cover of this booklet to download the HomeID App, or visit www.home.id/support.
This machine has been tested with coffee. Although it has been carefully cleaned, there may be some
coffee residues left. We guarantee, however, that the machine is absolutely new.
The machine automatically adjusts the amount of ground coffee that is used to make the best-tasting
coffee. You should brew 5 coffees initially to allow the machine to complete its self-adjustment.
When the machine has finished brewing, it switches off automatically to save energy after default time of
15 minutes.
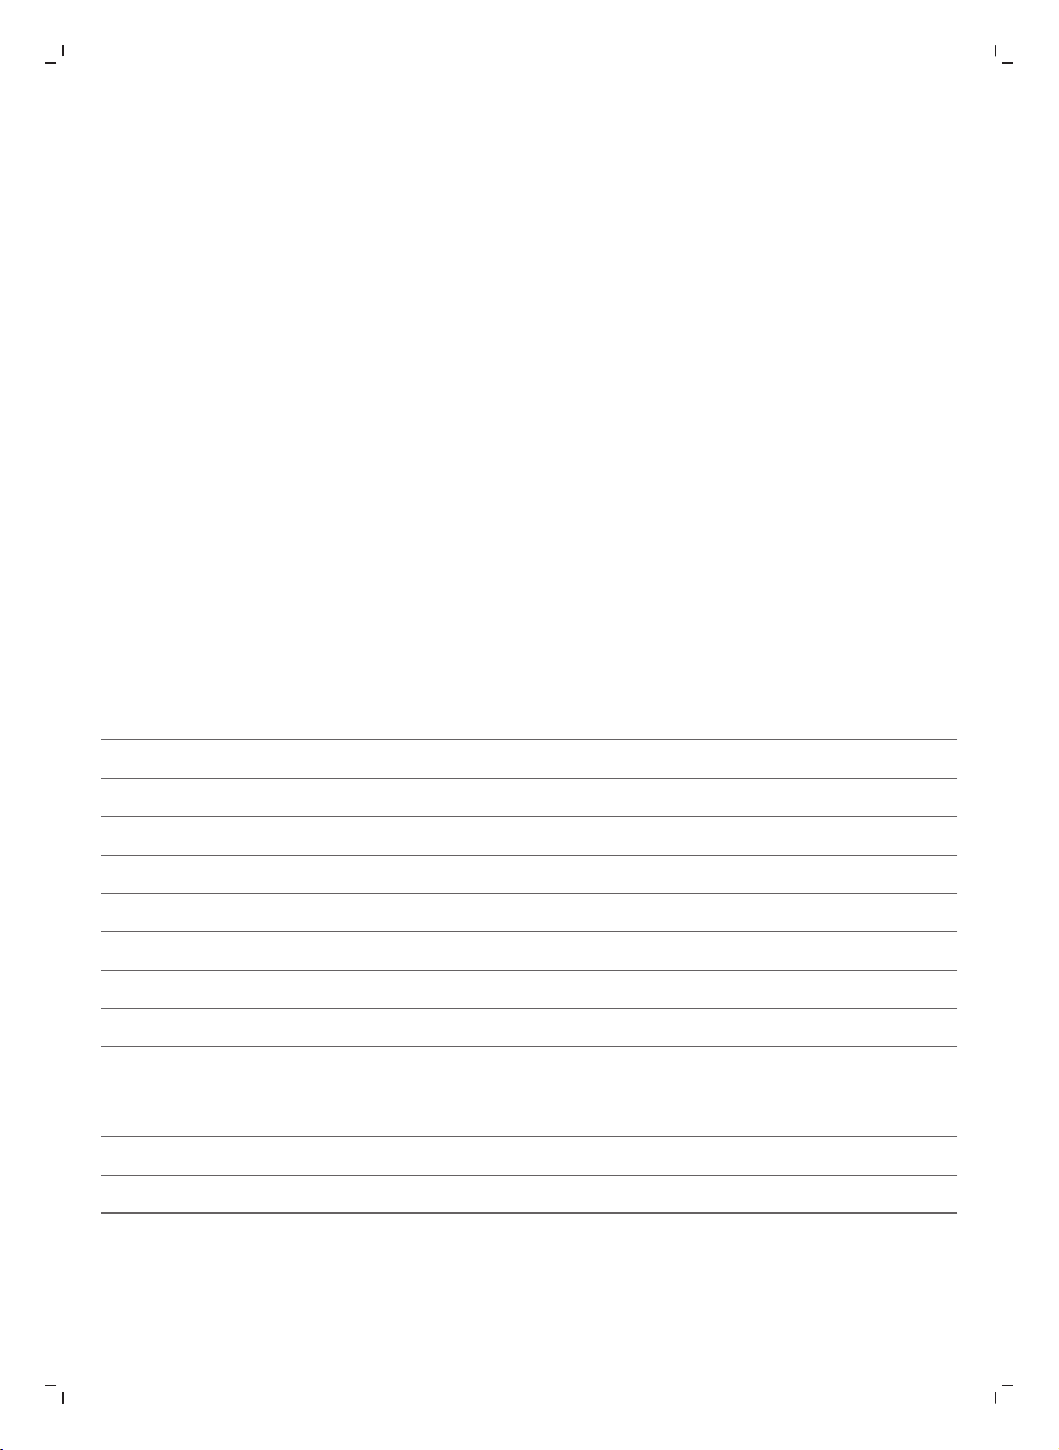
Before first use
Setting up the machine
6
English
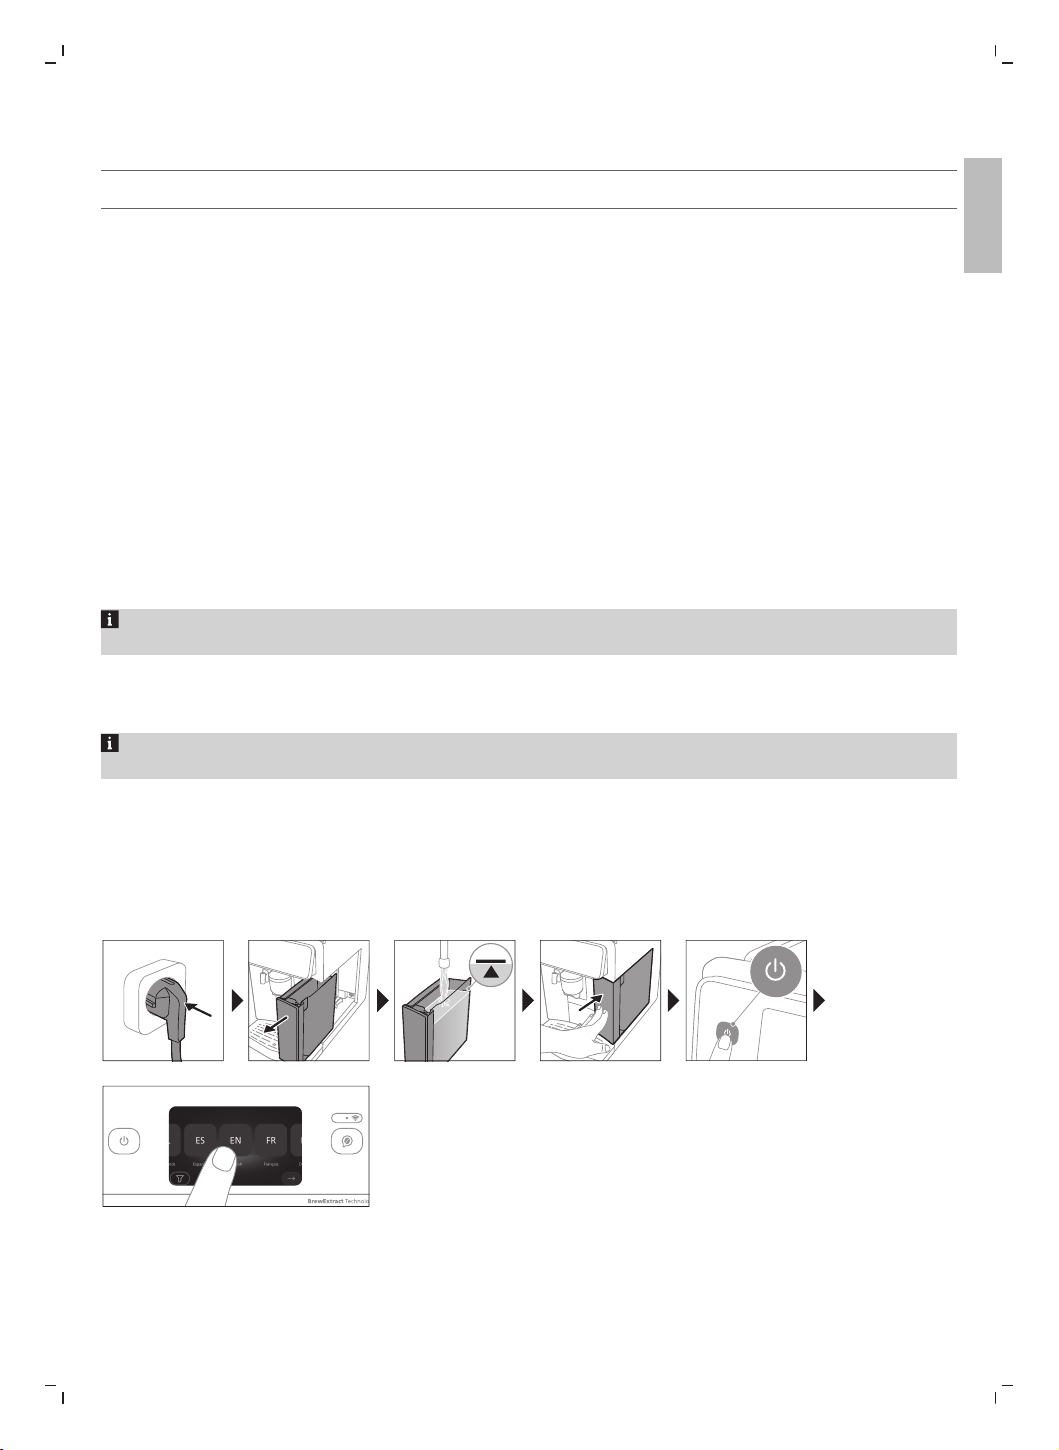
Assembling LatteGo Pro
CLICK
Setting the water hardness
For best coffee experience, use fresh water. For the best coffee taste and the machine longevity, do not
fill water tank with demineralized, distilled or mineral water.
We advise you to adjust the water hardness setting to the water hardness level in your region for optimal
performance and a longer lifetime of the machine. This also prevents you from having to descale the
machine too often. The default water hardness setting is 4 red squares: hard water.
Use the water hardness test strip supplied in the box to determine the water hardness
in your region:
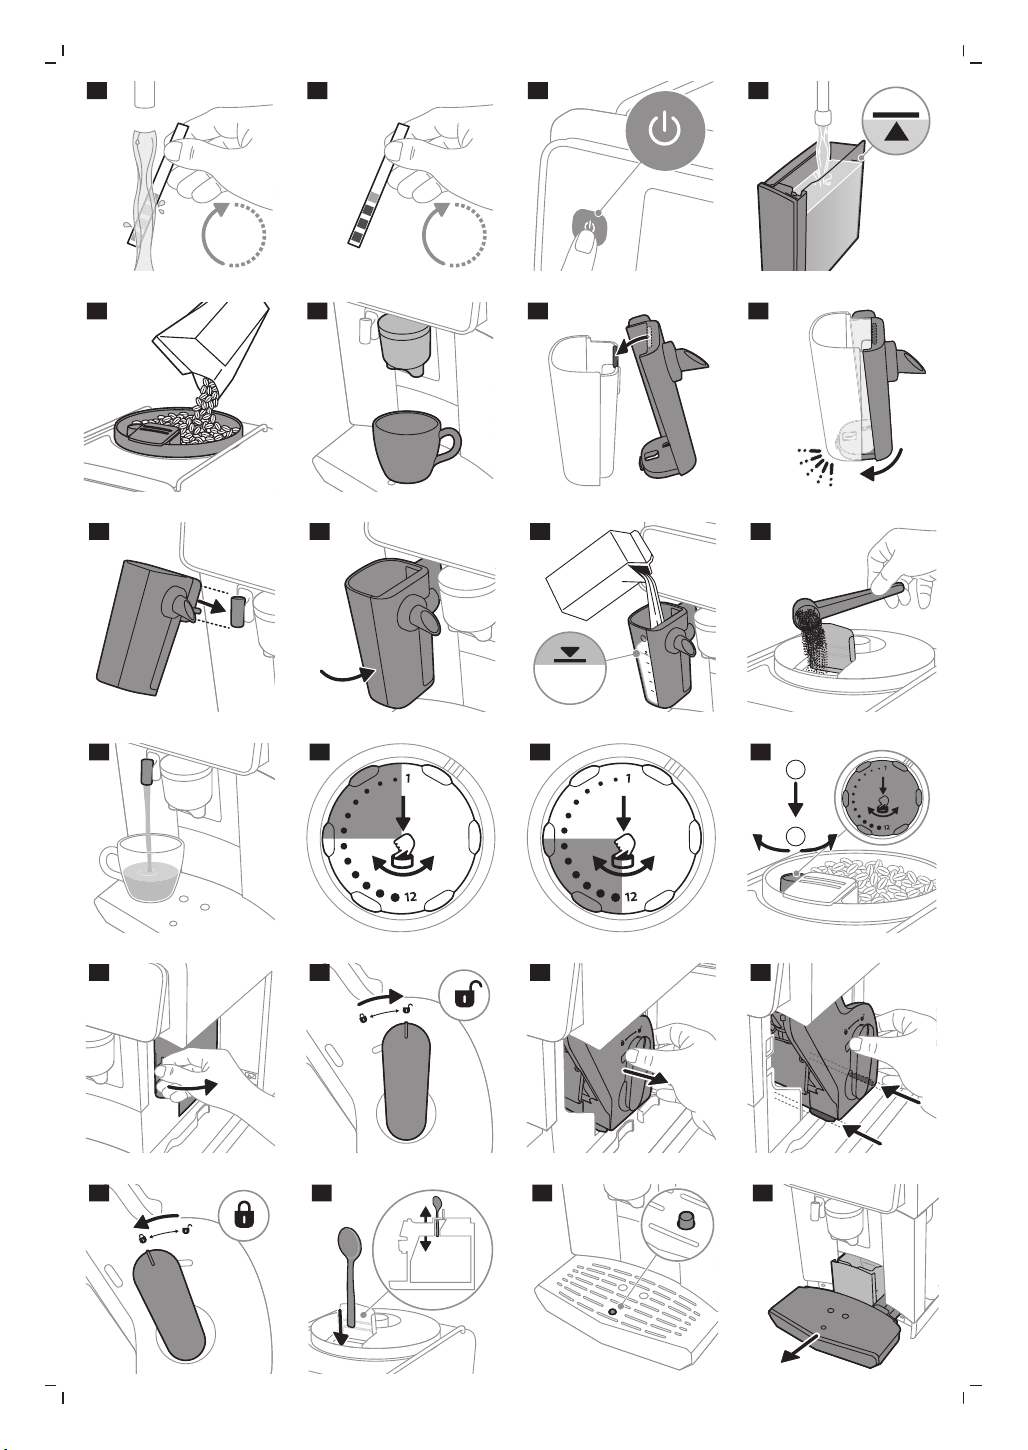
1 Immerse the water hardness test strip in tap water or hold it under the tap for 1 second (Fig. 1).
2 Wait 1 minute (Fig. 2).
3 Scroll to select the water hardness level. The number of red squares on the screen should match the
number of red squares on the test strip.
4 Confirm.
Yon can re-set water hardness later under the Menu by tapping "Machine Settings" and scrolling to select
"Water Hardness".
Connecting the machine to the HomeID App
Make sure that you connect your machine to a 2.4 GHz home Wi-Fi network.
1 Download the Philips HomeID App.
-
Scan the QR code on the cover or on your Quick Start Guide, or search for Philips HomeID in the
Google Play Store (Android) or App Store (iOS).
2 Add your machine.
-
Open the HomeID App on your smartphone and follow the instructions until you see "Add Appliance
".
-
Select your coffee machine.
3 Pair via Wi-Fi.
-
Make sure your smartphone's Wi-Fi is enabled.
-
Follow the steps on your App to complete setup.
Once connected, you become the owner of the machine. You can share access with others by inviting them
via the App.
We recommend downloading the HomeID App and adding your machine to the App as soon as you set up
your machine for the first time. This enables you to get the best coffee experience, such as:
-
Barista assistant feature to get personal recommendations and help on adjusting coffee to your taste,
choosing the right beans, exploring new drinks and much more
-
Customize and brew drinks remotely
-
Set a timer for your machine to wake up
7
English
English
-
Access over 75 coffee-based recipes
-
Use Alexa if available in your country to turn your machine on and brew
-
Personalize your profile even more
-
Get access to customer support
-
Receive latest firmware updates
AquaClean water filter
Your machine is AquaClean enabled. You can place the AquaClean water filter in the water tank to preserve
the taste of your coffee. It also diminishes the need for descaling by reducing limescale build-up in your
machine. You can purchase an AquaClean water filter from your local retailer*, from authorized service
centers or online at https://www.home-appliances.philips/parts-accessories.
*Availability varies per country.
Activating the AquaClean water filter (5 min.)
The machine does not automatically detect that a filter has been placed in the water tank. Therefore you
need to activate each new AquaClean water filter that you install in the "Maintenance" menu.
When the machine stops showing the filter activation message, you can still activate an AquaClean water
filter, but you will need to descale the machine first.
Your machine has to be completely limescale-free before you start using the AquaClean water filter.
Before activating the AquaClean water filter, you have to prepare it as described on the screen.
1 Under the Menu, tap "Maintenance" and "Remove limescale".
2 Tap "AquaClean", tap "Install" and follow the steps on the screen.
Soak the filter in water. Otherwise, air might be drawn into the machine instead of water, which makes a
lot of noise and prevents the machine from being able to brew coffee.
Replacing the AquaClean water filter (5 min.)
After 95 liters of water have flowed through the filter, the filter will cease to work. The machine will remind
you to replace the filter. If you do not replace the filter in time, you need to descale the machine.
1 Take out the old AquaClean water filter.
2 Install a new filter and activate it as described in chapter 'Activating the AquaClean water filter (5 min.)'.
We advise you to replace the AquaClean water filter at least every 3 months, even if the machine does
not yet indicate that replacement is required.
Brewing drinks
General steps
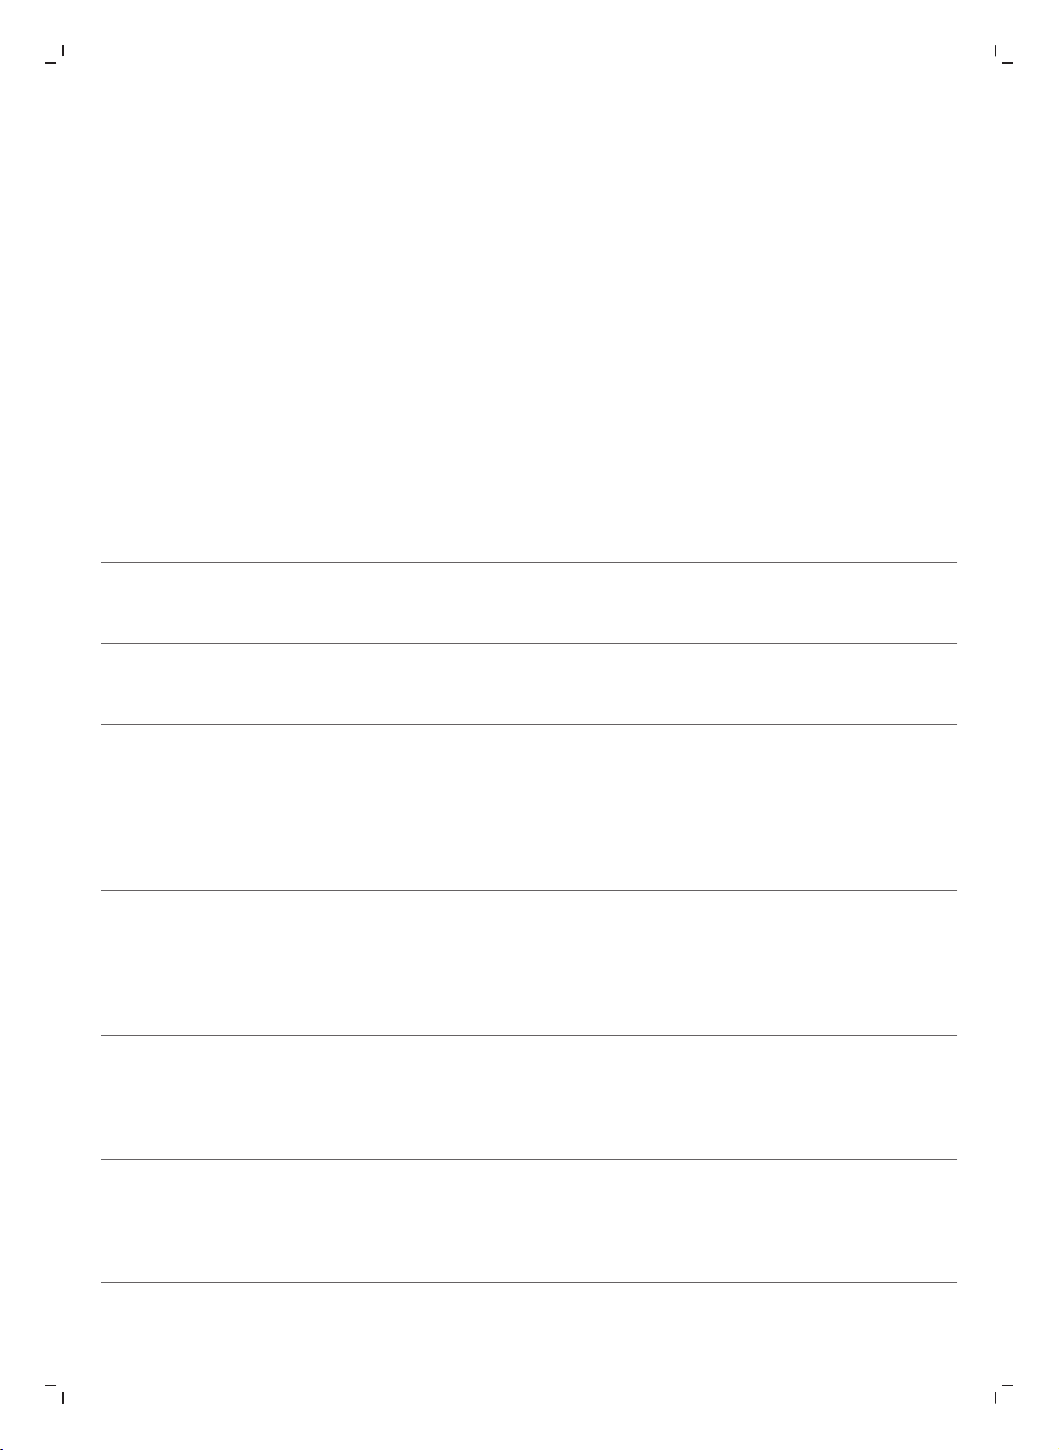
1 Switch on the machine and follow the guidelines from the screen (Fig. 3).
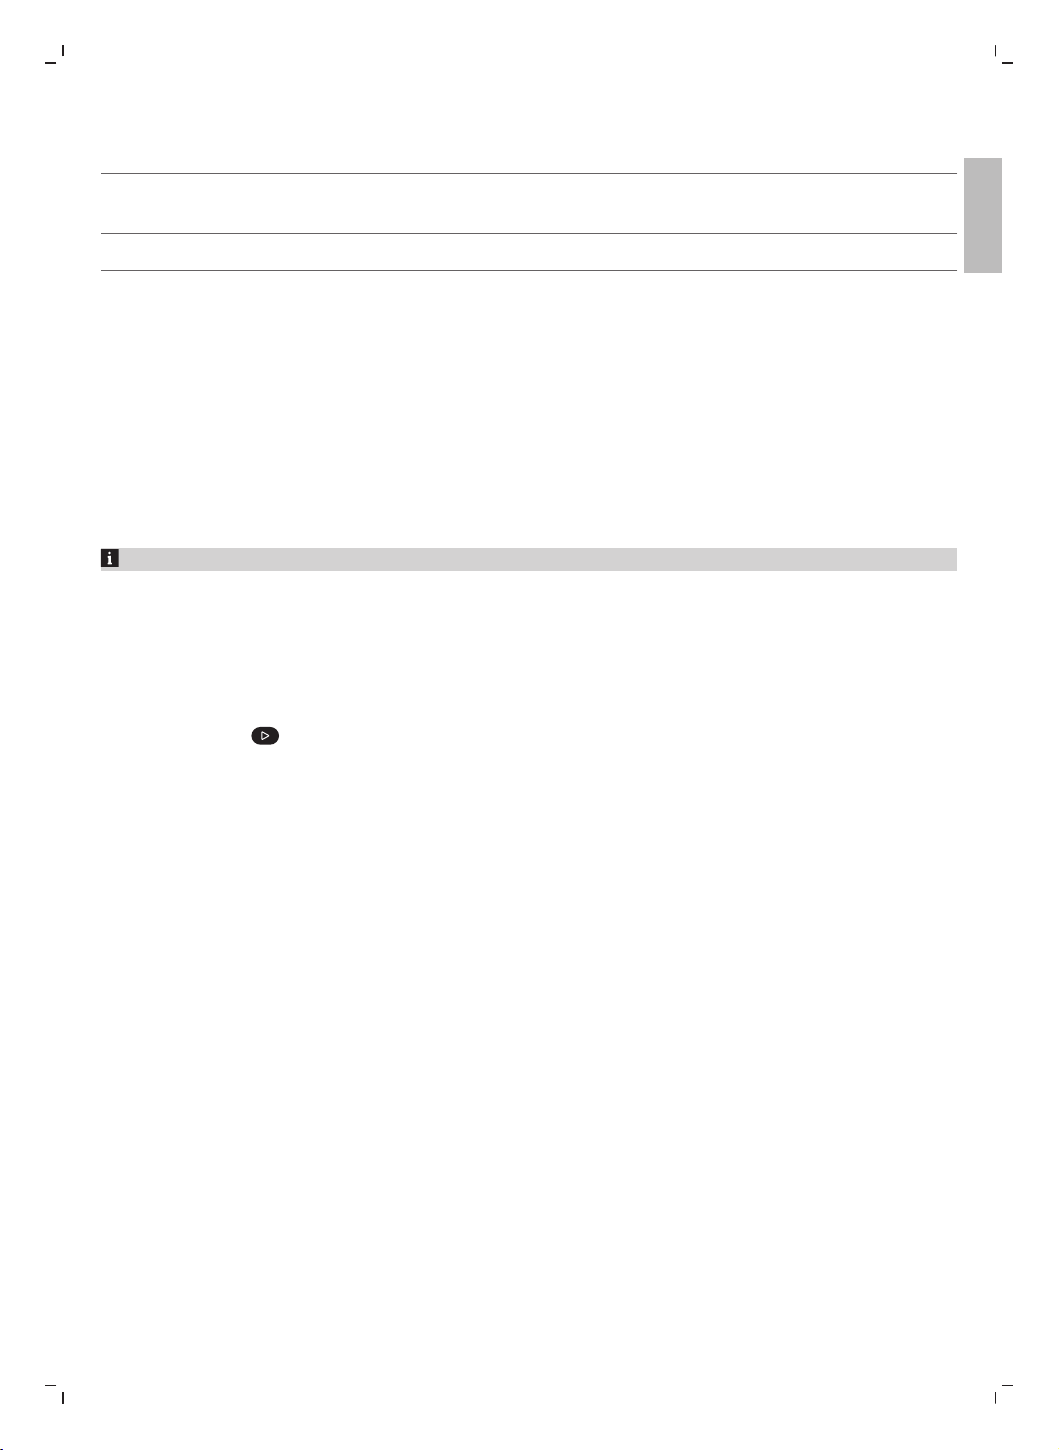
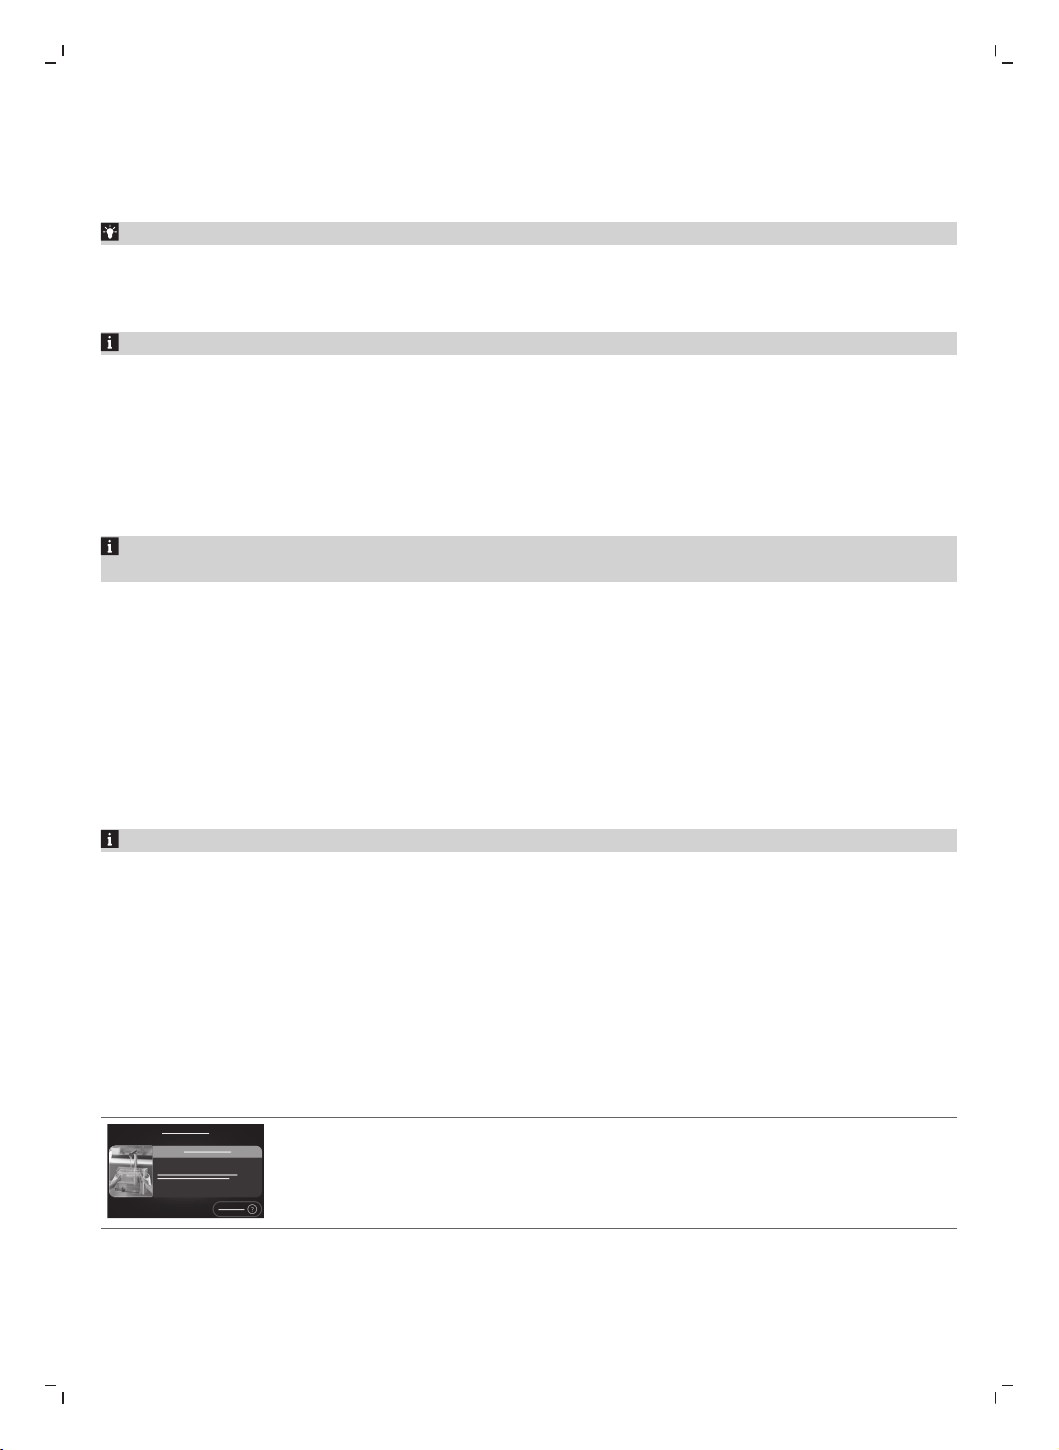
2 Fill the water tank with fresh cold water (Fig. 4) and fill the bean hopper with fresh beans (Fig. 5).
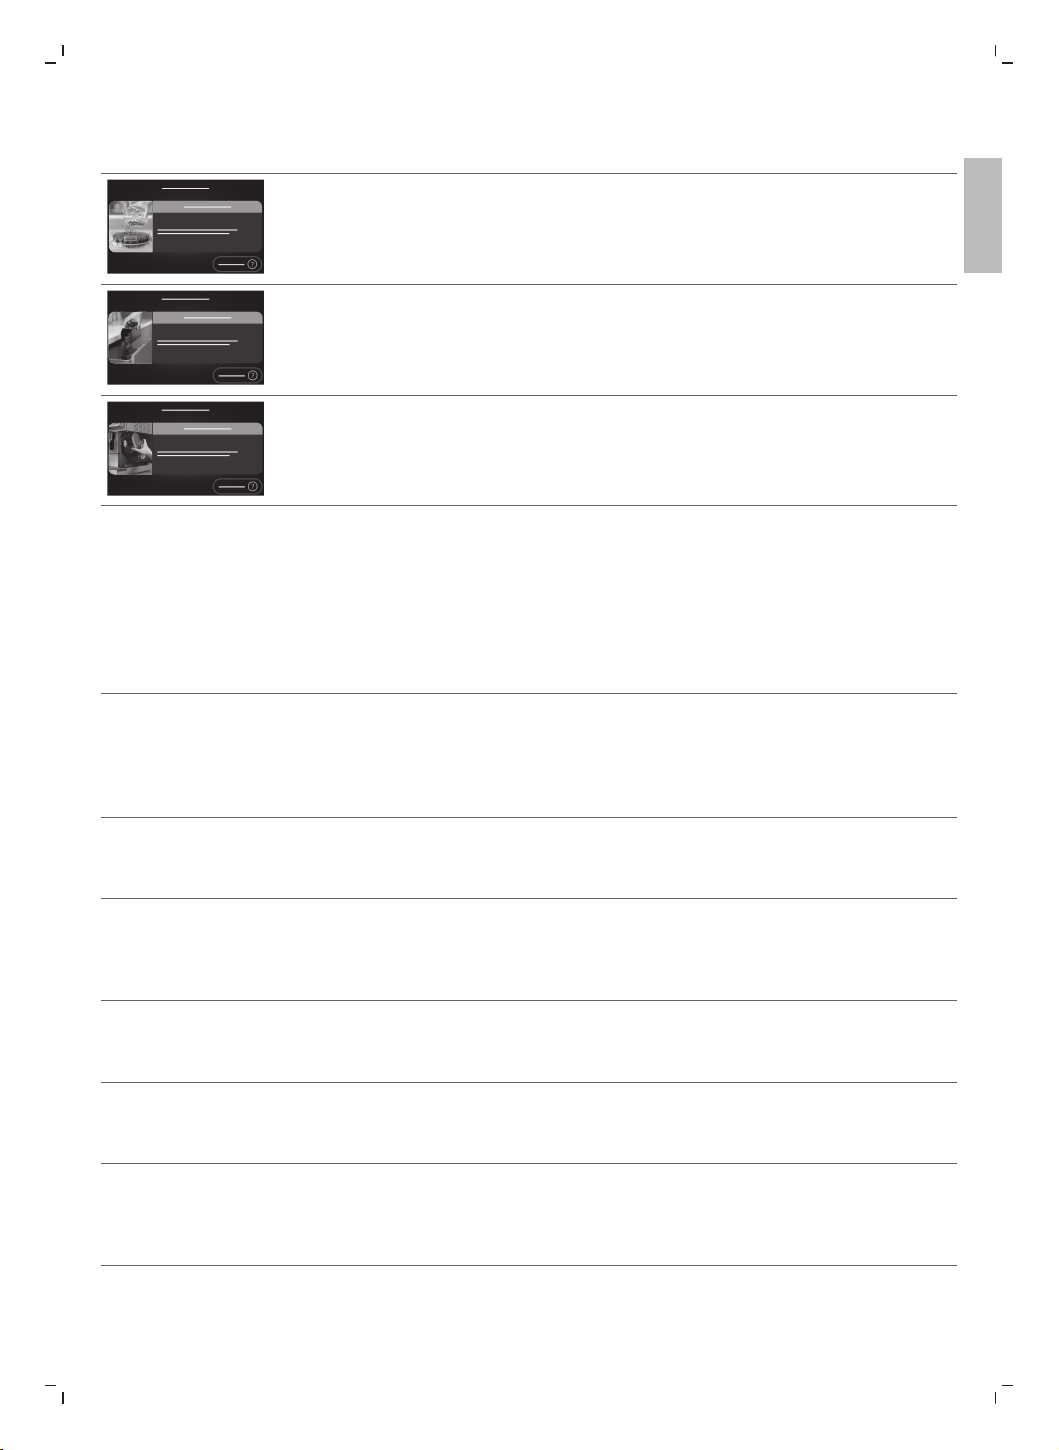
3 Place a cup under the adjustable coffee spout (Fig. 6).
8
English
Use the water in the water tank within 1 to 2 days. If the machine is not used for 3 days or longer, empty
the water tank, rinse it thoroughly and refill with fresh potable water before making any drink.
Brewing coffee with beans
1 To brew a coffee, tap a category and select a drink.
-
You can now adjust the drink to your personal taste using the Customize icon.
2 Tap the Play icon at any time to start brewing the selected drink.
3 To stop dispensing drink before the machine has finished, tap the Stop icon.
Do not use caramelized or flavored coffee beans to avoid damage of your coffee machine.
Brewing milk-based drinks with LatteGo Pro
LatteGo Pro hot and cold milk systems consist of a milk container, a frame and a storage lid. To
avoid leakage, make sure the frame and the milk container are properly assembled before you fill the milk
container.
1 To assemble LatteGo Pro, first insert the top of the milk container under the hook at the top of the frame
(Fig. 7). Then press home the bottom part of the milk container. You hear a click when it locks into place
(Fig. 8).
Make sure that the milk container and the frame are clean before you connect them.
2 Slightly tilt LatteGo Pro and put it on the hot water spout (Fig. 9). Then press it home until it locks into
place (Fig. 10).
3 Fill the milk container with milk. Do not fill it beyond the maximum indication (Fig. 11).
Always use milk coming directly from the fridge for optimal results.
4 Place a cup on the drip tray under the LatteGo Pro and adjustable coffee spout.
5 Tap a category and select a drink.
-
You can now adjust the drink using the Customize icon.
6 Tap the Play icon.
-
To stop dispensing milk before the machine has dispensed the preset amount, tap the Skip icon.
-
To stop dispensing the complete drink before the machine has finished, tap the Stop icon.
LatteGo Pro cold system is the best choice for cold drinks, together with fully-skimmed milk.
Brewing cold drinks
Cold drinks are brewed slowly (some minutes) without heat. You will enjoy a smooth, sweet and less acidic
coffee.
We recommend to fill water tank with fresh cold water before making any cold drinks.
Brewing iced drinks
Iced drinks are brewed at a lower temperature and slower speed, resulting in a slightly sweeter and tangy
flavor.
Add ice cubes for a more refreshing result.
Match with cold milk froth for the best taste experience.
9
English
English
Special functions
ExtraShot
When you have selected the ExtraShot function, you can only brew one coffee at the time.
Your machine offers you the possibility to add an extra shot of Ristretto to your coffee and milk drinks, for
example if you want to have a stronger coffee.
1 Place a cup under the the adjustable coffee spout.
2 Select a drink by scrolling and tapping on the screen.
3 Tap the Customize icon on the screen.
4 Tap the ExtraShot icon and tap the Play icon to start brewing the drink.
5 To stop dispensing the drink before the machine has finished, tap the Stop icon.
Pre-Ground coffee
When you have selected the Pre-Ground function, you can only brew one coffee at the time.
Never load more than one level measuring scoop of pre-ground coffee. We advise you to use the
provided measuring scoop and use fine ground coffee which is used for espresso.
You can choose to use pre-ground coffee instead of beans, for example if you prefer a different coffee
variety or decaffeinated coffee.
1 Open the lid of the pre-ground coffee compartment and pour one leveled measuring scoop of pre-
ground coffee into it (Fig. 12). Then close the lid.
2 Select a drink by scrolling and tapping on the screen.
3 Tap the Customize icon on the screen.
4 Tap the pre-ground coffee icon and tap the Play icon to start brewing the drink.
5 To stop dispensing coffee before the machine has finished, tap the Stop icon.
Barista assistant
To fully benefit from this feature and get the best experience, ensure your coffee machine is connected to
the HomeID App.
Barista assistant is your personal coffee guide, helping you get the most out of every cup through tailored
settings, expert tips and bean recommendations, including:
-
Adjusting settings to your beans
-
Drink rate and review
-
Bean suggestions
-
Grinding settings information
-
Tips and Tricks
-
Special recipes
1 Open the HomeID App on your phone.
2 Tap the pop-up barista icon to start interacting with the barista assistant to personalize your coffee
experience.
Barista assistant helps you get the best taste from your coffee beans by automatically fine-tuning machine
settings based on the bean type and roast level you use.
1 Press the barista assistant button on the machine.
2 Tap "Start now" and follow the guided questions from the barista assistant.
3 Select the type of beans. You can choose between 100% Arabica and mix of Arabica/Robusta.
4 Select the roasting level of your beans among light, medium and dark.
5 Tap "Adjust now". The brewing settings are optimized automatically.
-
Enjoy your next coffee.

10
English
You can simply press the barista assistant button again when you change your coffee beans.
Dispensing hot water
Hot water cannot be dispensed from the App.
1 If attached, remove LatteGo Pro.
2 Place a cup under the hot water spout.
3 Tap "Hot water".
4 Adjust quantity and temperature using the Customize icon.
5 Tap the Play icon. Hot water is dispensed from the hot water spout (Fig. 13).
6 To stop dispensing hot water before the machine has finished, tap the Stop icon.
Personalizing drinks
The machine allows you to adjust the settings of a drink to your own preference.
1 Select a drink by scrolling and tapping on the screen.
2 Tap the Customize icon on the screen.
3 Adjust settings according to the selected drink: volume, strength and temperature where available.
Adjustable settings depend on the selected drink.
Creating a profile
1 On the home screen, tap "Profile +".
2 Scroll through the available profiles and select color.
3 Tap icon to continue.
4 Scroll and select up to 8 favorite drinks.
5 Tap a preferred drink.
6 Tap icon to continue.
-
Now your profile is made, you may edit it again every time you want.
In case you do not select any profile, you can still personalize the settings to your own preference but the
recipes you brew will not be stored.
Adjusting machine settings
Adjusting grinder setting
By adjusting the grinder, you may personalize your coffee to perfectly match your taste preferences.
-
Level 1-6 (Fig. 14)
-
Finer grinder setting
-
The best setting if you like stronger and more bitter taste
-
Ideal for short drinks or traditional milk-based recipes such as Espresso, Ristretto and Cappuccino
-
Level 7-12 (Fig. 15)
-
Coarser grinder setting
-
The best setting if you like weaker and sourer taste
11
English
English
-
Ideal for long drinks such as Coffee, Iced Coffee and Cold Brew
For more information, please visit www.home.id.
The machine has been set up to get the best taste out of your coffee beans. Therefore we advise you not to
adjust the grind setting until you have brewed 100-150 cups (approx. 1 month of use).
You can only adjust the grinder settings when the machine is grinding coffee beans. You need to brew 2
to 3 drinks before you can taste the full difference.
Do not turn the grinder setting knob more than one notch at a time to prevent damage to the grinder.
1 Place a cup under the adjustable coffee spout.
2 Open the lid of bean hopper.
3 Select a drink from the control panel and tap the Play icon.
4 When the grinder starts grinding, press down the grinder setting knob and turn it to the left or right (Fig.
16).
Adjusting other machine settings
By tapping the Machine Settings icon, you can adjust the following machine settings:
-
Water hardness: select between 5 levels according to the water hardness in your region
-
Standby time: select 15, 30, 60 or 180 min
-
Display brightness: select low, medium or high
-
Display back light: select 'always on' or 'dim after 3 mins'
-
Cup light: select 'always off', 'always on', 'always dimmed' or 'on while brewing'
-
Language
-
Sound: activate or deactivate the beeping sound of the machine
-
Measuring units: select ml. or oz.
-
Rinsing: activate or deactivate an automatic rinsing cycle when you switch on the machine
-
Home screen: select 'show drinks overview' or 'show last used profile'
-
Eco mode: activate or deactivate automatic adjustment of your settings to the most energy efficient
option
-
Factory settings: reset your machine to default settings
Restoring factory settings
The machine offers you the possibility to restore the factory settings at any moment.
1 Under the Menu, tap "Machine Settings" and "Factory Settings".
2 Tap "Reset" and confirm.
-
The settings are now being restored.
All the following machine settings will be restored except statistics: water hardness, standby time, display
brightness, display back light, cup light, language, sound, measuring units, rinsing, home screen, eco mode.
In addition, stored Wi-Fi credentials and pairing with HomeID account will be lost.
Removing and inserting the brew group
Go to www.home.id/support for detailed video instructions on how to remove, insert and clean the brew
group.
Removing the brew group from the machine
1 Remove the water tank and open the service door (Fig. 17).
12
English
2 Unlock the brew group by moving the yellow handle to the right (Fig. 18).
3 Slide the brew group from the machine (Fig. 19).
Reinserting the brew group
1 Slide the brew group back in until it clicks in the position (Fig. 20).
2 Lock the brew group by moving the yellow handle to the left (Fig. 21).
3 Close the service door and place the water tank back into the machine.
Cleaning and maintenance
Regular cleaning and maintenance keeps your machine in top condition and ensures good-tasting coffee
for a long time with a steady coffee flow.
Consult the table below for a detailed description on when and how to clean all detachable parts of the
machine. You can find more detailed information and video instructions on www.home.id/support. See
figure B for an overview of which parts can be cleaned in the dishwasher.
Detachable parts When to clean How to clean
Brew group Weekly Remove the brew group from the machine.
Rinse it under the tap (see 'Cleaning the brew
group under the tap').
Brew group Monthly Clean the brew group with the Philips coffee
oil remover tablet (see 'Cleaning the brew
group with the coffee oil remover tablets').
Pre-ground coffee
compartment
Check the pre-ground coffee
compartment weekly to see if it is
clogged.
Unplug the machine and remove the brew
group. Open the lid of the pre-ground coffee
compartment and insert the spoon handle into
it. Move the handle up and down until the
clogged ground coffee falls down (Fig. 22). Go
to www.home.id/support for detailed video
instructions.
Coffee grounds
container
Empty the coffee grounds
container when prompted by the
machine. Clean it weekly.
Remove the coffee grounds container while
the machine is switched on. Rinse it under the
tap with some washing-up liquid or clean it in
the dishwasher. The front panel of the coffee
grounds container (Fig. A15) is not
dishwasher-safe.
Drip tray Empty the drip tray daily or as
soon as the red 'drip tray full'
indicator pops up through the
drip tray (Fig. 23). Clean the drip
tray weekly.
Remove the drip tray (Fig. 24) and rinse it
under the tap with some washing-up liquid or
clean it in the dishwasher. The front panel of
the coffee grounds container (Fig. A15) is
not dishwasher-safe.
LatteGo Pro After every use Clean LatteGo Pro attached to the machine by
using the 'Clean LatteGo Pro' program (see
'Cleaning LatteGo Pro'). Remove it from the
machine (Fig. 25) and rinse it under the tap or
clean it in the dishwasher.
13
English
English
Detachable parts When to clean How to clean
Water tank Before every refill Rinse the water tank under the tap before
refilling with fresh water.
Machine front Weekly Clean with a non-abrasive cloth.
Cleaning the brew group
Regular cleaning of the brew group prevents coffee residues from clogging up the internal circuits. Visit
www.home.id/support for support videos on how to remove, insert and clean the brew group.
Cleaning the brew group under the tap
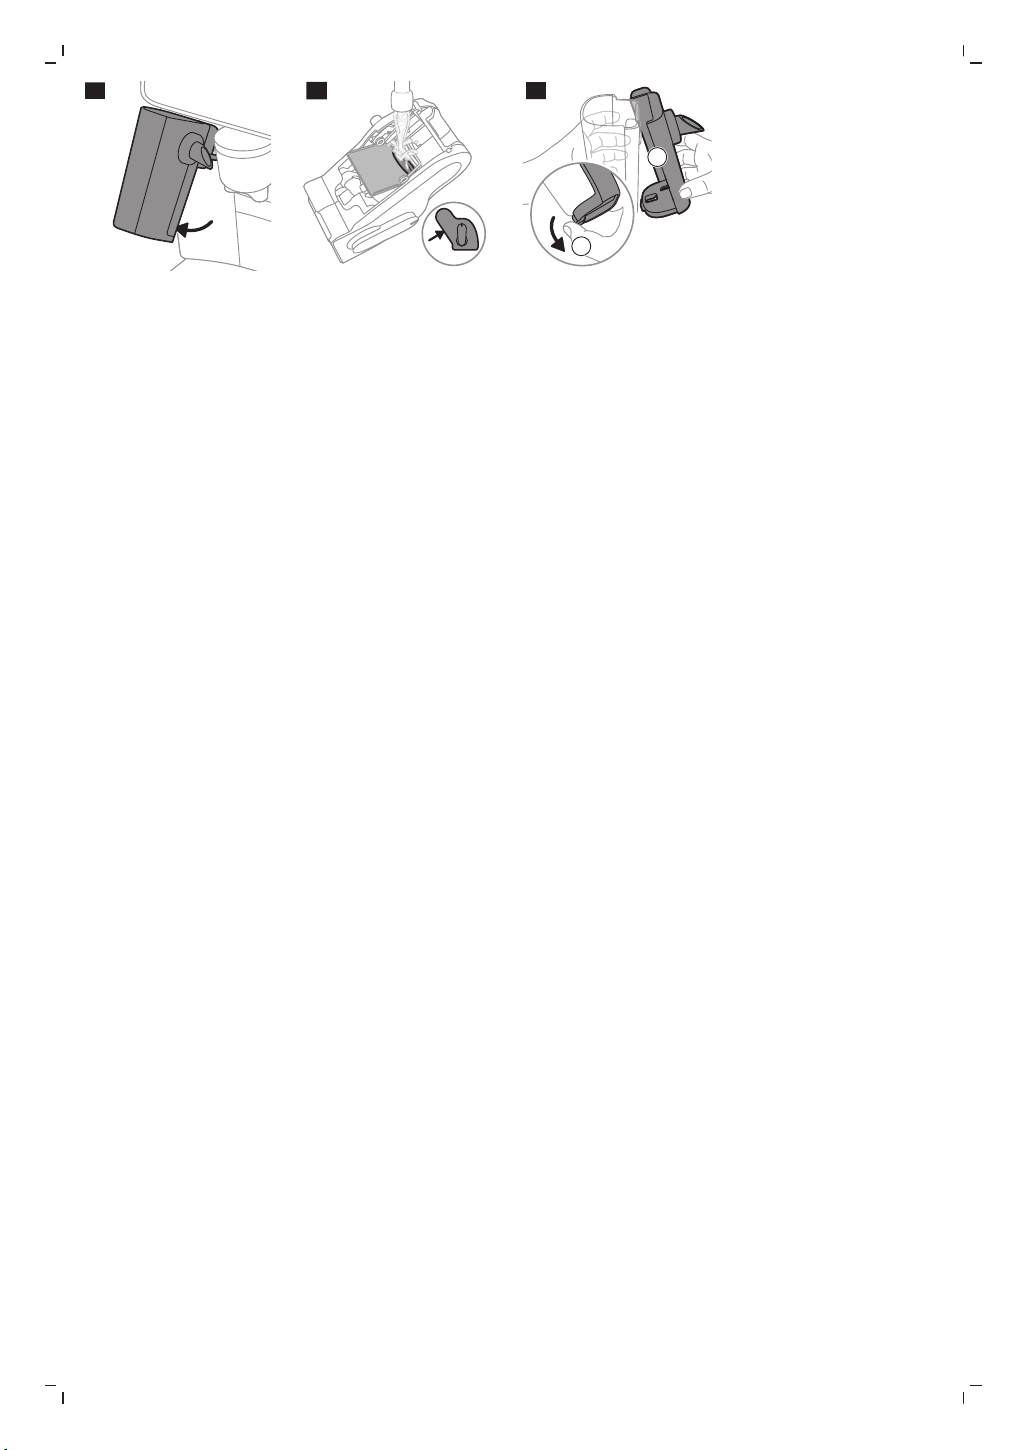
1 Remove the brew group.
2 Rinse the brew group thoroughly with water and remove any coffee residues left on the brew group flap
(Fig. 26).
3 Place the brew group back into the machine (Fig. 20).
Do not dry the brew group with a dry cloth to prevent fibers from collecting inside.
Cleaning the brew group with the coffee oil remover tablets
To clean the brew group, we recommend to use Philips coffee oil remover tablets if available in your
country.
1 Under the Menu, tap "Maintenance" and "Remove Coffee Oil".
2 Follow the steps on the screen.
-
Tap the Play icon.
Cleaning LatteGo Pro
Quickly cleaning LatteGo Pro
1 Make sure LatteGo Pro is properly attached to the machine.
2 Place a cup under the hot water spout.
3 Under the Menu, tap "Maintenance" and "Clean LatteGo Pro".
4 Tap "Start" and follow the steps on the screen.
-
Small jets of hot water will be dispensed by the LatteGo Pro.
5 Store LatteGo Pro with the remaining milk in the fridge.
Thoroughly cleaning LatteGo Pro
1 Remove LatteGo Pro from the machine.
2 Pour out any remaining milk.
3 Press the release button and remove the milk container of the LatteGo Pro you want to clean (Fig. 27).
4 Clean all parts in the dishwasher or under the tap with lukewarm water and some washing-up liquid.
Descaling procedure
To clean and descale the machine, we recommend to use the Philips maintenance products if available in
your country. Under no circumstances should you use a descaler based on sulfuric acid, hydrochloric acid,
sulfamic or acetic acid (vinegar) as this may damage the water circuit in your machine and not dissolve the
limescale properly. Failure to descale the appliance will also void your warranty. You can buy Philips
descaling solution in the online shop at https://www.home-appliances.philips/parts-accessories.
14
English
When the machine needs descaling, the machine will advise you to descale.
1 Under the Menu, tap "Maintenance" and "Remove Limescale".
2 Tap "Descale" and follow the steps on the screen.
Tip: Using the AquaClean filter reduces the need for descaling!
What to do if the descaling procedure is interrupted
You can exit the descaling procedure by long pressing the On-off button on the control panel.
If the descaling procedure is interrupted before it is complete, do the following:
1 Empty and rinse the water tank thoroughly.
2 Fill the water tank with fresh water up to the Calc / Clean level indication and switch the machine on.
3 Before brewing any drinks, perform a manual rinsing cycle.
-
Dispense half a water tank of hot water by repeatedly selecting the hot water function.
-
Brew several cups of pre-ground coffee without adding ground coffee.
If the descaling procedure is not complete, the machine will require another descaling procedure as soon
as possible.
Ordering accessories
To clean and descale the machine, we advise you to use the Philips maintenance products such as descaling
solution, AquaClean water filter and coffee oil remover tablets if available in your country. These products
can be purchased from your local retailer, from the authorized service centers or online at
https://www.home-appliances.philips/parts-accessories. To find a full list of spare parts online, enter
the model number of your machine. You can find the model number on the inside of the service door (Fig.
A11).
Brita-filters are not compatible with this machine.
Troubleshooting
This chapter summarizes the most common problems you could encounter with the machine. If you are
unable to solve the problem, contact the Consumer Care Center in your country or go to
www.home.id/support for support videos and a complete list of frequently asked questions.
Warning icons
Warning Solution
The 'Add water' screen pops up.
- The water tank is almost empty. Fill the water tank with fresh water to the
maximum level indication.
- The water tank is not in place. Place back the water tank.
15
English
English
Warning Solution
The 'Add beans' screen pops up.
- Fill the bean hopper with coffee beans.
The 'Empty coffee grounds container' screen pops up.
- The coffee grounds container is full. Remove and empty the coffee grounds
container while the machine is switched on. Wait 5 seconds before you place it
back.
The 'Insert brew group' screen pops up.
- The brew group is not in place or not placed correctly. Remove the brew group
and make sure it is locked into place. See chapter 'Removing and inserting the
brew group' for step-by-step instructions.
Error codes
Below you find a list of the error codes showing problems that you can solve yourself. Video instructions are
available on www.home.id/support. If another error code appears, please contact the Philips Consumer
Care Center in your country. For contact details, see the warranty leaflet.
Error
code
Problem Possible solution
01 The coffee funnel is
clogged.
Switch off the machine and unplug it. Remove the brew group.
Then open the lid of the pre-ground coffee compartment and
insert the spoon handle (Fig. 22). Move the handle up and down
until the clogged ground coffee falls down. Visit
www.home.id/support for detailed video instructions.
03 The brew group is dirty. Rinse the brew group with tap water and let it air-dry or dry with a
soft, damp cloth. Consult chapter 'Cleaning the brew group' or
visit www.home.id/support for detailed video instructions.
04 The brew group is not
positioned correctly.
Remove the brew group and reinsert it. Make sure that the brew
group is in the correct position before you insert it. Consult
chapter 'Reinserting the brew group' or visit
www.home.id/support for detailed video instructions.
05 There is air in the water
circuit.
Restart the machine by switching it off and on again. If this works,
dispense 2-3 cups of hot water. Descale the machine if you have
not done so for a longer period of time.
05 The AquaClean water
filter is not installed
properly or is clogged.
Remove the filter and try to brew a coffee again. If this works,
place the filter back into the water tank properly. If this still does
not work, the filter might be clogged and needs to be replaced.
11 Machine needs to adjust
to room temperature
Allow some time for the machine to adjust from
transport/outdoor temperature to room temperature. Switch off
the machine for 30 minutes and switch it on again. If this does not
work, contact the Consumer Care Center in your country.
16
English
Error
code
Problem Possible solution
14 The machine is
overheated.
Switch the machine off and switch it on again after 30 minutes.
19 The machine is not
connected to the wall
socket properly.
Make sure that the small plug of the power cord is properly
connected to the socket on the back of the machine. If this does
not work, contact the Consumer Care Center in your country.
Troubleshooting table
This chapter summarizes the most common problems you could encounter with the machine. Support
videos and a complete list of frequently asked questions are available on www.home.id/support. If you are
unable to solve the problem, contact the Consumer Care Center in your country. For contact details, see the
warranty leaflet.
Problem Cause Solution
There are some coffee
residues inside your new
coffee machine.
This machine has been tested
with coffee.
Although it has been carefully cleaned,
there may be some coffee residues left.
However, the machine is absolutely new.
The drip tray fills up
quickly or there is always
some water in the drip
tray.
This is normal. The machine uses
water to rinse the internal circuit
and brew group. Some water
flows through the internal system
directly into the drip tray.
Empty the drip tray daily or as soon as the
red 'drip tray full' indicator pops up
through the drip tray cover. Tip: place a
cup under the dispensing spout to collect
rinsing water that comes out of it.
The 'Empty coffee
grounds container' screen
remains on.
You emptied the coffee grounds
container while you switched off
the machine or you placed it back
too fast.
Empty the coffee grounds container while
the machine is switched on. Remove the
coffee grounds container, wait at least 5
seconds and then place it back.
The machine prompts to
empty the coffee grounds
container even though
the container is not full.
The machine does not reset the
counter the last time you empty
the coffee grounds container.
Wait about 5 seconds when you place
back the coffee grounds container. In this
way the coffee grounds counter will be
reset to zero and the number of coffee
pucks is counted correctly.
Empty the coffee grounds container while
the machine is switched on. If you empty
the coffee grounds container when the
machine is switched off, the coffee
grounds counter won't reset.
The coffee grounds
container is too full and
the 'Empty coffee
grounds container' screen
does not appear.
You removed the drip tray
without emptying the coffee
grounds container.
When you remove the drip tray, empty the
coffee grounds container even if it
contains only a few coffee pucks. This
ensures that the coffee pucks counter is
reset to zero and that the number of
coffee pucks is counted correctly.
17
English
English
Problem Cause Solution
You cannot remove the
brew group.
The brew group is not in the
correct position.
Reset the machine in the following way:
close the service door and place back the
water tank. Switch the machine off and
back on. Try again to remove the brew
group. See chapter 'Removing and
inserting the brew group' for step by step
instructions.
You cannot insert the
brew group.
The brew group is not in the
correct position.
Leave the brew group out and reset the
machine in the following way: close the
service door and place back the water
tank. Switch the machine off and unplug
it. Wait for 30 seconds, plug the machine
back in and switch it on. Then try again to
reinsert the brew group into the machine.
See chapter 'Removing and inserting the
brew group' for step by step instructions.
The coffee is watery. The brew group is dirty. Remove the brew group, rinse it under the
tap and leave it to dry.
The machine is performing its self-
adjustment procedure. This
procedure starts automatically
when you use the machine for the
first time, when you change to
another type of coffee beans or
after a long period of non-use.
Brew 5 cups of coffee initially to allow the
machine to complete its self-adjustment
procedure.
The grinder setting is too coarse. Adjust the grinder to a finer (lower)
setting (Fig. 16). Brew 2 to 3 drinks to be
able to taste the full difference (see
'Adjusting grinder setting').
The coffee is not hot
enough.
The temperature is set too low. Adjust the temperature for the desired
drink using Customize icon.
The automatic rinsing cycle is
disabled.
Activate the automatic rinsing cycle in the
Settings. The machine will heat up and
perform an automatic rinsing cycle when
you turn on the machine.
A cold cup reduces the
temperature of the coffee.
Preheat the cups by rinsing them with hot
water.
Adding milk reduces the
temperature of the coffee.
Regardless of whether you add hot or cold
milk, adding milk always reduces the
temperature of the coffee. Preheat the
cups by rinsing them with hot water.
Coffee does not come out
or coffee comes out
slowly.
The AquaClean water filter is not
prepared properly for installation.
Remove the filter and dispense some hot
water. If this works, the filter was not
installed properly. Reinstall and activate
the filter and follow all steps in chapter
'AquaClean water filter'.
18
English
Problem Cause Solution
After a long period of non-use, prepare
the filter for use again and dispense 2-3
cups of hot water.
The AquaClean water filter is
clogged.
Replace the filter every 3 months or when
advised by your machine.
The grinder setting is too fine. Adjust the grinder to a coarser (higher)
setting (Fig. 16). Note that this will impact
the coffee taste (see 'Adjusting grinder
setting'). Brew 2 to 3 drinks to be able to
taste the full difference.
The brew group is dirty. Remove the brew group and rinse it under
the tap (see 'Cleaning the brew group
under the tap').
The adjustable dispensing spout is
dirty.
Clean the adjustable dispensing spout and
its holes with a pipe cleaner or needle.
The pre-ground coffee
compartment is clogged.
Remove the brew group. Open the lid of
the pre-ground coffee compartment and
insert the spoon handle into it (Fig. 22).
Move the handle up and down until the
clogged ground coffee falls down. Place
the brew group back and lock in place.
Restart your machine.
The machine circuit is blocked by
limescale.
Descale the machine with Philips descaler
when the machine prompts you.
The milk does not froth. LatteGo Pro is assembled
incorrectly.
Make sure that the milk container is
properly assembled to the frame of
LatteGo Pro (you hear 'click' sound).
The milk container and/or frame
of LatteGo Pro are/is dirty.
Disassemble LatteGo Pro and rinse both
parts under the tap or clean them in the
dishwasher.
The type of milk used is not
suitable for frothing.
Different types of milk result in different
amounts of froth and different froth
qualities. Use Barista types of milk for best
results.
- For best result with cold froth, we
recommend to use skimmed milk.
- For best result with hot froth, we
recommend to use semi-skimmed
milk.
Milk is leaking from the
bottom of the LatteGo
Pro.
The frame and the milk container
are not assembled properly.
Insert the top of the milk container under
the hook at the top of the frame and press
home the bottom part of the milk
container. You hear a click when it locks
into place.
19
English
English
Problem Cause Solution
The milk container and/or frame
of LatteGo Pro are/is dirty.
Disassemble LatteGo Pro and rinse both
parts under the tap or clean them in the
dishwasher.
The machine seems to be
leaking.
The machine uses water to rinse
the internal circuit and brew
group. This water flows through
the internal system directly into
the drip tray, which is normal.
Empty the drip tray every day or as soon as
the 'drip tray full' indicator pops up
through the drip tray cover.
Tip: Place a cup under the adjustable
coffee spout and hot water spout to
collect water.
The drip tray is too full and has
overflowed.
Empty the drip tray every day or as soon as
the 'drip tray full' indicator pops up
through the drip tray cover (Fig. 24).
The water tank is not fully
inserted. Some water is leaking
out of the water tank and air is
drawn into the machine.
Remove the water tank and place it back
in the correct position.
The brew group is dirty or
clogged.
Rinse the brew group under the tap.
The machine is not placed on a
horizontal surface.
Place the machine on a horizontal surface
so that the drip tray does not overflow
and the 'drip tray full' indicator works
properly.
You cannot activate the
AquaClean water filter
and the machine asks for
descaling.
You did not replace the filter in
time after the screen shows the
AquaClean reminder. This means
your machine is not anymore
completely limescale free.
Descale your machine and install the filter.
The new water filter does
not fit.
You install another filter than the
Philips AquaClean water filter.
Only use the Philips AquaClean water
filter.
The rubber ring on the AquaClean
water filter is not in place.
Place back the rubber ring on the filter.
The machine is making a
loud noise.
It is normal that your machine
makes some noise during use.
If the machine starts to make a different
kind of noise, clean the brew group.
The AquaClean water filter is not
prepared properly and air is
drawn into the machine.
Remove the filter from the water tank and
properly prepare it for use before you
place it back. See chapter 'AquaClean
water filter' for step-by-step instructions.
The water tank is not fully
inserted and air is drawn into the
machine.
Remove the water tank and place it back
in the correct position.
The machine cannot
connect to Wi-Fi during
initial setup.
The machine and Wi-Fi router are
not within range of each other.
Ensure that the machine and the Wi-Fi
router are within range of each other or
use a Wi-Fi repeater.
20
English
Problem Cause Solution
The Wi-Fi router is not working
properly.
Ensure that the Wi-Fi router is working
properly and is connected to the internet.
The router your machine is trying
to connect to is 5 GHz band.
5 GHz networks are not supported. Hence
make your router supporting dual bands:
both 5 GHz and 2.4 GHz.
The machine is
experiencing connection
issues.
The Wi-Fi router is not working
properly.
Ensure that your Wi-Fi router is
functioning correctly and is connected to
the internet.
The Wi-Fi connectivity is
interrupted by electromagnetic or
other interferences.
Reduce interference by moving other
devices away or switching them off.
Connection with Cloud Check the Wi-Fi indicator on your
machine. If it is off or blinking fast, go to
Machine Settings > Connected Settings >
Wi-Fi, and tap "'Forget Network" to reset.
Then, reconnect your machine using the
HomeID App.
The machine cannot
connect to Wi-Fi after
changing internet
provider or router.
New router settings are not
compatible with the machine.
Check if it supports 2.4 GHz Wi-Fi network.
The machine is still paired with
your previous Wi-Fi network and
cannot recognize the new router.
Reset the Wi-Fi: Go to Machine Settings >
Connected Settings > Wi-Fi, and tap
"Forget Network". Reconnect your
machine using the HomeID App.
Other users are not able
to control the machine via
the App.
You haven't received or accepted
a sharing invitation from the
machine owner.
Ensure you have received and accepted a
sharing invitation from the machine
owner.
Other users can no longer
control the machine via
the App.
The machine owner has removed
the machine from their HomeID
App account.
Open the HomeID App and follow the
pairing process under ‘Add Appliance’.
Once paired, the user becomes the new
machine owner and can invite others
again.
The App is not working. Temporary phone or HomeID App
issue.
Close and restart the HomeID App or your
phone. Ensure you install the latest version
of the HomeID App (check for updates in
your App Store or Google Play). Empty the
cache of your phone (Settings > HomeID >
Empty Cache). If needed, uninstall and
reinstall the HomeID App.
Checking your Wi-Fi indicator status
Status Meaning
21
English
English
Off Machine is not connected to Wi-Fi.
Blinking slowly Machine is pairing to the router.
On Machine is connected to Wi-Fi.
Blinking fast Wi-Fi connection error.
Technical specifications
The manufacturer reserves the right to improve the technical specifications of the product. All the preset
quantities are approximate.
Description Value
Size (w x h x d) 251 x 389 x 452 mm
Weight 8.5 - 9 kg
Power cord length 800 - 1200 mm
Water tank 1.9 litres
Coffee bean hopper capacity 275 g
Coffee grounds container capacity up to 12 pucks
LatteGo Pro capacity 250 ml
Adjustable coffee spout height 88 - 145 mm
Nominal voltage - Power rating - Power supply See data label inside the service door (Fig. A11)
1
sec
1
1
min
2
3
4
5
6
7
CLICK
8
9
10
11
12
13
14
15
1
2
16
17
18
19
20
21
22
23
24
25
26
2
1
27
www.home.id
100% recycled paper
100% papier recyclé
2024 © Versuni Holding B.V.
PHILIPS and the Philips Shield
Emblem are registered trademarks
of Koninklijke Philips N.V. and are
used under license.
This product has been manufactured
by and is sold under the responsibility
of Versuni Holding B.V., and Versuni
Holding B.V. is the warrantor in
relation to this product.
