

EN
Original Instructions
Version 1 - November 2025
30273/30274
PETROL
C HAINSAWS
Stock No: 30274
Stock No: 30273

1.1 Product Reference
User Manual for: Petrol Chainsaws
Stock No: 30273, 30274
Part No: DTP06, DTP07
1.2 Revisions
Version 1: November 2025
First release
As our manuals are continually updated, always ensure
that the latest version is used.
Please visit drapertools.com/manuals for the latest
version of this manual and the associated parts list, if
applicable.
1.3 Understanding the Safety Content of
This Manual
WARNING! – Situations or actions that may result
in personal injury or death.
CAUTION! – Situations or actions that may result
in damage to the product or surroundings.
Important: – Information or instructions of particular
importance.
1.4 Copyright © Notice
Copyright © Draper Tools Limited.
Permission is granted to reproduce this manual for
personal and educational use ONLY. Commercial
copying, redistribution, hiring or lending is strictly
prohibited.
No part of this manual may be stored in a retrieval system
or transmitted in any other form or means without written
permission from Draper Tools Limited.
In all cases, this copyright notice must remain intact.
1. Preface
– 2 –
These are the original product instructions. Read the
instruction manual in full and retain for future
reference.
Please visit drapertools.com/manuals for the latest
version of this manual and the associated parts list,
if applicable.

2. Contents
– 3 –
EN
1. Preface 2
1.1 Product Reference 2
1.2 Revisions 2
1.3 Understanding the Safety Content of This
Manual 2
1.4 Copyright © Notice 2
2. Contents 3
3. Product Introduction 4
3.1 Intended Use 4
3.2 Specication 4
4. Health and Safety Information 5-7
4.1 General Health and Safety Precautions 5
4.2 Specic Health and Safety for Saw
Operation 5
4.3 Personal Protective Equipment (PPE) 6
4.4 Kickback and Pull Away Risks 6
4.5 Health & Safety Information for the use of
Fuels 7
4.6 Residual Risk 7
5. Identication and Unpacking 8-10
5.1 Product Overview 8
5.2 What’s in the Box? 10
5.3 Packaging 10
6. Assembly Instructions 11-13
6.1 Fitting the Spiked Bumper 11
6.2 Attaching/Adjusting Guide Bar and Chain
Assembly 11
6.3 Fuelling and Lubrication 12
7. Operating Instructions 13-17
7.1 Starting the Chainsaw 13
7.2 Stopping the Chainsaw 14
7.3 Holding the Chainsaw 14
7.4 Chain Brake 15
7.5 Basic Cutting 15
7.6 Felling 16
7.7 Delimbing 17
7.8 Cross Cutting/Bucking 17
8. Maintenance and Troubleshooting 18-21
8.1 General Maintenance 18
8.2 Draining the fuel 18
8.3 Fuel Filter 18
8.4 Chain Lubrication 18
8.5 Chain Sharpening 19
8.6 Carburettor Adjustment 19
8.7 Guide Bar Maintenance 19
8.8 Air Filter Care 20
8.9 Spark plug 20
8.10 Troubleshooting 21
9. Spares, Returns and Disposal 22
10. Warranty 22
11. Explanation of Symbols 23

3. Product Introduction
3.1 Intended Use
This petrol chainsaw is designed for general lopping,
cutting branches/limbs and felling of trees.
Any other application beyond the conditions established
for use will be considered misuse. Draper Tools accepts no
responsibility for improper use of this product.
Read this manual in full before attempting to assemble,
operate or maintain the product, and retain it for later use.
3.2 Specication
Stock No. 30273 30274
Part No. DTP06 DTP07
Engine:
Type: 2-stroke air cooling single cylinder 2-Stroke air cooling single cylinder
Max. power: 1800W 2200W
Displacement: 45cc 50.9cc
Idle speed: 3,000±300rpm 3,000±300rpm
Max. speed (under load): 8,500rpm 8,500rpm
Max. speed (no load): 11,000rpm 11,000rpm
Fuel/Oil mix:
Fuel/oil mix ratio: 40:1 40:1
Capacity: 550ml 550ml
Petrol type: E10 (95RON) E10 (95RON)
Oil type/grade: 2-stroke motor oil, JASO FC minimum 2-stroke motor oil, JASO FC minimum
Chain Lubrication oil:
Capacity: 260ml 260ml
Grade: ISO 100 ISO 100
Chain:
Specied pitch; 8.3mm (0.325”) 8.3mm (0.325”)
Specied drive link gauge: 14.7mm (0.58”) 14.7mm (0.58”)
Drive links number: 72 76
Guide bar length: 450mm (18”) 500mm (20”)
Chain speed 14,300rpm 14,300rpm
Noise emissions:
Sound pressure level (LpA): 96.99dB(A) 96.99dB(A)
Sound power level (LwA): 117.67dB(A) 117.67dB(A)
Uncertainty (K): 3dB(A) 3dB(A)
Guaranteed sound power level: 120dB(A) 120dB(A)
Vibration level:
Front handle; 12.005 m/s
2
12.005 m/s
2
Rear handle: 17.049 m/s
2
17.049 m/s
2
Uncertainty (K): 1.5 m/s
2
1.5 m/s
2
Net weight: 6.2kg 6.5kg
EN
– 4 –

Important: The declared vibration total values and noise
emissions values have been measured in accordance
with a standard test method and may be used for
comparing one tool with another. These values may also
be used in a preliminary assessment of exposure.
WARNING! The vibration and noise emissions
during actual use of the product can dier from
the declared values depending on the type of
work and the area upon which it is used. Before
each use, estimate the likely exposure resulting
from the actual conditions of use. Take into
account all parts of the operation cycle in order
to identify any safety measures required to
protect the operator.
3. Product Introduction
4. Health and Safety Information
EN
EN
– 5 –
Important: Read all the Health and Safety instructions
before attempting to operate, maintain or repair this
product. Failure to follow these instructions may result in
injury or damage to the user or the product.
4.1 General Health and Safety Precautions
• NEVER modify the chainsaw in anyway.
• Before use, inspect the chainsaw for wear and any
damage. Inspect and check the following:
− Guide bar rail for cracks and distortion.
− Condition and operation of the sprocket teeth,
drive sprocket and chain tension.
− Operation of the chain brake.
• NEVER operate the chainsaw alone in case of an
emergency. Have an assistant in visual/
communication range.
• Ensure the work area is assessed for potential risks
and bystanders are kept at a safe working distance.
Keep bystanders at a minimum of 10M away from the
work area.
• In case of accident, ensure that emergency services
can be contacted, and adequate information is
available to facilitate an urgent recovery.
• ALWAYS carry a basic rst aid kit containing large
wound dressings.
• Check and identify any gas, water, electric, phone
services etc. particularly overhead before using the
chainsaw.
• Ensure a distance of a least twice the tree height is
observed from all obstacles and dangers.
• Tree felling must only be carried out by a single
individual and only after the danger zones and escape
routes have been identied and cleared.
• DO NOT fell trees when wind conditions may
inuence/control the direction.
• Close observation and inspection of dead or diseased
wood and insecure limbs and branches must be
carried out prior to any cutting. Dead wood can cause
unexpected reactions during felling.
• Remove any scrub or other obstructions from the area
to enable a quick escape and ensure visibility of the
chain is not impeded during cutting.
• If working is being carried out due to wind damage,
ensure no unstable trees or limbs pose any further
damage.
• NEVER stand on anything other than the ground.
• When preparing to work on the ground, e.g. cross
cutting or limbing, ensure no obstacles are hidden or
obscured from view. Contact with such an object can
result in loss of footing or kickback from the chainsaw.
• ALWAYS maintain the chainsaw in good working
order and regularly serviced by an authorised service
agent. Only use replacement parts recommended
by Draper Tools.
4.2 Specic Health and Safety for Saw
Operation
• DO NOT operate the chainsaw without being
completely familiar with all the safety aspects,
functions and how to stop the chainsaw in an
emergency.
• DO NOT operate the chainsaw above shoulder height.
WARNING! DANGER OF DEATH! Chainsaws pose a
signicant health and safety risk, even to careful and
informed operators. The dangers of using and
applying a chainsaw should not be taken lightly. Seek
guidance, training or employ a professional to carry
out the task if uncertain or nervous of the potential
risk and dangers involved.
*Draper Tools recommends using an additive or stabiliser
with E10 petrol so the fuel can be safely stored in the fuel
tank for longer.
– 6 –
4. Health and Safety Information
EN
• Regularly clear the cut material as it builds up to
prevent a hazard under foot.
• NEVER use the chainsaw if the stop switch is faulty
or not functional.
• Ensure the chain does not rotate when the saw is
idle.
• NEVER operate the chainsaw with a maladjusted or
blunt chain as this is highly dangerous.
• Prior to each use inspect the chainsaw for damage.
Ensure all safety features and mechanisms especially
the chain brake is functioning correctly and that the
cutting means is of the type and design as specied
by the manufacturer.
• Adopt a secure and balance stance and hold the saw
close into your body for balance.
• Maintain a good grip with both hands on the saw. The
chainsaw is designed for operation only of the rear
handle by the right hand and the front handle by the
left hand. Grip the front handle with the left thumb
underneath to allow resistance in case of kickback.
• ALWAYS stop the chainsaw before setting it aside.
• DO NOT set a hot chainsaw down on or near easily
combustible materials e.g. dry leaves or grass.
• Only begin cutting with throttle at maximum speed.
• Operate the chain brake before moving with the saw.
If moving more than a short distance stop the saw and
ret the bar guard.
• DO NOT attempt to use the chainsaw if tired, ill or
under the inuence of alcohol or other drugs.
WARNING! DO NOT touch the hot engine parts,
in particularly the exhaust muer during and
after use.
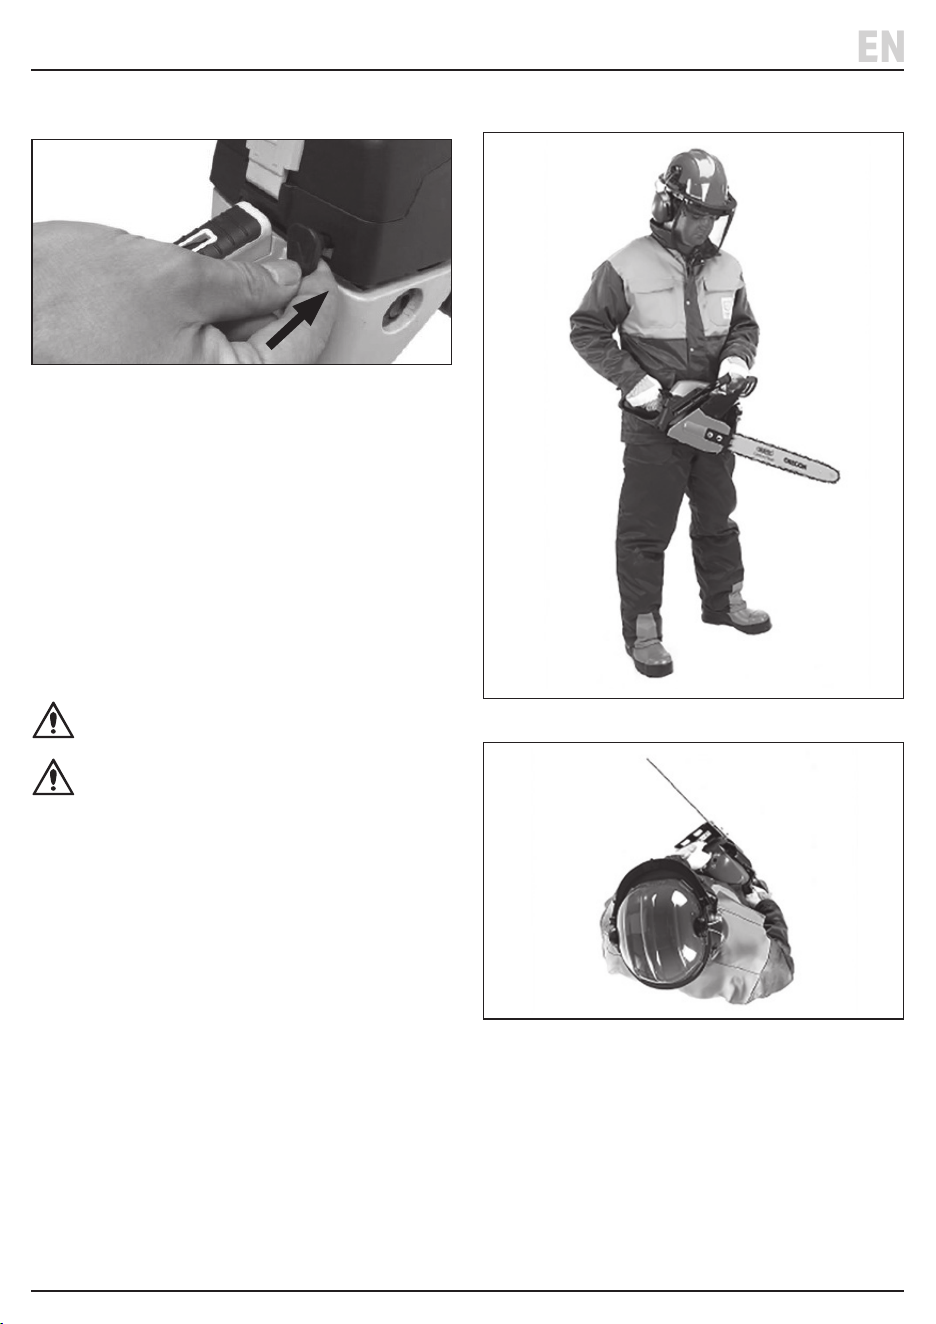
4.3 Personal Protective Equipment (PPE)
• ALWAYS wear appropriate Personal Protective
Equipment (PPE) specically designed for use with a
chainsaw as follows: Safety helmet (BS EN397 or BS
EN 14052) with mesh visor (BS EN ISO 16321-3) to
protect against falling or thrown debris.
• Hearing protection (BS EN 352) – ear defenders to
protect against the high level of noise generated.
• Gloves (BS EN ISO 11393-4) with protective guard on
back of left hand to defend against chain whip in the
event of a breakage.
• Leg protection (BS EN ISO 11393-2) with a chain
clogging material designed to stop the chain before it
penetrates fully through and into the esh.
• Non-slip foot protection (BS EN ISO 20345 or BS EN
ISO 17249) – safety boots with a good non slip tread
incorporating protection to toes and shins.
• High visibility close tting jacket.
• Gloves, boots and leg protection should be
marked with the symbol (shown) and
indicate the chain speed to which they
have been tested.
• Due to the nature and ferocity of a petrol driven
chainsaw, no PPE can provide 100% protection
against chainsaw cuts.
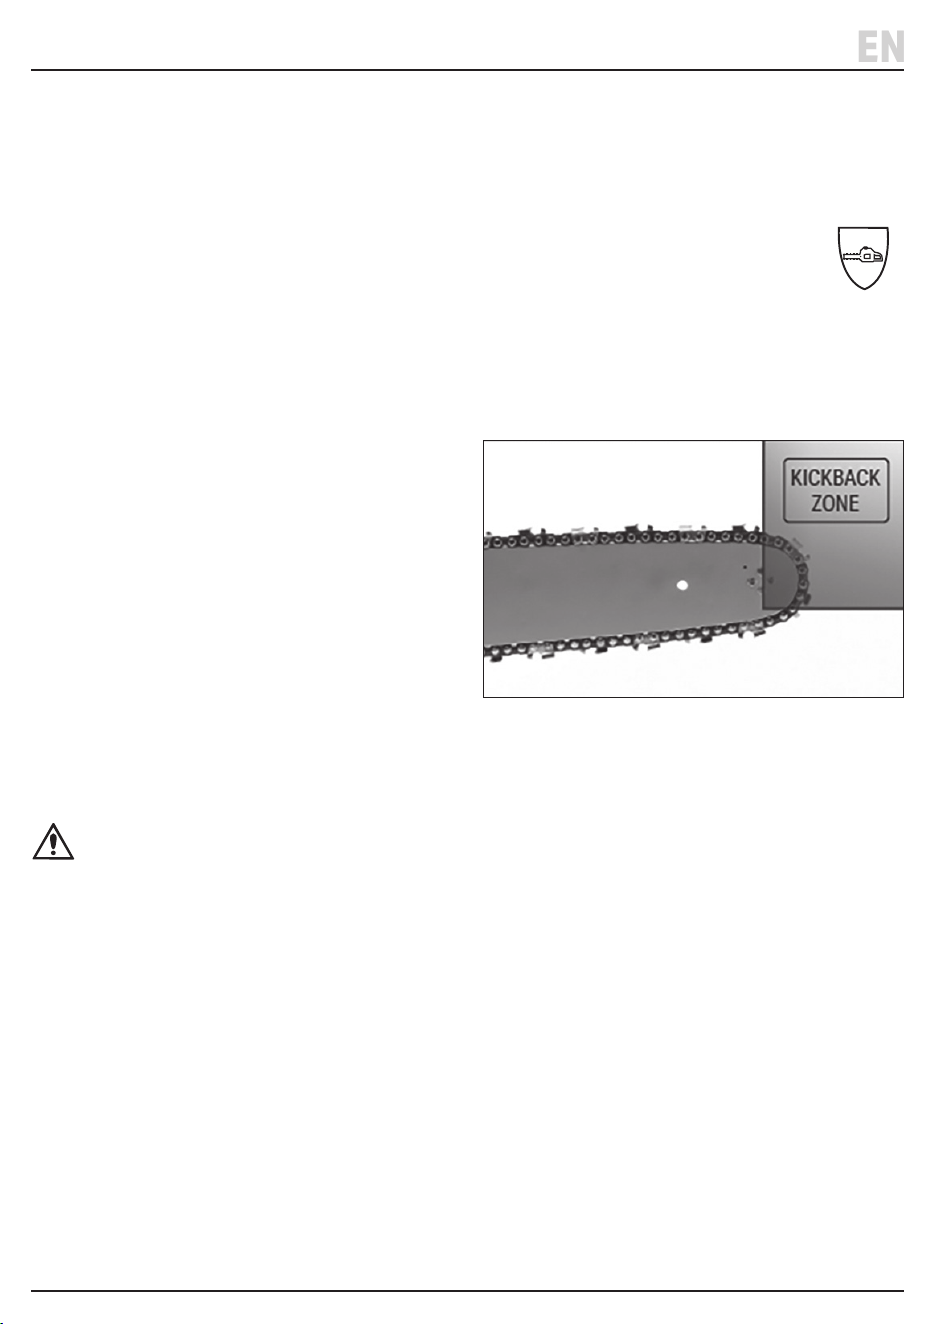
4.4 Kickback and Pull Away Risks (Fig.A)
• Kickback occurs when the chainsaw is stopped
suddenly, resulting in the tip or the guide bar being
violently thrown up towards the operator’s head/face.
Correct stance and knowledge of the operating
procedure can greatly reduce the risk.
• Kickback is the most common hazard associated with
chainsaws and can result in serious injuries, and even
fatalities.
• This chainsaw model is tted with an inertia activated
chain brake and a manually triggered chain brake. In
the event of a strong kickback, inertia generated will
release the brake lever and trigger the chain brake.
• In the event of a less severe kickback, the chain brake
lever will activate on the operator’s left hand side,
hence the necessity to operate two handed.
• To avoid kickbacks occurring, DO NOT use the tip of
the guide bar and take note of foreign objects and
other branches/limbs close to the cutting areas.
− ALWAYS make the initial cut on the tension
surface of the timber and use non metal spread
wedges to avoid the timber pinching the chain.
Fig.A

– 7 –
4. Health and Safety Information
EN
− Start cutting at full speed and ensure the body of
the saw and spiked bumper are against the timber.
− Cut only one piece of timber at a time and assess
the tension is correct.
− Use of a low kickback saw chain is advised to
reduce the chance of kickback occurring.
• DO NOT cut above shoulder height.
• Type of Kickback Risks/Dangers:
− If the chain becomes pinched or snags in the
kickback zone of the guide bar this can result in
chain movement in the opposing direction on the
guide bar.
− If the chain along the top of the guide bar
becomes pinched this can result in the chainsaw
being force backwards through the guide bar and
forced horizontally back towards the user.
• As well as kickback there is also a risk of the chainsaw
pulling away due to the chain pinching along the
bottom of the guide bar as it returns to the power
head. This can result in the chainsaw being pulled
from the operator’s hands.
• Additional to kickback, there is a risk of skating or
bouncing which can lead to a loss of control if the
initial incision moves sideways along the timber.
4.5 Health & Safety Information for the
use of Fuels
WARNING! During use, parts of this product
become hot enough to ignite some materials.
• DO NOT touch the engine or exhaust during or
immediately after use and allow it to cool before
refuelling.
• NEVER remove the fuel cap while the engine is
running or immediately after use.
− Take care when opening the fuel cap after use as
hot vapour may be released from the opening.
• NEVER place objects on the engine while it is in use
and keep all air vents clear of dust, dirt and other
obstructions.
• Faulty exhausts must be replaced.
• NEVER store the machine with fuel in the tank inside
any structure where petrol fumes could reach an open
ame or spark.
• To reduce the risk of re, keep the engine, exhaust
and petrol storage area free from vegetation and
excessive grease.
WARNING! Petrol is highly ammable:
− Store fuel in containers specically designed for
this purpose.
− NEVER use this product in environments where
there is a risk of explosion.
− NEVER smoke in the vicinity of the machine.
− Refuel outdoors only and do not smoke while
refuelling.
− Add fuel before starting the engine; never remove
the cap of the fuel tank or add petrol while the
engine is running or when the engine is hot.
− NEVER start the engine if you can smell petrol
vapour in the air.
− If petrol is spilled, DO NOT attempt to start the
engine but move the machine away from the area
of spillage and avoid creating any source of
ignition until petrol vapours have dissipated.
− Replace all fuel tank and container caps securely.
Important: E10 petrol is hygroscopic and attracts
moisture. It is recommended to use an additive or
stabiliser with E10 petrol to extend the period that it can
be safely stored in the fuel tank. ALWAYS read the label
of any additive or stabiliser applied.
WARNING! The machine exhaust emits toxic
carbon monoxide: a colourless, odourless gas.
− Breathing exhaust fumes can cause loss of
consciousness, permanent respiratory damage
and eventually death. ONLY operate this machine
in a well-ventilated outdoor environment, well
away from windows and doors. If you inhale
carbon monoxide, move to a ventilated area and
seek immediate medical attention.
4.6 Residual Risk
The safety instructions in this manual cannot account
for all possible conditions and situations that may occur.
Exercise common sense and caution when using this
product and protect against any additional
conceivable risks.

– 8 –
5. Identication and Unpacking
5.1 Product Overview
(1) Bar/Chain cover
(2) Guide bar
(3) Chain
(4) Chain brake level(front handle guard)
(5) Front handle
(6) Recoil starter handle
(7) Air lter cover
(8) Air lter cover clip
(9) Choke lever
(10) Throttle safety lever
(11) Rear handle
(12) Throttle trigger
(13) Rear handle guard/foot plate
(14) On/Stop switch
(15) Fuel tank window
(16) Fuel tank cap
(17) Carburettor set screw (idle speed adjuster)
(18) Chain oil tank cap
(19) Guide bar locking nuts
(20) Clutch cover
(21) Chain tension adjuster screw
(22) Front handle damping
EN
(16)(18) (17)
(15) (14) (13)
(1)
(12)
(2)
(3)
(4)
(5)
(6)
(7)
(10)
(8)
(9)
(11)
(20) (19)
(21)
(22)
– 9 –
5. Identication and Unpacking
(23) Exhaust
(24) Spiked bumper
(25) Chain catcher
(26) Sprocket
(27) Clutch
(28) Chain tension adjuster pin
(29) Fuel primer bulb
(30) Combination box spanner (13mm & 19mm)
storage
(31) Cutting edge
(32) Depth gauge
(33) Drive link
(34) Direction of rotation arrow
EN
(27) (26)
(23)
(24)
(25)
(28)
(30)
(29)
(33)
(34)
(31) (32)
5. Identication and Unpacking
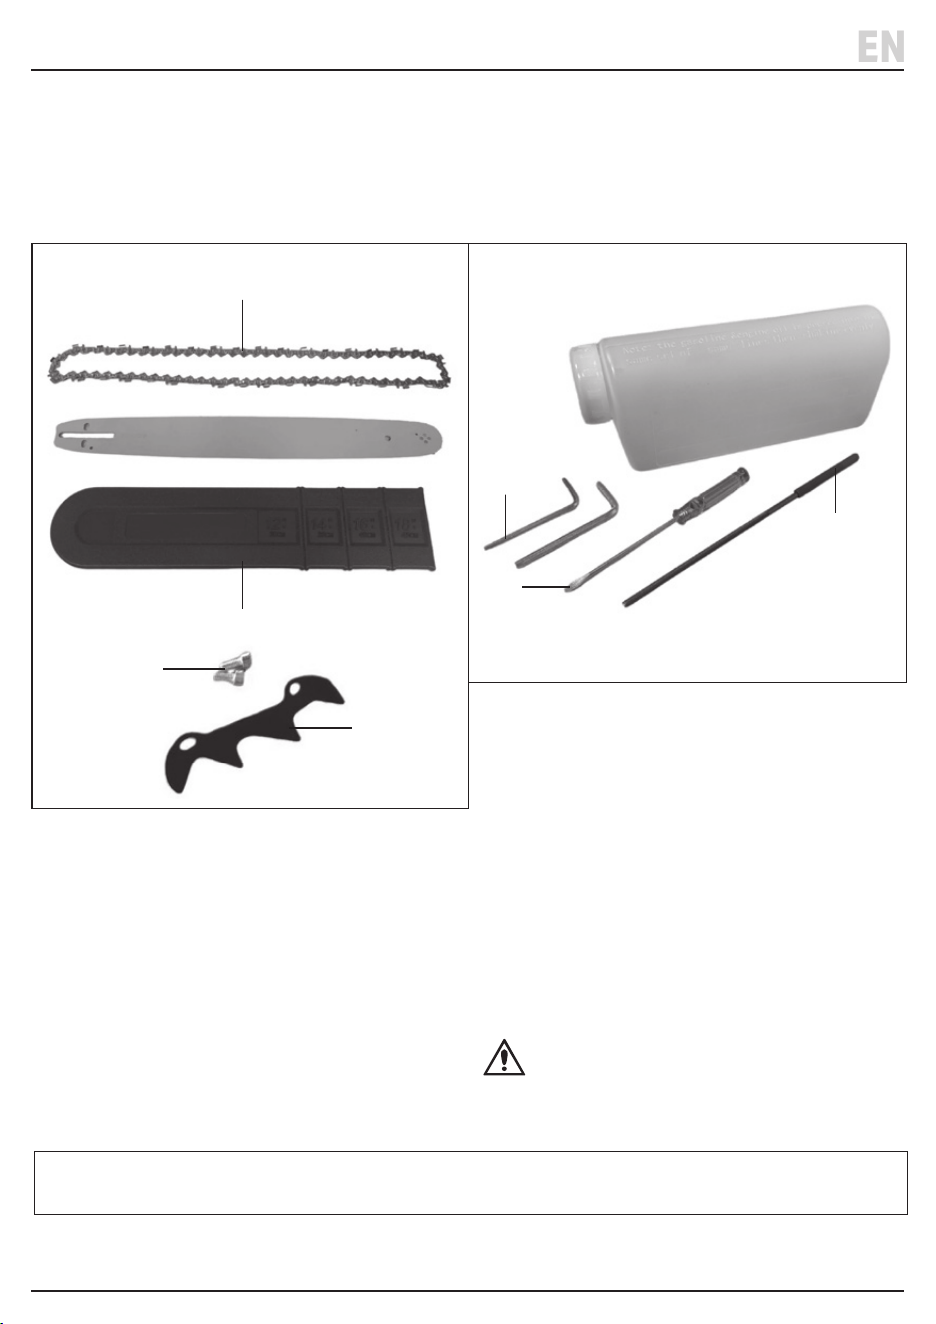
5.2 What’s in the Box?
Carefully remove the product from the packaging and
examine it for any signs of damage that may have occurred
during shipment. Before assembling the product, lay the
contents out and check them against the parts shown
below. If any part is damaged or missing, do not attempt to
use the product. Please contact the Draper Helpline;
contact details can be found at the back of this manual.
5.3 Packaging
Keep the product packaging for the duration of the
warranty period in case the product needs to be returned
for repair.
WARNING! Keep packaging materials out of
reach of children. Dispose of packaging
correctly and responsibly and in accordance
with local regulations.
EN
(1) Bar/Chain cover
(2) Guide bar
(3) Chain
(24) Spiked bumper
(24.1) 2 X M8 Bolts
(35) 1 X Mixing bottle
(36) 2 X Hex keys (3mm & 4mm)
(37) Plain slot screwdriver
(38) Chain le
Please visit drapertools.com for our full range of accessories and consumables.
– 10 –
(3)
(1)
(2)
(35)
(36)
(37)
(38)
(24.1)
(24)
– 11 –
6. Assembly Instructions
EN
Important: Before preparing or adjusting this product,
read and understand all the safety instructions listed in
this manual.
WARNING! DO NOT start the chainsaw before
mounting and correctly adjusting the guide bar
(2) and chain (3).
Attention: The saw chain is extremely sharp
– ALWAYS wear gloves when handling.
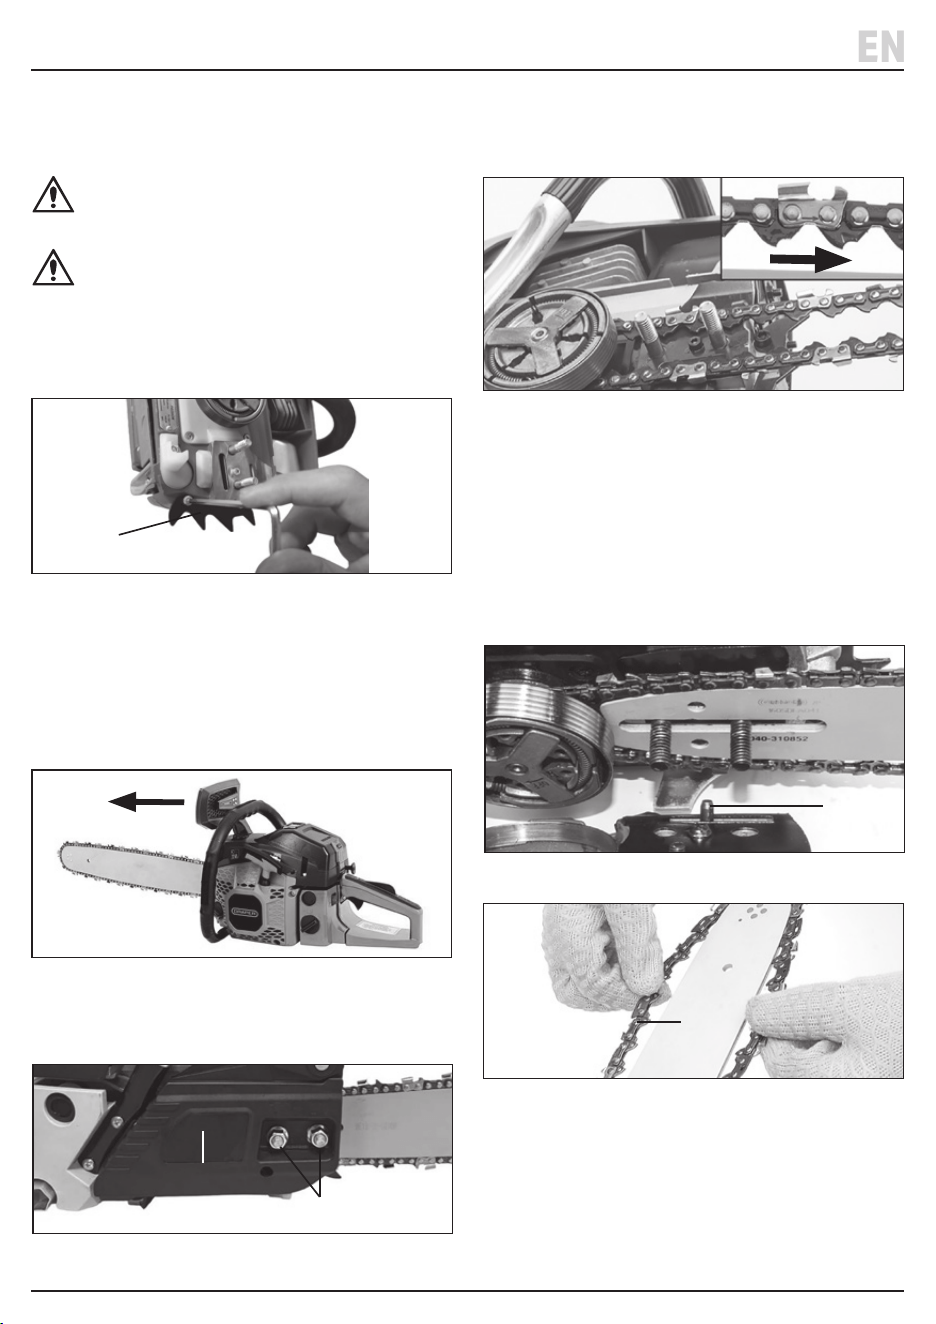
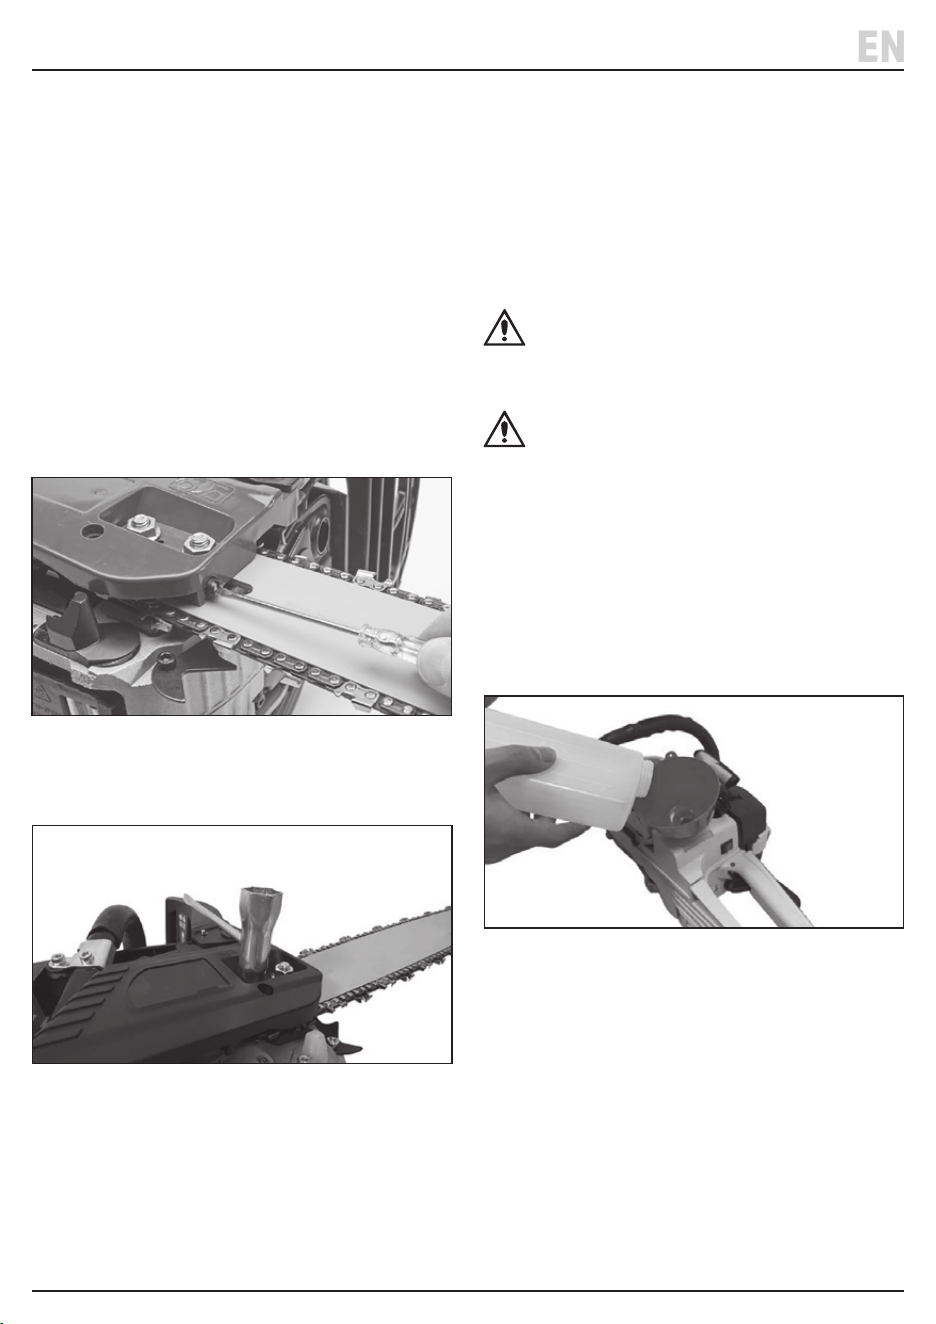
6.1 Fitting the Spiked Bumper (Fig.1)
1. Fit the spiked bumper (24 )to the chainsaw using the
two M8 bolts. Secure using the hex key supplied.
6.2 Attaching/Adjusting Guide Bar and
Chain Assembly (Fig.2 – Fig.8)
1. Position the chainsaw, ensuring the chain brake is
disengaged. (Fig.2).
• To disengage, push the chain brake level (4) forward.
2. Use a spanner to remove the two guide bar locking
nuts (19). Then remove the clutch cover (20). (Fig. 3)
3. Wrap the chain around the sprocket (26). Check the
markings on the chain, body and guide bar to ensure
the chain is pointing in the correct direction. (Fig 4).
4. Install the guide bar (2) and slide fully towards the
sprocket (26). Loosely wrap the chain around the guide
bar ensuring the chain sits within the groove around
the edge of the guide bar. (Fig.5).
5. Postion the guide bar (2) on to the bar locking threads
(2.1), then locate the chain tension adjuster pin (28) into
the aperture on the guide bar. To ease tting the tension
pin location may need pre-adjusting prior to tting.
6. Ret the clutch cover (20) and fasten using the
locking nuts.
7. Slot all the drive links (33) into the guide bar groove.
Mesh the drive links at the tip of the bar correctly
Fig.6
Fig.3
Fig.5
(2.1) (2.1)
(28)
(33)
(2)
Fig.2
Fig.1
Fig.4
(4)
(20)
(19)
(24)
(26)
6. Assembly Instructions
EN
round into the nose sprocket teeth. Slide the guide bar
away from the bar head to put tension on the saw chain
(Fig.6).
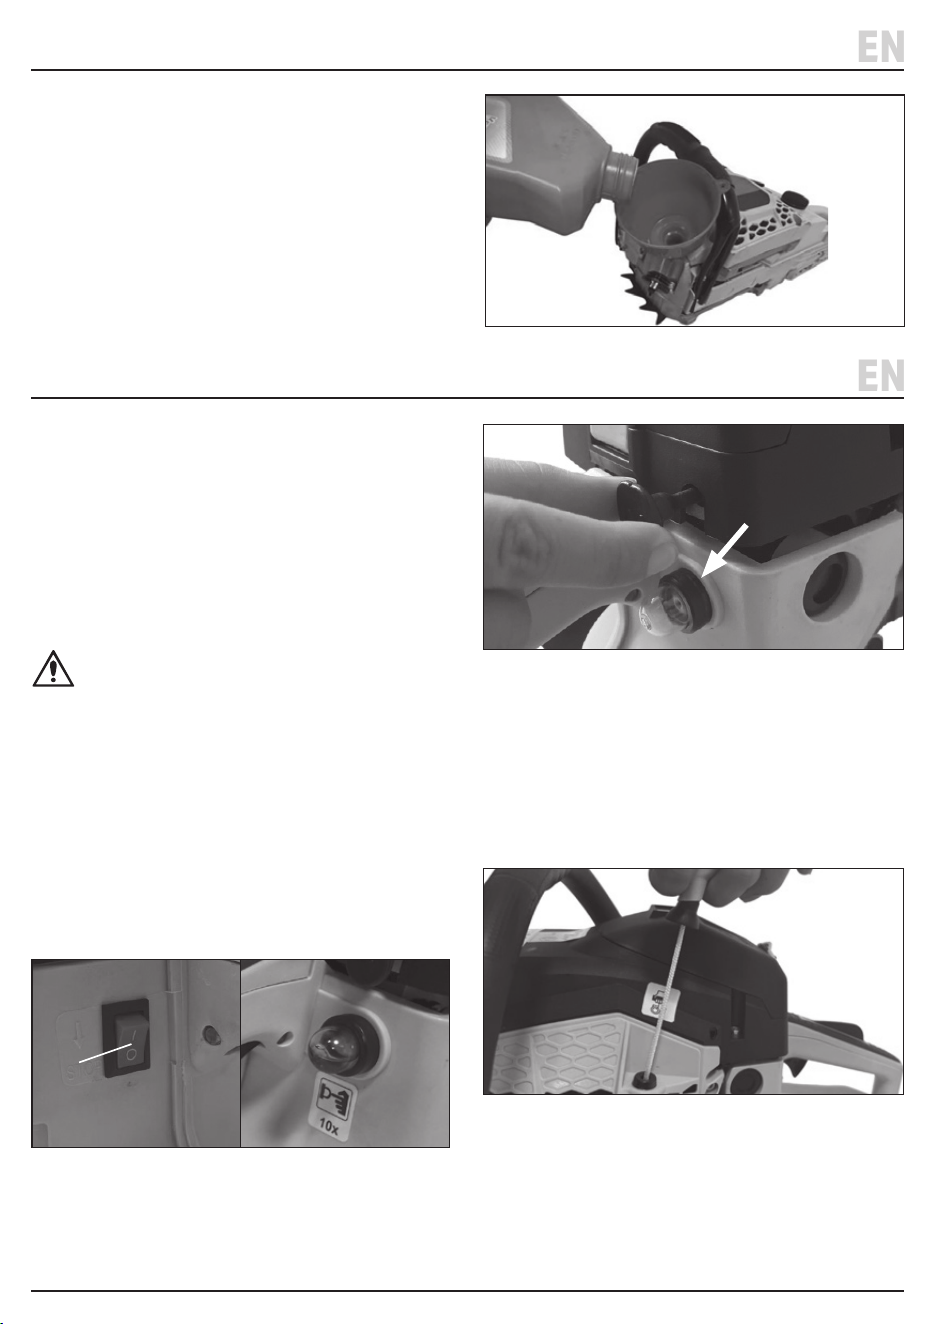
8. Use the screwdriver (37) to turn the chain tension adjuster
pin (28) until the saw chain (3) is tight around the guide
bar (2). After adjusting the tension, it should be possible to
lift the saw chain (3) 3-4mm from the guide bar (2).
9. For initial tension and before retting the clutch cover,
use the screwdriver (37), to tighten the chain tension
adjuster screw (21) clockwise. Ensure the chain and
guide bar do not come apart while tting the clutch
cover. Also ensure the drive links have not separated
from the sprockets.
10. Tighten the clutch cover nuts by hand only at this time,
to allow further chain tensioning and adjustment.
11. Fasten the xing nuts using a box spanner (Fig.8).
6.3 Fuelling and Lubrication (Fig.9 – Fig.10)
This chainsaw is equipped with a two-stroke air cooled
petrol engine and requires a mixture of fuel and oil to
perform and function correctly.
Important: Failure to use the correct oil, fuel and mix
ratio will cause permanent damage to the engine. Only
use fresh, clean, good quality unleaded fuel with a high
quality two-stroke oil.
CAUTION! This machine is shipped WITHOUT
fuel. Check the fuel level before EVERY use and
top up as appropriate. NEVER attempt to run the
engine on an empty fuel tank.
WARNING! ALWAYS fuel the machine in a
well-ventilated area away from sources of
ignition. Store fuel only for short periods, away
from direct sunlight and heat sources, and only in
containers specically designed for that
purpose. Avoid prolonged contact with the skin
and inhalation of petrol vapour.
• A mix ratio of 40:1 must be used. To mix a ratio of 40:1
add 25ml of 2 stroke oil into 1 litre of unleaded fuel.
1. Pour the petrol/oil mix into the mixing bottle (35)
supplied, replace the cap and shake gently.
• Note: the mixing bottle supplied is not suitable for
storing or transporting the petrol/oil mix.
2. Remove the fuel tank cap (16) by turning clockwise.
With the aid of a funnel pour the mix into the fuel tank.
Replace the cap rmly. DO NOT overll and avoid
spilling the mix.
Fig.7
Fig.8
Fig.9
Adding petrol/oil mix
– 12 –
(35)
(21)
– 13 –
7. Operating Instructions
EN
Important: Before operating this product, read and
understand all the safety instructions listed in this
manual. Ensure that the product is fully assembled,
correctly prepared for use and you are wearing the
correct PPE.
Important: When rst operating a chainsaw stop and
check the tension after a few minutes work (Engine
stopped and blade brake applied). This is necessary to
allow an initial stretch to be taken up in the chain links.
WARNING! A loose saw chain is dangerous and
could result in a serious accident.
7.1 Starting the Chainsaw (Fig.11 – Fig.15)
1. Place the chainsaw where it cannot come into contact
with any objects. Then engage the chain brake (4).
2. Move the On/Stop switch (14) to ‘I’/ON position.
3. Press the fuel primer (29) approximately ve times or
until the bulb is lled with fuel (Fig.12).
Note: Warm Start - only press the primer if the fuel is
relled.
4. Pull out the choke fully (9). (Fig.13)
5. Hold the chainsaw securely to the ground. Place your
left hand on the front handle (5) and place your right
foot on the foot plate (13) to secure.
6. Pull the recoil starter handle (6) slowly with your right
hand until you feel resistance and then pull using short
sharp movements for a maximum of four times. (Fig.14).
Fig.11
Fig.14
Fig.13
6. Assembly Instructions
EN
Adding Chainsaw Oil
3. Using oil specically designed for lubricating
chainsaws, remove the chain oil tank cap (18) by
turning anticlockwise.
4. With the aid of a funnel pour the lubricant into the tank
and replace cap rmly.
• Wipe o any spilt oil immediately.
Fig.10
Adding lubricating
chainsaw oil
Fig.12
(9)
(29)
(6)
(14)
– 14 –
7. Operating Instructions
7. Push the choke lever (9) in fully. (Fig.15).
8. Pull the recoil starter handle (6) briskly and strongly.
Repeat until the engine starts.
9. Squeeze the throttle safety lever (10) and throttle
trigger (12) together, then release them.
10. Allow the chainsaw to idle for one to two minutes to
allow it to warm up.
11. Disengage the chain brake (4).
12. To start cutting, grip with both hands, left hand
holding the front handle (5) and the right hand holding
the rear handle (11).
CAUTION! chain will start rotating as the
throttle is operated.
WARNING! The chain will continue to move for a
period after the throttle has been released.
7.2 Stopping the Chainsaw
Note: If the chainsaw has been running at full speed for a
prolonged period allow the saw to idle for a few minutes
before stopping the engine.
ALWAYS switch o the engine when refuelling, topping
up the chain oil, moving, cleaning or carrying out any
checks or adjustments.
1. Release the throttle trigger (12) and let the chainsaw
idle for a while.
2. Engage the chain brake (4).
3. Move the ‘Stop’ switch (14) to the ‘O/OFF’ position.
7.3 Holding the Chainsaw (Fig.16 – Fig.17)
1. Hold the chainsaw power head close into the body. In
this position the weight of the saw will be easier to
manage and in the event of a kickback will be more
controllable.
2. Firmly grip the rear handle pulling the power head
tight into the hip/thigh area.
EN
Fig.15
Fig.16
Fig.17

– 15 –
7. Operating Instructions
EN
3. With the left hand grip the front handle with thumb
on the underside. In this position with the body
turned slightly towards the saw, if a kickback occurs
the left arm will be stronger to brace against the force
of the kickback.
4. Work at hip height or bend the knees instead of the
back. This will be more comfortable and a safer stance
to adopt.
7.4 Chain Brake
• Before starting any cutting, manually check the chain
brake lever (4) moves backwards and forward correctly.
Check with the saw pre-warmed and ticking over.
• If the chain brake is not functioning correctly switch
o the engine immediately.
• DO NOT attempt to operate the chainsaw until the
issue has been resolved and the safety device is
operational.
• A worn brake mechanism is dangerous, so have it
checked by an authorised service agent regularly.
7.5 Basic Cutting
• Refer to the Health and Safety section before carrying
out any cutting operations.
• Ensure that the recommended checks have been
carried out and the correct PPE is available and worn.
• Immediately after any cutting operation release the
throttle and return the chainsaw to idle.
• DO NOT force the chain to cut, allow it to cut at its
own pace.
• The chainsaw is for cutting timber only.
• DO NOT allow the chain to come in contact with the
ground as soil and dirt will dull the chain quickly. Hard
wood will also rapidly dull the chain.
• When the chain is sharpened correctly, the cutting
yield will be high and there should be no abnormal
wear on the mechanical parts of the bar.
• Stop the chainsaw and clear the cut debris at
regularly intervals to maintain a rm footing.
– 16 –
7. Operating Instructions
EN
7.6 Felling (Fig.18 – Fig.20)
• ALWAYS seek advice from the local authority prior to
cutting down any trees as regulations, laws and
protection orders may aect or prohibit the work
involved.
• NEVER leave a partially felled or hung tree. In the
event of the tree becoming hung in another tree or
obstacle seek assistance from a professional.
• Ensure there is sucient fuel to safely complete the
felling cut.
• To fell a tree safely many factors need considering:
− Establish a safe perimeter at least 2½ times the
height of the tree.
− Place warnings of the activity taking place and
prevent bystanders from entering the area.
− The direction of the falling tree can be inuenced
but not guaranteed.
− Roads, footpaths and services such as overhead
power cables all present problems which need to
be addressed before commencing the work. If
unable to resolve these issues, have the work
carried out by a trained professional.
− The direction of fall can be changed by factors
such as the wind, sloping terrain, tree growth
(leaning, limb structure and decay) etc. Failure to
observe or account for these factors can result in
serve injury or fatality.
− Plan an escape route and ensure all scrub and
debris are cleared so that you can move quickly to
safety if the felling direction unexpectedly changes.
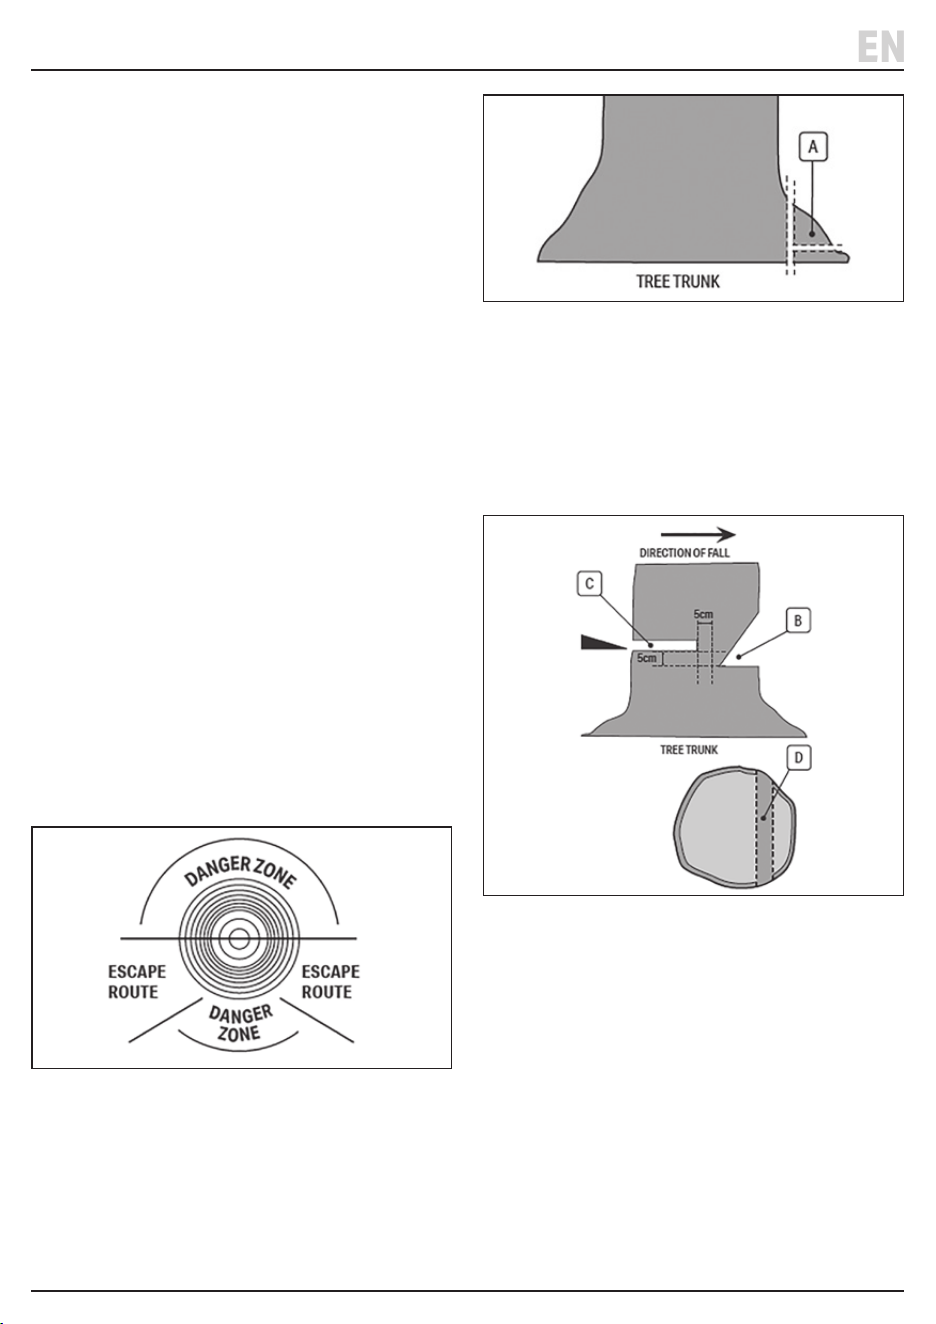
• Remove the lower tree branches/limbs up to shoulder
height. To protect against kickbacks use the tree
trunk/stem for protection and keep the guide bar
oset from the body.
• If the tree has large buttress roots (A) remove these to
enable the direction notch (B) to be cut as close to the
ground as possible.
• The direction notch (B) should be started 45° down
into approximately 1⁄3 of the tree’s diameter. Cut the
bottom of the notch at 90° and remove the wedge.
• On the opposite side and 5cm higher than the bottom
of the notch, make the felling cut ( C) at 90°. Make the
cut in one go and stop 5cm from the back of the
notch. This creates the hinge (D) to help control the
felling. The hinge must be parallel.
− Use the spiked bumper (24) to obtain a rm grip
and leverage while cutting.
− Wedges should be used to prevent the saw being
pinched and to complete the fell safely.
• For safety when the tree starts to fall move back and
away at 45° as quickly as possible. Branches on the
underside of the tree can cause the trunk/stem to
move sideways or backwards.
Fig.20
Fig.18
Fig.19
– 17 –
7. Operating Instructions
EN
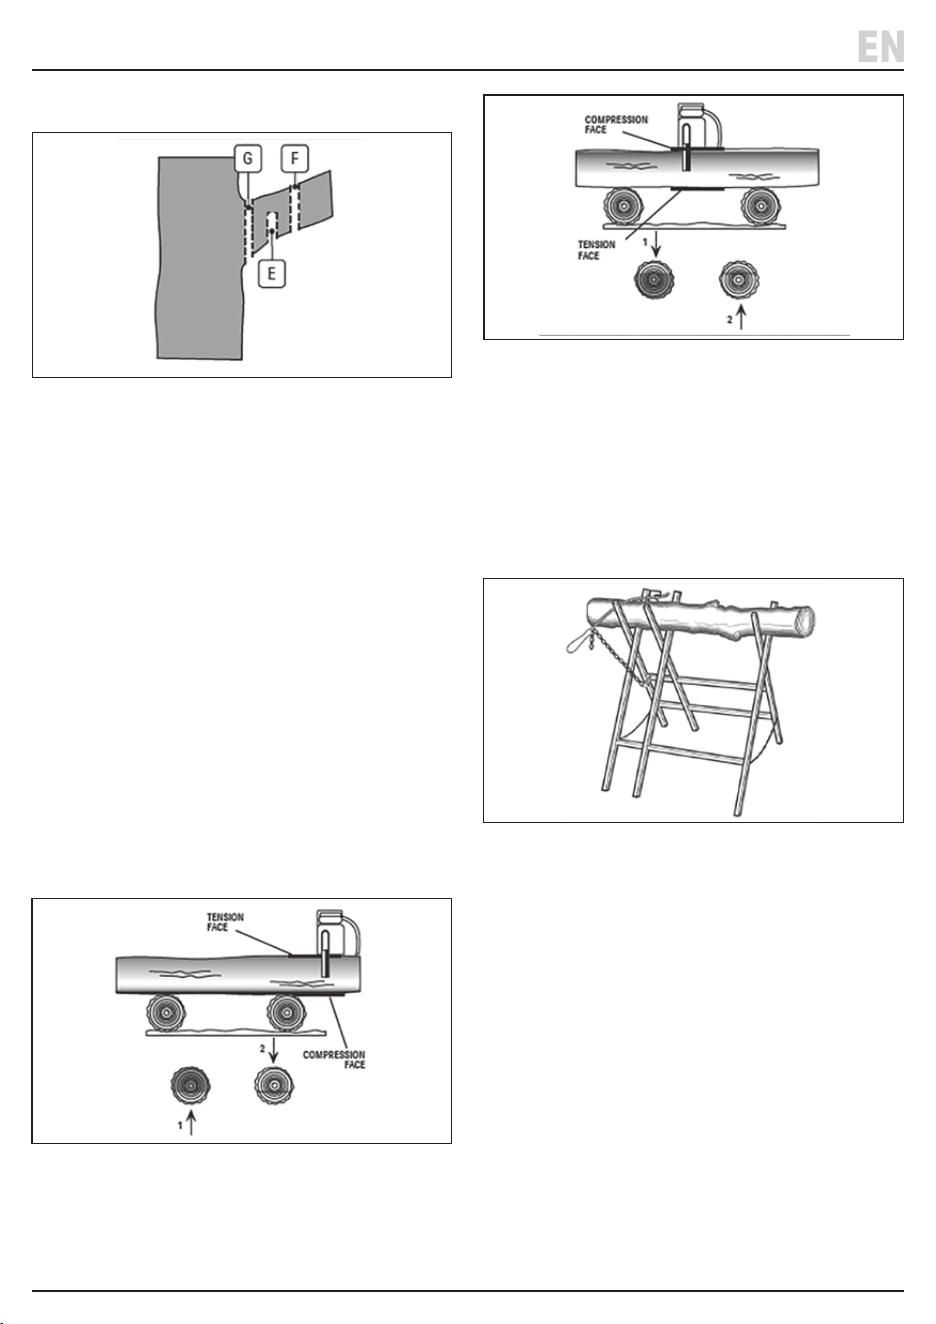
7.7 Delimbing (Fig.21)
• Ensure the tree is stable before work commences.
• Ideal work height is between waist and knee height.
• If the felled tree is on a slope always stay above the
tree in case the removal of the limb causes dangerous
movement.
• When removing smaller branches with a single cut
keep the tree between you and the chain.
• For larger limbs make three cuts.
− Use the top of the guide bar for the initial cut (E )
1⁄3 through the tensioned underside of the limb.
− Make the second cut (F) all the way through using
the underside of the guide bar.
− The third cut (G) is to leave a neat collar and only
necessary if the tree is not being felled.
• On a felled tree always work from butt/roots to tip with
the tree on your right side. Always keep the trunk
between you and the guide bar.
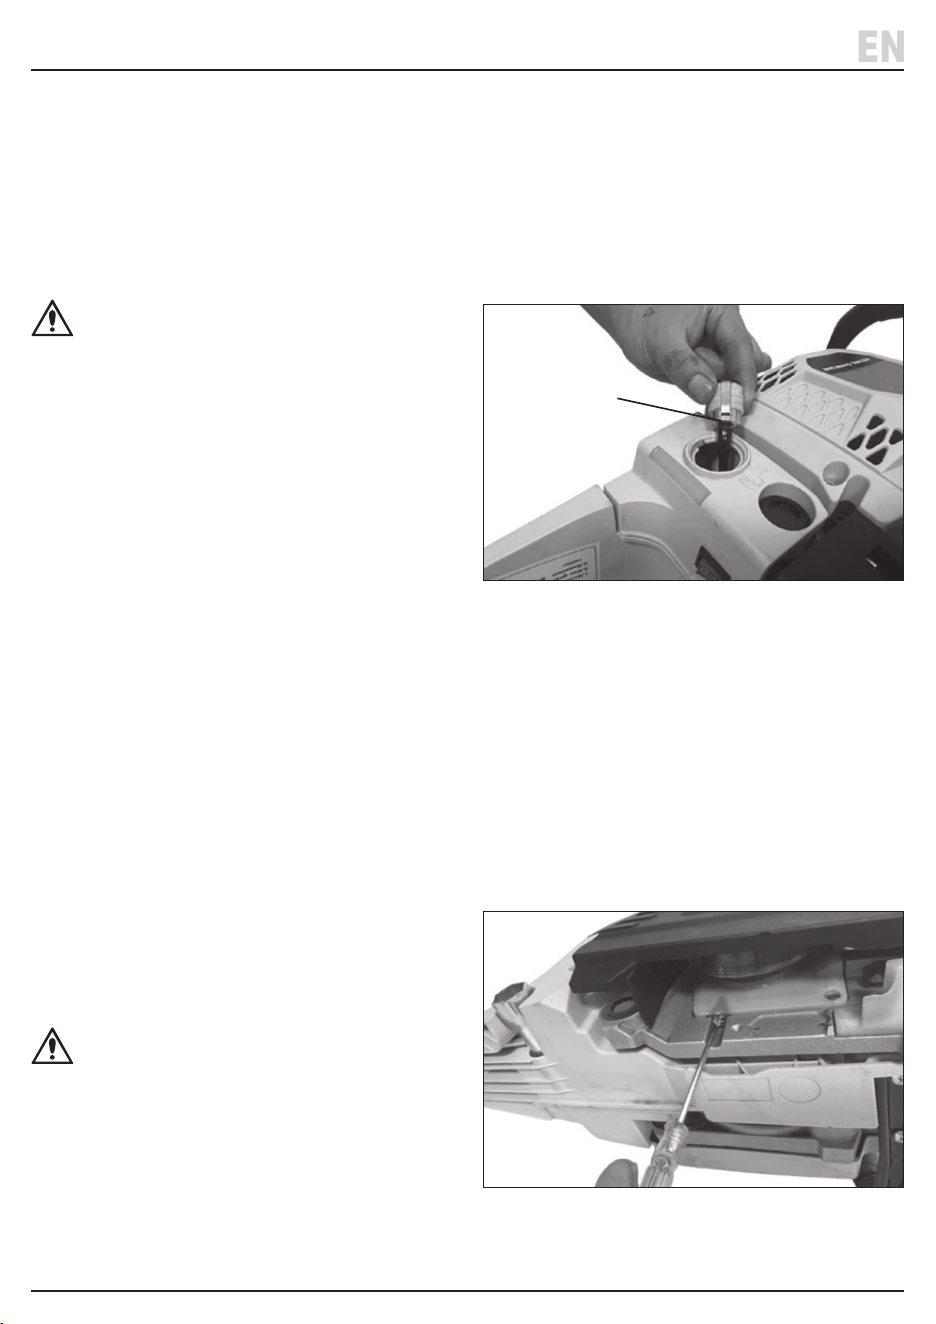
7.8 Cross Cutting/Bucking (Fig.22 – Fig.24)
• When cross cutting the compression face must always
be cut rst followed by a second cut from the other
side to meet and complete the cut. The initial cut
should be 1 ⁄ 3 the diameter and the second cut 2 ⁄ 3.
• Incorrectly assessing the tension can result in the
chain pinching or the timber splintering.
• ALWAYS use a log saw stand/horse for smaller logs.
Secure smaller logs before cutting as the chain speed
can cause the log to move and kick up.
• Use the spiked bumper (24) to achieve a rm grip and
leverage while cutting.
Fig.21
Fig.22
Fig.23
Fig.24
– 18 –
8. Maintenance and Troubleshooting
Important: Always stop the engine, engage the chain
brake and allow to cool down before carrying out any
maintenance, cleaning or adjustments to the
chainsaw.
DO NOT carry out any repairs to this chainsaw unless
you are qualied to do so, apart from the items listed in
this section. Have damaged parts replaced by an
authorised service agent before using this product.
DANGER! DO NOT make any changes or
modications to this chainsaw. In case of
repairs use replacement spare parts
recommended by Draper Tools.
8.1 General Maintenance
• ALWAYS stop the engine and allow to cool down before
cleaning, transporting or storing the chain saw.
• Maintain the chainsaw in good working order and
regularly serviced by an authorised service agent.
Ensure the handle remain clean and free from oil, fuel
and moisture.
• Regularly check external nuts and xings to ensure
vibrations during normal operation has not loosen them.
• Clean the plastic surfaces after each use with a mild
detergent and sponge. DO NOT use aggressive
cleaning agents.
• Periodically remove any shavings or sawdust from the
visible parts of the chain mechanism.
• Store the chainsaw in a safe, dry area out of the reach
of children.
8.2 Draining the fuel
Important: Fuel should be stored in the tank for no more
than four weeks. Drain the fuel from the machine before
storage, particularly if the machine will be stored for long
periods.
Important: Read all the Health and Safety guidance for
the use of petrol as a fuel before lling or draining this
product.
WARNING! NEVER drain the fuel tank indoors.
• To avoid engine problems, empty the fuel tank if
storing for longer than 30days. NEVER use engine or
carburettor cleaning products in the fuel tank as this
could cause permanent damage.
• DO NOT store the chainsaw or fuel in an enclosed
area where fuel vapours can reach sparks or ames
from switches, heaters or electric motors etc.
8.3 Fuel Filter (Fig.25)
Replace the fuel lter annually.
1. To change the fuel lter, remove the fuel tank cap (16).
2. Gently pull out the fuel lter (16.1) from the tank
using a pair of long nose pliers.
3. Replace the lter and ret fuel cap securely.
8.4 Chain Lubrication (Fig.26)
Important: Prior to use check the chain oil distribution
on a piece of paper or cut timber.
• If the chain is not suciently lubricated check the oil
tank level. If the oil level is sucient increase the oil
ow by rotating the adjuster screw (21).
• If the problem persists, stop the engine and allow to
cool. Remove any sawdust from behind the clutch
cover and clean the bar groove.
EN
Fig.25
Fig.26
(16.1)
(21)
– 19 –
8. Maintenance and Troubleshooting
8.5 Chain Sharpening (Fig.27)
Note: Sawdust instead of chips indicates that the saw
chain needs sharpening or replacing.
8.6 Carburettor Adjustment (Fig.28)
• During this process the chain will be moving. Suitable
protective equipment (PPE) must be worn.
Note: the chain MUST NOT move while the engine is
at idle speed.
• The carburetor values have been set during
manufacturer and adjustments to these values may
be required occasionally.
1. To adjust, start the engine and allow to idle.
− If the engine stalls the idle speed is too low.
− If the chain moves the idle speed is too high.
2. Use a cross-slot screwdriver to turn the adjustment
screw (17).
− Clockwise to increase the engine speed.
− Anticlockwise to decrease the engine speed.
8.7 Guide Bar Maintenance (Fig.29 – Fig.30)
1. Disassemble the guide bar (2) in reverse order from
assembly (refer to section 6.2).
2. Remove any dirt accumulated inside the guide bar (2)
slot using a putty knife (not provided).
EN
Fig.27
Fig.29
Fig.28
(17)
– 20 –
8. Maintenance and Troubleshooting
3. Check the guide bar “rail” for wear:
4. Hold a straight edge ruler against the side of the
guide bar (2) and “cutter side plates”.
− If there is a gap between the ruler and guide bar
(2) the guide bar “rail” is normal.
− If there is no gap (ruler ush against the side of
the guide bar (2)) the guide bar “rail” is worn and
needs to be replaced with a new one of the same
type (Fig.30).
8.8 Air Filter Care (Fig.31 – Fig.32)
• A clogged air lter can reduce the engine eciency,
reducing the cutting performance and increasing the
fuel consumption.
• Clean the air lter more frequently when the wood
being cut is dry or the work environment is dusty.
• Replace the lter if damaged, deformed or cracked.
1. Loosen the clip (8) and remove the top cover (7).
2. Then remove the air lter (7.1).
3. Use a screwdriver to separate the air lter into its two
parts and tap them on a stable surface to remove dust.
4. Use compressed air (max. 3 bar) to remove stubborn
dust or wash the air lter. Ensure it is dry before
retting.
5. Reassemble the lter parts and ret the air lter.
6. Ret the top cover (7) and clip securely back in place.
8.9 Spark plug (Fig.33 – Fig.34)
Inspect the spark plug every 25 used hours or before
long-term storage over 180 days. Clean or replace with a
new one if necessary.
1. Unclip and remove the top cover (7).
2. Remove the air lter (7.1).
3. Disconnect the spark plug connector.
4. Loosen the spark plug anti-clockwise using a box
spanner and remove it carefully.
5. Check the spark plug for damage or wear. Remove
any deposits from the electrode with a soft wired
brush. Avoid heavy cleaning of the electrode.
6. Dry the spark plug with a soft cloth if required.
EN
Fig.30
Fig.31
Fig.32
(8)
(7)
(7.1)

– 21 –
8. Maintenance and Troubleshooting
• If the electrodes are excessively soiled or very worn,
replace the spark plug. Excessive soiling can be due
to the incorrect ratio of oil to fuel being used.
Note:
− Ensure the spark plug has the correct heat range
for this chainsaw.
− The spark plug gap should be 0.6-0.7mm. Use
feeler gauges to check the gap is correct.
7. When replacing the spark plug, rst screw it in hand
tight and then lightly tighten it with a box spanner.
Fig.33 Fig.34
(30)
EN
Problem Possible Cause Remedy
Engine will not start/Only runs for a
few seconds.
Fuel tank empty. Fill with correct fuel/oil mixture
– See Section 6.3.
No fuel reaching carburettor. Check fuel lter – clean or replace if
required. Section 8.3. Check for
damage to fuel line.
Engine ooded. Wait a few minutes then restart.
‘Stop’ switch in ‘OFF’ position. Move switch to ‘ON’ position
Spark plug soiled or worn. Clean or replace spark plug – See
Section 8.9
Engine does not idle correctly.
Carburettor requires adjusting. Adjust carburettor – See Section 8.6
Other issues. Contact Draper Tools for advice.
Engine stutters or stalls under load.
Spark plug soiled. Clean or replace spark plug
– Section 8.9
Air lter dirty. Clean or replace lter – Section 8.8
Carburettor requires adjusting. Adjust carburettor – Section 8.6
Chain not moving or too tight.
Chain brake engaged. Disengage chain brake.
Insucient chain lubrication. Fill chain oil tank.
Excessive smoke from engine.
Too much oil mixed with
unleaded fuel.
Empty fuel tank and rell with
correct oil/fuel mixture.
Chain moves while engine at idle.
Carburettor requires adjusting. Adjust carburettor – Section 8.6
Clutch fault. Contact Draper Tools for advice.
8.10 Troubleshooting

– 22 –
For spare parts, servicing, and repair and replacement
options, please contact the Draper Tools Product
Helpline for details of your nearest authorised agent.
Draper Tools will endeavour to hold any spare parts, if
applicable, for seven years from the date that it sells the
nal matching stock item.
Any servicing or repairs carried out by unauthorised
personnel or installation of spare parts not supplied by
Draper Tools will invalidate your warranty.
Important: For safety, ALWAYS drain and clean the
product of any oil, fuel, chemicals or other substances
before returning it to Draper Tools or its authorised
agent. Store these materials in suitable containers and
dispose of them in accordance with local regulations.
Draper Tools and its agents cannot be responsible for the
disposal of these substances.
At the end of its working life, dispose of the product
responsibly and in line with local regulations. Recycle
where possible.
• DO NOT Dispose of oil separately and in accordance
with local regulations;DO NOT abandon it in the
environment.
9. Spares, Returns and Disposal
EN
This warranty covers parts and labour for 12 months
from date of purchase – visit drapertools.com/warranty
for more information.. However, if the tools are hired out,
the warranty period is 90 days from the date of purchase.
Should the tool develop a fault within the warranty
period, return the complete tool to the place of purchase
or contact Draper Tools directly. Proof of purchase must
be provided.
This warranty does not apply to any consumable parts or
normal wear and tear.
It also does not cover any damage caused by misuse,
careless or unsafe handling, modications, or repairs
carried out by any personnel other than an authorised
Draper Tools repair agent.
Please note that this guarantee is in addition to and does
not aect your statutory rights.
Draper Tools
10. Warranty
EN

– 23 –
11. Explanation of Symbols
EN
Read the instruction manual
Wear safety glasses/
face shield
Wear ear defenders
Wear suitable protective footwear.
Wear protective gloves
Do not abandon in the environment
Keep out of the reach of children
Warning!
Do not incinerate or throw onto re
European conformity
UK Conformity Assessed
Visual check
Refuelling, 95RON petrol
Filling with lubracating oil and
adjusting oil ow
The chain brake must be engaged when
the chain saw is started
Warning! Kickback may occur when the
nose or tip of the guide bar touches an
object, and cause a lightning fast reverse
reaction, kicking the guide bar up and
towards the operator. May cause serious
personal injury.
89
dB
Continuous A-weighted sound power level
Use both hands to operate the saw.
DO NOT operate with one hand.
Avoid bar nose contact.
118

© Published by Draper Tools Limited© Published by Draper Tools Limited
Contact Details
Draper Tools
Draper Tools Limited
Hursley Road
Chandler’s Ford
Eastleigh
Hampshire
SO53 1YF
UK
Website: drapertools.com
Email: [email protected]
Product Helpline: +44 (0) 23 8049 4344
Telephone Sales Desk: +44 (0) 23 8049 4333
General Enquiries: +44 (0) 23 8026 6355
Please contact the Draper Tools Product Helpline for repair and servicing enquiries.
Draper Tools Europe B.V.
Oude Graaf 8
6002 NL
Weert
Netherlands