Use and
Care Manual with
Installation Instructions
for built in wine cooler
HWS 1800
7082 635-01

2
IMPORTANT
All types and models are subject to continuous improvement. The manufacturer reserves the right to make
modifications in the shape, equipment and technology.
Keep these operating instructions in a safe place and pass them on to the next
owner, where applicable.
Contents Page
Safety ...................................................................................................................... 3
Please read and follow these instructions ........................................................ 3
California Proposition 65 ................................................................................... 3
Disposal of Old Appliance ................................................................................ 3
Electrical Safety ................................................................................................ 3
Important Safety Information ............................................................................ 4
Safety Regulations ............................................................................................ 4
Safety Instructions and Warnings ......................................................... 5
Disposal of Carton ........................................................................................... 5
Features ................................................................................................................... 6
Description of Appliance and Equipment ......................................................... 6
Fitting Dimensions ............................................................................................. 6
Installation ................................................................................................................ 7
Reversing Door Hinges ..................................................................................... 7
Installing in a Kitchen Unit................................................................................. 7
Operation.................................................................................................................. 8
Operating and Control Elements ...................................................................... 8
Turning the Appliance ON and OFF ................................................................. 8
Setting the Temperature .................................................................................... 8
Fan Switch ......................................................................................................... 9
Audible Warning Signal ..................................................................................... 9
Interior Light ...................................................................................................... 9
Setup Mode ................................................................................................ 10-11
Wine Cooler Compartment .................................................................................... 12
Equipment ....................................................................................................... 12
Storing Wine .................................................................................................... 12
Defrosting/Cleaning ............................................................................................... 13
Defrosting ........................................................................................................ 13
Cleaning .......................................................................................................... 13
Troubleshooting ...................................................................................................... 14
Customer Service ............................................................................................ 14
Appliance Information ..................................................................................... 14
Warranty ................................................................................................................. 15
Table of ConTenTs
2
3
safeTy
Please read and follow these
instructions
These instructions contain Warning and Caution
statements. This information is important for safe and
efficient installation and operation.
Always read and follow all Warning and Caution
statements!
DANGER
Danger indicates a hazard which
will cause serious injury or death if
precautions are not followed.
WARNING
Warning indicates a potentially hazardous
situation which, if not avoided, could
result in death or serious injury.
CAUTION
Caution indicates a potentially hazardous
situation which, if not avoided, may result
in minor or moderate injury.
IMPORTANT
This highlights information that is especially
relevant to a problem-free installation and
operation.
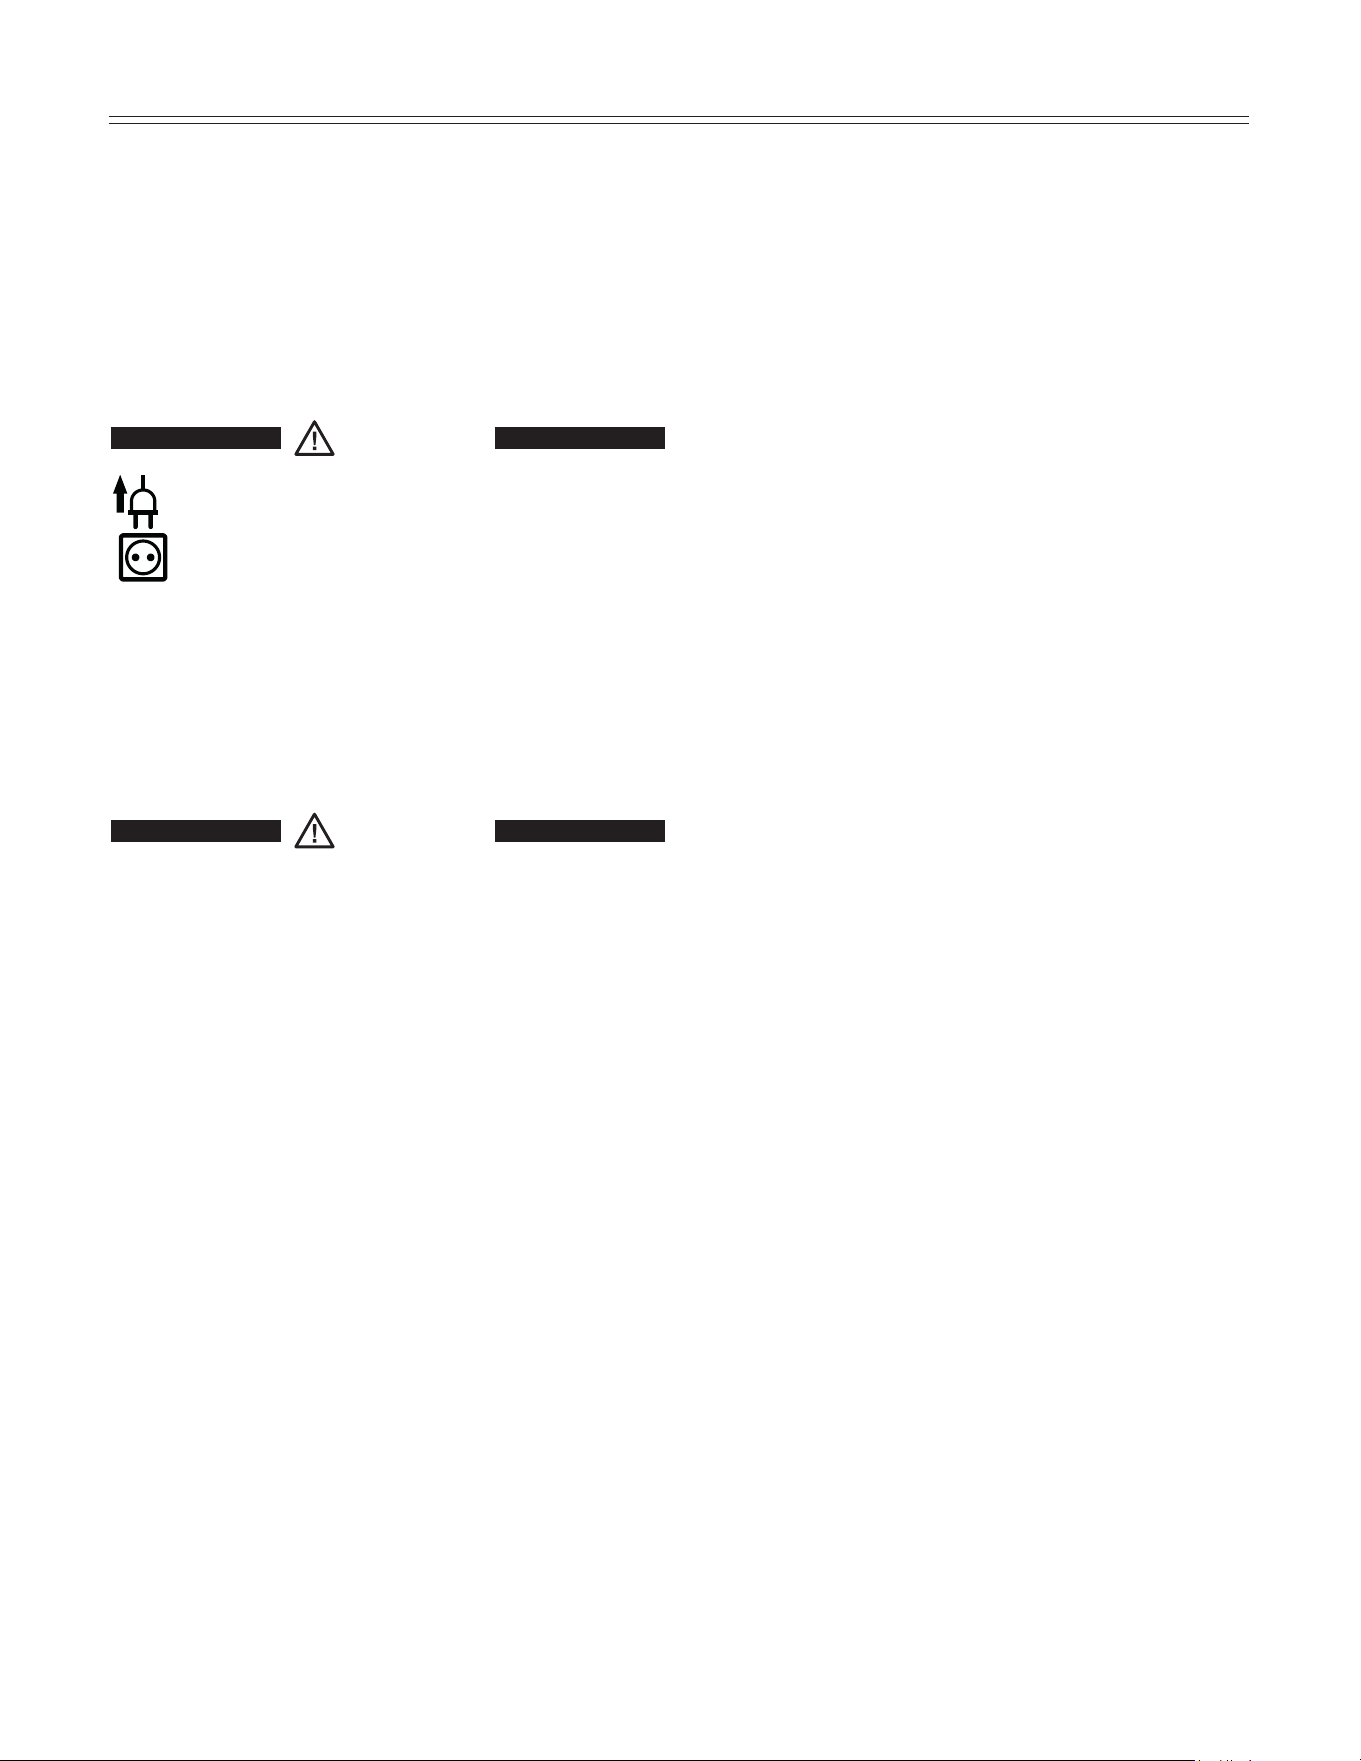
Make sure incoming voltage is the same as the
appliance rating. To reduce the risk of fire, electric shock,
or personal injury, installation work and electrical wiring
must be done by a qualified electrician in accordance
with all applicable codes and standards, including fire-
rated construction.
Disposal of Old Appliance
DANGER
Risk of child entrapment. Before you
discard your old refrigerator or freezer:
• Besuretofollowyourlocalrequire-
ments for disposal of appliances. Dis-
carded appliances can be dangerous.
• Removethedoors.
• Leavetheshelvesinplacesothat
children may not easily climb inside.
• Cutoffthepowercablefromthe
discarded appliance. Discard separately
from the appliance.
Following these instructions reduces the
possibility of causing personal injury,
especially to children playing.
Contact the trash collection agency in
your area for additional information.
Electrical Safety
Connect this appliance to a 110-120 VAC, 15 amp
circuit that is controlled by a circuit breaker or fuse. This
appliance should have its own separate grounded circuit.
Do not use an extension cord.
The power cord is equipped with a three-prong
(grounding) plug for your protection against possible
shock hazards. To maintain this protection:
• Donotmodifytheplugbyremovingtheround
grounding prong.
• Donotuseatwo-prongadapter.Whereatwo-prong
wall receptacle is encountered, contact a qualified
electrician and have it replaced with a three-prong
receptacle in accordance with all local codes and
ordinances.
• Donotuseapowercordthatisfrayedordamaged.
California Proposition 65
- This product contains chemicals known to the state of
California to cause cancer or reproductive harm.
- This product can expose you to chemicals including
Diisononyl Phthalate (DINP) which is known to
the State of California to cause cancer. For more
information go to www.P65Warnings.ca.gov.
- This product can expose you to chemicals including
Di-isodecyl Phthalate (DIDP) which is known to the
State of California to cause birth defects or other
reproductive harm. For more information go to
www.P65Warnings.ca.gov.

4
Safety Regulations
The appliance is designed to cool and store wine and
beverages. It is designed as a household appliance.
The appliance is set to operate within specific ambient
temperature limits according to its climate rating. These
temperature limits should not be exceeded. The cor-
rect climate rating for your appliance is indicated on the
model plate.
This is explained as follows:
Climate
Rating Set for Ambient Temperatures of
SN 50°F to 90°F (10°C to 32°C)
N 61°F to 90°F (16°C to 32°C)
ST 61°F to 100°F (16°C to 38°C)
SN-ST 50°F to 100°F (10°C to 38°C)
SN-T 50°F to 109°F (10°C to 43°C)
T 61°F to 109°F (16°C to 43°C)
- The refrigerant circuit has been tested for leaks.
- The appliance complies with current safety regulations
UL250 and CSA C22.2 #63.
We recommend cleaning the appliance before turning it
ON for the first time. See Cleaning. Turn ON the appli-
ance several hours before loading it.
WARNING
Do not allow children to play with the
appliance. Children must not climb, sit or
stand on the racks or door.
Failure to follow these instructions may
result in death or serious injury.
Important Safety Information
Follow the cautions and safety warnings throughout this
instruction manual including the following:
• Topreventinjurytoyouordamagetotheunit,the
appliance should be unpacked and set up by two
people.
• Iftheapplianceisdamagedondelivery,contactthe
supplier immediately before connecting to the power
source.
• Toguaranteesafeoperation,ensurethatapplianceis
set up and connected as described in these operat-
ing instructions.
• Disconnecttheappliancefromthepowersourceifa
fault occurs. Pull out the plug, turn off or disable the
power source.
• Whendisconnectingtheappliance,usetheplug.Do
not pull on the cord.
• Anyrepairsandworkontheapplianceshouldonly
be performed by the customer service department.
Unauthorized work may be dangerous to the user.
Changing the power source cable should only be
done by the customer service department.
• Donotstoreexplosivesorspraysusingcombustible
propellants such as butane, propane, pentane, etc.
in the appliance. Electrical components might cause
leaking gas to ignite. You may identify such sprays by
the printed contents or a flame symbol.
• Donotuseelectricalappliancesinsidetheappliance.
• Topreventpossibleinjuryduetoanelectricalshock,
be sure to disconnect the power cord or turn off the
circuit breaker before cleaning the appliance.
• Toavoidinjuryordamagetotheappliance,donot
use steam cleaning equipment to clean the appli-
ance.
• Donotoperatethewinecoolerinthepresenceof
explosive fumes.
• Intheeventofapoweroutage,minimizeopeningthe
door.
• Toprotectthewinecoolerfrompossibledamage,
allow the appliance to stand 1/2 to 1 hour in place
before turning the electricity on. This allows the refrig-
erant and system lubrication to reach equilibrium.
safeTy
5
safeTy
Safety Instructions and Warnings
Avoid placing the appliance in direct sunlight or near the
stove, range top, radiators and similar heat sources. Do
not place microwave ovens, toaster ovens or other heat-
emitting appliances on top of this unit.
Keep the appliance out of the weather. The ventilation
grilles should not be obstructed. Always ensure there is
good ventilation all around the appliance.
As soon as you uncrate the unit:
• Examinetheunitandpackagingforshippingdamage.
Contact the carrier immediately if you suspect there
is any damage.
• Notethetype(modelnumber),servicenumber,serial
number, date of purchase and where purchased on
the spaces provided in the back of this manual.
Disposal of Carton
The packaging is designed to protect the appliance and
individual components during moving and is made of
recyclable materials.
• Corrugatedboard/cardboard
• Moldedpolystyrene(foamed,CFC-freepolystyrene)
• Polythenebagsandsheets
• Polypropylenestraps
WARNING
Keep packaging materials away from
children. Polythene sheets and bags can
cause suffocation!
• Pleasetakethepackagingmaterialtoyourlocalrecy-
cling facility.
IMPORTANT!
Remove all transportation safety components.
6
feaTures
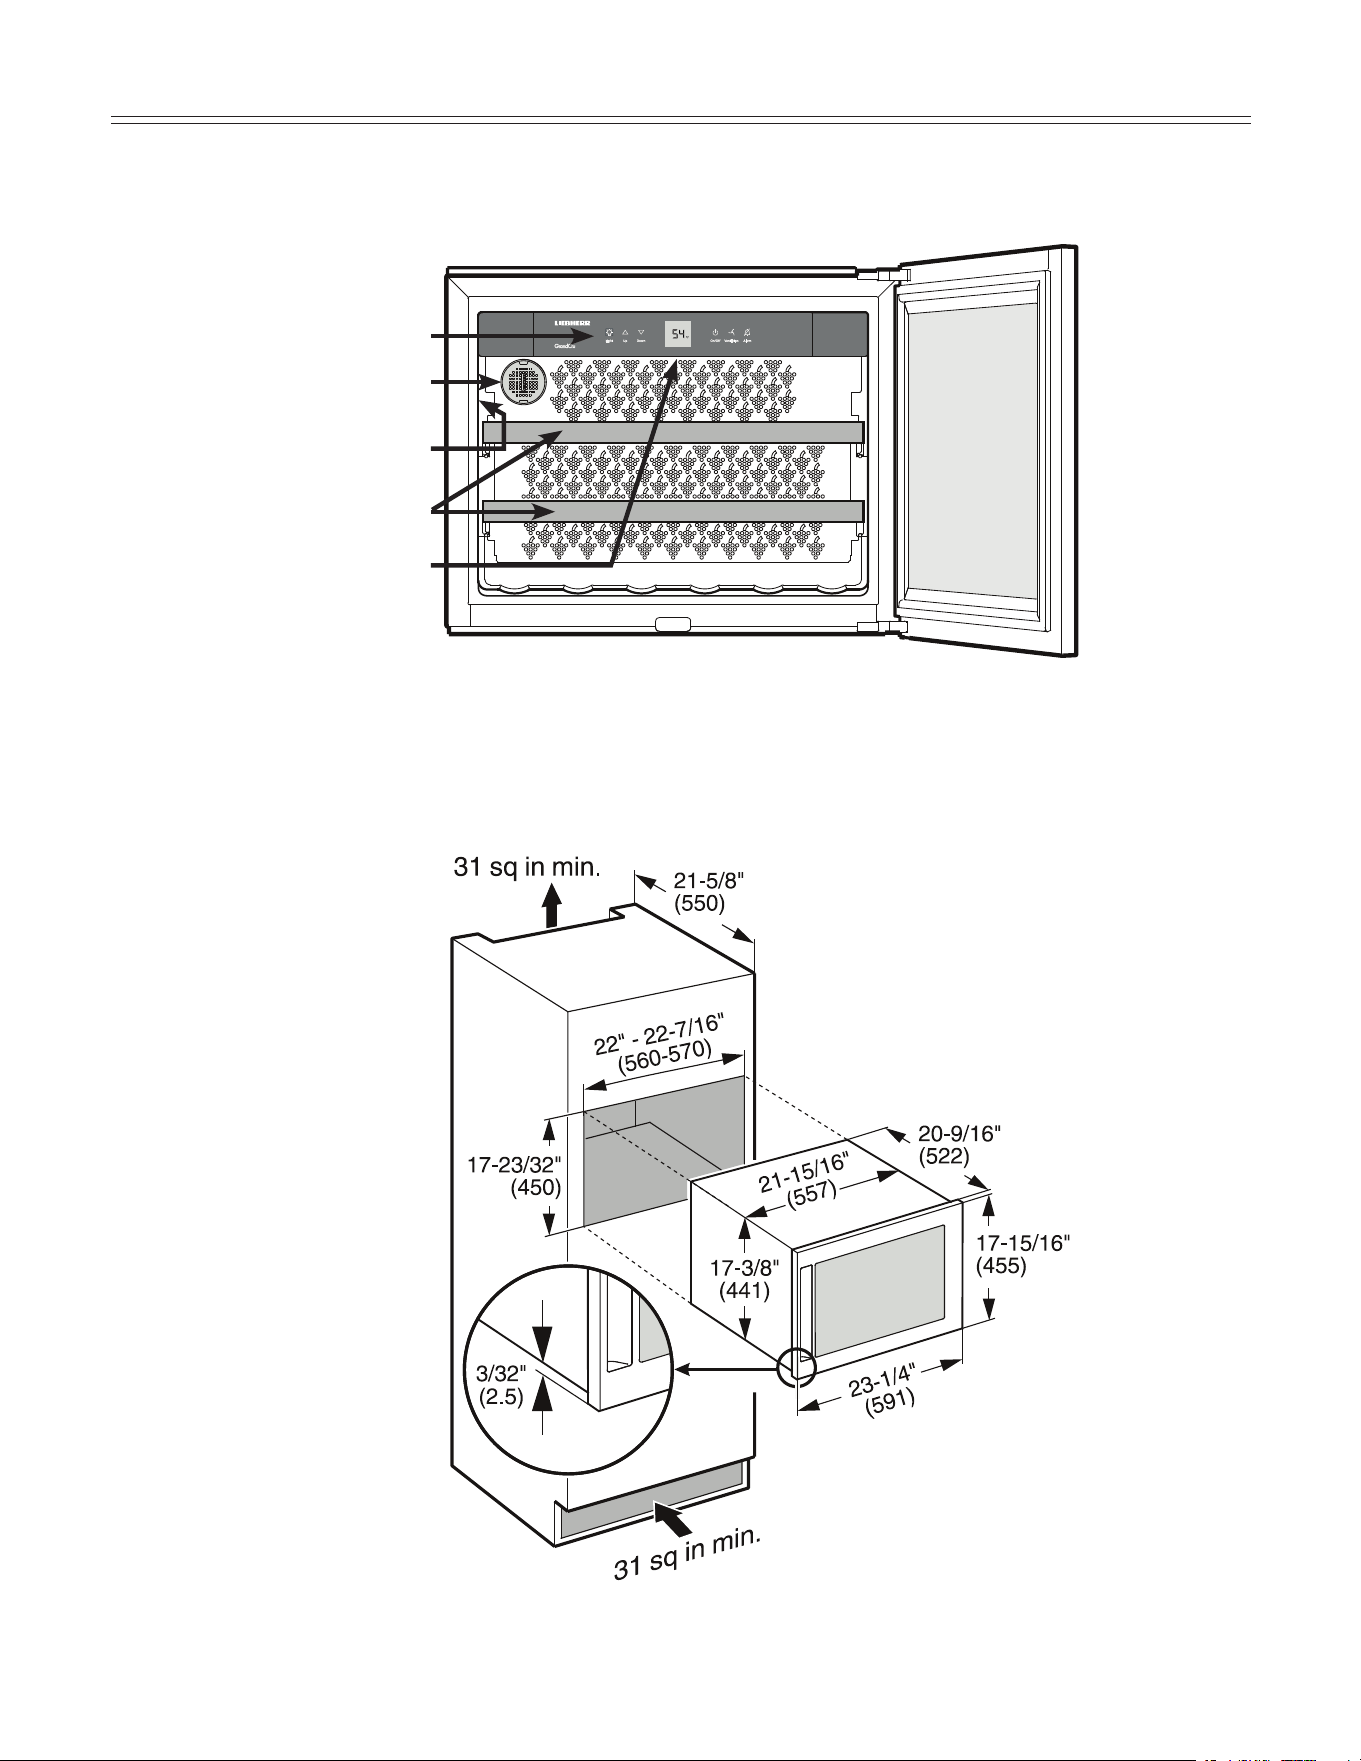
Description of Appliance and Equipment - Figure 1
Fitting Dimensions - Figure 2
Figure 2
Operating and control elements
Model plate
Activated charcoal filter
Pull-out shelves
Interior light
Figure 1
The area of ventilation above
the unit should be at least
31 square inches (200 cm²).
7
InsTallaTIon
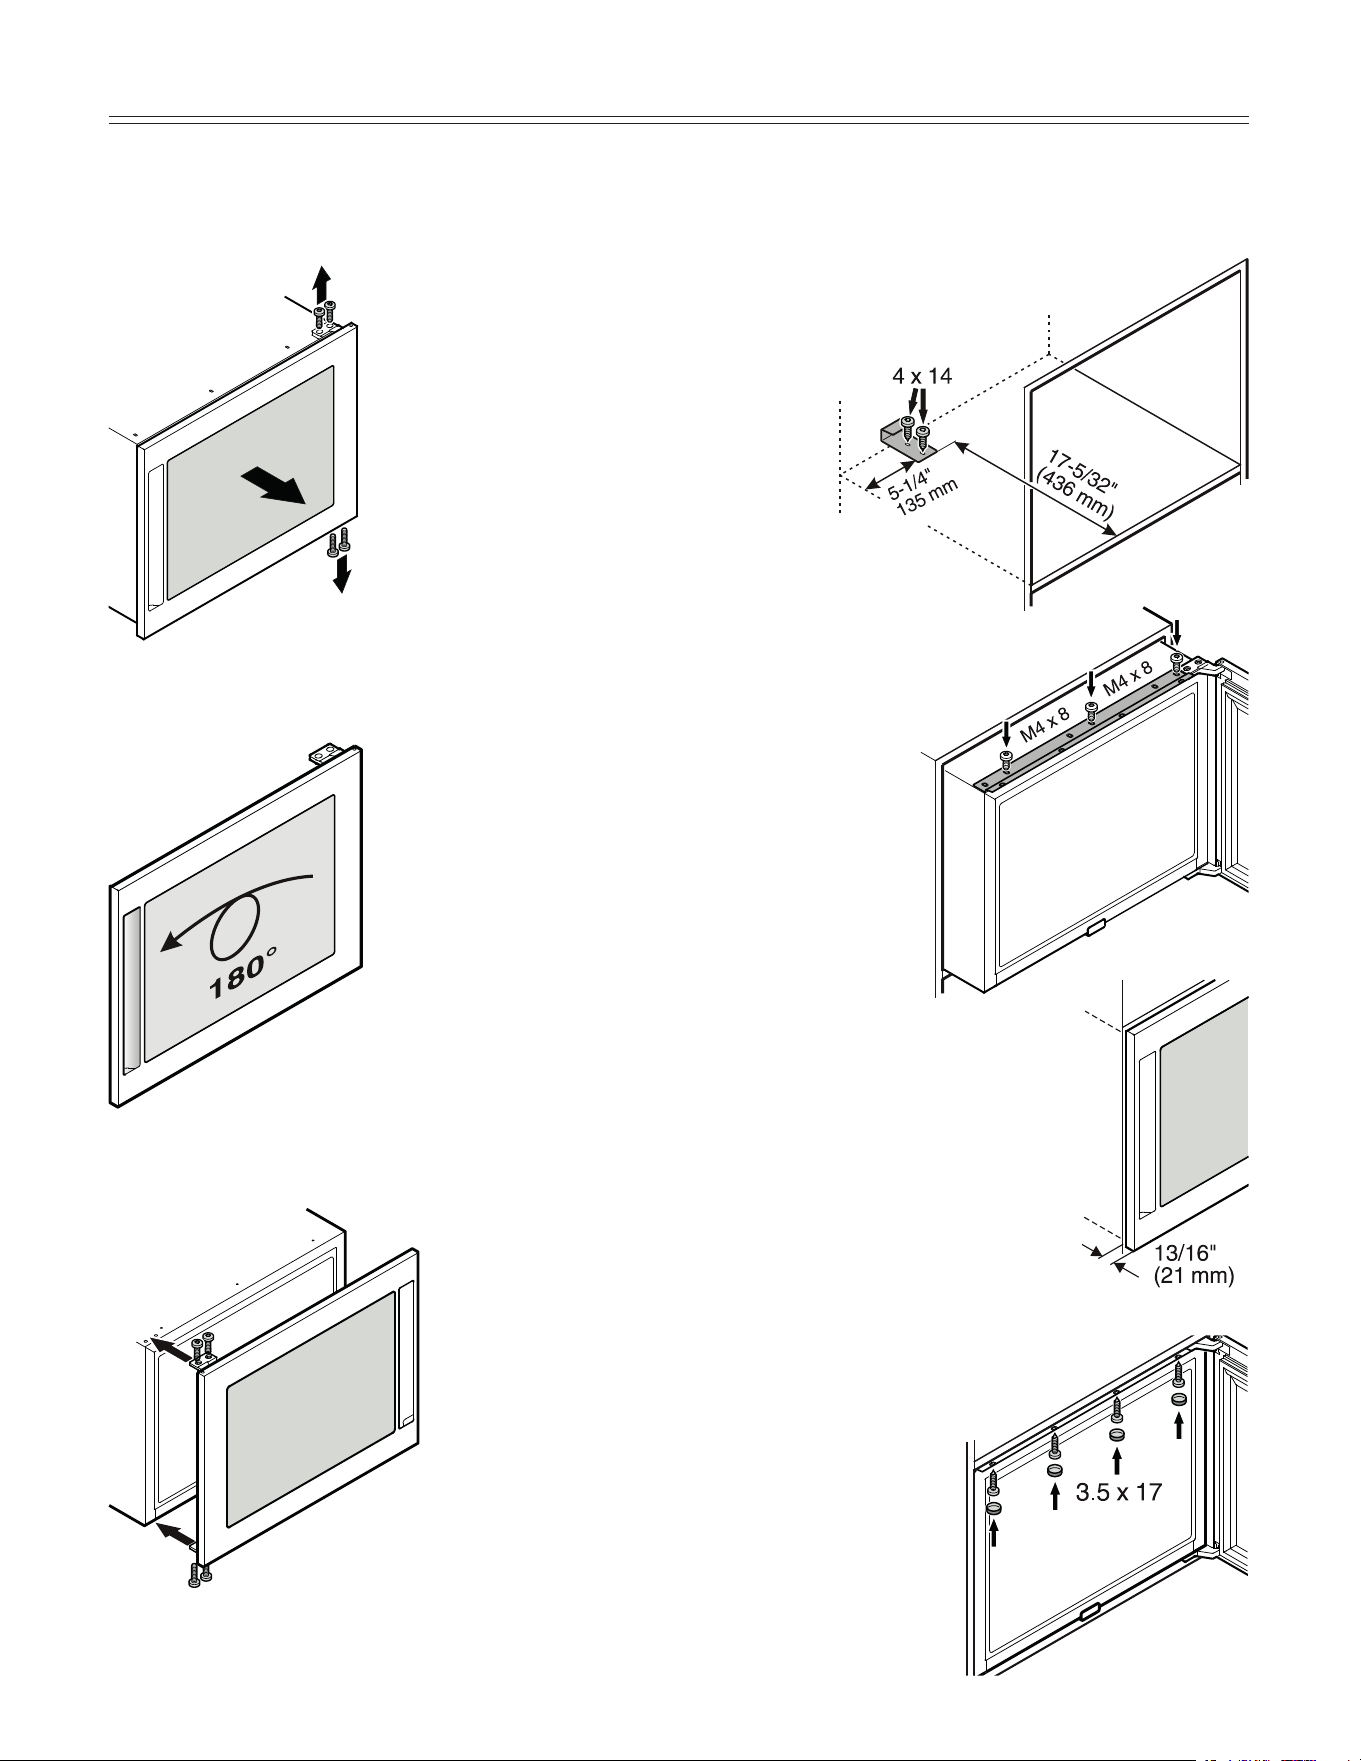
Reversing Door Hinges - Figure 3-5
1. Remove the door.
3. Reattach the door.
2. Rotate door by 180°.
Figure 3
Figure 4
Figure 5
5. Then secure the appliance with 3.5 x 17
chipboard screws through the top
bracket.
3. Before installing in a kitchen
unit, screw the attachment
plate provided onto
the appliance with
screws M4 x 8.
Installing in a Kitchen Unit -
Figure 6-9
1. Secure the stop bracket in the recess
with screws.
2. Connect the appliance to
the electrical outlet.
4. Slide the appliance into the recess
leaving a 13/16" gap between the
body of the unit and the front face of
the door.
Figure 6
Figure 7
Figure 8
Figure 9
8
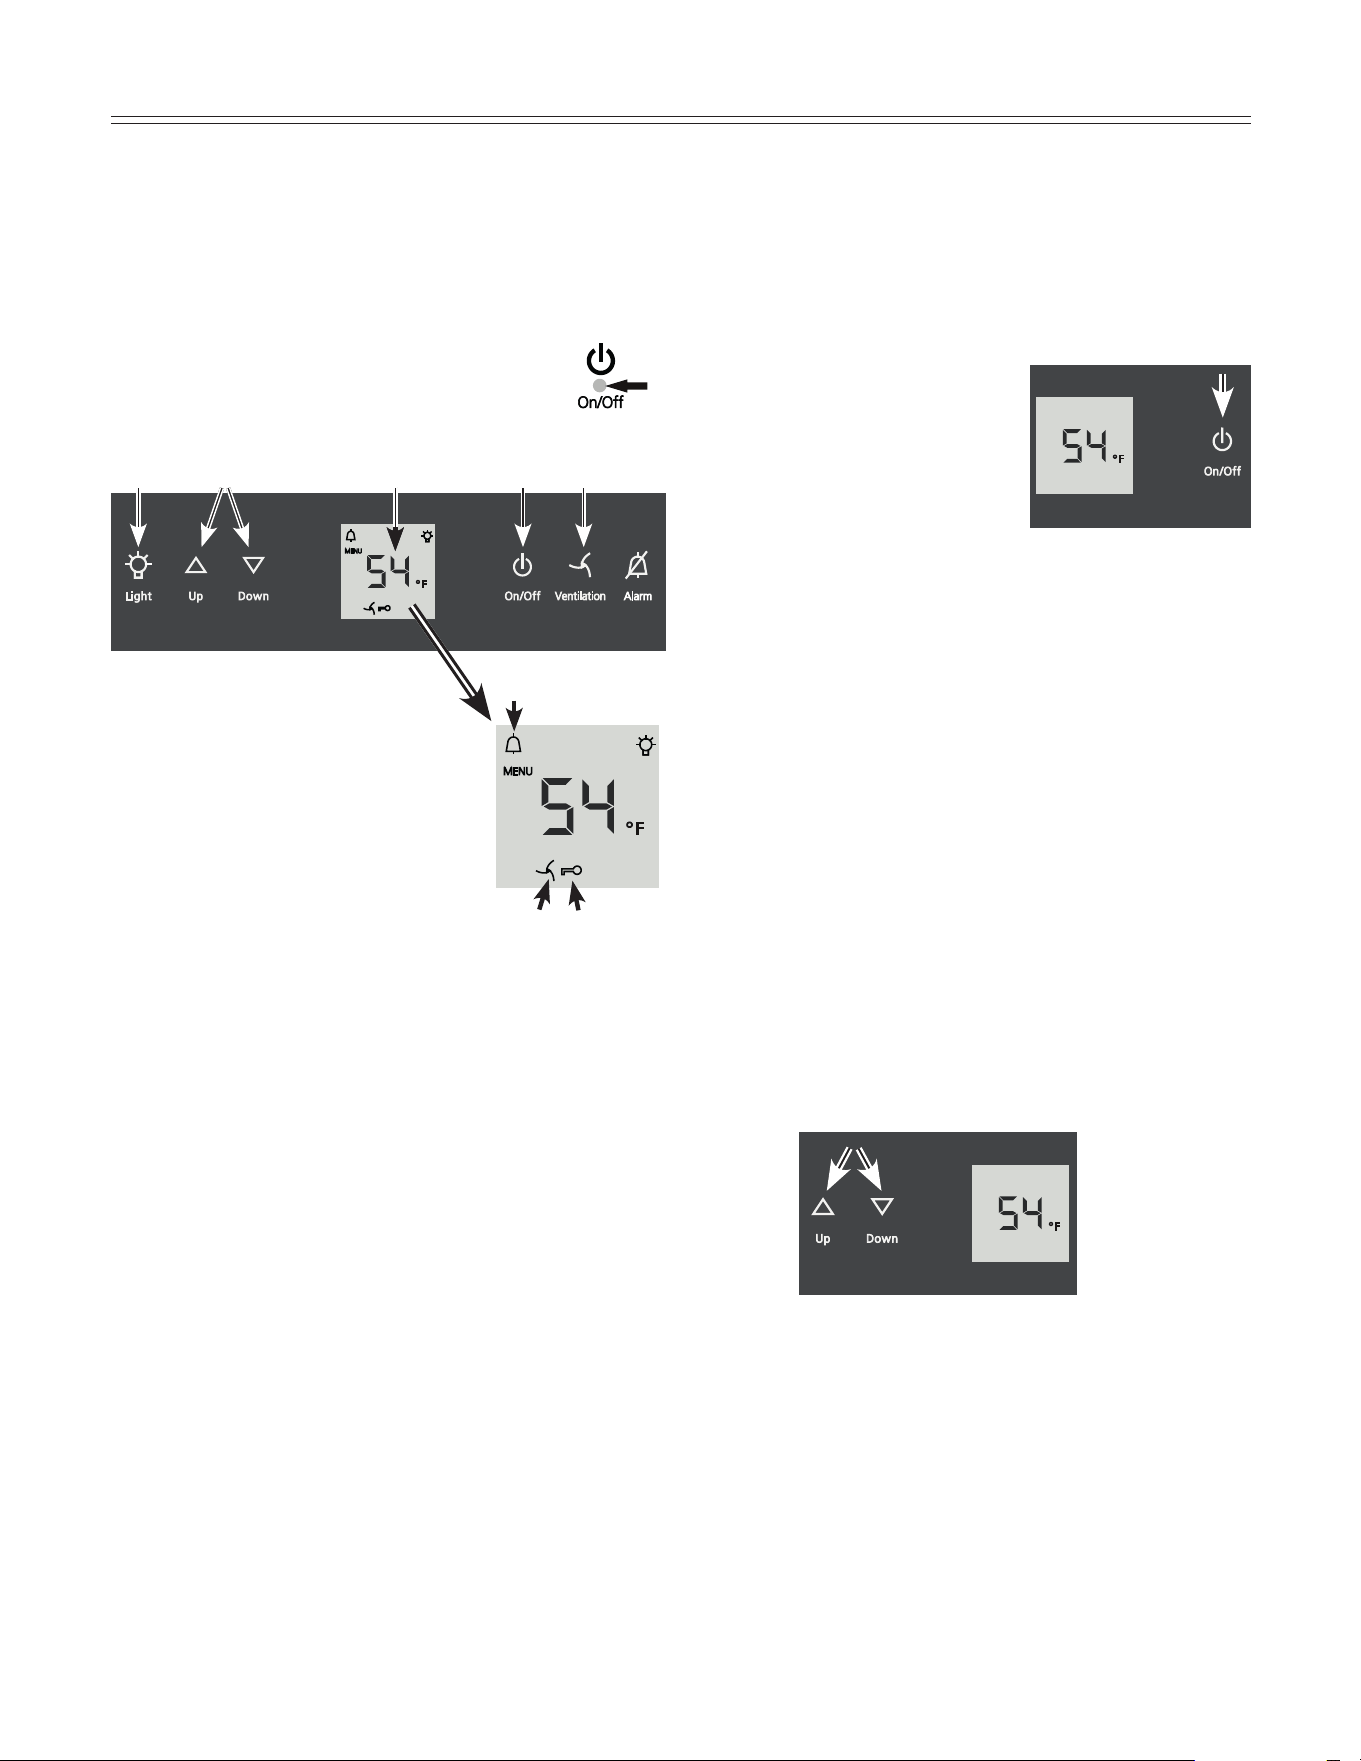
Turning the Appliance
ON and OFF - Figure 11
Clean the appliance before turning it on for the first time.
See Cleaning. Connect the appliance to the dedicated
outlet - the appliance is turned on.
To turn the appliance on: Press
the On/Off button so the
temperature display lights up.
To turn the appliance off:
Press the On/Off button for
approx. 3 seconds so that the
temperature display goes out.
operaTIon
Operating and Control Elements
-
Figure 10
The electronic control panel has the “Touch capacitance
technology”. Any function can be activated by a fingertip
on the symbol of the operating icons.
The exact contact point is between the Symbol
and its label .
7
8
bl 9
5
23
6
1
4
Appliance ON/OFF
Temperature setting buttons
Interior light ON/OFF
Mute alarm
Fan ON/OFF
Temperature display
Interior light ON symbol
Alarm symbol
Child lock activated symbol
Fan ON symbol
Figure 10
Figure 11
Setting the Temperature - Figure 12
To reduce the temperature: Press the Down button.
To increase the temperature: Press the Up button.
- While you are entering the temperature, the set
temperature will flash on the display.
- You can change the settings in increments of 1°F
briefly pressing the button again.
- The electronic controls will switch over automatically
about 5 seconds after the last time you pressed the
button, and the actual temperature will be displayed.
The temperature can be set at between 41°F and 68°F.
Figure 12
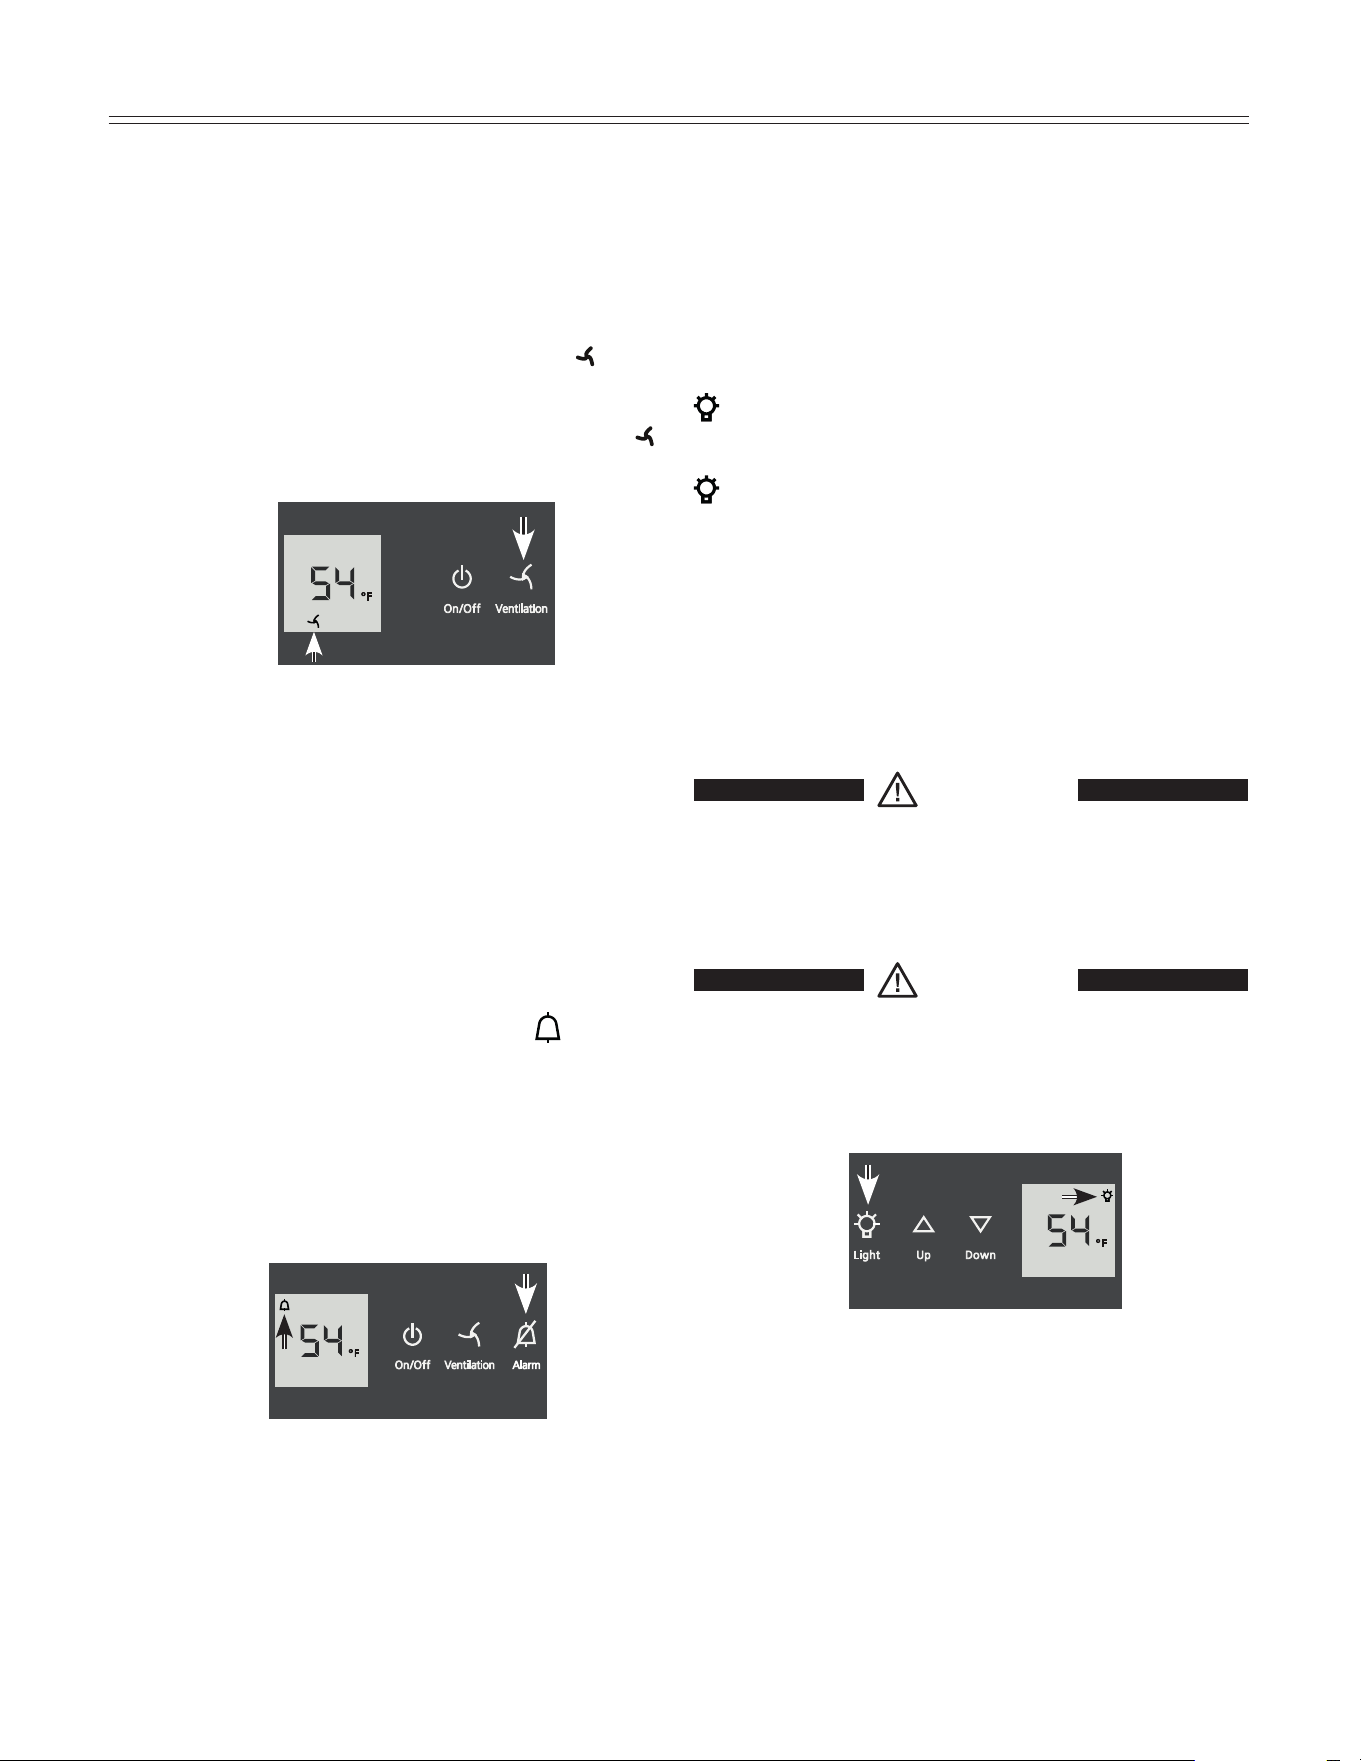
Fan Switch - Figure 13
Switching on the fan improves the climate inside the
appliance approaching that of a wine cellar. Corks are
prevented from drying out due to an increased level of
humidity.
Switching on: Press the Ventilation button. The
symbol will light up.
Switching off: Press the Ventilation button again. The
symbol will go out.
9
operaTIon
Figure 13
Audible Warning Signal - Figure 14
The audible warning signal helps to protect your wines
against excessive temperatures.
It sounds when the door has been left open for longer
than 180 seconds.
It sounds when the interior gets too warm or too cold.
The temperature display will also flash. The
symbol
lights up.
The audible warning device is switched off by pressing
the Alarm button.
The temperature display will continue to flash until the
cause of the alarm has been rectified.
Figure 14
Interior Light - Figure 15
The interior light comes on always when the door is
opened and illuminates with its maximum brightness.
When the door is shut, the interior light turns off or if the
light function is activated, it will dim to its set level.
To switch the interior light on: Press the Light button. The
symbol in the display lights up.
To switch the interior light off: Press the Light button. The
symbol in the display goes out.
Adjusting the brightness of the interior light
Press and hold the Light button and at the same time
press the temperature setting buttons to increase or
decrease the brightness.
Down = darker , Up = brighter
WARNING
The interior light emits class 1M laser radiation.
DO NOT look directly at light or through any
optical instruments when the light cover is
removed. Severe eye injury can occur.
WARNING
The lighting may only be replaced by
the customer service technician or by
competent skilled personnel!
Do not try to
change the defective lighting yourself!
Figure 15
10
operaTIon
Setup Mode
In the setup mode you can activate the following func-
tions:
= Sabbath mode
= Display brightness
= Temperature display mode
= Child lock
How to activate the setup mode:
• PresstheVentilation button for approximately five
seconds
- after 5 seconds
will flash in the display.
The appliance is in the setup mode now.
You can select the setup mode functions by pressing the
Up/Down buttons.
Note
In the setup mode the display will flash continuously.
Exit setup mode:
• PresstheOn/Off button. The appliance will change
back to normal operation.
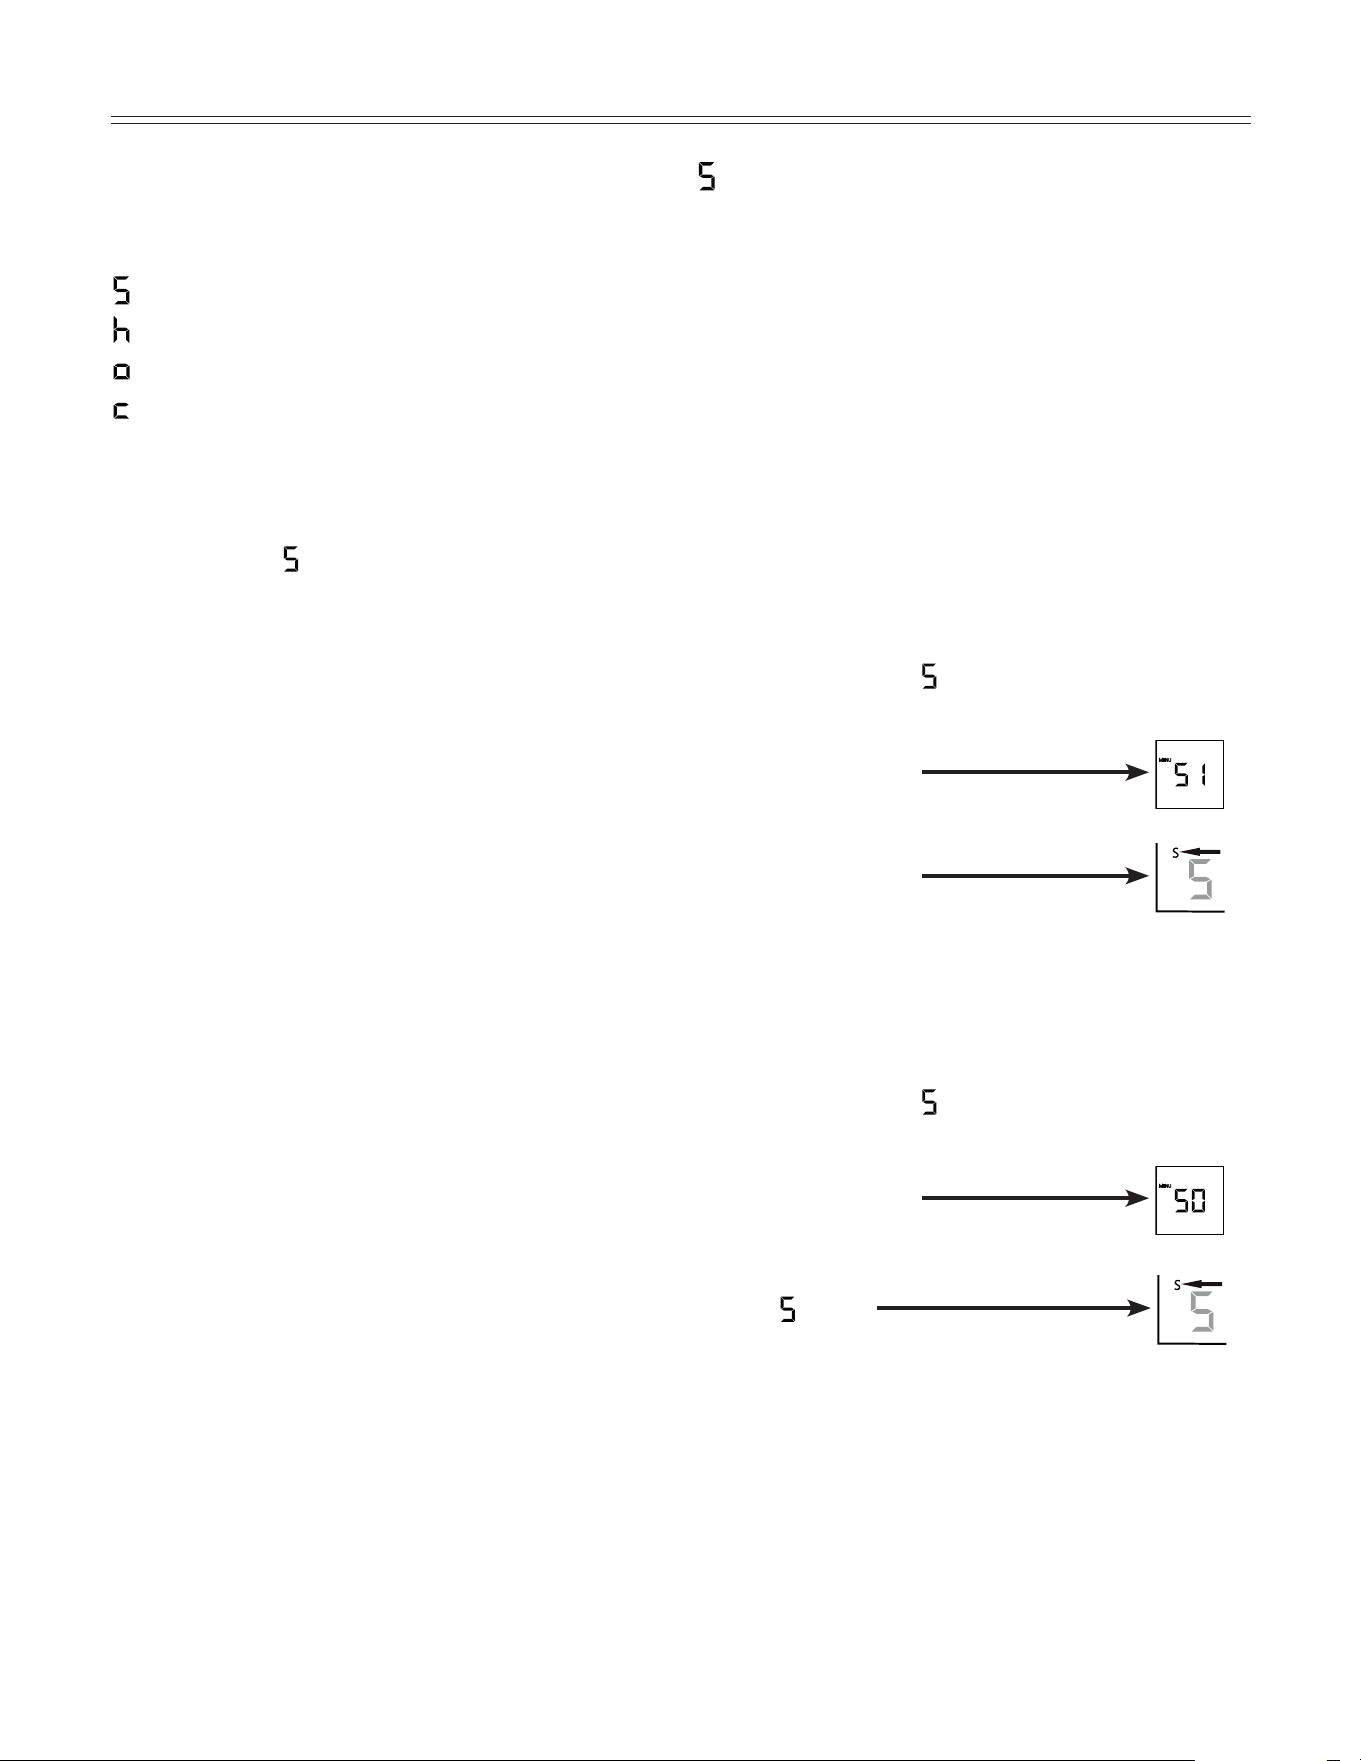
= Sabbath Mode
This feature considers the Religious requirements on
Sabbath or Holidays. When the Sabbath Mode is active
some functions of the electronic controls are switched
off.
The door can be opened and closed at any time.
• Thelightingremainsoff.
• Thecoolingfanremainsinitsactualstate:Ifitisonit
remains on, if it is off it remains off.
• Thereisnodooralarm.
• Thereisnotemperaturealarm.
• TheunitwillreturnintoSabbathModeafterapower
failure.
How to activate the Sabbath Mode
• ActivatethesetupmodebypressingtheVentilation
button for 5 seconds
- the display shows
.
• PresstheVentilation button
- the display shows
• PresstheVentilation button again
- the display shows
- the Sabbath mode is activated.
• ExitsetupmodebypressingtheOn/Off button.
How to deactivate the Sabbath Mode
• ActivatethesetupmodebypressingtheVentilation
button for 5 seconds
- the display shows
.
• PresstheVentilation button
- the display shows
• PresstheVentilation button again
- the
symbol
in the display disappears,
the Sabbath mode is deactivated.
• ExitsetupmodebypressingtheOn/Off button.

11
operaTIon
= Display brightness
How to adjust the display brightness
• ActivatethesetupmodebypressingtheVentilation
button for 5 seconds.
• Press the Down button until
appears in the display.
• PresstheVentilation button
- the display shows
• PressUp/Down buttons to select
0 = minimum to
5 = maximum brightness.
• PresstheVentilation button at the desired value.
• ExitsetupmodebypressingtheOn/Off button.
= Temperature display mode
You can choose the unit of temperature for the display
in degrees Fahrenheit or degrees Celsius.
Note
The factory setting is degrees Fahrenheit.
How to change the temperature display to
degrees Celsius
• ActivatethesetupmodebypressingtheVentilation
button for 5 seconds.
• PresstheDown button until
appears in the display.
• PresstheVentilation button
- the display shows
• PresstheVentilation button again
- the temperature reading is now displayed in degree
Celsius.
• ExitsetupmodebypressingtheOn/Off button.
Note
To change the temperature display back to degrees
Fahrenheit, follow the steps above.
= Child lock
The child lock is designed to protect the appliance
from being turned OFF accidentally.
How to activate the child lock
• ActivatethesetupmodebypressingtheVentilation
button for 5 seconds.
• Press the Down button until
appears in the display.
• PresstheVentilation button
- the display shows
• PresstheVentilation button again
- the LED
is lit and the child lock is activated.
• ExitsetupmodebypressingtheOn/Off button.
How to deactivate the child lock
• ActivatethesetupmodebypressingtheVentilation
button for 5 seconds.
• Press the Down button until
appears in the display.
• PresstheVentilation button
- the display shows
• PresstheVentilation button again
- the LED
goes out. The child lock is deactivated.
• ExitsetupmodebypressingtheOn/Off button.
12
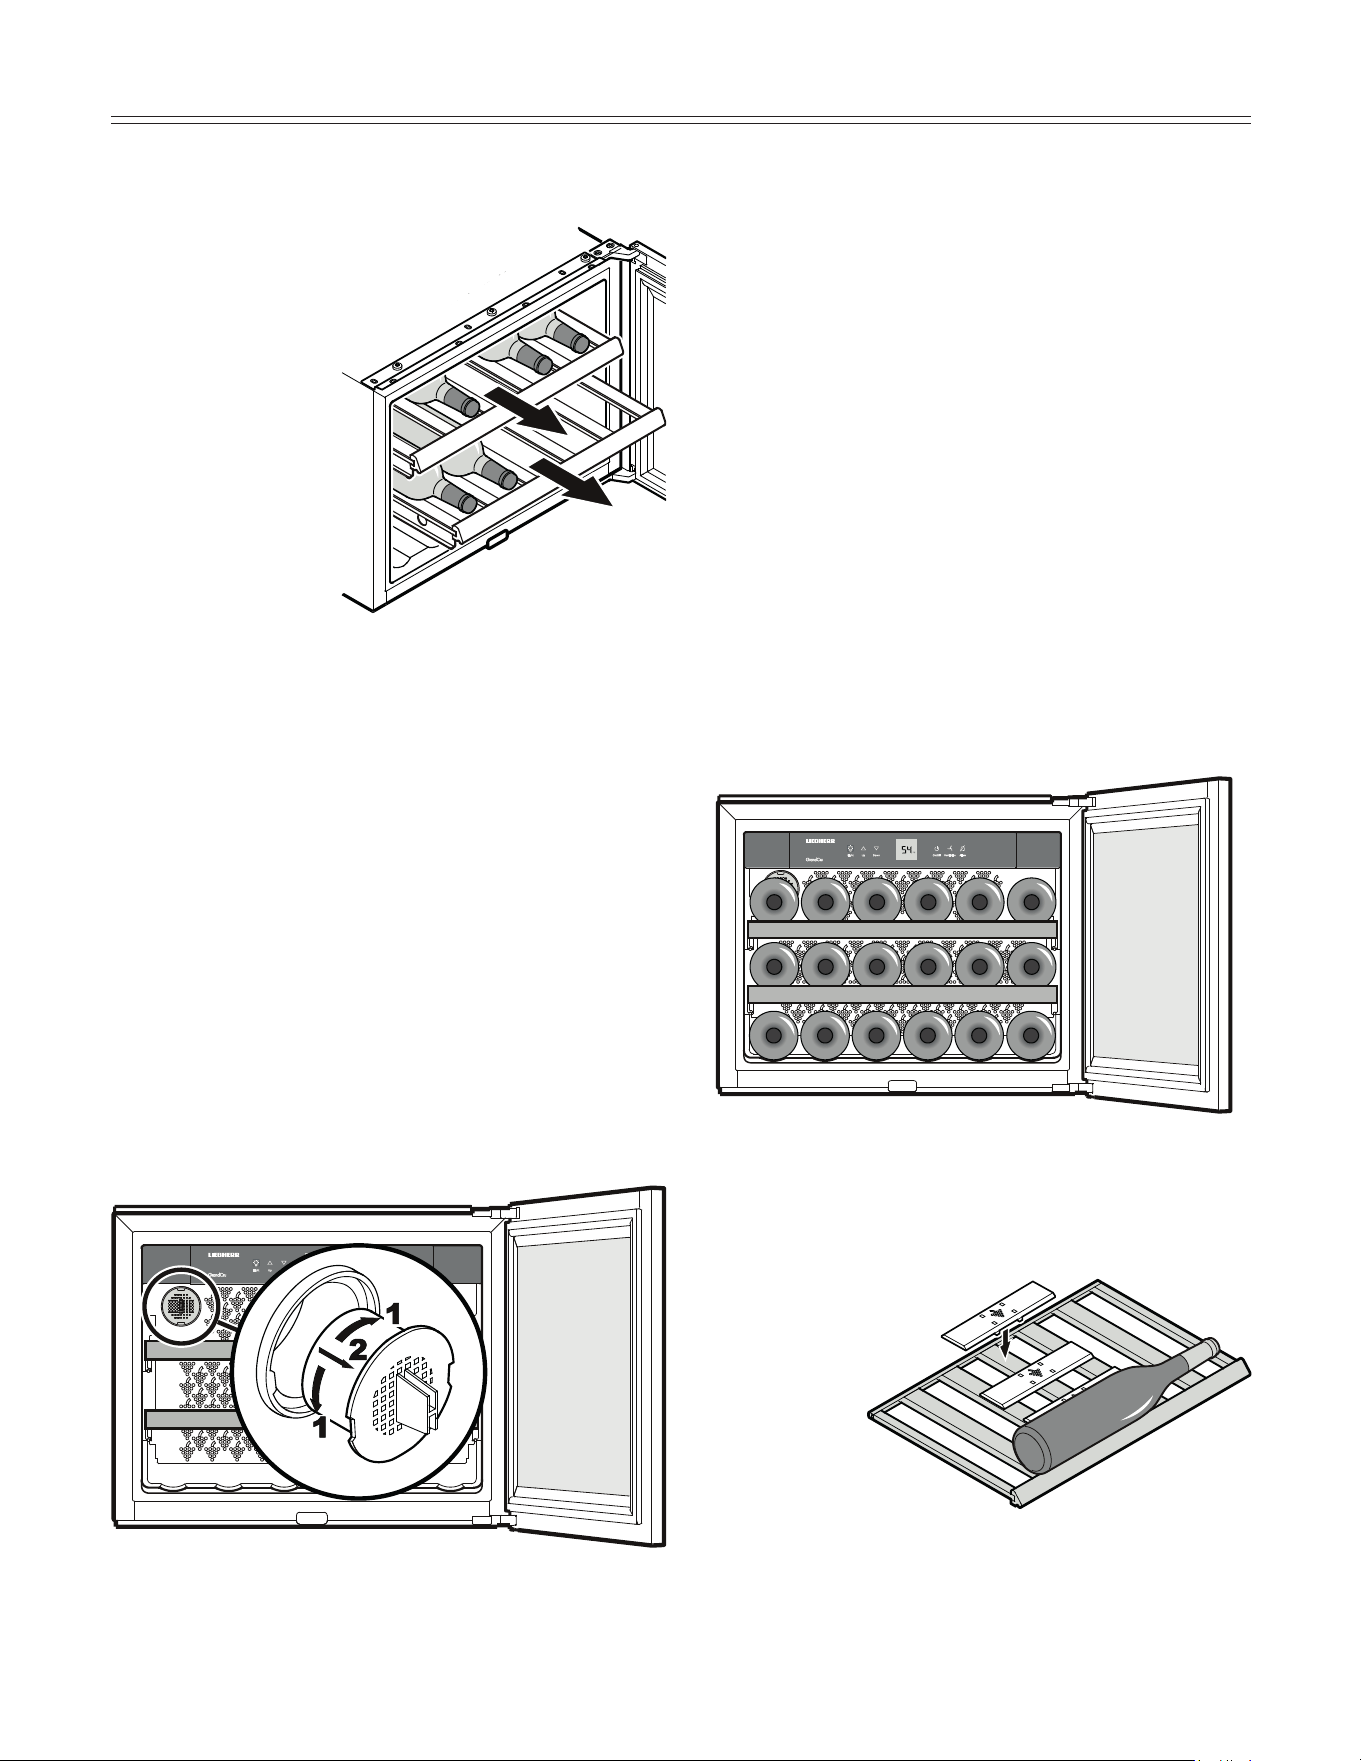
Equipment - Figure 16
Pull-out grid shelves
The pull-out grid shelf allows
bottles of wine to be removed
more easily.
Tall wine bottles can also be stored crossways in the
appliance (Figure 19).
To ensure stable storage of the
bottles, click the retaining
plates provided onto
the middle slat
of the wooden
shelf.
Storage diagram - Figure 18
(for 750 ml Bordeaux bottles)
Total: 18 bottles
Storing Wine
If you are storing wine for long periods of time, it should
be stored at a temperature of between 50°F and 57°F.
This is the temperature wine cellars are kept at, and it is
just right to allow wine to mature properly.
The following drinking temperatures are recommended
for the various types of wine.
Red wines: 57°F to 64°F
Rosé wines: 50°F to 54°F
White wines: 46°F to 54°F
Sparkling wines, Prosecco: 45°F to 48°F
Champagne: 41°F to 45°F
WIne Cooler ComparTmenT
Figure 18
Figure 19
Figure 16
Figure 17
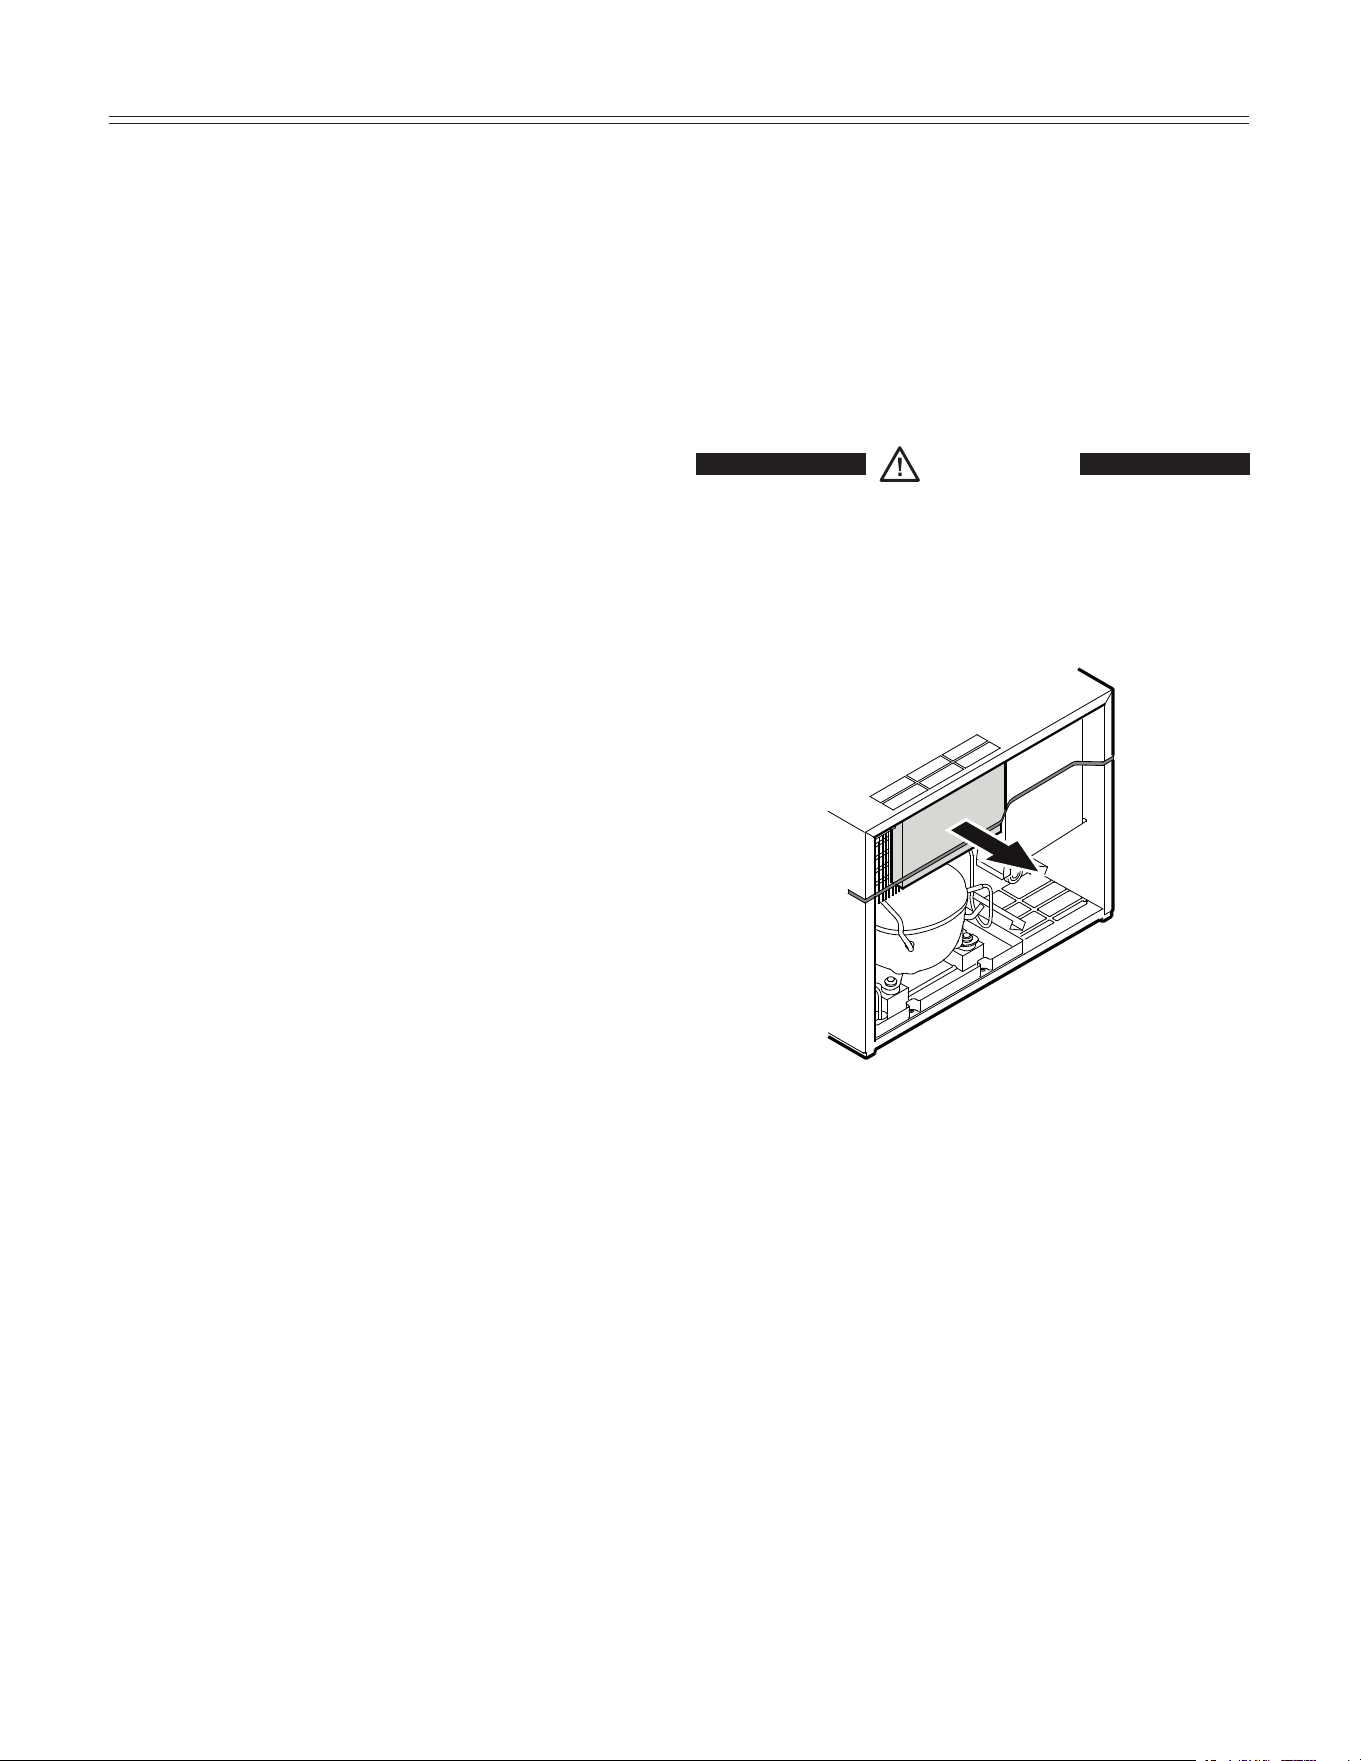
Air Exchange with Activated Charcoal Filter
- Figure 17
The way in which wines continue to mature depends on
the ambient conditions. The quality of the air is there-
fore decisive for preserving the wine. Your Liebherr wine
cooler is equipped with an activated charcoal filter in the
interior rear wall.
We recommend you replace the filters at least once a
year. Filters can be obtained from your Liebherr Dealer
or Distributor.
Removing the filter: Hold the filter by the handle. Turn it
90° to the left or right and remove.
Reinstalling the filter: Insert with the handle in a verti-
cal position. Turn it 90° to the left or right until it clicks
into place.
12
13
Defrosting
The wine cooler compartment defrosts automatically.
The water that forms on the rear wall drains into a res-
ervoir at the back of the appliance and evaporates auto-
matically through the compressor heat.
Cleaning
WARNING
• To prevent possible injury due to an
electrical shock, be sure to disconnect
the power cord or turn off the circuit
breaker before cleaning the appliance.
• To avoid injury or damage, do not use
steamcleaningequipmenttoclean
the appliance.
• Cleantheinsideoftheappliance,exceptthewooden
grid shelves, with lukewarm water and a little
detergent.
WARNING
To avoid short-circuits, ensure no cleaning
water penetrates into the electrical
components when cleaning the appliance.
Do not use a sponge or cloth that is overly
wet.
Do not use abrasive or scouring sponges. Do not use
concentrated cleaning agents. Never use abrasive or
acid cleaners or chemical solvents or steam cleaners.
• Cleanthesidepanelsanddoorsurfaceswithaclean
and soft cloth. If necessary, use a moist cloth (water +
detergent). Alternatively, use a micro-fibre cloth.
• Useaglasscleanertocleantheglasssurfaces.
• Dryallpartswellwithacloth.
• Do not damage or remove the model plate on the
inside of the appliance. It is very important for servic-
ing your appliance.
IMPORTANT
Mold can form on the bottles and labels depend-
ing on the type of adhesive used on the labels.
This can be prevented by carefully cleaning any
adhesive residues off the bottles.
DefrosTIng/CleanIng
13

14
TroubleshooTIng
Customer Service
If none of the above possible causes apply, and you
can not rectify the fault yourself, contact your nearest
customer service representative. Indicate the type (1) of
appliance, service number (2) and the appliance / serial
number (3) as indicated on the model plate. The model
plate is located on the left-hand inside wall.
Problem Possible Cause and Remedy
Your appliance is designed and manufactured for a long life and reliable operation.
If a problem occurs during operation, check whether it is due to an operating error. Please note that even during the
warranty period, some repair costs may be your responsibility.
You may be able to correct the following faults by checking the possible causes yourself:
Motor seems to
run too long
- Is the ambient temperature too hot? See Safety Regulations.
- Has the appliance been opened too often or left open too long?
- Are proper ventilation requirements met?
F8 appears in the
display
The temperature is
not cold enough
Appliance does not
work, display is off
The interior light does
not come on
The appliance has a fault. Contact your nearest customer service representative, indi-
cate the type of appliance, service number and appliance / serial number.
- Is the appliance turned on properly?
- Is the power cord properly inserted in the outlet?
- Is the circuit breaker or fuse in operating condition?
- Is the appliance turned on?
- Is the interior light turned on?
- The interior light is defective. Contact your Liebherr Dealer or Representative.
- Is the temperature setting correct? See Setting the Temperature.
- Does a separately installed thermometer show the correct reading?
- Is the ventilation system working properly?
- Is the appliance set up too close to a heat source?
Appliance Information
Record this information when the appliance is installed.
Type Designation: ______________________________
Service Number: _______________________________
Appliance / Serial Number: _______________________
Date of Purchase: ______________________________
Where Purchased: ______________________________

15
WarranTy

For Service in the U.S.
LiebherrServiceCenter
Toll Free: 1-866-LIEBHERor1-866-543-2437
Email: Service-appliances.us@liebherr.com
PlusOne Solutions, Inc.
3501 Quadrangle Blvd, Suite 120
Orlando, FL 32817
For Service in Canada
LiebherrServiceCenter
Toll Free: 1-888-LIEBHERor1-888-543-2437
www.euro-parts.ca
EURO-PARTS CANADA
39822 Belgrave Road
Belgrave, Ontario, N0G 1E0
Phone: (519) 357-3320
Fax: (519) 357-1326
www.liebherr-appliances.com
*708263501*