Xerox
®
C310 Color Printer Quick
Reference Guide
Print
PPrriinnttiinngg ffrroomm aa ccoommppuutteerr
Note: For labels, card stock, and envelopes, set the paper size
and type in the printer before printing the document.
1. From the document that you are trying to print, open the Print
dialog.
2. If necessary, adjust the settings.
3. Print the document.
PPrriinnttiinngg ffrroomm aa mmoobbiillee ddeevviiccee
PPrriinnttiinngg ffrroomm aa mmoobbiillee ddeevviiccee uussiinngg MMoopprriiaa PPrriinntt
SSeerrvviiccee
Mopria® Print Service is a mobile printing solution for mobile devices
running on Android version 4.4 or later. It allows you to print directly
to any Mopria-certified printer.
Note: Before printing, make sure that the Mopria Print
Service is enabled.
1. From the home screen of your mobile device, launch a
compatible application.
2. Tap Print, and then select a printer.
3. Print the document.
PPrriinnttiinngg ffrroomm aa mmoobbiillee ddeevviiccee uussiinngg AAiirrPPrriinntt
AirPrint is a mobile printing solution that allows you to print directly
from Apple devices to an AirPrint-certified printer.
• This application is supported only in some Apple devices.
• This application is supported only in some printer models.
1. From the home screen of your mobile device, launch a
compatible application.
2. Select an item to print, and then tap the share icon.
3. Tap Print, and then select a printer.
4. Print the document.
PPrriinnttiinngg ffrroomm aa MMoobbiillee DDeevviiccee UUssiinngg WWii--FFii DDiirreecctt
®®
Note: This feature is available only in some printer models.
Wi-Fi Direct is a printing service that lets you print to any Wi-Fi Direct-
ready printer.
Note: Make sure that the mobile device is connected to the
printer wireless network.
For more information, refer to Connecting a Mobile Device to the
Printer.
1. From your mobile device, launch a compatible application or
select a document from your file manager.
2. Depending on your mobile device, do one of the following:
• Tap
> Print.
• Tap
> Print.
• Tap
> Print.
3. Select a printer, and then adjust the settings, if necessary.
4. Print the document.
Maintain the Printer
Warning: Failure to maintain optimum printer performance,
or to replace parts and supplies, may cause damage to your
printer.
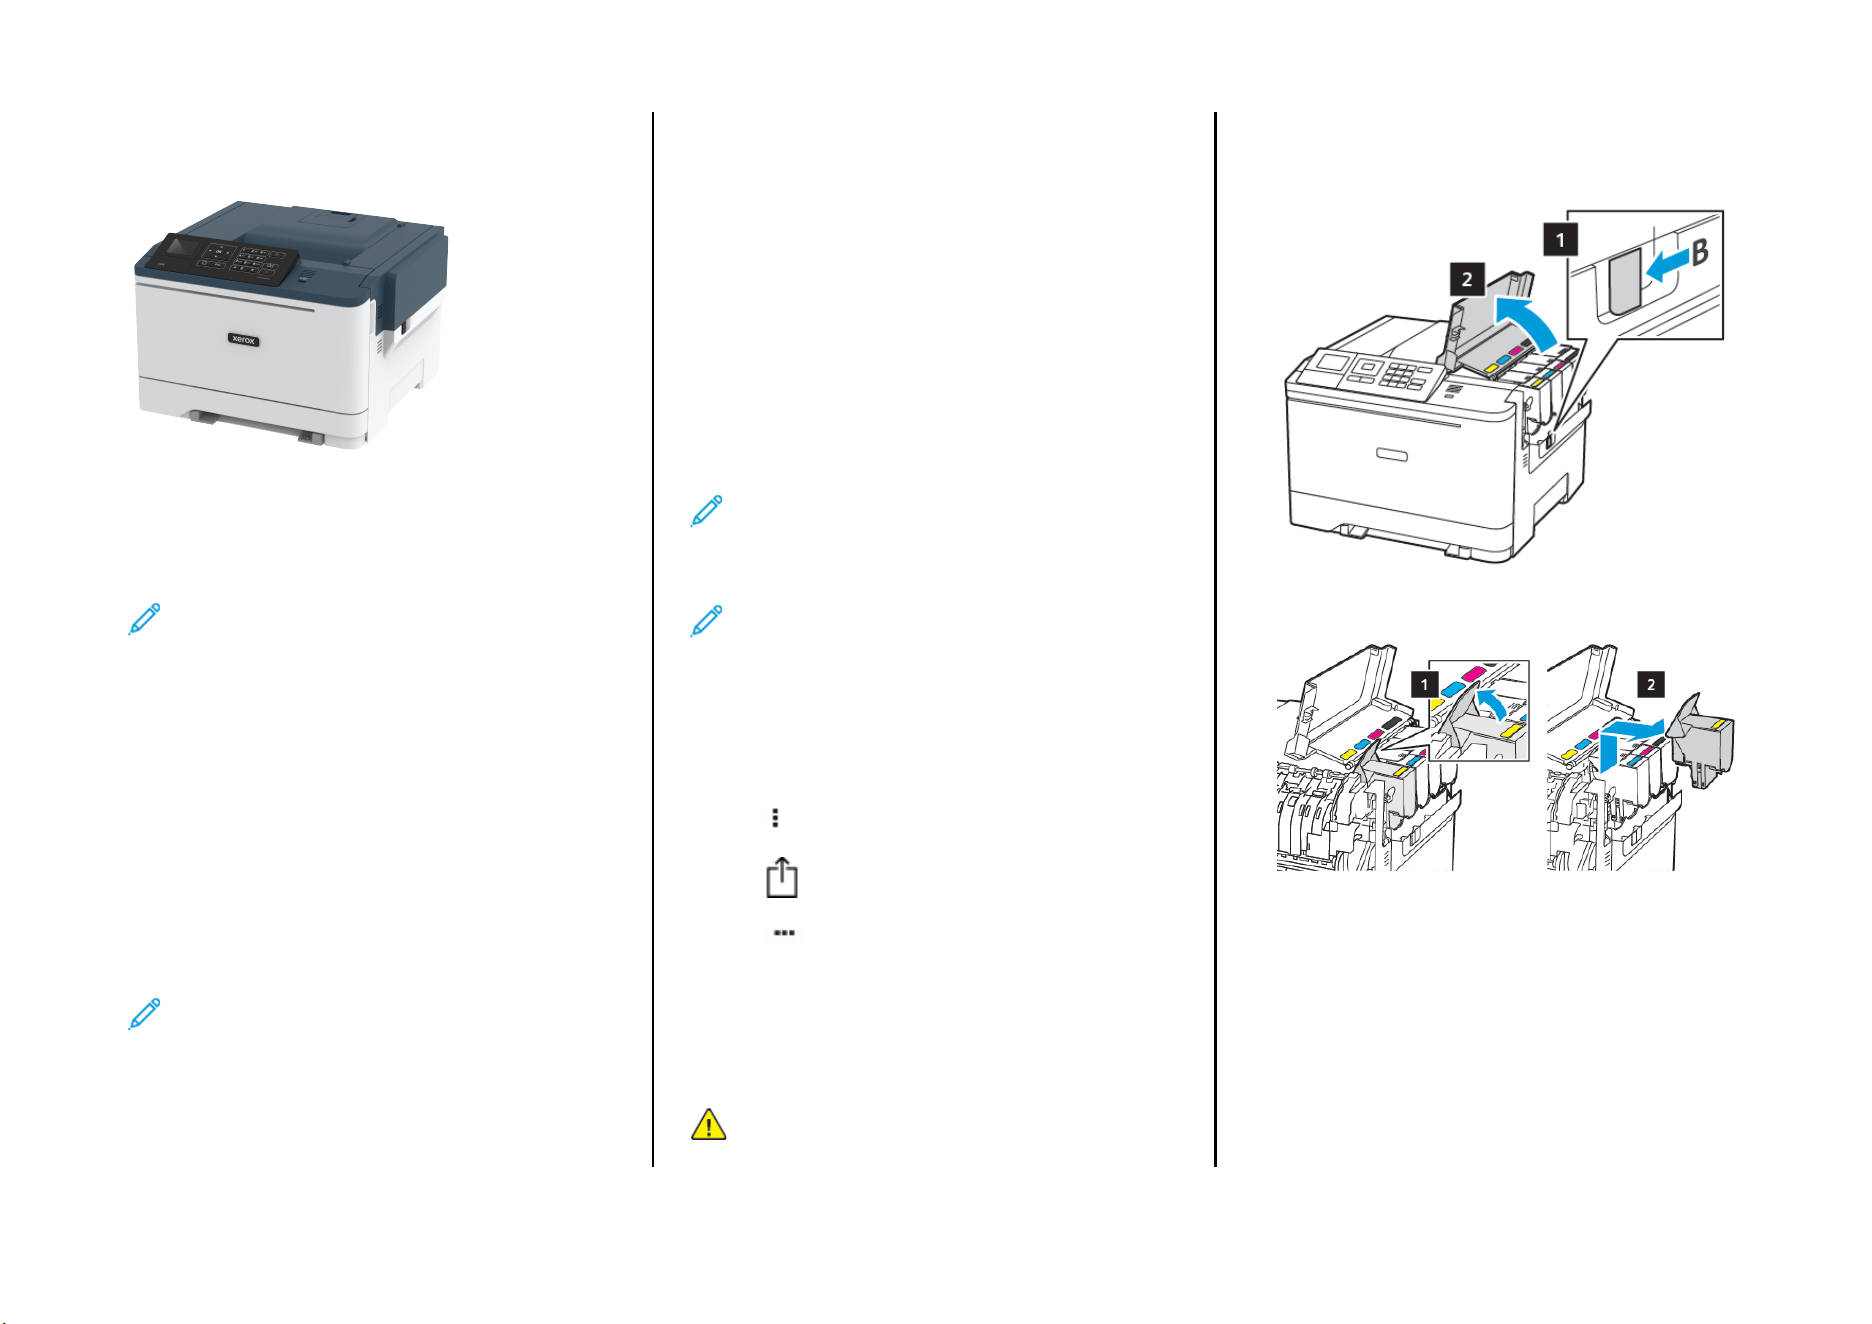
RReeppllaacciinngg aa ttoonneerr ccaarrttrriiddggee
1. Open door B.
2. Remove the used toner cartridge.
3. Unpack the new toner cartridge.
1
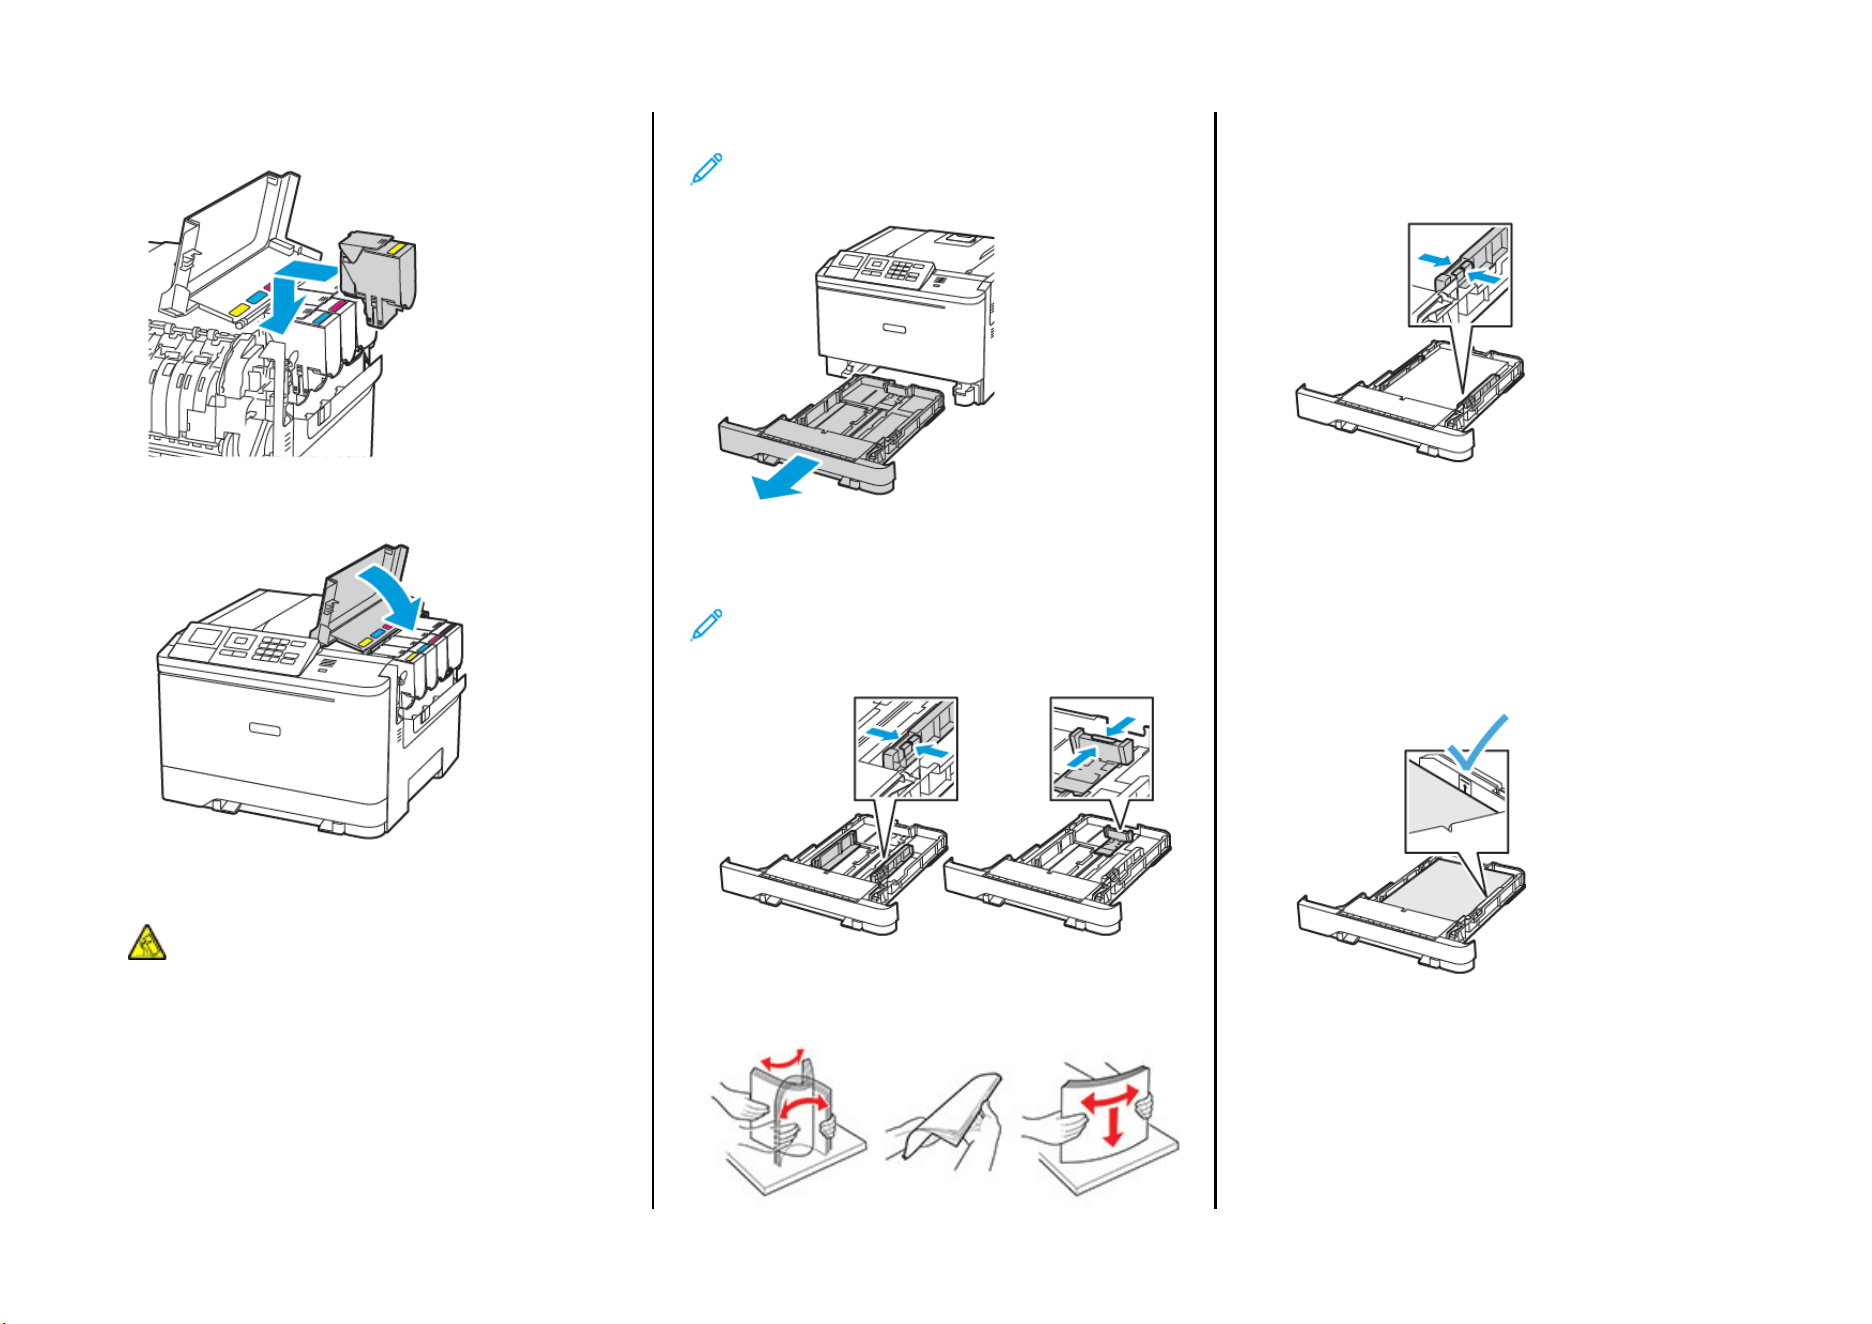
4. Insert the new toner cartridge.
5. Close door B.
LLooaaddiinngg ttrraayyss
CAUTION—TIPPING HAZARD: To reduce the risk of
equipment instability, load each tray separately. Keep all
other trays closed until needed.
1. Remove the tray.
Note: To avoid paper jams, do not remove trays while the
printer is busy.
2. Adjust the guides to match the size of the paper that you are
loading.
Note: Use the indicators on the bottom of the tray to
position the guides.
3. Flex, fan, and align the paper edges before loading.
4. Load the paper stack with the printable side faceup, and then
make sure that the side guides fit snugly against the paper.
• Load letterhead faceup with the header toward the front of
the tray for one-sided printing.
• Load letterhead facedown with the header toward the back
of the tray for two-sided printing.
• Do not slide paper into the tray.
• To avoid paper jams, make sure that the stack height is
below the maximum paper fill indicator.
5. Insert the tray.
If necessary, set the paper size and paper type from the control
panel to match the paper loaded.
2
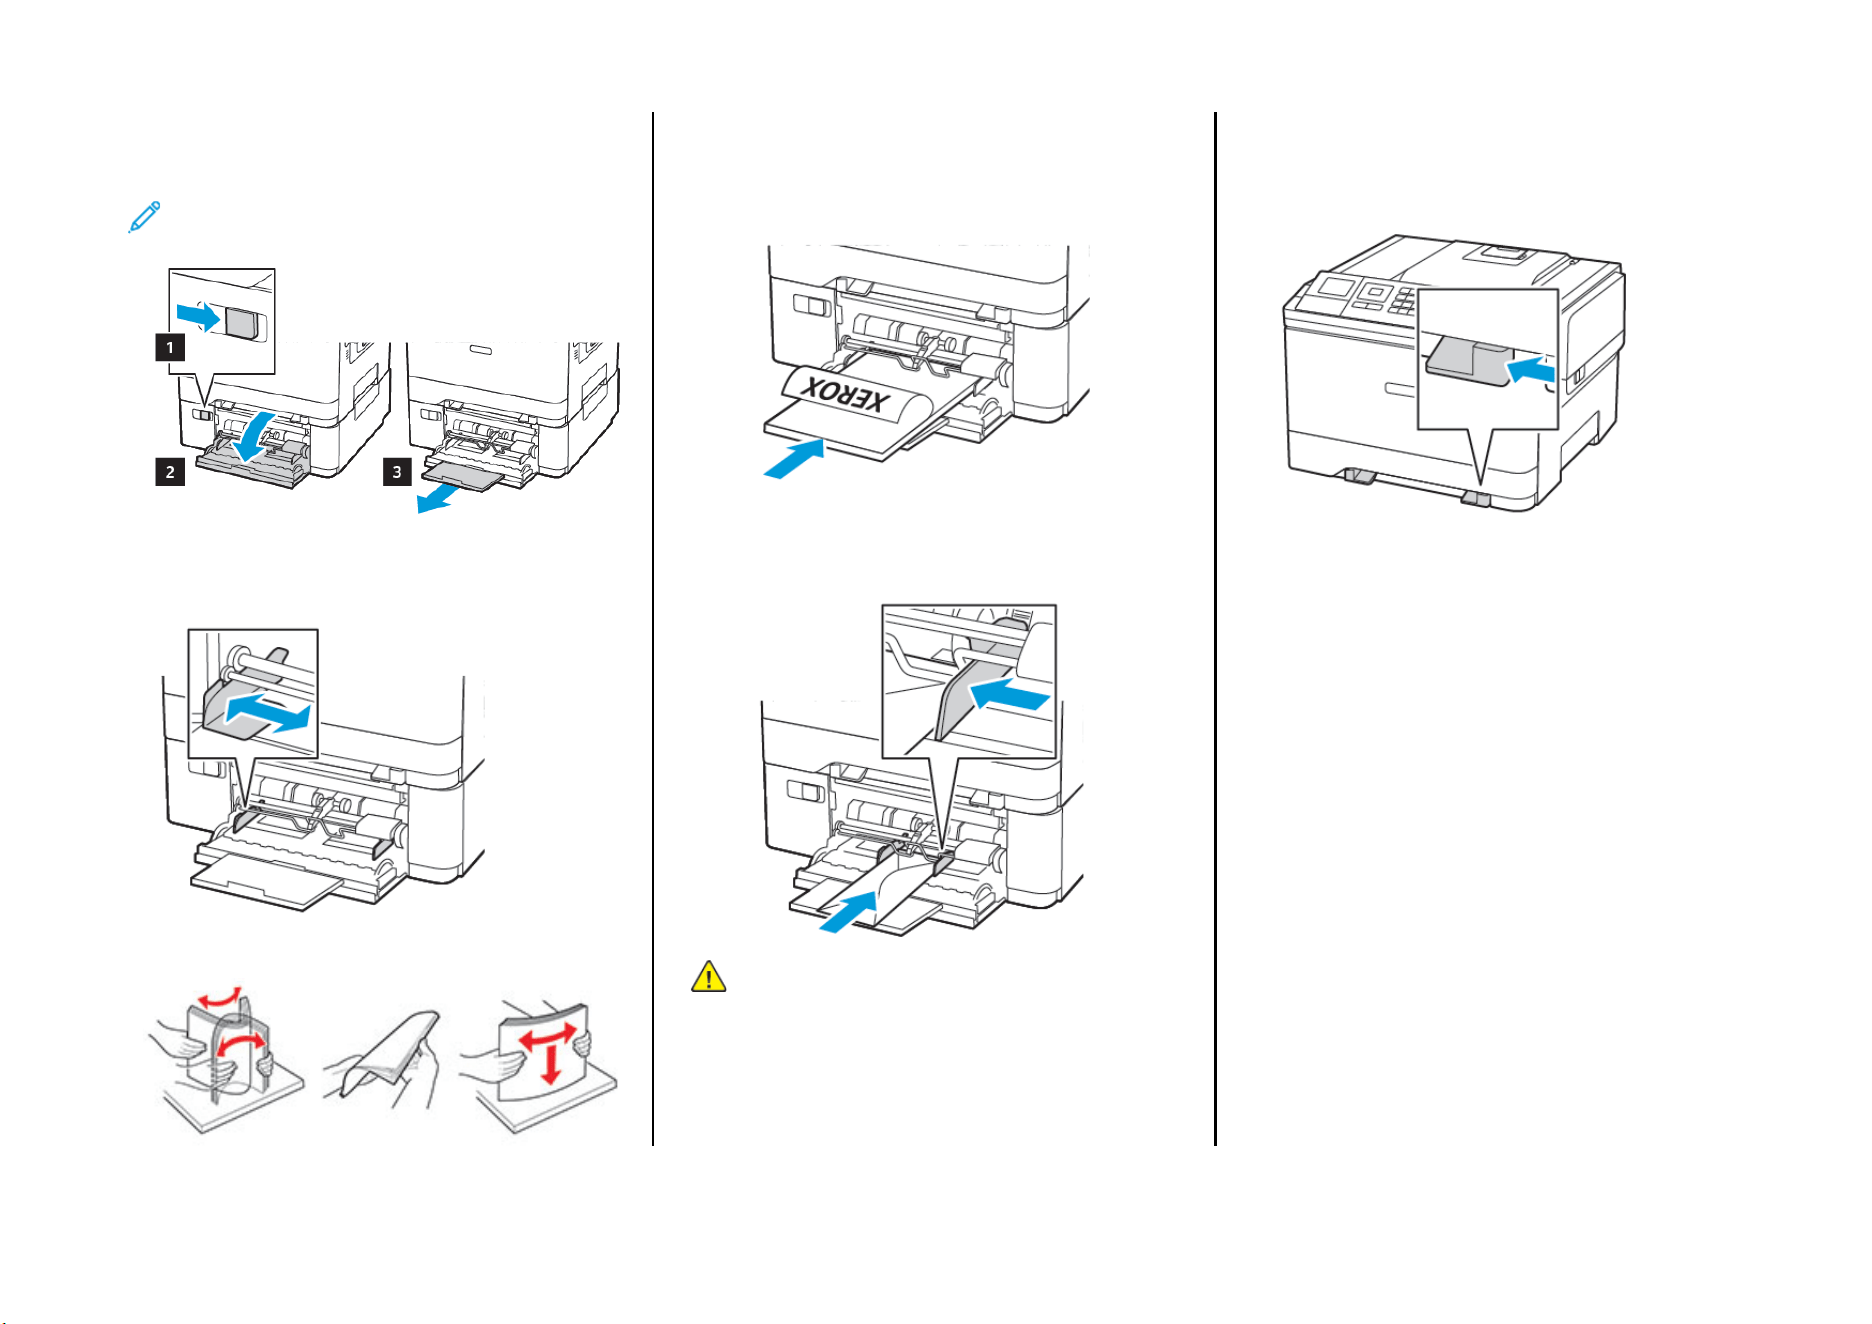
LLooaaddiinngg tthhee mmuullttiippuurrppoossee ffeeeeddeerr
1. Open the multipurpose feeder.
Note: The multipurpose feeder is available only in some
printer models.
2. Adjust the guide to match the size of the paper that you are
loading.
3. Flex, fan, and align the paper edges before loading.
4. Load paper.
• Load paper, card stock, and letterhead with the printable side
facedown and the top edge entering the printer first.
• Load envelopes with the flap side up and against the right
side of the paper guide.
Warning: Do not use envelopes with stamps, clasps,
snaps, windows, coated linings, or self-stick adhesives.
5. From the control panel, set the paper size and paper type to
match the paper loaded.
LLooaaddiinngg tthhee mmaannuuaall ffeeeeddeerr
1. Adjust the guide to match the size of the paper that you are
loading.
3
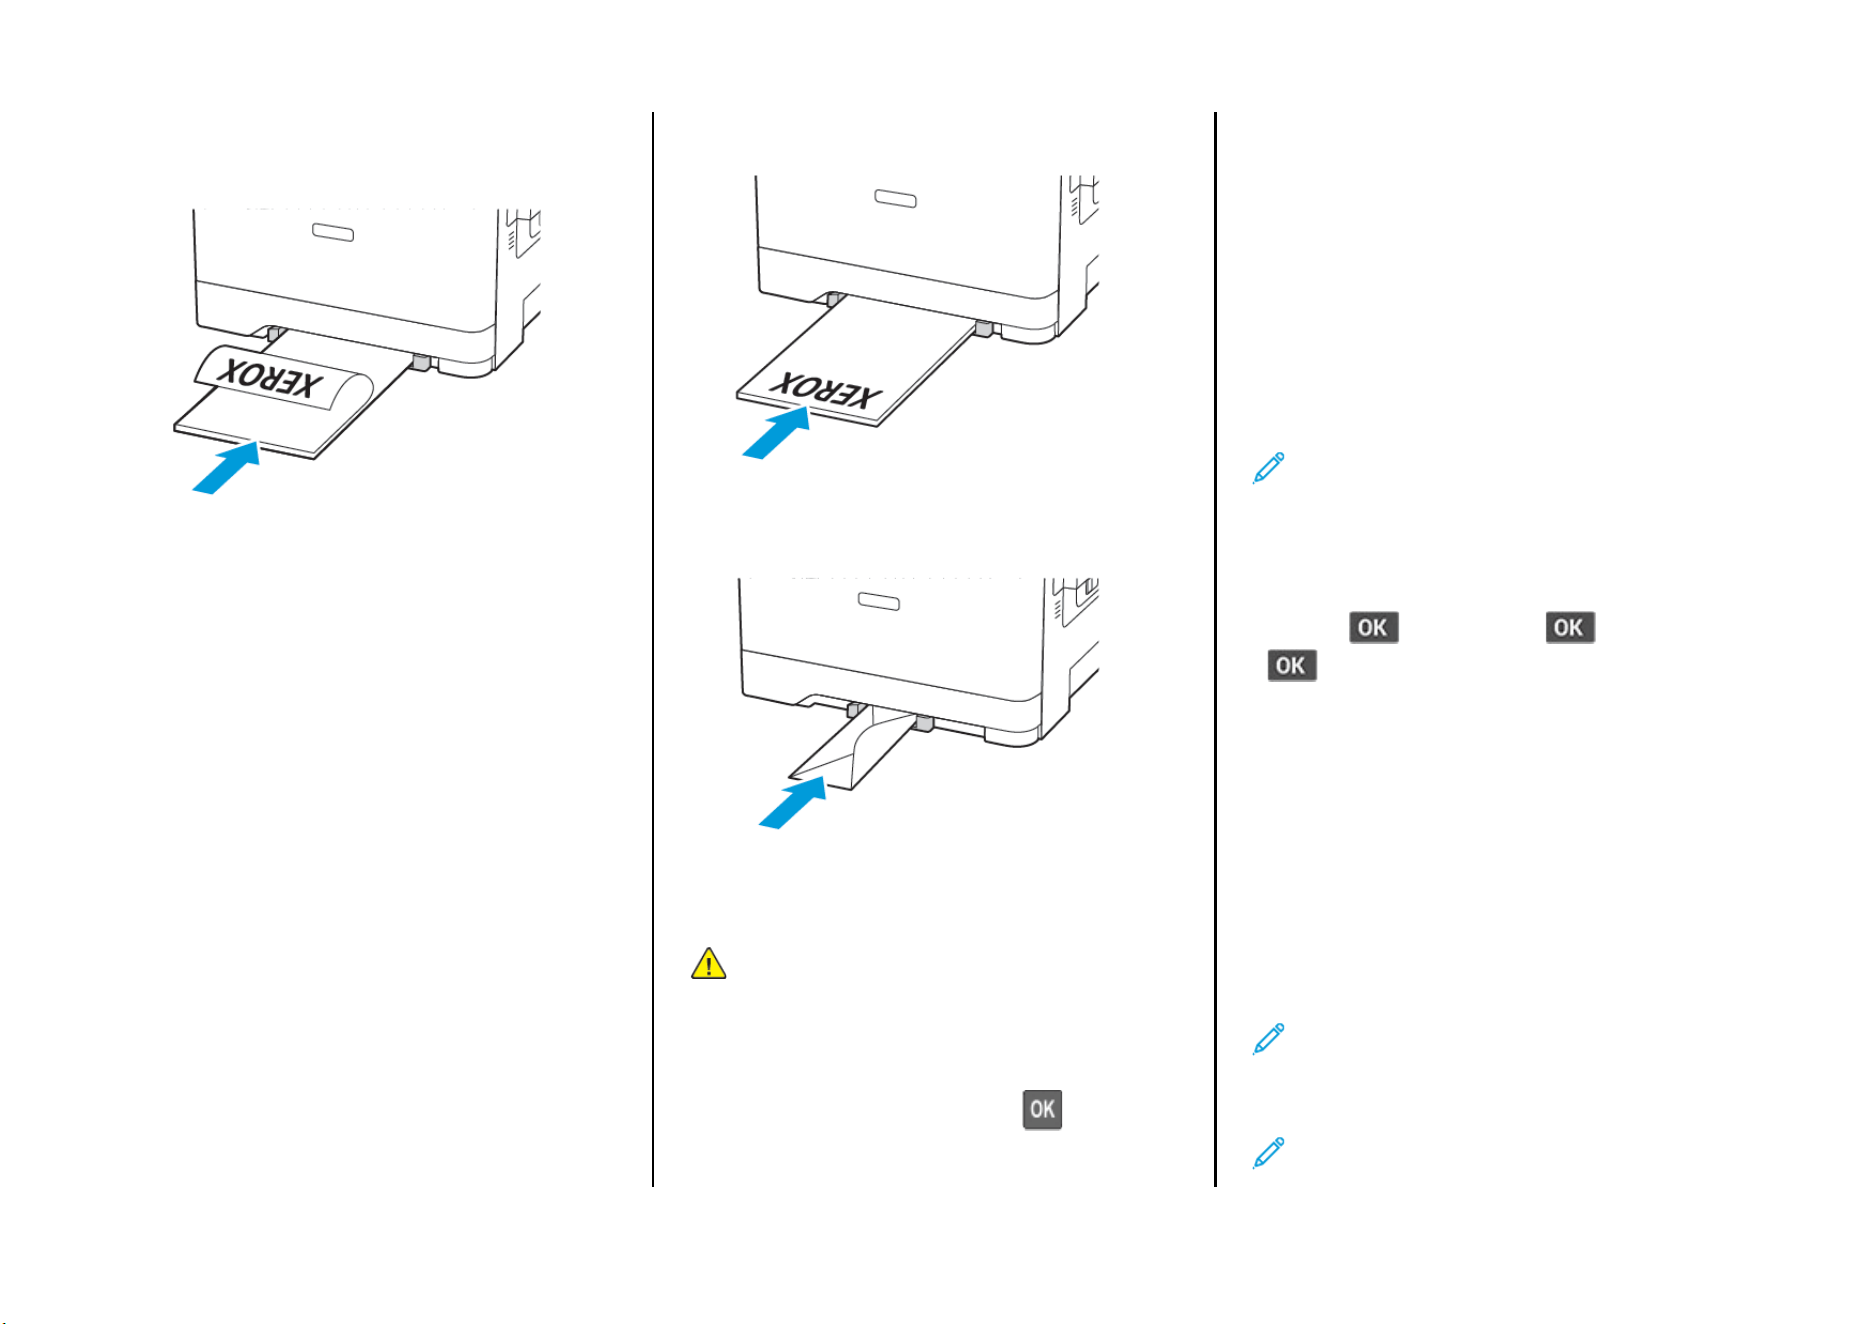
2. Load a sheet of paper with the printable side facedown.
• Load letterhead with the printable side facedown and the top
edge entering the printer first for one-sided printing.
• Load letterhead with the printable side faceup and the top
edge entering the printer last for two-sided printing.
• Load envelope with the flap side up and against the right side
of the paper guide.
3. Feed the paper until its leading edge gets pulled in.
Warning: To avoid paper jams, do not force paper into the
manual feeder.
SSeettttiinngg tthhee PPaappeerr SSiizzee aanndd TTyyppee
1. From the control panel, navigate to Settings > Paper > Tray
Configuration > Paper Size/Type, then select a paper source.
For non-touch-screen printer models, press
to navigate
through the settings.
2. Set the paper size and type.
UUppddaattiinngg ffiirrmmwwaarree
Some applications require a minimum device firmware level to
operate correctly.
For more information on updating the device firmware, contact
your Lexmark representative.
1. From the Embedded Web Server, click Settings > Device >
Update Firmware.
2. Browse to locate the required flash file.
3. Apply the changes.
CCoonnffiigguurriinngg WWii--FFii DDiirreecctt
®®
Note: This feature is available only in some printer models.
Wi-Fi Direct is a Wi-Fi-based peer-to-peer technology that allows
wireless devices to connect directly to a Wi-Fi Direct-enabled printer
without using an access point (wireless router).
1. From the control panel, navigate to:
Settings >
> Network/Ports > > Wi-Fi Direct >
2. Configure the settings.
• Enable Wi-Fi Direct—Enables the printer to broadcast its
own Wi-Fi Direct network.
• Wi-Fi Direct Name—Assigns a name for the Wi-Fi Direct
network.
• Wi-Fi Direct Password—Assigns the password for
negotiating the wireless security when using the peer-to-
peer connection.
• Show Password on Setup Page—Shows the password on
the Network Setup Page.
• Auto-Accept Push Button Requests—Lets the printer
accept connection requests automatically.
Note: Accepting push-button requests automatically
is not secured.
CCoonnnneeccttiinngg aa MMoobbiillee DDeevviiccee ttoo tthhee PPrriinntteerr
Note: This feature is available only in some printer models.
4
Before connecting your mobile device, make sure that Wi-Fi Direct has
been configured. For more information, see Configuring Wi-Fi Direct
®
.
CCoonnnneeccttiinngg UUssiinngg WWii--FFii DDiirreecctt
Note: These instructions apply only to Android mobile
devices.
1. From the mobile device, go to the settings menu.
2. Enable Wi-Fi, and then tap Wi-Fi Direct.
3. Select the printer Wi-Fi Direct name.
4. Confirm the connection on the printer control panel.
CCoonnnneeccttiinngg UUssiinngg WWii--FFii
1. From the mobile device, go to the settings menu.
2. Tap Wi-Fi, and then select the printer Wi-Fi Direct name.
Note: The string DIRECT-xy (where x and y are two random
characters) is added before the Wi-Fi Direct name.
3. Enter the Wi-Fi Direct password.
Clearing Jams
AAvvooiiddiinngg jjaammss
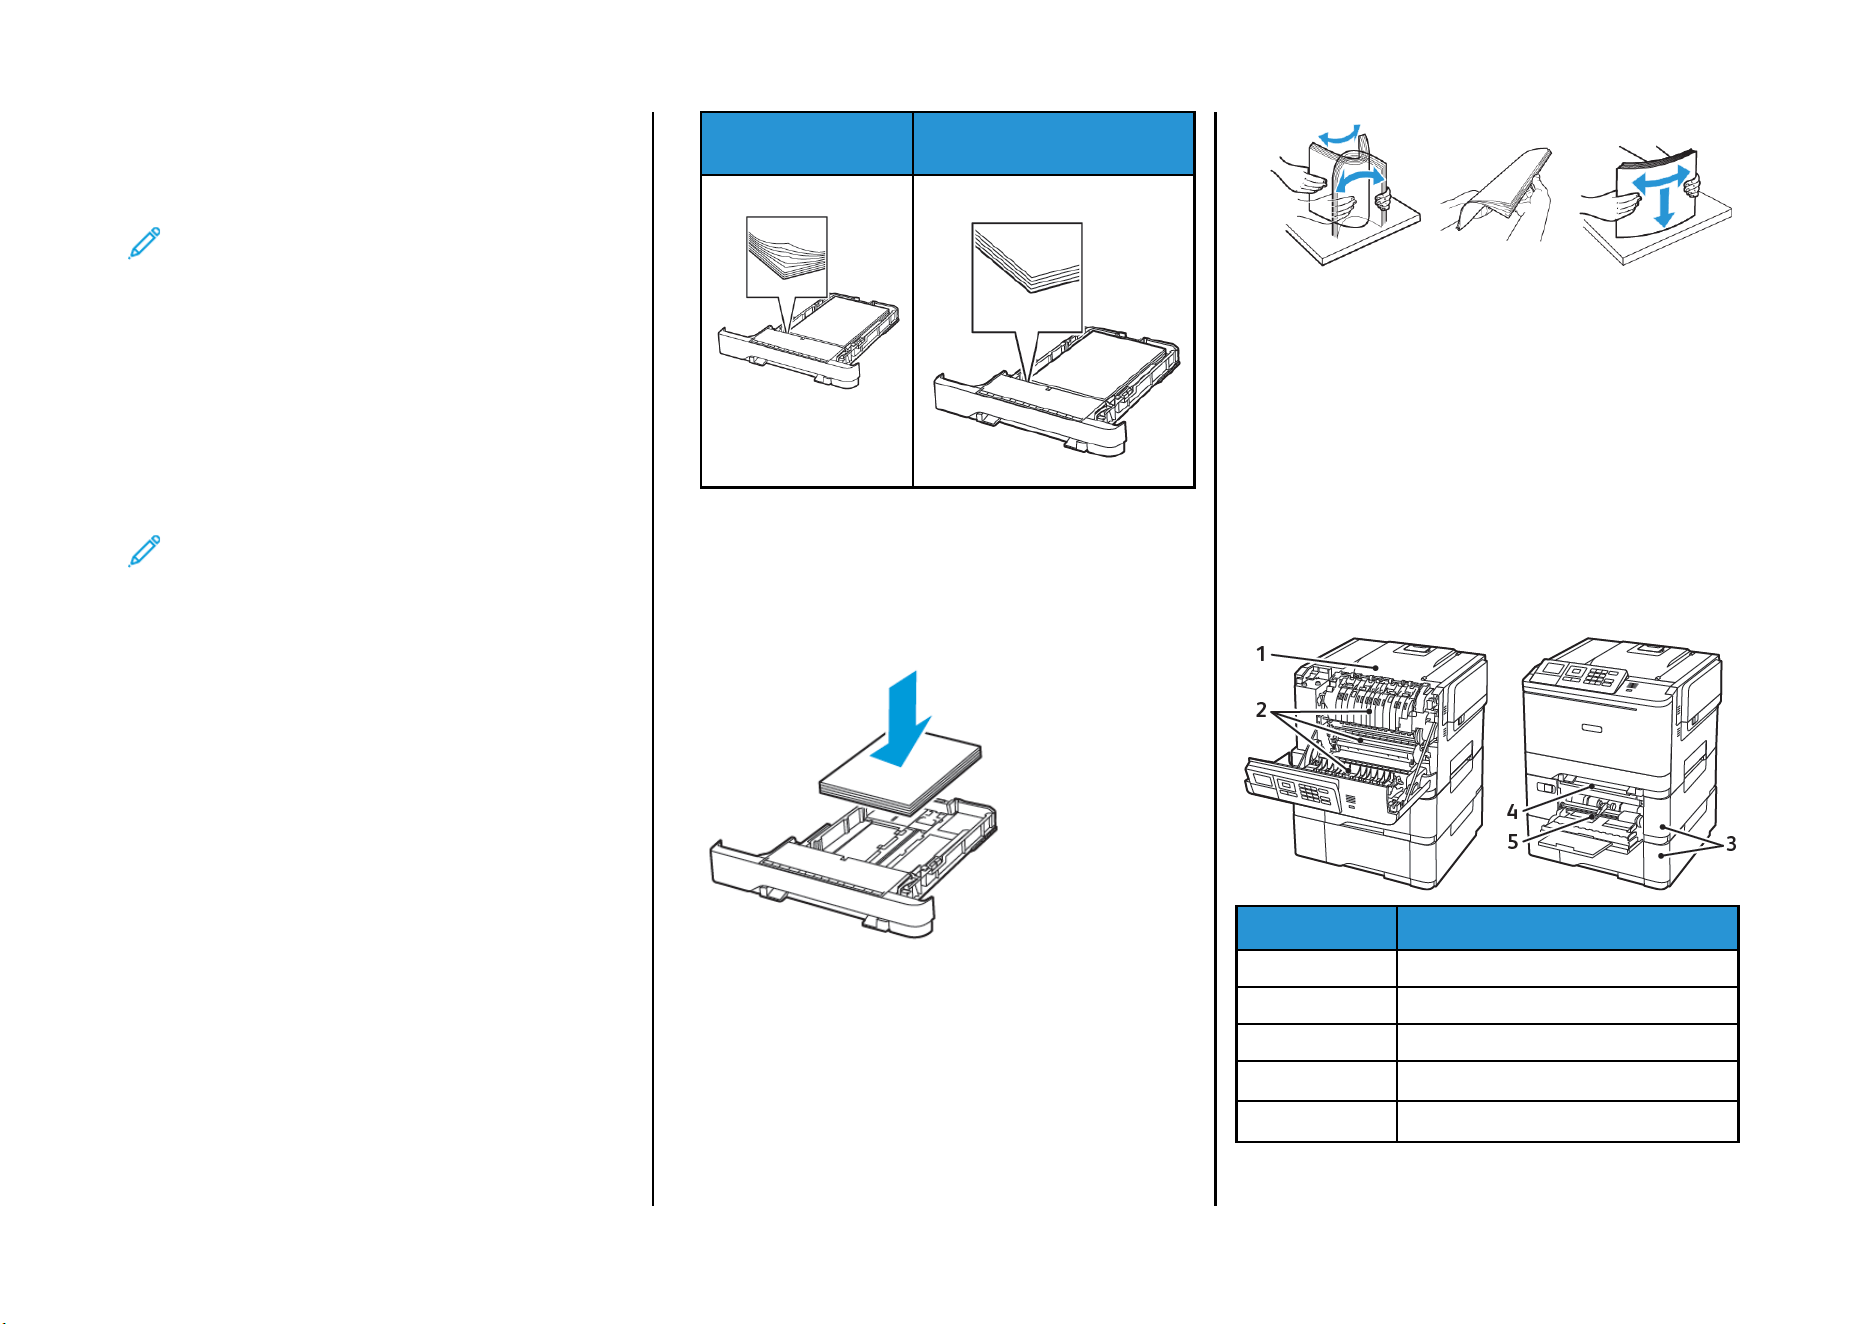
LLooaadd PPaappeerr PPrrooppeerrllyy
• Make sure that the paper lies flat in the tray.
Correct loading of paper Incorrect loading of paper
• Do not load or remove a tray while the printer is printing.
• Do not load too much paper. Make sure that the stack height is
below the maximum paper fill indicator.
• Do not slide paper into the tray. Load paper as shown in the
illustration.
• Make sure that the paper guides are positioned correctly and are
not pressing tightly against the paper or envelopes.
• Push the tray firmly into the printer after loading paper.
UUssee RReeccoommmmeennddeedd PPaappeerr
• Use only recommended paper or specialty media.
• Do not load paper that is wrinkled, creased, damp, bent, or curled.
• Flex, fan, and align the paper edges before loading.
• Do not use paper that has been cut or trimmed by hand.
• Do not mix paper sizes, weights, or types in the same tray.
• Make sure that the paper size and type are set correctly on the
computer or printer control panel.
• Store paper according to manufacturer recommendations.
IIddeennttiiffyyiinngg JJaamm LLooccaattiioonnss
• When Jam Assist is set to On, the printer flushes blank pages or
pages with partial prints after a jammed page has been
cleared. Check your printed output for blank pages.
• When Jam Recovery is set to On or Auto, the printer reprints
jammed pages.
Number Jam location
1 Standard bin
2 In the fuser
3 Below the fuser
4 Duplex unit
5 Trays
5
Number Jam location
6 Manual feeder
7 Multipurpose feeder
The multipurpose feeder is available only
in some printer models.
PPaappeerr jjaamm iinn ttrraayyss
1. Remove the tray.
2. Remove the jammed paper.
Note: Make sure that all paper fragments are removed.
3. Insert the tray.
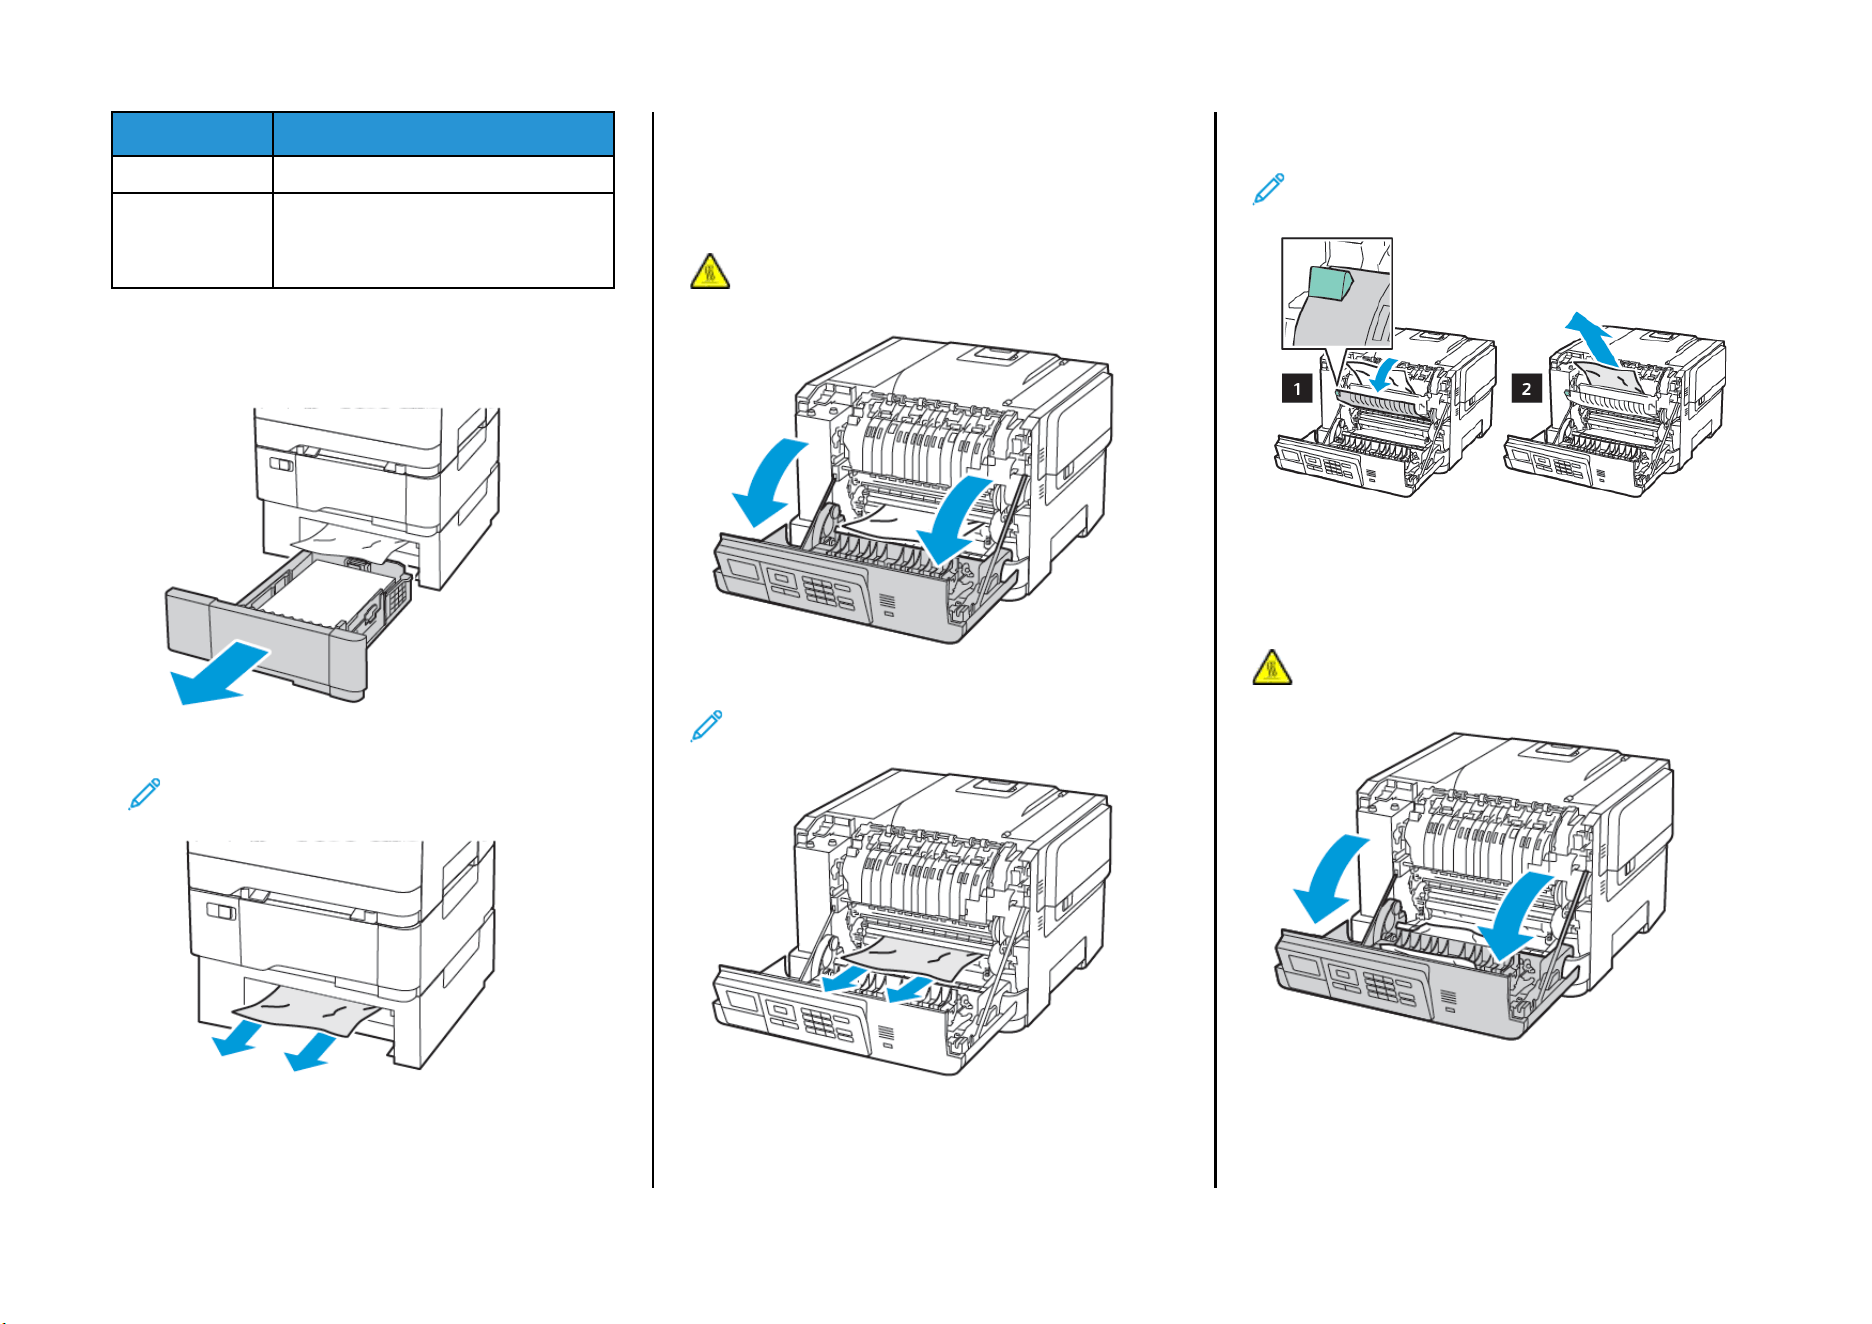
PPaappeerr JJaammss iinn DDoooorr AA
Paper jam in the fuser
1. Open door A.
CAUTION—HOT SURFACE: The inside of the printer might
be hot. To reduce the risk of injury from a hot component,
allow the surface to cool before touching it.
2. Remove the jammed paper.
Note: Make sure that all paper fragments are removed.
3. Open the fuser access door, and then remove the jammed
paper.
Note: Make sure that all paper fragments are removed.
4. Close door A.
Paper jam in the duplex unit
1. Open door A.
CAUTION—HOT SURFACE: The inside of the printer
might be hot. To reduce the risk of injury from a hot
component, allow the surface to cool before touching it.
6
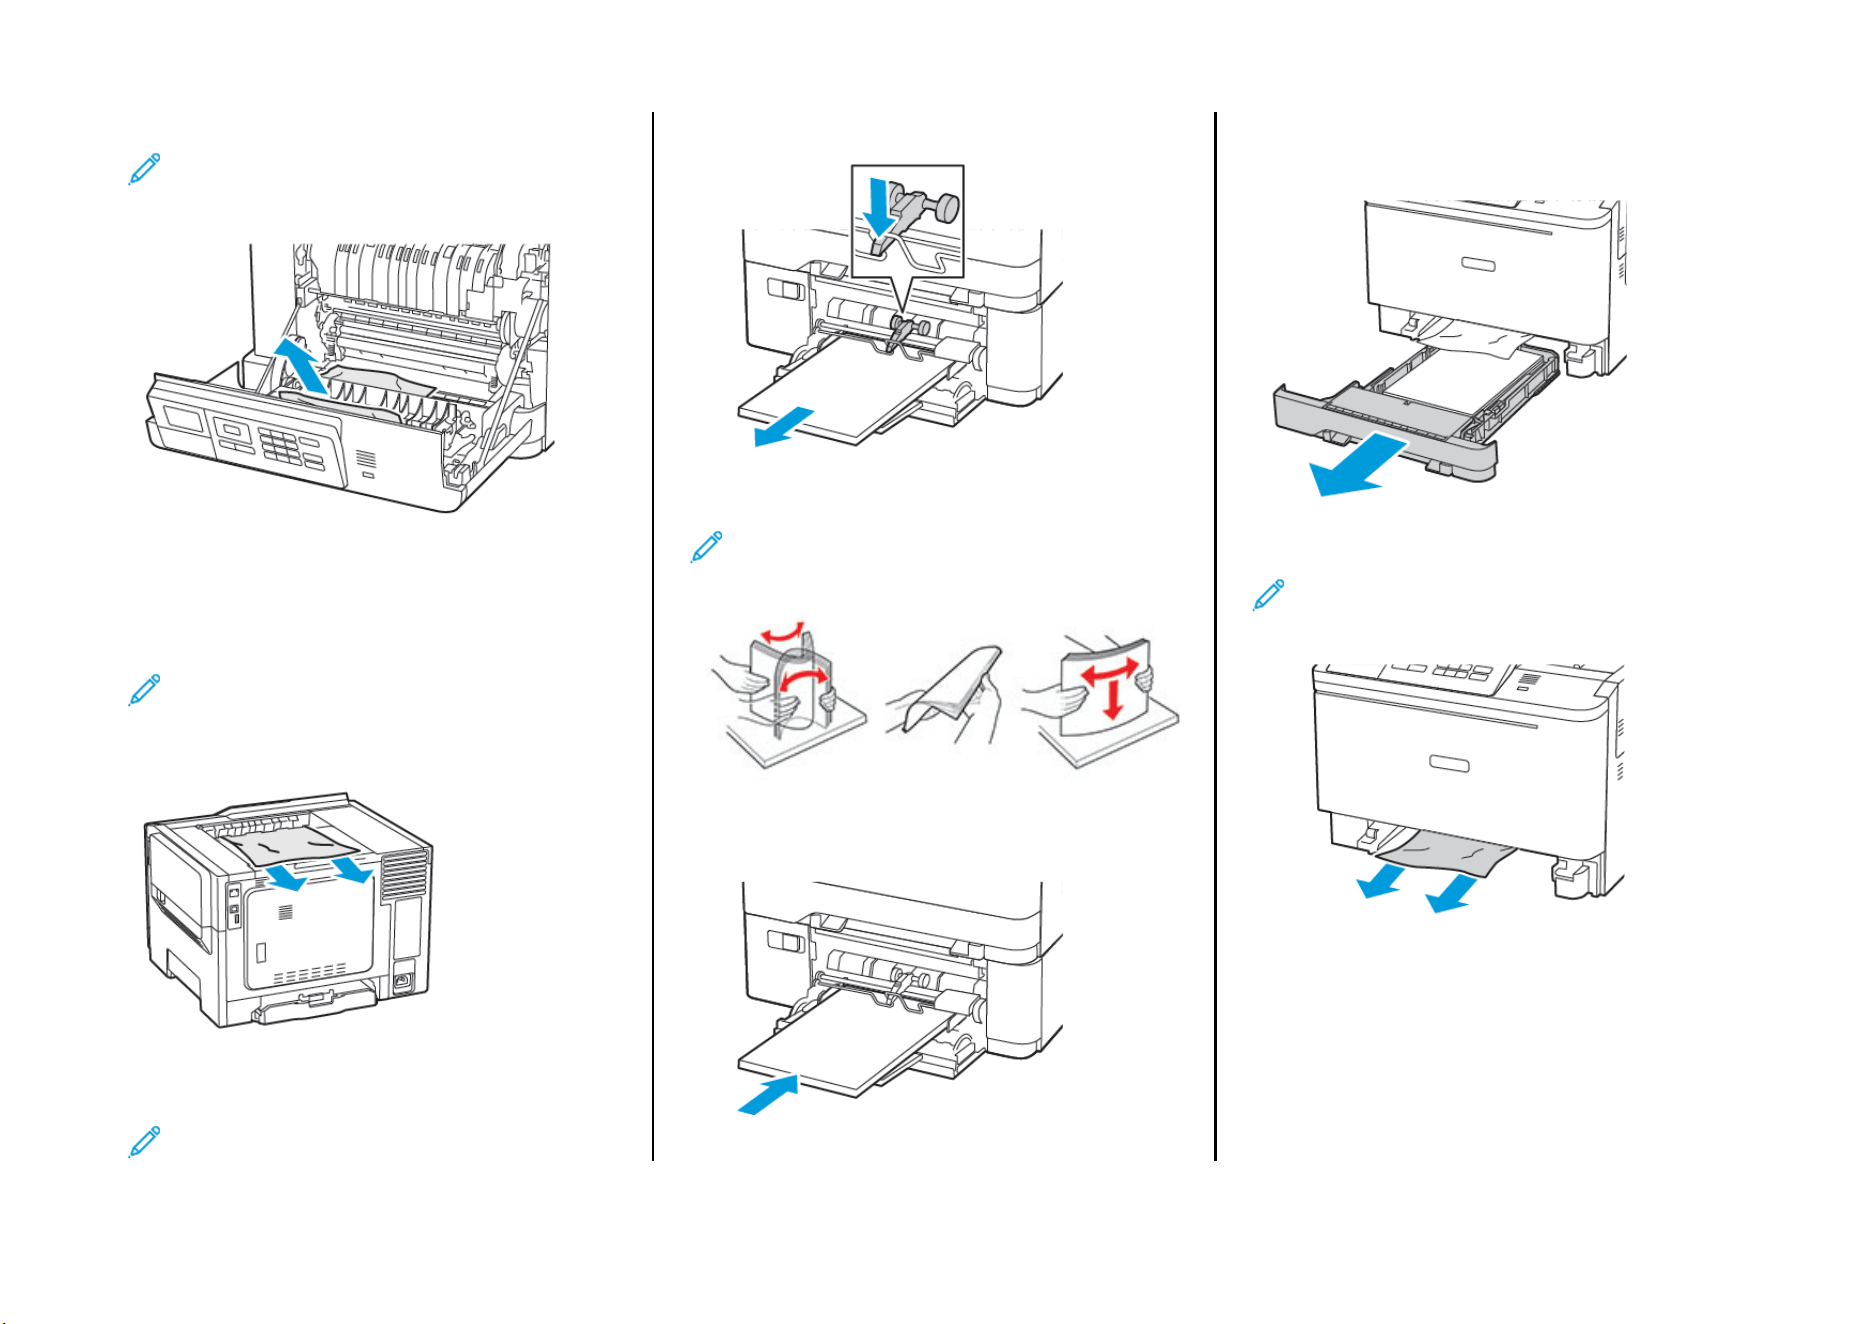
2. Remove the jammed paper.
Note: Make sure that all paper fragments are removed.
3. Close door A.
PPaappeerr JJaamm iinn tthhee SSttaannddaarrdd BBiinn
Remove the jammed paper.
Note: Make sure that all paper fragments are removed.
PPaappeerr JJaamm iinn tthhee MMuullttiippuurrppoossee FFeeeeddeerr
Note: The multipurpose feeder is available only in some
printer models.
1. Remove paper from the multipurpose feeder.
2. Remove the jammed paper.
Note: Make sure that all paper fragments are removed.
3. Flex, fan, and align the paper edges before loading.
4. Reload paper.
PPaappeerr JJaamm iinn tthhee MMaannuuaall FFeeeeddeerr
1. Remove the tray.
2. Remove the jammed paper.
Note: Make sure that all paper fragments are removed.
3. Insert the tray.
7

© 2021 Xerox Corporation. All rights reserved. Xerox
®
is a trademark of Xerox Corporation in the United States and other countries.
Apple
®
, iPad
®
, iPhone
®
, iPod
®
, iPod touch
®
, AirPrint
®
and the AirPrint Logo
®
are trademarks or registered trademarks of Apple Inc. in the U.S. and other countries. Google Cloud Print
™
web printing service,
Gmail
™
webmail service, and Android
™
mobile technology platform are trademarks of Google, Inc. Microsoft
®
, Windows Vista
®
, Windows
®
, Windows Server
®
, and OneDrive
®
are registered trademarks of
Microsoft Corporation in the United States and other countries. Mopria is a trademark of the Mopria Alliance. Wi-Fi CERTIFIED Wi-Fi Direct
®
is a trademark of the Wi-Fi Alliance. All other trademarks are the
property of their respective owners. 702P08612
BR32750
607E39620
8