Read all instructions before
assembling and using product.
IMPORTANT - Keep instructions for
future use.
0622R1-3810
Owner’s Manual
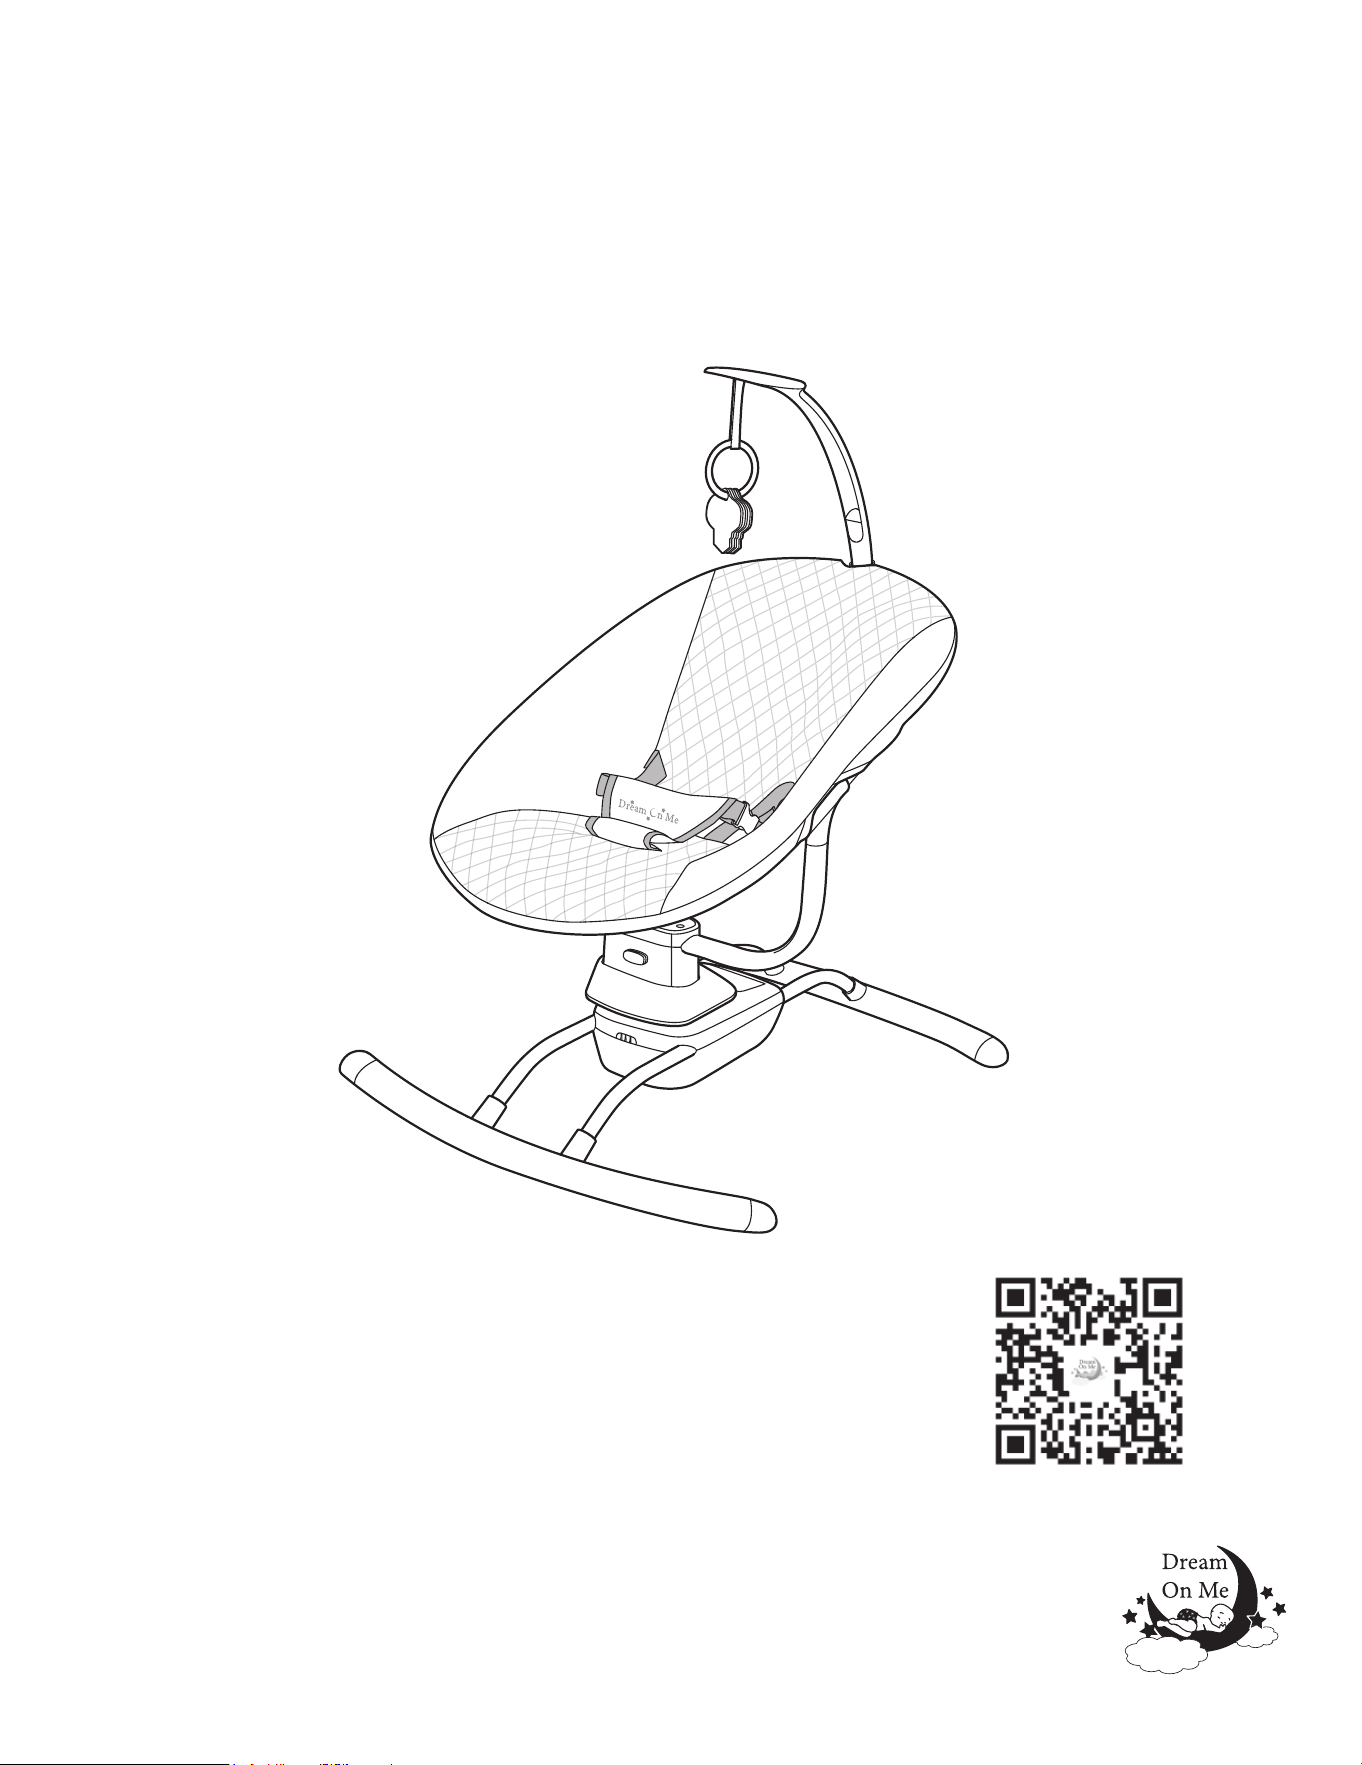
COMFORT ME
Electric Multi-function Swing
Scan the QR code to register your product
https://dreamonme.com/customercare/registration/

2
www.dreamonme.com/help
WARNINGS
• FAILURE TO FOLLOW THESE WARNINGS AND THE INSTRUCTIONS COULD RESULT IN
SERIOUS INJURY OR DEATH.
• PLEASE READ THESE INSTRUCTIONS CAREFULLY TO ENSURE THE SAFETY OF YOUR
CHILD.
• TO SECURE SAFE USE OF THIS PRODUCT, FOLLOW THE WARNINGS, GUIDELINES AND
RECOMMENDATIONS FROM THE INSTRUCTION MANUAL. THIS PRODUCT SHOULD BE
FULLY ASSEMBLED PRIOR TO USE.
• ADULT ASSEMBLY REQUIRED.
• NEVER LEAVE THE CHILD UNATTENDED IN THE PRODUCT.
• STOP USING THE PRODUCT ONCE YOUR CHILD IS ABLE TO SIT UNAIDED OR WEIGHS
MORE THAN 9 KG.
• THIS PRODUCT IS NOT INTENDED FOR LONG PERIODS OF USE AND SLEEP.
• NEVER LEAVE THIS PRODUCT ON ELEVATED, SLOPED OR SOFT SURFACES.
• ALWAYS USE THE SAFETY HARNESS.
• TO AVOID INJURY, MAKE SURE THAT THE CHILD IS AT SAFE DISTANCE WHILE MAKING
ADJUSTMENTS, UNFOLDING, FOLDING AND STORING THE PRODUCT.
• DO NOT MOVE THE PRODUCT OR LIFT THE PRODUCT WHILE THERE IS A CHILD IN IT.
• DO NOT ALLOW CHILDREN TO PLAY WITH THIS PRODUCT.
• SET THE SOUND VOLUME LOW TO AVOID DAMAGE TO THE CHILD'S HEARING.
• KEEP THE PRODUCT AWAY FROM FIRE.
• USE FOR BABIES AGED AROUND UP TO 6 MONTHS WITH MAXIMUM WEIGHT 9 KG.
• DO NOT USE THE PRODUCT FOR MORE THAN ONE CHILD.
• THE PRODUCT IS NOT A SUBSTITUTE FOR A COT OR BED. IF THE CHILD NEEDS
SLEEP, YOU MUST PUT IT IN A SUITABLE BED OR COT.
• DO NOT USE THE PRODUCT IF THERE ARE MISSING OR DAMAGED PARTS.
• DO NOT USE SPARE PARTS OR OTHER COMPONENTS, WHICH ARE NOT SUPPLIED BY
THE COMPANY. CONTACT DREAM ON ME INC. FOR REPLACEMENT PARTS AND
INSTRUCTIONS.
• DO NOT MAKE CHANGES OR MODIFICATIONS TO THE STRUCTURE. IF NECESSARY,
CONTACT DREAM ON ME INC OR AN AUTHORIZED SERVICE FOR ADVICE AND REPAIR.
• DO NOT TIE STRINGS OR CORDS TO THE PRODUCT TO AVOID RISK OF
SUFFOCATION/STRANGULATION.
• USE THE PRODUCT ONLY FOR ITS PURPOSE.
• ALL SETTINGS REGARDING THE POWER SUPPLY: TURNING ON/OFF, REPLACING OR
CHARGING OF BATTERIES IS TO BE DONE ONLY BY ADULTS.
• USE ONLY THE AC/DC ADAPTOR SUPPLIED BY DREAM ON ME INC.
• REGULARLY CHECK THE GOOD WORKING ORDER OF THE AC/DC ADAPTOR.
DISCONTINUE USAGE IN CASE OF DAMAGE.
• DO NOT ALLOW THE PRESENCE OF CHILDREN UNDER 3 YEARS BEFORE ASSEMBLY IS
COMPLETE TO AVOID THEIR ACCESS TO SMALL OR DISASSEMBLED PARTS.
• KEEP THE NYLON PACKAGING AWAY FROM CHILDREN TO AVOID RISK OF
SUFFOCATION.

www.dreamonme.com/help
3
WARNINGS (cont.)
WARNINGS AND GUIDELINES FOR USE OF BATTERIES:
• ONLY USE 4 PIECES OF 'C' TYPE BATTERIES.
• ALWAYS SECURE THE BATTERY COMPARTMENT COVER AFTER HAVING INSERTED
THE BATTERIES.
• DO NOT LET CHILDREN HAVE ACCESS TO THE BATTERIES OR PLAY WITH THEM.
• INSERT BATTERIES ONLY OF THE DESIGNATED TYPE AND VOLTAGE.
• DO NOT USE BATTERIES OF DIFFERENT TYPES.
• DO NOT MIX USED AND NEW BATTERIES.
• FOLLOW THE DESIGNATED POLARITY IN THE BATTERY COMPARTMENT.
• REMOVE THE DAMAGED OR WORN OUT BATTERIES.
• REMOVE THE BATTERIES WHEN YOU ARE NOT USING THE PRODUCT.
• DO NOT THROW THE BATTERIES IN AN OPEN FIRE. DO NOT BREAK THE BATTERIES
APART.
CAUTION:
• WASTE FROM EXHAUSTED OR UNUSABLE BATTERIES MUST BE DISPOSED OF
SEPARATELY.
• BATTERIES SHOULD NOT BE DISPOSED OF WITH HOUSEHOLD WASTE.
• BATTERIES SHOULD BE DISPOSED OF AT THE DESIGNATED LOCATIONS.

…. for choosing Dream On Me and congratulations on joining our family;
a family that has been transforming lives for over 30+ years!
We appreciate your feedback and wish you the very best in the
coming years with your new addition. If you have any questions
or concerns please don’t hesitate to reach out to us. One of our
trusted Customer Care representatives will be happy to assist you.
Thank you again for entrusting us to provide you with safe
and affordable baby products and accessories.
THANK YOU...
LIMITED WARRANTY:
• Dream On Me warrants its product to be free from defects in material and
workmanship and agrees to remedy any such defect.
• This warranty covers 1 year from the date of original purchase.
• This warranty is valid only upon presentation of proof of purchase.
• This is solely limited to the repair or replacement of defective furniture
components and no assembly labor is included.
• This warranty does not apply to any product which has been improperly
assembled, subjected to misuse or abuse or which has been altered or
repaired in any way.
• This warranty gives you specific legal rights and you may also have other
rights which vary from State to State.
www.dreamonme.com/help
4
www.dreamonme.com/help
5
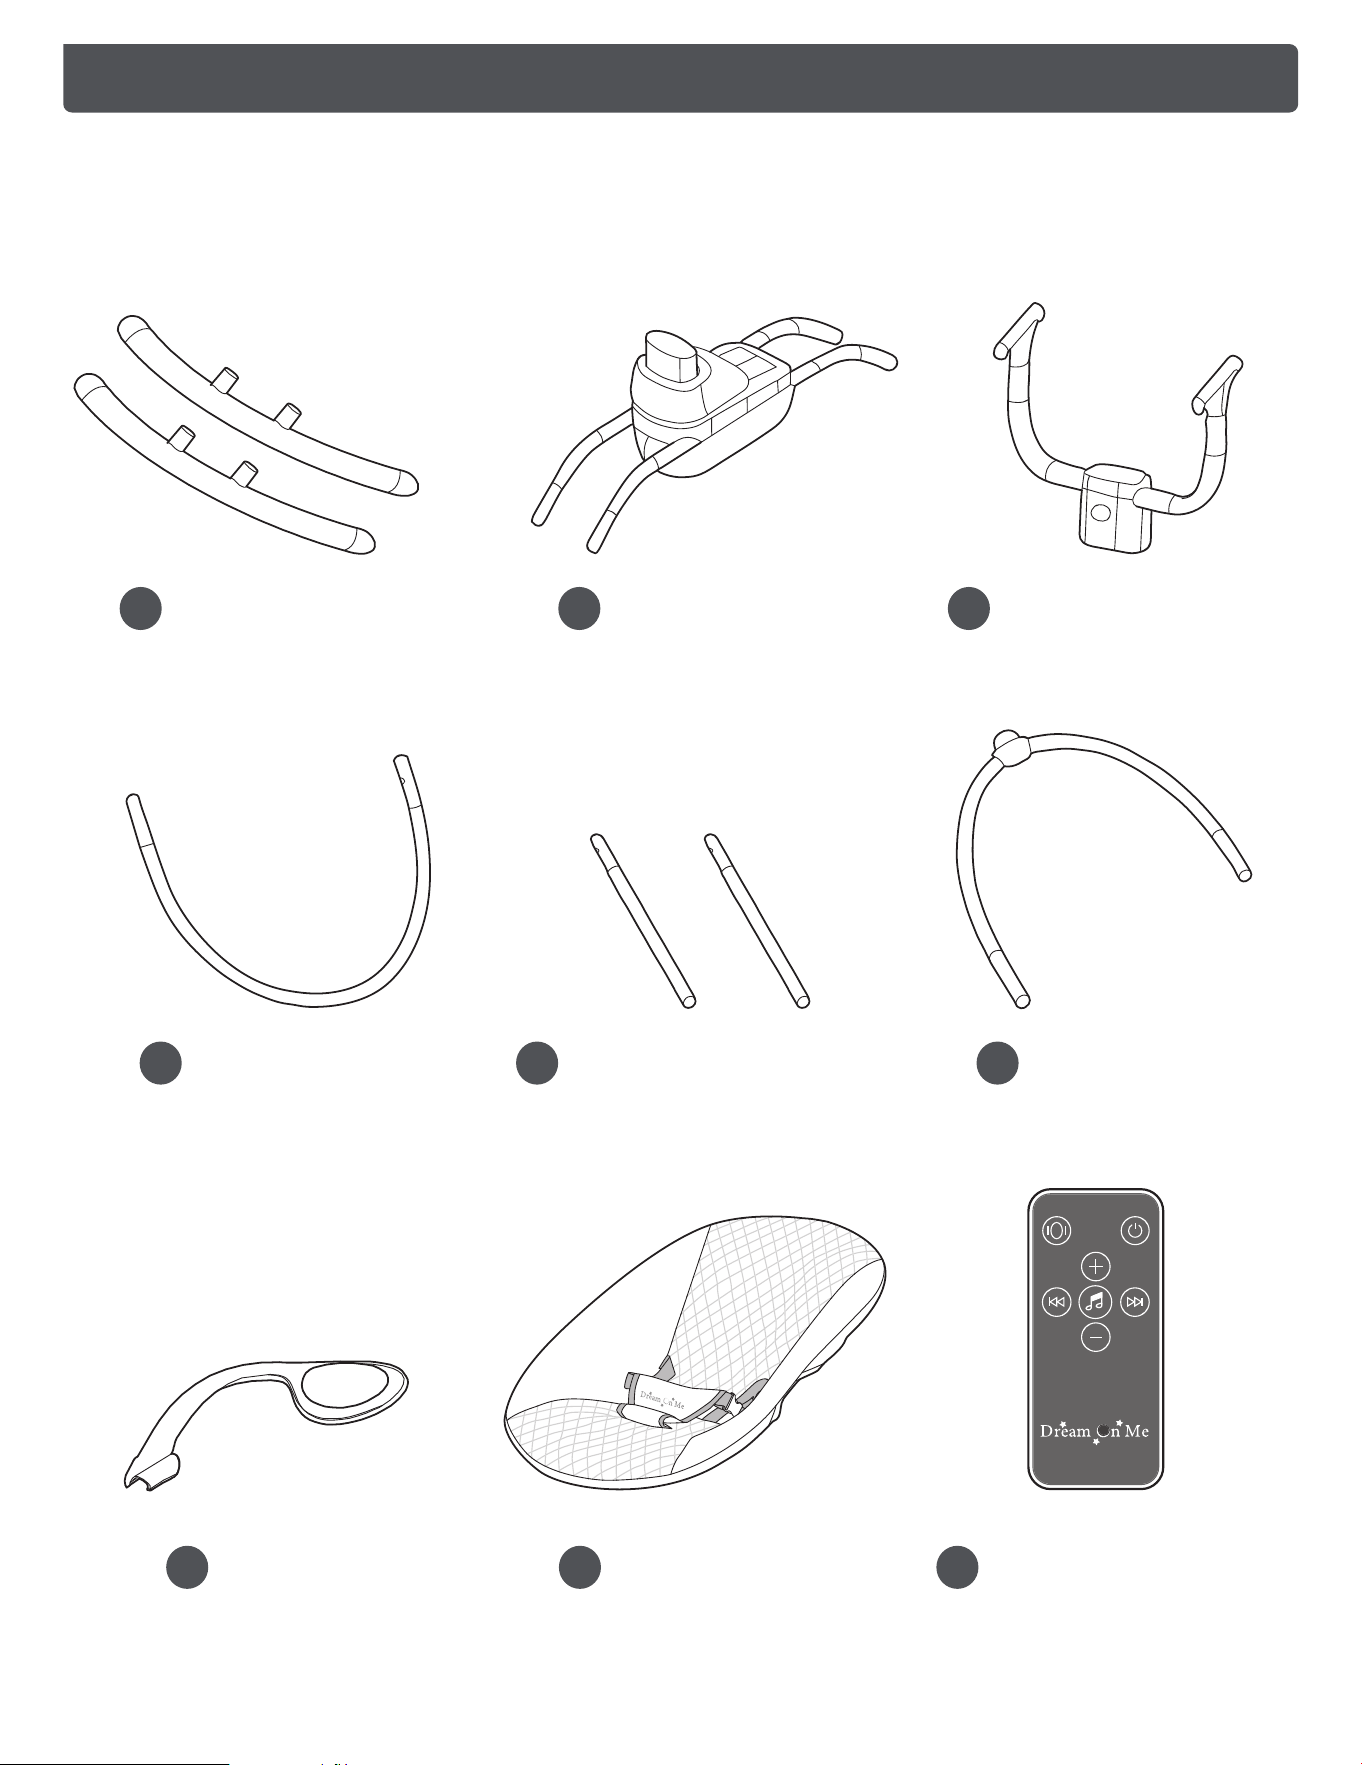
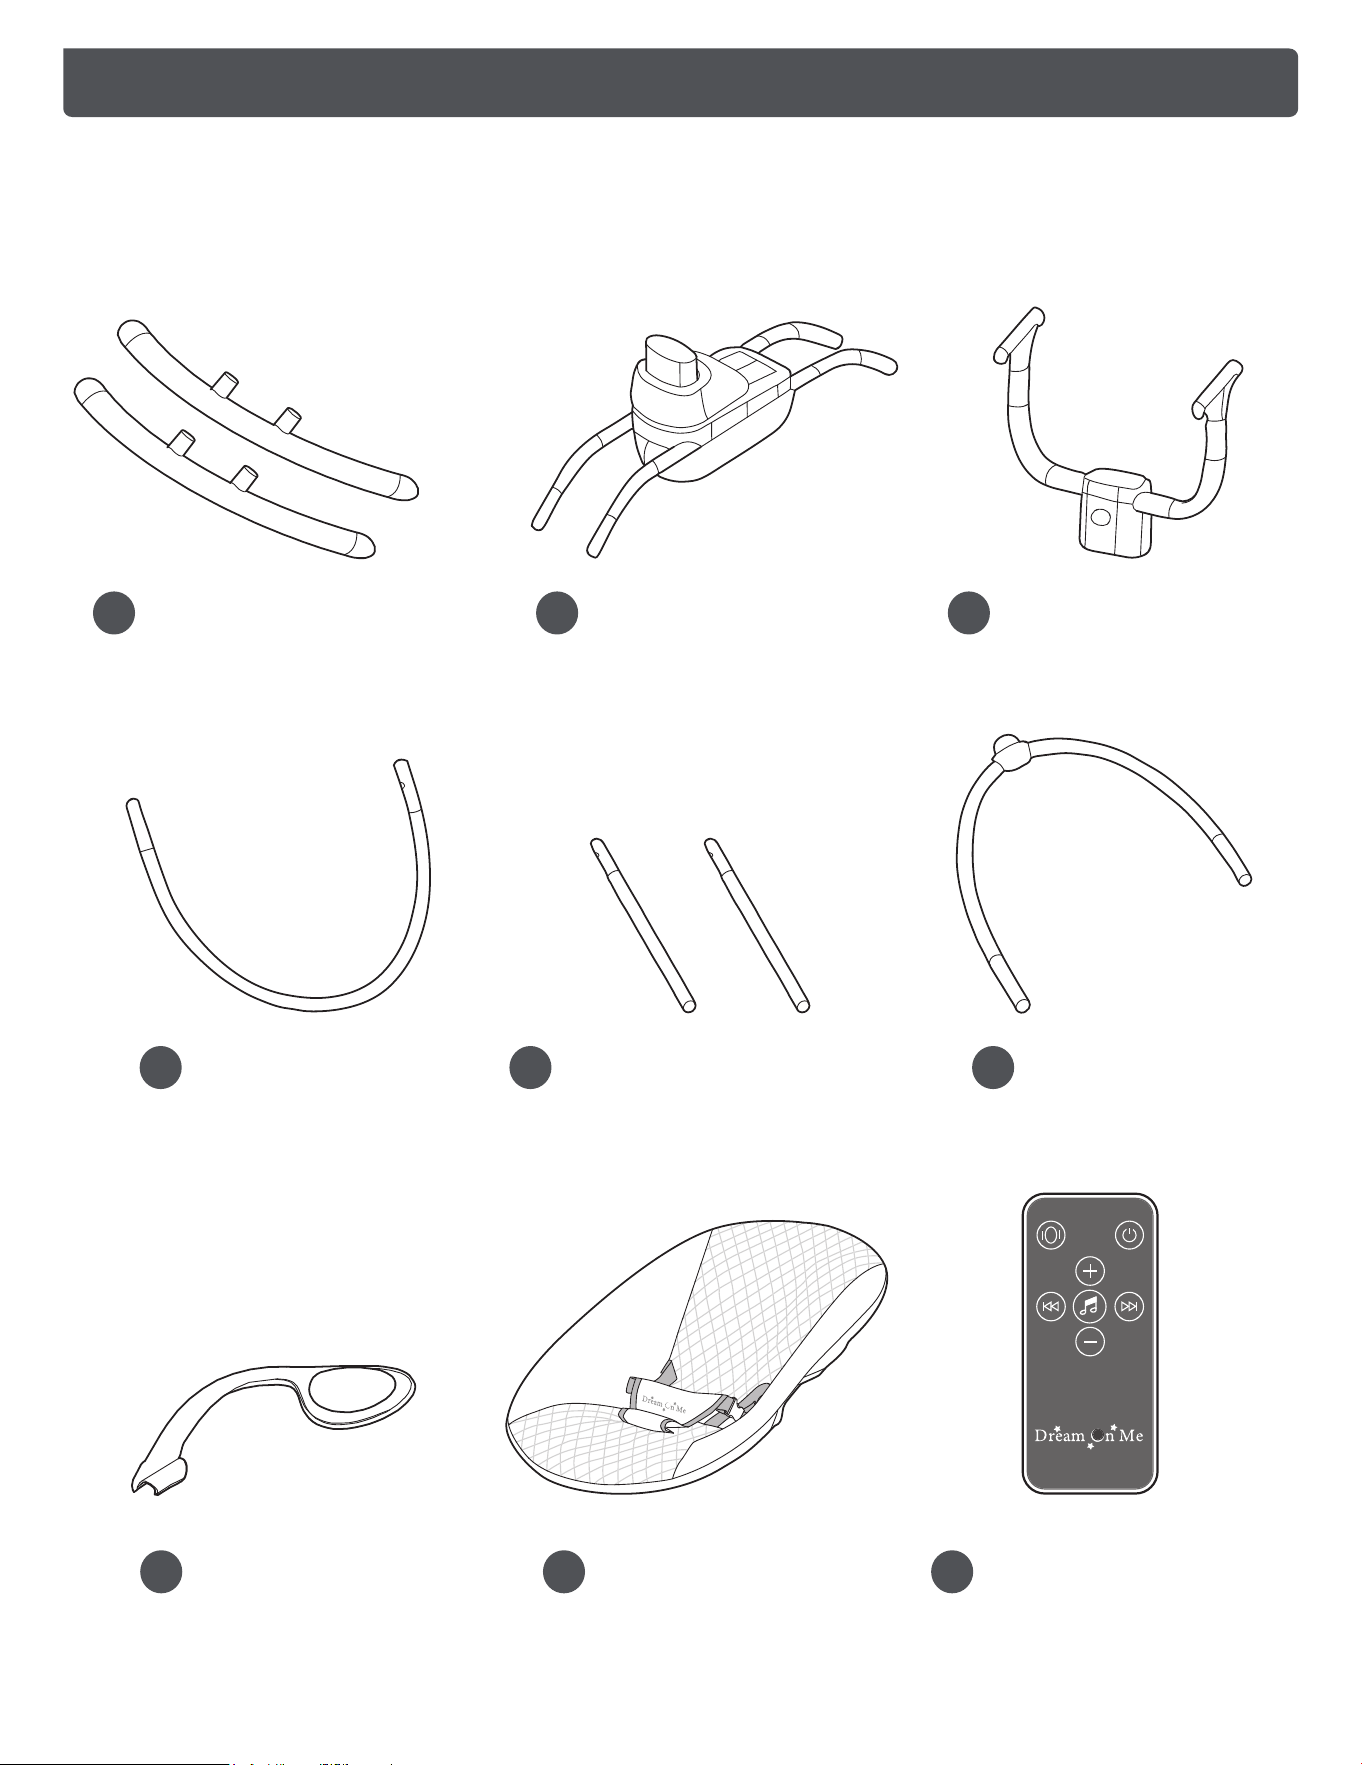
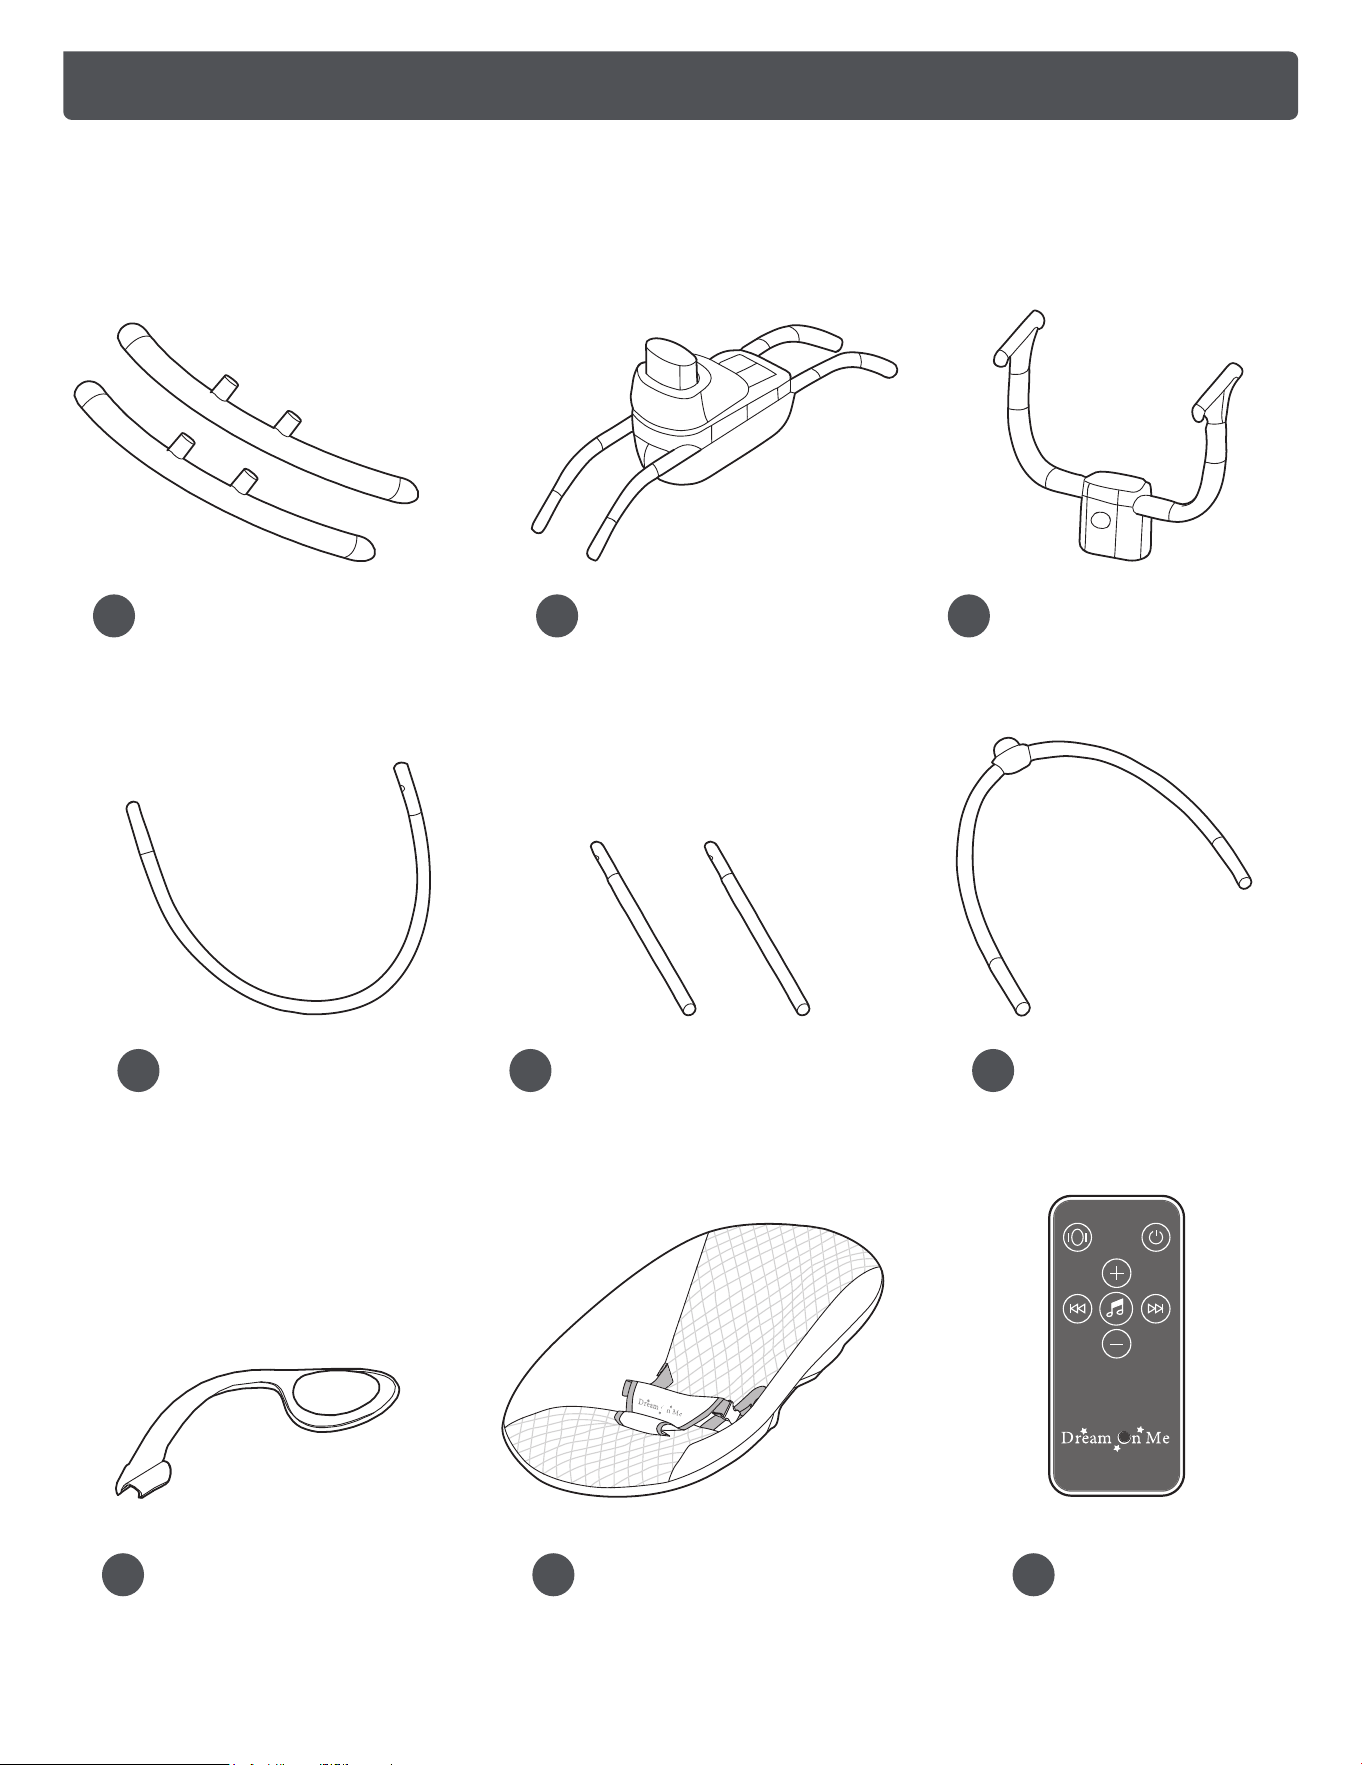
PARTS
If there are any missing parts, please contact Dream On Me before using the
product.
Plastic Base (X2)
1
Engine Machine
2
Seat Frame Base
3
Seat Frame
4
Connection Tube (X2)
5
Backrest Tube
6
Toy Bar
7
Seat Fabric
8
Remote Control
9
POWER
www.dreamonme.com/help
6
(2)
(2)
(1)
(1)
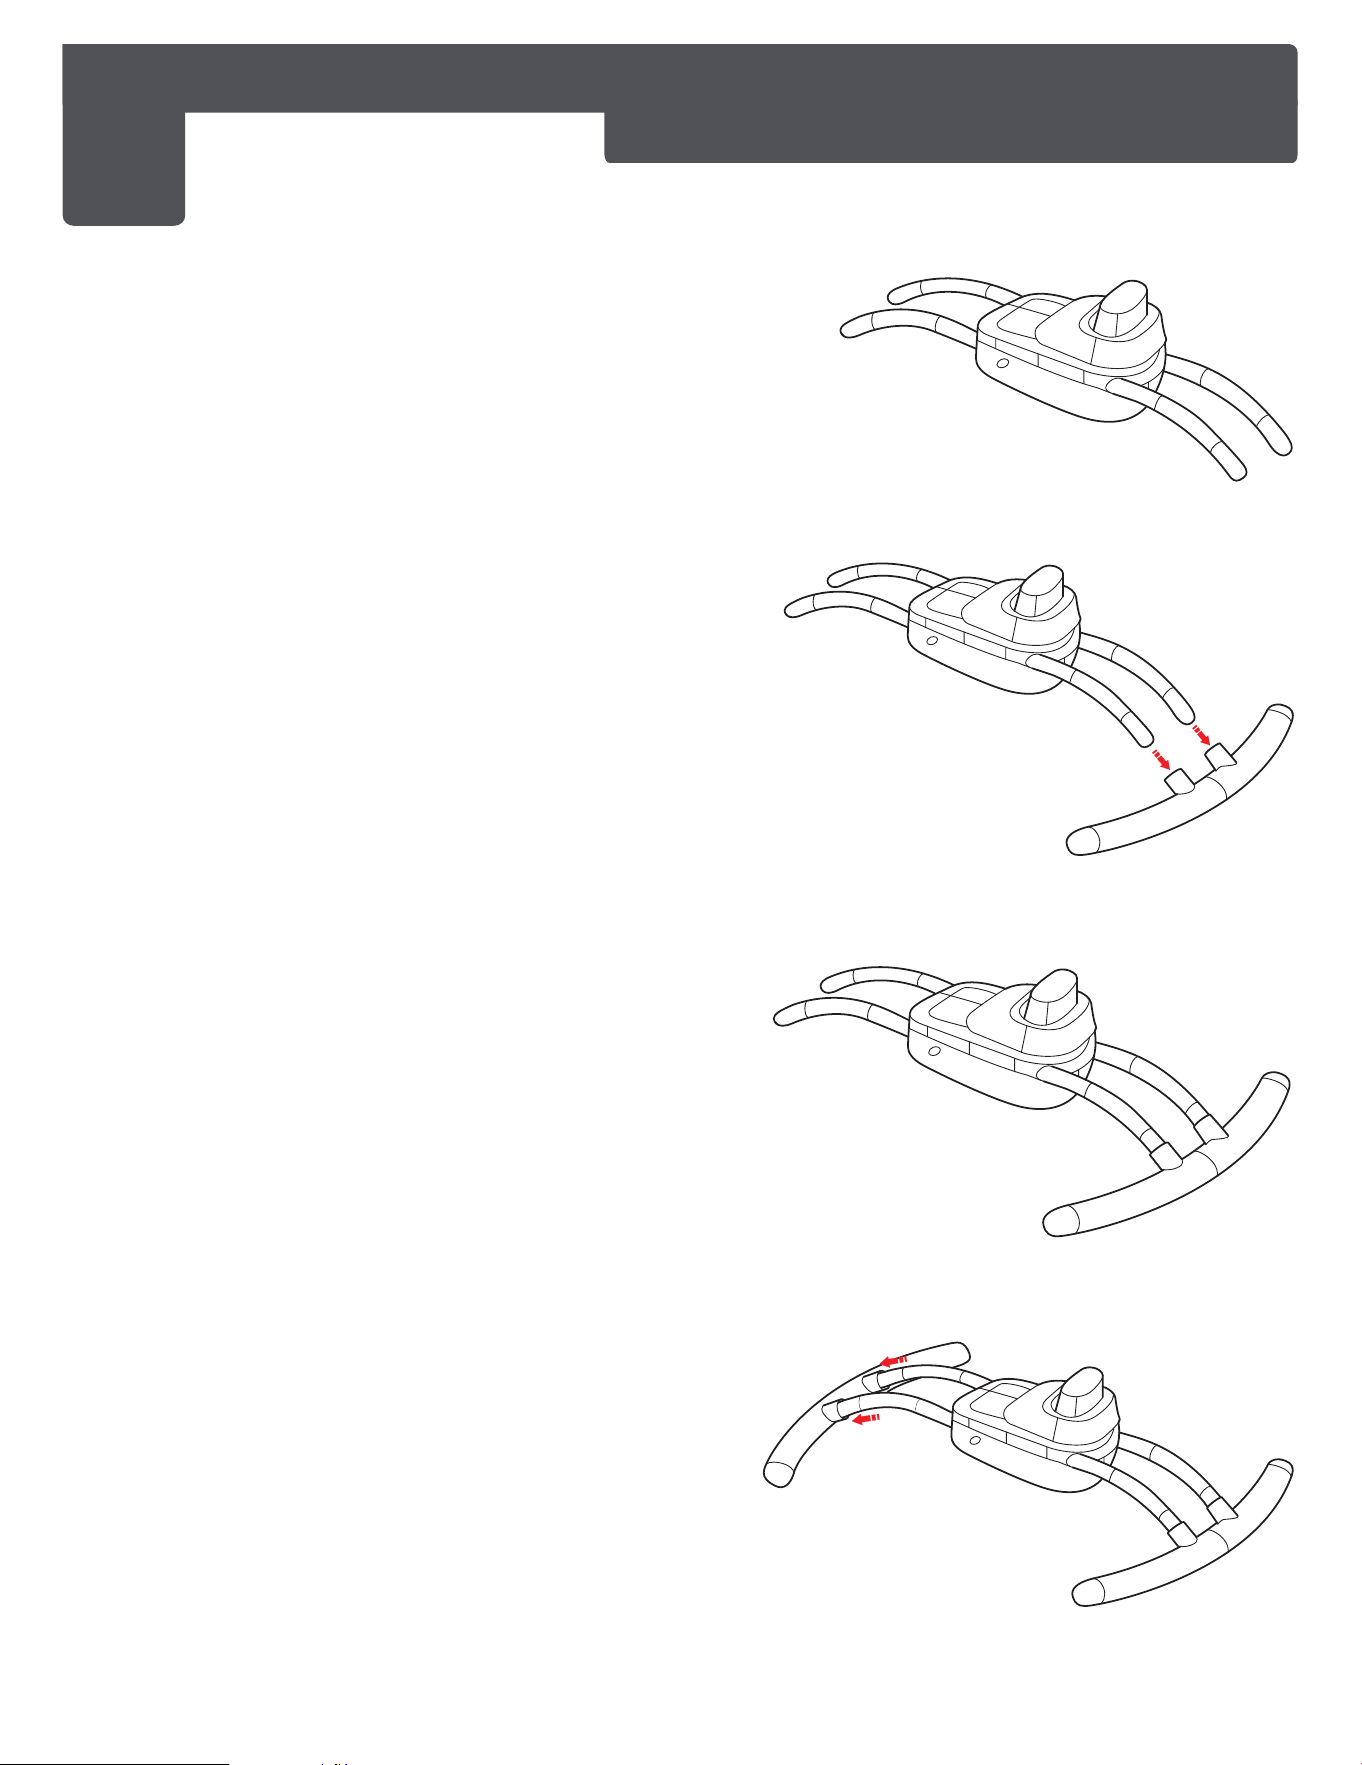
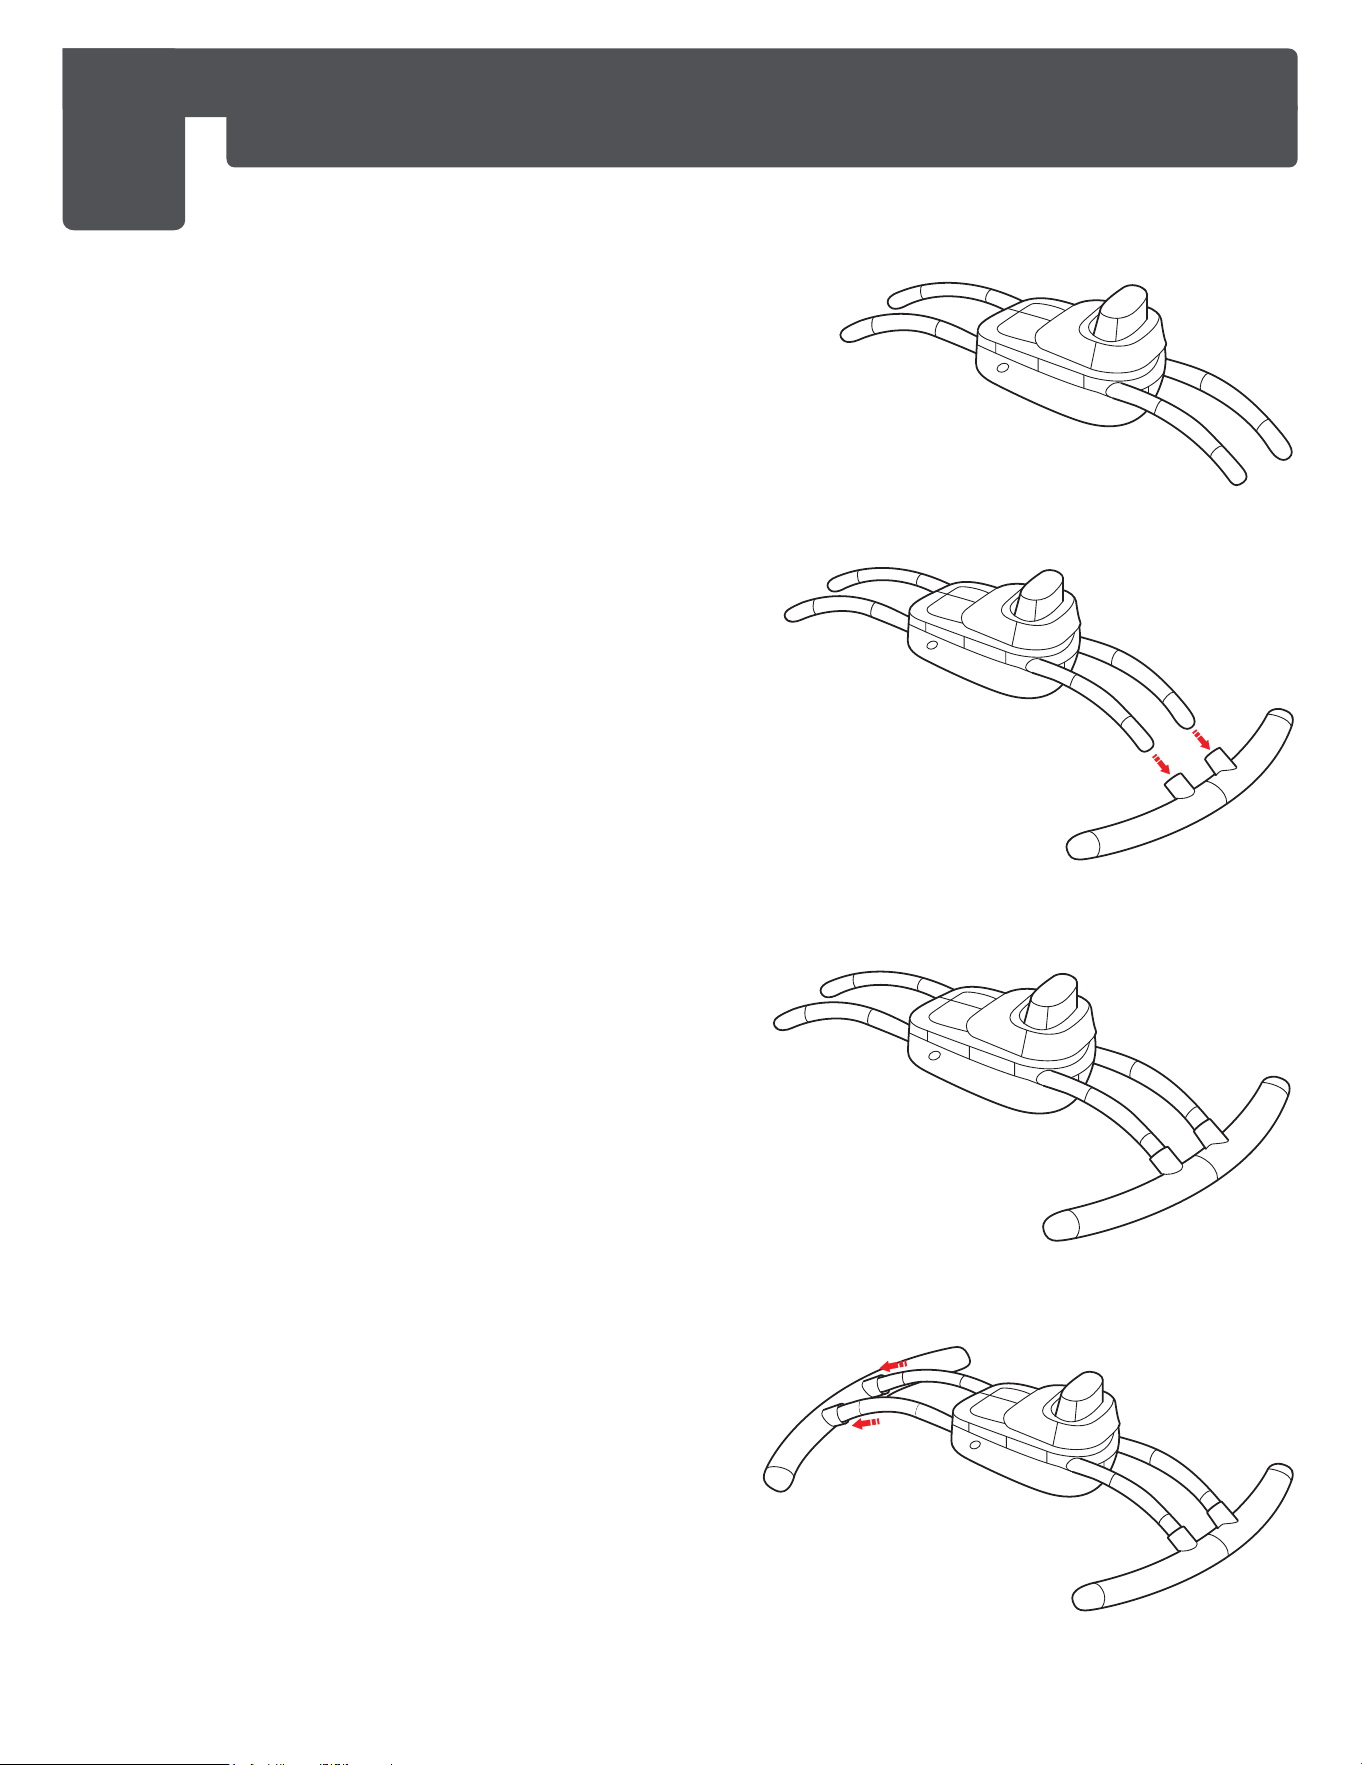
1
BABY SWING ASSEMBLY - INSTALLATION OF THE PLASTIC
BASE TO THE ENGINE MACHINE
1a. Place the parts of the swing on
a soft surface prior to assembly.
1b. As shown in the illustration,
align the slots on the Plastic
Base (1) with the tubes on the
Engine Machine (2).
1c. Place the tubes in the slots on
the Plastic Base and fix firmly.
www.dreamonme.com/help
7
(3)
(4)
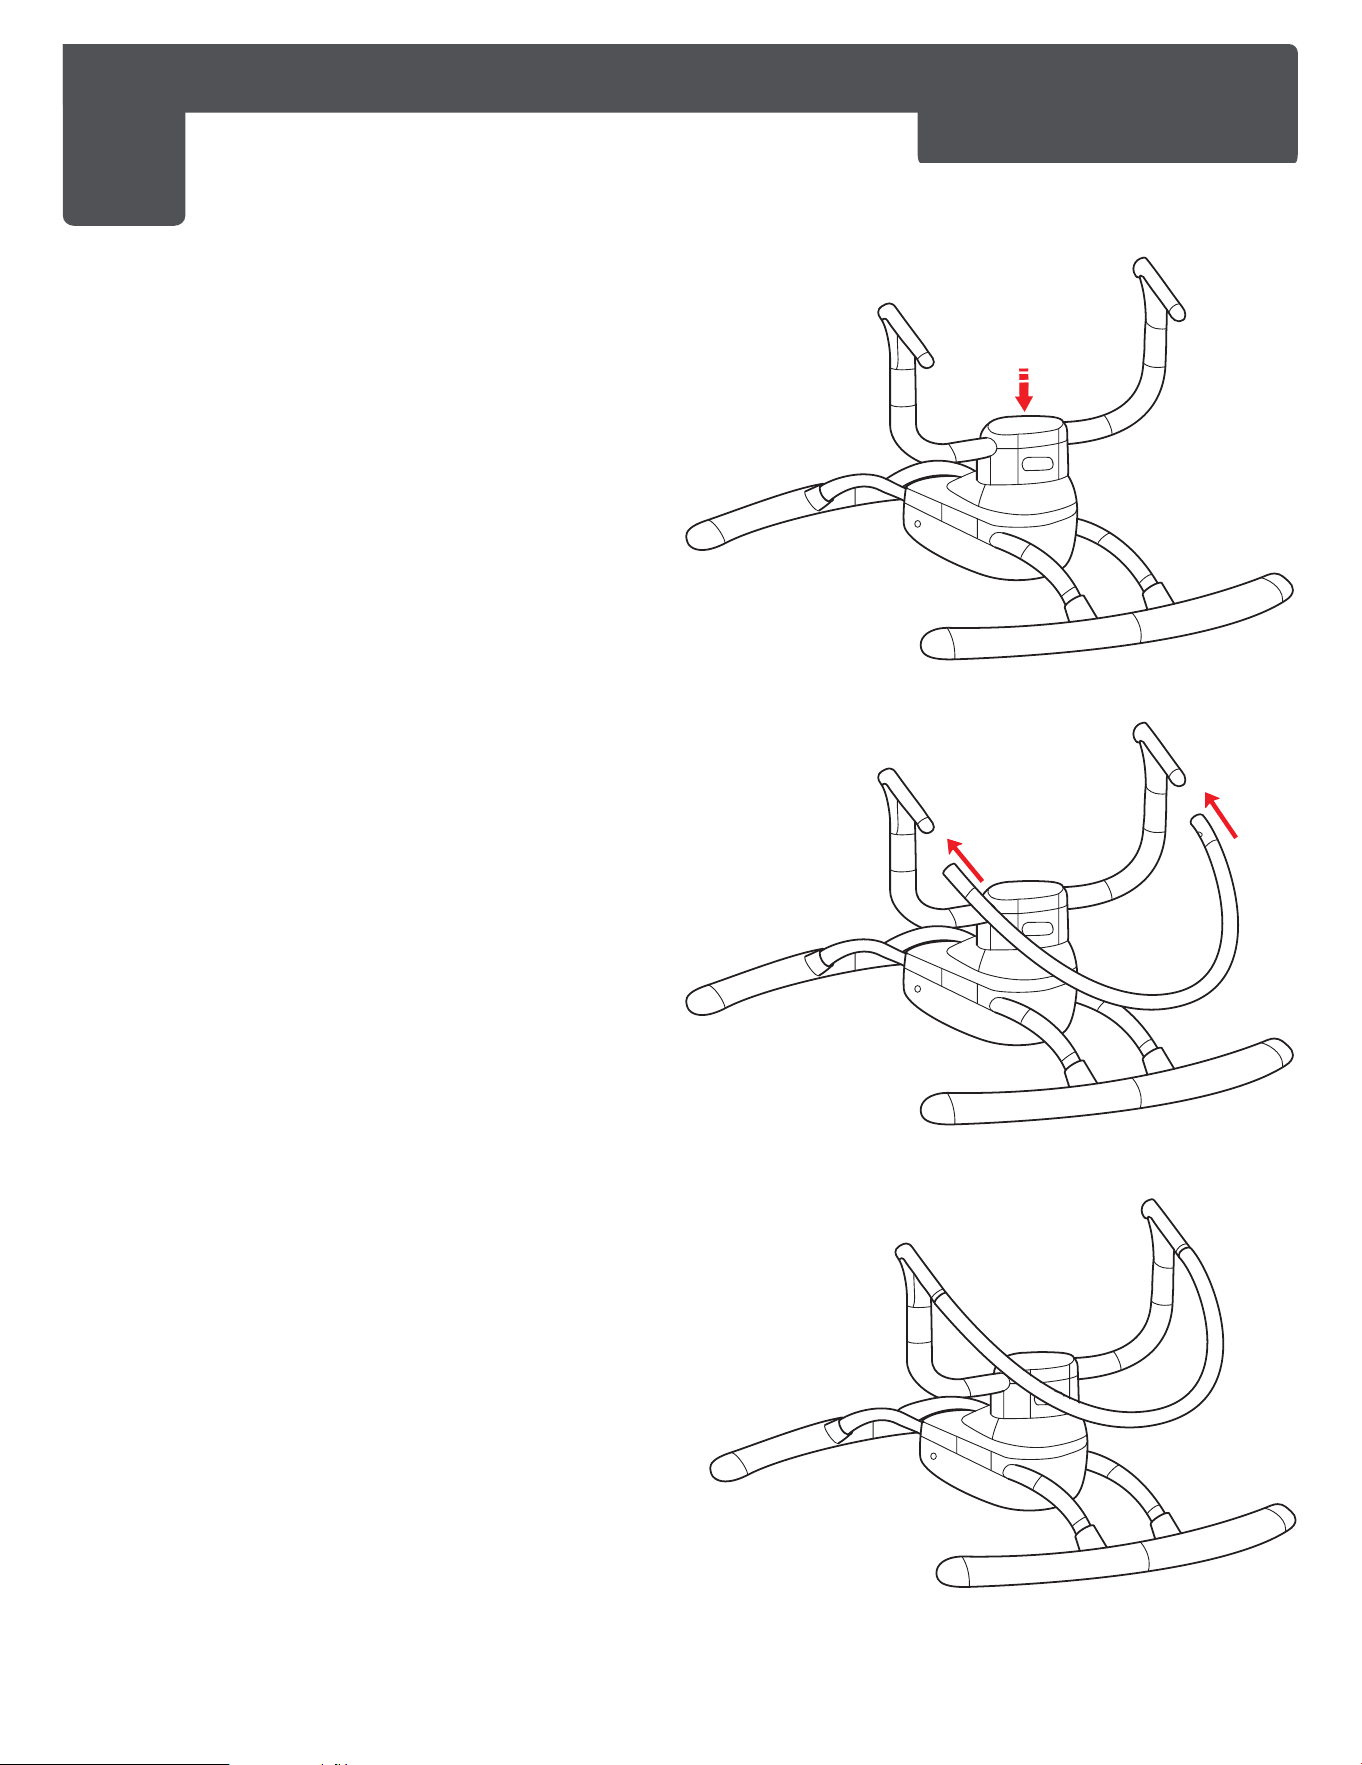
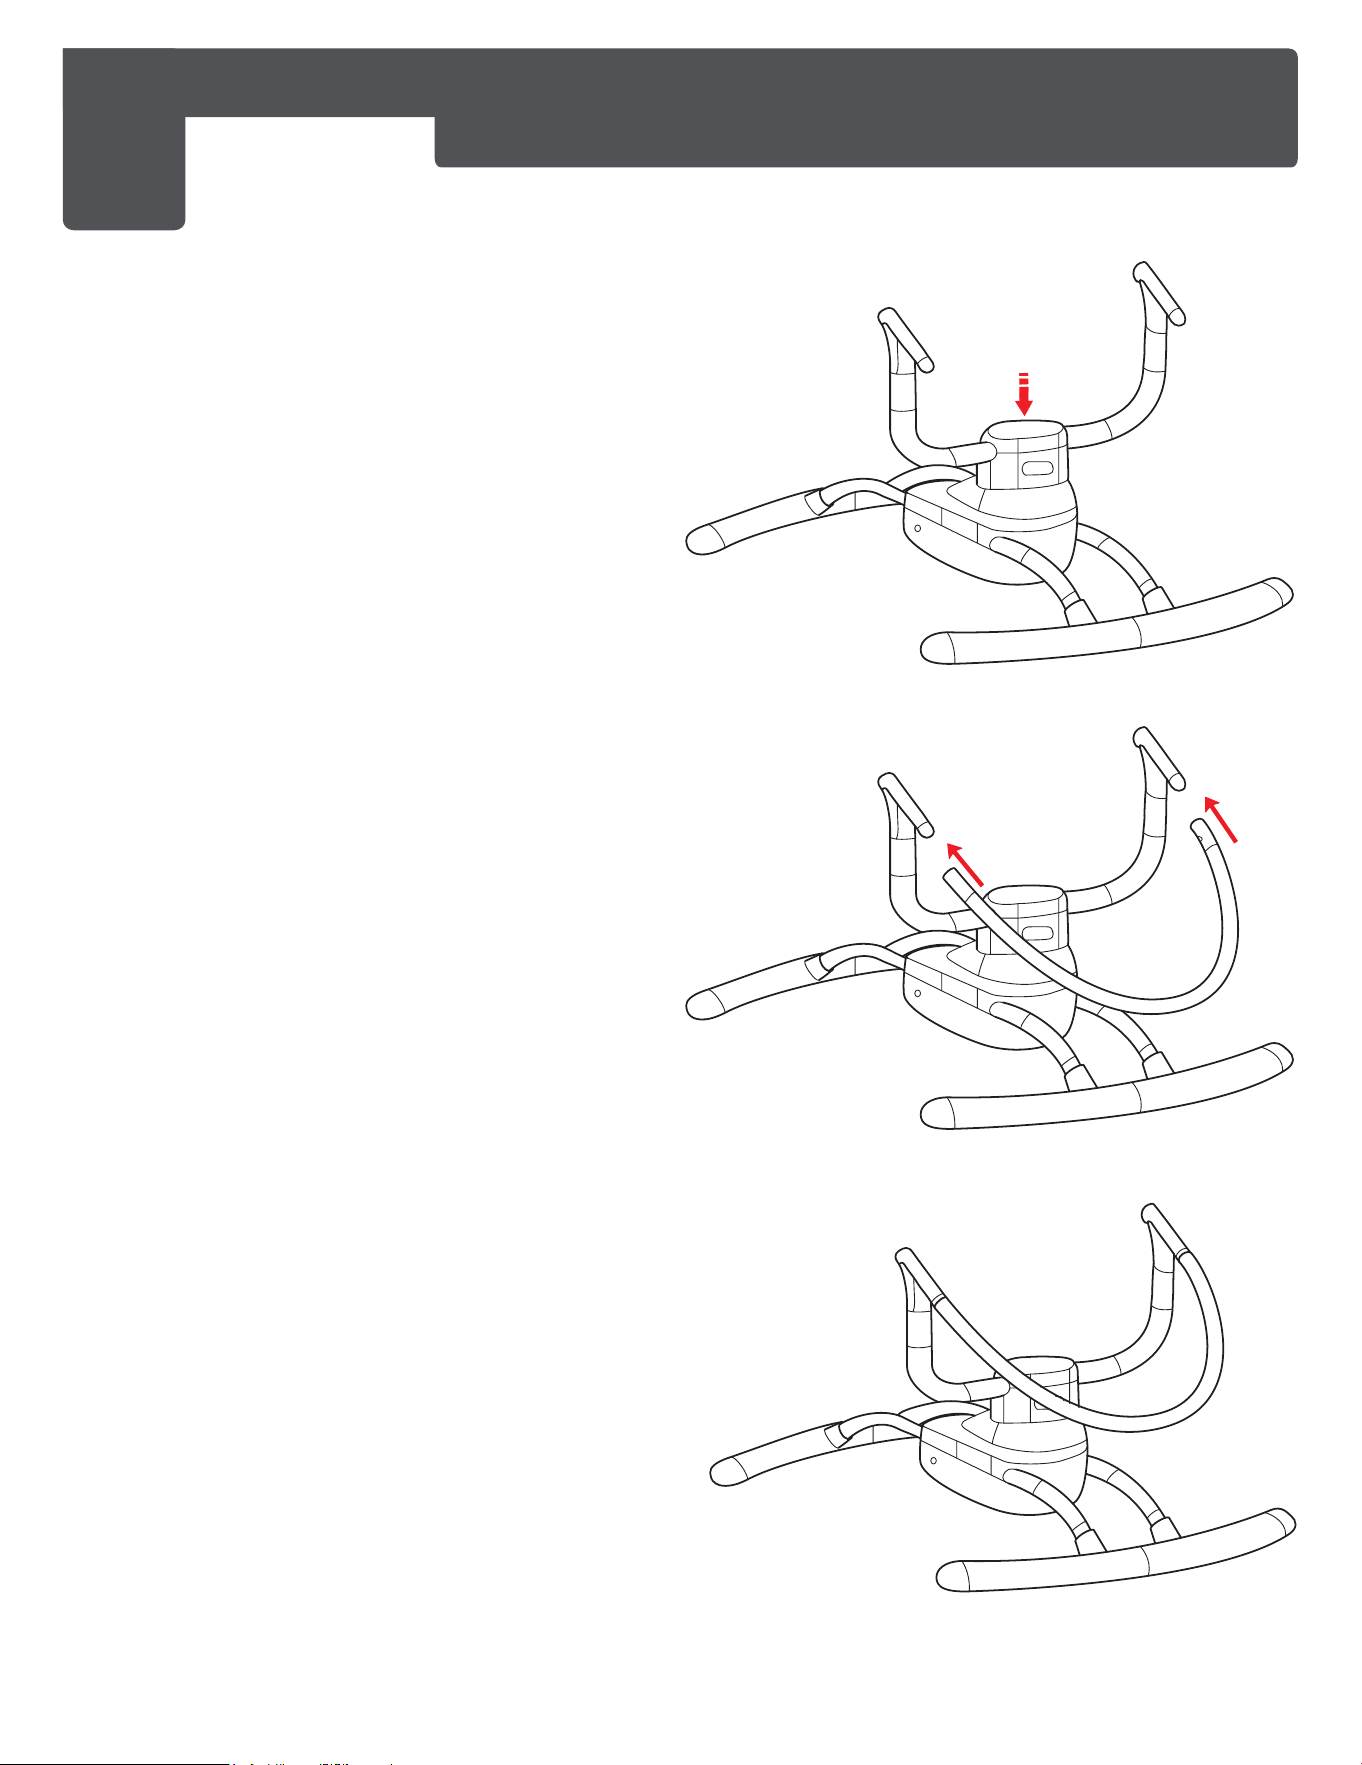
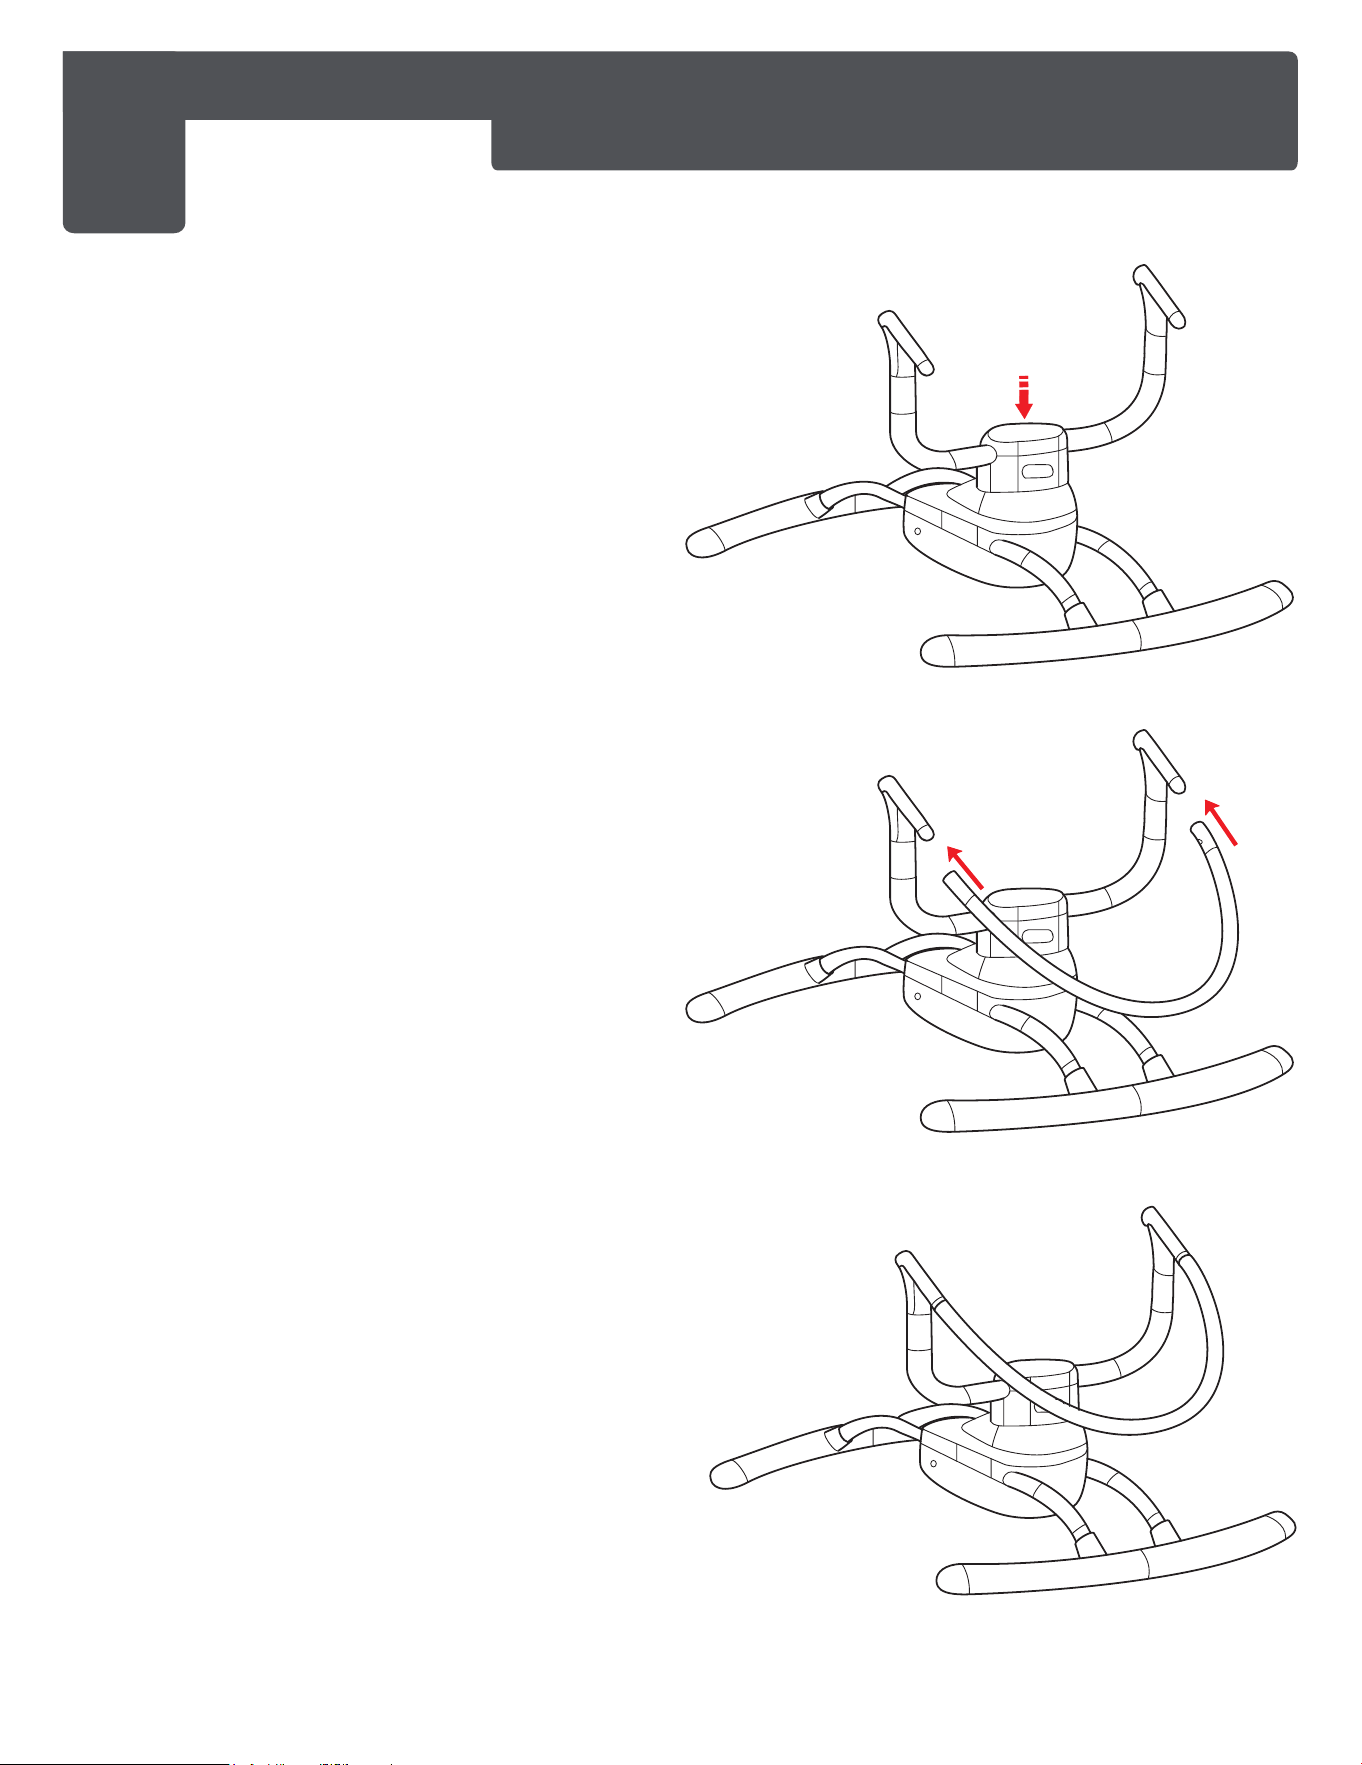
2
BABY SWING ASSEMBLY - INSTALLATION OF SEAT FRAME
AND SEAT TUBE
2a. Align the Seat Frame Base (3) to the
Engine Machine (2) as shown in the
illustration.
2b. Pay attention to the front and rear
direction of the Seat Frame Base. It
has an anti-dump design which
doesn’t allow the wrong direction to
be set in.
2c. Install the Seat Frame Base onto the
Engine Machine and once you hear a
click, the assembly is complete.
2d. Align the Seat Frame (4) parallely to
the handles of the Seat Frame Base.
2e. Insert the handles of the Seat Frame
Base into the Seat Frame until you
hear a click indicating the Seat
Frame is securely fixed.
www.dreamonme.com/help
8
(5)
(5)
(6)
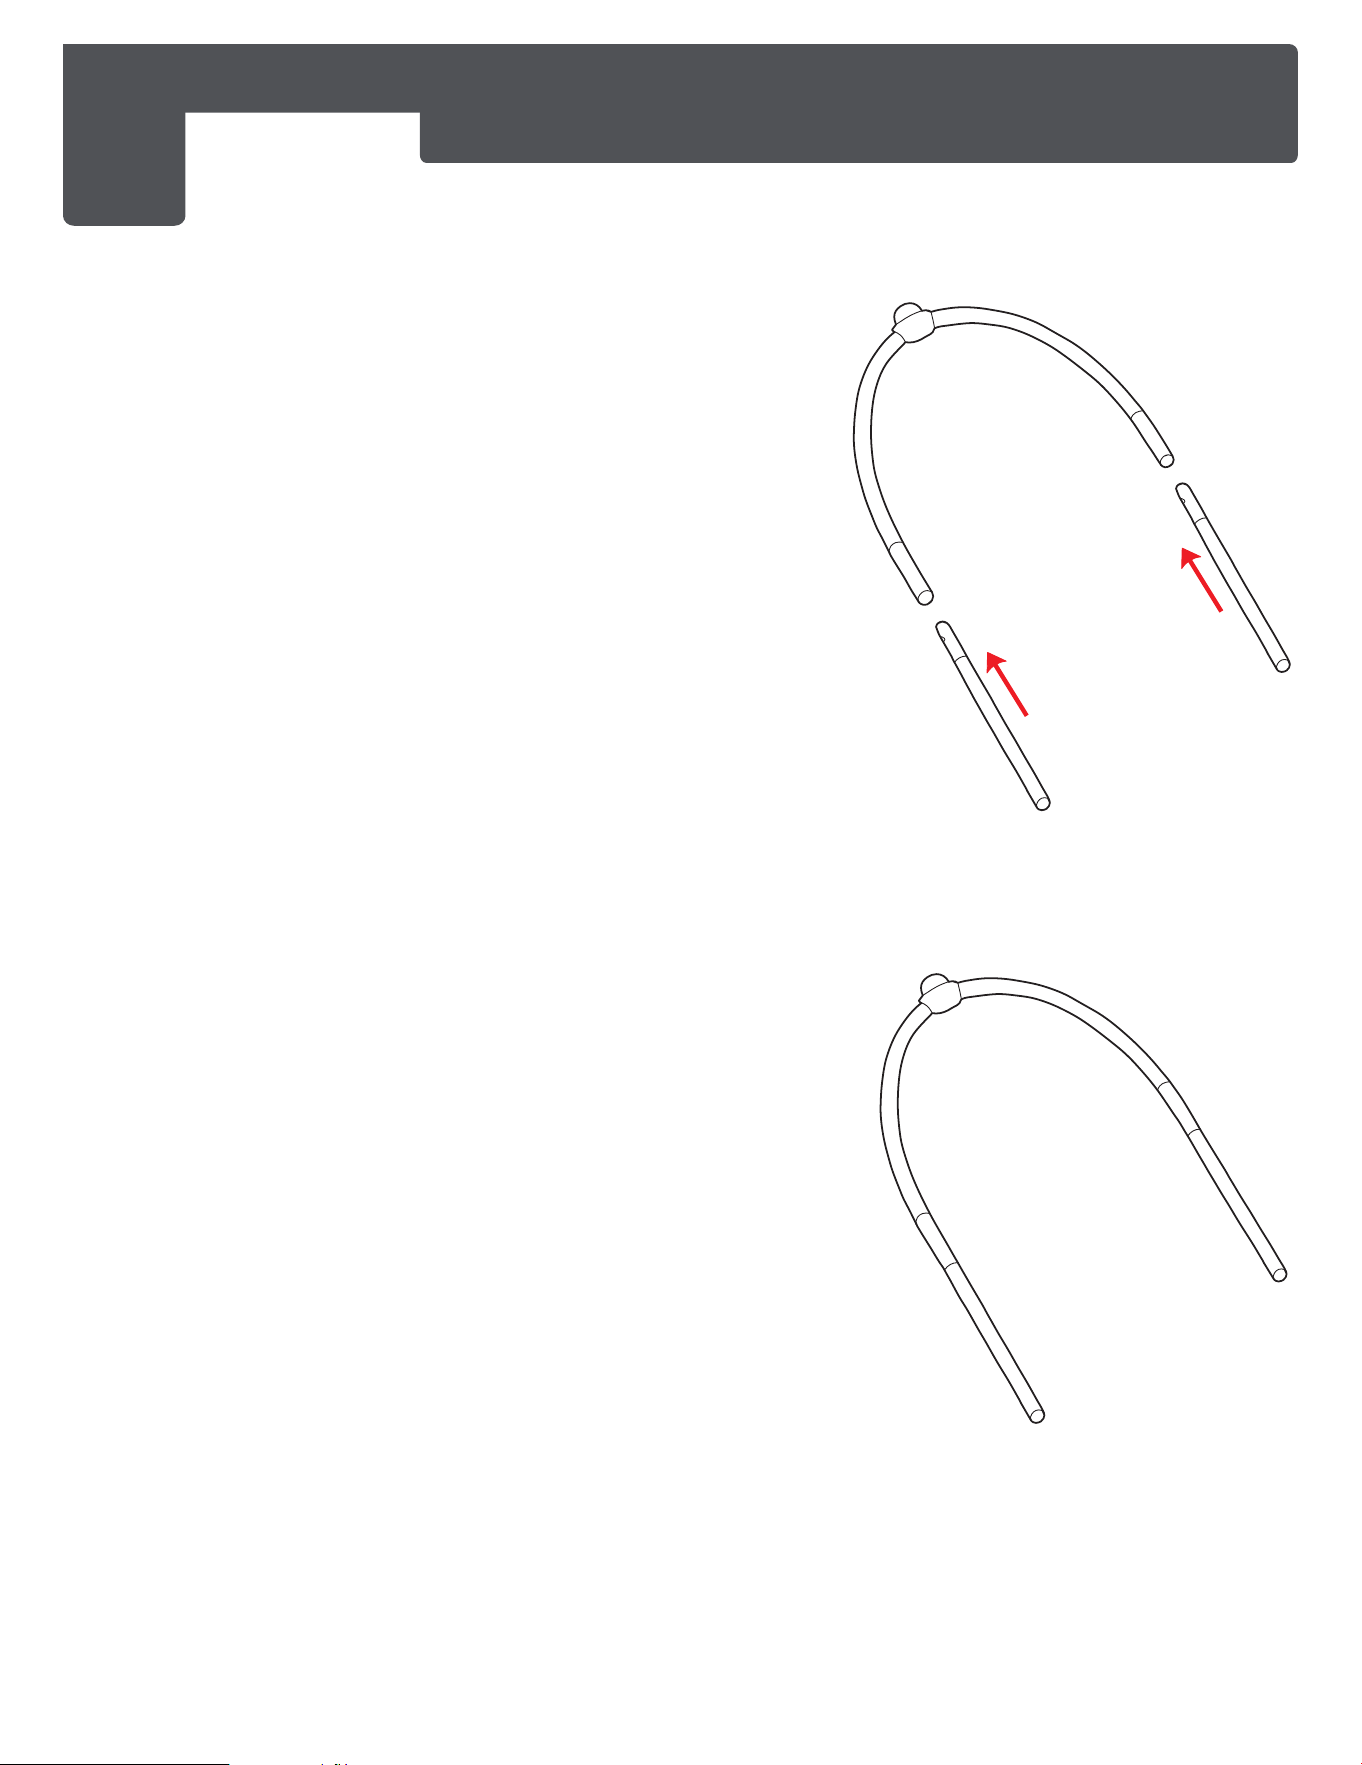
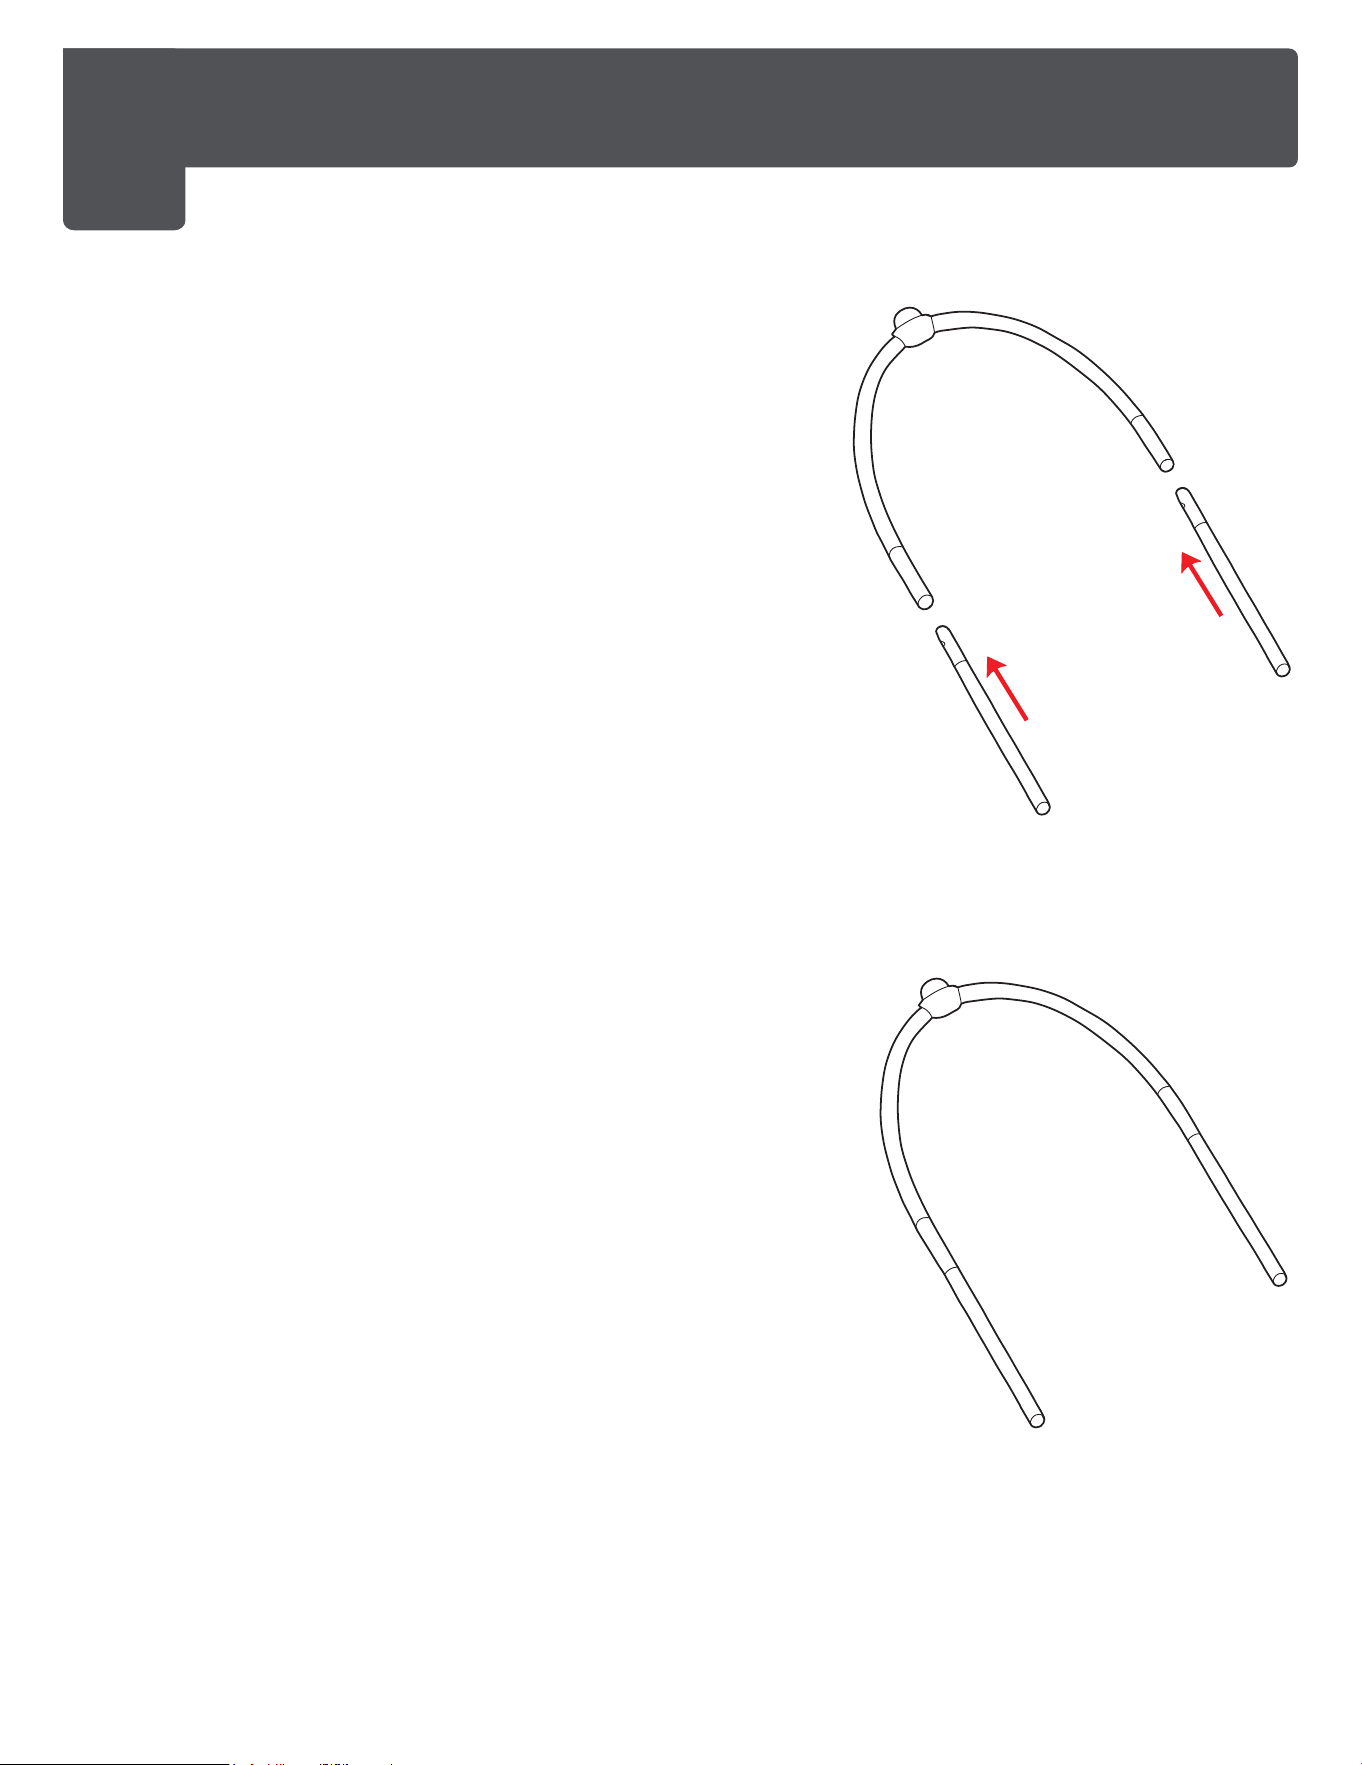
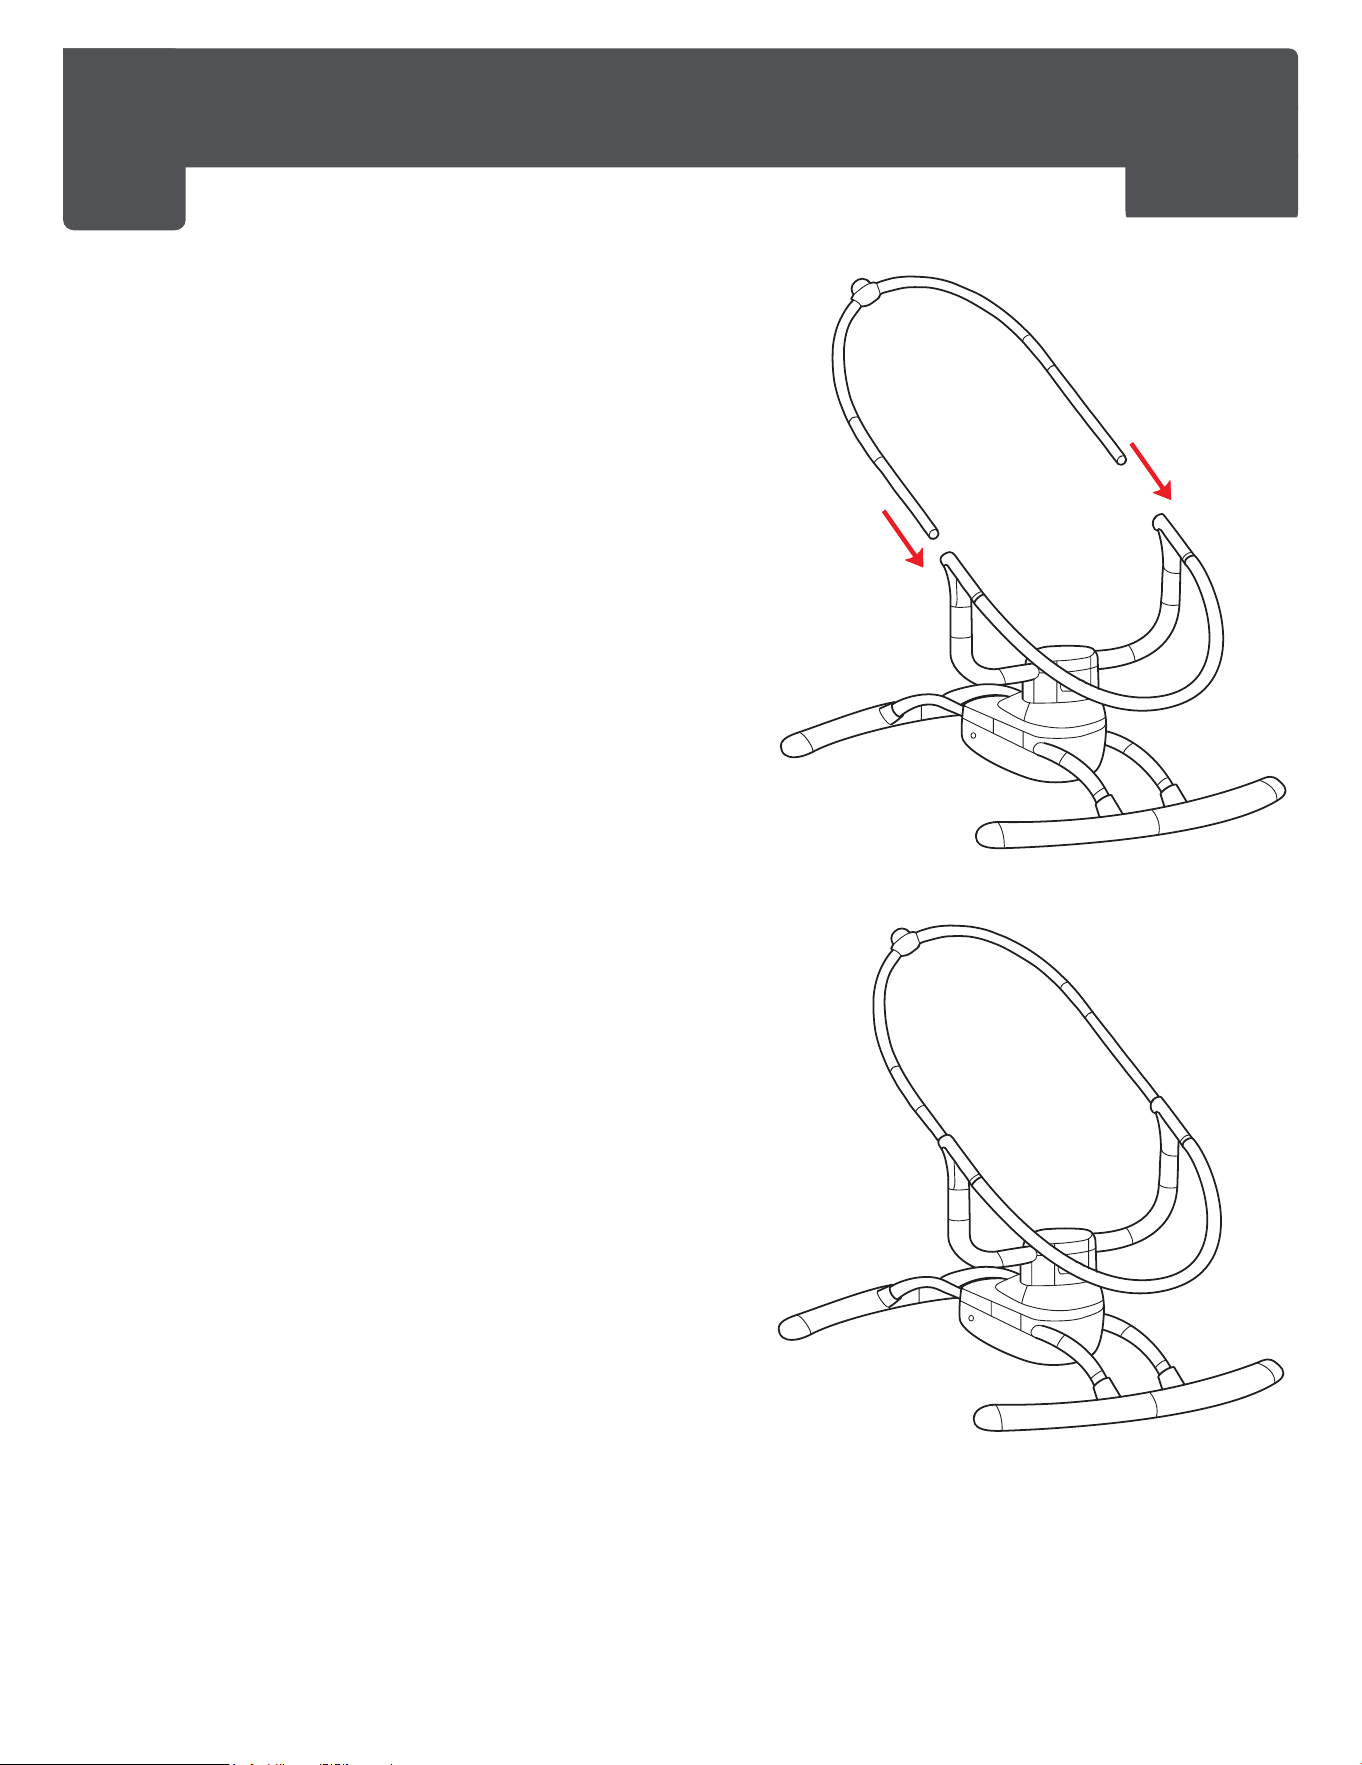
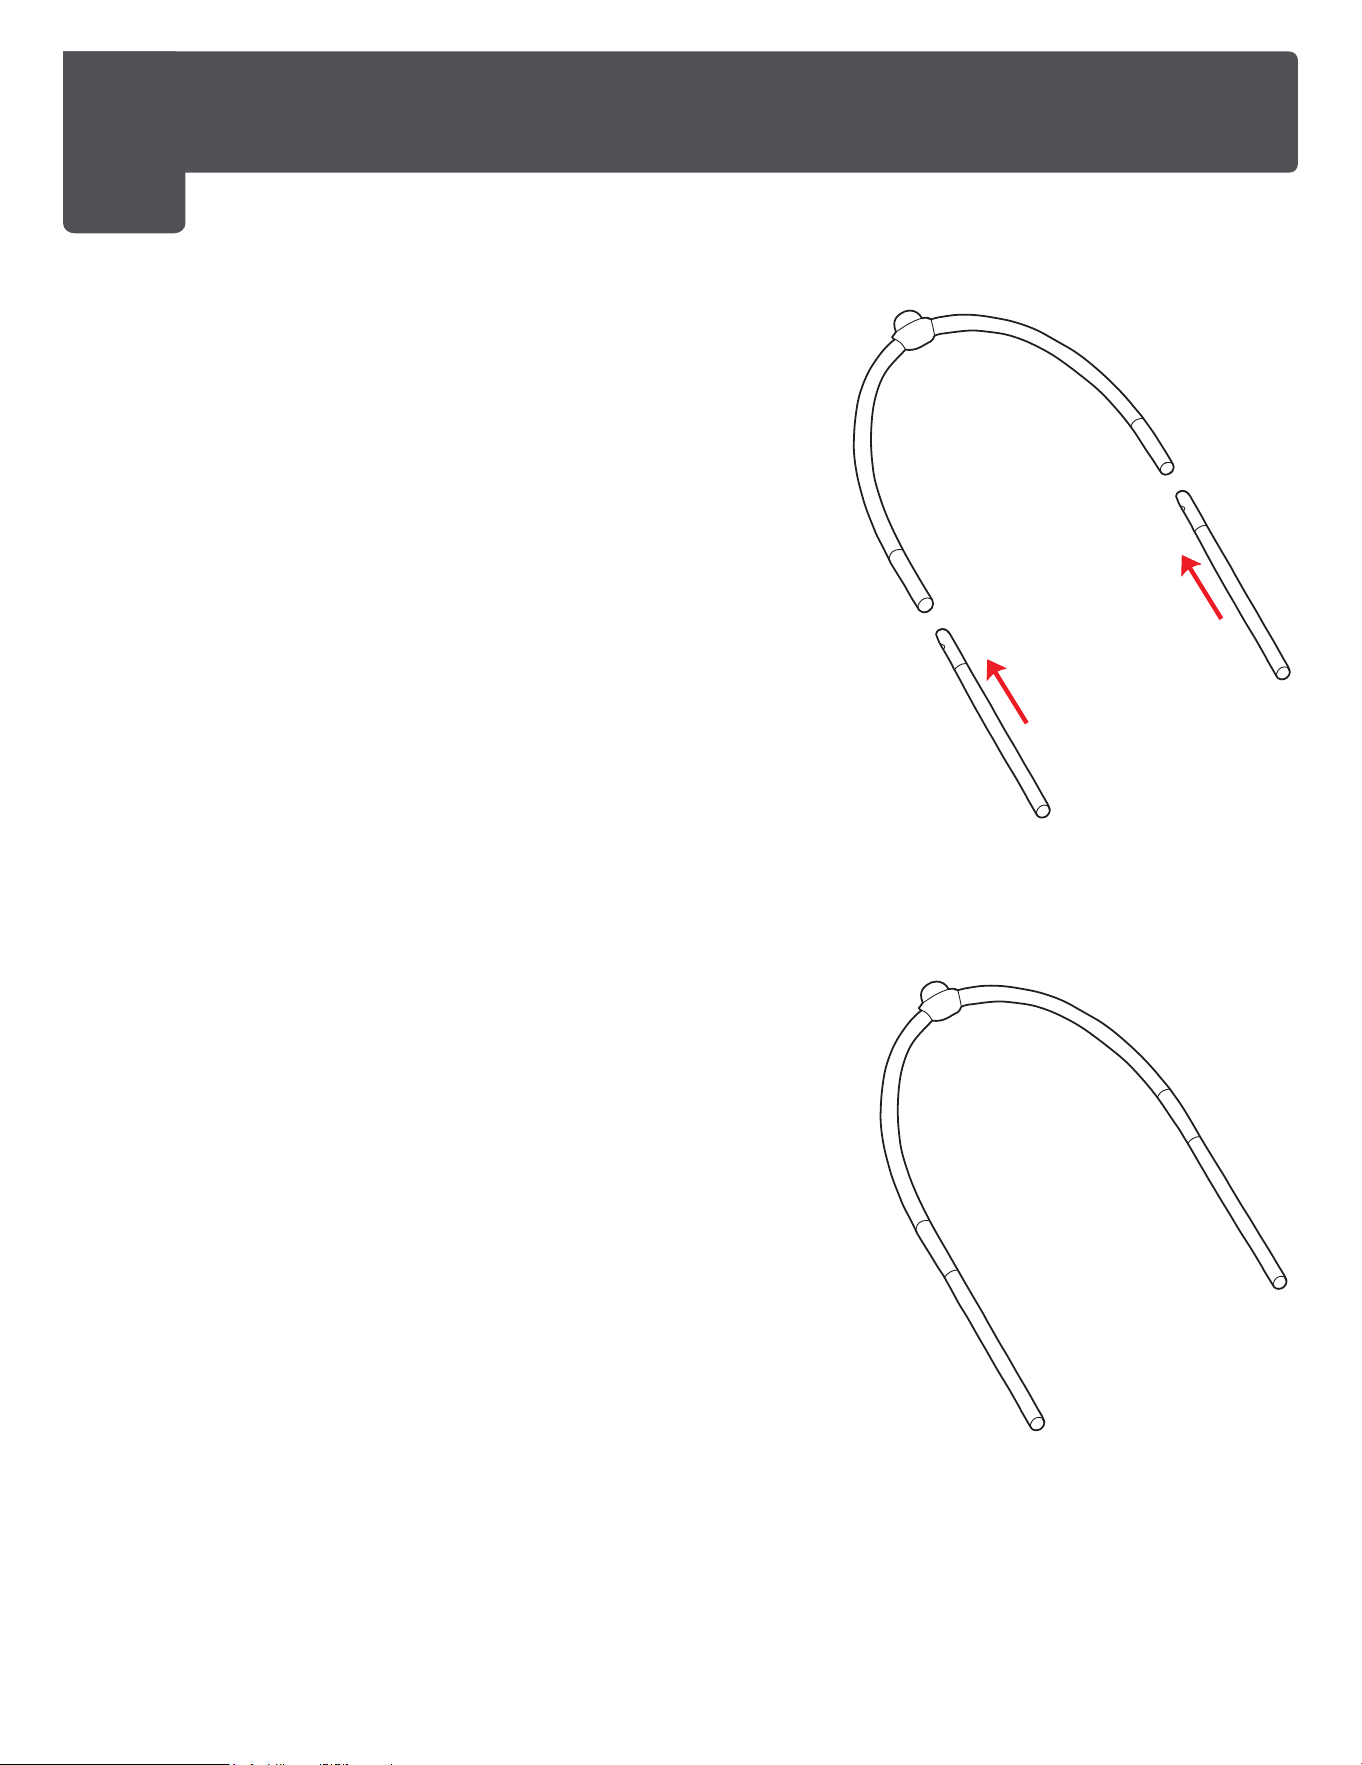
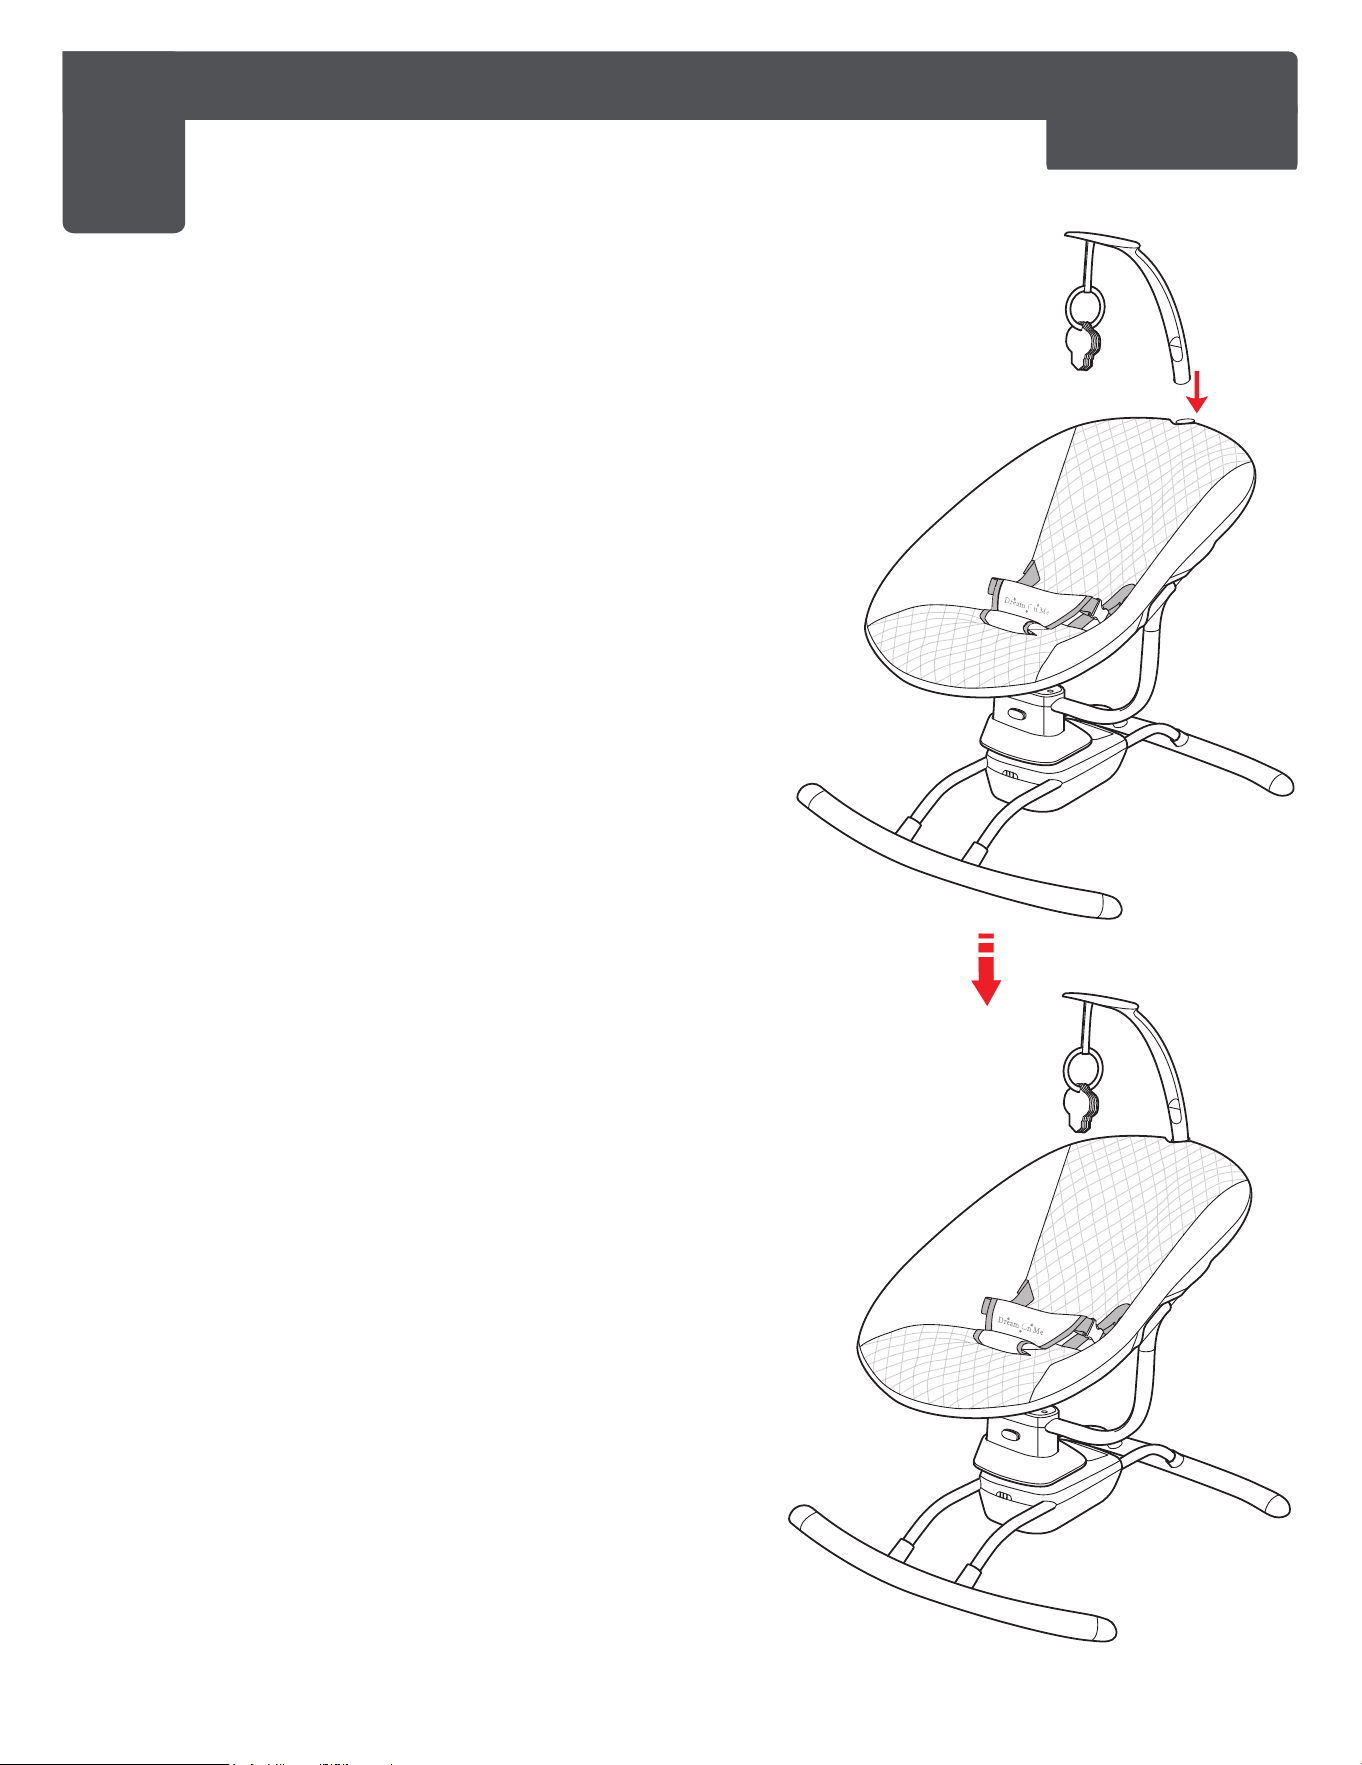
3
BABY SWING ASSEMBLY - INSTALLATION OF BACKREST
CONNECTION TUBE AND BACKREST TUBE
3a. Align the Connection Tube (5) to the
Backrest Tube (6) as shown in the
illustration.
3b. IInsert the Connection Tube into the
Backrest Tube until you hear a click
indicating the Connection Tube is
firmly fixed.
www.dreamonme.com/help
9
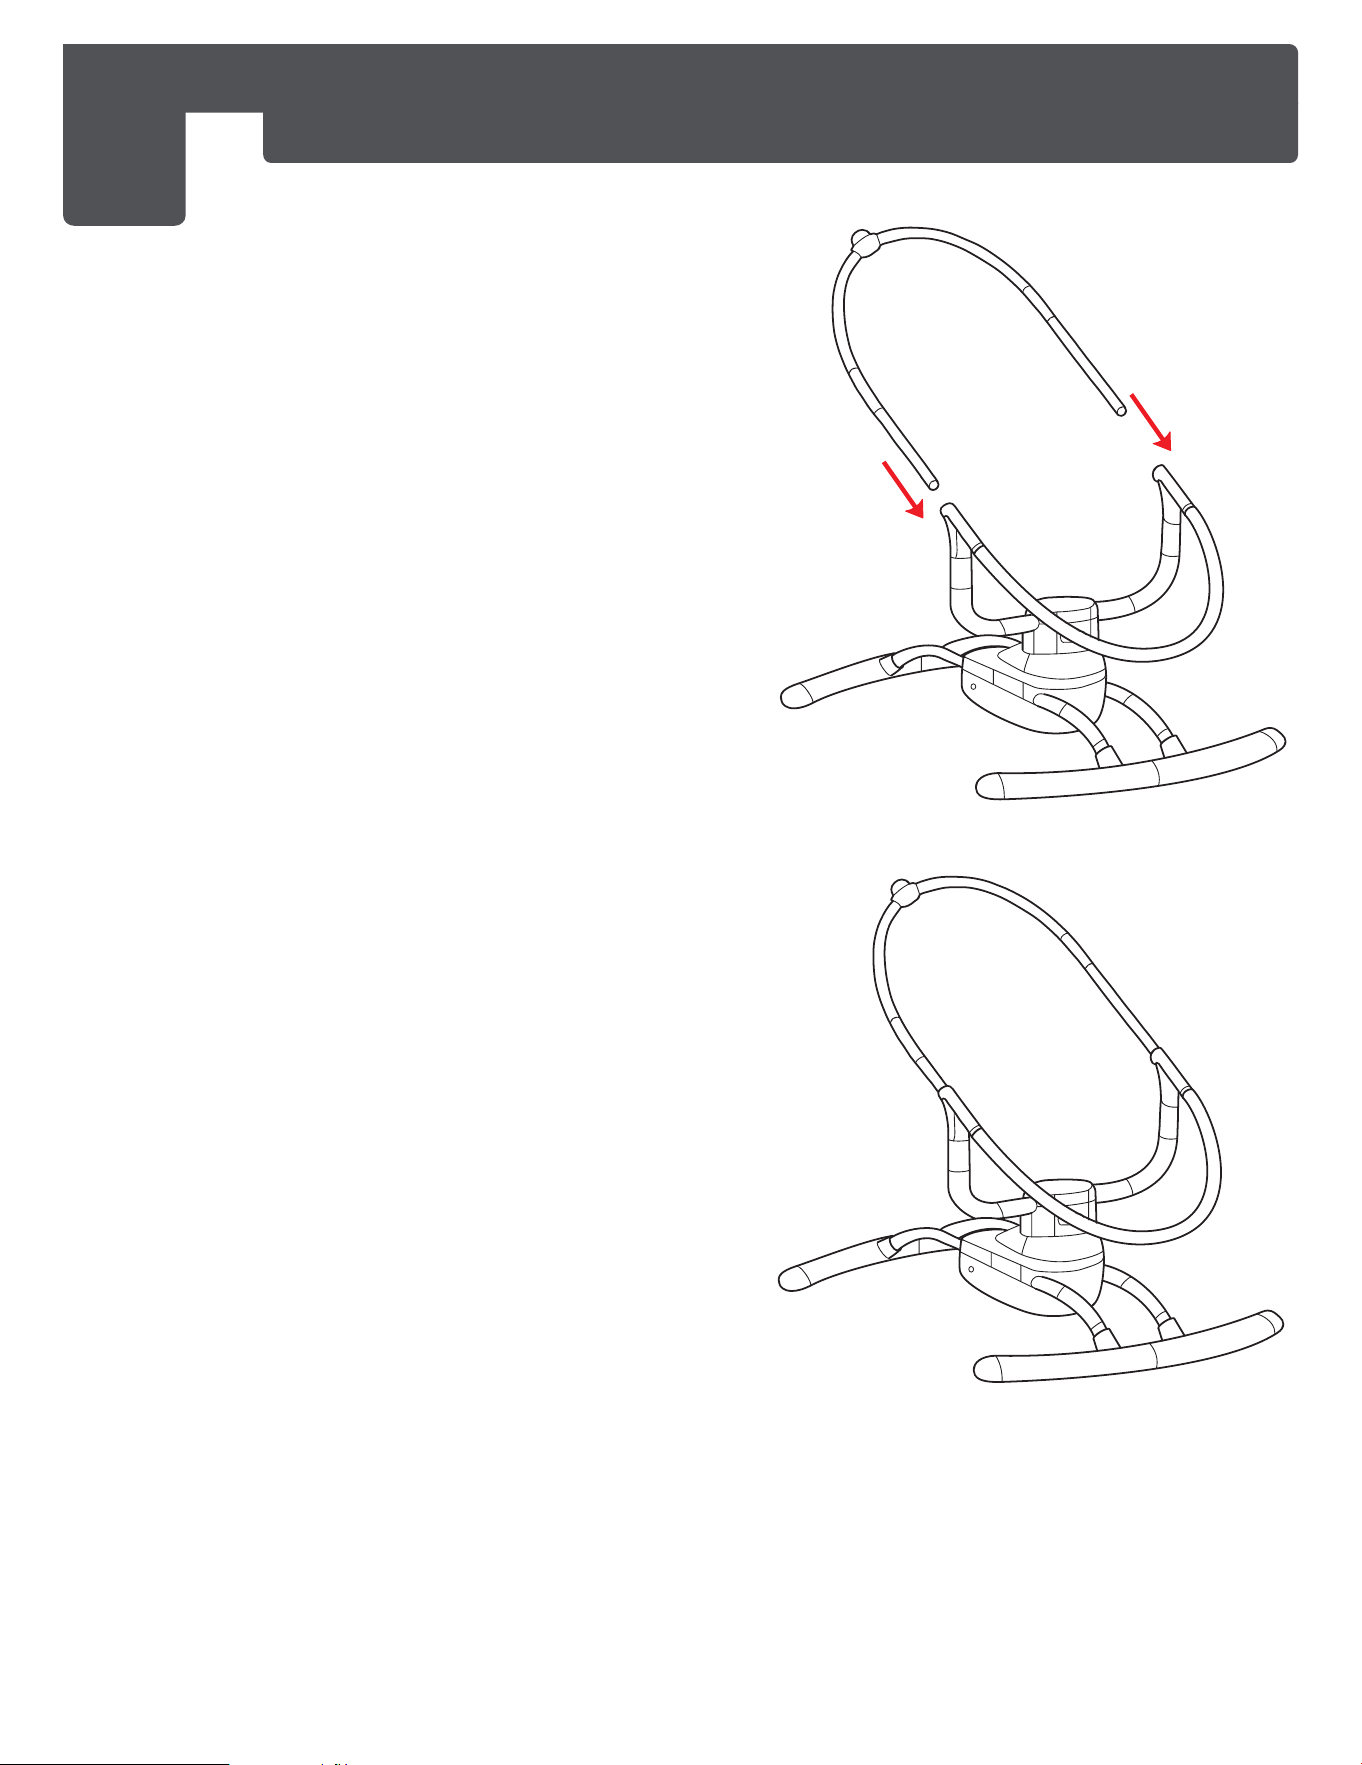
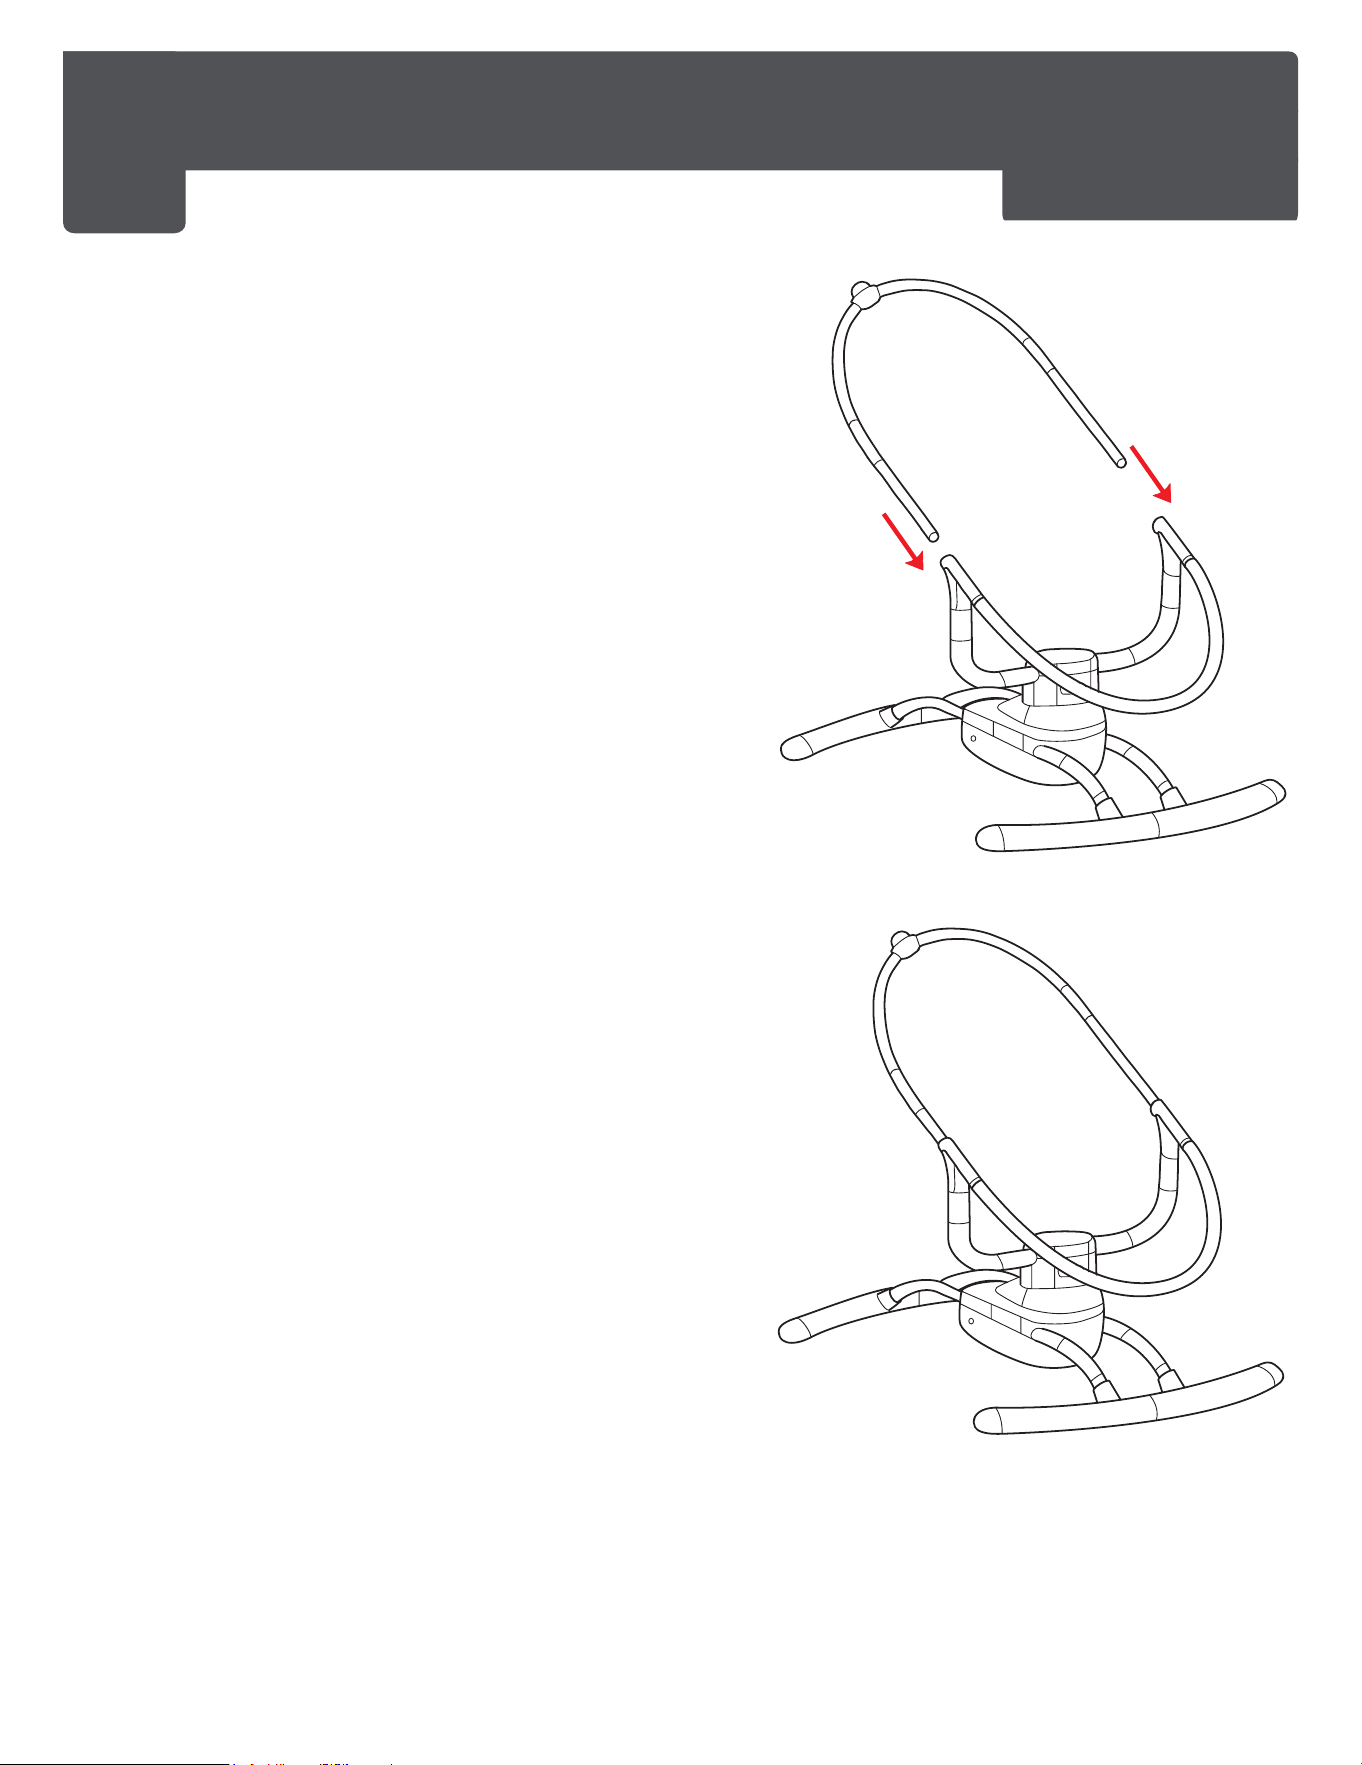
3
BABY SWING ASSEMBLY - INSTALLATION OF BACKREST
CONNECTION TUBE AND BACKREST TUBE (cont.)
3c. Align the assembled backrest and
connection tube to the half
assembled swing as shown in the
illustration.
3d. Insert the assembled backrest and
connection tube into the seat frame
until you hear a click.

www.dreamonme.com/help
10
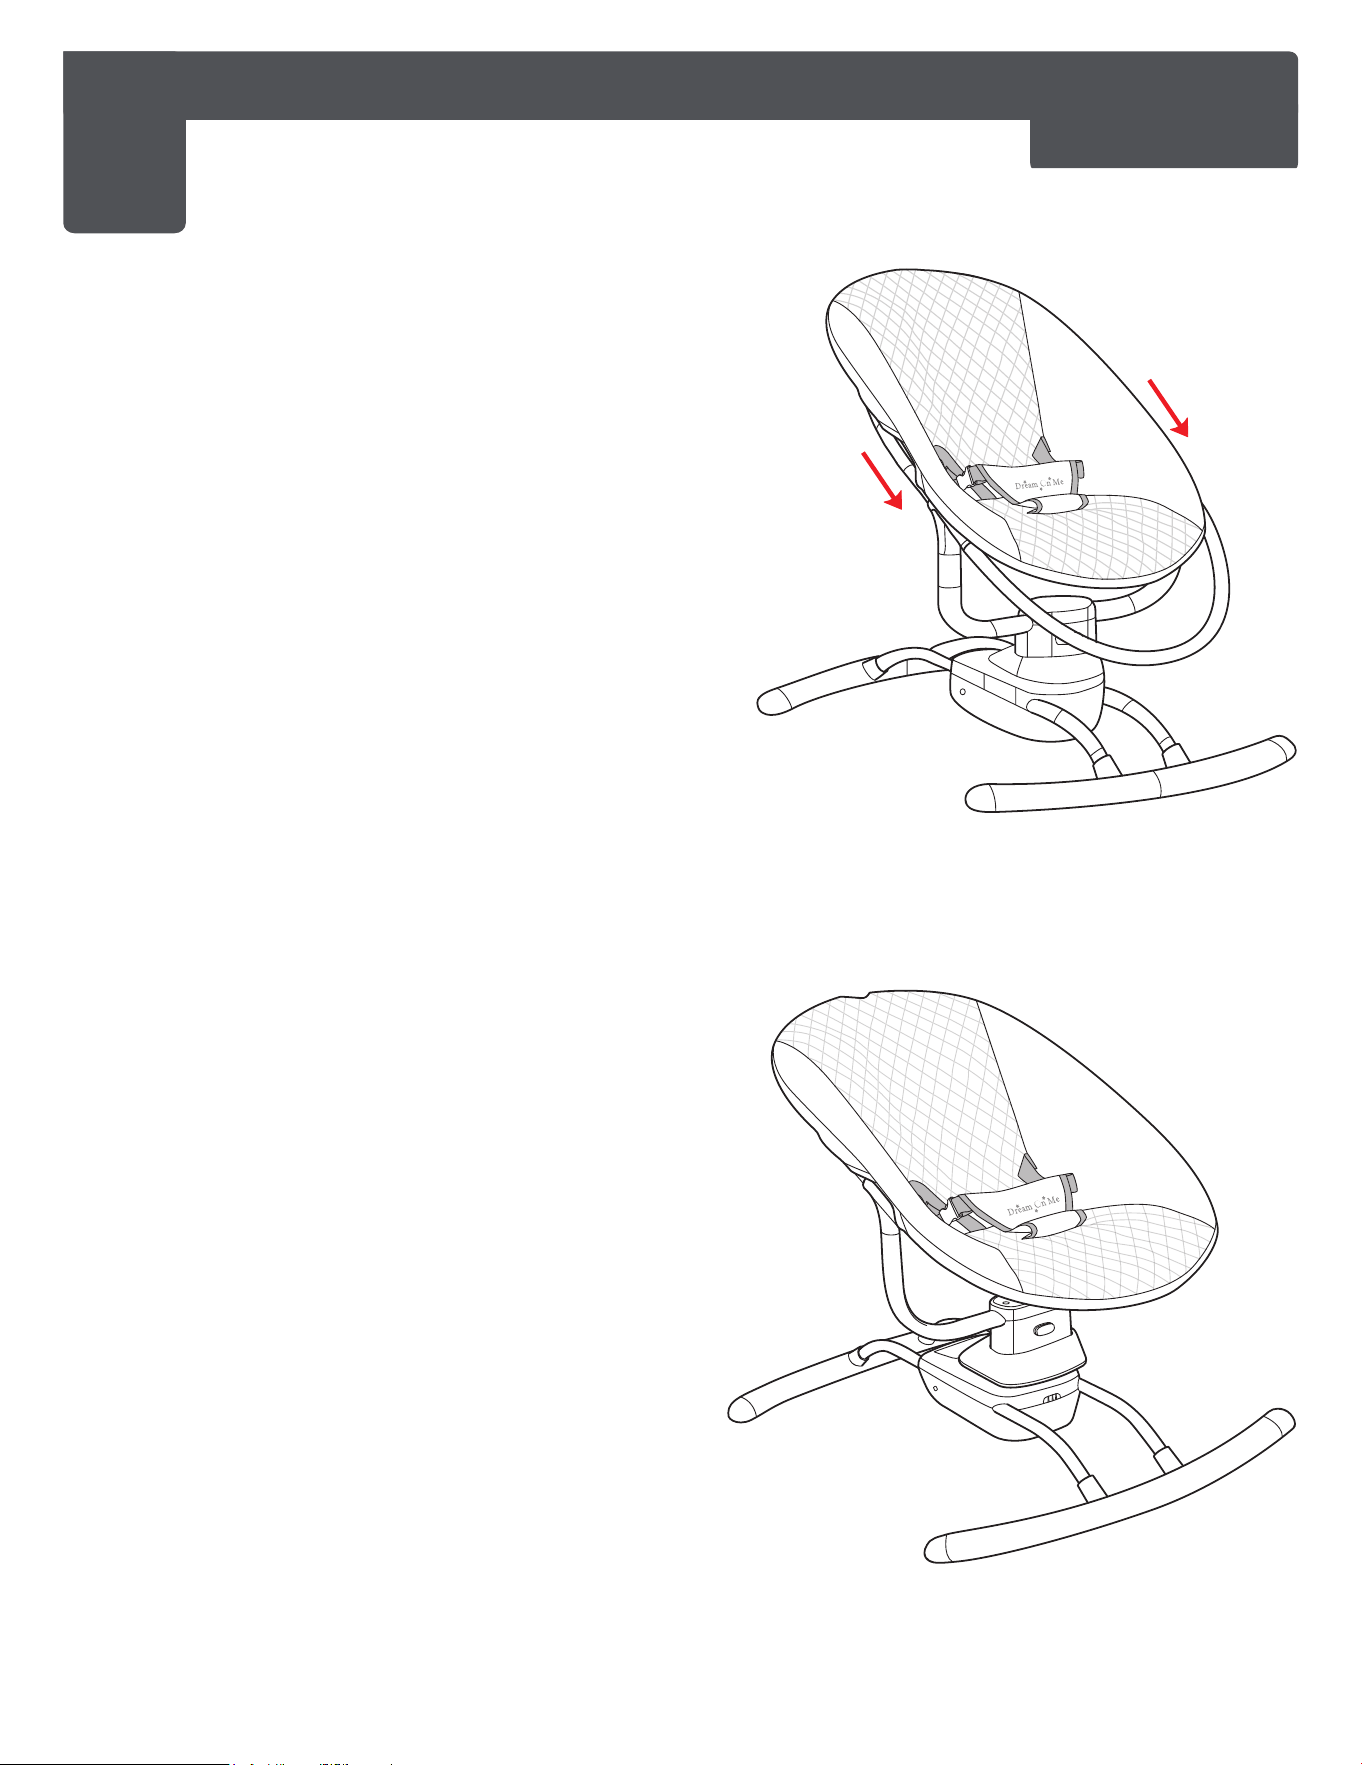
(8)
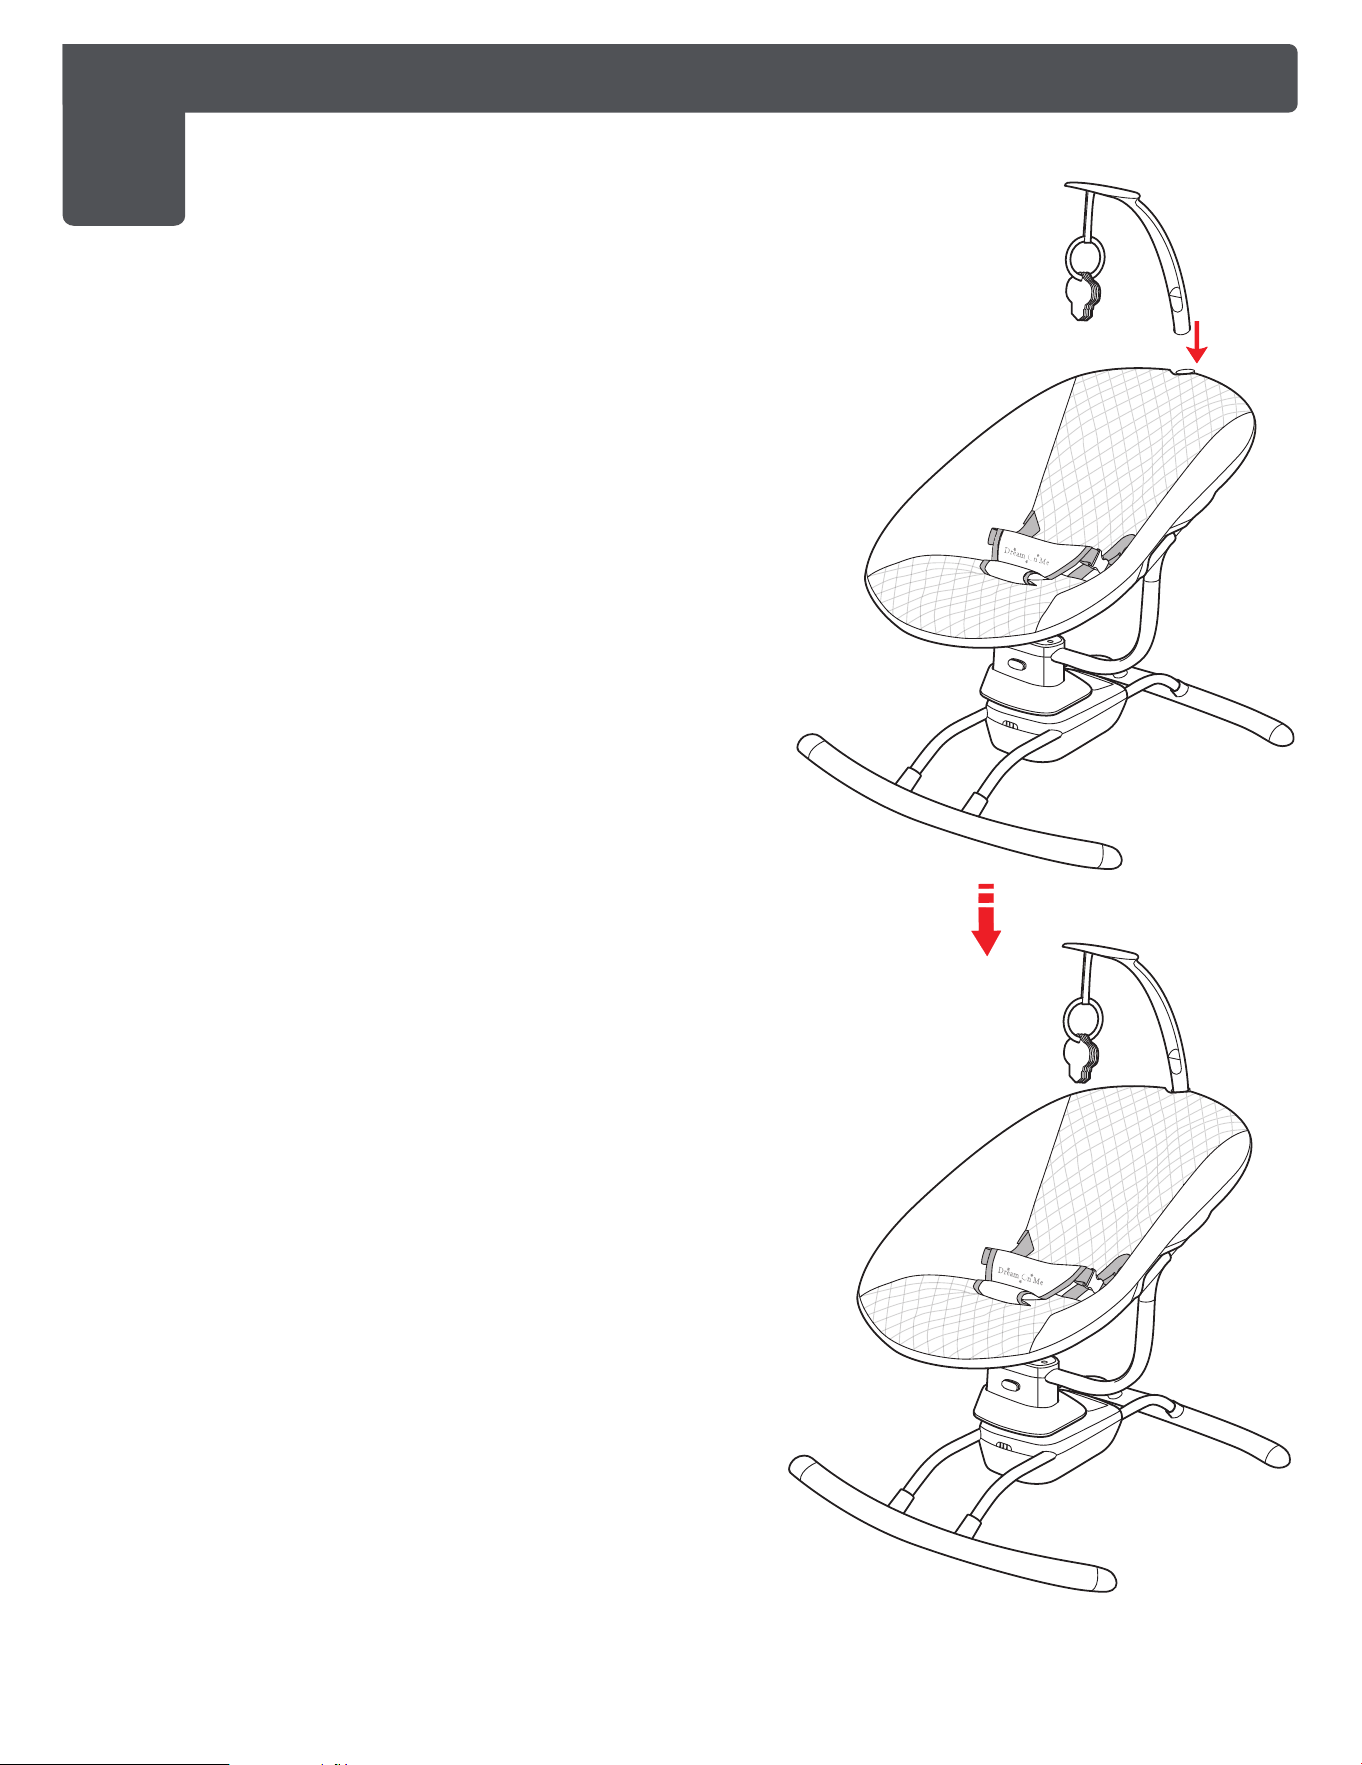
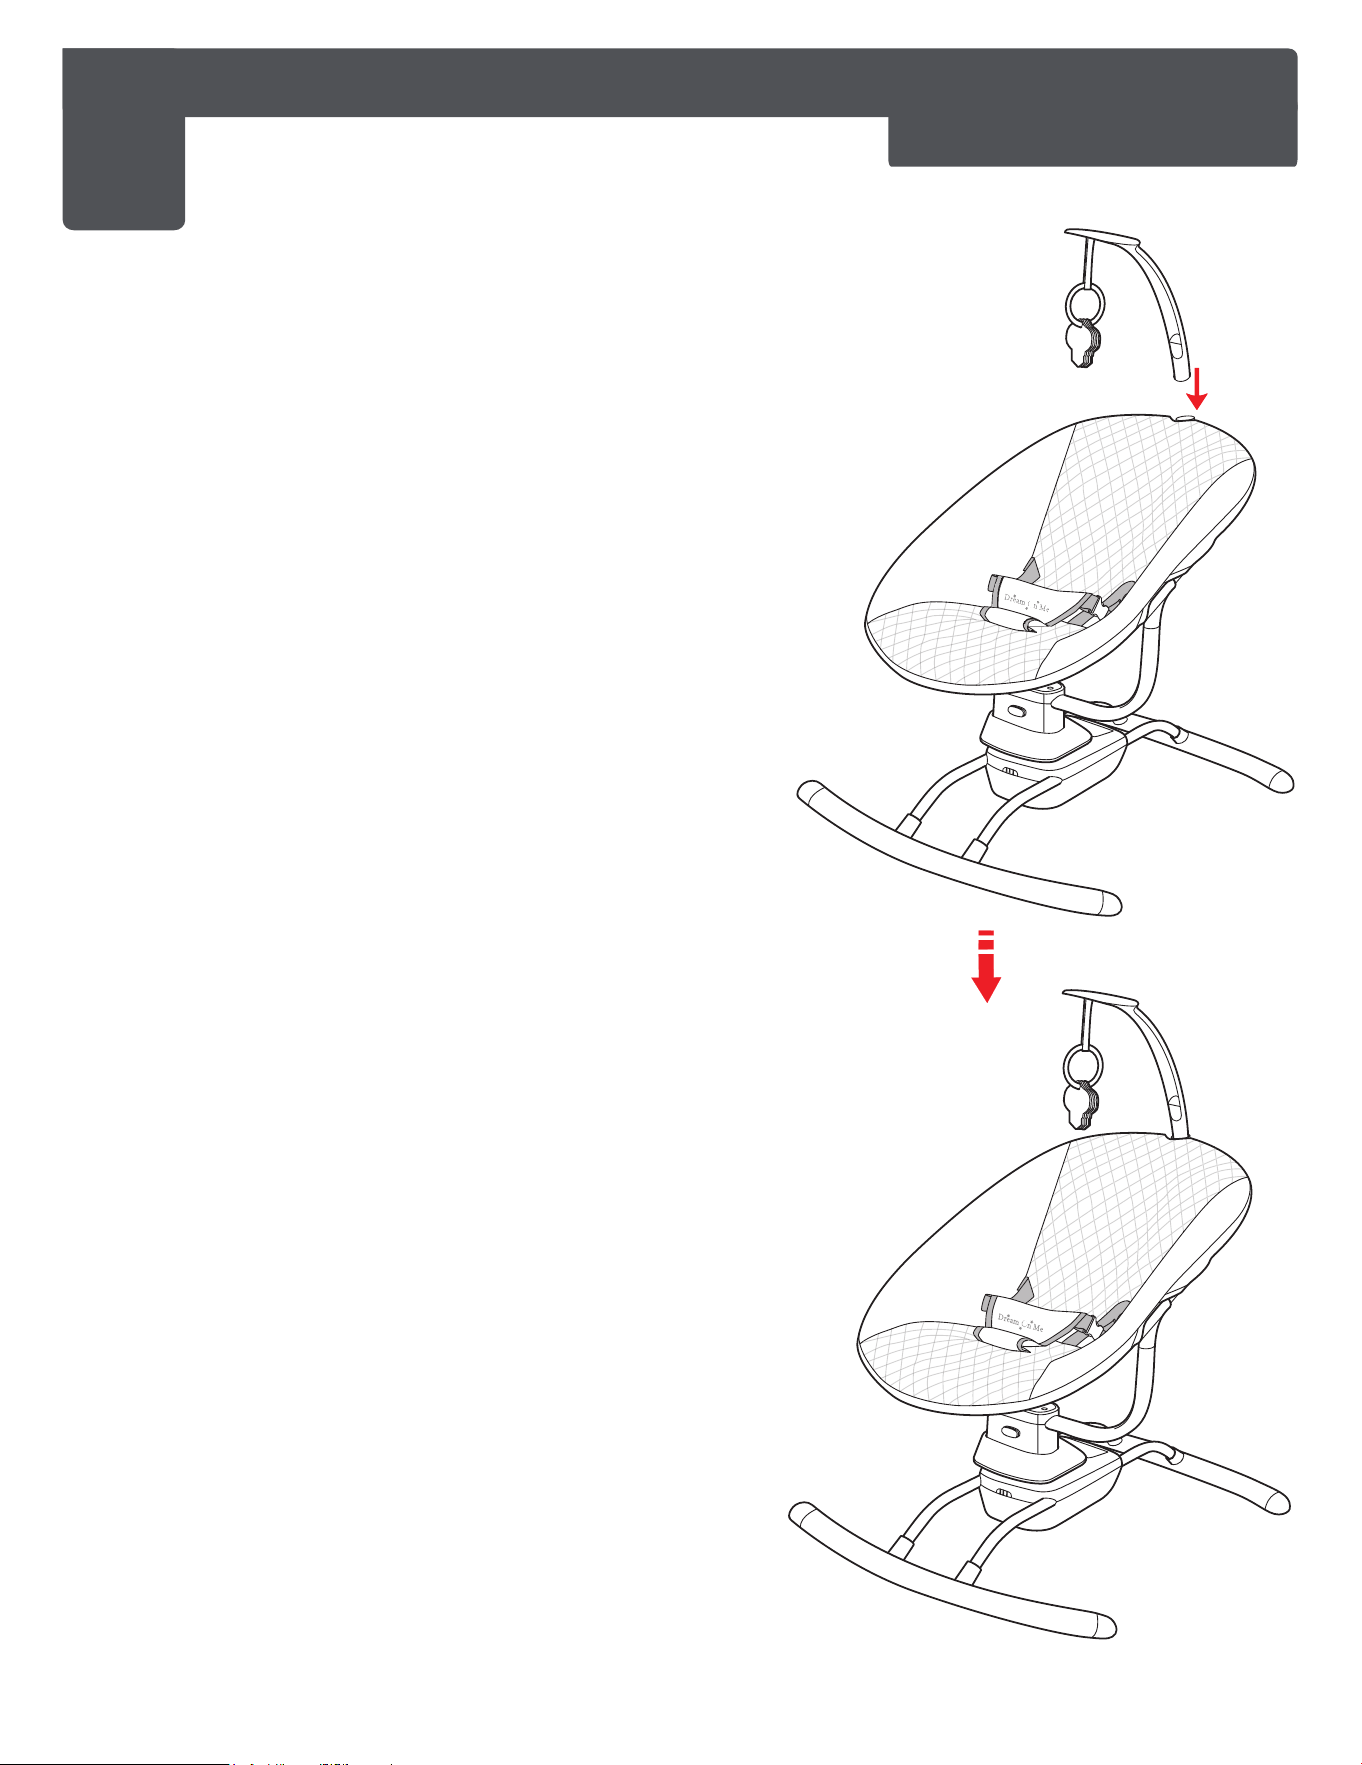
4
BABY SWING ASSEMBLY - INSTALLATION OF SEAT FABRIC
4a. Gently pull the Seat Fabric (8) onto the
backrest tube. The portion of the tube
onto which the toy bar is to be
attached should be left exposed.
Arrange the fabric onto both sides of
the tube smoothly
4b. Pull the lower right corner of the Seat
Fabric towards the right of the seat
tube first, then pull the seat fabric into
the seat frame tube from right to left
until it is fully inserted as shown in the
illustration.
www.dreamonme.com/help
11
(7)
5
BABY SWING ASSEMBLY - INSTALLATION OF TOY BAR
5a. Insert the Toy Bar directly in the toy
bar base on the backrest tube.
5b. Please ensure that the toy bar is firmly
fixed, so that the toy bar does not
come off when pulled out.
www.dreamonme.com/help
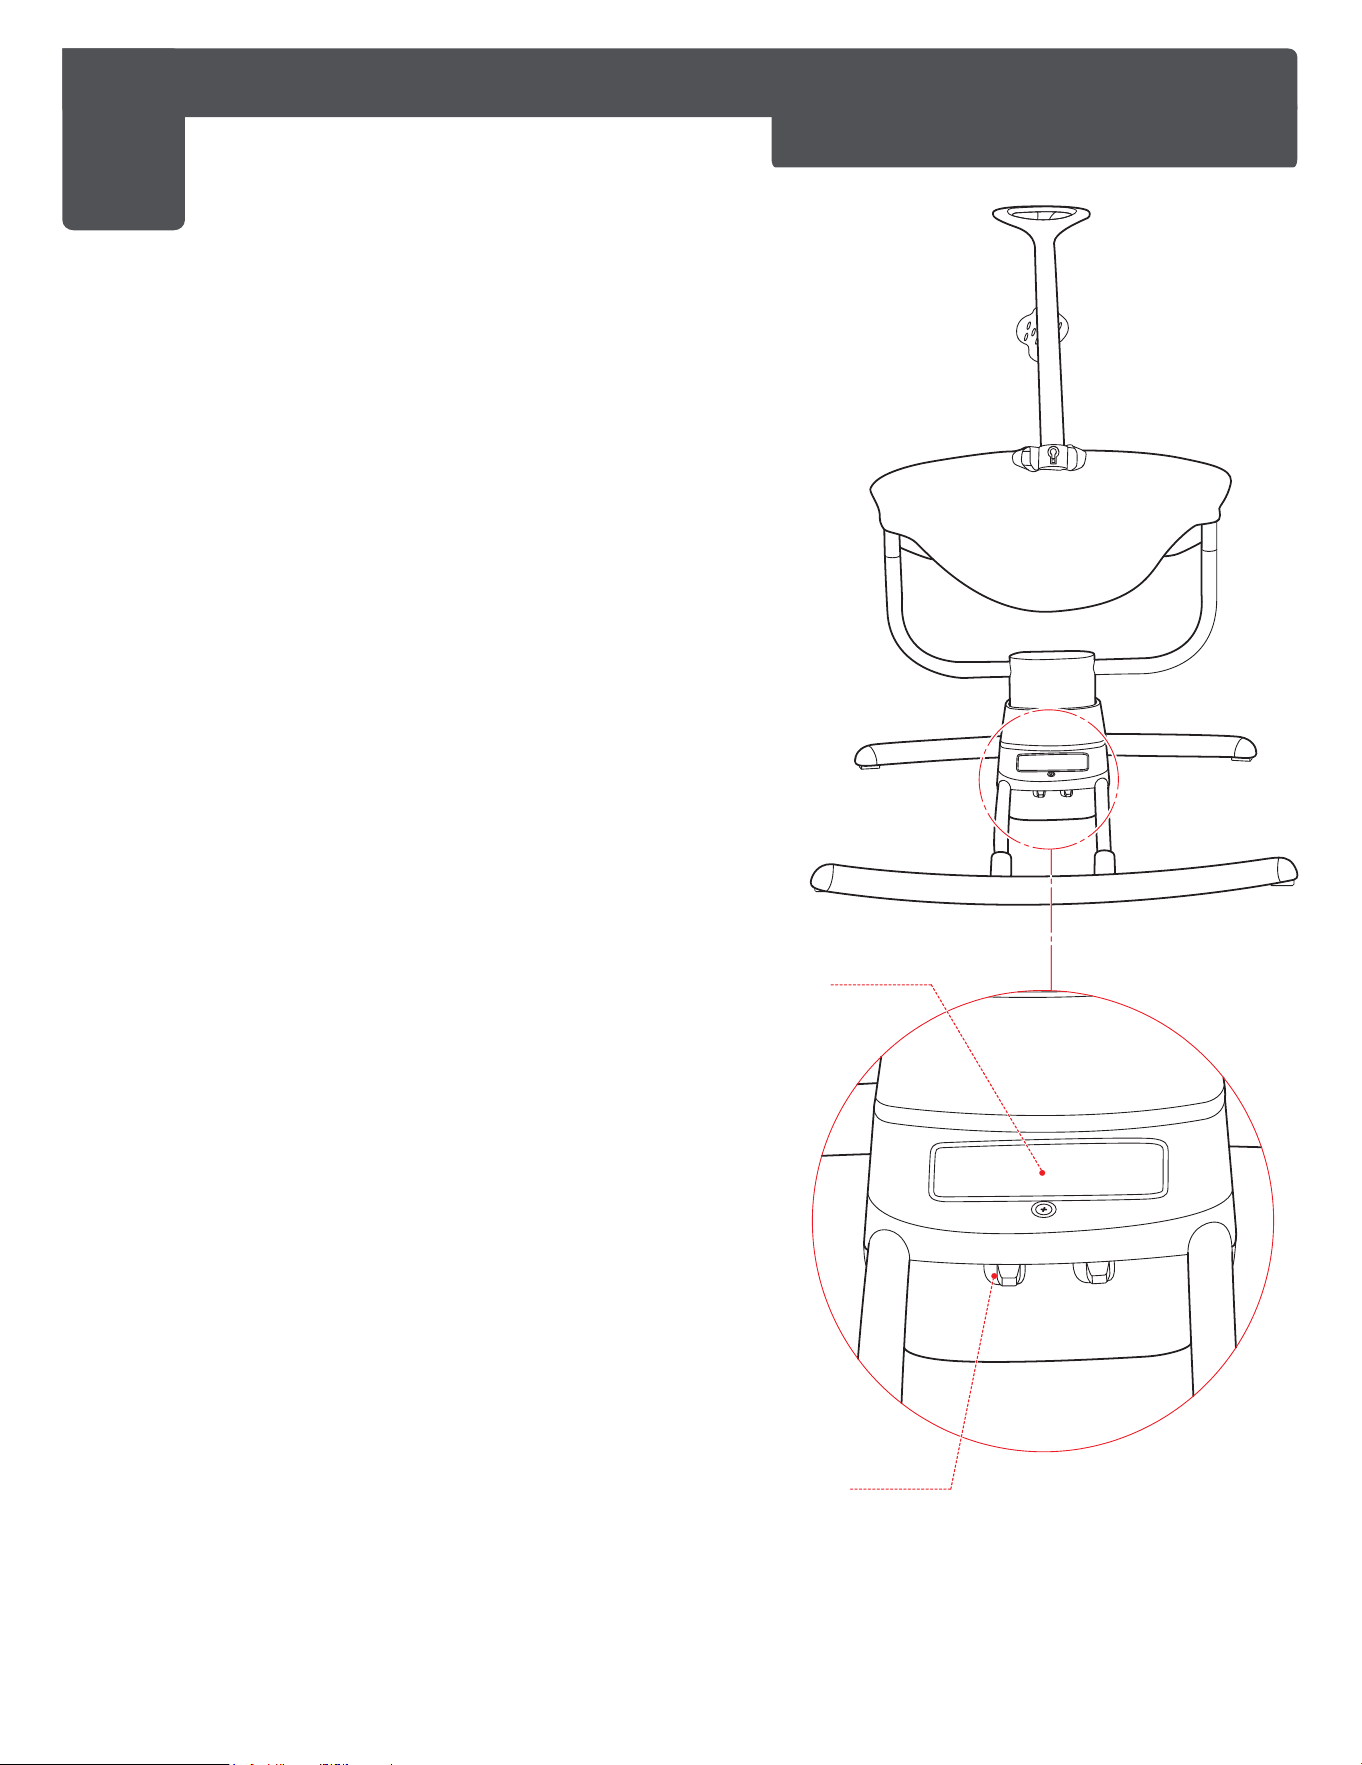
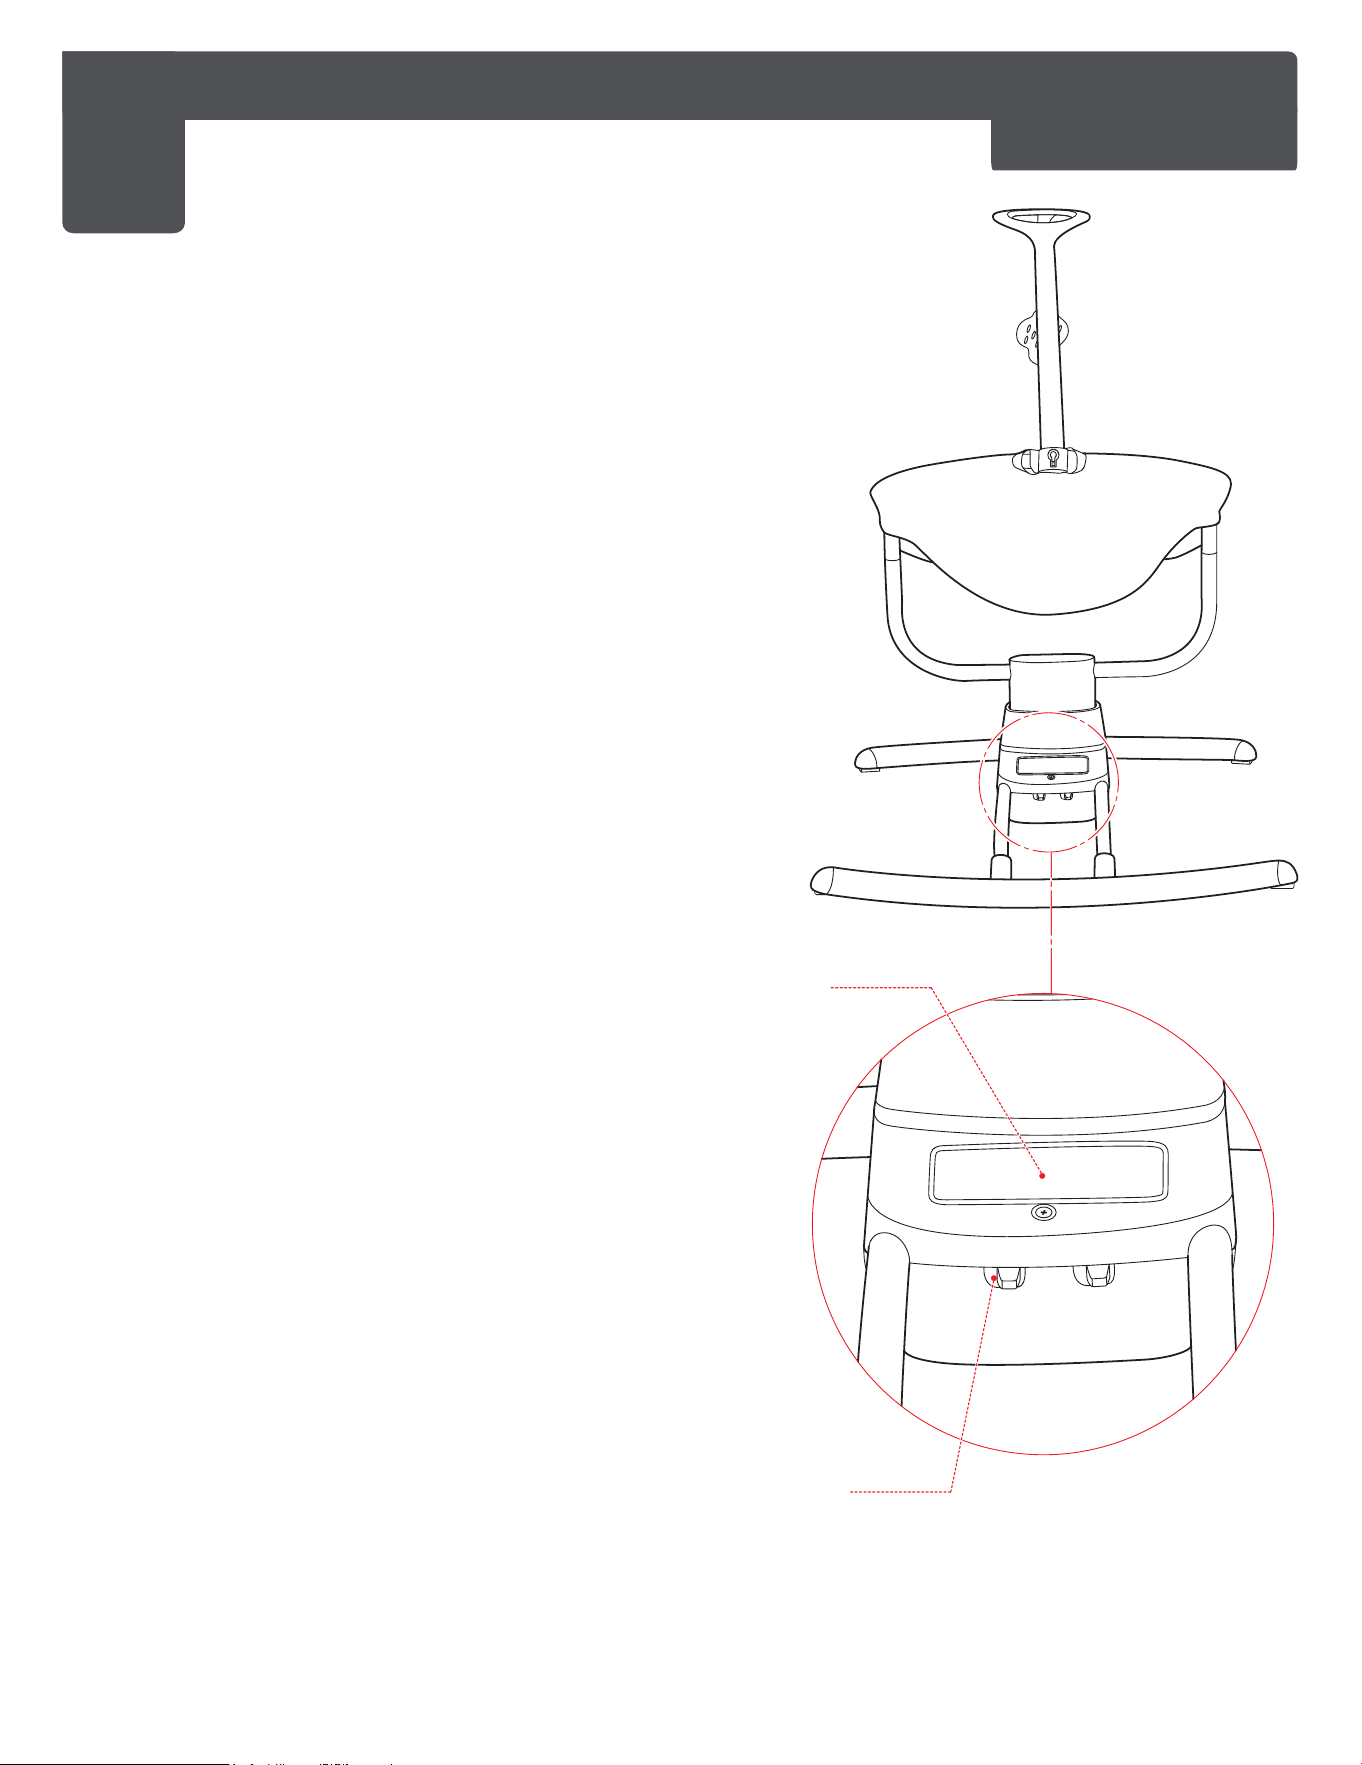
12
“Battery
Cover”
“Music
Button”
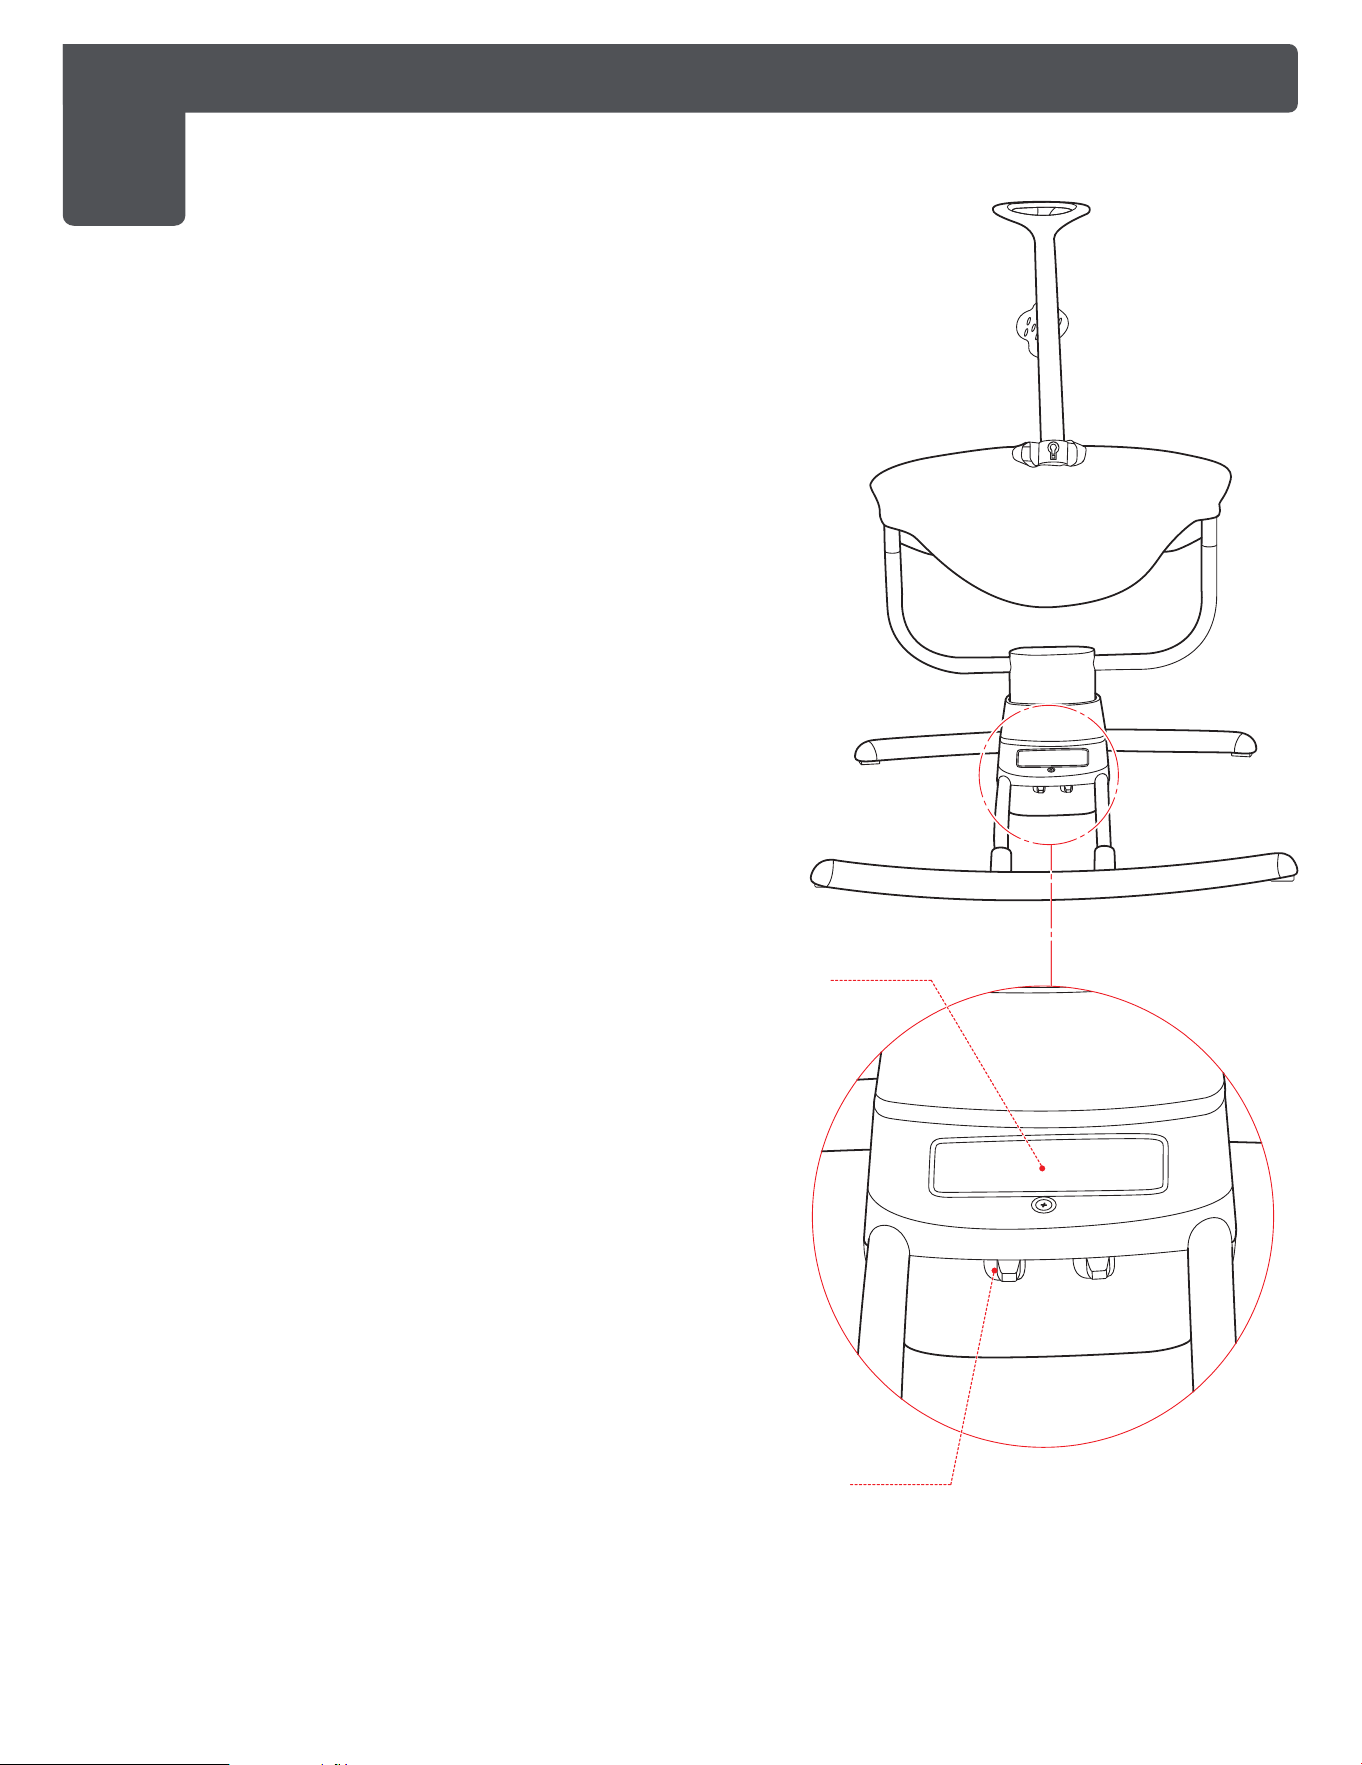
1
USAGE INSTRUCTIONS OF BABY SWING - USE OF BATTERIES
1a. To install/change batteries, use a cross
screwdriver (not provided) to open the
battery cover on the back of the music
box as shown in the illustration.
1b. Load four ‘C’ batteries into the battery
box and fix back the cover. Use the
swing with batteries when you are not
in the room.
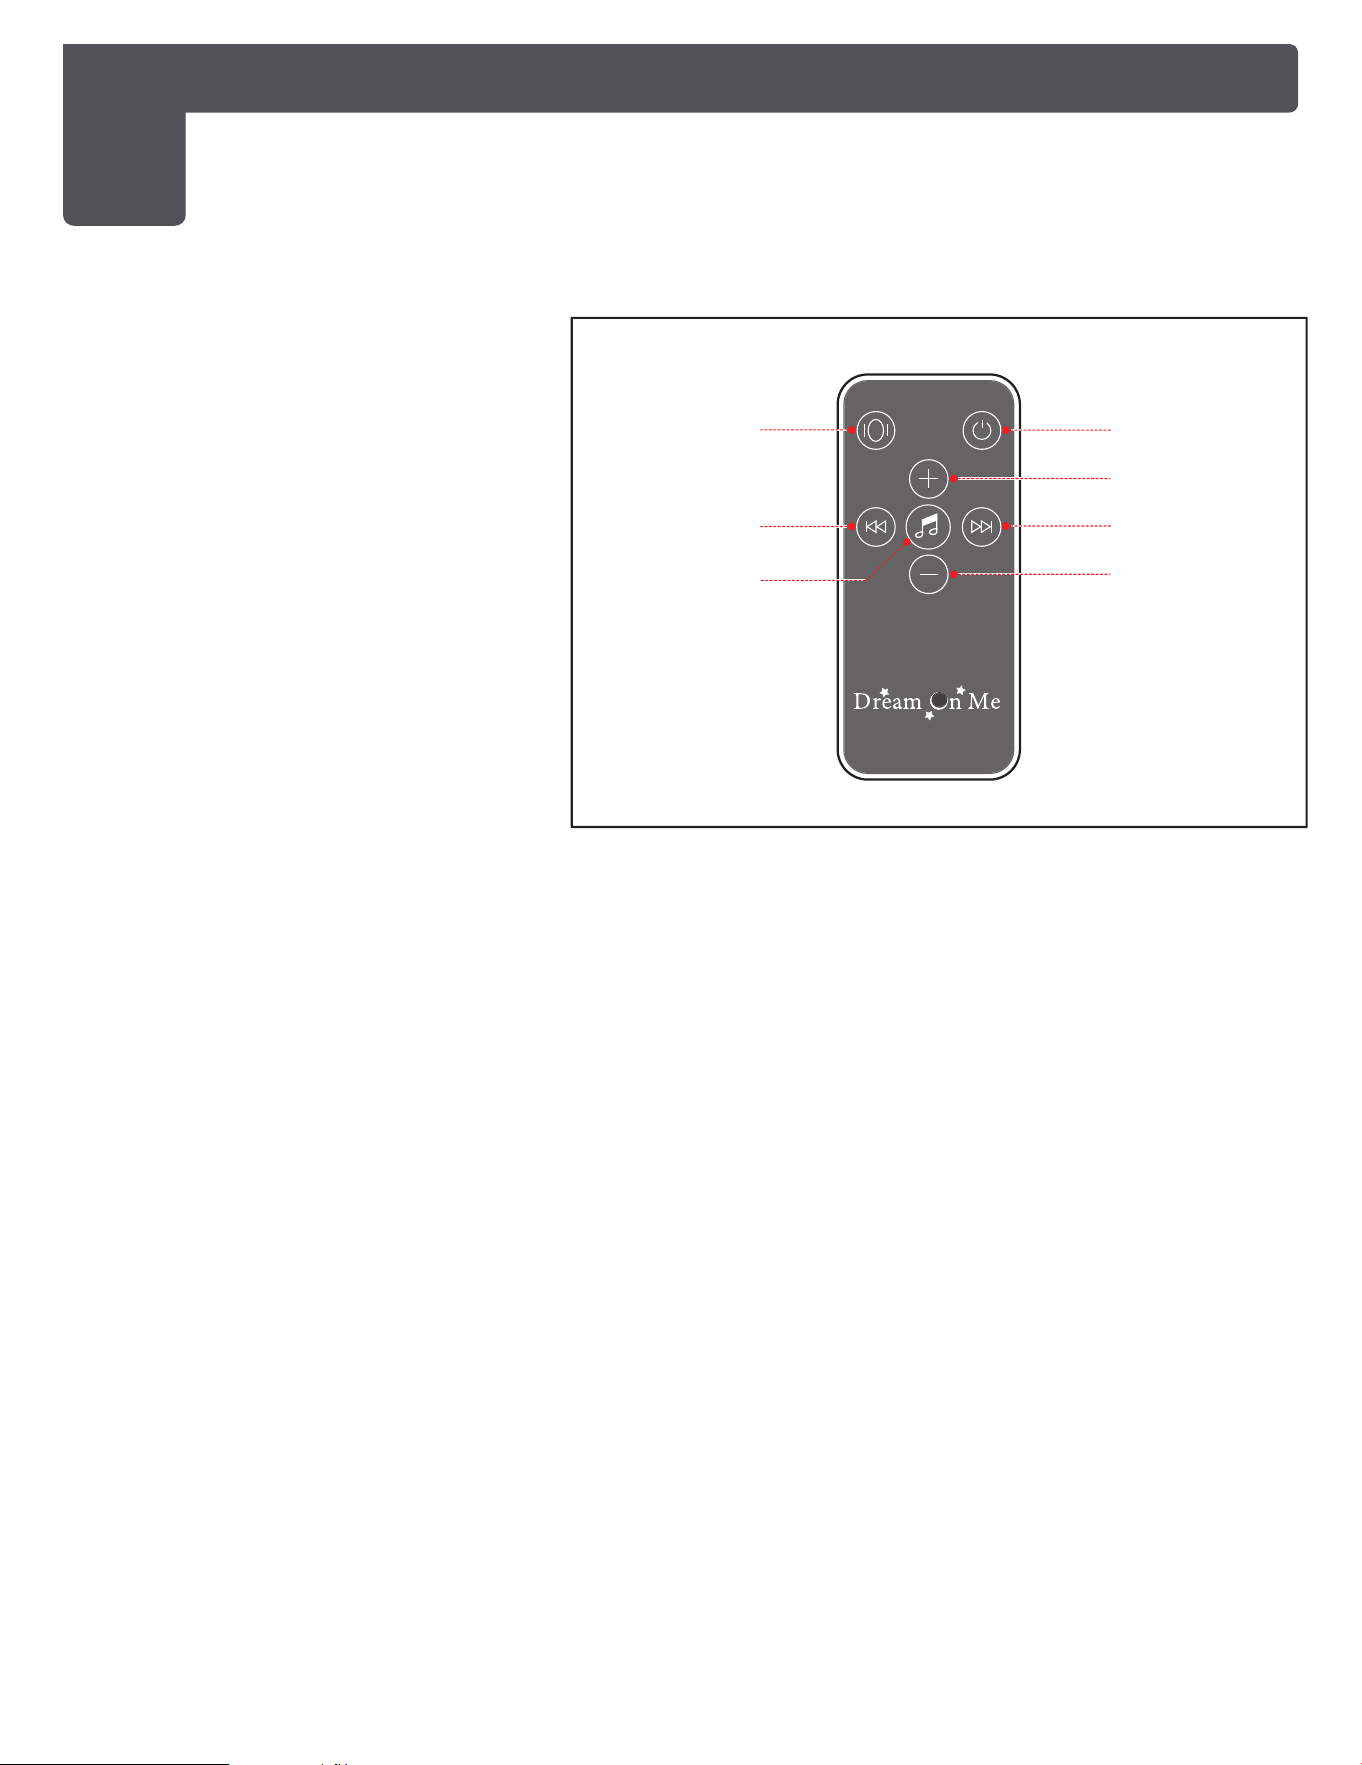
CONTROL PANEL
Power:
• When you press this key once, the
chair will swing at the first speed and
the light indicates red. The second
time, the red light displays and the
swing adjusts to the second speed.
The third time, the third indicator light
displays and the swing adjusts to the
third speed. At the fourth time, the
chair will stop swinging and the
indicator lights turn off.
• Music/Volume Press to play/pause the
music. There are 8 different tracks, and
the track will play twice before
automatically changing. You can
increase or decrease the volume when
the music is played by holding down
the music button.
NOTE:
• Turn off the swing and play music while
connected to the power supply. Press
the music switch while the swing is off.
www.dreamonme.com/help
13
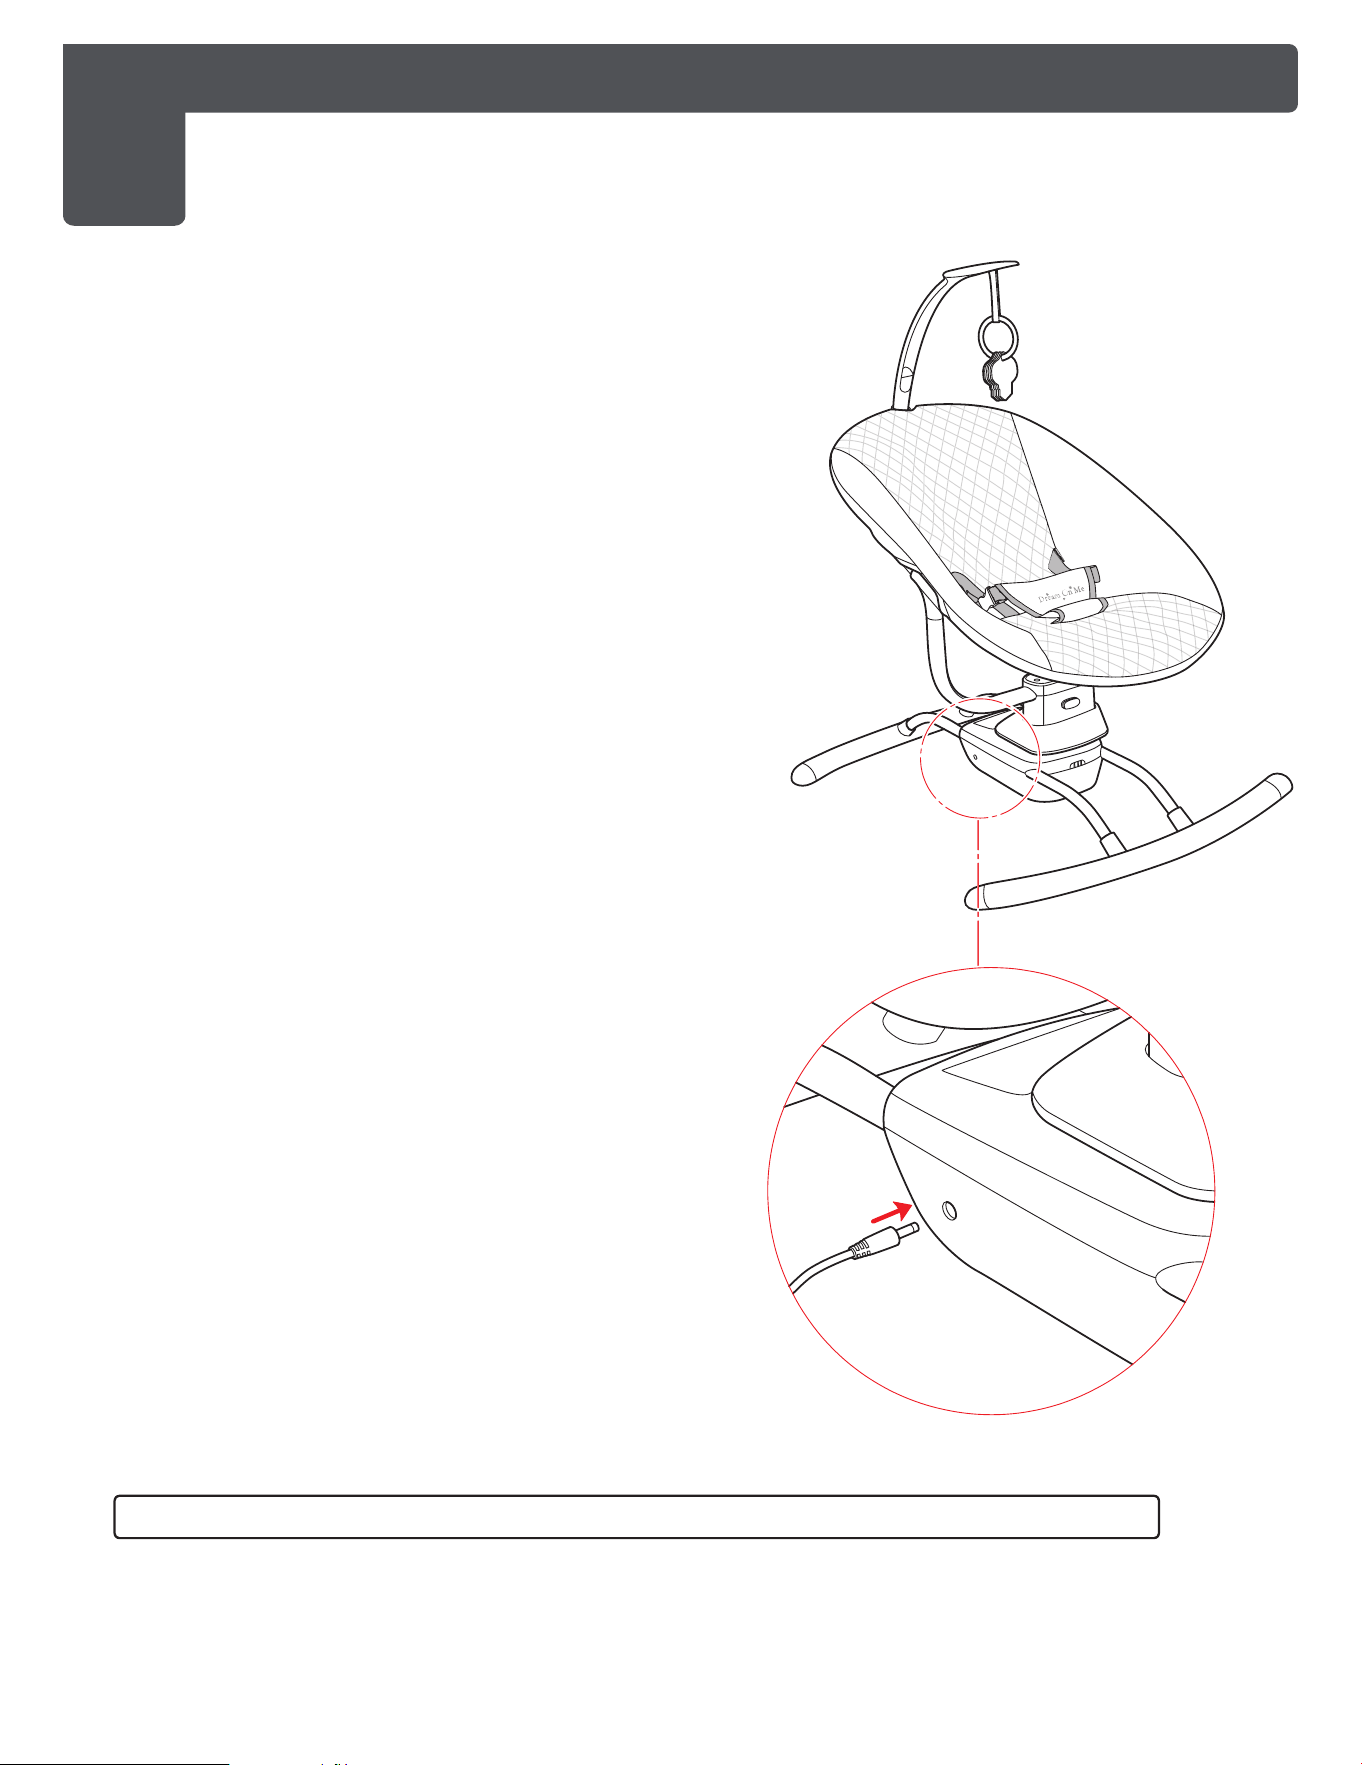
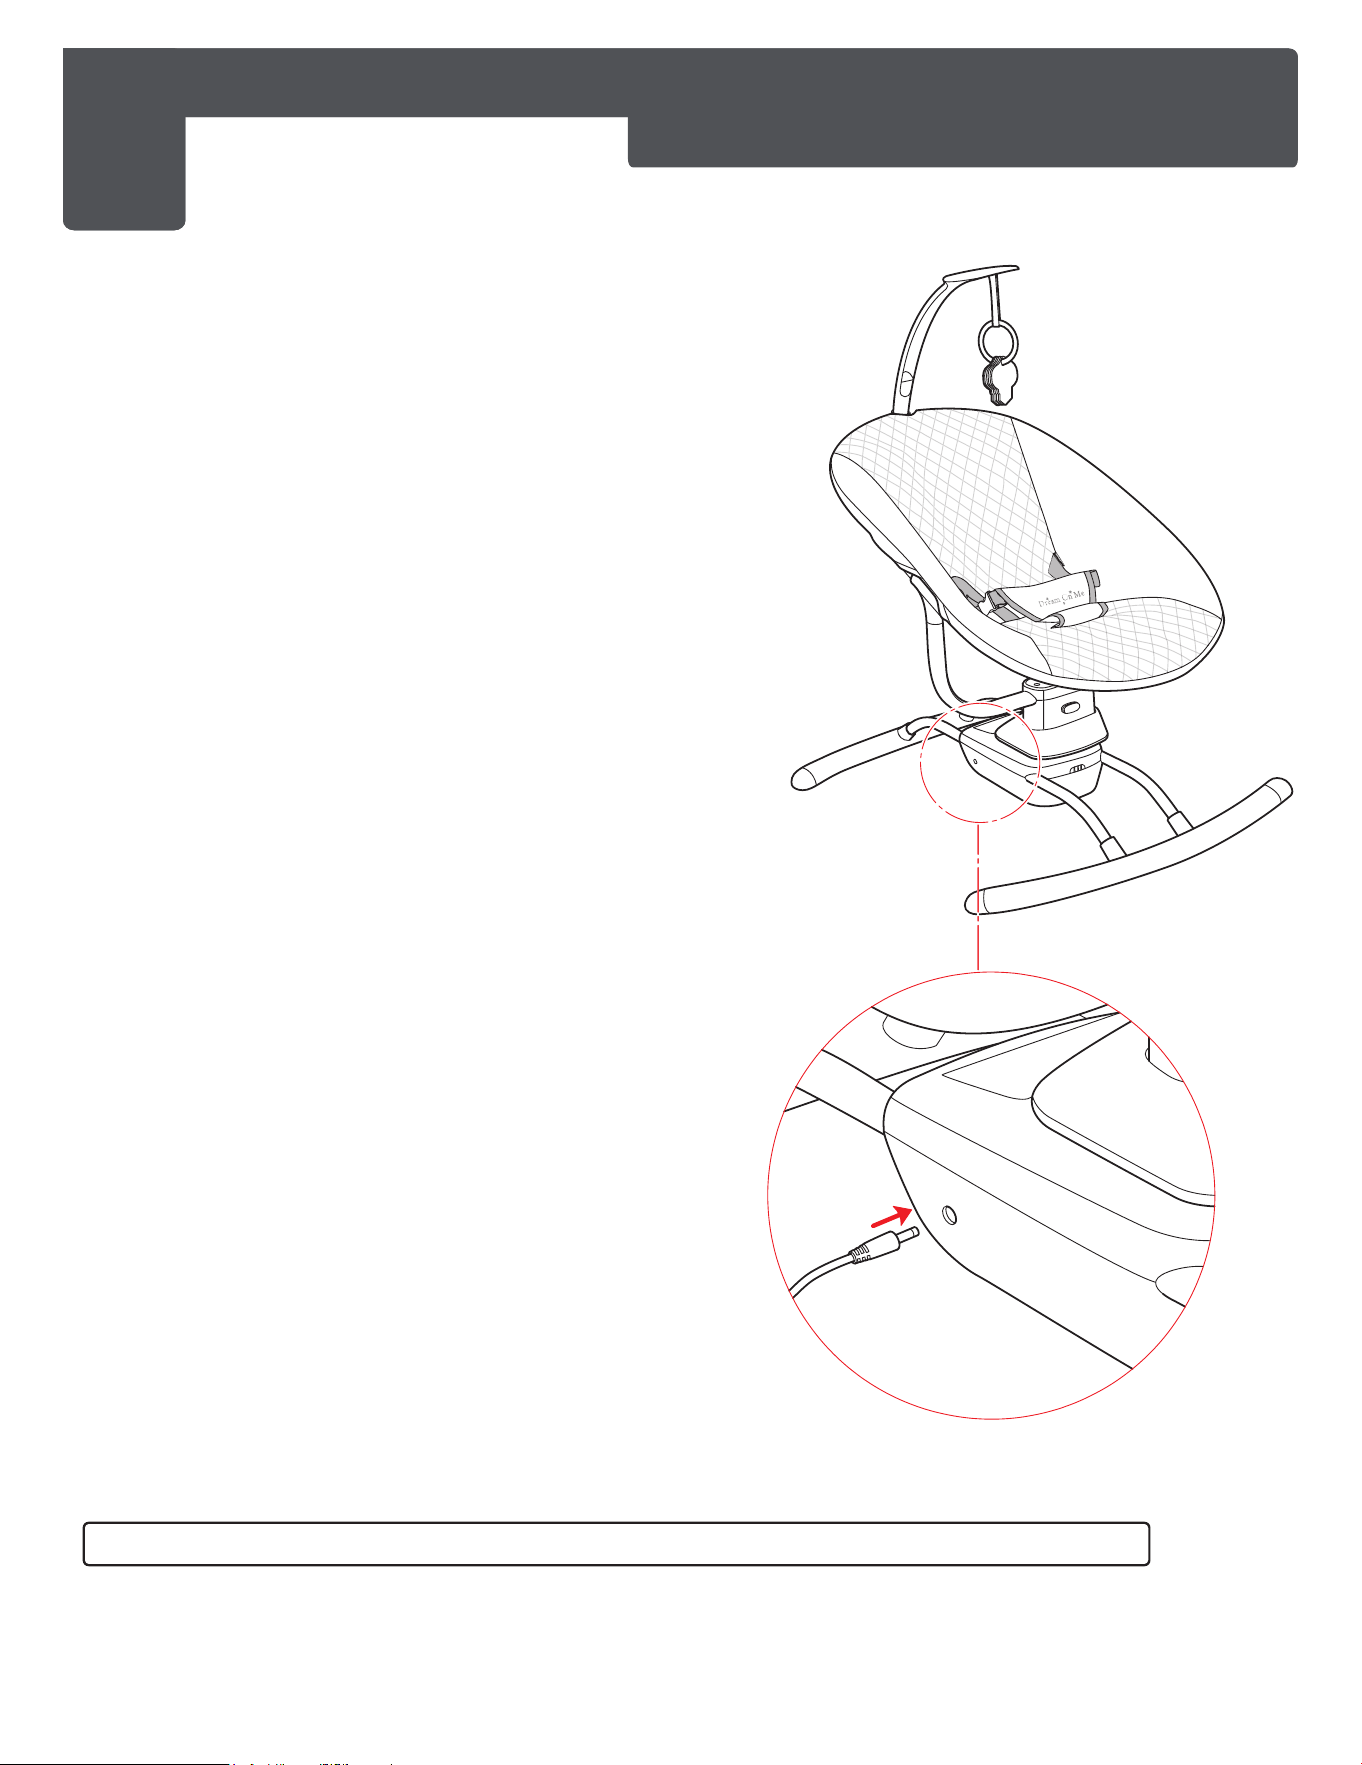
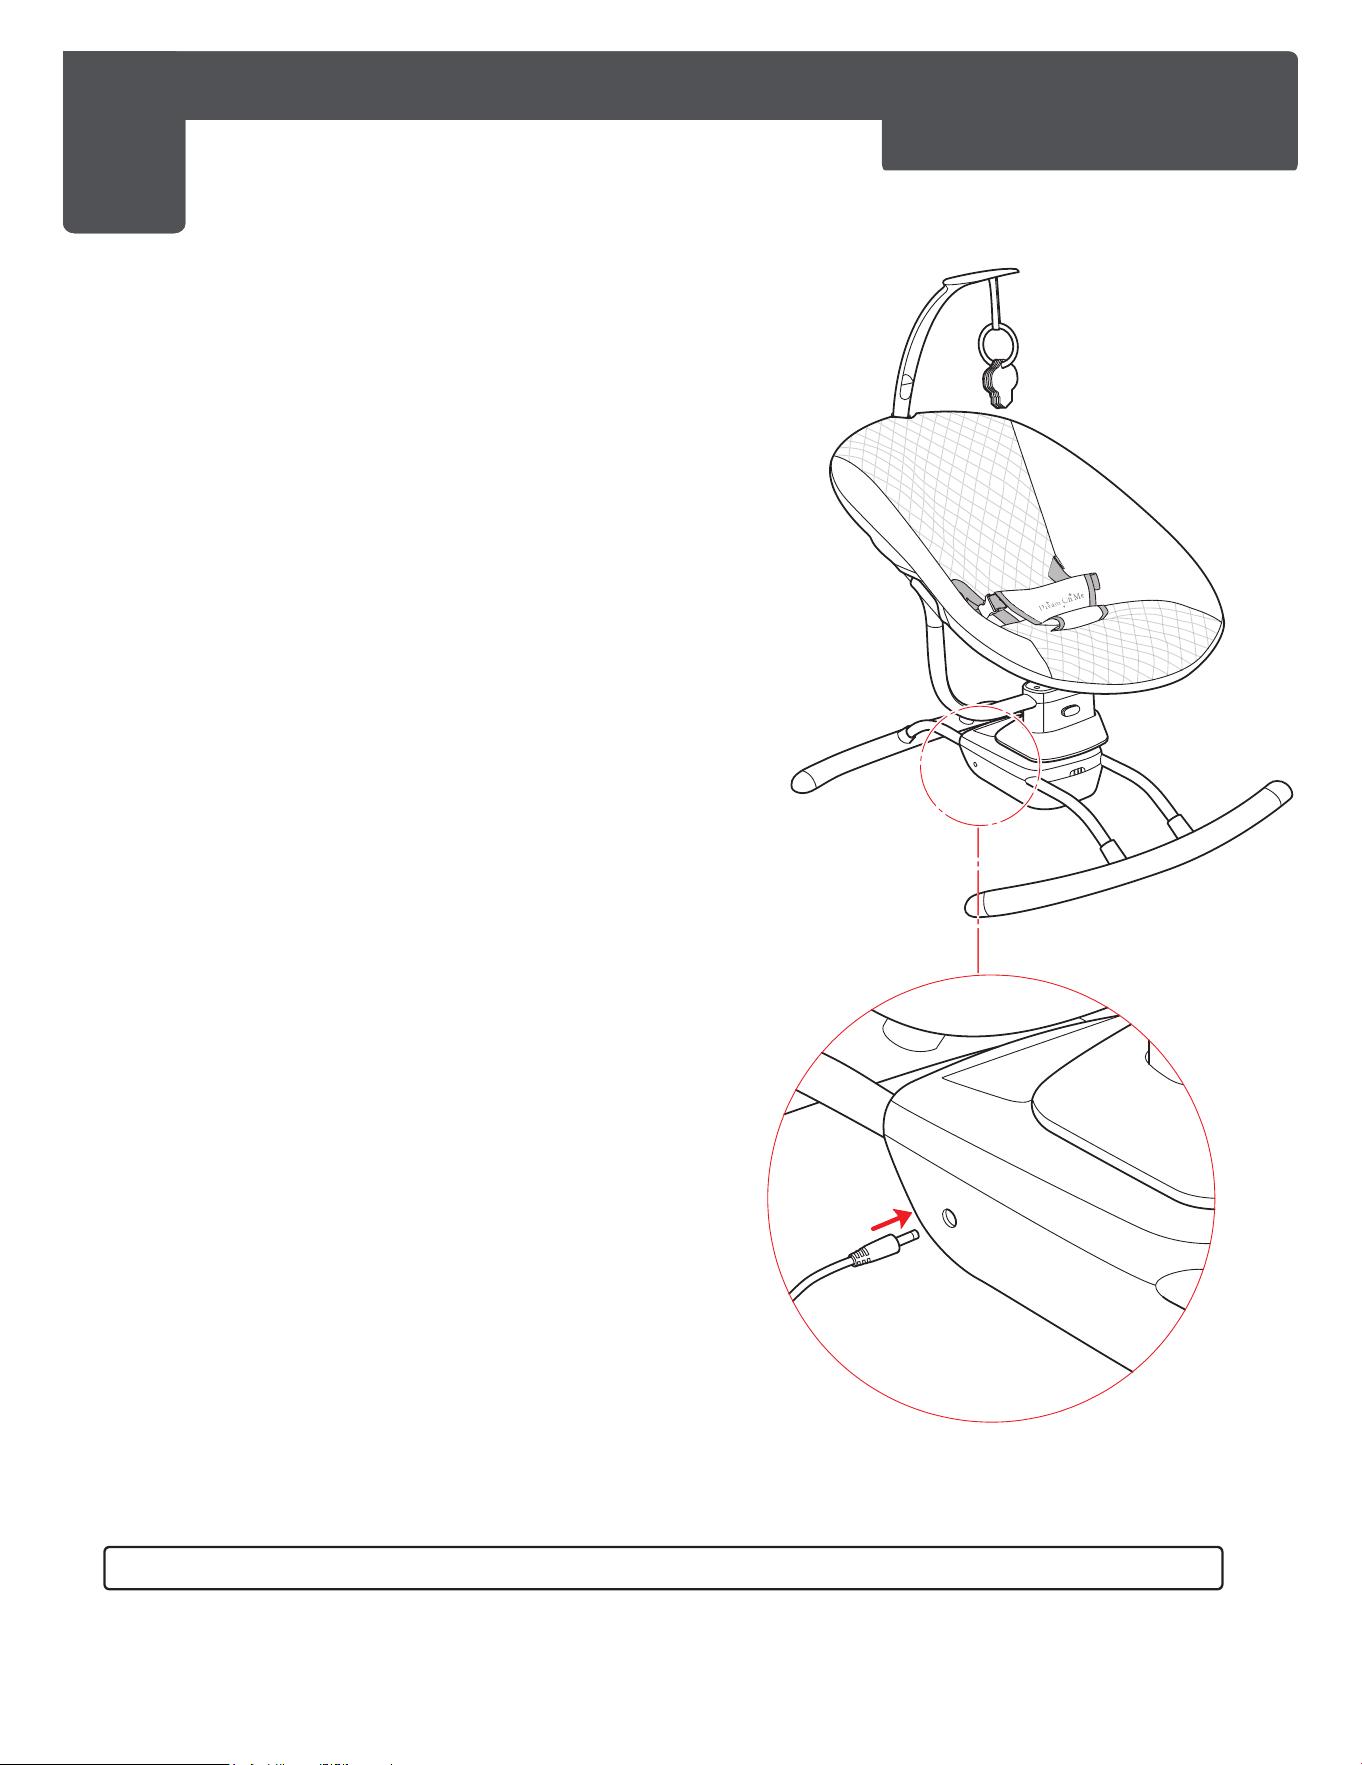
2
USAGE INSTRUCTIONS OF BABY SWING - USE OF ADAPTER
2a. The power supply with adapter - Input:
AC 100 to 240V - 50 to 60Hz, Output:
DC 6V/1A.
2b. Insert the Adapter in the control panel
as shown in the illustration. The plug
must be inserted in the wall outlet
(230V). Use the swing with the adapter
when you are in the room.
AC/DC Adapter (NOT INCLUDED, SOLD SEPARATELY in SKU #3810A)
POWER
www.dreamonme.com/help
14
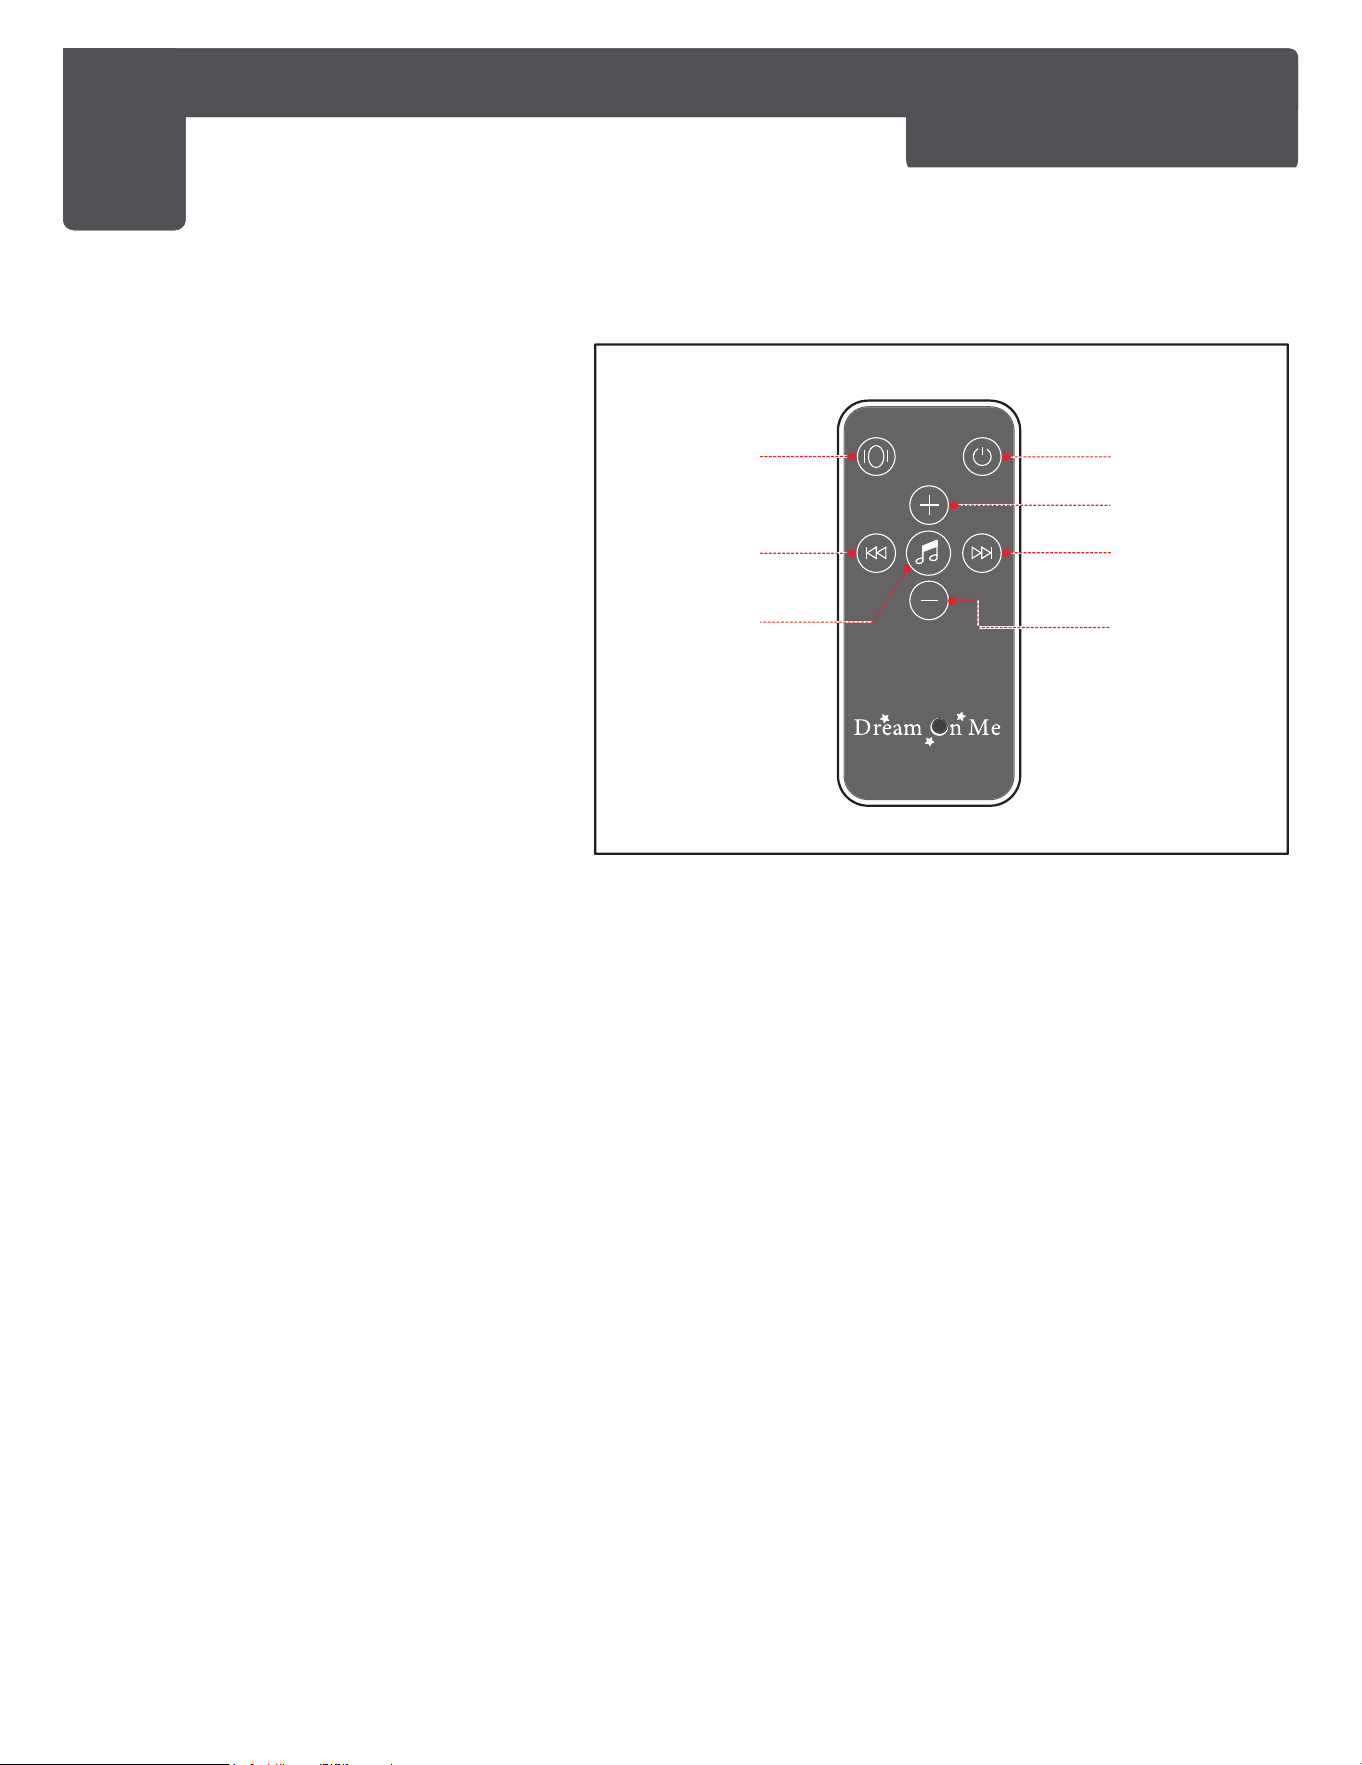
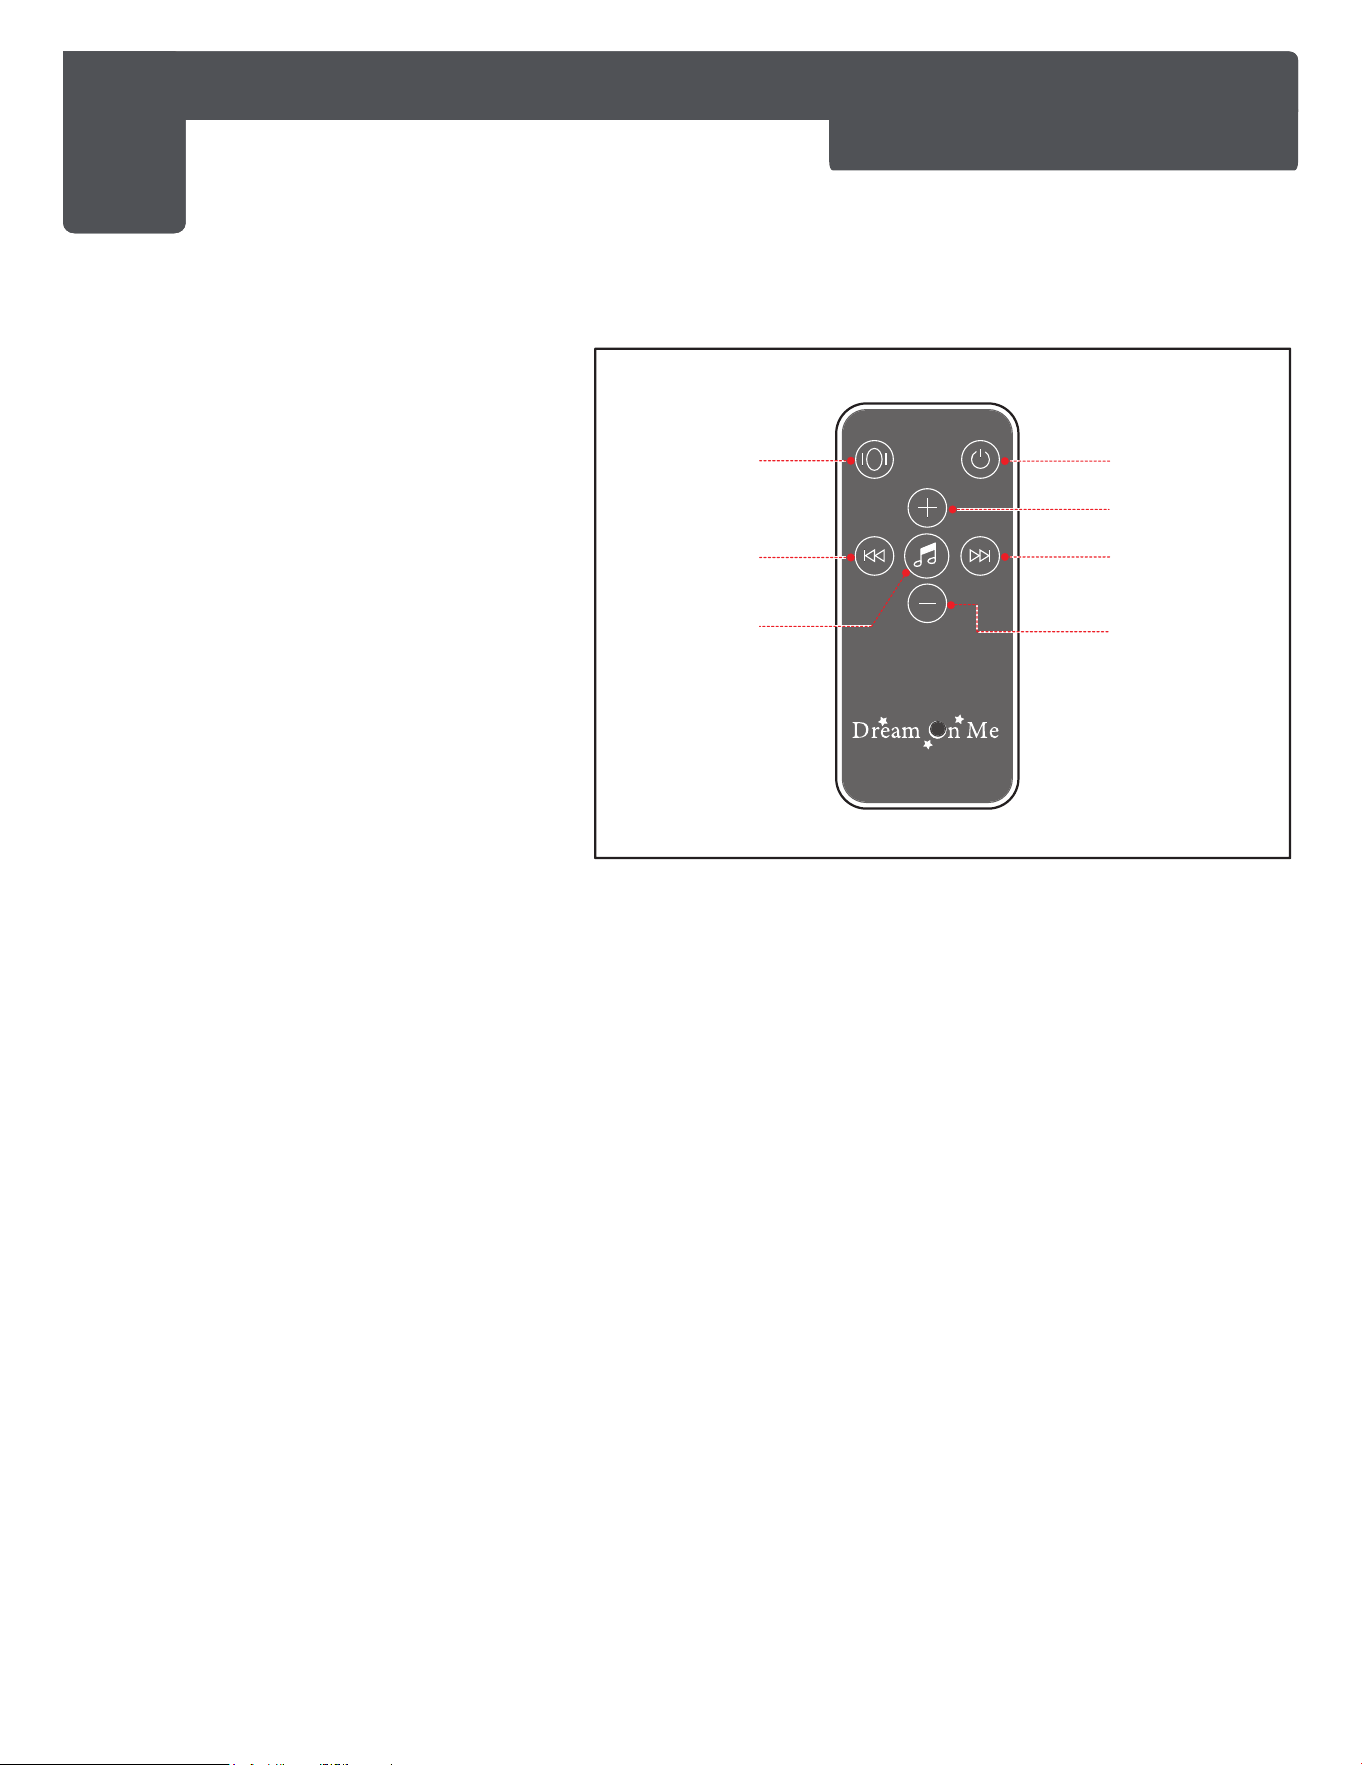
Power
Swing Speed
Last Melodies
Music
Volume +
Volume -
Next Melodies
(9)
NOTE:
• Remote is to be managed only by an adult.
• Remote control device is not a toy.
• In order to control the cradle with the remote control, you must point the
remote control to the control panel.
• IMPORTANT: Remove the plastic battery cover at the end of the remote
control before use to activate it.
3
USAGE INSTRUCTIONS OF BABY SWING - REMOTE CONTROL
3a. Power: Press the button to
power on the swing. Press the
button again to turn off the
power.
3b. Swing Speed: Press the
button when power is on, the
chair swings at the first speed.
Press once to swing to
second speed. Press the
second time to swing to the
third speed. Press the fourth
time to stop the swing.
3c. Music: Press the button in
order to start or stop playing
melodies.
3d. Last melodies: Choose the previous melodies.
3e. Next Melodies: Choose the next melodies.
3f. Volume +: To increase the volume of the music.
3g. Volume -: To decrease the volume of the music.

www.dreamonme.com/help
15
CARE AND MAINTENANCE
• CLEAN THE PLASTIC AND METAL PARTS WITH SLIGHTLY DAMP SOFT CLOTH
WITH MILD SOAP.
• CLEAN THE SWING CANOPY AND TOYS WITH A DAMP TOWEL. FOLLOW THE
GUIDELINES FROM THE LABEL OF EACH TOY.
• THE UPHOLSTERY MAY BE HAND WASHED.
• DO NOT TUMBLE OR MACHINE DRY.
• DO NOT WET THE ADAPTER, CONTROL BOX OR REMOTE CONTROL WITH
WATER OR OTHER LIQUIDS.
• BEFORE CLEANING, REMOVE THE PLUG OF THE ADAPTOR FROM THE SOCKET
AND TURN OFF THE POWER SUPPLY.
• DO NOT CLEAN WITH ABRASIVE DETERGENTS THAT CONTAIN AMMONIA,
BLEACH OR SPIRIT.
• WHEN YOU STORE OR TRANSPORT THE PRODUCT, DO NOT PLACE ITEMS OR
OBJECTS IN OR ON IT BECAUSE YOU MAY DAMAGE THE STRUCTURE, FABRIC
COVER OR CONTROL BOX.
• STORE THE PRODUCT IN A CLEAN AND DRY PLACE.
• DO NOT SUBJECT THE PRODUCT TO DIRECT ENVIRONMENTAL SUN, RAIN,
MOISTURE OR HARSH TEMPERATURE CHANGES.
1532 S. WASHINGTON AVE STE1
PISCATAWAY, NJ 08854-9908
www.dreamonme.com
Follow Us @dreamonmeinc
to get your nursery featured on our social media.
Enter our monthly giveaway!
Scan the QR code to register.
Chat with us!
Scan the QR code to Live Chat.
E-mail: [email protected]

0622R1-3810
Manuel du propriétaire
COMFORT ME
Balançoire Électrique Multifonctions
Scannez le code QR pour enregistrer votre produit
https://dreamonme.com/customercare/registration/
Lisez toutes les instructions avant
d'assembler et d'utiliser le produit.
IMPORTANT - Conservez les
instructions pour une utilisation future.

2
www.dreamonme.com/help
AVERTISSEMENTS
• LE NON RESPECT DE CES AVERTIS AVERTIS AVERTIS AVERTIS AVERTIS AVERTIS
D'UN RISQUE DE BLESSURES GRAVES OU LA MORT.
• VEUILLEZ LIRE ATTENTIVEMENT CES INSTRUCTIONS POUR ASSURER LA
SÉCURITÉ DE VOTRE ENFANT.
• POUR GARANTIR UNE UTILISATION SÛRE DE CE PRODUIT, SUIVEZ LES
AVERTISSEMENTS, DIRECTIVES ET RECOMMANDATIONS DU MANUEL
D'INSTRUCTIONS. CE PRODUIT DOIT ÊTRE ENTIÈREMENT ASSEMBLÉ AVANT
D'ÊTRE UTILISÉ.
• L'ASSEMBLAGE PAR UN ADULTE EST REQUIS.
• NE LAISSEZ JAMAIS L'ENFANT SANS SURVEILLANCE DANS LE PRODUIT.
• ARRÊTEZ D'UTILISER LE PRODUIT LORSQUE VOTRE ENFANT EST CAPABLE DE
S'ASSEOIR SANS AIDE OU LORSQU'IL PÈSE PLUS DE 9 KG.
• CE PRODUIT N'EST PAS DESTINÉ À ÊTRE UTILISÉ PENDANT DE LONGUES
PÉRIODES DE SOMMEIL.
• NE LAISSEZ JAMAIS CE PRODUIT SUR DES SURFACES ÉLEVÉES, INCLINÉES OU
MOLLES.
• UTILISEZ TOUJOURS LE HARNAIS DE SÉCURITÉ.
• POUR ÉVITER TOUTE BLESSURE, ASSUREZ-VOUS QUE L'ENFANT SE TROUVE À
UNE DISTANCE SÛRE PENDANT LES RÉGLAGES, LE DÉPLIAGE, LE PLIAGE ET LE
RANGEMENT DU PRODUIT.
• NE DÉPLACEZ PAS LE PRODUIT ET NE LE SOULEVEZ PAS LORSQU'UN ENFANT
S'Y TROUVE.
• NE LAISSEZ PAS LES ENFANTS JOUER AVEC CE PRODUIT.
• RÉGLEZ LE VOLUME SONORE À UN NIVEAU BAS POUR ÉVITER D'ENDOMMAGER
L'OUÏE DE L'ENFANT.
• GARDEZ LE PRODUIT À L'ÉCART DU FEU.
• UTILISEZ LE PRODUIT POUR LES BÉBÉS ÂGÉS DE 6 MOIS ENVIRON ET PESANT
AU MAXIMUM 9 KG.
• N'UTILISEZ PAS LE PRODUIT POUR PLUS D'UN ENFANT.
• LE PRODUIT NE REMPLACE PAS UN LIT D'ENFANT OU UN LIT. SI L'ENFANT A
BESOIN DE DORMIR, VOUS DEVEZ LE METTRE DANS UN LIT OU UN BERCEAU
ADAPTÉ.
• N'UTILISEZ PAS LE PRODUIT SI DES PIÈCES MANQUENT OU SONT
ENDOMMAGÉES.
• N'UTILISEZ PAS DE PIÈCES DE RECHANGE OU D'AUTRES COMPOSANTS QUI NE
SONT PAS FOURNIS PAR L'ENTREPRISE. CONTACTEZ DREAM ON ME INC. POUR
OBTENIR DES PIÈCES DE RECHANGE ET DES INSTRUCTIONS.
• N'APPORTEZ PAS DE CHANGEMENTS OU DE MODIFICATIONS À LA STRUCTURE.
SI NÉCESSAIRE, CONTACTEZ DREAM ON ME INC OU UN SERVICE AUTORISÉ
POUR DES CONSEILS ET DES RÉPARATIONS.

www.dreamonme.com/help
3
AVERTISSEMENTS (suite)
• NE PAS ATTACHER DE CORDES OU DE CORDONS AU PRODUIT POUR ÉVITER
TOUT RISQUE DE SUFFOCATION/TRANGULATION.
• N'UTILISEZ LE PRODUIT QUE POUR SON USAGE.
• TOUS LES RÉGLAGES CONCERNANT L'ALIMENTATION ÉLECTRIQUE : MISE EN
MARCHE/ARRÊT, REMPLACEMENT OU CHARGEMENT DES PILES DOIVENT ÊTRE
EFFECTUÉS UNIQUEMENT PAR DES ADULTES.
• UTILISEZ UNIQUEMENT L'ADAPTATEUR AC/DC FOURNI PAR DREAM ON ME INC.
• VÉRIFIEZ RÉGULIÈREMENT LE BON FONCTIONNEMENT DE L'ADAPTATEUR
AC/DC. ARRÊTEZ L'UTILISATION EN CAS DE DOMMAGE.
• NE PAS AUTORISER LA PRÉSENCE D'ENFANTS DE MOINS DE 3 ANS AVANT LA
FIN DU MONTAGE POUR ÉVITER QU'ILS AIENT ACCÈS AUX PETITES PIÈCES OU
AUX PIÈCES DÉMONTÉES.
• CONSERVEZ L'EMBALLAGE EN NYLON HORS DE PORTÉE DES ENFANTS POUR
ÉVITER TOUT RISQUE DE SUFFOCATION.
AVERTISSEMENTS ET DIRECTIVES POUR L'UTILISATION DES PILES :
• N'UTILISEZ QUE 4 PILES DE TYPE 'C'.
• FIXEZ TOUJOURS LE COUVERCLE DU COMPARTIMENT À PILES APRÈS AVOIR
INSÉRÉ LES PILES.
• NE LAISSEZ PAS LES ENFANTS AVOIR ACCÈS AUX PILES OU JOUER AVEC
ELLES.
• INSÉREZ UNIQUEMENT DES PILES DU TYPE ET DE LA TENSION INDIQUÉS.
• N'UTILISEZ PAS DE PILES DE TYPES DIFFÉRENTS.
• NE MÉLANGEZ PAS DES PILES USAGÉES ET DES PILES NEUVES.
• RESPECTEZ LA POLARITÉ INDIQUÉE DANS LE COMPARTIMENT DES PILES.
• RETIREZ LES PILES ENDOMMAGÉES OU USÉES.
• RETIREZ LES PILES LORSQUE VOUS N'UTILISEZ PAS LE PRODUIT.
• NE JETEZ PAS LES PILES DANS UN FEU OUVERT. NE SÉPAREZ PAS LES PILES.
ATTENTION :
• LES DÉCHETS PROVENANT DE PILES ÉPUISÉES OU INUTILISABLES DOIVENT
ÊTRE ÉLIMINÉS SÉPARÉMENT.
• LES PILES NE DOIVENT PAS ÊTRE JETÉES AVEC LES DÉCHETS MÉNAGERS.
• LES PILES DOIVENT ÊTRE ÉLIMINÉES AUX ENDROITS PRÉVUS À CET EFFET.

www.dreamonme.com/help
4
…. pour avoir choisi Dream On Me et félicitations pour avoir rejoint notre famille ;
une famille qui transforme des vies depuis plus de 30 ans !
Nous apprécions vos commentaires et vous souhaitons le meilleur dans le
années à venir avec votre nouvel ajout. Si vous avez des questions
ou des préoccupations, n'hésitez pas à nous contacter. L'un des nôtre
les représentants de confiance du service à la clientèle se feront un plaisir de vous
aider.
Merci encore de nous avoir fait confiance pour vous fournir en toute sécurité
et des produits et accessoires pour bébés abordables.
MERCI...
GARANTIE LIMITÉE:
• Dream On Me garantit que son produit est exempt de défauts de
matériaux et de fabrication et s'engage à remédier à tout défaut de ce
type.
• Cette garantie couvre 1 an à compter de la date d'achat d'origine.
• Cette garantie n'est valide que sur présentation d'une preuve d'achat.
• Ceci est uniquement limité à la réparation ou au remplacement des
composants de meubles défectueux et aucun travail d'assemblage n'est
inclus.
• Cette garantie ne s'applique à aucun produit qui a été mal assemblé,
soumis à une mauvaise utilisation ou à un abus ou qui a été modifié ou
réparé de quelque manière que ce soit.
• Cette garantie vous donne des droits légaux spécifiques et vous pouvez
également avoir d'autres droits qui varient d'un État à l'autre.
www.dreamonme.com/help
5
PARTS
S'il y a des pièces manquantes, veuillez contacter Dream On Me avant d'utiliser
le produit.
Base en plastique (X2)
1
Machine à moteur
2
Base du cadre
du siège
3
Cadre de siège
4
Tube de connexion (X2)
5
Tube du dossier
6
Barre de jouets
7
Tissu du siège
8
Télécommande
9
POWER
www.dreamonme.com/help
6
(2)
(2)
(1)
(1)
1
MONTAGE DE LA BALANÇOIRE BÉBÉ - INSTALLATION DE
LA BASE EN PLASTIQUE SUR LA MACHINE MOTEUR
1a. Placez les pièces de la balançoire
sur une surface souple avant
l'assemblage.
1b. Comme indiqué sur l'illustration,
alignez les fentes de la base en
plastique (1) avec les tubes de la
machine motrice (2).
1c. Placez les tubes dans les fentes de
la base en plastique et fixez-les
fermement.
www.dreamonme.com/help
7
(3)
(4)
2
MONTAGE DE LA BALANÇOIRE BÉBÉ : INSTALLATION DU
CADRE DE SIÈGE ET DU TUBE DE SIÈGE
2a. Alignez la base du cadre du siège (3)
sur la machine motrice (2) comme
indiqué sur l'illustration.
2b. Faites attention à la direction avant
et arrière de la base du cadre du
siège. Elle est dotée d'une
conception anti-basculement qui ne
permet pas de la placer dans une
mauvaise direction.
2c. Installez la base du cadre du siège
sur la machine à moteur et lorsque
vous entendez un clic, l'assemblage
est terminé.
2d. Alignez le cadre du siège (4)
parallèlement aux poignées de la
base du cadre du siège.
2e. Insérez les poignées de la base du
cadre du siège dans le cadre du
siège jusqu'à ce que vous entendiez
un clic indiquant que le cadre du
siège est bien fixé.
www.dreamonme.com/help
8
(5)
(5)
(6)
3
ASSEMBLAGE DE LA BALANÇOIRE POUR BÉBÉ - INSTALLATION DU
TUBE DE CONNEXION DU DOSSIER ET DU TUBE DU DOSSIER
3a. Alignez le tube de connexion (5) sur le
tube du dossier (6) comme indiqué sur
l'illustration.
3b. Insérez le tube de connexion dans le
tube du dossier jusqu'à ce que vous
entendiez un clic indiquant que le tube
de connexion est fermement fixé.
www.dreamonme.com/help
9
3
ASSEMBLAGE DE LA BALANÇOIRE POUR BÉBÉ - INSTALLATION DU
TUBE DE CONNEXION DU DOSSIER ET DU TUBE DU DOSSIER
(suite)
3c. Alignez le dossier assemblé et le tube
de connexion sur la balançoire à moitié
assemblée comme indiqué sur
l'illustration.
3d. Insérez le dossier assemblé et le tube
de connexion dans le cadre du siège
jusqu'à ce que vous entendiez un clic.

www.dreamonme.com/help
10
(8)
4
ASSEMBLAGE DE LA BALANÇOIRE POUR BÉBÉ - INSTALLATION
DU TISSU DU SIÈGE
4a. Tirez doucement le tissu du siège (8)
sur le tube du dossier. La partie du
tube sur laquelle la barre de jouets doit
être fixée doit être laissée exposée.
Disposez le tissu sur les deux côtés du
tube en douceur.
4b. Tirez d'abord le coin inférieur droit du
tissu du siège vers la droite du tube du
siège, puis tirez le tissu du siège dans
le tube du cadre du siège de droite à
gauche jusqu'à ce qu'il soit
complètement inséré comme indiqué
sur l'illustration.
www.dreamonme.com/help
11
(7)
5
ASSEMBLAGE DE LA BALANÇOIRE POUR BÉBÉ - INSTALLATION
DU TISSU DU SIÈGE
5a. Insérez la barre de jouets directement
dans la base de la barre de jouets sur le
tube du dossier.
5b. Veuillez vous assurer que la barre de
jouets est fermement fixée, afin que la
barre de jouets ne se détache pas
lorsqu'on la tire.
www.dreamonme.com/help
12
"Batterie
Couvercle"
"Musique
Bouton"
1a. Pour installer/changer les piles, utilisez un
tournevis cruciforme (non fourni) pour ouvrir le
couvercle des piles à l'arrière de la boîte à
musique, comme indiqué sur l'illustration.
1b. Placez quatre piles 'C' dans le compartiment à
piles et remettez le couvercle en place. Utilisez
la balançoire avec les piles lorsque vous
n'êtes pas dans la pièce.
PANNEAU DE CONTRÔLE:
Power:
• Lorsque vous appuyez une fois sur cette
touche, le fauteuil se balance à la
première vitesse et le voyant s'affiche en
rouge. La deuxième fois, le voyant rouge
s'affiche et le balancement s'ajuste à la
deuxième vitesse. La troisième fois, le
troisième témoin lumineux s'affiche et le
balancement s'ajuste à la troisième
vitesse. La quatrième fois, le fauteuil
s'arrête de se balancer et les voyants
lumineux s'éteignent.
• Musique/Volume Appuyez sur cette
touche pour lire ou mettre en pause la
musique. Il y a 8 pistes différentes, et la
piste sera jouée deux fois avant de
changer automatiquement. Vous pouvez
augmenter ou diminuer le volume
lorsque la musique est diffusée en
maintenant le bouton musique enfoncé.
REMARQUE:
• éteignez la balançoire et jouez de la
musique pendant qu'elle est connectée
à l'alimentation électrique. Appuyez sur
le bouton de musique lorsque la
balançoire est éteinte.the music switch
while the swing is off.
1
INSTRUCTIONS D'UTILISATION DE LA BALANÇOIRE POUR BÉBÉ
: UTILISATION DES PILES
www.dreamonme.com/help
13
2a. L'alimentation avec adaptateur - Entrée :
AC 100 à 240V - 50 à 60Hz, Sortie : DC
6V/1A.
2b. Insérez l'adaptateur dans le panneau de
commande comme indiqué sur
l'illustration. La fiche doit être insérée
dans la prise murale (230V). Utilisez la
balançoire avec l'adaptateur lorsque
vous êtes dans la pièce.
1
INSTRUCTIONS D'UTILISATION DE LA BALANÇOIRE POUR BÉBÉ
2
INSTRUCTIONS D'UTILISATION DE LA BALANÇOIRE POUR BÉBÉ
: UTILISATION DE L'ADAPTATEUR
Adaptateur CA/CC (NON INCLUS, VENDU SÉPARÉMENT SKU #3810A)
POWER
www.dreamonme.com/help
14
Puissance
Vitesse
d'oscillation
Dernières
mélodies
Musique
Volume +
Volume -
Mélodies
suivantes
(9)
REMARQUE:
• La télécommande doit être gérée uniquement par un adulte.
• La télécommande n'est pas un jouet.
• Pour pouvoir contrôler le berceau avec la télécommande, vous devez
diriger la télécommande vers le panneau de commande.
• IMPORTANT : Retirez le couvercle en plastique de la pile à l'extrémité de la
télécommande avant de l'utiliser pour l'activer.
3a. Mise en marche : Appuyez sur
le bouton pour mettre la
balançoire en marche.
Appuyez à nouveau sur le
bouton pour l'éteindre.
3b. Vitesse de la balançoire :
Appuyez sur le bouton lorsque
la balançoire est sous tension,
le fauteuil se balance à la
première vitesse. Appuyez
une fois pour passer à la
deuxième vitesse. Appuyez
une deuxième fois pour
passer à la troisième vitesse.
Appuyez une quatrième fois
pour arrêter le balancement.
3c. Musique : Appuyez sur le bouton pour lancer ou arrêter la lecture de
mélodies.
3d. Dernières mélodies : Choisissez les mélodies précédentes.
3e. Mélodies suivantes : Choisissez les mélodies suivantes.
3f. Volume + : Pour augmenter le volume de la musique.
3g. Volume - : Pour diminuer le volume de la musique.
1
INSTRUCTIONS D'UTILISATION DE LA BALANÇOIRE POUR BÉBÉ
3
INSTRUCTIONS D'UTILISATION DE LA BALANÇOIRE POUR BÉBÉ
: TÉLÉCOMMANDE

www.dreamonme.com/help
15
ENTRETIEN ET MAINTENANCE
• NETTOYEZ LES PARTIES EN PLASTIQUE ET EN MÉTAL AVEC UN CHIFFON DOUX
LÉGÈREMENT HUMIDE ET DU SAVON DOUX.
• NETTOYEZ LE TOIT DE LA BALANÇOIRE ET LES JOUETS AVEC UNE SERVIETTE
HUMIDE. SUIVEZ LES INSTRUCTIONS FIGURANT SUR L'ÉTIQUETTE DE CHAQUE
JOUET.
• LA TAPISSERIE PEUT ÊTRE LAVÉE À LA MAIN.
• NE PAS PASSER AU SÈCHE-LINGE OU À LA MACHINE.
• NE PAS MOUILLER L'ADAPTATEUR, LE BOÎTIER DE COMMANDE OU LA
TÉLÉCOMMANDE AVEC DE L'EAU OU D'AUTRES LIQUIDES.
• AVANT DE NETTOYER, RETIREZ LA FICHE DE L'ADAPTATEUR DE LA PRISE ET
COUPEZ L'ALIMENTATION ÉLECTRIQUE.
• NE NETTOYEZ PAS AVEC DES DÉTERGENTS ABRASIFS CONTENANT DE
L'AMMONIAQUE, DE L'EAU DE JAVEL OU DE L'ALCOOL.
• LORSQUE VOUS STOCKEZ OU TRANSPORTEZ LE PRODUIT, NE PLACEZ PAS
D'ARTICLES OU D'OBJETS À L'INTÉRIEUR OU SUR LE PRODUIT CAR VOUS
POURRIEZ ENDOMMAGER LA STRUCTURE, LA COUVERTURE EN TISSU OU LE
BOÎTIER DE COMMANDE.
• RANGEZ LE PRODUIT DANS UN ENDROIT PROPRE ET SEC.
• N'EXPOSEZ PAS LE PRODUIT AU SOLEIL, À LA PLUIE, À L'HUMIDITÉ OU À DES
CHANGEMENTS DE TEMPÉRATURE IMPORTANTS.
1532 S. WASHINGTON AVENUE
PISCATAWAY, NJ 08854
www.dreamonme.com
Courriel : [email protected]
Suivez-nous @dreamonmeinc
pour que votre crèche soit présentée sur nos médias sociaux.
Participez à notre concours mensuel !
Scannez le code QR pour vous inscrire.
Chattez avec nous !
Scannez le code QR pour accéder au
Live Chat.
0622R1-3810
Manual del usuario
COMFORT ME
Columpio Eléctrico Multifunción
Escanee el código QR para registrar su producto
https://dreamonme.com/customercare/registration/
Lea todas las instrucciones antes de
ensamblar y usar el producto.
IMPORTANTE - Conserve las
instrucciones para uso futuro.

2
www.dreamonme.com/help
ADVERTENCIAS
• EL INCUMPLIMIENTO DE ESTAS ADVERTENCIAS ADVERTENCIAS ADVERTENCIAS
ADVERTENCIAS DE UN RIESGO DE
• LESIONES GRAVES O LA MUERTE.
• LEA ATENTAMENTE ESTAS INSTRUCCIONES PARA GARANTIZAR LA SEGURIDAD
DE SU HIJO.
• PARA GARANTIZAR UN USO SEGURO DE ESTE PRODUCTO, SIGA LAS
ADVERTENCIAS, INSTRUCCIONES Y RECOMENDACIONES DEL MANUAL DE
INSTRUCCIONES. ESTE PRODUCTO DEBE ESTAR COMPLETAMENTE MONTADO
ANTES DE SU USO.
• SE REQUIERE EL MONTAJE DE UN ADULTO.
• NUNCA DEJE A UN NIÑO SIN VIGILANCIA EN EL PRODUCTO.
• DEJE DE UTILIZAR EL PRODUCTO CUANDO SU HIJO SEA CAPAZ DE SENTARSE
SIN AYUDA O PESE MÁS DE 9 KG.
• ESTE PRODUCTO NO ESTÁ DESTINADO A SER UTILIZADO DURANTE LARGOS
PERÍODOS DE SUEÑO.
• NUNCA DEJE ESTE PRODUCTO EN SUPERFICIES ALTAS, INCLINADAS O
BLANDAS.
• UTILICE SIEMPRE EL ARNÉS DE SEGURIDAD.
• PARA EVITAR LESIONES, ASEGÚRESE DE QUE EL NIÑO ESTÉ A UNA DISTANCIA
SEGURA CUANDO AJUSTE, DESPLIEGUE, PLIEGUE Y GUARDE EL PRODUCTO.
• NO MUEVA NI LEVANTE EL PRODUCTO MIENTRAS UN NIÑO ESTÉ EN ÉL.
• NO PERMITA QUE LOS NIÑOS JUEGUEN CON ESTE PRODUCTO.
• AJUSTE EL VOLUMEN A UN NIVEL BAJO PARA EVITAR DAÑOS EN EL OÍDO DE
LOS NIÑOS.
• MANTENGA EL PRODUCTO ALEJADO DEL FUEGO.
• UTILIZAR EL PRODUCTO PARA BEBÉS DE APROXIMADAMENTE 6 MESES Y
HASTA 9 KG DE PESO.
• NO UTILICE EL PRODUCTO PARA MÁS DE UN NIÑO.
• EL PRODUCTO NO ES UN SUSTITUTO DE UNA CUNA O CAMA. SI EL NIÑO
NECESITA DORMIR, DEBES COLOCARLO EN UNA CAMA O CUNA ADECUADA.
• NO UTILICE EL PRODUCTO SI FALTA ALGUNA PIEZA O ESTÁ DAÑADO.
• NO UTILICE PIEZAS DE REPUESTO U OTROS COMPONENTES QUE NO HAYAN
SIDO SUMINISTRADOS POR LA EMPRESA. PÓNGASE EN CONTACTO CON
DREAM ON ME INC. PARA OBTENER PIEZAS DE REPUESTO E INSTRUCCIONES.
• NO REALICE NINGÚN CAMBIO O MODIFICACIÓN EN LA ESTRUCTURA. SI ES
NECESARIO, PÓNGASE EN CONTACTO CON DREAM ON ME INC. O CON UN
SERVICIO TÉCNICO AUTORIZADO PARA QUE LE ASESOREN Y REPAREN.
• NO SUJETE CUERDAS O CORDONES AL PRODUCTO PARA EVITAR EL RIESGO
DE ASFIXIA/TRANGULACIÓN.
• UTILICE EL PRODUCTO SÓLO PARA EL FIN PREVISTO.

www.dreamonme.com/help
3
ADVERTENCIAS (continuación)
• TODOS LOS AJUSTES DE LA FUENTE DE ALIMENTACIÓN:
ENCENDIDO/APAGADO, SUSTITUCIÓN O CARGA DE LAS PILAS DEBEN SER
REALIZADOS ÚNICAMENTE POR ADULTOS.
• UTILICE ÚNICAMENTE EL ADAPTADOR AC/DC SUMINISTRADO POR DREAM ON
ME INC.
• COMPRUEBE REGULARMENTE EL ADAPTADOR AC/DC PARA ASEGURARSE DE
QUE FUNCIONA CORRECTAMENTE. DEJE DE UTILIZARLO SI ESTÁ DAÑADO.
• NO PERMITA QUE LOS NIÑOS MENORES DE 3 AÑOS ESTÉN PRESENTES HASTA
QUE SE HAYA COMPLETADO EL MONTAJE PARA EVITAR QUE ACCEDAN A LAS
PIEZAS PEQUEÑAS O A LAS PIEZAS DESMONTADAS.
• MANTENGA EL EMBALAJE DE NYLON FUERA DEL ALCANCE DE LOS NIÑOS
PARA EVITAR EL RIESGO DE ASFIXIA.
ADVERTENCIAS Y DIRECTRICES PARA EL USO DE LA BATERÍA :
• UTILICE SÓLO 4 PILAS DE TIPO 'C'.
• ASEGURE SIEMPRE LA TAPA DE LAS PILAS DESPUÉS DE INSERTARLAS.
• NO PERMITA QUE LOS NIÑOS TENGAN ACCESO A LAS PILAS O JUEGUEN CON
ELLAS.
• INSERTE SÓLO BATERÍAS DEL TIPO Y VOLTAJE ESPECIFICADOS.
• NO UTILICE PILAS DE DISTINTO TIPO.
• NO MEZCLE LAS PILAS VIEJAS CON LAS NUEVAS.
• RESPETE LA POLARIDAD INDICADA EN EL COMPARTIMENTO DE LAS PILAS.
• RETIRE LAS PILAS DAÑADAS O AGOTADAS.
• RETIRE LAS PILAS CUANDO NO LAS UTILICE.
• NO TIRE LAS PILAS AL FUEGO. NO SEPARE LAS PILAS.
PRECAUCIÓN :
• LOS RESIDUOS DE LAS PILAS AGOTADAS O INSERVIBLES DEBEN ELIMINARSE
POR SEPARADO.
• LAS PILAS NO DEBEN ELIMINARSE CON LA BASURA DOMÉSTICA.
• LAS PILAS DEBEN ELIMINARSE EN LOS LUGARES ADECUADOS.

www.dreamonme.com/help
4
…. por elegir Dream On Me y felicidades por unirte a nuestra familia;
¡una familia que ha estado transformando vidas por más de 30 años!
Agradecemos sus comentarios y le deseamos lo mejor en el
próximos años con su nueva incorporación. Si tienes alguna pregunta
o inquietudes, no dude en comunicarse con nosotros. Uno de nosotros
Los representantes de atención al cliente de confianza estarán encantados de
ayudarle. Gracias nuevamente por confiar en nosotros para brindarle
seguridad
y productos y accesorios para bebés asequibles.
GRACIAS...
GARANTÍA LIMITADA:
• Dream On Me garantiza que su producto está libre de defectos de
material y mano de obra y acepta remediar cualquier defecto de este tipo.
• Esta garantía cubre 1 año a partir de la fecha de compra original.
• Esta garantía es válida únicamente previa presentación del comprobante
de compra.
• Esto se limita únicamente a la reparación o reemplazo de componentes
de muebles defectuosos y no se incluye mano de obra de ensamblaje.
• Esta garantía no se aplica a ningún producto que haya sido ensamblado
incorrectamente, sujeto a mal uso o abuso o que haya sido alterado o
reparado de alguna manera.
• Esta garantía le otorga derechos legales específicos y también puede
tener otros derechos que varían de un estado a otro.
www.dreamonme.com/help
5
PARTS
Si falta alguna pieza, póngase en contacto con Dream On Me antes de utilizar el
producto.
Base de plástico (X2)
1
Motor de la máquina
2
Base de la estructura
del asiento
3
Marco del asiento
4
Tubo de conexión (X2)
5
Tubo del respaldo
6
Barra de juguete
7
Tejido del asiento
8
Mando a
distancia
9
POWER

www.dreamonme.com/help
6
(2)
(2)
(1)
(1)
1
MONTAJE DEL COLUMPIO - INSTALACIÓN DE LA BASE DE
PLÁSTICO EN LA MÁQUINA DE MOTOR
1a. Coloque las piezas del columpio
sobre una superficie blanda antes
del montaje.
1b. Como se muestra en la ilustración,
alinee las ranuras de la base de
plástico (1) con los tubos del motor
principal (2).
1c. Coloca los tubos en las ranuras de
la base de plástico y fíjalos
firmemente.
www.dreamonme.com/help
7
(3)
(4)
2
MONTAJE DEL COLUMPIO PARA BEBÉS - INSTALACIÓN DEL
ARMAZÓN Y DEL TUBO DEL ASIENTO
2a. Alinee la base del bastidor del
asiento (3) con la máquina motriz (2)
como se muestra en la ilustración.
2b. Preste atención a la dirección
delantera y trasera de la base del
bastidor del asiento. Dispone de un
diseño antivuelco que no permite
que se coloque en la dirección
equivocada.
2c. Instale la base del armazón del
asiento en la máquina eléctrica y
cuando oiga un clic, el montaje
estará completo.
2d. Alinee el marco del asiento (4) en
paralelo a las asas de la base del
marco del asiento.
2e. Introduzca las asas de la base del
armazón del asiento en el armazón
del asiento hasta que oiga un clic
que indique que el armazón del
asiento está bien fijado.
www.dreamonme.com/help
8
(5)
(5)
(6)
3
MONTAJE DEL COLUMPIO PARA BEBÉS: INSTALACIÓN DEL TUBO
DE CONEXIÓN DEL RESPALDO Y DEL TUBO DEL RESPALDO
3a. Alinee el tubo de conexión (5) con el
tubo del respaldo (6) como se muestra
en la ilustración.
3b. Introduzca el tubo de conexión en el
tubo del respaldo hasta que oiga un
clic que indique que el tubo de
conexión está bien sujeto.
www.dreamonme.com/help
9
3
MONTAJE DEL COLUMPIO PARA BEBÉS: INSTALACIÓN DEL TUBO
DE CONEXIÓN DEL RESPALDO Y DEL TUBO DEL RESPALDO
(continuación)
3c. Alinee el respaldo ensamblado y el
tubo de conexión con el columpio
medio ensamblado como se muestra
en la ilustración.
3d. Introduzca el respaldo montado y el
tubo de conexión en el bastidor del
asiento hasta que oiga un clic.
www.dreamonme.com/help
10
(8)
4
MONTAJE DEL COLUMPIO - INSTALACIÓN DE LA TELA DEL
ASIENTO
4a. Tire suavemente de la tela del asiento
(8) sobre el tubo del respaldo. La parte
del tubo a la que se va a fijar la barra
de juguete debe dejarse al
descubierto. Coloque suavemente la
tela en ambos lados del tubo.
4b. En primer lugar, tire de la esquina
inferior derecha de la tela del sillín
hacia la derecha del tubo del sillín y, a
continuación, tire de la tela del sillín
hacia el tubo del bastidor del sillín de
derecha a izquierda hasta que esté
completamente insertada, tal como se
muestra en la ilustración.
www.dreamonme.com/help
11
(7)
5
MONTAJE DEL COLUMPIO: INSTALACIÓN DE LA TELA DEL
ASIENTO
5a. Inserte la barra de juguetes directamente
en la base de la barra de juguetes en el
tubo del respaldo.
5b. Por favor, asegúrese de que la barra de
juguete está firmemente fijada, para que
la barra de juguete no se desprenda al
sacarla.
www.dreamonme.com/help
12
"Batería
Cubierta"
"Música
Botón"
1a. Para instalar/cambiar las pilas, utilice un
destornillador Phillips (no suministrado) para
abrir la tapa de las pilas en la parte posterior
de la caja de música, como se muestra en la
ilustración.
1b. Coloque cuatro pilas "C" en el compartimento
de las pilas y vuelva a colocar la tapa. Utiliza el
columpio con las pilas cuando no estés en la
habitación.
PANEL DE CONTROL:
Power:
• Al pulsar este botón una vez, la silla se
balanceará a la primera velocidad y la
luz se mostrará en rojo. La segunda
vez, la luz roja aparece y la oscilación
se ajusta a la segunda velocidad. La
tercera vez, el tercer indicador
luminoso aparece y la oscilación se
ajusta a la tercera velocidad. A la
cuarta vez, la silla deja de oscilar y las
luces indicadoras se apagan.
• Música/Volumen Pulse este botón para
reproducir o pausar la música. Hay 8
pistas diferentes, y la pista se
reproducirá dos veces antes de
cambiar automáticamente. Puedes
subir o bajar el volumen mientras se
reproduce la música manteniendo
pulsado el botón de música.
NOTA:
• Apague el columpio y reproduzca
música mientras esté conectado a la
fuente de alimentación. Pulse el botón
de música cuando el columpio esté
apagado.
1
INSTRUCCIONES DE USO DEL COLUMPIO PARA BEBÉS - USO
DE LAS PILAS
www.dreamonme.com/help
13
2a. La fuente de alimentación con adaptador
- Entrada: AC 100 a 240V - 50 a 60Hz,
Salida: DC 6V/1A.
2b. Inserte el adaptador en el panel de
control como se muestra en la
ilustración. El enchufe debe introducirse
en la toma de corriente (230V). Utilice el
columpio con el adaptador cuando esté
en la habitación.
1
INSTRUCTIONS D'UTILISATION DE LA BALANÇOIRE POUR BÉBÉ
2
INSTRUCCIONES DE USO DEL COLUMPIO PARA BEBÉS - USO
DEL ADAPTADOR
Adaptador AC/DC (NO INCLUIDO, VENDIDO POR SEPARADO SKU #3810A)
POWER
www.dreamonme.com/help
14
NOTA:
• El mando a distancia sólo debe ser manejado por un adulto.
• El mando a distancia no es un juguete.
• Para controlar el soporte con el mando a distancia, debe apuntar el mando
a distancia hacia el panel de control.
• IMPORTANTE: Retire la tapa de plástico de las pilas del extremo del
mando a distancia antes de utilizarlo para activarlo.
3a. Encendido: Pulse el botón
para encender el columpio.
Pulse de nuevo el botón para
apagarlo.
3b. Velocidad de balanceo: Pulse
el botón cuando el columpio
esté encendido, la silla se
balancea a la primera
velocidad. Pulse una vez para
cambiar a la segunda
velocidad. Pulse una segunda
vez para cambiar a la tercera
velocidad. Pulse una cuarta
vez para detener el giro.
3c. Música: Pulse el botón para
iniciar o detener la
reproducción de melodías.
3d. Últimas melodías: Elige las melodías anteriores.
3e. Próximas melodías: Elige las siguientes melodías.
3f. Volumen +: Para aumentar el volumen de la música.
3g. Volumen -: Disminuye el volumen de la música.
1
INSTRUCTIONS D'UTILISATION DE LA BALANÇOIRE POUR BÉBÉ
3
INSTRUCCIONES DE USO DEL COLUMPIO PARA BEBÉS -
MANDO A DISTANCIA
Potencia
Velocidad
de oscilación
Últimas
melodías
Música
Volumen +
Volumen -
Próximas
melodías
(9)

www.dreamonme.com/help
15
CUIDADO Y MANTENIMIENTO
• Limpie las piezas de plástico y metal con un paño suave ligeramente humedecido y
un jabón suave.
• Limpie la parte superior del columpio y los juguetes con una toalla húmeda. Sigue
las instrucciones de la etiqueta de cada juguete.
• La tapicería se puede lavar a mano.
• No secar en secadora ni lavar a máquina.
• No moje el adaptador, la caja de control o el mando a distancia con agua u otros
líquidos.
• Antes de la limpieza, retire el enchufe del adaptador de la toma de corriente y
desconecte la alimentación.
• No limpiar con detergentes abrasivos que contengan amoníaco, lejía o alcohol.
• Cuando almacene o transporte el producto, no coloque artículos u objetos dentro o
encima del producto, ya que podría dañar la estructura, la cubierta de tela o la caja
de control.
• Almacenar el producto en un lugar limpio y seco.
• No exponga el producto a la luz solar, la lluvia, la humedad o los cambios bruscos
de temperatura.
1532 S. WASHINGTON AVENUE
PISCATAWAY, NJ 08854
www.dreamonme.com
Siga con nosotros @dreamonmeinc
para que su guardería aparezca en nuestras redes sociales.
Participa en nuestro sorteo mensual.
Escanee el código QR para registrarse.
Chatea con nosotros.
Escanee el código QR para el chat en vivo.
Correo electrónico: [email protected]