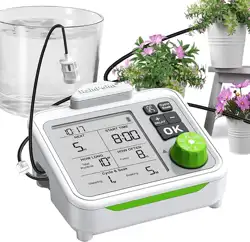
USER MANUAL
Indoor Auto Drip Irrigation Kit
Model No. IK153
Welcome to the RAINPOINT family! Please read the manual before use to
learn about the features and functions.


Contents
01
03
03
04
05
05
06
10
10
11
12
13
13
14
15
15
1. Box Contents
2. Introduction
2.1 Product Oveiew
2.2 Display Oveiew
2.3 Button Description
2.4 Specications
3. Tubing DIY Connection
4. Device Settings
4.1 How to Set An Auto Watering Plan
4.2 How to Set Cycle & Soak
4.3 Manual/Stop Watering
4.4 Suspend Auto Watering Plan
5. Precautions
6. Troubleshooting
7. Warranty Policy
8. Customer Suppo
EN
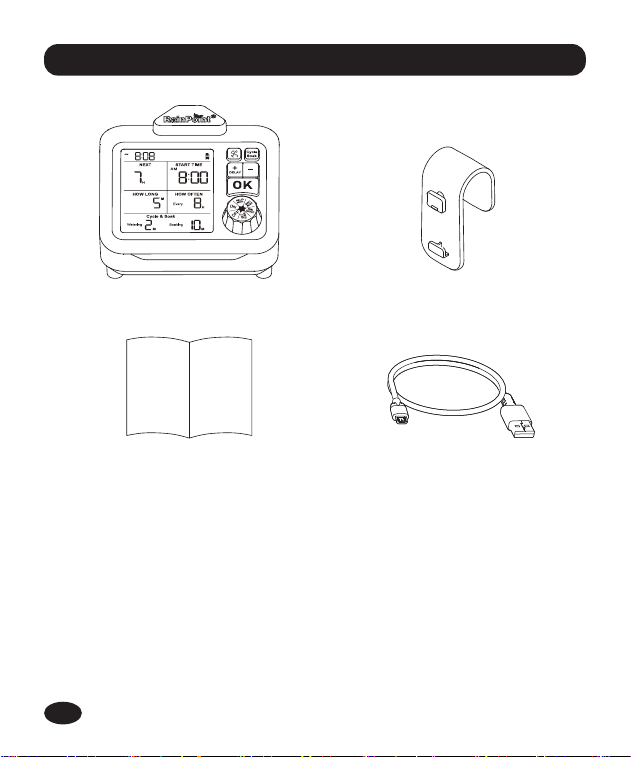
1. Box Contents
-01-
1 X ITP153 Indoor Auto Watering Pump
1 X User Manual
1 X Detachable Back Hook
1 X USB Cable
1 X DIK-10 Accessories Kit
(See next page)
1.
2.
3.
4.
5.
1 3
42
EN
-02-
Accessories
Included
Name
Tubing
Filter
1
1
Tubing End
Plug
3
Micro Drip
Emitter
10
T Barb Fitting 10
PCS
Function
Filter impurities from water
Stop water ow at the end
of the tubings
Inse into soil to water the plant root
directly
Split water ow and connect tubings
Split water ow and connect tubings
Prevent siphoning and backow
Tubing for Main Line
Len: 10m/32.8 ft
Inner diameter: 1/6 in. (4mm)
1
Cross Barb
Fitting
Secure and organize tubings10Zip Tie
1
Anti-Siphon
Valve
Tubing
1
Tubing for Branch Line
Len: 3m/9.8ft
Inner diameter: 1/8 in. (3mm)
IN OUT
water ow direction
EN
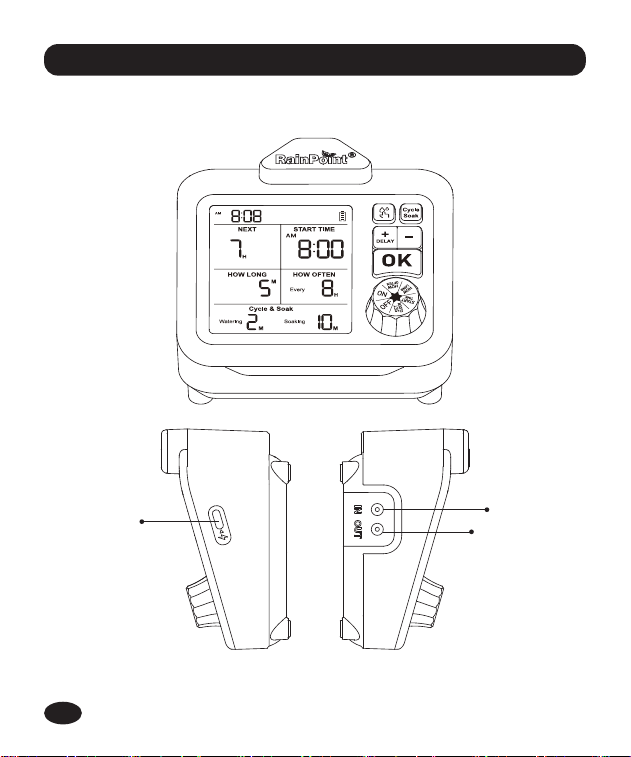
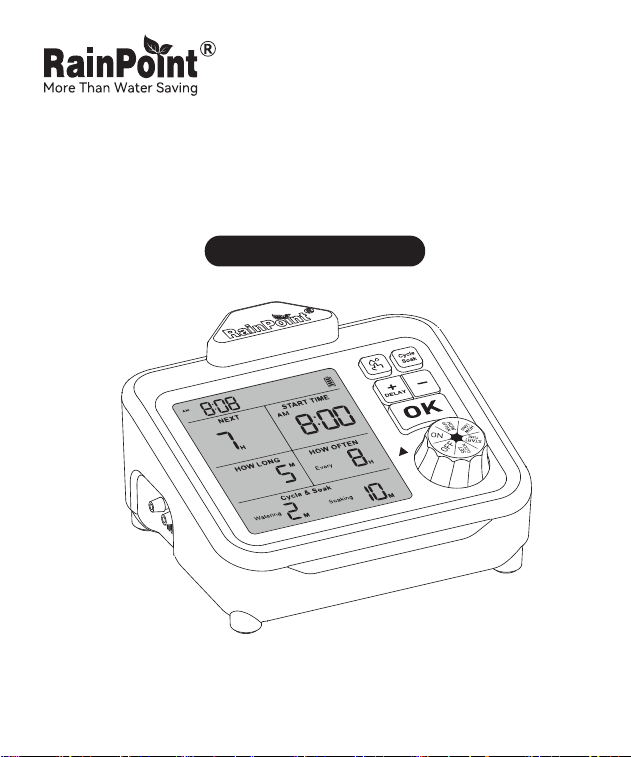
2.1 Product Oveiew
2. Introduction
-03-
CHARGING
PORT
INLET PORT
OUTLET PORT
EN
2.2 Display Oveiew
-04-
1
2
5
3
4
7
6
Current Time
Water Shoage Indicator
Batte Level Indicator
Note: When low batte icon shows up, the pump won’t work. Charge
immediately.
1.
2.
3.
Next Watering Countdown
Plan Sta Time
Watering In Process Icon
Cycle & Soak Setting
4.
5.
6.
7.
Indicates low batte power
EN
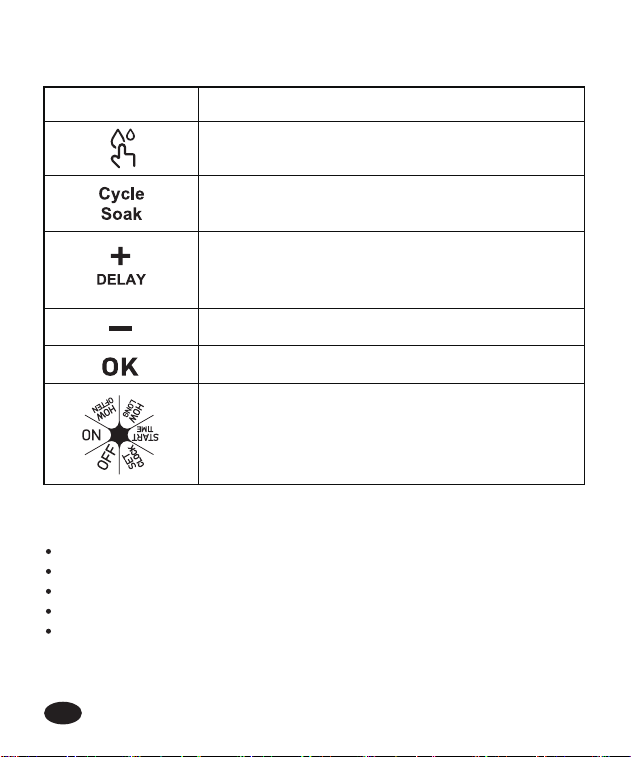
2.3 Button Description
2.4 Specications
BUTTON DEFINITION
Manual watering or terminate current watering
session
Turn on/o Cycle & Soak Function or choose Cycle
& Soak setting
Sho Press: Increase the time or 12/24H switch
Long Press: Activate Delay function
(The knob needs to be in "ON" position)
Decress the time
Conrm the setting
Control knob
Flow Rate Range: 7.92 gal/Hrs (30 L/Hrs)
Watering Duration: 20s~20min
Watering Frequency: 8Hrs~30D
Temperature Operating Range: 37°F~122°F (3°C~50°C)
Batte Type: 2000mAh rechargeable lithium-ion batte (included)
-05-
EN
-06-
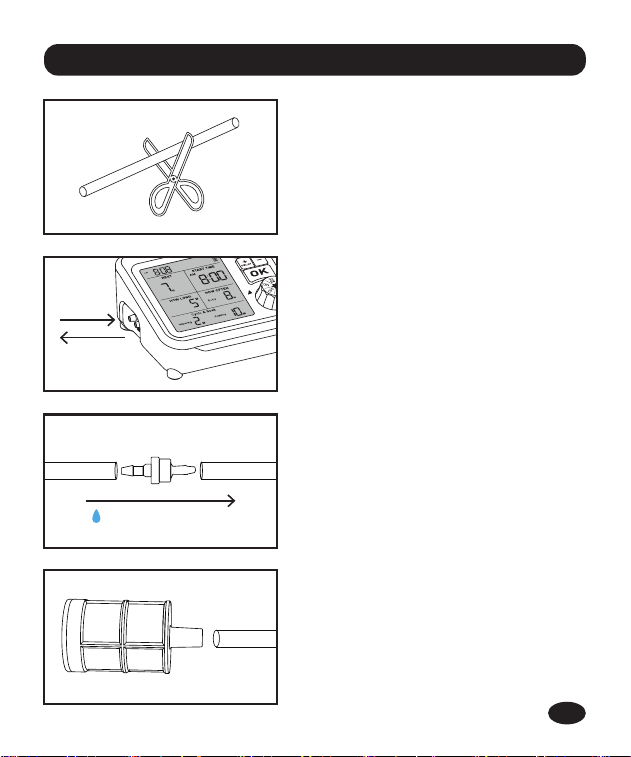
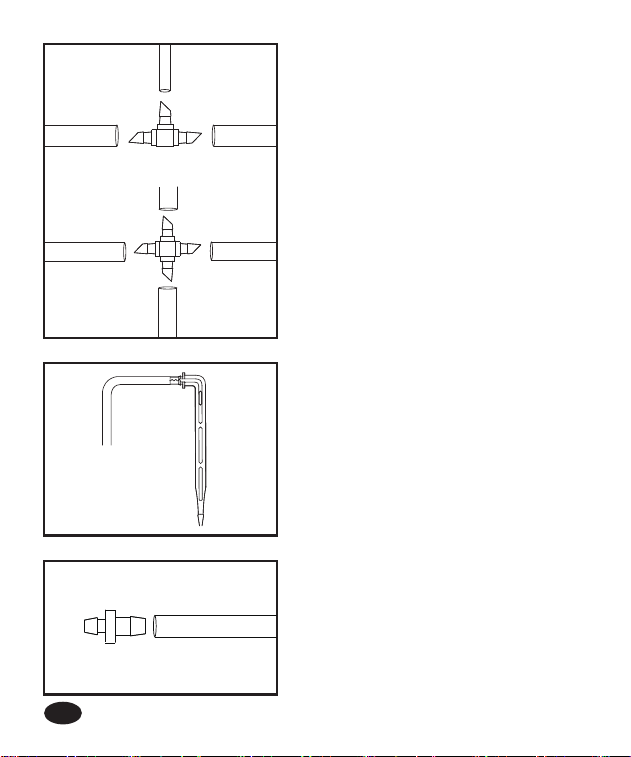
3. Tubing DIY Connection
Step 1:
Plan your drip watering layout and cut
the hose to desired length.
Step 3:
Connect anti-siphon valve to water
outlet hose and close to pump. It will
help prevent backow and siphoning.
(Note: The valve must be installed
correctly in accordance with the ow
direction.)
Step 2:
Connect the hose to water inlet and
outlet po.
Step 4:
Inse iter to the other end of water
inlet tubing, and put into water
container.
water ow direction
IN OUT
IN
OUT
EN
-07-
Step 6:
Connect micro drip emitter to the end
of the pipe for each branch to provide
targeted watering at the base of each
plant.
Tips: Loosen the soil rst, then inse
emitters at least 3 inches deep, which
will help water reach plant roots.
Step 5:
Connecting the suitable barb tting:
1) When you need to connect the
hose while splitting to two ways, you
can use the "T" barb tting.
2) When you need to connect a hose
while splitting to other 3 ways, you
can use the cross barb tting.
Step 7:
Install tubing end plug after water
ows out from the end of the pipe to
get rid of air left in the pipe.
1/8"
1/8"
1/6"
1/6"
1/6"
1/6"
1/6"
EN
-08-
Micro Drip
Emitter
T Barb
Fitting
Water Filter
Anti-Siphon
Valve
Inlet
Outlet
Tubing
End Plug
Main Line tubing (ID 1/6 inch or 4mm)
Branch Line tubing (ID 1/8 inch or 3mm)
EN
IN
OUT
water ow
direction
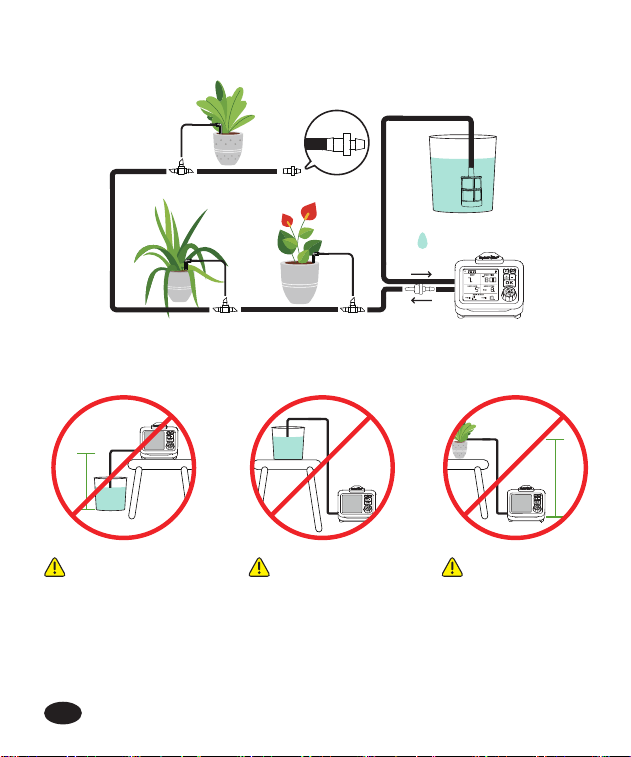
Please keep the whole system horizontal or above water container.
Tips: Install tubing end plug after water has owed from the pipe end.
Pump is higher
than water
container over
9.8ft (300cm).
>9.8ft
>9.8ft
Pump is lower
than water
container.
Plants are over
9.8ft (300cm)
higher than the
pump.
Inlet
Outlet
-09-
EN

-10-
4. Device Settings
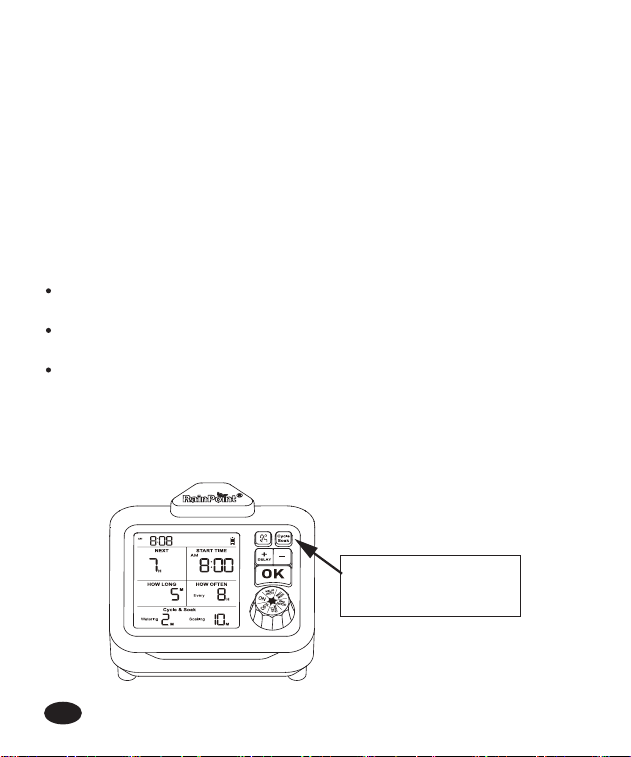
4.1 How to Set An Auto Watering Plan
Turn the Control Knob to "SET CLOCK". Press "+" button to select 12/24H
format, and press "OK" to conrm. Then set current time with "+" or "-"
buttons.
STEP 1: SET CURRENT TIME
Turn the Knob to to "START TIME" position. Then press "+" or "-" buttons
to select time.
STEP 2: START TIME SETTING
Turn knob to "HOW LONG" position, and press "+" or "-" buttons to set
your desired duration.
Note: Available duration settings: 20/30/40/50s, 1-20min
Note: Available frequency settings: 8/12h, 1-30 Days
STEP 3: SET WATERING DURATION
Turn knob to "HOW OFTEN" position, and press "+" or "-" buttons to set
your desired frequency.
STEP 4: SET WATERING FREQUENCY
Turn knob to "ON" position to conrm.
STEP 5: CONFIRM YOUR SETTING
EN
4.2 How to Set Cycle & Soak
Cycle & Soak is a watering method that split irrigation run time into
multiple shoer cycles with soak periods in between. This saves more water
by thoroughly soaking into the soil, preventing runo and encouraging
deeper root growth—resulting in stronger, healthier plants.
Note: When setting up Cycle and Soak, keep the control knob in "HOW
LONG" position. Once completed, turn to "ON" position to conrm.
Note: Total run time applies only to watering minutes, soak inteals are
additional.
When the irrigation run time is ≥2 min, you could press Cycle Soak
button to activate or deactivate the function.
You could choose watering 1 min + soaking 5 min mode , when the
total run time is set between 2 and 3min.
You could choose either watering 1min + soaking 5min mode or
watering 2min + soaking 10min mode, when the total run time is ≥4
min.
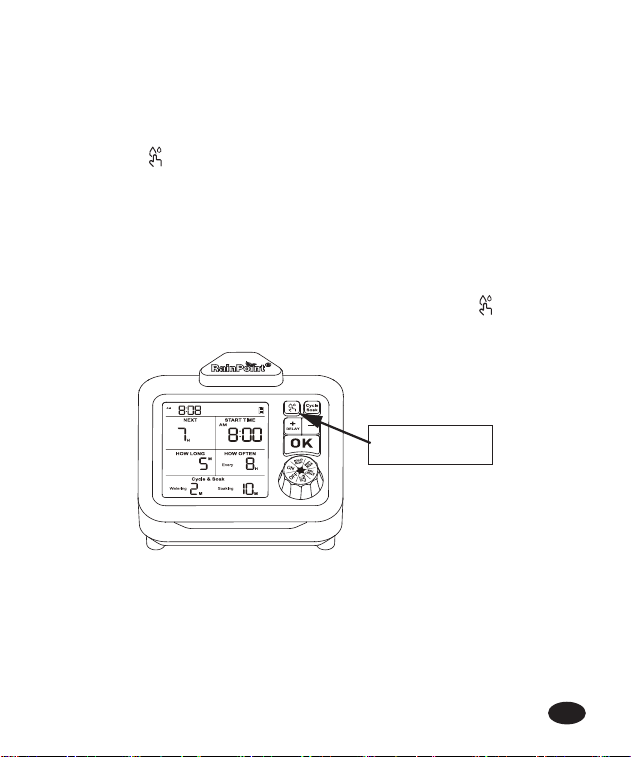
How to activate/deactivate Cycle & Soak?
-11-
Press to activate
/ deactivate
EN
4.3 Manual/Stop Watering
4.3.1 Manual Watering
Step 1: Make sure the knob is in "ON" position.
Step 2: Press to activate tempora manual watering mode.
Step 3: Press "+" or "-" buttons. to set your desired duration.
Step 4: Press "OK" to conrm, and manual watering will sta immediately.
Note: Cycle & Soak is available under manual watering mode.
4.3.2 Terminate Watering
To stop scheduled or manual watering session sooner, press to end the
watering session.
Press here
-12-
EN
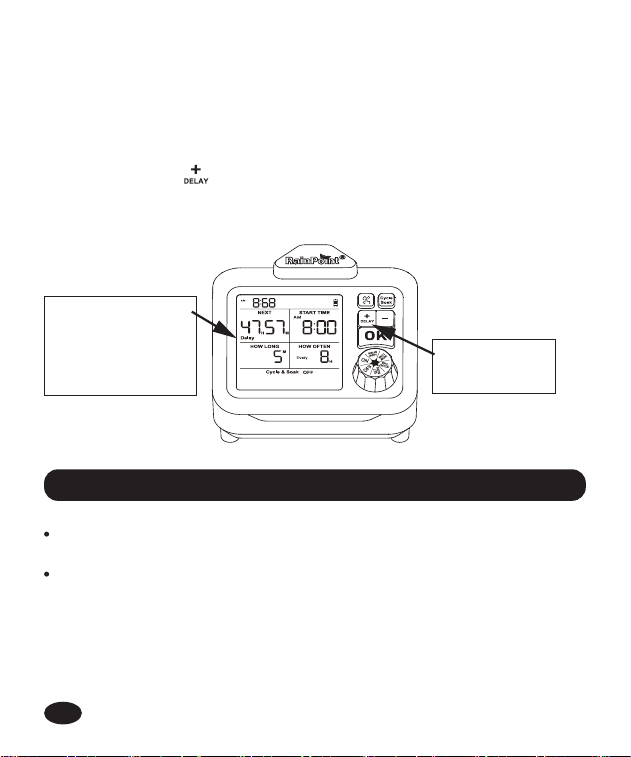
4.4 Suspend Auto Watering Plan
-13-
You could choose to delay/skip the scheduled watering plan for 24 / 48/ 72
hours per your desired.
Step 1: Make sure the knob is in "ON" position.
Step 2: Long press to activate.
Step 3: Press "+" to choose delay duration.
Step 4: Press "OK" to conrm.
Long press
to activate
"Delay" will
appear once
settings are
conrmed.
EN
Please tighten the tubing to the inlet and outlet po when installing to
avoid leakage.
T to place the pump higher than the water source to avoid siphon
phenomenon.
5. Precautions
-14-
6. Troubleshooting
Problem Possible Reason Solutions
Pump no
working or
can’t pump
water from
container
Impurities get into
the pump and
damage the pump.
Pump broken due to
falling or during
transpoation.
The anti-siphon valve
is installed in wrong
direction.
If the pump can’t work,
orcan’t pumping water,
please contact customer
seice from where you
buy in the warranty time.
Make sure the anti-si-
phon Valve in right
direction.
Weak water
ow comes
out
Too far away from
pots and water
container.
Air left in pipe.
Move the pump closer
to the plants and reduce
the pipe length.
When set up the watering
system, t to put on the
tubing end plug after
water has owed from
the pipe end.
Water leakage
from the
pump inlet or
outlet po
The pipe is not tightly
inseed or not fully
inseed.
Re-install the water pipe to
make sure the pipe end is
fully and tightly inse to
the inlet and outlet po.
EN
RAINPOINT provides a 1-year limited warranty on this product against
manufacturing defects in materials and workmanship.You can get an extra
two years of extended warranty by registering your product on our website
www.rainpointonline.com
7. Warranty Policy
-15-
8. Customer Suppo
Still have trouble with setup , please search for " RainPoint " on Youtube
for installation videos!
If the user manual doesn’t have what you're looking for or you need other
help, please contact us before returning the product to the store and let us
know the LOT NO. of your device.
LOT NO.: XXXXXX (on the back of the timer)
Made in China
This paper
box is recyclable
and reusable
Rechargeable Batte
(3.7V 2000mAh)
EN

Need Help ?
or
Email: suppo@rainpointonline.com
Tel: +1 (213) 594-7686
Scan the QR code for more help
V1
