CS 1400 R-IM
7085 587-02
Use and
Care Manual
For NoFrost Combined
Refrigerator-Freezers with IceMaker
2
Contents Page
Please Read and Follow these Instructions .................. 2
California Proposition 65 ................................................ 2
Disposal of Old Appliance ............................................. 3
Disposal of this Appliance ............................................. 3
R600a Refrigerant.......................................................... 3
Important Safety Information ......................................... 4
Electrical Safety ............................................................. 4
Safety Regulations ......................................................... 5
Saving energy ................................................................ 5
Description of Appliance and Equipment ...................... 5
Operating and Control Elements ................................... 6
Switching the Appliance On and Off ............................. 7
Temperature Display ...................................................... 7
Setting the Temperature ................................................ 7
SuperCool ...................................................................... 8
Audible Alarm Signal ..................................................... 8
Power Failure/FrostControl Display ............................... 8
Setup Mode .................................................................... 9
Interior Light ..................................................................11
Arranging Food .............................................................11
Equipment .....................................................................12
Freezing ........................................................................13
Freezing with SuperFrost ..............................................13
Freezing and Storage....................................................13
Safety Instructions and Warnings for the Automatic
Ice Maker
........................................................................ 14
Turning the Ice Maker On and Off ................................14
Ice Maker Description ..................................................14
Defrosting ......................................................................15
Cleaning ........................................................................15
Vacation Tips ................................................................15
Troubleshooting ............................................................16
Customer Service .........................................................16
T
able
of
C
onTenTs
IMPORTANT
All types and models are subject to continuous
improvement. The manufacturer reserves the right
to make modifications to the shape, equipment
and technology.
Please Read and Follow these
Instructions
These instructions contain Danger, Warning and Caution
notes.
This information is important for safe and efficient instal-
lation and operation.
Always read and comply with all Danger, Warning and
Caution notes!
DANGER!
Danger indicates a hazard which
will cause serious injury or death if
precautions are not followed.
WARNING!
Warning indicates a potentially hazardous
situation which, if not avoided, could
result in death or serious injury.
CAUTION!
Caution indicates a potentially hazardous
situation which, if not avoided, may result
in minor or moderate injury.
IMPORTANT
This indicates information that is especially
relevant to a problem-free installation and
operation.
California Proposition 65
- This product contains chemicals known to the state of
California to cause cancer or reproductive harm.
- This product can expose you to chemicals including
Diisononyl Phthalate (DINP) which is known to the
State of California to cause cancer. For more informa-
tion go to www.P65Warnings.ca.gov.
- This product can expose you to chemicals including
Di-isodecyl Phthalate (DIDP) which is known to the
State of California to cause birth defects or other repro-
ductive harm. For more information go to
www.P65Warnings.ca.gov.
3
s
afeTy
Disposal of Old Appliance
DANGER!
Risk of child entrapment.
Child entrapment and suffocation are not problems of
the past.
Junked or abandoned refrigerators are still dangerous –
even if they will sit for “just a few days.”
If you are getting rid of your old refrigerator, please follow
these instructions to help prevent accidents.
Before you discard old appliances:
• Take off the doors.
• Leave the shelves in place so that
children may not easily climb inside.
• Cut off the power cable from the
discarded appliance. Discard separately
from the appliance.
• Be sure to follow your local requirements
for disposal of appliances.
Contact the trash collection agency in
your area for additional information.
Disposal of this Appliance
This appliance contains flammable gases
within the refrigeration circuit and insulation
foam.
Contact the municipality or disposal company
in your area for information on approved
recycling or disposal.
R600a Refrigerant
WARNING!
The refrigerant R600a contained within
the appliance is environmentally friendly,
but flammable. Leaking refrigerant can
ignite.
To prevent possible ignition,
follow the warnings below:
•
Keep ventilation openings, in
the appliance enclosure or in
the built-in structure, clear of
obstruction.
• Do not use mechanical devices
or other means to accelerate the
defrosting process,
other than
those recommended by the
manufacturer.
• Do not damage the refrigerant circuit.
• Component parts and power cords
shall be replaced with like components
performed by factory authorized service
personnel only.
• Do not use electrical appliances inside
the food storage compartments of the
appliance, unless they are of the type
recommended by the manufacturer.
4
s
afeTy
• To protect the appliance from possible damage,
allow the appliance to stand 1/2 to 1 hour in
place before turning the electricity on. This allows
the refrigerant and system lubrication to reach
equilibrium.
Important Safety Information
• To prevent injury to you or damage to the unit,
the appliance should be unpacked and set up by
two people.
• If the appliance is damaged on delivery, contact
the supplier immediately before connecting to the
power source.
• To guarantee safe operation, ensure that the
appliance is set up and connected as described
in these operating instructions.
• Disconnect the appliance from the power source
if a fault occurs. Pull out the plug, turn off or
remove the fuse.
• When disconnecting the appliance, use the plug.
Do not pull on the cable.
• Any repairs and work on the appliance should
only be carried out by the customer service
department. Unauthorized work may be dan-
gerous to the user. Changing the power source
cable should only be done by the customer ser-
vice department.
• Do not eat ice cream, particularly ice cream
treats, or ice cubes, immediately from the
freezer compartment. There is a risk of “burning”
because of the very cold temperatures.
• Do not consume food which has been stored for
too long; it could cause food poisoning.
• Do not store explosives or sprays using com-
bustible propellants such as butane, propane,
pentane, etc. in the appliance. Electrical compo-
nents might cause leaking gas to ignite. You may
identify such sprays by the printed contents or a
flame symbol.
• To prevent possible injury due to an electrical
shock, be sure to disconnect the power cord or
turn off the circuit breaker before cleaning the
appliance.
• To avoid injury or damage to the appliance, do
not use steam cleaning equipment to clean the
appliance.
• Do not operate the appliance in the presence of
explosive fumes.
• In the event of a power outage, minimize opening
the appliance door(s). Do not attempt to re-freeze
any previously frozen food that has thawed.
Electrical Safety
Connect this appliance to a 15 amp or 20 amp, 110-
120 VAC, circuit which is grounded and protected by a
circuit breaker or fuse.
We recommend using a dedicated circuit for this appli-
ance to prevent circuit overload and the chance of inter-
ruption to the appliance.
This appliance is equipped with a three-prong (ground-
ing) polarized plug for your protection against possible
shock hazards.
Where a two-prong wall receptacle is encountered, con-
tact a qualified electrician and have it replaced with a
properly grounded three-prong receptacle in accordance
with all local codes and ordinances.
WARNING!
Electrocution hazard.
Electrical grounding required.
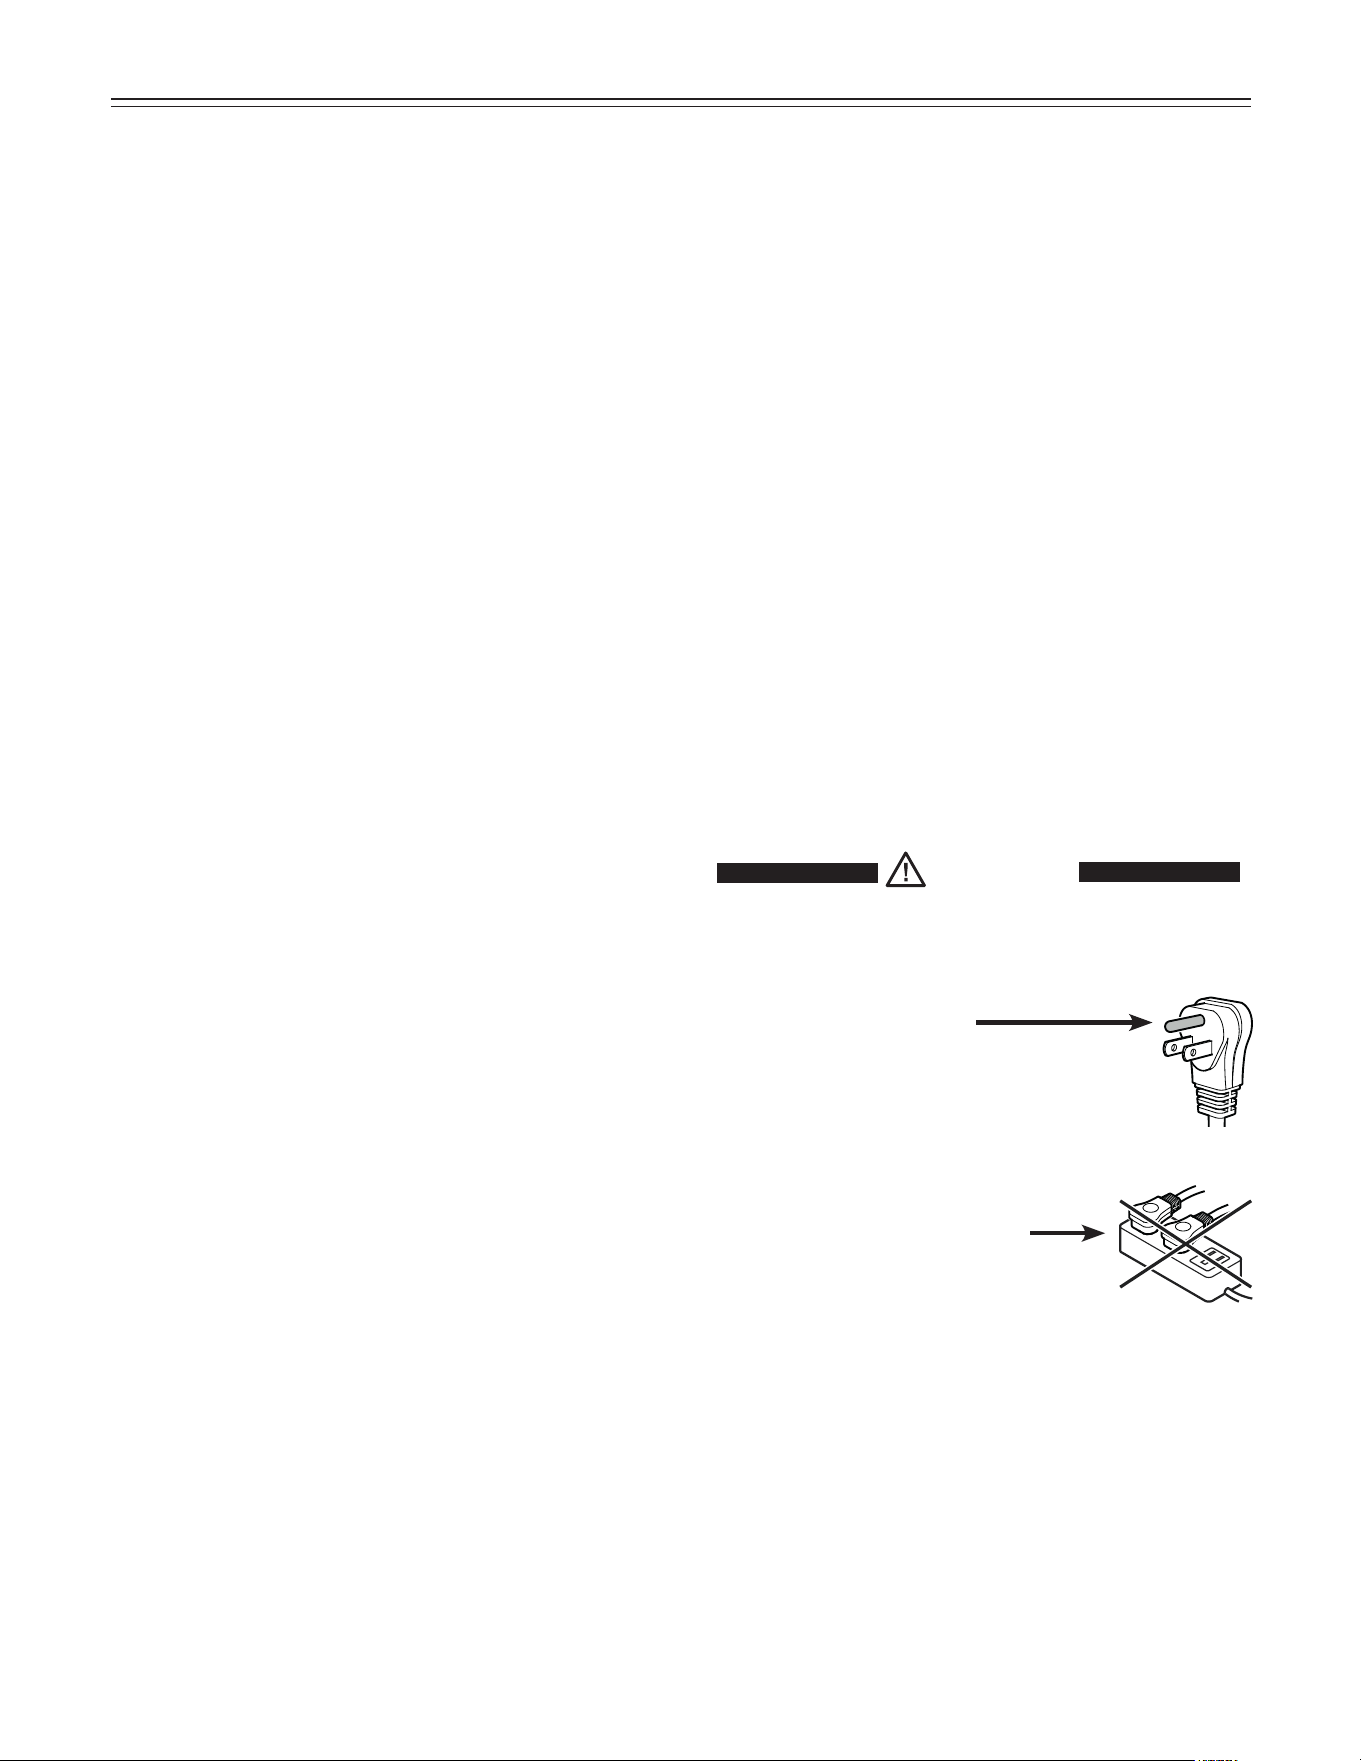
•
Do not remove the round grounding
prong from the plug.
•
Do not use extension cords or
ungrounded (two-prong) adapters.
• Do not use a power cord that is frayed or
damaged.
•
Do not use a power strip.
Failure to follow these instructions may
result in fire, electrical shock or death.
5
s
afeTy
f
eaTures
Safety Regulations
The appliance is designed to cool, freeze and store food
and to make ice. It is designed as a household appliance.
IMPORTANT
The appliance is not intended for outdoor use.
The appliance is manufactured to operate within specific
ambient temperature limits according to its climate rat-
ing.
The climate rating indicates the ambient temperature
at which the appliance may be operated in order to
achieve full refrigeration performance.
Climate Rating Ambient Temperature
SN-T 50°F to 109°F (10°C to 43°C)
IMPORTANT
Do not operate the appliance outside the specified
ambient temperature range.
- The refrigerant circuit has been tested for leaks.
- The appliance complies with current safety regulations
CAN/CSA C22.2 No.60335-1-11
UL 60335-1 Fifth Edition
CAN/CSA C22.2 No. 60335-2-24-06
UL 60335-2-24 First Edition
We recommend cleaning the appliance before turning it
on for the first time. See Cleaning.
Turn on the appliance several hours before loading it.
Do not load with frozen food until the temperature shows
approximately 0°F (-18°C).
WARNING!
Do not allow children to play with the
appliance. Children must not climb, sit or
stand on the racks or door.
Failure to follow these instructions may
result in death or serious injury.
Saving energy
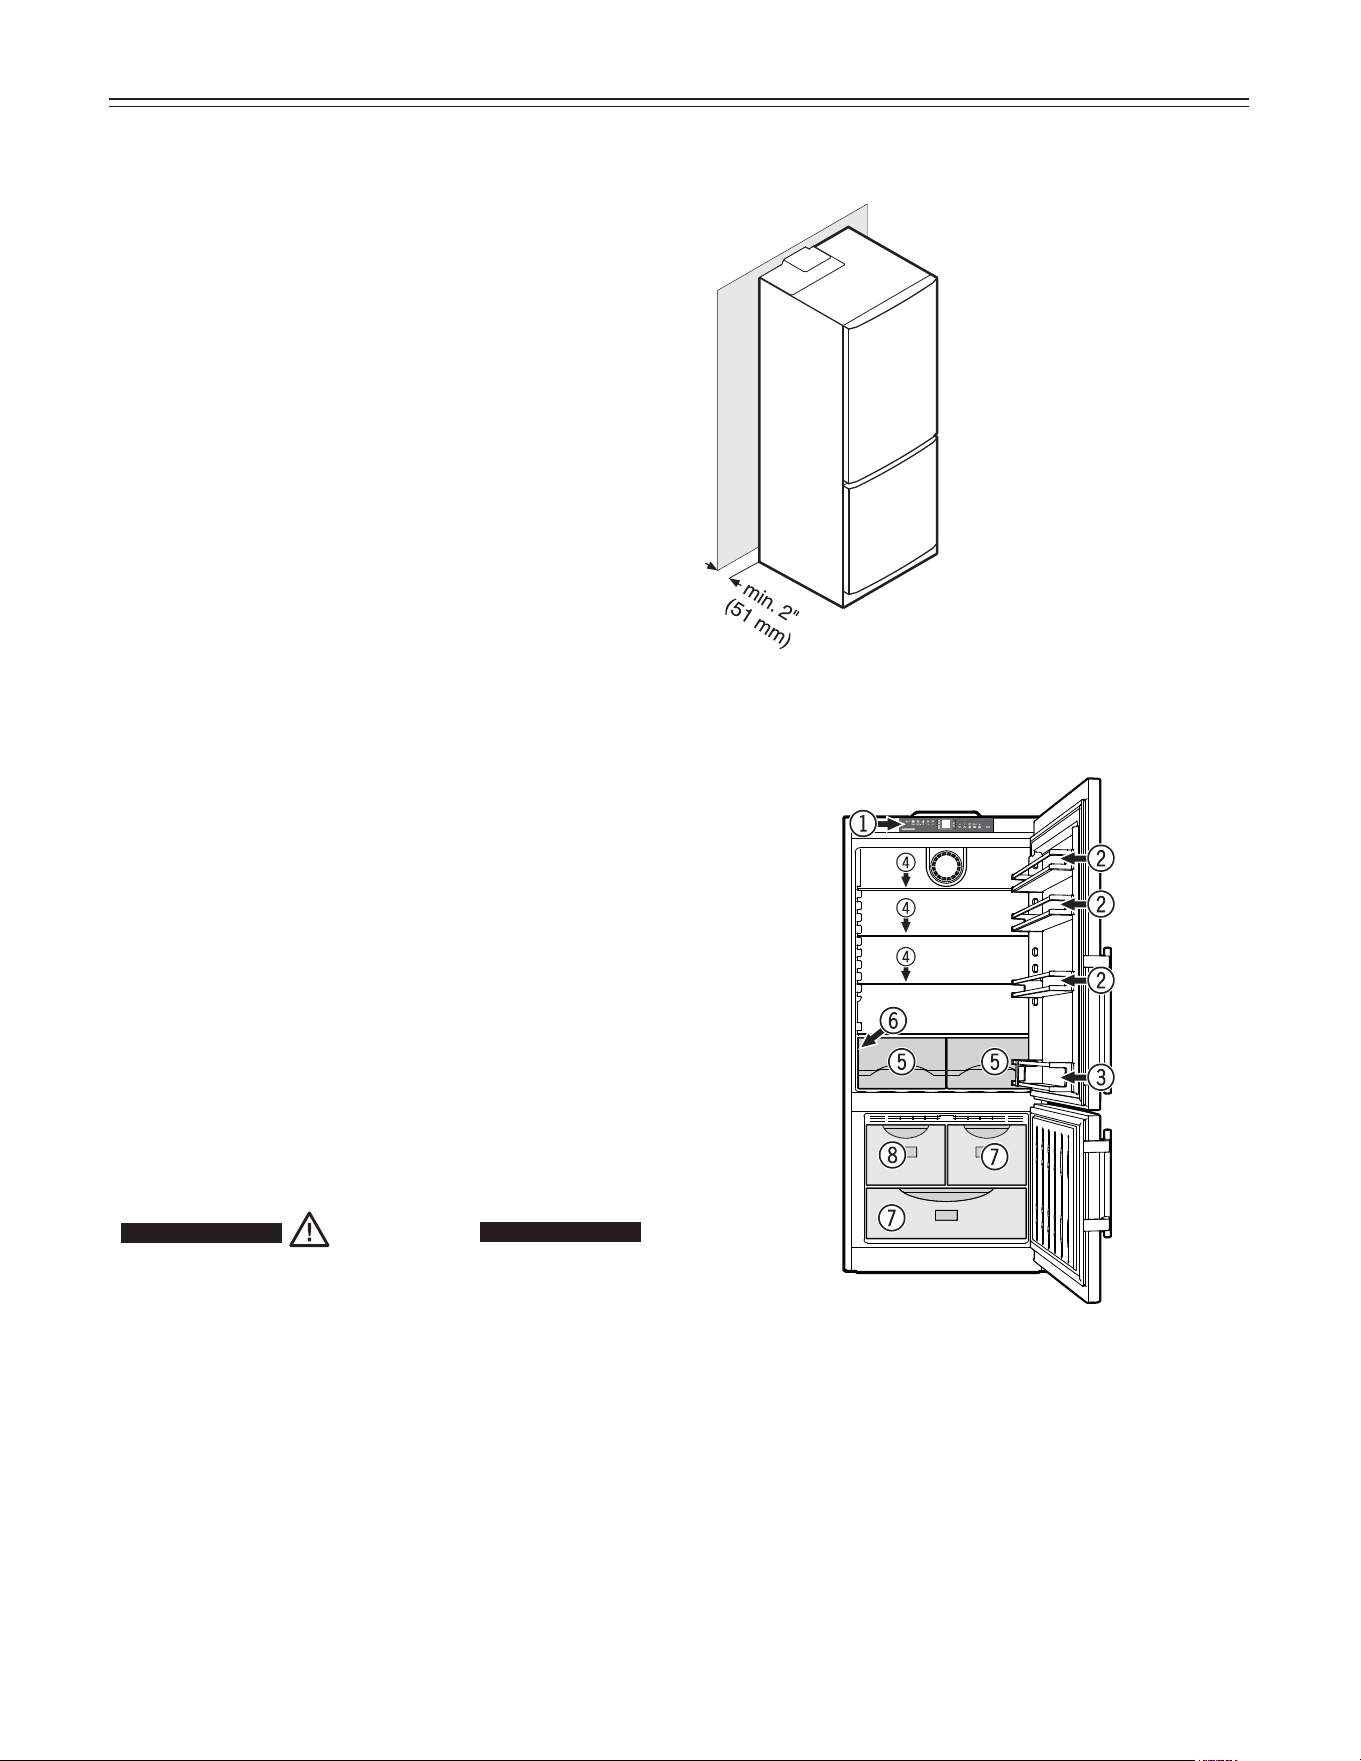
(1) Operating and control elements
(2) Adjustable door racks
(3) Bottle rack
(4) Adjustable shelves
(5) Vegetable drawers
(6) Model plate (behind the vegetable drawer on the
left hand side)
(7) Freezer drawers
(8) Ice maker (in the interior of the drawer)
Description of Appliance and
Equipment
Clearance on the back
must be 2 inch (51 mm).
NOTE
If the gap between the
rear of the appliance
and the wall is less
than 2 inch (51 mm),
the power consumption
level may increase
6
f
eaTures
Freezer operating icons
Temperature Up control (to
increase the freezer temperature)
Temperature Down control (to
reduce the freezer temperature)
Freezer On/Off
SuperFrost
Alarm mute (refrigerator and
freezer)
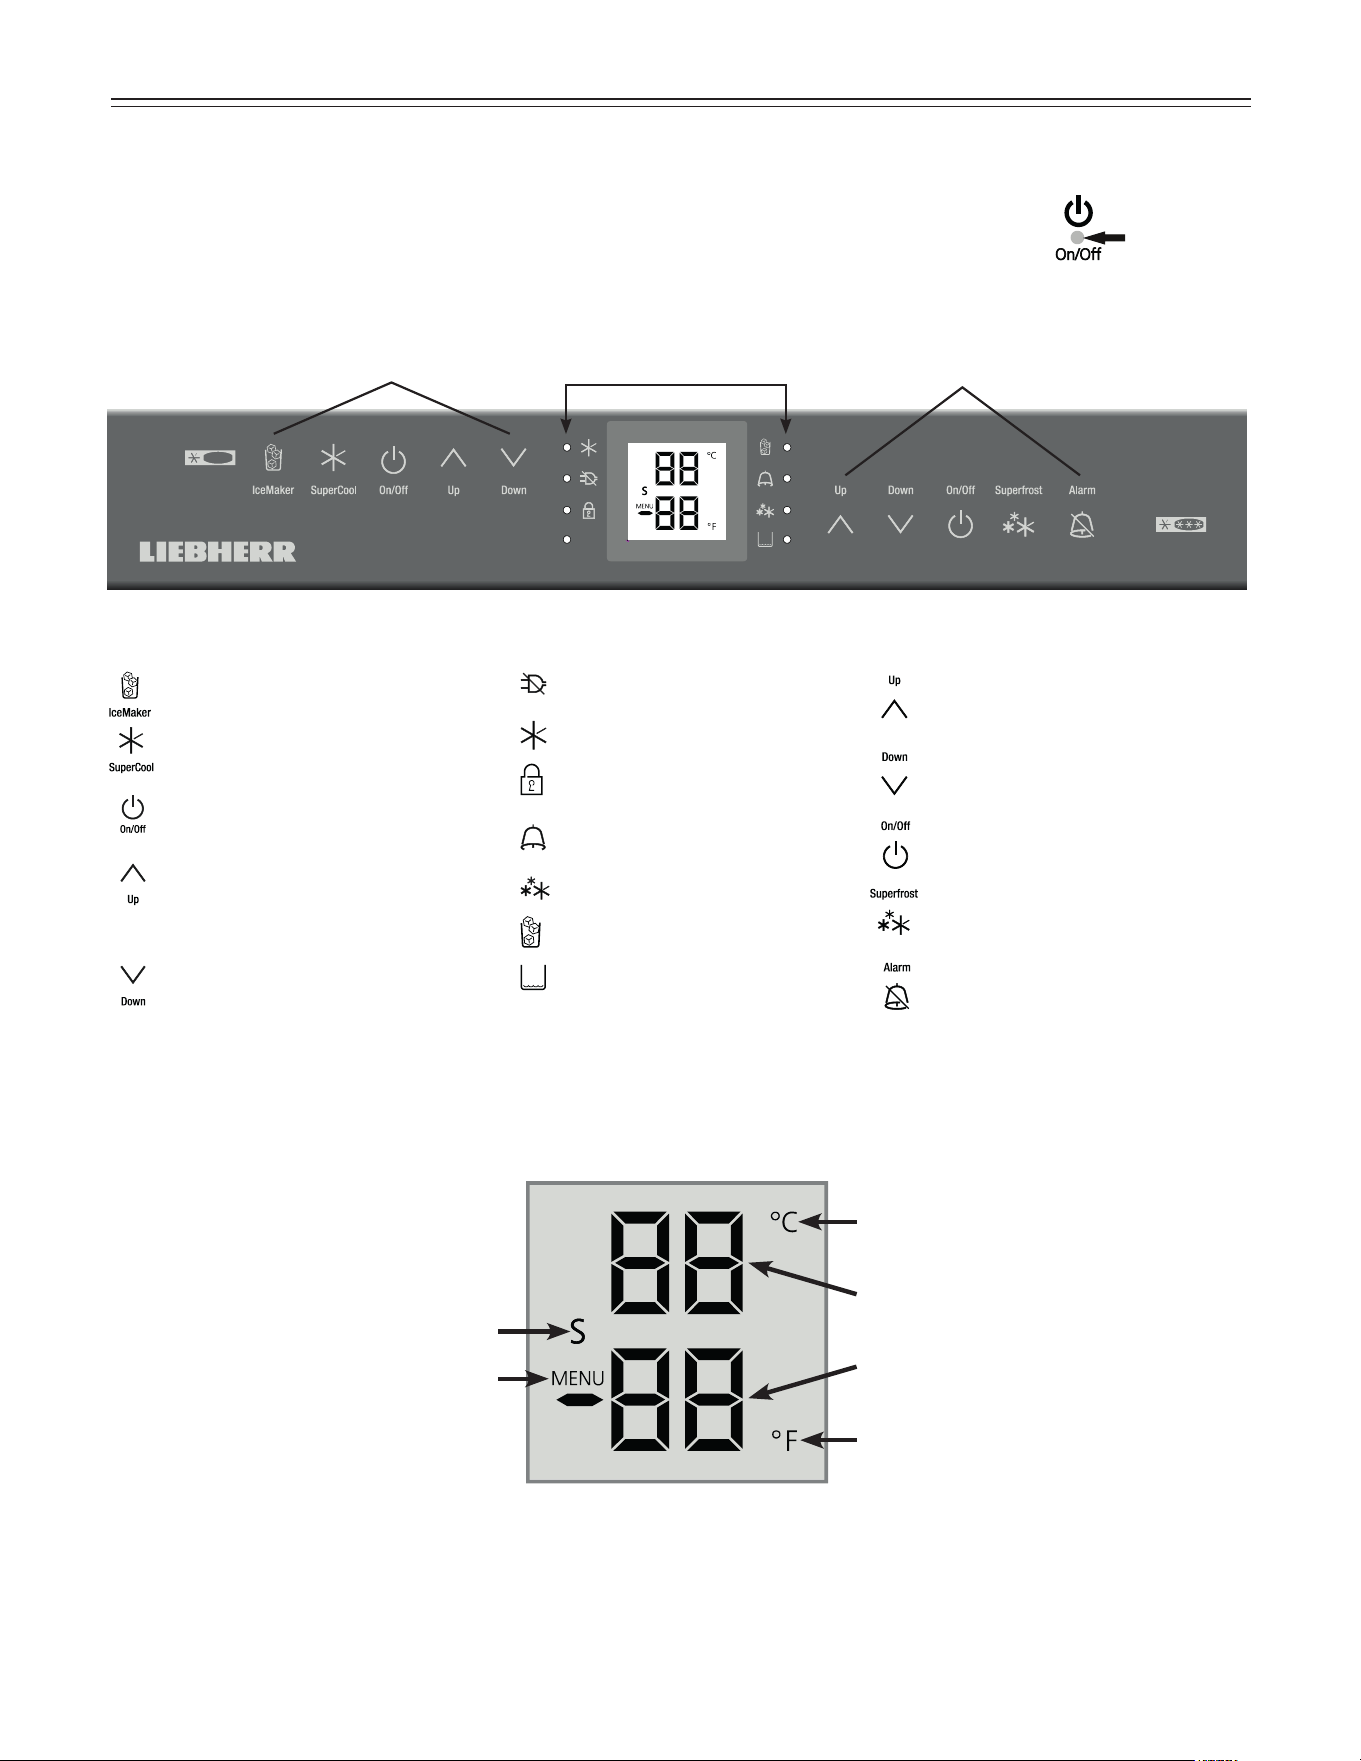
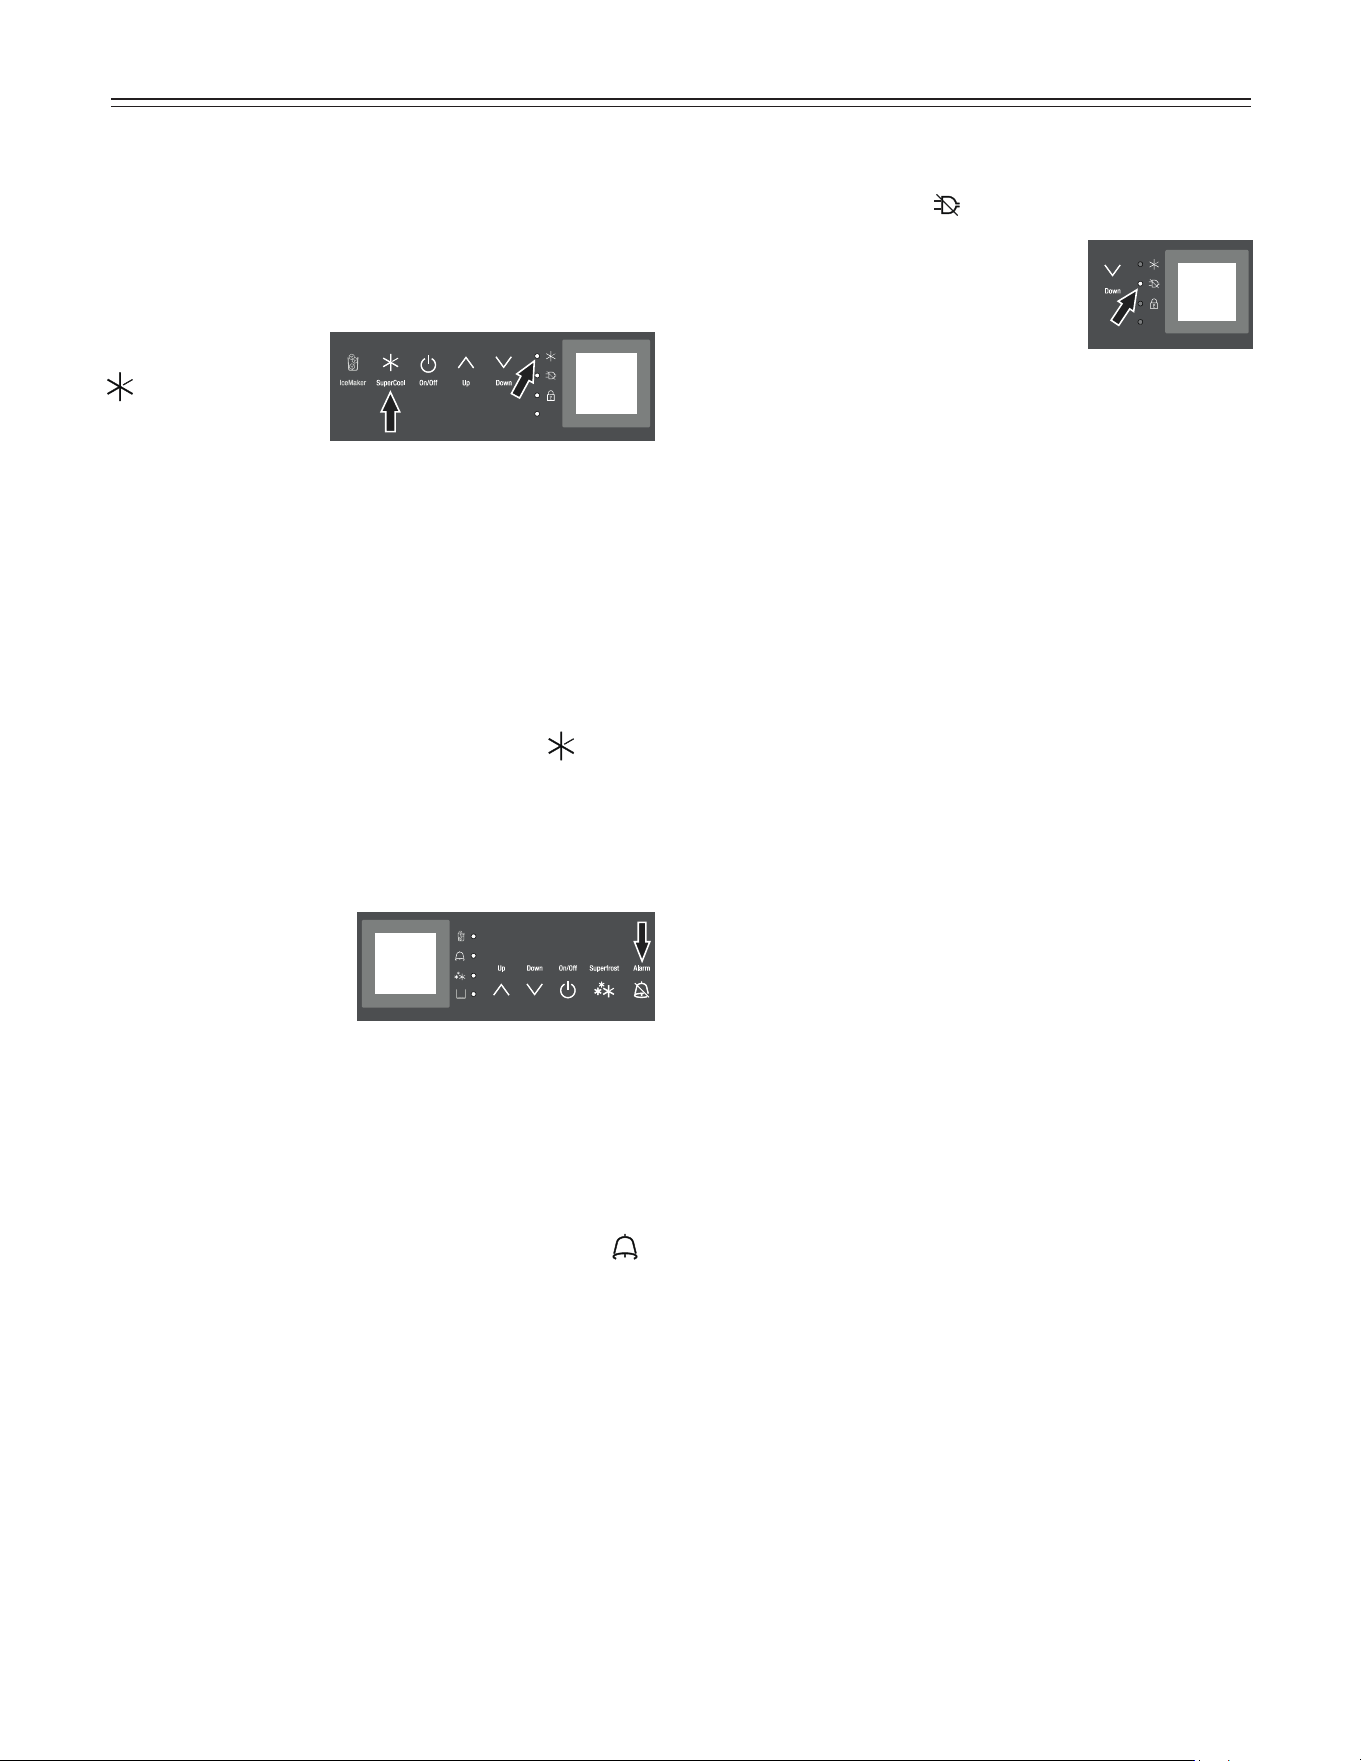
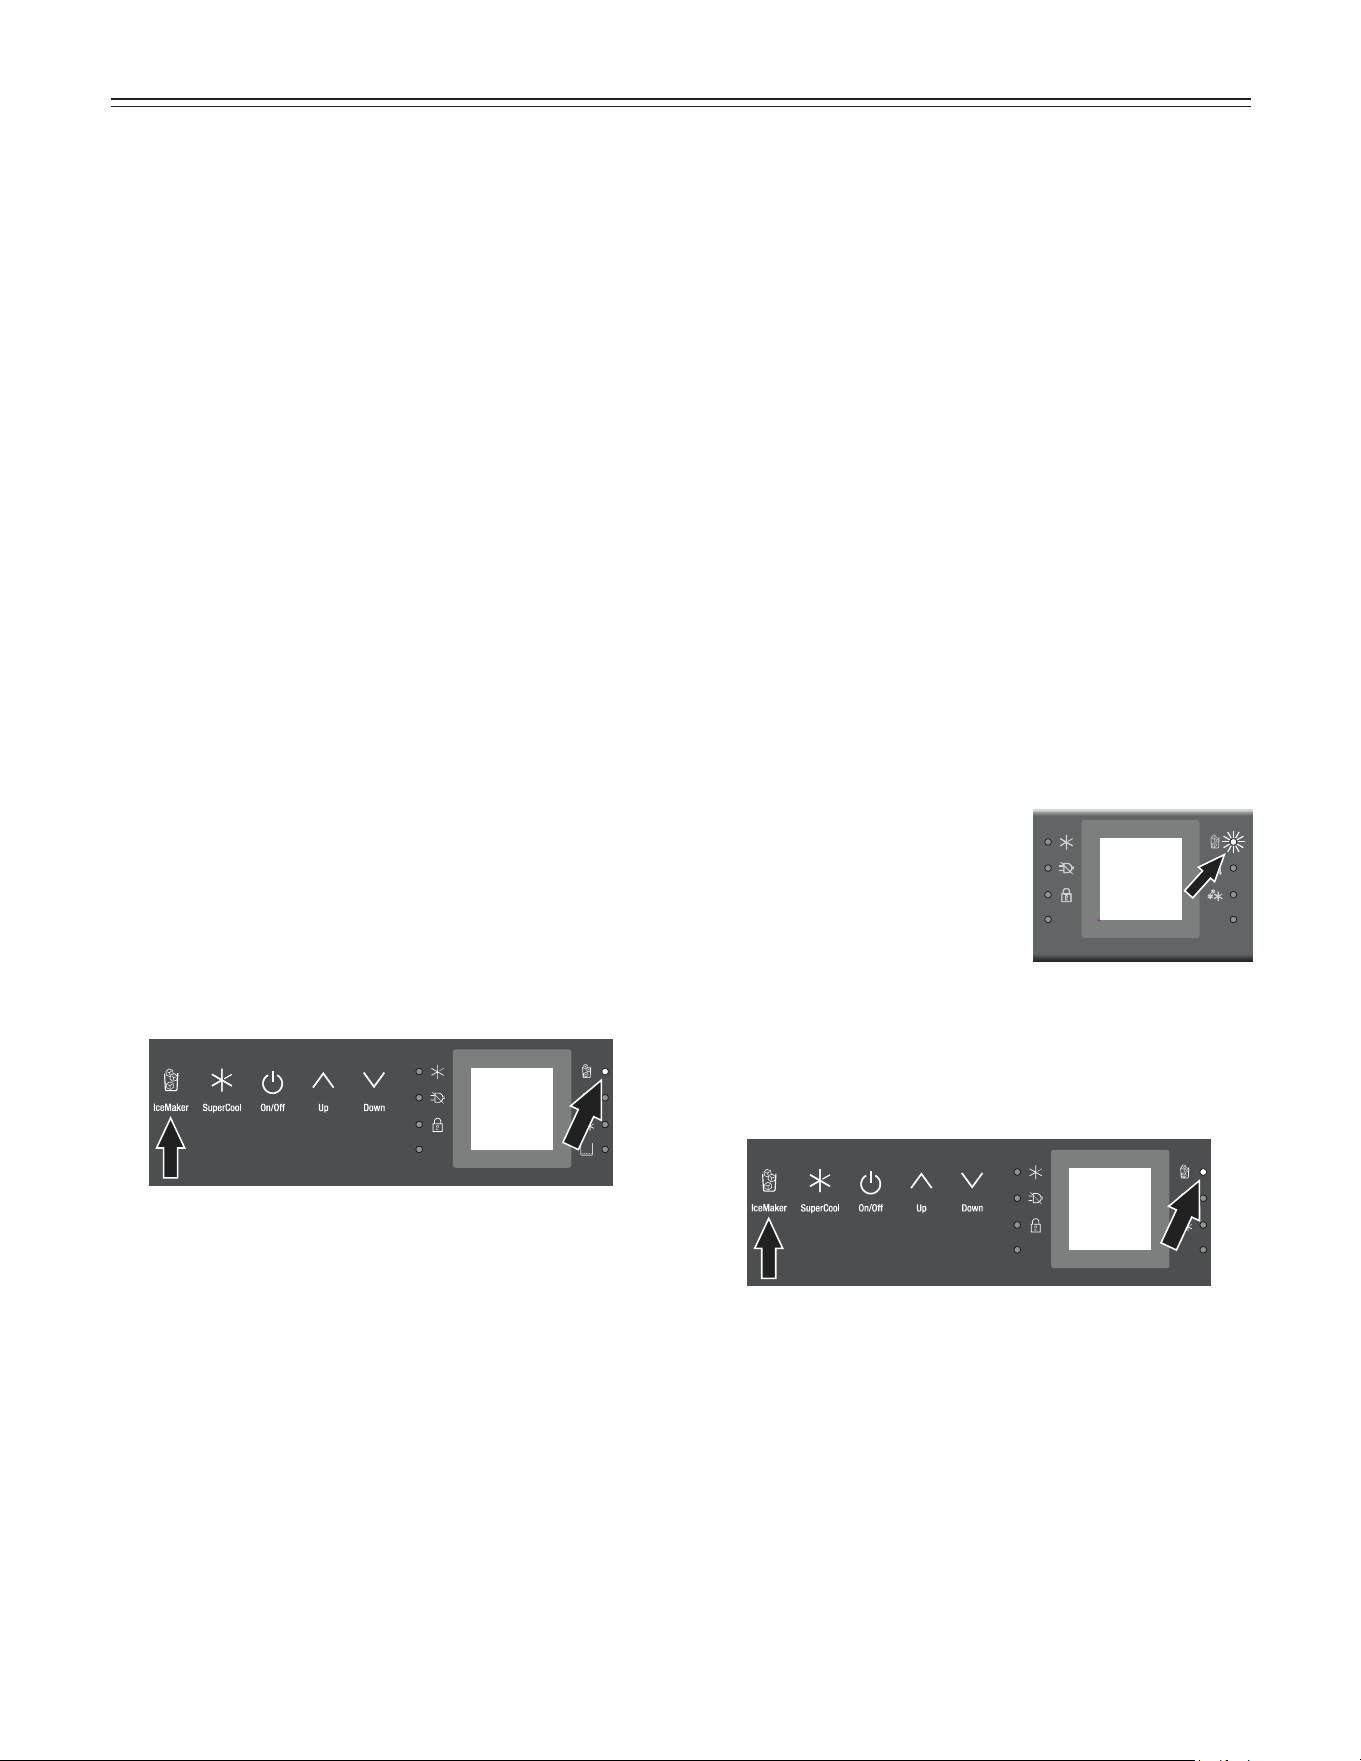
Operating and Control Elements
The electronic control panel has the Touch capacitance
technology. Any function can be activated by a fingertip
on the symbol of the operating icons.
Refrigerator operating icons
IceMaker On/Off
SuperCool
Refrigerator On/Off
Temperature Up control (to
increase the refrigerator tem-
perature)
Temperature Down control (to
reduce the refrigerator tem-
perature)
Refrigerator
operating icons
Appliance
control icons
Freezer
operating icons
Temperature and control display
Display mode degrees Celsius
Display mode degrees Fahrenheit
Refrigerator temperature display
Freezer temperature display
Sabbath mode is activated
Menu mode is activated
(for setting additional functions)
Appliance control icons
Power failure LED
SuperCool LED
Child lock LED
Alarm LED
SuperFrost LED
IceMaker ON LED
Top up water tank LED
(model CS 1640 only)
The exact contact point is between
the symbol and its label.
7
o
peraTion
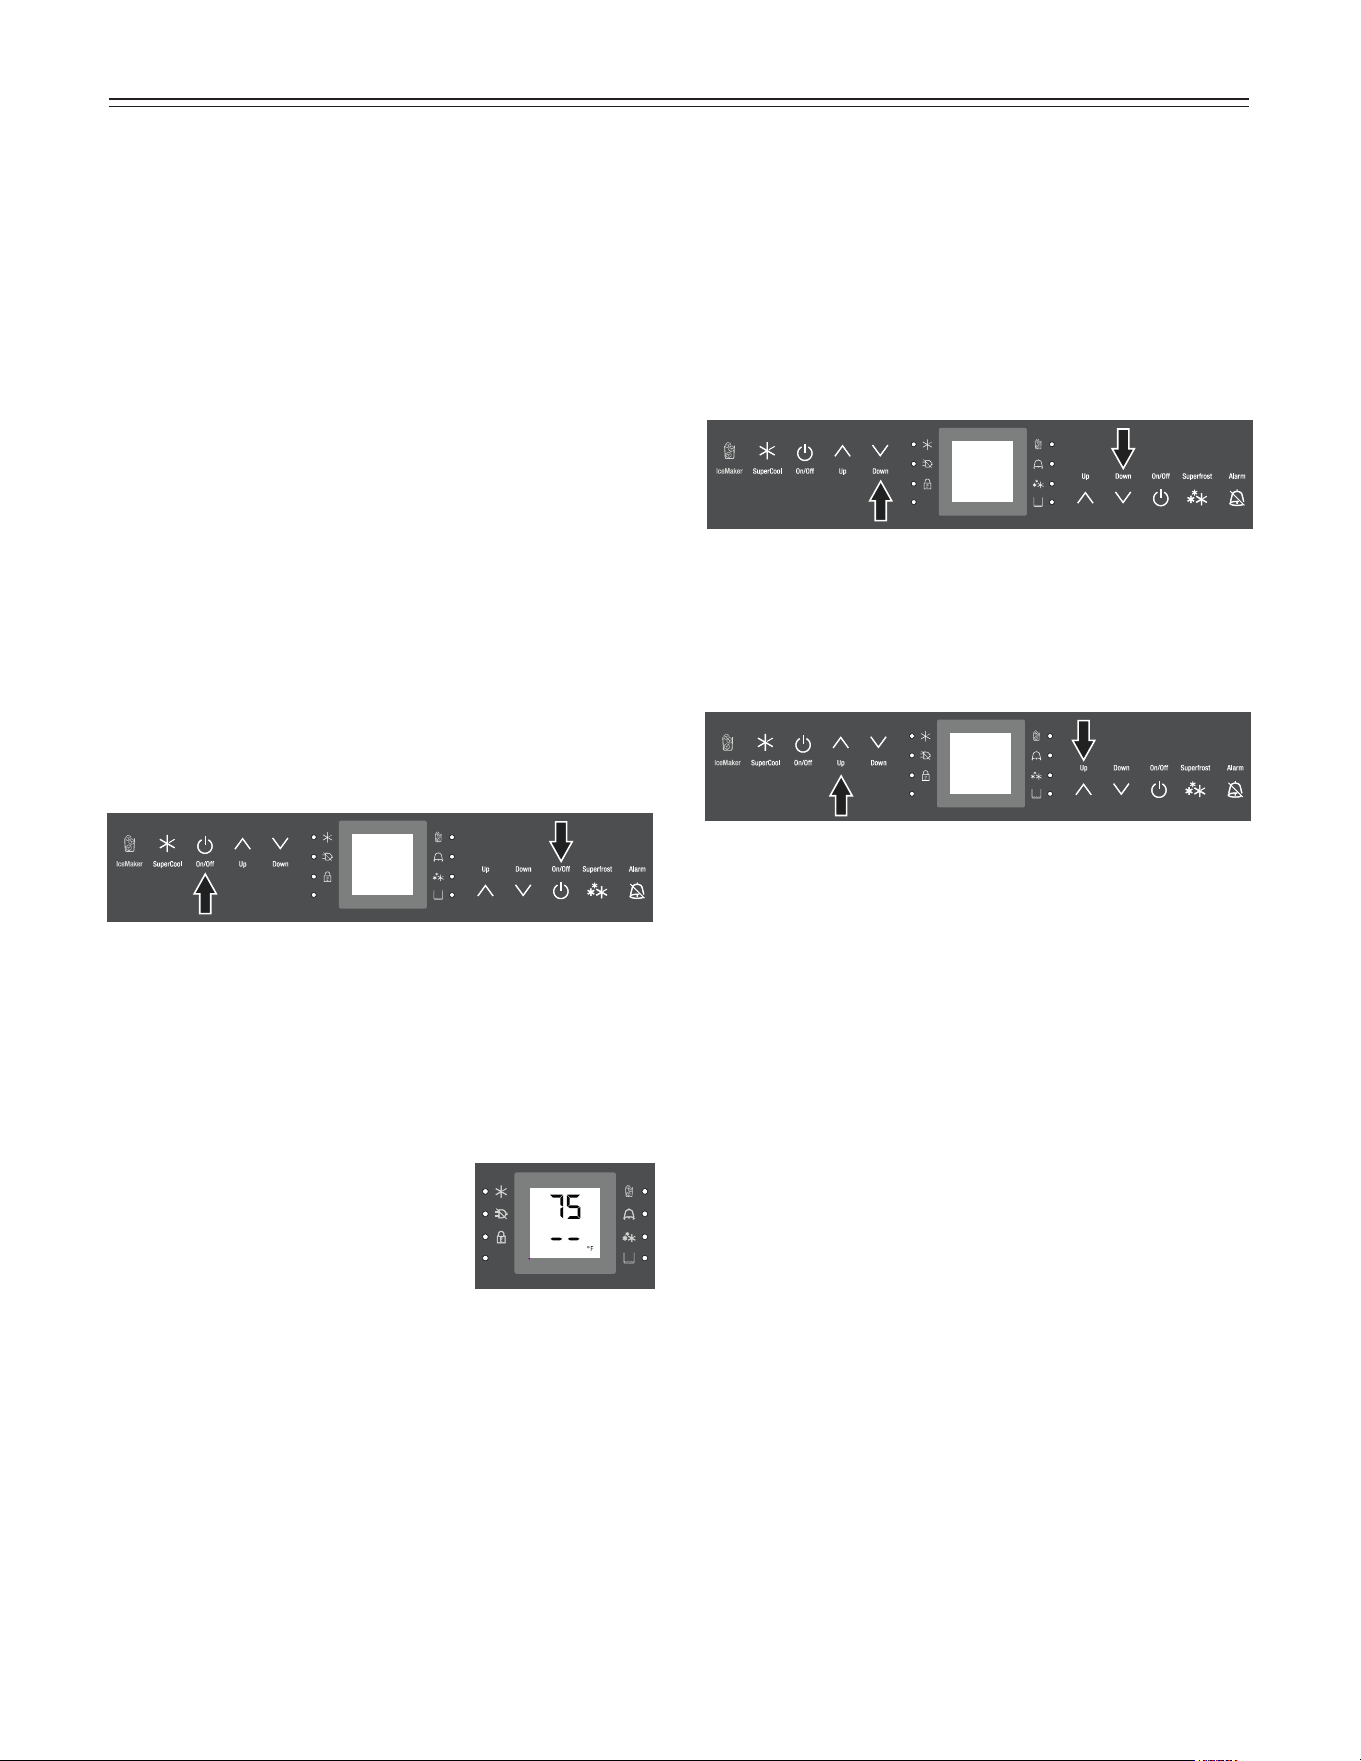
Setting the Temperature
The appliance is pre-set for normal operation. We recom-
mend temperatures of 38°F (3°C) in the refrigerator and
0°F (-18°C) in the freezer.
To reduce the temperature
Touch the Down icon on the left to reduce the refrigerator
temperature and the Down icon on the right to
reduce the freezer temperature.
Temperature Display
In normal operation, the following settings will be
displayed:
• the average refrigerator temperature
• the warmest frozen food temperature.
When starting up for the first time or
when the appliance is warm, dashes
will appear in the freezer temperature
display, until the temperature in the
freezer compartment is 32°F (0°C).
The display will flash:
• if you change the temperature or
• if the temperature rises by several degrees, indicating
cold loss, e.g. if you place fresh, “” food in the freezer
or if you remove or repack frozen food, the temperature
may rise for a short time due to warm air flowing into
the freezer.
To increase the temperature:
Touch the Up icon on the left to increase the refrigerator
temperature and on the right to increase the freezer
temperature.
• While you are entering the temperature, the set tem-
perature will flash on the display.
• When you touch the temperature setting icons for the
first time, the most recent setting is displayed.
• You can change the settings in increments of 1°F (1°C)
by briefly touching the icons again. If the icons are held,
the temperature setting will change faster.
• Approximately five seconds after the icon has been
released, the display will automatically show the actual
freezing or cooling temperature.
You can change the temperatures:
In the refrigerator between 36°F and 45°F (2°C and 7°C)
and in the freezer between -15°F and 7°F
(-27°C and -14°C).
Switching the Appliance On and Off
Clean the appliance before turning it on for the first time.
See Cleaning. Do not place frozen food in the freezer
until the temperature shows at least 0°F (-18°C).
Switching the appliance on
Touch the Refrigerator On/Off icon or the Freezer On/Off
icon so the temperature displays light up• Bleed the
water system of the appliance by performing the steps in
chapter “Bleeding the water pipe system and reset-
ting the drop symbol on the display” on page 10.
Switching the refrigerator compartment off
Touch the Refrigerator On/Off icon for approximately
3 seconds.
Note
If the freezer compartment is switched off, the entire
appliance will be switched off.
8
o
peraTion
Audible Alarm Signal
The audible alarm signal
is switched o by touch-
ing the alarm icon.
Audible door alarm
This sounds when the door has been left open for longer
than about 180 seconds. The sound switch-o function is
active as long as the door is left open. The alarm automat-
ically switches back to standby when the door is shut.
Audible/visual temperature alarm
It always sounds if the freezer temperature is not low
enough. The temperature display and the alarm LED
flash at the same time.
This can be caused by:
- warm, fresh food being placed in the freezer,
- too much warm air from the outside entering when re-
arranging or removing frozen food,
- a fault in the appliance.
The temperature display will continue to flash until the
cause of the alarm has been rectified. It will then stop
flashing and light up continually. The audible warning sig-
nal is now automatically reset.
Power Failure/FrostControl Display
If the power failure LED is lit, this means the freezer
temperature has risen too high during the last few hours
or days due to a power failure. The
freezer temperature display flashes at
the same time.
• If you touch the Alarm icon now, the
highest temperature registered during the power failure
will be displayed.
• Check the quality of the food in case it has become too
warm or even defrosted.
• The highest temperature will appear for approximately
one minute. After that, the actual temperature in the
freezer will reappear.
The display can be turned off by touching the Alarm icon
again.
SuperCool
It is recommended particularly if you wish to cool large
quantities of food, drinks, freshly baked goods or meals
rapidly.
Turning on
Touch the SuperCool
icon briefly so the LED
turns on. The refrig-
erator temperature
will drop to its lowest
value.
IMPORTANT
The SuperCool function uses slightly more energy.
After approximately six hours, however, the refrig-
erator switches back automatically to normal ener-
gy-saving operation. If required, the SuperCool
function can be turned off sooner.
Turning off
Touch the SuperCool icon again until the LED
turns
off.
9
o
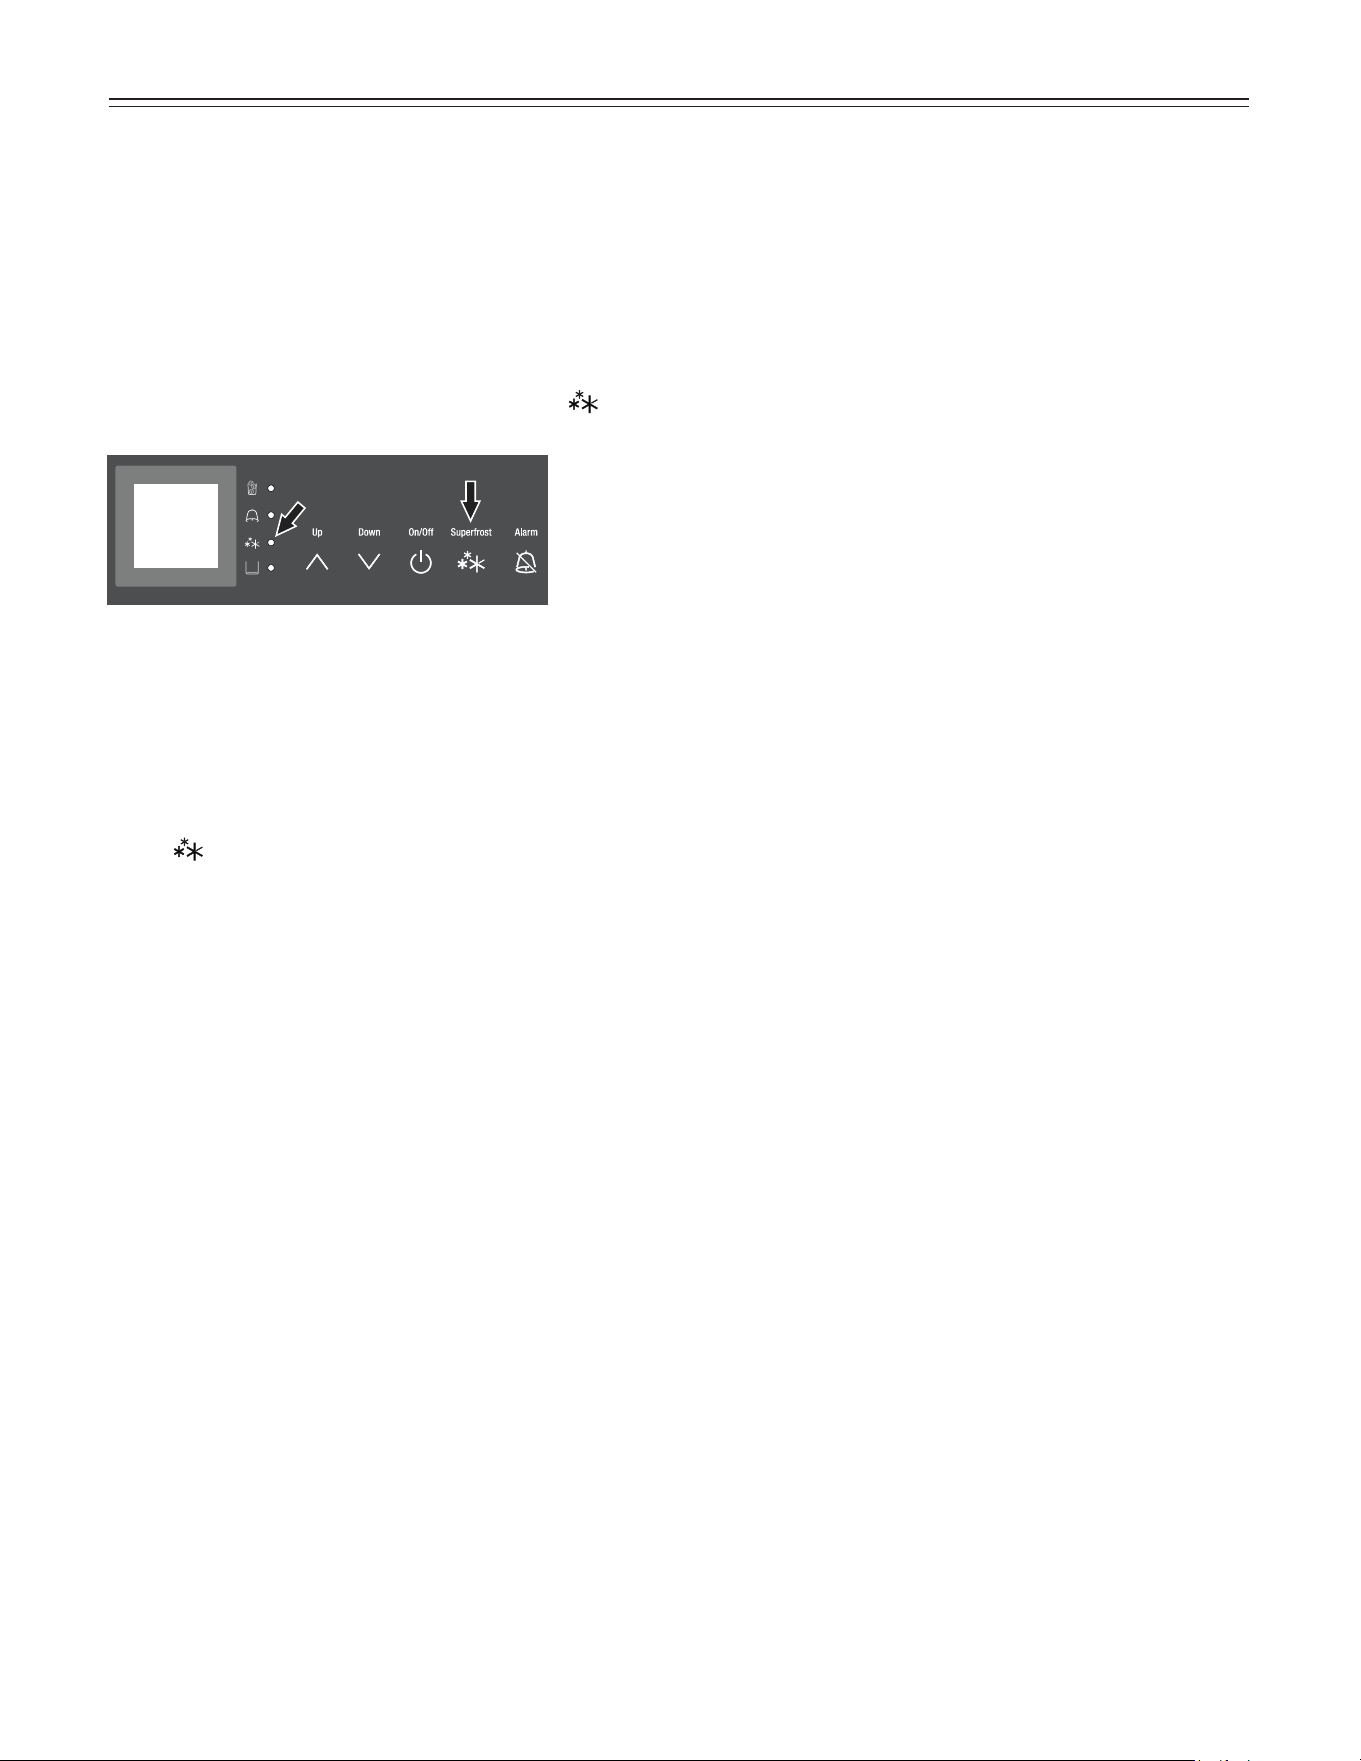
peraTion
= Sabbath mode
This feature considers the religious requirements on the
Sabbath or holidays. When the Sabbath mode is active,
some functions of the electronic controls are switched off.
• The lighting remains off.
• The cooling fan remains in its actual state: If it is on, it
remains on, if it is off, it remains off.
• There is no door alarm.
• There is no temperature alarm.
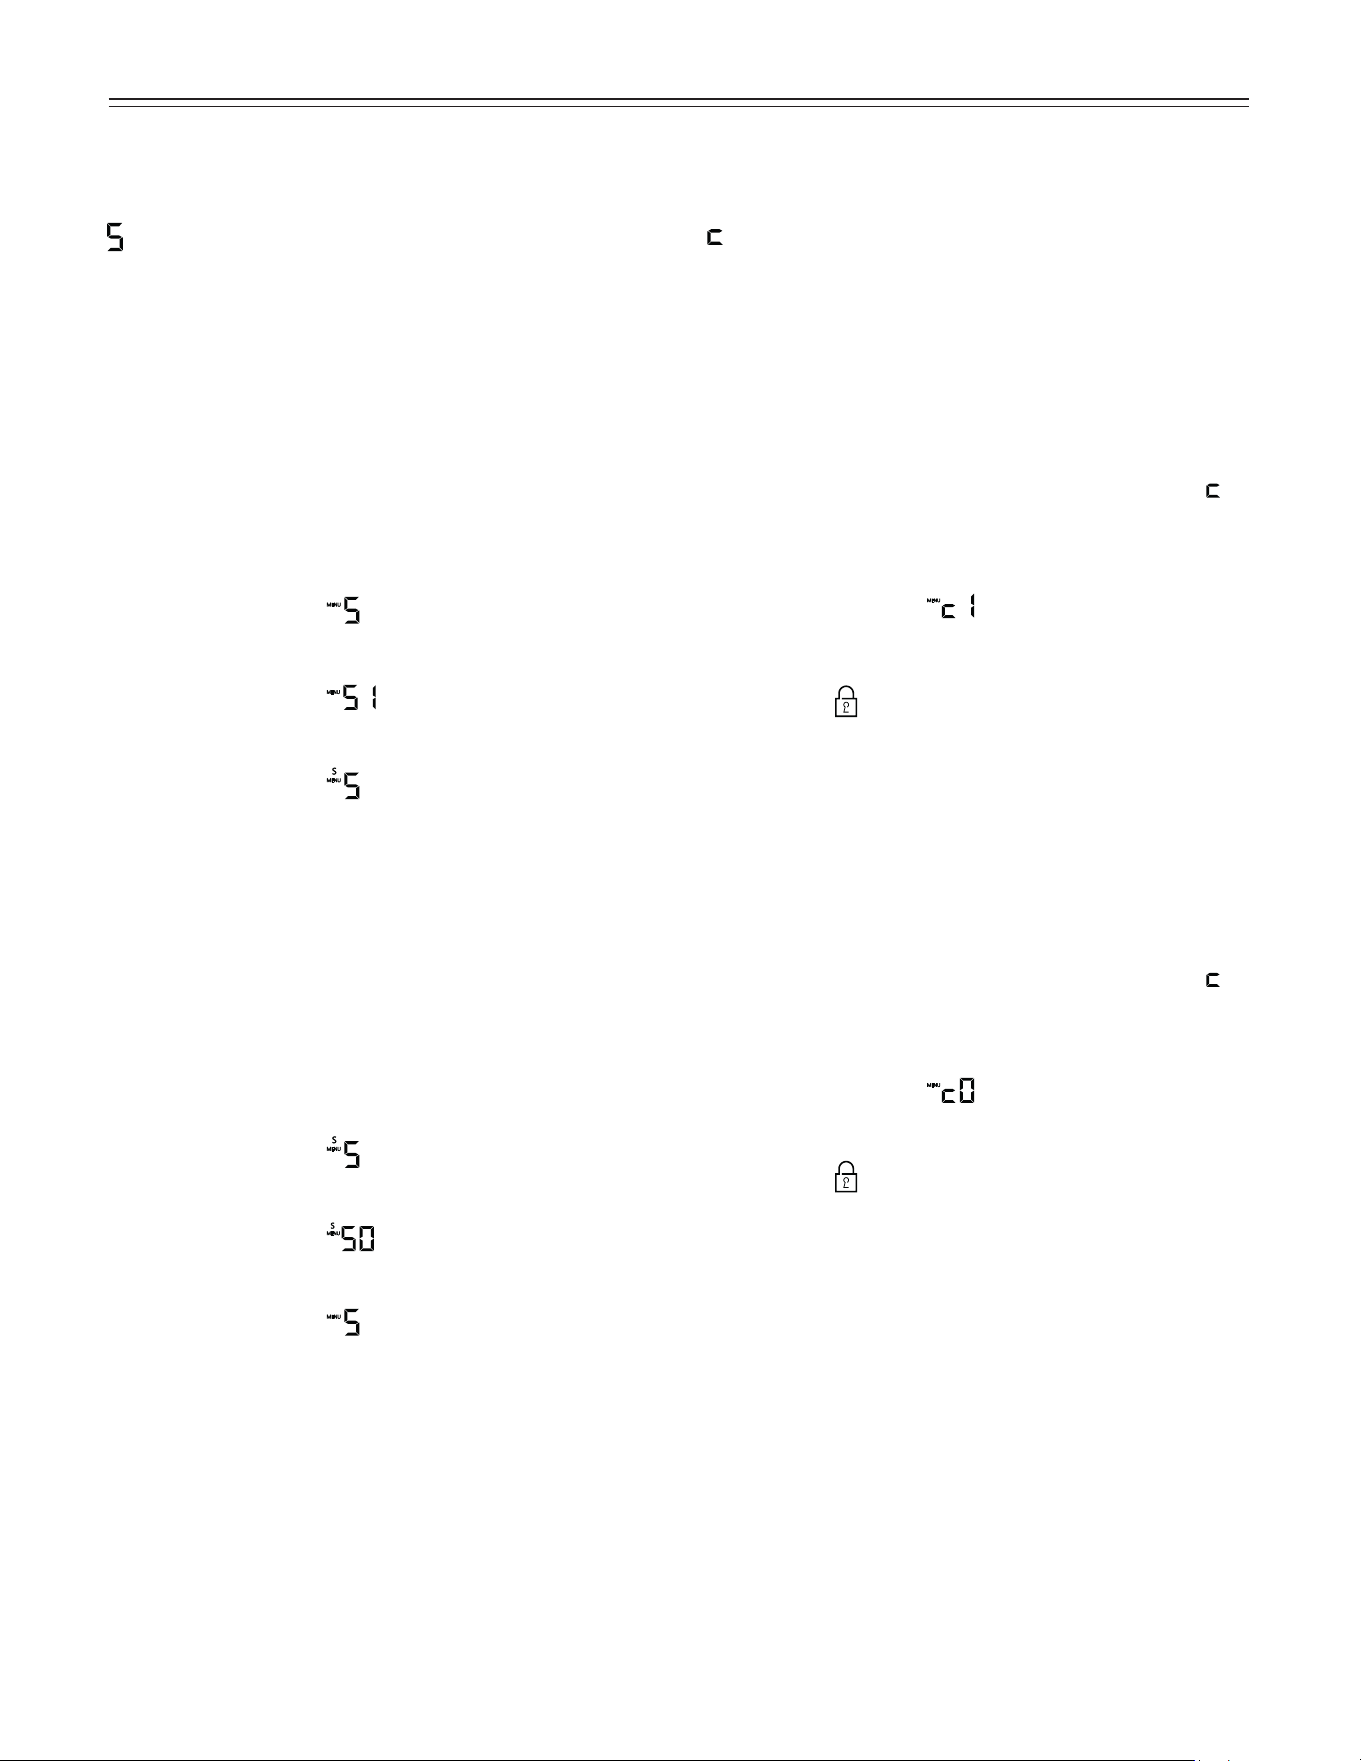
Activating the Sabbath mode
• Activate the setup mode by touching the SuperFrost
icon for 5 seconds.
- the display shows
• Touch the SuperFrost icon
- the display shows
• Touch the SuperFrost icon again
- the display shows
- the Sabbath mode is activated.
• Exit setup mode by touching the freezer compartment
On/Off icon.
Sabbath mode switches off automatically after 120 hours
if it is not manually switched off beforehand.
Deactivating the Sabbath mode
• Activate the setup mode by touching the SuperFrost
icon for 5 seconds.
- the display shows
• Touch the SuperFrost icon
- the display shows
• Touch the SuperFrost icon again
- the display shows
the Sabbath mode is deactivated.
• Exit setup mode by touching the freezer compartment
On/Off icon.
Setup Mode
In the setup mode, you can activate the following functions:
= Child lock
The child lock is designed to protect the appliance from
being switched off and the temperature setting from
being changed accidentally.
Activating the child lock
• Activate the setup mode by touching the SuperFrost
icon for 5 seconds.
• Touch the freezer compartment Down icon until
appears in the freezer temperature display.
• Touch the SuperFrost icon
- the display shows
• Touch the SuperFrost icon again
- the LED
is lit and the child lock is activated.
• Exit setup mode by touching the freezer compartment
On/Off icon.
Deactivating the child lock
• Activate the setup mode by touching the SuperFrost
icon for 5 seconds.
• Touch the freezer compartment Down icon until
appears in the freezer temperature display.
• Touch the SuperFrost icon
- the display shows
• Touch the SuperFrost icon again
- the LED
goes out. The child lock is deactivated.
• Exit setup mode by touching the freezer compartment
On/Off icon.
10
o
peraTion
= Water quantity for Ice cube tray
If the produced ice cubes of the ice maker are too small,
the inflowing water quantity can be adjusted.
• Activate the setup mode by touching the SuperFrost
icon for 5 seconds.
• Touch the freezer compartment Down icon until
appears in the freezer temperature display.
• Touch the SuperFrost icon
- the display shows
• Touch freezer compartment Up icon
once only so E 4 appears in the display.
IMPORTANT
Do not increase for more than one step. If the
adjusted value is too high, the ice cube tray of the
ice maker could overflow.
• Touch the SuperFrost icon again.
• Exit setup mode by touching the freezer compartment
On/Off icon.
Check the ice cube size within the next days. If the ice
cubes are still smaller as desired, follow the steps above
again.
= Ice maker function test
Activation by service personnel only.
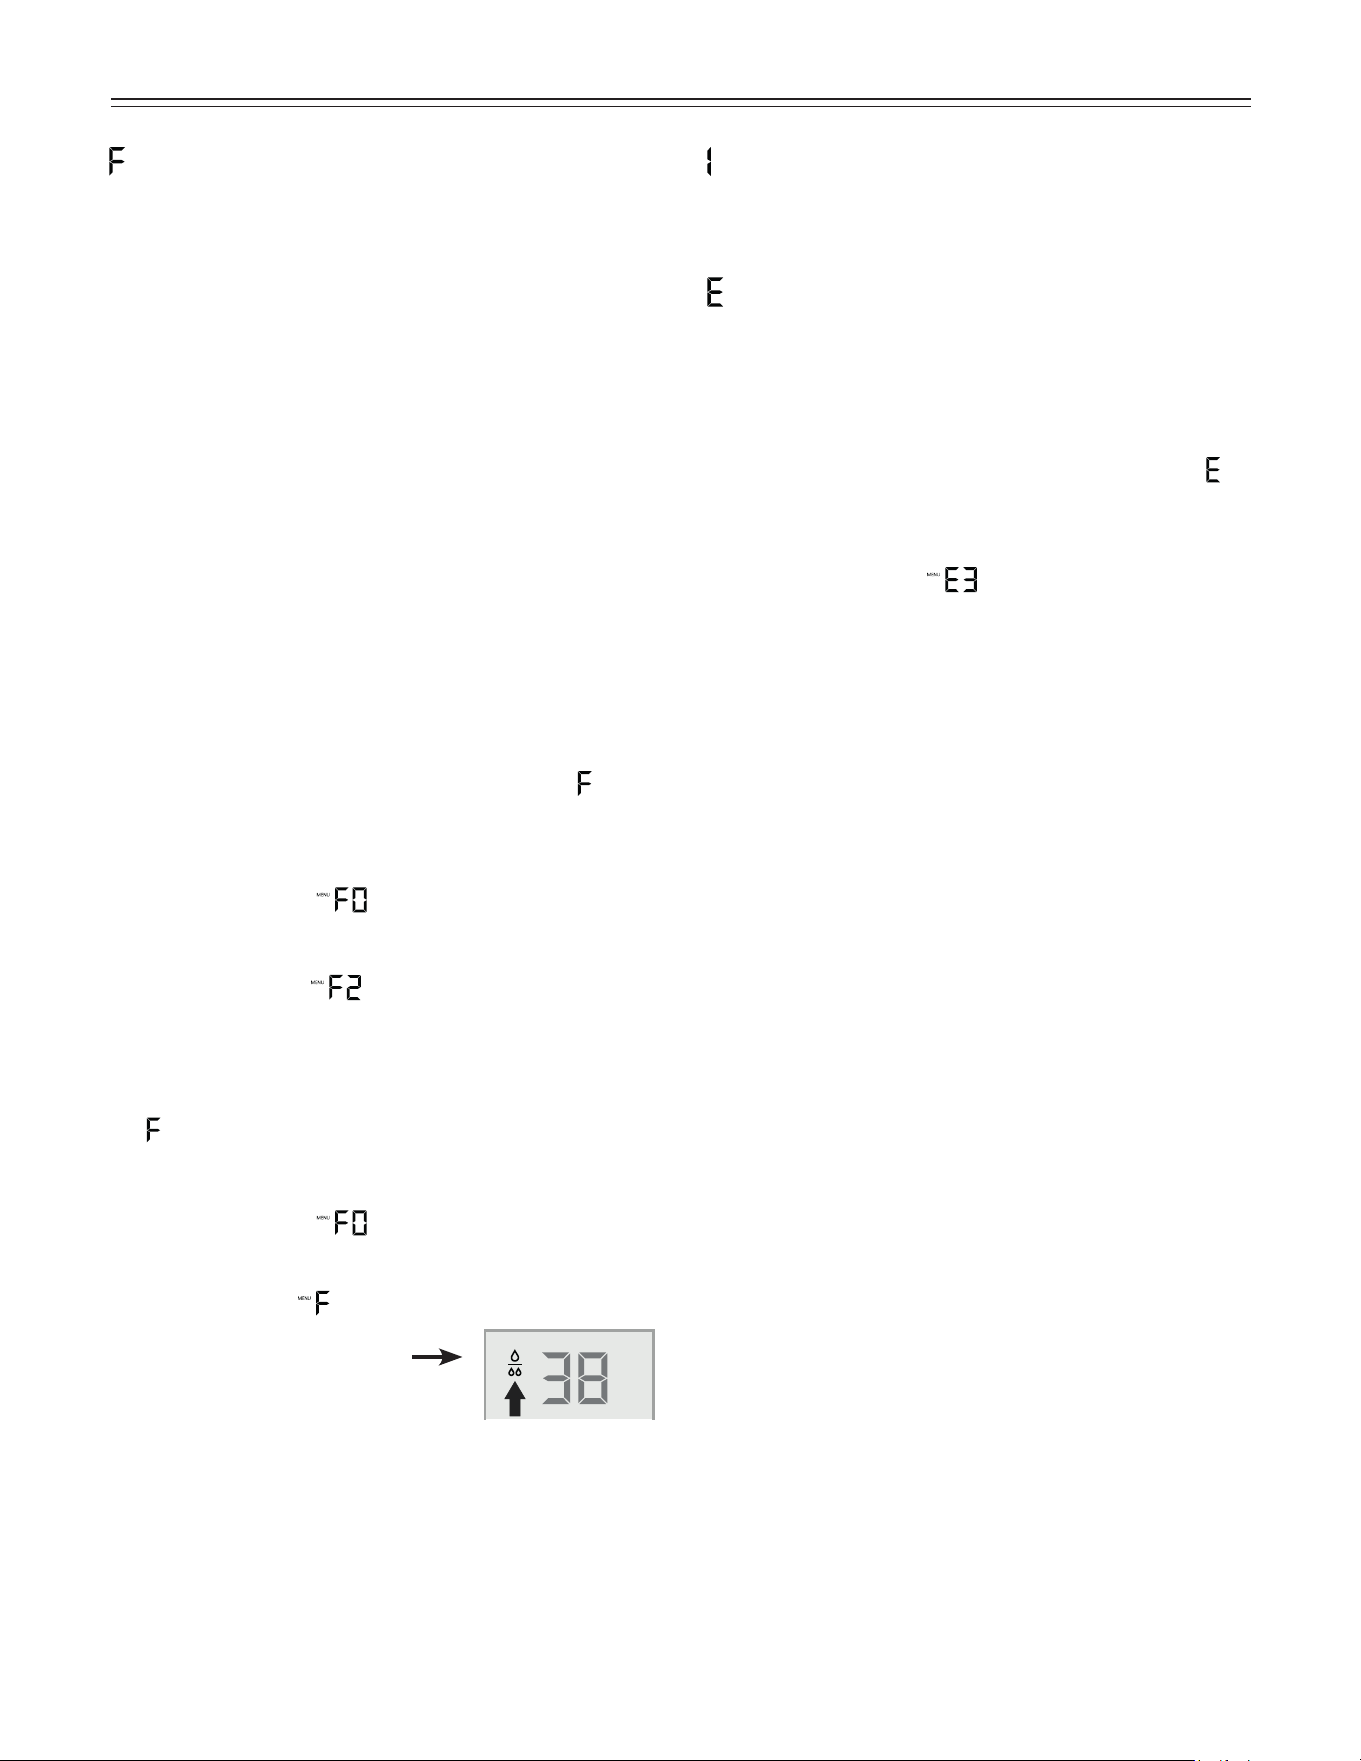
= Bleeding the water pipe system and resetting
the drop symbol on the display
After the appliance has been switched on for the first
time or the water filter (optional accessory) has been
renewed, follow these steps to bleed the water pipe
system. This is important for proper operation of the ice
maker.
The drop symbol on the display lights up in regular
intervals to remind you to change the water filter. If a
new water filter is fitted, the drop symbol can be reset if
desired to start a new interval.
There will be no functional issue if the drop symbol in the
display is not reset.
• Remove the IceMaker drawer (top left drawer in the
freezer compartment) and empty. Reinsert the drawer
and close the appliance door.
• Activate the setup mode by touching the SuperFrost
icon for 5 seconds.
• Touch the freezer compartment Up icon until
appears in the freezer temperature display.
• Touch the SuperFrost icon
- the display shows
• Touch the freezer compartment Up icon
- the display shows
• Touch the SuperFrost icon. The water intake of the
appliance opens for 25 seconds and bleeds all air from
the pipe system.
-
flashes in the display.
• Touch the SuperFrost icon
- the display shows
• Touch the SuperFrost icon again
- the display shows
• The drop symbol disappears.
• Exit setup mode by touching the
freezer compartment On/Off icon.
• Remove the IceMaker drawer, empty it and dry with
a cloth. Reinsert the drawer and close the appliance
door.
11
o
peraTion
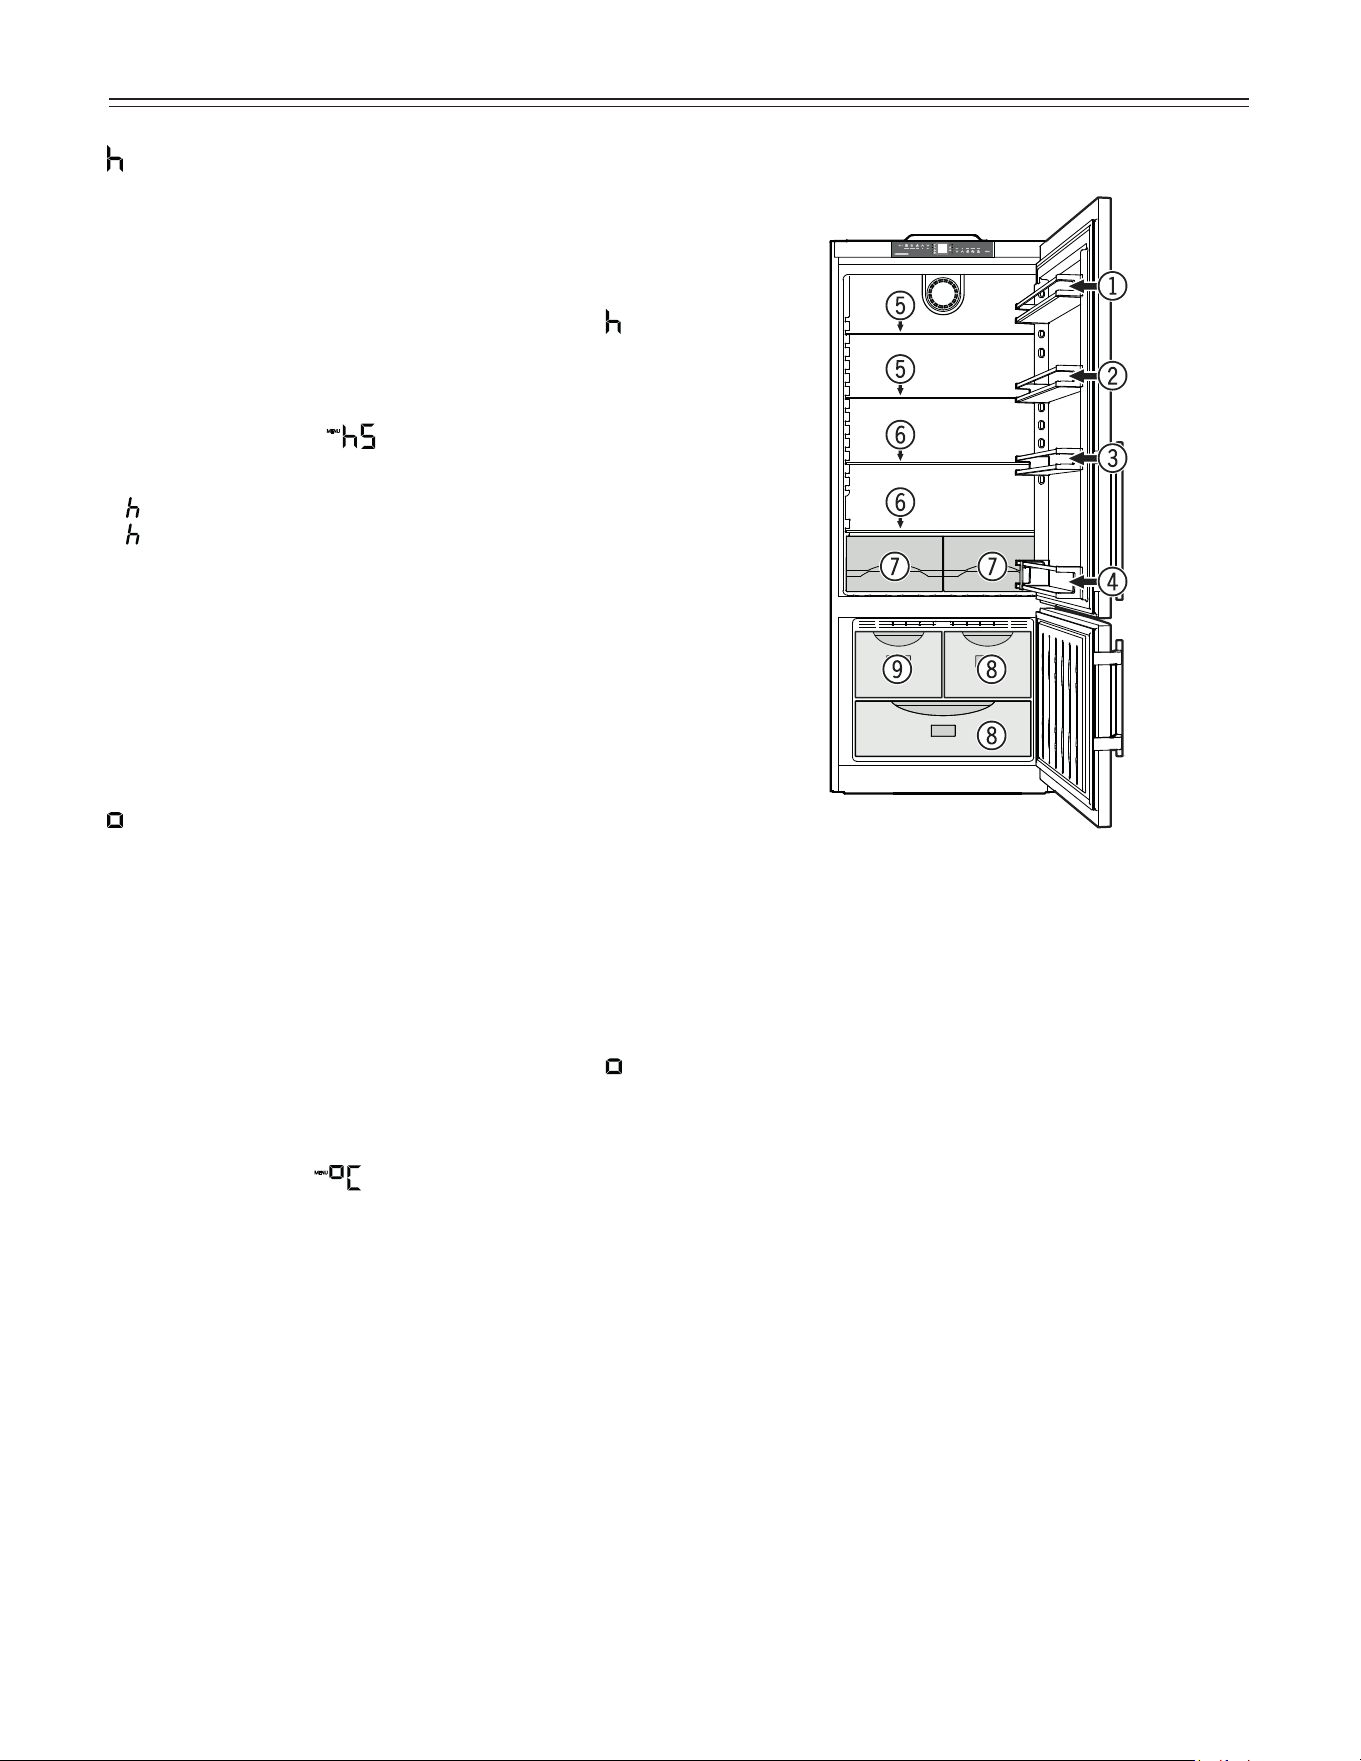
Arranging Food
(1) Butter, cheese
(2) Eggs
(3) Cans, drinks
(4) Bottles
(5) Baked goods, pre-cooked meals
(6) Meat and sausage products, dairy products
(7) Fruit, vegetables, salad
(8) Frozen food
(9) Ice cubes
IMPORTANT
• • •
= Display brightness
Adjusting the display brightness
• Activate the setup mode by touching the SuperFrost
icon for 5 seconds.
• Touch the freezer compartment Down icon until
appears in the freezer temperature display.
• Touch the SuperFrost icon
- the display shows
• Touch freezer compartment Up/Down icons to select
0 = minimum to
5 = maximum brightness
• Touch the SuperFrost icon at the desired value.
• Exit setup mode by touching the freezer compartment
On/Off icon.
• Close the appliance door. The adjusted brightness will
be activated after one minute.
= Temperature display mode
You can choose the unit of temperature for the display
in degrees Fahrenheit or degrees Celsius.
The factory setting is degrees Fahrenheit.
• Activate the setup mode by touching the SuperFrost
icon for 5 seconds.
• Touch the freezer compartment Down icon until
appears in the freezer temperature display.
• Touch the SuperFrost icon
- the display shows
• Touch the SuperFrost icon again
- the temperature reading is now displayed in degree
Celsius.
• Exit setup mode by touching the freezer compartment
On/Off icon.
• To change the temperature display back to degrees
Fahrenheit, follow the steps above.
12
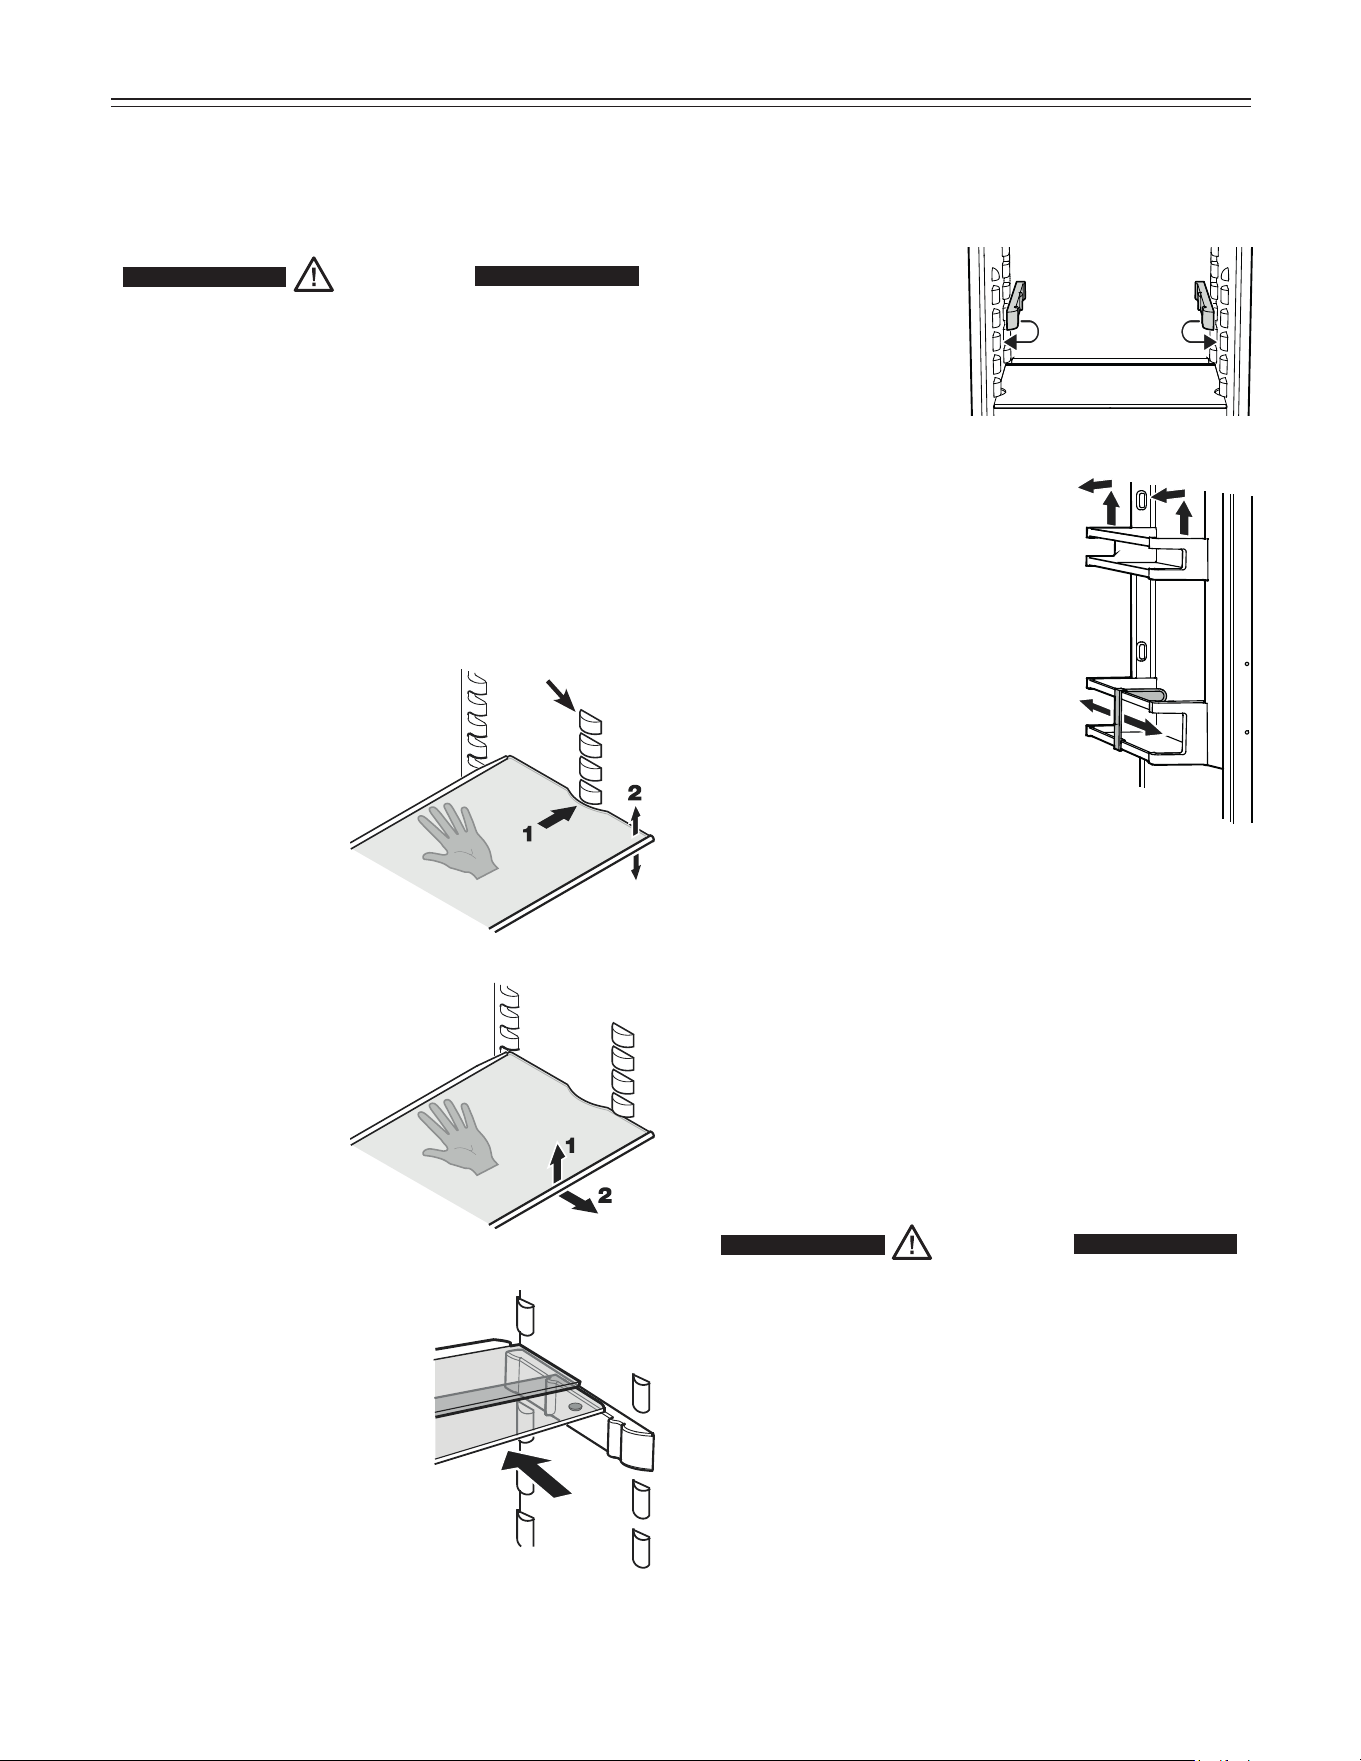
Repositioning the sectioned shelf
Place the shelf rails pro-
vided on the supports on
the left and right at the
desired height
Sectioned shelf
If you need to make space for tall
containers, simply slide the front
half of the sectioned glass shelf
carefully underneath the back
half.
r
efrigeraTor
C
omparTmenT
Repositioning the door racks
Slide the door rack up, pull out toward
you and replace in reverse order.
Bottle holder
You can protect the bottles from fall-
ing over when the door is opened and
closed.
Move the bottle holder to the desired
position. Always hold at the front for
moving.
Repositioning the shelves
Hold the shelf underneath with your hand to avoid from
tipping down backwards when removing.
Lift the shelf at the front.
1. Remove the shelf
forward until the
circular cutout of the
shelf is in line with the
front supports.
2. Lift the shelf up or
down and replace in
the desired position.
Removing the shelves
Open the door as far as
possible.
1. Lift the shelf at the
front.
2. Remove the shelf
forward.
Front
supports
Equipment
You can rearrange the height of the shelves and door
racks as required.
CAUTION!
Risk of injury and damage.
Only adjust an empty shelf or door rack.
Do not attempt to adjust a shelf or door
rack with food on it.
Interior Light
The light is located behind the cover located at the top of
the refrigerator compartment.
The light intensity of the LED light corresponds to
laser class 1/1M.
IMPORTANT
The light cover may only be removed by customer
service staff.
CAUTION!
Risk of eye damage.
If the cover is removed, do not look
directly at the light through optical lenses
from a close distance.
13
f
reezer
C
omparTmenT
Freezing and Storage
• Pack frozen food in standard freezer bags or reusable
plastic, metal or aluminum containers.
• Do not allow fresh food which is to be frozen to come
into contact with food already frozen. Always keep
packages dry in order to avoid them sticking together.
• Always write the date and contents on the package
and do not exceed the stated storage time for the food.
This prevents spoiling.
• Pack food which you are freezing yourself in quantities
right for your household. To ensure the food freezes
right through quickly, the following quantities should not
be exceeded per package:
- fruit, vegetables: up to 2-1/4 lbs (1 kg);
- meat: up to 5-1/2 lbs (2.5 kg).
• Do not freeze bottles and cans which contain carbon-
ated drinks as they might burst. Drinks can be cooled
down quickly, but take the bottles out of the freezer
compartment after an hour at the most.
• Only take out as much food as needed for thawing.
Cook food which has been thawed as quickly as pos-
sible. Frozen food can be thawed in the following ways:
- in a microwave oven
- in the refrigerator: the safer way to thaw food because
there is less chance of bacteria growth. Use this meth-
od for high density food such as roasts or poultry.
Freezing
Fresh food should be frozen completely and as rapidly as
possible. This is provided by the SuperFrost feature and
ensures that the nutritional value, appearance and flavor
of the food remains intact.
Freezing with SuperFrost
• Touch the SuperFrost icon briefly so the LED turns
on.
• Wait 24 hours.
• Then place the fresh food inside the freezer.
• The SuperFrost function turns off automatically.
Depending on the quantity of food placed in the
freezer, this will normally be between 30 and maximum
65 hours.
The freezing process is now complete; the SuperFrost
LED
will turn off, and the freezer will change back
to normal energy-saving operation.
You should not turn on the SuperFrost function:
• when placing frozen food in the freezer;
• when freezing up to approximately 4-1/2 lbs (2 kg)
fresh food daily.
14
i
Ce
m
aker
Safety Instructions and Warnings for
the Automatic Ice Maker
• The ice maker is designed exclusively to make ice
cubes in quantities needed by a household.
• All repairs and work on the ice maker may only be
done by customer service personnel or other appropri-
ately trained personnel.
• Do not consume or use the first three batches
of ice. This applies both to using the appliance
for the first time and also using it after it has not
been used for a long period of time.
• The manufacturer cannot accept liability for dam-
age caused by equipment or water lines between
the solenoid valve and the water supply.
• The ice maker is in the top left drawer in the freezer
compartment of the combined refrigerator-freezer. The
ice maker can only make ice cubes if the drawer is
completely closed.
• The ice maker will only make ice cubes if the freezer
compartment is operating.
Ice Maker Description
After you start the ice maker for the first time, it may take
up to 24 hours before the first ice cubes are ready.
The ice cubes fall out of the ice maker into the drawer.
IMPORTANT
The first three batches of ice must not be
consumed or used.
When the ice reaches a certain level in the drawer, the
appliance stops producing ice automatically.
The production capacity is 100 - 120 ice cubes in
24 hours at a temperature of 0°F (-18°C) inside the
freezer compartment.
To have the maximum capacity of approx. 150 ice cubes
in 24 hours, activate the SuperFrost function.
Be aware that this increases the energy consump-
tion because the compressor will run constantly.
If the IceMaker LED flashes,
the ice maker is not being
supplied with water. The audi-
ble alarm sounds at the same
time. Check if the shut off
valve of the water supply is
opened.
• Open the shut-off valve for the water supply.
• Touch the IceMaker icon so the IceMaker LED goes
out.
• Touch the IceMaker icon so the IceMaker LED comes
on.
The IceMaker LED will now light up permanently.
Turning the Ice Maker On and Off
To turn the ice maker on
• Touch the IceMaker icon so the IceMaker LED
comes on.
To turn the ice maker off
If you do not need any ice cubes, the ice maker can be
turned off independently of the freezer compartment.
• Touch the IceMaker icon so the IceMaker LED goes
out.
Ice maker at vacations
See chapter “Vacation tips”
15
Defrosting
Refrigerator compartment
The refrigerator compartment defrosts automatically. The
water that forms on the rear wall drains into a reservoir at
the back of the appliance and evaporates automatically
through the compressor heat.
Freezer compartment
The NoFrost system automatically defrosts the freezer
compartment. Any moisture will collect on the evaporator
and freeze. It will periodically defrost and evaporate.
Cleaning
WARNING!
• To prevent possible injury due to an electrical
shock, be sure to disconnect the power cord or
turn off the circuit breaker before cleaning the
appliance.
• To avoid injury or damage, do not use steam
cleaning equipment to clean the appliance.
•
To avoid short-circuits, ensure no cleaning water
penetrates into the electrical components when
cleaning the appliance. Do not use a sponge or
cloth that is overly wet.
• Clean the side panels and door surfaces with a
clean and soft cloth. If necessary, use a moist cloth
(water + detergent). Alternatively, use a micro-fibre
cloth.
Do not use abrasive or scouring sponges. Do not use
concentrated cleaning agents. Never use abrasive or
acid cleaners or chemical solvents.
• Remove all food from the refrigerator and freezer com-
partments and store in a cool place temporarily. Store
frozen food in other freezers if available.
• Remove the door racks.
• Remove glass shelves.
• Remove vegetable drawers.
• Clean the equipment parts by hand with lukewarm
water and dishwasher detergent.
• Clean the refrigerator and freezer drawers’ interior with
lukewarm water and dishwasher detergent.
• Dry all parts well with a cloth.
• Do not damage or remove the model plate on the
inside of the appliance. It is very important for servicing
your appliance.
Vacation Tips
Short vacations
It is not necessary to turn off the refrigerator and freezer if
you will be away for less than four weeks.
• Use all perishables.
• Freeze other items.
Long vacations
If you will be away for a month or more:
• Remove all food from the refrigerator and freezer com-
partments.
• Turn off the refrigerator and freezer compartments.
• Clean the appliance. Refer to Cleaning.
• Leave the door open to prevent unpleasant odors. This
will also keep mold from building up.
C
leaning
/V
aCaTion
16
T
roubleshooTing
Problem Possible Cause and Remedy
Appliance does not work,
display is off
- Is the appliance turned on properly?
- Is the power cord properly inserted in the outlet?
- Is the circuit breaker or fuse in operating condition?
The interior light does
not come on
- Is the refrigerator compartment turned on?
- Has the door been open for more than 15 minutes?
Loud running noise - Is the appliance standing firmly on the floor, or does the compressor
cause nearby items of furniture or objects to vibrate? If necessary, move
the appliance slightly, align by adjusting the adjustable feet, or adjust
bottles and containers.
Motor seems to
run too long
- Is the ambient temperature too hot? See Safety Regulations.
- Has the appliance been opened too often or left open too long?
- A large amount of food has been added.
- Unit is in SuperCool mode. Verify unit is in normal operation mode.
The temperature is
not cold enough
- Is the temperature setting correct? See Setting the Temperature.
- Has an excessive amount of fresh food been placed in the appliance?
- Does a separately installed thermometer show the correct reading?
- Is the ventilation system working properly?
- Is the appliance set up too close to a heat source?
Freezer temperature display
shows two dashes - -
The freezer temperature display will only show temperatures that are below freezing.
When initially starting the freezer it will not be below freezing. It will take three to five
hours (depending on ambient conditions) for freezing temperatures to be achieved
and thus displayed numerically. This may also occur after a power failure.
Ice maker cannot be turned
on
- Is the appliance connected to the electrical outlet?
Ice maker is not making any
ice
- Is the ice maker turned on?
- Is the water supply line open?
- Is the IceMaker drawer closed properly?
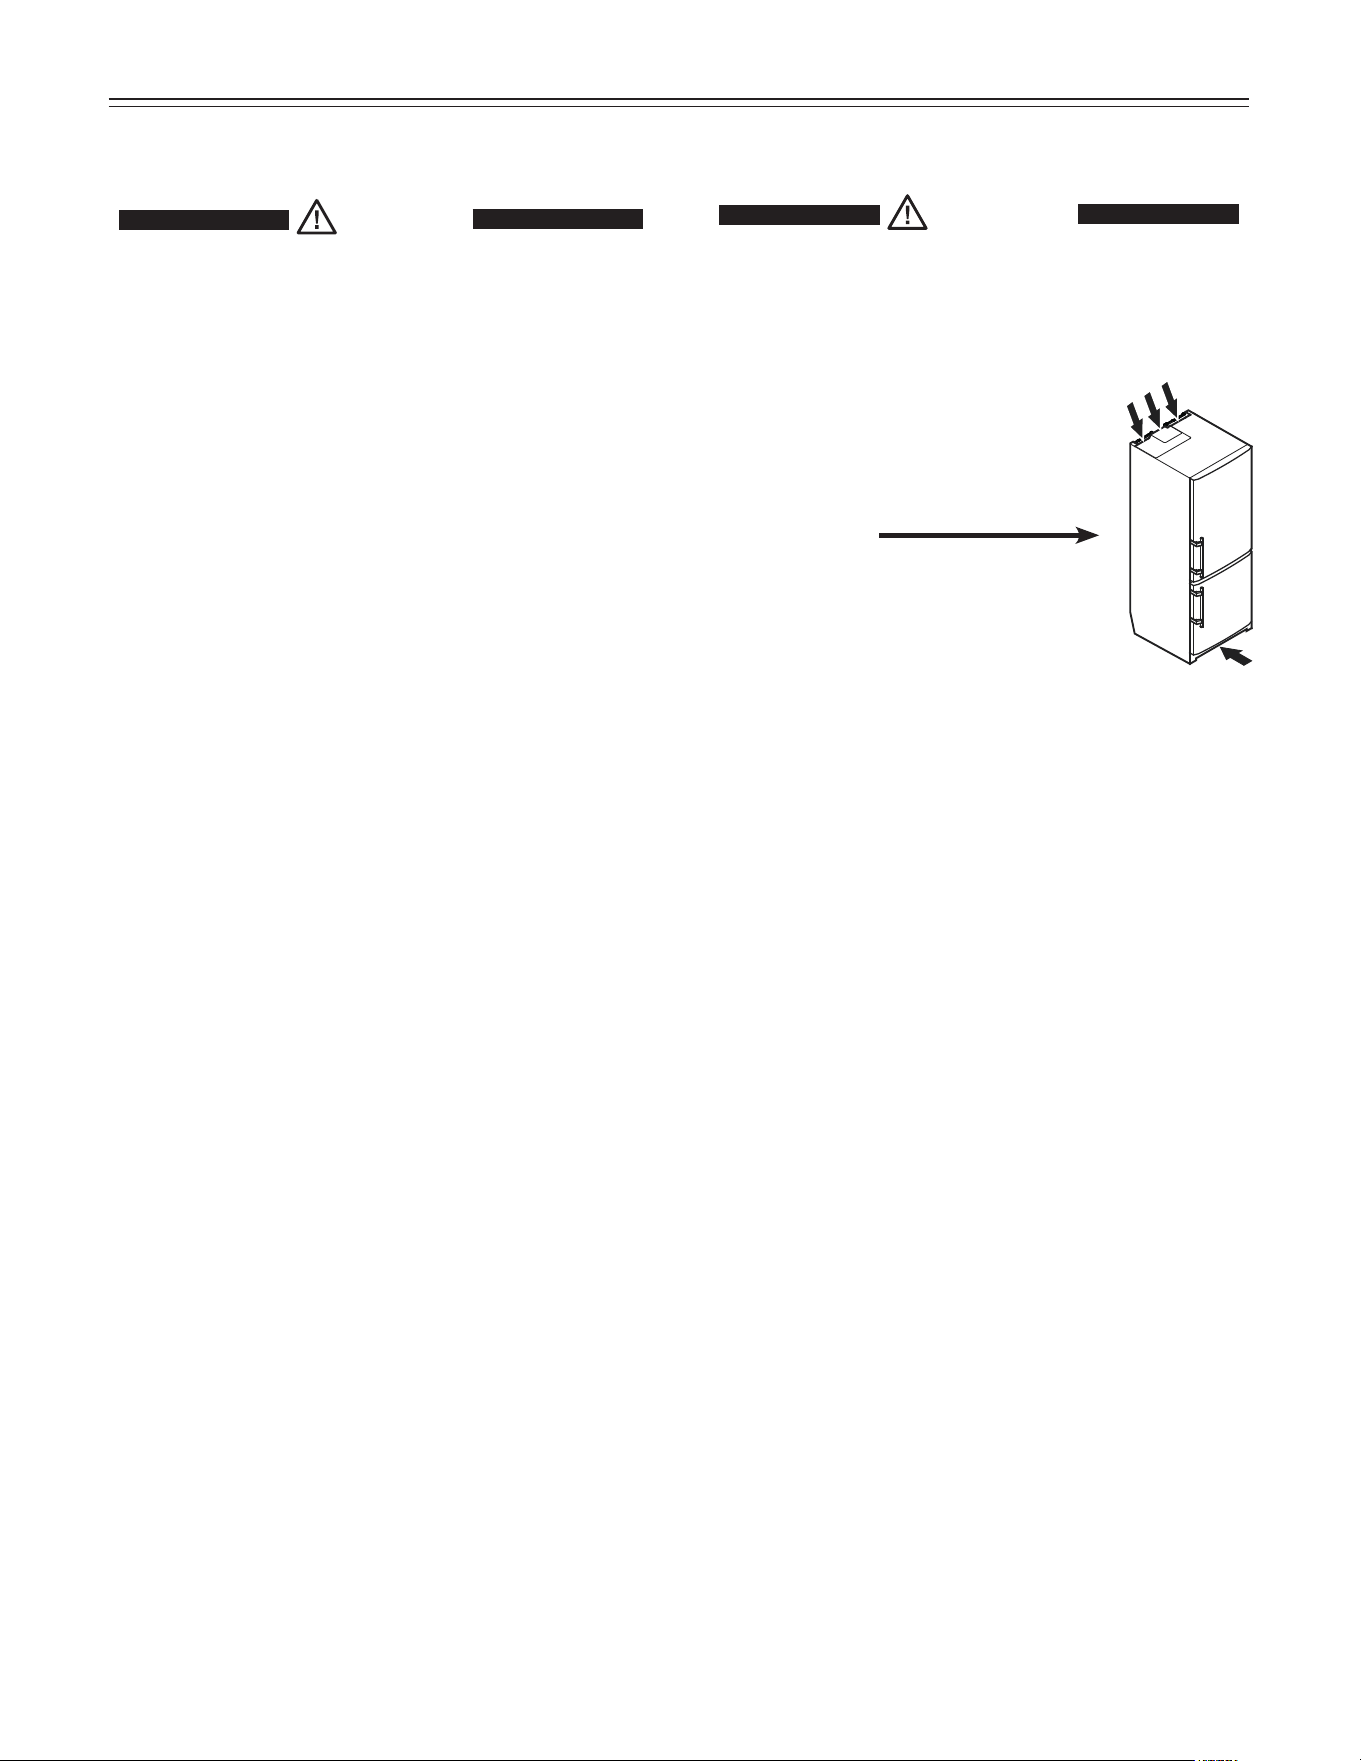
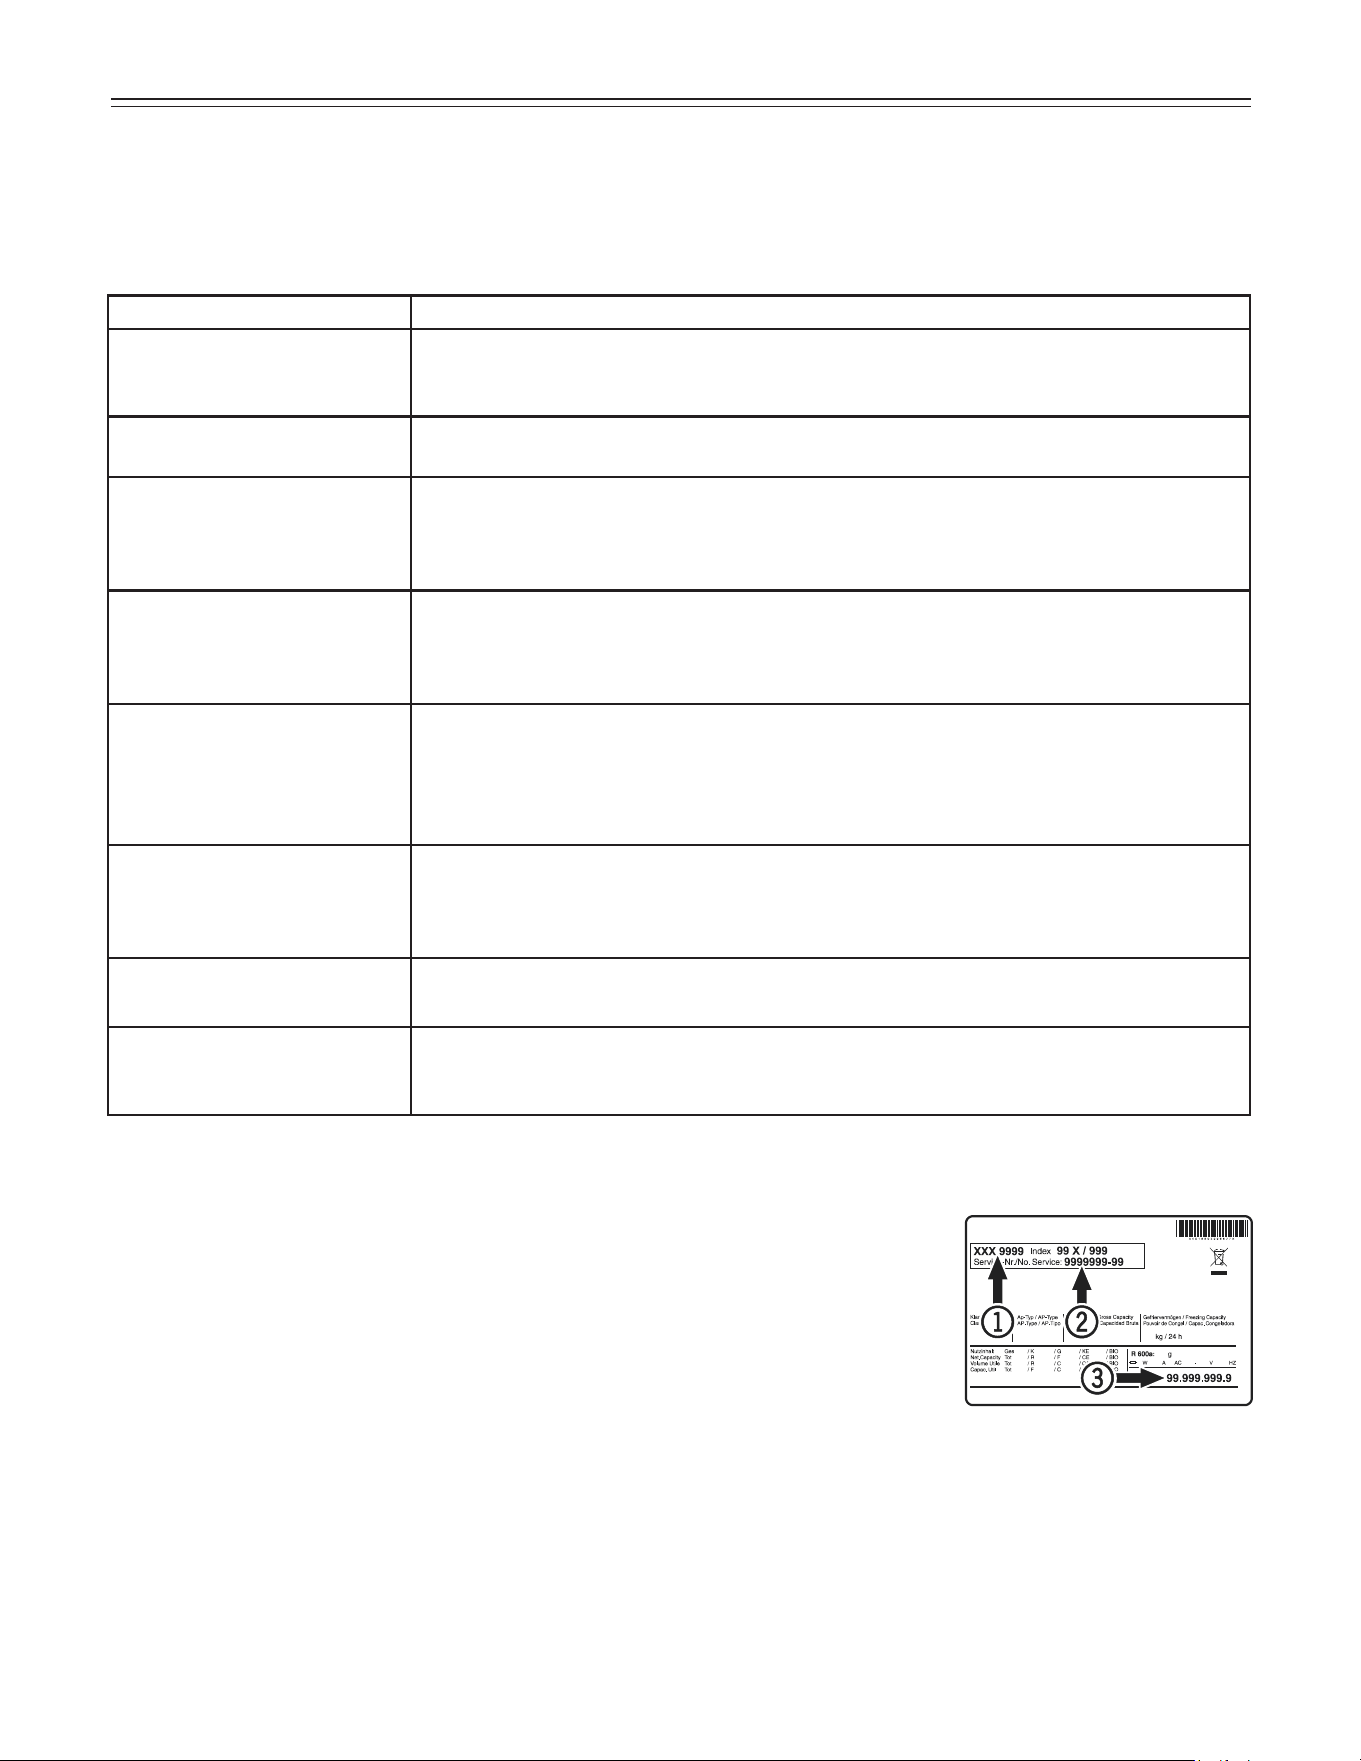
Customer Service
If none of the above possible causes apply, and you can not rectify the fault yourself,
contact the Liebherr Service Center. Indicate the type (1) of appliance, service num-
ber (2) and the appliance / serial number (3) as shown on the model plate.
The position of the model plate is shown in the section entitled Description of the
Appliance.
Your appliance is designed and manufactured for a long life and reliable operation.
If a problem occurs during operation, check whether it is due to an operating error.
Please note that even during the warranty period, you may be responsible for certain repair costs.


For Service in the U.S.
Liebherr Service Center
Toll Free: 1-866-LIEBHER or 1-866-543-2437
Email: Service-appliances.us@liebherr.com
PlusOne Solutions, Inc.
3501 Quadrangle Blvd, Suite 120
Orlando, FL 32817
For Service in Canada
Liebherr Service Center
Toll Free: 1-888-LIEBHER or 1-888-543-2437
www.euro-parts.ca
EURO-PARTS CANADA
39822 Belgrave Road
Belgrave, Ontario, N0G 1E0
Phone: (519) 357-3320
Fax: (519) 357-1326
www.liebherr-appliances.com
*708558702*
