
Technical Support and E-Warranty Certificate www.vevor.com/support
SHEET SANDER
MODEL: R7329
We continue to be committed to provide you tools with competitive price.
"Save Half", "Half Price" or any other similar expressions used by us only represents an
estimate of savings you might benefit from buying certain tools with us compared to the major
top brands and does not necessarily mean to cover all categories of tools offered by us. You
are kindly reminded to verify carefully when you are placing an order with us if you are
actually saving half in comparison with the top major brands.

- 1 -
MODEL: R7329
Have product questions? Need technical support? Please feel free to
contact us:
Technical Support and E-Warranty Certificate
www.vevor.com/support
NEED HELP? CONTACT US!
This is the original instruction, please read all manual instructions
carefully before operating. VEVOR reserves a clear interpretation of our
user manual. The appearance of the product shall be subject to the
product you received. Please forgive us that we won't inform you again if
there are any technology or software updates on our product.
SHEET SANDER
- 2 -
Warning-To reduce the risk of injury, user must read instructions
manual carefully.
Always wear ANSl approved safety goggles when working with tools
and equipment.
Wear eye protection.
Wear ear protection.
Wear protective gloves.
Wear a dust mask.
Wear protective, slip-resistant footwear.
Compliance is a EC & UK security certification.
This product is subject to the provision of European Directive
2012/19/EC. The symbol showing a wheelie bin crossed through
indicates that the product requires separate refuse collection in the
European Union. This applies to the product and all accessories
marked with this symbol. Products marked as such may not be
discarded with normal domestic waste, but must be taken to a
collection point for recycling electrical and electronic devices.
Switch the product off and disconnect it from the power supply before
assembly, cleaning,adjustments, maintenance, storage and
transportation.
This product is of protection class II. That means it is equipped with
enhanced or double insulation.

- 3 -
IMPORTANT SAFEGUARDS
Thank you for using this product. In order to make sure that you can operate the
machine correctly, read this instruction carefully before operation and keep it
properly for future reference. Please be sure to read the precautions and safety
rules on this page to ensure your safe use.
This manual will outline safety warnings and precautions, operating, maintenance
and cleaning. The warnings and instructions reviewed in this manual cannot cover
all possible conditions and situations that may occur. Caution and common sense
are not built into this product, since we believe that the uses will comply with these
codes. If you have any problems, please call us. Do not try to fix the problems
yourself, or it will cause injury or property damage.
Please read ALL the instructions before using your machine.
1. WORK AREA SAFETY
● Keep work area clean and well lit. Cluttered or dark areas invite accidents.
● Do not operate power tools in explosive atmospheres, such as in the presence
of flammable liquids, gases or dust. Power tools create sparks which may ignite
the dust or fumes.
● Keep children and bystanders away while operating a power tool. Distractions
can cause you to lose control.
2. ELECTRICAL SAFETY
● Power tool plugs must match the outlet. Never modify the plug in any way. Do
not use any adapter plugs with earthed (grounded) power tools.Unmodified plugs
and matching outlets will reduce risk of electric shock.
● Avoid body contact with earthed or grounded surfaces such as pipes, radiators,
ranges and refrigerators. There is an increased risk of electric shock if your body is
earthed or grounded.
● Do not expose power tools to rain or wet conditions.Water entering a power tool
will increase the risk of electric shock.
● Do not abuse the cord. Never use the cord for carrying, pulling or unplugging the
power tool. Keep cord away from heat, oil, sharp edges or moving parts. Damaged
or entangled cords increase the risk of electric shock.

- 4 -
● When operating a power tool outdoors, use an extension cord suitable for
outdoor use. Use of a cord suitable for outdoor use reduces the risk of electric
shock.
● If operating a power tool in a damp location is unavoidable, use an earth leakage
circuit breaker. Use of an earth leakage circuit breaker reduces the risk of electric
shock.
3. PERSONAL SAFETY
● Stay alert, watch what you are doing and use common sense when operating a
power tool. Do not use a power tool while you are tired or under the influence of
drugs, alcohol or medication. A moment of inattention while operating power tools
may result in serious personal injury.
● Use personal protective equipment. Always wear eye protection. Protective
equipment such as dust mask, non-skid safety shoes, hard hat, or hearing
protection used for appropriate conditions will reduce personal injuries.
● Prevent unintentional starting. Ensure the switch is in the off-position before
connecting to power source and/or battery pack, picking up or carrying the tool.
Carrying power tools with your finger on the switch or energising power tools that
have the switch on invites accidents.
● Remove any adjusting key or wrench before turning the power tool on. A wrench
or a key left attached to a rotating part of the power tool may result in personal
injury.
● Do not overreach. Keep proper footing and balance at all times. This enables
better control of the power tool in unexpected situations.
● Dress properly. Do not wear loose clothing or jewelry. Keep your hair, clothing
and gloves away from moving parts. Loose clothes, jewelry or long hair can be
caught in moving parts.
● If devices are provided for the connection of dust extraction and collection
facilities, ensure these are connected and properly used. Use of dust collection
can reduce dust-related hazards.
4. POWER TOOL USE AND CARE
● Do not force the power tool. Use the correct power tool for your application. The
correct power tool will do the job better and safer at the rate for which it was

- 5 -
designed.
● Do not use the power tool if the switch does not turn it on and off. Any power tool
that cannot be controlled with the switch is dangerous and must be repaired.
● Disconnect the plug from the power source and/or the battery pack from the
power tool before making any adjustments, changing accessories, or storing
power tools. Such preventive safety measures reduce the risk of starting the
power tool accidentally.
● Store idle power tools out of the reach of children and do not allow persons
unfamiliar with the power tool or these instructions to operate the power tool.
Power tools are dangerous in the hands of untrained users.
● Maintain power tools. Check for misalignment or binding of moving parts,
breakage of parts and any other condition that may affect the power tool's
operation. If damaged, have the power tool repaired before use. Many accidents
are caused by poorly maintained power tools.
● Keep cutting tools sharp and clean. Properly maintained cutting tools with sharp
cutting edges are less likely to bind and are easier to control.
● Use the power tool, accessories and tool bits etc., in accordance with these
instructions, taking into account the working conditions and the work to be
performed. Use of the power tool for operations different from those intended could
result in a hazardous situation.
5.SERVICE
● Have your power tool serviced by a qualified repair person using only
identical replacement parts. This will ensure that the safety of the power
tool is maintained.
SAFETY INSTRUCTIONS FOR SANDER
1. SAFETY INSTRUCTIONS FOR ALL OPERATIONS
a) This power tool is intended to function as a sanding. Read all safety warnings,
instructions, illustration sand specifications provided with this power tool. Failure to
follow all instructions listed below may result in electric shock, fire and/or serious
injury.
b) This power tool is not recommended for grinding,wire brushing or cutting

- 6 -
off operations.Operations for which the power tool was not designed may create a
hazard and cause personal injury.
c) Do not allow any loose portion of the bonnet or its attachment strings to
spin freely. Tuck away or trim any loose attachment strings. Loose and spinning
attachment strings can entangle your fingers or snag on the work piece.
d) Do not use accessories which are not specifically designed and recommended
by the tool manufacturer. Just because the accessory can be attached to your
power tool, it does not assure safe operation.
e) The rated speed of the accessory must be at least equal to the maximum speed
marked on the power tool.Accessories running faster than their rated speed can fly
apart.
f) The outside diameter and the thickness of your accessory must be within the
capacity rating of your power tool. Incorrectly sized accessories cannot be
adequately guarded or controlled.
g) The arbour size of wheels, flanges, backing pads or any other accessory must
properly fit the spindle of the power tool.Accessories with arbour holes that do not
match the mounting hardware of the power tool will run out of balance, vibrate
excessively and may cause loss of control.
h) Do not use a damaged accessory. Before each use inspect the accessory such
as abrasive wheels for chips and cracks, backing pads for cracks, tear or excess
wear, wire brushes for loose or cracked wires. If the power tool or accessory is
dropped, inspect for damage or install an undamaged accessory.After inspecting
and installing an accessory, position yourself and bystanders away from the plane
of the rotating accessory and run the power tool at maximum no load speed for
one minute. Damaged accessories will normally break apart during this test time.
i ) Wear personal protective equipment .Depending on application, use face shield,
safety goggles or safety glasses.As appropriate, wear dust mask, hearing
protectors, gloves and shop apron capable of stopping small abrasive or work
piece fragments. The eye protection must be capable of stopping flying debris
generated by various operations. The dust mask or respirator must be capable of
filtrating particles generated by your operation. Prolonged exposure to high
intensity noise may cause hearing loss.
j) Keep bystanders a safe distance away from work area. Anyone entering the
work area must wear personal protective equipment. Fragments of the work piece

- 7 -
or of a broken accessory may fly away and cause injury beyond the immediate
area of operation.
k) Position the cord clear of the spinning accessory. If you lose control, the cord
may be cut or snagged and your hand or arm may be pulled into the spinning
accessory.
l ) Never lay the power tool down until the accessory has come to a complete stop.
The spinning accessory may grab the surface and pull the power tool out of your
control.
m) Do not run the power tool while carrying it at your side. Accidental contact with
the spinning accessory could snag your clothing, pulling the accessory into your
body.
n) Regularly clean the power tool's air vents. The motor's fan will draw the dust
inside the housing and excessive accumulation of powdered metal may cause
electrical hazards.
o) Do not operate the power tool near flammable materials. Sparks could ignite
these materials.
p) Do not use accessories that require liquid coolants. Using water or other liquid
coolants may result in electrocution or shock.
2. KICK BACK AND RELATED WARNINGS
Kickback is a sudden reaction to a pinched or snagged rotating wheel, backing
pad, brush or any other accessory.Pinching or snagging causes rapid stalling of
the rotating accessory which in turn causes the uncontrolled power tool to be
forced in the direction opposite of the accessory's rotation at the point of the
binding.
For example, if an abrasive wheel is snagged or pinched by the workpiece, the
edge of the wheel that is entering into the pinch point can dig into the surface of
the material causing the wheel to climb out or kick out. The wheel may either jump
toward or away from the operator, depending on the direction of the wheel's
movement at the point of pinching. Abrasive wheels may also break under these
conditions. Kickback is the result of power tool misuse and/or incorrect operating
procedures or conditions and can be avoided by taking proper precautions as
given below.
a) Maintain a firm grip on the power tool and position your body and arm to allow

- 8 -
you to resist kickback forces. Always use auxiliary handle, if provided, for
maximum control over kickback or torque reaction during start-up. The operator
can control torque reactions or kickback forces, if proper precautions are taken.
b) Never place your hand near the rotating accessory. The accessory may
kickback over your hand.
c) Do not position your body in the area where power tool will move if kickback
occurs. Kickback will propel the tool in the direction opposite to the wheel's
movement at the point of snagging.
d) Use special care when working corners, sharp edges etc. Avoid bouncing and
snagging the accessory. Corners, sharp edges or bouncing have a tendency to
snag the rotating accessory and cause loss of control or kickback.
e) Do not attach a saw chain woodcarving blade or toothed saw blade. Such
blades create frequent kickback and loss of control.
GENERAL
● Use this tool for sanding wood、paint removal、polishing.
● Use the sanding paper and sponge pad which are supplied with this tool
● Only use this tool for dry sanding.
● This tool should not be used by people under the age of 16 years
● Always disconnect plug from power source before making any adjustment or
changing any accessory
● Do not work materials containing asbestos (asbestos is considered
carcinogenic).
ACCESSORIES
● Use only accessories with an allowable speed matching at least the highest
no-load speed of the tool.
● Do not use damaged, deformed or vibrating accessories.
OUTDOOR USE
● When used outdoors, connect the tool via a fault current (FI) circuit breaker with
a triggering current of 30mA maximum, and only use an extension cord which is
intended for outdoor use and equipped with a splashproof coupling-socket.
- 9 -
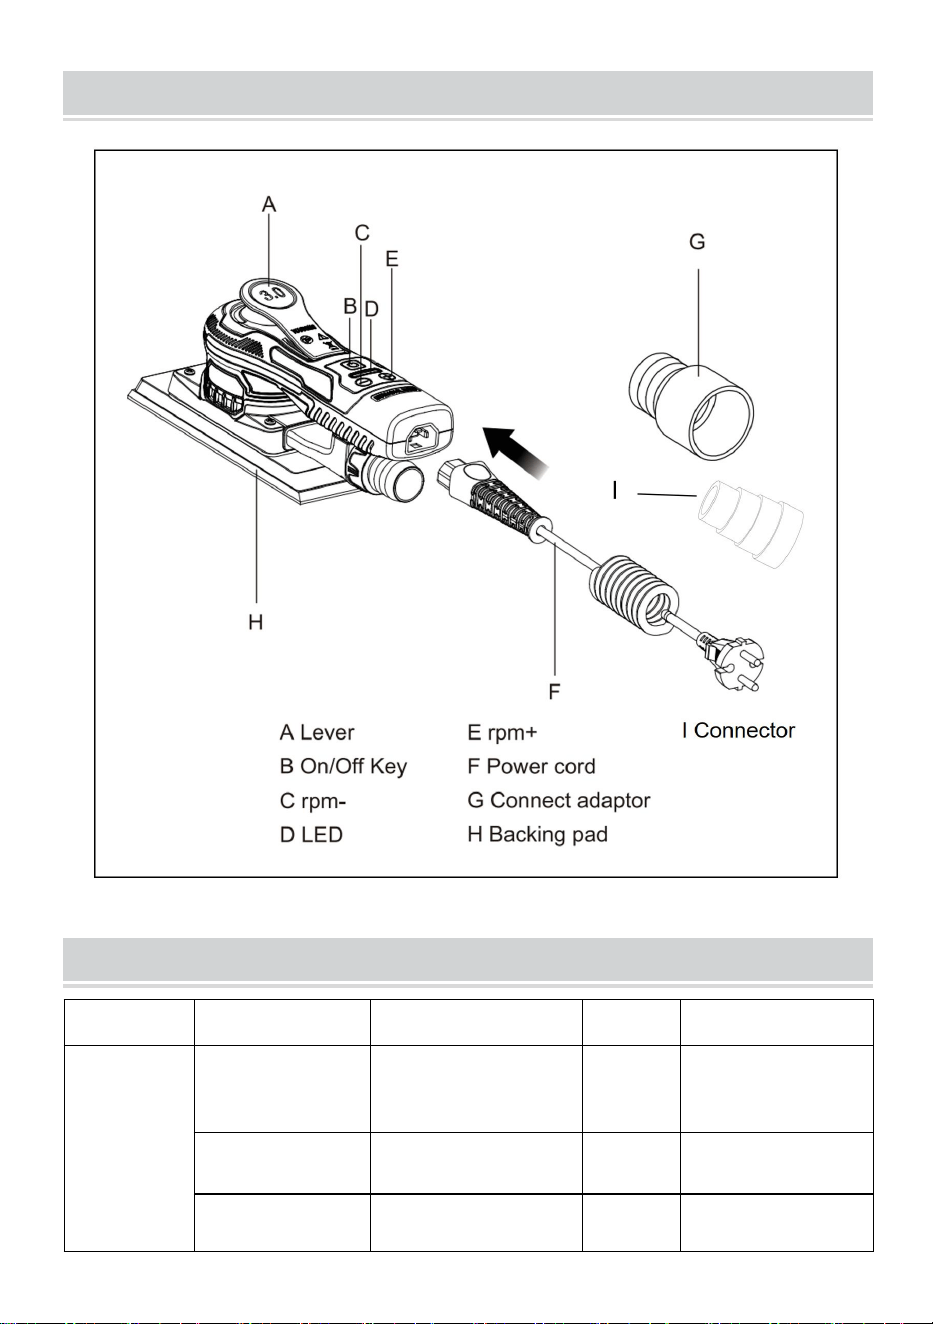
PRODUCT OVERVIEW
PRODUCT PARAMETERS
MODEL
Region
Voltage
Power
Plug Type
R7329
North America
AC110-120 V
60Hz
350W
American PLUG
Europe
AC220-240V 50Hz
350W
European PLUG
Australia
AC220-240V 50Hz
350W
Australia PLUG

- 10 -
No-load Speed
4000 - 10000 RPM
Backing Pad Size
70x195mm
Eccentric
3mm
Note: Please use the correct power source voltage.
BEFORE USING
Before using the appliance for the first time, peel off any promotional and
packaging materials and check that the product is clean and dust-free. Please
dispose of all plastic bags carefully and keep them away from children and pets.
Check all components provided according to the list in this manual.
● Always check that the supply voltage is the same as the voltage indicated on the
nameplate of the tool.
● Dust from material such as paint containing lead,some wood species, minerals
and metal may be harmful (contact with or inhalation oft he dust may cause allergi
reactions and/or respiratory diseases to the operator or bystanders); wear a dust
mask and work with a dust extraction device when connectable.
● Certain kinds of dust are classified as carcinogenic(such as oak and beech dust)
especially in conjunction with additives for wood conditioning; wear a dust mask
and work with a dust extraction device when connectable
● Follow the dust-related national requirements for the materials you want to work
with.
● Secure the work-piece (a work-piece clamped with clamping devices or in a vice
is held more securely than by hand).
● Do not clamp the tool in a vice.
● Use completely unrolled and safe extension cords with a capacity of 10 Amps.
AFTER USE
● Before you put down the tool, switch off the motor and ensure that all moving
parts have come to a complete standstill
● After switching off the tool, never stop the rotation of the accessory by a lateral
force applied against it.

- 11 -
Proper use of tool
This sander is designed for sanding all types of materials, i.e.metals, wood, stone,
plastics,etc.using abrasives designed for this purpose. Do not use this sander for
any other purpose than that specified without consulting the manufacturer or the
manufacturer's authorized supplier
Work stations
The tool is intended to be operated as a hand-held tool.It is always recommended
that the tool should be used when standing on a solid floor.It can be in any position
but before any such use,the operator must be in a secure position,having a firm
grip and footing and be aware that the sander can develop a torque reaction.See
the section ”Operating instructions”.
ATTACHING AND CHANGING THE SANDING PAPER
Place the sanding paper in the center of the sanding pad and press on.
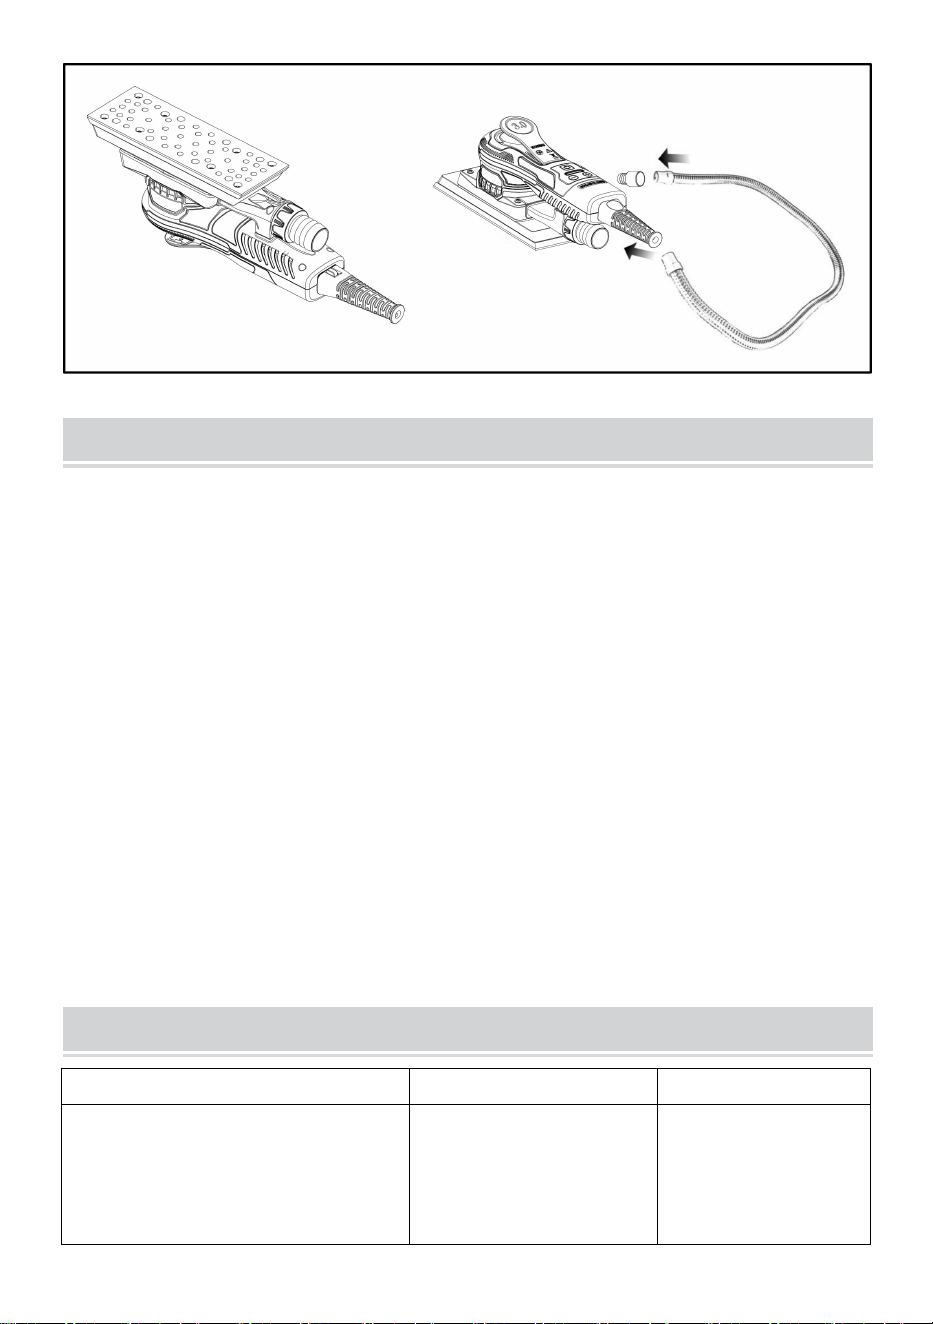
REPLACING THE BACKING PAD
● Flip the sander over and place on a flat, level surface.
● Use the Phillips screwdriver to unscrew the screw of the disk
counterclockwise.
● Remove the old pad and change to the new one.
● Tighten the screw clockwise.
VACUUM PIPE INSTALLATION
● Choose one end of the vacuum pipe, connected to the dust outlet of the
machine.
● Choose another end of the vacuum pipe, connect with 35mm adapter/ Pagoda
joint first, then connected with the vacuum cleaner.
- 12 -
OPERATING INSTRUCTIONS
The tool is intended to be operated as a hand held tool. The tool can be used in
any position. Note! The sander can develop a torque reaction when started. Make
sure the sander is switched off. Select a suitable abrasive and secure it to the
backing pad. Make sure the abrasive is centered on the backing pad. Switch on
the sander by pressing the On/Off key, The sander LED is now green.
1. The sander can now be started by pressing the lever.
2. The max rpm can be adjusted by pressing rpm+or rpm-,Each press increases or
reduces the speed by 1,200rpm until it reaches the limits.The rpm can be adjusted
in the range 4,000 to 10,000 rpm.
3. When sanding,always place the tool on the work surface before starting the
tool.Always remove the tool from the work surface before stopping it.This will
prevent gouging of the work surface due to excess speed of the abrasive.
4. When sanding is finished,turn off the sander by pressing the On/Off key. The
sander LED is now turned off.
TROUBLESHOOTING GUIDE
Symptom
Possible cause
Solution
The sander LED shows
normal,the rpm-and rpm+
keys are normal,but the switch
does not work
Damaged Hall
components.
Send machine
back to after sales
service, changing
hall components.

- 13 -
After plugging in,no matter what
button is pressed, the LED light
will not light up.
Switch damaged.
Change switch
components.
The LED light does not light up
and the machine stops
working.
Input voltage is lower
than 170VAC
±10VAC, the machine
enters low voltage
protection.
Change to the right
input voltage,
above 180V and
below 285V.
Input voltage is lower
than 90VAC
±10VAC, the machine
enters low voltage
protection.
Change to the right
input voltage,
above 100V and
below 150V.
The LED1,LED3,LED5 light up,
Other lights off.
Input voltage is higher
than 275VAC±10VAC,
the machine enters
high voltage
protection.
Change to the right
input voltage,
above 180V and
below 285V.
Input voltage is higher
than 160VAC±10VAC,
the machine enters
high voltage
protection.
Change to the right
input voltage,
above 100V and
below 150V
The LED1,LED6 light up, other
lights off.
The three wires of the
motor are loose or
broken.
Send machine
back to after sales
service for repair.

- 14 -
CLEANING & STORAGE
1. Please unplug the power cord and make sure the product is stopped before
cleaning.
2. Wipe with a dry towel, do not soak in liquid.
3. Always keep tool and cord clean(especially ventilation slots).
4. Do not attempt to clean ventilation slots by inserting pointed objects through
openings.
TIPS: Compressed air can be used to clean the powder on the surface of the
product.
5. Always unplug the machine before storage.
6. Always ensure the machine is cleaned, cooled, and dried before the string.
7. Cleaning and user maintenance shall not be carried out by children without
supervision.
Manufacturer: Shanghaimuxinmuyeyouxiangongsi
Address: Shuangchenglu 803nong11hao1602A-1609shi, baoshanqu,
shanghai 200000 CN.
Imported to AUS: SIHAO PTY LTD, 1 ROKEVA STREETEASTWOOD
NSW 2122 Australia
Imported to USA: Sanven Technology Ltd., Suite 250, 9166 Anaheim
Place, Rancho Cucamonga, CA 91730
REP
EC
E-CrossStu GmbH
Mainzer Landstr.69, 60329 Frankfurt am Main.
REP
UK
YH CONSULTING LIMITED.
C/O YH Consulting Limited Office 147, Centurion House,
London Road, Staines-upon-Thames, Surrey, TW18 4AX