Digital Microscope 407-pro Users Manual

CONTENTS
Safety and Maintenance............................................................................................................................. 1
Basic Parameters...........................................................................................................................................1
What’s in the Box...........................................................................................................................................2
Bracket Installation Steps..........................................................................................................................3
Buttons...............................................................................................................................................................4
Quick Start........................................................................................................................................................5
Adjusting the Magnification and Focus..................................................................................... 6
Using a Micro SD Card to Save Images.......................................................................................6
Mode Switch...........................................................................................................................................6
To Record Videos.................................................................................................................................6
To Capture Pictures............................................................................................................................6
Reviewing and Managing Images.................................................................................................7
HDMI Output................................................................................................................................................... 8
Settings...............................................................................................................................................................9
FAQ....................................................................................................................................................................12
Warranty........................................................................................................................................................ 13

1
Safety and Maintenance
1. This microscope is safe and low-maintenance, as long as common sense is employed.
2. The assembly includes small parts, particularly the thumbscrews used to hold the main device in
place. Do NOT allow unsupervised access by infants or toddlers.
3. The microscope is not intended for field use. It is not waterproof, and should not be exposed to
extreme temperatures. Treat as you would any other electronic device, such as laptop or tablet.
4. The surface of the lens at the bottom of the main device should be cleaned whenever you start to
notice a degradation in image quality. Use a few drops of lens-cleaning fluid on lens tissues or use a
microfiber cleaning cloth.
5. The rest of the microscope can be cleaned with a damp cloth.
6. The display on the device is very fragile. Please use with care. Do not drop, press hard or touch
the display with sharp objects. The display is not waterproof, please clean it with dry and soft
material. Do not press the display when adjusting the angle of the display.
Basic Parameters
Image sensor
4 Mega Pixels HD Sensor
Video output
UHD 2880X2160 24FPS; FHD1920X1080 60FPS/30FPS,
HD1280X720 120FPS,
Video format
MP4
Magnification Ratio
Up to 270X (27 inch HDMI monitor output)
Photo resolution
MAX 4032*3024 (12M 4032*3024)
Photo format
JPG
Minimum focus distance
5cm
Frame Rate
Max 120f/s (under 600 Lux Brightness& HDP120)
Storage
Micro-SD card (not included), up to 64G
Power source
5V DC
Stand size
20cm*18cm*32cm
Screen size
7 inch
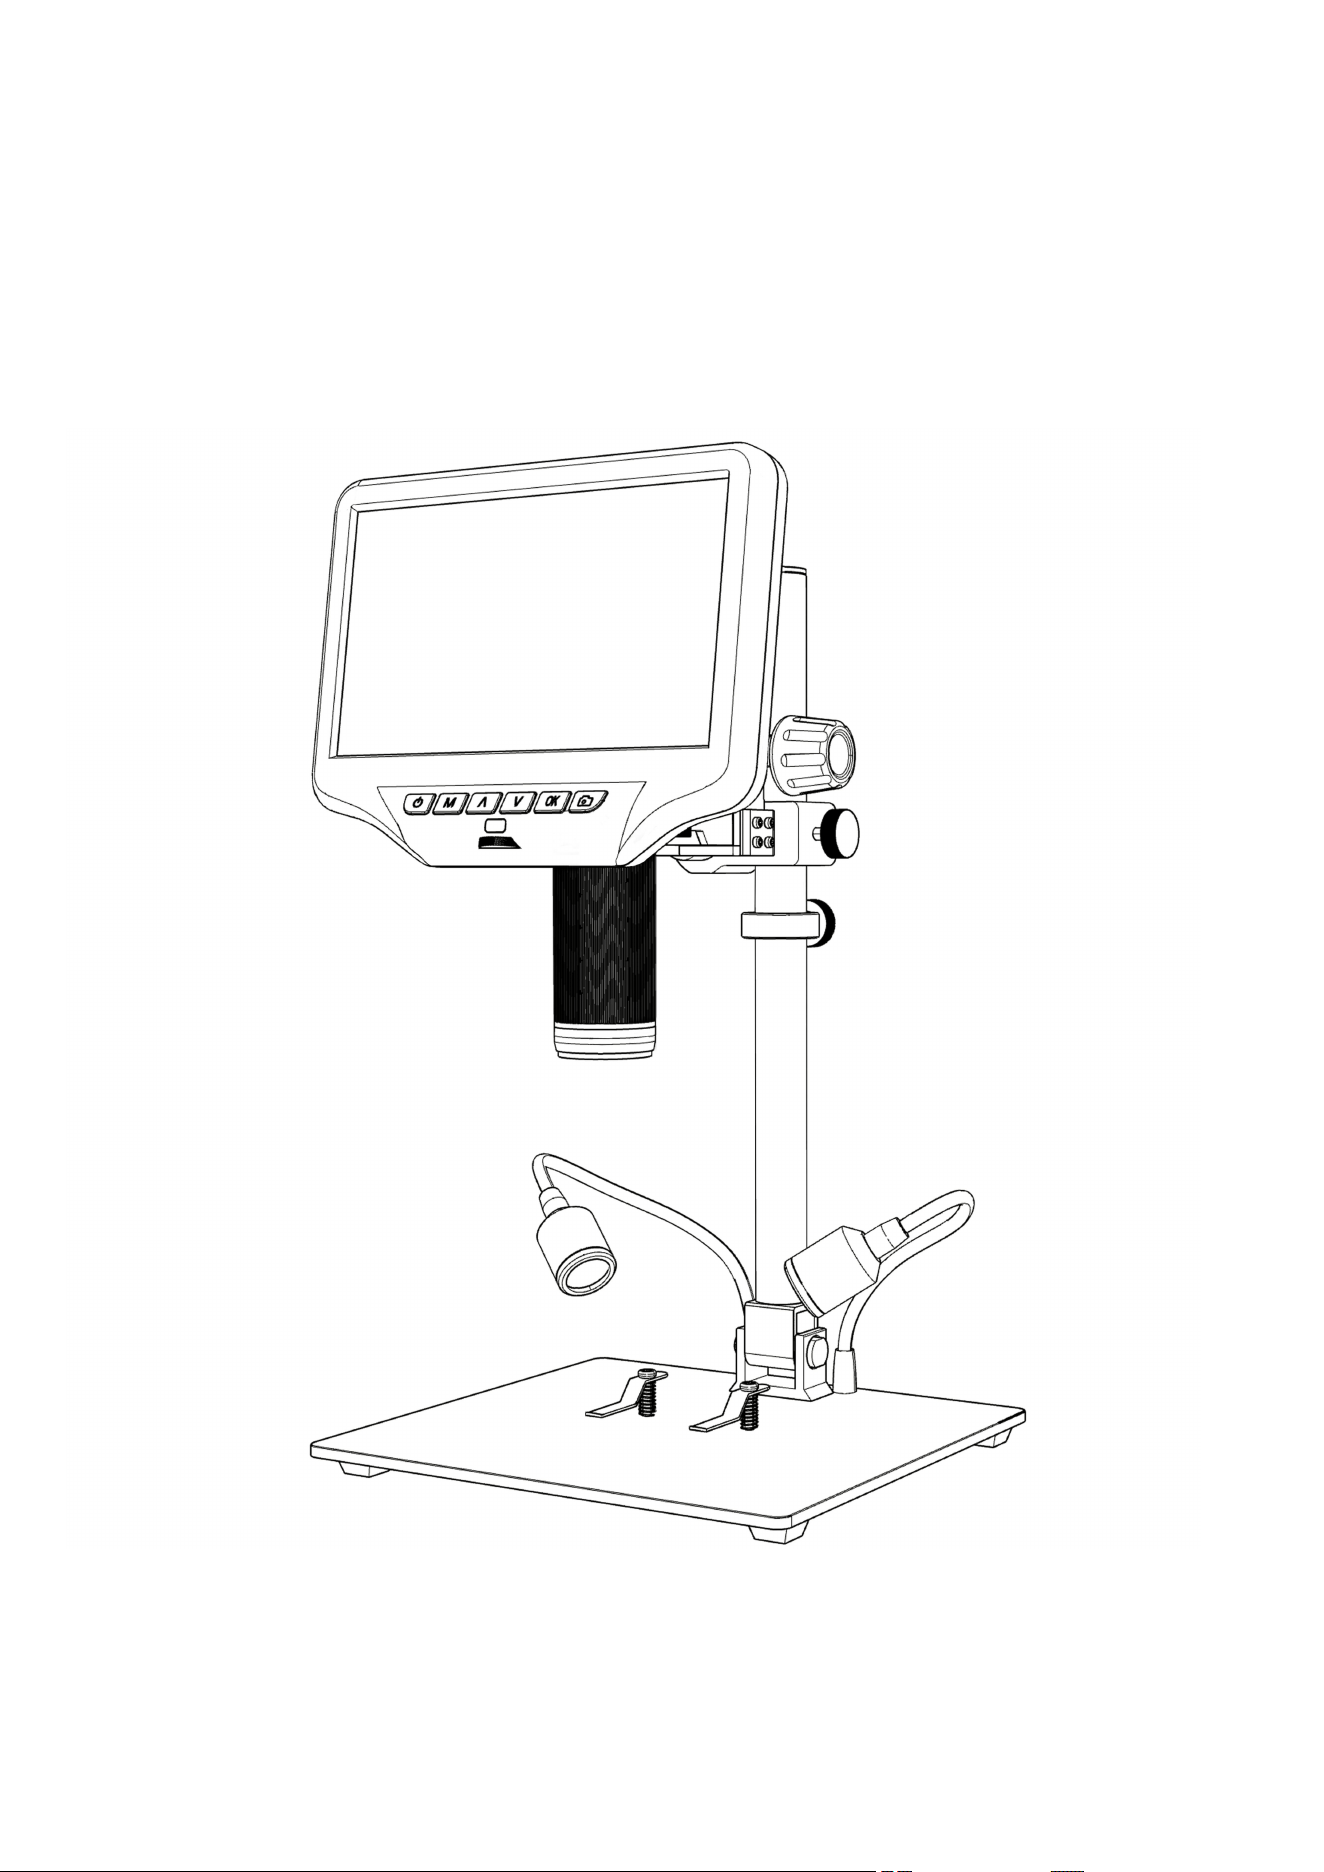
What's in the box
Base, Microscope Monitor, Beam, Column, HDMI cable, Power
Adapter, UV filter (assembled), Remote, Wrench, Screw*2,
Spring, Metal clip, Power cable, Users Manual
Packing data
2.1kg /29.5*26*14.5cm
2
What’s in the Box
(P1 what’s in the box)
3
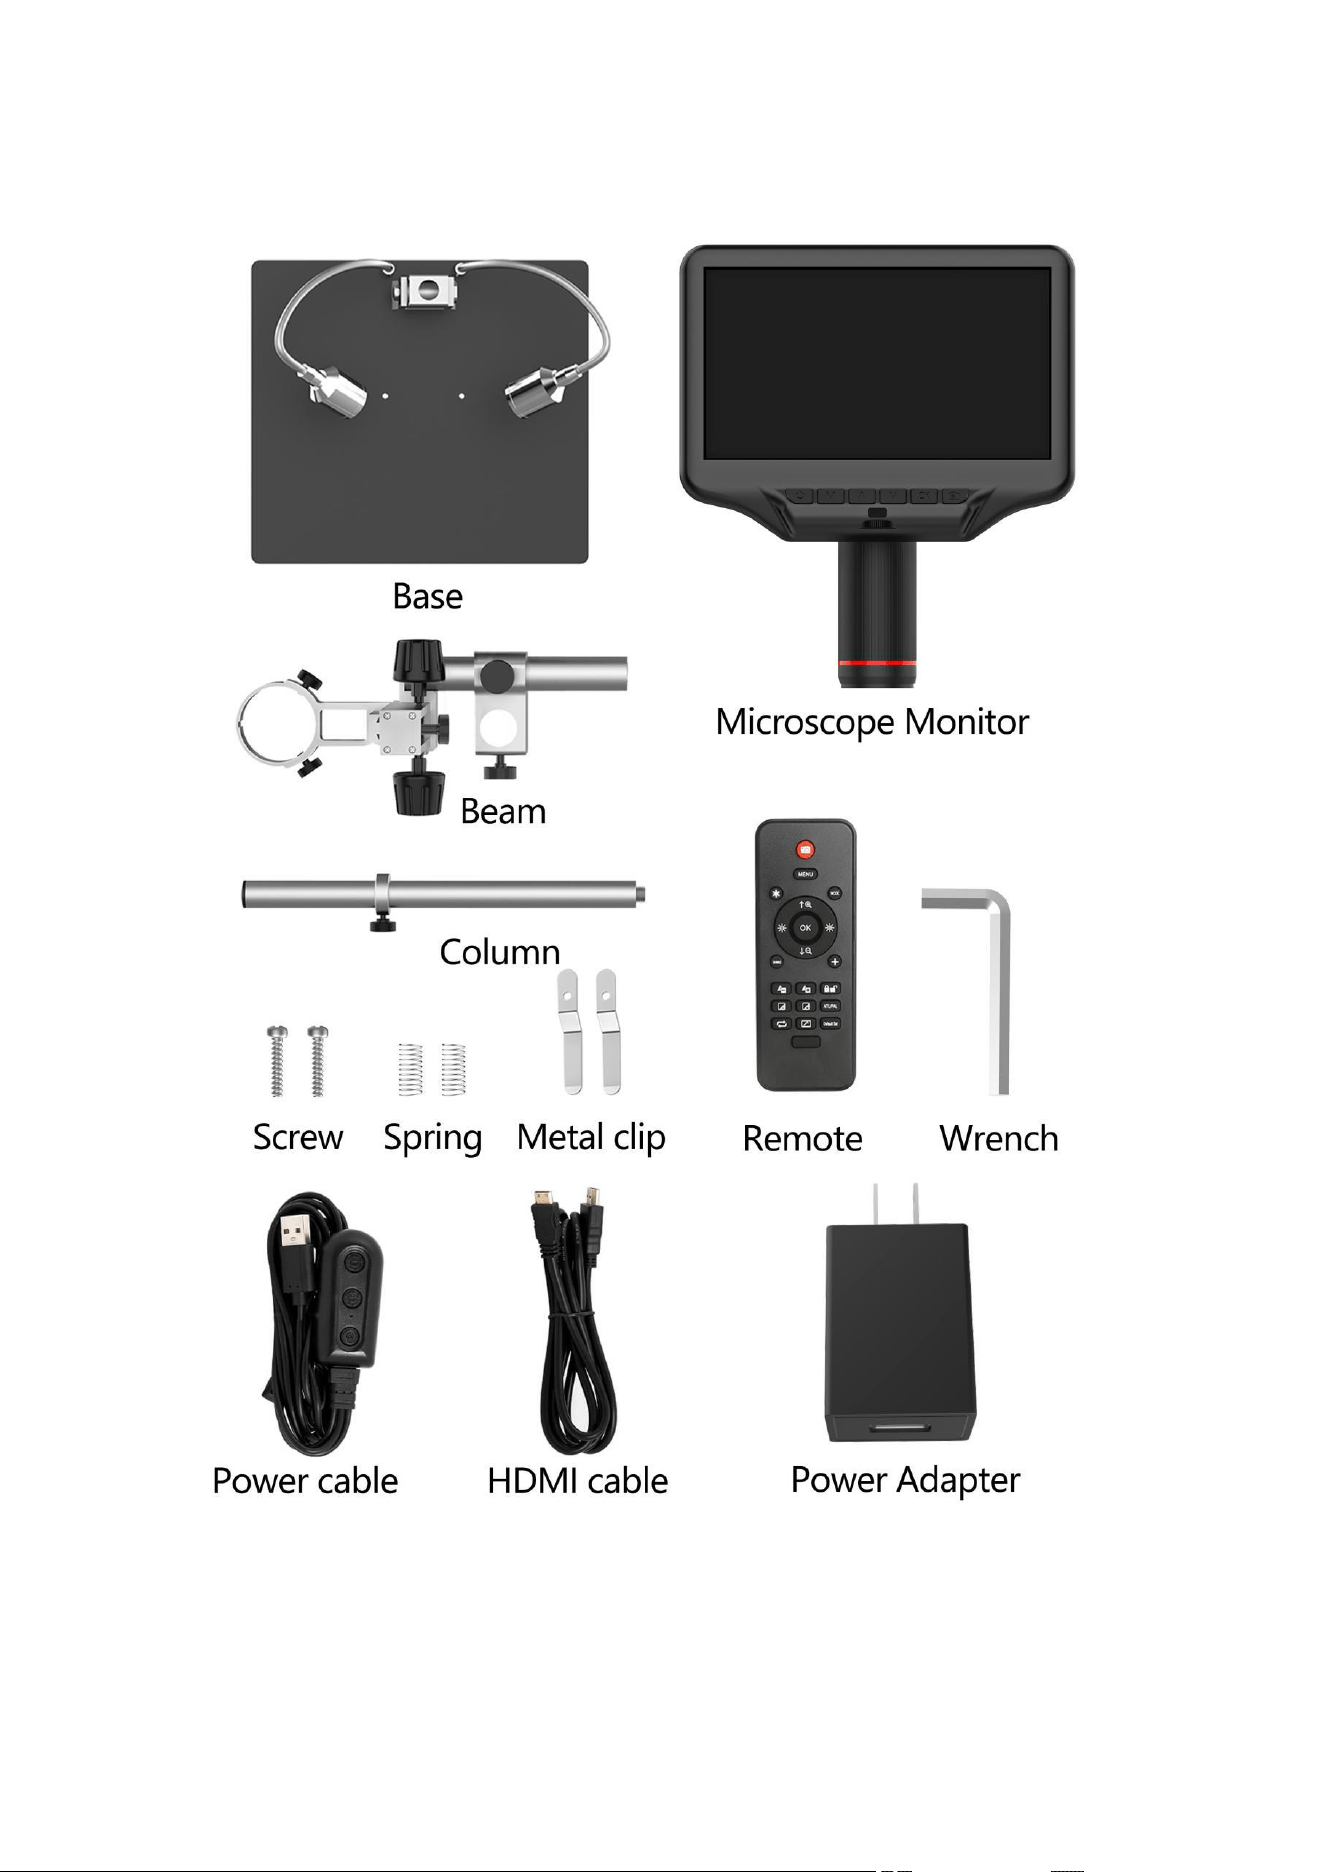
Bracket Installation Steps
Step 1 : Install the column to the base plate.
Step 2: Insert the beam into the column, then tighten the beam fixing screw and the beam anti-slip
screw clockwise.
After the bracket is assembled, loosen the host fixing screw (see Step 2) in a counterclockwise
direction, and insert the microscope main unit into the main unit hole. Adjust the position and
orientation of the microscope, and then tighten the fixing screws of the microscope.
Be careful not to get the focusing controller stuck in the hole of the main unit during this process.
If done correctly, the focusing tube, the microscope screen and the angle between the column and
the base can be adjusted freely. If there is any problem during installation, please contact us in time
to avoid damage to the product caused by improper installation and affect normal use.
4
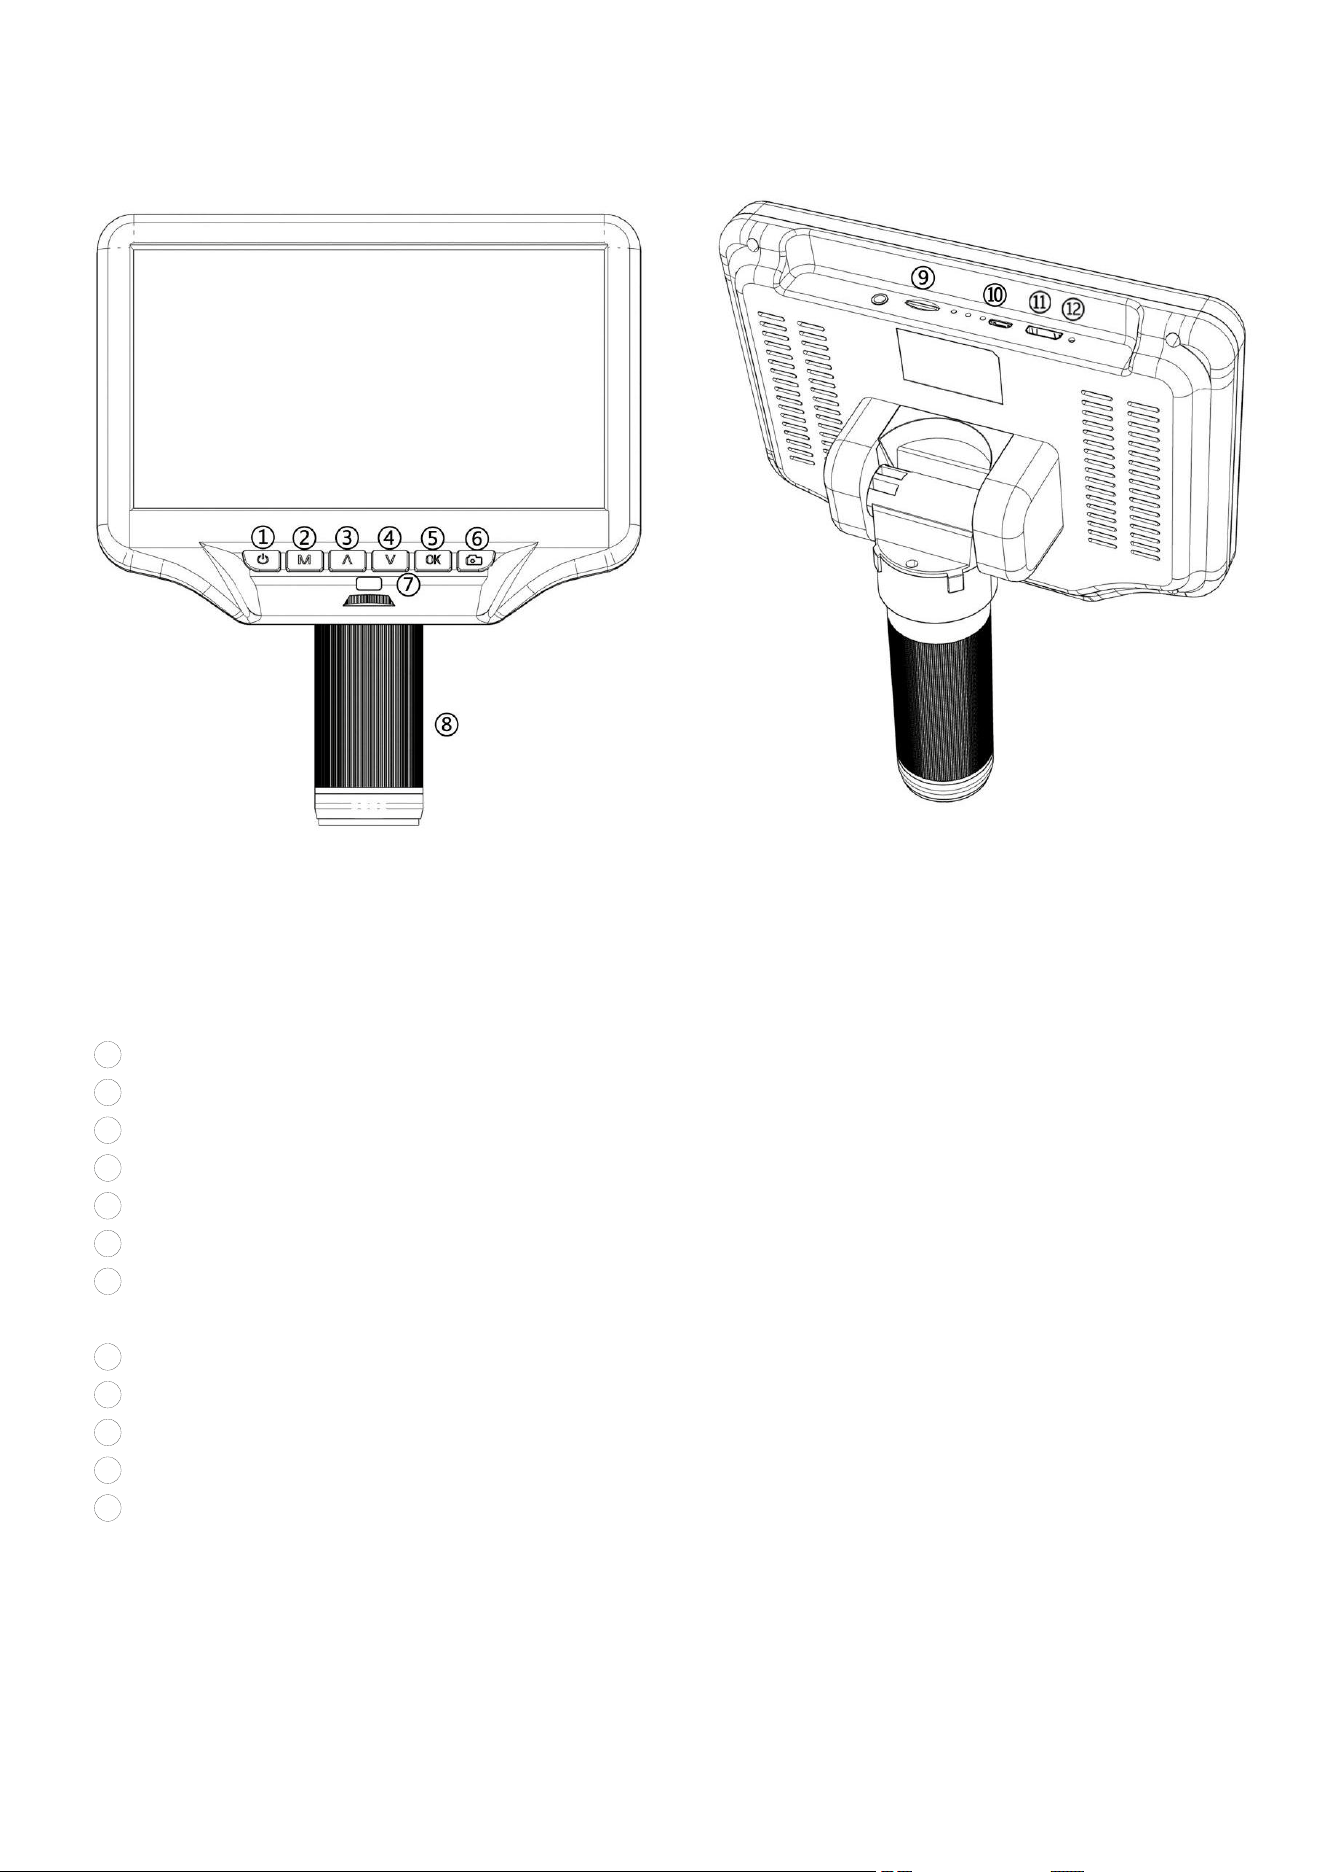
Buttons
(P2 buttons)
1 Power on/off
2 Mode/menu
3 Up (digital zoom in)
4 Down (digital zoom out)
5 OK/Start video record
6 Picture capture
7 Infrared sensor
(when you are using the remote, please point the remote to this so the device would response)
8 Focus controller
9 Memory card slot
10 USB interface
11 HDMI port
12 Reset hole
5
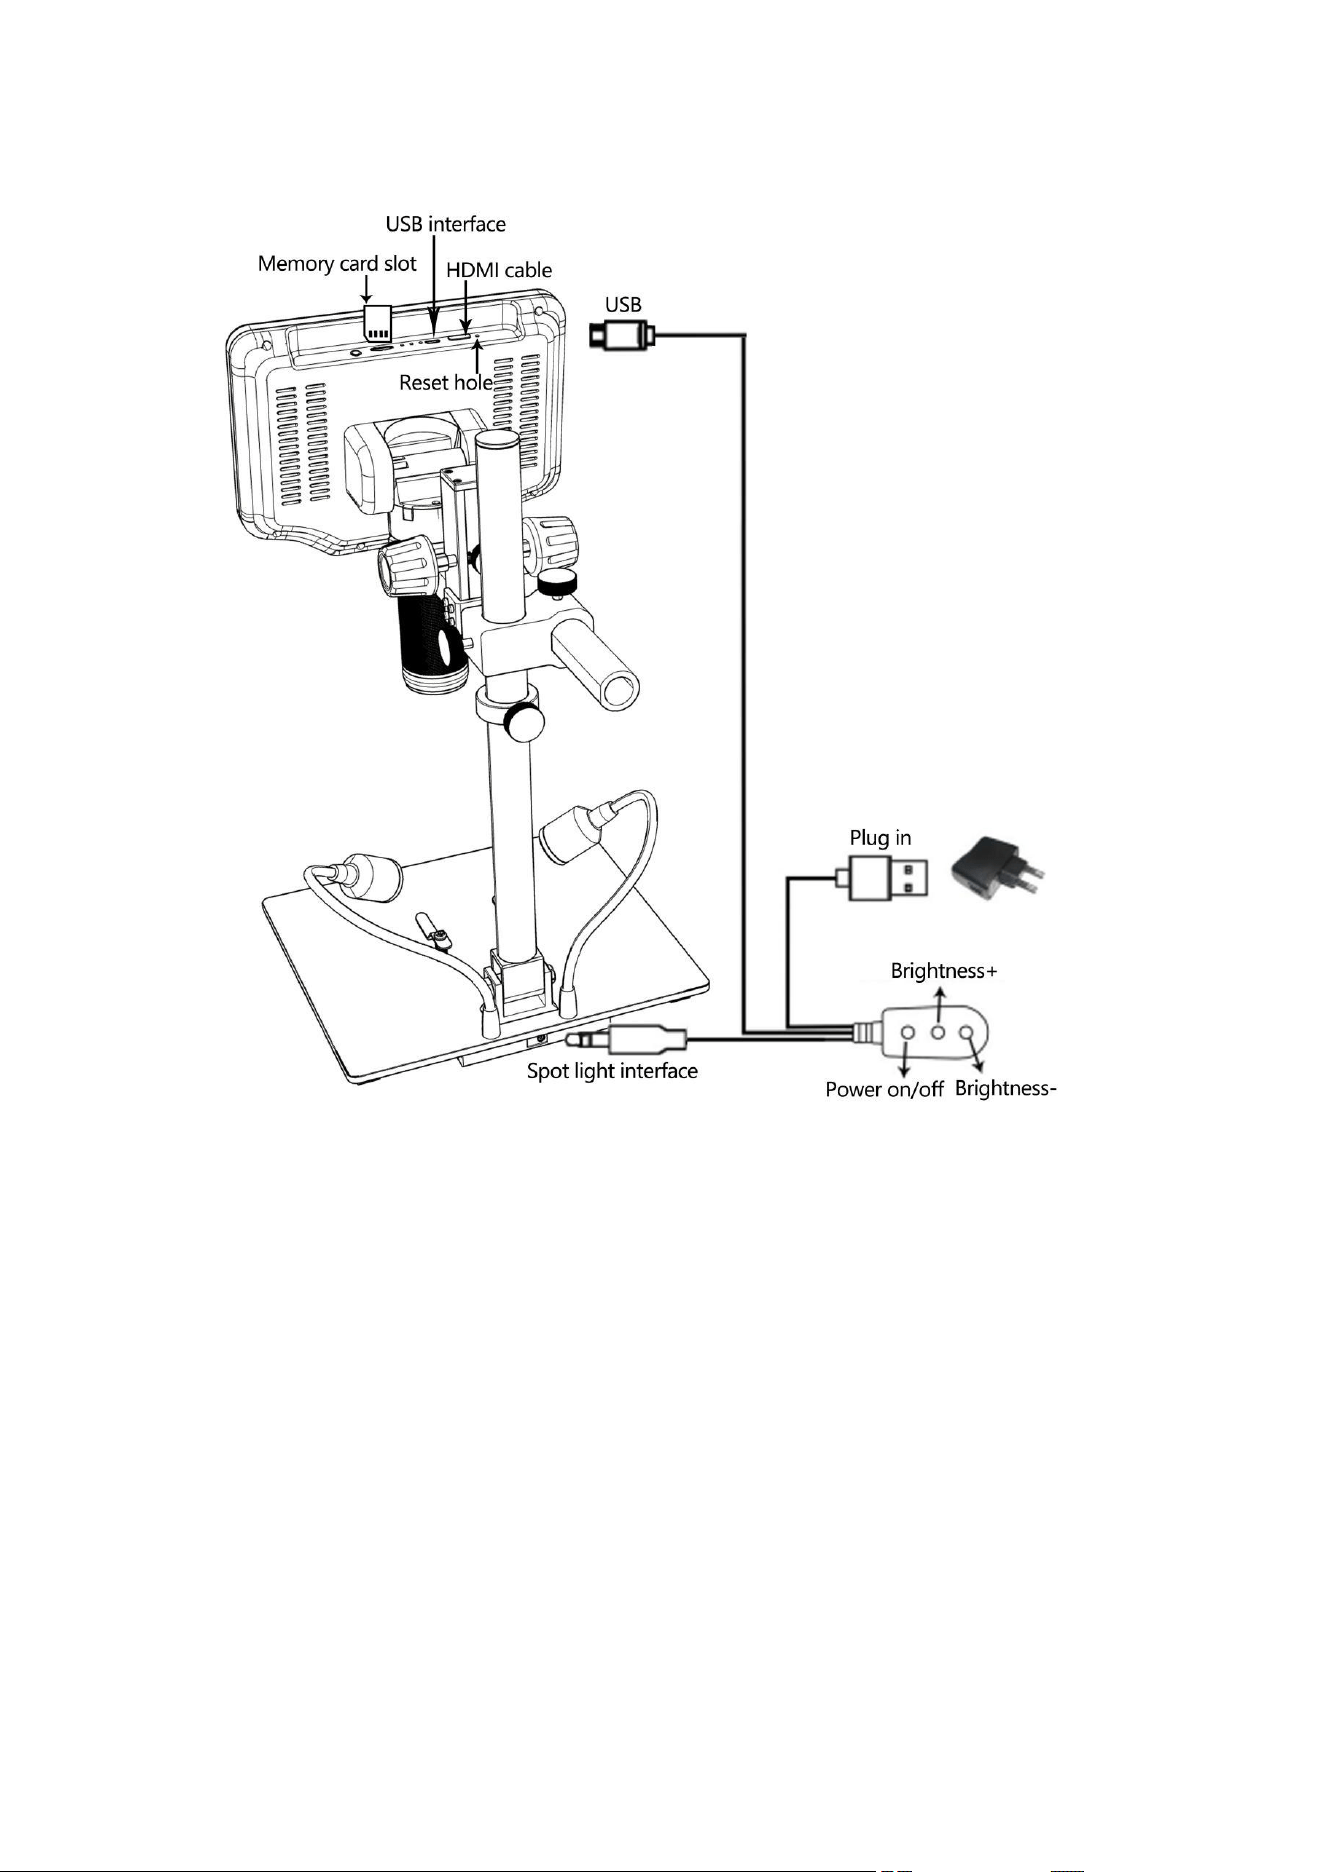
Quick Start
(P3 connect )
1. Connect the microscope to the power supply via the dimmer cable. See the (P3) above.
2. Then press and hold the Power button (① from the P2 “Buttons”) underneath the display until
the display turns on. (It may turn on automatically while you connecting cables at the first time, and
it’s totally fine.)
*Troubleshooting
If the display freezes, locate the “reset ” hole (⑫ from the P2 “Buttons”) on the back of the monitor.
Use a narrow object such as an unfolded paperclip to depress the button located inside. This resets
all settings to their factory values and restarts the display, the image and video files saved in the
memory card will not be deleted.

6
Adjusting the Magnification and Focus
① Unscrew the beam fixing screw and the beam anti-slip screw counterclockwise to lift the
microscope main unit to the required height. The lower the height, the greater the magnification is.
But be careful not to let the bottom of the lens touch the object being observed. (Note that you may
need to reposition the spotlights when adjusting the object distance). Turn the focus controller(⑧
from the P2 “Buttons”) to focus the image.
② To increase the digital magnification, press and hold the Up button (③ from the P2 “Buttons” )
until the desired digital magnification(up to an additional 3X beyond the optical magnification) is
reached. Use the Down button (④ from the P2 “Buttons”) to decrease the digital magnification.
Using a Micro SD Card to Save Images
By using a Micro SD card (not provided), you can save images and videos to review later or export
to a computer or other device .
Insert the Micro SD card in to the TF slot on top back of the monitor. (be careful with the direction.
The side which has metal exposed should face down. See the P3 )
Push it in until you hear a click. (If you don't push it in far enough, it will be ejected.)
*If you insert the card while the microscope’s working, the device would switch off automatically.
Press the Power button and hold it until the screen lights up again.
Mode Switch
The Mode button (② from the P2 “Buttons”, marked with an "M") can be used to cycle between
three modes: video standby ( ), still image ( ), and playback ( ).
In video standby mode, there are white color numbers located upper left corner of the screen,
shows how many time the rest storage of the card would allow you to record video.
To Record Videos
Short press the OK button to begin recording. The elapsed time(red color) in the recording will
appear at the top left. To stop recording, hit the OK button again.
The OK button on the remote has the same function.
To Capture pictures
In video mode( ), photo mode( ) and while the microscope is recording, short press the
Picture Capture button (⑥ from the P2 “Buttons”) to take photos.
The picture capture button on the remote has the same function.
Note: Unable to take pictures or videos in playback mode.
7
Reviewing and Managing Images
To review and manage images on the display, use the Mode button to select review
mode. Use the Up and Down buttons to cycle through the pictures and videos.
To play a video, press the OK button to start play. Press the OK button again to pause.
Hit the Mode button again to to enter the video standby mode.
While reviewing a still image or video, the Menu button can be used to provide
additional options. Press the Menu button and hold for a while till options show up.
Delete:
Delete Current: deleting just the current image/video;
Delete All: deleting all unprotected images and videos;
Protect:
Lock Current/All: provides protection for the current/all image/video from deleting accidentally,
but not from Format function;
Unlock Current/All: unlock the current/all image/video.
Slide Show: You can choose 2 seconds, 5 seconds or 8 seconds for each play, and press OK to end
the play.
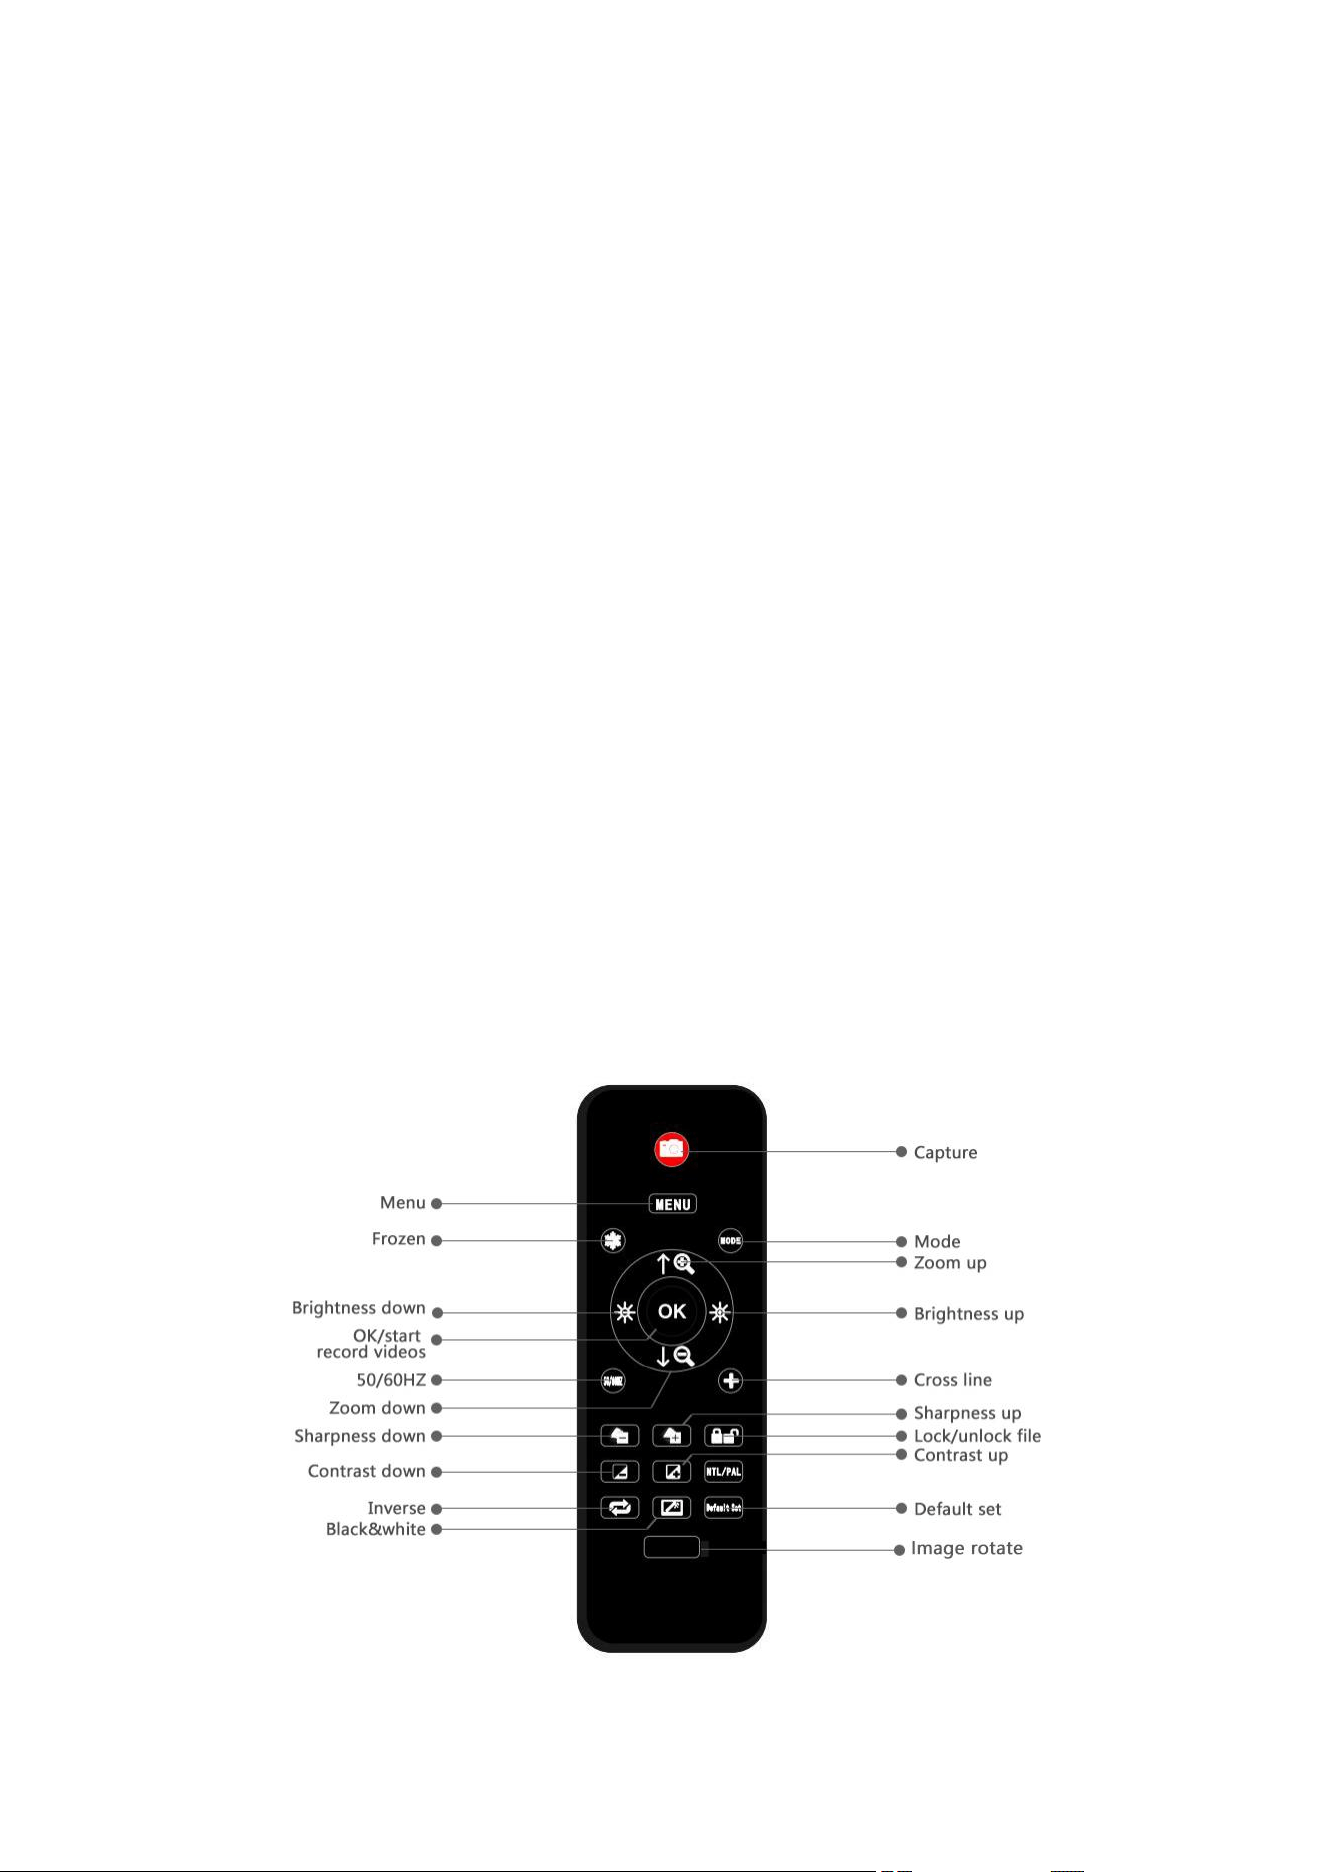
Remote
*Freeze: Stop the image on the display, works in video mode, photo mode and while recording.
*Illumination+ & -: exposure compensation from +2.0 to -2.0.
*Sharpness up&down: three levels of sharpness: Soft/Normal/Strong. Those two buttons are both
used to switch the levels, but in different orders.
*Contrast up&down: same principle as Sharpness
(P4 remote)
8
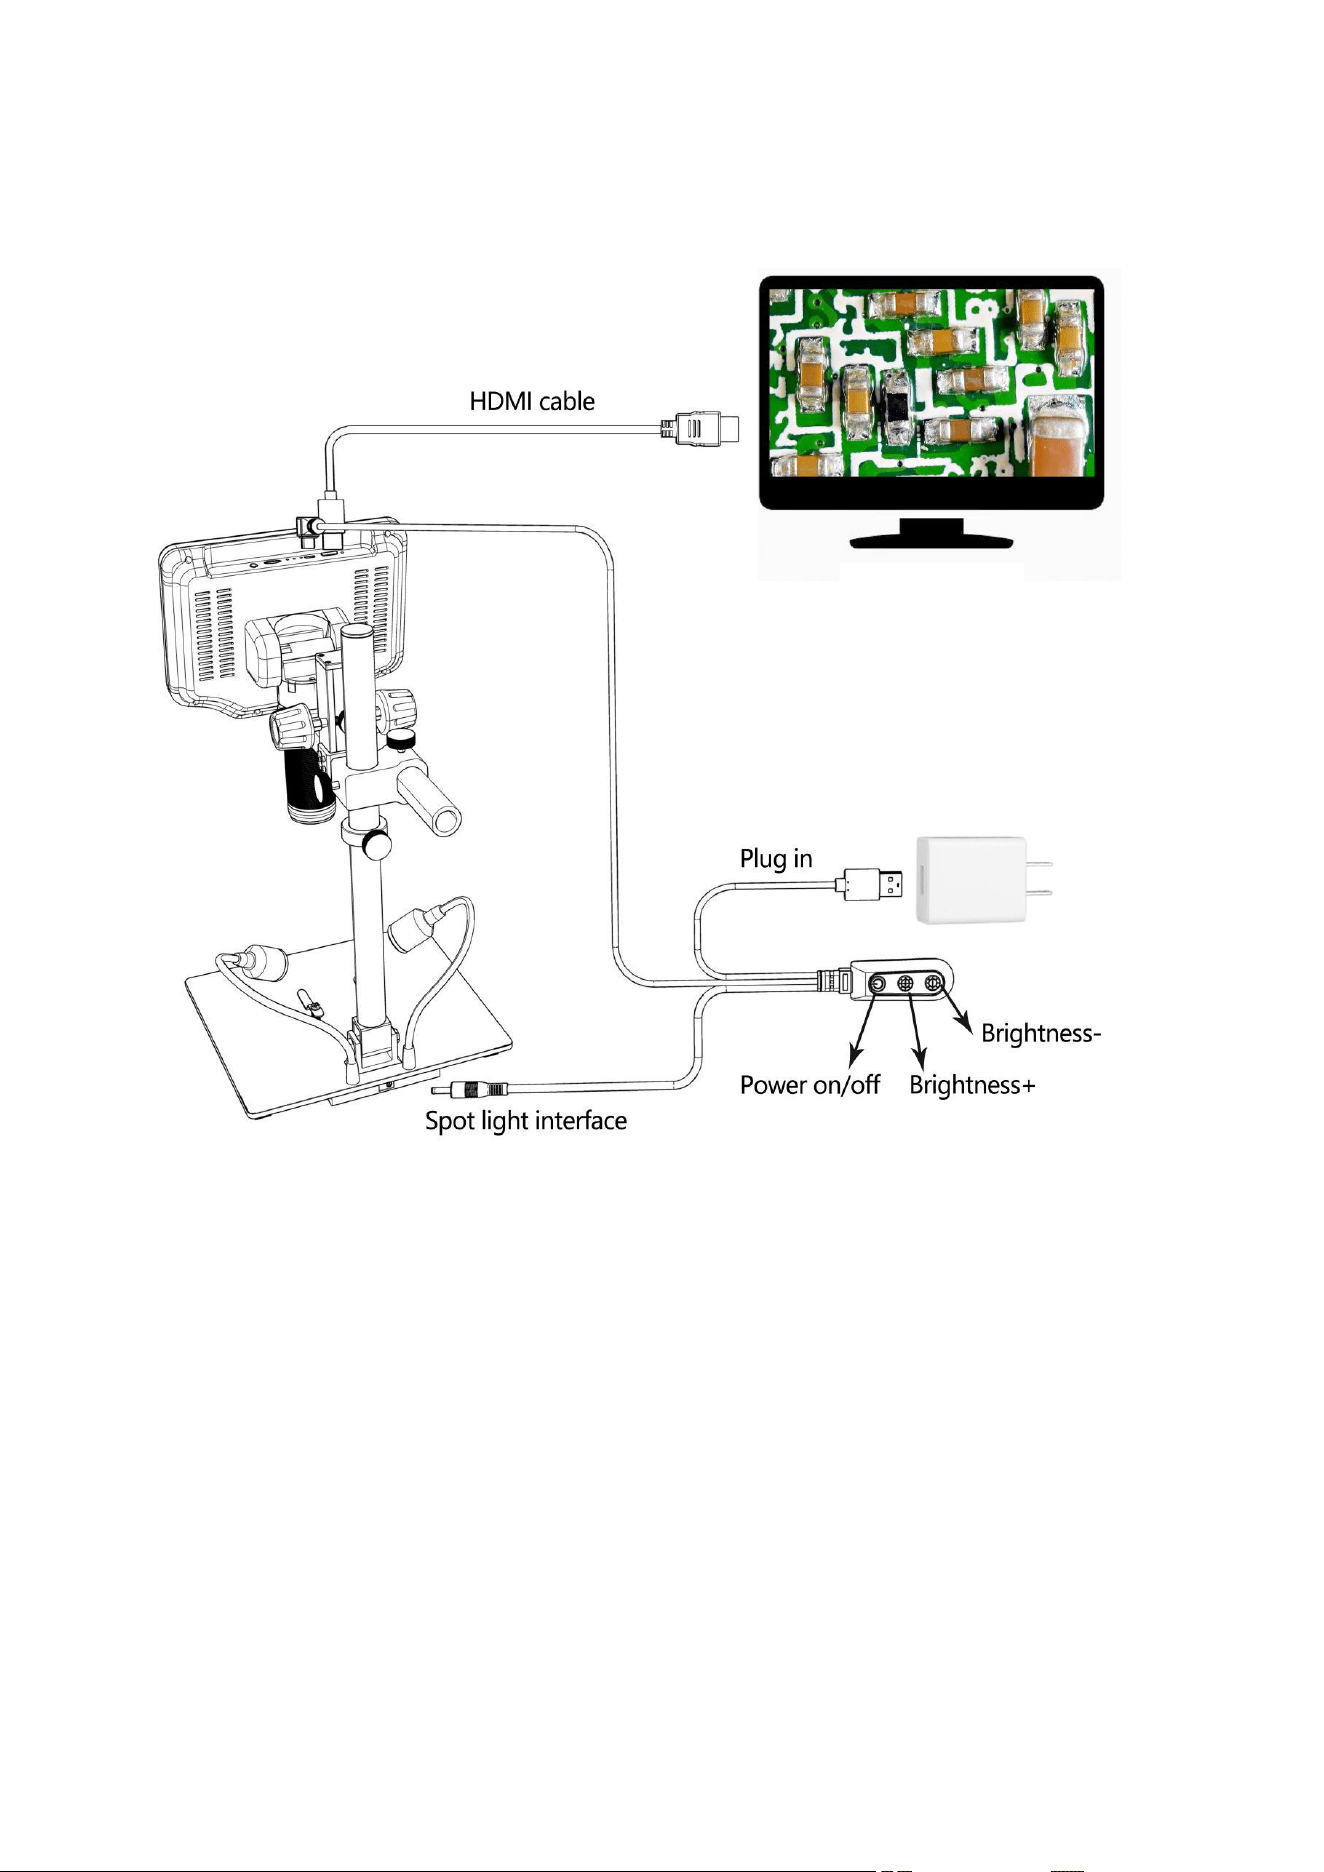
HDMI output
(P5 HDMI output)
• Please make sure that the monitor connected to the microscope is a HD monitor, otherwise the
image effect will not reach 1080P.
• The microscope does not contain a built-in battery, so make sure the microscope is powered on at
all times.
Use HDMI cable to connect the microscope to the HD display (as shown in P5). Adjust the
brightness of the LED lights on both sides of the bracket, the focusing controller and the object
distance, and you can see that the observed image is simultaneously presented on the microscope
host and the external HD monitor.
*Photo and video can be taken in HDMI mode.
9
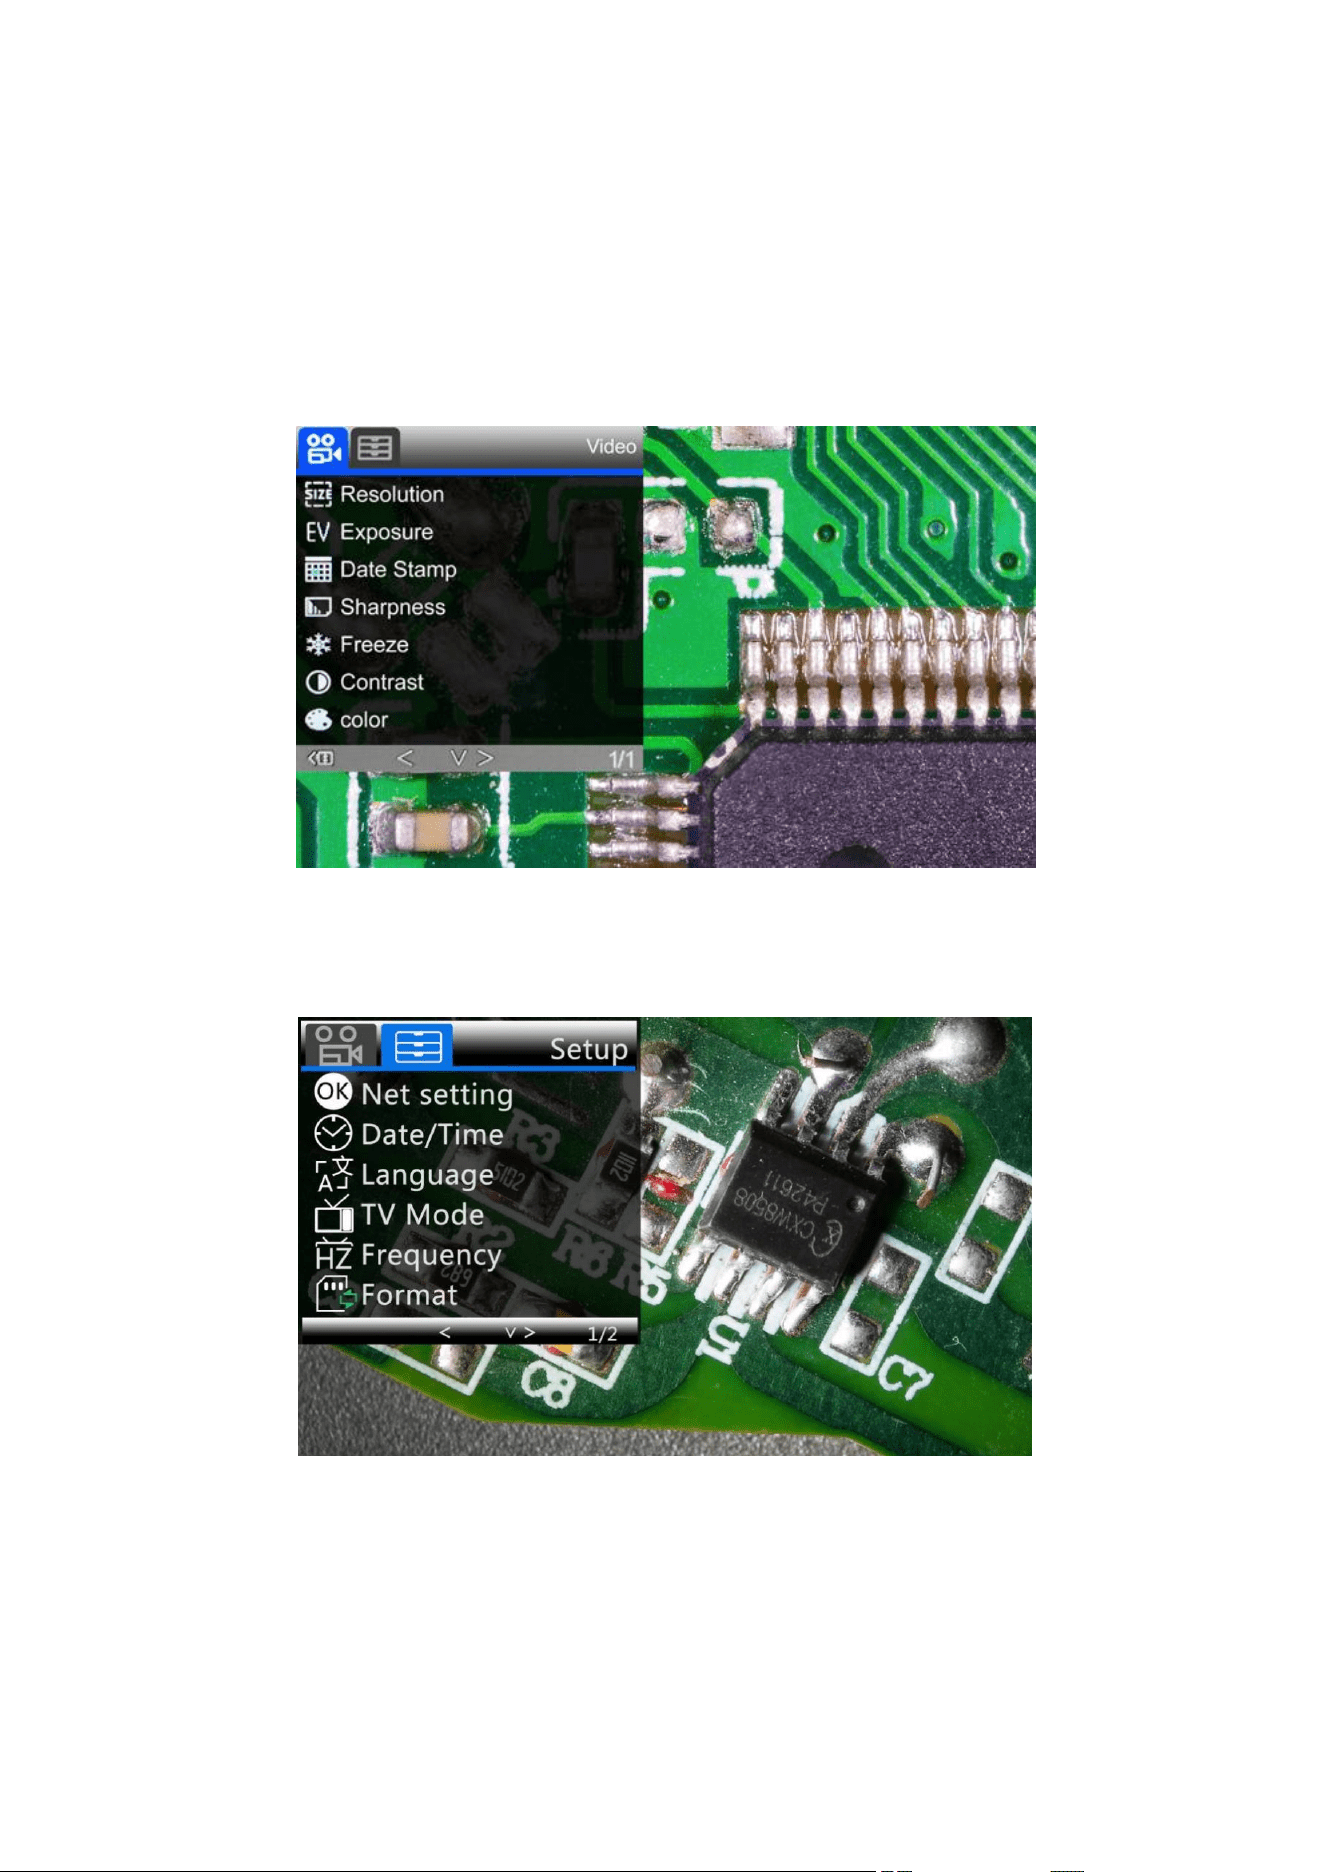
Settings
In each mode, press the M button and hold it for a while until the Video/Still/Playback Menu shows
up on the display (Or you can press MENU button on the remote). Hit M button again, get into the
general Setup Menu.
For example, if you are in video standby mode, and you press MENU, this is the first menu would
show, the “Video menu”:
(P6 video menu)
Then, press MENU button (or M on the monitor) again, you get into the Setup menu, like this:
(P7 setup menu)
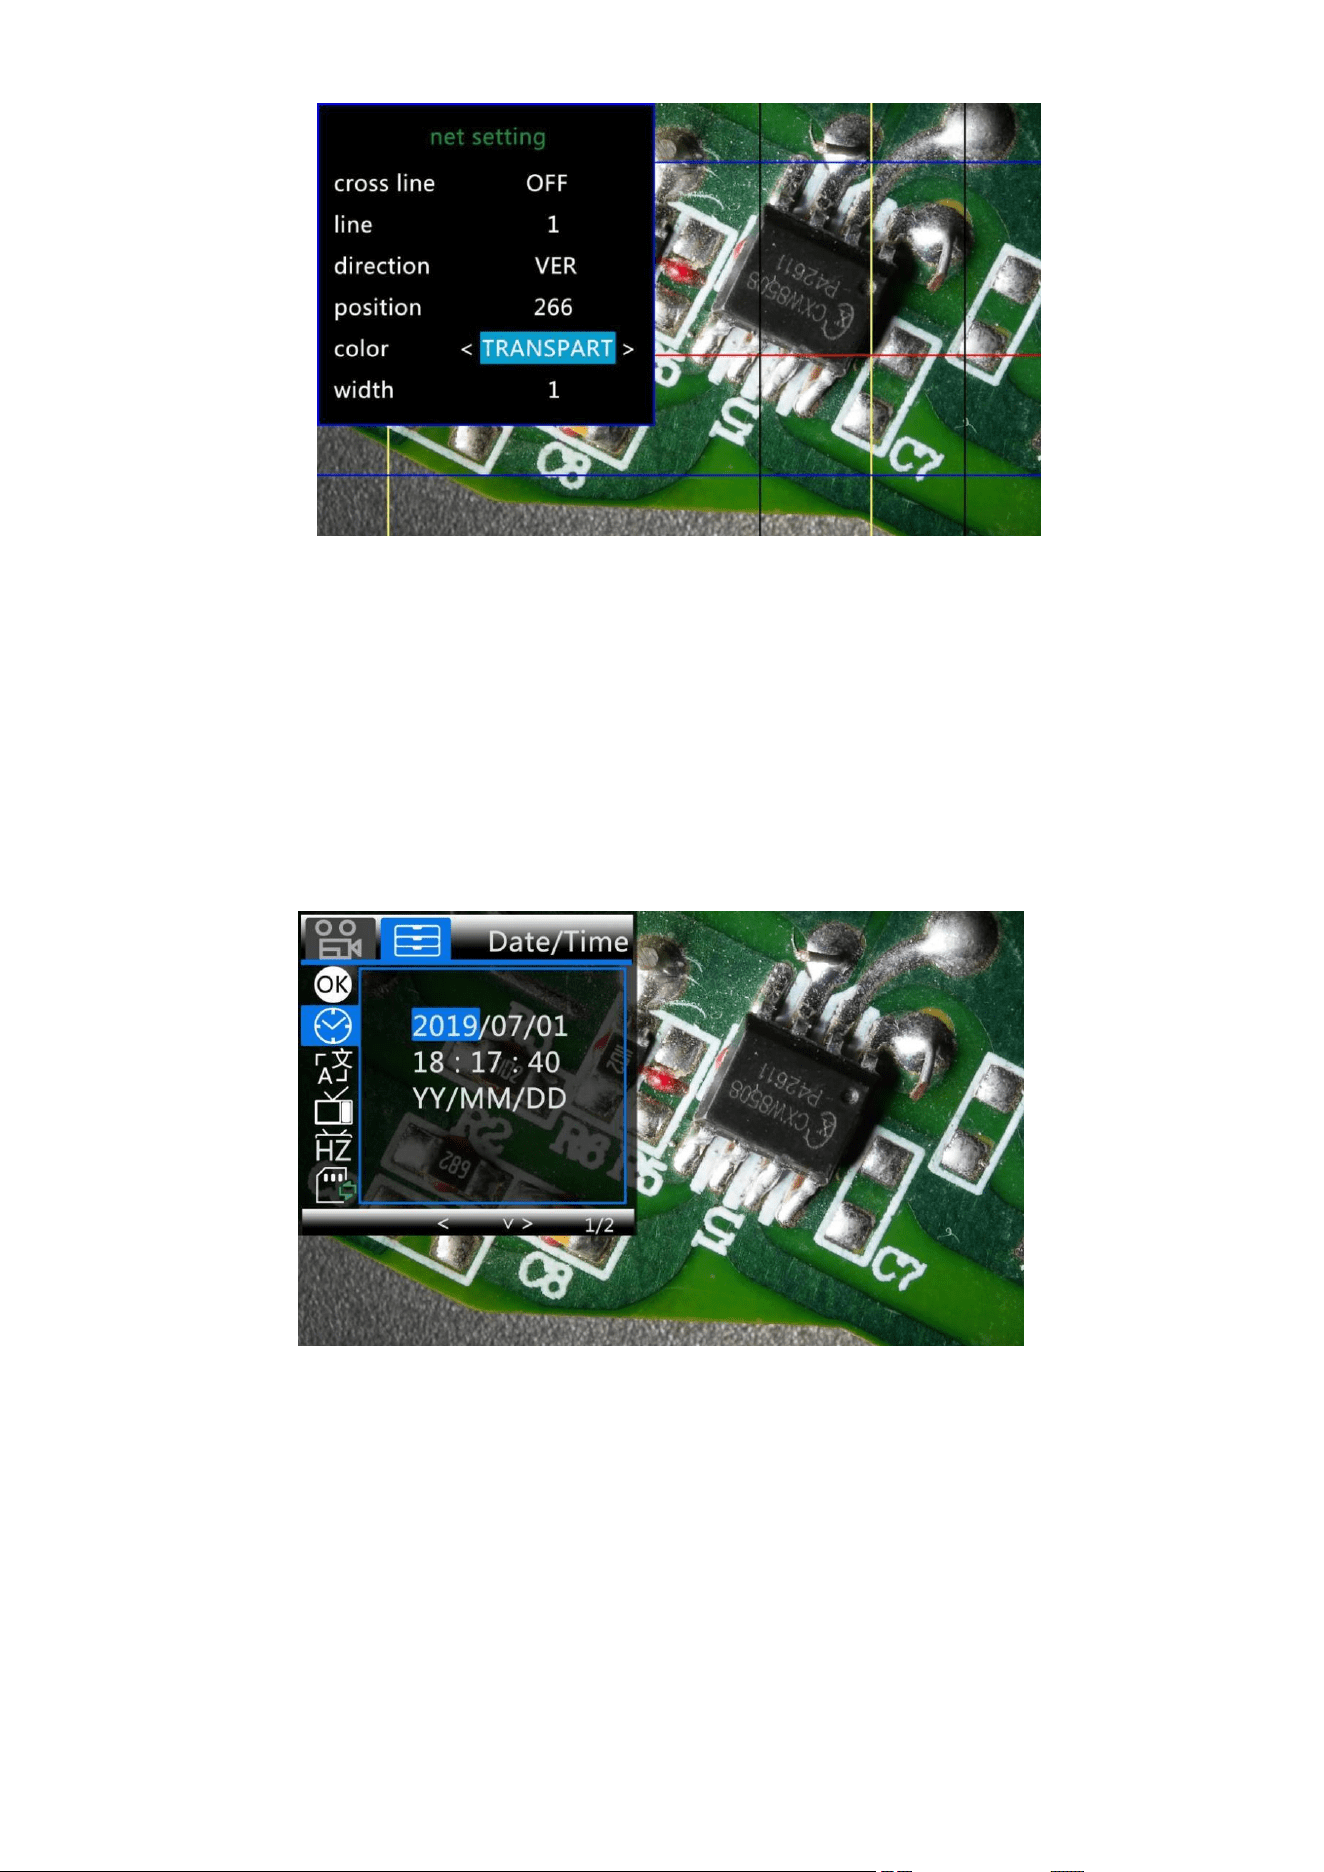
Gridline Settings (remote needed)
Use “Up” and “Down” to select among “cross line”、“line”、“direction”、“position”、“color”and “width”.
Use “Left” and “Right” on the remote to change the settings.
* Gridlines cannot be set without a remote control.

10
Cross line means 十 shaped lines that located literally in the middle of the view. when you set the
cross line “on”, you will see one horizontal and one vertical showing in the middle of the view.
(P8 cross line original) (P9 cross line on)
When you turn on the “Line”, there will be 8 lines showing up automatically.
For each one, you could change it’s direction between “HOR” and “VER”(stand for “horizontal” and
“vertical”), position, color and width.
There are 480 positions on direction “HOR”, and 800 positions on direction “VER”. So, when you
change the direction from “HOR” to “VER”, the position would change at the same time,
HOR/VER=480/800. For example, you change a line from HOR&160(P10) to a vertical line, the
position would become 266(P11).
→
(
P10 line 1,HOR&160
) (
P11 line1,VER&266
)
If you don’t want that many lines in the view, you could also change the color of the certain lines
into “TRANSPARENT”.
11
(P12 set the color of line 1 to transparent)
Date/Time:
Press “OK” into Date/time setting. Use “Up” and “Down” to select the correct number for
year/month/day. Once you finish setting a number, press “OK” on the monitor to the next number.
Or, you can use “Left” and “Right” on the remote to get to the one that you want.
Press “MENU” button on the remote to exit date/time setting directly. If you don’t have the remote,
you have to go through all over these settings one by one and then press OK again to exit.
(P13 date/time setting)
To save settings
After you set everything right, you should turn off the device by pressing ON/OFF button on the
monitor and hold it until the device switching off.
If you turn off the device by pressing the button on the switch cable, or just simply cut off the power
supply, the setting would not be saved.

12
FAQ
1. Why can't I boot normally?
Please confirm that the wiring is normal as shown in P3, and ensure that the product is powered on.
After confirming the correct operation, if the machine still cannot be turned on normally, please use
the reset hole on the back of the main unit to restart the machine.
2. Why can’t I get a clear image?
Please confirm the illumination work properly, and shine directly to the surface of the specimen.
Adjust the height of the boom arm, or the secondary bracket lift to change the distance from the
lens to the specimen, and turn the focusing tube properly. If the image is still blurry, please clean the
bottom of the lens use a piece of clean and soft cloth.
3. Why the setting changes can’t be memorized?
After changing settings, press and hold the button on the monitor to switch off the device. DO NOT
cut off the power supply directly or use the dimmer cable to switch off the device.
4. Why the microscope reboots repeatedly?
Please check the if the cable connection is firm and if the power supply is stable and strong enough.
Please check your power adapter is high quality 5V 2A.
5. Why does the system crash, memory card error or memory card full prompt appear after
inserting the TF card?
After inserting the TF card, please format it first.
(Formatting steps: long press the M key to open the menu - then short press the M key to switch to
the system function setting bar - press the down key to select - find the format option - press the OK
key to confirm)
Due to the higher performance requirements of the memory card, when recording video, if it still
cannot be used normally after formatting, please replace the high-quality TF card with class 10 or
above.
PS:If there are other questions or problems, please contact us as soon as possible, we will do
our best to help! Thanks for your support!

13
Warranty
Warranty
User’s name:
Address:
Phone number:
Post code:
Email:
Model name:
Purchase date:
Fault feedback:
Date:
Fault:
Notice:
Our warranty doesn’t cover:
1
If users can not provide the purchase proof or the Warranty.
2
If users use it in an improper environment, such as incompatible power supply,
high temperature environment etc.
3
If the fault caused by accident, oversight, misoperation or natural disasters etc.
4
If the fault caused by people who are not belong to authorized organizations of our
company during repacking, repair, dismantle, Or if users repack, repair or
dismantle the device not following our advice.
5
Out of warranty period.
