TAAL SMART
Infrarot-Heizung
Infrared Heater
Radiador infrarrojo
Radiateur Infrarouge
Radiatore a infrarossi
Hinweis: Dieses Produkt ist nur für gut isolierte Räume
oder für den gelegentlichen Gebrauch geeignet.
Note: This product is only suitable for well insulated
spaces or occasional use.
Advertencia: Este producto está indicado únicamente en
lugares abrigados o para una utilización punctual.
Remarque : Ce produit ne peut être utilisé que dans
des locaux bien isolés ou de manière occasionnelle.
Nota: Questo prodotto è adatto solo per spazi
ben isolati o uso occasionale.
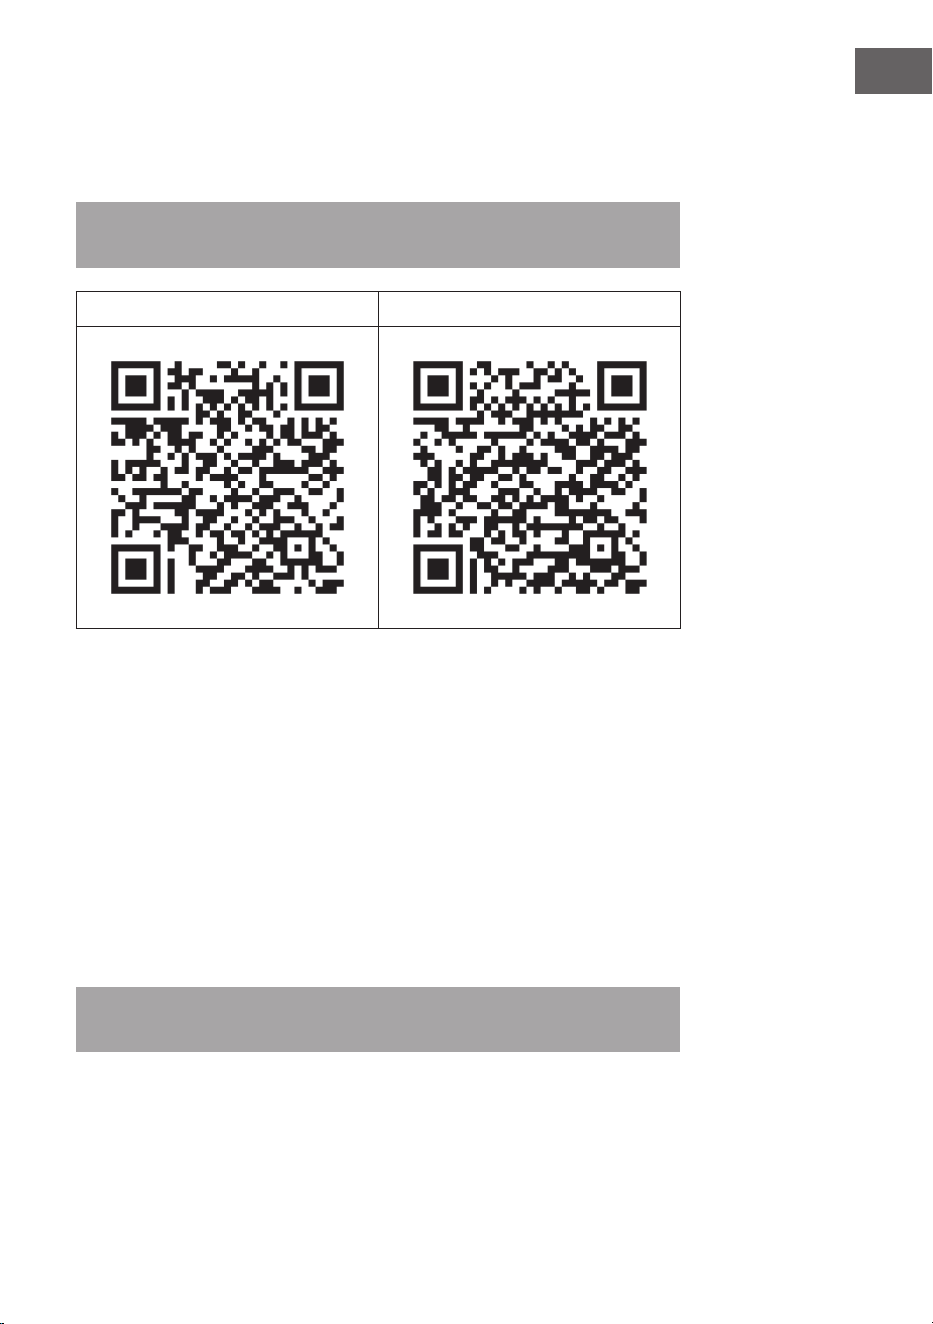
www.klarstein.com
10041869 10041870


3
DE
Sehr geehrter Kunde,
wir gratulieren Ihnen zum Erwerb Ihres Gerätes. Lesen Sie
die folgenden Hinweise sorgfältig durch und befolgen Sie
diese, um möglichen Schäden vorzubeugen. Für Schäden,
die durch Missachtung der Hinweise und unsachgemäßen
Gebrauch entstehen, übernehmen wir keine Haftung.
Scannen Sie den folgenden QR-Code, um Zugri auf die
aktuellste Bedienungsanleitung und weitere Informationen
rund um das Produkt zu erhalten.
INHALTSVERZEICHNIS
Sicherheitshinweise 4
Wandmontage 6
Bedienung 8
Gerätesteuerung per Smartphone 10
Reinigung und Pege 12
Spezielle Entsorgungshinweise für Verbraucher in Deutschland 13
Hinweise zur Entsorgung 15
Konformitätserklärung 15
Produktdatenblatt 16
TECHNISCHE DATEN
Artikelnummer 10041869, 10041870
Stromversorgung 220-240 V ~ 50 Hz
Leistung 750 W
WiFi-Standard
802.11 b/g/n
WiFi-Frequenz
2,4 GHz
WiFi-Sendeleistung (max.)
20 dBm
English 17
Español 29
Français 41
Italiano 53
4
DE
SICHERHEITSHINWEISE
Gerätespezische Sicherheitshinweise
• Die Infrarotheizung erreicht während des Betriebs eine Oberächen-
temperatur von ca. 95 °C, wenn sie an der Wand montiert ist. Berühren Sie
die Heizung NICHT, wenn sie eingeschaltet ist. Längerer Hautkontakt kann zu
Verletzungen oder Verbrennungen führen.
• Decken Sie die Heizung NICHT ab, dies kann zur Überhitzung und Bränden
führen.
• Das Heizgerät darf NICHT zum Trocknen von Textilien verwendet werden, und
es dürfen keine Gegenstände auf das Gerät gestellt oder an das Gerät gelehnt
werden.
• Halten Sie einen Mindestabstand von 40 cm zur Vorderseite und 20 cm zu
den Seiten zu allen Gegenständen und Wänden ein. Andernfalls kann es zu
einem Hitzestau hinter der Heizung kommen und zum Erlöschen der Garantie
führen.
• Die Heizung ist für die Wandmontage vorgesehen, montieren Sie die Heizung
nicht an der Decke.
• Sie können die Heizung ganz einfach mit Ihrem Smartphone bedienen,
über das gleiche WLAN, ein anderes WLAN oder über ein 3G- oder
4G-Mobilfunknetz. Dadurch kann das Gerät, ohne direkte Überwachung,
gesteuert werden. Stellen Sie dennoch sicher, dass auch beim Fernbetrieb des
Geräts alle in derBedienungsanleitung angegebenen Sicherheitsmaßnahmen
eingehalten werden.
• Vergewissern Sie sich, dass die Lufteinlässe und -auslässe unter keinen
Umständen abgedeckt werden können, da dies sonst zu einer Überhitzung
der Heizung führt.
Gefahren für Kinder und Personen mit eingeschränkten Fähigkeiten
• Dieses Gerät kann von Kindern ab 8 Jahren sowie von Personen mit
verringerten physischen, sensorischen und geistigen Fähigkeiten oder Mangel
an Erfahrung und/oder Wissen benutzt werden, wenn sie beaufsichtigt
werden oder im sicheren Gebrauch des Gerätes unterwiesen wurden und die
daraus resultierenden Gefahren verstanden haben.
• Kinder dürfen nicht mit dem Gerät spielen. Reinigungs- und Wartungsarbeiten
dürfen von Kindern nicht ohne Aufsicht durchgeführt werden.
• Kinder unter 3 Jahren sollten von der Heizung ferngehalten werden, es sei
denn, sie werden ständig beaufsichtigt.
• Kinder im Alter von 3 bis unter 8 Jahren dürfen das Gerät nur dann ein- und
ausschalten, wenn es in der vorgesehenen normalen Betriebsposition
aufgestellt oder installiert wurde und sie beaufsichtigt oder in die sichere
Verwendung des Geräts eingewiesen wurden und die damit verbundenen
Gefahren verstehen. Kinder im Alter von 3 bis unter 8 Jahren dürfen das Gerät
nicht an den Strom anschließen, keine Einstellungen vornehmen und keine
Reinigungs- oder Wartungsarbeiten daran durchführen.
5
DE
VORSICHT
Verbrennungsgefahr! Einige Geräteteile können sehr heiß werden
und Verbrennungen verursachen. Besondere Vorsicht ist geboten,
wenn Kinder und gefährdete Personen anwesend sind.
• Wenn das Netzkabel beschädigt ist, muss es vom Hersteller, dem
Kundendienst oder einer ähnlich quali zierten Person ausgetauscht werden,
um eine Gefährdung zu vermeiden.
• Betreiben Sie das Heizgerät NICHT in kleinen Räumen, wenn sich dort
Personen aufhalten, die nicht in der Lage sind, den Raum selbständig zu
verlassen. Die Ober äche des Heizgerätes kann eine Ober ächentemperatur
von bis zu 95 °C erreichen. Achten Sie darauf, dass sich das Gerät außerhalb
der Reichweite von Kindern und Menschen mit Behinderung be ndet.
• Halten Sie Säuglinge und Kinder von allen Verpackungsmaterialien wie
Plastiktüten fern, um Erstickungsgefahr zu vermeiden.
Elektrische Sicherheitsvorschriften
• Schalten Sie die Heizung vor der Installation, Reparatur oder Wartung aus und
ziehen Sie den Netzstecker. Stellen Sie vor der Installation sicher, dass das
Gerät keine Schäden aufweist.
• Wenn die Heizung oder das Netzkabel in irgendeiner Form beschädigt ist,
dürfen Sie die Heizung NICHT verwenden. Wenden Sie sich für eine Reparatur
oder einen Austausch des Geräts an den Hersteller oder Kundendienst.
Reparaturen, Wartung oder Änderungen dürfen nur vom Hersteller,
Kundendienst oder quali zierten Fachkräften durchgeführt werden.
• Versuchen Sie NICHT, das Heizgerät selbst zu reparieren, da dies zum
Erlöschen der Garantie führt.
• Wenn das Heizgerät fallen gelassen wurde, nehmen Sie es NICHT in Betrieb
und wenden Sie sich an den Hersteller oder Kundendienst, um sicherzustellen,
dass es keine Schäden aufweist.
• Dieses Heizgerät ist für den Betrieb mit 220-240 V, 50 Hz AC ausgelegt. Wenn
Ihr Stromnetz diese Anforderung nicht erfüllt, dürfen Sie das Gerät NICHT
verwenden.
• Die Heizung darf sich nicht direkt unterhalb einer Steckdose be nden.
WARNUNG
Verletzungsgefahr! Die Heizung darf nicht verwendet werden,
wenn die Glasober äche beschädigt ist.
WARNUNG
Verletzungsgefahr! Verwenden Sie die Heizung nicht in kleinen
Räumen, wenn sich darin Personen aufhalten, die nicht in der Lage
sind, den Raum selbständig zu verlassen, es sei denn, eine
permanente Beaufsichtigung ist sichergestellt.

6
DE
WANDMONTAGE
Wand
Schablone für die Wandmontage
Wand
Wand
Wand
Wand
Wand
7
DE
• Schritt 1: Verwenden Sie die mitgelieferte Schablone, um die Position der
Löcher an der Wand zu markieren.
• Schritt 2: Bohren Sie die Löcher mit einem 8-mm-Bohrer in die Wand.
• Schritt 3: Stecken Sie die Dübel in die Löcher.
• Schritt 4: Schrauben Sie die mitgelieferten Schrauben an der Wand fest.
• Schritt 5: Befestigen Sie die Wandhalterung von der Rückseite des Paneels aus
am Heizgerät und befestigen Sie dann das Paneel an den Schrauben in der
Wand.
• Schritt 6. Schieben Sie das Paneel nach rechts und dann nach unten, bis es
befestigt ist.
Hinweis: Der im Lieferumfang enthaltene Montagesatz ist für die horizontale
Montage an einer stabilen Wand vorgesehen. Für die Montage an anderen
Wandtypen benötigen Sie entsprechende Befestigungen (nicht im Lieferumfang
enthalten). Stellen Sie sicher, dass die Wand für die Montage geeignet ist. Es
wird dringend empfohlen, das Paneel von einer qualizierten Elektrikofachkraft
oder einem vom Hersteller autorisierten Installateur installieren zu lassen.
Das Heizgerät muss mindestens 20 cm von allen Gegenständen, Wänden usw.
entfernt sein.
• Dieses Heizgerät ist nur für eine horizontale Wandmontage vorgesehen. Eine
vertikale Wandmontage ist nicht zulässig.
• Für die freistehende Verwendung des Heizgeräts installieren Sie die Standfüße
an der Unterseite des Heizgerätes.

8
DE
BEDIENUNG
Allgemeine Einweisung in die Bedienelemente
Die Taal Smart-Reihe verfügt über eine integrierte WLAN-Steuereinheit, was
bedeutet, dass kein zusätzliches Thermostat zur Steuerung des Heizgeräts
erforderlich ist. Sobald das Heizgerät mit der APP verbunden ist, übernimmt
das Smartphone die Steuerung und kommuniziert mit der Steuereinheit. Wenn
das Internet zu Hause nicht funktioniert, kann die Heizung immer noch über die
Fernbedienung oder die Tasten ander Steuereinheit bedient werden. Sobald die
Heizung wieder mit dem WLAN verbunden ist, übernimmt das Smartphone wieder
die Steuerung.
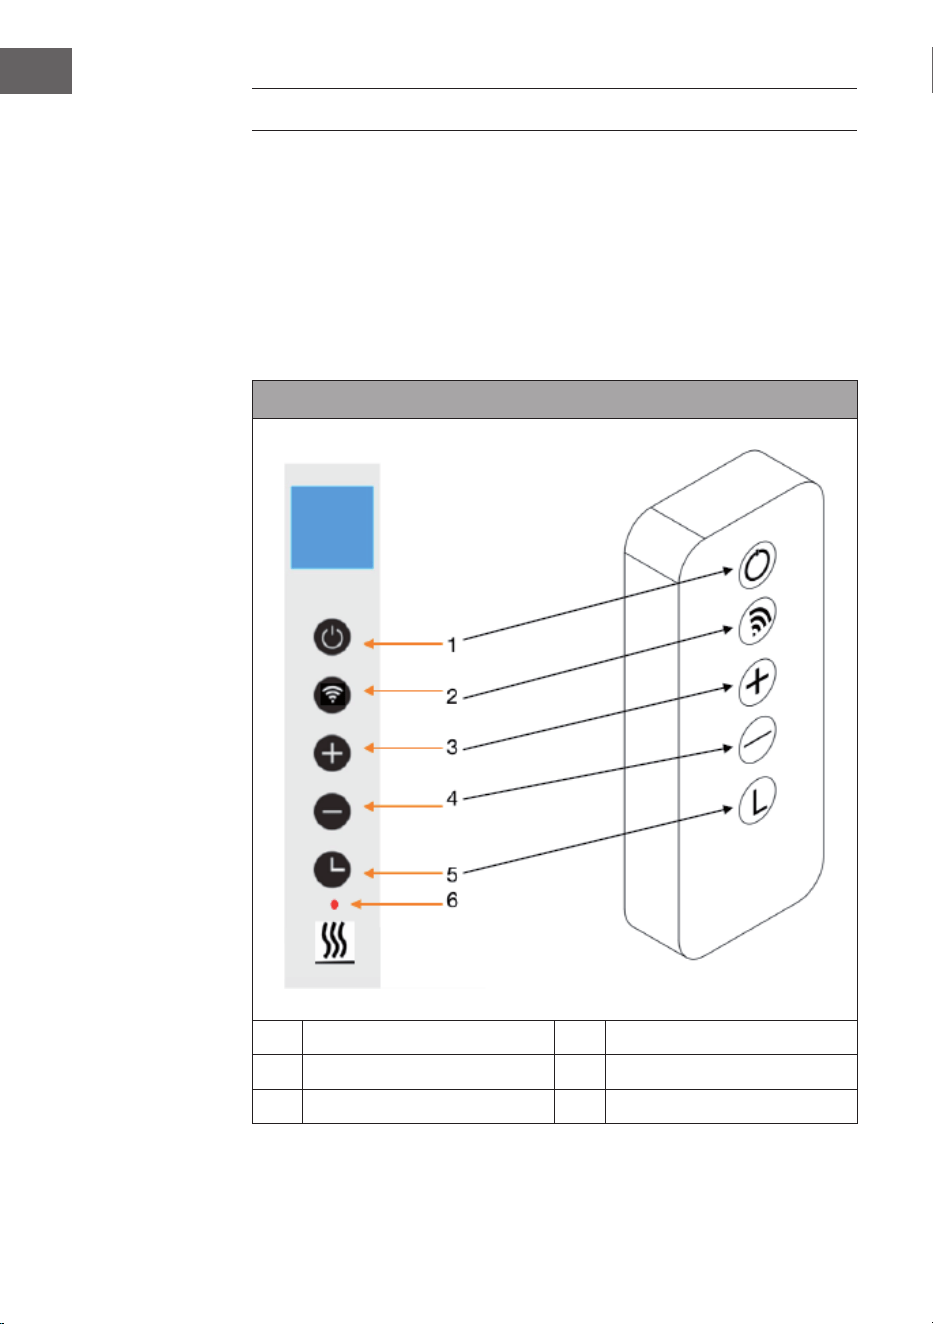
Bedienfeld und Fernbedienung
1 Ein/Aus-Taste 4 - Taste (senken)
2 WLAN-Taste 5 Timer-Taste
3 + Taste (erhöhen) 6 Heizstatus-Anzeige

9
DE
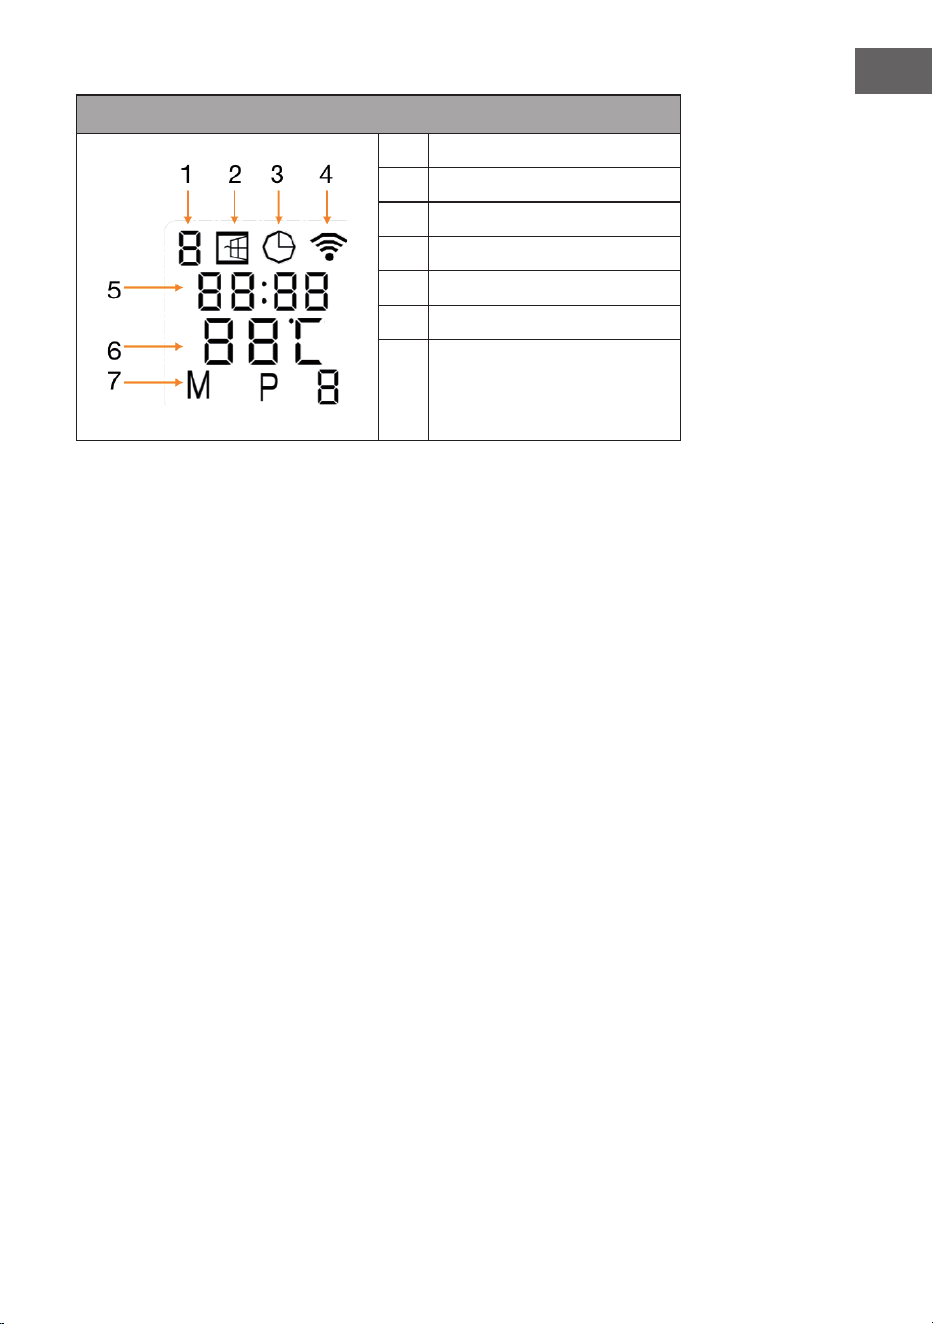
Displayanzeigen
1 Wochentag
2 Oene-Fenster-Anzeige
3 Timer-Anzeige
4 WLAN-Anzeige
5 Uhrzeit
6 Temperatur
7 Modi:
M = Manueller Modus
P = Programmdauer (P1-P4)
H = Urlaubsmodus
Oenes-Fenster-Erkennung
Diese Heizung ist mit einer Funktion zur Erkennung oener Fenster ausgestattet.
Wenn das Steuerungssystem feststellt, dass die Raumtemperatur in einem kurzen
Zeitraum drastisch sinkt, während die Heizung in Betrieb ist, wird automatisch
erkannt, dass ein Fenster geönet ist. Die Oene-Fenster-Anzeige beginnt im
Display zu blinken, die Heizung schaltet sich für 30 Minuten aus und kehrt nach
30 Minuten automatisch zur vorherigen Einstellung zurück.
Sie können diese Funktion ein- und ausschalten, indem Sie die Taste „-“
5 Sekunden lang gedrückt halten, woraufhin die Oene-Fenster-Anzeige im
Display entsprechend erscheint oder verschwindet.
Temperaturkalibrierung
Halten Sie die Taste + 5 Sekunden lang gedrückt, um die Temperaturkalibrierung
aufzurufen. Passen Sie die Temperaturkalibrierung durch Drücken der Tasten +
oder - an. Der Kalibrierungsbereich liegt zwischen -5 und +5 Grad.
WLAN zurücksetzen
Schalten Sie das Gerät ein und drücken Sie die WLAN-Taste 5 Sekunden lang, bis
die WLAN-Anzeige zu blinken beginnt und die WLAN-Verbindung zurückgesetzt
wird.
WLAN-Funktion ein-/ausschalten
Drücken Sie die Timer-Taste 10 Sekunden lang, um die WLAN-Funktion der
Heizung auszuschalten. Die WLAN-Anzeige im Display verschwindet. Drücken Sie
die Timer-Taste 10 Sekunden lang, um die WLAN-Funktion wieder einzuschalten.
10
DE
Manuelle Bedienung
Um in den manuellen Modus zu gelangen, schalten Sie den Netzschalter ein und
drücken Sie die Ein/Aus-Taste, um die Heizung einzuschalten. Das „M“-Symbol
wird im Display angezeigt. Stellen Sie die gewünschte Temperatur ein, indem Sie
die Tasten + oder - drücken. Nach 2 Sekunden wird im Display wieder die aktuelle
Raumtemperatur angezeigt.
Wenn Sie den Timer einstellen möchten, drücken Sie die Timer-Taste und „00H“
wird im Display angezeigt. Stellen Sie die gewünschte Zeit bis zum automatischen
Ausschalten der Heizung mit den Tasten + oder - ein.
Kindersicherung
Drücken Sie 5 Sekunden lang die Ein/Aus-Taste auf dem Bedienfeld, um die
Kindersicherung zu aktivieren. Auf dem Display wird „CL“ angezeigt. Drücken Sie
5 Sekunden lang die Ein/Aus-Taste, um die Kindersicherung zu deaktivieren.
GERÄTESTEUERUNG PER SMARTPHONE
Wenn Sie Ihr Klarstein-Gerät in Ihr heimisches WLAN einbinden, können Sie es
ganz bequem über die dazugehörige Klarstein-App bedienen. Die App ermöglicht
es Ihnen, nicht nur das Gerät über Ihr Smartphone fernzusteuern, sondern bietet
Ihnen zudem Zugang zu Rezepten und weiterführenden Informationen.
Gehen Sie folgendermaßen vor, um Ihr Smartphone mit Ihrem Klarstein-Gerät zu
verbinden:
1. Laden Sie zuerst die Klarstein-App herunter, indem Sie mit Ihrem Smartphone
den QR-Code scannen (siehe unten) oder laden Sie diese direkt aus dem App
Store oder bei Google Play herunter.
2. Versichern Sie sich, dass Ihr Smartphone mit demselben WLAN-Netzwerk
verbunden ist, mit dem Ihr Klarstein-Gerät verbunden werden soll.
3. Önen Sie die Klarstein-App.
4. Melden Sie sich mit Ihrem Konto an. Wenn Sie noch keinen Account haben,
registrieren Sie sich in der Klarstein-App.
5. Folgen Sie den Anweisungen der App.
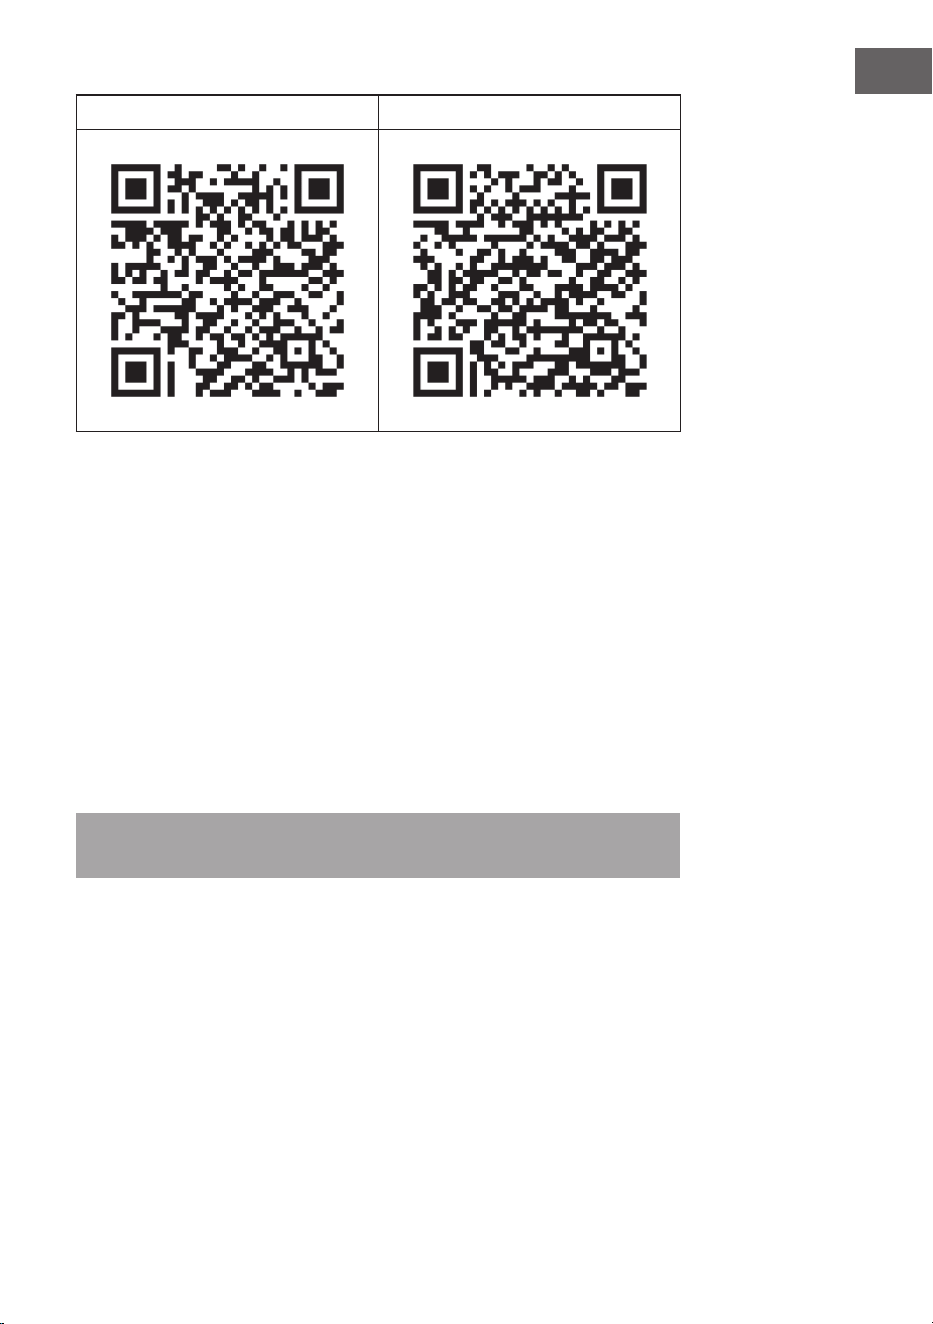
App-Download
Verwenden Sie die Scan-Funktion Ihres Handys, um den QR-Code zu scannen, und
speichern Sie die App auf Ihrem Smartphone.
Hinweis: Weitere Hinweise zur Bedienung der App und Hilfestellungen zur
Herstellung der Verbindung mit Ihrem Gerät liefert Ihnen die App, sobald Sie sie
das erste Mal önen.
11
DE
iOS Android
Fehlerbehebung bei Verbindungsproblemen
Wenn Ihr Klarstein-Gerät im WLAN nicht gefunden werden kann, überprüfen Sie
Folgendes:
• Ist das Gerät eingesteckt?
• Ist die WLAN-Funktion des Smartphones aktiviert?
• Ist die WLAN-Funktion des Klarstein-Gerätes aktiviert? (Befolgen Sie die
Anweisungen in der App.)
• Ist das WLAN-Passwort korrekt eingegeben worden?
• Benden sich Router, Klarstein-Gerät und Smartphone während des
Kopplungsversuches in unmittelbarer Nähe? (Idealerweise nicht mehr als 5 m
voneinander entfernt.)
• Falls Sie in den Einstellungen ihres WLAN-Routers das 2,4-GHz-Band
deaktiviert haben, aktivieren Sie dieses in Ihren Routereinstellungen.
Hinweis: Für weitere Hilfestellungen folgen Sie den Anweisungen der App beim
Verbindungsaufbau.

12
DE
REINIGUNG UND PFLEGE
Hinweis: Schalten Sie das Gerät aus und ziehen Sie den Stecker aus der
Steckdose. Warten Sie, bis das Gerät vollständig abgekühlt ist, bevor Sie es
reinigen.
• Besprühen Sie das Gerät nicht mit Flüssigkeiten und tauchen Sie es nicht in
Wasser oder andere Flüssigkeiten.
• Reinigen Sie die Heizung mit einem weichen, feuchten Tuch. Bei Modellen aus
Glas verwenden Sie ein weiches Tuch und Glasreiniger.
• Verwenden Sie keine Scheuermittel, Lösungsmittel oder harten
Reinigungsschwämme, da dies zu Kratzern oder anderen irreparablen
Schäden führen kann.
• Verwenden Sie niemals ein nasses Tuch und trocknen Sie das Heizgerät nach
der Reinigung mit einem trockenen Tuch ab. Bevor Sie das Heizgerät wieder in
Betrieb nehmen, muss es vollständig trocken sein.
Hinweise zum Gebrauch
• Beachten Sie, dass sich die Heizung bei regelmäßigem Gebrauch verfärben
kann. Dies ist auf die Luftverschmutzung zurückzuführen und weist nicht auf
eine Fehlfunktion hin.
• Bekleben Sie Ihre Heizung nicht mit einer Bildfolie und bemalen oder
bedrucken Sie sie nicht. Dies könnte das Heizelement beschädigen und führt
zum Erlöschen der Garantie.
• Sollten Sie Geräusche, Gerüche, sichtbare Schäden oder außergewöhnlich
hohe Temperaturen feststellen, stellen Sie den Betrieb der Heizung ein und
wenden Sie sich an den Hersteller oder Kundendienst.
Reparatur
Reparaturen dürfen ausschließlich von hierfür qualizierten Fachkräften
durchgeführt werden. Kontaktieren Sie dazu den Hersteller oder Kundendienst.
Versuchen Sie nicht, die Heizung selbst zu reparieren oder das Gerät zu
modizieren.

13
DE
SPEZIELLE ENTSORGUNGSHINWEISE FÜR
VERBRAUCHER IN DEUTSCHLAND
Entsorgen Sie Ihre Altgeräte fachgerecht. Dadurch wird gewährleistet, dass die
Altgeräte umweltgerecht verwertet und negative Auswirkungen auf die Umwelt
und menschliche Gesundheit vermieden werden. Bei der Entsorgung sind
folgende Regeln zu beachten:
• Jeder Verbraucher ist gesetzlich verpichtet, Elektro- und Elek-
tronikaltgeräte (Altgeräte) sowie Batterien und Akkus getrennt
vom Hausmüll zu entsorgen. Sie erkennen die entsprechenden
Altgeräte durch folgendes Symbol der durchgestrichene Müll-
tonne (WEEE Symbol).
• Sie haben Altbatterien und Altakkumulatoren, die nicht vom Altgerät
umschlossen sind, sowie Lampen, die zerstörungsfrei aus dem Altgerät
entnommen werden können, vor der Abgabe an einer Entsorgungsstelle vom
Altgerät zerstörungsfrei zu trennen.
• Bestimmte Lampen und Leuchtmittel fallen ebenso unter das Elektro- und
Elektronikgesetz und sind dementsprechend wie Altgeräte zu behandeln.
Ausgenommen sind Glühbirnen und Halogenlampen. Entsorgen Sie
Glühbirnen und Halogenlampen bitte über den Hausmüll, sofern Sie nicht das
WEEE Symbol tragen.
• Jeder Verbraucher ist für das Löschen von personenbezogenen Daten auf dem
Elektro- bzw. Elektronikgerät selbst verantwortlich.
Rücknahmepicht der Vertreiber
Vertreiber mit einer Verkaufsäche für Elektro- und Elektronikgeräte von
mindestens 400 Quadratmetern sowie Vertreiber von Lebensmitteln mit einer
Gesamtverkauäche von mindestens 800 Quadratmetern, die mehrmals im
Kalenderjahr oder dauerhaft Elektro- und Elektronikgeräte anbieten und auf dem
Markt bereitstellen, sind verpichtet,
1. bei der Abgabe eines neuen Elektro- oder Elektronikgerätes an einen Endnutzer
ein Altgerät des Endnutzers der gleichen Geräteart, das im Wesentlichen die
gleichen Funktionen wie das neue Gerät erfüllt, am Ort der Abgabe oder in
unmittelbarer Nähe hierzu unentgeltlich zurückzunehmen und
2. auf Verlangen des Endnutzers Altgeräte, die in keiner äußeren Abmessung
größer als 25 Zentimeter sind, im Einzelhandelsgeschäft oder in unmittelbarer
Nähe hierzu unentgeltlich zurückzunehmen; die Rücknahme darf nicht an den
Kauf eines Elektro- oder Elektronikgerätes geknüpft werden und ist auf drei
Altgeräte pro Geräteart beschränkt.

14
DE
• Bei einem Vertrieb unter Verwendung von Fernkommunikationsmitteln
ist die unentgeltliche Abholung am Ort der Abgabe auf Elektro- und
Elektronikgeräte der Kategorien 1, 2 und 4 gemäß § 2 Abs. 1 ElektroG, nämlich
„Wärmeüberträger“, „Bildschirmgeräte“ (Oberäche von mehr als 100 cm²)
oder „Großgeräte“ (letztere mit mindestens einer äußeren Abmessung
über 50 Zentimeter) beschränkt. Für andere Elektro- und Elektronikgeräte
(Kategorien 3, 5, 6) ist eine Rückgabemöglichkeit in zumutbarer Entfernung
zum jeweiligen Endnutzer zu gewährleisten.
• Altgeräte dürfen kostenlos auf dem lokalen Wertstohof oder in folgenden
Sammelstellen in Ihrer Nähe abgegeben werden: www.take-e-back.de
• Für Elektro- und Elektronikgeräte der Kategorien 1, 2 und 4 an bieten wir auch
die Möglichkeit einer unentgeltlichen Abholung am Ort der Abgabe. Beim
Kauf eines Neugeräts haben sie die Möglichkeit eine Altgerätabholung über
die Webseite auszuwählen.
• Batterien können überall dort kostenfrei zurückgegeben werden, wo sie
verkauft werden (z. B. Super-, Bau-, Drogeriemarkt). Auch Wertsto- und
Recyclinghöfe nehmen Batterien zurück. Sie können Batterien auch per Post
an uns zurücksenden. Altbatterien in haushaltsüblichen Mengen können Sie
direkt bei uns von Montag bis Freitag zwischen 07:30 und 15:30 Uhr unter der
folgenden Adresse unentgeltlich zurückgeben:
Chal-Tec GmbH
Member of Berlin Brands Group
Handwerkerstr. 11
15366 Dahlwitz-Hoppegarten
Deutschland
• Wichtig zu beachten ist, dass Lithiumbatterien aus Sicherheitsgründen vor der
Rückgabe gegen Kurzschluss gesichert werden müssen (z. B. durch Abkleben
der Pole).
• Finden sich unter der durchgestrichenen Mülltonne auf der Batterie zusätzlich
die Zeichen Cd, Hg oder Pb ist das ein Hinweis darauf, dass die Batterie
gefährliche Schadstoe enthält. (»Cd« steht für Cadmium, »Pb« für Blei und
»Hg« für Quecksilber).
Hinweis zur Abfallvermeidung
Indem Sie die Lebensdauer Ihrer Altgeräte verlängern, tragen Sie dazu bei,
Ressourcen ezient zu nutzen und zusätzlichen Müll zu vermeiden. Die
Lebensdauer Ihrer Altgeräte können Sie verlängern indem Sie defekte Altgeräte
reparieren lassen. Wenn sich Ihr Altgerät in gutem Zustand bendet, könnten Sie
es spenden, verschenken oder verkaufen.

15
DE
HINWEISE ZUR ENTSORGUNG
Wenn es in Ihrem Land eine gesetzliche Regelung
zur Entsorgung von elektrischen und elektronischen
Geräten gibt, weist dieses Symbol auf dem Produkt oder
auf der Verpackung darauf hin, dass dieses Produkt
nicht im Hausmüll entsorgt werden darf. Stattdessen
muss es zu einer Sammelstelle für das Recycling von
elektrischen und elektronischen Geräten gebracht
werden. Durch regelkonforme Entsorgung schützen
Sie die Umwelt und die Gesundheit Ihrer Mitmenschen
vor negativen Konsequenzen. Informationen zum
Recycling und zur Entsorgung dieses Produkts,
erhalten Sie von Ihrer örtlichen Verwaltung oder Ihrem
Hausmüllentsorgungsdienst.
Dieses Produkt enthält Batterien. Wenn es in Ihrem
Land eine gesetzliche Regelung zur Entsorgung von
Batterien gibt, dürfen die Batterien nicht im Hausmüll
entsorgt werden. Informieren Sie sich über die örtlichen
Bestimmungen zur Entsorgung von Batterien. Durch
regelkonforme Entsorgung schützen Sie die Umwelt
und die Gesundheit Ihrer Mitmenschen vor negativen
Konsequenzen.
KONFORMITÄTSERKLÄRUNG
Hersteller:
Chal-Tec GmbH, Wallstraße 16, 10179 Berlin, Deutschland.
Importeur für Großbritannien:
Berlin Brands Group UK Ltd
PO Box 1145
Oxford, OX1 9UW
United Kingdom
Hiermit erklärt Chal-Tec GmbH, dass der Funkanlagentyp
Taal Smart der Richtlinie 2014/53/EU entspricht. Der
vollständige Text der EU-Konformitätserklärung ist unter
der folgenden Internetadresse verfügbar:
use.berlin/10041869
16
DE
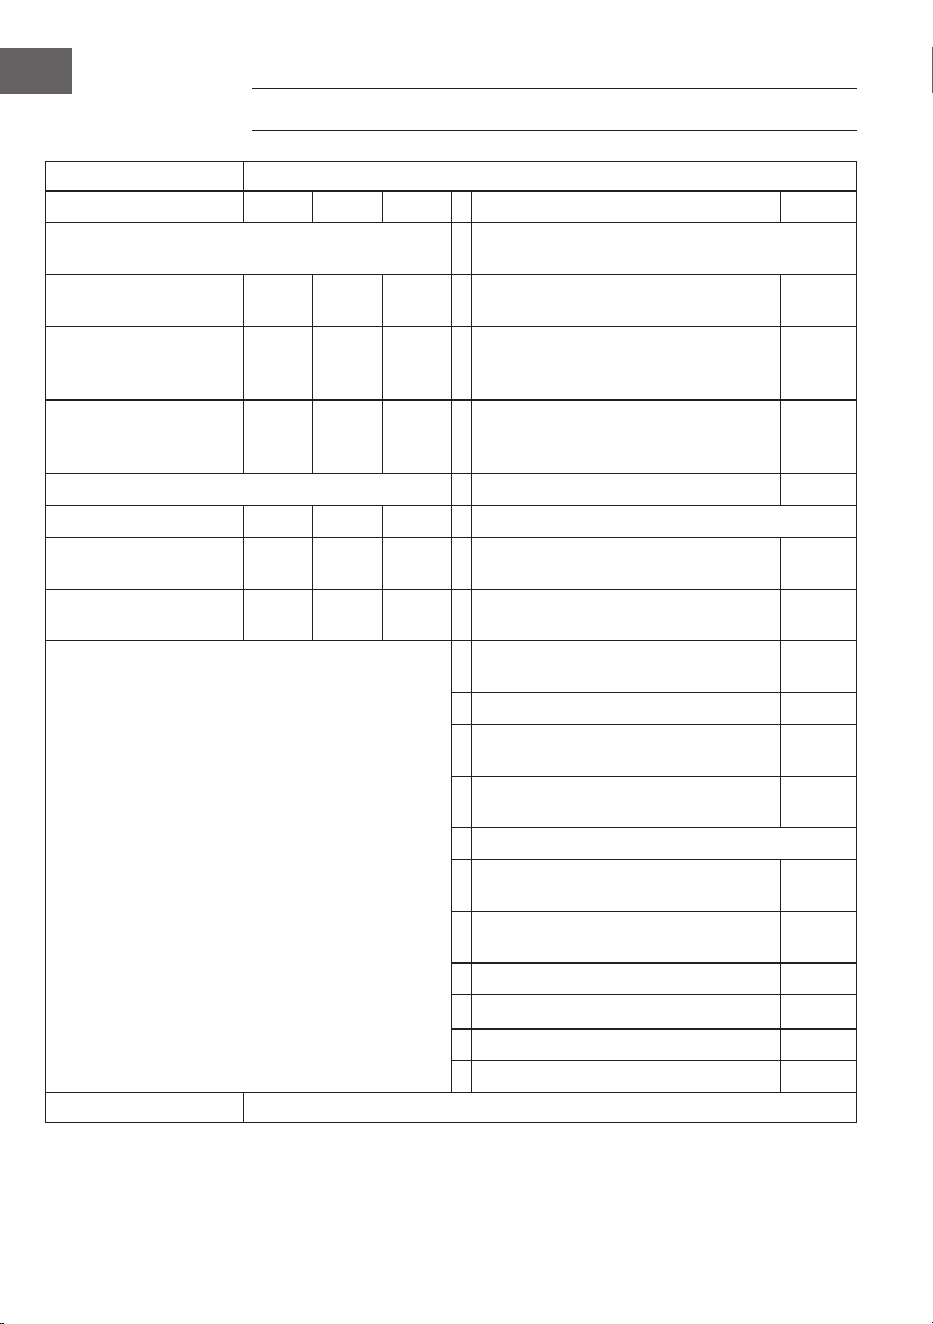
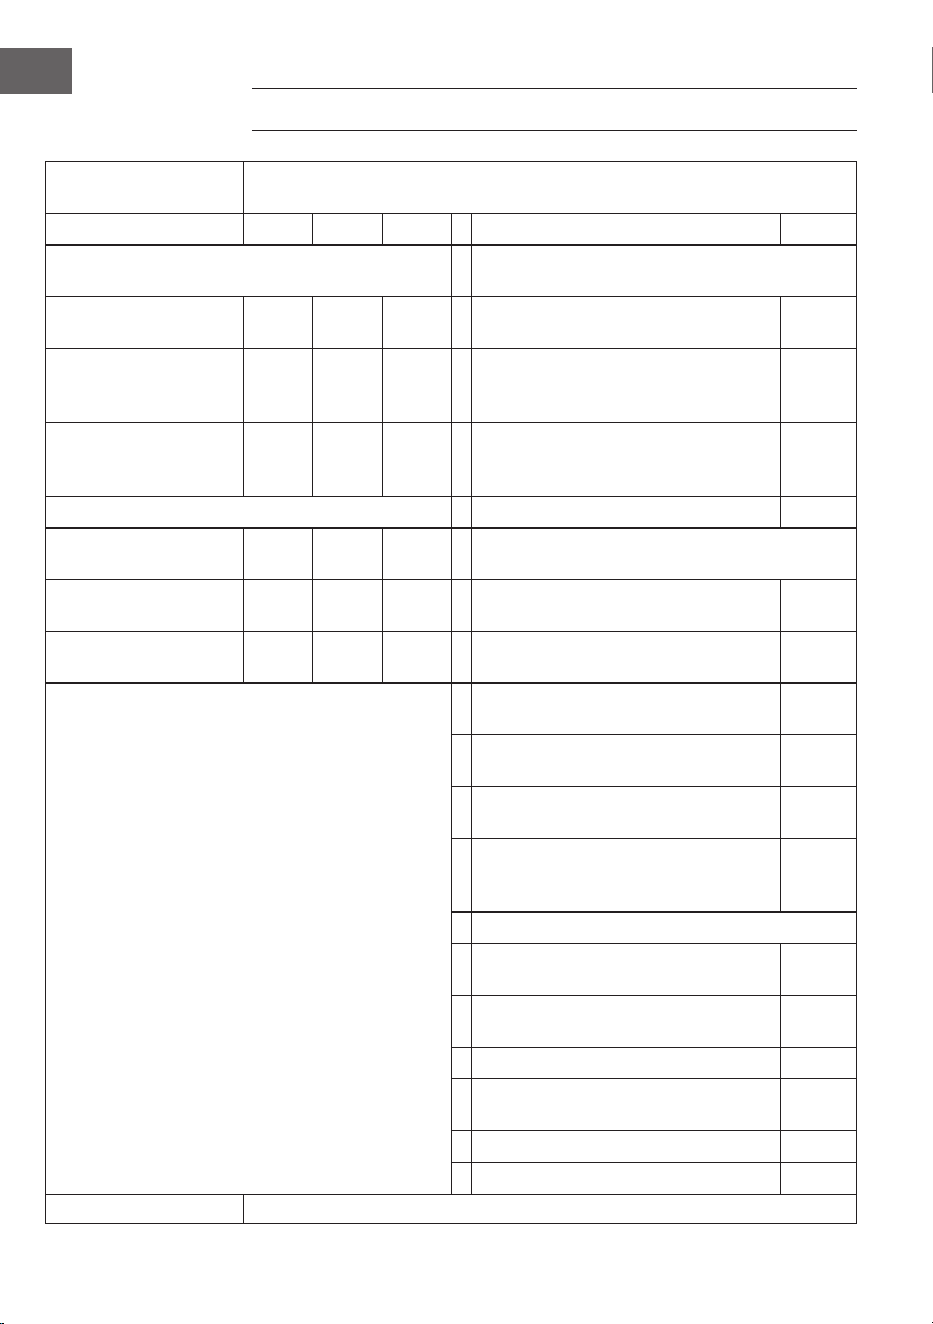
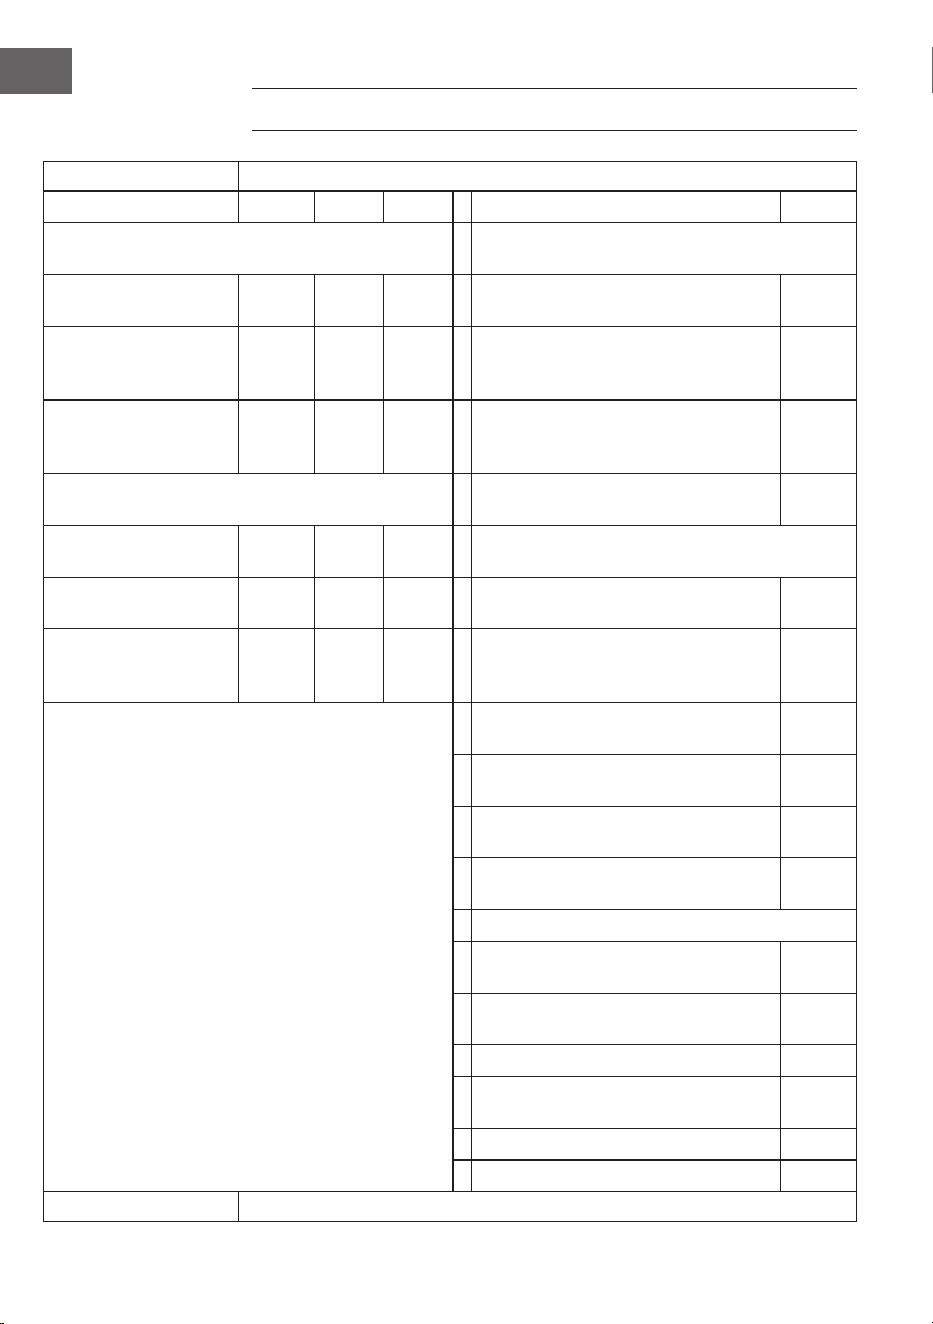
PRODUKTDATENBLATT
Modellkennung(en) 10041869, 10041870
Angabe Symbol Wert Einheit Angabe Einheit
Wärmeleistung Nur bei elektrischen Speicher-Einzelraumheizgeräten:
Art der Regelung der Wärmezufuhr
Nennwärmeleistung P
nom
0,75 kW Manuelle Regelung der Wärmezufuhr mit
integriertem Thermostat
nein
Mindestwärmeleistung
(Richtwert)
P
min
0,0 kW Manuelle Regelung der Wärmezufuhr
mit Rückmeldung der Raum- und/oder
Außentemperatur
nein
Maximale kontinuierliche
Wärmeleistung
P
max,c
0,75 kW Elektronische Regelung der Wärmezufuhr
mit Rückmeldung der Raum- und/oder
Außentemperatur
nein
Hilfsstromverbrauch Wärmeabgabe mit Gebläseunterstützung nein
Bei Nennwärmeleistung el
max
0,75 kW Art der Wärmeleistung/Raumtemperaturkontrolle
Bei Mindestwärmeleistung el
min
0,0 kW Einstuge Wärmeleistung, keine
Raumtemperaturkontrolle
nein
Im Bereitschaftszustand el
SB
0,001 W Zwei oder mehr manuell einstellbare Stufen,
keine Raumtemperaturkontrolle
nein
Raumtemperaturkontrolle mit mechanischem
Thermostat
nein
Mit elektronischer Raumtemperaturkontrolle nein
Mit elektronischer Raumtemperaturkontrolle
und Tageszeitregelung
nein
Mit elektronischer Raumtemperaturkontrolle
und Wochentagsregelung
ja
Sonstige Regelungsoptionen
Raumtemperaturkontrolle mit
Präsenzerkennung
nein
Raumtemperaturkontrolle mit Erkennung
oener Fenster
ja
Mit Fernbedienungsoption nein
Mit adaptiver Regelung des Heizbeginns nein
Mit Betriebszeitbegrenzung nein
Mit Schwarzkugelsensor nein
Kontaktangaben Chal-Tec GmbH, Wallstraße 16, 10179, Berlin, Deutschland

17
EN
Dear Customer,
Congratulations on purchasing this device. Please read the
following instructions carefully and follow them to prevent
possible damages. We assume no liability for damage
caused by disregard of the instructions and improper use.
Scan the QR code to get access to the latest user manual and
more product information.
CONTENTS
Safety Instructions 18
Wall Mounting 20
Operation 22
Device Control via Smartphone 24
Cleaning and Care 26
Disposal Considerations 27
Declaration of Conformity 27
Product Data Sheet 28
TECHNICAL DATA
Article number 10041869, 10041870
Power supply 220-240 V ~ 50 Hz
Power 750 W
WiFi standard
802.11 b/g/n
WiFi frequency
2.4 GHz
WiFi transmission power (max.)
20 dBm
18
EN
SAFETY INSTRUCTIONS
Device-speci c safety instructions
• The infrared heater reaches a surface temperature of approx. 95 °C during
operation when mounted on the wall. DO NOT touch the heater when it is
switched on. Prolonged skin contact may cause injury or burns.
• DO NOT cover the heater, this can cause overheating and res.
• The heater must NOT be used for drying textiles and no objects may be placed
on or leaned against the appliance.
• Keep a minimum distance of 40 cm to the front and 20 cm to the sides from
all objects and walls. Otherwise, heat may build up behind the heater and
invalidate the warranty.
• The heater is designed for wall mounting, do not mount the heater on the
ceiling.
• You can easily operate the heating with your smartphone, via the same WLAN,
another WLAN or via a 3G or 4G mobile network. This allows the appliance
to be controlled without direct monitoring. Nevertheless, make sure that all
safety measures speci ed in the operating instructions are observed even
when operating the unit remotely.
• Make sure that the air inlets and outlets cannot be covered under any
circumstances, otherwise this will cause the heater to overheat.
Hazards for children and persons with reduced abilities
• This device may only be used by children from the age of 8 and up or by
persons with reduced physical, sensory and mental capabilities or a lack of
experience and / or knowledge if they are supervised or have been instructed
in the safe use of the device and have understood the resulting dangers.
• Children must not play with the device. Cleaning and maintenance work must
not be carried out by children without supervision.
• Children under 3 years of age should be kept away from the heater unless
they are supervised at all times.
• Children aged 3 to under 8 years should not turn the appliance on or o
unless it is placed or installed in the normal position for use and they are
supervised or have been instructed in the safe use of the appliance and
understand the hazards involved. Children aged 3 to under 8 years must not
connect the appliance to the mains, make any adjustments or carry out any
cleaning or maintenance work on it.
CAUTION
Burn risk! Some parts of the appliance can become very hot and
cause burns. Special care should be taken when children and in rm
persons are present.
19
EN
• If the power cord is damaged, it must be replaced by the manufacturer, its
service agent or a similarly quali ed person to avoid a hazard.
• DO NOT operate the heater in small rooms if there are people in the room
who are not able to leave the room on their own. The surface of the heater
can reach a surface temperature of up to 95 °C. Make sure that the appliance
is out of reach of children and people with disabilities.
• Keep babies and children away from all packaging materials such as plastic
bags to avoid choking hazards.
Electrical safety regulations
• Switch o and unplug the heater before installation, repair or maintenance.
Before installation, make sure that there is no damage to the unit.
• If the heater or the mains cable is damaged in any way, DO NOT use
the heater. Contact the manufacturer or customer service for repair or
replacement of the unit. Repairs, maintenance or modi cations may only be
carried out by the manufacturer, customer service or quali ed specialists.
• DO NOT attempt to repair the heater yourself as this will invalidate the
warranty.
• If the heater has been dropped, DO NOT operate it and contact the
manufacturer or after-sales service to ensure that there is no damage.
• This heater is designed for operation with 220-240 V, 50 Hz AC. If your mains
supply does not meet this requirement, DO NOT use the appliance.
• The heater must not be located directly below a socket.
WARNING
Risk of injury! The heater must not be used if the glass surface is
damaged.
WARNING
Risk of injury! Do not use the heater in small rooms if there are
people in them who are not able to leave the room independently,
unless permanent supervision is ensured.

20
EN
WALL MOUNTING
Wall
Template for wall mounting
Wall
Wall
Wall
Wall
Wall
21
EN
• Step 1: Use the template provided to mark the position of the holes on the
wall.
• Step 2: Drill the holes in the wall with an 8 mm drill bit.
• Step 3: Insert the dowels into the holes.
• Step 4: Screw the supplied screws to the wall.
• Step 5: Attach the wall bracket to the heater from the back of the panel and
then x the panel to the screws in the wall.
• Step 6. slide the panel to the right and then down until it is attached.
Note: The mounting kit included in the scope of delivery is intended for
horizontal mounting on a stable wall. For mounting on other types of walls, you
need corresponding xings (not included in the scope of delivery). Please make
sure that the wall is suitable for the installation. It is strongly recommended that
the panel be installed by a qualied electrician or an installer authorised by the
manufacturer. The heater must be at least 20 cm away from all objects, walls,
etc.
• This heater is designed for horizontal wall mounting only. Vertical wall
mounting is not permitted.
• For free-standing use of the heater, install the feet on the bottom of the
heater.
22
EN
OPERATION
General instruction in the operating elements
The Taal Smart range has an integrated WLAN control unit, which means that no
additional thermostat is required to control the heater. As soon as the heater is
connected to the app, the smartphone will take over control and communicate
with the control unit. If the Internet is not working at home, the heating can still be
operated via the remote control or the buttons on the control unit. As soon as the
heating is connected to the WLAN again, the smartphone takes over the control
again.
Control panel and remote control
1 On / o button 4 - Key (lower)
2 WLAN button 5 Timer button
3 + key (increase) 6 Heating status display
23
EN
Display indications
1 Weekday
2 Open window display
3 Timer display
4 WLAN display
5 Time
6 Temperature
7 Modes:
M = Manual mode
P = Programme duration (P1-P4)
H = Holiday mode
Open window detection
This heater includes an open window detection function. If the control system
detects that the room temperature drops drastically in a short period of time while
the heating is in operation, it automatically detects that a window is open. The
open window indicator starts ashing in the display, the heating switches o for
30 minutes and automatically returns to the previous setting after 30 minutes.
You can switch this function on and o by pressing and holding the "-" key for
5 seconds, whereupon the open-window indicator in the display appears or
disappears accordingly.
Temperature calibration
Press and hold the + button for 5 seconds to enter temperature calibration. Adjust
the temperature calibration by pressing the + or - buttons. The calibration range is
between -5 and +5 degrees.
Resetting the Wi-Fi
Turn on the appliance and press the WLAN button for 5 seconds until the WLAN
indicator starts ashing and the WLAN connection is reset.
Switching the WLAN function on/o
Press the timer button for 10 seconds to switch o the WLAN function of the
heater. The WLAN indicator in the display disappears. Press the timer button for
10 seconds to switch the WLAN function back on.
24
EN
Manual operation
To access manual mode, turn on the power switch and press the on/o button
to turn on the heater. The "M" symbol appears in the display. Set the desired
temperature by pressing the + or - buttons. After 2 seconds, the display shows the
current room temperature again.
If you want to set the timer, press the timer button and "00H" appears in the
display. Set the desired time until the heating switches o automatically with the +
or - buttons.
Child safety lock
Press the On/O button on the control panel for 5 seconds to activate the child
lock. CL" is shown on the display. Press the On/O button for 5 seconds to
deactivate the child lock.
DEVICE CONTROL VIA SMARTPHONE
If you integrate your Klarstein appliance into your home WLAN, you can operate
it conveniently via the associated Klarstein app. The app not only allows you to
control the appliance remotely via your smartphone, but also gives you access to
recipes and further information.
Follow these steps to connect your smartphone to your Klarstein appliance:
1. First download the Klarstein app by scanning the QR code with your
smartphone (see below) or download it directly from the App Store or Google
Play.
2. Make sure that your smartphone is connected to the same WiFi network that
your Klarstein device is to be connected to.
3. Open the Klarstein app.
4. Log in with your account. If you don't have an account yet, register in the
Klarstein app.
5. Follow the instructions in the app.
App download
Use the scan function of your mobile phone to scan the QR code and save the app
on your smartphone.
Note: Further instructions on how to use the app and help on how to connect to
your device are provided by the app when you open it for the rst time.
25
EN
iOS Android
Troubleshooting connection problems
If your Klarstein device cannot be found in the WLAN, check the following:
• Is the unit plugged in?
• Is the WLAN function of the smartphone activated?
• Is the WLAN function of the Klarstein device activated? (Follow the instructions
in the app)
• Has the WiFi password been entered correctly?
• Are the router, Klarstein device and smartphone in close proximity during the
pairing attempt? (Ideally no more than 5 m apart)
• If you have deactivated the 2.4 GHz band in the settings of your WLAN router,
activate it in your router settings.
Note: For further assistance, follow the app's instructions when establishing the
connection.

26
EN
CLEANING AND CARE
Note: Switch o the appliance and remove the plug from the socket. Wait until
the appliance has cooled down completely before cleaning it.
• Do not spray or immerse the device in water or any other liquid.
• Clean the heater with a soft, damp cloth. For models made of glass, use a soft
cloth and glass cleaner.
• Do not use abrasive cleaners, solvents or hard cleaning sponges as this may
cause scratches or other irreparable damage.
• Never use a wet cloth, and dry the heater with a dry cloth after cleaning.
Before you put the heater back into operation, it must be completely dry.
Notes on use
• Note that the heater may become discoloured with regular use. This is due to
air pollution and does not indicate a malfunction.
• Do not cover your heater with a picture lm and do not paint or print on it.
This could damage the heating element and will void the warranty.
• If you notice any noises, smells, visible damage or unusually high
temperatures, stop operating the heater and contact the manufacturer or
customer service.
Repairs
Repairs may only be carried out by qualied personnel. Contact the manufacturer
or customer service for this purpose. Do not attempt to repair the heater yourself
or modify the appliance.
27
EN
DISPOSAL CONSIDERATIONS
If there is a legal regulation for the disposal of electrical
and electronic devices in your country, this symbol on the
product or on the packaging indicates that this product
must not be disposed of with household waste. Instead,
it must be taken to a collection point for the recycling
of electrical and electronic equipment. By disposing of
it in accordance with the rules, you are protecting the
environment and the health of your fellow human beings
from negative consequences. For information about the
recycling and disposal of this product, please contact your
local authority or your household waste disposal service.
This product contains batteries. If there is a legal regulation
for the disposal of batteries in your country, the batteries must
not be disposed of with household waste. Find out about local
regulations for disposing of batteries. By disposing of them in
accordance with the rules, you are protecting the environment
and the health of your fellow human beings from negative
consequences.
DECLARATION OF CONFORMITY
Manufacturer:
Chal-Tec GmbH, Wallstrasse 16, 10179 Berlin, Germany.
Importer for Great Britain:
Berlin Brands Group UK Ltd
PO Box 1145
Oxford, OX1 9UW
United Kingdom
Hereby, Chal-Tec GmbH declares that the radio equipment
type Taal Smart is in compliance with Directive 2014/53/EU.
The full text of the EU declaration of conformity is available at
the following internet address: use.berlin/10041869
For Great Britain: Hereby, Chal-Tec GmbH declares that the
radio equipment type Taal Smart is in compliance with the
relevant statutory requirements. The full text of the declaration
of conformity is available at the following internet address:
use.berlin/10041869
28
EN
PRODUCT DATA SHEET
Model identier(s) 10041869, 10041870
Specication Symbol Value Unit Specication Unit
Heat output Only for electric storage room heaters: Type of heat
supply control
Nominal heat output P
nom
0.75 kW Manual control of the heat supply with
integrated thermostat
no
Minimum heat output
(guide value)
P
min
0.0 kW Manual control of the heat supply with
feedback of the room and/or outside
temperature
no
Maximum continuous heat
output
Pmax
,c
0.75 kW Electronic control of the heat supply with
feedback of the room and/or outside
temperature
no
Auxiliary power consumption Heat output with fan support no
Nominal heat output el
max
0.75 kW Type of heat output/room temperature control
With minimum heat output el
min
0.0 kW Single stage heat output, no room
temperature control
no
Standby mode el
SB
0.001 W Two or more manually adjustable levels, no
room temperature control
no
Room temperature control with mechanical
thermostat
no
With electronic room temperature control no
With electronic room temperature control and
time of day control
no
With electronic room temperature control and
day of week control
yes
Other regulatory options
Room temperature control with presence
detection
no
Room temperature control with open window
detection
yes
With remote control option no
With adaptive control of the heating start no
With operating time limit no
With black ball sensor no
Contact details Chal-Tec GmbH, Wallstraße 16, 10179 Berlin, Germany.

29
ES
Estimado cliente:
Le felicitamos por la adquisición de este producto. Lea
atentamente el siguiente manual y siga cuidadosamente
las instrucciones de uso con el n de evitar posibles daños.
La empresa no se responsabiliza de los daños ocasionados
por un uso indebido del producto o por haber desatendido
las indicaciones de seguridad. Escanee el siguiente código
QR para obtener acceso al manual de usuario más reciente
e información adicional sobre el producto.
ÍNDICE
Indicaciones de seguridad 30
Montaje en pared 32
Funcionamiento 34
Control del aparato a través del smartphone 36
Limpieza y cuidado 38
Indicaciones sobre la retirada del aparato 39
Declaración de conformidad 39
Ficha del producto 40
DATOS TÉCNICOS
Número del artículo 10041869, 10041870
Suministro eléctrico 220-240 V ~ 50 Hz
Potencia 750 W
Estándar wi
802.11 b/g/n
Frecuencia wi
2,4 GHz
Potencia de transmisión wi (máx.)
20 dBm

30
ES
INDICACIONES DE SEGURIDAD
Indicaciones de seguridad especí cas del aparato
• El calentador de infrarrojos alcanza una temperatura super cial de
aproximadamente 95 °C durante su funcionamiento cuando está montado
en la pared. NO toque el calefactor por infrarrojos cuando esté encendido. El
contacto prolongado con la piel puede causar lesiones o quemaduras.
• NO cubra el calentador, esto puede causar sobrecalentamiento e incendios.
• La estufa NO debe utilizarse para secar textiles y no se deben colocar objetos
sobre el aparato ni apoyarlos en él.
• Mantenga una distancia mínima de 40 cm al frente y 20 cm a los lados de
todos los objetos y paredes. De lo contrario, el calor puede acumularse detrás
del calentador e invalidar la garantía.
• La estufa está diseñada para ser montada en la pared, no la monte en el
techo.
• Puede manejar fácilmente la calefacción con su smartphone, a través de
la misma WLAN, de otra WLAN o de una red móvil 3G o 4G. Esto permite
controlar el aparato sin necesidad de una supervisión directa. No obstante,
asegúrese de que se respetan todas las medidas de seguridad especi cadas
en las instrucciones de uso, incluso cuando se utiliza el aparato a distancia.
• Asegúrese de que las entradas y salidas de aire no pueden estén
cubiertas bajo ninguna circunstancia, de lo contrario esto provocará el
sobrecalentamiento del calentador.
Peligros para los niños y las personas con capacidades reducidas
• Los niños a partir de 8 años y las personas con capacidades físicas, sensoriales
o mentales reducidas o con falta de experiencia o conocimientos pueden
utilizar este aparato siempre que se les supervise o instruya sobre cómo usar
el mismo de forma segura y entiendan los peligros que conlleva.
• No permita que los niños jueguen con el aparato. No permita que los niños
realicen tareas de mantenimiento o limpieza si no se encuentran bajo
supervisión.
• Los niños menores de 3 años deben mantenerse alejados del calentador a
menos que estén supervisados en todo momento.
• Los niños de entre 3 y 8 años sólo pueden encender y apagar el aparato si
se ha colocado o instalado en la posición de funcionamiento normal prevista
y han sido supervisados o instruidos para un empleo seguro del aparato y
comprenden los peligros que conlleva. Los niños de entre 3 y 8 años no deben
conectar el aparato a la red eléctrica, ni realizar ajustes o trabajos de limpieza
o mantenimiento en él.
ATENCIÓN
¡Riesgo de quemaduras! Algunas partes del aparato pueden
calentarse mucho y causar quemaduras. Hay que tener especial
cuidado cuando hay niños y personas vulnerables.
31
ES
• Si el cable de alimentación está dañado, debe ser sustituido por el fabricante,
el servicio de atención al cliente o una persona con cuali cación similar para
evitar un peligro.
• NO haga funcionar el calefactor en habitaciones pequeñas si hay personas en
la habitación que no pueden salir por sí mismas. La super cie del calefactor
puede alcanzar una temperatura super cial de hasta 95 °C. Asegúrese de que
el aparato y el cable de alimentación estén fuera del alcance de los niños y
personas con discapacidad.
• Mantenga a los bebés y a los niños alejados de todos los materiales de
embalaje, como por ejemplo las bolsas de plástico, para evitar el riesgo de
as xia.
Indicaciones de seguridad eléctrica
• Apague y desenchufe el calentador antes de la instalación, reparación o
mantenimiento. Antes de la instalación, asegúrese de que no haya daños en
el aparato.
• Si el calefactor o el cable de alimentación están dañados de alguna manera,
NO utilice el calefactor. Póngase en contacto con el fabricante o el servicio
de atención al cliente para reparar o sustituir la unidad. Las reparaciones,
el mantenimiento o las modi caciones sólo pueden ser realizadas por el
fabricante, el servicio de atención al cliente o especialistas cuali cados.
• NO intente reparar el calentador usted mismo ya que esto invalidará la
garantía.
• Si la estufa se ha caído, NO la ponga en funcionamiento y póngase en
contacto con el fabricante o el servicio posventa para asegurarse de que no
hay daños.
• Este calefactor está diseñado para funcionar con una red 220-240 V, 50 Hz CA.
Si su red eléctrica no cumple este requisito, NO utilice el aparato.
• La calefacción no debe estar situado directamente debajo de una toma de
corriente.
ADVERTENCIA
¡Riesgo de lesiones! ADVERTENCIA: no utilice el aparato si la
super cie de cristal está dañada.
ADVERTENCIA
¡Riesgo de lesiones! No utilice el calefactor en habitaciones
pequeñas si hay personas en ellas que no pueden salir de la
habitación de forma independiente, a menos que se garantice una
supervisión permanente.
32
ES
MONTAJE EN PARED
Pared
Plantilla para el montaje en la pared
Pared
Pared
Pared
Pared
Pared
33
ES
• Paso 1: Utiliza la plantilla suministrada para marcar la posición de los agujeros
en la pared.
• Paso 2: Perfora los agujeros en la pared con una broca de 8 mm.
• Paso 3: introduzca los tacos en los oricios.
• Paso 4: Atornille los tornillos suministrados a la pared.
• Paso 5: Coloque el soporte de pared en el calentador desde la parte posterior
del panel y luego je el panel a los tornillos en la pared.
• Paso 6. Deslice el panel hacia la derecha y luego hacia abajo hasta que quede
jado.
Nota: El kit de montaje incluido en el volumen de suministro está previsto
para el montaje horizontal en una pared estable. Para el montaje en otros
tipos de paredes, se necesitan las jaciones correspondientes (no incluidas
en el suministro). Asegúrese de que la pared es adecuada para el montaje.
Se recomienda encarecidamente que el panel sea instalado por personal
electricista cualicado o por un instalador autorizado por el fabricante. El
calentador debe estar al menos a 20 cm de distancia de todos los objetos,
paredes, etc.
• Este calefactor está diseñado únicamente para el montaje horizontal en la
pared. No se permite el montaje vertical en la pared.
• Para utilizar la estufa de forma independiente, instale las patas en la parte
inferior de la estufa.
34
ES
FUNCIONAMIENTO
Instrucciones generales sobre los elementos de control
La gama Taal Smart cuenta con una unidad de control wi integrada, lo que
signica que no se necesita ningún termostato adicional para controlar el
calefactor. En cuanto la estufa se conecta a la APP, el smartphone toma el control
y se comunica con la unidad de control. Si no hay Internet en casa, la calefacción
puede seguir funcionando a través del mando a distancia o de los botones de
la unidad de control. En cuanto la calefacción se conecta de nuevo a la WLAN, el
smartphone vuelve a tomar el control.
Panel de control y mando a distancia
1 Botón de encendido/apagado 4 - Clave (inferior)
2 Botón wi 5 Botón del temporizador
3 + tecla (aumentar) 6 Indicación del estado de la
calefacción

35
ES
Indicadores de visualización
1 Día de la semana
2 Ventana abierta de visualización
3 Pantalla del temporizador
4 Indicador WiFi
5 Hora
6 Temperatura
7 Modos:
M = Modo manual
P = Duración del programa
(P1-P4)
H = Modo de vacaciones
Detección de ventanas abiertas
Esta calefacción está equipado con una función de detección de ventana abierta.
Si el sistema de control detecta que la temperatura de la habitación desciende
drásticamente en un breve periodo de tiempo mientras la calefacción está en
funcionamiento, detecta automáticamente que hay una ventana abierta. El
indicador de ventana abierta comienza a parpadear en la pantalla, la calefacción
se apaga durante 30 minutos y vuelve automáticamente al ajuste anterior
después de 30 minutos.
Esta función puede activarse y desactivarse manteniendo pulsada la tecla "-"
durante 5 segundos, tras lo cual aparece o desaparece el indicador de ventana
abierta en la pantalla.
Calibración de la temperatura
Mantenga pulsado el botón + durante 5 segundos para entrar en la calibración de
la temperatura. Ajuste la calibración de la temperatura pulsando los botones + o -.
El rango de calibración se sitúa entre -5 y +5 grados.
Restablecer el wi
Encienda el aparato y pulse el botón WLAN durante 5 segundos hasta que el
indicador WLAN empiece a parpadear y se restablezca la conexión WLAN.
36
ES
Activación/desactivación de la función WLAN
Pulse el botón del temporizador durante 10 segundos para desconectar la función
WLAN del calefactor. El indicador WLAN en la pantalla desaparece. Pulse el botón
del temporizador durante 10 segundos para volver a activar la función WLAN.
Funcionamiento manual
Para entrar en el modo manual, encienda el interruptor de alimentación y pulse
el botón de encendido/apagado para encender el calentador. El símbolo M se
visualiza en la pantalla. Ajuste la temperatura deseada pulsando los botones + o
-. Después de 2 segundos, la pantalla vuelve a mostrar la temperatura ambiente
actual.
Si desea ajustar el temporizador, pulse el botón del temporizador y aparecerá
"00H" en la pantalla. Ajuste el tiempo deseado hasta que la calefacción se apague
automáticamente con los botones + o -.
Bloqueo infantil
Pulse el botón de encendido/apagado del panel de control durante 5 segundos
para activar el bloqueo para niños. En la pantalla aparece "CL". Pulse el botón de
encendido/apagado durante 5 segundos para desactivar el bloqueo para niños.
CONTROL DEL APARATO A TRAVÉS DEL
SMARTPHONE
Si conecta su aparato Klarstein a la red Wi de su casa, podrá manejarlo
cómodamente a través de la aplicación «Klarstein». La aplicación no solo permite
controlar el aparato a distancia a través del smartphone, sino que también da
acceso a recetas y a más información.
Siga los siguientes pasos para conectar su teléfono inteligente al aparato Klarstein:
1. En primer lugar, descargue la aplicación Klarstein escaneando el código QR
con su teléfono inteligente (véase más abajo) o descárguela directamente
desde la App Store o Google Play.
2. Asegúrese de que el teléfono inteligente está conectado a la misma red Wi a
la que desea conectar el aparato Klarstein.
3. Abra la aplicación de Klarstein
4. Inicie sesión con su cuenta. Si aún no tiene una cuenta, regístrese en la
aplicación de Klarstein.
5. Sigue las instrucciones de la aplicación.
37
ES
Descarga de la aplicación
Utilice la función de escaneo del teléfono para escanear el código QR y guardar la
aplicación en el móvil.
Nota: la primera vez que abra la aplicación, esta proporciona más instrucciones
sobre el uso de la aplicación y ayuda sobre cómo conectarse al aparato.
iOS Android
Solución de problemas de conexión
Si su aparato Klarstein no se conecta a la red wi, compruebe lo siguiente:
• ¿Está el aparato enchufado?
• ¿Está activada la función wi del teléfono inteligente?
• ¿Está activada la función wi del aparato? (Siga las instrucciones de la
aplicación.)
• ¿Se ha introducido correctamente la contraseña de la red wi?
• ¿Están el router, el aparato Klarstein y el teléfono inteligente muy cerca
durante el intento de emparejamiento? (Lo ideal es que no haya más de 5 m
de distancia entre ellos).
• Si ha desactivado la banda de 2,4 GHz en los ajustes de su router wi, actívela
en los ajustes de su router.
Nota: Para obtener más ayuda, siga las instrucciones de la aplicación al
establecer una conexión.

38
ES
LIMPIEZA Y CUIDADO
Nota: apague el aparato y desconecte el enchufe de la toma de corriente.
Espere a que el aparato se haya enfriado por completo antes de limpiarlo.
• Nunca sumerja el aparato en agua ni en ningún otro líquido ni lo pulverice con
líquidos.
• Limpie el calentador con un paño suave y húmedo. Para los modelos de
cristal, use un paño suave y un limpiacristales.
• No utilice limpiadores abrasivos, disolventes o esponjas de limpieza duras, ya
que pueden causar arañazos u otros daños irreparables
• No utilice nunca un paño húmedo y seque la estufa con un paño seco después
de limpiarla. Antes de volver a poner el calentador en funcionamiento, debe
estar completamente seco.
Notas sobre el uso correcto
• Tenga en cuenta que el calentador puede decolorarse con el uso regular. Esto
se debe a la contaminación del aire y no indica un mal funcionamiento.
• No cubra su calentador con una película de imagen y no pinte ni imprima
sobre él. Esto podría dañar la resistencia y anularía la garantía.
• Si observa ruidos, olores, daños visibles o temperaturas inusualmente altas,
deje de utilizar el calentador y póngase en contacto con el fabricante o el
servicio de atención al cliente.
Reparación
Las reparaciones sólo deben ser realizadas por una persona cualicada para ello.
Contacta además con el servicio técnico o el fabricante. No intente reparar la
estufa usted mismo ni modicar el aparato.
39
ES
INDICACIONES SOBRE LA RETIRADA DEL APARATO
Si en su país existe una disposición legal relativa a la
eliminación de aparatos eléctricos y electrónicos, este
símbolo estampado en el producto o en el embalaje
advierte que no debe eliminarse como residuo doméstico.
En lugar de ello, debe depositarse en un punto de
recogida de reciclaje de aparatos eléctricos y electrónicos.
Una gestión adecuada de estos residuos previene
consecuencias potencialmente negativas para el medio
ambiente y la salud de las personas. Puede consultar más
información sobre el reciclaje y la eliminación de este
producto contactando con su administración local o con
su servicio de recogida de residuos.
Este producto contiene baterías. Si en su país existe una
disposición legal relativa a la eliminación de baterías,
estas no deben eliminarse como residuo doméstico.
Infórmese sobre la normativa vigente relacionada con
la eliminación de baterías. Una gestión adecuada de
estos residuos previene consecuencias potencialmente
negativas para el medio ambiente y la salud de las
personas.
DECLARACIÓN DE CONFORMIDAD
Fabricante:
Chal-Tec GmbH, Wallstraße 16, 10179 Berlín, Alemania.
Importador para Gran Bretaña:
Berlin Brands Group UK Ltd
PO Box 1145
Oxford, OX1 9UW
United Kingdom
Por la presente, Chal-Tec GmbH declara que el tipo de
equipo radioeléctrico Taal Smart es conforme con la
Directiva 2014/53/UE. El texto completo de la declaración
UE de conformidad está disponible en la dirección Internet
siguiente: use.berlin/10041869
40
ES
FICHA DEL PRODUCTO
Denominación(es) del
modelo
10041869, 10041870
Datos Símbolo Valor Unidad Datos Unidad
Potencia caloríca Solo en calefactores eléctricos para habitaciones
individuales: tipo de regulación del suministro de calor
Potencia caloríca nominal P
nom
0,75 kW Regulación manual del suministro caloríco
con termostato integrado
no
Potencia caloríca mínima
(valor de referencia)
P
mín.
0,0 kW Regulación manual del suministro caloríco
con reacción de la temperatura ambiente o
exterior
no
Potencia caloríca
continuada máxima
P
máx
0,75 kW Regulación electrónica del suministro
caloríco con reacción de la temperatura
ambiente o exterior
no
Consumo de corriente auxiliar Emisión de calor con soporte de ventilador no
Con potencia caloríca
nominal
el
máx.
0,75 kW Tipo de potencia caloríca/controles de temperatura
ambiente
Con potencia caloríca
mínima
el
mín.
0,0 kW Potencia caloríca de nivel único, sin control
de temperatura ambiente
no
En modo de espera el
SB
0,001 W Dos o más niveles ajustables manualmente,
sin control de temperatura ambiente
no
Controles de temperatura ambiente con
termostato mecánico
no
Con control de temperatura ambiente
electrónico
no
Con control de temperatura ambiente
electrónico y regulación de las horas del día
no
Con control de temperatura ambiente
electrónico y regulación de los días de la
semana
sí
Otras opciones de regulación
Controles de temperatura ambiente con
detección de presencia
no
Controles de temperatura ambiente con
detección de ventana abierta
sí
Con opción de mando a distancia no
Con regulación adaptativa del inicio de la
calefacción
no
Con limitación de tiempo de funcionamiento no
Con sensor de bola negra no
Datos de contacto Chal-Tec GmbH, Wallstraße 16, 10179, Berlín, Alemania.
41
FR
Cher client, chère cliente,
Toutes nos félicitations pour l’acquisition de ce nouvel
appareil. Lisez attentivement les indications suivantes et
suivez-les pour éviter d'éventuels dommages. Nous ne
saurions être tenus pour responsables des dommages dus
au non-respect des consignes et à la mauvaise utilisation
de l’appareil. Scannez le QR-Code pour obtenir la dernière
version du mode d'emploi ainsi que d'autres informations
concernant le produit.
SOMMAIRE
Consignes de sécurité 42
Montage mural 44
Utilisation 46
Contrôle de l’appareil par smartphone 48
Nettoyage et entretien 50
Informations sur le recyclage 51
Déclaration de conformité 51
Fiche de données produit 52
FICHE TECHNIQUE
Numéro d'article 10041869, 10041870
Alimentation 220-240 V ~ 50 Hz
Puissance 750 W
Norme WiFi
802.11 b/g/n
Fréquence de WiFi
2,4 GHz
Puissance d'émission de WiFi (max)
20 dBm
42
FR
CONSIGNES DE SÉCURITÉ
Consignes de sécurité spéci ques de l'appareil
• Pendant son fonctionnement, le radiateur infrarouge atteint une température
de surface d'environ 95 °C lorsqu'il est monté au mur. Ne touchez PAS
le radiateur lorsqu'il est allumé. Un contact prolongé avec la peau peut
provoquer des blessures ou des brûlures.
• NE PAS couvrir le radiateur car cela peut entraîner une surchau e et un
incendie.
• Le radiateur ne doit PAS être utilisé pour sécher des textiles et aucun objet ne
doit être posé sur l'appareil ou appuyé contre celui-ci.
• Gardez une distance minimale de 40 cm à l'avant et de 20 cm sur les côtés
par rapport aux autres objets et murs. Le non-respect de cette consigne peut
entraîner une accumulation de chaleur derrière le radiateur et invalider la
garantie.
• Le radiateur est prévu pour un montage mural, ne le montez pas au plafond.
• Le radiateur se commande facilement avec votre smartphone, sur le même
réseau WiFi, un autre réseau WiFi ou un réseau de téléphonie mobile 3G ou
4G. Cela permet de contrôler l'appareil sans surveillance directe. Néanmoins,
veillez à ce que toutes les mesures de sécurité spéci ées dans le mode
d'emploi soient respectées, même lorsque vous utilisez l'appareil à distance.
• Assurez-vous que les entrées et les sorties d'air ne peuvent en aucun cas être
couvertes, car cela entraînerait une surchau e du radiateur.
Dangers pour les enfants et les personnes à capacités réduites
• Les enfants à partir de 8 ans et les personnes sou rant de handicaps
mentaux, sensoriels et physiques ne peuvent utiliser l'appareil que s'ils ont été
parfaitement familiarisés avec les fonctions et les précautions de sécurité par
une personne responsable et s'ils comprennent les risques associés.
• Les enfants ne sont pas autorisés à jouer avec l'appareil. Le nettoyage et
l'entretien ne doivent pas être réalisés par des enfants sans surveillance.
• Les enfants de moins de 3 ans doivent être tenus à l'écart de l'appareil s'ils ne
sont pas surveillés en permanence.
• Les enfants âgés de 3 à moins de 8 ans ne doivent pas mettre l'appareil en
marche ou l'arrêter, à moins qu'il ne soit placé ou installé dans la position
normale d'utilisation prévue et qu'ils soient surveillés ou aient reçu des
instructions sur la manière d'utiliser l'appareil en toute sécurité et de
comprendre les risques qu'il présente. Les enfants de 3 à moins de 8 ans ne
doivent pas brancher, régler ou nettoyer l'appareil, ni e ectuer des travaux
d'entretien sur l'appareil.
ATTENTION
Risque de brûlure ! Certaines parties de cet appareil peuvent être
très chaudes et provoquer des brûlures. Il convient d'être
particulièrement vigilant en présence d'enfants et de personnes
handicapées.
43
FR
• Si le cordon d'alimentation est endommagé, il doit être remplacé par le
fabricant, le service après-vente ou une personne de quali cation similaire
a n d'éviter tout danger.
• N'utilisez PAS le radiateur dans de petites pièces si les personnes présentes
ne peuvent quitter la pièce par elles-mêmes. La surface du radiateur peut
atteindre une température de 95 °C. Assurez-vous que l'appareil et le cordon
d'alimentation sont hors de portée des enfants et des personnes handicapées.
• Tenez les bébés et les enfants à l'écart de tous les matériaux d'emballage, tels
que les sacs en plastique, a n d'éviter tout risque d'étou ement.
Règles de sécurité électrique
• Éteignez et débranchez le radiateur avant de l'installer, de le réparer ou
de l'entretenir. Avant l'installation, assurez-vous que l'appareil n'est pas
endommagé.
• Si le radiateur ou le cordon d'alimentation est endommagé d'une manière
ou d'une autre, n'utilisez PAS le radiateur. Contactez le fabricant ou le service
après-vente pour une réparation ou un remplacement de l'appareil. Les
réparations ne peuvent être e ectuées que par le fabricant, le service clients
ou des spécialistes quali és.
• N'essayez PAS de réparer vous-même le radiateur, car cela entraînerait
l'annulation de la garantie.
• Si le radiateur a fait une chute, ne le mettez PAS en service, mais contactez
le fabricant ou le service après-vente pour vous assurer qu'il n'est pas
endommagé.
• Ce radiateur est conçu pour fonctionner sur courant alternatif 220-240 V, 50
Hz. Si votre réseau électrique ne répond pas à cette exigence, vous ne devez
PAS utiliser l'appareil.
• Le radiateur ne doit pas être placé directement sous une prise de courant.
MISE EN GARDE
Risque de blessure ! N'utilisez pas le radiateur si la surface vitrée
est endommagée.
MISE EN GARDE
Risque de blessure ! N'utilisez pas le radiateur dans les petites
pièces s'il s'y trouve des personnes qui ne peuvent pas quitter la
pièce par leurs propres moyens, sauf si une surveillance constante
est assurée.

44
FR
MONTAGE MURAL
Mur
Gabarit pour le montage mural
Mur
Mur
Mur
Mur
Mur

45
FR
• Étape 1 : Utilisez le gabarit fourni pour marquer la position des trous sur le
mur.
• Étape 2 : Percez des trous dans le mur avec une mèche de 8 mm.
• Étape 3 : Insérez les chevilles dans les trous.
• Étape 4 : Vissez les vis fournies sur le mur.
• Étape 5 : Fixez le support mural au radiateur à partir de l'arrière du panneau,
puis xez le panneau aux vis dans le mur.
• Étape 6 : Poussez le panneau vers la droite puis vers le bas jusqu'à ce qu'il soit
xé.
Remarque : Le kit de montage inclus dans la livraison est prévu pour un
montage horizontal sur un mur stable. Pour le montage sur d'autres types de
murs, il vous faudra d'autres éléments de xation appropriés (non inclus dans
la livraison). Assurez-vous que le mur est adapté à l'installation. Il est fortement
recommandé de faire installer le panneau par un électricien qualié ou un
installateur agréé par le fabricant. Le radiateur doit être à au moins 20 cm de
tous les objets, murs, etc.
• Ce radiateur est uniquement prévu pour un montage mural horizontal. Un
montage mural vertical n'est pas autorisé.
• Pour une utilisation autonome du radiateur , installez les pieds sur la partie
inférieure du radiateur.

46
FR
UTILISATION
Instruction générale pour les éléments de commande
La gamme Taal Smart est dotée d'une unité de contrôle Wi intégrée, ce qui
signie qu'aucun thermostat supplémentaire n'est nécessaire pour contrôler le
chauage. Dès que le radiateur est connecté à l'application, le smartphone prend
le contrôle et communique avec l'unité de contrôle. Si l'Internet ne fonctionne pas
à la maison, le radiateur peut toujours se commander par télécommande ou avec
les touches de l'unité de commande. Dès que le radiateur est reconnecté au Wi,
le smartphone reprend le contrôle.
Panneau de commande et télécommande
1 Touche de marche/arrêt 4 Touche - (diminuer)
2 Touche Wi 5 Touche de minuterie
3 Touche + (augmenter) 6 Achage de l'état du radiateur

47
FR
Voyants à l'écran
1 Jour de semaine
2 Témoin de fenêtres ouvertes
3 Achage de la minuterie
4 Témoin de Wi
5 Horloge
6 Température
7 Modes :
M = Mode manuel
P = durée du programme
(P1-P4)
H = Mode vacances
Détection de fenêtre ouverte
Ce radiateur est équipé d'une fonction de détection de fenêtre ouverte. Si le
système de contrôle détecte une chute rapide de la température de la pièce dans
un court laps de temps alors que le radiateur est en marche, il conclut qu'une
fenêtre est ouverte. Le témoin de fenêtre ouverte commence à clignoter sur
l'écran, le chauage s'éteint pendant 30 minutes et revient automatiquement au
réglage précédent après 30 minutes.
Vous pouvez activer ou désactiver cette fonction en maintenant la touche « - »
pendant 5 secondes, après quoi le témoin de fenêtre ouverte apparaît ou disparaît
à l'écran en conséquence.
Étalonnage de la température
Maintenez la touche + pendant 5 secondes pour accéder à l'étalonnage de la
température. Réglez l'étalonnage de la température en appuyant sur les touches +
ou -. La plage d'étalonnage est comprise entre -5 et +5 degrés.
Réinitialisation du Wi
Allumez le radiateur et appuyez sur la touche de WIFI pendant 5 secondes jusqu'à
ce que le voyant Wi clignote et que la connexion Wi soit réinitialisée.
48
FR
Activer/désactiver la fonction WiFi
Appuyez sur la touche de la minuterie pendant 10 secondes pour désactiver la
fonction WiFi du radiateur. Le témoin de WiFi sur l'écran disparaît. Appuyez sur la
touche de la minuterie pendant 10 secondes pour réactiver la fonction WiFi.
Fonctionnement manuel
Pour passer en mode manuel, allumez l'interrupteur et appuyez sur la touche
On/O pour mettre le radiateur en marche. Le symbole « M » apparaît à l'écran.
Appuyez sur + ou - pour régler la température souhaitée. Après 2 secondes, l'écran
ache à nouveau la température ambiante actuelle.
Pour régler la minuterie, appuyez sur la touche de la minuterie. L'écran ache «
00H ». Réglez la durée souhaitée avant l'arrêt automatique du radiateur à l'aide
des touches + ou -.
Verrouillage parental
Appuyez sur la touche de marche/arrêt du panneau de commande pendant 5
secondes pour activer le verrouillage parental. L'écran ache « CL ». Appuyez sur
la touche de marche/arrêt pendant 5 secondes pour désactiver le verrouillage
parental.
CONTRÔLE DE L'APPAREIL PAR SMARTPHONE
Si vous intégrez votre appareil Klarstein à votre WiFi domestique, vous pouvez
le contrôler confortablement à l'aide de l'application Klarstein associée.
L'application vous permet non seulement de contrôler l'appareil à distance sur
votre smartphone, mais vous donne également accès à des recettes et à d'autres
informations.
Procédez comme suit pour connecter votre smartphone à votre appareil Klarstein :
1. Téléchargez d'abord l'application Klarstein en scannant le code QR avec votre
smartphone (voir ci-dessous) ou téléchargez-la directement depuis l'App Store
ou Google Play.
2. Assurez-vous que votre smartphone est connecté au réseau WiFi auquel vous
voulez connecter votre appareil Klarstein.
3. Ouvrez l'application Klarstein.
4. Connectez-vous à votre compte. Si vous n'avez pas encore de compte,
enregistrez-vous dans l'application Klarstein.
5. Suivez les instructions dans l'application.
49
FR
Téléchargement de l'application
Utilisez la fonction scan de votre téléphone portable pour scanner le code QR et
enregistrer l'application sur votre smartphone.
Remarque : Au premier démarrage, l'application vous fournit des informations
supplémentaires sur son utilisation et une assistance pour établir une
connexion avec votre appareil.
iOS Android
Résolution des problèmes de connexion
Si votre appareil Klarstein est introuvable sur le Wi, vériez les points suivants :
• L'appareil est-il branché ?
• Le Wi est-il activé sur le smartphone ?
• Le Wi est-il activé sur l'appareil Klarstein ? (Suivez les instructions dans
l'application.)
• Avez-vous saisi correctement le mot de passe Wi ?
• Le routeur, l'appareil Klarstein et le smartphone se trouvent-ils à proximité
immédiate lors de la tentative d'appairage ? (Idéalement pas plus de 5 m l'un
de l'autre.)
• Si vous avez désactivé la bande 2,4 GHz dans les paramètres de votre routeur
sans l, activez-la dans les paramètres de votre routeur.
Remarque : Pour obtenir de l'aide, suivez les instructions de l'application lors de
l'établissement de la connexion.
50
FR
NETTOYAGE ET ENTRETIEN
Remarque : Éteignez l'appareil et débranchez la che de la prise. Attendez que
l'appareil refroidisse complètement avant de le nettoyer.
• Ne vaporisez pas l'appareil avec des liquides et ne l'immergez pas dans l'eau
ou d'autres liquides.
• Nettoyez le radiateur avec un chion doux et humide. Pour les modèles en
verre, utilisez un chion doux et un produit de nettoyage pour les vitres.
• N'utilisez pas de produits abrasifs, de solvants ou d'éponges dures, car cela
peut entraîner des rayures ou d'autres dommages irréparables à l'appareil.
• N'utilisez jamais un chion mouillé et essuyez l'appareil avec un chion
sec après le nettoyage. Avant de remettre l'appareil en service, il doit être
complètement sec.
Consignes d'utilisation
• Notez que le radiateur peut se décolorer s'il est utilisé régulièrement. Cela est
dû à la pollution de l'air et n'indique aucun dysfonctionnement.
• Ne collez pas de lm photo sur votre radiateur et ne peignez pas ou
n'imprimez pas dessus. Cela pourrait endommager l'élément chauant et
entraîner l'annulation de la garantie.
• Si vous remarquez un bruit, une odeur, des dommages visibles ou des
températures anormalement élevées, cessez d'utiliser le radiateur et contactez
le fabricant ou le service client.
Réparations
Les réparations doivent être eectuées par un spécialiste qualié exclusivement.
Contactez pour cela le fabricant ou le service clients. N'essayez pas de réparer ou
de modier l'appareil vous-même.
51
FR
INFORMATIONS SUR LE RECYCLAGE
S‘il existe une réglementation pour l‘élimination ou le
recyclage des appareils électriques et électroniques dans
votre pays, ce symbole sur le produit ou sur l‘emballage
indique que cet appareil ne doit pas être jeté avec les
ordures ménagères. Vous devez le déposer dans un point
de collecte pour le recyclage des équipements électriques
et électroniques. La mise au rebut conforme aux règles
protège l‘environnement et la santé de vos semblables
des conséquences négatives. Pour plus d‘informations
sur le recyclage et l‘élimination de ce produit, veuillez
contacter votre autorité locale ou votre service de
recyclage des déchets ménagers.
Ce produit contient des piles. S‘il existe une
réglementation pour l‘élimination ou le recyclage des
piles dans votre pays, vous ne devez pas les jeter avec les
ordures ménagères. Renseignez-vous sur les dispositions
locales relatives à la collecte des piles usagées. La mise au
rebut conforme aux règles protège l‘environnement et la
santé de vos semblables des conséquences négatives.
DÉCLARATION DE CONFORMITÉ
Fabricant :
Chal-Tec GmbH, Wallstraße 16, 10179 Berlin, Allemagne.
Importateur pour la Grande Bretagne :
Berlin Brands Group UK Ltd
PO Box 1145
Oxford, OX1 9UW
United Kingdom
Le soussigné, Chal-Tec GmbH, déclare que l’équipement
radioélectrique du type Taal Smart est conforme à la
directive 2014/53/UE. Le texte complet de la déclaration UE
de conformité est disponible à l’adresse internet suivante :
use.berlin/10041869
52
FR
FICHE DE DONNÉES PRODUIT
Référence(s) du modèle 10041869, 10041870
Donnée Symbole Valeur Unité Donnée Unité
Puissance thermique Uniquement pour les radiateurs électriques à
accumulation : type de contrôle de l'apport de chaleur
Puissance thermique
nominale
P
nom
0,75 kW Contrôle manuel de l'apport de chaleur avec
un thermostat intégré
non
Puissance thermique
minimale (valeur indicative)
P
min
0,0 kW Contrôle manuel de l'apport de chaleur avec
retour de la température ambiante et/ou
extérieure
non
Puissance thermique
continue maximale
P
max,c
0,75 kW Régulation électronique de l'apport de chaleur
avec retour de la température ambiante et/
ou extérieure
non
Consommation d'énergie auxiliaire Dissipation thermique avec assistance par
ventilateur
non
À puissance calorique
nominale
el
max
0,75 kW Type de puissance thermique / régulation de la
température ambiante
À puissance thermique
minimale
el
min
0,0 kW Puissance calorique à une vitesse, pas de
contrôle de la température ambiante
non
En veille el
SB
0,001 W Deux vitesses ou plus réglables
manuellement, pas de contrôle de la
température ambiante
non
Contrôle de la température ambiante par
thermostat mécanique
non
Contrôle électronique de la température
ambiante
non
Contrôle électronique de la température
ambiante et réglage de l'heure de la journée
non
Contrôle électronique de la température
ambiante et réglage des jours de la semaine
oui
Autres options de réglage
Régulation de la température ambiante avec
détection de présence
non
Régulation de la température ambiante avec
détection de fenêtre ouverte
oui
Avec option télécommande non
Avec contrôle adaptatif du démarrage du
chauage
non
Avec limite de durée de fonctionnement non
Avec capteur à boule noire non
Coordonnées de contact Chal-Tec GmbH, Wallstraße 16, 10179, Berlin, Allemagne

53
IT
Gentile cliente,
La ringraziamo per l'acquisto del dispositivo. La preghiamo
di leggere attentamente le seguenti indicazioni e di
seguirle per prevenire eventuali danni. Non ci assumiamo
alcuna responsabilità per danni scaturiti da una mancata
osservanza delle avvertenze di sicurezza e da un uso
improprio del dispositivo. Scansionare il seguente codice
QR per accedere al manuale d'uso più recente e ricevere
informazioni sul prodotto.
INDICE
Avvertenze di sicurezza 54
Montaggio a parete 56
Utilizzo 58
Controllo del dispositivo con smartphone 60
Pulizia e manutenzione 62
Avviso di smaltimento 63
Dichiarazione di conformità 63
Scheda informativa del prodotto 64
DATI TECNICI
Numero articolo 10041869, 10041870
Alimentazione 220-240 V ~ 50 Hz
Potenza 750 W
Standard WiFi
802.11 b/g/n
Frequenza Wi-Fi
2,4 GHz
Potenza di trasmissione Wi-Fi (max.)
20 dBm
54
IT
AVVERTENZE DI SICUREZZA
Avvertenze di sicurezza speci che del dispositivo
• La stufa a infrarossi raggiunge una temperatura super ciale di circa 95 °C
durante il funzionamento quando è installata a parete. NON toccare la stufa
quando è accesa. Il contatto prolungato con la pelle può causare lesioni o
ustioni.
• NON coprire la stufa per evitare surriscaldamenti e incendi.
• La stufa NON deve essere utilizzata per asciugare tessuti e non è consentito
appoggiare oggetti sopra o contro il dispositivo.
• Mantenere una distanza minima di 40 cm sul lato anteriore e di 20 cm sugli
altri lati del dispositivo da oggetti e pareti. In caso contrario, potrebbe
veri carsi un accumulo di calore dietro alla stufa e la garanzia perde validità.
• La stufa è progettata per il montaggio a parete. Non installarla sul so tto.
• La stufa può essere facilmente gestita con lo smartphone, tramite la stessa
rete WiFi, un'altra rete WiFi o una rete mobile 3G o 4G. Questo permette di
controllare il dispositivo senza monitoraggio diretto. Assicurarsi comunque
che tutte le misure di sicurezza speci cate nel manuale d'uso siano rispettate
anche quando si utilizza il dispositivo a distanza.
• Assicurarsi che le entrate e le uscite dell'aria non possano essere coperte in
nessun caso, altrimenti la stufa si surriscalda.
Pericoli per bambini e persone con capacità ridotte
• Questo dispositivo può essere utilizzato da bambini a partire da 8 anni e da
persone con limitate capacità siche, psichiche e sensoriali o con conoscenza
e/o esperienza insu cienti, solo se sono tenuti sotto controllo o se sono stati
istruiti sulle modalità di utilizzo sicuro del dispositivo e comprendono i rischi
che ne risultano.
• I bambini non devono giocare con il dispositivo. Pulizia e manutenzione non
possono essere realizzate da bambini senza la dovuta supervisione.
• I bambini sotto i 3 anni devono essere tenuti lontani dalla stufa a meno che
non siano costantemente sorvegliati.
• I bambini di età compresa tra i 3 e gli 8 anni possono accendere e spegnere
il dispositivo solo se è stato collocato o installato nella posizione di
funzionamento normale prevista e se sono stati sorvegliati o istruiti sull'uso
sicuro del dispositivo e comprendono i pericoli a esso connessi. I bambini
di età compresa tra i 3 e gli 8 anni non devono collegare, regolare, pulire il
dispositivo o eseguire lavori di manutenzione.
ATTENZIONE
Pericolo di ustioni! Alcuni componenti del dispositivo possono
diventare estremamente caldi e causare ustioni. È necessario
prestare particolare attenzione in presenza di bambini e persone a
rischio.

55
IT
• Se il cavo di alimentazione è danneggiato, deve essere sostituito dal
produttore, dal servizio di assistenza ai clienti o da una persona con quali ca
equivalente, in modo da evitare pericoli.
• NON utilizzare la stufa in stanze piccole se ci sono persone che non sono
in grado di lasciare il locale autonomamente. La super cie della stufa può
raggiungere una temperatura no a 95 °C. Assicurarsi che dispositivo e cavo di
alimentazione siano fuori dalla portata dei bambini e di persone con disabilità.
• Tenere i neonati e i bambini lontano da tutti i materiali di imballaggio come i
sacchetti di plastica per evitare il rischio di so ocamento.
Norme di sicurezza elettrica
• Spegnere e scollegare la stufa prima dell'installazione, della riparazione o della
manutenzione. Prima dell'installazione, assicurarsi che non ci siano danni al
dispositivo.
• Se la stufa o il cavo di alimentazione sono danneggiati in qualsiasi modo,
NON utilizzare il dispositivo. Contattare il produttore o il servizio di assistenza
ai clienti per la riparazione o la sostituzione del dispositivo. Riparazioni,
manutenzione o modi che devono essere eseguite solo da personale
quali cato.
• NON tentare mai di riparare la stufa autonomamente, altrimenti la garanzia
perde validità.
• Se la stufa è stata fatta cadere, non metterla in funzione, ma contattare il
produttore o il servizio di assistenza ai clienti per assicurarsi che non sia
danneggiata.
• Questa stufa è progettata per l'utilizzo con 220-240 V, 50 Hz AC. Se la rete
elettrica non soddisfa questo requisito, NON utilizzare il dispositivo.
• La stufa non deve essere posizionata direttamente sotto una presa di
corrente.
ATTENZIONE
Rischio di lesioni! La stufa non può essere utilizzata se la super cie
di vetro è danneggiata.
ATTENZIONE
Rischio di lesioni! Non usare il dispositivo in locali piccoli se ci sono
persone all'interno che non sono in grado di lasciare la stanza
autonomamente, a meno che non sia garantita una supervisione
costante.

56
IT
MONTAGGIO A PARETE
Parete
Dima per il montaggio a parete
Parete
Parete
Parete
Parete
Parete

57
IT
• 1° passaggio: utilizzare la dima fornita per segnare la posizione dei fori sulla
parete.
• 2° passaggio: praticare dei fori nel muro con una punta da 8 mm.
• 3° passaggio: inserire i tasselli nei fori.
• 4° passaggio: avvitare alla parete le viti in dotazione.
• 5° passaggio: ssare il supporto a parete alla stufa dal retro del pannello e poi
ssare il pannello alle viti nella parete.
• 6° passaggio: far scorrere il pannello verso destra e poi verso il basso no al
ssaggio.
Nota: il kit di montaggio in dotazione è destinato al montaggio orizzontale
su una parete stabile. Per il montaggio su pareti di altro tipo, sono necessari
elementi di ssaggio adeguati (non inclusi nella fornitura). Assicurarsi che la
parete sia adatta all'installazione. Si raccomanda vivamente di far installare
il pannello da un elettricista qualicato o da un installatore autorizzato dal
produttore. La stufa deve essere ad almeno 20 cm di distanza da tutti gli
oggetti, pareti, ecc.
• Questa stufa è progettata solo per il montaggio a parete orizzontale. Non è
consentito il montaggio a parete verticale.
• Per il posizionamento libero della stufa, installare i piedini sul fondo.
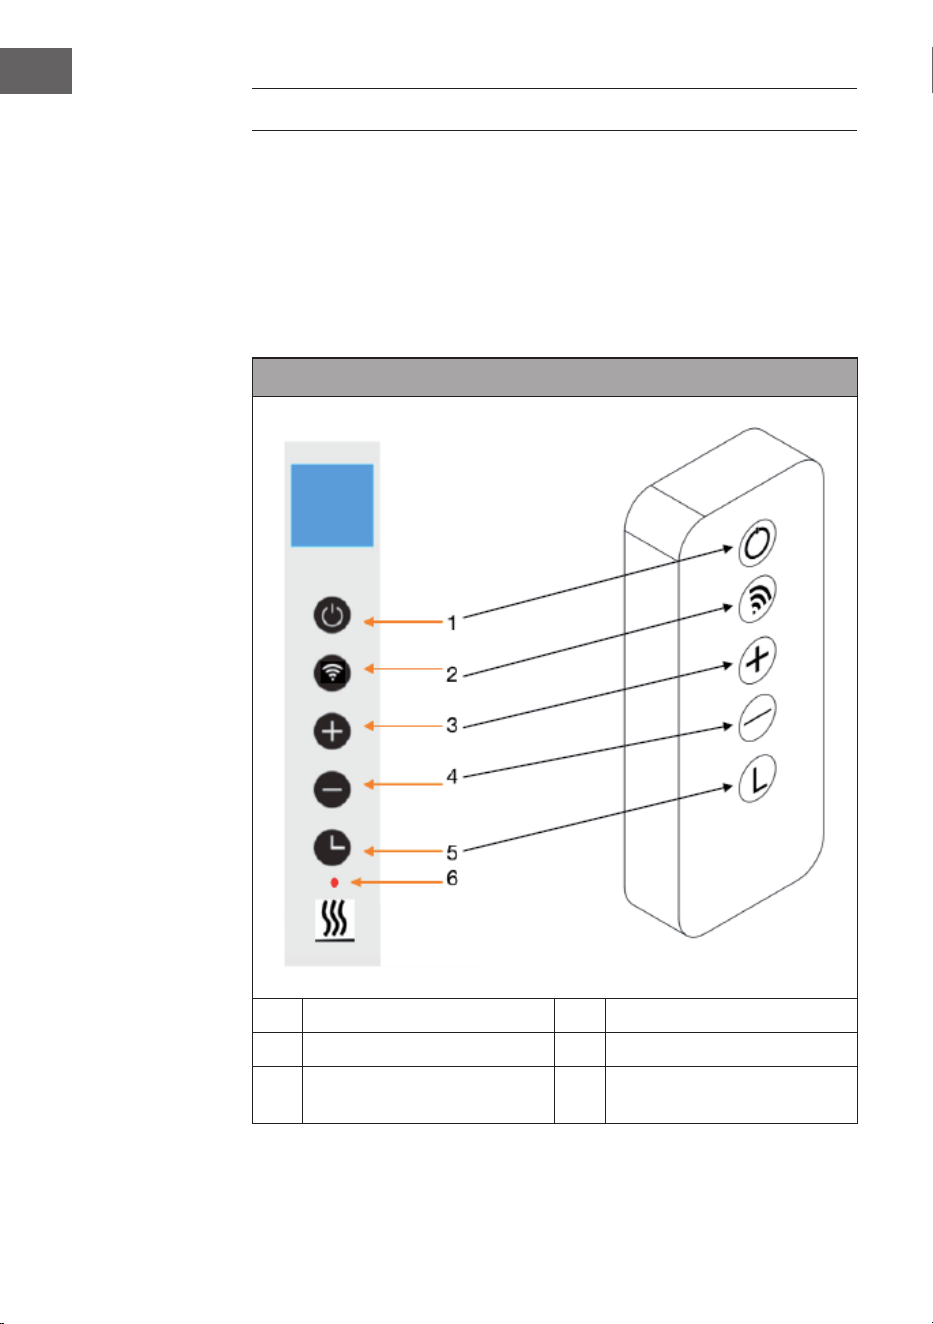
58
IT
UTILIZZO
Istruzioni generali sugli elementi di controllo
La gamma Taal Smart ha un'unità di controllo WiFi integrata, il che signica che
non è necessario un termostato aggiuntivo per controllare la stufa. Non appena
la stufa è collegata alla app, lo smartphone assume la gestione e comunica con
l'unità di controllo. Se a casa non funziona Internet, la stufa può ancora essere
gestita con il telecomando o i tasti sull'unità di controllo. Non appena la stufa è di
nuovo collegata al WiFi, lo smartphone riprende il controllo.
Pannello di controllo e telecomando
1 Tasto on/o 4 Tasto - (abbassare)
2 Tasto WiFi 5 Tasto timer
3 Tasto + (alzare) 6 Indicazione dello stato del
riscaldamento
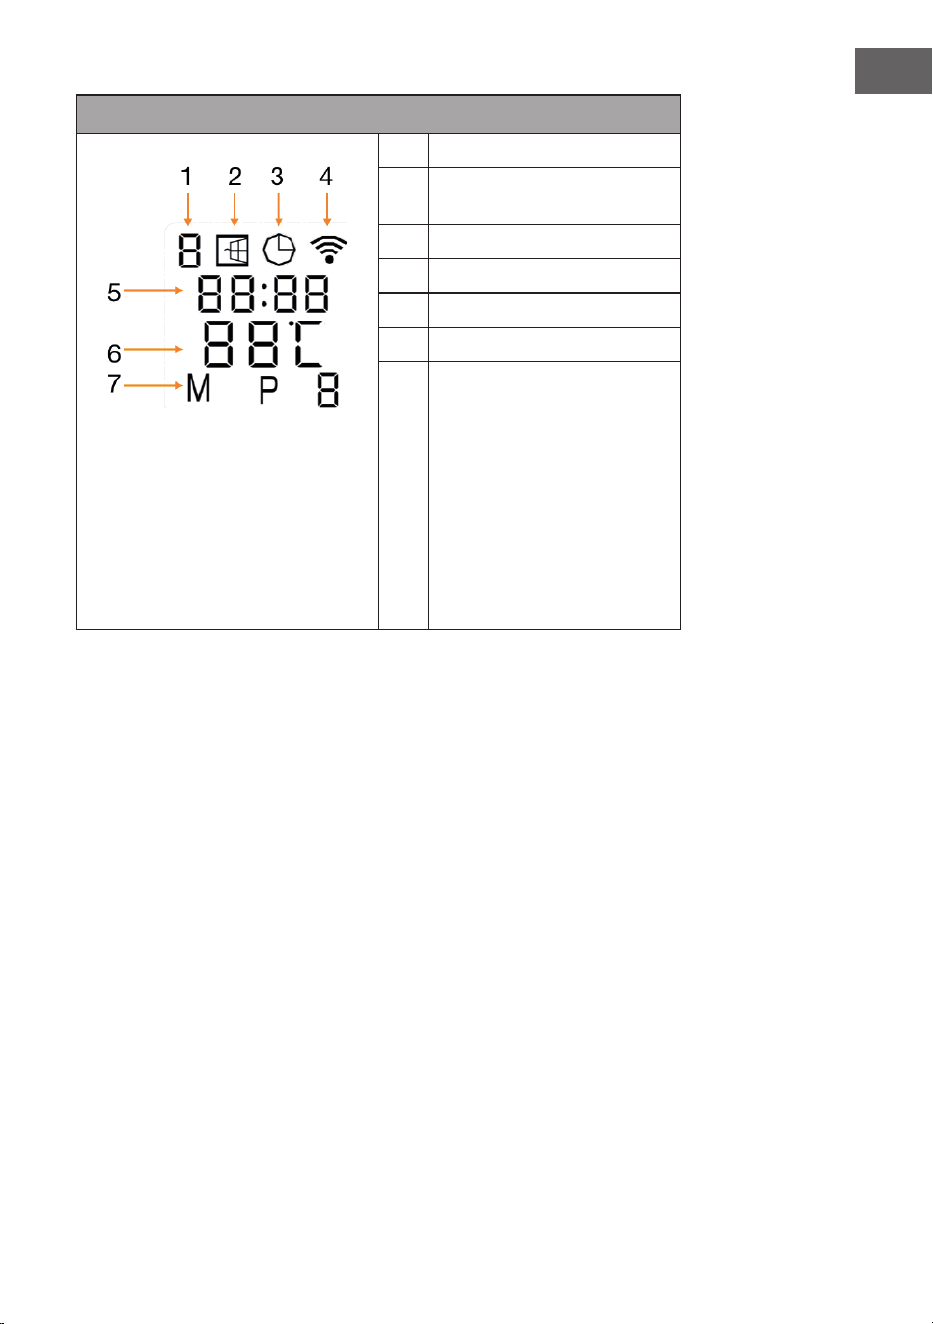
59
IT
Indicazioni del display
1 Giorno settimanale
2 Indicazione in caso di nestra
aperta
3 Indicazione del timer
4 Indicazione WiFi
5 Ora
6 Temperatura
7 Modalità:
M = modalità manuale
P = durata del programma
(P1-P4)
H = modalità vacanza
Rilevamento in caso di nestra aperta
Questa stufa è dotata di una funzione di rilevamento di nestre aperte. Se il
sistema di controllo rileva che la temperatura della stanza scende drasticamente
in un breve periodo di tempo mentre la stufa è in funzione, determina che
una nestra è aperta. L'indicazione per la nestra aperta inizia a lampeggiare
sul display, la stufa si spegne per 30 minuti e torna poi automaticamente
all'impostazione precedente.
Questa funzione può essere attivata o disattivata tenendo premuto il tasto "-"
per 5 secondi, dopodiché l'indicazione della nestra aperta sul display appare o
scompare di conseguenza.
Calibrazione della temperatura
Per accedere alla calibrazione della temperatura, tenere premuto il tasto + per
5 secondi. Regolare la calibrazione della temperatura premendo i tasti + o -.
L'intervallo di calibrazione è compreso tra -5 e +5 gradi.
Resettare il WiFi
Accendere il dispositivo e tenere premuto il tasto WiFi per 5 secondi nché
l'indicazione WiFi non inizia a lampeggiare e la connessione WiFi viene ripristinata.

60
IT
Attivazione/disattivazione della funzione WiFi
Premere il tasto del timer per 10 secondi per disattivare la funzione WiFi della
stufa. L'indicazione WiFi sul display scompare. Premere il tasto del timer per 10
secondi per riattivare la funzione WiFi.
Utilizzo manuale
Per entrare in modalità manuale, accendere l'interruttore di rete e premere il
tasto On/O per accendere la stufa. Il simbolo "M" compare sul display. Impostare
la temperatura desiderata premendo + o -. Dopo 2 secondi, il display mostra
nuovamente la temperatura ambiente attuale.
Se si desidera impostare il timer, premere il tasto timer e sul display compare
"00H". Impostare il tempo desiderato no allo spegnimento automatico della stufa
con i tasti + o -.
Blocco di sicurezza per bambini
Tenere premuto il tasto On/O sul pannello di controllo per 5 secondi per attivare
il blocco di sicurezza per bambini. Sul display compare "CL". Tenere premuto il
tasto On/O per 5 secondi per disattivare il blocco di sicurezza per bambini.
CONTROLLO DEL DISPOSITIVO CON SMARTPHONE
Se si collega il dispositivo Klarstein con la rete WiFi di casa, è possibile utilizzarlo
comodamente con l’apposita app di Klarstein. La app non permette solo di
controllare il dispositivo a distanza con lo smartphone, ma ore anche accesso a
utili informazioni.
Procedere in questo modo per collegare lo smartphone al dispositivo Klarstein:
1. Scaricare la app di Klarstein scansionando il codice QR (v. sotto) con lo
smartphone o scaricandola direttamente dall’App Store o da Google Play.
2. Assicurarsi che lo smartphone sia collegato alla stessa rete WiFi con cui si
desidera connettere il dispositivo Klarstein.
3. Aprire la app di Klarstein.
4. Accedere con il proprio account. Se ancora non si dispone di un account,
eettuare la registrazione nella app di Klarstein.
5. Seguire le istruzioni della app.
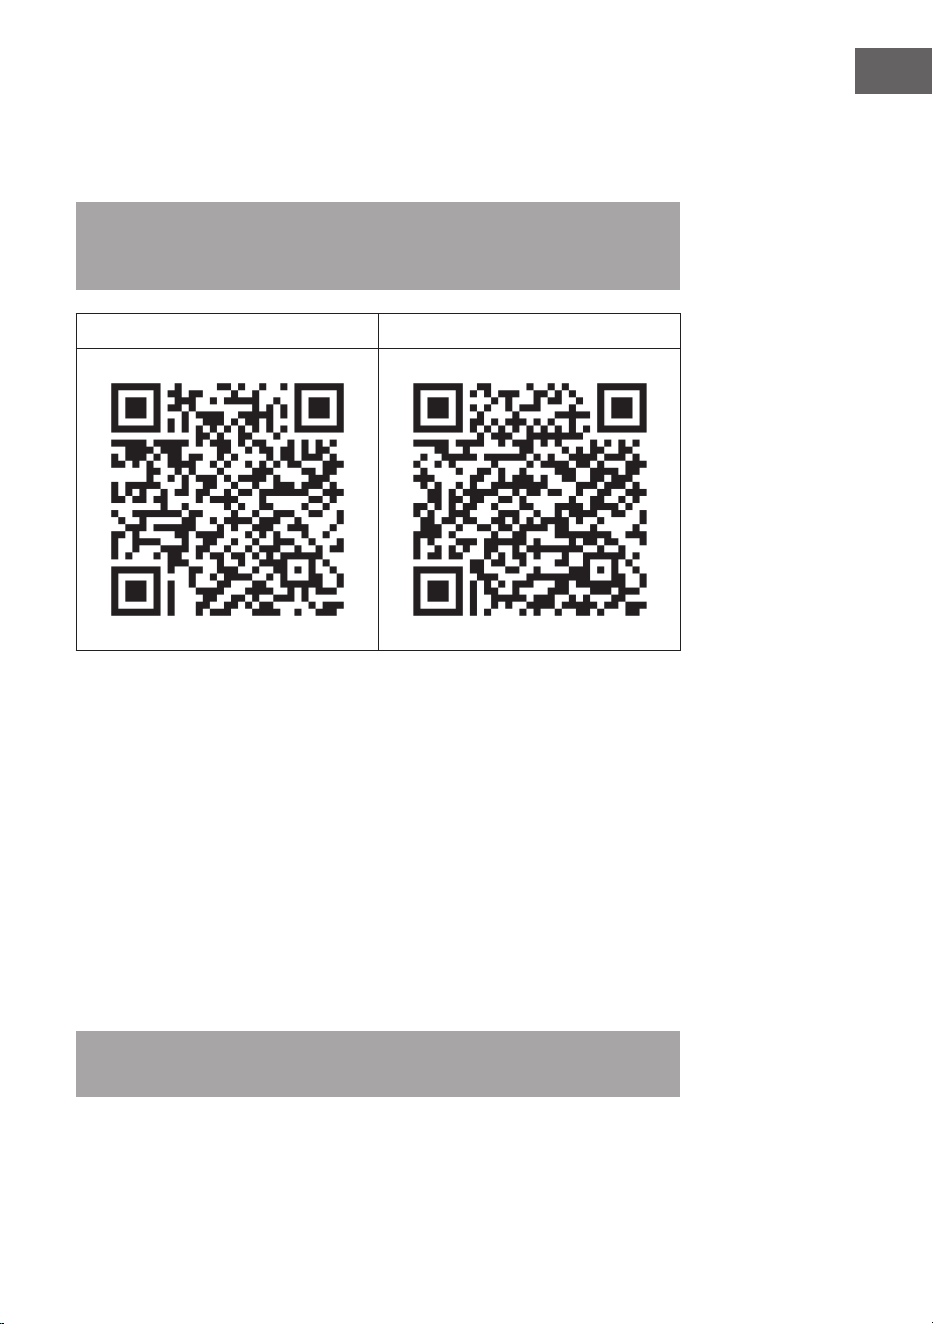
61
IT
Download della app
Utilizzare la funzione di scansione dello smartphone per scansionare il codice QR
e salvare la app sullo smartphone.
Nota: ulteriori informazioni sull’utilizzo della app e supporto per stabilire la
connessione con il dispositivo vengono fornite dalla app non appena la si apre
per la prima volta.
iOS Android
Correzione degli errori in caso di problemi di connessione
Se non è possibile trovare il dispositivo Klarstein nella rete WiFi, controllare i
seguenti punti:
• La spina del dispositivo è collegata alla presa elettrica?
• La funzione Wi-Fi dello smartphone è attiva?
• La funzione Wi-Fi del dispositivo Klarstein è attiva? (seguire le indicazioni
nell’app)
• La password per la rete Wi-Fi è stata inserita correttamente?
• Router, dispositivo Klarstein e smartphone si trovano vicini tra loro mentre
si cerca di stabilire la connessione? (idealmente a non più di 5 metri l’uno
dall’altro)
• Se è stata disattivata la banda da 2,4 GHz nelle impostazioni del router Wi-Fi,
attivarla nelle impostazioni del router.
Nota: per ulteriore supporto, seguire le indicazioni per stabilire la connessione
nell'app.

62
IT
PULIZIA E MANUTENZIONE
Nota: spegnere il dispositivo e staccare la spina dalla presa. Attendere che il
dispositivo si sia completamente rareddato prima di pulirlo.
• Non spruzzare liquidi sul dispositivo e non immergerlo in acqua o altri liquidi.
• Pulire la stufa con un panno morbido e umido. Per i modelli in vetro usare un
panno morbido e un detergente per vetri.
• Non usare detergenti abrasivi, solventi o spugne dure perché potrebbero
causare gra o altri danni irreparabili.
• Non usare mai un panno bagnato e asciugare la stufa con un panno asciutto
dopo la pulizia. Prima che la stufa possa essere rimessa in funzione, deve
essere completamente asciutta.
Indicazioni sull'utilizzo
• Tenere presente che un uso regolare può causare lo scolorimento della stufa.
Ciò è dovuto all'inquinamento dell'aria e non indica un malfunzionamento.
• Non coprire la stufa con una pellicola fotograca, non dipingerla non
stamparci sopra. Ciò potrebbe danneggiare l'elemento riscaldante e invalidare
la garanzia.
• Se si notano rumori, odori, danni visibili o temperature insolitamente alte,
interrompere l'uso della stufa e contattare il produttore o il servizio clienti.
Riparazione
Eventuali riparazioni devono essere realizzate solo da personale qualicato. A
tal ne, contattare il produttore o il servizio di assistenza clienti. Non cercare di
riparare o modicare il dispositivo in modo autonomo.

63
IT
AVVISO DI SMALTIMENTO
Se nel proprio paese si applicano le regolamentazioni
inerenti lo smaltimento di dispositivi elettrici ed
elettronici, questo simbolo sul prodotto o sulla confezione
segnala che questi prodotti non possono essere
smaltiti con i ri uti normali e devono essere portati a
un punto di raccolta di dispositivi elettrici ed elettronici.
Grazie al corretto smaltimento dei vecchi dispositivi si
tutela il pianeta e la salute delle persone da possibili
conseguenze negative. Informazioni riguardanti il riciclo
e lo smaltimento di questi prodotti si ottengono presso
l’amministrazione locale oppure il servizio di gestione dei
ri uti domestici.
Il prodotto contiene batterie. Se nel proprio paese si
applicano le regolamentazioni inerenti lo smaltimento
di batterie, non possono essere smaltite con i normali
ri uti domestici. Preghiamo di informarvi sulle
regolamentazioni vigenti sullo smaltimento delle batterie.
Grazie al corretto smaltimento dei vecchi dispositivi si
tutela l’ambiente e la salute delle persone da conseguenze
negative.
DICHIARAZIONE DI CONFORMITÀ
Produttore:
Chal-Tec GmbH, Wallstraße 16, 10179 Berlino, Germania.
Importatore per la Gran Bretagna:
Berlin Brands Group UK Ltd
PO Box 1145
Oxford, OX1 9UW
United Kingdom
Il fabbricante, Chal-Tec GmbH, dichiara che il tipo di
apparecchiatura radio Taal Smart è conforme alla direttiva
2014/53/UE. Il testo completo della dichiarazione di
conformità UE è disponibile al seguente indirizzo Internet:
use.berlin/10041869
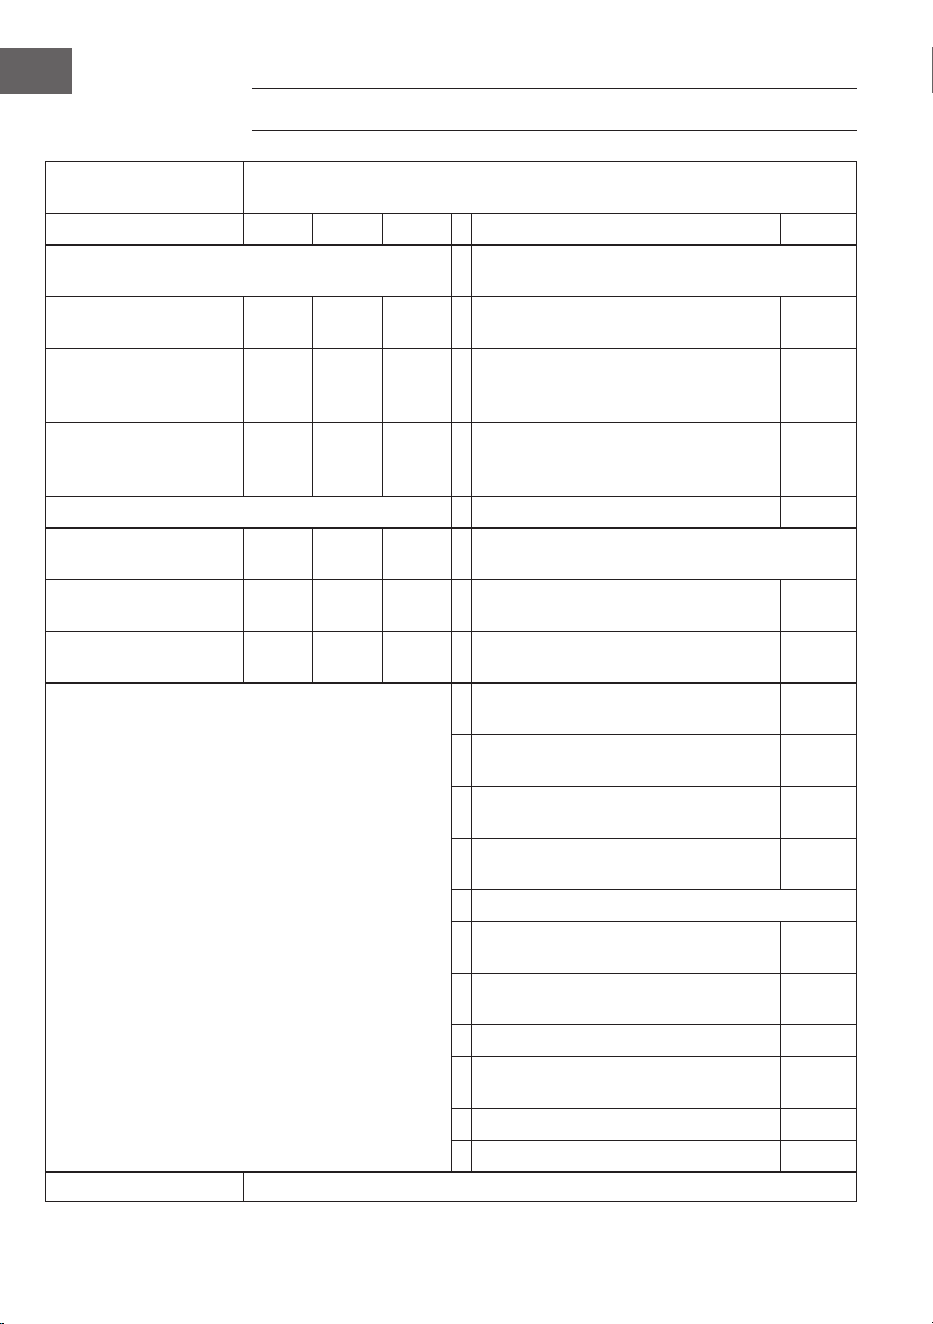
64
IT
SCHEDA INFORMATIVA DEL PRODOTTO
Contrassegno/i del
modello
10041869, 10041870
Indicazione Simbolo Valore Unità Indicazione Unità
Potenza termica Solo per dispositivi elettrici di accumulo di calore per
locali singoli: tipo di regolazione dell'ausso di calore
Potenza termica nominale P
nom
0,75 kW Controllo manuale dell'apporto termico con
termostato integrato
no
Potenza termica minima
(valore indicativo)
P
min
0,0 kW Controllo manuale dell'apporto termico con
riscontro della temperatura ambiente e/o
esterna
no
Potenza termica massima
continua
P
max,c
0,75 kW Controllo elettronico dell'apporto termico
con riscontro della temperatura ambiente e/o
esterna
no
Consumo di elettricità ausiliaria Rilascio termico con supporto del ventilatore no
Per la potenza termica
nominale
el
max
0,75 kW Tipo di potenza termica/controllo della temperatura
ambiente
Per la potenza termica
minima
el
min
0,0 kW Potenza termica di un solo livello, senza
controllo della temperatura ambiente
no
In modalità stand-by el
SB
0,001 W Due o più livelli impostabili manualmente,
senza controllo della temperatura ambiente
no
Controllo della temperatura ambiente con
termostato meccanico
no
Con controllo elettronico della temperatura
ambiente
no
Con controllo elettronico della temperatura
ambiente e timer giornaliero
no
Con controllo elettronico della temperatura
ambiente e timer settimanale
sì
Altre opzioni di controllo
Controllo della temperatura ambiente con
rilevamento di presenza
no
Controllo della temperatura ambiente con
rilevamento di nestre aperte
sì
Con opzione telecomando no
Con controllo di avvio adattabile del
riscaldamento
no
Con limitazione della durata operativa no
Con sensore a sfera nera no
Contatti Chal-Tec GmbH, Wallstraße 16, 10179, Berlino, Germania