

EN
STEAM GENERATOR
Translation of the original manual
SSI 0950BZ
SSI 0950BZ
A
1
2
3
4
5
6
7 8
9
10
11
12
13
14
15
16
17
B
1
POWER
+
–
–
2
3
4
6
7
8
9
5
C1
C2
D

- 1 -
07/2024
2024
EN Steam Generator
Important Safety Instructions
READ CAREFULLY AND STORE FOR FUTURE USE.
General Warnings
• This appliance may be only used by children aged 8 and
older and by persons with physical, sensory or mental
impairments or by inexperienced persons, if they are
properly supervised or have been informed about how
to use the product in asafe manner and understand the
potential dangers.
• Children must not play with the appliance. Cleaning and
maintenance must not be performed by children without
supervision.
• If the power cable is damaged, have it replaced in
aprofessional service centre in order to prevent
adangerous situation. It is forbidden to use the appliance
with the power cable damaged.
• The iron must not be left unattended when connected to
apower supply.
• The plug must be pulled out of the socket before filling the
water tank.
• Filling, descaling, rinsing or inspection openings under
pressure must not be opened during use.
• The iron must be used and used and placed on aflat and
stable surface.
- 2 -
07/2024
2024
• When placing the iron on the stand, ensure that the
surface on which the stand is located is stable.
• The iron must not be used if it has fallen, if there are visible
signs of damage, or if it leaks.
• Do not leave the iron and its power supply within reach
of children under 8 years of age when it is powered or
cooling.
WARNING. Hot surface.
• Surfaces may become hot during use.
Additional Important Safety Instructions forUse of the Appliance
• Before connecting the base to the power socket, ensure that the voltage indicated on its rating plate matches the voltage in the socket.
• Connect the base only to aproperly grounded socket. Do not use an extension cord.
• Do not touch the iron with wet or moist hands when connected to the power socket.
• To prevent the risk of electric shock, do not wash the iron or base under running water, spray it with water, or immerse it in water or any other liquid.
• Ensure that the power cable does not come into contact with water, moisture or aheated surface.
• Do not place heavy objects on the power cord. Make sure that the power cord does not hang over the edge of the table or touch hot surfaces or
sharp objects.
• Disconnect the base from the power socket by pulling the plug of the power cord, not the cable itself. Otherwise, damage to the power cord or the
socket may occur.
• Do not pull or carry the base by the power cord. Do not pull the iron by its cable.
• To avoid the risk of electric shock, do not repair the iron or base yourself or modify them in any way. All repairs should be carried out by an
authorised service centre. By interfering with the product, you risk losing the legal right to defective performance or warranty for quality.
• If the iron cable is damaged, have it replaced at aspecialised service centre. It is forbidden to use the iron with adamaged cable.
• The iron is intended for household use. Do not use it in an industrial environment or outdoors.
• Do not place the iron on or near an electric or gas stove or other sources of heat.
• Never iron clothes while wearing them.
• Do not touch the hot soleplate. Otherwise, burns may occur.
• Ironed clothes may be hot immediately after removing the iron. Take extra care to avoid burns.
• Never fill the water tank directly under the tap. Always use asuitable container for filling the tank. Do not add vinegar, descalers, or other additives to
the tank.
• Before cleaning or any other handling of the iron and the base that you have disconnected from the power socket, allow the soleplate to cool down.
• The steam generator will emit awarning signal and automatically shut down if the ambient temperature drops below 0 °C.

- 3 -- 3 -
07/2024
2024
• Thank you for purchasing our SENCOR product; we hope it will serve
to your satisfaction.
• Before using this appliance, please familiarise yourself with the user
manual, even if you are already familiar with using similar types of
appliances. Use the appliance only as described in this user manual.
Keep the manual for future reference.
• It is recommended to keep the original packaging, packing material,
receipt and confirmation of the extent of the seller'sliability or warranty
certificate at least for the duration of the legal right of defective
performance or quality guarantee. When transporting the appliance,
we recommend packaging it again in the original box provided by the
manufacturer.
. . . . . . . . . . . . . . . . . . . . . . . . . . . . . . . . . . . . . . . . . . . . . . . . . . . . . . . . . . . . . . . . . . . .
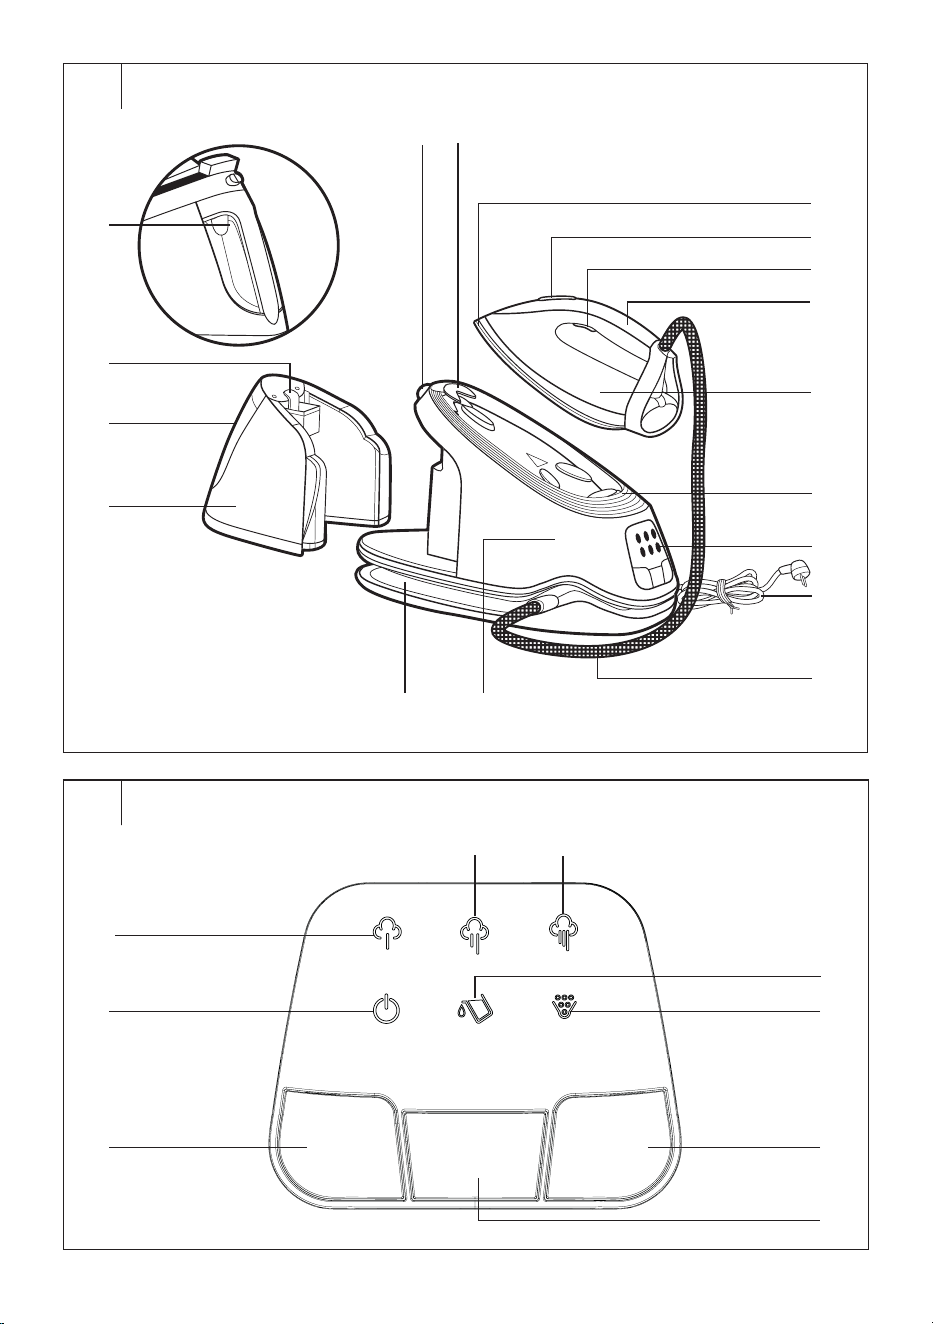
DESCRIPTION OF THE STEAM GENERATOR
A1 Water tank release button
A2 Filling opening
A3 Water tank handle
A4 Water tank
A5 Iron lock button
A6 Iron lock
A7 Iron cable storage space
A8 Steam generator base
A9 Soleplate
A10 Temperature indicator
A11 Steam release button
A12 Iron handle
A13 Iron
A14 Heat-insulated surface
A15 Control panel
A16 Power cord
A17 Iron cable
. . . . . . . . . . . . . . . . . . . . . . . . . . . . . . . . . . . . . . . . . . . . . . . . . . . . . . . . . . . . . . . . . . . .
DESCRIPTION OF THE CONTROL PANEL
B1 Power indicator
B2 Low temperature indicator
(145 ± 20 °C)
B3 Medium temperature indicator
(145 ± 20 °C)
B4 High temperature indicator
(160 ± 20 °C)
B5 Low water level indicator
B6 Descaling/cleaning indicator
B7 + button
B8 POWER button
B9 – button
. . . . . . . . . . . . . . . . . . . . . . . . . . . . . . . . . . . . . . . . . . . . . . . . . . . . . . . . . . . . . . . . . . . .
PURPOSE OF USE
• The steam generator iron is intended for ironing clothes, fabrics, or
materials specifically designed for ironing. Refer to the information
label on the clothes, fabric or material.
. . . . . . . . . . . . . . . . . . . . . . . . . . . . . . . . . . . . . . . . . . . . . . . . . . . . . . . . . . . . . . . . . . . .
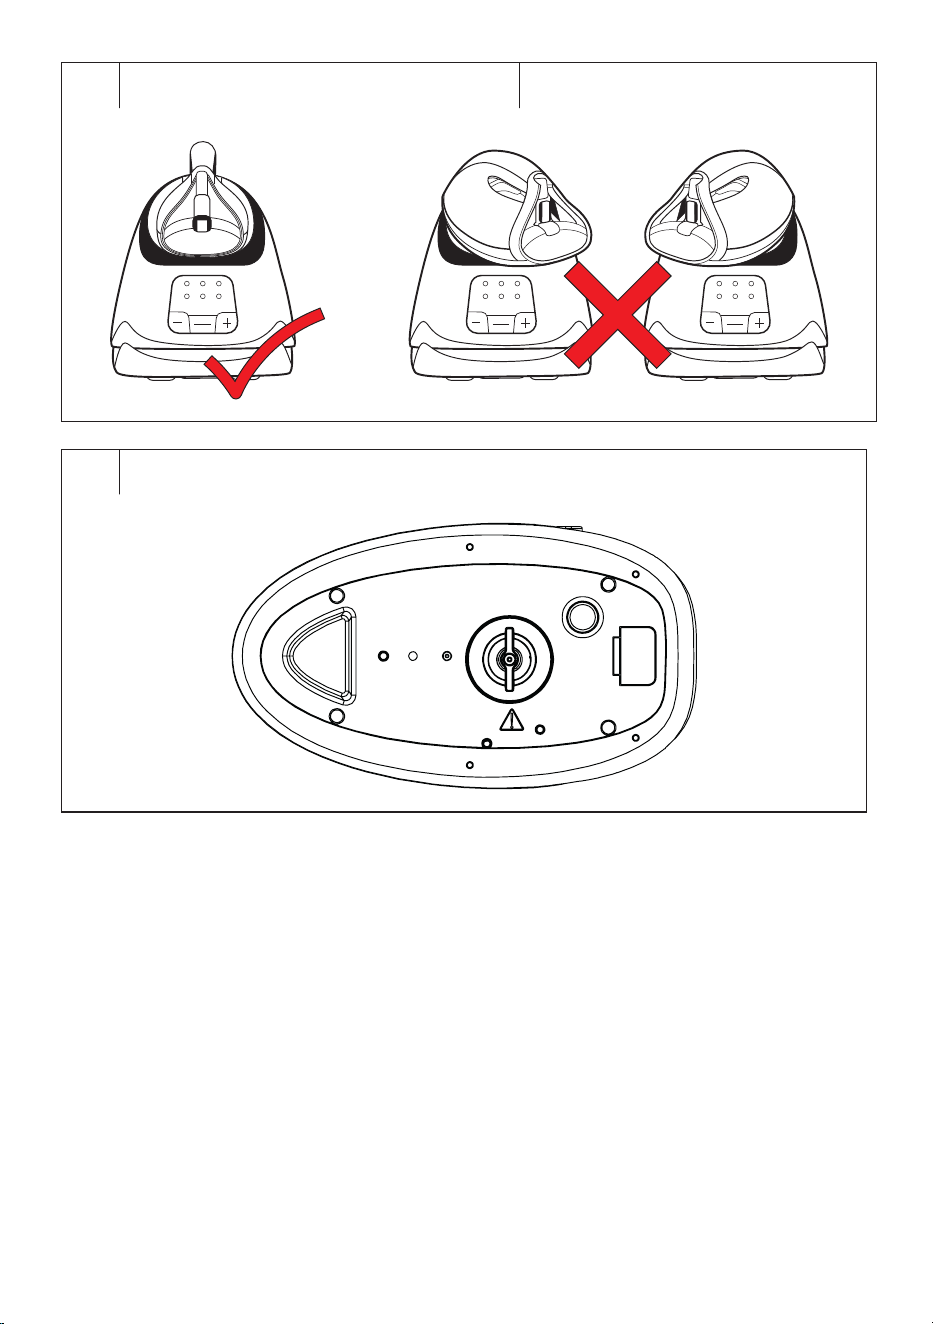
PLACING THE STEAM GENERATOR
• Place the steam generator on afirm, flat anddry surface at asufficient
distance from the power socket.
• Keep the steam generator at asufficient distance from heat andsteam
sensitive surfaces or materials.
• Place the iron flat on the heat-insulated surface – see figure C1. The
iron should not be placed on its side – see figure C2.
. . . . . . . . . . . . . . . . . . . . . . . . . . . . . . . . . . . . . . . . . . . . . . . . . . . . . . . . . . . . . . . . . . . .
BEFORE FIRST USE
• Before first use, remove the appliance and its accessories form the
packaging and discard all promotional labels and tags. Check that
neither the appliance nor any of its components is damaged.
• Wipe the soleplate of the iron with alightly damp cloth and then dry
it. Also, wipe the outer parts of the iron with adry or lightly damp cloth
and dry them thoroughly.
. . . . . . . . . . . . . . . . . . . . . . . . . . . . . . . . . . . . . . . . . . . . . . . . . . . . . . . . . . . . . . . . . . . .
PREPARATION FOR USE
Filling the Water Tank
Warning:
Always ensure that the steam generator is switched off
and the power cord plug is disconnected from the power
socket before filling the tank.
1. Press the water tank release button andpull the water tank out of the
base by the handle.
2. Remove the water tank cap andpour clean cold water into the tank.
Wipe any spilled water with adry cloth. The capacity of the tank is
approximately 1.5 l.
3. Put the cap back on, making sure it seals properly, andinsert the
tank back into the base.
• Use afilling measuring cup when filling the tank. Do not fill the water
tank directly from the tap.
• Do not overfill the tank. Always fill to the MAX mark indicated on the
tank during filling.
• Fill the tank only with clean cold tap water or use it incombination
withdistilled water, depending on the hardness of the water in your
area. The harder the water, the higher the distilled water ratio.
Warning:
Never fill the tank with hot or boiling water, service
water or any other liquid. Do not add water softener,
vinegar, starch, descaling agent, perfume mixes, or
other additives.
Iron lock
• Forsafety reasons, the steam generator is equipped with an iron lock.
• When the iron is placed on aheat-insulated surface, press the iron
lock button to release the lock and remove the iron.
• If you are ironing, leave the lock loose so that you can place the iron
on aheat-insulated surface during ironing.
• After ironing, place the iron on aheat-insulated surface andpress the
lock button to close the lock. The iron will not be removable from the
heat-insulated surface.
• If you want to place the iron on the heat-insulated surface but the lock
is locked, first press the lock button to release it, then place the iron on
the heat-insulated surface and press the lock button to lock it.
First Use of the Iron
• Before the first use of the iron, we recommend ironing asmall damp
cloth or towel with the iron at ahigh temperature to remove any
possible residues on the soleplate.
• You may notice astrange smell during the first use. This is anormal
occurrence. It disappears with use.
• During the first use of the iron, small particles or impurities may come
out of the holes on the soleplate. Do not be surprised or disturbed by
this. This does not affect the proper functioning of the steam generator.
Note:
After turning on, you will hear the sound of the pump.
This is anormal sound.
Note:
During the heating process of the soleplate, asmall
amount of water may flow from the soleplate. This is
anormal occurrence.
. . . . . . . . . . . . . . . . . . . . . . . . . . . . . . . . . . . . . . . . . . . . . . . . . . . . . . . . . . . . . . . . . . . .
EN
Steam Generator
User Manual
- 4 -- 4 -
07/2024
2024
USING THE STEAM GENERATOR
Connecting to aPower Source
• Place the steam generator on an ironing board or surface where you
will be ironing.
• Unwind the power cord completely andplug the power cord plug into
aproperly grounded power socket.
Turning On the Steam Generator
• Press the POWER button to turn the steam generator on. The power
indicator will light up.
• The low steam intensity indicator will flash on the display, indicating
the default setting. Aflashing indicator means that the steam
generator is heating up.
Temperature Setting
When the steam generator is on, use the + or – buttons to select the
temperature.
low temperature
medium temperature
high temperature
With each press of the + or - button, there will be ashort beep. The
indicator of the selected temperature will flash on the display. When it
lights up, the steam generator is ready foruse at the set temperature.
Temperature
Indicator
Temperature Fabric
Low
145 ± 20°C Acetate (artificial silk)
Fabrics withelastene
Polyamide
Polypropylene
Cupro
Polyester
Silk
Triacetate fabric
Viscose
Wool
Cotton
Linen
Medium
145 ± 20°C
High
160 ± 20°C
Note:
You can change the temperature during ironing. Always
wait for the indicator to light up. We recommend
sorting the clothes so that you iron it from low to high
temperatures.
Warning:
HOT SURFACE AND HOT STEAM!
Be especially careful when ironing andhandling the
iron. The soleplate and the steam temperature are very
hot. Serious injury and burns can occur with improper
handling.
Never touch the soleplate with your hands! Do not iron
clothes directly on yourself or on others!
Warning:
Never leave the steam generator on unattended. Pay
extra attention if children are near the steam generator,
even when it is turned off.
Ironing without Steam
• If you iron without steam, do not fill the water tank. Leave it empty.
• Use the +/– buttons to select the desired temperature and wait for the
indicator to light up.
Ironing withSteam
• Before ironing withsteam, it is necessary to refill the water tank.
Follow the instructions inthe “Filling the Tank” section.
• Use the +/– buttons to select the desired temperature and wait for the
indicator to light up.
• Press andhold the steam release button while ironing. Steam will
come out of the steam outlets. When you release the steam release
button, the steam release stops. This will allow you to use the iron for
use dry ironing even if there is water in the tank.
Steam Boost
• The steam boost releases alarger amount of steam at themaximum
temperature. Use this function for heavily wrinkled fabrics or garments
where you need to loosen fibers for easier ironing.
• Press the steam release button twice within 1 second to activate the
steam boost.
Putting the Iron Down during Ironing
• Place the iron on the heat-insulated surface of the steam generator
during ironing. Make sure the iron lock is released so you can easily
place the iron.
Refilling the Water Tank
• When the water inthe tank drops below the minimum level, the low
water level indicator in the tank will light up will light up and
ashort beep will sound twice.
• Refill the water tank following the instructions in the section “Filling
the Water Tank”.
Turning Off the Steam Generator
• After finishing ironing, press and hold the POWER button for
2seconds to turn the generator off. Icons on the display will go out.
• Disconnect the power cord from the power socket andallow the steam
generator to cool before cleaning.
Automatic Shutdown
• The steam generator will automatically turn off after about 10 minutes
of inactivity. To restart, press the POWER button.
Transporting the Steam Generator
• Before transporting the steam generator, make sure that the iron is
securely placed on aheat-insulated surface and that the iron lock is
locked.
• Coil the iron cable around the base. There is aspace into which the
cable can be inserted and wound. Coil and secure the power cord with
astrap to avoid stepping on it during transport.
• We recommend transporting the steam generator when it has cooled
down.
• Hold the steam generator by the base with both hands for comfortable
transport.
• The steam generator can also be transported by the iron handle
placed on the surface with the lock engaged. However, this method of
transport is only suitable for short distances.
. . . . . . . . . . . . . . . . . . . . . . . . . . . . . . . . . . . . . . . . . . . . . . . . . . . . . . . . . . . . . . . . . . . .
IRONING TIPS AND TRICKS
• Follow the care instructions foreach garment. Iron only solid-coloured
andheat-resistant fabrics. We recommend ironing theprinted clothes
inside out.
• Sort the clothes by temperature from low to high. Start ironing items at
alow temperature and gradually increase it, as the iron heats up faster
than it cools down.
• Never iron over areas with sweat stains or other stains. High heat will
set the stain making it difficult to remove.
• To prevent silk, wool, and synthetic fabrics from becoming shiny after
ironing, iron them inside out.
• Some materials are easier to iron when lightly damp.
• For fine fabrics, sprinkle water or iron over aslightly damp cloth. You
can also hold the iron about 2 cm above the fabric.
• Iron heavily wrinkled garments at ahigh temperature with steam and
use the steam boost function to loosen and straighten the fabric fibres.
• Avoid ironing zips, studs or other decorative parts of clothing. This
could damage the soleplate.
- 5 -- 5 -
07/2024
2024
• To prevent wrinkling, select an appropriate spin speed when washing
and hang the laundry correctly on the clothesline or rack. Hang
certain clothing items, such as shirts, on hangers, and dry sweaters,
cardigans, etc., on aflat surface.
. . . . . . . . . . . . . . . . . . . . . . . . . . . . . . . . . . . . . . . . . . . . . . . . . . . . . . . . . . . . . . . . . . . .
CLEANING AND MAINTENANCE
• Before cleaning, turn the iron off with the POWER button, unplug of
the power cord and let it cool down completely.
• Do not use abrasive cleaning agents, solvents, or any substances to
clean any parts of the appliance that could damage the surface of the
appliance.
Warning:
To prevent the risk of electric shock, do not immerse
the appliance, plug or power cord in water or any other
liquid.
Cleaning the Steam Generator
Wipe the soleplate of the iron with alightly damp cloth and then dry it.
Also, wipe the outer parts of the iron with adry or lightly damp cloth and
dry them thoroughly.
Removing Mineral Deposits
• When the descaling/cleaning indicator of the iron lights up,
it is necessary to clean the steam generator to prevent excessive
accumulation of mineral deposits.
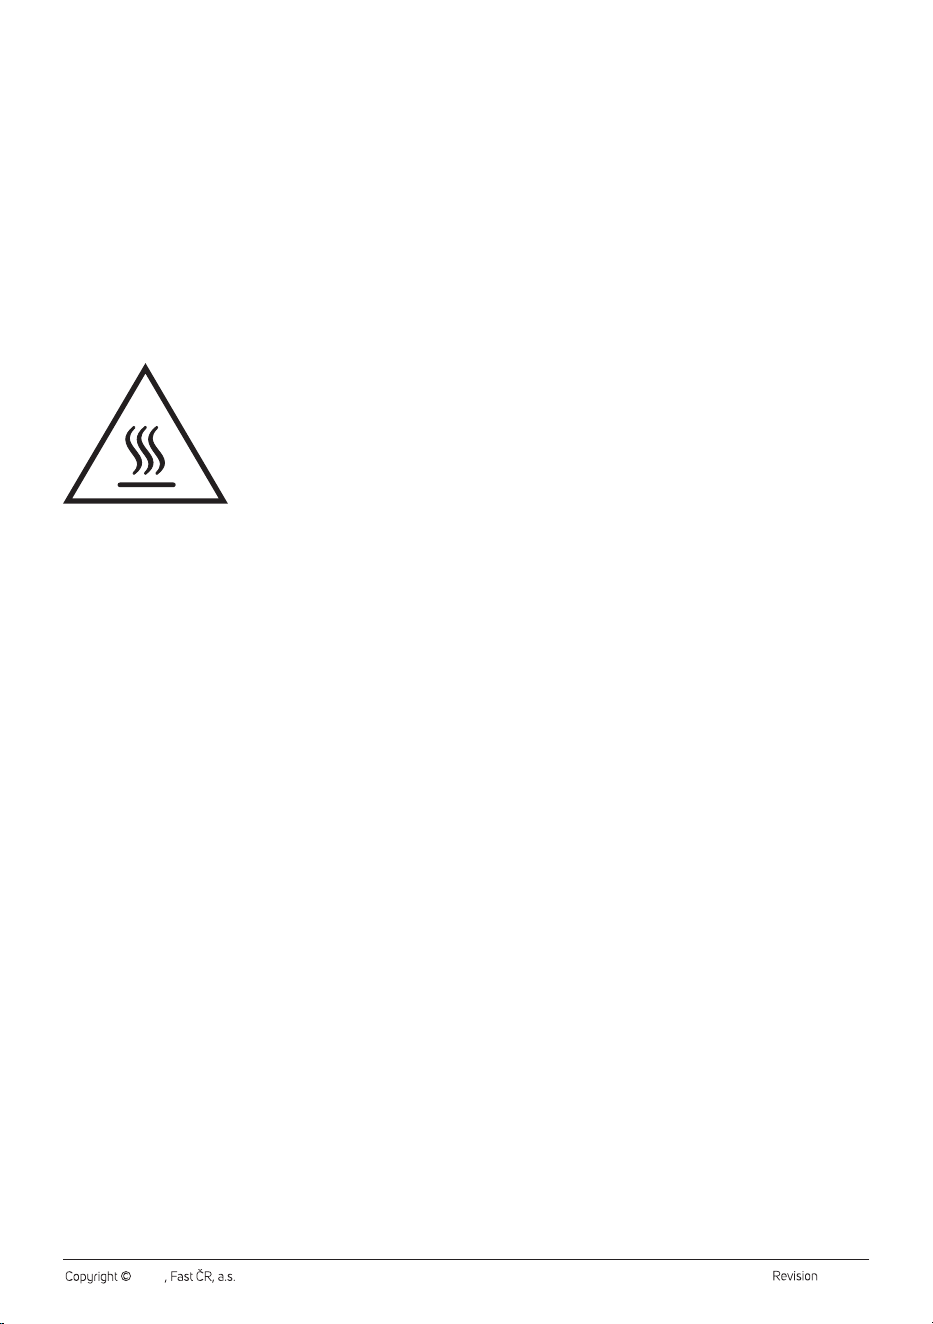
• To remove mineral deposits, proceed as follows:
• Turn the base of the steam generator upside down andplace it
horizontally on aflat surface. Make sure it is stable.
• Arotary knob is located at the bottom of the base – see figure D.
• Cover the knob with atowel andslowly rotate it to release it.
• Release the steam generator. Fill it and pour out the water. Repeat this
two to three times to clean it.
• When the steam generator is clean, insert the rotary knob back and
turn it.
• Place the base back in the upright position.
Warning:
To avoid the risk of scalding, make sure the steam
generator is completely cooled down before removing
the rotary knob.
Storage
• If you do not use the steam generator, turn it off, unplug it from the
power socket, and let it cool down completely.
• Empty the water tank and place the iron on athermally insulated
surface. Secure it with the lock.
• Coil the iron cable around the base. There is aspace into which the
cable can be inserted and wound. Coil and secure the power cord with
astrap to avoid stepping on it during transport.
• Store the steam generator in adry, clean, and well-ventilated place
away from extreme temperatures and out of the reach of children or
pets.
. . . . . . . . . . . . . . . . . . . . . . . . . . . . . . . . . . . . . . . . . . . . . . . . . . . . . . . . . . . . . . . . . . . .
TECHNICAL SPECIFICATIONS
Rated voltage range ..............................................................................220−240 V~
Rated frequency ......................................................................................... 50−60 Hz
Rated power input ............................................................................2520–3000 W
Water tank capacity ................................................................................................. 1.5 l
Heating time .....................................................................approximately 3 minutes
We reserve the right to change the text and technical specifications.
. . . . . . . . . . . . . . . . . . . . . . . . . . . . . . . . . . . . . . . . . . . . . . . . . . . . . . . . . . . . . . . . . . . .
INSTRUCTIONS AND INFORMATION ON DISPOSAL OF USED
PACKAGING MATERIAL
Dispose of used packaging material in the designated waste disposal area
determined by the municipality
DISPOSAL OF USED ELECTRICAL AND ELECTRONIC EQUIPMENT
This symbol on products or original documents means that
used electric or electronic products must not be added to
ordinary municipal waste. For proper disposal and recycling
of these products, deliver them to designated collection
points. Alternatively, in some European Union states or
other European countries the products can be returned to
the local retailer when buying an equivalent new product.
By properly disposing of this product, you help preserve
valuable natural resources and contribute to preventing potential negative
impacts on the environment and human health resulting from improper
waste disposal. For further details, contact your local authorities or the
nearest collection point.
Fines may be imposed for improper disposal of this type of waste in
accordance with national regulations.
For Business Entities in European Union States
If you want to dispose of electric or electronic devices, ask your retailer or
supplier for the necessary information.
Disposal in Other Countries Outside the European Union
This symbol is valid in the European Union. To dispose of this product
elsewhere, request necessary information on the correct disposal method
from local authorities or your retailer.
This product complies with all the essential requirements of
the applicable EU directives.

FAST ČR, a.s.
U Sanitasu 1621
CZ-251 01 Říčany
www.sencor.eu
