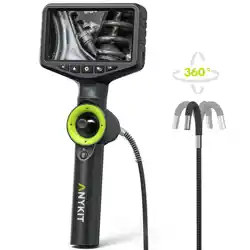
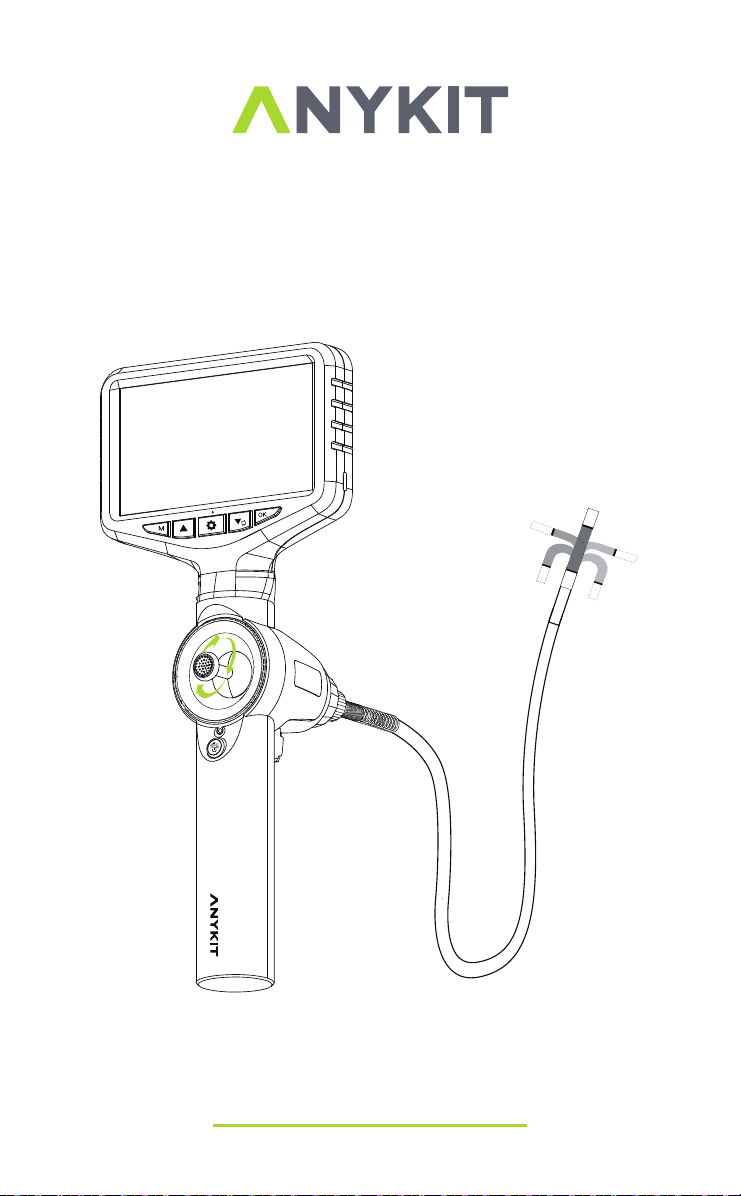
Model No.: AN150P
360° Articulating Borescope

READ BEFORE USE
By using this product, you signify that you have read, understand, and
accept the terms and conditions here.
It is recommended to watch all tutorial videos on the official Anykit
website and read the safety guidelines before using.
Prepare for your first use by reviewing the quick start guide and refer
to this user manual for more information.
Scan the QR code to watch
the AN150P tutorial videos,
which demonstrates how to
use the AN150P safely.
Video Tutorials
Scan this QR code to get the
manual in PDF, which can be
enlarged and viewed on your
mobile device.
ONLINE MANUAL
Read the following documents before using.
(1)Safety Guidelines
(2)Quick Start Guide
(3)User Manual

Features
Applications
WARNING!
Please read all safety warnings and instructions before
using this product. Failure to follow these warnings may result in electric
shock, fire or serious injury.
Keep the tool dry, clean, free from oil, water, gas or other materials
that may cause corrosion.
Keep your work area clean and well lit.
This appliance is not intended for use by persons with limited physical,
sensory or mental capabilities.
This appliance is not intended for medical use or personal inspection.
Keep bystanders, and children away while operating the tool.
Do not overreach, keep proper footing and balance at all times.
OVERVIEW
SAFETY INSTRUCTION
·
·
·
·
·
·
·
·
·
·
·
·
·
·
·
·
·
5-inch HD IPS Screen
360° Joystick Articulating Borescope
210° Image Rotation
Adjustable LED lights
Detachable Screen Design
Inspect inside pipes to identify blockages, leaks, corrosion,
and other issues.
Examination of automotive engine internals, exhaust tubing, brake
systems, etc...
Inspection of internal components like engines, combustion chambers,
ducts, etc...
Assessment of equipment interiors for wear, corrosion, cracks,
and similar conditions.
Surveying concealed areas within buildings, such as internal walls
and pipelines.
Examination of ship hull interiors, compartments, drainage systems, etc...

ABOUT ANYKIT------------------------------
KNOW YOUR PRODUCT------------------------
SPECIFICATIONS-----------------------------
PREPARATION & SETUP------------------------
DISPLAY----------------------------------
LANGUAGE SETTINGS-------------------------
CHANGE THE TEMPERATURE UNITS---------------
LED BRIGHTNESS ADJUSTMENT------------------
ADJUSTABLE LENS FIELD OF VIEW----------------
SWITCH BETWEEN PHOTO & VIDEO RECORDING-------
IMAGE PLAYBACK----------------------------
TF CARD INSERTION AND REMOVAL GUIDE-----------
COPY PHOTO AND VIDEO FILES TO COMPUTER--------
MAINTENANCE------------------------------
TROUBLESHOOTING--------------------------
WARRANTY--------------------------------
1
2
3
4
5
5
6
6
7
8
8
9
9
10
11
12
TABLE OF CONTENTS

- 1 -
ABOUT ANYKIT
Anykit is a trendy and practical tool brand. We focus on simplicity and
ease of use, providing people with convenience in their everyday lives.
Our products including otoscopes, endoscopes, and a variety of
household tools to enable DIY enthusiasts to embrace creativity and
convenience.
Follow Anykit on Amazon for More
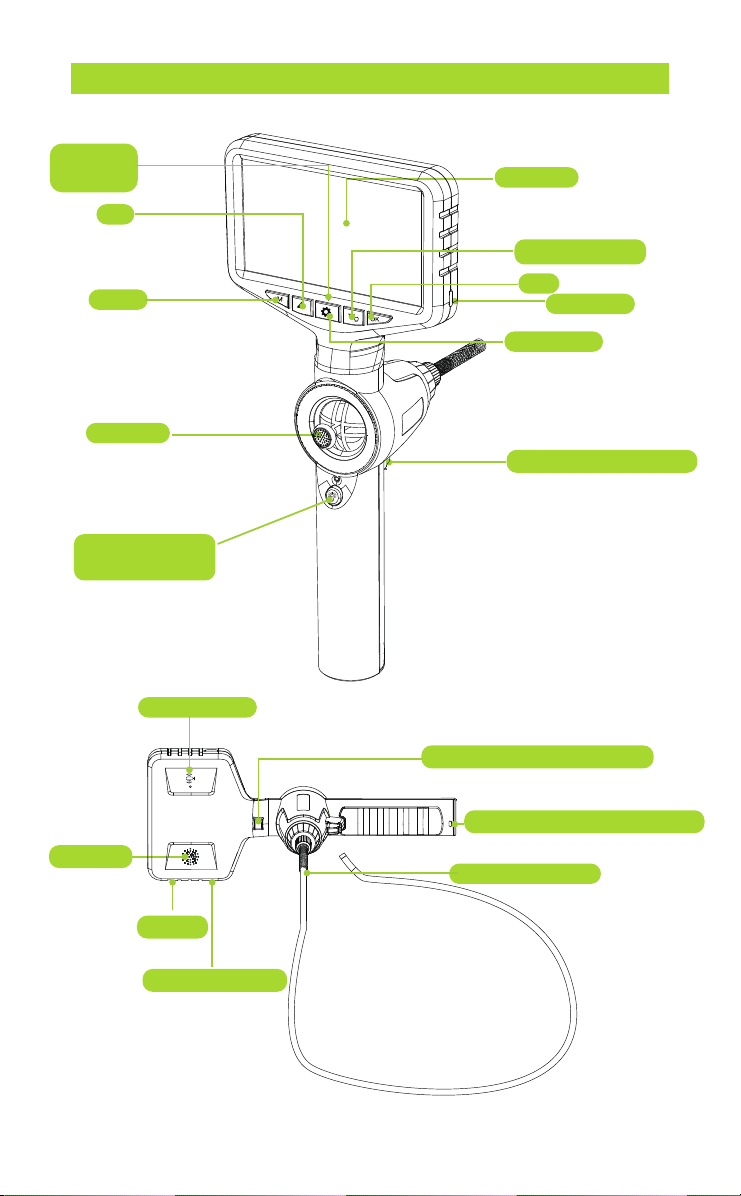
- 2 -
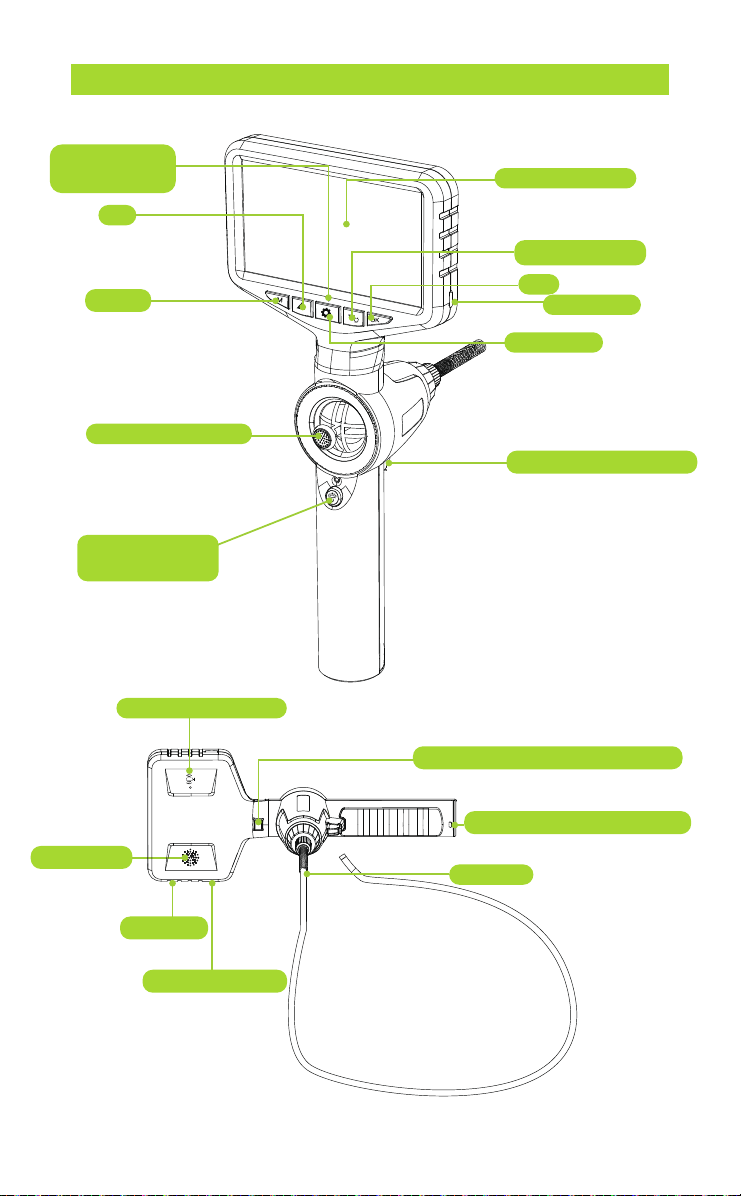
Power
Indicator
UP
Mode
Joystick
Power On/Off
LED Adjust
Display
Down/Toggle
OK
TF Card
Settings
Photo/Video Button
KNOW YOUR PRODUCT
Microphone
Handle Removal Switch
Lanyard Connecting Ring
Speaker
Charging Port
Reset
Insertion Tube

Image Resolution
Video Resolution
DOF
FOV
Manual dimming
Power supply
Use time
High temperature
protection
Battery capacity
Camera light source
Camera probe length
Articulation
Steering angle
Bending radius
Storage
Waterproof grade
Camera probe material
1920*1080
1280*720
5ft (1m)
360 Degrees
≤ 210°
38mm
Standard 32GB-TF Card
20-100mm
70°
Three adjustment levels
High temperature intelligent protection
3.7V
About 4h
3000mAh
Adjustable LED
IP67
Wear resistant metal hose
Operating
environment
Input voltage
Humidity
Work environment
-20℃~70℃
DC5V/1A
10~80%
Machine
SPECIFICATIONS
- 3 -

- 4 -
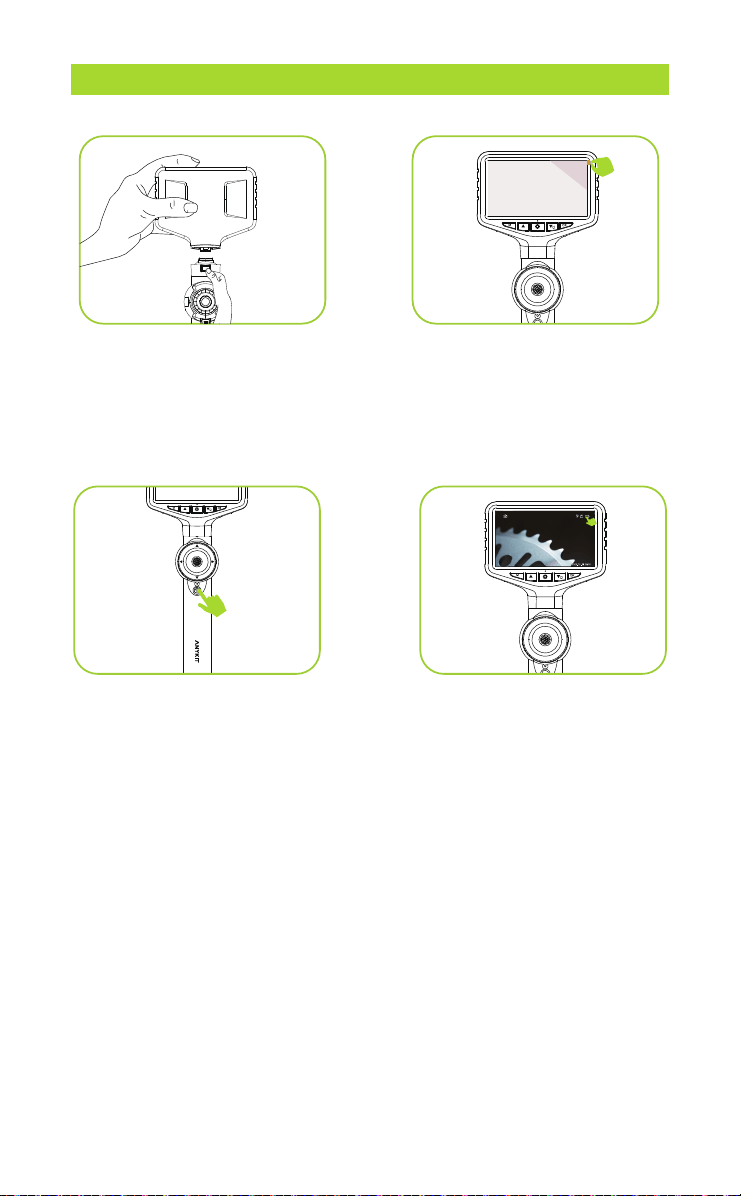
PREPARATION & SETUP
Step 1:
Install the screen and
handle, align them with the
interface, and press firmly until
you hear a click, indicating that
they are connected
.
Step 2:
Remove the plastic
screen cover.
Step 3:
Turn the camera on/off
by pressing and holding the
"POWER" button for a few
seconds.
Step 4:
Low Battery Indicator: If
the battery icon on the screen
displays low battery, please
ensure it is fully charged before
use.
90
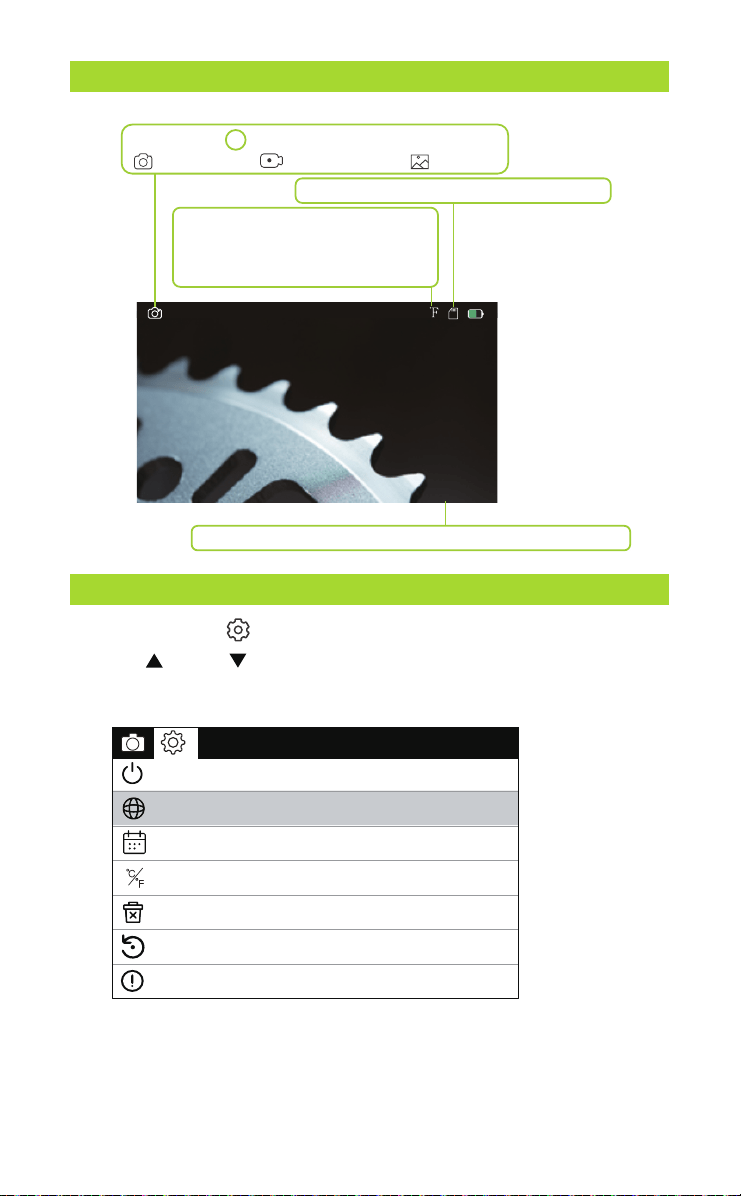
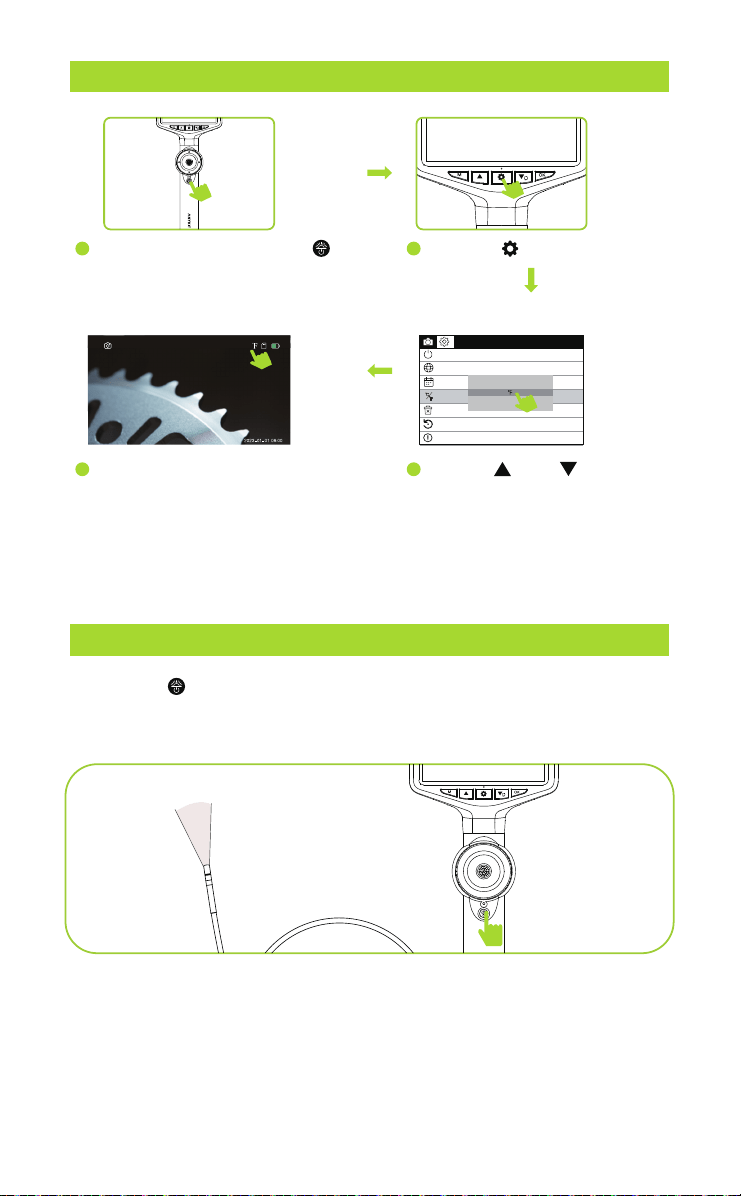
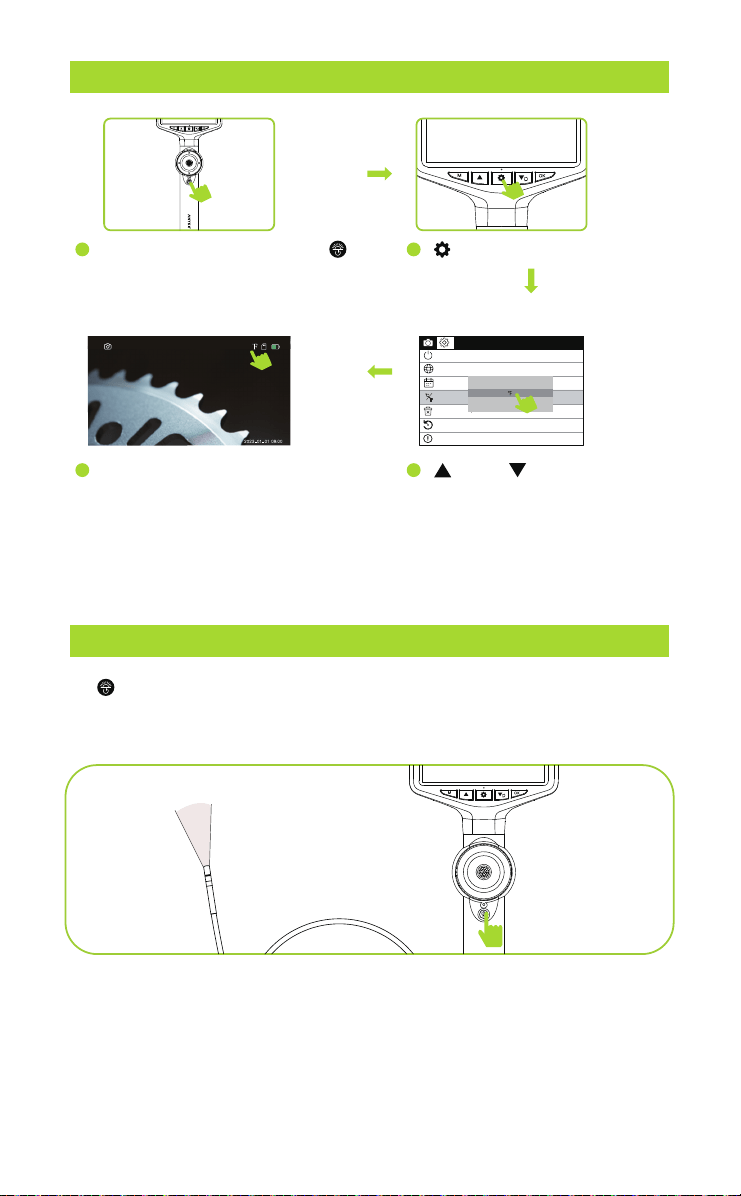
SETTINGS
Press the button “ ” twice to enter the settings page.
Press “ ” and “ ” to select the items you need.
Press “ OK ” to save your choice.
Mode: Press M to switch between the three modes:
photo taking/ video recording/ playback
TF card status: TF card inserted/no card
Date and time - modify the date and time in Settings menu
2023-01-01 08:00
Temperature Unit: The temperature
display unit on the screen can be
switched between Fahrenheit and
Celsius.
90
DISPLAY
- 5 -
Language settings
Temperature Unit
Date Time
Automatic shut-down
Default Settings
Version
Format
℃
F
LED BRIGHTNESS ADJUSTMENT
CHANGE THE TEMPERATURE UNITS
Press the “ ” briefly to adjust the brightness of the camera light.
The brightness cycles through bright, medium, dim, and light off.
- 6 -
1
4
90
Language settings
Temperature Unit
Date Time
Automatic shut-down
Default Settings
Version
Format
℃
F
℃
Long Press the power button to
power on, the monitor will light up
and the blue power indicator will
turn on.
Then the temperature on the screen
will be displayed in the unit you
have selected.
2
Press the key twice.
3
Use the“ ”and “ ” to select
whether to set Fahrenheit or
Celsius, then press the“OK
”
to confirm the temperature
unit.
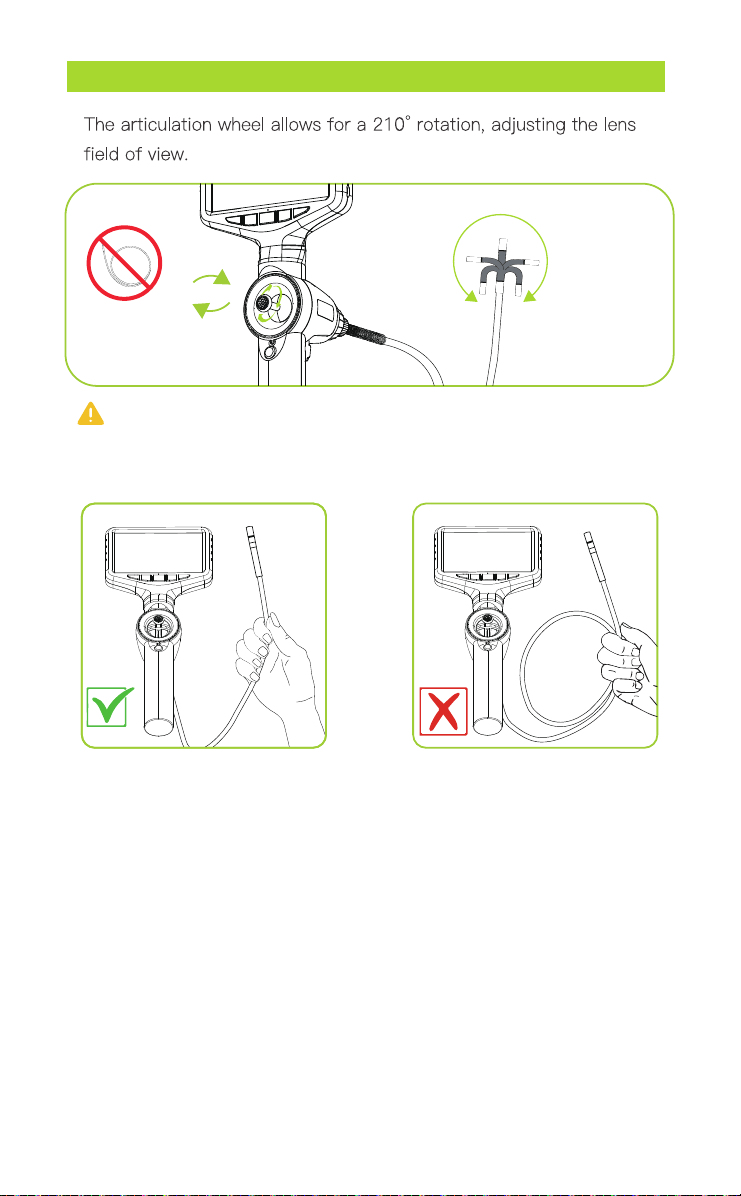
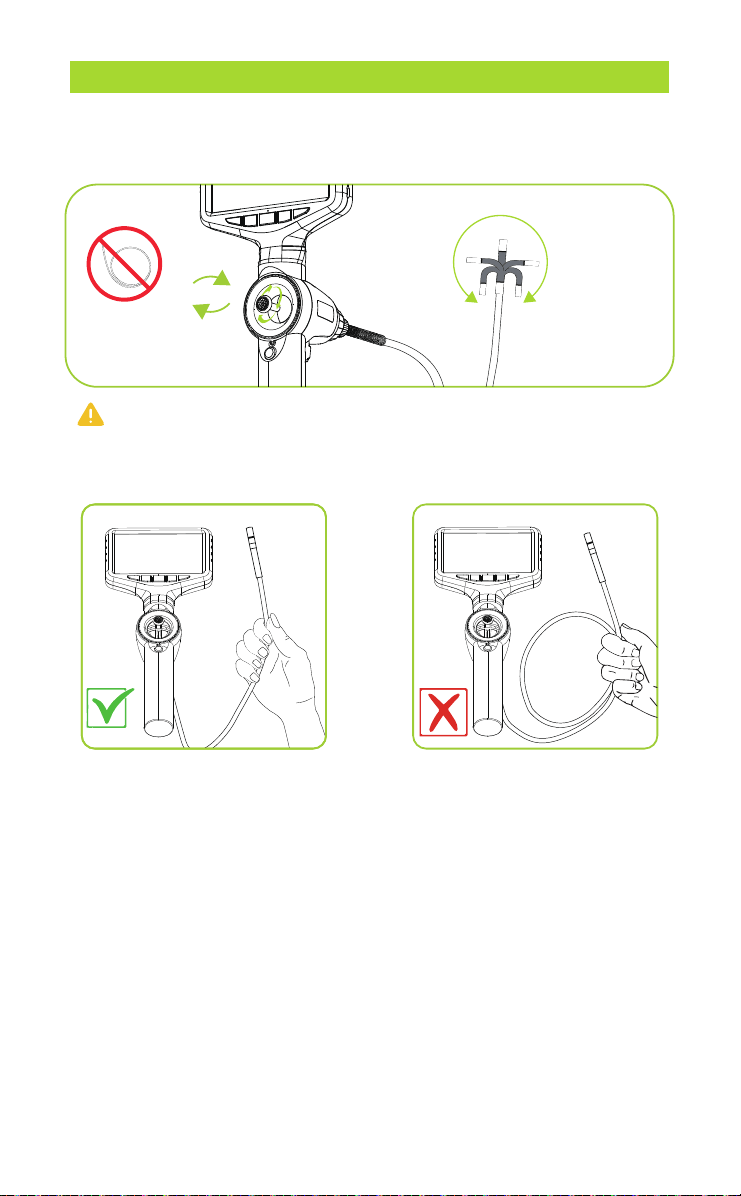
ADJUSTABLE LENS FIELD OF VIEW
Tips: To achieve the max articulation angle, the cable should
not be coiled in a circle.
+/-210°
360°
joy stick
Notice:When using the borescope, it is important to emphasize that
the coil should not be wound up as this can affect the steering function
and cause the articulation angle to become smaller.
- 7 -
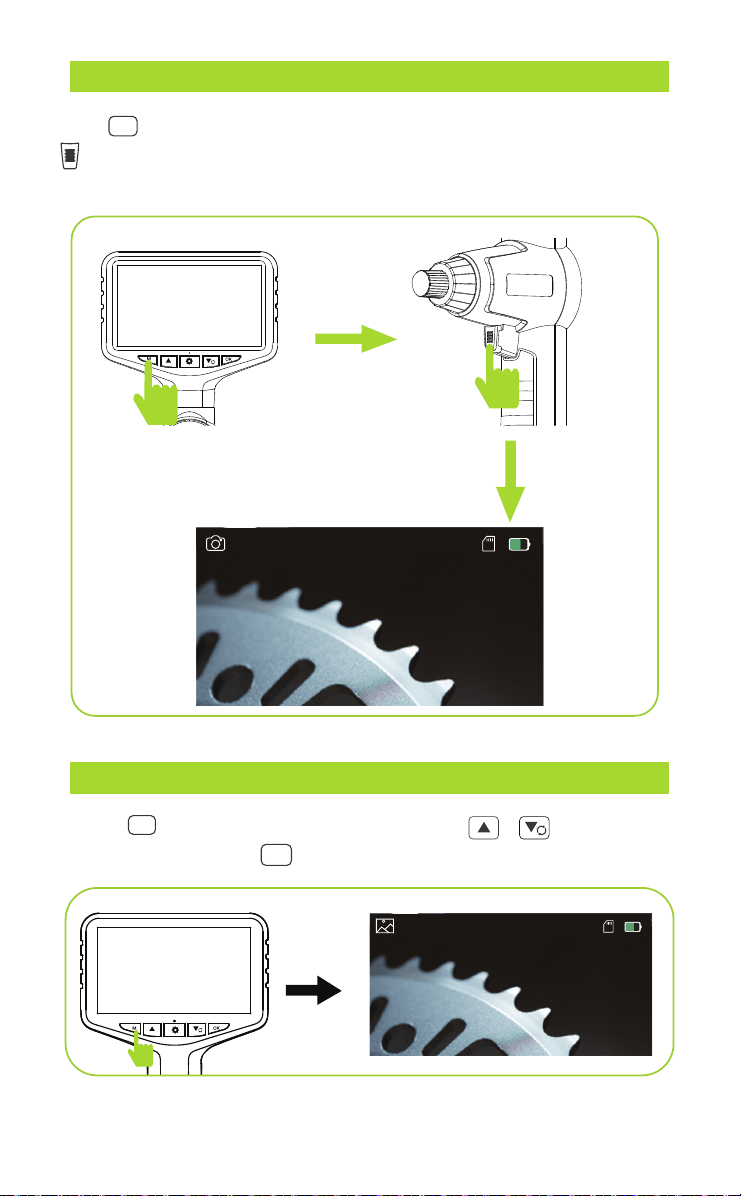
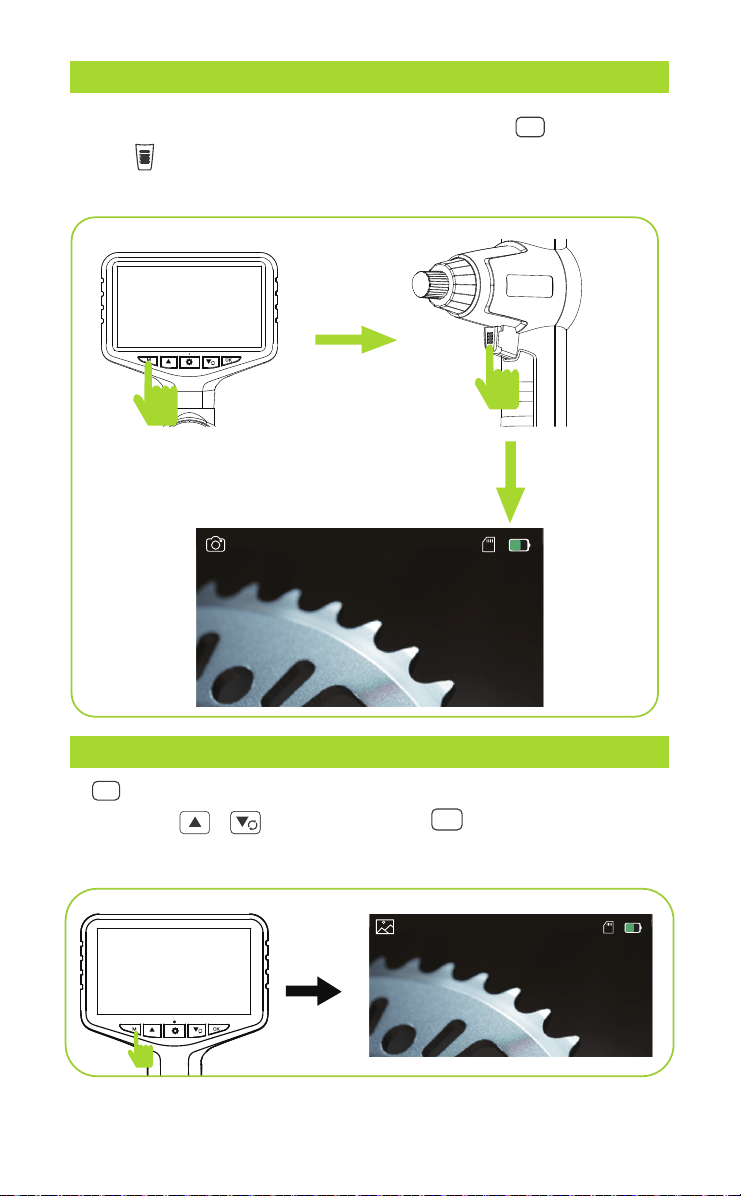
SWITCH BETWEEN PHOTO & VIDEO RECORDING
IMAGE PLAYBACK
Press “ M ” to switch to the photo taking or video recording mode, and press
“ ”( located at the back of the product)to take a photo or start
recording.
Take Photo
2023-01-01 08:00
Short press
Press “ M ” to switch to playback mode, press “ ” to select
photo or video, press “ OK ” to play back the video.
Playback Mode
2023-01-01 08:00
Short press
- 8 -
TF CARD INSERTION AND REMOVAL GUIDE
Insert TF card:
Power off the device first before inserting the TF card.
Make sure the direction and the front and back orientation is
correct when inserting the TF card.
Do not use excessive force when inserting or removing the TF
card to prevent damage to the card slot structure.
The device is equipped with a TF
memory card(inserted). Gently
press to eject the card.
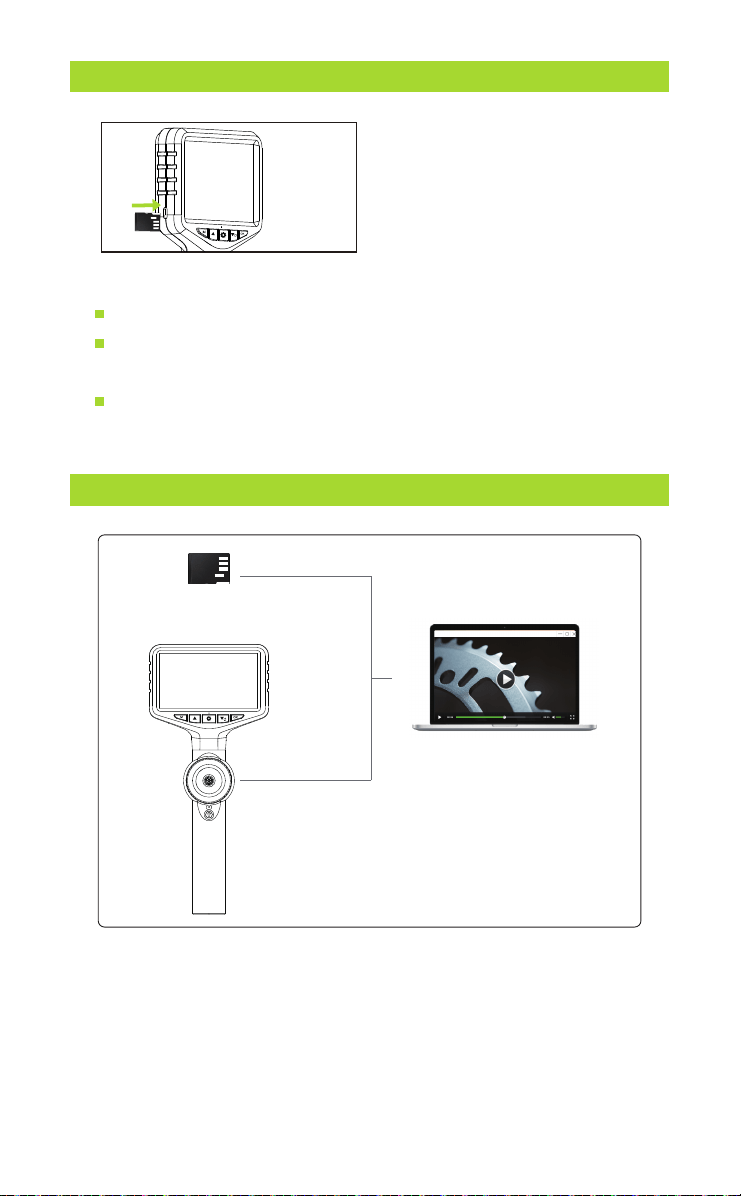
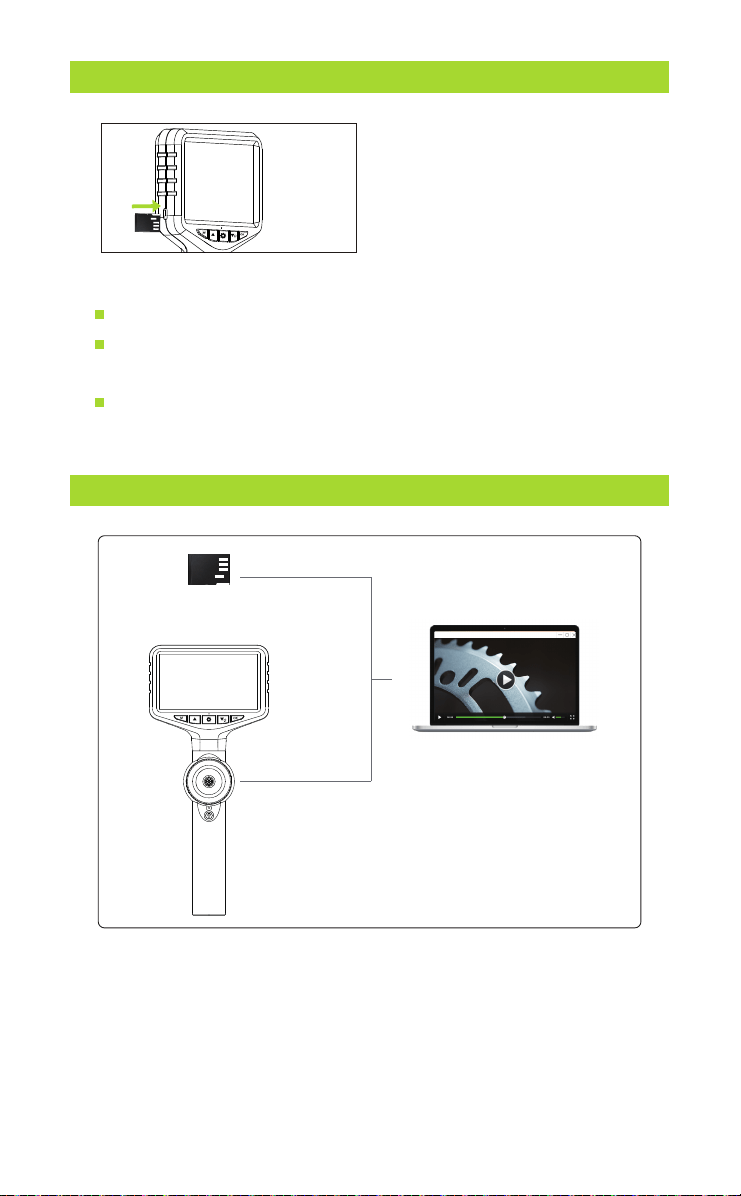
COPY PHOTO AND VIDEO FILES TO COMPUTER
Card reader
Type-C USB cable
or
You can use a TF card reader to copy data directly or use a
Type-c cable to connect to a computer for copying.
- 9 -

Before cleaning your borescope, it's important to power it off and disconnect
it to ensure it's completely safe. To maintain optimal image quality, delicately
wipe the camera lens with a soft microfiber cloth and cotton swab before and
after each use to remove dust and smudges.
When cleaning the screen, use a microfiber cloth and a mixture of warm water
and medical-grade alcohol to gently wipe off dust and fingerprints. Avoid
using abrasive cleansers, chemicals, or solvents as they can damage the
device's exterior and interior components. Be careful not to let moisture
infiltrate any device openings or ports during the cleaning process, and ensure
the device is thoroughly dry before reconnecting to power or use.
When storing the device, power it down and keep it in a dry, cool, and
well-ventilated area. If your device features a coiled probe, gently coil it
without bending it too tightly. Avoid coiling it tighter than it was packaged
originally and shield it from direct sunlight, extreme temperatures, and humid
conditions. Keep it away from sharp objects and heavy items to prevent any
damage.
By following these detailed cleaning and maintenance instructions, you can
extend the lifespan of your industrial endoscope while maintaining top-notch
performance and image quality.
MAINTENANCE
- 10 -

TROUBLESHOOTING
Problems Solutions
No Picture
Cannot Be Turned On
Auto Shutdown
TF Card Insertion Error
No Camera
Unable to Charge
Blurry Picture
Blurry Screen Display
Connection Interruption
Difficulty Operating
Abnormal Screen Colors
Screen Flickering or Lines
Device Heating Up
Difficulty Starting the Device
Image Inversion or Reversal
Slow Screen Response
Difficulties Bending the Probe
Check probe and power. Restart the device.
Unplug and reinsert the monitor, ensure
the monitor and controller are well
connected.
Insufficient power, charge it and try to
turn it on.
Check cable and port. Try different
cable/adapter.
Clean lens/screen. Adjust focus if possible.
Adjust contrast and brightness
for clearer visuals.
Secure cable connection. Swap if needed.
Study manual or video guides.
Check cable. Contact support if
issue persists.
Check power. Restart.
Ensure ventilation. Avoid high temps.
Check battery. Hold power button.
Adjust image settings in menu.
Restart device. Manage memory usage.
Coil probe gently. Stop if resistance.
Insert compatible card. Format if needed.
The probe will automatically shut down
when it exceeds the protection
temperature, you can try to turn it on
again after it cools down.
*If you encounter any issues while using the product, don't hesitate to reach
out to us. We'll provide feedback within 24 hours and work swiftly to resolve
the matter.
- 11 -

WARRANTY
30-Day Guarantee
We will give you a full refund if you are not
satisfied with the product.
We offer a limited warranty that commences
from the date of purchase of the product.
One-Year Warranty
Visit anykit.com or scan the QR code for more details.
- 12 -
CUSTOMER SUPPORT
If you have any questions or concerns about your product,
please contact our Customer Support Team
Facebook Messenger
1-877-888-7979
Mon.-Fri. 8:00-5:00 PST(US)
www.anykit.com
@anykit
@anykit
モデル番号: AN150P
360°可動式ボアスコープ

ご使用前にお読みください
この製品を使用することにより、ここに記載されている利用規約を読ん
で理解し、受け入れたことを示しています。
ご使用前に、公式のAnykitウェブサイトで提供されているすべてのチュー
トリアルビデオを視聴し、安全ガイドラインを読むことをお勧めします。
初めての使用に備えて、クイックスタートガイドを確認し、詳細な情報に
ついてはこのユーザーマニュアルを参照してください。
AN150Pのチュートリアルビデオ
を視聴するためにQRコードをス
キャンしてください。これらのビ
デオでは、AN150Pを安全に使用
する方法がデモンストレーション
されています。
ビデオチュートリアル
このQRコードをスキャンして、
PDF形式のマニュアルを入手し、
モバイルデバイスで拡大表示お
よび閲覧できます。
オンラインマニュアル
以下の文書を使用前にお読みください。
(1)安全ガイドライン
(2)クイックスタートガイド
(3)ユーザーマニュアル

特徴
用途
警告!
この製品を使用する前に、すべての安全警告と指示をお読みくださ
い。
これらの警告に従わないと、感電、火災、または重傷を引き起こす可能性
があります。
ツールを乾燥させ、油、水、ガス、または腐食を引き起こす可能性のある
他の物質から清潔に保ちます。
作業エリアを清潔に保ち、十分な照明を確保します。
この器具は、身体的、感覚的、または精神的な能力に制限のある人による
使用を意図していません。
この器具は医療用や個人的な検査には使用しないでください。 ツールを操
作する間、周囲の人や子供を遠ざけてください。
過度に伸びないようにし、常に適切な足元とバランスを保ちます。
概要
安全指導
·
·
·
·
·
·
·
·
·
·
·
·
·
·
·
·
·
5インチのHD IPSスクリーン
360°のジョイスティック可動式ボアスコープ
210°の画像回転
調整可能なLEDライト
取り外し可能なスクリーンデザイン
ブロック、漏れ、腐食などの問題を特定するためのパイプ内部の検査。
自動車エンジンの内部、排気管、ブレーキシステムなどの検査。
エンジン、燃焼室、ダクトなどの内部部品の検査。
機器の内部の摩耗、腐食、クラックなどの状態の評価。
建物内部の隠れた領域の調査、内部壁やパイプラインなど。
船の船体内部、区画、排水システムなどの検査。

ANYKITについて-----------------------------
製品の紹介------------------------ --------
仕様-------------------------------------
準備とセットアップ---------------------------
ディスプレイ-------------------------------
言語設定----------------------------------
温度の単位変更------------------------------
LEDの明るさ調整-----------------------------
調整可能なレンズの視野------------------------
写真とビデオの切り替え------------------------
画像の再生--------------------------------
TFカードの挿入と取り外しのガイド----------------
写真とビデオファイルをコンピュータにコピーする方法----
メンテナンス-------------------------------
トラブルシューティング------------------------
保証-------------------------------------
1
2
3
4
5
5
6
6
7
8
8
9
9
10
11
12
目次

- 1 -
ANYKITについて
Anykit(エニーキット)は、トレンディで実用的なツールブランドです。
私たちはシンプルさと使いやすさに焦点を当て、人々に日常生活での便益
を提供しています。当社の製品には、耳鏡、内視鏡、さまざまな家庭用ツ
ールが含まれており、DIY愛好家が創造性と便益を享受できるようになっ
ています。
もっと詳しくAnykitの製品を知りたい場合は、Amazonで
Anykitをフォローしてください。
- 2 -
電源
インジケーター
上
モード
電源オン/オフ
LED調整
下/切り替え
OK
設定
写真/ビデオボタン
製品を理解しましょう
マイクロフォン
ハンドルの取り外しスイッチ
ランヤード接続リング
スピーカー
リセット
挿入管
充電ポート
ジョイスティック
TFカード
ディスプレイ

画像解像度
ビデオ解像度
焦点距離
視野
手動調光
電源供給
使用時間
高温保護
バッテリー容量
カメラの光源
カメラプローブの長さ
可動性
操舵角度
曲げ半径
保存容量
防水等級
カメラプローブの材質
1920*1080
1280*720
5フィート (1メートル)
360度
210度以下
38mm
標準の32GB-TFカード
20-100mm
70°
三つの調整レベル
高温インテリジェント保護: あり
3.7V
約4時間
3000mAh
調整可能なLED
IP67
耐摩耗性の金属ホース
動作環境
入力電圧
湿度
作業環境
-20°C から 70°C
DC 5V/1A
10% から 80%
機械
仕様
- 3 -
- 4 -
準備とセットアップ
ステップ1:
画面とハンドルを取
り付けます。インターフェースと
一致させ、しっかりと押し込んで
、クリック音が聞こえるまで接続
されたことを確認してください。
ステップ2:
プラスチック
の画面カバーを取り外してく
ださい。
ステップ3:
カメラの電源をオン
/オフするには、「POWER」ボタ
ンを数秒間押し続けてください。
ステップ4:
低バッテリーインジ
ケーター:画面にバッテリーアイ
コンが低電池を表示する場合は、
使用前に完全に充電されているこ
とを確認してください。
90

設定
設定ページに入るには、ボタン “ ” を2回押してください。
必要なアイテムを選択するには、“▲”と“▼”ボタンを押してください。
選択を保存するには、「OK」ボタンを押してください。
モード: を押して、 写真撮影/ ビデオ録画/
再生の3つのモードを切り替えます。
TFカードの状態: TFカードが挿入されている/カードなし。
日付と時刻 - 設定メニューで日付と時刻を変更してください。
2023-01-01 08:00
温度単位:画面上の温度表示単位を
華氏と摂氏の間で切り替えることが
できます。
90
ディスプレイ
M
- 5 -
言語設定
温度測定
日付と時刻
自動シャットダウン
デフォルト設定
バージョン
フォーマット
℃
F
LEDの輝度調整
温度単位を変更します。
「 」を短く押して、カメラライトの輝度を調整します。
輝度は、明るい、中程度、暗い、消灯の間を循環します。
- 6 -
1
4
90
言語設定
温度測定
日付と時刻
自動シャットダウン
デフォルト設定
バージョン
フォーマット
℃
F
℃
電源を入れるために電源ボタン“ ”
を長押しします。モニターが点灯し、
青い電源インジケータが点灯します。
温度が画面に表示されるようになり
ます。
2
「 」キーを2回押してください。
3
「 」と「 」を使用して、
華氏または摂氏を設定するかど
うかを選択し、温度単位を確認
するために「OK」を押してくだ
さい。
可変式レンズの視野調整
ヒント: 最大の可動角を実現するには、ケーブルを円状に巻かない
ようにしてください。
+/-210°
360度
ジョイスティック
注意: ボアスコープを使用する際、コイルを巻き上げないようにすること
は重要です。コイルを巻き上げると、操舵機能に影響を与え、可動角が小
さくなる可能性があります。
- 7 -
アーティキュレーションホイールを使用して、210°の回転を行い、レン
ズの視野を調整できます
写真とビデオの録画モードを切り替えます。
画像再生
写真を撮る
2023-01-01 08:00
短押し
「 」ボタンを押して再生モードに切り替え、写真またはビデオを選
択するには「 」ボタンを押し、「 」ボタンを押してビデオ
を再生します。
再生モード
2023-01-01 08:00
短押し
- 8 -
写真撮影またはビデオ録画モードに切り替えるには「 」ボタンを押
し、「 」ボタン(製品の背面にある)を押して写真を撮影または録
画を開始します。
M
M
OK
TFカードの挿入および取り外しガイド
TFカードを挿入してください:
TFカードを挿入する前に、デバイスの電源を切ってください。
TFカードを挿入する際に、方向と正面と背面の向きが正しいこと
を確認してください。
TFカードを挿入または取り外す際に過度な力を使用しないように
して、カードスロットの構造が損傷しないようにしてください。
デバイスにはTFメモリーカードが装
備されています(挿入済み)。カー
ドを取り外すには、優しく押してく
ださい。
写真とビデオファイルをコンピュータにコピーします。
カードリーダー
Type-C USBケーブル
または
データを直接コピーするにはTFカードリーダーを使用するか、コ
ンピュータに接続するためにType-Cケーブルを使用できます。
- 9 -

ボアスコープを掃除する前に、安全を確保するために電源を切り、接続を切断
することが重要です。最適な画像品質を維持するために、各使用前と使用後に
、柔らかいマイクロファイバークロスと綿棒を使用して、カメラレンズを優し
く拭いて、ほこりや指紋を取り除いてください。
画面を掃除する際には、マイクロファイバークロスと温水と医療用アルコール
の混合物を使用して、ほこりや指紋を優しく拭き取ってください。研磨剤、化
学薬品、または溶剤の使用は避けてください。これらはデバイスの外部および
内部の部品に損傷を与える可能性があります。清掃の過程で湿気がデバイスの
開口部やポートに浸透しないように注意し、デバイスが完全に乾燥してから電
源を再接続するか使用する前に確認してください。
デバイスを保管する際には、電源を切り、乾燥していて涼しい場所に保管し、
通気性の良い環境を確保してください。デバイスにコイルプローブが搭載され
ている場合、過度に巻きすぎずに注意して巻いてください。元々のパッケージ
で提供されたよりもきつく巻かないようにし、直射日光、極端な温度、湿度の
高い状況から保護してください。鋭利な物体や重い物から遠ざけ、損傷を防ぐ
ようにしてください。
これらの詳細な清掃とメンテナンスの指示に従うことで、産業用内視鏡の寿命
を延ばし、高性能と画質を維持できます。
メンテナンス
- 10 -

トラブ ル シュー ティング
問題 解決策
画像がありません
電源が入りません
自動シャットダウン
TFカード挿入エラー
カメラがありません
充電できません
画像がぼやけています
画面表示がぼやけています
接続が途切れます
操作が難しい
画面の色が異常です
画面のちらつきや線が
表示されます
デバイスが熱くなります
デバイスの起動が難しい
画像の反転または逆転
画面の反応が遅い
プローブを曲げるのが難しい
プローブと電源を確認して、デバイスを再起動
してください。
電力が不足している場合、充電してから電源を入
れてみてください。
ケーブルとポートを確認してください。
異なるケーブル/アダプターを試してみてください。
レンズ/スクリーンをきれいにし、フォーカス
を調整できる場合は調整してください。
映像をより明確にするためにコントラスト
と明るさを調整してください。
ケーブルの接続を確実にし、必要に応じて
交換してください。
取扱説明書やビデオガイドを参照してください。
ケーブルを確認して、問題が解決しない
場合はサポートに連絡してください。
電力を確認し、再起動してください。
適切な通気を確保して、高温を避けてください。
バッテリーを確認し、電源ボタンを押してください。
メニューで画像設定を調整してください。
デバイスを再起動し、メモリ使用量を管理
してください。
プローブを優しく巻いてください。
抵抗があれば停止してください。
互換性のあるカードを挿入してください。
必要に応じてフォーマットしてください。
*製品を使用中に問題が発生した場合、お気軽にお問い合わせください。私たちは24
時間以内にフィードバックを提供し、迅速に問題を解決いたします。
モニターの差し込みを外し、再度差し込み、モニ
ターとコントローラーがしっかり接続されている
ことを確認してください。
プローブが保護温度を超えると自動的にシャット
ダウンします。冷却された後、再び電源を入れて
みてください。
- 11 -

保証
30日間の保証
製品にご満足いただけない場合、
全額返金いたします。
製品の購入日から始まる限定保証を提
供しております。
1年間の保証
詳細については、anykit.comを訪問するか、QRコードをスキャンしてください。
- 12 -
お客様サポート
製品に関するご質問やご心配事がございましたら、お手数ですが
弊社のカスタマーサポートチームにご連絡ください。
Facebook Messenger
www.anykit.com
@anykit
@anykit
