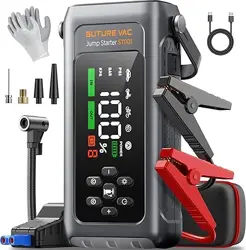
QUICK-START GUIDE
ST001 Jump Starter With Air Compressor
Ver.1.0

Language
English
Deutsch
España
01-09
10-18
19-27

1
ATTENTION: Please read the following safety warning before using
the product and take safety protection measures to avoid malfunc-
tions caused by accidental operation.
1. Store in a cool and well-ventilated place out reach of children and
pets.
2. Do not place the product in high temperature environment for a
long time. The operation temperature of this product is -4°F~140°F.
The storage temperature should not exceed 122°F.
Personal Safety
1. Do not litter the product and it should be safely recycled.
2. Do not incinerate the product or exposed to high temperaturesas
they may explode.
3. Only use replacement parts or accessories provided or recom-
mended by manufacturer.
Battery Safety
1. Only start vehicles with the smart jumper cable supplied by the
manufacturer.
2. Do not use the product if the clamp or cable is damaged.
3. Do not connect the red and black clamps together when the
product is outputting.
4. Do not connect the red and black clamps to the same piece of
metal.
5. Do not disassemble or modify this product.
6. Do not use detergent to clean this product.
7. Do not abuse this product and avoid heavy dropping or repeatedly
hitting it.
8. Do not operate the product in explosive environments such as
flammable liquidsgases or dusts.
9. Do not immerse the product in water.
Electrical Safety
EN

2
WARRANTY
BUTURE VAC provides customers with warranty of 24 months from
the date of purchase.
For assistance or warranty cover claim, please contact us via email at
sales@buturevac.com
1. Please use the included USB-C cable and 5V/2A or above adapter
for charging.
2. Please make sure the device is fully charged before using the
product for the first time.
3. It is recommended to fully charge the device at least once every 3
months to help extend the life of the device.
PRECAUTIONS BEFORE USE
SPECIFICATIONS
Model
Capacity
USB-C IN
USB OUTPUT
ST001
7200mAh, 26.64Wh
5V/2A, 9V/2A, 12V/1.5A
5V/2A
EN
3
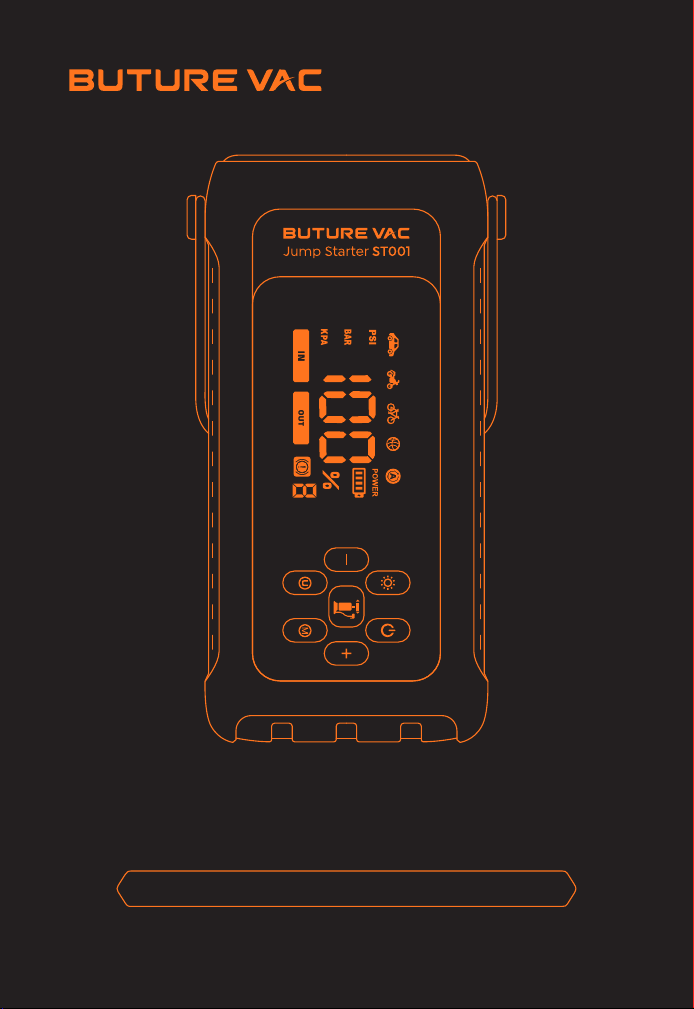
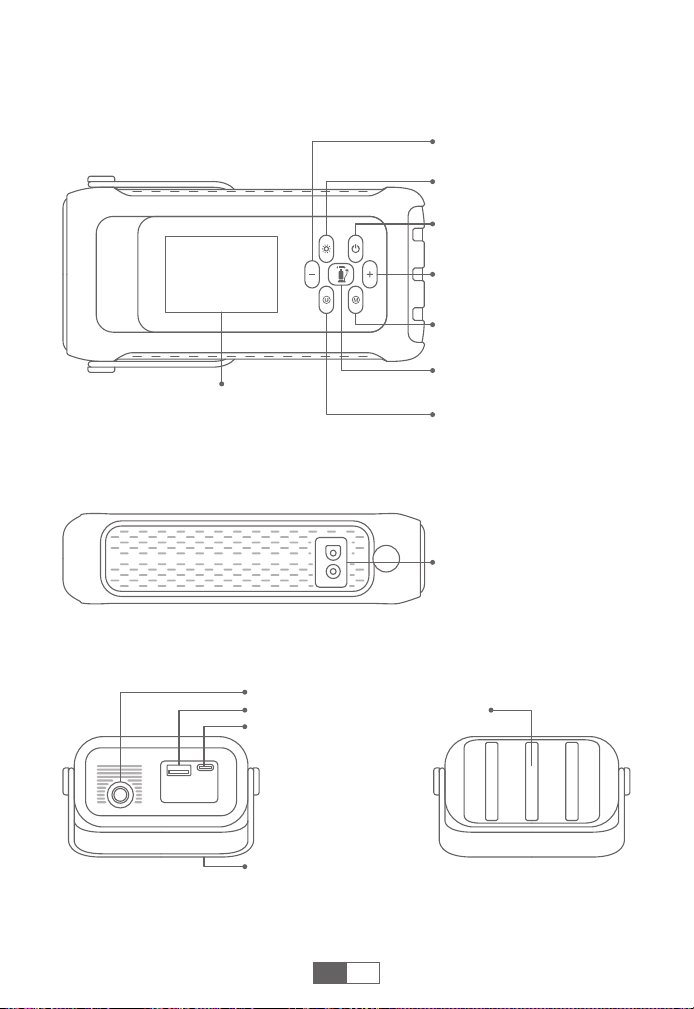
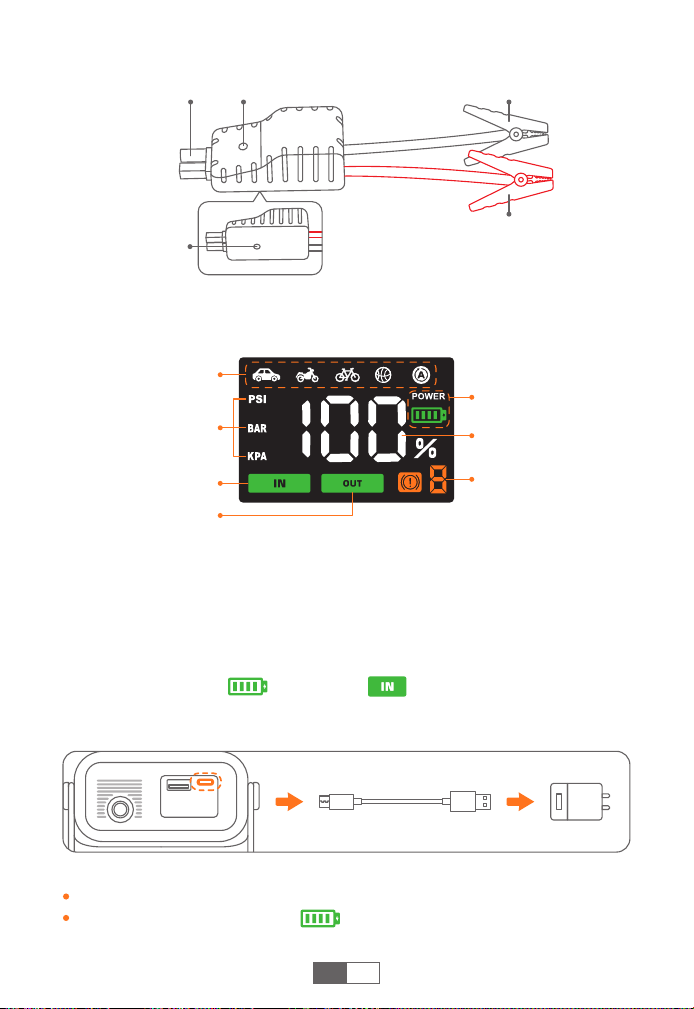
PRODUCT OVERVIEW
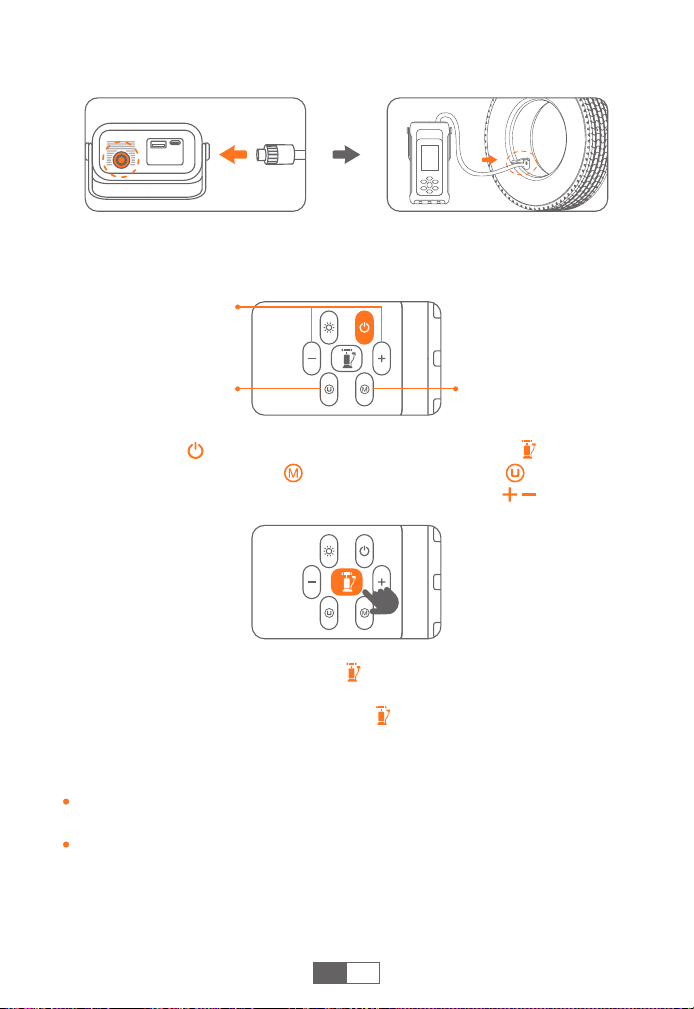
Power Button
Air Pressure Increase
Button (+)
Inflation Mode Switch
Button
Pressure Unit Switch
Button
Inflation Button
LCD Display
LED Light Button
Air Pressure Reduction
Button (-)
Jumpstart Port
USB-C Input
Silicone Handle
LED LightUSB Output
Air Hose Interface
EN
4
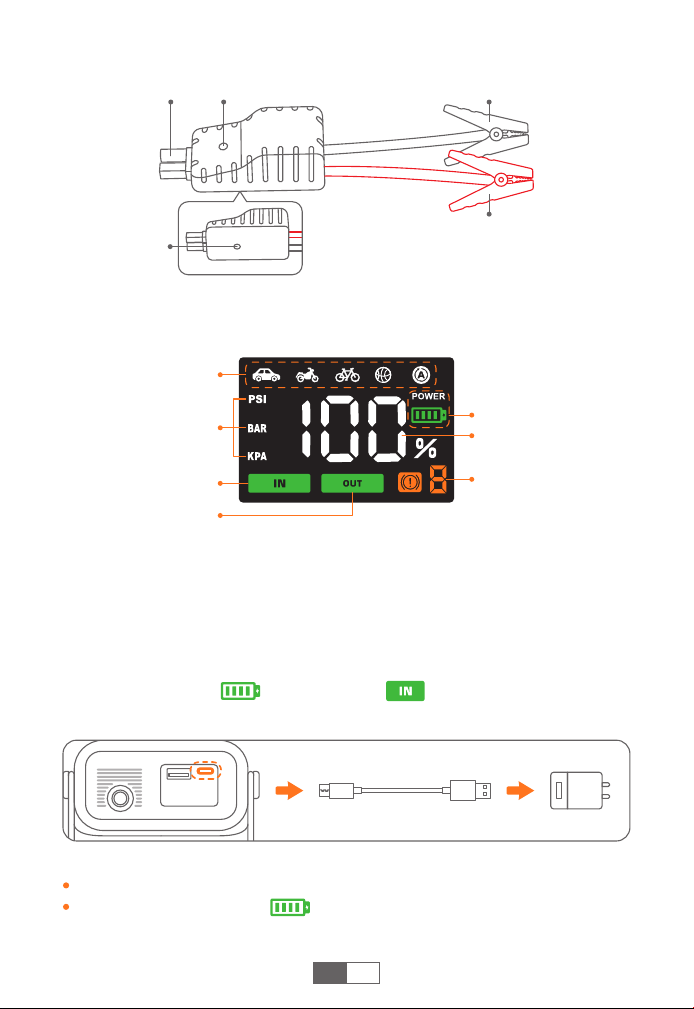
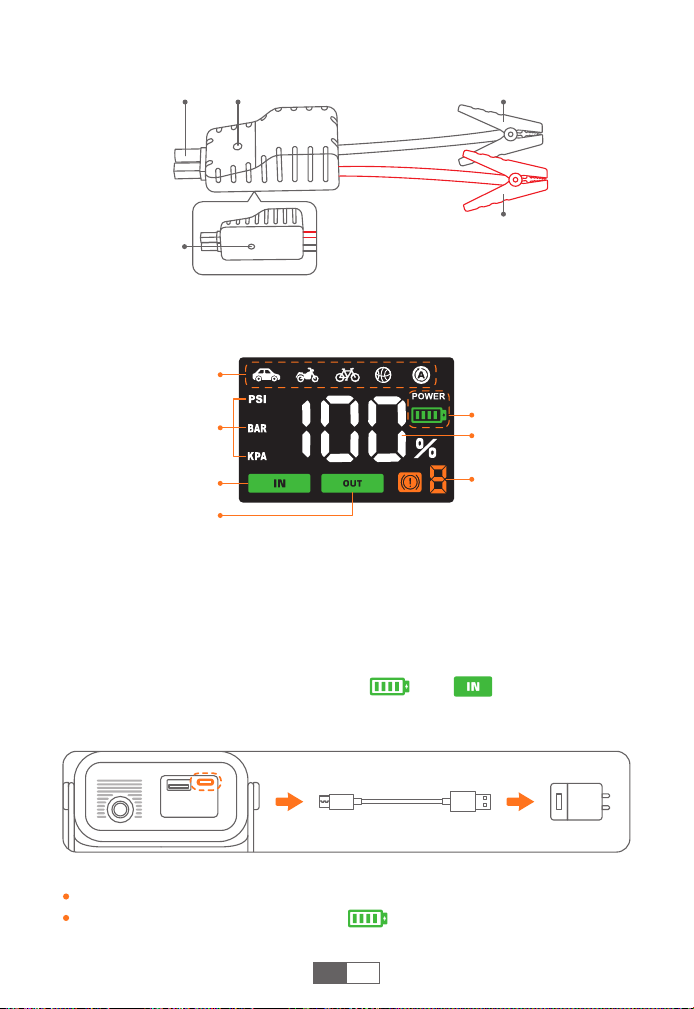
DISPLAY OVERVIEW
CHARGING YOUR JUMP STARTER
Inflation Mode
Air Pressure Unit
(3 Types)
Air Pressure Value,
Battery Percentage
Battery Symbol
Error Indicator
Input Indicator
Output Indicator
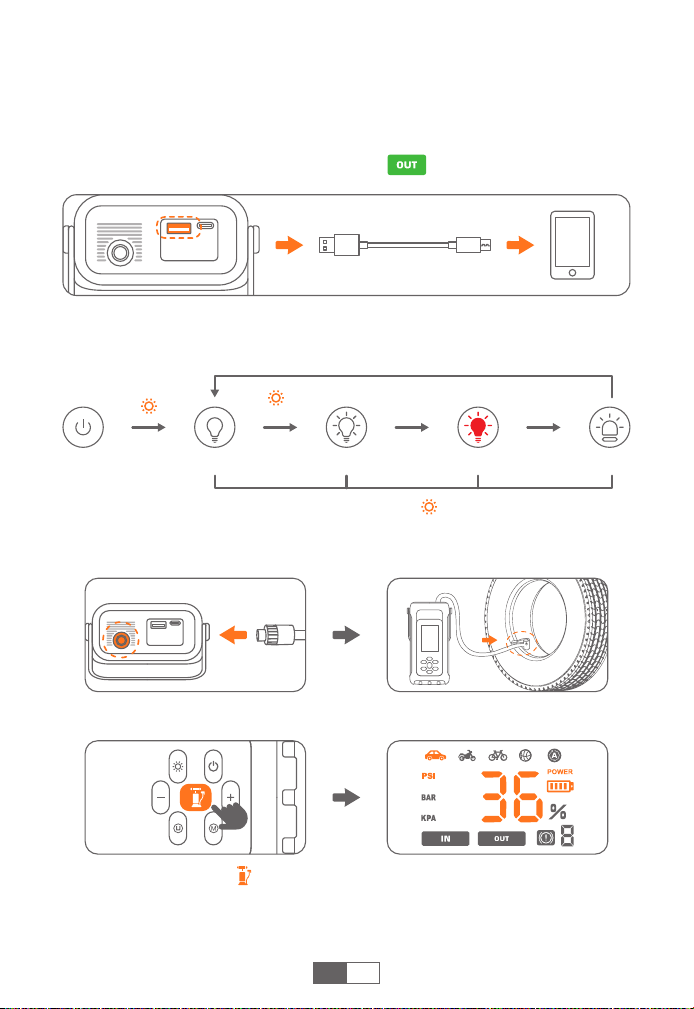
❶
Insert the charging cable into the USB-C port.
❷
Connect the charging cable to a 5V/2A or above adapter (adapter
not included).
❸
When charging, is flashing and is steady. It will be
automatically off when fully charged, or when no activity for 30s.
Tips:
Fully charge the device before first use.
When the battery is low, will flash. Please recharge the device.
EN
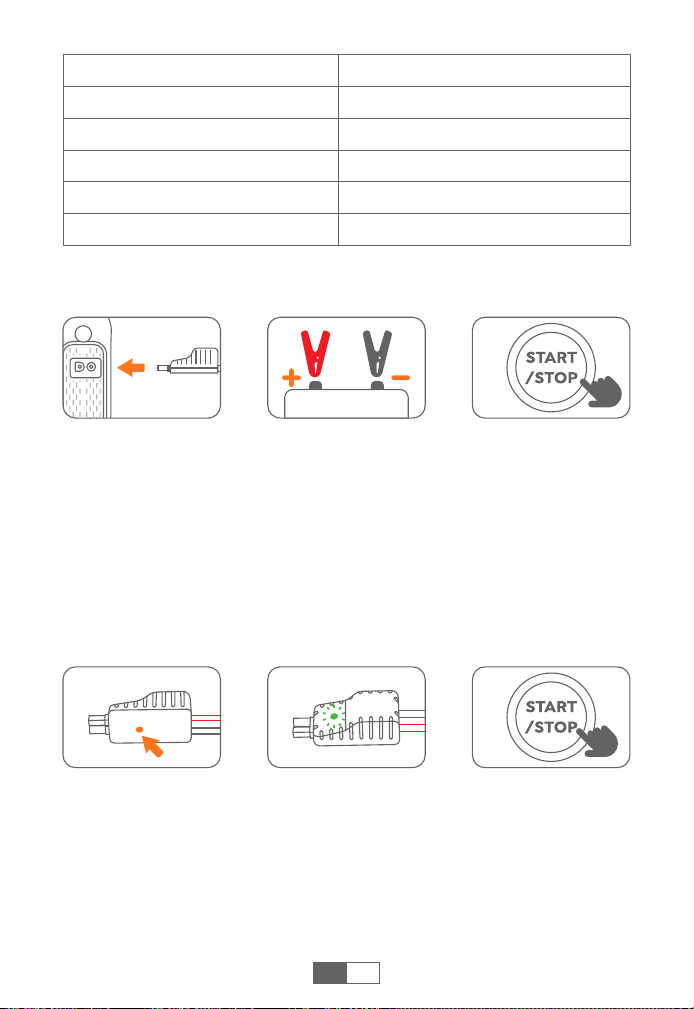
Smart Clamp
Connector
Force Start
Button
Smart Clamp
Indicator
Black Clamp
(Negative)
Red Clamp
(Positive)
5
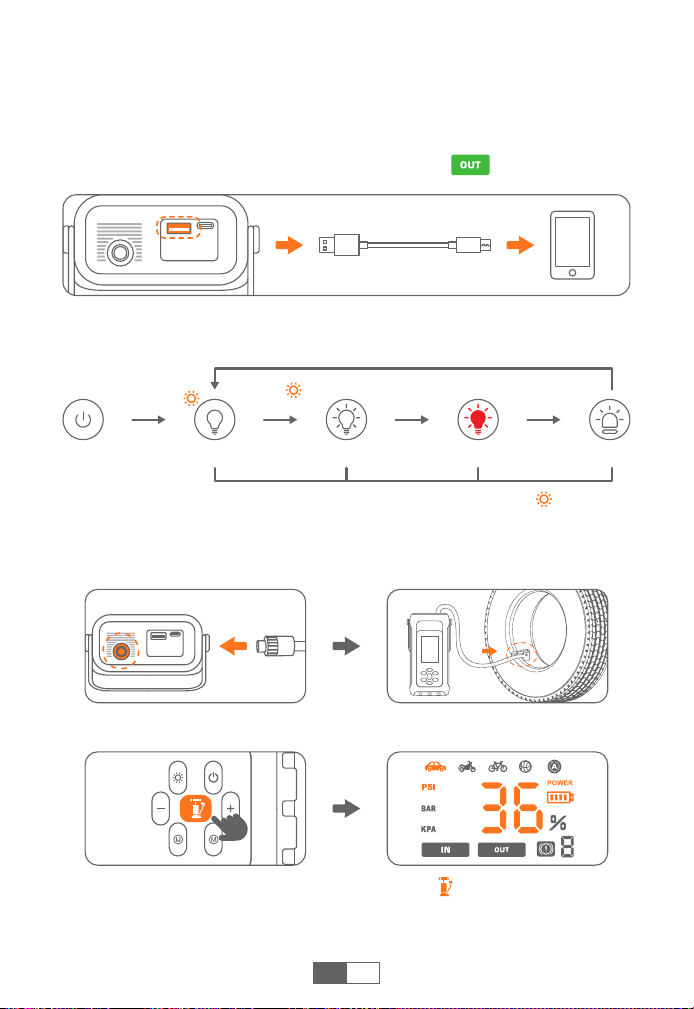
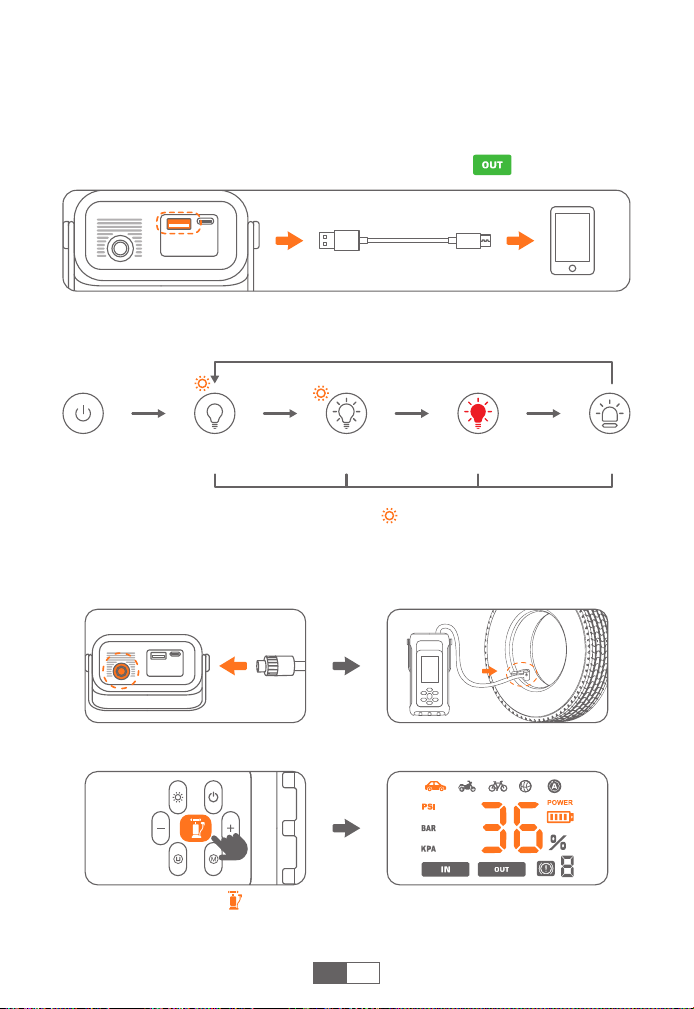
CHECK YOUR CAR'S TIRE PRESSURE
❶
Firmly connect the air hose to both the product and the tire.
❷
Turn on and press , the screen will display a flashing preset
pressure value, then it will automatically switches to real-time tire
pressure 3 seconds later.
EN
LED LIGHTING
Lighting SOSStrobe(White) Strobe(Red)
Press shortly Press shortly Press shortly
Press shortly
Turn on and long
press for 3s
In any light mode, long press the to turn off the light directly.
CHARGE ELECTRONIC DEVICES
❶
Plug the cable into USB output port.
❷
Connect to electronics, such as smart phones.
❸
When the device has current output, is steady.
6
❸
Long press the inflation button to start pump. It will stop
automatically when the air pressure reaches the preset value, and
you can also shortly press again to stop.
Tips:
If used for a long time, it is recommended to stop every 10 minutes to
cool down.
Pressure above 65 PSI can only be set in customized inflation mode.
EN
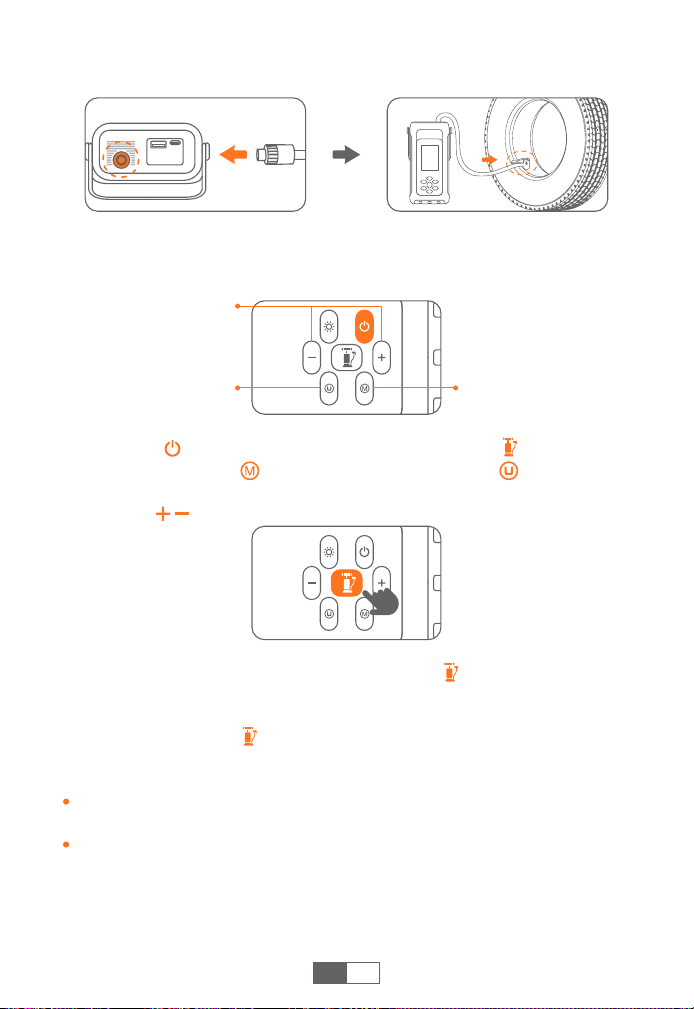
INFLATE YOUR CAR TIRES
❶
Connect the air hose firmly to the product and tire respectively,
and tighten it.
❷ Turn on and short press inflation button . Select the inflation
mode and air pressure unit , then optionally adjust the air
pressure value with buttons .
Inflation Mode Switch
Customized Pressure
Value Adjust
Pressure Unit Switch
7
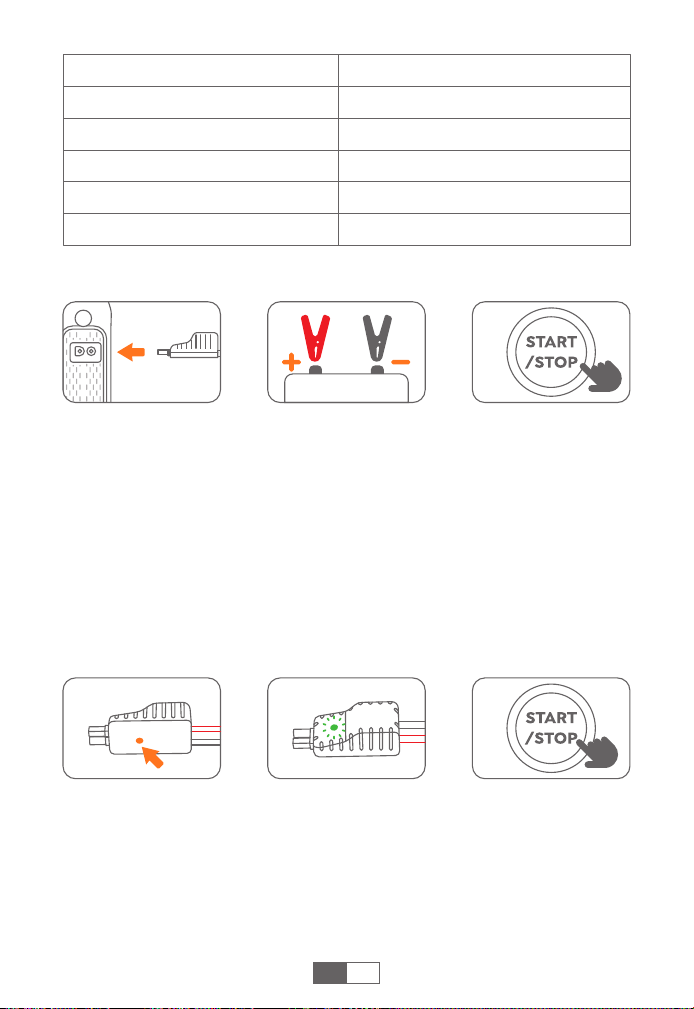
ABOUT THE FORCE START FUNCTION
If three attempts fail when the clamps correctly connected to your
car, you can use the Force Start Function to enter boost mode.
❶
Check the clamps connection and the product's battery is above
50%.
❷
Press the Force Start Button for 3s.
❸
The indicator will be green, and go back to start your car in 30s.
Caution: When using this function, auto-detection and safety
features will be disabled temporarily.
EN
❶
Insert the jumper cable into the jump starter (50% power at least).
The smart clamp indicator flashes red and green alternately.
❷
Connect the clamps to the car battery (red to +, black to -). The
smart clip indicator light stays green.
❸
Start your car engine in 30s.
JUMP START YOUR CAR
Inflation Modes
Car inflation mode
Motorcycle inflation mode
Bicycle inflation mode
Basketball inflation mode
Custom inflation mode
Pressure Range
26~51 PSI, 1.8~3.5 BAR, 180~350 KPA
26~44 PSI, 1.8~3.0 BAR, 180~300 KPA
30~65 PSI, 2.0~4.0 BAR, 210~450 KPA
4~16 PSI, 0.27~1.1 BAR, 25~110 KPA
0~150 PSI, 0~10.3 BAR, 20~999 KPA

8
EN
After car ignition
Others
Please contact sales@buturevac.com with details
Solid red
Over-heating protection
---Remove the clamps to let it cool
Red and green
light flashing
alternately after
solid green
Reverse Charging Protection
---The battery voltage is higher than
the product voltage. Please confirm
whether the car is a 12V battery
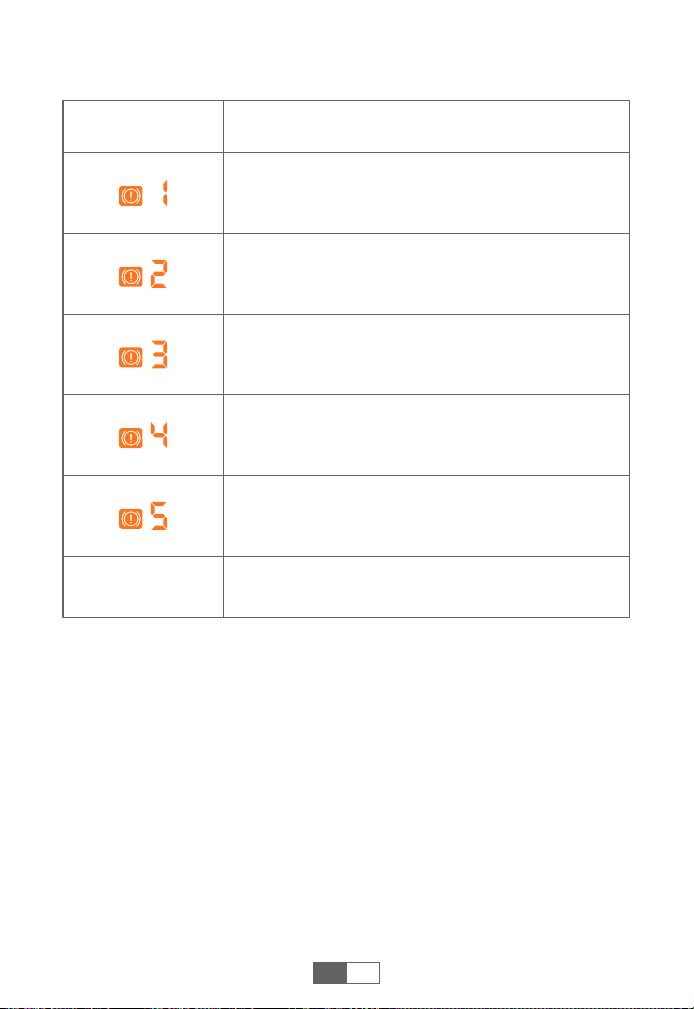
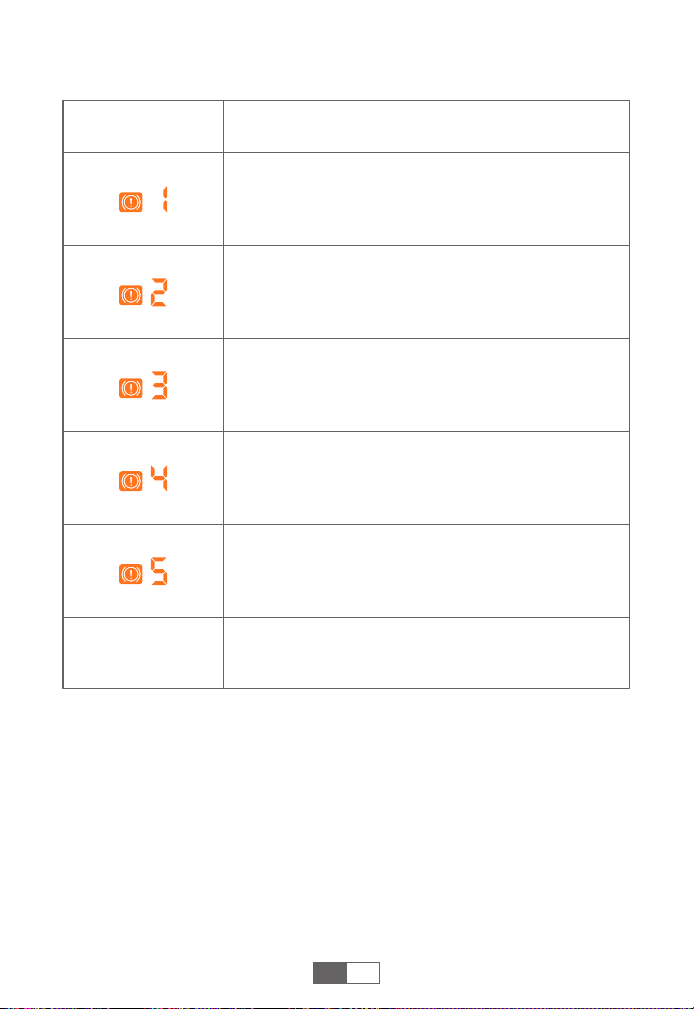
TROUBLESHOOTING ABOUT CLAMPS
Connection
Status
Situations and Solutions
Smart clamps
connected to the
jump starter only
Smart clamps
connected to
both the jump
starter and the
car battery
Standby status
Indicator
Flashing red and
green
Timeout protection
---Please start the car within 30s, or
remove and reconnect to try again
after 30s
Solid red
Reverse polarity protection
---Reverse the clips and ensure the
correct connection (red to +, black to -)
Short-circuit protection
---Don't connect the clips together or
to the same metal
Solid red with
long beep
Green light
flashing slowly
Low voltage protection
---Recharge the product
Solid green Ready to start
9
EN
TROUBLESHOOTING ABOUT JUMP STARTER
Other
Indicator Situations
Overcurrent Protection
---The connected device is not compatible. Please
contact us to confirm.
Short-Circuit Protection
---Please replace the charging cable or clean the
charging interface.
Sensor Detection Failure
--- Make sure the smart clamp connector is fully
inserted.
Inflation High Temperature Protection
--- Stop inflation and wait 10 minutes for automatic
recovery.
High Temperature Charging Protection
--- Unplug the charger and wait for more than 10
minutes for the protection to reset.
Please contact sales@buturevac.com with details

10
ACHTUNG: Bitte lesen Sie die folgenden Sicherheitshinweise,
bevor Sie das Produkt verwenden, und ergreifen Sie Sicherhe-
itsmaßnahmen, um Fehlfunktionen durch versehentliche
Bedienung zu vermeiden.
1. Bewahren Sie das Gerät an einem kühlen und gut belüfteten Ort
außerhalb der Reichweite von Kindern und Haustieren auf.
2. Legen Sie das Produkt nicht über längere Zeit in eine Umgebung
mit hohen Temperaturen. Die Betriebstemperatur dieses Produkts
beträgt -20°C~60°C. Die Lagertemperatur sollte 50°C nicht
überschreiten.
Persönliche Sicherheit
1. Werfen Sie das Produkt nicht in den Müll, sondern recyceln Sie es
sicher.
2. Verbrennen Sie das Produkt nicht und setzen Sie es keinen hohen
Temperaturen aus, da es explodieren kann.
3. Verwenden Sie nur Ersatzteile oder Zubehör, die vom Hersteller
geliefert oder empfohlen werden.
Sicherheit der Batterie
1. Starten Sie Fahrzeuge nur mit dem vom Hersteller gelieferten
Smart-Jumper-Kabel Hersteller.
2. Verwenden Sie das Produkt nicht, wenn die Klemme oder das Kabel
beschädigt ist.
3. Verbinden Sie die rote und die schwarze Klemme nicht zusammen,
wenn das Produkt ausgibt.
4. Verbinden Sie die rote und die schwarze Klemme nicht mit
demselben Metallstück.
5. Zerlegen oder modifizieren Sie dieses Produkt nicht.
6. Verwenden Sie keine Reinigungsmittel, um dieses Produkt zu
reinigen.
7. Missbrauchen Sie dieses Produkt nicht und vermeiden Sie es, es
fallen zu lassen oder wiederholt darauf zu schlagen.
8. Betreiben Sie das Produkt nicht in explosionsgefährdeten Umge-
bungen, wie z.B. bei entflammbaren Flüssigkeiten, Gasen oder
Stäuben.
9. Tauchen Sie das Gerät nicht in Wasser ein.
Elektrische Sicherheit
DE

11
DE
GARANTIE
BUTURE VAC gewährt seinen Kunden eine Garantie von 24 Monaten
ab dem Kaufdatum.
Für Unterstützung oder Garantieansprüche kontaktieren Sie uns bitte
per E-Mail an sales@buturevac.com
1. Bitte verwenden Sie das mitgelieferte USB-C-Kabel und 5V/2A
oder höher Adapter zum Aufladen.
2. Bitte stellen Sie sicher, dass das Gerät vollständig aufgeladen ist,
bevor Sie das Produkt zum ersten Mal verwenden.
3. Es wird empfohlen, das Gerät mindestens einmal alle 3 Monate
vollständig aufzuladen, um die Lebensdauer des Geräts zu
verlängern.
VORSICHTSMASSNAHMEN VOR DEM GEBRAUCH
SPEZIFIKATIONEN
Modell
Kapazität
USB-C-Eingang
USB-Ausgang
ST001
7200mAh, 26.64Wh
5V/2A, 9V/2A, 12V/1.5A
5V/2A

12
PRODUKTÜBERSICHT
Netzschalter
Druckerhöhungstaste (+)
Pumpmodus-
Umschalttaste
Druckeinheit-
Umschalttaste
Pumptaste
LCD-Display
LED-Lichttaste
Druckreduziertaste (-)
Starthilfeanschluss
USB-C-Eingang
Silikongriff
LED-LichtUSB-Ausgang
Luftschlauchanschluss
DE
13
ANZEIGEÜBERSICHT
AUFLADEN DES JUMPSTARTERS
Aufblas-Modus
Luftdruckeinheit
(3 Typen)
Luftdruckwert,
Prozentsatz der Batterie
Batteriesymbol
Fehlerindikator
Eingabe-Anzeige
Ausgabe-Anzeige
❶
Stecken Sie das Ladekabel in den USB-C-Anschluss.
❷
Schließen Sie das Ladekabel an einen 5V/2A oder höheren Adapter
an (Adapter nicht enthalten).
❸
Während des Ladevorgangs blinkt und leuchtet
konstant. Es schaltet sich automatisch aus, wenn es vollständig
geladen ist oder 30 Sekunden lang keine Aktivität stattfindet.
Tipss:
Laden Sie das Gerät vor dem ersten Gebrauch vollständig auf.
Wenn der Akku schwach ist, blinkt . Bitte laden Sie das Gerät
wieder auf.
DE
Smart Clamp-
Anschluss
Start erzwingen
Taste
Smart Clamp
Anzeiger
Schwarze Klemme
(Negativ)
Rote Klemme
(Positiv)
14
PRÜFEN SIE DEN REIFENDRUCK IHRES AUTOS
❶
Schließen Sie den Luftschlauch fest an das Gerät und den Reifen an.
❷ Schalten Sie das Gerät ein und drücken Sie , das Display zeigt
einen blinkenden voreingestellten Druckwert an, dann schaltet es
3 Sekunden später automatisch auf Echtzeit-Reifendruck um.
DE
LED-Licht
Beleuchtung SOSStroboskop(Weiß) Stroboskop(Rot)
Drücken kurz Kurz drücken Kurz drücken
Kurz drücken
Einschalten und 3s
lang drücken
Drücken Sie in jedem Lichtmodus lange auf ,
um das Licht direkt auszuschalten.
ELEKTRONISCHE GERÄTE AUFLADEN
❶
Stecken Sie das Kabel in den USB-Ausgangsanschluss.
❷
Verbinden Sie es mit elektronischen Geräten, wie z. B. Smartphones.
❸
Wenn das Gerät einen Stromausgang hat, ist konstant.
15
❸
Drücken Sie den Aufpumpknop lang, um die Pumpe zu starten.
Sie stoppt automatisch, wenn der Luftdruck den voreingestellten
Wert erreicht. Sie können auch kurz drücken, um sie wieder zu
stoppen.
Tipps:
Bei längerem Gebrauch wird empfohlen, alle 10 Minuten anzuhalten,
um abzukühlen.
Ein Druck über 65 PSI kann nur im benutzerdefinierten Aufblasmodus
eingestellt werden.
DE
IHRE AUTOREIFEN AUFPUMPEN
❶
Schließen Sie den Luftschlauch fest an das Produkt bzw. den
Reifen an und ziehen Sie ihn fest.
❷ Schalten Sie und drücken Sie kurz die Inflationstaste . Wählen
Sie den Aufpumpmodus und die Luftdruckeinheit , und stellen
Sie dann optional den Luftdruckwert mit den Tasten ein.
Schalter für
Aufpumpmodus
Kundenspezifische
Druckwerteinstellung
Schalter für
Druckeinheit

16
ÜBER DIE ZWANGSSTARTFUNKTION
Wenn drei Versuche fehlschlagen, wenn die Klemmen korrekt an Ihr
Auto angeschlossen sind, können Sie die Force-Start-Funktion
verwenden, um den Boost-Modus zu aktivieren.
❶
Prüfen Sie, ob die Klemmen richtig angeschlossen sind und die
Batterie des Geräts über 50 % ist.
❷
Drücken Sie die Force Start Taste für 3s.
❸
Die Anzeige leuchtet grün und kehrt zurück, um Ihr Auto in 30s zu
starten.
Vorsicht: Wenn Sie diese Funktion verwenden, werden die automa-
tische Erkennung und die Sicherheitsfunktionen vorübergehend
deaktiviert.
DE
❶
Stecken Sie das Überbrückungskabel in die Starthilfe (mindestens
50% Leistung). Die Smart Clip-Anzeigeleuchte blinkt abwechselnd
rot und grün.
❷
Schließen Sie die Klemmen an die Autobatterie an (rot an +,
schwarz an -). Die Kontrollleuchte des smart clip bleibt grün.
❸
Starten Sie den Motor Ihres Fahrzeugs innerhalb von 30 Sekunden.
STARTHILFE FÜR IHR AUTO
Aufblas-Modi
Auto-Aufblasmodus
Motorrad-Aufblasmodus
Aufblasen von Fahrrädern
Basketball-Aufblasmodus
Benutzerdefinierter Aufblasmodus
Druckbereich
26~51 PSI, 1.8~3.5 BAR, 180~350 KPA
26~44 PSI, 1.8~3.0 BAR, 180~300 KPA
30~65 PSI, 2.0~4.0 BAR, 210~450 KPA
4~16 PSI, 0.27~1.1 BAR, 25~110 KPA
0~150 PSI, 0~10.3 BAR, 20~999 KPA

17
DE
Nach der
Zündung des
Fahrzeugs
Andere
Bitte wenden Sie sich mit Einzelheiten an
sales@buturevac.com
Einfarbig rot
Überhitzungsschutz
---Entfernen Sie die Klammern, um es
abkühlen zu lassen
Rotes und grünes
Licht blinken
abwechselnd
nach grünem
Dauerlicht
Schutz vor umgekehrter Aufladung
---Die Batteriespannung ist höher als
die Produktspannung. Bitte bestätigen
Sie, ob das Auto eine 12V-Batterie ist
FEHLERSUCHE BEI KLEMMEN
Verbindungs-
status
Situationen und Lösungen
Intelligente
Klemmen nur an
die Starthilfe
angeschlossen
Intelligente
Klemmen, die
sowohl an die
Starthilfe als auch
an die Autobatterie
angeschlossen
werden
Standby-Status
Indikator
Rot und grün
blinkend
Timeout-Schutz
---Bitte starten Sie das Fahrzeug
innerhalb von 30s, oder entfernen Sie
es und schließen Sie es erneut an, um
es nach 30s erneut zu versuchen
Einfarbig rot
Schutz vor Verpolung
---Verpolen Sie die Klemmen und
achten Sie auf den richtigen Anschluss
(rot an +, schwarz an -)
Schutz gegen Kurzschluss
---Verbinden Sie die Klemmen nicht
miteinander oder mit demselben Metall
Dauerrot mit
langem Piepton
Grünes Licht
blinkt langsam
Niederspannungsschutz
--- Wiederaufladen des Produkts
Einfarbig grün Bereit zum Start

18
DE
FEHLERSUCHE ÜBER DIE STARTHILFE
Andere
Blinker Zustände
Überstromschutz
---Das angeschlossene Gerät ist nicht kompatibel.
Bitte kontaktieren Sie uns zur Bestätigung.
Kurzschluss-Schutz
---Bitte ersetzen Sie das Ladekabel oder reinigen Sie
die Ladeschnittstelle.
Sensor-Erkennungsfehler
--- Vergewissern Sie sich, dass der Stecker der Smart
Clamp vollständig eingesteckt ist.
Aufblasbarer Hochtemperaturschutz
--- Stoppen Sie das Aufpumpen und warten Sie 10
Minuten, bis die Temperatur automatisch wiederherg-
estellt ist.
Lade-Hochtemperaturschutz
--- Ziehen Sie den Stecker des Ladegeräts und warten
Sie mehr als 10 Minuten, bis der Schutz zurückgesetzt
wird.
Wenn Sie noch Hilfe benötigen, wenden Sie sich bitte
an sales@buturevac.com.

19
ATENCIÓN: Lea las siguientes advertencias de seguridad antes
de utilizar el producto y tome las medidas de protección
necesarias para evitar averías causadas por un funcionamiento
accidental.
1. Guárdelo en un lugar fresco y bien ventilado, fuera del alcance de
niños y mascotas.
2. No exponga el producto a altas temperaturas durante mucho
tiempo. La temperatura de funcionamiento de este producto es de
-4°F~140°F. La temperatura de almacenamiento no debe superar
los 122°F.
Seguridad Personal
1. No tire el producto a la basura y debe reciclarse de forma segura.
2. No incinere el producto ni lo exponga a altas temperaturas ya que
pueden explotar.
3. Utilice únicamente piezas de repuesto o accesorios suministrados
o recomendados por el fabricante.
Seguridad de la Batería
1. Arranque los vehículos únicamente con el cable de arranque
inteligente suministrado por el suministrado por el fabricante.
2. No utilice el producto si la pinza o el cable están dañados.
3. No conecte los clips rojo y negro juntos cuando el producto esté
saliendo.
4. No conecte las pinzas roja y negra a la misma pieza de metal.
5. No desmonte ni modifique este producto.
6. No utilice detergente para limpiar este producto.
7. No maltrate este producto y evite dejarlo caer o golpearlo
repetidamente.
8. No utilice el producto en entornos explosivos, tales como líquidos-
gases o polvos inflamables.
9. No sumerja el producto en agua.
Seguridad Eléctrica
ES

20
ES
GARANTÍA
BUTURE VAC ofrece a sus clientes una garantía de 24 meses a partir
de la fecha de compra.
Para asistencia o reclamación de cobertura de garantíapor favor,
póngase en contacto con nosotros por correo electrónico a
sales@buturevac.com.
1. Por favor, utilice el cable USB-C incluido y el adaptador de 5V/2A o
superior para la carga.
2. Por favor, asegúrese de que el dispositivo está completamente
cargado antes de utilizar el producto por primera vez.
3. Se recomienda cargar completamente el dispositivo al menos una
vez cada 3 meses para ayudar a prolongar la vida útil del dispositivo.
PRECAUCIONES ANTES DEL USO
ESPECIFICACIONES
Modelo
Capacidad
ENTRADA USB-C
SALIDA USB
ST001
7200mAh, 26.64Wh
5V/2A, 9V/2A, 12V/1.5A
5V/2A
21
RESUMEN DEL PRODUCTO
Botón de Encendido
Botón de Aumento de la
Presión del Aire (+)
Botón de Cambio de
Modo de Inflado
Botón de Cambio de la
Unidad de Presión
Botón de Inflado
Pantalla LCD
Botón de Luz LED
Botón de Reducción de la
Presión del Aire (-)
Puerto de Arranque
Entrada USB-C
Asa de Silicona
Luz LEDSalida USB
Interfaz de la Manguera de Aire
ES
22
RESUMEN DE PANTALLA
CARGAR EL ARRANCADOR
Modo de Inflado
Unidad de Presión
de Aire (3 Tipos)
Valor de Presión de
Aire,Porcentaje de
Batería
Símbolo de Batería
Indicador de Error
Indicador de
Entrada
Indicador de Salida
❶
Inserta el cable de carga en el puerto USB-C.
❷
Conecta el cable de carga a un adaptador de 5 V/2 A o superior
(adaptador no incluido).
❸
Durante la carga, parpadea y está fijo.Se apagará
automáticamente cuando esté completamente cargado, o
cuando no haya actividad durante 30s.
Consejos:
Cargue completamente el dispositivo antes de usarlo por primera vez.
Cuando la batería esté baja, parpadeará. Por favor, recarga el
dispositivo.
ES
Conector de
Pinza Inteligente
Botón de
Arranque
Forzado
Indicador de Pinza
Inteligente
Pinza Negra
(Negativo)
Pinza Roja
(Positivo)
23
COMPRUEBE LA PRESIÓN DE LOS NEUMÁTICOS
DE SU COCHE
❶
Conecte firmemente la manguera de aire tanto al producto como al
neumático.
❷
Encienda y pulse , la pantalla mostrará un valor de presión
preestablecido parpadeante, luego cambiará automáticamente a
la presión de los neumáticos en tiempo real 3 segundos después.
ES
ILUMINACIÓN LED
Iluminación SOSEstroboscópica
(Blanca)
Estroboscopio
(Rojo)
Pulse
brevemente
Pulse
brevemente
Pulse
brevemente
Pulsar brevemente
Encender y pulsar
prolongadamente
durante 3s
En cualquier modo de luz,
pulse prolongadamente para apagar la luz directamente.
CARGA DISPOSITIVOS ELECTRÓNICOS
❶
Conecta el cable al puerto de salida USB.
❷
Conectar a dispositivos electrónicos, como teléfonos inteligentes.
❸
Cuando el dispositivo tiene salida de corriente, está fijo.
24
❸
Pulse prolongadamente el botón de inflado para poner en
marcha la bomba. Se detendrá automáticamente cuando la
presión de aire alcance el valor preestablecido, y también puede
pulsar brevemente de nuevo para detenerla.
Consejos:
Si se utiliza durante mucho tiempo, se recomienda parar cada 10
minutos para enfriarse.
La presión superior a 65 PSI sólo puede ajustarse en el modo de
inflado personalizado.
ES
INFLE LOS NEUMÁTICOS DE SU COCHE
❶
Conecte firmemente la manguera de aire al producto y al
neumático respectivamente, y apriétela.
❷ Encienda y pulse brevemente el botón de inflado . Seleccione
el modo de inflado y la unidad de presión de aire y, a continu-
ación, ajuste opcionalmente el valor de presión de aire con los
botones .
Interruptor de modo
de inflado
Ajuste personalizado
del valor de presión
Interruptor de la
unidad de presión
25
ACERCA DE LA FUNCIÓN DE ARRANQUE FORZADO
Si fallan tres intentos con las pinzas correctamente conectadas a tu
coche, puedes utilizar la función de arranque forzado para entrar en
el modo boost.
❶
Compruebe la conexión de las pinzas y que la batería del producto
esté por encima del 50%.
❷
Pulsa el botón de arranque forzado durante 3s.
❸
El indicador se pondrá verde, y volverá a arrancar su coche en 30s.
Precaución: Al utilizar esta función, la detección automática y las
funciones de seguridad se desactivarán temporalmente.
ES
❶
Inserte el cable de arranque en el arrancador (Al menos el 50%
cargado). La luz indicadora de smart clip parpadea en rojo y verde
alternativamente.
❷
Conecta las pinzas a la batería del coche (rojo a +, negro a -). La luz
indicadora de smart clip permanece verde.
❸
Arranca el motor de tu coche en 30s.
ARRANCA TU COCHE
Modos de inflado
Modo de inflado para coches
Modo de inflado para motocicletas
Modo de inflado de bicicletas
Modo de inflado de baloncesto
Modo de inflado personalizado
Rango de Presión
26~51 PSI, 1.8~3.5 BAR, 180~350 KPA
26~44 PSI, 1.8~3.0 BAR, 180~300 KPA
30~65 PSI, 2.0~4.0 BAR, 210~450 KPA
4~16 PSI, 0.27~1.1 BAR, 25~110 KPA
0~150 PSI, 0~10.3 BAR, 20~999 KPA

26
ES
Después del
encendido del
coche
Otros
Si desea más información, póngase en contacto con
sales@buturevac.com
Rojo fijo
Protección contra sobrecalentamiento
---Retire las abrazaderas para dejarlo
enfriar
Luz roja y verde
parpadeando
alternativamente
después de verde
fijo
Protección de carga inversa
---El voltaje de la batería es superior al
voltaje del producto. Por favor, confirme
si el coche es una batería de 12V
SOLUCIÓN DE PROBLEMAS SOBRE ABRAZADERAS
Estado de la
Conexión
Situaciones y Soluciones
Pinzas inteligentes
conectadas sólo al
arrancador de
emergencia
Pinzas inteligentes
conectadas tanto
al arrancador
como a la batería
del coche
Indicador
Protección de tiempo de espera
---Por favor, encienda el coche dentro
de 30s, o quitar y volver a conectar
para volver a intentarlo después de 30s
Rojo fijo
Protección contra polaridad inversa
---Invierta las pinzas y asegúrese de
que la conexión es correcta (rojo con +,
negro con -)
Protección contra cortocircuitos
---No conecte las pinzas entre sí ni al
mismo metal.
Rojo fijo con pitido
largo pitido
Estado de espera
Parpadeando en
rojo y verde
Luz verde
parpadeando
lentamente
Protección contra baja tensión
---Recarga el producto
Verde fijo Listo para empezar
27
ES
SOLUCIÓN DE PROBLEMAS SOBRE EL ARRANCADOR
Otros
Indicador Situaciones
Protección de sobrecorriente
---El dispositivo conectado no es compatible.
Póngase en contacto con nosotros para confirmarlo.
Protección contra cortocircuitos
---Por favor, sustituya el cable de carga o limpie la
interfaz de carga.
Fallo de detección del sensor
---Asegúrese de que el conector de la pinza
inteligente está completamente insertado.
Protección contra alta temperatura de inflado
--- Detenga el inflado y espere 10 minutos para la
recuperación automática.
Protección de carga a alta temperatura
--- Desenchufe el cargador y espere más de 10
minutos para que se restablezca la protección.
Si todavía necesita ayuda, póngase en contacto con
sales@buturevac.com con los detalles.

Federal Communication Commission Interference Statement
NOTE: This equipment has been tested and found to comply with the
limits for a Class B digital device, pursuant to part 15 of the FCC Rules.
These limits are designed to provide reasonable protection against
harmful interference in a residential installation. This equipment
generates, uses and can radiate radio frequency energy and, if not
installed and used in accordance with the instructions, may cause
harmful interference to radio communications. However, there is no
guarantee that interference will not occur in a particular installation. If
this equipment does cause harmful interference to radio or television
reception, which can be determined by turning the equipment off and
on, the user is encouraged to try to correct the interference by one or
more of the following measures:
· Reorient or relocate the receiving antenna.
· Increase the separation between the equipment and receiver.
· Connect the equipment into an outlet on a circuit different from that
to which the receiver is connected.
· Consult the dealer or an experienced radio/TV technician for help.
Caution: Changes or modifications not expressly approved by the
party responsible for compliance could void the user's authority to
operate this equipment.
This device complies with part 15 of the FCC Rules. Operation is subject
to the following two conditions:
(1) This device may not cause harmful interference, and
(2) This device must accept any interference received, including
interference that may cause undesired operation.

Declaration of Conformity
We (EU based importer is responsible for this declaration)
SUCCESS COURIER SL
(Company name)
CALLE RIO TORMES NUM.1, PLANTA 1, DERECHA, OFICINA 3, Fuenlabra-
da, Madrid,28947 Spain
(Company address)
declare under our sole responsibility that the product
Trade name: BUTURE VAC
Equipment: Jump Starter
Model No. : ST001
to which this declaration relates is in conformity with the essential
requirement set out in the Council Directive on the Approximation of
the laws of the Member States relating to LVD Directive(2014/35/EU) &
EMC Directive(2014/30/EU) & RoHS(2011/65/EU) product is responsible
to affix CE marking, the following standards were applied:
EN IEC 62368-1:2020+A11:2020
EN 55032:2015 AMD.1:2020+A11:2020
EN 55035:2017AMD.1:2020
EN IEC 61000-3-2:2019/A1:2021
EN 61000-3-3:2013AMD.1:2019+ AMD.2:2021
IEC62321-3-1:2013
IEC62321-4:2013
IEC62321-5:2013
IEC62321-6:2015
IEC62321-7-1:2015
IEC62321-7-2:2017
IEC62321-8:2017
Full Name: George.wang Position: Approbation Manager
Signature: Place/Date: Shenzhen,China/Apr.02-2025

[email protected] buturevac.com
WHERE TO GET MORE HELP
Scan And Download PDF Version Of User Manual
https://buturevac.com/pages/user-manuals
