SPECIAL FEATURES
NO.G11235700
INTRODUCTION
2018
NT08-115X
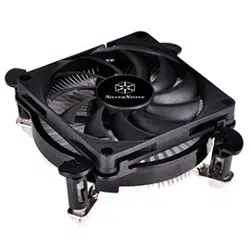
Superior low-profile thermal solution for
Intel LGA1150/1151/1155/1156
SilverStone Technology’s Nitrogon NT08-115X is a low-profile CPU cooler designed for space limited applications
that utilizes LGA1150/1151/1155/1156 platforms. It has a true, solid copper center and base with extruded aluminum
fins for superior thermal conductivity for up to 95W, a figure that rivals many larger and original coolers. The custom
92mm PWM fan was designed with fan blades to achieve the highest air pressure possible while maintaining an
acoustic profile that is rare for cooler of this size. At a total height of 48mm tall, the NT08-115X is an excellent
upgrade for any low-profile system on LGA1150/1151/1155/1156 platforms.
Nitrogon Series
65w
95W
▓ Supports Intel LGA1150/1151/1155/1156 processors
▓ Designed for low-profile systems at 48mm tall
▓ Large custom 92mm PWM fan for excellent cooling and low noise
▓ True solid copper contact base enables heat dissipation up to 95W
▓ Copper center and base with extruded aluminum fins
▓ Easy to install
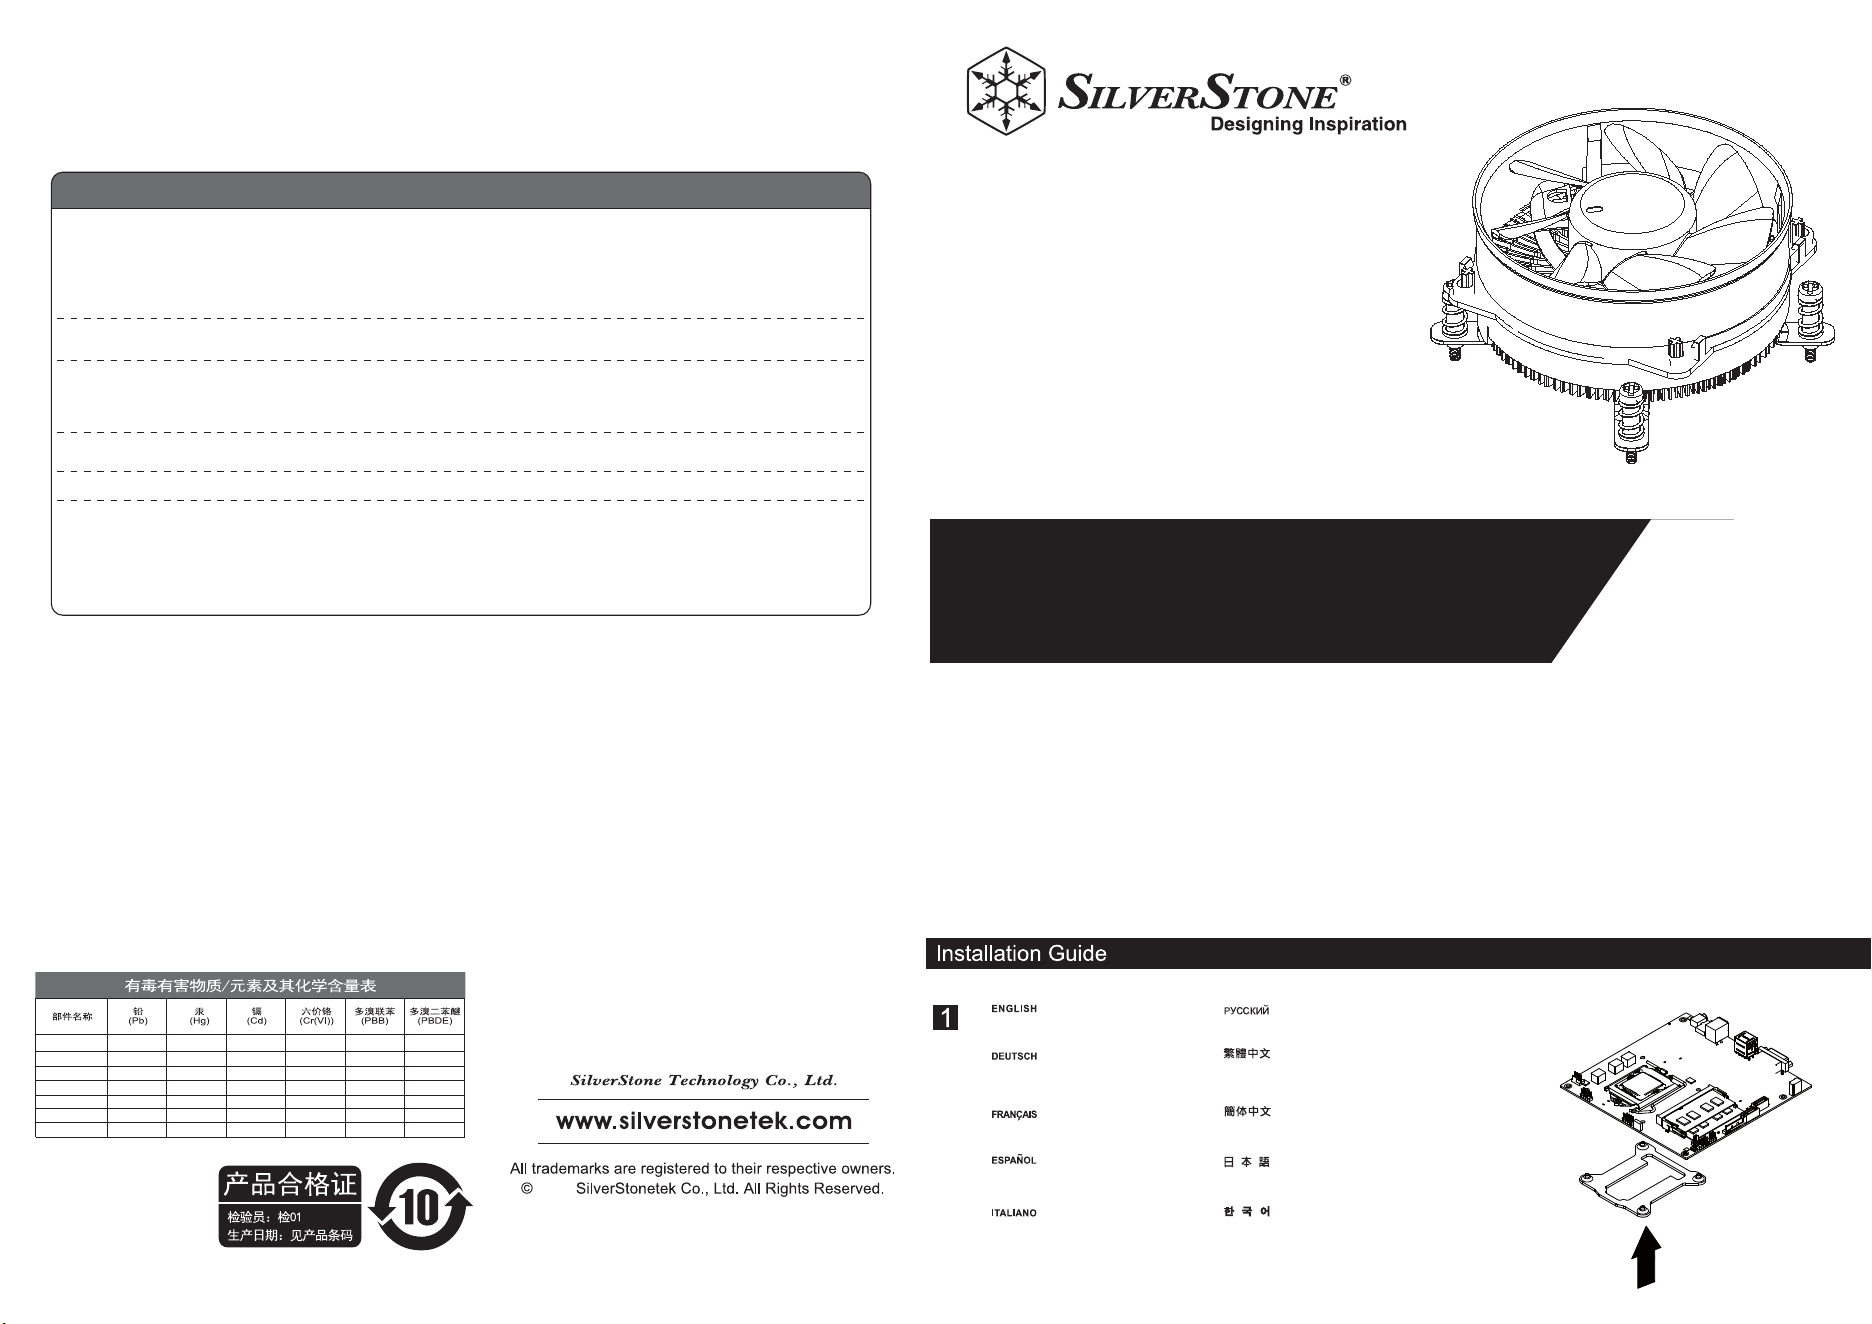
Install included back-plate onto
the backside of the motherboard.
Установите прилагаемую установочную
панель на задней части системной платы.
Installieren Sie die mitgelieferte
Rückplatte an der Rückseite des
Motherboards.
Installez la plaque arrière sur la face
arrière de la carte mère.
Instale la placa trasera incluida en la
parte trasera de la placa base.
Installare la piastra posteriore fornita
in dotazione sul retro della scheda
madre.
제공된 백 플레이트를 메인보드의 뒷면에 설치합니다.
請將所附背板安裝於主機板背面。
请将所附背板安装于主机板背面。
付属のバックプレートをマザーボードの裏側に取
り付けます。
Warranty Information
This product has a limited 1 year warranty in North America and Australia.
For information on warranty periods in other regions, please contact your reseller or SilverStone authorized distributor.
本产品自购买之日起,于中国地区(不包含澳门,香港特别行政区)享有一年有限责任保固(部分产品为二年,三年或五年)。
详细保固年限请参照官方网站 https://silverstonetek.com.cn/ 公布之产品型号为依据。
1. Product component defects or damages resulted from defective production is covered under warranty.
Defects or damages with the following conditions will be fixed or replaced under SilverStone Technology’s jurisdiction.
a) Usage in accordance with instructions provided in this manual, with no misuse, overuse, or other inappropriate actions.
b) Damage not caused by natural disaster (thunder, fire, earthquake, flood, salt, wind, insect, animals, etc…)
c) Product is not disassembled, modified, or fixed. Components not disassembled or replaced.
d) Warranty mark/stickers are not removed or broken.
Loss or damages resulted from conditions other than ones listed above are not covered under warranty.
2. Under warranty, SilverStone Technology’s maximum liability is limited to the current market value for the product (depreciated value, excluding
shipping, handling, and other fees). SilverStone Technology is not responsible for other damages or loss associated with the use of product.
3. Under warranty, SilverStone Technology is obligated to repair or replace its defective products. Under no circumstances will SilverStone
Technology be liable for damages in connection with the sale, purchase, or use including but not limited to loss of data, loss of business, loss of
profits, loss of use of the product or incidental or consequential damage whether or not foreseeable and whether or not based on breach of warranty,
contract or negligence, even if SilverStone Technology has been advised of the possibility of such damages.
4. Warranty covers only the original purchaser through authorized SilverStone distributors and resellers and is not transferable to a second hand
purchaser.
5. You must provide sales receipt or invoice with clear indication of purchase date to determine warranty eligibility.
6. If a problem develops during the warranty period, please contact your retailer/reseller/SilverStone authorized distributors or SilverStone
http://www.silverstonetek.com.
Please note that: (i) You must provide proof of original purchase of the product by a dated itemized receipt; (ii) You shall bear the cost of shipping
(or otherwise transporting) the product to SilverStone authorized distributors. SilverStone authorized distributors will bear the cost of shipping
(or otherwise transporting) the product back to you after completing the warranty service; (iii) Before you send the product, you must be issued a
Return Merchandise Authorization (“RMA”) number from SilverStone. Updated warranty information will be posted on SilverStone’s official website.
Please visit http://www.silverstonetek.com for the latest updates.
Warranty terms & conditions
Additional info & contacts
For North America ([email protected])
SilverStone Technology in North America may repair or replace defective product with refurbished product that is not new but has been functionally tested.
Replacement product will be warranted for remainder of the warranty period or thirty days, whichever is longer. All products should be sent
back to the place of purchase if it is within 30 days of purchase, after 30 days, customers need to initiate RMA procedure with SilverStone Technology
in USA by first downloading the “USA RMA form for end-users” form from the below link and follow its instructions.
http://silverstonetek.com/contactus.php
For Australia only ([email protected])
Our goods come with guarantees that cannot be excluded under the Australian Consumer Law.
You are entitled to a replacement or refund for a major failure and for compensation for any other reasonably foreseeable loss or damage.
You are also entitled to have the goods repaired or replaced if the goods fail to be of acceptable quality and the failure does not amount to a major failure.
Please refer to above “Warranty terms & conditions” for further warranty details.
SilverStone Technology Co., Ltd. 12F No. 168 Jiankang Rd., Zhonghe Dist., New Taipei City 235 Taiwan R.O.C. + 886-2-8228-1238
(standard international call charges apply)
For Europe ([email protected])
For China ([email protected])
For all other regions ([email protected])
电机组件
金属结构件
塑胶结构件
线缆/ 连接器
介质/其它
包装材料
辅助材
X
O
O
O
O
O
O
O
O
O
O
O
O
O
O
O
O
O
O
O
O
O
O
O
O
O
O
O
O
O
O
O
O
O
O
O
O
O
O
O
O
O
○:表示该有毒有害物质在该部件
所有均质材料中的含量均在GB
/T 26572 规定的限量要求以下。
本表格依据SJ/T 11364的规定编制
×:表示该有毒有害物质至少在该部
件的某一均质材料中的含量超出
GB/T 26572 规定的限量要求。
2
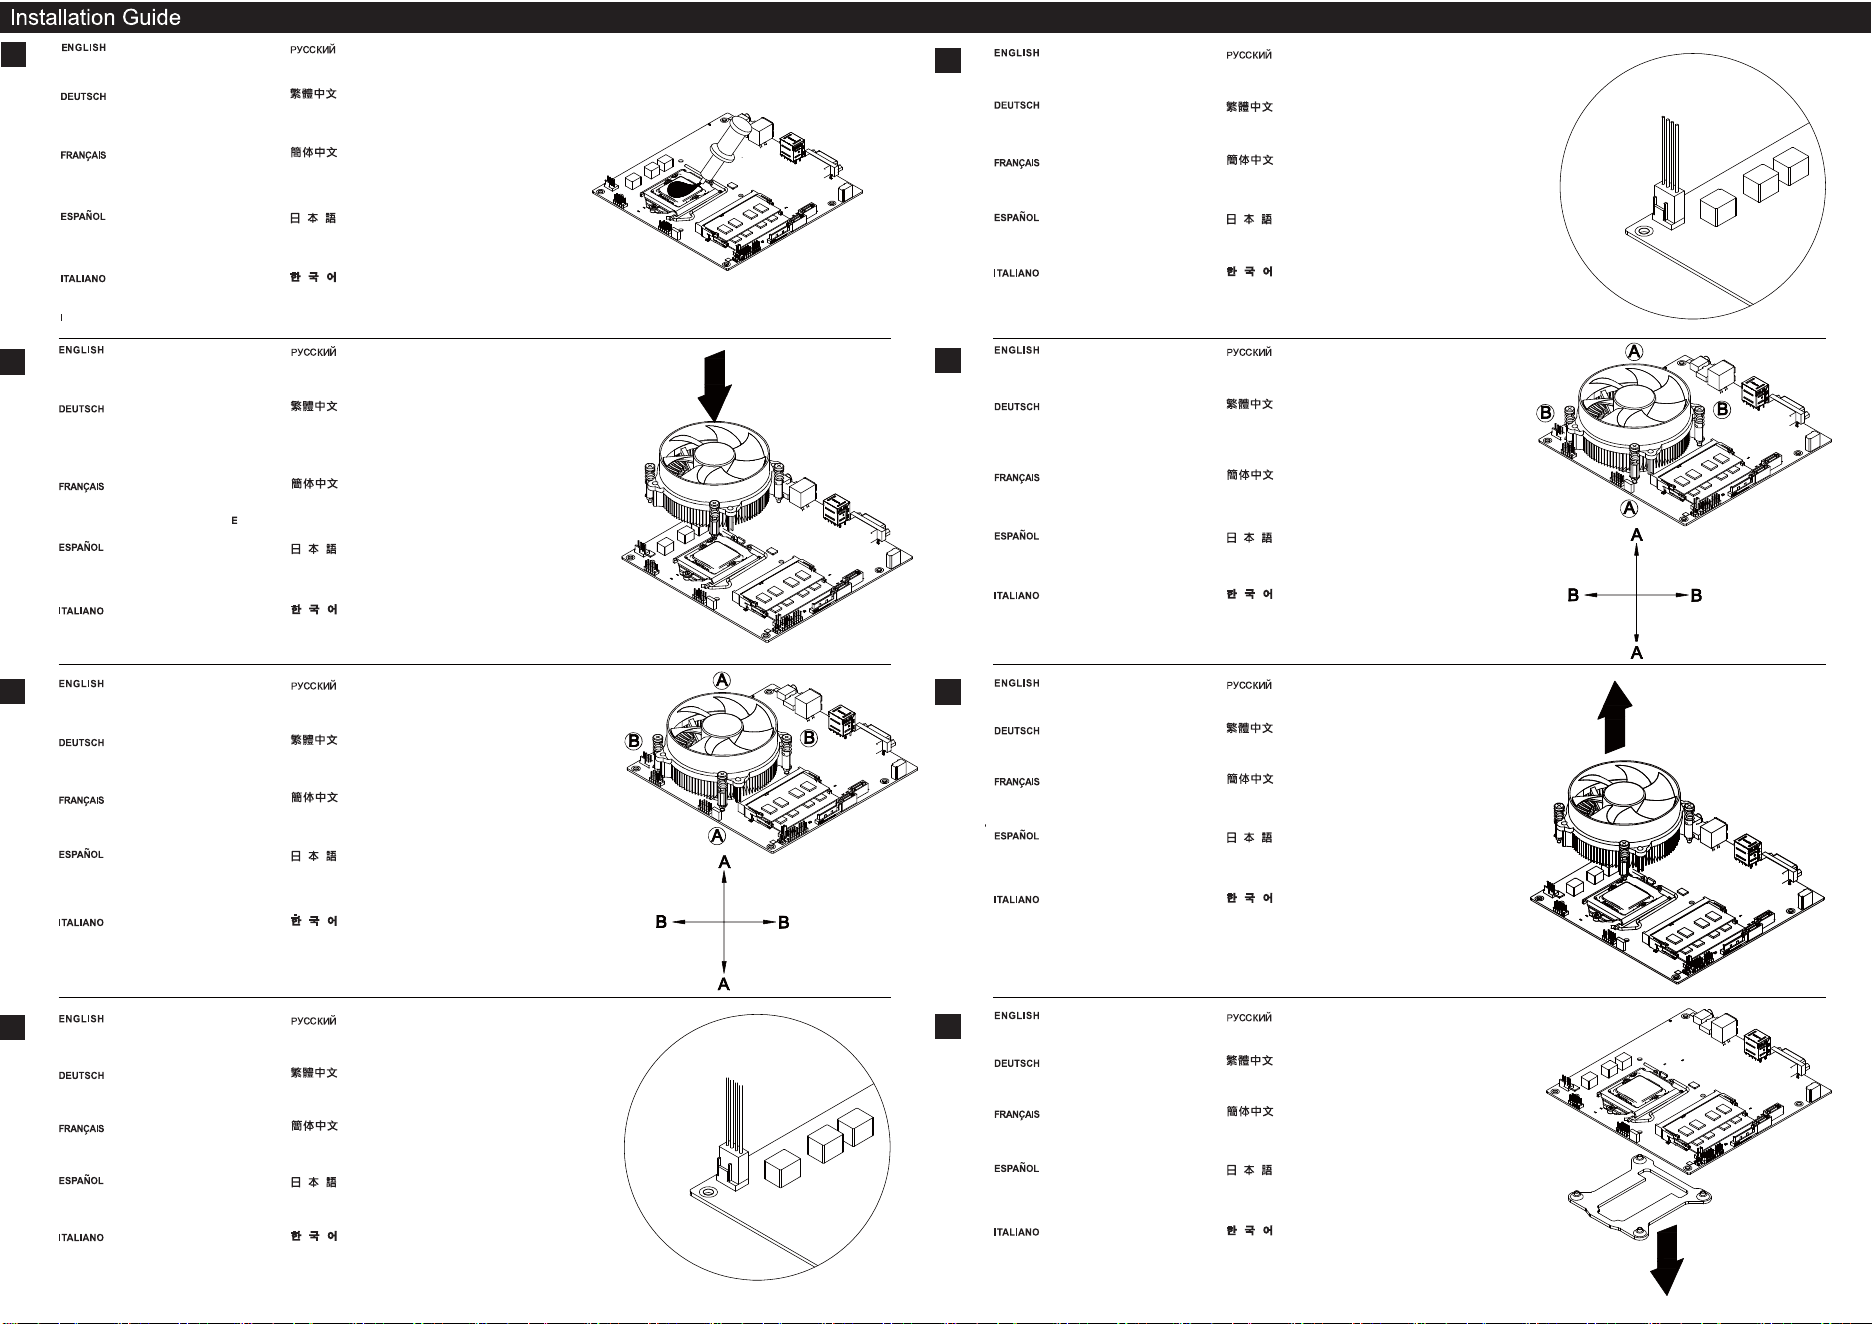
Apply included heatsink compound on you
CPU evenly.
Равномерно нанесите прилагаемую термопасту
на процессор.
Tragen Sie die mitgelieferte Wärmeleitpaste
gleichmäßig auf Ihre CPU auf.
Appliquez le dissipateur de chaleur composé
sur votre CPU de façon régulière.
Aplique el compuesto conductor térmico
incluido en su CPU de forma uniforme.
Applicare in modo uniforme sulla CPU
il composto termico per il dissipatore
di calore fornito in dotazione.
제공된 방열판 접착제를 CPU에 고르게 바릅니다.
請將散熱膏均勻地塗抹在CPU上。
请将散热膏均匀地涂抹在CPU上。
付属のヒートシンクコンパウンドをCPUにむらなく塗ります。
2
3
Loosen and pull up two screws in position A
and then the other two in position B to remove
the CPU Cooler from the motherboard
Ослабьте и потяните вверх два винта в положении A, а
затем другие два винта в положении B для снятия вентилятора
процессора с системной платы
Lösen und entnehmen Sie zum Entfernen des
CPU-Kühlers vom Motherboard die beiden
Schrauben in Position A, dann die beiden
Schrauben in Position B.
Devissez et retirez deux vis en position A puis
les deux autres en position B pour retirer le
refroidisseur de CPU de la carte mère.
Afloje y tire de los dos tornillos en la posición
A y luego de los otros dos en la posición B para
retirar el disipador de la CPU de la placa base.A
Allentare e sollevare le due viti in posizione A,
quindi le altre due viti in posizione B per
rimuovere il dissipatore di calore CPU dalla
scheda madre
위치 A에서 2개의 나사를 풀어 위로 당긴 후 위치 B에서
나머지 2개의 나사도 풀어 위로 당겨 CPU 쿨러를
메인보드에서 분리합니다.
請依圖示依序鬆開並拉起位置A的螺絲,
再依序鬆開並拉起位置B的螺絲。
请依图标依序松开并拉起位置A的螺丝,
再依序松开并拉起位置B的螺丝。
Aの位置のネジ2本を緩めて外し、それからBの位置のネジを緩め
てCPUクーラーをマザーボードから取り外します。
Remove the CPU cooler from the
motherboard.
Выньте кулер ЦП из материнской
платы.
Nehmen Sie den CPU-Kühler vom
Motherboard ab.
Retirez le dissipateur de la carte mère.
Retire el disipador de la CPU de la placa
base.
Rimuovere il cooler del CPU dalla scheda
madre.
메인보드로 부터 CPU 쿨러를 제거합니다.
請將NT08-115X散熱器自主機板上方移除。
请将NT08-115X散热器自主机板上方移除。
マザーボードからCPUクーラーを取り外します。
Remove back-plate from the
motherboard.
Снимите установочную панель с системной платы.
Entfernen Sie die Rückplatte
vom Motherboard.
Retirez la plaque arrière de la carte mère.
Retire la placa trasera de la placa base.
Rimuovere piastra posteriore dalla scheda
madre.
백 플레이트를 메인보드에서 분리합니다.
請將所附背板從主機板背面移除。
请将所附背板从主机板背面移除。
マザーボードからバックプレートを取り外します。
4
3
Place the NT08-115X cooler on top of the
installed CPU, and align the four spring screw
with the holes on the motherboard.
Расположите вентилятор NT08-115X над верхней частью
установленного процессора и
совместите четыре пружинных винта с отверстиями на
системной плате.
Bringen Sie den NT08-115X-Kühler auf der
installierten CPU an, richten Sie die vier
Federschrauben an den Löchern am
Motherboard aus.
Placez le refroidisseur le NT08-115X sur le
dessus du CPU intégré, puis alignez les quatre
vis à ressort avec les trous sur la carte mère.
Coloque el disipador NT08-115X sobre la CPU
instalada y alinee los cuatro tornillos con los
agujeros de la placa base.
Collocare il dissipatore di calore NT08-115X
sopra la CPU installata, ed allineare le quattro
viti a molla con i fori sulla scheda madre.
NT08-115X 쿨러를 설치된 CPU의 상부에
올려놓고 4개의 스프링 나사를 메인보드의
구멍에 맞춥니다.
請將NT08-115X散熱器置於已安裝CPU上方,
並將四顆散熱器螺絲對準主機板上的孔位。
请将NT08-115X散热器置于已安装CPU上方,
并将四颗散热器螺丝对准主机板上的孔位。
NT08-115Xクーラーを装着されたCPUの上に置き、
マザーボードの4つのネジ穴に合わせます。
4
Press and fasten two screws in position A as
shown and then the other two in position B to
fix the CPU cooler in place.
Нажмите и закрепите два винта в положении
A, как показано, а затем два винта в
положении B для фиксации процессора.
Befestigen Sie zum Fixieren des CPU-Kühlers
zwei Schrauben wie abgebildet in Position A
und zwei weitere Schrauben in Position B.
Appuyez sur deux vis et vissez deux vis en
position A comme indiqué puis les deux autres
en B pour fixer le refroidisseur de CPU en place.
Presione y fije dos tornillos en la posición A
como se muestra y luego los otros dos en la
posición B para colocar el disipador de la CPU
en su lugar.
Premere e stringere le due viti in posizione A,
come mostrato, quindi le due viti in posizione B
per fissare in posizione il dissipatore di calore
CPU.
그림과 같이 위치 A에서 2개의 나사를 눌러 조인 후
위치 B에서 나머지 2개의 나사를 사용하여
CPU 쿨러를 제자리에 고정합니다.
請依圖示依序下壓並鎖固位置A的螺絲,
再依序下壓並鎖固位置B的螺絲。
请依图标依序下压并锁固位置A的螺丝,
再依序下压并锁固位置B的螺丝。
CPUクーラーは、図のようにAの位置にネジ2本で固定し、
残り2本はBの位置に締めて所定の位置に固定します。
When the NT08-115X is installed, connect the
CPU fan cable to the motherboard fan header
for CPU.
После установки NT08-115X подсоедините
кабель вентилятора процессора к разъему
вентилятора системной платы.
Wenn der NT08-115X installiert ist, verbinden
Sie das CPU-Lüfterkabel mit der
Motherboard-Lüftersteckleiste für die CPU.
Une fois le NT08-115X installé, connectez le
câble du ventilateur de CPU à la tête du
ventilateur de la carte mère de CPU.
Cuando la NT08-115X esté instalada, conecte
el cable del ventilador de la CPU al conector
del ventilador de la CPU en su placa base.
Quando NT08-115X è installato, collegare il
cavo ventola CPU al collettore ventola CPU
della scheda madre.
NT08-115X가 설치되면 CPU 팬 케이블을 CPU용
메인보드 팬 헤더에 연결합니다.
當NT08-115X安裝完成後,將CPU風扇的連接線
接上主機板風扇接頭。
当NT08-115X安装完成后,将CPU风扇的连接线
接上主机板风扇接头。
NT08-115Xが設置されたら、CPUファンケーブルをマ
ザーボードのCPUファンヘッダに接続します。
5
2
1
Remove the CPU fan cable from the
motherboard fan header.
Отсоедините кабель вентилятора процессора
от разъема вентилятора системной платы.
Entfernen Sie das CPU-Lüfterkabel
von der Motherboard-Lüftersteckleiste.
Retirez le câble du ventilateur de la tête du
ventilateur de la carte mère.
Retire el cable del ventilador de la CPU del
conector de la placa base.
Rimuovere il cavo ventola CPU dal collettore
ventola della scheda madre.
CPU 팬 케이블을 메인보드 팬 헤더에서 분리합니다.
將CPU風扇的連接線從主機板風扇接頭移除。
将CPU风扇的连接线从主机板风扇接头移除。
CPUファンケーブルをマザーボードのファンヘッダか
ら外します。
Removal Guide