
I
�
us
TREEOER
----------------------------
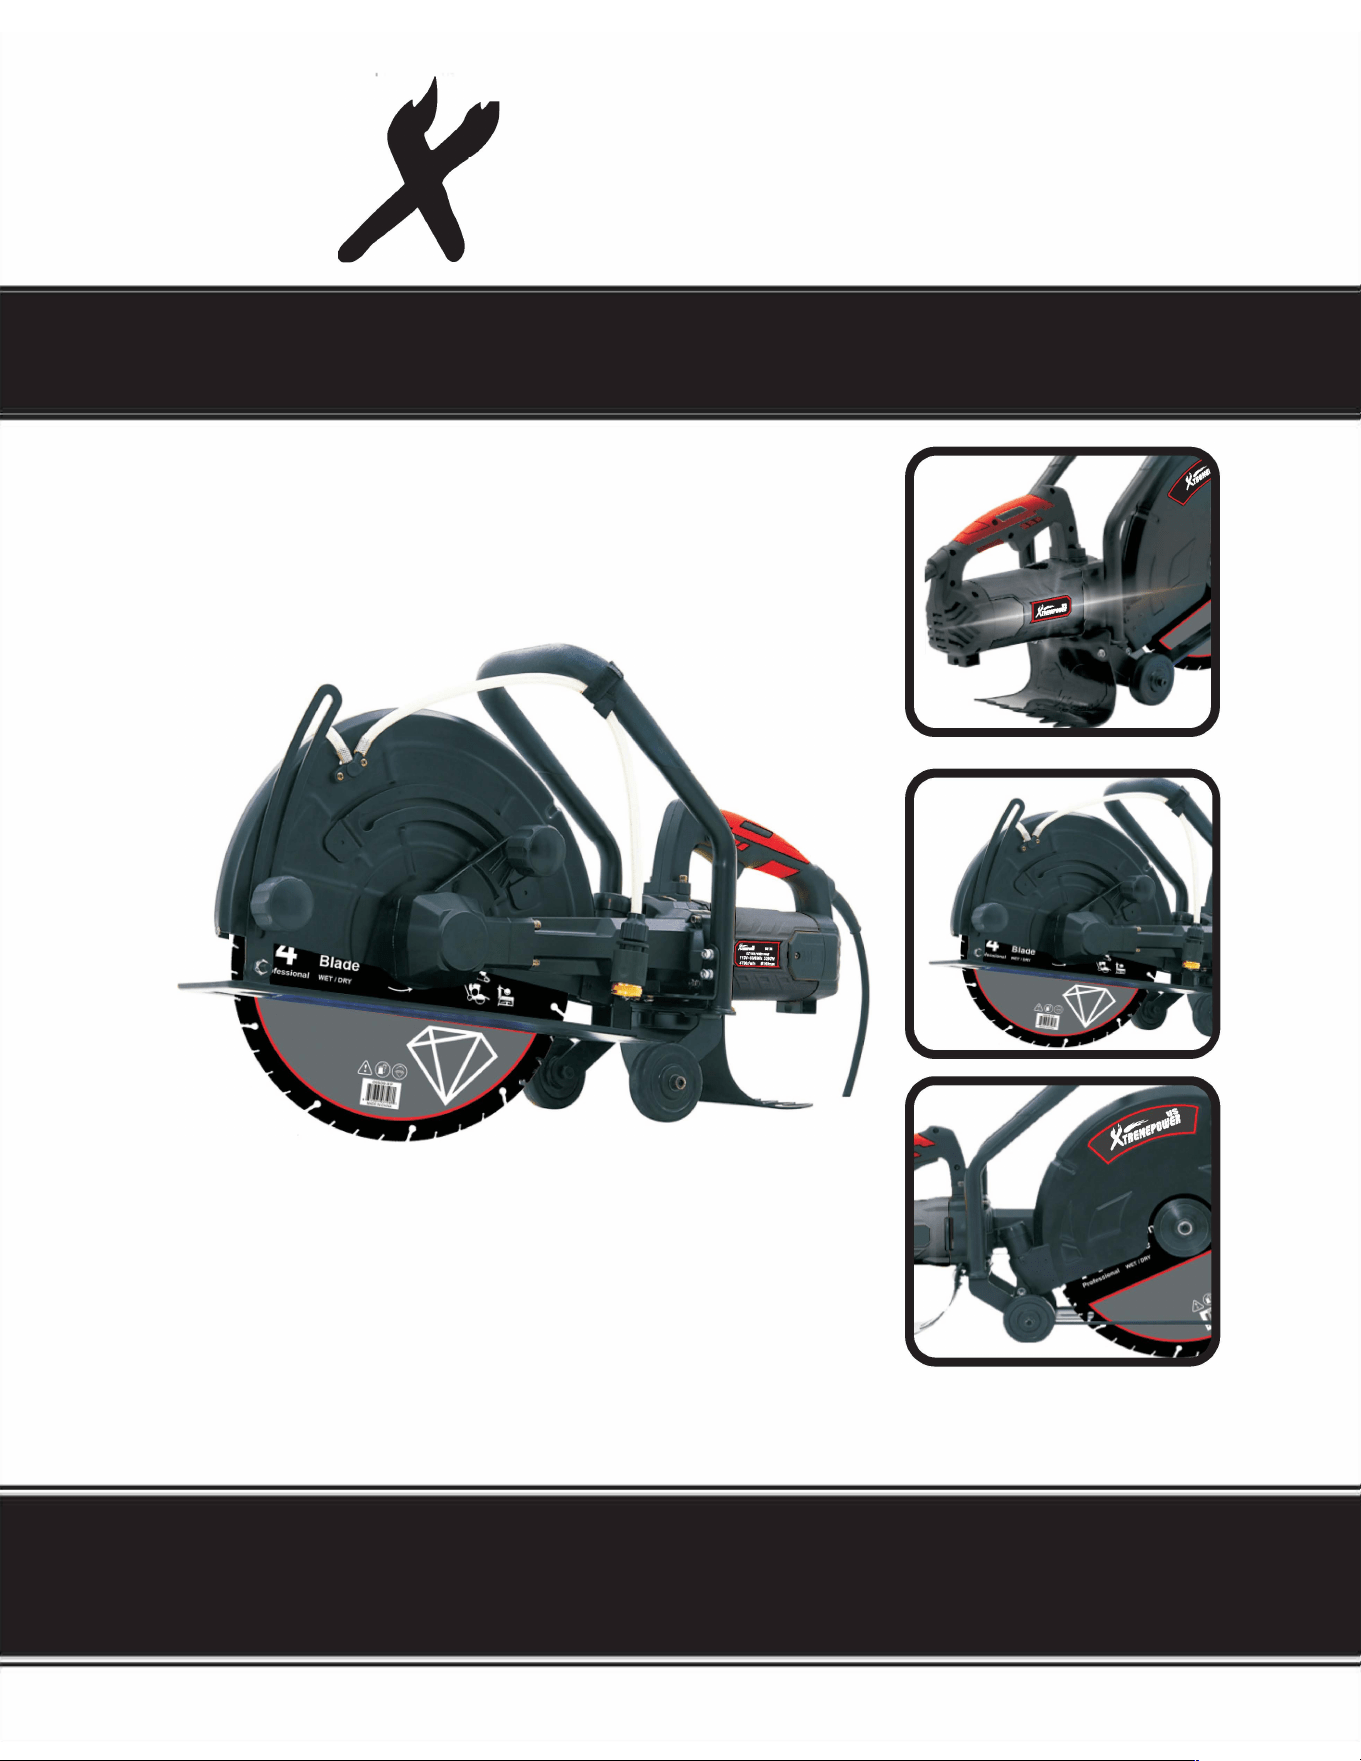
16" 3200W POWER CUTTER SAW
ITEM: 50130
----------------------------
OWNER'S MANUAL AND SAFETY INSTRUCTIONS
SAVE THIS MANUAL. KEEP THIS MANUAL FOR SAFETY RNINGS, PRECAUTIONS, ASSEMBLY,
OPERATING, INSPECTION, MAINTENANCE AND CLEANING PROCEDURES. WRITE THE PRODUCT'S
SERIAL NUMBER ON THE BACK OF THE MANUAL , OR THE MONTH AND YEAR OF PURCHASE IF
PRODUCT HAS NO SERIAL NUMBER .
FOR QUESTIONS. PLEASE CALL CUSTOMER SERVICE: 909.628.0880

SAFETY RNINGS
Read all safety warnings and instructions. Failure to follow the warnings and
instructions may result in injury and/or property damage. Save all warnings and
instructions for future reference.
The warning and safety instructions in this manual are not meant to cover all possible conditions and
situations that may occur. Common sense, caution and care must be exercised when operating or
cleaning tools and equipment. Always contact your dealer, distributor, service agent or manufacturer
about problems or conditions you do not understand before operating the product.
• Keep the work area clean and well lit. A cluttered work area may cause accidents. Never allow children to
use this product. When operating this product, keep children and animals at a safe distance from the work
area.
• Do not operate power tools in explosive atmospheres, such as in the presence of flammable liquids, gases or
dust. Power tools create sparks which may ignite the dust or fumes.
• Keep children and bystanders away while operating a power tool.
• Power tool plugs must match the outlet. Never modify the plug in any way. Do not use any adapter plugs with
grounded power tools. Unmodified plugs and matching outlets will reduce risk of electric shock.
• Avoid body contact with grounded suaces such as pipes, radiators, ranges and refrigerators. There is an
increased risk of electric shock if your body is grounded.
• Do not expose power tools to rain or wet conditions. Water entering a power tool will increase the risk of
electric shock.
• Be aware of all power lines, electrical circuits, water pipes and other mechanical hazards in your work area,
particularly those hazards below the work surface hidden from the operator's view that may be unintentionally
contacted and may cause personal harm or property damage.
• Do not abuse the cord. Never use the cord for carrying, pulling or unplugging the power tool. Keep cord away
from heat, oil, sharp edges or moving parts. Damaged or entangled cords increase the risk of electric shock.
• When operating a power tool outdoors, use an extension cord suitable for outdoor use. Use of a cord suitable
for outdoor use reduces the risk of electric shock.
• If operating a power tool in a damp location is unavoidable, use a Ground Fault circuit interrupter (GFci)
protected supply. Use of a GFCI reduces the risk of electric shock.
• Stay alert, watch what you are doing and use common sense when operating a power tool. Do not use a
power tool while you are tired or under the influence of drugs, alcohol or medication. A moment of inattention
while operating power tools may result in serious personal injury.
• Use personal protective equipment. Always wear eye protection. Safety equipment such as dust mask, non
skid safety shoes, hard hat, or hearing protection used for appropriate conditions will reduce personal injuries.
• Prevent unintentional starting. Ensure the switch is in the o-position before connecting to power source,
picking up or carrying the tool. Carrying power tools with your finger on the switch or energizing power tools
that have the switch on invites accidents.
• Remove any adjusting key or wrench before turning the power tool on. A wrench or a key left attached to a
rotating part of the power tool may result in personal injury.
• Do not overreach. Keep proper footing and balance at all times. This enables better control of the power tool
in unexpected situations.
1

SAFETY WARNINGS
• Dress properly. Do not wear loose clothing or jewelry. Keep your hair, clothing and gloves away from moving
parts. Loose clothes, jewelry or long hair can be caught in moving parts.
• If devices are provided for the connection of dust extraction and collection facilities, ensure these are connected
and properly used. Use of these devices can reduce dust-related hazards.
• Only use safety equipment that has been approved by an appropriate standards agency. Unapproved safety
equipment may not provide adequate protection. Eye protection must be ANSI-approved and breathing
protection must be NIOSH-approved for the specific hazards in the work area.
• Do not force the power tool. Use the correct power tool for your application. The correct power tool will do the
job better and safer at the rate for which it was designed.
• Do not use the power tool if the switch does not turn it on and o. Any power tool that cannot be controlled with
the switch is dangerous and must be repaired.
• Disconnect the plug from the power source before making any adjustments, changing accessories, or storing
power tools. Such preventive safety measures reduce the risk of starting the power tool accidentally.
• Store idle power tools out of the reach of children and do not allow persons unfamiliar with the power tool or
these instructions to operate the power tool. Power tools are dangerous in the hands of untrained users.
• Maintain power tools. Check for misalignment or binding of moving parts, breakage of parts and any other
condition that may aect the power tool's operation. If damaged, have the power tool repaired before use.
Many accidents are caused by poorly maintained power tools.
• Keep cutting tools sharp and clean. Properly maintained cutting tools with sharp cutting edges are less likely
to bind and are easier to control.
• Use the power tool, accessories and tool bits etc. in accordance with these instructions, taking into account
the working conditions and the work to be performed. Use of the power tool for operations dierent from those
intended could result in a hazardous situation.
• Keep hands away from cutting area and the blade. Keep your second hand on auxiliary handle, or motor
housing. If both hands are holding the saw, they cannot be cut by the blade.
• Do not reach underneath the workpiece. The guard cannot protect you from the blade below the workpiece.
• Adjust the cutting depth to the thickness of the workpiece. Less than a full tooth of the blade teeth should be
visible below the workpiece.
•
Never hold piece being cut in your hands or across your leg. Secure the workpiece to a stable platform. It is
important to support the work properly to minimize body exposure, blade binding, or loss of control.
• Hold power tool by insulated gripping surfaces when performing an operation where the cutting tool may
contact hidden wiring or its own cord. Contact with a "live" wire will also make exposed metal parts of the
power tool "live" and shock the operator.
• Always use blades with correct size and shape (diamond versus round) of arbor holes. Blades that do not
match the mounting hardware of the saw will run eccentrically, causing loss of control.
2
SAFETY RNINGS

SAFETY WARNINGS
CAUSES AND OPERATOR PREVENTION OF KICKBACK:
• Kickback is a sudden reaction to a pinched, bound or misaligned saw blade, causing an uncontrolled saw to lift
up and out of the workpiece toward the operator;
• When the blade is pinched or bound tightly by the kerf closing down, the blade stalls and the motor reaction
drives the unit rapidly back toward the operator;
• If the blade becomes twisted or misaligned in the cut, the teeth at the back edge of the blade can dig into the
top surface of the wood causing the blade to climb out of the kerf and jump back toward the operator.
• Kickback is the result of saw misuse and/ or incorrect operating procedures or conditions and can be avoided
by taking proper precautions as given below:
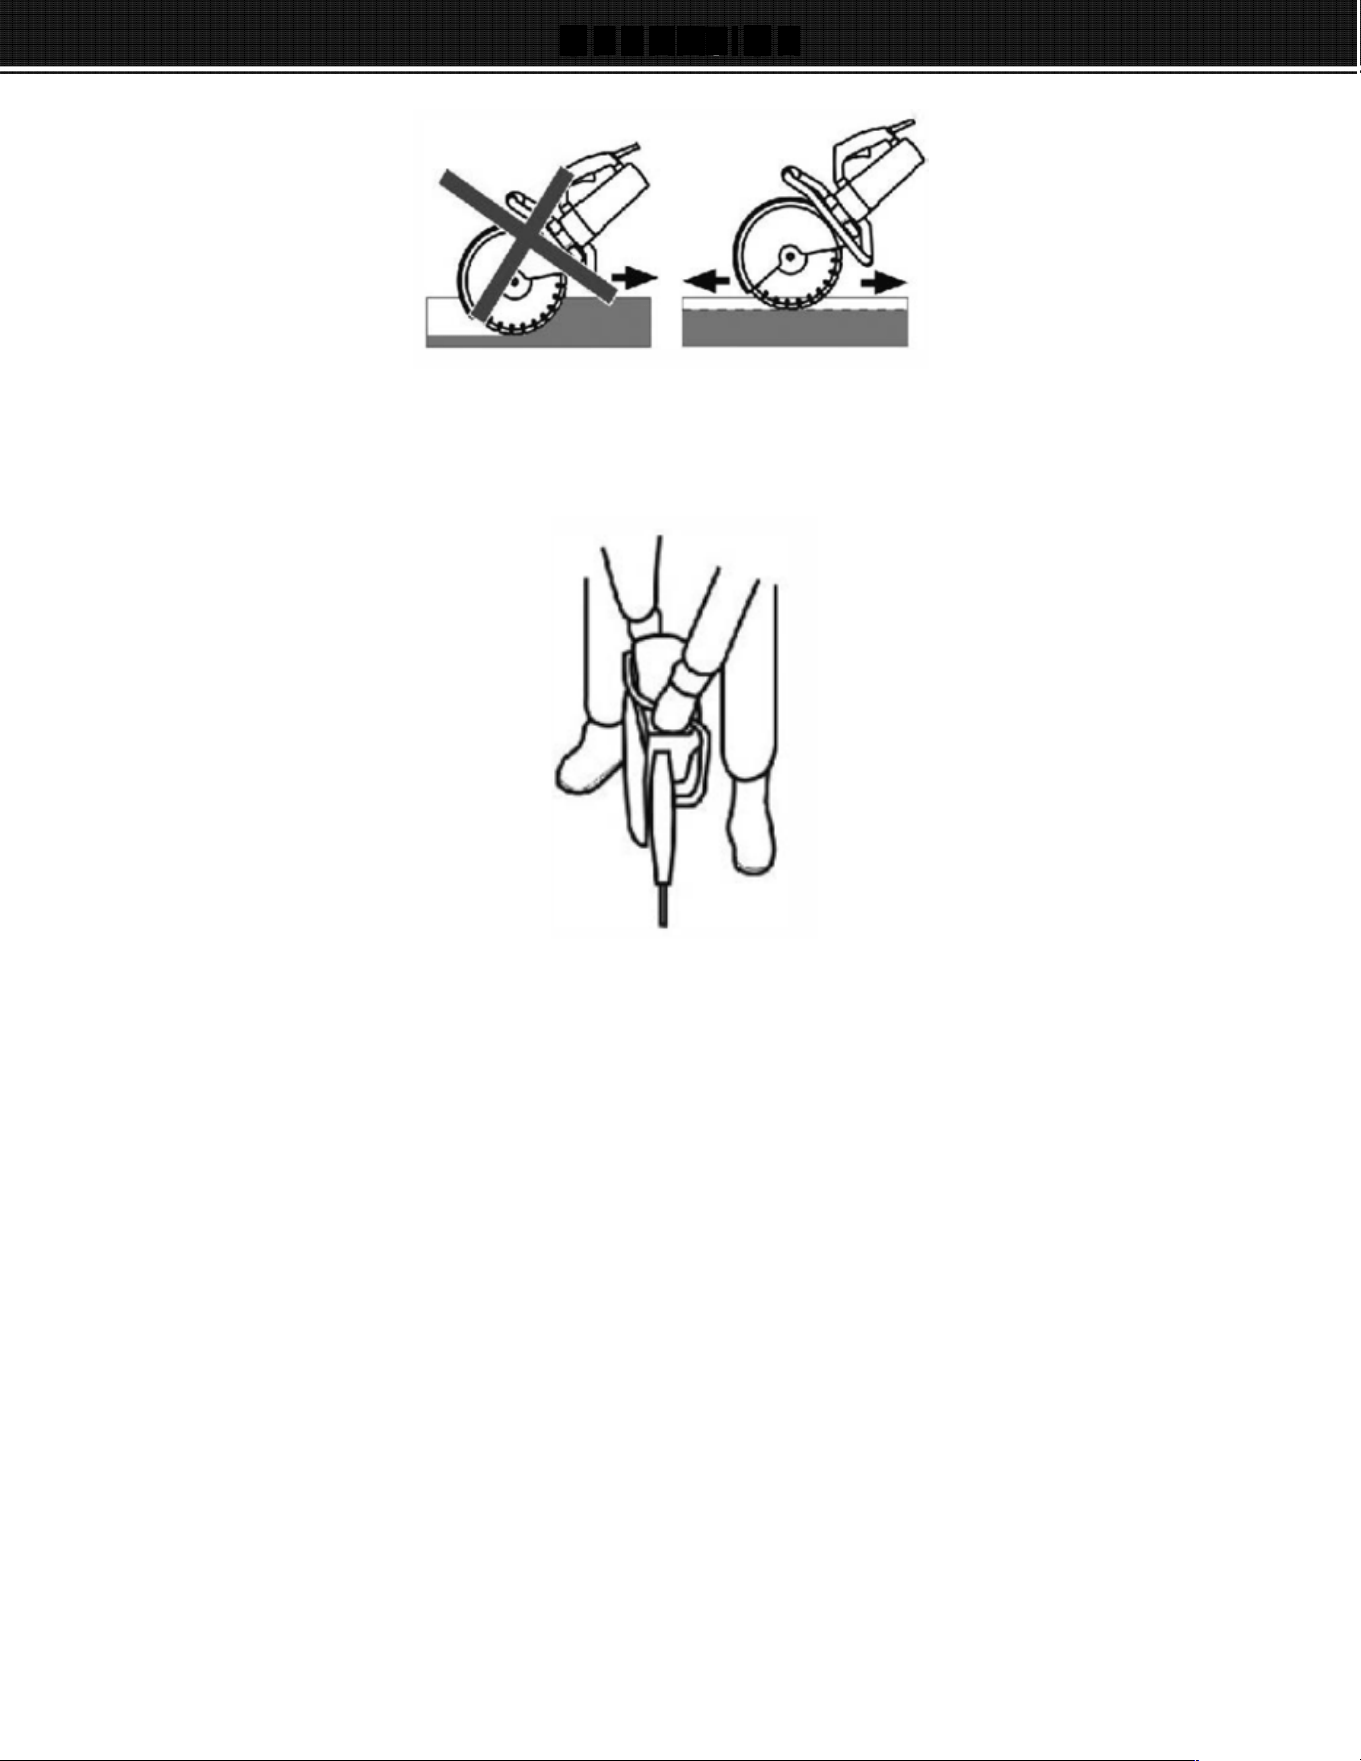
A. Maintain a firm grip with both hands on the saw and position your arms to resist kickback forces. Position your
body to either side of the blade, but not in line with the blade. Kickback could cause the saw to jump backwards,
but kickback forces can be controlled by the operator, if proper precautions are taken.
B. When blade is binding, or when interrupting a cut for any reason, release the trigger and hold the saw
motionless in the material until the blade comes to a complete stop. Never attempt to remove the saw from the
work or pull the saw bacard while the blade is in motion or kickback may occur. Investigate and take corrective
actions to eliminate the cause of blade binding.
C. When restarting a saw in the workpiece, center the saw blade in the kerf and check that saw teeth are not
engaged into the material. If saw blade is binding, it may walk up or kickback from the workpiece as the saw is
restarted.
D. Support large panels to minimize the risk of blade pinching and kickback. Large panels tend to sag under
their own weight. Supports must be placed under the panel on both sides, near the line of cut and near the edge
of the panel.
E. Do not use dull or damaged blades. Unsharpened or improperly set blades produce narrow kerf causing
excessive friction, blade binding and kickback.
F. Blade depth and bevel adjusting locking levers must be tight and secure before making cut. If blade adjustment
shifts while cutting, it may cause binding and kickback.
G. use extra caution when making a "plunge cut" into existing walls or other blind areas. The protruding blade
may cut objects that can cause kickback.
• Maintain labels and nameplates on the tool. These carry important safety information.
• Do not lay the tool down until it has come to a complete stop.
• When using a handheld power tool, maintain a firm grip on the tool with both hands to resist starting torque.
• Do not leave the tool unattended when it is plugged into an electrical outlet.
• Use clamps (not included) or other practical ways to secure and support the workpiece to a stable platform.
• People with pacemakers should consult their physician(s) before use. Electromagnetic fields in close proximity
to heart pacemaker could cause pacemaker interference or pacemaker failure.
3
SAFETY RNINGS
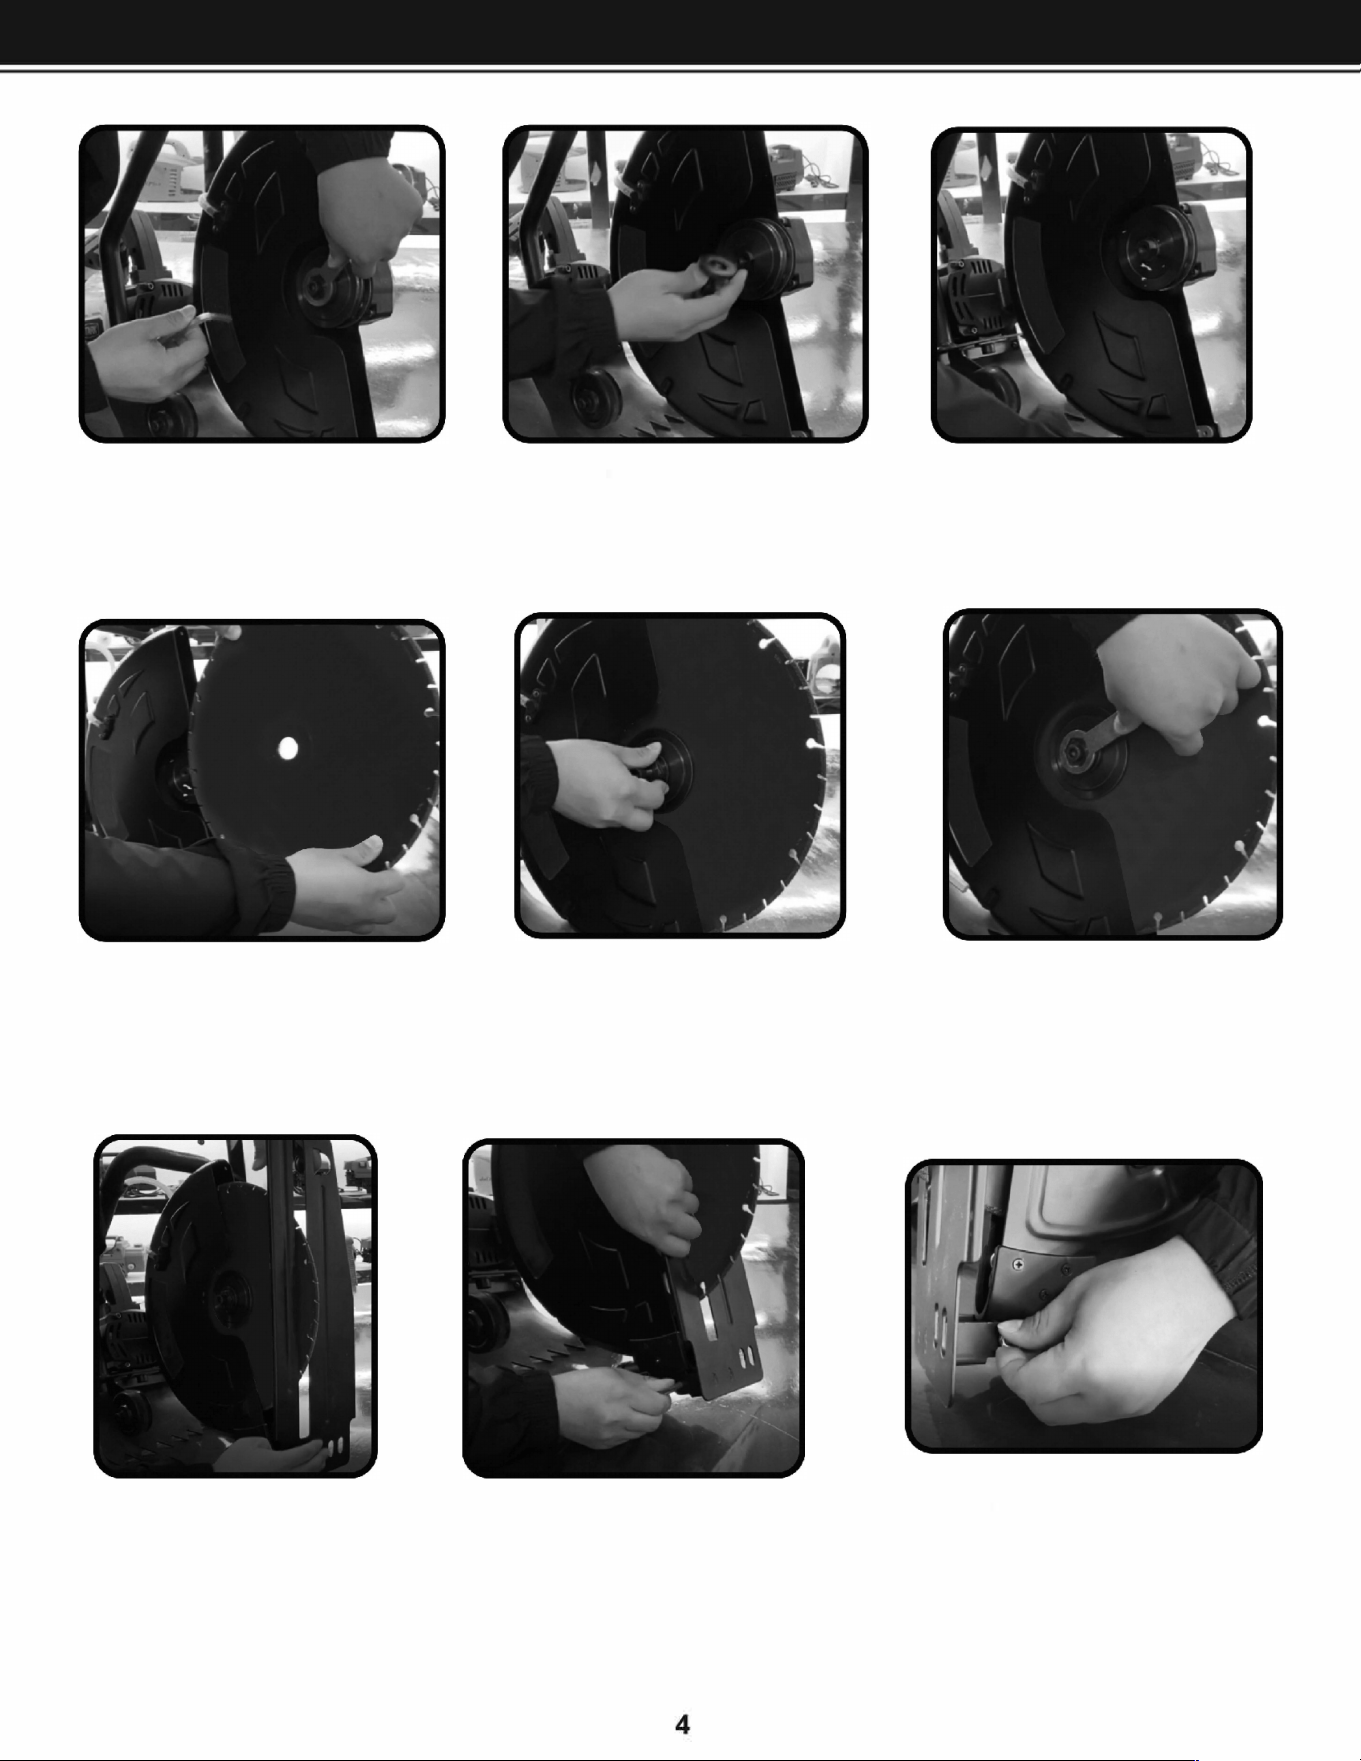
ASSEMB
1. Connect the cutting blade to the arbor using the lock nut supplied.
2. Secure the blade into the saw and tighten the bolt.
3. Place the guide over the blade and secure it in place using the screw nut provided.
ASSEMBLY
4. Connect the other side of the guide using a screw nut.
5. Attach the stationa knob and confirm it will allow you to
adjust the depth.
6. Press in the hose adapter for
water applications.
5

6
OP
E
R
A
TION
PRIOR TO OPERATION
1. Power source: Ensure that the power source to be utilized conforms to the power requirements
specified on the product nameplate.
2. Power switch: Ensure that the power switch is in the OFF position. If the plug is connected to a power
receptacle while the power switch is in the ON position, the power tool will start operating immediately,
which can cause a serious accident.
3. Extension cord: When the work area is removed from the power source, use an extension count of
sufficient thickness and rated capacity. The extension cord should be kept as short as practicable.
4. Checking and installing the diamond wheel
Check the diamond wheel is a specified one and is not cracked. broken or damaged. Check that the
diamond wheel is installed securely. For installation refer to " installing and removing diamond wheel".
5. Check that the knob
Check that the knob used to secure the wheel guard is tight. Make sure that the knob that secures the
wheel guard is adequately is tight. If this knob is loose, it may reset and injury to the operator.
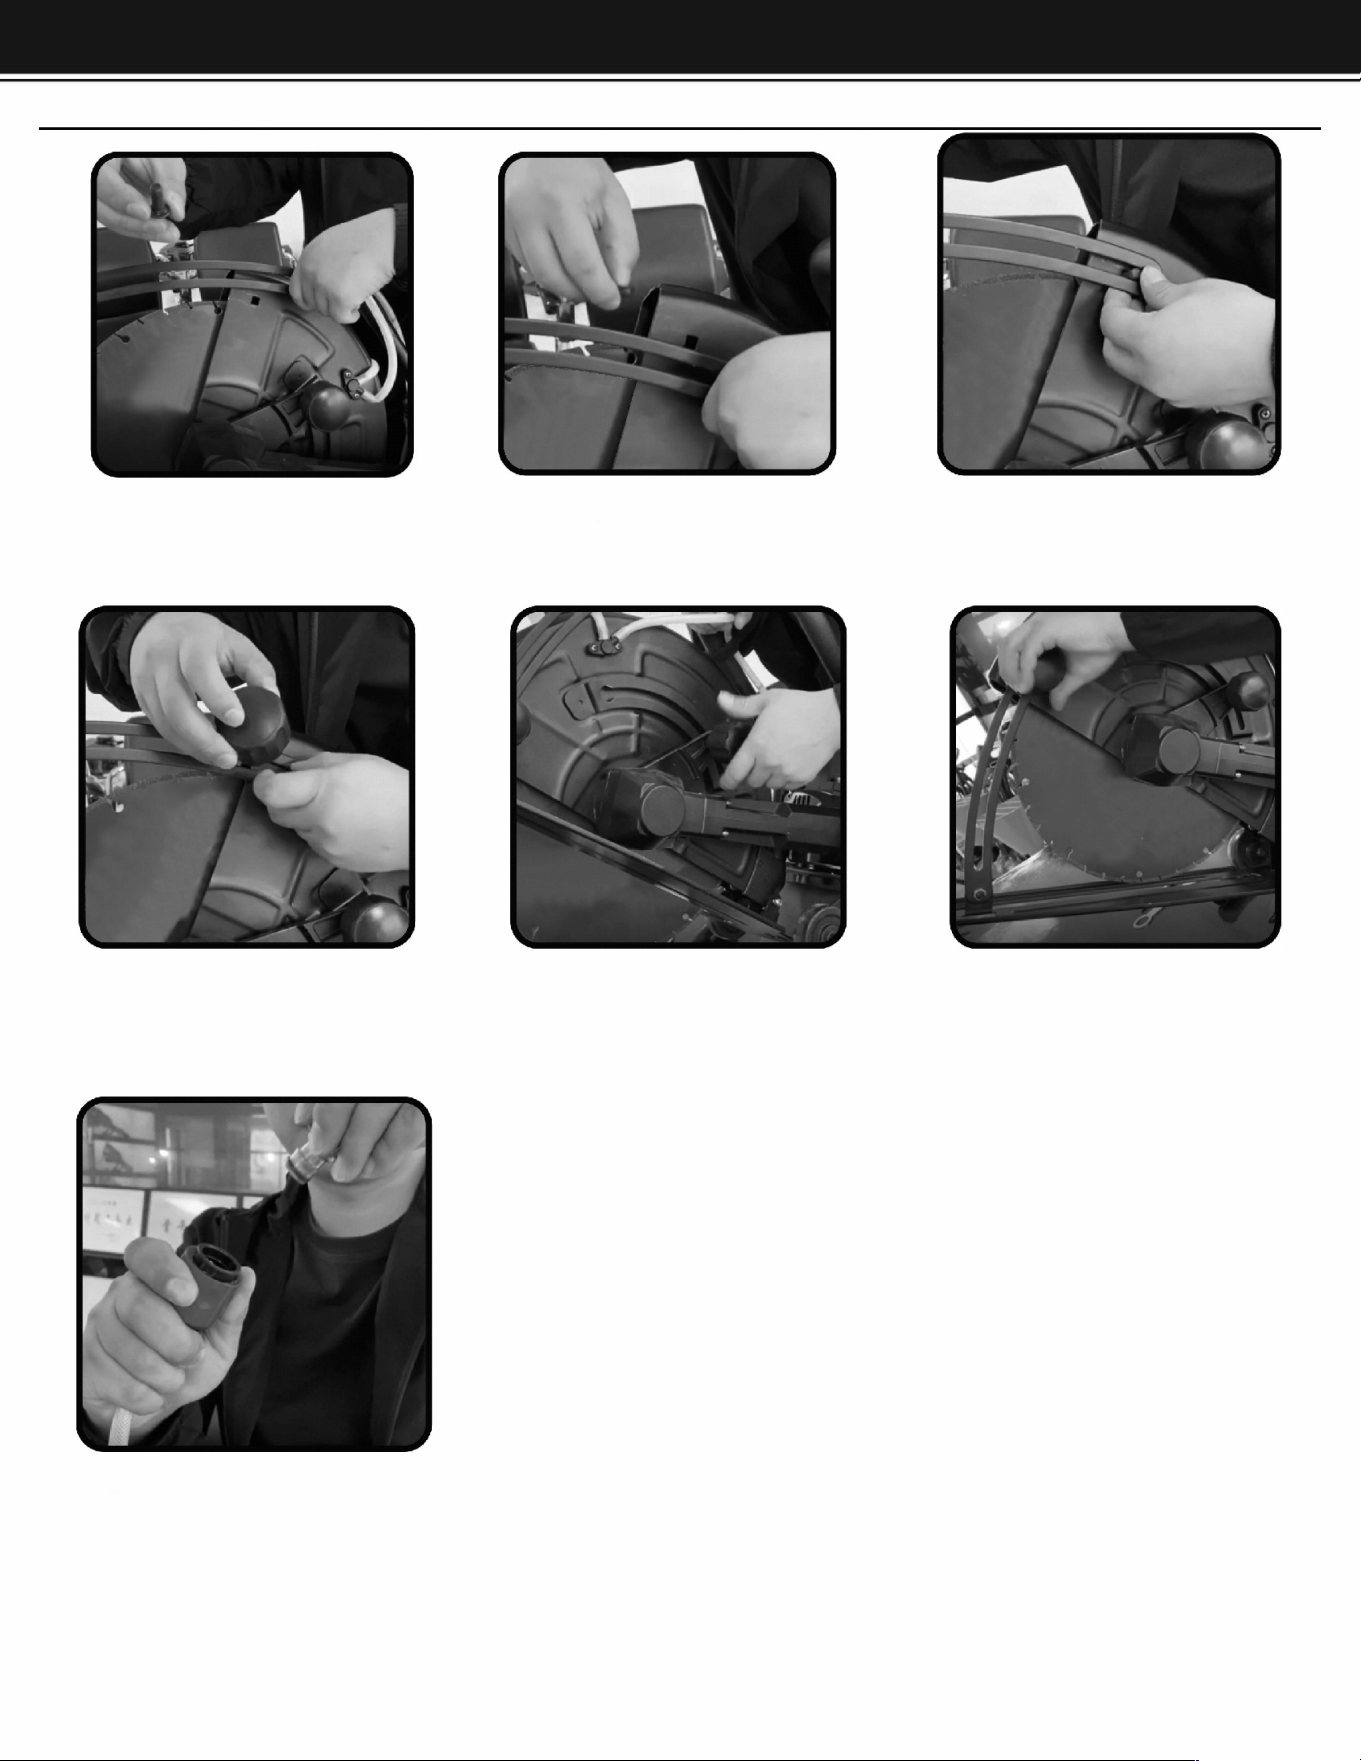
INSTALLING DUST COLLECTION HOSE
When cutting a material which generates cutting dust, use the dust collection nose as follows:
(1) Remove the rubber cab and install the accessory hose.
(2) Install the dust collector hose for the power tool in the access hose.
•
Do not use the dust collection hose with cutting metal.
•
Always install a rubber cap on the dust collection adapter when the dust collection hose is not
used.
INSTALLING/REMOVING DIAMOND WHEEL
1. Installation
(1) Wipe the cutting dust from the spindle and washers.
(2) Make sure the rotation direction of the diamond wheel conforms to the direction indicated on the wheel
guard and install the diamond wheel.
(3) Press the lock pin and secure the spindle Tighten the bolt adequately with the approved wrench.
(4) Rotate the wheel by hand to ensure the spindle lock has released.
NOTE
Always use the provided wrench to secure the belt.
•
Be careful because the bolt tightens to the left (counter
-
clockwise direction to prevent it from being
loosened during cutting.
OP
E
R
A
TION
2. Removal
Remove the bolt with the provided wrench and remove the diamond wheel.
CUTTING
1.Wheel guard adjustment
Adjust the wheel guard angle with the knob so dust and debris from the material or sparks do not
contact the operator during the cutting operation.
2.Cutting Procedures
(1) Place this tool on the material to be cut and align the pre-marked line and the diamond wheel. The
culling can be pre-lined smoothly if you cut straight ahead on the line in the initial cut.
(2) Turn on the switch when the diamond wheel is not touching the material to be cut.
CAUTION
•
Always check the diamond wheel before starting work. Newer use a diamond wheel which is cracked,
broken or bent.
•
Do not apply water or coolant to the diamond wheel.
•
Start cutting only when diamond wheel reaches its maximum speed.
•
lf the diamond wheel seizes or there is any abnormal noise, immediately turn the power off.
•
Never use the diamond wheel to cut zig zag or curved lines.
• Never use the side surface of the diamond wheel.
• Never use to perform inclination cutting
•
If excessive force is applied to the diamond wheel to make it align with the pre-marked line during
cutting, this might not only overload the motor and cause burn damage, but may also overheat the
diamond wheel and shorten the service life.
•
Take care not to allow the power cord to come into contact with the diamond wheel during operation.
•
When the work is completed, turn the power off and disconnect the power plug from the receptacle.
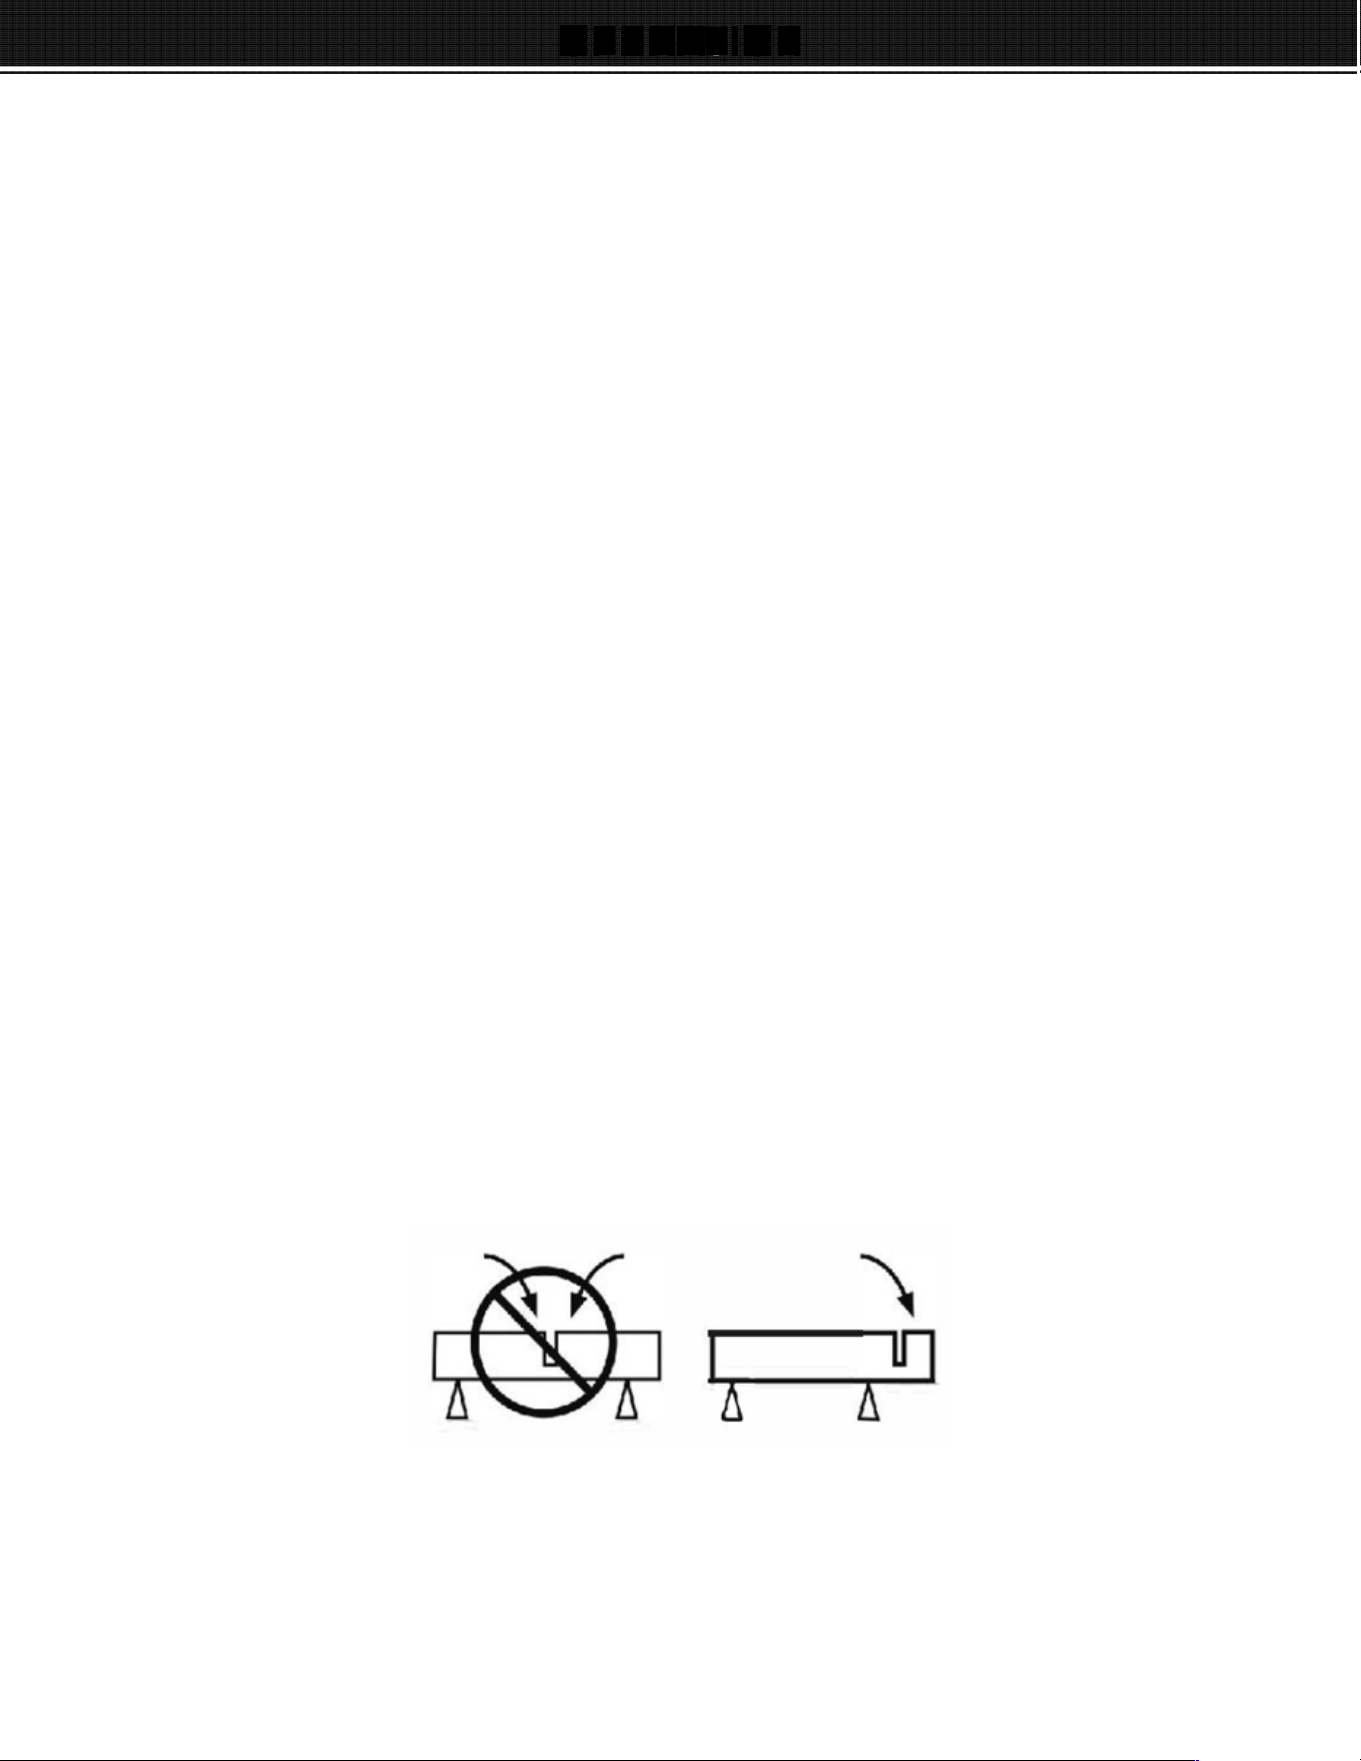
•
Support the work piece in such a way that it is possible to predict what will happen, and so that the cut
remains open while cutting.
•
Check that the blade is not in contact with anything when the machine is started.
•
Always cut at the maximum speed
•
Start cutting smoothly, allowing the machine to work without forcing or pressing the blade.
•
Move the blade slowly forwards and backwards to achieve a small contact area between the blade and
the material to be cut. This reduces the temperature of the
blade and ensures effective cutting.
7
•
Feed down the machine in line with the blade. Pressure from the side can damage the blade and is
very dangerous.
OP
E
R
A
TION
/ MA
INT
E
N
A
N
CE
1. Inspection of the diamond wheel
A worn diamond wheel overloads the motor and reduces working efficiency. Replace it with a new one.
2. Inspecting the mounting screws
Regularly inspect all mounting screws and ensure that they are property tightened Should any of the
screw's be lose, retighten them immediately. Failure to do so can result in serious injury.
3. Maintenance of the motor
Exercise due care to ensure the winding does not become damaged and/or wet with oil or water.
4. Keep tool clean and free from debris
Avoid using cleaning products, which include benzene. trichloroethane, chloride, or ammonia as these
can damage plastic parts.
5. In case of electrical or mechanical malfunction. Immediately switch off the tool and disconnect the
plug.
6. For all other service take machine contact us at [email protected]
M
AINT
E
NANC
E
8
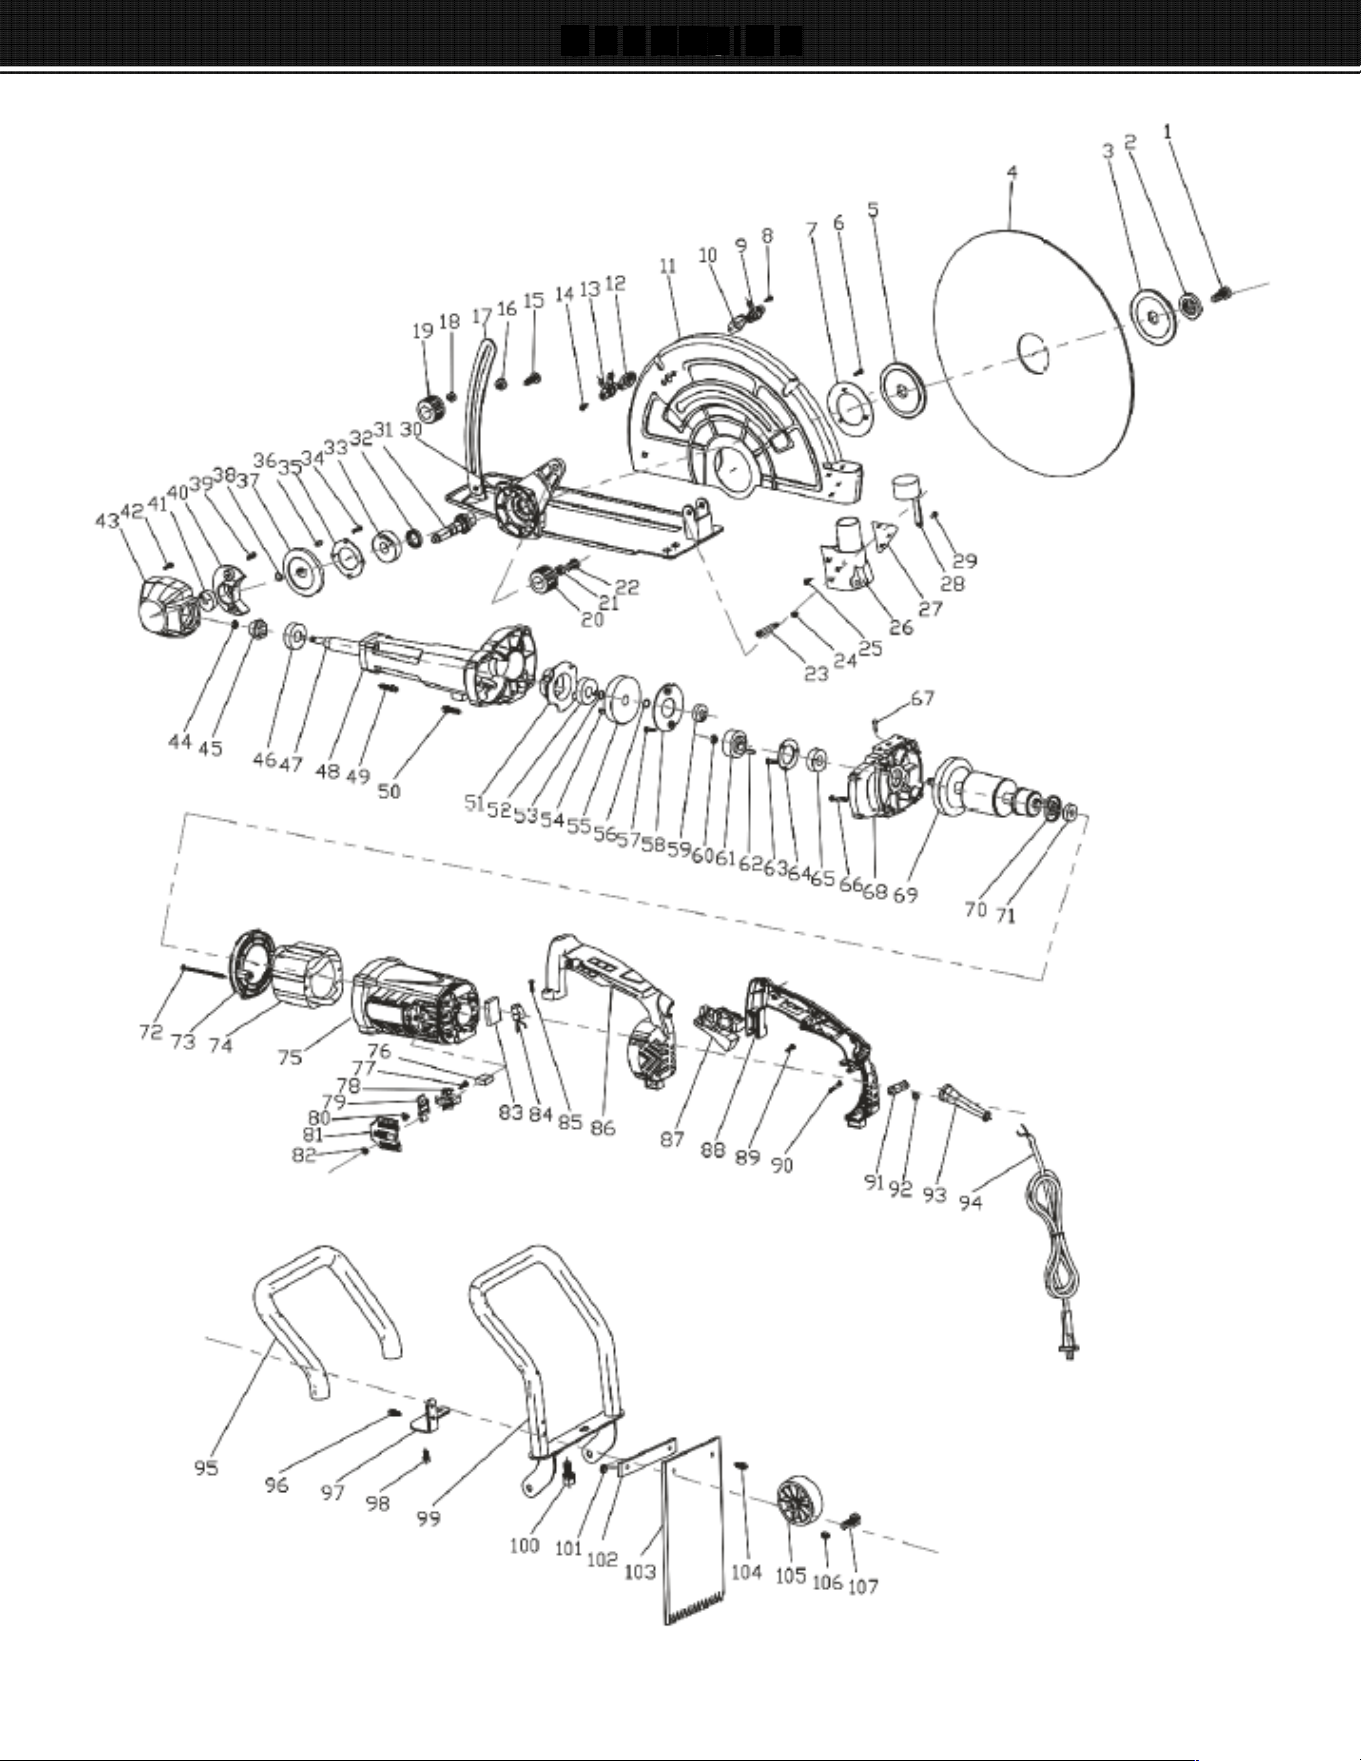
PARTS INFORMATION
9

PARTS INFORMATION
10

DISCLAIMER
PLEASE READ THE FOLLOWING CAREFULLY
THE MANUFACRER AND/OR DISTRIBOR H PROVIDED THE PARTS LIST AND ASSEMB
DIAG IN IS MANU AS A REFERENCE TOOL ONLY. NEITHER THE MANUFACTURER OR
DISTRIBUTOR MAKES ANY REPRESENTATION OR WARNTY OF ANY KIND TO THE BUYER TH HE
OR SHE IS QUALIFIED TO ME ANY REPAIRS THE PRODUCT, OR TH HE OR SHE IS QUIFIED
TO REPLACE ANY RT S OF E PRODUC IN CT, THE NUCRER AND/OR DISTRIBUTOR
EXPRESSLY STAS THAT ALL REPAIRS AND PARTS REPLACEMENTS SHOULD BE UNDERTAKEN
BY CERTIFIED AND LICENSED TECHNICIS, AND NOT BY THE BUYER. THE BUYER ASSUMES
ALL RISK AND LIABILITY ARISING OUT OF HIS OR HER REPAIRS THE ORIGINAL PRODUCT OR
REPCEMENT RTS THERO, OR ARISING OUT OF HIS OR HER INSLLION OF REPLACEMENT
PAR THERETO.
Record Producs Serial Number Here: __________________ _
Note: If product has no serial number, record month and year of purchase instead.
Note: Some parts are listed and sho for illustration purposes only and are not available
individually as replacement parts.
nu: material m tins nual 1s fori11format1unill pm11esonl) lhe pdul{s} 1t lhribs an: ubjel lo "h.mge without
pnor nult:". d tu the rnanutac1ur�r� cuntmuolb devdo.,mnt prngram. Xlr�ePu·erUS maks no reprentations
or warrant,es w,lh spt to th,s manu,11 orw11h pl tn the pduct, dcnd herein 1reinePowerlJS ,hall not e
liable tor a11�· u.ages, losses, os or exp11ses, tl1l, 111d1n·cl ur tnL1fontal. tu11quc11t1al ur sp«1al, uus1ng out ot, or
lated 10 the u ot this atenal or the product., deribed herein
Questions, issues or missing parts?
Before returning to your retailer, our customer seice team Is here to help.
Call Us: 909.628.0880
Email Us: customer@remepowesa.com
Hours of Operation: 9am - 3pm PST Monday • Friday
E IN CHINA
11