
SVC 7221BK
EN
CORDLESS VERSATILE VACUUM
CLEANER 2 IN 1
Translation of the original manual

SVC 7221BK

A
10
1
2
3
4
5
6
7
8
9
11
12
13
14
15
16
17
B
C
D
E
F
G
H


- 1 -
02/2025
2025, .
EN
Cordless Versatile Vacuum Cleaner 2 in 1
User Manual
Important Safety Instructions
READ CAREFULLY AND STORE FOR FUTURE USE.
• This vacuum cleaner may be used by children 8 years of
age and older and by persons with physical, sensory or
mental impairments or by inexperienced persons, if they
are properly supervised or have been informed about
how to use of this vacuum cleaner in asafe manner and
understand the potential dangers.
• Children must not play with the appliance. Cleaning and
maintenance must not be performed by unsupervised
children.
• If the power adapter is damaged, it must be replaced by
the original type. For areplacement power adapter contact
an authorised service centre. It is forbidden to use the
appliance if it has adamaged power adapter.
WARNING:
Avoid contact with the rotating parts of the hand-
held accessories of the vacuum cleaner. There is
arisk of catching onthese parts andpossible injury.
Only use the vacuum cleaner with the original
power adapter, charging base andaccessories
supplied with it.
. . . . . . . . . . . . . . . . . . . . . . . . . . . . . . . . . . . . . . . . . . . . . . . . . . . . . . . . . . . . . . . . . . . . . . . . . . . . . . . . . . . . . . . . . . . . . . . . . . . . . . . . . . . . . . . . . . . . . . . . . . . . . . . . . . . . . . . . . . . .
ROD VACUUM CLEANER
- 2 -
02/2025
2025, .
Additional Important Safety Instructions forUse of the Appliance
• This vacuum cleaner is designed for use in households, offices and similar types of areas. Do not use in industrial surroundings.
• Do not expose the vacuum cleaner to direct sunlight and do not place it near an open fire or appliances that are asource of heat.
• Before connecting the adapter to apower socket check that the technical details on its rating label match the electrical voltage in the socket.
• Make sure that the power cord of the power adapter does not touch hot surfaces or sharp objects. Position the power cable so that it is not tripped
over.
• Do not submerge the vacuum cleaner, charging base or power adapter in water or any other liquid, and do not rinse it with running water.
• Before turning on the vacuum cleaner, ensure that it is correctly assembled and that all input and output filters are installed in their places.
• Make sure that the air outlet or suction opening is not blocked when the vacuum cleaner is in operation.
• Do not use the vacuum cleaner to vacuum the following items:
– smouldering cigarettes, burning objects, matches or hot ashes;
– water and other liquids;
– flammable or volatile substances;
– sharp objects such as shards, needles, pins, etc;
– flour, plaster, cement and other building materials;
– larger pieces of paper or plastic bags, which can easily block the suction opening.
• Vacuuming certain types of floor coverings may create electrostatic charge, which poses no danger to the user.
• Always switch off the vacuum cleaner when left unattended, after use and before cleaning.
• Before cleaning andafter charging, disconnect the power adapter from the socket.
• When disconnecting the power adapter from the socket, always pull the plug, not the power cord. Otherwise, damage to the power cord or the
socket could occur.
• If the power adapter is damaged, it must be replaced with the original type. For areplacement power adapter contact an authorised service centre.
• Do not use the vacuum cleaner if it is not working correctly, if it has been damaged or has been submerged in water.
• Do not repair or modify the vacuum cleaner yourself. All repairs should be carried out by an authorised service centre. Tampering with the appliance
may result in the loss of your legal rights regarding faulty performance or warranty for quality.
. . . . . . . . . . . . . . . . . . . . . . . . . . . . . . . . . . . . . . . . . . . . . . . . . . . . . . . . . . . . . . . . . . . . . . . . . . . . . . . . . . . . . . . . . . . . . . . . . . . . . . . . . . . . . . . . . . . . . . . . . . . . . . . . . . . . . . . . . . . .
EXPLANATION OF SYMBOLS PLACED ON THE PRODUCT OR INTHE ACCOMPANYING DOCUMENTATION
The product meets all the basic requirements of the applicable EU directives.
This symbol on products or original documents means that used electric or electronic products must not be added to ordinary municipal
waste.
Product with protection class II
Electric shock protection is provided by double or heavy-duty insulation.
The product is intended for household use only. The product is not intended for outdoor use.
Before using the product, please carefully read all instructions for use.
This symbol indicates that the appliance must not be used if the power plug is damaged.
. . . . . . . . . . . . . . . . . . . . . . . . . . . . . . . . . . . . . . . . . . . . . . . . . . . . . . . . . . . . . . . . . . . . . . . . . . . . . . . . . . . . . . . . . . . . . . . . . . . . . . . . . . . . . . . . . . . . . . . . . . . . . . . . . . . . . . . . . . . .
- 3 -
02/2025
2025, .
• Thank you for purchasing our SENCOR product; we hope it will serve
to your satisfaction.
• Prior to using this appliance, please read the user manual thoroughly,
even in cases when you are already familiar with the use of similar
types of appliances. Use the appliance only as described in this
user manual. Keep the manual for future reference. If you pass the
appliance on to another person, ensure that this user manual is
included.
• Carefully unpack the appliance and make sure not to discard any part
of the packaging material until you have found all its components. It
is recommended to keep the original packaging, packing material,
receipt and confirmation of the extent of the seller'sliability or warranty
certificate at least for the duration of the legal right of defective
performance or quality guarantee. When transporting the appliance,
we recommend packaging it again in the original box provided by the
manufacturer.
. . . . . . . . . . . . . . . . . . . . . . . . . . . . . . . . . . . . . . . . . . . . . . . . . . . . . . . . . . . . . . . . . . . .
DESCRIPTION
A1 Battery charge indicator
A2 I/II button to set the power
A3 On/off button
A4 Motor unit release button
A5 Metal tube
A6 Floor nozzle release lock
A7 Floor nozzle
A8 Electric brush lock
A9 LED light
A10 Handle
A11 Battery
A12 Dust container
A13 Dust container bottom release
button for quick removal of dirt
A14 Button toadjust the length of
the metal tube
A15 Travel wheels
A16 Combination slot nozzle with
aretractable brush
A17 Power adapter
Without illustration:
Wall mount, dowels andscrews
. . . . . . . . . . . . . . . . . . . . . . . . . . . . . . . . . . . . . . . . . . . . . . . . . . . . . . . . . . . . . . . . . . . .
ASSEMBLING AND DISASSEMBLING THE VACUUM CLEANER
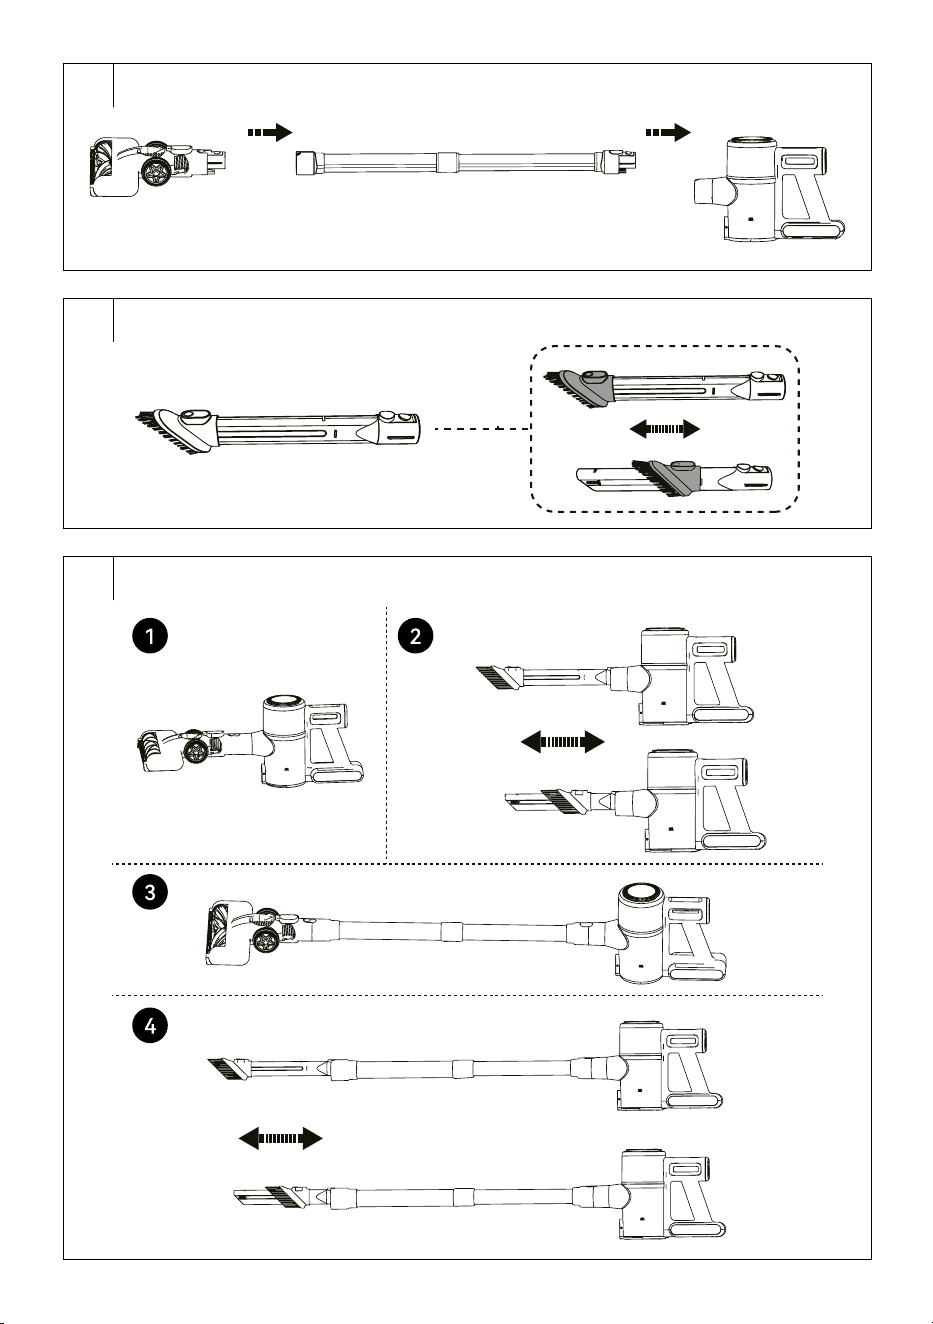
1. Assembly anddisassembly of the vacuum cleaner (fig. B)
• Always place the floor nozzle on aflat, dry and stable surface. Attach
the tube to the floor nozzle so that the connectors at the back of the
floor nozzle are aligned with the holes in the inside of the tube. Press
until you hear aclick.
• Insert the outlet hole of the motor unit into the tube so that the
connectors at the back of the tube are aligned with the holes in the
inner space of the outlet hole.
• If you need to unfold the vacuum cleaner, press the lock to release the
motor unit. Then press the lock torelease the floor nozzle.
2. Assembling anddisassembling the vacuum cleaner withaccessories
• To ensure perfect cleaning of your home, you can connect some of the
supplied accessories to the outlet of the motor unit. Simply remove the
accessory by pulling the accessory out of the outlet of the motor unit.
Forthe rotary brush, first press the lock to release it.
COMBINATION SLOT NOZZLE (FIG. C)
• Slot nozzle for vacuuming in hard to reach places (e.g. windows,
corners, book shelves, areas between mattresses, upholstery, etc.).
Hold down the button andmove the brush forward. To retract the
brush, press the button andmove it backwards.
Note:
For options on how to combine the accessories with each
other, see Figure D.
. . . . . . . . . . . . . . . . . . . . . . . . . . . . . . . . . . . . . . . . . . . . . . . . . . . . . . . . . . . . . . . . . . . .
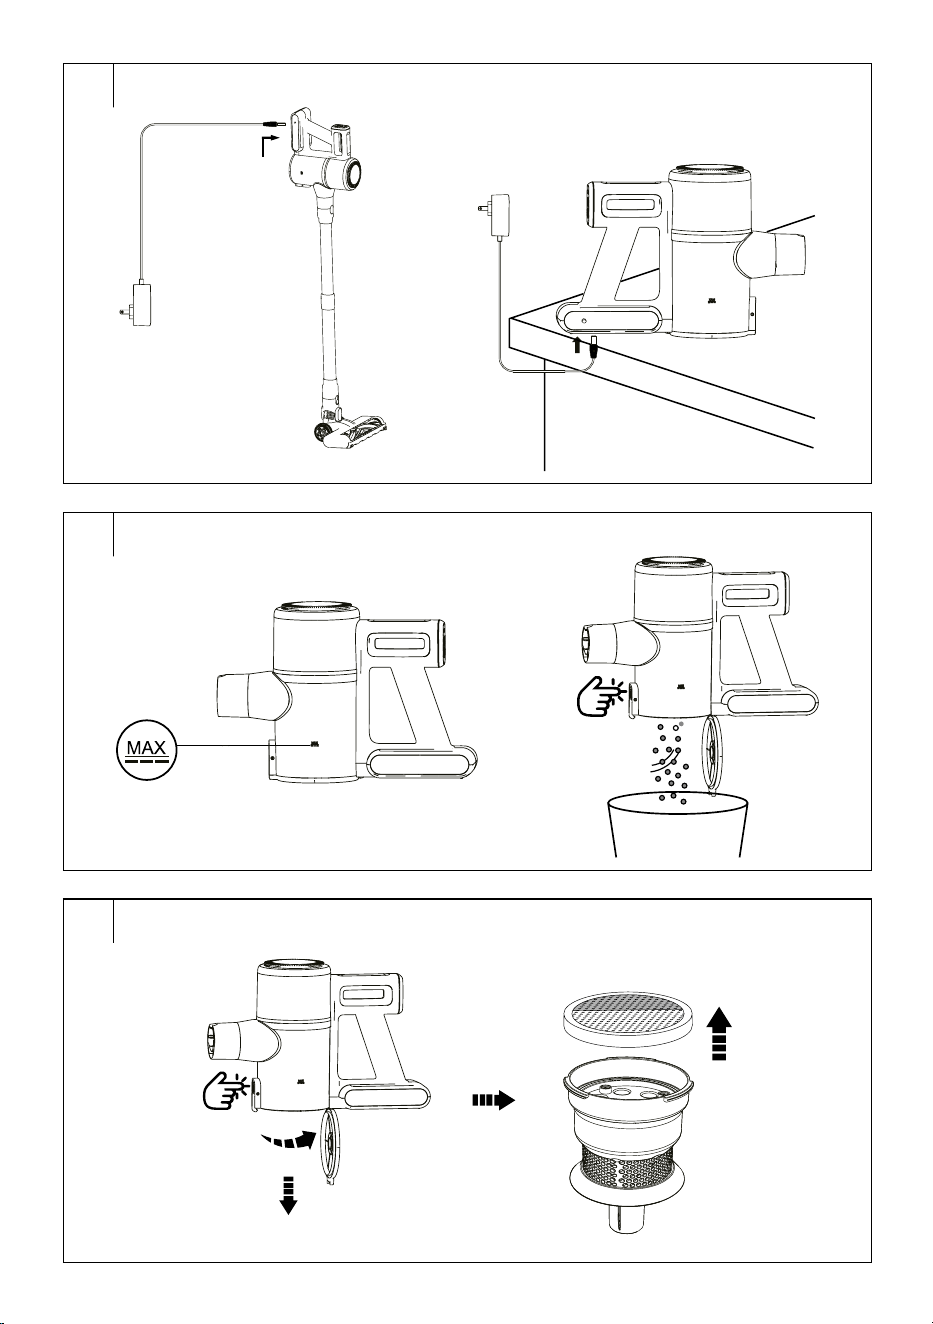
CHARGING THE BATTERY
• The battery is partially charged from the factory and needs to be
charged to full capacity.
• Connect the power adapter connector to the socket on the side of the
battery and connect the adapter plug to amains socket (see Figure E).
• The charging indicator will flash slowly. Charging time is usually
5.5 hours. The battery is charged when the charging indicator stops
flashing andlights up.
• Disconnect the power adapter connector from the battery socket
before using the vacuum cleaner. Connect the power adapter
connector to the battery socket once you finish vacuuming and clean
the vacuum cleaner.
• Keep the charging power supply permanently in thepower socket.
The electronics in thedevice control the charging of the battery so that
it is always optimally charged. When the battery is fully charged, the
electronics will stop charging and recharge the battery if necessary.
There is no need to worry about unnecessary electricity consumption.
• Only incase of prolonged absence, pull the charging power supply
out of the power socket. After returning, insert it into the socket so that
the vacuum cleaner is ready forfurther use. The battery charge status
will be displayed on the screen. If the state of charge drops below
20%, the vacuum cleaner will automatically switch fromhigh power to
low power. High power cannot be set.
• As soon as the battery is almost discharged, the vacuum cleaner
automatically stops running to prevent the battery from being
completely discharged.
. . . . . . . . . . . . . . . . . . . . . . . . . . . . . . . . . . . . . . . . . . . . . . . . . . . . . . . . . . . . . . . . . . . .
USING THE VACUUM CLEANER
1. Assemble the vacuum cleaner according to the instructions inthe
“ASSEMBLING AND DISASSEMBLING THE VACUUM CLEANER”
section.
2. Press the On/Off button and the vacuum cleaner will start.
3. You can set the vacuum cleaner power using the +/– buttons.
The following options are available:
– daily cleaning,
– maximum power output.
4. When you have finished using the vacuum cleaner, press the on/off
button to switch the vacuum cleaner off.
Note:
The electric rotary brush will stop automatically if it is
blocked, e.g. by aforeign object or alarge amount of hair
or hair. This is asafety feature to protect the brush from
damaging. Inthis case, turn off the vacuum cleaner by
pressing the on/off button andremove the blocked object or
hair from thebrush.
. . . . . . . . . . . . . . . . . . . . . . . . . . . . . . . . . . . . . . . . . . . . . . . . . . . . . . . . . . . . . . . . . . . .
STORAGE DURING REGULAR USE
The SVC 7221BK comes with abracket that can be mounted on the wall.
Choose aplace where the holder will be easily accessible and there will
be enough free space around it.
Mounting the Wall Bracket
1. Place the bracket against the wall anduse apencil to mark the
places on the wall where the holes will need to be drilled.
2. Drill the two holes into which the dowels are inserted.
3. Place the bracket against the wall andinto the hole inthe bracket
insert the screws that tighten with ascrewdriver. Check that the
bracket does not move and that the bolts are properly tightened.
. . . . . . . . . . . . . . . . . . . . . . . . . . . . . . . . . . . . . . . . . . . . . . . . . . . . . . . . . . . . . . . . . . . .
CLEANING AND MAINTENANCE
Make sure that the vacuum cleaner is turned off before cleaning.
CLEANING THE MOTOR UNIT AND THE ACCESSORIES
To clean the outer parts of the vacuum cleaner, use asoft cloth dipped
in lukewarm water. Do not use aggressive cleaning agents, thinners
or solvents. Using these solutions could damage the surface of the
appliance.
EN
Cordless Versatile Vacuum Cleaner 2 in 1
User Manual
- 4 -
02/2025
2025, .
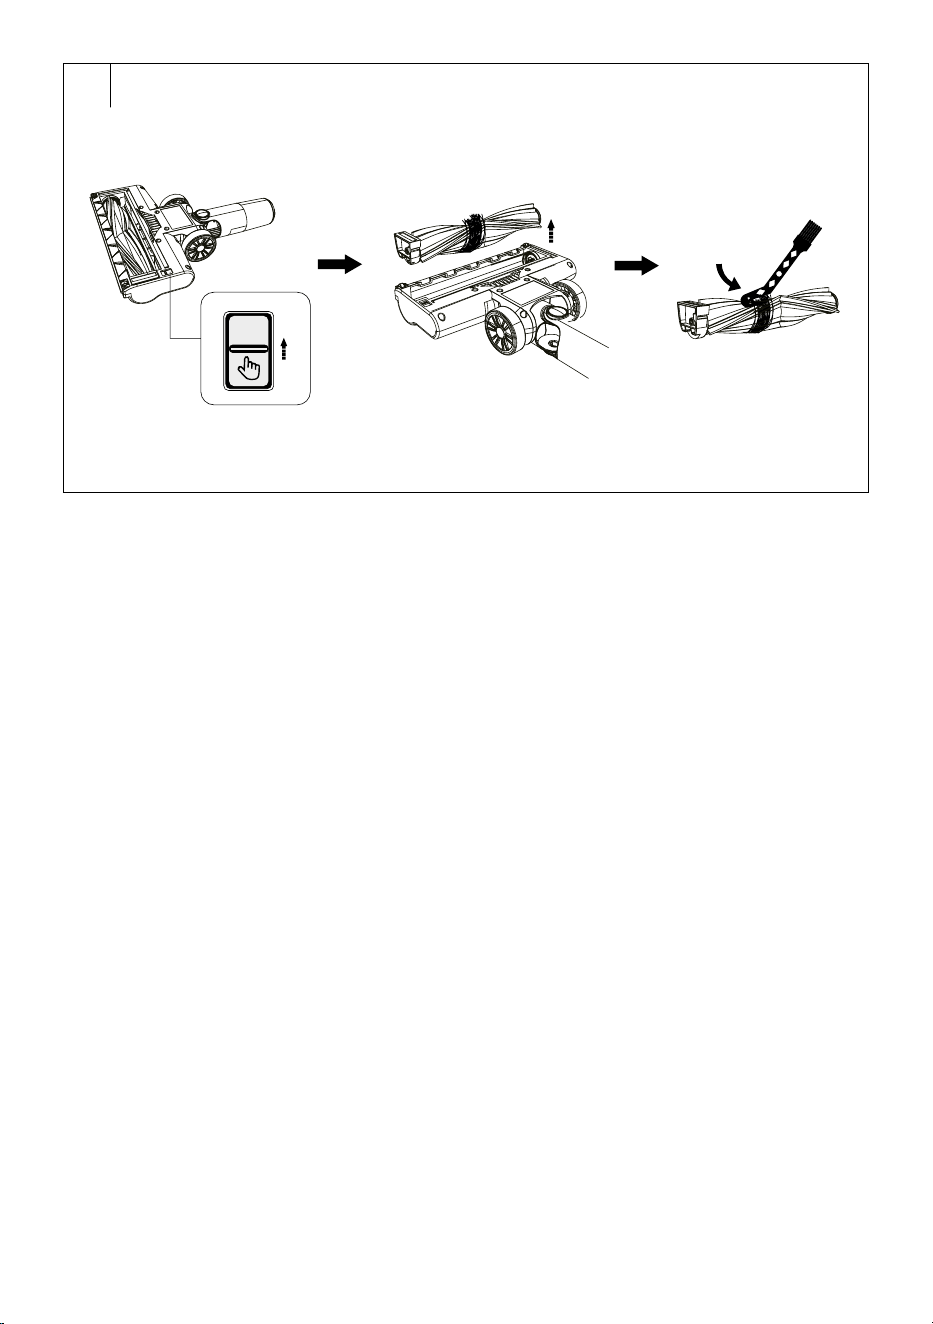
Emptying the Dust Container (Fig. F)
We recommend cleaning and emptying the dust container after each use.
However, if the level of dirt reaches the MAX line, the dust containers must
be emptied immediately.
1. Remove the attached accessory from the motor unit.
2. Move the motor unit over the trash can so that the bottom of the dust
container is pointing down.
3. Press the bottom release button and the bottom of the container will
release andopen.
4. By doing this, you will dump the contents of the container directly
into the garbage bin.
5. Close the bottom of the container by hand. Correct locking is
indicated by aclick.
Cleaning the Dust Container (Fig. G)
1. Regularly clean the dust container to prevent the formation of
unpleasant odours.
2. Remove the attached accessories from the motor unit andempty the
dust container as instructed above.
3. Turn the filter unit to release it and remove it.
4. Wipe the inner walls of the dust container with aslightly moistened
soft sponge. Wipe dry with aclean cloth.
5. Remove the filter andremove the dirt fromit. The filter is washable.
Inthe event of heavy soiling, you can wash it inclean water using
asoft sponge. Then wipe dry or allow to dry freely. Make sure the
appliance is fully dry before assembling.
6. Rinse the filter unit under clean running water and wipe them dry
with aclean cloth.
7. Make sure all parts are dry.
8. Insert the filter into the filter unit and insert it into the dust container.
9. Close the bottom of the container by hand. Correct locking is
indicated by aclick.
Warning:
Do not install awet or damp filter. There is arisk
of damaging the vacuum cleaner andcreating
adangerous situation.
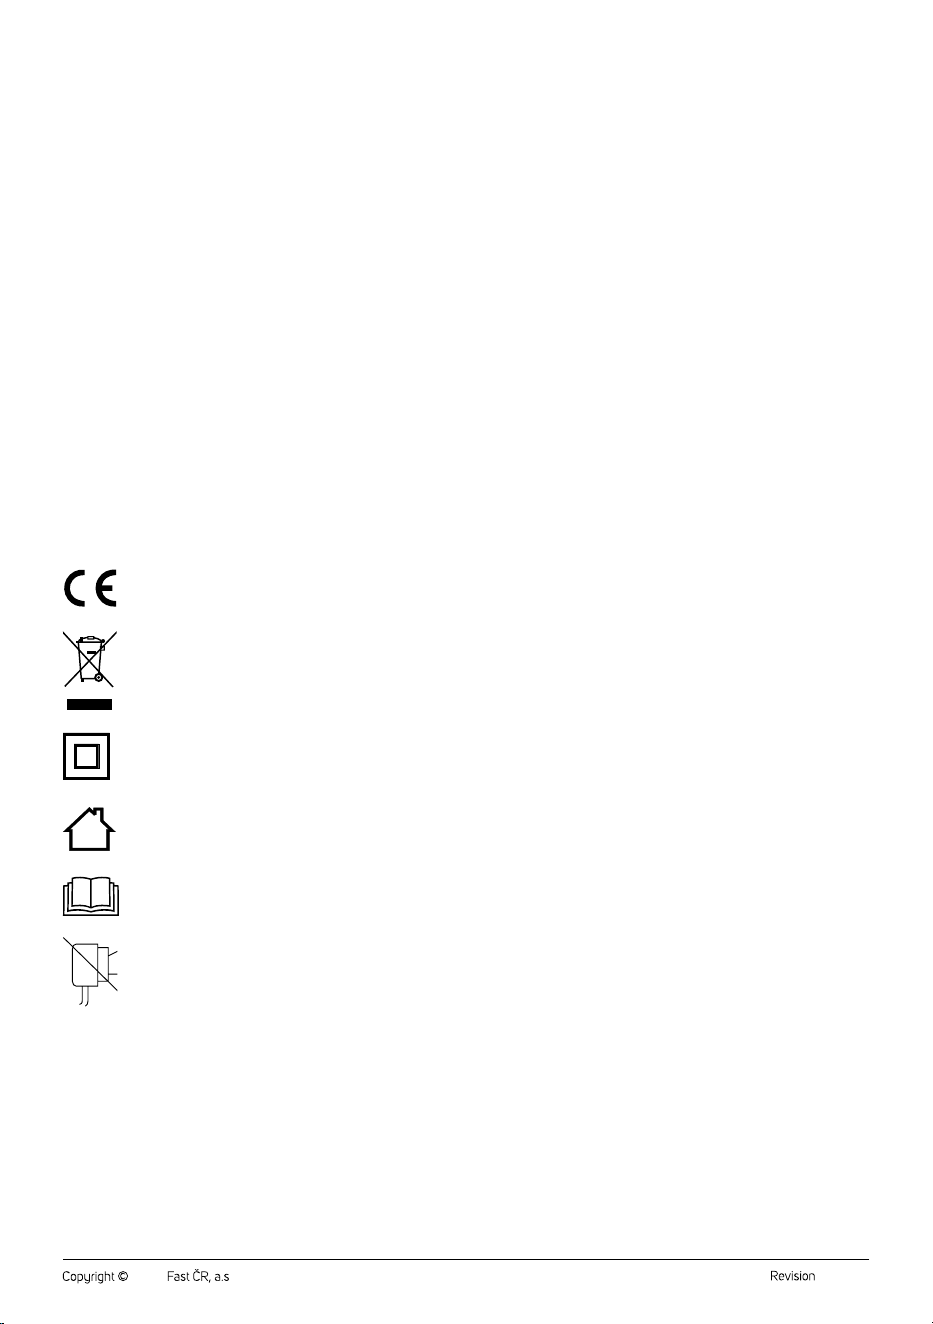
Cleaning the floor nozzle (fig. H)
The floor nozzle must be cleaned regularly to ensure the required
andconsistent suction performance.
1. Remove the floor nozzle from thevacuum cleaner andturn it upside
down.
2. Press the lock to release the rotating brush.
3. Carefully remove the rotary brush.
4. Remove wound hair, hair andother dirt from the rotary brush.
For faster removal of tangled hair or hair, you can use scissors.
Storage
• If the vacuum cleaner will not be used for along time, clean it
according to the above instructions.
• Before storing, make sure that the appliance and all accessories are
thoroughly clean and dry.
• Store the appliance in adry, clean, and well-ventilated place away
from extreme temperatures and out of the reach of children or pets.
• We recommend that you recharge the battery regularly, every
6months.
. . . . . . . . . . . . . . . . . . . . . . . . . . . . . . . . . . . . . . . . . . . . . . . . . . . . . . . . . . . . . . . . . . . . . . . . . . . . . . . . . . . . . . . . . . . . . . . . . . . . . . . . . . . . . . . . . . . . . . . . . . . . . . . . . . . . . . . . . . . .
TROUBLESHOOTING
Before you decide to contact an authorized service centre, please read the following tips in the troubleshooting chart:
Problem Possible Cause Solution
The vacuum cleaner will not
start.
The battery is depleted. Charge the battery before using the vacuum cleaner.
Alarge amount of hair is tangled on the rotary brush. Clean the rotating brush.
The dust container is full. Empty the dust container.
The suction output is weak. The dust container is full. Empty the dust container.
The filter unit is not inserted correctly. Correctly insert the filter unit.
Alarge amount of hair is tangled on the rotary brush. Clean the rotating brush.
The battery is depleted. Charge the battery before using the vacuum cleaner.
Suction opening is blocked. Remove the dirt from the suction hole.
The engine makes an unusual
sound.
Suction opening is blocked. Remove the dirt from the suction hole.
The dust container is full. Empty the dust container.
The filter unit is not inserted correctly. Correctly insert the filter unit.
The battery does not charge
itself.
The adapter is not connected correctly. Connect the adapter correctly until the charge indicator
starts flashing slowly.
You are not using an original adapter. Use only the supplied adapter.
Warning:
If your problem is not listed in the table above or the problem persists, stop using the vacuum cleaner, turn it off andcontact an
authorised service centre.
- 5 -
02/2025
2025, .
. . . . . . . . . . . . . . . . . . . . . . . . . . . . . . . . . . . . . . . . . . . . . . . . . . . . . . . . . . . . . . . . . . . .
TECHNICAL SPECIFICATIONS
Adapter
Input ...........................................................................100–240 V~ 50/60 Hz 0.5 A
Output ........................................................................................ 27 V 0.5 A, 13.5 W
Vacuum cleaner
Power consumption .........................................................................................200 W
Electric rotary brush ............................................................................................. 15 W
Battery ......................................................................... Li-Ion / 22,2 V/ 2600 mAh
The time required for afull charge ..............................approximately 5.5 hours
Operating time at full charge .............................................................. up to 35 min
Noise level ...................................................................................................... <76dB(A)
Dust container capacity .................................................................................... 0,55 l
The declared noise emission level of the appliance is ≤ 76 dB(A), which
represents alevel Aof acoustic power with respect to areference acoustic
power of 1 pW.
. . . . . . . . . . . . . . . . . . . . . . . . . . . . . . . . . . . . . . . . . . . . . . . . . . . . . . . . . . . . . . . . . . . .
INSTRUCTIONS AND INFORMATION ON DISPOSAL OF USED
PACKAGING MATERIAL
Dispose of used packaging material at the location designated by the
municipality for waste disposal.
DISPOSAL OF USED ELECTRICAL AND ELECTRONIC EQUIPMENT
Used electrical andelectronic products must not be added to ordinary
municipal waste. For proper disposal and recycling of these products,
deliver them to designated collection points. Alternatively, in some
European Union states or other European countries the products can be
returned to the local retailer when buying an equivalent new product.
By properly disposing of this product, you help preserve valuable natural
resources and contribute to preventing potential negative impacts on the
environment and human health resulting from improper waste disposal.
For more details, contact your local authority or nearest collection point.
Fines may be imposed for improper disposal of this type of waste as per
national regulations.
For Business Entities in European Union States
To dispose of electric or electronic equipment, request necessary
information from your retailer or supplier.
Disposal in Other Countries Outside the European Union
If you wish to dispose of this product, request the necessary information
about the correct disposal method from the local council or from your
retailer.
. . . . . . . . . . . . . . . . . . . . . . . . . . . . . . . . . . . . . . . . . . . . . . . . . . . . . . . . . . . . . . . . . . . .
Changes to text and technical parameters are reserved.

- 6 -
02/2025
2025, .

FAST ČR, a.s.
U Sanitasu 1621
CZ-251 01 Říčany
www.sencor.com
info@sencor.cz