
Technical Support and E-Warranty Certificate
www.vevor.com/support
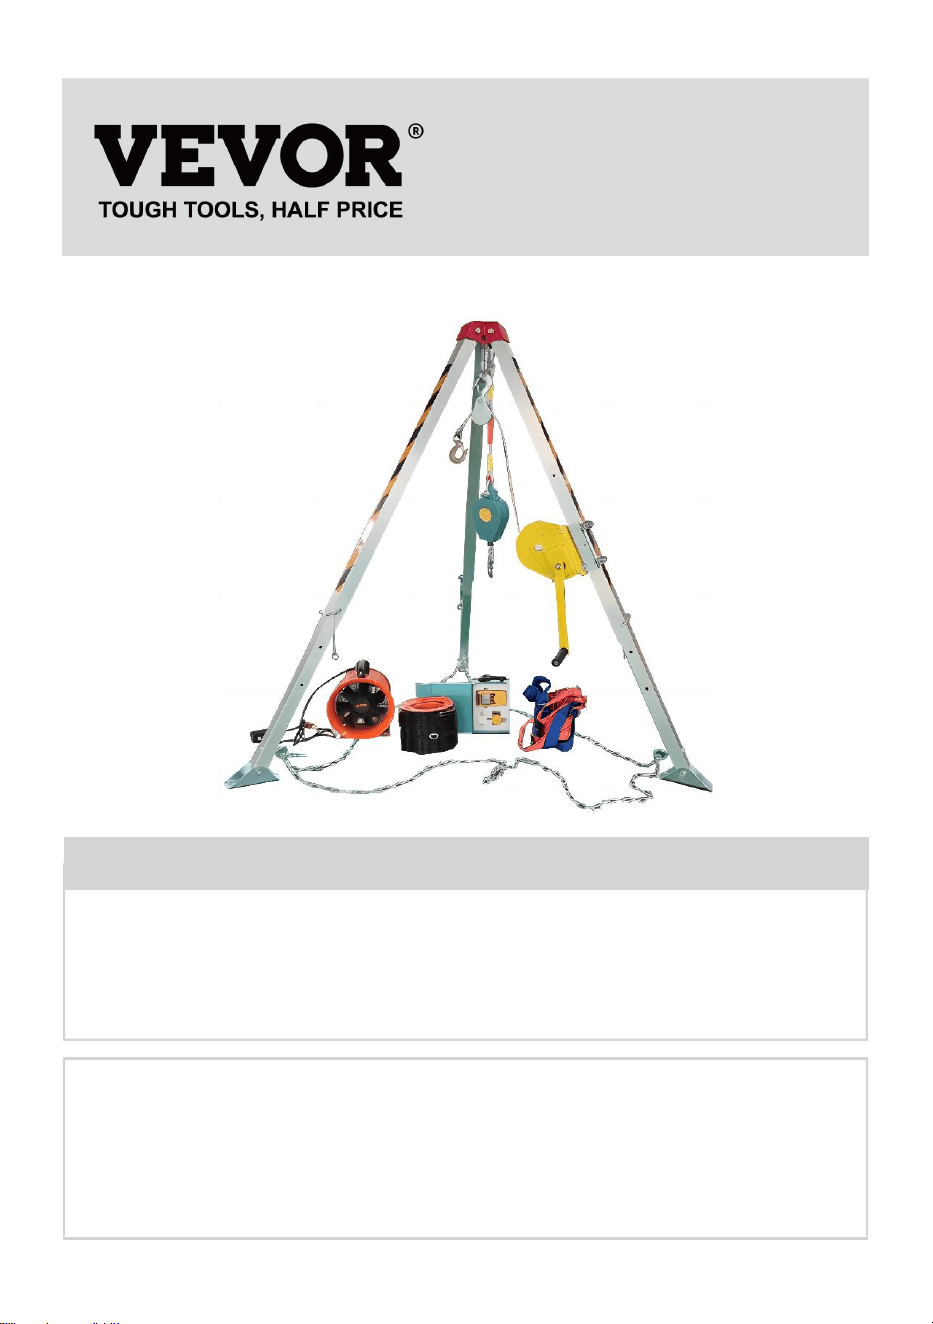
CONFINED SPACE TRIPOD KIT
USER MANUAL
MODEL: HXRT-06/HXRT-07/HXRT-08
HXRT-09HXRT-10/HXRT-05
We continue to be committed to provide you tools with competitive price.
"Save Half", "Half Price" or any other similar expressions used by us only represents an
estimate of savings you might benefit from buying certain tools with us compared to the major
top brands and does not necessarily mean to cover all categories of tools offered by us. You
are kindly reminded to verify carefully when you are placing an order with us if you are
actually saving half in comparison with the top major brands.

- 1 -
MODEL: HXRT-06/HXRT-07/HXRT-08/HXRT-09/HXRT-10/HXRT-05
Have product questions? Need technical support? Please feel free to
contact us:
Technical Support and E-Warranty Certificate
www.vevor.com/support
NEED HELP? CONTACT US!
This is the original instruction, please read all manual instructions
carefully before operating. VEVOR reserves a clear interpretation of our
user manual. The appearance of the product shall be subject to the
product you received. Please forgive us that we won't inform you again if
there are any technology or software updates on our product.
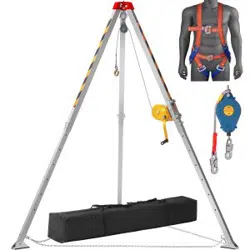
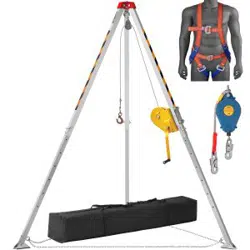
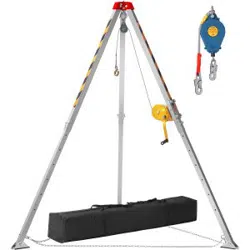
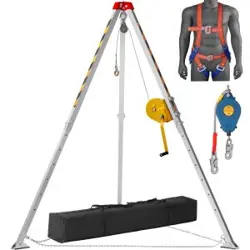
CONFINED SPACE
TRIPOD KIT
- 2 -
SAFETY INSTRUCTION AND PRECAUTIONS
WARNING:
Read this material before using this product. Failure to do so can
result in serious injury.
1. This product is not a toy. Do not allow children to play with this item.
2. Use as intended only.
3. Never exceed the load capacity of the Confined Space Tripod Kit.
4. HXRT-Rescue Tripod is suitable for sewer operations and limited spaces,
including manholes, buckets, cabins, power or telecommunications and
other operations to prevent falling requirements. The tripod is used with a
hand winch to perform rescue operations quickly and safely. This device is
for one person only.
5. Before using this equipment for fall protection and rescue lifting
purposes, please read the instructions carefully and use them accurately.
6. Please keep the instructions properly and read them at any time if
necessary.
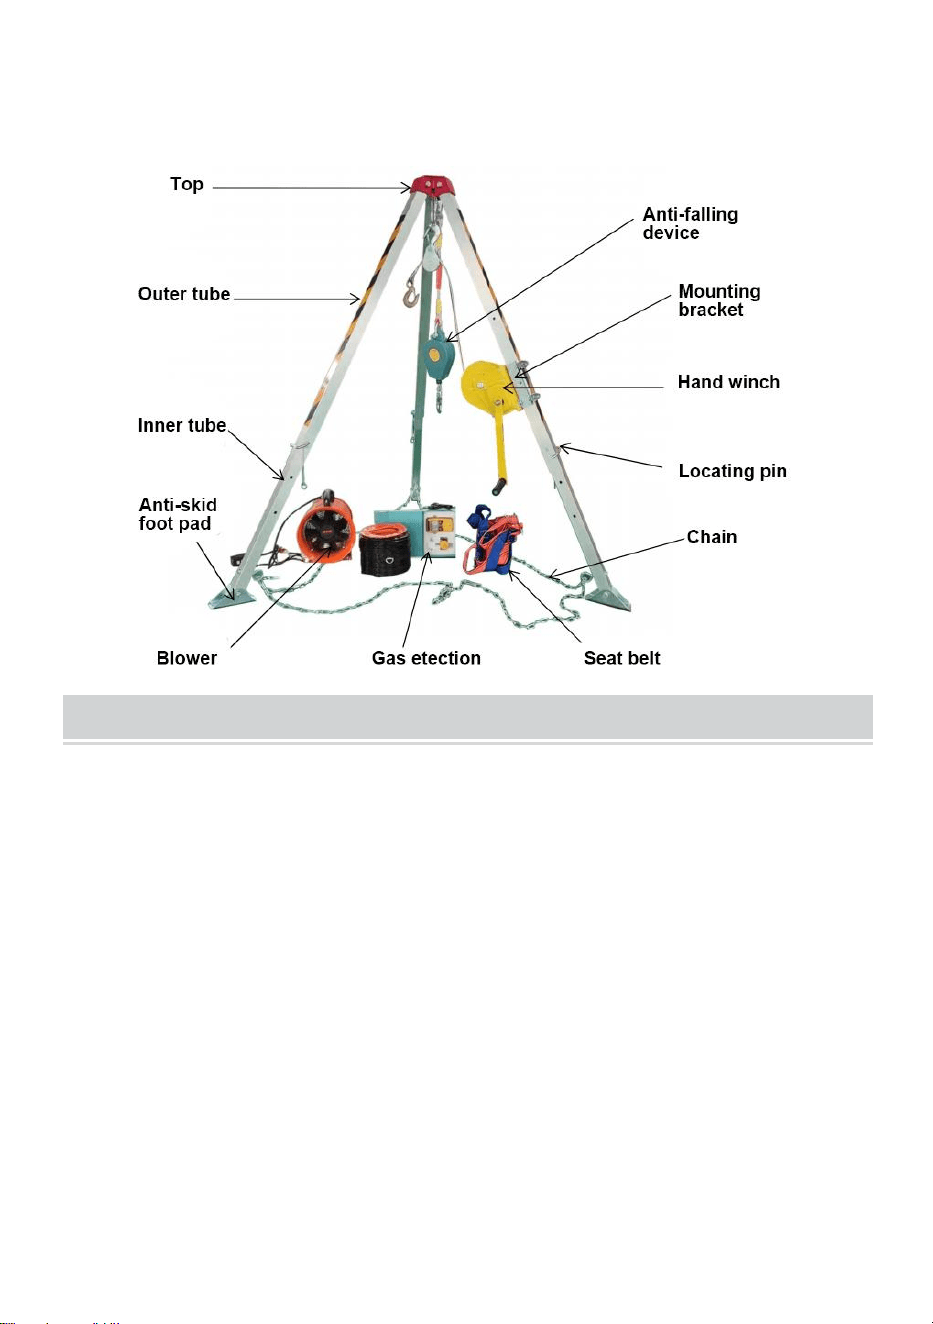
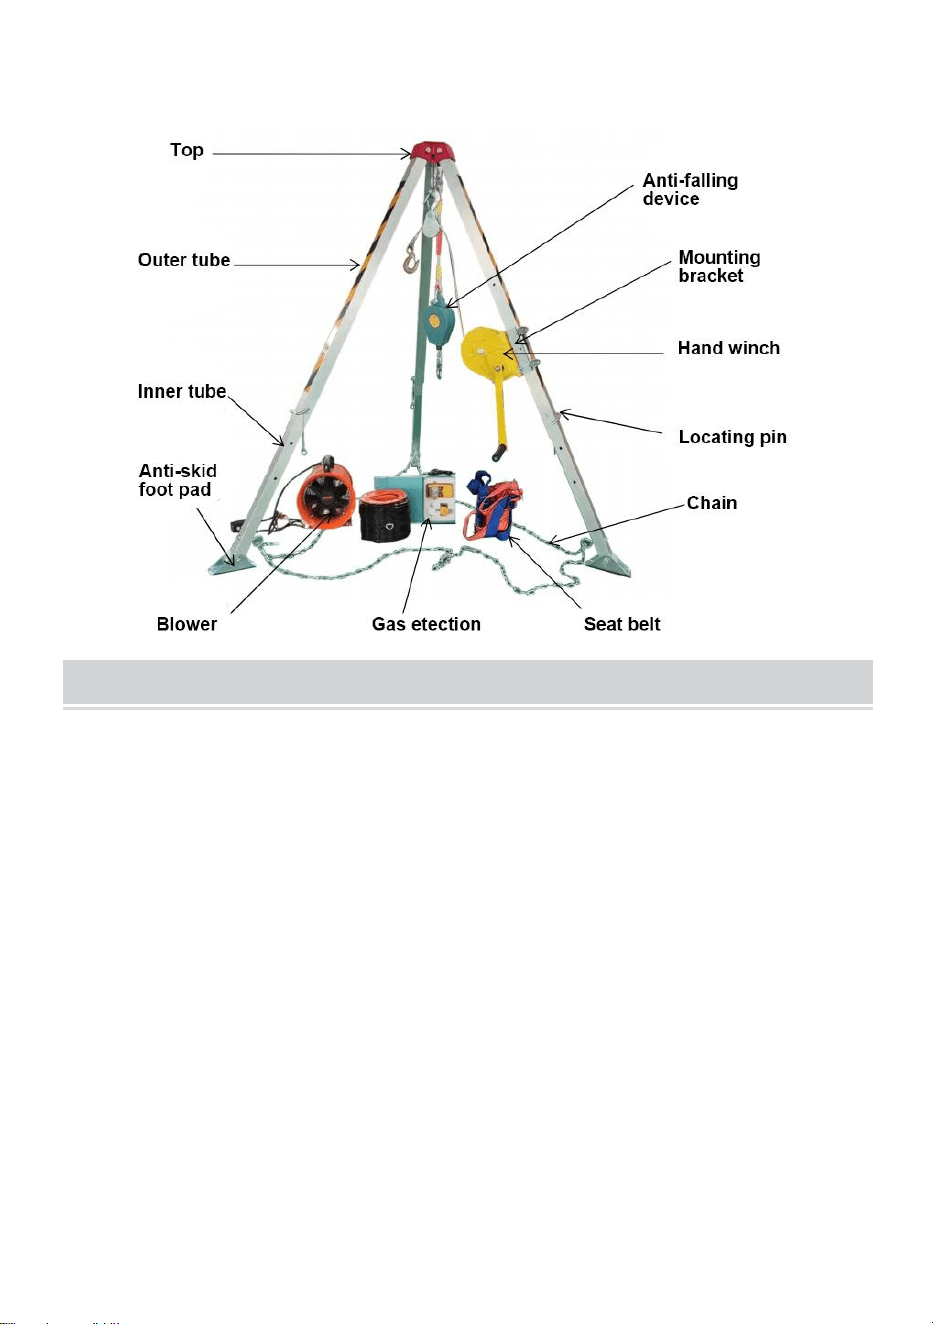
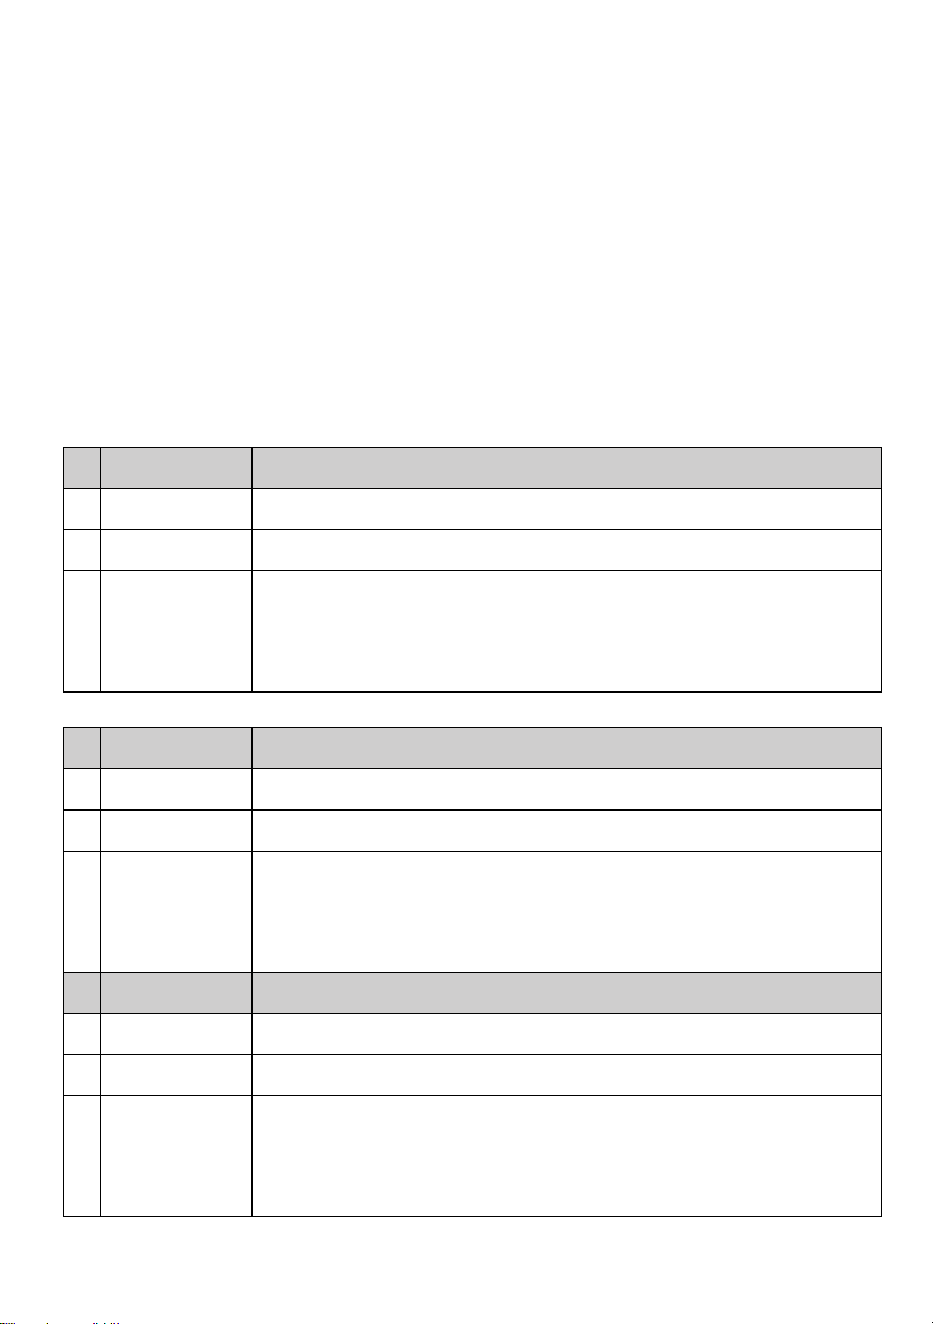
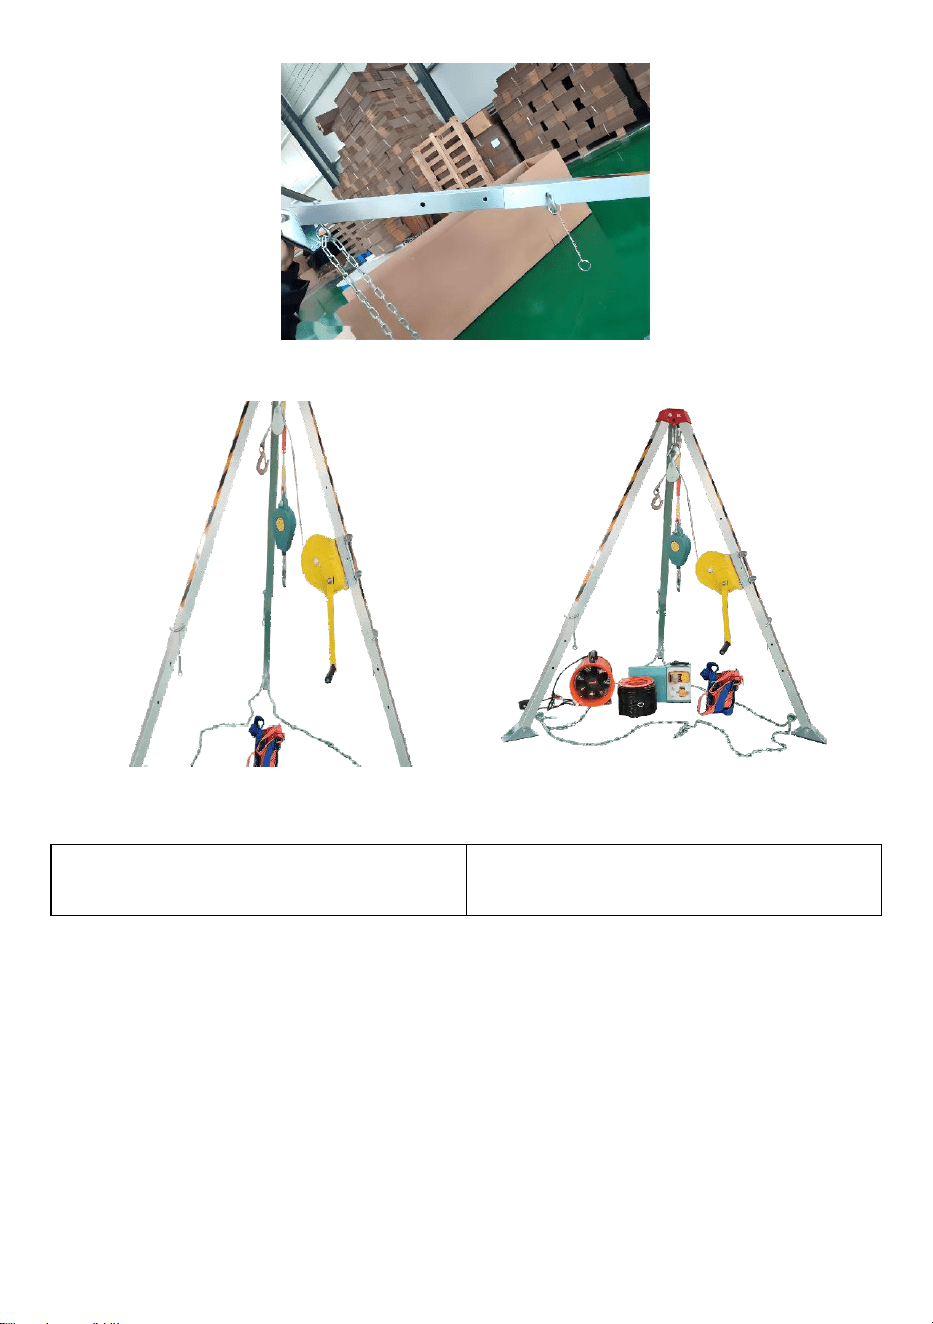
Tripod assembly:
(This section describes only the component names. The actual
configuration depends on the specific model)
·Top: Red top hat
·Hand winch: 1200 lbs/1800lbs/2600lbs
(Indicates the model only, not the load-bearing capacity of the tripod)
·Mounting bracket: The hand winch is mounted on the bracket
·Fall Arrester: 10m
·48x48mm Leg: Outer tube: Size: 48x48mm
·Foot: Inner tube: Size: 42*42mm
·Anti-skid foot pad: anti-skid rubber bottom steel
·Chain: 4mm*7.5m
·Locating pins
·Seat belts
·Blower
·Gas detector
- 3 -
BEFORE USE
[A] Tripod
1. Check the consistency of product identification.
2. Check loose screws, bent or damaged parts. It should be complete and
tight screws and rivets.
3. Check whether the order is bent, exceptional goods, or other damages.
4. Check legs and feet for distortion, cracks or other damage.
5. Check whether the chain is distorted, cracked or damaged.
[B] Hand Winch & Wire Rope & Support
1. Check the consistency of product identification.
2. Check the screws sent, bent or damaged parts. It should be complete
and tight screws and rivets.
3. Check the hook for any damage, corrosion or other damage.
4. Check whether there are cutting, kinking, corrosion, chemical contact
areas or severe wear areas in the wire rope.
5. Check whether the bracket and winch are twisted, cracked, or damaged.
- 4 -
MAINTENANCE
1. Operate strictly according to the following instructions, and do not cause
adverse effects on the equipment.
2. Use professional detergents; If mild, neutral PH soap or warm water, the
equipment should be pre-cleaned to remove dirt (belt parts) or debris (wire
rope parts).
3. Wipe disinfection equipment with 70% ethanol in cloth or sponge.
OPERATION AND USE
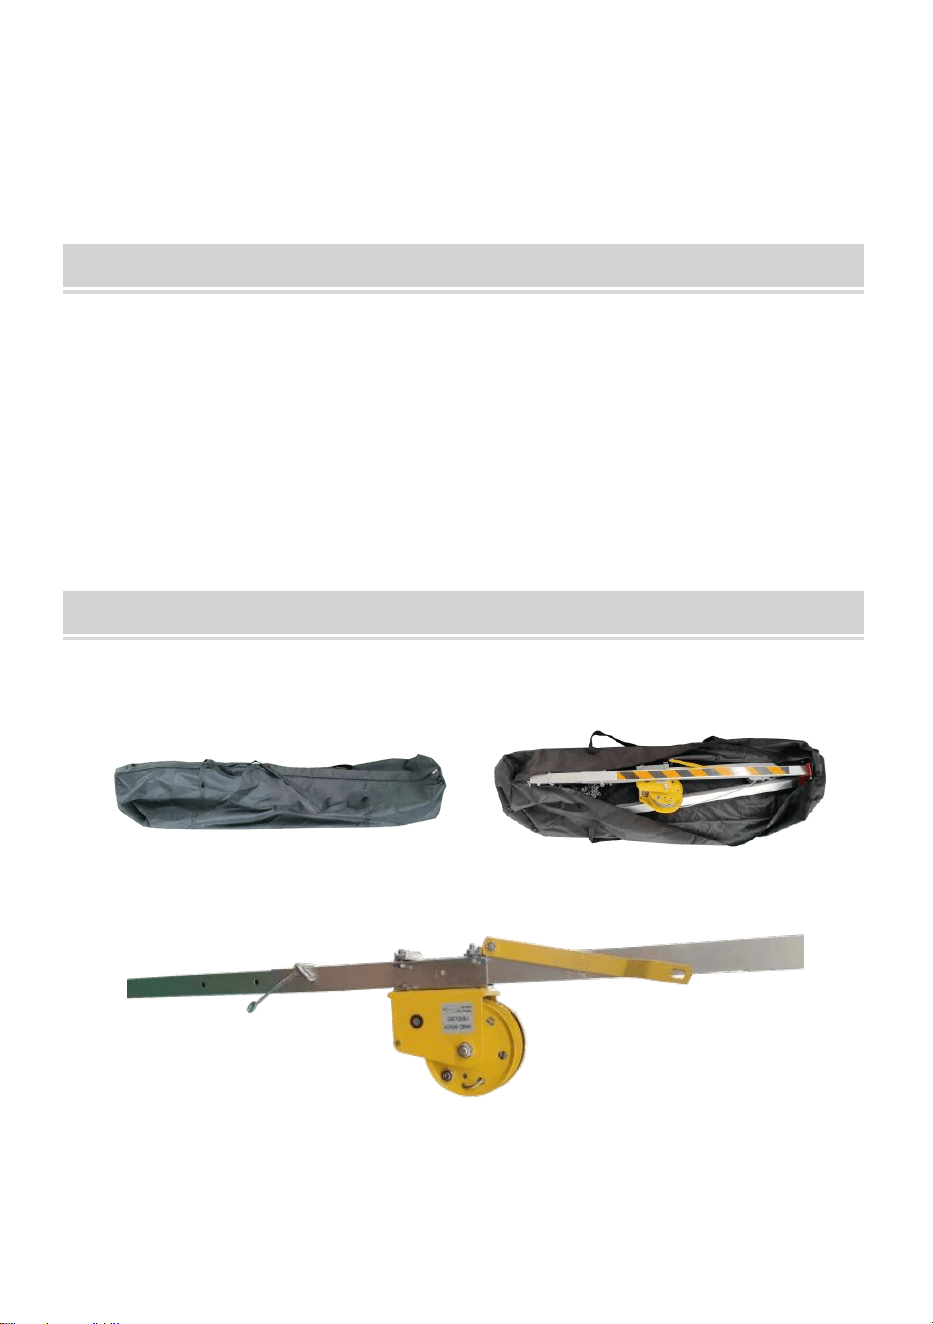
A.Tripod Installation Procedures
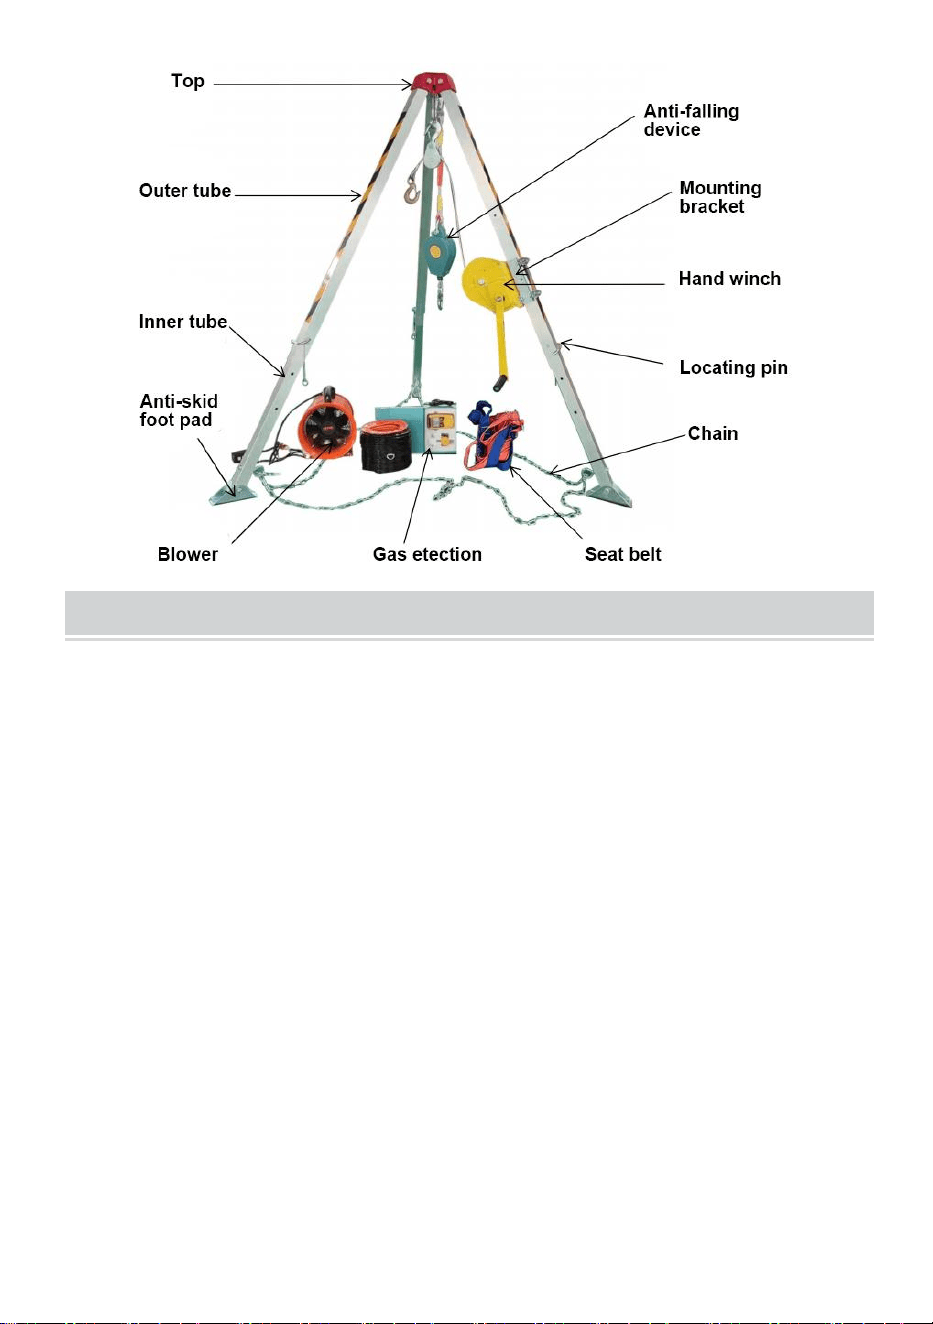
1.Remove the tripod from the bag.
2.Pull out the locating bolt and pull out the inner pipe to a proper position.
3. Repeat the above actions on the other two legs and pull out the inner
tube to the appropriate position.
- 5 -
4.Lift the tripod and move each foot outward to the maximum position.
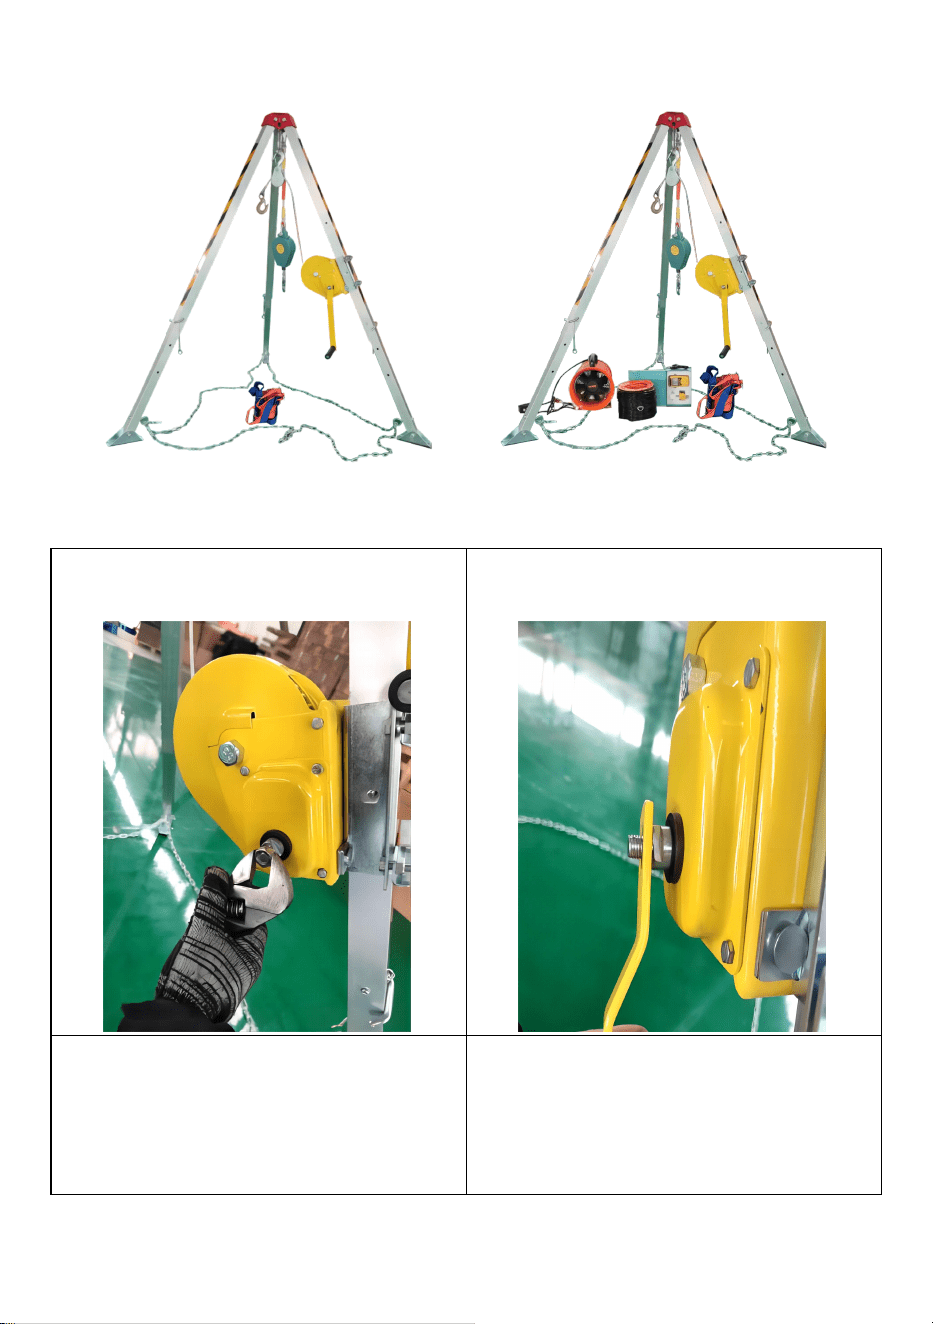
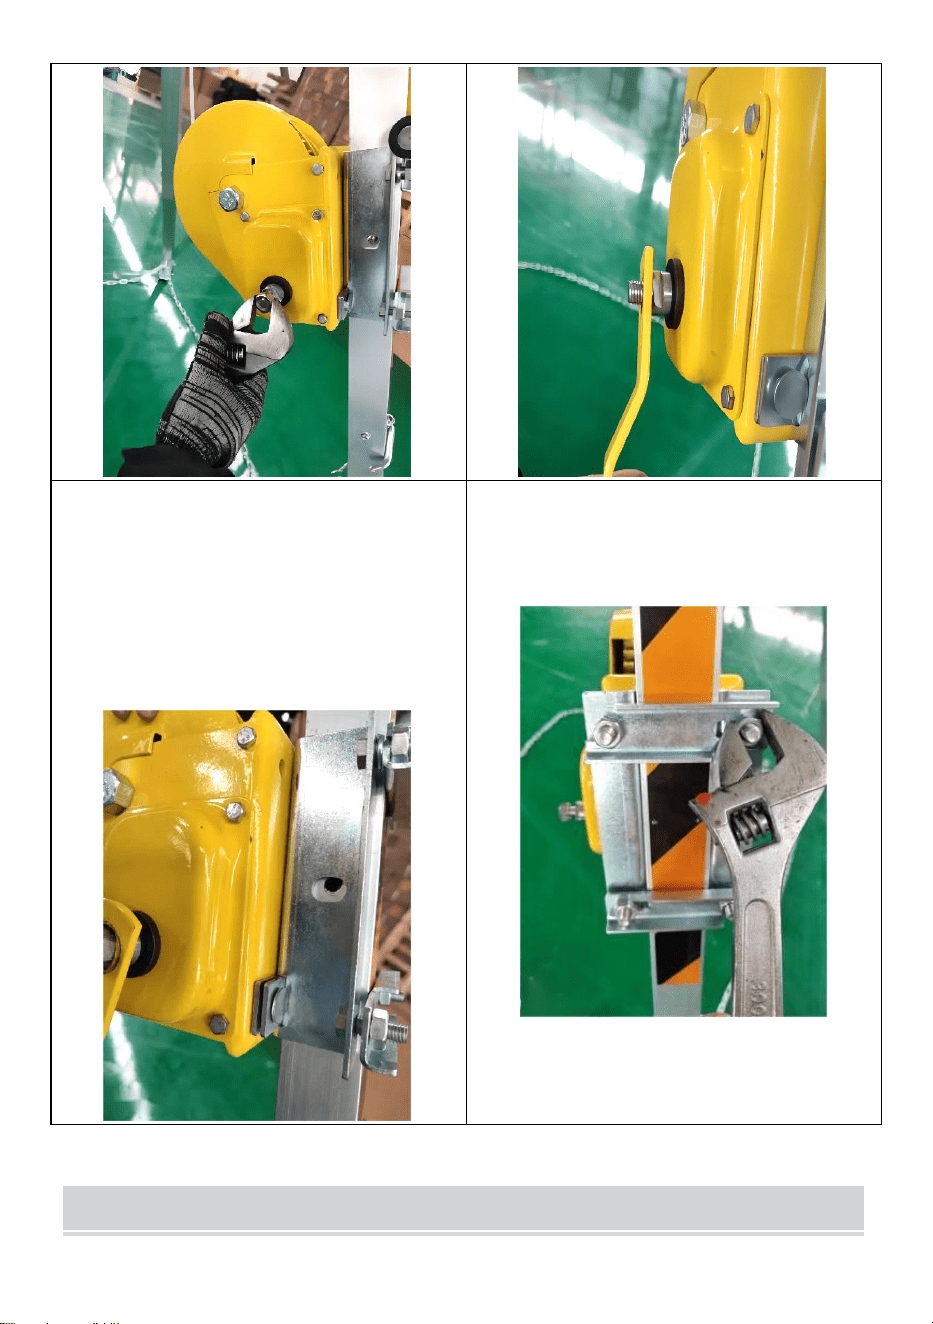
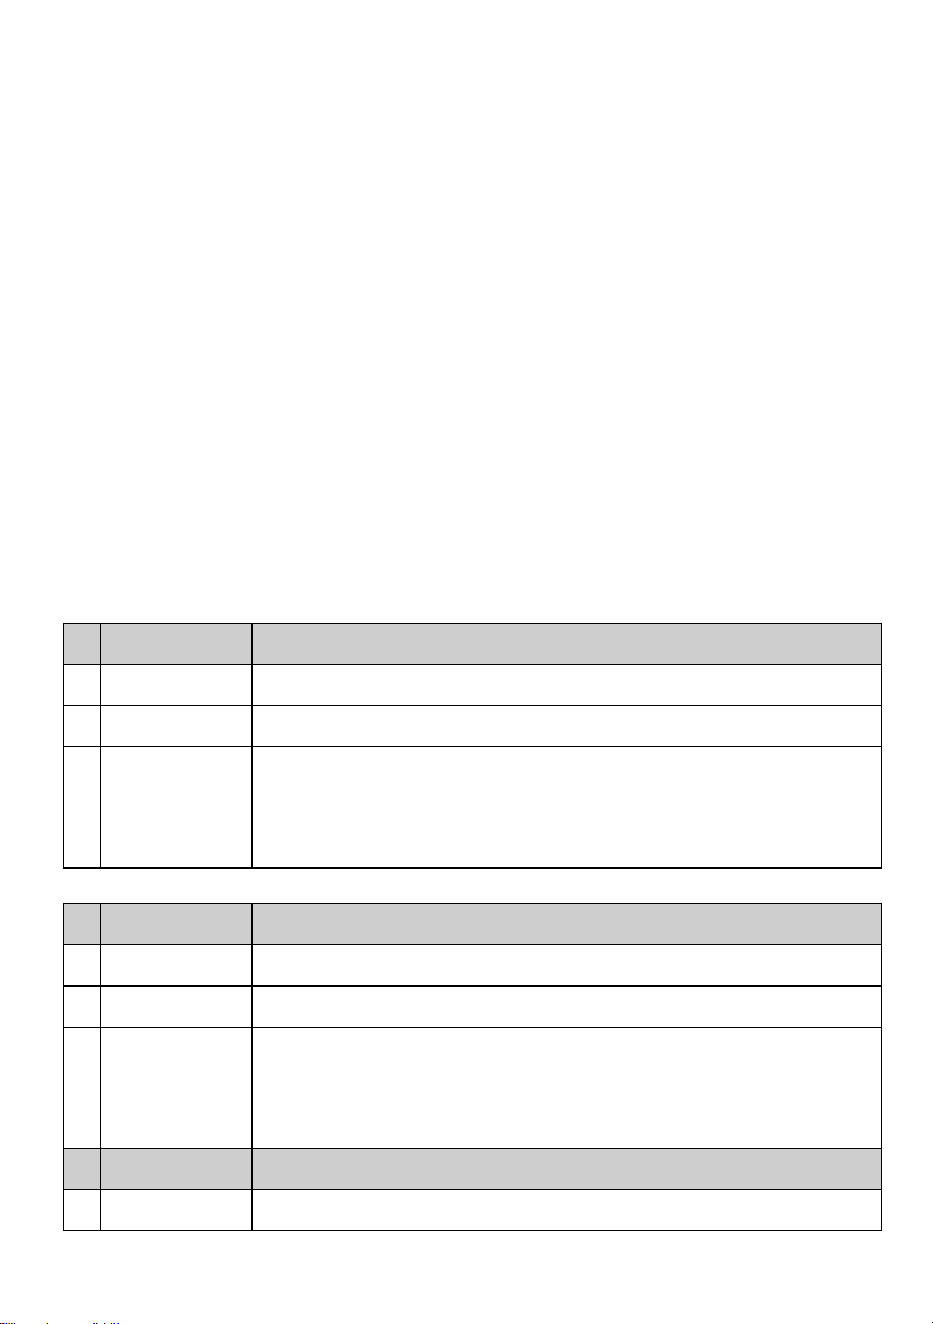
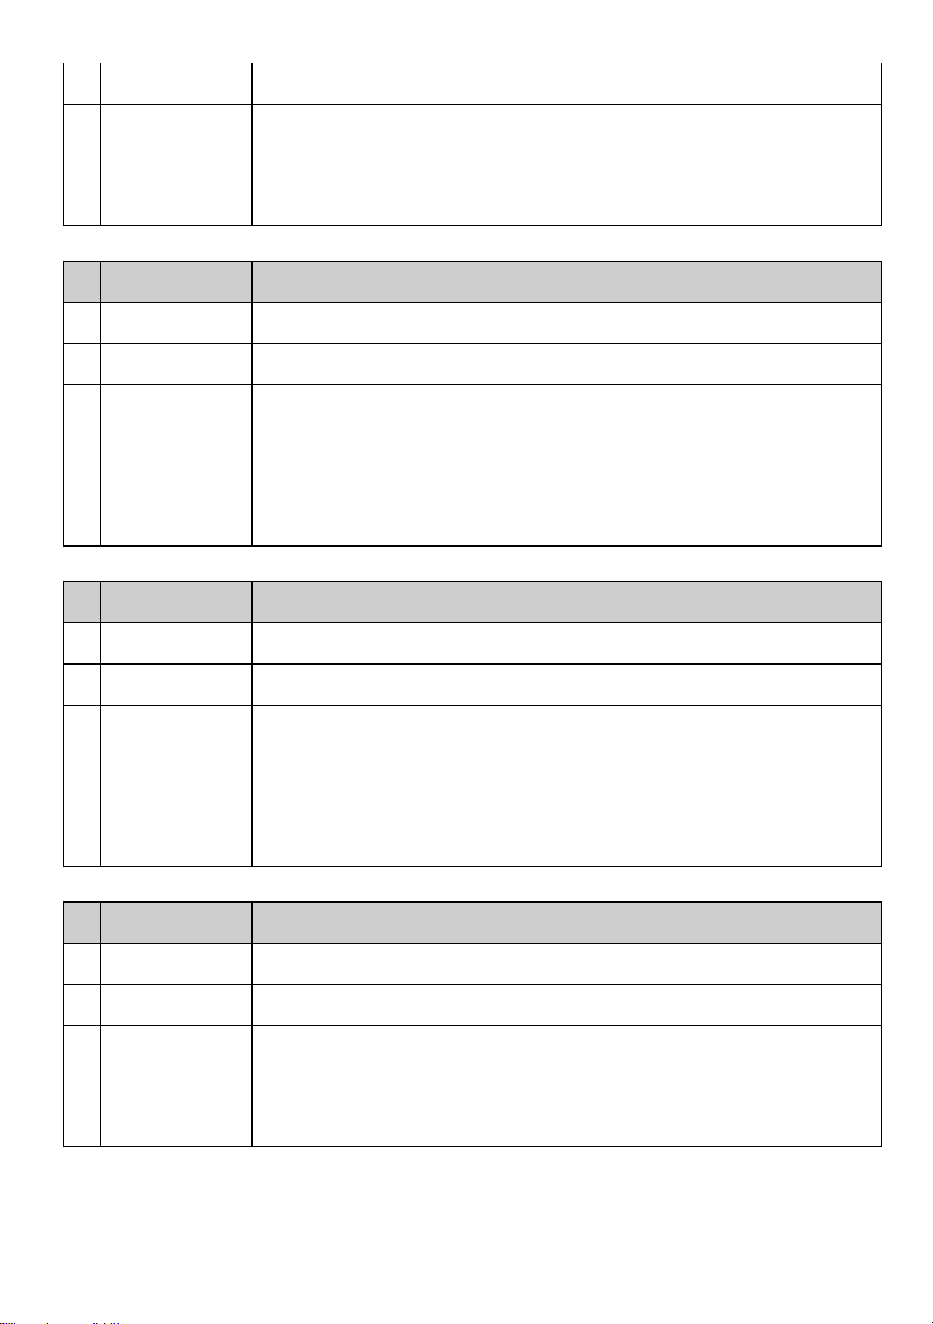
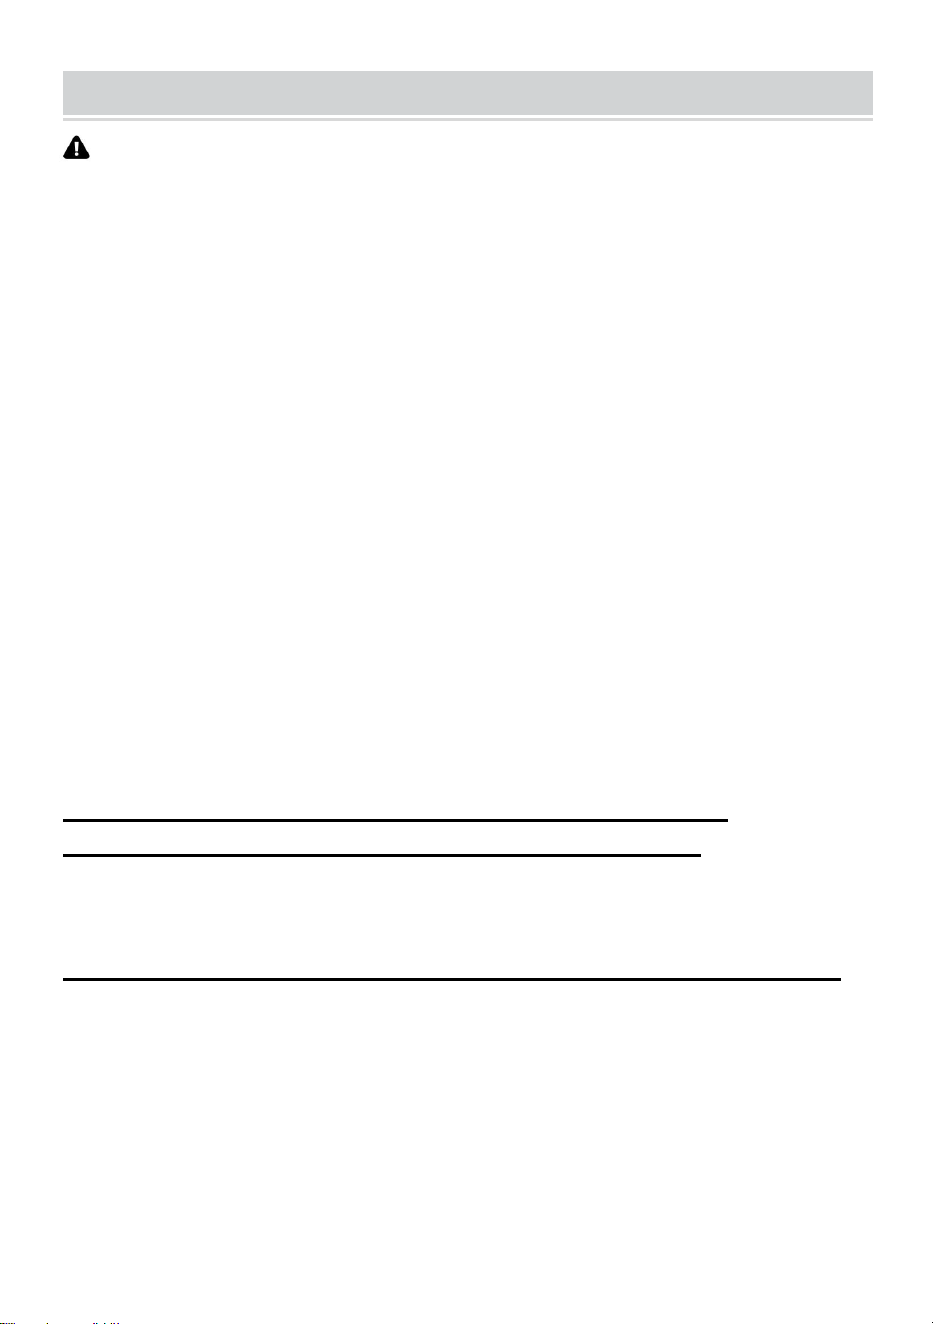
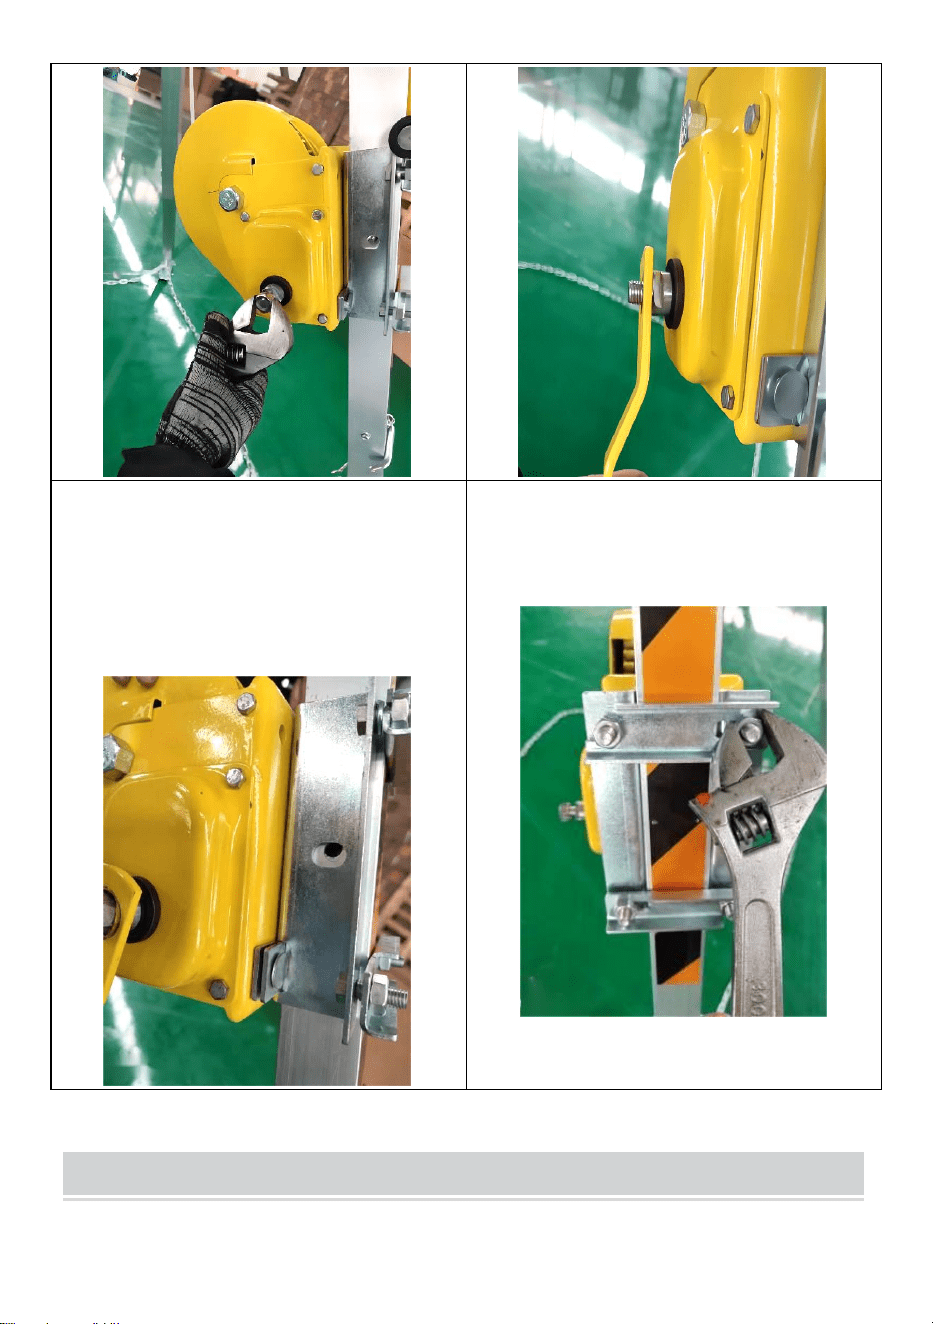
B.Winch Installation Procedures
1.Unscrew the nut with an
open-ended wrench.
2.Place the handle on top and
tighten the nut.
3.Insert the fixing bolt on the
mounting plate into the fixing hole of
the mounting plate and tighten the
screws to fix the hand winch.
4.Tighten the screws on the winch
mounting plate with an open-ended
wrench.

- 6 -
OPERATING PROCEDURE
1.Connect to full-body seat belts and fall arresters. Rotating hooks on
winches or hanging point rotating ring equipment.
2.Working environment
Regarding hazards that may affect the performance of equipment and
the corresponding safety precautions must be observed, such as
temperature and sharp edge influence, Chemical reagents, electrical
conductivity, cutting, wear, ultraviolet degradation, and other climatic
conditions.
3.Rescue lifting
Class A rescue lifting device. Rescue lifting device can only be used in
unimpeded lifting process, and should not be used if obstacles are
dangerous.
When using this equipment for rescue, the correct method is to connect
the hitch fastening device to the D-ring at the front end of the seat belt.
4.Hoist and fixed hanging point device.

- 7 -
Warning: The hoist is used for lifting function only for rescue
purposes, not for lifting loads.
Warning!
Before use
1. It must be used by people who can use it correctly, and the user must be
in good health before entering this operation.
2. Do not place the tripod in chemical gas environment for a long time,
which will cause corrosion of metal parts.
3. The tripod is only used by one person and must not be overloaded.
4. Equipment combinations whose safety performance is affected by other
equipment or conflicts with other safety equipment are not allowed.
5. In the following cases, the equipment will be revoked immediately
1) There are doubts about the safe use conditions.
2) The function of safe use is in doubt.
3) It has been used to fall and can no longer be used until qualified
personnel confirm.
6. Before each use, it is necessary to ensure the free space required by the
user under the workplace, so that in case of falling, it will not collide with
the ground or other obstacles in the falling path.
7. There should be direct or indirect visual contact or other means of
communication with rescuers at all times during the rescue process.
8. During installation; If the hanging point is deformed or damaged, please
stop using it.
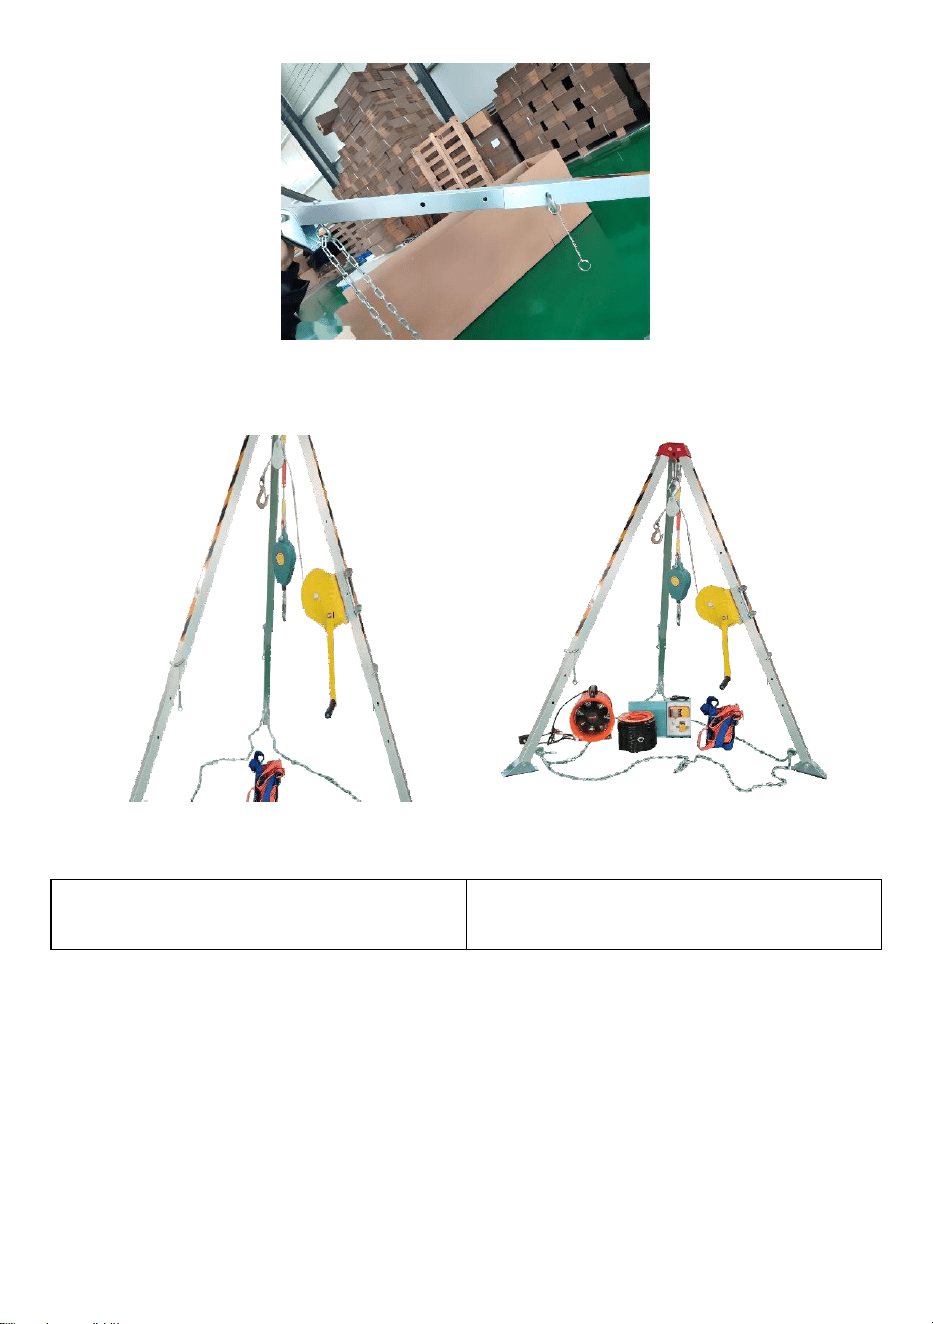
9. When working on uneven ground, the tripod should be tied with chains
to balance the force opposite to the front facing the tripod.
- 8 -
After use
10. Regular inspection is required, and product safety depends on
continuous maintenance and maintenance of equipment.
11. When the equipment becomes wet, whether in use or clean, it should
be dried naturally and avoid direct heating.
12. The frequency of regular inspection should be at least once every
March.
13. Periodic inspection is only suitable for qualified personnel, and is
carried out in strict accordance with the manufacturer's periodic inspection
procedures.
14. This product is a complete system, and no parts can be replaced at will.
15. Storage procedures: Including all necessary precautionary
requirements, environmental or other factors may affect the condition of
parts,For example: humid environment, sharp angle, vibration, and
ultraviolet decomposition.
Items
Description
1
Name
Confined Space Tripod Kit
2
Model
HXRT-06
3
Parameter
MAX personal carrying capacity (up and down)
:
397lbs
Lateral tractive effort
:
1200lbs
Adjustable length range of support feet
:
1.34-2.15m
Items
Description
1
Name
Confined Space Tripod Kit
2
Model
HXRT-07
3
Parameter
MAX personal carrying capacity (up and down)
:
397lbs
Lateral tractive effort
:
1800lbs
Adjustable length range of support feet
:
1.34-2.15m
- 9 -
Items
Description
1
Name
Confined Space Tripod Kit
2
Model
HXRT-08
3
Parameter
MAX personal carrying capacity (up and down)
:
397lbs
Lateral tractive effort
:
2600lbs
Adjustable length range of support feet
:
1.6-2.45m
Items
Description
1
Name
Confined Space Tripod Kit
2
Model
HXRT-09
3
Parameter
MAX personal carrying capacity (up and down)
:
397lbs
Lateral tractive effort
:
2600lbs
Adjustable length range of support feet
:
1.6-2.45m
Axial portable ventilation fan
、
Portable Multi-gas Detector
Items
Description
1
Name
Confined Space Tripod Kit
2
Model
HXRT-10
3
Parameter
MAX personal carrying capacity (up and down)
:
397lbs
Lateral tractive effort
:
2600lbs
Adjustable length range of support feet
:
1.6-2.45m
Axial portable ventilation fan
、
Portable Multi-gas Detector
Items
Description
1
Name
Confined Space Tripod Kit
2
Model
HXRT-05
3
Parameter
MAX personal carrying capacity (up and down):397lbs
Lateral tractive effort:1200lbs
Adjustable length range of support feet:1.34-2.15m
- 10 -
Address: Baoshanqu Shuangchenglu 803long 11hao 1602A-1609shi Shanghai
Imported to AUS: SIHAO PTY LTD. 1 ROKEVA STREETEASTWOOD NSW 2122
Australia
Imported to USA: Sanven Technology Ltd. Suite 250. 9166 Anaheim Place,
Rancho Cucamonga, CA 91730
REP
EC
SHUNSHUN GmbH
Römeräcker 9 Z2021, 76351
Linkenheim-Hochstetten, Germany
REP
UK
Pooledas Group Ltd
Unit 5 Albert Edward House, The
Pavilions Preston, United Kingdom
Made In China


- 2 -
Assistance technique et certificat de garantie électronique
www.vevor.com/support
KIT DE TRÉPIED POUR ESPACES CONFINÉS
MANUEL DE L'UTILISATEUR
MODÈLE: HXRT-06/HXRT-07/HXRT-08
HXRT-09HXRT-10/HXRT-05
We continue to be committed to provide you tools with competitive price.
"Save Half", "Half Price" or any other similar expressions used by us only represents an
estimate of savings you might benefit from buying certain tools with us compared to the major
top brands and does not necessarily mean to cover all categories of tools offered by us. You
are kindly reminded to verify carefully when you are placing an order with us if you are
actually saving half in comparison with the top major brands.
- 1 -
MODÈLE: HXRT-06/HXRT-07/HXRT-08/HXRT-09/HXRT-10/HXRT-05
Have product questions? Need technical support? Please feel free to
contact us:
Technical Support and E-Warranty Certificate
www.vevor.com/support
NEED HELP? CONTACT US!
This is the original instruction, please read all manual instructions
carefully before operating. VEVOR reserves a clear interpretation of our
user manual. The appearance of the product shall be subject to the
product you received. Please forgive us that we won't inform you again if
there are any technology or software updates on our product.
CONFINED SPACE
TRIPOD KIT
- 2 -
SAFETY INSTRUCTION AND PRECAUTIONS
AVERTISSEMENT:
Lisez ce document avant d'utiliser ce produit. Ne pas le faire peut
entraîner des blessures graves.
1. Ce produit n’est pas un jouet. Ne laissez pas les enfants jouer avec cet
article.
2. Utiliser uniquement comme prévu.
3. Ne dépassez jamais la capacité de charge du kit de trépied pour espace
confiné.
4. Le trépied HXRT-Rescue convient aux opérations d'égouts et aux
espaces limités, y compris les trous d'homme, les seaux, les cabines,
l'électricité ou les télécommunications et d'autres opérations pour éviter les
chutes d'exigences. Le trépied est utilisé avec un treuil manuel pour
effectuer des opérations de sauvetage rapidement et en toute sécurité. Cet
appareil est destiné à une seule personne.
5. Avant d'utiliser cet équipement à des fins de protection contre les chutes
et de levage de sauvetage, veuillez lire attentivement les instructions et les
utiliser avec précision.
6. Veuillez conserver correctement les instructions et les lire à tout moment
si nécessaire.
Assemblage du trépied :
(Cette section décrit uniquement les noms des composants. La
configuration réelle dépend du modèle spécifique)
·Haut : chapeau haut de forme rouge
·Treuil manuel : 1 200 lb/1 800 lb/2 600 lb
( Indique uniquement le modèle, pas la capacité de charge du
trépied )
·Support de montage : le treuil manuel est monté sur le support
·Antichute : 10 m
· Jambe 48x48 mm : Tube extérieur : Taille : 48x48 mm
·Pied : Chambre à air : Taille : 42*42 mm
- 3 -
·Coussin de pied antidérapant : acier inférieur en caoutchouc antidérapant
·Chaîne : 4 mm*7,5 m
· Localisation des broches
·La ceinture de sécurité
·Ventilateur
·Détecteur de gaz
BEFORE USE
[A] Trépied
1. Vérifier la cohérence de l'identification du produit.
2. Vérifiez les vis desserrées, les pièces pliées ou endommagées. Il doit
s'agir de vis et de rivets complets et bien serrés.
3. Vérifiez si la commande est pliée, si des marchandises exceptionnelles
ou d'autres dommages.
4. Vérifiez les pieds et les pieds pour déceler toute déformation, fissure ou
autre dommage.
5. Vérifiez si la chaîne est déformée, fissurée ou endommagée.
[B] Treuil manuel, câble métallique et support
- 4 -
1. Vérifier la cohérence de l'identification du produit.
2. Vérifiez les vis envoyées, les pièces pliées ou endommagées. Il doit
s'agir de vis et de rivets complets et bien serrés.
3. Vérifiez le crochet pour déceler tout dommage, corrosion ou autre
dommage.
4. Vérifiez s'il y a des zones de coupure, de pliage, de corrosion, de
contact chimique ou de zones d'usure importante dans le câble métallique.
5. Vérifiez si le support et le treuil sont tordus, fissurés ou endommagés.
MAINTENANCE
1. Opérez strictement selon les instructions suivantes et ne provoquez pas
d’effets néfastes sur l’équipement.
2. Utilisez des détergents professionnels ; S'il s'agit de savon doux au pH
neutre ou d'eau tiède, l'équipement doit être pré-nettoyé pour éliminer la
saleté (pièces de la courroie) ou les débris (pièces du câble métallique).
3. Essuyez le matériel de désinfection avec de l'éthanol à 70 % dans un
chiffon ou une éponge.
OPERATION AND USE
A.Procédures d'installation du trépied
1. Retirez le trépied du sac.
2. Retirez le boulon de positionnement et retirez le tuyau intérieur dans une
position appropriée.
- 5 -
4. Répétez les actions ci-dessus sur les deux autres jambes et tirez la
chambre à air dans la position appropriée.
4. Soulevez le trépied et déplacez chaque pied vers l'extérieur jusqu'à la
position maximale.
C.Procédures d'installation du treuil
1.Dévissez l'écrou avec une clé à
fourche.
2. Placez la poignée sur le dessus
et serrez l'écrou.

- 6 -
3.Insérez le boulon de fixation sur la
plaque de montage dans le trou de
fixation de la plaque de montage et
serrez les vis pour fixer le treuil
manuel.
4.Serrez les vis de la plaque de
montage du treuil avec une clé à
fourche.
OPERATING PROCEDURE

- 7 -
1. Connectez-vous aux ceintures de sécurité complètes et aux antichutes.
Crochets rotatifs sur treuils ou équipements à anneaux rotatifs à point
d'accrochage.
2.Environnement de travail
Concernant les dangers pouvant affecter les performances de
l'équipement, les précautions de sécurité correspondantes doivent être
respectées, telles que la température et l'influence des bords tranchants,
les réactifs chimiques, la conductivité électrique, la découpe, l'usure, la
dégradation par les ultraviolets et d'autres conditions climatiques.
3. Levage de sauvetage
Dispositif de levage de sauvetage de classe A. Le dispositif de levage de
sauvetage ne peut être utilisé que dans un processus de levage sans
entrave et ne doit pas être utilisé si les obstacles sont dangereux.
Lorsque vous utilisez cet équipement pour le sauvetage, la méthode
correcte consiste à connecter le dispositif de fixation de l'attelage à
l'anneau en D situé à l'extrémité avant de la ceinture de sécurité.
4. Palan et dispositif de point de suspension fixe.
Avertissement : Le palan est utilisé uniquement pour la fonction de
levage à des fins de sauvetage, et non pour soulever des charges.
Avertissement!
Avant utilisation
1. Il doit être utilisé par des personnes capables de l'utiliser correctement
et l'utilisateur doit être en bonne santé avant d'accéder à cette opération.
2. Ne placez pas le trépied dans un environnement de gaz chimique
pendant une longue période, car cela provoquerait la corrosion des pièces
métalliques.

- 8 -
3. Le trépied n'est utilisé que par une seule personne et ne doit pas être
surchargé.
4. Les combinaisons d'équipements dont les performances de sécurité
sont affectées par d'autres équipements ou entrent en conflit avec d'autres
équipements de sécurité ne sont pas autorisées.
5. Dans les cas suivants, l'équipement sera immédiatement révoqué
1) Il existe des doutes quant aux conditions d’utilisation sûres.
2) La fonction d’utilisation sûre est mise en doute.
3) Il a été utilisé pour tomber et ne peut plus être utilisé jusqu'à ce que le
personnel qualifié le confirme.
6. Avant chaque utilisation, il est nécessaire de garantir l'espace libre
requis par l'utilisateur sous le lieu de travail, afin qu'en cas de chute, il
n'entre pas en collision avec le sol ou d'autres obstacles sur le chemin de
chute.
7. Il doit y avoir un contact visuel direct ou indirect ou d'autres moyens de
communication avec les sauveteurs à tout moment pendant le processus
de sauvetage.
8. Pendant l'installation ; Si le point de suspension est déformé ou
endommagé, veuillez cesser de l'utiliser.
9. Lorsque vous travaillez sur un sol irrégulier, le trépied doit être attaché
avec des chaînes pour équilibrer la force opposée à l'avant face au trépied.
Après utilisation
10. Une inspection régulière est requise et la sécurité des produits dépend
de l'entretien et de la maintenance continus de l'équipement.
11. Lorsque l'équipement devient mouillé, qu'il soit utilisé ou propre, il doit
être séché naturellement et éviter tout chauffage direct.

- 9 -
12. La fréquence des inspections régulières devrait être d'au moins une
fois en mars.
13. L'inspection périodique ne convient qu'au personnel qualifié et est
effectuée en stricte conformité avec les procédures d'inspection périodique
du fabricant.
14. Ce produit est un système complet et aucune pièce ne peut être
remplacée à volonté.
15. Procédures de stockage : y compris toutes les exigences de précaution
nécessaires, les facteurs environnementaux ou autres peuvent affecter
l'état des pièces, par exemple : environnement humide, angle vif,
vibrations et décomposition ultraviolette.
Articles
Description
1
Nom
Kit de trépied pour espaces confinés
2
Modèle
HXRT-06
3
Paramètre
Capacité de charge personnelle MAX (haut et bas)
:
397 lb
Effort de traction latéral
:
1 200 lb
Plage de longueur réglable des pieds de support
:
1,34 à 2,15 m
Articles
Description
1
Nom
Kit de trépied pour espaces confinés
2
Modèle
HXRT-07
3
Paramètre
Capacité de charge personnelle MAX (haut et bas)
:
397 lb
Effort de traction latéral
:
1 800 lb
Plage de longueur réglable des pieds de support
:
1,34 à 2,15 m
Articles
Description
1
Nom
Kit de trépied pour espaces confinés
2
Modèle
HXRT-08
- 10 -
3
Paramètre
Capacité de charge personnelle MAX (haut et bas) : 397 lb
Effort de traction latéral : 2 600 lb Plage
de longueur réglable des pieds de support : 1,6 à 2,45 m
Articles
Description
1
Nom
Kit de trépied pour espaces confinés
2
Modèle
HXRT-09
3
Paramètre
Capacité de charge personnelle MAX (haut et bas) : 397 lb
Effort de traction latéral : 2 600 lb Plage
de longueur réglable des pieds de support : 1,6 à 2,45 m
Ventilateur de ventilation portable axial, détecteur multi-gaz portable
Articles
Description
1
Nom
Kit de trépied pour espaces confinés
2
Modèle
HXRT-10
3
Paramètre
Capacité de charge personnelle MAX (haut et bas) : 397 lb
Effort de traction latéral : 2 600 lb Plage
de longueur réglable des pieds de support : 1,6 à 2,45 m
Ventilateur de ventilation portable axial, détecteur multi-gaz portable
Articles
Description
1
Nom
Kit de trépied pour espaces confinés
2
Modèle
HXRT-05
3
Paramètre
Capacité de charge personnelle MAX (haut et bas)
:
397 lb
Effort de traction latéral
:
1 200 lb
Plage de longueur réglable des pieds de support
:
1,34 à 2,15 m
Adresse : Baoshanqu Shuangchenglu 803long 11hao 1602A-1609shi Shanghai
Importé en Australie : SIHAO PTY LTD. 1 ROKEVA STREETASTWOOD NSW
2122 Australie

- 11 -
Importé aux États-Unis : Sanven Technology Ltd. Suite 250 . 9166 Anaheim
Place, Rancho Cucamonga, Californie 91730
REP
EC
SHUNSHUN GmbH
Römeräcker 9 Z2021, 76351
Linkenheim-Hochstetten, Germany
REP
UK
Pooledas Group Ltd
Unit 5 Albert Edward House, The
Pavilions Preston, United Kingdom
Fabriqué en Chine


- 2 -
Zertifikat für technischen Support und E-Garantie
www.vevor.com/support
STATIV-KIT FÜR BEENGTE
PLATZVERHÄLTNISSE
BENUTZERHANDBUCH
MODELL: HXRT-06/HXRT-07/HXRT-08
HXRT-09HXRT-10/HXRT-05
We continue to be committed to provide you tools with competitive price.
"Save Half", "Half Price" or any other similar expressions used by us only represents an
estimate of savings you might benefit from buying certain tools with us compared to the major
top brands and does not necessarily mean to cover all categories of tools offered by us. You
are kindly reminded to verify carefully when you are placing an order with us if you are
actually saving half in comparison with the top major brands.

- 1 -
MODELL: HXRT-06/HXRT-07/HXRT-08/HXRT-09/HXRT-10/HXRT-05
Have product questions? Need technical support? Please feel free to
contact us:
Technical Support and E-Warranty Certificate
www.vevor.com/support
NEED HELP? CONTACT US!
This is the original instruction, please read all manual instructions
carefully before operating. VEVOR reserves a clear interpretation of our
user manual. The appearance of the product shall be subject to the
product you received. Please forgive us that we won't inform you again if
there are any technology or software updates on our product.
CONFINED SPACE
TRIPOD KIT
- 2 -
SAFETY INSTRUCTION AND PRECAUTIONS
WARNUNG:
Lesen Sie dieses Material, bevor Sie dieses Produkt verwenden.
Andernfalls kann es zu schweren Verletzungen kommen.
1. Dieses Produkt ist kein Spielzeug. Erlauben Sie Kindern nicht, mit
diesem Artikel zu spielen.
2. Nur bestimmungsgemäß verwenden.
3. Überschreiten Sie niemals die Tragfähigkeit des Stativ-Kits für beengte
Räume.
4. Das HXRT-Rescue-Stativ eignet sich für Kanalisationsarbeiten und
begrenzte Räume, einschließlich Mannlöcher, Eimer, Kabinen, Strom- oder
Telekommunikations- und andere Arbeiten, um herabstürzende
Anforderungen zu verhindern. Das Stativ wird mit einer Handwinde
verwendet, um Rettungseinsätze schnell und sicher durchzuführen. Dieses
Gerät ist nur für eine Person bestimmt.
5. Bevor Sie dieses Gerät für Absturzsicherungs- und Rettungshubzwecke
verwenden, lesen Sie bitte die Anweisungen sorgfältig durch und
verwenden Sie sie sorgfältig.
6. Bitte bewahren Sie die Anleitung sorgfältig auf und lesen Sie sie bei
Bedarf jederzeit durch.
Stativmontage:
(In diesem Abschnitt werden nur die Komponentennamen
beschrieben. Die tatsächliche Konfiguration hängt vom jeweiligen
Modell ab.)
· Oben: Roter Zylinder
·Handwinde: 1200 lbs/1800 lbs/2600 lbs
( Zeigt nur das Modell an, nicht die Tragfähigkeit des Stativs )
·Montagehalterung: Die Handwinde wird an der Halterung montiert
·Absturzsicherung: 10 m
·48x48mm Bein: Außenrohr: Größe: 48x48mm
·Fuß: Innenrohr: Größe: 42*42 mm
·Rutschfestes Fußpolster: rutschfeste Gummiunterseite aus Stahl
·Kette: 4 mm x 7,5 m
- 3 -
·Fixierstifte
·Sicherheitsgurte
·Gebläse
·Gasmelder
BEFORE USE
[A] Stativ
1. Überprüfen Sie die Konsistenz der Produktidentifikation.
2. Überprüfen Sie lose Schrauben, verbogene oder beschädigte Teile. Es
sollten vollständige und festsitzende Schrauben und Nieten vorhanden
sein.
3. Überprüfen Sie, ob die Bestellung verbogen, außergewöhnlich gut oder
anderweitig beschädigt ist.
4. Überprüfen Sie die Beine und Füße auf Verformung, Risse oder andere
Beschädigungen.
5. Prüfen Sie, ob die Kette verzogen, gerissen oder beschädigt ist.
[B] Handwinde & Drahtseil & Stütze
1. Überprüfen Sie die Konsistenz der Produktidentifikation.

- 4 -
2. Überprüfen Sie die Schrauben, verbogene oder beschädigte Teile. Es
sollten vollständige und festsitzende Schrauben und Nieten vorhanden
sein.
3. Überprüfen Sie den Haken auf Beschädigungen, Korrosion oder andere
Schäden.
4. Überprüfen Sie, ob das Drahtseil Schnitt-, Knick-, Korrosions-,
chemische Kontaktbereiche oder starke Verschleißbereiche aufweist.
5. Überprüfen Sie, ob die Halterung und die Winde verdreht, gerissen oder
beschädigt sind.
MAINTENANCE
1. Halten Sie sich strikt an die folgenden Anweisungen und achten Sie
darauf, dass das Gerät nicht beeinträchtigt wird.
2. Verwenden Sie professionelle Reinigungsmittel; Bei milder Seife mit
neutralem pH-Wert oder warmem Wasser sollte die Ausrüstung
vorgereinigt werden, um Schmutz (Bandteile) oder Ablagerungen
(Drahtseilteile) zu entfernen.
3. Wischen Sie die Desinfektionsausrüstung mit einem Tuch oder
Schwamm mit 70 %igem Ethanol ab.
OPERATION AND USE
A. Installationsverfahren für das Stativ
1.Nehmen Sie das Stativ aus der Tasche.
2.Ziehen Sie den Fixierbolzen heraus und ziehen Sie das Innenrohr in die
richtige Position heraus.
- 5 -
5. Wiederholen Sie die oben genannten Schritte an den anderen beiden
Beinen und ziehen Sie das Innenrohr in die entsprechende Position
heraus.
4. Heben Sie das Stativ an und bewegen Sie jeden Fuß nach außen in die
maximale Position.
D.Windeninstallationsverfahren
1.Schrauben Sie die Mutter mit
einem Gabelschlüssel ab.
2.Setzen Sie den Griff oben auf und
ziehen Sie die Mutter fest.
- 6 -
3. Stecken Sie den
Befestigungsbolzen der
Montageplatte in das
Befestigungsloch der Montageplatte
und ziehen Sie die Schrauben fest,
um die Handwinde zu befestigen.
4.Ziehen Sie die Schrauben an der
Windenmontageplatte mit einem
Gabelschlüssel fest.
OPERATING PROCEDURE

- 7 -
1. An Ganzkörper-Sicherheitsgurte und Absturzsicherungen anschließen.
Drehhaken an Winden oder Aufhängepunkt-Drehringgeräten.
2. Arbeitsumgebung
Bezüglich Gefahren, die die Leistung von Geräten beeinträchtigen
können, müssen die entsprechenden Sicherheitsvorkehrungen beachtet
werden, wie z. B. der Einfluss von Temperatur und scharfen Kanten,
chemische Reagenzien, elektrische Leitfähigkeit, Schneiden, Verschleiß,
Zersetzung durch ultraviolette Strahlung und andere klimatische
Bedingungen.
3. Rettungshub
Rettungshebegerät der Klasse A. Das Rettungshebegerät kann nur im
ungehinderten Hebevorgang verwendet werden und sollte nicht verwendet
werden, wenn Hindernisse gefährlich sind.
Wenn Sie diese Ausrüstung für Rettungszwecke verwenden, besteht die
richtige Methode darin, die Befestigungsvorrichtung der Anhängerkupplung
am D-Ring am vorderen Ende des Sicherheitsgurts zu befestigen.
4.Hebezeug und festes Aufhängepunktgerät.
Warnung: Das Hebezeug dient ausschließlich der Hebefunktion für
Rettungszwecke, nicht zum Heben von Lasten.
Warnung!
Vor Gebrauch
1. Es muss von Personen verwendet werden, die es richtig verwenden
können, und der Benutzer muss bei guter Gesundheit sein, bevor er mit
diesem Vorgang beginnt.
2. Stellen Sie das Stativ nicht für längere Zeit in eine Umgebung mit
chemischen Gasen, da dies zur Korrosion von Metallteilen führen kann.

- 8 -
3. Das Stativ darf nur von einer Person verwendet werden und darf nicht
überlastet werden.
4. Gerätekombinationen, deren Sicherheitsleistung durch andere Geräte
beeinträchtigt wird oder mit anderen Sicherheitsgeräten in Konflikt geraten,
sind nicht zulässig.
5. In den folgenden Fällen erfolgt der sofortige Widerruf des Gerätes
1) Es bestehen Zweifel an den sicheren Einsatzbedingungen.
2) Die Funktion der sicheren Verwendung ist zweifelhaft.
3) Es ist heruntergefallen und kann bis zur Bestätigung durch qualifiziertes
Personal nicht mehr verwendet werden.
6. Vor jeder Nutzung muss sichergestellt werden, dass der Benutzer unter
dem Arbeitsplatz ausreichend Freiraum hat, damit dieser im Falle eines
Sturzes nicht mit dem Boden oder anderen Hindernissen im Fallweg
kollidiert.
7. Während des Rettungsvorgangs sollte jederzeit direkter oder indirekter
Sichtkontakt oder eine andere Kommunikationsmöglichkeit mit den Rettern
bestehen.
8. Während der Installation; Wenn der Aufhängepunkt verformt oder
beschädigt ist, verwenden Sie ihn bitte nicht mehr.
9. Bei Arbeiten auf unebenem Boden sollte das Stativ mit Ketten
festgebunden werden, um die Kraft auszugleichen, die der Vorderseite des
Stativs entgegenwirkt.
Nach Gebrauch
10. Regelmäßige Inspektionen sind erforderlich, und die Produktsicherheit
hängt von der kontinuierlichen Wartung und Instandhaltung der Ausrüstung
ab.
- 9 -
11. Wenn das Gerät nass wird, sei es beim Gebrauch oder beim Reinigen,
sollte es auf natürliche Weise getrocknet werden und direktes Erhitzen
vermieden werden.
12. Die regelmäßige Inspektion sollte mindestens einmal im März erfolgen.
13. Die regelmäßige Inspektion ist nur für qualifiziertes Personal geeignet
und wird in strikter Übereinstimmung mit den regelmäßigen
Inspektionsverfahren des Herstellers durchgeführt.
14. Bei diesem Produkt handelt es sich um ein komplettes System und es
können keine Teile nach Belieben ausgetauscht werden.
15. Lagerungsverfahren: Einschließlich aller erforderlichen
Vorsichtsmaßnahmen können Umweltfaktoren oder andere Faktoren den
Zustand der Teile beeinflussen, zum Beispiel: feuchte Umgebung, scharfer
Winkel, Vibration und UV-Zersetzung.
Artikel
Beschreibung
1
Name
Stativ-Kit für beengte Platzverhältnisse
2
Modell
HXRT-06
3
Parameter
MAX. persönliche Tragfähigkeit (auf und ab): 397 lbs
. Seitliche Zugkraft: 1200 lbs
. Einstellbarer Längenbereich der Stützfüße: 1,34–2,15 m
Artikel
Beschreibung
1
Name
Stativ-Kit für beengte Platzverhältnisse
2
Modell
HXRT-07
3
Parameter
MAX. persönliche Tragfähigkeit (auf und ab): 397 lbs
. Seitliche Zugkraft: 1800 lbs
. Einstellbarer Längenbereich der Stützfüße: 1,34–2,15 m
Artikel
Beschreibung
1
Name
Stativ-Kit für beengte Platzverhältnisse
- 10 -
2
Modell
HXRT-08
3
Parameter
MAX. persönliche Tragfähigkeit (auf und ab): 397 lbs
. Seitliche Zugkraft: 2600 lbs
. Einstellbarer Längenbereich der Stützfüße: 1,6–2,45 m
Artikel
Beschreibung
1
Name
Stativ-Kit für beengte Platzverhältnisse
2
Modell
HXRT-09
3
Parameter
MAX. persönliche Tragfähigkeit (auf und ab): 397 lbs
. Seitliche Zugkraft: 2600 lbs
. Einstellbarer Längenbereich der Stützfüße: 1,6–2,45 m
Axialer tragbarer Ventilator, tragbarer Multigasdetektor
Artikel
Beschreibung
1
Name
Stativ-Kit für beengte Platzverhältnisse
2
Modell
HXRT-10
3
Parameter
MAX. persönliche Tragfähigkeit (auf und ab): 397 lbs
. Seitliche Zugkraft: 2600 lbs
. Einstellbarer Längenbereich der Stützfüße: 1,6–2,45 m
Axialer tragbarer Ventilator, tragbarer Multigasdetektor
Artikel
Beschreibung
1
Name
Stativ-Kit für beengte Platzverhältnisse
2
Modell
HXRT-05
3
Parameter
MAX. persönliche Tragfähigkeit (auf und ab): 397 lbs
. Seitliche Zugkraft: 1200 lbs
. Einstellbarer Längenbereich der Stützfüße: 1,34–2,15 m
Adresse: Baoshanqu Shuangchenglu 803long 11hao 1602A-1609shi Shanghai

- 11 -
Importiert nach AUS: SIHAO PTY LTD. 1 ROKEVA STREETEASTWOOD NSW
2122 Australien
In die USA importiert: Sanven Technology Ltd. Suite 250 . 9166 Anaheim Place,
Rancho Cucamonga, CA 91730
REP
EC
SHUNSHUN GmbH
Römeräcker 9 Z2021, 76351
Linkenheim-Hochstetten, Germany
REP
UK
Pooledas Group Ltd
Unit 5 Albert Edward House, The
Pavilions Preston, United Kingdom
In China hergestellt


- 2 -
Supporto tecnico e certificato di garanzia elettronica
www.vevor.com/support
KIT TREPPIEDE PER SPAZI CONFINATI
MANUALE D'USO
MODELLO: HXRT-06/HXRT-07/HXRT-08
HXRT-09HXRT-10/HXRT-05
We continue to be committed to provide you tools with competitive price.
"Save Half", "Half Price" or any other similar expressions used by us only represents an
estimate of savings you might benefit from buying certain tools with us compared to the major
top brands and does not necessarily mean to cover all categories of tools offered by us. You
are kindly reminded to verify carefully when you are placing an order with us if you are
actually saving half in comparison with the top major brands.

- 1 -
MODELLO: HXRT-06/HXRT-07/HXRT-08/HXRT-09/HXRT-10/HXRT-05
Have product questions? Need technical support? Please feel free to
contact us:
Technical Support and E-Warranty Certificate
www.vevor.com/support
NEED HELP? CONTACT US!
This is the original instruction, please read all manual instructions
carefully before operating. VEVOR reserves a clear interpretation of our
user manual. The appearance of the product shall be subject to the
product you received. Please forgive us that we won't inform you again if
there are any technology or software updates on our product.
CONFINED SPACE
TRIPOD KIT
- 2 -
SAFETY INSTRUCTION AND PRECAUTIONS
AVVERTIMENTO:
Leggere questo materiale prima di utilizzare questo prodotto. In caso
contrario si potrebbero causare lesioni gravi.
1. Questo prodotto non è un giocattolo. Non permettere ai bambini di
giocare con questo oggetto.
2. Utilizzare solo come previsto.
3. Non superare mai la capacità di carico del kit treppiede per spazi
confinati.
4. Il treppiede di salvataggio HXRT è adatto per operazioni fognarie e spazi
limitati, inclusi tombini, secchi, cabine, alimentazione o telecomunicazioni e
altre operazioni per evitare requisiti di caduta. Il treppiede viene utilizzato
con un argano manuale per eseguire operazioni di salvataggio in modo
rapido e sicuro. Questo dispositivo è per una sola persona.
5. Prima di utilizzare questa attrezzatura per la protezione anticaduta e per
il sollevamento di salvataggio, leggere attentamente le istruzioni e
utilizzarle in modo accurato.
6. Si prega di conservare attentamente le istruzioni e di leggerle in
qualsiasi momento, se necessario.
Assemblaggio treppiede:
(Questa sezione descrive solo i nomi dei componenti. La
configurazione effettiva dipende dal modello specifico)
·In alto: cappello a cilindro rosso
·Verricello manuale: 1.200 libbre/1.800 libbre/2.600 libbre
( Indica solo il modello, non la capacità di carico del treppiede )
·Staffa di montaggio: l'argano manuale è montato sulla staffa
·Anticaduta: 10 m
·Gamba 48x48mm: Tubo esterno: Dimensioni: 48x48mm
·Piede: Camera d'aria: Dimensioni: 42*42 mm
·Pedana antiscivolo: fondo in gomma antiscivolo in acciaio
·Catena: 4 mm*7,5 m
·Perni di posizionamento
- 3 -
·Cinture di sicurezza
·Ventilatore
·Rilevatore di gas
BEFORE USE
[A] Treppiede
1. Controllare la coerenza dell'identificazione del prodotto.
2. Controllare viti allentate, parti piegate o danneggiate. Dovrebbero
essere viti e rivetti completi e serrati.
3. Controlla se l'ordine è piegato, merce eccezionale o altri danni.
4. Controllare gambe e piedi per eventuali distorsioni, crepe o altri danni.
5. Controllare se la catena è distorta, incrinata o danneggiata.
[B] Verricello manuale, fune metallica e supporto
1. Controllare la coerenza dell'identificazione del prodotto.
2. Controllare le viti inviate, le parti piegate o danneggiate. Dovrebbero
essere viti e rivetti completi e serrati.
3. Controllare il gancio per eventuali danni, corrosione o altri danni.

- 4 -
4. Controllare se sono presenti tagli, attorcigliamenti, corrosione, aree di
contatto chimico o aree di forte usura nella fune metallica.
5. Controllare se la staffa e il verricello sono attorcigliati, incrinati o
danneggiati.
MAINTENANCE
1. Operare rigorosamente secondo le seguenti istruzioni e non causare
effetti negativi sull'apparecchiatura.
2. Utilizzare detergenti professionali; Se si utilizza sapone neutro a PH
neutro o acqua calda, l'attrezzatura deve essere pre-pulita per rimuovere
sporco (parti del nastro) o detriti (parti del cavo metallico).
3. Pulire l'attrezzatura per la disinfezione con etanolo al 70% in un panno o
una spugna.
OPERATION AND USE
A.Procedure di installazione del treppiede
1.Rimuovere il treppiede dalla borsa.
2.Estrarre il bullone di posizionamento ed estrarre il tubo interno in una
posizione corretta.
6. Ripetere le azioni precedenti sulle altre due gambe ed estrarre la
camera d'aria nella posizione appropriata.

- 5 -
4.Sollevare il treppiede e spostare ciascun piede verso l'esterno fino alla
posizione massima.
E.Procedure di installazione dell'argano
1.Svitare il dado con una chiave
fissa.
2.Posizionare la maniglia sopra e
serrare il dado.
- 6 -
3.Inserire il bullone di fissaggio sulla
piastra di montaggio nel foro di
fissaggio della piastra di montaggio
e serrare le viti per fissare l'argano
manuale.
4.Serrare le viti sulla piastra di
montaggio del verricello con una
chiave fissa.
OPERATING PROCEDURE

- 7 -
1.Collegarsi alle cinture di sicurezza per tutto il corpo e ai dispositivi
anticaduta. Ganci rotanti su argani o attrezzature ad anello rotante per
punti di sospensione.
2.Ambiente di lavoro
Per quanto riguarda i pericoli che possono influenzare le prestazioni
dell'apparecchiatura, è necessario osservare le corrispondenti precauzioni
di sicurezza, come la temperatura e l'influenza dei bordi taglienti, i reagenti
chimici, la conduttività elettrica, il taglio, l'usura, la degradazione dei raggi
ultravioletti e altre condizioni climatiche.
3.Sollevamento di salvataggio
Dispositivo di sollevamento di salvataggio di classe A. Il dispositivo di
sollevamento di salvataggio può essere utilizzato solo in un processo di
sollevamento senza ostacoli e non deve essere utilizzato se gli ostacoli
sono pericolosi.
Quando si utilizza questa attrezzatura per il salvataggio, il metodo
corretto è collegare il dispositivo di fissaggio dell'attacco all'anello a D
all'estremità anteriore della cintura di sicurezza.
4. Dispositivo di sollevamento e punto di sospensione fisso.
Avvertenza: il paranco viene utilizzato solo per la funzione di
sollevamento a scopo di salvataggio, non per il sollevamento di
carichi.
Avvertimento!
Prima dell'uso
1. Deve essere utilizzato da persone in grado di utilizzarlo correttamente e
l'utente deve essere in buona salute prima di eseguire questa operazione.
2. Non posizionare il treppiede per lungo tempo in un ambiente con gas
chimici, poiché ciò causerebbe la corrosione delle parti metalliche.

- 8 -
3. Il treppiede viene utilizzato solo da una persona e non deve essere
sovraccaricato.
4. Non sono consentite combinazioni di apparecchiature le cui prestazioni
di sicurezza sono influenzate da altre apparecchiature o sono in conflitto
con altre apparecchiature di sicurezza.
5. Nei seguenti casi l'attrezzatura verrà revocata immediatamente
1) Ci sono dubbi sulle condizioni di utilizzo sicuro.
2) La funzione dell'uso sicuro è in dubbio.
3) È stato utilizzato per cadere e non può più essere utilizzato fino alla
conferma da parte del personale qualificato.
6. Prima di ogni utilizzo è necessario garantire lo spazio libero necessario
all'utente sotto il posto di lavoro, in modo che in caso di caduta non urti il
suolo o altri ostacoli lungo il percorso di caduta.
7. Dovrebbe esserci un contatto visivo diretto o indiretto o altri mezzi di
comunicazione con i soccorritori in ogni momento durante il processo di
salvataggio.
8. Durante l'installazione; Se il punto di sospensione è deformato o
danneggiato, smettere di usarlo.
9. Quando si lavora su un terreno irregolare, il treppiede deve essere
legato con catene per bilanciare la forza opposta alla parte anteriore rivolta
verso il treppiede.
Dopo l'uso
10. È necessaria un'ispezione regolare e la sicurezza del prodotto dipende
dalla manutenzione e dalla manutenzione continue delle apparecchiature.
11. Quando l'attrezzatura si bagna, sia in uso che pulita, deve essere
asciugata naturalmente ed evitare il riscaldamento diretto.
- 9 -
12. La frequenza dell'ispezione regolare dovrebbe essere almeno una
volta ogni marzo.
13. L'ispezione periodica è adatta solo a personale qualificato e viene
eseguita in stretta conformità con le procedure di ispezione periodica del
produttore.
14. Questo prodotto è un sistema completo e nessuna parte può essere
sostituita a piacimento.
15. Procedure di conservazione: compresi tutti i requisiti precauzionali
necessari, fattori ambientali o di altro tipo possono influenzare le condizioni
delle parti, ad esempio: ambiente umido, angoli acuti, vibrazioni e
decomposizione ultravioletta.
Elementi
Descrizione
1
Nome
Kit treppiede per spazi confinati
2
Modello
HXRT-06
3
Parametro
Capacità di trasporto personale MAX (su e giù): 397 libbre
. Sforzo di trazione laterale: 1.200 libbre.
Gamma di lunghezza regolabile dei piedini di supporto: 1,34-2,15 m.
Elementi
Descrizione
1
Nome
Kit treppiede per spazi confinati
2
Modello
HXRT-07
3
Parametro
Capacità di trasporto personale MAX (su e giù): 397 libbre
Sforzo di trazione laterale: 1800 libbre
Gamma di lunghezza regolabile dei piedi di supporto: 1,34-2,15 m
Elementi
Descrizione
1
Nome
Kit treppiede per spazi confinati
2
Modello
HXRT-08

- 10 -
3
Parametro
Capacità di trasporto personale MAX (su e giù): 397 libbre
Sforzo di trazione laterale: 2600 libbre
Gamma di lunghezza regolabile dei piedini di supporto: 1,6-2,45 m
Elementi
Descrizione
1
Nome
Kit treppiede per spazi confinati
2
Modello
HXRT-09
3
Parametro
Capacità di trasporto personale MAX (su e giù): 397 libbre
Sforzo di trazione laterale: 2600 libbre
Gamma di lunghezza regolabile dei piedini di supporto: 1,6-2,45 m
Ventilatore assiale portatile, rilevatore multigas portatile
Elementi
Descrizione
1
Nome
Kit treppiede per spazi confinati
2
Modello
HXRT-10
3
Parametro
Capacità di trasporto personale MAX (su e giù): 397 libbre
Sforzo di trazione laterale: 2600 libbre
Gamma di lunghezza regolabile dei piedini di supporto: 1,6-2,45 m
Ventilatore assiale portatile, rilevatore multigas portatile
Elementi
Descrizione
1
Nome
Kit treppiede per spazi confinati
2
Modello
HXRT-05
3
Parametro
Capacità di trasporto personale MAX (su e giù): 397 libbre
. Sforzo di trazione laterale: 1.200 libbre.
Gamma di lunghezza regolabile dei piedini di supporto: 1,34-2,15 m.
Indirizzo: Baoshanqu Shuangchenglu 803long 11hao 1602A-1609shi Shanghai
Importato in AUS: SIHAO PTY LTD. 1 ROKEVA STREETEASTWOOD NSW
2122 Australia

- 11 -
Importato negli Stati Uniti: Sanven Technology Ltd. Suite 250 . 9166 Anaheim
Place, Rancho Cucamonga, CA 91730
REP
EC
SHUNSHUN GmbH
Römeräcker 9 Z2021, 76351
Linkenheim-Hochstetten, Germany
REP
UK
Pooledas Group Ltd
Unit 5 Albert Edward House, The
Pavilions Preston, United Kingdom
Made in China


- 2 -
Soporte técnico y certificado de garantía electrónica
www.vevor.com/support
KIT DE TRÍPODE PARA ESPACIOS
CONFINADOS
MANUAL DE USUARIO
MODELO: HXRT-06/HXRT-07/HXRT-08
HXRT-09HXRT-10/HXRT-05
We continue to be committed to provide you tools with competitive price.
"Save Half", "Half Price" or any other similar expressions used by us only represents an
estimate of savings you might benefit from buying certain tools with us compared to the major
top brands and does not necessarily mean to cover all categories of tools offered by us. You
are kindly reminded to verify carefully when you are placing an order with us if you are
actually saving half in comparison with the top major brands.

- 1 -
MODELO: HXRT-06/HXRT-07/HXRT-08/HXRT-09/HXRT-10/HXRT-05
Have product questions? Need technical support? Please feel free to
contact us:
Technical Support and E-Warranty Certificate
www.vevor.com/support
NEED HELP? CONTACT US!
This is the original instruction, please read all manual instructions
carefully before operating. VEVOR reserves a clear interpretation of our
user manual. The appearance of the product shall be subject to the
product you received. Please forgive us that we won't inform you again if
there are any technology or software updates on our product.
CONFINED SPACE
TRIPOD KIT
- 2 -
SAFETY INSTRUCTION AND PRECAUTIONS
ADVERTENCIA:
Lea este material antes de usar este producto. De lo contrario, se
pueden producir lesiones graves.
1. Este producto no es un juguete. No permita que los niños jueguen con
este artículo.
2. Úselo únicamente según lo previsto.
3. Nunca exceda la capacidad de carga del kit de trípode para espacios
confinados.
4. El trípode HXRT-Rescue es adecuado para operaciones de
alcantarillado y espacios limitados, incluidos pozos de registro, cubos,
cabinas, energía o telecomunicaciones y otras operaciones para evitar
caídas. El trípode se utiliza con un cabrestante manual para realizar
operaciones de rescate de forma rápida y segura. Este dispositivo es para
una sola persona.
5. Antes de utilizar este equipo para protección contra caídas y elevación
de rescate, lea atentamente las instrucciones y utilícelas con precisión.
6. Conserve las instrucciones correctamente y léalas en cualquier
momento si es necesario.
Montaje de trípode:
(Esta sección describe solo los nombres de los componentes. La
configuración real depende del modelo específico)
·Top: sombrero de copa rojo
· Cabrestante manual: 1200 lbs/1800lbs/2600lbs
( Indica únicamente el modelo, no la capacidad de carga del trípode )
·Soporte de montaje: el cabrestante manual está montado en el soporte.
·Anticaídas: 10m
·Pata de 48x48mm: Tubo exterior: Tamaño: 48x48mm
·Pie: Cámara de aire: Tamaño: 42*42mm
·Almohadilla de pie antideslizante: base de acero de goma antideslizante
·Cadena: 4mm*7.5m
·Pasadores de localización
·Cinturones de seguridad
- 3 -
·Soplador
·Detector de gas
BEFORE USE
[A] Trípode
1. Verifique la coherencia de la identificación del producto.
2. Revisar tornillos flojos, piezas dobladas o dañadas. Debe estar
completo y bien apretado con tornillos y remaches.
3. Verifique si el pedido está doblado, es producto excepcional u otros
daños.
4. Revise las piernas y los pies en busca de distorsiones, grietas u otros
daños.
5. Compruebe si la cadena está deformada, agrietada o dañada.
[B] Cabrestante manual, cable metálico y soporte
1. Verifique la coherencia de la identificación del producto.
2. Revisar los tornillos enviados, piezas dobladas o dañadas. Debe estar
completo y bien apretado con tornillos y remaches.
3. Compruebe el gancho en busca de daños, corrosión u otros daños.
- 4 -
4. Verifique si hay cortes, torceduras, corrosión, áreas de contacto químico
o áreas de desgaste severo en el cable metálico.
5. Compruebe si el soporte y el cabrestante están torcidos, agrietados o
dañados.
MAINTENANCE
1. Opere estrictamente de acuerdo con las siguientes instrucciones y no
cause efectos adversos en el equipo.
2. Utilice detergentes profesionales; Si se trata de un jabón suave de PH
neutro o de agua tibia, el equipo debe limpiarse previamente para eliminar
la suciedad (partes de la correa) o los residuos (partes del cable metálico).
3. Limpie el equipo de desinfección con etanol al 70% en un paño o
esponja.
OPERATION AND USE
A.Procedimientos de instalación del trípode
1.Retire el trípode de la bolsa.
2. Retire el perno de localización y extraiga el tubo interior hasta colocarlo
en la posición adecuada.
7. Repita las acciones anteriores en las otras dos patas y extraiga el tubo
interior hasta la posición adecuada.
- 5 -
4.Levante el trípode y mueva cada pie hacia afuera hasta la posición
máxima.
F.Procedimientos de instalación del cabrestante
1.Desatornille la tuerca con una
llave de boca.
2.Coloque el mango encima y
apriete la tuerca.

- 6 -
3. Inserte el perno de fijación de la
placa de montaje en el orificio de
fijación de la placa de montaje y
apriete los tornillos para fijar el
cabrestante manual.
4.Apriete los tornillos de la placa de
montaje del cabrestante con una
llave de boca.
OPERATING PROCEDURE

- 7 -
1. Conéctelo a cinturones de seguridad de cuerpo completo y dispositivos
anticaídas. Ganchos giratorios en cabrestantes o equipos de anillo
giratorio con punto de suspensión.
2.Entorno de trabajo
Respecto a los peligros que pueden afectar el rendimiento del equipo,
se deben observar las precauciones de seguridad correspondientes, como
temperatura e influencia de bordes cortantes, reactivos químicos,
conductividad eléctrica, corte, desgaste, degradación ultravioleta y otras
condiciones climáticas.
3.Levantamiento de rescate
Dispositivo de elevación de rescate clase A. El dispositivo de elevación
de rescate sólo se puede utilizar en procesos de elevación sin obstáculos
y no se debe utilizar si los obstáculos son peligrosos.
Cuando se utiliza este equipo para rescate, el método correcto es
conectar el dispositivo de sujeción del enganche al anillo en D en el
extremo delantero del cinturón de seguridad.
4. Polipasto y dispositivo de punto fijo para colgar.
Advertencia: El polipasto se utiliza para la función de elevación
únicamente con fines de rescate, no para levantar cargas.
¡Advertencia!
Antes de usar
1. Debe ser utilizado por personas que puedan utilizarlo correctamente, y
el usuario debe gozar de buena salud antes de iniciar esta operación.
2. No coloque el trípode en un ambiente de gas químico durante mucho
tiempo, ya que provocará corrosión en las piezas metálicas.
3. El trípode sólo lo utiliza una persona y no debe sobrecargarse.

- 8 -
4. No se permiten combinaciones de equipos cuyo rendimiento de
seguridad se vea afectado por otros equipos o entren en conflicto con
otros equipos de seguridad.
5. En los siguientes casos, el equipo será revocado inmediatamente
1) Existen dudas sobre las condiciones de uso seguro.
2) La función de uso seguro está en duda.
3) Ha estado acostumbrado a caerse y ya no se puede utilizar hasta que
personal cualificado lo confirme.
6. Antes de cada uso, es necesario asegurar el espacio libre requerido por
el usuario debajo del lugar de trabajo, de modo que en caso de caída, no
choque con el suelo u otros obstáculos en el camino de caída.
7. Debe haber contacto visual directo o indirecto u otros medios de
comunicación con los rescatistas en todo momento durante el proceso de
rescate.
8. Durante la instalación; Si el punto para colgar está deformado o dañado,
deje de usarlo.
9. Cuando trabaje en terreno irregular, el trípode debe estar atado con
cadenas para equilibrar la fuerza opuesta al frente del trípode.
Después de su uso
10. Se requiere una inspección periódica y la seguridad del producto
depende del mantenimiento y mantenimiento continuo del equipo.
11. Cuando el equipo se moje, ya sea en uso o limpio, se debe secar de
forma natural y evitar el calentamiento directo.
12. La frecuencia de la inspección periódica debe ser al menos una vez
cada mes de marzo.
- 9 -
13. La inspección periódica sólo es adecuada para personal calificado y se
lleva a cabo estrictamente de acuerdo con los procedimientos de
inspección periódica del fabricante.
14. Este producto es un sistema completo y ninguna pieza puede
reemplazarse a voluntad.
15. Procedimientos de almacenamiento: incluidos todos los requisitos de
precaución necesarios, los factores ambientales u otros factores pueden
afectar el estado de las piezas, por ejemplo: ambiente húmedo, ángulos
agudos, vibraciones y descomposición ultravioleta.
Elementos
Descripción
1
Nombre
Kit de trípode para espacios confinados
2
Modelo
HXRT-06
3
Parámetro
Capacidad máxima de carga personal (arriba y abajo): 397 lb
Esfuerzo de tracción lateral: 1200 lb
Rango de longitud ajustable de los pies de soporte: 1,34-2,15 m
Elementos
Descripción
1
Nombre
Kit de trípode para espacios confinados
2
Modelo
HXRT-07
3
Parámetro
MÁXIMA capacidad de carga personal (arriba y abajo): 397 lb
Esfuerzo de tracción lateral: 1800 lb
Rango de longitud ajustable de los pies de soporte: 1,34-2,15 m
Elementos
Descripción
1
Nombre
Kit de trípode para espacios confinados
2
Modelo
HXRT-08
3
Parámetro
Capacidad máxima de carga personal (arriba y abajo): 397 lb
Esfuerzo de tracción lateral: 2600 lb
Rango de longitud ajustable de los pies de soporte: 1,6-2,45 m

- 10 -
Elementos
Descripción
1
Nombre
Kit de trípode para espacios confinados
2
Modelo
HXRT-09
3
Parámetro
Capacidad máxima de carga personal (arriba y abajo): 397 lb
Esfuerzo de tracción lateral: 2600 lb
Rango de longitud ajustable de los pies de soporte: 1,6-2,45 m
Ventilador portátil axial, detector portátil de gases múltiples
Elementos
Descripción
1
Nombre
Kit de trípode para espacios confinados
2
Modelo
HXRT-10
3
Parámetro
Capacidad máxima de carga personal (arriba y abajo): 397 lb
Esfuerzo de tracción lateral: 2600 lb
Rango de longitud ajustable de los pies de soporte: 1,6-2,45 m
Ventilador portátil axial, detector portátil de gases múltiples
Elementos
Descripción
1
Nombre
Kit de trípode para espacios confinados
2
Modelo
HXRT-05
3
Parámetro
Capacidad máxima de carga personal (arriba y abajo): 397 lb
Esfuerzo de tracción lateral: 1200 lb
Rango de longitud ajustable de los pies de soporte: 1,34-2,15 m
Dirección: Baoshanqu Shuangchenglu 803long 11hao 1602A-1609shi Shanghai
Importado a AUS: SIHAO PTY LTD. 1 ROKEVA STREET ASTWOOD NSW 2122
Australia
Importado a EE. UU.: Sanven Technology Ltd. Suite 250 . 9166 Anaheim Place,
Rancho Cucamonga, CA 91730

- 11 -
REP
EC
SHUNSHUN GmbH
Römeräcker 9 Z2021, 76351
Linkenheim-Hochstetten, Germany
REP
UK
Pooledas Group Ltd
Unit 5 Albert Edward House, The
Pavilions Preston, United Kingdom
Hecho en china


- 2 -
Wsparcie techniczne i certyfikat e-gwarancji
www.vevor.com/support
ZESTAW STATYWU DO PRZESTRZENI
ZAMKNIĘTYCH
INSTRUKCJA OBSŁUGI
MODEL: HXRT-06/HXRT-07/HXRT-08
HXRT-09HXRT-10/HXRT-05
We continue to be committed to provide you tools with competitive price.
"Save Half", "Half Price" or any other similar expressions used by us only represents an
estimate of savings you might benefit from buying certain tools with us compared to the major
top brands and does not necessarily mean to cover all categories of tools offered by us. You
are kindly reminded to verify carefully when you are placing an order with us if you are
actually saving half in comparison with the top major brands.

- 1 -
MODEL: HXRT-06/HXRT-07/HXRT-08/HXRT-09/HXRT-10/HXRT-05
Have product questions? Need technical support? Please feel free to
contact us:
Technical Support and E-Warranty Certificate
www.vevor.com/support
NEED HELP? CONTACT US!
This is the original instruction, please read all manual instructions
carefully before operating. VEVOR reserves a clear interpretation of our
user manual. The appearance of the product shall be subject to the
product you received. Please forgive us that we won't inform you again if
there are any technology or software updates on our product.
CONFINED SPACE
TRIPOD KIT
- 2 -
SAFETY INSTRUCTION AND PRECAUTIONS
OSTRZEŻENIE:
Przeczytaj ten materiał przed użyciem tego produktu.
Niezastosowanie się do tego może spowodować poważne obrażenia.
1. Ten produkt nie jest zabawką. Nie pozwalaj dzieciom bawić się tym
przedmiotem.
2. Używaj wyłącznie zgodnie z przeznaczeniem.
3. Nigdy nie przekraczaj dopuszczalnego obciążenia zestawu statywu do
przestrzeni zamkniętych.
4. Statyw ratowniczy HXRT nadaje się do prac w kanałach i ograniczonych
przestrzeniach, w tym włazach, wiadrach, kabinach, instalacjach
energetycznych lub telekomunikacyjnych oraz innych operacjach
zapobiegających spadającym wymaganiom. Trójnóg w połączeniu z
wciągarką ręczną umożliwia szybkie i bezpieczne przeprowadzanie akcji
ratowniczych. To urządzenie jest przeznaczone wyłącznie dla jednej osoby.
5. Przed użyciem tego sprzętu do celów ochrony przed upadkiem lub do
celów ratunkowych należy uważnie przeczytać instrukcję i dokładnie z niej
korzystać.
6. Prosimy o dokładne przechowywanie instrukcji i zapoznanie się z nią w
każdej chwili, jeśli zajdzie taka potrzeba.
Montaż statywu:
(W tej sekcji opisano jedynie nazwy komponentów. Rzeczywista
konfiguracja zależy od konkretnego modelu)
· Góra: Czerwony cylinder
·Wciągarka ręczna: 1200 funtów/1800 funtów/2600 funtów
( Wskazuje tylko model, a nie nośność statywu )
·Wspornik montażowy: Wciągarka ręczna jest montowana na wsporniku
· Urządzenie zabezpieczające przed upadkiem: 10m
·48x48mm Noga: Rura zewnętrzna: Rozmiar: 48x48mm
·Stopa: Dętka: Rozmiar: 42*42mm
·Antypoślizgowy podnóżek: antypoślizgowy gumowy spód ze stali
·Łańcuch: 4mm*7,5m

- 3 -
·Kołki ustalające
·Pasy bezpieczeństwa
·Dmuchacz
·Wykrywacz gazu
BEFORE USE
[A] Statyw
1. Sprawdź spójność identyfikacji produktu.
2. Sprawdź poluzowane śruby, wygięte lub uszkodzone części. Powinno
być kompletne i dokręcone śrubami i nitami.
3. Sprawdź, czy zamówienie nie jest pogięte, towar wyjątkowy lub ma inne
uszkodzenia.
4. Sprawdź nogi i stopy pod kątem zniekształceń, pęknięć lub innych
uszkodzeń.
5. Sprawdź, czy łańcuch nie jest zniekształcony, pęknięty lub uszkodzony.
[B] Wciągarka ręczna i lina stalowa i wspornik
1. Sprawdź spójność identyfikacji produktu.
- 4 -
2. Sprawdź wysłane śruby, wygięte lub uszkodzone części. Powinno być
kompletne i dokręcone śrubami i nitami.
3. Sprawdź hak pod kątem uszkodzeń, korozji lub innych uszkodzeń.
4. Sprawdź, czy na linie nie występują miejsca przecięcia, załamania,
korozja, kontakt z substancjami chemicznymi lub obszary silnego zużycia.
5. Sprawdź, czy wspornik i wciągarka nie są skręcone, popękane lub
uszkodzone.
MAINTENANCE
1. Należy postępować ściśle według poniższych instrukcji i nie powodować
niekorzystnego wpływu na sprzęt.
2. Używaj profesjonalnych detergentów; Jeśli używasz łagodnego mydła o
neutralnym pH lub ciepłej wody, sprzęt należy wstępnie oczyścić, aby
usunąć brud (części paska) lub zanieczyszczenia (części liny stalowej).
3. Wytrzeć sprzęt do dezynfekcji 70% etanolem szmatką lub gąbką.
OPERATION AND USE
A. Procedury instalacji statywu
1. Wyjmij statyw z torby.
2.Wyciągnij śrubę ustalającą i wyciągnij rurę wewnętrzną do
odpowiedniego położenia.
8. Powtórz powyższe czynności na pozostałych dwóch nóżkach i
wyciągnij dętkę do odpowiedniej pozycji.

- 5 -
4. Podnieś statyw i przesuń każdą stopę na zewnątrz do pozycji
maksymalnej.
G.Procedury instalacji wciągarki
1.Odkręcić nakrętkę kluczem
płaskim.
2. Umieść uchwyt na górze i dokręć
nakrętkę.
- 6 -
3. Włóż śrubę mocującą płytę
montażową w otwór mocujący płyty
montażowej i dokręć śruby, aby
zamocować wciągarkę ręczną.
4.Dokręcić śruby na płycie
montażowej wyciągarki za pomocą
klucza płaskiego.
OPERATING PROCEDURE

- 7 -
1. Podłącz do pasów bezpieczeństwa zakrywających całe ciało i urządzeń
zabezpieczających przed upadkiem. Haki obrotowe na wciągarkach lub
sprzęcie z pierścieniem obrotowym z punktem zawieszenia.
2.Środowisko pracy
Jeśli chodzi o zagrożenia, które mogą mieć wpływ na działanie sprzętu,
należy przestrzegać odpowiednich środków ostrożności, takich jak
temperatura i wpływ ostrych krawędzi, odczynniki chemiczne,
przewodność elektryczna, przecięcie, zużycie, degradacja pod wpływem
ultrafioletu i inne warunki klimatyczne.
3.Podnoszenie ratownicze
Ratunkowe urządzenie podnoszące klasy A. Ratunkowego urządzenia
podnoszącego można używać wyłącznie w procesie podnoszenia bez
przeszkód i nie należy go używać, jeśli przeszkody są niebezpieczne.
W przypadku używania tego sprzętu do akcji ratowniczych właściwą
metodą jest podłączenie urządzenia mocującego zaczep do pierścienia D
na przednim końcu pasa bezpieczeństwa.
4. Podnośnik i stałe urządzenie do zawieszenia.
Ostrzeżenie: Wciągnik służy wyłącznie do podnoszenia w celach
ratowniczych, a nie do podnoszenia ładunków.
Ostrzeżenie!
Przed użyciem
1. Musi być używany przez osoby, które potrafią go prawidłowo używać, a
użytkownik musi być w dobrym zdrowiu przed przystąpieniem do tej
operacji.
2. Nie umieszczaj statywu na dłuższy czas w środowisku gazów
chemicznych, gdyż może to spowodować korozję części metalowych.

- 8 -
3. Statyw jest używany tylko przez jedną osobę i nie może być
przeciążony.
4. Niedozwolone są kombinacje urządzeń, na które poziom
bezpieczeństwa wpływa inny sprzęt lub które kolidują z innymi
urządzeniami zabezpieczającymi.
5. W poniższych przypadkach sprzęt zostanie natychmiastowo odebrany
1) Istnieją wątpliwości co do warunków bezpiecznego stosowania.
2) Funkcja bezpiecznego użytkowania budzi wątpliwości.
3) Doszło do upadku i nie można go używać do czasu potwierdzenia przez
wykwalifikowany personel.
6. Przed każdym użyciem należy zapewnić odpowiednią dla użytkownika
wolną przestrzeń pod stanowiskiem pracy, tak aby w przypadku upadku
nie zderzyło się z podłożem lub innymi przeszkodami na drodze upadku.
7. Przez cały czas trwania akcji ratowniczej powinien być zapewniony
bezpośredni lub pośredni kontakt wzrokowy lub inne środki komunikacji z
ratownikami.
8. Podczas instalacji; Jeśli punkt zawieszenia jest zdeformowany lub
uszkodzony, przestań go używać.
9. Podczas pracy na nierównym podłożu statyw należy uwiązać
łańcuchami w celu zrównoważenia siły działającej przeciwnie do przodu
zwróconego w stronę statywu.
Po użyciu
10. Wymagana jest regularna kontrola, a bezpieczeństwo produktu zależy
od ciągłej konserwacji i konserwacji sprzętu.
11. Gdy sprzęt zamoczy się, niezależnie od tego, czy jest używany, czy
czysty, należy go wysuszyć w naturalny sposób i unikać bezpośredniego
ogrzewania.

- 9 -
12. Częstotliwość regularnych inspekcji powinna wynosić co najmniej raz
w marcu.
13. Przegląd okresowy jest przeznaczony wyłącznie dla
wykwalifikowanego personelu i jest przeprowadzany ściśle według
procedur producenta dotyczących przeglądów okresowych.
14. Ten produkt jest kompletnym systemem i żadnych części nie można
dowolnie wymieniać.
15. Procedury przechowywania: Uwzględniając wszystkie niezbędne
wymagania ostrożności, czynniki środowiskowe lub inne mogą mieć wpływ
na stan części, na przykład: wilgotne środowisko, ostry kąt, wibracje i
rozkład w ultrafiolecie.
Rzeczy
Opis
1
Nazwa
Zestaw statywu do przestrzeni zamkniętych
2
Model
HXRT-06
3
Parametr
MAKSYMALNY udźwig (w górę i w dół): 397 funtów
Boczna siła pociągowa: 1200 funtów
Regulowany zakres długości stóp podporowych: 1,34–2,15 m
Rzeczy
Opis
1
Nazwa
Zestaw statywu do przestrzeni zamkniętych
2
Model
HXRT-07
3
Parametr
MAKSYMALNY udźwig (w górę i w dół): 397 funtów
Boczna siła pociągowa: 1800 funtów
Regulowany zakres długości stóp podporowych: 1,34–2,15 m
Rzeczy
Opis
1
Nazwa
Zestaw statywu do przestrzeni zamkniętych
2
Model
HXRT-08

- 10 -
3
Parametr
MAKSYMALNY udźwig (w górę i w dół): 397 funtów
Boczna siła pociągowa: 2600 funtów
Regulowany zakres długości stóp podporowych: 1,6–2,45 m
Rzeczy
Opis
1
Nazwa
Zestaw statywu do przestrzeni zamkniętych
2
Model
HXRT-09
3
Parametr
MAKSYMALNY udźwig (w górę i w dół): 397 funtów
Boczna siła pociągowa: 2600 funtów
Regulowany zakres długości stóp podporowych: 1,6–2,45 m
Przenośny wentylator osiowy, przenośny detektor wielogazowy
Rzeczy
Opis
1
Nazwa
Zestaw statywu do przestrzeni zamkniętych
2
Model
HXRT-10
3
Parametr
MAKSYMALNY udźwig (w górę i w dół): 397 funtów
Boczna siła pociągowa: 2600 funtów
Regulowany zakres długości stóp podporowych: 1,6–2,45 m
Przenośny wentylator osiowy, przenośny detektor wielogazowy
Rzeczy
Opis
1
Nazwa
Zestaw statywu do przestrzeni zamkniętych
2
Model
HXRT-05
3
Parametr
MAKSYMALNY udźwig (w górę i w dół): 397 funtów
Boczna siła pociągowa: 1200 funtów
Regulowany zakres długości stóp podporowych: 1,34–2,15 m
Adres: Baoshanqu Shuangchenglu 803long 11hao 1602A-1609shi Szanghaj
Import do AUS: SIHAO PTY LTD. 1 ROKEVA STREETEASTWOOD NSW 2122
Australia

- 11 -
Import do USA: Sanven Technology Ltd. Suite 250 . 9166 Anaheim Place,
Rancho Cucamonga, Kalifornia 91730
REP
EC
SHUNSHUN GmbH
Römeräcker 9 Z2021, 76351
Linkenheim-Hochstetten, Germany
REP
UK
Pooledas Group Ltd
Unit 5 Albert Edward House, The
Pavilions Preston, United Kingdom
Wyprodukowano w Chinach


- 2 -
Technische ondersteuning en e-garantiecertificaat
www.vevor.com/support
STATIEFSET VOOR BESLOTEN RUIMTES
HANDLEIDING
MODEL: HXRT-06/HXRT-07/HXRT-08
HXRT-09HXRT-10/HXRT-05
We continue to be committed to provide you tools with competitive price.
"Save Half", "Half Price" or any other similar expressions used by us only represents an
estimate of savings you might benefit from buying certain tools with us compared to the major
top brands and does not necessarily mean to cover all categories of tools offered by us. You
are kindly reminded to verify carefully when you are placing an order with us if you are
actually saving half in comparison with the top major brands.

- 1 -
MODEL: HXRT-06/HXRT-07/HXRT-08/HXRT-09/HXRT-10/HXRT-05
Have product questions? Need technical support? Please feel free to
contact us:
Technical Support and E-Warranty Certificate
www.vevor.com/support
NEED HELP? CONTACT US!
This is the original instruction, please read all manual instructions
carefully before operating. VEVOR reserves a clear interpretation of our
user manual. The appearance of the product shall be subject to the
product you received. Please forgive us that we won't inform you again if
there are any technology or software updates on our product.
CONFINED SPACE
TRIPOD KIT
- 2 -
SAFETY INSTRUCTION AND PRECAUTIONS
WAARSCHUWING:
Lees dit materiaal voordat u dit product gebruikt. Als u dit niet doet,
kan dit leiden tot ernstig letsel.
1. Dit product is geen speelgoed. Laat kinderen niet met dit artikel spelen.
2. Alleen gebruiken zoals bedoeld.
3. Overschrijd nooit het draagvermogen van de Statiefset voor besloten
ruimten.
4. HXRT-Rescue-statief is geschikt voor rioolwerkzaamheden en beperkte
ruimtes, inclusief mangaten, emmers, hutten, stroom- of telecommunicatie-
en andere werkzaamheden om vallende eisen te voorkomen. Het statief
wordt gebruikt met een handlier om reddingsoperaties snel en veilig uit te
voeren. Dit apparaat is slechts voor één persoon bedoeld.
5. Voordat u deze uitrusting gebruikt voor valbescherming en
reddingshijsdoeleinden, dient u de instructies aandachtig te lezen en deze
nauwkeurig te gebruiken.
6. Bewaar de instructies zorgvuldig en lees ze indien nodig te allen tijde
door.
Statief montage:
(In dit gedeelte worden alleen de componentnamen beschreven. De
daadwerkelijke configuratie is afhankelijk van het specifieke model)
·Top: Rode hoge hoed
·Handlier: 1200 lbs/1800 lbs/2600 lbs
( Geeft alleen het model aan, niet het draagvermogen van het statief )
·Montagebeugel: De handlier wordt op de beugel gemonteerd
·Valvanger: 10m
·48x48mm Poot: Buitenbuis: Afmeting: 48x48mm
·Voet: Binnenband: Maat: 42*42mm
·Antislipvoetkussen: antislip rubberen onderkant van staal
·Ketting: 4 mm * 7,5 m
·Pennen bepalen
·Veiligheidsriemen
·Blazer

- 3 -
·Gas detector
BEFORE USE
[A] Statief
1. Controleer de consistentie van de productidentificatie.
2. Controleer losse schroeven, verbogen of beschadigde onderdelen. Het
moeten complete en strakke schroeven en klinknagels zijn.
3. Controleer of de bestelling krom is, uitzonderlijke goederen of andere
beschadigingen heeft.
4. Controleer poten en voeten op vervorming, scheuren of andere
beschadigingen.
5. Controleer of de ketting vervormd, gescheurd of beschadigd is.
[B] Handlier & staalkabel & ondersteuning
1. Controleer de consistentie van de productidentificatie.
2. Controleer de verzonden schroeven, verbogen of beschadigde
onderdelen. Het moeten complete en strakke schroeven en klinknagels
zijn.

- 4 -
3. Controleer de haak op beschadigingen, corrosie of andere
beschadigingen.
4. Controleer of er snij-, knik-, corrosie-, chemische contactplekken of
ernstige slijtageplekken in de staalkabel zitten.
5. Controleer of de beugel en de lier verdraaid, gescheurd of beschadigd
zijn.
MAINTENANCE
1. Werk strikt volgens de volgende instructies en veroorzaak geen nadelige
gevolgen voor de apparatuur.
2. Gebruik professionele wasmiddelen; Bij milde, neutrale PH-zeep of
warm water moet de apparatuur vooraf worden gereinigd om vuil
(onderdelen van de riem) of vuil (onderdelen van staalkabels) te
verwijderen.
3. Veeg desinfectieapparatuur af met 70% ethanol in een doek of spons.
OPERATION AND USE
A.Statiefinstallatieprocedures
1. Haal het statief uit de tas.
2.Trek de bevestigingsbout eruit en trek de binnenbuis naar de juiste
positie.
9. Herhaal bovenstaande handelingen op de andere twee poten en trek
de binnenband naar de juiste positie.
- 5 -
4. Til het statief op en verplaats elke voet naar de maximale positie.
H.Lierinstallatieprocedures
1. Draai de moer los met een
steeksleutel.
2.Plaats het handvat erop en draai
de moer vast.

- 6 -
3. Steek de bevestigingsbout op de
montageplaat in het bevestigingsgat
van de montageplaat en draai de
schroeven vast om de handlier te
bevestigen.
4. Draai de schroeven op de
liermontageplaat vast met een
steeksleutel.
OPERATING PROCEDURE

- 7 -
1. Sluit aan op veiligheidsgordels voor het hele lichaam en valbeveiligers.
Roterende haken op lieren of ophangpunt roterende ringapparatuur.
2. Werkomgeving
Met betrekking tot gevaren die de prestaties van apparatuur kunnen
beïnvloeden, moeten de bijbehorende veiligheidsmaatregelen in acht
worden genomen, zoals temperatuur en invloed van scherpe randen,
chemische reagentia, elektrische geleidbaarheid, snijden, slijtage,
ultraviolette degradatie en andere klimatologische omstandigheden.
3. Reddingshijsen
Klasse A reddingshijstoestel. Een reddingshijsapparaat kan alleen
worden gebruikt bij een onbelemmerd hefproces en mag niet worden
gebruikt als obstakels gevaarlijk zijn.
Bij gebruik van deze uitrusting voor reddingsacties is de juiste methode
het bevestigen van de trekhaak aan de D-ring aan de voorkant van de
veiligheidsgordel.
4. Hijs- en vast ophangpuntapparaat.
Waarschuwing: De takel wordt uitsluitend gebruikt voor het hijsen
van reddingsdoeleinden, niet voor het heffen van lasten.
Waarschuwing!
Voor gebruik
1. Het moet worden gebruikt door mensen die het correct kunnen
gebruiken, en de gebruiker moet in goede gezondheid verkeren voordat hij
aan deze operatie begint.
2. Plaats het statief niet gedurende langere tijd in een chemische
gasomgeving, omdat dit corrosie van metalen onderdelen veroorzaakt.
3. Het statief wordt slechts door één persoon gebruikt en mag niet
overbelast worden.

- 8 -
4. Apparatuurcombinaties waarvan de veiligheidsprestaties worden
beïnvloed door andere apparatuur of conflicteren met andere
veiligheidsapparatuur zijn niet toegestaan.
5. In de volgende gevallen wordt de apparatuur onmiddellijk ingetrokken
1) Er zijn twijfels over de veilige gebruiksomstandigheden.
2) Er bestaat twijfel over de functie van veilig gebruik.
3) Het is gebruikt om te vallen en kan niet langer worden gebruikt totdat
gekwalificeerd personeel dit bevestigt.
6. Vóór elk gebruik is het noodzakelijk om de vrije ruimte die de gebruiker
nodig heeft onder de werkplek te garanderen, zodat deze bij een val niet
tegen de grond of andere obstakels op het valpad botst.
7. Tijdens het reddingsproces moet er te allen tijde direct of indirect visueel
contact of ander communicatiemiddel zijn met reddingswerkers.
8. Tijdens installatie; Als het ophangpunt vervormd of beschadigd is, stop
dan met het gebruik ervan.
9. Wanneer u op oneffen terrein werkt, moet het statief met kettingen
worden vastgebonden om de kracht tegengesteld aan de voorkant, gericht
naar het statief, te compenseren.
Na gebruik
10. Regelmatige inspectie is vereist en de productveiligheid hangt af van
continu onderhoud en onderhoud van apparatuur.
11. Wanneer de apparatuur nat wordt, zowel tijdens gebruik als schoon,
moet deze op natuurlijke wijze worden gedroogd en directe verwarming
worden vermeden.
12. De frequentie van de reguliere inspecties moet minimaal één keer per
maart zijn.

- 9 -
13. Periodieke inspectie is alleen geschikt voor gekwalificeerd personeel
en wordt uitgevoerd in strikte overeenstemming met de periodieke
inspectieprocedures van de fabrikant.
14. Dit product is een compleet systeem en er kunnen geen onderdelen
naar believen worden vervangen.
15. Opslagprocedures: Inclusief alle noodzakelijke voorzorgsmaatregelen
kunnen omgevings- of andere factoren de toestand van onderdelen
beïnvloeden, bijvoorbeeld: vochtige omgeving, scherpe hoek, trillingen en
ultraviolette ontleding.
Artikelen
Beschrijving
1
Naam
Statiefset voor besloten ruimtes
2
Model
HXRT-06
3
Parameter
MAX persoonlijk draagvermogen (op en neer): 397 lbs
Laterale trekkracht: 1200 lbs
Instelbaar lengtebereik van steunvoeten: 1,34 - 2,15 m
Artikelen
Beschrijving
1
Naam
Statiefset voor besloten ruimtes
2
Model
HXRT-07
3
Parameter
MAX persoonlijk draagvermogen (op en neer): 397 lbs
Laterale trekkracht: 1800 lbs
Instelbaar lengtebereik van steunvoeten: 1,34 - 2,15 m
Artikelen
Beschrijving
1
Naam
Statiefset voor besloten ruimtes
2
Model
HXRT-08
3
Parameter
MAX persoonlijk draagvermogen (op en neer): 397 lbs
Laterale trekkracht: 2600 lbs
Instelbaar lengtebereik van steunvoeten: 1,6-2,45 m
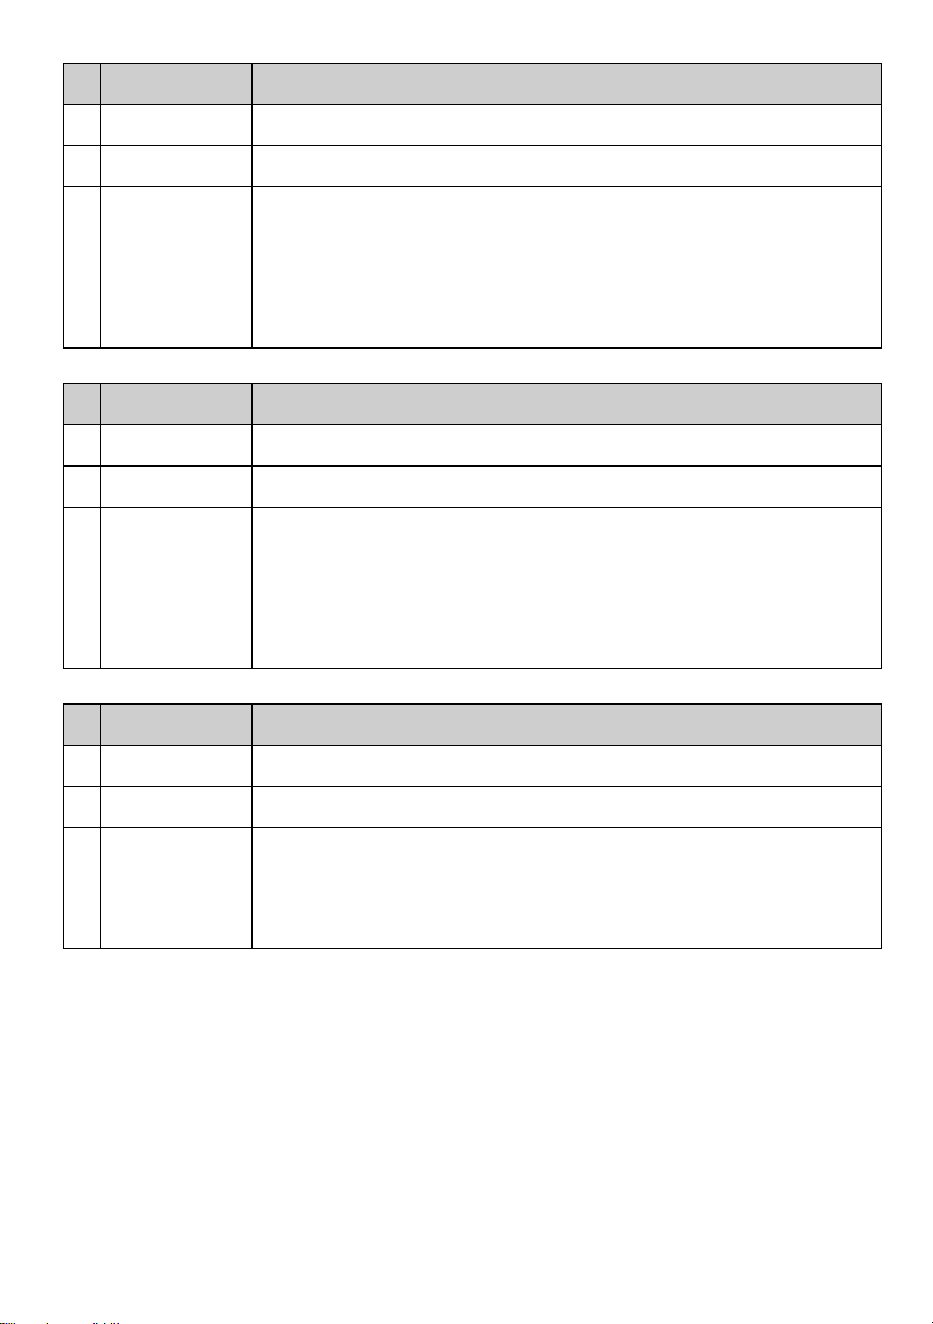
- 10 -
Artikelen
Beschrijving
1
Naam
Statiefset voor besloten ruimtes
2
Model
HXRT-09
3
Parameter
MAX persoonlijk draagvermogen (op en neer): 397 lbs
Laterale trekkracht: 2600 lbs
Instelbaar lengtebereik van steunvoeten: 1,6-2,45 m
Axiale draagbare ventilator, draagbare multigasdetector
Artikelen
Beschrijving
1
Naam
Statiefset voor besloten ruimtes
2
Model
HXRT-10
3
Parameter
MAX persoonlijk draagvermogen (op en neer): 397 lbs
Laterale trekkracht: 2600 lbs
Instelbaar lengtebereik van steunvoeten: 1,6-2,45 m
Axiale draagbare ventilator, draagbare multigasdetector
Artikelen
Beschrijving
1
Naam
Statiefset voor besloten ruimtes
2
Model
HXRT-05
3
Parameter
MAX persoonlijk draagvermogen (op en neer): 397 lbs
Laterale trekkracht: 1200 lbs
Instelbaar lengtebereik van steunvoeten: 1,34 - 2,15 m
Adres: Baoshanqu Shuangchenglu 803long 11hao 1602A-1609shi Shanghai
Geïmporteerd naar AUS: SIHAO PTY LTD. 1 ROKEVA STREETEASTWOOD
NSW 2122 Australië
Geïmporteerd naar de VS: Sanven Technology Ltd. Suite 250 . 9166 Anaheim
Place, Rancho Cucamonga, CA 91730

- 11 -
REP
EC
SHUNSHUN GmbH
Römeräcker 9 Z2021, 76351
Linkenheim-Hochstetten, Germany
REP
UK
Pooledas Group Ltd
Unit 5 Albert Edward House, The
Pavilions Preston, United Kingdom
Gemaakt in China


- 2 -
Teknisk support och e-garanticertifikat
www.vevor.com/support
STATIVSATS FÖR BEGRÄNSAT UTRYMME
ANVÄNDARMANUAL
MODELL: HXRT-06/HXRT-07/HXRT-08
HXRT-09HXRT-10/HXRT-05
We continue to be committed to provide you tools with competitive price.
"Save Half", "Half Price" or any other similar expressions used by us only represents an
estimate of savings you might benefit from buying certain tools with us compared to the major
top brands and does not necessarily mean to cover all categories of tools offered by us. You
are kindly reminded to verify carefully when you are placing an order with us if you are
actually saving half in comparison with the top major brands.

- 1 -
MODELL: HXRT-06/HXRT-07/HXRT-08/HXRT-09/HXRT-10/HXRT-05
Have product questions? Need technical support? Please feel free to
contact us:
Technical Support and E-Warranty Certificate
www.vevor.com/support
NEED HELP? CONTACT US!
This is the original instruction, please read all manual instructions
carefully before operating. VEVOR reserves a clear interpretation of our
user manual. The appearance of the product shall be subject to the
product you received. Please forgive us that we won't inform you again if
there are any technology or software updates on our product.
CONFINED SPACE
TRIPOD KIT
- 2 -
SAFETY INSTRUCTION AND PRECAUTIONS
VARNING:
Läs detta material innan du använder denna produkt. Underlåtenhet
att göra det kan resultera i allvarliga skador.
1. Denna produkt är inte en leksak. Tillåt inte barn att leka med detta
föremål.
2. Använd endast på avsett sätt.
3. Överskrid aldrig lastkapaciteten för stativsatsen med begränsat
utrymme.
4. HXRT-Rescue Tripod är lämpligt för avloppsoperationer och begränsade
utrymmen, inklusive brunnar, skopor, hytter, el eller telekommunikation och
andra operationer för att förhindra fallande krav. Stativet används med en
handvinsch för att utföra räddningsinsatser snabbt och säkert. Denna
enhet är endast för en person.
5. Innan du använder denna utrustning för fallskydd och räddningslyft, läs
instruktionerna noggrant och använd dem korrekt.
6. Förvara instruktionerna ordentligt och läs dem när som helst om det
behövs.
Stativmontering:
(Detta avsnitt beskriver endast komponentnamnen. Den faktiska
konfigurationen beror på den specifika modellen)
·Översida: Röd topphatt
·Handvinsch: 1200 lbs/1800lbs/2600lbs
( Indikerar endast modellen, inte stativets bärförmåga )
·Monteringsfäste: Handvinschen monteras på konsolen
·Fallskydd: 10m
·48x48mm Ben: Ytterrör: Storlek: 48x48mm
·Fot: Innerslang: Storlek: 42*42mm
·Anti-sladd fotkudde: anti-sladd gummibottenstål
·Kedja: 4mm*7,5m
· Lokaliseringsstift
·Säkerhetsbälten

- 3 -
·Blåsare
·Gasdetektor
BEFORE USE
[A] Stativ
1. Kontrollera att produktidentifieringen är konsekvent.
2. Kontrollera lösa skruvar, böjda eller skadade delar. Det ska vara
kompletta och åtdragna skruvar och nitar.
3. Kontrollera om beställningen är böjd, exceptionella varor eller andra
skador.
4. Kontrollera ben och fötter för deformation, sprickor eller andra skador.
5. Kontrollera om kedjan är förvriden, sprucken eller skadad.
[B] Handvinsch & stålrep & stöd
1. Kontrollera att produktidentifieringen är konsekvent.
2. Kontrollera de skickade skruvarna, böjda eller skadade delar. Det ska
vara kompletta och åtdragna skruvar och nitar.
3. Kontrollera kroken för eventuella skador, korrosion eller andra skador.
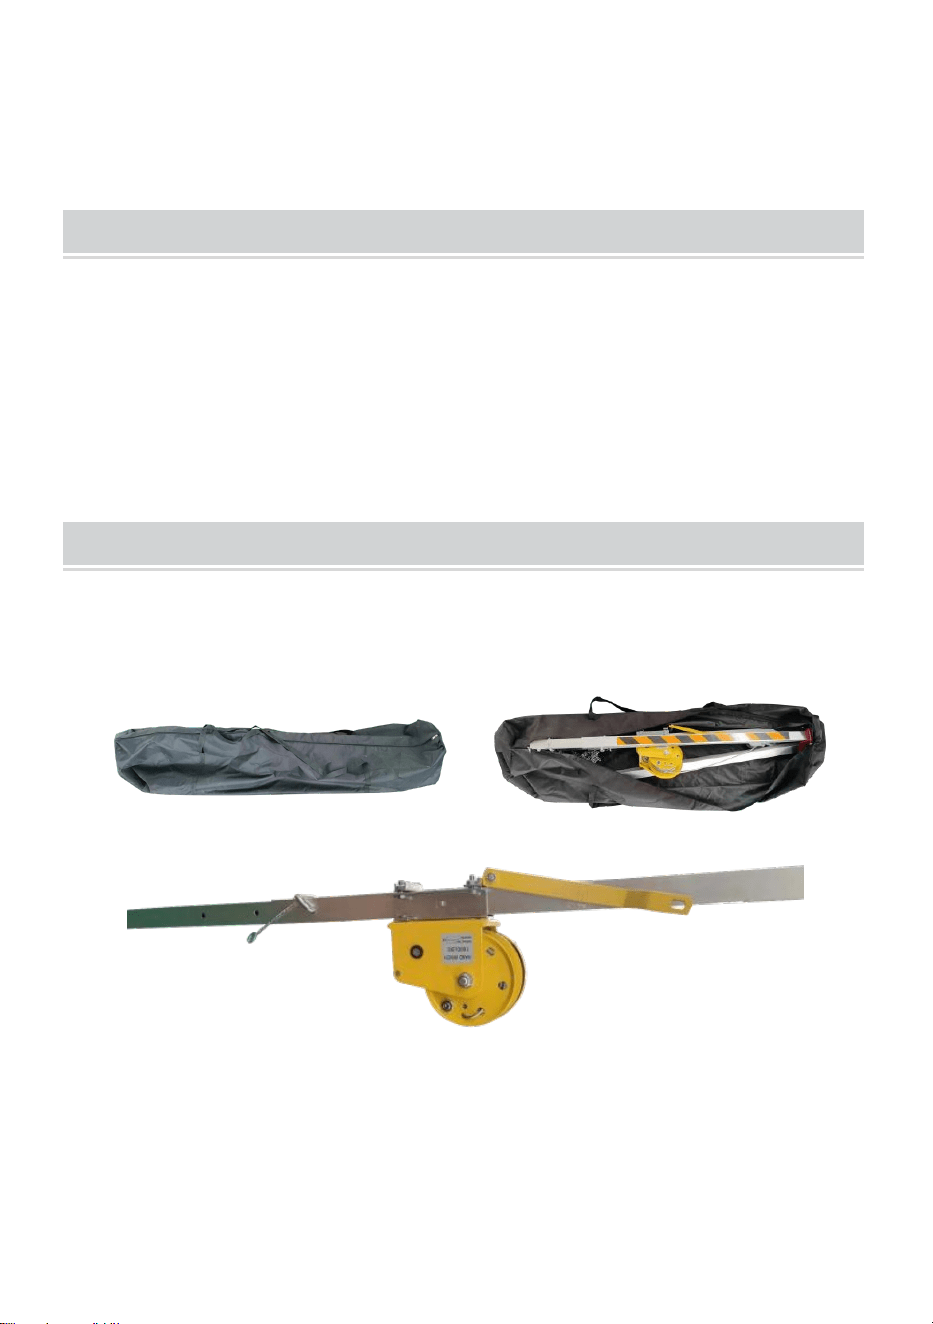
- 4 -
4. Kontrollera om det finns skärande, veck, korrosion, kemiska kontaktytor
eller kraftigt slitage i vajern.
5. Kontrollera om fästet och vinschen är vridna, spruckna eller skadade.
MAINTENANCE
1. Använd strikt enligt följande instruktioner och orsaka inte negativa
effekter på utrustningen.
2. Använd professionella rengöringsmedel; Om det är mild, neutral PH-tvål
eller varmt vatten, ska utrustningen förrengöras för att avlägsna smuts
(bältesdelar) eller skräp (lindelar).
3. Torka av desinfektionsutrustning med 70 % etanol i trasa eller svamp.
OPERATION AND USE
A.Installationsprocedurer för stativ
1.Ta bort stativet från väskan.
2. Dra ut lokaliseringsbulten och dra ut innerröret till rätt läge.
10.Upprepa ovanstående åtgärder på de andra två benen och dra ut
innerslangen till lämplig position.
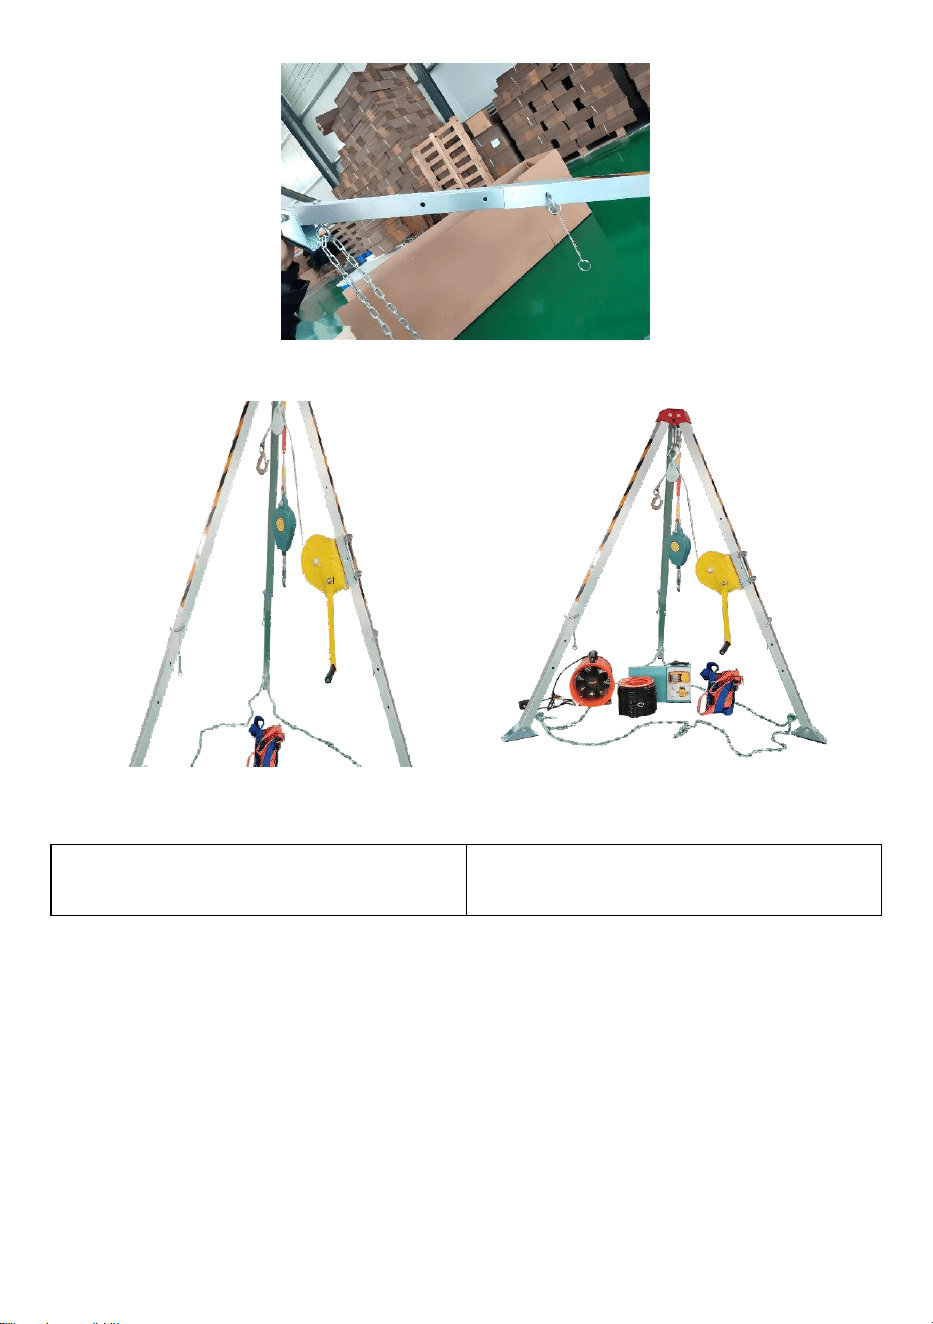
- 5 -
4. Lyft stativet och flytta varje fot utåt till maximalt läge.
I.Vinschinstallationsprocedurer
1.Skruva loss muttern med en
skiftnyckel.
2. Placera handtaget ovanpå och
dra åt muttern.

- 6 -
3. Sätt i fästbulten på
monteringsplattan i fästhålet på
monteringsplattan och dra åt
skruvarna för att fixera
handvinschen.
4. Dra åt skruvarna på vinschens
monteringsplatta med en
skiftnyckel.
OPERATING PROCEDURE

- 7 -
1.Anslut till helkroppsbälten och fallskydd. Roterande krokar på vinschar
eller hängpunkt roterande ringutrustning.
2.Arbetsmiljö
Beträffande faror som kan påverka utrustningens prestanda och
motsvarande säkerhetsåtgärder måste iakttas, såsom temperatur och
vassa kanter, kemiska reagenser, elektrisk ledningsförmåga, skärning,
slitage, ultraviolett nedbrytning och andra klimatförhållanden.
3. Räddningslyft
Klass A räddningslyftanordning. Räddningslyftanordning kan endast
användas i obehindrad lyftprocess och bör inte användas om hinder är
farliga.
När du använder den här utrustningen för räddning är den korrekta
metoden att ansluta dragfästanordningen till D-ringen i den främre änden
av säkerhetsbältet.
4. Hiss och fast hängpunktsanordning.
Varning: Lyften används endast för lyftfunktion för
räddningsändamål, inte för att lyfta last.
Varning!
Innan användning
1. Den måste användas av personer som kan använda den på rätt sätt,
och användaren måste vara vid god hälsa innan denna operation påbörjas.
2. Placera inte stativet i kemisk gasmiljö under en längre tid, vilket kommer
att orsaka korrosion av metalldelar.
3. Stativet används endast av en person och får inte överbelastas.
4. Utrustningskombinationer vars säkerhetsprestanda påverkas av annan
utrustning eller konflikt med annan säkerhetsutrustning är inte tillåtna.

- 8 -
5. I följande fall återkallas utrustningen omedelbart
1) Det finns tvivel om de säkra användningsförhållandena.
2) Funktionen av säker användning är osäker.
3) Den har använts för att falla och kan inte längre användas förrän
kvalificerad personal bekräftar.
6. Före varje användning är det nödvändigt att säkerställa det fria utrymme
som krävs av användaren under arbetsplatsen, så att den vid fall inte
kolliderar med marken eller andra hinder i fallbanan.
7. Det bör finnas direkt eller indirekt visuell kontakt eller andra
kommunikationsmedel med räddare hela tiden under räddningsprocessen.
8. Under installationen; Om hängspetsen är deformerad eller skadad,
vänligen sluta använda den.
9. Vid arbete på ojämnt underlag ska stativet knytas med kedjor för att
balansera kraften som är motsatt den främre delen som är vänd mot
stativet.
Efter användning
10. Regelbunden inspektion krävs, och produktsäkerheten är beroende av
kontinuerligt underhåll och underhåll av utrustning.
11. När utrustningen blir blöt, oavsett om den används eller ren, bör den
torkas naturligt och undvika direkt uppvärmning.
12. Frekvensen av regelbunden inspektion bör vara minst en gång i mars.
13. Periodisk inspektion är endast lämplig för kvalificerad personal och
utförs i strikt överensstämmelse med tillverkarens rutiner för periodiska
inspektioner.
14. Denna produkt är ett komplett system och inga delar kan bytas ut efter
behag.
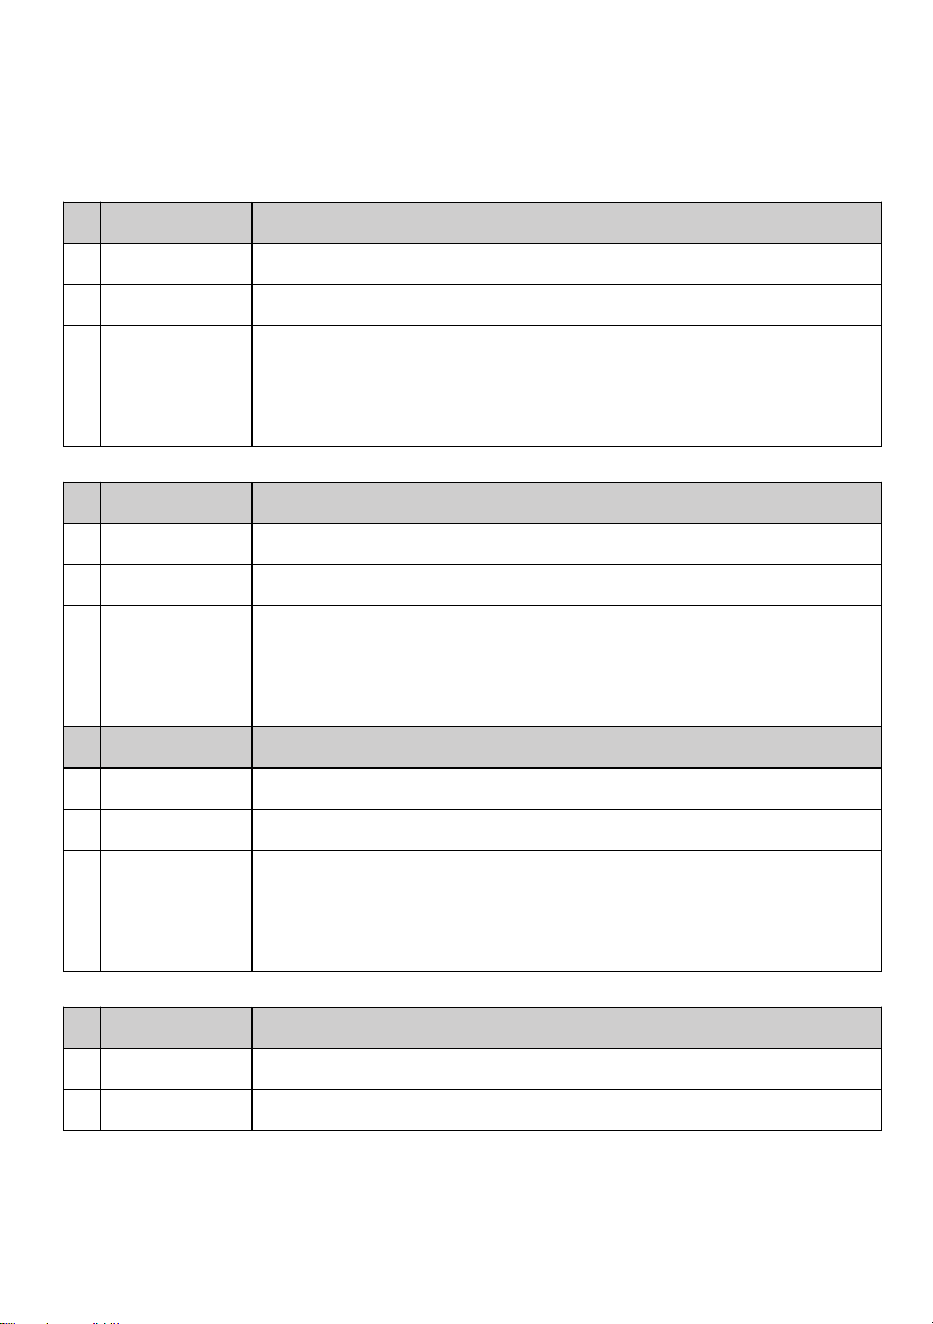
- 9 -
15. Förvaringsprocedurer: Inklusive alla nödvändiga försiktighetskrav,
miljöfaktorer eller andra faktorer kan påverka delarnas tillstånd, Till
exempel: fuktig miljö, skarp vinkel, vibrationer och ultraviolett nedbrytning.
Föremål
Beskrivning
1
namn
Stativsats för begränsat utrymme
2
Modell
HXRT-06
3
Parameter
MAX personlig bärförmåga (upp och ner): 397lbs
Dragkraft i sidled
:
1200lbs
Justerbar längd på stödfötter
:
1,34-2,15m
Föremål
Beskrivning
1
namn
Stativsats för begränsat utrymme
2
Modell
HXRT-07
3
Parameter
MAX personlig bärförmåga (upp och ner): 397lbs
dragkraft i sidled
:
1800lbs
Justerbar längd på stödfötter
:
1,34-2,15m
Föremål
Beskrivning
1
namn
Stativsats för begränsat utrymme
2
Modell
HXRT-08
3
Parameter
MAX personlig bärförmåga (upp och ner): 397lbs
Dragkraft i sidled:2600lbs
Justerbar längd på stödfötter:1,6-2,45m
Föremål
Beskrivning
1
namn
Stativsats för begränsat utrymme
2
Modell
HXRT-09
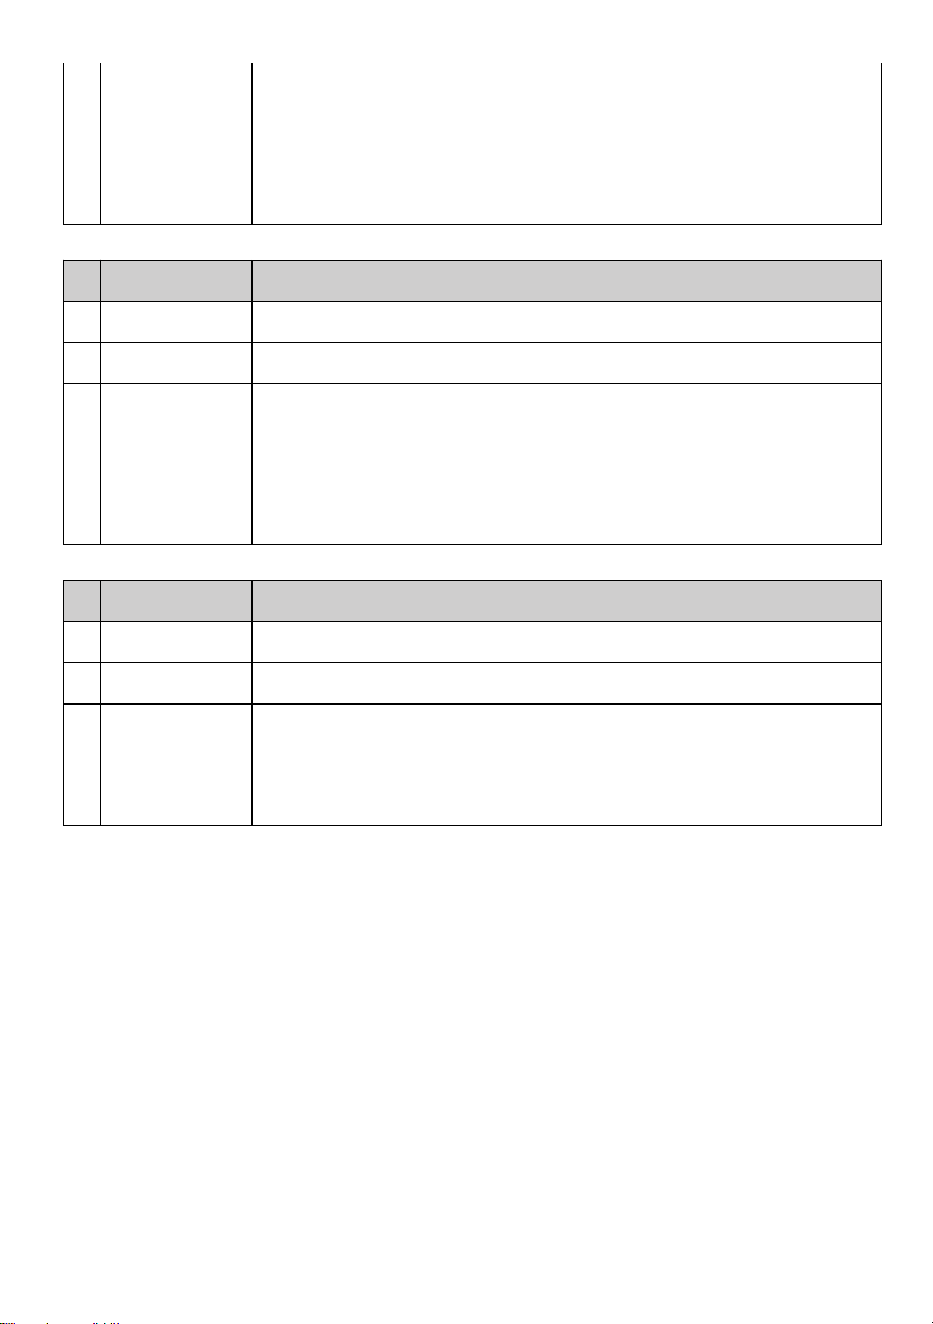
- 10 -
3
Parameter
MAX personlig bärförmåga (upp och ner): 397lbs
Dragkraft i sidled:2600lbs
Justerbar längd på stödfötter:1,6-2,45m
Axiell bärbar ventilationsfläkt、Bärbar multigasdetektor
Föremål
Beskrivning
1
namn
Stativsats för begränsat utrymme
2
Modell
HXRT-10
3
Parameter
MAX personlig bärförmåga (upp och ner): 397lbs
Dragkraft i sidled:2600lbs
Justerbar längd på stödfötter:1,6-2,45m
Axiell bärbar ventilationsfläkt、Bärbar multigasdetektor
Föremål
Beskrivning
1
namn
Stativsats för begränsat utrymme
2
Modell
HXRT-05
3
Parameter
MAX personlig bärförmåga (upp och ner): 397lbs
Dragkraft i sidled:1200lbs
Justerbar längd på stödfötter:1,34-2,15m
Adress: Baoshanqu Shuangchenglu 803long 11hao 1602A-1609shi Shanghai
Importerad till AUS: SIHAO PTY LTD. 1 ROKEVA STREETEASTWOOD NSW
2122 Australien
Importerad till USA: Sanven Technology Ltd. Suite 250 . 9166 Anaheim Place,
Rancho Cucamonga, CA 91730

- 11 -
REP
EC
SHUNSHUN GmbH
Römeräcker 9 Z2021, 76351
Linkenheim-Hochstetten, Germany
REP
UK
Pooledas Group Ltd
Unit 5 Albert Edward House, The
Pavilions Preston, United Kingdom
Tillverkad i Kina