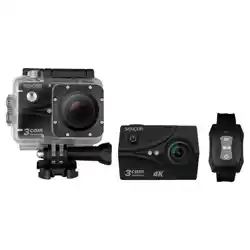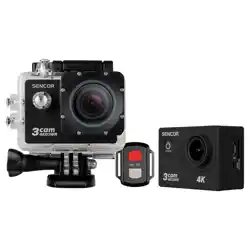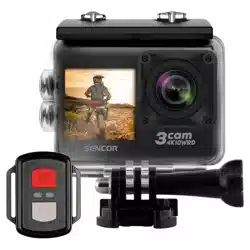
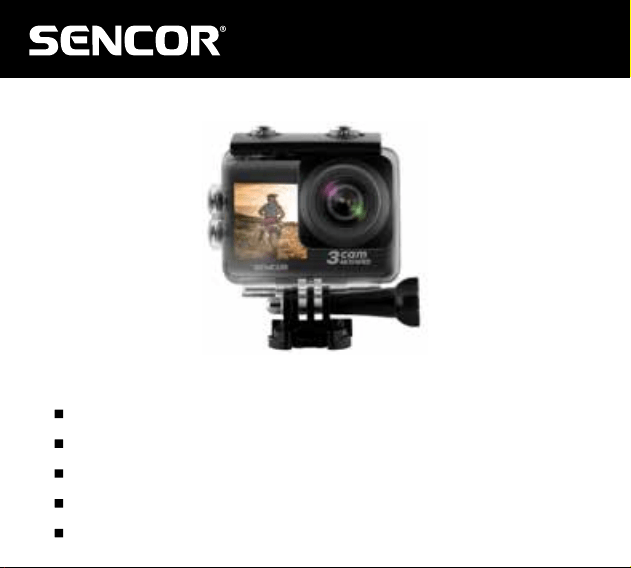
3CAM 4K10WRD
EN User Manual OUTDOOR CAMERA
CZ
Uživatelská příručka OUTDOOROVÁ KAMERA
SK
Používateľská príručka OUTDOOROVÁ KAMERA
HU
Felhasználói kézikönyv SZABADIDO-KAMERA
PL
Podręcznik użytkownika KAMERA OUTDOOROWA

EN 3
Copyright © 2024, Fast ČR, a. s. Revision 06/2024
EN
1. Warning
1. The product has been manufactured with ahigh precision and designed with respect to
its multi-purpose outdoor use for individual entertainment.
2. While recording, please observe the privacy protection laws in force, especially in your
absence.
3. Protect the product from falls and collisions, particularly with sharp and angular objects,
stones etc.
4. Do not expose the device to strong fields from magnets or electric motors. Keep out of
reach of strong radio signals. Strong magnetic fields may damage data in the device
memory (on the card), distort sound and video or even render the product inoperative.
5. Do not expose the product to high temperatures and direct sunlight.
6. Use fast and branded microSD cards. Non-branded or slow memory cards cannot
guarantee correct function and recording properties.
7. Protect the battery contacts from short-circuiting. Ashort-circuit will increase the battery
temperature and may even set fire to surrounding objects.
8. If overheating, smoke or unpleasant smoke appear during charging or handling,
disconnect the device immediately and remove the battery to avoid the risk of fire.
9. Take care to ensure your safety and observe the traffic rules while using the product in
acar. Start the device while your car is still at standstill and do not operate it if you are
adriver, ask your passenger for cooperation instead.
10. The product is not intended to be atoy. Keep it out of reach of children, particularly
during charging. Awrong connection to power may result in injury, involuntary
suffocation or electric shock.
11. The device is not asecurity equipment or aremote controlled unit. Always keep the
device at hand while using it and stop first if it’sto be operated in acar.
12. Store the device in acold, dry and dustless location.
OUTDOOR CAMERA

EN
4 EN
Copyright © 2024, Fast ČR, a. s. Revision 06/2024
Storage
1. Keep in mind that this product is also designed for outdoor use where it may get dirty.
Before storing the product for ashort or long period of time, such as off-season, clean
it carefully including the accessories and blow the dust off dirty areas. Dust may impair
the contact conductivity and reduce or eliminate the product immunity to dust. Please
check the product cleanliness before season.
2. At the end of the season or at least once ayear check the camera door sealing and
buttons and replace them if necessary.
3. Do not use chemical or abrasive substances or instruments for cleaning, use dry and
soft fabric only. Non-electric accessories can be washed in warm water.
4. The battery may be exposed to asignificant mechanical stress due to varying outdoor
conditions. For this reason, inspect the battery from time to time (at least once in
aseason) for any change in shape, package colouring and check the contact oxidation
status and degree. Battery wear is indicated by reduced capacity, i.e. shortened
operational lifetime or shape change. If you notice changes in the battery shape, contact
surface oxidation or asignificant capacity reduction, this indicates the end of lifetime.
Replace the battery for anew one.
5. If you need to store the battery for along period of time, charge it to the full capacity,
then remove it from the device. This will prolong the battery lifetime, allowing you to
make abetter use of its capacity.

EN 5
Copyright © 2024, Fast ČR, a. s. Revision 06/2024
EN
Outdoor Use
Before using outdoors, assemble the camera and its accessories at ease in adry environment.
Check if the camera is ready to record the scenes you want to capture and is not obstructed by
any equipment or clothing parts. In this way, you can avoid the need to adjust the device and
open the sealed camera housing in environment with dust, sand, rain or while wearing gloves.
Remember that before using outdoors, you should close the waterproof housing properly. Protect
the battery contacts from contamination and short-circuit when handling the battery. When
the battery is removed, put the it in aplastic bag. Do not use the camera in running water and
thermal springs. When you finish working with the camera in salty water, wash the camera
housing in clean water and have the salt crystalised on the surface. Open the housing in adry
and clean environment, remove the camera and check the sealing and the buttons. If you find
any salt residues, wash the housing in clean water again and let it dry at room temperature
without using hot air or heating. The housing will thus remain waterproof for further use.
The camera does not float. To prevent the camera from getting lost in water, please use
asuitable tie. Pay special attention to the housing glass, protecting it from dust, dirt and
scratching. Your reward will be clean and sharp pictures.
Using the Camera at Low Temperatures
At low temperatures, the battery capacity will decrease temporarily and will be restored when
the camera has reached room temperature. We recommend to carry the camera in warm
environment, such as in aclothing pocket. Do not charge the battery at alow temperature.
The display brightness and colours may vary at temperatures around the freeze point. Air
humidity may condensate or freeze mainly around the buttons at low temperatures, making
the camera operation difficult. This may also adversely affect the quality of images. Try to
avoid condensation and freezing.

EN
6 EN
Copyright © 2024, Fast ČR, a. s. Revision 06/2024
2. Introduction
This product is designed for recording digital video at avery high resolution. It provides
anumber of superior features including digital video and still image recording, sound
recording, video playback and areplaceable battery, thus becoming an ideal solution for
taking photographs, recording during sport activities, diving, slow-motion recording of fast
actions and time-lapse of slow actions etc., allowing you to record video at any time and
anywhere.
Outdoor sports - Water sports - Diving
Depending on the activities you want to shoot you can insert aholder to ensure appropriate
lens field of view for you to capture the entire scene. Keep in mind that the camera field
of view is wider than ahuman eye can cover. In practice, this means that straight edges of
objects may be recorded curved. This phenomenon is also described as afisheye effect. Take
atest recording to make sure that the camera can cover the required scene and there are no
obstacles to the recording. Try to keep the holder as short as possible while inserting. This
will prevent the camera from being extended unnecessarily, making it less liable to damage
by arandom collision with an obstacle, reducing the vibrations that may be transferred onto
the camera from the pad. This will result in smoother video recording. If you decide to fix the
holder with an adhesive tape, use the tape supplied with the camera and carefully clean and
degrease the locations the tape is to be applied to. Find an area which is smooth and large
enough to fix the holder. Before applying the tape, make sure it’sclean, undamaged and not
too old (an old tape may have poor adhesive effect).

EN 7
Copyright © 2024, Fast ČR, a. s. Revision 06/2024
EN
Get anew quality branded tape if needed. The camera holder (bottom) was designed with
ruggedness and ease of use in mind while the window unveils only part of the display. If you
need to adjust the camera, remove it from the holder and put it back when done.
2.1. Function
1. Awaterproof housing allows you to capture fascinating water scenes with watertightness
up to 30 meters.
2. Two displays – front and rear
3. Aremovable battery can be easily replaced, extending the camera lifetime.
4. You can record videos even during charging.
5. Wide-angle lens with HD resolution
6. HDMI output port
7. Supports memory cards with up to 128GB capacity
8. Recording in MP4 format (H.264)
9. Several still image modes: single shooting, snapshots
10. WiFi
11. Remote Control

EN
8 EN
Copyright © 2024, Fast ČR, a. s. Revision 06/2024
3. Putting into Operation
3.1. Inserting and Removing aMicroSD Card
1. Insert the microSD card into the camera slot with the contacts first and press until
aclick is heard.
2. To remove the card, press it gently until it clicks and ejects from the slot. The remove
the card from the camera with your fingers.
Note: Please use your own branded microSD card and format it before first use in your PC.
With non-branded memory cards correct camera function cannot be guaranteed. When the
card is inserted, the camera will check the file system usability and offer formatting if needed.
Please use acard with sufficient capacity for the intended purposes. Otherwise, the camera
will report insufficient total capacity or lack of free space on the card and reject the required
operation. With respect to the card writing speeds, asize of 64GB is recommended as optimal.
The highest resolution recordings (typically 4K) require that the card inserted should have at
least U3 speed class. For cards with alower speed class, select lower quality and resolution
of the recording.
3.2. Battery Installation and Removal
Note: there is athin ribbon on the battery allowing it to be pulled out of the tight
battery compartment. Do not remove the ribbon.
1. Press the battery compartment lock gently with your nail and open it when it’stoggled
up by the spring.

EN 9
Copyright © 2024, Fast ČR, a. s. Revision 06/2024
EN
2. Insert the battery fully into the camera (with the correct contact orientation). Make sure
that the battery ribbon is still accessible.
3. Replace the battery compartment cover (towards the camera side) and close it carefully
until the latch clicks.
4. Removing the battery: open the cover and pull the ribbon to remove the battery.
Tip: We recommend to fully charge the battery (until the red LED goes out) and let it fully
discharge until the camera turns off. This will extend the battery lifetime.
Note: If the battery charge is low, unexpected conditions including spontaneous shut-off
may occur. Please charge the battery before using the camera for the first time.
3.3. Charging
To charge the battery inside the camera, connect the camera to aPC or apower adapter. The
output adapter voltage must be 5V. Please use either apower socket adapter or acar adapter.
Before connecting the power adapter, make sure it’scompatible with either the grid voltage or
the car’son-board voltage. You can charge the battery inside the camera in either on or off state.
You can record even while the charging is in progress (such as in acar). The red indicator (top
left) lights while the charging is in progress. While the charging is in progress, adapter, battery as
well as the camera heat up slightly. This is anormal state during energy conversion.
3.4. Turning the Camera On and Off
1. To turn your camera on or off, hold down the on/off button for 3 to 5 seconds. Blue
indicator (bottom left) or active display indicate the camera is turned on.
EN
10 EN
Copyright © 2024, Fast ČR, a. s. Revision 06/2024
2. To turn the camera on or off (according to the current settings, see below), connect
or disconnect the power supply. In acar, for example, this is achieved by turning the
ignition key to appropriate position.
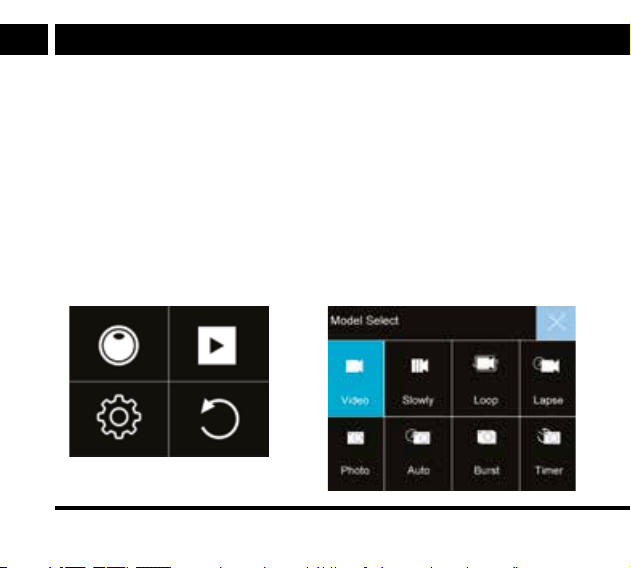
3.5. Switching the Modes
To switch to the camera mode, press the following key briefly: Video Recording/Fast Event
Recording/Loop Recording/Time Lapse/Photo/Photo Auto/Photo Set/Timer/.
The selected mode is indicated by the symbols in the active display’supper left corner:
Option Tools is available by long-pressing the OK button and has 4 items. Use the Up/
Down buttons to select: switch Camera Modes (similar to above, switching work modes), Play
recordings and photos from inserted card, Settings, Exit. You can also exit the tool selection
by briefly pressing the power button (M).

EN 11
Copyright © 2024, Fast ČR, a. s. Revision 06/2024
EN
3.6. Recording Video and Photo Shooting
Recording (Video recording mode) and photo shooting (Camera) will be available if acorrectly
formatted memory card is inserted into the camera. This can be easily achieved by pressing
OK in the camera top section while the display is enabled. If the display is disabled
(PowerSave mode), pressing the first time enables the display, pressing the second time starts
the required function.
To stop the ongoing recording, press OK again while the display is enabled. There may be
adelay of up to several seconds after OK is pressed to allow the file to close correctly.
While the recording is in progress, ablue indicator is flashing slowly and ared dot is shown
on the display. Taking ashot is accompanied by atypical shutter sound from the camera
speaker.
3.7. Playing Back Recorded Videos and Viewing Still Images
To browse the files, switch to the playback mode. Press Up and Down arrows to browse the
files. You can also play back entire video files - press OK to start/pause video playback. To
stop playback, press the On button briefly. To delete the currently displayed file, long press
OK, select “Confirm” aOK.
3.8. HDMI Connection
You can watch the video camera recordings on amonitor (TV) if connected with an
appropriate cable. The camera is equipped with aMicro HDMI (type D) connector. When the
camera is connected to aTV with the HDMI cable, the camera display will turn off, redirecting
the camera image to the connected monitor (TV), keeping the button features unchanged.
When the HDMI cable is disconnected, the camera will turn the display back on.

EN
12 EN
Copyright © 2024, Fast ČR, a. s. Revision 06/2024
3.9. Operating Indicator Lights
Blue LED – operation 1. Video recording - while recording video, the blue
indicator flashes.
Yellow (next to the ON
button) LED – WiFi
1. While connecting to WiFi, the indicator is flashing;
2. When connected to WiFi, the indicator lights steadily.
Red LED - charging 1. The red indicator is lights steadily while the charging is
in progress.
2. When the charging is finished, the red indicator goes
out.
3.10 Working with Two Displays
The camera has amain 2“ display on the back to set all modes and display traffic. In
addition, the camera has an auxiliary 1.3“ display on the front that shows only camera
operation. It can be used when taking pictures of yourself. You can switch between displays
by long pressing the Down, and only in operation mode, not, for example, during setup.

EN 13
Copyright © 2024, Fast ČR, a. s. Revision 06/2024
EN
4. PC Connection
Connect the camera to your PC (Windows) USB port with the supplied cable. In addition to
the battery charging, you can use the cable to transfer data.
As soon as the camera detects aPC connection, amessage appears with the option to select
USB storage mode, PC camera, charging. Press Up/Down to switch between them.
Storage mode - connects the camera memory card as the PC external storage. This memory
device functions as another PC hard drive, allowing you to copy your recordings into PC. The
card contains video camera recordings (MP4) and photos (JPG).
Note: The card is write-protected from PC due to possible integrity and readability
disruption. The files saved on the card cannot be erased, edited and the card cannot be
formatted.
PC camera mode - this can be used in video communication applications (720p). Depending
on the application used, the camera may be also be named e.g. UVC Camera etc.
When the camera is connected to any PC port for the first time, the PC will usually search for
adriver for acorresponding connection. Downloading the operating system updates requires
an internet connection. Wait until the installation process is finished. If the installation fails, try
connection to another port or use adifferent cable.
Card reading - You can remove the microSD card from the camera in the off-state and insert
it into the corresponding PC card reader slot. This will allow you to read the files directly from
the card folders and save them for further processing or archiving in your PC.

EN
14 EN
Copyright © 2024, Fast ČR, a. s. Revision 06/2024
5. Wi-Fi Control
The camera can capture video and receive basic control commands from asmartphone
(Android/iPhone) using awireless Wi-Fi connection.
By default, the Wi-Fi feature is disabled to save energy. Enabling Wi-Fi (long pressing Up) will
enable the camera transmitter which waits for an external control application to be connected,
the display will show Wi-Fi and once the transmitter is initialized, transmitter name (WiFi-
SSID) and connection message will be shown.
To enable Wi-Fi control (with initial values), proceed as follows:
1. Install an application suitable for your smartphone type from the store, such as XDV
PRO (wisdomplus).
2. Enable the Wi-Fi function on both camera and smartphone and start the applications.
3. Select the name matching the one shown on the camera display from the available
wireless networks.
4. The default Wi-Fi connection password is“1234567890". Enter acorrect password on your
smartphone and the camera will connect. Then connect the running application to the camera.
5. The camera image appears on your smartphone, along with icons to control shooting,
video, settings and downloading photos and videos to your phone'smemory.
EN 15
Copyright © 2024, Fast ČR, a. s. Revision 06/2024
EN
Note:
There is atwo-point connection between the camera and the smartphone meaning
that once connected to one smartphone, you cannot establish connection to another
smartphone until the connection to the first smartphone is cancelled. Smartphones with
Android 4.4 or higher or iOS are supported. The video being transferred slightly lags behind
the real time. The Wi-Fi connection range depends on the surrounding environment (due
to interference etc.). As reliable data transfer requires sufficiently strong signal, watch the
signal indicator on the phone. If the signal is weak, the data transfer may fluctuate or may
not function at all, resulting in the camera remote control failure. Due to the large date
volumes, hardware of sufficient performance is required for processing in your phone.
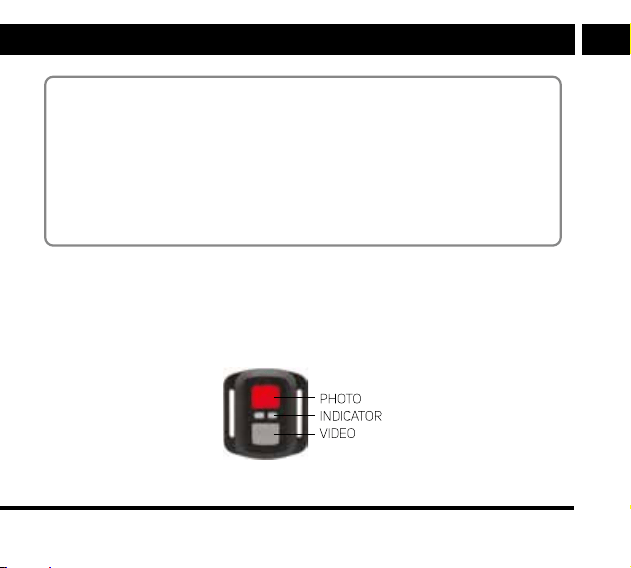
6. Remote Control
The basic functions (recording start/stop) and taking aphoto can be performed from the
supplied wristband remote control. To control, please keep asmall distance between the
camera and the controller. You can also replace the remote control battery which should last
about 1 year when used normally.

EN
16 EN
Copyright © 2024, Fast ČR, a. s. Revision 06/2024
7. Camera Settings
The camera settings must correspond to working in different modes. Before you start working
with the camera in full, take time to test the camera and make correct settings. In this way, you
will avoid possible disappointment if the work result fails to meet your expectations. You should
consider whether or not the camera will move during the recording, how long the recording will
take, how to power the camera etc. Also, keep in mind possible conflicts when processing the
cues (random start, motion detection, delayed start, connecting the power adapter to charge the
battery) to avoid missing the event you wished to capture only because the first cue is followed
by asecond one. Adjust the settings by pressing the Power button repeatedly to select the Mode
(Video Recording/Fast Event Recording/Loop Recording/Time Lapse/Photo/Auto/Photo Set/
Timer). Then long press OK to enter the tool selection and use the Up/Down buttons to select the
third item: Settings (gear wheel) and press OK. To navigate between the setting items, press Up
andDown and confirm the selection by pressing OK. Select the required menu item value and
press OK to save and close the item. To exit setup mode, press OK on Back (last in line).
7. 1. Settings, Tools Tab
Video resolution – from 4K/60 fps up to 720p/30 fps. Ahigher resolution will capture more
details but also means greater usage of your memory card space and requires ahigher
memory card speed. Ahigher frame rate is useful for fast actions, but also means greater
usage of your memory card space and requires ahigher memory card speed. We recommend
the 1920×1080 60P mode, which provides very good picture results for both TV transfer and
further PC processing.
EIS (stabilisation) – Electronic stabilisation of image shaking.
Distortion Correction – Correction of image shape distortion, “barrel distortion”.
White Balance – Manual or automatic white balance adjustment according to the prevailing
lighting in the scene.

EN 17
Copyright © 2024, Fast ČR, a. s. Revision 06/2024
EN
Metering – Select the focus metering method
Exposure (Exposure setting) – Select an EV number from -3 to +3
Sharpness – Select the degree of sharpening of the image
Video Quality (Video Quality) – Select the quality of video storage
EV – Adjust the exposure from lighter (overexposure) to darker (underexposure) according to
the scene being shot.
ISO – Selecting the equivalent 35mm film speed. Higher ISO speeds are more sensitive, but
the sensor generates more image noise.
Time stamp – Inserting atime stamp in the recording.
Rec Audio (Audio Recording) – Select whether to use amicrophone
Image Rotation (Upside Down) – To record an image upside down.
WiFi – Turning the camera WiFi transmitter on and off. To save energy consumption, turn
WiFi off when not in use. Note: the same function can be performed by long pressing the Up
button (4 sec) in standby.
WiFi Information – Display setpoints
WiFi Reset – Return to original settings
Light Source Frequency – Set the grid frequency according to your region to improve the
flickering processing of lights, screens. Select Auto/50 Hz/60 Hz.
LED Indicator – Blue indicator function off
Screen saver – Determines the time after which the screen is to go out when no user action
is made.
Auto shutdown – If no action is made until this time has elapsed, the camera will shut down.
You can turn the screen back on.
Button Prompt (Button Sound) – Adjust the volume or turn off the sound
Language – Select one of the available OSD languages.
Data format – Determine the order in which the camera will show day, month and year.
Time setting – Set the time the camera will insert in images and store on the card.
Date setting – Set the date the camera will insert in images and store on the card.

EN
18 EN
Copyright © 2024, Fast ČR, a. s. Revision 06/2024
Format – matching the card to optimal use in the camera in aformat suitable for making
recordings. This “card cleaning” is irreversible! Note: if acard with inappropriate data format
is inserted, aprompt to format will be shown; without formatting, no recording can be made.
Tip: After alonger single-purpose use, it’ssuitable to perform afull (slow) formatting in aPC
from time to time.
Device Info (Camera Info) – Camera software version
Factory Reset – Restore the factory settings of all values. Due to anumber of various, even
contradictory camera settings, this is the fastest way to achieve the correct values of all
settings.
Different entries for each mode:
Slowly Rec – Select 1080p 4×, 1080p 2×, 720p 8×, 720p 4×
Video Lenght (Loop Length) – Select between 2/3/5 min. For permanent recordings, it’suseful
to split aconsistent recording into smaller sections for later processing.
Rec Interval (Record Interval) – Select between 0.5/1/2/5/10/30/60 sec. Slow and very long
events can be recorded as aseries of consecutive frames with agiven interval. You can play it
as avideo without sound later on.
Photo resolution – Choose between 16M, 13M and 8M. The camera’sgraphic processor will
upscale to ahigher resolution.
Photo Interval – Select between 3/10/15/20/30 sec.
Photo Frequency – Select between 3/5/10 frames per second. Continuous shooting (Burst)
takes multiple photos with one press of the shutter button.
Self-release – Selectable camera self-release delay. Select 3/5/10/20 sec.
EN 19
Copyright © 2024, Fast ČR, a. s. Revision 06/2024
EN
Note:
If some features or their combinations cannot work together or are illogical, their menu
selection will grey out and cannot be enabled or changed. Similarly, options restricted
by hardware will also remain greyed out, such as selecting avideo loop for acard with
insufficient free space.
ATTENTION:
For demanding recordings (high resolutions, high speeds, top recording quality,
scenes with ahigh contrast) it’snecessary that the card should receive and write
data in speeds provided by the camera. Try out the required setting options and
use fast and branded cards. Also, it’suseful to refrain from using the maximum
possible settings and use the most efficient ones instead. Please note that the
memory card operation speed may be also affected by temperature, thus the
recordings made under severe outdoor conditions may differ from tests made under
room conditions.

EN
20 EN
Copyright © 2024, Fast ČR, a. s. Revision 06/2024
8. Technical Data
LCD display 2“+ 1.3“
Lens Wide-angle HD lens with 170° field of view
Video/codec formats MP4/H.264
Recorded video resolution
Resolution:
3840×2160p, 60 fps
3840×2160p, 30 fps
2688×1520p, 30 fps
1920×1080p, 120 fps
1920×1080p, 60 fps
1920×1080p, 30 fps
1280×720p, 240 fps
1280×720p, 120 fps
1280×720p, 60 fps
1280×720p, 30 fps
Still image format JPEG
Still image resolution 16M/13M/8M
Storage microSD, max 128GB
USB interface USB-C
TV output HDMI, D type
Required power source 5V/1A
Battery capacity 750 mAh

EN 21
Copyright © 2024, Fast ČR, a. s. Revision 06/2024
EN
Recording duration approximately 2 hours with anew, fully charged
battery (and the display turned off)
Charging time approximately 2 hours
Dimensions 60 × 44 × 32 mm
Camera weight including battery 70 g
Operating temperature –10°C ~ +55°C
Storage –20°C ~ +70°C
Humidity 5% ~ 95%
Water tightness in housing up to 30m in depth
WiFi 2.4 GHz band
Note: Technical specifications may be updated. The product itself may be considered to be
astandard.
EN
22 EN
Copyright © 2024, Fast ČR, a. s. Revision 06/2024
INSTRUCTIONS AND INFORMATION ON THE DISPOSAL OF PACKAGING MATERIALS
Dispose of packaging material at acollection yard.
DISPOSAL OF DISCARDED ELECTRICAL AND ELECTRONIC EQUIPMENT
This symbol on the product, accessories or packaging indicates that the product
must not be treated as ordinary household waste. Please dispose of this product in
acollection yard designated for the recycling of electrical and electronic equipment.
In some European Union countries or in some European countries, you can return
your products to the local retailer when purchasing an equivalent new product.
Correct disposal of this product helps save valuable natural resources and prevents
possible adverse impacts on the environment and human health that might be
caused by improper waste disposal. Please contact local authorities or the nearest
waste collection yard for further details. Improper disposal of this type of waste may
result in legal penalties.
For Companies in the European Union
If you need to dispose of electrical or electronic equipment, ask your retailer or
supplier for the necessary information.
Disposal in Countries Outside the European Union
To dispose of this product, please ask your local authorities or dealer for the
necessary information on correct disposal.
This product complies with EU requirements.

EN 23
Copyright © 2024, Fast ČR, a. s. Revision 06/2024
EN
Changes in the text, design and technical specifications may be made without prior notice
and we reserve the right to make such changes.
The original version is in the Czech language.
Manufacturer’saddress:
FAST ČR, a. s., USanitasu 1621, Říčany CZ-251 01

EN
24 EN
Copyright © 2024, Fast ČR, a. s. Revision 06/2024
EN
Warranty conditions
Warranty card is not apart of the device packaging.
This product is warranted for the period of 24 months from the date of purchase to the end-user. Warranty
is limited to the following conditions. Warranty is referred only to the customer goods using for common
domestic use. The claim for service can be applied either at dealer’sshop where the product was bought, or
at below mentioned authorized service shops. The end-user is obligated to set up aclaim immediately when
the defects appeared but only till the end of warranty period. The end user is obligated to cooperate to certify
the claiming defects. Only completed and clean (according to hygienic standards) product will be accepted.
In case of eligible warranty claim the warranty period will be prolonged by the period from the date of claim
application till the date of taking over the product by end-user, or the date the end-user is obligated to take it
over. To obtain the service under this warranty, end-user is obligated to certify his claim with duly completed
following documents: receipt, certificate of warranty, certificate of installation.
This warranty is void especially if apply as follows:
Defects which were put on sale.
Wear-out or damage caused by common use.
The product was damaged by unprofessional or wrong installation, used in contrary to the applicable
instruction manual, used in contrary to legal enactment and common process of use or used for another
purpose which has been designed for.
The product was damaged by uncared-for or insufficient maintenance.
The product was damaged by dirt, accident of force majeure (natural disaster, fire, and flood).
Defects on functionality caused by low duality of signal, electromagnetic field interference etc.
The product was mechanically damaged (e.g. broken button, fall).
Damage caused by use of unsuitable media, fillings, expendable supplies (batteries) or by unsuitable
working conditions (e.g. high temperatures, high humidity, quakes).
Repair, modification or other failure action to the product by unauthorized person.
End-user did not prove enough his right to claim (time and place of purchase).
Data on presented documents differs from data on products.
Cases when the claiming product cannot be indentified according to the presented documents (e.g. the
serial number or the warranty seal has been damaged).
Manufacturer:
FAST ČR, a.s., U Sanitasu 1621, Říčany 251 01, Czech Republic
Visit www.sencor.com for detailed information about authorized service centers.
The original version of the instructions is in the Czech language, other language versions are made by the
appropriate translation.

EN 25
Copyright © 2024, Fast ČR, a. s. Revision 06/2024
EN
EN
Warranty conditions
Warranty card is not apart of the device packaging.
This product is warranted for the period of 24 months from the date of purchase to the end-user. Warranty
is limited to the following conditions. Warranty is referred only to the customer goods using for common
domestic use. The claim for service can be applied either at dealer’sshop where the product was bought, or
at below mentioned authorized service shops. The end-user is obligated to set up aclaim immediately when
the defects appeared but only till the end of warranty period. The end user is obligated to cooperate to certify
the claiming defects. Only completed and clean (according to hygienic standards) product will be accepted.
In case of eligible warranty claim the warranty period will be prolonged by the period from the date of claim
application till the date of taking over the product by end-user, or the date the end-user is obligated to take it
over. To obtain the service under this warranty, end-user is obligated to certify his claim with duly completed
following documents: receipt, certificate of warranty, certificate of installation.
This warranty is void especially if apply as follows:
Defects which were put on sale.
Wear-out or damage caused by common use.
The product was damaged by unprofessional or wrong installation, used in contrary to the applicable
instruction manual, used in contrary to legal enactment and common process of use or used for another
purpose which has been designed for.
The product was damaged by uncared-for or insufficient maintenance.
The product was damaged by dirt, accident of force majeure (natural disaster, fire, and flood).
Defects on functionality caused by low duality of signal, electromagnetic field interference etc.
The product was mechanically damaged (e.g. broken button, fall).
Damage caused by use of unsuitable media, fillings, expendable supplies (batteries) or by unsuitable
working conditions (e.g. high temperatures, high humidity, quakes).
Repair, modification or other failure action to the product by unauthorized person.
End-user did not prove enough his right to claim (time and place of purchase).
Data on presented documents differs from data on products.
Cases when the claiming product cannot be indentified according to the presented documents (e.g. the
serial number or the warranty seal has been damaged).
Manufacturer:
FAST ČR, a.s., U Sanitasu 1621, Říčany 251 01, Czech Republic
Visit www.sencor.com for detailed information about authorized service centers.
The original version of the instructions is in the Czech language, other language versions are made by the
appropriate translation.
Copyright © 2024, Fast ČR, a. s. Revision 06/2024
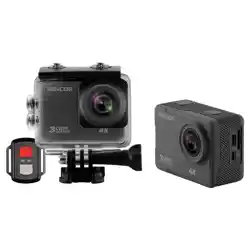
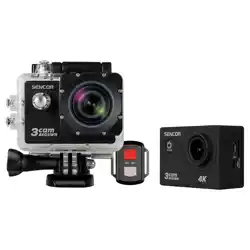
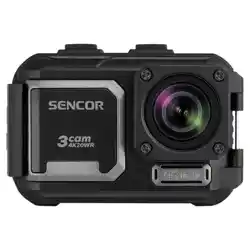
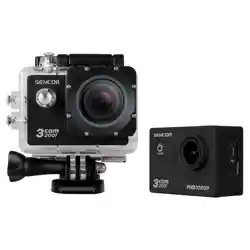
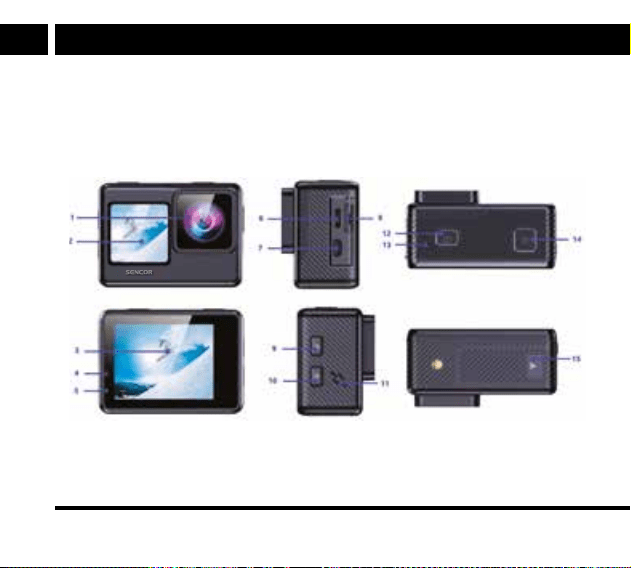
Product image / Obrázek produktu / Obrázok produktu / Akamera rézei /
Zdjęcie produktu

Copyright © 2024, Fast ČR, a. s. Revision 06/2024
EN
1. Lens
2. Front screen
3. Screen
4. Red LED - charging
5. Blue LED - operation
6. USB
7. HDMI
8. microSD
9. Button - up arrow
10. Button - down arrow
11. Loudspeaker
12. Switching / mode
13. LED indicator
14. OK
15. Battery compartment
lock
CZ
1. Objektiv
2. Přední obrazovka
3. Obrazovka
4. Modré světlo LED
– provoz
5. Červené světlo LED
– nabíjení
6. USB
7. HDMI
8. microSD
9. Tlačítko – šipka nahoru /
Wi-Fi
10. Tlačítko – šipka dolů
11. Reproduktor
12. Přepínání / režim
13. Kontrolka LED
14. OK
15. Zámek bateriového
prostoru
SK
1. Objektív
2. Predná obrazovka
3. Obrazovka
4. Červené svetlo LED
– nabíjanie
5. Modré svetlo LED
– prevádzka
6. USB
7. HDMI
8. microSD
9. Tlačidlo – šípka hore
10. Tlačidlo – šípka dole
11. Reproduktor
12. Prepínanie/režim
13. Kontrolka LED
14. OK
15. Zámka batériového
priestoru

Copyright © 2024, Fast ČR, a. s. Revision 06/2024
HU
1. Objektív
2. Elülső képernyő
3. Képernyő
4. Piros LED – töltés
5. Kék LED – működés
6. USB
7. HDMI
8. microSD
9. Kurzor felfelé gomb
10. Kurzor lefelé gomb
11. Hangszóró
12. Átkapcsolás / mód
13. LED kontrollfény
14. OK
15. Elemtér reteszzár
PL
1. Obiektyw
2. Przedni ekran
3. Ekran
4. Czerwona kontrolka LED
– ładowanie
5. Niebieska kontrolka LED
– działanie
6. USB
7. HDMI
8. microSD
9. Przycisk – kursor w górę
10. Przycisk – kursor w dół
11. Głośnik
12. Przełączanie / tryb
13. Kontrolka LED
14. OK
15. Blokada zasobnika na
baterie
Copyright © 2024, Fast ČR, a. s. Revision 06/2024

FAST ČR, a.s., USanitasu 1621, Říčany CZ-251 01