7084 980-01
Original operating instructions Page 14
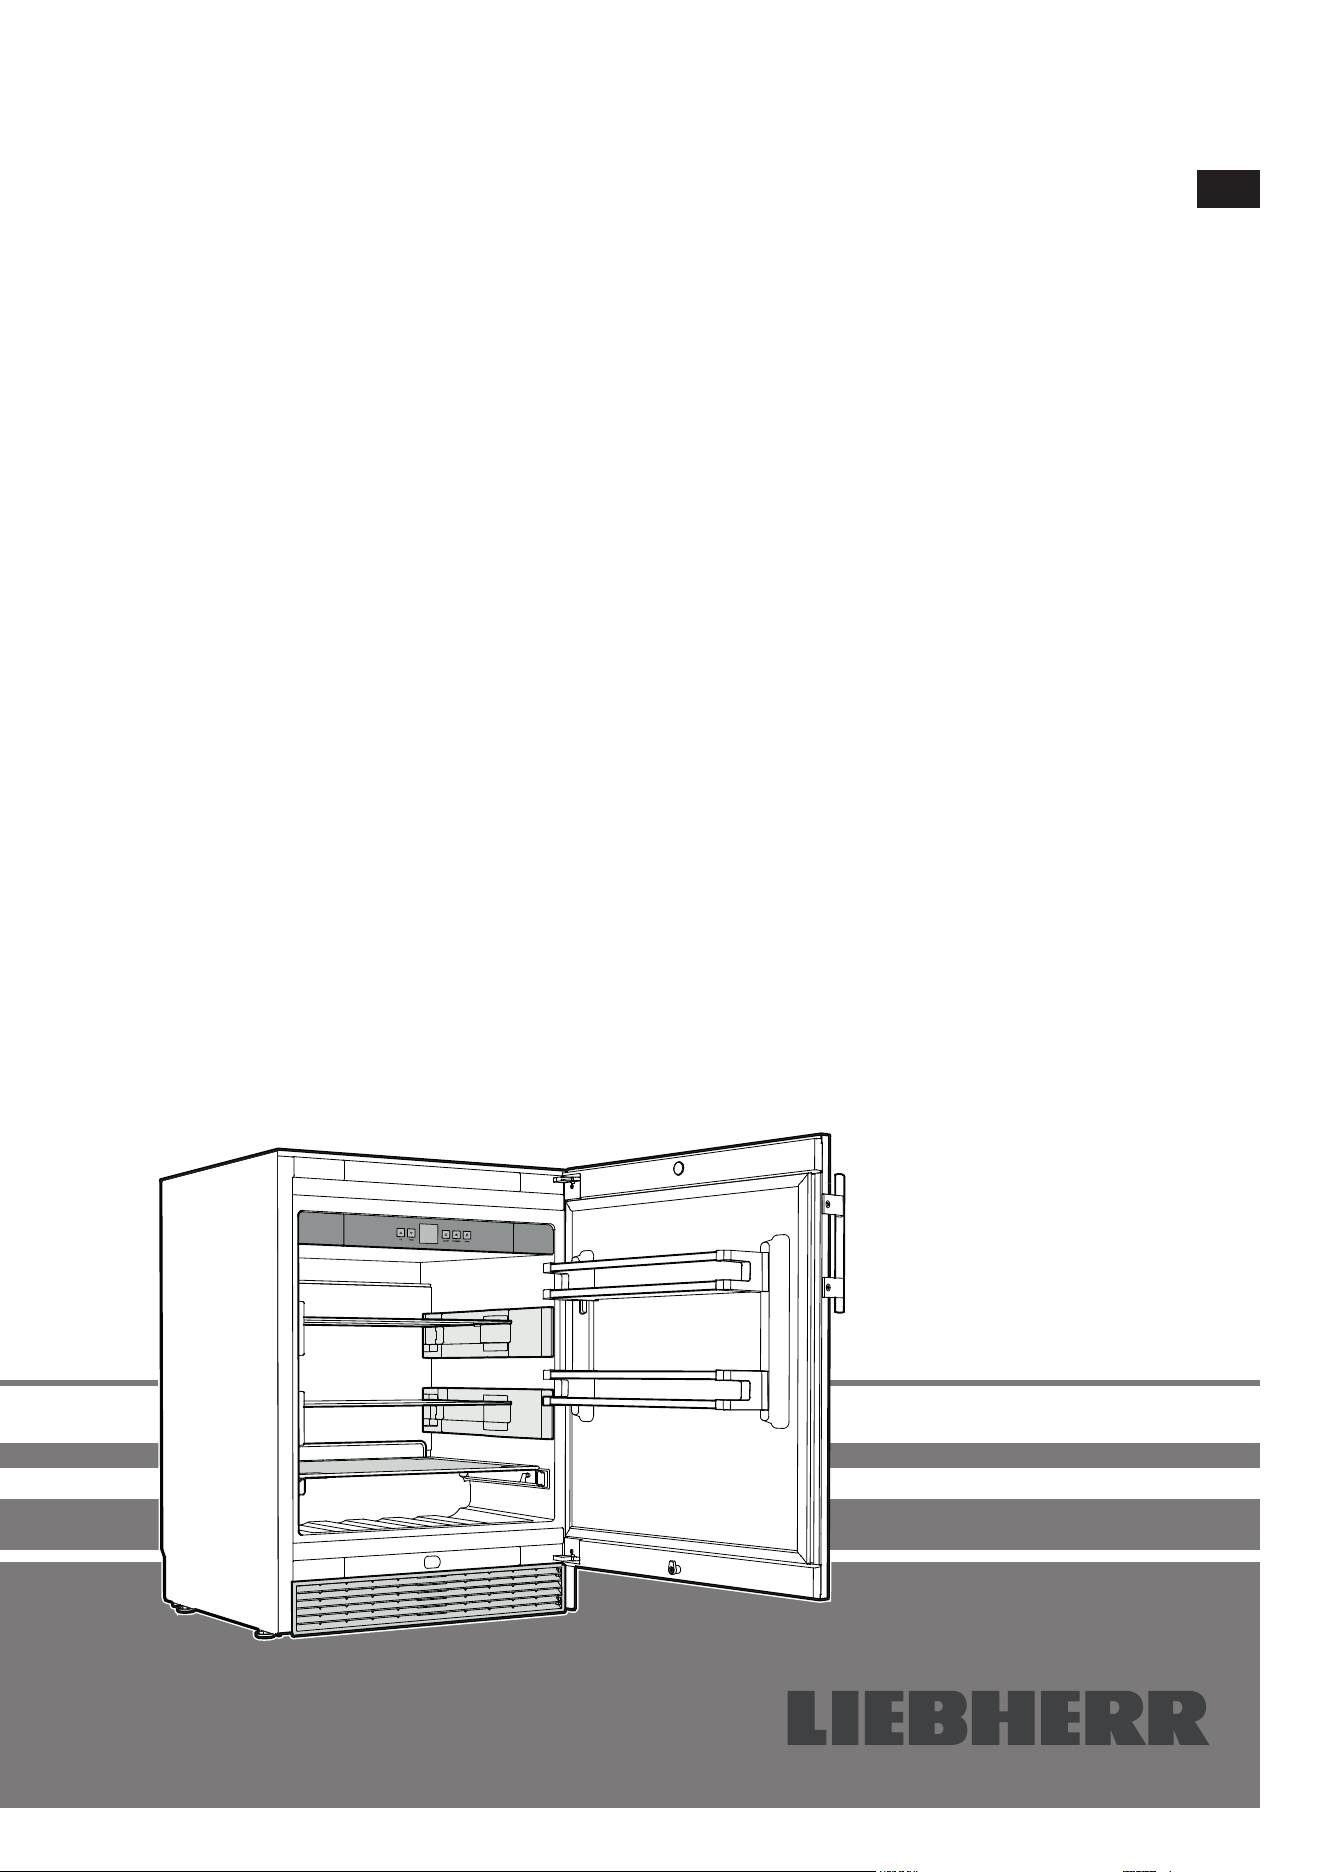
Beverage cooler
Read the operating instructions before switching on for the rst time
EN
OKes 1750
14
Content
Priority of warnings .................................................................14
Safety instructions and warnings ...........................................14
Symbols on the appliance ...................................................... 15
Intended use ...........................................................................15
Foreseeable incorrect use......................................................15
Declaration of conformity .......................................................15
Noise emissions from the appliance ......................................15
EPREL database .................................................................... 15
Climate class .......................................................................... 16
Description of the appliance ...................................................16
Setting up ...............................................................................16
Electrical connection .............................................................. 16
Operating and control elements .............................................17
Switching the appliance on and o ........................................ 17
Setting the temperature ..........................................................17
Door open alarm ..................................................................... 17
Temperature alarm ................................................................. 17
Setup mode ............................................................................ 17
Cooling ................................................................................... 18
Humidity function ...................................................................18
Safety lock ..............................................................................18
Equipment ..............................................................................18
Cleaning .................................................................................19
Storing the appliance out of season .......................................20
Shutting the appliance down .................................................20
Disposal notes ........................................................................20
Malfunctions ........................................................................... 21
Additional information:............................................................21
Supplied Accessories ............................................................21
Levelling the appliance ...........................................................21
Appliance dimensions ............................................................22
Installation dimensions ...........................................................22
Mounting the dust lter ...........................................................22
Air circulation in the appliance plinth area ..............................22
Mounting the ventilation grille .................................................22
Changing Over Door Hinges ..................................................23
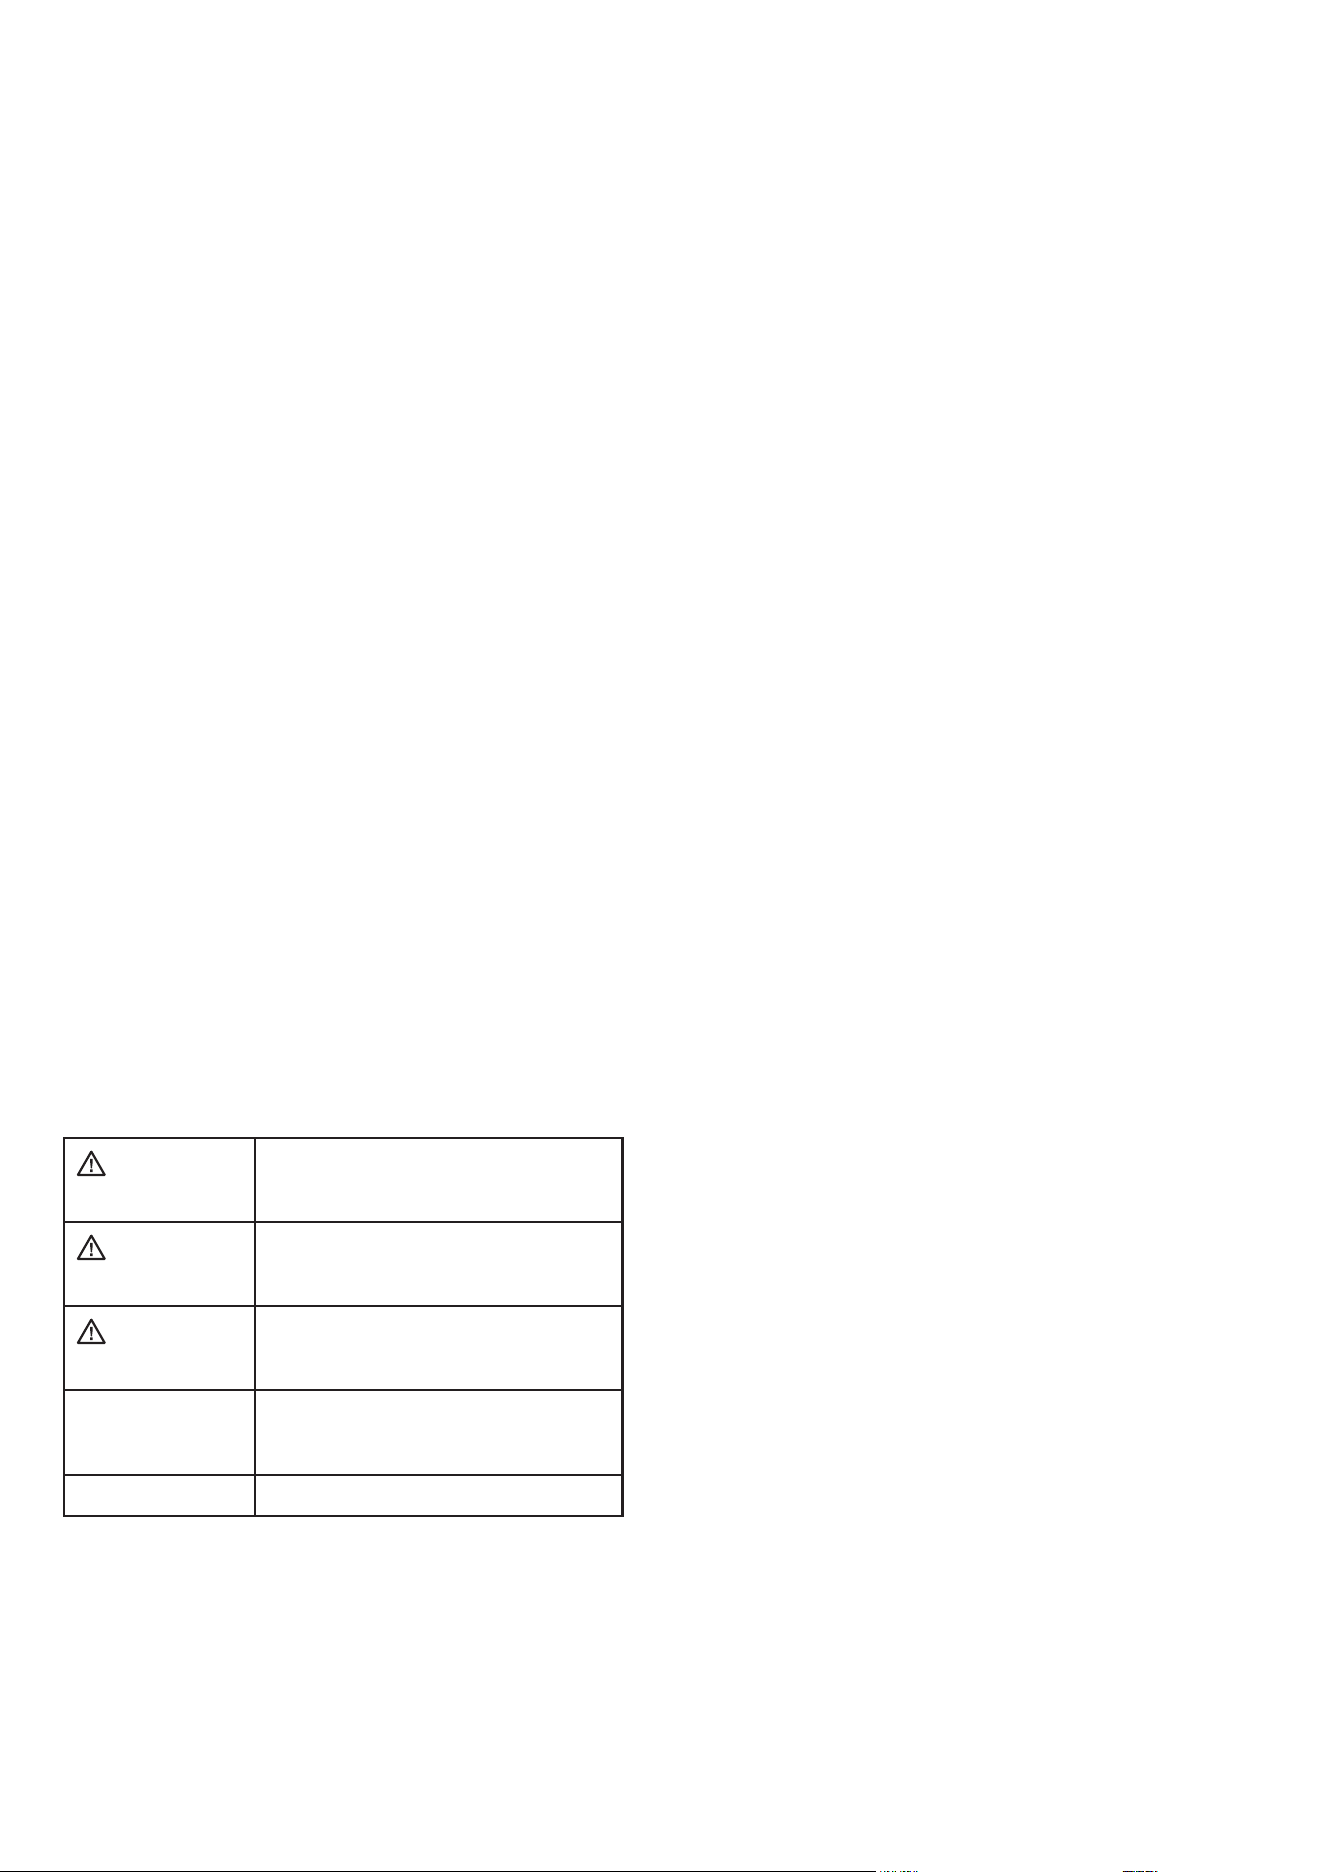
Priority of warnings
DANGER
identies a situation involving direct
danger which, if not obviated, may result
in death or severe bodily injury.
WARNING
identies a dangerous situation which,
if not obviated, may result in death or
severe bodily injury.
CAUTION
identies a dangerous situation which,
if not obviated, may result in minor or
medium bodily injury.
NOTICE
identies a dangerous situation
which, if not obviated, may result in
damage to property.
Note
identies useful information and tips.
Safety instructions and warnings
- WARNING: do not seal ventilation openings on
the appliance housing or enclosure.
- WARNING: only use the mechanical devices or
other aids recommended by the manufacturer to
help speed up the defrosting process.
- WARNING: do not damage the refrigerant circuit.
- WARNING: do not use any electrical devices in the
refrigerator compartment which do not comply with
the design recommended by the manufacturer.
- WARNING: the mains cable must not be dam-
aged while installing the appliance.
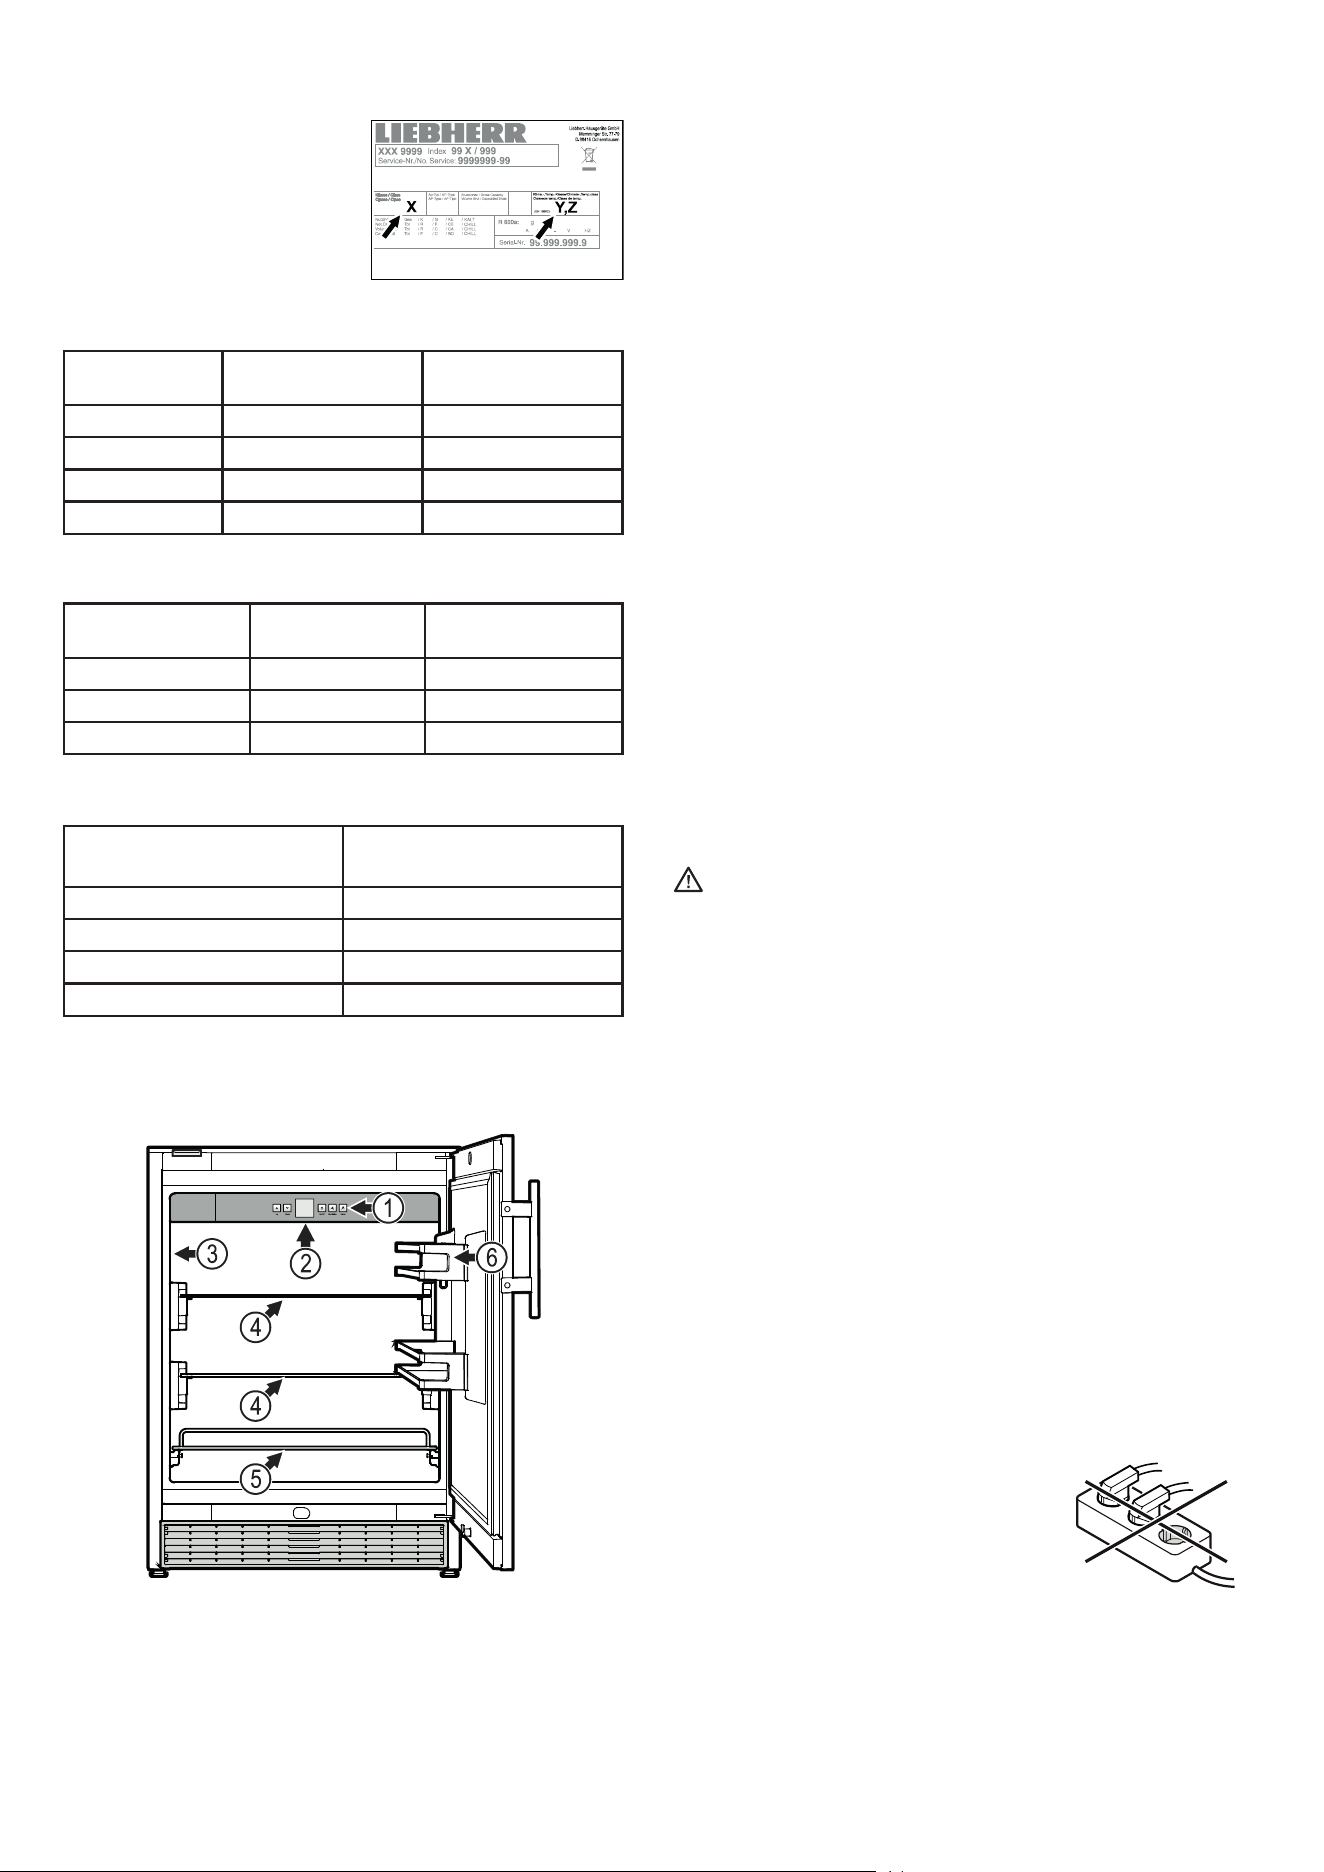
- WARNING: multi-sockets or distributor strips
and other electronic devices (such as halogen
transformers) must not be positioned and oper-
ated at the rear of appliances.
- WARNING: danger of injury through electric
shock. There are live parts under the cover. Only
have the interior LED light replaced or repaired
by customer service staff or trained personnel.
- WARNING: risk of injury from the LED lamp. The
light intensity of the LED light complies with laser
class RG 2. If the cover is defective, do not look
directly at the light through optical lenses from
close distance. This may damage your eyes.
- WARNING: this appliance must be secured as
described in the operating instructions to rule
out any potential risks due to its instability.
- This appliance can be used by children of 8 years
old and over, and also by persons with restricted
physical, sensory or mental capacity or lack of
experience and knowledge, if they are supervised
or have been instructed on safe use of the appli-
ance and understand the resulting risks. Children
must not be allowed to play with the appliance.
Cleaning and user maintenance must not be
carried out by children without supervision.
- Do not store any explosive substances, such as
aerosol containers with flammable propellant
gas, inside the appliance.
- To prevent injury and damage to property, the
appliance should only be installed by two people.
- After unpacking it, check the appliance for signs
of damage. Contact the supplier if it is damaged.
Do not connect the appliance to the mains power
supply.
- Avoid prolonged skin contact with cold surfaces
(e.g. chilled/frozen products). If necessary, take
safety action (e.g. gloves).

15
EN
- All repairs and work on the appliance may only
be carried out by customer service personnel
or other trained personnel. The same applies to
changing the mains power cable.
- Only carry out repair and other work on the ap-
pliance when the mains plug has visibly been
disconnected.
- Only install, connect and dispose of the appliance
as described in these operating instructions.
- In the event of a fault, pull out the plug or switch
o the fuse.
- When disconnecting the appliance from the
mains, pull on the plug. Do not pull on the cable.
- Ensure that food which has been stored for too
long is not consumed. Dispose of food which has
been stored for too long properly.
- Do not use the interior LED light to light the room.
The interior LED light is only designed to illuminate
the interior of the appliance.
- Do not allow naked ames or ignition sources to
enter the appliance.
- Alcoholic drinks or other vessels containing al-
cohol should be sealed tightly for storage.
Symbols on the appliance
The symbol can be located on the compressor. It
refers to the oil in the compressor and indicates
the following danger: swallowing or inhaling can
be fatal. This is only relevant for recycling. There
is no danger in normal operation.
Warning about inammable substances.
A sticker to this eect may be applied to the rear
of the appliance. It refers to the foampadded
panels in the door and/or the housing. This is
only relevant for recycling. Do not remove the
sticker.
Noise emissions from the appliance
The noise level while the appliance is operating is below 70 dB(A)
(relative noise level 1 pW).
Declaration of conformity
The refrigerant circuit has been tested for leaks. The appliance
complies with the relevant safety regulations and EU Directives
2006/42/EG, 2014/30/EU, 2009/125/EG and 2011/65/EU.
Intended use
This refrigeration appliance is designed for storing chilled food.
It is not designed for the presentation of food or for the removal
of food by customers.
The appliance may be used in a covered outdoor area protected
from sunlight, rain and stormy weather and is suitable for the fol-
lowing congurations:
• as an under worktop appliance
• as a free-standing appliance
Foreseeable incorrect use
Do not use the appliance for the following applications:
• Storage and cooling of
- chemically unstable, inflammable or caustic substances
- blood, plasma or other bodily fluids for the purposes of infu-
sion, application or insertion into the human body.
• Use in potentially explosive atmospheres.
• Use outdoors or in areas where it is exposed to splash water or
damp conditions.
Incorrect use of the appliance will result in damaging or spoiling
the goods stored in it.
EPREL database
As from 1 March 2021, information about energy labelling and
ecodesign requirements will be available in the European product
database (EPREL). You can access the product database using
the following link: https://eprel.ec.europa.eu/. You will be asked
to enter the model identier. You will nd the model identier on
the type plate.
16
Setting up
The appliance is intended for outdoor use.
NOTICE
At the installation site, the area for the appliance, and particularly
for the mains cable, must be protected from water accumulation
or extreme weather conditions.
• Do not place the appliance in direct sunlight or near cookers,
radiators and similar sources of heat.
• Do not place heat-emitting appliances, e.g. microwave oven,
toaster, etc., on top of the appliance.
• The more coolant there is in the appliance, the larger the room
in which the appliance is installed must be. If the room is too
small, any leak may create a flammable mixture of gas and air.
For each 8 g of coolant the installation space must be at least
1 m³. Information on the coolant is on the model plate inside the
appliance.
Electrical connection
WARNING
Danger of electric shock!
Danger of re caused by moisture!
If live parts or the mains power cable become
damp, a short-circuit may occur.
The socket to which the appliance is connected
must feature an RCCB (residual-current-operated
circuit-breaker).
Only operate the appliance with alternating current (AC).
The permissible voltage and frequency are indicated on the type
plate. The position of the type plate is shown in the section entitled
Description of the appliance.
The socket must be properly earthed and protected by a fuse.
The tripping current of the fuse must be between 10 A and 16 A.
The socket must not be situated behind the appli-
ance and must be easily accessible.
Do not connect the appliance using an exten-
sion cable or extension socket.
Do not use stand-alone inverters (conversion
of direct current to alternating current/three-
phase current) or energy-saving plugs. Risk
of damage to the electronic control system!
Climate class
The climate class [X] specifies the
ambient conditions in which the
appliance can be operated safely.
The climate class [Y] and tempera-
ture class [Z] define the maximum
outline conditions in which the
appliances will operate perfectly.
The climate rating is indicated on the type plate.
[X]
Climate class
Max. room
temperature
Max. relative
humidity
3 25 °C 60 %
4 30 °C 55 %
5 40 °C 40 %
7 35 °C 75 %
The minimum room temperature at the place of installation is 0°C.
[Y]
Climate class
Temperature
[°C]
Relative humidity
[%]
CC1 25,0 60
CC2 32,2 65
CC3 40,6 75
Recommended temperature setting:
[Z]
Temperature class
Temperature setting
[°C]
K1 3,5
K2 2,5
K3 -1,0
K4 +5,0
Description of the appliance
(1) Operating and control elements
(2) Interior light (LED light strip)
(3) Type plate
(4) Adjustable shelves
(5) Pull-out shelf
(6) Adjustable door rack
NOTICE
The maximum load per storage shelf (4) is 15 kg.
The maximum load per pull-out shelf is 15 kg.
The maximum load per door rack is 10 kg.
17
EN
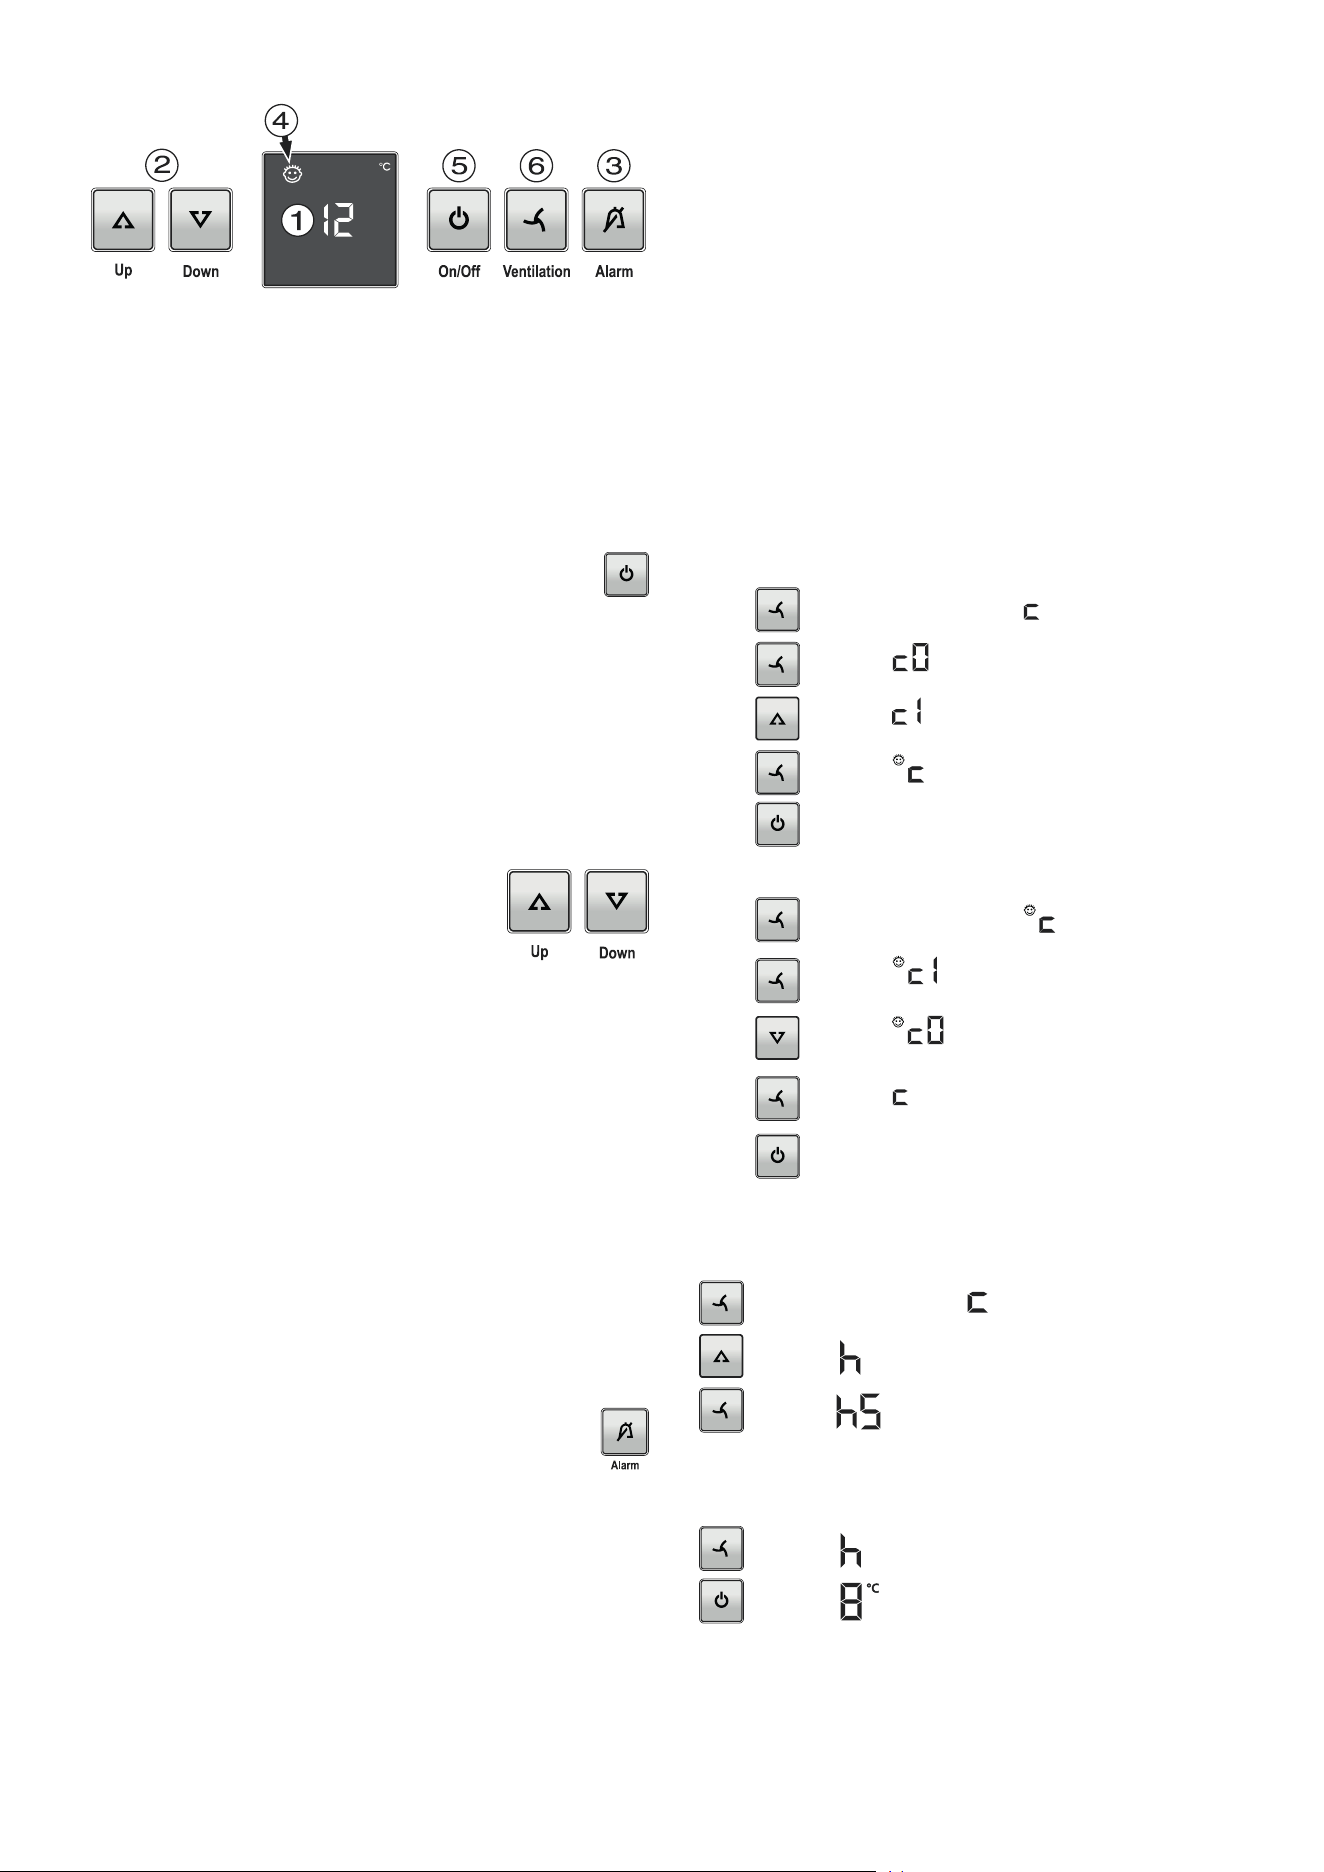
(1) Temperature display (display)
(2) Temperature setting buttons
(3) Audible warning on/off button
(4) Child lock activated symbol
(5) On/Off button
(6) Fan button
Operating and control elements
Switching the appliance on and o
Switching the appliance on
Press the On/O button until the temperature display
lights up.
Switching the appliance o
Keep the On/O button pressed for approx. 3 seconds so that
the temperature display goes out.
Note
If the On/O button is held down for a further 3 seconds after
the temperature display has gone out, the appliance is switched
on again.
Temperature alarm
If the temperatures in the interior are out of the permitted range,
the audible warning signal will sound and the temperature display
will ash.
After a lengthy power failure, the temperature in the interior may
have risen to too high a level. After the power supply returns, the
fall in temperature can be watched on the display.
• Cancel the audible warning signal by pressing the Alarm button.
The temperature display will stop ashing as soon as the tem-
perature in the interior has reached the set value.
Door open alarm
If the door is left open for more than 180 seconds, the audible
warning signal will sound.
If the door must be opened for a lengthy period to place
items into the appliance, cancel the audible warning signal
by pressing the Alarm button.
The alarm switches back to standby when the door is shut.
Setting the temperature
To increase the temperature
Press the Up button.
To reduce the temperature
Press the Down button.
- When pressing one of the buttons for the first time, the display
will start to flash.
- Pressing this button again enables you to change the temperature
setting.
- The electronic controls will switch over automatically about
5 seconds after the last time you pressed the button, and the
actual temperature will be displayed.
Note
The temperature in the warmest area of the interior may be higher
than the temperature setting.
If the door is left open for a lengthy period, the temperature in the
appliance's compartments may rise dramatically.
Setup mode
In setup mode, you can set the child lock and adjust the bright-
ness of the display.
The child lock is designed to protect the appliance from being
switched o accidentally.
Activating the child lock
Press for 5 seconds. Display =
Press Display =
Press Display =
Press Display =
Press The child lock is activated.
Deactivating the child lock
Press for 5 seconds. Display =
Press Display =
Press Display =
Press Display =
Press The child lock is deactivated.
Adjusting the display brightness
for 5 seconds. Display =
Display =
Display =
Use buttons Up and Down to select the desired setting.
h1 = minimum brightness
h5 = maximum brightness
Display =
Display =
The adjusted brightness will be activated after one minute.
Note
If a button is pressed, the display lights up for one minute at
maximum brightness.
When commissioning the appliance, the adjusted brightness will
only be active once the set interior temperature of the appliance
has been reached.
Temperature alarm after a fault in the appliance
If the appliance develops a fault, the temperature in the interior
may rise too high or fall too low. The audible warning signal will
sound and the temperature display will ash.
If the temperature displayed is too high (warm), rst check whether
the door is closed correctly.
If the temperature display continues to show a value that is too high
or too low after one hour, contact the customer service department.
• Cancel the audible warning signal by pressing the Alarm button.
18
Humidity function
Certain foods must be stored in a humid atmosphere (e.g. baked
goods). To prevent such foods from drying out, the humidity func-
tion must be activated.
To switch on
Press the fan button - the symbol lights up.
Cooling
NOTICE
Store raw meat or sh in clean sealed containers on the bottom
shelf of the refrigerator/freezer compartment so that it cannot
come into contact with any other food or drip liquid onto it.
A failure to follow these instructions may result in the food being
spoilt.
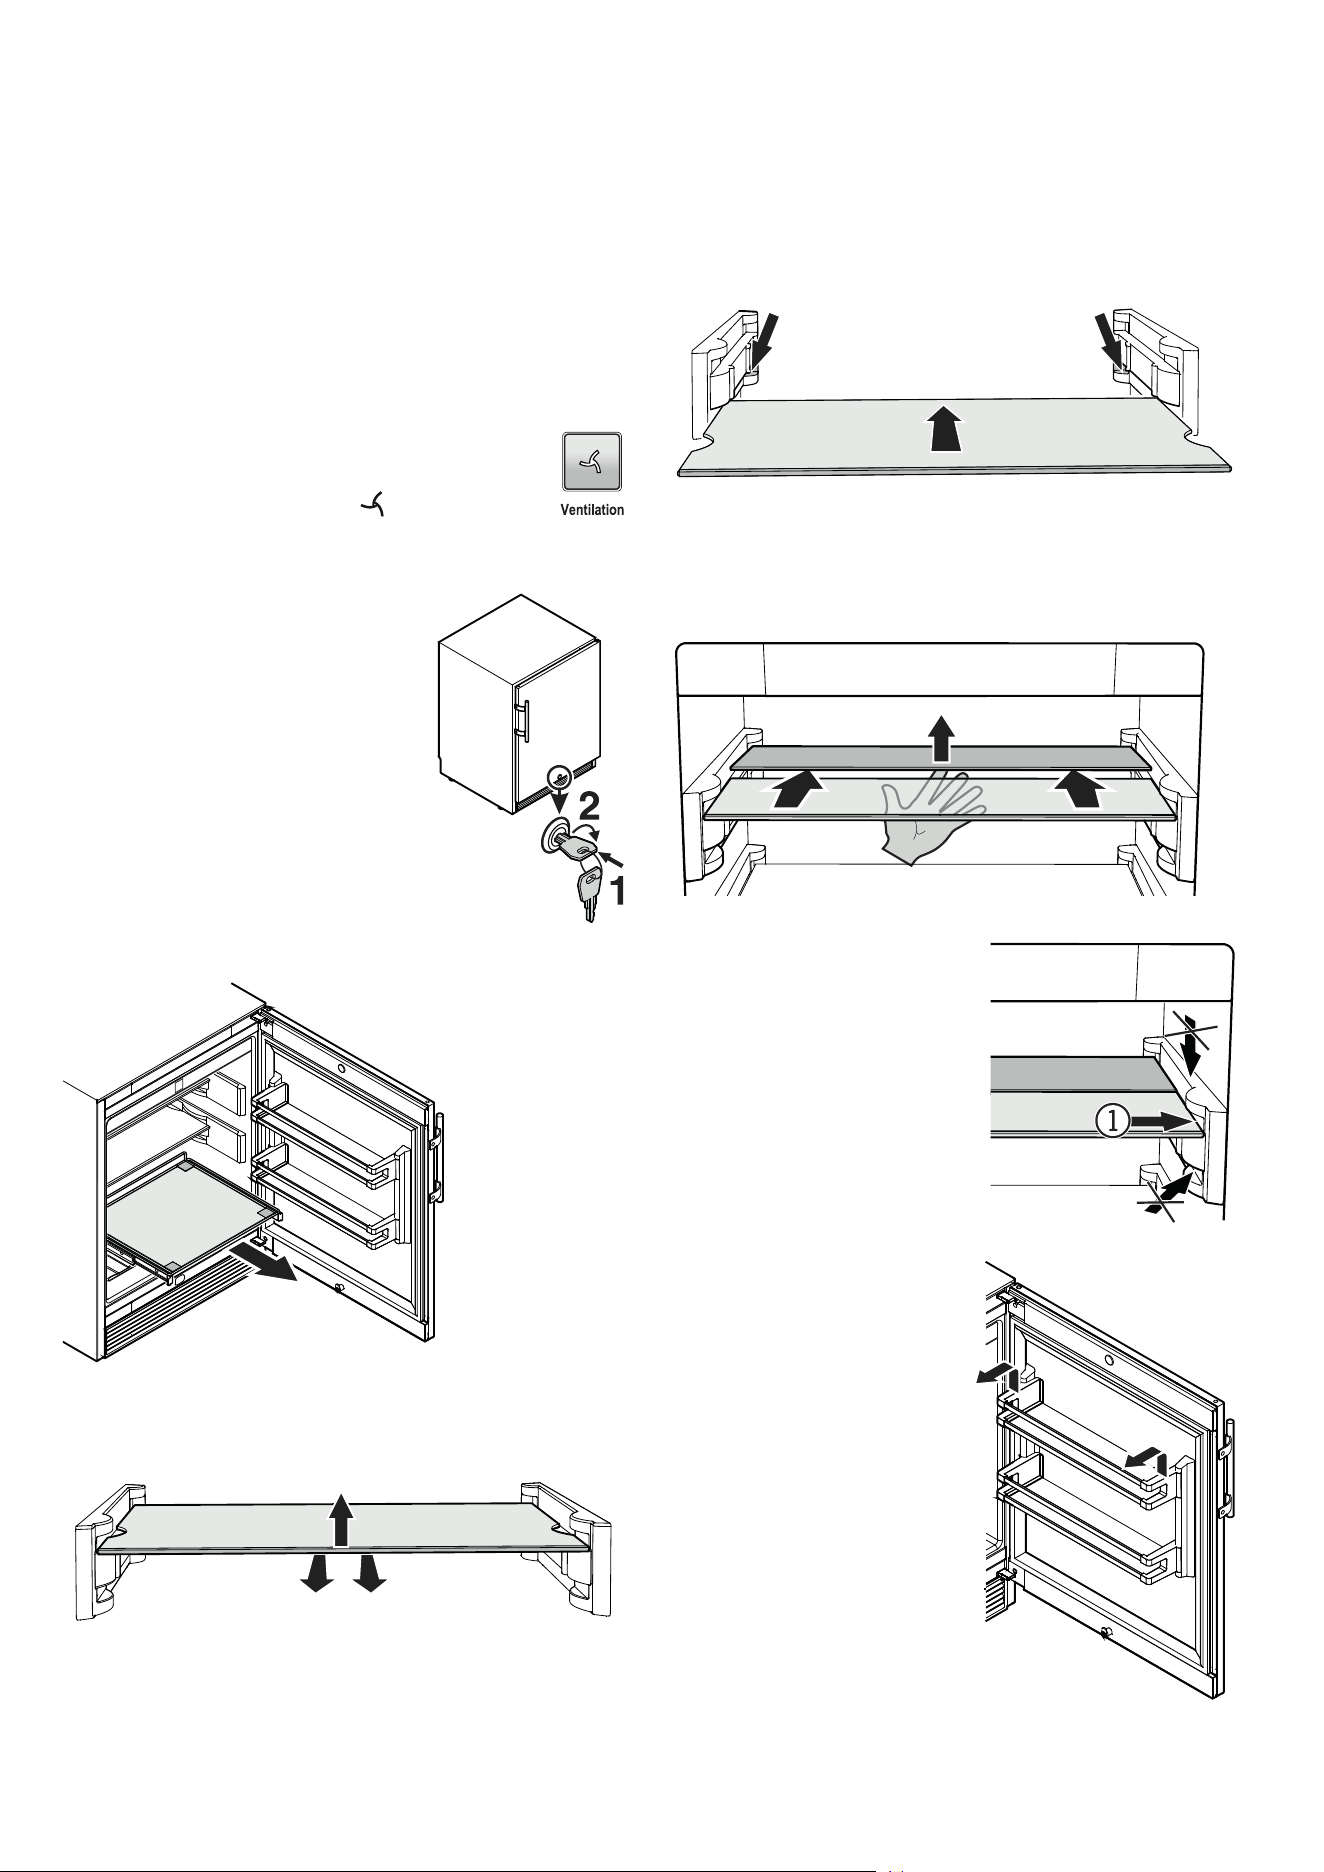
Safety lock
The lock in the appliance door is equipped
with a safety mechanism.
Locking the appliance
• Insert the key as shown by arrow 1.
• Turn the key 90°.
To unlock the appliance, the same proce-
dure must be repeated in the same order.
Pull-out shelf
Equipment
Using the sectioned shelf
If you need to make space for tall containers, simply carefully slide
the front half of the sectioned glass shelf underneath the back half.
(1) The sectioned glass shelf may
only be inserted in the top chan-
nel of the supports.
Do not insert the sectioned shelf
above or below it.
Repositioning the shelves
Lift the shelf up and remove
Insert the shelf in the bottom channel of the supports.
Be sure the rear angles of the shelf rests on the marked areas
of the supports.
Do not place the shelf on the top of the supports.
Adjustable Door Rack
Lift door rack vertically, lift out to
the front and re-insert at a dier-
ent height, following these steps
in the reverse order
19
EN
Cleaning
WARNING
Before cleaning, always disconnect the appliance
from the mains. Pull out the plug or switch o the
fuse.
CAUTION
Risk of damage to the appliance components and
risk of injury due to hot steam.
Do not use steam cleaning equipment to clean
the appliance.
NOTICE
Surfaces which may come into contact with food
and accessible drain systems must be cleaned at
regular intervals.
• Remove the food from the appliance and store in a cool place.
• Remove the shelves and door racks.
Refer to chapter Equipment.
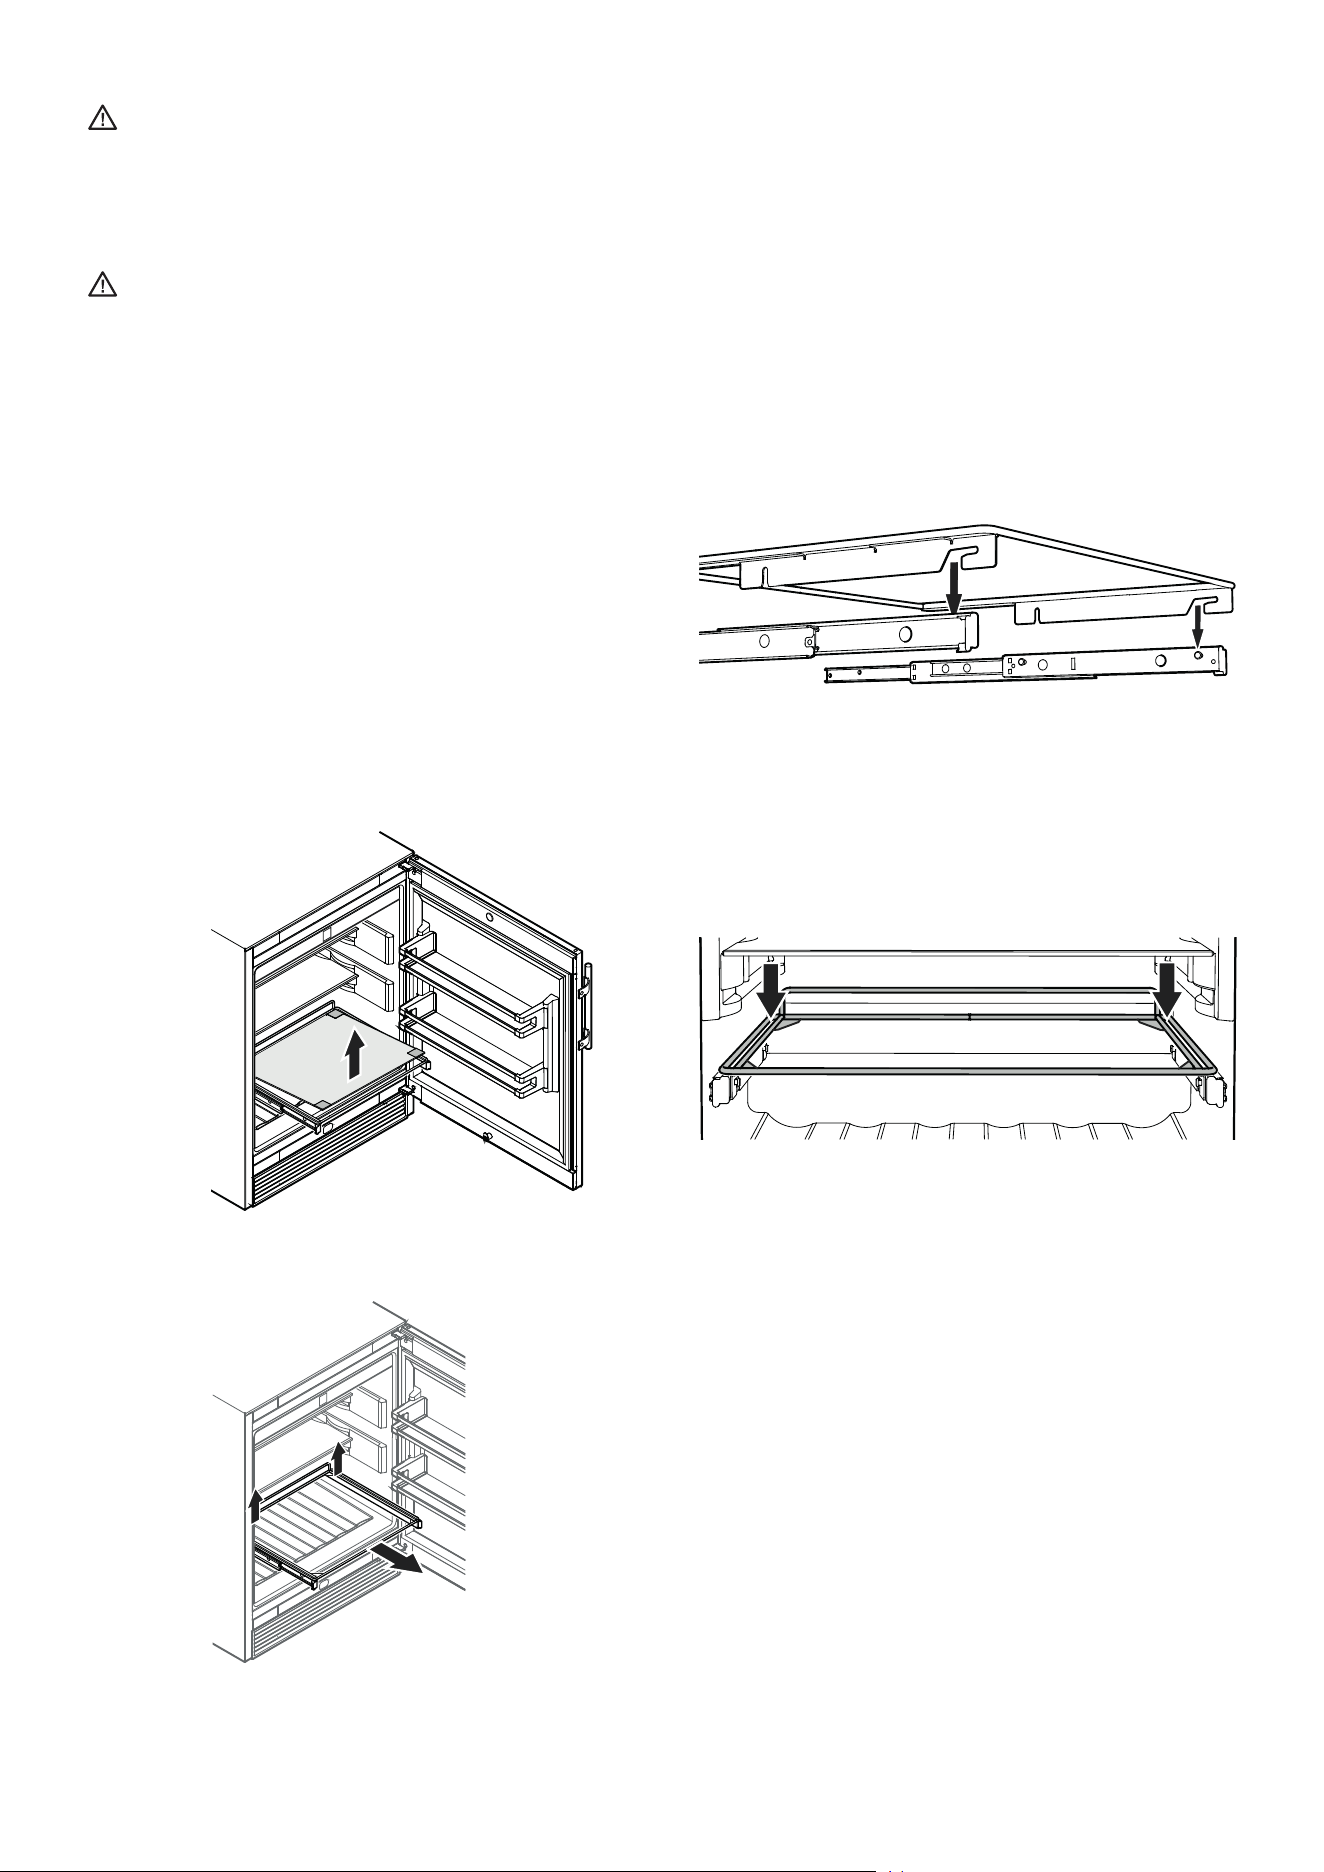
Remove glass plate.
Pull the pull-out shelf upwards on the right and
left at the back (release) and then remove it
towards you.
• Clean the inside, equipment parts and outer walls with lukewarm
water and a little detergent. Do not use chemical solvents or any
cleaning agents containing sand or acid.
• Ensure that no cleaning water penetrates into the electrical
components or ventilation grille.
• Dry all parts well with a cloth.
• Do not damage or remove the type plate on the inside of the
appliance. It is very important for servicing purposes.
Inserting the pull-out shelf
Extend the pull-out rails as far as they will go. Place the front
recesses of the shelf on the securing pins.
Slide the shelf together with the pull-out rails into the appliance
as far as they will go.
Push the shelf downwards on the right and left at the back and
click into place.
Install all equipment parts and replace the food in the appliance.
20
Disposal notes
The appliance contains reusable materials and should
be disposed of properly - not simply with unsorted
household refuse. Appliances which are no longer
needed must be disposed of in a professional and
appropriate way, in accordance with the current local
regulations and laws.
Do not damage the refrigerant circuit of an appliance that is no
longer needed during its disposal.
This appliance contains inammable gases in the refrigerant
circuit and insulation foam.
Your local council or a waste disposal contractor can provide
information about how to dispose of the appliance correctly.
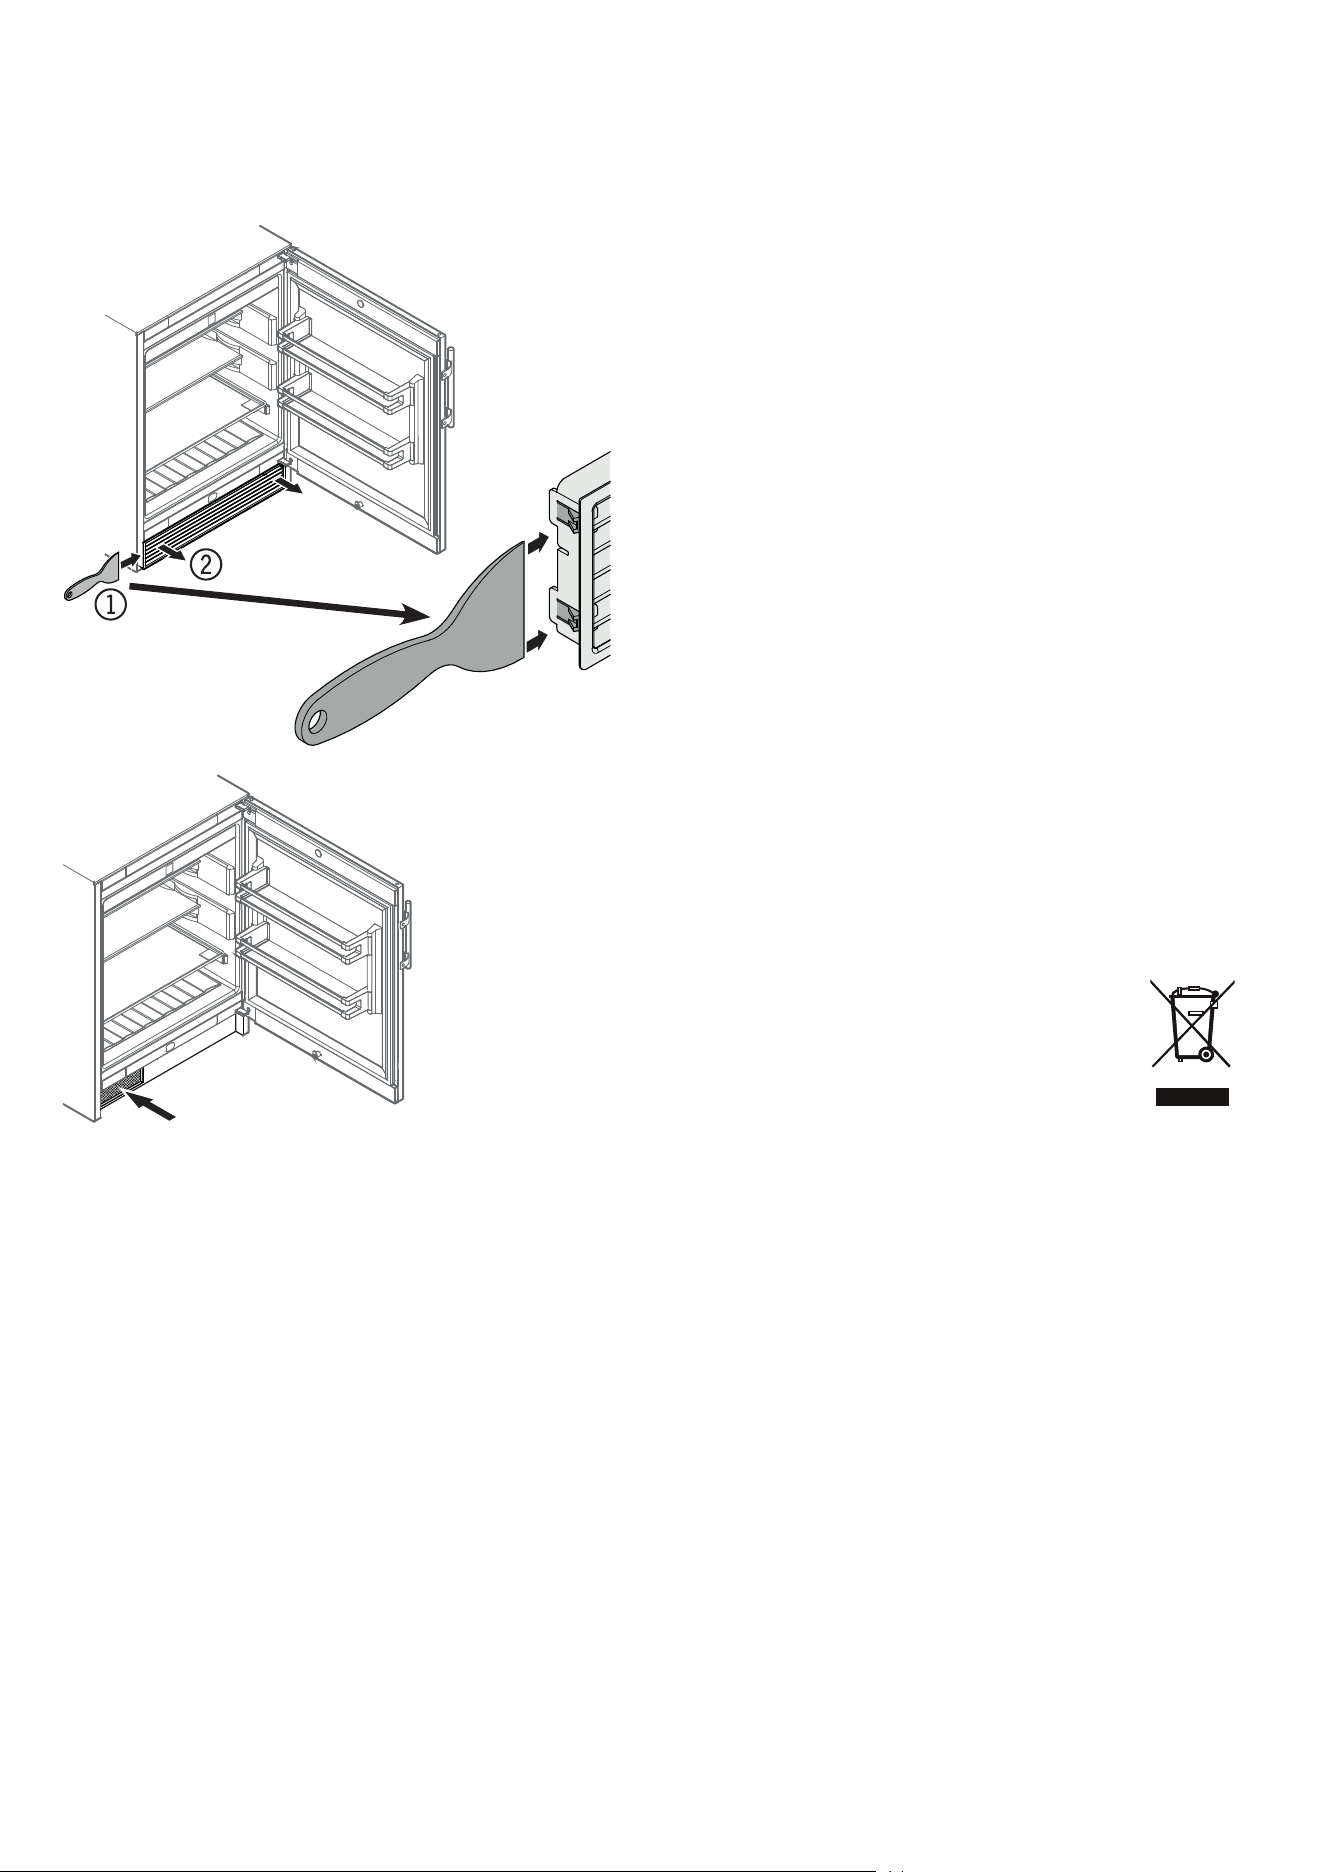
Cleaning the dust lter
The dust lter in the appliance plinth must be cleaned at least
once a year.
• Clean the dust filter using a vacuum cleaner.
• Click the ventilation grille back into place.
Storing the appliance out of season
Shutting the appliance down
If the appliance is to be left outdoors for the whole year
The ambient temperature must not fall below 0°C at any time
during the year and the appliance must be in an area protected
from extreme weather conditions.
In the event of a lengthy absence
• Remove the food from the appliance.
• Pull out the mains plug.
• Clean the appliance.
• Close the appliance door.
• Connect the appliance to the mains.
• Set the internal temperature to the highest (warmest) value of
14°C. The appliance continues to operate.
If the appliance is switched o for a lengthy period
of time
• Remove the food from the appliance.
• Pull out the mains plug.
• Clean the appliance.
• Store the appliance in an enclosed area and leave the door of
the appliance open to prevent odours forming.
NOTICE
Do not store the appliance outdoors with the door
open as small animals or insects may get into it.
21
EN
Malfunctions
• F1 appears in the display.
– The appliance has suffered a fault. Contact the customer service
department.
You may be able to rectify the following faults by checking
the possible causes yourself:
• Appliance does not function:
– Is the appliance switched on?
– Is the plug correctly fitted in the mains socket?
– Is the fuse intact?
• When inserting the mains plug, the refrigeration unit does
not switch on, but a value is shown in the temperature
display.
– Demo mode is activated.
Contact the customer service department.
• The temperature is not low enough:
– Is the temperature setting correct (see "Setting the temperature")?
– Does the separately installed thermometer show the correct
reading?
– Is the ventilation system working properly?
– Is the appliance set up too close to a heat source?
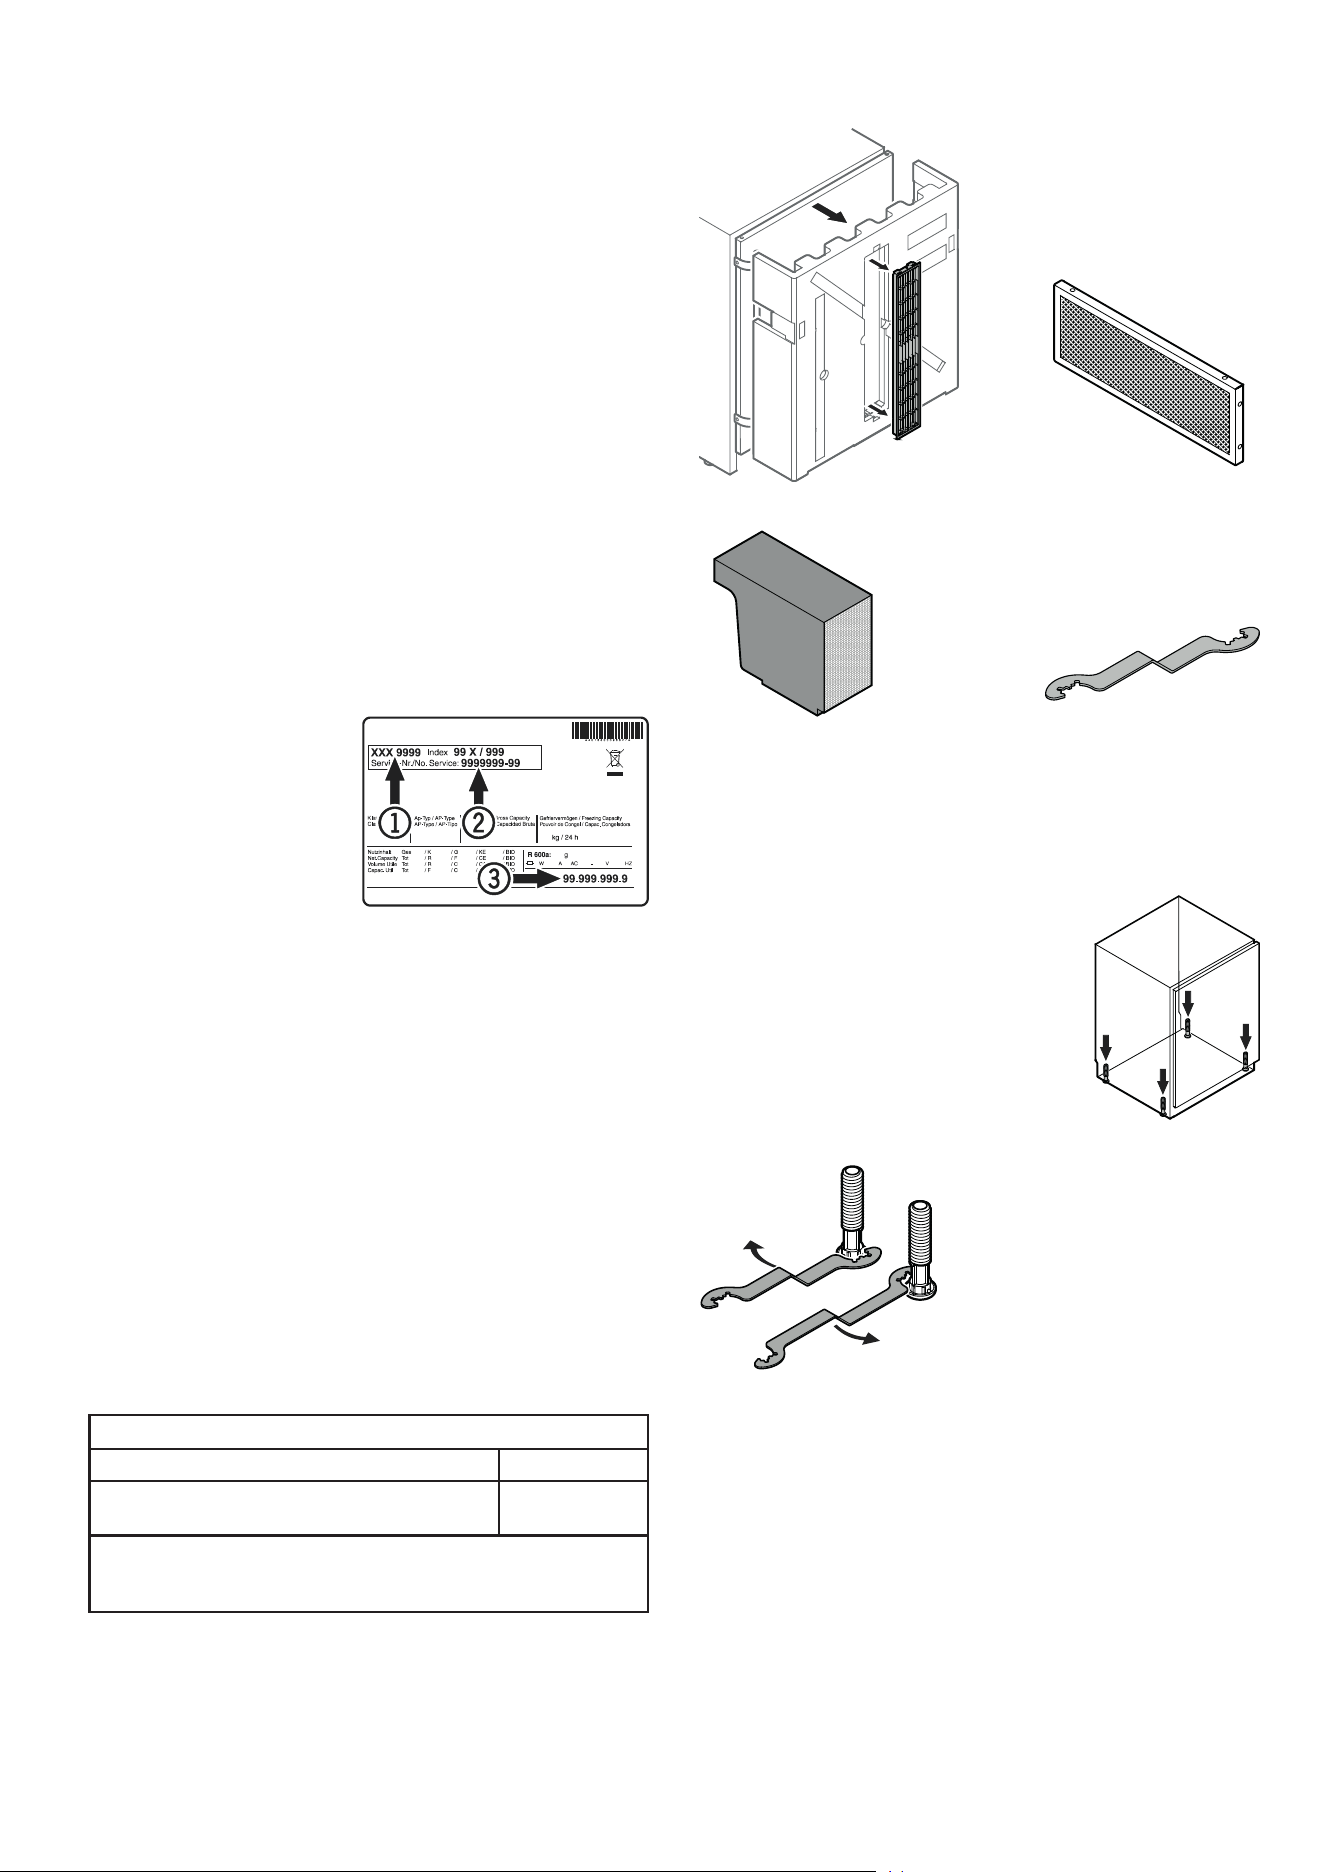
If none of the above causes
apply and you cannot rectify
the fault yourself, contact the
nearest customer service de-
partment stating the type des-
ignation (1), service number (2)
and appliance number (3) as
indicated on the type plate.
The position of the type plate is shown in the section entitled
Description of the appliance.
Additional information:
- Food will remain fresh for longer if stored at the correct tempera-
ture. This can prevent having to discard food needlessly.
- If the condenser coil is not cleaned every year, it will significantly
reduce the appliance's efficiency.
- The period during which spare parts, necessary for the repair
of the refrigerating appliance with a direct sales function, are
available is 10 years.
- The minimum duration of the guarantee of the refrigerating ap-
pliance with a direct sales function offered by the manufacturer,
importer or authorised representative is 2 years.
Supplied Accessories
Ventilation grille
Wrench to adjust the height of
the appliance
Foam block for ventilation duct
in appliance base
Dust lter
Levelling the appliance
• Place the appliance in its final position at
the place of installation.
• Compensate floor unevenness using the
adjustable feet.
NOTICE
The appliance must be aligned horizontally
and vertically. If the appliance is not level, the
main body of the appliance can be deformed
and the door will not close properly.
Turn the spanner clockwise to raise
the appliance and anticlockwise
to lower it.
Position the spanner accordingly.
Lighting
Class
1
Light source
This product contains a light source that meets
energy eciency rating G
LED
1
The appliance may contain light sources with dierent
energy eciency classes. The lowest energy eciency class
is indicated.
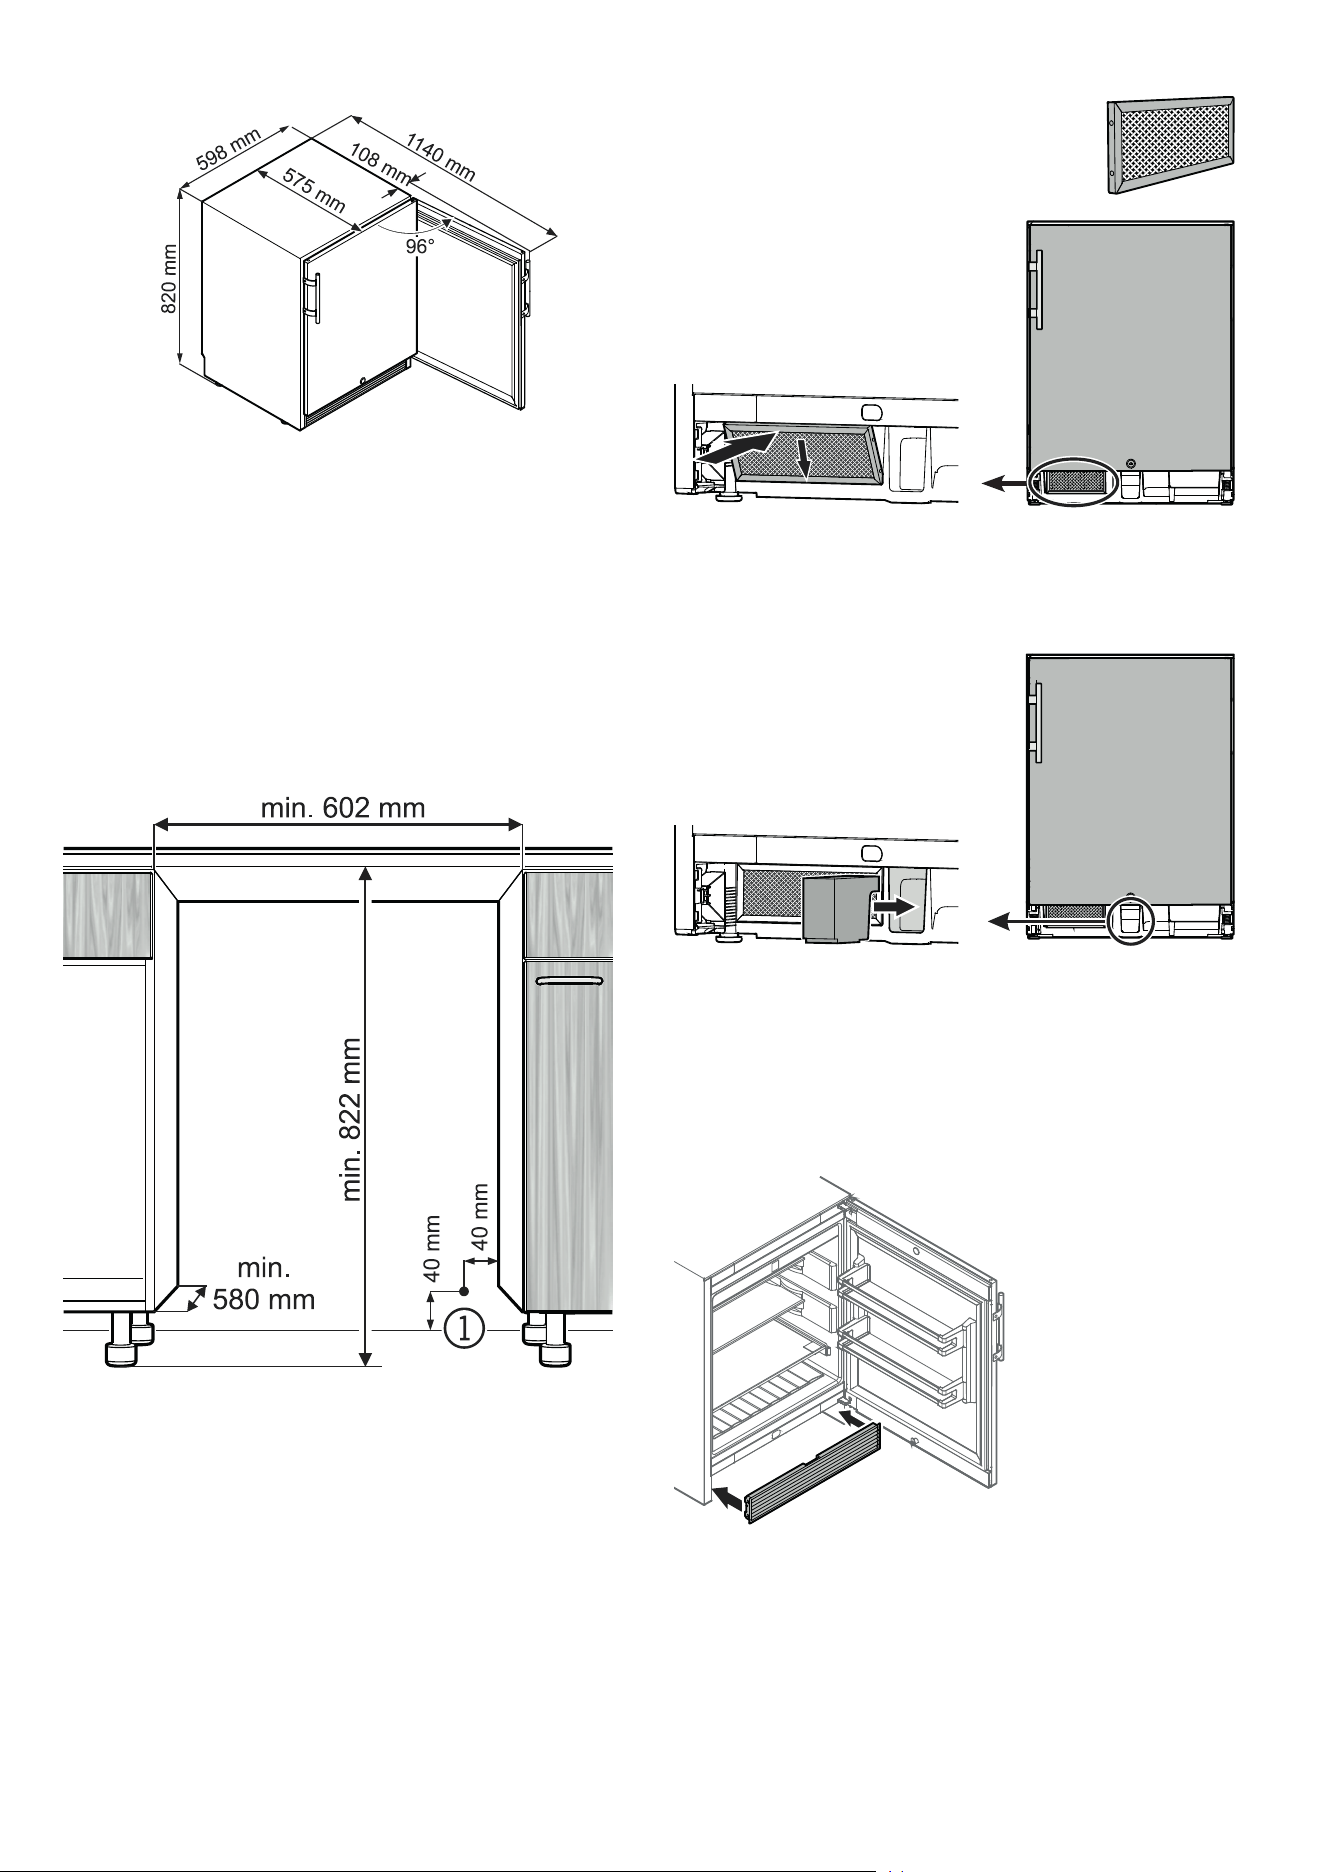
22
Appliance dimensions
Air circulation in the appliance plinth area
The refrigeration unit is located in the appliance plinth.
To ensure proper air circulation in the
plinth area, install the foam moulding
provided as shown in the illustration.
Mounting the dust lter
The supplied dust filter prevents that dirt enters
the motor compartment, reducing the refrigeration
performance. Therefore always install the dust filter.
Remove the protective lm from the
dust lter.
Insert the lter at the bottom and click
into place at the top.
Mounting the ventilation grille
Fit the provided ventila-
tion grille at the front
and click into place.
NOTICE
If the foam moulding is not installed, the appliance will not achieve
its full refrigeration performance during operation.
(1) In this area, the power cord comes out of the appliance rear.
Free length of the power cord = 2000 mm
Choose the position of the socket considering these specications.
The socket must not be situated behind the appli-
ance and must be easily accessible.
Installation dimensions
NOTICE
In order to avoid any problems when installing the appliance and
to avoid damage to the appliance, the following conditions must
be complied with.
The oor on which the appliance stands must be horizontal and
level.
The kitchen unit must be aligned horizontally and vertically.
23
EN
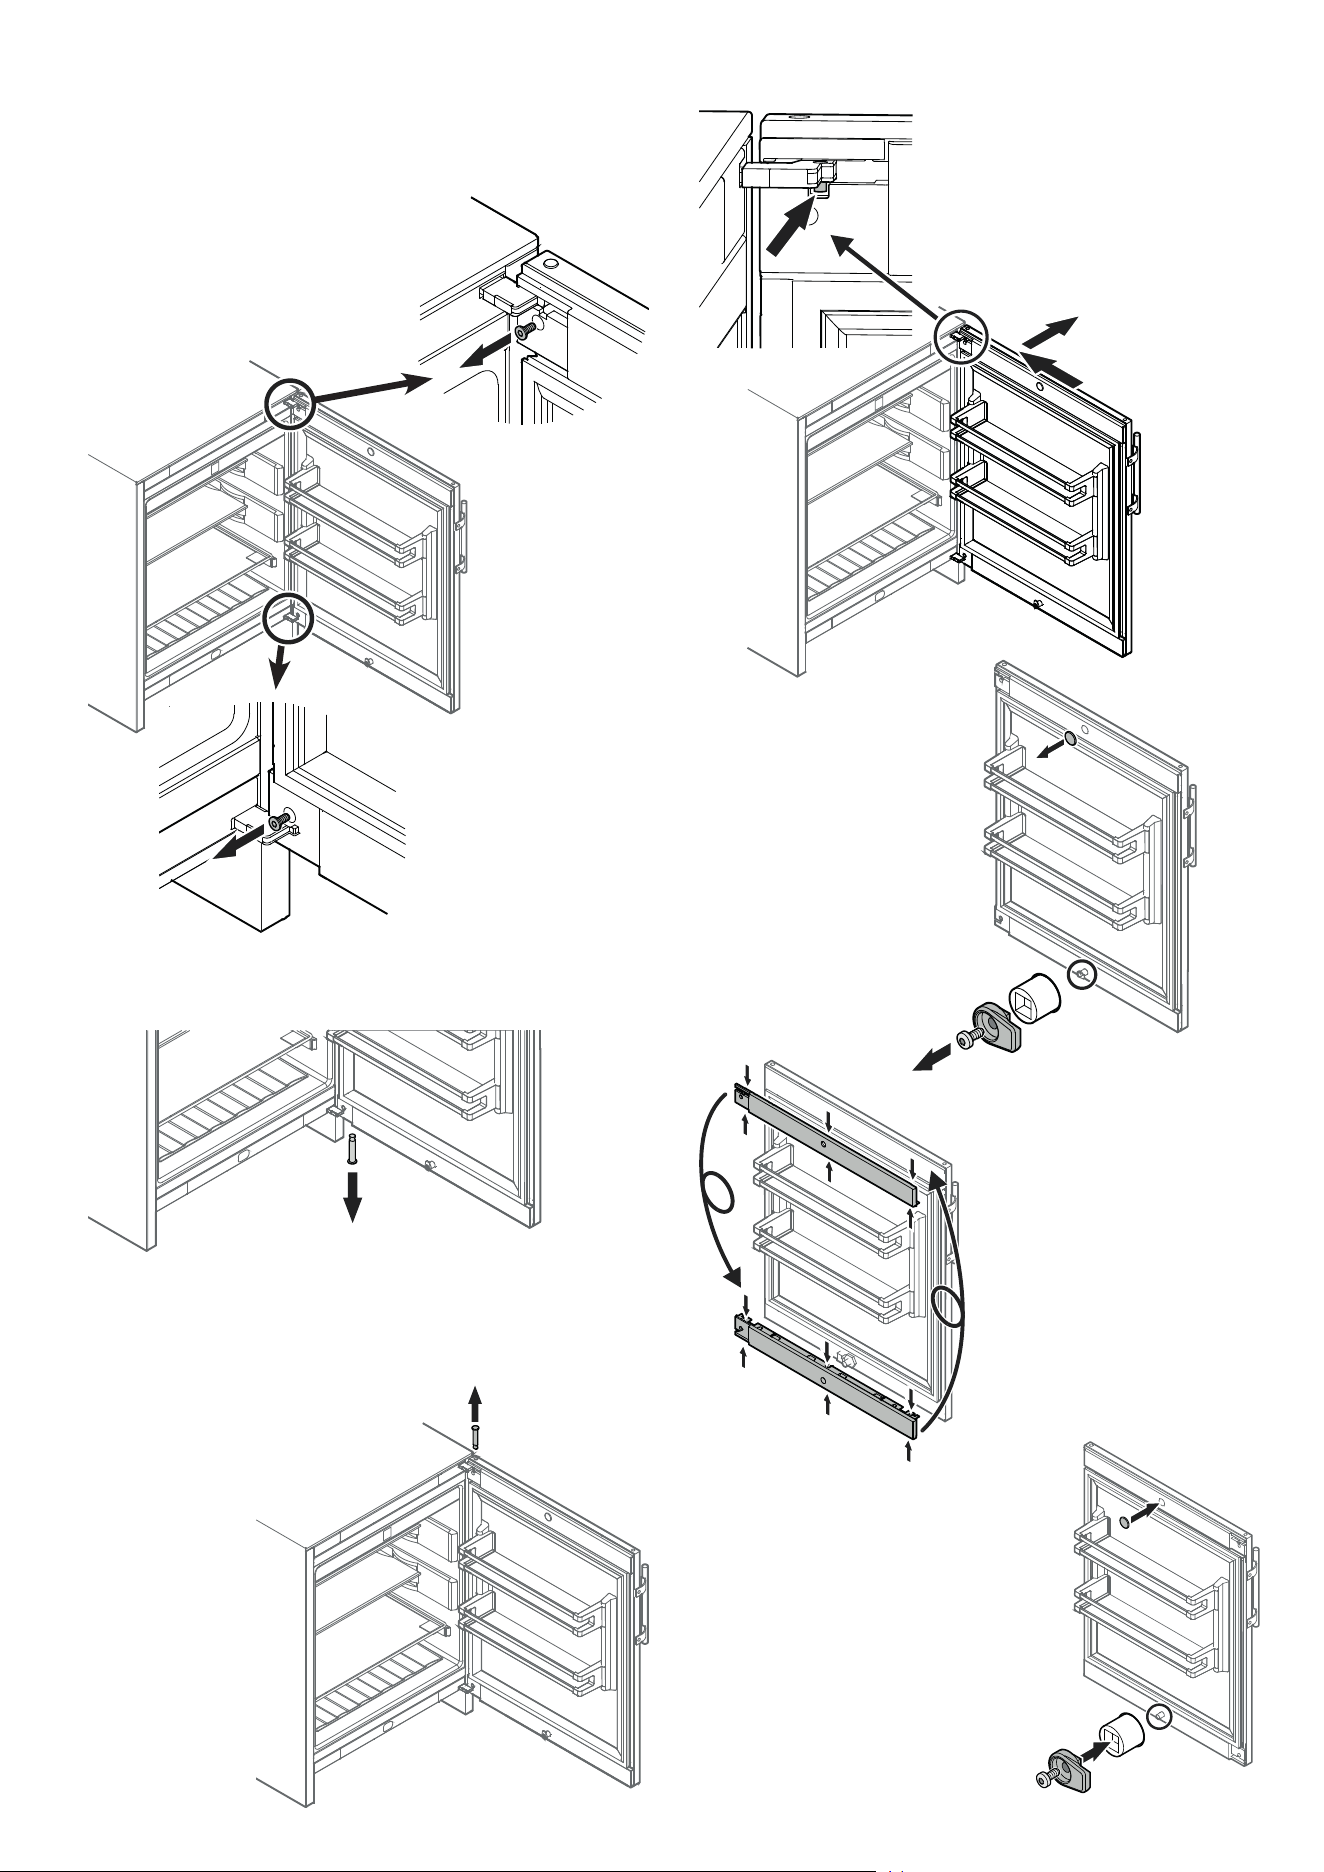
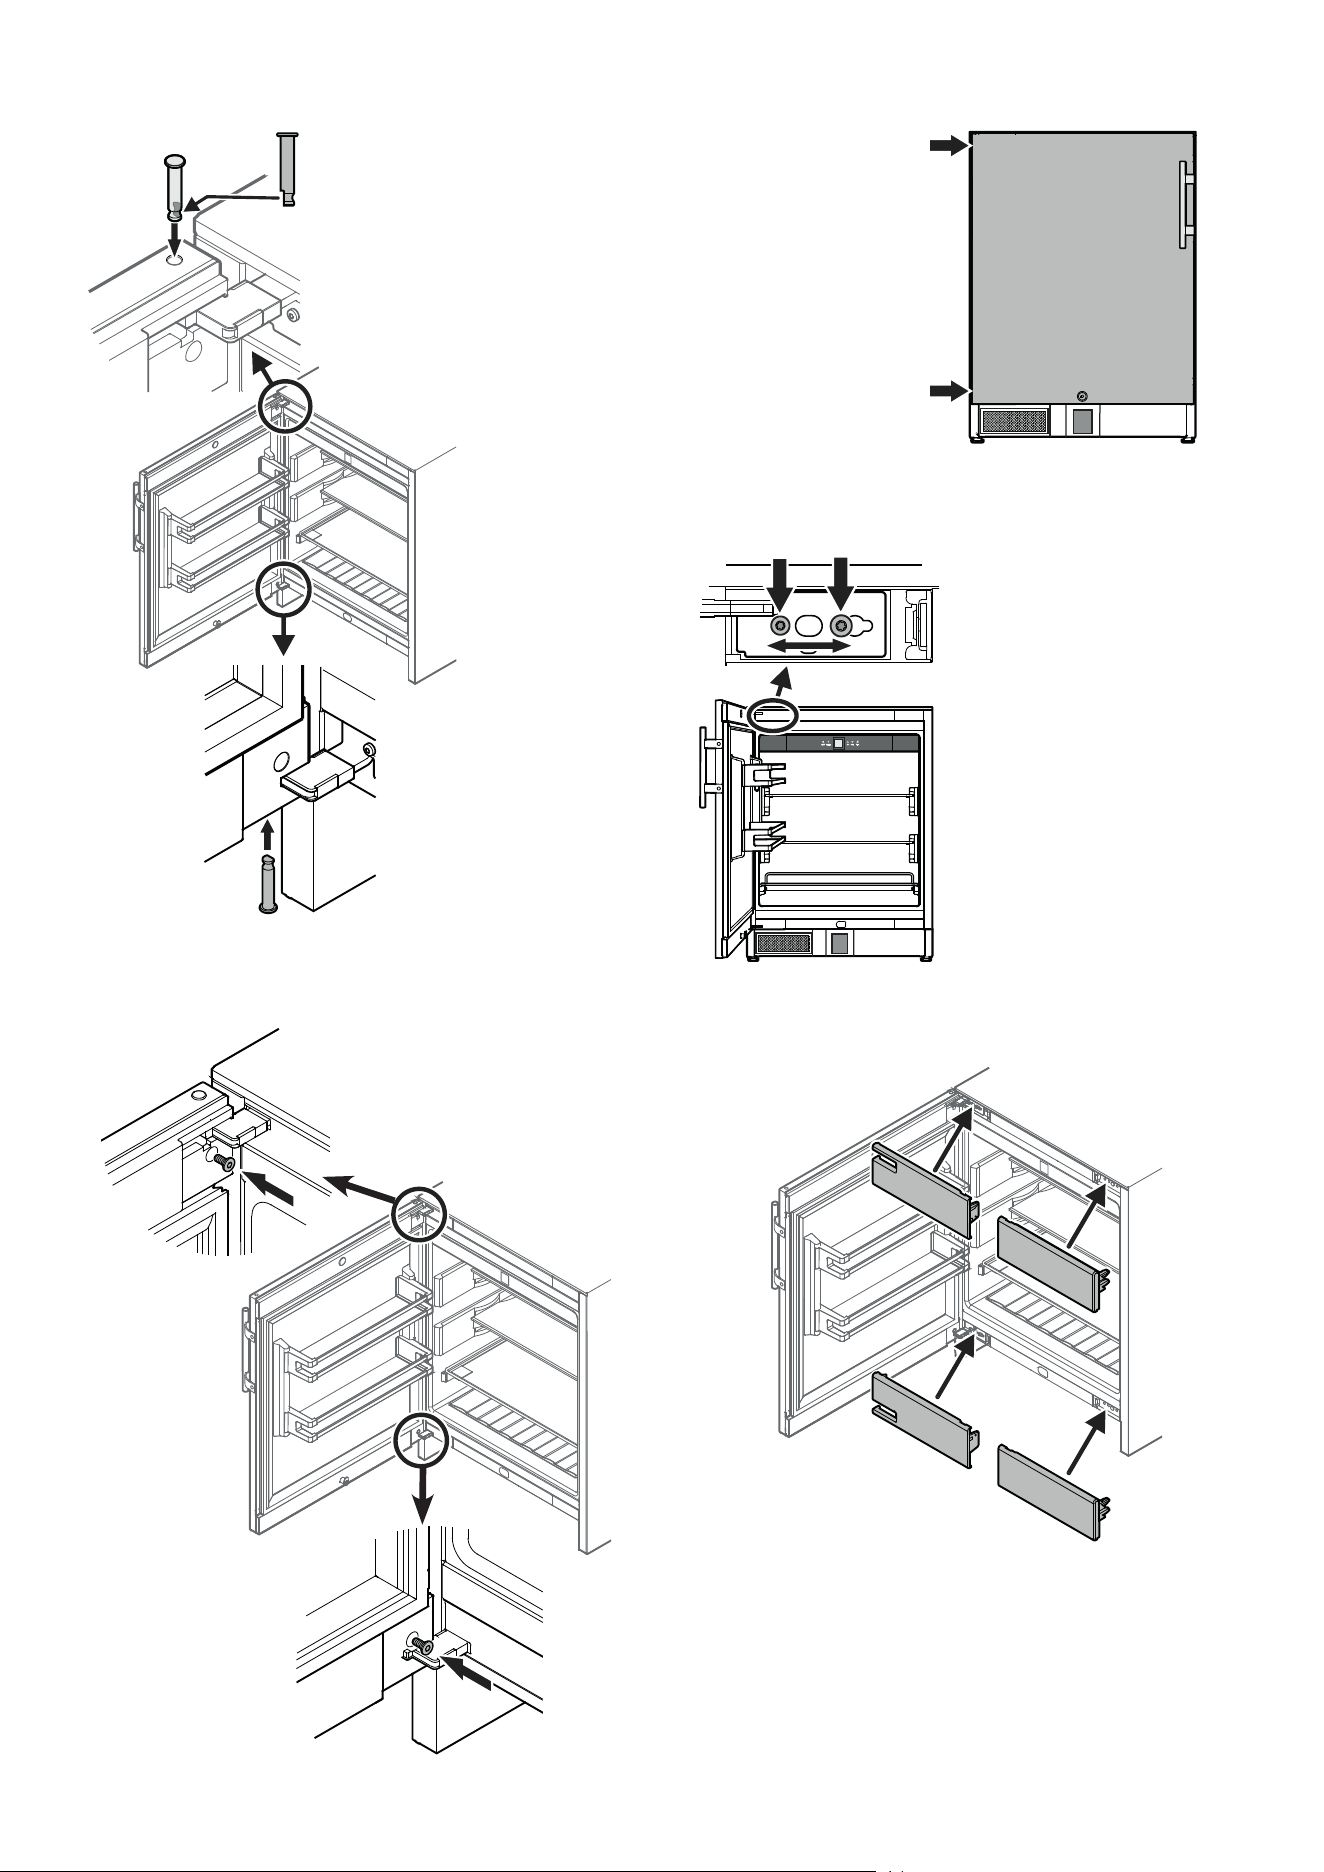
3.
Changing Over Door Hinges
Door hinges should only be changed by a trained expert.
Changing over the door hinges requires two people.
1.
2.
1. Remove screw.
2. Remove screw.
NOTICE
The door must now be held secure by another person.
3. Pull out hinge pin.
4.
4. Remove upper hinge pin.
5.
5. Move the door towards the ap-
pliance until the pin in the hinge
bracket is visible (see detailed
drawing).
Remove door.
6.
7.
6. Remove cover.
7. Unscrew door
latch.
8. Compress the covers in the
places shown and release.
Turn the covers 180° and click
into place on the opposite
side.
9. Click cover into place.
10. Screw on the door latch.
8.
9.
10.
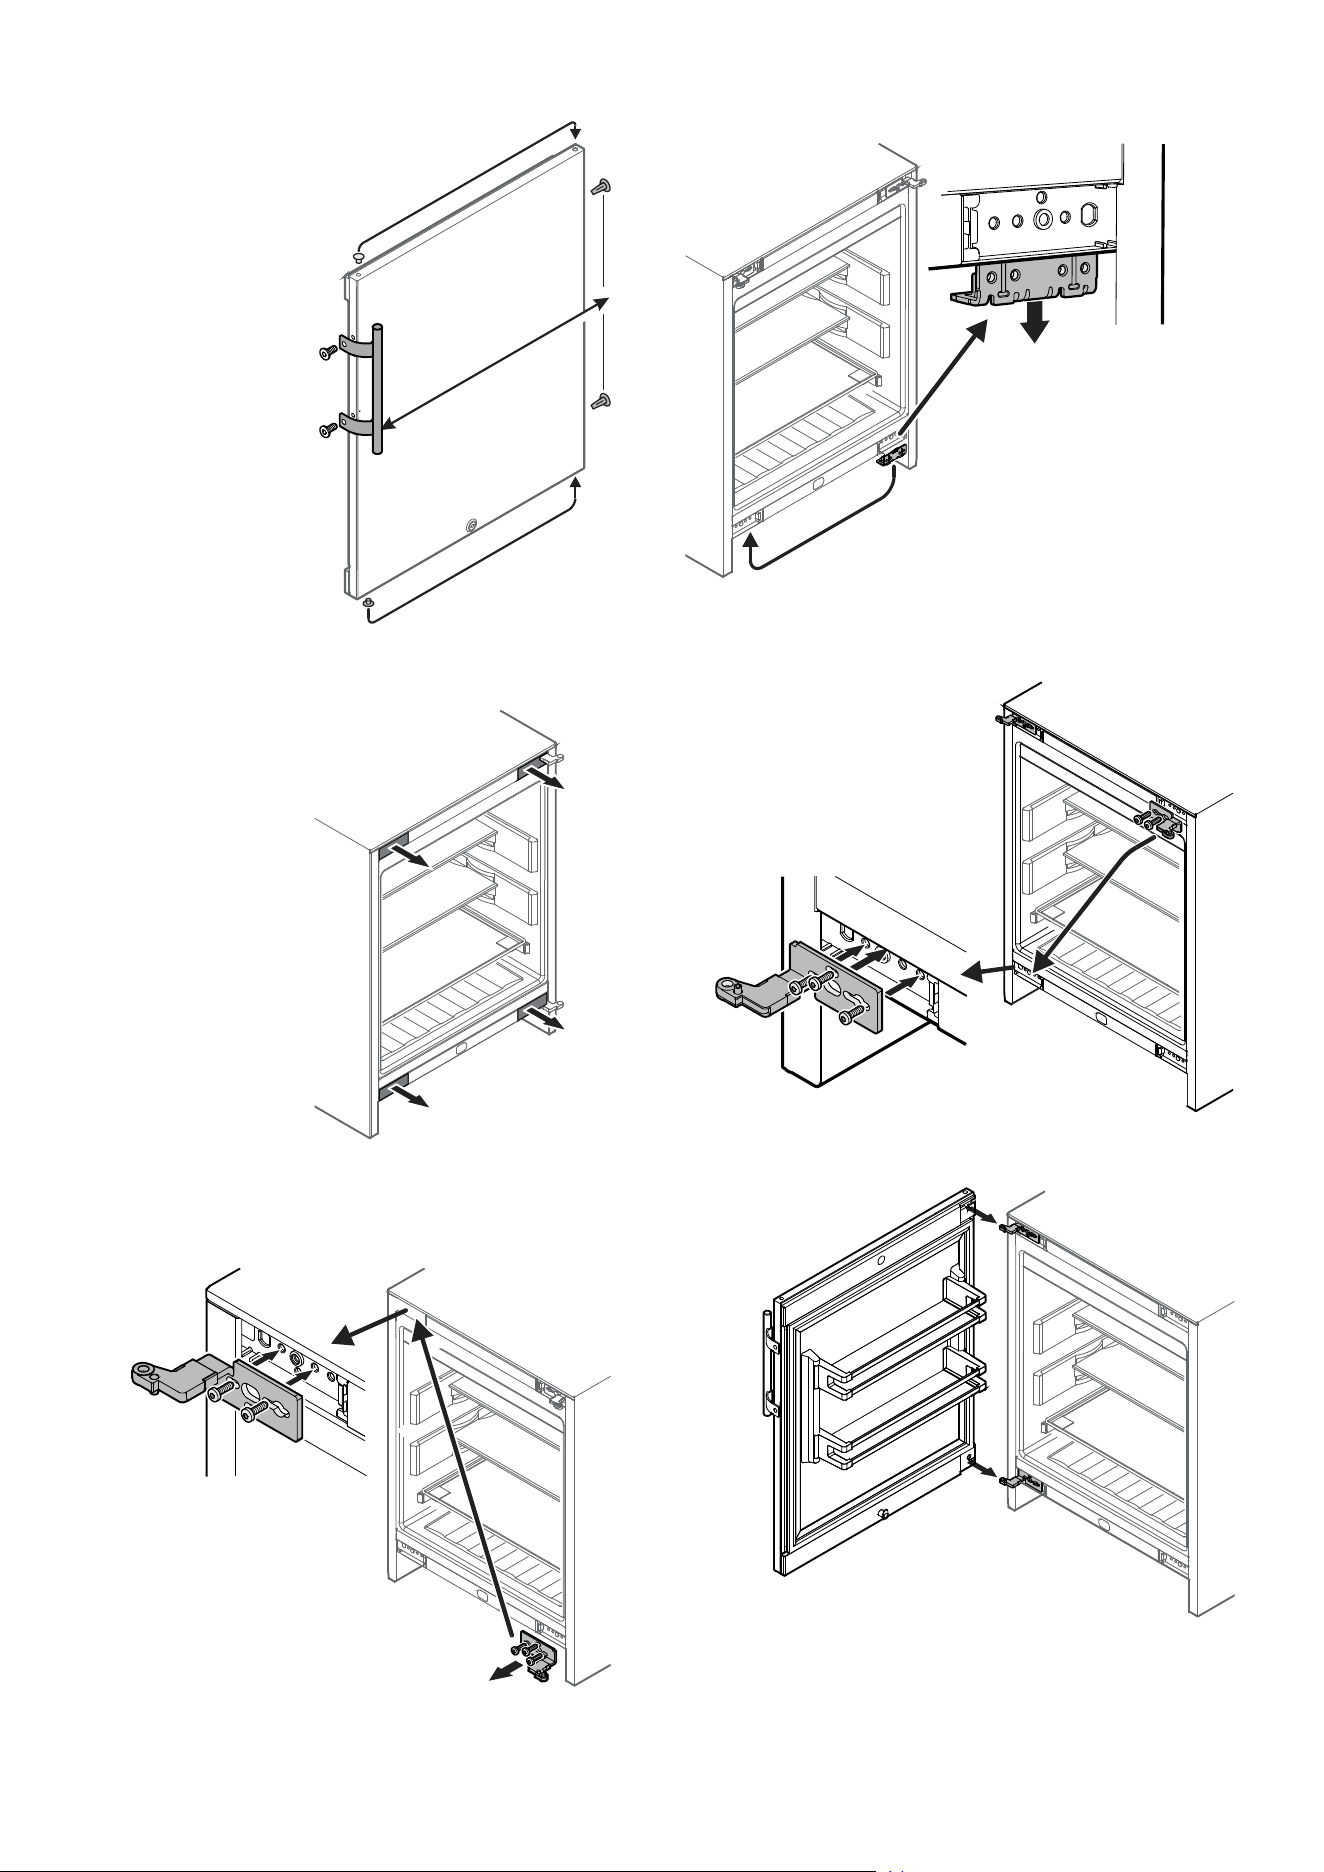
24
11. Transfer door handle and
plugs to the opposite
side.
11.
12. Remove the covers.
13. Unscrew the hinge bracket and
re-fit on the left at the top.
Insert screws in the marked
openings.
12.
13.
16. Fit the door on the hinge brackets.
NOTICE
The door must now be held secure by another
person.
15.
15. Unscrew the hinge bracket
and re-fit on the left at the
bottom.
Insert screws in the marked
openings.
14.
14. Remove the lower retaining
bracket and transfer to the
opposite side.
16.
25
EN
17. Insert hinge pin.
The door must be open 90°.
Insert the hinge pin with the at part
facing the appliance.
The hinge pin must be fully inserted
in the borehole and may not pro-
trude at the top.
18. Insert the bottom hinge
pin in the same way.
20. Close door and check to
ensure that it is aligned
with the side walls of the
appliance.
19.
19. Screw in the screws at the top
and bottom.
20.
22.
Adjusting the lateral tilt of
the door
If the door is at an angle, adjust
the angle.
21. Undo screws and slide hinge
bracket to the right or left.
Tighten screws.
22. Fit the covers.
21.
18.
17.
*708498001*
Liebherr-Hausgeräte GmbH
Memminger Straße 77-79
88416 Ochsenhausen
Germany
home.liebherr.com
