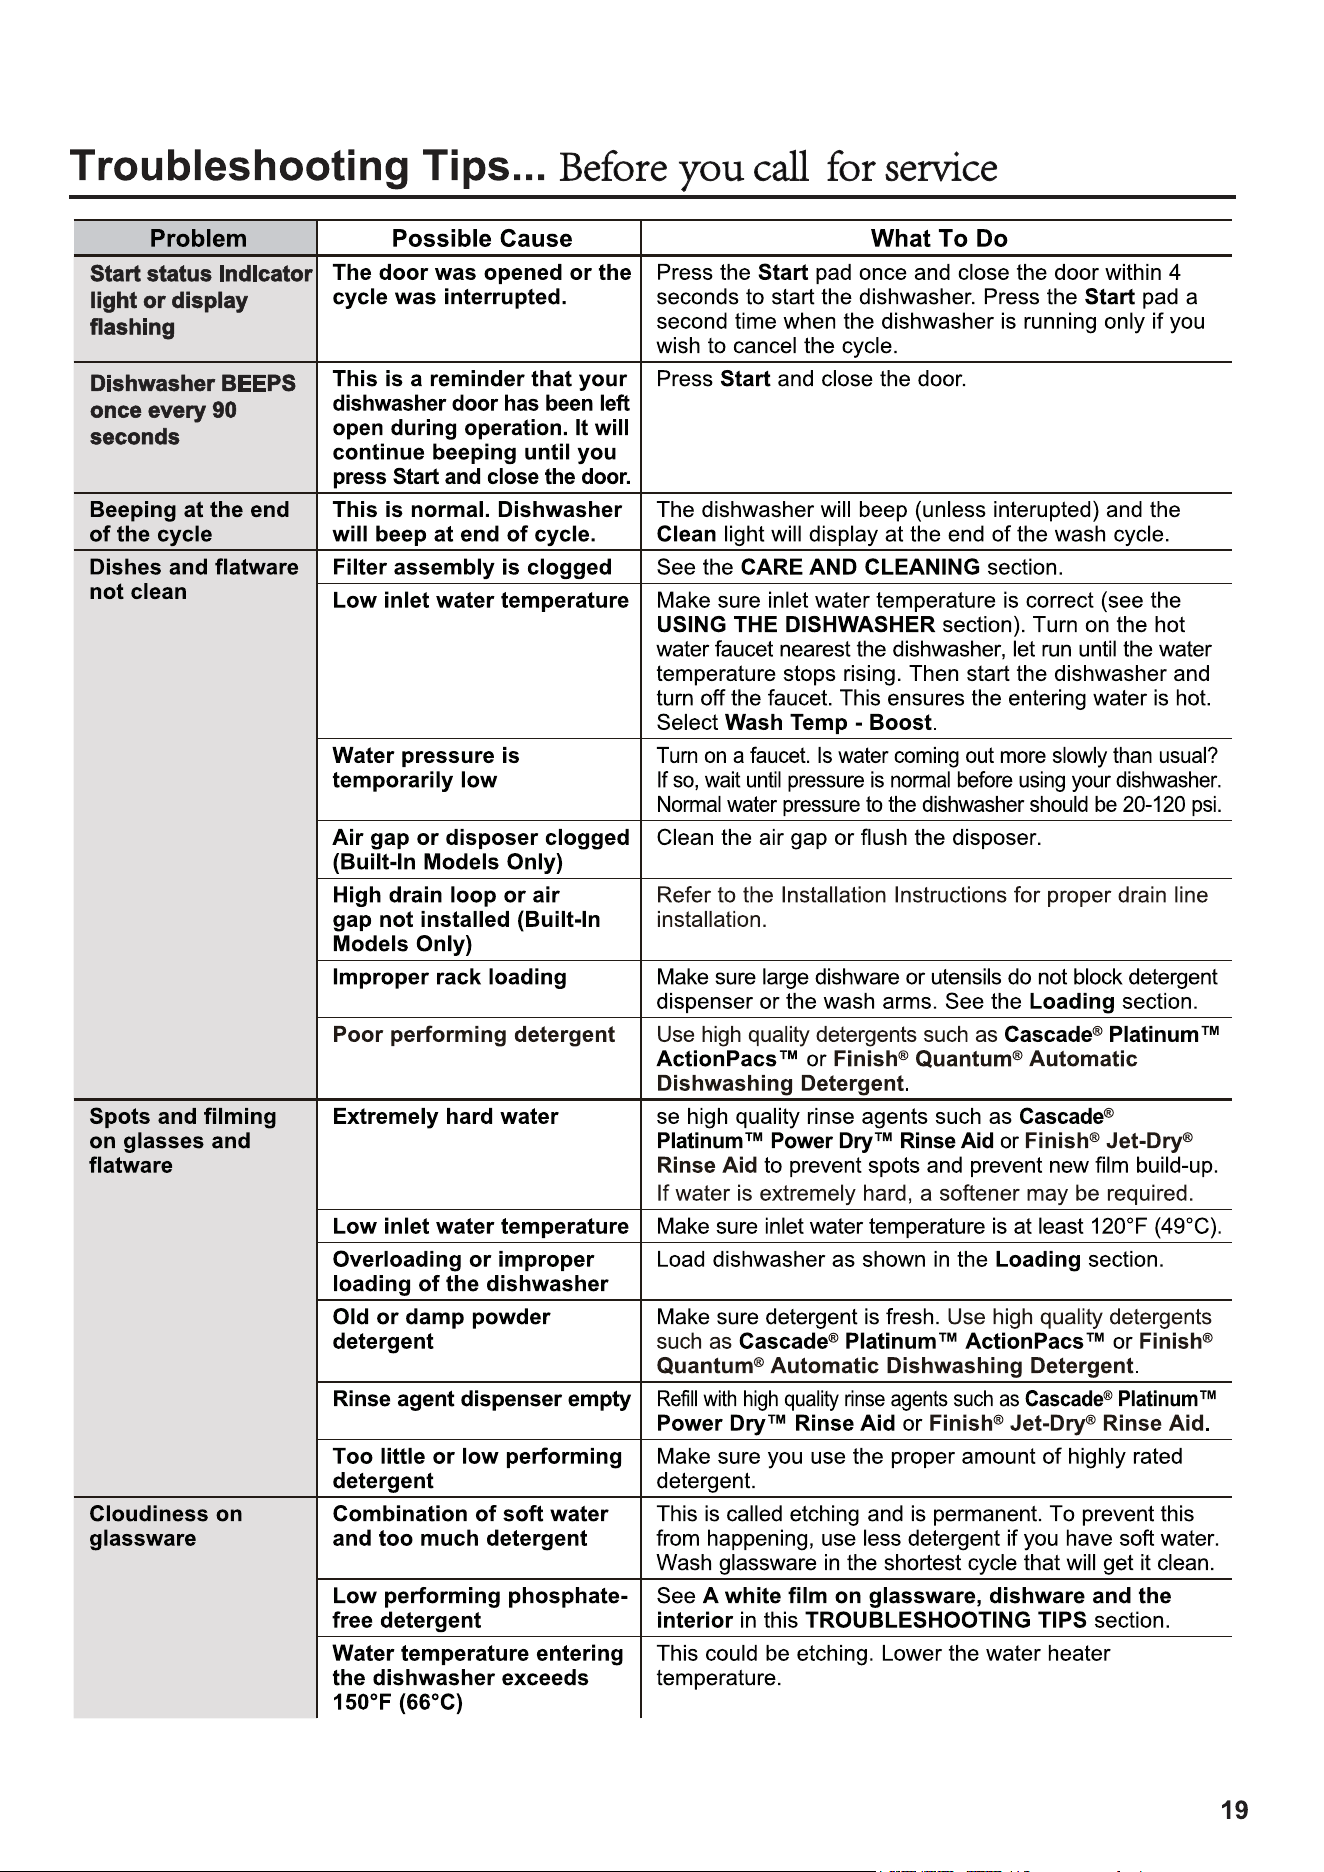
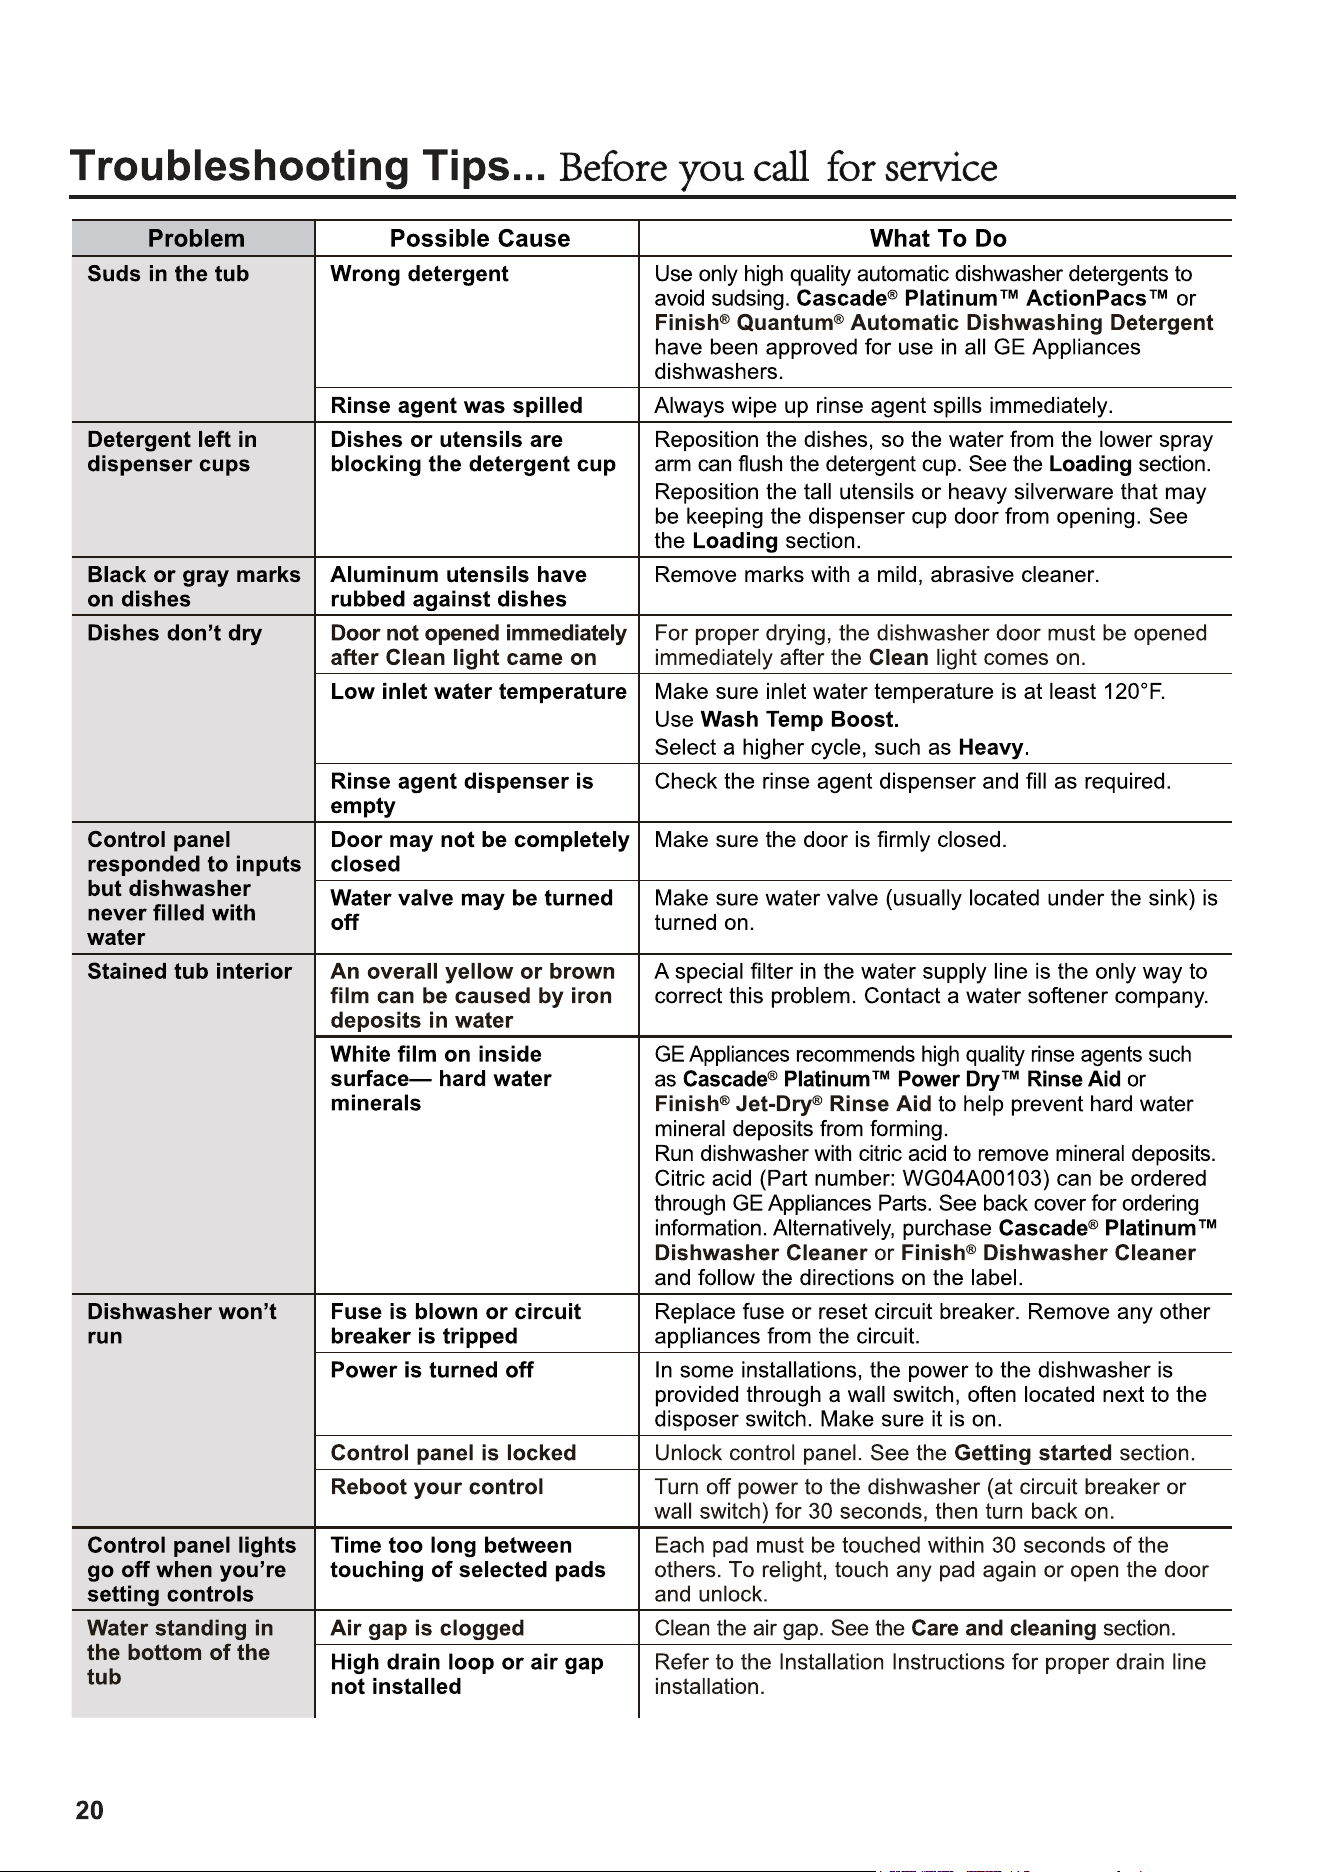
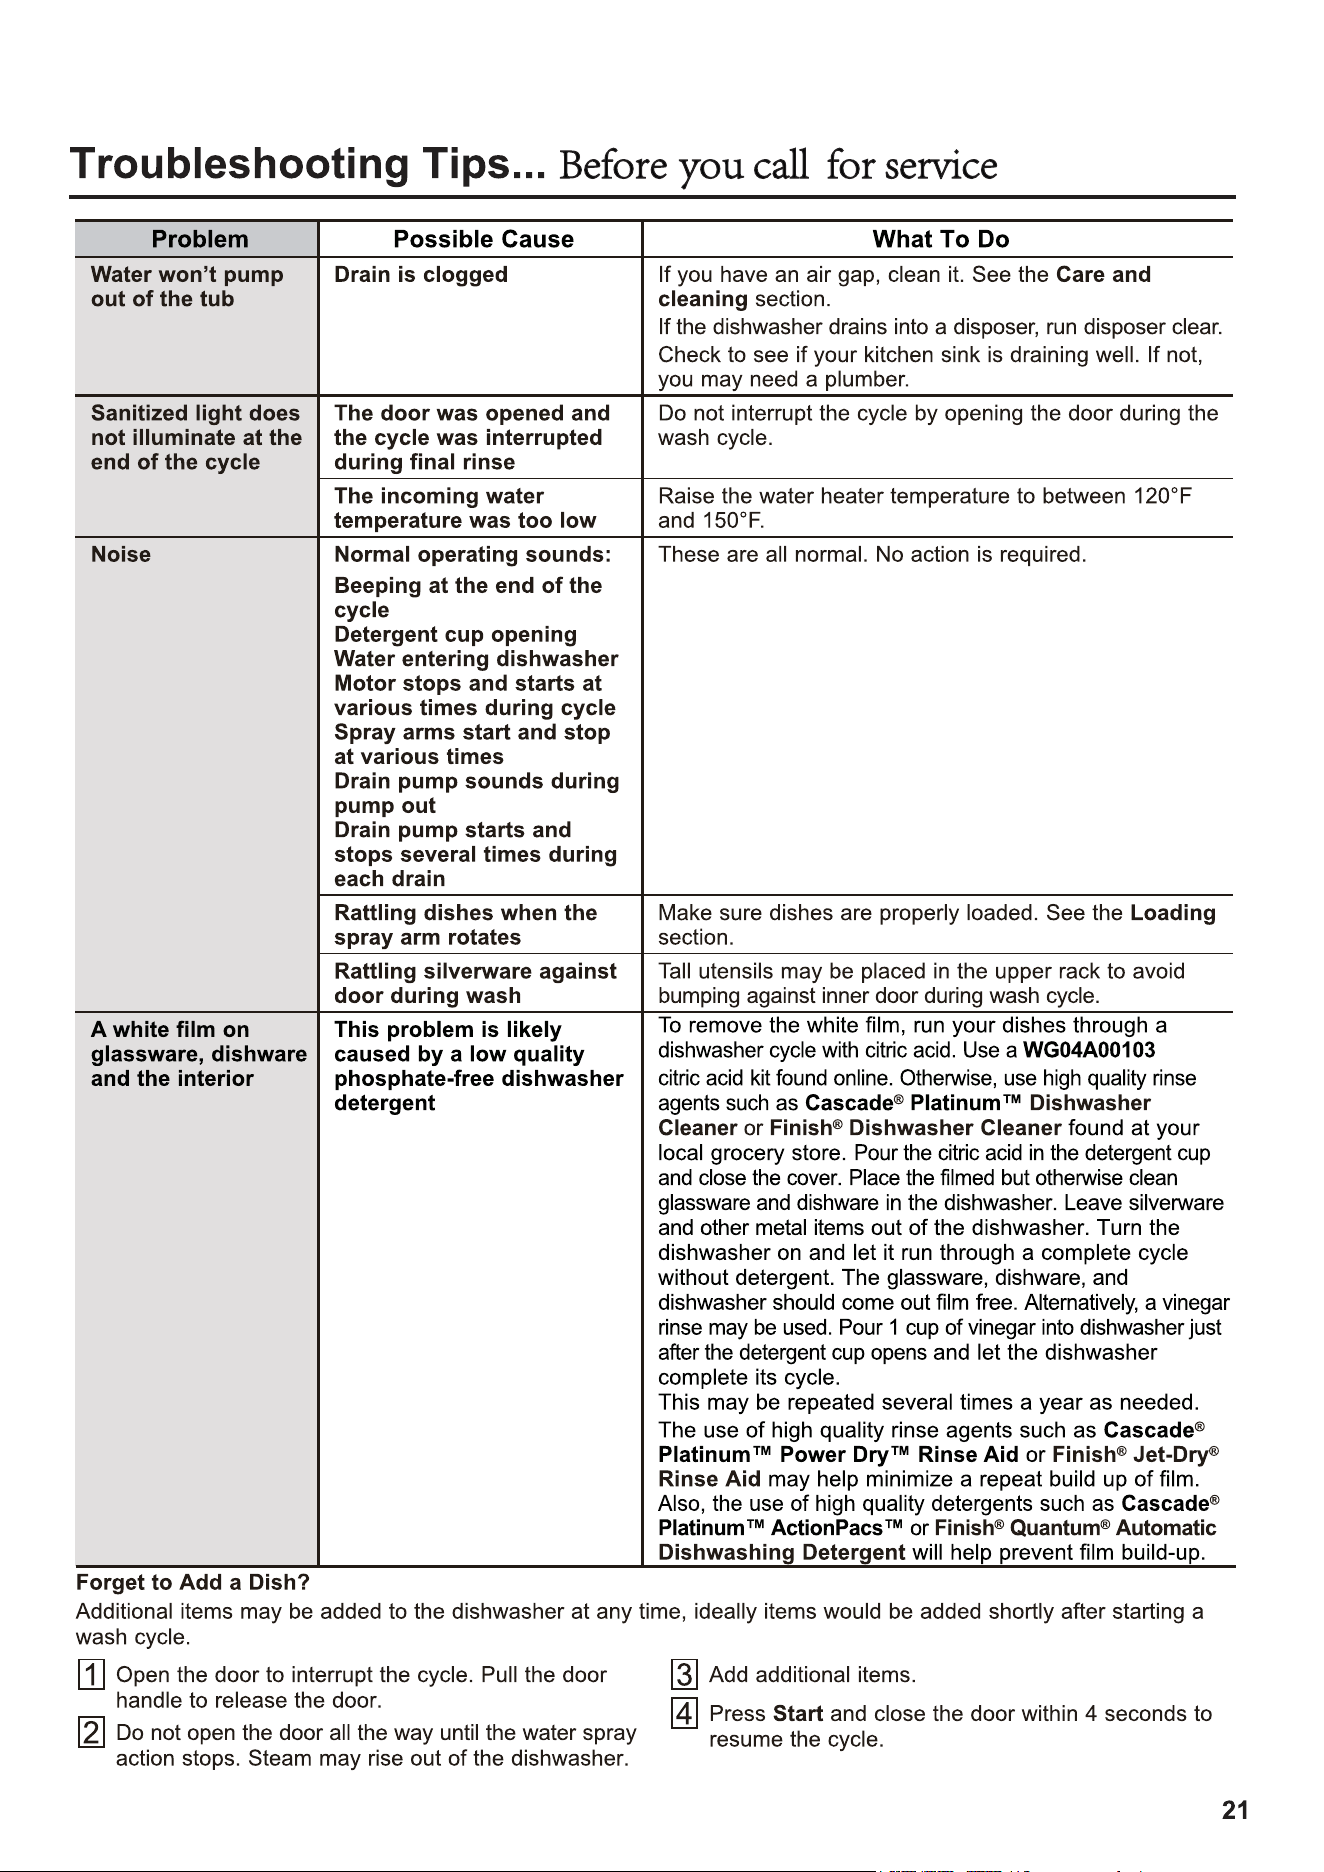
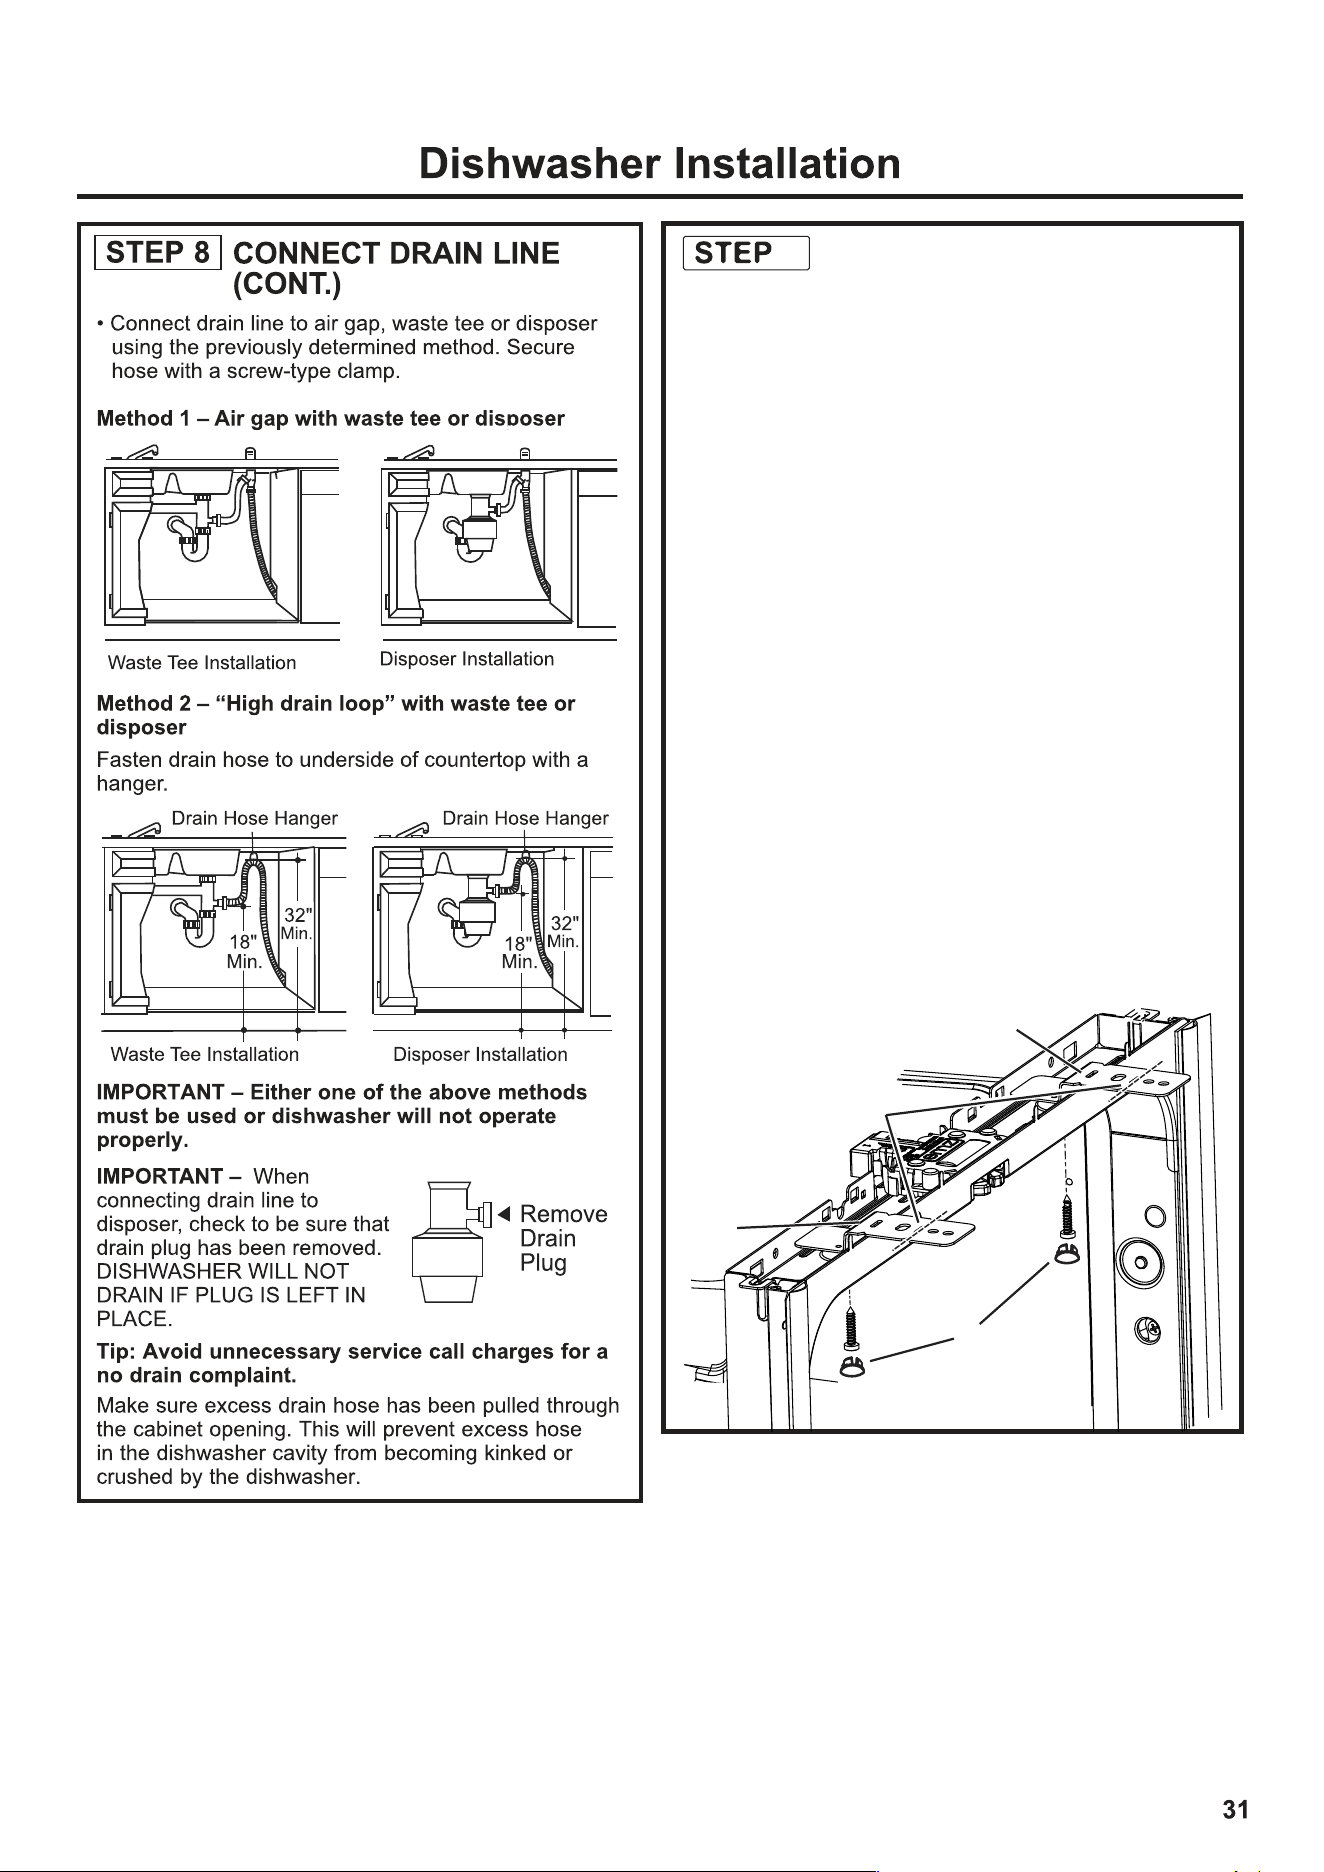
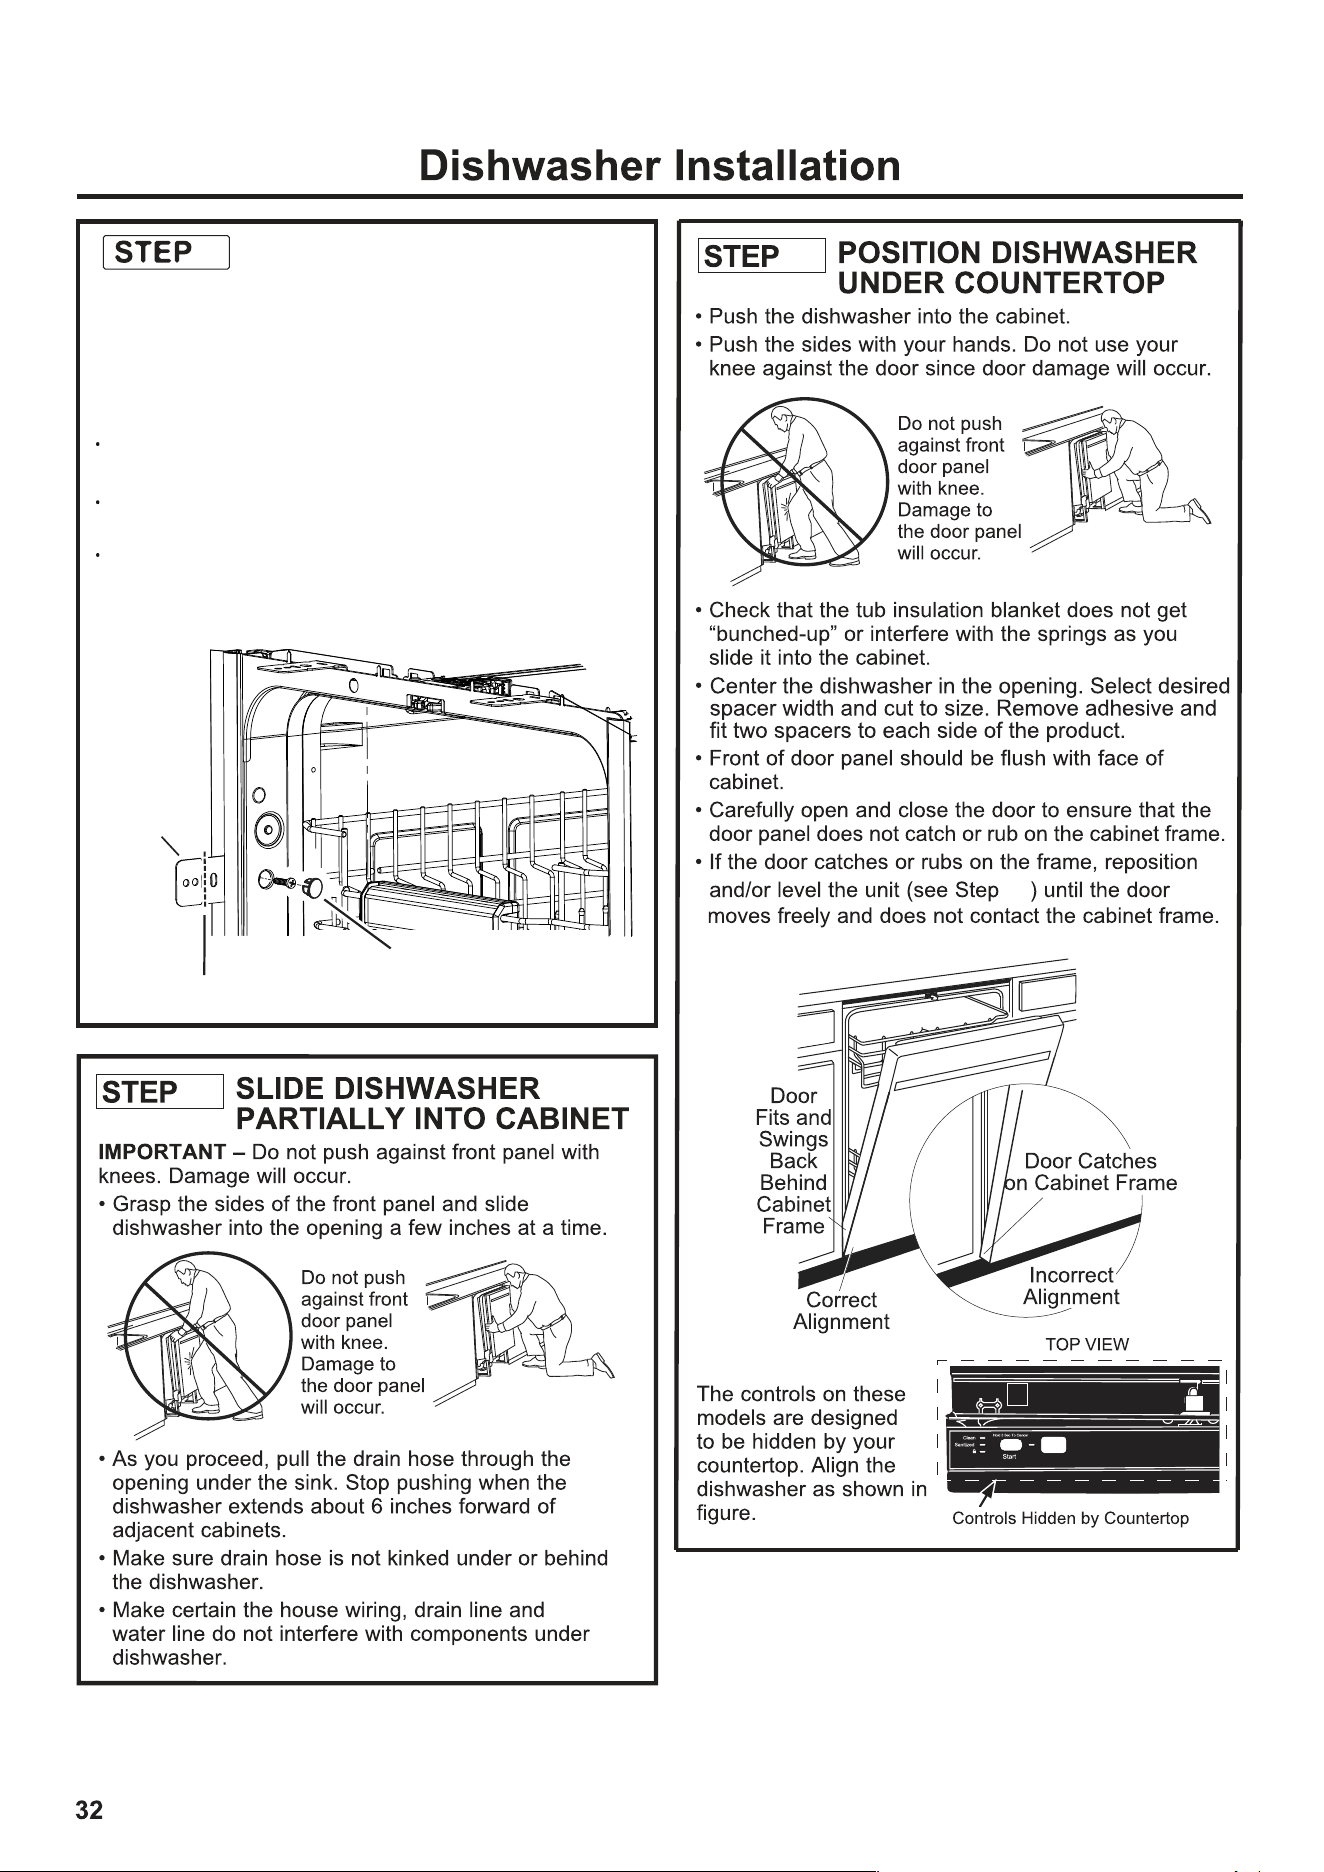
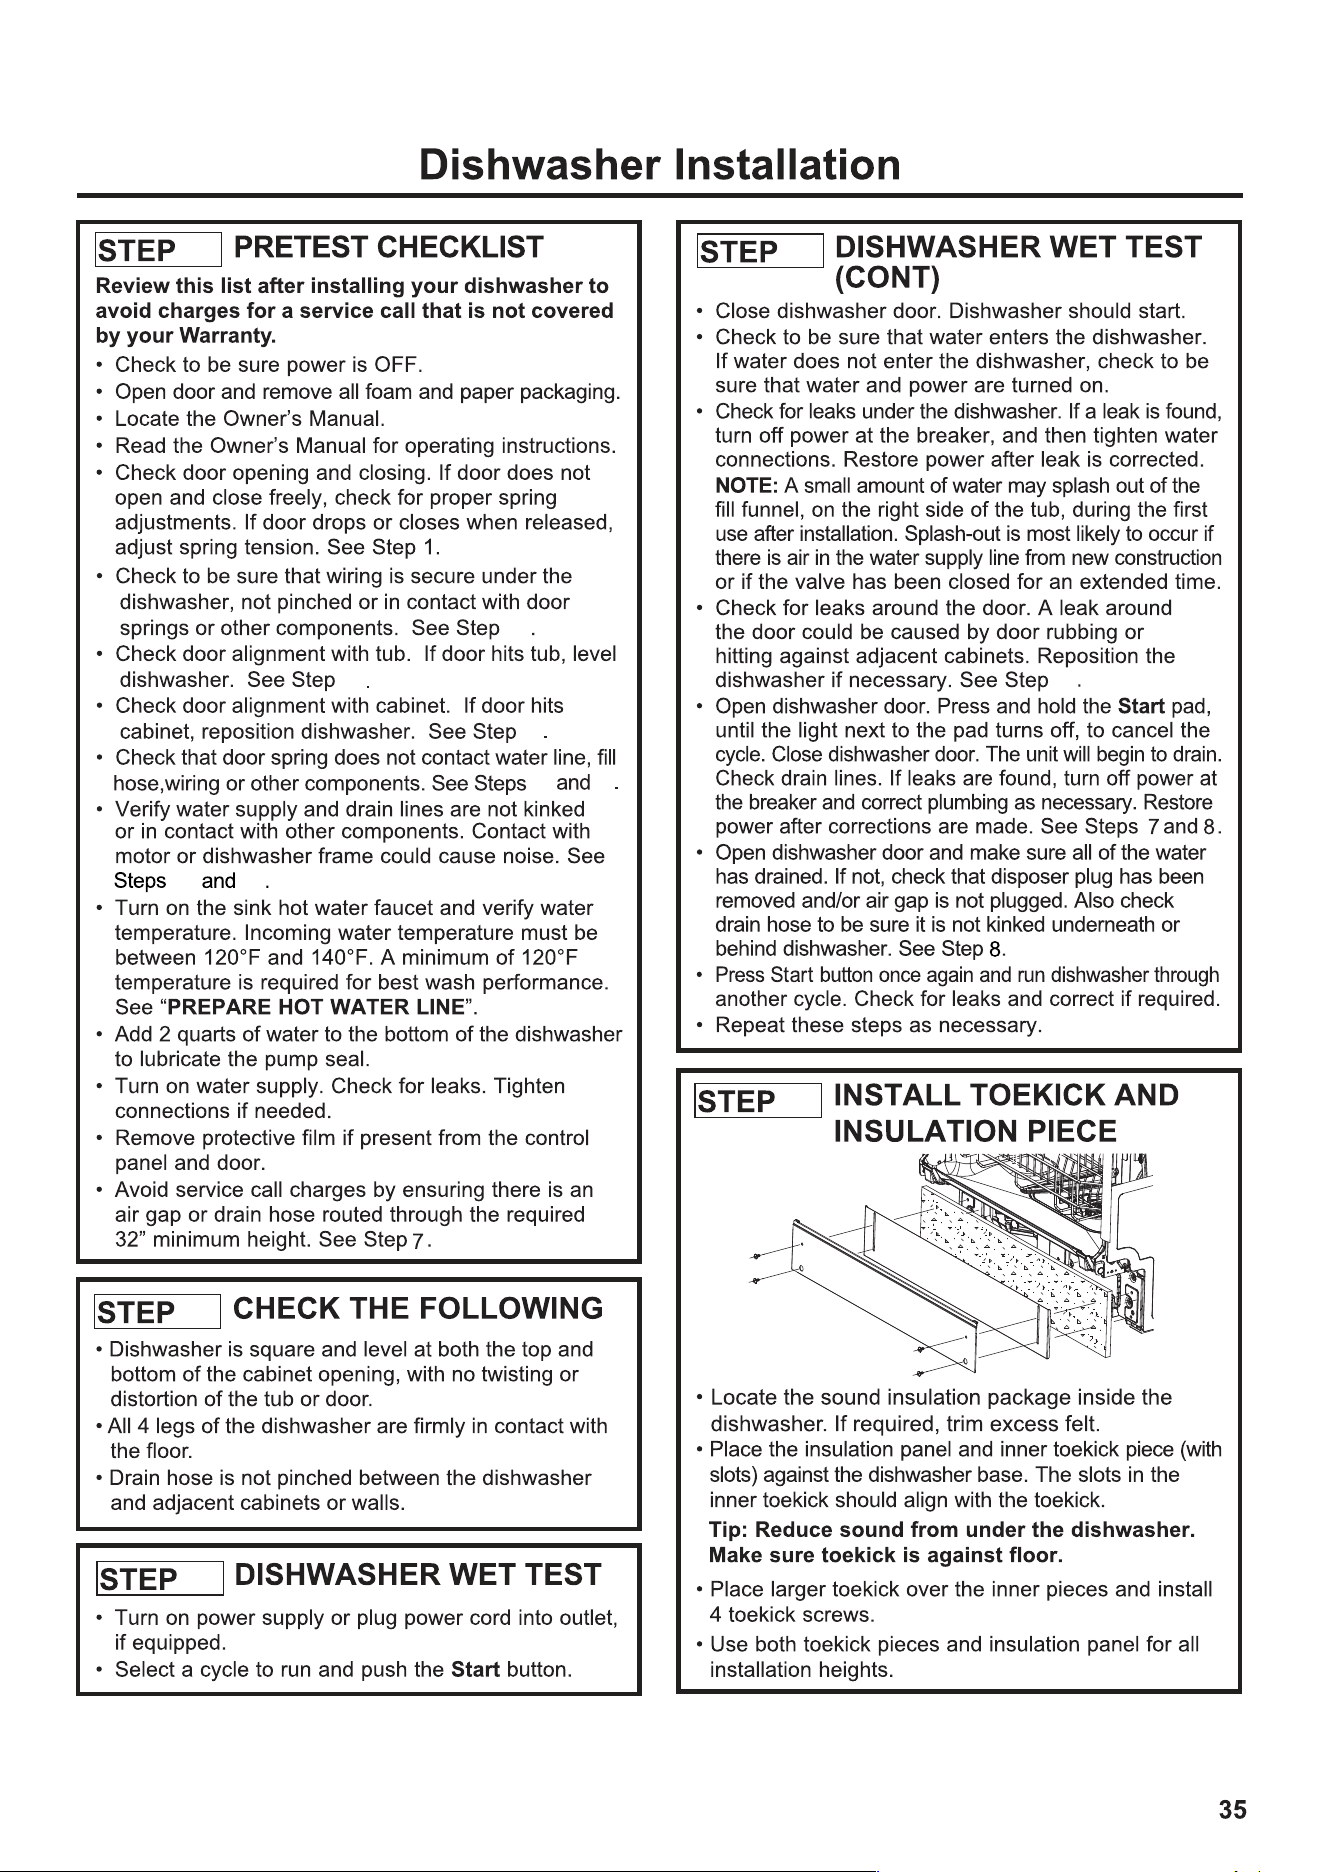
10-25 MCC
0120506644

MC COMMERCIAL Inc. | 1100 Burloak Dr, Suite 601 | Burlington, ON L7L 6B2
Warrantor: MC Commercial Inc., Burlington, ON, L7L 6B2
In Canada (including the province of Québec):
For Québec consumers only - Notice on the warranty of availability of spaare parts, repair services and
information necessary for repair or maintenance (s. 39 oI the Consumer Protection Act):
This limited warranty is extended to the original purchaser and any succeeding owner for products purchased in
Canada including Québec for home use within Canada including Québec. If tthe product is located in an area where
service by a GE Appliances Authorized Servicer is not available, you may besponsible for a trip charge or you
may be required to bring the product to an Authorized GE AppliancesService location
Some provinces including Québec do not allow the exclusion or limitation oincidental or consequential damages
This limited warranty gives you specific legal rights, and you may alsohave other rights which vary from province
to province including Québec. To know what your legal rights are, consult your local or provincial consumer affairs
office.
Please be advised that MC Commercial Inc. ("MC Commercial") dopes not guarantee, within the meaning of section
39 of the Consumer Protection Act, CQLR, C. P-40.1 and sections 79.18 to 79.20 of the Regulation respecting the
application of the Consumer Protection Act, CQLR, C P-40.1, r. 3, thee availability of replacement parts, repain
services, or the information necessary for the maintenance orrepair of goods manufactured, imported,
advertised, or sold by MC Commercial.
Please note that MC Commercial Inc. continues to offer thee manufacturer's limited warranty as stated in the
Owner's Manual or Quick Guide, and that this limited warranty is distinct from the statutory warranty of
availability provided for under section 39 of the Consumer Protection Act.
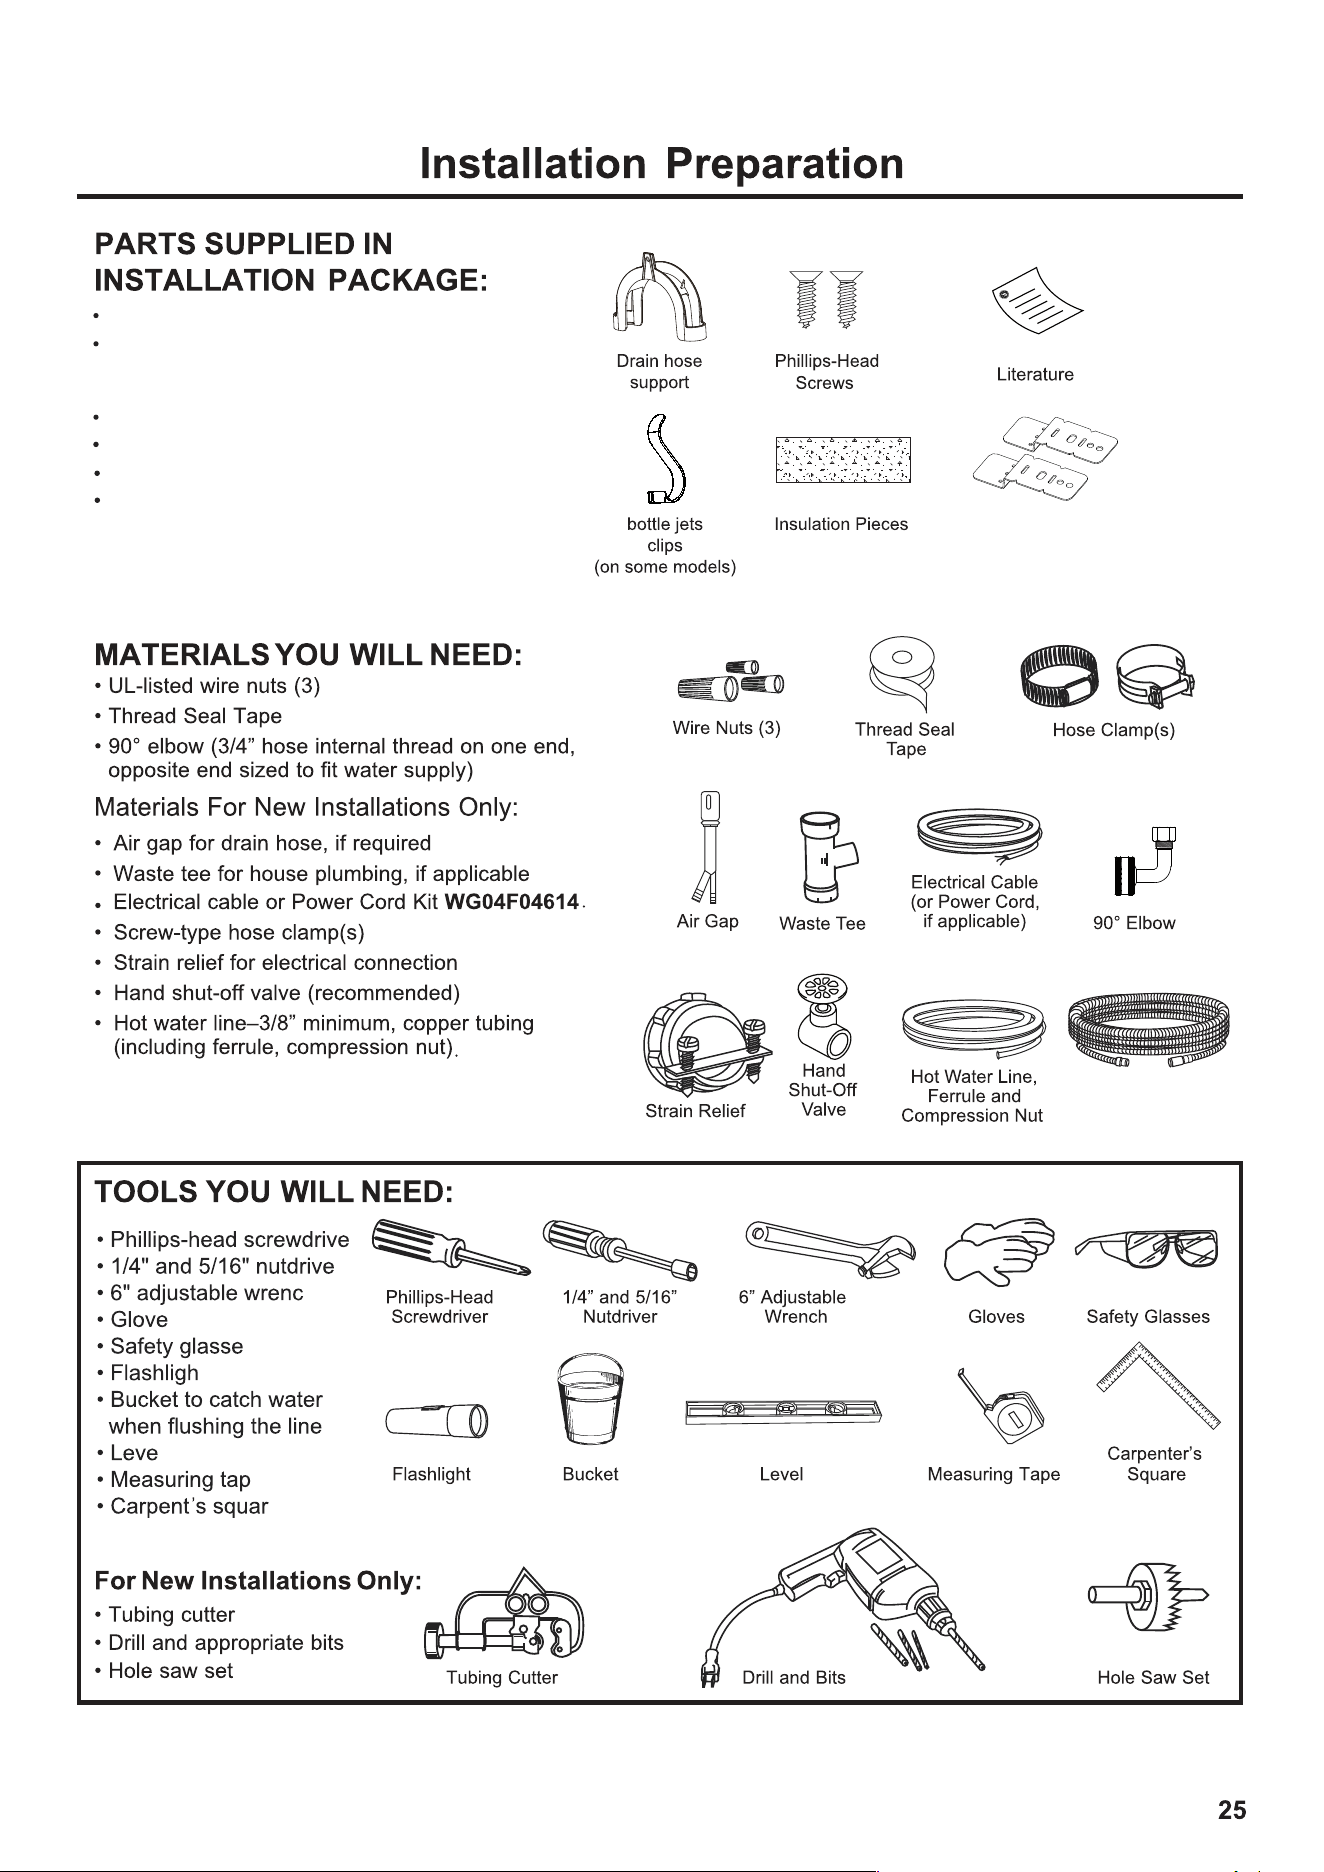
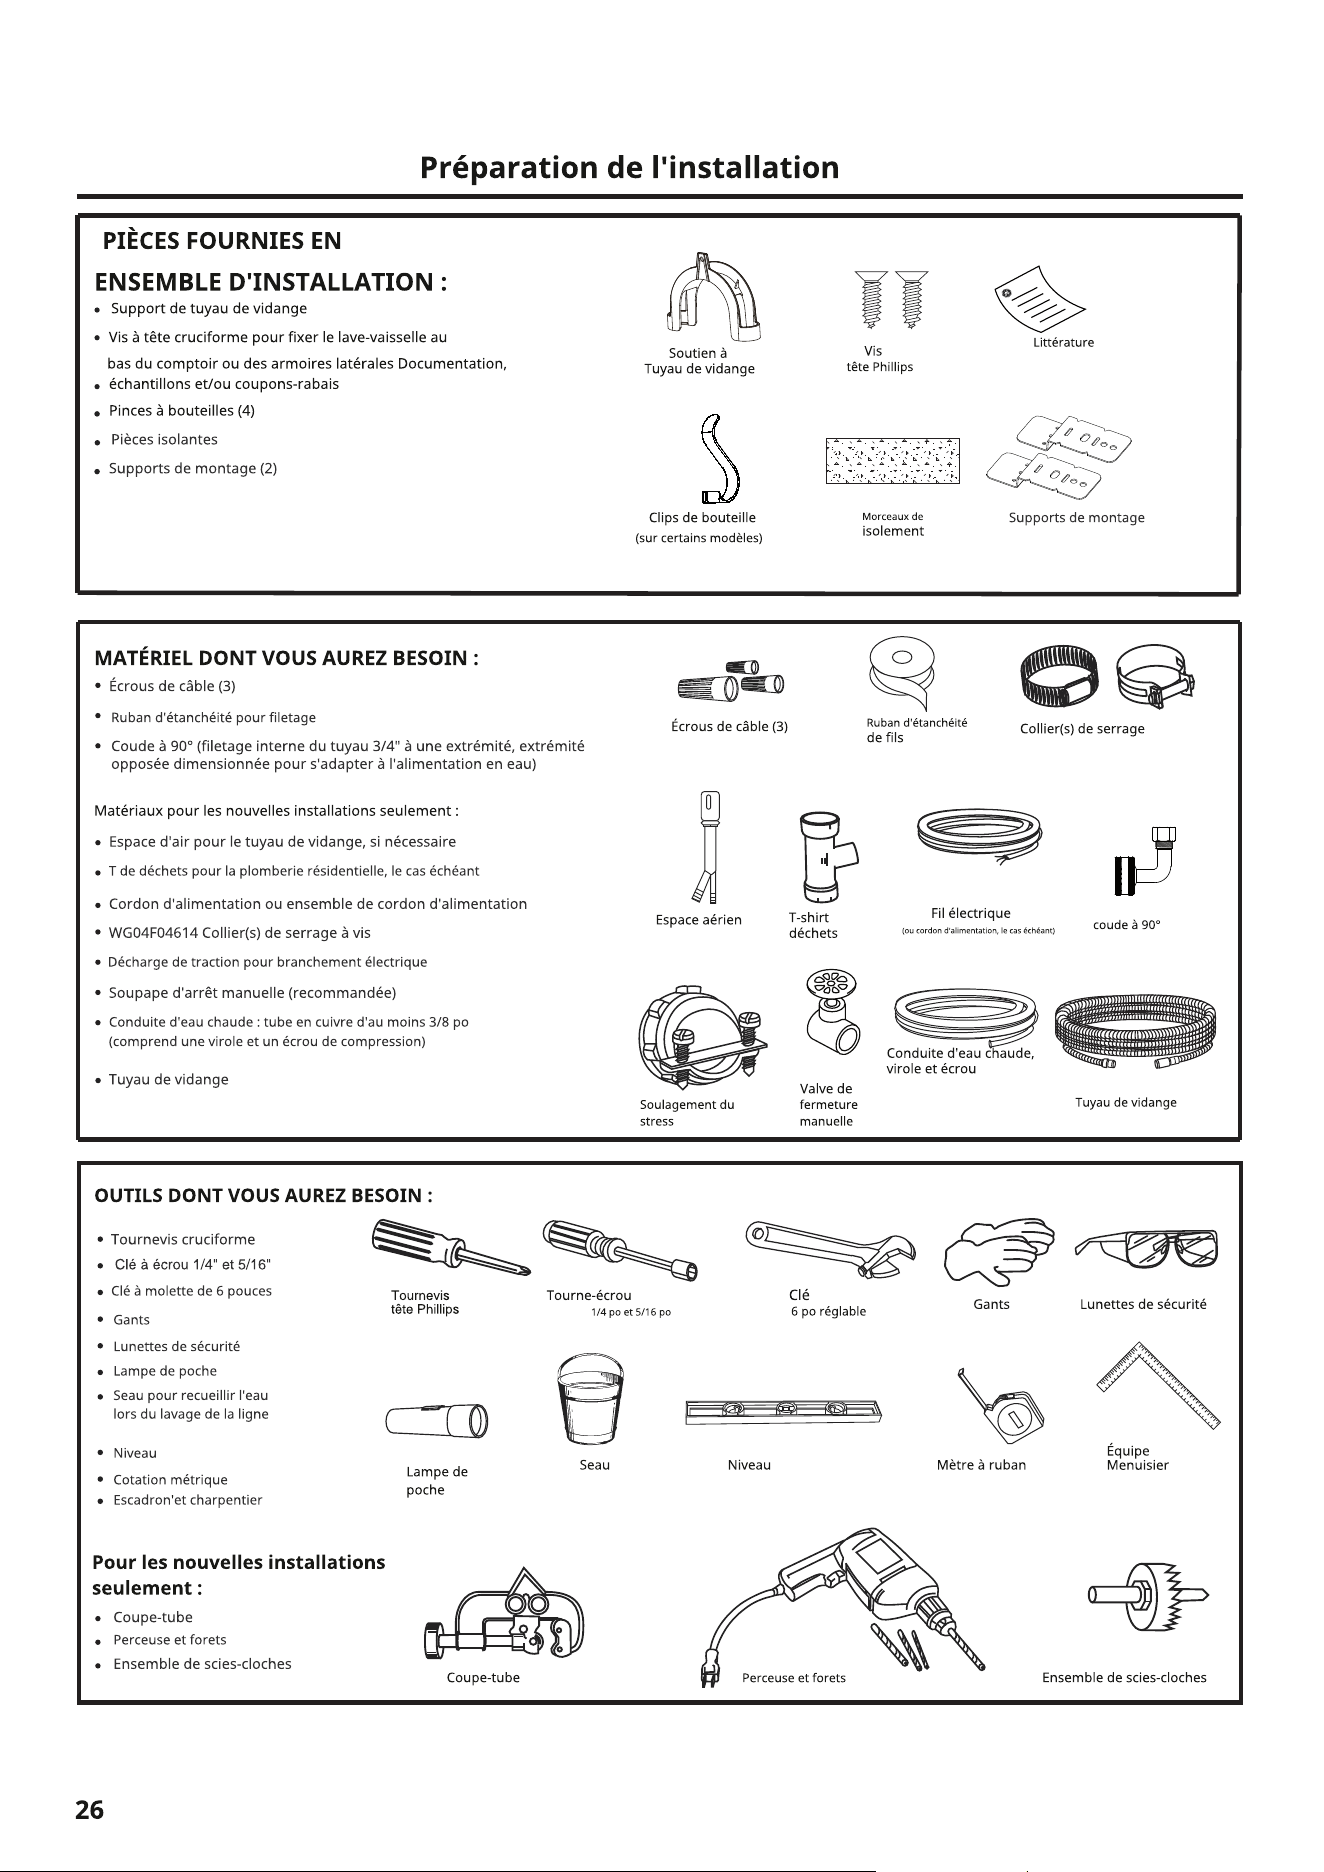
Mounting Brackets
Drain hose support
Phillips-Head screws to secure dishwasher to
underside of countertop(2) or to side cabinets
(4),to secure the inselation(4).
Literature, samples and/or coupons
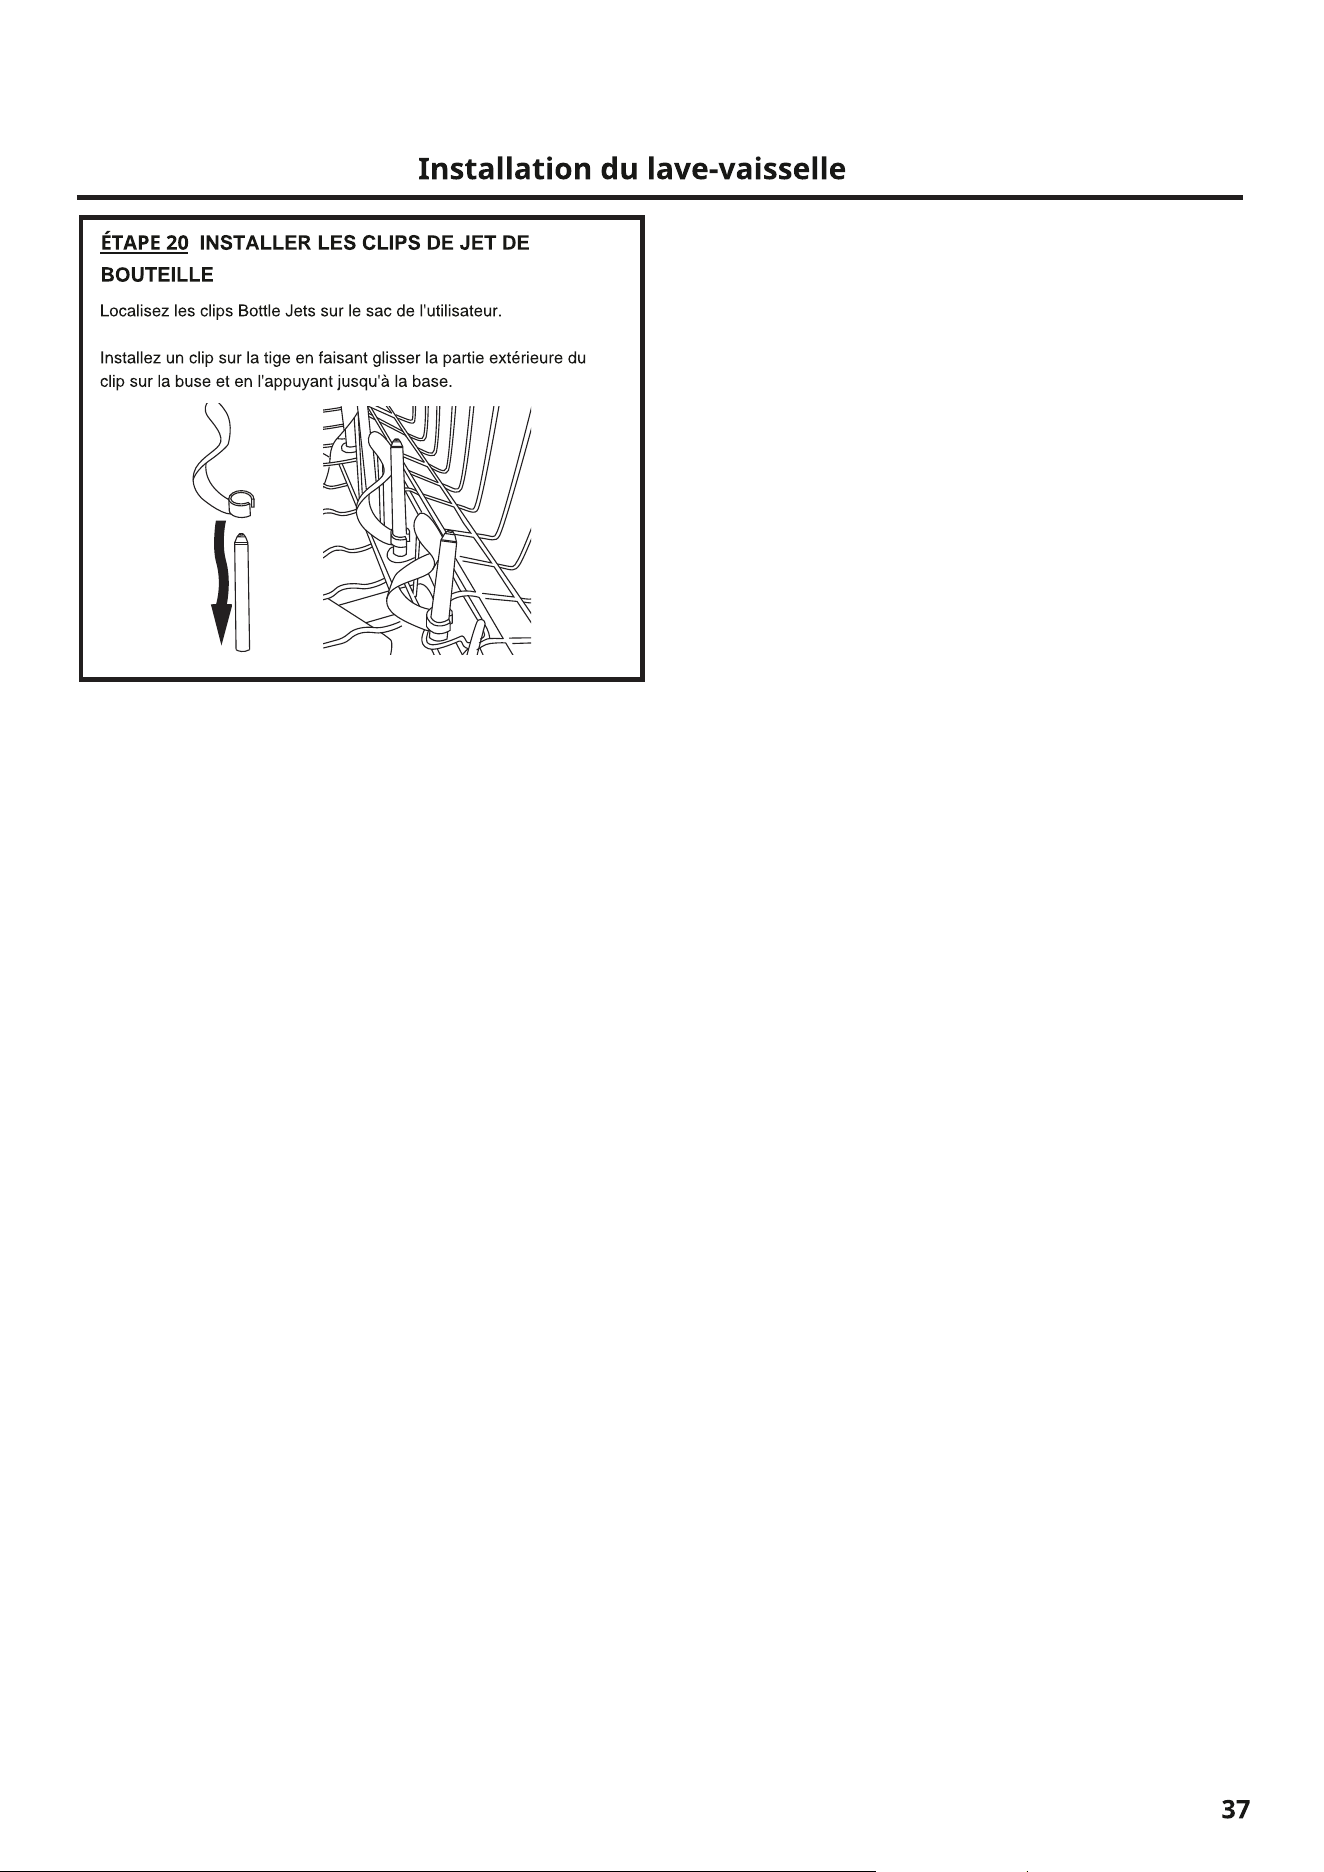
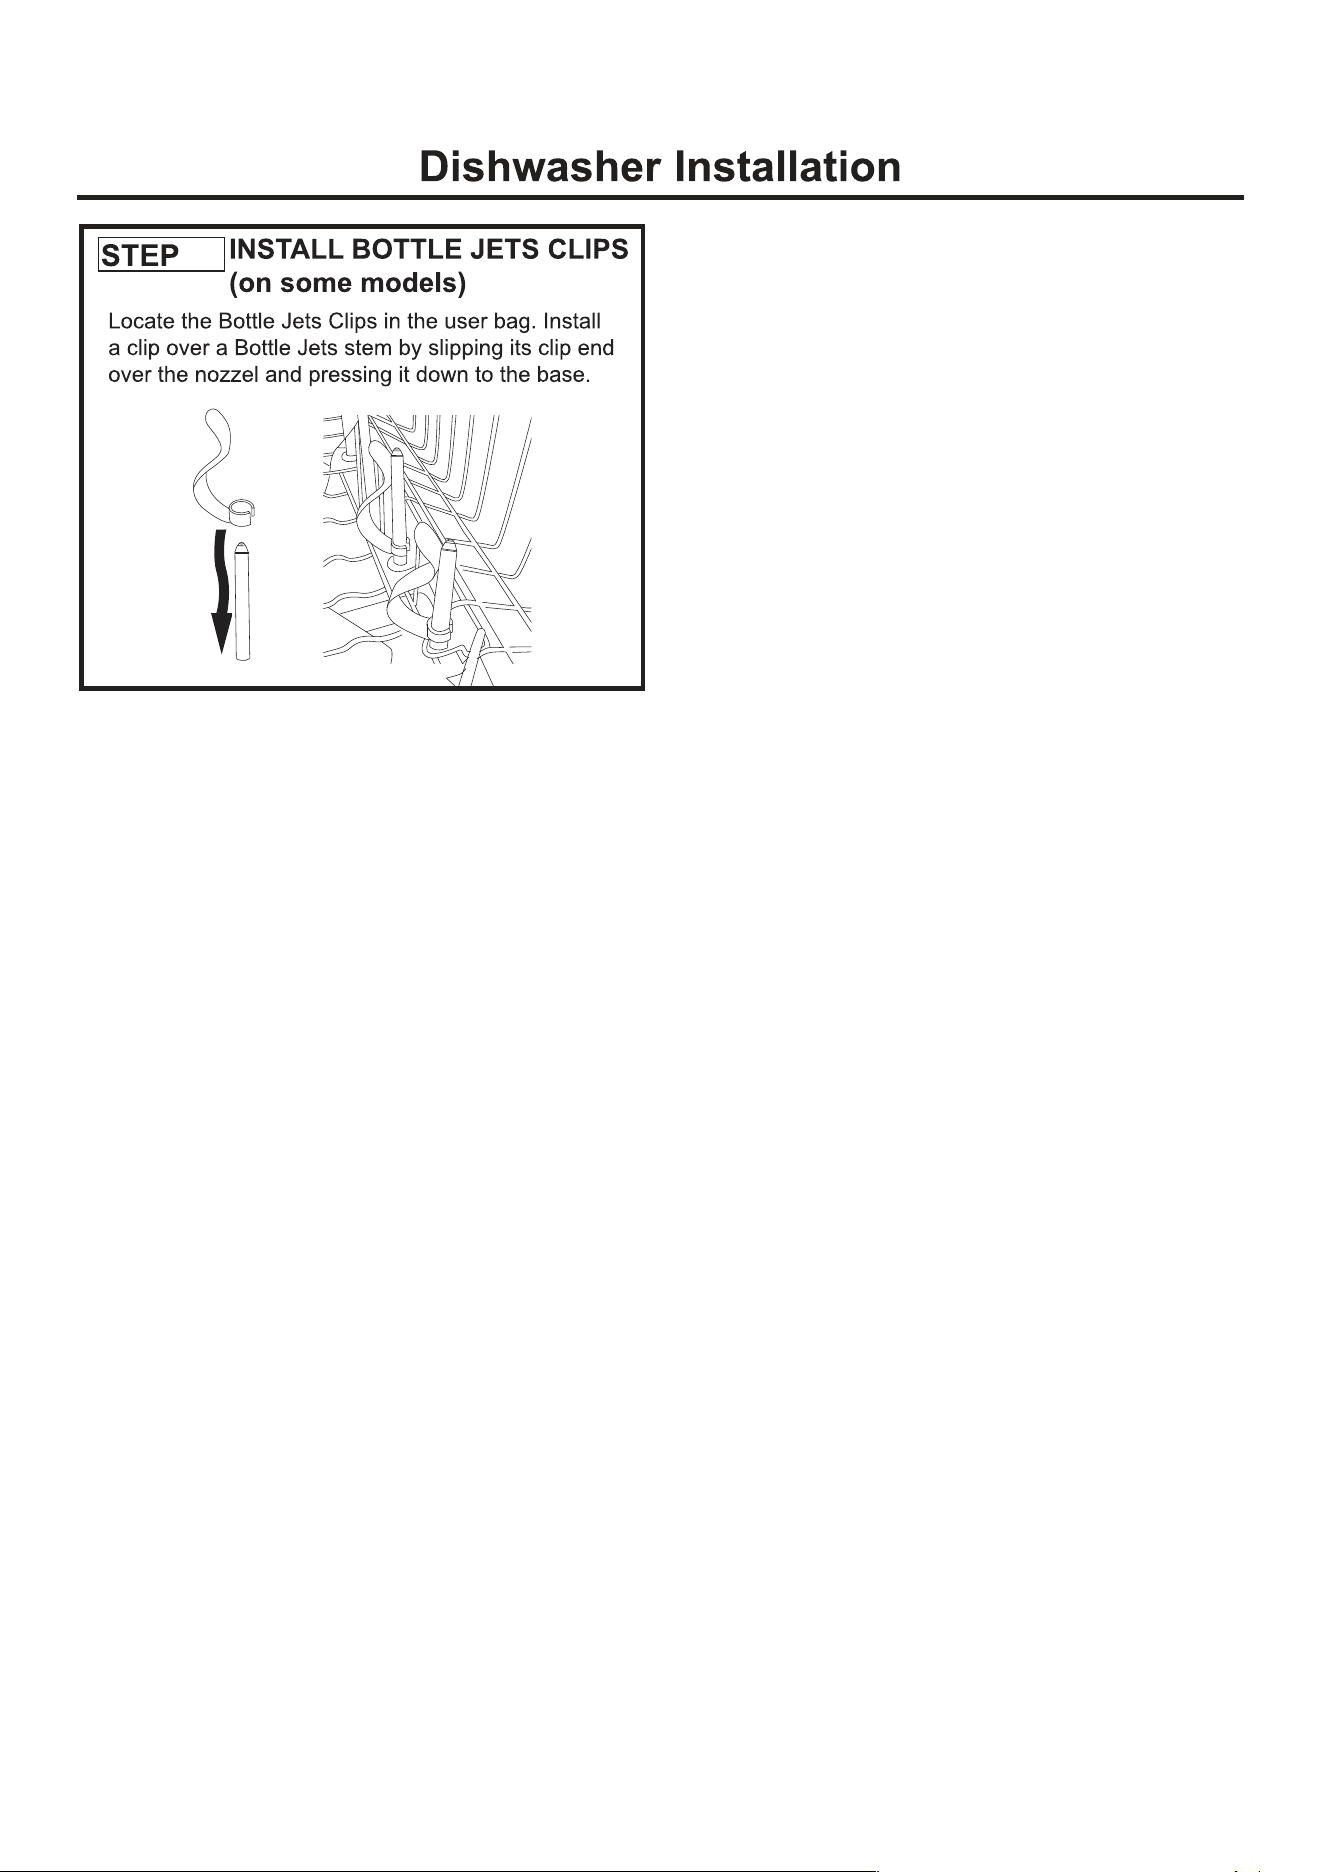
Bottle jets clips (4)
Insulation Pieces
Mounting Brackets(2)
Drain pipe
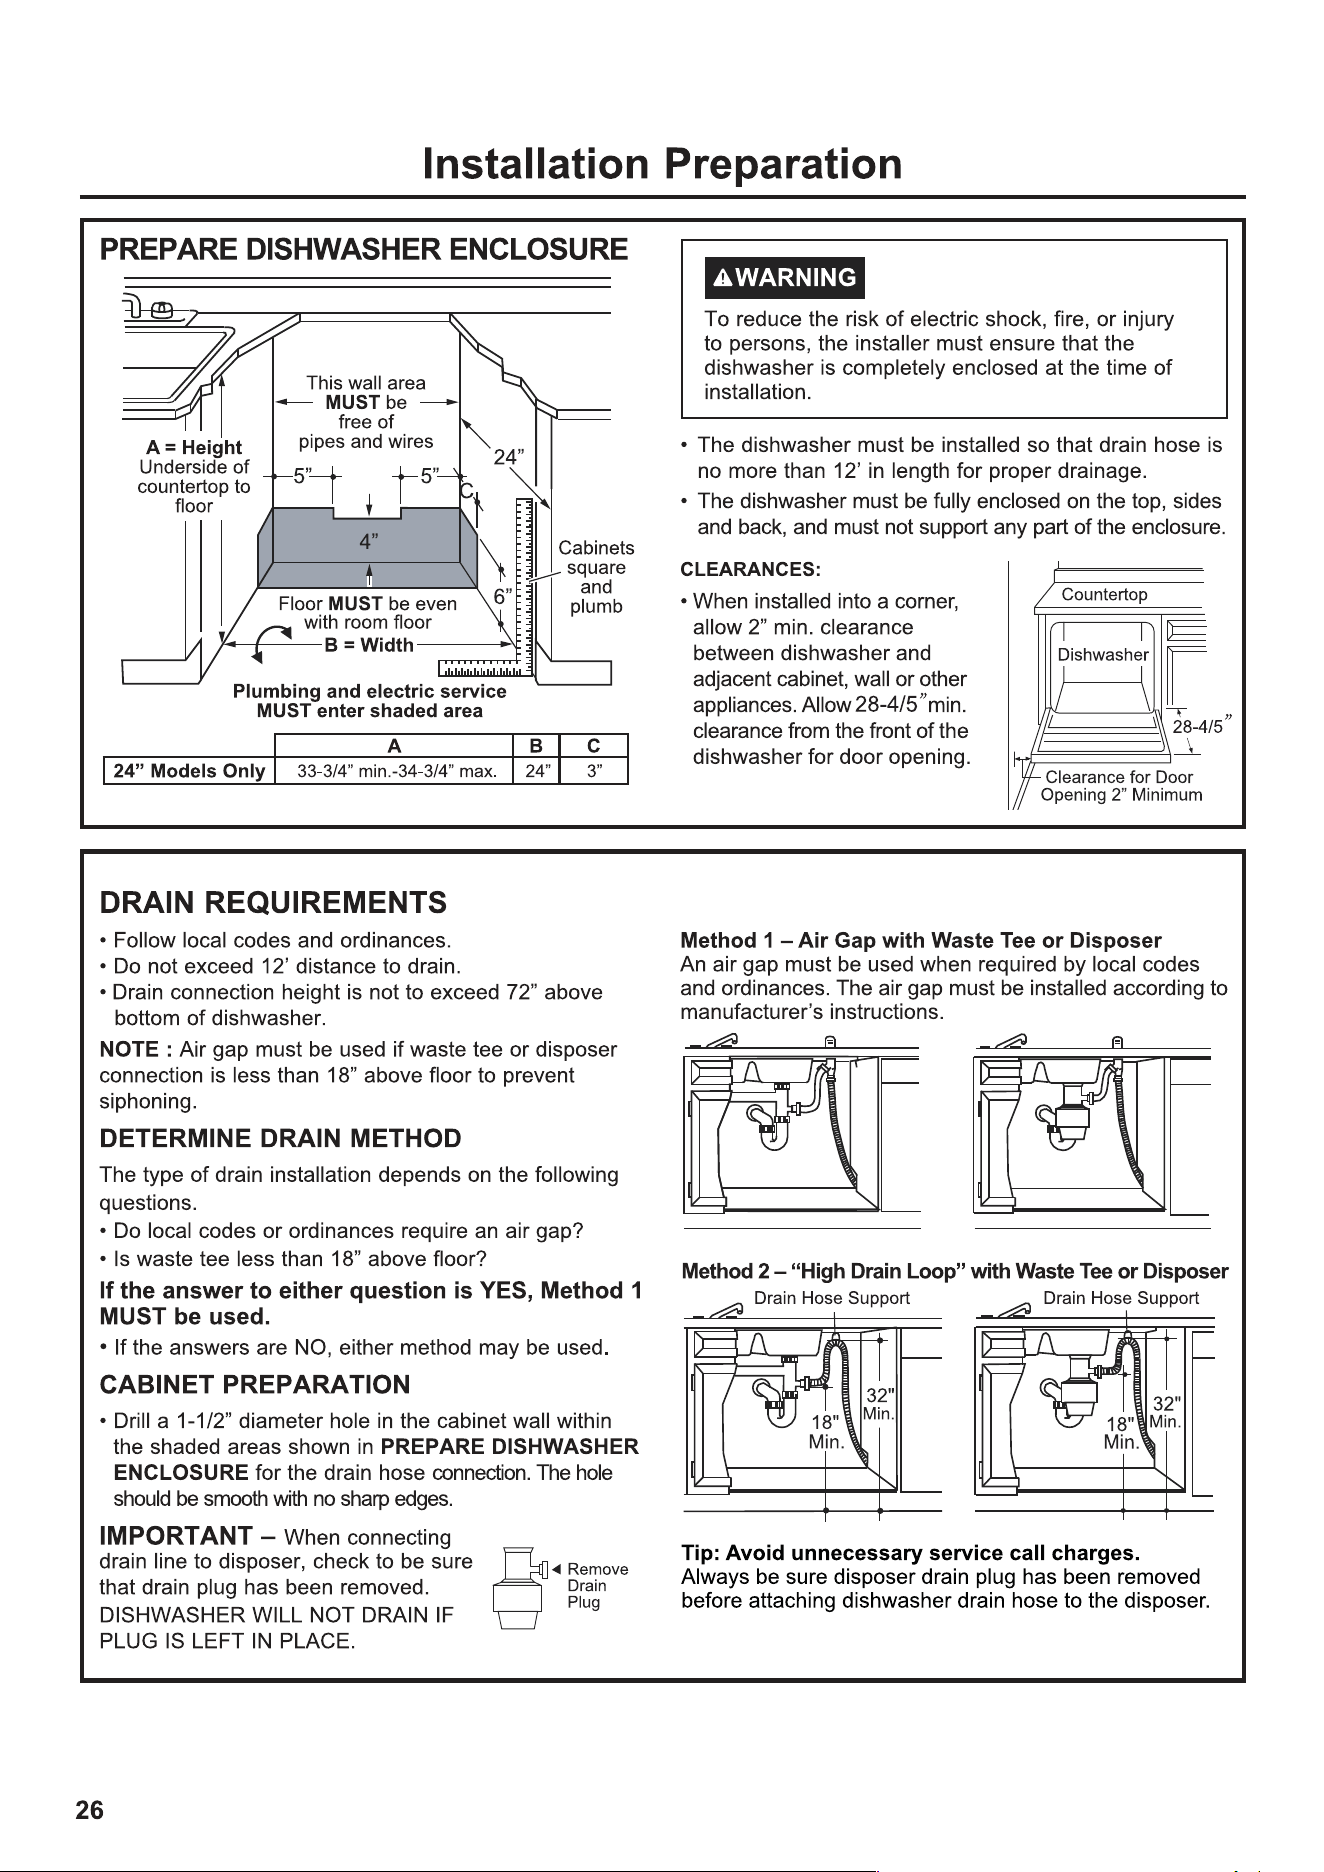
19
Phillips screws
and sockets
Medium
Medium
Fold and snap into the slots cut on
the brackets (if necessary) on both
sides after installation if the
countertop has a short overhang.
9
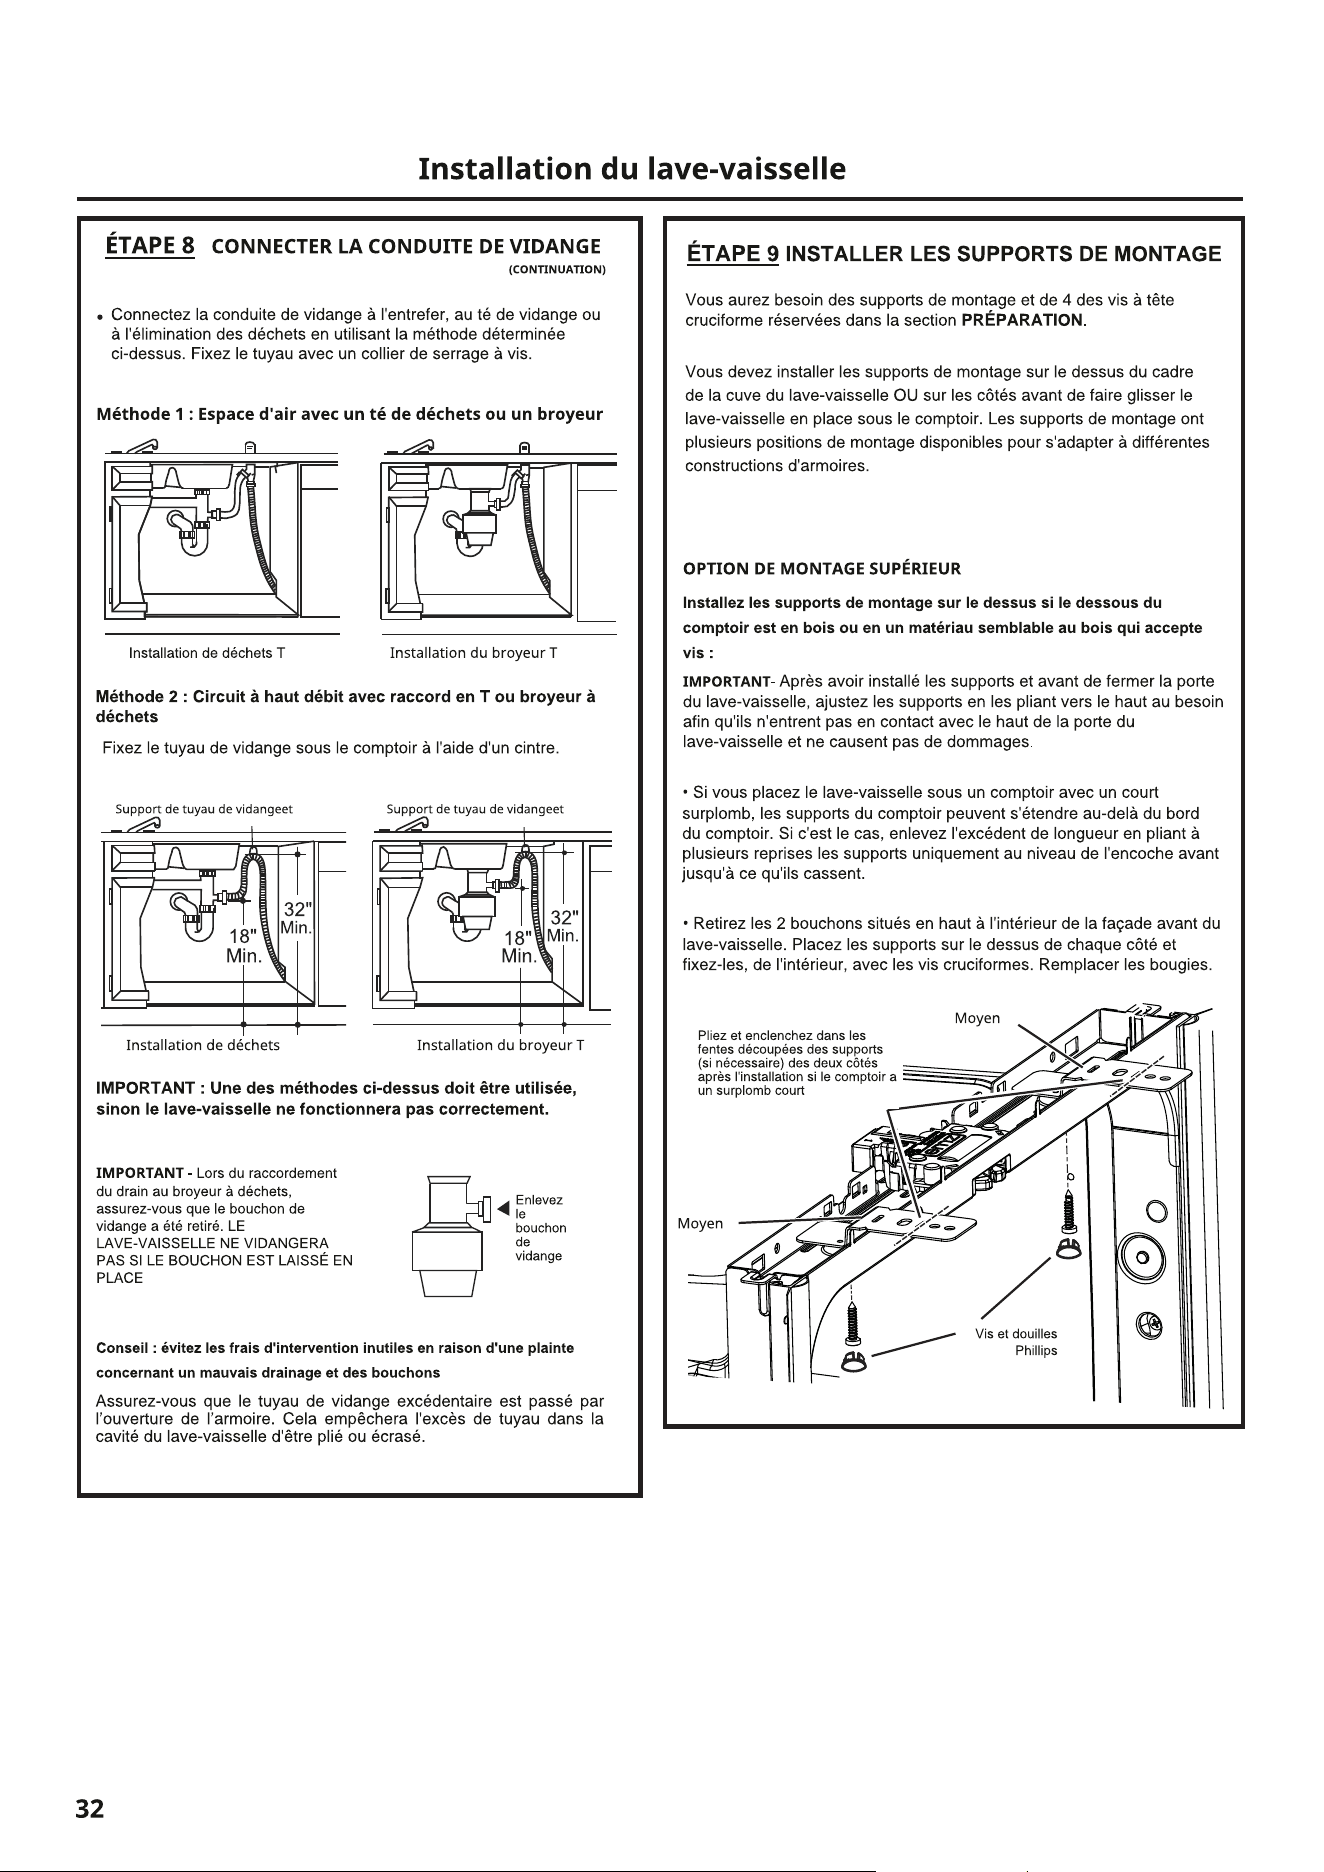
You will need the mounting brackets and 4 of the cross-head
screws set aside in the PREPARATION section.
You must install the mounting brackets on top of the dishwa-
-sher tub frame OR on the sides before sliding the dishwasher
into position under the countertop. The mounting brackets
have multiple mounting positions available to accommodate
different cabinet constructions.
TOP MOUNTING OPTION
Install the mounting brackets on top if the underside of
the countertop is made of wood or wood-like material
that accepts screws:
INSTALL THE MOUNTING
BRACKETS
IMPORTANT - After installing the brackets and before closing
the dishwasher door, adjust the brackets by bending them
upward as needed to prevent contact with the top of the dis-
-hwasher door and avoid damage.
• If you install the dishwasher under a counter with a short
overhang, the counter supports may extend beyond the
counter edge. If this occurs, remove the excess length by
repeatedly bending the supports only at the front notch until
they break.
• Remove the 2 plugs located at the top inside of the dishwa-
-sher's front facade. Position the brackets on top on each
side and secure them from the inside using cross-head
screws. Replace the plugs.
9
INSTALL THE MOUNTING
BRACKETS
SIDE MOUNTING OPTION
Install the mounting brackets on the sides if the countertop
is made of granite or similar material that does not accept
wood screws:
Break the front of the tab at the indicated location using pliers
before placing it in the dishwasher.
Position the support on the left side as indicated. Repeat the
procedure with the appropriate support.
Remove the two plugs located inside the dishwasher. Position the
supports on each side and secure them from the inside using cross-
-head screws.
Replace the plugs.
Support
(on both
sides)
Cross-head screw and plug (on both sides)
Fold and snap into the slots cut into the supports (if necessary)
on both sides before installation.
10
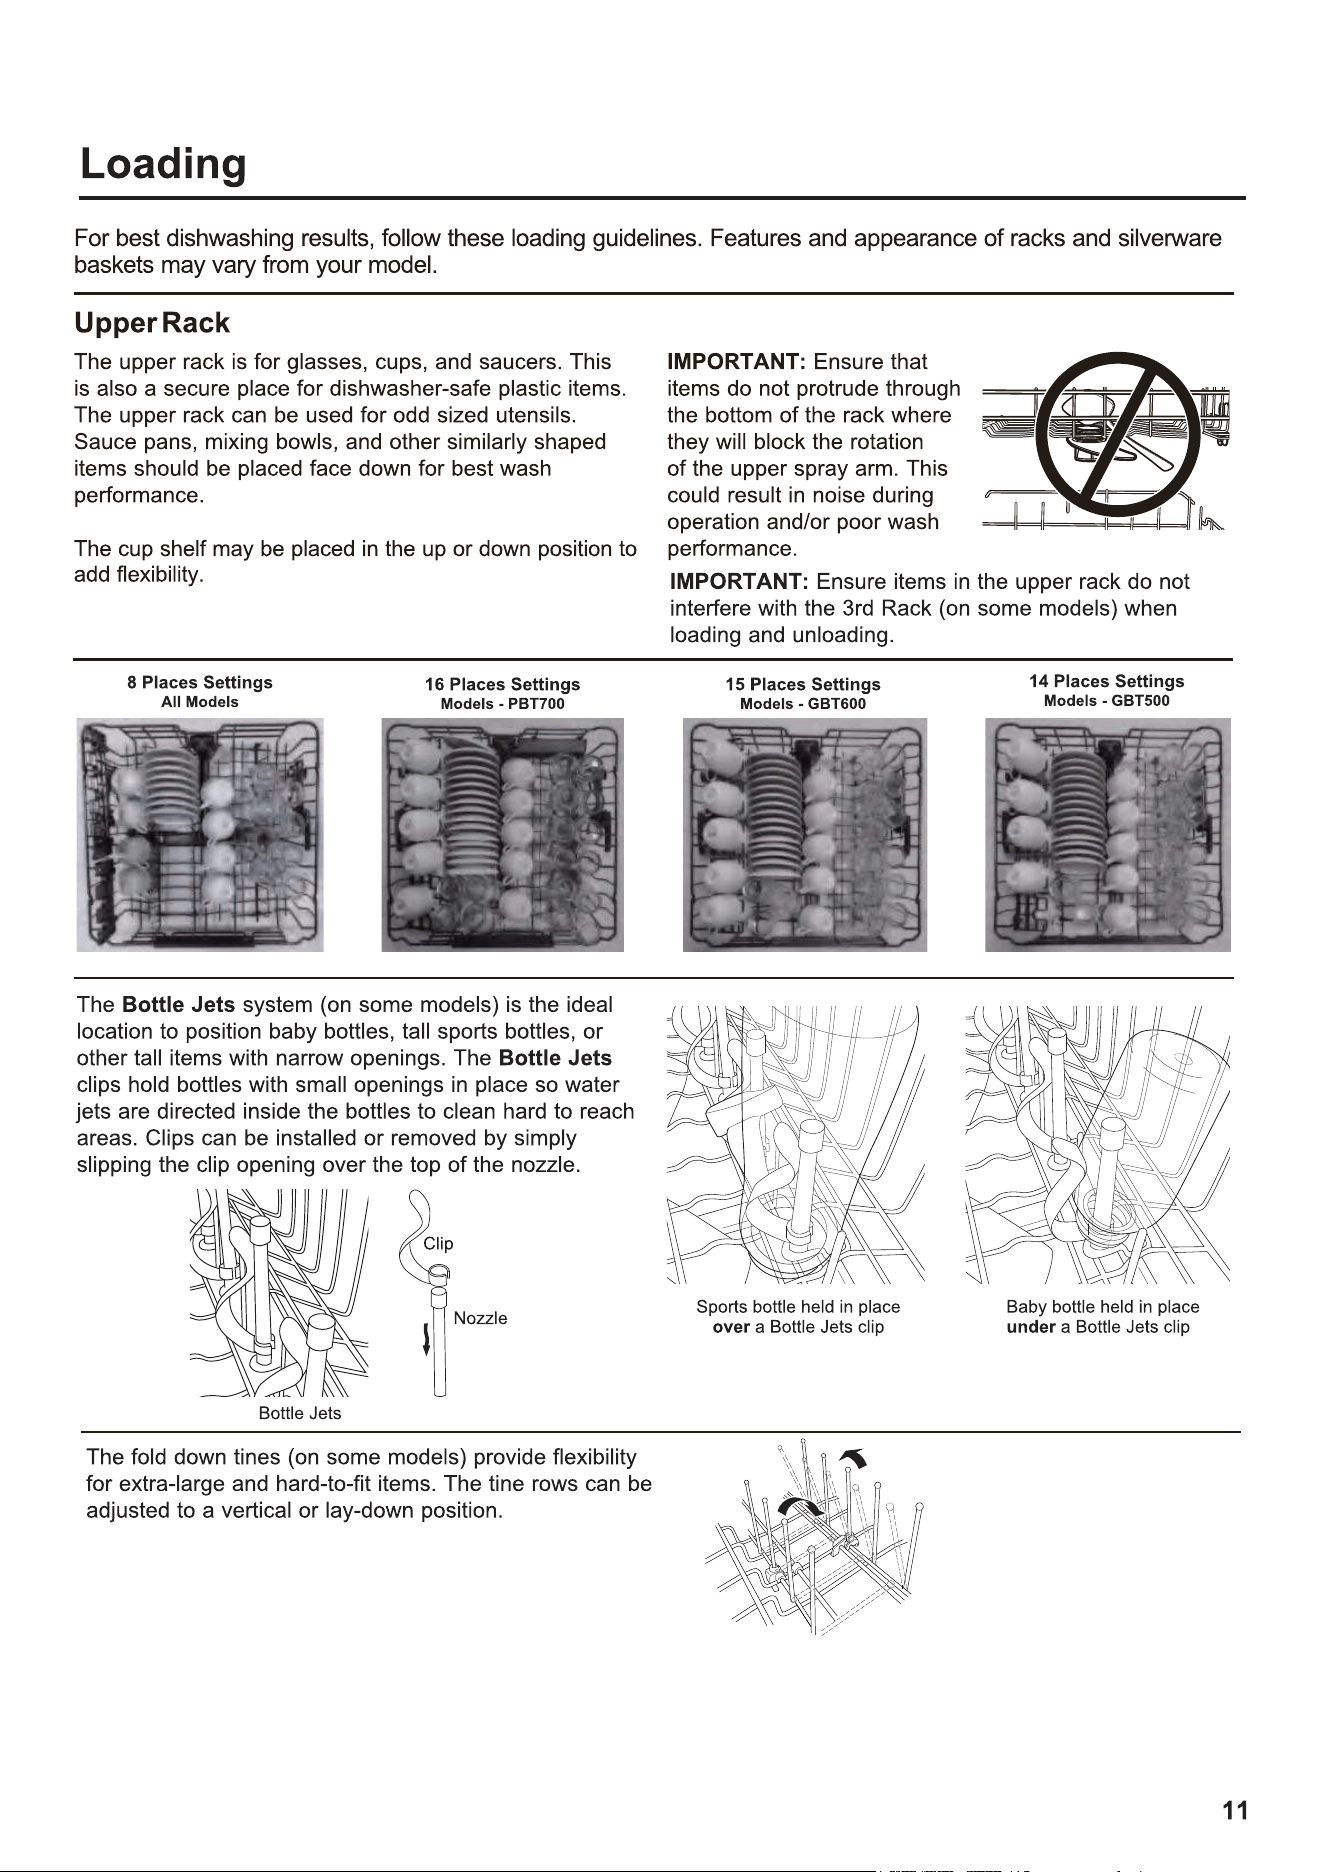
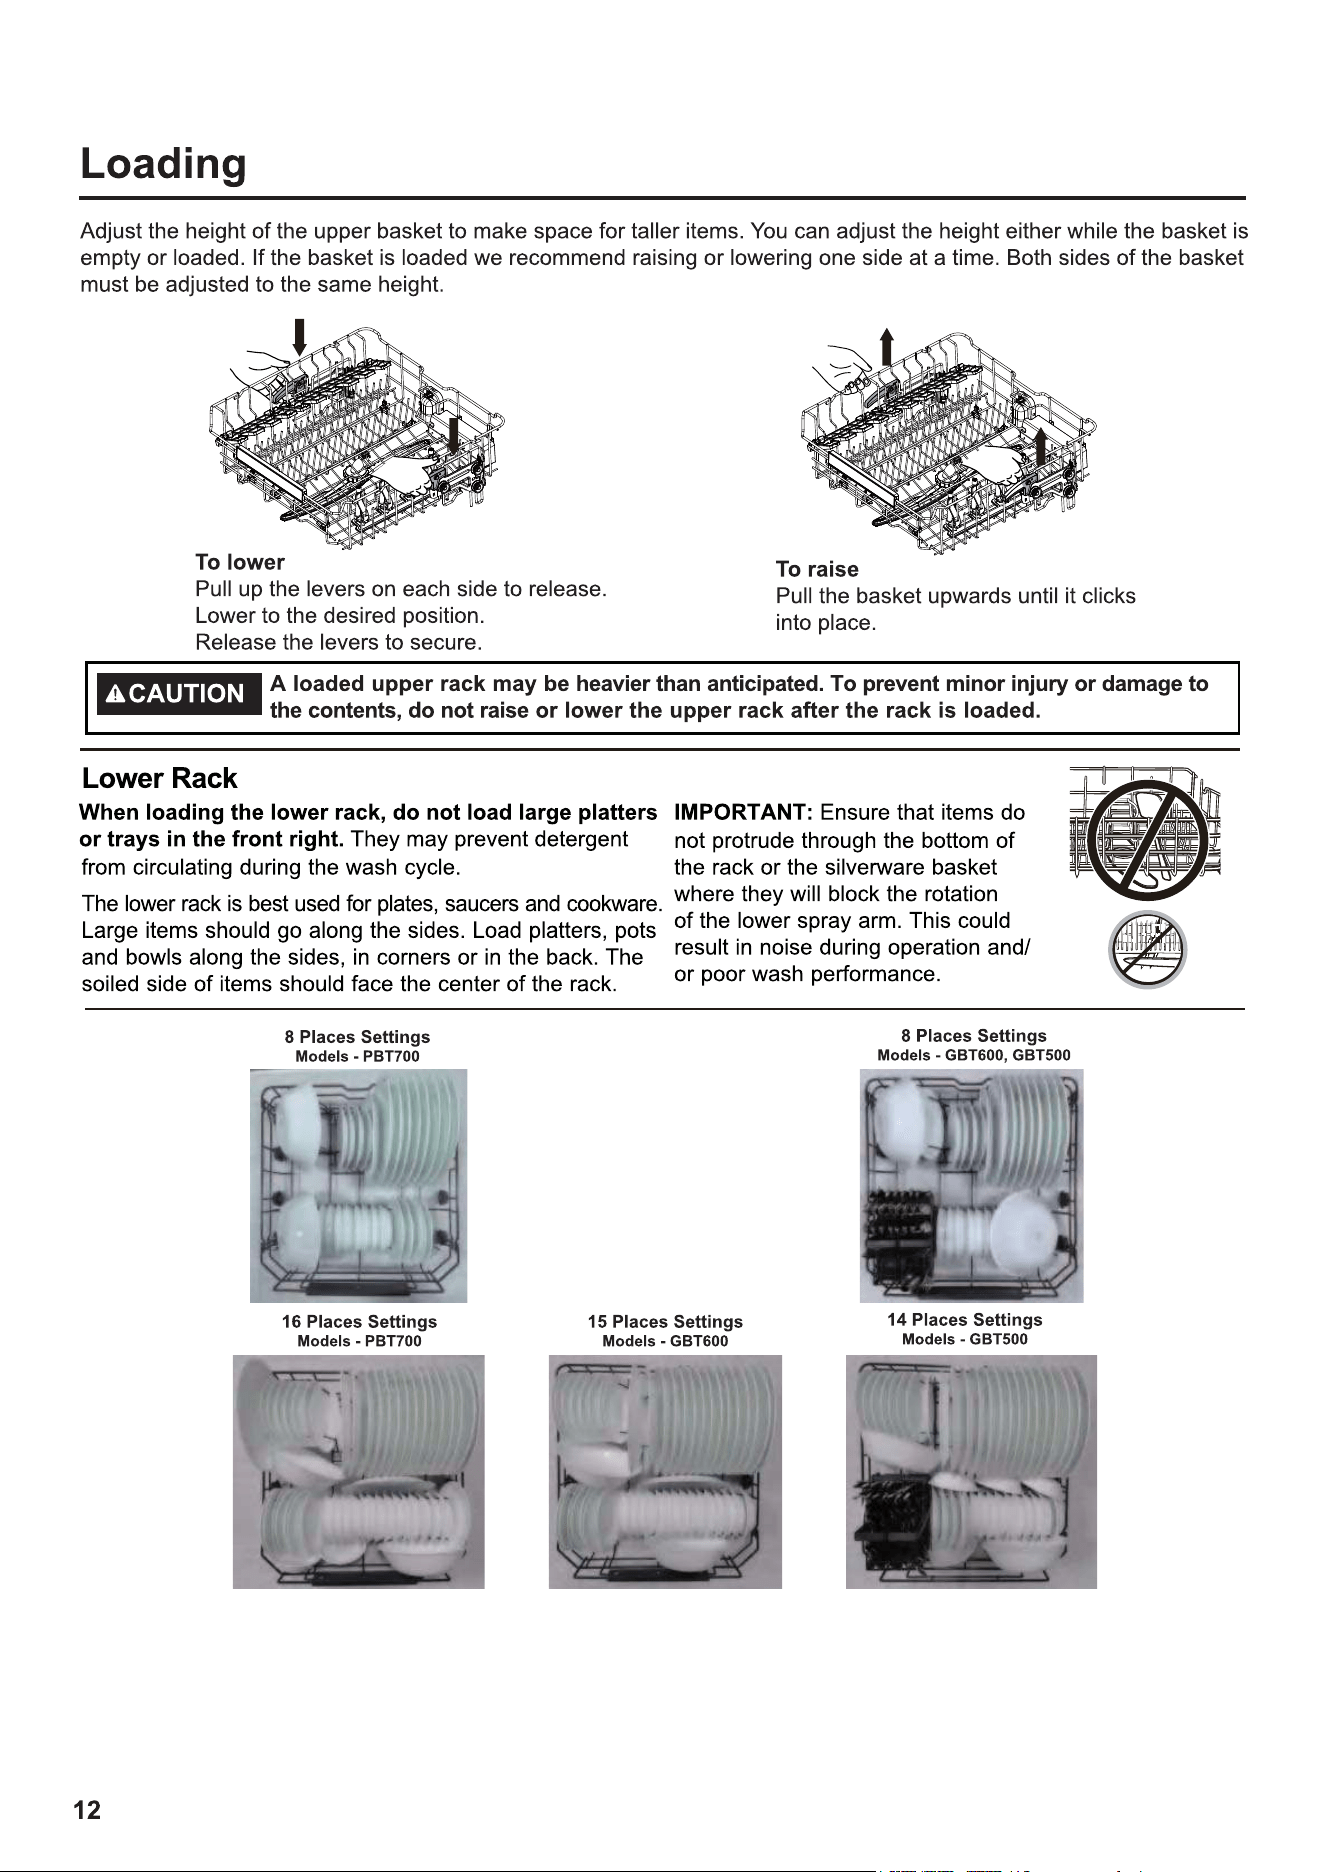
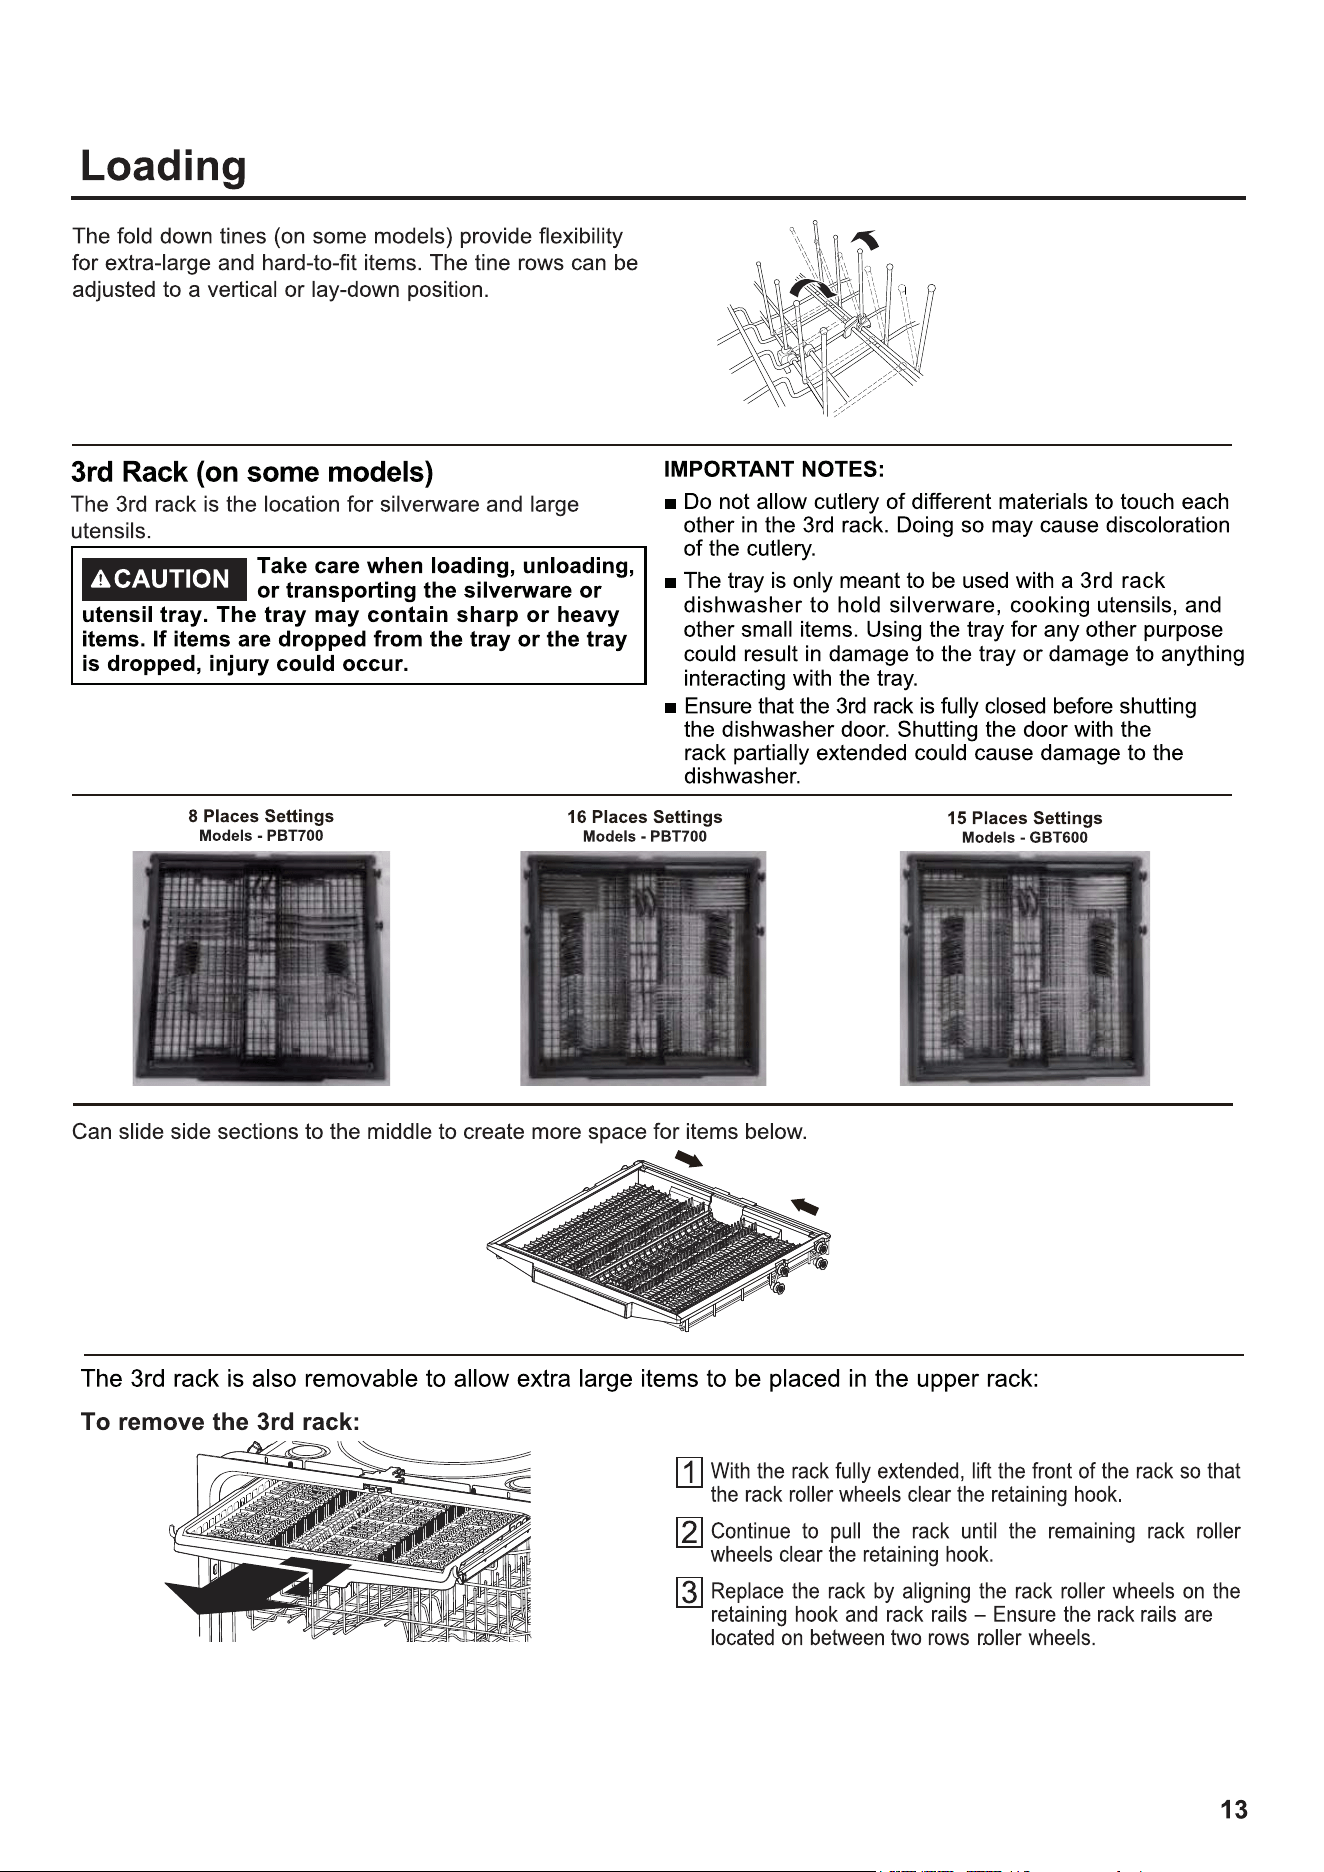
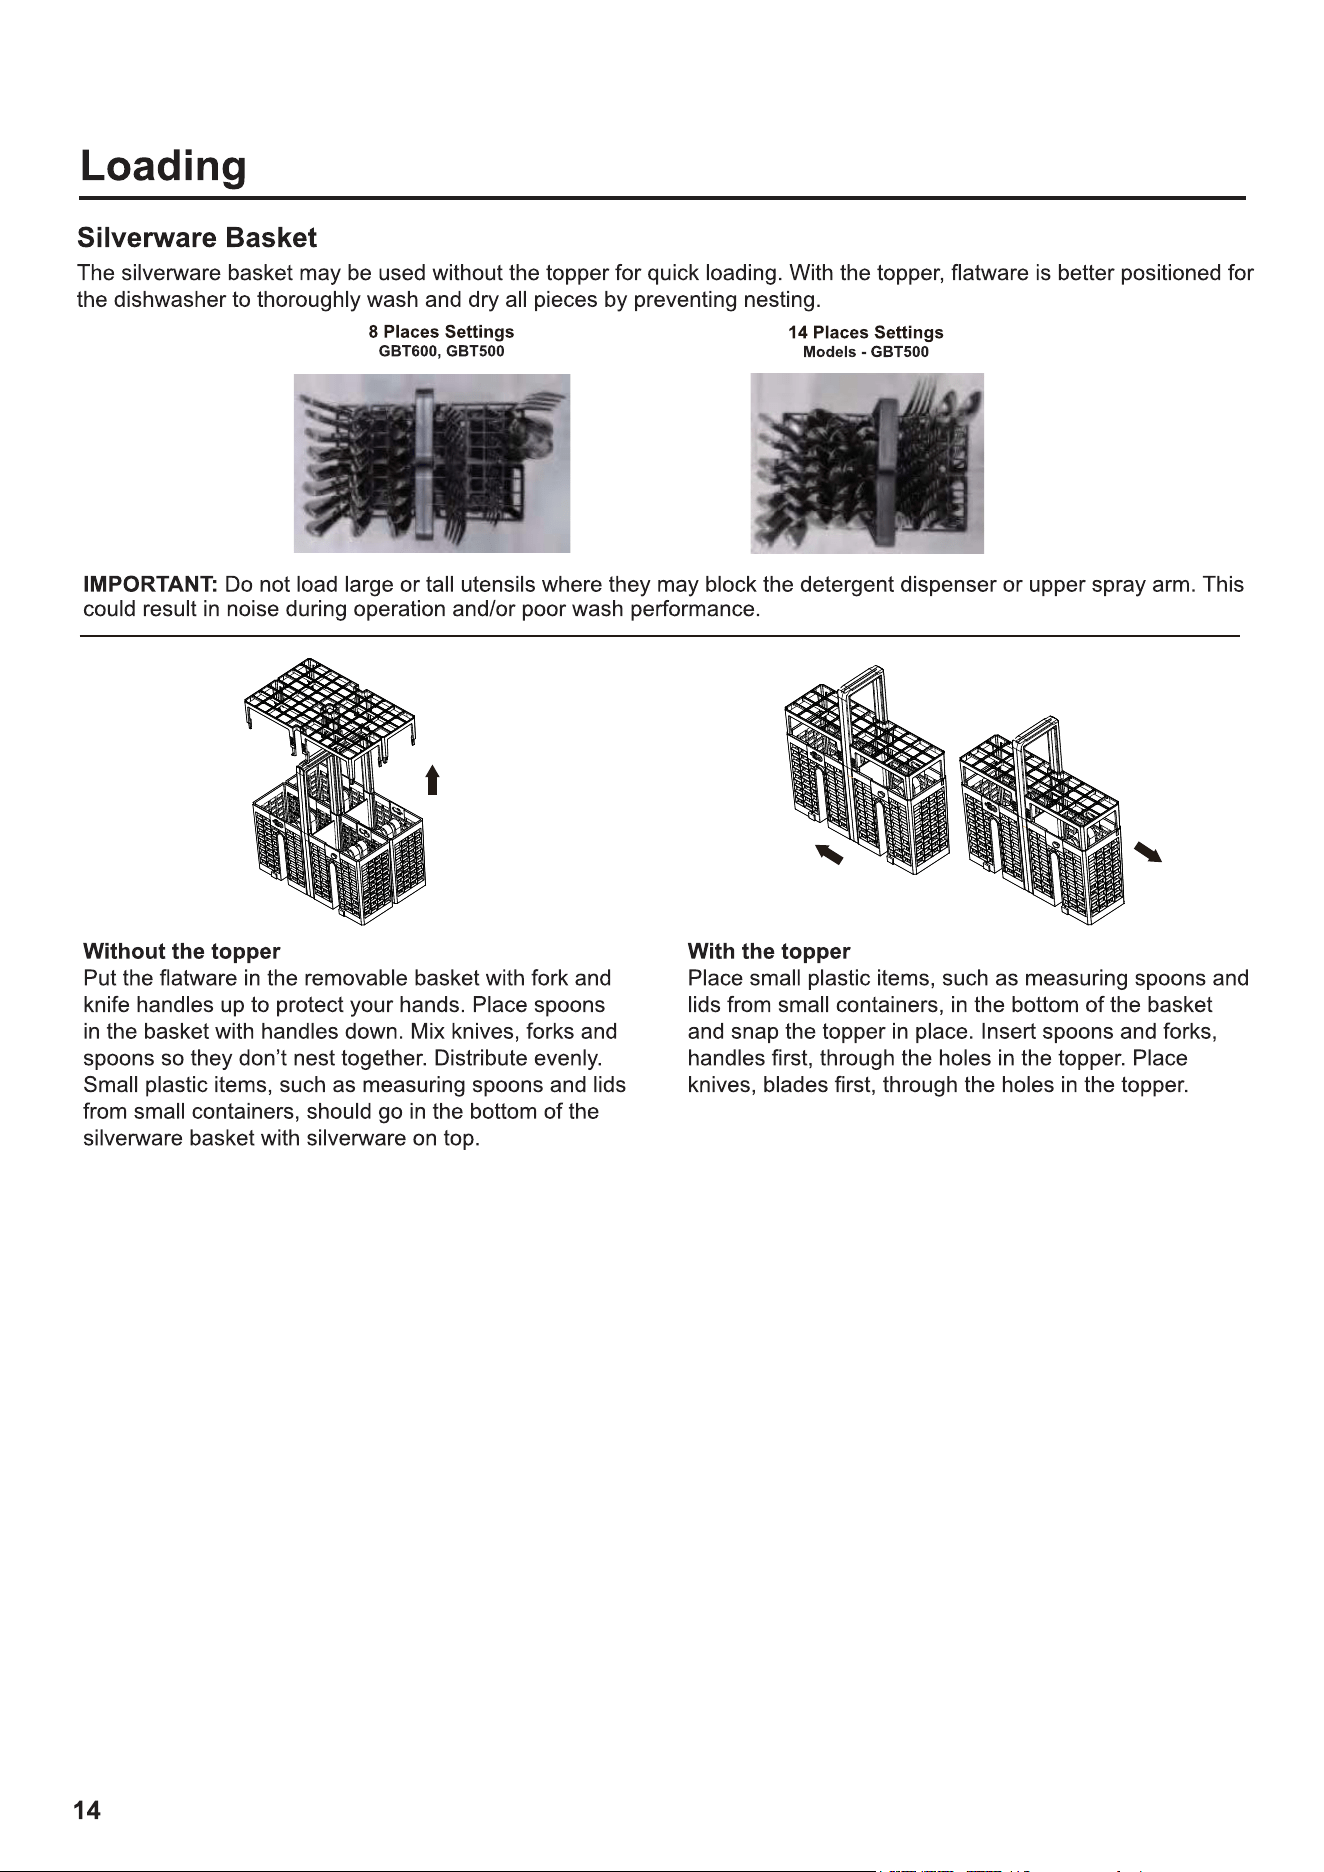
11
14

11
12
13
14
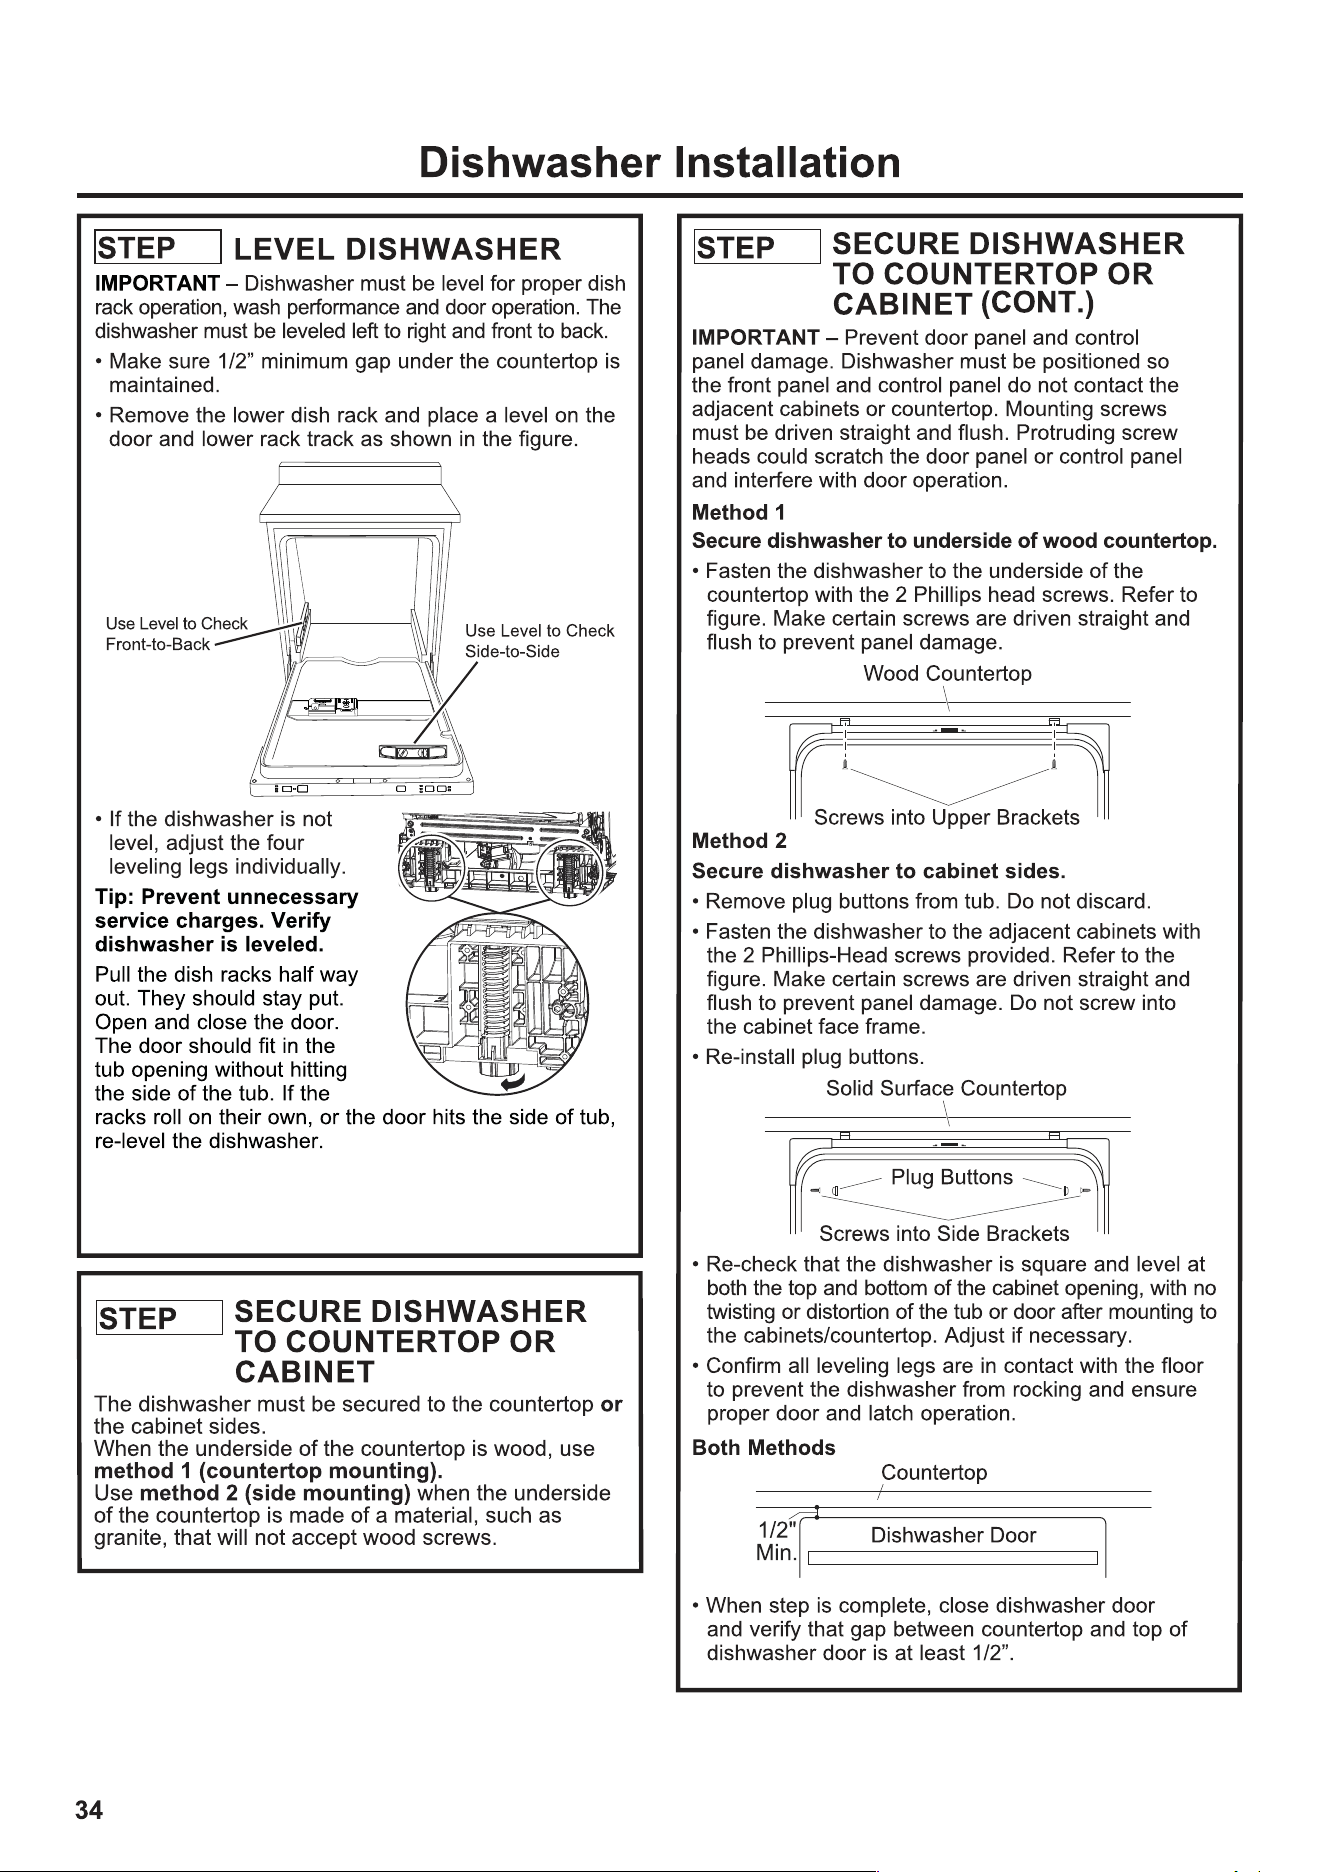
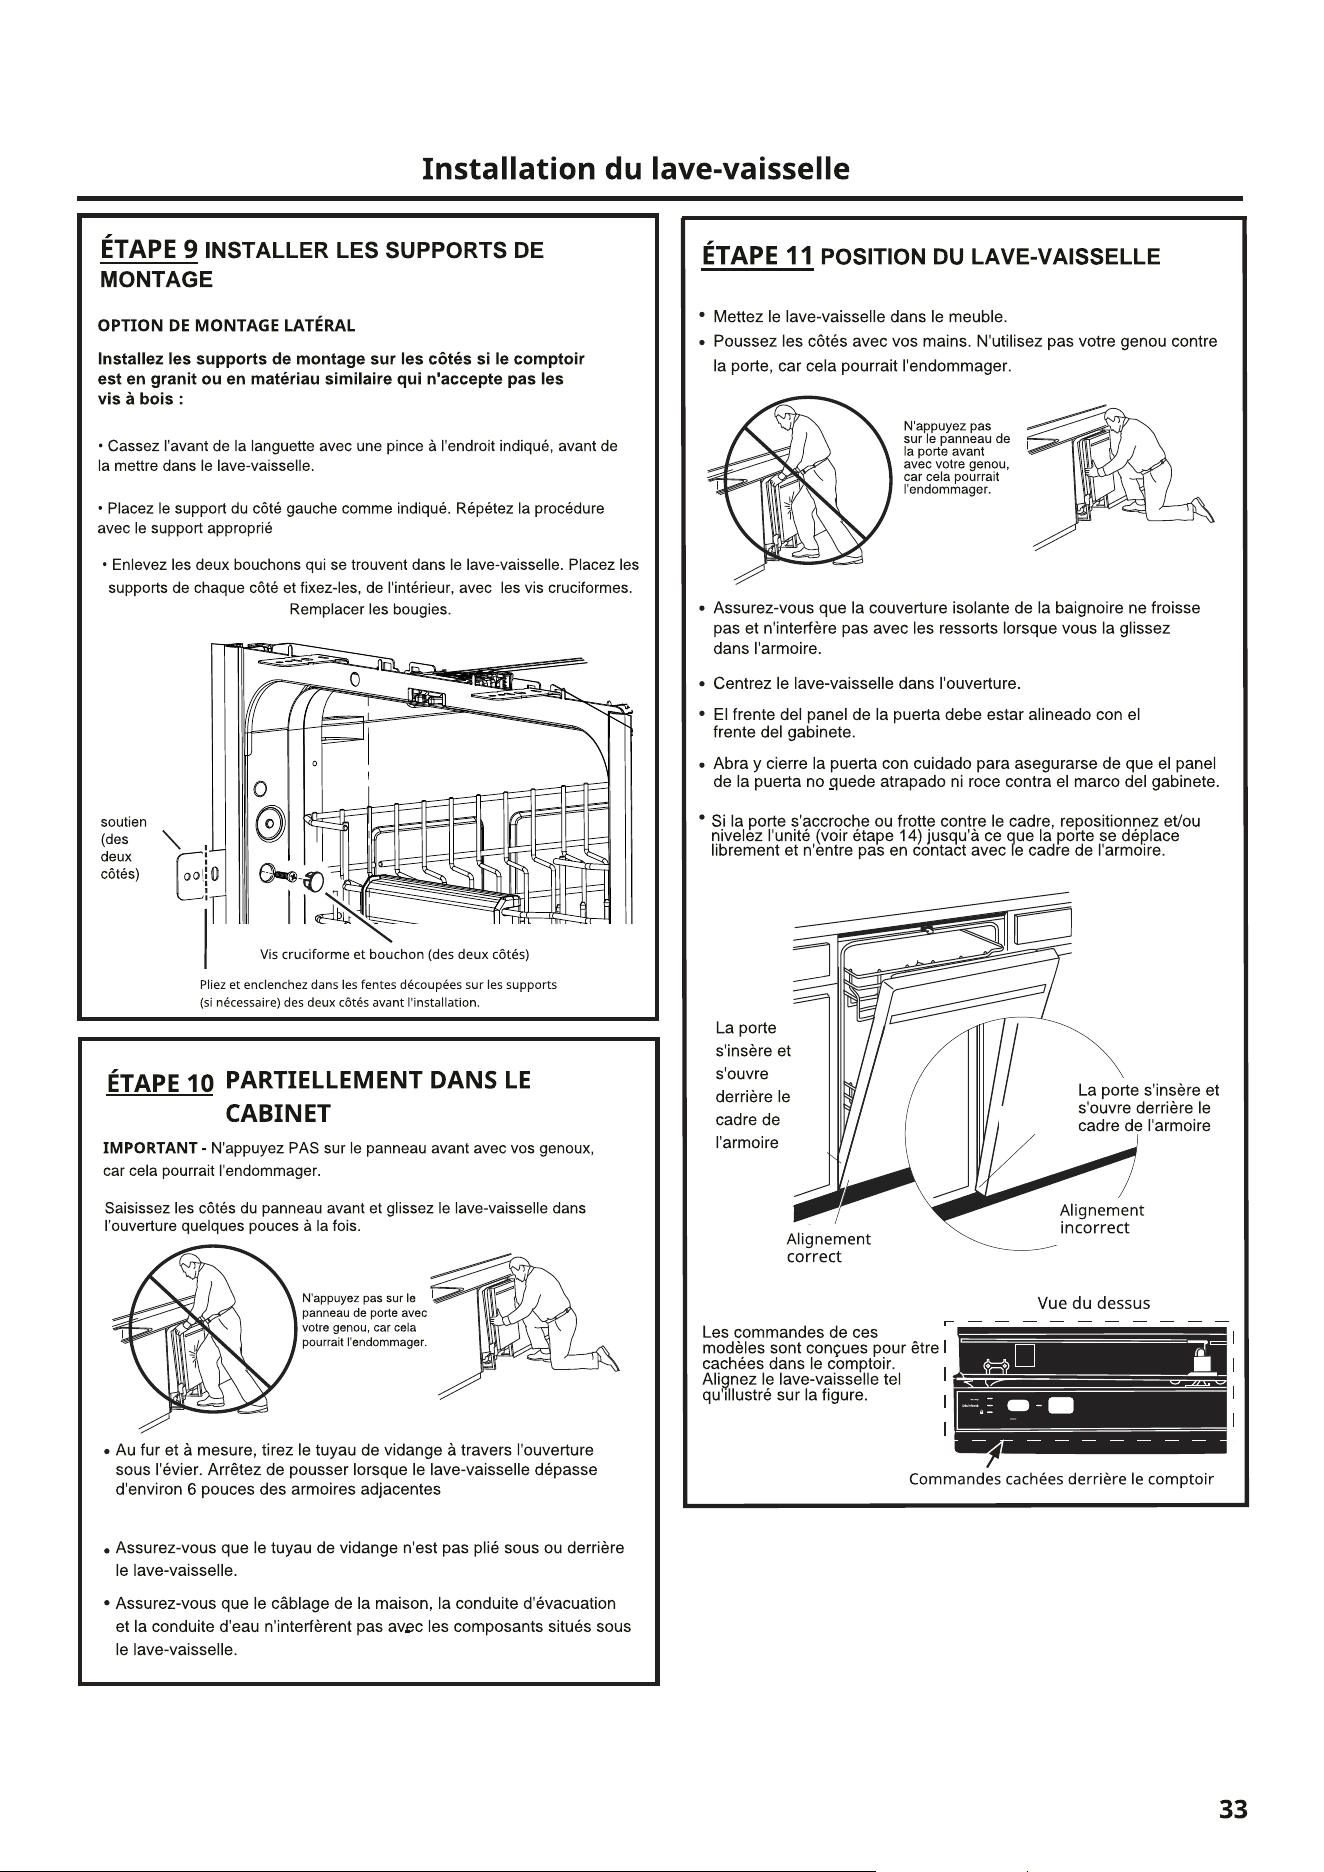
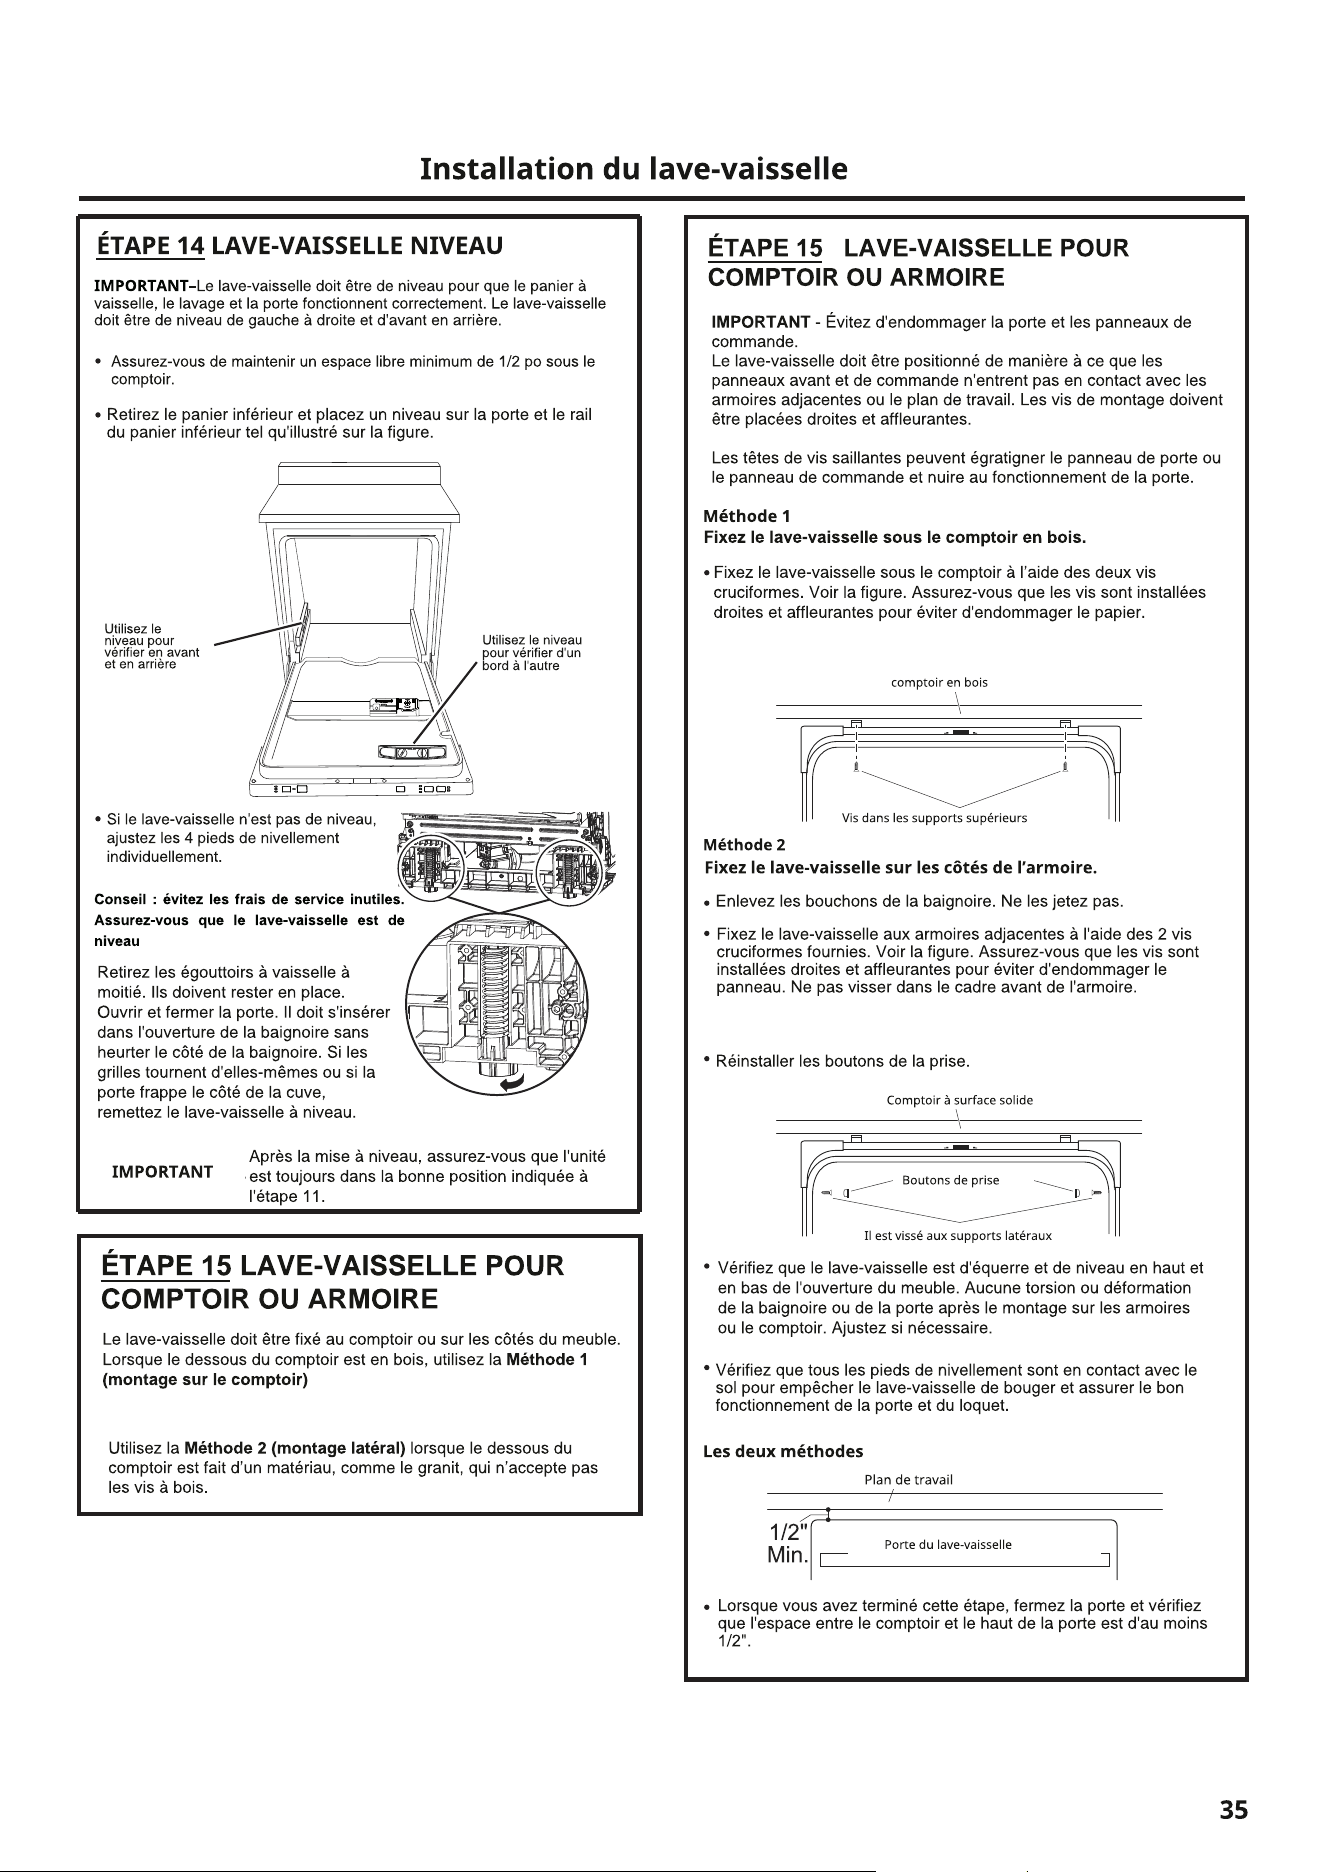
IMPORTANT - After leveling, verify that the dishwasher
is still in the correct psition shown in Step 11.
14
15
15
16
13
14
11
10
11
10 11
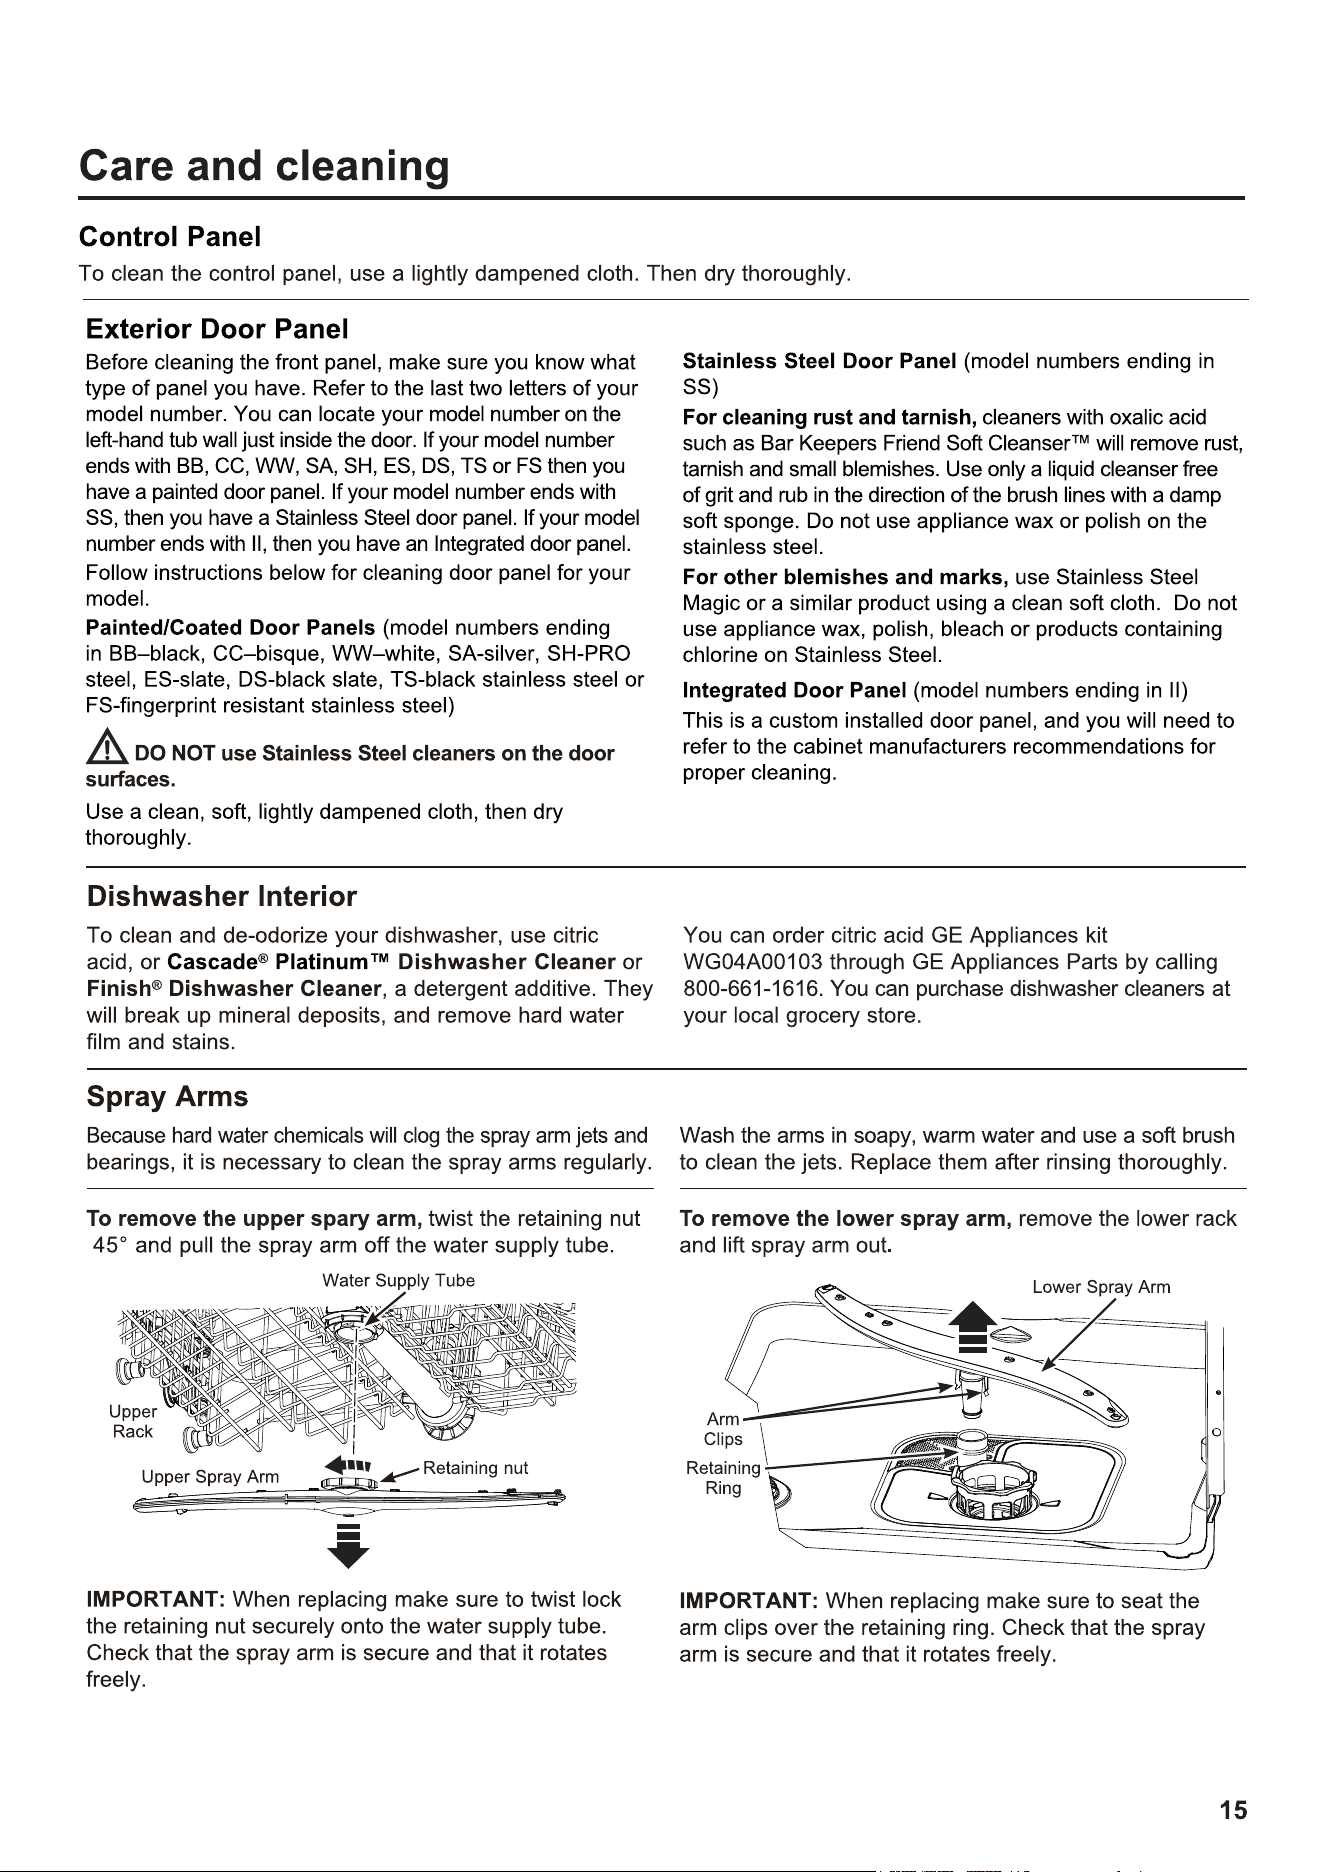
17
18
18
19
11
20
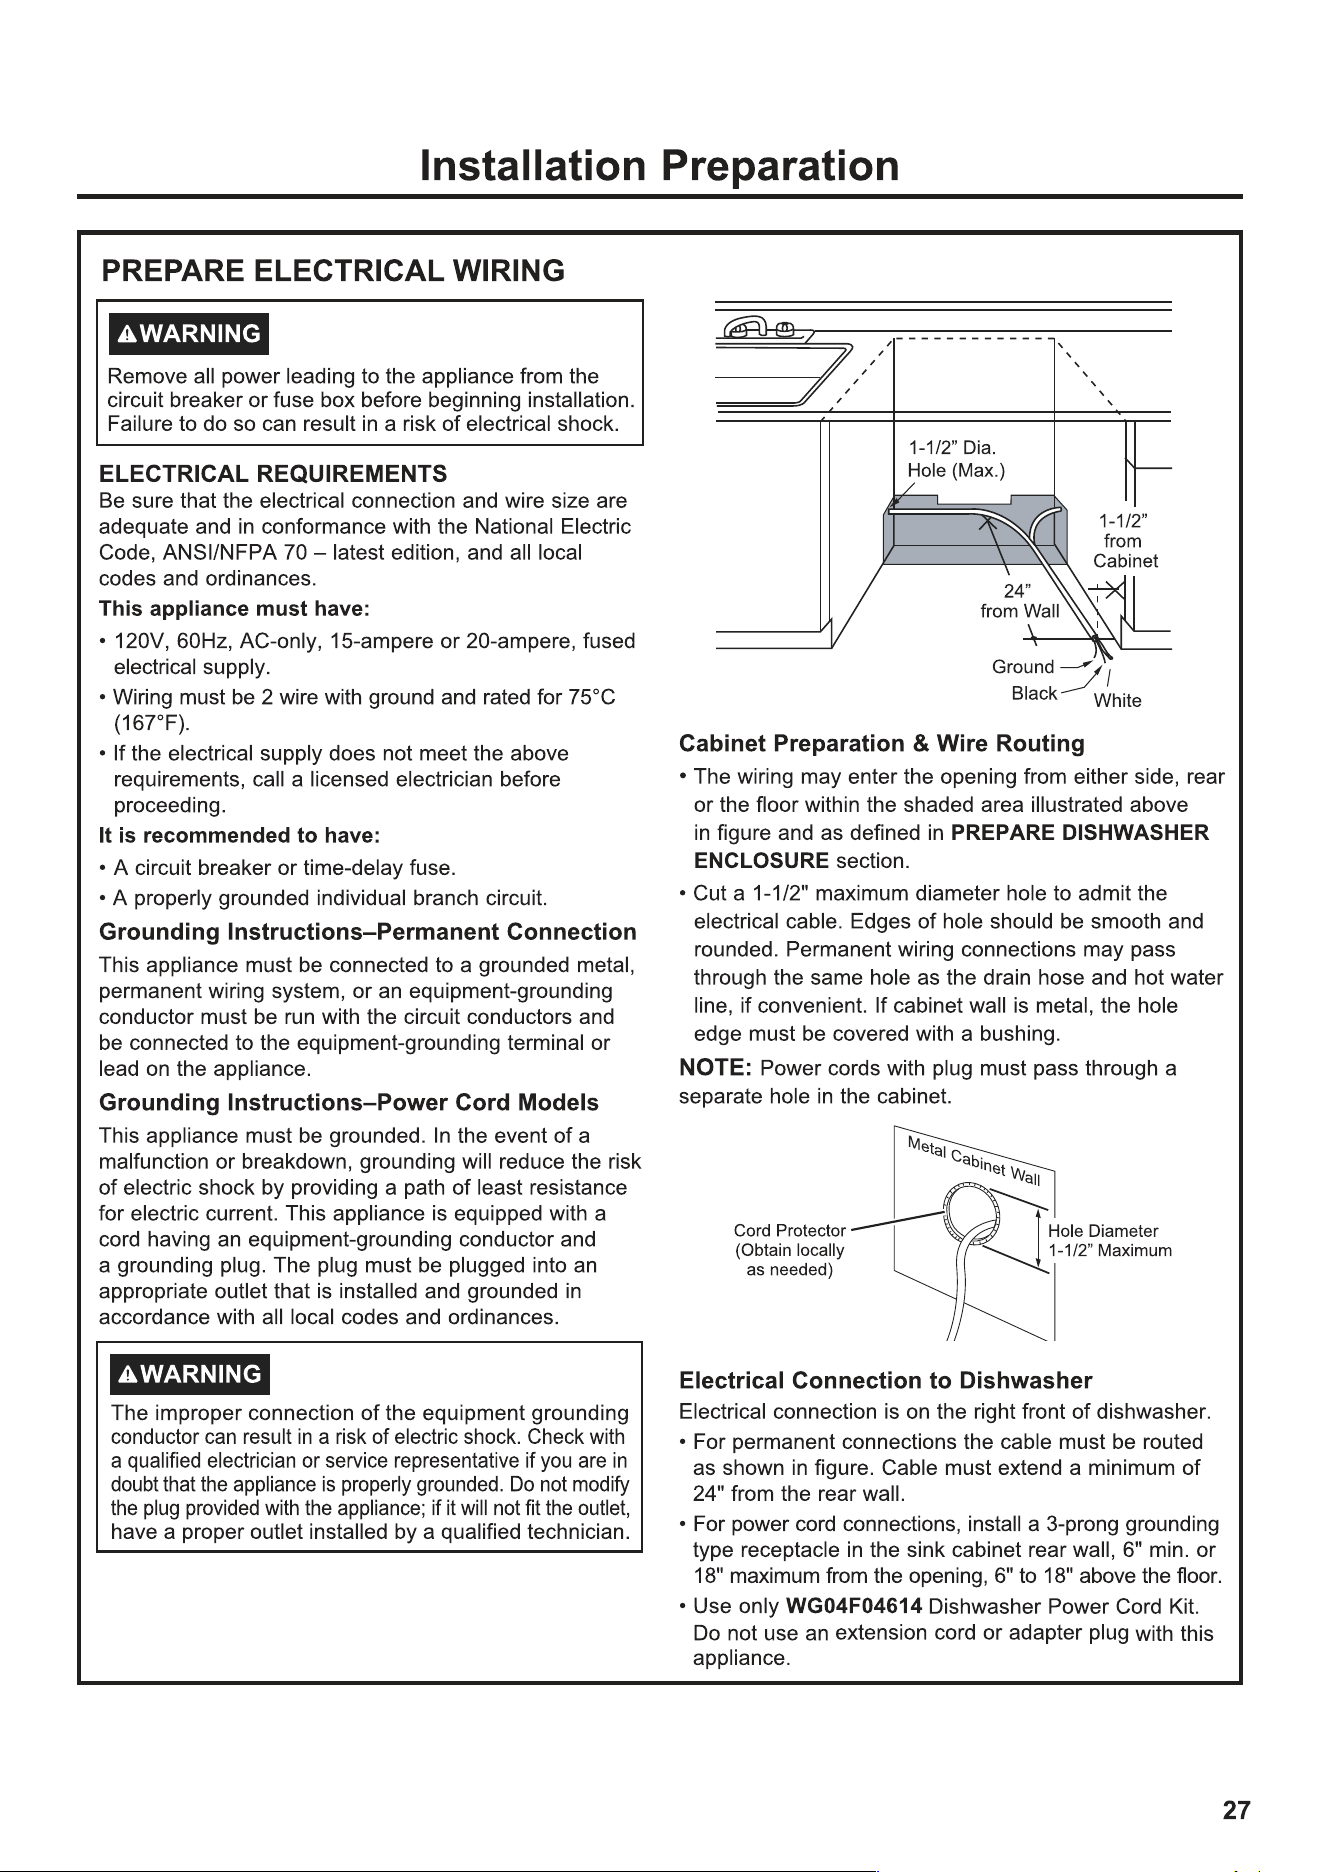
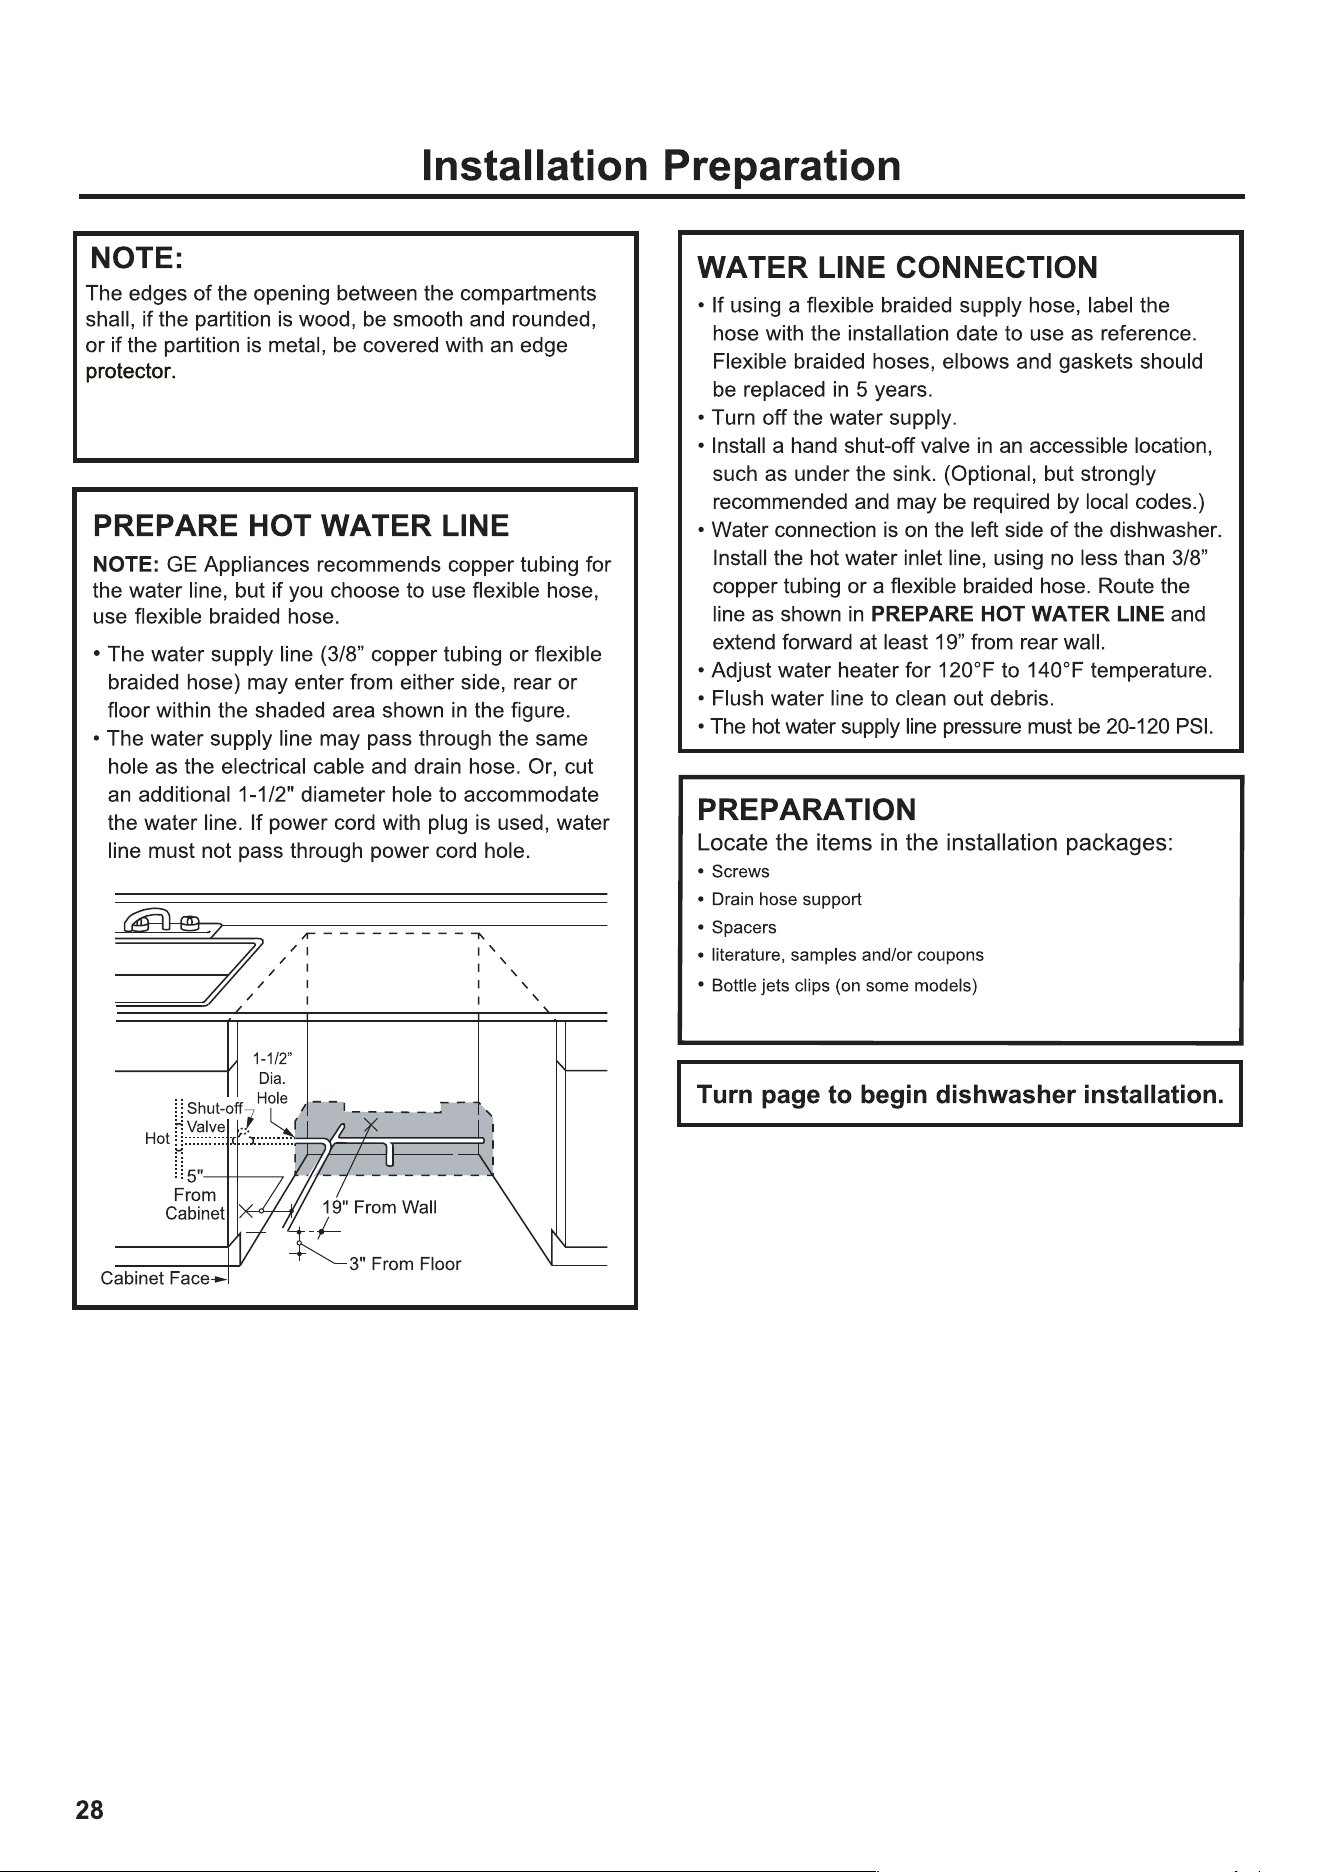
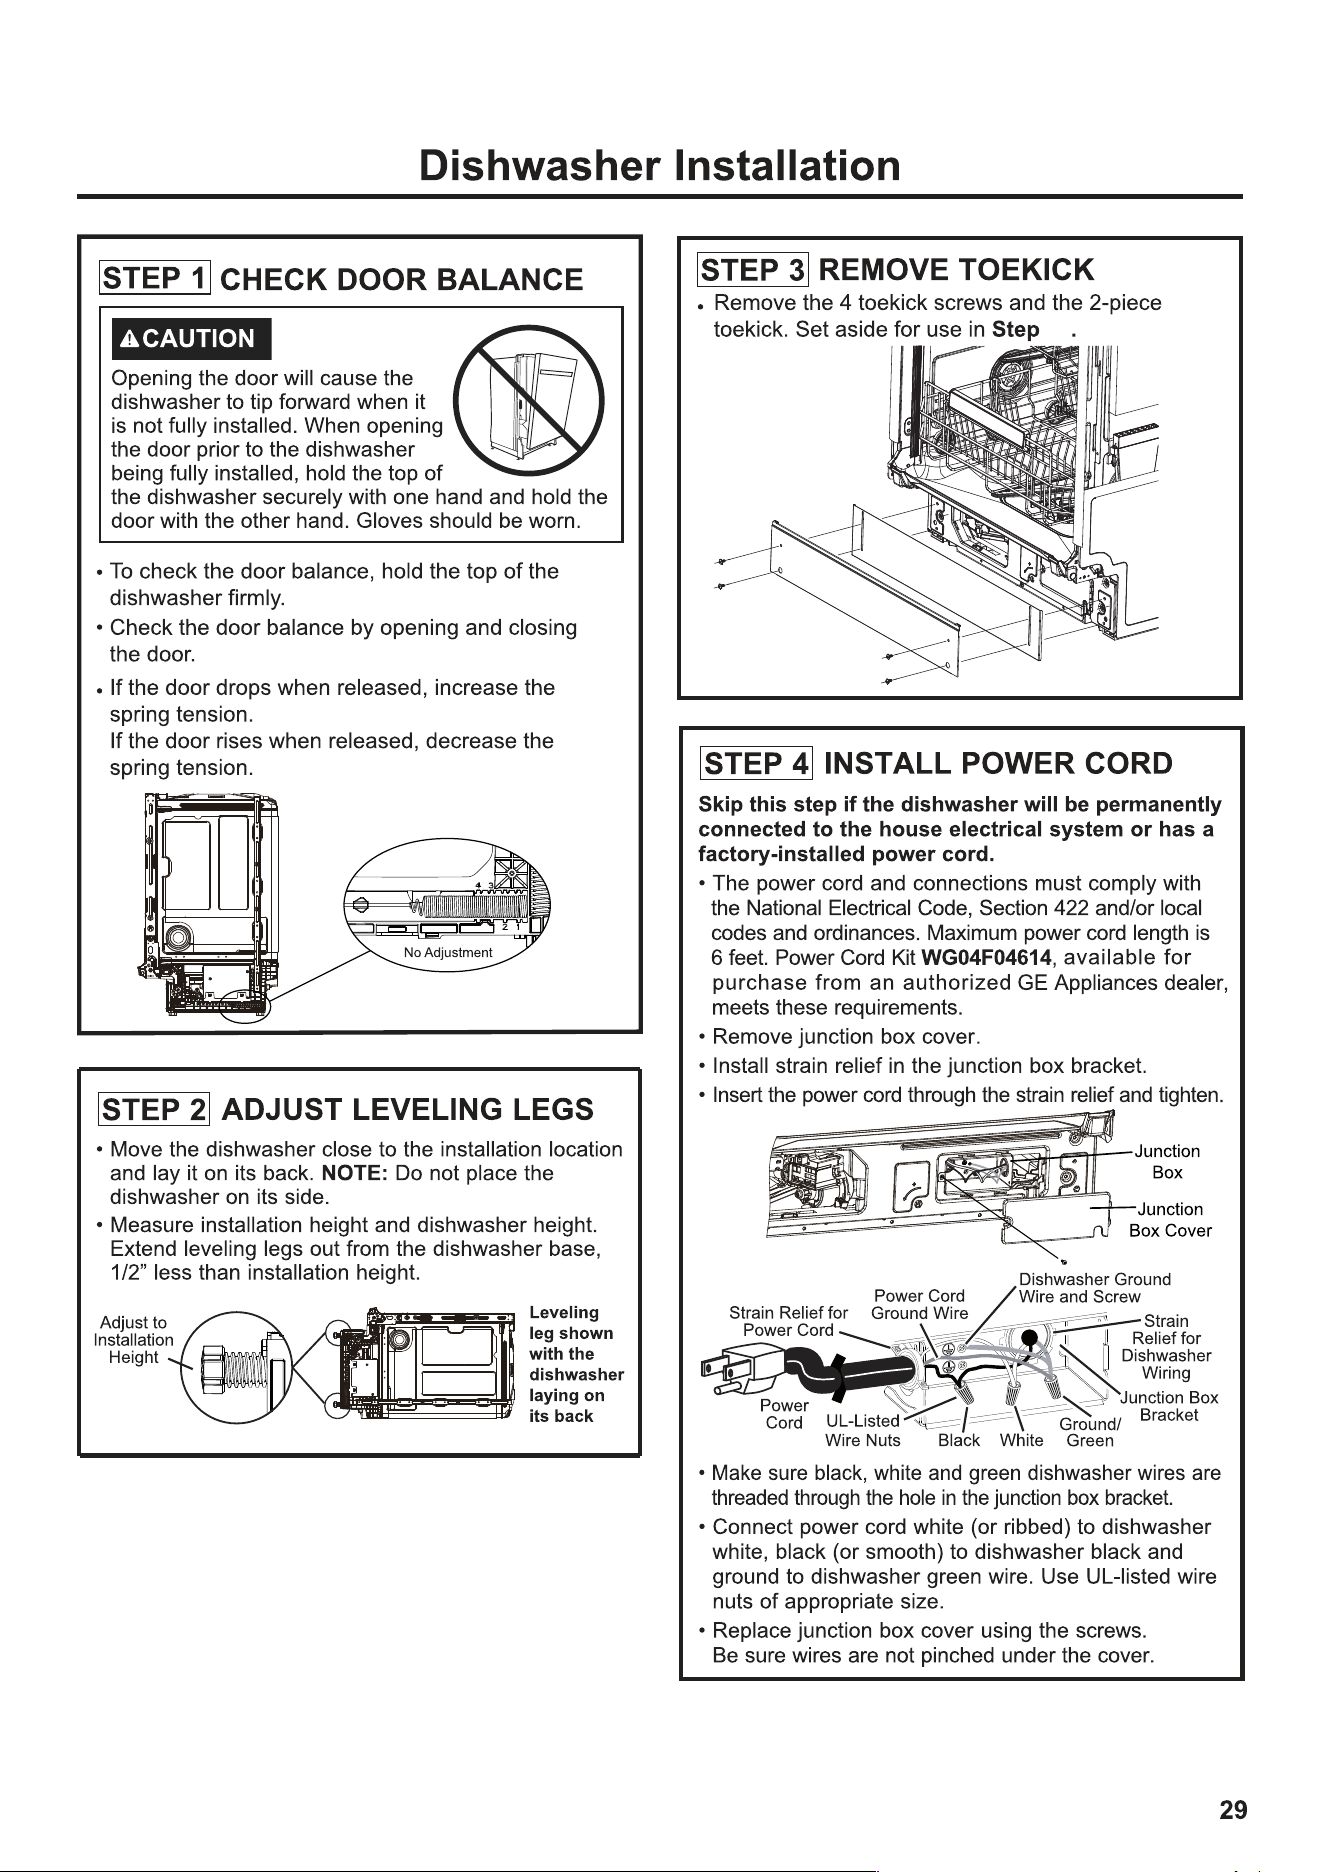
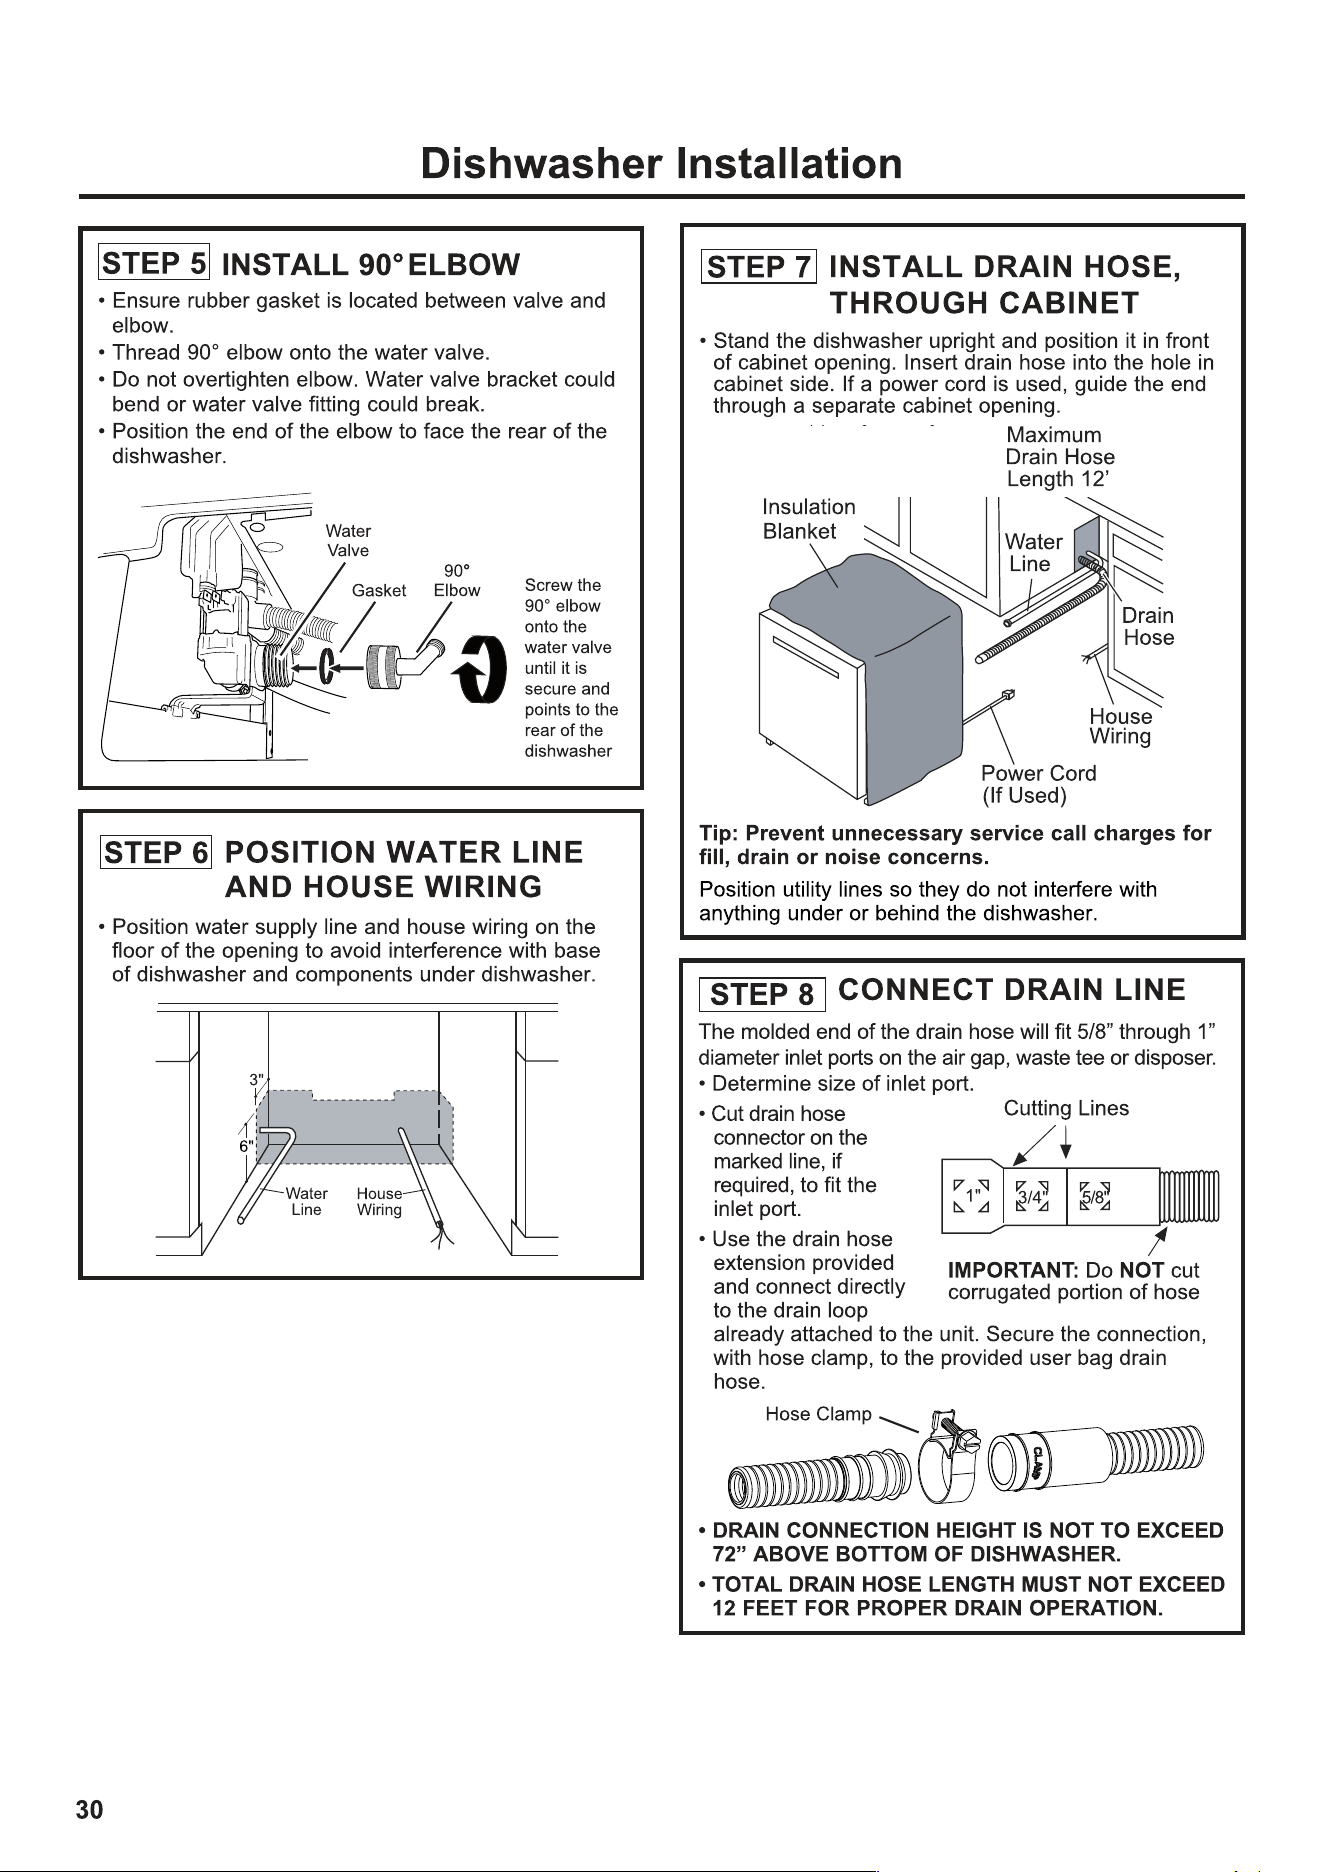
3
5
8
9
10
11
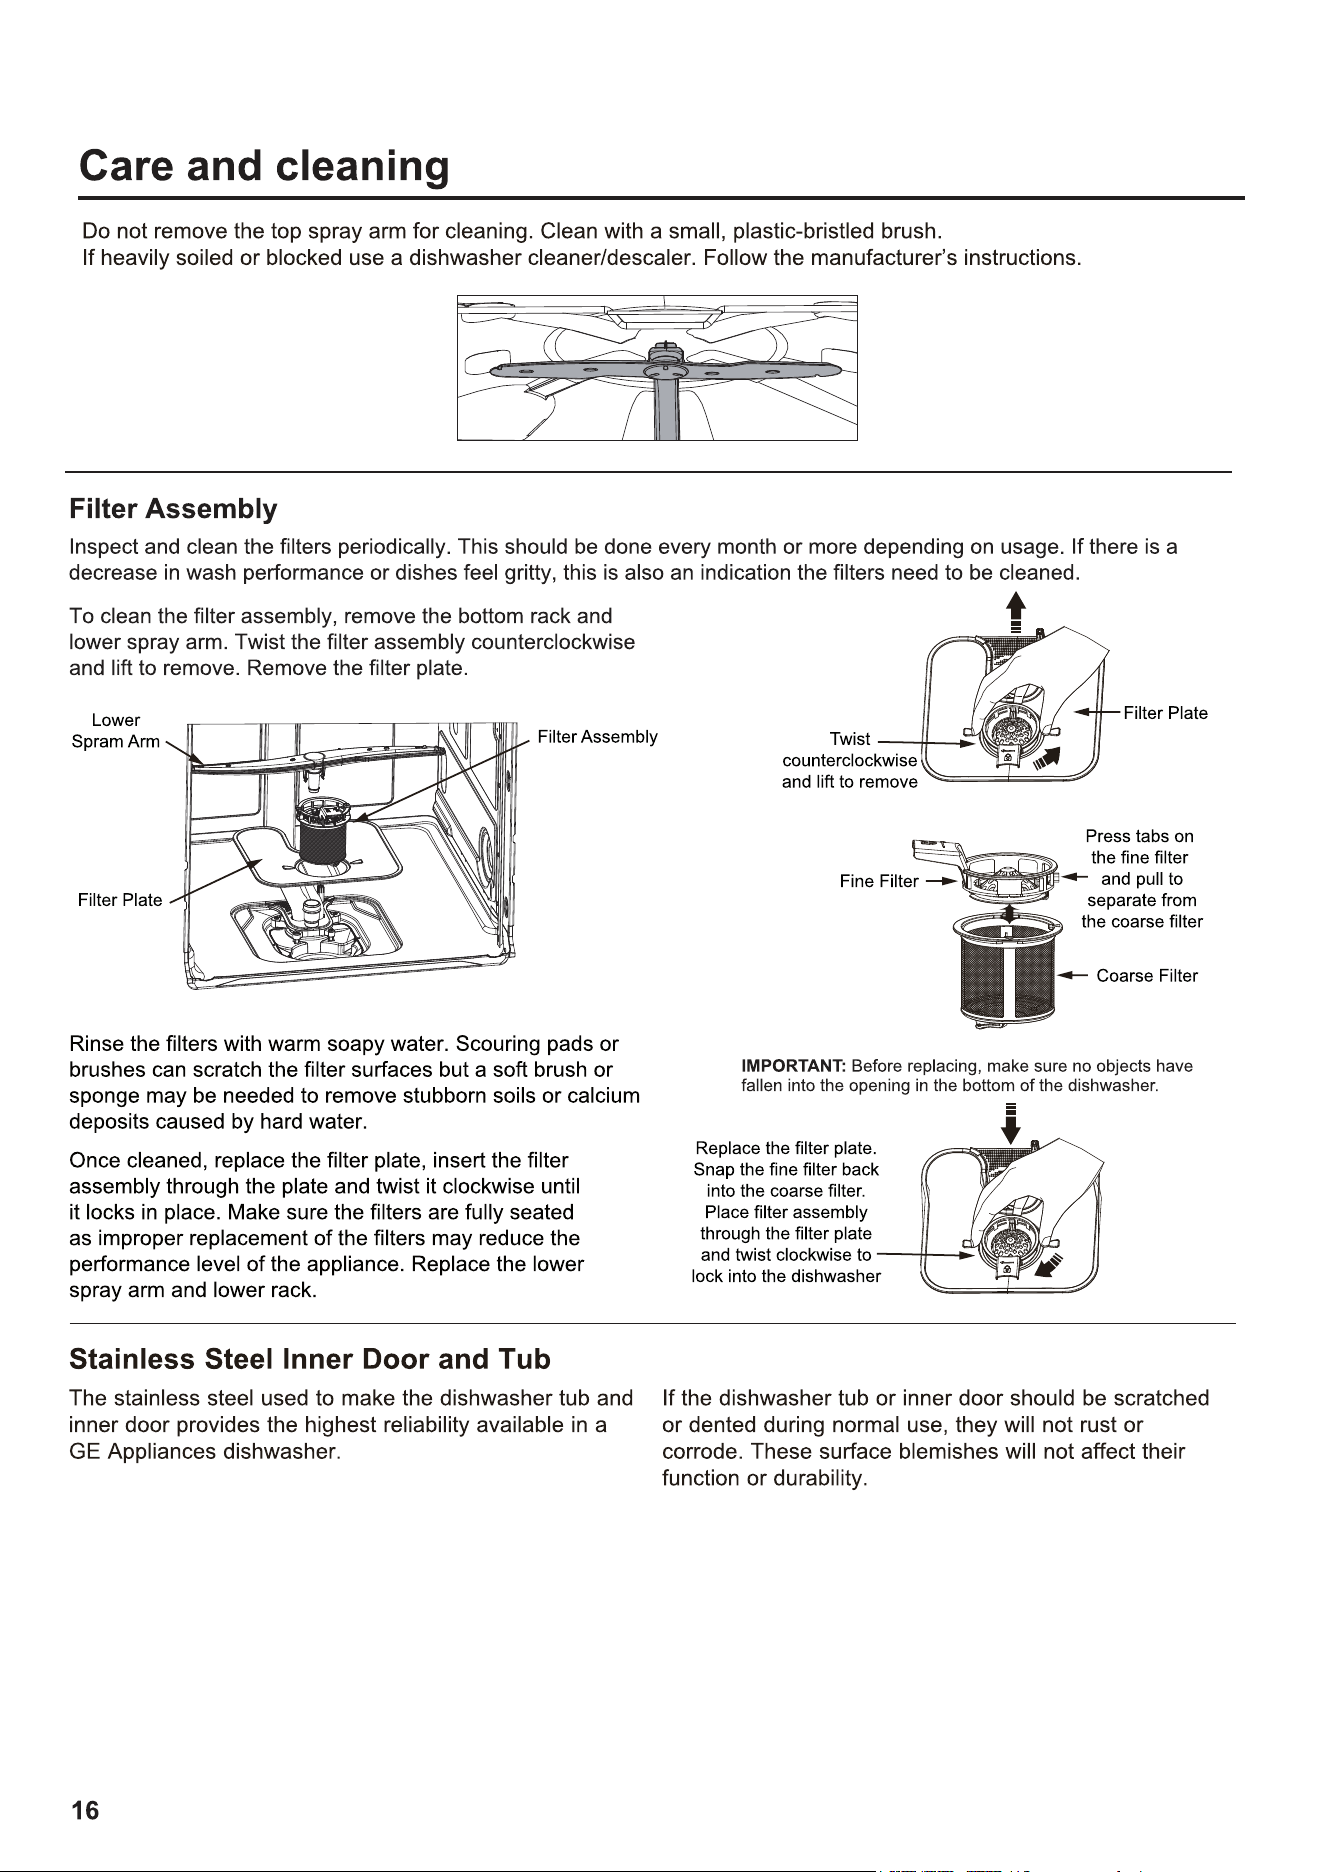
15
17
18
23
24
25
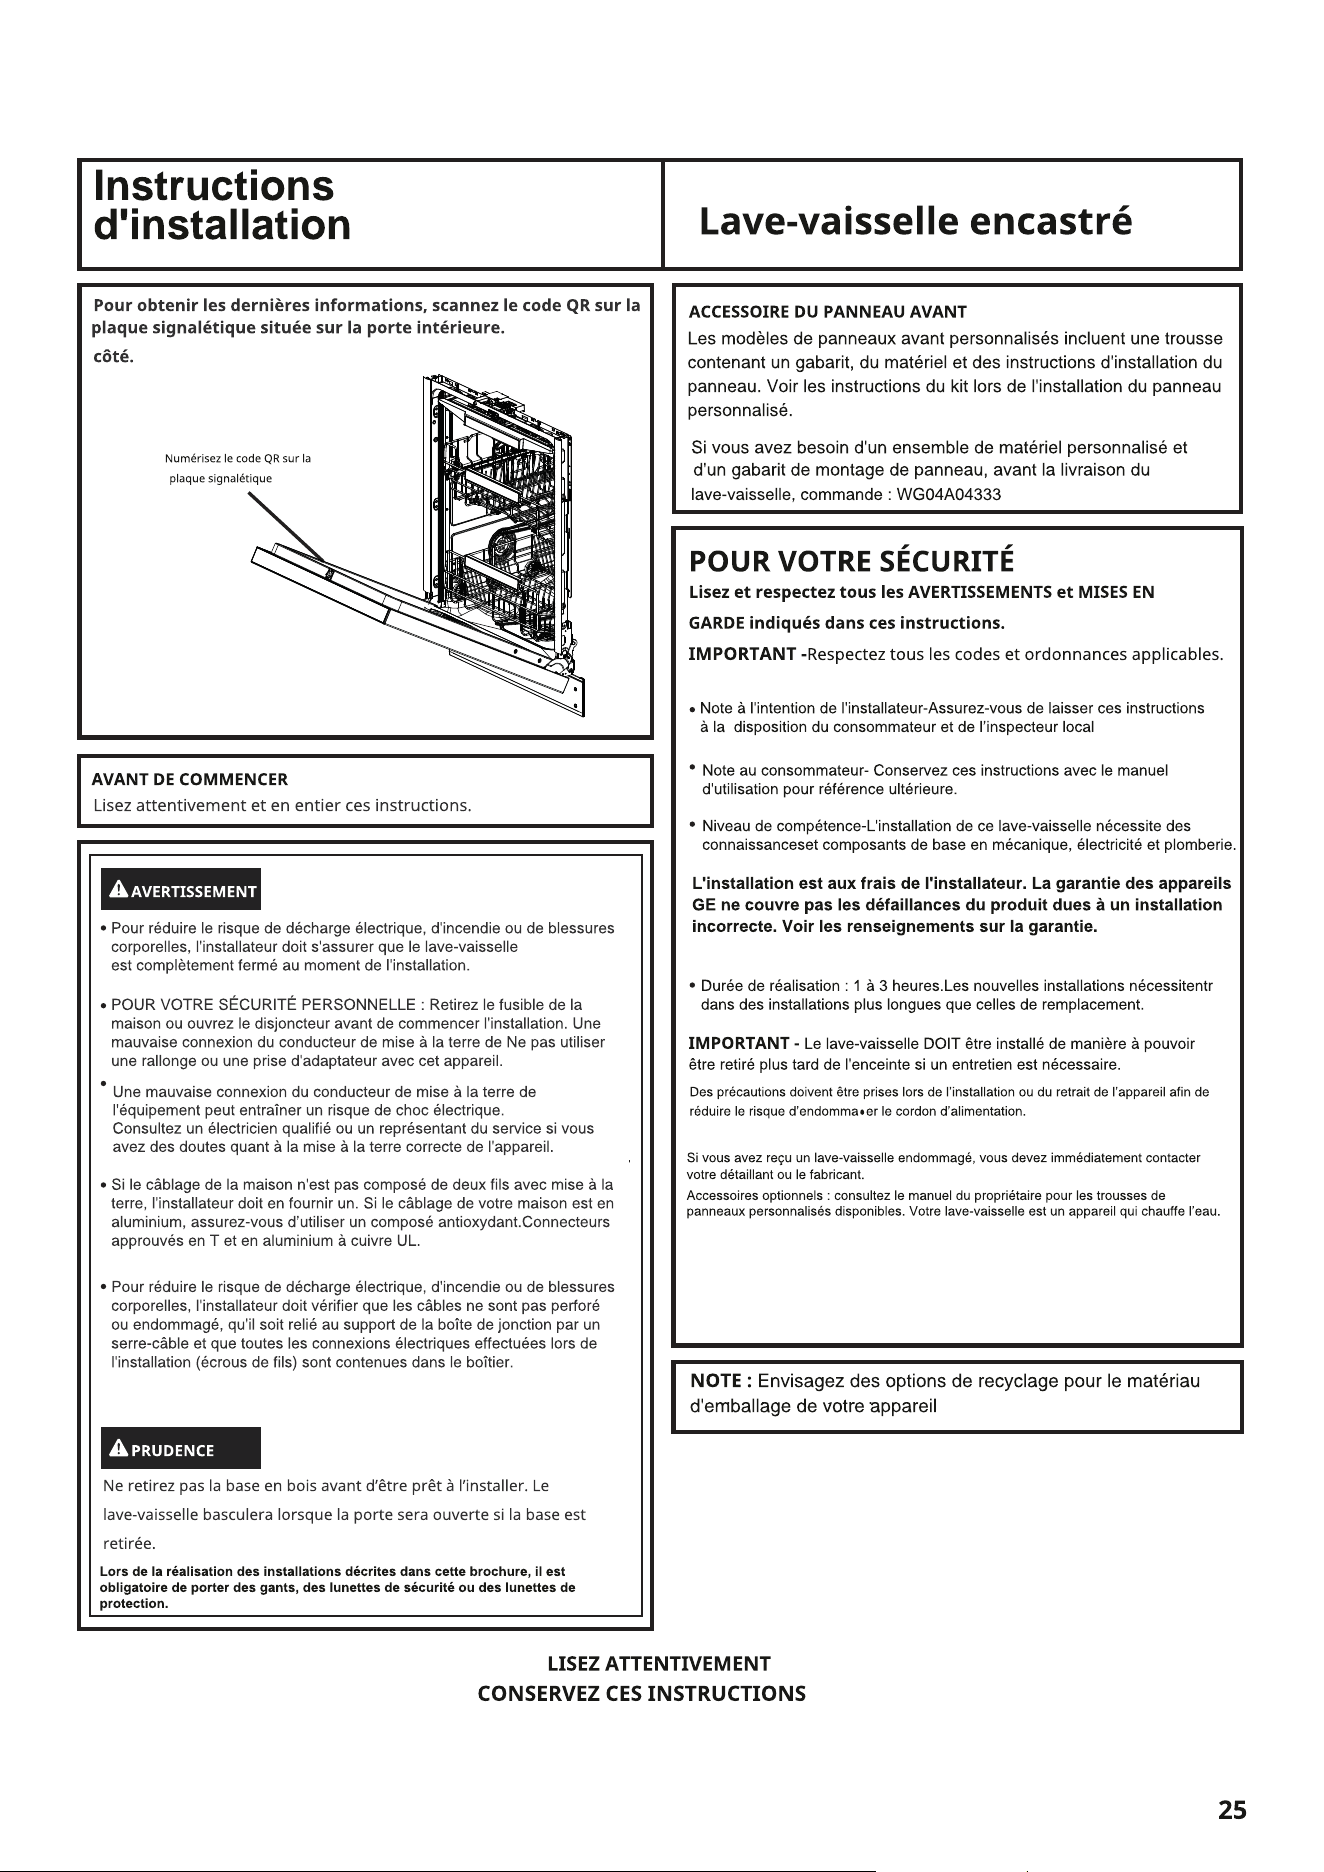
Scannez le code QR sur
la plaque de classement
Ce manuel contient les instructions d'installation. Suivez intégralement
ces instructions.
Pour obtenir les informations les plus récentes, scannez
le code QR sur la plaque signalétique située sur la porte
latérale.
Caractéris�ques et apparence peuvent différer selon les par�es du manuel
è
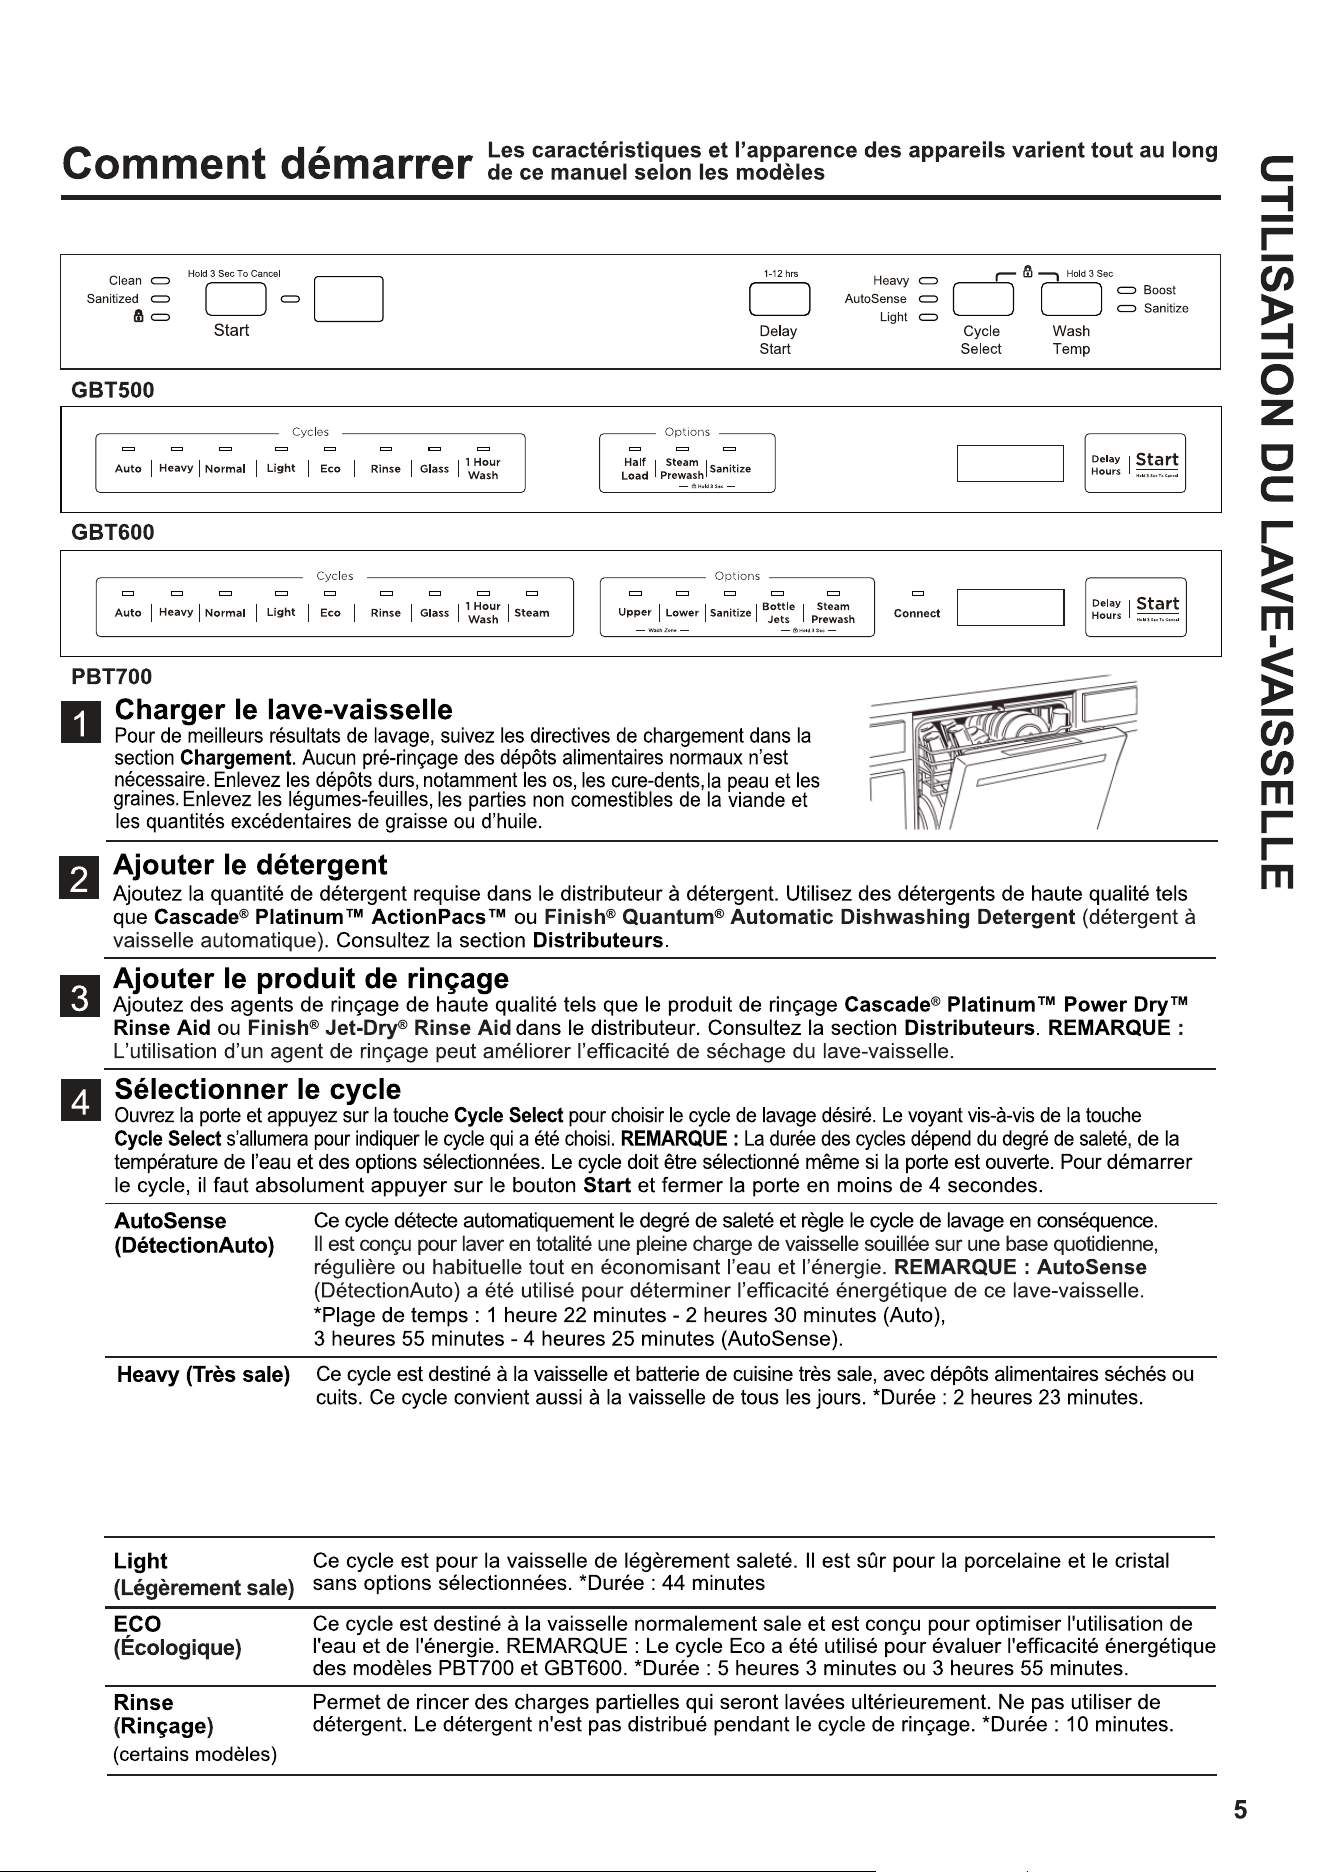
Ce cycle est conçu pour une utilisation quotidienne, régulière ou typique afin de laver comp
lètement une charge complète de vaisselle normalement sale, et il est conçu pour économiser
à la fois l'eau et l'énergie.
NOTE : La norme Nformal a été utilisée pour évaluer l'efficacité énergétique des mod
èles PBT700 et GBT600. *Durée : 3 heures 22 minutes (PBT700) ou 2 heures 44 minutes (GBT600).
Indique qu'un débit d'eau est détecté sur le flotteur de base. Coupez l'alimentation en eau
pour éviter tout dommage.
400
Indique qu'aucun débit d'eau n'est détecté. Assurez-vous que l'eau est connectée et
activée.
405
404
Indique un débit d'eau insuffisant. Vérifiez que l'alimentation en eau est correctement
branchée et entièrement ouverte.
400
4
74
7
15
25
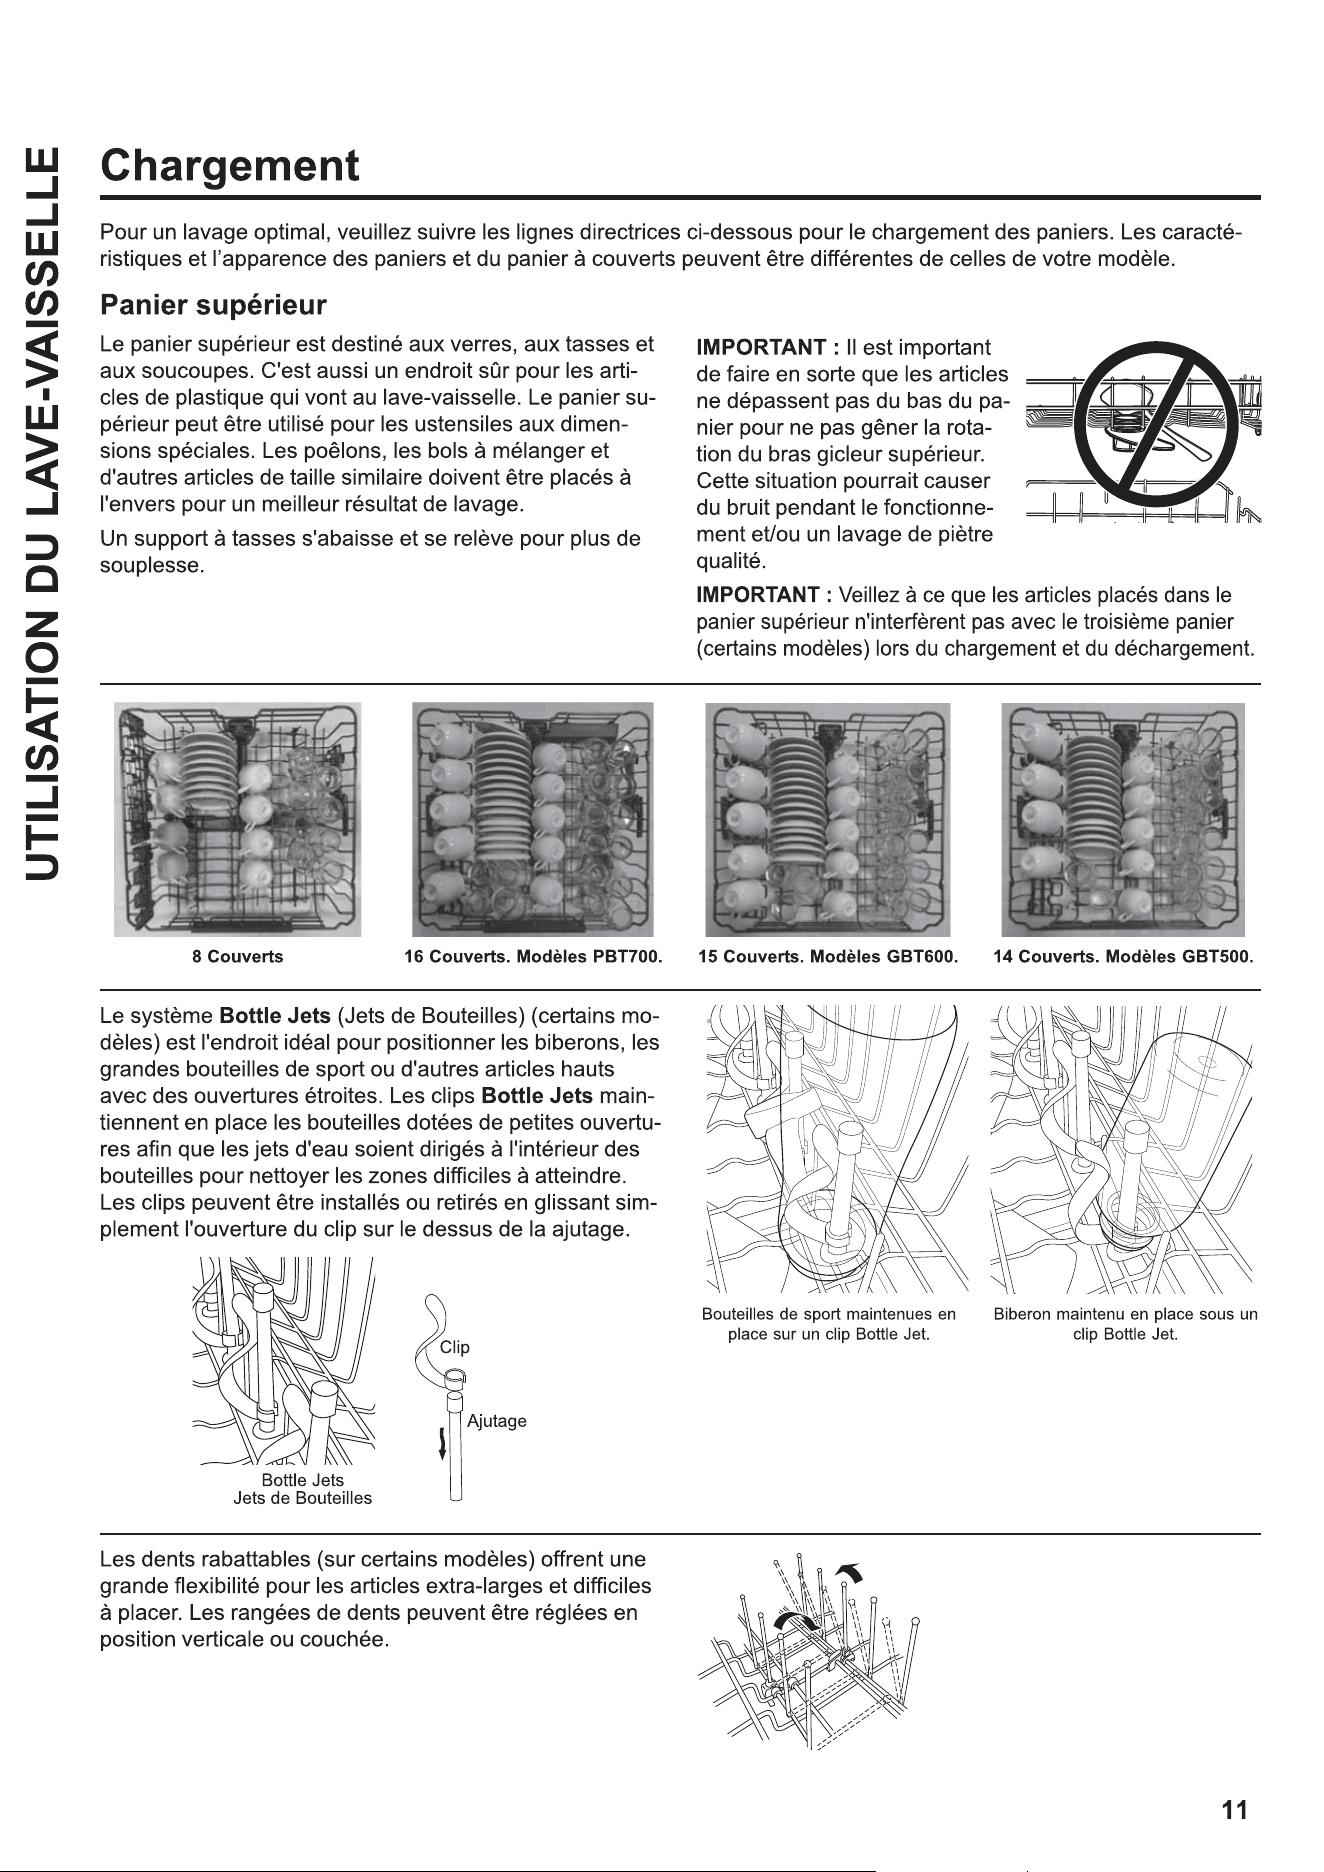
Les dents rabattables (sur certains modèles) offrent une flexibilité
pour les articles de très grande taille et difficiles à loger. Les rangé
es de dents peuvent être ajustées en position verticale ou couchée.
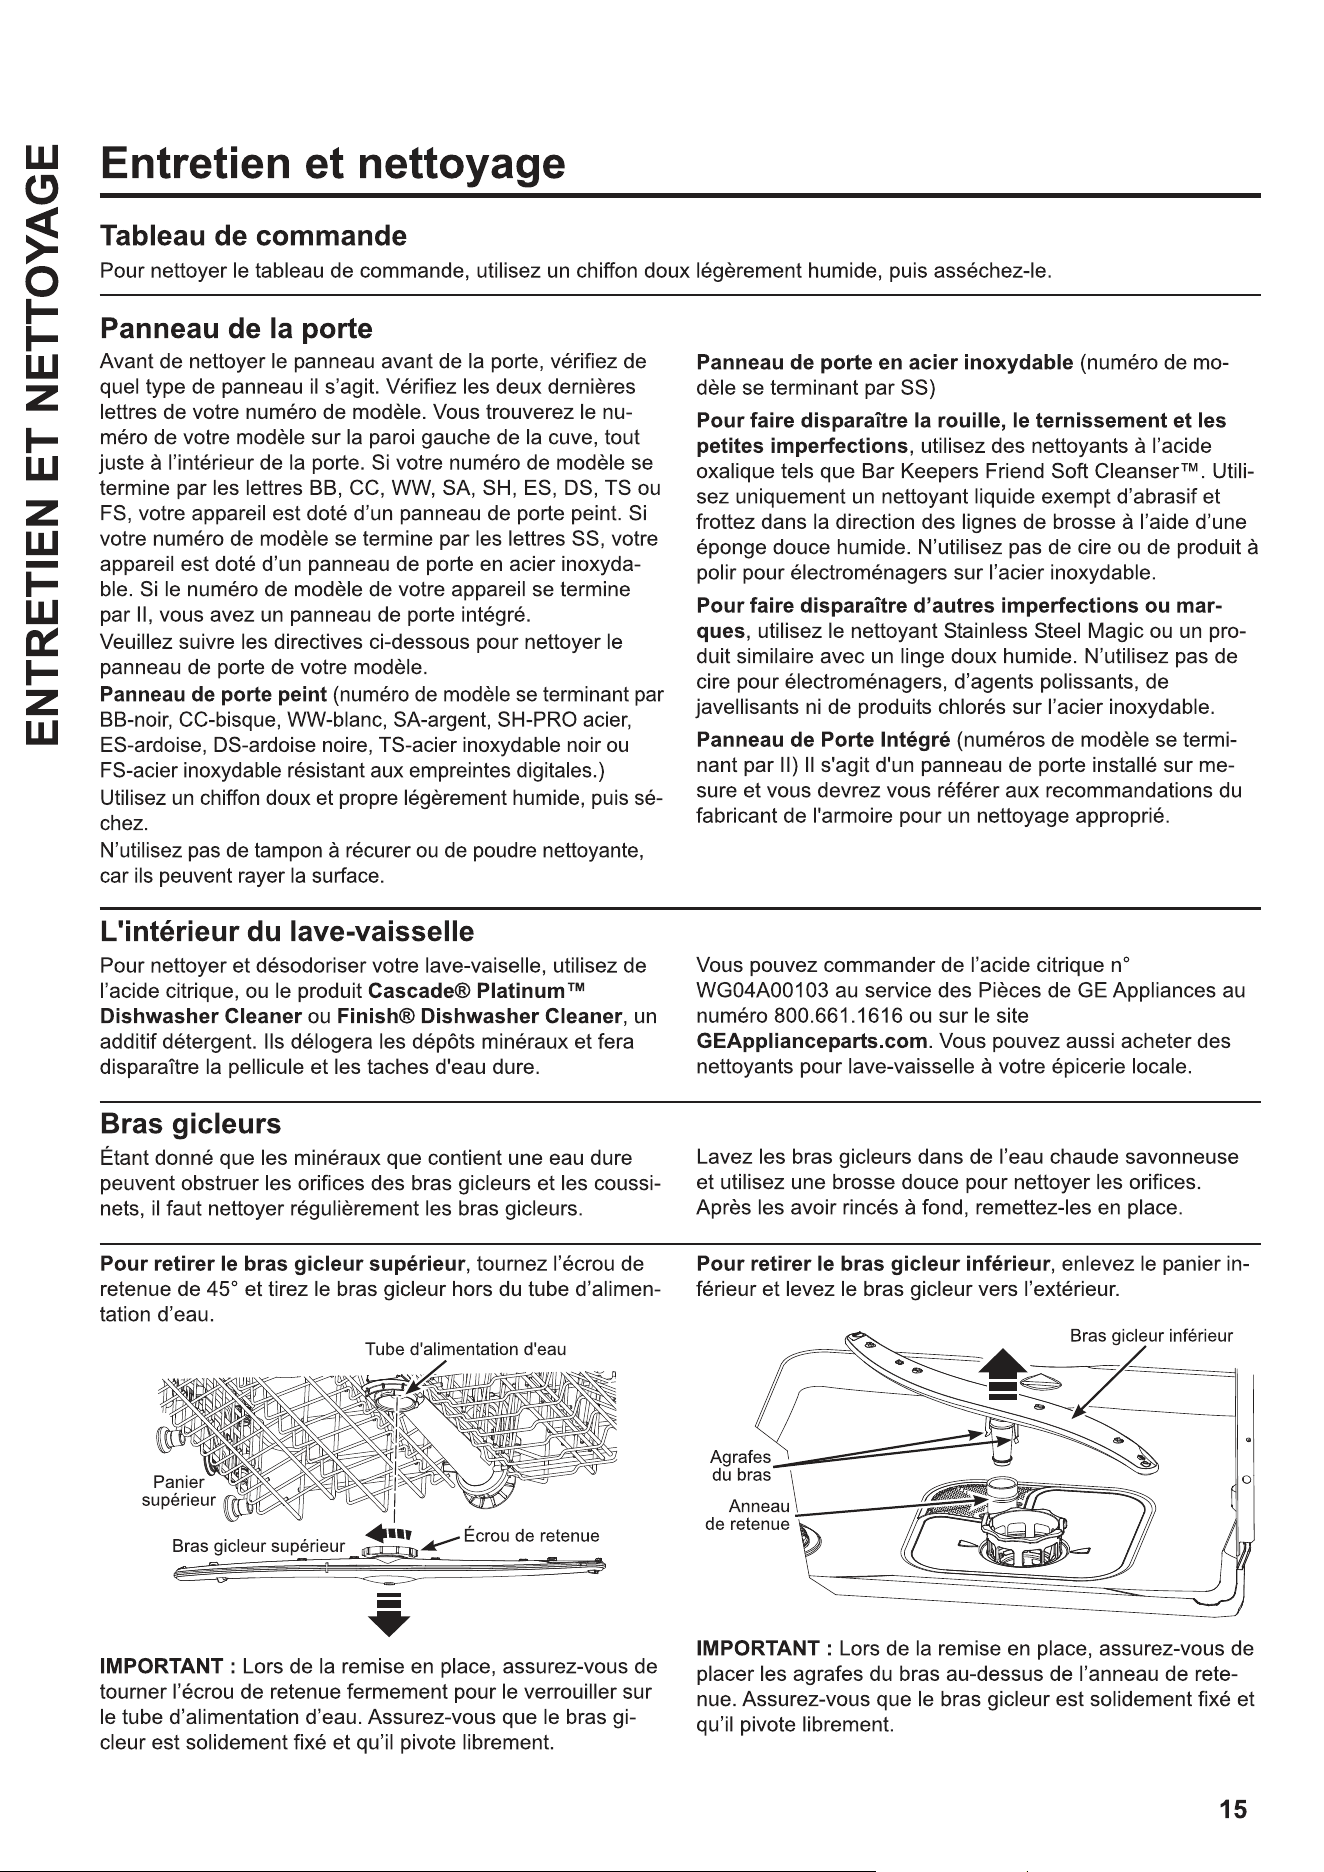
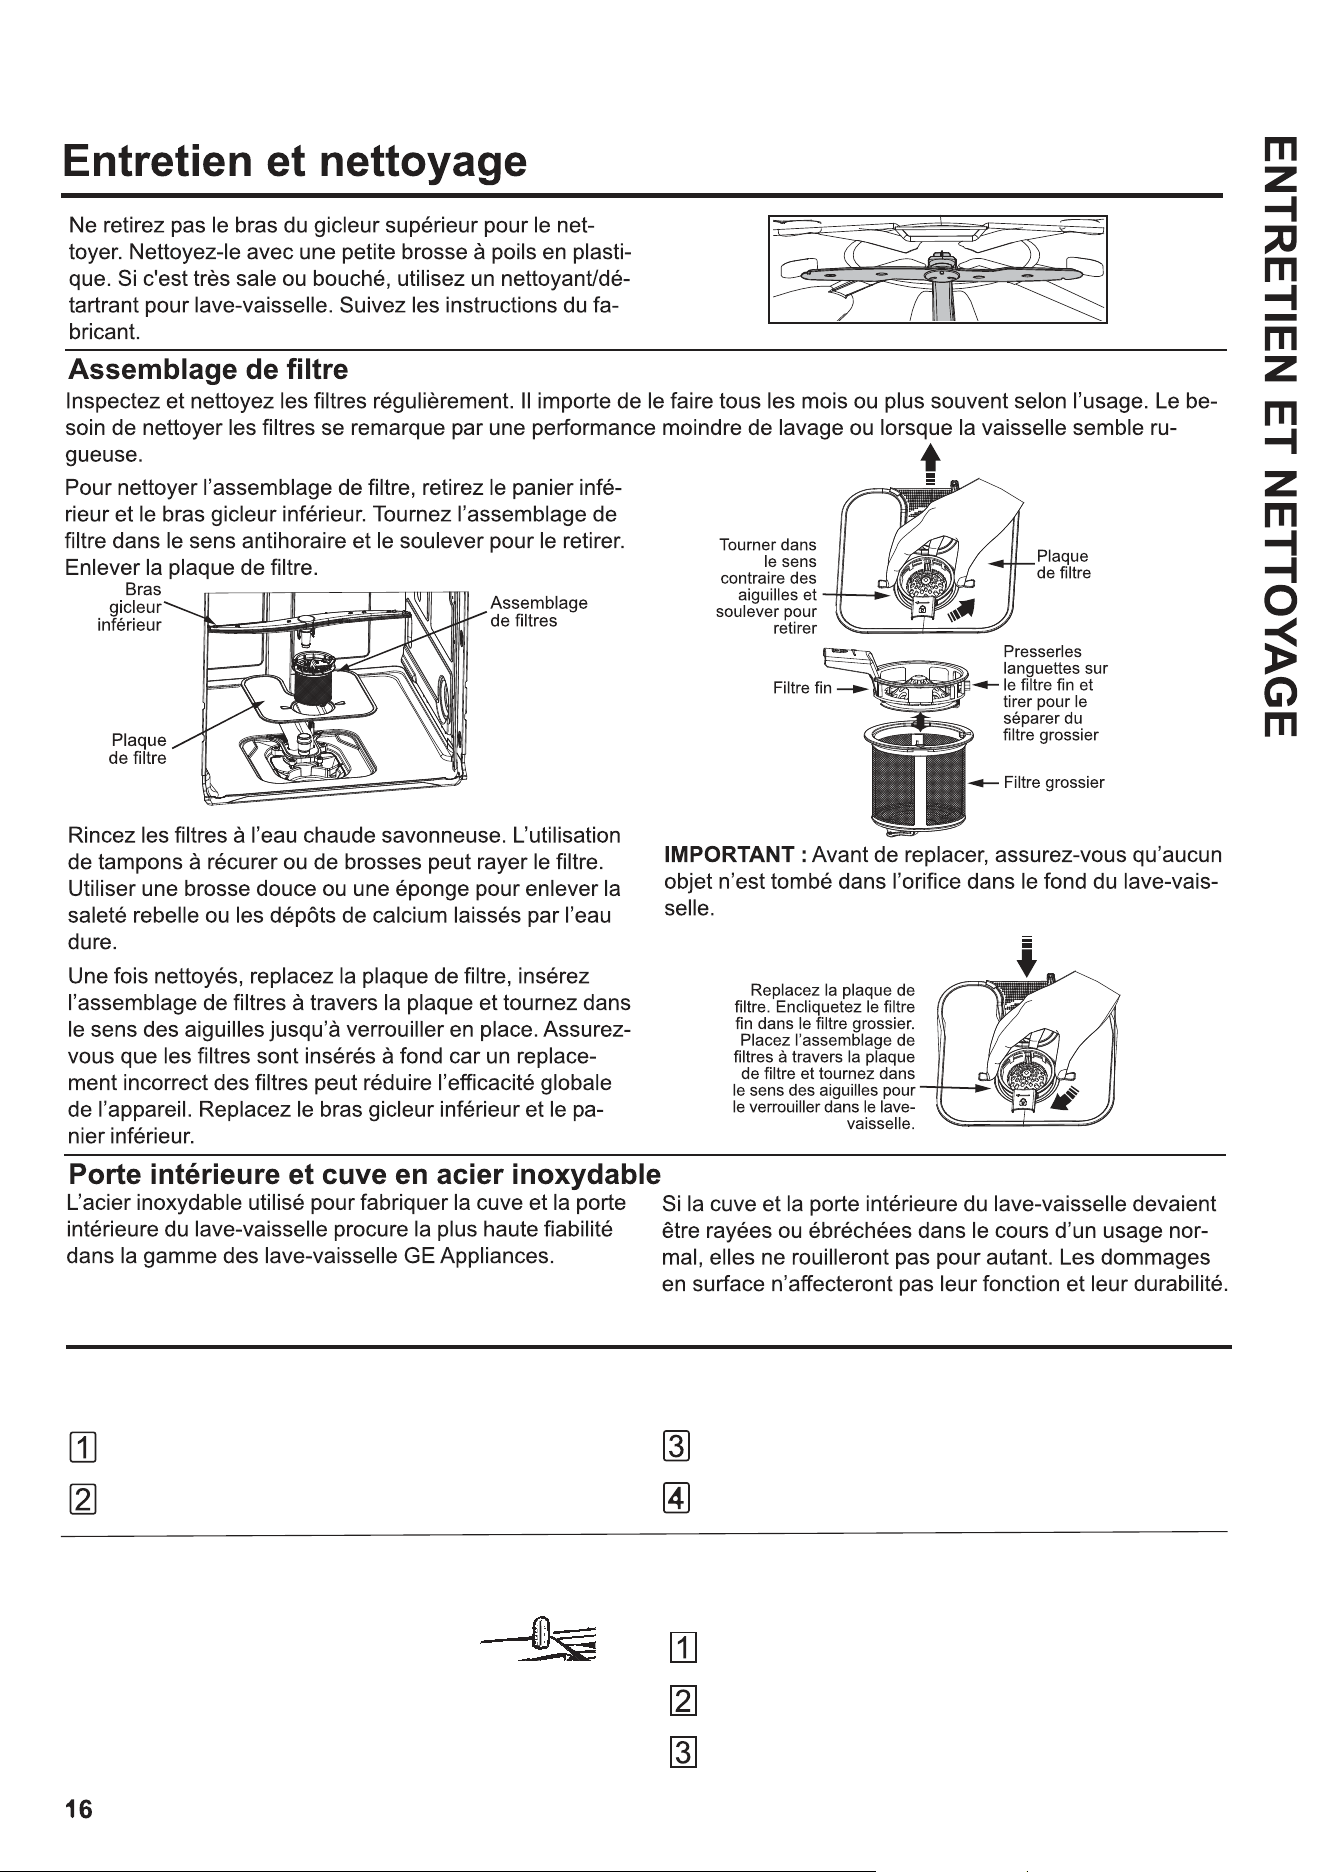
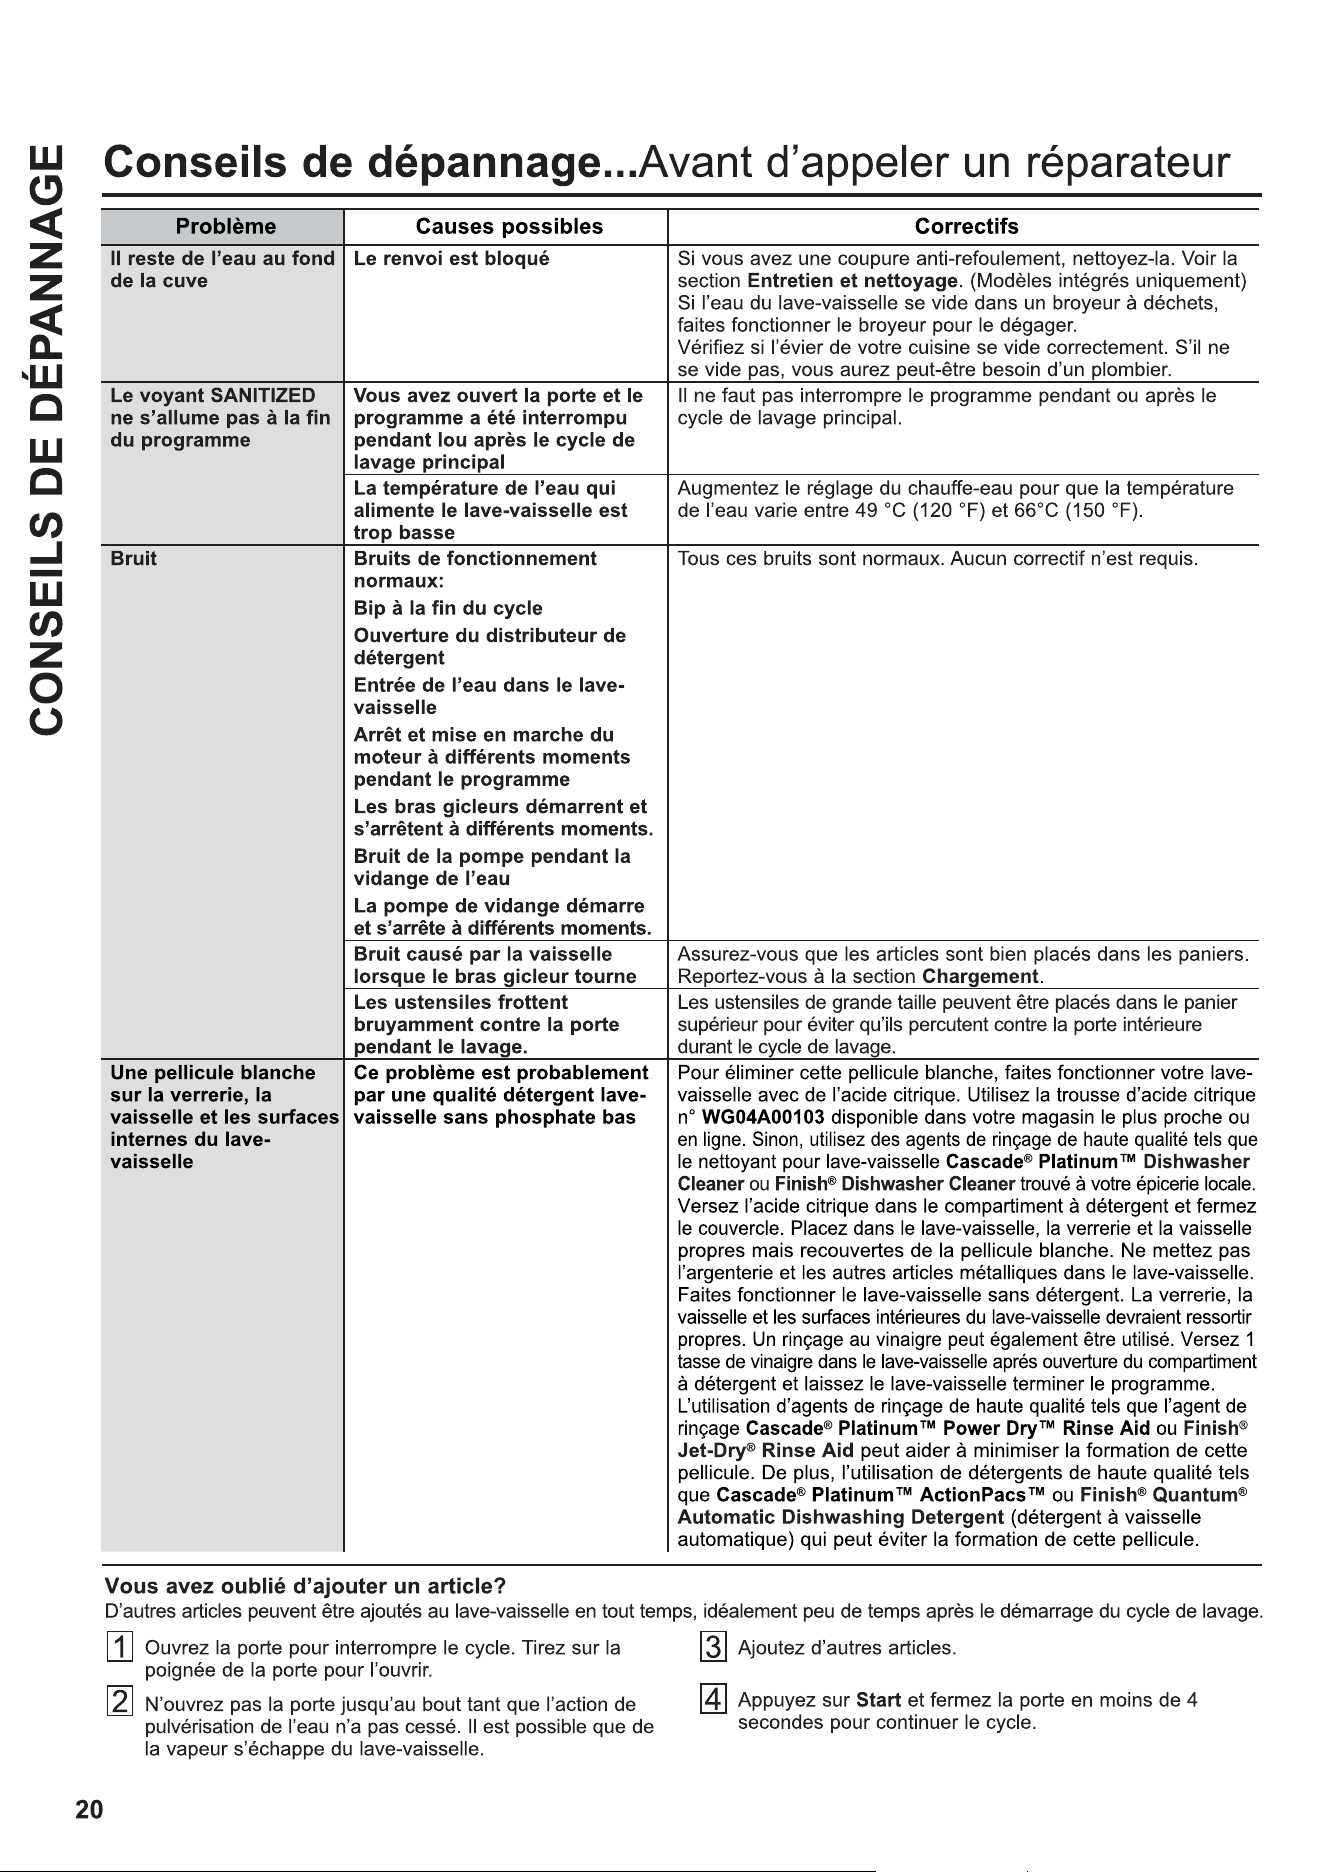
Entretien et nettoyage
Protéger contre le gel
Si votre lave-vaisselle est laissé dans un endroit non chauffé pendant l'hiver,
faites appel à un technicien de service pour :
Coupez l'alimentation électrique du lave-vaisselle.
Retirez les fusibles ou déclenchez le disjoncteur.
Fermez l'alimentation en eau et débranchez le tuyau
d'arrivée d'eau de la vanne.
Videz l'eau de la conduite d'arrivée d'eau et de la vanne.
(Utilisez une casserole pour récupérer l'eau.)
Rebranchez le tuyau d'arrivée d'eau sur la vanne.
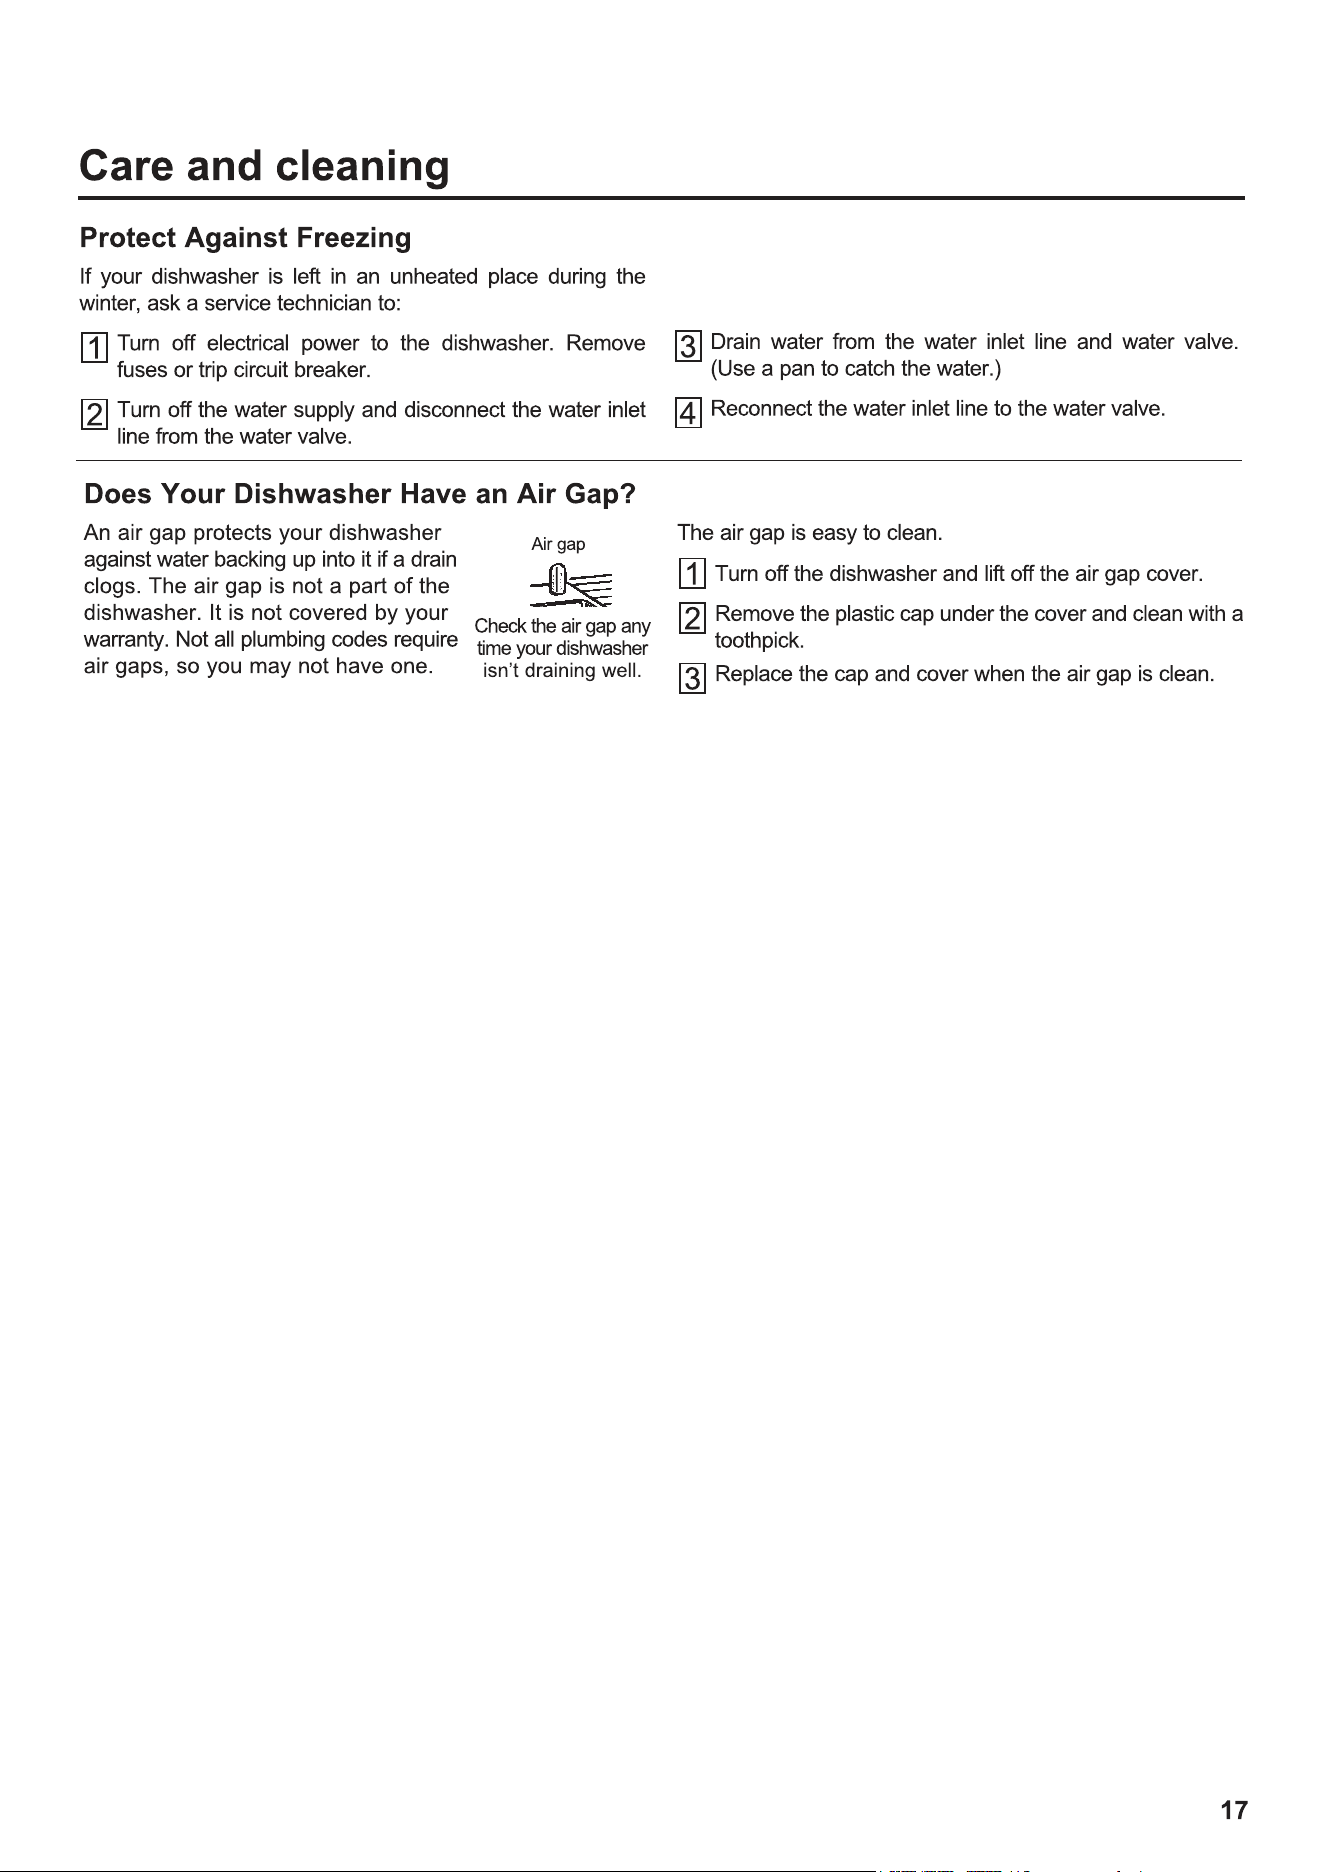
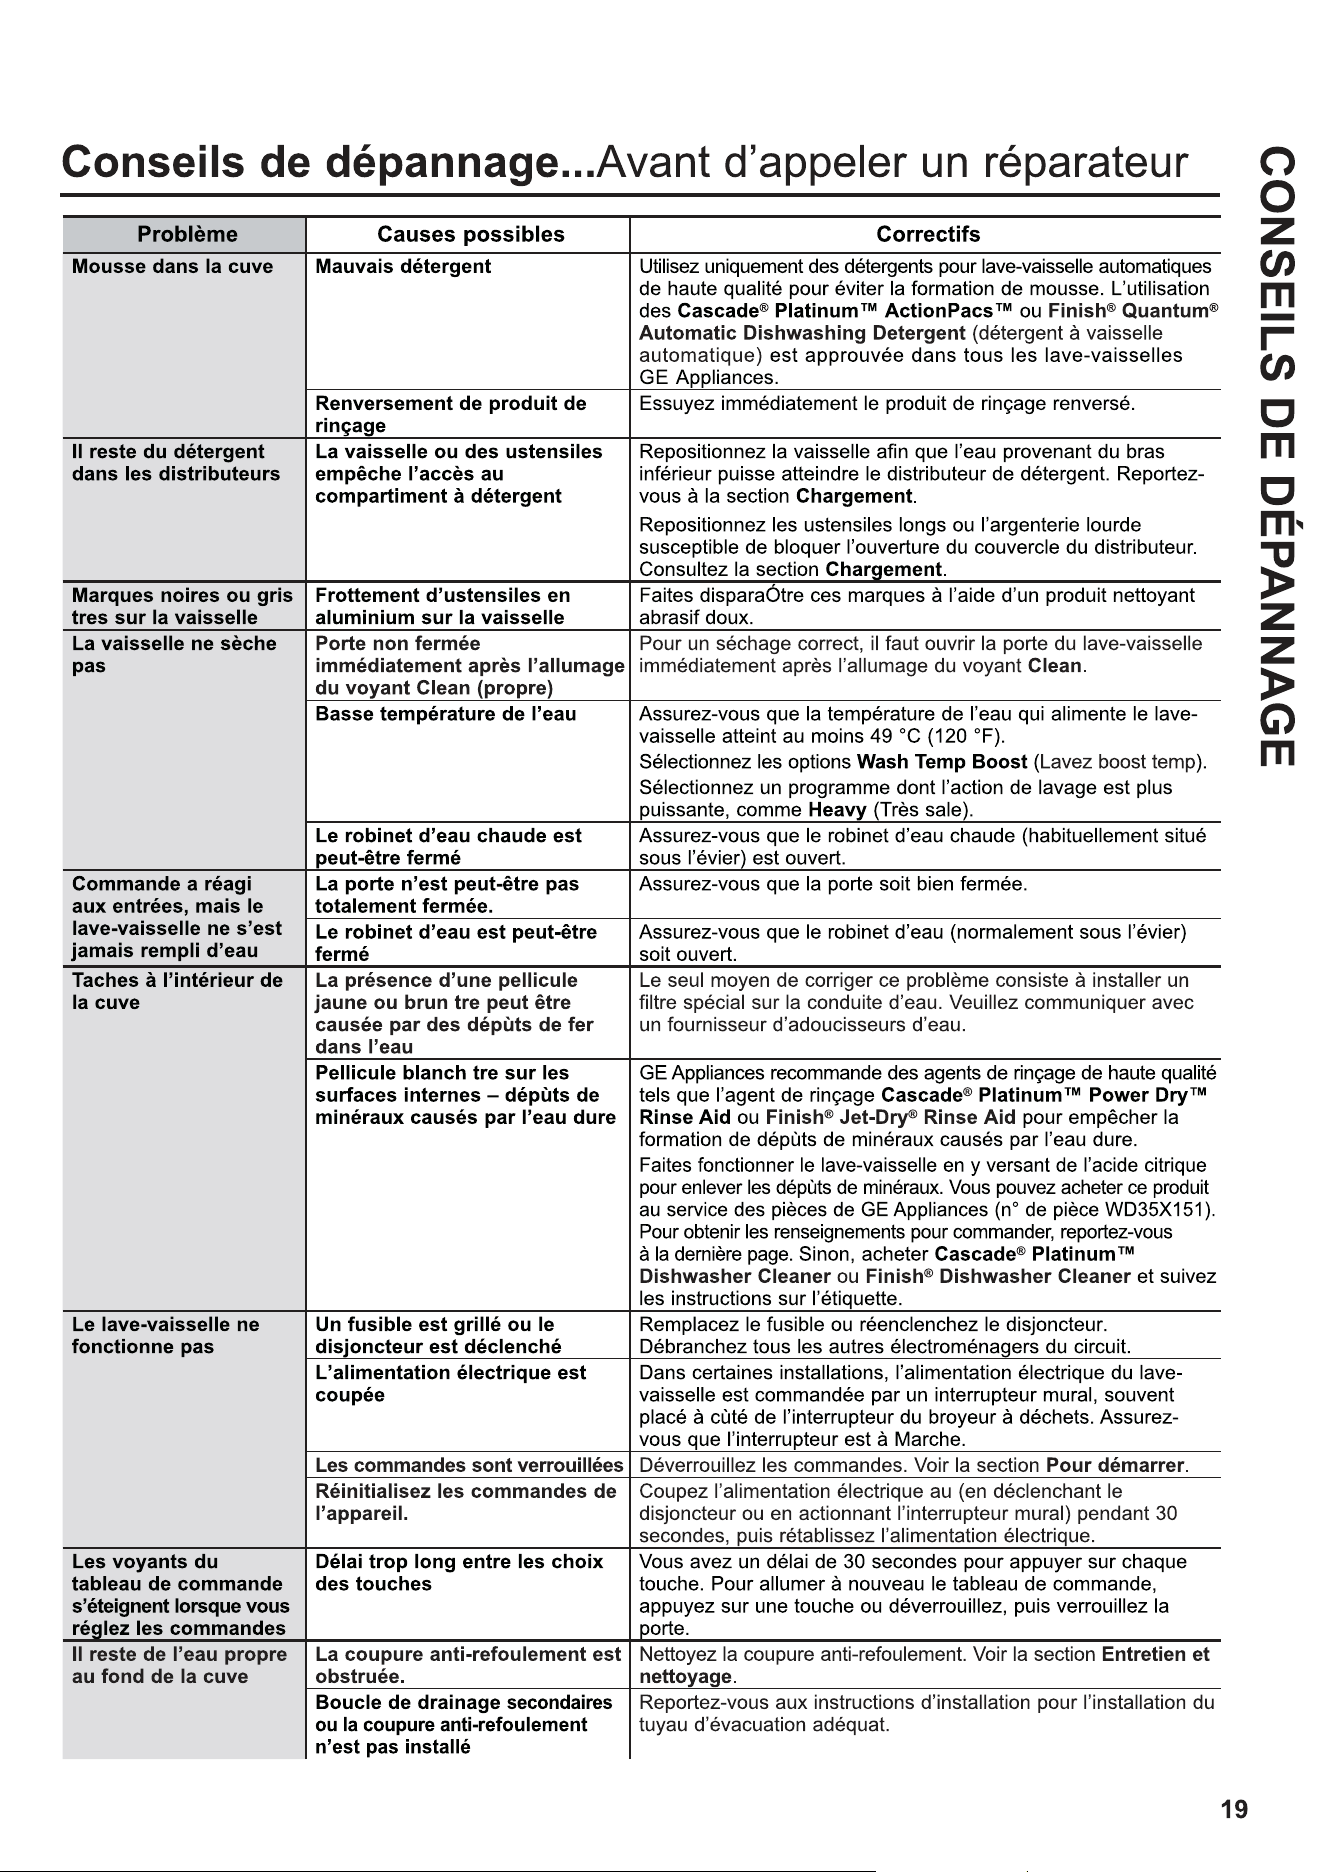
Votre lave-vaisselle est-il équipé d'un clapet anti-retour ?
Un clapet anti-retour protège votre
lave-vaisselle contre le refoulement
d'eau en cas d'obstruction de l'éva-
cuation. Le clapet anti-retour ne fait
pas partie du lave-vaisselle. Il n'est
pas couvert par votre garantie. Tous
les codes de plomberie n'exigent pas
de clapets anti-retour, vous pouvez
donc ne pas en avoir.
Le clapet anti-retour est facile à nettoyer.
Éteignez le lave-vaisselle et soulevez le couvercle du
clapet anti-retour.
Retirez le bouchon en plastique sous le couvercle et
nettoyez avec un cure-dent.
Remettez le bouchon et le couvercle en place une
fois le clapet anti-retour nettoyé.
Clapet anti-retour
Vérifiez le clapet
anti-retour chaque
fois que votre lave-
vaisselle ne se vide
pas correctement.
‘ ’
‘ ’
MC COMMERCIAL Inc. | 1100 Burloak Dr, Suite 601 |
Burlington, ON L7L 6B2
Au Canada (incluant la province de Québec) :
À l’inten�on des consommateurs québécois uniquement - Avis sur la garan�e de disponibilité des
pièces de rechange, des services de répara�on et des renseignements nécessaires à la répara�on ou à
l’entre�en (art. 39 de la Loi sur la protec�on du consommateur)
:
Garant : MC Commercial Inc., Burlington, ON, L7L 6B2
Cette garantie limitée s'étend à l'acheteur initial et à tous les proppriétaires ultérieurs pour les produits achetés au
Canada, y compris au Québec, et qui sont destinés à un usage domestique au Canada, y compris au Québec.
Toutefois, si le produit se trouve dans une région où un réparateur agrée GE Appliances n'est pas disponible, vous
pourriez être tenu de payer des frais de déplacement ou de vous rendre dans un centre de service agrée GE
Appliances.
Certains territoires, comme le Québec, interdisent l'exclusion ou la restrtion des dommages collatéraux ou
indirects. Cette garantie limitée vous confère des droits légaux spécifiqu; vous pouvez également bénéficier
d'autres droits qui varient d'une province à l'autre, y compris au Québec.Pour en savoir plus sur vos droits légaux,
adressez-vous à votre bureau régional ou provincial de pprotection des consommateurs
Veuillez noter que MC Commercial Inc. (« MC Commercial ») ne garrantit pas, au sens de l'article 39 de la Loi sur la
protection du consommateur, RLRQ, C. P-40.1, et des articles 79.18 à 79.20 du Règlement d'application de la Loi sur
la protection du consommateur, RLRQ, c. P -40.1, r. 3, la disponibilité deces de rechange, des services de
réparation ou des renseignements nécessaires à l'entretien ou à la réparatn des biens fabriqués, importés,
annoncés ou vendus par MC Commercial.
Veuillez noter que MC Commercial Inc. continue d'offrir la garantie liimitée du fabricant, telle qu'énoncée dans le
manuel du propriétaire ou le guide rapide. Cette garantie limitée diffère la garantie légale de disponibilité
énoncée à l'article 39 de la Loi sur la protection du consommateur
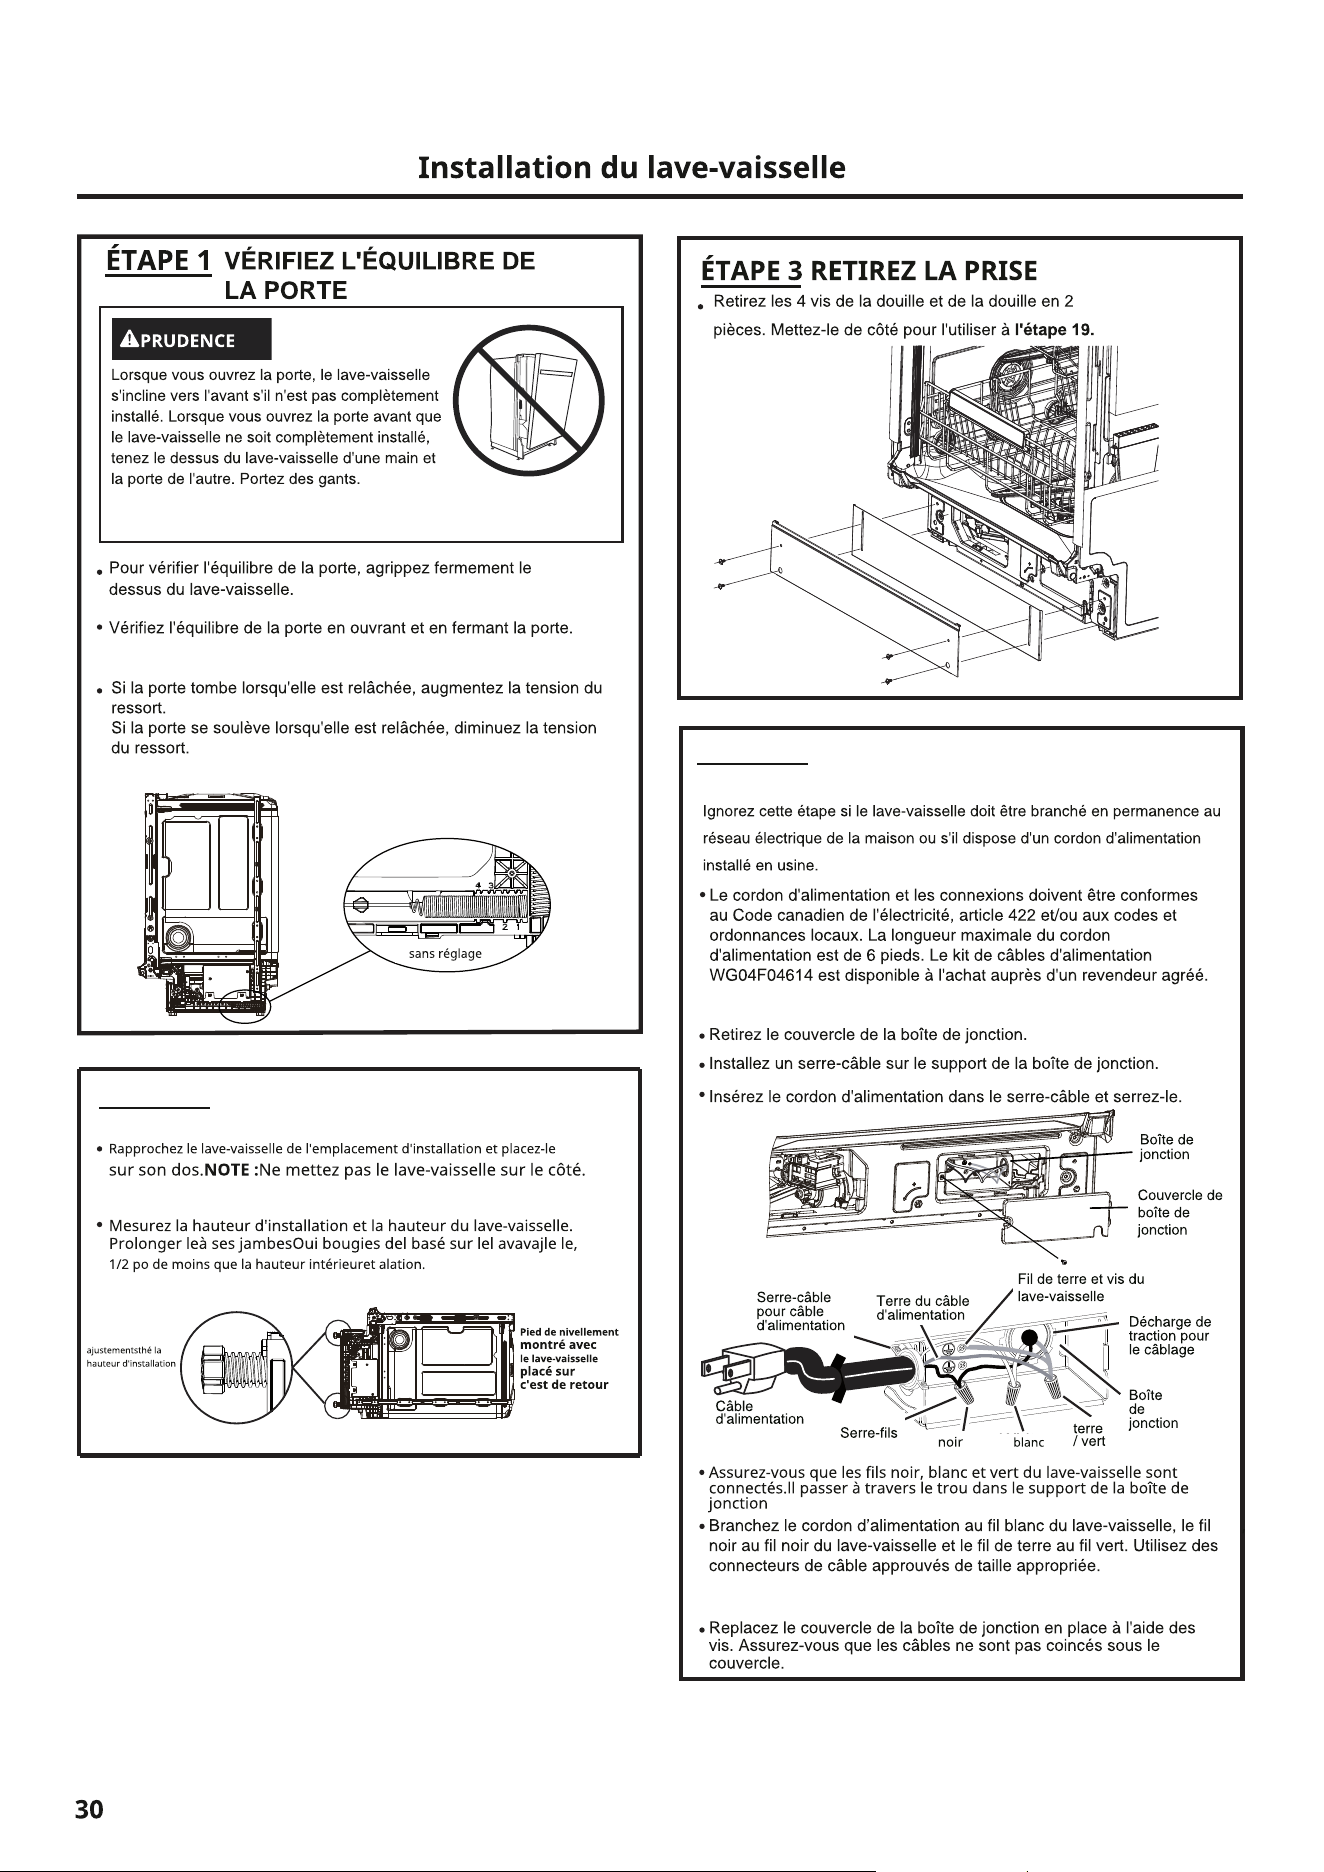
ÉTAPE 2 RÉGLAGE DES PIEDS DE
NIVELLEMENT
ÉTAPE 4 INSTALLATION DU CÂBLE
D'ALIMENTATION