SOH 8211GY
EN
SMART OIL FILLED RADIATOR
Translation of the original manual
This product is only suitable for well-insulated areas or occasional use. This product is not suitable as
amain heat source for heating. Information regarding electric local space heaters as required by
EU Commission Regulation 2015/1188 is provided in the Annex to this manual.
SOH 8211GY
A
1
2
3
4
5
6
B
1
2
3
4
5
6
7
C2
1
1
4
4
C1
1
2
3
1
2
C3
– 1 –
09/2024
2024, .
EN
Smart Oil Filled Radiator
User Manual
Important Safety Instructions
READ CAREFULLY AND STORE FOR FUTURE USE.
• This appliance may be used by children 8 years of age
and older and by persons with physical, sensory or mental
impairments or by inexperienced persons, if they are
properly supervised or have been informed about how
to use of the product in asafe manner and understand
the potential dangers. Children must not play with the
appliance. Cleaning and maintenance must not be
performed by unsupervised children.
• If the power cord is damaged, have it replaced in
aprofessional service centre in order to prevent
adangerous situation. It is forbidden to use the appliance
with the power cable damaged.
• Children younger than 3 years of age should be prevented
from accessing the appliance unless they are under
constant supervision.
• Children between the ages of 3 and 8 may only turn
this appliance on/off if it has been placed or installed in
its intended normal operating position and if they are
supervised or have been instructed in the safe use of the
appliance and understand the potential hazards. Children
between the ages of 3 and 8 must not insert the plug into
the socket, regulate or clean the appliance or carry out
maintenance by the user.
– 2 –
09/2024
2024, .
CAUTION: Certain parts of this product may
become very hot and cause burns. Special attention
should be paid when children and handicapped
people are present.
WARNING: Do not cover. To prevent
overheating, do not cover the heater.
• The heater must not be located just below the power
socket.
• Do not use the heater in the near vicinity of abath, shower
or swimming pool.
• This heater is filled with the exact amount of special oil.
Repairs requiring the opening of the oil tank must only be
carried out by the manufacturer or its service technician,
who should be contacted in the event of an oil leak.
• When disposing of the heater, follow the regulations
regarding oil handling.
WARNING: Do not use the heater in small rooms
if they are occupied by persons who are unable
to leave the room on their own, unless permanent
supervision is provided.
WARNING: To reduce the risk of fire, keep textiles,
curtains or any other flammable material at
adistance of at least 1 m from the air outlet.
• Do not use the heater if it has fallen.
• Do not use the heater if there are visible signs of damage.
– 3 –
09/2024
2024, .
• Use the heater on astable and horizontal surface. This
heater is not designed for wall mounting.
. . . . . . . . . . . . . . . . . . . . . . . . . . . . . . . . . . . . . . . . . . . . . . . . . . . . . . . . . . . . . . . . . . . . . . . . . . . . . . . . . . . . . . . . . . . . . . . . . . . . . . . . . . . . . . . . . . . . . . . . . . . . . . . . . . . . . . . . . . . .
• Before connecting the appliance to apower socket, check that the nominal voltage on the appliance'srating label matches the electrical voltage in
the socket.
• Do not connect the appliance to an extension cord or two way adapter.
• Caution: Do not use this appliance with aprogrammer, timer, remote control system or any other component that would switch the appliance on
automatically.
• The appliance is designed for use in households, offices and similar types of areas.
• Do not use the appliance in very dusty or humid rooms such as laundries or bathrooms, in areas where chemicals are stored, in industrial
surroundings or outdoors.
• Do not use the appliance in the near vicinity of abath, shower or swimming pool.
• This appliance is not intended to be mounted on awall.
• Do not place the appliance on unstable surfaces such as carpets with very long and thick fibres. The appliance must be located on astable and
even surface.
• Do not use the appliance near furniture, curtains, drapes or other flammable materials.
• Free space of at least 100 cm in front of the appliance and 50 cm behind the appliance must be maintained while it is running to ensure sufficient air
circulation.
• Never insert any objects through the front grill for the outflow of air or the back grill for the inflow of air. Aelectrical short circuit could occur, afire
might be started or the appliance may be damaged.
• To avoid potential injury by electric shock do not submerge any part of this appliance in water or any other liquid and do not touch the appliance with
damp or wet hands.
• Always turn off the appliance and disconnect it from the power socket if you will not be using it or before cleaning.
• Do not leave the appliance running while you sleep.
• When cleaning the appliance, do not submerge it in water or wipe it with awet cloth.
• To avoid damaging the power cord, do not excessively bend or twist it.
• Ensure that the power cord does not come into contact with hot surfaces or sharp objects.
• Do not disconnect the appliance from the power socket by pulling on the power cord. This could damage the power cord or the power socket.
• Disconnect the cord from the power socket by gently pulling the plug of the power cord.
• If the power cord is damaged, it must be replaced by an authorised service centre or by another similarly qualified person, this will prevent the
creation of adangerous situation.
• Do not use the appliance if it is not working correctly, if it has been damaged or has been submerged in water. To avoid the risk of electric shock, do
not repair or modify the appliance yourself. Have all repairs or adjustments of the appliance performed at an authorised service centre. By tampering
with the appliance you risk voiding your legal rights arising from unsatisfactory performance or quality warranty.
• The manufacturer is not responsible for any damages caused by the incorrect use of this appliance.
. . . . . . . . . . . . . . . . . . . . . . . . . . . . . . . . . . . . . . . . . . . . . . . . . . . . . . . . . . . . . . . . . . . . . . . . . . . . . . . . . . . . . . . . . . . . . . . . . . . . . . . . . . . . . . . . . . . . . . . . . . . . . . . . . . . . . . . . . . . .
EXPLANATION OF SYMBOLS PLACED ON THE PRODUCT OR INTHE ACCOMPANYING DOCUMENTATION
This product meets all the basic requirements of the applicable EU directives.
This symbol on products or original documents means that used electric or electronic products must not be added to ordinary municipal
waste.
. . . . . . . . . . . . . . . . . . . . . . . . . . . . . . . . . . . . . . . . . . . . . . . . . . . . . . . . . . . . . . . . . . . . . . . . . . . . . . . . . . . . . . . . . . . . . . . . . . . . . . . . . . . . . . . . . . . . . . . . . . . . . . . . . . . . . . . . . . . .
– 4 –
09/2024
2024, .
• Thank you for purchasing our SENCOR product; we hope it will serve
to your satisfaction.
• Before using this appliance, please familiarise yourself with the user
manual, even if you are already familiar with using similar types of
appliances. Use the appliance only as described in this user manual.
Keep the manual for future reference.
• It is recommended to keep the original packaging, packing material,
receipt and confirmation of the extent of the seller'sliability or warranty
certificate at least for the duration of the legal right of defective
performance or quality guarantee. When transporting the appliance,
we recommend packaging it again in the original box provided by the
manufacturer.
. . . . . . . . . . . . . . . . . . . . . . . . . . . . . . . . . . . . . . . . . . . . . . . . . . . . . . . . . . . . . . . . . . . .
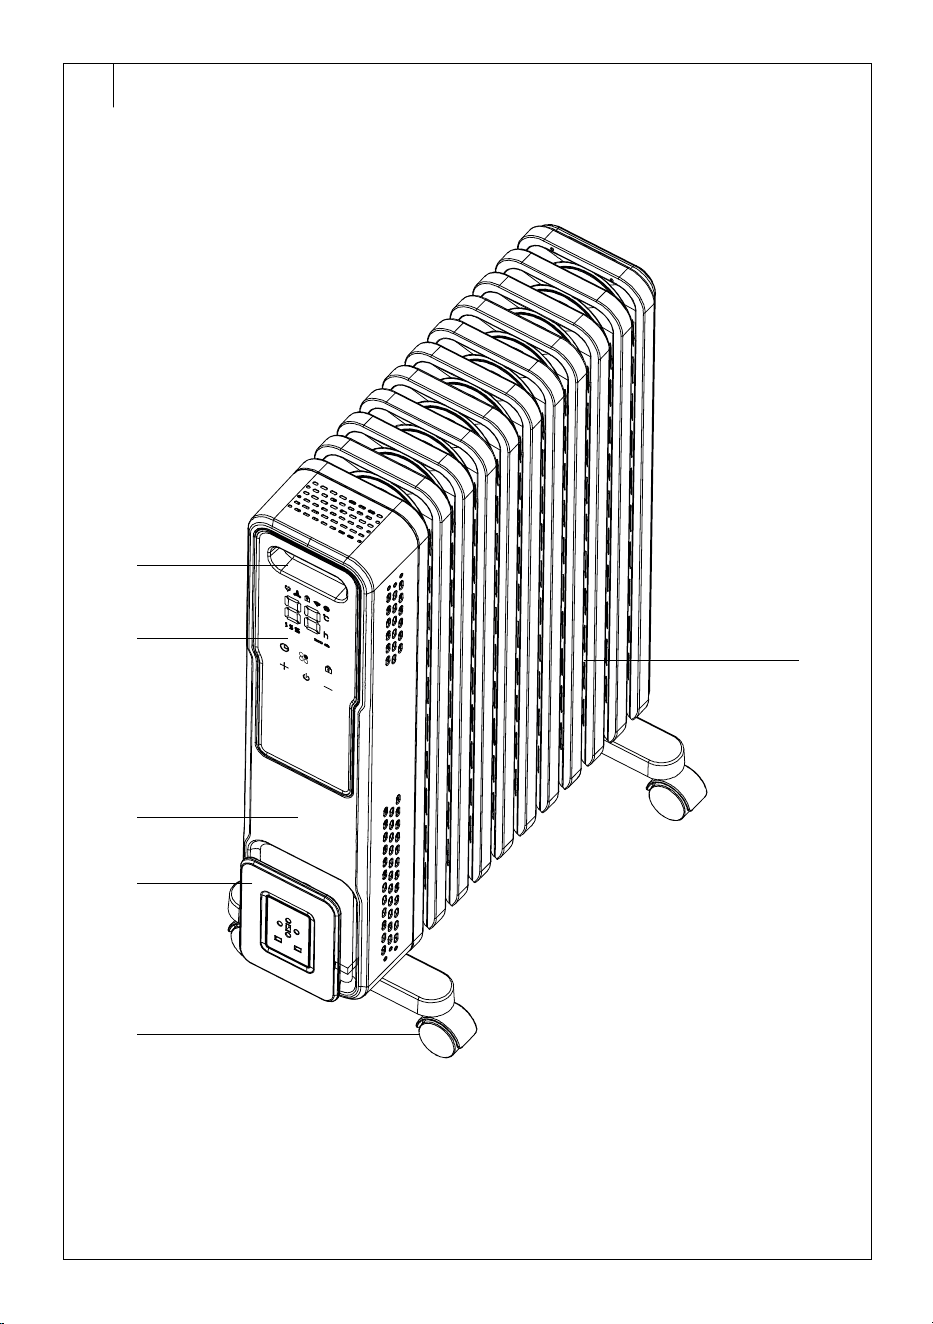
DESCRIPTION OF THE ELECTRIC OIL FILLED RADIATOR
A1 Handle
A2 Control panel
A3 Front panel
A4 Bracket forwinding up the
power cord
A5 Castors
A6 Radiator heating elements
. . . . . . . . . . . . . . . . . . . . . . . . . . . . . . . . . . . . . . . . . . . . . . . . . . . . . . . . . . . . . . . . . . . .
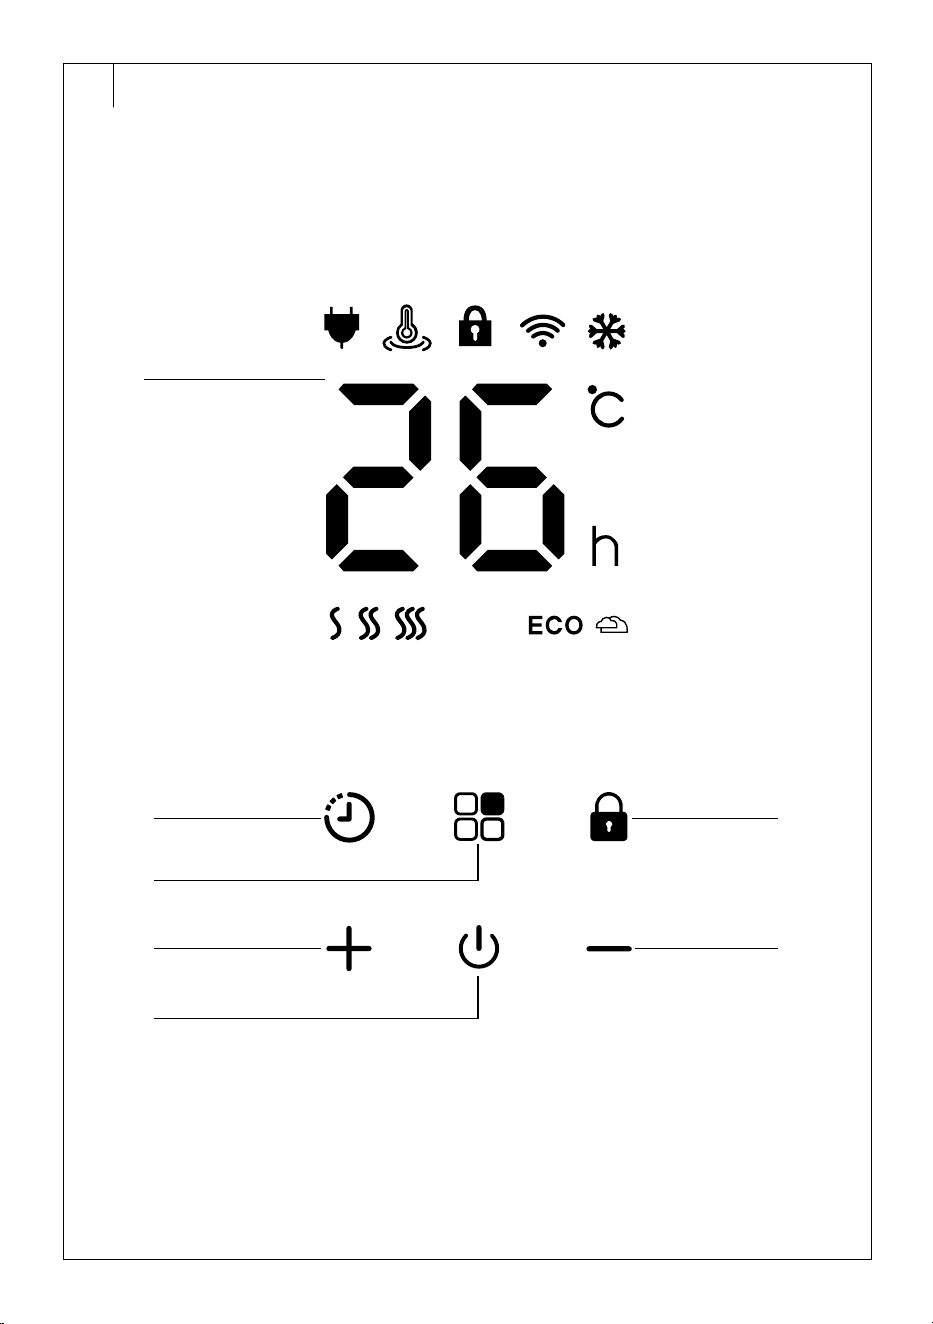
DESCRIPTION OF THE CONTROL PANEL
B1 Display
B2 Timer button
B3 Button to select the operating
mode
B4 + button
B5 Power on / standby button
B6 Control panel lock button
B7 – button
. . . . . . . . . . . . . . . . . . . . . . . . . . . . . . . . . . . . . . . . . . . . . . . . . . . . . . . . . . . . . . . . . . . .
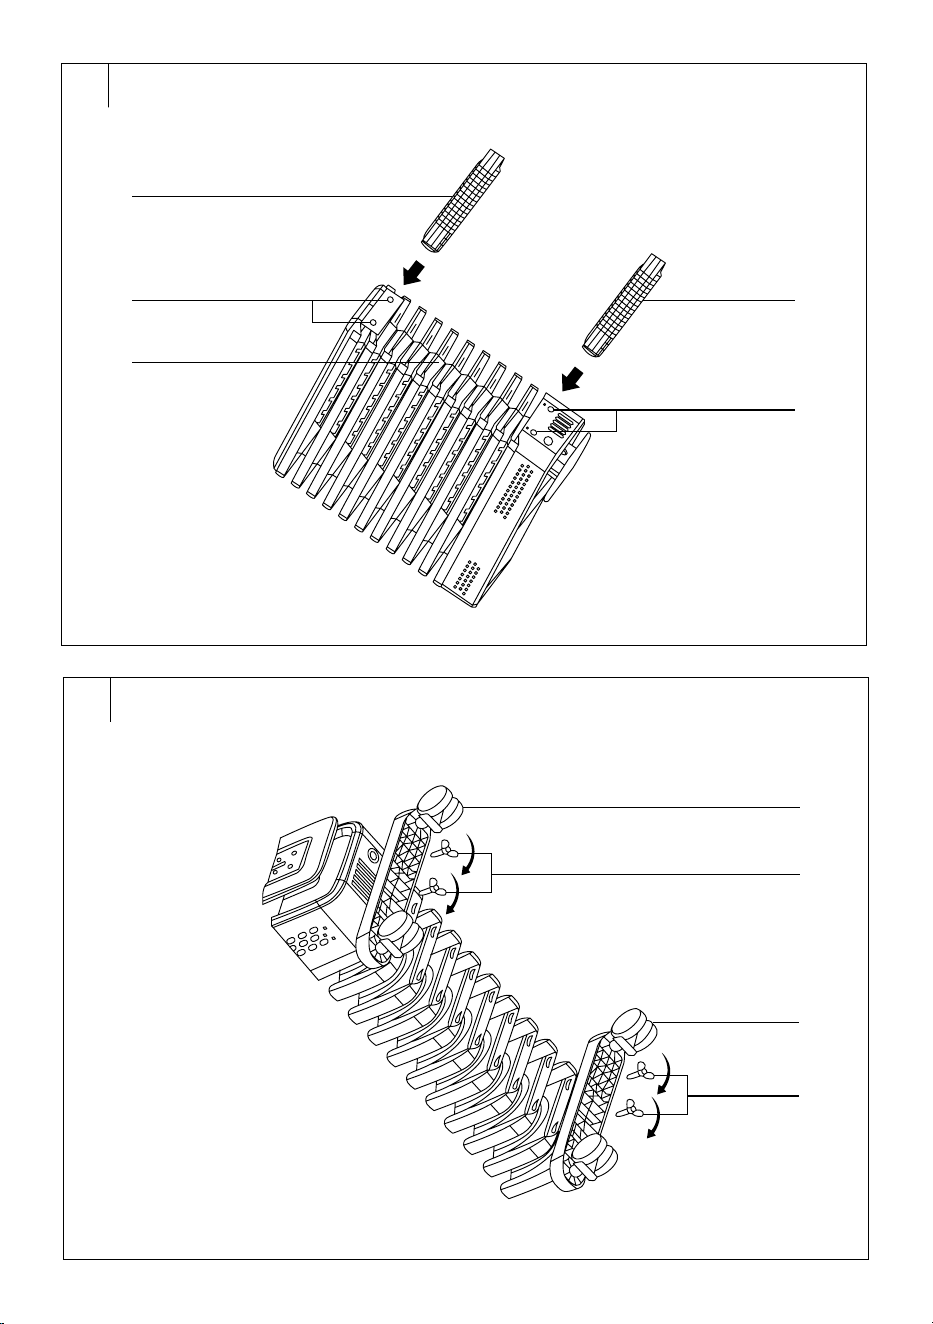
ASSEMBLY DESCRIPTION (FIG. C1–C3)
1. Castors
2. Holes in the bottom part of the radiator
3. Bottom part of the radiator
4. Wing screws
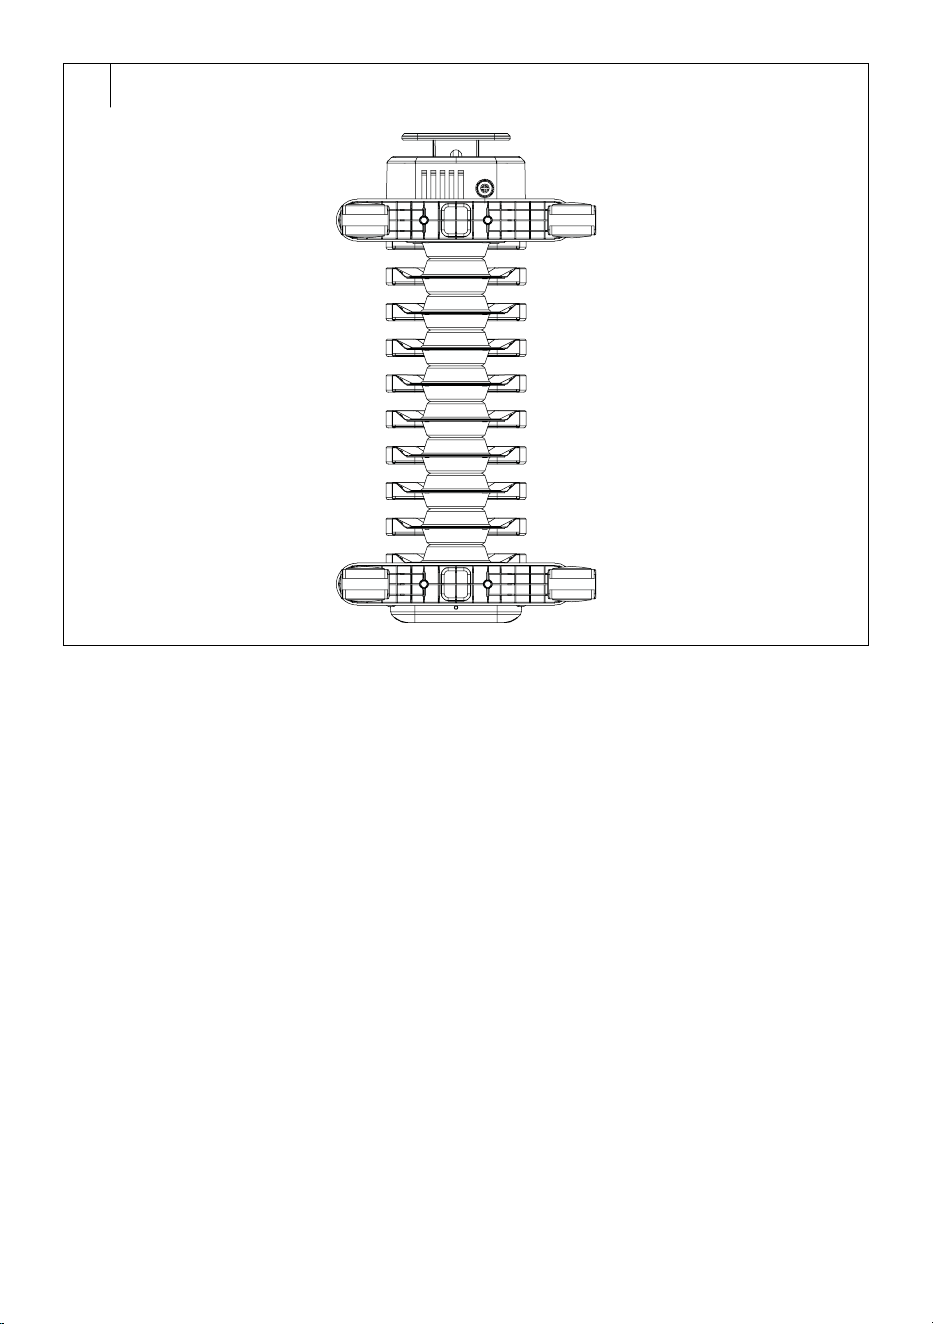
Fig. C3: Folded radiator – bottom view
. . . . . . . . . . . . . . . . . . . . . . . . . . . . . . . . . . . . . . . . . . . . . . . . . . . . . . . . . . . . . . . . . . . .
ASSEMBLING THE ELECTRIC OIL FILLED RADIATOR
Warning:
Do not plug the oil heater into apower socket before
or during installation.
Before starting the installation, check the oil
filled radiator for damage, e.g. caused by afall or
transportation.
When assembling, proceed as follows:
1. We recommend placing ablanket or other soft pad where you will
assemble the oil radiator.
2. Place the oil radiator upside down.
3. Apply the castors to the bottom of the radiator so that the holes in
the bottom are aligned with the holes in the castors – see figure C1.
4. Use the wing screws to attach the castors tothe radiator – see figure
C2.
5. Once the castors are properly attached – see figure C3, place the
oil radiator on afirm and even surface. Check that all the castors
are touching the ground and that the oil radiator is not tilted to either
side.
6. Before switching on, allow the radiator to stand for approximately
30 minutes to allow the operating fluids to flow back into their
respective positions and the radiator to function properly.
. . . . . . . . . . . . . . . . . . . . . . . . . . . . . . . . . . . . . . . . . . . . . . . . . . . . . . . . . . . . . . . . . . . .
PUTTING INTO OPERATION
• Place the oil radiator on afirm, level surface well away from the mains
socket.
• Provide free space around the oil radiator for proper air circulation.
• Do not place the oil radiator near flammable materials and heat-
sensitive objects.
• Insert the power plug into aproperly grounded power socket. Ashort
audible warning sounds and the oil radiator switches to standby mode.
. . . . . . . . . . . . . . . . . . . . . . . . . . . . . . . . . . . . . . . . . . . . . . . . . . . . . . . . . . . . . . . . . . . .
POWER ON/OFF
• Press the
button briefly to switch on the radiator.
• When you turn on the radiator for the first time, or you turn it on
after it has been disconnected from the mains socket, it will start in
the default mode when the high heating power (S3) is set and the
temperature is set to 26°C.
• When you turn on the radiator (it was not disconnected from the
mains socket), it turns on in the mode in which it was previously
turned off.
• While the radiator is inoperation, press the
button to turn it off
andswitch to standby mode.
Note:
Do not disconnect the power plug from the power socket
if you will be using the radiator via the app. Disconnect
the radiator from the power supply only when you are
cleaning it, need to move it, will not use it for along time or
will store it.
Note:
Aslight odour may be felt when the oil filled radiator is first
turned on or after an extended period where it has not been
used. This event will go away after ashort while.
. . . . . . . . . . . . . . . . . . . . . . . . . . . . . . . . . . . . . . . . . . . . . . . . . . . . . . . . . . . . . . . . . . . .
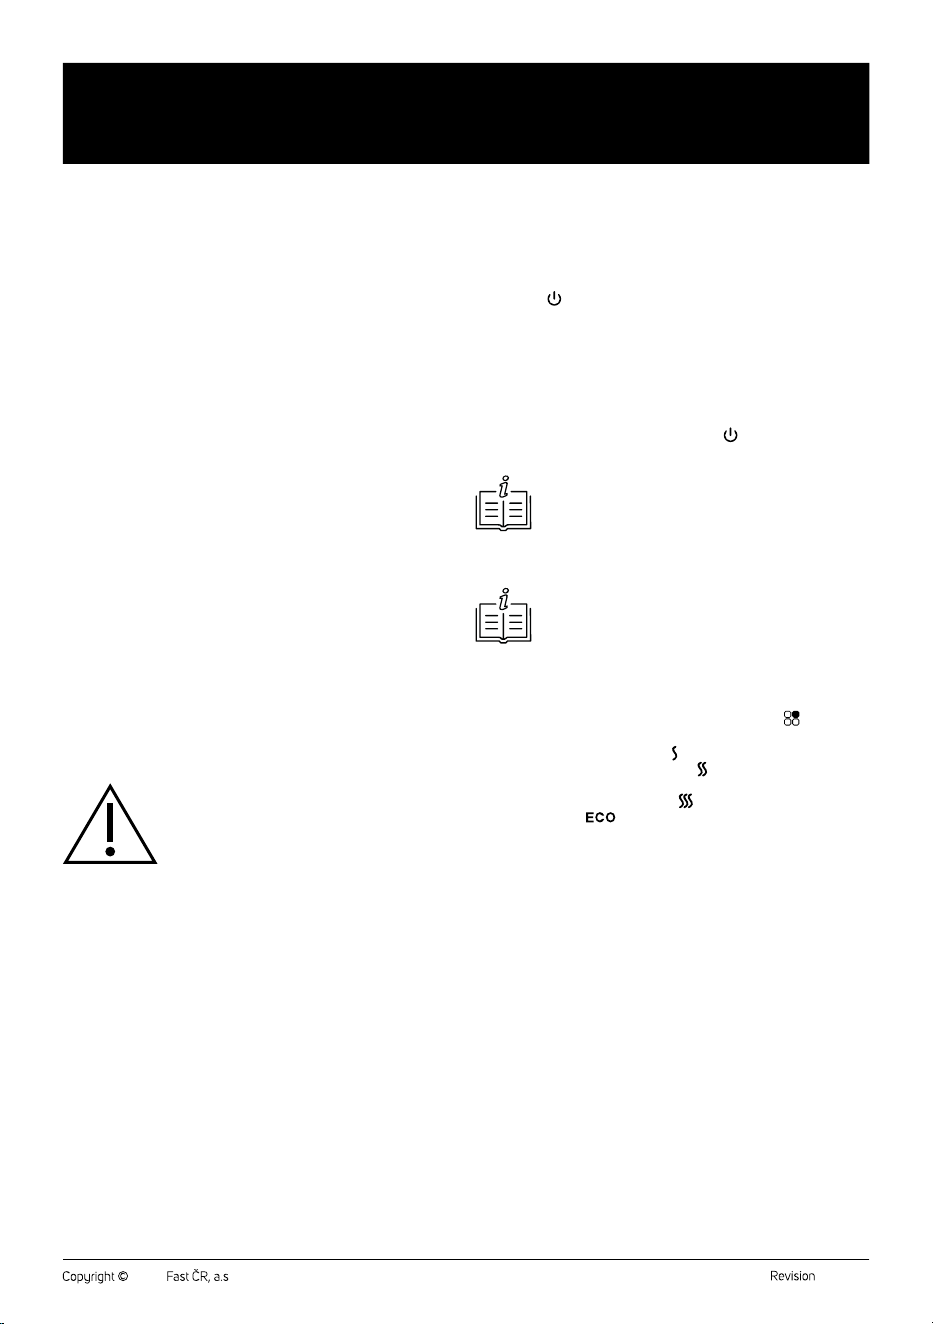
SELECTING AN OPERATING MODE
• While the radiator is inoperation, repeatedly press the
button to
select the operating mode:
– Low heating power; S1 and
icon will light up on the display;
– Medium heating power; S2 and
icon will light up on the
display;
– High heating power; S3 and
icon will light up on the display;
– Eco mode; icon will light up.
Eco Mode
• After switching on the eco mode, the heater is set to high power for
20 minutes, then switches to medium power for 10 minutes, then
switches back to high power for 10 minutes and finally switches to
automatic temperature control.
• In theeco mode it is not possible to set the temperature.
. . . . . . . . . . . . . . . . . . . . . . . . . . . . . . . . . . . . . . . . . . . . . . . . . . . . . . . . . . . . . . . . . . . .
SETTING THE TEMPERATURE
• While the radiator is inoperation, press the +/– buttons repeatedly to
set the desired temperature in the range from 5°C to 35°C. Press the
+ button to increase the temperature, the – button to decrease the
temperature.
• If you press andhold down the + or – button, the temperature setting
will speed up.
• Wait approximately 5 seconds for the temperature setting to be stored
in memory and the radiator to heat up to the newly set temperature.
. . . . . . . . . . . . . . . . . . . . . . . . . . . . . . . . . . . . . . . . . . . . . . . . . . . . . . . . . . . . . . . . . . . .
TIMER SETTING
• The radiator allows you to set the OFF timer (the time after which the
radiator turns off andenters standby mode) and the ON timer (the time
after which the radiator turns on).
EN
Smart Oil Filled Radiator
User Manual
– 5 –
09/2024
2024, .
Sleep Timer
1. While the radiator is inoperation, press
.
2. Use the +/- buttons to set the time after which the radiator turns off
and switches to standby mode. You can set the time from 0 to 24
hours. The set time is displayed on the numeric display. Short press
the + or – button to increase or decrease the time by1 hour. If you
press andhold down the + or – button, you will speed up the time
setting.
3. Wait approximately 5 seconds for the set time to be stored in
memory. The “h” icon lights up on the display and the countdown
starts.
4. During the first 20 seconds following the setting, the set temperature
and the remaining time until the automatic shut off will be displayed
alternately on the numerical display. The numeric display will be
turned off after that.
5. Once the set time elapses, the radiator will turn off and switch to
standby mode.
On Timer
1. While the radiator is off in standby mode, press
.
2. Use the +/– buttons to set the time after which the radiator turns on.
You can set the time from 0 to 24 hours. The set time is displayed
on the numeric display. Short press the + or – button to increase or
decrease the time by1 hour.
3. Wait approximately 5 seconds for the set time to be stored in
memory. The “h” icon lights up on the display and the countdown
starts.
4. As soon as the set time has elapsed, the radiator will automatically
turn on.
Cancelling the Timer
• If the device is turned on, you can long press the
button to disable
the off timer.
• You can disable the on timer at any time by pressing the
button or
setting the time to “0”.
. . . . . . . . . . . . . . . . . . . . . . . . . . . . . . . . . . . . . . . . . . . . . . . . . . . . . . . . . . . . . . . . . . . .
CHILD LOCK
• The child lock allows you to lock the control panel to prevent
accidental changes to the settings, e.g. by children.
• Press and hold the
button. The icon will be lit in the display
andthe lock will be activated. No buttons will function. If you press
any button while the child safety lock is activated, the controls and the
display will only light up.
• To cancel the child lock, press and hold the
button until the icon
turns off.
. . . . . . . . . . . . . . . . . . . . . . . . . . . . . . . . . . . . . . . . . . . . . . . . . . . . . . . . . . . . . . . . . . . .
SWITCHING OFF THE CONTROL PANEL SOUND SIGNAL
• To enable/disable the control acoustic signalling, hold down + and –
button simultaneously (for about 5 sec.).
. . . . . . . . . . . . . . . . . . . . . . . . . . . . . . . . . . . . . . . . . . . . . . . . . . . . . . . . . . . . . . . . . . . .
STORING THE POWER CORD
• You can wind the power cable around the bracket located under
the control panel. Do this whenever you move, transport, store the
radiator, etc.
. . . . . . . . . . . . . . . . . . . . . . . . . . . . . . . . . . . . . . . . . . . . . . . . . . . . . . . . . . . . . . . . . . . .
ADDITIONAL FUNCTIONS
Display Backlight
• The display automatically turns off after 20 seconds of inactivity.
Press any button to light up the display.
Anti-freeze Protection
• If the radiator temperature sensor detects atemperature drop below
5°C, it will automatically switch to medium heating power and run
until the temperature rises above 7°C.
Overturning
• If the radiator tilts atan angle of less than 35°± 5° (the angle between
the tilt and the horizontal surface), the radiator is switched off.
• You will be able to use it again if it is straightened to the operating
position.
Open Window and Door Detection
• If the temperature sensor detects adecrease in temperature
of5°C during 10 minutes and the room does not heat up to the set
temperature within 30 minutes, the radiator will automatically turn off.
. . . . . . . . . . . . . . . . . . . . . . . . . . . . . . . . . . . . . . . . . . . . . . . . . . . . . . . . . . . . . . . . . . . .
THERMAL PROTECTION
• This oil filled radiator model is equipped with atwo-level thermal
protection:
• The first stage (reversible thermal fuse) switches off the oil radiator
in case of overheating. In such acase, it is necessary to leave the
radiator turned off for several minutes. As soon as it cools down, the
thermal fuse is automatically deactivated and it is possible to continue
to use the radiator.
• The second stage (non-reversible thermal fuse) will be activated
should the first stage fail and the temperature continues to rise. In this
case, it is necessary to contact an authorised service that will restore
the functionality of the radiator by professional intervention.
. . . . . . . . . . . . . . . . . . . . . . . . . . . . . . . . . . . . . . . . . . . . . . . . . . . . . . . . . . . . . . . . . . . .
CONTROL THROUGH THE Sencor HOME APP
• The radiator can be controlled via the Sencor HOME application.
• Download the application to your smart phone, register yourself and
control the radiator via the application. If the app is already installed,
add the radiator to your devices.
Adding the Radiator to the List of Devices via Bluetooth
• You can add the radiator to the Sencor HOME app by pairing via
Bluetooth.
• Turn on the Bluetooth function on your mobile phone.
• Turn on the radiator.
• Open the app and on the app'shome page, click the “+” icon.
• The device itself will offer the “Do not add / Go to add” options.
• Click on “Go to add” and the app will automatically guide you through
the addition.
Note:
If the Bluetooth connection fails or is not possible, make
sure there are no solid obstacles between your phone and
the radiator and that the two devices are close together.
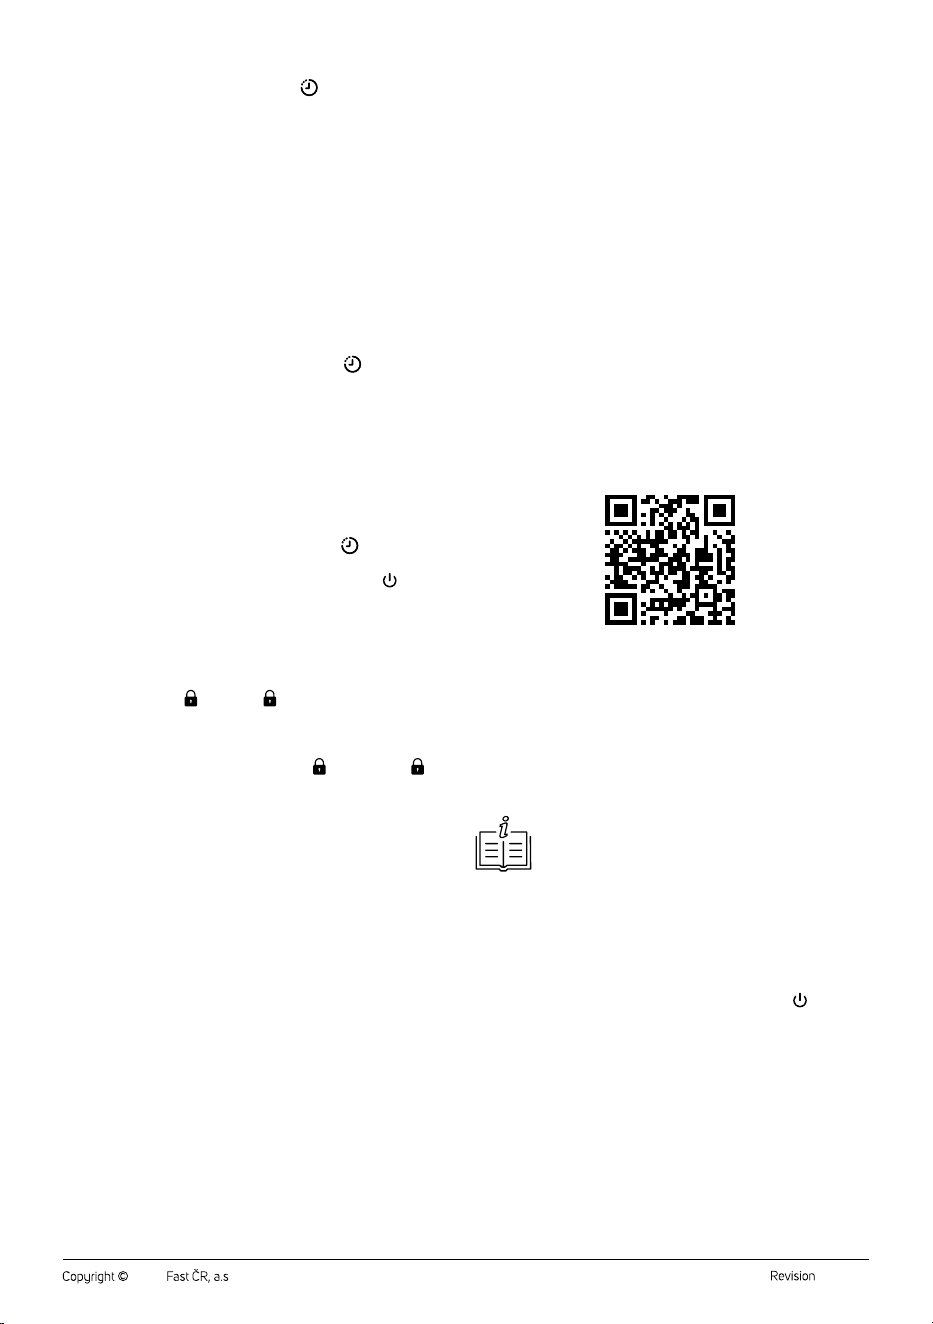
Adding the Radiator to the Device List viaQR Code
• The radiator can also be added to the Sencor HOME app using the
QR code provided below. On the home page, click on the “+” icon and
select "[–] Scan QR Code" in the top right corner. After scanning the
QR code, you will be prompted to select aWi-Fi network (in the 2.4
GHz band). Select the network, enter your password andclick “Next”.
• You will be prompted toreset the device. Hold down the
button for
about 3 seconds. The Wi-Fi indicator light blinks. This means that the
radiator is ready to be paired. Instructions can also be found on the
application screen.
• Inthe app, confirm that the (Wi-Fi) light is blinking, then click “Next”.
• Click on “Connect”. Then, in the Wi-Fi settings on your mobile device,
connect the Wi-Fi to theradiator. Then go back to the app andwait for
the radiator to pair.
• In the device list on the main screen, click on the radiator icon to enter
its control.
– 6 –
09/2024
2024, .
QR Code for Adding the Control Panel of the Radiator to the Sencor
HOME App
Manually Add the Radiator to the Device List
• On the home screen, click on “Add Device” or the “+” in the top right
corner, and then click on "Add Device".
• Ascreen with appliance categories and alist of appliances will appear.
• Click on “Heating” and select the model of the radiator from the list
of products.
• On the next screen, you will be prompted toselect aWi-Fi network
(in the
2.4 Ghz band). Select the network, enter your password andclick
“Next”.
• You will be prompted toreset the device. Hold down the
button for
about 3 seconds. The Wi-Fi indicator light blinks. This means that the
radiator is ready to be paired. Instructions can also be found on the
application screen.
• Inthe app, confirm that the (Wi-Fi) light is blinking, then click “Next”.
• Click on “Connect”. Then, in the Wi-Fi settings on your mobile device,
connect the Wi-Fi to theradiator. Then go back to the app andwait for
the radiator to pair.
• In the device list on the main screen, click on the radiator icon to enter
its control.
Wi-Fi Reset
• Hold down the
button for about 3 seconds. The Wi-Fi icon on the
radiator control panel will start flashing. If it does not start flashing,
press again.
. . . . . . . . . . . . . . . . . . . . . . . . . . . . . . . . . . . . . . . . . . . . . . . . . . . . . . . . . . . . . . . . . . . .
MAINTENANCE AND CLEANING
• Ensure that the appliance is turned off and that it has cooled down
before cleaning it.
• Clean the appliance using asoft dry cloth. Do not use chemicals or
abrasive cleaning products for cleaning. Otherwise the surface of the
appliance may be damaged.
• Do not spray the appliance with water or submerge it in water or
another liquid.
. . . . . . . . . . . . . . . . . . . . . . . . . . . . . . . . . . . . . . . . . . . . . . . . . . . . . . . . . . . . . . . . . . . .
STORAGE
• If you will not be using the appliance, store it in adry, clean place out
of children'sreach. Allow the appliance to cool down before storing.
. . . . . . . . . . . . . . . . . . . . . . . . . . . . . . . . . . . . . . . . . . . . . . . . . . . . . . . . . . . . . . . . . . . .
TECHNICAL SPECIFICATIONS
Rated voltage...........................................................................................220-240 V~
Rated frequency ...........................................................................................50-60 Hz
Max. rated power input .................................................................2 000-2 400 W
Power levels .......................................................................... 1 000 W(low power) /
............................................................................................1 200W(medium power) /
...........................................................................2 400 W(high power) / ECO mode
Number of heating elements.....................................................................................11
Dimensions ...............................................................................50.5 × 24.5 × 66cm
Weight .....................................................................................................................11.4 kg
We reserve the right to change the text and technical specifications.
. . . . . . . . . . . . . . . . . . . . . . . . . . . . . . . . . . . . . . . . . . . . . . . . . . . . . . . . . . . . . . . . . . . .
INSTRUCTIONS AND INFORMATION ON DISPOSAL OF USED
PACKAGING MATERIAL
Dispose of used packaging material at the location designated by the
municipality for waste disposal.
DISPOSAL OF USED ELECTRICAL AND ELECTRONIC EQUIPMENT
For proper disposal and recycling of these products, deliver them to
designated collection points. Alternatively, in some European Union states
or other European countries the products can be returned to the local
retailer when buying an equivalent new product. By properly disposing of
this product, you help preserve valuable natural resources and contribute
to preventing potential negative impacts on the environment and human
health resulting from improper waste disposal. For further details, contact
your local authorities or the nearest collection point. Fines may be
imposed for improper disposal of this type of waste in accordance with
national regulations.
For Business Entities in European Union States
To dispose of electric or electronic equipment, request necessary
information from your retailer or supplier.
Disposal in Other Countries Outside the European Union
To dispose of this product elsewhere, request necessary information on
the correct disposal method from local authorities or your retailer.
. . . . . . . . . . . . . . . . . . . . . . . . . . . . . . . . . . . . . . . . . . . . . . . . . . . . . . . . . . . . . . . . . . . .

- 1 -
09/2024
2024
EN ■ Attachment to the user’s manual for the following product:
CZ ■
SK ■
HU ■ Az alább feltüntetett termék használati útmutatójának a melléklete:
PL ■ Aneks do instrukcji obsługi dla poniżej podanego wyrobu:
HR ■ Dodatak korisničkom priručniku za dolje opisani proizvod:
GR ■ Συνημμένο αρχείο του παρόντος εγχειριδίου χρήσης για το προϊόν
το οποίο περιγράφεται παρακάτω:
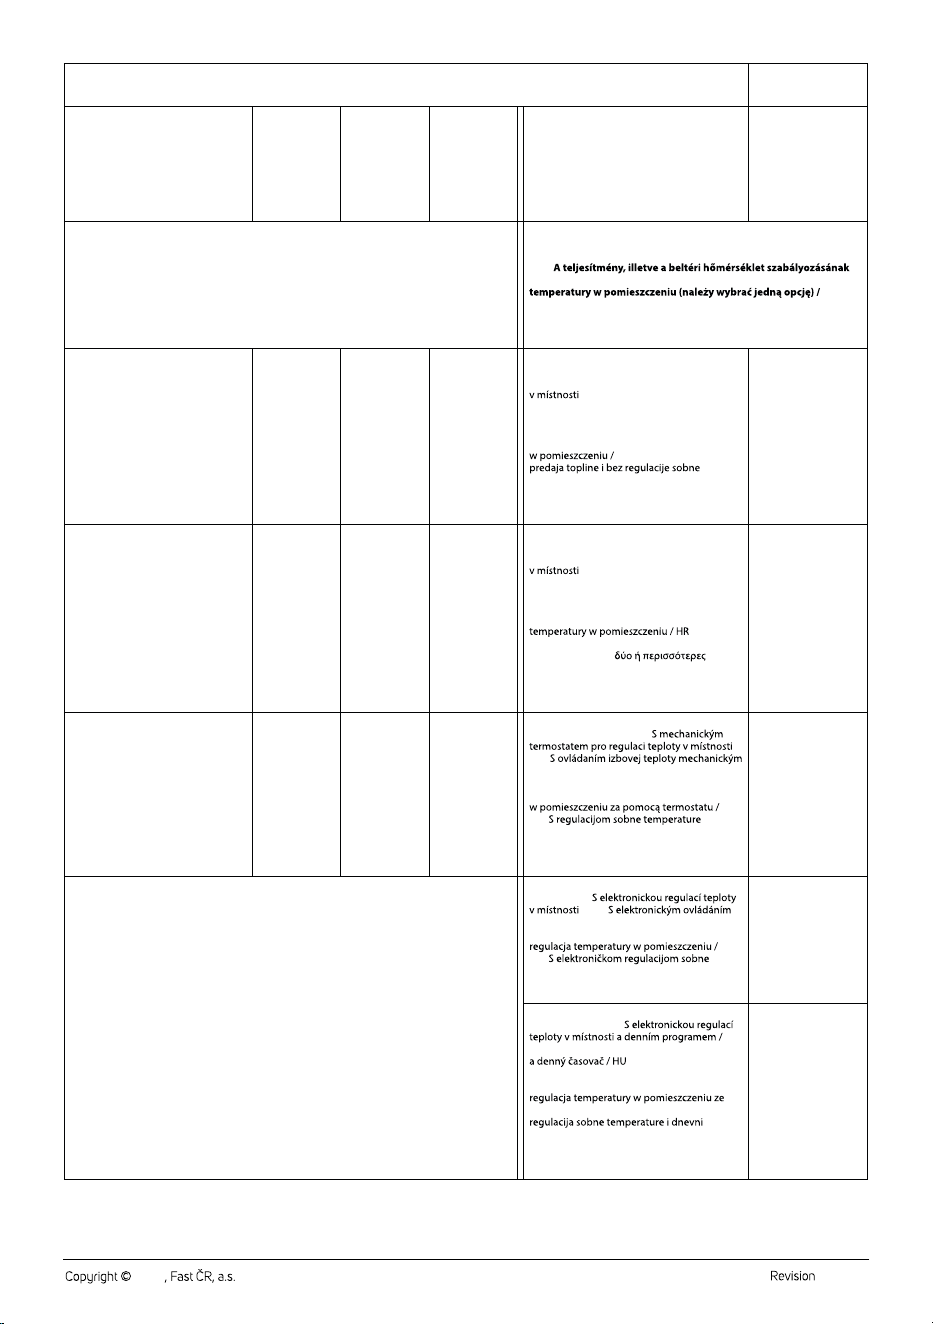
EN ■ Information requirements for electric local space heaters
CZ ■ Požadavky na informace týkající se elektrických lokálních topidel
SK ■ Požiadavky na informácie pre elektrické lokálne ohrievače priestoru
HU ■ Az elektromos egyedi helyiségfűtő berendezések termékinformációs
követelményei
PL ■
ogrzewaczy pomieszczeń
HR ■ Zahtjevi za informacije za električne grijalice za lokalno grijanje
prostora
GR ■ Απαιτήσεις πληροφόρησης για ηλεκτρικούς τοπικούς θερμαντήρες
χώρου
3/2022
1
SOH 8211GY
SOH 8211GY
- 2 -
09/2024
2024
EN ▪ Model identier: / CZ ▪ Identikační značka modelu: / SK ▪ Identikačný (-é) kód (-y) modelu: / HU ▪ Modellazonosító: / PL ▪ Identykator(-y)
modelu: / HR ▪ Identikacijska(-e) oznaka(-e) modela: / GR ▪ Αναγνωριστικό(-ά) μοντέλου:
H
BK
EN ▪ Item / CZ ▪ Údaj / SK ▪ Položka /
HU ▪ Jellemző / PL ▪ Parametr /
HR ▪ Značajka /
GR ▪ Χαρακτηριστικό
EN ▪ Symbol /
CZ ▪ Značka /
SK ▪ Symbol /
HU ▪ Jel /
PL ▪ Oznaczenie /
HR ▪ Simbol /
GR ▪ Σύμβολο
EN ▪ Value /
CZ ▪ Hodnota /
SK ▪ Hodnota /
HU ▪ Érték /
PL ▪ Wartość /
HR ▪ Vrijednost /
GR ▪ Αριθμητική
τιμή
EN ▪ Unit /
CZ ▪ Jednotka /
SK ▪ Jednotka /
HU ▪ Mértékegység /
PL ▪ Jednostka /
HR ▪ Jedinica /
GR ▪ Μονάδα
EN ▪ Item / CZ ▪ Údaj / SK ▪ Položka /
HU ▪ Jellemző / PL ▪ Parametr / HR ▪ Značajka /
GR ▪ Χαρακτηριστικό
EN ▪ Unit /
CZ ▪ Jednotka /
SK ▪ Jednotka /
HU ▪ Mértékegység /
PL ▪ Jednostka /
HR ▪ Jedinica /
GR ▪ Μονάδα
EN ▪ Heat output / CZ ▪ Tepelný výkon / SK ▪ Tepelný výkon / HU ▪ Hőteljesítmény /
PL ▪ Moc cieplna / HR ▪ Toplinska snaga / GR ▪ Θερμική ισχύς
EN ▪ Type of heat output / room temperature control (select one) /
CZ ▪ Typ výdeje tepla / regulace teploty (vyberte jeden) / SK ▪ Druh
ovládania tepelného výkonu / izbovej teploty (vyberte jeden) /
HU ▪
típusa (egyet kell megjelölni) / PL ▪ Rodzaj mocy cieplnej / regulacja
HR ▪ Vrsta izlazne topline / regulacija sobne temperature (odabrati
jednu) / GR ▪ Είδος θερμικής ισχύος / ρυθμιστή θερμοκρασίας
δωματίου (να επιλεχθεί μια δυνατότητα)
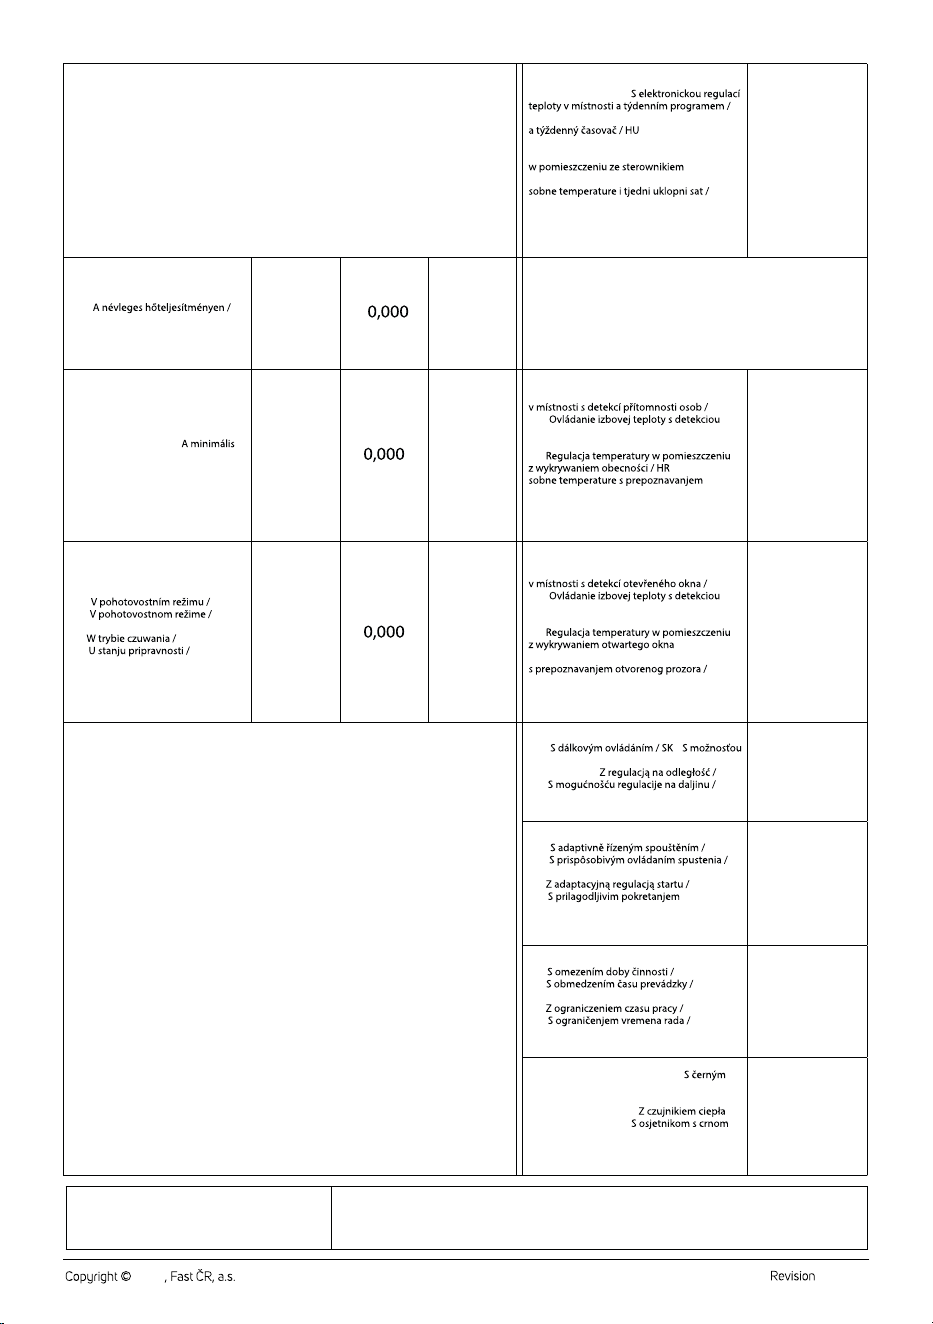
EN ▪ Nominal heat output /
CZ ▪ Jmenovitý tepelný výkon /
SK ▪ Menovitý tepelný výkon /
HU ▪ Névleges hőteljesítmény /
PL ▪ Nominalna moc cieplna /
HR ▪ Nazivna toplinska snaga /
GR ▪ Ονομαστική θερμική ισχύς
P
nom
kW
EN ▪ Single stage heat output and no room
temperature control / CZ ▪ Jeden stupeň
tepelného výkonu, bez regulace teploty
/ SK ▪ Jednoúrovňový tepelný
výkon bez ovládania izbovej teploty /
HU
▪ Egyetlen állás, beltéri hőmérséklet-
szabályozás nélkül / PL ▪ Jednostopniowa
moc cieplna bez regulacji temperatury
HR ▪ Jednostupanjska
temperature / GR ▪ μονοβάθμια θερμική ισχύς
και χωρίς ρυθμιστή θερμοκρασίας δωματίου
no / ne / nie / nem /
nie / ne / όχι
EN ▪ Minimum heat output
(indicative) / CZ ▪ Minimální tepelný
výkon (orientační) / SK ▪ Minimálny
tepelný výkon (orientačne) /
HU ▪ Minimális hőteljesítmény
(indikatív) / PL ▪ Minimalna moc
cieplna (orientacyjna)/
HR ▪ Minimalna toplinska snaga
(referentna) / GR ▪ Ελάχιστη θερμική
ισχύς (ενδεικτική)
P
min
kW
EN ▪ Two or more manual stages, no room
temperature control / CZ ▪ Dva nebo více
ručních stupňů, bez regulace teploty
/ SK ▪ Dve alebo viac manuálnych
úrovní bez ovládania izbovej teploty / HU ▪ Két
vagy több kézi szabályozású állás, beltéri
hőmérséklet-szabályozás nélkül / PL ▪ Co
najmniej dwa ręczne stopnie bez regulacji
▪ Dva ili
više ručna stupnja, bez regulacije sobne
temperature / GR ▪
χειροκίνητες βαθμίδες χωρίς ρυθμιστή
θερμοκρασίας δωματίου
no / ne / nie / nem /
nie / ne / όχι
EN ▪ Maximum continuous heat
output / CZ ▪ Maximální trvalý tepelný
výkon / SK ▪ Maximálny priebežný
tepelný výkon / HU ▪ Maximális
folyamatos hőteljesítmény /
PL ▪ Maksymalna stała moc cieplna /
HR ▪ Maksimalna kontinuirana
toplinska snaga / GR ▪ Μέγιστη
συνεχής θερμική ισχύς
P
max, c
kW
EN ▪ With mechanic thermostat room
temperature control / CZ ▪
/
SK ▪
termostatom / HU ▪ Mechanikus termosztátos
beltéri hőmérséklet-szabályozás /
PL ▪ Mechaniczna regulacja temperatury
HR ▪
mehaničkim termostatom / GR ▪ με μηχανικό
θερμοστατικό ρυθμιστή θερμοκρασίας δωματίου
EN ▪ With electronic room temperature
control / CZ ▪
/ SK ▪
izbovej teploty / HU ▪ Elektronikus beltéri
hőmérséklet-szabályozás / PL ▪ Elektroniczna
HR ▪
temperature / GR ▪ με ηλεκτρονικό ρυθμιστή
θερμοκρασίας δωματίου
yes / ano / ano / igen /
tak / da / ναι
EN ▪ Electronic room temperature control
plus day timer / CZ ▪
SK ▪ Elektronické ovládanie izbovej teploty
▪ Elektronikus beltéri
hőmérséklet-szabályozás és napszak
szerinti szabályozás / PL ▪ Elektroniczna
sterownikiem dobowym / HR ▪ Elektronička
uklopni sat / GR ▪ με ηλεκτρονικό ρυθμιστή
θερμοκρασίας δωματίου και χρονοδιακόπτη
ημέρας
no / ne / nie / nem /
nie / ne / όχι
EN ▪
SK ▪ Vlastná spotreba elektrickej energie / HU
PL ▪ Zużycie energii elektrycznej na potrzeby własne / HR
električne energije / GR
EN ▪
CZ ▪
SK ▪
HU ▪
PL ▪ Przy nominalnej mocy cieplnej /
HR ▪ Kod nazivne toplinske snage /
GR ▪ Στην ονομαστική θερμική ισχύ
EN ▪
CZ ▪
výkonu / SK
tepelnom výkone / HU
hőteljesítményen / PL
minimalnej mocy cieplnej /
HR ▪ Kod minimalne toplinske snage /
GR ▪ Στην ελάχιστη θερμική ισχύ
EN ▪
CZ ▪
SK ▪
HU
▪
PL ▪
HR ▪
GR ▪ σε κατάσταση αναμονής
2
no / ne / nie / nem / nie
/ ne / όχι
SOH 8211GY
1,0
1,0
2,2
- 3 -
09/2024
2024
H
BK
Mértékegység /
Type of heat output / room temperature control (select one) /
Druh
Rodzaj mocy cieplnej / regulacja
Vrsta izlazne topline / regulacija sobne temperature (odabrati
no / ne / nie / nem /
no / ne / nie / nem /
yes / ano / ano / igen /
no / ne / nie / nem /
EN ▪ Auxiliary electricity consumption / CZ ▪ Spotřeba pomocné elektrické energie /
SK ▪ Vlastná spotreba elektrickej energie / HU ▪ Kiegészítő villamosenergia-fogyasztás /
PL ▪ Zużycie energii elektrycznej na potrzeby własne / HR ▪ Potrošnja pomoćne
električne energije / GR ▪ Βοηθητική κατανάλωση ηλεκτρικής ενέργειας
EN ▪ Electronic room temperature control
plus week timer / CZ ▪
SK ▪ Elektronické ovládanie izbovej teploty
▪ Elektronikus beltéri
hőmérséklet-szabályozás és heti szabá- lyozás
/ PL ▪ Elektroniczna regulacja temperatury
tygodniowym / HR ▪ Elektronička regulacija
GR ▪ Με ηλεκτρονικό ρυθμιστή θερμοκρασίας
δωματίου και χρονοδιακόπτη εβδομάδας
no / ne / nie / nem /
nie / ne / όχι
EN ▪ At nominal heat output /
CZ ▪ Při jmenovitém tepelném výkonu /
SK ▪ Pri menovitom tepelnom výkone /
HU ▪
PL ▪ Przy nominalnej mocy cieplnej /
HR ▪ Kod nazivne toplinske snage /
GR ▪ Στην ονομαστική θερμική ισχύ
el
max
kW
EN ▪ Other control options (multiple selections possible) / CZ ▪ Další
možnosti regulace (lze vybrat více možností) / SK ▪ Ďalšie možnosti
ovládania (možnosť viacnásobného výberu) / HU ▪ Más szabályozási
lehetőségek (több is megjelölhető) / PL ▪ Inne opcje regulacji
(można wybrać kilka) / HR ▪ Druge mogućnosti regulacije (moguć
odabir više opcija) / GR ▪ Άλλες δυνατότητες ρύθμισης
(επιτρέπονται πολλές επιλογές)
EN ▪ At minimal heat output /
CZ ▪ Při minimálním tepelném
výkonu / SK ▪ Pri minimálnom
tepelnom výkone / HU ▪
hőteljesítményen / PL ▪ Przy
minimalnej mocy cieplnej /
HR ▪ Kod minimalne toplinske snage /
GR ▪ Στην ελάχιστη θερμική ισχύ
el
min
kW
EN ▪ Room temperature control, with
presence detection / CZ ▪ Regulace teploty
SK ▪
prítomnosti / HU ▪ Beltéri hőmérséklet-
szabályozás jelenlét-érzékeléssel /
PL ▪
▪ Regulacija
prisutnosti / GR ▪ ρυθμιστής θερμοκρασίας
δωματίου με ανιχνευτή παρουσίας
no / ne / nie / nem /
nie / ne / όχι
EN ▪ In standby mode /
CZ ▪
SK ▪
HU
▪ Készenléti üzemmódban /
PL ▪
HR ▪
GR ▪ σε κατάσταση αναμονής
el
SB
kW
EN ▪ Room temperature control, with open
window detection / CZ ▪ Regulace teploty
SK ▪
otvoreného okna / HU ▪ Beltéri hőmérséklet-
szabályozás nyitottablak-érzékeléssel /
PL ▪
/
HR ▪ Regulacija sobne temperature
GR ▪ ρυθμιστής θερμοκρασίας δωματίου με
ανιχνευτή ανοιχτού παραθύρου
yes / ano / ano / igen /
tak / da / ναι
EN ▪ With distance control option /
CZ ▪
▪
diaľkového ovládania / HU ▪ Távszabályozási
lehetőség / PL ▪
HR ▪
GR ▪ με δυνατότητα ρύθμισης εξ αποστάσεως
EN ▪ With adaptive start control /
CZ ▪
SK ▪
HU ▪ Adaptív bekapcsolásszabályozás /
PL ▪
HR ▪
regulacije /
GR ▪ με ρυθμιστή προσαρμοζόμενης
εκκίνησης
no / ne / nie / nem /
nie / ne / όχι
EN ▪ With working time limitation /
CZ ▪
SK ▪
HU ▪ Működési idő korlátozása /
PL ▪
HR ▪
GR ▪ με περιορισμό διάρκειας λειτουργίας
yes / ano / ano / igen /
tak / da / ναι
EN ▪ With black bulb sensor / CZ ▪
kulovým čidlem / SK ▪ So snímačom
čiernej žiarovky / HU ▪ Feketegömb-
érzékelővel ellátva / PL ▪
promieniowania / HR ▪
žaruljom / GR ▪ με αισθητήρα θερμομέτρου
μελανής σφαίρας
no / ne / nie / nem /
nie / ne / όχι
3
no / ne / nie / nem / nie
no / ne / nie / nem /
nie / ne / όχι
EN ▪ Contact details / CZ ▪ Kontaktní údaje /
SK ▪ Kontaktné údaje / HU ▪ Kapcsolatfelvételi adatok /
PL ▪ Dane teleadresowe / HR ▪ Podaci za kontakt /
GR ▪ Στοιχεία επικοινωνίας
FAST ČR, a.s., U Sanitasu 1621, 251 01 Říčany, Czechia

FAST ČR, a.s.
U Sanitasu 1621
CZ-251 01 Říčany
www.sencor.eu
